

WALKTHROUGH MENU
- CHAPTER 1
- CHAPTER 2
- CHAPTER 3
- CHAPTER 4
- CHAPTER 5
- CHAPTER 6
- CHAPTER 7
- CHAPTER 8
- CHAPTER 9
- CHAPTER 10
- CHAPTER 11
GENERAL TIPS
- Each chapter must be completed within 25 minutes. If you take too long, you will have to start from the beginning of the chapter again.
- Each chapter begins with 3 hints available to you.
- Finding 3 or more items in rapid succession will reward you with an extra hint.
- Clue items cannot be found until the clue note under your item list has been decrypted.
- You can skip any of the puzzles without penalty by clicking the skip button on the left side of your screen.
- Each chapter has a certain amount of items hidden in it. Your objective is to locate all of its hidden items by completing each location that chapter.
- You can always return to the map screen by clicking on the map button. The map button is located below your item list.
HINTS
- Click on the hint icon at the top of your item list to equip a magnifying glass to your mouse cursor. Afterwards, click on an item from in your item list to use a hint.
- When a hint is used the location of the item you clicked on reveals itself.
- The number of hints you have left is displayed on the hint icon.
- Your hints will recharge whenever you have less than 3 available. Every time your hint meter is full, you will gain another hint.
- Hints recharge at a slow rate, so try not to depend on it.
- The faster way to get a hint is to collect a small number of items at a rapid pace.
- You can collect 3 or more items in rapid succession to gain an extra hint.
CLUES
- There are several different types of clues to find in this game.
- During some scenes there will be a clue note under your item list. A clue note is a hint that helps you find a clue item.
- When the text on the clue note is blue, the riddle on the note will guide you to the clue item in that scene.
- When the text is red, it means that the clue note is encrypted and must be decrypted.
- Click on an encrypted clue note to enter the decryption room.
- Clue items are items that can only be found after a clue note has been decrypted.
- Clue items usually have photos hidden underneath them. After you collect a clue item, pick up the shimmering clue it left behind.
- Clue cards are found by collecting a specific item from your item list.
- Each clue card has a statement from a key character involved in the mystery. If you read each card carefully, you might be able to solve the mystery before you complete the game.
MAP
- The highlighted areas on the map are the locations that you can visit.
- After completing a location it will be marked with big black “X”. You can still revisit the location if you want to, even though it has been completed.
- The locations of the map have 2 sets of numbers near them. The first set of numbers show the amount of items you have left to collect in that location. The second set of numbers show the amount of items the location started with.
- For example, “6/12” means you have 6 items to collect of the total 12 that used to be there.
SCREENSHOTS
- Certain screenshots in this guide have been highlighted with specific colors. This small section provides information on what the different colors indicate.
- Note that these colors only concern the location screenshots in this guide.
- The objects highlighted in red are the normal items from your item list. Normal items are randomly set into your item list.
- The objects highlighted in green are the clue card items. These items reveal clue cards once they are collected.
- The objects highlighted in Yellow are clue items. These are the items you find by using the clue notes.
- The objects highlighted in purple are the location puzzle items. These are the special items that must be relocated and not collected.
CHAPTER 1
COMIC BOOK
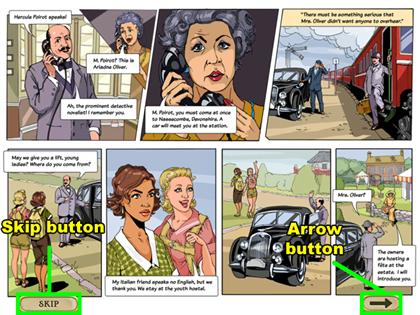
- When the game begins you will enter a comic book dialog sequence.
- Move your mouse to reveal the dialog buttons at the bottom of your screen.
- The dialog buttons on the first page are different from the buttons on any other page.
- The first page includes a skip button, and a right arrow button. The skip button will allow you to skip the entire dialog sequence, and the right arrow will take you to the next scene in the dialog.
- With any other page there will be a left arrow button, and a continue button. Use the left arrow button to revisit the previous page in the dialog, and use the continue button go to progress through the dialog.
- After the comic book dialog, you will arrive at the map screen. This is where you will choose which scene to visit.
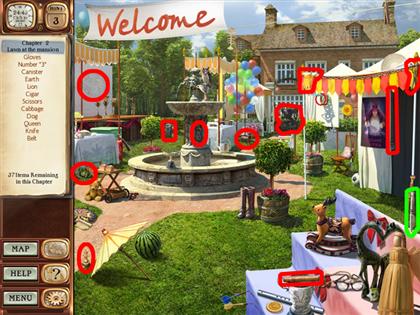
- The Lawn is the only scene available right now, so click on the only highlighted area of the map to advance.
LAWN
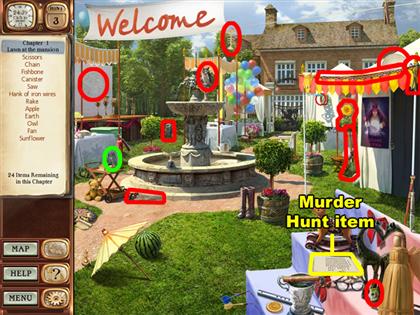
- Collect the hank of wires to reveal your first clue card. It is located near the center of the left side of this scene. These clue card items are highlighted in green.
- After collecting all of the items on the item list, you will receive your first clue note. Clue notes help you to find clue items that are hidden in the scene.
- Clue notes are displayed under your item list. This clue note says “find the murder hunt instruction sheet”.
- Collect the instruction sheet in the bottom right corner of this scene.
- After collecting the clue item, collect the shimmering photograph that was hidden underneath it.
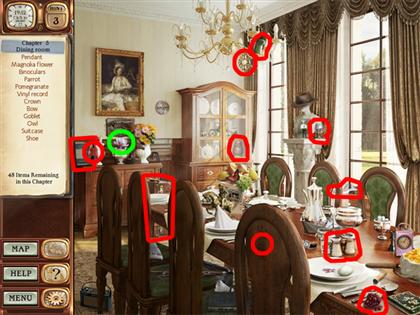
DINING ROOM
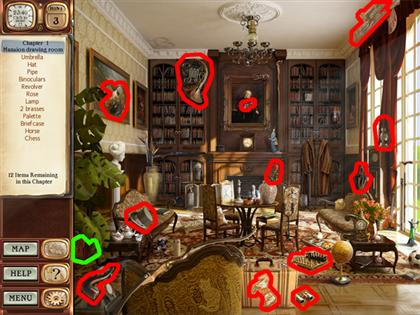
- After returning to the map screen, click on the dining room location to visit this scene.
- Collect the brief case located in the bottom left corner of this scene. This specific item will reveal a clue card.
- Collect the remaining items to advance to the Bonus puzzle.
BONUS PUZZLE
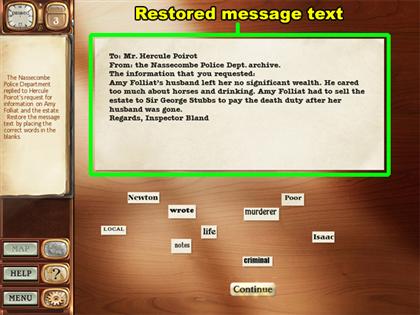
- Restore this message text to move on to the next chapter.
- Place the words in the bottom half of your screen into the blanks of the message text.
- When the word you use to fill in a blank is correct, it will snap into place like a puzzle piece.
- When the word you use is incorrect, it will be returned to the word pile.
- The restored message reads: To: Mr. Hercule Poirot From: the Nessecombe Police Dept. archive. The information that you requested: Amy Folliat’s husband left her no significant wealth. He cared too much about horses and drinking. Amy Folliat had to sell the estate to Sir George Stubbs to pay the death duty after her husband was gone. Regards, Inspector Bland.
CHAPTER 2
LAWN
- Collect the knife above the bottom right corner of this scene. This item has a clue card item in it.
DINING ROOM
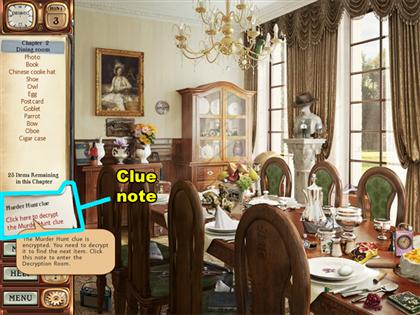
- Click on the clue note below your item list.
- Whenever the clue card text is red it means that you need to decrypt the clue. After clicking on the clue card, you will enter the decryption room.
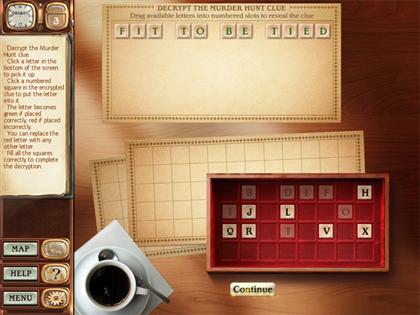
DECRYPTION ROOM
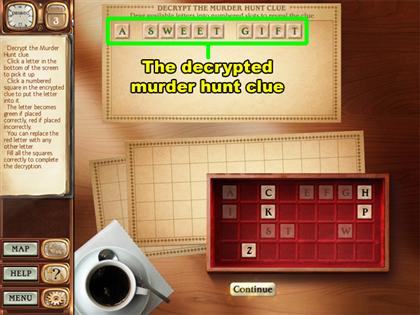
- Decrypt the murder hunt clue by placing the letters into their correct cells.
- Click on a letter from the bottom of your screen to pick it up; click again to place it into a cell.
- When you use the correct letter will turn green; otherwise the letter will turn red.
- Each empty cell is numbered, and sometimes multiple cells have the same numbers. In this case using a letter on one of these cells will cause the other cells to inherit the same letter.
- This decryption for this clue is “A SWEET GIFT”.
DINING ROOM
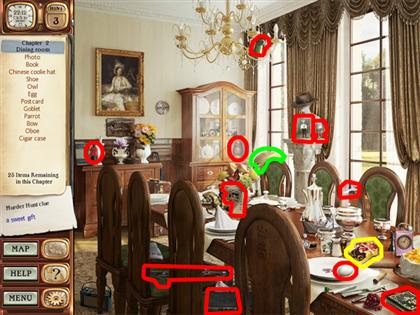
- Collect the Chinese coolie hat in the center of this scene. This item has a clue card within it.
- Collect the clue item near the bottom right corner of this scene. This clue item looks like small container of candy. There is always a shimmering picture hiding behind a clue item.
- Collect the picture that was behind the container of candy.
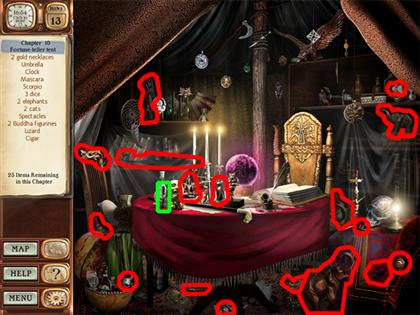
FORTURN-TELLER TENT
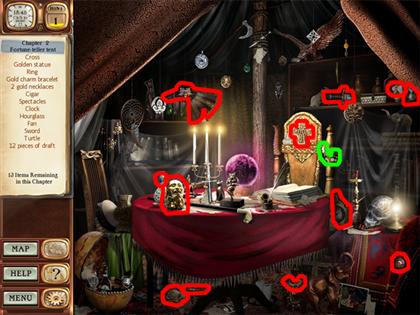
- Collect the gold charm bracelet to the right of the center of this scene. This item will reveal a clue card.
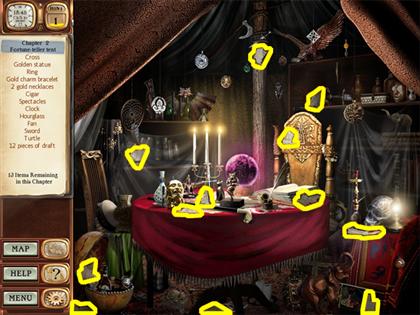
- Collect all 12 pieces of the draft.
- Two are in the bottom left corner of this scene.
- One is near the center of the left side of this scene.
- Two are left of the center of this scene.
- One is at the bottom center of this scene.
- One is near the top center of this scene.
- Two are to the right of the center of this scene.
- One is above the center of the right half of this scene.
- One is in the bottom right corner of this scene.
- One is above the bottom right corner of this scene.
BONUS PUZZLE
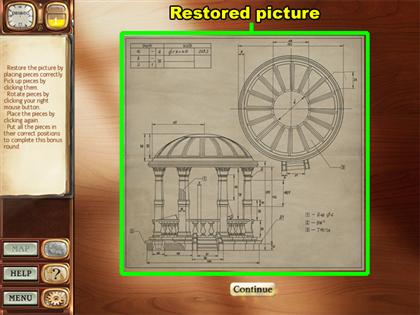
- Restore the picture by placing the pieces together correctly.
- Left-click a draft piece to pick it up and Left-click again to set it somewhere.
- Right-click a draft piece while it is picked up to rotate it.
CHAPTER 3
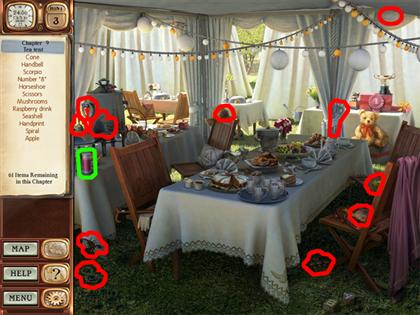
TEA TENT
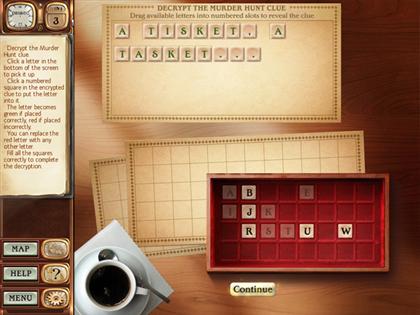
- Click on the murder hunt card to enter the decryption room.
- The decryption code is “A TISKET, A TASKET…”
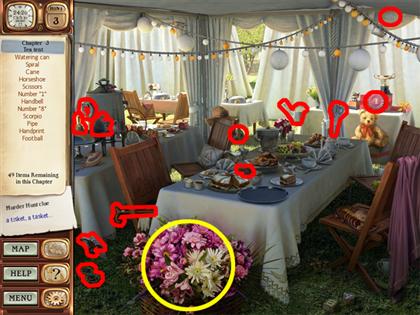
- The clue item is to the right of the bottom left corner of this scene. This clue item looks like a bouquet of flowers.
FORTUNE-TELLER TENT
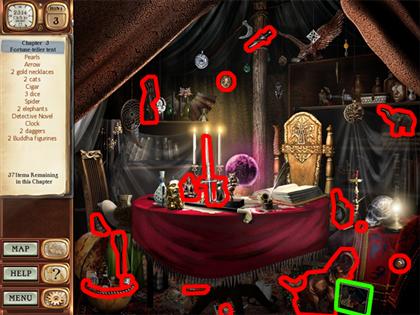
- Collect the detective novel to the left of the bottom right corner. This is a clue card item.
DINING ROOM
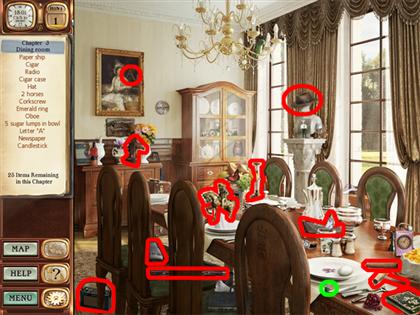
- Collect the emerald ring to the left of the bottom right corner. This is a clue card item.

- Place the 5 sugar lumps into the bowl.
- The bowl is above the bottom right corner of this scene.
- The sugar lumps are scattered around this scene.
- One is above the bottom right corner of this scene.
- One is to the left of the center of this scene.
- One is near the bottom center of this scene.
- Two are to the right of the center of this scene.
DRAWING ROOM
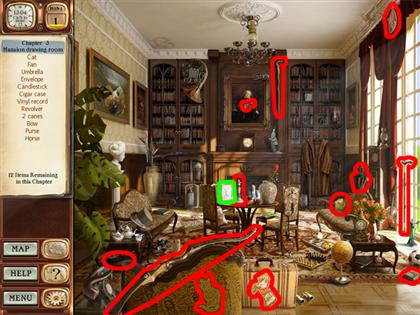
- Collect the envelope in the center of this scene. This item has a clue card in it.
BONUS PUZZLE
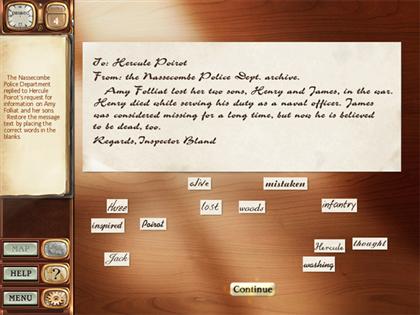
- The restored letter reads: To: Hercule Poirot From: the Nassecombe Police Dept. archive. Amy Folliat lost her two sons, Henry and James, in the war. Henry died while serving his duty as a naval officer. James was considered missing for a long time, but now he is believed to be dead, too. Regards, Inspector Bland
CHAPTER 4
LAWN
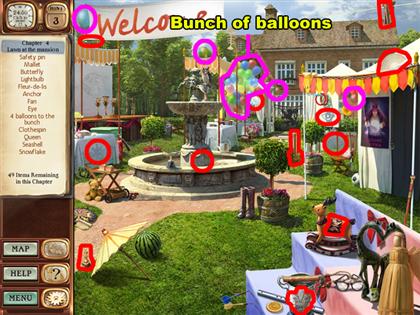
- Place the 4 scattered balloons into the bunch of balloons above the center of this scene.
- One is in the upper left corner of this scene.
- One is to the left of the bunch of balloons.
- One is to the right of the bunch of balloons.
- One is above the center of the right half of this scene.
DRAWING ROOM
- Collect the mink coat to the right of the center of this scene. This coat is a clue card item.
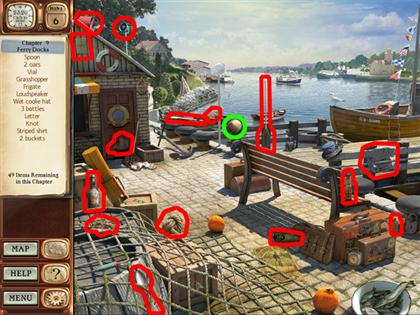
FERRY DOCKS
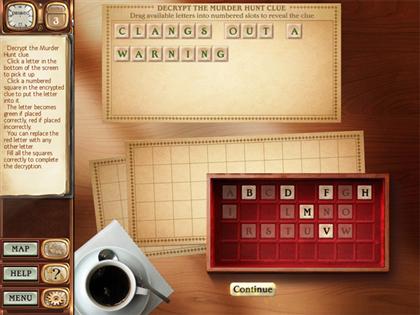
- Click on the clue note to enter this decryption room.
- The clue code is “CLANGS OUT A WARNING”.
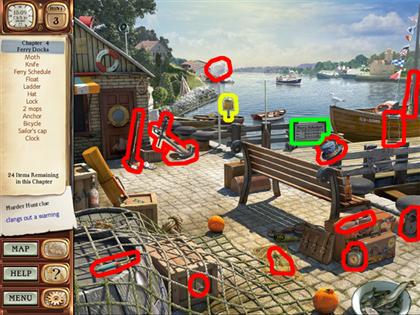
- Collect the ferry schedule to the right of the center of this scene. This item includes a clue card.
- Collect the clue item above the center of this scene. This item looks like a gold bell.
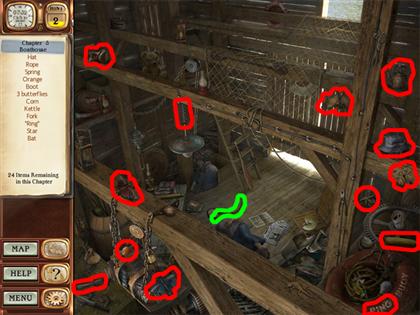
BOATHOUSE
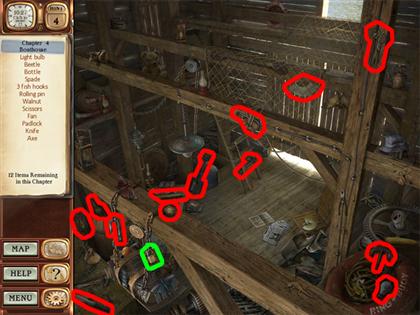
- Collect the padlock below the center of the left half of this scene. This is a clue card item.
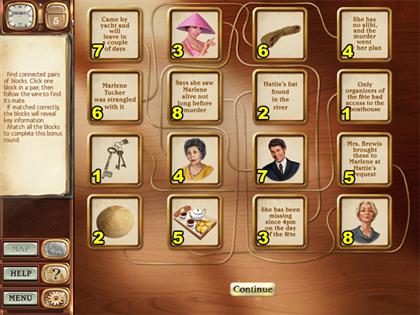
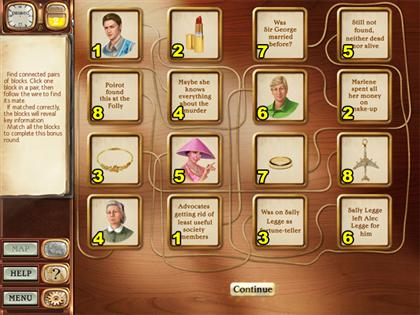
BONUS PUZZLE
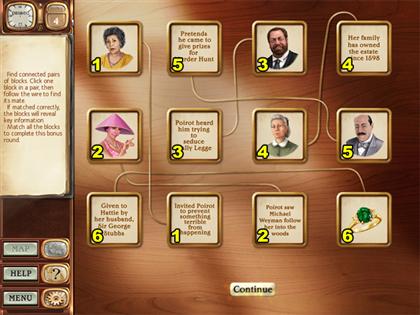
- Connect the correct pairs of blocks together.
- Each pair of cards is connected to one another by a thin wire.
- Use the wires to find the location of the correct pairs.
- The correct pairs have been marked in the screenshot with numbers. Any 2 blocks with the same number are a matching pair.
CHAPTER 5
TEA TENT
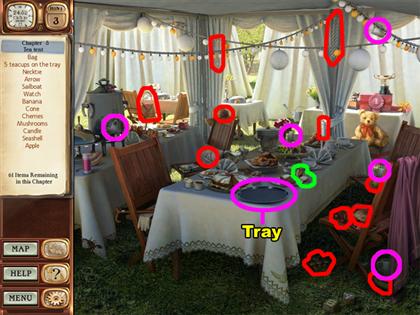
- Collect the watch to the right of the center of this scene. The watch contains a clue card.
- Place the 5 tea cups onto the tray in the center of this scene.
- One tea cup is in the center of the left side of this scene.
- One is in the center of this scene.
- One is in the bottom right corner of this scene.
- One is above the bottom right corner of this scene.
- One is in the upper right corner of this scene.
DINING ROOM
- Collect the magnolia flower in the center of the left side of this scene. This flower contains a clue card.
MRS. FOLLIAT’S GARDEN
- Click on the clue card and enter the decryption room.
- The clue code is “FIT TO BE TIED”.
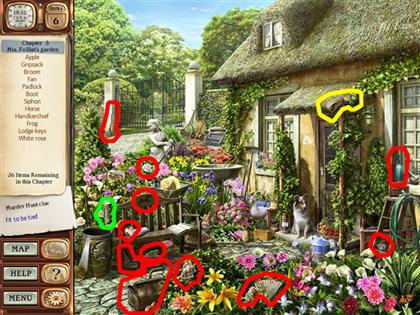
- Collect the lodge keys above the bottom left corner of this scene. This is a clue card item.
- Collect the clue item above the center of the right half of this scene. This item looks like a rope.
BOATHOUSE
- Collect the rope below the center of this scene. This rope is a clue card item.
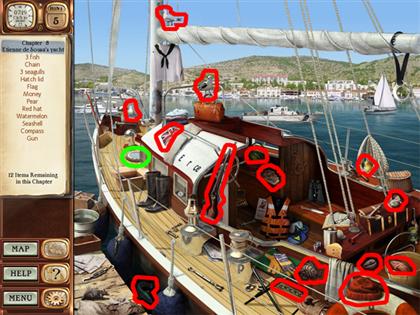
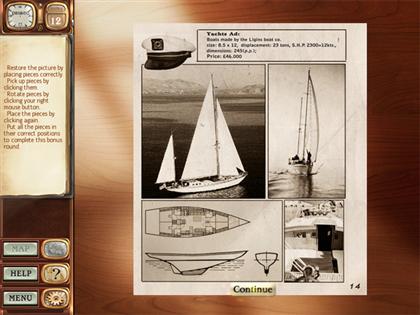
YACHT

- Collect the peaked cap in the center of this scene. This cap is a clue card item
BONUS PUZZLE
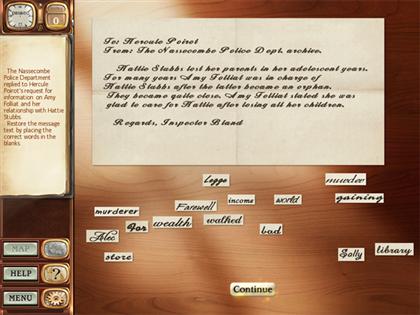
- The decryption reads: To: Hercule Poirot From: The Nassecombe Police Dept. archive. Hattie Stubbs lost her parents in her adolescent years. For many years Amy Folliat was in charge of Hattie Stubbs after the latter became an orphan. They became quite close. Amy Folliat stated she was glad to care for Hattie after losing all her children. Regards, Inspector Bland
CHAPTER 6
TEA TENT
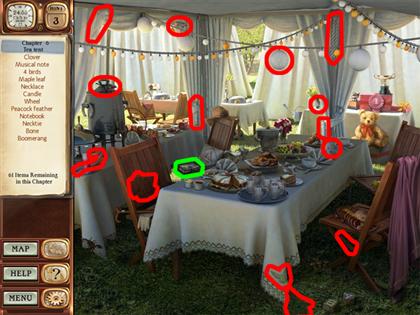
- Collect the notebook to the left of the center of this scene. This item contains a clue card.
LAWN
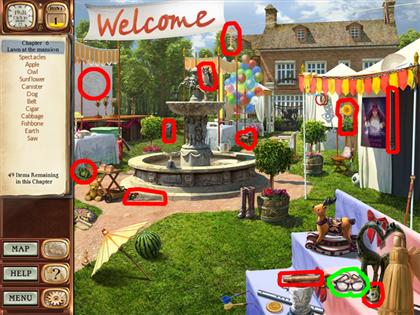
- Collect the spectacles in the bottom right corner of this scene. This item has a clue card.
MRS. FOLLIAT’S GARDEN
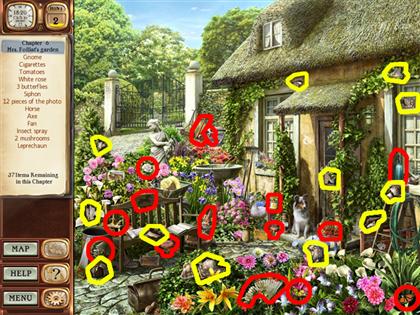
- Collect all of the items on your item list to receive a clue card.
- Collect the 12 pieces of photo from around this scene.
- One is in the bottom left corner of this scene.
- Two are above the bottom left corner of this scene.
- Two are to the right of the bottom left corner of this scene.
- One is above the center of the right half of this scene.
- One is in the center of the right half of this scene.
- One is below the center of the right half of this scene.
- Two are in the center of the right side of this scene.
- Two are below the upper right corner of this scene.
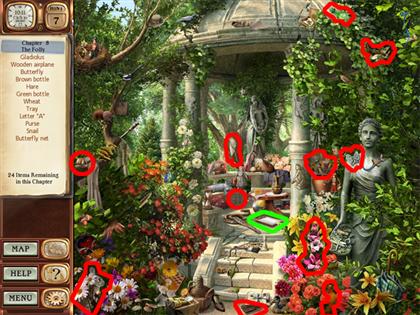
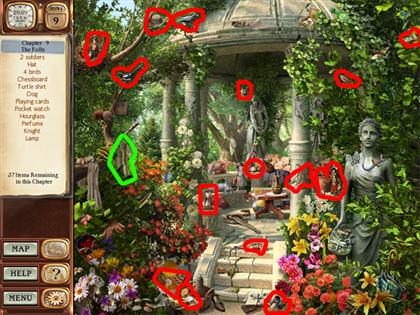
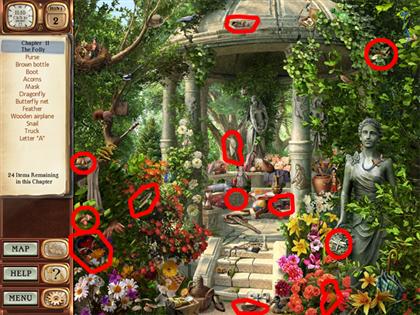
THE FOLLY

- Click on the clue card to enter this decryption room.
- The clue code is “NATURAL SEATING”.
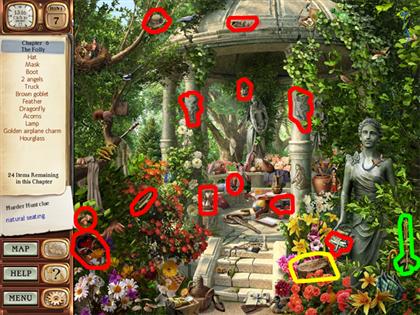
- Collect the golden airplane charm above the bottom right corner of this scene. This item has a clue card in it.
- Collect the clue item to the left of the bottom right corner of this scene. This item looks like a tree stump.
YACHT
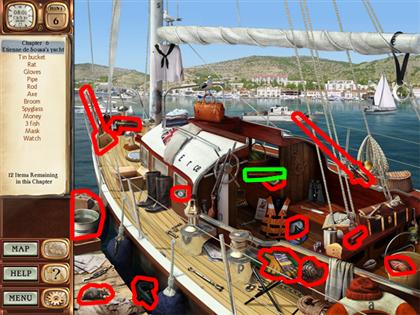
- Collect the spyglass in the center of this scene. This spyglass has a clue card within it.
BONUS PUZZLE
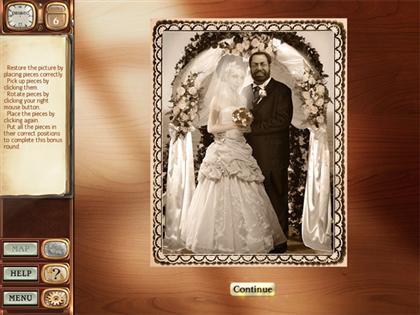
- Restore this picture by placing the picture pieces together correctly.
CHAPTER 7
TENNIS COURT
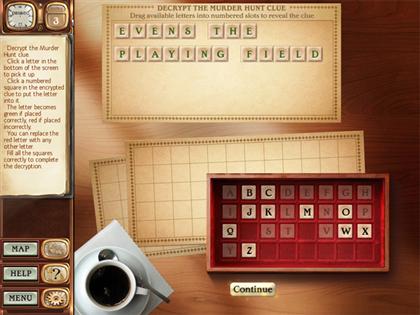
- Click on the clue note to enter this room.
- The clue code is “EVENS THE PLAYING FIELD”.
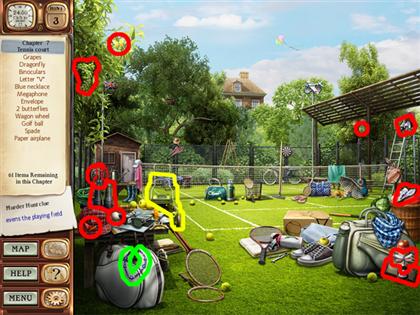
- Collect the blue necklace in the bottom left corner of this scene. This item contains a clue card in it.
- Collect the clue item below the center of the left half of this scene. This item looks like a type of lawn mower.
DINING ROOM
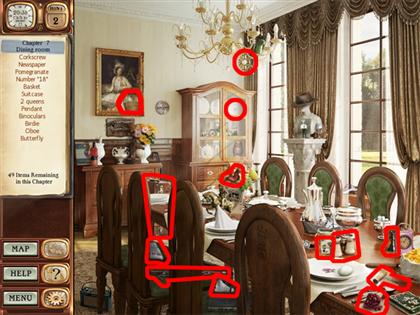
- Collect all the items on the item list to receive a clue card.
SIR GEORGE STUBB’S BEDROOM
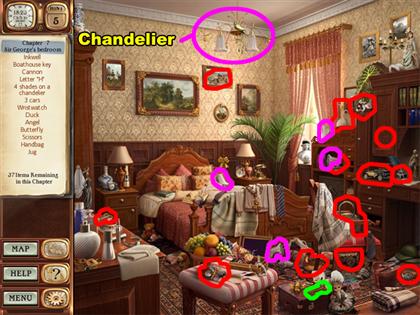
- Collect the boathouse key to the left of the bottom right corner of this scene. This key is a clue card item.
- Place the 4 shades onto the chandelier at the top center of this scene.
- The 4 shades are scattered around this scene.
- One is in the center of this scene.
- One is below the center of this scene.
- Two are to the right of the center of this scene.
FERRY DOCKS
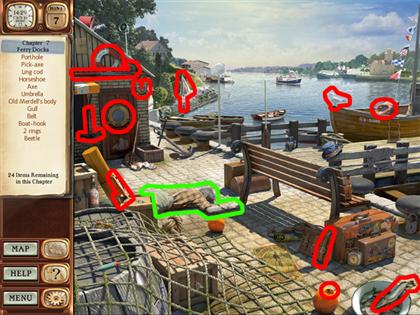
- Click on old Merdell’s body near the center of this scene. His body has a clue card.
BOATHOUSE
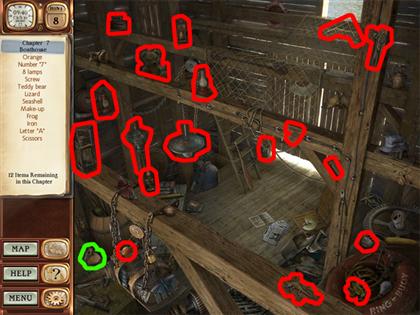
- Collect the make-up above the bottom left corner of this scene. This is a clue card item.
BONUS PUZZLE
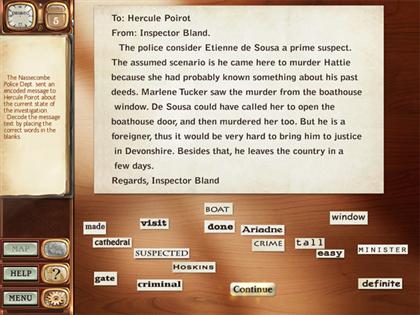
- The decryption reads: To: Hercule Poirot From: Inspector Bland. The police consider Etienne de Sousa a prime suspect. The assumed scenario is he came here to murder Hattie because she had probably known something about his past deeds. Marlene Tucker saw the murder from the boathouse window. De Sousa could have called her to open the boathouse door, and then murdered her too. But he is a foreigner, thus it would be very hard to bring him to justice in Devonshire. Besides that, he leaves the country in a few days. Regards, Inspector Bland
CHAPTER 8
FORTUNE-TELLER TENT
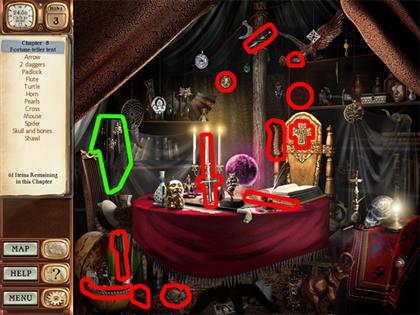
- Collect the shawl in the center of the left side of this scene. This shawl comes with a clue card.
DRAWING ROOM

- Collect the plate of cakes below the center of the left half of this scene. This item has a clue card.
- Place the 4 chimney tools onto the tool rack to the right of the center of this scene.
- Two chimney tools are to the left of center of this scene.
- One is below the center of this scene.
- One is above the bottom right corner of this scene.
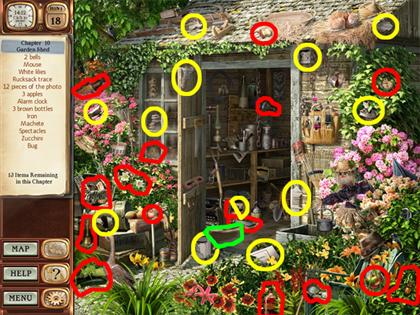
GARDEN SHED
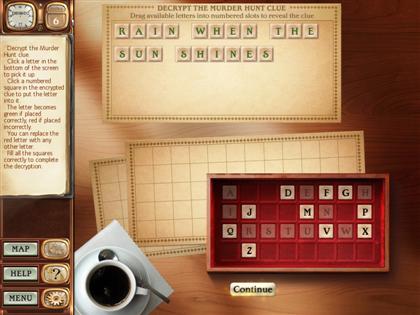
- Click on the clue note to enter this room.
- The clue code is “RAIN WHEN THE SUN SHINES”.
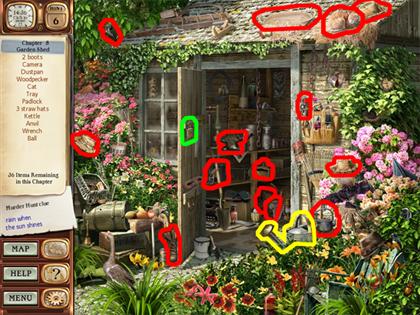
- Collect the padlock to the left of the center of this scene. This item has a clue card.
- The clue item is below and to the right of the center of this scene. It looks like a watering can.
THE FOLLY
- Collect the tray below the center of this scene. This item comes with a clue card.
YACHT
- Collect the hatch lid near the center of the left half of this scene. This is a clue card item.
BONUS PUZZLE
- Find the correct match for each of the blocks.
- The correct pairs have been marked in the screenshot with numbers. Any 2 blocks with the same number are a matching pair.
CHAPTER 9
TEA TENT
- Collect the raspberry drink in the center of the left side of this scene. This item has a clue card within it.
FERRY DOCKS
- Collect the wet coolie hat in the center of this scene. This item comes with a clue card.
THE FOLLY
- Collect the turtle shirt near the center of the left half of this scene. This item has a clue card.
BOATHOUSE

- Collect the comic book below the center of this scene. This comic book has a clue card in it.
YACHT

- Click on the clue note to decrypt this clue.
- The clue code is “ALAS, POOR YORICK…”
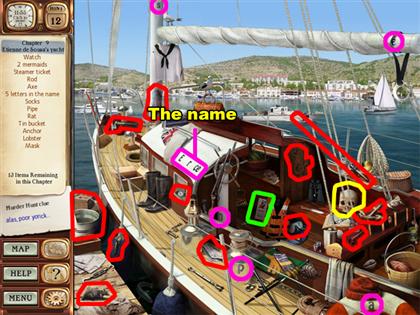
- Collect the steamer ticket below the center of this scene. This ticket comes with a clue note.
- Collect the clue item below the center of the right half of this scene. This item looks like a skull.
- Use the 5 letters to spell the name “ESPE’RANCE”. Use the letters in the area to the left of the center of this scene.
- One letter is to the right of the top left corner of this scene.
- Two letters are below the center of this scene.
- One letter is in the bottom right corner of this scene.
- One letter is in the top right corner of this scene.
BONUS PUZZLE
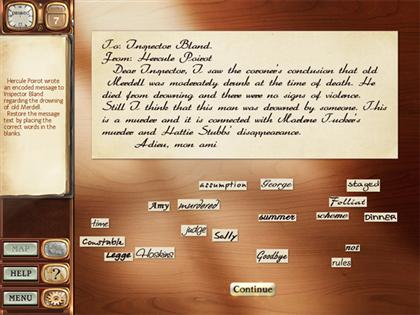
- The decryption for this letter reads: To: Inspector Bland. From: Hercule Poirot Dear Inspector, I saw the coroner’s conclusion that old Merdell was moderately drunk at the time of death. He died from drowning and there were no signs of violence. Still I think that this man was drowned by someone. This is a murder and it is connected with Marlene Tucker’s murder and Hattie Stubb’s disappearance. Adieu, mon ami
CHAPTER 10
TUCKERS’ HOUSE
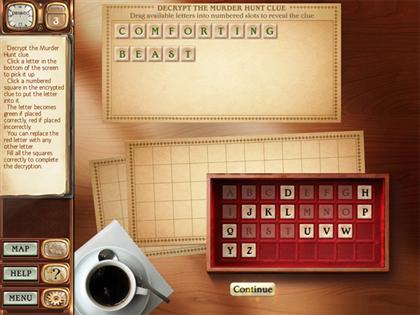
- Click on the clue note to begin decrypting.
- The clue code is “COMFORTING BEAST”.
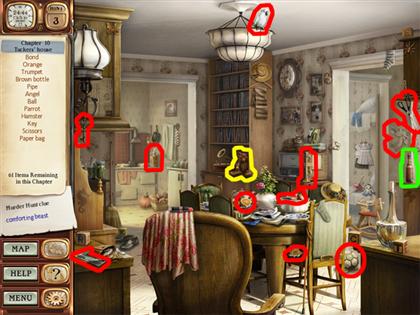
- Collect the brown bottle in the center of the right side of this scene. This is a clue card item.
- Collect the clue item in the center of this scene. The item looks like a teddy bear.
TENNIS COURT

- Collect the calipers below the center of this scene. These calipers come with a clue card.
SIR GEORGE STUBB’S BEDROOM
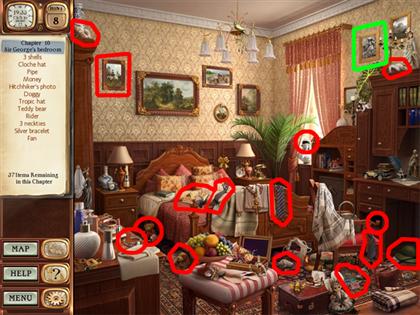
- Collect the hitchhiker’s photo in the top right corner of this scene. This photo is a clue card item.
FORTUNE TELLER’S TENT
- Collect the mascara to the left of the center of this scene. This item includes a clue card.
GARDEN SHED
- Click on the rucksack trace below the center of this scene. The rucksack trace comes with a clue card.
- Collect the 12 pieces of the photo.
- One is above the bottom left corner of this scene.
- One is below the top left corner of this scene.
- Three are above the center of the left half of this scene.
- Three are below the center of this scene.
- One is to the right of the center of this scene.
- One is in the upper right corner of this scene.
- One is left of the upper right corner of this scene.
- One is below the upper right corner of this scene.
BONUS PUZZLE
- Use the pieces of the photo to restore this picture.
CHAPTER 11
TUCKERS’ HOUSE
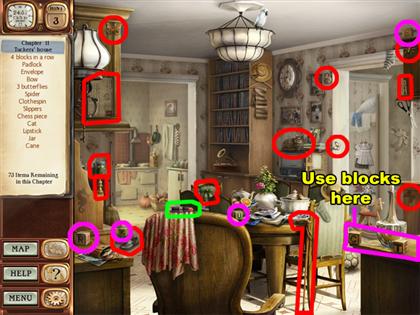
- Collect the lipstick to the left of the center of this scene. This item comes will a clue card.
- Place the 4 blocks in a row alphabetically. Place 4 blocks in the area above the bottom right corner of this scene.
- Two blocks are above the bottom left corner of this scene.
- One is in the center of this scene.
- One is in the top right corner of this scene.
- The blocks should spell out “CEKRTU”.
SIR GEORGE STUBB’S BEDROOM
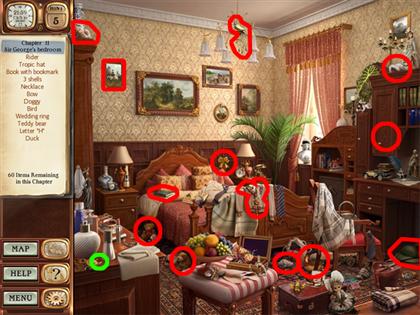
- Collect the wedding ring above the bottom left corner of this scene. This ring contains a clue card.
MRS. FOLLIAT’S SITTING ROOM
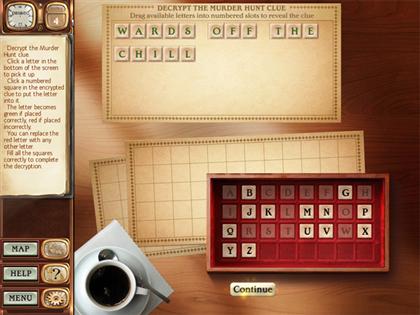
- Click on the clue note to begin decrypting this clue.
- The clue code is “WARDS OF THE CHILL”
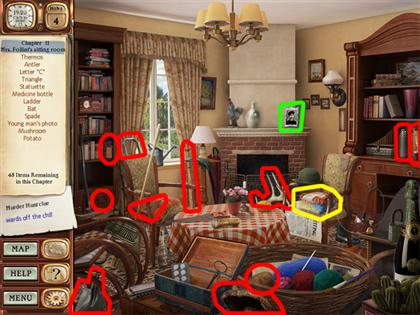
- Collect the young man’s photo to the right of the center of this scene. This photo contains a clue card.
- Collect the clue item to the right of the center of this scene. This item looks like a heap of folded scarves.
GARDEN SHED
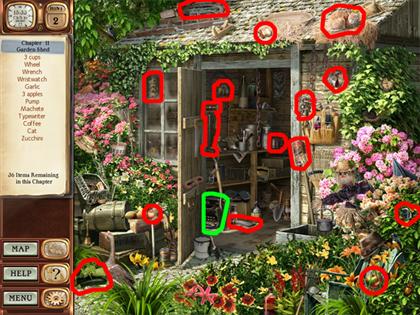
- Collect the typewriter below the center of this scene. This item comes with a clue card.
MRS. FOLLIAT’S SITTING ROOM
- Collect all of the items on the item list to gain a clue card.
BONUS PUZZLE
- Match the correct pairs of blocks together by following the path of the connecting wires.
- The blocks have been labeled by numbers in this screenshot. Match the numbers on the cards to find the correct pairs.
BOATHOUSE
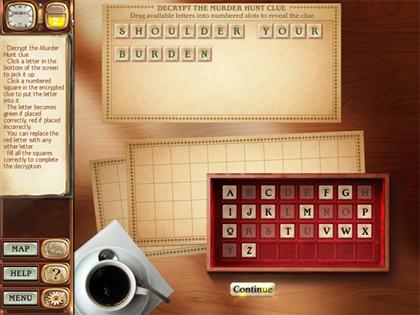
- Click on the clue note to enter this decrypting room.
- The clue code is “SHOULDER YOUR BURDEN”.
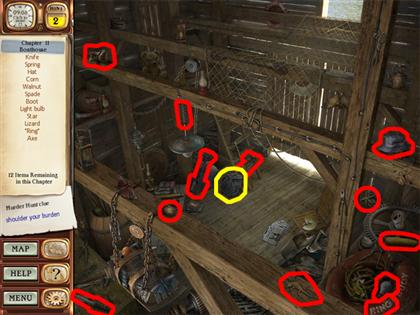
- Collect the clue item in the center of this scene. This item looks like a backpack.
- Pick up the shimmering flask that was under the clue item.
- This is the last scene in the game. Enjoy discovering whodunit.
Created at: 2009-12-26