

Walkthrough Menu
- General Tips
- Chapter 1: Secret Room
- Chapter 2: Tailor's Workshop
- Chapter 3: Drugstore/Poison
- Chapter 4: Jeweler's Workshop/The Ring
- Chapter 5: Fortress Yard/ Fencing Hall
- Chapter 6: Drugstore/Elixirs
- Chapter 7: Fencing Hall/Underground Entrance
- Chapter 8: Underground
- Chapter 9: The Artist’s Workshop
- Chapter 10: Mark’s Tower/Telescope
- Chapter 11: Labyrinth/Poison Transmission near the Pond
- Chapter 12: Kitchen/Clues
- Chapter 13: Diana’s Bedroom/Open-air Cage
- Chapter 14: Amulet/Returning Back Home
General Tips
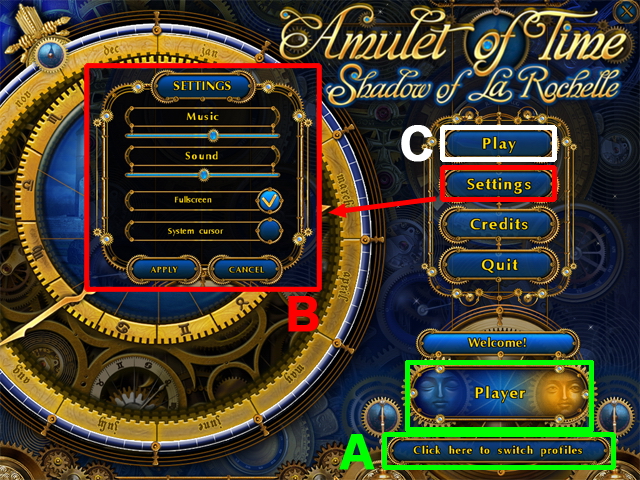 • Click on the profile panel on the main screen to add or delete player profiles (A).
• Select ‘Play’ to begin or continue your game (C).
• You may play this game in full screen or windowed mode by changing the options in the Settings menu (B).
• You may adjust the volume of sounds, music, and turn off the system cursor in the Settings menu (B).
• The Settings menu is accessible from both the main screen and the in-game menu.
• We will use the acronym ‘HOS’ for Hidden Object Scenes.
• Click on the profile panel on the main screen to add or delete player profiles (A).
• Select ‘Play’ to begin or continue your game (C).
• You may play this game in full screen or windowed mode by changing the options in the Settings menu (B).
• You may adjust the volume of sounds, music, and turn off the system cursor in the Settings menu (B).
• The Settings menu is accessible from both the main screen and the in-game menu.
• We will use the acronym ‘HOS’ for Hidden Object Scenes.
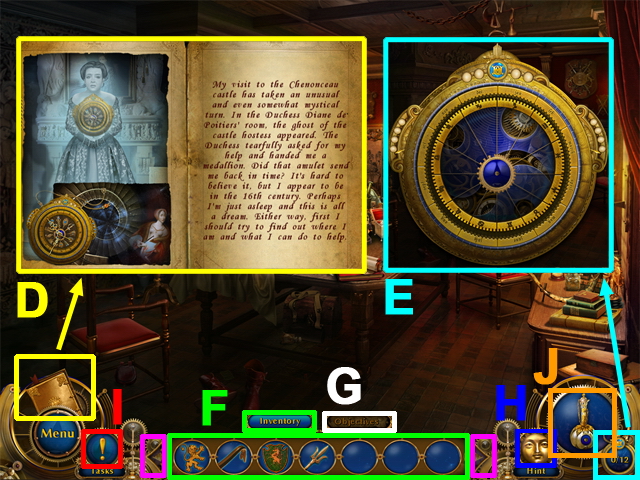 • The Player’s Journal is the location in which all information regarding game characters and events are recorded.
• Amulet – during the course of the game, the Player will gather pieces of the amulet.
• Inventory – player’s items (F).
• If you have more than 7 items in your inventory use the arrows (purple) to scroll through inventory.
• Objectives – will show the items that need to be found.
• To go to Objectives press the button marked in white (G).
• Several puzzle solutions are random; there will be video solutions posted for some of the random puzzles and a screenshot solution of the final image for others.
• If the panel Inventory/Objectives is minimized, drag the cursor to it.
• Use Hint, if you need help (H).
• Use Tasks if you don’t understand the current objective.
• Later on in the game, the player can use the elixirs (J).
• To open the in-game menu press ‘Menu’ in the lower left.
• The Player’s Journal is the location in which all information regarding game characters and events are recorded.
• Amulet – during the course of the game, the Player will gather pieces of the amulet.
• Inventory – player’s items (F).
• If you have more than 7 items in your inventory use the arrows (purple) to scroll through inventory.
• Objectives – will show the items that need to be found.
• To go to Objectives press the button marked in white (G).
• Several puzzle solutions are random; there will be video solutions posted for some of the random puzzles and a screenshot solution of the final image for others.
• If the panel Inventory/Objectives is minimized, drag the cursor to it.
• Use Hint, if you need help (H).
• Use Tasks if you don’t understand the current objective.
• Later on in the game, the player can use the elixirs (J).
• To open the in-game menu press ‘Menu’ in the lower left.
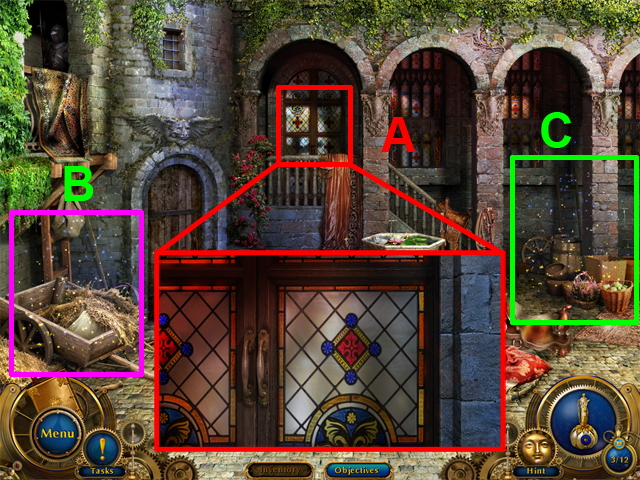
Chapter 1: Secret Room
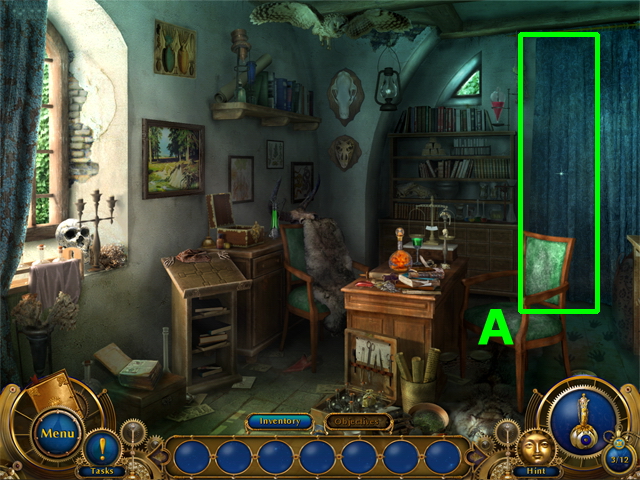
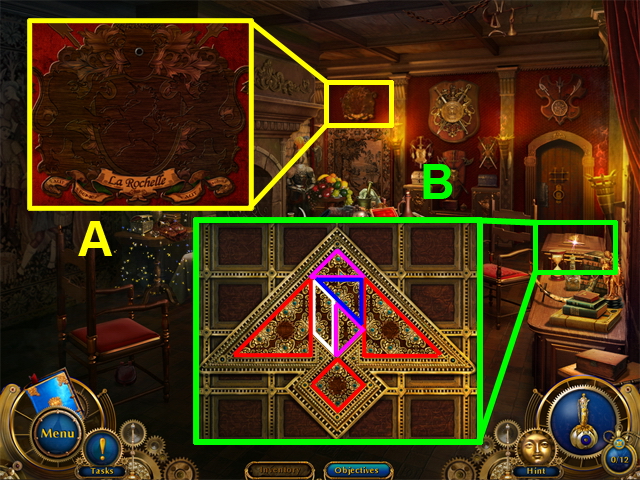 • Open the emblem to gain the objective (A).
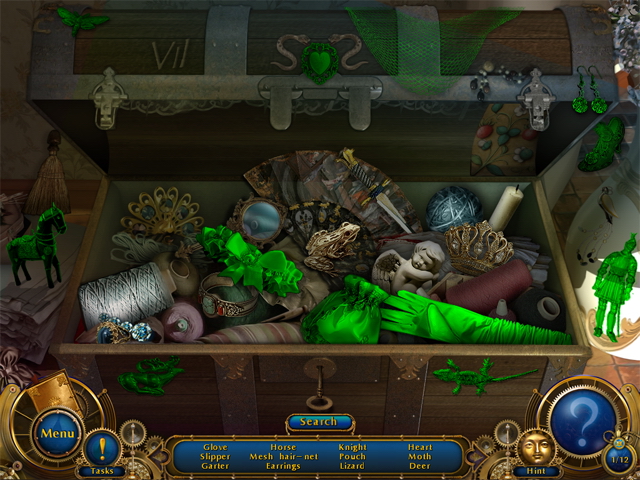
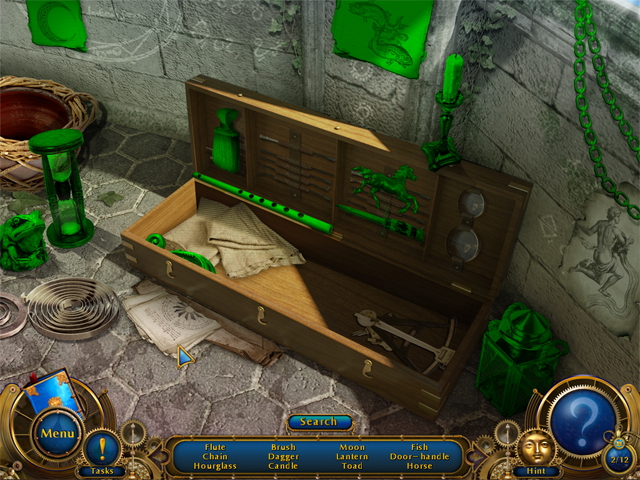
• Open the chest and collect the picture. Outlines of the figures which must be set up are marked in red, purple, white and blue.
• Open the emblem to gain the objective (A).
• Open the chest and collect the picture. Outlines of the figures which must be set up are marked in red, purple, white and blue.
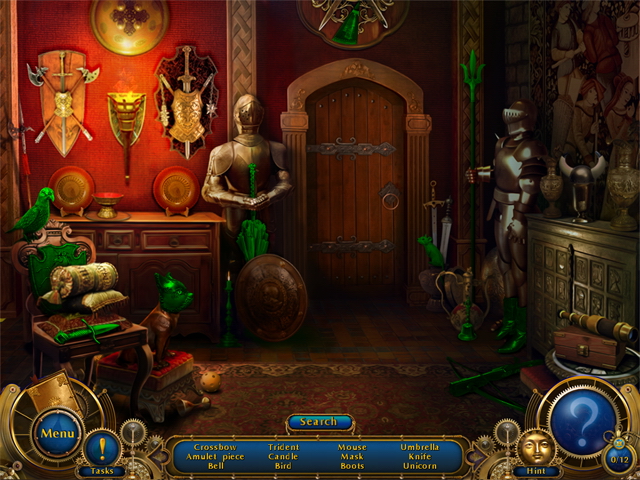
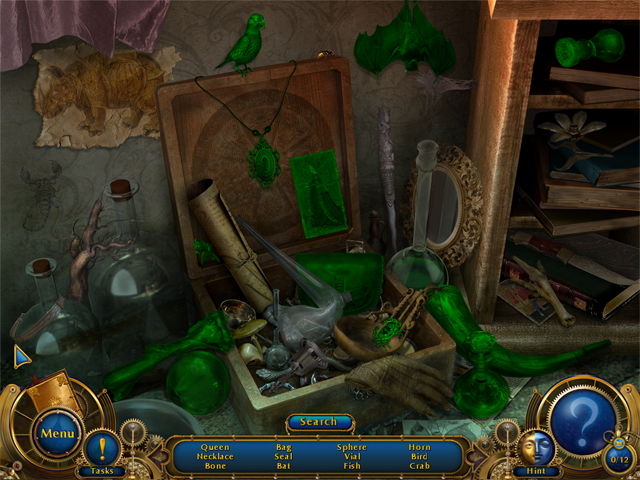
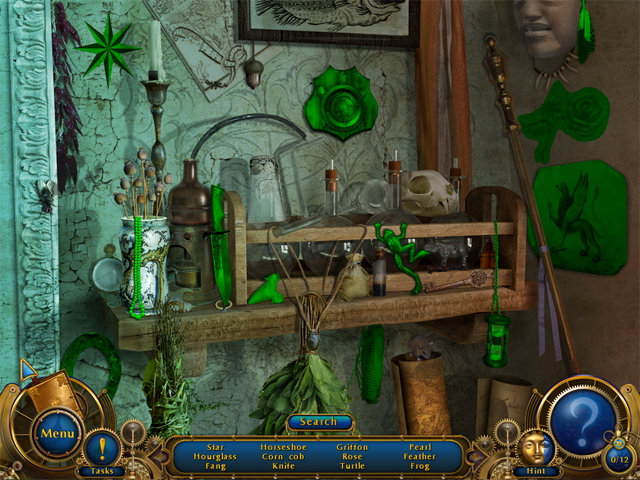
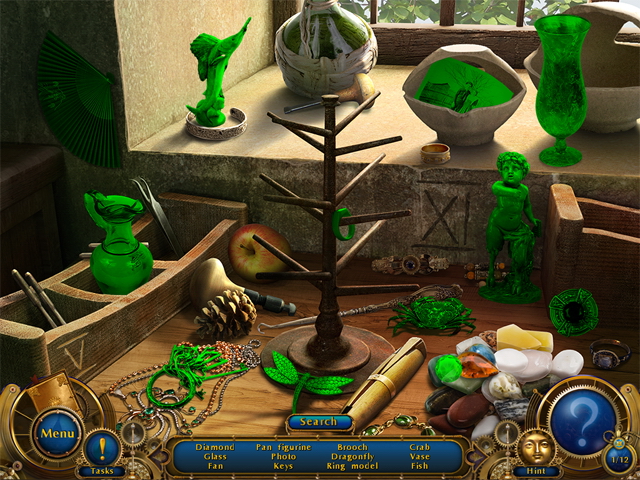
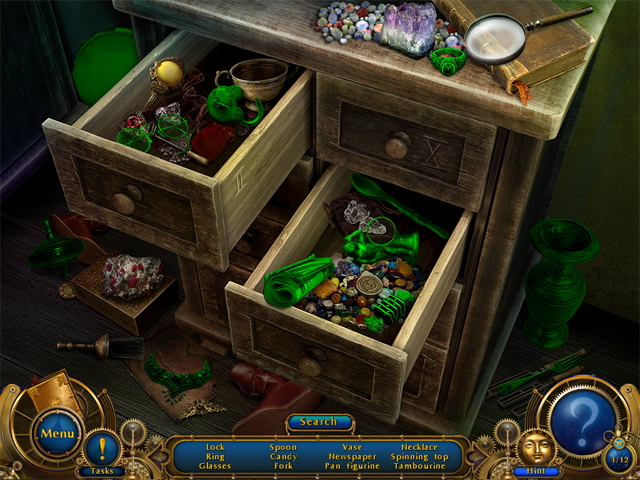
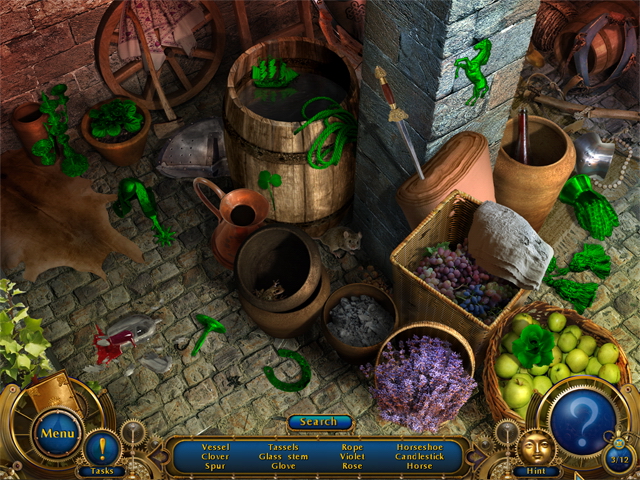
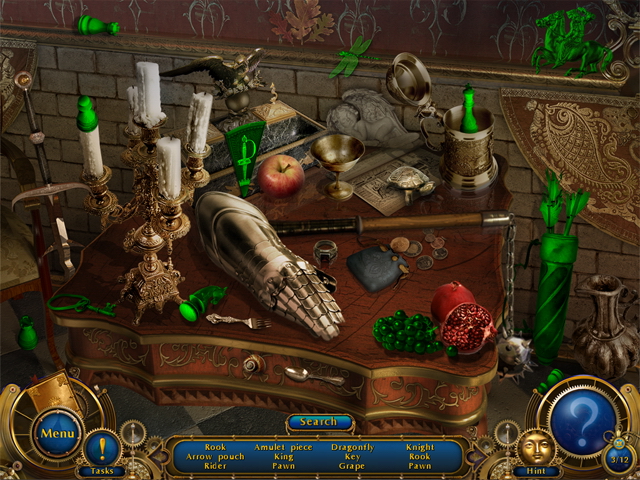
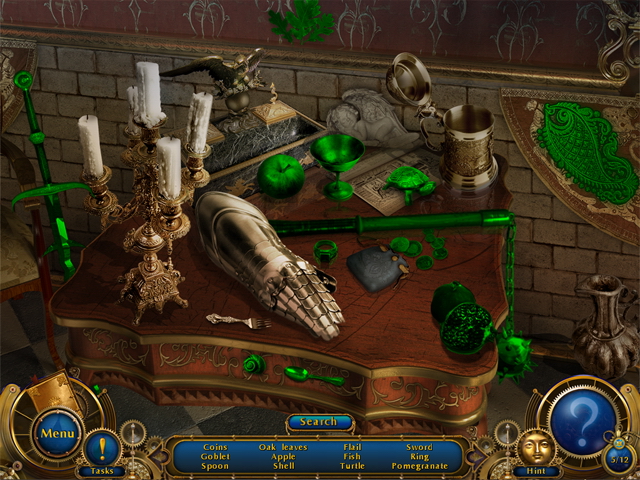
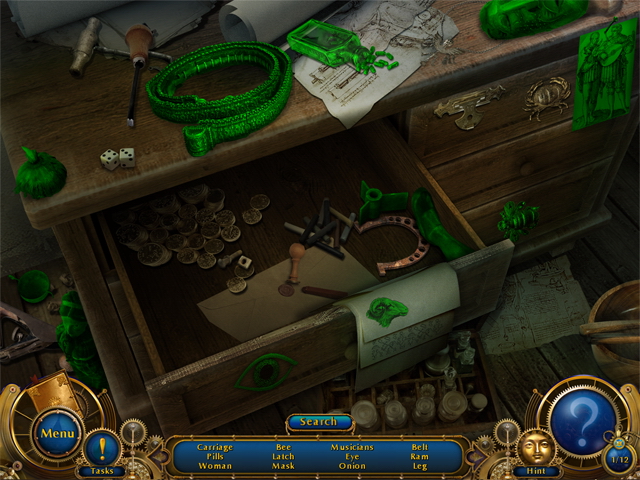
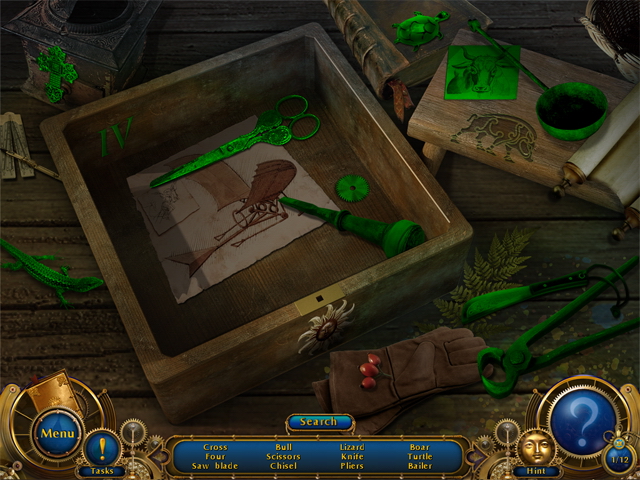
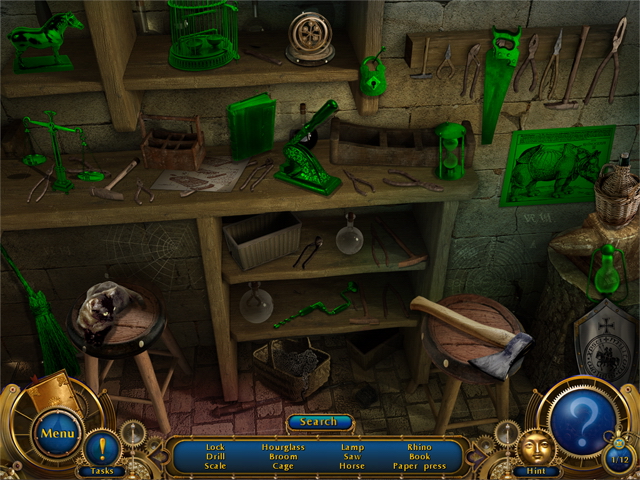
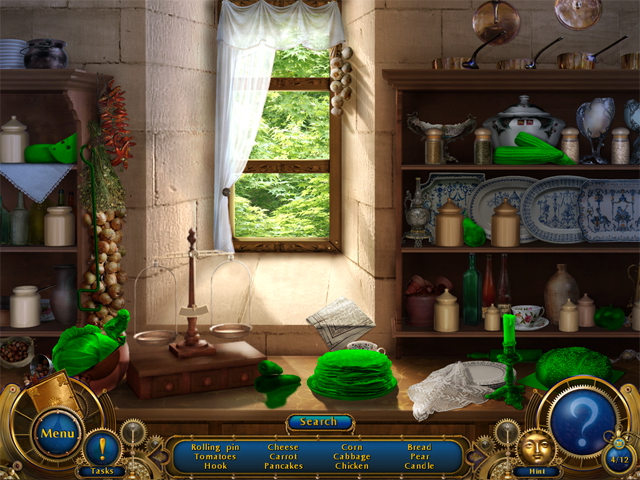
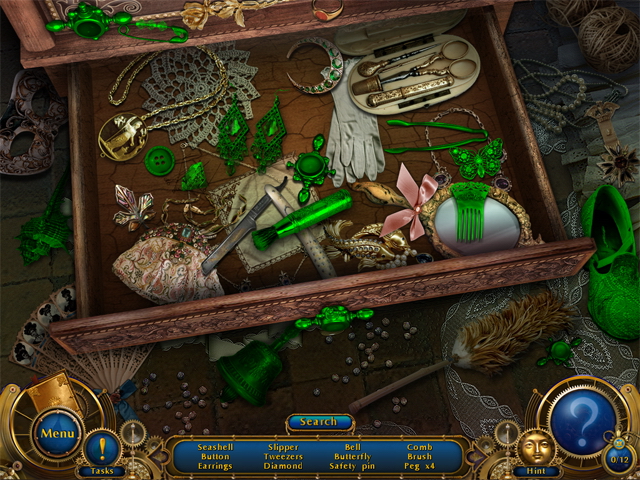
 • Find all the objects from the list.
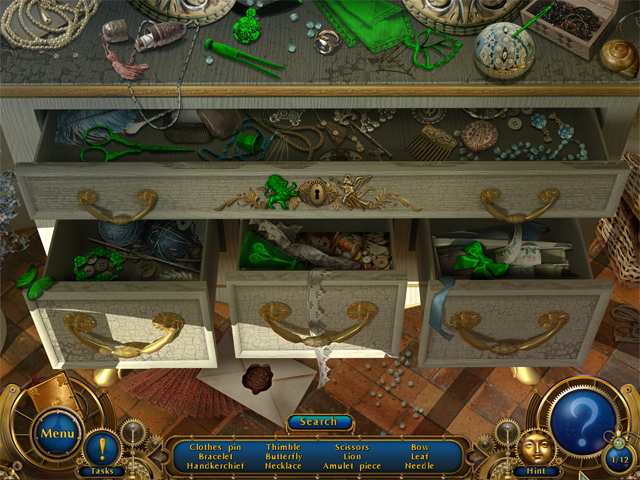
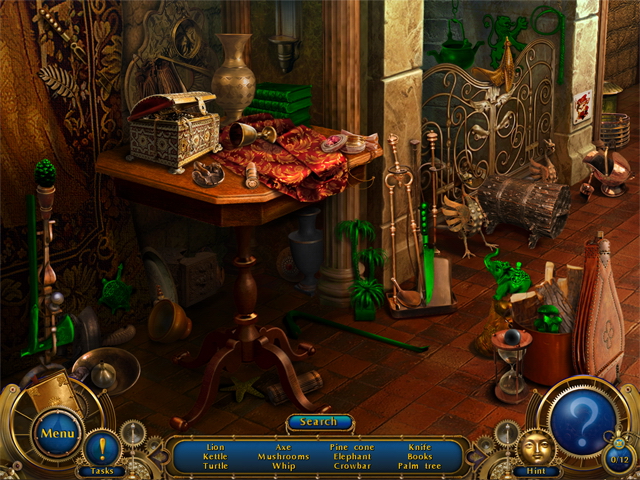 • Find all the objects from the list near the table in the HOS.
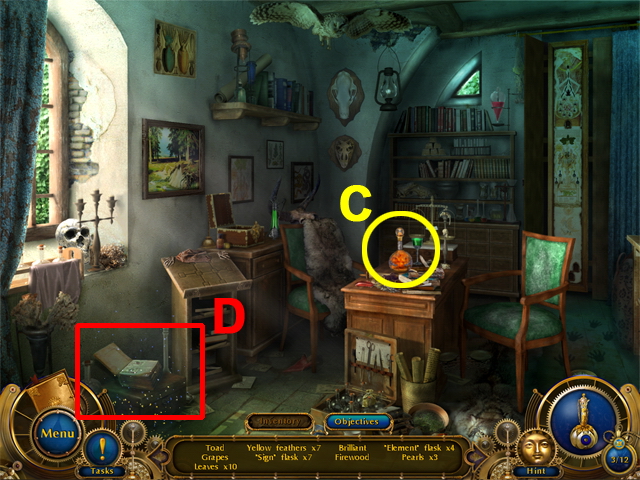
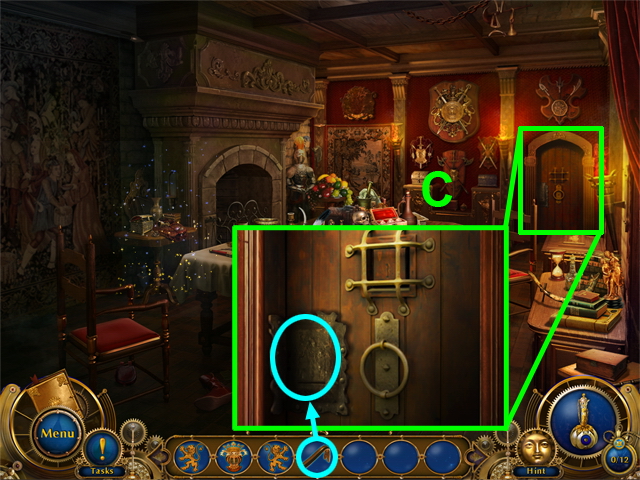 • Open the door zone (C) and use the crowbar.
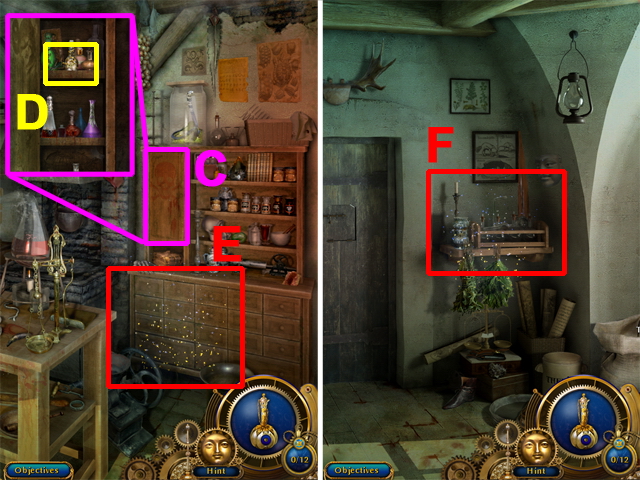
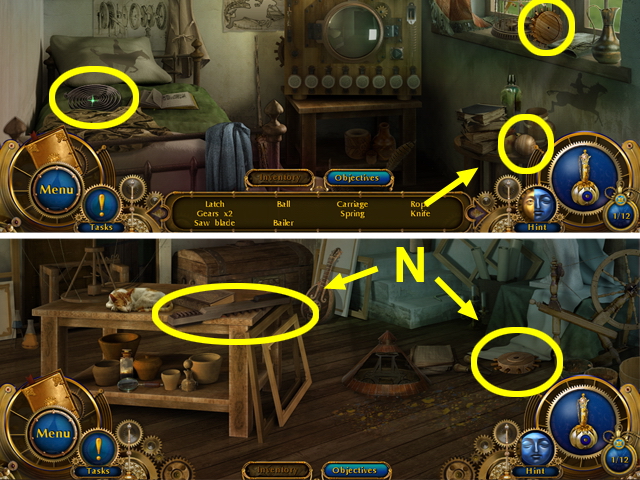
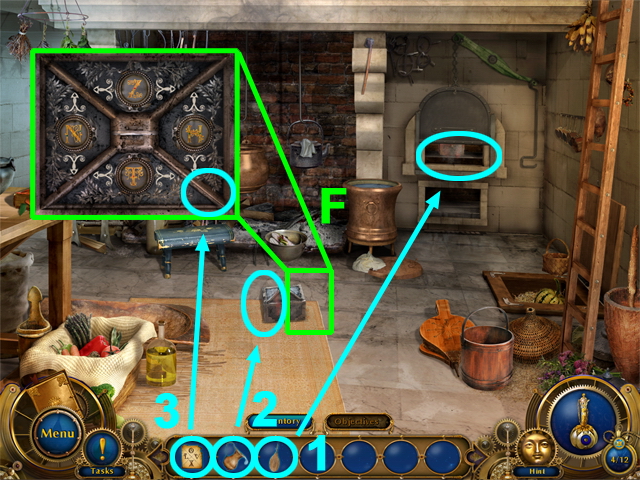
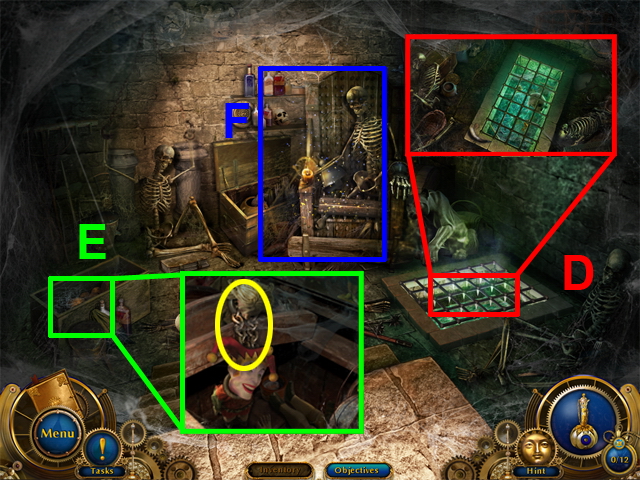 • Enter the cellar and look in the zone with the grid (D).
• Open the box and take the chain (E).
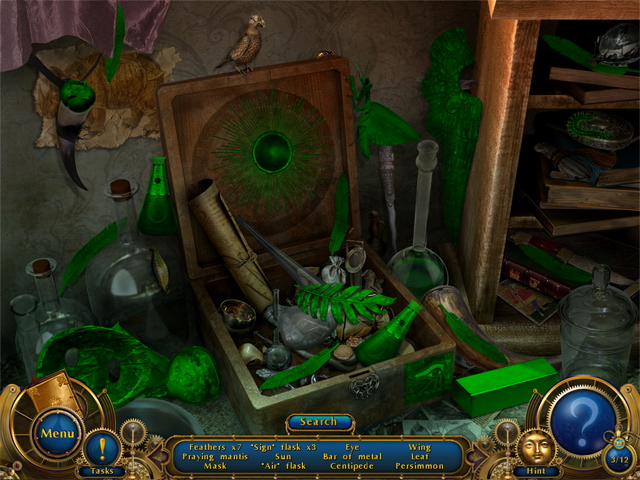
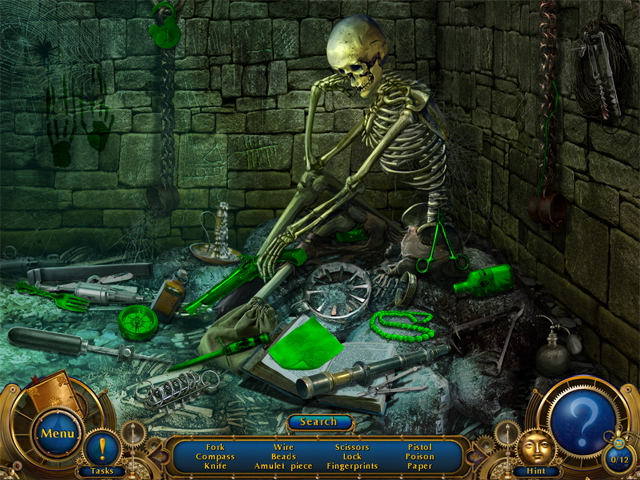
• Enter the HOS near the skeleton on the armchair (F).
• Enter the cellar and look in the zone with the grid (D).
• Open the box and take the chain (E).
• Enter the HOS near the skeleton on the armchair (F).
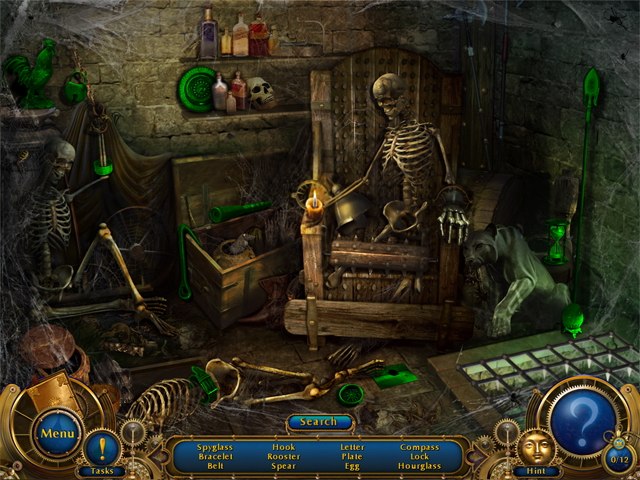 • Find all the objects from the list.
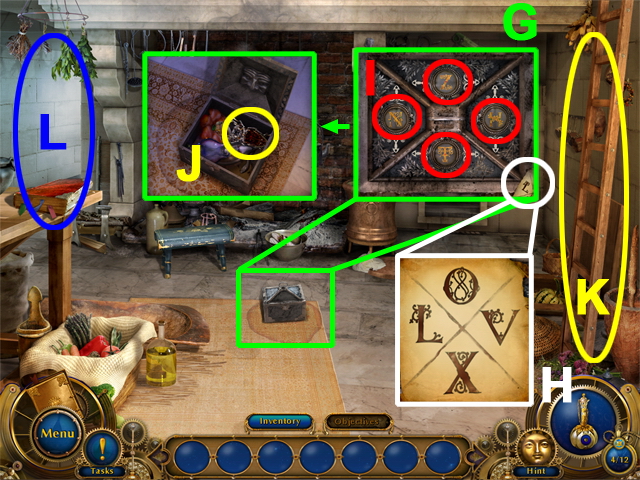
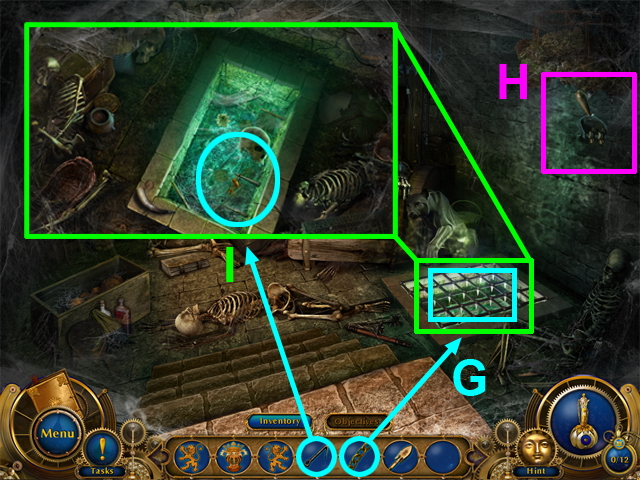 • Use the chain in the grid (G).
• Press on the lever (H).
• Enter the water pit zone (I) and use the hook on a key.
• Use the chain in the grid (G).
• Press on the lever (H).
• Enter the water pit zone (I) and use the hook on a key.
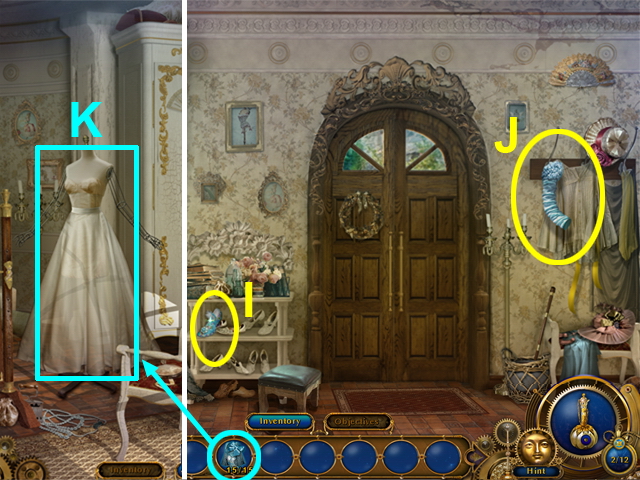
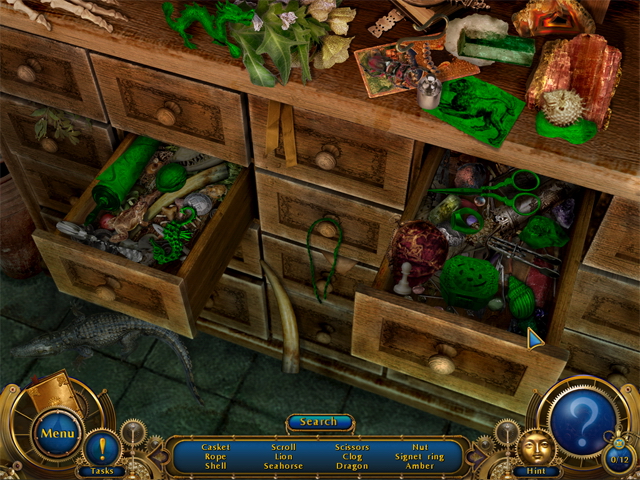
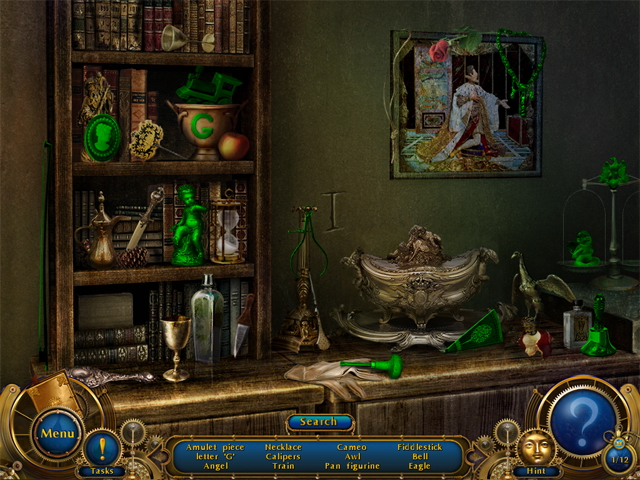
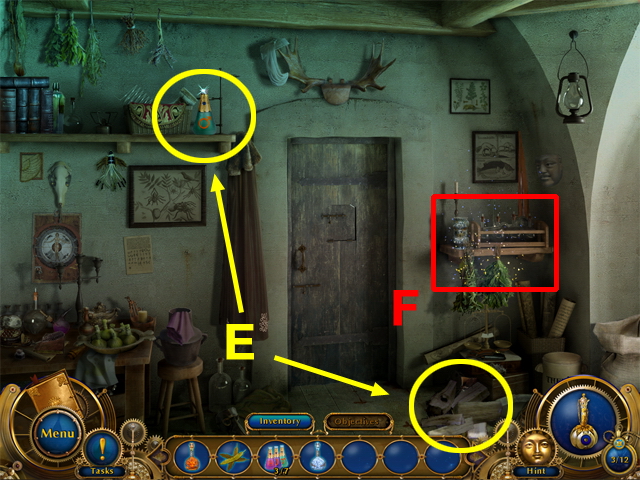
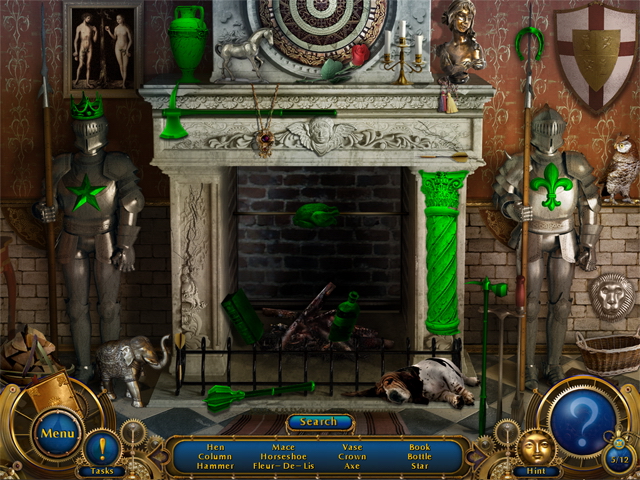
 • Go out from the cellar, enter the HOS at the left side of the room and find all the objects from the list.
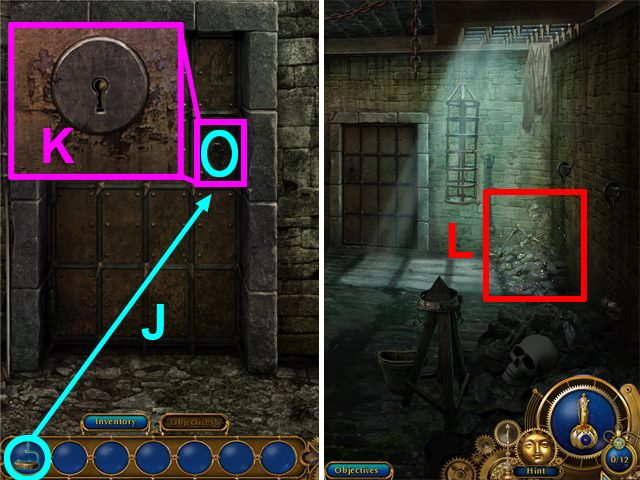
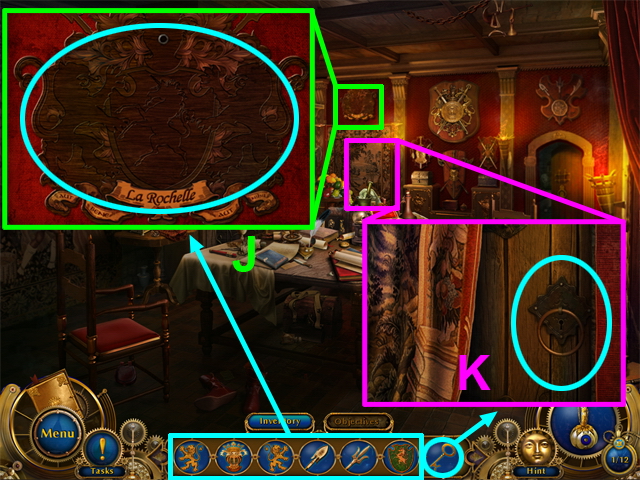 • Open the emblem (J); use its parts in the right spots.
• Enter the door zone (K); use the key and go out the fortress yard.
• Go to tailor's workshop.
• Open the emblem (J); use its parts in the right spots.
• Enter the door zone (K); use the key and go out the fortress yard.
• Go to tailor's workshop.
Chapter 2: Tailor's Workshop
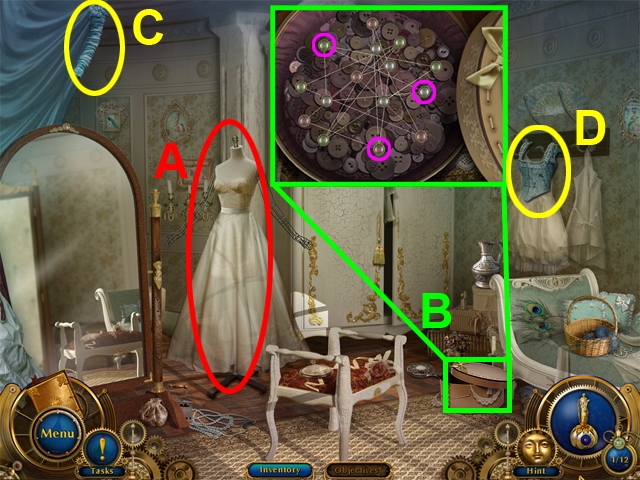 • Go to the tailor's dummy in the tailor's workshop.
• Press on the dummy to gain the objective (A)
• Enter the ‘Box with threads’ close-up (B) and untangle the threads by dragging the buttons.
• Pick up the parts of the dress (C) and (D).
• Go to the left.
• Go to the tailor's dummy in the tailor's workshop.
• Press on the dummy to gain the objective (A)
• Enter the ‘Box with threads’ close-up (B) and untangle the threads by dragging the buttons.
• Pick up the parts of the dress (C) and (D).
• Go to the left.
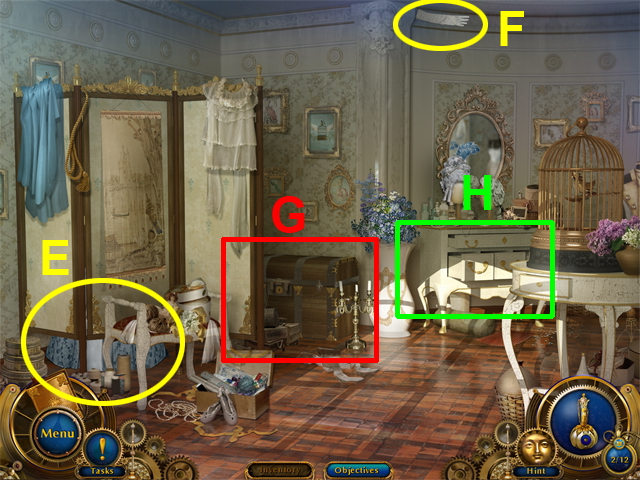 • Pick up the parts of the dress (E) and (F)
• Open HOS in the chest zone (G) and commode zone (H).
• Pick up the parts of the dress (E) and (F)
• Open HOS in the chest zone (G) and commode zone (H).
 • Collect all the objects in chest HOS.
 • Collect all the objects in commode HOS.
 • Go to the left
• Pick up the part of the dress (J) and the blue shoe (I).
• Go to the left.
• Use collected part of the dress on the dummy.
• Go to Masters Street.
• Enter the drugstore.
• Go to the left
• Pick up the part of the dress (J) and the blue shoe (I).
• Go to the left.
• Use collected part of the dress on the dummy.
• Go to Masters Street.
• Enter the drugstore.
Chapter 3: Drugstore/Poison
• Go to the right room.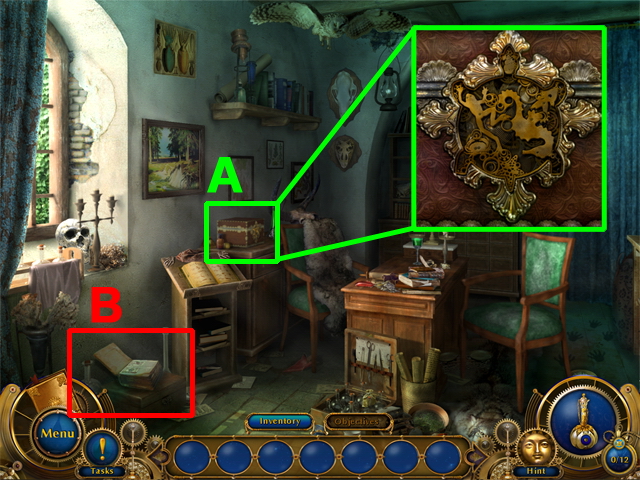 • Press on a box and gain the objective (A).
• Enter the HOS (B).
• Press on a box and gain the objective (A).
• Enter the HOS (B).
 • Collect all the objects.
• Go to the right.
• Collect all the objects.
• Go to the right.
 • Loon in the wardrobe (C) and take the golden sea-star (D).
• Open HOS in the drugstore’s wardrobe zone (E) and the shelf near the drugstore exit (F).
• Loon in the wardrobe (C) and take the golden sea-star (D).
• Open HOS in the drugstore’s wardrobe zone (E) and the shelf near the drugstore exit (F).
 • Find all hidden objects.
 • Find all hidden objects.
 • Return to the box.
• Use all found items on a box (G): first (1) and then (2).
• Return to the box.
• Use all found items on a box (G): first (1) and then (2).
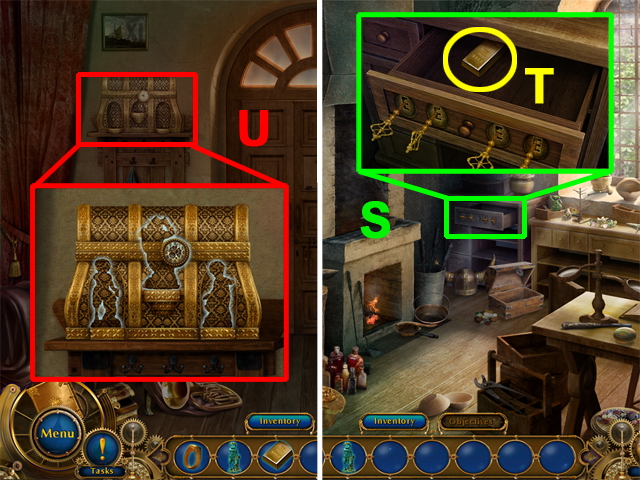
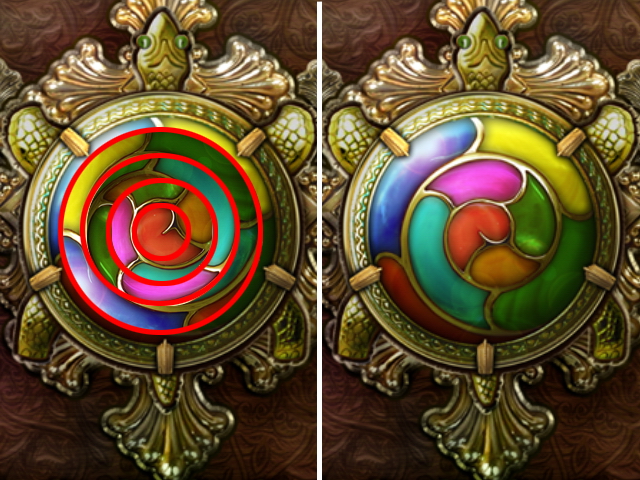 • Rotate the parts marked in red on the left, to form the image on the right side of the screenshot, ‘Turtle lock’ collect it.
• Take the note from the open box.
• Rotate the parts marked in red on the left, to form the image on the right side of the screenshot, ‘Turtle lock’ collect it.
• Take the note from the open box.
 • Open the book with poisons (H).
• Zoom into the ‘Box’ (I); take the root and the mushroom (J).
• Go to the left room.
• Open the book with poisons (H).
• Zoom into the ‘Box’ (I); take the root and the mushroom (J).
• Go to the left room.
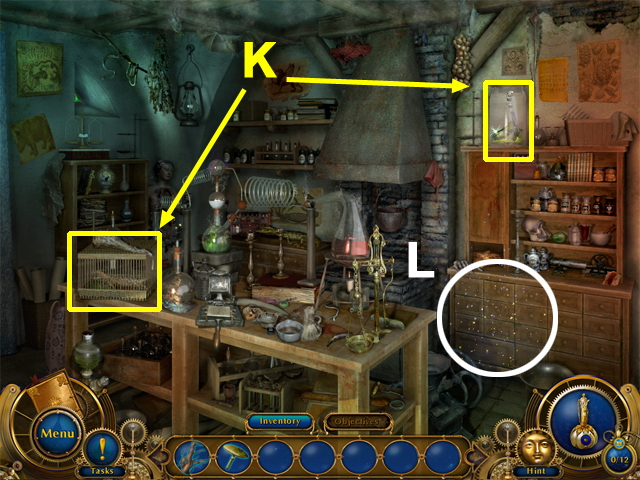 • Open the zooms with reptiles (K). Click on the reptile and gain the objective to find a bear spear.
• Press on HOS (L).
• Open the zooms with reptiles (K). Click on the reptile and gain the objective to find a bear spear.
• Press on HOS (L).
 • Find all hidden objects.
• Than go the right room.
• Find all hidden objects.
• Than go the right room.
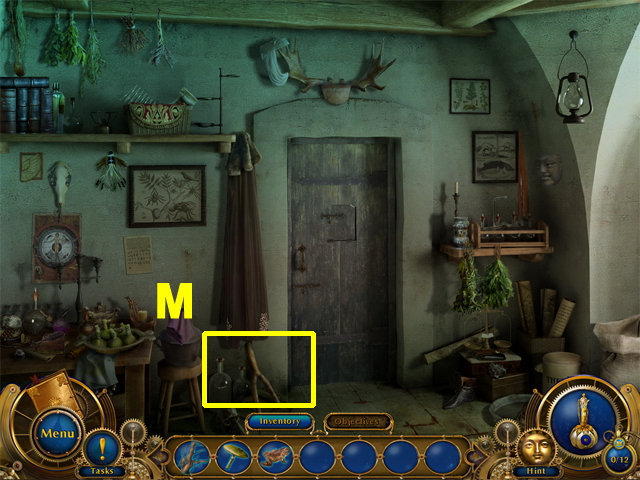 • Take a bear spear (M).
• Go to the right room.
• Take a bear spear (M).
• Go to the right room.
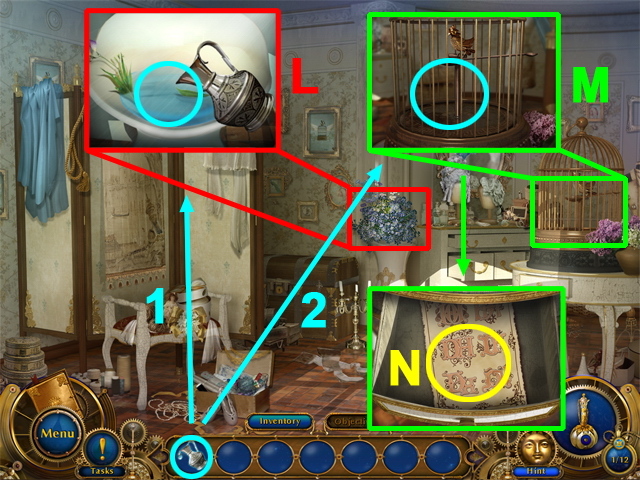
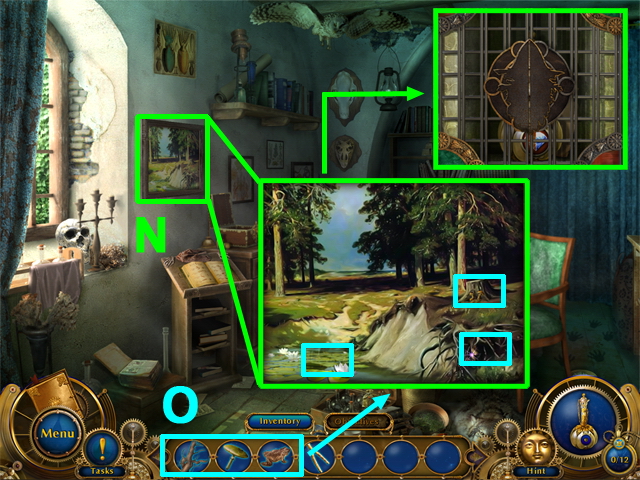 • Press on a picture (N).
• Use the items (O).
• Gain the objective in the open hiding place.
• Go to the right room.
• Press on a picture (N).
• Use the items (O).
• Gain the objective in the open hiding place.
• Go to the right room.
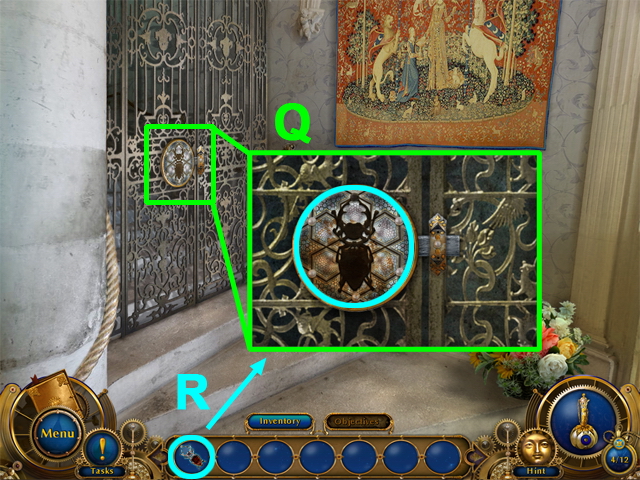
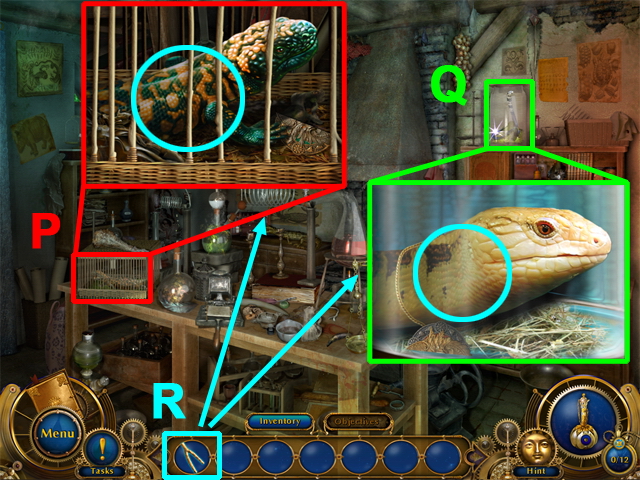 • Press on a cage (P) and use the bear spear (R).
• Press on a jar (Q) and use the bear spear.
• Go to the left room.
• Press on a cage (P) and use the bear spear (R).
• Press on a jar (Q) and use the bear spear.
• Go to the left room.
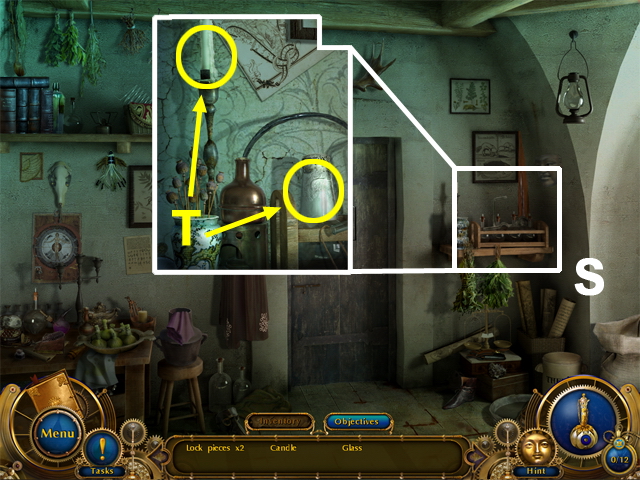 • Zoom into the shelf near the door (S).
• Take the candle and the glass (T).
• Go to the left room.
• Zoom into the shelf near the door (S).
• Take the candle and the glass (T).
• Go to the left room.
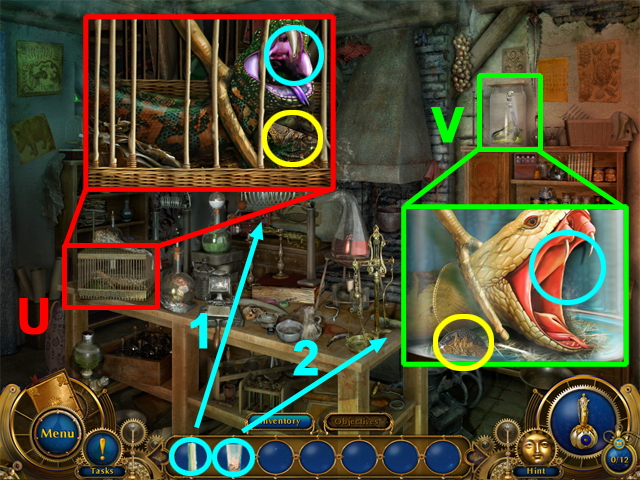 • Press on the cage with Heloderma (U) and use the candle (1).
• After you’ve sealed up the tooth, take the part of the lock from the hidden place (marked in yellow).
• Press on the jar with snakes (V) and use the glass (2).
• After you’ve collected the poison take the part of the lock (marked in yellow)
• Go to the left room.
• Press on the cage with Heloderma (U) and use the candle (1).
• After you’ve sealed up the tooth, take the part of the lock from the hidden place (marked in yellow).
• Press on the jar with snakes (V) and use the glass (2).
• After you’ve collected the poison take the part of the lock (marked in yellow)
• Go to the left room.
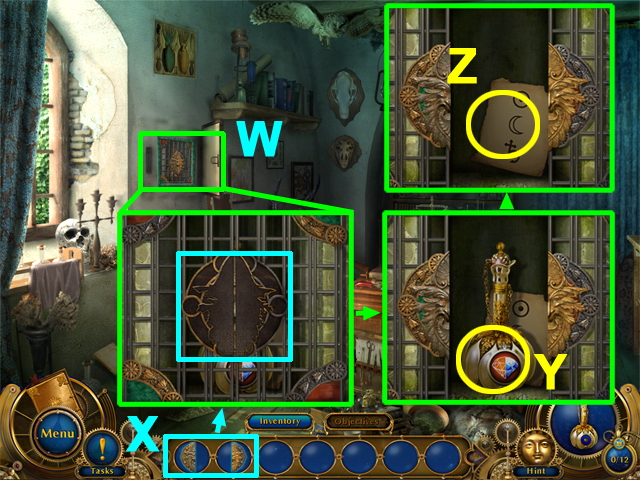 • Select the hidden place (W).
• Use the objects from the inventory (X) to open the lock.
• Take the elixir (Y).
• Take the note with a code (Z).
• Go to the left room.
• Go to the Masters Street.
• Select the hidden place (W).
• Use the objects from the inventory (X) to open the lock.
• Take the elixir (Y).
• Take the note with a code (Z).
• Go to the left room.
• Go to the Masters Street.
Chapter 4: Jeweler's Workshop/The Ring
 • Select the jewelry workshop door.
• Use the note with code from inventory (1).
• Enter the code (2).
• Enter the jewelry workshop and go to the right room.
• Select the jewelry workshop door.
• Use the note with code from inventory (1).
• Enter the code (2).
• Enter the jewelry workshop and go to the right room.
 • Press on the table box (B) and gain the objective.
• Open zoom ‘Wardrobe with the keys’ (C).
• Move the chips (marked in red), solve the puzzle, the door will open.
• Take the keys (D).
• Press on the table box (B) and gain the objective.
• Open zoom ‘Wardrobe with the keys’ (C).
• Move the chips (marked in red), solve the puzzle, the door will open.
• Take the keys (D).
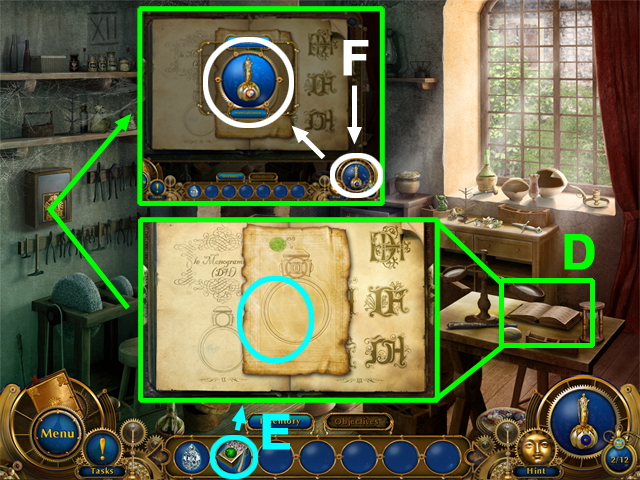
 • Open zoom ‘Table box’ (E). Use the keys from inventory (F).
• Using the hint (G), place the keys and rotate them the necessary number of times (see screenshot).
• Take the monogram catalogue (H) in the open box.
• Open the monogram catalogue on the table (I) and get an objective.
• Go to the left room.
• Go out to the Street of Masters
• Enter the tailor's workshop.
• Go to the right room.
• Open zoom ‘Table box’ (E). Use the keys from inventory (F).
• Using the hint (G), place the keys and rotate them the necessary number of times (see screenshot).
• Take the monogram catalogue (H) in the open box.
• Open the monogram catalogue on the table (I) and get an objective.
• Go to the left room.
• Go out to the Street of Masters
• Enter the tailor's workshop.
• Go to the right room.
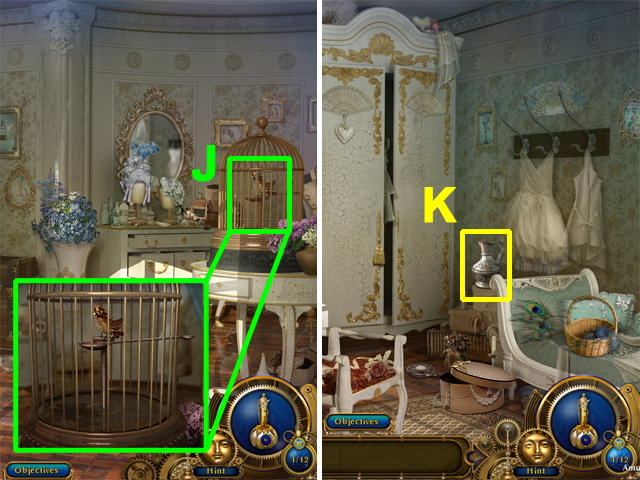 • Press on the cage (J) and get an objective.
• Go to the right room.
• Take a jug (K).
• Return to the right room.
• Press on the cage (J) and get an objective.
• Go to the right room.
• Take a jug (K).
• Return to the right room.
 • Open the zoom ‘Vase with flowers’ (L), use the jug from your inventory and fill it with water.
• Go to the cage (M) and use the jug filled with water from your inventory.
• Take a sheet with embroidered monograms (N).
• Return to the jeweler’s workshop and go to the right room.
• Open the zoom ‘Vase with flowers’ (L), use the jug from your inventory and fill it with water.
• Go to the cage (M) and use the jug filled with water from your inventory.
• Take a sheet with embroidered monograms (N).
• Return to the jeweler’s workshop and go to the right room.
 • Press on the monogram catalogue
• Use the sheet with embroidered monograms from the inventory (P).
• Find 5 differences (Q) and get an objective.
• Select the HOS (R).
• Press on the monogram catalogue
• Use the sheet with embroidered monograms from the inventory (P).
• Find 5 differences (Q) and get an objective.
• Select the HOS (R).
 • Find all hidden objects.
 • Press on the table box (S) and take the golden bar (T).
• Go to the left room.
• Press on a chest (U) and get an objective.
• Go to the left room.
• Press on the table box (S) and take the golden bar (T).
• Go to the left room.
• Press on a chest (U) and get an objective.
• Go to the left room.
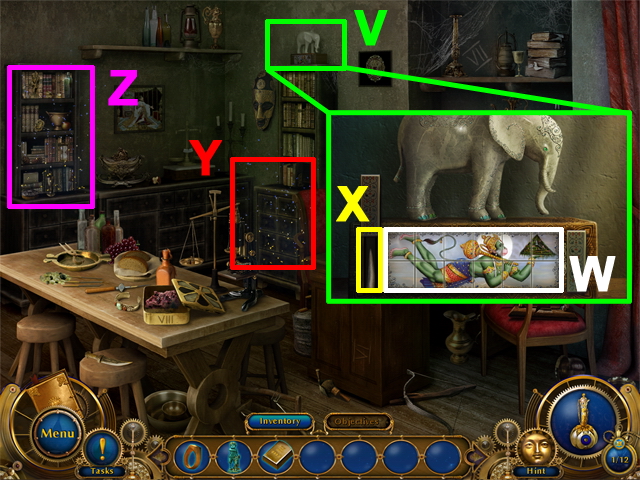 • Press on the statue of the elephant (V).
• Swap the chips to collect the picture to open the hidden place. An example of collected picture (W).
• Take an ivory (X).
• Open HOS (Y) and HOS (Z).
• Press on the statue of the elephant (V).
• Swap the chips to collect the picture to open the hidden place. An example of collected picture (W).
• Take an ivory (X).
• Open HOS (Y) and HOS (Z).
 • Find all hidden objects.
 • Find all hidden objects.
• Go to the right room.
• Find all hidden objects.
• Go to the right room.
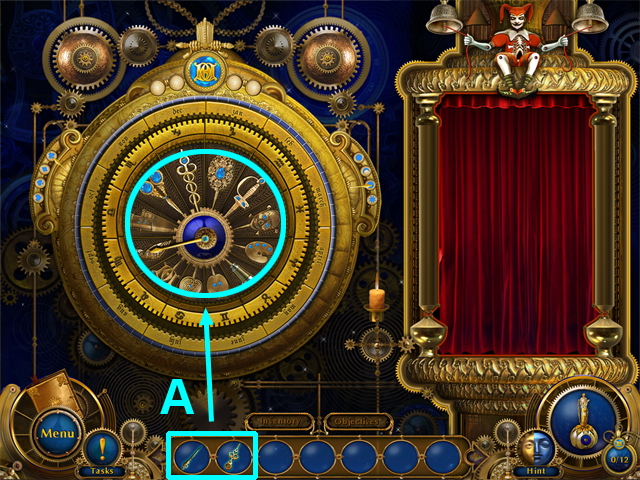
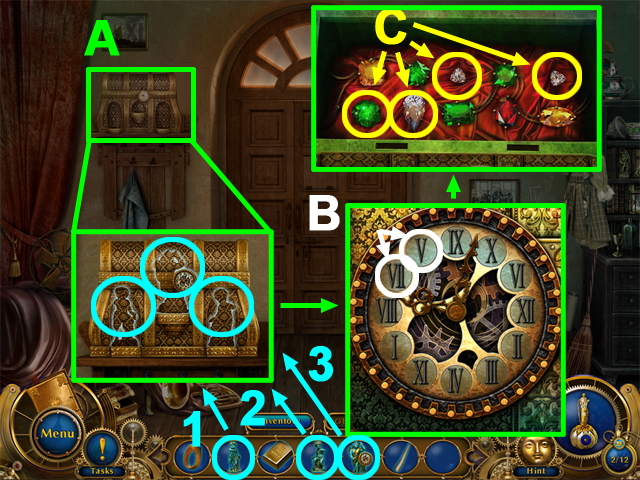 • Select the chest (A) and place the statues from the inventory 1, 2, and 3.
• Put the figures in right the order (B) by changing places of neighboring figures on the clock dial.
• Take all the accessible gems (C).
• Go to the right room.
• Select the chest (A) and place the statues from the inventory 1, 2, and 3.
• Put the figures in right the order (B) by changing places of neighboring figures on the clock dial.
• Take all the accessible gems (C).
• Go to the right room.
 • Press on the monogram catalogue on the table (D).
• Use the parts of the ring from the inventory (E).
• To see the materialized image of the ring use the elixir of ‘Materialization’ (F).
• Go to the left room and go out to the Masters Street.
• Go to the fortress yard.
• Press on the monogram catalogue on the table (D).
• Use the parts of the ring from the inventory (E).
• To see the materialized image of the ring use the elixir of ‘Materialization’ (F).
• Go to the left room and go out to the Masters Street.
• Go to the fortress yard.
Chapter 5: Fortress Yard/ Fencing Hall
 • Open zoom ‘The door to fencing hall’ (A) to get an objective.
• Open HOS ‘Cart’ (B) and HOS ‘Near the column’ (C).
• Open zoom ‘The door to fencing hall’ (A) to get an objective.
• Open HOS ‘Cart’ (B) and HOS ‘Near the column’ (C).
 • Collect all the items in the HOS.
 • Collect all the items in the HOS.
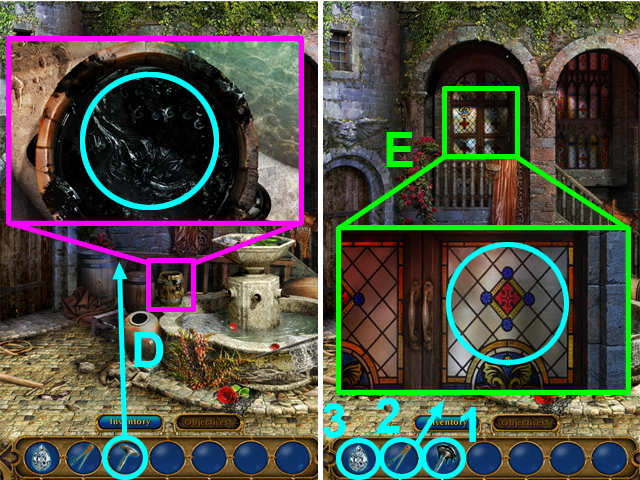 • Open the zoom ‘Barrel with tar’ and use the leg of the goblet from the inventory (D).
• Open the zoom ‘The door to fencing hall’ (E) and use the items from the inventory in the following order: 1, 2, and 3.
• Go to the fencing hall after the dialogue on the fencers.
• Open the zoom ‘Barrel with tar’ and use the leg of the goblet from the inventory (D).
• Open the zoom ‘The door to fencing hall’ (E) and use the items from the inventory in the following order: 1, 2, and 3.
• Go to the fencing hall after the dialogue on the fencers.
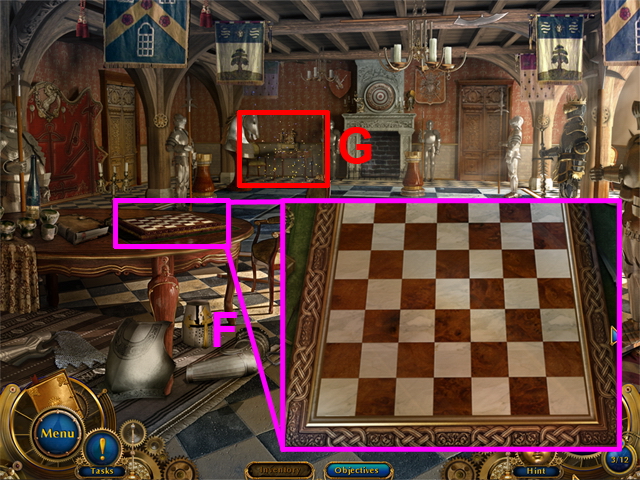 • Open zoom with chessboard to get an objective (F).
• Open HOS ‘Table near the fireplace’ (G).
• Open zoom with chessboard to get an objective (F).
• Open HOS ‘Table near the fireplace’ (G).
 • Collect all the items in the HOS.
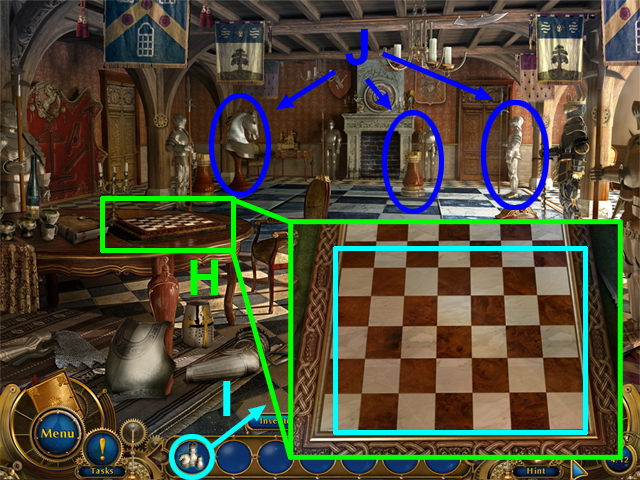 • Open the ‘Chessboard’ close-up (H) and use the items from inventory (I).
• Press on any of the figures (J) in the hall.
• Go out to the fortress yard, then go to Masters Street and enter the drugstore.
• Open the ‘Chessboard’ close-up (H) and use the items from inventory (I).
• Press on any of the figures (J) in the hall.
• Go out to the fortress yard, then go to Masters Street and enter the drugstore.
Chapter 6: Drugstore/Elixirs
 • Go to the left room.
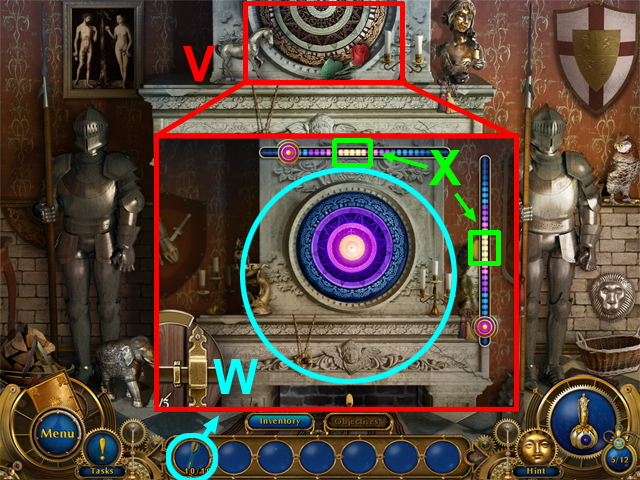
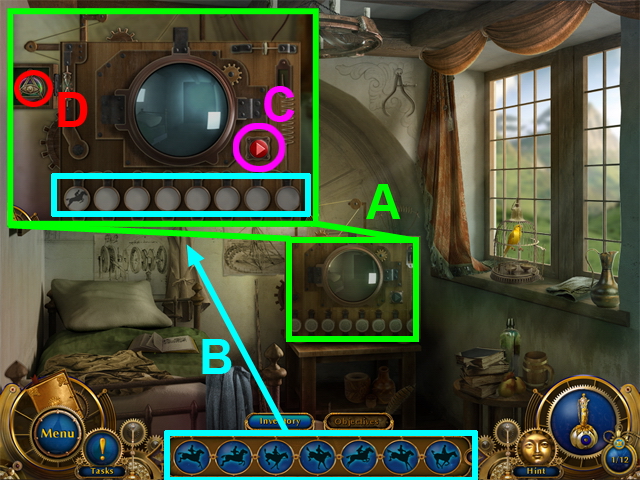
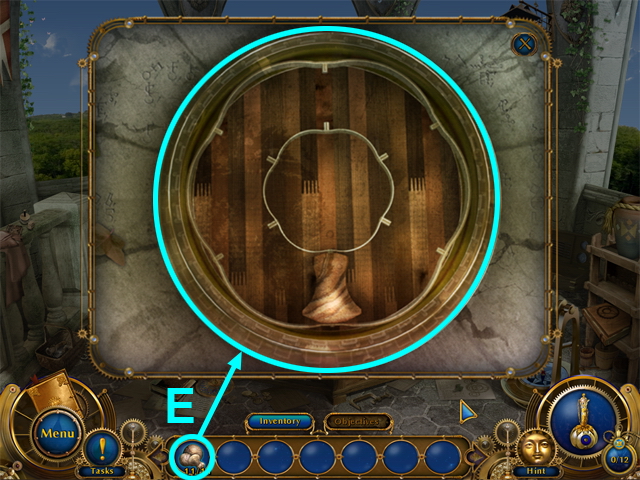
• Open the blinds. Open the ‘The lock of the wardrobe door’ close-up behind the open blinds.
• Go to the left room.
• Open the blinds. Open the ‘The lock of the wardrobe door’ close-up behind the open blinds.
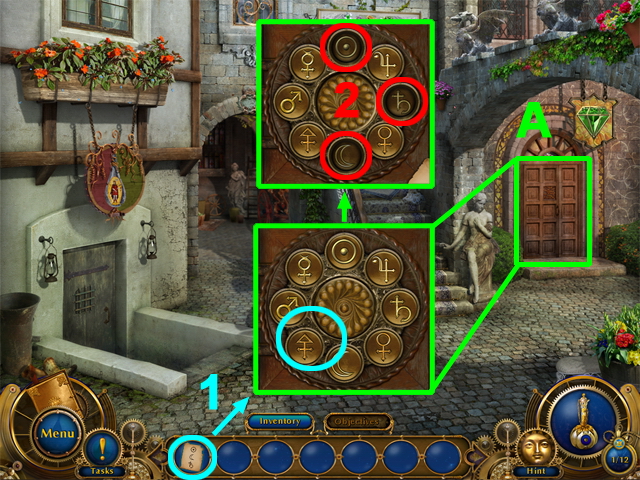
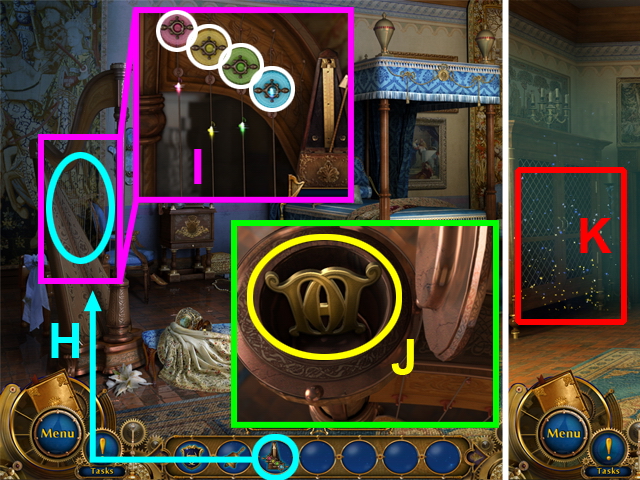
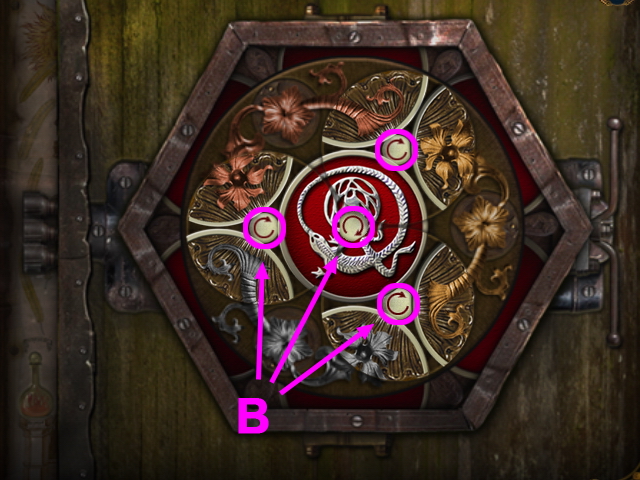 • Solve the lock puzzle by pressing on the center buttons to rotate the circles.
• Get the objective from the magical picture.
• Solve the lock puzzle by pressing on the center buttons to rotate the circles.
• Get the objective from the magical picture.
 • Take a flask from the table (C).
• Open HOS ‘Box’ (D).
• Take a flask from the table (C).
• Open HOS ‘Box’ (D).
 • Find all hidden objects.
• Go to the left room.
• Find all hidden objects.
• Go to the left room.
 • Pick up the objects: flask and firewood (E).
• Open the HOS ‘Shelf near the exit’ (F).
• Pick up the objects: flask and firewood (E).
• Open the HOS ‘Shelf near the exit’ (F).
 • Find all hidden objects.
• Then go to the left room.
• Find all hidden objects.
• Then go to the left room.
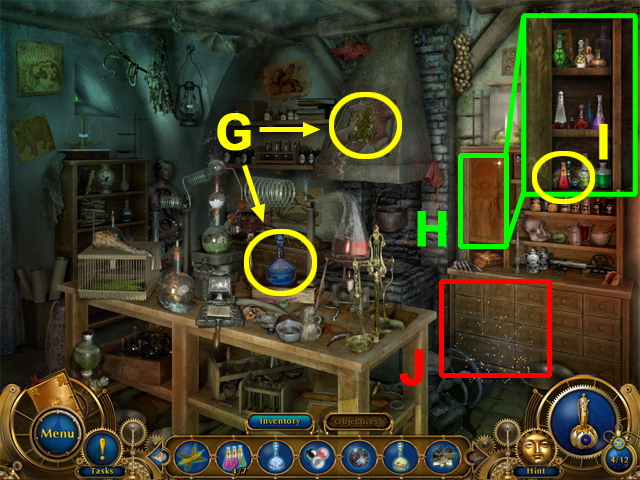 • Pick up the items: flask and toad (G).
• Open zoom ‘Wardrobe with poisons’ (H) and take the flask (I).
• Open HOS (J).
• Pick up the items: flask and toad (G).
• Open zoom ‘Wardrobe with poisons’ (H) and take the flask (I).
• Open HOS (J).
 • Find all hidden objects.
• Then go to the room at the left.
• Find all hidden objects.
• Then go to the room at the left.
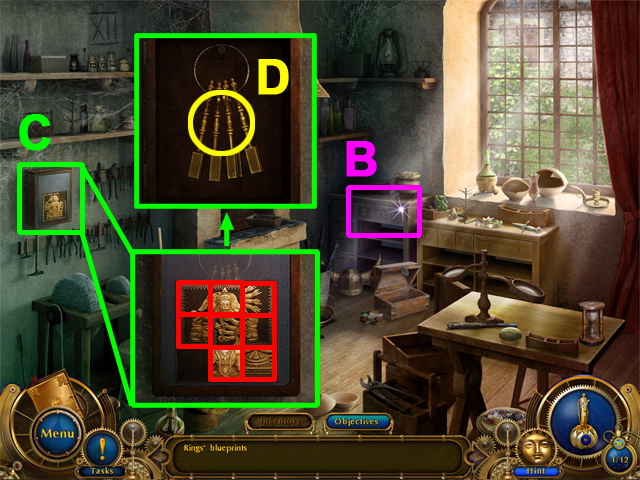
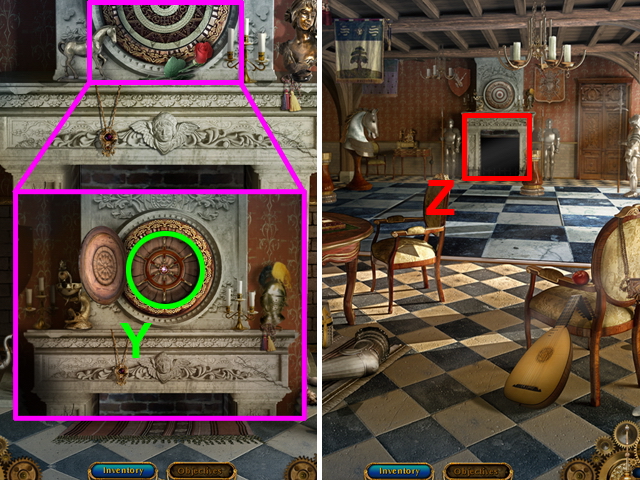
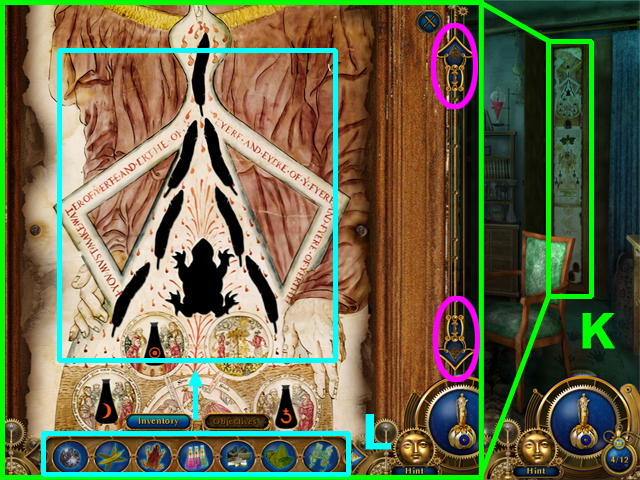 • Open the magic picture zoom (K).
• Use the up and down arrows (marked in purple) to move the picture along and place all the inventory items (L) into their corresponding spots.
• Open the magic picture zoom (K).
• Use the up and down arrows (marked in purple) to move the picture along and place all the inventory items (L) into their corresponding spots.
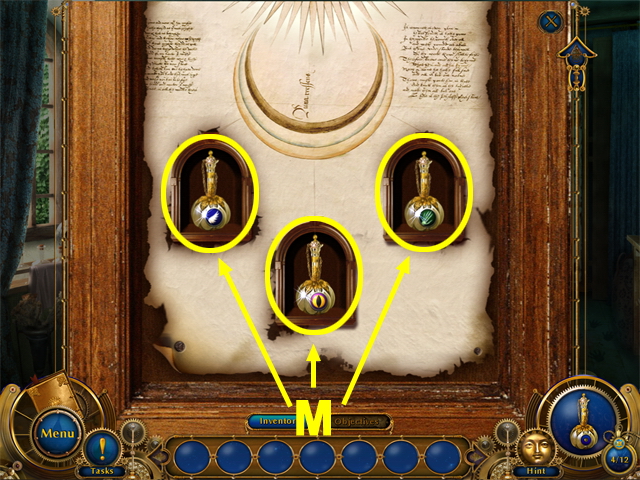 • Take the elixirs (M).
• Go to the room on the left and go out to Masters Street.
• Go to the fortress yard and enter the fencing hall.
• Take the elixirs (M).
• Go to the room on the left and go out to Masters Street.
• Go to the fortress yard and enter the fencing hall.
Chapter 7: Fencing Hall / Underground Entrance
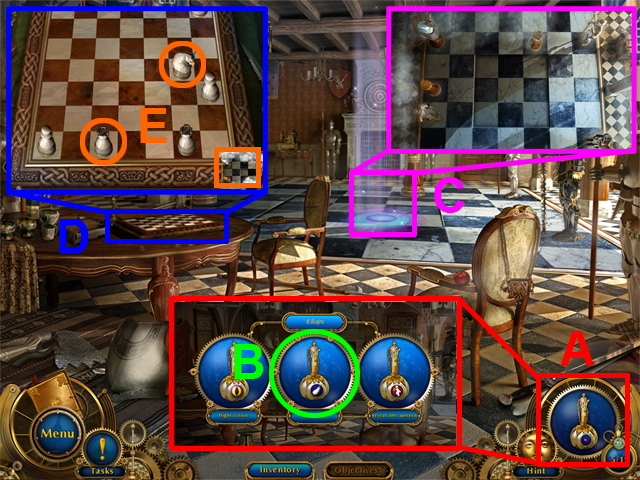 • Open the elixir panel (A) and press on the elixir of levitation (B).
• Press on the zone of appeared portal (C).
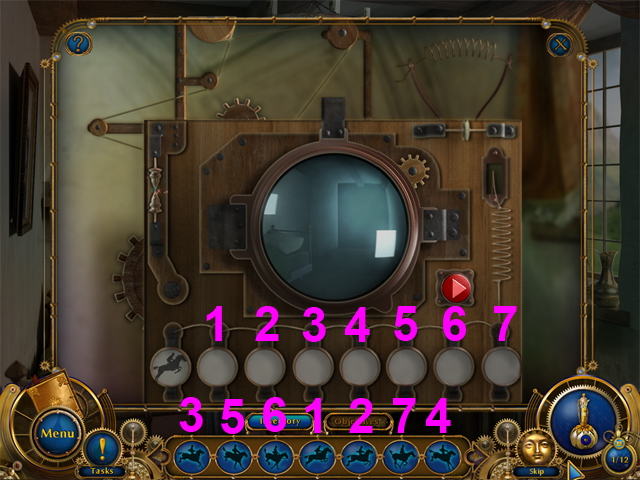
• Open the chessboard zoom (D).
• Place the chess figures in the same order in which they are standing in the hall. Use the hint (E).
• Open the elixir panel (A) and press on the elixir of levitation (B).
• Press on the zone of appeared portal (C).
• Open the chessboard zoom (D).
• Place the chess figures in the same order in which they are standing in the hall. Use the hint (E).
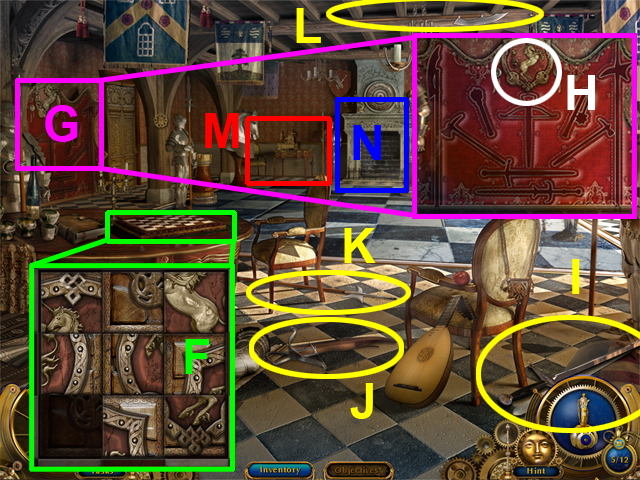 • Solve the puzzle with the unicorn (F).
• Open the stand with the weapons (G) and press on the unicorn (H).
• Take the weapons: I, J, K, and L.
• Open the ‘The table near the fireplace’ HOS (M).
• Open the ‘Fireplace’ HOS (N).
• Solve the puzzle with the unicorn (F).
• Open the stand with the weapons (G) and press on the unicorn (H).
• Take the weapons: I, J, K, and L.
• Open the ‘The table near the fireplace’ HOS (M).
• Open the ‘Fireplace’ HOS (N).
 • Collect all the HOS items.
 • Collect all the HOS items.
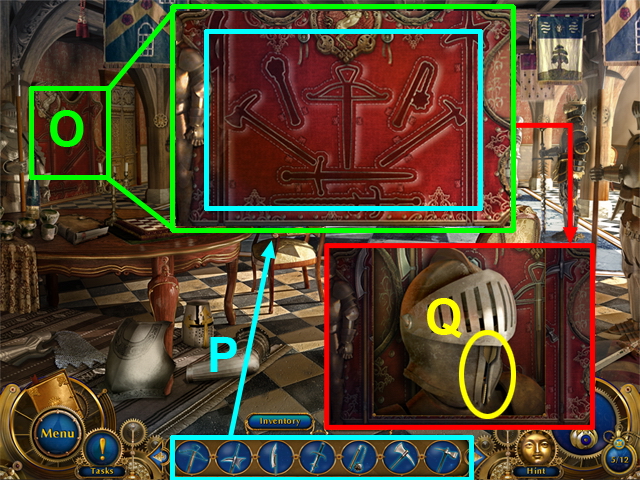 • Open the stand with weapons (O) and use all the weapons from the inventory on the stand (P).
• Take a dart from the open helmet (Q).
• Open the stand with weapons (O) and use all the weapons from the inventory on the stand (P).
• Take a dart from the open helmet (Q).
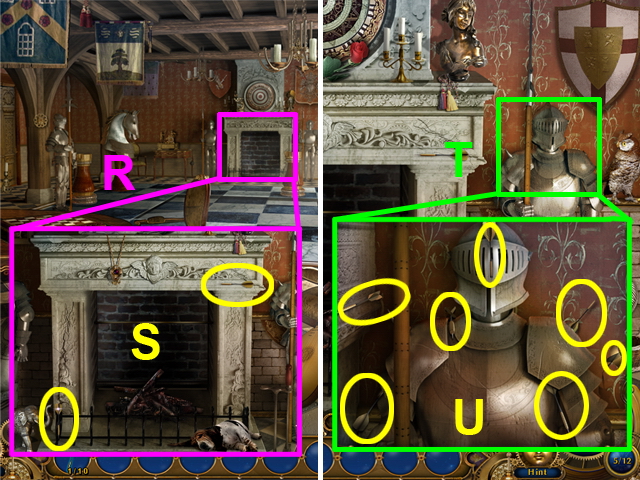 • Open the zoom near the fireplace (R) and take two darts (S).
• Open the zoom with a knight (T) and open the zoom with a fireplace; collect the rest of the darts (U).
• Open the zoom near the fireplace (R) and take two darts (S).
• Open the zoom with a knight (T) and open the zoom with a fireplace; collect the rest of the darts (U).
 • Open the ‘Darts’ zoom (V) and use the collected darts from the inventory on it (W).
• Throw the darts by pressing on the left mouse button. Hit the yellow circle 5 times. You should throw the dart at the moment when the slider on the indicator is in the yellow zone (X).
• Open the ‘Darts’ zoom (V) and use the collected darts from the inventory on it (W).
• Throw the darts by pressing on the left mouse button. Hit the yellow circle 5 times. You should throw the dart at the moment when the slider on the indicator is in the yellow zone (X).
 • Press on the steering wheel in the hidden place (Y).
• Return from the fireplace zone to the hall and enter the open the fireplace (Z).
• Press on the steering wheel in the hidden place (Y).
• Return from the fireplace zone to the hall and enter the open the fireplace (Z).
Chapter 8: Underground
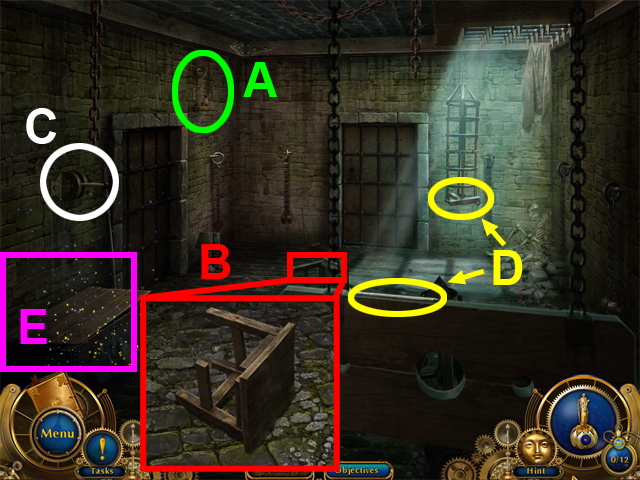 • Press on the oil lamp (A).
• Open the zoom ‘zone of the fallen stool’ to get the objective (B).
• Use the lever (C) to drop the plank.
• Take a nail on the plank and a chair leg in the cage (D).
• Open the ‘Box’ HOS (E).
• Press on the oil lamp (A).
• Open the zoom ‘zone of the fallen stool’ to get the objective (B).
• Use the lever (C) to drop the plank.
• Take a nail on the plank and a chair leg in the cage (D).
• Open the ‘Box’ HOS (E).
 • Collect all the HOS items.
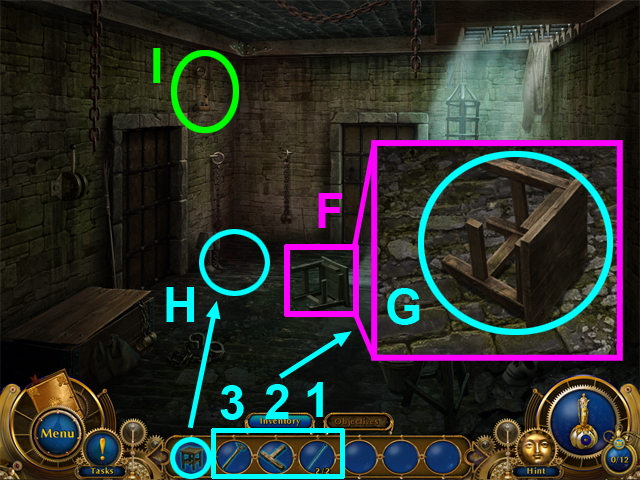 • Enter the stool zone (F) and use the nails, the leg and the hammer on the stool in the following order (1,2,3).
• Use the repaired stool from the inventory on a corner under the lamp (H)
• Take a lamp (I).
• Enter the stool zone (F) and use the nails, the leg and the hammer on the stool in the following order (1,2,3).
• Use the repaired stool from the inventory on a corner under the lamp (H)
• Take a lamp (I).
 • Go to the left room and use the lamp from the inventory on a lock (J).
• Open the lock zoom zone (K) to get and objective.
• Go to the main view (one time down).
• Open the ‘Skeleton in the corner’ HOS (L).
• Go to the left room and use the lamp from the inventory on a lock (J).
• Open the lock zoom zone (K) to get and objective.
• Go to the main view (one time down).
• Open the ‘Skeleton in the corner’ HOS (L).
 • Collect all the items in the HOS.
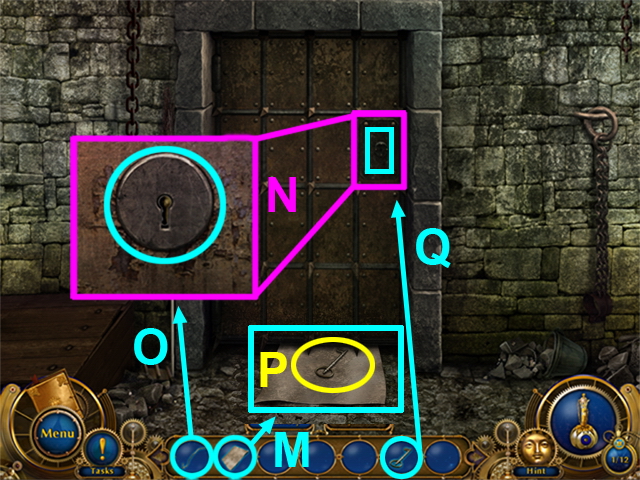 • From the main view, open the left door close-up.
• Use a sheet of paper from the inventory on the area under the door (M).
• Enter the lock zoom zone (N) and use a piece of the wire from inventory on the keyhole (O).
• Take the key (P).
• Use the key from the inventory on the lock and exit the room (Q).
• From the main view, open the left door close-up.
• Use a sheet of paper from the inventory on the area under the door (M).
• Enter the lock zoom zone (N) and use a piece of the wire from inventory on the keyhole (O).
• Take the key (P).
• Use the key from the inventory on the lock and exit the room (Q).
 • Open the elixir panel (R).
• Use the night vision elixir by pressing on it (S).
• Open the door with the lock zoom to get an objective (T).
• Open the elixir panel (R).
• Use the night vision elixir by pressing on it (S).
• Open the door with the lock zoom to get an objective (T).
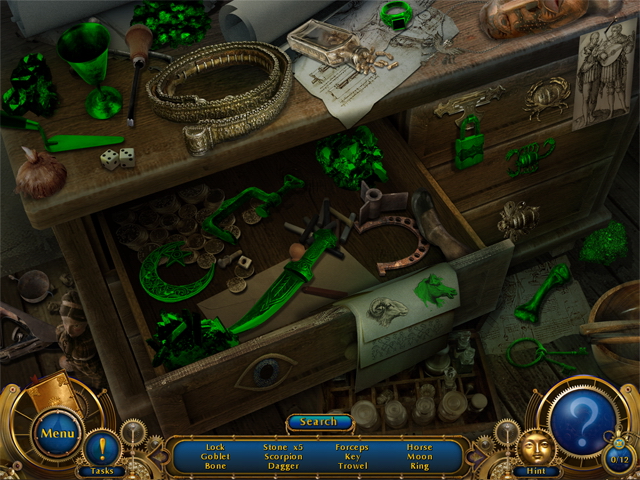
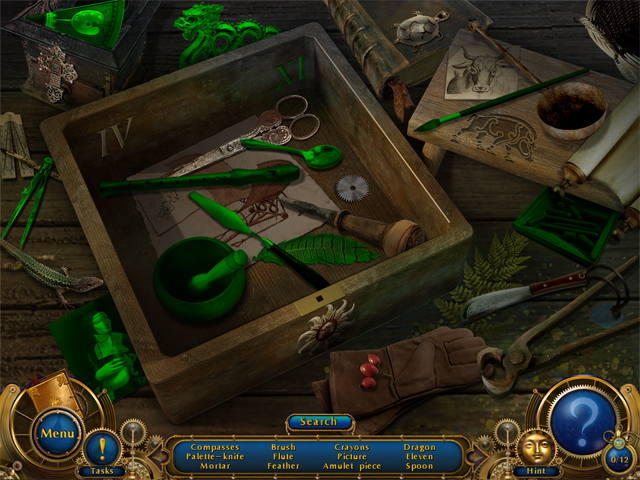
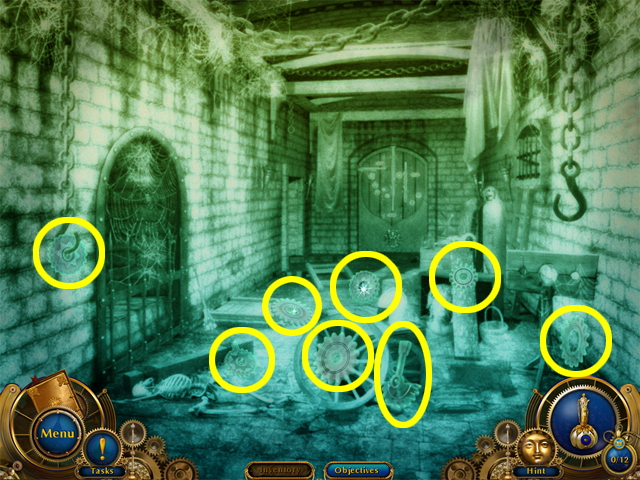 • Collect the items circled in yellow.
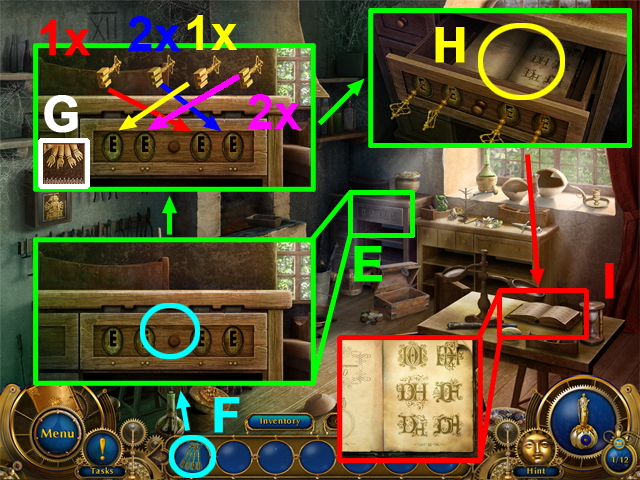
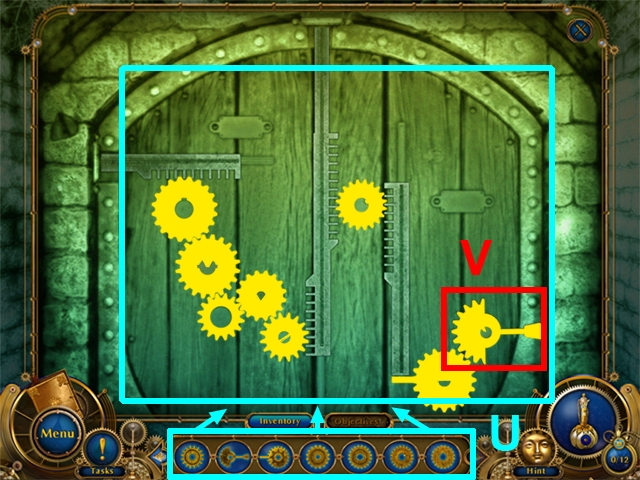 • Open the ‘door with the lock’ zoom and place the parts from the inventory in the right spots taking into account their shape.
• After you’ve placed all the parts, press the lever (V). The right position of the gears is shown in yellow.
• Open the ‘door with the lock’ zoom and place the parts from the inventory in the right spots taking into account their shape.
• After you’ve placed all the parts, press the lever (V). The right position of the gears is shown in yellow.
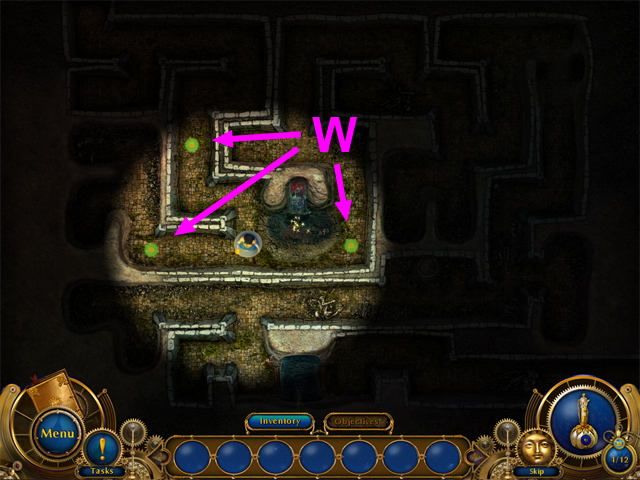 • Move through the labyrinth by pressing the green checkpoints on the floor (W). Pass all the labyrinth checkpoints until you reach the lower right corner.
Chapter 9: The Artist’s Workshop
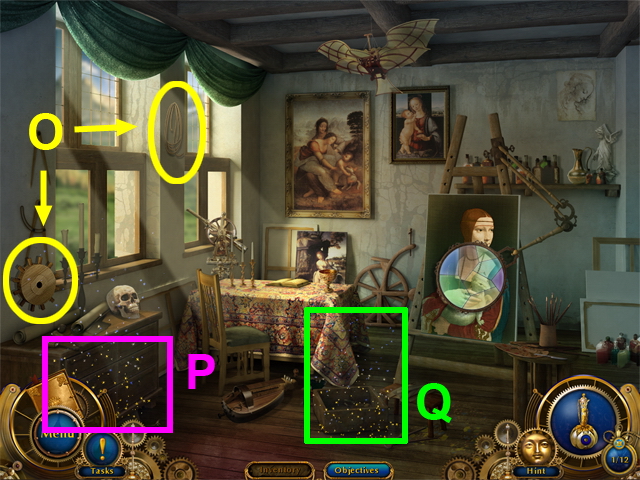
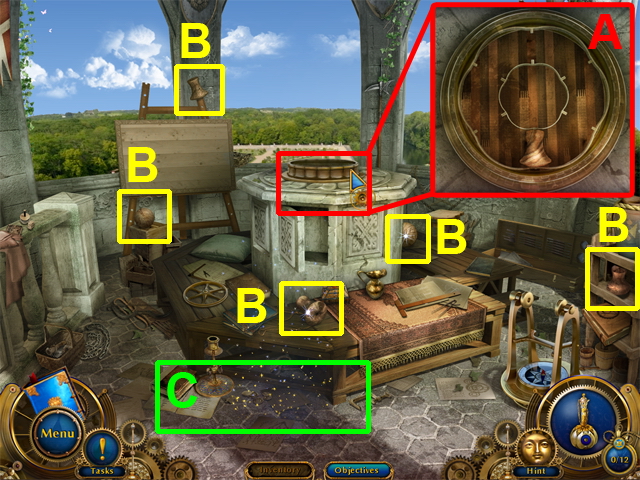
 • Leave the cellar and press on the easel to get an objective (A).
• Collect the items circled in yellow (B).
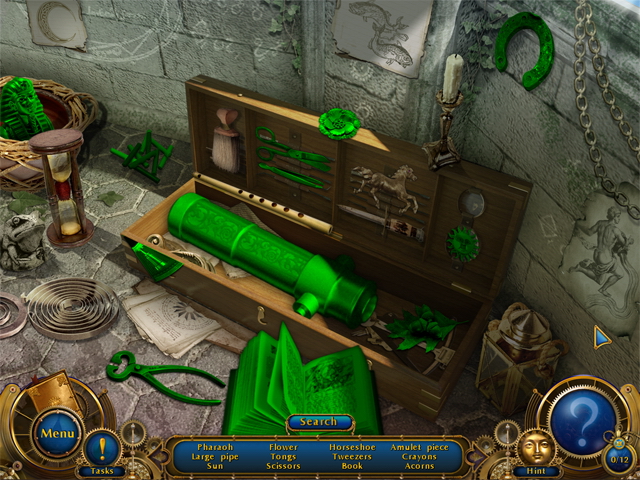
• Open the ‘Chest of drawers’ HOS (C).
• Open the ‘Box on the floor’ HOS (D).
• Leave the cellar and press on the easel to get an objective (A).
• Collect the items circled in yellow (B).
• Open the ‘Chest of drawers’ HOS (C).
• Open the ‘Box on the floor’ HOS (D).
 • Collect all the items in the HOS.
 • Collect all the items in the HOS.
 • Go to the right and take the black mineral from the table then go upstairs to the artist rest room and take the blue mineral (E).
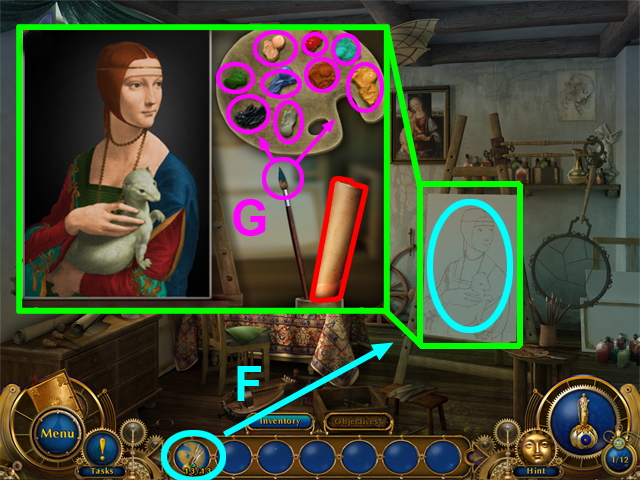 • Use the items from the inventory on the easel (F).
• Paint the sketch; dip the end of the brush into the paint on the palette (G). For a hint use the scroll (marked in red).
• Use the items from the inventory on the easel (F).
• Paint the sketch; dip the end of the brush into the paint on the palette (G). For a hint use the scroll (marked in red).
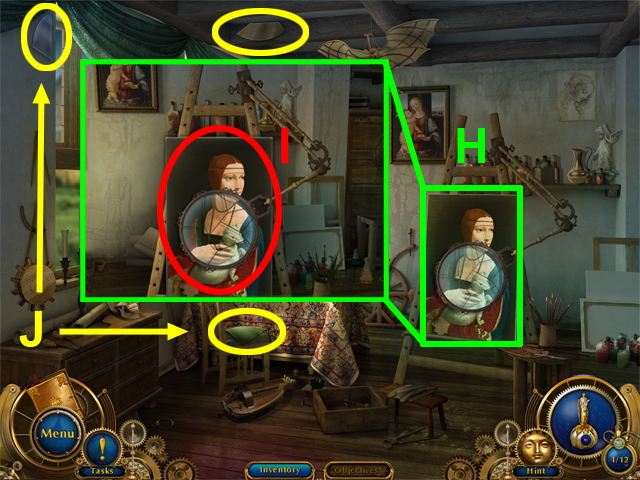 • Open the zoom with the painted picture (H) and press on the portrait to get an objective (I).
• Collect three colored glasses (J).
• Open the zoom with the painted picture (H) and press on the portrait to get an objective (I).
• Collect three colored glasses (J).
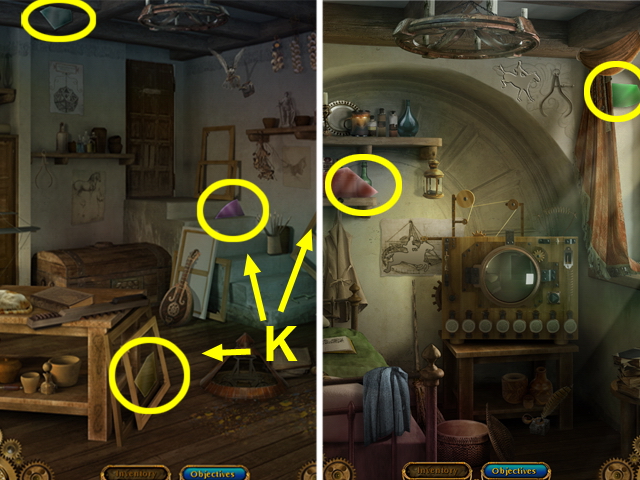 • Go to the right and collect 3 colored glasses, then go to the artist rest room and take two more (K).
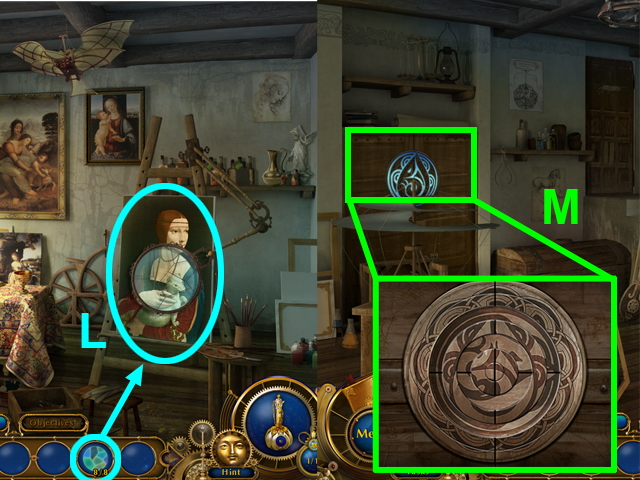 • Use the glasses from inventory on the easel (L).
• Go to the right and open the zoom with a wardrobe lock (M). Rotating the parts of the round puzzle get the correct image.
• Use the glasses from inventory on the easel (L).
• Go to the right and open the zoom with a wardrobe lock (M). Rotating the parts of the round puzzle get the correct image.
 • Pick up 3 parts of the catapult and then go upstairs to the artist restroom and get 2 more (N).
 • Go downstairs; then to the left and pick up two parts of the catapult.
• Open the ‘Chest of drawers’ HOS (P).
• Open the ‘Box on the floor’ HOS (Q)
• Go downstairs; then to the left and pick up two parts of the catapult.
• Open the ‘Chest of drawers’ HOS (P).
• Open the ‘Box on the floor’ HOS (Q)
 • Collect all the items in the HOS.
 • Go to the right and open the zoom wardrobe with a catapult (R).
• Use the parts of the catapult from the inventory (S).
• After getting the objective regarding searching of runes, open the elixir panel and use the elixir. ‘See Invisible’ (T).
• Go to the right and open the zoom wardrobe with a catapult (R).
• Use the parts of the catapult from the inventory (S).
• After getting the objective regarding searching of runes, open the elixir panel and use the elixir. ‘See Invisible’ (T).
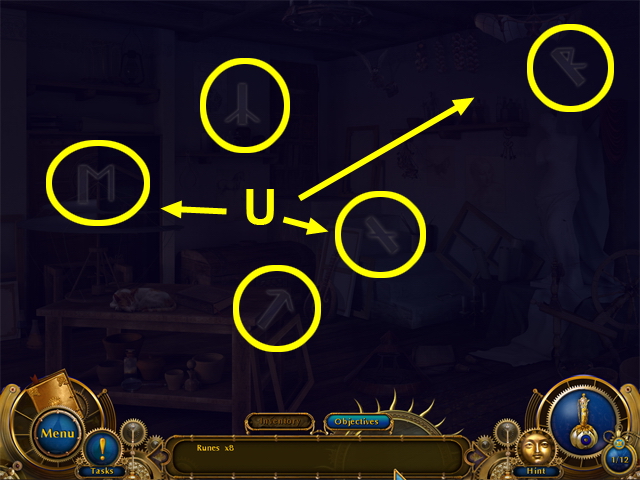 • Collect the runes (U).
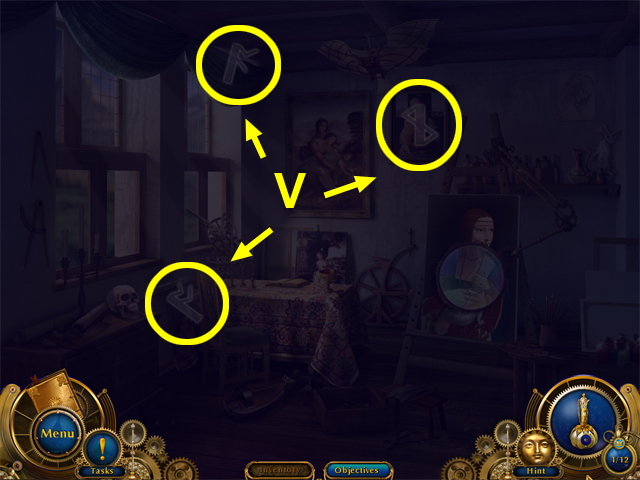 • Collect the runes (V).
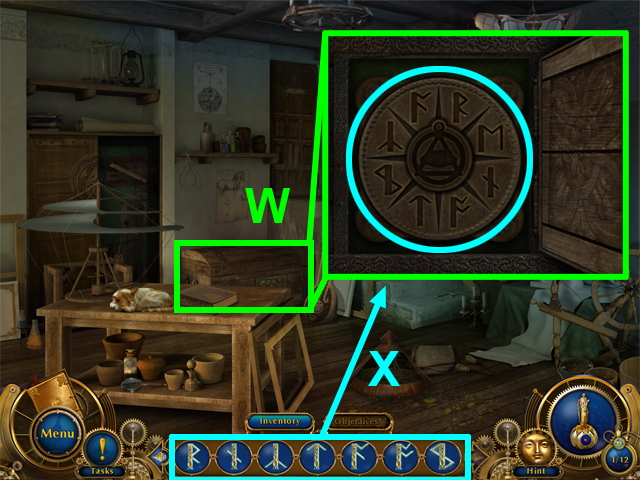 • Go to the right and open the chest zoom zone (W).
• Put the runes in their places (X).
• Go to the right and open the chest zoom zone (W).
• Put the runes in their places (X).
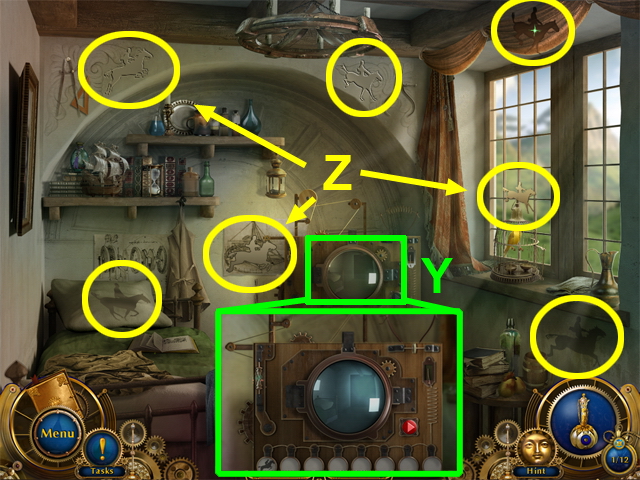 • Go to the artist rest room and enter the Da Vinci TV-set zone to get an objective (Y).
• Collect the horsemen (Z).
• Go to the artist rest room and enter the Da Vinci TV-set zone to get an objective (Y).
• Collect the horsemen (Z).
 • Open TV-set zoom zone (A) and place the horsemen to get the right order of animation frames (B). The right order of putting the horsemen is shown on the screenshot. The horsemen can be placed in differently; it depends on their order.
• Press the button (C).
• Take the key-medallion (D).
• Open TV-set zoom zone (A) and place the horsemen to get the right order of animation frames (B). The right order of putting the horsemen is shown on the screenshot. The horsemen can be placed in differently; it depends on their order.
• Press the button (C).
• Take the key-medallion (D).
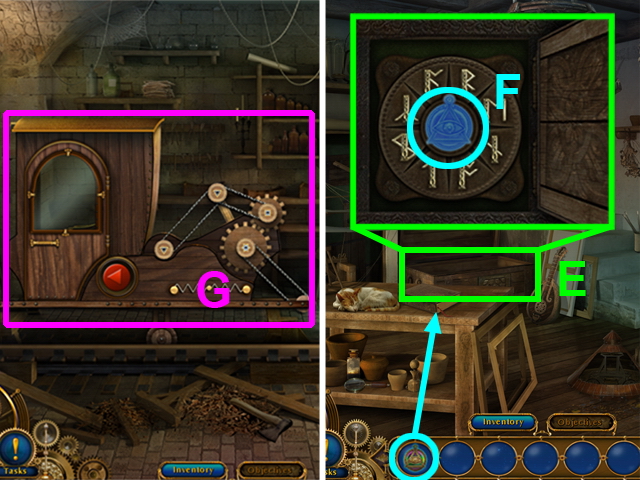 • Leave the rest room and open the chest zone (E).
• Use the key-medallion from the inventory (F).
• Go downstairs into the cellar through the open hidden pass in the chest. Press on the carriage in the cellar (G).
• Leave the rest room and open the chest zone (E).
• Use the key-medallion from the inventory (F).
• Go downstairs into the cellar through the open hidden pass in the chest. Press on the carriage in the cellar (G).
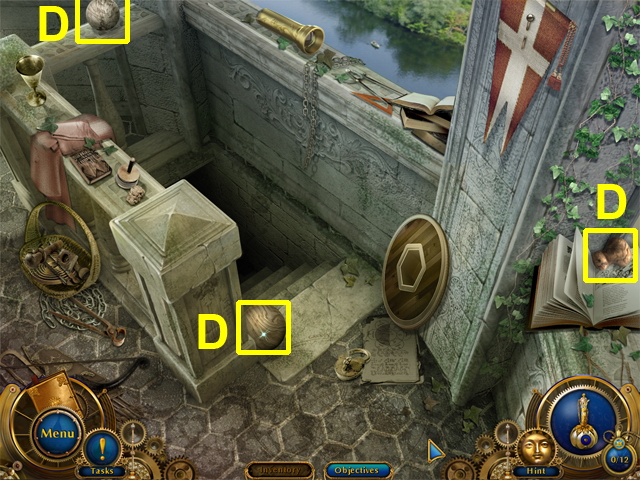
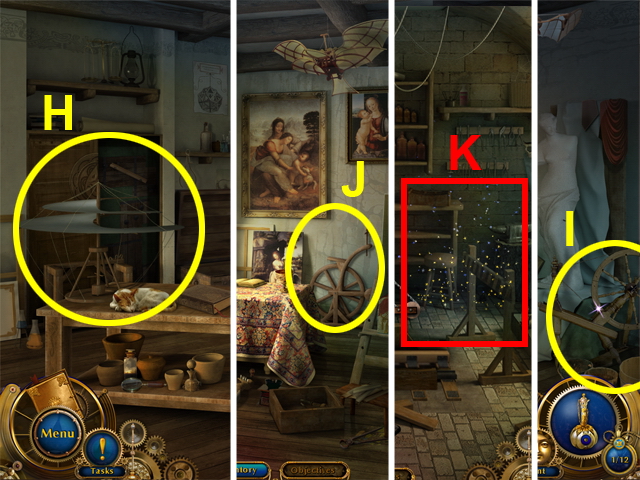 • Leave the cellar and collect Da Vinci’s helicopter (H), and distaff (I).
• Go to the left and take Da Vinci’s bicycle (J).
• Return to the right and go downstairs to the cellar through the hidden pass in the chest.
• Open the ‘Shelf with instruments’ HOS in the cellar (K).
• Leave the cellar and collect Da Vinci’s helicopter (H), and distaff (I).
• Go to the left and take Da Vinci’s bicycle (J).
• Return to the right and go downstairs to the cellar through the hidden pass in the chest.
• Open the ‘Shelf with instruments’ HOS in the cellar (K).
 • Collect all the items in the HOS.
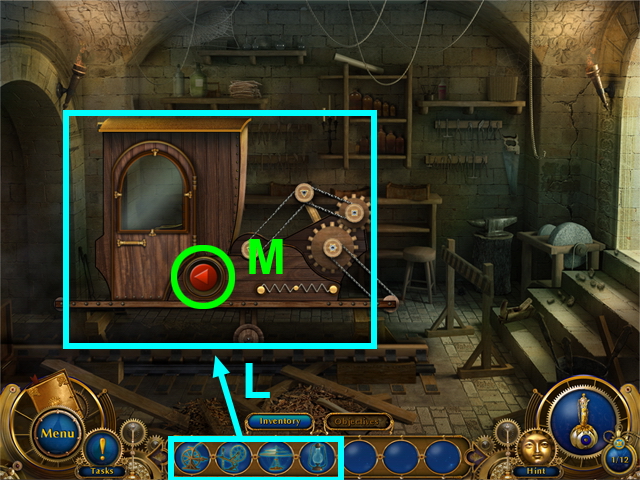 • Use the parts from the inventory on a carriage (L).
• Press the start button (M).
• Use the parts from the inventory on a carriage (L).
• Press the start button (M).
Chapter 10: Mark’s Tower/Telescope
 • Enter the tower and go upstairs to the observation.
• Press on the pedestal and open the zoom with ‘non-assembled support’ of the telescope (A).
• Get an objective to search balls and rollers.
• In this location collect 2 balls and 3 rollers (B).
• Open the HOS under the pedestal (C).
• Enter the tower and go upstairs to the observation.
• Press on the pedestal and open the zoom with ‘non-assembled support’ of the telescope (A).
• Get an objective to search balls and rollers.
• In this location collect 2 balls and 3 rollers (B).
• Open the HOS under the pedestal (C).
 • Collect all the items in the HOS.
 • Go to the left to the exit of observation.
• Collect 2 balls and one roller (D).
• Go to the left to the exit of observation.
• Collect 2 balls and one roller (D).
 • Return to the pedestal and open the zoom with the support of the telescope (E).
• Restore the support using balls and rollers.
• Get an objective to find the parts of the telescope.
• Return to the pedestal and open the zoom with the support of the telescope (E).
• Restore the support using balls and rollers.
• Get an objective to find the parts of the telescope.
 • In this location collect the wheel and the compass (F).
• Open the HOS (G).
• In this location collect the wheel and the compass (F).
• Open the HOS (G).
 • Collect all the items in the HOS.
 • Go to the left and collect the turntable and small tube (H).
 • Return to the pedestal; enter the support of the telescope zone and use all the collected items from inventory to get a telescope.
• From the main view with the pedestal, click on a restored telescope and enter the working telescope zone (I).
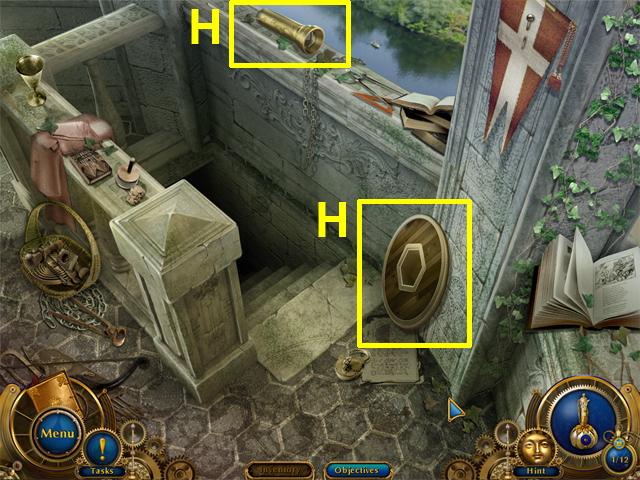
• Get an objective to find the map and pins.
• Enter the box zone (J) and get the map (K).
• Enter the zone under the cover (L) and get three pins (M).
• Go to the left to the exit the tower.
• Return to the pedestal; enter the support of the telescope zone and use all the collected items from inventory to get a telescope.
• From the main view with the pedestal, click on a restored telescope and enter the working telescope zone (I).
• Get an objective to find the map and pins.
• Enter the box zone (J) and get the map (K).
• Enter the zone under the cover (L) and get three pins (M).
• Go to the left to the exit the tower.
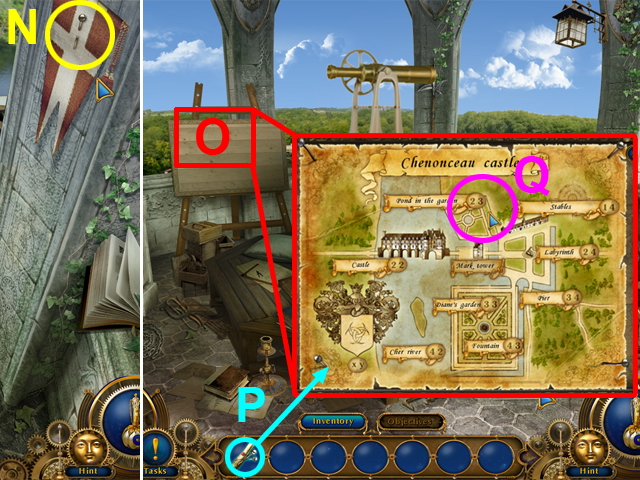 • Pick the pin up on the pennant (N).
• Return to the location with the telescope.
• Click on a map stand (O).
• Use the map with pins on the open zoom (P).
• On the open map remember the pond’s coordinates (Q).
• Pick the pin up on the pennant (N).
• Return to the location with the telescope.
• Click on a map stand (O).
• Use the map with pins on the open zoom (P).
• On the open map remember the pond’s coordinates (Q).
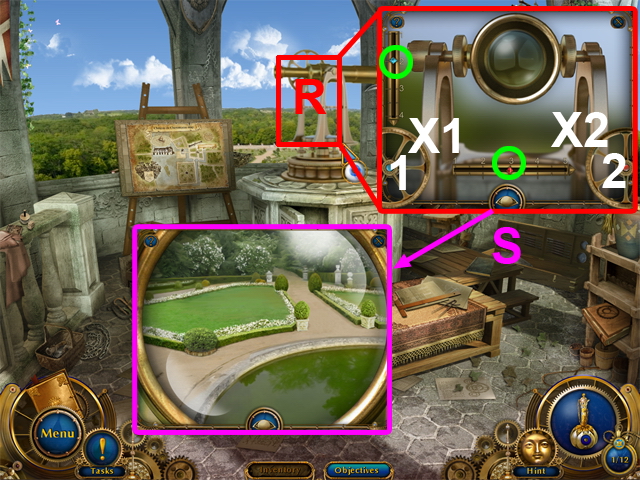 • Close the map. Enter the telescope zone (R); rotate the rollers to input the pond’s coordinates. The left roller (blue crystal) -2, the right one (red crystal) – 3 (marked in green).
• Press on the eye button (S) to look through the telescope.
• The ‘Zoomed view on the telescope’ can be closed by pressing eye button.
• Get an objective to search the sun clock.
• Go to the labyrinth: from the tower – go twice to the left, and go right at the fork in front of the tower.
• Close the map. Enter the telescope zone (R); rotate the rollers to input the pond’s coordinates. The left roller (blue crystal) -2, the right one (red crystal) – 3 (marked in green).
• Press on the eye button (S) to look through the telescope.
• The ‘Zoomed view on the telescope’ can be closed by pressing eye button.
• Get an objective to search the sun clock.
• Go to the labyrinth: from the tower – go twice to the left, and go right at the fork in front of the tower.
Chapter 11: Labyrinth/Poison Transmission near the Pond
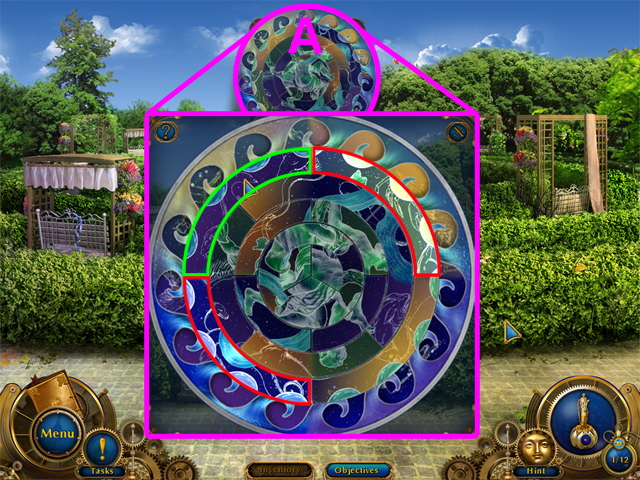 • After burning the entrance of the labyrinth by the joker select the Aquarius mini-game ‘Aquarius and it will open up a close-up.
• Switch around the parts of the round puzzle to obtain the picture of Aquarius.
• After putting out the fire, enter the labyrinth and the ‘Labyrinth’ HOS will open.
• After burning the entrance of the labyrinth by the joker select the Aquarius mini-game ‘Aquarius and it will open up a close-up.
• Switch around the parts of the round puzzle to obtain the picture of Aquarius.
• After putting out the fire, enter the labyrinth and the ‘Labyrinth’ HOS will open.
 • Collect all the items in the HOS.
 • After completing the HOS you’ll get the key; press on the sun clock (B).
• Remove the branches and leaves by removing the ones on top first.
• After you’ve removed the branches and see that it’s already eight o’clock (C), return to the telescope.
• Press on the telescope and the zoom will open. You should enter the pond coordinates: blue crystal – ‘2’, and red – ‘3’
• Watch for the poison transmission.
• Enter the open HOS ‘In a box’ HOS.
• After completing the HOS you’ll get the key; press on the sun clock (B).
• Remove the branches and leaves by removing the ones on top first.
• After you’ve removed the branches and see that it’s already eight o’clock (C), return to the telescope.
• Press on the telescope and the zoom will open. You should enter the pond coordinates: blue crystal – ‘2’, and red – ‘3’
• Watch for the poison transmission.
• Enter the open HOS ‘In a box’ HOS.
 • Collect all the items in the HOS.
• Now you have a key and a door handle. Go to the castle entrance (three times to the left).
• Collect all the items in the HOS.
• Now you have a key and a door handle. Go to the castle entrance (three times to the left).
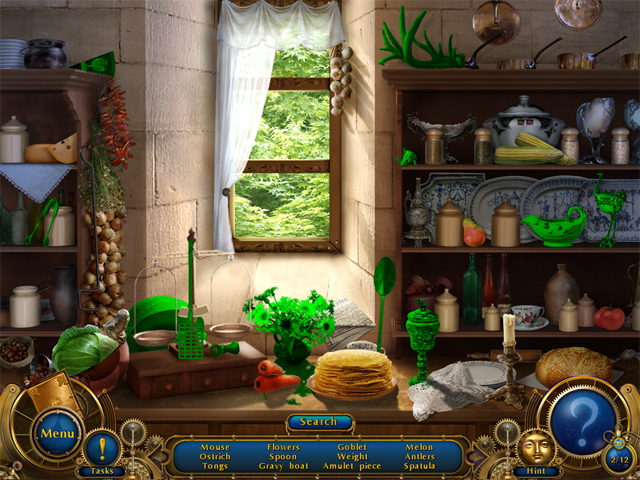
Chapter 12: Kitchen/Clues
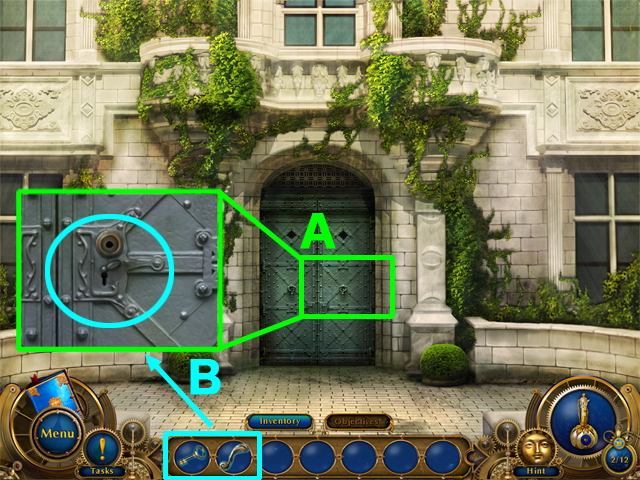 • Enter the zoom with the door lock (A).
• Use the key on the handle (B).
• Enter the castle.
• Enter the zoom with the door lock (A).
• Use the key on the handle (B).
• Enter the castle.
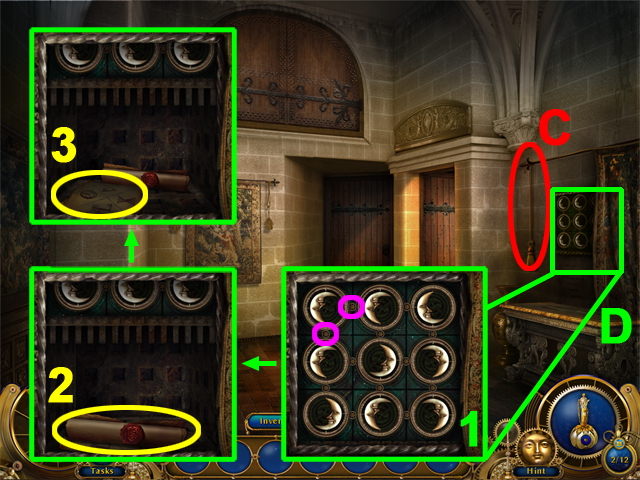
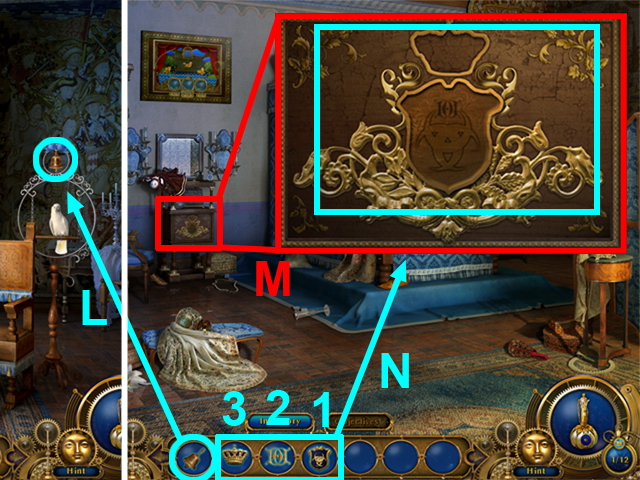
 • Press on the rope (C) to open the hidden stash.
• Select the hidden place (D).
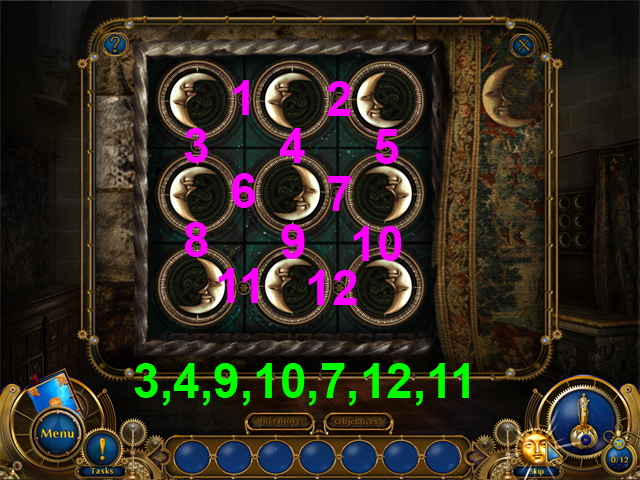
• Open the hidden place (1) and place the images in the right position. Rotate the circles using the buttons marked in purple (second screenshot).
• Pick up the roll (2) and the note (3).
• Then go through the open door to the kitchen.
• Go to the location with the black oven (one down).
• Press on the rope (C) to open the hidden stash.
• Select the hidden place (D).
• Open the hidden place (1) and place the images in the right position. Rotate the circles using the buttons marked in purple (second screenshot).
• Pick up the roll (2) and the note (3).
• Then go through the open door to the kitchen.
• Go to the location with the black oven (one down).
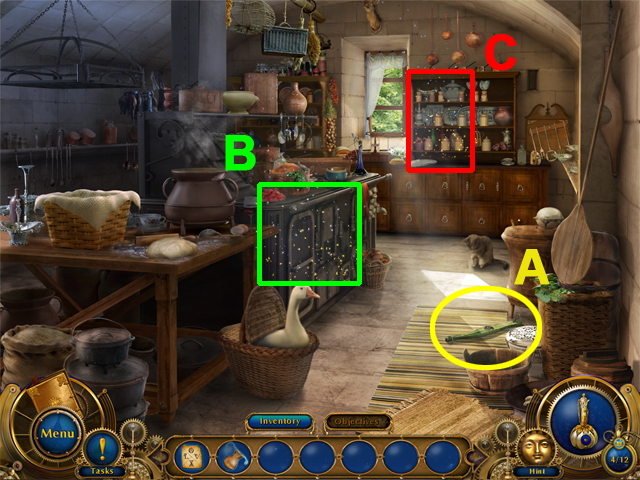
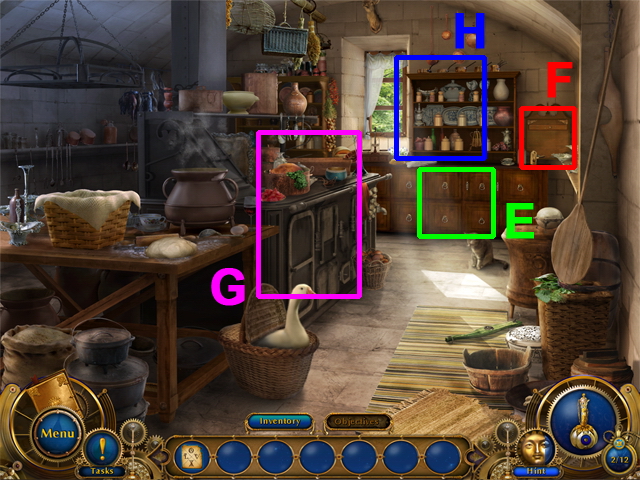 • Press on the wardrobe (E) and get an objective to find the keys.
• Press on the shelf (F) and get an objective to find the items.
• Open the ‘Black oven’ HOS (G).
• Open the ‘The wardrobe near the window’ HOS (H).
• Press on the wardrobe (E) and get an objective to find the keys.
• Press on the shelf (F) and get an objective to find the items.
• Open the ‘Black oven’ HOS (G).
• Open the ‘The wardrobe near the window’ HOS (H).
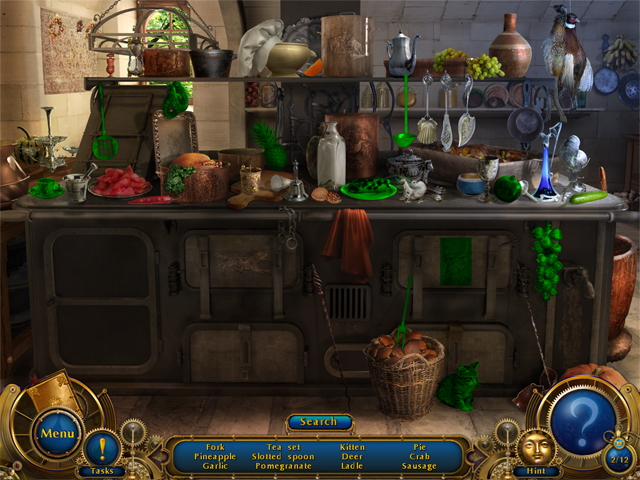 • Collect all the items in the HOS.
 • Collect all the items in the HOS.
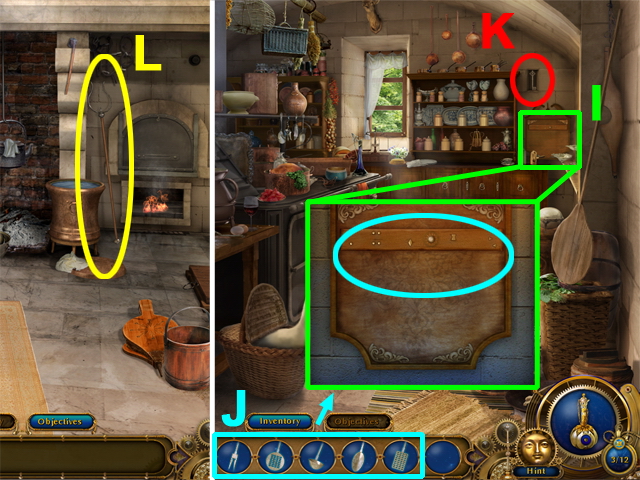 • Press on a rail for the kitchen accessories (I).
• Hang the kitchen accessories in their places (J).
• Press on a key in the open hidden place (K).
• Go down to the big oven.
• Take the oven fork (L) and return to the key.
• Press on a rail for the kitchen accessories (I).
• Hang the kitchen accessories in their places (J).
• Press on a key in the open hidden place (K).
• Go down to the big oven.
• Take the oven fork (L) and return to the key.
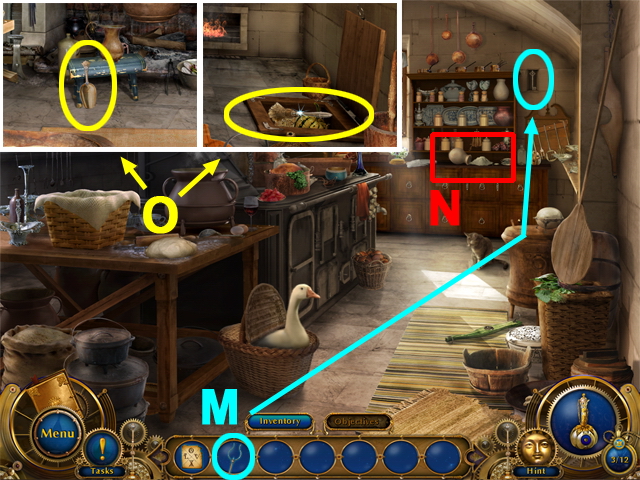 • Use the oven fork on a key (M).
• Press on the spilled flour on the table (N).
• Go downstairs.
• Pick up the besom and dustpan (O).
• Return to the spilled flour.
• Use the oven fork on a key (M).
• Press on the spilled flour on the table (N).
• Go downstairs.
• Pick up the besom and dustpan (O).
• Return to the spilled flour.
 • Open the zoom zone with spilled flour (P).
• Collect the flour using the dustpan first then the besom (2).
• Take the coin (Q).
• Open the zoom zone with spilled flour (P).
• Collect the flour using the dustpan first then the besom (2).
• Take the coin (Q).
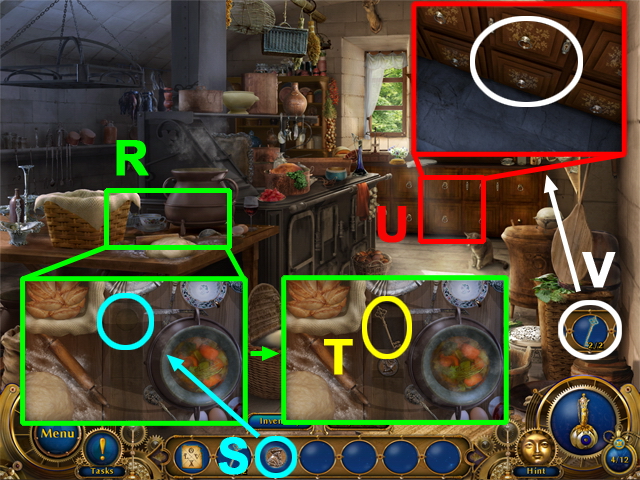 • Press on the kitchen table (R).
• Use the coin on the table to the cell on the table (S).
• Take a key in the open hidden place (T).
• Press on the boxes (U) and use the keys from inventory (V).
• Go downstairs.
• Press on the kitchen table (R).
• Use the coin on the table to the cell on the table (S).
• Take a key in the open hidden place (T).
• Press on the boxes (U) and use the keys from inventory (V).
• Go downstairs.
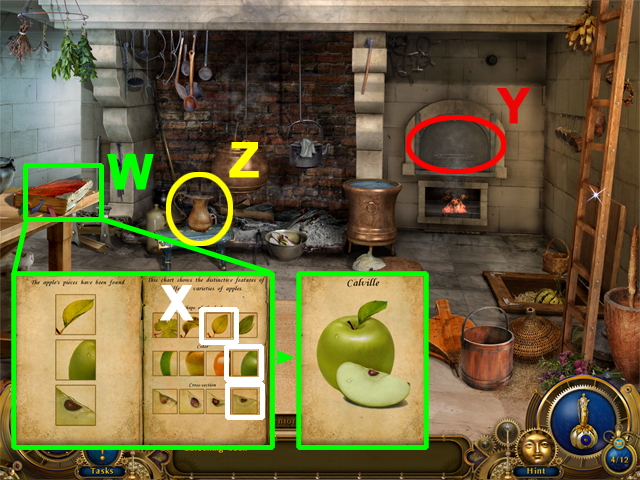 • Open the zoom with the gardener book (W).
• Choose the right pictures (X). This way you’ve sorted out the apple breed which will be used to poison the king.
• Press on the oven (Y).
• Take a jug (Z).
• Open the zoom with the gardener book (W).
• Choose the right pictures (X). This way you’ve sorted out the apple breed which will be used to poison the king.
• Press on the oven (Y).
• Take a jug (Z).
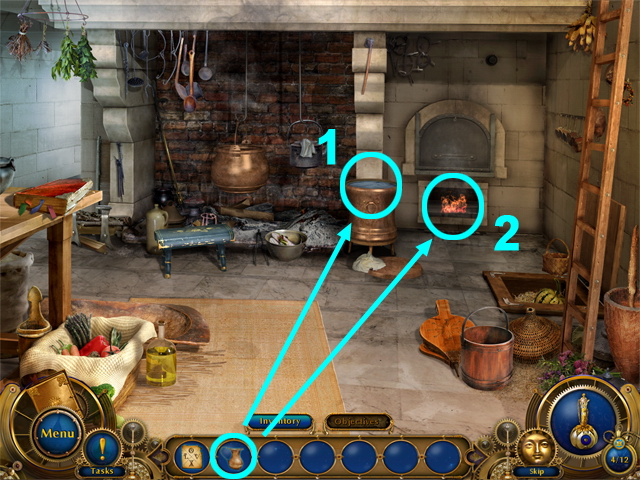 • Use the jug from the inventory on the vat with water (1).
• Use the jug with water from the inventory on the fire in the oven, put the fire out (2) and get an objective.
• Go downstairs.
• Use the jug from the inventory on the vat with water (1).
• Use the jug with water from the inventory on the fire in the oven, put the fire out (2) and get an objective.
• Go downstairs.
 • Take the lever of the mechanism which opens the oven (A).
• Open the ‘Wardrobe near the window’ HOS (C).
• Open the ‘Black oven’ HOS (B).
• Take the lever of the mechanism which opens the oven (A).
• Open the ‘Wardrobe near the window’ HOS (C).
• Open the ‘Black oven’ HOS (B).
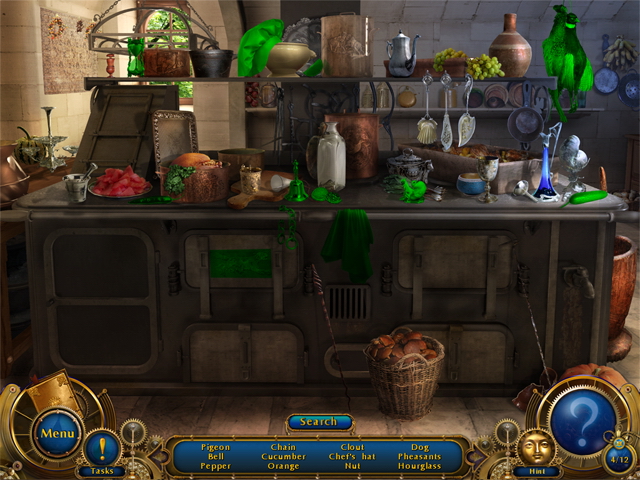 • Collect all objects in the HOS.
 • Collect all objects in the HOS.
• Go to the big oven.
• Collect all objects in the HOS.
• Go to the big oven.
 • Use the parts of the mechanism on the oven door in the following order (marked in blue), 1, 2, and 3.
• Press on the oven door (D) to open it and get an objective.
• Go downstairs.
• Take the big shovel (E).
• Return to the open oven door.
• Use the parts of the mechanism on the oven door in the following order (marked in blue), 1, 2, and 3.
• Press on the oven door (D) to open it and get an objective.
• Go downstairs.
• Take the big shovel (E).
• Return to the open oven door.
 • Use the big shovel from the inventory on the open oven (1).
• Use the jug with water on the hot box (2) to cool it.
• Press on the box (F).
• Use the hint (3) in the open window.
• Use the big shovel from the inventory on the open oven (1).
• Use the jug with water on the hot box (2) to cool it.
• Press on the box (F).
• Use the hint (3) in the open window.
 • In the ‘Box cover’ zoom (G) use the hint (H) and place the right letters on the buttons of the lock (I).
• Take the scarab in the open chest (J).
• After the Dian’s monologue take the ladder (K) and exit the kitchen (L).
• In the ‘Box cover’ zoom (G) use the hint (H) and place the right letters on the buttons of the lock (I).
• Take the scarab in the open chest (J).
• After the Dian’s monologue take the ladder (K) and exit the kitchen (L).
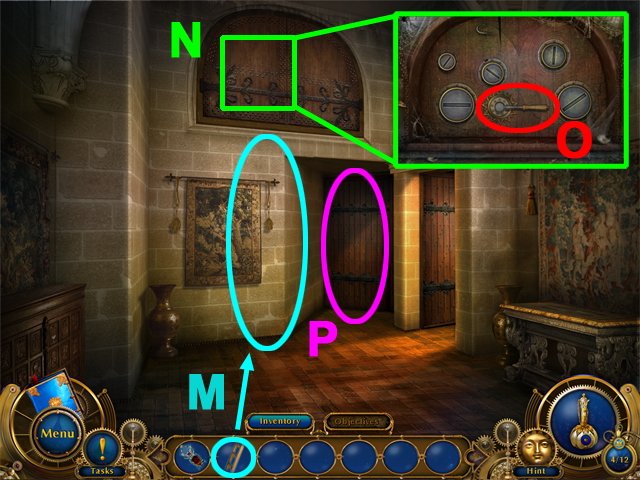 • Put the ladder to the wall (M).
• Open the doors (N) and press on a lever (O).
• Enter the opened door (P).
• Put the ladder to the wall (M).
• Open the doors (N) and press on a lever (O).
• Enter the opened door (P).
 • Press on a lock (Q).
• Use the scarab on a lock (R).
• Go through the door.
• Press on a lock (Q).
• Use the scarab on a lock (R).
• Go through the door.
Chapter 13: Diana’s Bedroom/Open-air Cage
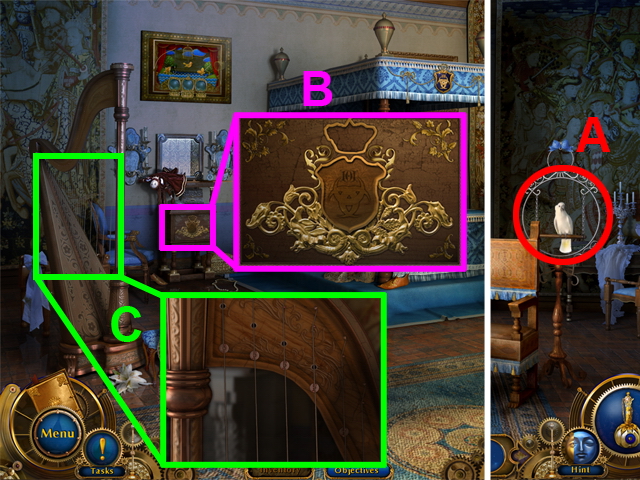 • Press on the parrot to get an objective (A).
• Go to the right then go to the zoom zone with a cabinet with arms (B).
• Open the harp zone (C).
• Press on the parrot to get an objective (A).
• Go to the right then go to the zoom zone with a cabinet with arms (B).
• Open the harp zone (C).
 • Take the shield (D).
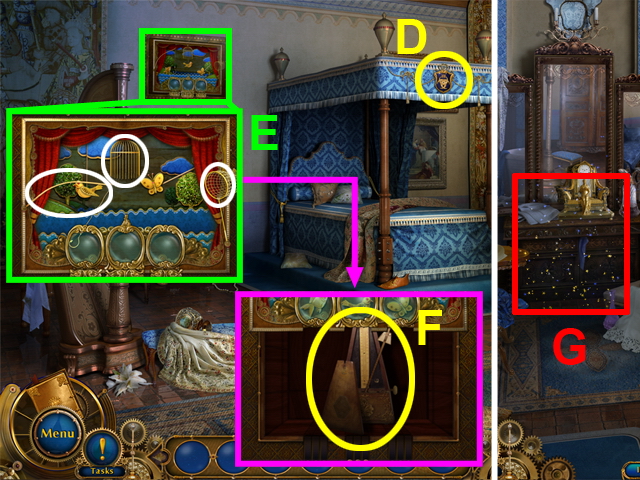
• Enter the mini-game zone with the ‘Catching’ picture (E). Catch a bird, a fish and a butterfly by pressing on the net, the cage or the rod.
• Take a metronome in the opened hidden place (F).
• Go to the right and open the ‘Wardrobe with a mirror’ HOS (G)
• Take the shield (D).
• Enter the mini-game zone with the ‘Catching’ picture (E). Catch a bird, a fish and a butterfly by pressing on the net, the cage or the rod.
• Take a metronome in the opened hidden place (F).
• Go to the right and open the ‘Wardrobe with a mirror’ HOS (G)
 • Collect all the items in the HOS.
 • Return to the left and use the items for the harp on it (H).
• Complete the mini-game (I).
• Take the monogram (J).
• Go to the left and open the ‘Wardrobe’ HOS (K).
• Return to the left and use the items for the harp on it (H).
• Complete the mini-game (I).
• Take the monogram (J).
• Go to the left and open the ‘Wardrobe’ HOS (K).
 • Collect all the objects in the HOS.
 • Use the bell (L).
• Go to the right and open the zoom zone of the cabinet with arms (M).
• Use the shield, the monogram and the crown in the correct order 1, 2, and 3 (N).
• Use the bell (L).
• Go to the right and open the zoom zone of the cabinet with arms (M).
• Use the shield, the monogram and the crown in the correct order 1, 2, and 3 (N).
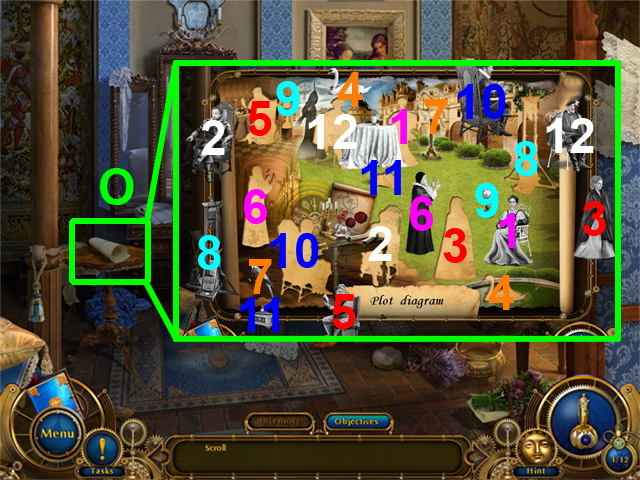 • Go to the right and press on the roll (O).
• Place the figures in the roll in their places (matches are marked with the same number).
• Go to the left and then go out from Dian’s bedroom.
• Go to the right and press on the roll (O).
• Place the figures in the roll in their places (matches are marked with the same number).
• Go to the left and then go out from Dian’s bedroom.
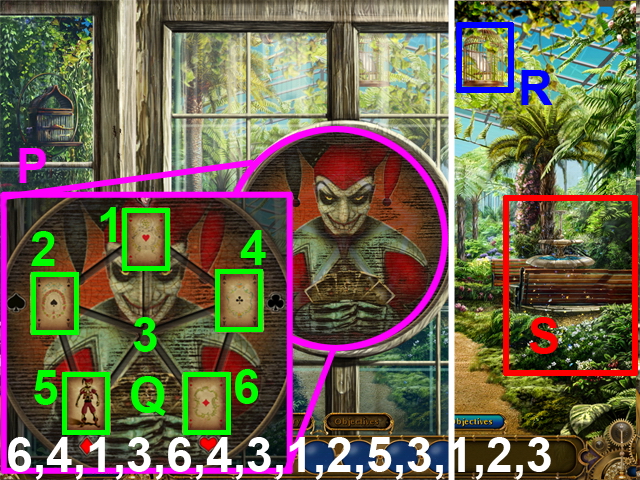 • Exit the castle. Go to the right, and then enter the glade for picnic. From there go to the open-air cage for birds. Press on the joker’s image to trigger a mini-game.
• Solve the mini-game by moving the cards along the lines and place them in the right places (use the solution marked in white).
• Press on the parrot (R) to get an objective.
• Open the ‘Near the fountain’ HOS (S).
• Exit the castle. Go to the right, and then enter the glade for picnic. From there go to the open-air cage for birds. Press on the joker’s image to trigger a mini-game.
• Solve the mini-game by moving the cards along the lines and place them in the right places (use the solution marked in white).
• Press on the parrot (R) to get an objective.
• Open the ‘Near the fountain’ HOS (S).
 • Collect all the objects in the HOS.
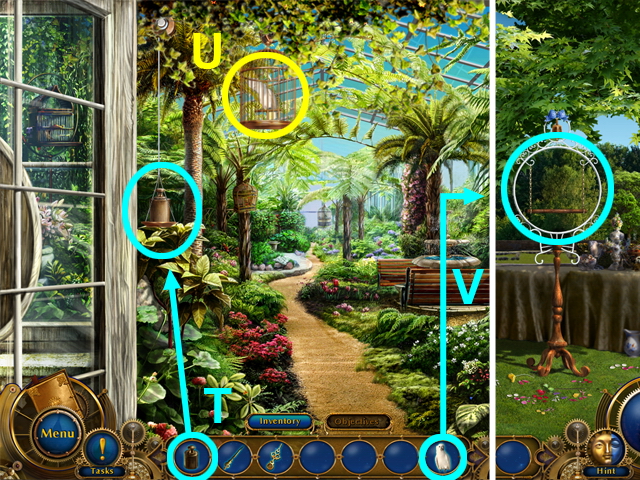 • Use the weight on the scale pan (T).
• Take the parrot from the cage (U).
• Go to the glade for picnic. Put the parrot on the stand at the same time when the poisoned apple is being served for dinner (V).
• Use the weight on the scale pan (T).
• Take the parrot from the cage (U).
• Go to the glade for picnic. Put the parrot on the stand at the same time when the poisoned apple is being served for dinner (V).
Chapter 14: Amulet/Returning Back Home
 • Place the arrows from inventory on the Amulet (A).
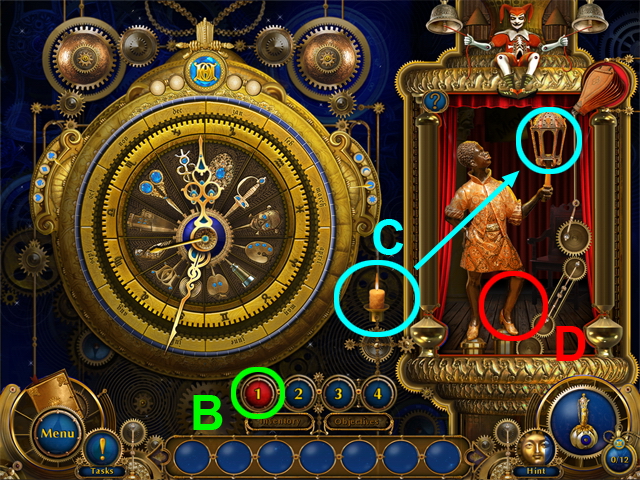 • Press on the ‘1’ button (B).
• Take a candle (C) and place it in the lantern.
• Press on the moor’s leg (D) until the candle burns.
• Press on the ‘1’ button (B).
• Take a candle (C) and place it in the lantern.
• Press on the moor’s leg (D) until the candle burns.
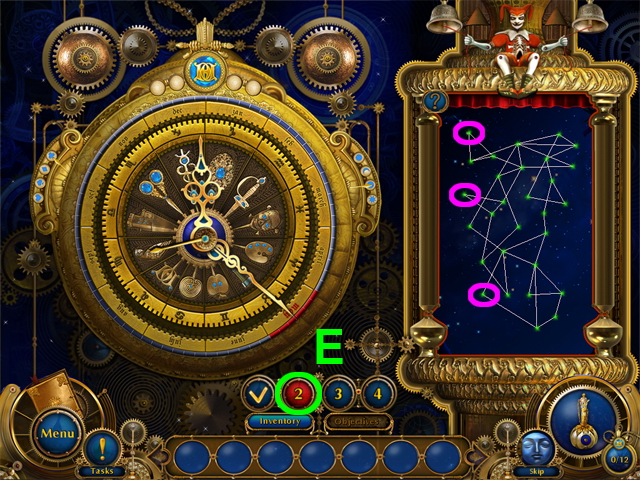 • Press on the ‘2’ button (E).
• Move the stars, marked in purple to untangle the lines.
• Press on the ‘2’ button (E).
• Move the stars, marked in purple to untangle the lines.
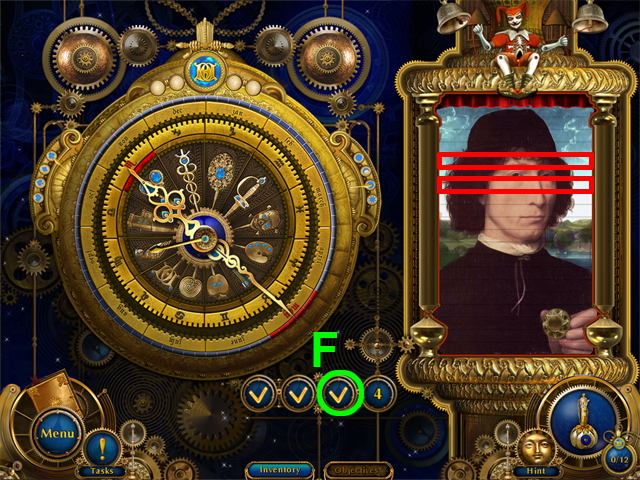 • Press on the ‘3’ button (F).
• Assemble the picture by swapping the parts of the puzzle.
• Press on the ‘3’ button (F).
• Assemble the picture by swapping the parts of the puzzle.
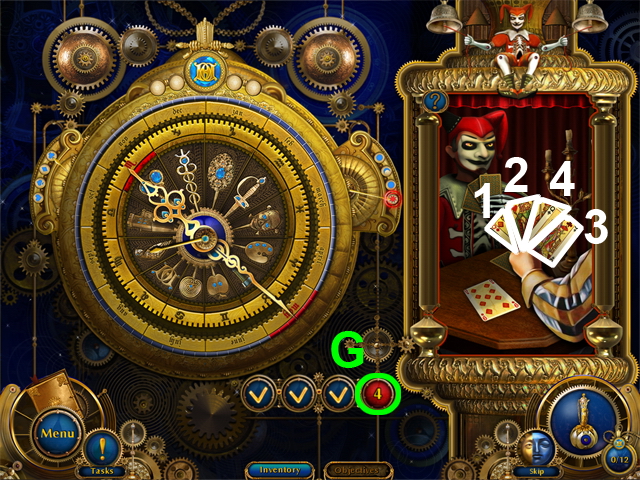 • Press the‘4’ button (G).
• Play the cards: 1, 2, 3, and 4.
• Congratulations! You have completed Amulet of Time: Shadow of La Rochelle!
• Press the‘4’ button (G).
• Play the cards: 1, 2, 3, and 4.
• Congratulations! You have completed Amulet of Time: Shadow of La Rochelle!Created at: 2012-02-14