

Walkthrough Menu
- General Tips
- Chapter 1: The First Key
- Chapter 2: The Second Key
- Chapter 3: The Third and Fourth Keys
- Chapter 4: The Fifth and Sixth Keys
- Chapter 5: The Seventh Key
General Tips
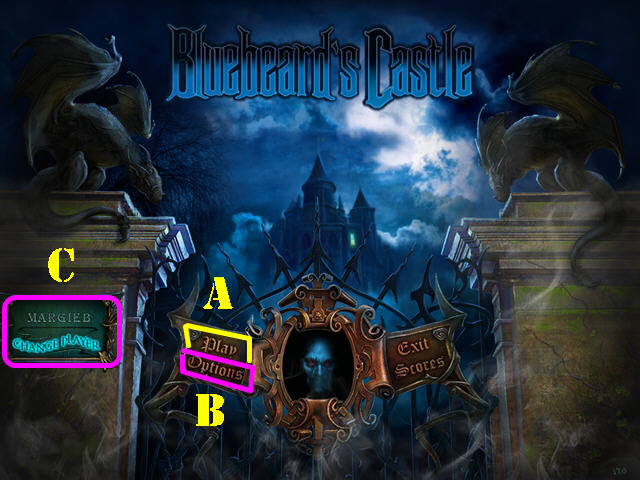
- Click on Play to begin your adventure (A).
- The Options (B) Button allows you to adjust the screen size, music, cursor, and sound.
- The 'Change Player' button (C) can be used to manage your profiles in the game.
- To exit close-up scenes, click on the 'Back' button in the lower right or click outside of the close-up area.
- This guide will refer to Hidden Object Scenes as 'HOS'.
- The lists in HOS are random.
- Use the HINT button in the lower left to get hints in HOS and quest Scenes.
- Click on the INFO button in the lower right to view your current location or to obtain general information.
- Items will stay in inventory until they are no longer needed.
- All mini-games can be skipped once the skip button has recharged.
Chapter 1: The First Key

- Take the GARDEN SHEARS PART (A).
- Zoom into the paper; take the NUMBERS CLUE (B).
- Click on the lever (C) and zoom into the panel.
- Click on the NUMBERS CLUE in your inventory.
- Click on the lights to rotate them until the matching numbers pair up according to the numbers clue.
- Please look at the screenshot for the solution (D).
- Go through the gate and head right.
- Take the SNAKE'S HEAD (E).
- Go back to the fountain.
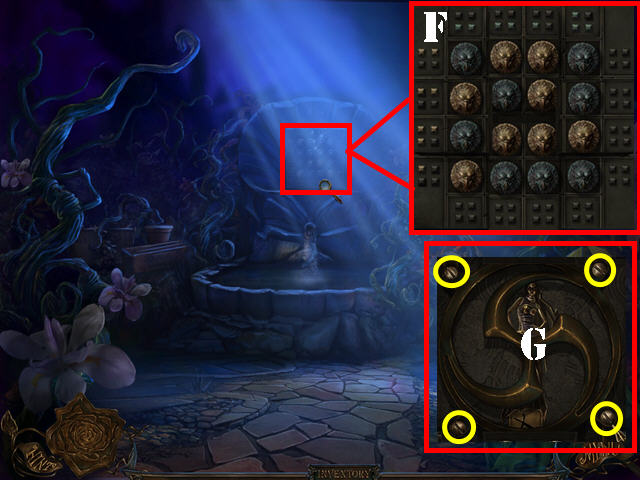
- Put the SNAKE'S HEAD on the snake (F).
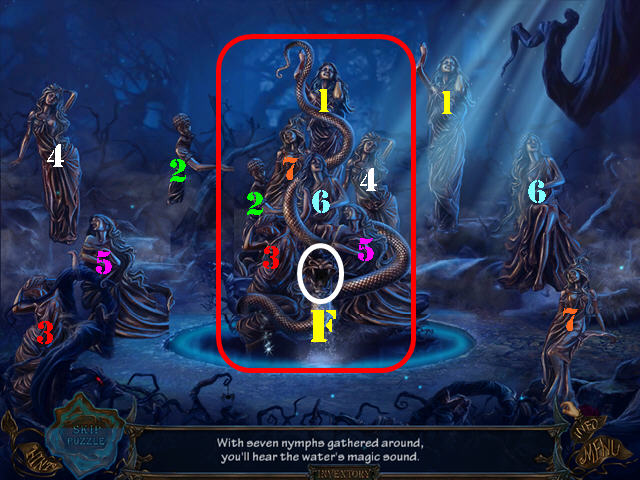
- Your goal is to place the 7 nymphs into the right spots.
- Click on the snake's head to view a silhouette of the nymph's positions.
- Please look at the screenshot for the solution.
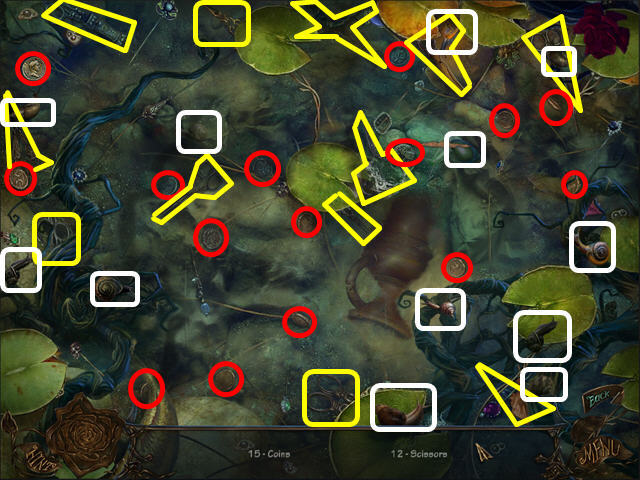
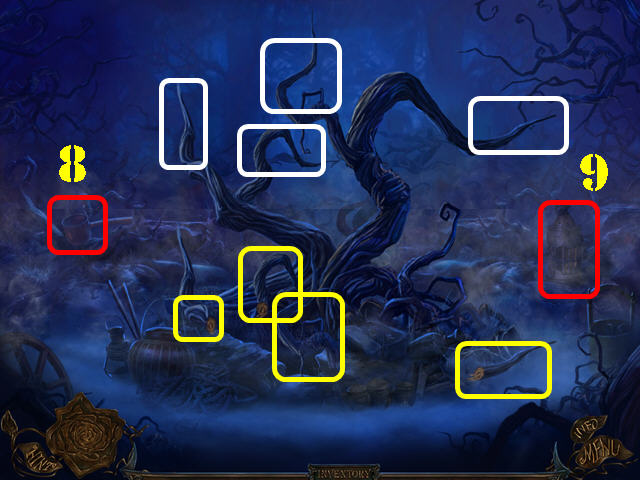
- Zoom into the base of the statue for a HOS.
- The lists are random.
- The coins are marked in red, the snails in white, and the scissors are marked in yellow.
- Note: some items may be blocked in the screenshot by passing objects but the screenshot will show the exact location of the item.
- Take the FISH KEY and the COINS will be added to inventory.
- Head right.
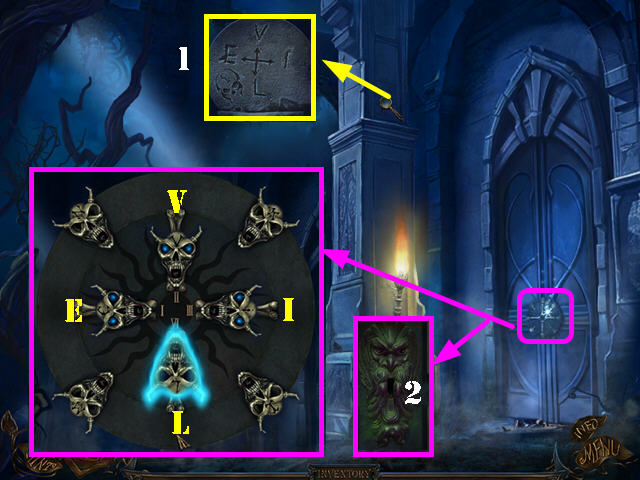
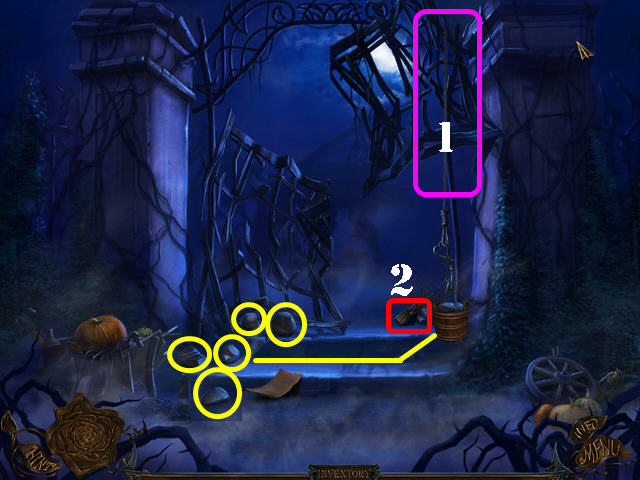
- Zoom into the left side of the wall; note the diagram (1).
- Zoom into the door.
- Click on the ring to rotate it so the letter 'V' is on top.
- Click on the letters in this order: E, V, I, and L.
- Insert the FISH KEY into the lock (2).
- Open the door and go through it.
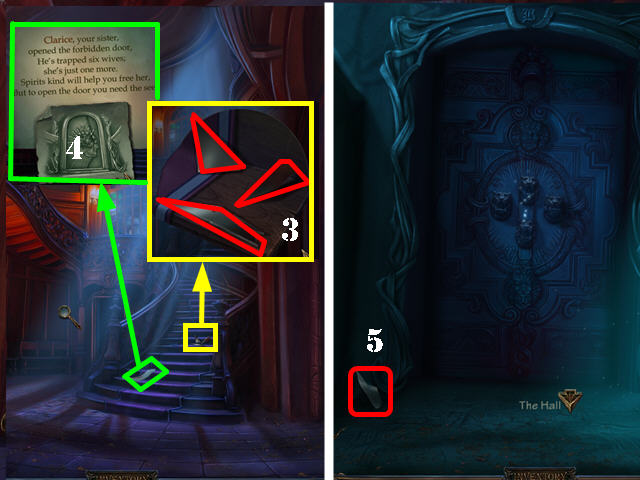
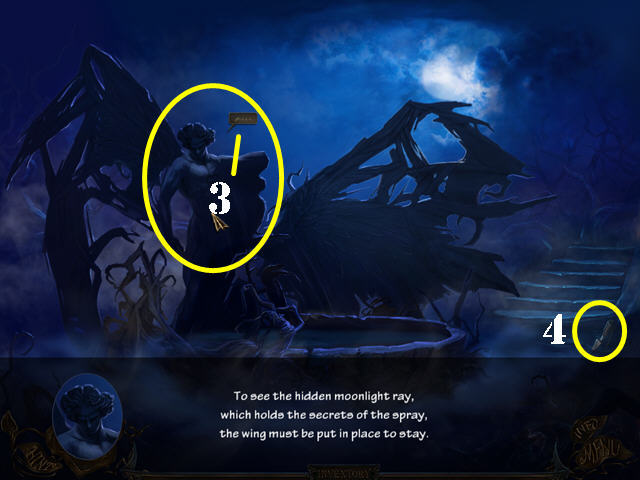
- Zoom into the steps (3); take the 3 MIRROR pieces (red).
- Zoom into the steps; note the diagram (4).
- Head left.
- Take the MIRROR (red) in the lower left (5).
- Click down and go up the steps.
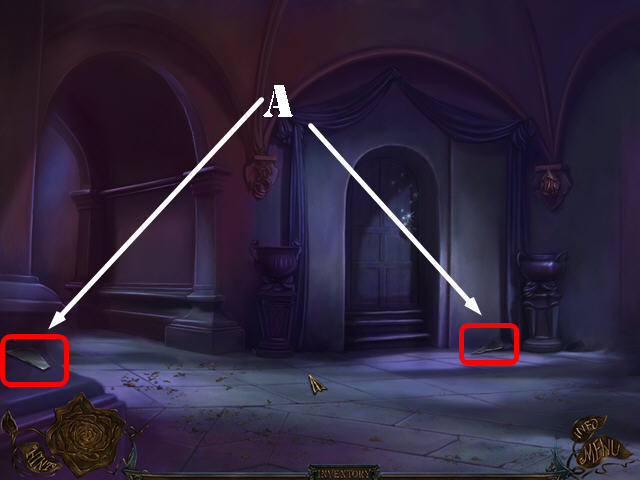
- Take the 2 MIRROR pieces (red) on the ground (A).
- Head left.

- Examine the frame (B); take the MIRROR piece (red).
- Zoom into the tile (C); take the 2 MIRROR pieces (red).
- Examine the left tile (D); take the 2 MIRROR pieces (red).
- Zoom into the back door to activate a puzzle (E).

- Drag the outer ring around until it's in the right place as shown in the screenshot. Then, rotate the small inner ring in place.
- Once the rings are in place, you must put the snakes in place.
- Click on the 4 yellow buttons to rotate the snakes into place.
- Please look at the screenshot for the complete solution (F).
- Go through the door to access Clarice's bedroom.

- Take the 4 MIRROR pieces (red) scattered around the room (G).
- Zoom into the mirror; put the 15 MIRROR pieces on the mirror to activate a puzzle.
- Put the mirror pieces into the right spots. Pieces placed correctly will lock in place.
- Please look at the screenshot for the solution (H).
- Take the SCISSORS on the mirror.
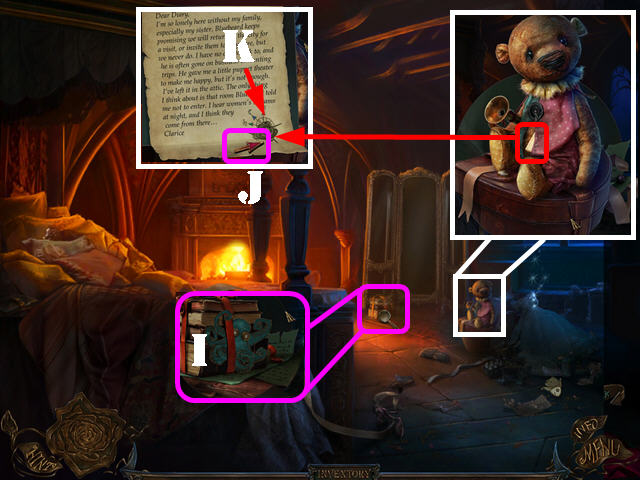
- Examine the books by the bottom of the mirror; take the OCTOPUS (I).
- Zoom into the teddy bear.
- Cut the clothes with the SCISSORS; click on the envelope and take the ARROW (J).
- Note the diagram attached to the letter (K).
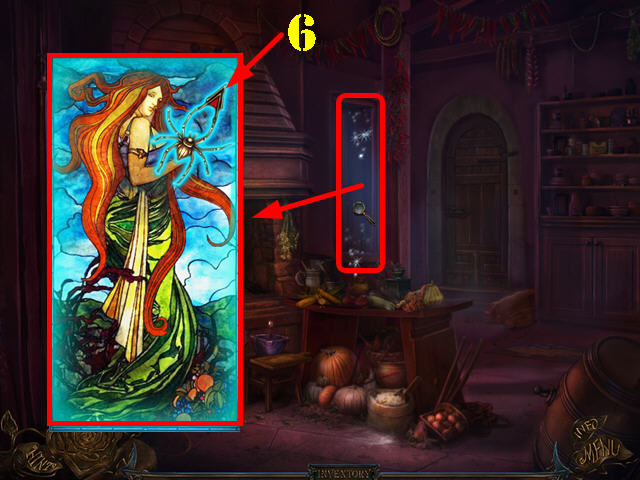
- Examine the sparkly area for a HOS.
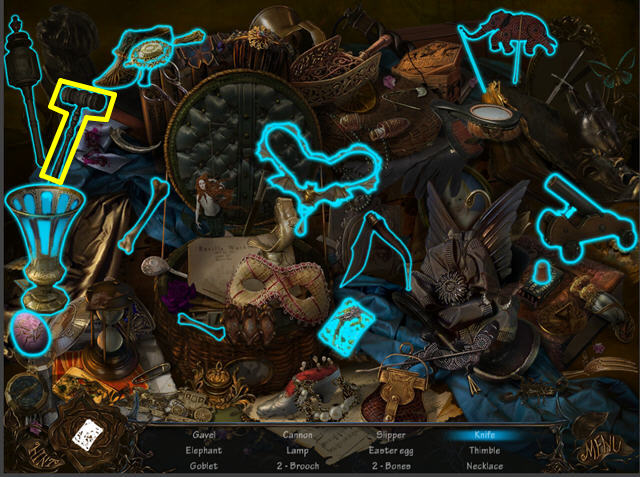
- Find the listed items to obtain the GAVEL.
- Click down three times.
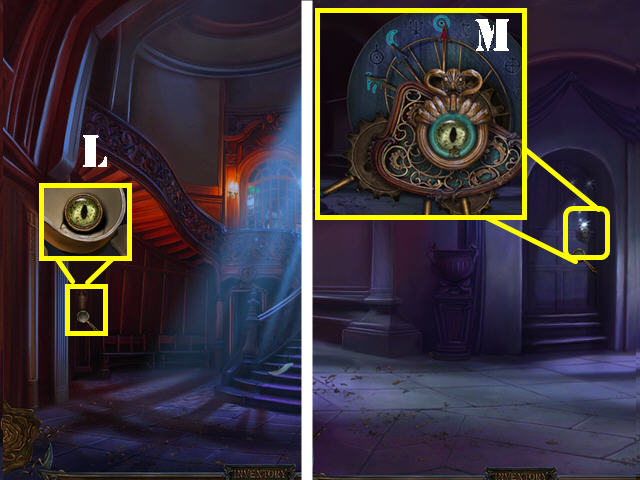
- Zoom into the vase on the left; break it with the GAVEL and take the SERPENT'S EYE (L).
- Go up the steps.
- Zoom into the door and place the ARROW on the lock.
- Move the arrows by using the levers. Make sure the arrows land on the same spots as the sketch found in Clarice's bedroom.
- Please look at the screenshot for the solution (M).
- Put the SERPENT'S EYE in the center.
- Go through the door to access the attic.
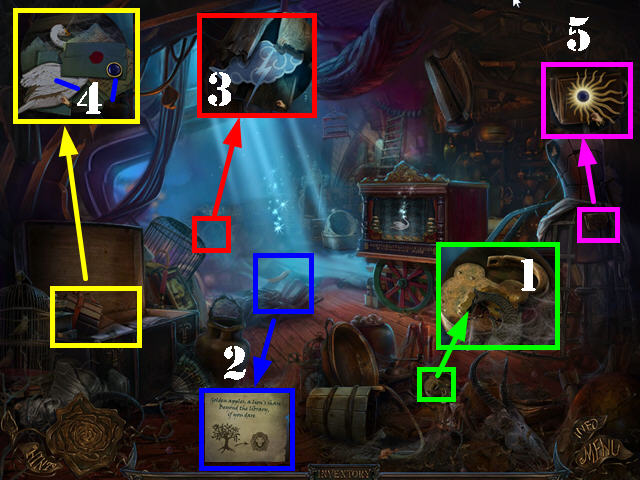
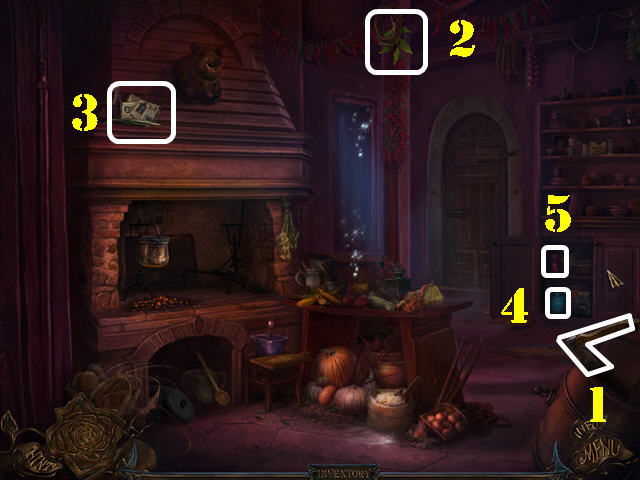
- Examine the items on the ground; take the FISH (1).
- Zoom into the center of the floor; look at the NOTE (2).
- Examine the back left area; take the DRY CLOUD (3).
- Examine the trunk; take the SWAN and the SUN CENTER PART (4).
- Zoom into the bodice; open the pocket book and put the SUN CENTER PART in the center of the rays.
- Take the SUN (5).
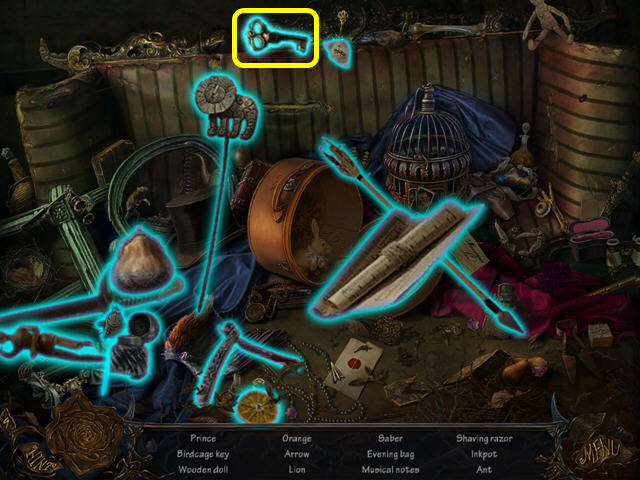
- Play the HOS in the back of the attic.
- Find the items listed to find the BIRDCAGE KEY.
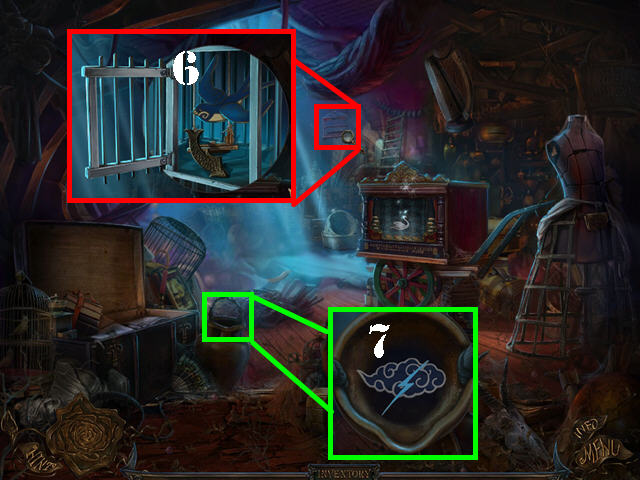
- Zoom into the birdcage; unlock it with the BIRDCAGE KEY and take the FISH TAIL and the SWALLOW (6).
- Examine the vase; put the DRY CLOUD in it and take the WET CLOUD (7).
- Return to Clarice's bedroom.
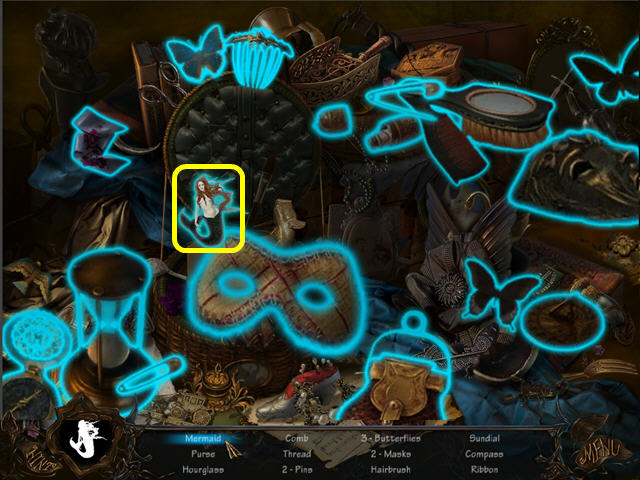
- Play the HOS to obtain the MERMAID.
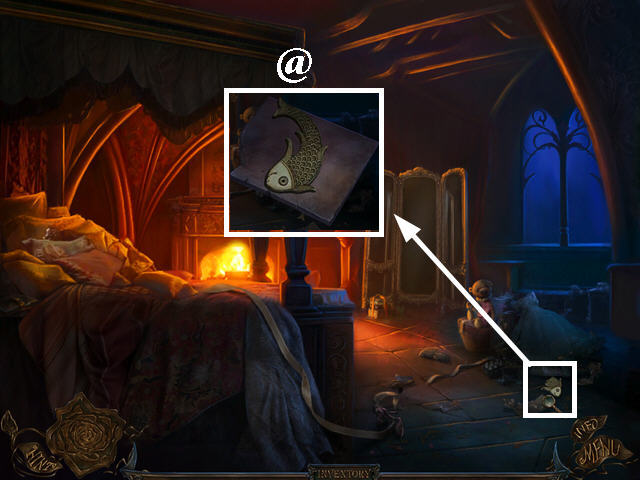
- Zoom into the fish; put the FISHTAIL on it and take the FISH (@).
- Return to the attic.
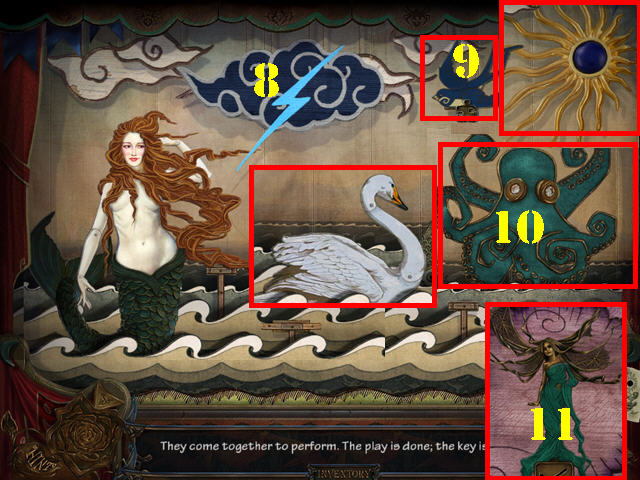
- Examine the stage; put the WET CLOUD in the sky (8).
- Put the SWALLOW on the right swing (9).
- Place the SUN and the OCTOPUS on the right (10).
- Put the SWAN, 2 FISH, and the MERMAID in the water.
- Take the FIRST KEY (11).

- Play the HOS in the back.
- Find the listed items to obtain the WOLF BONE.
Chapter 2: The Second Key
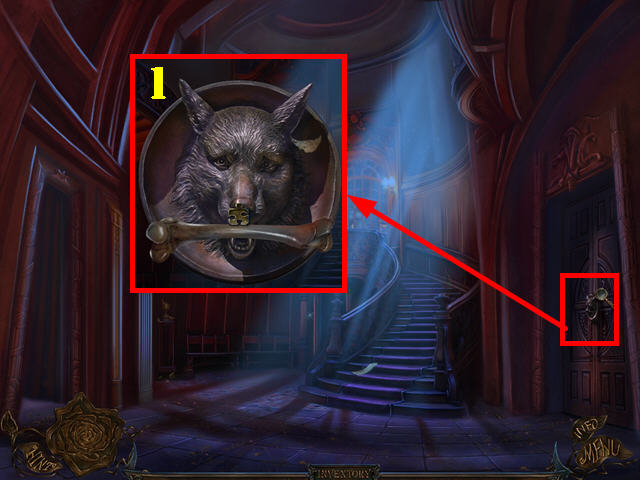
- Return to the downstairs Hall.
- Zoom into the right door.
- Put the WOLF BONE in the wolf's mouth (1).
- Go through the door to access the library.
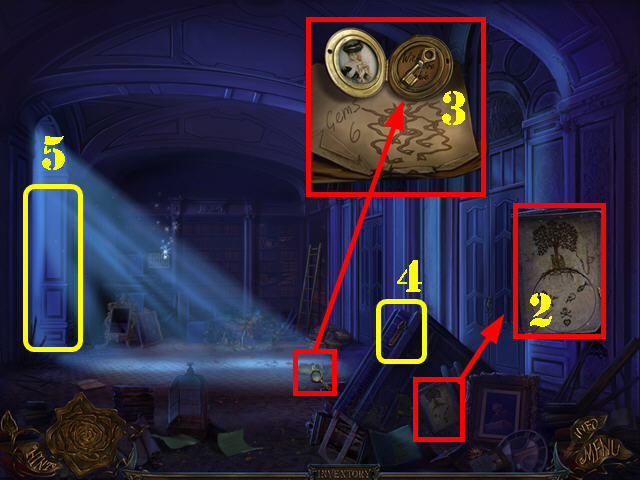
- Examine the lower right corner; look at the NOTE (2).
- Examine the ground; open the locket and take the CHEST KEY (3).
- Take the WRENCH (4).
- Head left towards the orchard (5).
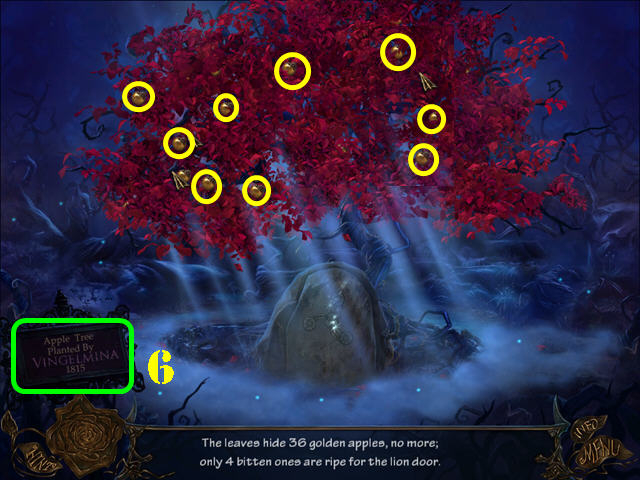
- Take the 36 golden APPLES on the tree. The apples appear as you move your cursor through the leaves.
- Note the name 'VINGELMINA' in the lower left (6).
- Use the hint to find all the apples if you get stuck.
- The 4/4 APPLES will be added to inventory.
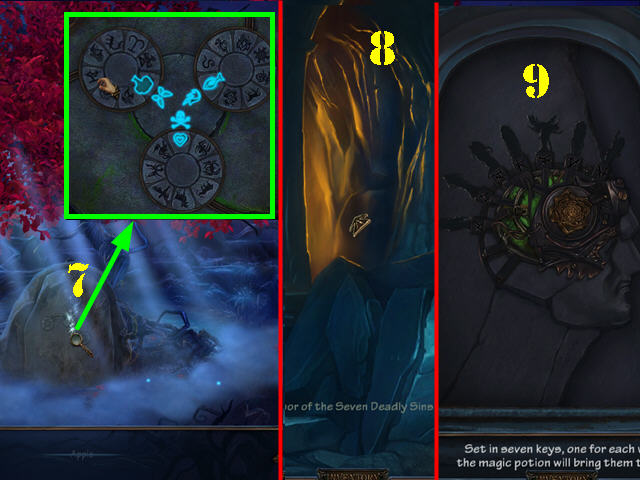
- Zoom into the stone (7).
- Click on the 3 dials to move them to the center.
- Once in the center, place the 3 matching pairs as shown in the screenshot. (The clue for this puzzle can be found in the library).
- Go through the stone to access the dungeon entrance (8).
- Go through the door; this is the location where the 7 keys need to be used (9).
- Go back to the library; click down, and head left.
- Zoom into the door.
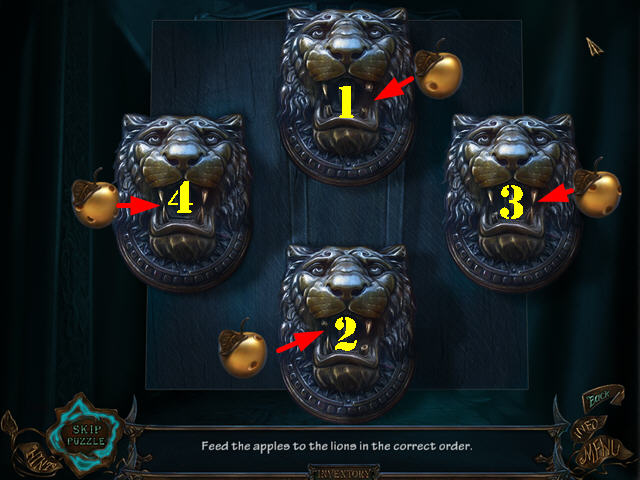
- Put the 4/4 APPLES on the door to activate a puzzle.
- Put the apples in the mouths of the correct lions and in the right order. Match fangs with the holes in the apples.
- Please look at the screenshot for the solution.
- Go through the door to access Bluebeard's study.

- Read the NOTE (A).
- Take the MATCHES on the ground (B).
- Examine the right side of the desk; take the GEMSTONE (C).
- Use the CHEST KEY on the lock; take the FEATHER PEN (D) and the GEMSTONE (E).
- Move the lid and take COGWHEEL (F).
- Click on the handle (G); zoom into the post (H). Look at the skull. This action activates a HOS.

- Play the HOS in the study.
- Find the listed items to obtain the BRUSH and the COG WHEEL.

- Examine the compartment on the left (@).
- Move the items aside to find the 2 COGWHEELS marked in yellow.
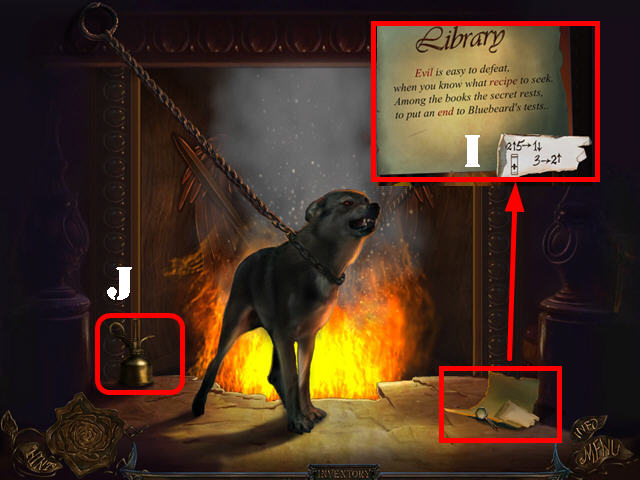
- Examine the fireplace.
- Look at the note and take the BOOK CLUE (I).
- Take the OIL CAN (J).
- Return to the library.
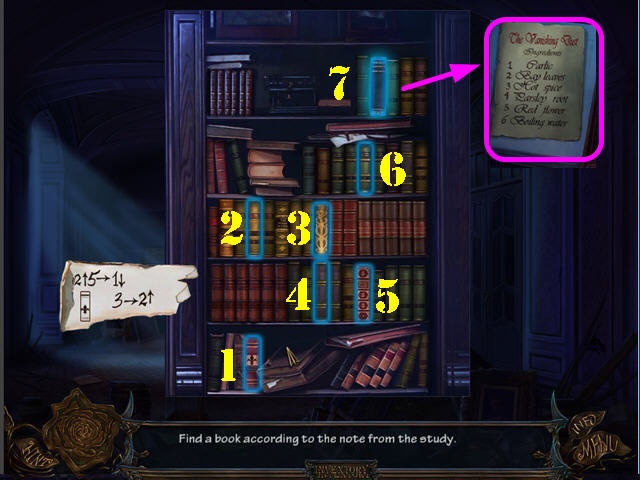
- Click on the ladder and zoom into the right bookcase.
- Put the BOOK CLUE on the bookcase.
- Click on the books in the order shown on the book clue.
- Please look at the screenshot for the solution.
- Open the last book; take the KITCHEN RECIPE (7).
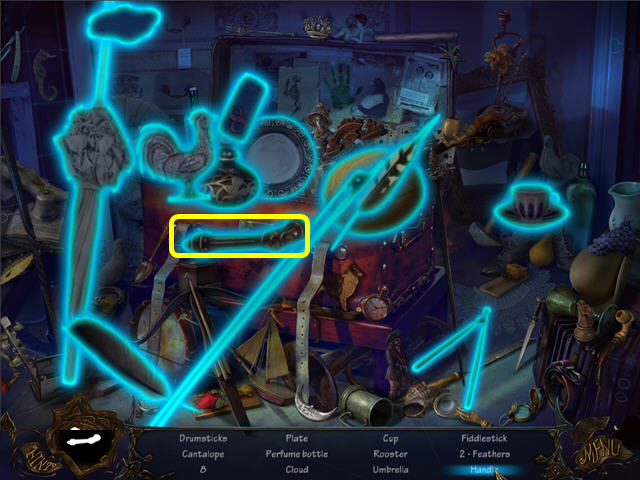
- Play the HOS in the back of the room.
- Find the listed items to obtain the KITCHEN HANDLE.
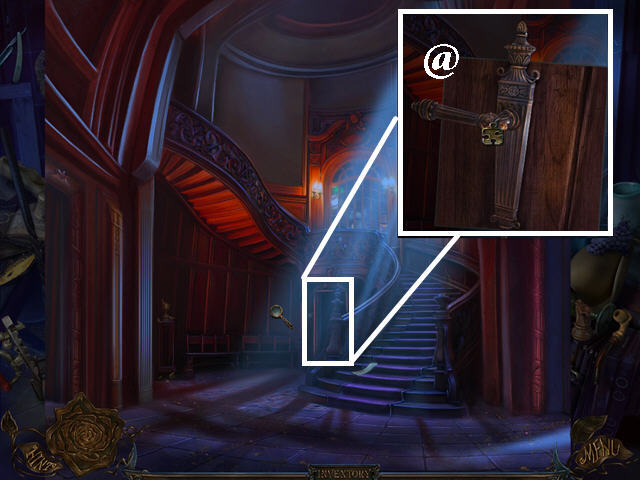
- Click down to return to the hallway.
- Zoom into the door behind the steps; put the KITCHEN HANDLE on the door (@).
- Go through the door to access the kitchen.
- Take the AXE in the lower right (1).
- Take the BAY LEAVES (2) in the upper center.
- Examine the top of the fireplace; look at the newspaper clippings (3).
- Open the cabinet; take the POTION BOTTLE (4) and the HOT SPICE (5).
- Look at the stained glass window to activate a puzzle.
- Click on the tiles to rotate them.
- Please look at the screenshot for the solution.
- Take the SPIDER (6).
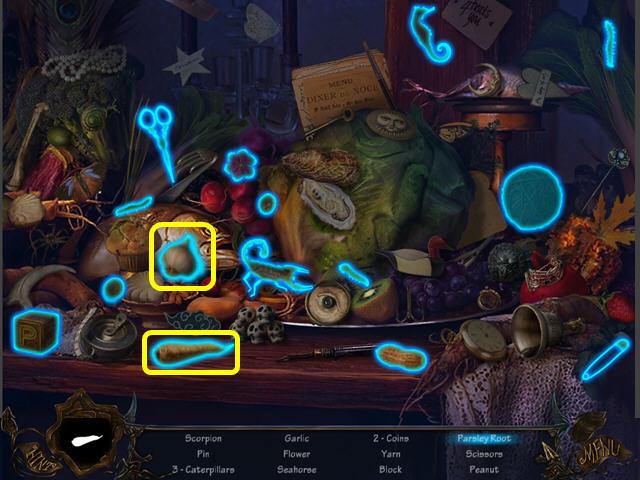
- Play the HOS on the table.
- Find the items listed to obtain PARSLEY ROOT and GARLIC.
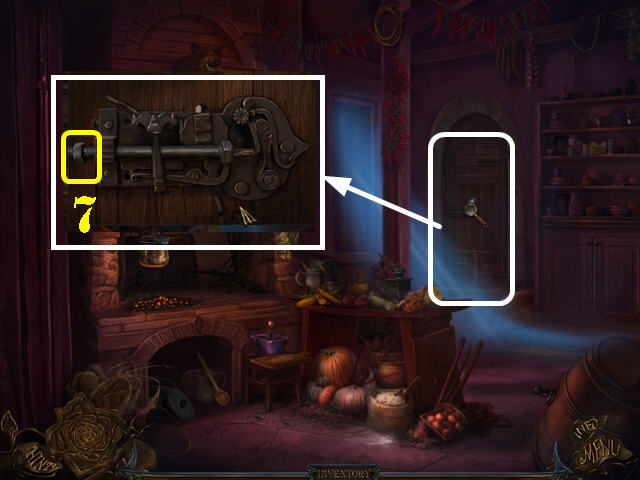
- Inspect the back door; loosen the SCREW with the WRENCH (7).
- Take the SCREW.
- Click on the latch; open the door and go through it to access the kitchen yard.
- Take the EMPTY POT on the left (8).
- Use the AXE on the 4 branches marked in white.
- Pick up the 4 TREE BRANCHES marked in yellow on the ground.
- Note the LANTERN on the right (9).
- Return to the library.
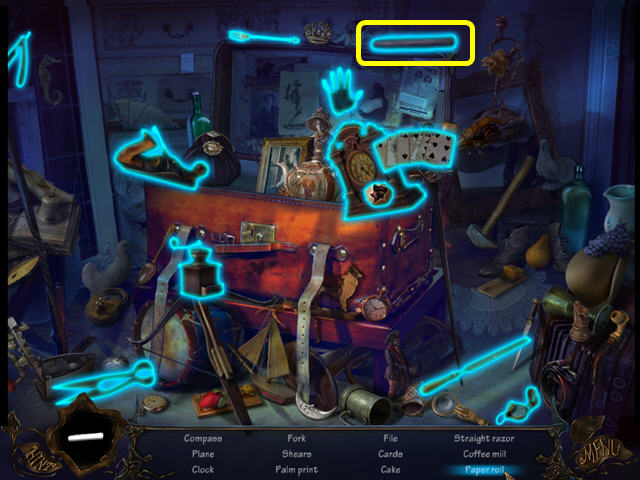
- Play the HOS.
- Find the listed items to obtain the PAPER ROLL.
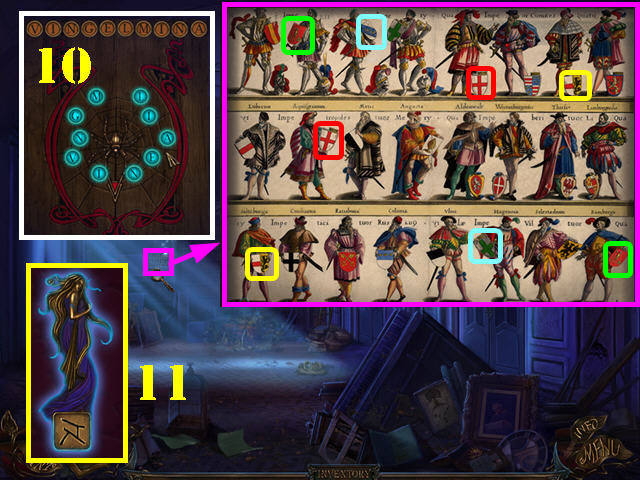
- Zoom into the puzzle in the back of the library.
- Find the 4 shield pairs.
- Please look at the screenshot for a random solution.
- Put the SPIDER in the center of the next puzzle that appears.
- Click on the letters to form the word:”VINGELMINA” (10).
- Take the SECOND KEY (11).
Chapter 3: The Third and Fourth Keys
- Return to Bluebeard's study and go right into the winter garden entrance.
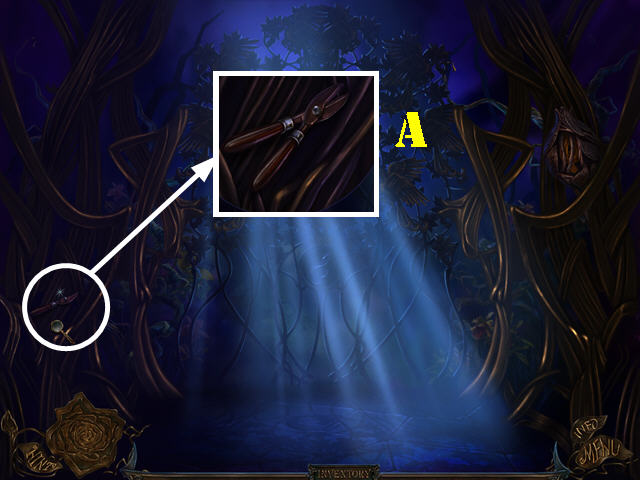
- Click on and zoom into the left branch; put the GARDEN SHEARS PART on the other piece (A).
- Place the SCREW on the shears; take the GARDEN SHEARS.
- Click down.
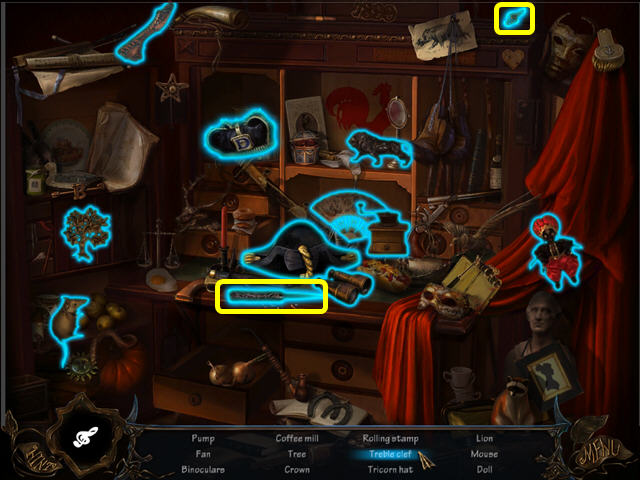
- Play the HOS in the study.
- Find the listed items to obtain the TREBLE CLEF and the ROLLING STAMP.
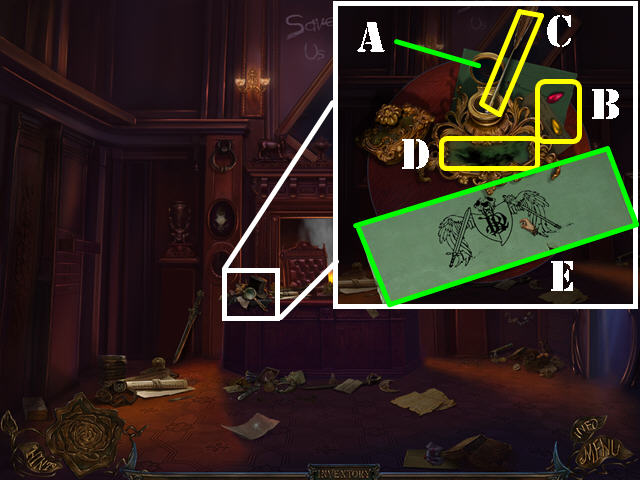
- Zoom into the left side of the desk; open the ink bottle cap (A).
- Take the 2 GEMSTONES (B).
- Dip the FEATHER PEN into the ink (C).
- Put the ROLLING STAMP into the ink blotter (D).
- Take the NOTE (E).
- Go out to the winter garden entrance on right.
- Put the TREBLE CLEF on the gate.
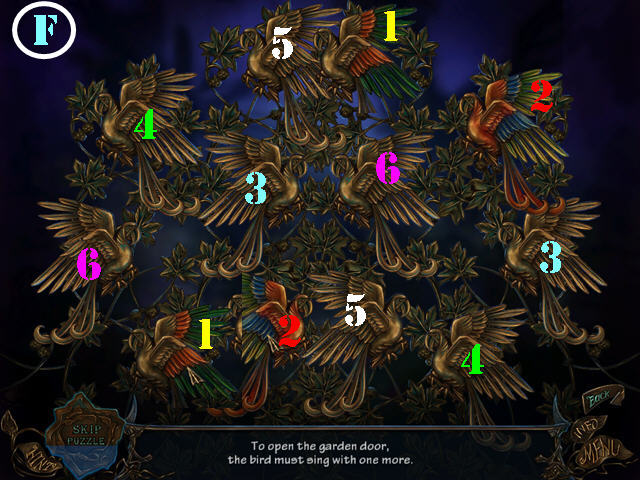
- Click on the birds above the gate to activate a puzzle.
- Click on the birds so you can see their colors. Click on 2 matching birds to eliminate them until all birds are gone.
- Please look at the screenshot for the solution (F).
- Go through the gate to access the winter garden.
- Cut the vines by the red flower with the GARDEN SHEARS to activate the HOS.
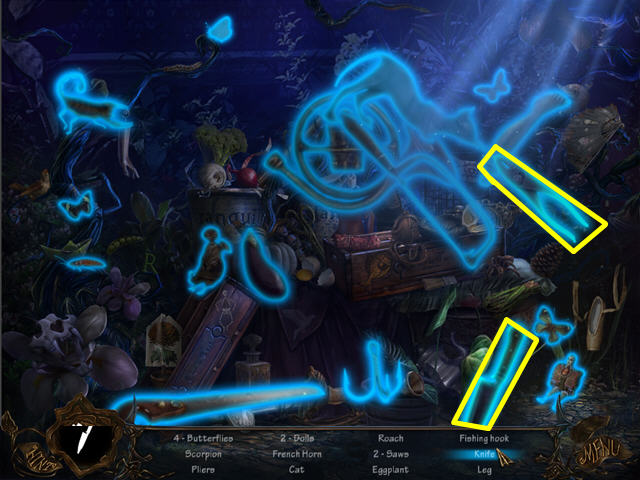
- Play the HOS on left.
- Find the listed items to obtain the KNIFE and the PLIERS.
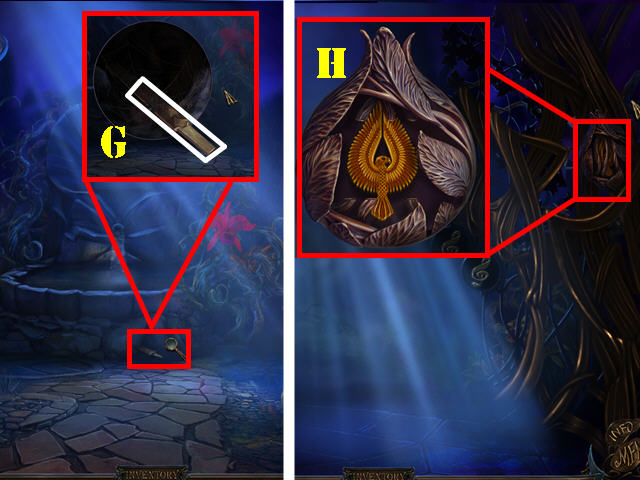
- Zoom into the base of the statue; take the FILE (G).
- Click down.
- Zoom into the steel rods; cut the rods with the FILE and take the PHOENIX (H).
- Return to the kitchen and go out to the kitchen yard.
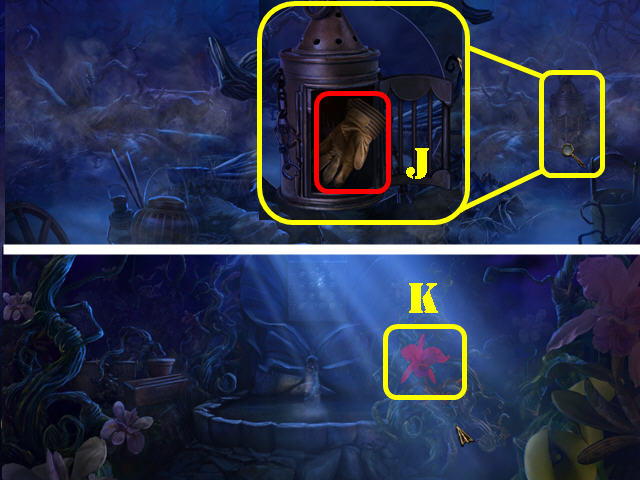
- Zoom into the lantern; cut the chain with the PLIERS.
- Open the lantern and take the GLOVE (J).
- Return to the winter garden.
- Take the FLOWER with the GLOVE (K). Note: Make sure that you already used the Garden Shears on the flower; otherwise, you will not be able to take the flower.
- Return to the kitchen.
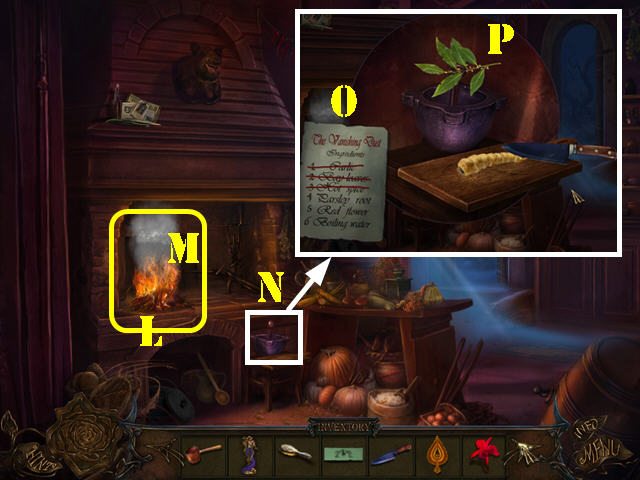
- Put the 4 TREE BRANCHES below the cauldron (L).
- Use the MATCHES on the branches.
- Put the EMPTY POT in the cauldron; take the FULL POT (M).
- Zoom into the mortar and pestle (N); click on the KITCHEN RECIPE located in your inventory (O).
- Place the GARLIC in the mortar.
- Put the BAY LEAVES over the mortar and click on each leaf (P).
- Place the HOT SPICE in the mortar.
- Put the PARSLEY ROOT on the cutting board; cut it with the KNIFE.
- Place the cut PARSLEY ROOT in the mortar.
- Put the FLOWER on the cutting board; cut it with the KNIFE.
- Place the cut FLOWER and the FULL POT in the mortar.
- Put the POTION BOTTLE in the mix and take the VANISHING DUST.
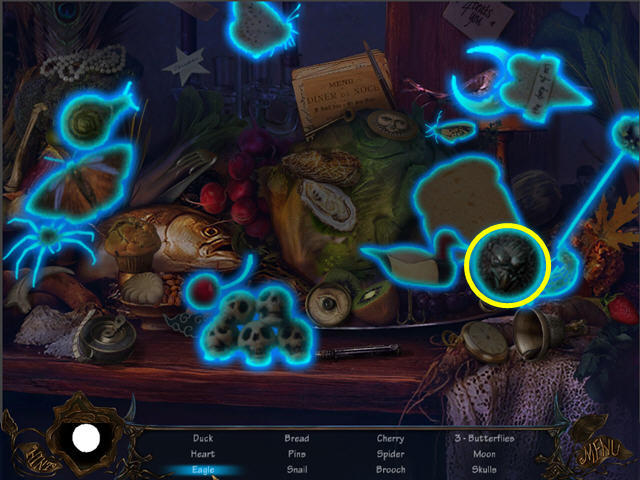
- Play the HOS in the kitchen.
- Find the listed items to obtain the EAGLE.
- Return to Bluebeard's study.
- Zoom into the fireplace.
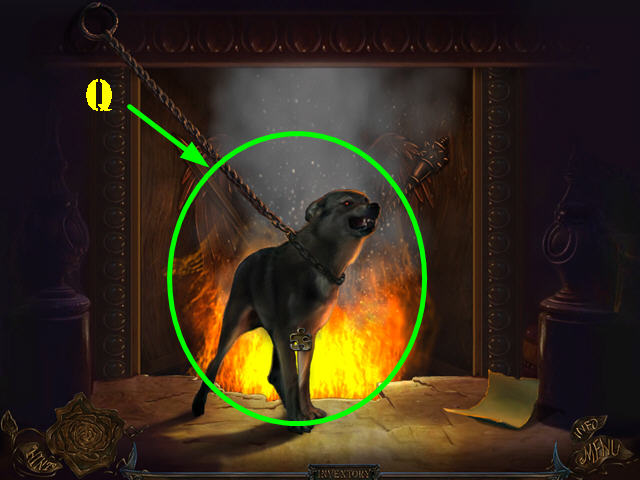
- Give the VANISHING DUST to the wolf (Q). This action activates a HOS in the winter garden.
- Return to the winter garden.
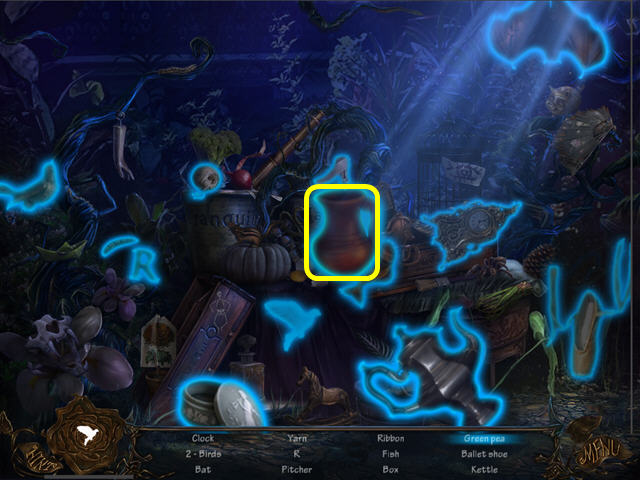
- Play the HOS.
- Find all the listed items to obtain the EMPTY PITCHER.
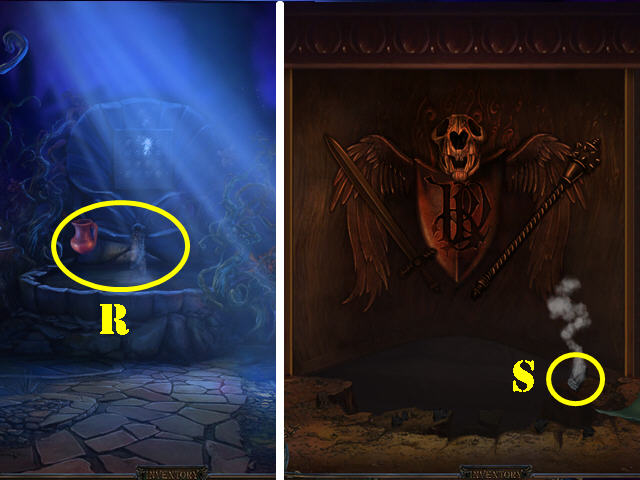
- Put the EMPTY PITCHER into the water; take the FULL PITCHER (R).
- Return to the fireplace in the study.
- Put the FULL PITCHER on the fire.
- Take the COAL (S).
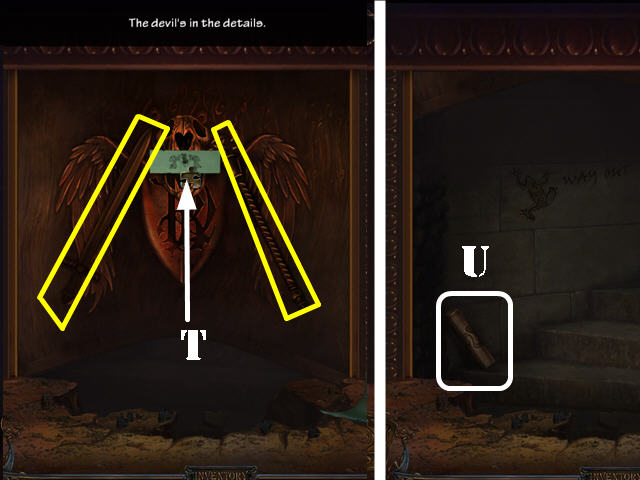
- Move the sword and the mace on the armor (yellow).
- Put the NOTE in the mouth (T).
- Take the BAR (U).
- Go into the secret room.
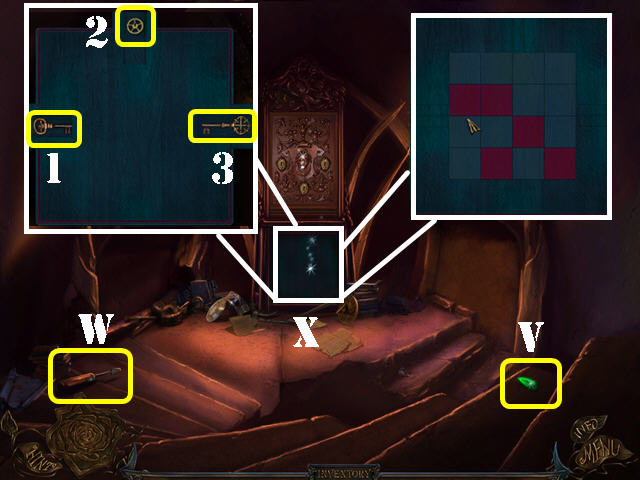
- Take the GEMSTONE (V) and the SCREWDRIVER (W).
- Click on the blue board to activate a puzzle (X).
- Click on the same squares the game is showing you. Duplicate 4 patterns correctly to beat one round. You must play 3 rounds to complete this puzzle.
- The patterns are random.
- Take the SECRET ROOM KEY after the first round (1).
- Take the COGWHEEL after the second round (2).
- Take the second SECRET ROOM KEY after the third round (3).
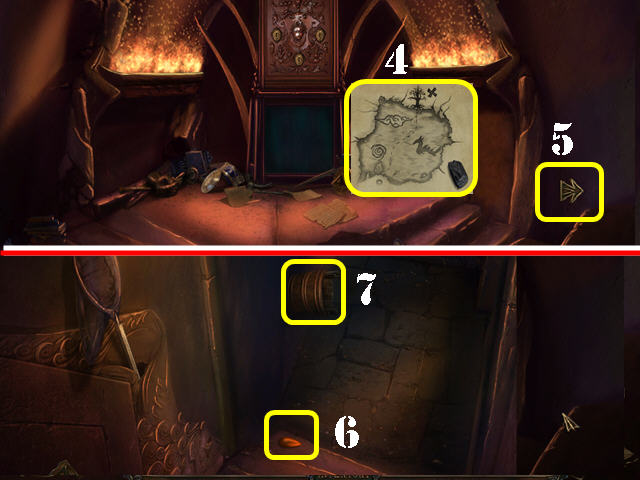
- Put the PAPER on the map.
- Put the COAL on the paper and take the SECRET ROOM MAP (4).
- Go right towards the secret room escape route (5).
- Take the GEMSTONE on the steps (6).
- Grab the BUCKET (7).

- Examine the back door; put the BAR on it to activate a puzzle.
- Click on the bars to change the image until the image of the frog is complete.
- Please look at the screenshot for the solution (8).
- Go through the door to access the lost soul garden entrance.
- Read the NOTE (9).
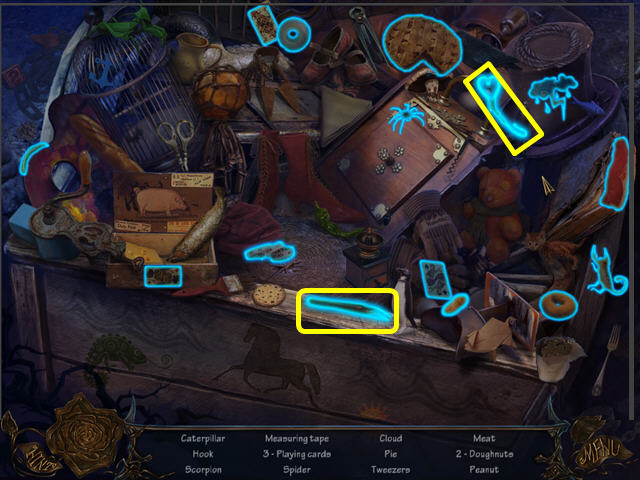
- Click on the pumpkin for a HOS.
- Find the listed items to obtain the TWEEZERS and the HOOK.
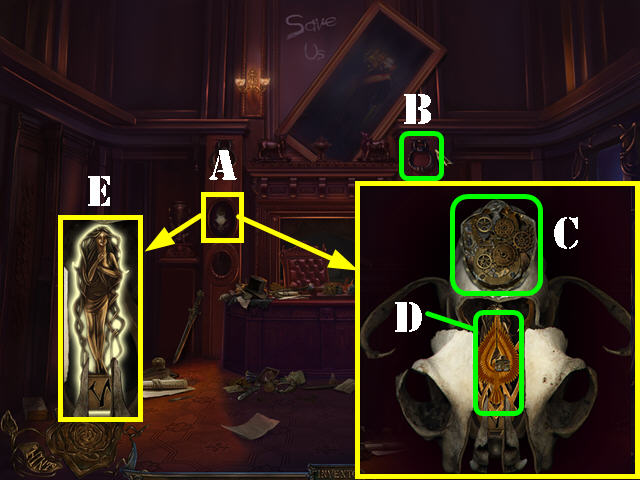
- Click down 4 times to return to the study.
- Zoom into the post (A). If it is not accessible to you yet, make sure you click on the handle (B) first.
- Clean the cobwebs with the BRUSH.
- Put the 5 COGWHEELS on the scene and arrange them on the brain as shown in the screenshot (C).
- Put the OIL CAN on the gears.
- Place the PHOENIX on the lock (D) and take the THIRD KEY (E).
- Return to the winter garden.
- Zoom into the puzzle on the back wall; put the EAGLE in the empty slot.
- Arrange the eagles according to the rivets on the board.
- Click on any 2 pieces to swap their positions.
- Please look at the screenshot for the solution (F).
- Remove the 4 screws with the SCREWDRIVER (yellow).
- Take the FOURTH KEY (G).
Chapter 4: The Fifth and Sixth Keys
- Return to the lost soul garden entrance beyond the secret room. Directions from the winter garden: Click down twice; go through the fireplace. Go into the secret room; head right and then forward.
- Put the HOOK on the rope and the BUCKET on the hook (1).
- Place the 5 rocks marked in yellow into the bucket.
- Remove the twigs; take the SPATULA by the gate (2).
- Go through the gate into the lost soul garden.
- Click on the angel's speech bubble (3).
- Take the CHISEL (4).
- Head right.
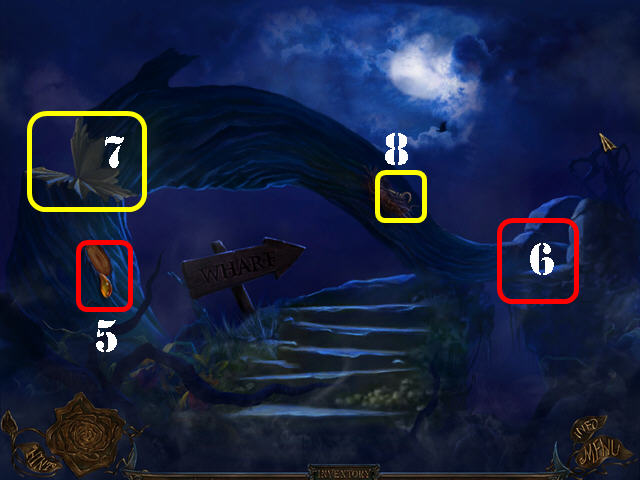
- Use the SPATULA on the resin; take the RESIN (5).
- Click on the wharf entrance and the walkway will self-destruct (6).
- Chop down the tree with the AXE (7); take the third SECRET ROOM KEY (8).
- Go into the wharf.
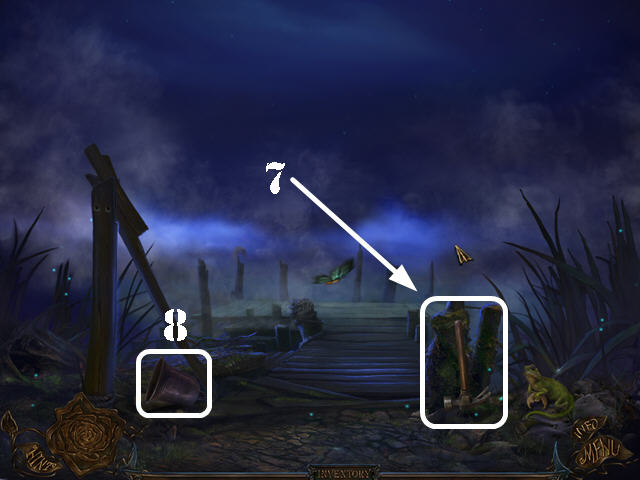
- Take the HAMMER (7).
- Click on the bell (8); you can come back here later.
- Click down three times.
- Play the pumpkin HOS.
- Find the items listed to obtain the PLIERS and the ROPE.

- Zoom into the wheel; take the NAILS with the HAMMER (9).
- Click down.
- Use the CHISEL on the wall; take the BUTTERFLY NET (10).
- Click down.
- Zoom into the lock on the back door; insert the 3 SECRET ROOM KEYS into the locks (A).
- Take a closer look at the box.
- Place the 6 GEMSTONES on the board.
- Drag the GEMSTONES into the eye sockets as shown in the screenshot (B).
- Take the FIFTH KEY (C).
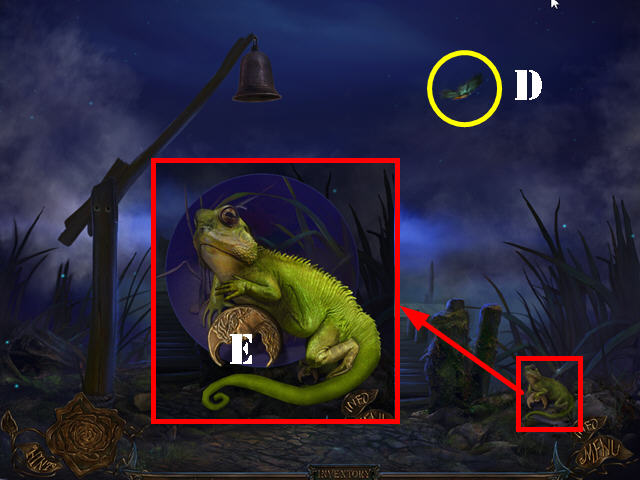
- Return to the wharf.
- Catch the BUTTERFLY with the BUTTERFLY NET (D).
- Zoom into the lizard; give it the BUTTERFLY and take the MOON (E).
- Return to the lost soul garden.
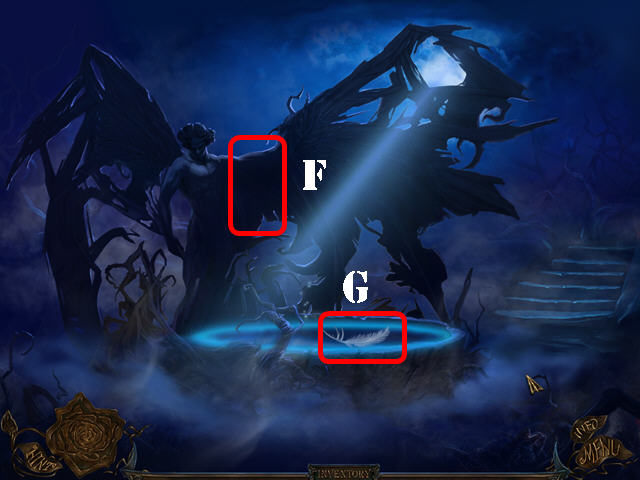
- Put the TREE RESIN on the right side of the statue; drag the wing in place (F).
- Take the FEATHER (G).
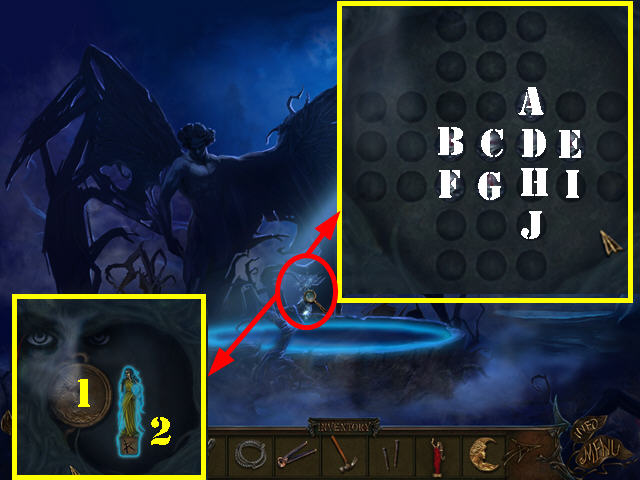
- Open the puzzle by the fountain.
- Drag the skulls over each other until none are left.
- To solve the puzzle, drag the skulls in this order: F to H, D to J, B to D, A to H, J to D, and E to C.
- Put the MOON in the slot (1).
- Take the SIXTH KEY (2).
Chapter 5: The Seventh Key
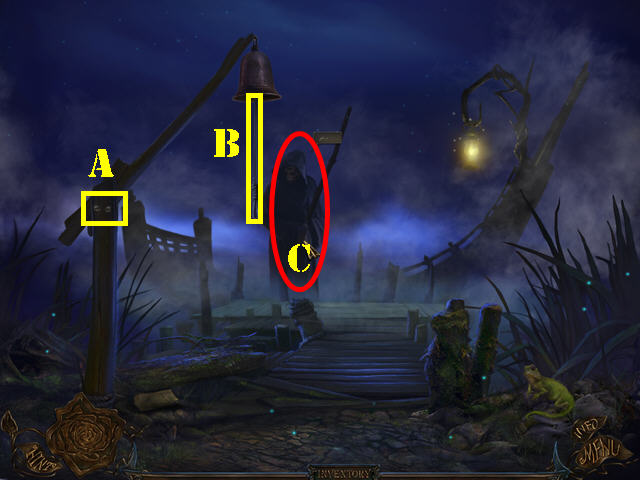
- Return to the wharf.
- Click on the bell (if you haven't already).
- Put the NAILS on the pole and use the HAMMER on the NAILS (A).
- Put the ROPE in the bell (B); click on the rope for the boatman to appear.
- Click on the boatman's speech bubble; give him the COINS and the SECRET ROOM MAP (C).

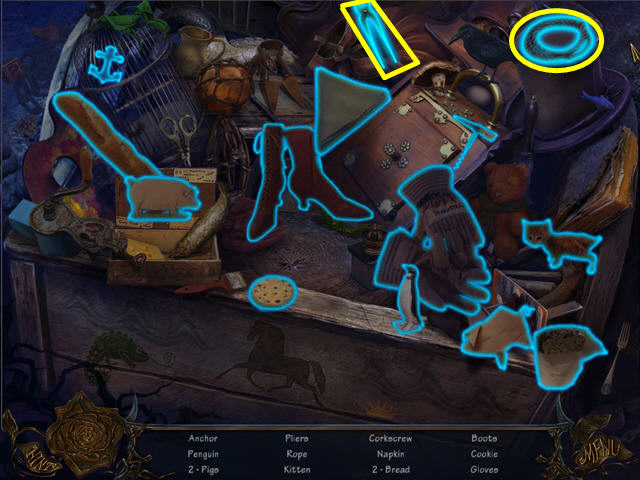
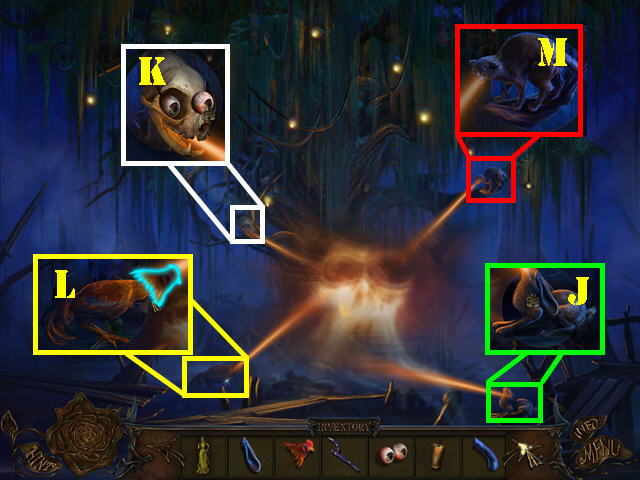
- Play the HOS in the shaman's entrance.
- Find the listed items to obtain RAVEN BROOCH and the CRANK HANDLE.
- Head left towards the swamp.
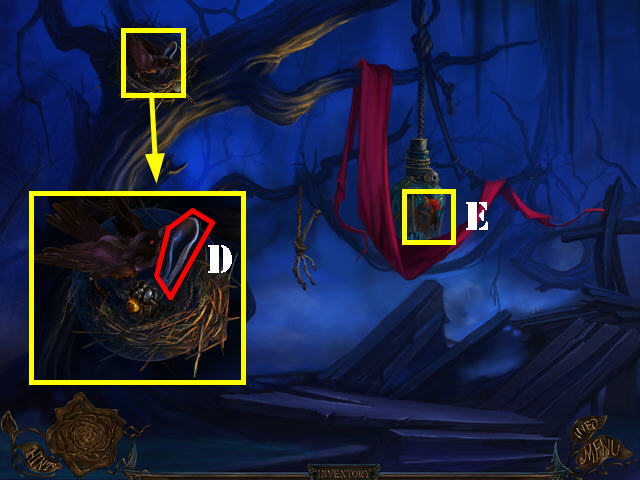
- Zoom into the nest; give the RAVEN BROOCH to the bird and take the RABBIT'S EAR (D).
- Use the TWEEZERS on the broken bottle to retrieve the ROOSTER'S HEAD (E).
- Click down and head right to the dead silence garden entrance.
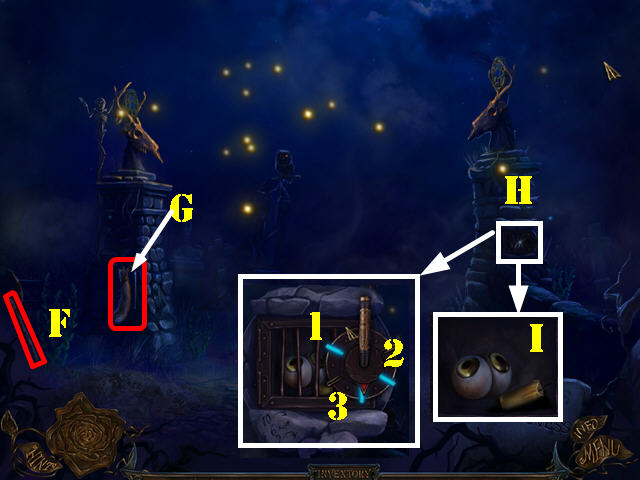
- Take the STICK (F).
- Use the PLIERS to remove the wire attached to the cat's tail; take the CAT'S TAIL (G).
- Examine the right post (H); use the CRANK HANDLE in the slot to activate a puzzle.
- Move the handle in the order shown in the markings on the rock: 10 clockwise, 6 counterclockwise and 2 clockwise.
- Take the CANDLE and the SKULL'S EYE (I).
- Click down.
- Zoom into the rabbit; put the RABBIT'S EAR on it (J).
- Zoom into the skull; put the 2 SKULL'S EYES in the socket (K).
- Zoom into the rooster; put the ROOSTER'S HEAD on it (L).
- Zoom into the cat; put the CAT'S TAIL on it (M).
- Enter the Shaman's hut.
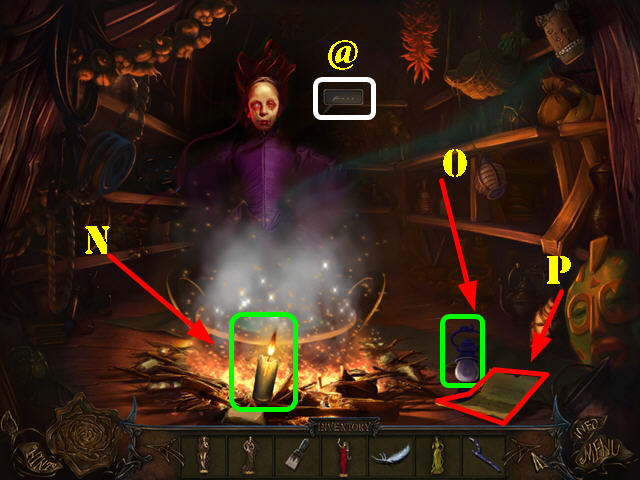
- Click on the Shaman's speech bubble (@); The Shaman will ask you for a list of items.
- Put the CANDLE in the fire to light it; take the CANDLE back (N).
- Take the EMPTY LAMP (O).
- Grab the INGREDIENTS LIST (P).
- Click down.
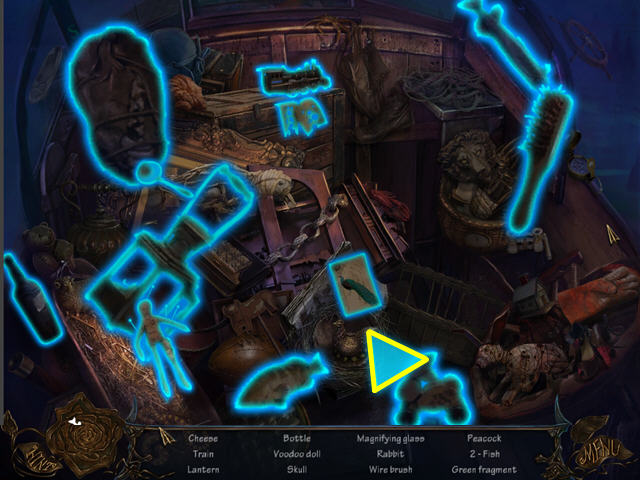
- Play the HOS.
- Find the listed items to obtain GREEN FRAGMENT.
- Return to the swamp.
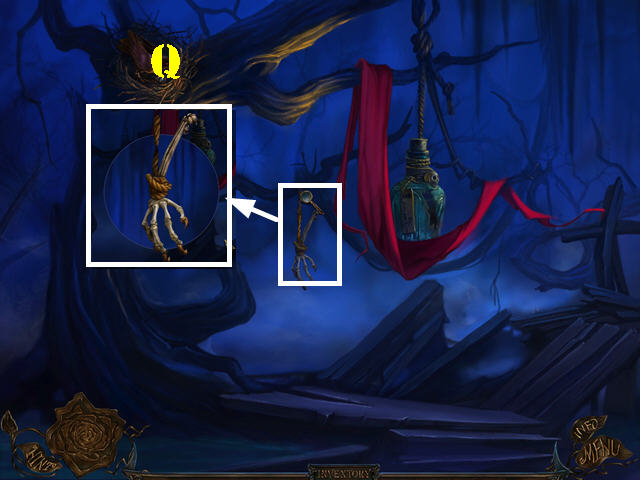
- Zoom into the hanging hand; use the CANDLE on it to add the BONE HAND (Q) to inventory. Note: You must light the candle first in the Shaman's hut.
- Click down and go right.
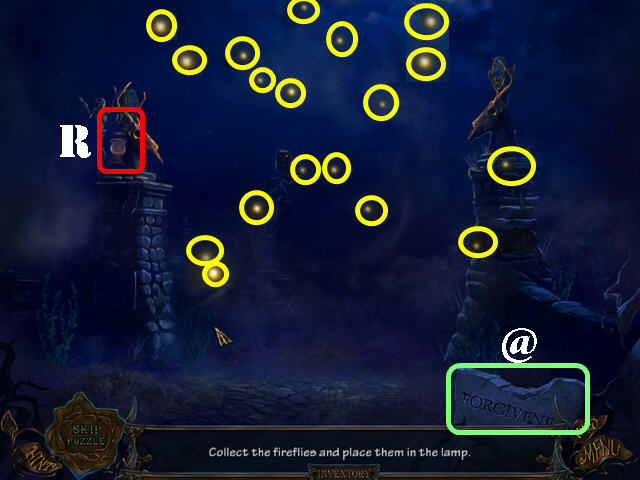
- Hang the EMPTY LAMP on the tiny statue on the left (R).
- Click on the fireflies to add them to the empty lamp. You must collect them all until they disappear.
- Take the LAMP.
- Note the word: FORGIVENESS engraved in the lower right (@).
- Go forward to the cemetery.
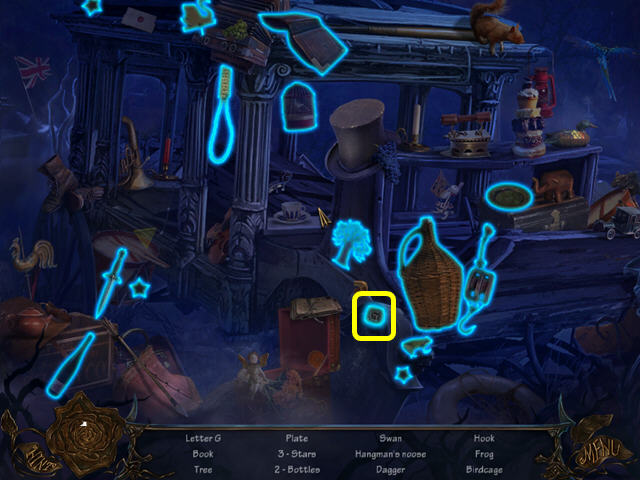
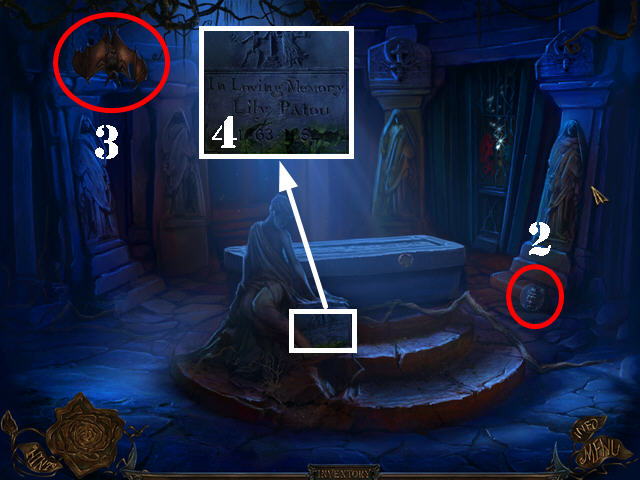
- Play the HOS in the lower left.
- Find the listed items to obtain the LETTER G.
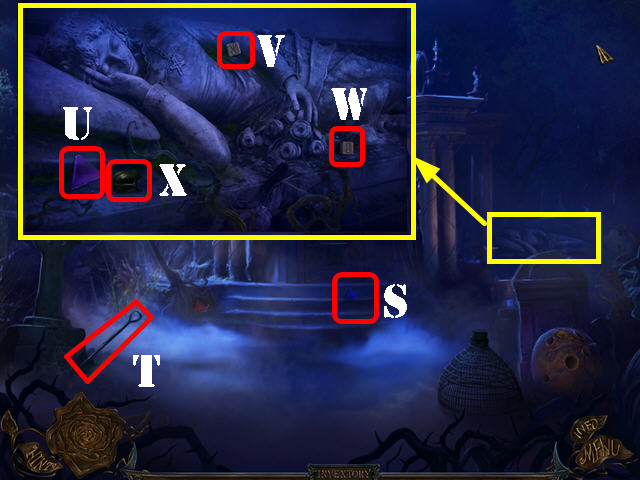
- Take the DARK-BLUE FRAGMENT (S).
- Grab the SHOVEL (T).
- Zoom into the statue on the right; take the VIOLET FRAGMENT (U), the LETTER V (V), and the LETTER I (W).
- Click on the FROG to add it to inventory (X).
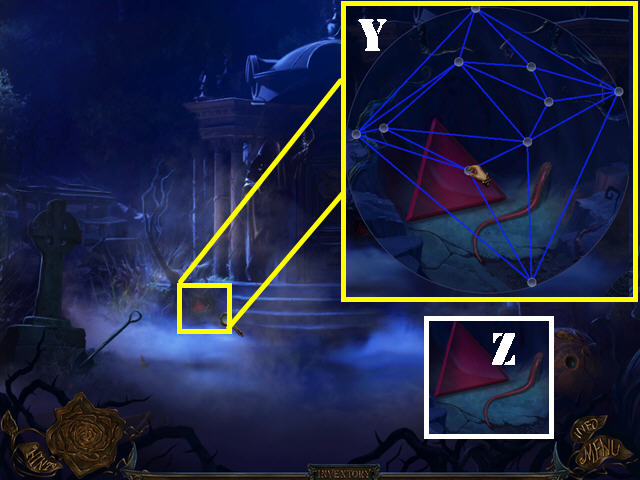
- Examine the lower left side of the steps for a puzzle.
- Pull the web apart until all the lines turn blue as shown in the screenshot (Y).
- Take the MOUSE'S TAIL and the RED FRAGMENT (Z).
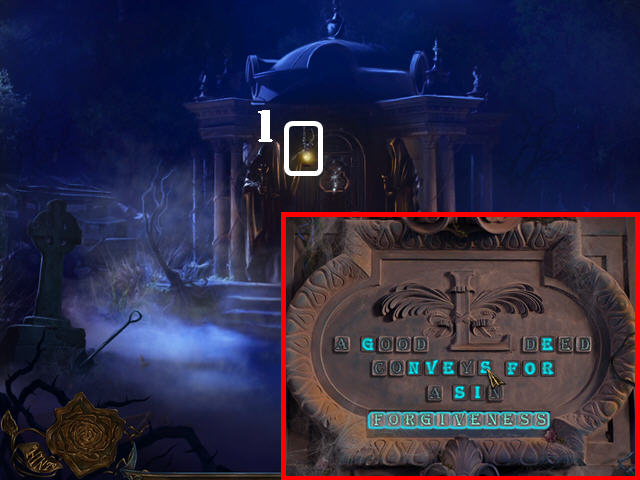
- Put the LAMP on the back door (1).
- Zoom into the back door to activate a puzzle.
- Put the LETTER G, LETTER I, and the LETTER V on the board to complete the sentence: 'A good deed conveys for a sin'.
- Click on the letters: F, O, R, G, I, V, E, N, E, S, S.
- Enter the family tomb.
- Take the DEVIL'S DISC (2).
- Grab the BAT (3).
- Click on the stone; remove the moss with the SPATULA (4). Note the numbers: 1638.
- Click down.
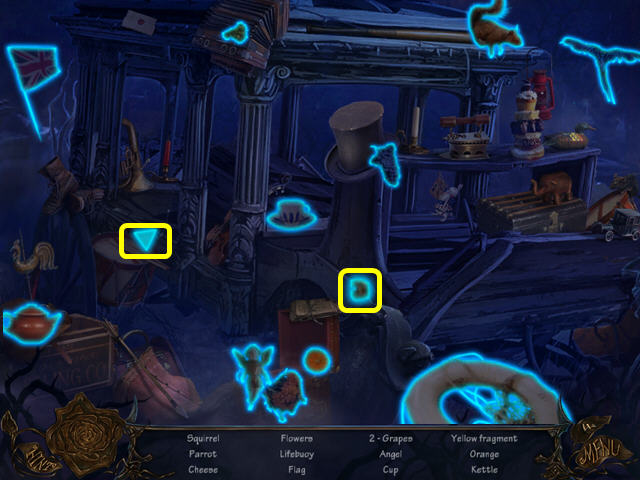
- Play the HOS in the cemetery.
- Find the items listed to obtain the CHEESE and the YELLOW FRAGMENT.

- Put the CHEESE in the mousetrap (5).
- Put the STICK on the mousetrap; take the MOUSE from inside the trap.
- Click down.
- Zoom into the owl; give it the MOUSE and take the BLUE FRAGMENT (6).
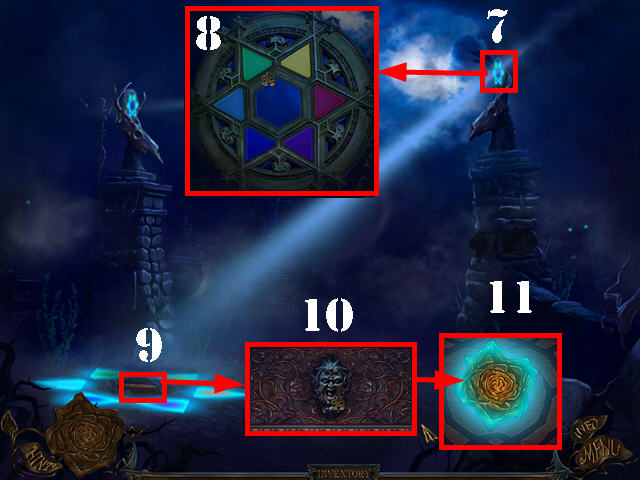
- Zoom into the puzzle in the upper right (7).
- Insert the BLUE FRAGMENT, YELLOW FRAGMENT, RED FRAGMENT, VIOLET FRAGMENT, GREEN FRAGMENT, and DARK-BLUE FRAGMENT into the slots to activate a puzzle (8).
- Use the SHOVEL on the spot the light is shining on (9).
- Zoom into the box; insert the DEVIL'S DISC in the center (10).
- Press on the disc to open the box and take the ROSE (11).
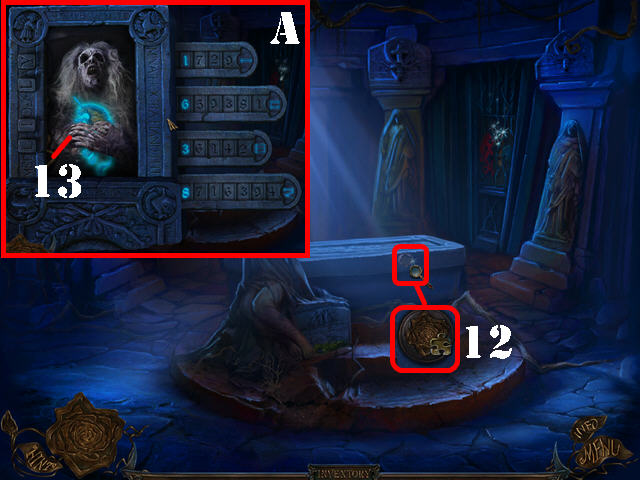
- Return to the family tomb.
- Zoom into the recess on the casket; put the ROSE in it (12).
- Zoom into the casket to activate a puzzle.
- Move the boards around to the numbers:'1638' (A).
- Take the UNICORN (13).
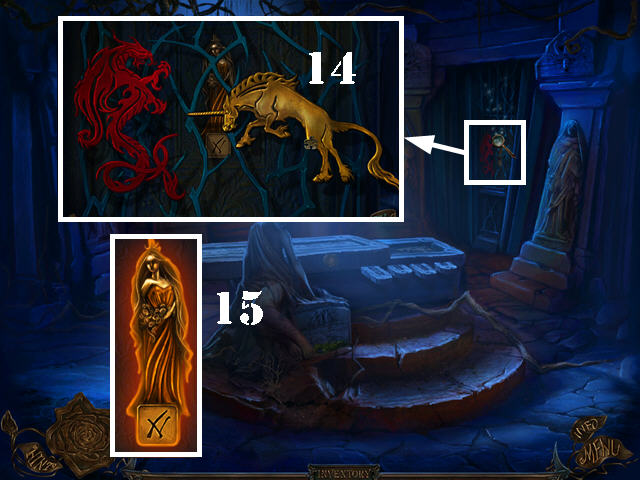
- Zoom into the back door; put the UNICORN on the right (14).
- Take the SEVENTH KEY (15).
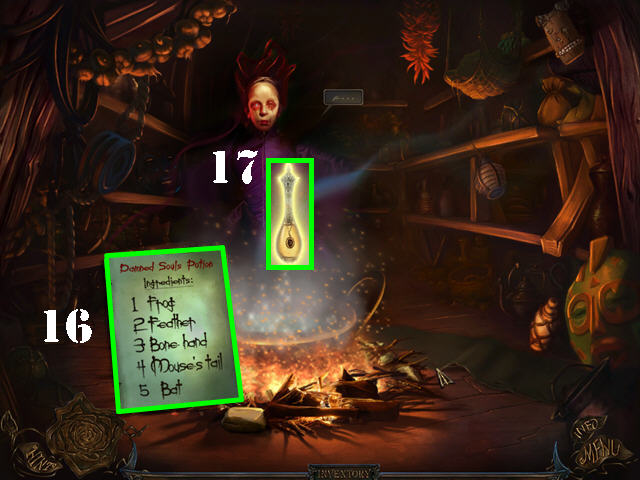
- Return to the Shaman's hut.
- Click on the INGREDIENTS LIST in your inventory (16).
- Put the FROG, FEATHER, BONE HAND, MOUSE'S TAIL, and BAT into the cauldron.
- Take the DAMNED SOULS POTION (17).
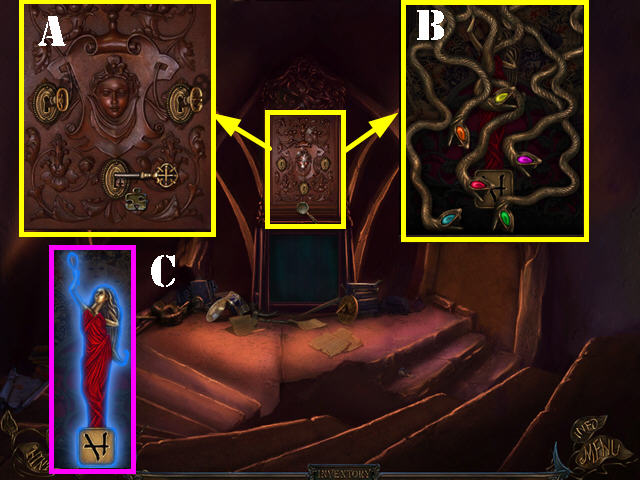
- Click down until you reach the main Hall. Head right into the library; go into the left door (orchard), into the dungeon entrance, and finally into the door of the seven deadly sins.
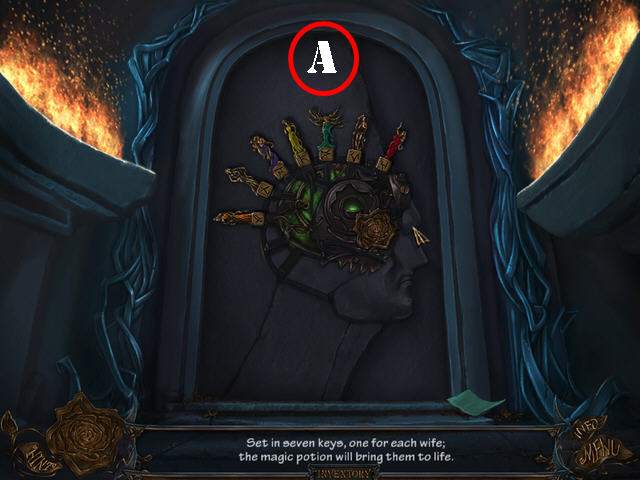
- Insert the FIRST KEY, SECOND KEY, THIRD KEY, FOURTH KEY, FIFTH KEY, SIXTH KEY, and the SEVENTH KEY into the slots (A).
- Put the DAMNED SOULS POTION in the center of the lock.
- Go through the door.
- Congratulations! You have completed Bluebeard's Castle!
Created at: 2011-11-12