

Walkthrough Menu
- General Tips
- Chapter 1: Waking Up and the Mother's Mind
- Chapter 2: The Blue Keycard and the Black Hallway
- Chapter 3: The Generator and the Purple Keycard
- Chapter 4: Room 201 and the Books
- Chapter 5: Room B-2 and the Machine Room
- Chapter 6: The Basement Office and the Car
General Tips
- This is a Hidden Object Puzzle Adventure game. Throughout the guide, we will use the acronym 'HOS' for Hidden Object Scenes.
- There is no timer.
- Use the Main Menu icon in the lower left to return to the Main Menu.
- From the Main Menu, you can access the OPTIONS at any time. You can adjust the brightness, and choose other display options.
- Use 'Change the Difficulty' in the lower left of the Main Menu screen to change from Expert to Normal mode. The Normal Mode highlights Active Areas with sparkles and has a faster Hint recharge.
- The HINT button only works in the HOS. You have unlimited hints, just wait for the HINT button to recharge.
- Some main scenes and mini-games have a HELP button in the upper right corner which will give you some clues about what to do next.
- There is a Map Icon in the lower right. Available Active Areas are marked with a '!' Available HOS are marked with a '?'.
- Click on the X by the Skull in the upper right to exit a mini-game or a zoom scene.
- This game does not allow you to use Active Areas in the scene until you need them. For example, if there are two cabinets in the scene, you might open one, but not be allowed to open the other until after you have read a poster on the wall. So whenever you complete a zoom scene or collect an inventory item, scan the room again to see if there is anything new that you can do.
Chapter 1: Waking Up and the Mother's Mind
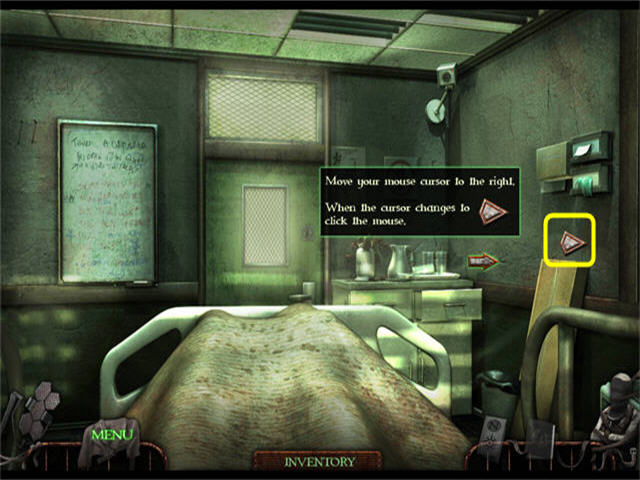
- Go Right until you can see your right hand.
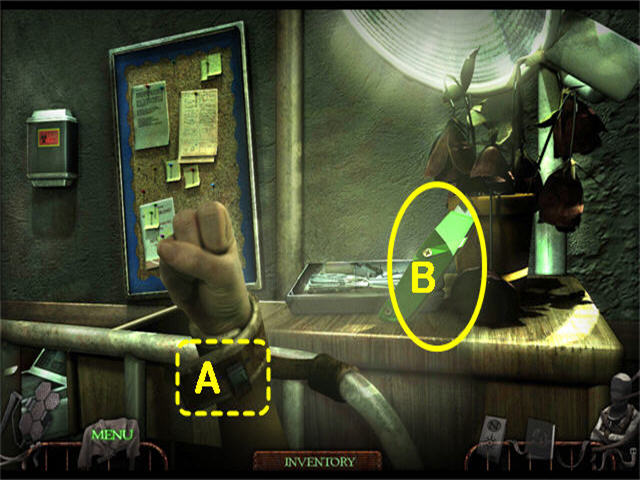
- Click on the Wrist Strap (A) 3 times to remove it.
- Collect the BOX CUTTER (B).
- Go Left twice until you can see your left hand.
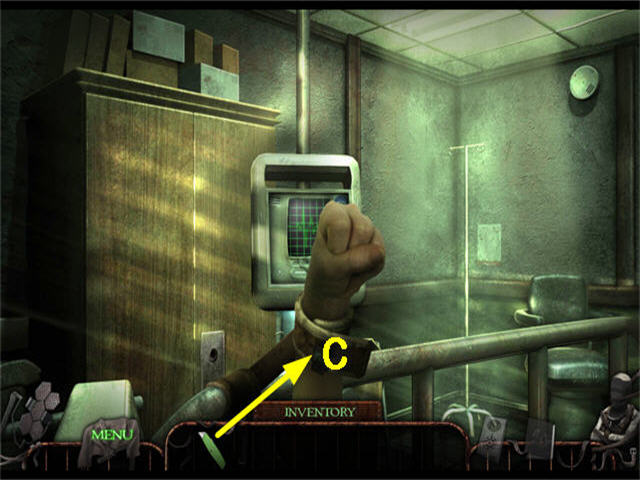
- Move your cursor over the INVENTORY icon at the bottom of the screen so the Inventory Tray opens.
- Use the BOX CUTTER from the right scene 3 times on the Wrist Strap (C). Now you can get out of the bed.
- Click on the text box at the top of the screen and you will automatically shift to the view where you are looking at the end of the bed.
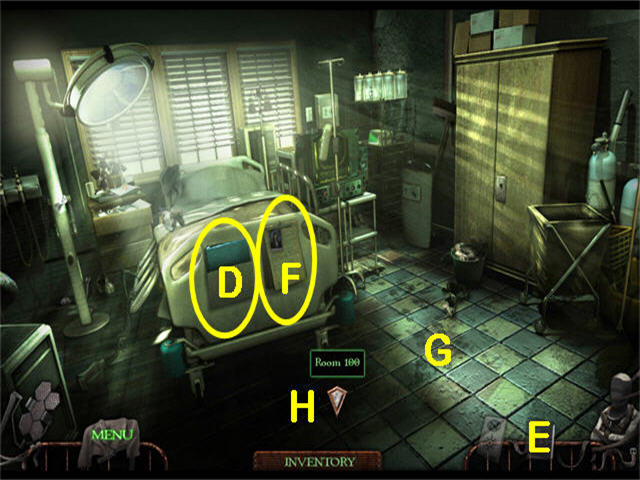
- Collect the FILE FOLDER (D).
- Review the JOURNAL (E).
- Collect the PHOTO (F).
- Examine the Footprints (G).
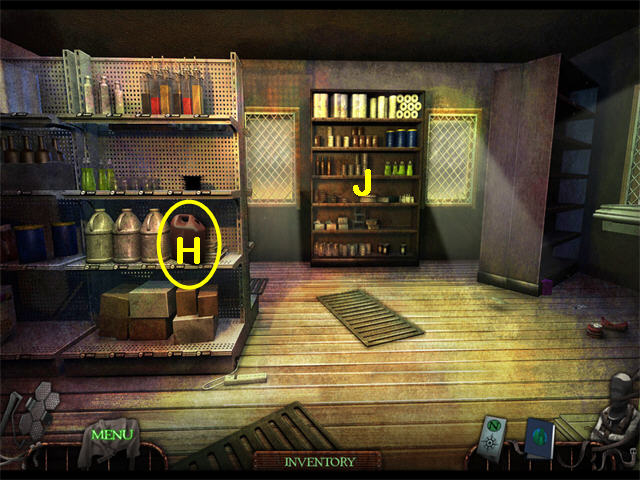
- Click Down (H).
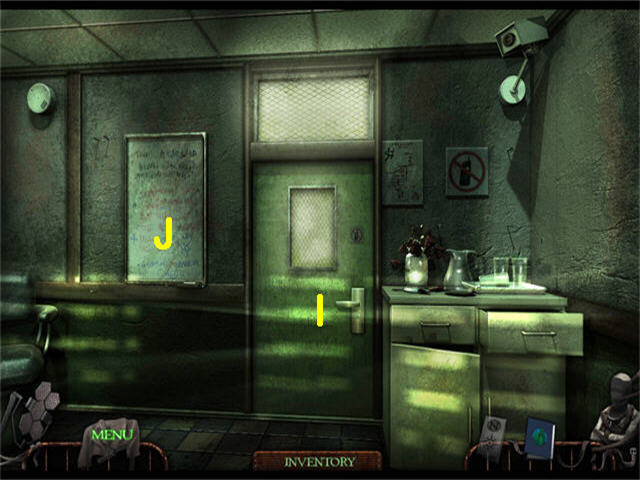
- Examine the Door (I). It's locked.
- Click on the Whiteboard (J).
- Click Down.
- Several new Active Areas are now available.
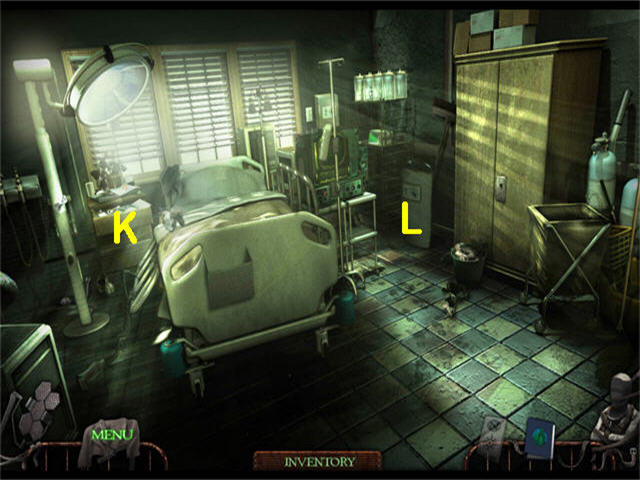
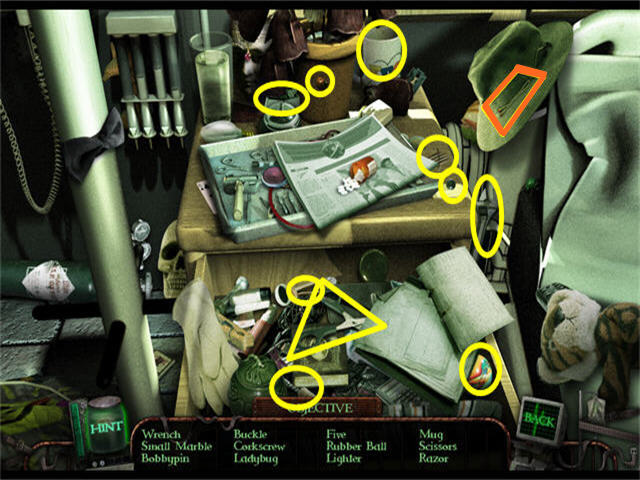
- Zoom into the nightstand (K) for a HOS.
- Find the listed items. The BOBBY PIN will be added to inventory.
- The 'Razor' is a Razor Blade.
- The only Scissors that count have green handles. The surgical scissors on the tray do not count.
- Zoom into the Trash Can (L).
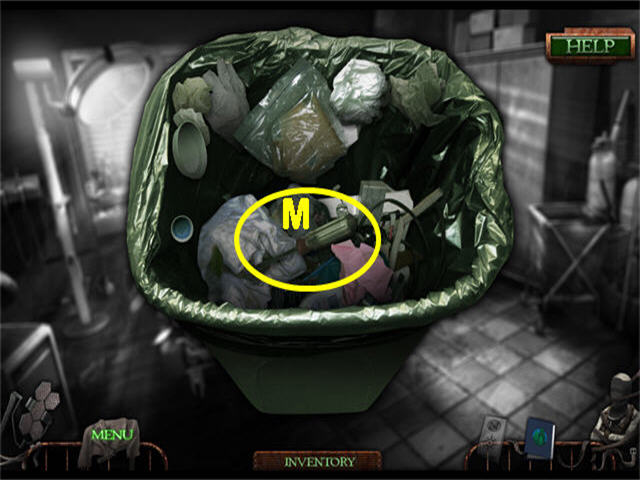
- Drag the trash around, revealing the SCREWDRIVER (M). Collect it.
- Click Down so you can see the Door.
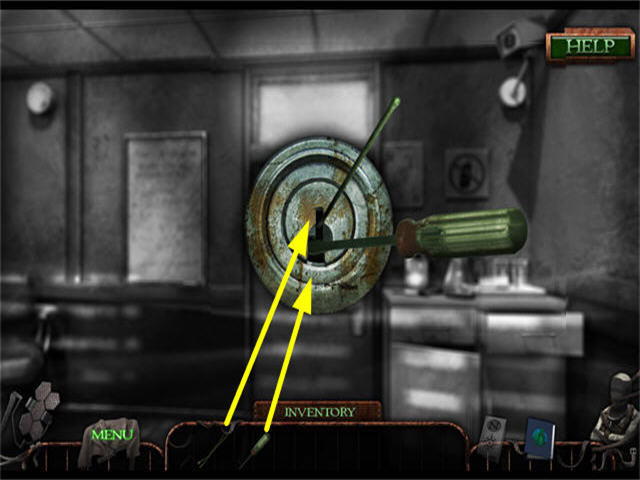
- Zoom into the Lock.
- Open your Inventory Tray. Put the BOBBY PIN (from the Nightstand HOS) into the lock.
- Then put the SCREWDRIVER (from the Trashcan on the right side of the Bed) into the lock.
- Drag the BOBBY PIN by the tip to the two o'clock position as shown in the screenshot.
- Click on the SCREWDRIVER to open the Lock.
- Watch the Cut Scene.
- Go Up to the Main Hall.

- Collect the MAP (A). This will activate the Map Icon (B).
- The Map Icon will show your current location, available rooms, and may have some Active Areas and HOS marked.
- Examine the Fire Extinguisher (C). You need something to break the glass.
- Try the door by the Exit Sign (D). It is locked.
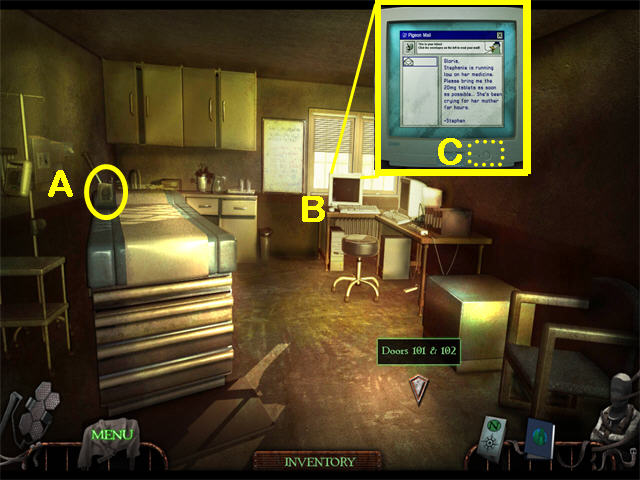
- Go Up towards Room 101.
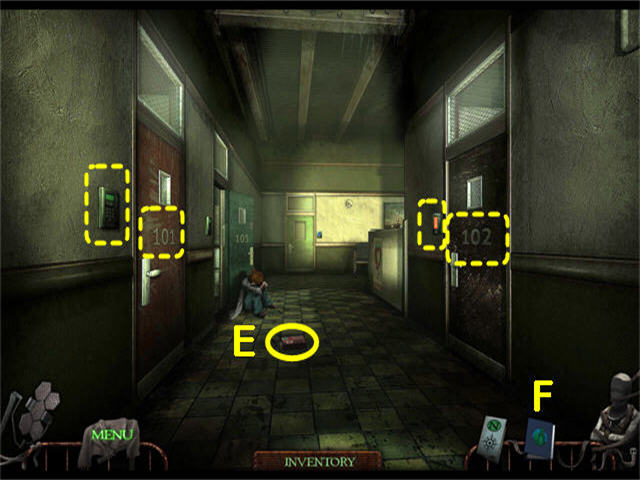
- Examine Door 101 and its security panel and Door 102 and its security panel. Door 101 requires a combination. Door 102 requires a Keycard. There is a person in Room 101, but Room 102 looks empty.
- Collect the AUDIOTAPE (E). This is Doctor's Note #2.
- Click on the Journal Icon (F).

- Click on Audiotape #2 (G) to listen to it. The text will also be written on the left page.
- From now on when you have the Journal open you can use the Tape Button (H) to get to the Audiotapes you have collected and the Pages Button (I) to return to the regular Journal pages.
- When you are done with the Journal, use the X below the Skull (J) to close the Journal and return to the main scene.
- Click Up towards Room 103.
- Talk to the little girl.
- Go into Room 103.
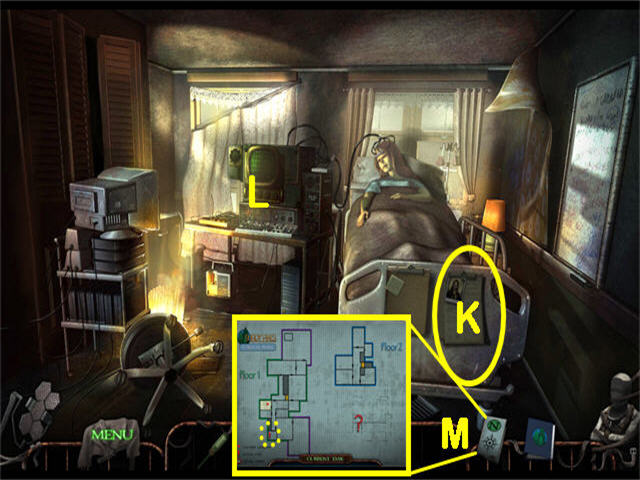
- Collect the Case File (K).
- Examine the Machine (L).
- Check the Map Icon (M). There is now an '!' in Room 100, telling you an Active Area is now available there.
- Go Down to the Main Hallway.
- Go Down four times until you are back in Room 100 and have turned to face the Bed.
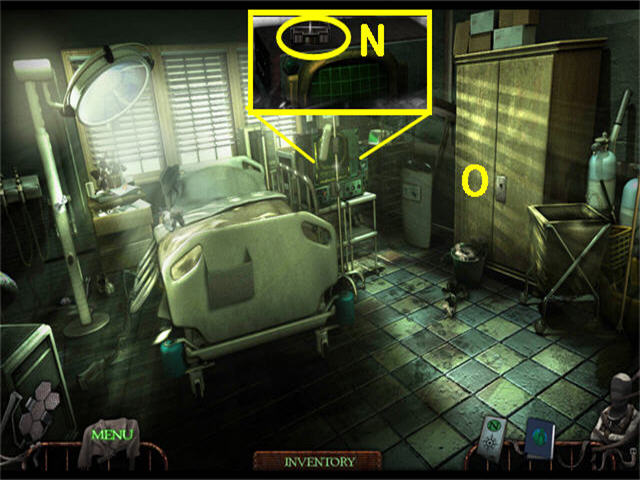
- Zoom into the Machine and collect the STRANGE BATTERY (N).
- Examine the Cabinet (O). It is missing a Door Handle.
- Return to Room 103.
- Put the STRANGE BATTERY (from Room 100) into the Machine.
- Zoom into the Machine again. It is working now.
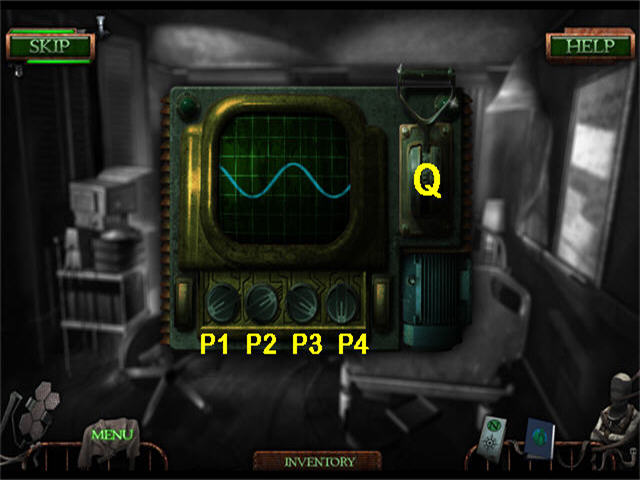
- There are two waves, one orange and one green. Turn the knobs (P) until they match.
- Solution: P1 (4 clicks), P2 (1 click), P3 (2 clicks), P4 (3 clicks).
- The Machine will buzz when the settings are correct.
- Pull the Lever (Q).
- You are now in an attic room. Talk to the woman. She will tell you about a family. This information will be written to your Journal.
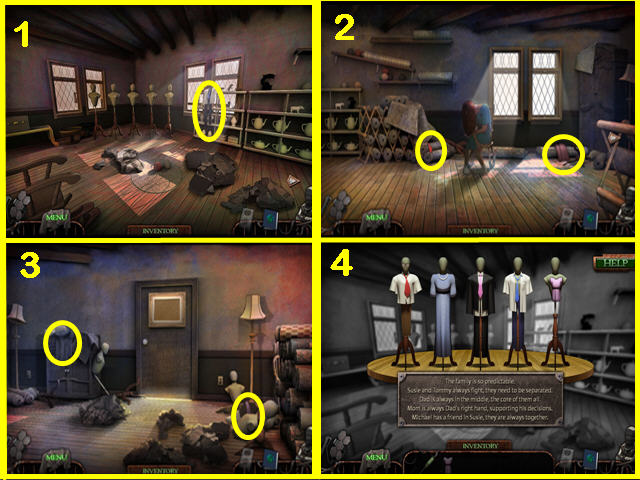
- Go Left so you can see 5 Mannequins.
- Zoom into the Mannequins and you will find out you have to find outfits that represent the 5 family members. You need to check all three sections of the Attic Room.
- Once you have all 5 outfits, return to the Mannequins and place them as shown (4).
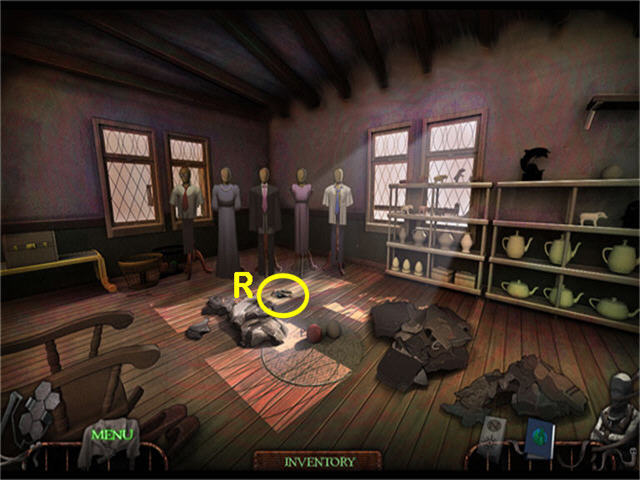
- Collect the TORN PHOTO PIECES (R) from the floor by the Mannequins.
- Go Right.
- Talk to the woman again. She is talking about a car crash.
- Go Right so you can see the Door.
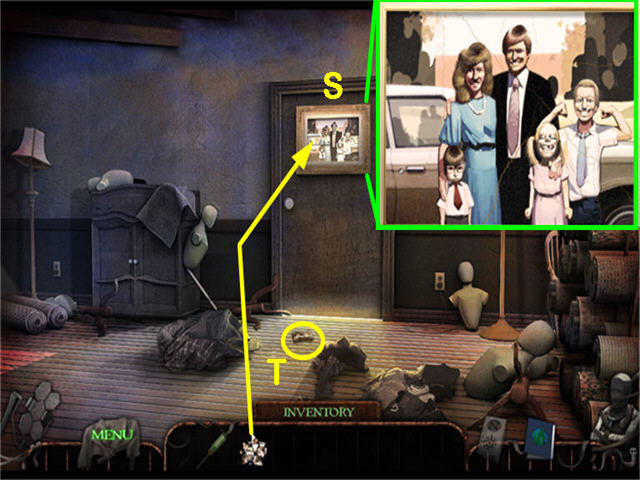
- Put the TORN PHOTO PIECES (from the floor by the Mannequins) onto the Corkboard (S). This will start a jigsaw puzzle mini-game.
- Complete the photo as shown. The pieces will lock into place when set correctly.
- Collect the AUDIOTAPE (T) from the floor.
- Click on the Journal and listen to Audiotape #3. The little girl in the hallway is not the daughter of the patient in Room 103.
- Return to the Main Hallway.
- Click Up.
- You are now in the Nurse Station Lobby at the end of the Main Hallway. Talk to the little girl, whose name is Stephanie.
- Watch the cutscene. A man has taken Stephanie through the Blue Keycard Door.
Chapter 2: The Blue Keycard and the Black Hallway
- You should have already checked every Door and every Security Panel in the Main Hallway. If not, go back and check them now, then return to the Nurse Station Lobby at the end of the Main Hallway.
- This is what you know so far. You woke up in Room 100, and can return there at any time. The Cupboard in that room is missing a Door Knob.
- There is a Fire Extinguisher on the wall by the Exit Door, but you need something to break the glass. The Exit Door is locked and needs a Key. Room 101 is locked and you need a combination to open it. There is someone inside. Room 102 is locked and you need an orange Keycard to open it. Room 103 is where the mother in the coma is.
- A strange man took the little girl, Stephanie, through the door by the Nurse Station Lobby and you need a Blue Keycard to open it.
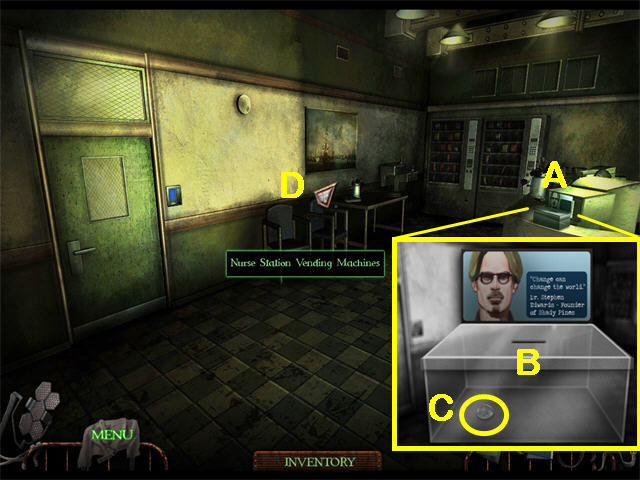
- Examine the Donation Box (A).
- Open the Lid (B).
- Once the Donation Box is open, collect the COIN (C).
- Click the Upper Right Arrowhead to go to the Nurse Station Vending Machines (D).
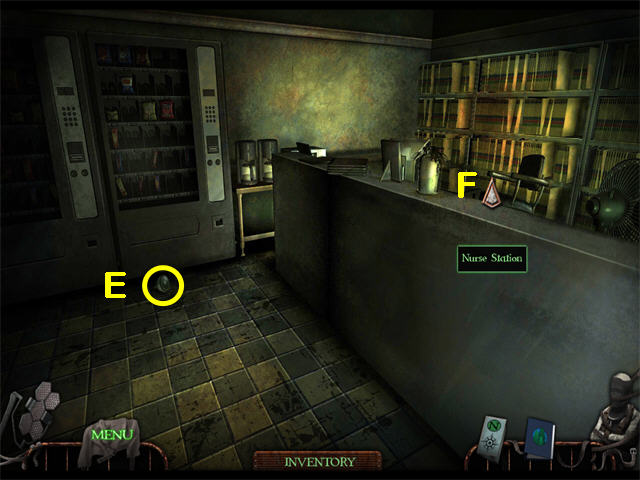
- Collect the SMALL DOOR KNOB (E).
- Go to the Nurse Station (F).
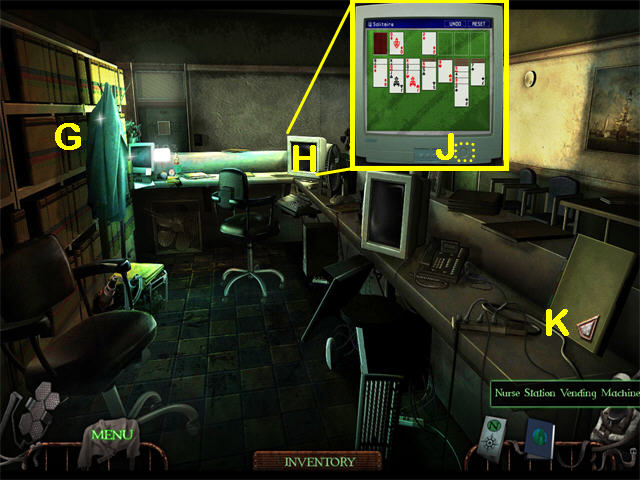
- Zoom into the Bookshelf by the Jacket (G) for a HOS.
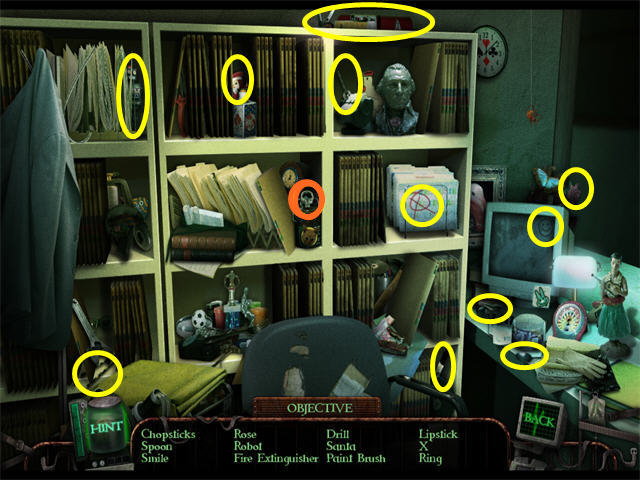
- Find the listed items. The RING will be added to inventory.
- The Drill is just to the left of the Rooster on the shelf in the upper right.
- Zoom into the last Computer (H); turn the power on (J). This will start a Solitaire mini-game. It plays like regular Solitaire except that you have to click each card to stick it or turn it over.
- When the mini-game is complete you will view an email that has the combination for Room 101.
- Go to the Nurse Station Vending Machines (K).
- Return to Room 101.
- Zoom into the Keypad on the Wall; enter the Code (from the Nurse Station computer).
- Enter Room 101. It is dark.
- Turn on the Light Switch on the left wall.
- Click Up.
- Zoom in twice on the Mannequin to start a mini-game.
- Use the red buttons to set the numbers until all are correct.
- The 5 moves by itself. All the other buttons change two numbers. So if at any time you can get all the numbers except the 5 set correctly, you can then just set the 5 to solve the puzzle.
- There are many possible solutions.
- From the starting position: Set the 2. Set the 3. Click the 1 once. Set the 3. Set the 1. Set the 3. Set the 4. Set the 6. Set the 1. Set the 3. Set the 5.
- Collect the HAMMER from the Mannequin's neck.
- Return to the Main Hallway.
- Click Down until you can see the Fire Extinguisher.
- Zoom into the Fire Extinguisher; use the HAMMER (from the mini-game in Room 101) several times to break the glass.
- Move the Fire Extinguisher and collect the SMALL KEY.
- Zoom into the Exit Door; use the SMALL KEY on the Lock.
- Turn the Key, then turn the Handle.
- Enter Reception.
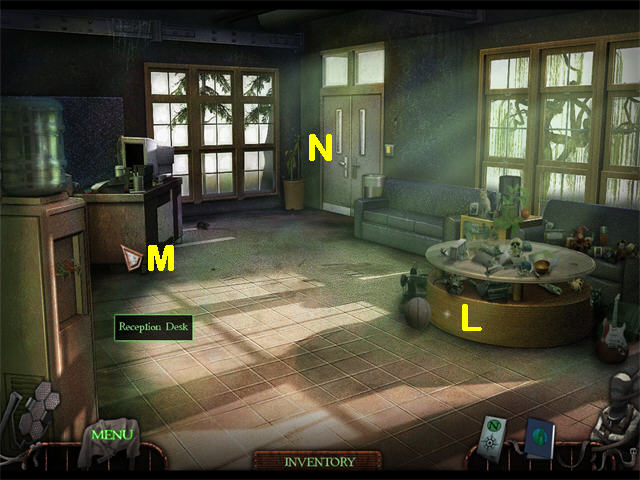
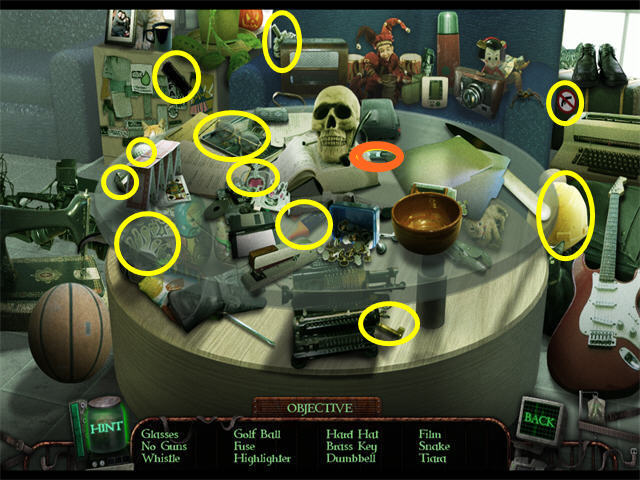
- Zoom into the Table (L) for a HOS.
- Find the listed items. The FUSE will be added to inventory.
- Go to the Reception Desk (M).
- Zoom in twice on the Desk Drawer. You will need something to pry it open.
- Click in the Upper Right to go to Reception.
- Go to the Main Door (N).
- Zoom into the Main Door. It is locked with a Yellow Keypad.
- Go Down twice to the Main Hallway.
- Go Down until you are back in Room 100 and are looking at the Bed.
- Use the SMALL KNOB (from the floor by the Vending Machines in the Nurse Station Lobby) on the Cupboard.
- Click to open the Cupboard.
- Zoom in for a HOS.
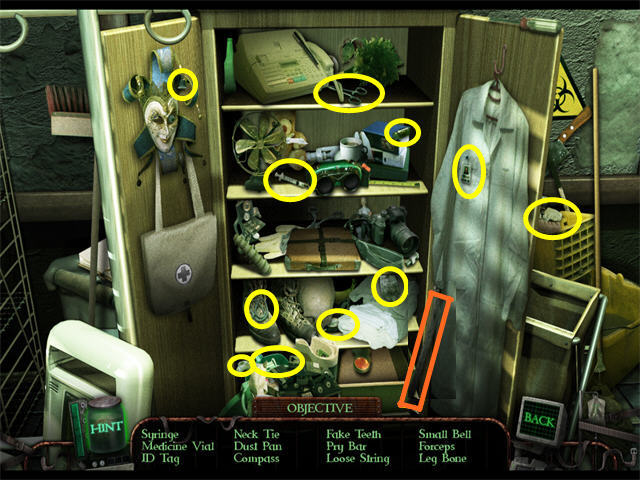
- Find the listed items. The PRY BAR will be added to inventory.
- The Loose String is a green string on the left boot.
- The Small Bell is a gray bell on the right side of the Jester's cap.
- Go Down twice to the Main Hallway.
- Go through the Exit Door.
- Go to the Reception Desk.
- Zoom in twice on the drawers; use the PRY BAR (from the Cupboard in Room 100) to open the drawers.
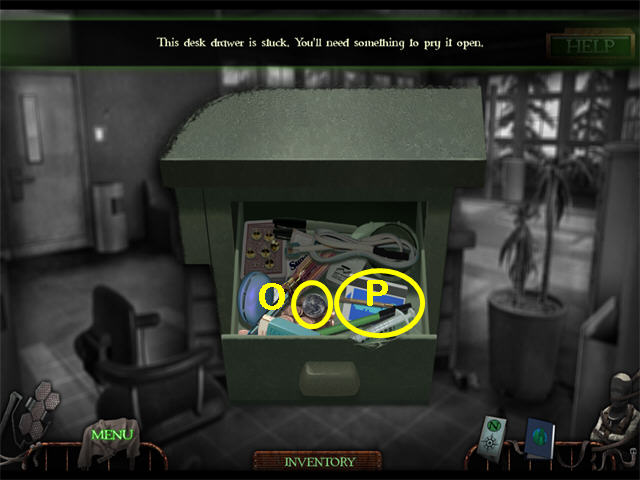
- Collect the QUARTER (O) and the BLUE KEYCARD (P).
- Click Upper Right to Reception.
- Go Down until you are back at the Door that needs the BLUE KEYCARD at the end of the Main Hall.
- Zoom into the Security Panel; use the BLUE KEYCARD (from the drawer in the Reception Desk) to open the Door.
- Go into the Back Hallway. Watch the Cut Scene.
- Collect the PHOTOGRAPH that fell to the floor.
- Go towards the Elevator.
- Go Left to the Commons Area.
- Click Up until you are in the Patient Commons Room.
- Go Right to the Art Corner.
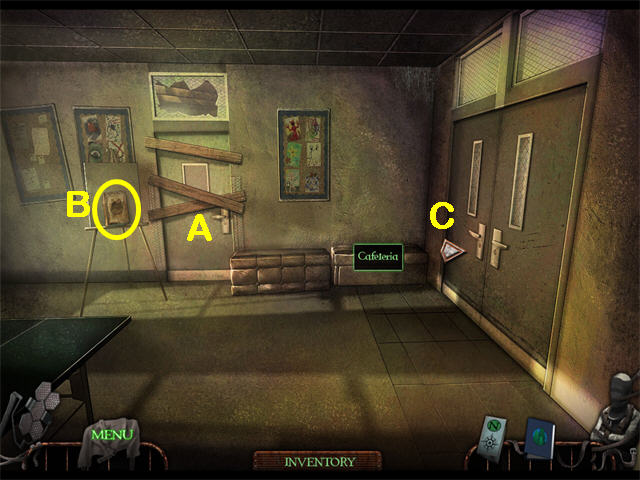
- Examine the Blocked Door (A). You can't get in.
- Collect the AMERICAN REVOLUTION BOOK (B).
- Go Right (C) to the Cafeteria.
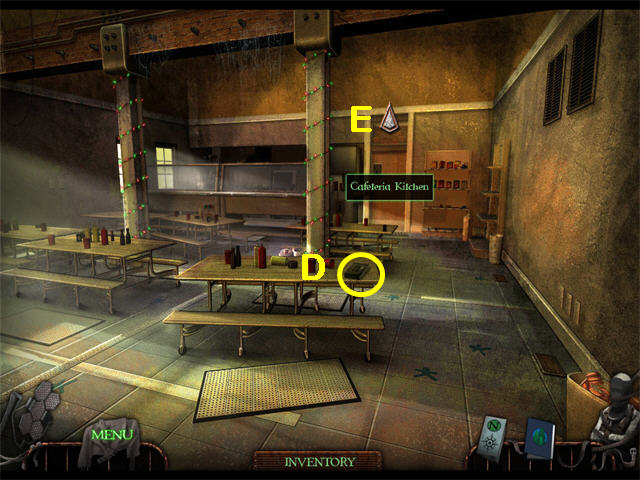
- Collect the FRENCH REVOLUTION BOOK (D).
- Go Up (E) to the Cafeteria Kitchen.
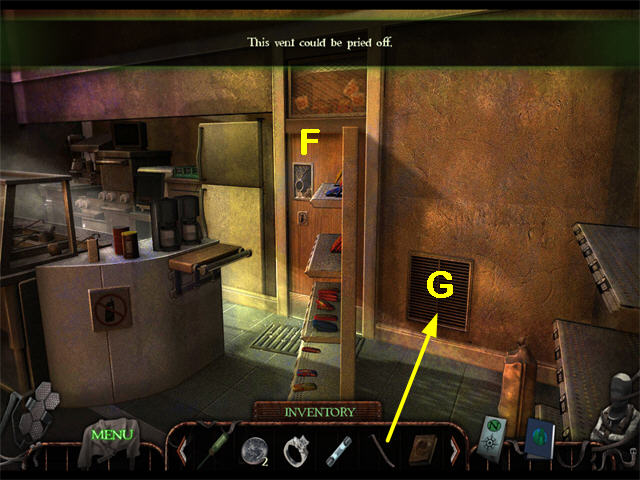
- Zoom into the Door (F). It is blocked.
- Move the Snack Shelf to reveal a Grate (G).
- Use the PRY BAR (from the Cupboard in Room 100) to remove the Grate.
- Go through the Grate into the Supply Room.
- Collect the EMPTY GAS CAN (H).
- Click Up to the Supply Shelves (J). You can look around here, but there's nothing more you can do.
- Click Down until you are back in the Patients Common Room.
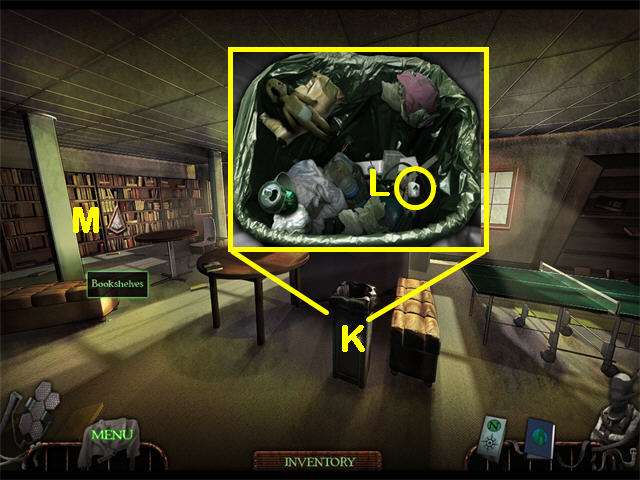
- Search in the Wastebasket (K).
- Collect the CALL BUTTON (L).
- Go to the Bookshelves (M).
- Zoom in. There are several books missing.
- Go Down until you can see the Elevator.
- Go to the First Floor Elevator Lobby.
- Zoom into the Elevator Button.
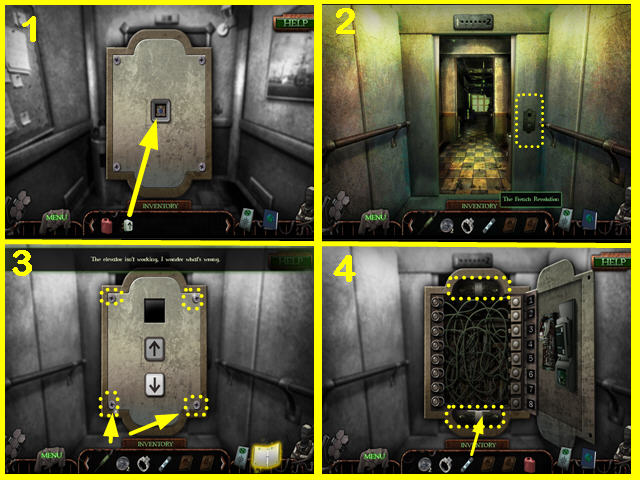
- Put the CALL BUTTON (from the Wastebasket in the Common Room) in the Slot (1).
- Click the CALL BUTTON to open the Elevator Doors.
- Go into the Elevator. You will automatically turn around and face the Lobby you just came from.
- Zoom into the Control Panel (2) and press the Up button.
- The Elevator isn't working.
- Use the SCREWDRIVER on all four screws (3).
- There are two missing FUSES (4). You have one FUSE (from the HOS in Reception). Put it in place. Now you have to find another one.
- Go Up to the First Floor Elevator Lobby.
- Go Down to the Back Hallway. Continue to go Down until you are back in Room 100 facing the Bed.
- Zoom into the Nightstand on the left of the Bed for a HOS.
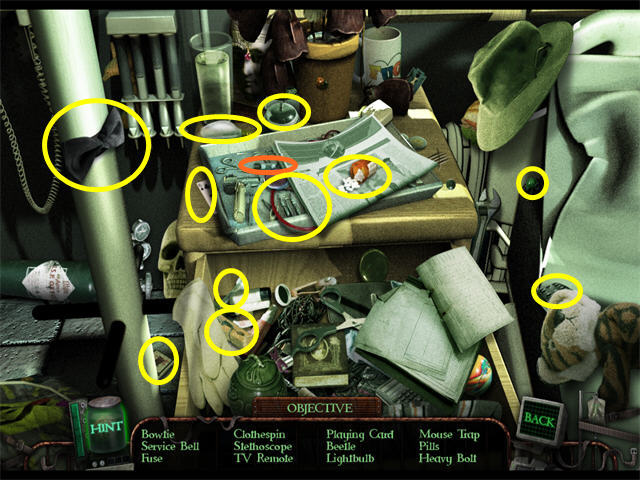
- Find the listed items. The FUSE will be added to inventory.
- Return to the Elevator and enter it.
- Zoom into the Control Panel.
- Put the SECOND FUSE (from the HOS in the Nightstand in Room 100) in the slot to start a mini-game.
- You must find the sequence that will start the Elevator by sliding the levers on the left side of the Control Panel. The sequence is random. If you make a mistake, you have to start again at the beginning with the same sequence.
- Our solution is shown in the screenshot.
- Press the Up Button.
- Go to the Second Floor Elevator Lobby.
- Collect the LADDER.
- Go Down to the Elevator.
- Zoom into the Control Panel; press the Down Button.
- Go to the First Floor Elevator Lobby.
- Go Down to the Back Hallway.
- Return to the Art Corner in the Patients Common Room.
- Use the LADDER (from the Second Floor Elevator Lobby) on the Blocked Door.
- Click on the Back Window to go into the Back Room.
- There is a Door straight ahead. Go through the Door to the Hospital Grounds.
Chapter 3: The Generator and the Purple Keycard
- You are on the Hospital Grounds. There is a Fountain on your right and the Garage up ahead.
- You can see a fire in the Garage. Click Up twice to enter the Garage.
- Examine the Sprinkler Pipes on the ceiling. You need to repair them.
- Click Down twice to return to the Fountain.
- Zoom into the Fountain for a pipes mini-game.
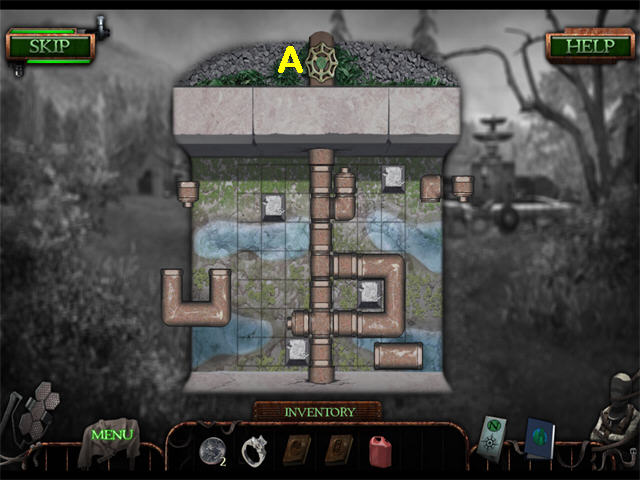
- You do not have to use all the pieces. There are several possible solutions.
- The pieces with tabs on the end are dead-end pieces used to seal off an opening.
- Once you have completed the pipes, turn the Valve (A) to start the water.
- Zoom into the Fountain again for a HOS.

- Collect all the items on the Find List. The RUBBER HOSE will be added to inventory.
- Click Up.
- There is an Axe on the right of the door, but you can't do anything with it yet.
- Enter the Garage. The Sprinklers are working since you fixed the Fountain and they will put out the fire.
- Remember you came out here in the first place because the power is off to the second floor. Zoom into the Generator. Examine the Fuel Gauge (B). It is empty. HELP will tell you that you need fuel and a SPARK PLUG.
- Return to the main scene.
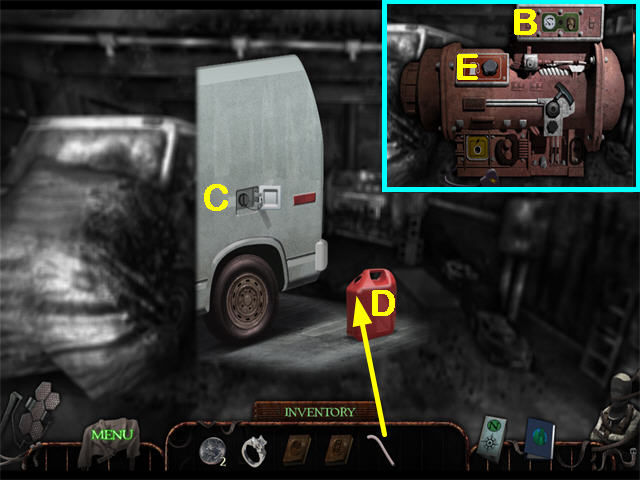
- Zoom into the Van.
- Open the Gas Tank Door (C).
- Put the EMPTY GAS CAN on the ground near the Van.
- Put the RUBBER HOSE into the Empty Gas Can (D).
- You will receive a FULL GAS CAN.
- Zoom into the Generator; remove the Gas Cap (E).
- Put the FULL GAS CAN into the Generator's gas tank.
- You need to find a SPARK PLUG. The Map will show you there is a new HOS in the Supply Room. Go Down four times to the Art Corner.
- Go Right into the Cafeteria.
- Go Up into the Cafeteria Kitchen, then go through the Grate into the Supply Room.
- Once you are in the Supply Room, go Up towards the Shelves.
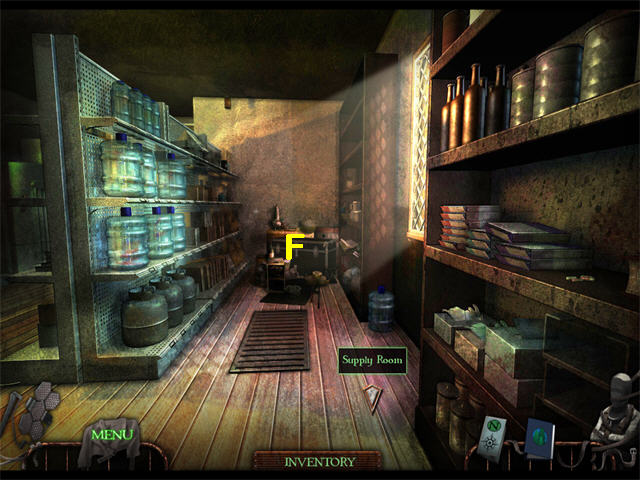
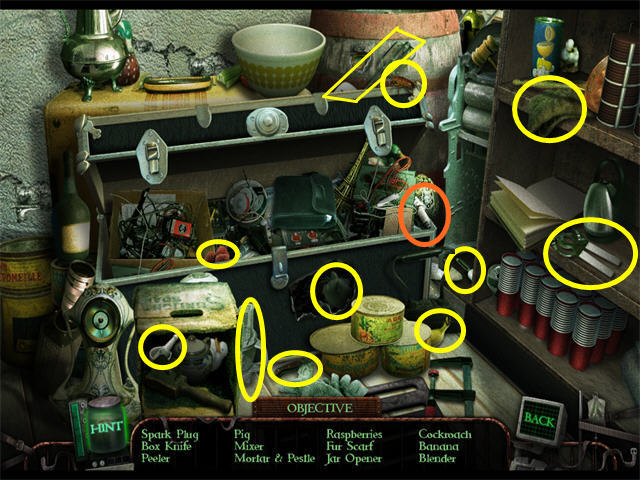
- Zoom into the Table (F) in the back for a HOS.
- Find the listed items. The SPARK PLUG will be added to inventory.
- The 'box knife' is a folding knife.
- Go Down until you are in the Art Corner, then climb through the Window above the Blocked Door to get into the Back Room.
- Go through the Door to the Hospital Grounds.
- Return to the Garage.
- Zoom into the Generator.
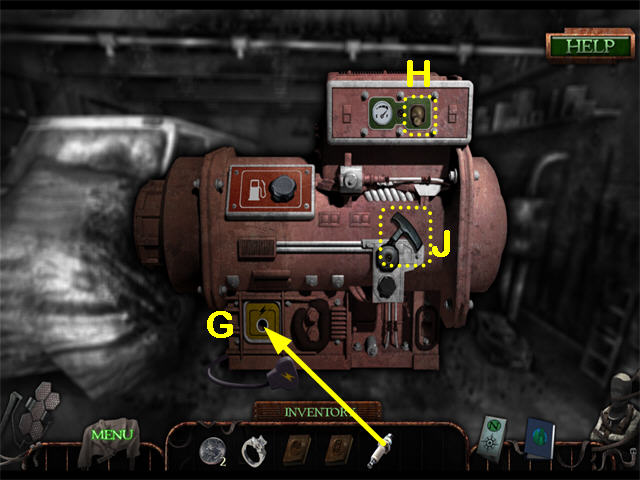
- Put the SPARK PLUG (from the HOS in the Supply Room) into the Socket (G).
- Flip the top Switch (H). A small green light will come on. If it doesn't, you probably haven't put the Gas in yet.
- Once the green light is on, pull the Starter Cord (J). The Generator will start.
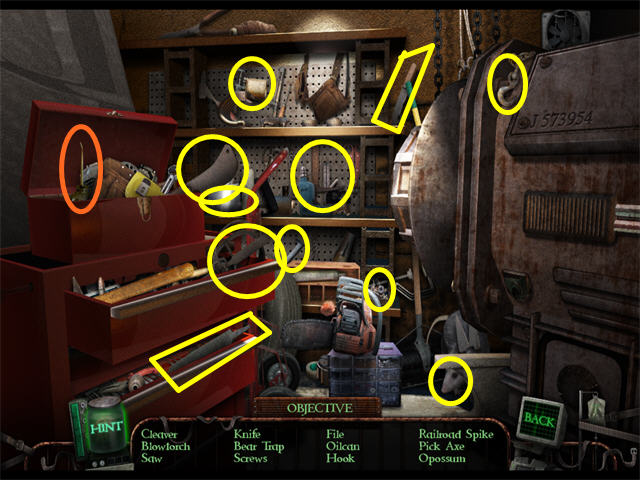
- Zoom into the Tool Chest for a HOS.
- Open the Tool Chest drawers.
- Find the listed items. A Quarter will be added to inventory.
- The Paint Thinner is a white bottle on the second shelf.
- The Compass is silver. It is in the red toolbox.
- The Rope is part of the Block and Tackle hanging from the ceiling on the right.
- The Pliers are red-handled needle nose pliers in the lower drawer.
- Go Down until you can see the Elevator.
- Enter the Elevator and go to the second floor. The lights should be on. If not, you need to go back to the Garage and fix the Generator.
- Go to the Second Floor Elevator Lobby.
- Watch the cut scene.
- The Door ahead needs a Purple Keycard.
- Go Left to the Treatment and Break Rooms.
- Collect the FOURTH AUDIOTAPE from the Table.
- Click on the Journal and listen to the Fourth Audiotape.
- Go Left into the Treatment Room.
- There is a BOOK on the Chair, but it is attached to electric wires and you can't collect it yet.
- Go Down to the Treatment Room Hallway.
- Go Right into the Staff Break Room.

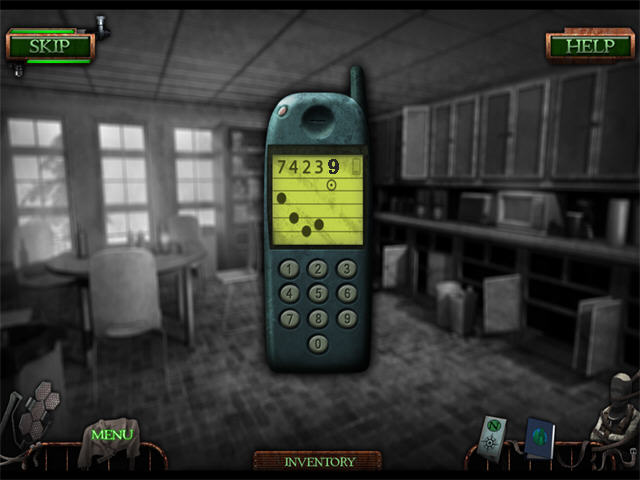
- The Cellphone (A) will start ringing. Pick it up.
- Repeat the sequence that you hear. If you make a mistake, you will have to start over with the same sequence. The solutions are random.
- Our solution is shown in the screenshot. The code will be copied to your journal, but you don't know what it's for yet.
- Examine the Vending Machines (B). The PURPLE KEYCARD is visible, but you need $2.00 (eight quarters). So far you have three QUARTERS: one from the Donation Box in the Nurse Station Lobby, one from the Drawer in the Reception Desk, and one from the HOS in the Garage. You will need to find five more.
- Go Down twice to the Second Floor Elevator Lobby.
- Go Right to the Second Floor Hallway.
- Examine the Poster on the Wall.
- Go Up towards Room 201.
- Zoom into the Security Panel for Room 201. It needs a Code, but the one from the Cellphone doesn't work.
- Look in Room 201. Someone is in there.
- Click Upper Right towards the Bathroom.
- Go into the Bathroom.
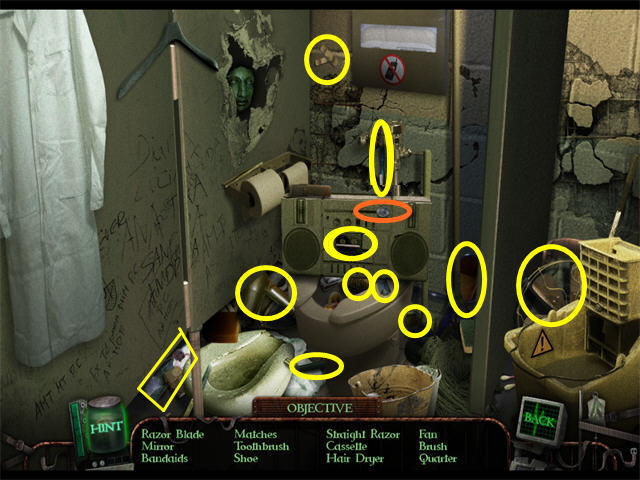
- Zoom into the right Stall for a HOS.
- Find the listed items. A QUARTER will be added to inventory.
- Zoom into the Mirror twice. It is too dirty.
- Return to the Elevator and take it down to the First Floor to look for more quarters.
- Many areas that were not active before will now be available, so search each room thoroughly again.
- There is nothing available in the First Floor Elevator Lobby.
- Click Down.
- Take the next QUARTER out of the Mop Bucket.
- Click Down to the Back Hall.
- Collect the RUBBER GLOVES from the Shelf on the left wall.
- Go Down to the Nurse Station Lobby.
- Click on the Vending Machines and you will receive the next QUARTER.
- Click Up to the Nurse Station.
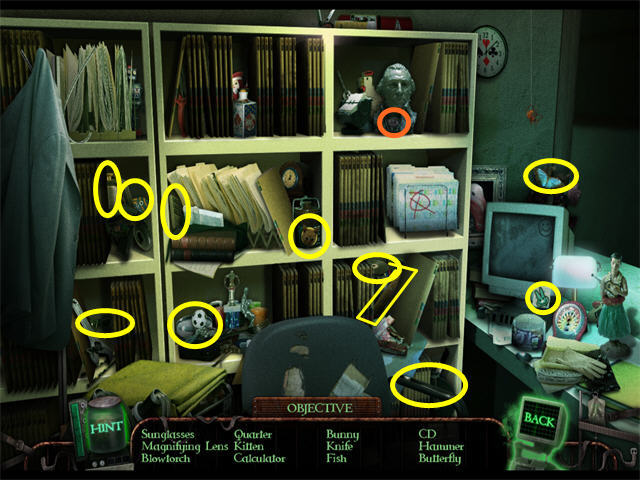
- Zoom into the Bookshelf next to the Jacket for a HOS.
- Find the listed items. A QUARTER will be added to inventory.
- The Knife is a black scalpel.
- Click Upper Right to return to the Nurse Station Vending Machines.
- Go into the Back Hallway, then left into the Patient Commons Room, then right to the Art Corner.
- Enter the Back Room through the broken Window.
- Click on the Black Shoe (C) and the last QUARTER (D) will fall out. Collect it.
- Go Down until you see the Elevator.
- Enter the Elevator and go up to the Second Floor.
- Go Left and continue to the Staff Break Room.
- Zoom into the Vending Machines.
- You should now have eight QUARTERS. They were: in the Donation Box in the Nurse Station Lobby (First Floor), in the Drawer in the Reception Desk (First Floor), in the HOS in the Garage (First Floor, Outside), in the HOS in the Bathroom (Second Floor), in the Mop Bucket in the Back Hallway (First Floor), in the Nurse Station Vending Machines (First Floor), in the HOS in the Nurse Station (First Floor), and in the Black Shoe in the Back Room (First Floor).
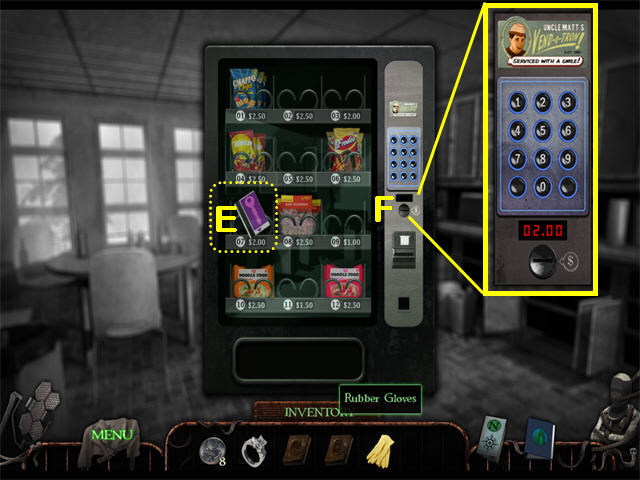
- The PURPLE KEYCARD (E) is in slot 07.
- Zoom into the Coin Slot (F); put all eight QUARTERS into the Coin Slot.
- When the money total = $2.00, enter 07 on the keypad.
- Collect the PURPLE KEYCARD.
- Click Down twice.
- Use the PURPLE KEYCARD on the Security Panel.
- Enter the Doctor's Office.
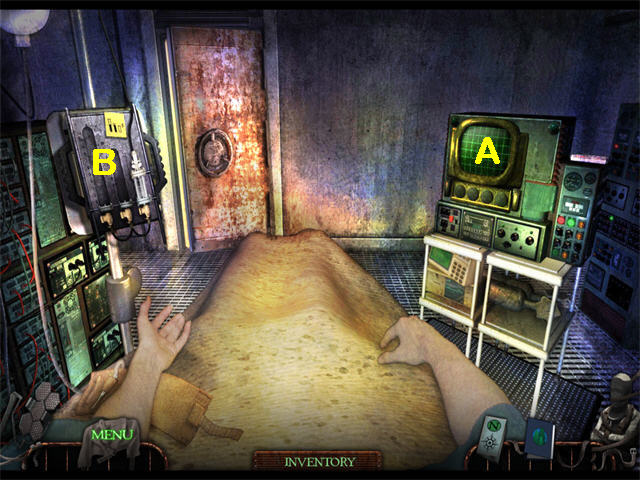
- Go to the Doctor's Desk.
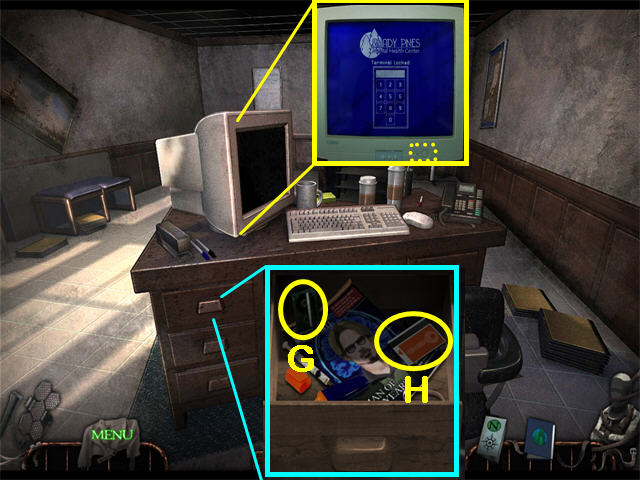
- Zoom into the Computer; turn on the Power. It says 'Terminal Locked'.
- Enter the Code from the Cell Phone in the Staff Break Room. It's in your Journal if you don't remember it.
- You will see an email with the Code to Room 201.
- Open the desk drawer. Collect the AUDIOTAPE (G) and the ORANGE KEYCARD (H).
- Click on your Journal and listen to Audiotape #5.
- Click Up to go to the main view of the Doctor's Office.
- Go Down to the Second Floor Elevator Lobby.
- Go Left and continue to Room 201.
Chapter 4: Room 201 and the Books
- Zoom into the Security Panel outside Room 201; enter the Code (from the Computer in the Doctor's Office).
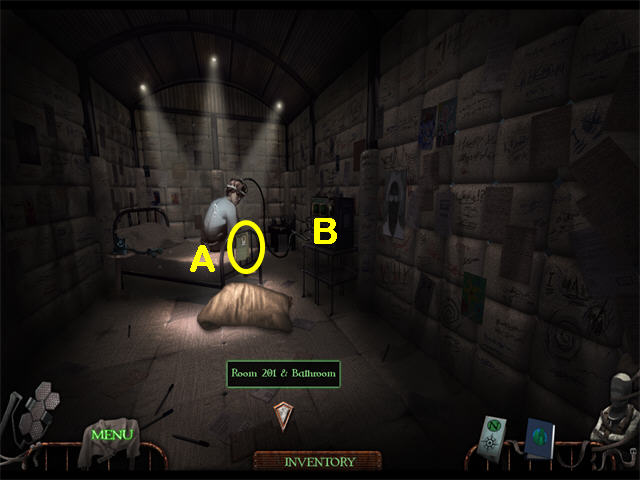
- Go into Room 201.
- Talk to the man.
- Collect his PATIENT FILE (A) and read it.
- Examine the Machine for a mini-game (B).
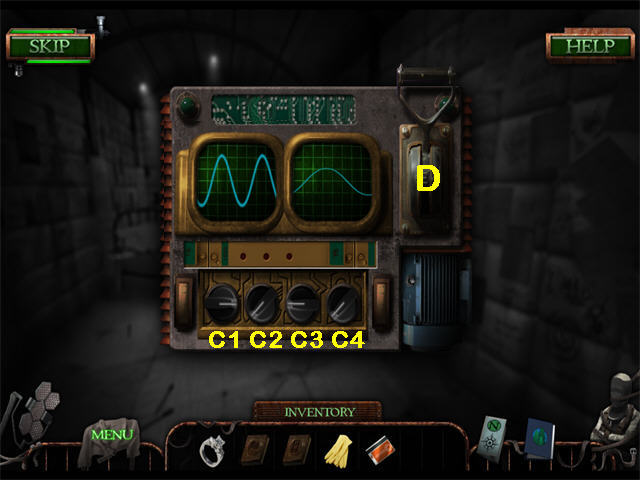
- Play a mini-game which is similar to the one you played in Room 103; except that this time there are two screens.
- See the screenshot for the solution.
- Pull the Lever (D).
- You are now in an attic room. Talk to the man. You need to find out the names of his multiple personalities.
- Zoom in on the Calendar on the back wall and collect the four NAME TAGS.
- Click one more time to see that one of the names is written on each day.
- Talk to the shadow. He says 'I close the show every time. A real pal, I'd say'.
- Go Left.
- Talk to the shadow Cowboy. He says, 'I'm his least favorite, but he still keeps me around, nonetheless'.
- Talk to the shadow Pirate. He says, 'We be off in the right direction, he and I, best of friends. Even though he be changin' course a few times'.
- Go Right twice.
- Talk to the shadow Woman. She says, 'Well, he seems to like me the most, we never miss a date/'
- Go Left.
- Zoom in on the Calendar.
- You now have enough clues to solve the puzzle.
- Jim is the last one written, so he's the one who 'closes the show,' the shadow in the center scene.
- Brandy is the only one who doesn't have a red X cancelling a date, so that must be the woman.
- The least favorite is Jack, so he's the Cowboy.
- That leaves Morgan as the Pirate.
- Go to each Shadow and give them their nametag. Each Shadow will tell you you are right and drop some pieces of a PHOTOGRAPH on the ground.
- Collect all four sets of PHOTOGRAPH PIECES.
- Go Right until you can see the Door.
- Put the PHOTOGRAPH PIECES on the Corkboard for a jigsaw puzzle.
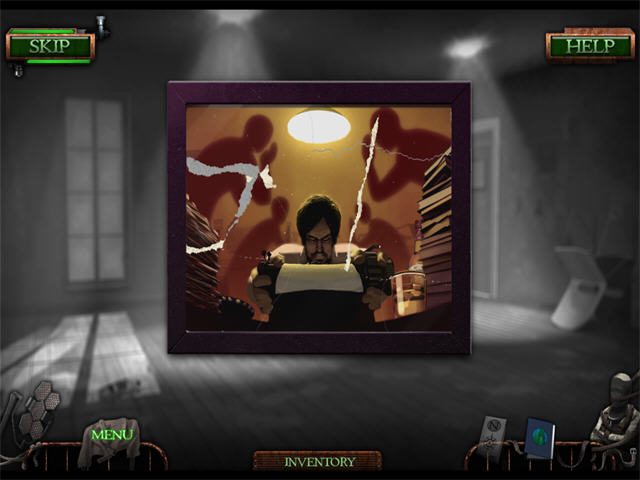
- Complete the puzzle as shown.
- AUDIOTAPE #6 will fall to the ground. Collect it.
- Click on the Journal and listen to Audiotape #6.
- Go through the Door. The writer is an alcoholic.
- You are back in Room 201. The Man tells you to look under the Blanket on the floor.
- Collect the piece of the MAP and the JOURNEY TO AMERICA BOOK.
- Click on the Map Icon. The Basement has been added to the Map. There are also two new Active Areas to check.
- Go Down three times to the Second Floor Elevator Lobby.
- Go to the Treatment Room.
- Use the RUBBER GLOVES (from the Back Hallway) to remove the BATTLE OF NORMANDY BOOK.
- Take the Elevator to the First Floor and go to Room 102 in the Main Hallway.
- Zoom in on the Security Panel; use the ORANGE KEYCARD (from the drawer in the Doctor's Desk).
- Go into Room 102.
- Collect the TALE OF CAESAR BOOK (A).
- Zoom into the Computer (B); turn on the Power (C).
- Read the email.
- Go to the Patient Commons Room through the Back Hallway.
- Go the Bookshelf.
- Zoom in.
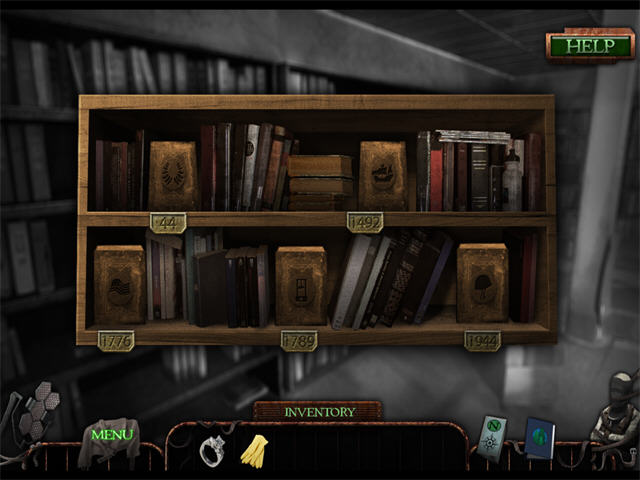
- You should now have 5 books. Match them to the appropriate year. 44: AGE OF CAESAR (Room 102), 1492: DISCOVERY OF AMERICA (Room 201), 1776: AMERICAN REVOLUTION (Art Corner, First Floor), 1789: FRENCH REVOLUTION (Cafeteria, First Floor), 1944: BATTLE OF NORMANDY (Treatment Room, Second Floor).
- The Bookshelf will move, revealing the Freight Elevator to the Basement.
Chapter 5: Room B-2 and the Machine Room
- Go into the Freight Elevator. You will automatically turn around so you are facing towards the Bookshelves.
- Pull the Lever on the right to go down to the Basement.
- Go into the Basement Hall.
- Collect the red CLEANING RAG from the Crate on the right.
- Go forward once.
- Go into the Burned Room. Examine it.
- Return to the Basement Hall.
- Go Up twice.
- Watch the cut scene.
- Zoom into the Machine Room Door. It needs a Handle.
- Click Upper Right to the Basement Office Door.
- Zoom into the Security Panel; it needs a Code.
- Zoom into the Basement Office Door twice; it is electrified.
- Check the Map. There is a new Active Area in the Second Floor Bathroom. It's time to use the CLEANING RAG.
- Click Down five times until you are in the Freight Elevator.
- Pull the Handle on the right to go back up to the Patient Commons Room.
- Return to the Second Floor Bathroom.
- Zoom into the Mirror; use the CLEANING RAG (from the Basement Hall).
- There is an Arrow written on the Mirror. It points to a crack in the glass.
- Remove the left piece of glass to reveal a KEY (A). Collect it.
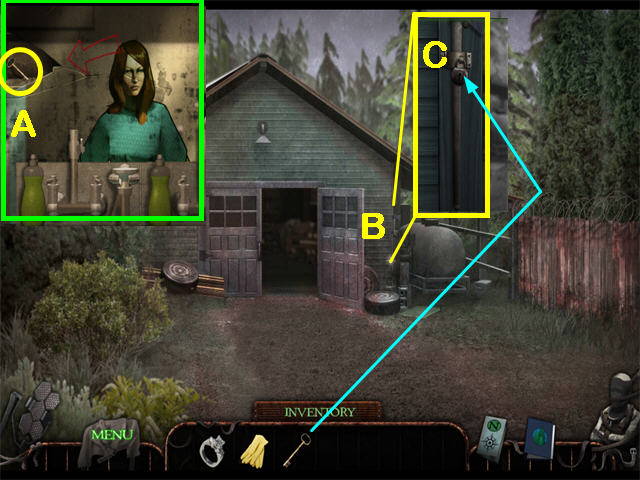
- Go to the Garage.
- Zoom into the AXE (B); use the KEY on the Padlock (C).
- Collect the AXE.
- Return to the Basement Hall.
- Go Up to Room B-2.
- Zoom into Room B-2; use the AXE (from the Garage) on the boarded-up Door.
- Use the AXE (from the Garage) several times on the Door until it is clear.
- Go into Room B-2.
- Collect the PATIENT FILE (A). This is Gloria, an employee at Shady Pines.
- Collect AUDIOTAPE #8 (B).
- Click on the Journal and listen to Audiotape #8. The doctor caused Gloria's accident so he could experiment on her.
- Zoom into the Machine (C). This will start a mini-game like the one in Room 103, except this one has three screens.
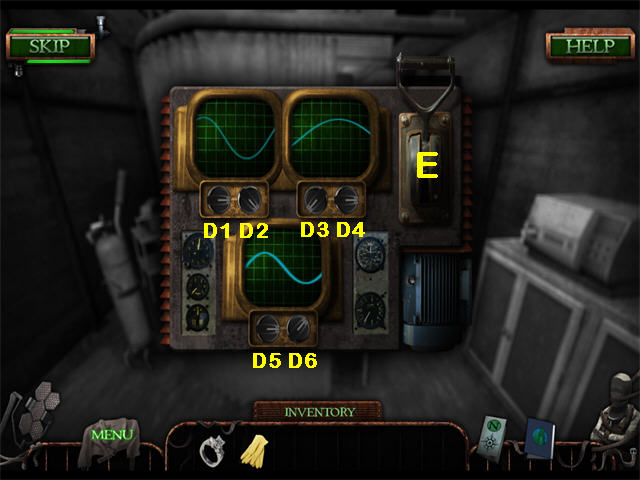
- Solution: D1 (2 clicks), D2 (3 clicks), D3 (5 clicks), D4 (1 click), D5 (2 clicks), D6 (1 click).
- Pull the Lever (E).
- You are in the burning room. Gloria will tell you a secret.
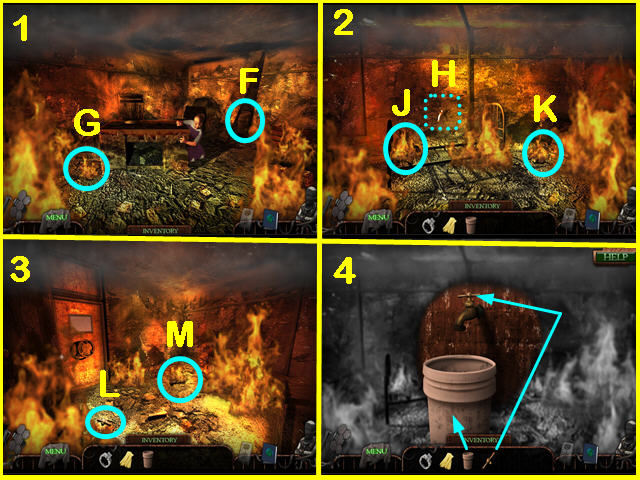
- Collect the BUCKET (F).
- Examine the Small Fire (G). You need water.
- Go Left.
- Examine the Faucet (H). It needs a HANDLE.
- Examine the BURNING PHOTOS (J and K).
- Go Left.
- Collect the HANDLE (L).
- Examine the Small Fire (M).
- Go Right.
- Zoom into the Faucet on the back wall.
- Put the HANDLE (from the far left scene) on top of the Faucet.
- Put the BUCKET (from the far right scene) on the ground below the Faucet.
- Click on the Handle to start the water.
- Collect the BUCKET WITH WATER.
- Use the BUCKET WITH WATER to put out the four Small Fires (G, J, K, and M) and collect the BURNED PHOTOS.
- Go Left as far as you can.
- Zoom in on the Door for a jigsaw puzzle mini-game.
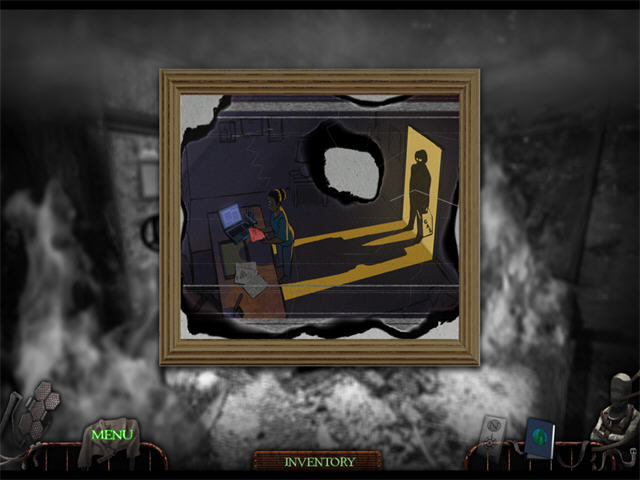
- Put all the BURNED PHOTOS on the Corkboard and assemble the photo as shown.
- AUDIOTAPE #7 will fall onto the floor. Collect it.
- Click on your Journal and listen to Audiotape #7.
- Go through the Door and you will be back in Room B-2.
- Collect the METAL MACHINE NUT from the floor by the Machine.
- Click Down twice.
- Enter the Burned Room.
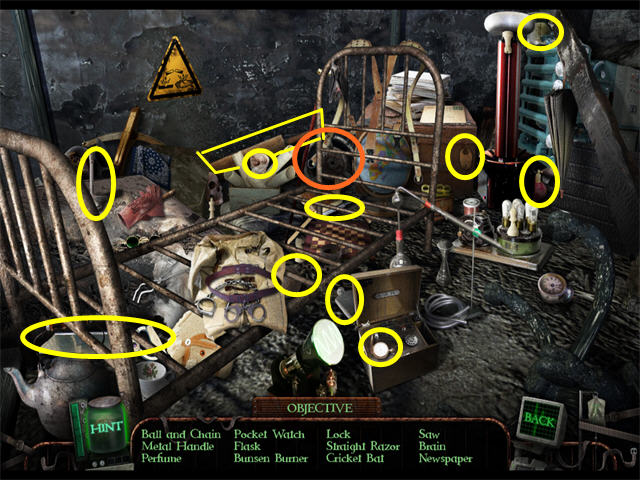
- Zoom into the far wall for a HOS.
- Find the listed items. A large round METAL HANDLE will be added to inventory.
- Go Down to the Basement Hallway.
- Go Up twice.
- Zoom into the Machine Room Door.

- Put the METAL HANDLE (from the HOS in the Burned Room) on the Door.
- Put the MACHINE NUT (from Room B2) into the center of the Metal Handle.
- Click the Handle. It is too rusty.
- Go to the Garage to look for OIL.
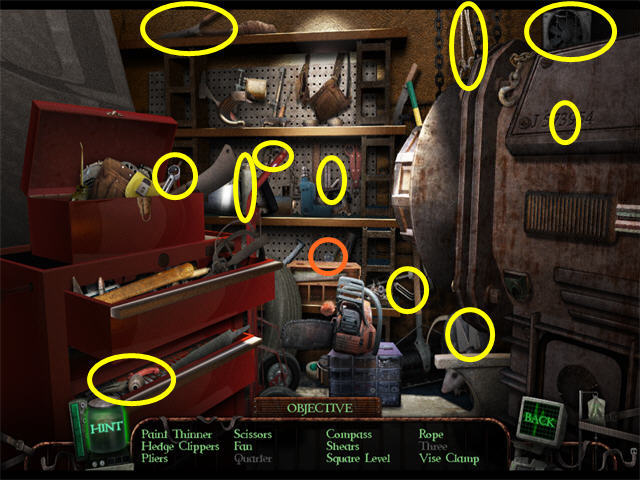
- Zoom Into the Toolbox for a HOS.
- Find the listed items. An OIL CAN will be added to inventory.
- The Saw is behind the Cleaver.
- The Pickaxe has a short handle. It is on the second shelf.
- Return to the Machine Room in the Basement.
- Zoom into the Door; use the OIL CAN (from the HOS in the Garage).
- Click the Handle.
- Enter the Machine Room.
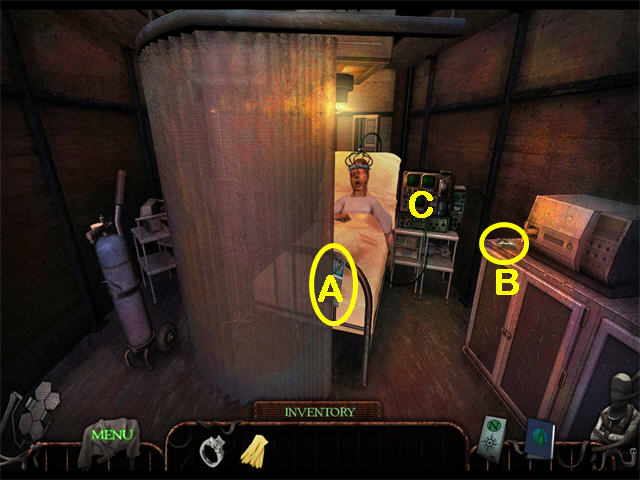
- Go Up to the Bed.
- You decide to use the Machine on yourself. Examine the Machine (A). You need sedative.
- Examine the Sedative Dispenser (B). You need VIALS.
- Go Up to the main view of the Machine Room.
- Go Down twice to Room B-2.
- Enter Room B-2.
- Zoom into the Machine; collect the Vial.
- Go to the Basement Hall.
- Go Down until you are outside the Burned Room.
- Zoom in on the Wastebasket on the right.
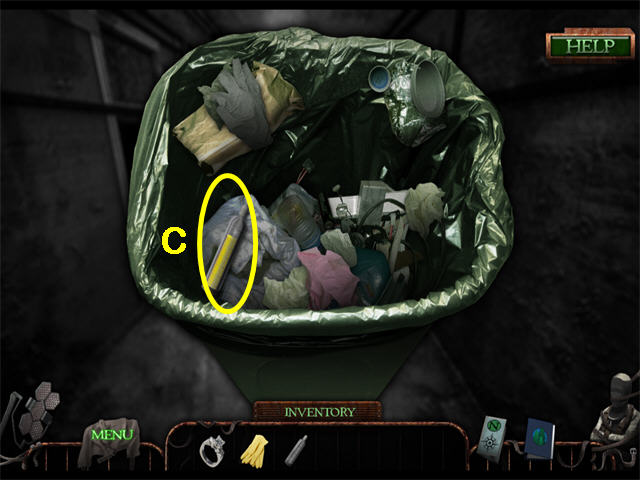
- Move the items until you can see the VIAL (C). Collect it.
- Return to the Machine Room.
- Go Up to the Bed.
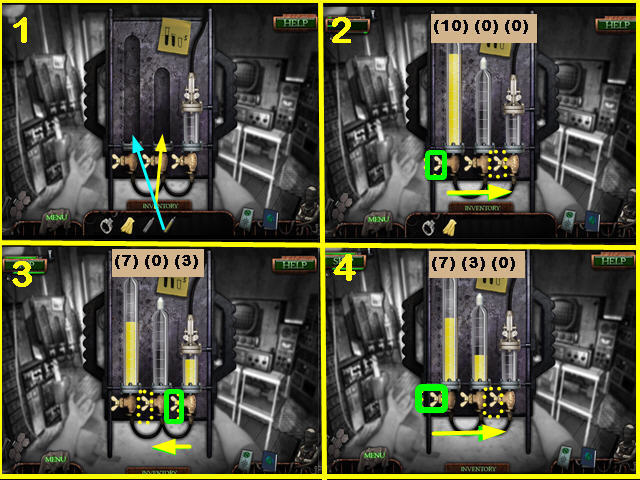
- Zoom into the Sedative Dispenser; put the two VIALS in place. (One was in the Machine in B-2; the other was in the Wastebasket outside the Burned Room).
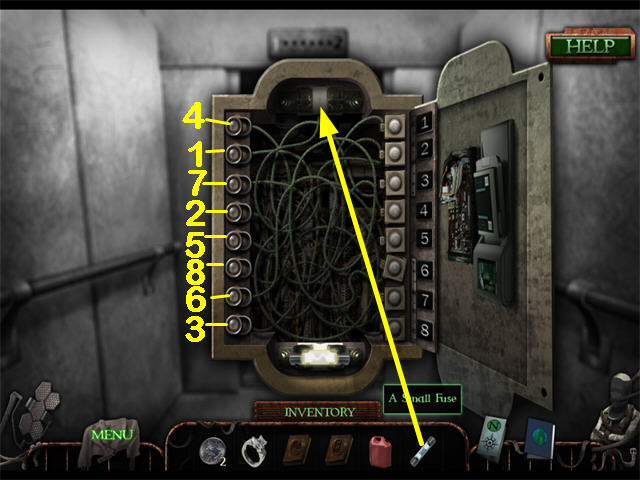
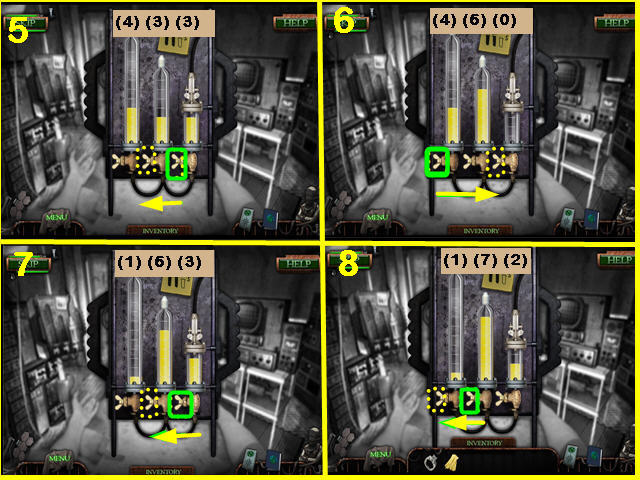
- Now you need to put 5 units into the left Vial and the Center Vial.
- To move liquid from one vial to another, turn the handle on the switch for the Vial you want to take fluid from. Then turn the handle on the switch for the Vial you want to send fluid to. The switch you should turn first is green in the screenshots.
- The screenshots show one possible solution.
- Once you get the setup Left (8) Center (0) Right (2) or Left (8) Center (2) Right (0) it's easy to solve.
- The screenshot shows one complete solution, but there are many possibilities.
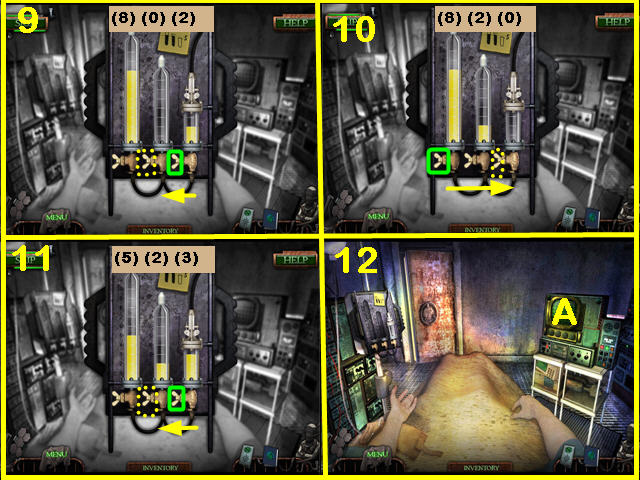
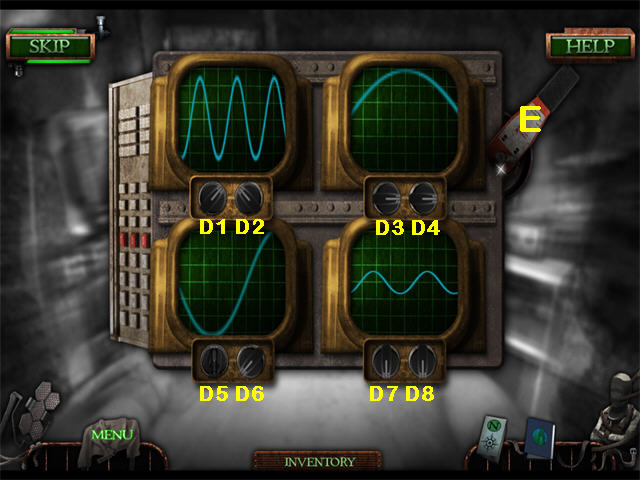
- Zoom into the Machine (A) for a mini-game. This time there are four screens.
- Solution: D1 (1 clicks), D2 (7 clicks), D3 (2 clicks), D4 (1 click), D5 (0 clicks), D6 (5 clicks), D7 (4 clicks), D8 (2 clicks).
- Pull the Lever (E).
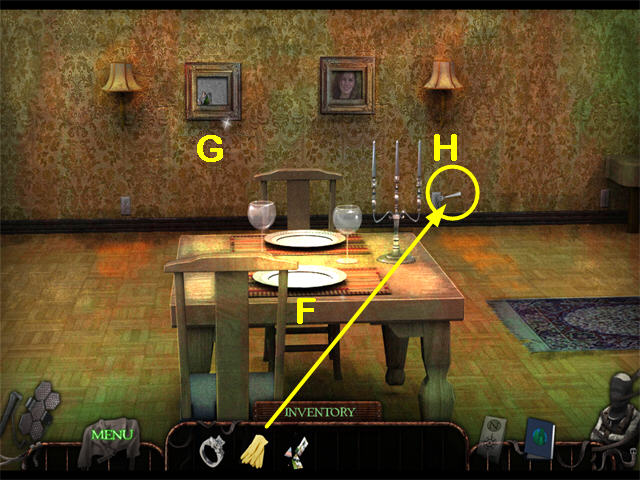
- Zoom into the Table (F) twice. You need to collect tableware.
- Use the RUBBER GLOVES to collect the OYSTER FORK (G).
- Zoom into the Frame (H); collect the PHOTO PIECES.
- Go Left.
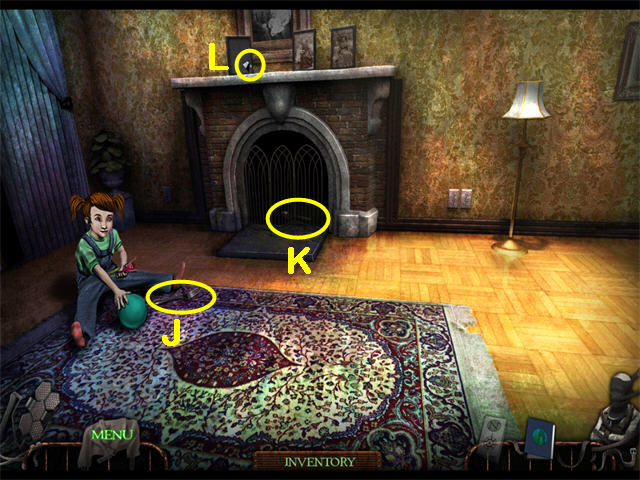
- Talk to Stephanie.
- Collect the DINNER FORK (J).
- Open the Fireplace Grate and collect the DINNER SPOON (K).
- Zoom into the Frame (L); collect the PHOTO PIECES.
- Go Right twice.
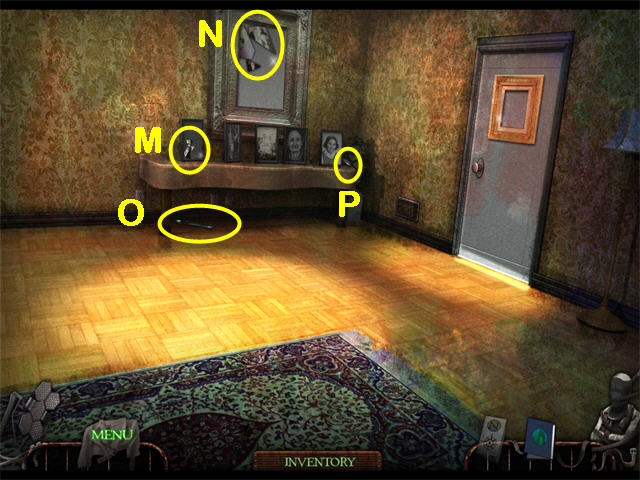
- Collect two sets of PHOTO PIECES (M and N).
- Collect the SALAD FORK (P).
- Collect the KNIFE (O).
- Go right.
- Zoom into the Table.
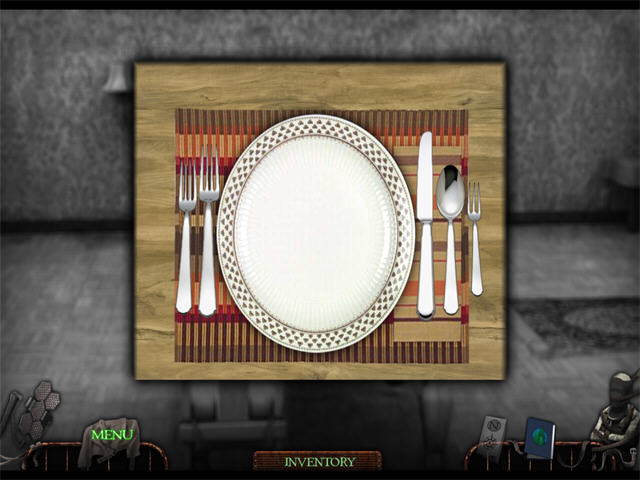
- Place the tableware exactly as shown in the screenshot. From left to right: SALAD FORK, DINNER FORK, PLATE, KNIFE, DINNER SPOON, OYSTER FORK.
- Collect the last set of PHOTO PIECES.
- Read the number written on the card.
- Go Right.
- Zoom in on the Door for a jigsaw puzzle mini-game.
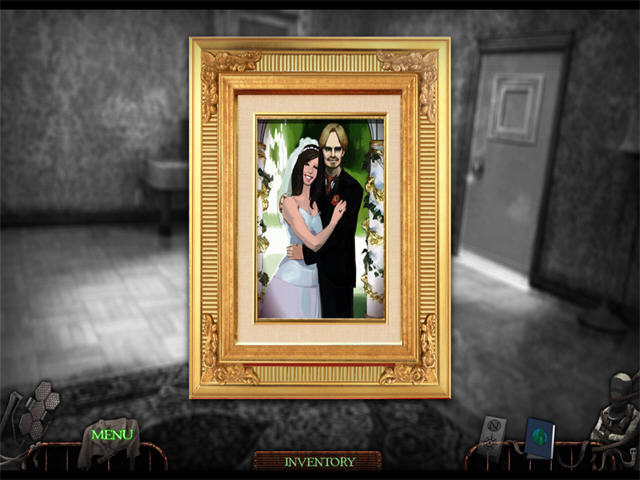
- Put all the PHOTO PIECES on the Corkboard and assemble the photo as shown.
- AUDIOTAPE #1 will fall onto the floor. Collect it.
- Click on your Journal and listen to Audiotape #1.
- Go through the Door and you will be back in bed. Click on your arm several times to remove the IV.
- Click Up to turn and look at the Bed.
- Click Down to go to the Basement Hall.
- Click Upper right and go to the Basement Office Door.
Chapter 6: The Basement Office and the Car
- Zoom into the Security Panel; enter the date (0317) from the Table in the Machine Room dream.
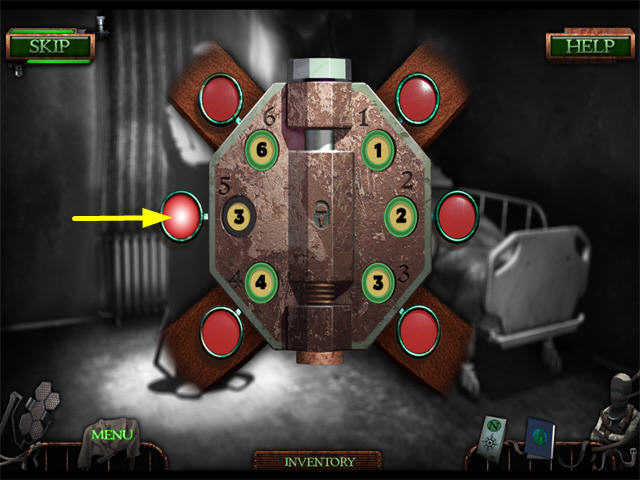
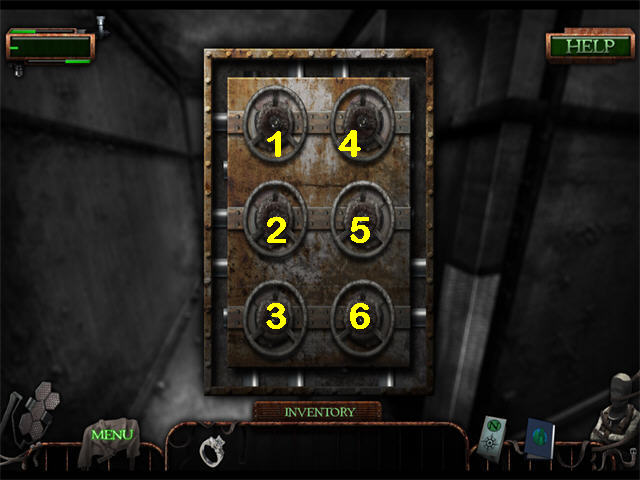
- Zoom into the Basement Office Door.
- You must clear all the bars along the edges by moving the Dials. There are many possible solutions:
- Solution: 1, 4, 2, 5, 3, 6, 1, 5
- Go into the Basement Office.
- Talk to the Doctor.
- Examine Stephanie.
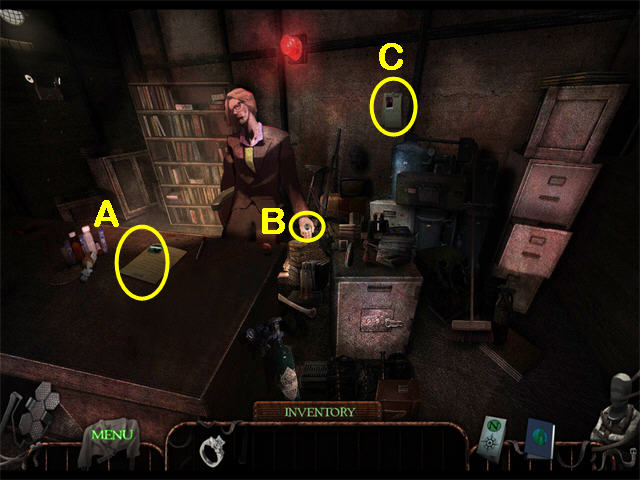
- Zoom into the Doctor's Desk.
- Examine the Doctor. He is nonresponsive.
- Collect the NOTE (A).
- Collect AUDIOTAPE #9.
- Click on your Journal. Audiotape #9 is the same as the Note from the Desk.
- Examine the Photograph with the Note.
- The Alarm will go off.
- Collect the MAN'S WEDDING RING (B).
- Read the PATIENT FILE (C).
- Zoom into the Safe.
- Put the two WEDDING RINGS on the Safe Door.
- Pull the Safe Handle to open it.
- Zoom into the open Safe for a HOS.
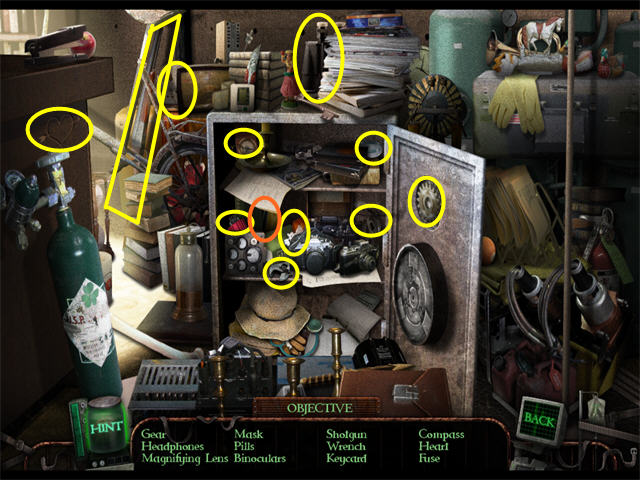
- Find the listed items. The YELLOW KEYCARD will be added to inventory.
- The Fuse is a red detonator on the second shelf.
- Go Down to the main view of the Basement Office.
- Pick up Stephanie.
- Go Down until you are in the Freight Elevator.
- Go to the First Floor Main Hallway.
- Go Down until you are at the Exit Sign.
- Go into Reception.
- Go to the Main Door.
- Zoom into the Security Panel; use the YELLOW KEYCARD (from the Basement Office Safe HOS).
- Go through the Main Door into the Parking Lot. Go Up to the Car.
- Click on the Car Door and it will open.
- Click on the Car several times to put Stephanie inside and zoom in.
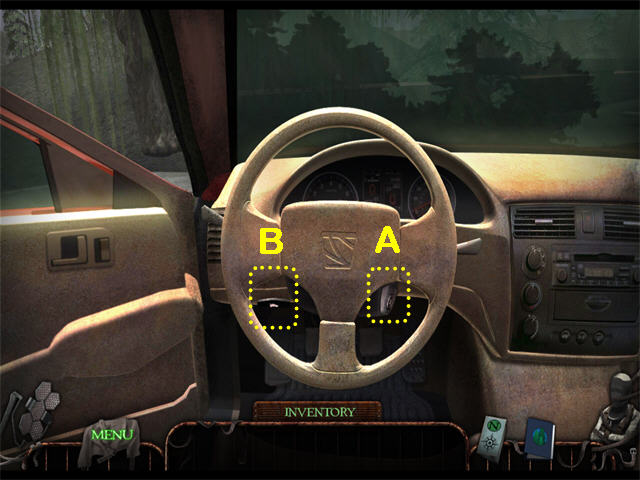
- Examine the Ignition (A). You need to find the CAR KEYS.
- Zoom in twice on the Trunk Release (B); pull the Release Handle.
- Go Left to get out of the Car.
- Go to the Car Trunk. It should be open. If not, get back into the Car and try the Trunk Release again.
- Zoom into the Car Trunk for a HOS.
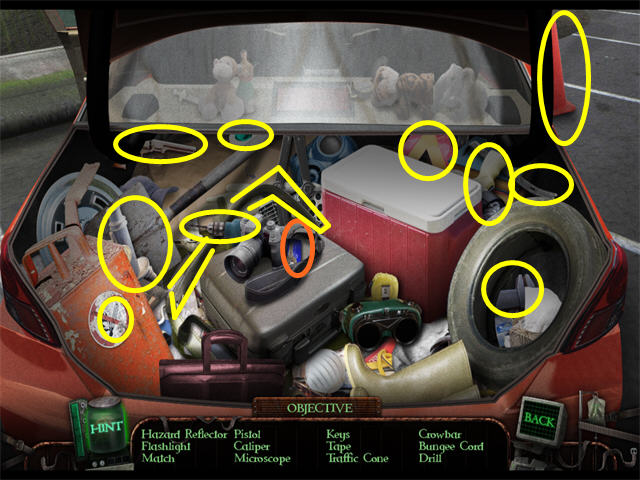
- Find the listed items. The KEYS will be added to inventory.
- Go back into the Car.
- Zoom into the Ignition twice; use the KEYS (from the Car Trunk).
- Click on the Keys to start the Car.
- Watch the ending scene. Congratulations! You have completed Committed: Mystery at Shady Pines!
Created at: 2011-10-22