

Walkthrough Menu
- General Tips
- Chapter 1: The Magic Pearl
- Chapter 2: The Soul Key
- Chapter 3: The House of Mirrors
- Chapter 4: The Joker Statue
- Chapter 5: The Six Mirrors
- Chapter 6: The Island
General Tips
- This is a Hidden Object Puzzle Adventure game. Throughout the guide, we will use the acronym 'HOS' for Hidden Object Scene.
- There is no timer.
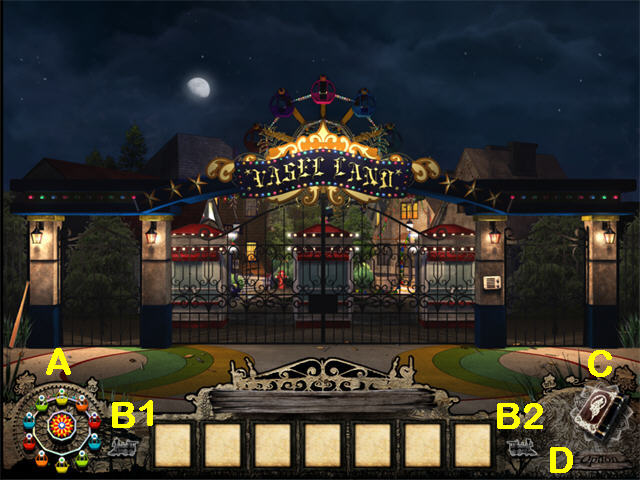
- The Ferris Wheel (A) is the Hint Button. When all the cars are lit, it has recharged. Click in the center of the Ferris Wheel to use a Hint.
- There are unlimited Hints, just wait for the HINT Button the recharge.
- The HINT button only works in the Hidden Object Scenes.
- Move the cursor down towards the Inventory Tray until it turns into a down arrow, then click to exit a mini-game or a scene.
- Your Inventory Items are stored in your Inventory Tray. You can scroll these by clicking on the Train Engines (B) on the left and right of the Tray.
- The Map is in the Journal (C). To change the pages, click on the tabs on the left side of the Map. Different pages will be available as you play through the game.
- Use the OPTION button (D) to return to the Main Menu.
- When you are in a Hidden Object Scene, position the cursor so that the tip of the black dart is on the object you want to collect, then click.
- Should you want to reset a mini-game, use the BACK button. When you return, it will usually have reset.
- Many activities are triggered by visiting other locations first. If you use our walkthrough and can't find an HOS or other activity, read through from the beginning of the chapter to make sure you've done all the required steps.
Chapter 1: The Magic Pearl

- Use the BASEBALL BAT (A) to break the Gate Control Panel (B).
- Zoom into the Gate Control Panel and connect the wires as shown.
- Go through the open Gate (C) to the Main Street Plaza.
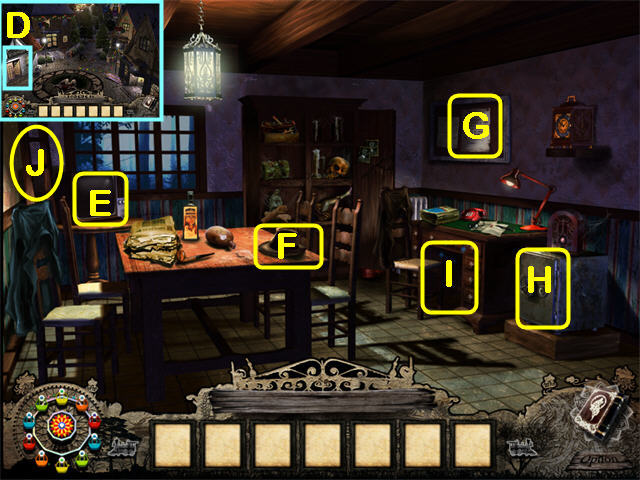
- Enter the Security Room (D).
- Try the Television (E).
- Click on the Hat (F) to reveal the Bookshelf.
- Read the Note (G). You need to find the CRYSTAL BALL and put it back in the Fortuneteller's Machine.
- Try the Safe (H). It's locked.
- Zoom in under the Desk (I) for an HOS.
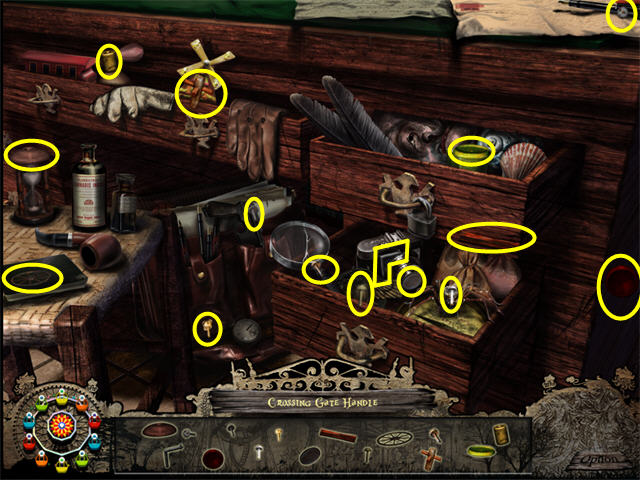
- Collect the CROSSING GATE HANDLE.
- Collect the LADDER (J).
- Go Down to the Main Street Plaza.

- Enter the Main Street Train Station (K).
- Examine the Missing Child Poster (L).
- Go Down to the Main Street Plaza.
- You can enter the Gift Shop on the right and examine several objects, but there's nothing else to do there yet.
- Go up the road (M) towards the Fountain.
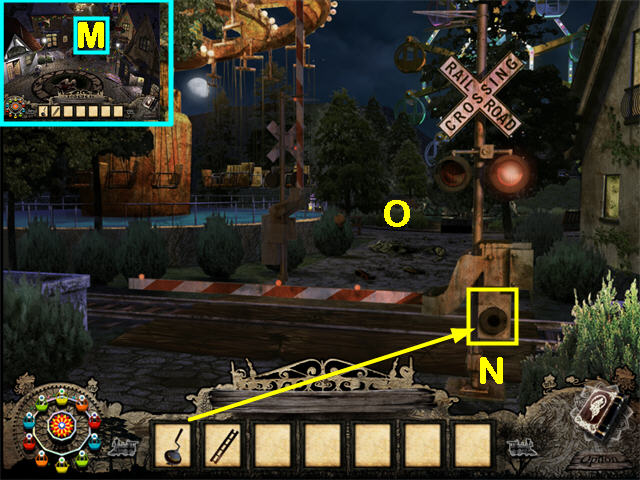
- There is a railroad track. The Crossing Gate is blocking your way.
- Zoom into the empty holder (N); put the CROSSING GATE HANDLE (from the HOS in the Security Room) into the holder. The Crossing Gate will open.
- Continue forward (O) to the Fountain.
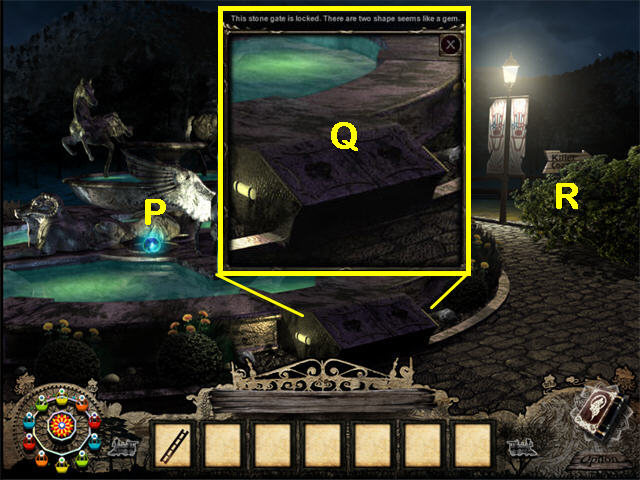
- You can see the MAGIC PEARL (P), but you can't collect it yet.
- Zoom into the Lock (Q). You will need two GEMS to open it.
- There is a path (R) to the Killer Coaster, but it's blocked by a Bush.
- Check the Map. An HOS is available outside the Security Room, so return there.
- Zoom into the Trash Can in front of the Security Room for an HOS.
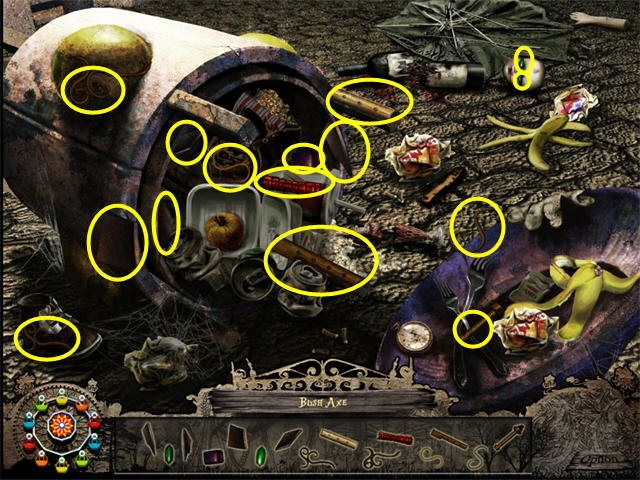
- Collect the BUSH AXE.
- Return to the Fountain.
- Use the BUSH AXE on the Bush to open the pathway.
- Go Right to the entrance to the Killer Coaster.
- Zoom into the top of the Coaster behind the fence and you will see your sister hanging from the frame.
- There is nothing else you can do here now. You need TOKENS for the mini-game in the booth.
- Go Left to the Fortune Teller.
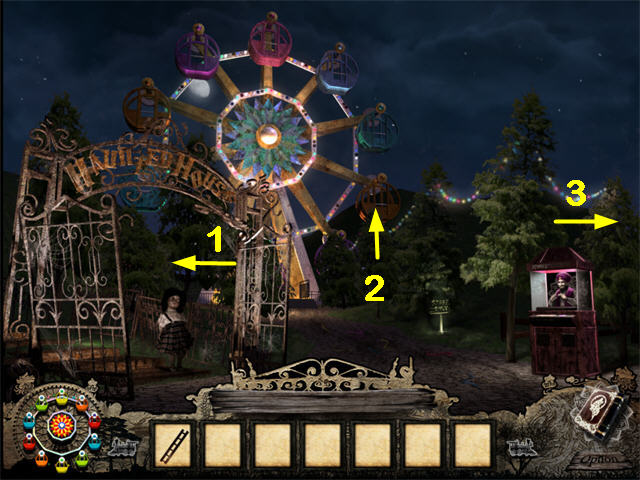
- Now you have three choices. You can go right (1) to try to get into the Killer Coaster from the side, you can go forward (2) to the Ferris Wheel, or you can go left (3) into the Haunted House.
- Go Right (1) to the back fence of the Killer Coaster.
- You can still see your sister, but you need something to remove the Nails from the Fence before you can get through.
- Go Down to return to the Fortune Teller.
- Go Left to the Haunted House.
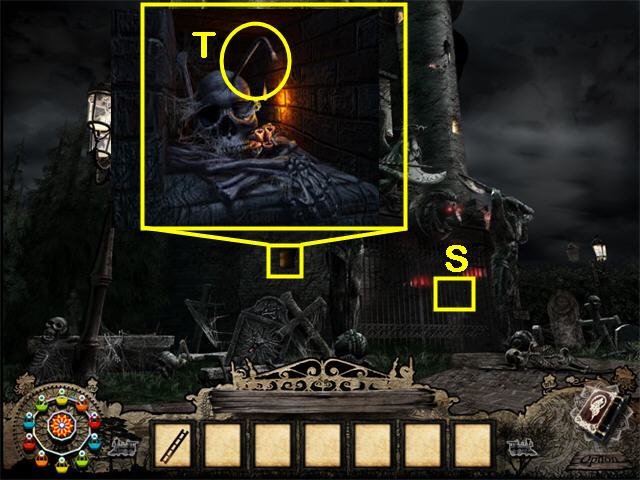
- Zoom into the Gate (S). You need more light.
- Zoom into the small window on the left; take the CROWBAR (T) from the Skull.
- Go Down to the Fortune Teller.
- Go Up to the Ferris Wheel.
- Zoom into the Booth for an HOS.
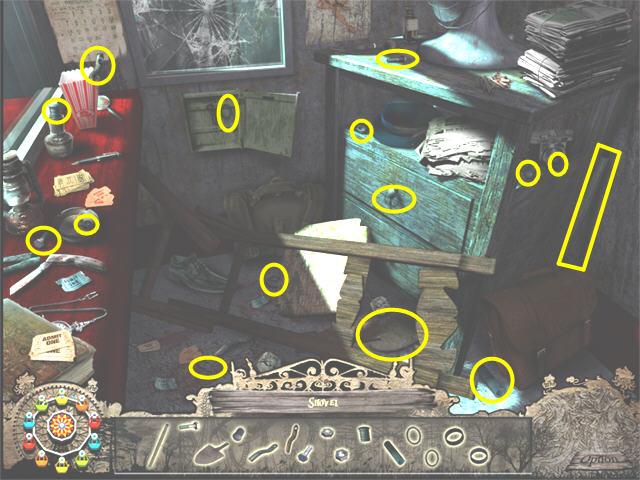
- Collect the pieces of the SHOVEL.
- Go Down to the Fortune Teller.
- Go Right to the back of the Killer Coaster.
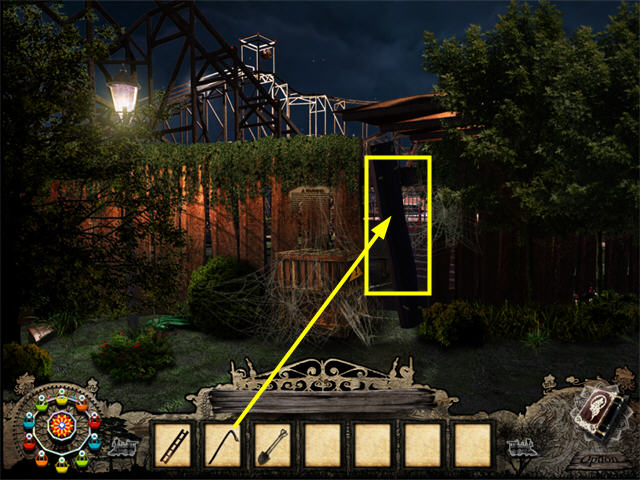
- Use the CROWBAR (from the Haunted House) to loosen the Boards on the Fence as shown.
- Go through the gap in the Fence.
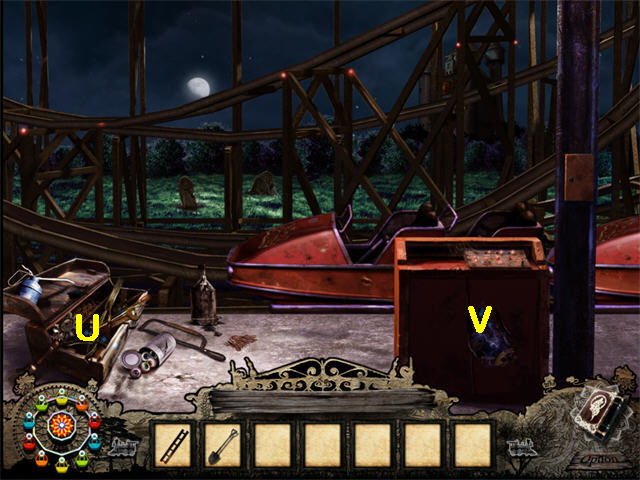
- You are now at the Control Panel for the Killer Coaster.
- Zoom into the Toolkit (U) to complete a Hidden Object Scene.
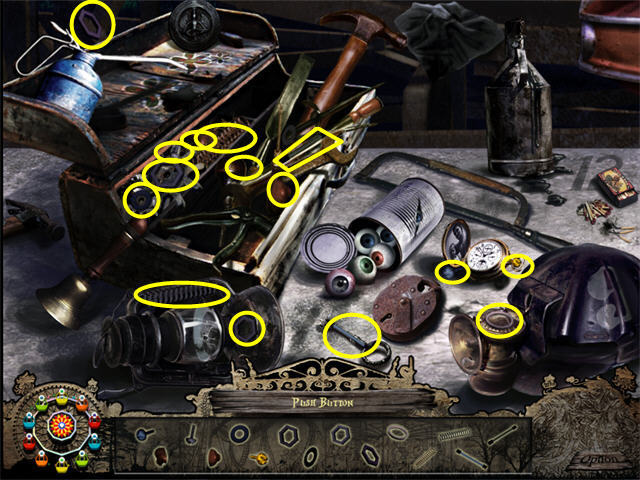
- Collect the PUSH BUTTON.
- Zoom into the Control Box (V) to complete the Gears mini-game.
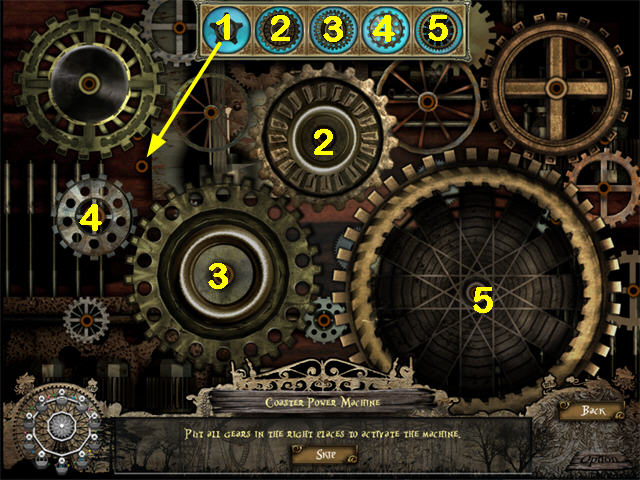
- There are 5 empty red pegs. You must put one of the Gears from the top on each peg.
- Click on a Gear's picture in the top row to move the Gear after you put it on a peg, or to put it back in the top row.
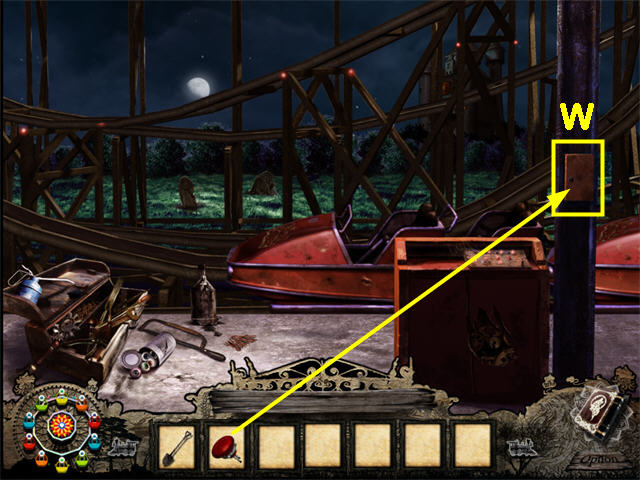
- Click the PUSH BUTTON from the Hidden Object Scene in the Toolkit twice on the Post (W).
- Watch the cut scene. The Fairy asks you to find the SOUL KEY to free her.
- Return to the Fortune Teller.
- Zoom in to find out it needs the MAGIC PEARL.
- Go to the Fountain; collect the MAGIC PEARL.
- Return to the Fortune Teller.
- Zoom into the Fortune Teller; put the MAGIC PEARL in the Fortune Teller's hands.
- The Fortune Teller tells you to find HOLY WATER, a SOUL KEY, and a RED RIDINGHOOD.
Chapter 2: The Soul Key
- Go to the Fountain.
- Zoom into the Fountain for an HOS.
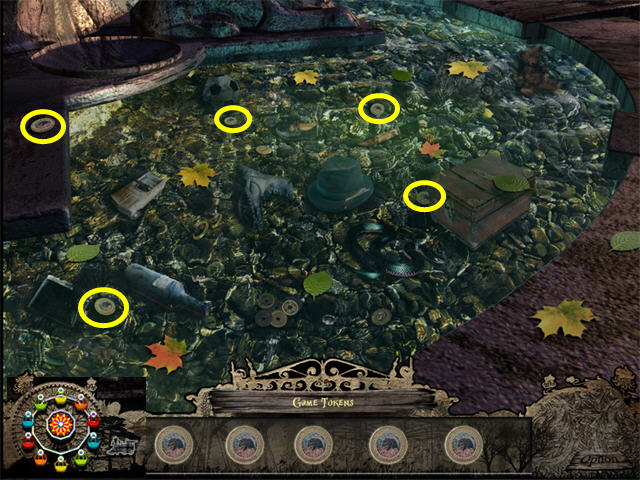
- Collect the five TOKENS.
- Go Right to the entrance to the Killer Coaster.
- Put the TOKENS in the Coin Slot on the Game Booth.
- Zoom into the Game Booth; play the game.
- You have 10 chances. You must click on 7 dolls in red hoods.
- Collect the RED RIDING HOOD.
- Go Down three times to the Main Street Plaza.
- Enter the Gift Shop.
- Zoom into the open Drawer to the left of the Doll for an HOS.
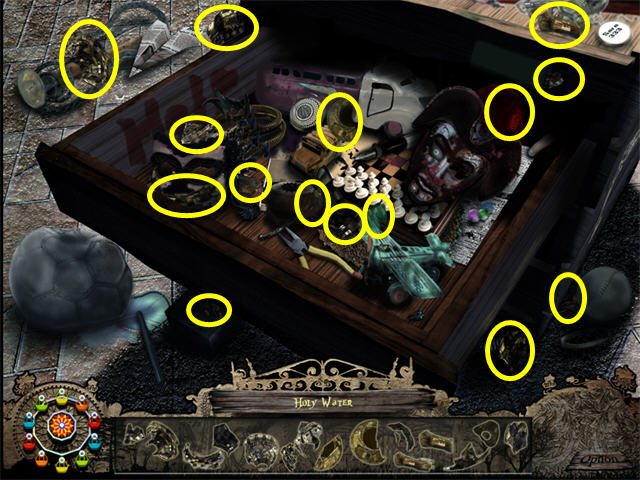
- Collect the HOLY WATER.
- The piece just above the Airplane is green, although it looks brown in the Find List.
- Go to the Fortune Teller.
- Go Right to the back of the Killer Coaster.
- Go through the gap in the fence to the Killer Coaster Control Panel.
- Zoom into the Toolkit for an HOS.
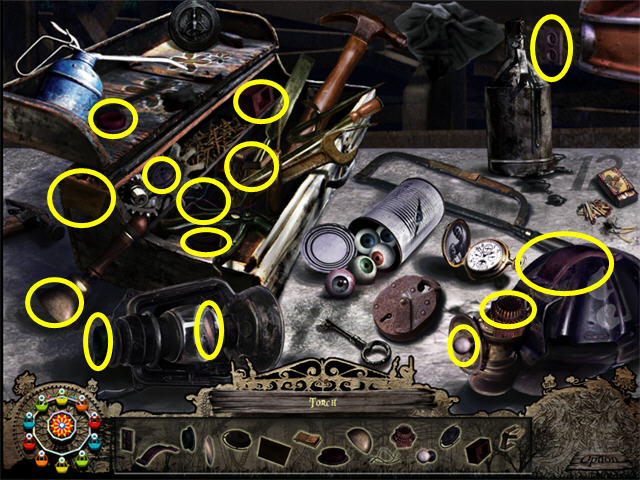
- Collect the TORCH (Flashlight).
- The Wires are the three colored Wires in the toolbox near the bottom of the Wrench.
- Go Down twice.
- Go to the Haunted House.
- Click on the Gates. They will open now because you have the TORCH (from the HOS by the Control Panel for the Killer Coaster).
- Go into the Haunted House.

- Zoom into the left Door on the Upper Landing (A); the Ghost will appear.
- Click on the Ghost and he will tell you to play the Piano to unlock the Door.
- Zoom into the Piano (B) to play the mini-game.
- Click at the top of the screen to start the game.
- Repeat the four sequences.
- Each time you must enter the same number of notes as the sequence before the game will tell you if you are right or wrong.
- First Sequence: 1, 8, 4, 12.
- Second Sequence: 8, 5, 9, 6, 8, 5, 9, 6.
- Third Sequence: 1, 6, 9, 1, 6, 9, 2, 8, 11, 2, 8, 11.
- Fourth: 6, 5, 8, 4, 9, 5, 8, 4.
- The left Door will unlock. Go in.
- Zoom into the Bed for an HOS.
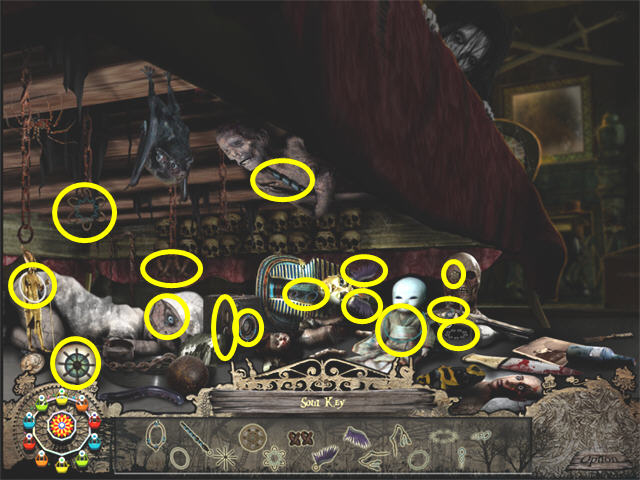
- Collect the SOUL KEY.
- Zoom into the Fireplace; collect some FUEL WOOD from the right side of the burning logs.
- Go Down to the Staircase.
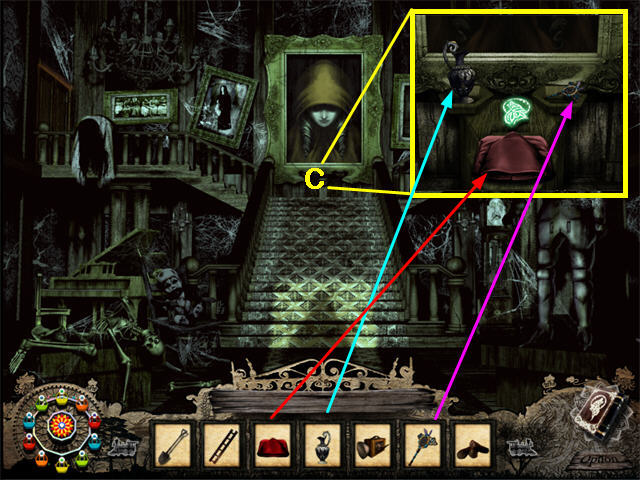
- Zoom into the large Painting (C); put the SOUL KEY (from the Bed HOS in the next room), the RED RIDING HOOD (from the Game Booth by the front entrance of the Killer Coaster), and the HOLY WATER (from the HOS in the Gift Shop) in the three Bowls.
- The Wolf Icon in the center will glow when the three items are placed correctly. Click on it.
- Watch the Cut Scene. The Fairy tells you to collect six MIRRORS and take them to the Wolf's Cave to free Clara.
Chapter 3: The House of Mirrors
- Start inside the Haunted House.
- Go through the Door on the right at the top of the Landing. You are now in Area 2.
- Go Forward until you see the House of Mirrors. Enter.
- Zoom into the Man. He tells you he is trapped in the Mirror and you have to break it.
- Zoom into the Floor in front of the Mirror.
- Zoom in again for an HOS.
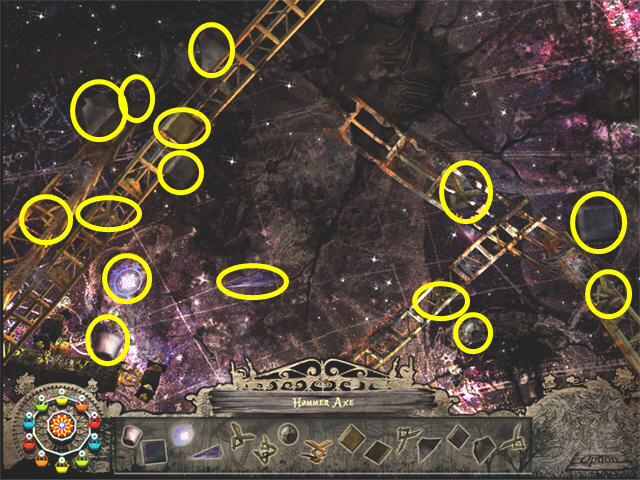
- Collect the HAMMER AXE.
- Use the HAMMER AXE on the Mirror near the Man. This will start a mini-game.
- The instructions say to aim the weapon, but you have no control over where the target appears. Click in the center of the target to crack the Mirror.
- You must crack the Mirror 8 times to break it. You get unlimited tries.
- The Man will give you the BLUE MAGIC MIRROR.
- Go forward through the House of Mirrors to the Fast Food Stand.
- Go forward past the Carousel to the Bridge. Use the Up Arrow near the bottom of the Lamp Post.
Chapter 4: The Joker Statue
- Start at the Bridge just past the Carousel in Area 2.
- Use the SHOVEL (from the HOS at the Ferris Wheel in Area 1) on the Pile of Sand on the Bridge.
- Now put the cursor on the far side of the Bridge and you will be able to cross to the Gingerbread House.
- Go into the Gingerbread House.
- Zoom into the red Candy Container for an HOS.
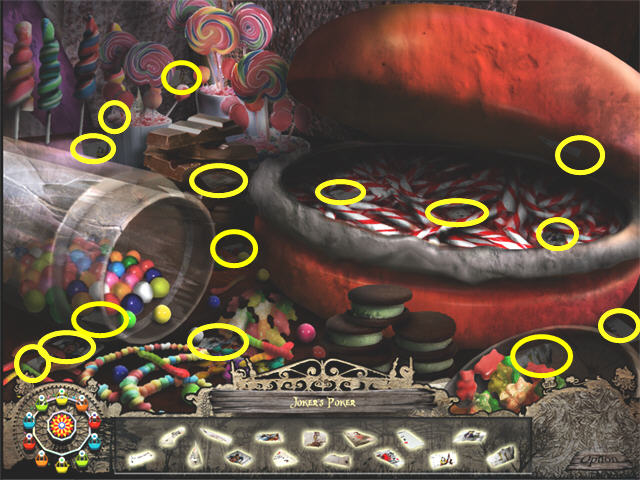
- Collect the JOKER'S POKER.
- Go Left to the Gingerbread Man.
- You can see the JOKER'S HAT, but you will not be allowed to collect it yet.
- Zoom into the Ice Cream Cone for an HOS.
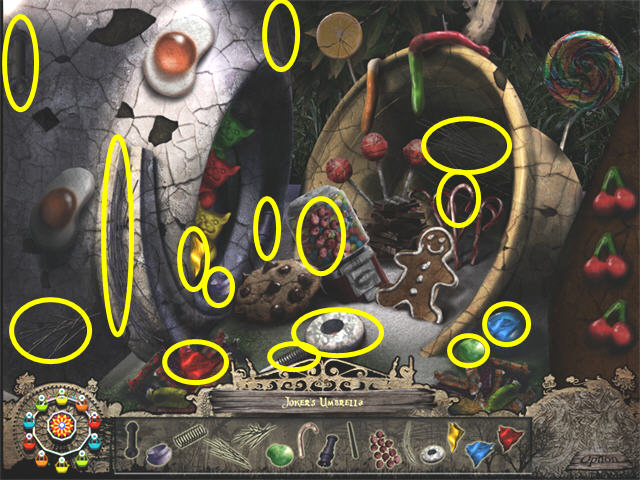
- Collect the JOKER'S UMBRELLA.
- Go Down twice so you are in front of the Gingerbread House.
- Go Right to the Area 2 Train Station.
- Zoom into the Joker Statue. He will ask you to help find his clothes.
- Go Down to the Gingerbread House.
- Go into the Gingerbread House.
- Go left to the Gingerbread Man.
- Collect the JOKER'S HAT. It is a brown Top Hat in the lower right.
- Return to the Train Station.
- Try to give the Joker Statue the HAT. He wants the TROUSERS first.
- Zoom into the Train; place the FUEL WOOD (from the Bedroom in the Haunted House).
- The Train will travel to the Main Street Train Station. From now on whenever you zoom into the Train, it will travel between the Main Street Train Station and the Area 2 Train Station.
- When you get to the Main Street Train Station, go down to the Main Street Plaza.
- Go into the Gift Shop.
- Collect the JOKER'S COAT from the Table on the right side of the Shop.
- Go to the back of the Killer Coaster.
- Collect the JOKER'S GREEN VEST from the ground by the Fence.
- Go to the Ferris Wheel.
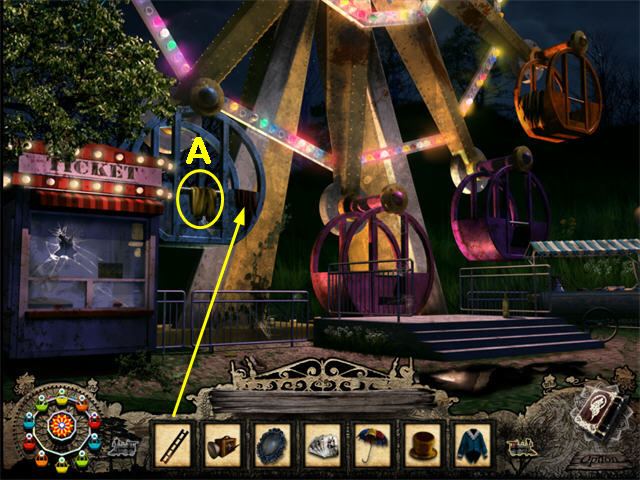
- There are two pieces of cloth hanging from the Ferris Wheel. Put the LADDER (from the Security Room) as shown. Then collect the JOKER'S TROUSERS (A).
- Go to the Haunted House and enter.
- Go through the right Door to Area 2.
- Go forward until you see the House of Mirrors.
- Collect the JOKER'S PINK OUTER VEST from the right side of the House of Mirrors.
- Go forward until you come to the Gingerbread House.
- Go Right to the Area 2 Train Station.
- Zoom into the Joker Statue: put on the JOKER'S TROUSERS (from the Ferris Wheel) on the Joker Statue.
- Put the JOKER'S GREEN VEST (from the back of the Killer Coaster) on the Joker Statue.
- Put the JOKER'S COAT (from the Gift Shop) on the Joker Statue.
- Put the JOKER'S PINK OUTER VEST (from the House of Mirrors) on the Joker Statue.
- Put the JOKER'S HAT (from the Gingerbread House) on the Joker Statue.
- Put the JOKER'S UMBRELLA (from the HOS in the Gingerbread House) on the Joker Statue.
- Put the JOKER'S POKER (from the HOS in the Gingerbread House) on the Joker Statue. Click on the statue's chest, not its hand.
- Zoom into the Joker Statue; collect the PURPLE MAGIC MIRROR.
Chapter 5: The Six Mirrors
- You should already have the PURPLE MAGIC MIRROR from the Joker Statue. If not, go back and do the steps in Chapter 4.
- Go to the Carousel in Area 2.
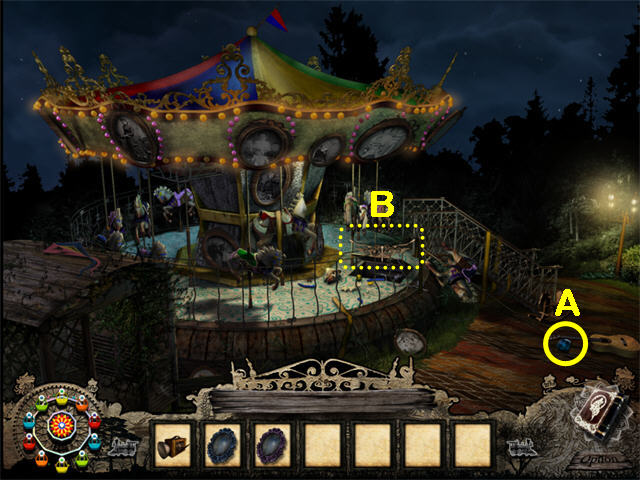
- Collect the BLUE GEM (A).
- There are two Down arrows in this scene. The one at the bottom of the screen takes you back to the Fast Food Stand. The one directly over the Trap Door (B) on the Carousel takes you into the Carousel Control Room.
- Enter the Carousel Control Room.
- Zoom into the Box of Tools on the left for an HOS.
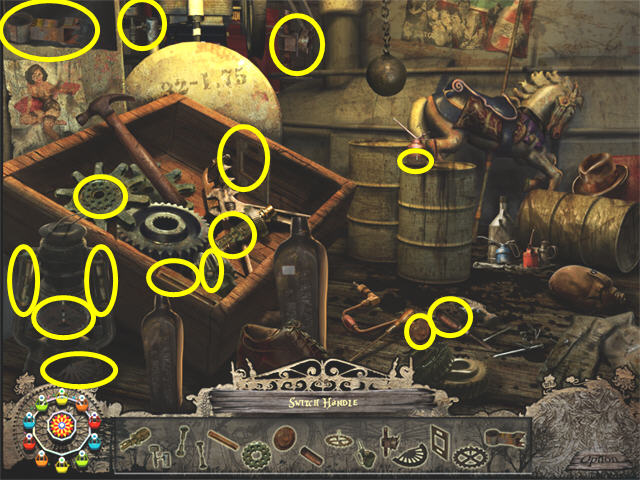
- Collect the SWITCH HANDLE.
- Zoom into the Control Box straight ahead; put the SWITCH HANDLE (from the HOS in the box of tools) on the right side.
- You will see a Carriage drop down onto the Carousel and the engine will start.
- Go Down to return to the Carousel.
- Collect the RED MAGIC MIRROR from the end of the Carriage on the Carousel. It looks like a glowing blue dot with a red circle around it.
- Go forward until you see the Gingerbread House.
- Go left to the Tea Cup Ride. You are now in Area 3.
- Zoom into the Bench on the left for an HOS.
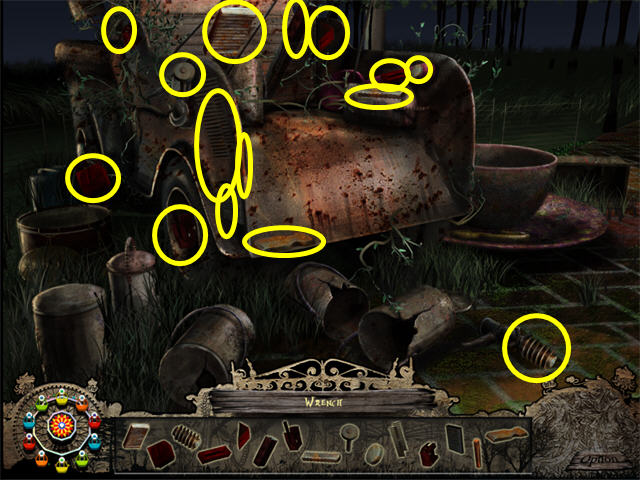
- Collect the WRENCH.
- Zoom into the Tea Cup Ride.
- Zoom into the Tea Cup on the left.
- Use the WRENCH (from the HOS at the Bench next to the Tea Cup Ride) to remove the Lid. You need a different tool for the screws.
- Return to the Carousel.
- Go Down through the Trap Door to the Carousel Control Room.
- Zoom into the Box of Tools for another HOS.
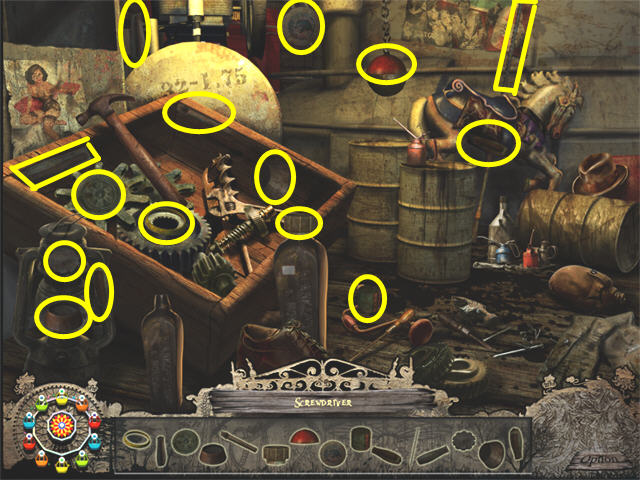
- Collect the SCREWDRIVER.
- Return to the Tea Cup Ride.
- Zoom into the Tea Cup Ride.
- Zoom into the Tea Cup on the left.
- Use the SCREWDRIVER (from the HOS in the Carousel Control Room) on the screws.
- Click on the GOLD MAGIC MIRROR to start a mini-game.
- You need to move the latches around the outside ring so the mirror can lift out. You can also rotate the mirror itself.
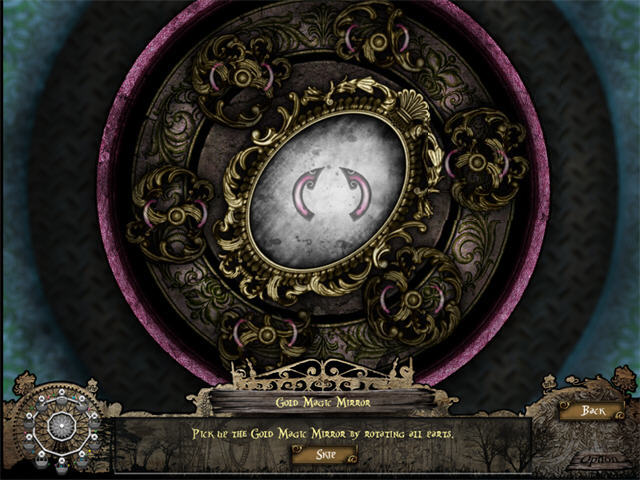
- There are several possible solutions. The screenshot shows one.
- The GOLD MAGIC MIRROR will go into inventory.
- Return to the Carousel Control Room.
- Zoom into the Skeleton on the right for an HOS.
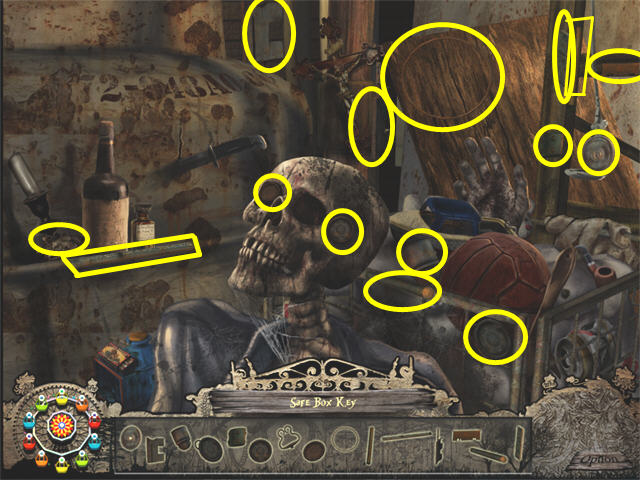
- Collect the SAFE BOX KEY.
- Go to the Fountain.
- Zoom into the Fountain for an HOS.
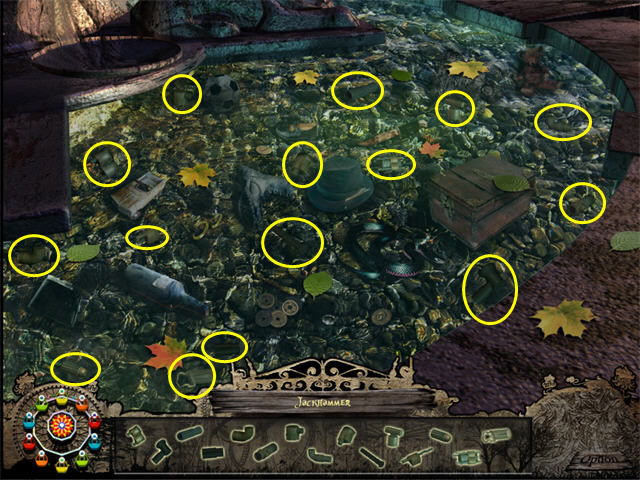
- Collect the JACKHAMMER.
- Go to the Security Room.
- Use the SAFE BOX KEY (from the HOS in the Carousel Control Room) on the Safe.
- Collect the JADE MAGIC MIRROR.
- Go to the Entrance Plaza.
- Go into the Gift Shop.
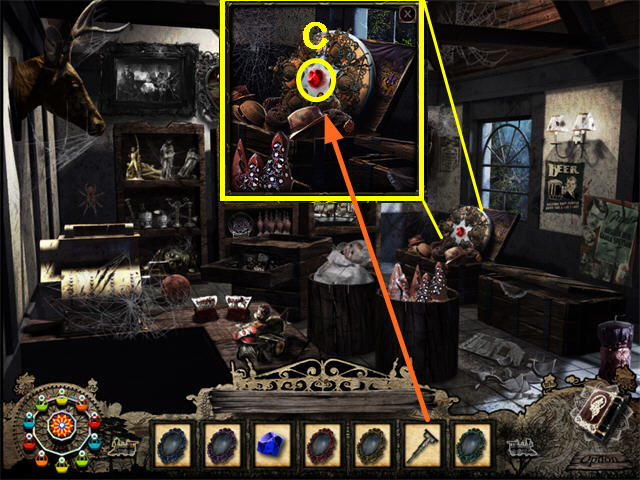
- Zoom into the RED GEM; use the JACKHAMMER (from the HOS at the Fountain) to remove the RED GEM (C).
- Go to the Fountain.
- Zoom into the Keystone; place the BLUE GEM (from the Carousel) and the RED GEM (from the Gift Shop). This will unlock a Secret Chamber beneath the Fountain.
- Close the zoom scene.
- Enter the Secret Chamber.
- Zoom in twice on the Statue; Collect the SILVER MIRROR.
- Go Down to the Fountain.
- Go to the Main Street Train Station and take the Train to the Area 2 Train Station.
- Go Down to the Gingerbread House.
Chapter 6: the Island
- Start at the Gingerbread House in Area 2.
- Go left to the Tea Cup Ride.
- Go Forward until you see the Boathouse.
- Once you have all six MAGIC MIRRORS, the light in the Boathouse will come on and an HOS will be available in the Swan Boat on the right side.
- Location of the six MAGIC MIRRORS: Blue Mirror (House of Mirrors), Purple Mirror (Joker Statue at the Area 2 Train Station), Jade Mirror (Safe in the Security Room), Red Mirror (Carousel), Gold Mirror (Teacup Ride), Silver Mirror (Secret Chamber under the Fountain).
- Zoom into the Swan Boat on the right for an HOS.
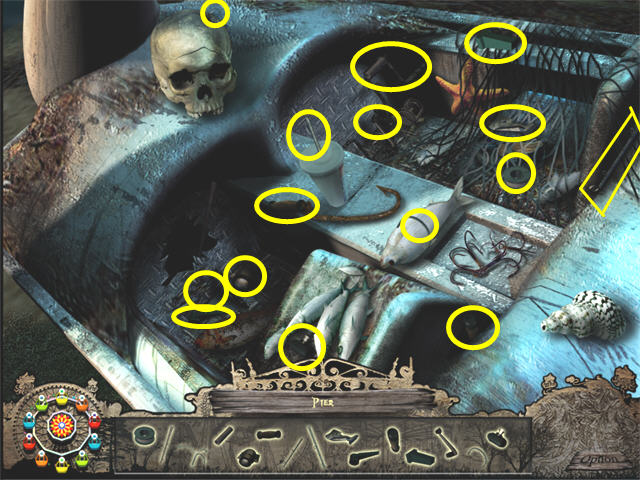
- Collect the PIER (Fishing Pole).
- Use the PIER (Fishing Pole) on the Swan Boat that is out on the water and it will come to the Boat House.
- Zoom into the Swan Boat on the left and it will take you to the Island.
- Enter the Big Tree.
- Watch the cut scene.
- Put the SIX MAGIC MIRRORS on the matching colored holders. Each mirror will only stick if it's on the correct color. Click slightly below and to the right of the holder to get the mirror to stick.
- Zoom into the center of the mirror holders for a mini-game.
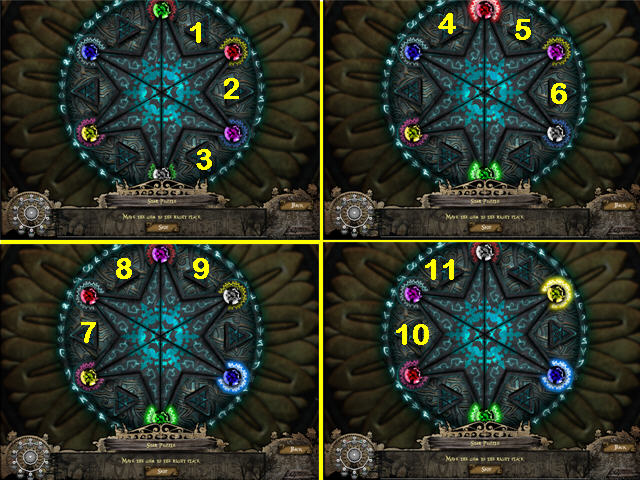
- When you click the triangle in between two gems, they will switch places.
- Move each gem to the holder that matches its color. Work one gem at a time.
- There are many possible solutions. We placed the gems in this order: Green, Blue, Yellow, Red.
- Watch the ending.
Created at: 2011-11-07