

Walkthrough Menu
- General Tips and Information
- World 1: The Scientist’s House
- World 2: Robo-City
- World 3: River World
- World 4: The Flying City
General Tips and Information
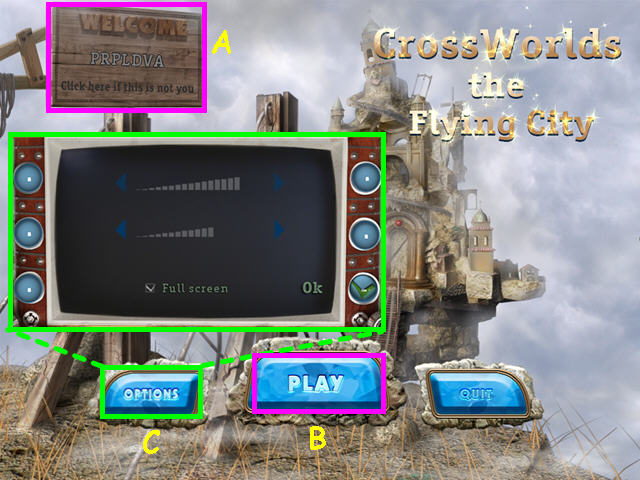
- Click on the profile panel on the main screen to add or delete player profiles (A).
- Select “Play” to begin or continue your game (B).
- You may play this game in full screen or windowed mode by changing the settings in the Options menu (C).
- You may adjust the volume of effects and music in the Options menu.
- The best way to use this walkthrough is by clicking on the 'CTRL' and 'F' keys on your keyboard to simultaneously bring up a search box.
- Type the keyword into the search box at the bottom of your screen and click on 'NEXT' to find the section you need help with. Clicking 'NEXT' again will bring up all instances in which that keyword was mentioned in the guide.
- The Options menu is accessible from both the main screen and the in-game menu.
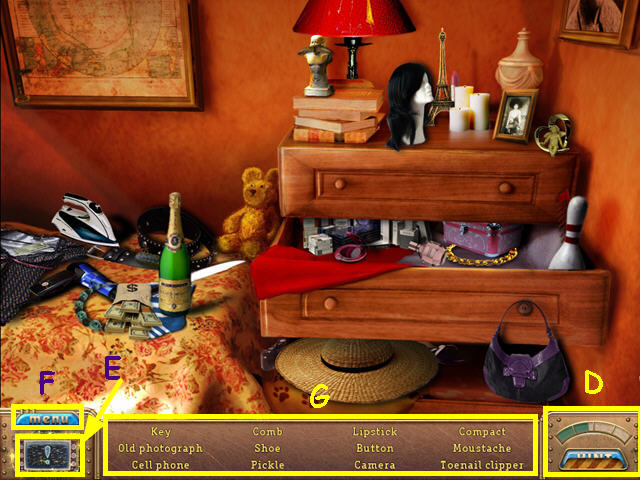
- Hints are unlimited, but you must wait for the meter to re-fill (D).
- Click the menu button to access the settings menu (E).
- Check your diary to read your current tasks (F).
- Your hidden object list/inventory is at the bottom center (G).
- Your cursor will change to an eye if a closer look is available.
- The cursor will become a hand is you can interact with an item.
- Gears will appear when another object is needed.
World 1: The Scientist’s House
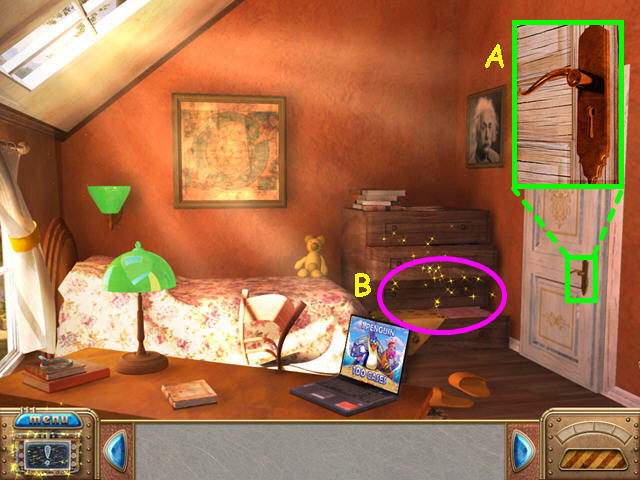
- Note the lock on the door (A).
- Select the sparkling area at the dresser for a hidden object area (B).
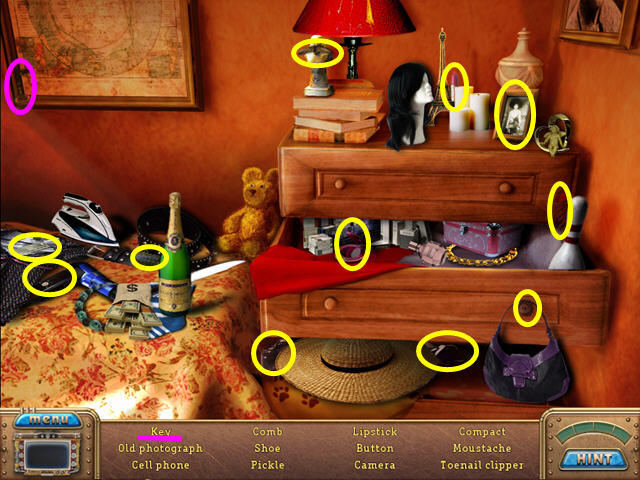
- Locate all the items on the list.
- The KEY will go into your inventory.
- Look at the close-up of the door lock and use the KEY.
- Open the door and exit the room.
- Note the different directions you can move.
- Should you get stuck, look for other areas to visit.
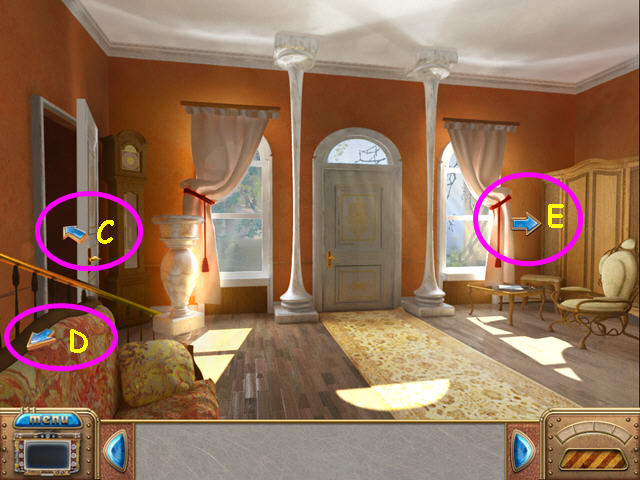
- The right arrow will take you to the basement (C).
- The arrow pointing down and to the left will return you to the bedroom (D).
- Click on the right arrow to walk to the other side of the living room (E).
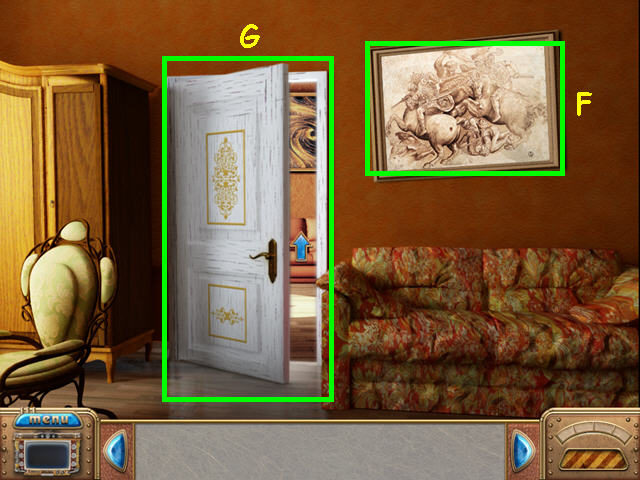
- Look at the painting on the wall (F).
- Open the door and exit the living room (G).
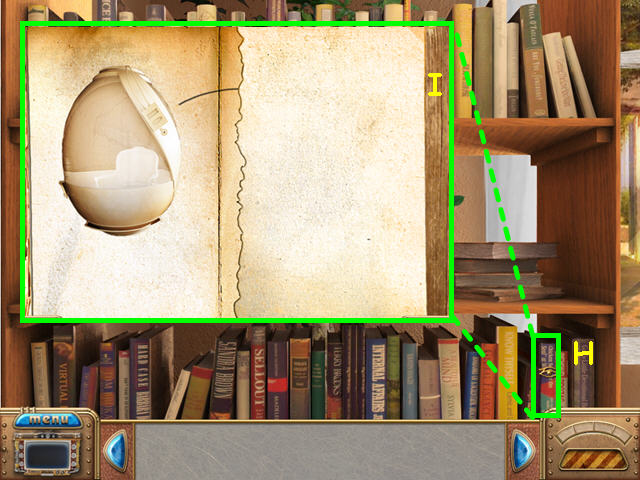
- Walk forward to look at the bookcase.
- Look at the 2nd book from the right on the bottom shelf (H).
- Note the missing page (I).
- Walk down to return to the desk.
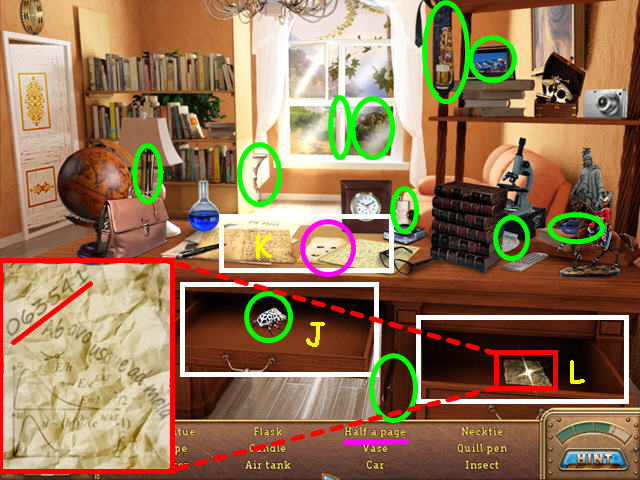
- Collect all the items on the list.
- Open the center drawer to find the insect (J).
- Click on the pile of papers several times to find the HALF-PAGE (K).
- The HALF-PAGE will go into your inventory.
- Look at the paper in the upper right drawer to find a combination (L).

- Return to the bookcase and return the HALF-PAGE to the 2nd book from the right on the bottom shelf.
- Walk down to exit the bookcase, then go left through the door.
- Walk down to return to the main area of the living room.
- Open the left door and go to the basement.
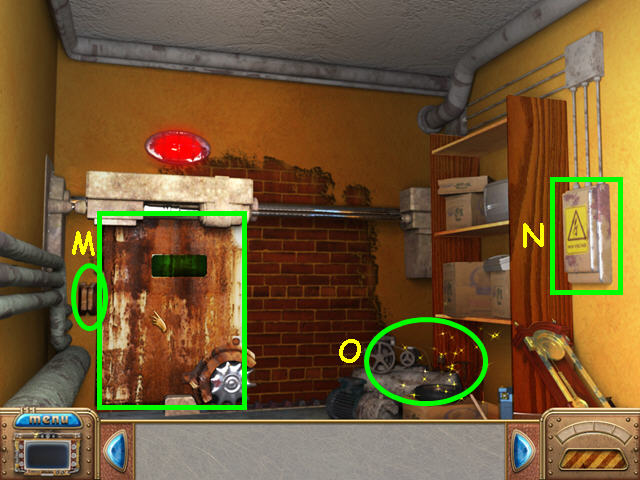
- Look at the locked door and the card reader on the left (M).
- Note the power supply box on the right wall (N).
- Select the sparkling area for a hidden object scene (O).
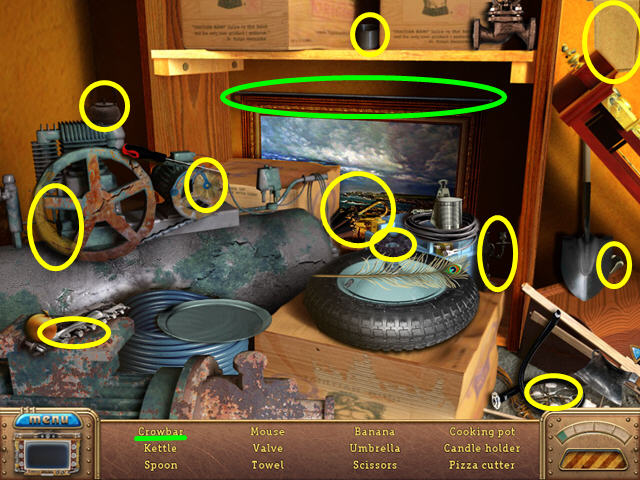
- Locate all the items on the list.
- The CROWBAR will go into your inventory.
- Walk down to exit the basement, then go to the right.
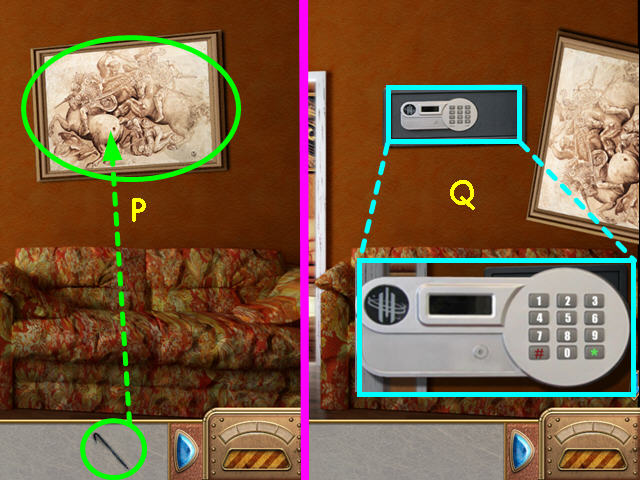
- Use the CROWBAR on the painting (P).
- Look at the safe and try to enter the code, but there is no power (Q).
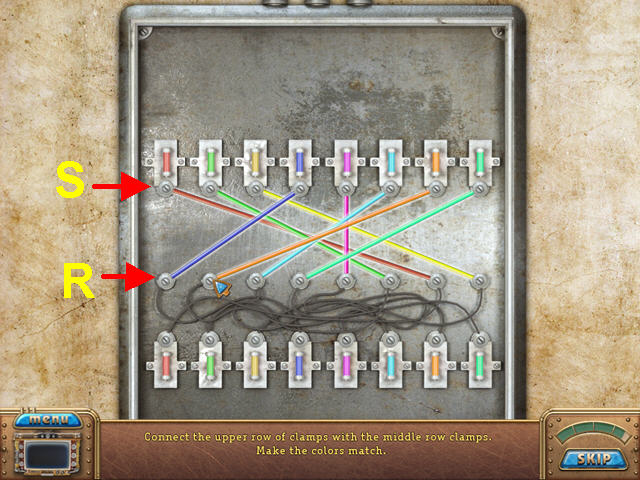
- Return to the basement and look at the power supply box on the right for a mini-game.
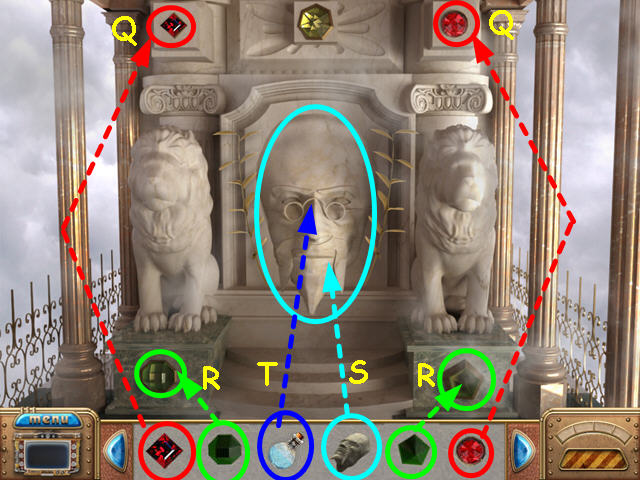
- The object is to connect all the wires based on colors.
- Trace the tangled wires to determine which color connects to the lower set of screws (R).
- Find the matching color above the upper set of screws (S).
- Left-click, hold and drag from the upper screw to the lower screw to make the connection.
- Exit the basement and return to the safe under the painting.
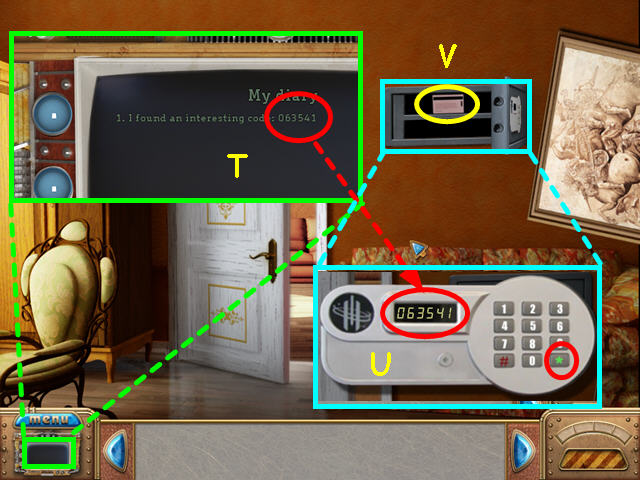
- Look at the diary to see the code (T).
- Look at the close-up of the safe and enter the code 0-6-3-5-4-1, followed by the star (U).
- Open the safe and take the KEYCARD (V).
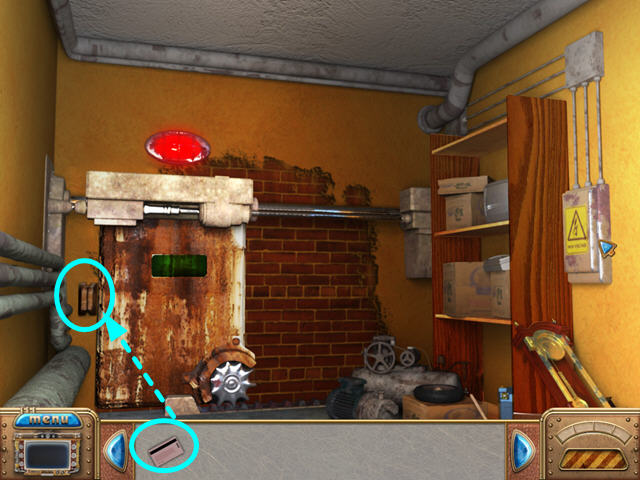
- Return to the basement and use the KEYCARD on the reader to the left of the door.
- Walk forward to enter the lab.
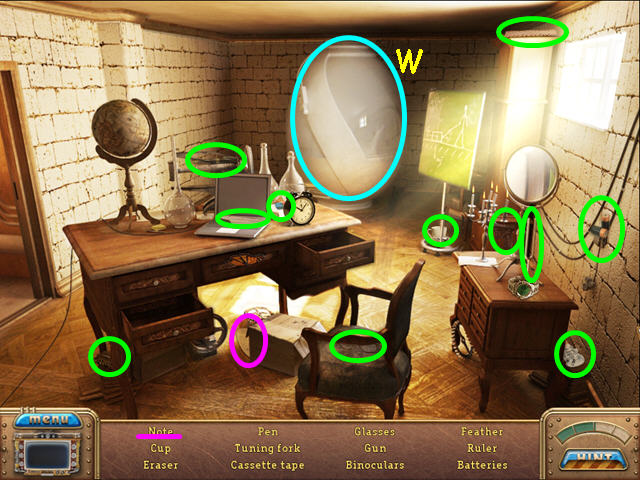
- Locate all the items on the list.
- Read the note from your father.
- Note the teleporter in the back of the lab (W).
- Walk left to exit the lab.
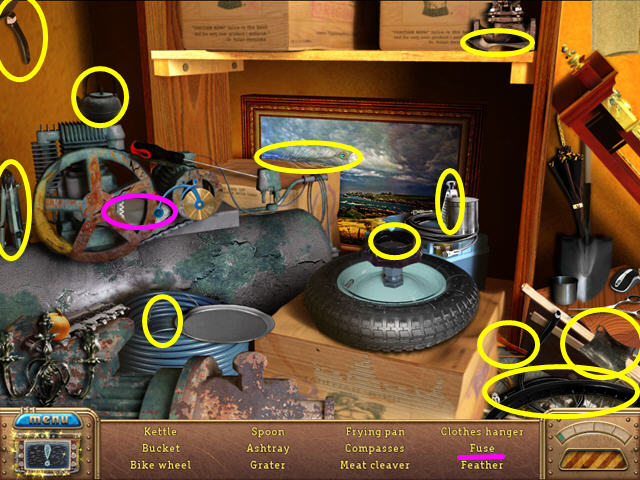
- Select the sparkling area on the right for a hidden object scene.
- Locate all the items on the list.
- The oval FUSE will go into your inventory.
- Walk down to exit the basement.
- Move your cursor to the lower left corner, then click to return to the bedroom.
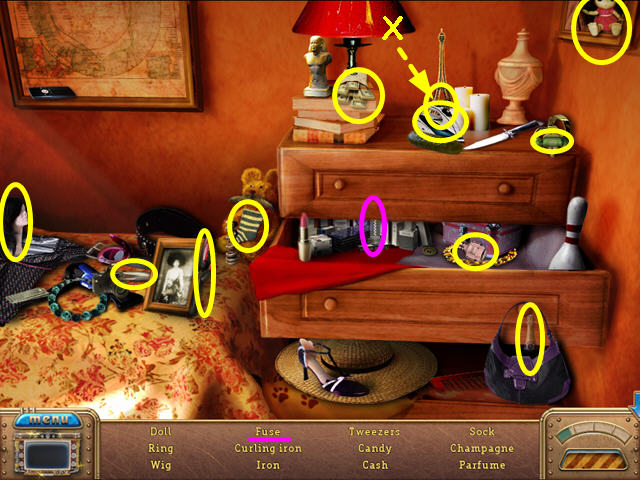
- Select the sparkling area on the dresser for a hidden object scene.
- Locate all the items on the list.
- Note that the ring is behind the iron and under the Eiffel Tower (X).
- The cylinder FUSE will go into your inventory.
- Exit the bedroom and return to the basement.
- Enter the lab and walk to the teleporter.
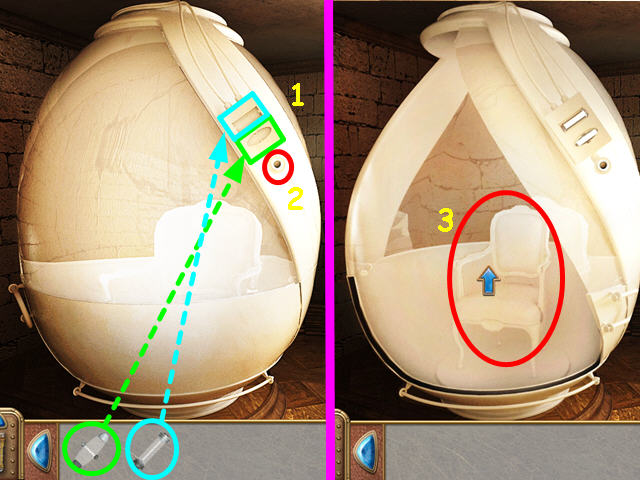
- Place the 2 FUSES into the matching slots (1).
- Press the button (2).
- Enter the teleporter (3).
World 2: Robo-City
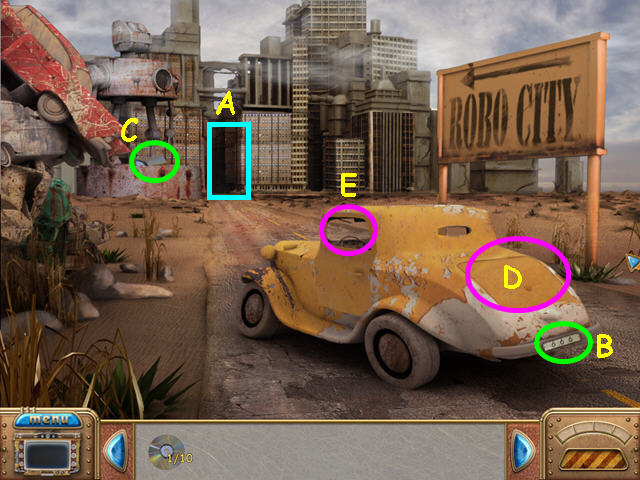
- Walk forward.
- Note that it is too far to walk to Robo City (A).
- Take the LICENSE PLATE (B).
- Take the COMPACT DISC PIECE 1/10(C).
- Look at the trunk of the car (D).
- Try to get in the car to learn you need a crowbar (E).
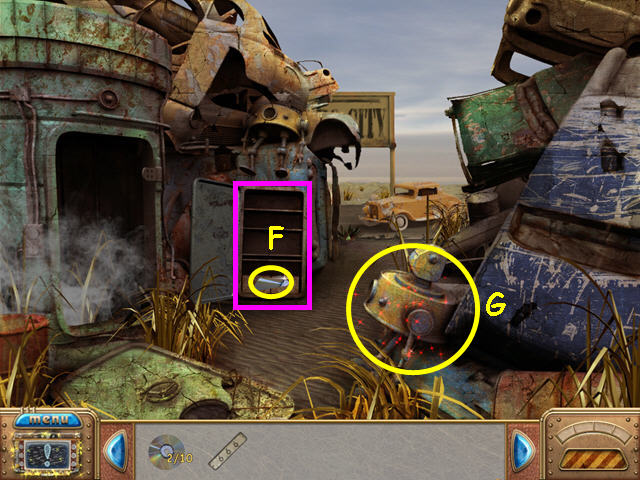
- Walk left to return to the junk yard.
- Open the cabinet and take the COMPACT DISC PIECE 2/10(F).
- Select the sparkling area for a hidden object scene (G).
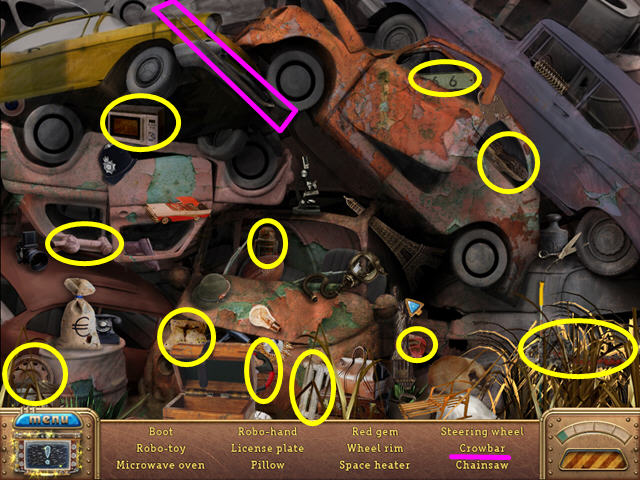
- Locate all the items on the list.
- The CROWBAR will go into your inventory.
- Walk forward to return to the car.
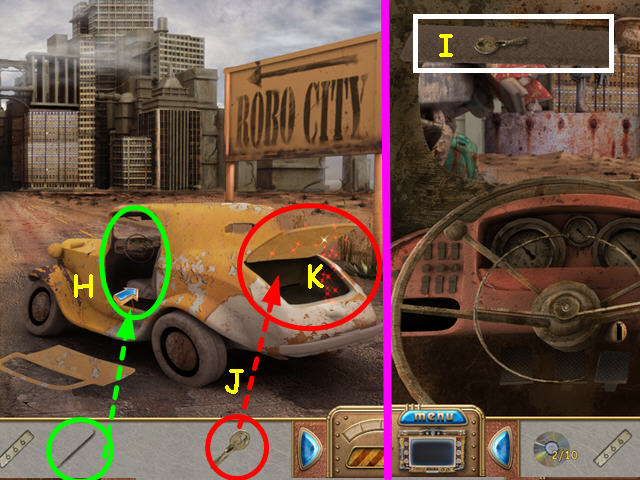
- Use the CROWBAR to remove the car door (H).
- Enter the car.
- Fold down the left visor and take the KEY (I).
- Exit the car and look at the close-up of the trunk.
- Use the KEY to open the trunk (J).
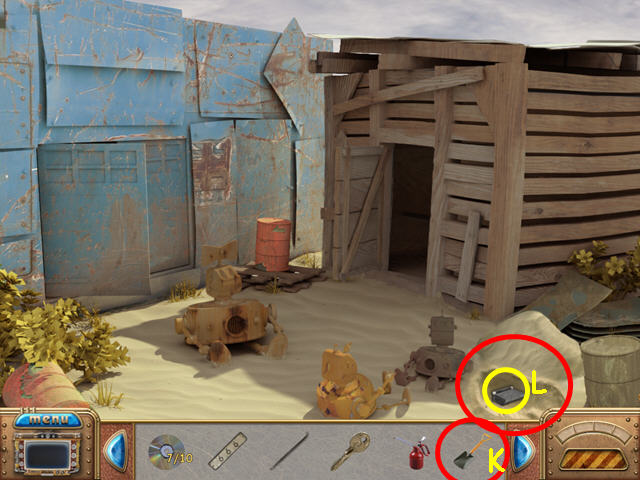
- Select the sparkling area in the trunk for a hidden object area (K).
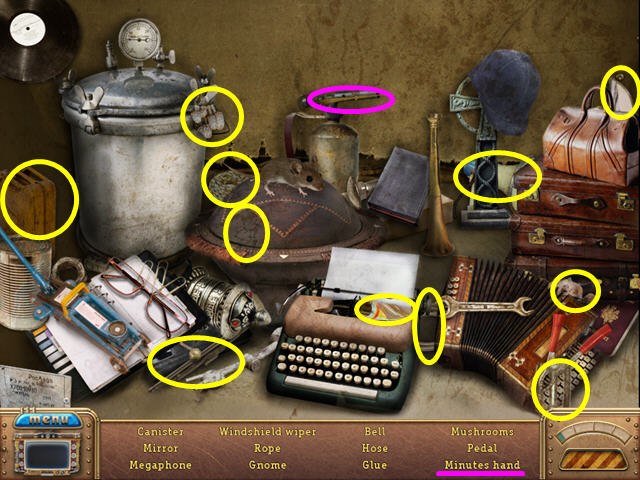
- Locate all the items on the list.
- The ARROW (minute hand) will go into your inventory.
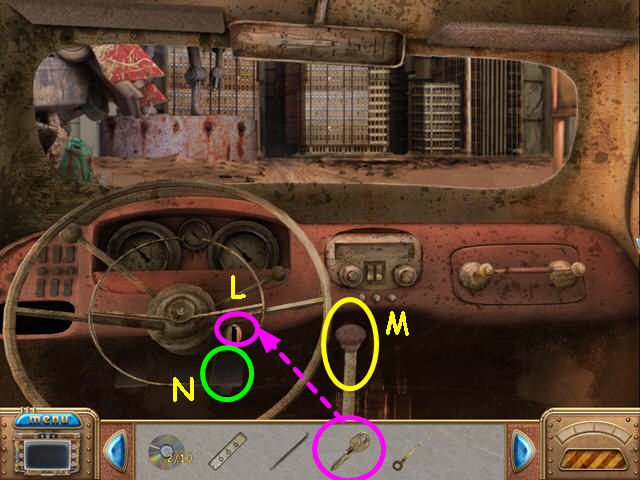
- Enter the car.
- Use the KEY in the ignition until the engine starts (L).
- Select the gear shift knob (M).
- Press the gas pedal (N).
- Exit the car.
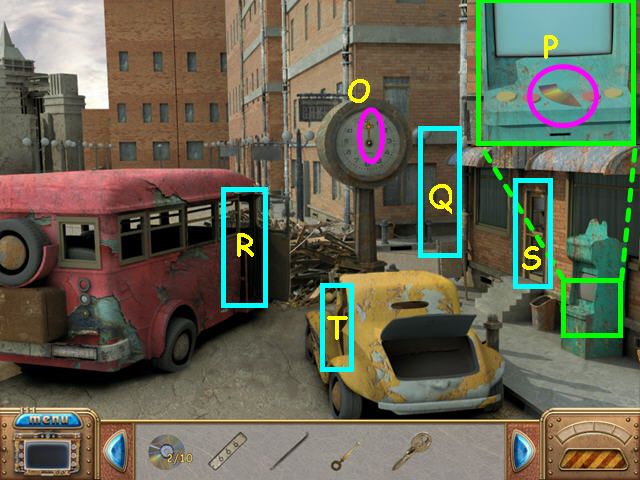
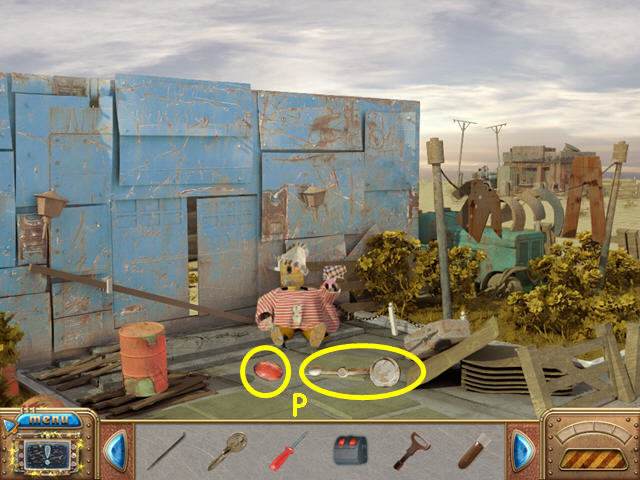
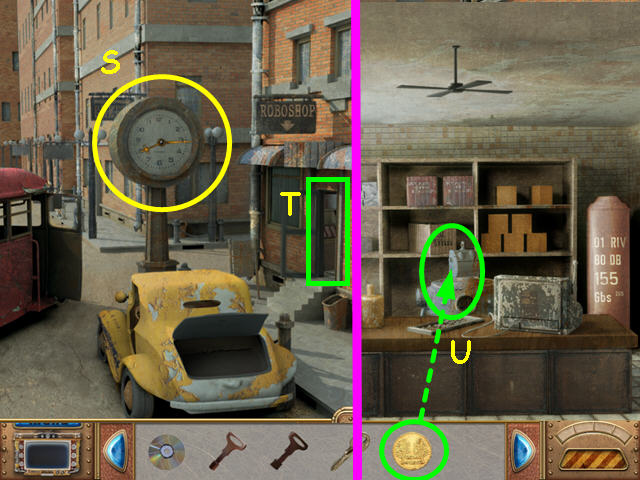
- Take the ARROW (hour hand) from the clock (O).
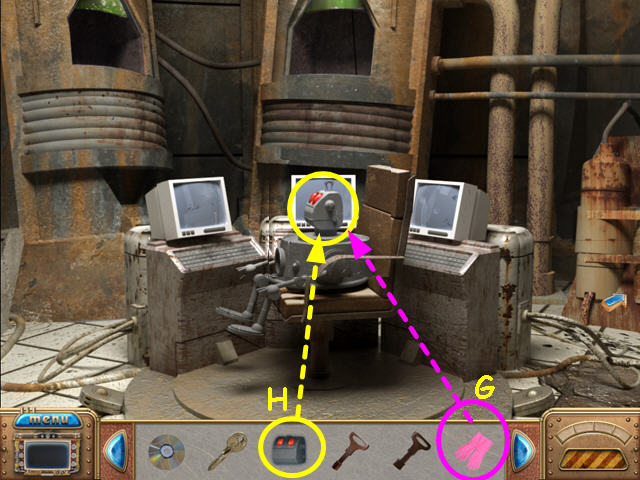
- Look at the machine and take the COMPACT DISC PIECE 3/10(P).
- Note the alley (Q).
- Enter the bus and look at the robot bus driver (R).
- Exit the bus.
- Enter the Robo Shop and look at the robot behind the counter (S).
- Exit the shop and enter the car (T).
- Drive back to the junk pile.
- Exit the car and walk to the left.
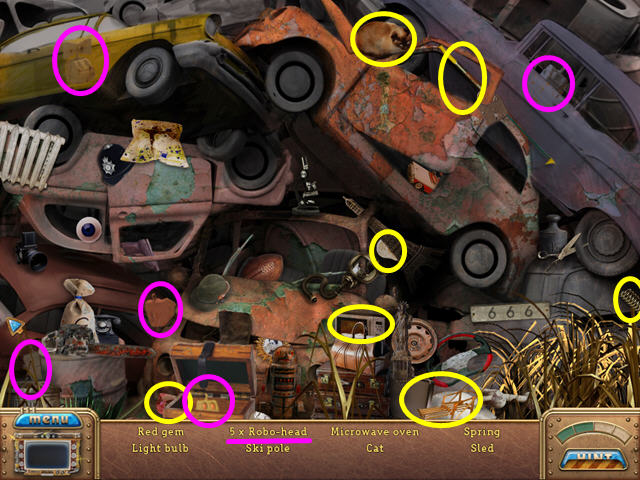
- Select the sparkling area for a hidden object scene.
- Locate all the items on the list.
- The 5 ROBO-HEADS will go into your inventory.
- Return to the car and drive back to the city.
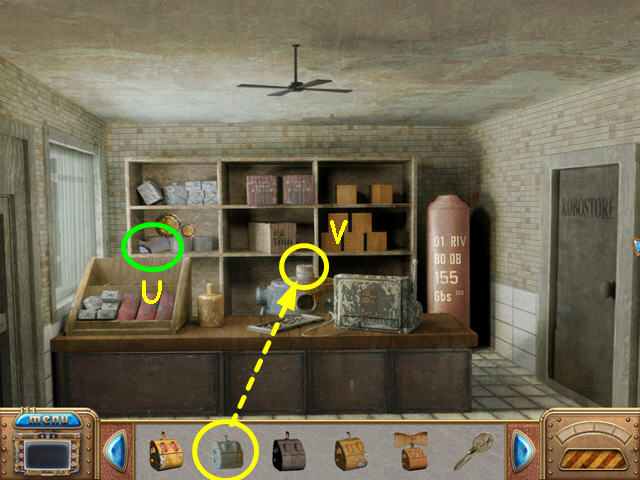
- Exit the car and enter the shop.
- Take the COMPACT DISC PIECE 4/10(U).
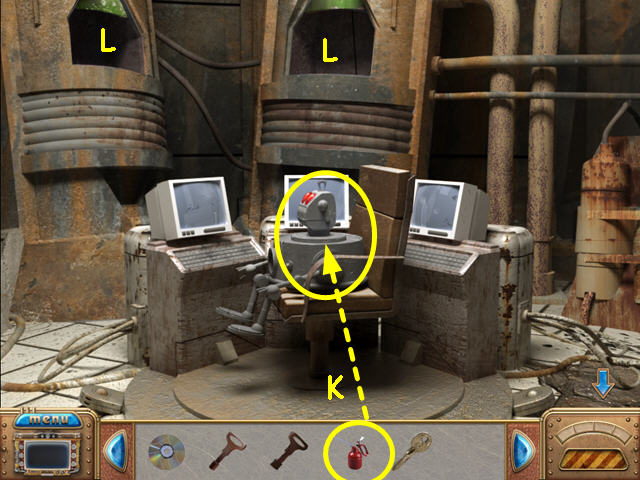
- Place the gray ROBO-HEAD onto the robot (V).
- Talk to the robot to learn he sells things for coins.
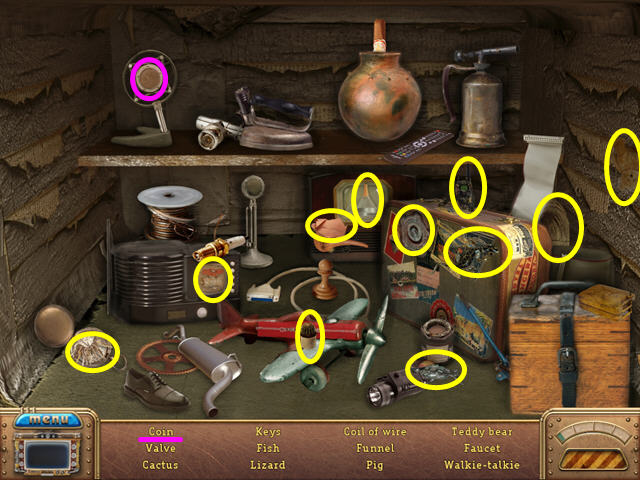
- Exit the shop and look in the trunk of the car for a hidden object scene.
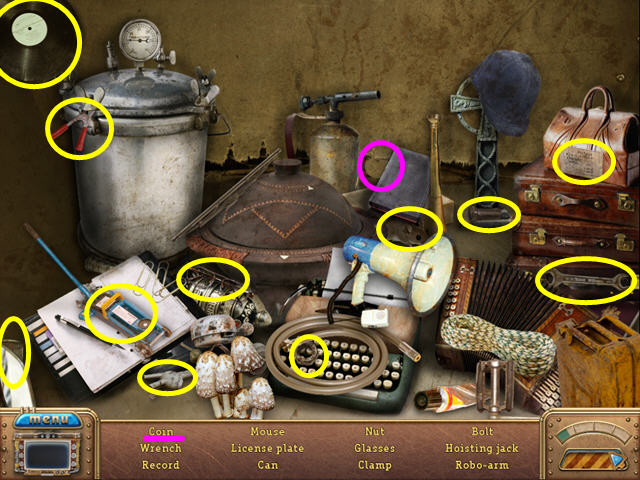
- Locate all the items on the list.
- The COIN will go into your inventory.
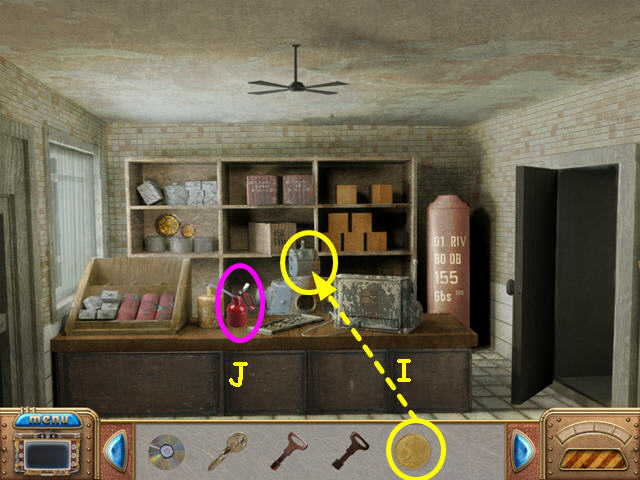
- Return to the shop and give the robot the COIN.
- Take the OIL CAN from the counter.
- Exit the shop and enter the alley.
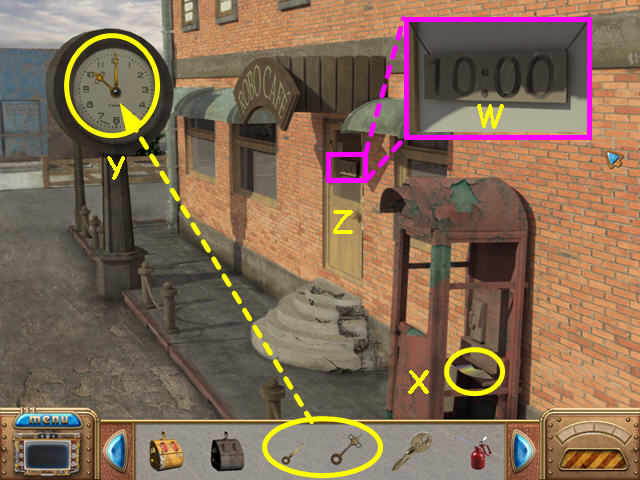
- Look at the sign on the cafe (W).
- Take the COMPACT DISC PIECE 5/10 from the phone booth (X).
- Use the 2 ARROWS (clock hands) on the clock (Y).
- Click on the clock to set the time toe 10:00.
- Note that the cafe door can now be opened (Z).
- Walk forward.
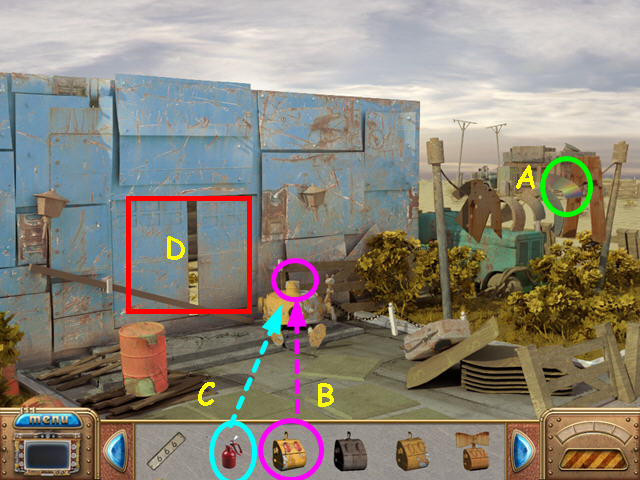
- Take the COMPACT DISC PIECE 6/10 (A).
- Place the yellow ROBO-HEAD on the robot (B).
- Use the OIL CAN on the robot (C).
- Talk to the robot to learn he is sad that he has no purpose.
- Walk through the double doors (D).
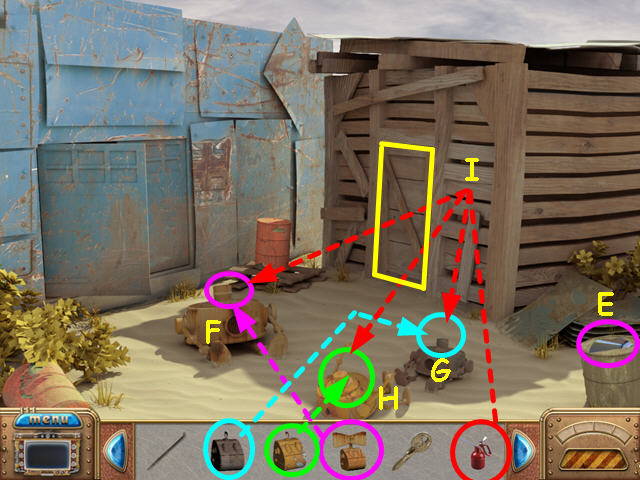
- Take the COMPACT DISC PIECE 7/10 (E).
- Place the ROBO-HEAD with the bow on the largest robot (F).
- Place the gray CHILD ROBO-HEAD on the gray robot (G).
- Place the gold CHILD ROBO-HEAD on the gold robot (H).
- Use the OIL CAN on all three robots (I).
- Talk to the larger robot to learn the child robots have hidden the bus driver's jaw.
- You learn they may tell you for some nut-candies.
- Note the locked shed.
- Exit to the left.
- Walk down, then enter the cafe.
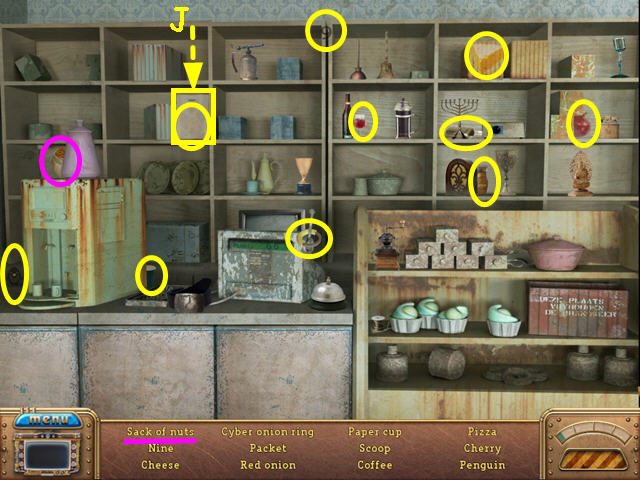
- Select the sparkling area on the counter for a hidden object scene.
- Locate all the items on the list.
- Note the pizza is behind the packet (J).
- The SACK of NUTS will go into your inventory.
- Exit the cafe, walk up, then enter the double doors.
- Give the large robot the SACK of NUTS.
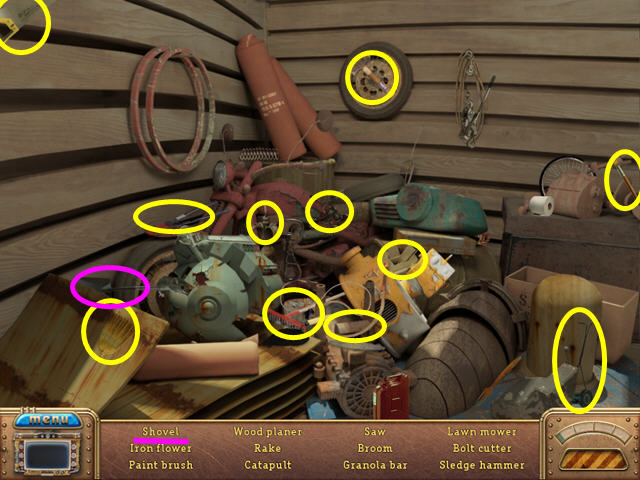
- Open the shed door for a hidden object scene.
- Locate all the items on the list.
- The SHOVEL will go into your inventory.
- Use the SHOVEL on the spot with the twinkle 3 times (K).
- Take the JAW (L).
- Walk left, then down twice.
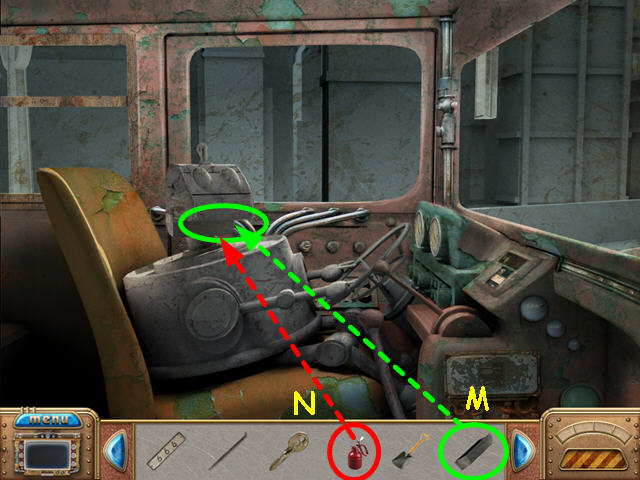
- Enter the bus.
- Use the JAW on the robot (M).
- Use the OIL CAN on the robot (N).
- Talk to the robot to learn you need to shovel the dump, put air in the tire, and find a special license plate.
- The things you need can be found at the Robo-Store at 1:45 pm.
- Exit the bus and walk down the alley.
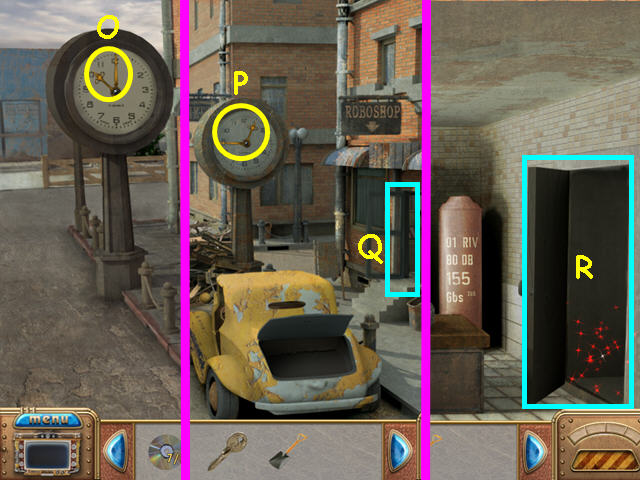
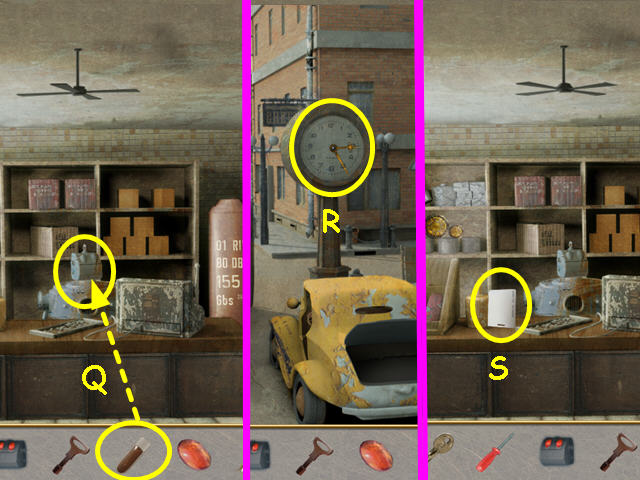
- Take the two ARROWS (clock hands) from the clock and walk down (O).
- Use the two ARROWS on the clock and click on the hands to set it to 1:45 (P).
- Enter the Robo-Store (Q).
- Open the door on the right for a hidden object scene (R).
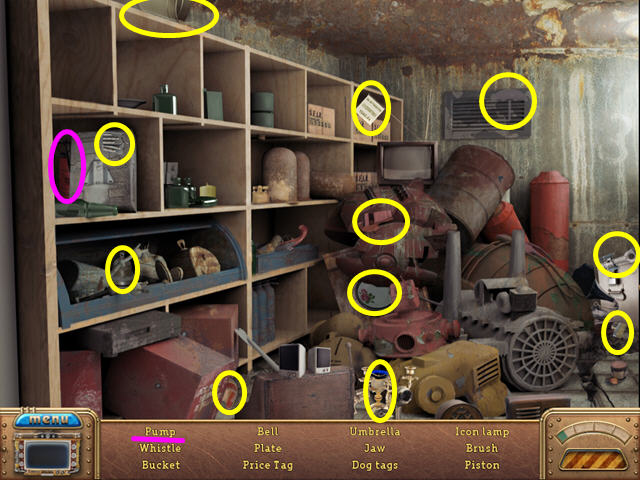
- Locate all the items on the list.
- The PUMP will go into your inventory.
- Exit the store.
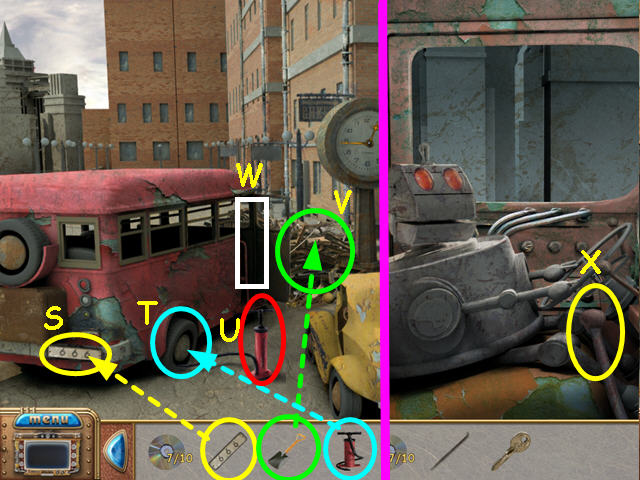
- Use the LICENSE PLATE on the back of the bus (S).
- Use the PUMP on the flat tire (T).
- Click on the pump several times to inflate the tire (U).
- Use the SHOVEL on the pile of debris (V).
- Enter the bus (W).
- Pull the lever (X).
- Exit the bus.
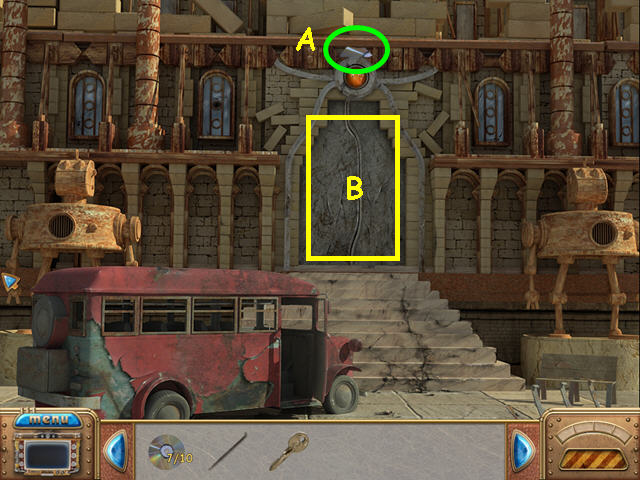
- Take the COMPACT DISC PIECE 8/10(A).
- Enter the double doors (B).
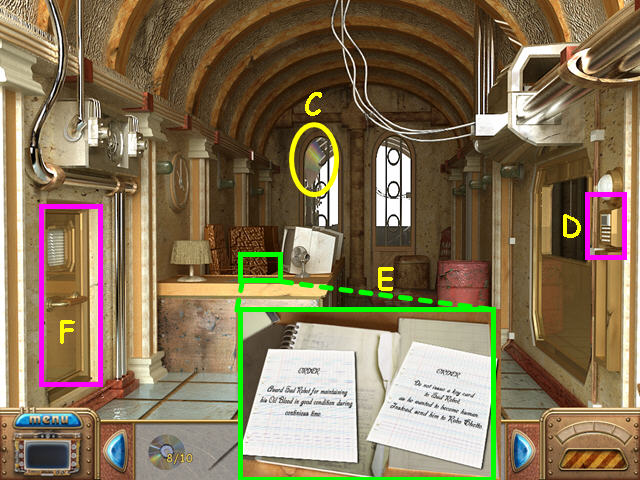
- Take the COMPACT DISC PIECE 9/10(C).
- Note the keypad (D).
- Look at the 2 orders for Sad robot (E).
- Open and walk through the left door (F).
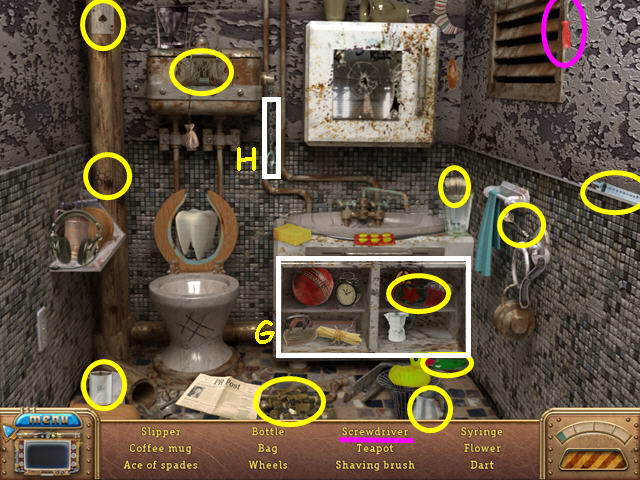
- Open the door at the end of the locker room for a hidden object scene.
- Locate all the items on the list.
- Open the cabinet doors (G).
- You can flush the toilet for fun (H).
- The SCREWDRIVER will go into your inventory.

- Walk to the left side of the lockers.
- Open all the lockers (I).
- Take the HEAD (J).
- Take the last COMPACT DISC PIECE 10/10 (K).
- Look at the code (L).
- Take the THIRD KEY (M).
- Walk down 3 times to exit the building and get on the bus.
- Pull the gear lever to return to the other part of town.
- Exit the bus and walk down the alley.
- Walk forward and talk to the sad robot.
- He wants clothes.
- Walk down twice and enter the shop.
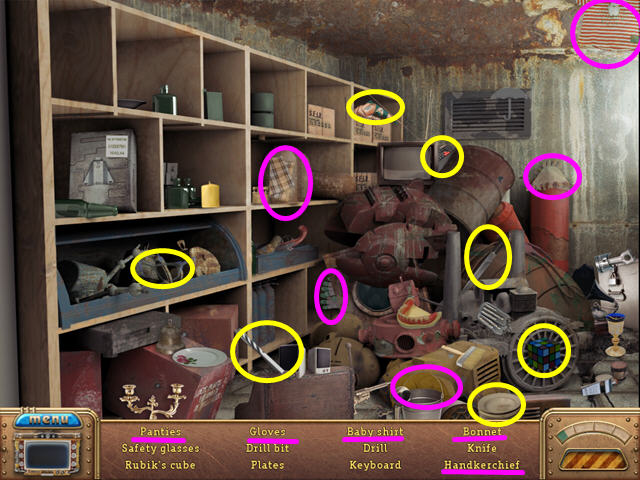
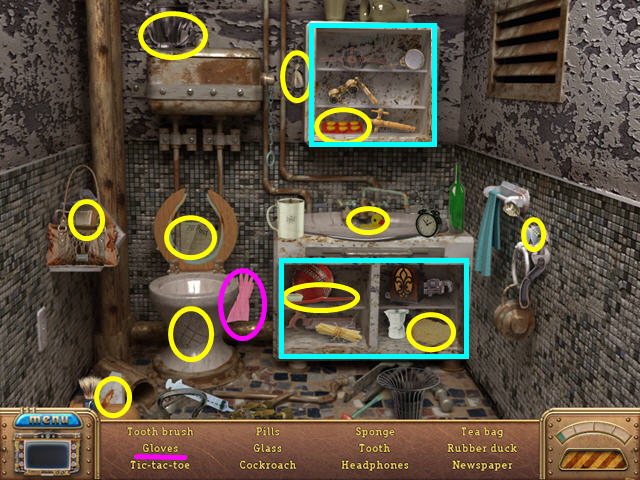
- Select the sparkling area in the right door for a hidden object scene.
- Locate all the objects on the list.
- The PANTIES, BABY SHIRT, BONNET, GLOVES, and HANDKERCHIEF will go into you inventory.
- Exit the shop and return to the sad robot.
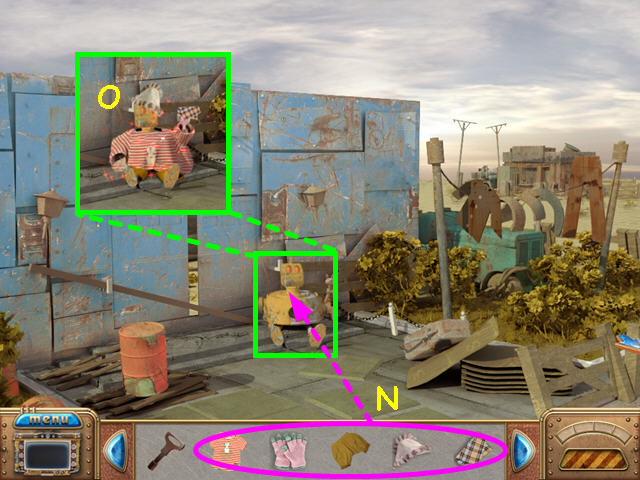
- Use the PANTIES, BABY SHIRT, BONNET, GLOVES, and HANDKERCHIEF on the sad robot (N).
- Talk to the robot until you get a mini-game (O).
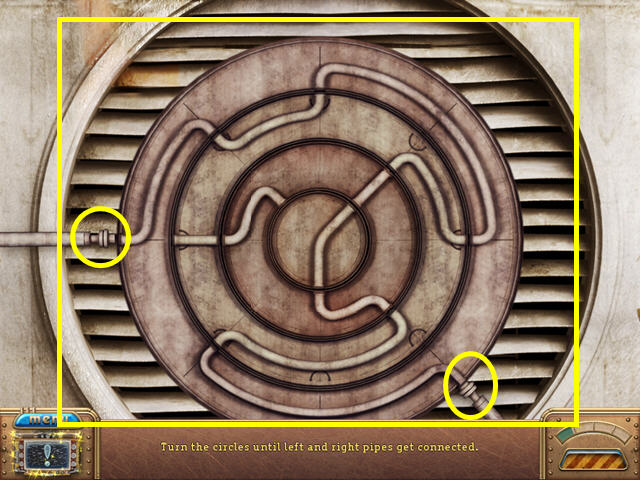
- The object is to connect the two pipes.
- Rotate the rings to move the pipes until the connection is made.
- You will get the ROBO-BLOOD.
- Take the ROBO-EYE and the ROBO-ARM (P).
- Walk down twice and return to the Robo-Shop.
- Give the ROBO-BLOOD to the robot (Q).
- Exit the shop.
- Set the clock to 3:25 (R).
- Enter the shop and take the KEY CARD (S).
- Exit the shop, then get on the bus and pull the lever.
- Exit the bus and enter the double doors.
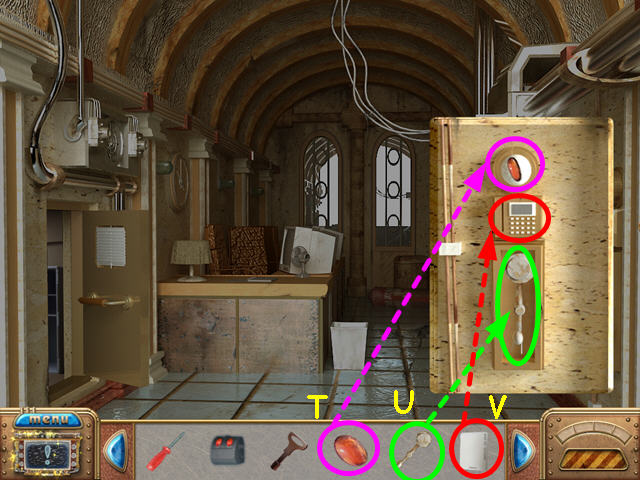
- Look at the keypad on the right.
- Place the ROBO-EYE in the spot above the keypad (T).
- Place the ROBO-ARM in the compartment below the keypad (U).
- Use the KEY CARD on the keypad (V).
- Open and enter the door on the right.
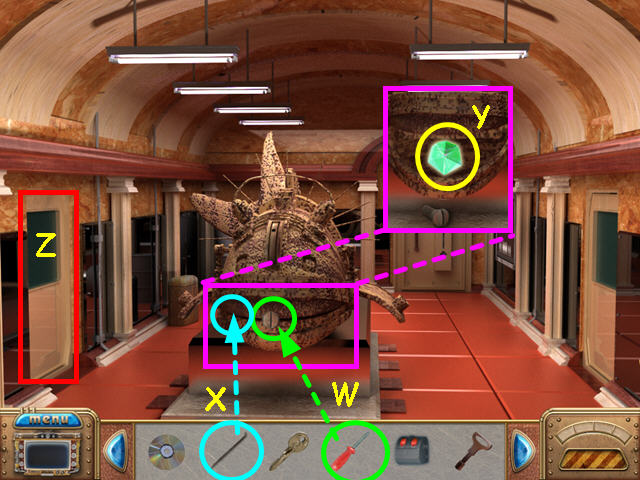
- Use the SCREWDRIVER on the screw in the fish mouth (W).
- Use the CROWBAR to pry open the mouth (X).
- Try to take the gem, but you need to stop the energy source (Y).
- Open and enter the door on the left (Z).
- Try to put the HEAD on the robot to learn you need rubber gloves (A).
- Look at the 2 overhead compartments (B).
- Walk to the upper right (C).
- Collect the 8 items.
- One item will go into the trash as it is broken.
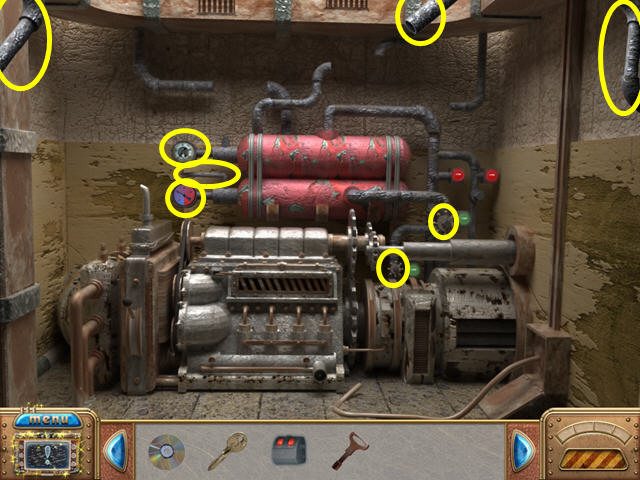
- Place the 7 items on the generator to repair the damage.
- Attach the hose (D).
- Pull the lever (E).
- Take the FIRST KEY from the compartment (F).
- Walk down 3 times, then enter the door on the left.
- Open the door at the back of the locker room for a hidden object scene.
- Locate all the items on the list.
- You will need to open and close the upper and lower cabinets.
- The GLOVES will go into your inventory.
- Walk down, then to the right.
- Enter the door on the left.
- Use the GLOVES on the robot (G).
- Place the HEAD on the robot (H).
- Look at the robot to learn it needs oil.
- Walk down 3 times to exit the building.
- Select the sparkling area at the rear of the bus for a hidden object scene.
- Locate all the objects on the list.
- The COIN will go into your inventory.
- Enter the bus and pull the lever.
- Exit the bus and enter the Robo-Shop.
- Give the COIN to the robot (I).
- Take the OIL CAN from the counter (J).
- Exit the shop and take the bus back to the headquarters.
- Enter the double doors and walk to the right.
- Enter the left door.
- Use the OIL CAN on the robot (K).
- Talk to the robot to learn you need to fix the conveyor and find fuel for the shafts (L).
- Exit the building and take the bus to the other side of town.
- Exit the bus and enter the alley.
- Walk forward, then enter the double doors.
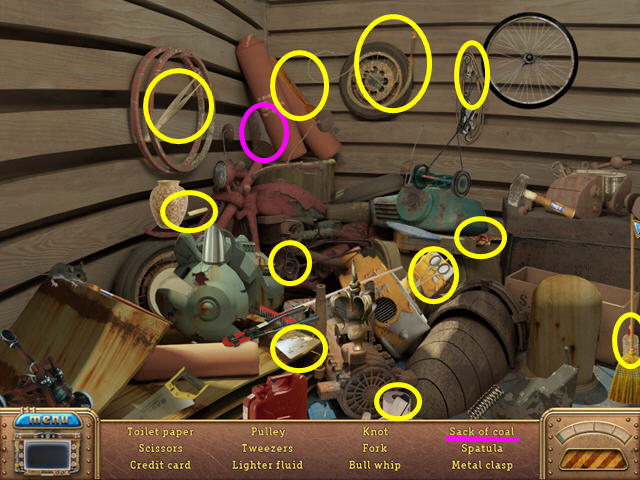
- Select the sparkling area in the shack for a hidden object scene.
- Locate all the objects on the list.
- The COAL will go into your inventory.
- Return to the bus and travel back to headquarters.
- Exit the bus and enter the building.
- Walk to the right, then enter the left door.
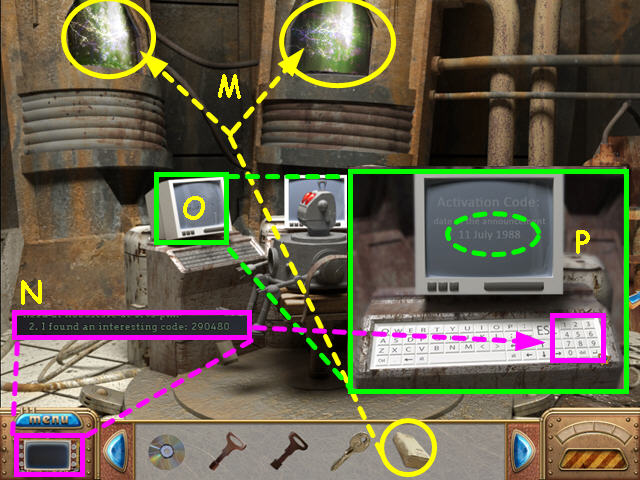
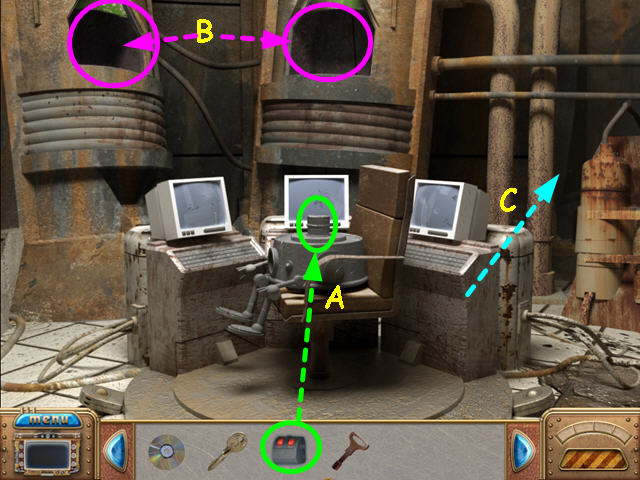
- Use the COAL on the 2 shafts (M).
- Look in the diary to get the code (N).
- Look at the computer and enter the code (O).
- Note the Activation code date (P).
- Walk down to exit the room.
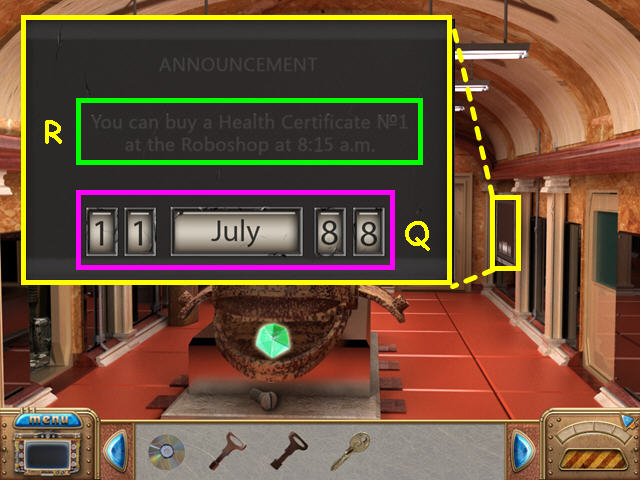
- Look at the panel on the right and enter the Activation Code Date of 11 JULY 88 (Q).
- You learn you can buy the health Certificate at the Robo-shop at 8:15 am (R).
- Exit the building and take the bus back to town.
- Walk down the alley and enter the cafe.
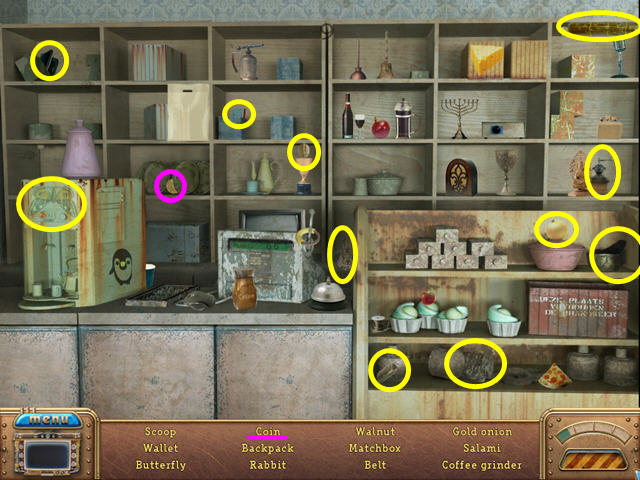
- Select the sparkling area on the counter for a hidden object scene.
- Locate all the objects on the list.
- The COIN will go into your inventory.
- Exit the shop and walk down.
- Set the clock to 8:15 (S).
- Enter the shop (T).
- Give the COIN to the robot (U).
- Talk to the robot to learn the certificate is digitally encoded.
- Exit the shop and take the bus to headquarters.
- Exit the bus and enter the building.
- Walk to the right, then enter the conveyor room on the right.
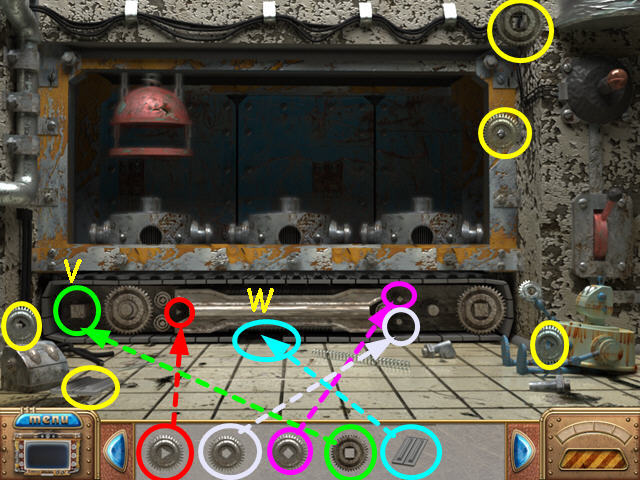
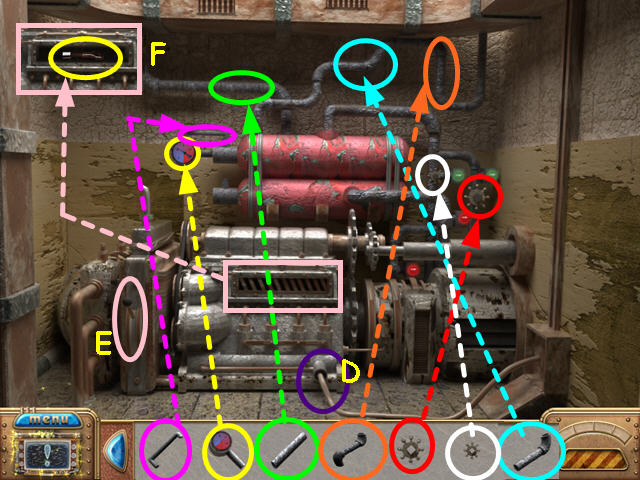
- Locate the 4 GEARS and the TRACK.
- Place the GEAR with the square hole on the left peg (V).
- Place the TRACK in the empty spot (W).
- Place the remaining GEARS on the small pegs with the same design.
- Exit the building.
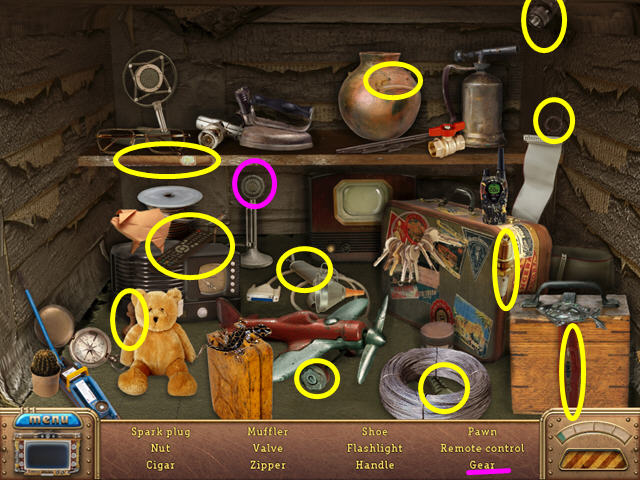
- Select the sparkling area at the back of the bus for a hidden object area.
- Locate all the items.
- The GEAR will go into your inventory.
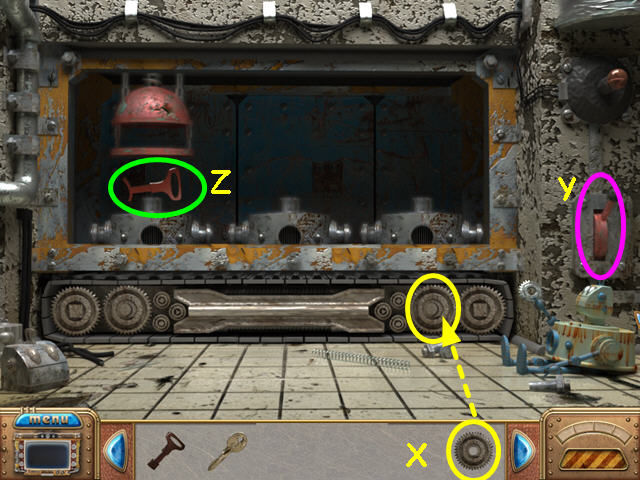
- Enter the building and return to the conveyor room.
- Place the final GEAR on the pegs (X).
- Pull the lever (Y).
- Take the SECOND KEY (Z).
- Exit the conveyor room and look at the door in the back.
- Use the FIRST, SECOND AND THIRD KEYS in the locks.
- Open and enter the door.
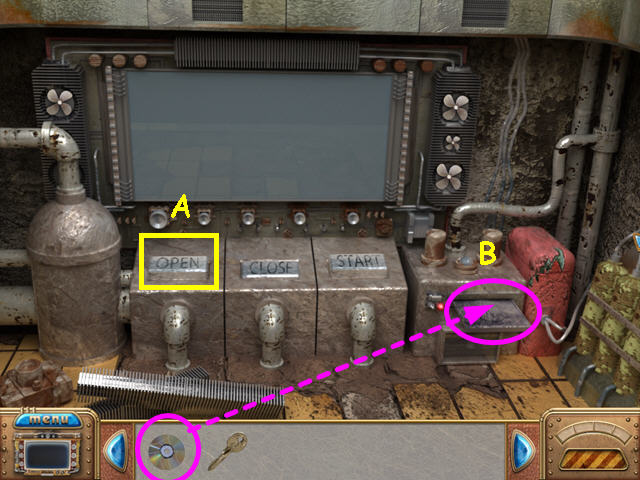
- Press the OPEN button (A).
- Place the CD into the drive for a mini-game (B).
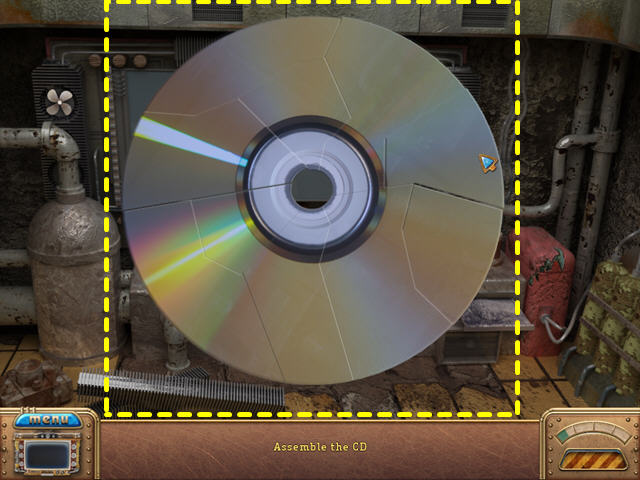
- The object is to restore the CD.
- Restore the CD by dragging all the pieces into place.
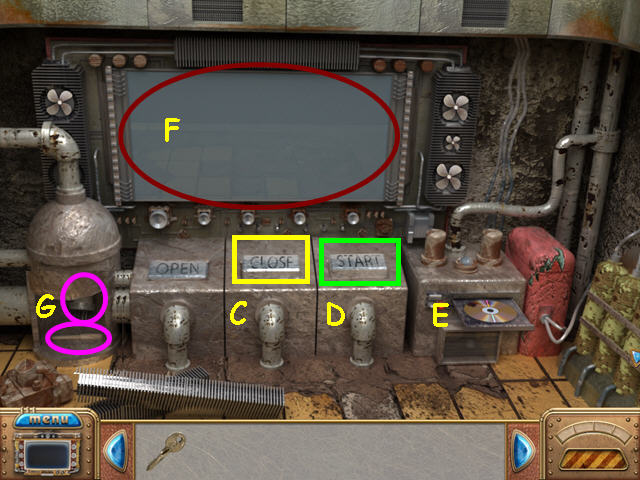
- Press the CLOSE button (C).
- Press the START button (D).
- Make note of the screen (E).
- Take the LEVER and the TRANSISTOR from the compartment (F).
- Walk down to exit the room.

- Use the lever on the fish to open the mouth wider (G).
- Replace the crystal with the transistor (H).
- Enter the 3-key door in the back of the room (I).
- Touch the video-screen.
World 3: River World
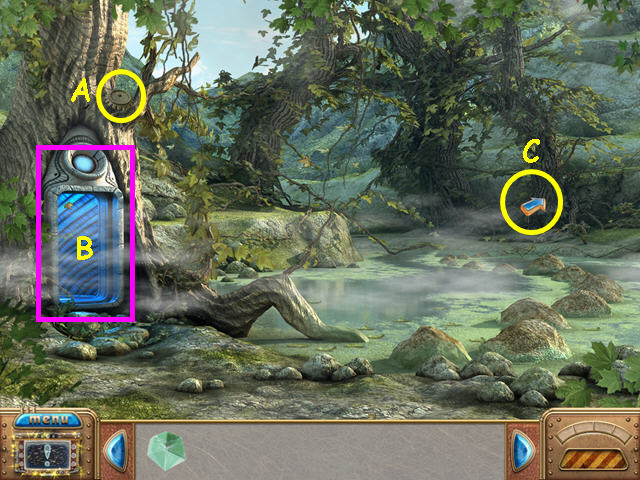
- Take the GEAR (A).
- Look at the teleporter (B).
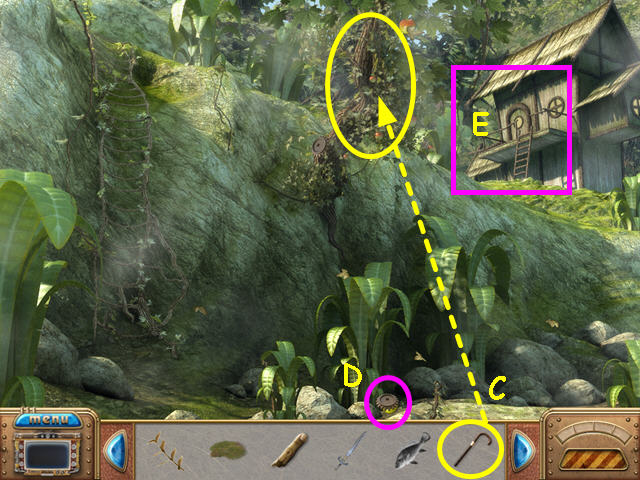
- Walk to the right (C).
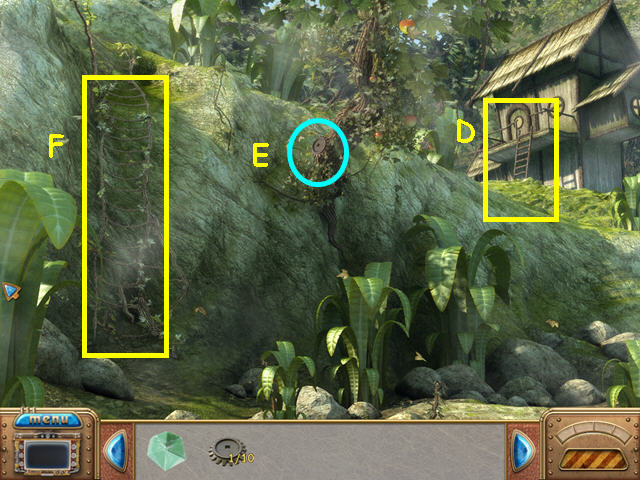
- Note the house on the right (D).
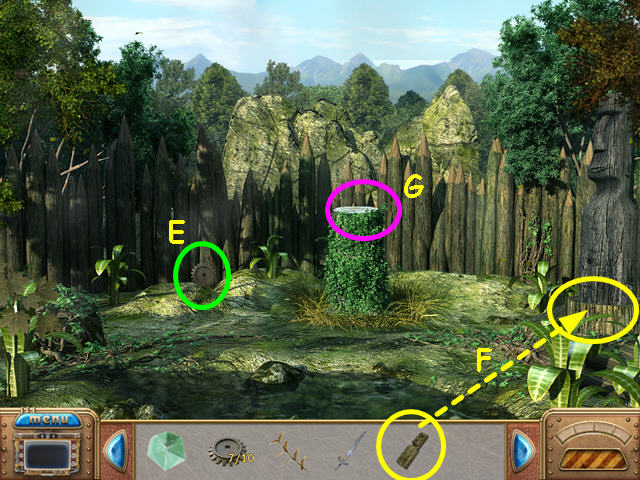
- Look at the gear in the tree, but it is too high (E).
- Climb up the ladder on the left (F).
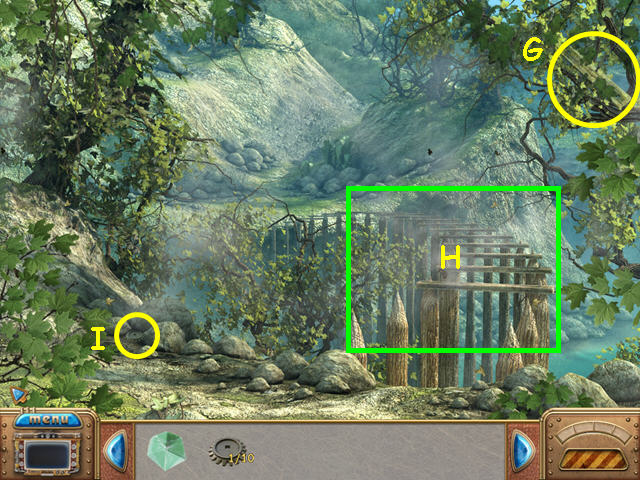
- Take the PLANK from the tree (G).
- Look at the bridge (H).
- Take the GEAR (I).
- Walk down twice.
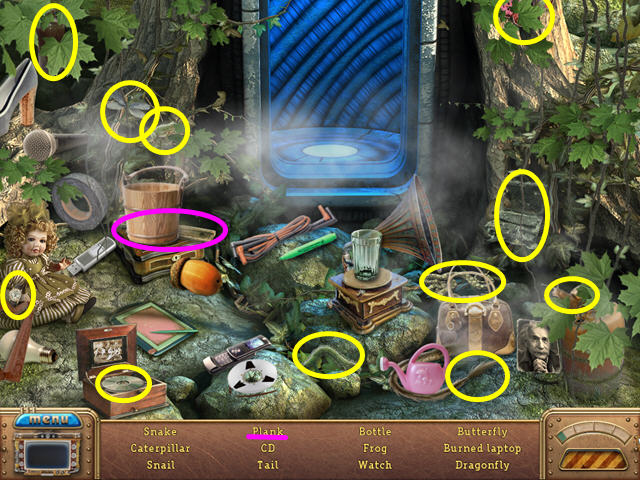
- Select the sparkling area by the teleporter for a hidden object area.
- Locate all the items.
- The PLANK will go into your inventory.
- Walk to the right, then up the ladder.
- Place the 2 PLANKS on the bridge, then walk forward.

- Look at the statue (J).
- Notice the shop that is closed (K).
- You can travel to the left or right on the wooden paths.
- Enter the rightmost hut (L).
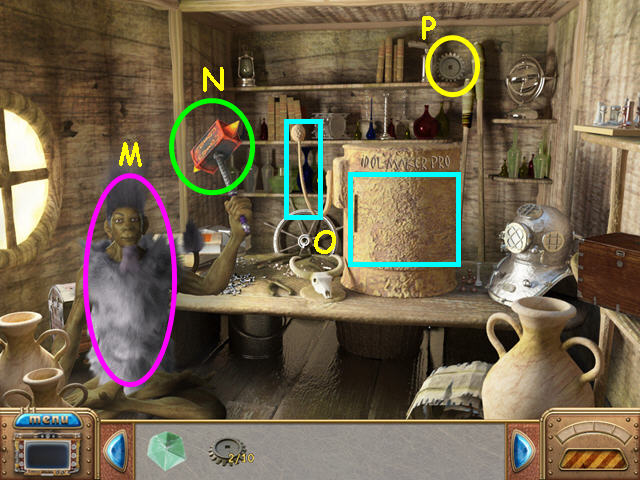
- Talk to the master (M).
- Note the fire hammer (N).
- Note the handle and door on the Idolmaker Pro (O).
- Take the GEAR (P).
- Walk down 3 times, then visit the hut on the right.
- Talk to the hermit, then exit the hut.
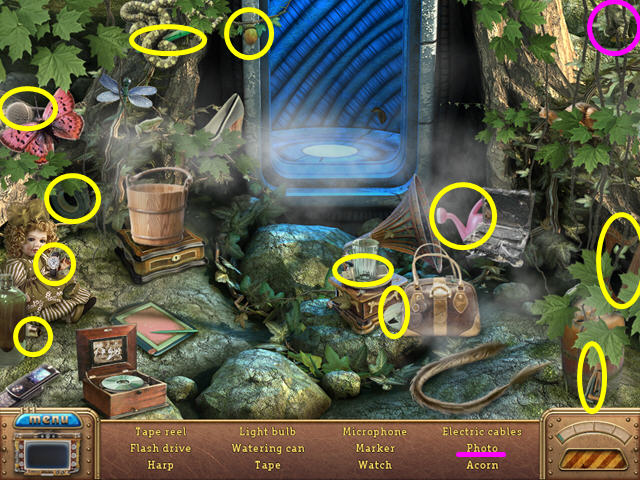
- Walk down once and select the sparkling area by the teleporter for a hidden object scene.
- Locate all the items on the list.
- The PHOTO will go into your inventory.
- Walk to the right twice to return to the hermit's hut.
- Give the PHOTO to the hermit (Q).
- Learn of your father's imprisonment on a bas-relief.
- Select the sparkling area in the alcove for a hidden object scene (R).
- Locate all the items on the list.
- The ARTIFACT (branch) will go into your inventory.
- Exit the hut and climb the ladder.
- Cross the bridge, then enter the right hut.
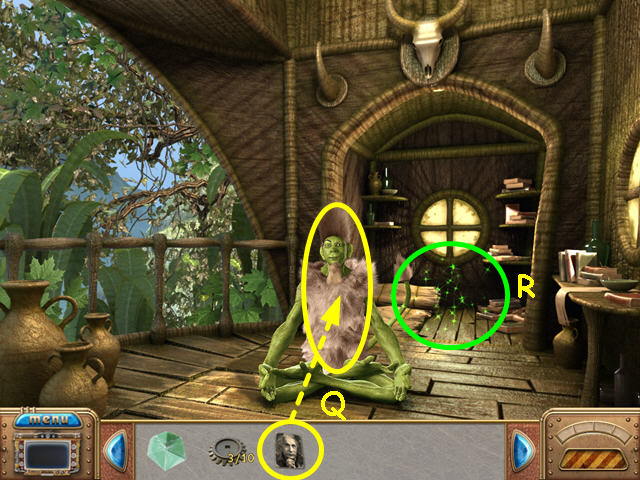
- Talk to the master to learn that the river needs to be restored.
- Exit the hut and take the left path.
- Walk forward and talk to Little Monkey in jail (S).
- Learn you need to make a potion to free him from the cage.
- Take the MOSS (T).
- Take the GEAR (U).
- Walk down twice.
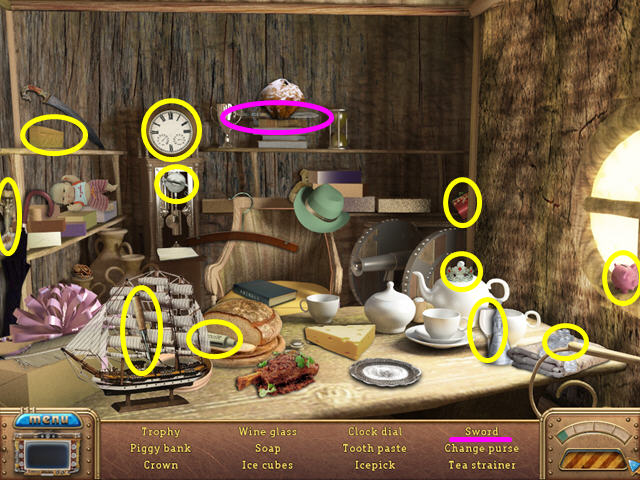
- Select the sparkling shop for a hidden object scene.
- Locate all the items on the list.
- The SWORD will go into your inventory.
- Walk to the left.
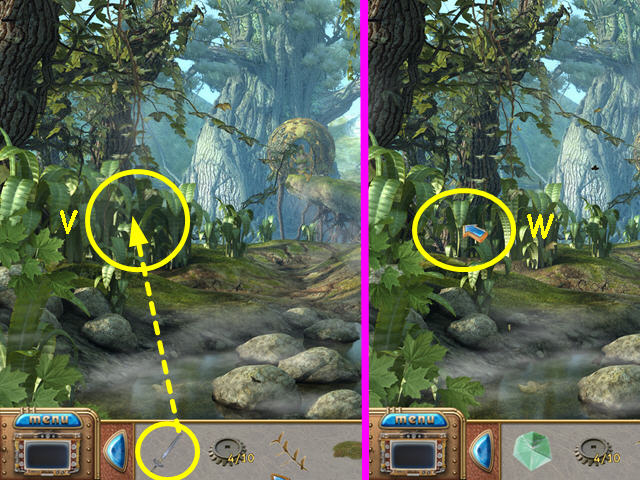
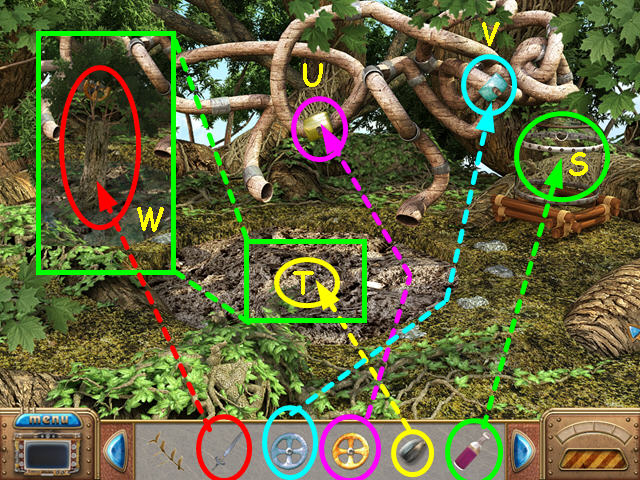
- Use the SWORD to cut the undergrowth (V).
- Walk to the left for a hidden object scene (W).
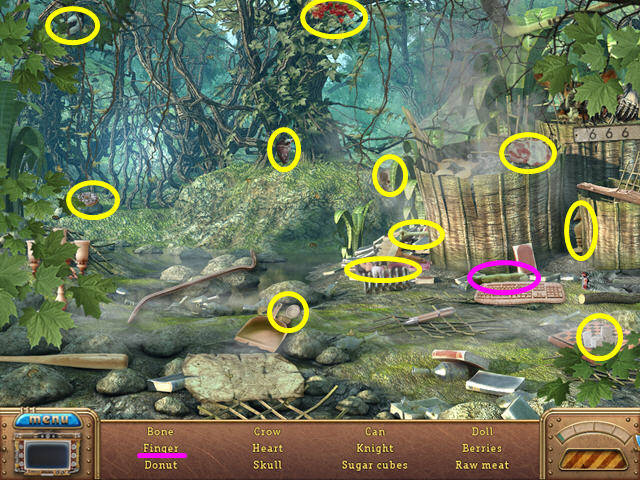
- Locate all the items on the list.
- The ROTTEN FINGER will go into your inventory.
- Walk down twice, then walk to the right.
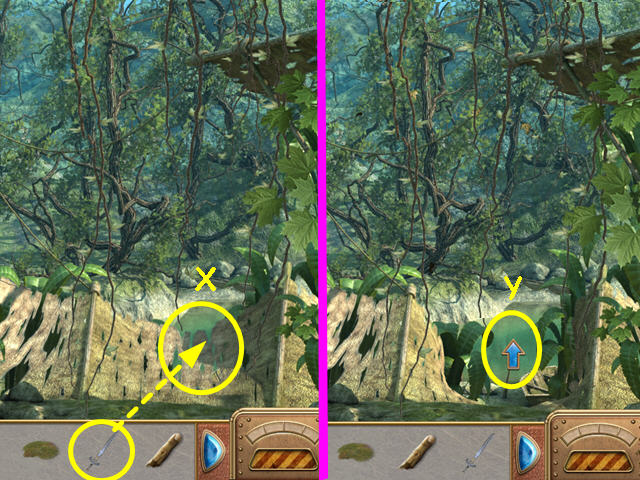
- Use the SWORD to cut an opening (X).
- Walk forward through the opening (Y).
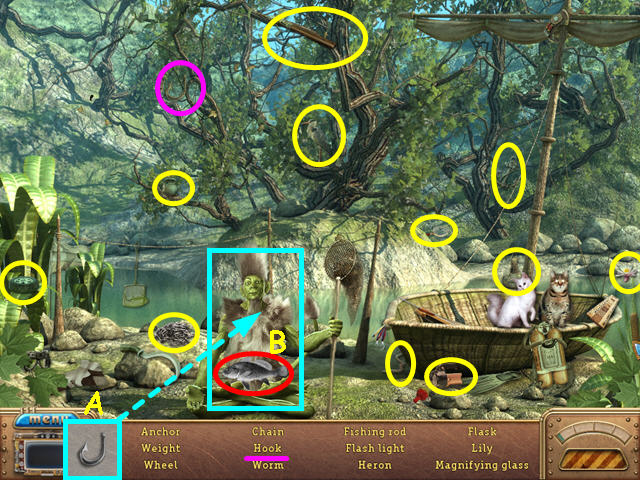
- Talk to the fisherman until he sparkles.
- Click on the fisherman for a hidden object scene.
- Locate all the items on the list.
- The HOOK will go into your inventory.
- Give the HOOK to the fisherman (A).
- Take the FISH from his lap (B).
- Walk down 3 times and look at the apples in the tree with the gear that is between the rope ladder and the hermit's hut.
- Climb up the ladder and walk forward to the village.
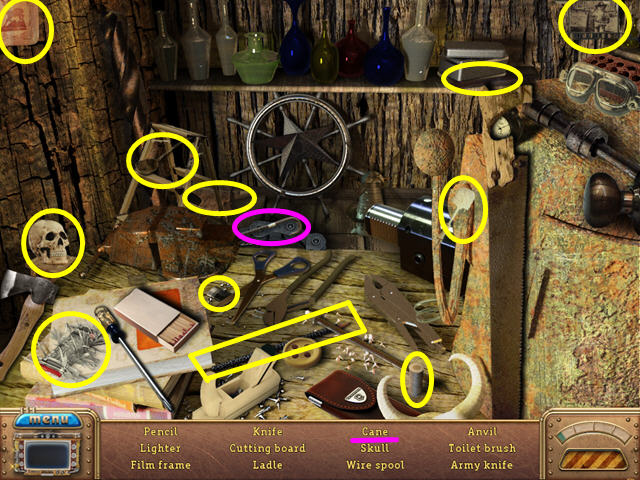
- Enter the right hut.
- Select the sparkling area on the table for a hidden object scene.
- Locate all the items on the list.
- The CANE will go into your inventory.
- Walk down 3 times.
- Use the CANE on the apple tree (C).
- Take the GEAR and the APPLE (D).
- Enter the hermit's hut (E).
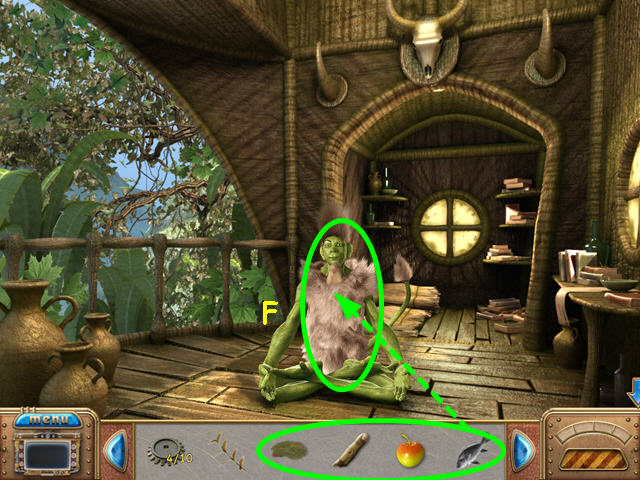
- Give the MOSS, ROTTEN FINGER, APPLE, and FISH to the hermit (F).
- The hermit needs to know the time.
- Exit the hut and climb the ladder.
- Cross the bridge to the village and enter the right hut.
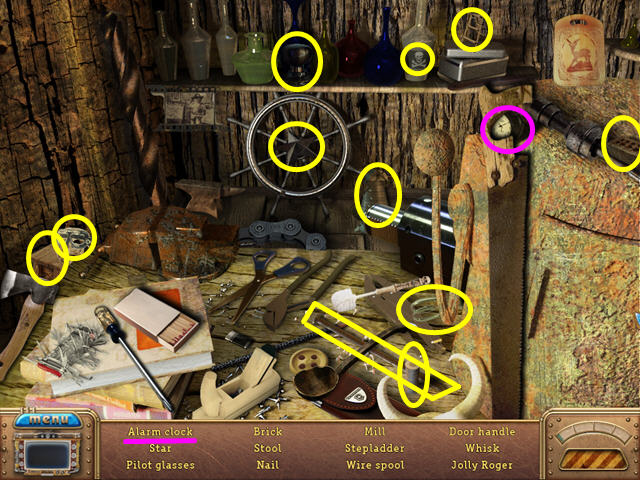
- Select the sparkling area on the table for a hidden object scene.
- Locate all the items on the list.
- The ALARM CLOCK will go into your inventory.
- Walk down 3 times, then enter the hermit's hut.
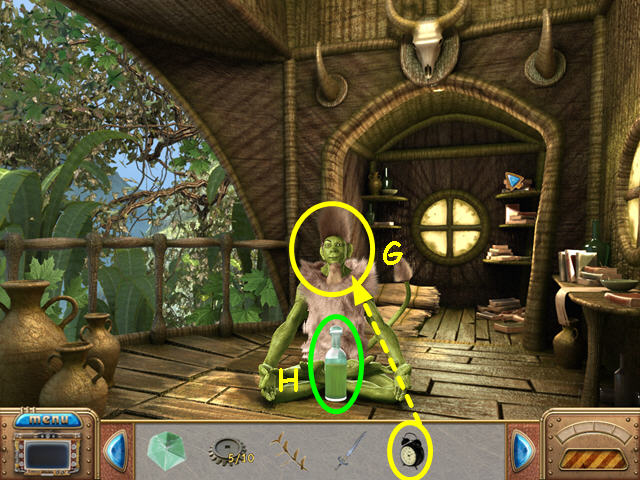
- Give the ALARM CLOCK to the hermit (G).
- Take the POTION that appears (H).
- Exit the hut, then climb the ladder.
- Walk forward across the bridge, then go to the left.
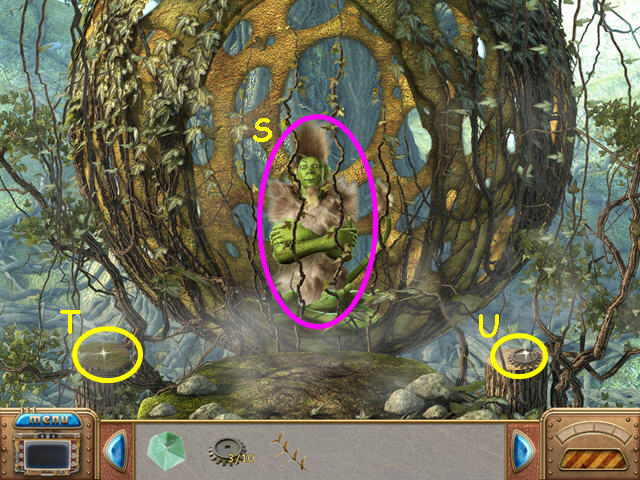
- Walk forward to the jail cage area.
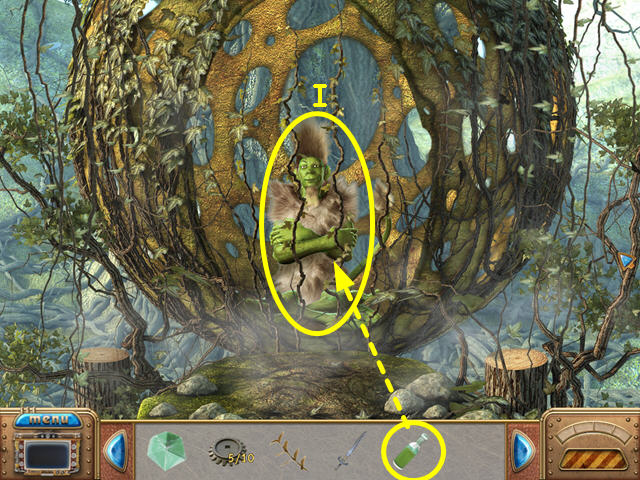
- Give the POTION to Little Monkey (I).
- Talk to Little Monkey to learn about the idol and tree.
- Walk down once, then head to the left.
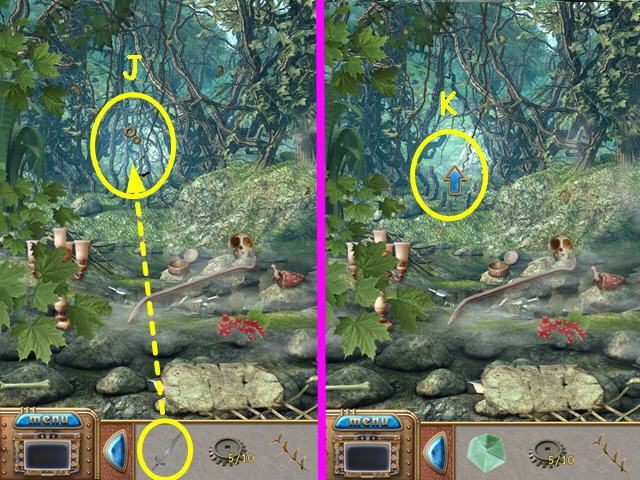
- Use the SWORD to cut the brambles (J).
- Walk forward through the opening (K).
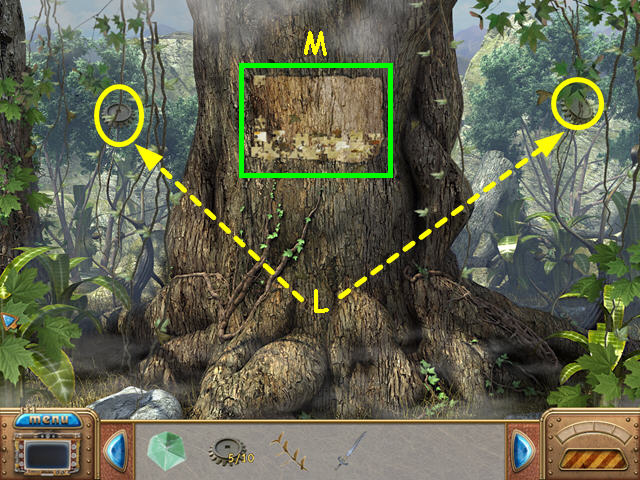
- Take the 2 GEARS (L).
- Select the rectangular area on the tree for a mini-game (M).
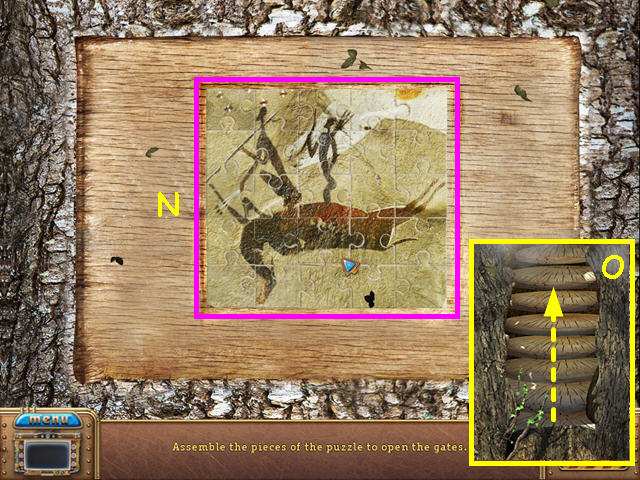
- Restore the picture in this jigsaw-style mini-game (N).
- Pieces will lock in place when in the proper position.
- Walk up the steps that appear in the tree (O).
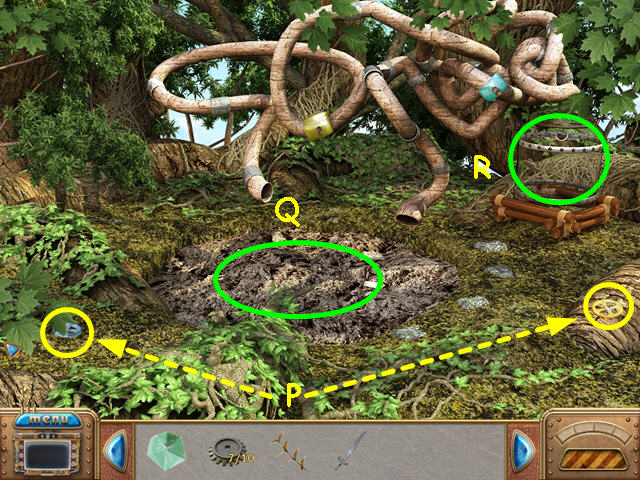
- Take the 2 VALVES (P).
- Look at the soil (Q).
- Look at the water tank (R).
- Walk down twice for a hidden object scene.
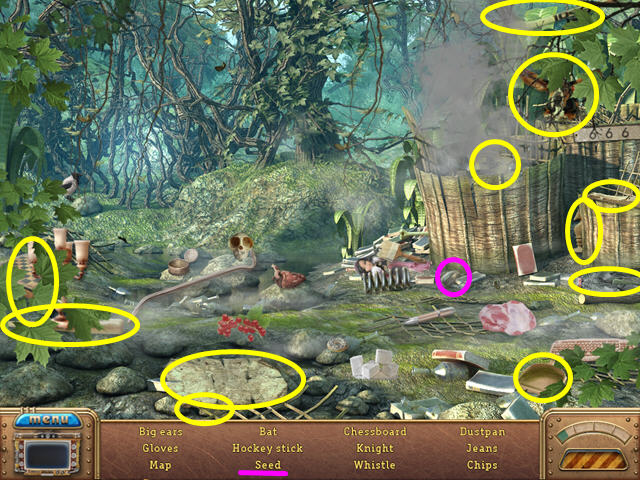
- Locate all the items on the list.
- The SEED will go into your inventory.
- Walk down twice, then select the sparkling area at the shop for a hidden object scene.
- Locate all the items on the list.
- The LIFE WATER (vial) will go into your inventory.
- Walk to the left twice, then forward twice.
- Place the LIFE WATER into the tank (S).
- Place the SEED into the soil (T).
- Place the yellow VALVE (handle) on the yellow junction (U).
- Place the blue VALVE (handle) on the blue junction (V).
- Click on the blue and yellow valves to turn them on.
- Use the SWORD to cut down the tree (W).
- Take the DWARFISH TREE.
- Walk down 4 times, then enter the right hut.
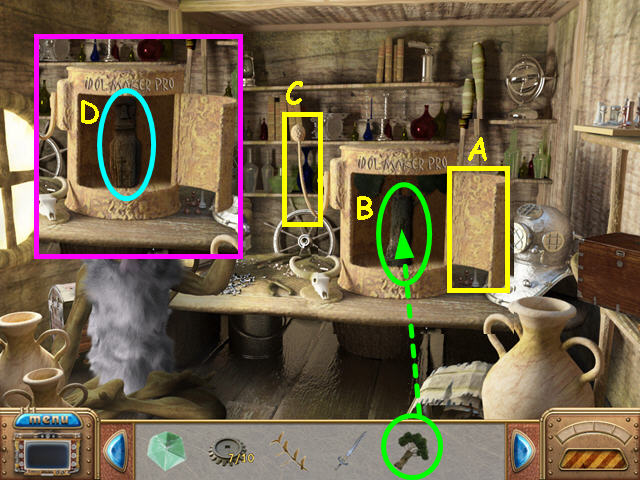
- Open the door to the Idolmaker (A).
- Place the DWARFISH TREE inside the Idolmaker and close the door (B).
- Pull the lever (C).
- Open the door and take the IDOL (D).
- Walk down twice, then head to the left.
- Take the GEAR (E).
- Place the IDOL on the stump on the right (F).
- Look at the tree stump that appears for a mini-game (G).
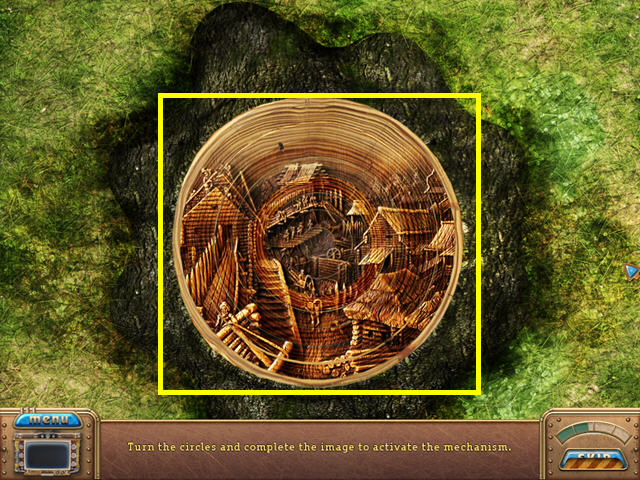
- The object is to restore the picture by rotating the rings.
- Click on each ring to move it into position.
- The outer ring does not move.
- Once you have solved the mini-game, walk forward through the opening.
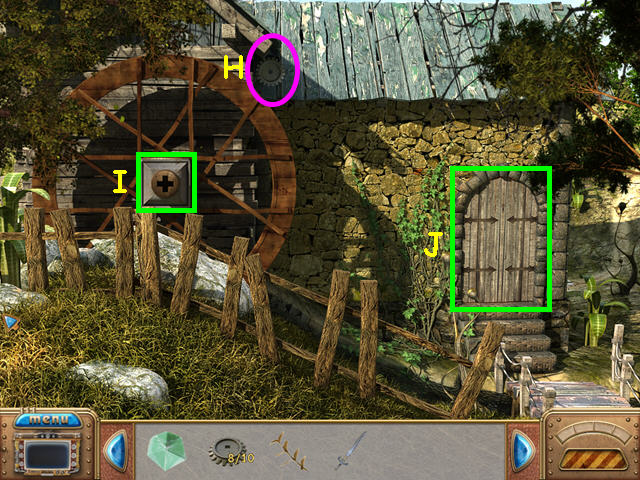
- Take the GEAR (H).
- Note the keyhole on the water wheel (I).
- Note the closed door (J).
- Walk to the right.
- Take the final GEAR (K).
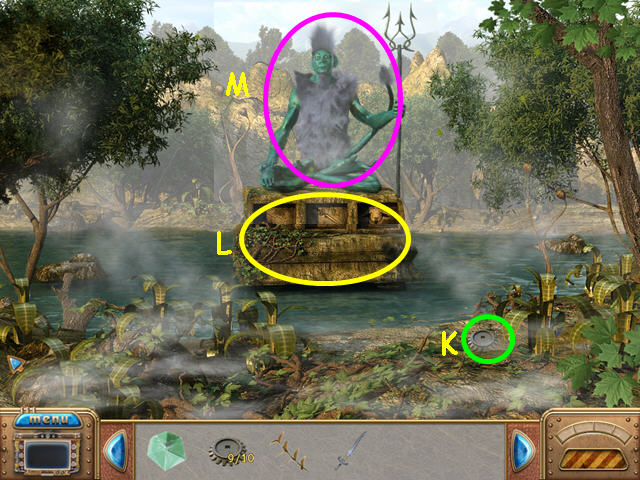
- Click on the pedestal (L).
- Talk to the river god that appears (M).
- Learn you need to repair the mill and bring him 3 gifts.
- Walk down and enter the now open door to the mill.
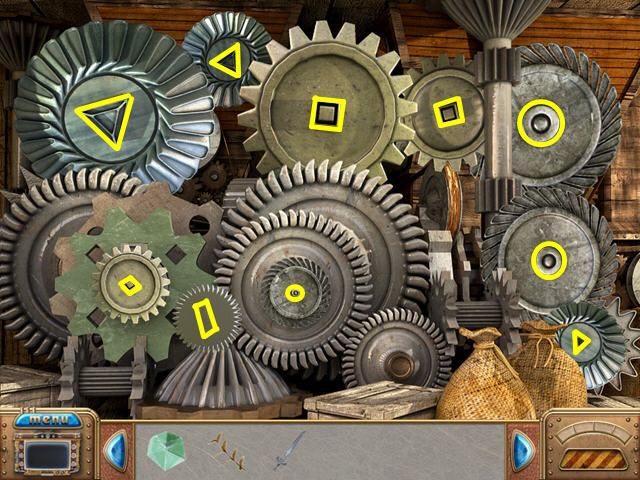
- Place the GEARS anywhere to trigger the mini-game.
- Place the gears in the correct position.
- Left-click and drag the gears.
- Use the shape in the center of the gears to determine where they should be placed.
- Walk down 4 times, then enter the hermit's hut.
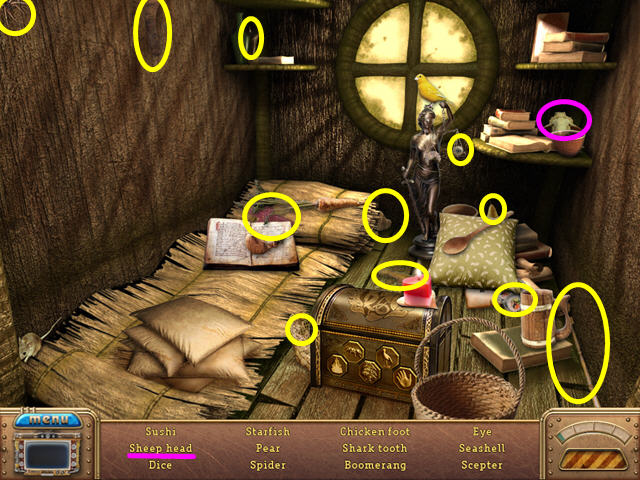
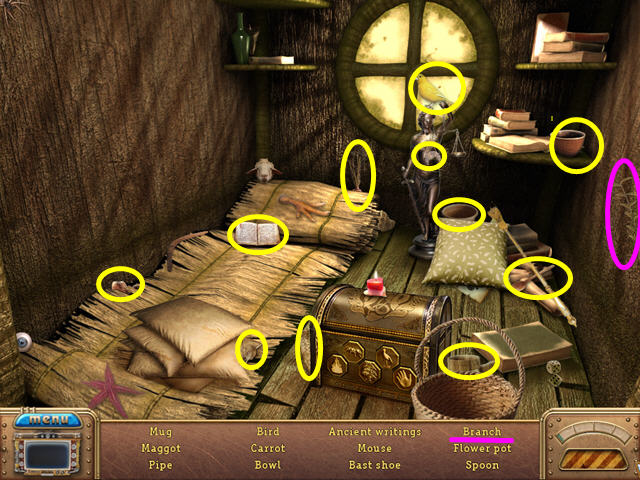
- Select the sparkling area in the alcove for a hidden object scene.
- Locate all the items on the list.
- The RAM HEAD (sheep head) will go into your inventory.
- Exit the hut and climb the ladder.
- Cross the bridge, then walk right.
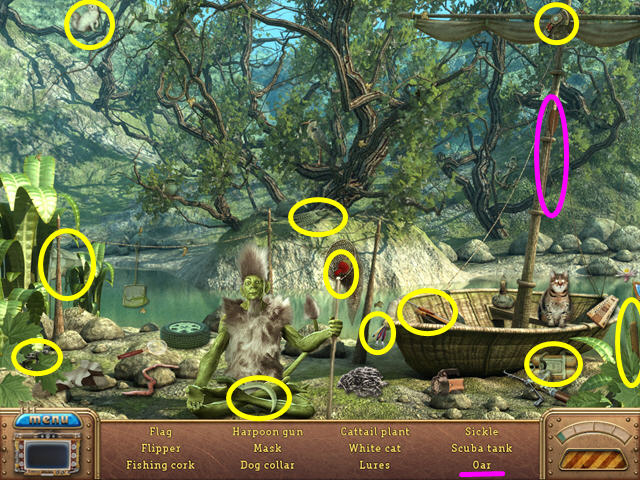
- Enter the opening for a hidden object scene with the fisherman.
- Locate all the items.
- The OAR will go into your inventory.
- Walk down 3 times, then take the left path.
- Walk forward and then walk to the right.
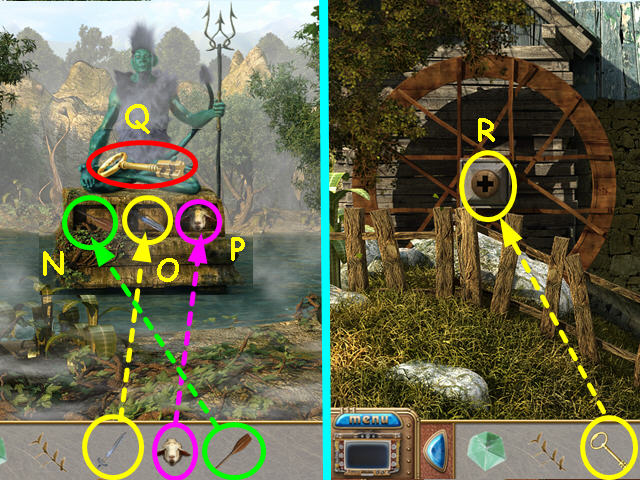
- Place the OAR into the left niche of the pedestal (N).
- Place the SWORD into the center niche of the pedestal (O).
- Place the RAM HEAD into the right niche of the pedestal (P).
- Take the MILL KEY that appears in the river god's lap (Q).
- Walk down once to the mill.
- Use the MILL KEY in the center of the water wheel (R).
- Walk down 4 times.
- Enter the teleporter.
World 4: The Flying City
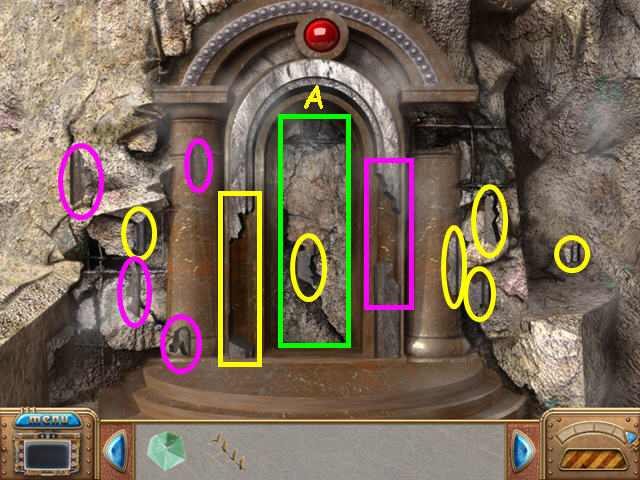
- Walk forward across the bridge.
- Click on the entrance- the fragments missing from the stone arch will appear (A).
- Place each of the 10 pieces back into the arch.
- The pieces circled in yellow fit into the left side of the arch, while the pink will fit the right side.
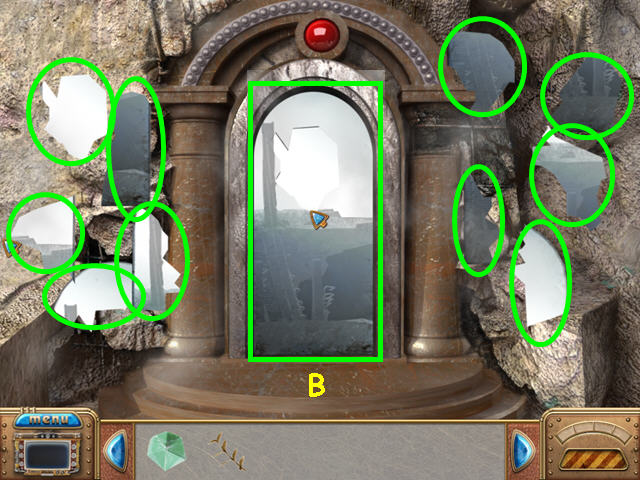
- Fit the 10 mirror fragments into the arch, jigsaw-style (B).
- Left-click and drag the pieces into position.
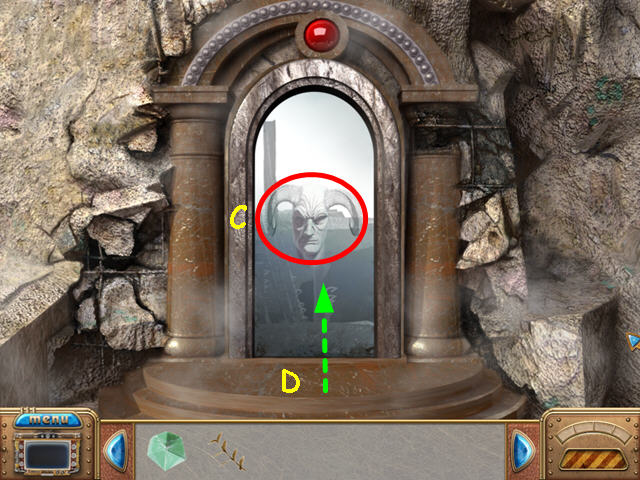
- Talk to the guard who warns you not to free your father (C).
- Click on the mirror to enter the city (D).
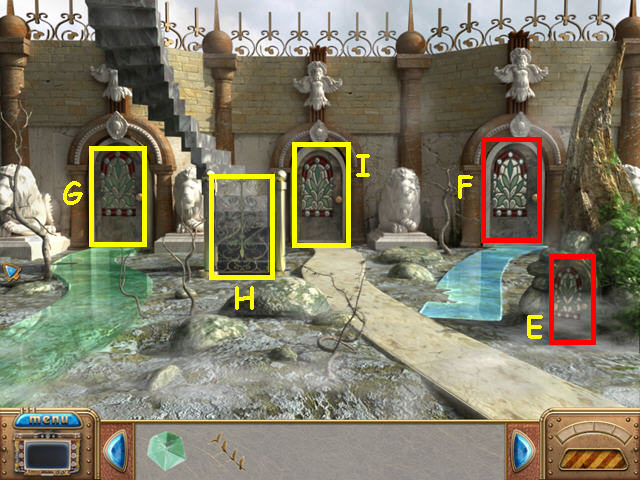
- Open the door on the right, but learn you are too large to enter (E).
- Try the 2nd door from the right, but you need a key (F).
- Note the left door is open (G).
- Note the gate to the stairs is open (H).
- Enter the center door (I).
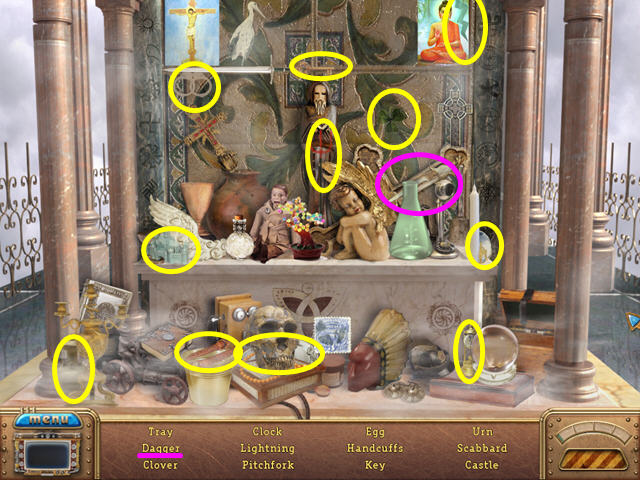
- Select the sparkling area for a hidden object scene.
- Locate all the items.
- The DAGGER will go into your inventory.
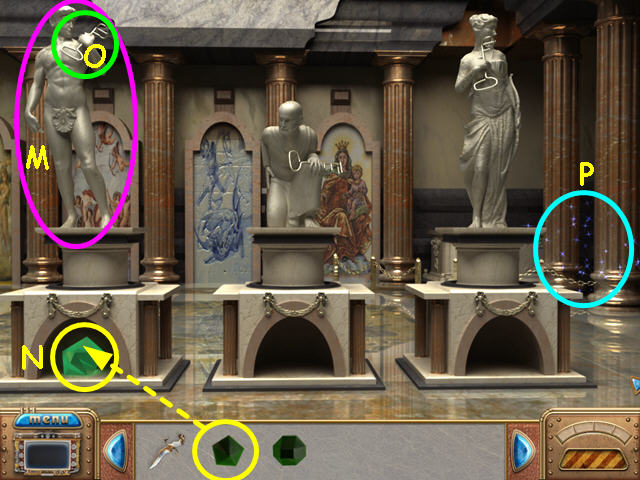
- Walk forward.

- Take the 2 EMERALDS (J).
- Place the LIFE CRYSTAL in the upper, center niche (K).
- Place the ARTIFACT on the left side of the alcove (L).
- Walk down twice and enter the left door.
- The right and center statues do not want to talk to you.
- Talk to the left statue (M).
- Place the 5-sided EMERALD in the alcove at the base of the left statue (N).
- Take the KEY from the left statue (O).
- Select the sparkling area on the right for a hidden object scene (P).
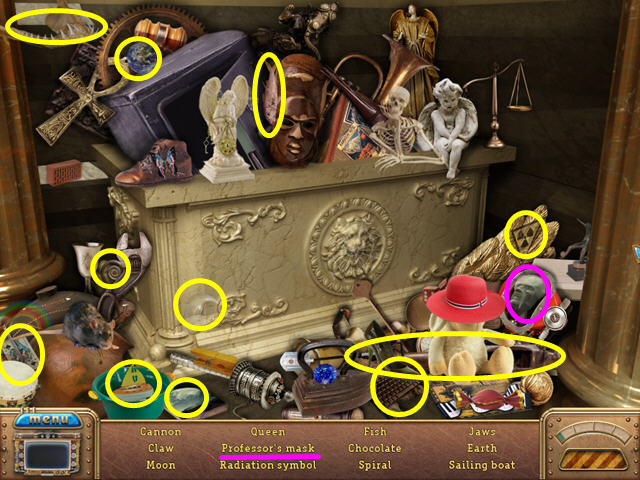
- Locate all the items on the list.
- The PROFESSOR'S MASK will go into your inventory.
- Exit the room.
- Open the gate and climb the stairs.
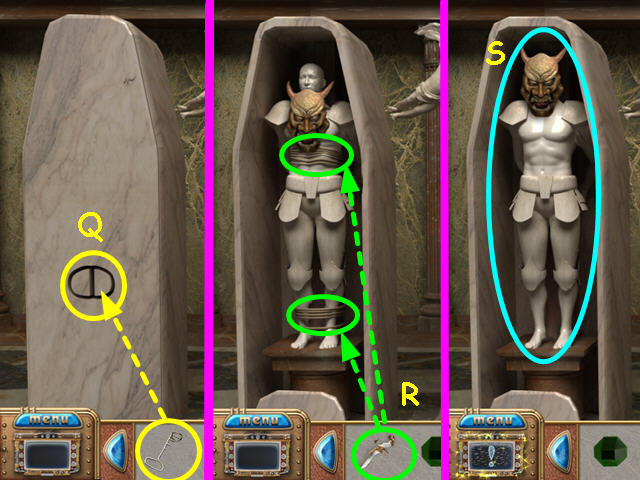
- Use the KEY on the left sarcophagus (Q).
- Use the DAGGER to cut the ropes in 2 places (R).
- Talk to the statue (S).
- Walk down, then enter the left door.
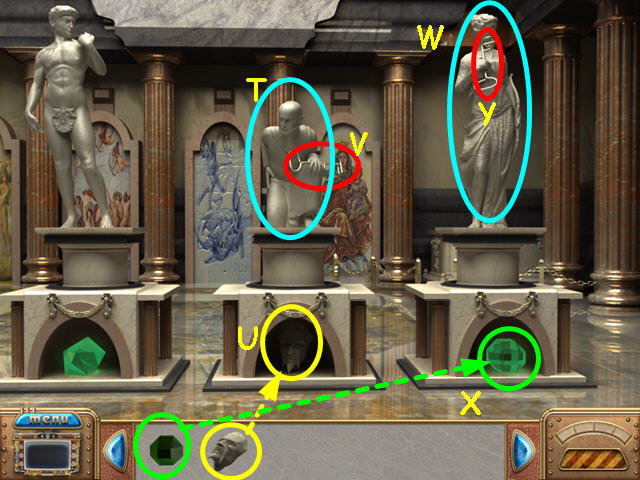
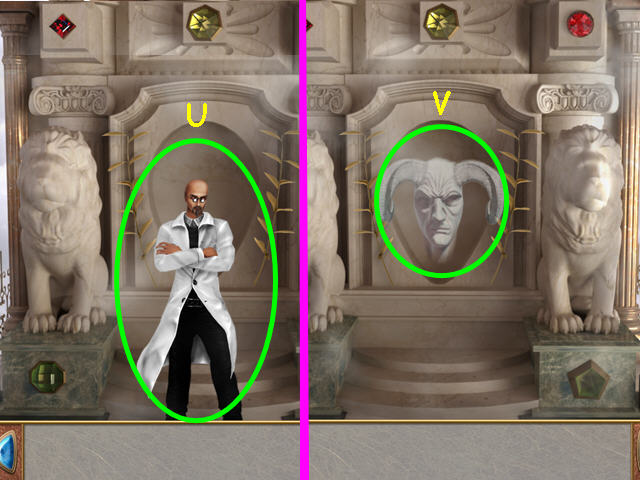
- Talk to the center statue (T).
- Place the PROFESSOR'S MASK in the alcove at the base of the center statue (U).
- Take the KEY from the center statue (V).
- Talk to the right statue (W).
- Place the EMERALD in the alcove at the base of the right statue (X).
- Take the KEY from the right statue (Y).
- Exit the room, then go up the stairs.
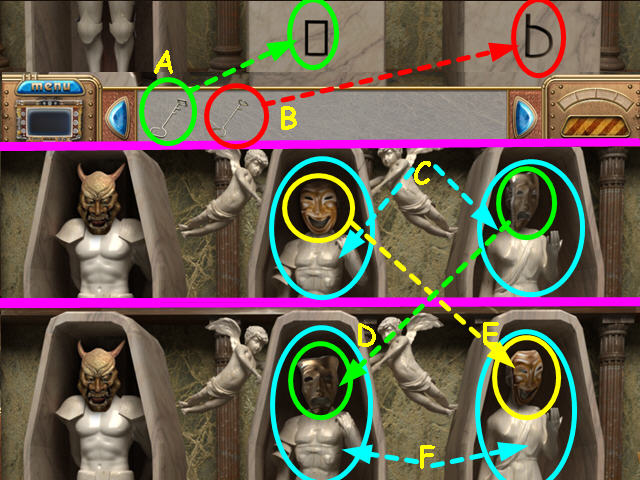
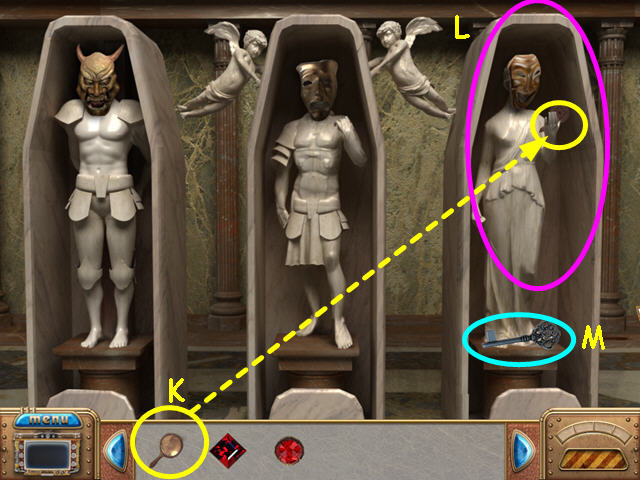
- Use the rectangular KEY on the center sarcophagus (A).
- Use the 'b' KEY on the right sarcophagus (B).
- Talk to the center and right statues (C).
- Take the center and right statue's MASKS.
- Place the SAD MASK on the center statue (D).
- Place the GLAD MASK on the right statue (E).
- Talk to both statues again (F).
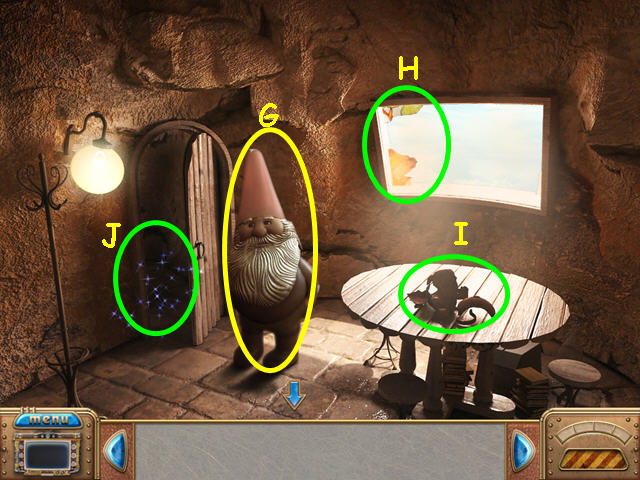
- Walk down and enter the small door on the right.
- Talk to the gnome (G).
- Note the broken window (H).
- Note the broken pottery on the table (I).
- Select the sparkling area on the left for a hidden object area (J).
- Locate all the items on the list.
- The MIRROR will go into your inventory.
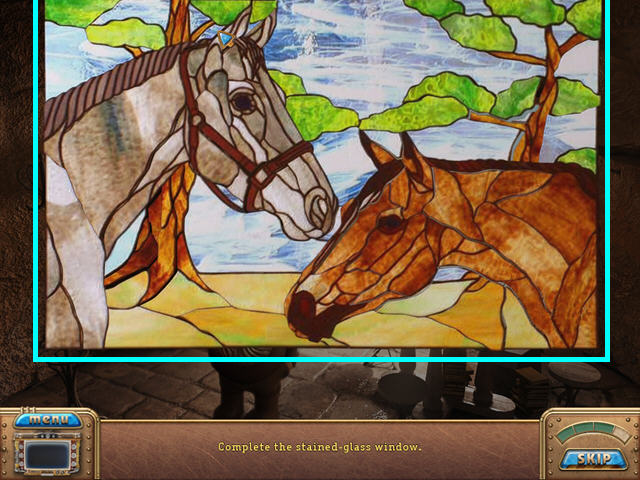
- Select the broken window for a mini-game.
- Restore the stained glass picture.
- Drag pieces into position.
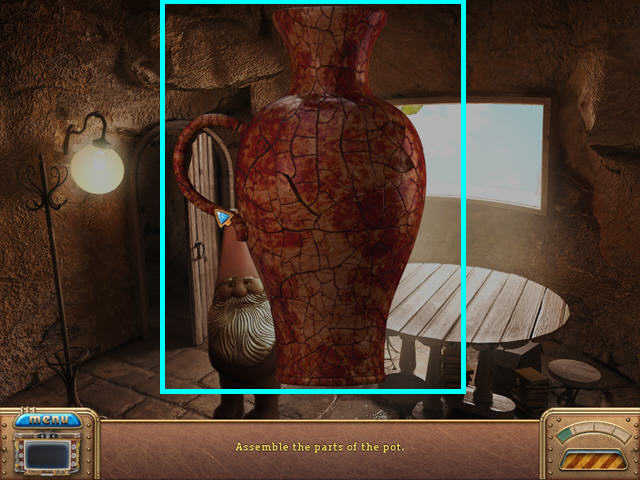
- Select the broken pottery on the table for a mini-game.
- Restore the broken pot.
- Drag pieces into the correct position.
- Take the 2 RUBIES that appear at the gnome's feet.
- Exit the gnome's house and walk up the stairs.
- Place the MIRROR in the right statue's hand (K).
- Talk to the statue once it stops laughing (L).
- Take the FOUNTAIN KEY that appears (M).
- Exit the room.
- Use the FOUNTAIN KEY on the 2nd door from the right.
- Look at any of the piles of dirt (N).
- Learn you need a shovel.
- Exit the fountain area and enter the left door.
- Select the sparkling area for a hidden object scene.
- Locate all the items on the list.
- The SHOVEL will go into your inventory.
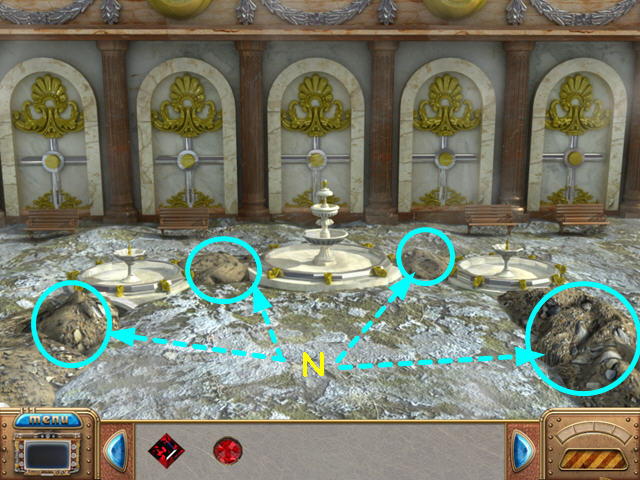
- Exit the room and return to the fountain.
- Use the shovel to dig out the 4 areas of dirt.
- Exit the fountain area and enter the center door.
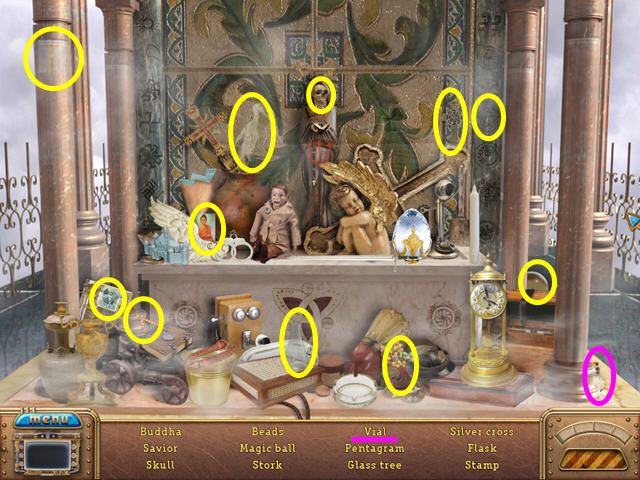
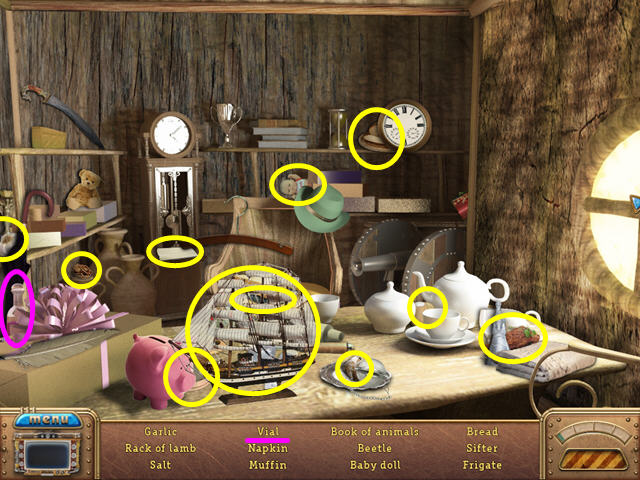
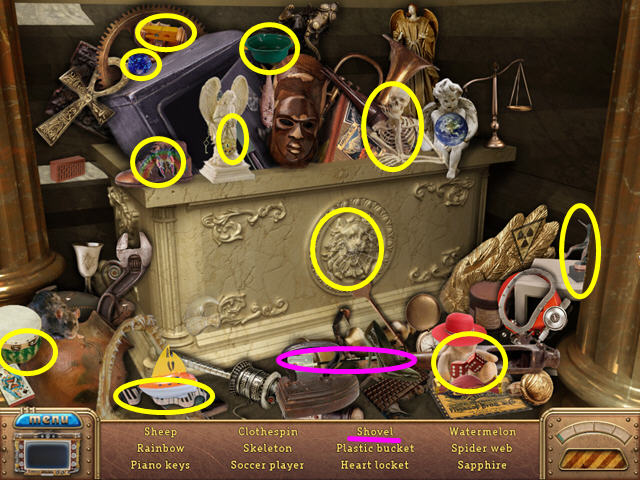
- Select the sparkling area for a hidden object scene.
- Locate all the items.
- The VIAL will go into your inventory.
- Walk down and return to the fountains.
- Use the VIAL on the center fountain.
- Take the vial with the LIFE WATER.
- Exit the fountains, then enter the left door.
- Talk to any of the statues until he says, 'over my dead body'.
- Exit the room and enter the small door on the right.
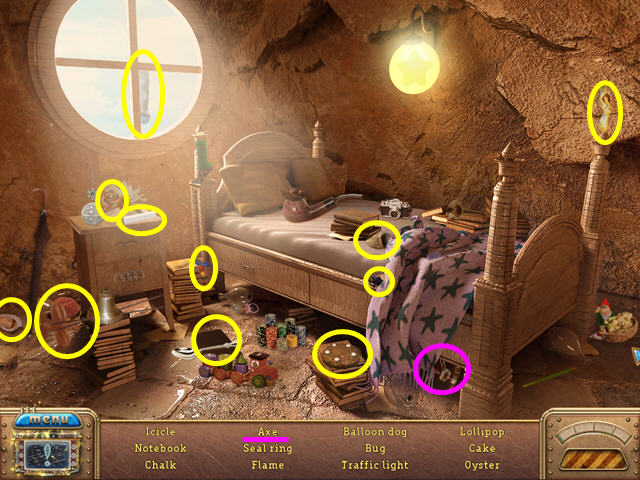
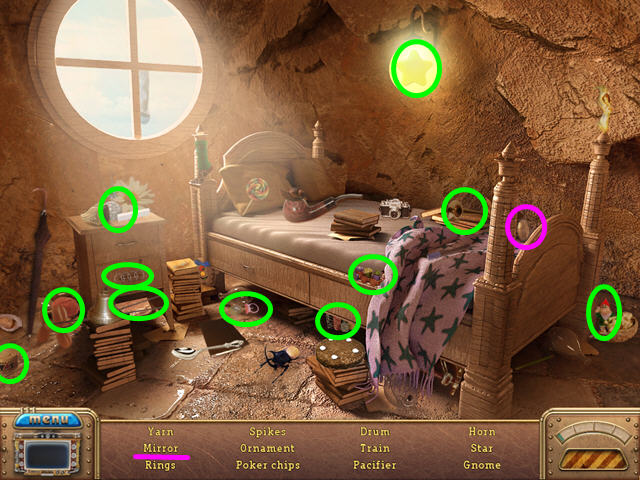
- Select the sparkling area in the gnome's bedroom for a hidden object scene.
- Find all the items on the list.
- The AXE will go into your inventory.
- Exit the gnome's house and enter the left door.

- Use the AXE on all three statues (O).
- Take the 2 EMERALDS and the PROFESSOR'S MASK from the bases of the statues (P).
- Walk down, then enter the center door.
- Walk forward.
- Place the 2 RUBIES in the upper niches (Q).
- Place the 2 EMERALDS in the lower niches (R).
- Place the PROFESSOR'S MASK in the center (S).
- Use the LIFE WATER on the mask (T).
- Talk to your father (U).
- Learn that he is evil.
- Talk to the guardian (V).
- The guardian orders you to bring your father back to prevent vast destruction.
- Congratulations! You have completed CrossWorlds: The Flying City!
Created at: 2011-01-10