

Walkthrough Menu
- General Tips
- Chapter 1: Darkfall Manor
- Chapter 2: Secret Dungeon
- Chapter 3: Pirate's Pier
- Chapter 4: Woodland Cottage
- Chapter 5: Scarecrow Alley
- Chapter 6: Lost Garden
General Tips
- Some Hidden Object Scenes and Mini Games are randomized. Your solution may vary. Throughout this walkthrough, Hidden Object Scenes are referred to as HOS.
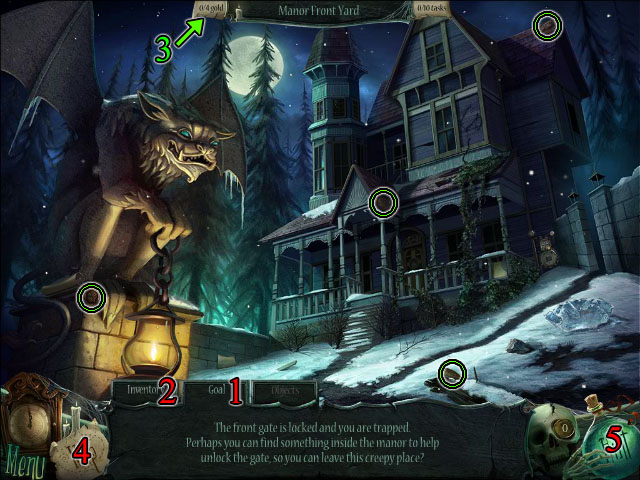
- Click on the Goals tab to view your current goal (1). Click on the Inventory tab to view your items (2).
- Collect all of the Gold Coins (3)in a location to get a map piece for your map. Use your Map to travel quickly to different locations (4).
- Hints are unlimited, but you must wait for the potion bottle to recharge (5).
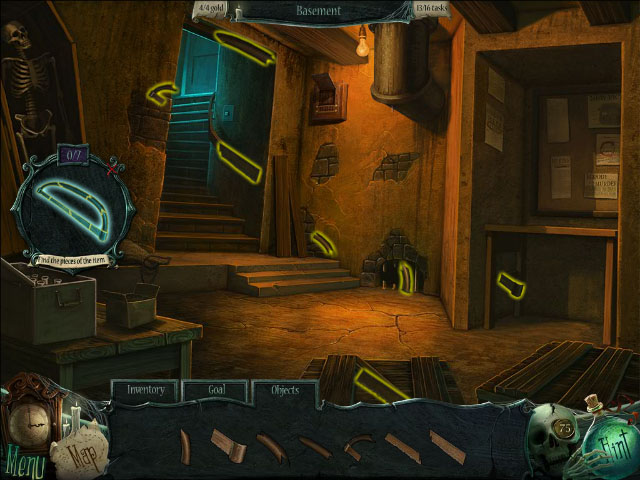
Chapter 1: Darkfall Manor
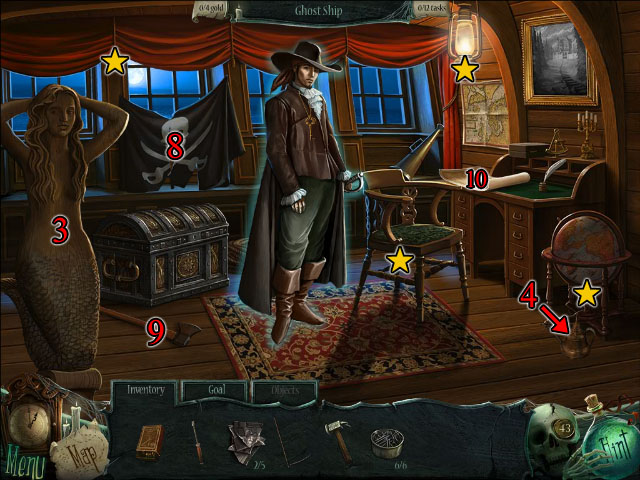
- Collect three NOTE PIECES (1).
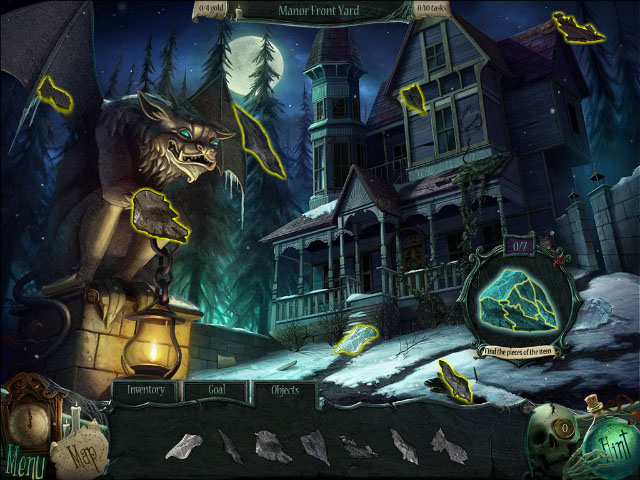
- Click on the sharp rock and find the fragments to obtain a ROCK (2).
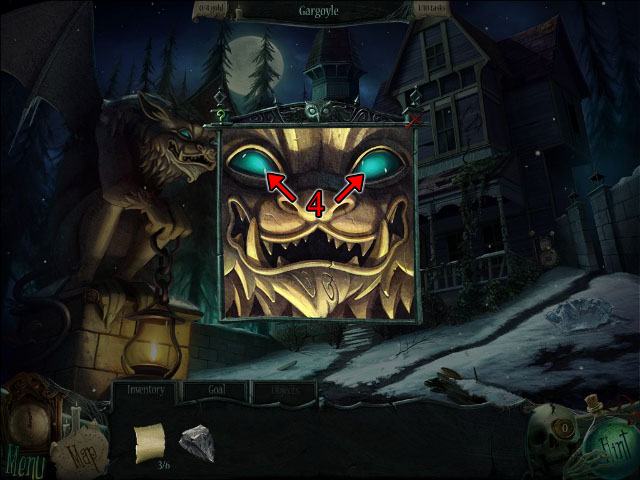
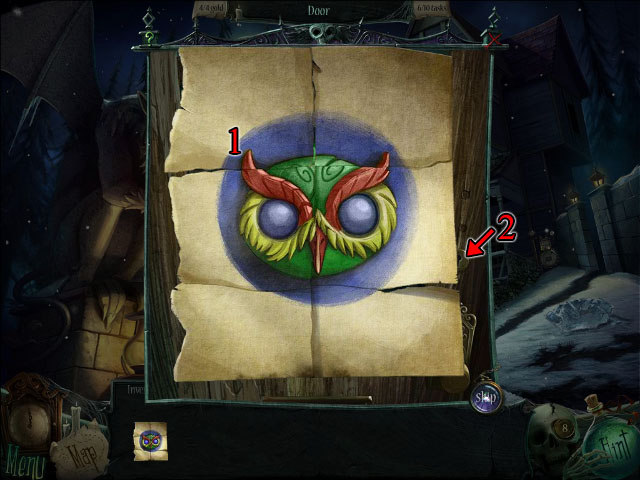
- Zoom in on the gargoyle's head (3). Use the rock on the gargoyle's eyes (4). Take the OWL PLAQUE PIECE.
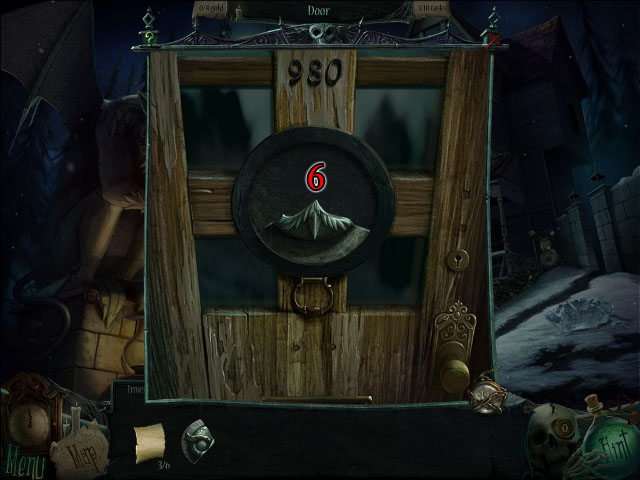
- Zoom in on the door (5). Put the OWL PLAQUE PIECE in the frame (6).

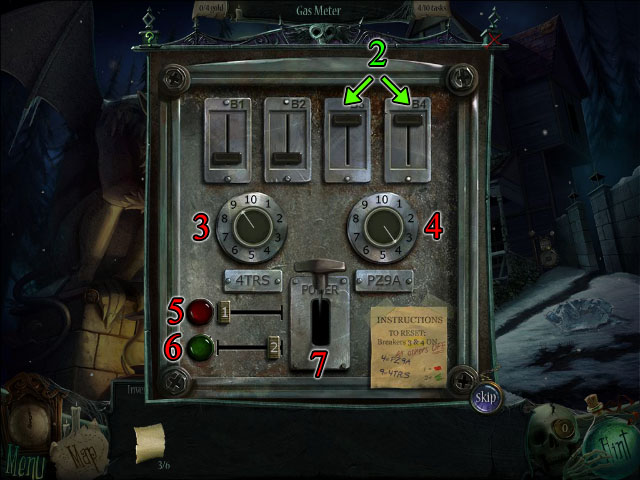
- Zoom in on the gas meter to trigger a mini-puzzle (1). Slide the two right breakers all the way up (2). Click the left dial until it points to 9 (3). Click the right dial to set it to 4 (4). Move the top slider all the way to the left until the light turns red (5). Move the bottom slider all the way to the right until the light turns green (6). Click the Power switch (7).
- Collect the gold coins.
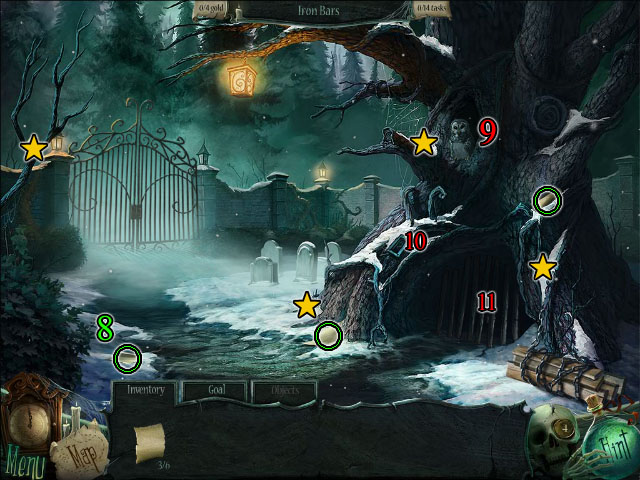
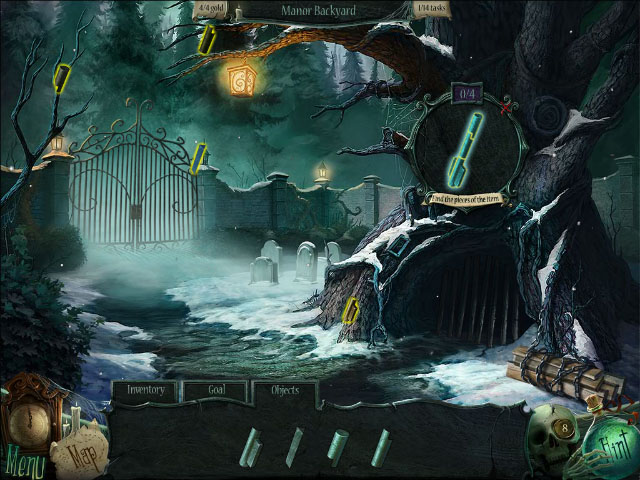
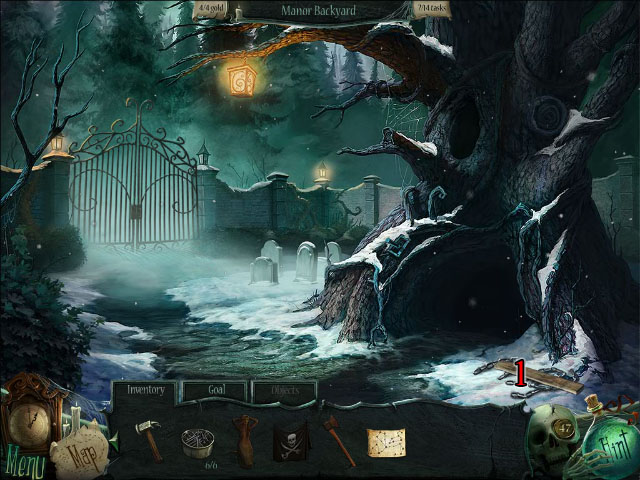
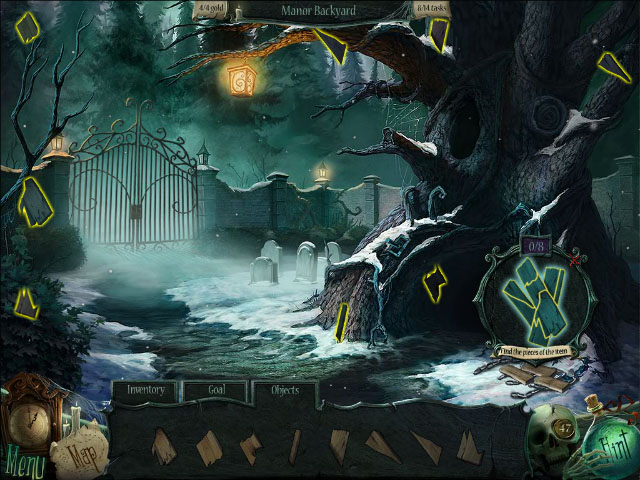
- Go to the Backyard and collect the gold coins.
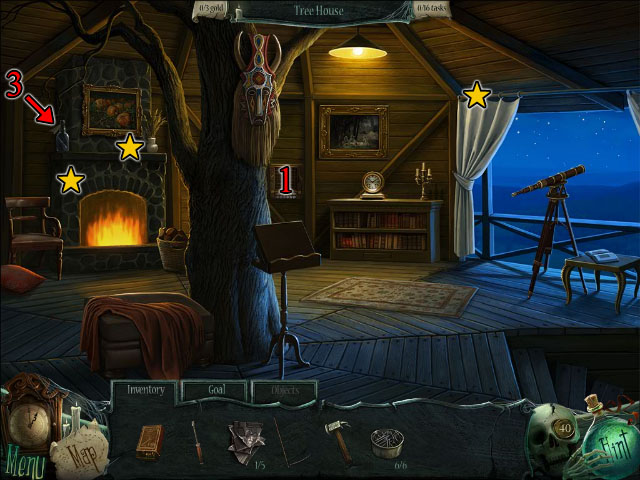
- Collect the three NOTE PIECES (8). The six pieces combine to create the OWL NOTE. Click on the owl. Click on the lever and find the fragments to obtain LEVER (9).
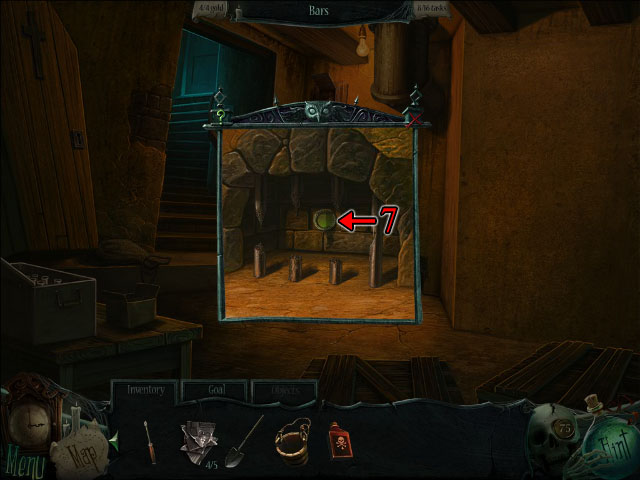
- Zoom in on the slot and put the LEVER in it (10). Click on the lever. The iron grate at the base of the tree disappears. Click on the tunnel entrance to trigger a HOS (11). When all items are found, take the OWL PLAQUE PIECE.
- Return to the Front Yard and zoom in on the door. Place the OWL PLAQUE PIECE in the frame to trigger a mini-puzzle. Click on each piece repeatedly until it matches the OWL NOTE (1). Click the key which appears in the keyhole to unlock the door (2).
- Enter the Manor and collect the gold coins.
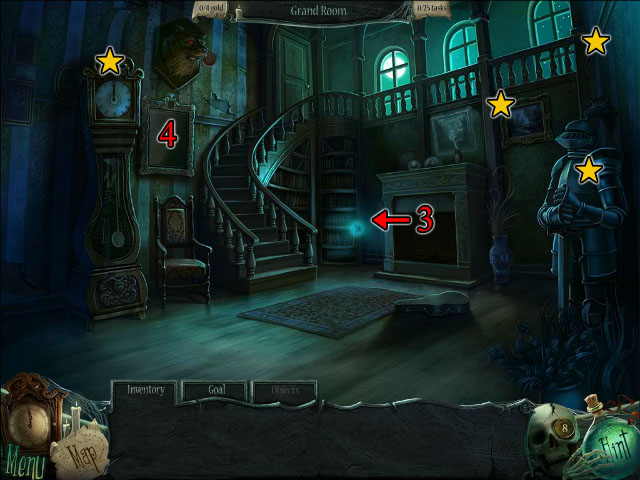
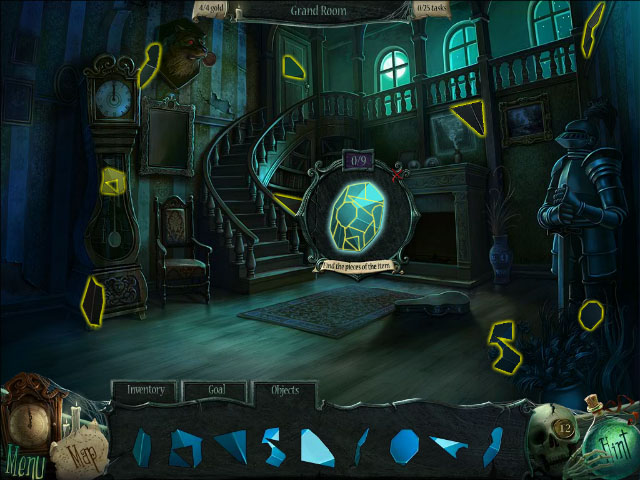
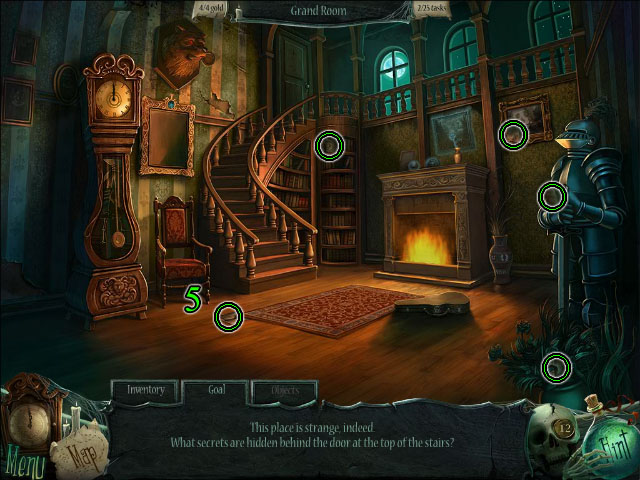
- Click on the floating gem, and find the fragments to obtain the BLUE GEM (3). Zoom in on the portrait beside the grandfather clock and put the BLUE GEM into the round slot at the top of the frame (4).
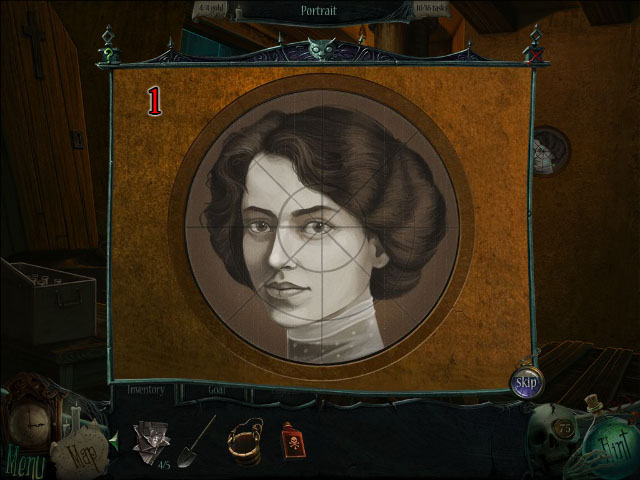
- Collect five PORTRAIT PIECES (5).
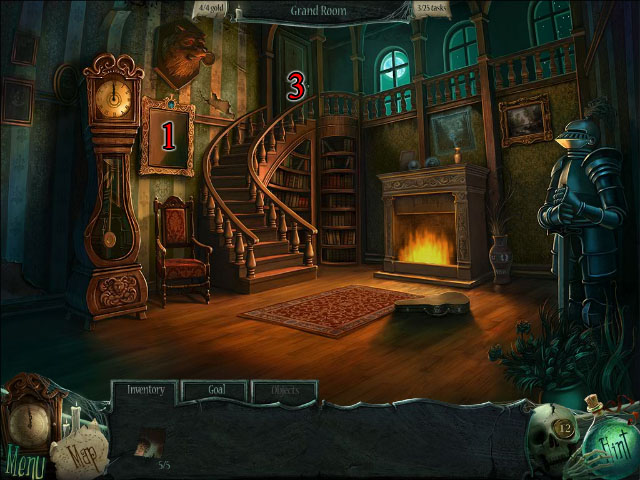
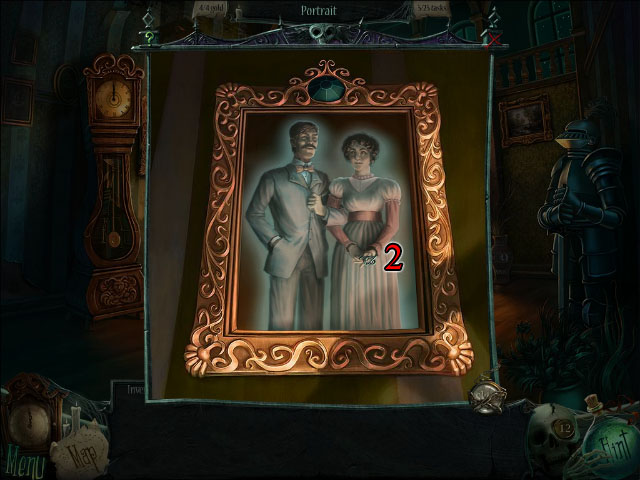
- Zoom in on the portrait and put the PORTRAIT PIECES onto the canvas to trigger a mini-puzzle (1). Swap and rotate the pieces to complete the portrait. Take the PORTRAIT KEY (2).
- Zoom in on the door at top of the stairs (3). Use the PORTRAIT KEY on the keyhole. Click the key to open the door.
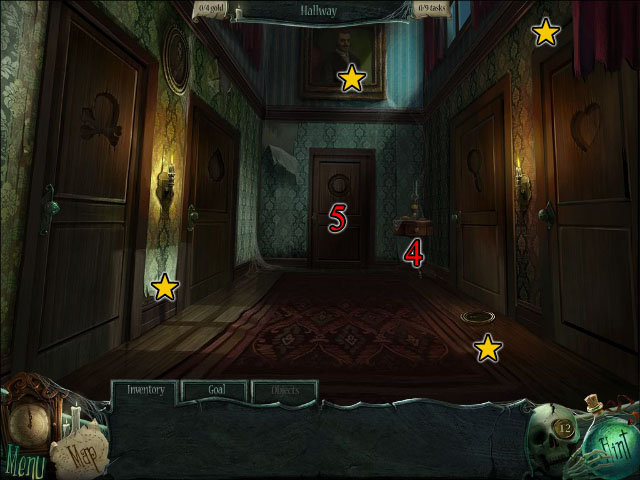
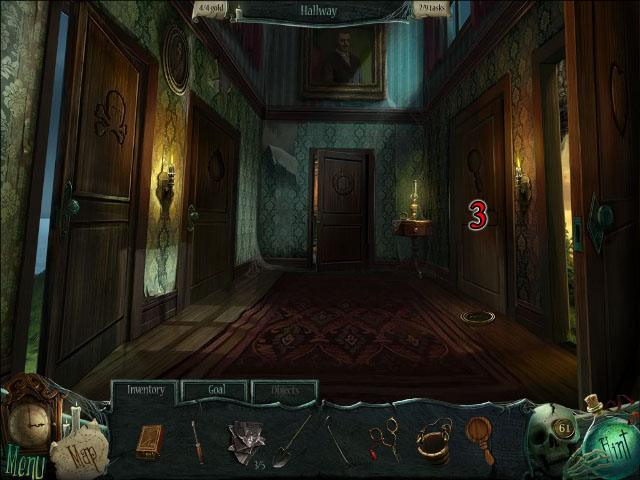
- Enter the Hallway and collect the gold coins.
- Zoom in on the small table in the corner, and take the WOODEN RING (4).
- Zoom in on the north door and place the WOODEN RING into the ring-shaped indention to unlock the door (5).
Chapter 2: Secret Dungeon

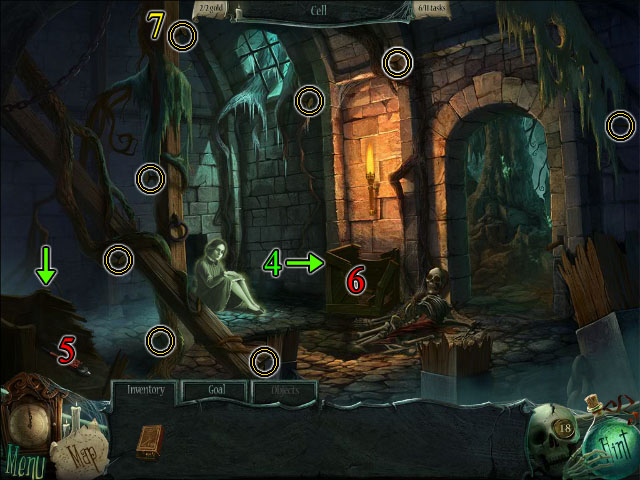
- Go through the door to enter the Cell. Talk to Sarah, the ghost girl. She tells you to find a special ring.
- Click on the matchbox on the crate to obtain BOX OF MATCHES (1).
- Click on BOX OF MATCHES in your inventory to equip MATCH then use the MATCH on the BOX OF MATCHES to obtain LIT MATCH. Use the LIT MATCH on the torch to light the room (2).
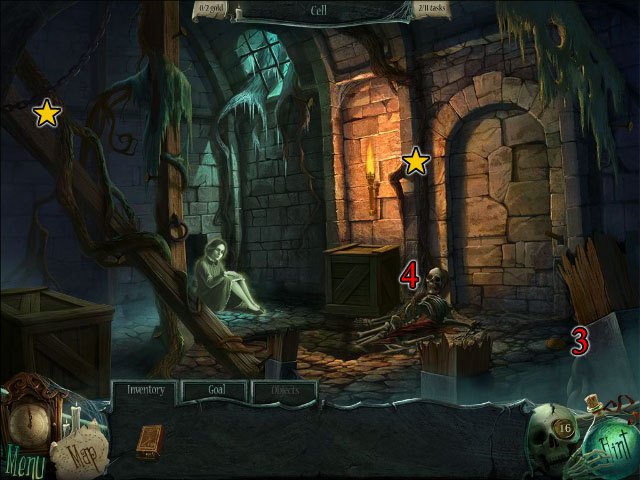
- Collect the gold coins.
- Pick up the COPPER COIN below the archway (3). Zoom in on the skull (4). Place the COPPER COIN in the empty eye socket (5). Take the SCROLL from the skull's jaws (6).
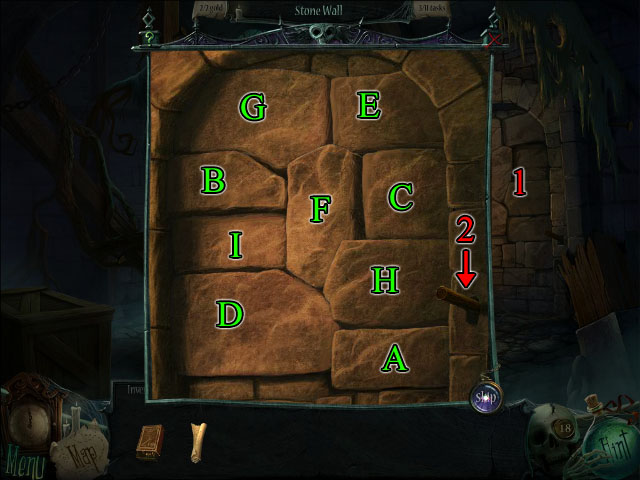
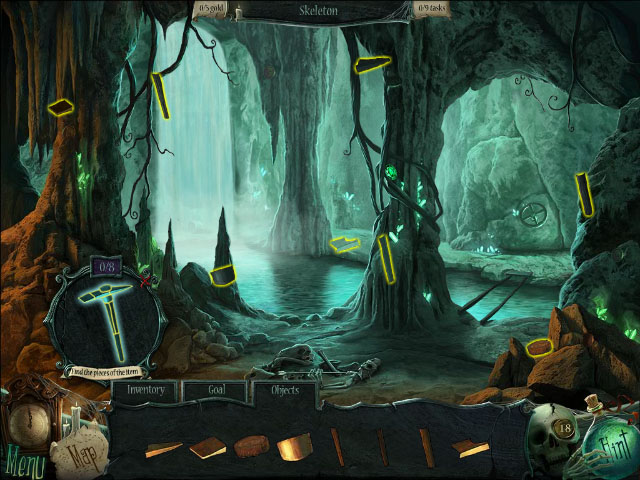
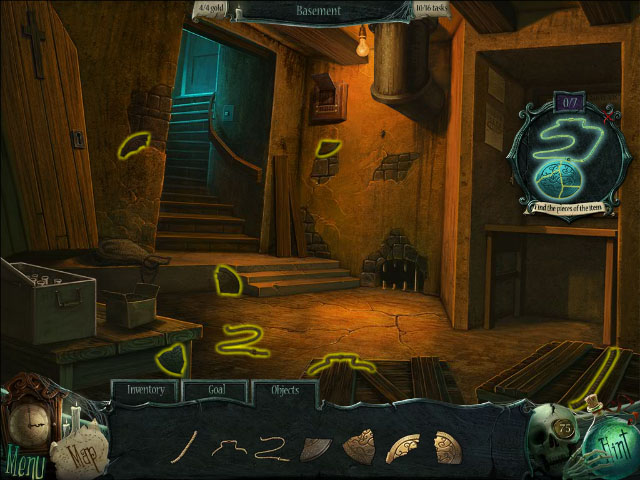
- Click on the archway to trigger a mini-puzzle (1). Press the blocks in the right order on the scroll then click the lever (2). Go through the door into the Secret Cavern. Click on the pick axe and find the fragments to obtain the PICK AXE (3).
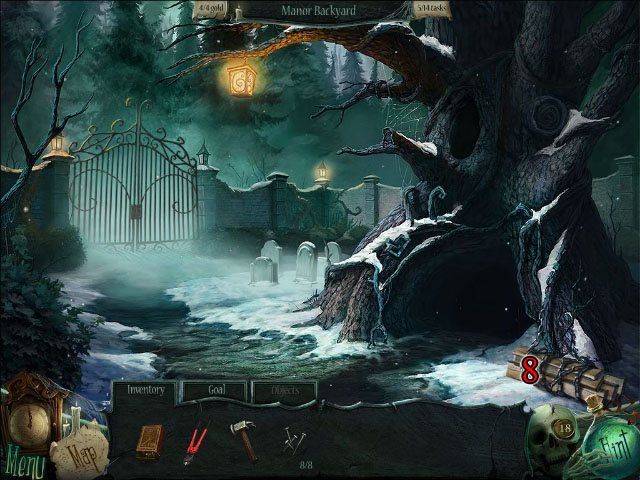
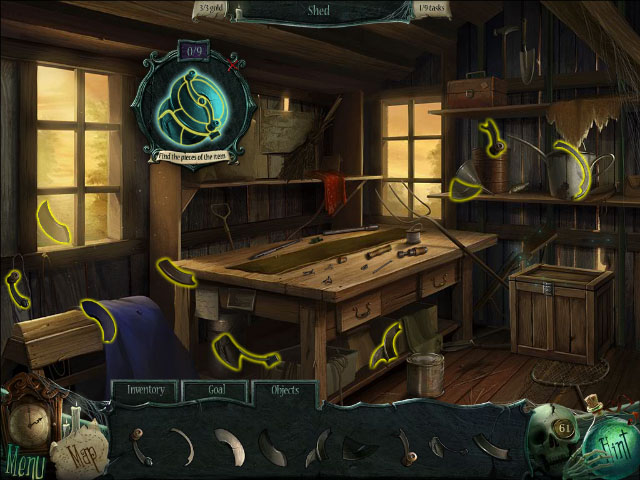
- Return to the Cell and use the PICK AXE on the two crates (4). Take the CHAIN CUTTER (5) and the HAMMER (6). Gather eight NAILS (7). Go to the Manor Backyard and use the CHAIN CUTTER on the pile of wood that is chained to the tree (8). The chains break. Take the WOODEN PLANKS.
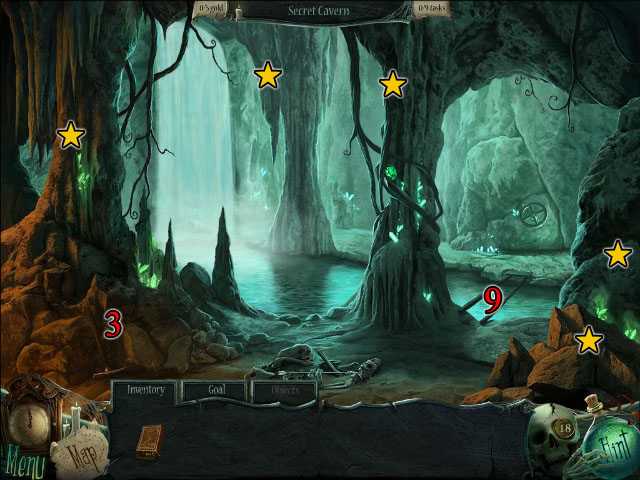
- Return to the Secret Cavern and collect the gold coins.
- Zoom in on the partial bridge over the stream (9). Place the four WOODEN PLANKS on the bridge supports. Place the eight NAILS on each end of the four PLANKS. Use the HAMMER on each NAIL to complete the bridge.
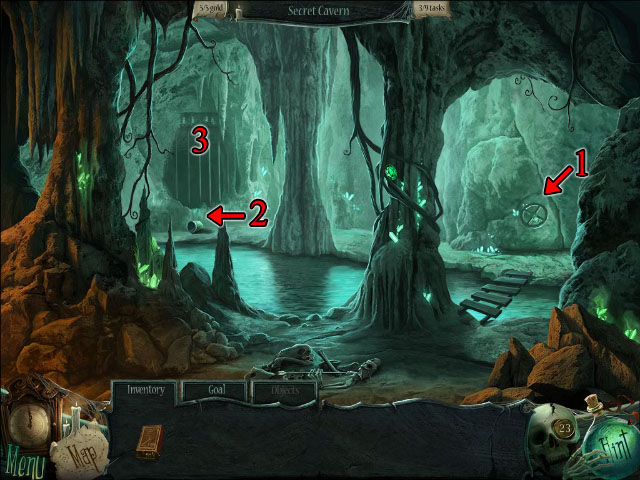
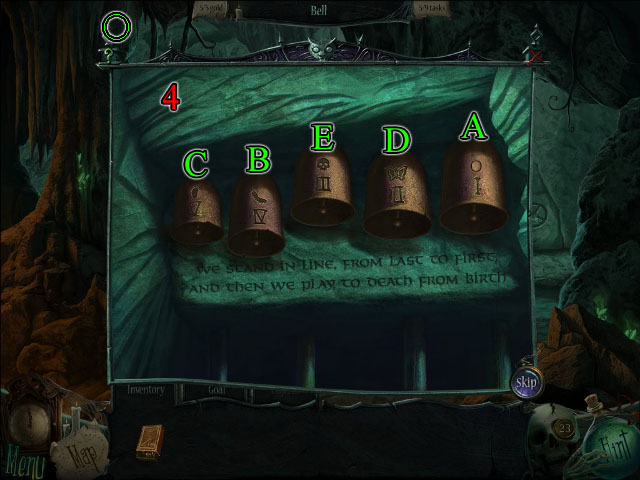
- Click on the valve to turn off the waterfall (1). Then, click on the bell and find its fragments to obtain the BELL (2).
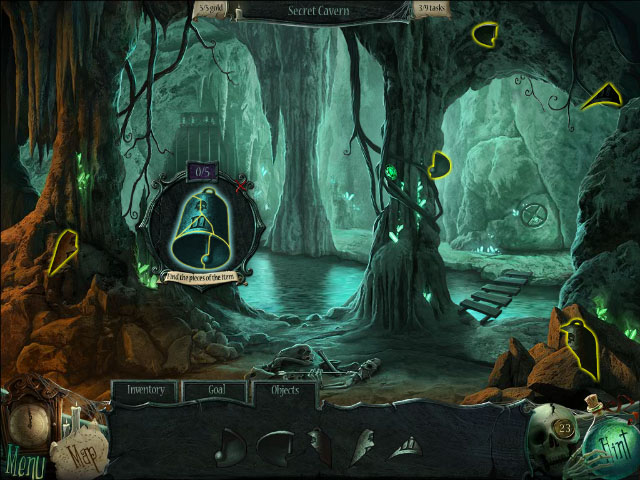
- Zoom in on the bells above the iron grate (3). Place the BELL on the empty hook. Arrange the bells in reverse numerical order (V, IV, III, II, I). When in order, the bells will turn a copper color. Ring bells in order from the beginning of life to death (egg, caterpillar, chrysalis, butterfly, and skull) to open the portcullis (4).
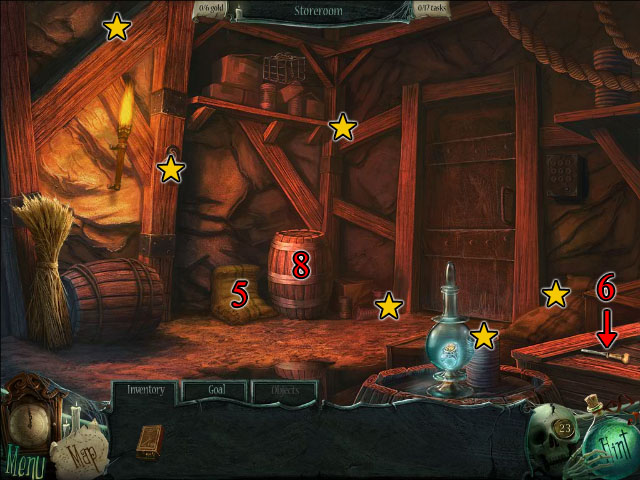
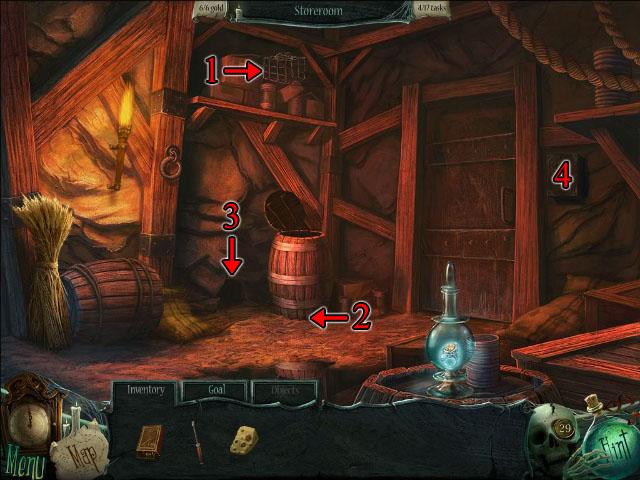
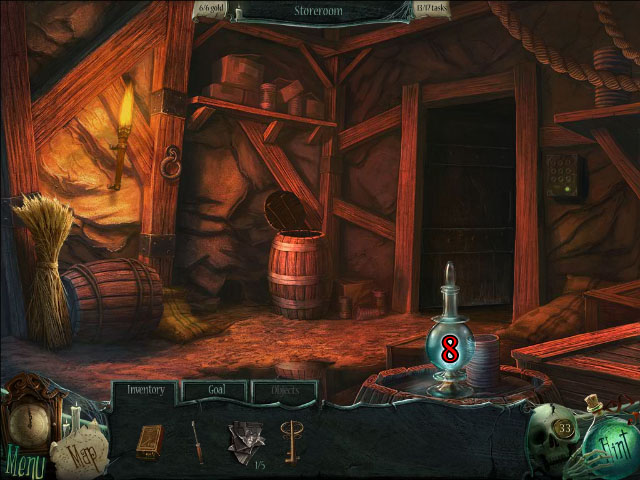
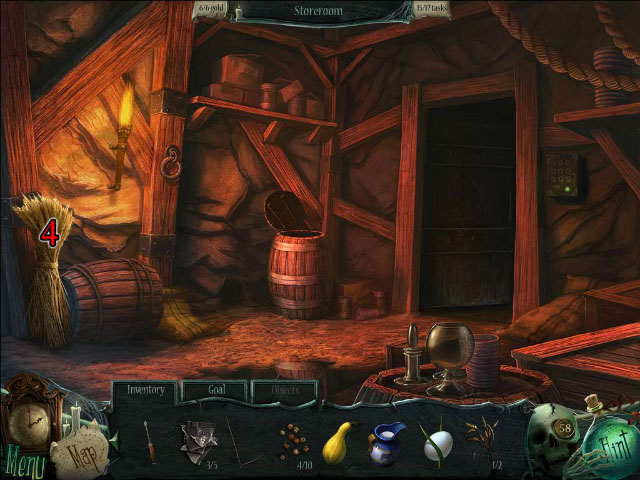
- Enter the Store Room and collect the gold coins.
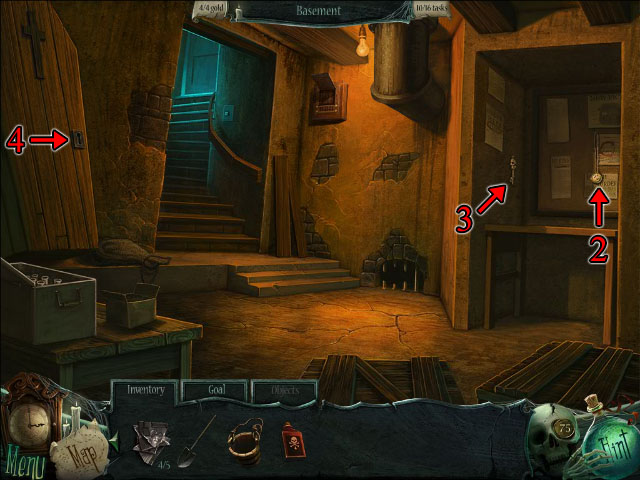
- Move the sack to uncover a mouse hole (5). Take the CHISEL (6). Go to the Manor Front Yard. Use the CHISEL on the ice (7). Take the SCREWDRIVER.
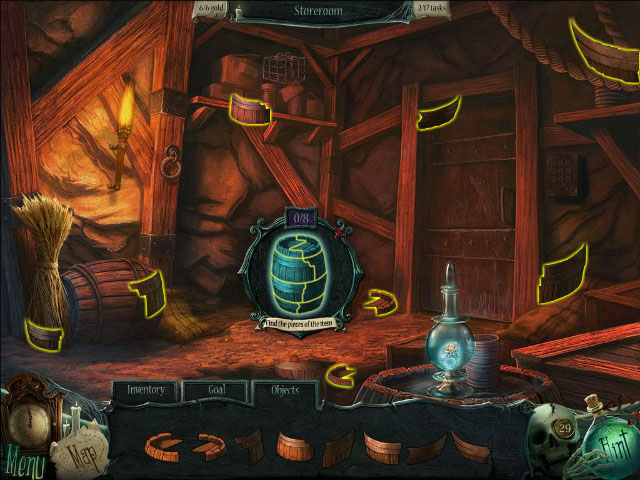
- Return to the Store Room, click on barrel and find its fragments (8). Zoom in on the barrel and take the CHEESE.
- Take the MOUSETRAP (1) and place it on the ground in front of the mouse hole (2). Prop the mousetrap door open with the SCREWDRIVER (you could also use the CHISEL for this, if you have not obtained the SCREWDRIVER). Place the CHEESE into the mousetrap to catch the mouse. Take the MOUSE from the mousetrap. The SCREWDRIVER automatically returns to your Inventory.
- Click on the mouse hole and complete the HOS (3). Click on the un-stoppered vase to obtain the ENERGY CRYSTAL.
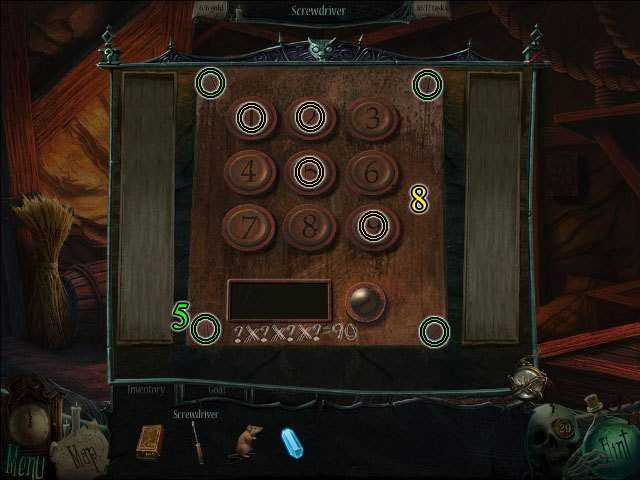
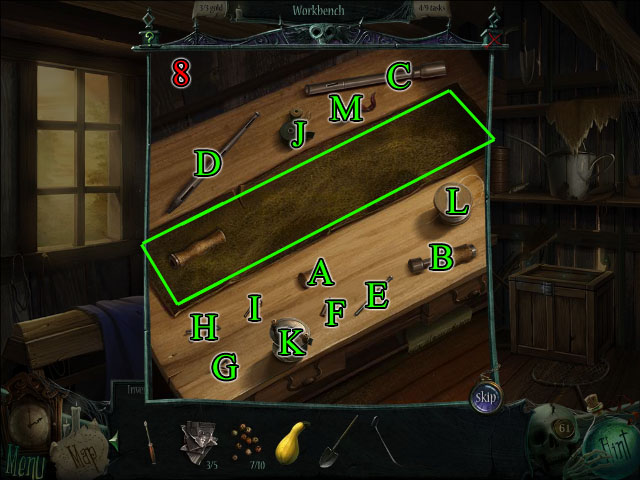
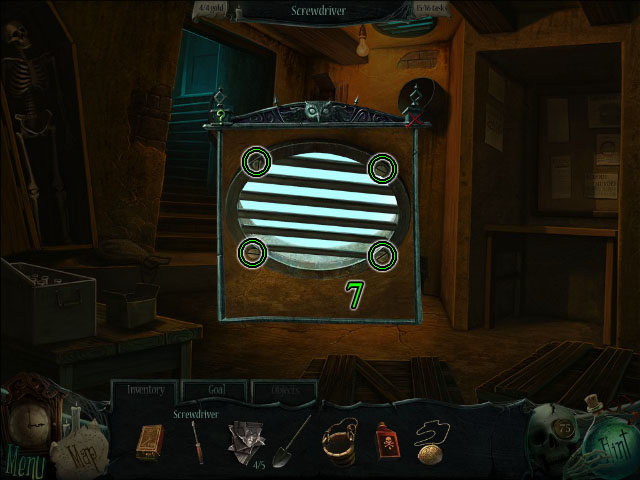
- Zoom in on the panel beside the door (4). Use the SCREWDRIVER to remove the four screws (5). Place the ENERGY CRYSTAL in the panel to trigger a mini-puzzle (6). Place wires to connect the two ends of each color (7). When electricity is restored, press the buttons until the green number equals 90. One solution is: 9, 5, 2, 1 (8).
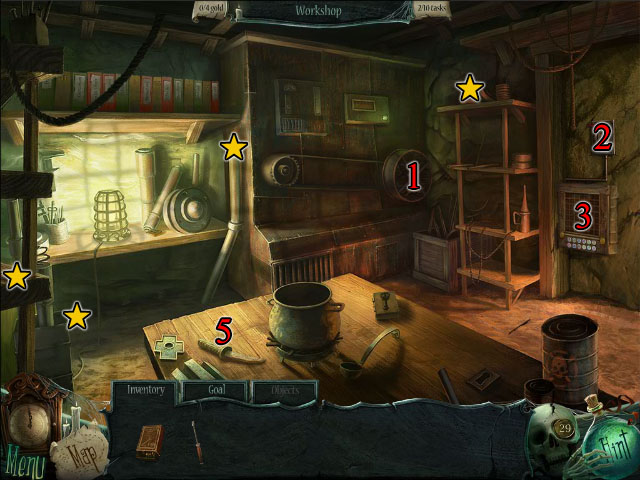
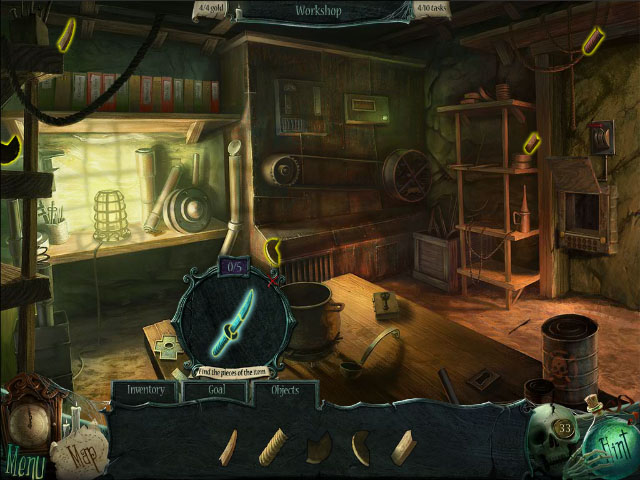

- Enter the Workshop and place the MOUSE into the wheel (1). Click the switch on the wall to turn on the lights (2).
- Collect the gold coins.
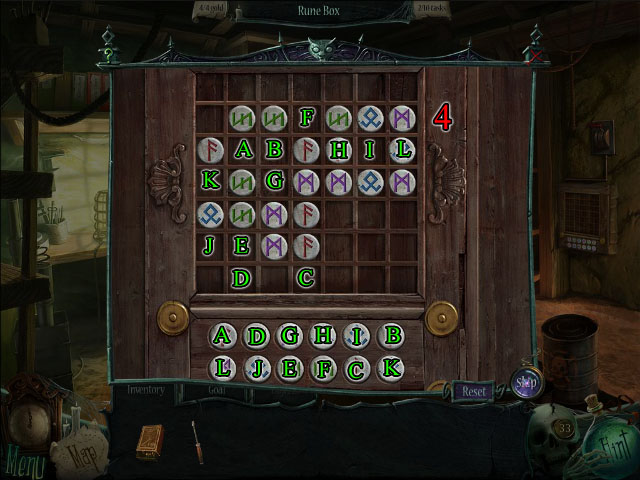
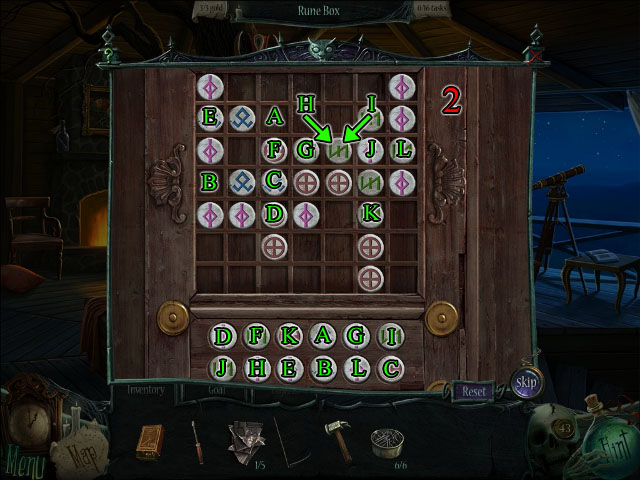
- Click on the wooden box to trigger a mini-puzzle (3). Place the runes in the correct slots (4). When all runes are gone, a secret drawer opens. Take the PHOTO FRAGMENT.
- Click on the knife and find its fragments to obtain the KNIFE (5).
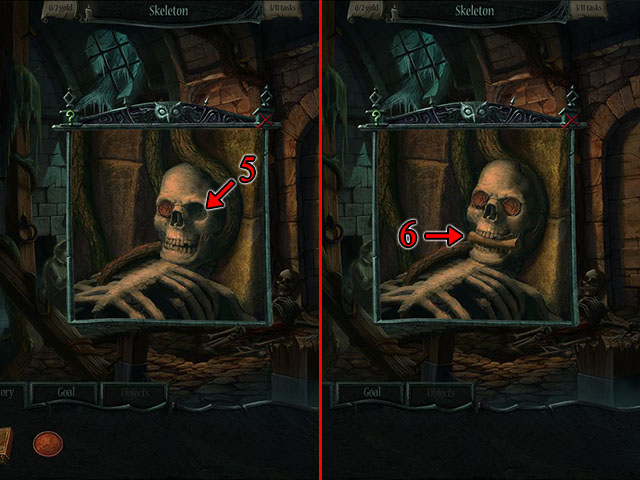
- Return to the Cell and zoom in on the skeleton (6). Use the KNIFE to remove two COPPER COINS from the skull's eye sockets (7).
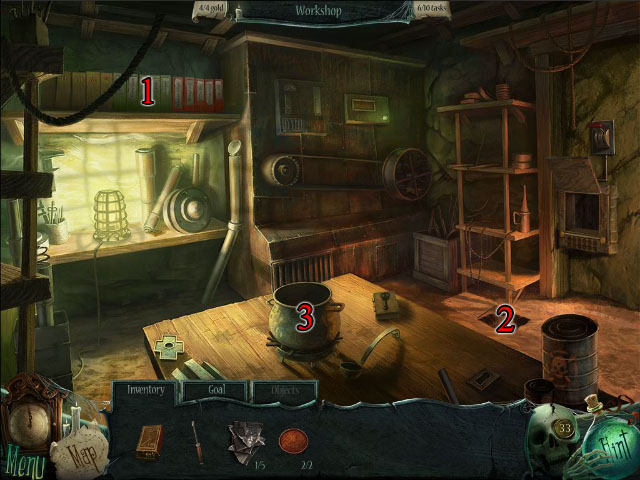
- Return to the Workshop and click on the shelf that contains the key molds (1). Put the molds in this order: I, II, III, IV, V, Fennel, Geranium, Hawthorn, Iris, Juniper, From life's begin, Through end, The key, To happiness, Is love.
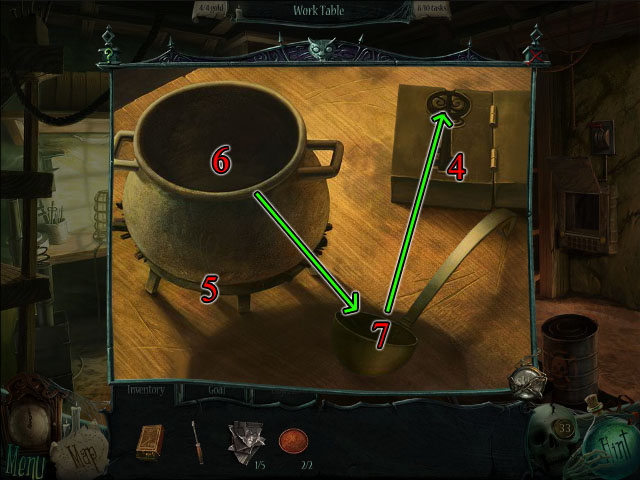
- A chamber in the floor opens (2). Take the KEY MOLD half. Zoom in on the worktable (3). Place the KEY MOLD half on the worktable (4). Click the key mold to stand it. Light a MATCH and use it on the wood (5). Place the two COPPER COINS in the cauldron (6). Use the ladle to scoop the liquid into the key mold (7). Click the mold to open it and take the COPPER KEY.
- Return to the Storeroom and zoom in on the crystal vase (8). Use the COPPER KEY to unlock the crystal vase. Take the GHOST RING from the crystal vase.
- Return to the Cell and give Sarah the GHOST RING. You return to the Grand Room.
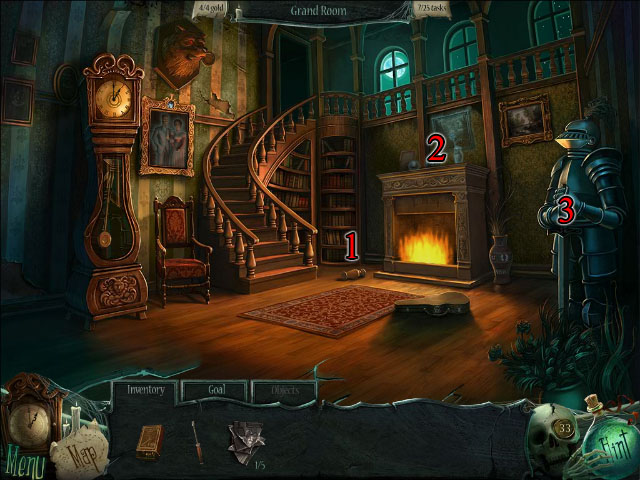
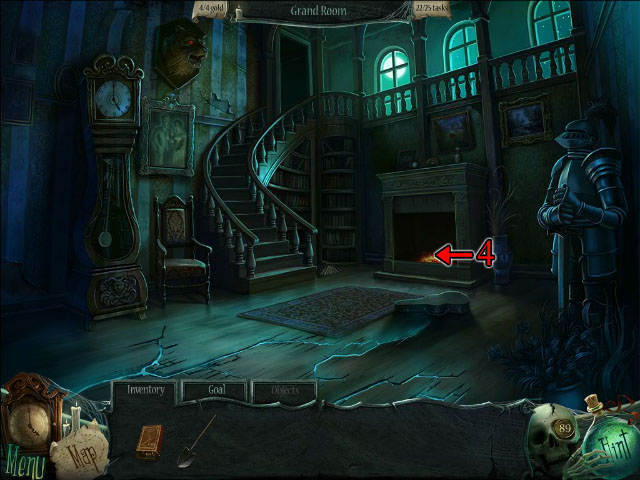
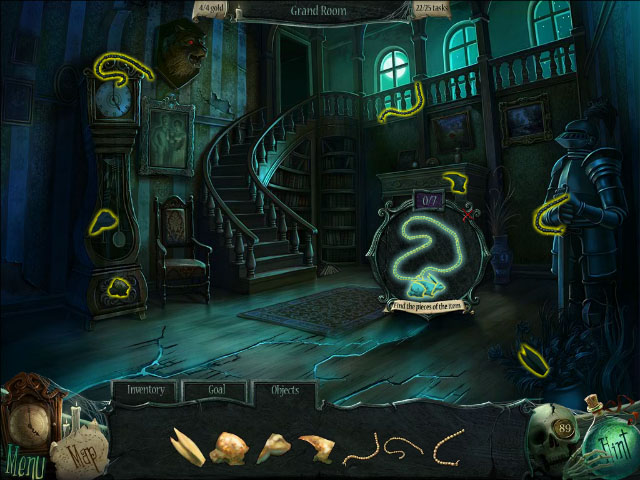
- Click on the vase on the floor in front of the fireplace and find its fragments to obtain the VASE (1). Zoom in on the mantle and place the VASE on it (2).
- Zoom in on the knight's hand and take the WOODEN SKULL SHAPE (3).
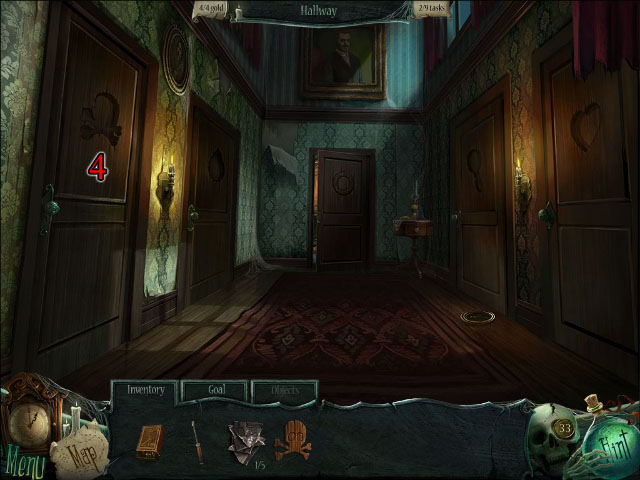
- Return to the Hallway and zoom in on the door with a skull indention (4). Use the WOODEN SKULL SHAPE on the indention to unlock the door.
Chapter 3: Pirate's Pier
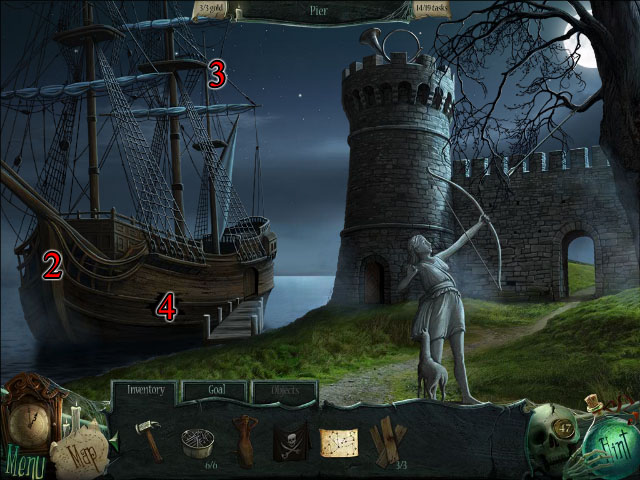
- From the manor's hallway, go through the door to enter the Pier. Then, collect the gold coins.
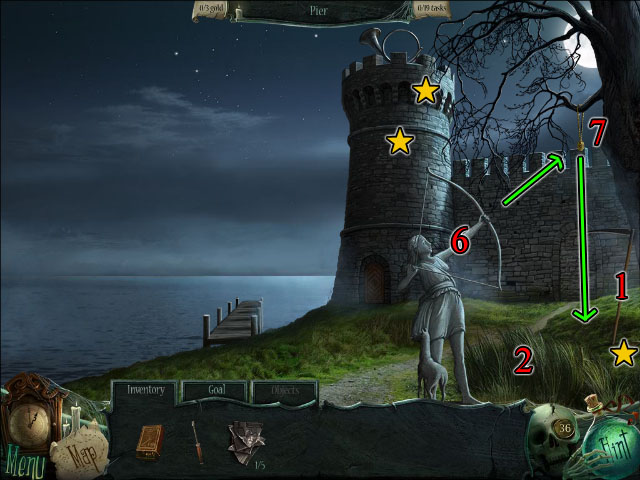
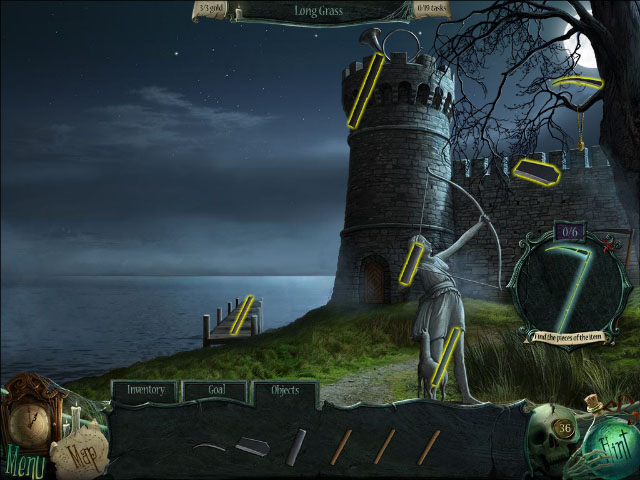
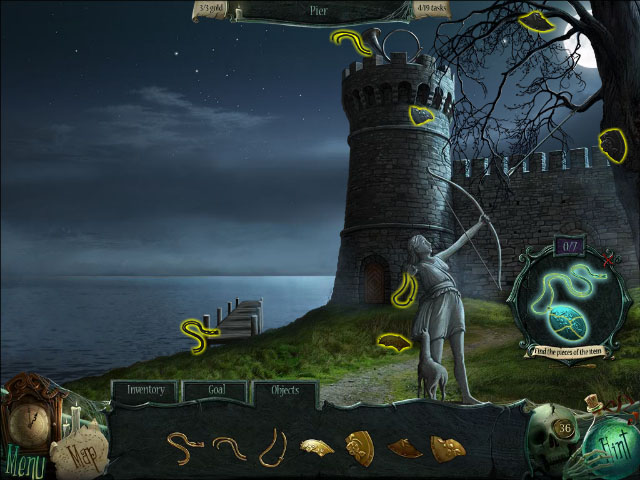
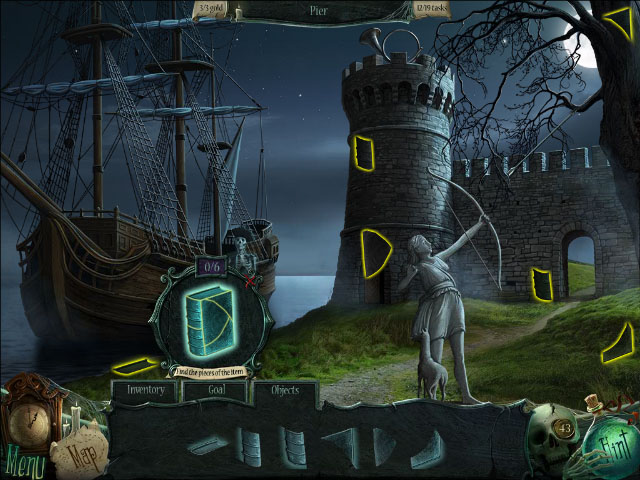
- Click on the scythe and find its fragments to receive the SCYTHE (1). Use the SCYTHE to cut the tall grass in front of the archer (2). Take the MAGIC SYMBOL.
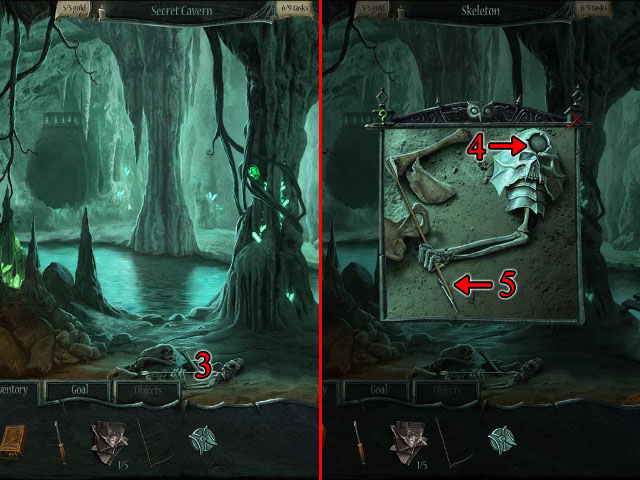
- Return to the Secret Cavern. Zoom in on the skeleton (3). Put the MAGIC SYMBOL in the slot (4). Take the ARROW (5). Return to the Pier. Use the ARROW on the archer statue (6). The archer shoots down the locket. Click on the locket and find its fragments to obtain the LOCKET (7).
- Zoom in on the tower door and use the LOCKET in the indentation (8). The tower door opens. Zoom in on the tower. Take the HAMMER (9) and NAILS (10). Remove the lid from the barrel and take the CHALK (11).

- Zoom in on the bricked-in stone archway to trigger a mini-puzzle (1). Use the CHALK to draw a house, jack-o-lantern, boat, and moon to open the archway.
- Go through the archway and collect the gold coins.
- Click on the pile of wood and complete the HOS (2). Take the BATTERY.
- Zoom in on the Scarecrow (3). Put the BATTERY in place. Pull the lever three times. The flowers by the tree house bloom. Zoom in on the flowers and take five PEARLS (4).
- Zoom in on the door (5). Place the five PEARLS in the rectangular indentation to trigger a mini-puzzle. Move the PEARLS into the circular slots (6).
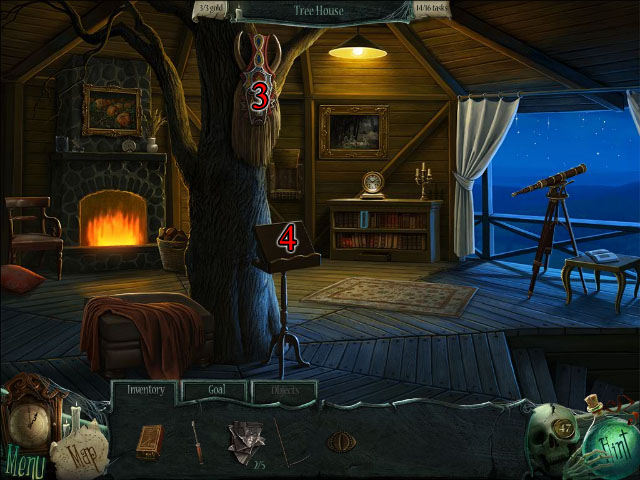
- Enter the Tree House and collect the gold coins.
- Click on the wooden box to trigger a mini-puzzle (1). Place the runes in the correct slots (2). When all runes are gone, take the PHOTO FRAGMENT.
- Zoom in on the bottle on the mantle. Use the HAMMER on the bottle (3). Take the HORN MOUTHPIECE.
- Return to the Pier and zoom in on the tower door. Place the HORN MOUTHPIECE on the horn (4). Click on the horn to blow it. A pirate ship appears outside.
- Try to talk to the ghost pirate. He won't let you onto the ship without a coin. Click on the book at the pirate's feet and find its fragments to obtain the GHOST BOOK.

- Return to the Tree House and zoom in on the bookshelf (1). Place the GHOST BOOK in the empty spot. Take the SILVER COIN from the drawer under the shelf (2). Return to the Pier and give the SILVER COIN to the pirate ghost.
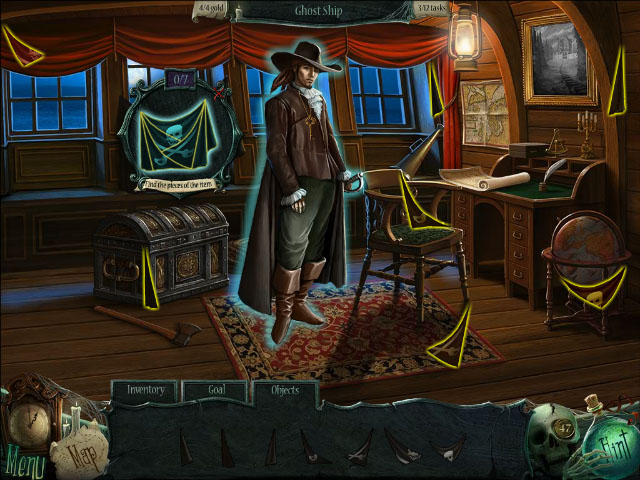
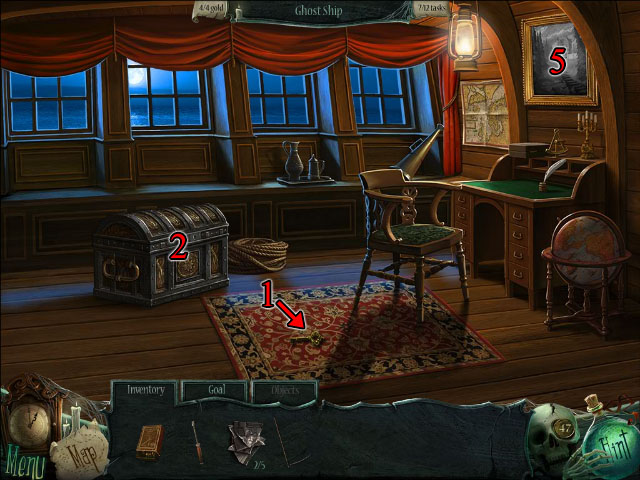
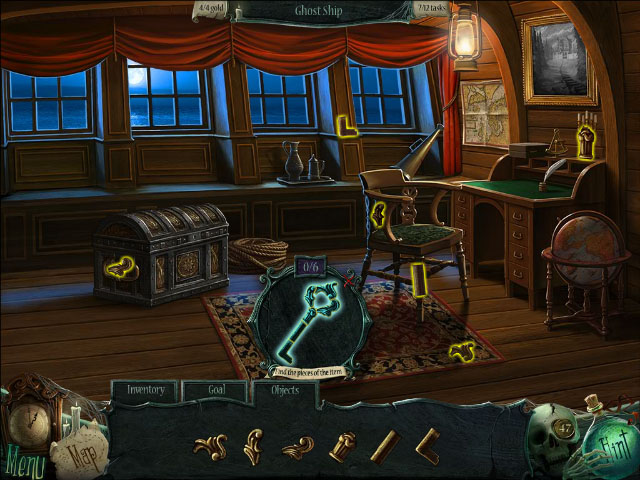
- Enter the Ghost Ship and talk to the ghost pirate. Then, collect the gold coins.
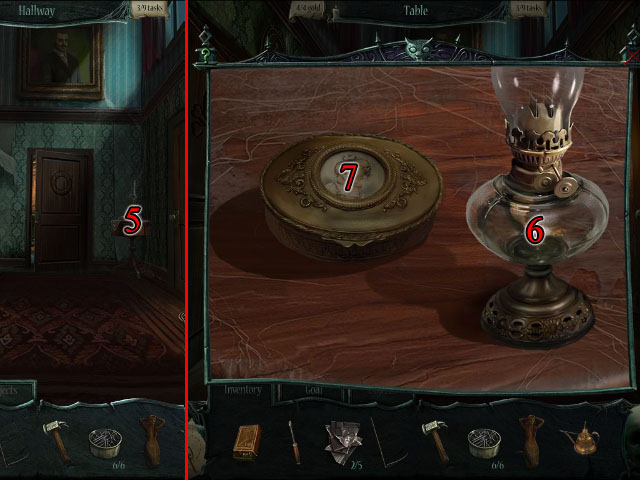
- Take the MERMAID (3). Take the LAMP OIL (4). Return to the Manor Hallway. Zoom in on the table (5). Use the LAMP OIL in the lamp (6). Use a LIT MATCH on the lamp. Take the NEEDLE AND THREAD (7). Return to the Ghost Ship.
- Use the NEEDLE AND THREAD on the pirate flag to repair it. Click on the flag and find its fragments to obtain the JOLLY ROGER (8).
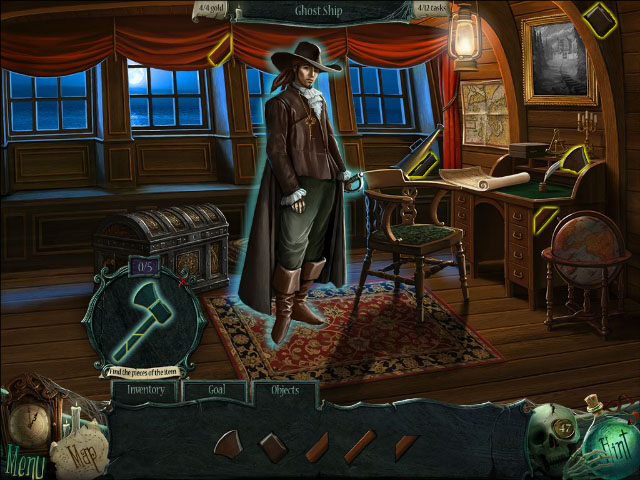
- Click on the axe and find its fragments to obtain the AXE (9). Take the UNMARKED STAR MAP from the desk (10).
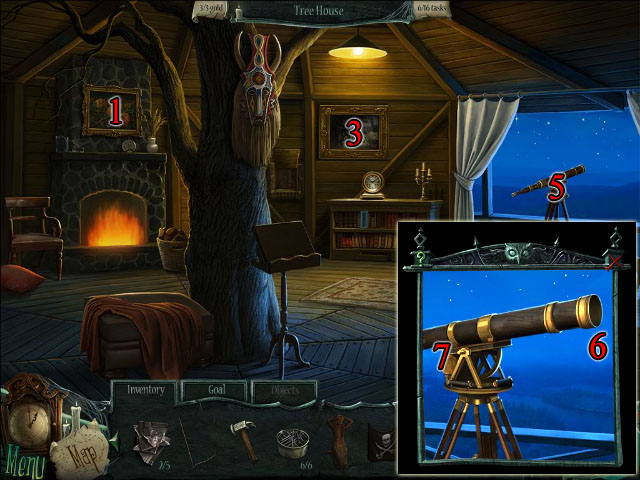
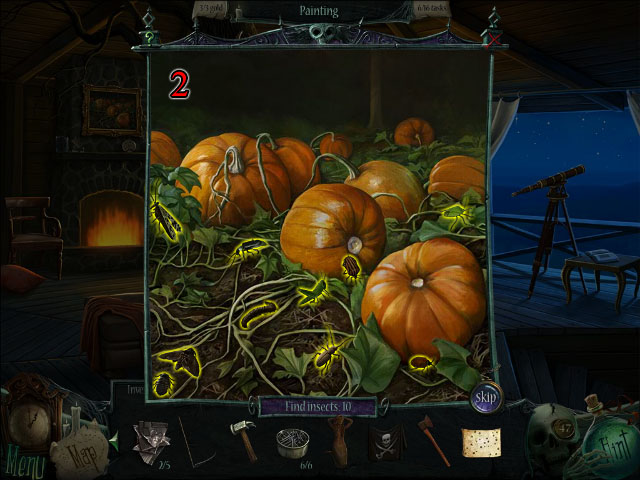
- Return to the Tree House and zoom in on the pumpkin painting to trigger a mini-puzzle (1). Find all the insects (2). Take the TELESCOPE CRANK.
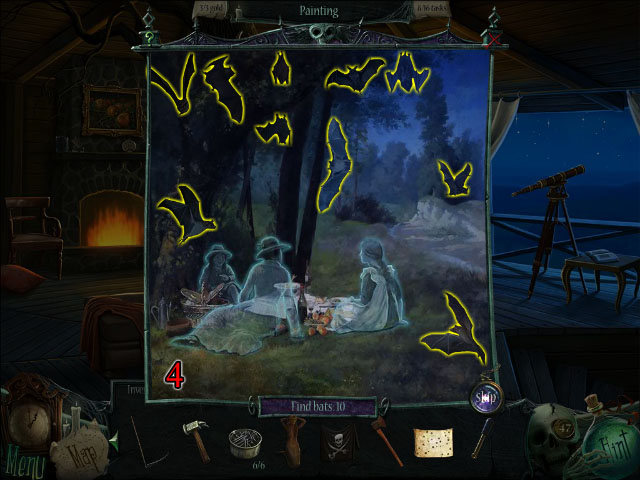
- Zoom in on the picnic painting to trigger a mini-puzzle (3). Find all the bats (4). Take the TELESCOPE LENS.
- Zoom in on the telescope (5). Add the TELESCOPE LENS to the scope (6). Add the TELESCOPE CRANK to the side (7).
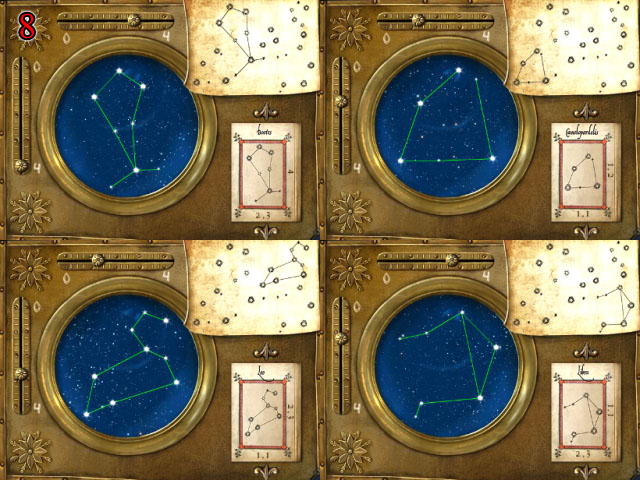
- Zoom in on the Telescope again. Place the UNMARKED STAR MAP to trigger a mini-puzzle. Mark the stars for each constellation in the lens (8). When complete, you get the MARKED STAR MAP.

- Go to the Manor Backyard and use the AXE to chop the pile of wood into planks (1). Click on the boards and find their fragments to obtain PLANKS.
- Return to the Pier and place the MERMAID on the bow of the ship (2). Place the JOLLY ROGER on the flagpole (3). Zoom in on the hole (4). Place the three PLANKS over the hole on the ship. Place the NAILS at the ends of each plank (5). HAMMER the nails in to repair the ship.
- Enter the Ghost Ship and give the MARKED STAR MAP to the Pirate Ghost. He drops a key and disappears.
- Click on the key and find its fragments to obtain the PIRATE KEY (1). Zoom in on the Treasure Chest (2) and use the PIRATE KEY on the lock. Take the WOODEN EYE.
- Return to the Tree House and zoom in on the mask (3). Place the WOODEN EYE into the empty eye socket. Take the PAINTBRUSH that appears on the lectern (4).
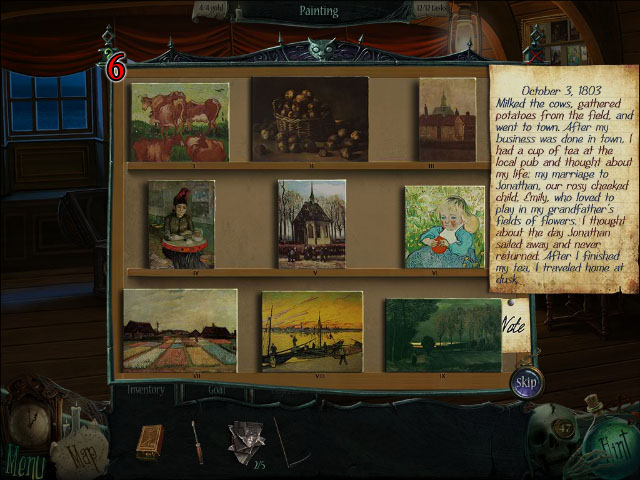
- Return to the Ghost Ship and zoom in on the painting (5). Use the PAINTBRUSH three times to trigger a mini-puzzle. Use the note to reorder the paintings (6). You obtain PAINTING.

- Return to the Grand Room, zoom in on the mantle, and place the PAINTING on the wall (1).
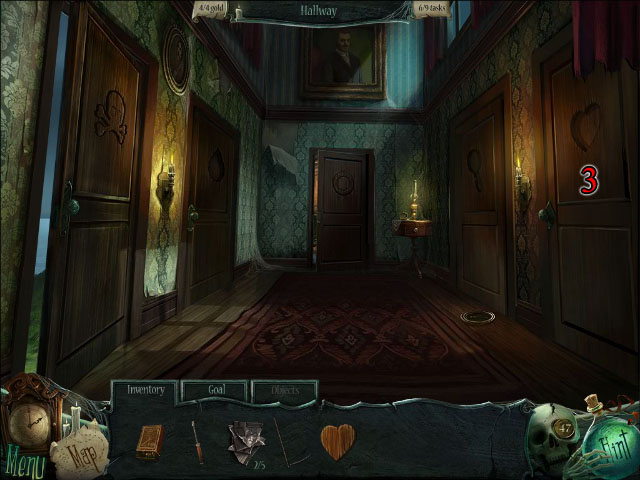
- Zoom in on the bookshelf and take the HEART SHAPE (2).
- Go upstairs to the Hallway, zoom in on the door with a heart-shaped indentation, and use the HEART SHAPE to unlock the door (3).
Chapter 4: Woodland Cottage
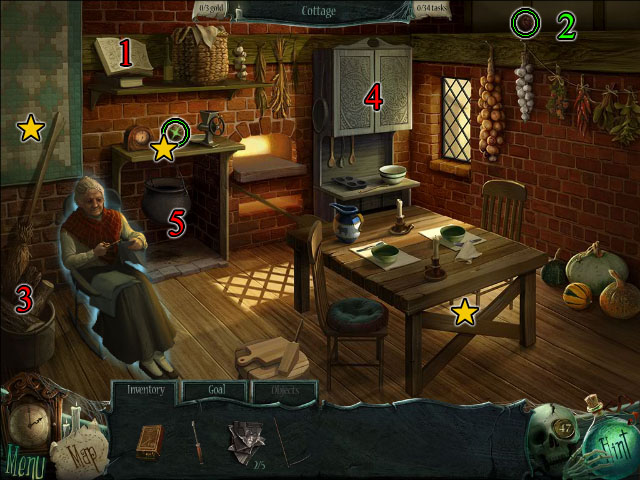
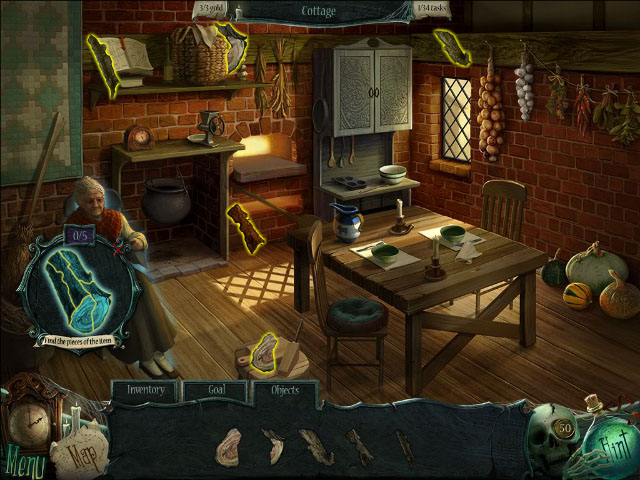
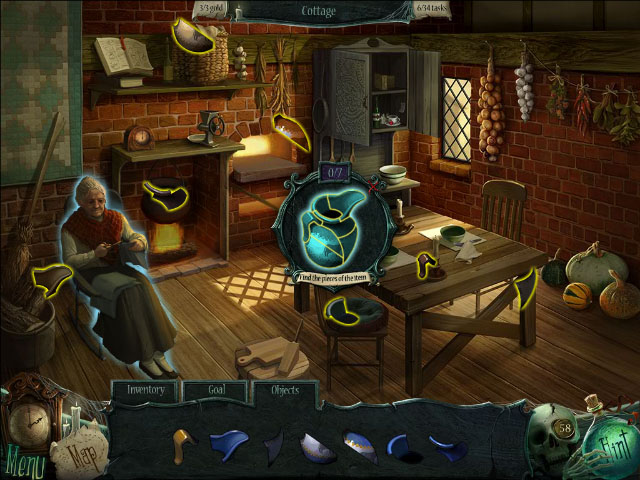
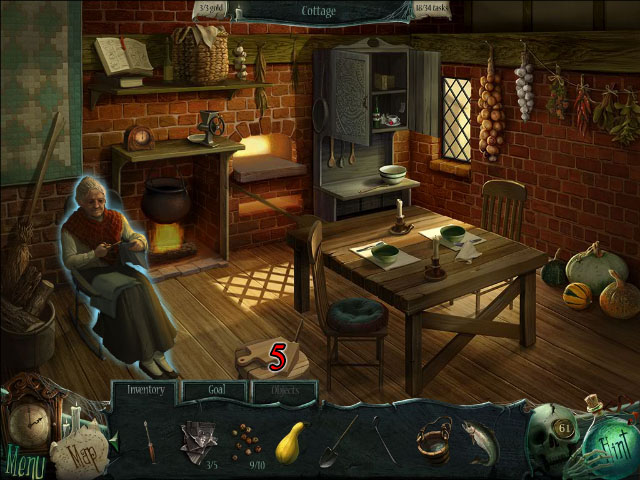
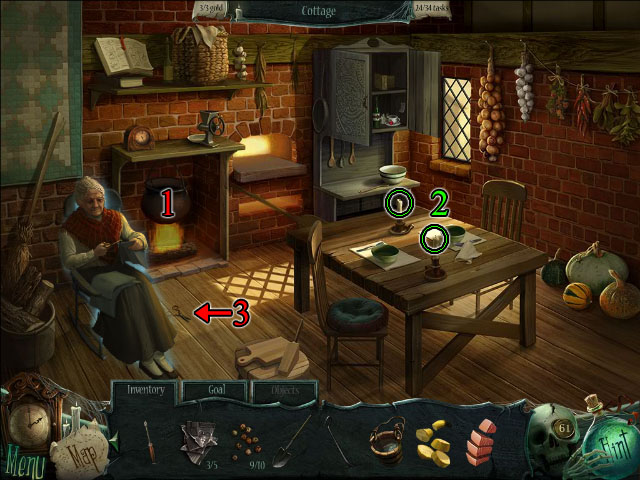
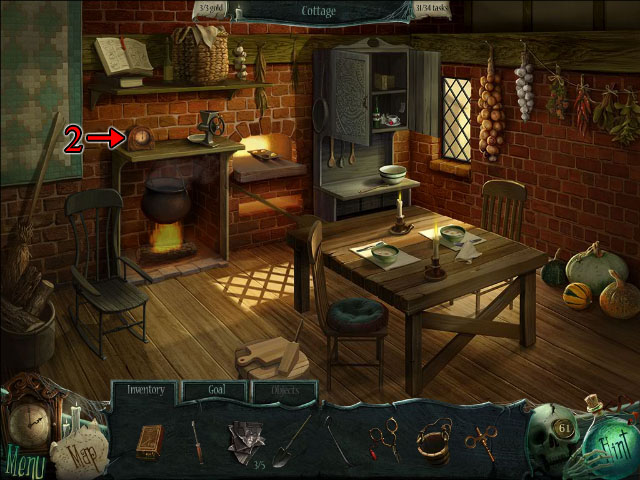
- Go through the door to enter the front yard of the cottage. Enter the Cottage and talk to Grandma. Then, collect the gold coins.
- Zoom in on the cookbook on the shelf and read the recipe for fish soup (1).
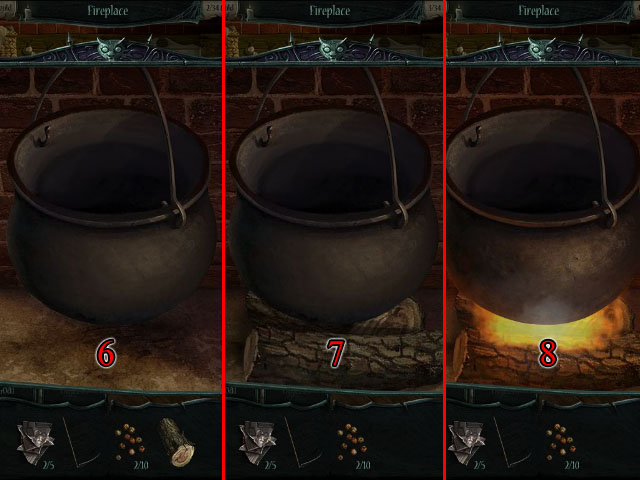
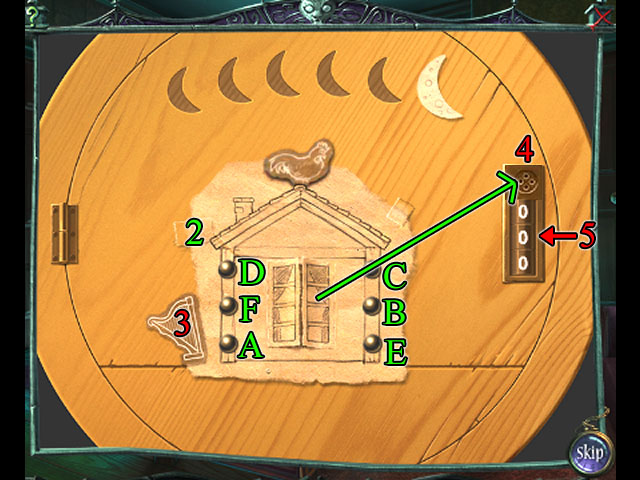
- Take the two PEPPERCORNS (2). Click on the firewood and find the fragments to obtain FIREWOOD (3). Zoom in on the cupboard and take the EMPTY BEE SMOKER (4).
- Zoom in on the fireplace (5). Place the FIREWOOD under the cauldron (6). Use a LIT MATCH on the FIREWOOD (7). Use the EMPTY BEE SMOKER on the fire to obtain a FULL BEE SMOKER (8).
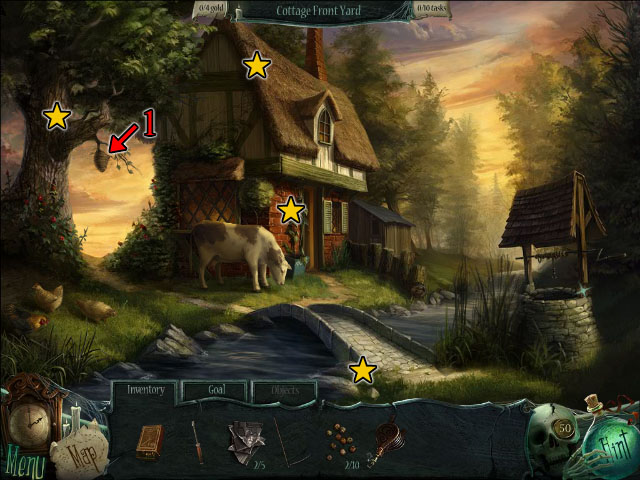
- Return to the Cottage Front Yard and zoom in on the beehive (1). Use the FULL BEE SMOKER on the bees.
- Collect the gold coins.
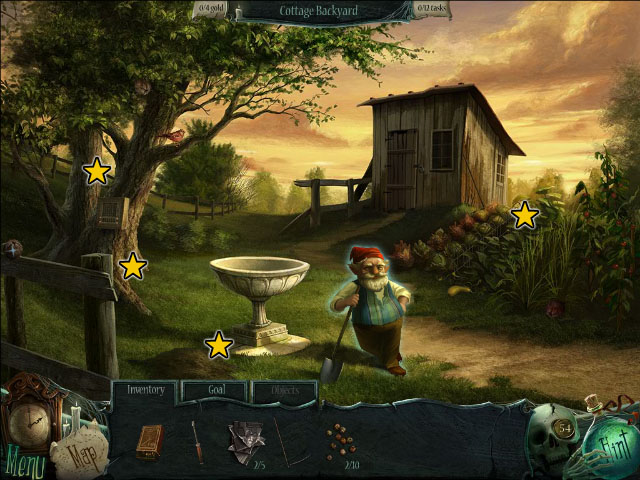
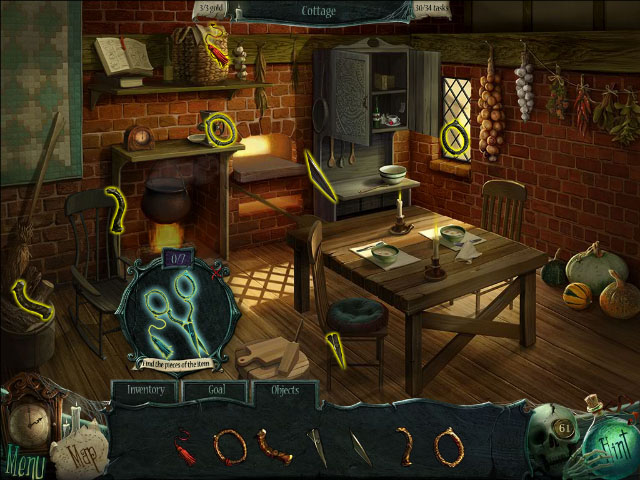
- Go to the Cottage Backyard. Talk to Grandfather, who asks you for a Biscuit. Then, collect the gold coins.
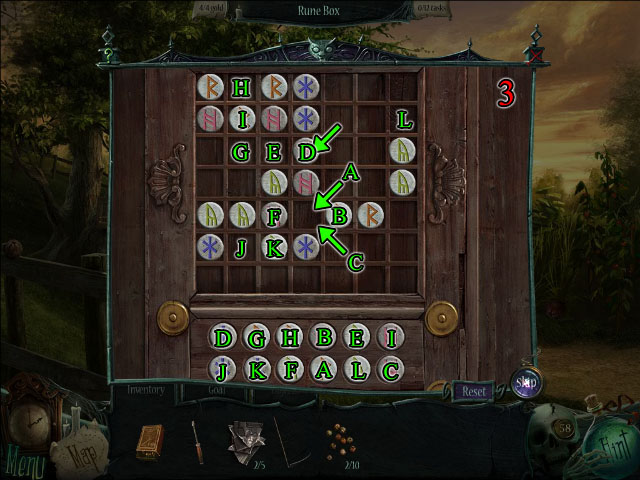
- Click on the wooden box to trigger a mini-puzzle (2). Place the runes in the correct slots (3). When all runes are gone, take the PHOTO FRAGMENT.
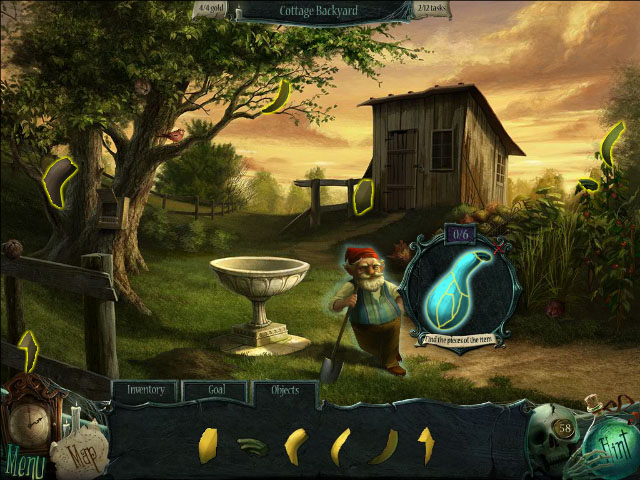
- Click on the squash and find its fragments to obtain SQUASH (4). Take the three PEPPERCORNS (5).
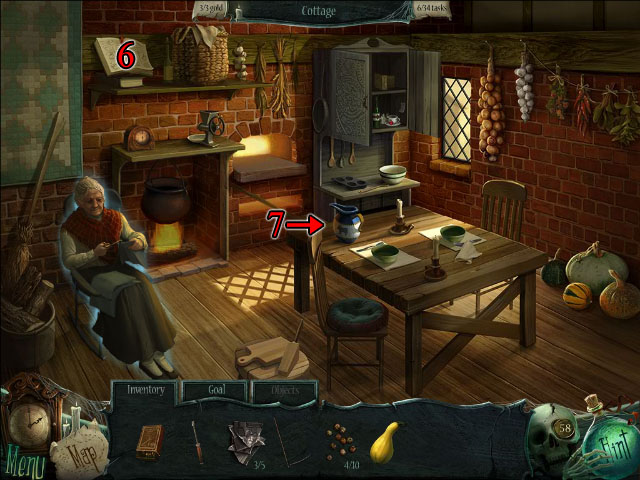
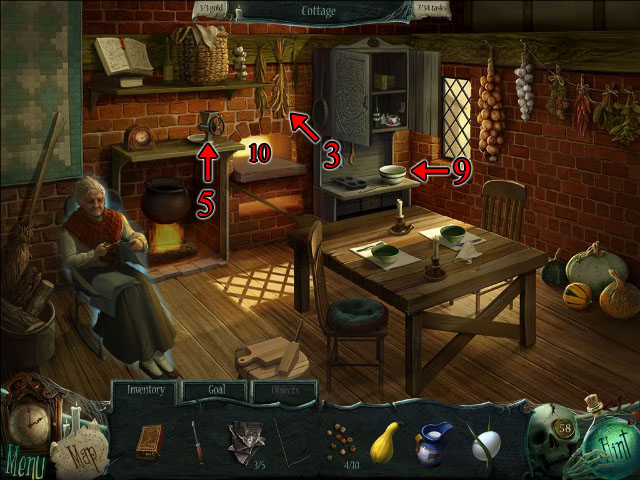
- Return to the Cottage and zoom in on the cookbook (6). Read the recipe for biscuits. Click on the carafe and find its fragments to obtain the CARAFE (7).

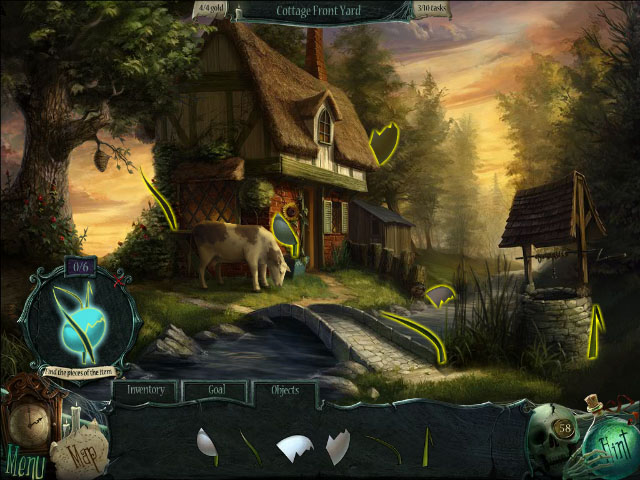
- Go to the Cottage Front Yard and zoom in on the cow (1). Use the CARAFE on the cow's udder to obtain MILK. Click on the reeds below the chickens. Click on the egg and find its fragments to obtain an EGG (2).
- Enter the Cottage and take the WHEAT (3). Return to the Storeroom and use SCYTHE on the bushel of wheat (4). Wheat falls off it. Take the fallen WHEAT. Return to the Cottage.
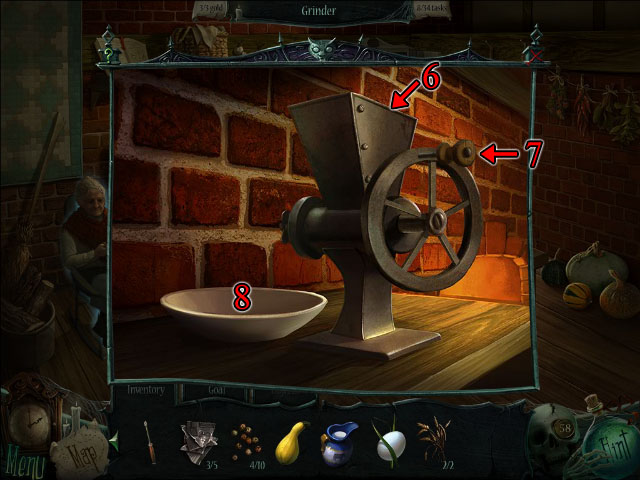
- Zoom in on the grinder (5). Place the wheat in the hopper (6). Click the handle (7). Take the FLOUR (8). Zoom in on the mixing bowl (9). Add the EGG, FLOUR, and MILK to the bowl. Stir mixture with the spoon. Place the dough in the muffin tin. Place the muffin tin into the brick oven (10) and wait for the biscuits to cook. Take a BISCUIT from the muffin tin.
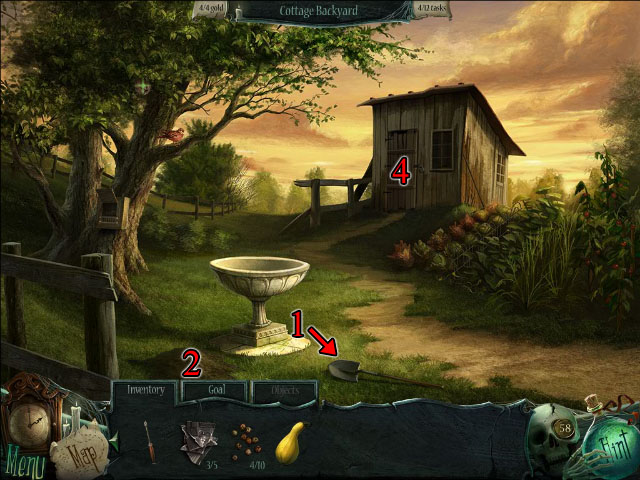
- Return to the Cottage's Back Yard. Give the BISCUIT to Grandfather. Take the SHOVEL (1). Use it on the pile of dirt (2). Zoom in on the hole to trigger a mini puzzle. Find the unique worm in each round then take WORM.
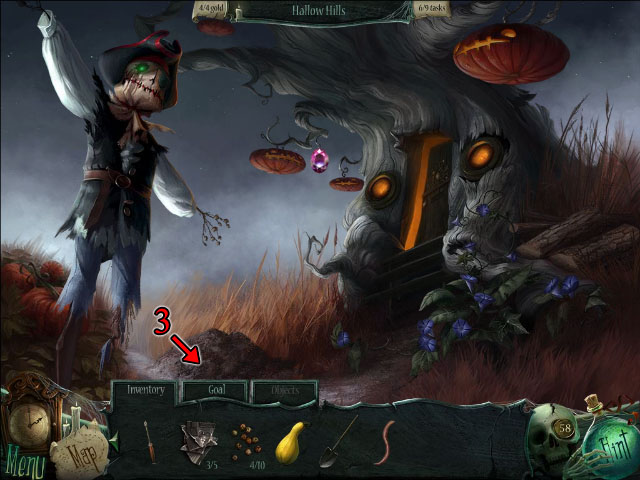
- Return to Hallow Hills. Use the SHOVEL on the pile of dirt (3). Zoom in on the hole and take the CROWBAR. Return to the Cottage's Backyard. Use the CROWBAR on the shed door (4).
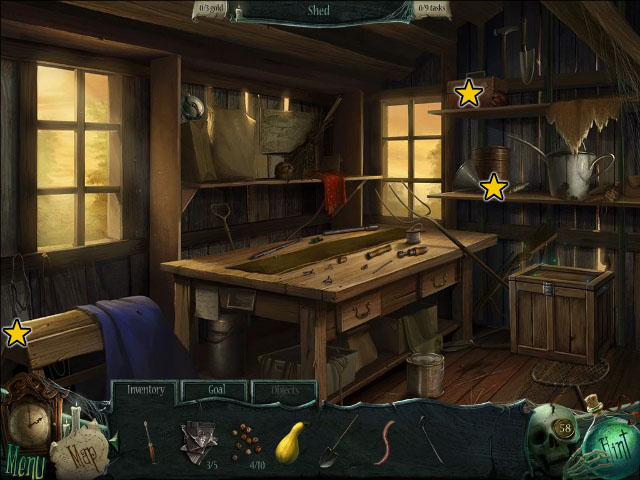
- Enter the Shed. Take three PEPPERCORNS (5). Then, collect the gold coins.
- Click on the reel and find its fragments to obtain the REEL (6). Zoom in on the table (7). Place the REEL and WORM on the table to trigger a mini-puzzle. Put the Fishing Rod together (8). Take the FISHING ROD. Click on the wooden toolbox and complete the HOS (9). Once all the items are found, take the BUCKET.

- Return to the Cottage's front yard. Use the BUCKET on the well (1). Click on the well's crank (2). Take the BUCKET OF WATER.
- Take the two PEPPERCORNS (3).
- Zoom in on the stream and use the FISHING ROD to catch a TROUT (4).
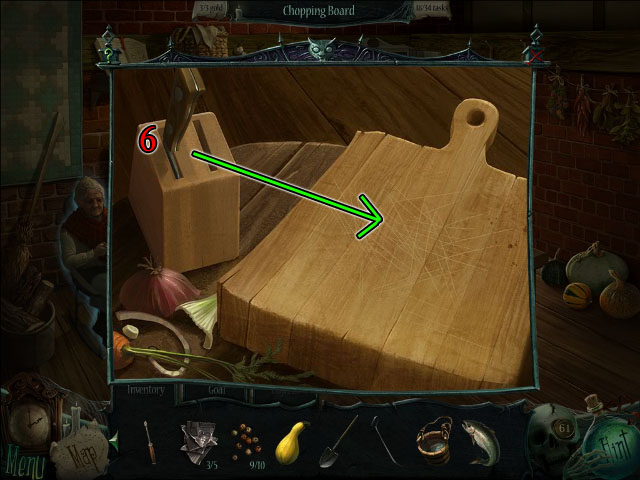
- Enter the Cottage and zoom in on the cutting board (5). Place the SQUASH on the cutting board and slice it into five pieces, using the knife from the knife block (6). Then take the CHOPPED SQUASH. Place the TROUT on the cutting board and slice it into five pieces. Then take the CHOPPED TROUT.

- Zoom in on the cauldron (1). Pour the BUCKET OF WATER into the cauldron. Add CHOPPED SQUASH, CHOPPED TROUT, and 10 PEPPERCORNS to the cauldron to complete the fish soup.
- Use a LIT MATCH to light the two candles on the table (2). Grandma fades away, leaving her scissors on the floor. Click on the scissors and find their fragments to obtain SCISSORS (3).
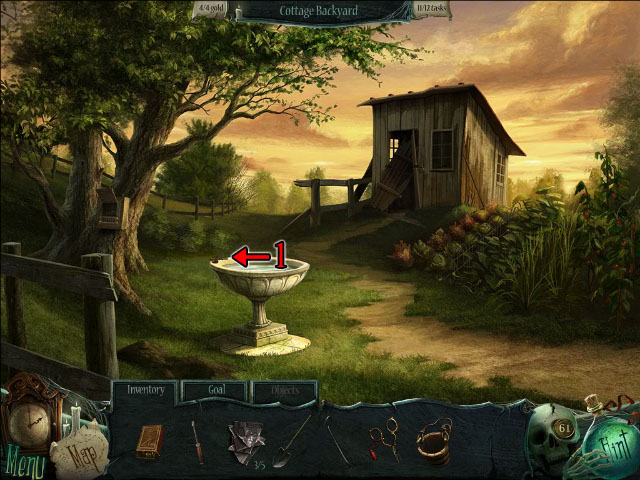
- Go to the Cottage's Front Yard and use BUCKET on the well again to obtain a BUCKET OF WATER.
- Go to the Cottage's Backyard and zoom in on the bird bath. Pour the BUCKET OF WATER into the bird bath (4). The bird flies down for a drink.
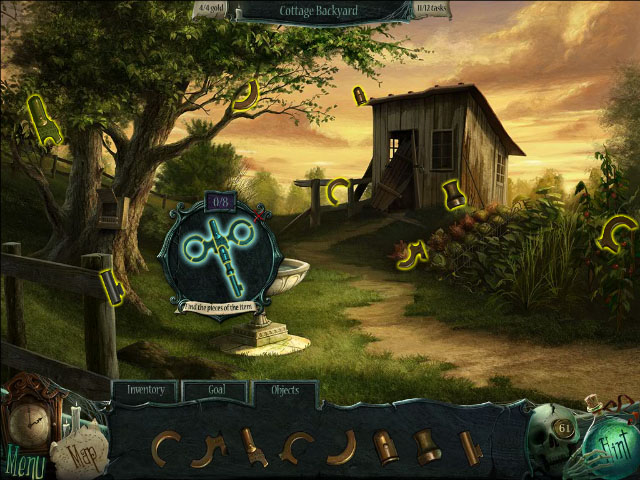

- Zoom in on the bird bath again and use the SCISSORS to cut the cord tying a key to the bird's leg. The bird flies away, leaving a key. Click on the key and find its fragments to obtain the CLOCK KEY (1).
- Return to the Cottage and zoom in on the clock on the mantle (2). Use the CLOCK KEY to open the clock. Place the gears on the correct pegs (3). Pull the red handle (4). Click on the dog (5). Take the bone from the nest and give it to the dog (6). Push the button (7). You obtain CLOCK.
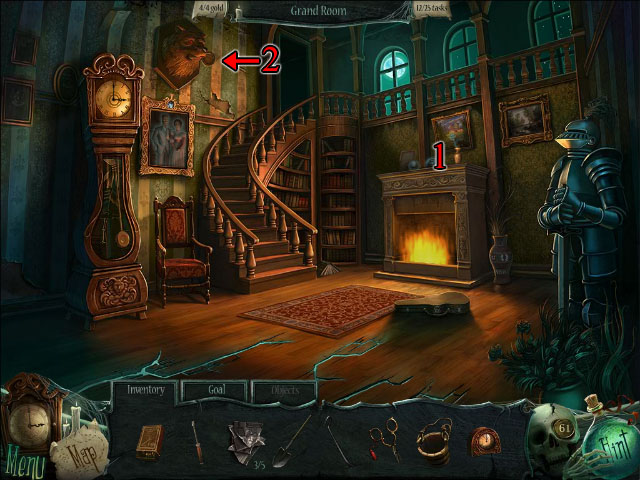
- Return to the Grand Room, zoom in on the mantle, and place the CLOCK on it (1).
- Zoom in on the beast head and take the MAGNIFYING GLASS SHAPE (2).
- Return upstairs to the Hallway and zoom in on the door with a magnifying glass-shaped indentation. Use the MAGNIFYING GLASS SHAPE on the indention to unlock the door (3).
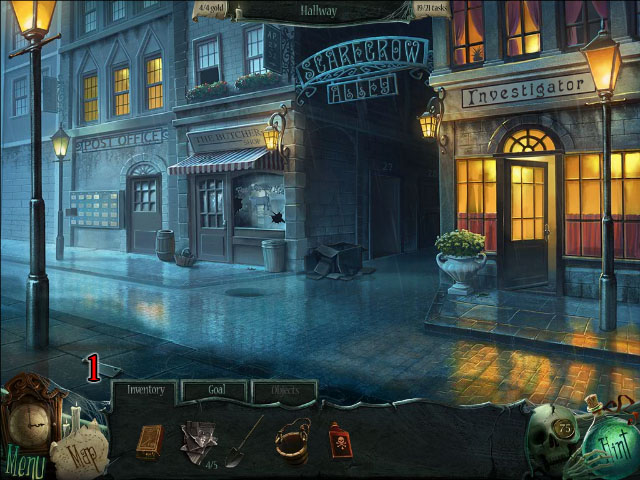
Chapter 5: Scarecrow Alley
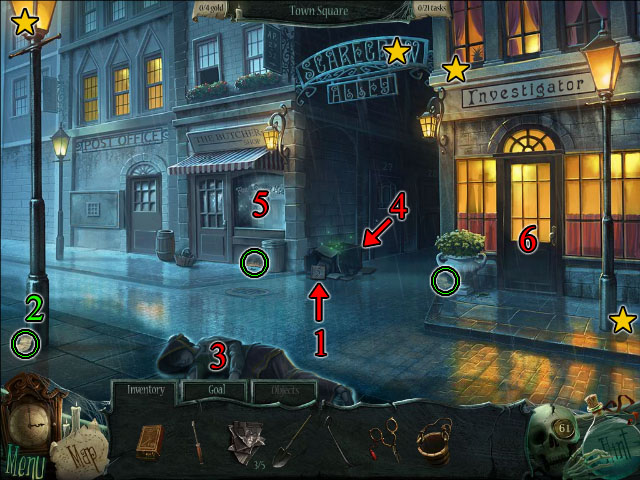

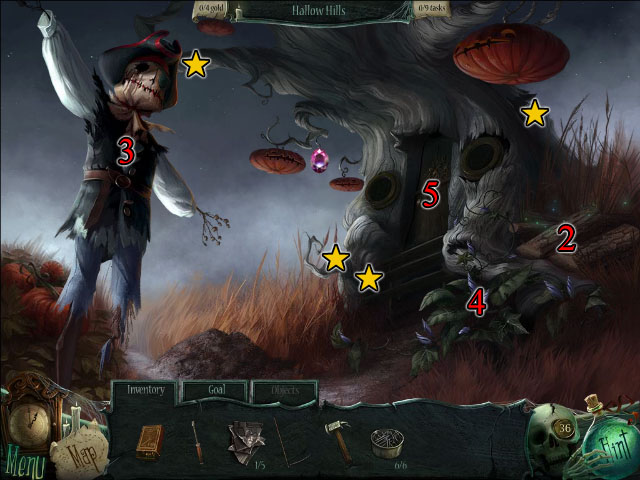
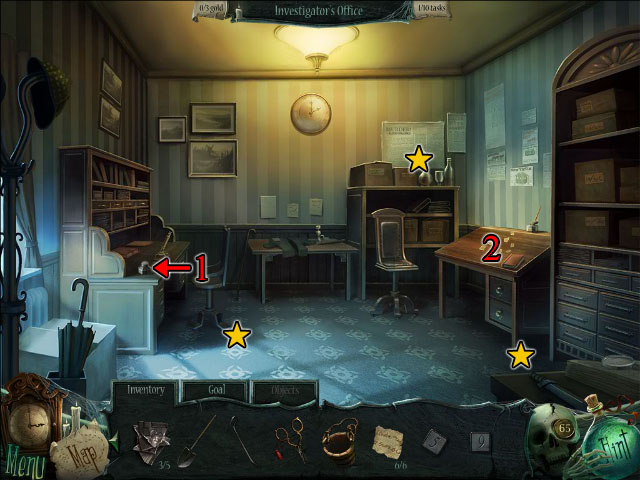
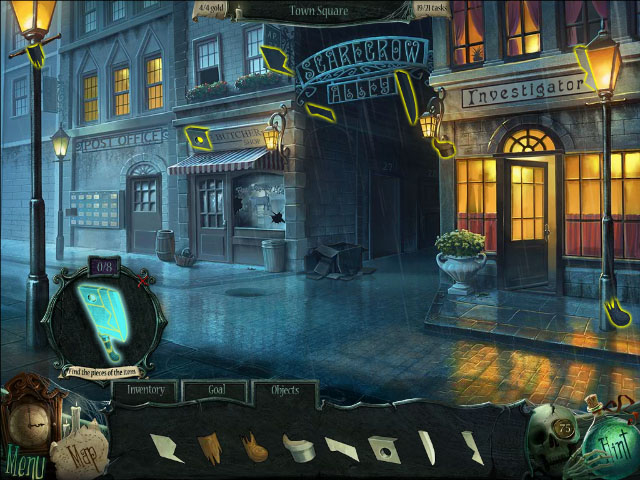
- Go through the door to enter the Town Square. Talk to the Investigator then, collect the gold coins.
- Take the NUMBER 5 tile (1).
- Take three NOTE FRAGMENTS (2). Zoom in on the girl's body. Take the NOTE FRAGMENT (3). Click on the pile of trash to trigger an HOS (4). When complete, you obtain a NOTE FRAGMENT. Zoom in on the butcher window (5). Take the NOTE FRAGMENT.
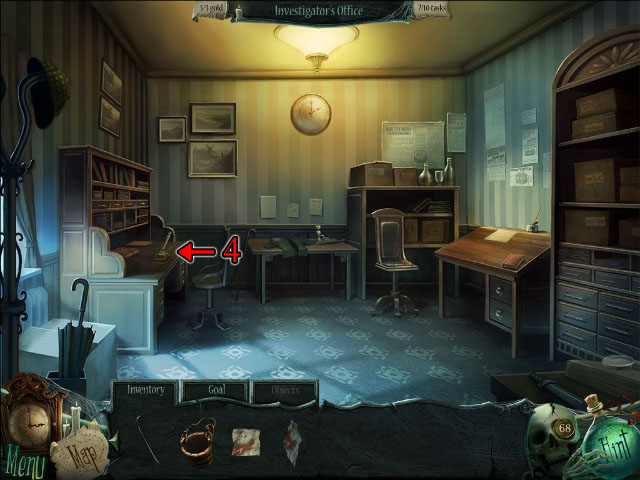
- Talk to the Inspector to obtain OFFICE KEY. Zoom in on the investigator's door and use the OFFICE KEY to unlock it (6). Enter the Investigator's Office and take the NUMBER 9 tile (7).
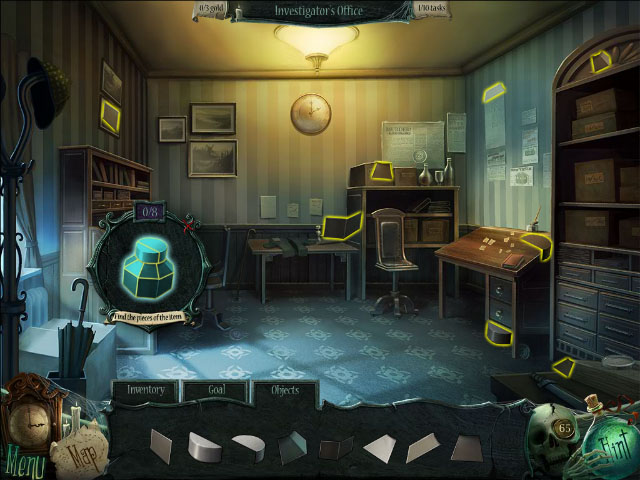
- Click on the bottle and find its fragments to obtain INK REMOVER (1).
- Collect the gold coins.
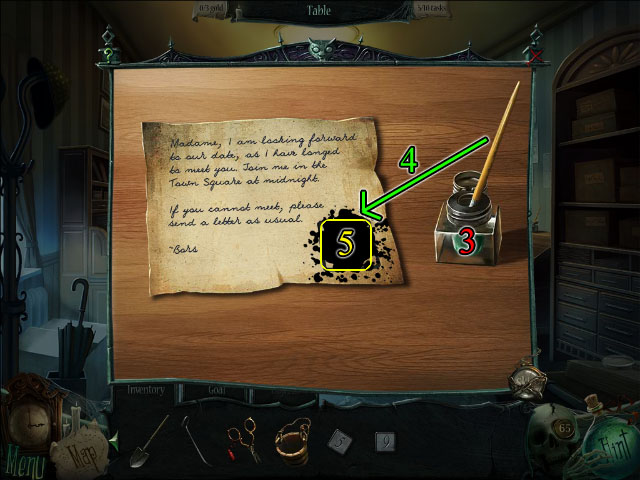
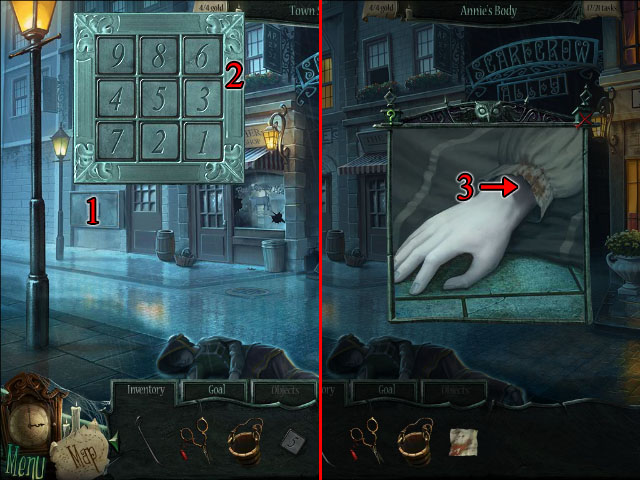
- Zoom in on the writing table (2). Pour the INK REMOVER into the empty bottle (3) and place the six NOTE PIECES on the table to trigger a mini-puzzle. Arrange the paper to form a completed note then use Ink Remover Brush on the stain (4) four times to reveal a number tile. Use Scissors to cut out the NUMBER 3 tile (5).
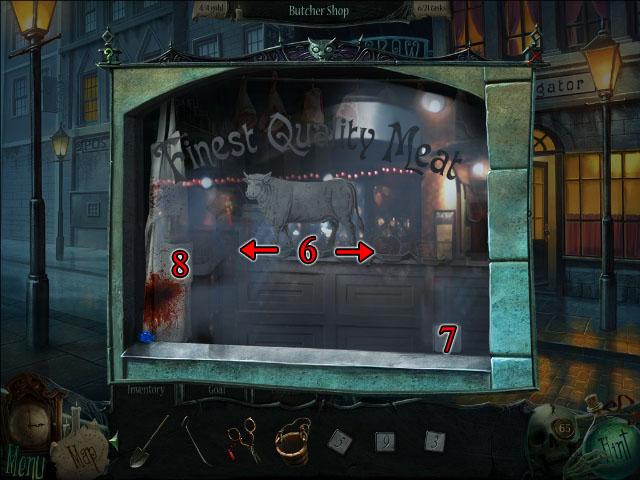
- Return to the Town Square and zoom in on the butcher window. Use the CROWBAR twice to break the window (6). Take the NUMBER 2 tile (7). Take the POST OFFICE KEY from the apron pocket (8).
- Zoom in on the Post Office Boxes (1). Place the NUMBER TILES 2, 3, 5, and 9 to trigger a mini-puzzle. Swap numbers until the sum of a row totals the number to the left of the row (2).
- Use the POST OFFICE KEY to open box 13. Zoom in on the mail and take the BLOODSTAINED RAG. Zoom in on the girl's body. Use the SCISSORS to cut DRESS FRAGMENT from the sleeve (3).
- Enter the Investigator's Office and zoom in on the Microscope (4). Click the button to turn on its light. Place the BLOODSTAINED RAG and the DRESS FRAGMENT onto the slide to trigger a mini-puzzle. Match all the shapes.
- The Inspector enters and tells you the blood samples match, and asks you to search the Butcher's house.
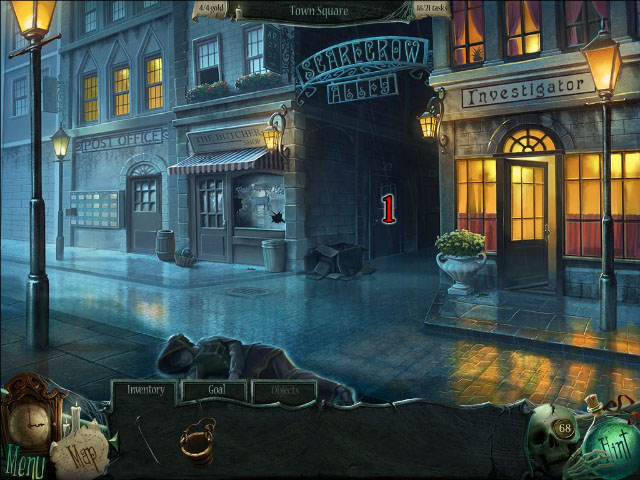
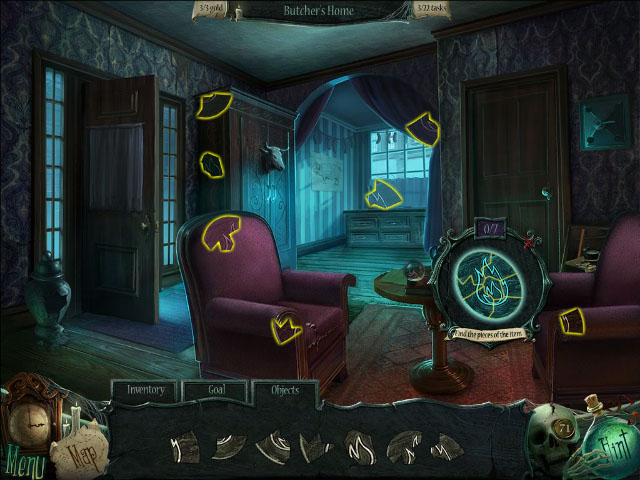
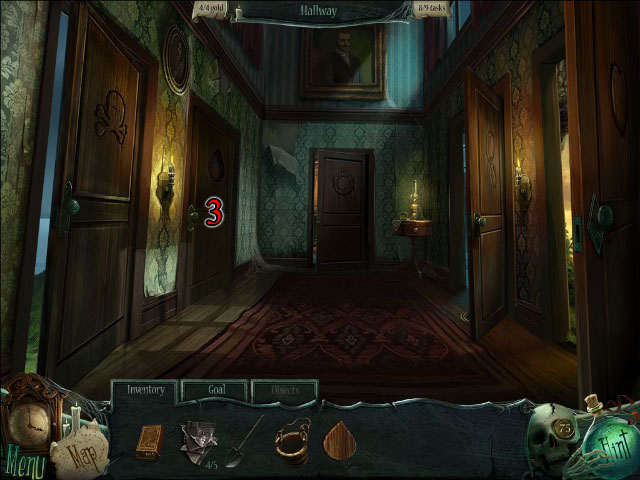
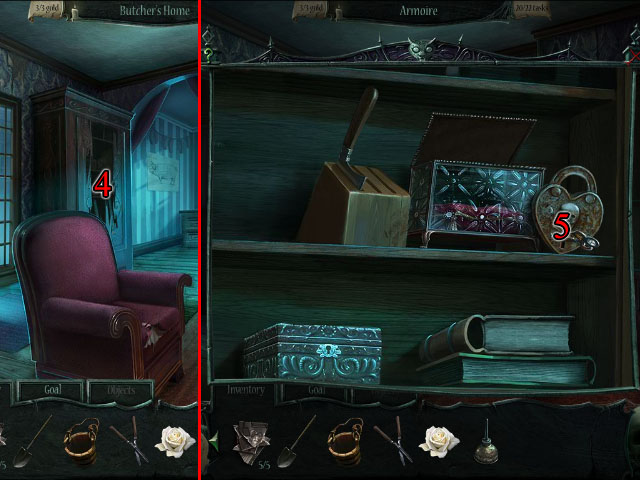
- Go to the Town Square and zoom in on door 27 in Scarecrow Alley (1). Enter the Butcher's home.
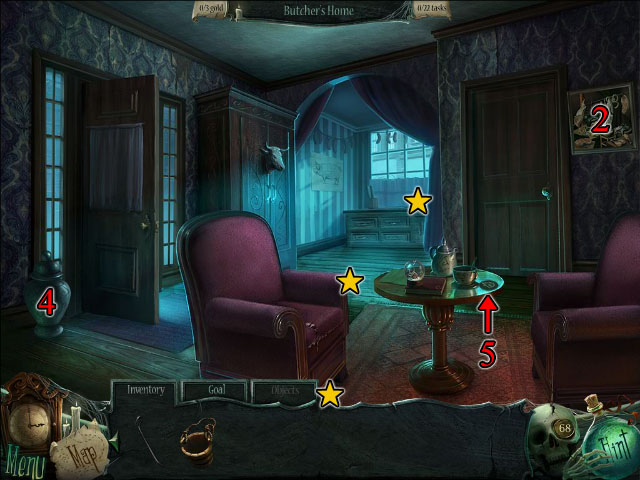
- Collect the gold coins.
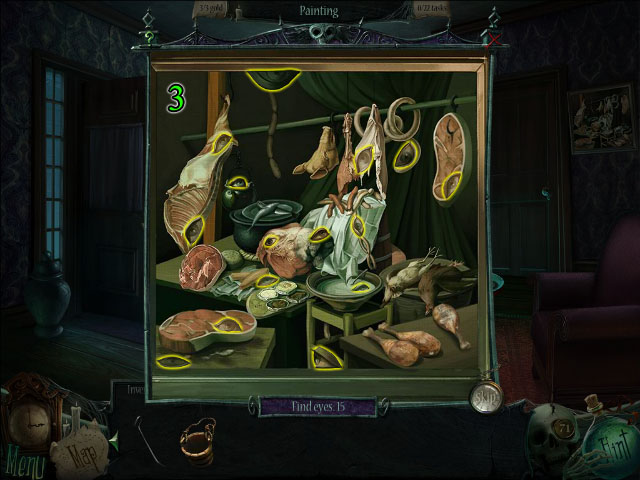
- Zoom in on the painting hanging beside the basement door to trigger a mini-puzzle (2). Find all 15 eyes in the picture (3). The painting falls, revealing a wall safe.
- Zoom in on the urn beside the front door (4). Use the CROWBAR to break the urn. Take the spider LOCK PIECE which falls out of the urn.
- On the table, click on the Lock Piece and find its fragments to obtain the fire LOCK PIECE (5).

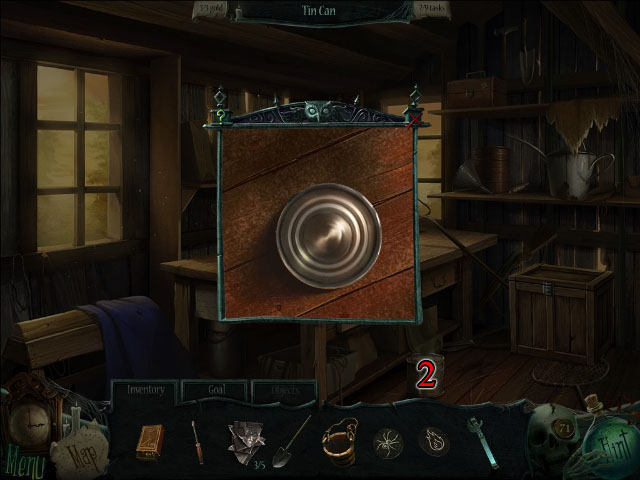
- Zoom in on the kitchen drawer (1). Take the CAN OPENER. Return to the Shed. Zoom in on the sealed can (2). Use the CAN OPENER on the can. Take the eye LOCK PIECE.
- Return to the Butcher's House. Zoom in on the loosely-sewn chair cushion (3), and pull open the stitches to reveal a lock piece. Take the horseshoe LOCK PIECE.
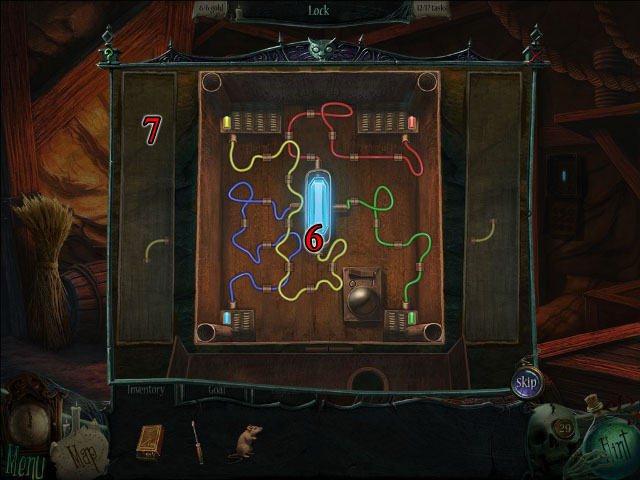
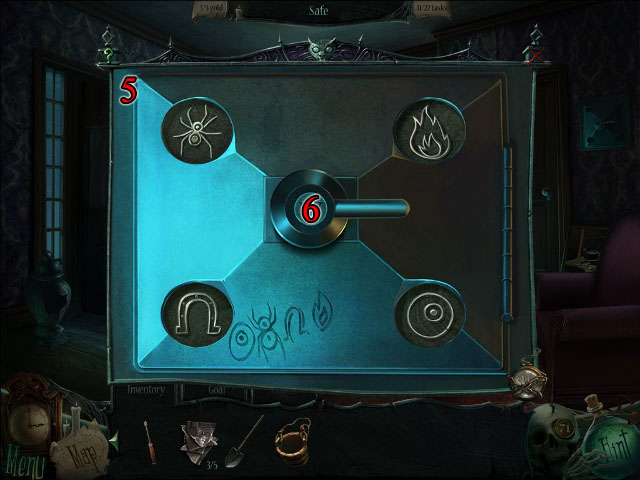
- Zoom in on the wall safe (4). Place the LOCK PIECES in the appropriate slots (5). Click on the handle to trigger a mini-puzzle (6). Swap the pieces so that no piece is duplicated in any row or column (7). Take the BASEMENT KEY from the safe.
- Zoom in on the basement door and use the BASEMENT KEY to unlock it (8).
- Enter the basement. Click on the light switch to turn on the light (1). The butcher slams the door shut and locks you in.
- Collect the gold coins.
- Click on the wooden box to trigger a mini-puzzle (2). Place the runes in the correct slots (3). When all runes are gone, take the PHOTO FRAGMENT.
- Zoom in on the metal box on the table (4). Click on the empty vial to break it. Take the GLASS SHARD.
- Use the GLASS SHARD to cut down the burlap sack (5). Zoom in on the bag and take the ACID.
- Use the ACID on the bars at the base of the wall (6). Push the green button (7). A portrait appears on the wall (8).

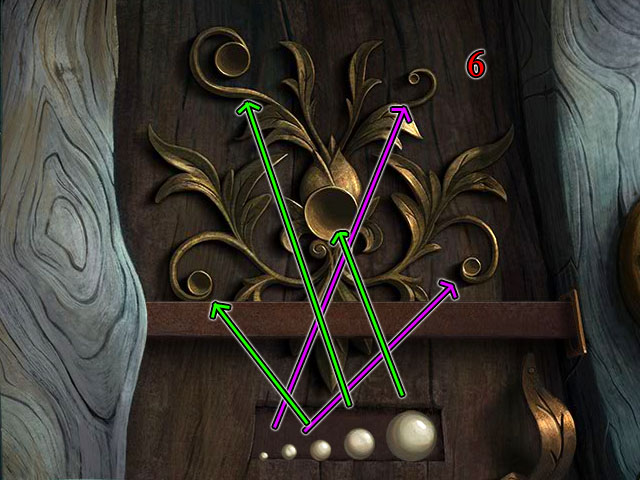
- Zoom in on the portrait to trigger a mini-puzzle. Swap the sections to make a complete picture (1). The wall disappears, revealing a secret room.
- Click on the locket and find its fragments to obtain the LOCKET (2).
- Take the COFFIN KEY from the secret room (3). Use the COFFIN KEY on the coffin to open it (4). Click on the saw and find its fragments to obtain the SAW (5).
- Use the SAW on the large pipe to reveal a grate (6). Zoom in on the grate. Use the SCREWDRIVER to remove the four screws (7). Click on the grate. It falls to the floor. Climb out the opening to return to the Town Square.
- Give the LOCKET to the Inspector. He apprehends the Butcher and takes him away. Click on the meat cleaver which the butcher dropped and find its fragments to obtain the CLEAVER (1).
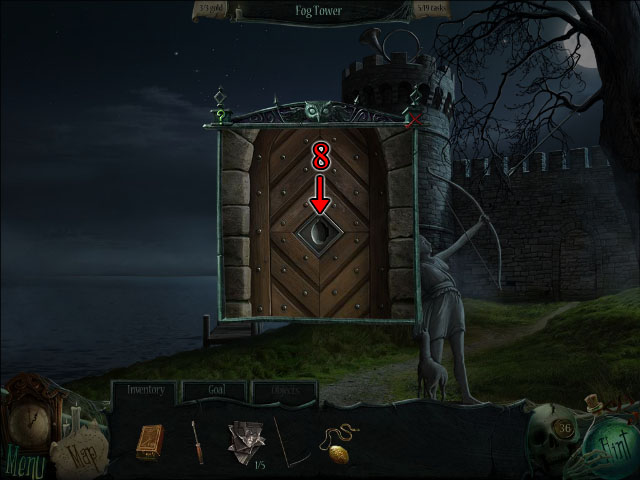
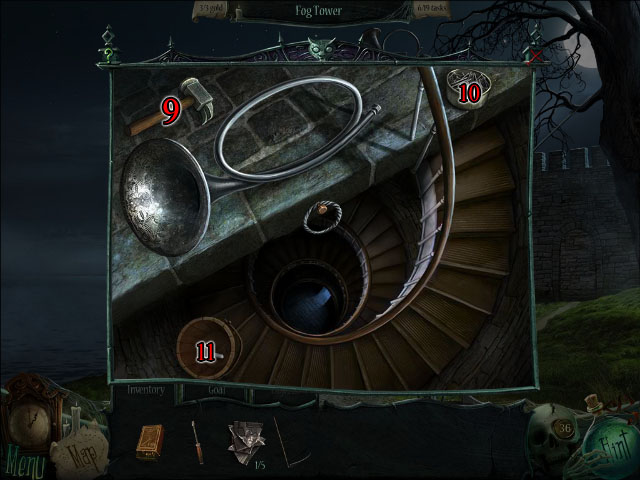
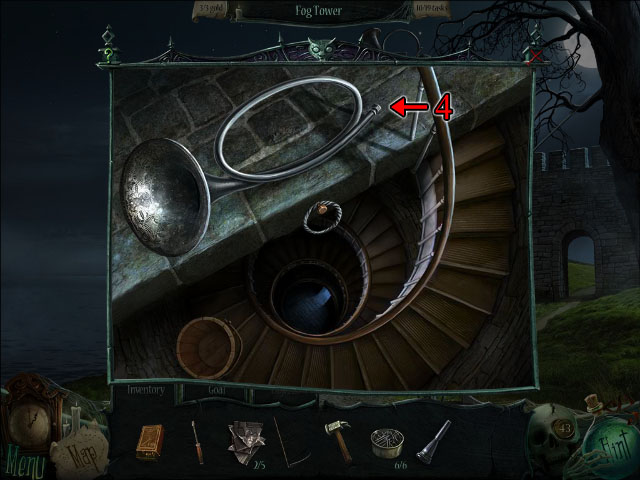
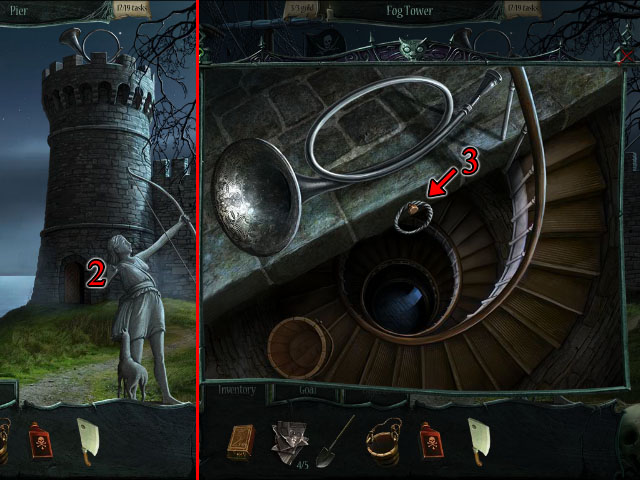
- Return to the Pier. Zoom in on the Fog Tower (2). Use the ACID on the metal ring (3). Take BULL'S RING.
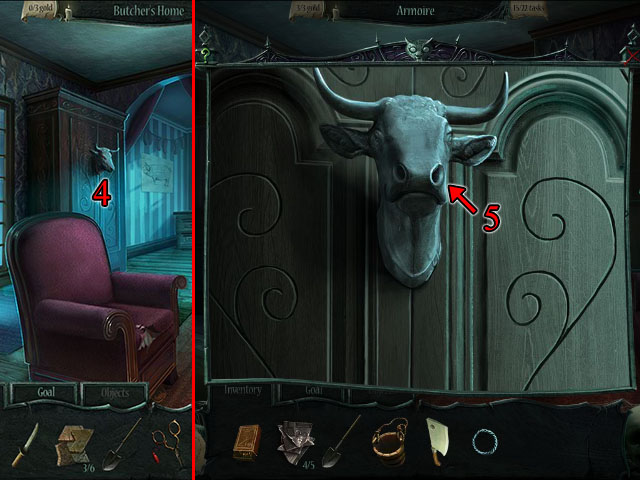
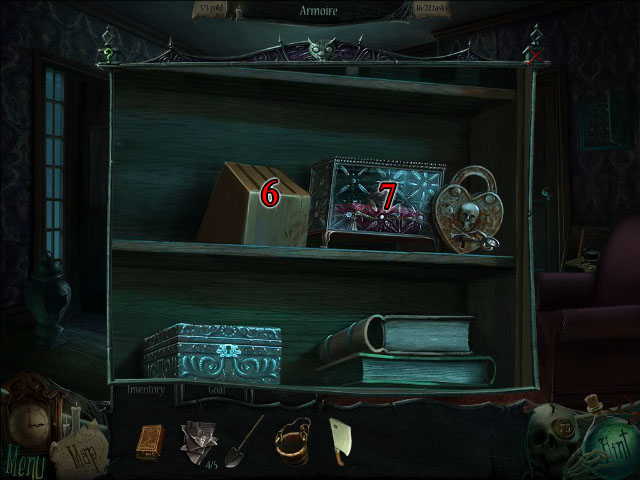
- Return to the butcher's home. Zoom in on the armoire (4). Use the BULL'S RING on the bull's head (5). The armoire blasts open. Zoom in on the armoire. Place the CLEAVER into the Knife Block (6). The Jewelry Box opens. Take the TURNKEY from Jewelry Box (7).
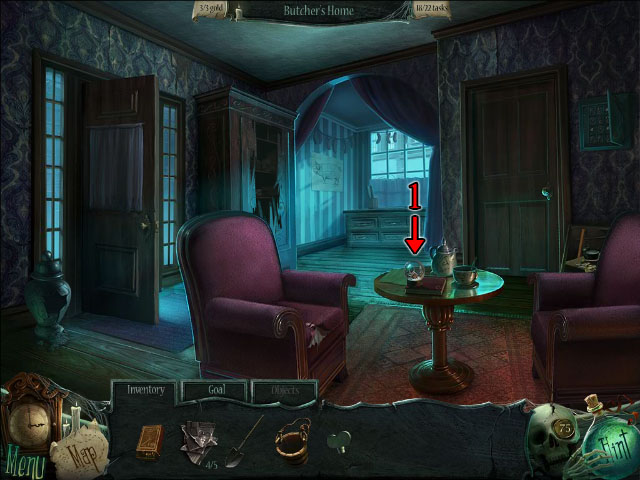
- Zoom in on the Snow Globe on the table (1). Use the TURNKEY to unlock the Snow Globe. Zoom in on the snow globe again to trigger a mini-puzzle.
- Click on the lights in the correct order (2). Click on the harp to reveal a clock showing 9:30 (3). Move the combination button to the combination lock (4). Set the combination lock to 930 (5). Push the combination button.
- Click on the star boxes to match the constellation shown below it (6). When complete, press the red button. The un-cursed SNOW GLOBE is added to your Inventory.
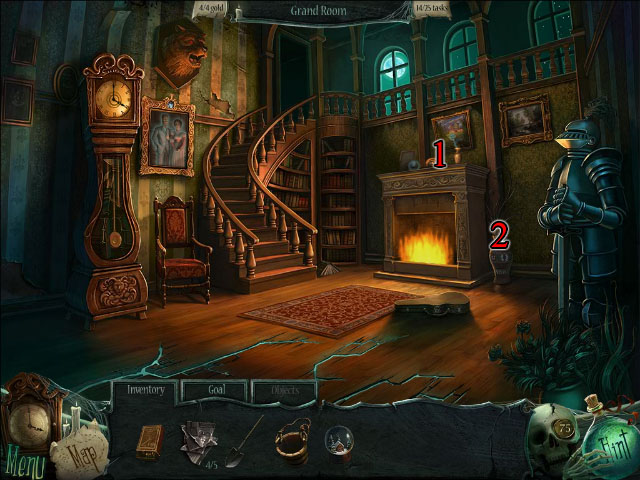
- Return to the Grand Room and zoom in on the mantle. Place the SNOW GLOBE on the mantle (1).
- Zoom in on the reeds in the vase beside the fireplace. Take the TEAR SHAPE (2).
- Go upstairs to the hallway and zoom in on the door with a tear-shaped indentation. Use the TEAR SHAPE on the indention to unlock the door(3).
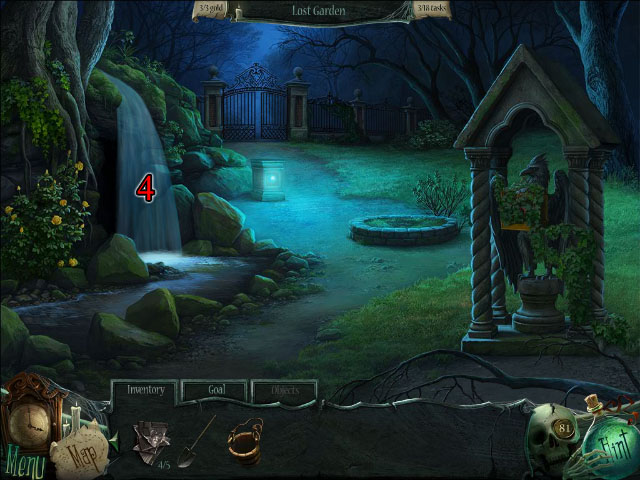
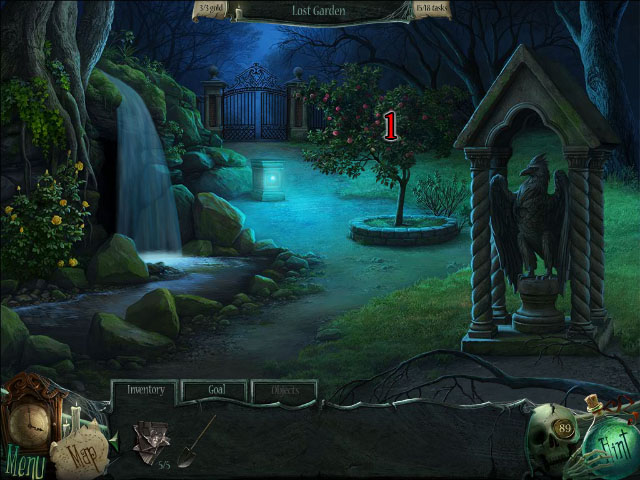
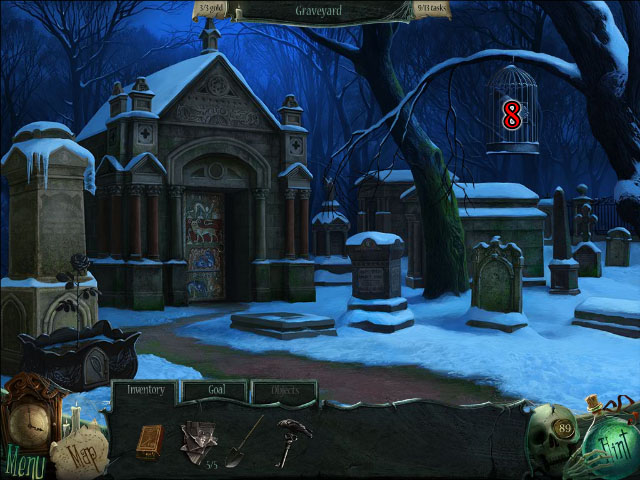
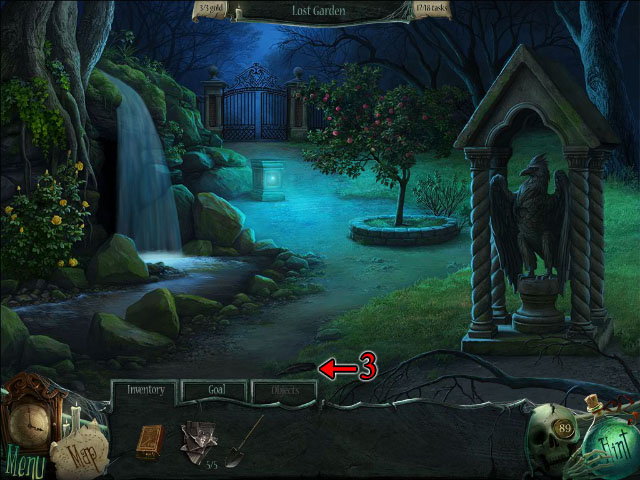
Chapter 6: Lost Garden
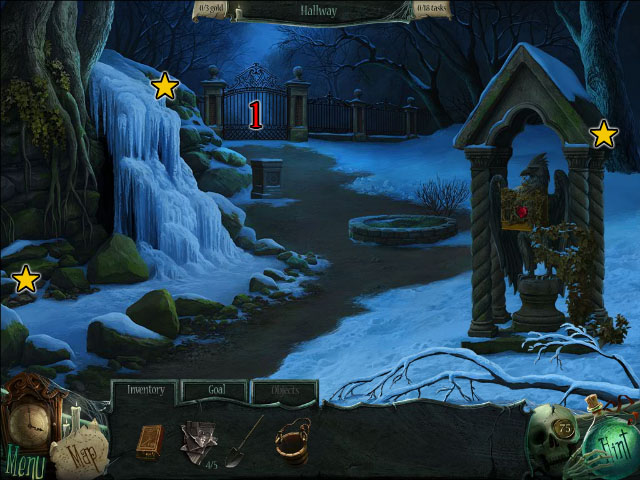
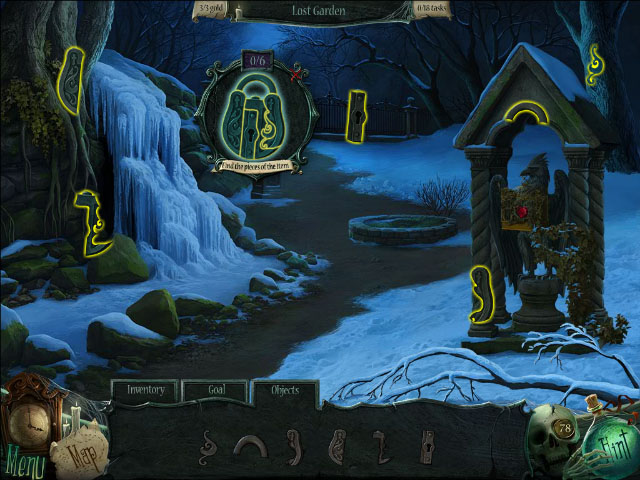
- Go through the door to enter the Lost Garden. Then, collect the gold coins.
- Click on the cemetery gate and find the fragments of the lock to open the gate (1).
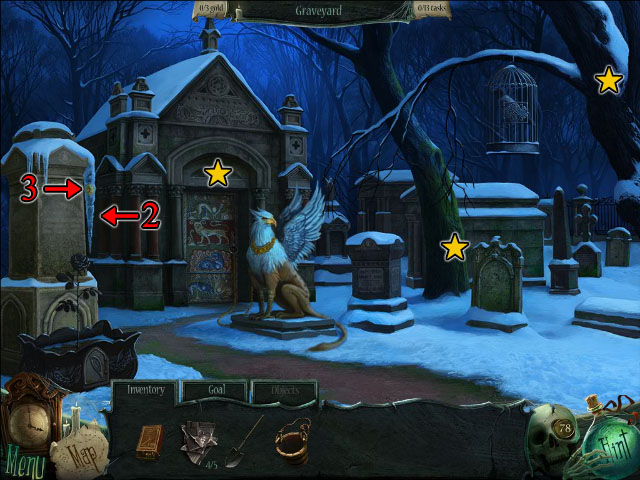
- Go through the gate to enter the Graveyard. Then collect the gold coins. Use a LIT MATCH on the icicle (2). Click the icicle stub to obtain TOPAZ (3).
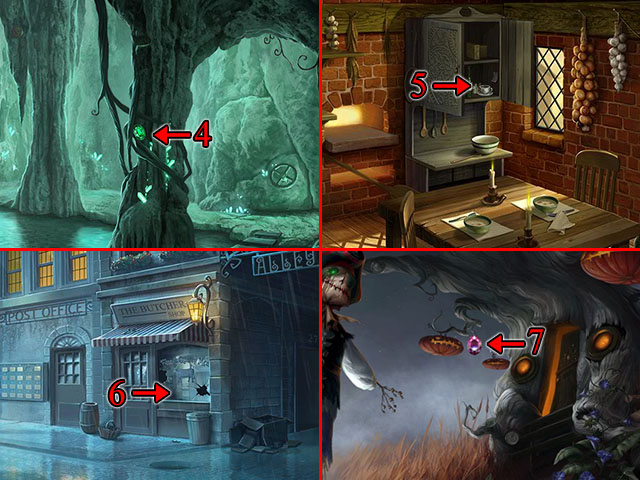
- Return to the Secret Cavern and obtain EMERALD (4). Return to the Cottage, zoom in on the cupboard, and take the RUBY (5). Return to the Town Square, zoom in on the butcher's window and take the SAPPHIRE (6). Return to Hallow Hills and take the TOURMALINE (7).
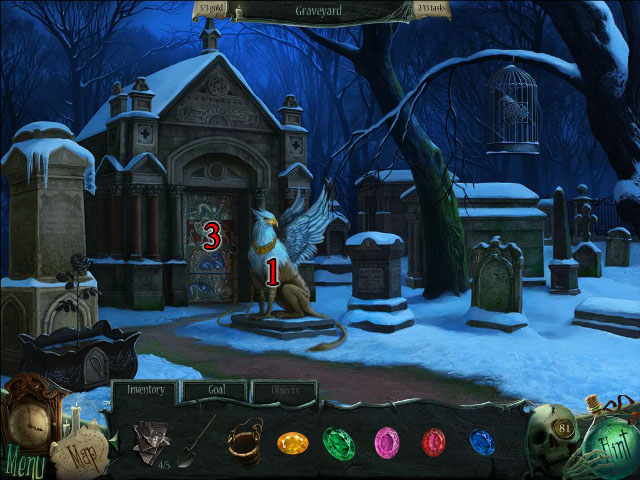
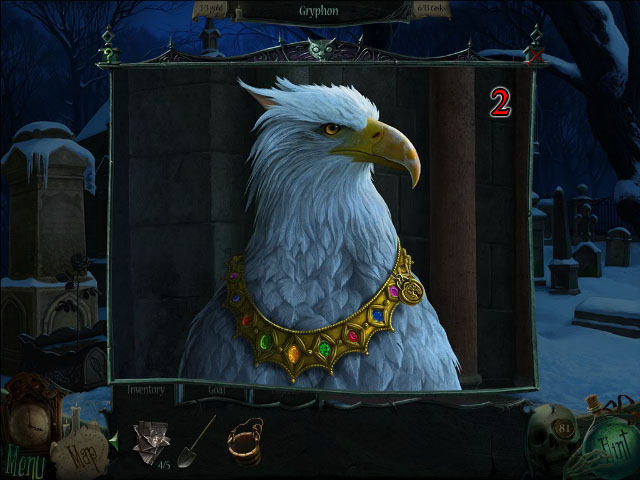

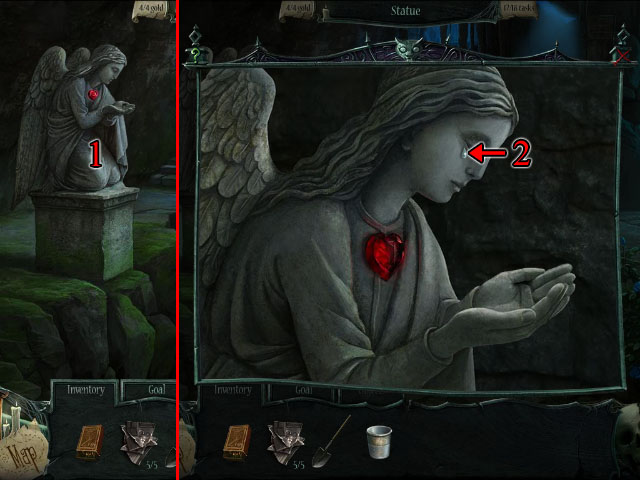
- Return to the Graveyard and zoom in on the Gryphon (1). Place the TOPAZ, EMERALD, RUBY, SAPPHIRE, and TOURMALINE in the collar (2). The Gryphon is set free.
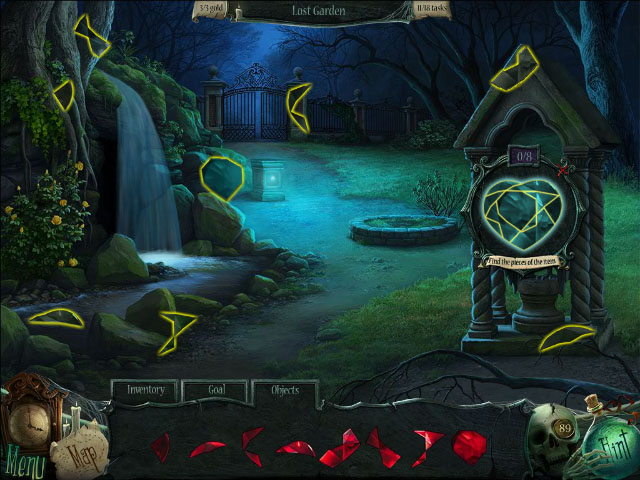
- Zoom in on the crypt door to trigger a mini-puzzle (3). Click on the 15 skulls in the fresco to open the door (4). Click on the open crypt door to trigger an HOS. When you are done, take the SUN ORB.
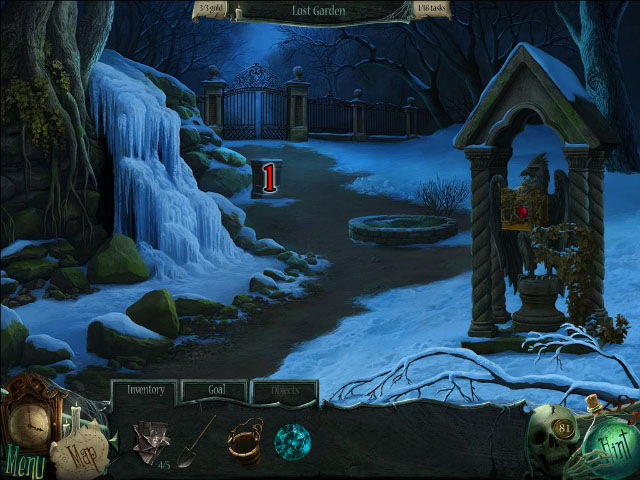
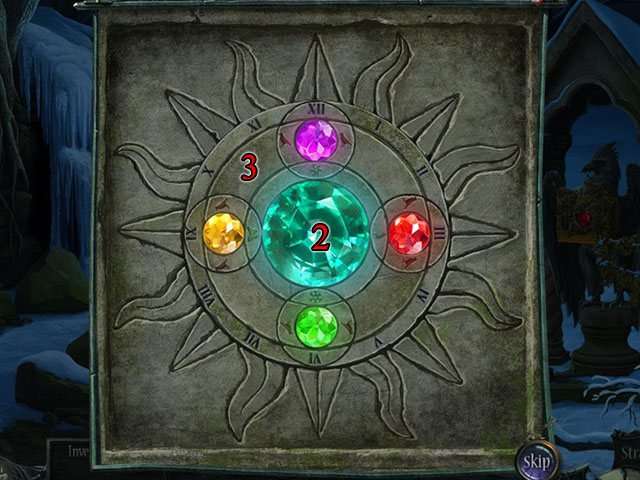
- Return to the Lost Garden and zoom in on the Sun Pedestal (1). Place the SUN ORB to trigger a mini-puzzle (2). Press the gems in the following order: Red, Red, Yellow, Yellow, Blue, Red, Red, Yellow, Yellow, Blue, Blue (3). Note: the blue gem is the one you placed on the pedestal.
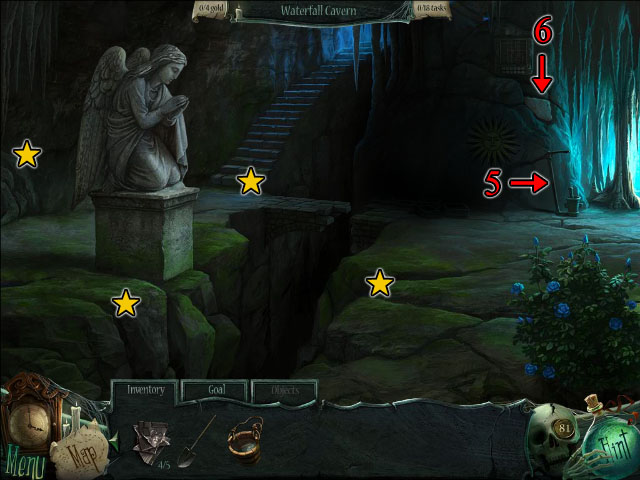
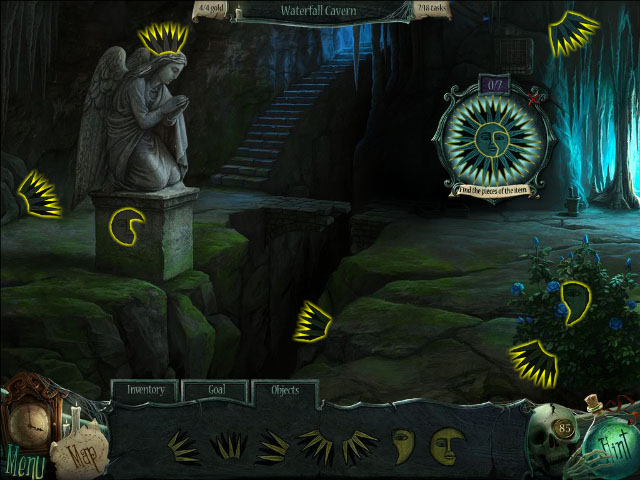
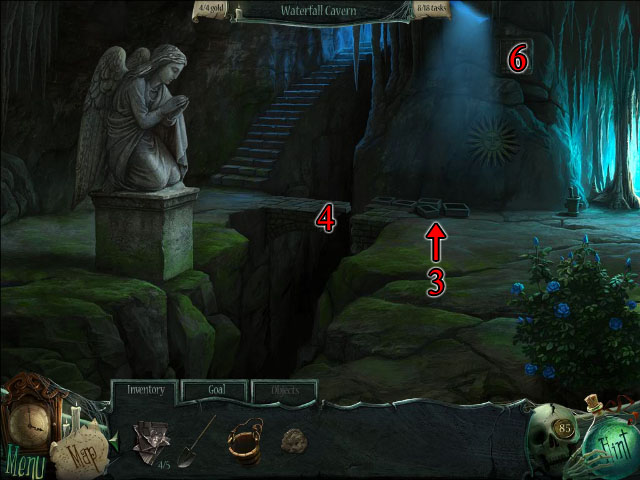
- If your BUCKET is empty, fill it from the WATERFALL (4). Then, go into the Waterfall Cavern and collect the gold coins.
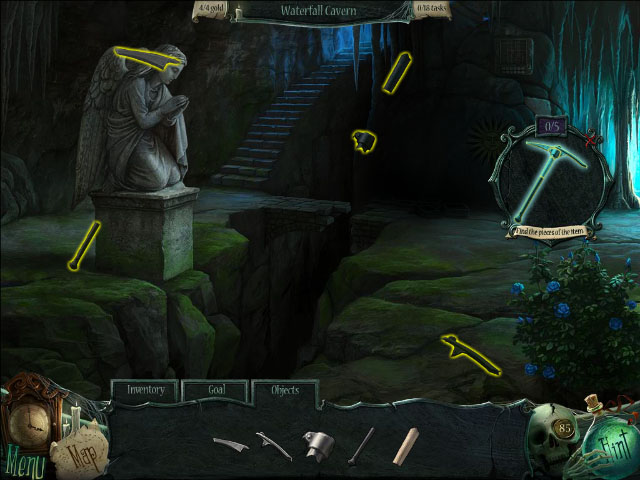
- Click on the pickaxe and find its fragments to obtain the PICKAXE (5). Use the PICKAXE on the Sandstone (6). A piece falls to the floor. Take the SANDSTONE on the floor.
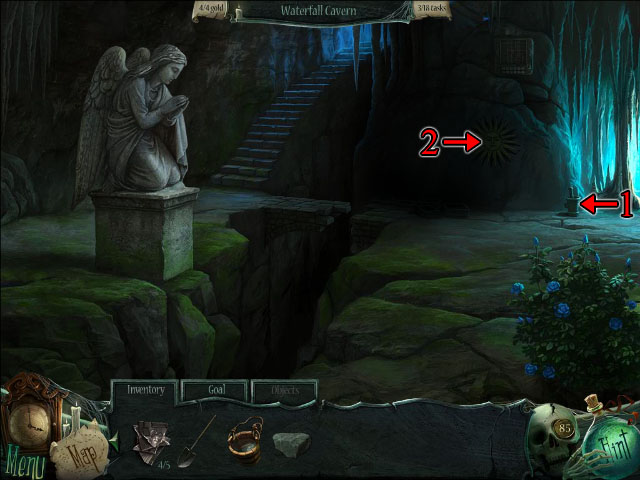
- Zoom in on the Mortar and Pestle (1). Put the SANDSTONE and BUCKET OF WATER into the mortar. Use the pestle to create mud. Take the MUD from the Mortar.
- On the wall, click on the sun diagram and find its fragments to allow light to flood the chamber (2).
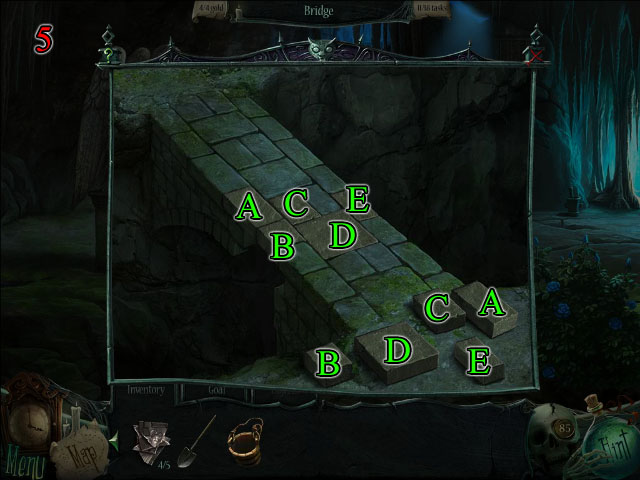
- Zoom in on the brick molds (3). Add MUD to each mold. Take the BRICKS. Zoom in on the broken bridge and put the BRICKS next to the bridge to trigger a mini-puzzle (4). Place the bricks in the correct holes to repair the bridge (5).
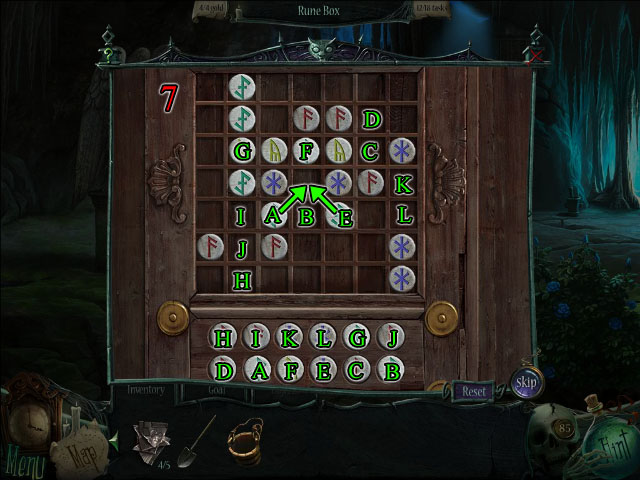
- Click on the wooden box to trigger a mini-puzzle (6). Place the runes in the correct slots (7). When all runes are gone, take the PHOTO FRAGMENT.
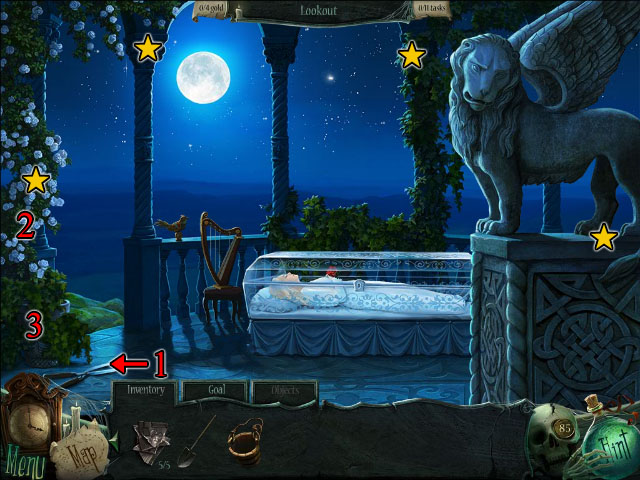
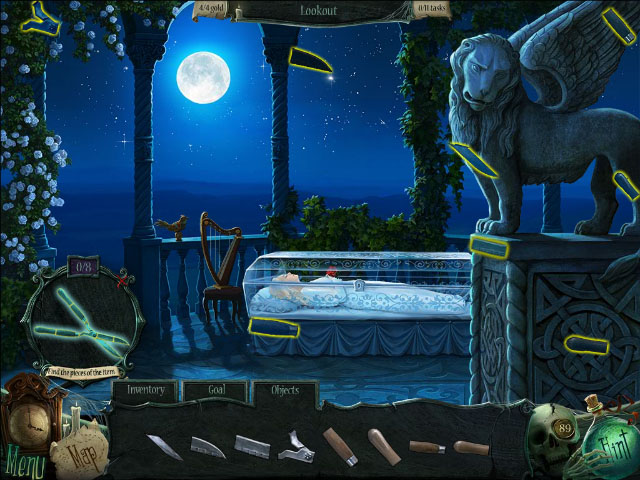
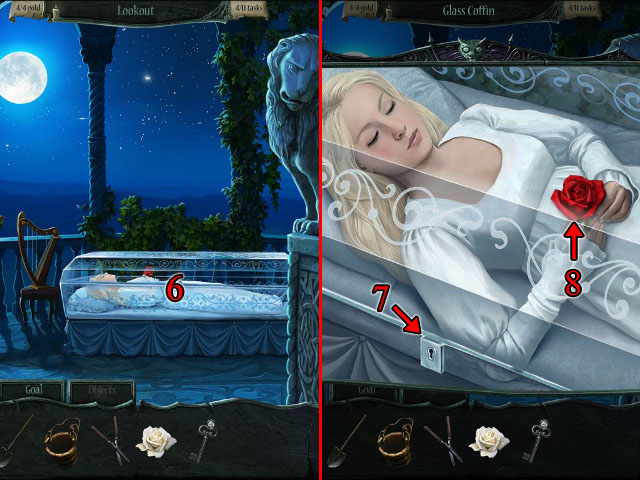
- Climb the stone staircase to the Lookout and collect the gold coins.
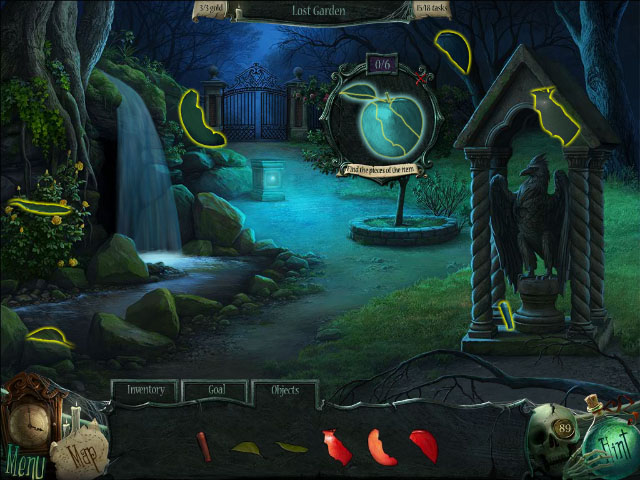
- Click on the garden shears and find the fragments to obtain the SHEARS (1). Use SHEARS on the rose bush to take a WHITE ROSE (2). Use the SHEARS on the vines at the base of the rosebush (3). Zoom in on the pot and take the OIL CAN.
- Return to the Butcher's House. Zoom in on the armoire (4). Use the OILCAN on the heart-shaped lock (5). Take GLASS KEY. Return to the Lookout. Zoom in on the glass coffin (6). Use the GLASS KEY to unlock the coffin (7). Take the RED ROSE from the coffin (8).
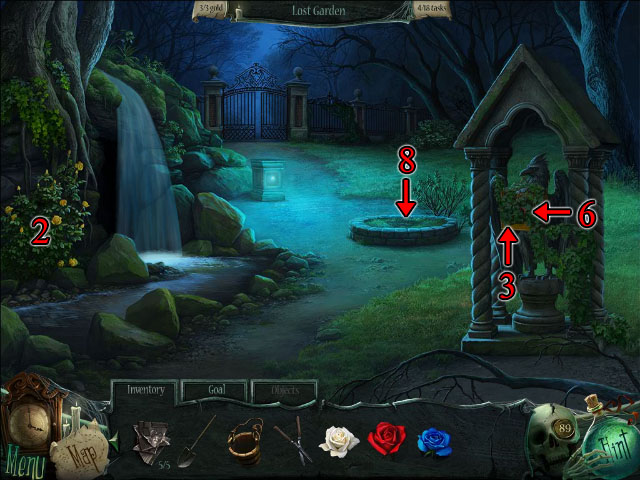
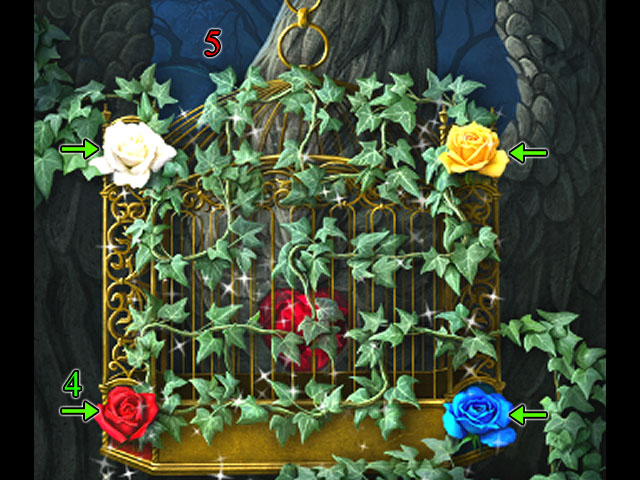
- Return to the Waterfall Cavern and use SHEARS on the bush to take a BLUE ROSE (1). Return to the Lost Garden and use SHEARS on the bush to take a YELLOW ROSE (2). Use SHEARS to cut the vines from the shrine (3). Zoom in on the shrine. Place the RED ROSE, WHITE ROSE, BLUE ROSE, and YELLOW ROSE in corners to trigger a mini-puzzle (4). Rotate the vines until they all connect (5).
- Click on the ruby heart and find the fragments to obtain RUBY HEART (6). Return to the Waterfall Cavern and zoom in on the statue (7). Place the RUBY HEART on the statue. Take the APPLE SEED.
- Return to the Lost Garden and get another BUCKET OF WATER. Use the APPLE SEED and BUCKET OF WATER on the planter (8).
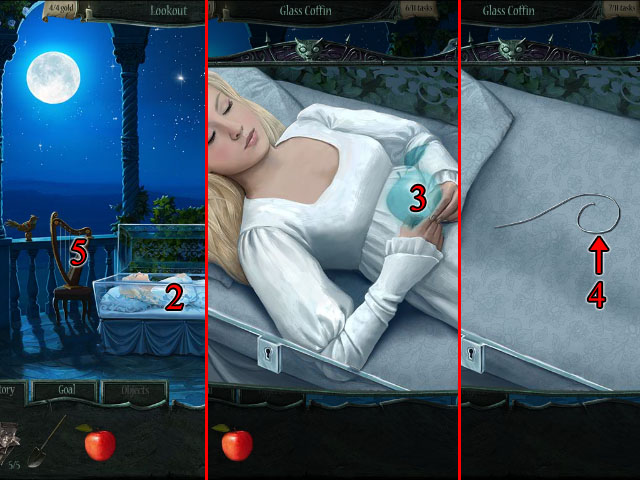
- Click on the apple tree and find the fragments to obtain an APPLE (1). Return to the Lookout and zoom in on the coffin (2). Place the APPLE into the hands of the girl (3). She awakens. Zoom in on the coffin again. Take the HARP STRING.
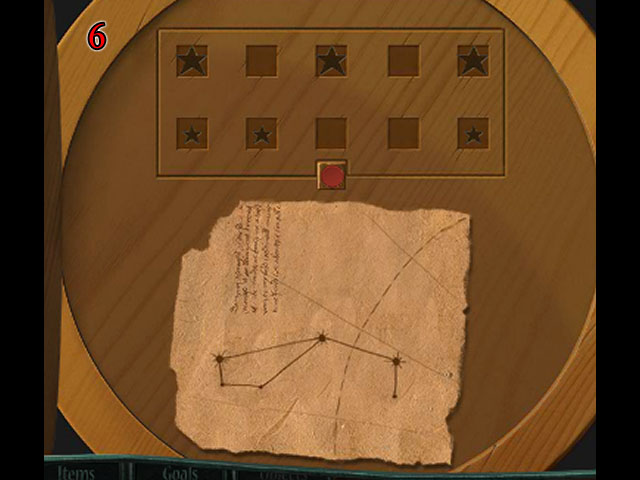
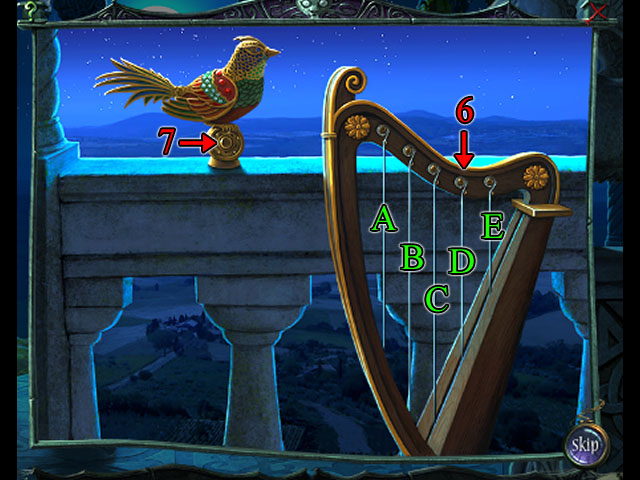
- Zoom in on the Harp (5). Use the HARP STRING on the harp to trigger a mini-puzzle (6). Click the button on the bird (7) and enter the sequence on the harp: A, D, B. The second sequence is: C, E, A, B. The third sequence is A, D, C, A, C, B. When you are done, take the RAVEN KEY.
- Return to the Graveyard and zoom in on the bird cage (8). Use the RAVEN KEY on the lock. The raven flies away. Zoom in on the bird cage again and take the THIMBLE.

- Return to the Lost Garden and talk to the Girl.
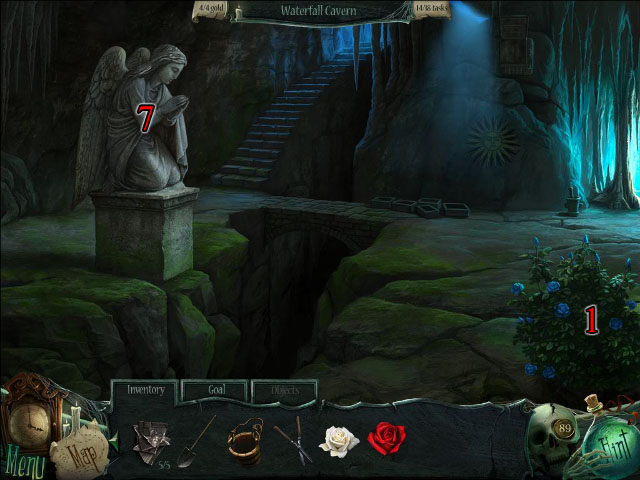
- Return to the Waterfall Cavern and zoom in on the weeping Statue (1). Use the THIMBLE to catch a TEAR (2).
- Return to the Lost Garden and use the TEAR on the Raven. Pick up the RAVEN FEATHER (3).
- Return to the Graveyard and zoom in on the planter which contains an Iron Rose (4). Place the RAVEN FEATHER on planter to trigger a mini-puzzle.
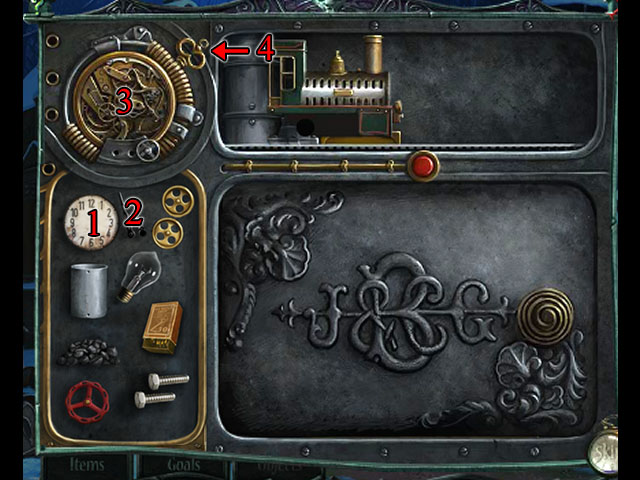
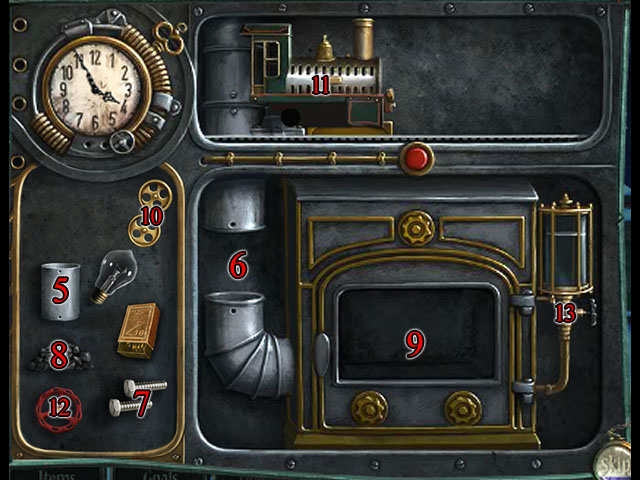
- Move the dial (1) and hands (2) onto the watch (3). Click the winding stem (4).
- Move the pipe piece (5) to the pipe (6) and fasten it with the two bolts (7). Place the coal (8) in the furnace (9). Light the coal with a lit match. Place the two train wheels (10) onto the train (11). Place the valve (12) on the hole (13). Click the valve to turn it on.
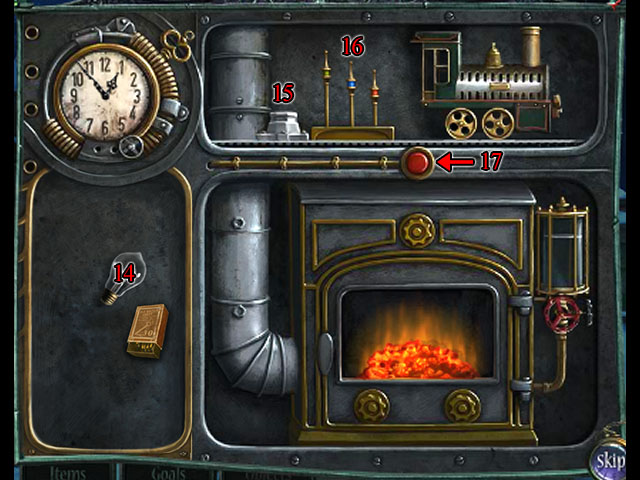
- Place the bulb (14) into the socket (15). Click the blue and red levers (16) to light the bulb. Press the red button (17) to complete the puzzle.
- You obtain the now-living ROSE from the planter.
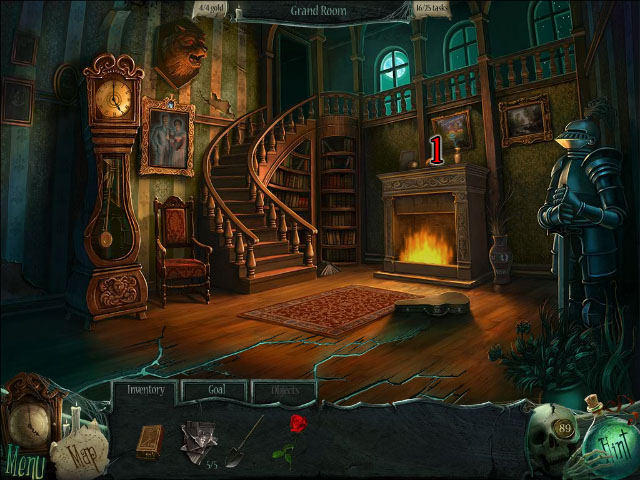
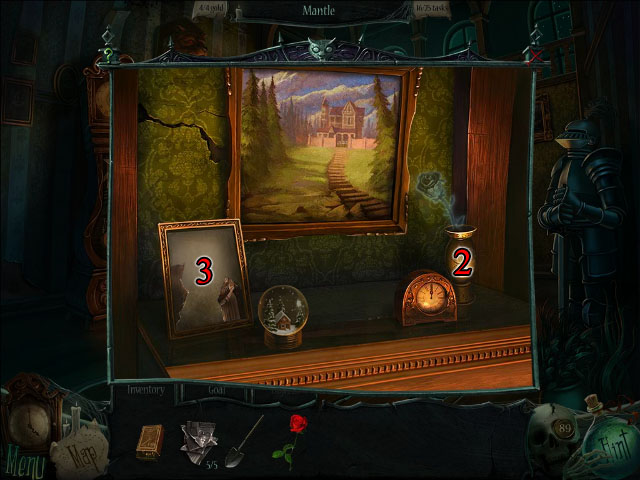
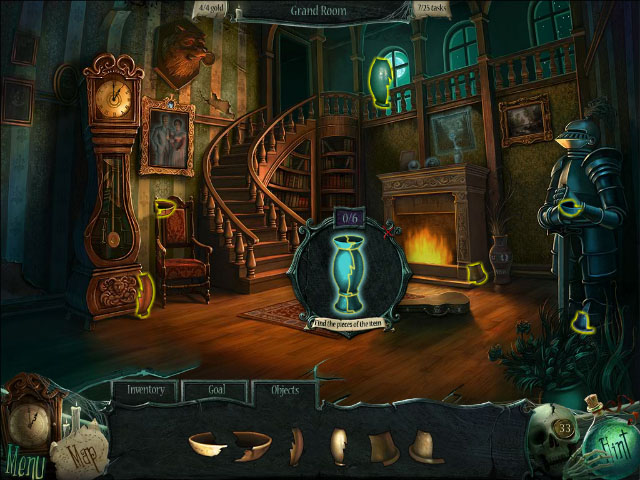
- Return to the Grand Room and zoom in on the mantle (1). Place the ROSE in the vase (2). Then, place the five PHOTO FRAGMENTS in the photo frame to complete the picture (3).
- Click on the rabbit medallion in the fireplace and find the fragments to obtain the RABBIT MEDALLION (4).
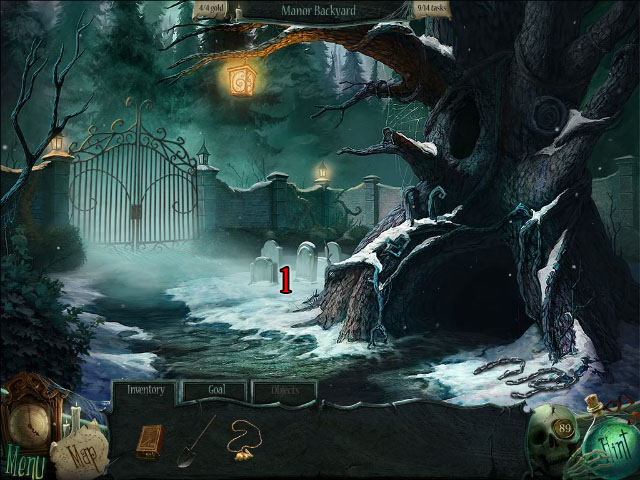
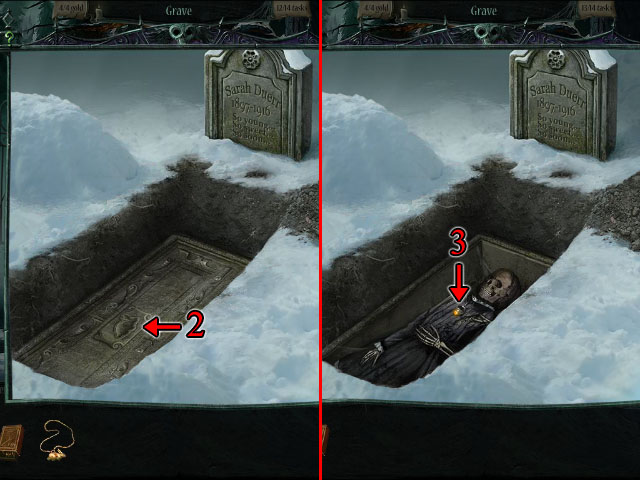
- Return to the Manor's Backyard and zoom in on the gravestones (1). Push aside the snow and use your SHOVEL to dig up the grave.
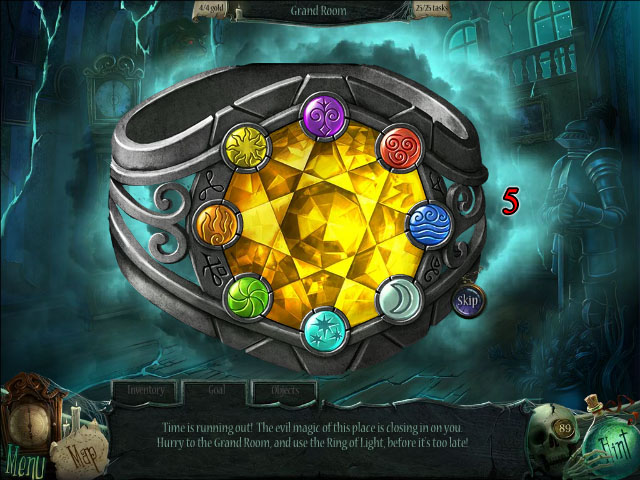
- Put the RABBIT MEDALLION in the coffin lid (2). After the lid explodes, take the RING OF LIGHT (3).
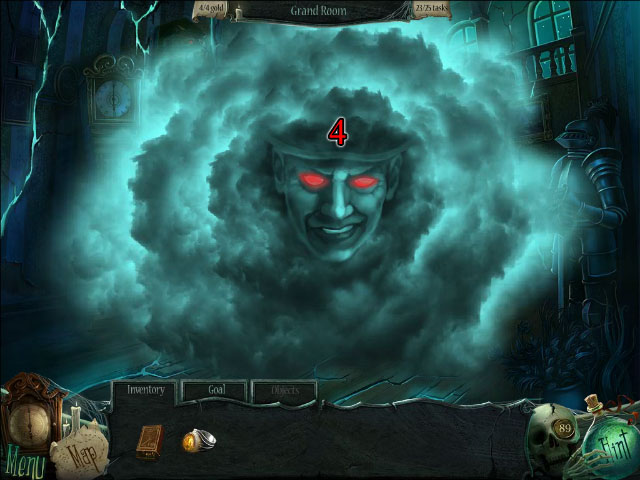
- Return to the Grand Room and use the RING OF LIGHT on Grim to trigger a mini game (4). Move each gem into the slot with a matching symbol (5).
- The ring destroys the house Grim created to trap you. You and Sarah are set free.
Created at: 2012-02-03