

Walkthrough Menu
- General Tips
- Chapter 1: Take the Train
- Chapter 2: Find Morgan's House
- Chapter 3: Escape Jail
- Chapter 4: Take the Airship
- Chapter 5: Fix the Fountain
- Chapter 6: Citadel
General Tips
- This is the official guide for Depths of Betrayal Standard Edition
- Make sure to use the scroll bars, on the side, to see all of the available hints before changing the page.
- You will not need to follow the exact path of this guide; however, some actions are required before you can complete another scene.
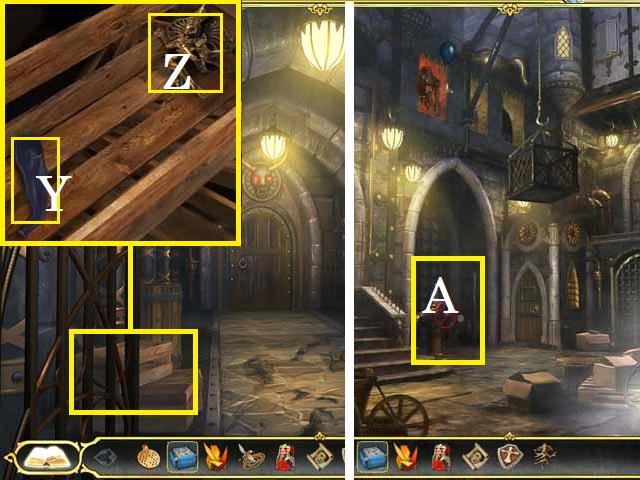
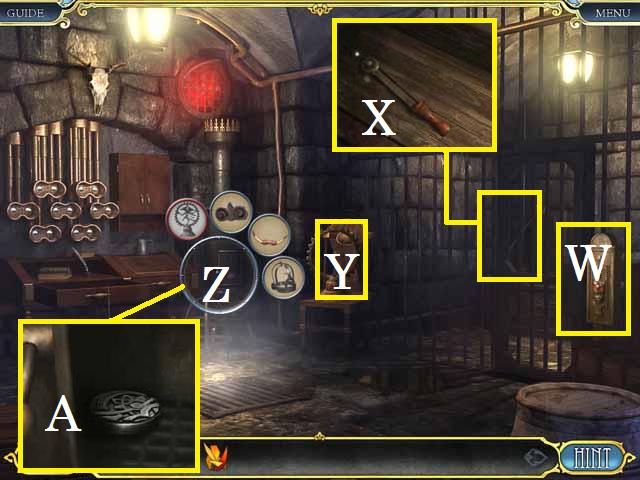
- Each scene contains Key Objects (Z). You must collect all required individual items to acquire the Key Object.
- It may be necessary to combine Inventory Items (Y) from other scenes with an individual item before it can be added to the Key Object. See the guide for further instructions.
- If you get stuck in your game play you can use the Hint Button (X).
- Make sure to pick up notes and papers along the way for additional hints in the game.
Chapter 1: Take the Train
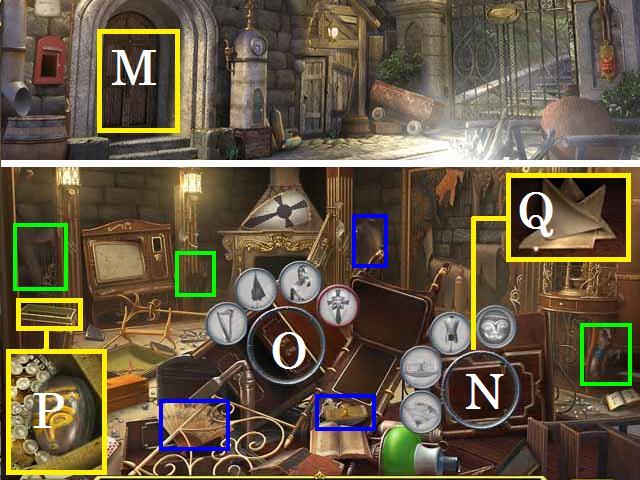
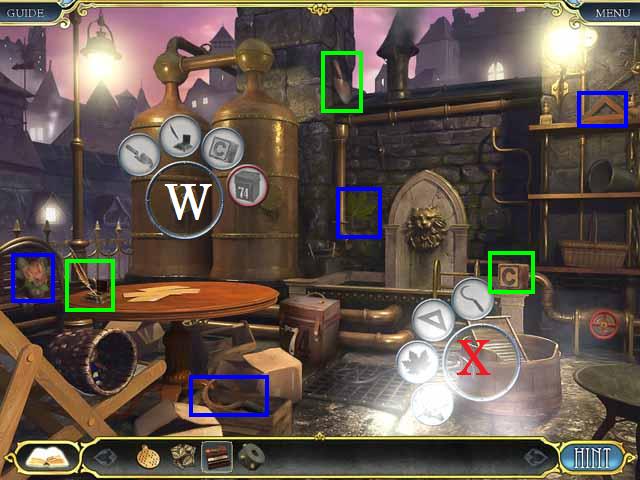
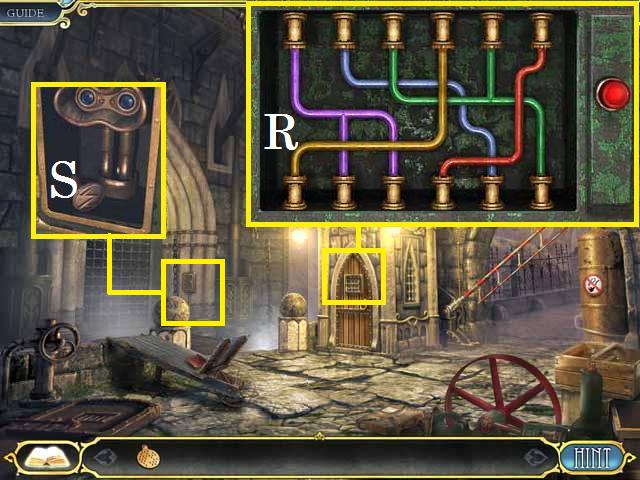
- After the opening sequence has finished, tap the letter to begin gameplay.
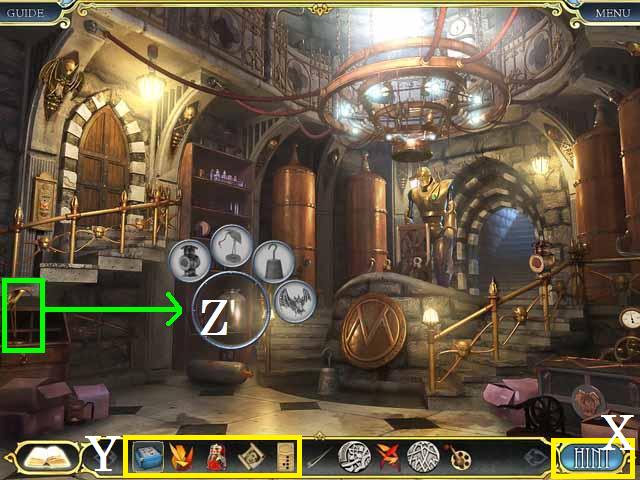
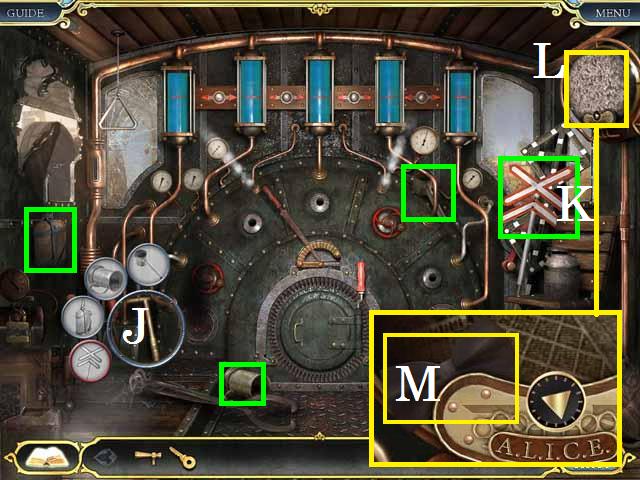
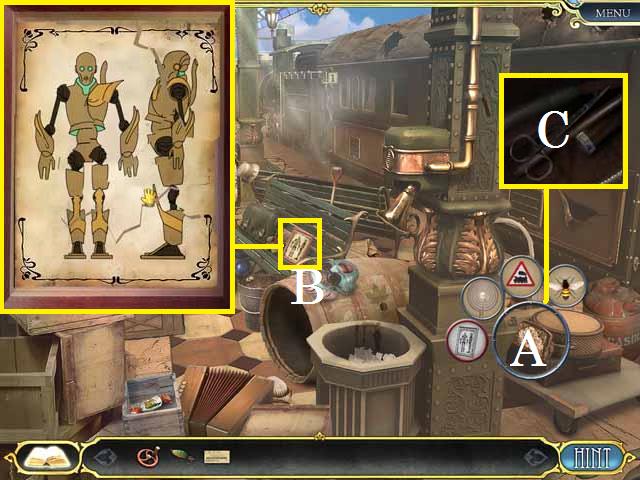
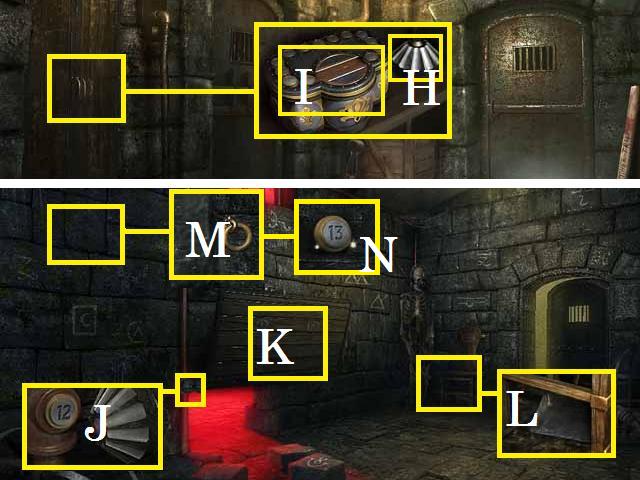
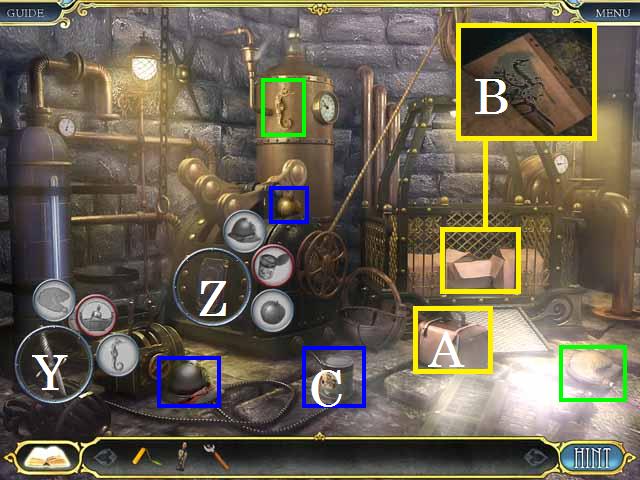
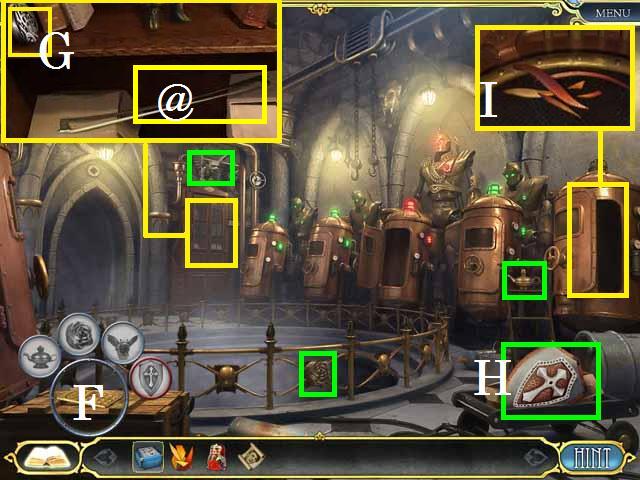
- Open the Door Key Object (C).
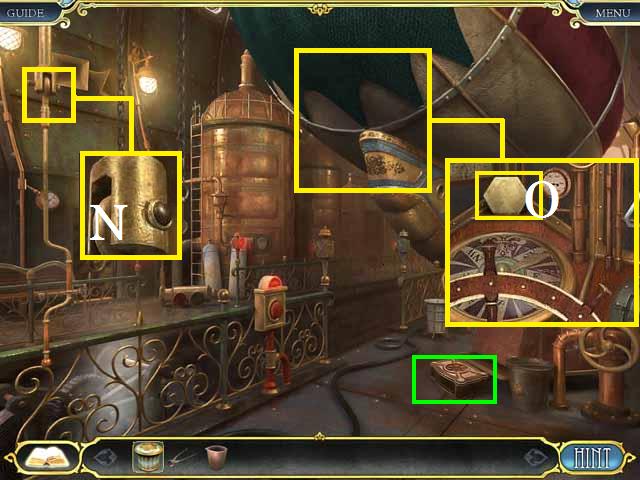
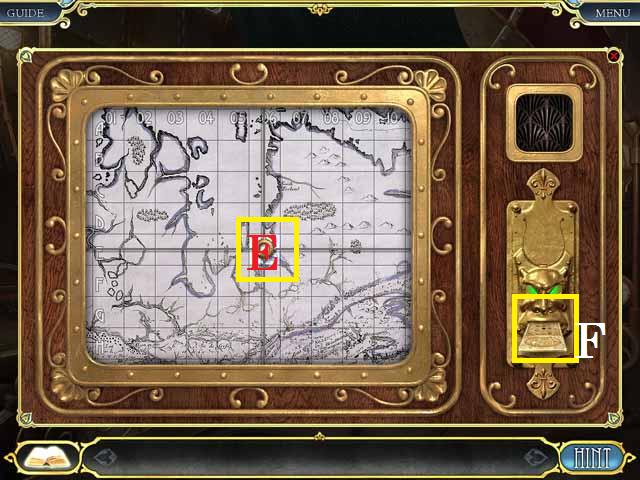
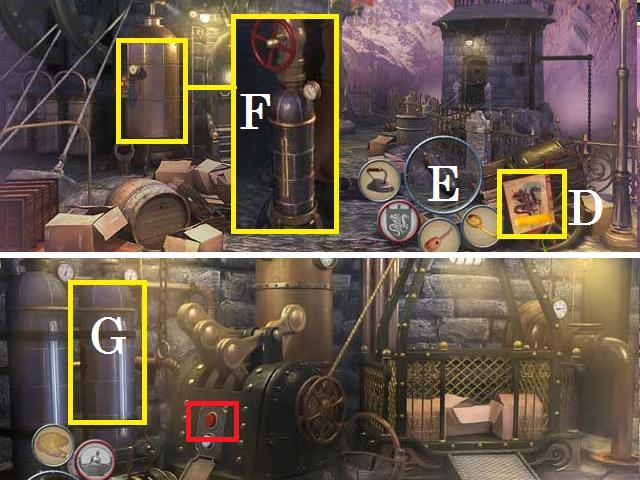
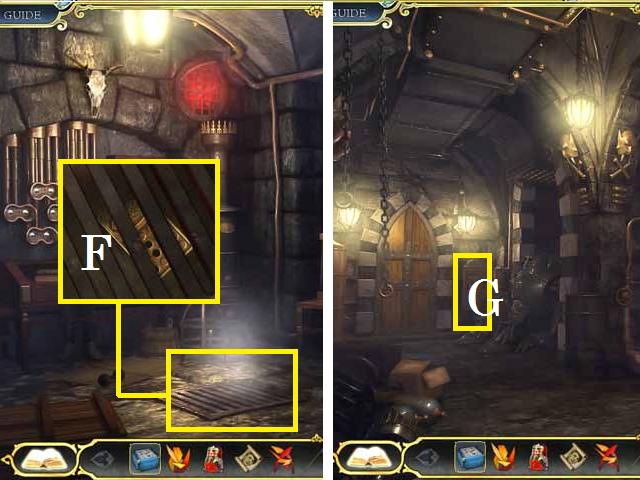
- Zoom into the ticket window; pick up the INDEX PLATE PART (E).
- Place the INDEX PLATE PART next to the 64 (F).
- Drag all items marked in green into the Door Key Object (C).
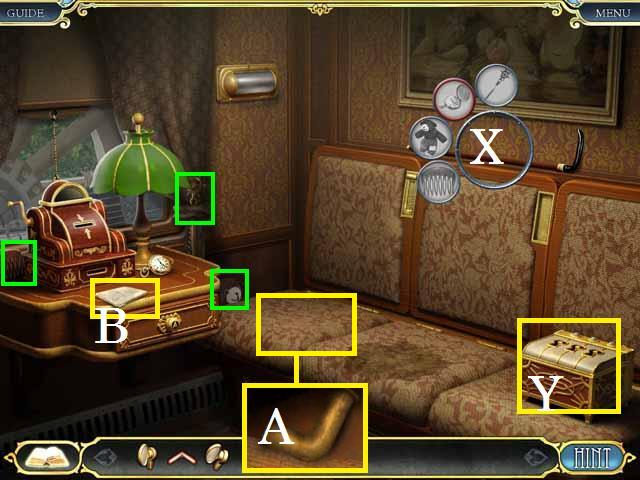
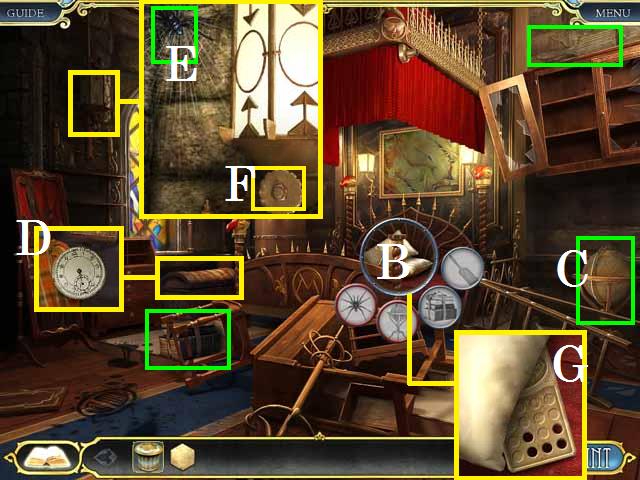
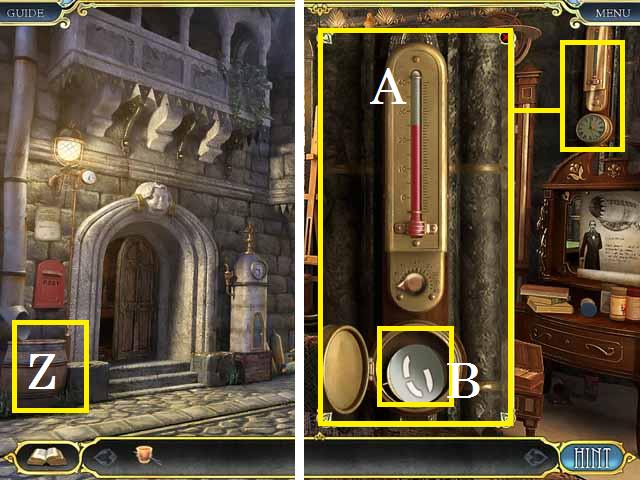
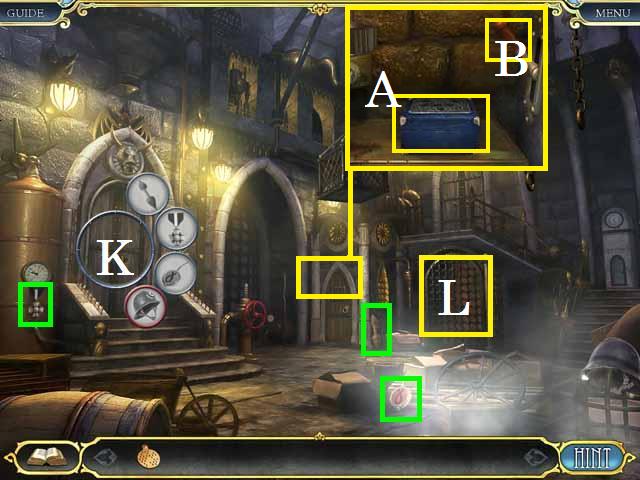
- Open the Clock Key Object (A), the Grate Key Object (B).
- Drag all items marked in blue into the Grate Key Object (B).
- Drag all items marked in orange into the Clock Key Object (A).
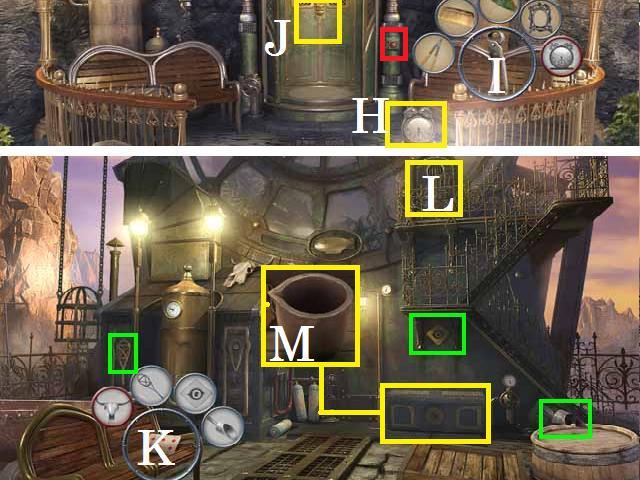
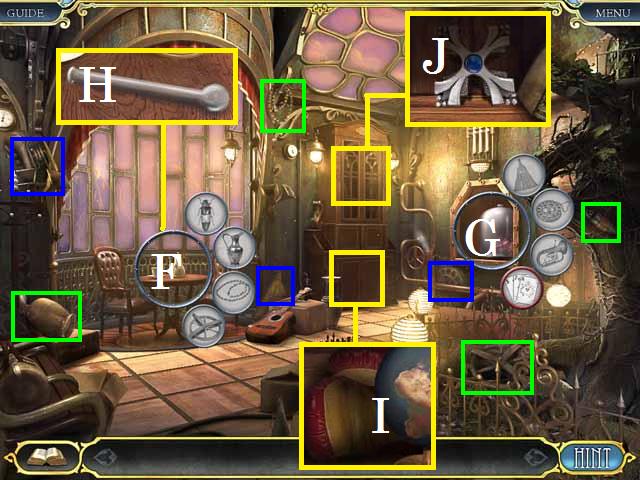
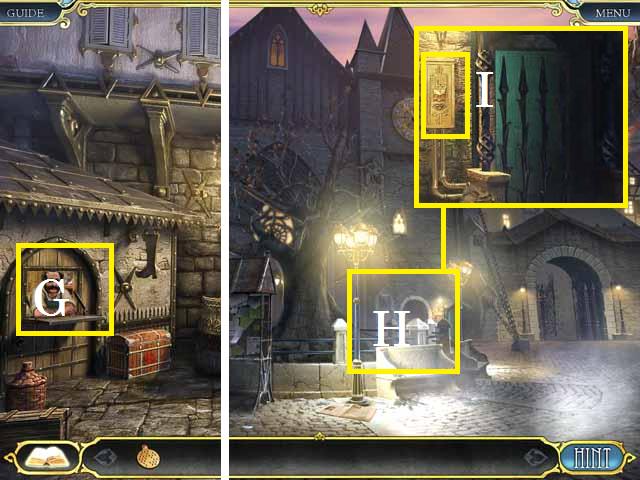
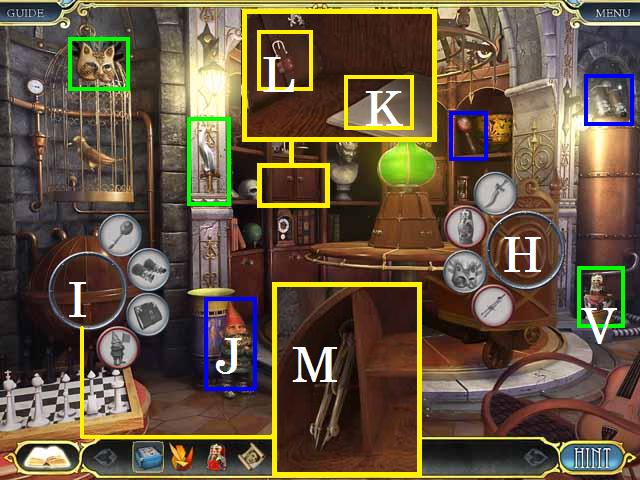
- After completing the Clock Key Object, zoom into the clock to pick up the FIVE (H).
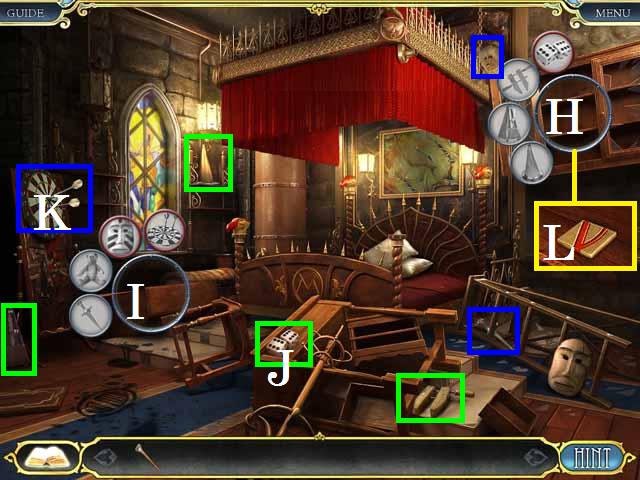
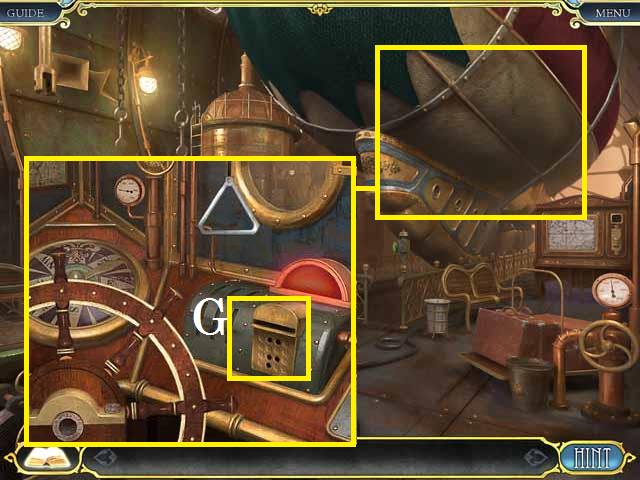
- Zoom into the vending machine; pick up the SWITCH (J).
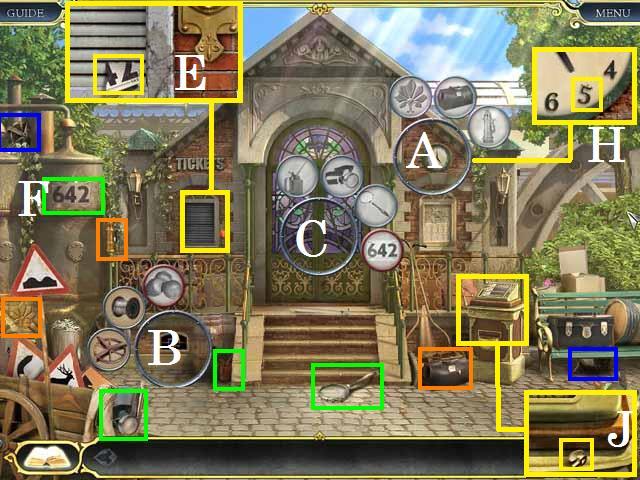
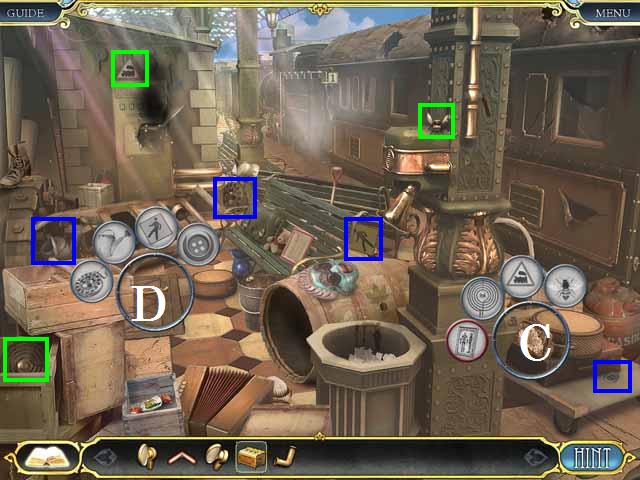
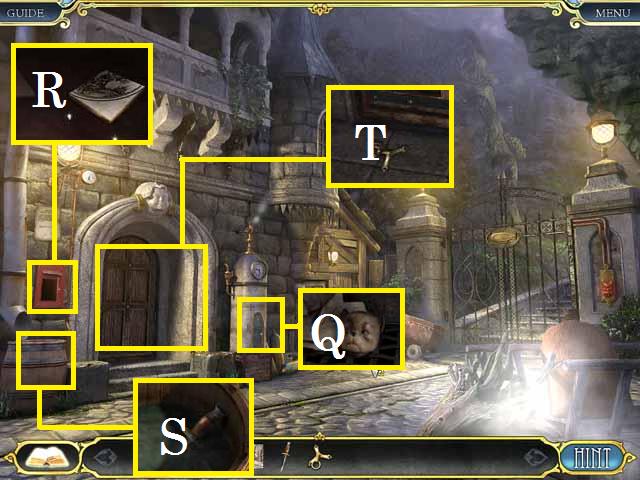
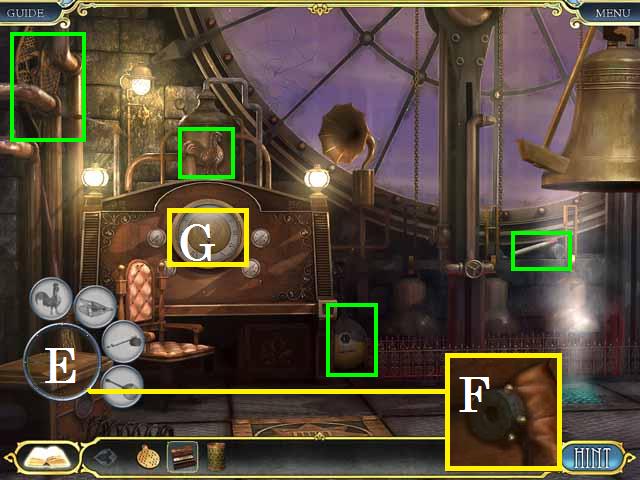
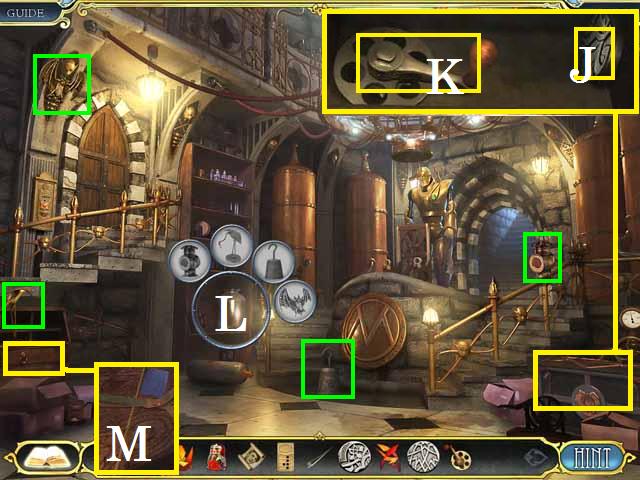
- Enter the Train Depot.
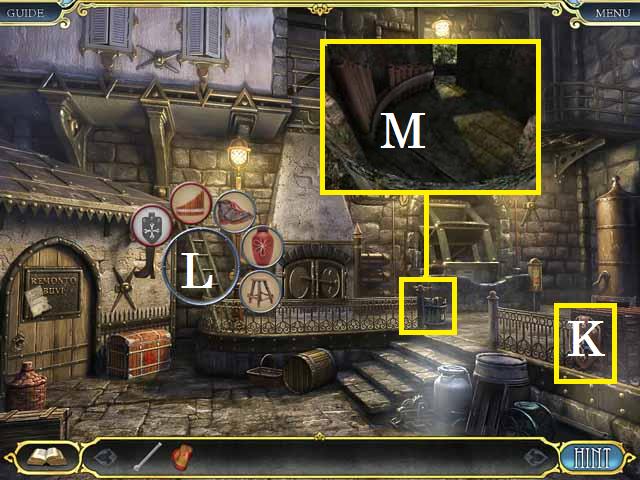
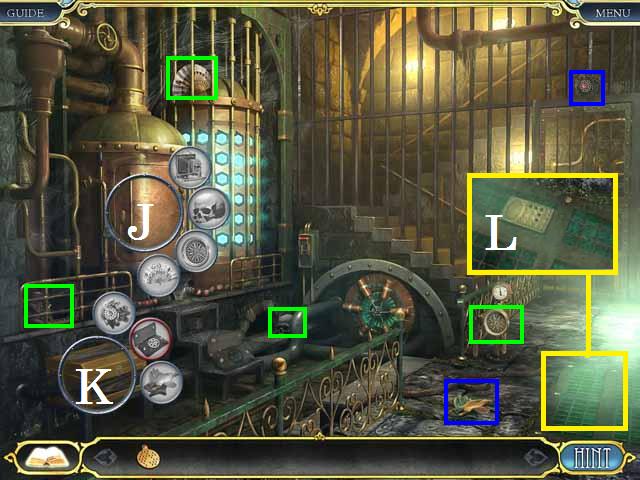
- Open up the Ladder Key Object (K) and the Hatch Key Object (L).
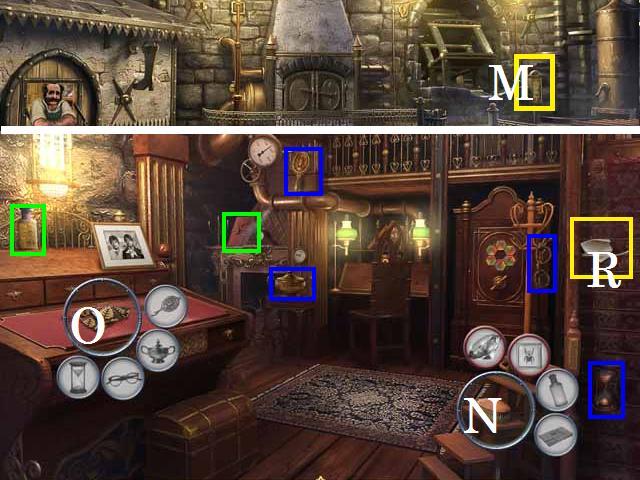
- Pick up the paper (M).
- Combine the FIVE with the frame (N).
- Drag all items marked in green into the Hatch Key Object (L).
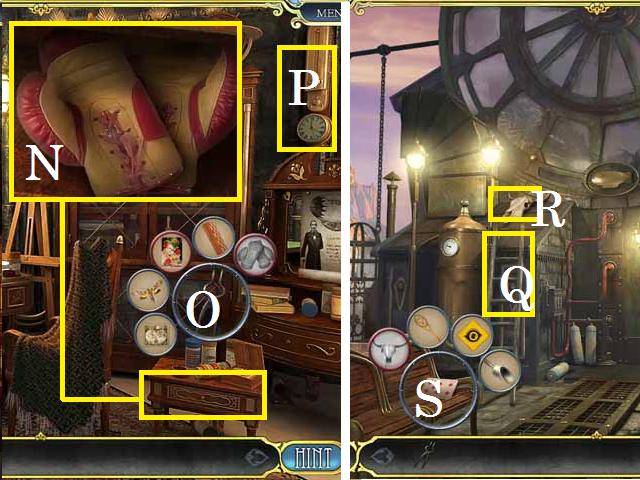
- Zoom into the open hatch; pick up the SWITCH (O) and the PART OF A SIGN (P).
- Drag all items marked in blue into the Ladder Key Object (K).
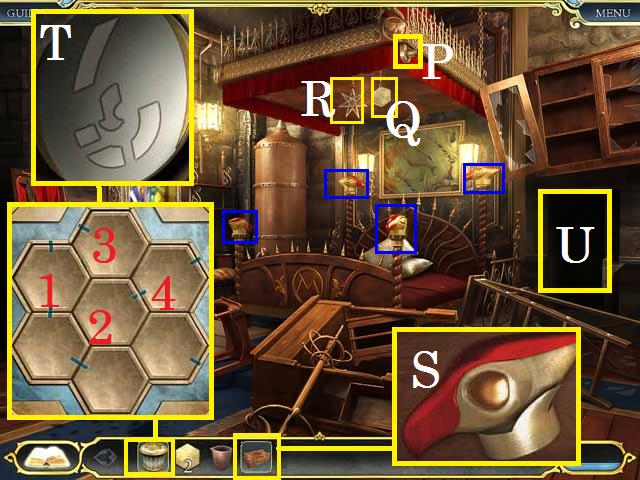
- Zoom into the large hole; drag the item (R) to the Ladder Key Object (K).
- Zoom into the small hole; pick up the FEATHER (Q).
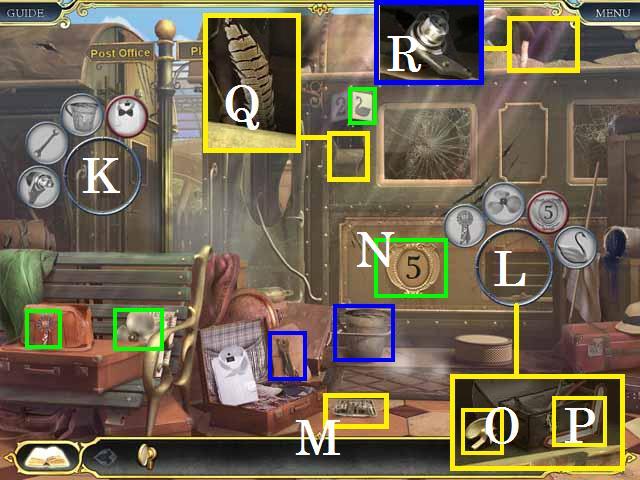
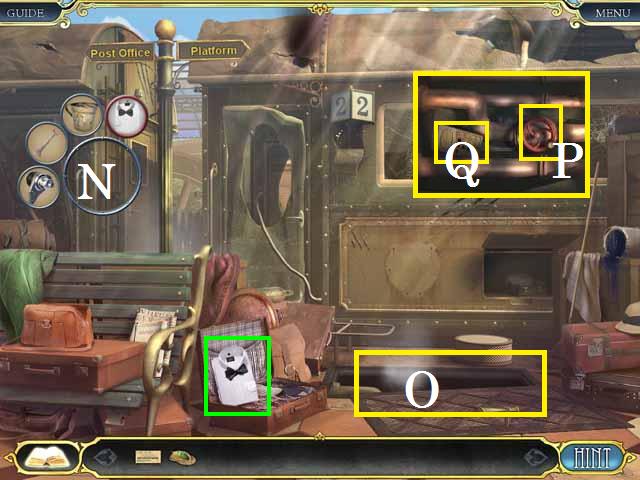
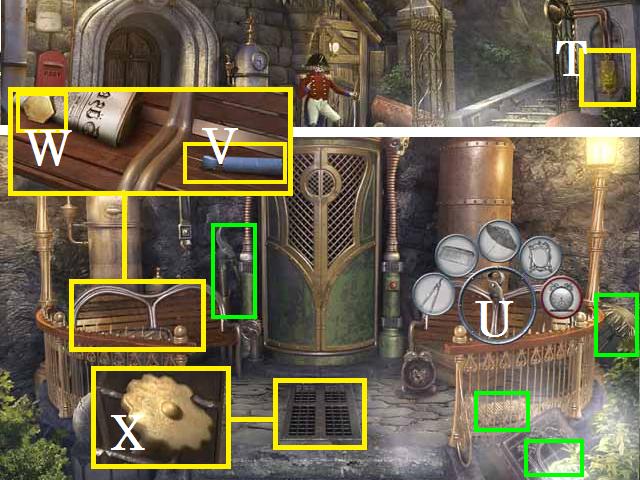
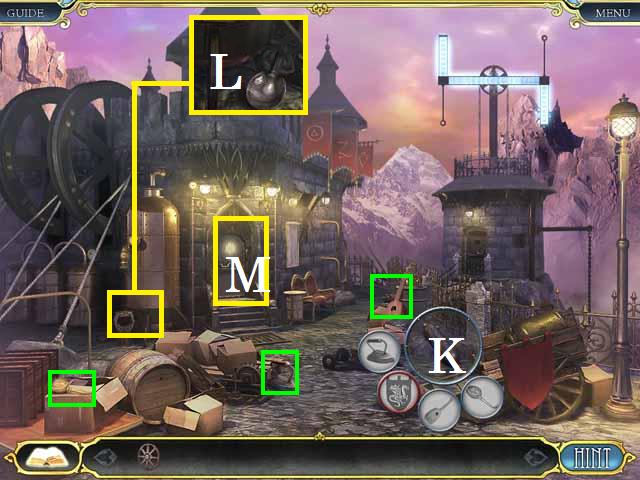
- Take a right to enter the Platform.
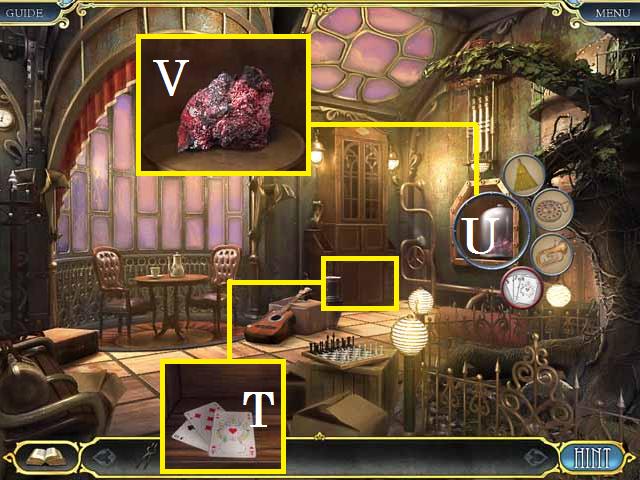
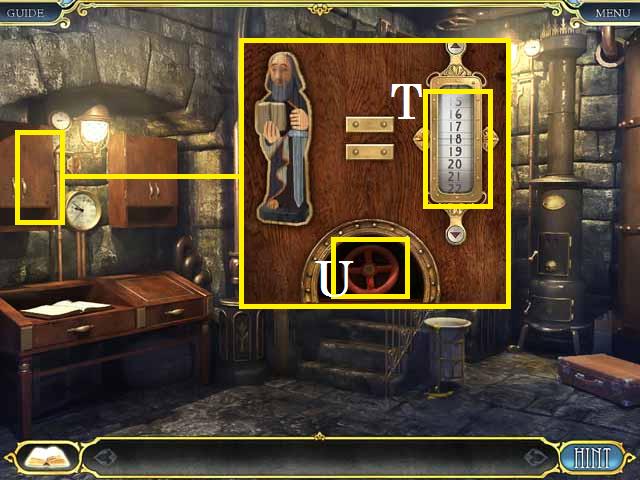
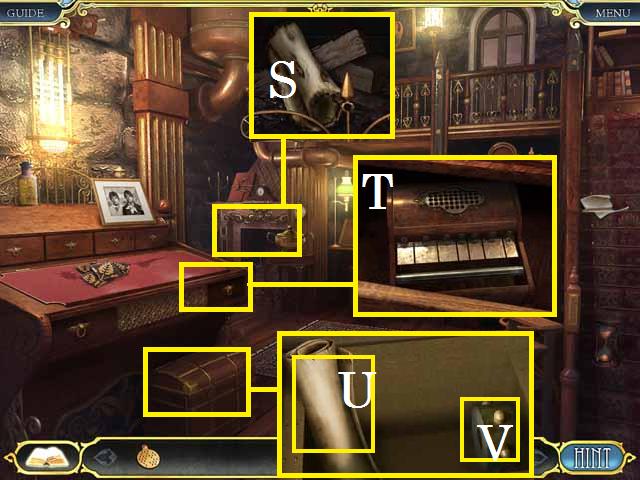
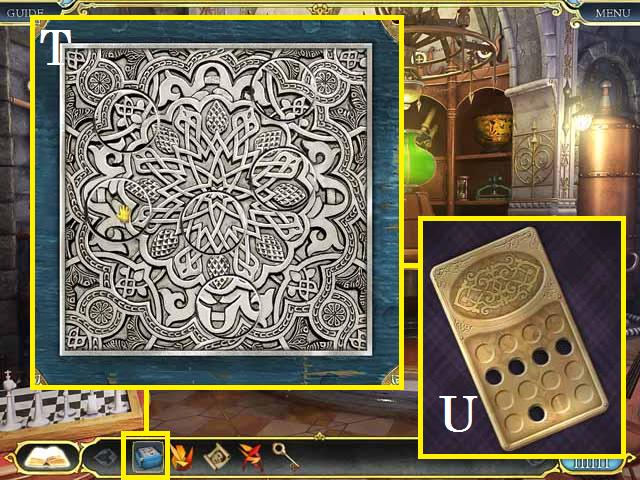
- Open up the Lure Key Object (T) and the Drinking Fountain Key Object (U).
- Place the FEATHER in the hat (V).
- Drag all items marked in green into the Drinking Fountain Key Object (U).
- Drag all items marked in blue into the Lure Key Object (T).
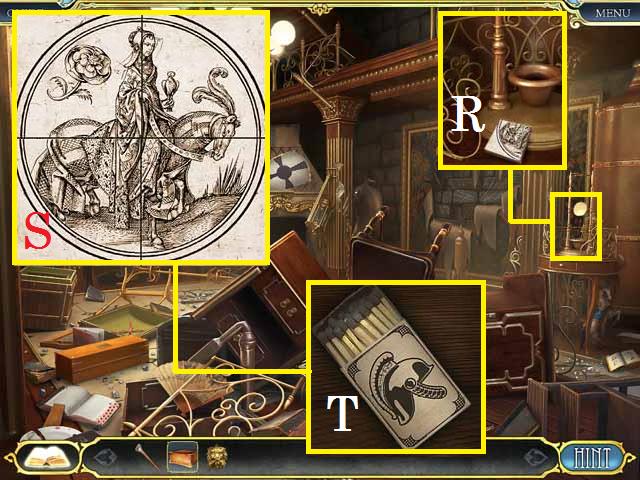
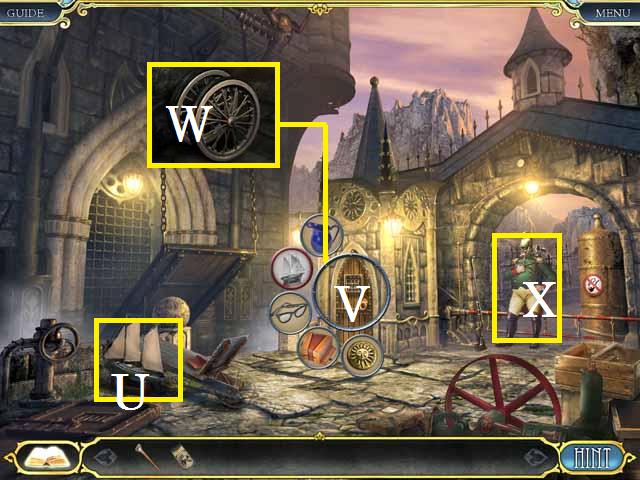
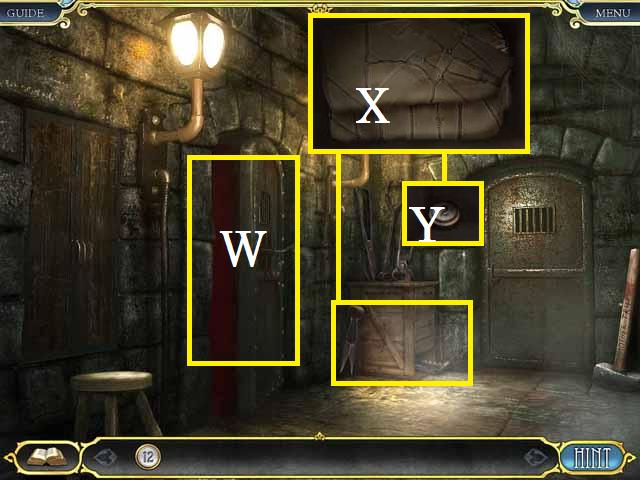
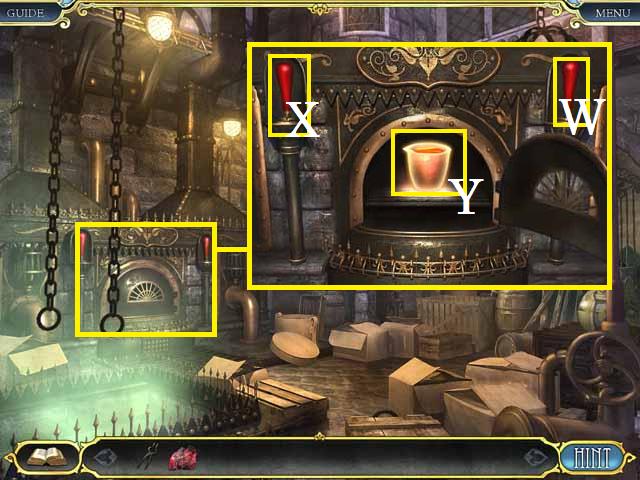
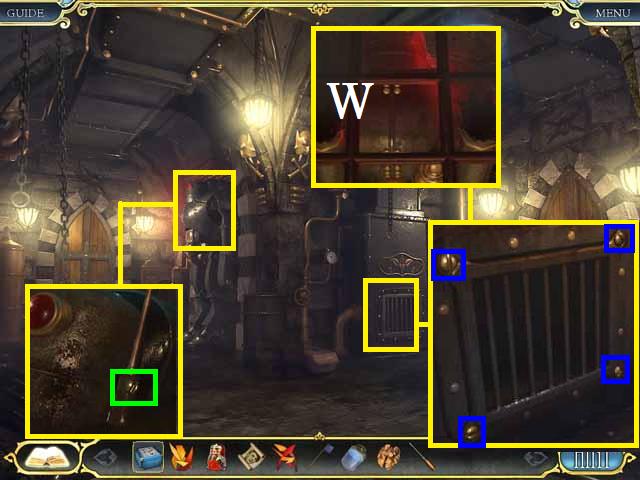
- Zoom into the passenger car gate (W).
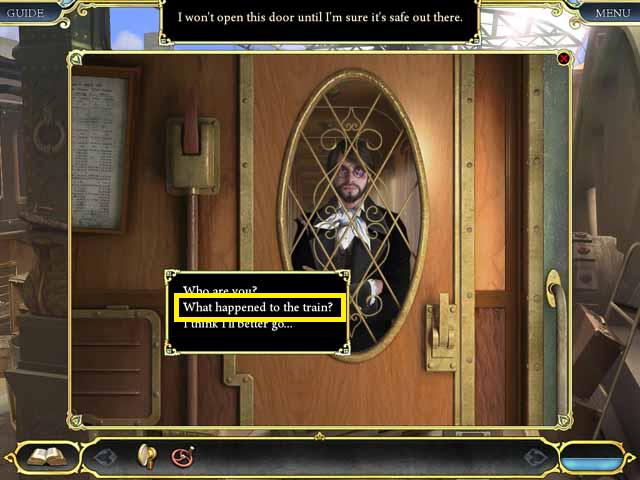
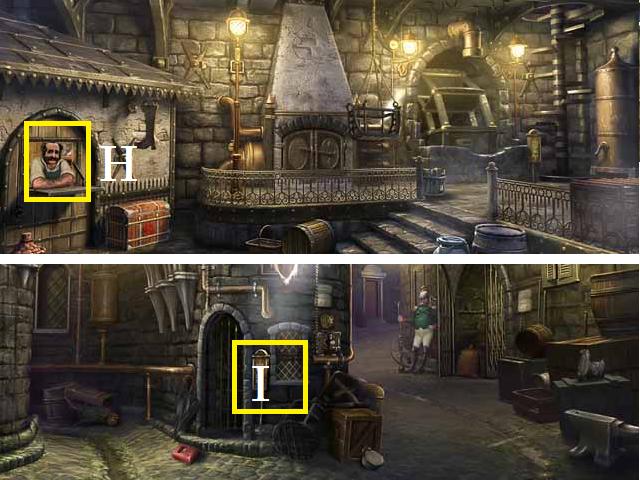
- Start up dialogue by tapping the man.
- Choose the dialogue in the following order: 'What happened to the train?', 'What monster? What did he look like?', 'He's nowhere to be seen. A golden knight with burning eyes isn't the best at hiding.' and 'Thank you. Good luck with your search'.
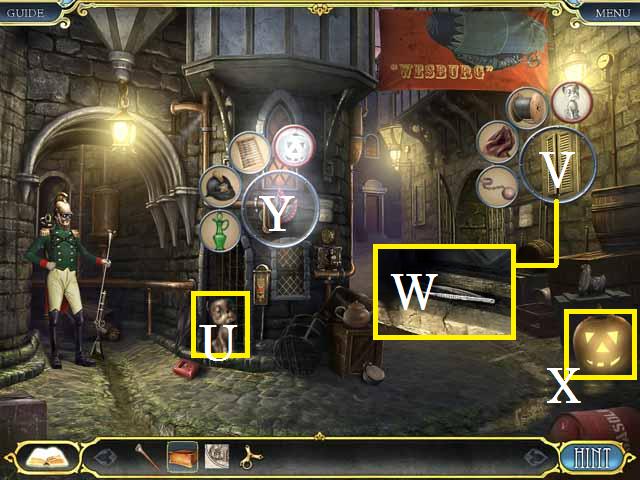
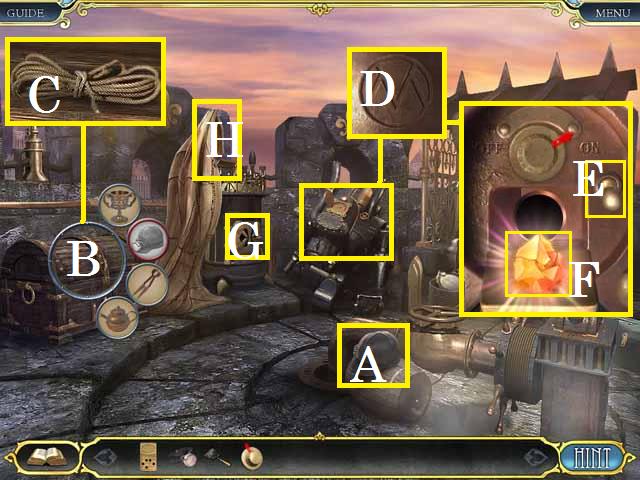
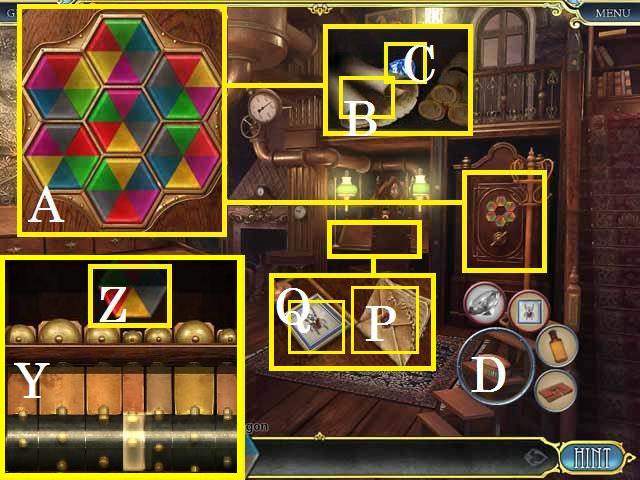
- Enter the Passenger Car.
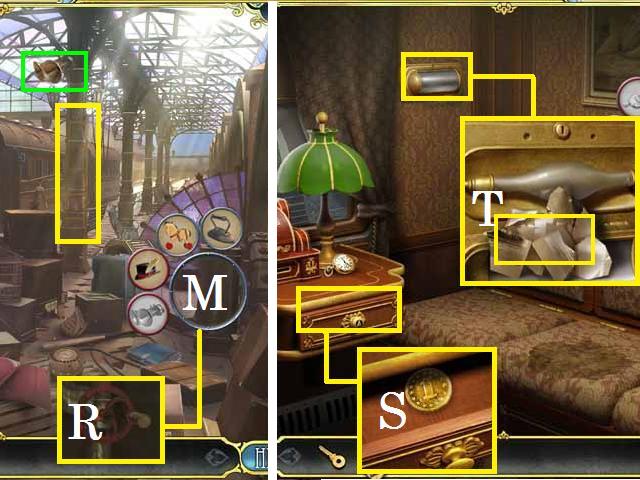
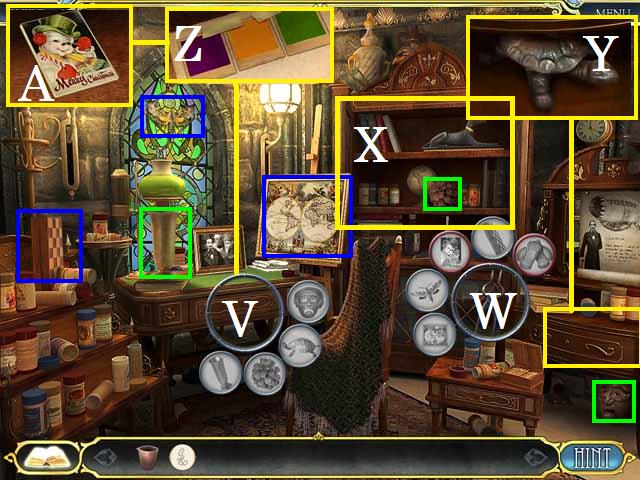
- Open up the Cane Key Object (X).
- Drag all items marked in green into the Cane Key Object (X).
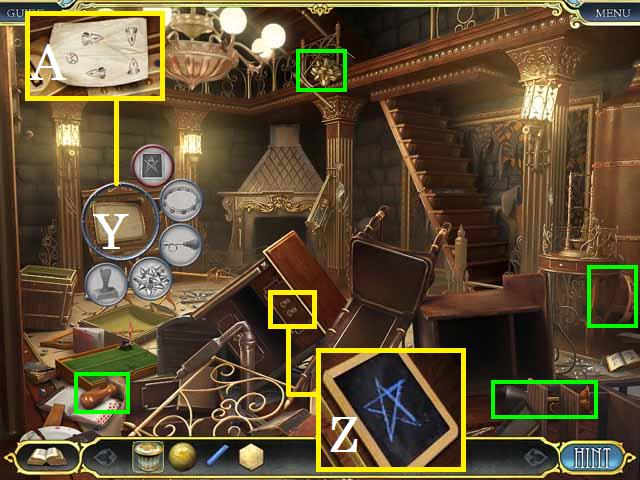
- Pick up the CHEST (Y).
- Lift the seat bottom and zoom in; pick up the PIPE (A).
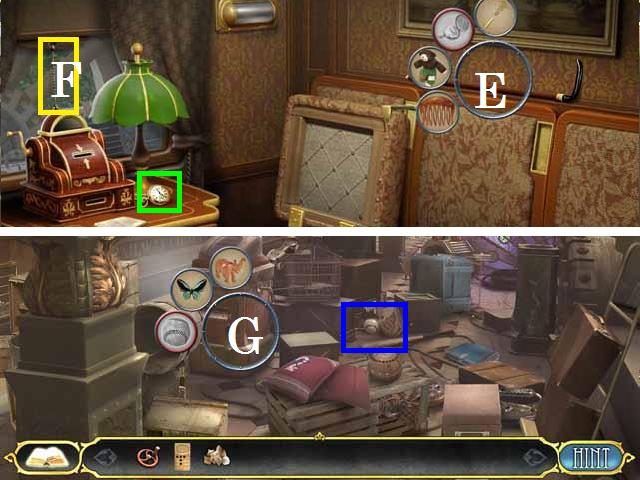
- Pick up the paper (B).
- Exit back two scenes and go left towards the Post Office.
- Open the Purse Key Object (C) and the Handle Key Object (D).
- Drag all items marked in green into the Purse Key Object (C).
- Drag all items marked in blue into the Handle Key Object (D).
- Receive the HANDLE.
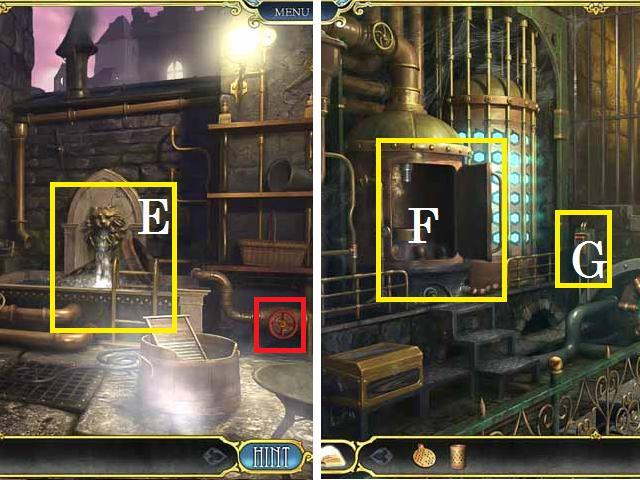
- Place the PIPE on the speaker system (E) and pull the handle (F).
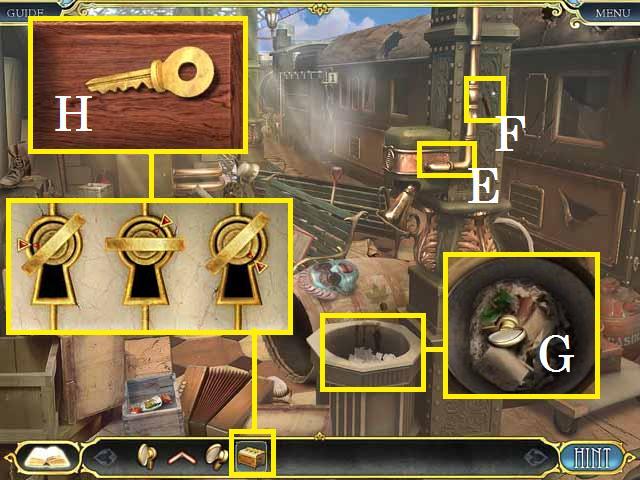
- Zoom into the trashcan and pick up the SWITCH (G).
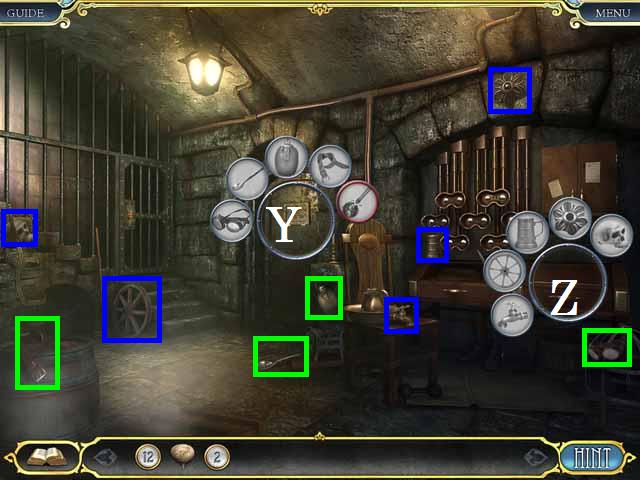
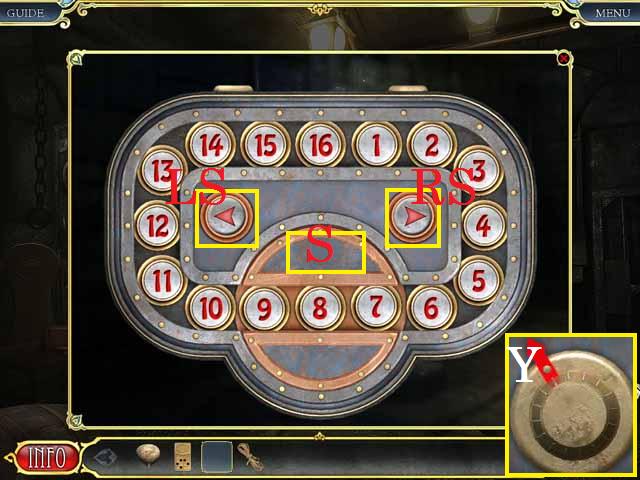
- Open up the CHEST from your inventory and place all three SWITCHES in the CHEST.
- Beginning with the two outer keys and finishing with the center one, spin the keys as shown in the screenshot.
- Pick up the GOLDEN KEY (H).
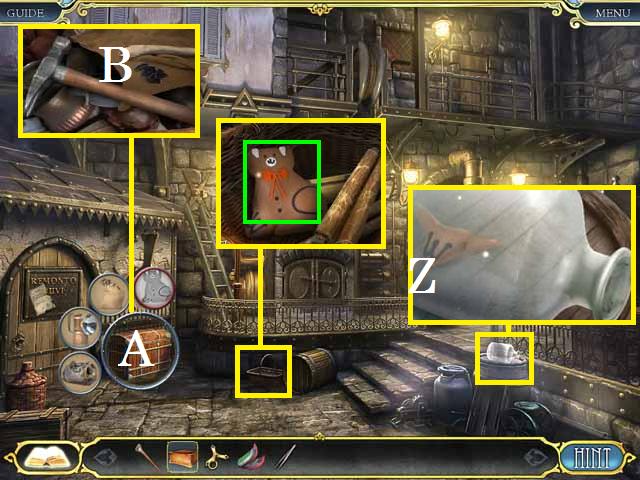
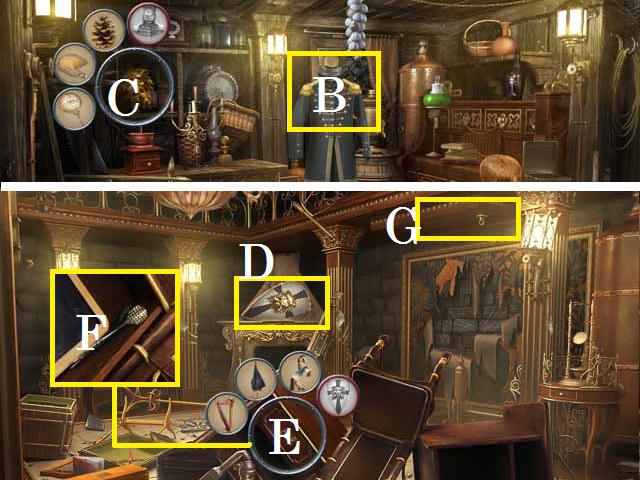
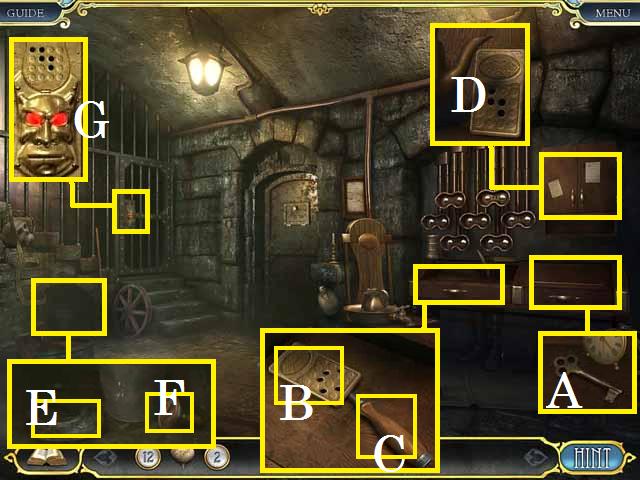
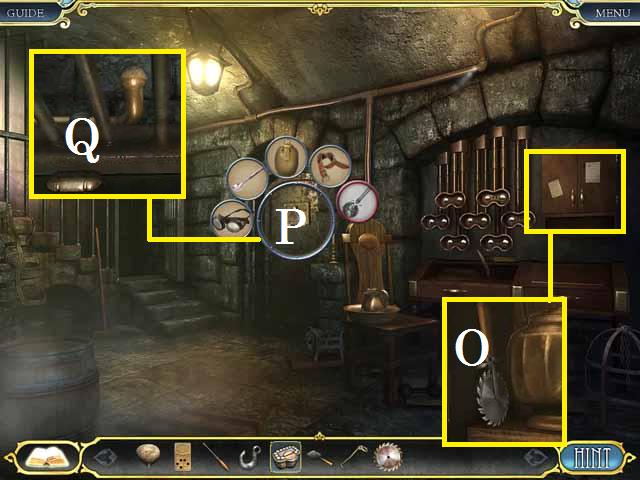
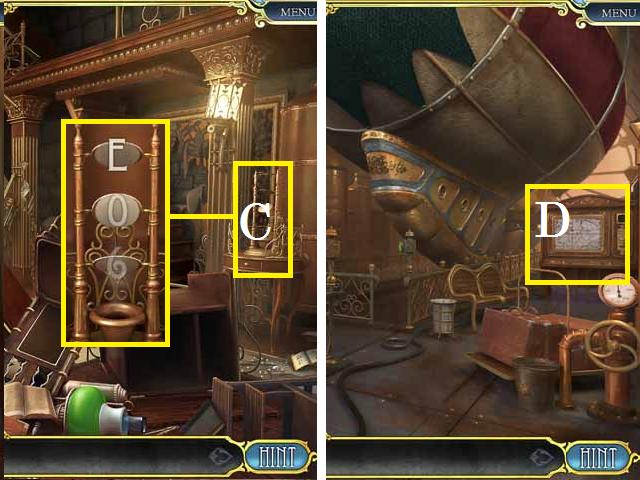
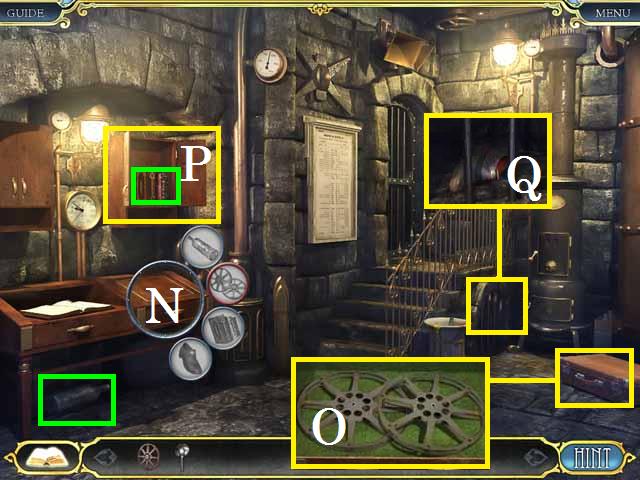
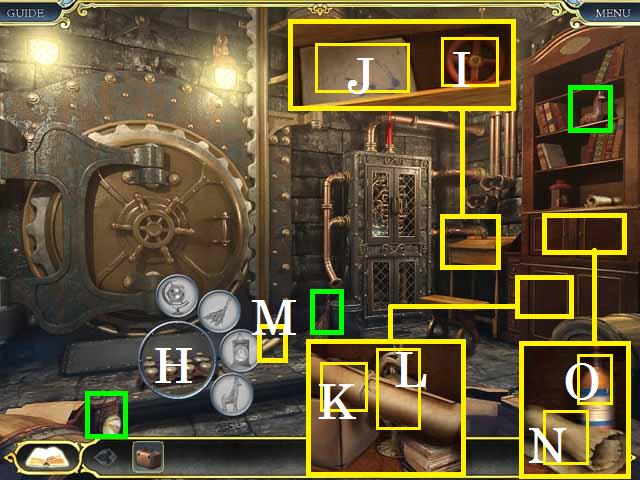
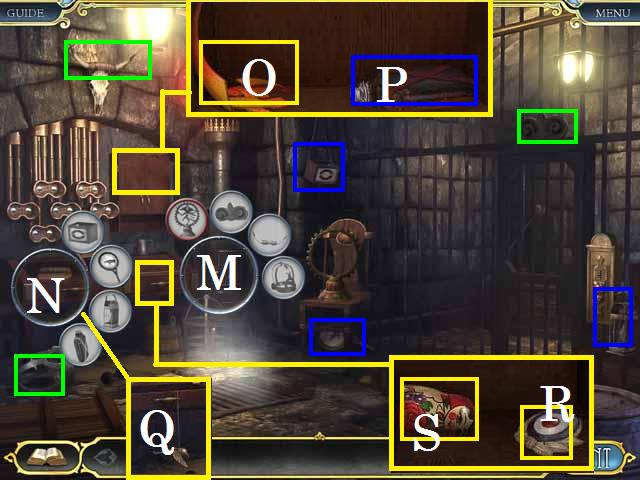
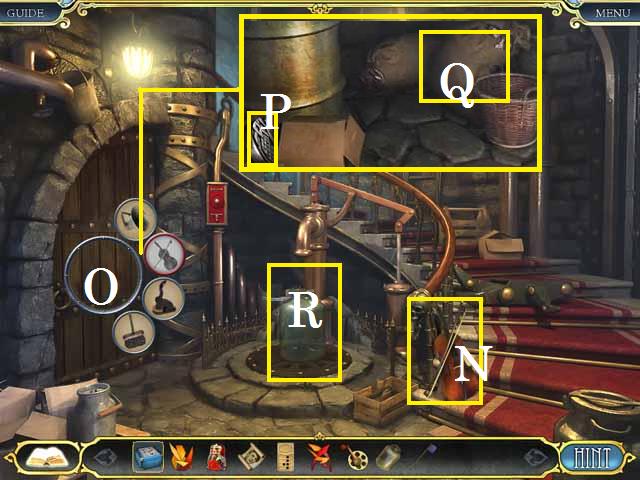
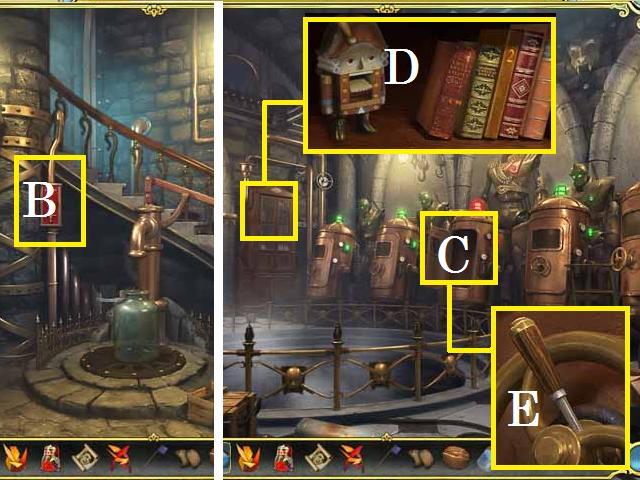
- Enter the Engine at the front of the train.
- Open up the T-key Key Object (J).
- Place the PART OF A SIGN on the sign (K).
- Drag all items marked in green into the T-key Key Object (J).
- Receive the T-KEY.
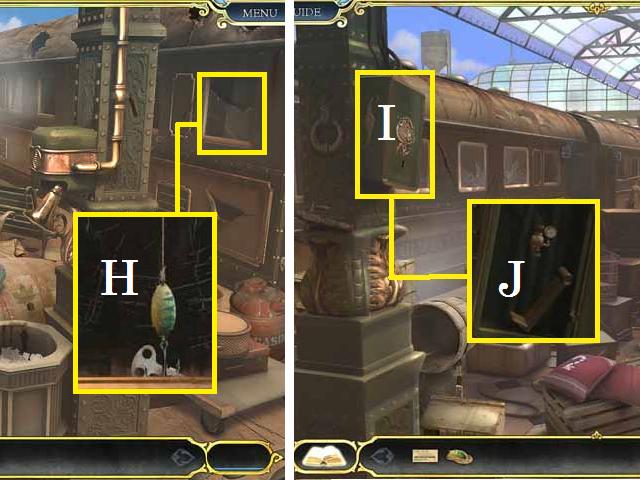
- Zoom into the screen (L); watch the video and pick up the BOW TIE (M).
- Move back two scenes.
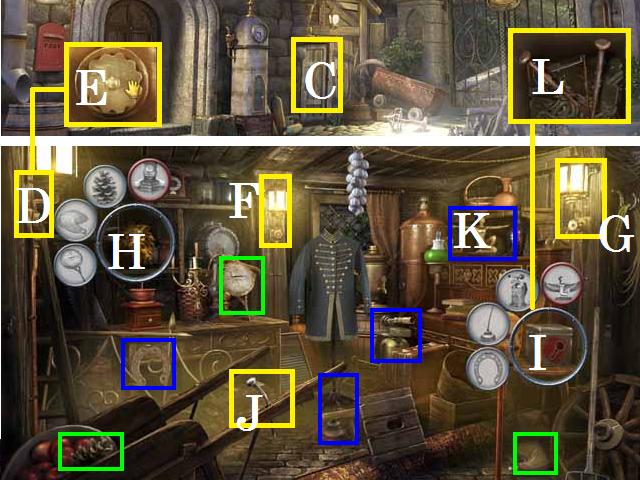
- Place the BOW TIE on the shirt (green).
- Place the shirt and bow tie into the Ladder Key Object (N).
- Receive the LADDER.
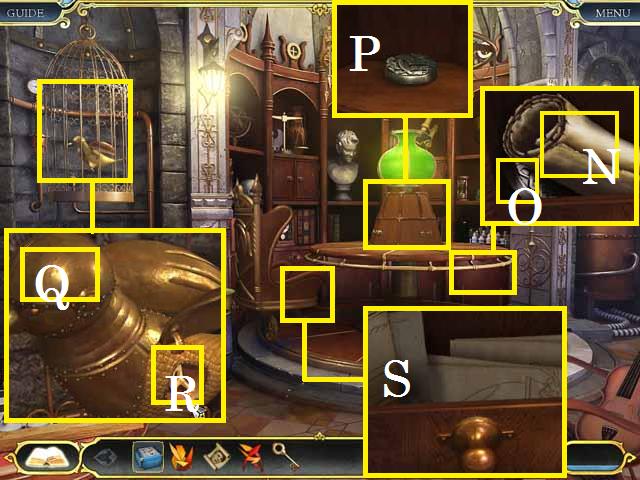
- Place the HANDLE on the panel (O).
- Zoom into the open panel; pick up the VALVE (P) and the PUNCH CARD (Q).
- Take a right to the Platform.
- Place the ladder under the speakers (green) and drag the speakers to the Drinking Fountain Key Object (M).
- Zoom into the now-open fountain; pick up the VALVE (R).
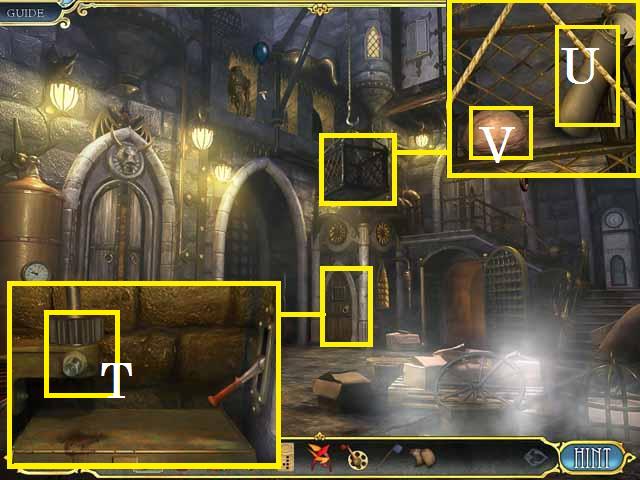
- Enter the Passenger Car.
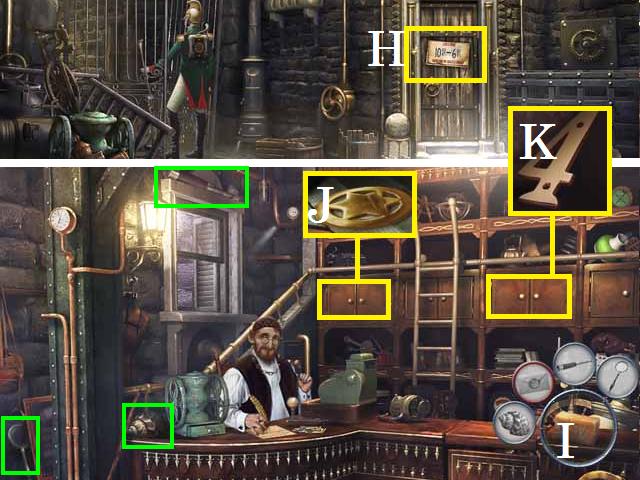
- Unlock the drawer with the T-KEY; zoom in and pick up the COIN (S).
- Unlock the light with the GOLDEN KEY; pick up the TORN PHOTO (T).
- Move back two scenes and exit the Depot.
- Place the COIN in the vending machine's slot (V).
- Push the button (W).
- Drag the nuts (green) over to the Grate Key Object (Q).
- Zoom into the now-open grate; pick up the WATCH COVER (Y).
- Zoom into the ticket window; place the PUNCH CARD in the slot (Z) and pick up the TICKET (X).
- Return to the front of the Post Office.
- Zoom into the frame (B); drop the TORN PHOTO onto it (B). Unscramble the puzzle as shown in the screenshot.
- Drag the frame to the Purse Key Object (A).
- Open the purse; pick up the SCISSORS (C).
- Return to the Passenger Car.
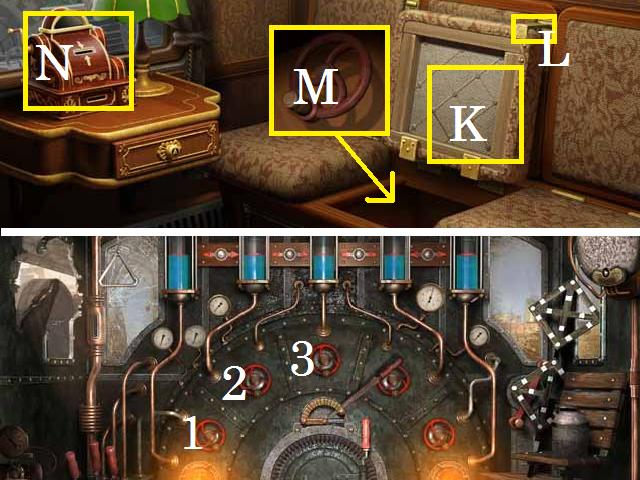
- Place the WATCH COVER on the watch (green).
- Drag the completed watch to the Cane Key Object (E).
- Receive the CANE.
- Cut the rope (F) with the SCISSORS.
- Receive the ROPE.
- Exit the Passenger Car.
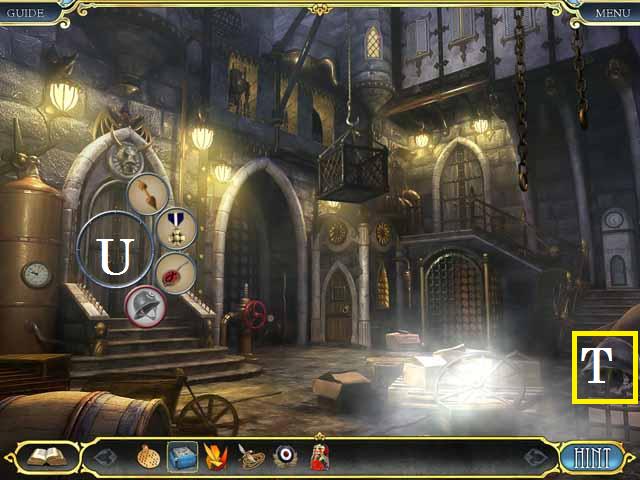
- Zoom into the baseball mitt (blue); scoot the baseball closer with the CANE.
- Drag the baseball to the Lure Key Object (G).
- Receive the LURE.
- The FISHHOOK and the ROPE will automatically merge to become the LURE WITH ROPE.
- Back up one scene and take a left to the Post Office.
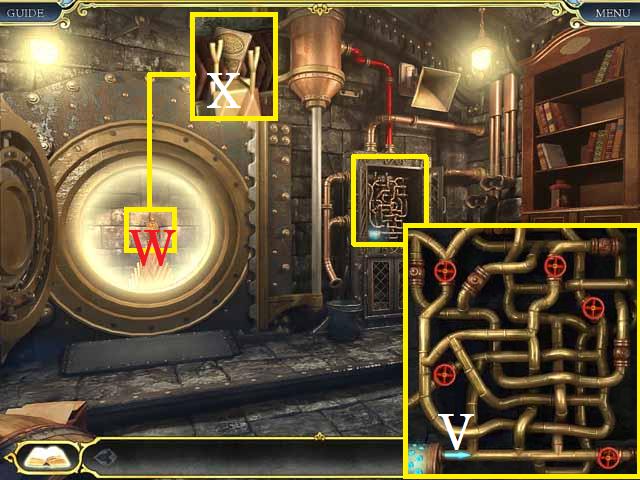
- Zoom into the broken window; Drop the LURE WITH ROPE down the broken window to retrieve the SILVER KEY (H).
- Stop by the Platform on the way back to the Passenger Car.
- Unlock the box (I) with the SILVER KEY.
- Zoom into the box; pick up the HOLDER (J).
- Enter the Passenger Car.
- Place the HOLDER (L) and lift the seat cushion (K).
- Zoom into the seat; pick up the VALVE (M).
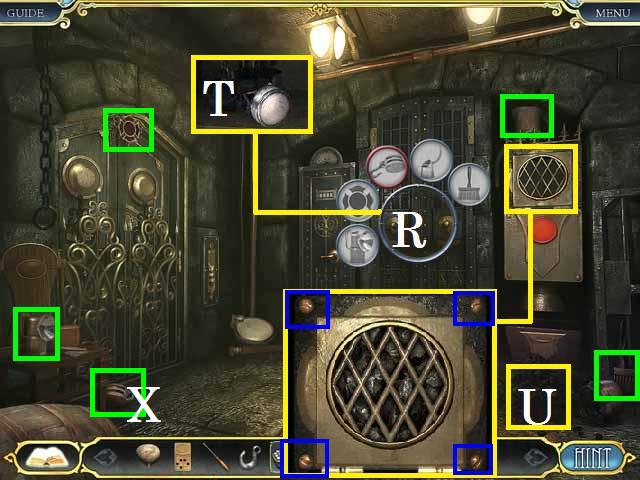
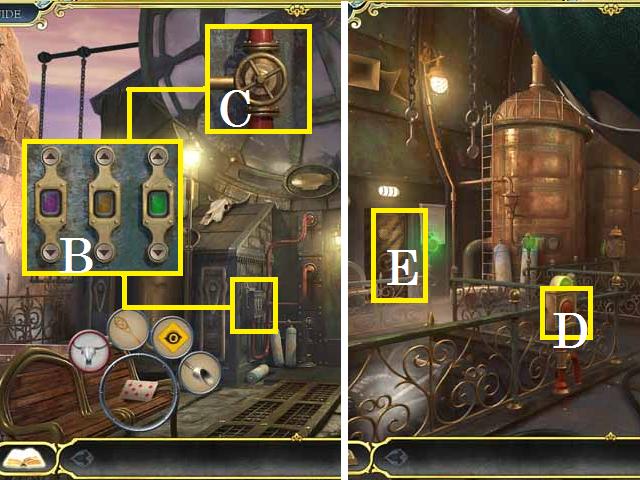
- Return to the Engine.
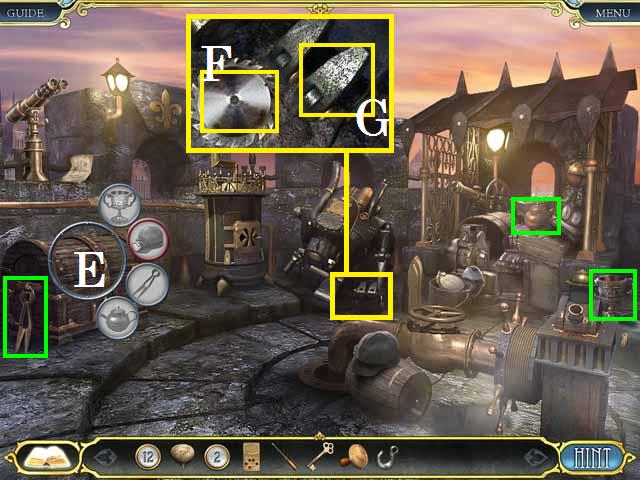
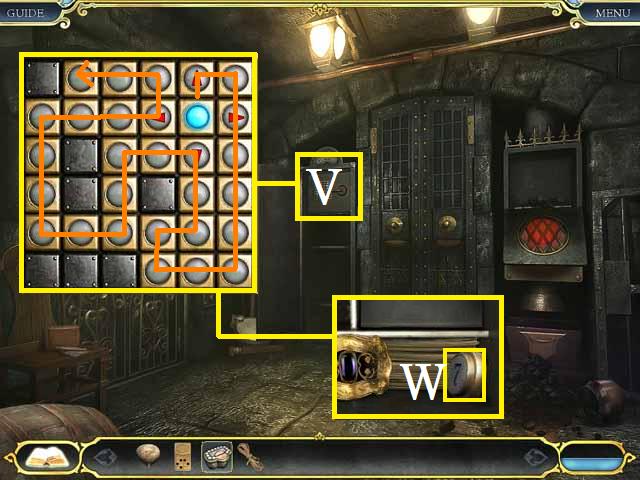
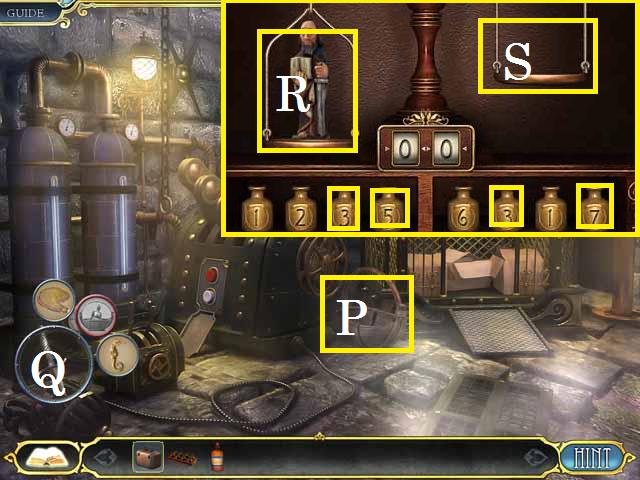
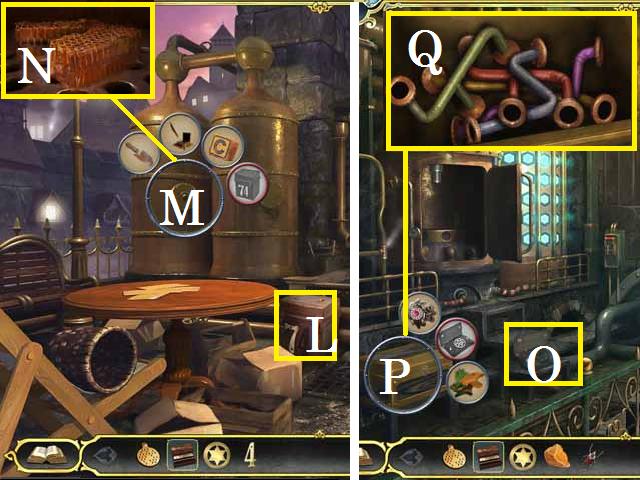
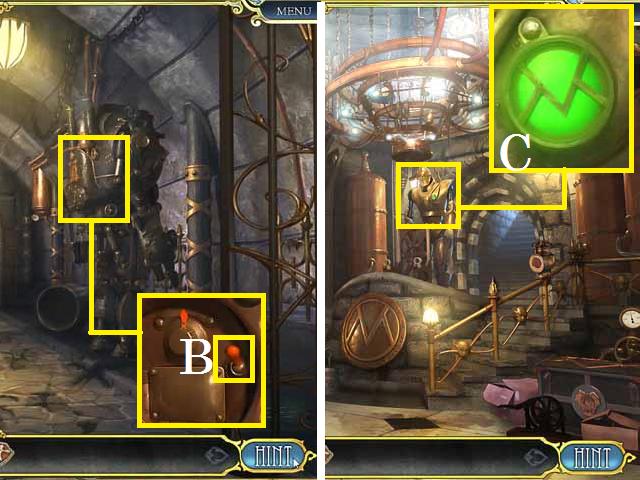
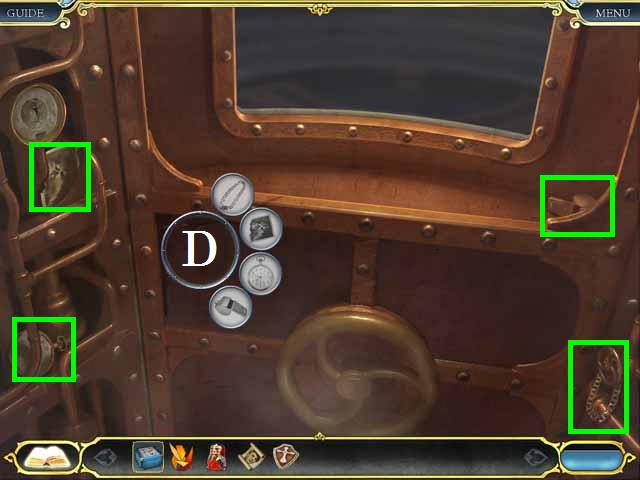
- Place all the VALVES as shown in the screenshot.
- Turn the (1) valve once, the (2) valve once, and the (3) valve twice.
- Return to the Passenger Car.
- Place the TICKET in the machine (N).
Chapter 2: Find Morgan's House
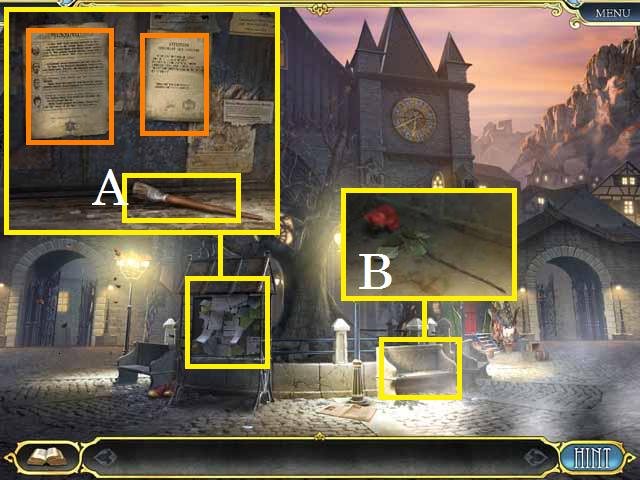
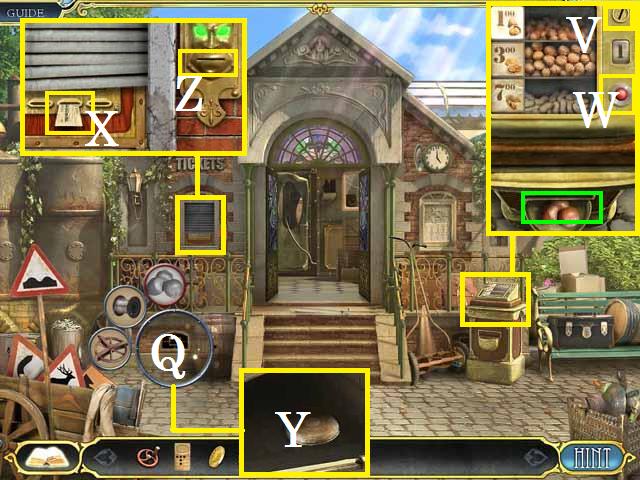
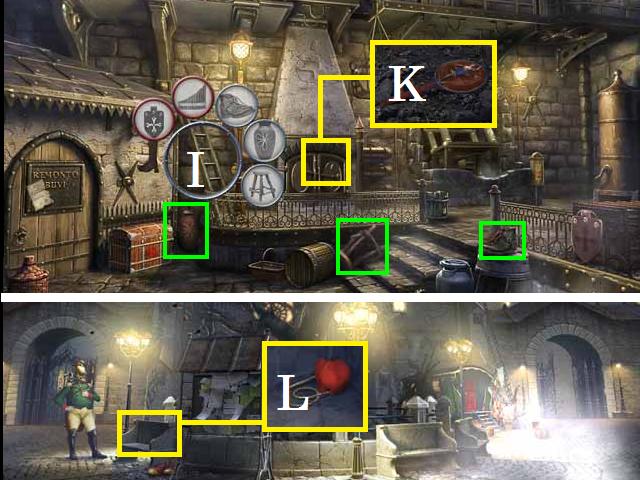
- Zoom into the notice board; pick up the PAINTBRUSH (A) and read the notices (orange).
- Zoom into the bench; pick up the ROSE (B).
- Head right towards the alley.
- Open up the Wings Key Object (C) and the Window Key Object (D).
- Pick up the PUZZLE BOX (E).
- Drag all items marked in green into the Wings Key Object (C).
- Drag all items marked in blue into the Window Key Object (D).
- Enter the Cobbler Shop through the open gate.

- Open the Chest Key Object (F) and the Bucket Key Object (G).
- Drag the items marked in green to the Chest Key Object (F).
- Drag the items marked in blue to the Bucket Key Object (G).
- Zoom into the bucket; pick up the STICKERS (H).
- Back up two scenes to the Town Square then move forward through the gate on the left.
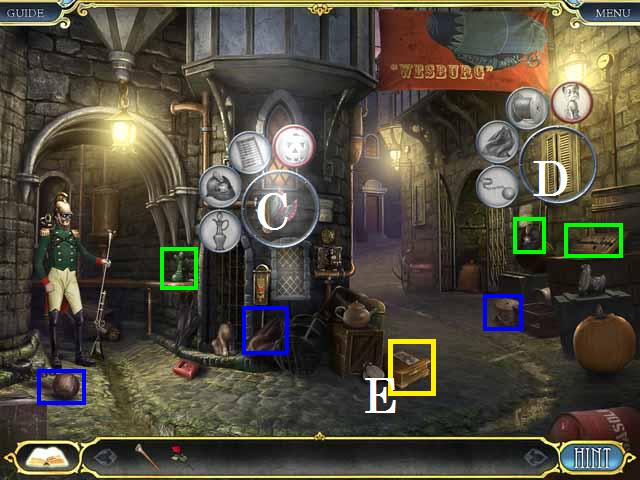
- Open the Door Key Object (I) and the Shade Key Object (J).
- Drop the STICKERS over the suitcase (K).
- Drag the items marked in green to the Door Key Object (I).
- Drag the items marked in blue to the Shade Key Object (J).
- Receive the SHADE.
- After you drag the suitcase to the Shade Key Object a pop-up window will open.
- Pick up the KEY (L).
- Return to the alley, then move forward towards the Back Gate.
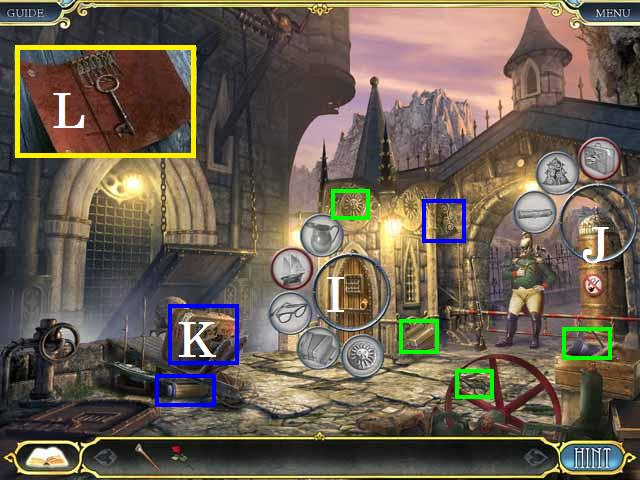
- Open the Postbox Key Object (M) and the Clock Key Object (N).
- Place the SHADE on the lamp (O).
- Place the ROSE in the glove (P).
- Drag the items marked in green to the Postbox Key Object (M).
- Drag the items marked in blue to the Clock Key Object (N).
- Zoom into the clock base; pick up the DOG'S HEAD (Q).
- Zoom into the postbox; pick up the PUZZLE PIECE (R).
- Zoom into the barrel; pick up the KNIFE (S).
- Zoom into the door; pick up the HANDLE (T).
- Back up one scene to the Alley.
- Place the DOG'S HEAD on the dog (U).
- Drag the dog to the Window Key Object (V).
- Zoom into the window; pick up the TWEEZERS (W).
- Carve the pumpkin (X) with the KNIFE and drag it to the Wings Key Object (Y).
- Receive the WINGS.
- Move through the open gate.
- Zoom into the bottle; remove the COOKIE (Z) piece with the TWEEZERS.
- Zoom into the basket; place the COOKIE piece in the basket and drag the whole cookie (green) to the Chest Key Object (A).
- Zoom into the chest; pick up the HAMMER (B).
- Return to the Back Gate.
- Zoom into the small door (C); use the KEY to unlock it.
- Enter the Storage Room.
- Zoom in and turn the dial (E) to turn on the light (D).
- Turn on lights (F) and (G), the same way you turned on the first light (D).
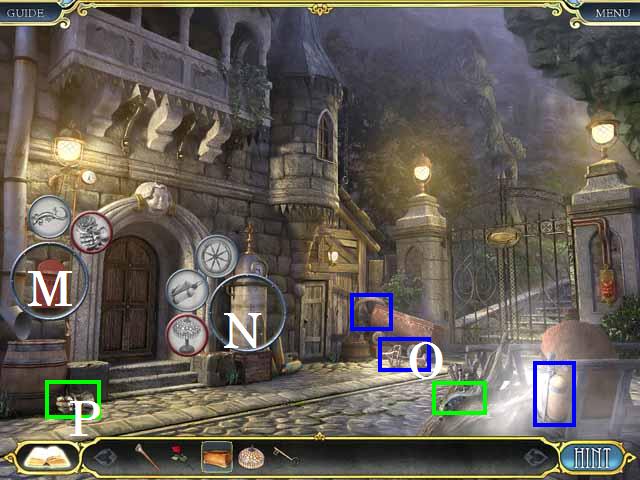
- Open up the Lion's Head Key Object (H) and the Box Key Object (I).
- Remove the NAIL (J) with the HAMMER.
- Place the WINGS on the statue (K).
- Drag the items marked in green to the Lion's Head Key Object (H).
- Drag the items marked in blue to the Box Key Object (I).
- Zoom into the box; pick up the NAILS (L).
- The NAILS and HANDLE will automatically combine to become the HANDLE WITH NAILS.
- Exit back one scene.
- Place the HANDLE WITH NAILS on the large door (M).
- HAMMER the nails in(orange).
- Enter the Living Room.
- Open the Cupboard Key Object (N) and the Drawer Key Object (O).
- Drag the items marked in green to the Drawer Key Object (O).
- Drag the items marked in blue to the Cupboard Key Object (N).
- Zoom into the crate; drag the mask (P) to the Cupboard Key Object (N).
- Zoom into the cupboard; pick up the papers and then the SAILS (Q).
- Zoom into the holder; pick up the PUZZLE PIECE (R).
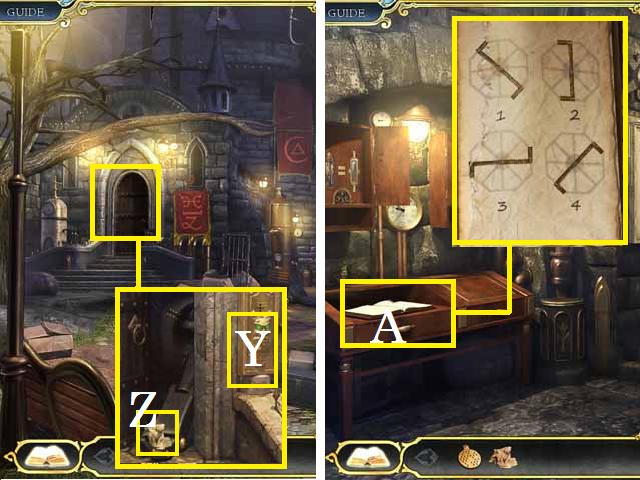
- Open the PUZZLE BOX from your inventory and drop both PUZZLE PIECES over the box.
- Create the picture shown in the screenshot (S) to open the box.
- Pick up the MATCHES (T).
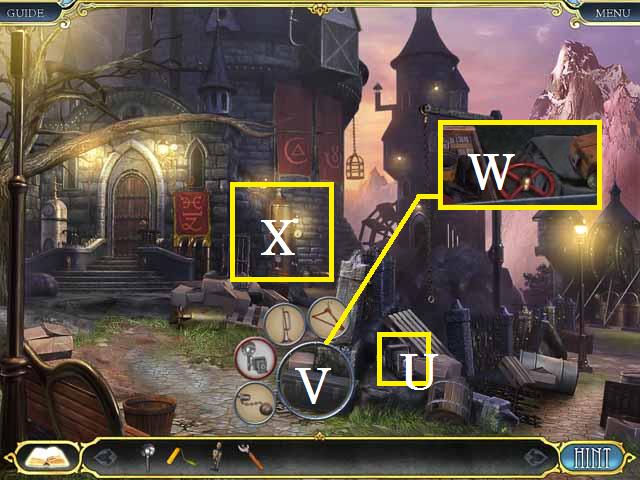
- Return to the Town Square and take a left to the Citadel Gate.
- Place the SAILS on the boat (U).
- Drag the boat to the Door Key Object (V).
- Zoom into the door; pick up the WHEELS (W).
- Give the guard (X) the MATCHES and receive the DIE.
- Return to the Alley and take a left.

- Open the Pole Hook Key Object (Y) and the Epaulette Key Object (Z).
- Place the WHEELS on the trike (A).
- Drag the items marked in green to the Pole Hook Key Object (Y).
- Receive the POLE HOOK.
- Drag the items marked in blue to the Epaulette Key Object (Z).
- Receive the EPAULETTE.
- Return to the Back Gate and enter the Storage Room.
- Place the EPAULETTE on the suit (B).
- Drag the suit to the Lion's Head Key Object (C).
- Receive the LION'S HEAD.
- Exit the Storage Room and enter the Living Room.
- Place the LION'S HEAD on the shield (D).
- Drag the shield to the Drawer Key Object (E).
- Zoom into the drawer; pick up the DARTS (F).
- Zoom into the hatch (G); pull down the stairs with the POLE HOOK.
- Take the stairs to the bedroom.
- Open up the Shelf Key Object (H) and the Nightstand Key Object (I).
- Place the DIE with the other die (J).
- Place the DARTS on the dart board (K).
- Drag the items marked in green to the Shelf Key Object (H).
- Zoom into the shelf; pick up the TILE (L).
- Drag the items marked in blue to the Nightstand Key Object (I).
- Return to the Living Room.
- Zoom into the box; place the TILE on the box.
- Unscramble two tiles using the following sequence: Move the tile in position (6) to position (9) and (3) to (6). Continue with (2) to (3), (5) to (2), (4) to (5), (7) to (4), and (8) to (7).
- Zoom back into the box; dip the BRUSH into the paint (J).
- Pick up the BRUSH WITH PAINT.
- Return to the Bedroom.
- Paint the mask (K) with the BRUSH WITH PAINT.
- Drag the mask to the Nightstand Key Object (L).
- Zoom into the upright nightstand; pick up the letter (M).
- Exit the house.
Chapter 3: Escape Jail
- Open up the Plate Key Object (N).
- Zoom into the sink reservoir; drag the duster (O) to the Plate Key Object (N).
- Drag all items marked in green to the Plate Key Object (N).
- Receive the PLATE.
- Zoom into the sink; pick up the SPOON (P).
- Zoom into the wall (orange). Carve out the grout with the SPOON, and then push all four stones through the wall.
- Crawl through the hole to the Second Cell.
- Zoom into the door; pick up the ROPE (Q).
- Return to the First Cell.
- Lower the bench (R).
- Zoom into the window (S); hang the ROPE from the bars, then raise the bench.
- Zoom into where the ROPE meets the bench; push the rope onto the latch (T).
- Place the PLATE on top of the bench (U).
- Return to the Second Cell.
- Pull the rope (V) out of the window.
- Exit the cell through the door to the Hallway.
- Close the cell door (W).
- Open the cabinet door; pick up the BALLOON (X) and then the BARREL (Y).
- Move forward to the Guard Station.
- Open up the Door Key Object (Y) and the Drawer Key Object (Z).
- Drag the items marked in green to the Door Key Object (Y).
- Drag the items marked in blue to the Drawer Key Object (Z).
- Zoom into the Drawer; pick up the KEY (A).
- Open the left drawer; pick up the PUNCH CARD (B) and the SCREWDRIVER (C).
- Zoom into the cabinet; pick up the PUNCH CARD (D).
- Zoom into the niche; pick up the HOOK (E) and the SEAL (F).
- Unlock the gate (G) with the PUNCH CARD (D) from the cabinet.
- Move through the gate to the Rooftop.
- Open up the Chest Key Object (E).
- Drag the items marked in green to the Chest Key Object (E).
- Zoom into the robot's hand; pick up the PIZZA CUTTER (F); then lower the fingers (G) to see the safe code.
- Return to the Hallway outside of the Second Cell.
- Zoom into the cabinet, then unlock it with the KEY; examine the opened cabinet and take the GEAR (H) and the PUZZLE (I).
- Enter the Cell.
- Zoom into the gear; pick up the BARREL (J) and place the GEAR in its place.
- Lift the bunk (K).
- Zoom into the chair; pick up the SCOOP (L).
- Zoom into the bottom of the bunk; make note of the symbols there.
- Zoom into the wall; pull the WIRE (M) then pick up the BARREL (N).
- Return to the Guard Station.
- Zoom into the cabinet; place the PIZZA CUTTER on the handle (O) and drag it to the Door Key Object (P).
- Zoom into the door; open the latch (Q) with the WIRE.
- Enter the Elevator Room.
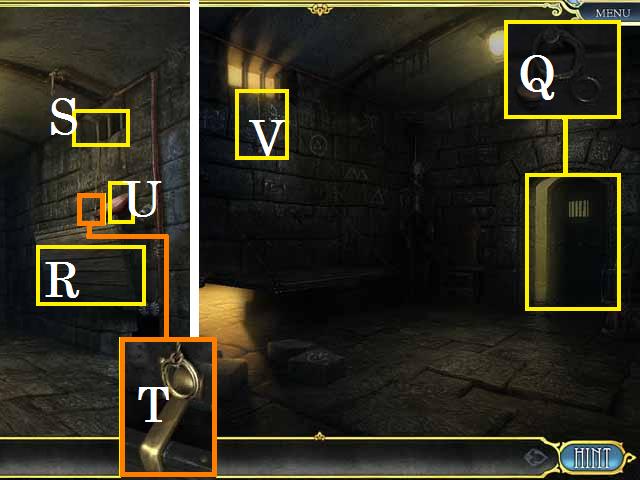
- Open the Wardrobe Key Object (R).
- Place the HOOK on the pulley (X).
- Drag the items marked in green to the Wardrobe Key Object (R).
- Zoom into the Wardrobe; pick up the HEADLAMP (T).
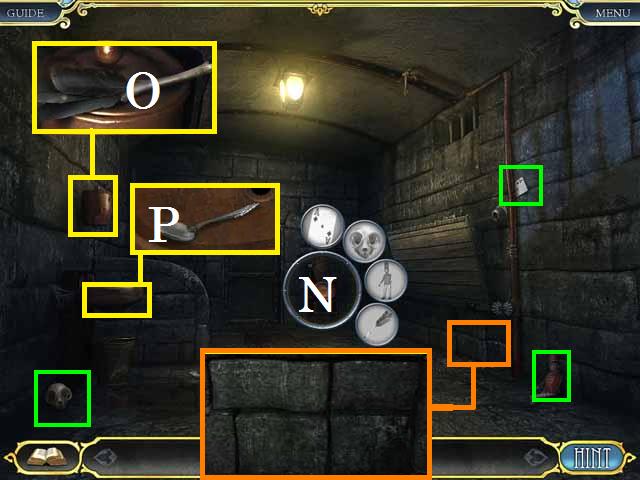
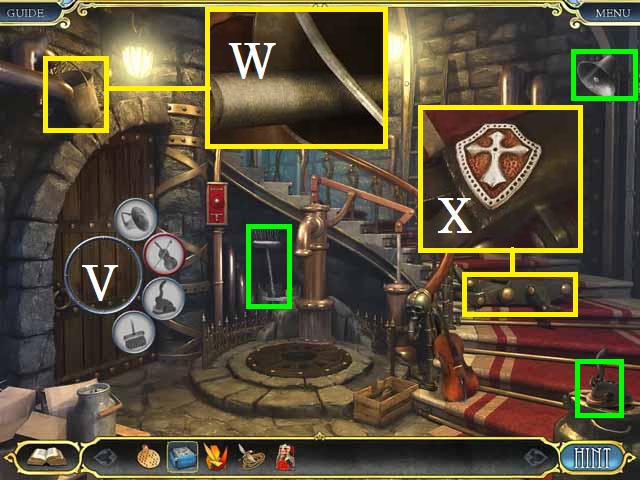
- Zoom into the furnace; remove all four screws (blue) with the SCREWDRIVER.
- SCOOP up the COAL (U).
- Zoom into the safe (V); set the code to 7148.
- Zoom into the safe; follow the path marked in the screenshot.
- Zoom back into the safe; pick up the BARREL (W).
- Place all four BARRELS on the PUZZLE from your inventory.
- Use the following sequence to arrange the numbers correctly: (S= spin, LA =left arrow, RA= right arrow) S, LA, LA, S, LA, S, LA, S, LA, S, LA, LA, LA, LA, LA; at this point you should have the 16, 9, and 6 in the center.
- Continue with the sequence: S, LA, LA, S, RA, RA, RA, S, RA, S, RA, S, RA, RA, S, LA, LA, and S.
- Pick up the TUMBLER (Y).
- Return to the Rooftop.
- Place the HEADLAMP on the helmet (A) and drag it to the Chest Key Object (B).
- Zoom into the chest; pick up the ROPE (C).
- Zoom into the robot's chest; place the SEAL (D) to open the panel.
- Place the TUMBLER as shown in the screenshot and flip the switch (E).
- Pick up the FIERY CRYSTAL (F).
- Zoom into the oven (G). Place the COAL in the oven, followed by the FIERY CRYSTAL.
- Attach the BALLOON to the oven pipe (H) and tie on the ROPE.
- Grab ahold of the hot air balloon to escape from jail.
Chapter 4: Take the Airship
- Move forward through the gate on the right to the Cobbler Shop.
- Open the Ladder Key Object (I).
- Drag the items marked in green to the Ladder Key Object (I).
- Zoom into the fireplace; pick up the RATTLE (K).
- Exit back to the Alley then back once more to the Town Square.
- Zoom into the bench; pick up the CLOWN'S NOSE (L).
- Return to the Alley and take a left.

- Open up the Cage Key Object (M).
- Place the CLOWN'S NOSE on the clown head (N).
- Drag all items marked in green to the Cage Key Object (M).
- Zoom into the cage; pick up the GLOBE (O).
- Move forward to the Furnace.
- Open the Hatbox Key Object (P).
- Zoom into the crate; place the RATTLE and drag the item (Q) to the Hatbox Key Item (P).
- Drag the items marked in green to the Hatbox Key Object (P).
- Zoom into the Hatbox; pick up the BOX (R).
- Zoom into the box; pick up the PIPES (S).
- Return to the Alley and move forward towards the Back Gate.
- Insert the PUNCH CARD into the lock (T) to open the gate.
- Move through the gate to the City Elevator.
- Open the Pincers Key Object (U).
- Drag the items marked in green to the Pincers Key Object (U).
- Zoom into the bench; pick up the CHALK (V) and HEXAGON (W).
- Zoom into the grate; pick up the WING NUT (X).
- Move back to the City Gate.
- Enter the Living Room.
- Open the TV Key Object (Y).
- Zoom into the drawer; draw in the chalkboard (Z) with the CHALK and drag it to the TV Key Object (Y).
- Drag the items marked in green to the TV Key Object (Y).
- Zoom into the TV; pick up the note (A).
- Take the stairs to the Bedroom.
- Open the Pillow Key Object (B).
- Place the GLOBE on the stand (C).
- Drag the items marked in green to the Pillow Key Object (B).
- Zoom into the chest; pick up the CLOCK FACE (D).
- Zoom into the lamp; place the WING NUT (F) and drag the spider (E) to the Pillow Key Object (B).
- Move the pillow and pick up the PUNCH CARD (G).
- Return to the City Elevator.
- Place the CLOCK FACE on the clock (H) and drag it to the Pincers Key Object (I).
- Receive the PINCERS.
- Push the red button (red).
- Zoom into the elevator (J); place the PUNCH CARD in the elevator's lock (J).
- Take the City Elevator up to the Hanger Entrance.
- Open the Card Key Object (K).
- Drag the items marked in green to the Card Key Object (K).
- Zoom into the chest; pick up the CRUCIBLE (M).
- Enter the Hanger through the door (L).
- Zoom into the lever joint; remove the PIN (N) with the PINCERS to receive the SPIN HANDLE.
- Zoom into the Airship; pick up the HEXAGON (O).
- Pick up the BOX (green).
- Return to the Bedroom.
- Place the SPIN HANDLE in the crank (P).
- Pick up the HEXAGON (Q) and the STAR (R).
- Place the STAR on the last BOX from your inventory; pick up the BIRD'S HEAD (S).
- Combine the first BOX from your inventory and the HEXAGONS.
- Swap TILE 1 with 2, and 3 with 4.
- Pick up the DISC (T).
- Place the BIRD'S HEAD on the bedpost and spin all the bird heads (blue) to the positions shown in the screenshot.
- Enter the Secret Room (U).
- Open up the Drawer Key Object (V) and the Tongs Key Object (W).
- Open the cabinet door (X).
- Drag the items marked in green to the Drawer Key Object (V).
- Drag the items marked in blue to the Tongs Key Object (W).
- Zoom into the drawer; drag the item (Y) to the Drawer Key Object (V).
- Open the drawer; pick up the Color Palette (Z) and then drag the Snowman Picture to the Tongs Key Object (W).
- Take the City Elevator up to the Outside of the Hanger.
- Zoom into the electrical box; set the colors as shown in the screenshot (B).
- Spin the valve (C).
- Enter the Hangar.
- Press the bridge button (D).
- Enter the Lounge (E).
- Open up the Table Key Object (F) and the Vermillion Key Object (G).
- Drag the items marked in green to the Table Key Object (F).
- Zoom into the table; pick up the FLASK (H).
- Zoom into the bottom of the china hutch; pick up the BOXING GLOVE (I).
- Zoom into the top of the china hutch; pick up the CROSS (J).
- Drag the items marked in blue to the Vermillion Key Object (G).
- Return to the Cobbler Shop.
- Place the CROSS on the shield (K).
- Drag the shield to the Ladder Key Object (L).
- Zoom into the bucket; place the PIPES and drag the pan flute (M) to the Ladder Key Object (L).
- Receive the LADDER.
- Return to the Secret Room.
- Zoom into the drawer; place the BOXING GLOVE with its mate (N) and drag them to the Tongs Key Object (O).
- Receive the TONGS.
- Zoom into the thermometer (P); place the FLASK in it.
- Take the City Elevator to the outside of the Hangar.
- Place the LADDER (Q).
- Drag item (R) to the Card Key Object (S).
- Receive the Card.
- Return to the Lounge.
- Zoom into the bottom of the china hutch; place the CARD and drag the cards (T) to the Vermilion Key Object (U).
- Pick up the VERMILION (V).
- Return to the Alley, take a left, and move through the gate to the Furnace.
- Open the furnace with the right handle (W).
- Place the CRUCIBLE followed by the VERMILION in the furnace.
- Close the door with the right handle (W).
- Light the fire with the left handle (X).
- Open the door and remove the HOT MERCURY (Y) with the TONGS.
- On your way back to the Secret Room, stop by the Back Gate.
- Zoom into the barrel (Z); submerge the HOT MERCURY into the water to receive the COLD MERCURY.
- Return to the Secret Room.
- Zoom into the thermometer; place the COLD MERCURY in the thermometer (A) and pick up the DISC (B).
- Move downstairs to the Living Room.
- Place both DISKS in the holder (C) and make note of the code.
- Return to the Hangar.
- Zoom into the screen (D).
- Press the code ‘E 06' on the screen (E).
- Pick up the PUNCH CARD (F).
- Zoom into the Airship; place the PUNCH CARD in the slot (G).
Chapter 5: Fix the Fountain

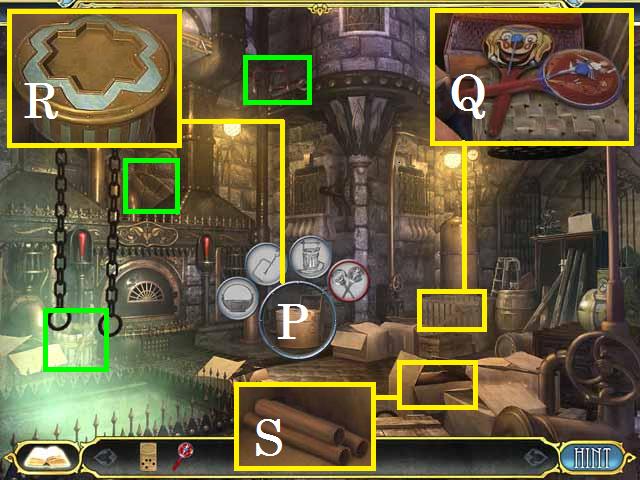
- Open up the Chest Key Object (H).
- Drag the items marked in green to the Chest Key Object (H).
- Zoom into the door; pick up the REEL (I) and read the letter (J).
- Take a right.
- Open up the Empty Tank Key Object (K).
- Drag the items marked in green to the Empty Tank Key Object (K).
- Zoom into the keg; pick up the FLASH (L).
- Enter the Chemical Hall through the door (M).
- Open the Desk Key Object (N).
- Open up the suitcase; place the REEL and drag the reels (O) to the Desk Key Object (N).
- Open the cabinet (P).
- Drag the items marked in green to the Desk Key Object (N).
- Zoom into the grate; drag item (Q) to the Desk Key Object (N).

- Pick up the ROLLER (R) from the trashcan.
- Pick up the FIGURINE (S) from the oven.
- Zoom into the desk; pick up the CAN OPENER (T).
- Back up two scenes to the Front of the Castle.
- Place the FLASH on the camera (U) and drag them to the Chest Key Object (V).
- Zoom into the chest; pick up the VALVE (W).
- Move forward to the Elevator (X).
- Open up the Knife Key Object (Y) and the Elevator Controls Key Object (Z).
- Pick up the Case (A).
- Zoom into the cardboard box; pick up the DRAGON STENCIL (B).
- Drag the items marked in green to the Knife Key Object (Y).
- Open the can (C) with the opener.
- Drag the items marked in blue to the Elevator Controls Key Object (Z).
- Return to the outside of the Chemical Lab.
- Place the STENCIL on the flag (D) and drag the ROLLER over it.
- Drag the flag to the Empty Tank Key Object (E). Receive the EMPTY TANK.
- Place the VALVE and EMPTY TANK on the keg (F) as shown in the screenshot. Spin the VALVE to receive the FULL TANK.
- Return to the front of the Castle and move forward to the Elevator.
- Place the FULL TANK (G).
- Press the red button (red) to take the elevator down.
- Open the Weights Key Object (H).
- Drag the items marked in green to the Weights Key Object (H).
- Zoom into the desk; pick up the VALVE (I) and the note (J).
- Zoom into the lower cabinet; pick up the scroll (K) and drag the item (L) to the Weights Key Object (H).
- Receive the WEIGHTS.
- Pick up the scroll (M).
- Zoom into the middle cabinet; pick up the scroll (N) and the SOLUTION (O).
- Back up one scene.
- Place the SOLUTION in the basket (P) and drag them to the Knife Key Object (Q).
- Receive the KNIFE.
- Open the CASE from your inventory and place the FIGURINE on the scale (R).
- Drop the WEIGHTS over the scales, then pick the 7, 3, 5, and 3 (or any combination that equals eighteen) weights to be placed on the other scale (S).
- Enter the Chemical Lab Hall.
- Zoom into the cabinet; set the dial to 18 as shown in the screenshot (T).
- Pick up the VALVE (U).
- Return to the Elevator and ride down to the Vault.
- Zoom into the panel; place the VALVES and rearrange them as shown in the screenshot (V).
- Zoom in to the opened vault door; pick up the GOLEM'S KILL SWITCH (W) and the PUNCH CARD (X).
- Exit back to the Citadel Gate.
- Zoom into the door; place the PUNCH CARD in the slot (Y) and pick up the TORN PAGE (Z).
- Return to the Chemical Lab Hall.
- Place the TORN PAGE in the book (A).
- Exit the Hall.
- Zoom in to the control tower door; cut the rope (B) with the KNIFE and zoom in again.
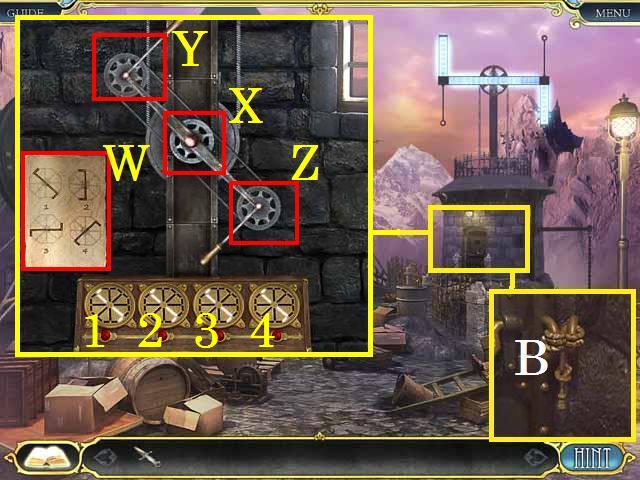
- Click on the center gear (X) to rotate the mechanism, and click on the handles (Y and Z) to move them.
- Move the mechanism into the same position as figure 1 on the diagram (W), then press the corresponding red button (1). Continue to do this for figures 2-4.

- Once you arrive on the other side of the Castle Wall, open the Barrel Key Object (C).
- Zoom into the trashcan; drag the weight (D) to the Barrel Key Object (C).
- Drag the items marked in green to the Barrel Key Object (C).
- Take the tunnel (F) to the Citadel Gate. Back up one scene to the Town Square, then move through the right gate to the Alley; go right to the Cobbler's shop.
- Speak with the Cobbler (G).
- Use the dialogue in the following order: 'How Can I enter the Citadel?', 'But the sewer entrance is closed', and 'I'd better go'.
- Receive the PUNCH CARD.
- Return to the Town Square and move forward to the Fountain (H).
- Place the PUNCH CARD in the slot (I) to open the gate and enter the Pumping Station.
- Open the Panel Key Object (J) and the Box Key Object (K).
- Drag the items marked in green to the Panel Key Object (J).
- Drag the items marked in blue to the Box Key Object (K).
- Zoom into the grate; pick up the PUNCH CARD (L).
- Return to the Cobbler Shop.
- Place the PUNCH CARD in the lock (M).
- Take the stairs up to the Study.
- Open the Brush Key Object (N) and the Tiles Key Object (O).
- Drag the items marked in green to the Brush Key Object (N).
- Drag the items marked in blue to the Tiles Key Object (O).
- Receive the TILES.
- Pick up the note (R).
- Zoom into the fireplace; pick up the note (S).
- Zoom into the drawer; pick up the MUSIC BOX (T).
- Zoom into the chest; pick up the paper (U) and the BARREL (V).
- Take the doorway to the Roof.
- Open the Collar Key Object (W) and the Washtub Key Object (X).
- Drag the items marked in green to the Collar Key Object (W).
- Drag the items marked in blue to the Washtub Key Object (X).

- Zoom into the Washtub; pick up the TILES (Y).
- Zoom into the basket; pick up the CLOWN (Z).
- Return to the Cobbler Shop.
- Release the pulley (A) to lower the basket; zoom in and pick up the RED CROWBAR (B).
- Return to the Fountain and enter the Pumping Station.

- Using the RED CROWBAR, pry the DIRTY FILTER (C) out of the machine.
- Zoom into the gate; place the TILES in the lock. You can rearrange the tiles, as shown in the screenshot (D) by using the following sequence: Move the tile in position 3 to position 1, 2 to 3, 4 to 9, 6 to 7, 8 to 4, 2 to 8 and 6 to 2.
- Move forward through the gate.
- Open the Chest Key Object (E).
- Drag the items marked in green to the Chest Key Object (E).
- Zoom into the chest; pick up the BARREL (F).
- Zoom into the clock (G); set the hands to 10:00.
- Return to the Alley and take a left.
- Enter the Junk Store (H).
- Open the Soap Key Object (I).
- Drag the items marked in green to the Soap Key Object (I).
- Zoom into the cabinet; pick up the STAR (J).
- Zoom into the cabinet; pick up the FOUR (K).
- Return to the Study above the Cobbler Shop and exit to the Roof Top.
- Place the FOUR on the item (L) and drag it to the Collar Key Object (M).
- Zoom into the collar; pick up the HONEYCOMB (N).
- Return to the inside of the Fountain.
- Place the STAR on item (O) and drag it to the Chest Key Object (P).
- Zoom into the chest; pick up the TUBES (Q).
- Return to the Citadel Entrance.
- Zoom into the door and place the TUBES inside; arrange as shown in the screenshot (R), and push the button.
- Zoom into the panel and open it; pick up the SEAL (S).
- Move forward through the gate.

- Place the CLOWN on the chair (T) and drag them to the Separator Key Object (U).
- Place the HONEYCOMB in the separator to receive the WAX.
- Zoom into the bee hive; pick up the BEETLE (I).
- Return to the Junk Store.
- Zoom into the window; place the WAX on the envelope (V) followed by the SEAL.
- Drag the envelope to the Soap Key Object (W).
- Receive the SOAP.
- Pick up the BARREL (X).
- Return to the Study.
- Place all of the BARRELS on the MUSIC BOX from your inventory.
- Arrange the barrels as shown in the screenshot (Y).
- Pick up the HEXAGON (Z).
- Place the HEXAGON on the safe's lock; arrange the hexagons as shown in the screenshot (A) (Hint: change the orientation of the center hexagon first, as shown in the screenshot, then spin the remaining hexagons to match).
- Pick up the paper (B) and drag the item (C) to the Brush Key Object (D).
- Zoom into the desk; pick up the envelope (P), place the BEETLE in the frame (Q) and drag it to the Brush Key Object (D).
- Receive the BRUSH.
- Move to the Rooftop.
- Place the DIRTY FILTER in the fountain (E).
- Turn the valve (red).
- Place the SOAP and the BRUSH in the fountain.
- Pick the filter back up to receive the CLEAN FILTER.
- Return to the Inside of the Pumping Station.
- Place the Clean Filter in the pump (F).
- Flip the switch (G).
- Return to the Cobbler Shop.
- Tell the Cobbler (H); 'I fixed fountain' to receive the PUNCH CARD then end the conversation with 'I'd better go'.
- Return to the Alley.
- Place the PUNCH CARD in the lock (I) and enter the Sewer.
Chapter 6: Citadel
- Open the Door Key Object (K).
- Drag the items marked in green to the Door Key Object (K).
- Zoom into the door; pick up the METAL BOX (A) and pull the handle (B).
- Take the Tunnel (L) to the Cell.
- Open the Oven Key Object (M) and the Desk Key Object (N).
- Drag the items marked in green to the Oven Key Object (M).
- Drag the items marked in blue to the Desk Key Object (N).
- Zoom into the Cabinet; pick up the GLASS FLAME (O) and drag the item (P) to the Desk Key Object (N).
- Pick up the BIRD ON A ROPE (Q).
- Zoom into the desk; pick up the EMBLEM (R) and the PART OF RUSSIAN DOLL (S).
- Exit back one scene.
- Place the EMBLEM on the helmet (T) and drag it to the Door Key Object (U).
- Enter the Tower Staircase.
- Open the Door Key Object (V).
- Drag the items marked in green to the Door Key Object (V).
- Zoom into the bucket; pick up the PICTURE (W).
- Zoom into the robot's hand; pick up the PART OF SHIELD (X).
- Move upstairs.
- Zoom into the crate; pick up the BALLOON (Y) and FIGURINE (Z).
- Exit back two scenes.
- Zoom into the pump (A); place the BALLOON on the pump and spin the valve.
- Quickly tie the BIRD ON A ROPE to the full balloon.
- Return to the Tower Staircase and climb the stairs.
- Zoom into the robot's back; flip the switch (B).
- Move forward to the Ventilation Room and enter the room on the right.
- Place the KILL SWITCH on the Golem's chest (C).
- Once you are in the Capsule, open the Panel Key Object (D).
- Drag the items marked in green to the Panel Key Object (D).
- Zoom into the panel for a puzzle.
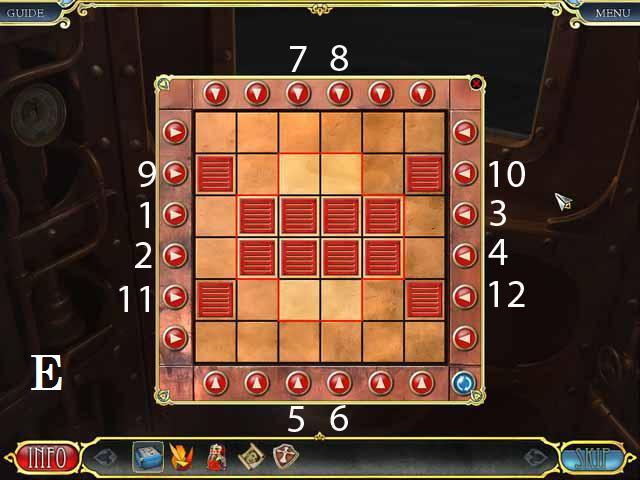
- To solve the puzzle, press the arrows in the following sequence; 1, 1, 2, 2, 3, 4, 5, 5, 5, 5, 6, 6, 6, 6, and 7, 7, 8, 8. (You should now have the arrangement shown in the screenshot (E).
- Finish the puzzle with; 9, 9, 9, 9, 10, 10, 11, 11, 11, 11, and 12, 12.
- Exit the Capsule.
- Open the Punch Card Key Object (F).
- Place the PART OF SHIELD on the shield (H).
- Drag the items marked in green to the Punch Card Key Object (F).
- Receive the PUNCH CARD.
- Zoom into the cabinet; pick up the TILE (G) and the BOW (@).
- Zoom into the capsule; pick up the GLASS FLAME (I).
- Move through the doorway to the Lab.
- Zoom into the chest; pick up the TILE (J) and WINCH (K).
- Open the Jar Key Object (L).
- Drag the items marked in green to the Jar Key Object (L).
- Receive the JAR.
- Open the drawer; pick up the FLAG (M).
- Return to the Tower Staircase.
- Place the BOW on the violin (N) and drag it to the Door Key Object (O).
- Zoom into the door; pick up the TILE (P) and BAGS WITH SAND (Q).
- Place the JAR (R).
- Exit back one scene.
- Zoom into the small door; place the WINCH (T).
- Zoom into the basket; pick up the paper (U) and the CIRCASSIAN WALNUT (V).
- Enter the Cell.
- Zoom into the lock (W); place the PUNCH CARD in the slot.
- Zoom into the cell; pick up the LEVER (X).
- Place the FIGURINE on the stand (Y) and drag it to the Oven Key Object (Z).
- Zoom into the oven; pick up the TILE (A).
- Return to the Tower Stairway.
- Place the LEVER (B) and receive the FULL JAR.
- Return to the Lab and enter the Capsule Room.
- Zoom into the shelf; place the CIRCASSIAN WALNUT in the nutcracker (D) to receive the NUT KERNEL.
- Place the BAGS WITH SAND in the capsule (C); pick up the SCREWDRIVER (E).
- Back up two scenes to the Ventilation Room.
- Zoom into the vent; unscrew all four screws (blue) with the SCREWDRIVER.
- Pour the FULL JAR into the open vent (W).
- Zoom into the robot; remove the screw (green) with the SCREWDRIVER to receive the LITTLE HOOK.
- Return to the Cell.
- Zoom into the grate; pick up the PUNCH CARD (F) using the LITTLE HOOK.
- Return to the Ventilation Room.
- Zoom into the lock (G); Place the PUNCH CARD in the slot.
- Enter the Tower Study.
- Open the Chair Key Object (H) and the Globe Key Object (I).
- Place the FLAG on the gnome (J).
- Place the PART OF RUSSIAN DOLL on the doll (V).
- Drag the items marked in green to the Chair Key Object (H).
- Drag the items marked in blue to the Globe Key Object (I).
- Zoom into the cabinet; pick up the paper (K) and drag the item (L) to the Globe Key Object (I).
- Zoom into the globe; open the door and drag the item (M) to the Chair Key Object (H).
- Zoom into the lower shelf; pick up the paper (N) and the TILE (O).
- Zoom into the table; pick up the TILE (P).
- Zoom into the cage; open the bird's head (Q) and place the NUT KERNEL inside.
- Pick up the KEY (R).
- Move the chair to zoom into the lower cabinet; pick up all of the papers (S).
- Place the TILES on the METAL BOX from your inventory as shown in the screenshot (T).
- Pick up the PUNCH CARD (U).
- Return to the Lab.

- Zoom into the lock (V); Place the PUNCH CARD into the slot.
- Enter the Observatory.
- Open the Folding Doors Key Object (W).
- Place the PHOTO in the frame (X).
- Drag the items marked in green to the Folding Doors Key Object (W).
- Zoom into the secret desk's cabinet; unlock the cabinet with the KEY and pick up the GLASS FLAME (Y).
- Zoom into the fireplace and place all of the GLASS FLAMES. Insert all of the pieces into the correct slots to complete the puzzle; see the screenshot for the final image (Z).
- Pick up the REMOTE CONTROL (A).
- Zoom into the viewer; press the red button (B).
- Congratulations, you have completed Depths of Betrayal Standard Edition!
Created at: 2012-03-16