

Walkthrough Menu
- General Tips & Information
- Cairo, Part One
- The Pyramids
- Cairo, Part Two
- Tibetan Village & Mountains
- Temple Ruins & Jungle
- Temple Mazes
General Tips & Information
- To access the main menu, hit escape. Here you can save and load games. There is no auto-save feature, so it is recommended that you save your game often. There are 10 save game slots.
- On the upper left of the game screen is the inventory. To use an item, select it with the mouse. You can show/hide the inventory by using a right-click or the "I" key.
- Your cursor will change when interactions are possible except when you are holding an item. If you get stuck, search carefully for hot spots, and then try to use items.
Cairo, Part One
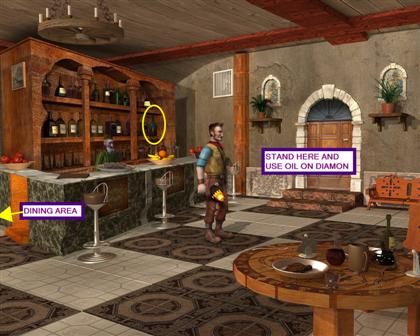
- Talk to Ahmed El Kashim at the bar to discover that he gives away nothing on credit.
- Walk left to the dining room and talk to John Milton. He nearly reveals information about a precious artifact falling into the wrong hands, but insists on good wine for his tale. To get the wine, you will need to distract the bartender.
- Walk back to the bar and give Ahmed the penny; he will give you some rancid oil.
- Take the oil from the bar and walk to the center of the floor.
- Use the rancid oil on Diamon Jones to spill it on the floor.
- After the cut-scene of Samuel Johnson slipping in the oil and calling Ahmed over, take the wine off the right shelf from behind the bar.
- Walk left to the dining room and give the wine to John Milton. He tells you about his expedition and the deaths of all the members, and then promptly passes out cold.
- Walk right and attempt to leave the bar without being seen. Samuel Johnson stops you and demands payment of a two year-old debt. He demands payment in the form of a parchment from the local museum. Diamon has no choice, but to agree.
- Exit the pub and walk right to the street.
- Speak with the craftsman and discover he has lost his tools.
- Return to the front of the pub.
- Take the hammer from the melon cart, and find the chisel in the rightmost barrel.
- Return to the street and give the hammer and chisel to the craftsman. As a reward, he will allow you the use of his workshop and give you a ruby.
- Look in the box and take the rope.

- Walk north to the museum and enter the front door.
- Look at the rope with stones in the far left case. The guard is fast asleep, but quickly wakes when Diamon looks around at the exhibits. The guard tosses him from the building.
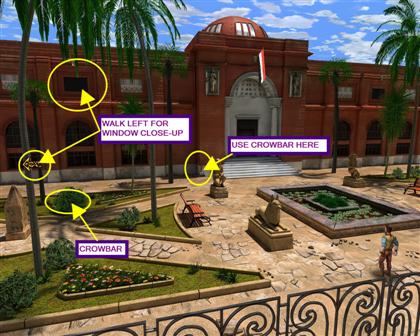
- Walk to the left to see the close-up of the window and the flagpole.
- Walk right to return to the museum yard.
- Look in the top left bush and take the crowbar.
- Use the crowbar on the cracked masonry just below and to the left of the museum entrance.
- Exit the museum yard and return to the street.
- Enter the workshop and take the hammer and chisel.
- Place the rocks into the tray.
- Use the hammer and chisel on the rocks.
- Take the rocks with holes and combine them with the rope in the inventory.
- Return to the close-up of the window and use the rope with rocks on the flagpole.
- Select the rope to start a mini-game.
- To keep Diamon from falling off the rope, you must click the left mouse button when you see the left arrow, and the right mouse button when you see the right arrow.
- Enter the Museum director's office.
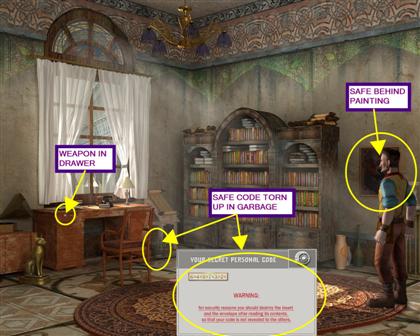
- Look at the painting on the right and notice there are hinges.
- Open the painting to reveal a safe.
- Look at the garbage can and take the torn note to open a mini-game.
- Piece together, jigsaw style, the torn pieces of the combination sheet. The combination reads, "6>4<9>7<3>2<."
- Select the safe to start the mini-game.
- Right-click 6 times, left-click 4 times, right-click 9 times, left-click 7 times, right-click 3 times and left-click 2 times. Press the space bar to open the safe. Note: the space bar will reset the mini-game if you make a mistake. To exit the mini-game, hit ESC.
- Take the key and the map.
- Walk left to the storage and take the hammer from the floor.
- Return to the office and use the hammer on the desk lock; take the gun you find.
- Walk left to leave the office, and then use the key on the back door to exit the museum.
- Back at the bar, Sam Johnson is plotting against Diamon. He assigns Billy Smith to steal the map.
- You are now playing Billy Smith. Exit the bar and walk to the museum grounds.
- Talk to Andy Rain. They are going to ambush Diamon at the back door of the museum. All three enter the alley at the same time. The shooting begins.
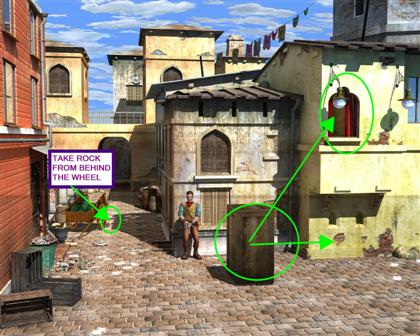
- You are back to playing Diamon. Diamon needs to distract Billy so he can hide in the balcony window. To do this, move the watermelon cart.
- Look at the wheel and take the stone from behind the wheel. The cart knocks Billy out cold.
- Examine the window, and then select the crate to open the mini-game.
- The crate needs to be moved so that the left side of the crate is even with the left side of the balcony. Click when the needle is in the center. Too much to the right, and Diamon will push the crate too far; Diamon will not push it far enough if the needle is too far to the left.
- Inside the balcony window, Diamon meets Fatima. She has been locked in her room for refusing to marry the old banker.
- Look on the round table and take the hairpin.
- Use the hairpin on the door to trigger a mini-game.
- Numbering the tumblers 1-5, from left to right, click in the following sequence: 1, 3, 2, 5, 4. Diamon and Fatima escape her room and head to the hangar.
- Fuffy Wilson, the pilot, is passed out drunk on the floor.
- Walk to the rear of the hangar and look in all the drawers.
- Take the coffee, coffeepot, sugar, ammonia ampule, and matches.
- On the third shelf from the left is a cup with water.
- Return to the front of the hangar.
- Try the ammonia ampule on Fuffy, to no avail.
- Inside the inventory, combine the coffeepot, coffee, sugar and water.
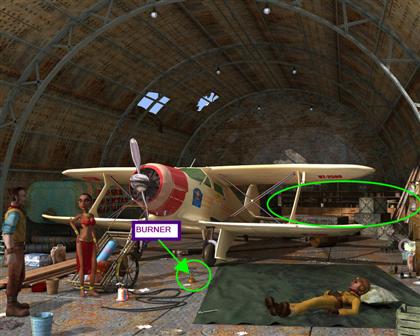
- Return to the front of the hangar and place the coffeepot on the burner at the left end of the blanket. Use the matches on the burner, and the hot coffee will automatically go into the inventory.
- Combine the hot coffee with the coffee cup and give it to Fuffy.
- The coffee has the opposite of the desired effect on Fuffy, and he falls asleep. Diamon decides to fly the plane himself and leaves Fatima behind.
- In the plane mini-game, use the right and left mouse buttons to keep the plane as level as possible. Go too far to one side and the plane will crash! Click and hold the buttons to maintain the level. You will also need to steer slightly, to avoid the birds. Diamon parachutes out of the plane as it crashes and burns.
The Pyramids
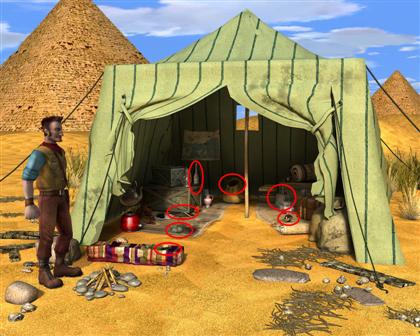
- From inside of the tent, take the flask, bottle of kerosene, screwdriver, and lighter from the left, and the metal rod from the right.
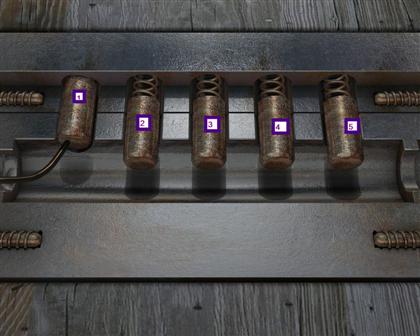
- Look at the suitcase to trigger a mini-game.
- Numbering the buttons 1-5 from left to right, click on buttons 1, 4, 2, 5, and 3 (this may be randomized).
- Look inside the suitcase and take the rope and two emeralds.
- Take the clay tablets from the backpack in the back of the tent.
- Walk left to the front of the tomb.
- Use the metal bar on the lever hole and pull the lever.
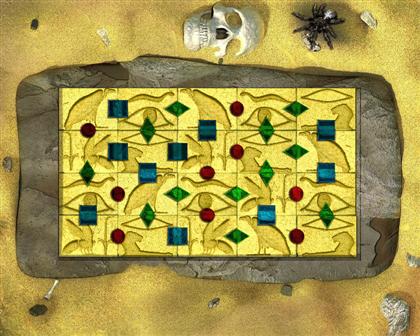
- The stone mat by the door turns to reveal a mini-game. Looking at it reveals that some pieces are missing.
- Use an emerald on each of the stone tablets in the inventory.
- Use a screwdriver on the sphinx's eyes to get two sapphires and use them on the tablets.
- Use the ruby on the tablet with an open slot.
- Add each tablet to the stone mat, and then solve the puzzle by matching all the colors. The door opens.
- Enter the tomb to find Mary Ocean. She has been trapped for two days inside the tomb.
- Look at the torches and pull the torch in the center of the screen, and then the left torch, and finally the torch on the right side of the screen.
- A light shines down, and a ruby appears on the floor.
- Take the ruby.
- Look at the guards with the metal rods.
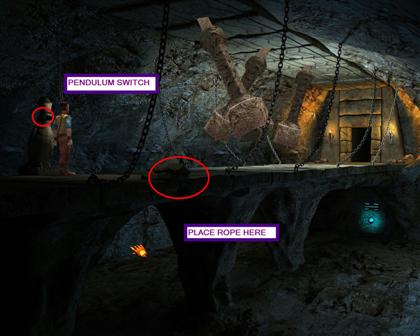
- Walk down to enter the first room and find killer pendulums! Run past each swinging rock by double-clicking. Use the chains as start/stop points between each pendulum.
- Look at the bird statue and click on its eye to stop the pendulums.
- On the opposite side of the bridge, tie a rope on the remains of another bird statue.
- Climb down the rope and walk to the left.
- Take the sapphire and notice the water symbol.
- Use the flask on the spring water.
- Walk left to the throne room.
- Look at the bridge control and notice some levers are missing.
- Pull the right torch, and then the left torch to return to the tomb entrance.
- Take the levers from each guard statue.
- Return to the throne room and use the levers on the bridge control.
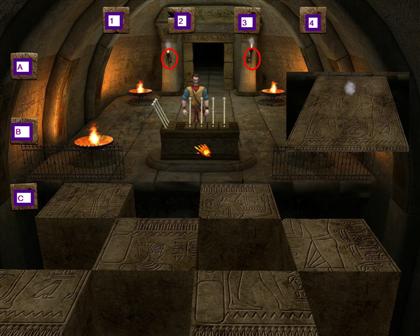
- Clicking on the bridge control opens a mini-game.
- Labeling the buttons across the top 1-4, and the buttons on the left side A-C, left-click on 1, 2, C. Right-click B twice, and then 3, 1, B. Left-click B to solve. To reset, you must completely exit the game and re-start.
- After the smoke clears, take the topaz from the bridge and walk to the third room.
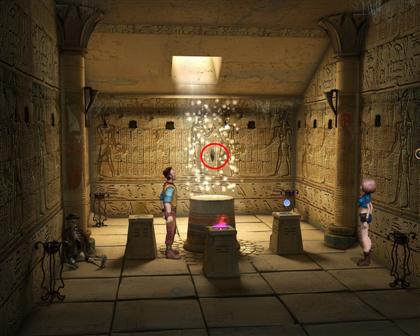
- Put the sapphire in the right pedestal, and then use the flask of water.
- Place the ruby in the center small pedestal and add the kerosene.
- Light the kerosene with the lighter.
- Put the topaz in the left pedestal.
- Return to the tomb entrance, talk to Mary, and then go outside.
- Take sand from just left of the door and return to the third room.
- Use the sand on the topaz.
- Take the Amulet of the World from the center dais. Ahmed and his henchmen are waiting! A fight ensues, but Diamon prevails.
Cairo, Part Two
- Samuel Johnson wants the amulet and Diamon Jones dead! You are once again, playing the part of Billy Smith.
- Take the dice from the left end of the bar and talk to the Sea Dog at the first table.
- Billy wants a favor repaid, but the Sea Dog hits him with the candlestick. Use the dice to challenge him to a match.
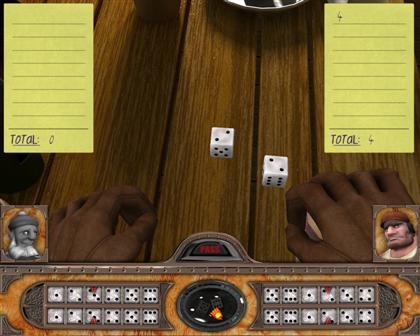
- This mini-game is similar to Blackjack. You need to get as close to 30 points as possible without going over, but scoring high enough to beat your opponent. If you lose the first time, the Sea Dog will take your gun. The second time, he will take your ammunition. Keep playing until you win money. If you run out of items to wager, load your last save point and try again. Remember to save often!
- Click on the lower center button to start shaking the dice and again to roll. To stop before 30, select pass.
- Exit the bar and talk to the constable to discover Diamon's whereabouts. He's not talking, so give him the cash as a bribe.
- Talk to Andy Rain.
- Walk down screen to the hotel and find that the door is blocked. Flashback to a few minutes earlier, and you are Diamon again, in his hotel suite.
- Walk left to the living room and talk to Mary Ocean. She insists the amulet must go to Tibet to restore the world balance upset by someone having taken the amulet in the first place. Mary leaves for the ship. Take the note off the desk. Mary apologizes and asks Diamon to join her on the ship.
- Walk to the bedroom and look out the window. Diamon notices Billy Smith approaching.
- Time to escape! Exit the bedroom and go through the living room to the corridor.
- Look at the door. Mary has taken the key! Diamon needs to find something to secure the door.
- Walk to the living room and take the candlestick.
- Return to the corridor and use the candlestick on the door.
- Go back to the bedroom and look at the trunk. It holds Diamon's gun.
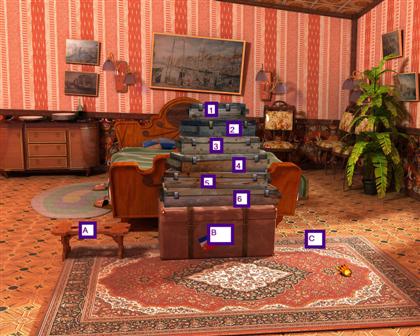
- Mary has boxes of artifacts piled on top. Click on them to open a mini-game.
- Number the boxes 1-6, from the smallest to the largest; label the bench as position A, the chest as position B, and the floor as position C. Make the following moves: 1A, 2C, 1C, 3A, 1B, 2A, 1A, 4C, 1C, 2B, 1B, 3C, 1A, 2C, 1C, 5A, 1B, 2A, 1A. 3B, 1C, 2B, 1B, 4A, 1A, 2C, 1C, 3A, 1B, 2A, 1A, 6C, 1C, 2B, 1B, 3C, 1A, 2C, 1C, 4B, 1B, 2A, 1A, 3B, 1C, 2B, 1B, 5C, 1A, 2C, 1C, 3A, 1B, 2A, 1A, 4C, 1C, 2B, 1B, 3C, 1A, 2C, 1C.
- Try to leave through the window, but find it’s too high.
- Go to the living room and take the tablecloth.
- Return to the bedroom and take the sheets.
- Combine the sheets and tablecloth in the inventory to make a rope.
- Tie the rope to the bed and climb out the window.
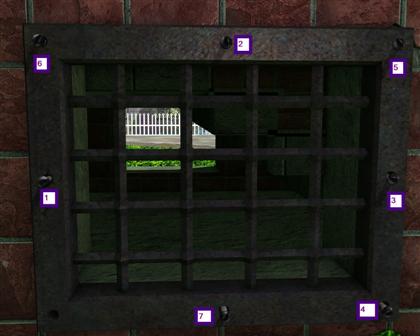
- To get past the henchmen, click on the grate below the stairway to open a mini-game.
- Remove the screws in the proper sequence. You will see red holes if you have made a wrong move. Starting center left and going around clockwise, assign the following numbers: 1,6,2,5,3,4,7 (this may be randomized). Remove the screws in numerical order.
- Crawl though the grate and head to Main Street.
- Talk to Mary Ocean. She missed the last boat.
- Enter the pub and talk to Fuffy Wilson. He is still upset with Diamon for crashing his plane.
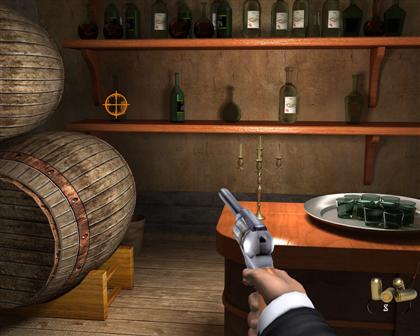
- Talk to the Sea Dog. He wants to be drunk for three days.
- Talk to him again to trigger a shooting gallery mini-game.
- Each round has five bottles that you must shoot. You have eight rounds of ammunition for each round of the game. After each round, Diamon and the Sea Dog both take a drink, resulting in each subsequent round being a bit more difficult. If you lose a round, you have to leave the pub to sober up. You must to win five times.
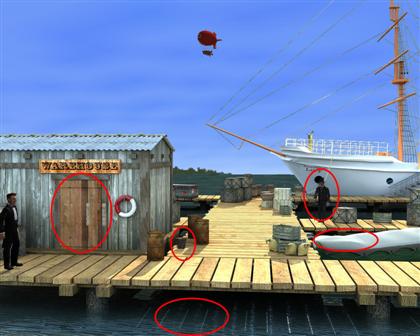
- The Sea Dog sends Diamon to the port to find out if the ship is ready to sail. Exit the pub and walk up-screen to the landing.
- Look at the covered boat.
- Look under the tarpaulin and take the boat hook.
- Talk to the gentleman to learn he has lost his wallet.
- Walk up to the schooner and talk to the sailor. Learn that he is ill.
- Look at the boxes in the foreground and see the wallet.
- Try to recover it from the boxes only to find that your hand is too large.
- Use the boat hook on the boxes, and retrieve the wallet.
- Walk to the landing and return the wallet to the gentleman. He rewards you with his trophy silver razor.
- Take the bucket and combine it with the boat hook.
- Use the combination on the seawater.
- Return to the schooner and use the seawater on the sailor.
- He demands stiff drinks for the crew before he will tell the captain they are ready to sail. Leave the schooner and enter the warehouse.
- Use the boat hook on the boxes in the rear to open a mini game.
- Slide the crate of rum from the upper left corner to the lower right corner.
- Take the crate of rum and return to the schooner.
- Give the crate of rum to the sailor.
- The ship still cannot leave, because someone has tied the ship’s line into knots! Use the razor on the rope and talk to the sailor. He now tells Diamon that he can advise the captain that they are ready to sail.
- Return to the pub and tell the Sea Dog.
- Leave the pub and talk to Mary Ocean.
Tibetan Village & Mountains
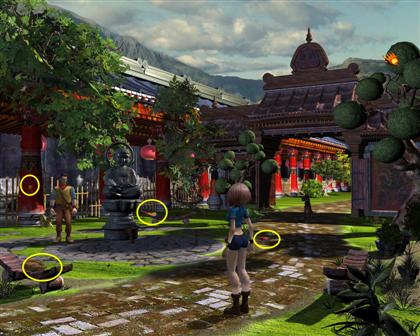
- Diamon and Mary arrive in Tibet and need to find a guide to take them to the temple. Talk to the guide and find out he won't leave until his girlfriend agrees to marry him.
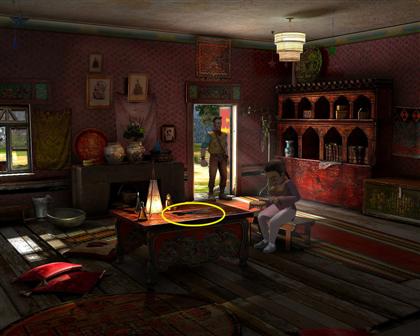
- Enter the girl's room and talk to the Tibetan girl. The fortune teller predicted that her true love will arrive on a sunny day, wearing a nice suit and a gold ring, and he will give her beautiful flowers.
- Take the rusty scissors from the table.
- Exit the girl's room and talk to the guide once more.
- Walk left to the side street and talk to the village man. He's a wizard with his hands.
- Give him the rusty scissors and he will return them to you sharpened.
- Take the broom from beneath the prayer wheel with ribbons.
- Look at the flowers behind the center building.
- Pick the flowers using the scissors.

- Walk up screen to the merchant's shop.
- Look at the suit on the shelf and try to take it.
- Talk to the merchant and find out the suit is not for sale.
- Return to the side street and talk to the boy. He agrees to take the suit while Diamon distracts the merchant.
- Return to the shop and talk to the merchant.
- After the boy takes the suit, leave the merchant and return to the side street.
- Talk to the boy and he will give you the suit.
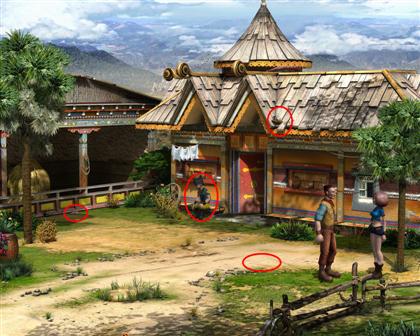
- Return to the village entrance.
- Look at the bird nest on the top of the house. The bird has a ring!
- Take the bag of grain, just below the center of the fence.
- Use the grain on Diamon and he will put some down for the bird.
- Use the broom on the bird nest, and the bird will fly to the grain and drop the ring.
- Take the ring and give it to the guide, along with the suit and flowers.
- Talk to the guide and he agrees to take you to the temple.
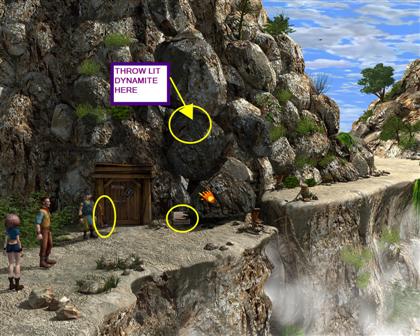
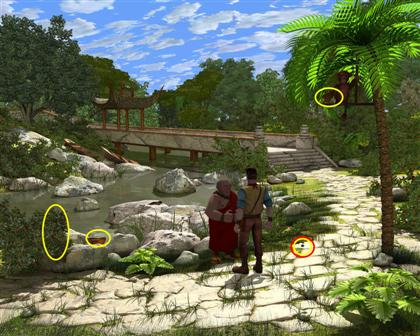
- Talk to the guide and find he is fearful of evil spirits, and will not go further. The bridge has been destroyed and there are dangerous boulders to pass.
- Take a stick of dynamite and combine it with the lighter.
- Take the lit dynamite out of your inventory and throw it at the large boulders to fill in the gap. You will only have a few seconds before Diamon throws the dynamite into the ravine to prevent it from exploding in his bag. If this happens, just take another stick of dynamite and repeat the process.
- Take the hammer from just left of the mine door. The guide leaves.
- Cross the makeshift bridge and go north
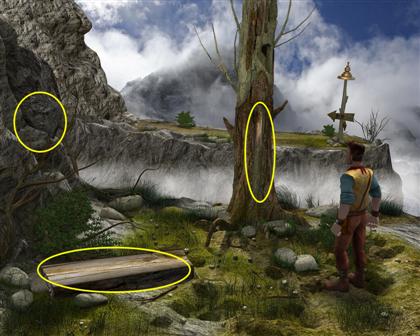
- Look at and then take the log.
- Try to take the dried tree, but find that it will not budge.
- Take the wedge-like bough from the front of the dried tree.
- Look at the gap under the stones on the left.
- Use the log under the unstable rock.
- Place the branch wedge under the unstable rock.
- Use the hammer on the wedge and the rock will knock the dried tree over the precipice.
- Click on the fallen tree to cross the gap and open a mini-game.
- Using the mouse buttons, try to keep the arrow in the green and prevent Diamon from falling to his death!
Temple Ruins & Jungle
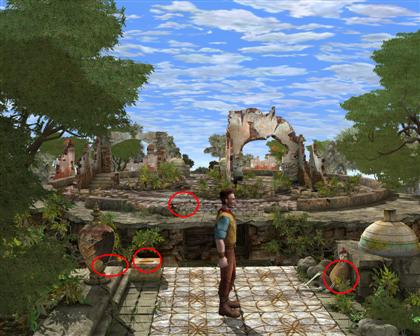
- Another precipice! Look in the broken vase and take the lever.
- Put the lever in the pedestal hole.
- Click on the lever to activate a mini-game.
- Use the right and left mouse buttons to steer the bridge slab in the slot on the other side.
- Take the lever.
- Make note of the skeleton.
- Take the axe from the northwest end of the bridge.
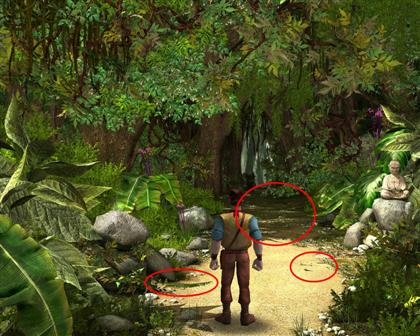
- Walk forward into the jungle.
- Look at the sand; there's something there.
- Take the palm frond and sweep the sand.
- Pick up the tiles and toss them, one at a time, onto the path ahead. They will trigger the pendulums and it will be safe to pass.
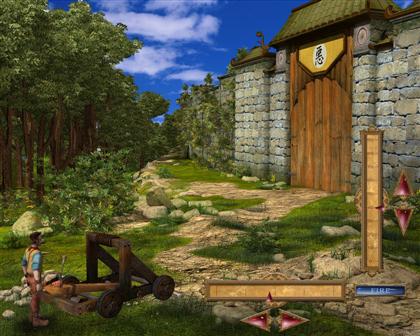
- Walk forward to the gates.
- Knocking on the gates is useless. Look at the catapult and discover it is missing a few pieces.
- There is a knife holding a note. Take both, and look at the note.
- The note appears to be in Chinese so run back to Nancy at the mine entrance.
- Give her the note to translate. Mary's translation shows that the note is a manual on how to repair and operate the catapult.
- Diamon will need to attach a spoon to a small rod made of bull's tendons and tie the spoon's upper part to the big drum; then insert a lever into the hole on the left side of the drum.
- Walk to the precipice and take the log. You will need the axe to dig it out and when you are finished it will look like a spoon.
- Forge ahead to the ruins and use the razor on the skeleton to get the rope.
- Use the spoon on the catapult and then attach the rope and lever. You will need something to block the wheels.
- Take the brick from just in front of the gate and use it with a wheel on the catapult.

- Take a rock from the pile to activate a mini-game.
- Use the catapult to first break the four hinges; after that, one hit dead center will do the trick.
- Adjust the horizontal to about 3 -4 clicks to the left of the center hash mark and the vertical to 40. Fire! Those settings should take out the upper left hinge.
- Adjust the vertical to a little under 30 and fire again.
- Move the horizontal control about nine clicks to the right of the center hash mark and fire.
- Readjust the vertical to 40 and fire to knock down the gate. You have unlimited shots, so keep firing.
- Enter the monastery gardens.
- Talk to the fat monk. He tells you that the mechanism to open the way into the monastery is broken and the monkeys have scattered the parts. He then gives you a banana.
- Walk across the bridge to the water mechanism.
- Take the gutter piece and the water step.
- Return to the fat monk.
- Take the small stone, just to the right of the monk.
- Toss it at the monkey and he will get mad and throw the water step.
- Take a twig from the far left bush and use it to retrieve the third water step from the edge of the pond.
- Return to the water mechanism.
- Place the gutter in the metal brackets.
- Take the water steps and insert them below the water on the left. Now the machine is operational and the stairs to the monastery open up.
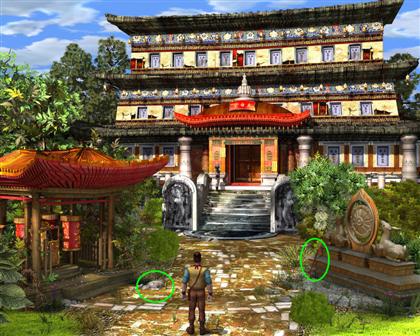
- Climb the stairs and enter the monastery.

- Note the gear embedded in the column.
- Take the meat and the horn. You need to get the dog to leave.
- Use the horn on the cat. The cat will run and the dog will follow.
- Walk right to the monastery yard.
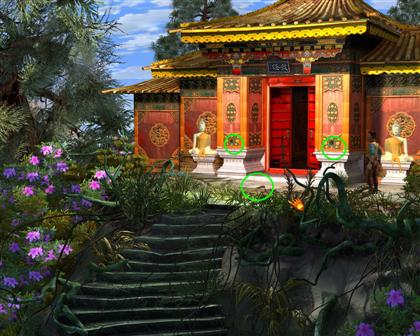
- Look at the door to the temple. Mary translates, "Movement and wind will wake metal. Metal will wake up Buddha and the key will come from under his feet."
- Walk right to the temple premise. The travel arrow is just to the right of the temple steps.
- Take the Tibetan Pharba knife.
- Use the Pharba on the two gears embedded in the columns.
- Walk right to return to the temple and go back to the courtyard.
- Use the Pharba to get the gear embedded in the column.
- Return to the temple.
- Take the lever from the rocks and enter the gazebo with the prayer wheels.
- Use the gears and crank on the mechanism.
- Turn the crank and make note of the tune.
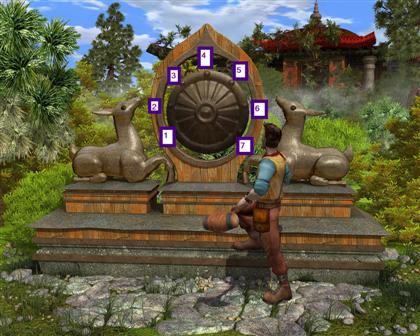
- Exit the gazebo and take the gong hammer.
- Walk to the close-up of the gong.
- Starting at the lower left and numbering the buttons around the edge of the gong 1-7, use the gong hammer on the following buttons: 2, 4, 3, and 5. The ground shakes when correct. If you make an error, you must re-spin the prayer wheels.
- Return to the entrance and see that Buddha has opened up to reveal a key!
- Return to the temple and open the door with the key.
Temple Mazes
- The temple maze is five rooms by five rooms. Scattered throughout are 10 pieces of gold and four map pieces. Once you have collected all four map pieces, you can look at the assembled map to see your location within the maze, marked by a red dot.
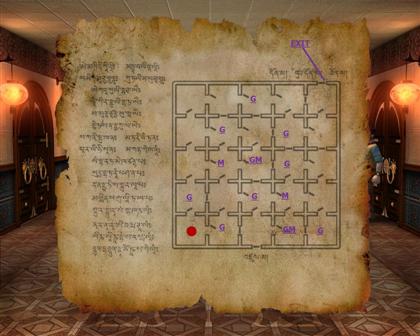
- To exit the maze, go to the upper right room.
- Look at the mosaic.
- Use a piece of gold on the mosaic to open a mini-game.
- Reassemble the gold dragon statuette by sliding the pieces. Your last move can be canceled with the button at the bottom.
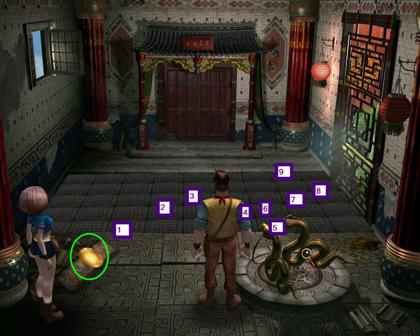
- The next room has an unusual floor. If you step on it, you will plummet into the depths below!
- Talk to Mary until she runs out of new information
- Take the gold bowl and use it on the snakes sculpture.
- One of the floor tiles is highlighted. Step on that tile and others will light, but there is only one correct answer. After Daimon is across, Mary will follow.
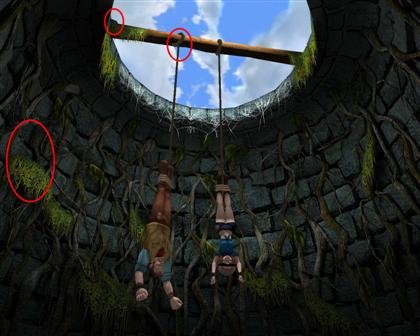
- Oh no, it's that Samuel Johnson again! He has captured Diamon and Mary and hung them upside down in a well.
- Talk to Mary and the screen inverts.
- Look at the bough on the left.
- Try the belt on the bough, but find out it’s not long enough.
- Ask Mary for her belt.
- Combine the belts and use them on the bough.
- Look at the rat on the beam.
- Use the meat on Diamon's knotted rope. The rat chews through the rope and Diamon climbs down the well.
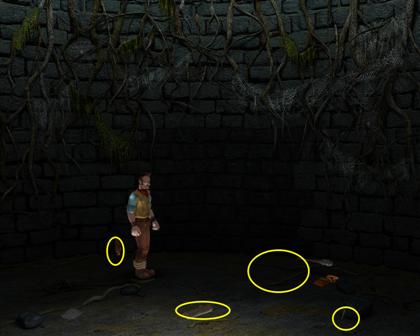
- Click on the bag and Diamon hops to it with his feet still tied.
- Use the razor on the ankle ropes.
- Pick up the dry stick, dry log, and rotten wood.
- Combine the dry stick and dry log.
- Add the rotten wood.
- Use the fire starter on the fireplace to get some light.
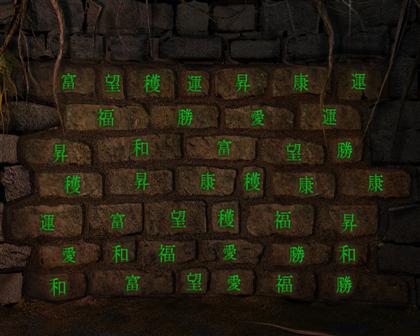
- Look at the wall to reveal a mini-game.
- In this memory match game, match all the pairs until all the symbols are showing. The walls will break away. Pull the lever to the right of the entrance to lower Mary. Use the razor to cut the rope around her ankles.
- Examine the large hole in the wall, and then take the torch and use it with the fire.
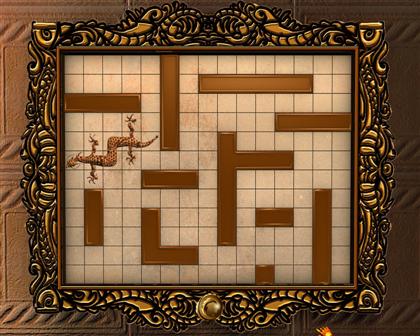
- Enter the dark crevice and discover another maze.
- Walk straight along the bottom edge until there is a short wall blocking you.
- Walk up and to the right a bit to find the skeleton.
- Take the golden snake.
- Retrace your steps to the bottom area and work your way to the upper left to reach the exit door.
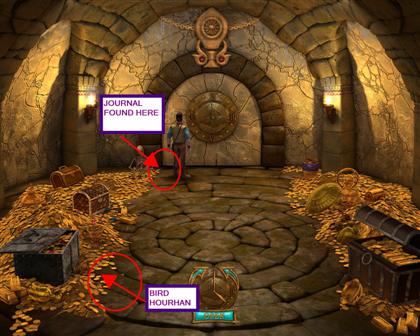
- Enter the treasure room.
- Look at the skeleton.
- Take the adventurer’s bag.
- Inside is the journal of Johan Forster.
- Use ESC to exit the journal. He has figured out the secret of the clock lock. "The gates will open with the first morning hour."
- Take the bird hour hand from in front of the gray chest. Diamon takes a few coins, just in case.
- Attach the bird hour hand and the snake minute hand to the clock.
- Prime, or the First Hour, is prayer time and is said at the first hour of daylight, usually 6 am. Click on the face of the clock and use the arrow buttons to set it to six.
- Push the open button and the door opens.
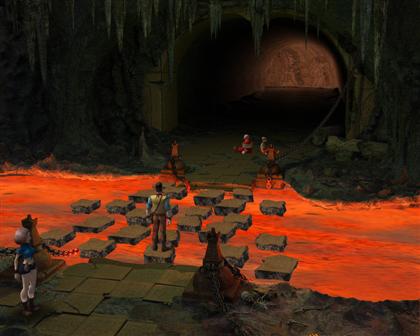
- The bridge has been blown up. Reach the opposite side by jumping on sturdy stones.
- After reaching the other side, use the razor to cut their ropes. The monks give you part of a sacred scroll.
- Exit the lava cave.
- Look at the Border to the World. Andy Rain is standing guard.
- Take the small chest.
- Toss some coins at Andy.
- When Andy bends down to collect the coins, smash his head with the small chest.
- Take Andy's gun and enter the Border to the World.

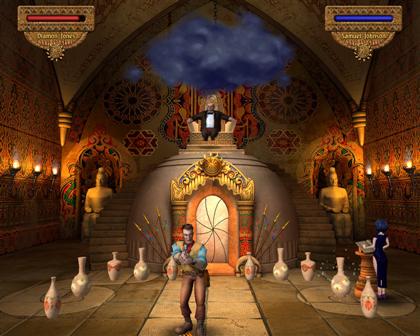
- Samuel Johnson plans to rule the world. You must stop him before the ritual is complete.
- Dodge the blue fire balls.
- When they get trapped in the vases, shoot them.
- After all the vases are gone, start shooting at Samuel Johnson.
- After he dies, the giant spirits appear and revive Diamon. They tell him they must destroy this gate to protect the world.
 Congratulations! You have successfully completed Diamon Jones: Amulet of the World!
Created at: 2009-05-12