

WALKTHROUGH MENU
- General Tips
- Chapter 1: Sunday Night
- Chapter 2: Monday Morning
- Chapter 3: Monday Afternoon
- Chapter 4: Monday Night
- Chapter 5: Tuesday Morning
- Chapter 6: Tuesday Afternoon
- Chapter 7: Tuesday Night
- Chapter 8: Wednesday Morning
- Chapter 9: Wednesday Evening
- Chapter 10: Wednesday Night
- Chapter 11: Thursday Morning
- Chapter 12: Thursday Afternoon
- Chapter 13: Thursday Night
- Chapter 14: Friday Morning
- Chapter 15: Friday Night
- Chapter 16: Saturday Morning
- Chapter 17: Saturday Afternoon
- Chapter 18: Saturday Evening
General Tips
- Dream Sleuth consists of 18 chapters. Each chapter has between 3 to 6 levels all varying in length.
- There are unlimited hints in the game but you have to wait for it to recharge before you can use it again.
- You cannot skip any of the puzzles or mini-games.
- To use a hint, click on the question mark that is located in the top right side of the scene.
- The hints can be used in some of the mini-games but not in all of them.
- Make sure that you click on everything in the scene. A lot of times objects will not be visible until you open doors, cabinets, windows etc.
- Some sparkly objects will move aside when you click on them. Sometimes they move because they have something either underneath them or behind them.
- Other times they move and you will see nothing there but that doesn’t mean that in another level there might not be something else there.
Chapter 1: Sunday Night
Level 1-1
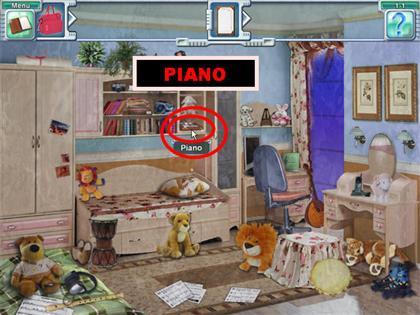
- Task: Find an object that could have a girl’s name on it.
- Click on the small door that is on the top right side of the large cabinet.
- Once the door is open, click on the small piano that is on the bottom shelf.
Level 1-2
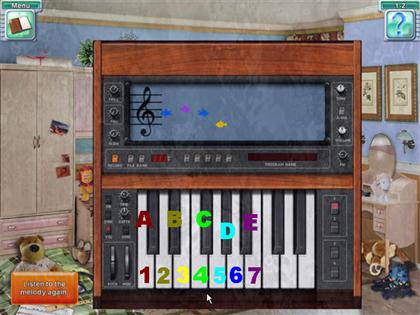
- Task: Learn the girl’s name by playing the notes indicated by the colored fish.
- Your goal in this game is to reproduce the tune that is being played.
- Watch the piano keys as the game is showing you the sequence. As the sequence is playing some colored fish will appear on the screen that is above the piano keys.
- Each fish color corresponds with the color of the keys on the piano.
- Please look at the screenshot for the way I numbered the keys on the piano The solutions are as follows:1st Solution: 6-7-6-3 2nd Solution: 6-E-6-2-3 3rd Solution: 2-6-5-3-7-6 4th Solution: 1-2-3-5-C-3-7
- Once the puzzle is complete the name “Lisa Fremont” will appear carved on top of the piano.
Chapter 2: Monday Morning
Level 2-1

- Task: Find Grandma’s business card organizer.
- Click on the blue organizer that is on the desk and it will move aside.
- Click on the calculator that was under the organizer and it will move aside as well.
- Pick up the key that appears under the paper.
- Place the key on the cabinet that is on the wall.
- Click on the left glass door for the cabinet and it will open.
- Click on the brown set of books that is on the second shelf. The books will move aside.
- Click on the business card organizer that appears behind the books. The organizer will land on the desk. Click on the organizer to end the level.
Level 2-2
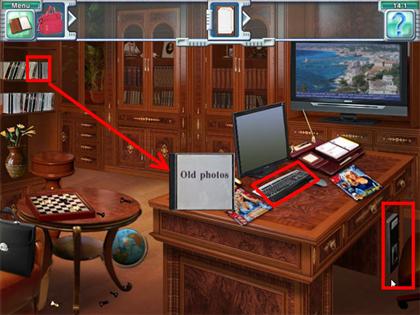
- Task: Collect the photographs scattered around the room.
- You need to find 20 photos that are scattered in this room.
- There are 14 photos on the desk. Move the items off the desk and you will find photographs under different items on the desk.
- There is one photo by the window.
- There are 3 photos by ton the bookcase.
- There are 2 more photos on the small shelf that is close to the window.
Level 2-3
- Task: Find Grandma’s photo album.
- Grab the broom that is on the lower left side of the scene and it will attach itself to your cursor.
- Place the broom on the picture that is located on top of the bookcase. Once the broom hits the picture it will fall down.
- The photo album appears behind the picture, Grab the broom again and place it on the photo album.
- The photo album will land on the desk. Click on the photo album to end the level.
Level 2-4
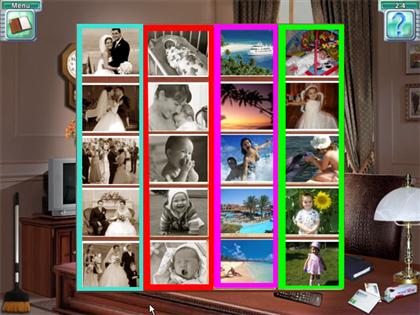
- Task: Find four photos that match the event shown in the photo at the top.
- In this mini-game your goal is to find the pictures on the scene that are related to the picture that is on top of the scene.
- Each picture has a different theme. When a certain theme is showing, you have to find the 4 pictures that relate to that picture.
- Click on each picture and look at a theme. Try to find 4 pictures that belong to that theme and click them consecutively.
- Once you find the first set of matching pictures, the next one will be revealed to you.
- Find all 4 sets to end the level. The screenshot shows you the solution for all the photos.
Chapter 3: Monday Afternoon
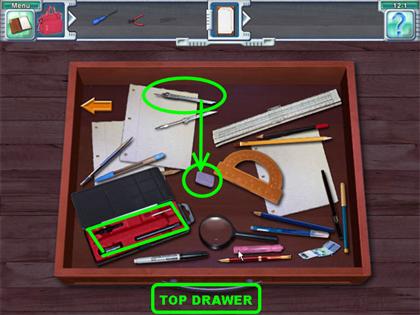
Level 3-1
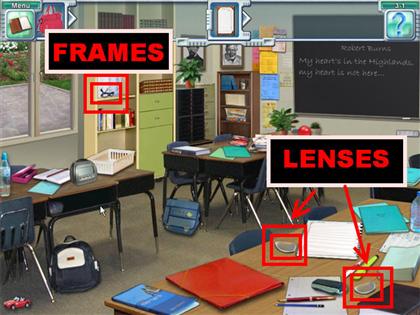
- Task: Find Mr. Carlson’s glasses.
- Click on the set of books that is on the 3rd shelf of the large bookcase closest to the window.
- The books will move aside, click on the frames that appear behind the books. The frames will land on the table.
- Click on the notebook that is next to where the frames landed on the desk. Once the notebook moves aside, drag the lens to the frames.
- Click on the big black book that is close to where the frames are and the book will move aside.
- Grab the lens that appears under the book and place the lens on the frames to end the level.
Level 3-2
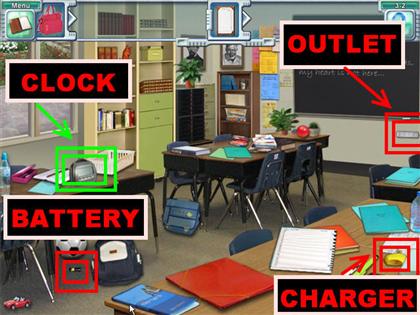
- Task: Fix the clock.
- Click on the backpack that is on the left side of the floor and it will move aside.
- Click on the soccer ball that appeared after the backpack was moved and it too will move aside.
- Pick up the battery that appears on the floor and it will be move to the desk automatically.
- Click on the battery and it will go into the inventory bar that is located on top of the scene.
- Click on the light blue book that is on the desk in the lower right side of the scene and the book will move aside.
- Pick up the yellow battery charger that appears under the book and it will go into inventory.
- From the inventory box, combine the battery and the charger, both pieces will merge.
- Place the battery charger with battery on the outlet that is below the chalkboard.
- Click on the charger and the battery will land on the desk fully charged.
- Place the battery on the clock that is on the table closest to the window to end the level.
Level 3-3

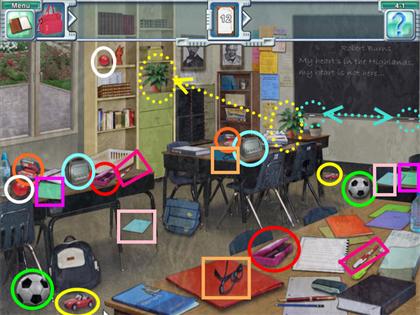
- Task: Help the teacher collect all the reports.
- There are 7 reports on the large table on the right side of the scene.
- There are 3 reports on the small table on the right side of the room.
- There are 2 reports on the table that is close to the blackboard.
- One report is on the floor, next to the blue bag.
- Move the basket that is on the table closest to the window and you will find 2 reports on the bottom shelf.
- There is one report on the table by the window.
- Make sure you move items out of the way to find all the reports.
Level 3-4
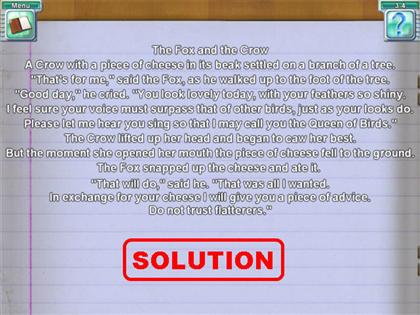
- Task: Move the lines of the fable around so they are in the proper order.
- Click on any 2 lines and they will swap positions.
- The solution is:The Fox and the Crow A Crow with a piece of cheese in its beak settled on a branch of a tree. “That’s for me, said the Fox, as he walked up to the foot of the tree. “Goodday,” he cried. “You look lovely today, with your feathers so shiny. I feel sure your voice must surpass that f the other birds, just as your looks do. Please let me hear you sing so that I may call you the Queen of Birds.” The Crow lifted up her head and began to caw her best. But the moment she opened her mouth the piece of cheese fell to the ground. The Fox snapped up the cheese and ate it. “That will do”, said he. “That was all I wanted. In exchange for your cheese I will give you a piece of advice. Do not trust flatterers.”
Chapter 4: Monday Night
Level 4-1
- Task: Remove all the pairs of objects by clicking on both of them.
- Click on two pieces that are alike and they will be removed from the scene.
- Collect all the pairs to win the level.
- If you get stuck and can’t find a pair use one of your hints to help you locate it.
- You can look at the screenshot for the solution as well. All the pairs have been highlighted in matching colors.
Level 4-2
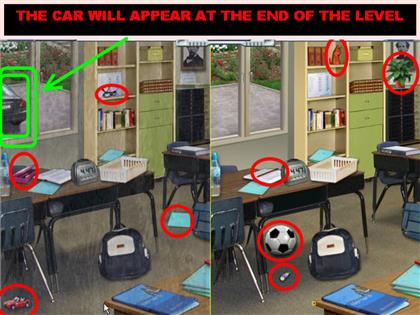
- Task: Find all the differences between the 2 classrooms.
- Find all the differences in the scene. Once you find your last item, a car will appear on the left window, click on it to end the level.
Level 4-3
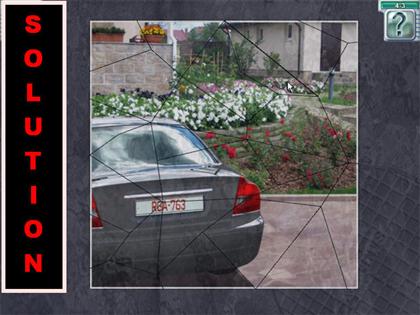
- Task: Reassemble the pieces to learn the license plate number.
- Your goal is to reassemble the picture in order to read the license plate number on the car.
- Drag 2 matching pieces together and they will lock into place regardless of where they are on the board.
- Please look at the screenshot for the solution to this puzzle.
Chapter 5: Tuesday Morning
Level 5-1
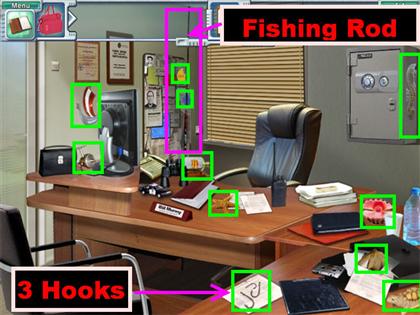
- Task: Find all sea-related objects in the sheriff’s office.
- Click on the black notebook that is on the table and it will move aside. Pick up the 3 fish hooks that are on the paper.
- Pick up the turtle, the shell and the fish head that are on the right side of the desk.
- There is a yellow and a blue fish on the wall next to the window.
- Pick up the fishing rod that is next to the window.
- Pick up the starfish, the ship in a bottle and the fishing reel that is on the left side of the desk.
- Click on the small ship that is on the wall behind the monitor.
- Pick up the seahorse that is on the upper right side of the scene.
Level 5-2
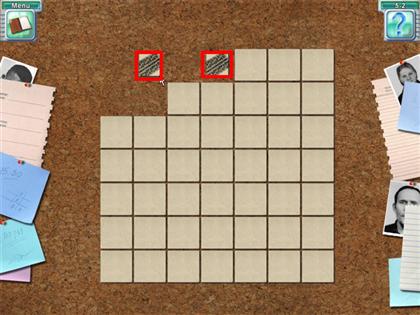
- Task: Pair up tire thread patterns until you’re left with the one that doesn’t have a match.
- This is a matching mini-game. All you have to do is match the 2 tire thread pieces that match.
- Each time you make a match those 2 pieces will disappear from the board. Clear the board to win the game.
Level 5-3
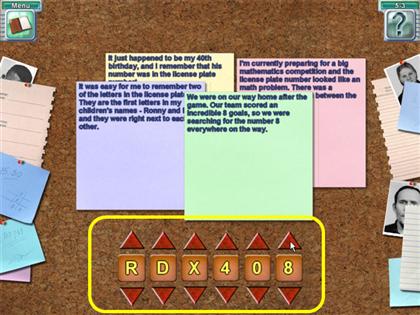
- Task: Identify the car’s license plate number based on the different testimonies.
- CLUE 1 - It was easy for me to remember two of the letters in the license plate. They are the first letters in my children’s names – Ronny and David and they were right next to each other. The answer here is “RD” for the first two letters on the number.
- CLUE 2 – It just happened to be my 40th birthday, and I remember that his number was in the license plate number!
- The answer here is “40.”
- CLUE 3 – I’m currently preparing for a big mathematics competition and the license plate number looked like a math problem. There was a multiplication symbol between the numbers and letters. The answer here is “X.”
- Clue 4 – We were on our way home after the game. Our team scored an incredible 8 goals, so we were searching for the number 8 everywhere on the way. The answer here is “8.”
- Click on the arrows above the numbers to change the numbers in each section.
- The solution is : R D X 4 0 8
Level 5-4
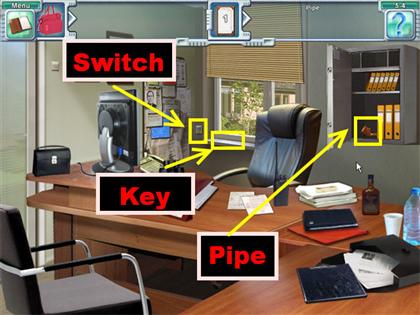
- Task: Check to see if the sheriff left his pipe in the room.
- Click on the switch on the wall that is on the lower left side of the window and the blinds will open up.
- Pick up the keys that appear on the window sill once the blinds are open.
- Place the key on the safe located on the left side of the wall and the safe will open.
- Click on the liquor bottle to move it aside. Pick up the pipe that was behind the bottle.
- The pipe will land on the desk, click on the pipe to end the level.
Chapter 6: Tuesday Afternoon
Level 6-1
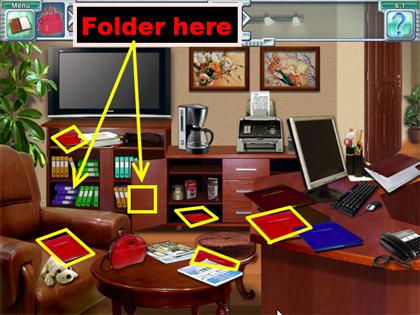
- Task: Find all the red folders for Mr. Rosenfeld.
- There is one folder on the desk.
- Click on the cabinet that is below the coffee maker and you will find a folder at the bottom.
- Close the cabinet door and move the yellow binders out of the way until you see the red folder.
- Move the red bag and the stuffed animal from the chair and you will find a red folder.
- There is a folder on the cabinet that is below the TV.
- Move the magazines on the coffee table and pick up the red folder.
- Move the blue binders that are in the lower left side cabinet that is below the TV and click on the red folder.
Level 6-2
- Task: Make some coffee.
- Click on the sparkly cabinet that is below the coffee machine.
- Once the cabinet is open, pick up the coffee that is inside and place it on the coffee machine. There are 2 coffee bags in the cabinet, either one will work.
- Pick up the water bottle that is next to the fax machine.
- Click the water bottle onto the coffee machine so it can fill with water.
- Place the coffee pot on the coffee machine.
- Turn the coffee machine on by clicking on the button that is on the side of the coffee machine.
- Click on the coffee cup that is inside of the cabinet and it will land on the small round coffee table.
- Grab the coffee pot and place it on the cup to end the level.
Level 6-3
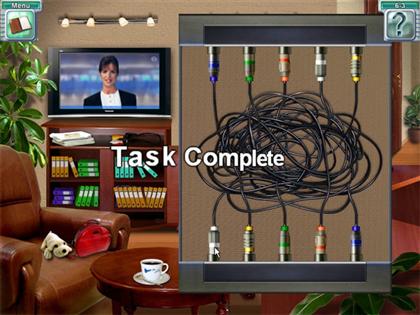
- Task: Reconnect the bottom cables until the TV signal comes in clearly.
- Your goal in this mini-game is to place the wires in the right order until you can get a clear view on the channel.
- Click on any 2 cables and they will swap places. Each time you switch cables, look at the TV’s reception to see if the picture is clearer.
- Keep switching around the cables until the TV becomes completely clear of snow.
- There is more than one solution for this puzzle; here are 2 of the solutions.
- Solution: Orange, yellow, blue, green and white.
- Alternate Solution: White, yellow, green, orange and blue.
Level 6-4
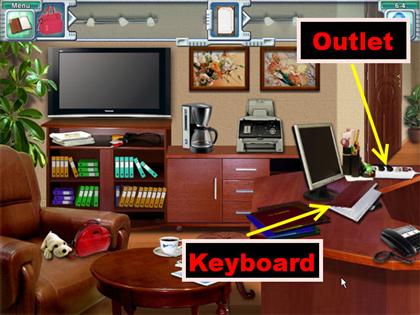
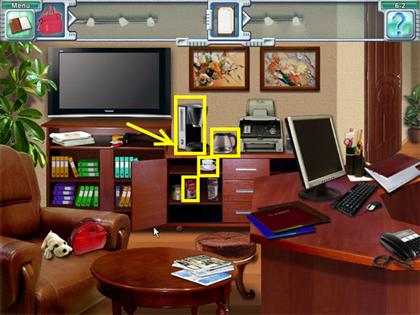
- Task: Figure out how to turn on the secretary’s computer.
- Click on the stack of folders that is on the right side of the monitor. You will find a power outlet underneath the folders.
- Click on the outlet to turn the power on for the computer.
- Click on the folders again because now they are covering up the keyboard. This action will make the keyboard visible again.
- Click on the keyboard to turn on the picture on the monitor.
Level 6-5
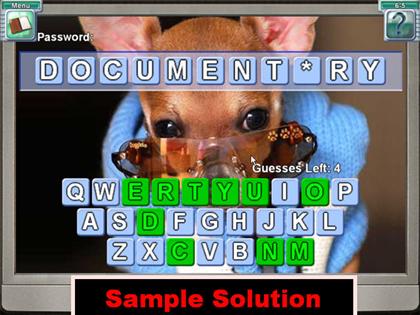
- Task: Figure out the password.
- Your goal is to figure out the password by guessing the right letters. You can only have 4 incorrect guesses or you will lose the round. If that happens, you will be given a new word to guess.
- Click on the keys of the keyboard at the bottom of the scene.
- Each time you click on a letter you will know whether it is part of the password or not.
- If the letter is part of the password, it will appear on the tiles on top of the page.
- If the letter is not in the password, you will lose one of your turns.
- You can use the hint button to help you solve the puzzle. When you use it, it will illuminate one of the letters in the solution.
- The solutions are random but here are a few of the words I came across while playing:ANCHORMAN DOCUMENTARY ENTERTAINMENT JOURNALIST REPORTER TELEVISION
Chapter 7: Tuesday Night
Level 7-1
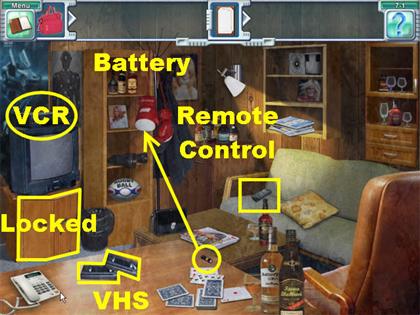
- Task: Find out who lives here.
- Click on the red boxing gloves that are on the left side of the scene. The boxing gloves will swing to the side.
- Click on the battery that is on the shelf before the boxing gloves go back to their original position. The battery will land on the desk.
- Click on the pillow that is on the couch and it will move aside. Click the remote control that appears under the pillow. The remote control will land on the table next to the battery.
- Combine the battery and the remote control and the remote control will be functional.
- Click the remote control onto the television and it will turn on the TV.
- Grab the two VHS tapes that are on the table and place them in the VCR one at a time.
- Once you pick up the second VHS tape, a key will appear on the table where the tapes used to be.
- Use the keys to open the locked cabinet that is under the television. The keys will unlock the cabinet.
- Click on the cabinet doors to open them. Place the VHS tape that appear inside the cabinet into the VCR to end the level.
Level 7-2
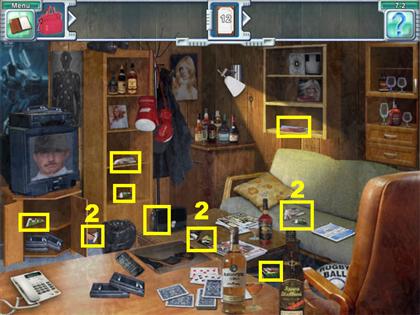
- Task: Collect pieces of the photograph.
- Move the liquor bottle off the table and pick up the piece that is on the floor.
- Move the pillow off the couch and pick up the 2 pieces that appear on the couch.
- Click on the cabinet door that is under the TV and pick up the piece of the photograph.
- Move the trashcan aside that is next to the TV and pick up the 2 pieces of paper on the floor. If the cabinet door is open, close it to get the other piece of paper.
- Move the magazine on the coffee table ad pick up the 2 pieces on the table.
- Click on the rugby ball and the picture that are at the bottom of the large cabinet next to the TV. Pick up the paper that is behind those items.
- Move aside the black bag that is on the floor next to the trashcan and pick up the paper that is on the floor.
- Click on the binoculars that are on the third shelf of the large cabinet that is next to the TV. Pick up the piece that is on the shelf.
- Click on the two magazines that are on the shelf on the right side of the room, pick up the piece that is on the shelf.
Level 7-3
- Task: Put the photograph back together.
- Your goal is to assemble the picture correctly.
- Click on a square and the spaces that you can move it to will light up. Choose the spot that you would like that square to go to.
- Repeat the same process until all the pictures are back in place according to the screenshot.
Chapter 8: Wednesday Morning
Level 8-1
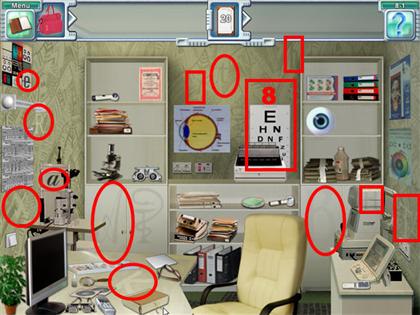
- Task: Find all the letters in the doctor’s office.
- There are 8 letters on the eye chart that is on the back wall.
- Move the book aside that is on the table and you will see a letter “K” on the table.
- Click on the light switch that is on the left side of the wall to turn off the lights.
- Click on the letters that appear on the wall.
- Please look at the screenshot for the location of the rest of the letters.
Level 8-2

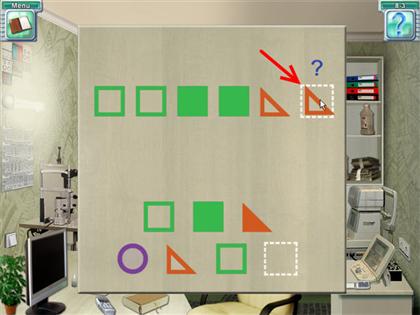
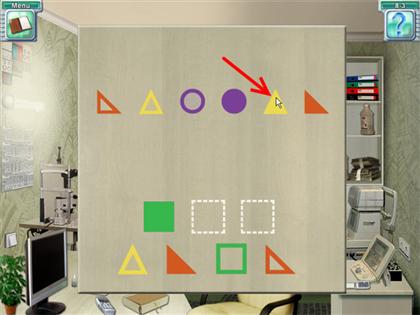
- Task: Find all the triangles and stars in the doctor’s office.
- Please look at the screenshot for the locations of all the stars and triangles.
Level 8-3
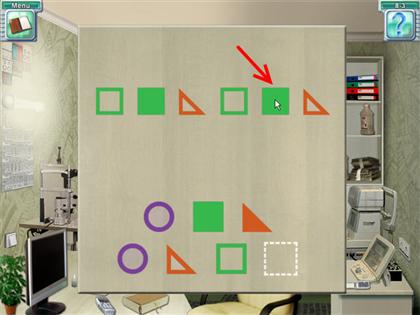
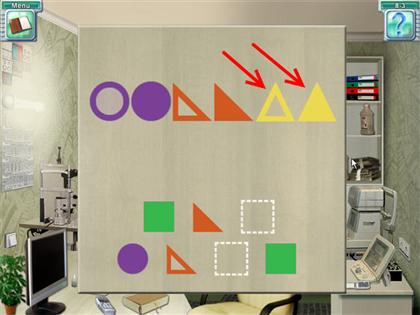
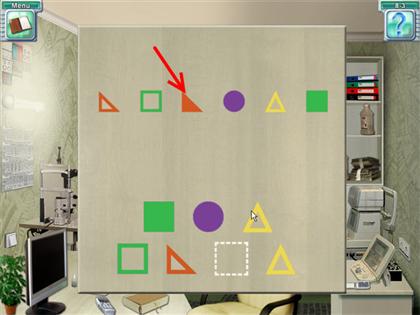
- Task: Complete the sequences using the colored figures beneath the sequence.
- Look at the geometrical shapes that are shown to you in each section.
- Fill in the blank by choosing one of the shapes at the bottom of the page.
- If your choice is correct, the shapes will pulsate and you will be given a new choice.
- If your choice is incorrect, simply choose a new shape and put it over the one you want to change.
- Complete 4 correct sequences to win the game.
Chapter 9: Wednesday Evening
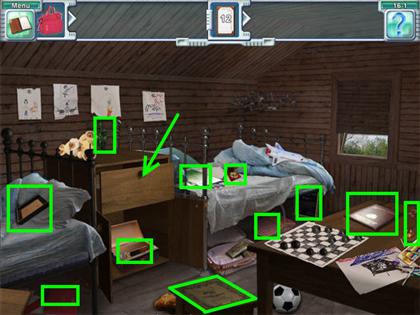
Level 9-1

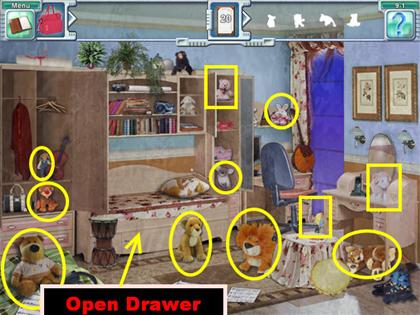
- Task: Collect Lisa’s toys by taking the objects that appear in the box at the top of the screen.
- Your goal in this task is to find the items in silhouette on top of the page in the main scene.
- Make sure that you open all the doors and move chairs and things out of the way. Click on the drawer that is under the bed, you will find 2 items that you need in there.
- You cannot click on items until they show up on the silhouettes.
- Please look at the screenshot for the solution.
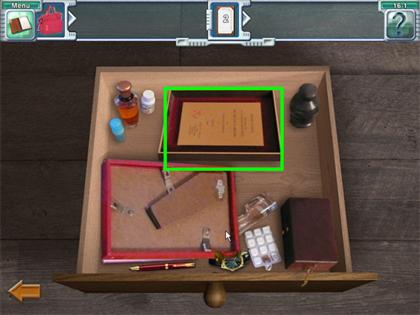
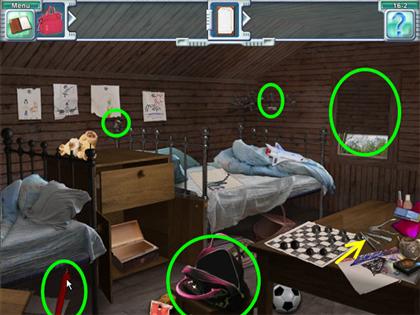
Level 9-2
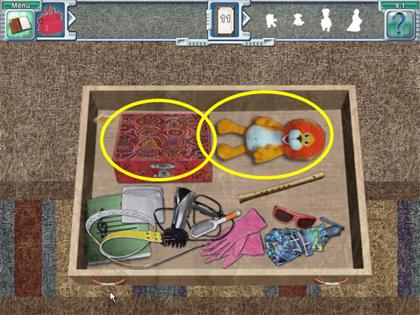
- Task: Find the lacquer box.
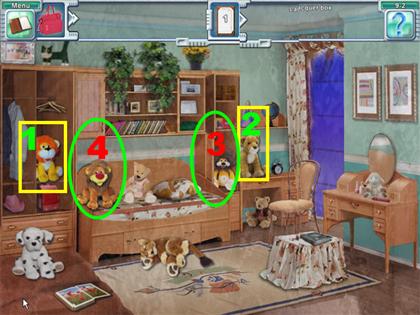
- Your goal in this task is to find the lacquer box that is n the drawer that the animal is blocking.
- You have to swap stuffed animals in the scene with each other until one of the animals lets you in the drawer to retrieve the lacquer box.
- Click on the cabinet door on the left side of the room and a stuffed lion will be inside.
- Place the lion over the sleeping cub that is on the floor.
- Place the lion that is on the right side of the room onto the lion that is on the floor.
- Click on the cabinet door that is on the right side of the cabinet and grab the lion that is inside. Place that lion over the one on the floor.
- Close the cabinet door that is on the left side and another lion will be on the bed. Place that lion over the one that is on the floor.
- Simply click on the last lion and it will move aside.
- Click on the drawer and it will open. Click on the drawer again and you will get a closer view of it.
- Click on the blue lacquer box that is inside the drawer to end the level.
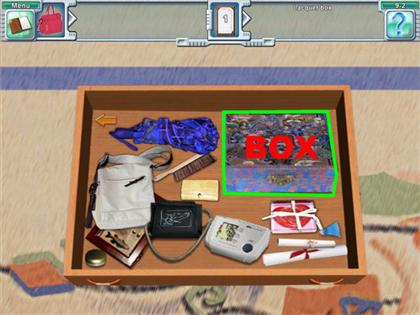
Level 9-3
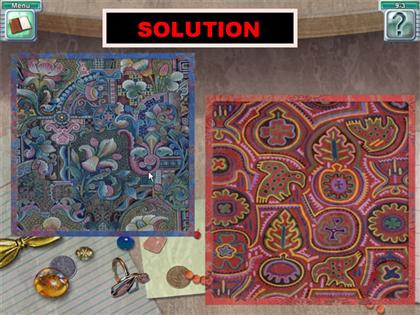
- Task: Open the boxes
- Click on one of the boxes and you will be able to see the pattern for both boxes up close.
- Your goal is to rotate the pieces around until you have the right design on both boxes.
- To rotate the pieces simply click on them. Stop clicking on the square once you have the design you need.
- Once both boxes have been set correctly the boxes will open.
Chapter 10: Wednesday Night
Level 10-1
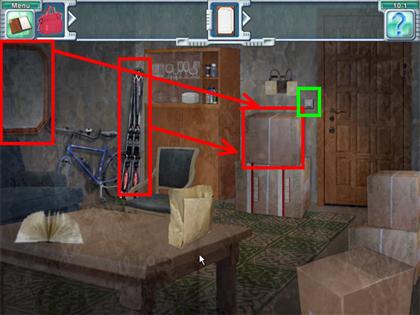
- Task: Find an object that helps determine Lisa’s location.
- Click on the box that is close to the door. You want to click on the box that is stacked on top of the other and the box will fall to the ground.
- Click on the skis that are on the left side of the room. You have to click on them twice and they will form the shape of an “X” in front of the bicycle.
- Place the skis on the box that is close to the door. The skis will barricade the door.
- Click on the skis again and they will move the box and then fall on the ground.
- Grab the mirror that is on the wall and place it behind the box.
- Click on the light switch that is by the door. You will now be able to read the address on the box.
Level 10-2
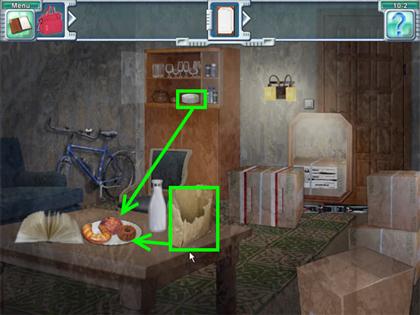
- Task: Find an object that will help locate the address of the bakery.
- Click on the grocery bag that is on the table and part of the bag will tear off.
- Click on the glass panel that is above the cabinet and the glass panel will slide open.
- There is a stack of dishes inside the cabinet. Click on the top plate and it will go on the table.
- Grab the pastries from the paper bag and place all 3 of them on the plate.
- Click on the bottle of milk that is inside of the bag and it will land on the table.
- Click on the empty paper bag and you will be able to see the receipt at the bottom of the bag.
Level 10-3

- Task: Find the objects Lisa plays tunes on.
- Click on the glass panel that is above the cabinet and the glass panel will slide open.
- Click on the 2 glasses that are inside the cabinet and 1 of them will land on the table and the other will be suspended in the air. Click on the glass that is suspended in air and it will be taken off the list.
- Place the milk bottle on the empty glass that is on the table and part of the milk will be transferred to the glass.
- Grab the other glass that is inside of the cabinet. Place the rest of the milk on the second glass and the bottle will now be empty.
- Click on the empty milk bottle and it will be suspended in air. Click on the bottle to take an item off the list.
- Click on the box that is close to the door and a frying pan will appear. Click on the frying pan and it will be suspended in air. Click on the frying pan to take it off your list.
- Open the doors at the bottom of the cabinet. Click on the lid and the pot that is on the top shelf. They will both be suspended on the page. Click on both items to take them off the list.
- Click on the box that is on the lower right side of the scene and the box will open. Click on the top board that is inside and it will move aside. Click on the whistle that appears underneath the board and it will be suspended on the page, click on it to eliminate it from the list.
- Click on the bell that is on the handles of the bicycle and the bell will be suspended in air. Click on the bell to eliminate the last item off your list.
Level 10-4
- Task: Find out what is written on the receipt by playing the melody that appears on the receipt, using the different objects that you have found.
- When you click on each item on the scene it lights up in a particular color. Your goal is to reproduce the sequences shown on the receipt.
- You will have to reproduce 4 sequences in total. If you make a mistake with the sequence you will have to start that one over again.
- Here are the solutions for all the sequences in this section:Solution 1: Lid, milk bottle, wine glass, whistle, bell, wine glass, frying pan. Solution 2: Milk bottle, lid, milk bottle, wine glass, milk bottle, frying pan, pot. Solution 3: Whistle, wine glass, bell, milk bottle, wine glass, lid, milk bottle, frying pan. Solution 4: Frying pan, wine glass, lid, pot, milk bottle, bell, wine glass, lid.
Chapter 11: Thursday Morning
Level 11-1
- Task: Help the sales lady clean up the mess and put away her fresh pastries on the trays.
- Grab the pastries that are on the right side of the kitchen and place them on the trays that are on the left side of the scene.
- The bagels, danishes and crosissants go on the tray that is against the wall on the left side of the kitchen.
- The loaves of bread go on the tray that is close to the window.
- Place all the pastries in the appropriate trays.
- Click on the toy truck that is on the floor and the truck will move to the lower left side of the scene.
- Click on the 4 colored blocks that are on the floor and each block will automatically load itself onto the toy truck.
- Click on the trash can that is under the table on the right side of the scene, and it will move out to the floor.
- Grab the paper bag that is on the left side of the floor and place it in the trash can.
- Grab the dust broom and dust pan that is under the table on the right side of the scene.
- Place the dust broom on the dirt that is on the left side of the floor. The dust broom will sweep all the dirt onto a pile on the floor.
- Place the dust pan next to the mound of dirt. Place the dust broom on the mound of dirt and it will load all the dirt onto the dust pan.
- Grab the dust pan full of dirt and place it on the trash can. All the dirt will go inside of the trash can.
Level 11-2
- Task: Mix the flour, milk, eggs, cocoa powder and honey and bake the cake.
- All the ingredients you need will be on the right side of the scene. You have to follow the instructions in the order shown if you want to complete this task.
- Place the flour in the baking pan that is on the table. Once you’re done with the flour put it back where you found it.
- Place the eggs in the baking pan.
- Place the milk in the baking pan.
- Grab the jar of honey from the middle shelf and place it on the baking pan. Put the honey back where you found it.
- Put the cocoa powder in the baking pan. Put the cocoa powder back where you found it.
- Click on the oven door to open it. Place the cake inside of the oven and the door will shut automatically.
- Turn on the oven by clicking on the knob that is on the top left side of the stove.
- Click on the oven door to open it.
- Grab the potholder that is on the bottom shelf of the table and place it on the cake that is inside of the oven.
Level 11-3
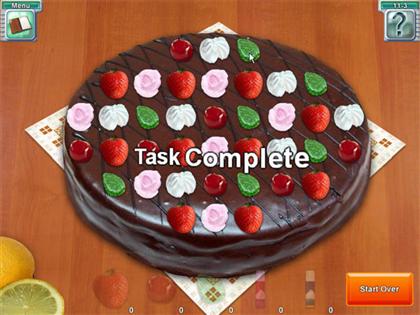
- Task: Decorate the cake making sure no two identical decorations are next to each other.
- Use the decorations on top of the cake. Make sure that the same decoration is not next to each other.
- Each decoration has a number of portions. Those portions are identified by the numbers that you see next to each decoration.
- You can use the same decoration several times in a row without having to pick up the decoration more than once. As long as the decoration is on your cursor click it onto as many spots as you can.
- Each time you place a decoration you will see some markings on the cake. If the square disappears then the decoration is in the right place. If you see a red mark, then you made a mistake.
- You can only place a decoration on one of the marked spots. If you make a mistake you can click on the “Start Over” button in the lower right side of the scene.
- I will write down the solutions starting from the top row and ending at the bottom row.
- Pink is for pink whipped cream.
- Blue is for blue whipped cream.
- Green is for the green gum drop.1st row: cherry, blue, green. 2nd row: strawberry, pink, strawberry, pink, strawberry, blue, green. 3rd row: pink, blue, green, blue, cherry, green, pink, strawberry, blue. 4th row: cherry, strawberry, cherry, strawberry, pink, strawberry, blue, green, cherry. 5th row: green, pink, blue, cherry, green, cherry, strawberry. 6th row: strawberry, pink, strawberry.
Chapter 12: Thursday Afternoon
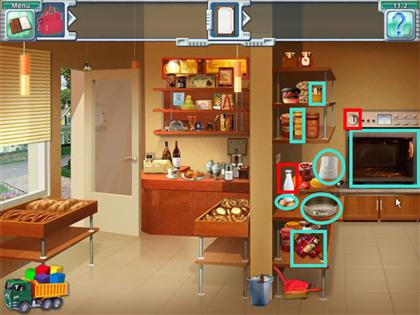
Level 12- 1
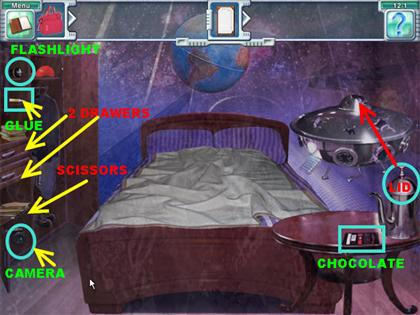

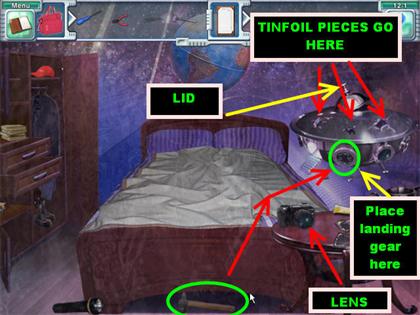
- Task: Fix the UFO
- Click on the cabinet door that is on the top left side of the scene. Click on the flashlight that appears in the cabinet. The flashlight will land by the foot of the bed.
- Click on the flashlight and you will be able to look under the bed. Once you click on the flashlight, you will be automatically taken to a closer view under the bed.
- You will only have the spotlight to see under the bed. Click on the box that is in the lower center of the scene and it will move aside.
- Click on the 2 roller skates that are on the lower center of the scene and it will move aside as well.
- Grab the hammer that appears on the floor.
- Click on the flashlight again and you will be taken back to the main scene.
- Pick up the tube of glue that is on the top left side of the scene. The glue will land on the round table on the right side of the room.
- Click on the folders that are on the lower left side of the cabinet. Click on the scissors that appear once the folders move aside. The scissors will land on the table.
- Click on the very last door on the left side of the cabinet. Inside of it you will find a camera, click on the camera and it will land on the table.
- Grab the lid that is on the coffee pot and place it on top of the UFO.
- Click on the wrapped chocolate bar that is on the table and the chocolate will be unwrapped. Click on the chocolate bar and the chocolate bar will move to the side of the table, leaving the tin foil by itself.
- Place the scissors on the tinfoil and it will cut the foil in 3 pieces.
- Click the glue onto all 3 pieces of tinfoil.
- Place the sticky tinfoil on the 3 holes that are on top of the UFO.
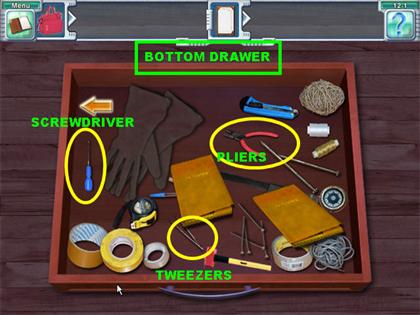
- Click on the bottom drawer that is on the left side of the scene and it will open. Click on the inside of the drawer and you will be taken to a closer view of the drawer.
- Move the brown glove that is inside the drawer. Double-click on the screwdriver that appears under the glove and it will go into inventory.
- Click on the yellow notebook that is in the same drawer. Double-click on the tweezers that appear under the notebook and it will go into inventory.
- Click on the other yellow notebook and you will find a pair of pliers inside. Place the pliers in inventory for now. Exit out of the drawer.
- Click on the top drawer that is on the left side of the scene. Click on the drawers a second time and you will be able to look inside of it.
- Click on the black box that is inside the drawer and the black box will open up. Click on the compass that is inside the case and the compass will move to another part of the drawer.
- Grab the screwdriver from inventory and place it on the compass, this will separate the compass into 2 pieces.
- Click on the protractor and it will move to the side, exposing a small purple plastic piece.
- Place the half of the compass that you can pick up on the blue plastic piece. The 2 pieces will merge forming a landing gear for a UFO. Grab that piece and place it in your inventory bar on top of the page.
- Exit of the drawer to go back to the room.
- Grab the hammer that is at the foot of the bed and place it on the broken mirror that is on the side of the UFO. The hammer will break off the shard pieces that were on the window.
- Take the screwdriver from inventory and place it on the lens of the camera that is on the table. The lens will land on the table.
- Place the lens on the side of the UFO, in the same place where the broken glass was located. The lens will fall right below the area where the mirror was.
- Place the tweezers on the lens and the lens will go back in the hole where the mirror was originally located.
- Place the hammer on the lid that is on top of the UFO and the lid will now fit correctly on the UFO.
- Grab the pliers from inventory and place them over the broken UFO landing gear that is under the UFO. The pliers will break off the piece that was hanging.
- Grab the UFO landing gear that is in inventory and place it on the landing gear under the UFO. Place the pliers on the landing gear to straighten it up.
Level 12-2
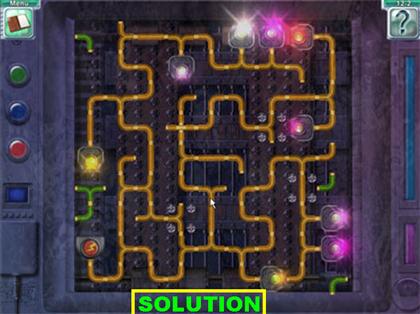
- Task: Supply electricity to all the batteries on the flying saucer.
- Your goal in this task is to light up all the batteries on the flying saucer by rotating the wires in the right manner.
- Click on the wires in order to rotate them.
- You do not have to connect all the wires in order to solve this puzzle.
- Please look at the screenshot for the solution to this puzzle.
Level 12-3
- Task: Find all the aliens.
- Click on the top drawer that is on the left side of the scene. Click on the drawer one more time to get a closer look.
- Click on the black box and it move aside. Click on the alien that appears underneath.
- Click on the bottom drawer that is on the left side of the scene. Click on the drawer one more time to get a closer look.
- Click on the brown glove and it move aside. Click on the alien that appears underneath.
- Click on the mattress two times and you will find 2 aliens under the sheets.
- Click on the cabinet door that is on the left side of the room, move the coats aside and you will find another alien.
- Close the cabinet door, move the guitar out of the way and you will find one more alien that needs to be lured in order to come out.
- Grab the chocolate bar that is on the table and place it on the table that is next to the alien. The alien will come out of hiding, click on him then.
- Look under the bed, click on the box that is in the lower center of the scene. Once the box moves aside the alien will appear.
Chapter 13: Thursday Night
Level 13-1
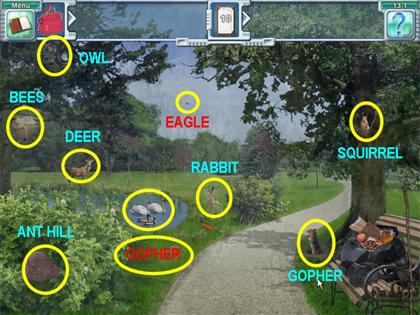
- Task: Take 10 good animal photos.
- The goal here is to take 10 pictures of the animals that are in the scene. Some animals will be out in the open and others have to be coaxed out of their hiding places.
- Each time you take a picture, the photo will appear on the screen, click on the photo to eliminate that item off your list.
- Grab the camera that is on the bench and click it onto the deer that is on the left side of the field. The camera will take a picture of the door which will appear in the middle of the scene. Click on the picture to eliminate one of the items from your list.
- Grab the camera and take a picture of the eagle in the sky.
- Pick up the stick that is on the left side of the ground. Once you click on it, the stick will land on the lower right side of the scene.
- Grab the stick and place it on the bushes that are on the left side of the scene. An ant hill will be behind those bushes. Take a picture of the ant hill.
- Grab the stick and place it on the hole in the ground that is in front of the tree on the right. A gopher will come out of the hole. Take a picture of it.
- Pick up the stick and place it on the beehive that is on the left side of the scene. Take a picture of the bees around the beehive.
- Grab a nut from the bag that is on the bench and give it to the squirrel that is in the hole of the tree on the right. Once the squirrel comes out of the hole, take a picture of it.
- Take a picture of the owl that is on the top left side of the scene.
- Give the apple to the hedgehog that is on the lower left side of the grass and it will come out to the path. Take a picture of it once it is on the path.
- Take the carrot out of the bag that is o the bench and place it on the rabbit that is hiding in the grass. Once the rabbit comes out, take a picture of it.
- Take the loaf of bread and place it on the edge of the water and the ducks and swans will swim out to eat it. Take a picture of them once they come out.
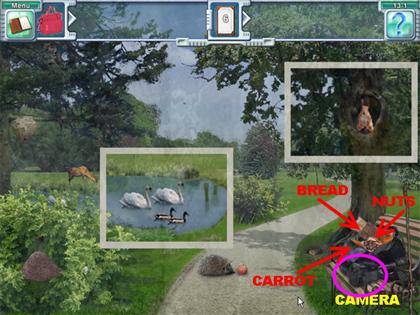
Level 13-2
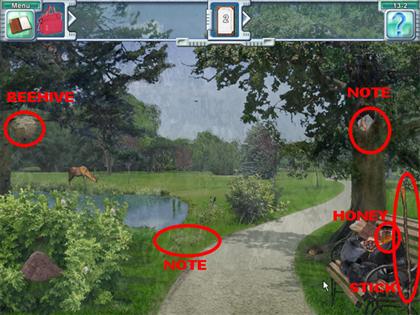
- Task: Find both parts of the note.
- Grab the stick and place it in the jar of honey that is on the bench.
- Place the stick with honey on the beehive.
- The bees will come out of their hive and will head towards the stick with honey.
- Place the stick with the honey and the bees on the squirrel that is inside the tree. The bees will chase the squirrel away. Grab the note that is inside of the tree.
- Click on the grassy area that is south of the water and the last part of the note will be under the grass. Click on the note to end the level.
Level 13-3
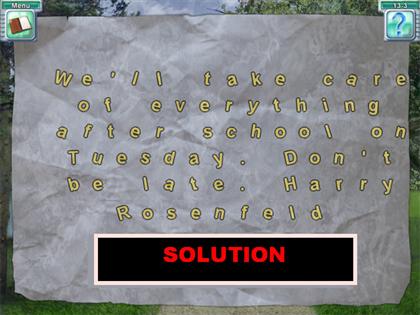
- Task: Decode the note.
- Your goal is to unscramble the letters so you can read what is on the note. Keep in mind that the punctuation marks can be moved as well as the letters.
- Click on two letters or symbols that are in the same group and they will swap places.
- This is the solution:“We’ll take care of everything after school on Tuesday. Don’t be late. Harry Rosenfeld”
Chapter 14: Friday Morning
Level 14-1
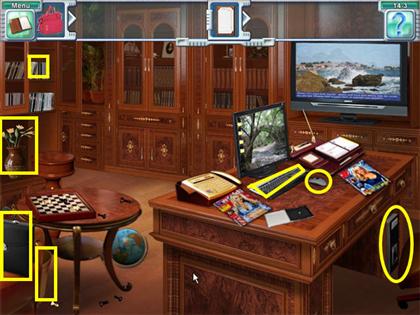
- Task: Find evidence of Mr. Rosenfeld’s involvement in Lisa’s kidnapping.
- Click on the magazines that are on the desk and they will move aside. Click on the keyboard that appears underneath the magazines and the computer will turn itself on.
- Click on the glass doors that are on the left side of the scene. Once the doors open all the pieces on the chessboard ad a few other items will fall to the ground.
- Click on the right side of the open cabinets until a CD lands on the desk.
- Click on the CD case while it is on the desk and the case will open.
- Click on the chair that is behind the desk and it will move side revealing a computer tower.
- Grab the CD from the desk and place it in the tower.
Level 14-2
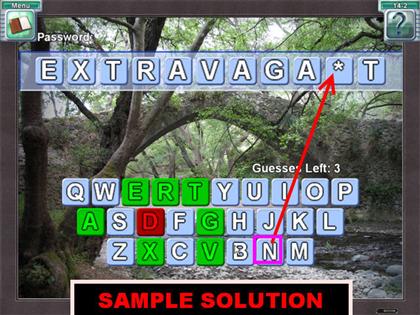
- Task: Figure out the password for the computer.
- Your goal is to figure out the password by guessing the right letters. You can only have 4 incorrect guesses or you will lose the round. If that happens, you will be given a new word to guess.
- Click on the keys of the keyboard at the bottom of the scene.
- Each time you click on a letter you will know whether it is part of the password or not.
- If the letter is part of the password, it will appear on the tiles on top of the page.
- If the letter is not in the password, you will lose one of your turns.
- You can use the hint button to help you solve the puzzle. When you use it, it will illuminate one of the letters in the solution.
- The solutions are random but here are a few of the words I came across while playing:BUSINESSPERSON EXTRAVAGANT INDUSTRIALIST INFLUENTIAL LUXURIOUS PRETENTIOUS PROSPEROUS
Level 14-3
- Task: View the photos on the CD and put everything back where it was.
- Click on the computer mouse that is on the desk several times and you will be able to view the photos. The photos will automatically stop scrolling once you find the picture of Mr. Rosenfeld.
- Click on the computer tower and the CD will go back in the case on top of the desk. Click on the CD again and the case will close.
- Put the CD back in the cabinet on the left side of the scene. The CD goes on the shelf that is behind the open glass door. Click on the glass door to close it.
- Click on the keyboard to turn off the computer. Click on all the magazines that are on the desk until they cover up the keyboard completely.
- Click on all the chess pieces that are on the floor and they will go back on the chessboard. Once the pieces are on the chessboard, click on all of them until they go back into place.
- Click on the briefcase that is on the lower left side of the scene. The briefcase will go on the ground.
- Click on the magazine that was under the briefcase and you will find a chess piece underneath it. Click on the chess piece and it will go back on the board.
- Click on the globe that is on the floor and it will go back on the small table.
- Pick up the chess piece that was under the globe and it will go back on the chessboard.
- Click on the chair that is behind the desk and it will go back into place.
- Click on the flower vase that is on the left side of the scene. The flower vase will dump some flowers and a chess piece on the table. Click on the chess piece and it will go back on the board.
- Click on the flowers 2 times and then drag them back to the vase.
- Click on the trashcan that is under the round table and it will come out in front of the table.
- Click on the trashcan again and you will be able to see inside of it. Click on the inside view of the trashcan and a chess piece will come out of it and land on the chessboard.
- Click on the trashcan to put it back in its place.
- Click on the briefcase and it will go back on the chair.
Chapter 15: Friday Night
Level 15-1
- Task: Continue your investigation.
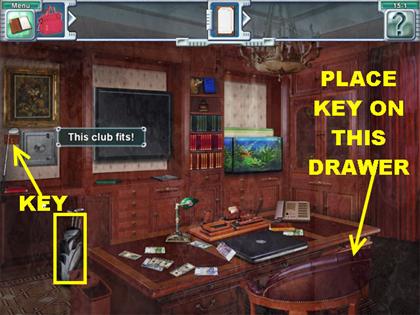
- Click on the portrait that is on the left side of the wall and it will reveal a safe underneath it.
- Click on the door of the cabinet that is below the safe and you will see a golf bag with some golf clubs inside of it.
- Click on the golf bag and it will come outside of the cabinet. There are 3 golf clubs in the bag, all of them have different lengths.
- Grab the gold clubs and place them underneath the portrait. When you find the right one, it will hold the picture up.
- Click on the key that appears on the red stripe that is on the wall next to the safe. The key will land on the table.
- Grab the key and place it on the safe. Move the chair from behind the desk and place the key on the second drawer on the right side.
- Click on all the items that come out of the drawer. The last book to come out of the drawer will land on top of all the other papers. Click on that book and it will open.
- Keep flipping the pages of the book and it will tell you that the code to the safe is the sum of all the marked banknotes.
Level 15-2
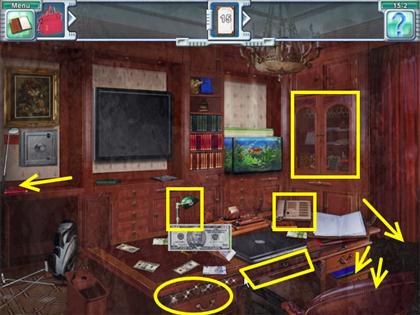
- Task: Find all the marked banknotes.
- Click on all the bank notes that you find on the desk. The ones that are marked will stay up on the screen, when this happens click on them to take them off your list.
- There are several drawers on the desk, you need to use the key to unlock the drawers. The keys will be on the desk. As you open each drawer click on the bank notes and the keys that appears inside of them.
- Use the keys to open the rest of the drawers on the desk.
- Pull the chair out, there is a banknote on the floor.
- Move the red notebook that is below the safe and you will find a banknote underneath.
- Move the lamp on the desk and you will find a banknote.
- Move the telephone and you will find a banknote underneath there as well.
- Click on the curtains and they will open. Click on the bank note that is on the floor.
- Grab one of the keys and place them on the locked cabinet that is next to the curtains. There are 2 banknotes inside of the glass cabinets.
Level 15-3
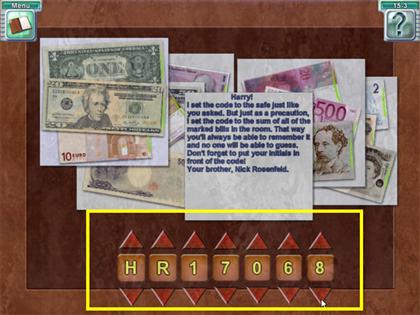
- Task: Figure out the combination and open the safe box.
- In order to figure out the combination you have to add up the amount of all the banknotes on the puzzle and use the initials of Mr. Rosenfeld.
- The clue says: ”Harry, I set the code to the safe just like you asked. But just as a precaution, set the code to the sum of all the marked bills in the room. That way you’ll always be able to remember it and no one will be able to guess. Don’t forget to put your initials in front of the code. Your brother, Nick Rosenfeld.”
- Click on the banknotes and add up their total which is $17,068.
- Click on the arrows to enter the following combination:“H R 1 7 0 6 8”
Level 15-4
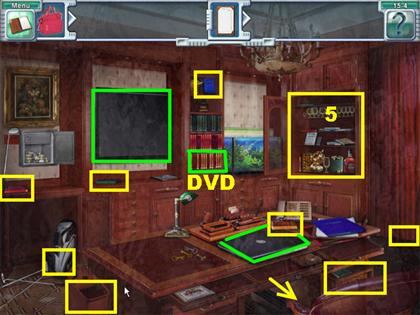
- Task: Find out what’s in the secret compartment.
- Use the keys that are on the desk on the lock that is on the top part of the safe. If one key does not fit, then try a different one.
- Click on the cipher key that appears inside of the safe. Double-click on the cipher key to place it in inventory.
- There are some other notes in the safe, click on them and they will be thrown away.
- Click on the note explaining how to use the cipher key and it will land on the desk. The note says: “The database disc is inside one of the DVD boxes. Find the title of the movie by applying the cipher key to the titles on DVD boxes.”
- Keep clicking on the notes inside of the safe. The database list will fall on the desk as soon as you click on it. The list says: “Databases: 1. Real Estate, 2. Clients, 3. Companies, 4. Partners.
- You now have to find all the DVD boxes that are in the room. Each time you click on one of them, they will go back in their matching slots.
- There is one on top of the desk.
- Two are in the right hand side of the drawer.
- One is in the floor next to the curtains.
- There are 5 of them in the cabinet that is close to the window.
- There is one below the safe, on the ledge.
- Click on the golf clubs and they will move aside. Click on the DVD that appears behind it.
- Click on the trashcan and you will find one on the floor in front of the desk.
- Pull the chair out and you will find one under the desk.
- There is one case below the plasma TV.
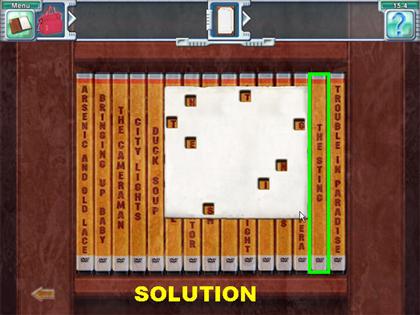
- Click on the blue book that is above the DVD cases and it will fall on the shelf below. Click on the DVD that appears behind it.
- Click on the green DVD cases and you will get a closer view.
- Grab the cipher key that is in inventory and place it over the books. Your goal is to be able to read one of the titles through all the holes in the card.
- When you place the card correctly on the yellow sets of DVDs you will be able to read the title: “The Sting.”
- Click on the card when it is in place, the DVD will go on the desk. Exit out of that scene by clicking on the arrows.
- Click on the case once it lands on desk and it will open.
- Place the DVD on the laptop and the plasma TV will show you the contents of the DVD.
Level 15-5
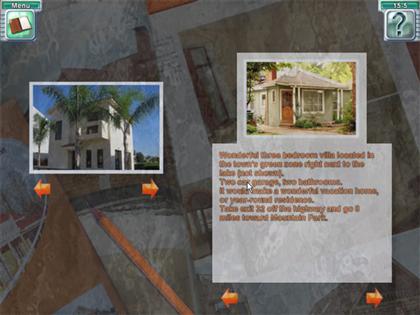
- Task: Find the address of the house where they are holding Lisa.
- Your goal is to place the pictures on the left side of the page on the page above the description for each house.
- Just drag the photo of the house over the description that you think fits it the best. If the picture is correct it will lock into place.
- If the picture is not correct, it will go back where it came from. Choose a different spot for that picture.
Chapter 16: Saturday Morning
Level 16-1
- Task: Find Grandma’s awards.
- Please look at the screenshots for the location of all the awards.
Level 16-2
- Task: Find the Silver Mic award.
- Click on the bag that is on the floor and it will open up. Click on all the items that are in the bag until the bag is completely empty. Most of the items will land on the desk.
- Pick up the tweezers that are on the desk and place them over the post that is close to the third drawing on the wall. The post will land on the desk as a microphone ball.
- Click on the umbrella that is under the left bed. Place the umbrella on the shutter that is on the right side of the room. A microphone handle will fall on the desk.
- Click on the toy soldier that is on the wall next to the window.
- Grab the wire cutters from the desk and place them over the toy soldier. You will be left with a microphone base.
- Click on the microphone base with the metal piece that us laying next to the black and white paper piece on the desk.
- Combine the microphone ball and handle that are on the desk. Combine that item with the microphone base to end the level.
Level 16-3
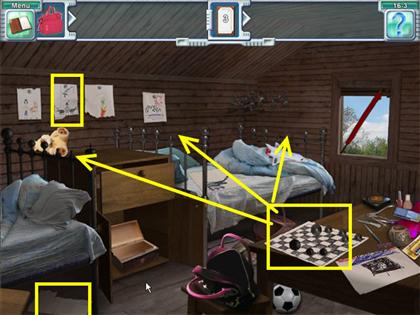
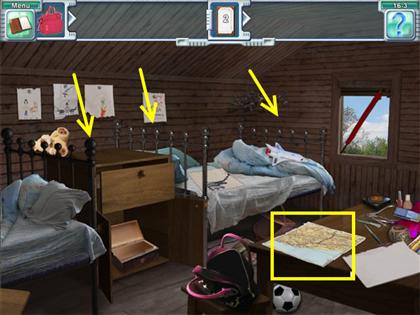
- Task: Find the map.
- Click on the box that is under the left bed. Click on the map that appears under the box. The paper moves in front of the bag, click on the piece and it will disappear off the floor.
- Click on the drawing that is on the desk and the drawing will flip over.
- Grab the balls that are on the black and white checkered paper and place them over the bed posts. The balls have to be placed in the right spot according to size and color.
- Some of the posts are gray and others are black.
- Place the small posts in the middle of the row. The large posts go on the ends of the bed posts. Keep in mind that one of the larger balls go on top of another post.
- Once all the balls are off the paper, click on the paper and it will flip over. Click on the paper again and it will disappear off the table.
- Take the tweezers and place them over the second picture that is on the back wall. The picture will fall on top of the dresser. Click on it and it will be taken off the list.
Level 16-4
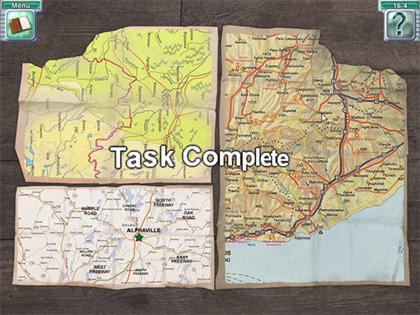
- Task: Piece the map back together.
- To reconstruct the map, click on any 2 pieces anywhere on the board and they will swap places.
- Since there are so many pieces it is best to start with the edge pieces first.
- Please look at the screenshot for the solution.
Chapter 17: Saturday Afternoon
Level 17-1
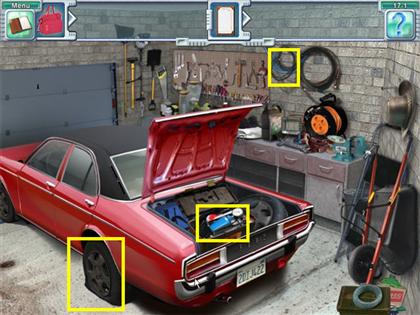
- Task: Inflate the tire.
- Click on the trunk to open it. Click on the yellow toolbox to open it. Grab the black and blue pump that is inside of the toolbox. The pump will land close to the flat tire.
- Grab the pump hose that is on the back wall and attach it to the pump.
- Place the pump hose on the tire to inflate it.
Level 17-2
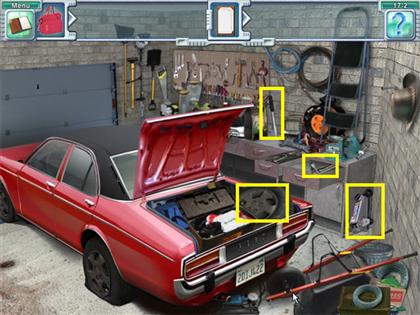
- Task: Replace the tire.
- Pick up the lug wrench that is on the right side of the wall, it is next to the cart. The lug wrench will land next to the tire.
- Click on the spare tire that is in the trunk and it will land on the floor next to the lug wrench.
- Click on the cart, the step ladder and the trashcan to move them out of the way. Pick up the jack that appears behind all those items.
- Place the jack under the car.
- Click on the bottle that is on the counter to move it aside. Pick up the jack handle that appears behind the bottle.
- Place the jack handle on the jack. Click on the handle to lift the car.
- Place the lug wrench on the wheel that is attached to the car. The wheel will come off the car.
- Put the spare tire in place of the one you just removed.
- Place the lug wrench on the lug nuts on the wheel and the wheel will be safely in place.
Level 17-3
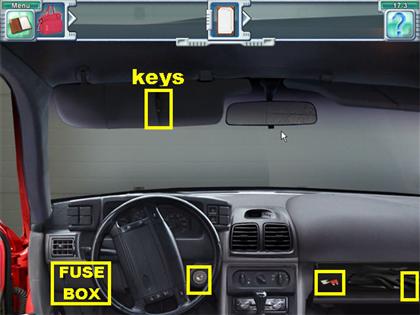
- Task: Find the spare key and start the engine.
- Click on the car door and it will open. Click on the open door to enter the car.
- Click on the left visor and it will open. Click on the keys that are tucked away inside of the visor. The keys will land on the dashboard.
- Take the keys and place them in the engine. Click on the keys to start the engine.
- You will get a message that the car is not starting to check the fuses. Click on the fuse box that is on the lower left side of the wheel.
- Click on the glove compartment and move all the items out of the way. Pick up the 2 fuses that are inside.
- Click on the bottle that is on the left side of the glove compartment to push it aside. Grab the fuse that is underneath.
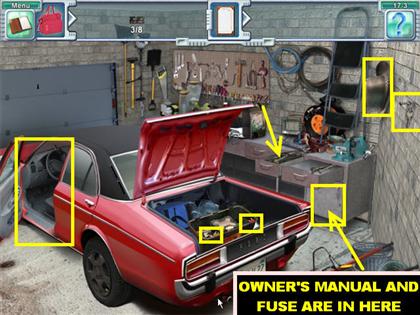
- Click on the car door to get out of the car.
- Go in the trunk of the car, click on the bag that is in the toolbox. Click on the 2 fuses that are underneath the bag.
- There is a third fuse in the toolbox but that one gets thrown on the floor when you click on it. Grab the fuse from the floor.
- Click on the middle drawer and pick up the fuse that is inside.
- Pick up the hat that is on the right side of the wall and place the hat over the hook that is close to the step ladder.
- Grab the keys that are behind the hat. Place the keys on the locked door that is underneath the last open drawer. Grab the fuse that is inside of that door.
- Go back in the car. Grab the fuses that are in inventory and place them on the fuse box that is next to the wheel.
- Click on the keys to start the car. The car will not start, the game tells you that you need to read the owner’s manual.
- Leave the car again by clicking on the door. Click on the owner’s manual that is on the lower right side of the cabinet.
Level 17-4
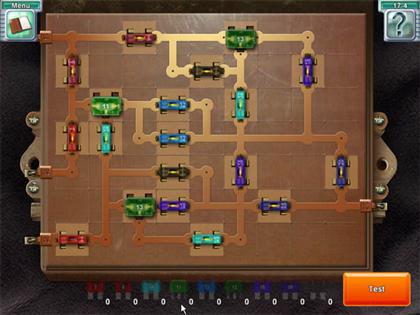
- Task: Arrange the fuses according to power value in decreasing order from right to left.
- Place the fuses on the board. Once you think you have them in the right place click on the orange test button in the lower right side of the scene.
- The correct fuses will stay locked into place. The incorrect ones will go back where they came from.
- Please look at the screenshot for the solution.
Chapter 18: Saturday Evening
Level 18-1
- Task: Distract the security guard.
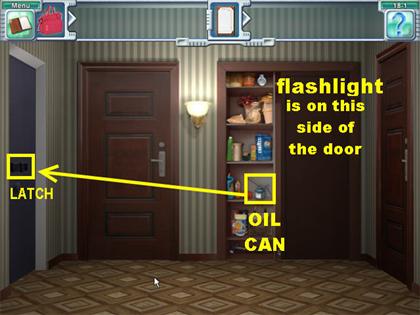
- There are two doors on the back wall, the one on the right has 2 sliding doors. Click on the door on the right until it opens, pick up the flashlight that is on the top shelf.
- Click on the left side of that same door. When the door opens move the items out of the way from the third shelf. Click on the oil can when you find it.
- Place the oil can on the latch of the door that is on the left side of the scene. Enter the utility room through that door.
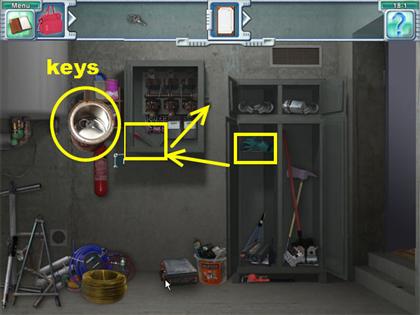
- In the utility room click on the can that is next to the hanging cabinet. Click on the keys that are inside of the can. The keys will fall to the ground.
- Place the keys on the top and bottom side of the large cabinet by the door.
- Grab the green rubber gloves that are on the left side of the cabinet.
- Click on the circuit breaker box to open it. Place the rubber gloves on the circuit breaker handle that is at the bottom of the circuit breaker box. The handle falls on the ground.
- Place the handle on the right side of the circuit breaker box. Click on the handle to end the level.
Level 18-2
- Task: Find the keys to Lisa’s room.
- When you first enter the scene you will only have a spotlight to look through the room.
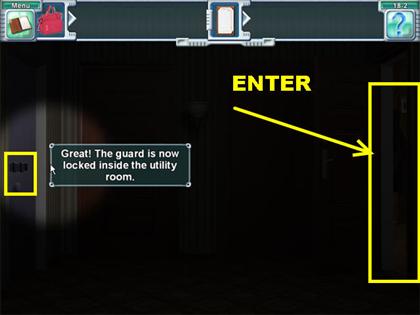
- Click on the door on the left to lock the security guard in place. Make sure that you also click on the latch to ensure that the guard does not get out.
- Enter the door on the right.
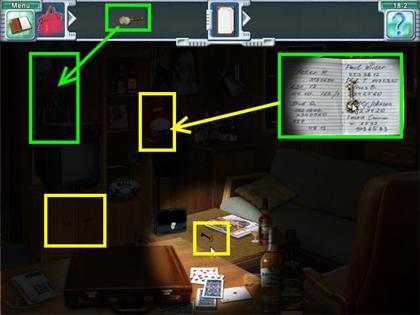
- Click on the magazine that is on the coffee table and grab the key that is underneath it.
- Place the key on the locked cabinet that is under the television.
- Pick up the magnifying glass that is inside of the cabinet.
- Click on the boxing gloves, one of them will start to swing. Click on the notebook that is inside the jacket.
- You will get a closer view of the book. Pick up the key that appears inside of the open book. The book and the key will land on the table.
- Place the key in the inventory section on top of the page.
- Place the magnifying glass on the shooting target that is on the left side of the room. When you place it over a red piece on the target some numbers will appear on the magnifying glass.
- One of those numbers will open the suitcase that is on the table.
- Click on the briefcase for a closer view.
- Grab the key from inventory and place it on the keyhole of the briefcase.
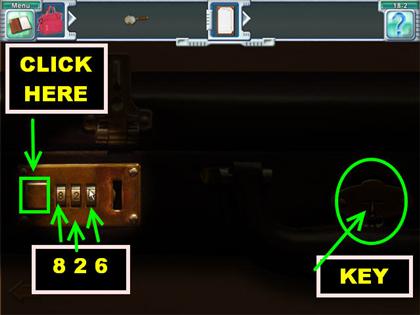
- Enter the combination “826” on the dial of the briefcase. Click on the dials to change the numbers.
- Click on the button that is on the left side of the dial and it will open the latch. Exit the close-up scene to return to the main room.
- Grab the keys that are inside of the briefcase and they will go into inventory.
- Go out of that room by exiting on the door on the left side of the scene.
- Once you’re out in the hallway, place the keys on the left door on the back wall to end the level.
Level 18-3

- Task: Figure out a sequence of four keys.
- The information to the right of the row will tell you whether the key belongs in the sequence, and whether it’s in the right place.
- Drag the assorted keys onto the board. Each time you click a key onto the board, it will make an impression of that key.
- If the keys are in the wrong position, you will see either a question mark or a check mark at the end of the key sequence.
- Each check mark you see after you place the keys tells how many keys are in the right place.
- Question marks tell you how many correct keys you have in the sequence.
- To switch keys you can either click on a new key or put back the one on your cursor.
- After you select 4 keys click on the orange button in the lower right side of the scene. If the keys are in the right place, the lock will open.
Created at: 2009-06-24