

Walkthrough Menu
General Tips
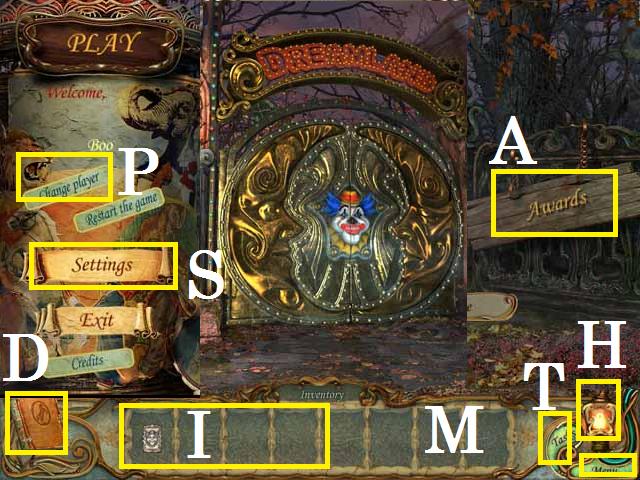
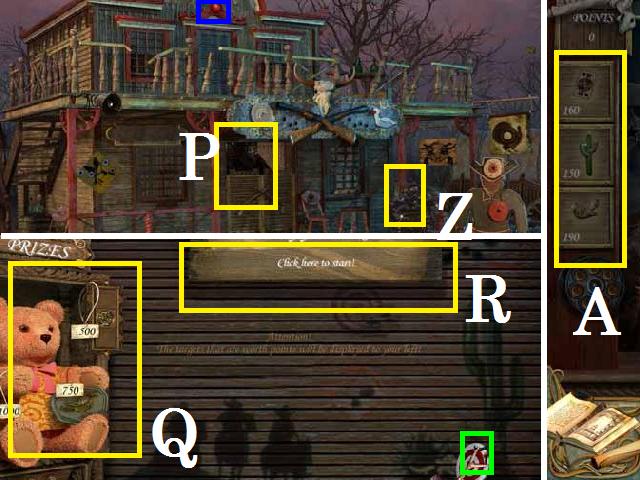
- From the main menu you can Change the player (P), Adjust your sound options with the Settings (S) button.
- From the main menu you can also see the Awards (A) you have gained during the game play.
- You can earn up to seven different Awards. Two can be earned by collecting all of the STARFISH and MARBLES throughout the game. Earn another by scoring over 1500 at the shooting gallery or by solving all of the puzzles without skipping any of them.
- Complete all of the hidden object games to receive an award and use less than 20 hints during gameplay for another. The last Award is for finishing the game in less than 5 hours.
- Click on the Menu (M) button in the lower right corner to exit, pause or resume the game. You can also adjust your sound options.
- Sparkling areas indicate Hidden Object scene and useable Inventory Items.
- During Hidden Object scenes an item list will populate at the bottom of the screen. Collect all of the items in the list to complete the scene and receive a needed Inventory Item that.
- Usable items are placed in your Inventory List (I).
- The first item in the list will require an action to complete or uncover the item before it can be picked up.
- Once the Hint Button (H) is full you may use it to show you where a hidden object is or the next step in the game.
- You may exit and reenter a Hidden Object Scene and your progress will be saved in that scene.
- You can zoom into your Diary (D) to review clues you have picked up along the way to help solve puzzles and see current tasks.
- You can go straight to your task list using the Task (T) button.
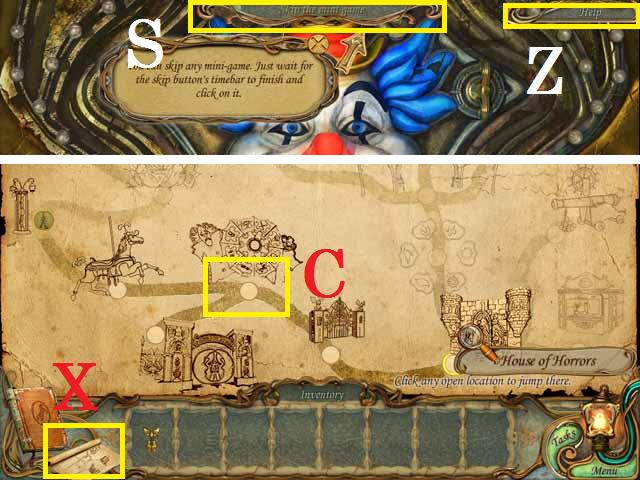
- Puzzles can be skipped once the Skip Button (S) is full.
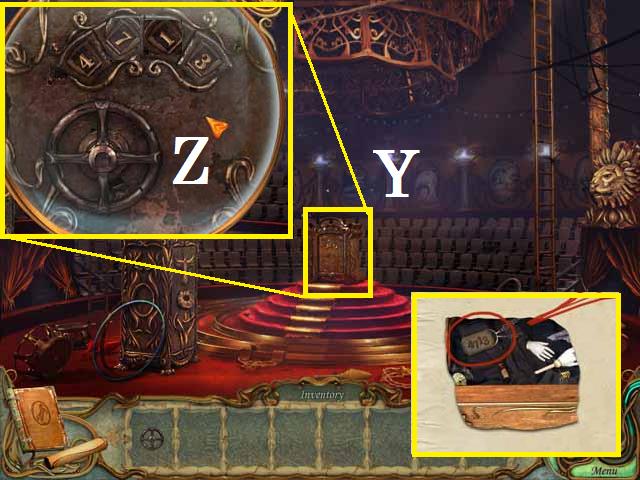
- If you need help figuring out a puzzle use the Puzzle Hint (Z) button.
- After you pick up the MAP (X) you can zoom into it to see what location you are currently in and where you can move to.
- You can jump from location to location using your Map.
- When a new puzzle or Hidden Object game is available the Dot (C) will glow outside the location on the Map.
- Not all of the location will be immediately available.
- You will always click at the bottom of a scene to return to the last location.
- Each time you play a Hidden Object Scene the items in the inventory list may change. The screenshots in this walkthrough shows the items as listed during the current gameplay.
- You will not need to follow the exact path that this walkthrough follows. There are no distinct levels or chapters in the game.
Introduction
- From the main menu, move forward down the path or click play to begin.
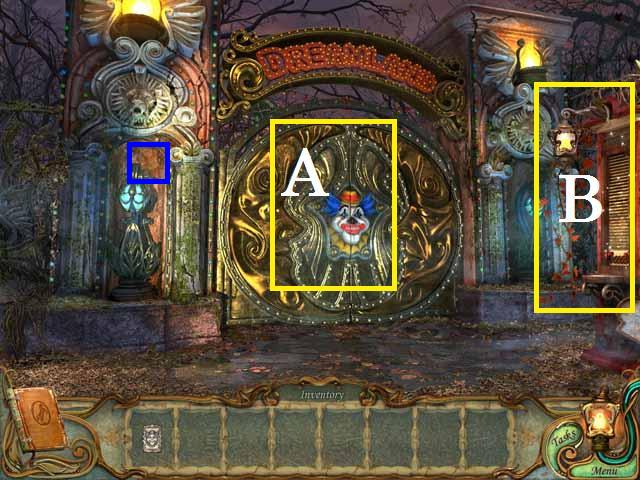
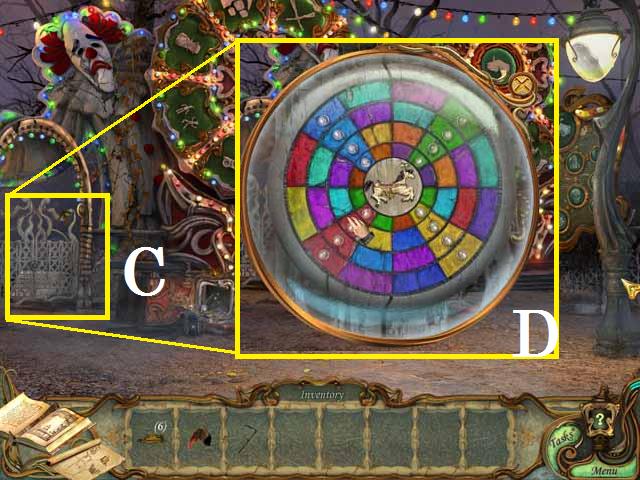
- Close the Diary, pick up the STARFISH (blue), zoom into the clown gate (A).
- Zoom into the sparkling Ticket Both (B) to trigger a Hidden Object Scene.
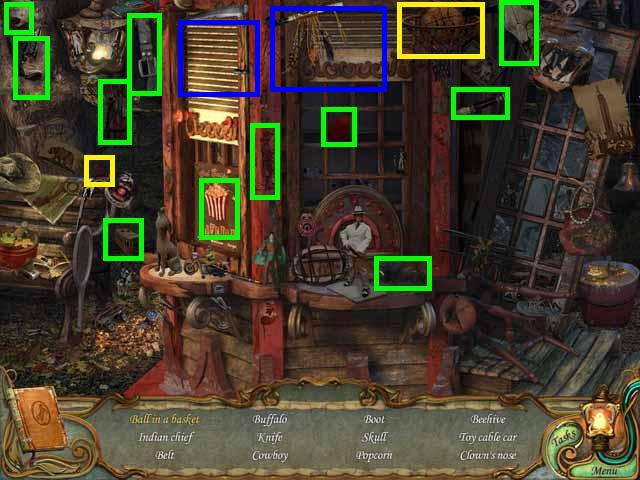
- Pick up the BALL (marked in yellow) and place it in the BASKET (yellow) then pick up the BALL in the BASKET.
- Open the window screens (blue).
- Pick up the remaining items in the list (all are marked in green) to receive the RED CLOWN NOSE.
- Zoom into the clown gate and place the RED CLOWN NOSE as shown in the screenshot.
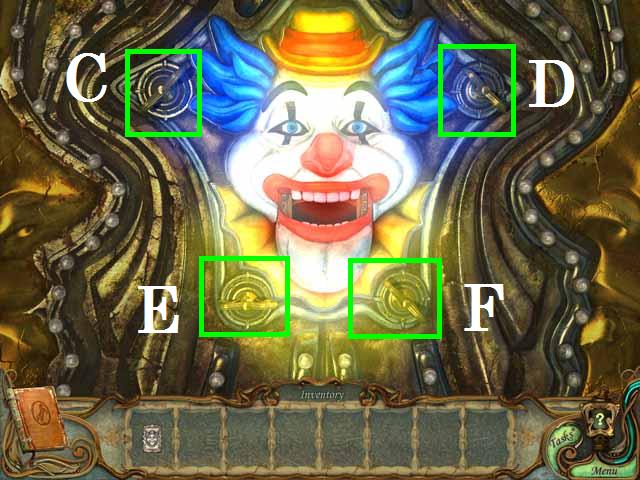
- Illuminate all for colors by turning the dials (C-F) in the following order: C-1 time, D-3 times, E-2 times, and F-3 times.
- Place the TICKET (G), from your inventory bar, in the clown’s mouth and go through.
- You can click through the dialogue.
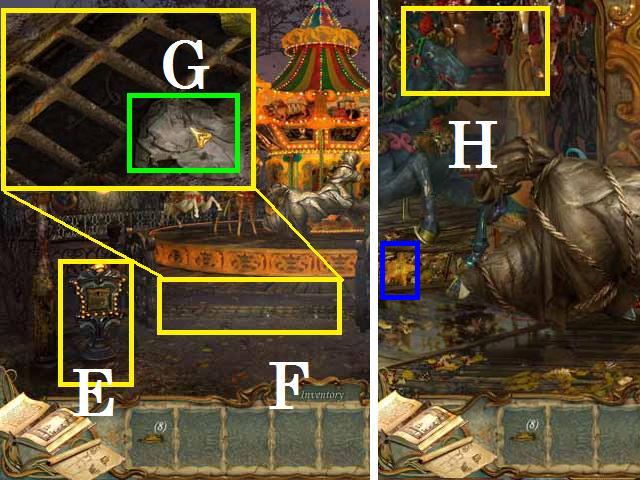
- Pick up two PIECES OF WOOD (green) and the MAP (green).
- Pick up the STARFISH (blue) and click the MAP again so that is goes to your sidebar.
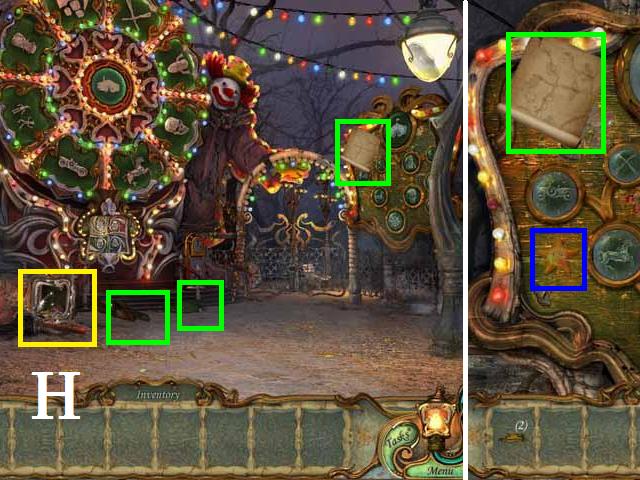
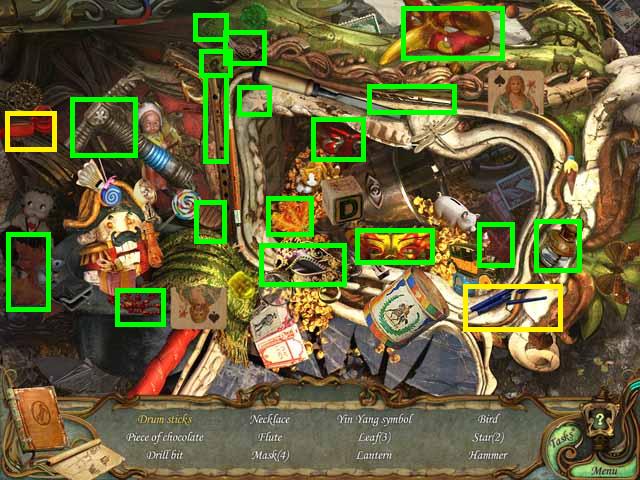
- Zoom into the popcorn stand (H) to trigger a Hidden Object Scene.
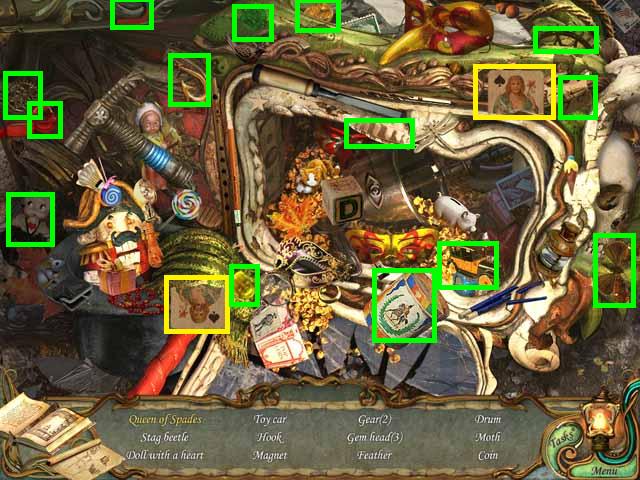
- Drag the bottom half of the card (yellow) to the top half (yellow) and pick up the QUEEN OF SPADES.
- Pick up the remaining items in the list (green) to receive the COIN WITH FOUR FACES.
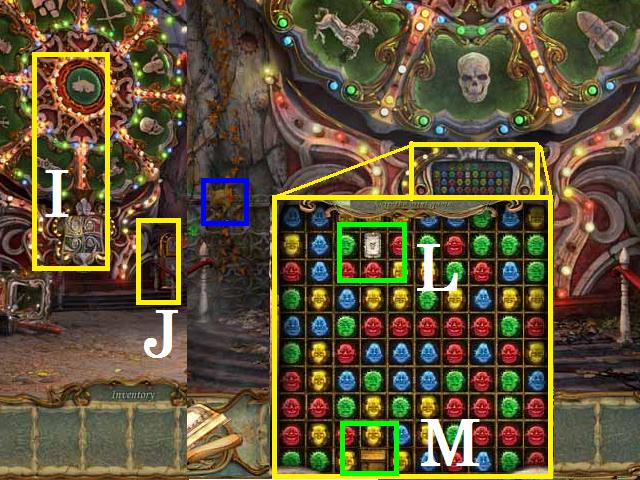
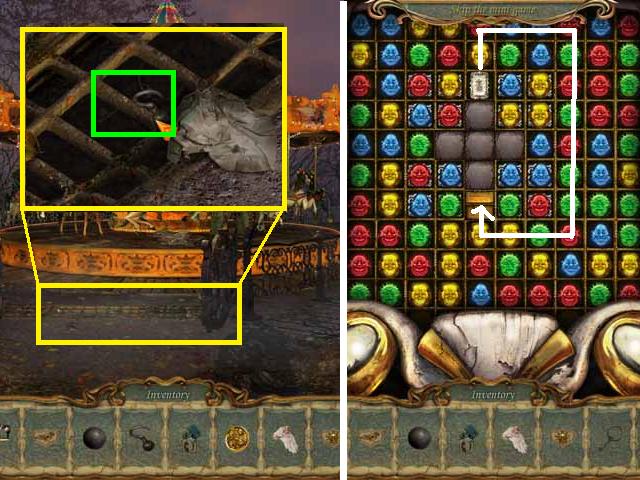
- Zoom into the wheel of fortune (I), pick up the STARFISH (blue) and place the COIN in the slot (J) to spin the wheel.
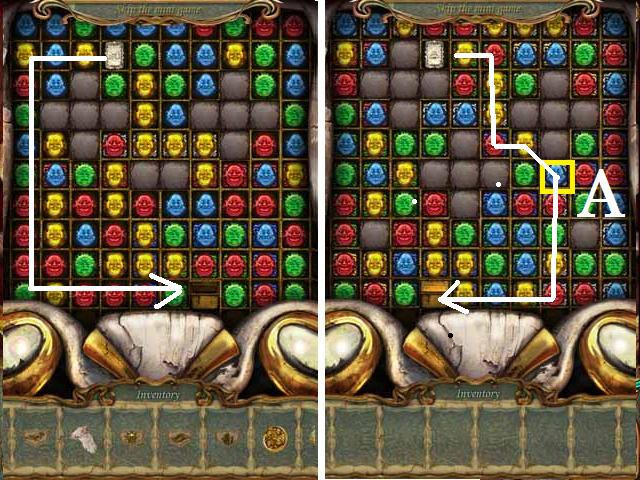
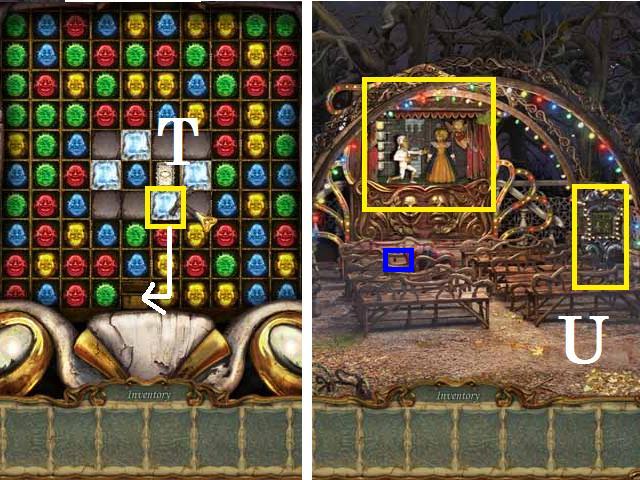
- Zoom into the now available grid (K) and move the TICKET (L) down to the dispenser (M) by removing the faces.
- Remove the faces by matching three or more of the same color in a row by swapping neighboring faces.
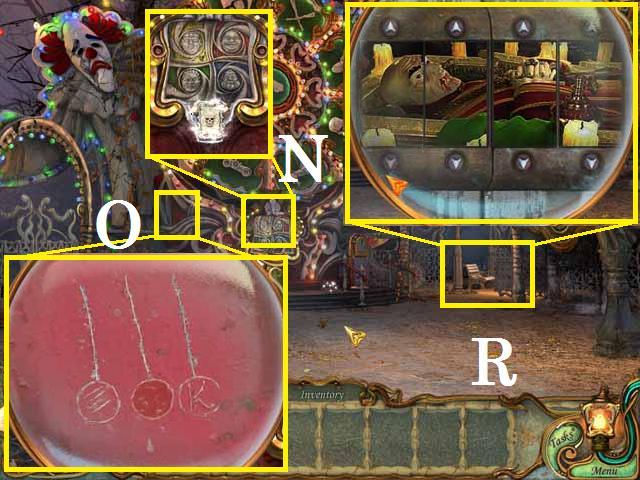
- Pick up the now available TICKET (N).
- Zoom into the scrapings (O) next to the wheel.
- Zoom into the gate (R) on the right side and solve the puzzle by completing a scene (S) as shown in the screenshot.
- Go through the gate towards the path.
- Pick up two more PIECES OF WOOD (green) and the STARFISH (blue).
- Move forward down the path towards the House of Horrors.
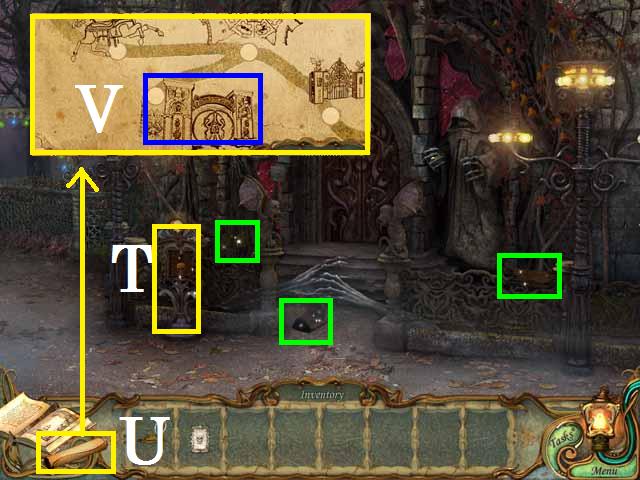
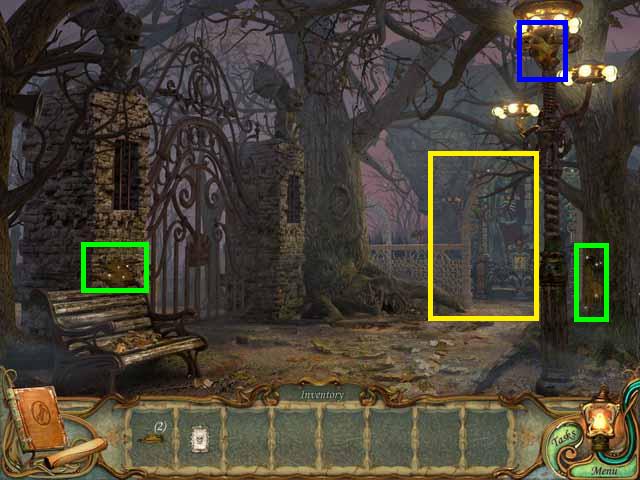
- Pick up two PIECES OF WOOD (green), and a WING (green).
- Place the TICKET in the slot (T).
- Zoom into the MAP (U) and click on the Main Entrance (V) to teleport there.
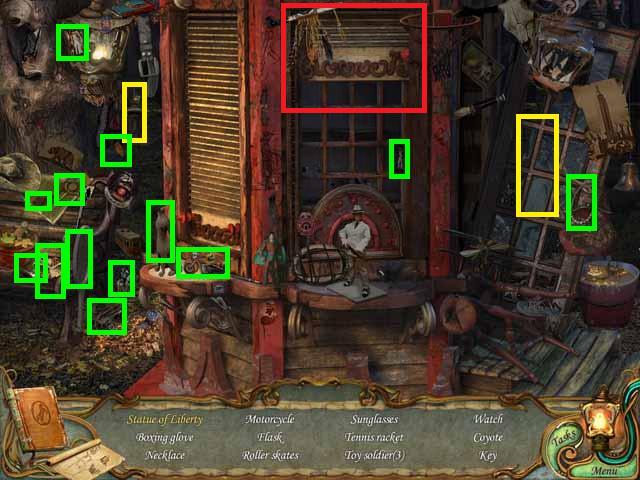
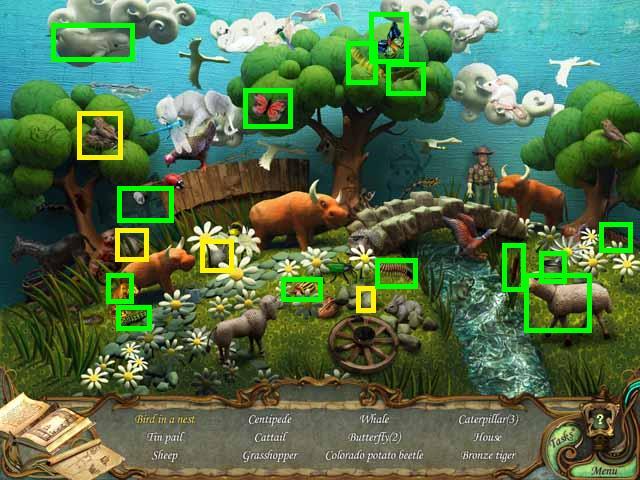
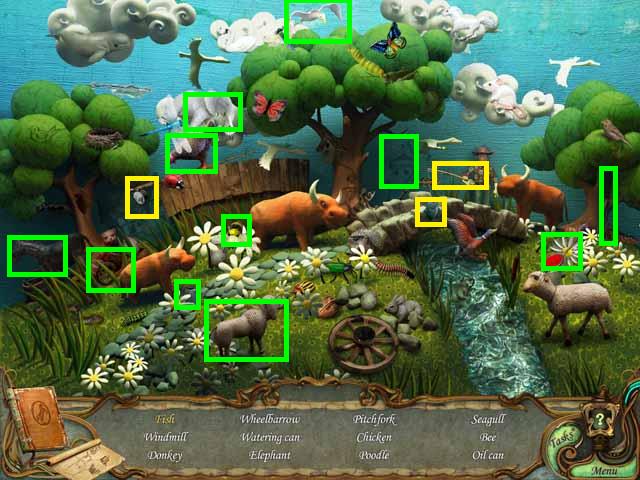
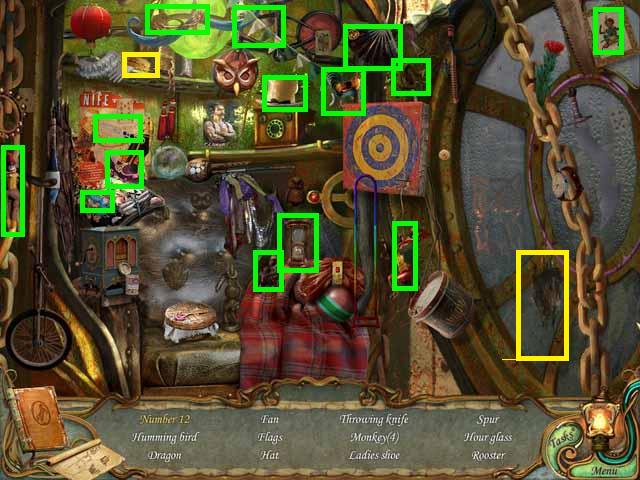
- Zoom back into the ticket booth to trigger a Hidden Object Scene.

- Place the PROPELLER (yellow) on the PLANE (yellow) and pick it up.
- Open the window screens (red).
- Pick up the remaining items in the list (green) to receive the RUSTY SCYTHE.
Chapter 1
- Go back through the clown gate and zoom back into the popcorn stand to trigger a Hidden Object Scene.
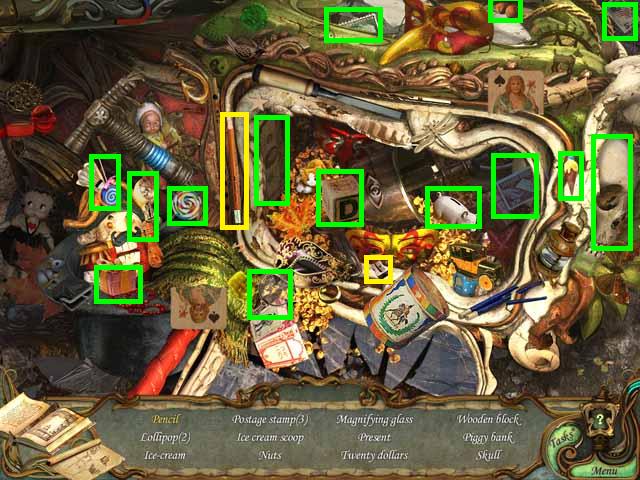
- SHARPEN (yellow) the PENCIL (yellow) and pick it up.
- Pick up the remaining items in the list (green) to receive the SKULL.
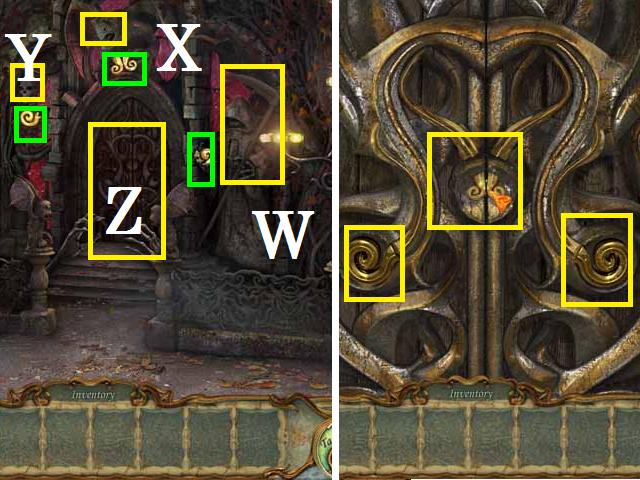
- Back outside the House of Horrors place the SCYTHE in the statues hand (W) the WING above the door (X) and the SKULL on the skeleton (Y).
- Pick up the three TWIRLS (green) and zoom into the door (Z).
- Place the TWIRLS as shown in the screenshot and enter the door.
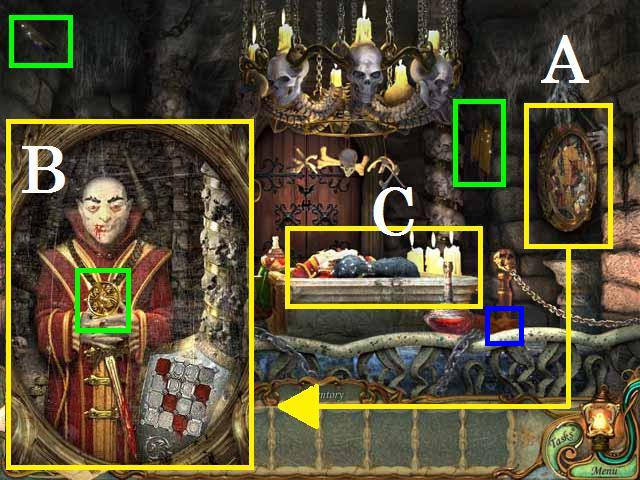
- Pick up the two PIECES OF WOOD (green), the STARFISH (blue), and zoom into the painting (A) on the right.
- Assemble the painting as shown in the screenshot (B) then pick up the COIN (green).
- Zoom into the Vampire (C) to trigger a Hidden Object Scene.
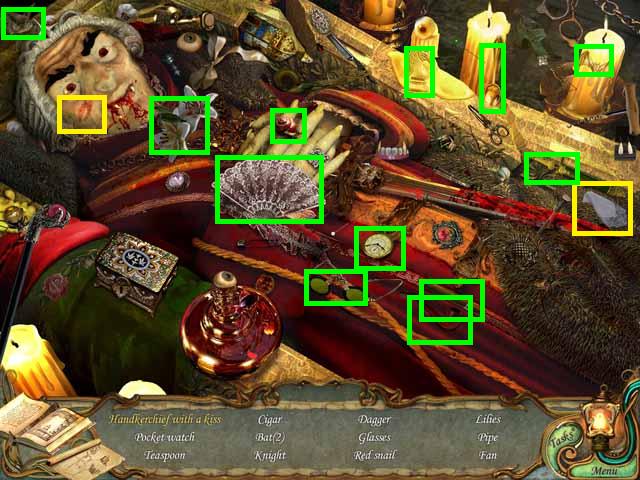
- Wipe the lipstick (yellow) off of the vampire’s cheek with the HANDKERCHIEF (yellow) and pick it up.
- Pick up the remaining items in the list (green) to receive the FAN.
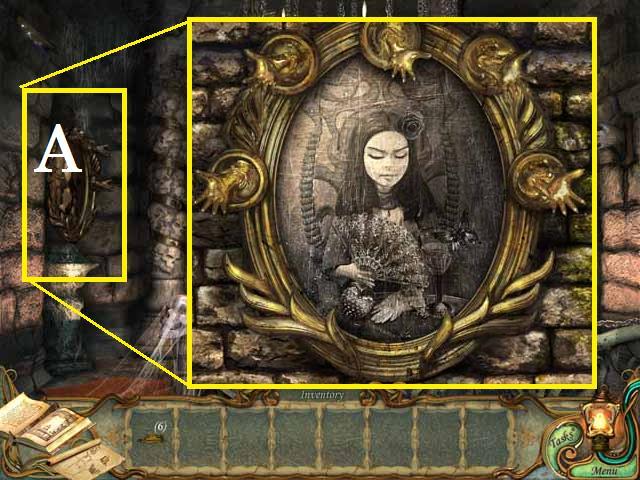
- Zoom into the painting (A) on the right and place the FAN in the paintings hands.
- Return to the Wheel of Fortune and place the COIN in the slot then zoom into the panel.
- Move the TICKET as done previously. If it is stuck above a grey cell break a matching row over the cell then repeat to move the TICKET.
- Pick up the TICKET.
- Zoom into the gate (C) to the left and solve the puzzle by aligning all of the matching colors with pearls (D) on them as shown in the screenshot.
- Enter the gate and place the TICKET in the slot (E).
- Zoom into the grate (F) and move the paper (G) to reveal a key.
- Enter the Merry-go-round, pick up the STARFISH (blue) and zoom into the ceiling (H) to trigger a Hidden Object Scene.
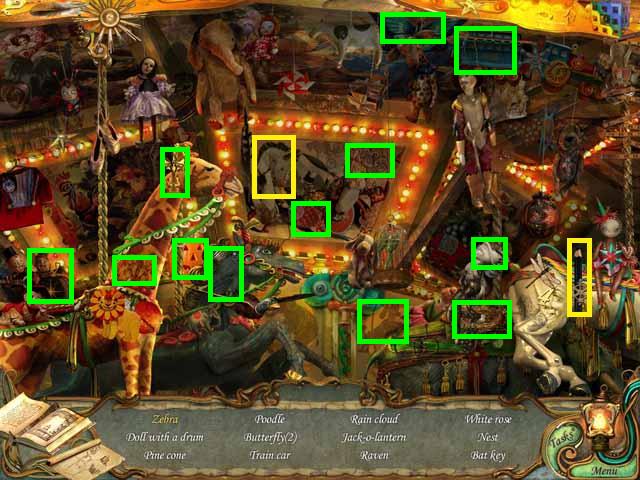
- Color the ZEBRA (yellow) with the PENCIL (yellow) and pick it up.
- Pick up the remaining items in the list (green) to receive the BAT KEY.
- Return to the House of Horrors and zoom back into the vampire to trigger a Hidden Object Scene.
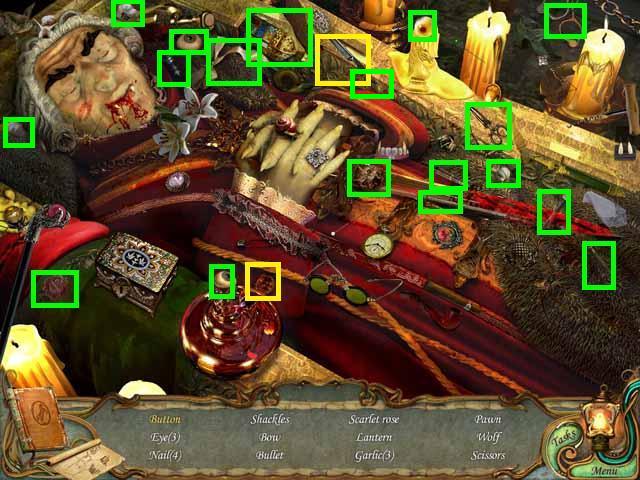
- Cut the BUTTON (yellow) with the STRAIT RAZOR (yellow) to pick up the BUTTON.
- Pick up the remaining items in the list (green) to receive the SCISSORS.
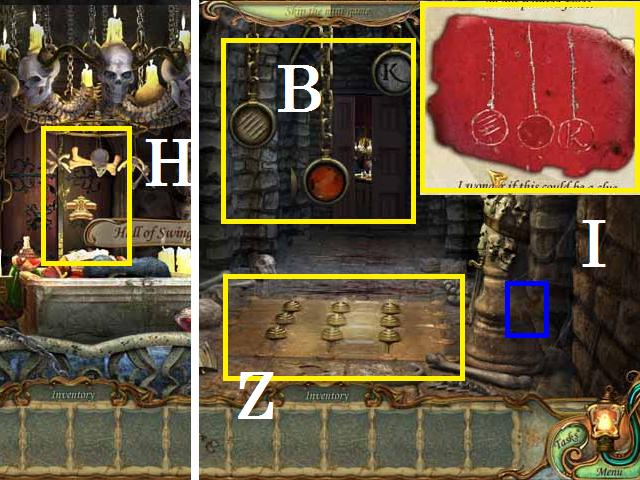
- Open the door (H) with the BAT KEY and enter the Hall of Swinging Axes.
- Pick up the STARFISH (blue).
- If you open your diary you can flip to the page that shows the etchings (I) from the Wheel of Fortune. Move the chains (B) up and down until they match the etchings to stop the swinging.
- Zoom into the floor (Z).
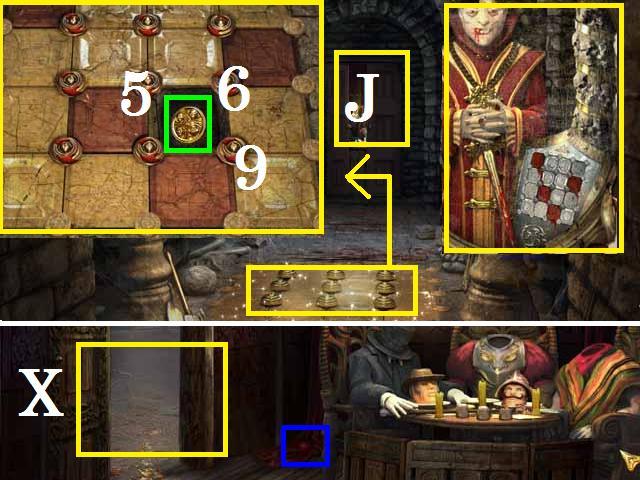
- Flip to the page with the painting on it and set the floor panels, by pushing the buttons (1-9) in the following sequence, 9-one time, 6- three times, and 5- three times to match the painting.
- Pick up the COIN (green) then enter the Room with the Shell Game through the door (J).
- Pick up the MARBLE (blue).
- Go through the open doorway (X) and move to the left to the Pirate Ship.
- Pick up the last PIECE OF WOOD (green) and a STARFISH (blue).
- Return to the Wheel of Fortune and use the COIN.
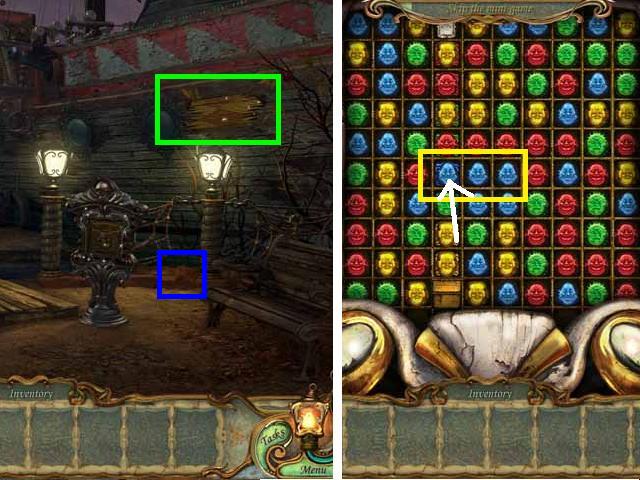
- This is the same as the previous one but you must match the colors to the blockage behind the faces.
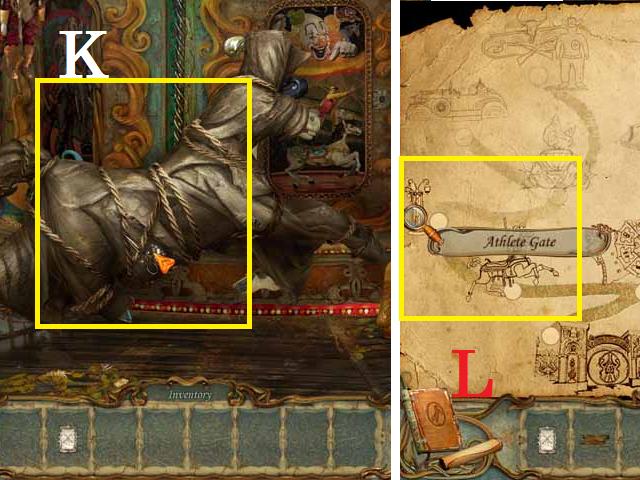
- After you have picked up the TICKET go to the Merry-go-round and remove the ropes from the horse (K) with the SCISSORS by cutting several times.
- Move to the Athlete Gate (L) to the right of the Merry-go-round.
- Pick up the last PIECE OF WOOD (green).
- Place the PIECES OF WOOD on the gate in the matching spots, see the final image in the screenshot, to open the gate and go through it.
Chapter 2
- Pick up the STARFISH (blue).
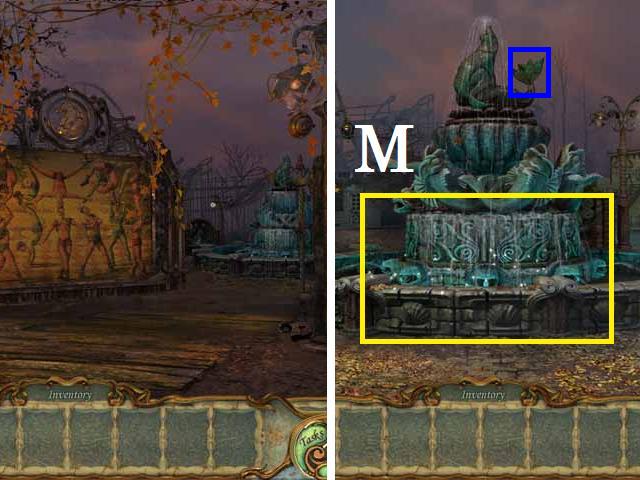
- Zoom into the Fountain (M) to trigger a Hidden Object Scene.
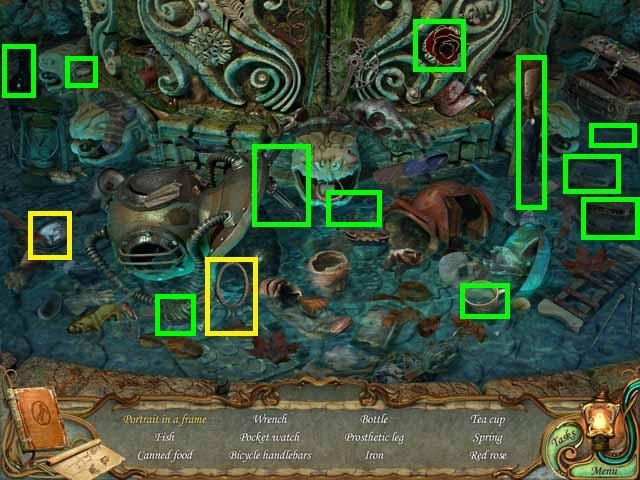
- Place the PICTURE (yellow) in the FRAME (yellow) and pick it up.
- Pick up the remaining items in the list (green) to receive the RED ROSE.
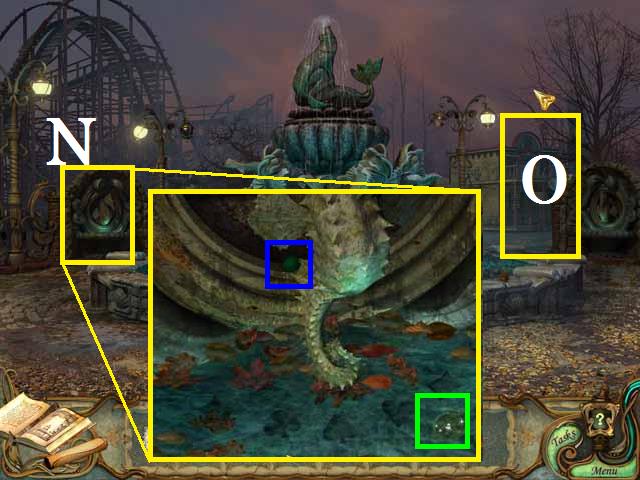
- Zoom into the small fountain (N) to the left and move the leaves by waving your curser over them until you fully reveal all five of the card suit symbols and the COIN.
- Pick up the MARBLE (blue) and the COIN (green) then zoom back out.
- Go forward to the right (O) to enter the Shooting Gallery.
- Pick up the MARBLE (blue).
- Place the TICKET in the slot (Z).
- Enter the Shooting Gallery through the door (P).
- To the left are three prizes (Q) that you need to collect. You will need to score at least the amount of points on each prize to win them. If you score 1500 or more, gain an award. You can play as many times as you like.
- Pick up the SLING SHOT (green) and click on the upper sign (R) to start the game.
- You get seven shots to hit targets that are worth points.
- The panel (A) on the left shows you what items are currently worth any points. The longer an item is available its worth decreases. When you get a target or the amount reaches zero it is replaced.
- Shoot targets by placing your cursor over it and clicking.
- Continue playing until you have won a COIN, a PINK BEAR, and a KEY with a RAVEN.
- Return to the Wheel of Fortune and use the COIN.
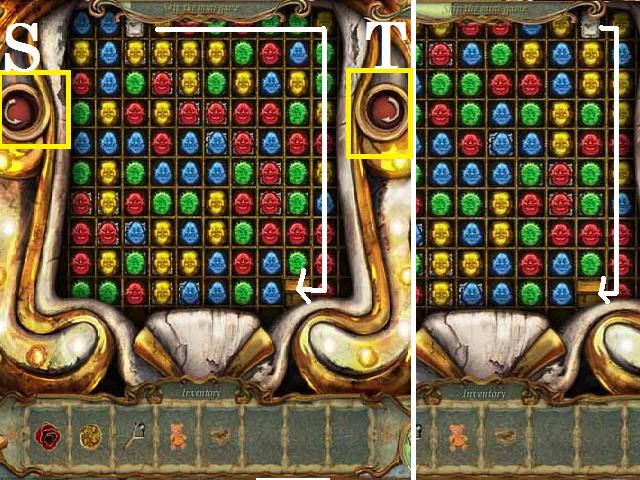
- Using the arrows (S, T) rotate the board to move the TICKET around road blocks.
- I turned the board clockwise (T) and moved the TICKET all the way to the bottom row.
- I then turned the board counter-clockwise (S) and moved the TICKET to the bottom row then flipped it counter-clockwise again to get it in the slot.
- Use the second COIN.
- I moved the board clockwise using the right button and moved the ticket down one row.
- Then, using the left button I moved the board back counter-clockwise and moved the Ticket all the way to the bottom and flipped it counter-clockwise again. (Note: Your original set up may be different each play through).
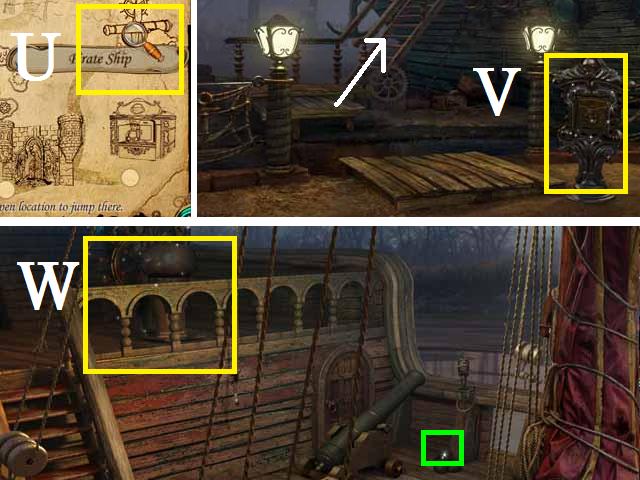
- Pick up the ticket and open the MAP to portal to the Pirate Ship (U).
- Place the TICKET in the slot (V) and board the ship.
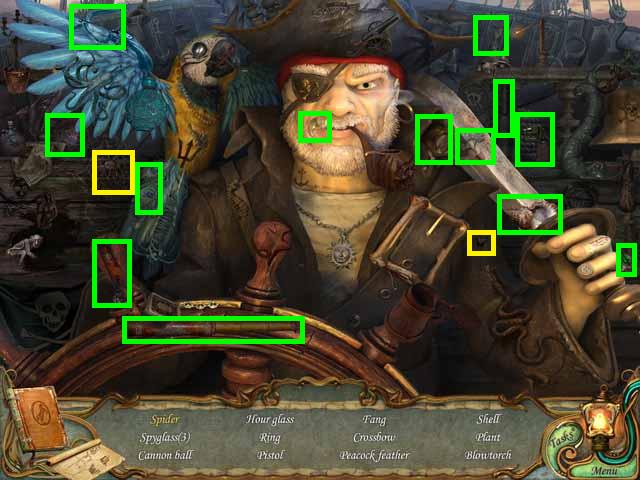
- Pick up the CANNON BALL (green) and zoom into the steering wheel (W) to trigger a Hidden Object Scene.
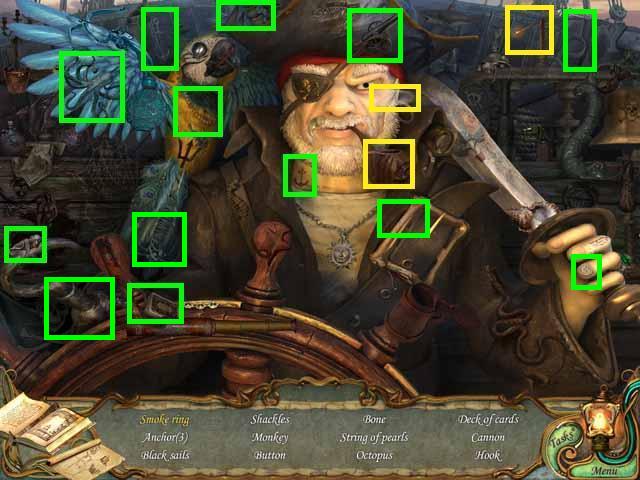
- Light the Pipe (yellow) with the lit PUNK (yellow) and click the resulting SMOKE RING.
- Pick up the remaining items in the list (green) to receive the HOOK.
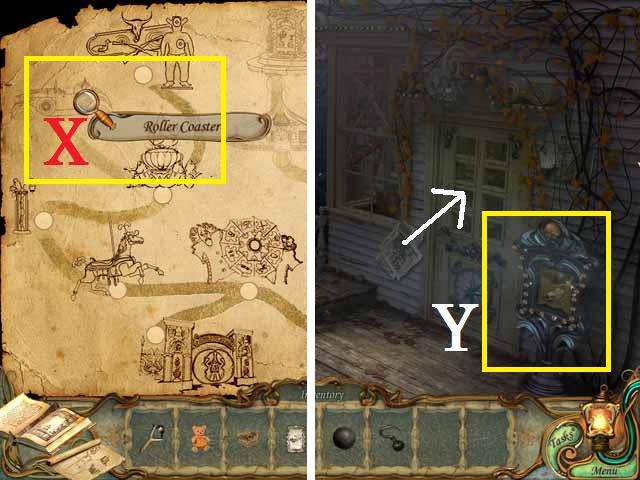
- Open your MAP and portal to the fountain then move to the left path to the Roller Coaster. Roller Coaster (X).
- Place the TICKET in the slot (Y) and enter the control booth.

- Pick up the STARFISH (blue) and the MARBLE (blue) then zoom into the car (Z) to trigger a Hidden Object Scene.
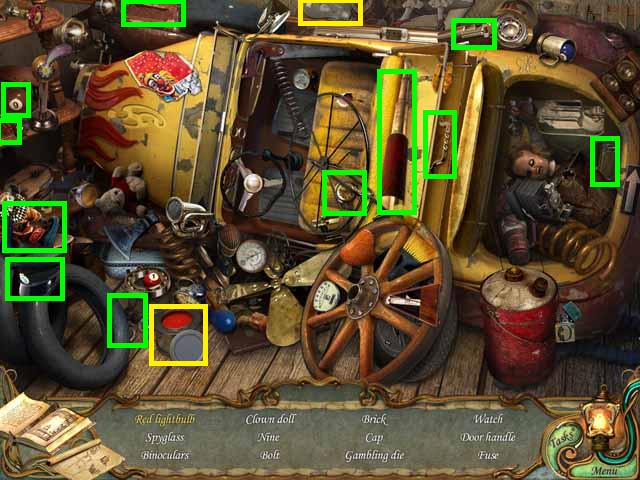
- Dip the clear BULB (yellow) in the red paint (yellow) to pick up the RED LIGHT BULB.
- Pick up the remaining items in the list (green) to receive the Fuse.
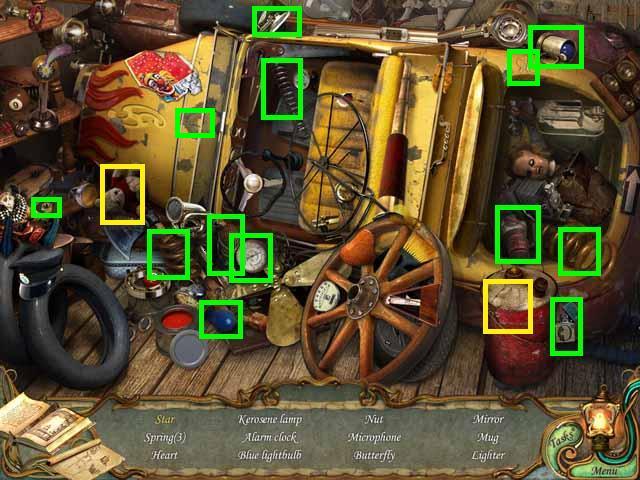
- Zoom back into the car to trigger a Hidden Object Scene.
- Wipe the gas can (yellow) with the TEDDY BEAR (yellow) to reveal the STAR and pick it up.
- Pick up the remaining items in the list (green) to receive the LIGHTER.
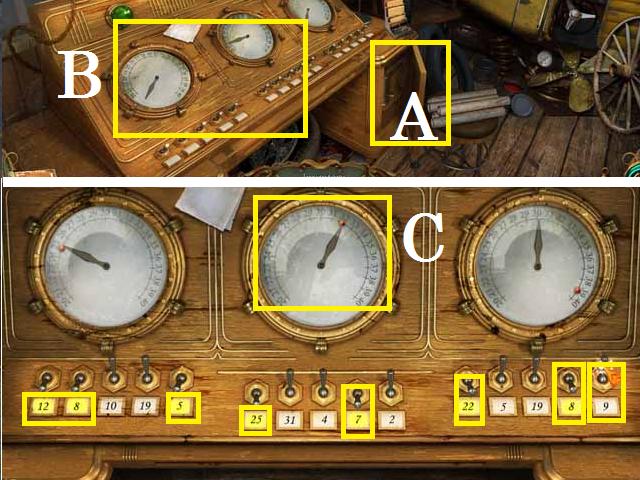
- Place the FUSE in the panel (A) and zoom into the control panel (B).
- Flip the switches (yellow) which numbers add up to the number on the dial (C) as shown in the screenshot.

- Exit the Control Room and zoom into the car (D).
- Place the PINK BEAR in the car.
- Pick up the GLOVES (green), the COIN (green), the MARBLE (blue), and the STARFISH (blue).
- Zoom into the RING BOX (green), pay attention to the shape of the holes on the tag (yellow) and close the pop-up window.

- Zoom into the briefcases lock (E) and push the buttons down in the same shape on the ring tag.
- Pick up the KEY (green).
- Return to the Merry-go-round and zoom back into the grate.
- Use the HOOK to grab the KEY (green).
- Move to the Wheel of Fortune and use the COIN.
- I flipped the board upside down and moved the TICKET to the bottom row then flipped the board counter-clockwise and moved it down three rows.
- I flipped the board counter-clockwise again and moved the TICKET down to the same row as the slot then flipped the board counter-clockwise and moved the TICKET to the slot.

- Pick up the TICKET and portal to the Café (F).
- Pick up the STARFISH (blue).
- Place the TICKET in the slot (G) and zoom into the booth.
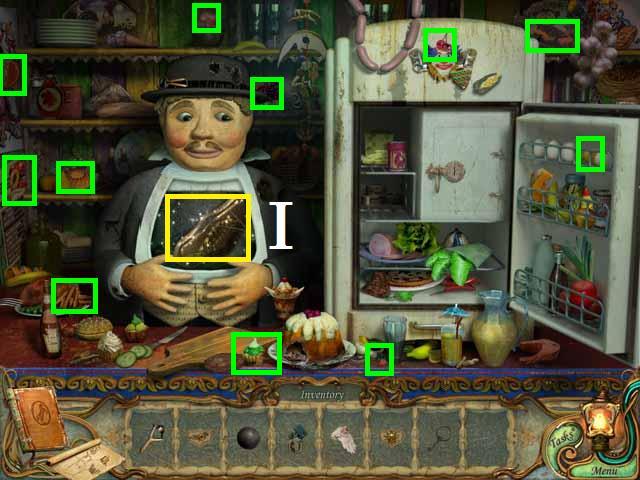
- Go ahead and open the refrigerator (H).
- Pick up all of the items (green) as they appear on the bib (I).
- When the bib flips up, pick up the KEY (yellow).
- Portal back to the Main Entrance and zoom into the ticket booth to trigger a Hidden Object Scene.
- Place the TORCH (yellow) on the STATUE (yellow) and pick it up.
- Open the window covers (red) and pick up the remaining items in the list (green) to receive the KEY.
Chapter 3
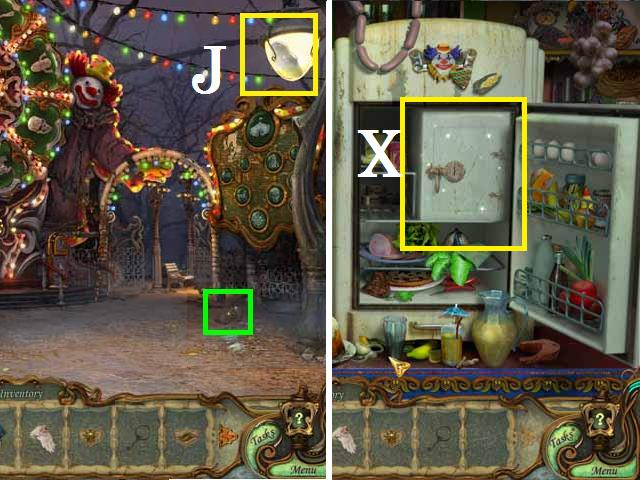
- Go through the clown gate and break the streetlamp (J) with the SLING SHOT.
- Pick up the KEY (green).
- Zoom into the Café and unlock the freezer (X) with the KEY that you got from the Main Entrance ticket booth.
- Move to the Pirate Ship and zoom into the steering wheel to trigger a Hidden Object Scene.
- Place the FLY (yellow) into the web (yellow) and pick up the now available SPIDER (yellow).
- Pick up the remaining items in the list (green) to receive the BLOWTORCH.
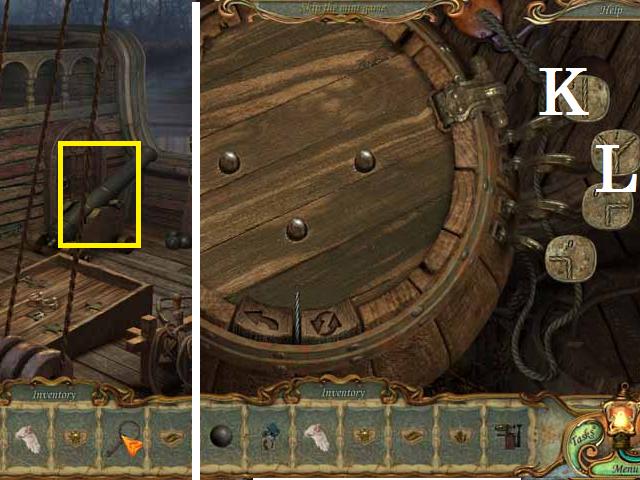
- Use the KEY from the grate with the iron ring to unlock the Ships Hold (yellow) and zoom in.
- Connect the bolts as shown in the screenshot by clicking the buttons (K-L) in the following sequence: K, L, K, and K.
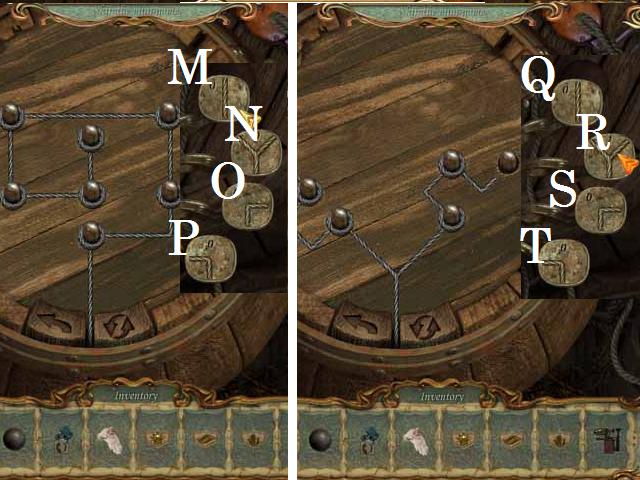
- Connect the bolts as shown in the screenshot by clicking the buttons (M-P) in the following sequence: M, O, M, P, M, M, P, M, M, M, P, M, P, M, P and M.
- Connect the bolts as shown in the screenshot by clicking the buttons (Q-T) in the following sequence: R, Q, T, S, S, T and R.
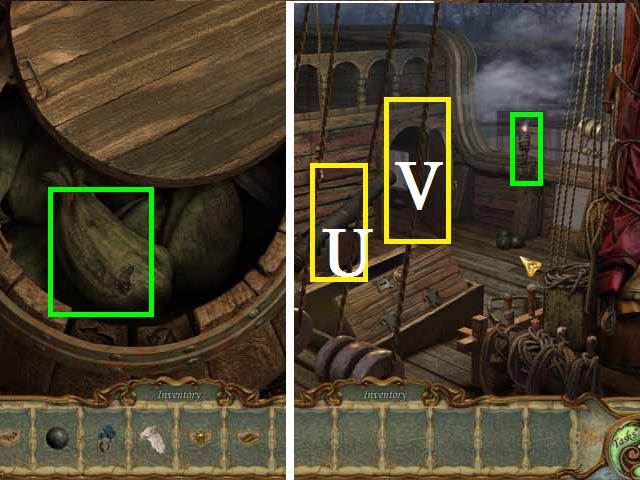
- Pick up a bag of GUN POWDER (green).
- Place the GUN POWDER in the cannon (U) followed by the CANNON BALL.
- Light the TORCH (green) with the LIGHTER and light the cannon with it.
- Go through the now open door (V) into the Captain’s Cabin.
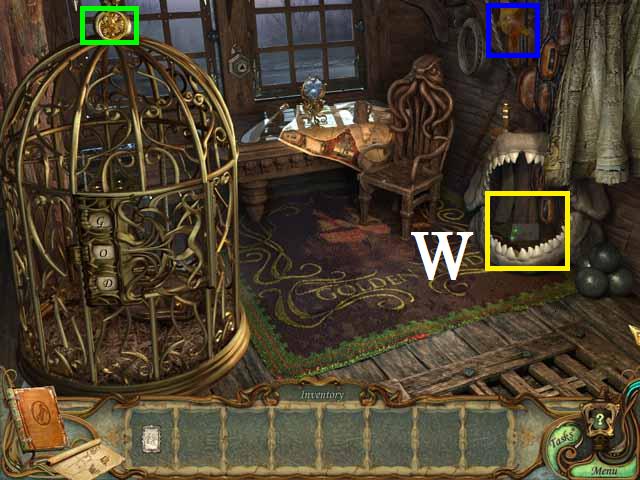
- Zoom into the picture (W) in the jaw bone and close the pop-up window.
- Pick up the STARFISH (blue) and the COIN (green).
- Return to the Café.
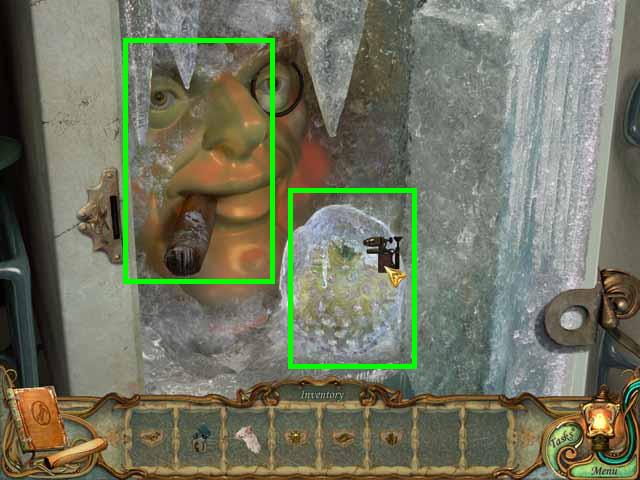
- Defrost the ice with the BLOWTORCH, click two times, and pick up the HEAD (green) and the APPLE (green).
- Return to the Room with the Shell Game.
- Pick up the two HEADS from the table and place them as shown in the screenshot.
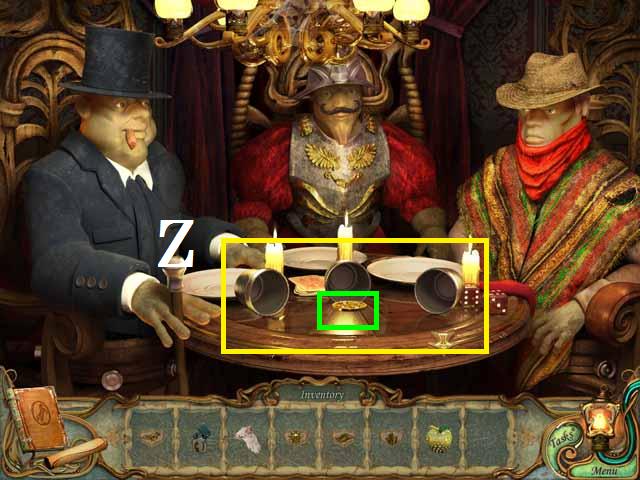
- Place the last HEAD from your inventory on the last body and click on the three cups (Z) on the table to trigger the game.
- After the shuffle click on the cup that the gold ball is under (Hint: During my game play it ended up in exactly the same position they started).
- After three correct plays pick up the COIN (green) that the ball turned into.
- Return to the Wheel of Fortune and use one of the COINS.
- I turned the board counter-clockwise and moved the TICKET to the bottom row then turned the board clockwise.
- I moved the Ticket to the bottom again and turned the board clockwise then moved it to the slot.
- Use the second COIN.
- I turned the board clockwise and moved the TICKET down two rows then flipped the board counter-clockwise.
- I then moved the TICKET down three rows then turned the board clockwise again and moved down one row.
- By breaking a blue row over the blue block (A) it pushed the ticket to that spot after I broke another row over it.
- I then moved the TICKET all the way to the bottom and flipped the board counter-clockwise and moved it into the slot.
- Pick up the TICKET.
- Go to the Fountain and zoom in to trigger a Hidden Object Scene.
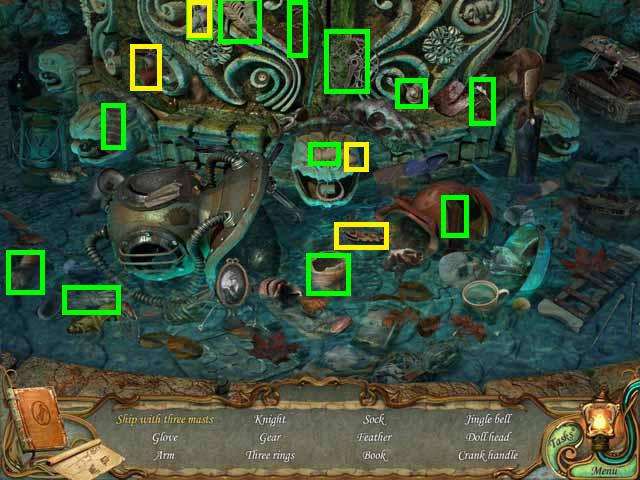
- Place the three MASTS (yellow) on the BOAT (yellow) and pick it up.
- Pick up the remaining items in the list (green) to receive the CRANK HANDLE.
- Return to the Pirate Ship and enter the Captain’s Cabin.
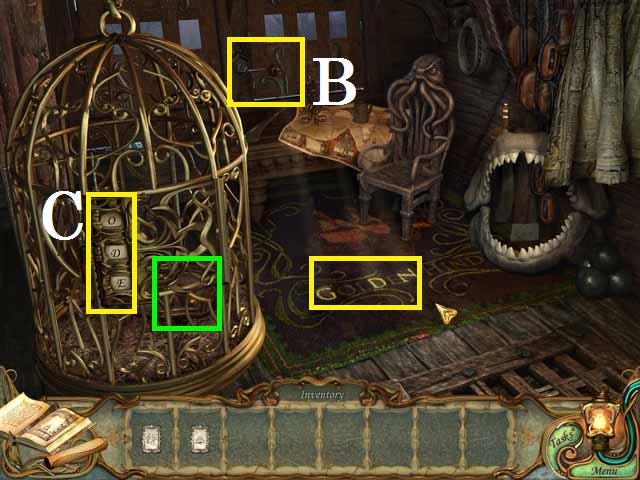
- Place the CRANK HANDLE on the window (B).
- Change the letters on the cage’s lock (C) to G D N as shown in the screenshot.
- Pick up the KEY (green).
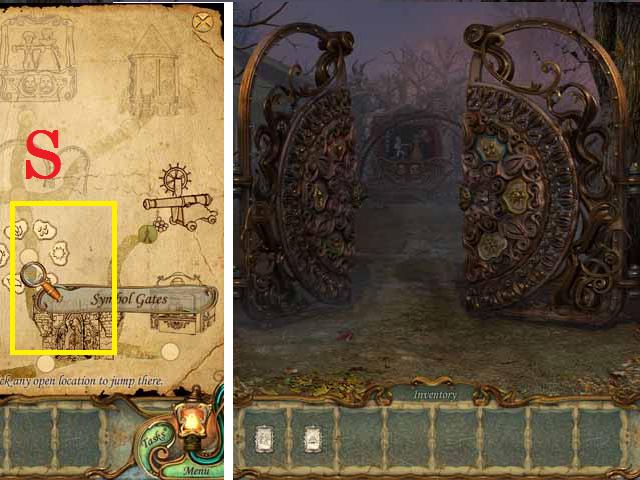
- Portal to the House of Horrors and move left to the Symbol Gate (D) and place the symbol KEYS as follows: LEAF green, RAIN on blue, SUN on yellow, RAVEN on black, and FIRE on red.
Chapter 4

- Move down the path to the right and pick up the MARBLE (blue) and STARFISH (blue).
- Place the TICKET in the slot (E) and enter the rocket (F).
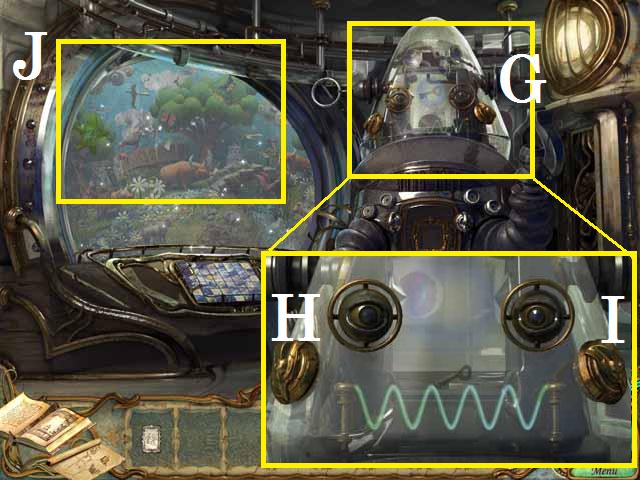
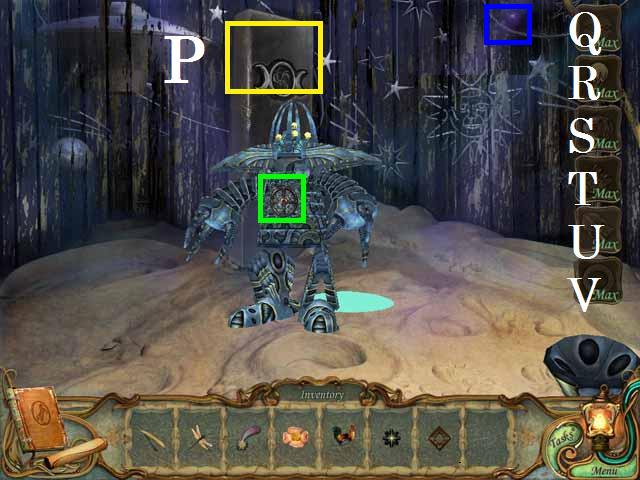
- Zoom into the robot (G).
- Set the wave length by clicking the left knob (H) eight times and the right knob (I) ten times.
- Zoom into the window (J) to trigger a Hidden Object Scene.
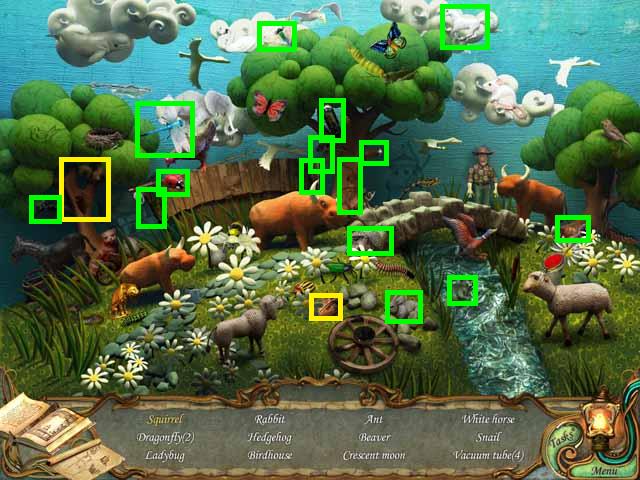
- Place the NUT (yellow) in the hole (yellow) and pick up the SQUIRREL (yellow).
- Pick up the remaining items in the list (green) to receive the VACUME TUBS.
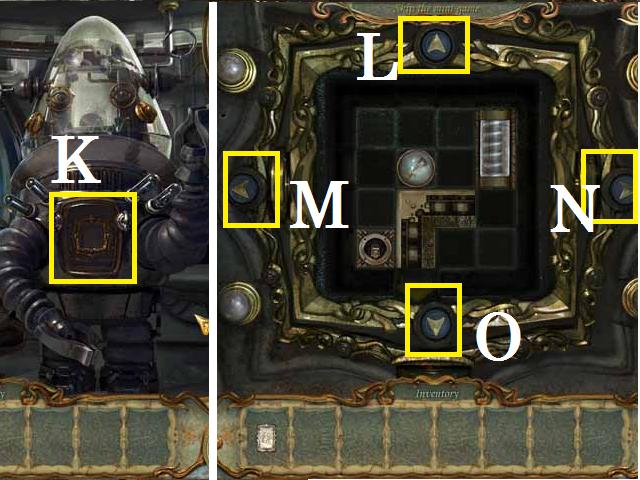
- Place the VACUME TUBS on the robot and zoom into its panel (K).
- First you need to remove the fuse by moving everything either up (L) left (M) right (N) or down (O) then remove the KEY.
- To remove the fuse move everything to the right, up, left, down, left, and down.
- Now remove the key by moving everything to the right, down, left, down, right, down, up, left, down, right, and down.
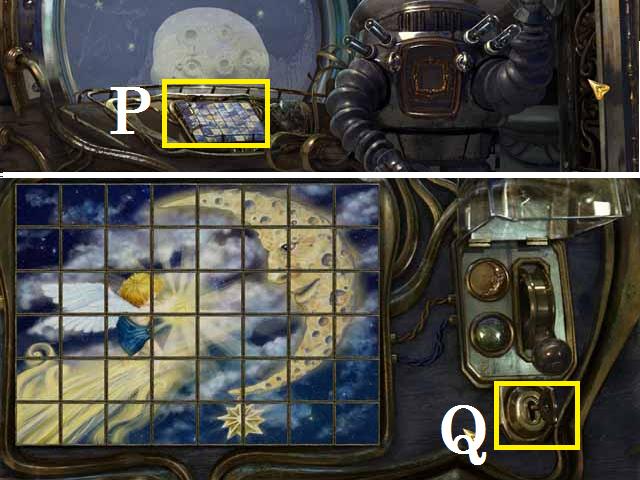
- Zoom into the rocket control panel (P) and insert the KEY into the hole (Q).
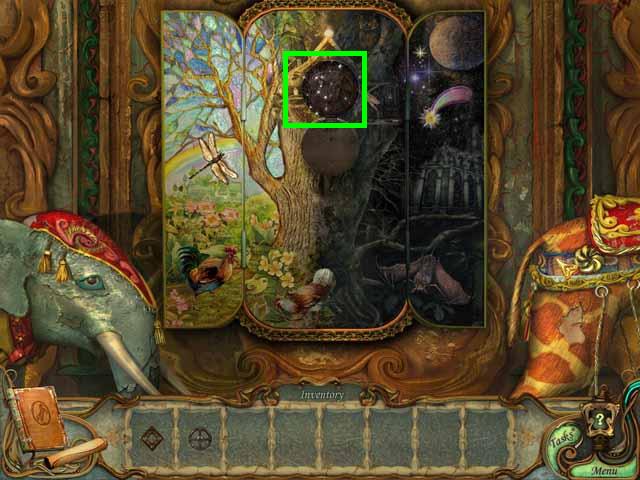
- Swap the tiles to create the picture as shown in the screenshot. (Hint: if a tile is in the correct spot it will not move. Move your cursor over the tiles until you find one that does not light up. Build off of that one).
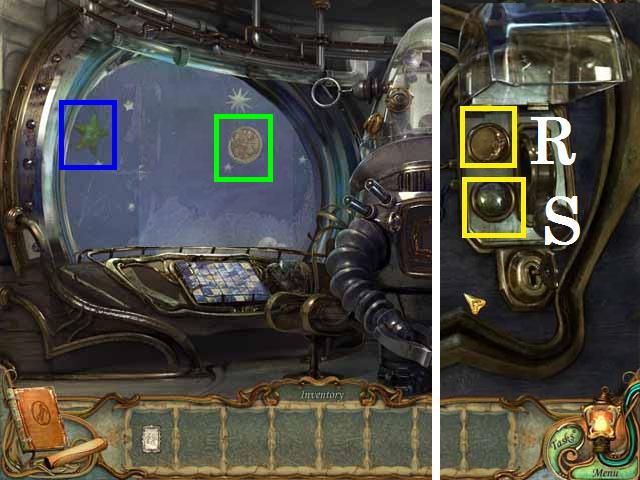
- Hit the moon button (R) to change the scenes.
- Try to pick up the COIN (green) as the screen moves passed it. You can hit the earth button (S) and go back and forth until you get it.
- Pick up the STARFISH (blue) and return to the Wheel of Fortune.
- Use the COIN and zoom into the panel. You will not be able to get the TICKET yet.
- Exit and zoom into the popcorn stand to trigger a Hidden Object Scene.
- TAPE (yellow) the DRUM STICKS (yellow) and pick them up.
- Pick up the remaining items in the list (green) to receive the HAMMER.
- Zoom back into the Wheel of fortune and use the HAMMER to break the ice blocks.
- After breaking the ice block (T) below the TICKET I moved it all the way to the bottom and rotated the board counter-clockwise then moved it to the slot.
- Pick up the TICKET and move to the Puppet Theater and place it in the slot (U).
- Pick up the STARFISH (blue).
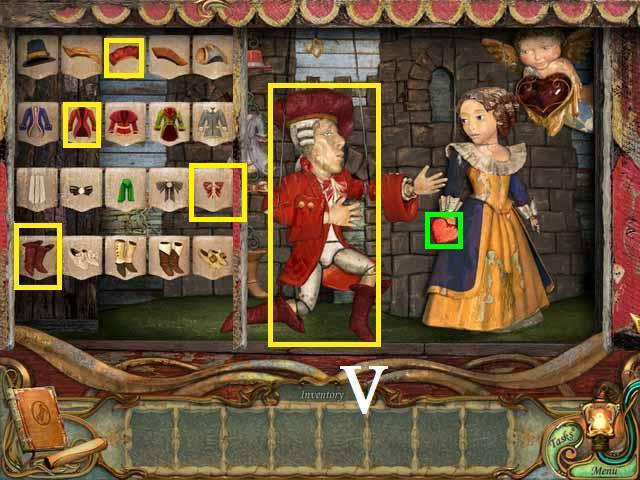
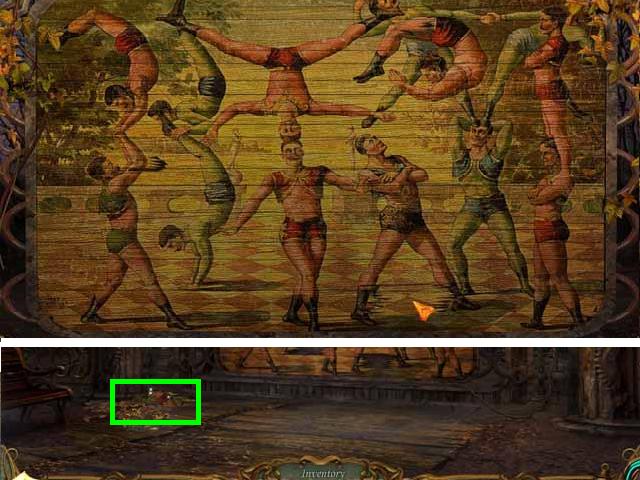
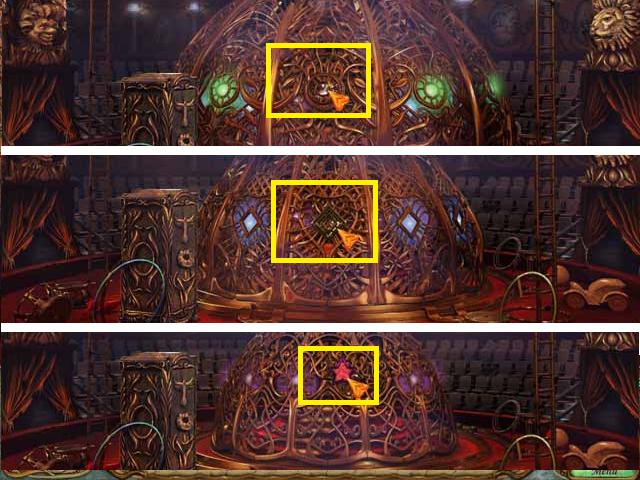
- Zoom into the stage and dress the male puppet (V) as shown in the screenshot and move the right panel to reveal the girl. If he is dressed properly you will receive a HEART to pick up (green).
- Move to the right towards the Circus Tent.
- Pick up the two MARBLES (blue) and the BUTERFLY (green).
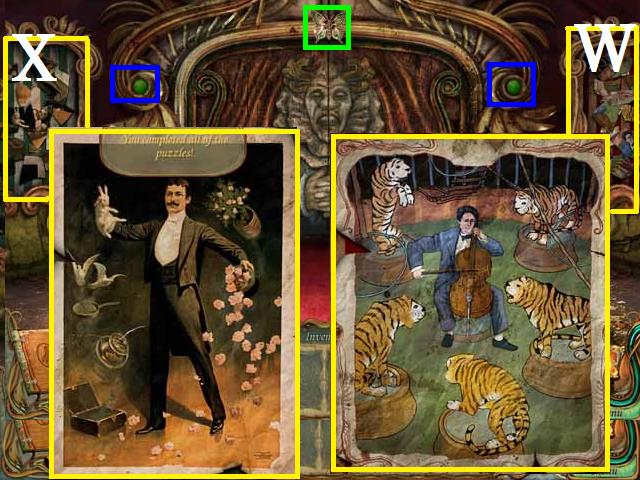
- Zoom into the poster on the right (W) and assemble it as shown in the screenshot.
- Zoom into the poster on the left (X) and assemble it as shown in the screenshot.
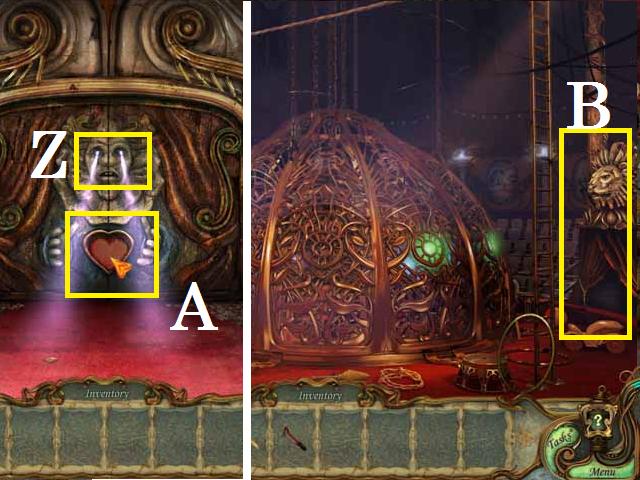
- Place the TICKET in the clowns mouth (Z) then place the HEART in the clowns hands (A).
Chapter 5
- Enter the Tent; you can click through the dialog.
- Click on the safe in the center of the stage.
- Zoom into the Lion Tamers Tent (B) on the right.
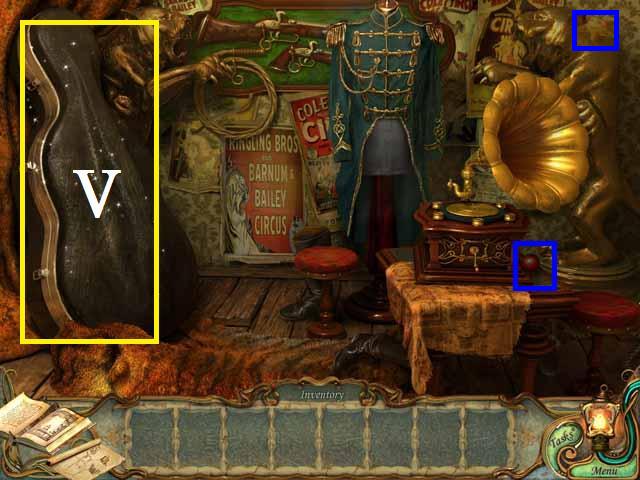
- Pick up the MARBLE (blue) and the STARFISH (blue) then zoom into the cello case (V) to trigger a Hidden Object Scene.
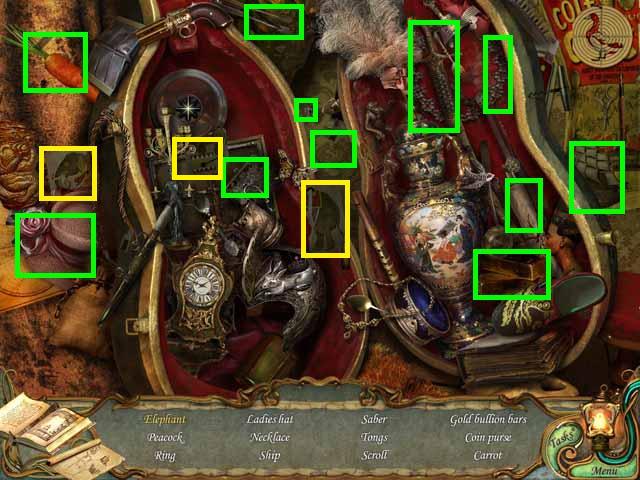
- Combine the three pieces of the ELEPHANT card (Yellow) and pick it up.
- Pick up the remaining items in the list (green) to receive the CARROT.
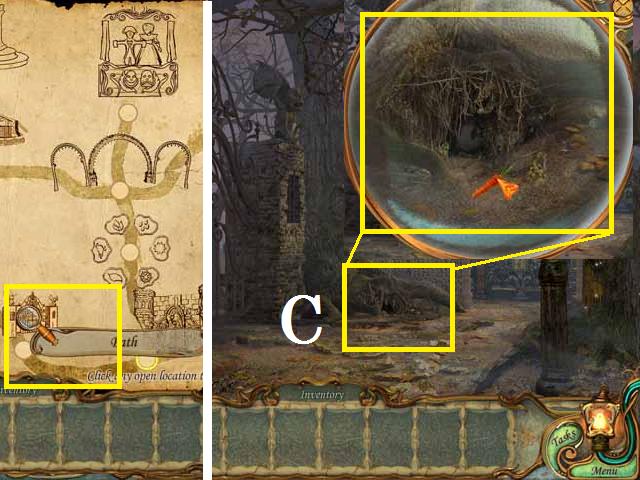
- Go to the Path and place the CARROT outside of the rabbit hole (C) to get the RABBIT.
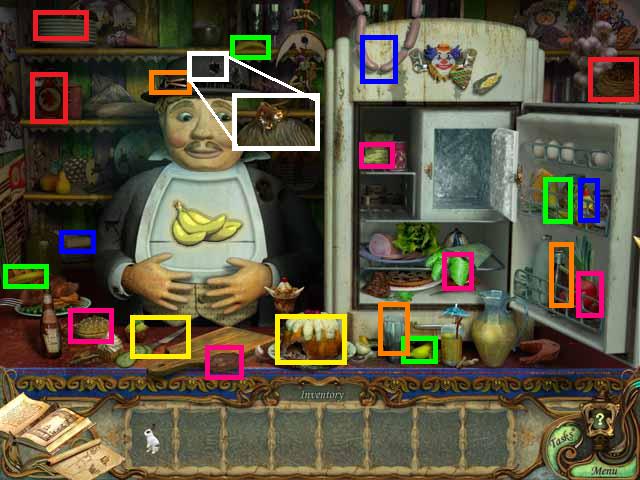
- Go to the Café and pick up the items as displayed on the bib. This time it will take a collection of items as shown color coded in the screenshot. For example to get the bunch of bananas you will need to pick them up individually. (Hint: to do the soda you need to hold the opener over the bottle then pour it into the glass).
- Pick up the LION (white) off of his head.
- Go to the Fountain and zoom in to trigger a Hidden Object Scene.
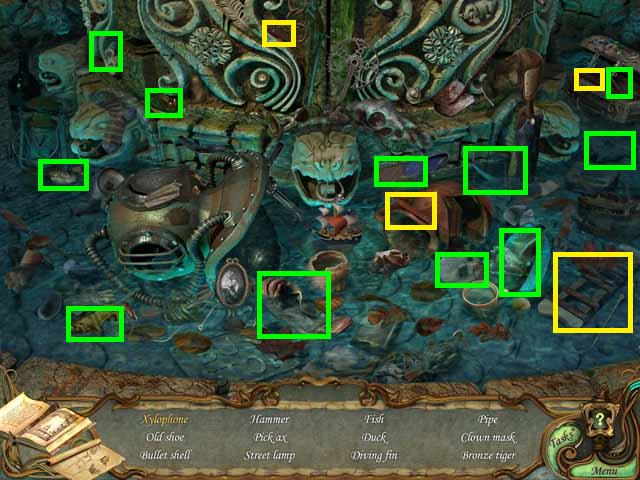
- Place the three BARS (yellow) on the XYLOPHONE (yellow) and pick it up.
- Pick up the remaining items in the list (green) to receive another LION.
- In the House of Horrors, zoom into the Vampire to trigger a Hidden Object Scene.
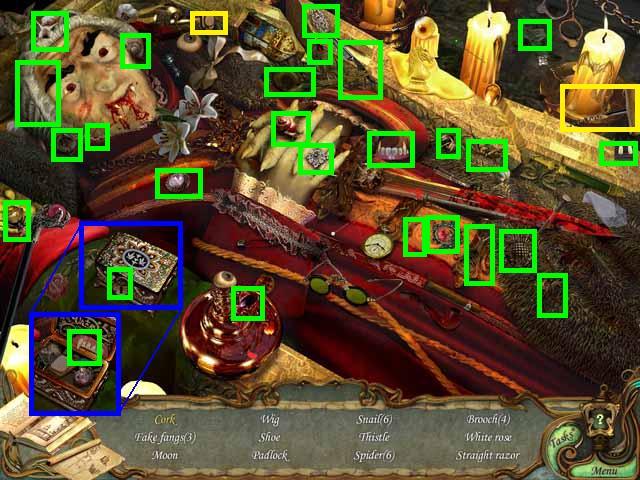
- Open the wine bottle (yellow) with the CORKSCREW (yellow) and pick up the CORK.
- Pick up the remaining items in the list (green) to receive the STRAIT RAZOR.
- Go to the Pirate Ship and zoom into the wheel to trigger a Hidden Object Scene.
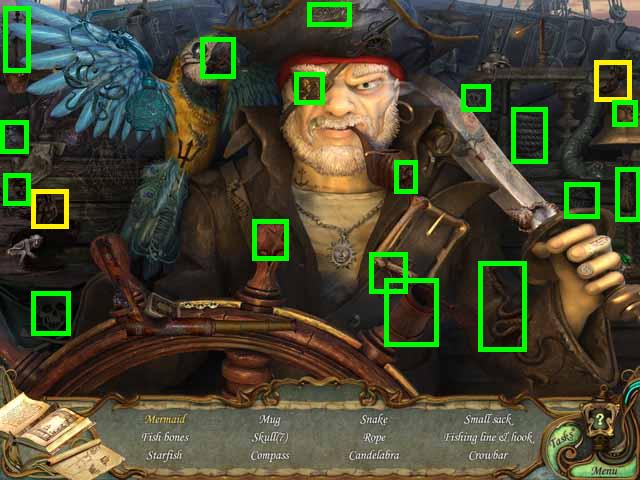
- Place the MERMAID TAIL (yellow) on the MERMAID (yellow) and pick it up.
- Pick up the remaining items in the list (green) to receive the CROWBAR.
- Return to the Rocket and zoom into the window with earth showing to trigger a Hidden Object Scene.
- Place three EGGS (yellow) in the nest (yellow) and pick up the BIRD that fly’s to the nest.
- Pick up the remaining items in the list (green) to receive another LION.
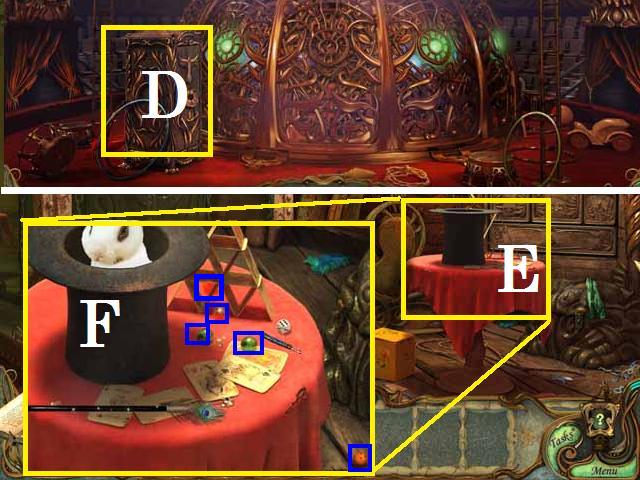
- Return to the Tent and zoom into the Magicians Dressing Room (D).
- Zoom into the table (E) and pick up five MARBLES (blue) and place the RABIT in the hat (F).
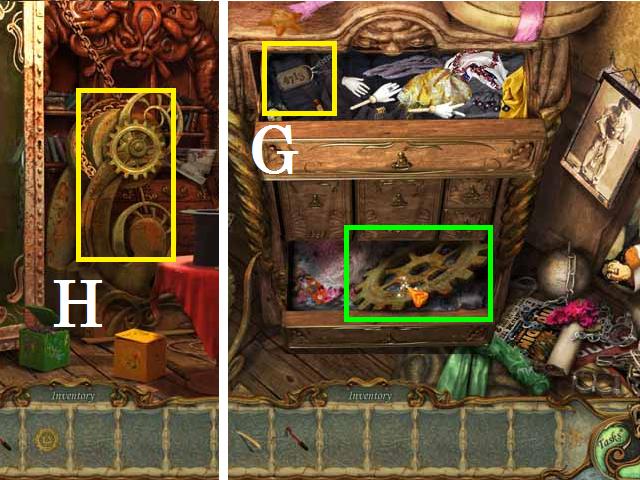
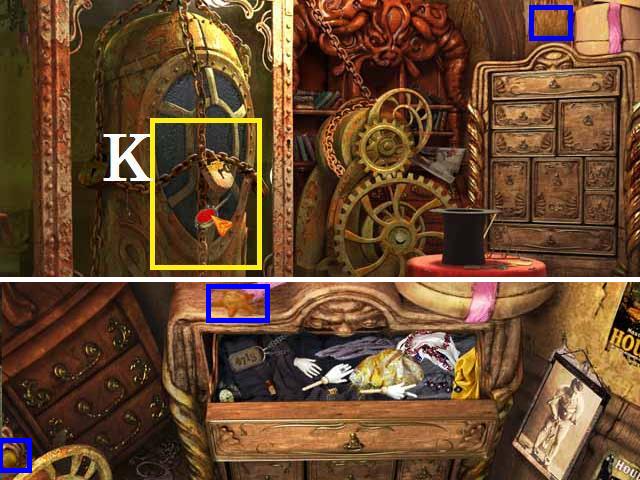
- Zoom into the dresser and click on the tag (G) then close the pop-up window.
- Open and close the drawers by clicking on them until the bottom drawer opens and pick up the GEAR (green) and the.
- Place the GEAR on the pulley (H) to lift the box out of the water.
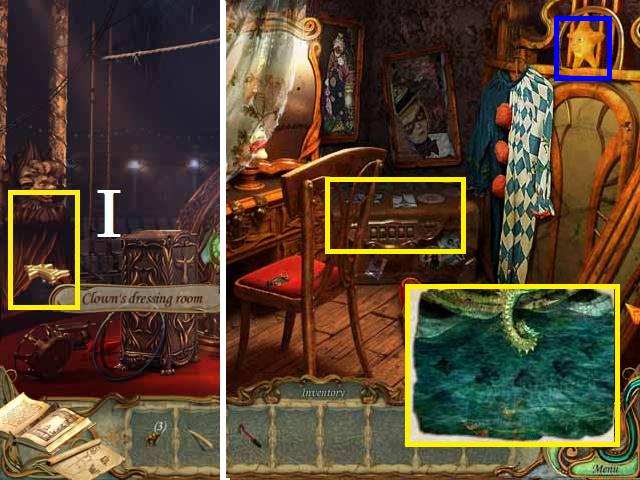
- Exit the room and enter the Clowns Dressing Room (I) on the left.
- Pick up the STARFISH (blue).
- Zoom into the trunk (J) and set the lock in the same order as shown in the small fountain. You can look it up in your diary.
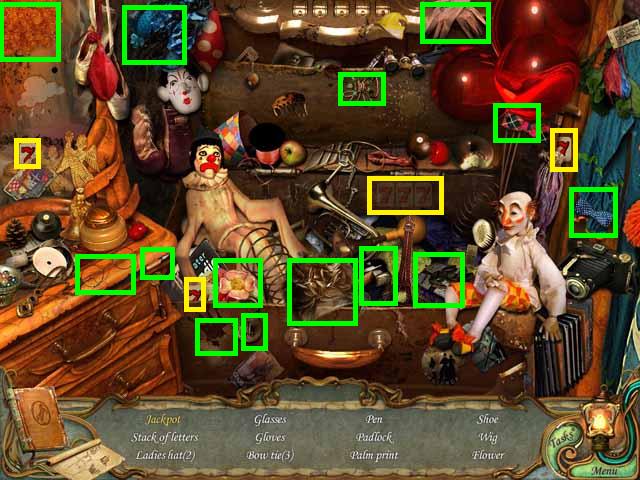
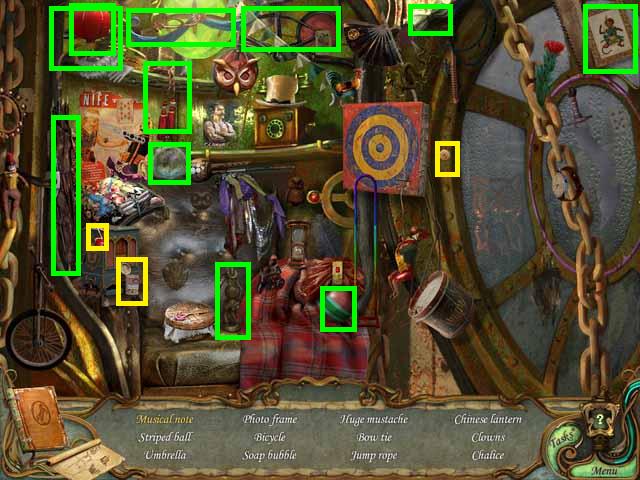
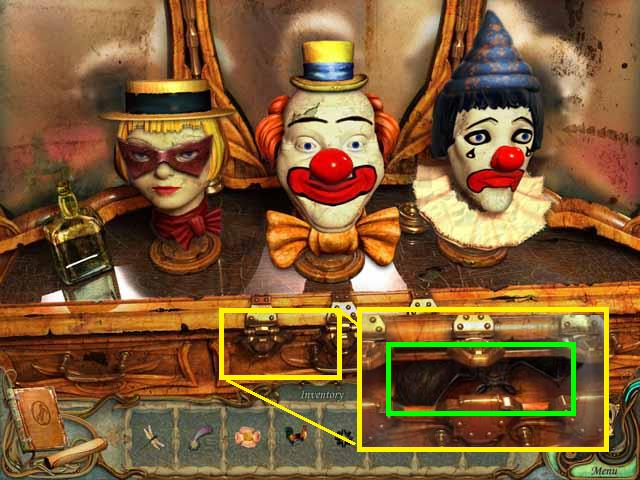
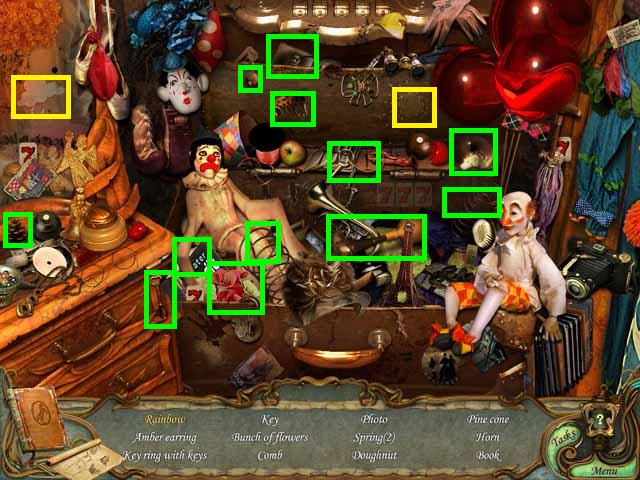
- Zoom into the trunk to trigger a Hidden Object Scene.
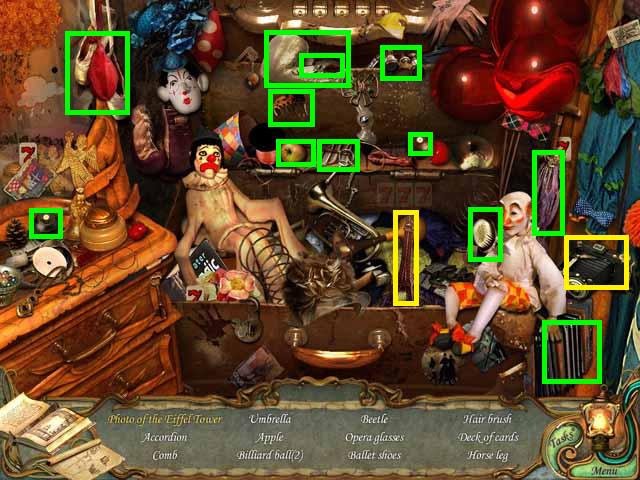
- Pick up the CAMERA (yellow) and drop it over the Eiffel Tower (yellow) then pick up the photo.
- Pick up the remaining items in the list (green) to receive the horse leg.

- Return to the Merry-go-round and place the LEG on the horse.
- Change the positioning of the horses legs by clicking on the joints as shown in the screenshot to get the KEY (green).
- Pick up the MARBLE (blue).
- Zoom into the back panel (K) open it with the KEY.
- Zoom into the Carousel Celling to trigger a Hidden object Scene.
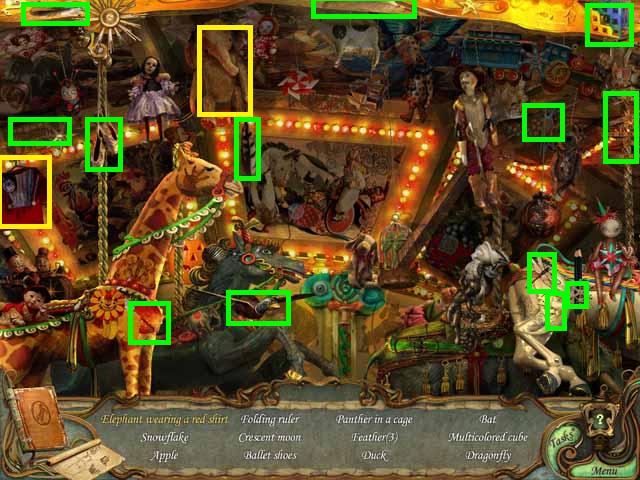
- Place the RED SHIRT (yellow) on the ELEPHANT (yellow) and pick it up.
- Pick up the remaining items in the list (green) to receive the DRAGONFLY.
- Zoom back into the celling to trigger another Hidden Object Scene.
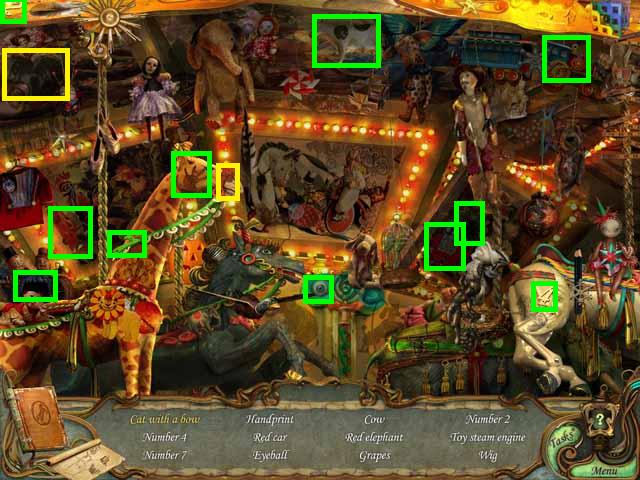
- Place the BOW (yellow) on the CAT (yellow) and pick it up.
- Pick up the remaining items in the list (green) to receive the WIG.
- Return to the Rollercoaster and zoom back into the car to trigger a Hidden Object Scene.
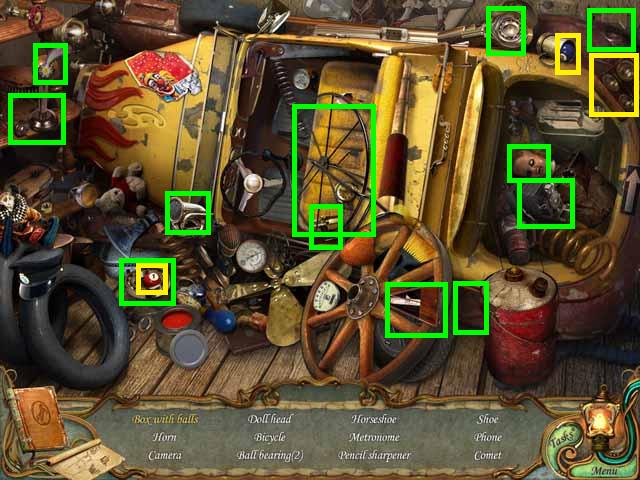
- Place the two BALLS (yellow) in the BOX (yellow) and pick it up.
- Pick up the remaining items in the list (green) to receive the COMET.
- Zoom into the window with earth showing in the Rocket to trigger a Hidden Object Scene.
- Place the FISHING ROD (yellow) in the man’s hands (yellow) then pick up the FISH (yellow).
- Pick up the remaining items in the list (green) to receive the OIL CAN.
- Return to the Clowns dressing room and zoom back into the chest to trigger a Hidden Object Scene.
- Place the three SEVENS (yellow) on the OUTLINE (yellow) and pick it up.
- Pick up the remaining items in the list (green) to receive the FLOWER.
- In the Magicians room pick up the STARFISH (blue).
- Zoom back into the dresser and pick up the STARFISH (blue) and MARBLE (blue).
- OIL the lock (K) on the box and zoom in to trigger a Hidden Object Scene.
- Put the COIN (yellow) in the music box (yellow) to get the MUSIC NOTE (yellow).
- Pick up the remaining items in the list (green) to receive the CHALICE.
- Zoom back into the box to trigger another Hidden Object Scene.
- Wipe the window (yellow) with the SPONG (yellow) to get the 12.
- Pick up the remaining items in the list (green) to receive the ROOSTER.
- Zoom into the cello case in the Lion Tamers Room to trigger a Hidden Object scene.
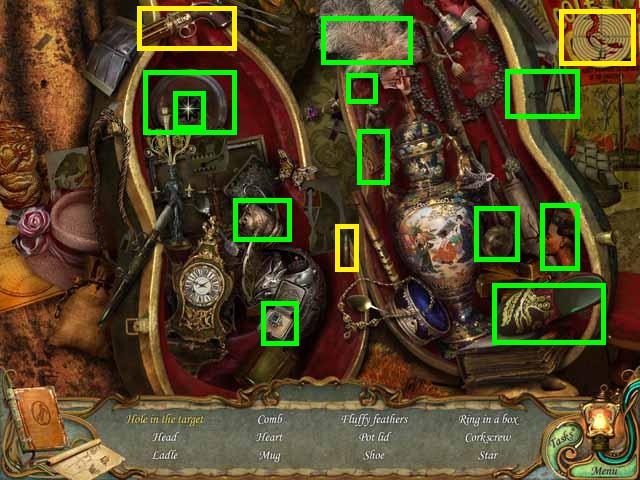
- Load the GUN (yellow) with the BULLET (yellow) and shoot the TARGET (yellow) then pick it up.
- Pick up the remaining items in the list (green) to receive the Star.
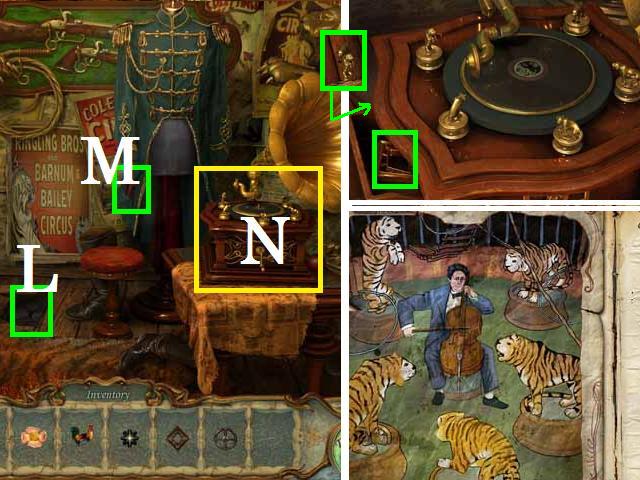
- Use the CROWBAR on the floorboard (L) and pick up the RECORD (green).
- Use the SRAIT RAZZOR on the coat (M) and pick up the MASK.
- Zoom into the record player (N) and place the LIONS as shown in the screenshot, two of them are sitting right next to it (green).
- Place the RECORD in the player and pick up the KEY (green) from the now open drawer.
- Return to the House of Horrors and zoom back into the girl painting on the right.
- Place the ROSE, APPLE, GLOVES, and the BUTTERFLY on the painting.
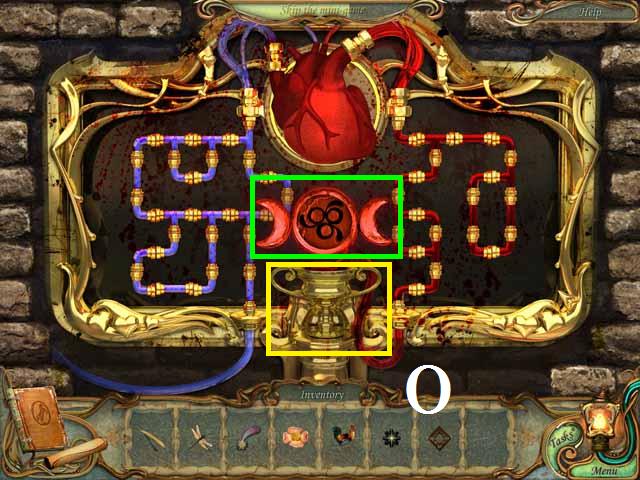
- Place the CHALICE at the bottom (O) and set the pipes as shown in the screenshot to solve the puzzle.
- Pick up the RUNE (green) and return to the moon in the Rocket.
- Pick up the MARBLE (blue).Place the RUNE on the pillar (P).
- Unlock the ROBOT PARTS by clicking on them (Q-V) in the following sequence: U, R, S, Q, V, and T.
- Pick up the IRON STERING WHEEL (green) off of the robot.
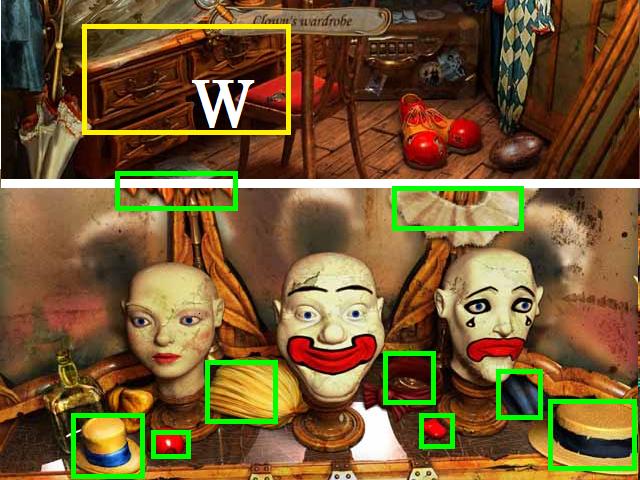
- Return to the Clowns Dressing Room and zoom into the table (W).
- Place the WIG and MASK on the heads as shown in the screenshot.
- Place the remaining items (yellow) on the heads as shown in the screenshot.
- Pick up the BAT (green) from the now open drawer.
- Return to the Merry-go-round and zoom into the hidden panel.
- Place the ROOSTER, COMET, STAR, BAT, DRAGONFLY, and FLOWER as shown in the screenshot.
- Pick up the CIRCLE KEY (green) and return to the tent.
- Open the first cage with the CIRCLE KEY.
- Use the SQUARE KEY to open the second one.
- Enter the Clowns Dressing Room.
- Zoom into the chest to trigger a Hidden Object Game.
- Drag the CLOUD (yellow) over the sun (yellow) to turn it into a RAINBOW and pick it up.
- Pick up the remaining items in the list (green) to receive the BOOK.
- Go to the Magicians Room and zoom back into the table.
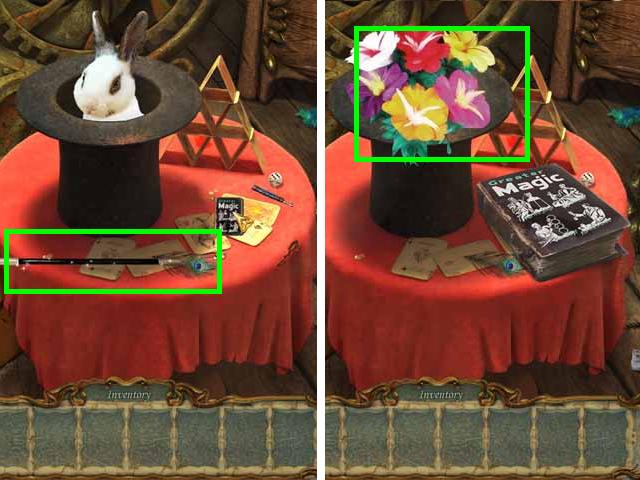
- Place the book next to the hat and pick up the WAND (green).
- While holding the left click move the wand in a figure 8 motion going clockwise first the counter-clockwise.
- Pick up the FLOWERS (green).
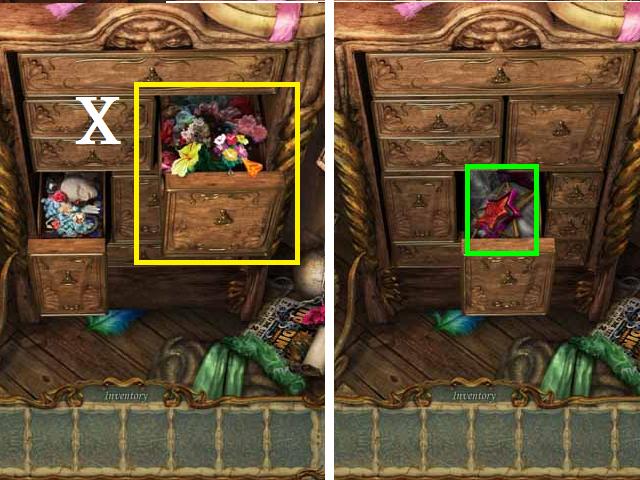
- Zoom back into the dresser and open and close the drawers until the drawer second from the top on the right (X) is open and place the FLOWERS in it as shown in the screenshot.
- The middle drawer will open; pick up the KEY (green).
- Open the last cage on with the STAR KEY.
- Place the WHEEL on the safe (Y).
- Set the dial (Z) as shown in the screenshot. This number can be found in your diary.
- Congratulations! You have destroyed the contract and saved your brother!
Created at: 2011-06-09