

Walkthrough Menu
- General Tips
- Chapter 1: The Guestrooom
- Chapter 2: The Chapel
- Chapter 3: The Church
- Chapter 4: The Mysterious Place
- Chapter 5: The Boathouse
- Chapter 6: The Other Side of the Lake
- Chapter 7: The Finale
General Tips
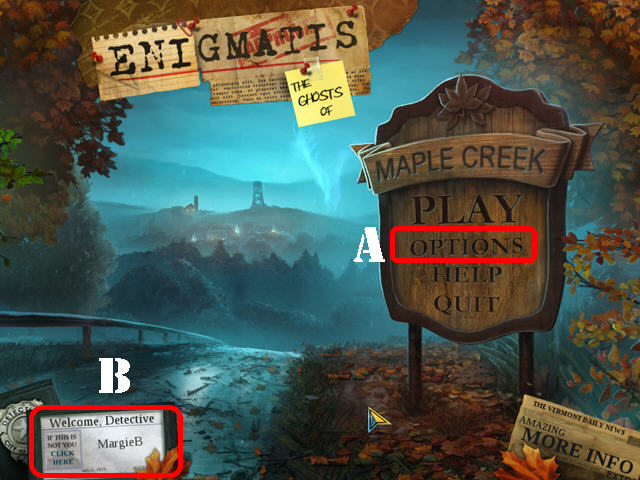
- Click on 'OPTIONS' (A) to change screen size, volume, mode, and the cursor.
- Click on 'Welcome Detective' (B) to manage the player profiles in the game.
- This guide will use the terminology used in the game to describe different locations.
- Use the map in the notebook to find available actions (nn regular mode only)nalong with your current location.
- Use the magnifying glass in the evidence tab to examine the evidence up close. The pictures and letters contain important clues and puzzle solution.
- Items written in blue in HOS (Hidden Object Scenes) need another action to be performed before they can be picked up.
- The lists in HOS are random; your lists may vary from the ones in the guide.
Chapter 1: The Guestroom

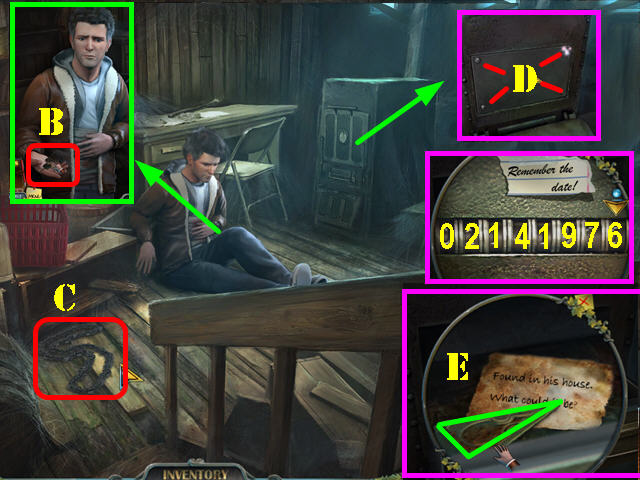
- Grab the DIARY (1).
- Zoom into the papers; move them aside and take the EVIDENCE (2) and the ROOM KEY (3).
- Head forward.
- Look at the fallen sign; take the EVIDENCE (4).
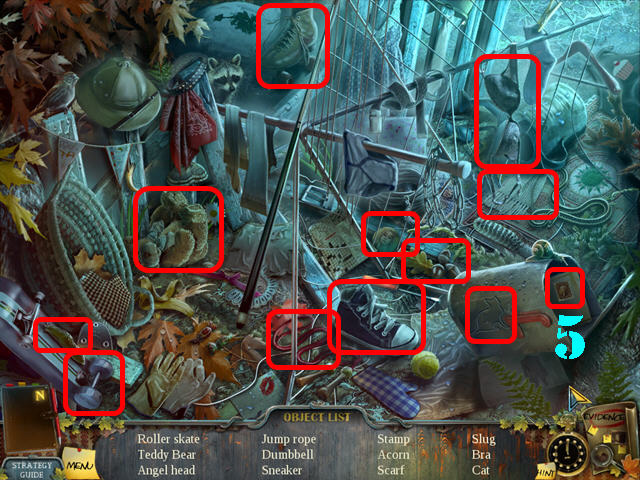
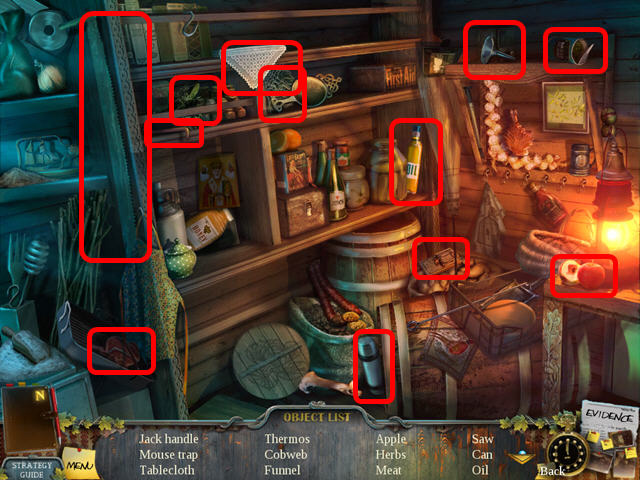
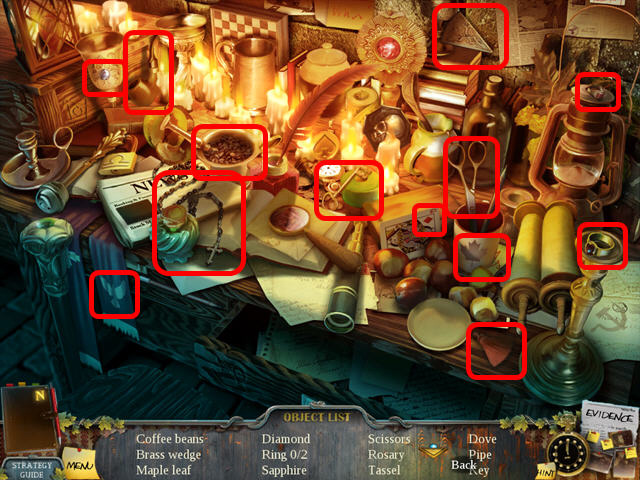
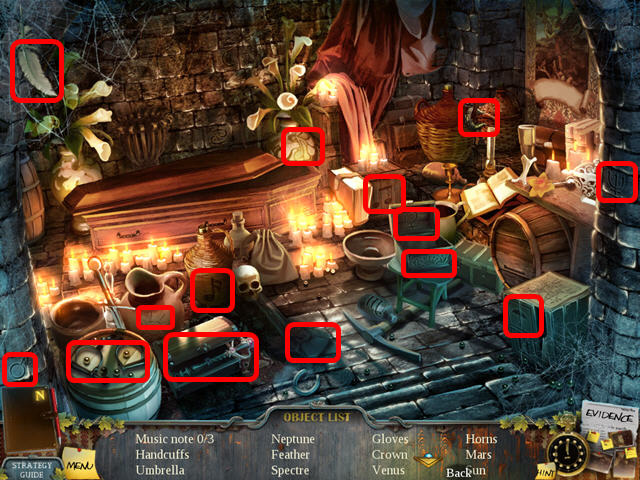
- Play the HOS.
- Open the mailbox; take the STAMP (5).
- The YELLOW ANGEL HEAD will be added to inventory.
- Head forward.
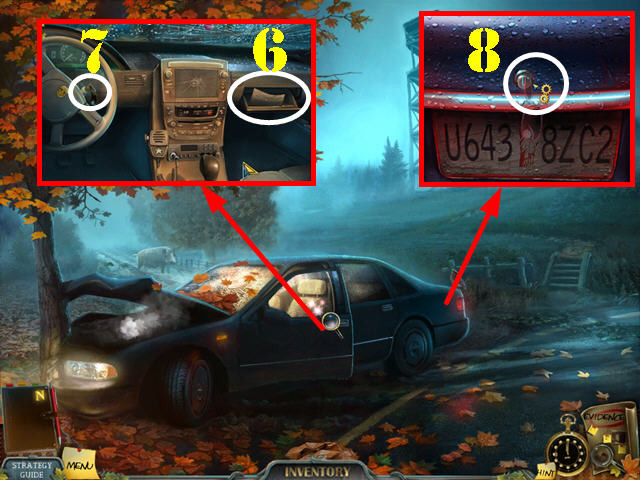
- Open the driver side door and zoom into it.
- Open the glove compartment; take the EVIDENCE and the ACCESS CARD behind it(6).
- Take the TRUNK KEY (7).
- Close the pop-up window.
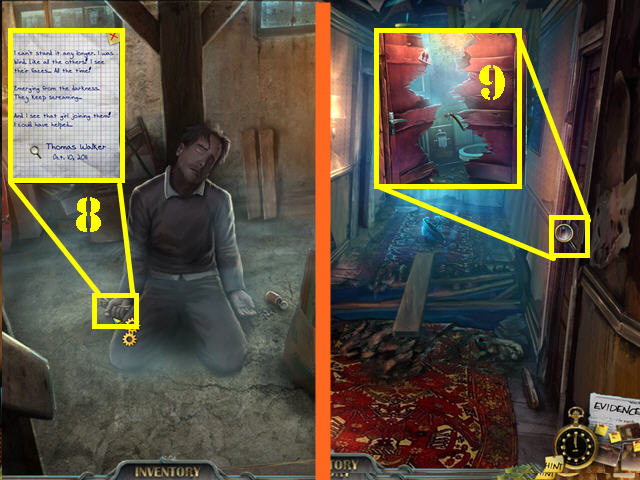
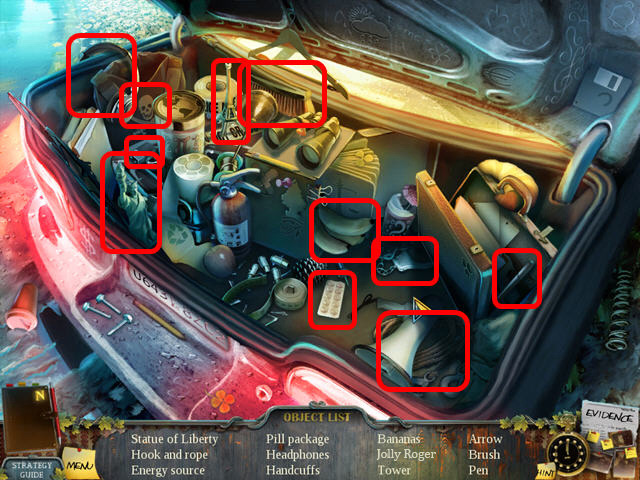
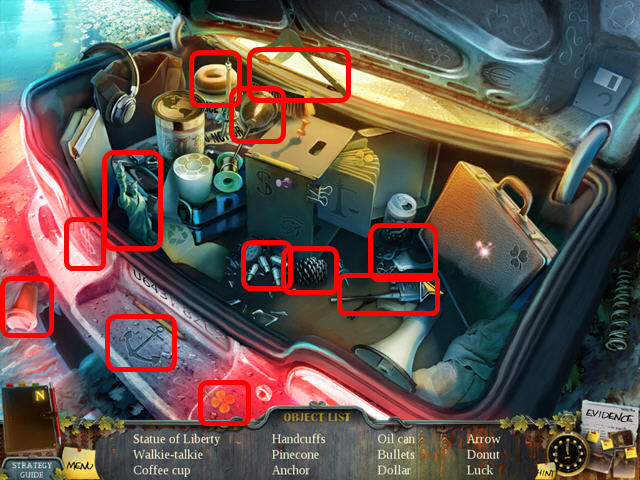
- Zoom into the car trunk; place the TRUNK KEY in the lock and turn the key to activate a HOS (8).
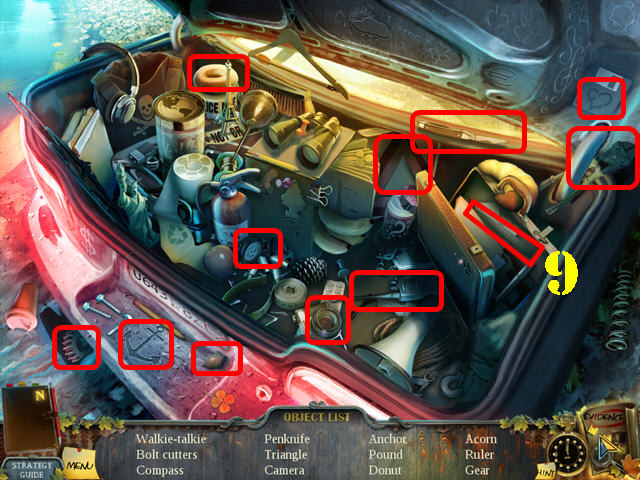
- Find the items listed.
- Open the suitcase; take the RULER (9).
- The BOLT CUTTERS will be added to inventory.
- Head right down the street; go forward across the bridge.
- Click on the man by the door.
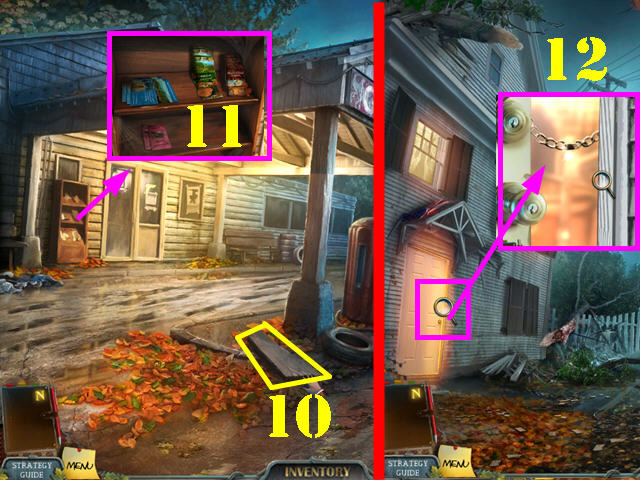
- Take the PLANK (10).
- Examine the brochures; click on each one of them (11).
- Return to the town center.
- Zoom into the left door; cut the chain with the BOLT CUTTERS (12).
- Enter the boarding house.
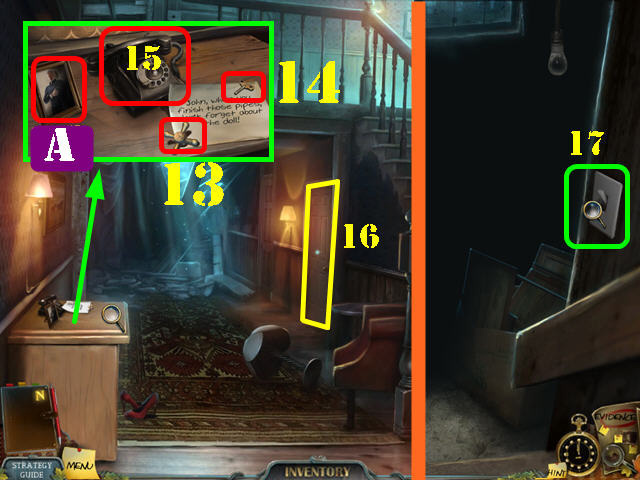
- Examine the dresser; take the photo out of the frame and take the EVIDENCE (A).
- Take the TAP HANDLE (13) and the WIND-UP KEY (14).
- Lift the telephone receiver; the line is dead (15).
- Open the door and go downstairs into the basement (16).
- Flip the switch (17) and the light bulbs will burn out.
- Click down and go upstairs.
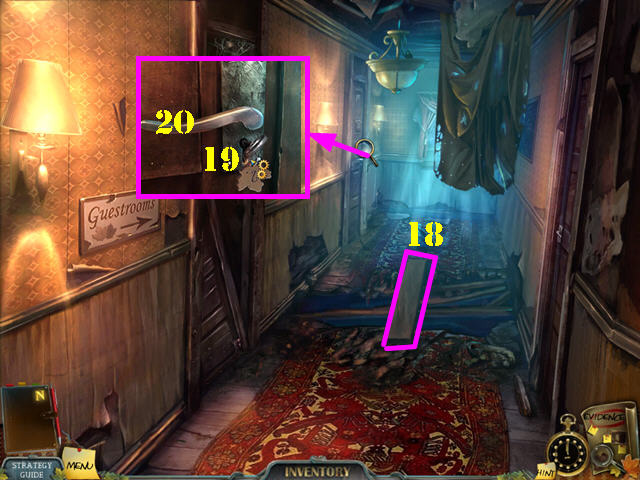
- Place the PLANK on the ground (18).
- Examine the door on the far left; use the ROOM KEY in the lock and turn it (19).
- Click on the HANDLE (20) and enter the guestroom; which is your room.
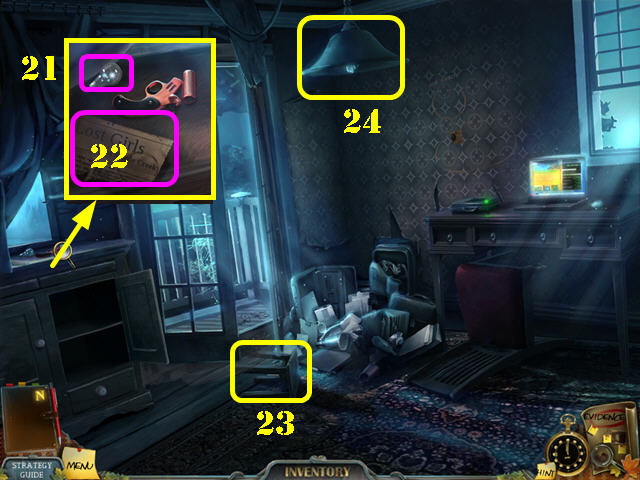
- Examine the top of the dresser; a hand will take the knife away.
- Examine the top of the dresser again; take the LIGHT BULB (21) and the EVIDENCE (22).
- Click on the stepstool to position it below the light fixture (23).
- Put the LIGHT BULB in the light fixture (24).
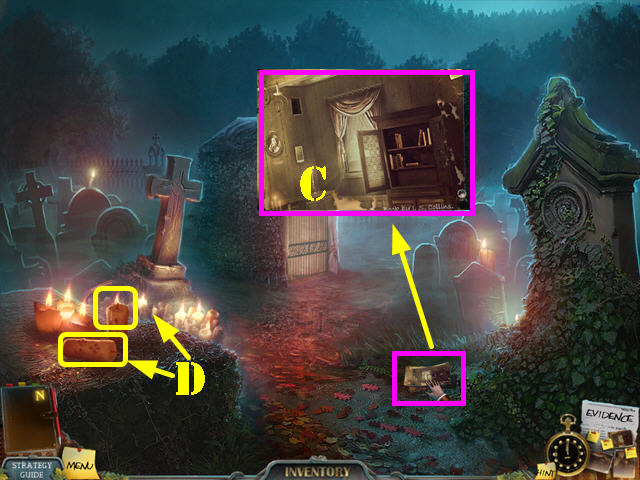
- Zoom into the right side of the wall so you can look at the evidence.
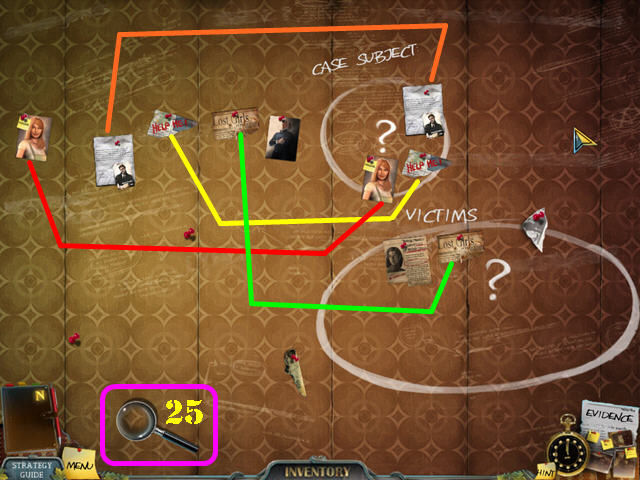
- Click on the journal page several times until all the evidence appears on the board.
- Arrange the evidence as shown in the screenshot.
- You can use the MAGNIFYING GLASS (25) to take a closer look at the evidence. Right-click on the magnifying glass to put it back in place.
- The evidence will now be stored in your room.
- Exit the evidence wall.
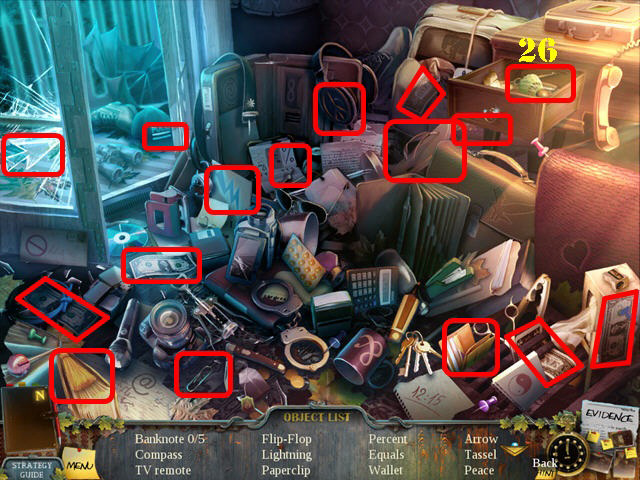
- Play the HOS.
- Open the drawer and take the COMPASS (26).
- The BENT PAPERCLIP will be added to inventory.
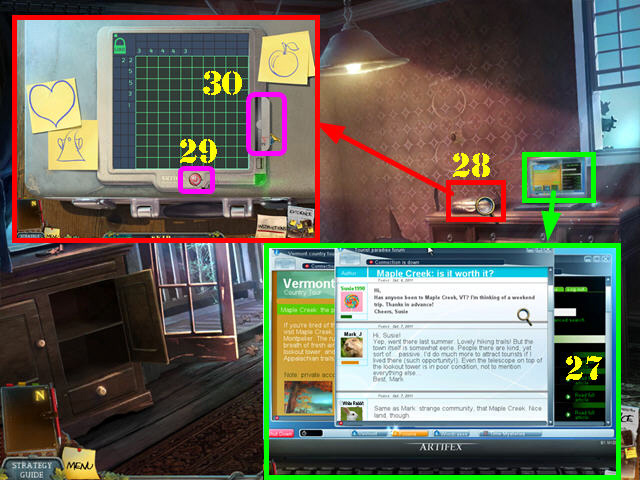
- Look at the laptop (27); read the email messages.
- Examine the SecuriCase (28).
- Use the BENT PAPERCLIP on the red button (29).
- Click on the red button twice for a message to appear.
- Use the ACCESS CARD in the slot to trigger a 3 part puzzle (30).
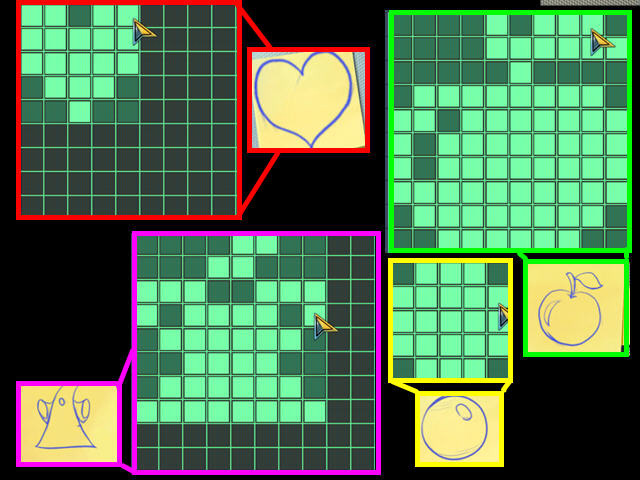
- Using the numbers on the side and on top click on the correct squares.

- Please look at the screenshot for some random solutions.
- Click on the screen to open the SecuriCase.
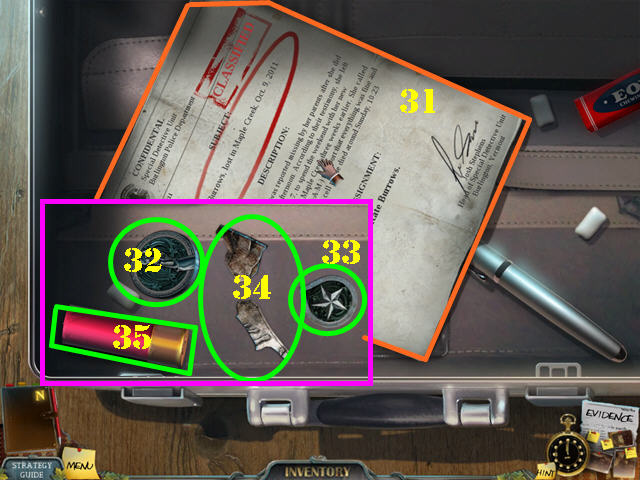
- Take the EVIDENCE (31).
- Click on the plastic bag to shake out the items.
- Grab the RIGHT-HAND RELIEF (32), the STAR SYMBOL (33), and the FLARE (35).
- Take the 1/4 and the 2/4 RELIEF PIECES (34).
- Exit the case.
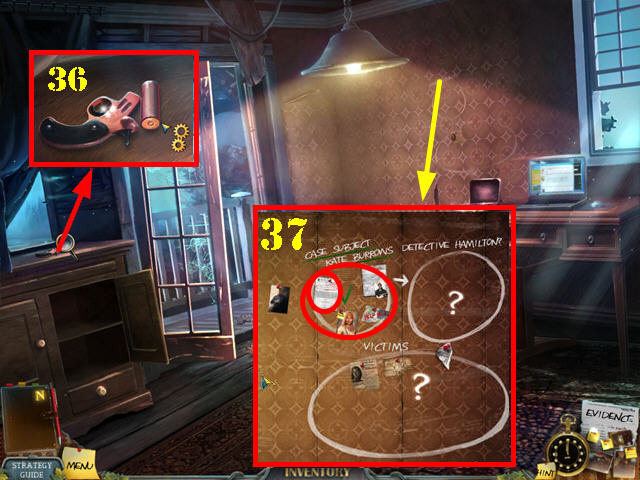
- Examine the top of the dresser; put the FLARE into the FLARE GUN (36).
- Close the barrel of the gun and take the FLARE GUN.
- Open the evidence wall.
- Place the EVIDENCE into the Case Subject to complete Kate Burrow's Case and open Hamilton's Case (37).
- Return to the town center.
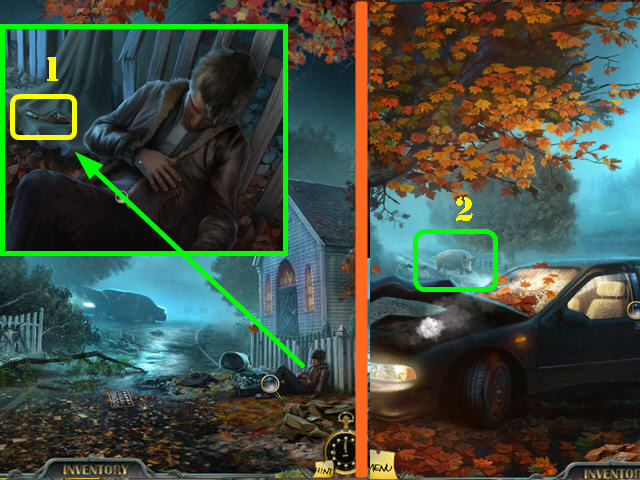
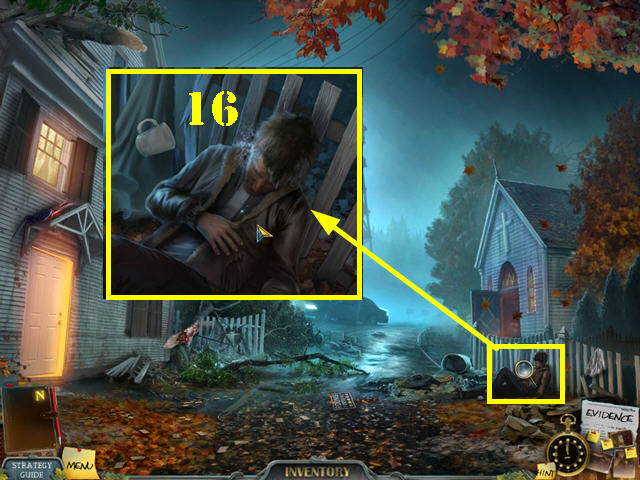
- Examine the unconscious man; take RELIEF PIECE 3/4 (1).
- Go forward towards the car.
- Use the FLARE GUN on the wild boar (2).
- Go up the road and head left towards the church gates.
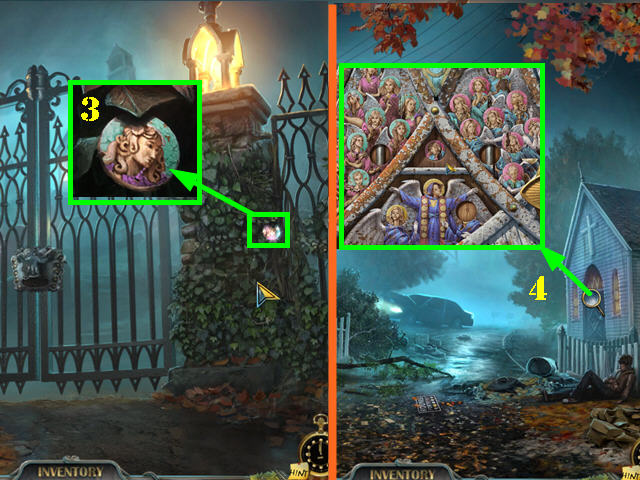
- Examine the right column; take the BLUE ANGEL HEAD (3).
- Return to the town center.
- Zoom into the chapel door (4).
Chapter 2: The Chapel
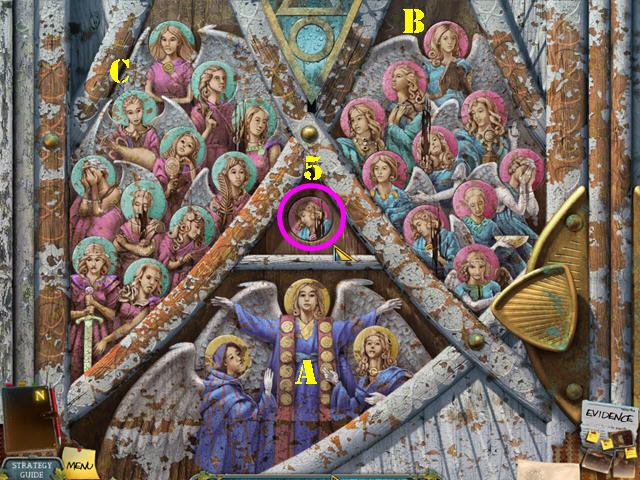
- Click on the center triangle and take the PINK ANGEL HEAD (5).
- Put the YELLOW ANGEL HEAD in the bottom slot.
- Click on any two heads to swap their positions.
- Move the heads into position as shown in fig. A.
- Place the PINK ANGEL HEAD in the empty slot on right; arrange the heads as shown in Fig. B.
- Place the BLUE ANGEL HEAD in the empty slot on left; arrange the heads as shown in Fig. C.
- Enter the chapel.
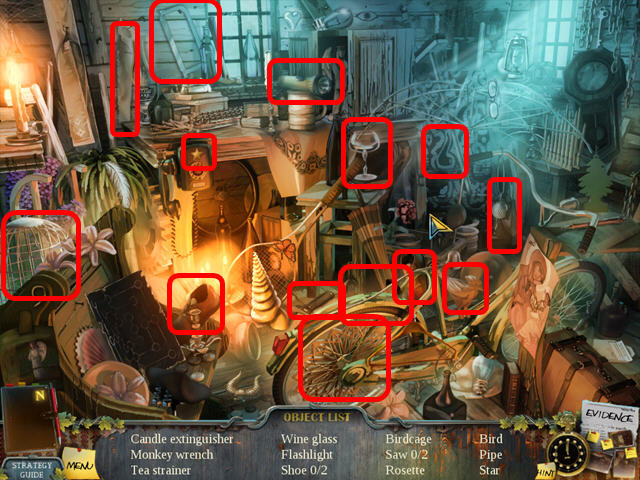
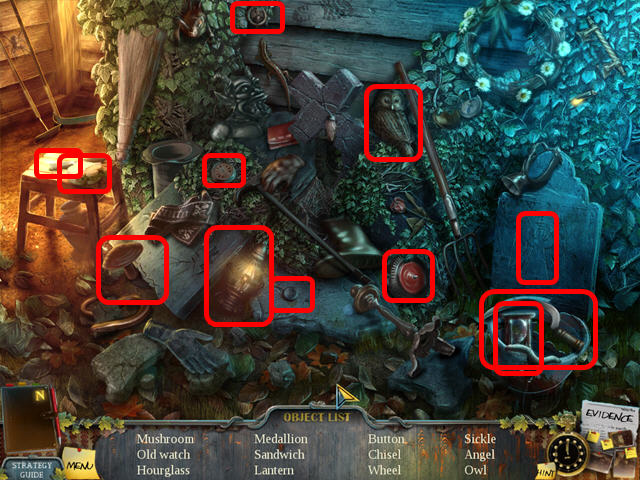
- Play the HOS.
- Find the items listed.
- The FLASHLIGHT will be added to inventory.
- Examine the left side of the wall; remove the 5 pieces of paper and take the EVIDENCE (6).
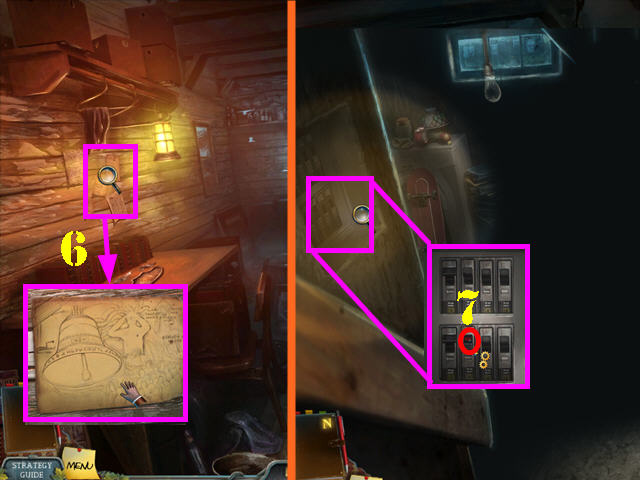
- Return to the basement in the boarding house.
- Use the FLASHLIGHT in the basement; there is a dead man there.
- Examine the switchbox on the left; flip the switch to turn on the lights (7).
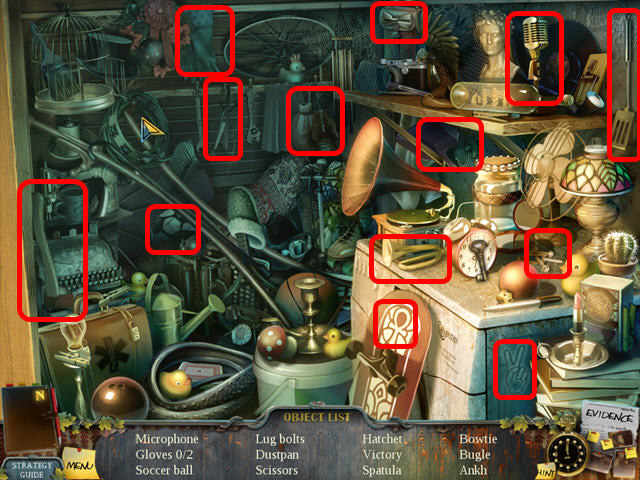
- Play the HOS.
- Find the items on the list.
- The HATCHET will be added to inventory.
- Open the man's hand; take the EVIDENCE (8).
- Click down and then go upstairs.
- Zoom into the right door (9); use the HATCHET on the door 3 times.
- Enter the bathroom.
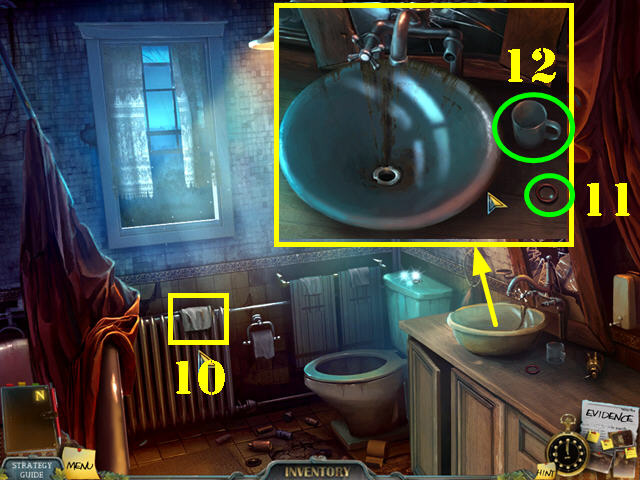
- Grab the DIRTY RAG on the radiator (10).
- Examine the sink; take the O-RING SEAL (11) and the MUG (12).
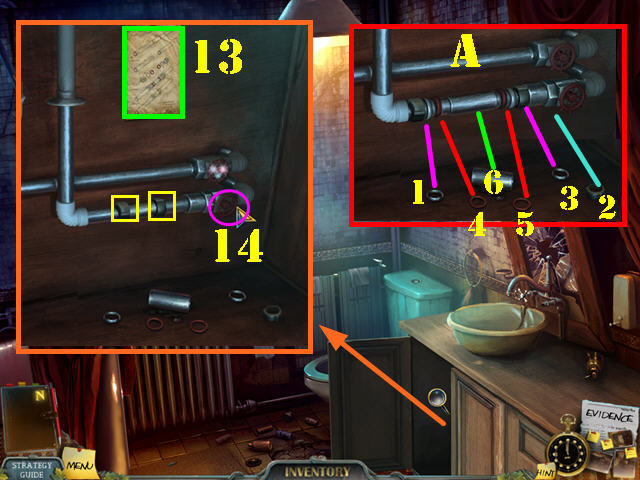
- Open the cabinet door and zoom into it; look at the instructions (13).
- Put the O-RING SEAL on the ground to activate a puzzle.
- Assemble the pieces as shown in Fig. A.
- Click on both rings marked in yellow.
- Turn the valve (14).
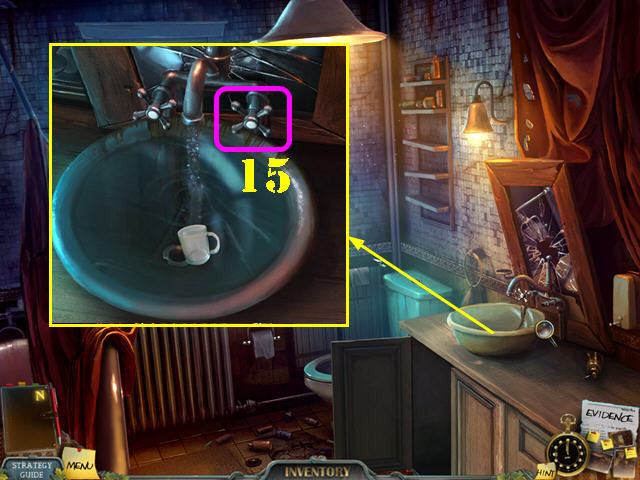
- Zoom into the sink.
- Put the TAP HANDLE on (15) and turn it.
- Use the MUG in the water to create the CUP OF WATER.
- Use the DIRTY RAG in the water to create the CLEAN RAG.
- Go out to the street.
- Examine the unconscious man; throw the CUP OF WATER on him (16).
- Talk to the man.
- Click down.
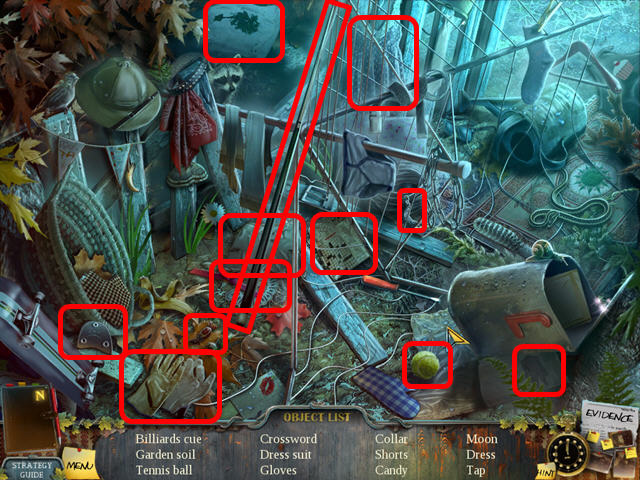
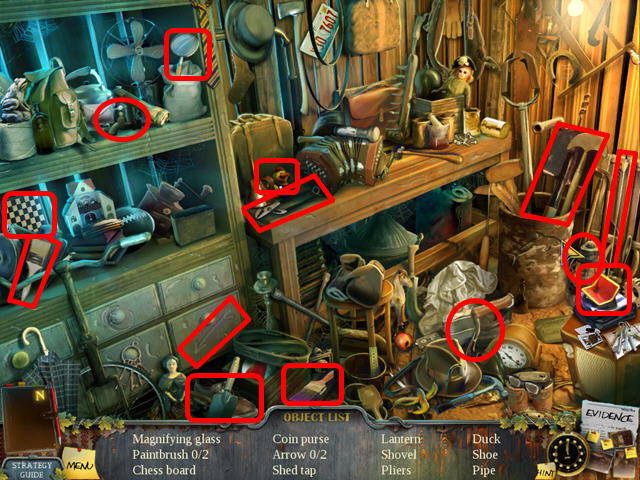
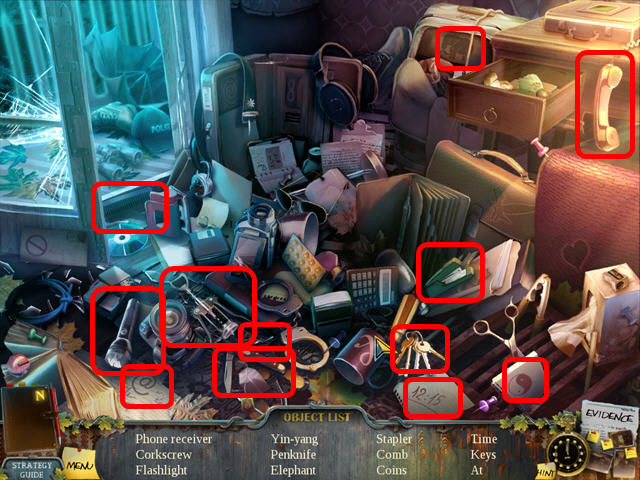
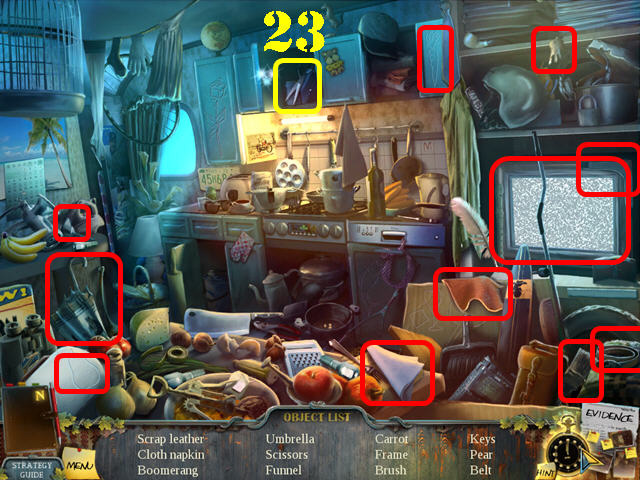
- Play the HOS in the town center.
- Find the listed items.
- The BILLIARDS CUE will be added to inventory.
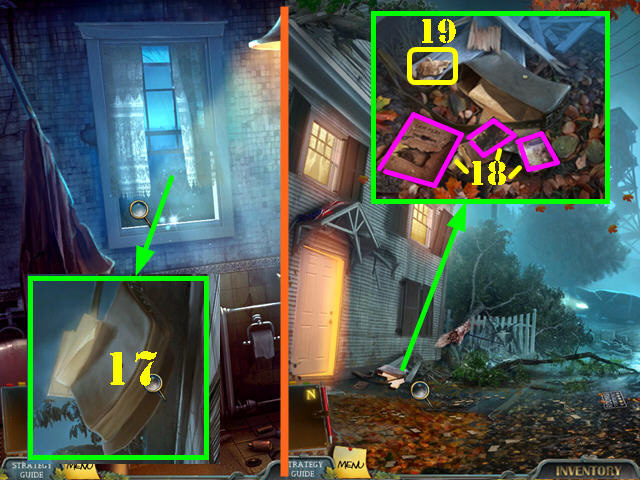
- Return to the bathroom in the boarding house.
- Zoom into the window; use the BILLIARDS CUE on the bag (17) to knock it down.
- Go outside.
- Click on the bag by the boarding house door for a cut scene to appear.
- Zoom into the bag; take the 3 pieces of EVIDENCE (18), and the RELIEF PIECE 4/4 (19).
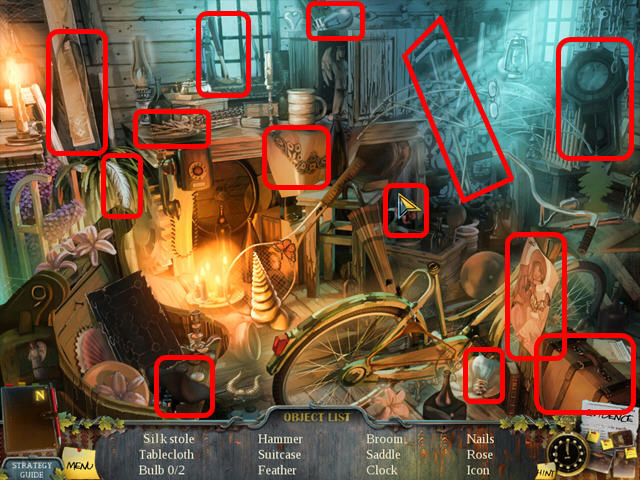
- Go into the chapel.
- Play the HOS.
- Find the listed items.
- The HAMMER AND NAILS will be added to inventory.
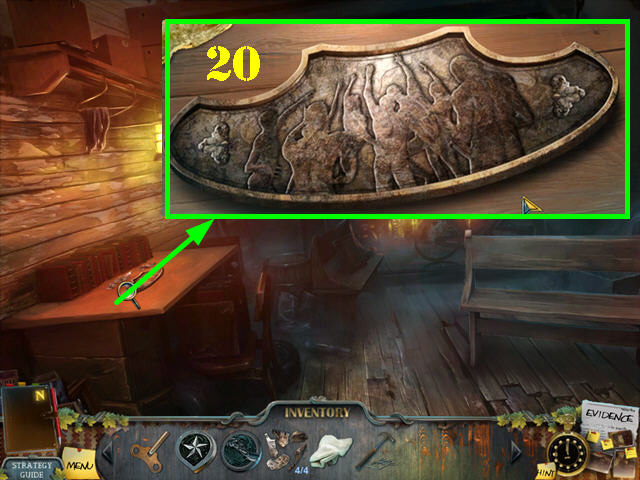
- Examine the desk; put the 4 RELIEF PIECES on the table to activate a puzzle.
- Drag the pieces into the right spots.
- Click on the pieces to rotate them.
- A piece placed correctly will lock in place.
- Please look at the screenshot for the solution (20).
- Take the METAL RELIEF after the puzzle has been solved.
- Return to the car.
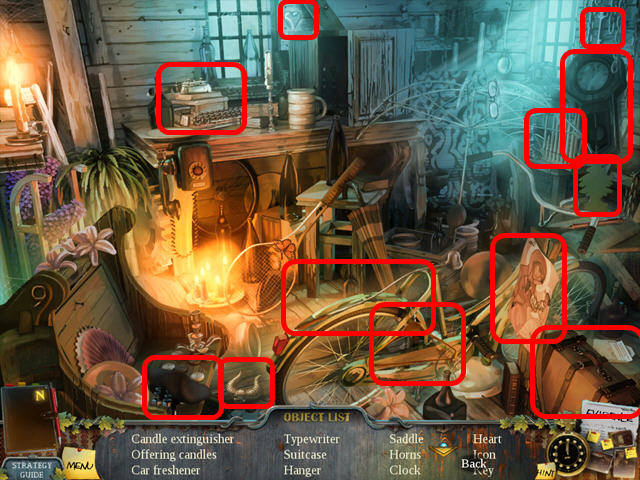
- Play the HOS.
- Find the listed items.
- The HOOK AND ROPE will be added to inventory.
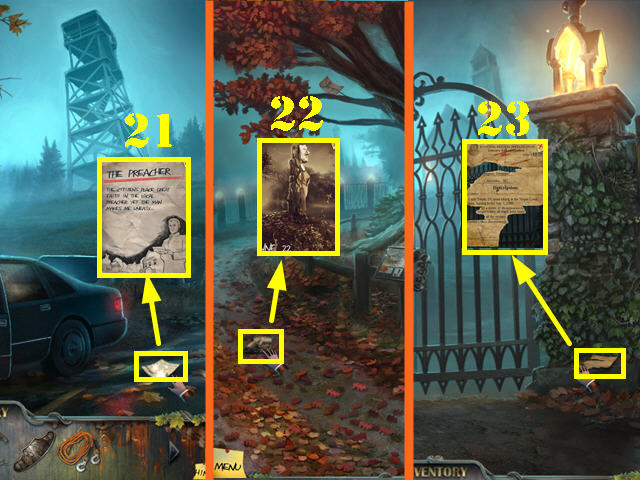
- Take the EVIDENCE (21) on the ground.
- Go up the road.
- Take the EVIDENCE (22) on the ground.
- Go towards the church gates.
- Take the EVIDENCE (23) on the ground.
- Return to your room in the boarding house.
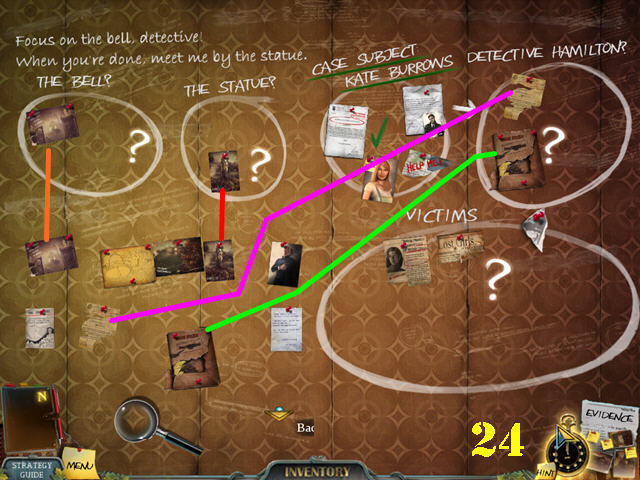
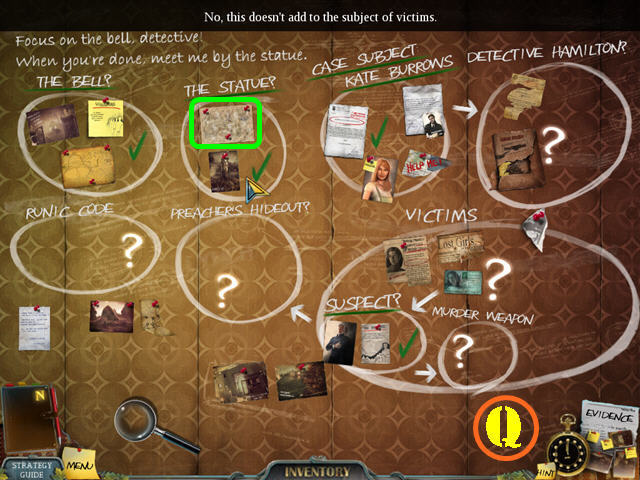
- Click on the evidence wall.
- Click on the journal page several times for 2 more circles to appear and to fill up the page.
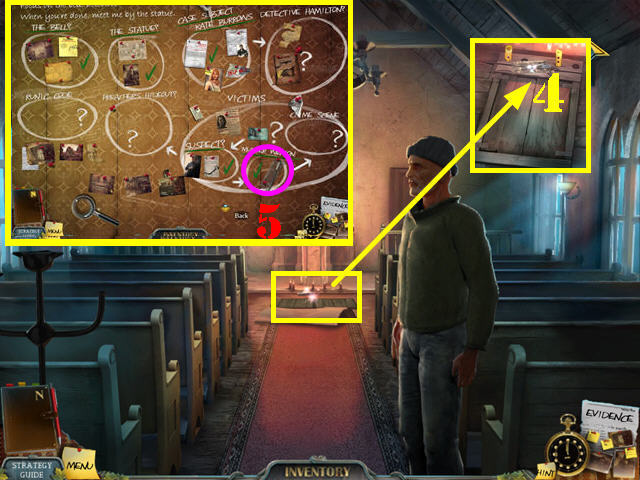
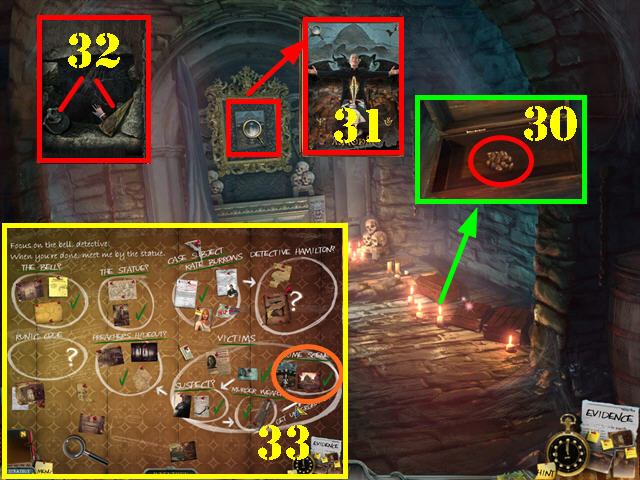
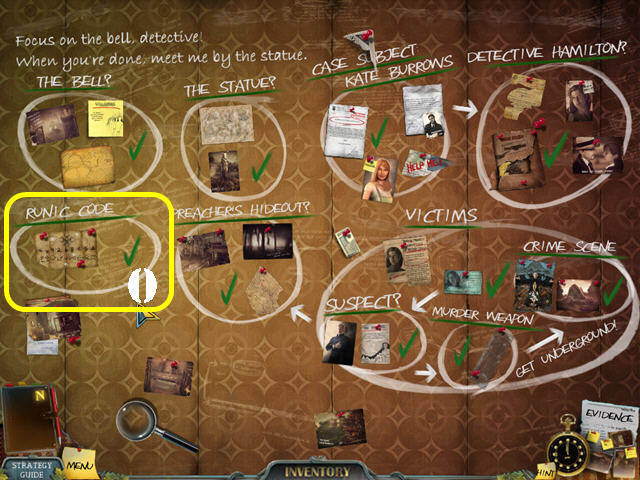
- A message appears on the wall stating: 'Focus on the bell detective! When you're done meet me by the statue'.
- Put the EVIDENCE PIECES as shown in the screenshot (24).
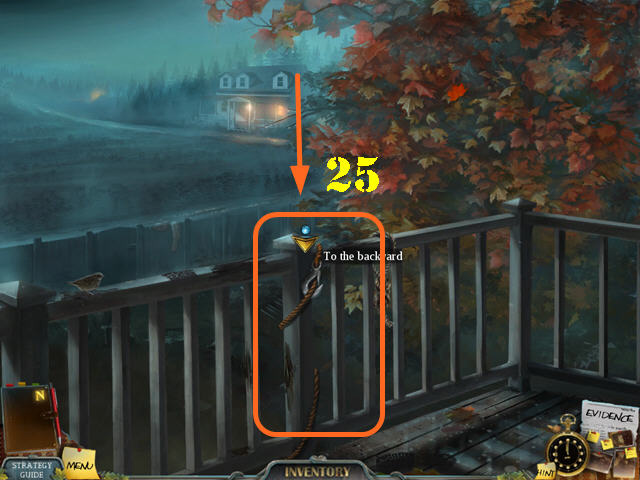
- Exit the evidence wall and head out the balcony.
- Put the HOOK AND ROPE on the railing (25).
- Go down to the backyard.
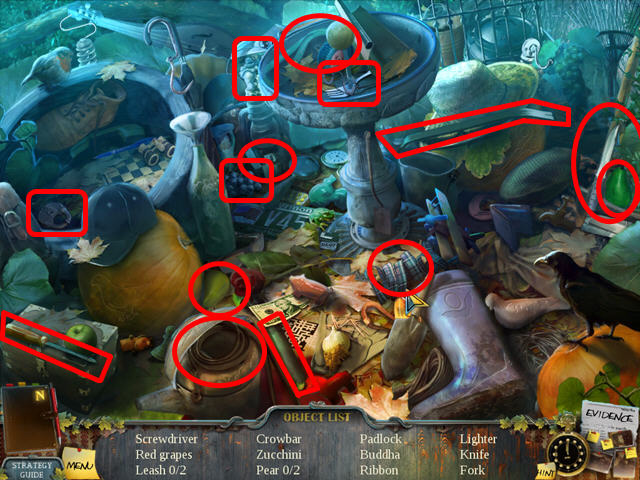
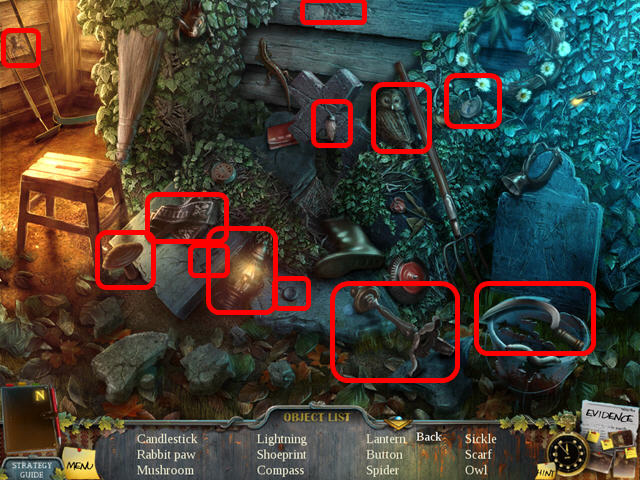
- Play the HOS.
- Find the listed items to obtain the CROWBAR.
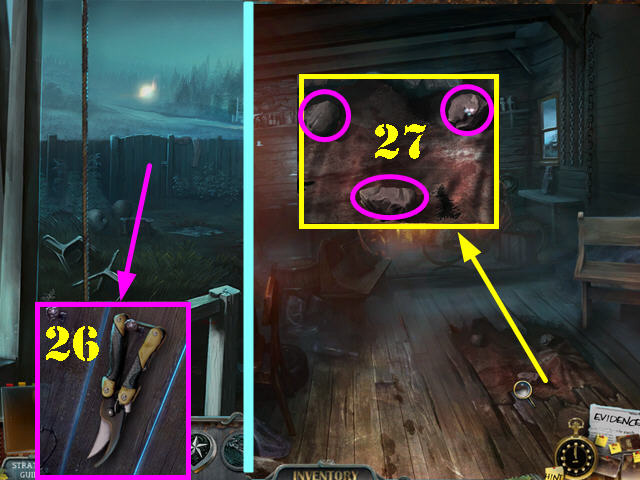
- Examine the fence; take the GARDEN SHEARS (26).
- Go back to the town center; the wounded man is now gone.
- Go into the chapel.
- Move the bench 3 times.
- Use the CROWBAR on the floor.
- Examine the hole in the floor; move the 3 rocks out of the way and click on the ground for some corpses to appear (27).
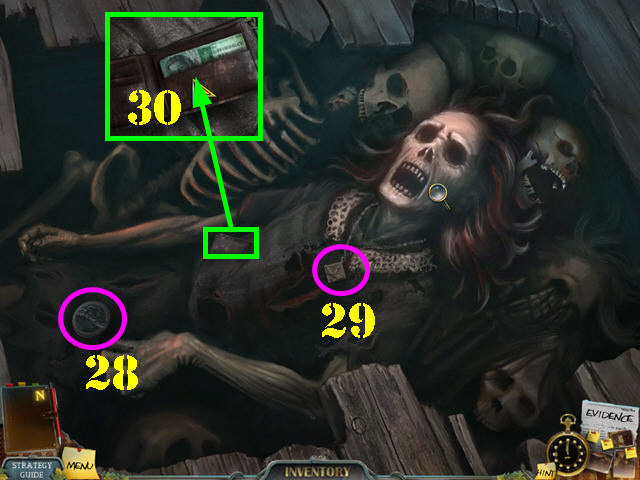
- Take the LEFT-HAND RELIEF (28) and the PENDANT (29).
- Zoom into the pocket; open the wallet and click on the EVIDENCE (30).
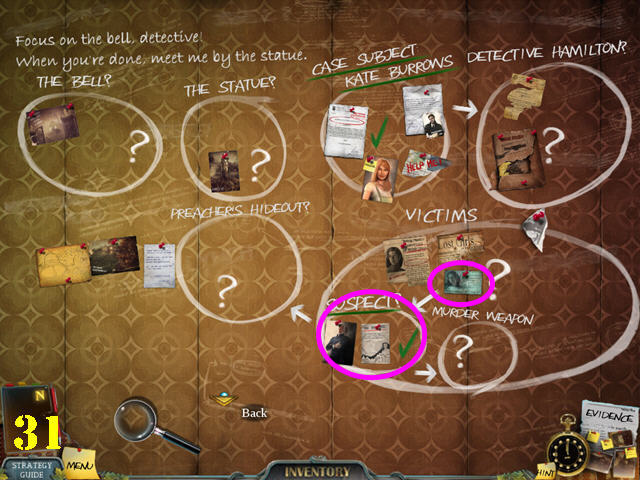
- Open the EVIDENCE TAB.
- Put the EVIDENCE into place as shown in the screenshot (31).
- Return to the church gates.
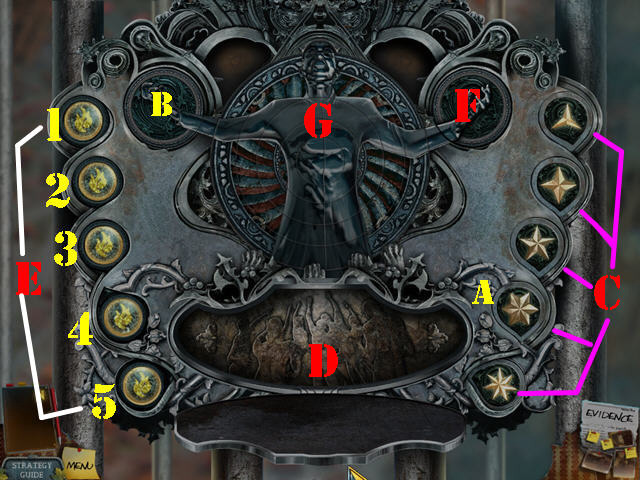
- Examine the center of the gate; remove the 2 leaves.
- Place the STAR SYMBOL (A) and the RIGHT-HAND RELIEF (B) in their appropriate slots.
- Move the 2 stars that appear on top over to the right side of the scene and place them according to Fig. C.
- Put the METAL RELIEF at the bottom of the lock (D).
- Click on the knobs on the left in this order: 2, 5, 4, 1, and 3 (E).
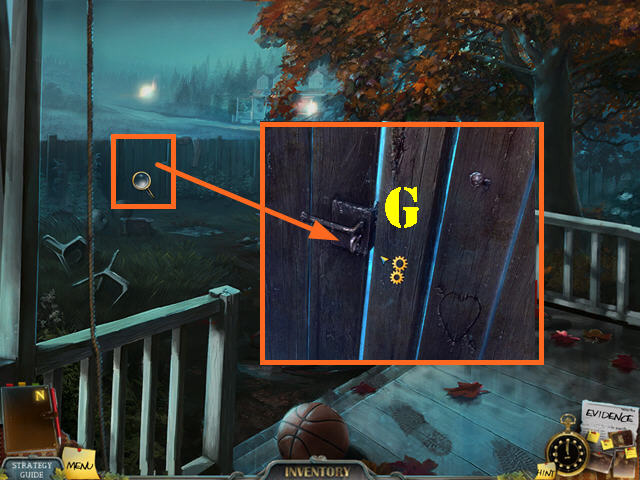
- Put the LEFT-HAND RELIEF in the slot (F) to activate a puzzle.
- Rotate the rings to form the correct image (G). Position the outer rings first and work your way in.
Chapter 3: The Church
- Go through the church gates.
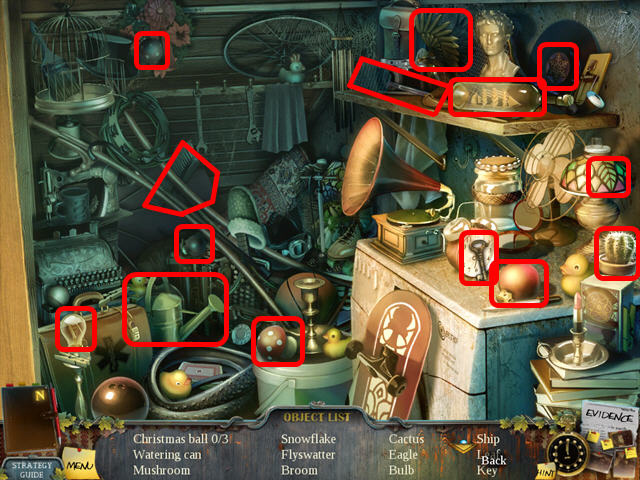
- Play the HOS.
- Find the listed items to obtain the CHISEL.
- Open the church door and go inside.
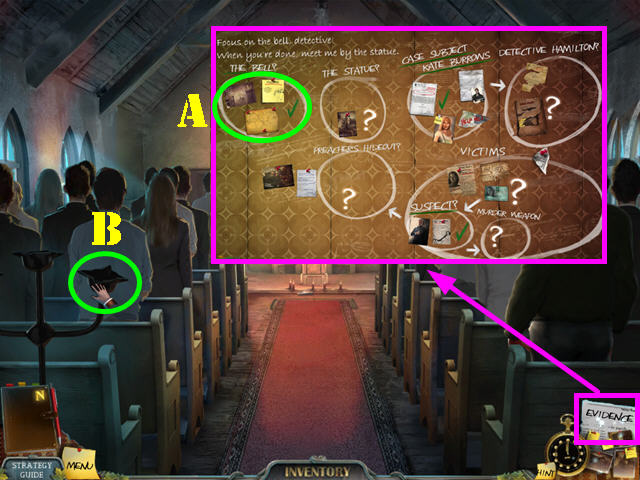
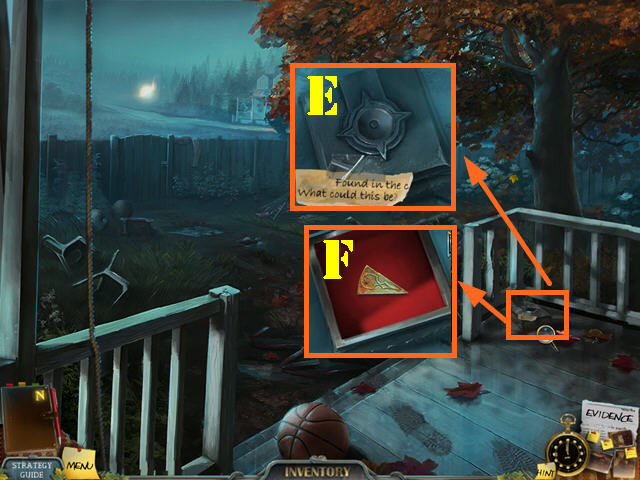
- Open the EVIDENCE TAB.
- Arrange the EVIDENCE as shown (A).
- Take the CANDELABRUM PART on the left (B).
- Exit the church and go right towards the graveyard.
- Take the EVIDENCE on the ground (C).
- Take the 1/3 and the 2/3 LARGE CANDLES on the left (D).

- Return to your bedroom; go out to the balcony and down to the backyard.
- Play the HOS.
- Find the listed items to obtain the ROPE.
- Examine the box in the lower right; put the CANDELABRUM PART on it (E).
- Open the box and take the BRASS WEDGE 1/6 (F).
- Return to the basement in the boarding house.
- Play the HOS.
- Find the listed items to obtain the RUSTY KEY.
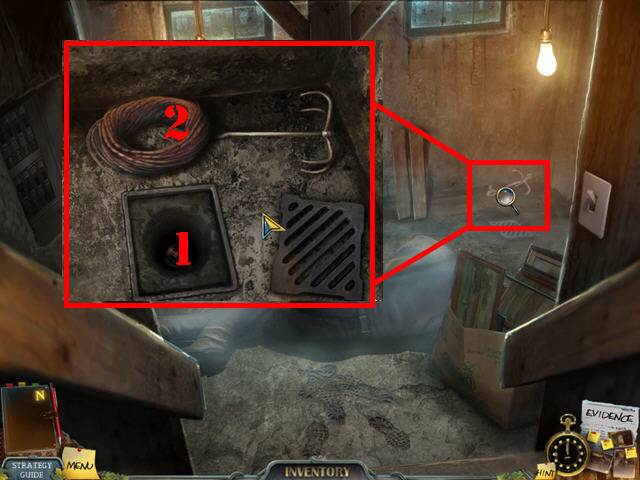
- Examine the grating and remove it; you need something to get the cork out (1).
- Put the ROPE on the grappling hook.
- Take the GRAPPLING HOOK (2).
- Return to the backyard.
- Zoom into the fence door; use the RUSTY KEY on the lock (G).
- Turn the key and then the handle.
- Go through the door to access the lonely house.
- Play the HOS.
- Find the listed items to obtain the SHOVEL.
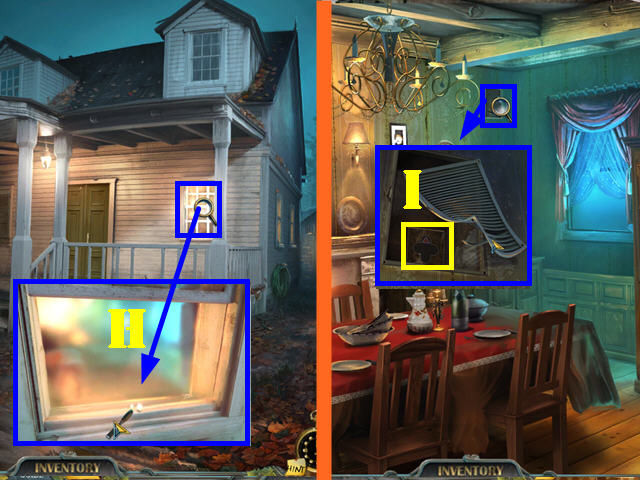
- Examine the window; use the CHISEL to open the window (H).
- Go through the window to get inside.
- Examine the vent; use the CHISEL to remove the vent and take the GLASS PIECE (I).

- Examine the cupboard; put the GLASS PIECE in the left slot to activate a puzzle.
- Put the latches in the correct order.
- Hover the mouse over the edge of a tile to see an arrow appear; click on that arrow to move the tile in that direction.
- Once the left side has been assembled correctly, the right side will unlock.
- Please look at the screenshot for the solution (J).
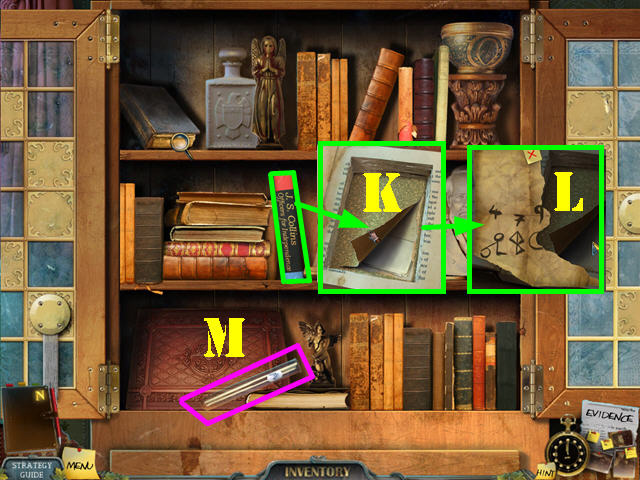
- Open the book; zoom into it and flip the page (K).
- Take the EVIDENCE (L).
- Take the TEST TUBE (M).
- Click down and head left towards the country lane.
- Take the EVIDENCE (1). Note: it can also be next to the lonely house or the farm.
- Go forward towards the farm and then right towards the ruins.
Chapter 4: The Mysterious Place

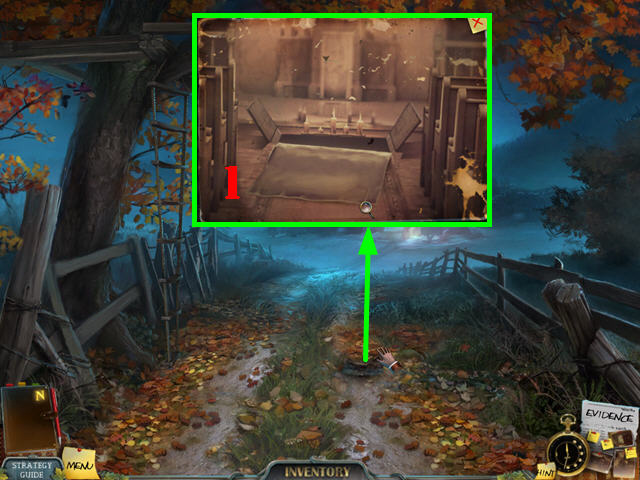
- Take the EVIDENCE on the ground for a cut scene to appear (N).
- Examine the block on the left; remove both planks.
- Use the SHOVEL on the dirt 3 times (O).
- Click on the mattress and then on the wooden boards to activate a puzzle.
- Assemble the correct image.
- Drag the pieces into the right spots.
- Click on the pieces to rotate them.
- A piece placed correctly will lock in place.
- Please look at the screenshot for the solution (P).
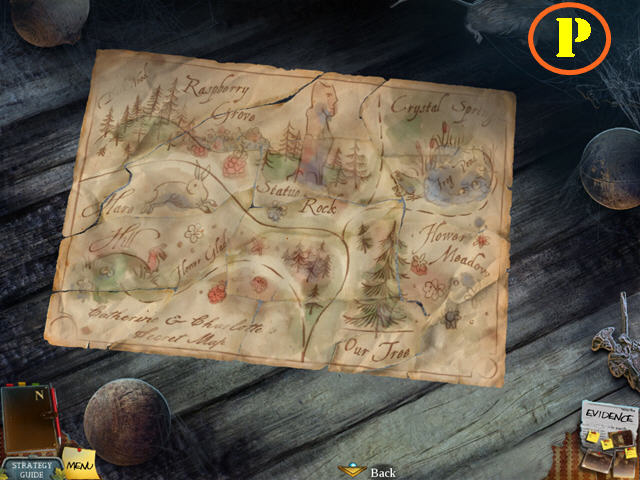
- Take the map after the puzzle has been solved.
- Open the EVIDENCE TAB.
- Arrange the EVIDENCE as shown (Q).
- Return to the lonely house.
- Play the HOS.
- Find the listed items to obtain the GLASS CLEANER.
- Return to your room.
- Play the HOS.
- Find the listed items to obtain the DOLLAR COIN.

- Return to the car.
- Examine the hood of the car; use the TEST TUBE on the ACID dripping from the battery (R).
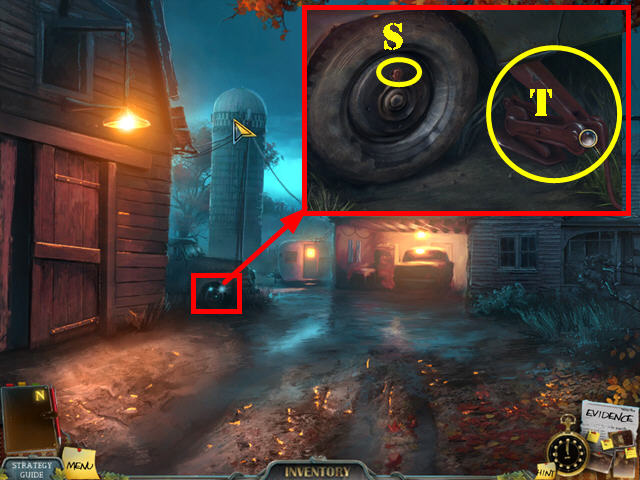
- Go towards the tower.
- Click on the owl (S).
- Take the EVIDENCE (T) on the ground.
- Examine the broken ladder; use the HAMMER AND NAILS on it to repair the ladder (U).
- Go up the tower.
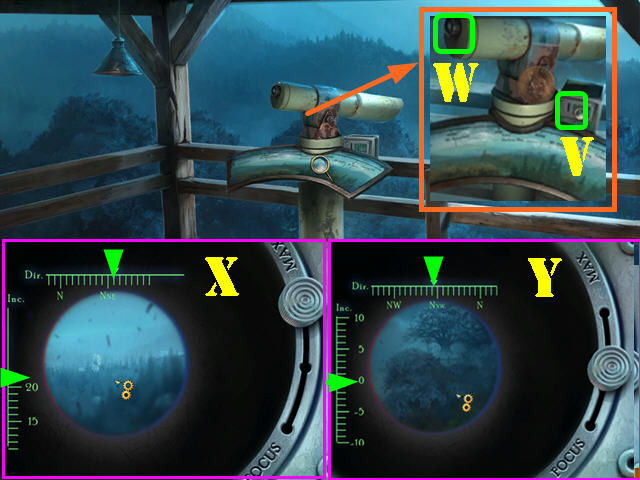
- Examine the telescope; put the DOLLAR COIN in the slot (V).
- Zoom into the lens (W); use the GLASS CLEANER and then the CLEAN RAG on the lens to activate a puzzle.
- Click on an empty space to move the button to that space.
- Click on any spot on the lens to activate it; then move your mouse (without clicking) in the direction you want to point to.
- Please look at the screenshot for the solutions (X and Y).
- Return to the church yard.
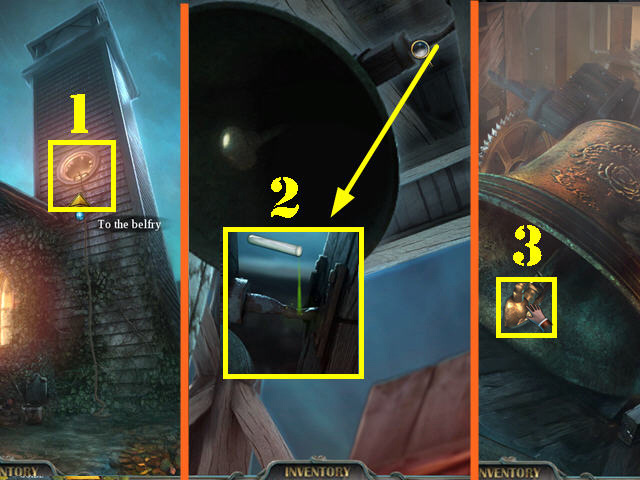
- Use the GRAPPLING HOOK on the belfry window (1).
- Enter the belfry; go up the steps.
- Zoom into the bell; pour the ACID on the bar to release the bell (2).
- Click down.
- Take the HORNED CLAPPER (3).
- Click down.
- Play the HOS.
- Find the listed items to obtain the COMPASS.
- Go inside the church.
- Talk to the man inside the church.
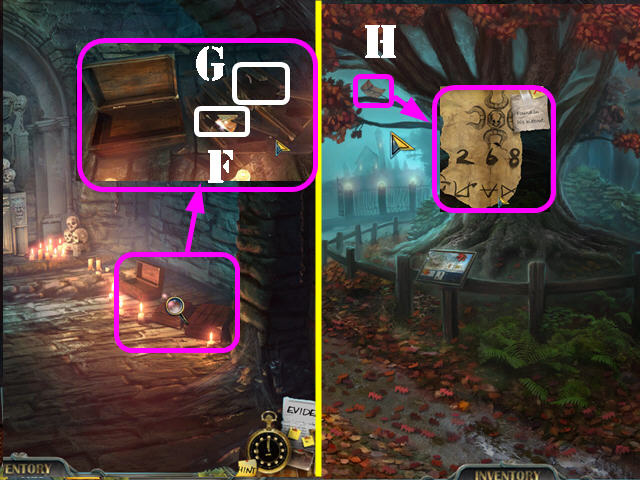
- Pull the edge of the carpet; zoom into it and take the EVIDENCE (4).
- Open the EVIDENCE TAB; place the evidence as shown in the screenshot (5).

- Return to the landmark tree; head right towards the woods.
- If you have the compass in inventory you should see it on the screen (A).
- Follow the compass going north (the directions are random) and then go forward towards the statue.
- Take the EVIDENCE on the ground (6).
- Grab the BRANCH on the lower left (7).
- Put the BRANCH in the tree hollow (8).
- Click on the bird and zoom into the nest; take the LOCK PICKS (9).

- Head right towards the cabin.
- Grab the RAKE on the side of the cabin (10).
- Enter the cabin.
- Talk to the man on the chair.
- Take the LARGE CANDLE 3/3 from the man's hand after the man stops talking (11).
- Grab the SAUSAGE (12).
- Click down 4 times until you reach the landmark tree; head left and continue until you can reach the church.
- Go inside the church.
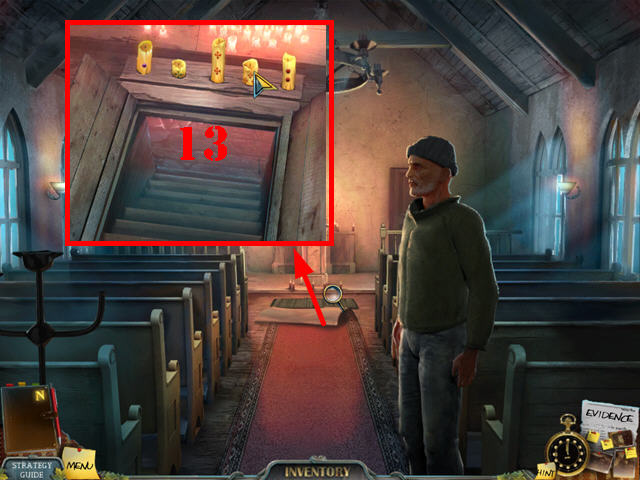
- Examine the trapdoor; put the 3 LARGE CANDLES in the slots.
- Arrange the candles in the same order as the EVIDENCE PHOTO in your tab.
- Please look at the screenshot for the solution (13).
- Go downstairs.
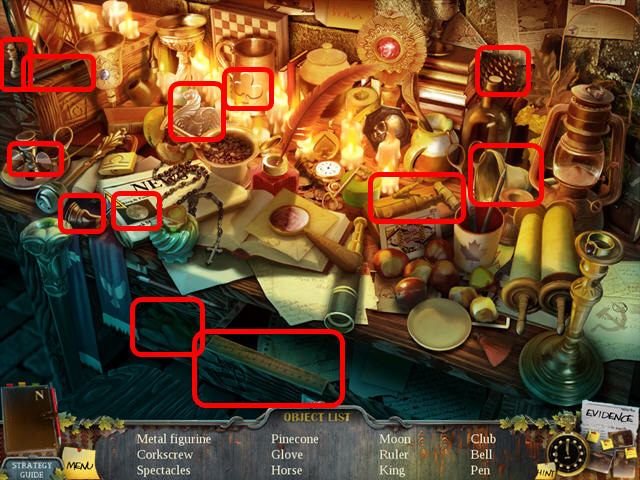
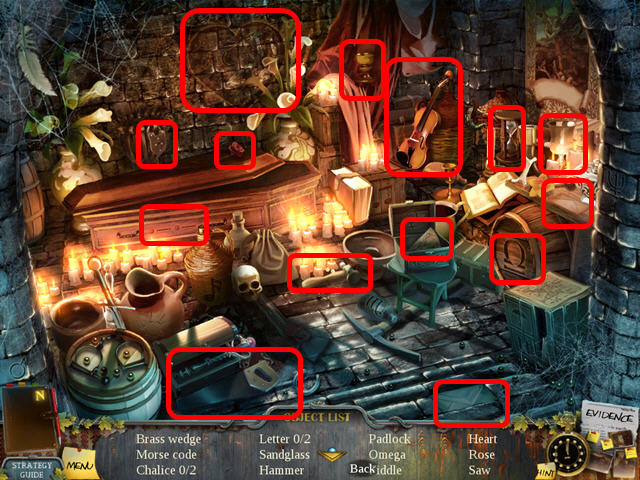
- Play the HOS.
- Find the listed items to obtain the METAL FIGURINE.
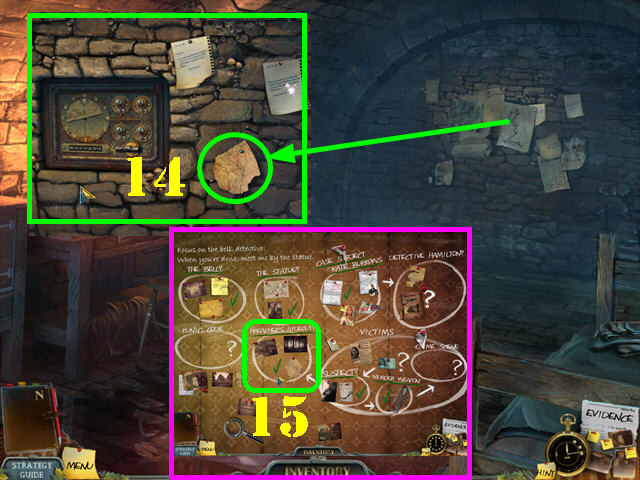
- Zoom into the back wall; remove all the papers that you can on the board.
- Take the EVIDENCE on the board (14).
- Open the evidence board; put the EVIDENCE as shown in the screenshot (15).
Chapter 5: The Boathouse
- Return to the rock statue in the woods; turn left to go deep into the forest.
- The message atop the screen says to go left, then right, twice left, right again and you should be there.
- Go forward towards the lake.
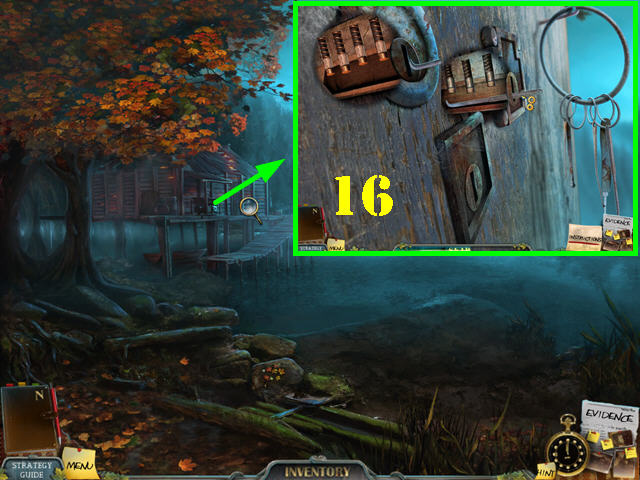
- Examine the boathouse door and click on it for a closer view.
- Put the LOCK PICKS on the door to activate a puzzle.
- Put the matching lock picks on the locks. Click on the pin when the lock pick is below each of the pins so you can raise them.
- Raise all the pins on each lock to beat this puzzle.
- If a lock pick does not fit in the lock choose another one (16).
- Enter the boathouse.
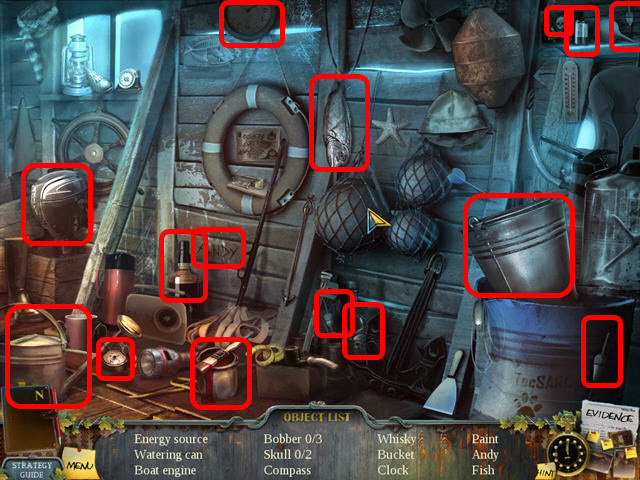
- Play the HOS.
- Find the listed items to obtain the BUCKET.
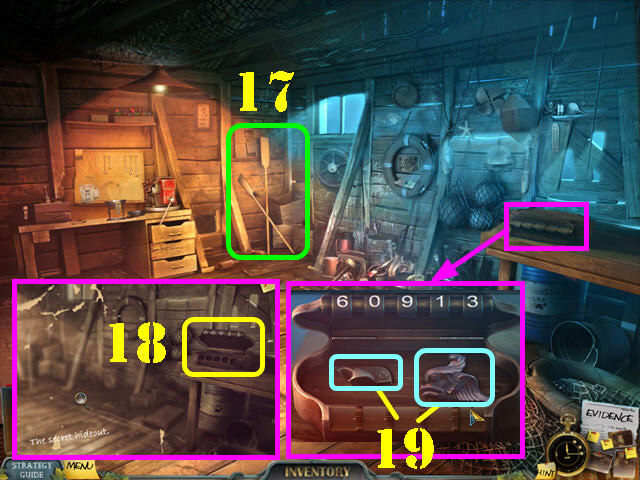
- Take the OARS (17).
- Examine the box; use the code on Hamilton's photo to decipher the code (18).
- Enter 60913 to unlock the box; take the METAL FIGURINE and the SKULL PLATE PIECE 1/3 (19).


- Return to the bathroom in the boarding house.
- Zoom into the sink; put the BUCKET in the water to create the BUCKET OF WATER (20).
- Return to the basement.
- Play the HOS.
- Find the listed items to obtain the DROPPER.
- Zoom into the grate.
- Put the BUCKET OF WATER in the drain and take the CORK (21).
- Return to the backyard by means of the balcony in your room. Go through the fence door. Head left along the country lane and straight to the farm.
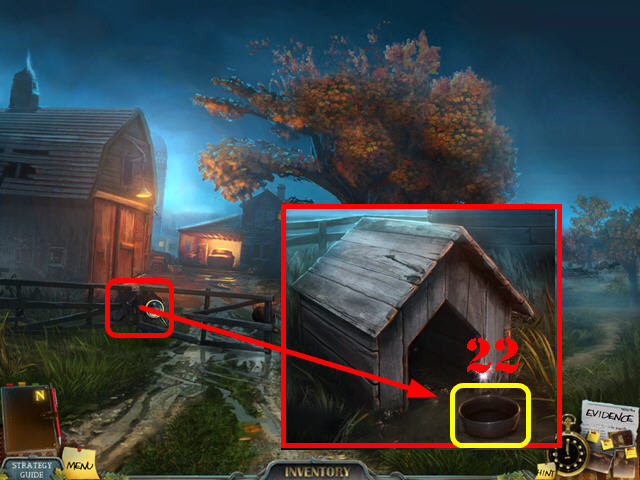
- Examine the dog house; put the SAUSAGE in the dog bowl (22).
- Go forward to the farmyard.
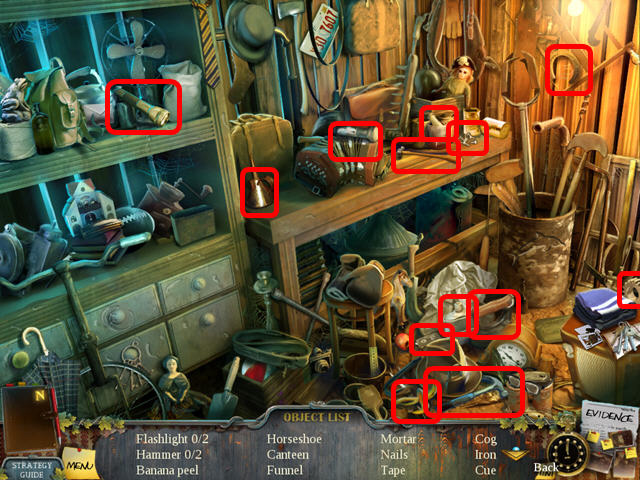
- Play the HOS.
- Open the drawer; take the SCISSORS (23).
- Find the rest of the items to obtain the SCRAP LEATHER.
- Head left into the barn.
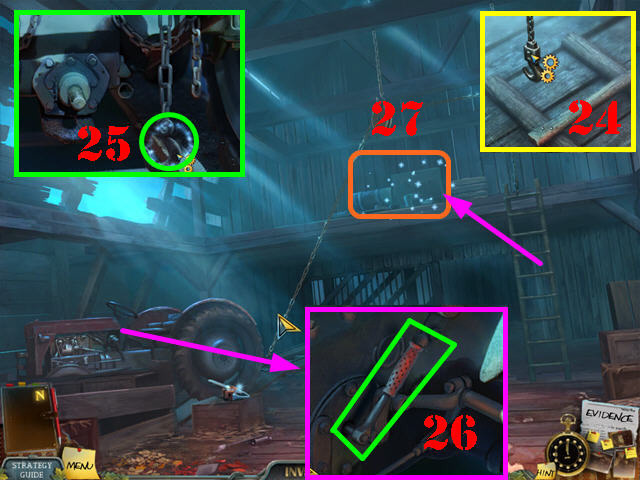
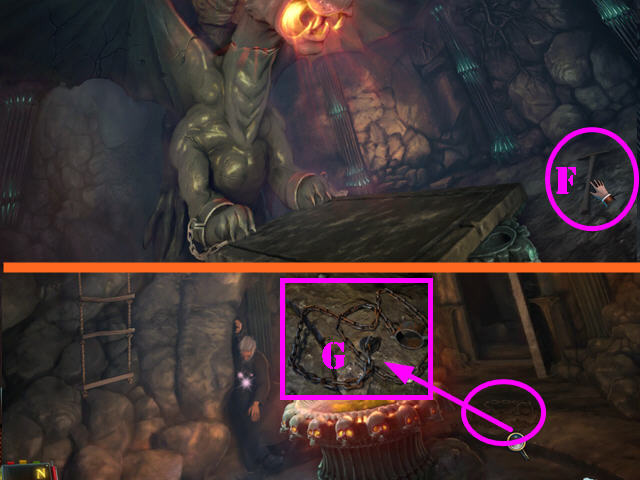
- Examine the ladder on the ground; click on the hook to attach it to the ladder (24).
- Zoom into the left chain; click on the hook (25).
- Examine the tractor; click on the lever to move the tractor and raise the ladder (26).
- Click on the ladder to activate a HOS; play it (27).
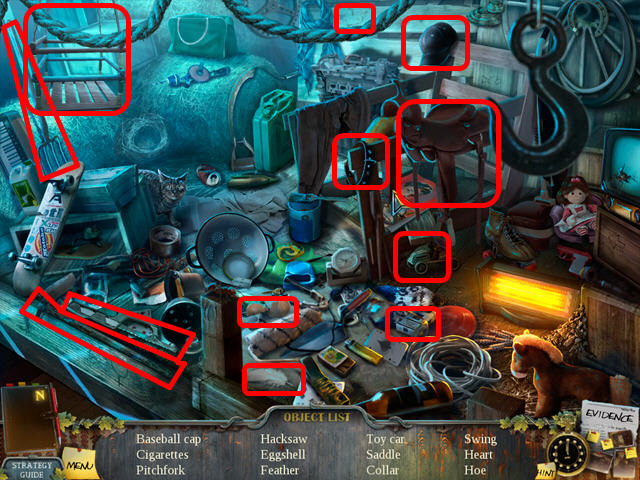
- Play the HOS.
- Find the listed items to obtain the HACKSAW.
- Go to the town center.
- Play the HOS.
- Find the listed items to obtain the SCREWDRIVER.

- Return to the landmark tree area.
- Zoom into the sign; put the SCRAP LEATHER on the cracked glass (28).
- Click on the glass and leather to obtain the GLASS SHARD.
- Return to the inside of the church; go downstairs.
- Examine the door; place the 2 METAL FIGURINES in the slot and the HORNED CLAPPER (29).
- Open the door; go through it to access the secret chamber.
- Examine the boxes; open the one on the left and take the RESIN (30).
- Remove the cloth in the back; zoom into the large painting and put the GLASS SHARD on the canvas.
- Take the painting EVIDENCE (31).
- Take the BRASS WEDGE 2/6 and the SKULL PLATE 2/ 3 (32).
- Open the EVIDENCE TAB; put the pictures in the circle shown in the screenshot (33).
- Return to the boathouse.
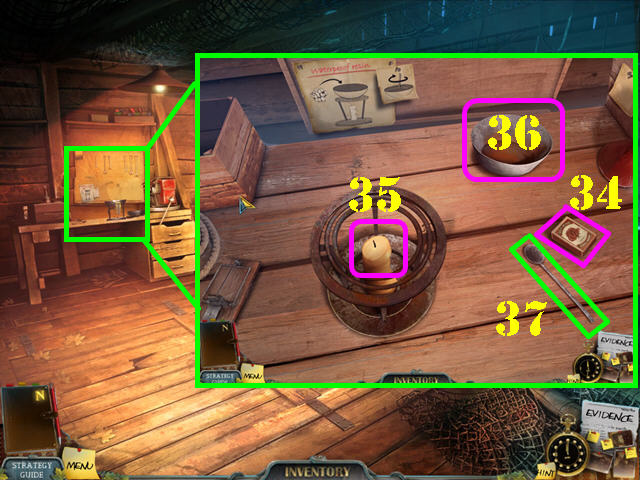
- Examine the table; take the MATCHES (34).
- Use the matches on the candle (35).
- Put the bowl on the burner (36).
- Place the RESIN in the bowl; stir it with the SPOON (37).
- Dip the DROPPER into the resin to create the WATERPROOF RESIN.
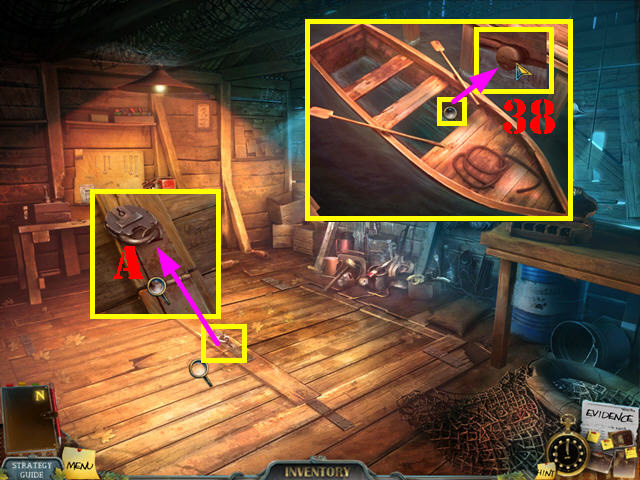
- Zoom into the lock on the ground; use the HACKSAW on the lock (A).
- Examine the boat; put the OARS in the boat.
- Zoom into the hole in the boat; put the CORK in the hole (38).
- Put the WATERPROOF RESIN in the hole.
- Use the BUCKET in the boat 3 times to remove the water.
- Click on the boat to sail to the other side of the lake.
Chapter 6: The Other Side of the Lake
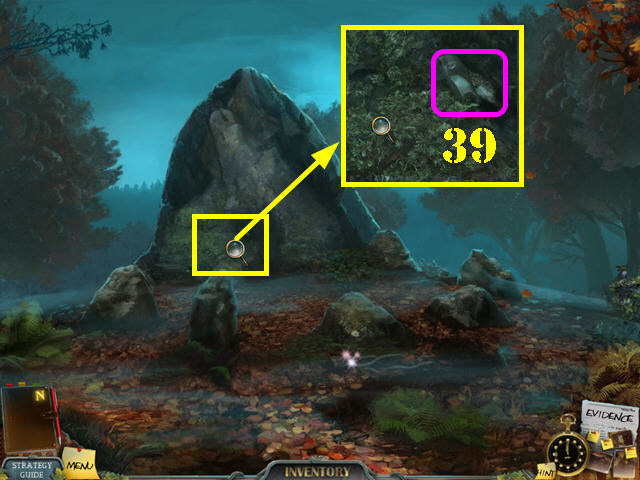
- Head right towards the rocks for a cut scene to appear.
- Zoom into the rocks; take the SKULL PLATE 3/3 (39).
- Click down and take the boat back to the boathouse.
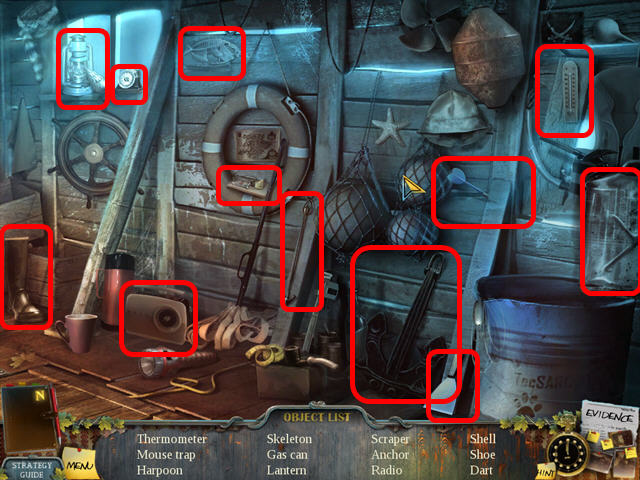
- Play the HOS.
- Find the items listed to obtain the SCRAPER.
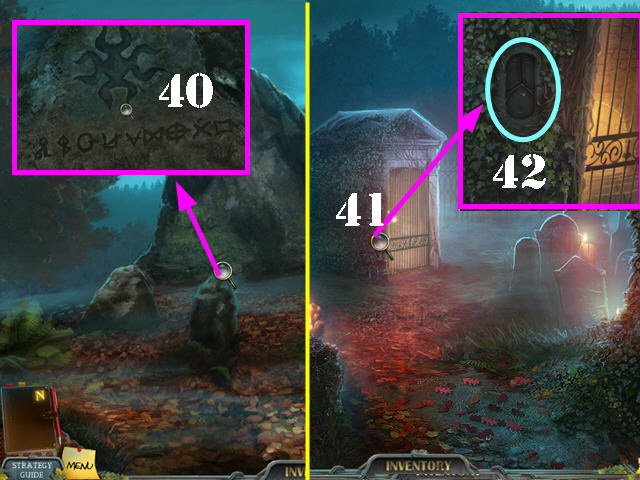
- Take the boat to the other side of the lake; head right towards the rocks.
- Zoom into the large rock; use the SCRAPER on the moss twice to reveal some symbols (40).
- Go to the graveyard next to the church.
- Examine the ivy by the mausoleum; cut the vines with the GARDEN SHEARS (41).
- Put the 3 SKULL PLATES in the slot (42).
- Go into the tomb.
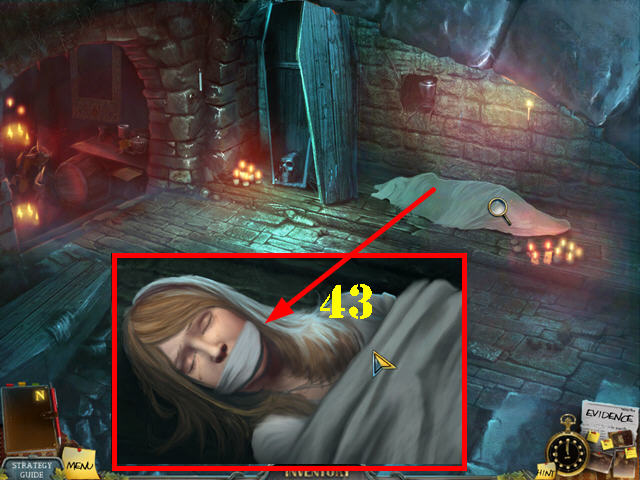
- Zoom into the body on the ground; remove the sheet.
- Remove the scarf around her mouth; talk to the Kate Burrows (43).
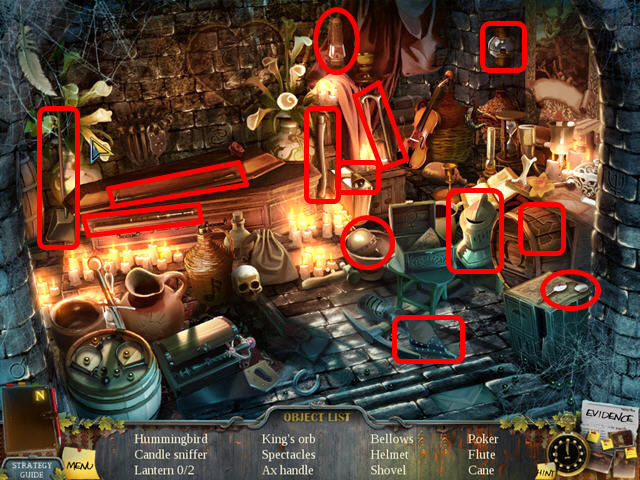
- Play the HOS.
- Find the listed items to obtain the AX HANDLE.
- Return to the cabin for a brief cut scene.
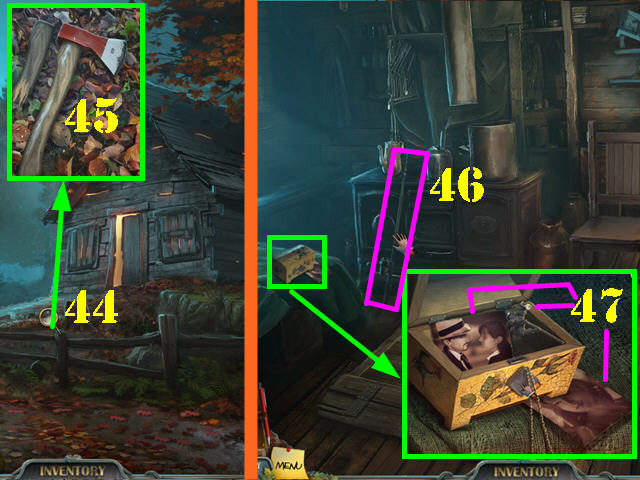
- Examine the leaves; use the RAKE on the leaves 3 times (44).
- Put the AX HANDLE on the ax head; take the AX (45).
- Go into the cabin.
- Take the FISHING ROD (46).
- Examine the box on the left; use the PENDANT on the lock.
- Click on the lock to open the box; take the 2 pieces of EVIDENCE and the TOY SOLDIER (47).
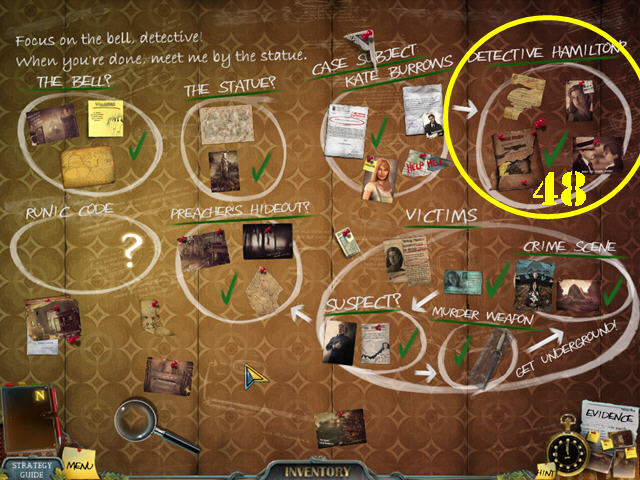
- Open the EVIDENCE TAB.
- Arrange the evidence as shown in the screenshot (48).
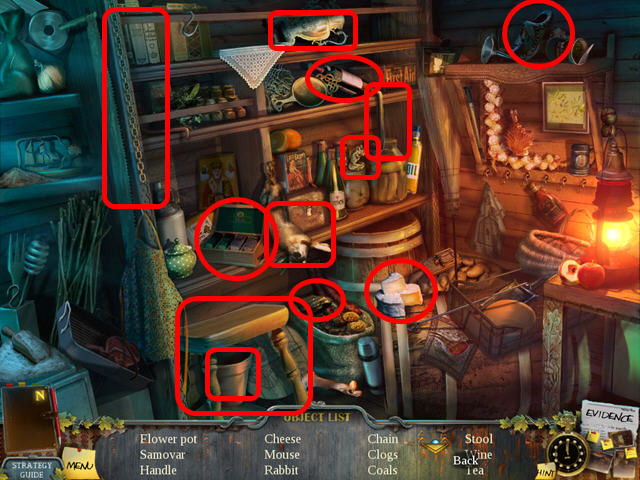
- Play the HOS in the cabin.
- Find the listed items to obtain the TRAPDOOR HANDLE.
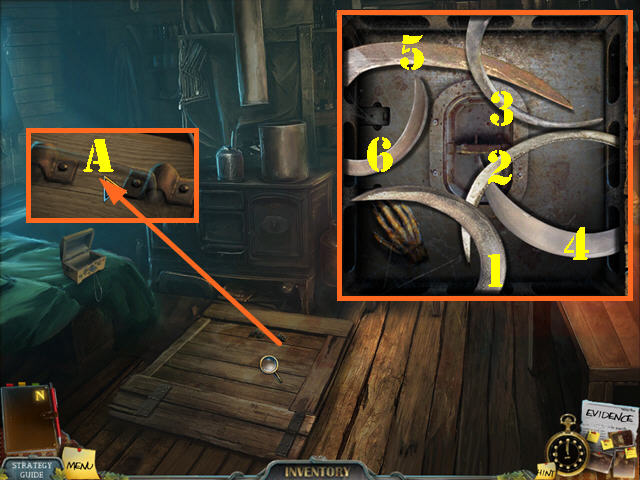
- Examine the trapdoor in the cabin; put the TRAPDOOR HANDLE on the latch (A).
- Open the trapdoor to activate a puzzle.
- Remove the blades in the order shown in the screenshot. Drag back into their holes to move them out of the way. Start dragging from the tip of the blade.
- Click on the latch to open the trapdoor and go down into the basement.
- Talk to Kate's boyfriend; take the CAR KEYS from him (B).
- Grab the CHAINSAW CHAIN on the ground (C).
- Examine the safe; click on the lid to remove it.
- Use the SCREWDRIVER on the 4 screws (D).
- Remove the cover and zoom into combination lock.
- Enter the number found on the photo: 02141976.
- Open the drawer and zoom into it; take BRASS WEDGE 3/6 (E).
- Click down.
- Play the HOS.
- Find the listed items to obtain the JACK HANDLE.
- Return to the car.
- Play the HOS.
- Find the listed items to obtain the OIL.
- Return to the inside of the church and go downstairs.
- Play the HOS.
- Find the listed items to obtain the BRASS WEDGE 4/6.
- Go into the secret chamber.
- Zoom into the boxes in the lower right; break each of the closed boxes twice with the AX.
- Take the BRASS WEDGE 5/6 (F) and the WALL CANDELABRUM (G).
- Return to the landmark tree.
- Take the EVIDENCE on the tree with the FISHING ROD (H).
- Return to the tomb.
- Play the HOS.
- Find the listed items to obtain the BRASS WEDGE 6/6.
- Examine the niche; use the WALL CANDELABRUM in the outlet (I).
- Click on the candelabrum to open the urn; take the DEMONIC SYMBOL 1/5 (J).
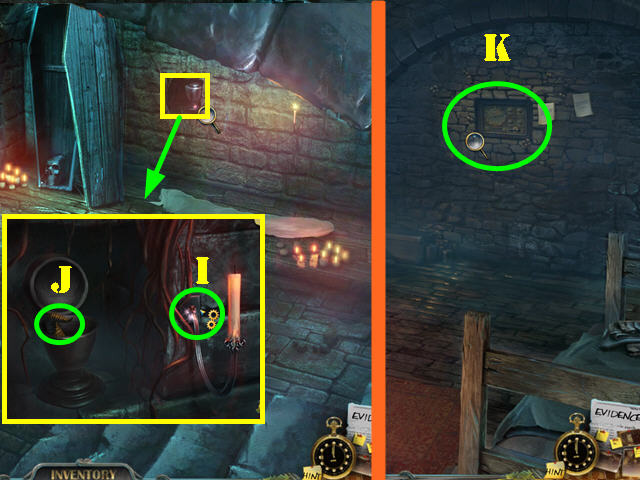
- Go to the church basement.
- Zoom into the back wall; click on the device and add the 6 BRASS WEDGES to the device to activate a puzzle (K).
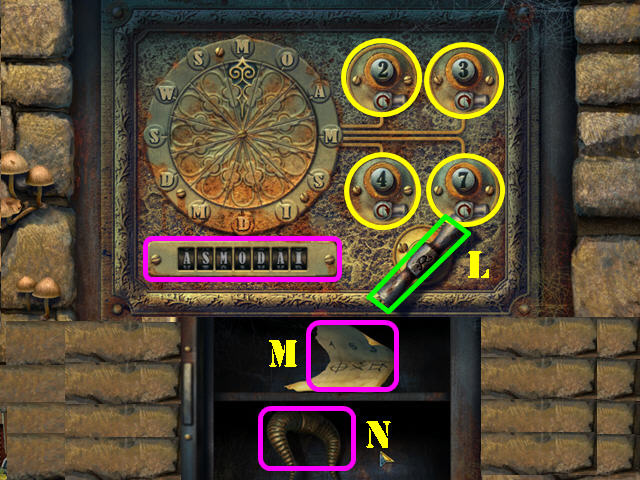
- Click on the numbers to turn the wheel the amount of times shown. Change the direction of the arrows to move the wheel in the opposite direction.
- Spell out the word: ASMODAI, as in the painting from the secret chamber.
- Click on the handle to reset the puzzle if you would like to follow this solution. Make sure all your arrows are facing clockwise.
- To solve the puzzle, click on the numbers in this order:
- Click on 2 and then reverse the arrow on the 3 and click on it.
- Click on 4, reverse the 2 and click on it.
- Reverse the 7 and click on it.
- Reverse the 4 and click on it.
- Reverse the 3 and click on it.
- Click on the handle (L) to open the safe; take the EVIDENCE (M) and the DEMONIC SYMBOLS 2/5 (N).
- Open the EVIDENCE TAB.
- Arrange the evidence as shown (O).
Chapter 7: The Finale
- Return to the outside of the lonely house.
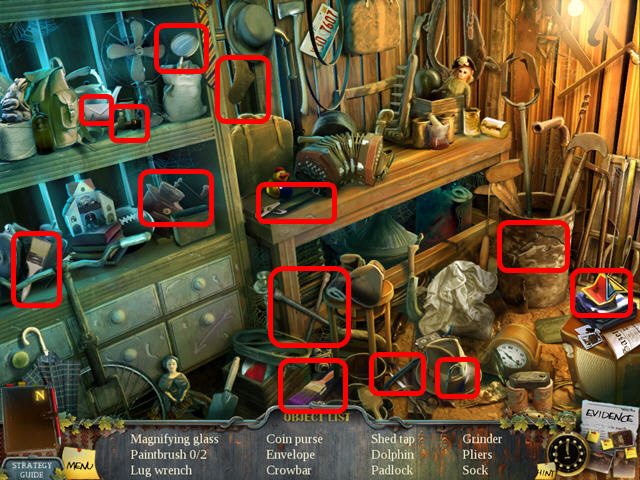
- Play the HOS.
- Find the items listed to obtain the LUG WRENCH.
- Return to the ruins next to the farm.
- Examine the burnt planks; remove both planks.
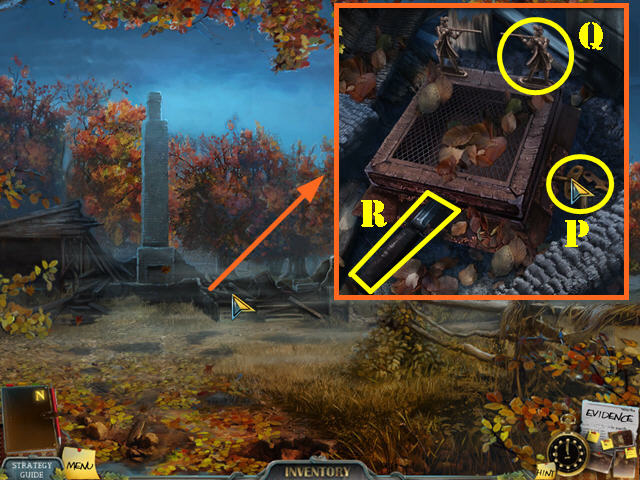
- Put the WIND-UP KEY on the side of the music box (P).
- Place the TOY SOLDIER in the right slot (Q).
- Click on the wind-up key and take the KNIFE (R). You can return to the country lane and cut the rope ladder, but you can also do it later.
- Click down and head left towards the farmyard.
- Play the HOS.
- Find the items listed to obtain the LUG BOLTS.
- Examine the wheel; put the JACK HANDLE on the jack and click on it.
- Place the OIL on the rusty nut bolt (S).
- Use the LUG WRENCH on the nut bolt.
- Take the WHEEL.
- Click on the JACK twice to automatically add it to inventory (T).
- Go into the barn.
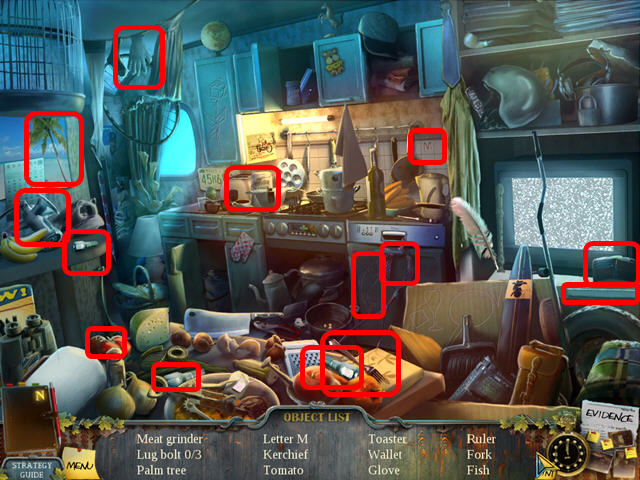
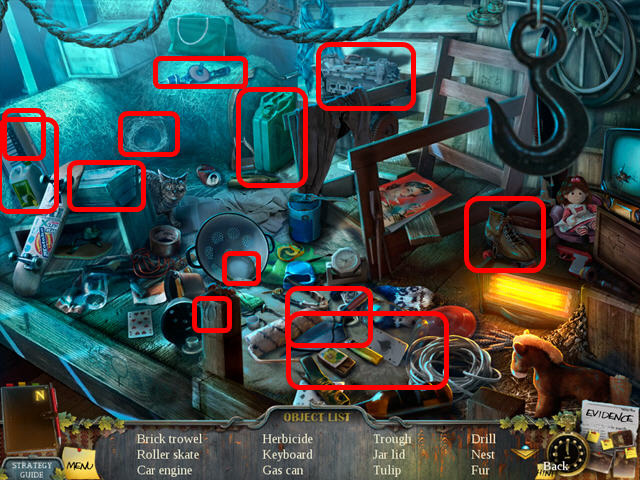
- Play the HOS.
- Find the items listed to obtain the GAS CAN.
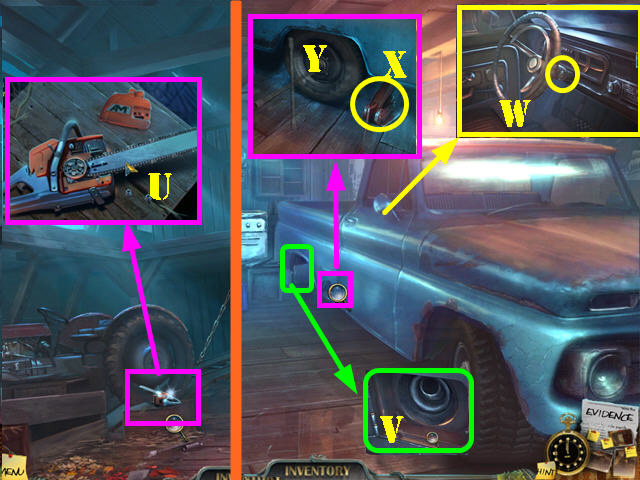
- Zoom into the chainsaw; remove the bolts and the cover (U).
- Put the CHAINSAW CHAIN on the chainsaw. Replace the cover and the bolts and take the CHAINSAW.
- Exit the barn and go into the garage. Examine the gas tank; open the lid and remove the cap (V).
- Put the GAS CAN in the gas tank. Put the cap back on and close the cover.
- Examine the inside of the car; put the CAR KEYS in the ignition (W).
- Examine the back wheel; put the JACK below the car and click on it once (X).
- Put the WHEEL on. Put the LUG BOLTS on the wheel and use the LUG WRENCH on the bolts. Click on the jack (Y).
- Go into the car and turn the keys. Click on the car to drive to the gas station.
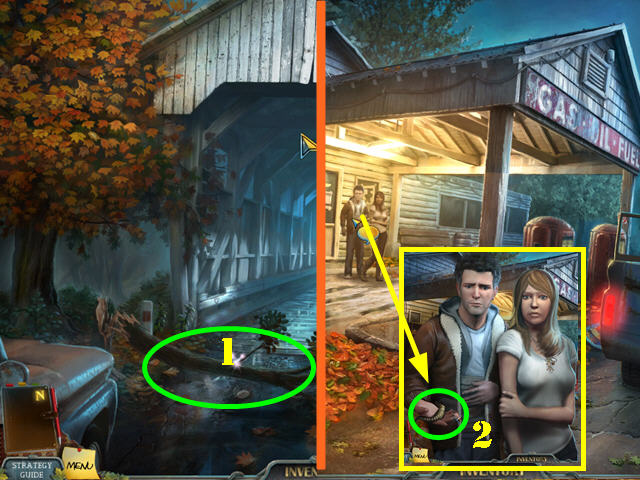
- Use the CHAINSAW on the tree blocking the road (1).
- Go forward to the gas station.
- Talk to Kate and her boyfriend.
- Take the DEMONIC SYMBOLS 3/5 from his hand (2).
- Return to the church basement.
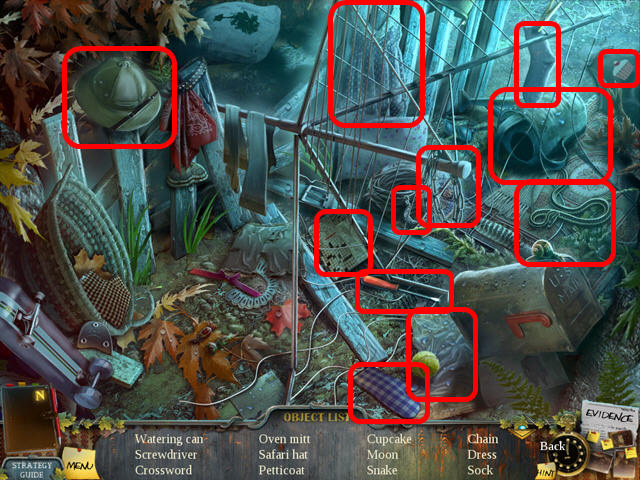
- Play the HOS.
- Find the items listed to obtain the DEMONIC SYMBOL 4/5.
- Go to the chapel and the tomb; one of the two HOS is active.
- Play the HOS.
- Find the items listed to obtain the DEMONIC SYMBOL 5/5.
- Return to the boathouse. Take the boat to the other side of the lake and head right towards the rocks.
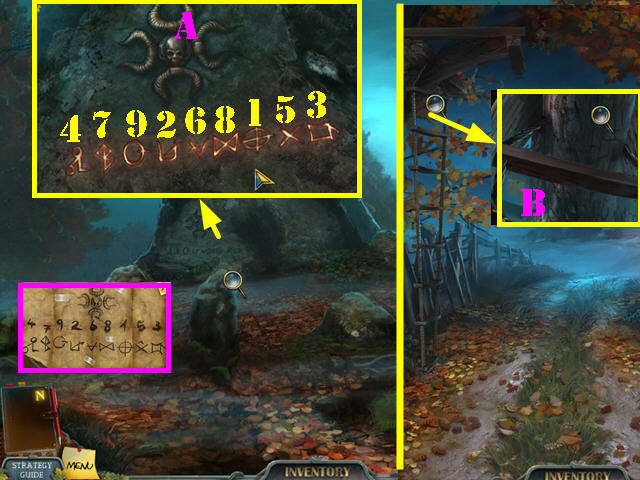
- Examine the large rock; put the 5 DEMONIC SYMBOLS in the center (A).
- Click on the runes in the same order as the paper in the evidence tab.
- Please look at the screenshot for the correct order.
- Return to the lonely house and head left along the country lane.
- Examine the top of the rope ladder; cut the rope with the KNIFE (B) and take the ROPE LADDER on the ground.
- Return to the boathouse and take it to the other side of the lake; head right towards the rock.
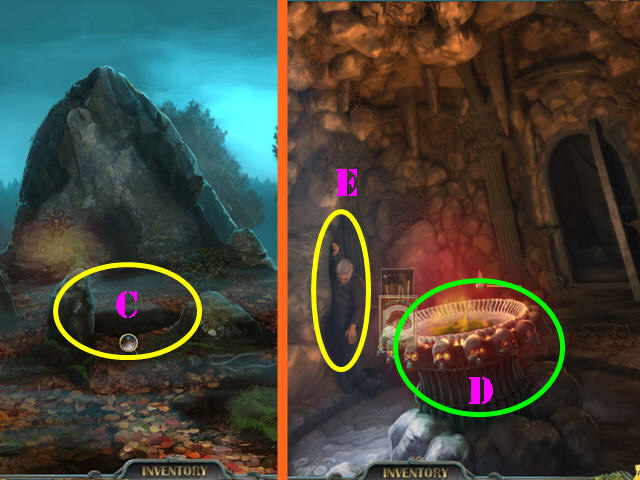
- Examine the hole in the ground; put the ROPE LADDER in and go down into the chambers (C).
- Put the MATCHES in the basin (D).
- Talk to the preacher (E).
- Head right into the ritual hall.
- Take the PICKAX on the ground (F).
- Click down for a cut scene.
- Examine the chains on the floor; use the PICKAX on the chain 3 times and take the RUSTY CHAIN (G).
- Return to the ritual hall.
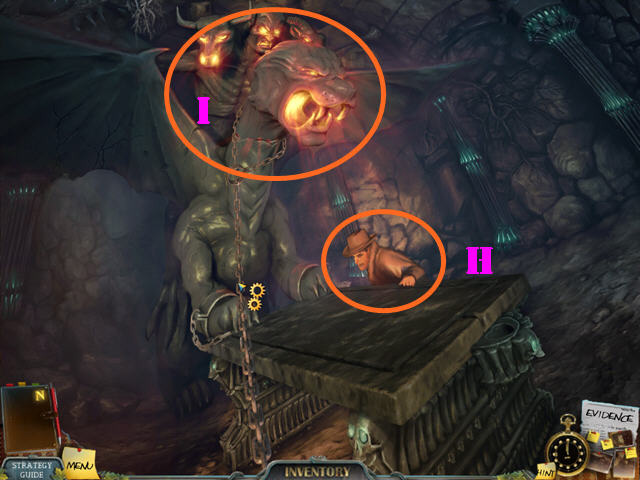
- Talk to Hamilton (H).
- Put the RUSTY CHAIN around the demon's neck (I).
- Click on the RUSTY CHAIN to remove the demon's head.
- Congratulations! You have completed Enigmatis: The Ghosts of Maple Creek!
Created at: 2011-09-24