

Walkthrough Menu
- General Tips
- Level 1
- Level 2
- Level 3
- Level 4
- Level 5
- Level 6
- Level 7
- Level 8
- Level 9
- Level 10
- Collectable Items
General Tips
- This is a guide for the adventure game “Escape from Frankenstein’s Castle!”
- Some puzzles and dialogue can be skipped using the SKIP Button.
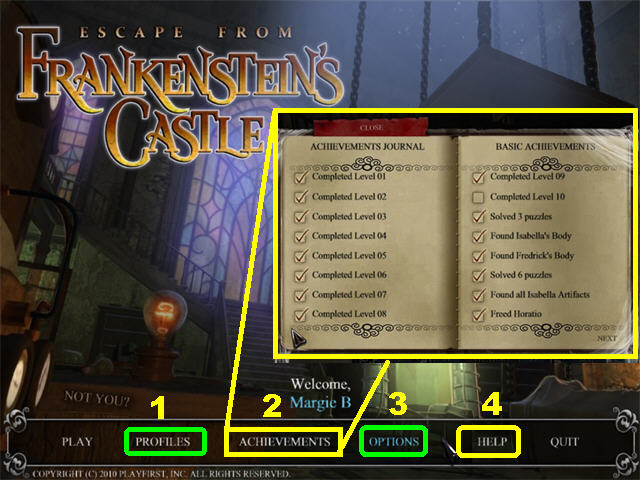
- Click on the PROFILES (1) button to add, delete, or edit any profile.
- In the ACHIEVEMENTS (2) section you can view all the items you’ve collected and any achievements you’ve gained.
- All of Isabella’s Collectable Items are marked in white in the screenshots (you can view a full list of locations at the end of the guide).
- You can return to Hannah’s Room at any time to view the items you’ve collected. Click on any item to read a brief explanation of that item.
- Use the OPTIONS (3) button to adjust sound, music, and screen size.
- The HELP (4) button gives you brief instructions for playing the game.
- Click on the red “View Isabella’s Memory” tab that appears above certain scenes to see how Isabella remembers things. Viewing this tab allows you to view the puzzle solution and hints.
- To exit Isabella’s memory, click the “Exit Isabella’s Memory” tab that appears above the scene.
- You can click on “TELL ME MORE” to read more of the story, or click on “CLOSE” to end the dialogue.
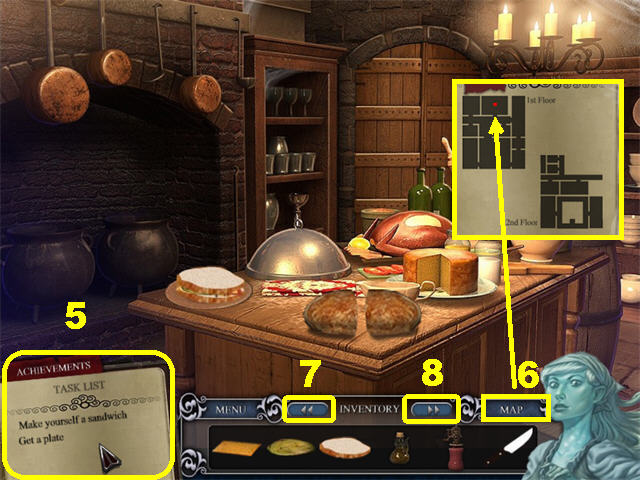
- Your Task List (5) is located in the lower left corner of each scene. Above the Task List is the red Achievements Journal tab.
- Certain tasks will not appear until you click certain triggers in the game.
- Click on any item on your task list to view the steps necessary to complete it and view images of inventory items needed.
- Each time you place your cursor around the edges of the scene, tags with location names will appear. Faded preview tags appear to show other hotspots within that view.
- Use the MAP (6) tab to view your current location, indicated by the red dot.
- All your inventory items will be stored in the Inventory Tray at the bottom of each scene.
- Certain inventory items can be reused several times throughout the game.
- Click on the inventory arrows (7 and 8) to scroll through all available items.
Level 1
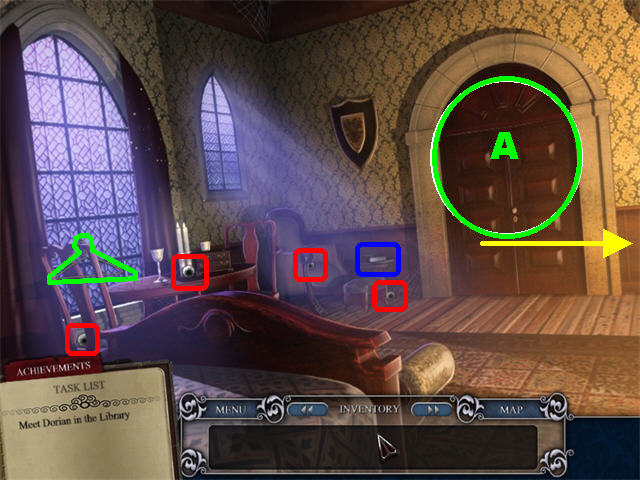
- Pick up the EYEBALLS marked in red.
- Pick up the HANGER marked in green.
- Click on the book marked in blue to read part of the story.
- Try to open the door (A) and Isabella will appear asking for her locket.
- Go right, toward the Armoire.
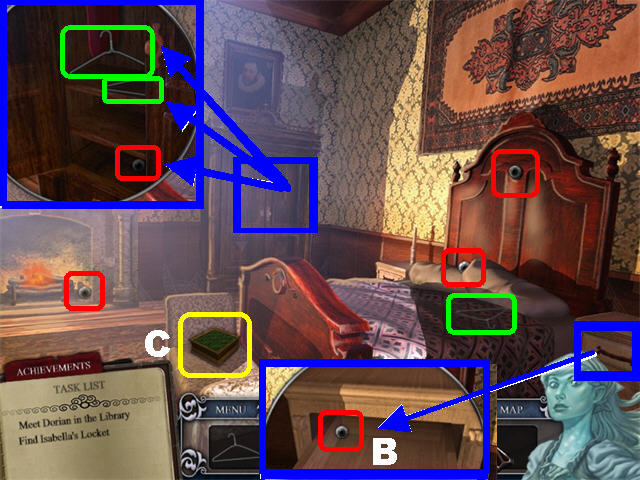
- Take the EYEBALLS marked in red.
- Pick up the HANGER marked in green on the bed.
- Take a closer look at the armoire; pick up the EYEBALL (red) and the HANGERS (green) inside.
- Open the drawer in the lower right; grab the EYEBALL (B).
- Zoom into the box (C).
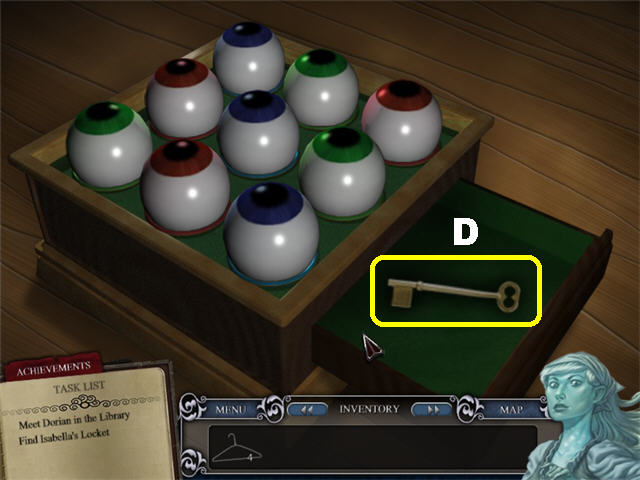
- Place all the EYEBALLS into the matching slots; take the KEY (D).
- Exit the pop-up window and go left.

- Use the KEY to unlock the box on the table.
- Take ISABELLA’S PRECIOUS LOCKET (E) from the box (this item will be added to the Achievements Journal).
- Click on “View Isabella’s Memory” above the screen (F).
- Read the comments and exit her memory.
- Go through the door, forward, and then left in the hallway.
- Enter through the door to the Library.
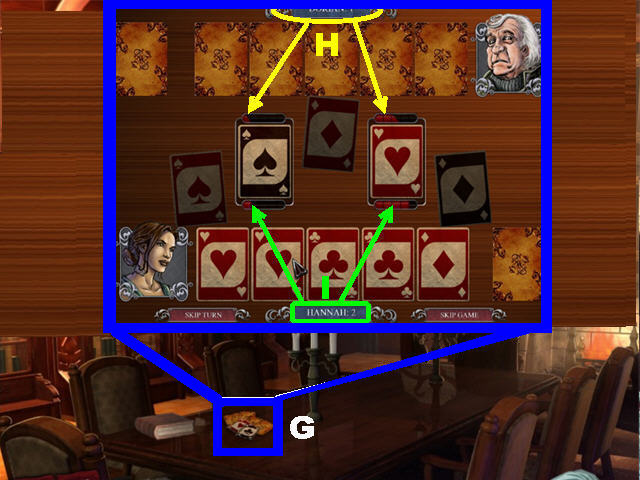
- Click on the cards (G) on the table to trigger a mini-game.
- Follow the instructions in the game by clicking on Dorian’s face in the upper right.
- Dorian’s score (H) is above the center cards.
- Your score is (I) below the center cards.
- The first person to win three rounds will win the game.
- Three questions will appear after you win the game. Click on any of the questions to trigger a new task.
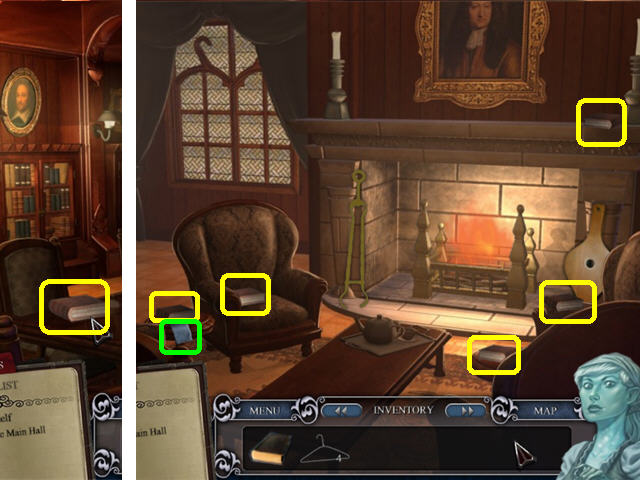
- Pick up the BOOK marked in yellow on the table.
- Go toward the fireplace.
- Pick up the BOOKS marked in yellow.
- Grab the CLEANING CLOTH on the chair marked in green.
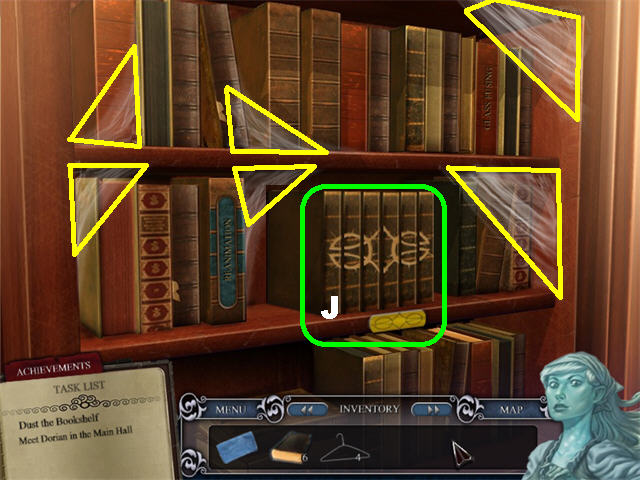
- Click down and zoom into the reference shelf on the left.
- Wipe away the cobwebs, marked in yellow, with the CLEANING CLOTH to view a pop-up window with gold symbols.
- Place the 6 BOOKS on the center shelf.
- Click on any two of the books you placed on the shelf to swap their positions until they reflect the image in the screenshot (J).
- FREDRICK’S LETTER will be added to the Journal after the books have been arranged correctly.
- Leave the room and then go down the steps to the Main Hall for a cutscene.
- Dorian has unlocked the Small Lab upstairs and wants the small electrical generator to be fixed.
- Go forward to the Main Hall.
Level 2
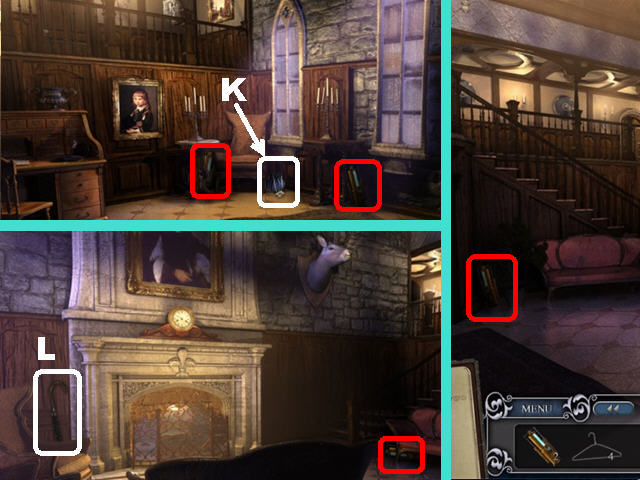
- Pick up ISABELLA’S SMALL PURSE (K) by the chair (this item will be added to your Achievements Journal).
- Take the POWER CELLS marked in red.
- Go left to the Right Staircase.
- Take the POWER CELL marked in red.
- Click in the upper left to access the Left Staircase.
- Take ISABELLA’S UMBRELLA (L), next to the fireplace; this item will be added to your Achievements Journal.
- Take the POWER CELL marked in red below the red couch.
- Click down 3 times, go up the steps, and head right in the hallway. Go through the door to access the Small Lab.
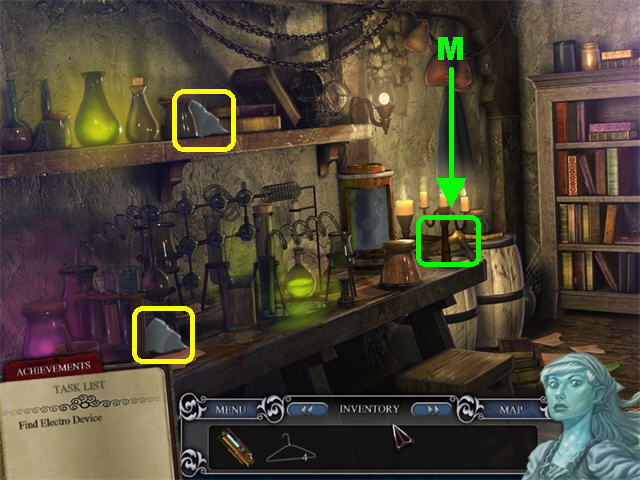
- Pick up the GLASS SHARDS marked in yellow.
- Pick up the CRANK HANDLE (M) marked in green on the table (below the candelabra).
- Go right. toward the Electrical Room.
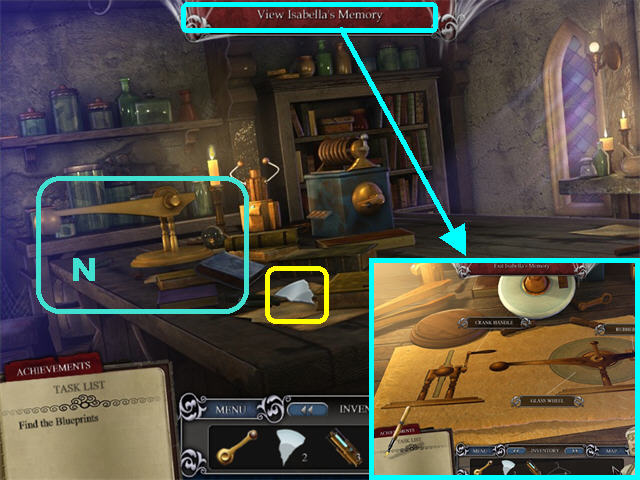
- Click on the electrical device (N) on the left.
- Click on “View Isabella’s Memory” in the upper center to view the blueprint for the device.
- You need to find the CRANK HANDLE, GLASS WHEEL, and RUBBER PAD.
- Exit Isabella’s Memory.
- Pick up the GLASS SHARD marked in yellow.
- Go right, toward the Alchemy Lab.
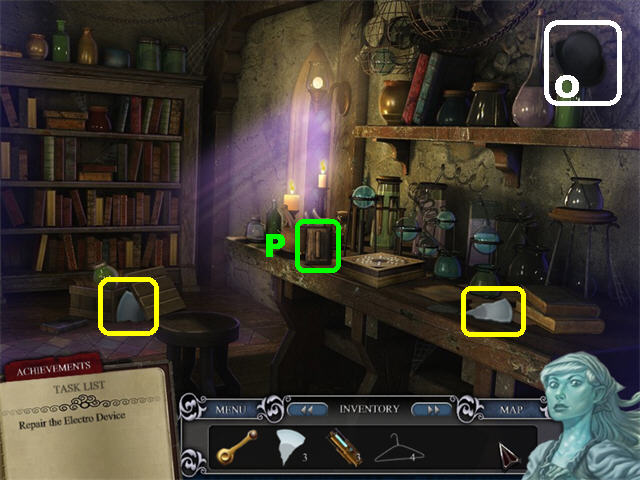
- Grab FREDRICK’S HAT (O) in the upper right (this item will be added to the Achievements Journal).
- Pick up the RUBBER PAD (P) marked in green on the left side of the table.
- Pick up the GLASS SHARDS marked in yellow.
- Return to the Library; zoom into the Reference section.
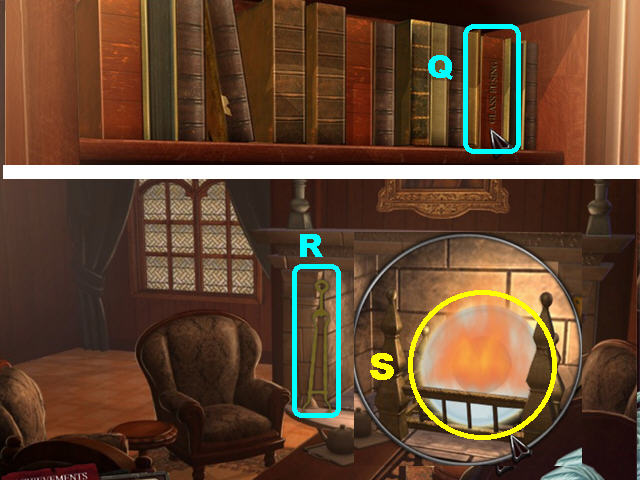
- Click on the red book marked GLASS FUSING (Q) in the upper right (it explains how to repair the glass wheel).
- Exit this view and then zoom into the Library fireplace.
- Place all of the GLASS SHARDS in the fire.
- Take the TONGS (R) from the side of the fireplace.
- Use the TONGS to retrieve the GLASS WHEEL (S).
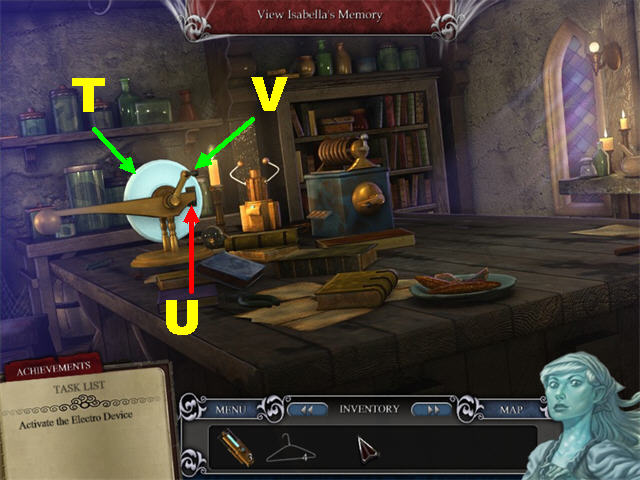
- Return to the Electrical Room in the Small Lab.
- In this order, place the GLASS WHEEL (T), RUBBER PAD (U), and CRANK HANDLE (V) on the Electro Device on the table.
- Click on the CRANK HANDLE to activate the device.
Level 3
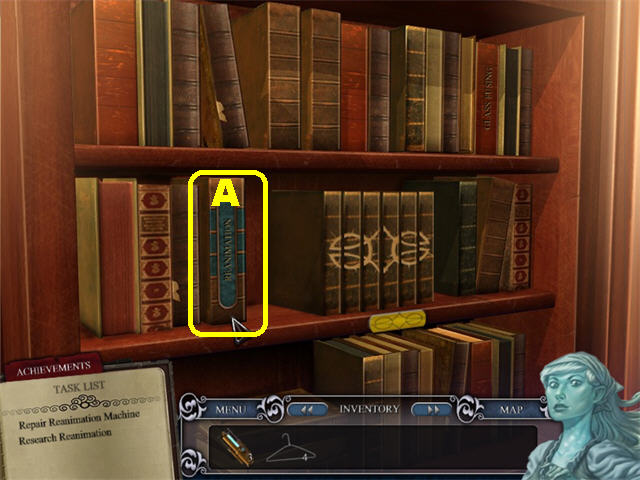
- Return to the Library.
- Zoom into the bookcase; click on the REANIMATION (A) book.
- You need some wires and power cells!
- The locations in which you picked up the wire hangers and the power cells are mentioned in the Level 1 and Level 2 Levels of this guide.
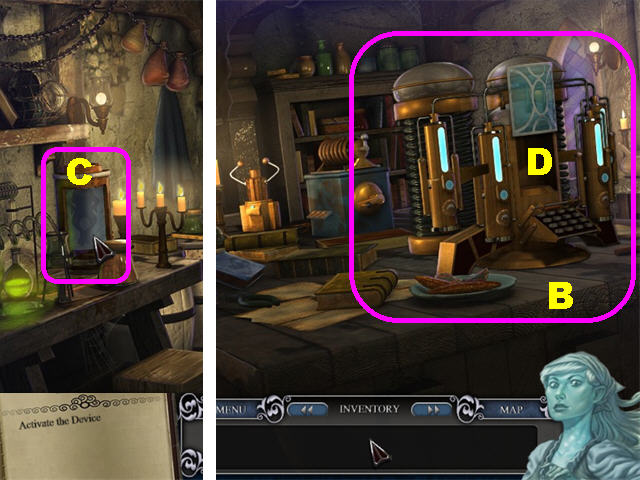
- Return to the Electrical Room in the Small lab.
- Place the WIRE HANGERS and the POWER CELLS on the Reanimation Device, on the table (B).
- Go left to the Chemistry Room.
- Pick up the FROG SPECIMEN CONTAINER (C).
- Go right.
- Place the FROG SPECIMEN CONTAINER in the slot (D) of the Reanimation Device to trigger a puzzle.

- Reanimate the frog by turning on all the buttons on the device.
- Click on the buttons in the following order: 3-7-10-11-6-3 (E).
- Click on the frog (F) to end the level.
Level 4
- Exit this room and head left toward the Library.
- Go down the steps, toward the Main Hall.
- Take the Right Staircase (on the left).
- Click on the small door on the left to access the Lower Hall.
- Go through the door on the right to access the Kitchen.
- Go through the back door to enter the Kitchen Storage.
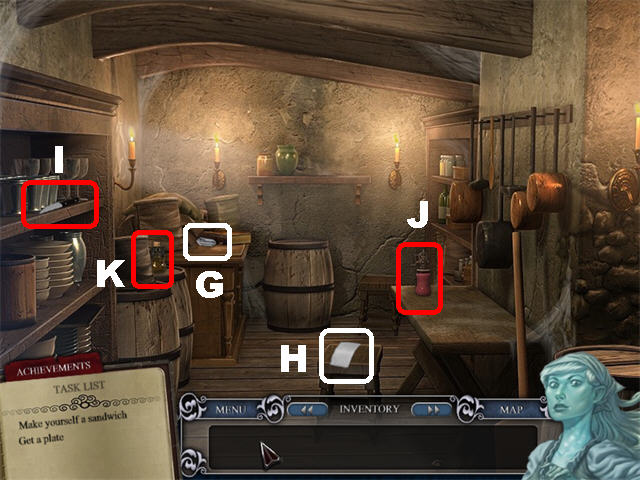
- Grab ISABELLA’S CRYSTAL KEEPSAKE (G) on the left (this item will be added to the Achievements Journal).
- Take ISABELLA’S HANDKERCHIEF (H) on the stool (this item will be added to the Achievements Journal).
- Grab the KNIFE (I) on the left.
- Pick up the GROUND SPICES (J) on the right.
- Take the OIL (K) on the left.
- Click down and head right, toward the Bread Oven.
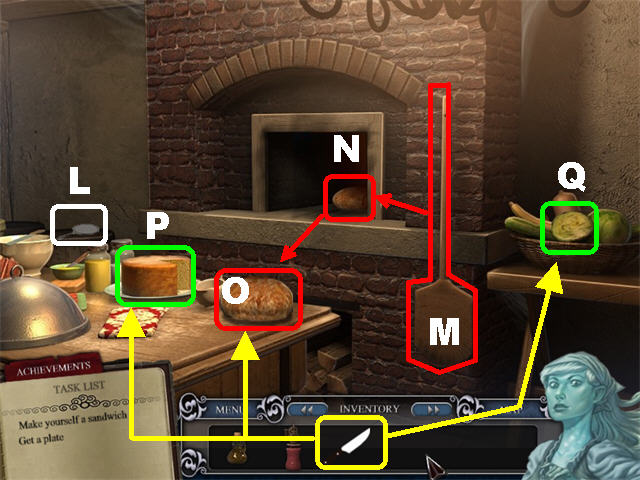
- Take ISABELLA’S HAND MIRROR (L) on the left (this item will be added to the Achievements Journal).
- Grab the BREAD PADDLE (M) on the right.
- Use the BREAD PADDLE to remove the BREAD (N) from the oven (the bread will land on the table).
- Slice the BREAD (O) with the KNIFE.
- Slice the CHEESE (P) with the KNIFE.
- Slice the LETTUCE (Q) with the KNIFE.
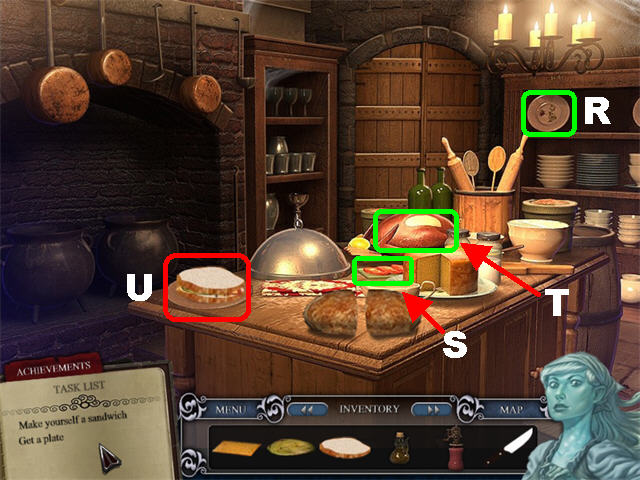
- Head left, toward the Prep Table.
- Grab the PLATE (R) in the upper right (the plate lands on the table).
- Take the TOMATO SLICES (S), next to the turkey.
- Slice the TURKEY (T) with the KNIFE.
- Place the SLICED BREAD on the PLATE.
- In this order, place the CHEESE SLICE, TURKEY SLICE, LETTUCE, TOMATOES, OIL, and GROUND SPICES on the bread (U).
- Place the last BREAD SLICE on top of the ingredients.
- Click on the SANDWICH to eat it.
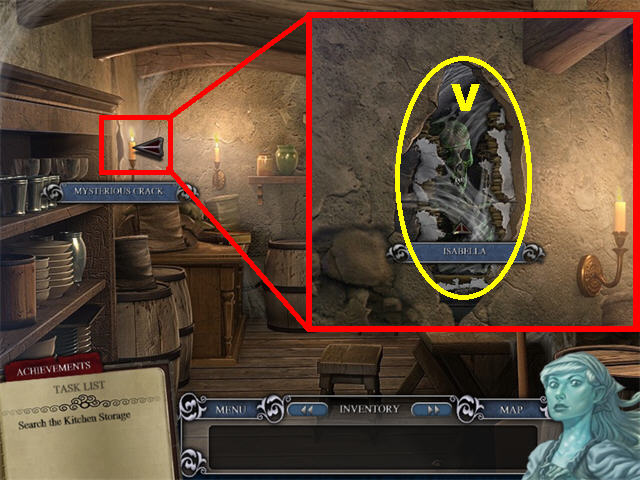
- Return to the Kitchen Storage in the back.
- Click on the Mysterious Crack on the upper left.
- Click on ISABELLA’S BODY (V) on the wall.
- Return to the Prep Table in the Kitchen to end the level.
Level 5
- Exit the Kitchen.
- Go left twice and through the back door to access the Banquet Hall.
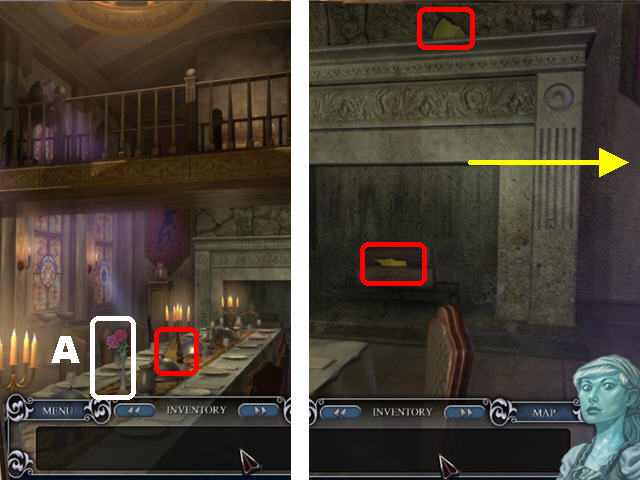
- Take ISABELLA’S LOVELY FLOWER (A) from the table (this item will be added to the Achievements Journal).
- Take the WINDOW GLASS SHARD marked in red on the table.
- Go forward, toward the Fireplace.
- Take the WINDOW GLASS SHARDS marked in red.
- Click inside the fireplace to trigger a new task.

- Head right, toward the Wall Carving.
- Take the WINDOW GLASS SHARD marked in red.
- Pick up the MEDALLION (B) from the floor.
- Place the MEDALLION on the lock to trigger a new task (the medallion needs to be transmuted to gold).
- Grab the MEDALLION from the wall.
- Go left twice to access the Window.
- Take ISABELLA’S HAIR CLIP (C) from the ground (this item will be added to the Achievements Journal).
- Take the WINDOW GLASS SHARD marked in red on the ground.
- Click on the busted window (D) to trigger a new task.
- View Isabella’s Memory (E) to watch the solution; exit out of her memory afterward.
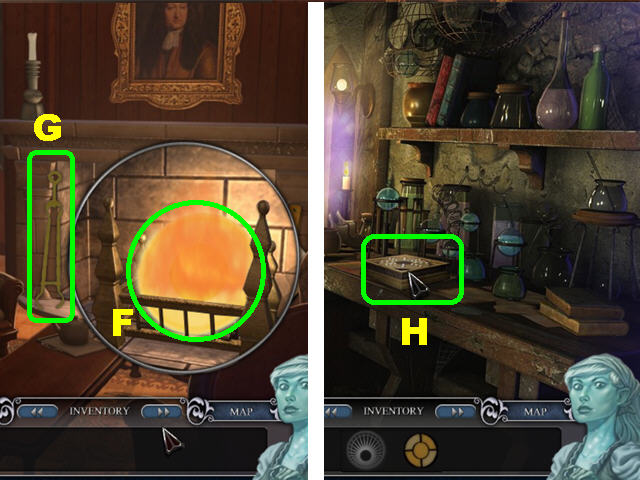
- Return to the Library upstairs; zoom into the fireplace.
- Place all of the WINDOW GLASS SHARDS into the fireplace (F).
- Retrieve the WINDOW GLASS with the TONGS (G) next to the fireplace.
- Return to the Alchemy Lab in the Small Lab.
- Zoom into the puzzle on the right (H).

- Place the MEDALLION in the center of the puzzle to activate it.
- Line up all the like-colored dots in rows (I).
- Click on the dots to switch their positions.
- Click on the rings to rotate them.
- Keep track of the order in which you place the dots so you can line them up.
- Take the TRANSMUTED MEDALLION from the center of the puzzle after you’ve solved it.
- Check out our video solution!
- Return to the Window next to the fireplace in the Banquet Hall.
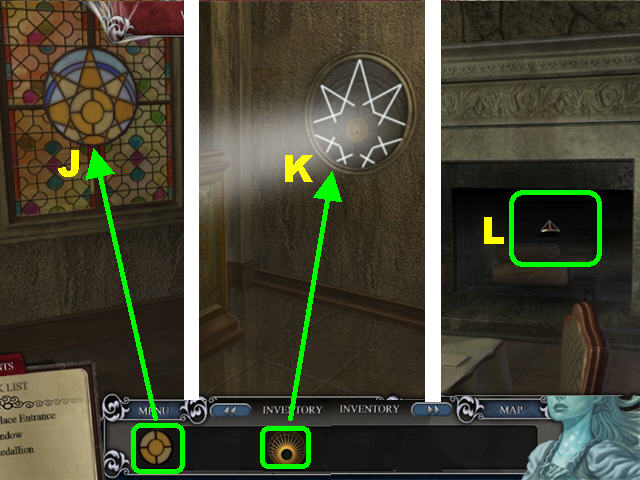
- Repair the window by placing the GLASS WINDOW in the center (J).
- Go right twice to access the Wall Carving area.
- Place the TRANSMUTED MEDALLION on the lock (K). The light from the window will shine on the medallion.
- Go through the fireplace (L) to access the Hidden Storage.
Level 6
- Isabella and Fredrick are reunited!
- Turn right, toward the Apothecary.
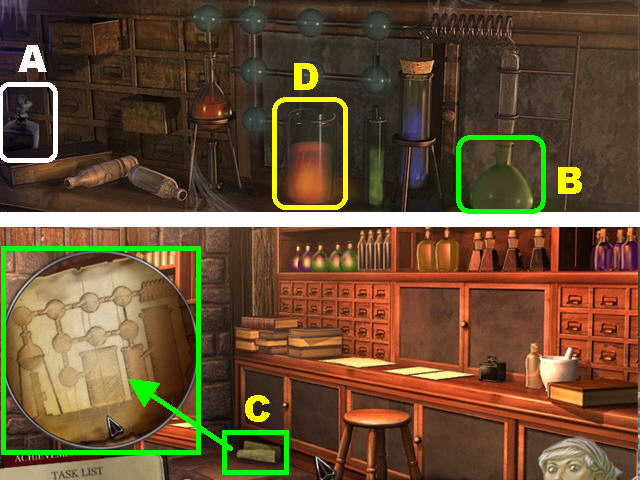
- Take ISABELLA’S PERFUME BOTTLE (A) on the left (it will be added to your Achievements Journal).
- Click on the green flask (B) to trigger a new task.
- View Isabella’s Memory in the upper center.
- Click on Victor’s Note (C) on the ground to trigger a new task.
- Exit Isabella’s Memory.
- Click on the Orange Solution (D) to trigger a new task: a bone fragment for the orange solution.

- Return to the Storage Room in the Kitchen and then click on the Mysterious Crack on the left side of the wall.
- Take the BONE FRAGMENT by clicking on the skeleton in the wall (E).
- Return to the Apothecary in the Hidden Storage.
- Place the BONE FRAGMENT in the orange solution (F).
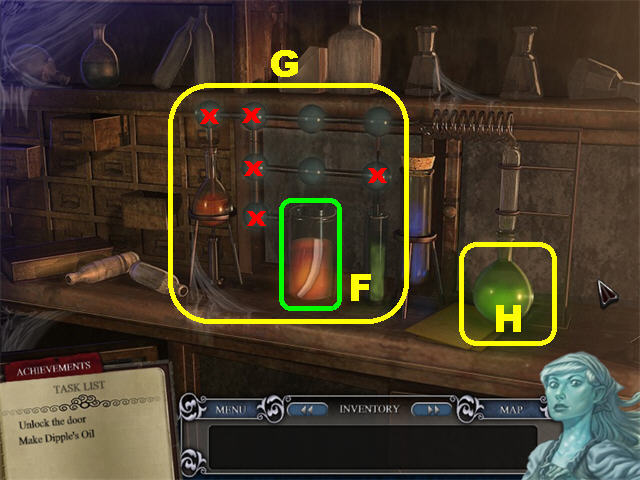
- Turn the distiller bulbs marked with a red “x” until all the tubes are connected (G).
- Take DIPPLE’S OIL (H) on the right.
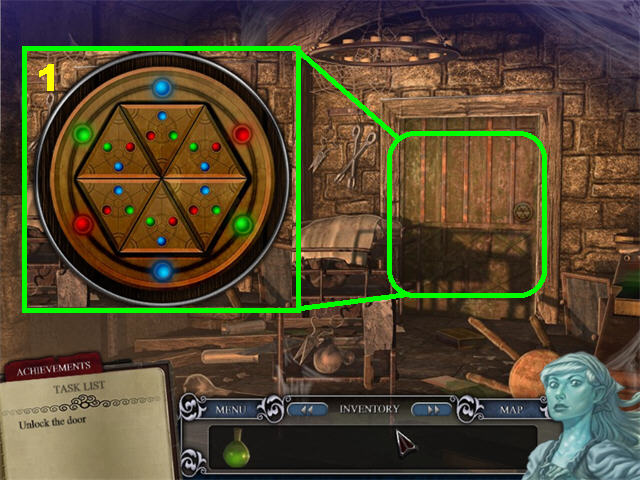
- Click down; zoom into the back door.
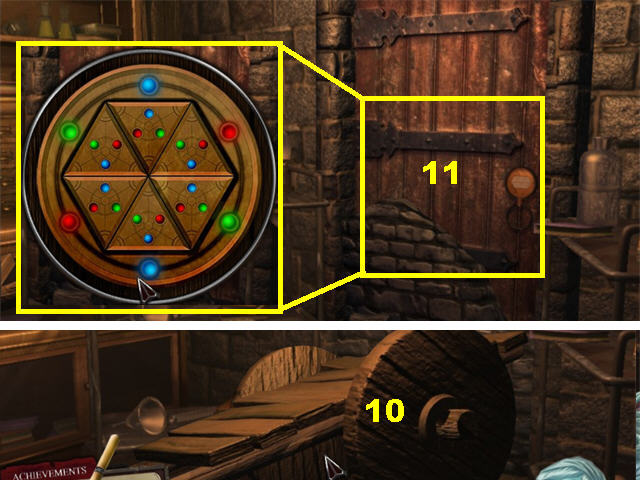
- Place DIPPLE’S OIL on all of the triangles and the outer wheel.
- Click on the triangles to rotate them until the color of the small ball matches the color of the large ball (1).
- Go into the Lab Storage.
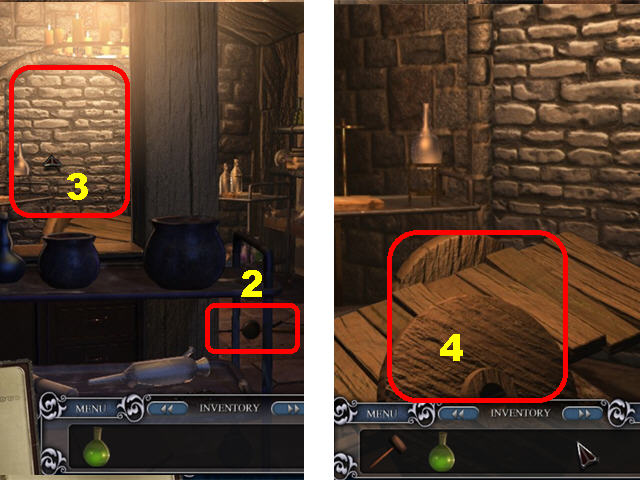
- Grab the MALLET (2) from the floor.
- Click on the back wall (3).
- Click on the broken cart (4) to activate a new task: a pin to fix the cart.
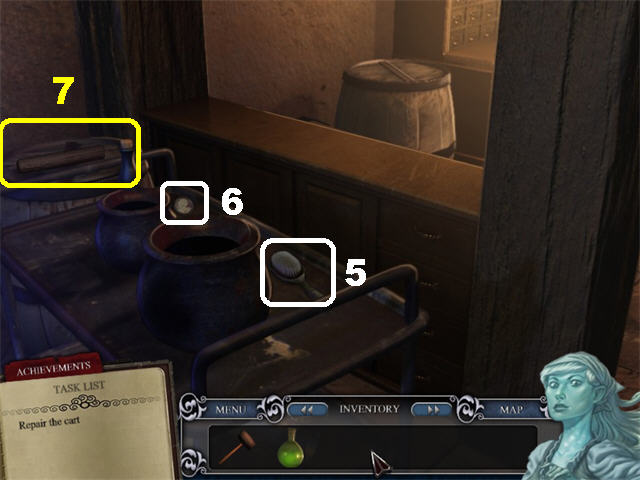
- Click down and then go left toward the Prep Table.
- Take ISABELLA’S HAIRBRUSH (5) from the table (it will be added to your Achievements Journal).
- Grab ISABELLA’S JEWELED BROACH (6) from the table (it will be added to your Achievements Journal).
- Take the WHEEL PIN (7) on the left. The wheel pin and mallet will merge to create a MALLET WITH WHEEL PIN.
- Exit this room and head right, toward the Shield.
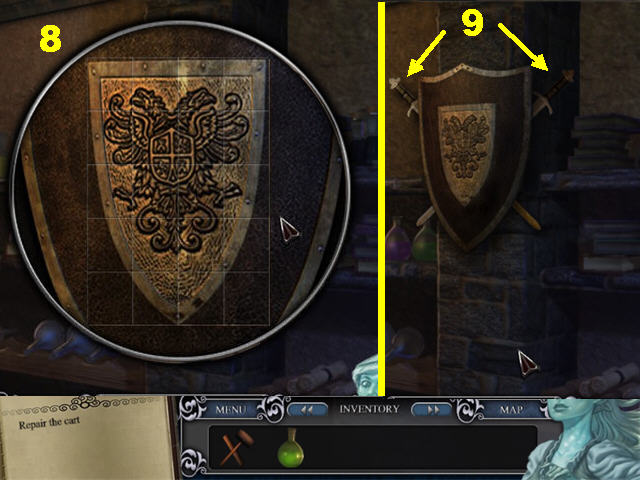
- Zoom into the shield to trigger a puzzle.
- Click on each tile to rotate it until it forms the image in the screenshot (8).
- Remove either SWORD (9) from the shield after the puzzle has been solved.
- Click down and go through the back wall.
- Place the MALLET WITH WHEEL PIN on the broken cart (10) to repair it and move it away from the door.
- Remove the bricks (11) from the back wall with the SWORD.
- Zoom into the back door.
- Place DIPPLE’S OIL on all of the triangles and the outer wheel.
- Click on the triangles to rotate them until the color of the small ball matches the color of the large ball.
- Go into the Main Lab.
Level 7
- Grab the RAG from the lower left.
- Go left, to the Stasis Chamber.
- Zoom into the Drawer (A).
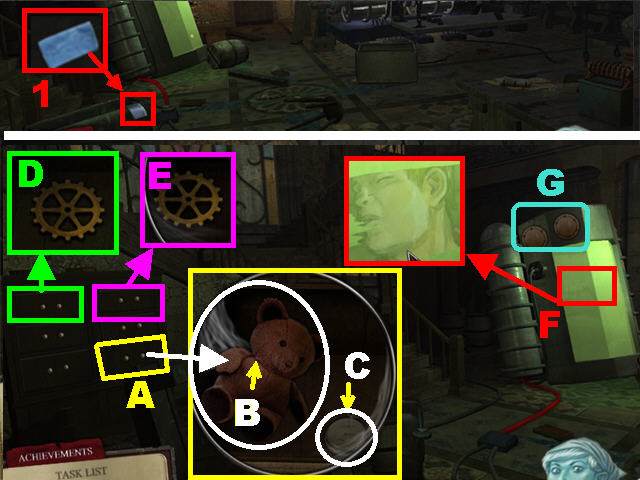
- Grab ISABELLA’S TEDDY BEAR (B) and FREDRICK’S POCKET WATCH(C) from the drawer (both items will be added to the Achievements Journal).
- Zoom into the Drawer (D); take the GEAR.
- Zoom into the Drawer (E); take the GEAR.
- Zoom into the glass on the Stasis Chamber on the right; wipe it with the RAG until Horatio appears (F), triggering a new task.
- Zoom into the access panel on the Stasis Chamber; click in the center of the panel to activate a task (G).

- Click down and go right.
- Pick up the SCREWDRIVER (H) on the table.
- Click on the paper on the ground; click on the parts of the paper until the code 216 appears (I).
- Return to the Stasis Chamber in the Main Lab.
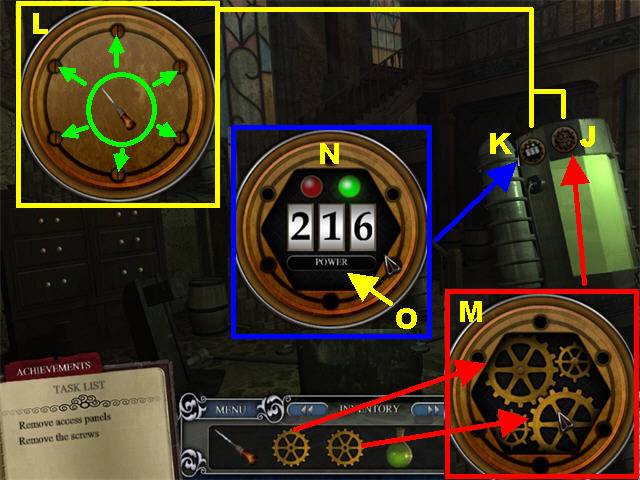
- Zoom into the right access panel (J).
- Remove all the screws with the SCREWDRIVER by clicking on each screw until it is removed (L).
- Click in the center to expose the broken gears.
- Place the GEARS in the inventory over the broken ones (M).
- Zoom into the left access panel (K).
- Remove all the screws with the SCREWDRIVER by clicking on each screw until it is removed (L).
- Click in the center of the panel to remove it.
- Click on each tumbler, changing the numbers to 216 (N).
- Click on the “POWER” (O) button to enter the code.
Level 8
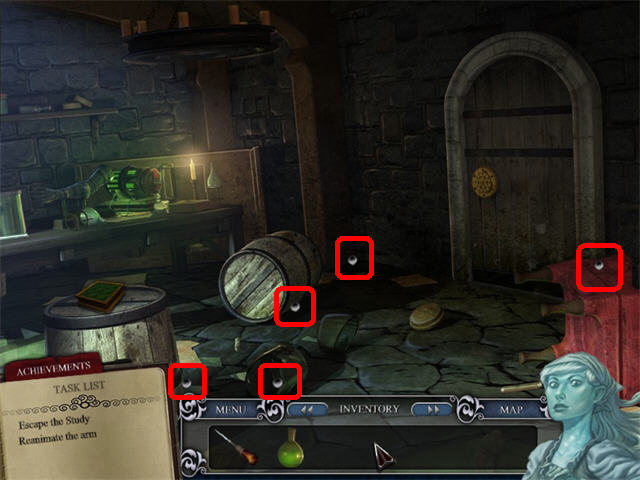
- You will return to the Private Study.
- Take the EYEBALLS marked in red.
- Go left, toward the Prep Table, to activate a new task.
- Take the EYEBALLS marked in red.
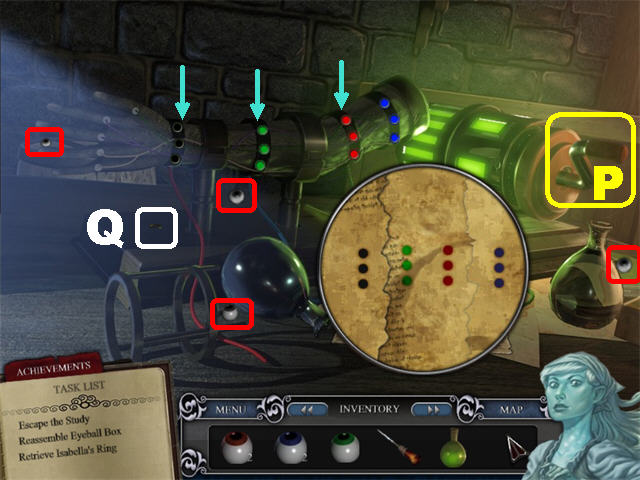
- Zoom into the DOCTOR’S NOTES in the lower right.
- Click on each of the note pieces to view the node settings for the arm.
- Click on the hand nodes according to the Doctor’s Notes.
- Crank the handle to reanimate the arm (P).
- Take ISABELLA’S WEDDING RING (Q) that falls below the hand once the hand opens (this item will be added to the Achievements Journal).
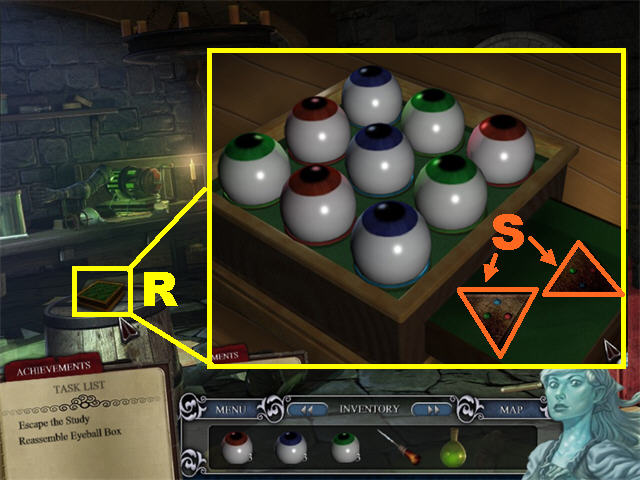
- Click down; zoom into the BOX (R).
- Place all the EYEBALLS into their matching slots.
- Take the TRIANGLES inside the box (S).
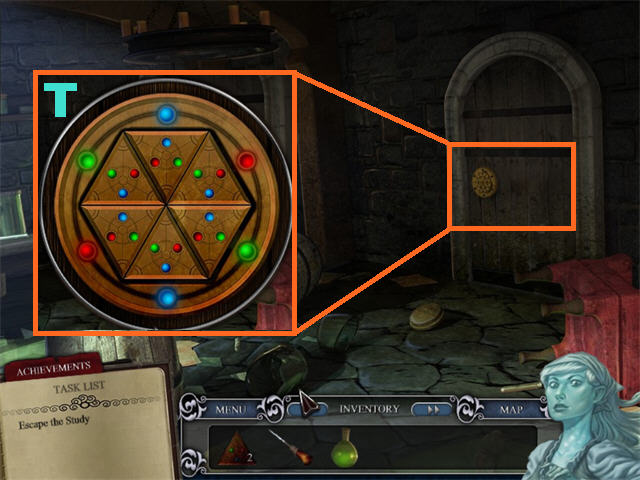
- Exit the box; zoom into the lock on the door.
- Place both TRIANGLES on the lock.
- Place DIPPLE’S OIL on all of the triangles and the outer wheel.
- Click on the triangles to rotate them until the color of the small ball matches the color of the large ball (T).
- Go through the door.
Level 9
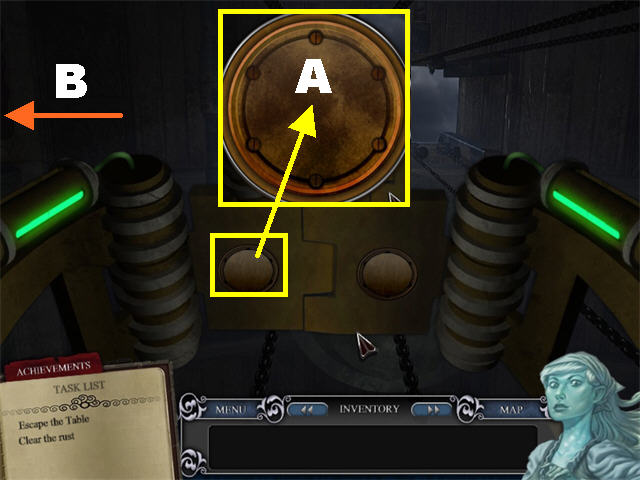
- Zoom into one of the rusted panels; click in the center of the panel to trigger a new task (A).
- Look left (B).
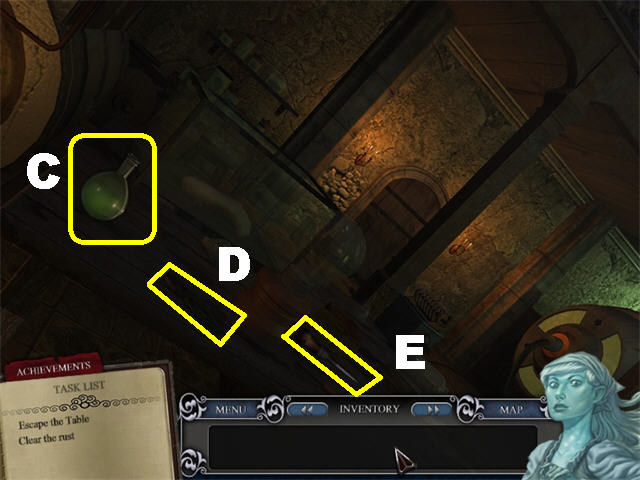
- Take the DIPPLE’S OIL (C) from the left.
- Grab the WIRE SNIPS (D) from the ground.
- Pick up the SCREWDRIVER (E) from the ground.
- Click down.
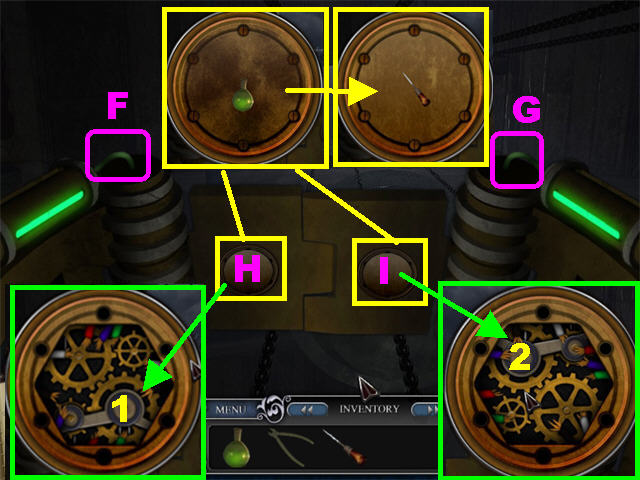
- Cut the left wire with the WIRE SNIPS (F), turning off the left green light.
- Cut the right wire with the WIRE SNIPS (G), turning off the right green light.
- Zoom into the left panel (H).
- Place DIPPLE’S OIL on the rusted panel.
- Remove all the screws with the SCREWDRIVER.
- Click on the panel to remove it, exposing the wires.
- Remove all the wires with the WIRE SNIP.
- Click on the release gears (1) to move the gears back into place.
- Zoom into the right panel (I).
- Place the DIPPLE’S OIL on the rusted panel.
- Remove all the screws with the SCREWDRIVER.
- Click on the panel to remove it, exposing the wires.
- Remove all the wires with the WIRE SNIP.
- Click on the release gears (2) to move the gears back into place and end this level.
Level 10
- You will enter the Main Lab.
- Go left.
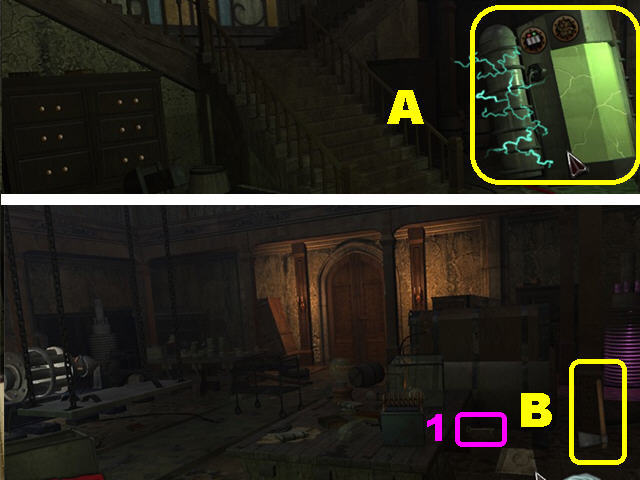
- Click on the Stasis Chamber (A) to trigger a new task.
- Click down and then go right, toward the Lower Hall.
- Grab the AXE (B) from the lower right corner.
- Take the MASTER KEY (1) from the lower right.
- Click down and then go left, to the Stasis Chamber.
- Cut the red power cable (C) with the AXE.
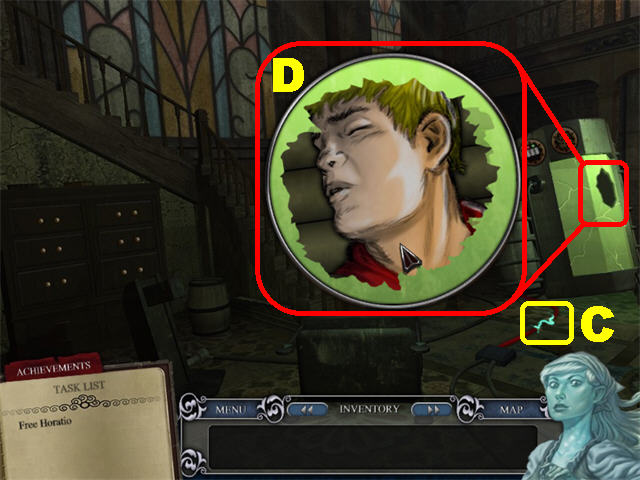
- Zoom into the glass of the Stasis Chamber.
- Hit the glass with the AXE until it shatters (D).
- Click on Horatio, through the glass, to free him.
- Return to the Main Hall.
- Zoom into the right door.
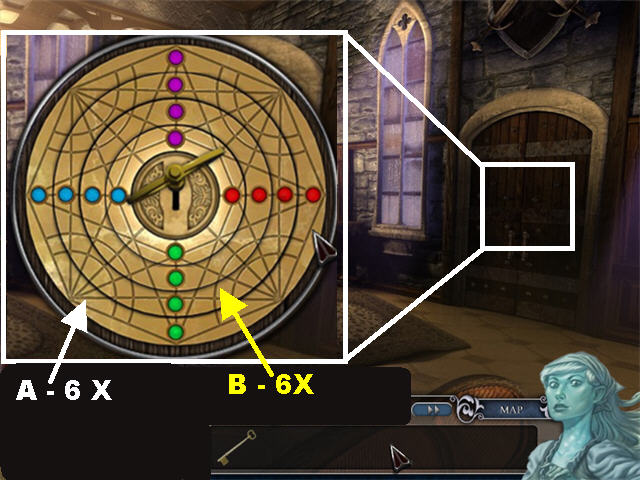
- Place the MASTER KEY into the keyhole to activate the puzzle.
- Click on the rings to rotate them.
- Place all the same color buttons in a row.
- Click on the outer ring (A) six times and the middle ring (B) six times.
- You can go to Hannah’s Room upstairs, to view all the artifacts you’ve collected, or you can go through the door, ending the game.
- Congratulations! You’ve Escaped Frankenstein’s Castle!
Collectable Items
- Here is a list of all the collectable items.
- If you missed any of these items, you can go back through the castle to retrieve them.
- The PRECIOUS LOCKET is in the Armoire area in Hannah’s Room. Use the KEY from the eyeball puzzle to unlock the box on the table and take the locket.
- FREDRICK’S LETTER is in the Reference Room in the Library. It will be added to the Journal once you’ve arranged the books correctly.
- The SMALL PURSE is in the Main Hall, by the chair.
- ISABELLA’S UMBRELLA is in the Left Staircase area, near the fireplace.
- FREDRICK’S HAT is in the upper right side of the Alchemy Lab.
- ISABELLA’S CRYSTAL KEEPSAKE is on the left side of the Kitchen Storage.
- ISABELLA’S HANDKERCHIEF is on the stool in the Kitchen Storage.
- ISABELLA’S HAND MIRROR is on the left side of the Bread Oven location in the Kitchen.
- ISABELLA’S LOVELY FLOWER is on the table in the Banquet Hall.
- ISABELLA’S HAIR CLIP is on the ground, by the window located to the left of the Fireplace in Banquet Hall.
- ISABELLA’S PERFUME BOTTLE is on the left side of the Apothecary in the Hidden Storage.
- ISABELLA’S HAIRBRUSH is on the table in the Prep Table area in the Lab Storage.
- ISABELLA’S JEWELED BROACH is on the table in the Prep Table area in the Lab Storage.
- ISABELLA’S TEDDY BEAR is in the lower right drawer in the Stasis Chamber.
- FREDRICK’S POCKET WATCH is in the lower right drawer in the Stasis Chamber.
- ISABELLA’S WEDDING RING will appear once you’ve reanimated the arm on the Prep Table in the Private Study.
Created at: 2010-09-02