

Walkthrough Menu
- General Tips
- Level 1: 1895 AD (Grandpa)
- Level 2: 9384 BC (Caveman)
- Level 3: 2470 BC (AmenhotepII)
- Level 4:1640 BC (Perseus)
- Level 5: 1138 BC (Maya)
- Level 6: 225 BC (Theseus)
- Level 7: 545 AD (Knight)
- Level 8: 1066 AD (Viking)
- Level 9:1492 AD (Christopher Columbus)
- Level 10: 1529AD (Robin Hood)
- Level 11: 1572 AD (Captain John)
- Level 12:1662 AD (D’Artagnan)
- Level 13:1814 AD (Monte Cristo)
- Level 14: 1869 AD (Captain Nemo)
General Tips
- This is a Hidden Object Puzzle Adventure game. There are 14 chapters in the game.
- From time to time you will need to combine items in your inventory to create new ones. Click on several items in the inventory tray to combine them.
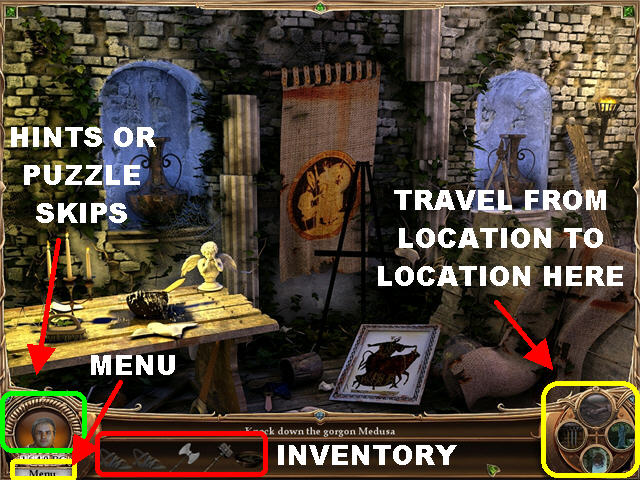
- Click on the Character Icon in the lower left corner to use a hint or skip a puzzle.
- Using a hint will show you where an inventory item needs to be used.
- The hints are unlimited, but must recharge between uses.
- You can skip a mini-game once the progress bar (in the lower left) is full.
- The Hand Icon allows you to pick up and add items to your inventory.
- At the end of the first level you can choose to play the game in Easy or Classic Mode. You can switch modes at anytime during the game by going through the options menu.
- The Magnifying Glass Icon allows you to take a closer look at a Hidden Object scene.
- The Location Wheel in the lower right corner allows you to travel from scene to scene.
- A green checkmark on a location signifies that it is complete, for the moment. The checkmark could disappear if a new task is introduced at that location.
- A location on the wheel with a question mark represents a location that has not been unlocked.
Level 1: 1895 AD (Grandpa)
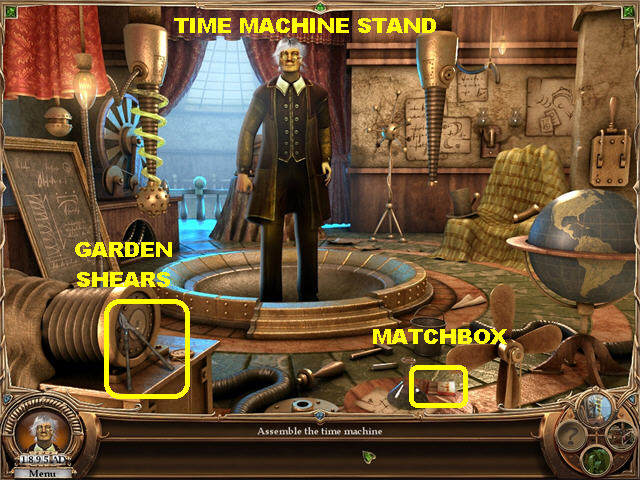
- Pick up the GARDEN SHEARS in the lower left corner.
- Pick up the MATCHBOX in the lower right corner.
- Select the Greenhouse scene from the location wheel in the lower right corner.
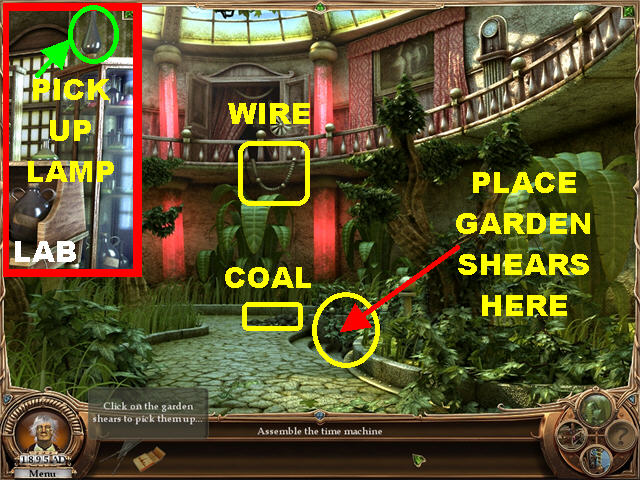
- Place the GARDEN SHEARS on the stairs.
- Pick up the COAL in the back of the scene.
- Pick up the WIRE on the balcony.
- Go to the Laboratory.
- Pick up the LAMP in the upper right corner.
- Go to the Cellar.
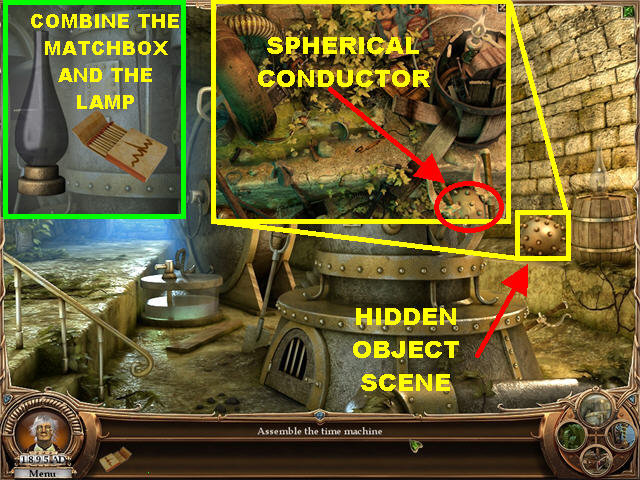
- Combine the MATCHBOX and LAMP in inventory to create a BURNING LAMP.
- Light the cellar by placing the BURNING LAMP anywhere in the scene.
- Click on the sparkly area in the back of the scene to trigger a Hidden Object Scene.
- You will obtain the SPHERICAL CONDUCTOR at the end of your search.
- Go to the Laboratory.
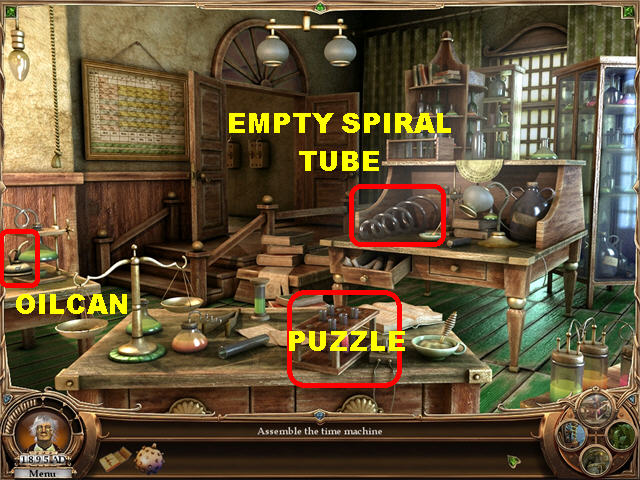
- Pick up the EMPTY SPIRAL TUBE on the desk.
- Grab the OILCAN in the lower left.
- Zoom into the test tubes in the lower center to trigger a puzzle.
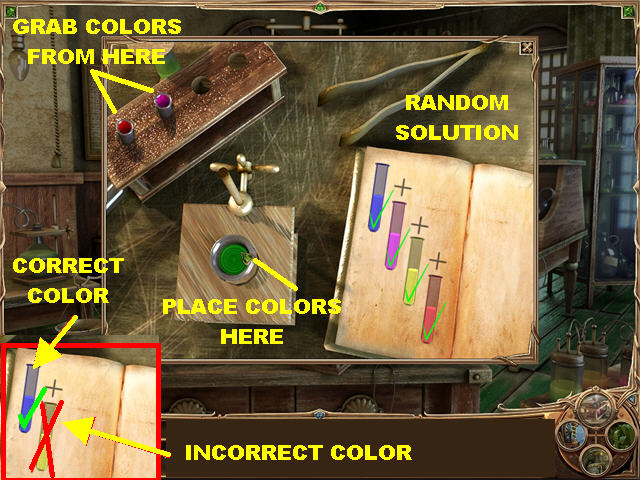
- Mix the colors in the proper order.
- Place a test tube on the holder. If the color is correct, it will appear in the book. If it’s incorrect, it will appear a red “X” over it.
- If you make a mistake, you will have to restart the puzzle.
- The solution is random so we cannot give you the exact colors to choose.
- The TEST TUBE WITH GREEN LIQUID is added to your inventory.
- Go to the Cellar.
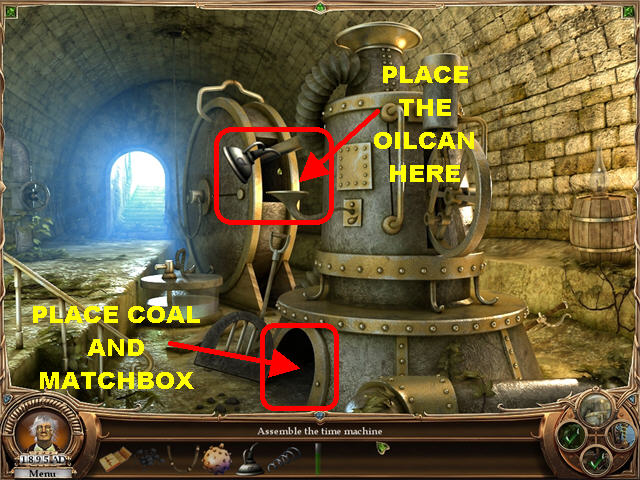
- Open the bottom of the furnace.
- Place the COAL in the furnace.
- Place the OILCAN on the funnel attached to the furnace.
- Light the furnace with the MATCHBOX.
- Return to the Time Machine Stand.
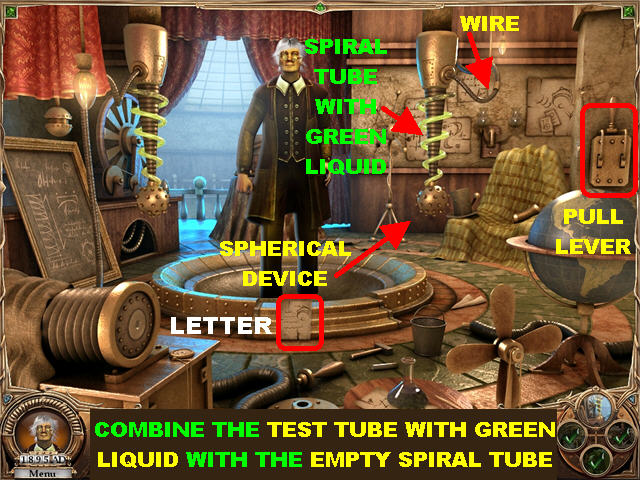
- Combine the TEST TUBE WITH GREEN LIQUID with the EMPTY SPIRAL TUBE in the inventory to create a SPIRAL TUBE WITH GREEN LIQUID.
- Place the SPIRAL TUBE WITH GREEN LIQUID on the DEVICE in the upper right.
- Place the SPHERICAL DEVICE at the bottom of the DEVICE on the right.
- Place the WIRE on top of the DEVICE.
- Pull the LEVER on the right side of the wall.
- Click on the LETTER in the lower center.
- Go to the Greenhouse.

- Pick up the GARDEN SHEARS on the ground and place them on the plant-covered Time Capsule.
- Click on the TIME CAPSULE to add it to inventory.
- Go to the Time Machine Stand and place the TIME CAPSULE on the center of the ground.
- Click on the Time Capsule and select your difficulty level, Easy or Classic.
- Click on the LEVER on the right to activate the time machine.
Level 2: 9384 BC (Caveman)
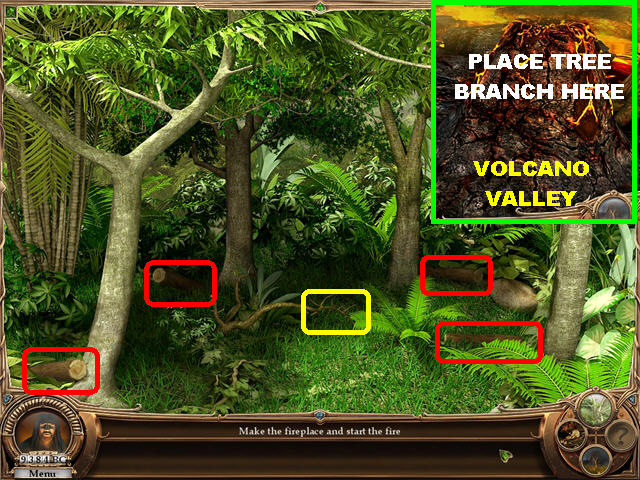
- Go to the Jungle.
- Pick up the 4 FIREWOOD LOGS marked in red.
- Pick up the TREE BRANCH marked in yellow.
- Go to Volcano Valley.
- Place the TREE BRANCH on the right to create the BURNING TREE BRANCH.
- Return to the Cave.
- Combine the 4 FIREWOOD LOGS to create FIREWOOD.
- Place the FIREWOOD and the BURNING TREE BRANCH in the fire pit on the ground.
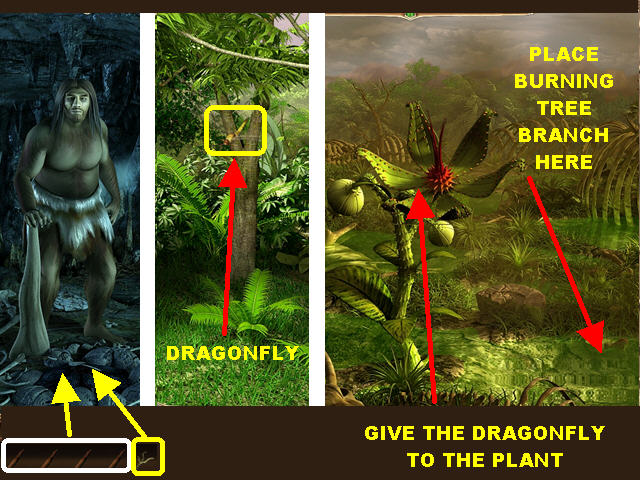
- Go to the Jungle and grab the DRAGONFLY floating in the air.
- Go to the Deadly Swamp.
- Feed the DRAGONFLY to the HUNGRY PLANT in the middle of the scene.
- Extinguish the BURNING TREE BRANCH in the water on the lower right.
- Go to the Cave.
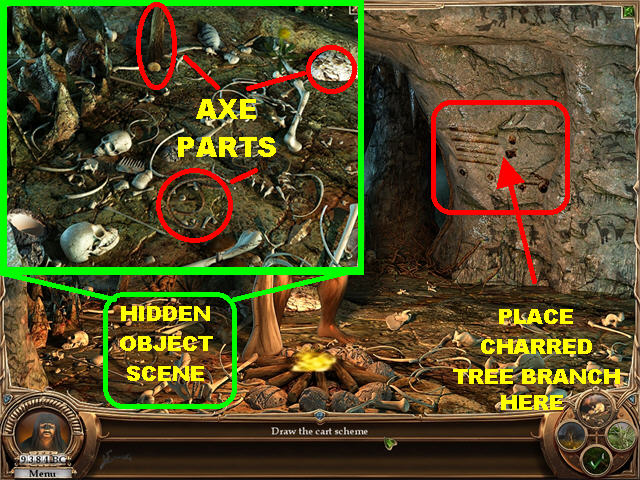
- Place the CHARRED TREE BRANCH on the right side of the wall to draw the CART SCHEME.
- Click on the Hidden Object Scene in the lower left.
- You will obtain the 3 AXE PARTS at the end of your search.
- Go to the Jungle.
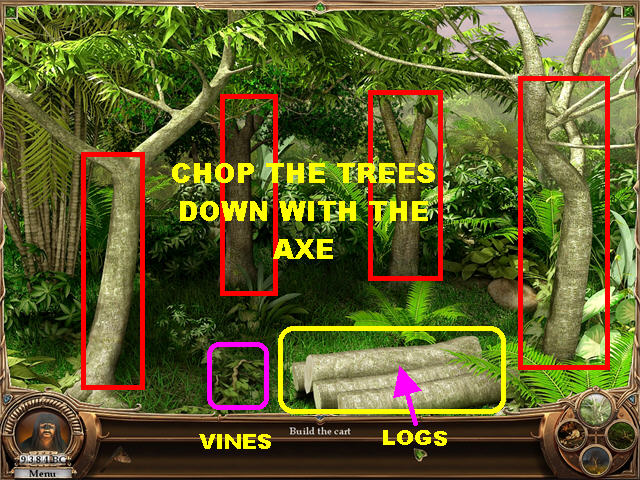
- Combine the 3 AXE PARTS to create the AXE.
- Chop the 4 TREES in the scene with the AXE.
- Pick up the 4 LOGS FOR THE CART on the ground.
- Pick up the VINES marked in purple in the lower left.
- Go to the Deadly Swamp.
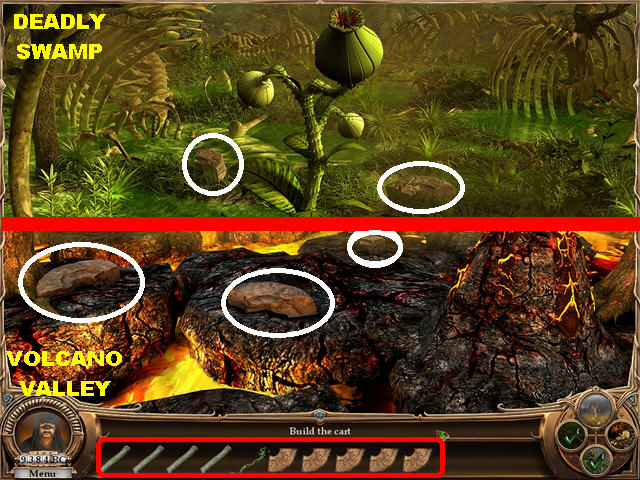
- Pick up the 2 PARTS OF THE STONE WHEEL marked in white.
- Go to Volcano Valley.
- Pick up the 3 PARTS OF THE STONE WHEEL marked in white.
- Combine the 5 PARTS OF THE STONE WHEEL to create the STONE WHEEL.
- Combine the VINES, 4 LOGS FOR THE CART, and the STONE WHEEL to trigger a puzzle.
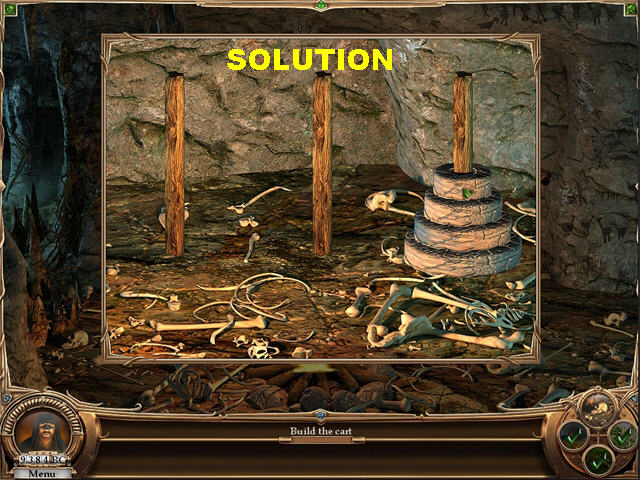
- Move the 4 stone rings from the left pole to the right pole in the same order.
- The CART will be complete after the puzzle has been solved.
- Please watch the video for a step-by-step solution for this puzzle.
- Click on the LEVER on the right to go to the next chapter.
Level 3: 2470 BC (Amenhotep II)
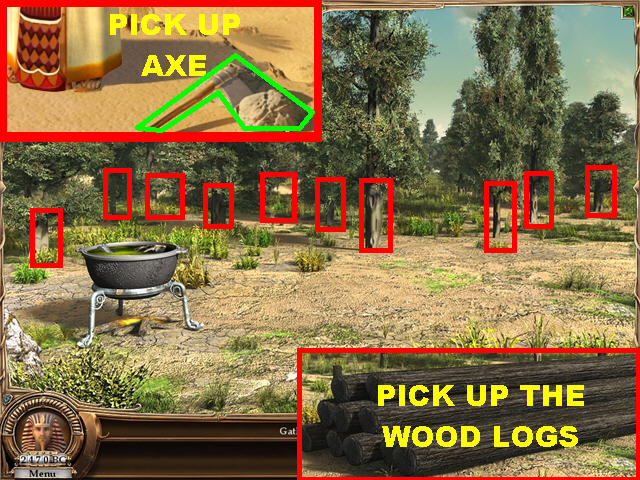
- Pick up the AXE in the lower center.
- Go to the Cypress Forest.
- Chop down the 10 TREES in the scene with the AXE (you can place the AXE anywhere on the scene).
- Pick up the WOOD LOGS on the ground.
- Return to the Pyramid Building Site; part of the construction will begin.
- Go to the Marble Mines.
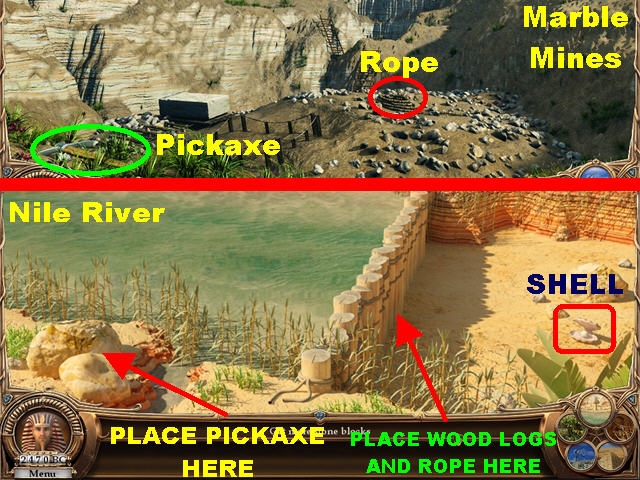
- Grab the PICKAXE in the lower left.
- Pick up the ROPE in the lower center.
- Go to the Nile River.
- Place the PICKAXE on the rocks in the lower left.
- Place the WOOD LOGS and the ROPE on the right side of the water.
- Return to the Pyramid Building Site to continue construction.
- Go to the Nile River and pick up the SHELL in the lower right.
- Go to the Cypress Forest.
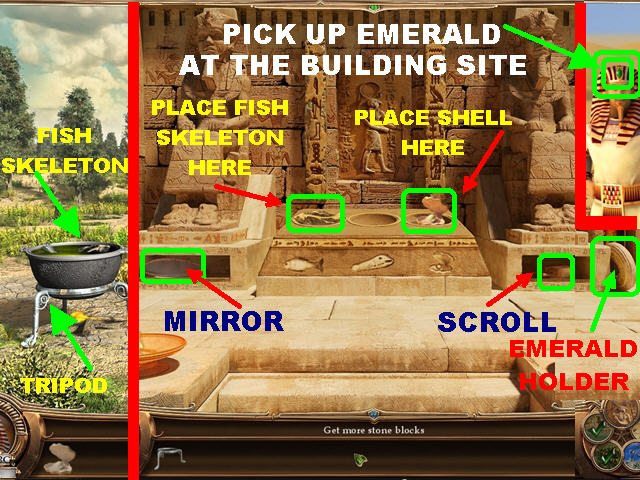
- Pick up the FISH SKELETON and the TRIPOD on the left.
- Go to the Temple of Ra.
- Pick up the EMERALD HOLDER in the lower right.
- Place the SHELL on the right hole on the pedestal and pick up the SCROLL below the right statue.
- Place the FISH SKELETON on the left hole on the pedestal and pick up the MIRROR below the left statue.
- Go to the Pyramid Building Site and grab the EMERALD from the pharaoh’s headdress.
- Go to the Marble Mines.
- Combine the EMERALD HOLDER, EMERALD, TRIPOD, SCROLL, and MIRROR items to trigger a puzzle.
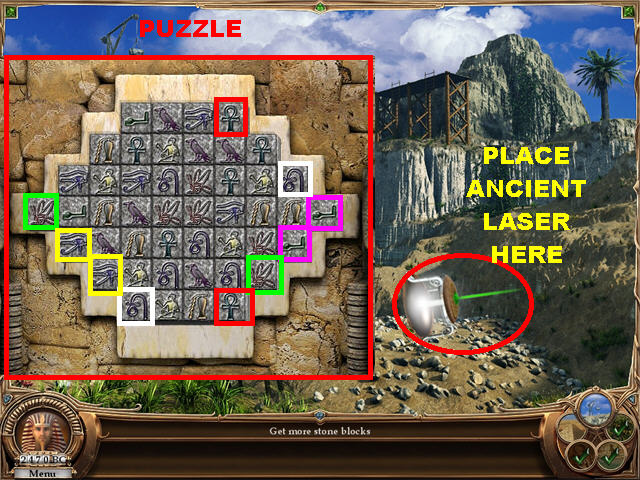
- Eliminate the matching pairs of tiles (you can only click available tiles).
- The ANCIENT LASER will be created after the puzzle has been completed.
- Place the ANCIENT LASER on the right side of the scene.
- Return to the Pyramid Building Site to continue construction.
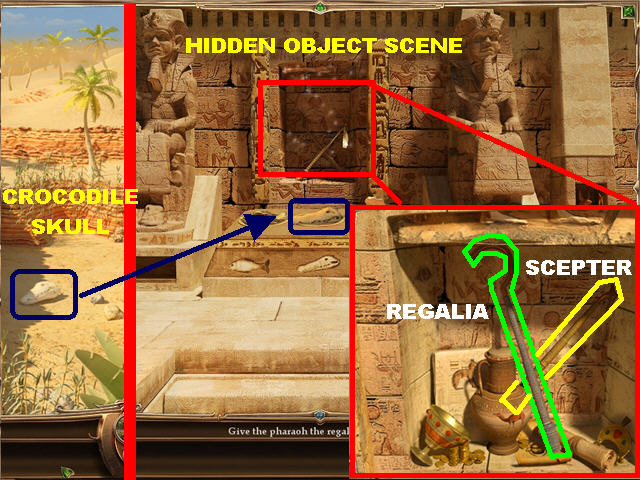
- Go to the Nile River and pick up the CROCODILE SKULL in the lower right.
- Go to the Temple of Ra.
- Place the CROCODILE SKULL in the middle of the stand; click on the back wall to trigger a Hidden Object scene.
- The SCEPTER and the REGALIA will be added to your inventory at the end of your search.
- Go to the Pyramid Building Site.
- Combine the SCEPTER with the REGALIA.
- Give the REGALIA AND SCEPTER to the pharaoh.
- Click on the LEVER on the right to go to the next chapter.
Level 4: 1640 BC (Perseus)
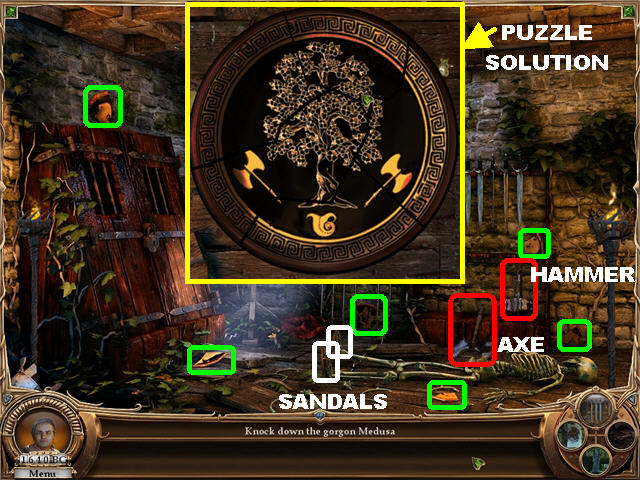
- Go to the Depot.
- Pick up the 6 BOWL PIECES marked in green.
- Pick up the HAMMER in the lower right.
- Pick up the AXE in the lower center.
- Pick up the 2 SANDALS from the skeleton’s feet marked in white.
- Combine the 6 BOWL PIECES to trigger a puzzle.
- Assemble the bowl by placing the pieces in the correct spots.
- Double-click on a piece to rotate it.
- Correctly placed pieces will make a unique sound.
- The BOWL will go into inventory after the puzzle has been solved.
- Go to the Workshop.
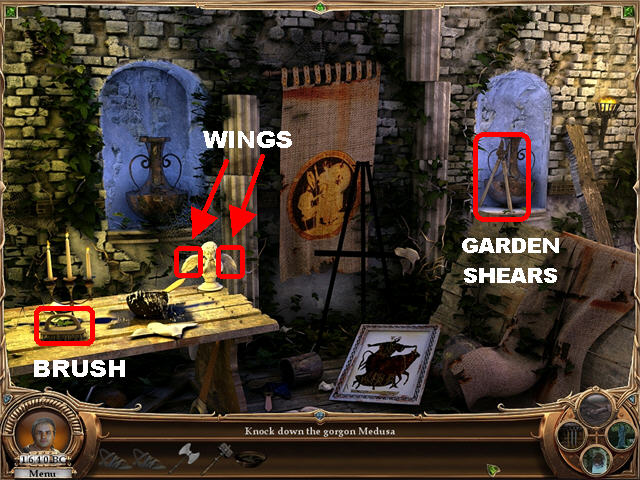
- Pick up the BRUSH on the table.
- Pick up the GARDEN SHEARS on the vase in the upper right.
- Pick up the 2 WINGS on the angel on the table.
- Go to the Forest.
- Cut the foliage with the GARDEN SHEARS until the GARDEN SHEARS disappear.
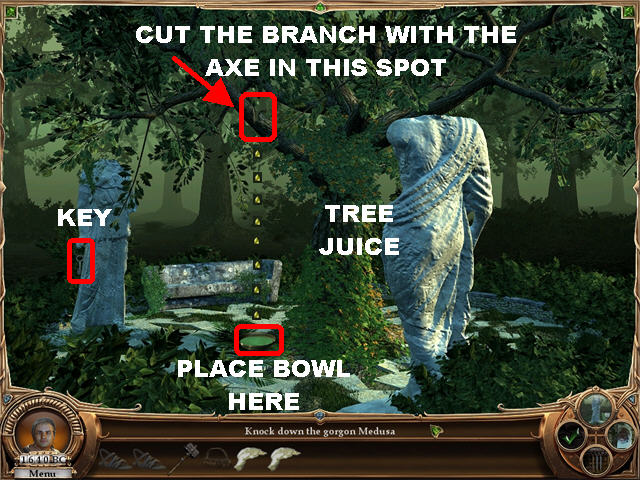
- Pick up the KEY on the side of the left statue.
- Cut the BRANCH in the upper left with the AXE; tree juice will drip from the cut.
- Place the BOWL below the tree juice.
- Pick up the BOWL once it is full of tree juice.
- Go to the Depot.

- Place the KEY on the lock on the left; zoom into the keyed lock to trigger a Hidden Object scene.
- The SHIELD will enter inventory after your search.
- Return to the Atrium.
- Combine the BRUSH, SHIELD, and BOWL WITH THE TREE JUICE to create the POLISHED SHIELD.
- Combine the 2 WINGS with the 2 SANDALS to create the WINGED SANDALS.
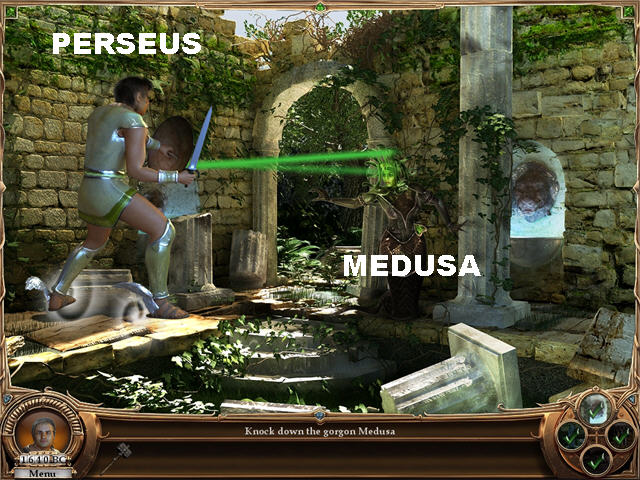
- In this order, give Perseus the WINGED SANDALS and the POLISHED SHIELD.
- Click on Medusa to make her move and turn to stone after the shield reflects the beams on her.
- Break the Medusa statue with the HAMMER.
- Click on the LEVER on the right to go to the next chapter.
Level 5:1138 BC (Maya)
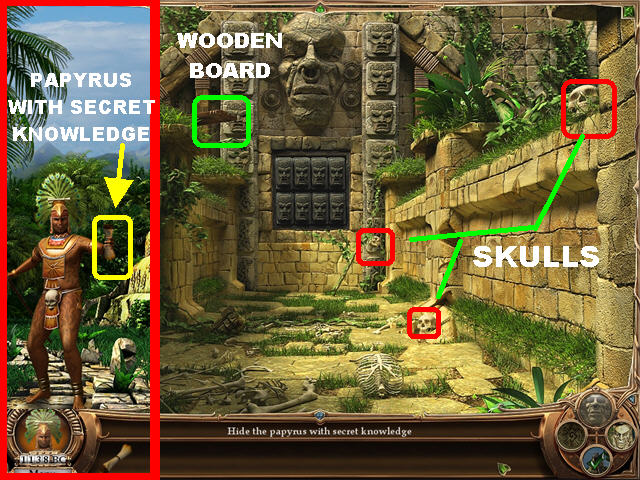
- Pick up the PAPYRUS WITH SECRET KNOWLEDGE from the Mayan man.
- Go to the Tunnel of Silence.
- Pick up the 3 SKULLS marked in red.
- Pick up the WOODEN BOARD in the upper left.
- Go to the Moon Temple.
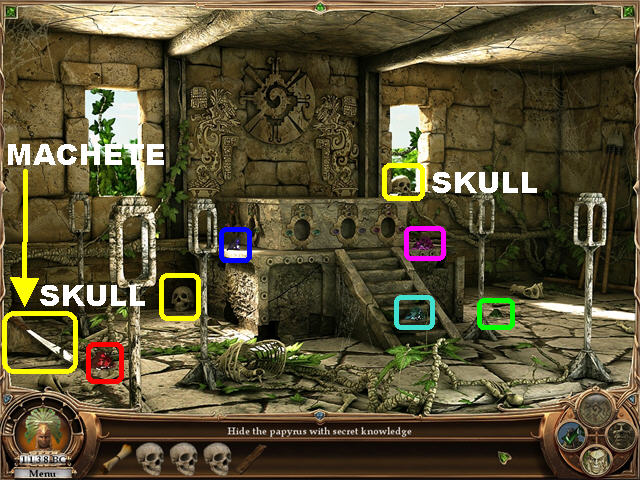
- Grab the MACHETE in the lower left.
- Pick up the SKULL on the left side of the back wall.
- Pick up the SKULL on the right window.
- Pick up the RED PIECE OF COLORED GLASS in the lower left.
- Pick up the BLUE PIECE OF COLORED GLASS on the altar.
- Pick up the PURPLE PIECE OF COLORED GLASS on the right side of the altar.
- Pick up the LIGHT BLUE PIECE OF COLORED GLASS on the steps.
- Pick up the GREEN PIECE OF COLORED GLASS in the lower right.
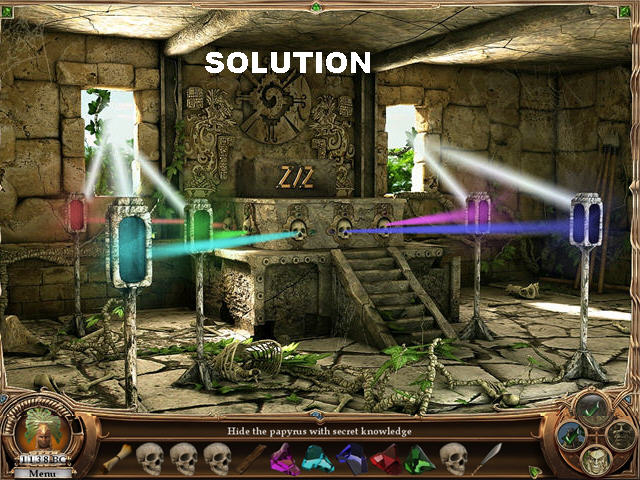
- Place the 5 SKULLS on the empty slots on the altar.
- Place the 4 PIECES OF COLORED STONES so their beams shine on their matching colors, next to the skull.
- Click on a crystal to remove it from its stand.
- Go to the Eagle Canyon.
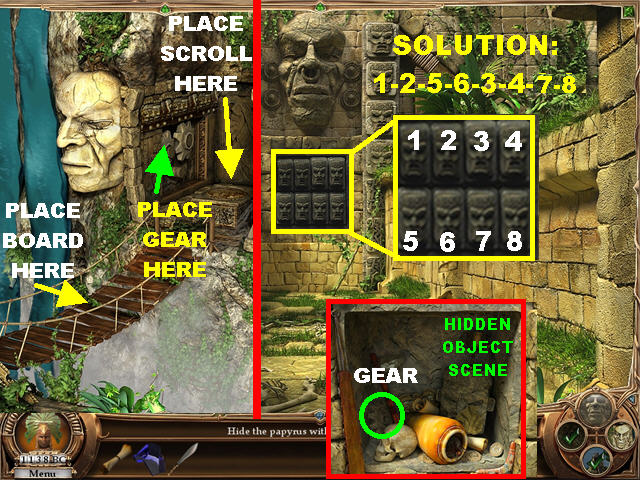
- Place the WOODEN BOARD on the bridge.
- Place the PAPYRUS WITH SECRET KNOWLEDGE on the altar.
- Go to the Tunnel of Silence.
- Click on the small stone faces on the back wall in the following order:1-2-5-6-3-4-7-8
- Click on the gear on the back wall to trigger a Hidden Object scene.
- The GEAR will go into inventory at the end of your search.
- Go to Eagle Canyon.
- Place the GEAR on the left side of the wall to trigger a puzzle.
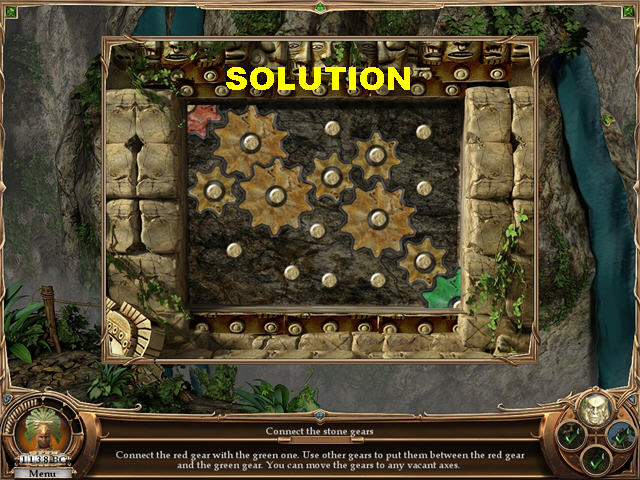
- Place the gears into the correct spots.
- Cut the bridge with the MACHETE.
- Click on the LEVER on the right to go to the next chapter.
Level 6: 225 BC (Theseus)
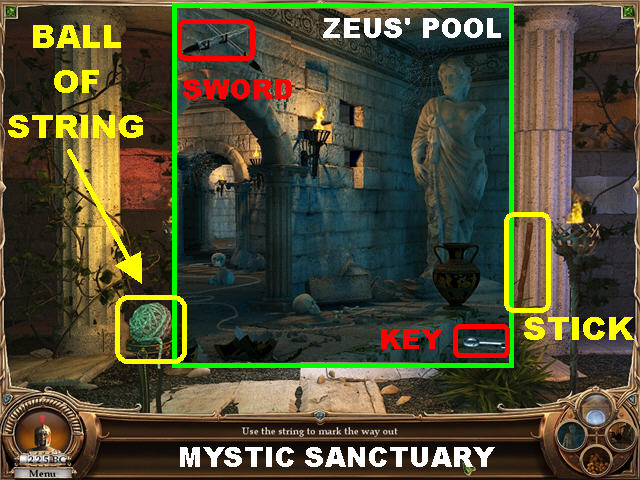
- Go to the Mystic Sanctuary.
- Pick up the BALL OF STRING in the lower left.
- Place the BALL OF STRING on the ground.
- Go to the Hall of Fame and place the BALL OF STRING on the floor.
- Go to Zeus’ Pool and place the BALL OF STRING on the ground.
- Return to the Lair of Minotaur.
- Place the BALL OF STRING on the ground.
- Click on the WHEEL in the lower right.
- Go to Zeus’ Pool.
- Pick up the KEY in the lower center.
- Pick up the SWORD in the upper left.
- Go to the Mystic Sanctuary and pick up the STICK on the right column.
- Go to the Hall of Fame.
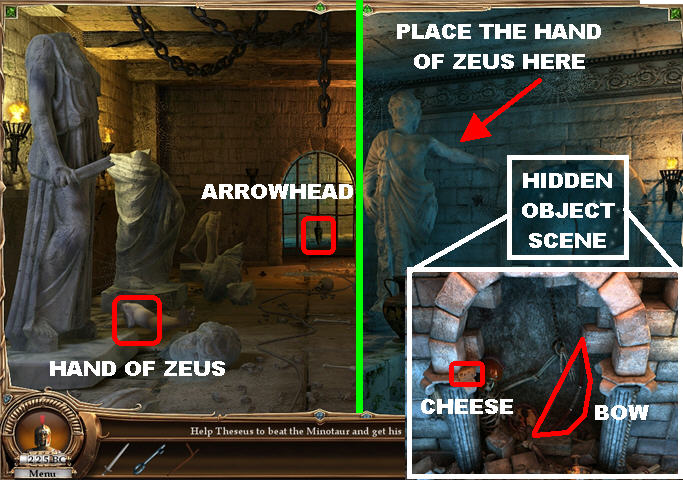
- Pick up the HAND OF ZEUS in the lower left.
- Pick up the ARROWHEAD on the gate in the back of the room.
- Go to Zeus’ Pool and place the HAND OF ZEUS on the statue.
- Click on the Hidden Object scene on the back wall.
- The CHEESE and the BOW will be added to your inventory at the end of your search.
- Go to the Mystic Sanctuary.
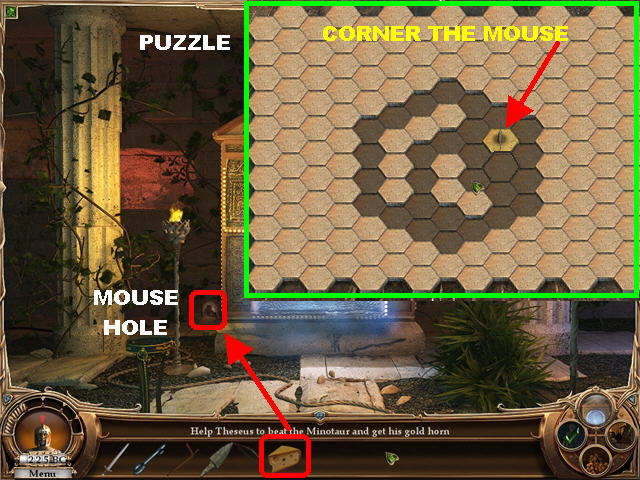
- Place the CHEESE in the mouse hole on the left to trigger a puzzle.
- Click on the tiles to surround and corner the mouse.
- Start clicking on the edges of the scene and work your way in.
- The MOUSE will be added to inventory after the puzzle has been solved.
- Go to the Hall of Fame.
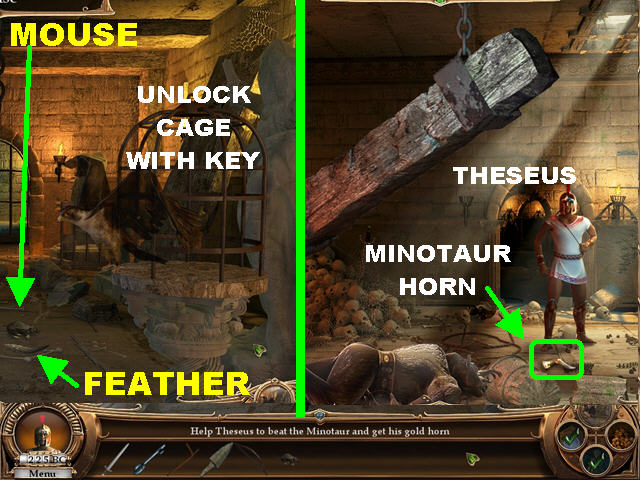
- Open the BIRD CAGE with the KEY.
- Place the MOUSE on the ground and the bird will come out of the cage.
- Pick up the FEATHER the bird leaves behind.
- Go to the Lair of the Minotaur.
- Combine the FEATHER, SWORD, ARROWHEAD, and STICK items to create the ARROW.
- Combine the BOW with the ARROW to create the BOW WITH ARROW
- Give the BOW WITH ARROW to Theseus so he can defeat the Minotaur.
- Pick up the MINOTAUR HORN on the ground and give it to Theseus.
- Click on the LEVER on the right to go to the next chapter.
Level 7: 545 AD (Knight)
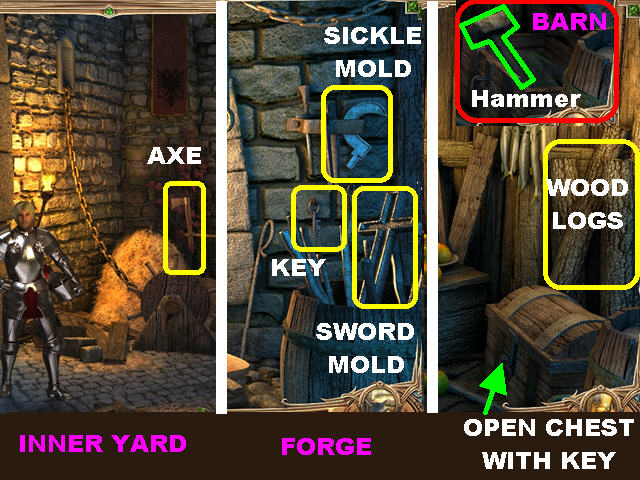
- Pick up the AXE in the center.
- Go to the Forge.
- Pick up the KEY on the right side of the wall.
- Pick up the SWORD MOLD on the right.
- Pick up the SICKLE MOLD in the upper right.
- Go to the Barn.
- Pick up the WOOD LOGS on top of the chest on the right.
- Unlock the CHEST on the right with the KEY; click on the unlocked chest to activate a Hidden Object Scene.
- The HAMMER is added to your inventory.
- Go to the Forge.
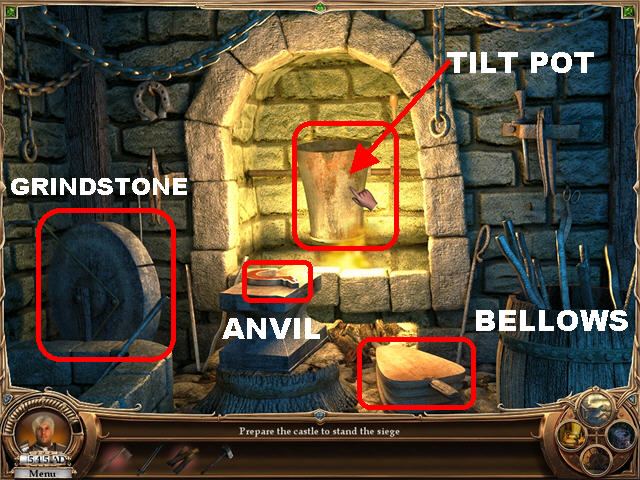
- Place the SICKLE MOLD on the anvil.
- Click on the BELLOWS on the ground to heat the pot.
- Tilt the POT in the fireplace to fill the SICKLE MOLD with liquid metal.
- Place the HAMMER on the sickle mold; then pick up the BLUNT SICKLE.
- Place the SWORD MOLD on the anvil and click on the BELLOWS to heat the pot.
- Tilt the POT in the fireplace to fill the SWORD MOLD with liquid metal.
- Place the HAMMER on the sword mold; then pick up the BLUNT SWORD.
- Place the BLUNT SICKLE on the grindstone in the lower left to create the SICKLE.
- Place the BLUNT SWORD on the grindstone to create the SWORD.
- Go to the Castle.
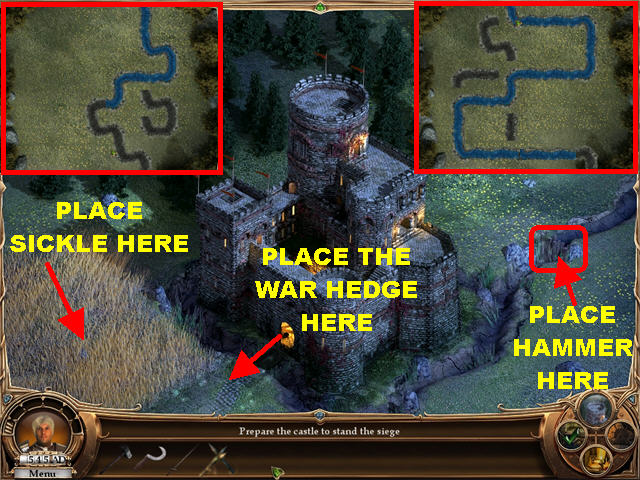
- Combine the WOOD LOGS with the AXE to create the WAR HEDGE.
- Place the WAR HEDGE in the lower left.
- Place the HAMMER on the lower right to trigger a puzzle.
- You must connect the top of the meadow with the bottom.
- Click on the ground to dig the trenches (you can start from any part of the ground).
- The solutions are random.
- Place the SICKLE in the lower left and pick up the WHEAT.

- Go to the Barn and place the WHEAT in the cart in the lower left.
- Go to the Inner Yard.
- Give the SWORD to King Arthur and click on the WHEEL.
- Click on the LEVER on the right to go to the next chapter.
Level 8: 1066 AD (Viking)
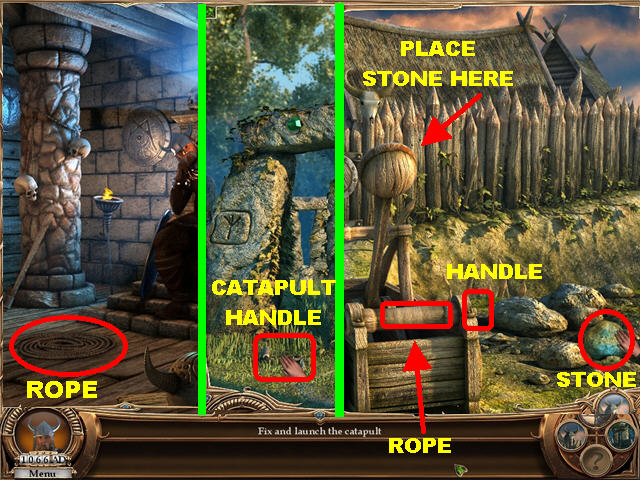
- Pick up the ROPE on the ground.
- Go to the Stonehenge and pick up the CATAPULT HANDLE in the lower left.
- Go to the Red Dogs Village.
- Place the ROPE at the bottom of the catapult.
- The CATAPULT HANDLE belongs on the right side of the catapult.
- Pick up the STONE in the lower right and place it on the catapult.
- Click on the CATAPULT HANDLE to launch the STONE.
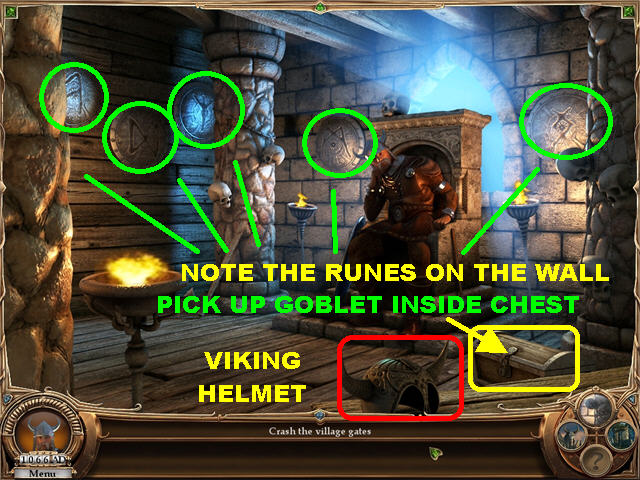
- You are transported to the Hall of Glory.
- Pick up the VIKING HELMET in the lower center.
- Note the order of the RUNES around the back wall, for a future puzzle.
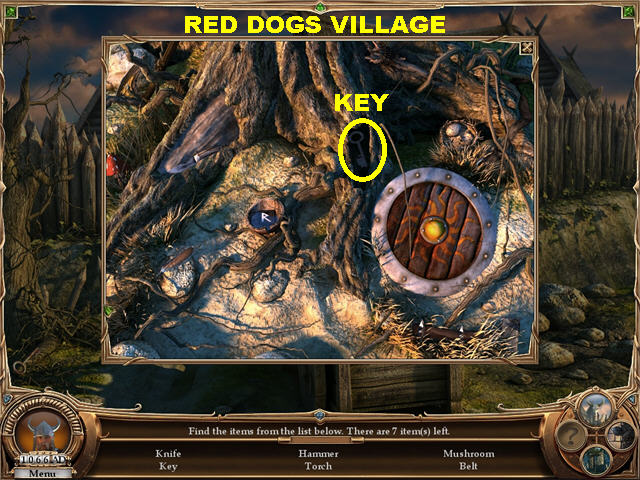
- Go to the Red Dogs Village and click on the Hidden Object scene in the lower left.
- The KEY will be added to your inventory after your search.
- Go to the Hall of Glory.
- Open the CHEST in the lower right with the KEY.
- Pick up the GOBLET inside the chest.
- Go to the Stonehenge.
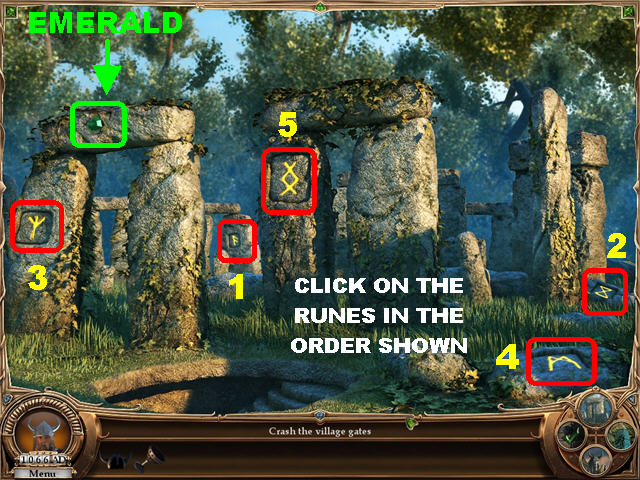
- Pick up the EMERALD in the upper left.
- Click on one of the carved stones; the runes are similar to the ones carved on the shield in the Hall of Glory.
- Click on the RUNES in the order shown on the screenshot.
- Go to the unlocked Sanctuary Crypt location.
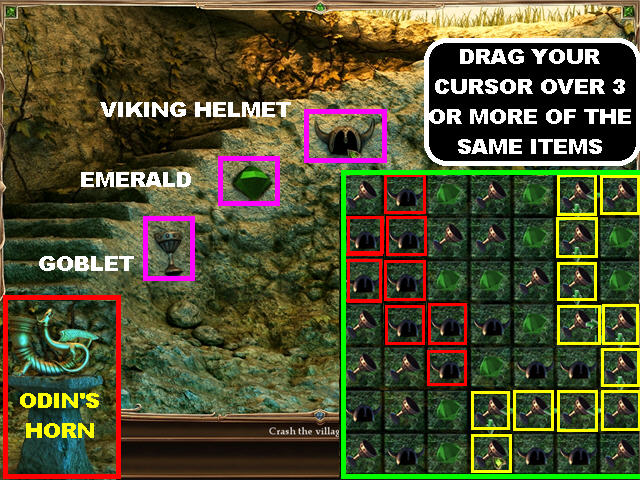
- Place the GOBLET, EMERALD, and VIKING’S HELMET on the matching spots on the wall to trigger a puzzle.
- Drag your cursor over 3 or more of the same items to eliminate them.
- Keep making matches until the background is clear.
- Pick up ODIN’S HORN after the puzzle has been solved.
- Go to the Red Dogs Village
- Place ODIN’S HORN on the village gates.
- Click on the LEVER on the right to go to the next chapter.
Level 9: 1492 AD (Christopher Columbus)
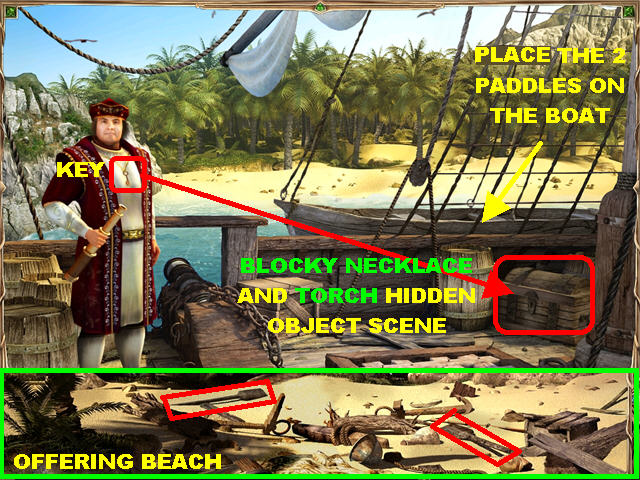
- Go to the Offering Beach and pick up the2 PADDLES on the beach.
- Return to the Caravel.
- Place the 2 PADDLES on the boat.
- Pick up the KEY around Christopher Columbus’ neck.
- Open the CHEST with the KEY; click on the keyed chest to trigger a Hidden Object Scene.
- The BLOCKY NECKLACE and the TORCH will be added to inventory at the end of your search.
- Go to Native Settlement.

- Pick up the TOMAHAWK on the left.
- Pick up the FLINT STONES on the right.
- Go to the Green Meadow.
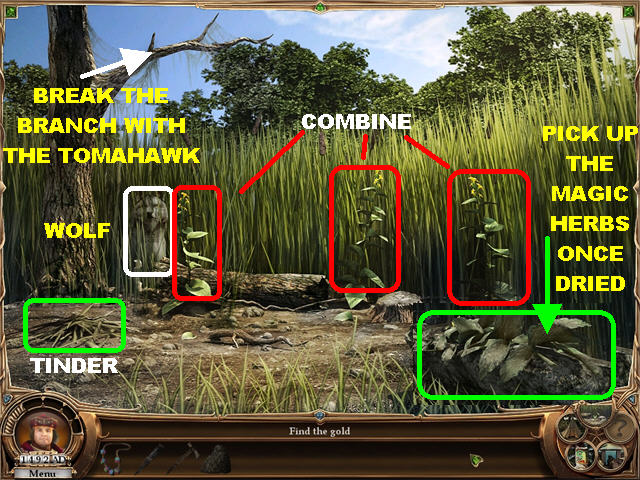
- Break the BRANCH in the upper left with the TOMAHAWK to scare away the wolf.
- Pick up the 3 MAGIC HERBS marked in red.
- Combine the 3 MAGIC HERBS and they will land in the lower right corner.
- Pick up the MAGIC HERBS once they’ve dried out.
- Pick up the TINDER in the lower left.
- Go to the Native Settlement.
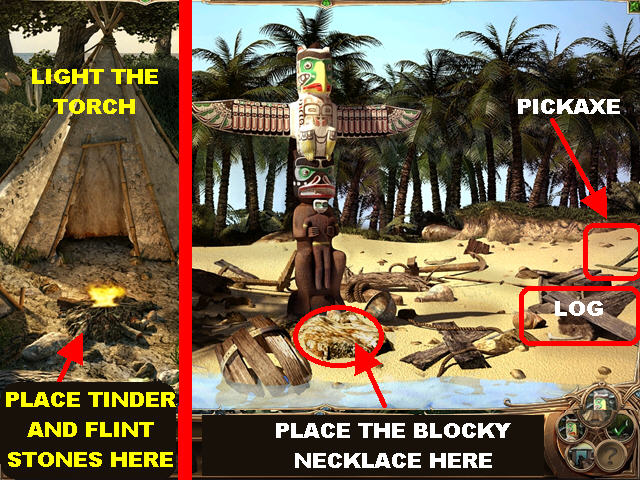
- Place the TINDER and FLINT STONES on the fire pit.
- Light the TORCH on the fire.
- Place the DRIED MAGIC HERBS on the fire.
- You are transported to Offering Beach.
- Place the BLOCKY NECKLACE on the fire pit.
- The Secret Mine has been unlocked!
- Pick up the LOG in the lower right.
- Grab the PICKAXE on the right.
- Go to the Secret Mine.
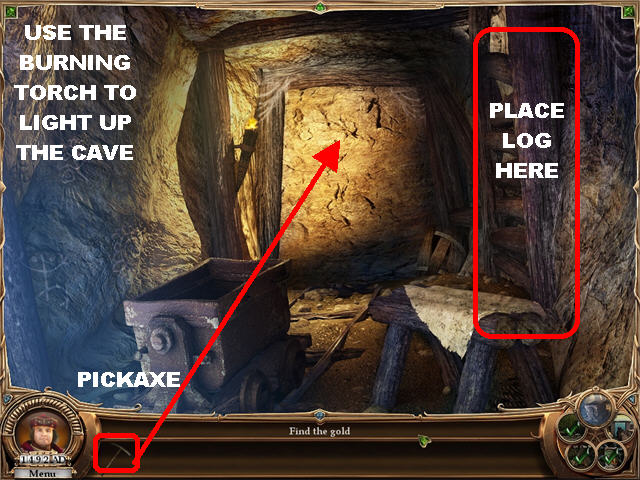
- Place the LOG on the right.
- Light up the Mine with the BURNING TORCH.
- Break the back wall with the PICKAXE.
- Click on the GOLD piece on the back wall to trigger a puzzle.
- Move the stone with the gold nugget to the bottom of the scene.
- Slide the blocks up, down, left, or right.
- GOLD will be added to inventory at the end of your search.
- Go to the Caravel.
- Give the GOLD to Christopher Columbus.
- Click on the LEVER on the right to go to the next chapter.
Level 10: 1529AD (Robin Hood)
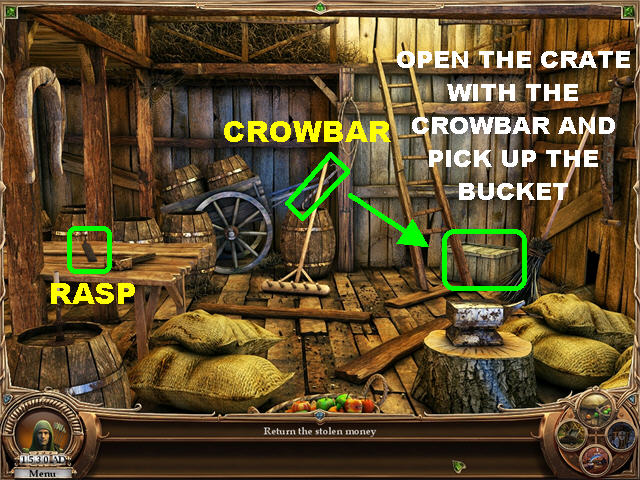
- Go to the Barn.
- Pick up the RASP on the table.
- Pick up the CROWBAR on the back wall.
- Open the CRATE on the right with the CROWBAR.
- Pick up the BUCKET in the crate.
- Go to the Village.
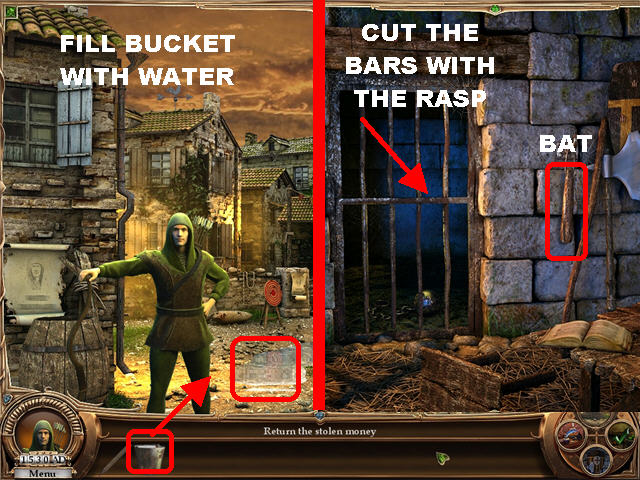
- Fill up the BUCKET with WATER from the puddle.
- Go to Prison.
- Pick up the BAT on the right side of the wall.
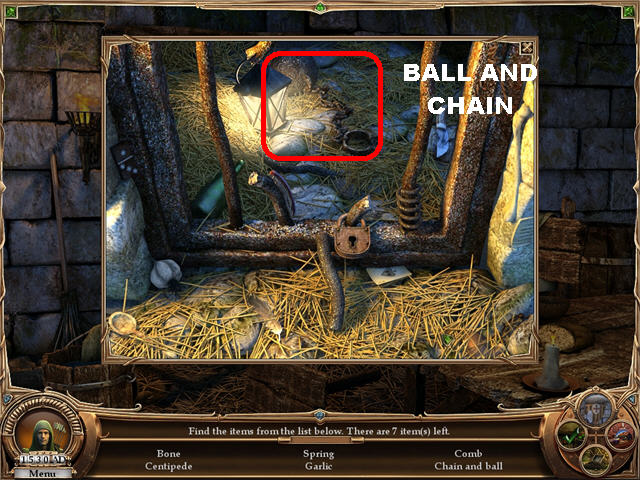
- Cut the BARS with the RASP. Click on the bars to trigger a Hidden Object scene.
- The CHAIN AND BALL will be added to inventory at the end of your search.
- Go to the Sheriff’s Room.

- Pick up the POKER on the left of the fireplace.
- Break the GLASS CASE with the BAT; pick up the SCROLL inside.
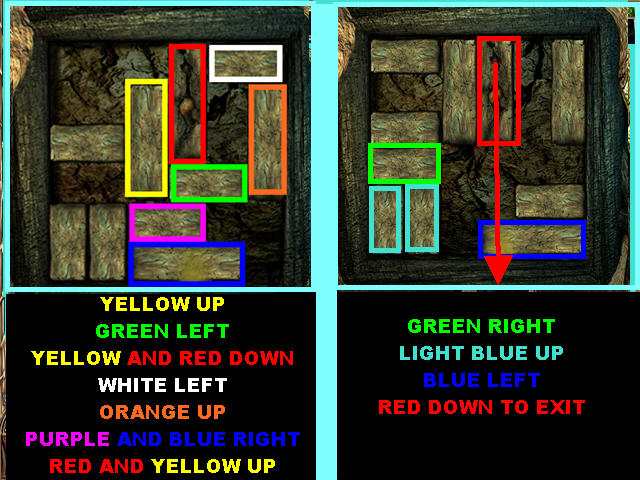
- Place the CHAIN AND BALL on the HOOK in the upper left to reveal a puzzle behind the painting.
- Click on the puzzle that appears on the back wall.
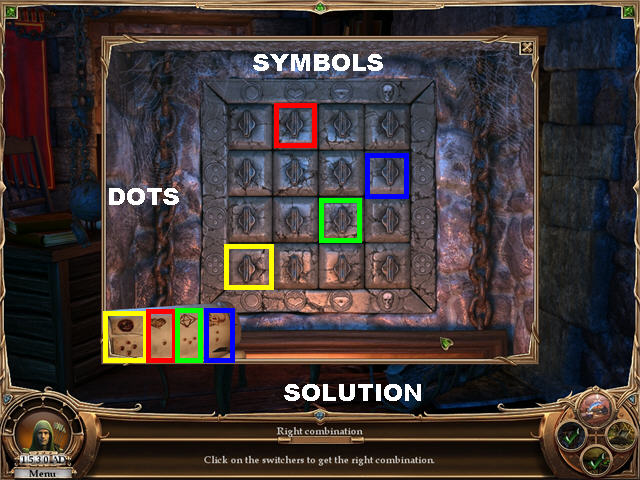
- Click on the correct switches by using the images in the lower left.
- Pay attention to the symbols and the number of dots below them.
- Find the connecting tiles for each combination; click on them to open the door.
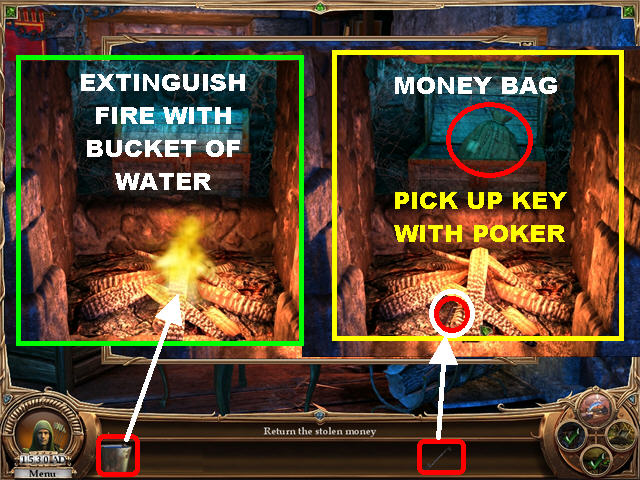
- Zoom into the fireplace and throw the BUCKET OF WATER into the fire.
- Zoom into the fireplace again and pick up the KEY with the POKER.
- Open the CHEST with the KEY and pick up the MONEY BAG inside the chest.
- Go to the Village and give the MONEY BAG to Robin Hood.
- Click on the LEVER on the right to go to the next chapter.
Level 11: 1572 AD (Captain John)
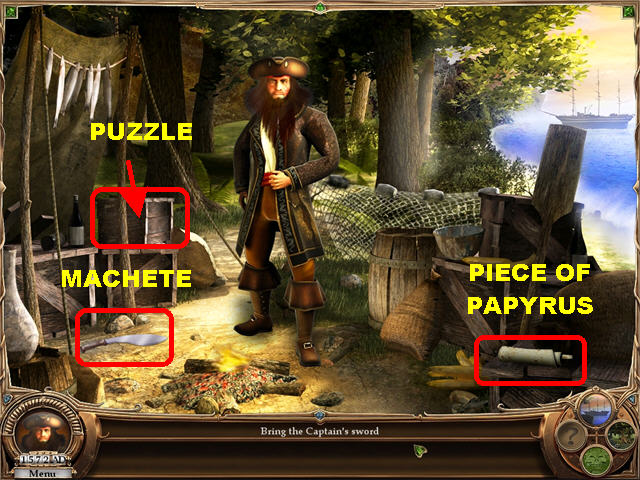
- Pick up the MACHETE in the lower left.
- Pick up the PIECE OF PAPYRUS PAPER in the lower right.
- Click on the puzzle on the left.


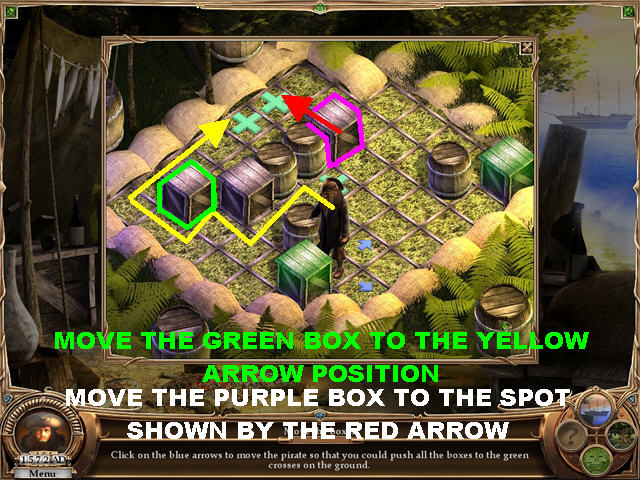
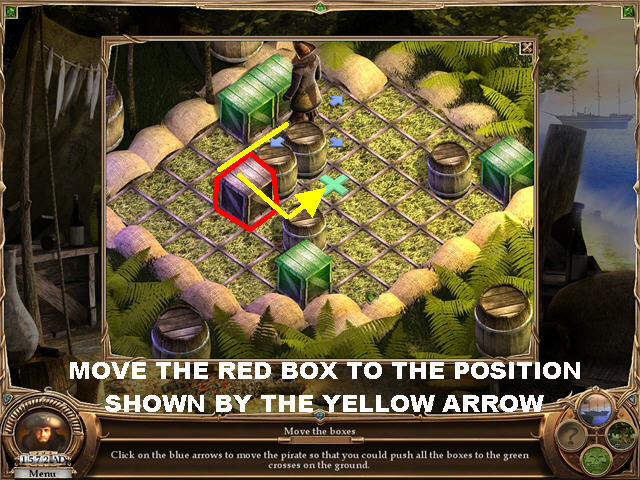
- The Pirate can only move in the direction of the blue arrows. Your goal is to push the boxes onto the green crosses.
- The crates will turn green when correctly placed.
- The game will reset when there are no more moves.
- Please watch the video for a step-by-step solution for this puzzle.
- The BOTTLE OF INK will be added to inventory once the puzzle has been completed.
- Go to the Rainforest.
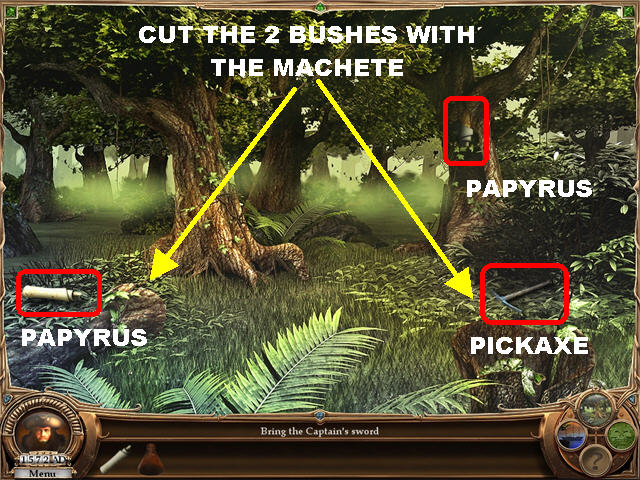
- Cut the 2 BUSHES with the MACHETE.
- Pick up the PICKAXE on the right.
- Grab the PIECE OF PAPYRUS PAPER on the left.
- Pick up the PIECE OF PAPYRUS in the upper right.
- Go to the Ancient Temple Ruins.
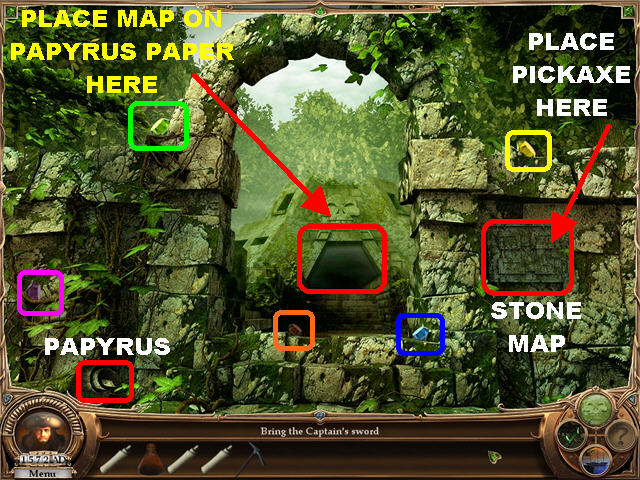
- Pick up the BLUE, YELLOW, ORANGE, GREEN, and PURPLE GEMS in the scene.
- Grab the PIECE OF PAPYRUS PAPER on the lower left.
- Put the PICKAXE on the stone map on the right side of the wall.
- Pick up the STONE MAP that fell in the lower right corner.
- Combine the 4 PIECES OF PAPYRUS to create PAPYRUS PAPER.
- Combine the PAPYRUS PAPER, BOTTLE OF INK, and STONE MAP to create the MAP ON PAPYRUS.
- Place the MAP ON PAPYRUS in the center of the scene to unlock Hidden Meadow.
- Go to the Hidden Meadow.
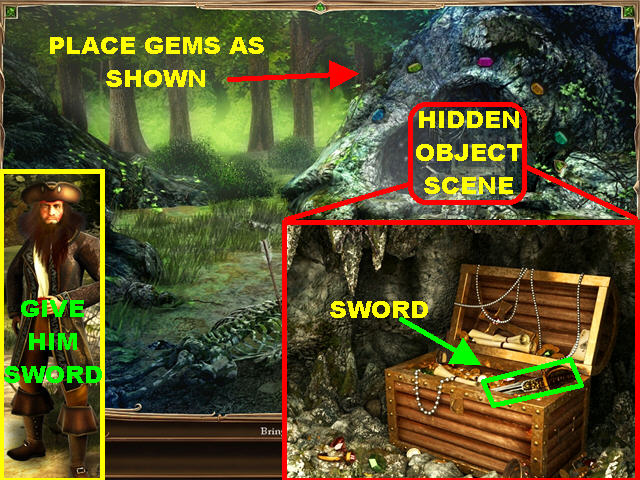
- Place the 5 GEMS in the spots shown on the screenshot.
- Click on the sparkly area on the right to trigger a Hidden Object scene.
- The SWORD will be added to inventory at the end of your search.
- Go to the Pirate’s Camp.
- Give the SWORD to Captain John.
- Click on the LEVER on the right to go to the next chapter.
Level 12: 1662 AD (D’Artagnan)
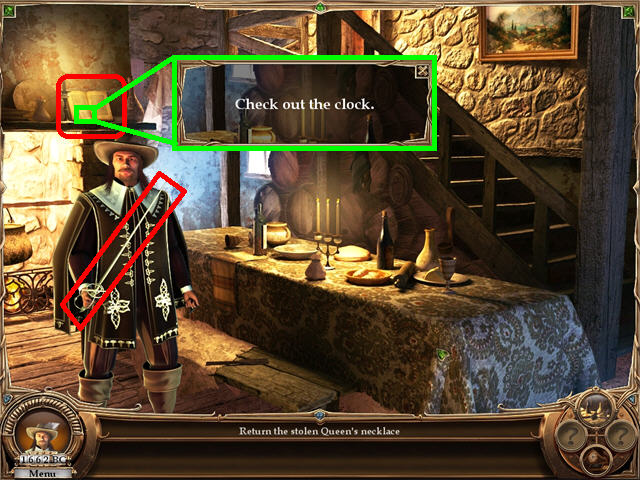
- Pick up the SWORD from D’Artagnan’s hand.
- Click on the book on the shelf in the upper left to open it; click on, and read, the note inside the book.
- Go to the Duke Room.
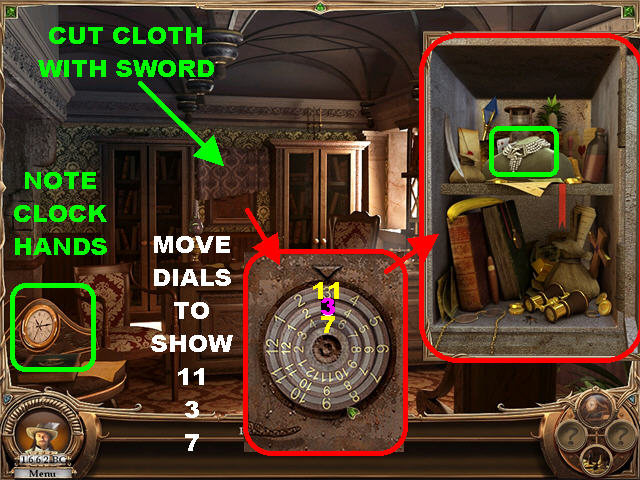
- Cut the CLOTH in the back wall with the SWORD.
- Click on the safe behind the cloth to trigger a puzzle
- Set the dials on the clock to reflect the numbers 11-3-7 from top to bottom.
- Click on the back wall to trigger a Hidden Object Scene.
- The NECKLACE will be added to inventory at the end of your search.
- Go back to the Tavern.
- Give the NECKLACE to D’Artagnan.
- Go to the Monastery.
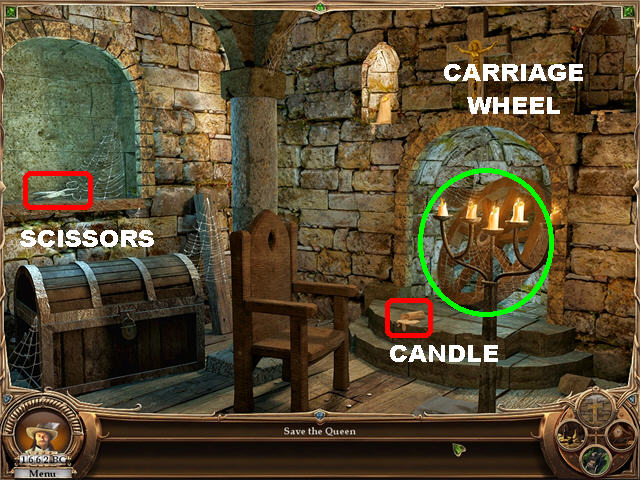
- Pick up the SCISSORS in the upper left.
- Pick up the CARRIAGE WHEEL on the right.
- Pick up the CANDLE on the steps.
- Light the CANDLE on one of the other lit candles in the scene to obtain the BURNING CANDLE.
- Go to the Tavern.
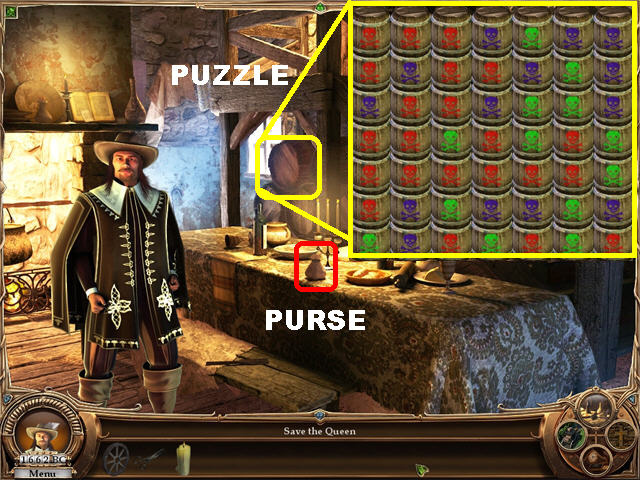
- Pick up the PURSE on the table.
- Combine the SCISSORS and the PURSE to obtain the KEY.
- Click on the BARREL on the center to trigger a puzzle.
- Explode all the Barrels by clicking on 2 or more barrels of the same color.
- Before you click a color, make sure you will still be left with more moves after that color collapses (lest you be forced to restart)!
- Clicking once highlights all the barrels that can explode if you decide to click them. Clicking a second time detonates that selection.
- The BARREL WITH GUNPOWDER goes into inventory after the puzzle has been completed.
- Go to the Monastery.
- Open the CHEST with the KEY.
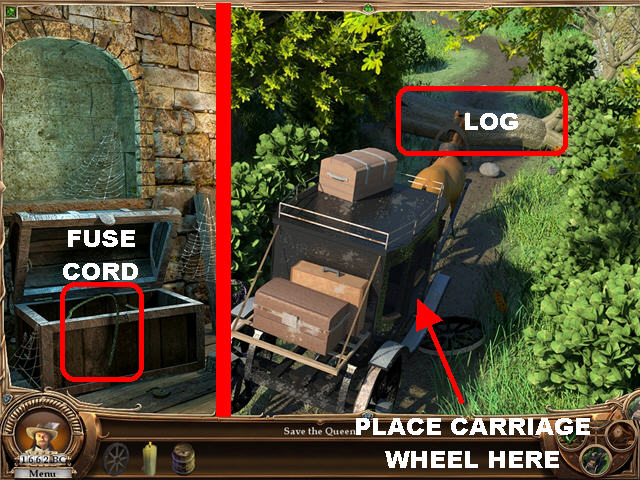
- Pick up the FUSE CORD inside the chest.
- Go to Ambush in the Forest.
- Combine the FUSE CORD with the BARREL WITH GUNPOWDER to create the POWDER BARREL ARMED.
- Place the CARRIAGE WHEEL on the carriage.
- In this order, place the POWDER BARREL ARMED and the BURNING CANDLE on the log blocking the way.
- Click on the LEVER on the right to go to the next chapter.
Level 13: 1814 AD (Monte Cristo)
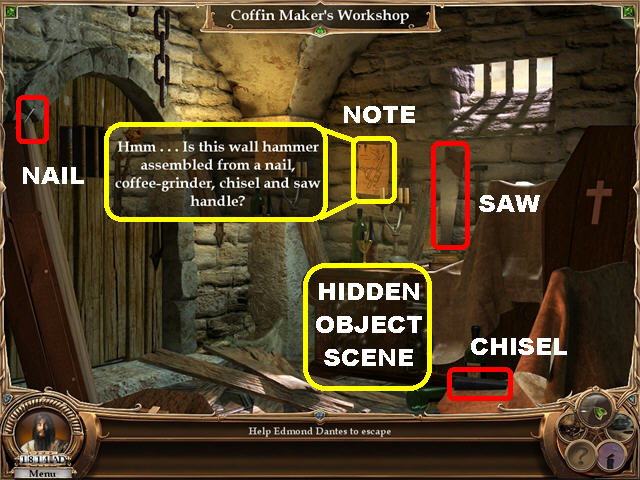

- Go to the Coffin Maker’s Workshop.
- Pick up the 7 BOARDS on the ground.
- Pick up the SAW above the desk.
- Pick up the CHISEL in the lower right.
- Grab the NAIL in the upper left.
- Click on the desk to trigger a Hidden Object Scene.
- The KNIFE and the SCREWDRIVER will go into inventory at the end of your search.
- Click on the NOTE on the back wall and read the resultant message.
- Go to the Kitchen.
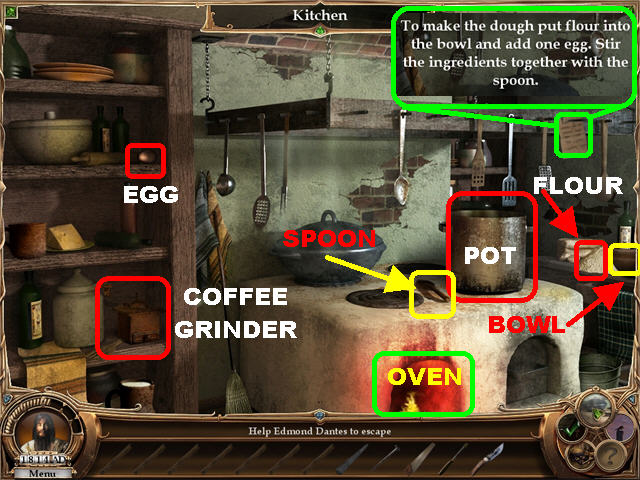
- Pick up the COFFEE GRINDER on the bottom shelf on the left.
- Pick up the POT on the stove.
- Pick up the SPOON on the stove.
- Grab the EGG on the top shelf on the left.
- Pick up the FLOUR on the right.
- Grab the BOWL on the right.
- Consult the note in the upper right and combine the FLOUR, EGG, BOWL, and SPOON to create DOUGH.
- Combine the COFFEE GRINDER with the POT to create the POT WITH 1 ITEM INSIDE.
- Combine the SCREWDRIVER with the SAW to create the HAND OF THE SAW.
- Combine the HAND OF THE SAW, CHISEL, NAIL, and DOUGH to create the DOUGH WITH 3 ITEMS INSIDE.
- Place DOUGH WITH 3 ITEMS INSIDE in the lit oven.
- Pick up the BREAD WITH 3 ITEMS INSIDE on top of the stove.
- Go to the Prison Cell.
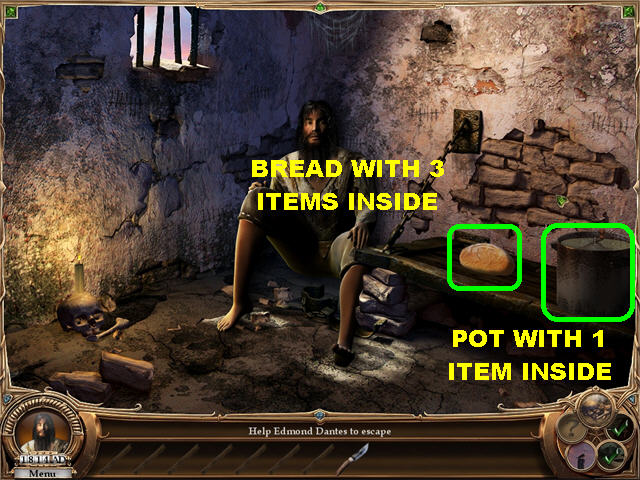
- Place the BREAD WITH 3 ITEMS INSIDE and the POT WITH 1 ITEM INSIDE on the bench.
- Click on the BREAD WITH 3 ITEMS INSIDE and the POT WITH 1 ITEM INSIDE to create the WALL HAMMER.
- Pick up the WALL HAMMER on the bench.
- Go to the Pier in Marseille.
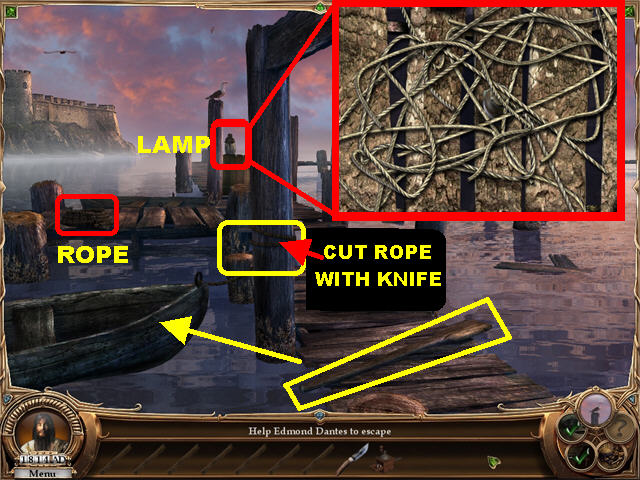
- Pick up the PADDLE on the ground.
- Pick up the ROPE on the left.
- Click on the LAMP on the right to trigger a puzzle.
- Click on the top rope to untangle them; your goal is to eliminate all the ropes.
- The LAMP will go into inventory after the puzzle has been solved; put it in the boat.
- Place the PADDLE and the LAMP into the boat.
- Cut the ROPE on the left beam with the KNIFE.
- Go to the unlocked Castle of Iff.
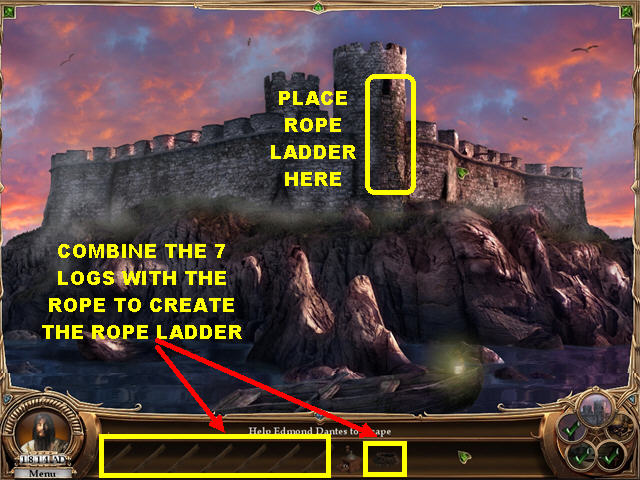
- Combine the 7 LOGS with the ROPE to create a ROPE LADDER.
- Place the ROPE LADDER on the wall.
- Go to the Prison Cell.
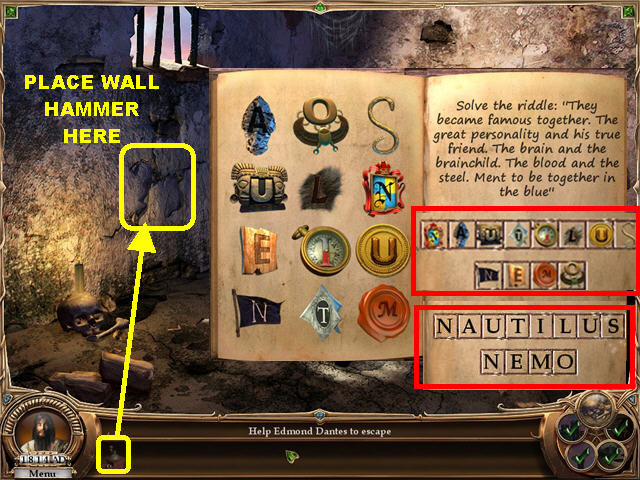
- Place the WALL HAMMER on the left side of the wall.
- You are asked to solve a riddle right after you break the wall.
- Grab the letters on the left side of the page and place them on the squares on the right side of the page.
- The solution is: NAUTILUS NEMO
- Click on the LEVER on the right to go to the next chapter.
Level 14: 1869 AD (Captain Nemo)
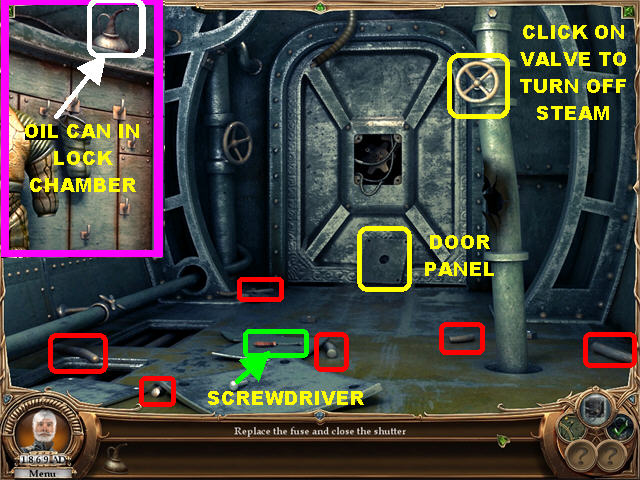
- Go to the Lock Chamber
- Pick up the OIL CAN in the upper left.
- Go to the Corridor.
- Click on the VALVE in the upper right to stop the steam.
- Pick up the SCREWDRIVER on the ground.
- Grab the DOOR PANEL on the back wall.
- Pick up the 6 DOOR HANDLE PARTS marked in red.
- Combine the 6 DOOR HANDLE PARTS to create the DOOR HANDLE.
- Place the OIL CAN, DOOR PANEL, and DOOR HANDLE (in that order) on the back door.
- Click on the Door Handle to open it.
- Go to the Workshop which is now unlocked.
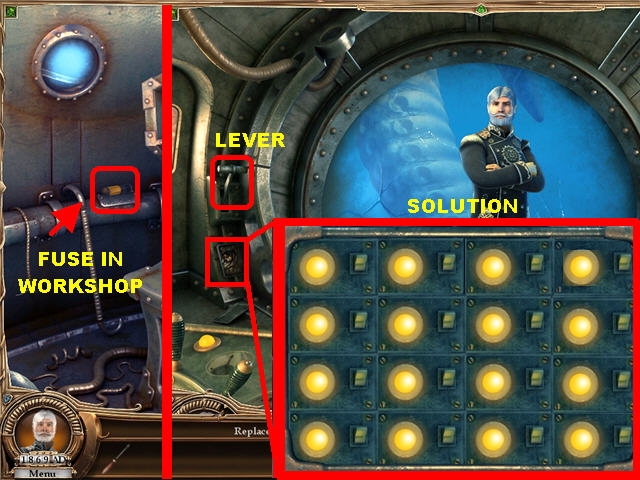
- Pick up the FUSE on the left.
- Go to the Captain’s Bridge.
- Open the FUSE PANEL in the lower left with the SCREWDRIVER.
- Place the FUSE in the FUSE PANEL to trigger a puzzle.
- Turn on the Switches Puzzle.
- Click on the switches to turn them on and off. Your goal is to light up all the lights.
- The solution to this puzzle is random.
- Click on the LEVER on the left after the puzzle has been solved.
- Go to the Lock Chamber.
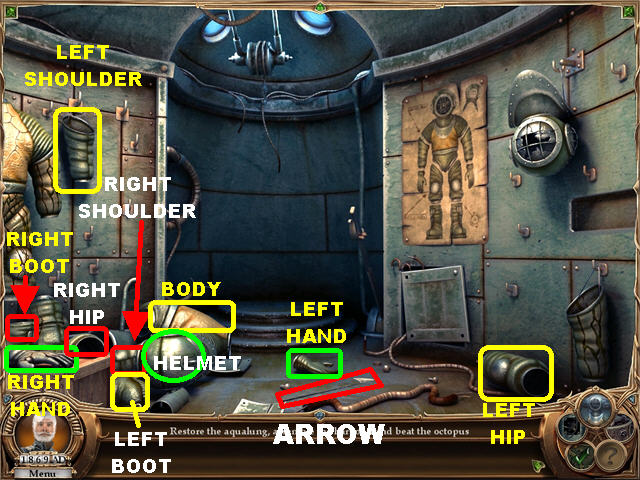
- Pick up the ARROW in the lower center.
- Pick up the AQUALUNG BODY on the lower left.
- Pick up the AQUALUNG HELMET on the lower left.
- Pick up the AQUALUNG LEFT HAND on the lower center.
- Pick up the AQUALUNG RIGHT HAND on the lower left.
- Pick up the AQUALUNG LEFT HIP on the lower right.
- Pick up the AQUALUNG RIGHT HIP on the lower left.
- Pick up the AQUALUNG LEFT BOOT on the lower left.
- Pick up the AQUALUNG RIGHT BOOT on the lower left.
- Pick up the AQUALUNG RIGHT SHOULDER on the lower left.
- Pick up the AQUALUNG LEFT SHOULDER on the upper left.
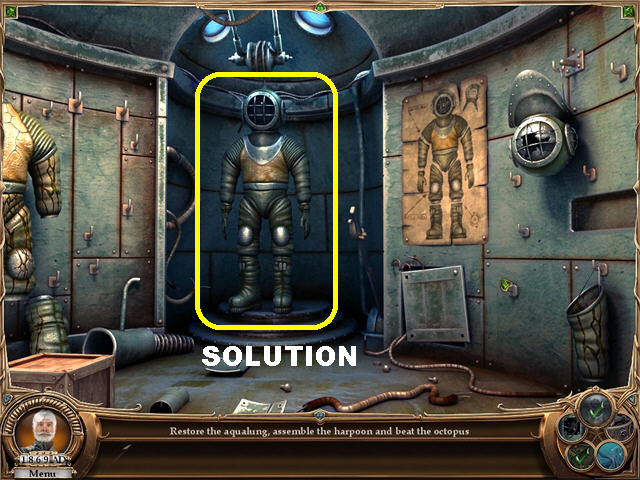
- Assemble the AQUALUNG HELMET, BODY, LEFT SHOULDER, LEFT HAND, RIGHT SHOULDER, RIGHT HAND, LEFT HIP, RIGHT HIP, LEFT BOOT, and RIGHT BOOT (in that order) on the back wall.
- The Underwater location is now available.
- Go to the Workshop.
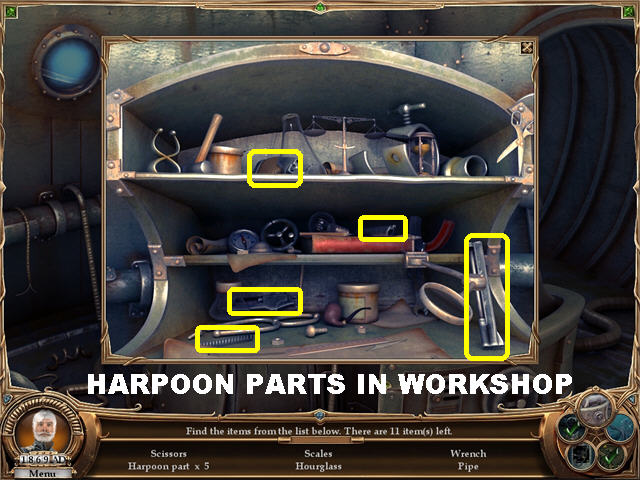
- Click on the shelf to trigger a Hidden Object scene.
- The 5 HARPOON PARTS are marked in yellow.
- Go to the Underwater location.
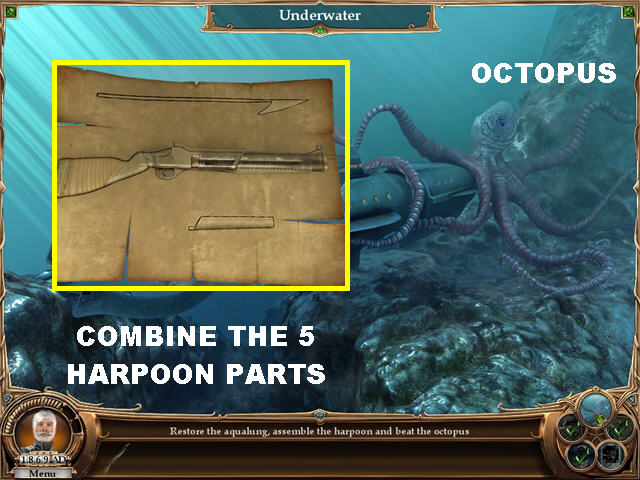
- Combine the 5 HARPOON PARTS with the ARROW to create the HARPOON.
- Place the HARPOON on the OCTOPUS to defeat it.
- Click on the LEVER on the right to finish the game!
Created at: 2010-05-01