

Walkthrough Menu
- General Tips
- Chapter 1: The Mansion
- Chapter 2: The Luxury Floor
- Chapter 3: The Nature Floor
- Chapter 4: The Surface Floor
General Tips
- This is the official guide for Fantastic Creations: House of Brass Standard Edition.
- You will not need to follow the exact path of this guide; however, some actions are required before you can complete another scene.
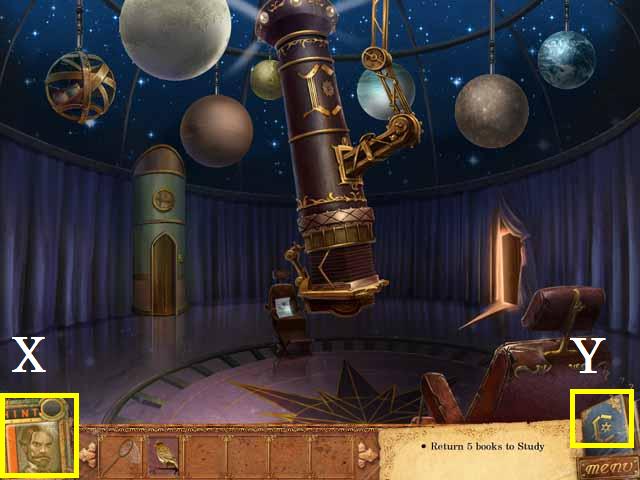
- If you get stuck in your game play you can use the Hint Button (X).
- Zoom into the sparkling areas to trigger a Hidden Object Scene. Throughout the guide, we will use the acronym ‘HOS' for Hidden Object Scenes.
- Make sure to pick up notes along the way for additional hints in the game.
- The notes can be viewed in the journal (Y).
Chapter 1: The Mansion
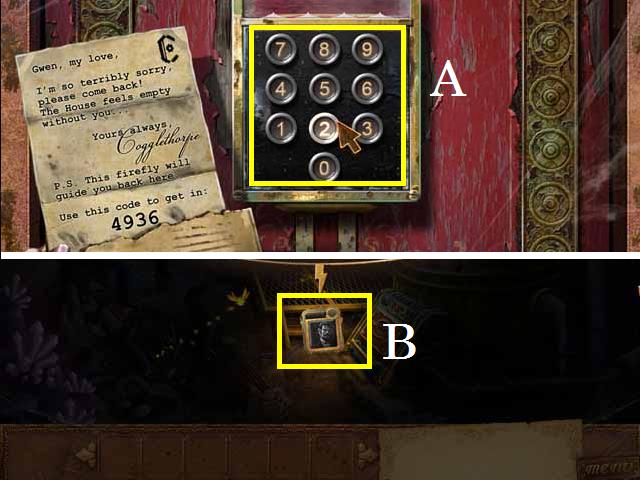
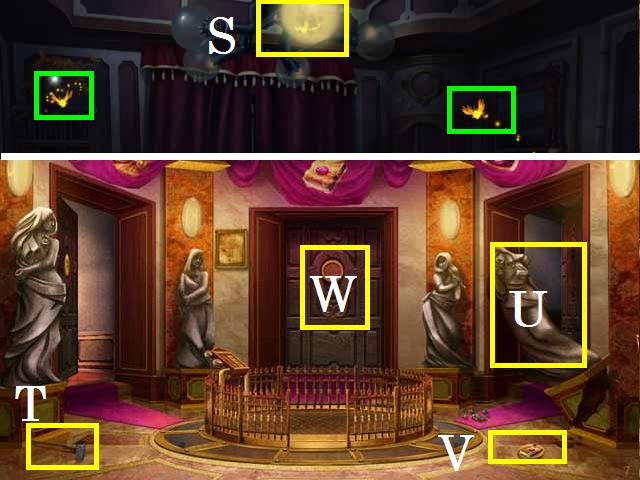
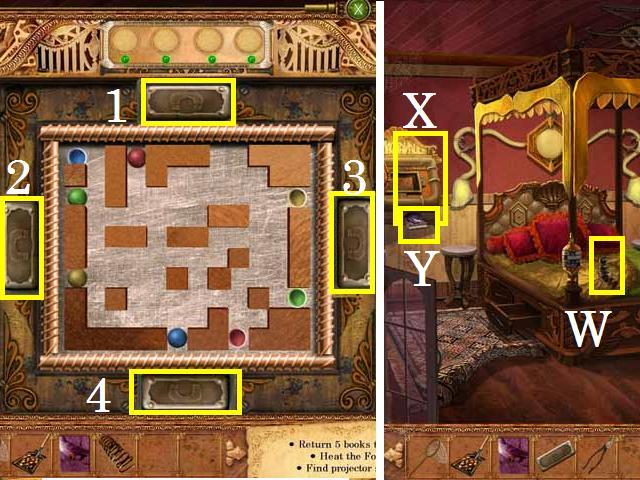
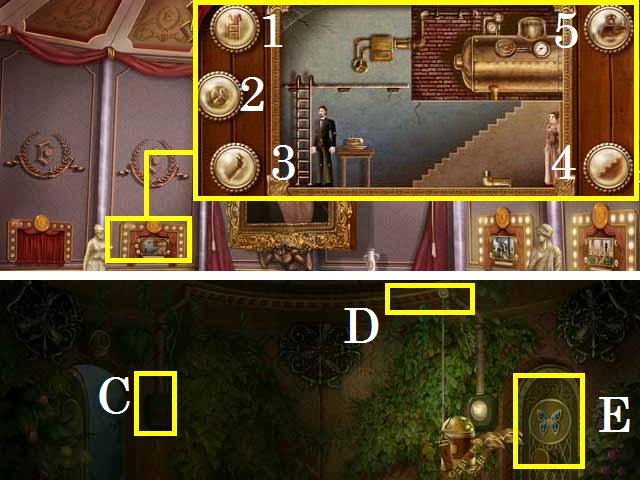
- Type in the code 4936 on the keypad (A).
- Pick up the transmitter (B). Note: this will become your hint button.
- Move forward to the Machine Room.
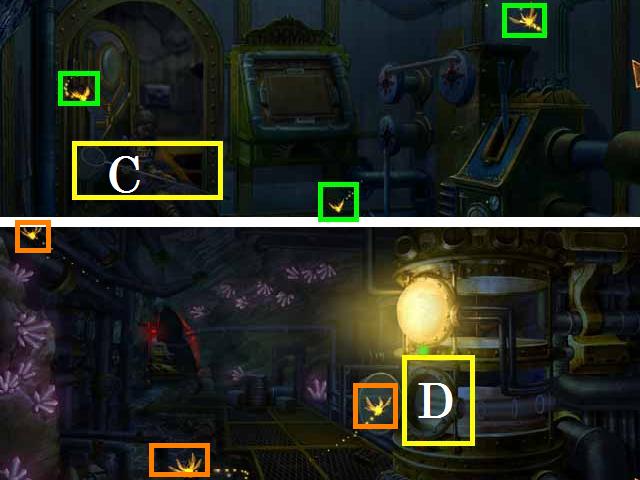
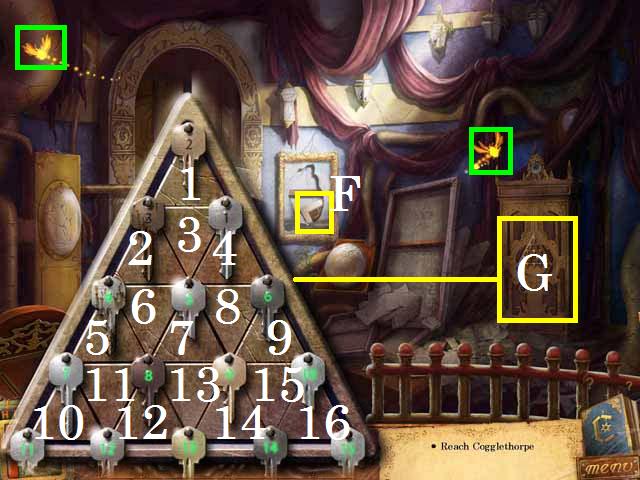
- Pick up the BUTTERFLY NET (C).
- Catch the three FIREFLIES (green) with the BUTTERFLY NET.
- Return to the Cave Engine.
- Catch the three FIREFLIES (orange) with the BUTTERFLY NET.
- Place all of the FIREFLIES into the light system (D).
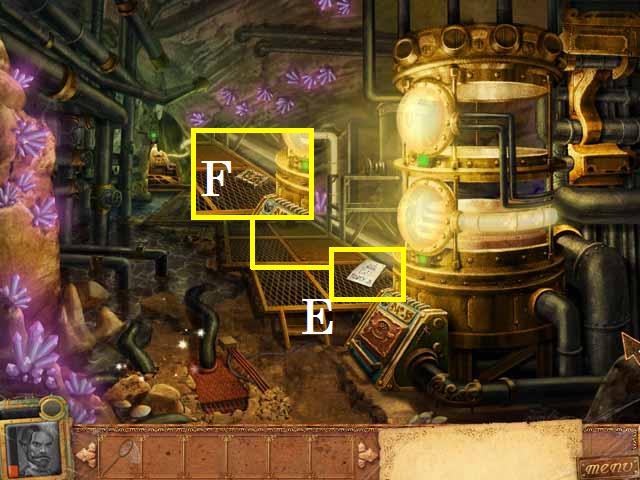
- Pick up the note (E) and then the BATTERY (F).
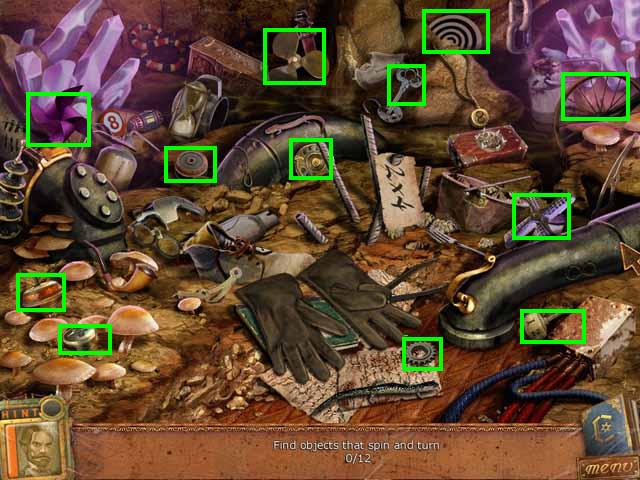
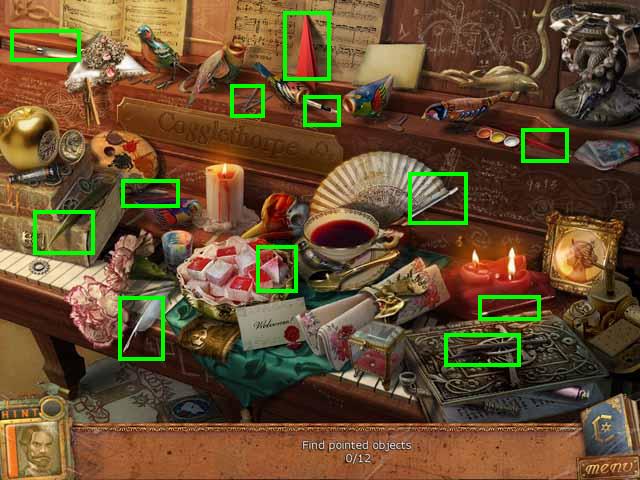
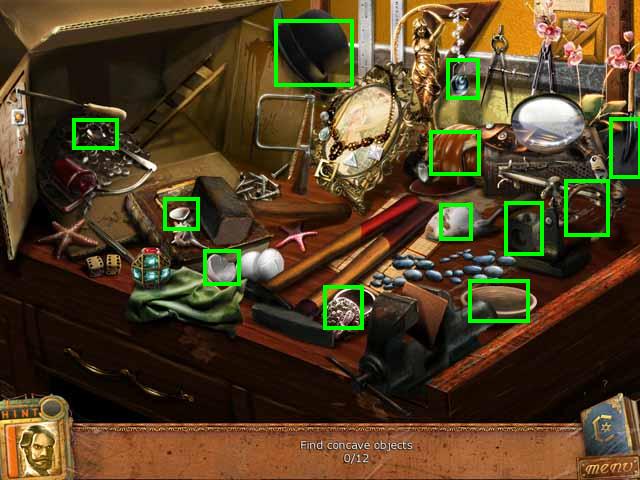
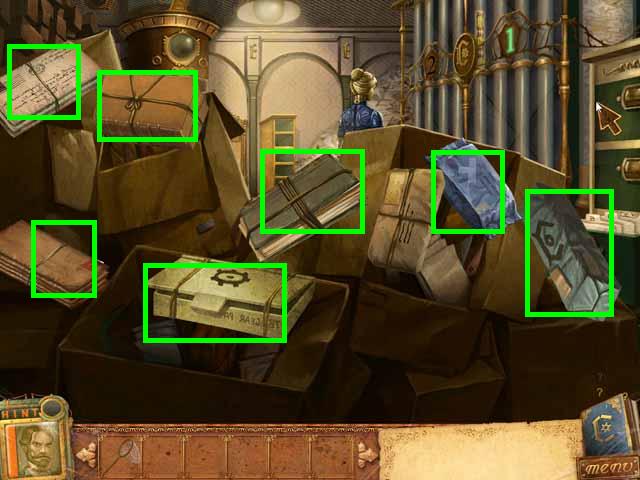
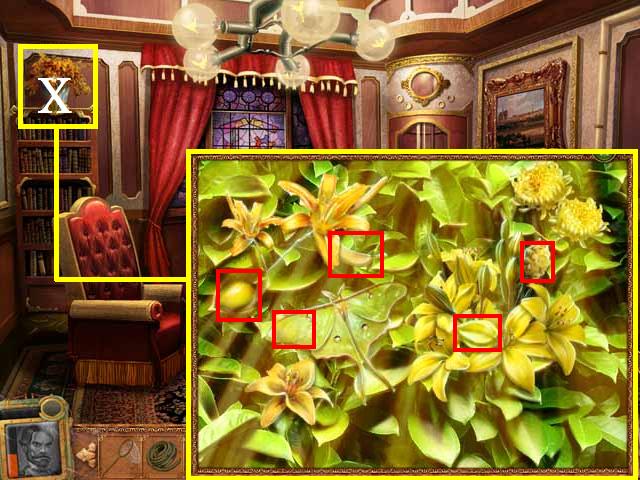
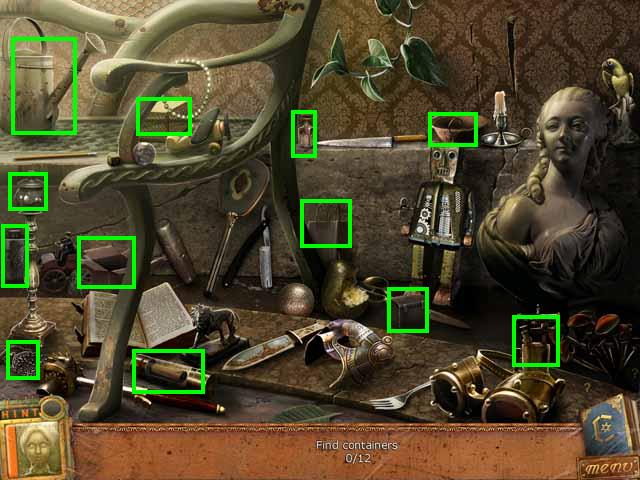
- Zoom into the sparkles to play a HOS.
- Pick up all of the items marked in green.
- You will receive the SMALL KEY.
- Return to the Machine Room.
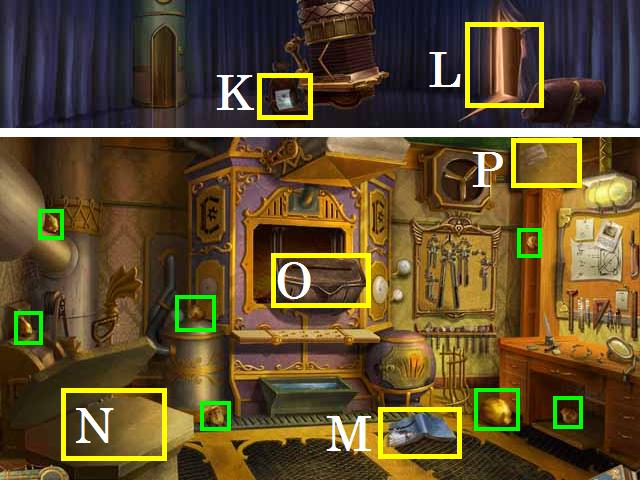
- Pick up the AWNING CRANK (G).
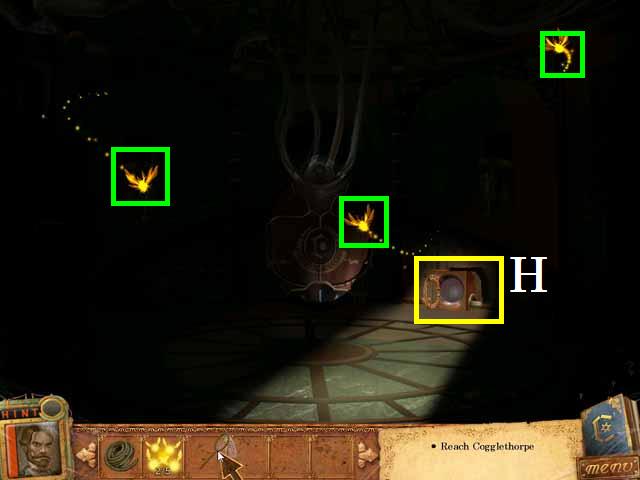
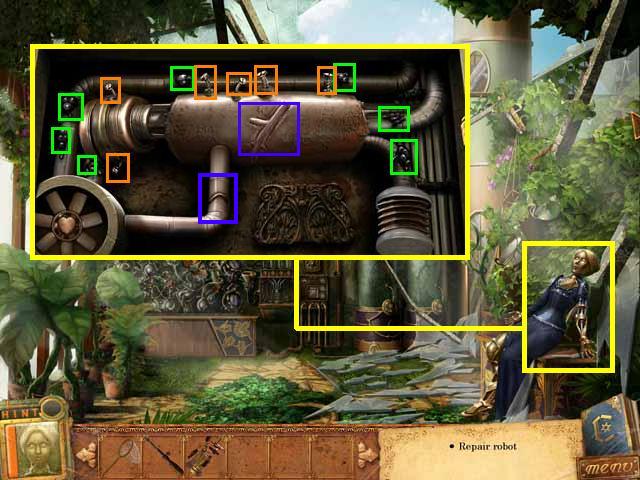
- Zoom into the robot; place the BATTERY (H) in it and rotate the pieces to match the arrangement shown in the screenshot.
- Move forward into the Storage Room.
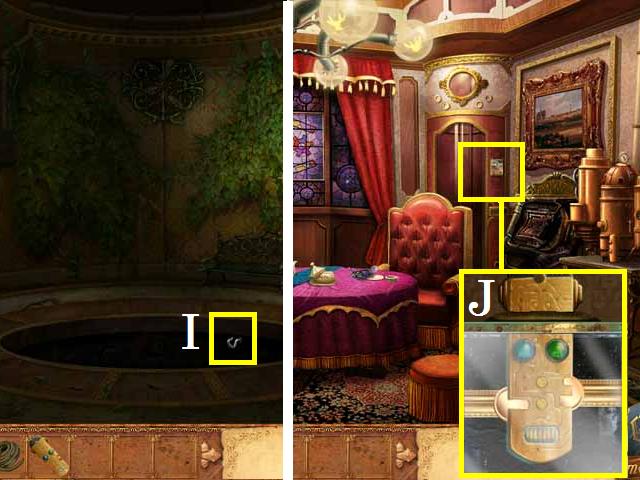
- Lower the ladder by placing the AWNING CRANK (I).
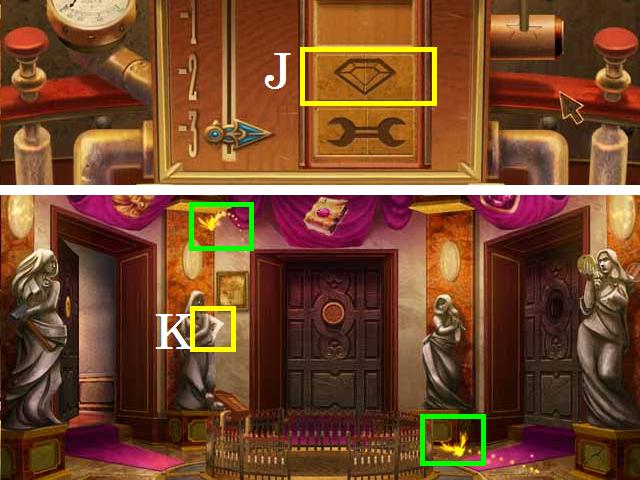
- Pick up the note (J) and the PIPE (K).
- Zoom into the sparkles to play a HOS.
- Pick up all of the items marked in green.
- Receive the CABINET KEYHOLE.
- Climb the ladder to the Clockwork Floor.
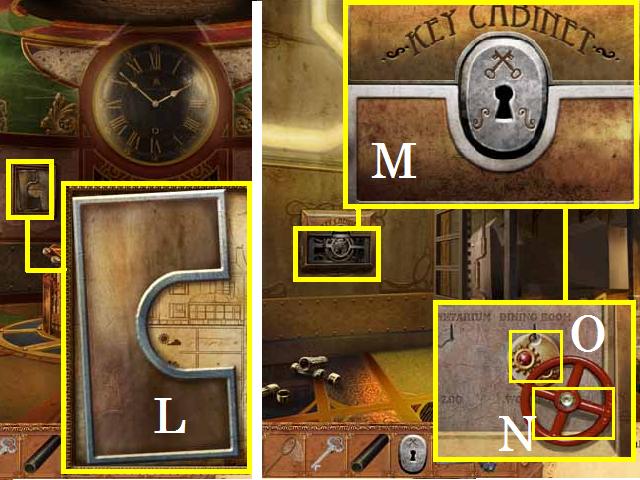
- Zoom into the panel; pick up the CABINET BASE (L).
- Return to the Storage Room.
- Zoom into the panel; place the CABINET BASE followed by the CABINET KEYHOLE as shown in the screenshot (M).
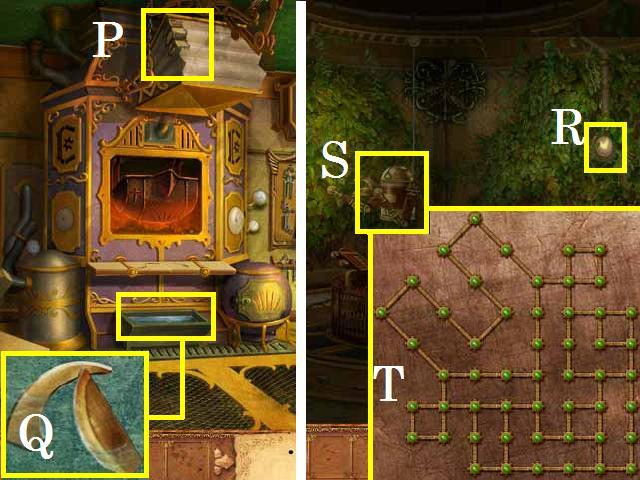
- Unlock the cabinet with the SMALL KEY; pick up the VALVE (N) and the WORKSHOP KEY (O).
- Return to the Clockwork Floor.
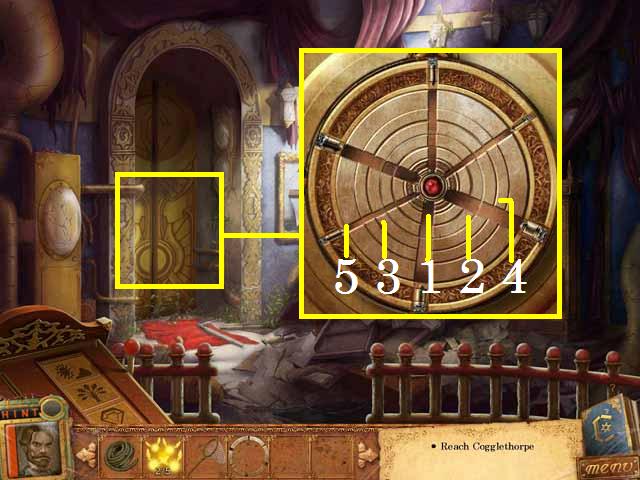
- Zoom into the door (P) and place the WORKSHOP KEY.
- Move forward into the Workshop.
- Pick up the MISSING WHEEL (Q).
- Return to the Machine Room.
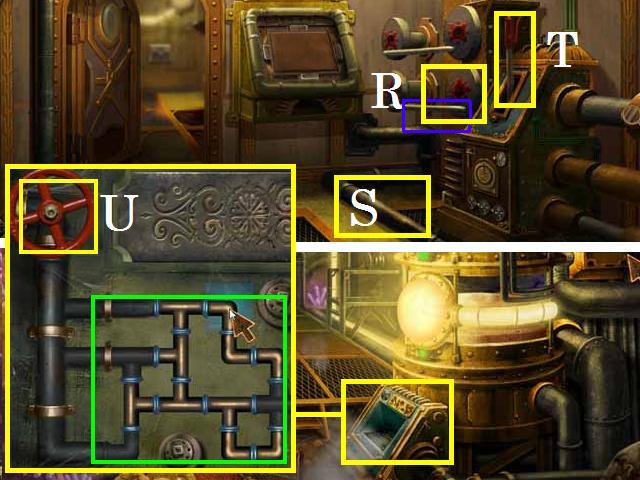
- Place the MISSING WHEEL (R) and the PIPE (S).
- Lift the rail (blue).
- Pull the handle (T).
- Back up to the Cave Engine.
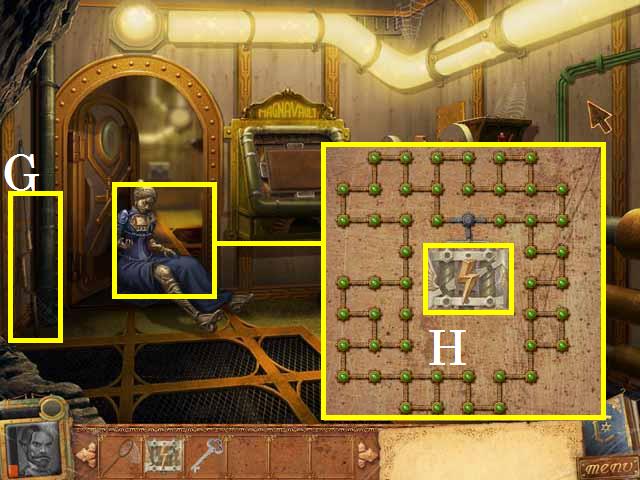
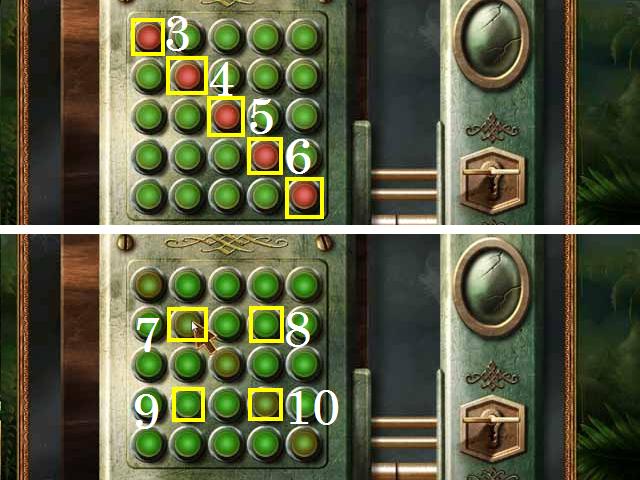
- Zoom into the panel; place the VALVE (U) and arrange the pipes as shown in the screenshot (green).
- Receive the STARSHAPED LEVER.
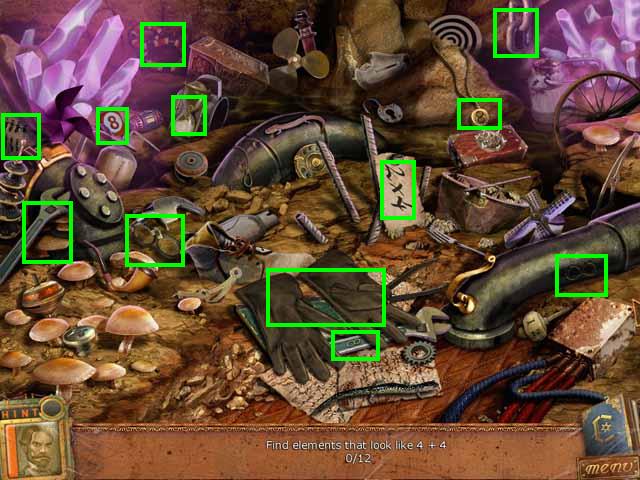
- Zoom into the sparkles to play a HOS.
- Receive the HOURGLASS.
- Return to the Clockwork Floor.
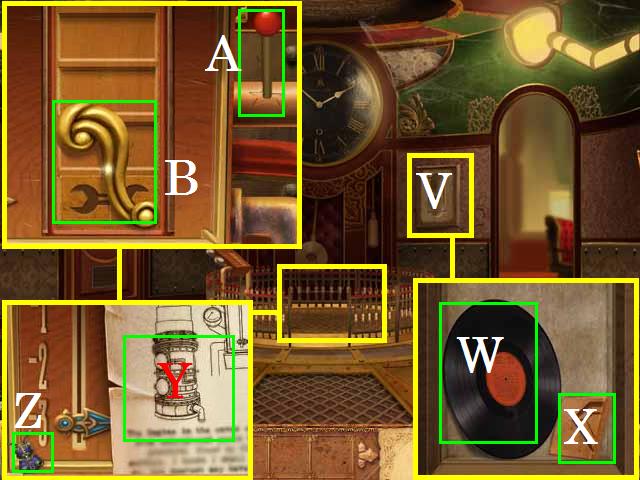
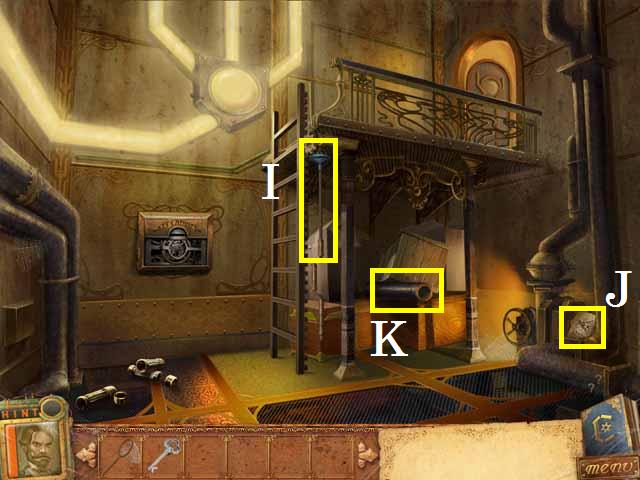
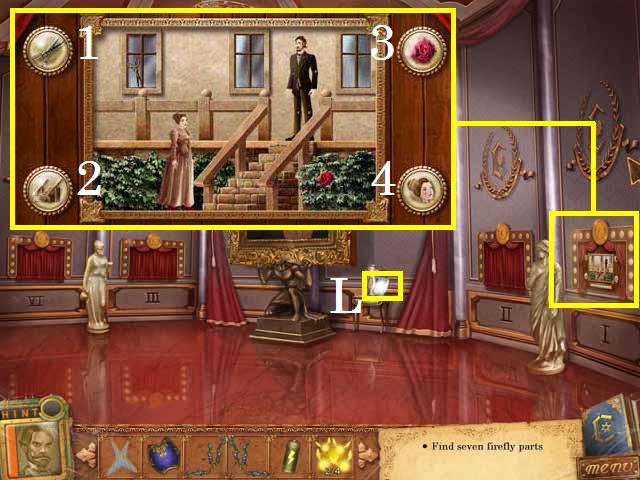
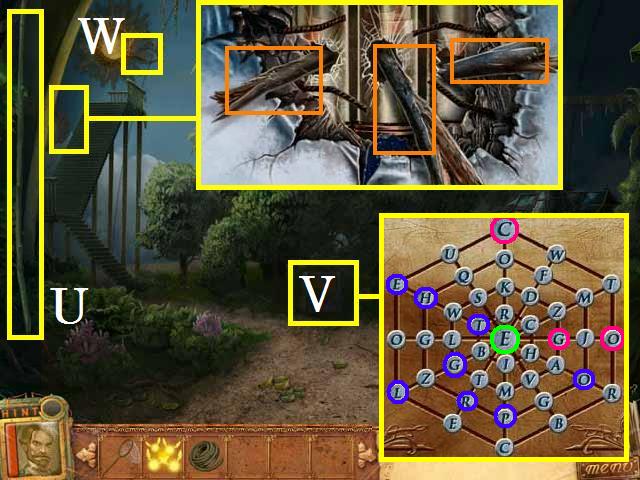
- Place the HOURGLASS on the panel (V); pick up the VINYL RECORD (W) and the ELEVATOR BUTTON HALF (X).
- Zoom into the platform controls.
- Pick up the note (Y) and the FIREFLY HEAD (Z).
- Place the STARSHAPED LEVER (A).
- Pick up the HANDLE (B).
- Enter the Workshop.
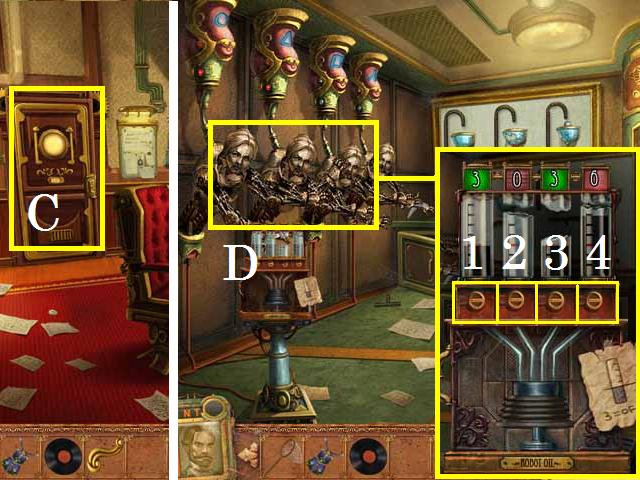
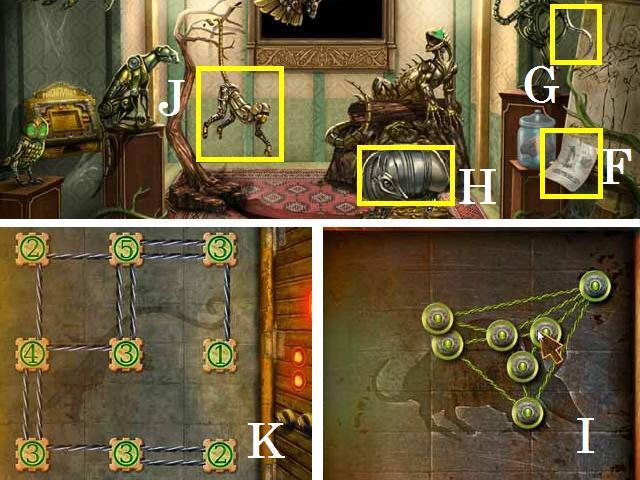
- Place the HANDLE on the door (C) and enter the Spare Parts Room.
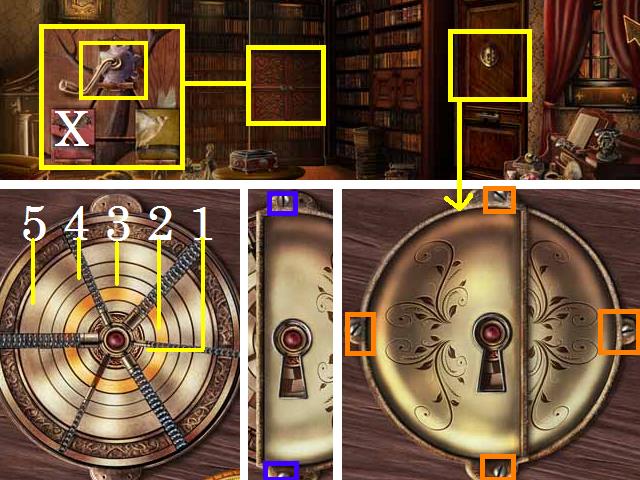
- Zoom into the robot oil (D).
- One solution is to first open valve (1) then (3), continue with (1) then (2), (3) to (1), (4) to (3), (2) to (4), (3) to (2) and finish with (4) to (3).
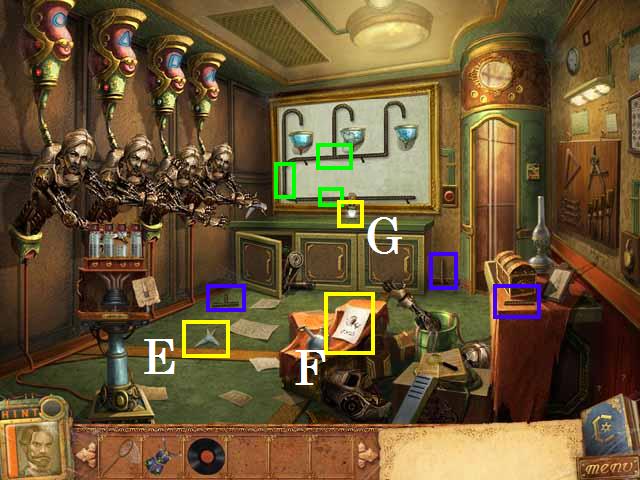
- Pick up the three TRACK PARTS (blue), the FIREFLY WINGS (E), and the note (F).
- Place the three TRACK PARTS on the board as shown in the screenshot (green) and pick up the IRON SPHERE (G).
- Return to the Storage Room.
- Zoom into the sparkles to play a HOS.
- Receive the SMALL BATTERY.
- Return to the Machine Room.

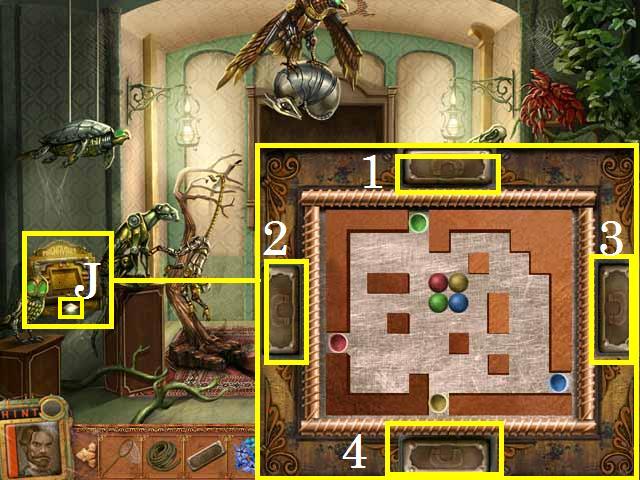
- Zoom into the Magnavault and place the IRON SPHERE in the hole (H).
- The nice thing about this puzzle is that you cannot place a ball in the wrong hole. One solution is: 4, 3, 1, 3, 2, 1, 2, 4, 3, 4, 2, 1, 3, 1, 2, 1, 4, 3, 1, and 2.
- Pick up the ELEVATOR BUTTON HALF (I).
- Return to the Clockwork Floor.
Chapter 2: The Luxury Floor
- Zoom into the Platform Controls.
- Place the two ELEVATOR BUTTON HALVES (J) on the controls and then press on them to move to the Luxury Floor.
- Catch the two FIREFLIES with the BUTTERFLY NET (green).
- Pick up the note (K).
- Enter the Gallery on the left.
- Pick up the note (L).
- Zoom into the panel; press the buttons in order from 1-4.
- Receive the FIREFLY LIGHTBULB.
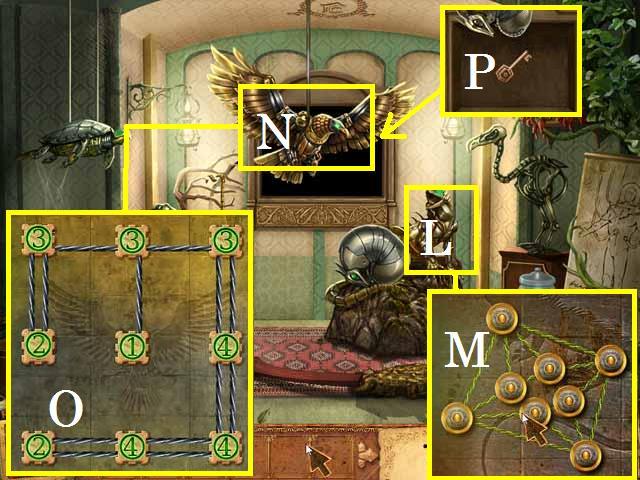
- Return to the Clockwork Floor and enter the Study.
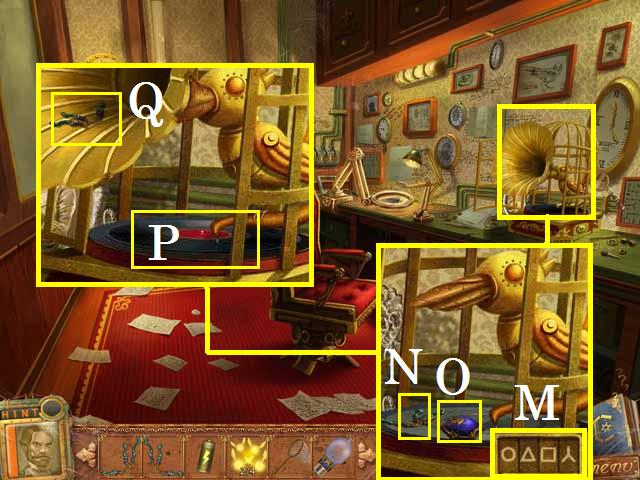
- Zoom into the cage; enter the code from the robots in the Spare Parts Room as shown in the screenshot (M).
- Pick up the FIREFLY LEG SET (N) and the FIREFLY BODY (O).
- Place the VINYL RECORD on the player (P) and pick up the FIREFLY LEG SET (Q).
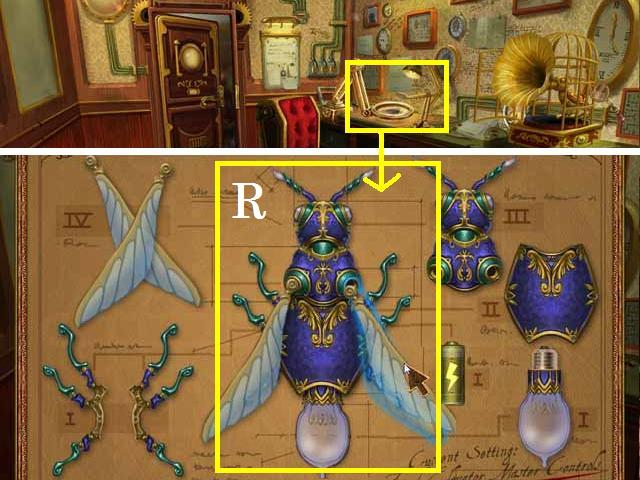
- Zoom into the desk; drop two FIREFLY LEG SETS, FIREFLY BODY, FIREFLY LIGHTBULB, SMALL BATTERY, FIREFLY WINGS, and the FIREFLY HEAD over the paper.
- Drag the parts to the diagram (R) in the following order; FIREFLY LIGHTBULB, SMALL BATTERY, both FIREFLY LEG SETS, FIREFLY BODY, FIREFLY HEAD, and finish with the FIREFLY WINGS.
- Follow the Firefly out of the room, to the luxury Floor, and into the Dining Room.
- Catch the two FIREFLIES (green).
- Place the FIREFLIES on the light (S).
- Exit the room.
- Once the statue drops the HAMMER (T) smash the other statue (U) with the HAMMER.
- Pick up the STUDY KEY (V).
- Zoom into the door (W); place on the STUDY KEY on the lock.
- Enter the Study.
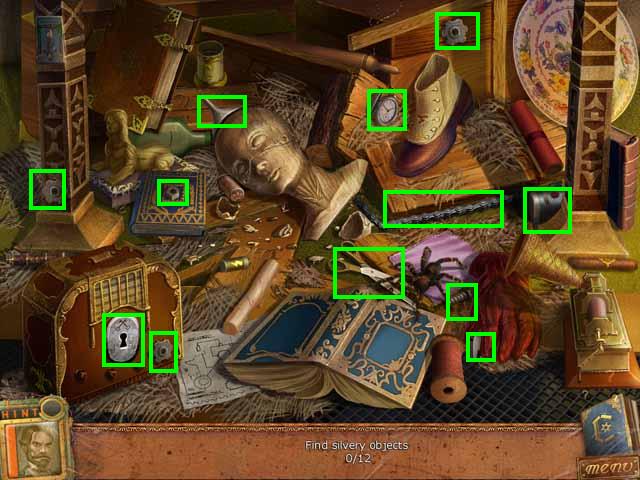
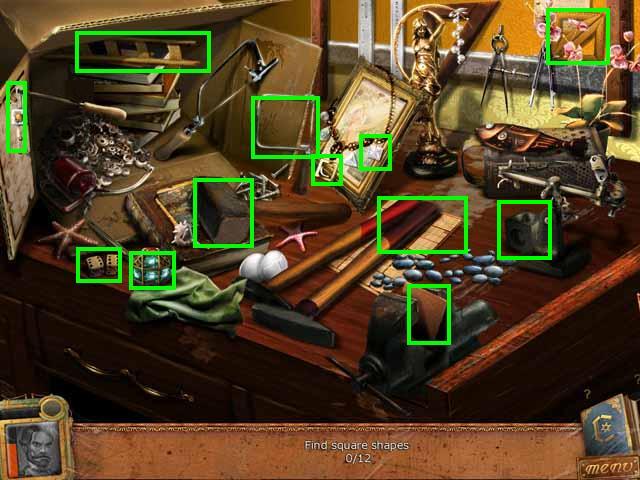
- Zoom into the sparkles to play a HOS.
- Collect all the items marked in green.
- Receive the SCREWDRIVER.
- Zoom into the panel; pick up the WARDROBE KEY (X).
- Zoom into the door; remove the screws (orange) with the SCREWDRIVER, then remove the additional two screws (blue).
- Set the innermost dial first (1), followed by (5), (4), (3), and (2) to complete the path.
- Enter the Bedroom.

- Zoom into the wardrobe door; place the Wardrobe key in the lock (Y).
- Move the coat (Z) and flip the rug (A).
- Open the cabinet door (B), the drawer (C), and the box (D).
- Pick up the seven WEIGHTS (green) and the note (E).
- Place the LEFT WEIGHTS on the left scale (F) and the RIGHT WEIGHTS on the right scale (G).
- Pick up the BIRD BOOK (H) and the THEATER DOLL (I).
- Return to the Gallery.

- Zoom into the second panel; place the THEATER DOLL and press the buttons in order from 1-4.
- Receive the PLANETARIUM KEY.
- Return to the Clockwork Floor.
- Zoom into the door (J); place the PLANETARIUM KEY on the lock.
- Enter the Planetarium.
- Pick up the note (K) and move the curtain (L).
- Enter the Forge through the curtain.
- Pick up the BIRD BOOK (M) and the seven GOLD NUGGETS (green).
- Place the GOLD NUGGETS on the press (N) and pick it up as the GOLD SHEET.
- Zoom into the Bucket (O); place the GOLD SHEET inside.
- Knock over the box (P).
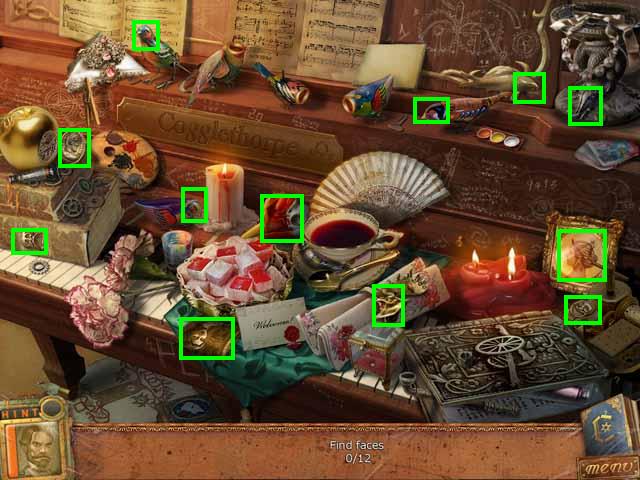
- Zoom into the sparkles to play a HOS.
- Pick up all the items marked in green.
- Receive the COAL SHOVEL.
- Return to the Study on the Luxury Floor.
- Zoom into the sparkles to play a HOS.
- Pick up all the items marked in green.
- Receive the PAINTING SCRAP.
- Drag the COAL SHOVEL over the fireplace (Q) to receive the SHOVEL WITH EMBERS.
- Enter the Bedroom.
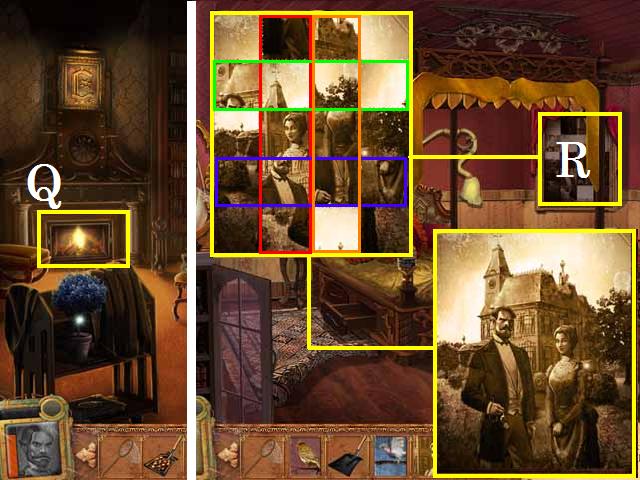
- Place the PAINTING SCRAP on the painting (R).
- Move the second column (red) up one space and the second row (green) to the right one space.
- Move the fourth row (blue) to the left once and the third column (orange) down once.
- Receive the ELEVATOR BUTTON HALF.
- Return to the Planetarium.
- Pick up the BIRD BOOK (S).
- Return to the Dining Room on the Luxury Floor.
- Pick up the note (T) and the MAGNAVAULT BUTTON (U).
- Open the curtains and zoom into the window (V).
- You can use the following sequence to solve the puzzle: 2, 1, 4, 4, 9, 9, 8, 7, 5, 8, 6, 9, 9, 6, 6, 6, and 9.
- Receive the PLIERS.
- Return to the Bedroom.
- Remove the SPRING (W) with the PLIERS.
- Zoom into the Magnavault (X) and place the MAGNAVAULT BUTTON (2).
- You can complete this puzzle using the following sequence: 3, 4, 3, 1, 2, 1, 3, 1, 3, 4, 3, 2, 4, 3, 4, 3, 1, 2, 1, 2, 3, 1, 3, 1, and 3.
- Pick up the BIRD BOOK (Y).
- Return to the Planetarium.
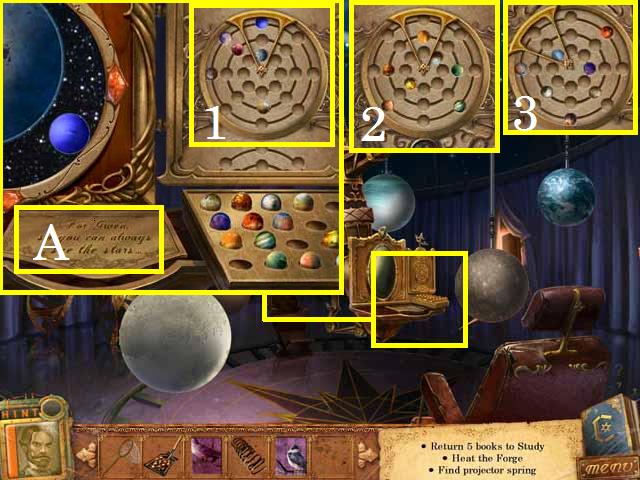
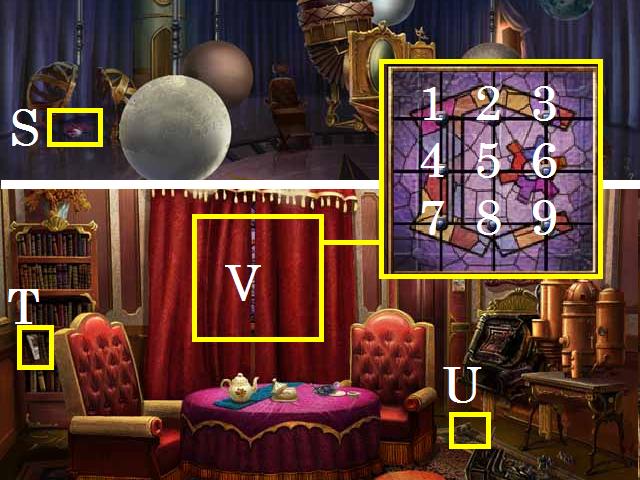
- Zoom into the projector; place the SPRING (A).
- Arrange the planets as shown in the screenshot (1). Note: if the planet is placed correctly it will spin.
- Scroll to the lower panel and place the planets as shown in the screenshot (2).
- Scroll to the upper panel and place the planets as shown in the screenshot (3).
- Enter the Forge.
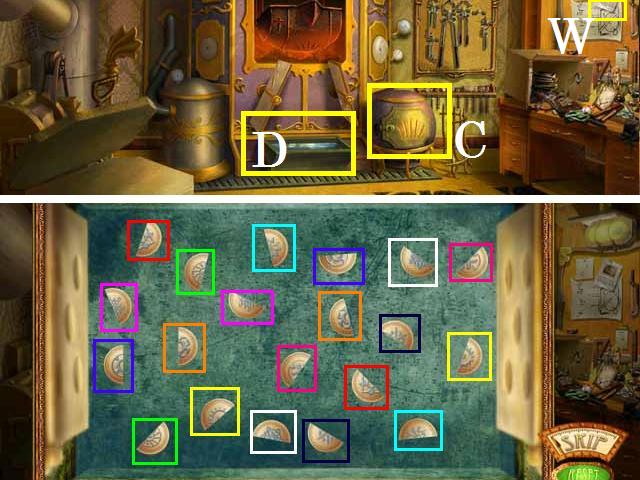
- Place the SHOVEL WITH EMBERS in the furnace (C).
- Pick up the note (W).
- Zoom into the mold (D).
- Match the pairs (color coded) to receive the BOOK BOX KEY.
- Return to the Study.
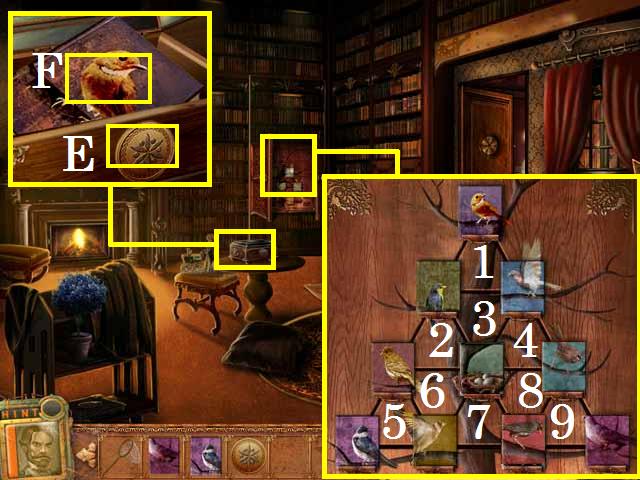
- Zoom into the box; place the BOOK BOX KEY in the lock (E) and pick up the BIRD BOOK (F).
- Zoom into the panel; place all of the BIRD BOOKS on the panel.
- You can use the following sequence to solve this puzzle: 5, 5, 3, 7, 7, 3, 1, 4, 9, 4, 8, 4, 1, 1, and 4.
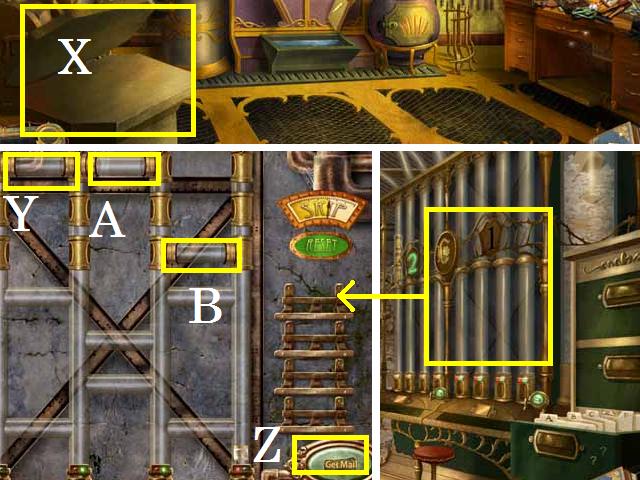
- Enter the Mail Room.
- Wave the cursor under items (green) to keep them from hitting the ground until the robot leaves the room.
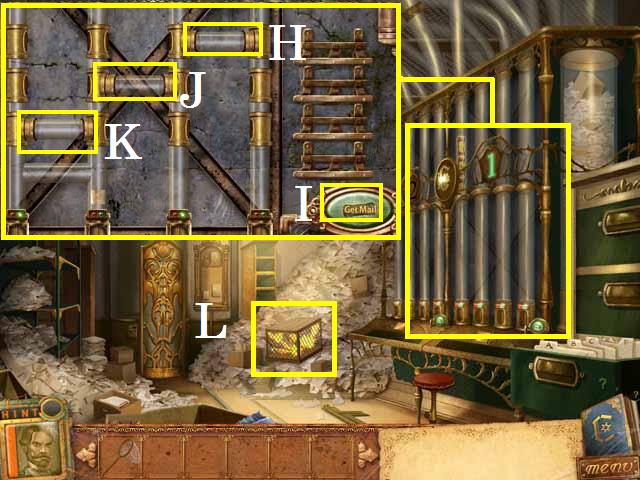
- Zoom into the mail tubes; place the first tube (H) and press the mail button (I).
- Place the second tube (J) and press the mail button (I).
- Place the third tube (K) and press the mail button (I).
- Receive the ELEVATOR BUTTON HALF, the CROWBAR, and a note.
- Free the FIREFLIES (L) using the CROWBAR.
- Catch the three FIREFLIES with the BUTTERFLY NET. Note: you may have to chase them into the Study, Bedroom, and back to the platform controls.
- Exit to the Luxury Floor and zoom into the platform controls.
- Place the two ELEVATOR BUTTON HALVES and push them to move to the Nature Level.
Chapter 3: The Nature Floor
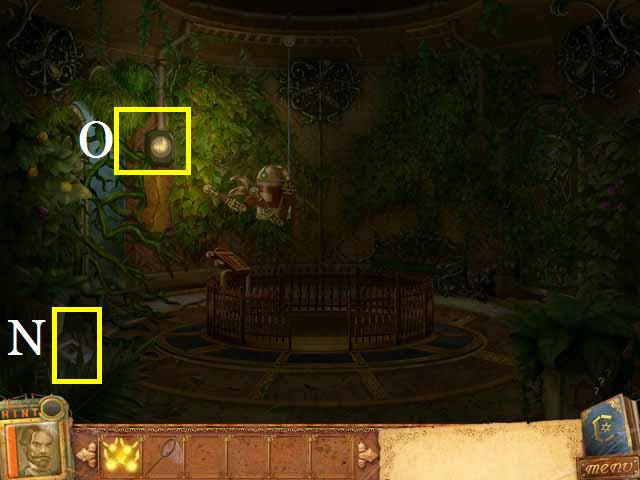
- Pick up the note (N).
- Tap the lamp (O).
- Zoom into the sparkles to play a HOS.
- Pick up all the items marked in green.
- Receive the PATCH.
- Return to the Forge.
- Place the PATCH on the billows (P).
- Zoom into the mold; pick up the ROBOT SHEARS (Q).
- Return to the Nature Level.
- Tap the light (R).
- Zoom into the robot (S) and place the ROBOT SHEARS.
- Rotate the pieces to match the image shown in the screenshot (T).
- Enter the Arboretum.
- Pick up the VINE (U).
- Zoom into the electric box (V).
- Start with the C, O, G marked in pink then follow with G, L, E, T, H, O, R, P (blue) and finish with the E (green).
- Pick up the BENT SUN DOME LID (W).
- Zoom into the mail tubes; remove the three sticks (orange).
- Return to the Forge.
- Zoom into the sparkles to play a HOS.
- Pick up all the items marked in green.
- Receive the RAIL TRACKS.
- Place the BENT SUN DOME LID on the press (X) and pick it back up as the SUN DOME LID.
- Move to the Mailroom.
- Zoom into the mail tubes; place the first tube (Y) and press the mail button (Z).
- Place the second tube (A) and press the mail button (Z).
- Place the third tube (B) and press the mail button (Z).
- Receive the THEATER BUTTONS and two notes.
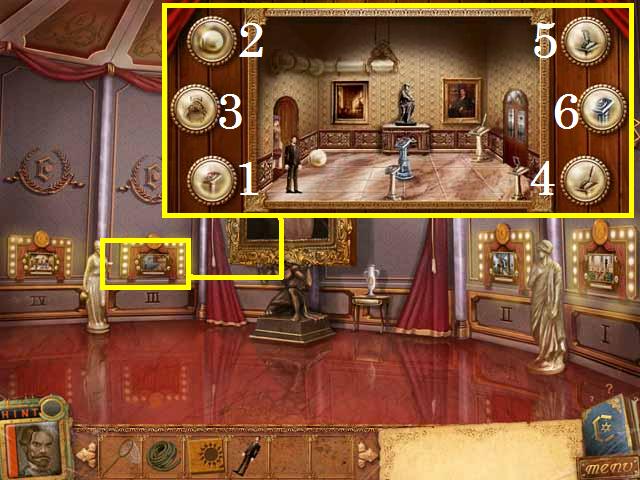
- Return to the Gallery.
- Zoom into the third panel; place the THEATER BUTTONS and press them in order, from 1-5.
- Receive the CLOCKWORK ZOO KEY.
- Return to the Nature Floor.
- Tap the light (C), if needed, to move it to the right.
- Place the RAIL TRACKS (D).
- Zoom into the door (E) and place the CLOCKWORK ZOO KEY.
- Enter the Clockwork Zoo.
- Pick up the note (F).
- Place the ARMADILLO TAIL (G) on the armadillo (H) to trigger a puzzle.
- See the screenshot (I) for an example of a winning solution.
- Receive the MONKEY ARM.
- Place the MONKEY ARM (J) on the monkey and zoom into it to activate a puzzle.
- See the screenshot (K) for a winning solution.
- Receive the IGUANA NECKPIECE.
- Place the IGUANA NECKPIECE (L) on the iguana and zoom into it.
- See the screenshot (M) for a winning solution.
- Receive the EAGLE TALONS.
- Place the EAGLE TALONS (N) on the eagle and zoom into it.
- See the screenshot (O) for a winning solution.
- Pick up the HEXAGONAL KEY (P).
- Return to the Arboretum.
- Place the BENT SUN DOME (Q) followed by the FIREFLIES.
- Zoom into the door; place the HEXAGONAL KEY in the keyhole (R).
- Press the buttons in order of 1- 2 for a winning solution.
- Press the buttons in order of 3- 7 for a winning solution.
- Press the buttons in order of 8-11 for a winning solution.
- Enter the Greenhouse.
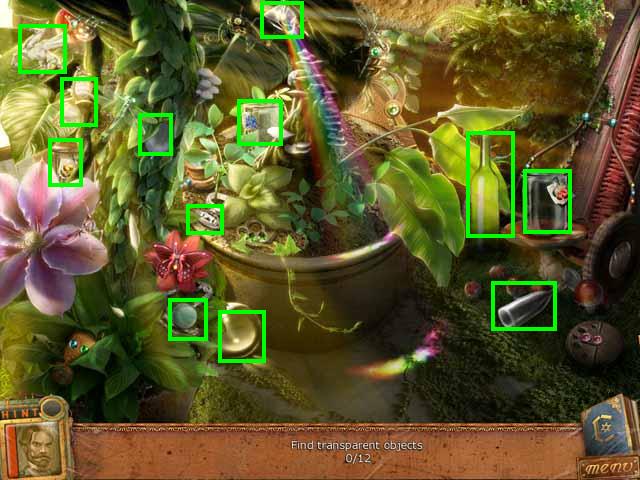
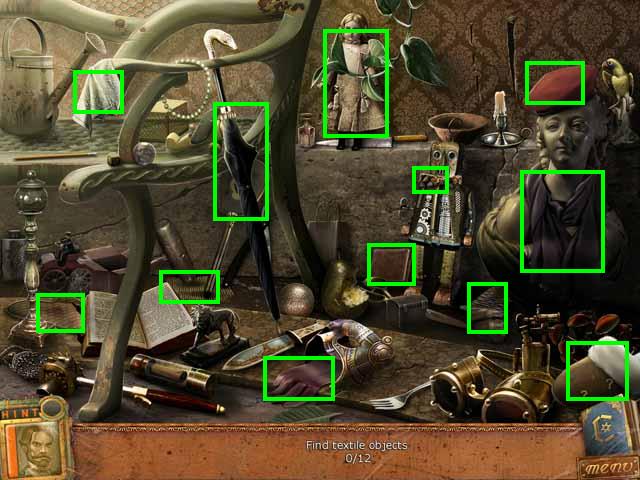
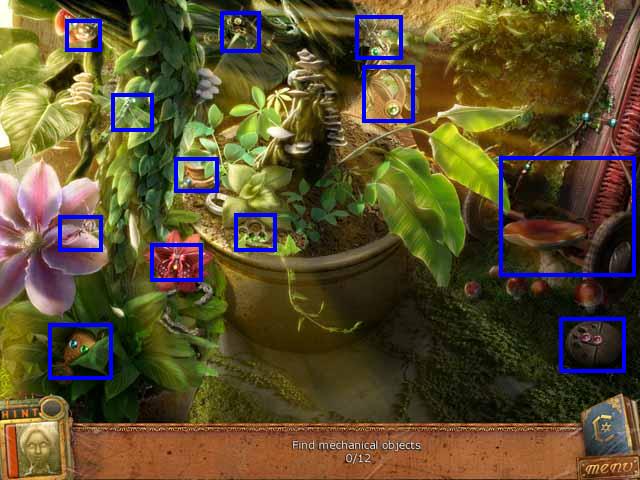
- Zoom into the sparkles to play a HOS.
- Pick up the items marked in green.
- Receive the BEAKERS.
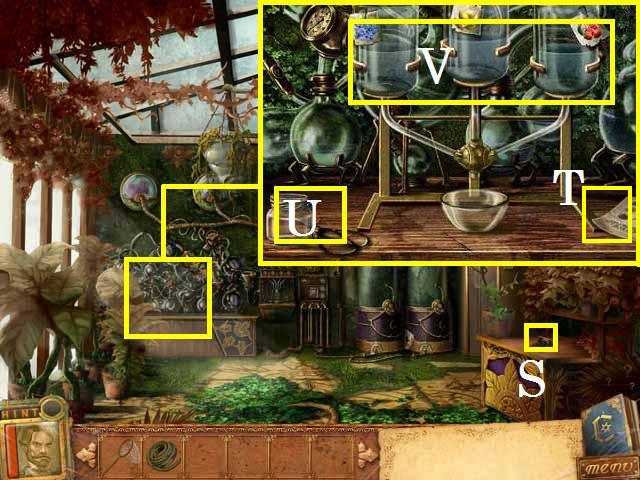
- Pick up the COLORED SPHERES (S).
- Zoom into the chemistry set; pick up the PLANT SAMPLE KIT (U), and note (T).
- Place the BEAKERS (V) on the stand.
- Return to the Study.
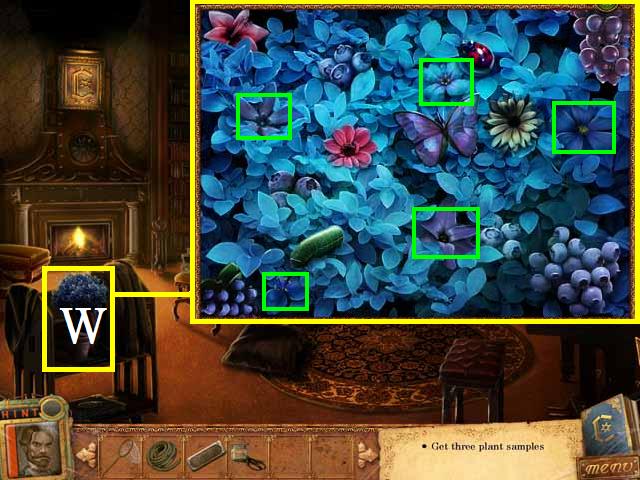

- Zoom into the plant (W); cut the five BLUE FLOWERS (green).
- Move to the Dining Room.
- Zoom into the plant (X); cut the five YELLOW FRUITS (red).
- Move to the Clockwork Zoo.
- Zoom into the plant (Y); cut the five RED BERRIES (blue).
- Zoom into the Magnavault; place the COLORED SPHERES (4).
- You can use the following sequence to finish this puzzle: 2, 4, 3, 1, 3, 1, 2, 1, 2, 4, 3, 4, 3, 1, and 2.
- Pick up the ELEVATOR BUTTON HALF (J).
- Return to the Greenhouse.
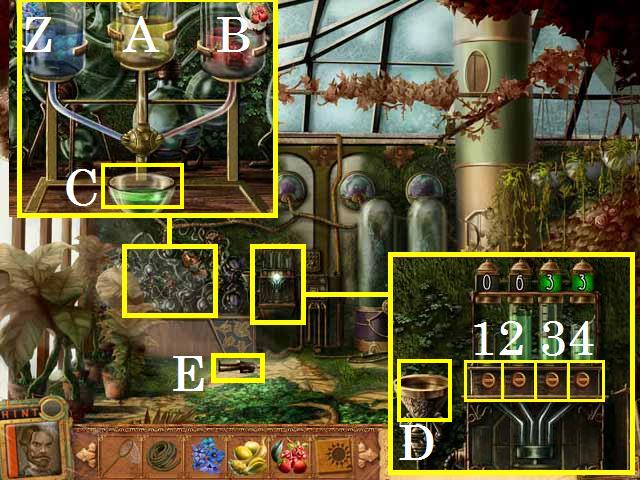
- Zoom into the chemistry set; place the BLUE FLOWER in the beaker (Z), the YELLOW FRUIT in (A) and the RED BERRIES in (B).
- Pick up the NUTRIENT CHEMICAL (C).
- Zoom into the nutrient distribution system; pour the NUTRIENT CHEMICAL in the funnel (D).
- One solution is to: open valve (1) then valve (2), followed by (3) to (1), (1) to (3), and (2) to (1).
- Pick up the THEATOR DOLL (E).
- Return to the Gallery.
- Zoom into the fourth panel; place the THEATER DOLL in the scene and press the buttons in order of 1-6.
- Receive the ELEVATOR BUTTON HALF.
- Exit the room and zoom into the platform controls.
- Place the two ELEVATOR BUTTON HALVES and press them to move to the surface.
Chapter 4: The Surface Floor
- Pick up the note (F).
- Catch the two FIREFLIES (green) with the BUTTERFLY NET.
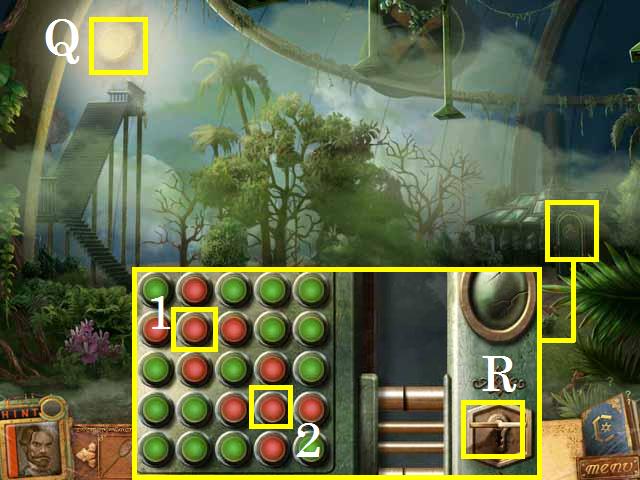
- Zoom into the key panel (G).
- Use the following sequence to complete this puzzle: 16, 16, 12, 10, 11, 10, 5, 7, 7, 4, 4, 1, 3, 2, 3, and 1.
- Receive the LOCK RING.
- Zoom into the door; place the LOCK RING and set the rings.
- One solution is to set the rings in the following order: ring 1, 5, 4, 3, and finish with 2.
- Enter Cogglethorpe's Lair.
- Catch the three FIREFLIES (green) with the BUTTERFLY NET.
- Place all of the FIREFLIES in the light (H).
- Zoom into the sparkles to play a HOS.
- Pick up all the items marked in blue.
- Receive the PNEUMATIC TUBE KEY.
- Exit back two scenes.
- Hang the VINE from the hook (I); climb down one level and enter the Dining Room.
- Zoom into the control panel; place the PNEUMATIC TUBE KEY (J) on the device.
- Take the tube down one level.

- Pick up the TAR BUCKET (K).
- Exit back two scenes to the Clockworks Floor.
- Zoom into the clock; arrange all of the pieces as shown in the screenshot (L) to receive the SCREWDRIVER and a note.
- Zoom into the platform controls and take it to the Nature Floor.
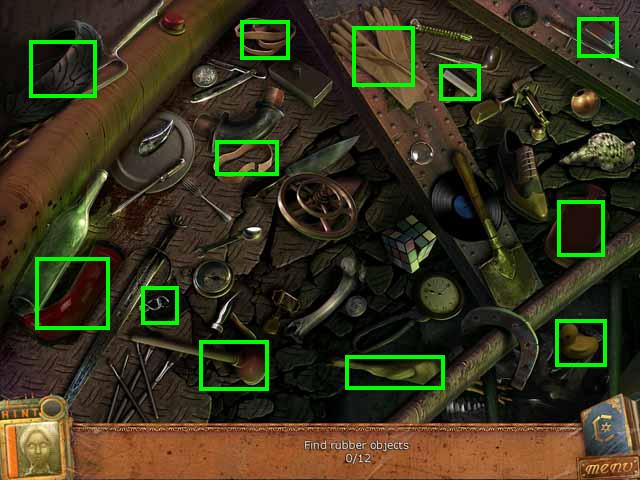
- Zoom into the sparkles to play a HOS.
- Pick up all the items marked in green.
- Receive A FILLED BLOWTORCH.
- Move to the Greenhouse.
- Zoom into the robot; patch all of the holes (green) with the TAR BUCKET.
- Fix the two cracks (blue) with A FILLED BLOWTORCH.
- Tighten all of the screws (orange) with the SCREWDRIVER.
- Return to Cogglethorpe's Lair.

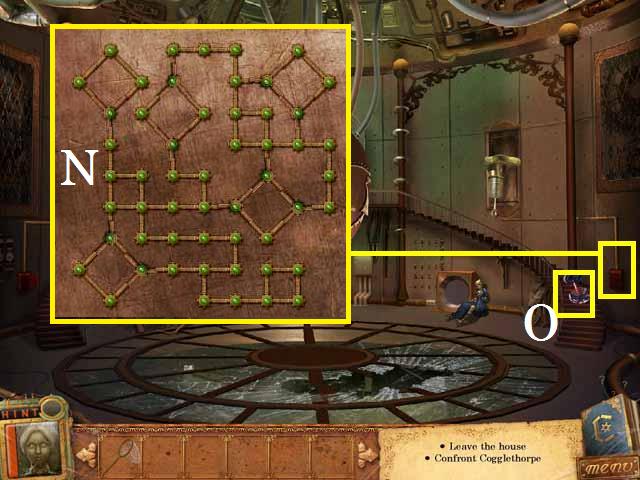
- Zoom into the panel.
- Set the pieces as shown in the screenshot (M).
- Zoom into the sparkles to play a HOS.
- Pick up all the items marked in green.
- Receive the RUBBER GLOVES.
- Zoom into the panels using the RUBBER GLOVES to activate a puzzle.
- See the screenshot (N) for a winning solution.
- Pick up the ELECTRICAL COIL (O).
- Zap the pods as they lower until they disappear. You will need to switch between them to keep them from hitting the ground.
- Congratulations, you have successfully escaped the house!
Created at: 2012-03-23