
Walkthrough Menu
- Game Overview
- Hints
- Gameplay
- Chapter 1
- Chapter 2
- Chapter 3
- Chapter 4
- Chapter 5
- Chapter 6
- Chapter 7
- Chapter 8
- Chapter 9
- Chapter 10
Game Overview
- There are nine areas that you will need to explore with three locations in each area. You will need to visit each location two times. After every two locations you visit you will need to solve a mini-puzzle.
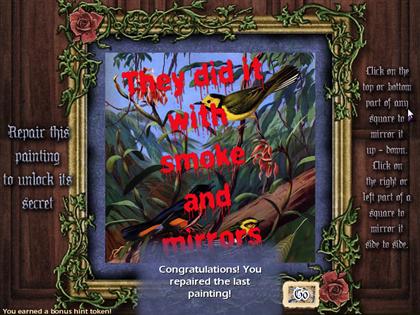
- There are three different types of mini-puzzles: reflecting mirrors, spotting the difference, and repairing jumbled images. Each type of puzzle will appear nine times.
- At the end of the game you will need to solve one final location, the "Mirror Mirror Room."
- There are a total of 82 levels: 27 locations you must visit two times each, 27 mini-puzzles, and one final location.
- You have four play options; timed, relaxed, original, or mirrored. Choosing the timed option will give you 59 minutes to play each area consisting of three locations played two times each. The timer will stop while you are in the mini-puzzles.
- Choosing relaxed mode allows you to play at your own enjoyable pace.
- In the mirrored mode vs. the original mode the gameplay is the same; however, the scenes are flipped.
- All of the screenshots and gameplay in this guide are taken from the original mode.
Hints
- If you need help in the game or are having trouble locating an object, you may choose to use one of your hint buttons, and it will show you where a random object on your list is.
- To use a hint, click on the hand mirrors containing the question mark at the bottom left of the screen. You may click the hint mirror again, without penalty, for locating the same object.
- At the start of the game you have four hint mirrors.
- After the first level, you will have the opportunity to gain at least one hint mirror every round by finding them hidden along with the other objects in each scene.
- The maximum amount of hint mirrors you can have at one time is five.
- Additionally, you will be awarded up to two hint mirrors for solving the first mini-puzzle, which is the third level you will play, and every ninth level thereafter.
- During the second mini-puzzle, you will have the option to gain up to four additional hint mirrors. This is the sixth level you play. You will have more chances every ninth level thereafter.
- Make sure to collect any hint mirrors you may need before collecting your last object on the list, as this will end the round.
Gameplay
- Randomly clicking more than six times without finding an object will cause a time penalty.
- Click on the location in the main stage screen to enter it. After every location you solve, a new location will become unlocked.
- At the bottom of the screen you will find an item list. The goal is to find all the hidden objects on the item list. Once an object has been located, simply click on the item to collect it.
- After visiting all three locations in one area, you will need to revisit those same three before you can move on to another area. The order in which you revisit the first two locations in an area is unimportant. You will have to visit both. The second time around you will need to collect a key in one location and a letter in another.
- The keys, letters, and boxes are hidden behind other objects which will always be the last objects in your item list.
- The third location in an area has a hidden box containing a mirror shard that you will need to collect. Before entering these locations, you will need to solve a reflecting mirrors puzzle that will give you a hint for the location of the box.
- You may choose to uncover the box the first time through these locations, or wait for the second time around. In this guide it is collected the first time around.
- Only a couple of the objects on the item lists are circled. Every time you start a new game, or revisit a scene, the item list will change; however, all the individual objects will remain in the same place.
- The hint mirrors are circled in red. The key, letter, and box are in blue. A few objects in each screen are marked with white stars.
Chapter 1
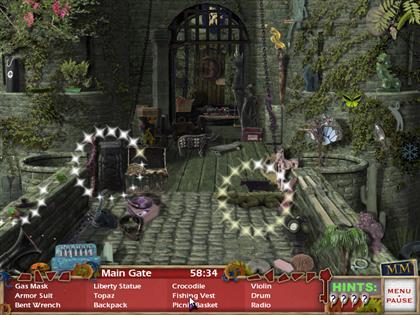
Main Gate (Tutorial Level) 1
- Find all of the objects in the item list and collect them.
Drawing Room 1
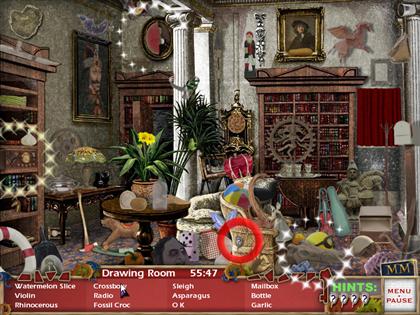
- The hint mirror is on the rattan chair in the middle of the room.
- Find all of the objects in the item list and collect them.
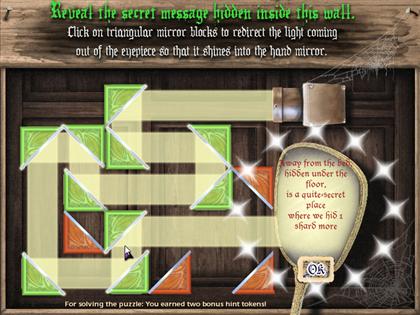
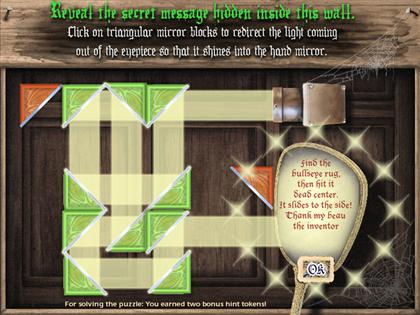
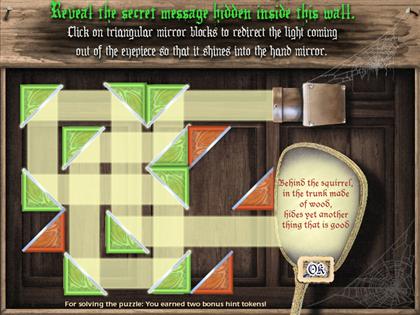
Mini-Puzzle 1
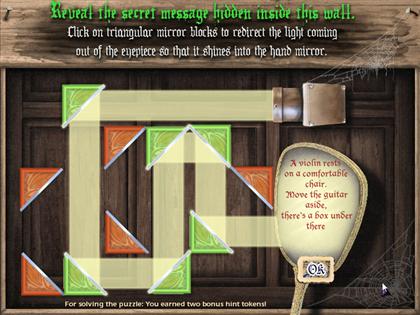
- There may be more than one possible configuration.
- Rotate each mirror piece by clicking on it until the light reflects in the hand mirror.
- Follow the light to the left for the first mirror piece, and reflect the light beam down.
- Follow the light to the next mirror piece, and reflect the light beam to the right.
- Follow the light to the next mirror piece, and reflect the light beam up.
- Follow the light to the next mirror piece, and reflect the light beam to the right.
- Follow the light to the next mirror piece, and reflect the light beam down.
- Follow the light to the next mirror piece, and reflect the light beam right into the mirror.
- The clue that the mirror reveals will help you find the box containing a mirror shard in the next scene.
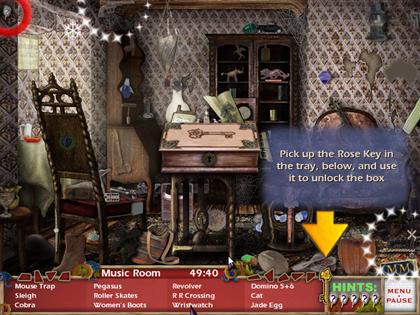
Music Room 1

- The hint mirror is located in the top left corner of the scene.
- Click the guitar near the chair at the right of the screen.
- In order to open the box you will need to revisit the last two scenes to locate the key. It does not matter which one you visit first, as you will need to visit both.
- Find all of the objects in the item list and collect them.
Main Gate 2
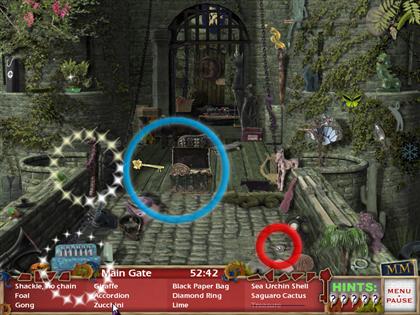
- The hint mirror is located near the bottom right corner, next to the sea diver’s mask. This was not available the first time around.
- The key is hidden behind the chest, to the middle left of the scene. Move the chest by clicking on it.
- Click on the key to collect it.
- Find all of the objects in the item list and collect them.
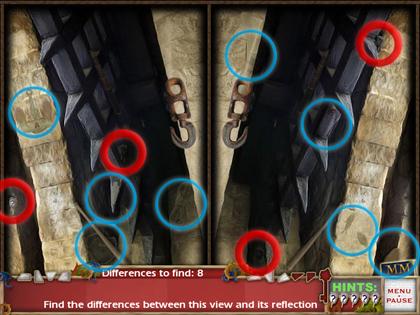
Mini-Puzzle 2
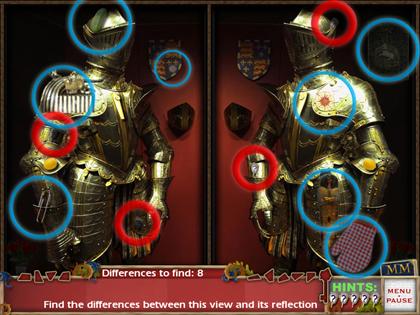
- You will need to locate the eight items that are different in each scene.
- There are also four hint mirrors located in this scene that you can collect.
- The differences are circled in blue, and the hint mirrors are circled in red, in the screenshot.
Drawing Room 2

- The hint mirror is on the rattan chair in the middle of the room.
- Click on the red curtain in the middle far right of the scene.
- Click on the framed painting that you have uncovered to view a hidden note.
- Find all of the objects in the item list and collect them.
Music Room 2
- The hint mirror is located in the top left corner of the scene.
- Click on the box under the chair at the far left of the scene.
- Click and drag the key next to the collected hint mirrors, and move your mouse over the keyhole.
- Click one more time to release the key, and the box will open, revealing a mirror piece.
- Find all of the objects in the item list and collect them.
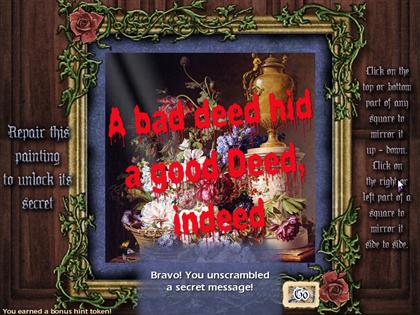
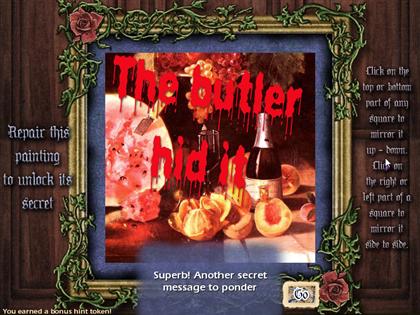
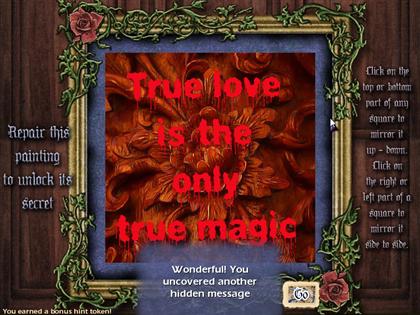
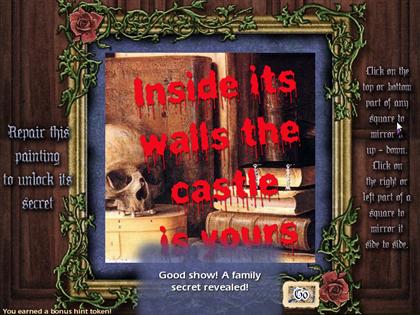
Mini-Puzzle 3
- The beginning tile arrangements are random each time this puzzle is played.
- Each tile can be flipped four ways by clicking on the top, bottom, right, and left sides.
- Once a tile is in the correct position, it will flatten into place and no longer rotate.
- The correct position of each tile can be obtained with no more than three moves.
- Click each tile first on the right side, followed by the top, and then the left side.
- It may take one, or all three clicks. See screenshot for final arrangement.
Chapter 2
The Attic 1
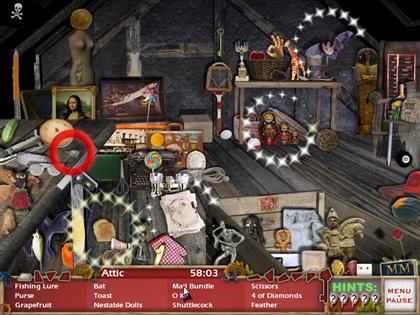
- The hint mirror is located near the pie on the table.
- Find all of the objects in the item list and collect them.
The Staircase 1
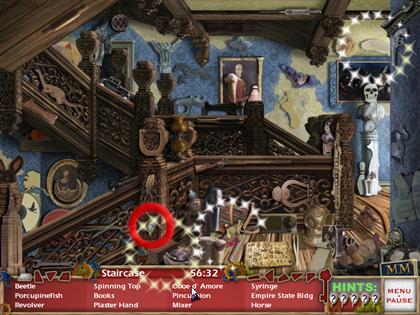
- The hint mirror is located on the banister in the middle of the scene.
- Find all of the objects in the item list and collect them.
Mini-Puzzle 4
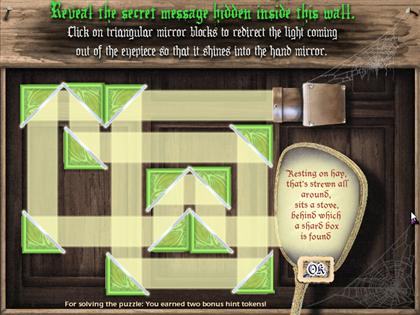
- There may be more than one possible configuration.
- Rotate each mirror piece by clicking on it until the light reflects in the hand mirror.
- Follow the light to the left for the first mirror piece, and reflect the light beam down.
- Follow the light to the next mirror piece, and reflect the light beam to the right.
- Follow the light to the next mirror piece, and reflect the light beam up.
- Follow the light to the next mirror piece, and reflect the light beam to the left.
- Follow the light to the next mirror piece, and reflect the light beam up.
- Follow the light to the next mirror piece, and reflect the light beam to the left.
- Follow the light to the next mirror piece, and reflect the light beam down.
- Follow the light to the next mirror piece, and reflect the light beam to the right.
- Follow the light to the next mirror piece, and reflect the light beam up.
- Follow the light to the next mirror piece, and reflect the light beam to the right.
- Follow the light to the next mirror piece, and reflect the light beam down.
- Follow the light to the next mirror piece, and reflect the light beam right into the mirror.
- The clue that the mirror reveals will help you find the box containing a mirror shard in the next scene.
The Stables 1
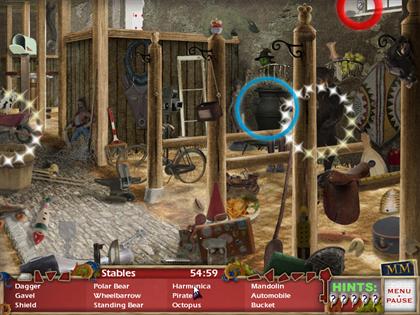
- The hint mirror is located at the top right of the scene, in the window.
- Click on the stove to reveal the mirror shard box.
- Find all of the objects in the item list and collect them.
The Attic 2
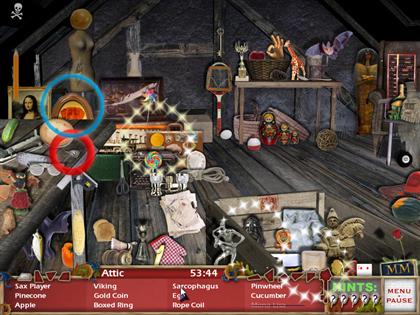
- The hint mirror is located near the pie on the table.
- Click on the "Mona Lisa" to reveal a framed photo, and retrieve a letter.
- Find all of the objects in the item list and collect them.
Mini-Puzzle 5
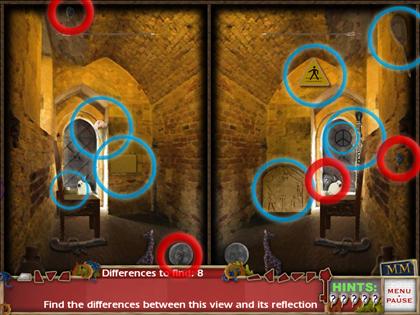
- You will need to locate the eight items that are different in each scene.
- There are also four hint mirrors located in this scene that you can collect.
- The differences are circled in blue, and the hint mirrors are circled in red, in the screenshot.
- Hint: you will need to click on the left scene to collect the mirror over the moon.
The Staircase 2
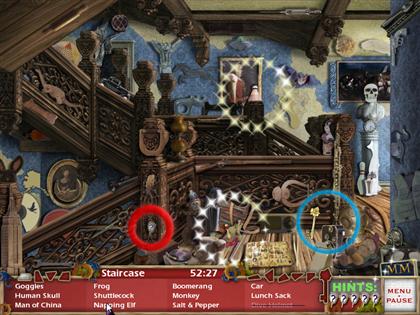
- The hint mirror is located on the banister in the middle of the scene.
- Click on the diver’s mask to reveal the key.
- Find all of the objects in the item list and collect them.
The Stables 2
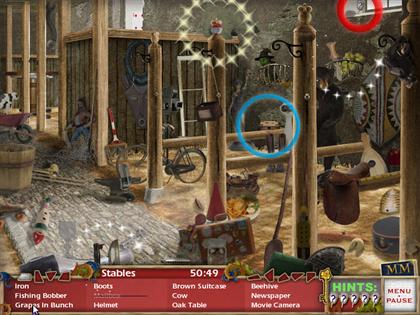
- The hint mirror is located at the top right of the scene in the window.
- Click on the box you located previously.
- Click and drag the key over the keyhole to collect the mirror shard.
- Find all of the objects in the item list and collect them.
Mini-Puzzle 6
- Click each tile first on the right side, followed by the top, and then the left side.
- It may only take up to three clicks. See screenshot for final arrangement.
Chapter 3
The Armory 1
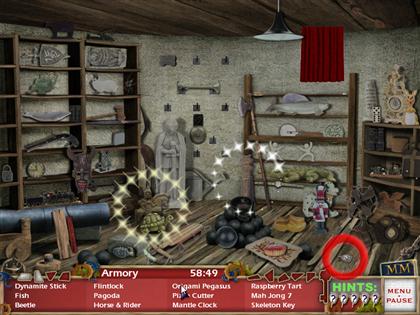
- The hint mirror is located in the bottom right corner.
- Find all of the objects in the item list and collect them.
The Kitchen 1
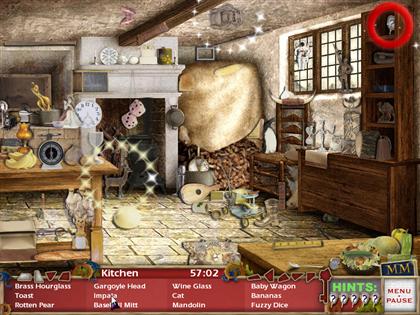
- The hint mirror is located in the upper right corner, on the shelf.
- Find all of the objects in the item list and collect them.
Mini-Puzzle 7
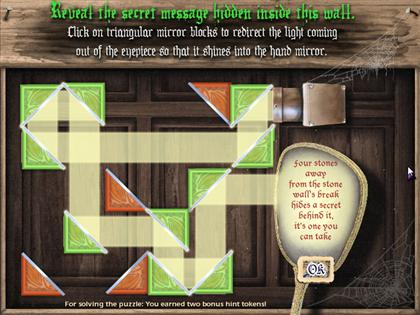
- Rotate each mirror piece by clicking on it until the light reflects in the hand mirror.
- Follow the light to the left for the first mirror piece, and reflect the light beam down.
- Follow the light to the next mirror piece, and reflect the light beam to the left.
- Follow the light to the next mirror piece, and reflect the light beam up.
- Follow the light to the next mirror piece, and reflect the light beam to the right.
- Follow the light to the next mirror piece, and reflect the light beam down.
- Follow the light to the next mirror piece, and reflect the light beam to the right.
- Follow the light to the next mirror piece, and reflect the light beam down.
- Follow the light to the next mirror piece, and reflect the light beam to the right.
- Follow the light to the next mirror piece, and reflect the light beam up.
- Follow the light to the next mirror piece, and reflect the light beam right into the mirror.
- The clue that the mirror reveals will help you find the box containing a mirror shard in the next scene.
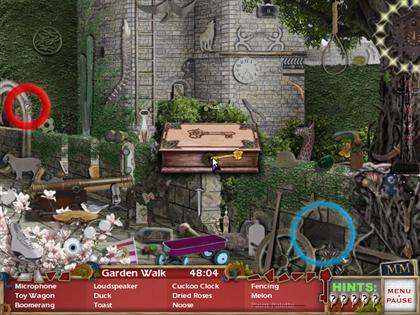
The Garden Walk 1
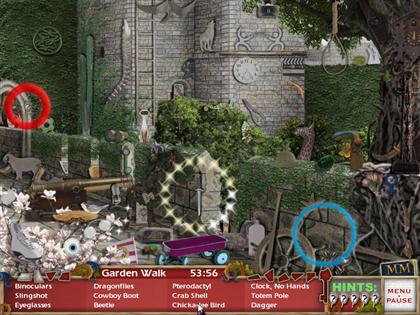
- The hint mirror is located in the arch at the left side, near the soccer ball.
- Click on the third stone to the left of the break in the wall to reveal the mirror shard box.
- Find all of the objects in the item list and collect them.
The Armory 2
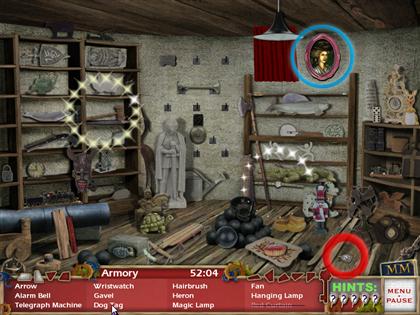
- The hint mirror is located in the bottom right corner.
- Click on the red curtain to reveal a framed photo, and retrieve a letter.
- Find all of the objects in the item list and collect them.
Mini-Puzzle 8
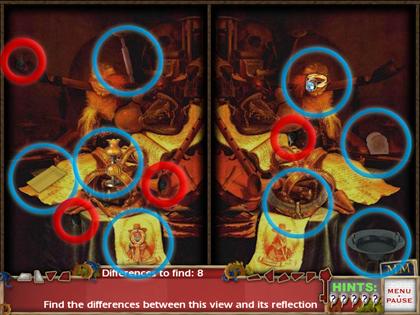
- You will need to locate the eight items that are different in each scene.
- There are also four hint mirrors located in this scene that you can collect.
- The differences are circled in blue, and the hint mirrors are circled in red, in the screenshot.
The Kitchen 2
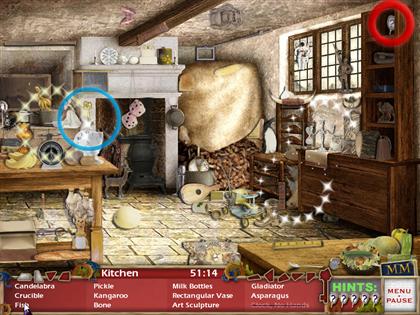
- The hint mirror is located in the upper right corner, on the shelf.
- Click the clock hanging on the fireplace to reveal the key.
- Find all of the objects in the item list and collect them.
The Garden Walk 2
- The hint mirror is located in the arch at the left side, near the soccer ball.
- Click on the box you located previously.
- Click and drag the key over the keyhole to collect the mirror shard.
- Find all of the objects in the item list and collect them.
Mini-Puzzle 9

- The correct position of each tile can be obtained with no more than three moves.
- Click each tile first on the right side, followed by the top, and then the left side.
- It may take up to all three clicks to reach the correct position. See screenshot for final arrangement.
Chapter 4
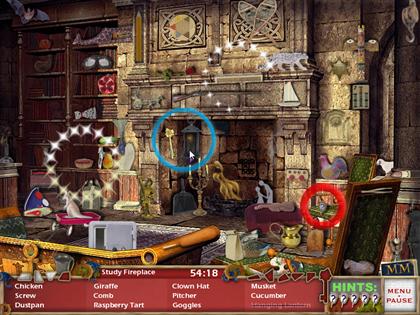
The Study Fire Place 1
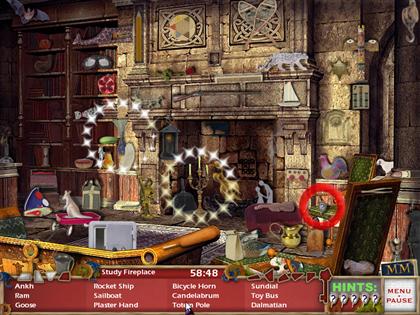
- The hint mirror is located on the green chair near the fireplace.
- Find all of the objects in the item list and collect them.
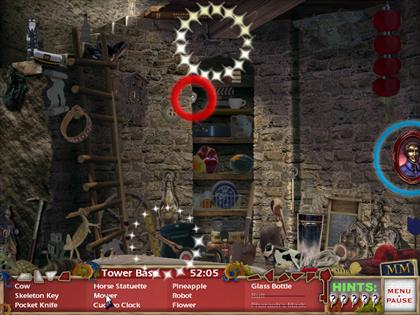
The Tower Base 1
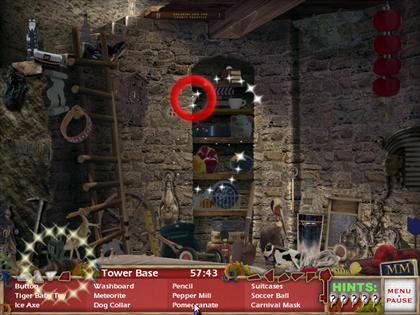
- The hint mirror is located in the middle of the room, on the second shelf down.
- Find all of the objects in the item list and collect them.
Mini-Puzzle 10
- Rotate each mirror piece by clicking on it, until the light reflects in the hand mirror.
- Follow the light to the left for the first mirror piece, and reflect the light beam down.
- Follow the light to the next mirror piece, and reflect the light beam to the right.
- Follow the light to the next mirror piece, and reflect the light beam down.
- Follow the light to the next mirror piece, and reflect the light beam left.
- Follow the light to the next mirror piece, and reflect the light beam up.
- Follow the light to the next mirror piece, and reflect the light beam left.
- Follow the light to the next mirror piece, and reflect the light beam down.
- Follow the light to the next mirror piece, and reflect the light beam right.
- Follow the light to the next mirror piece, and reflect the light beam up.
- Follow the light to the next mirror piece, and reflect the light beam right into the mirror.
- The clue that the mirror reveals will help you find the box containing a mirror shard in the next scene.
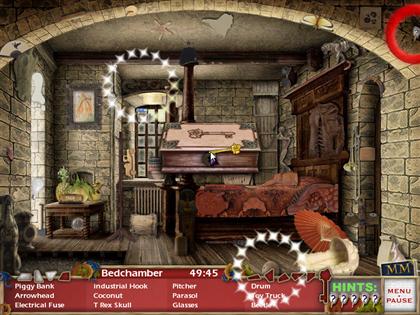
The Bed Chamber 1
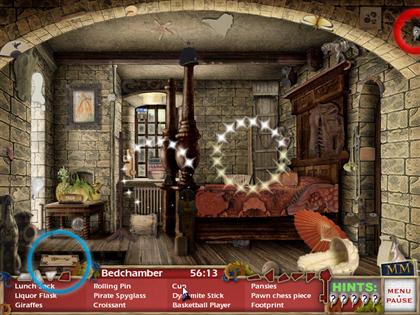
- The hint mirror is located in the upper right corner.
- Click on the floor in the left corner to reveal the mirror shard box.
- Find all of the objects in the item list and collect them.
The Study Fire Place 2
- The hint mirror is located on the green chair near the fireplace.
- Click on the hanging lantern by the fire to reveal the key.
- Find all of the objects in the item list and collect them.
Mini-Puzzle 11
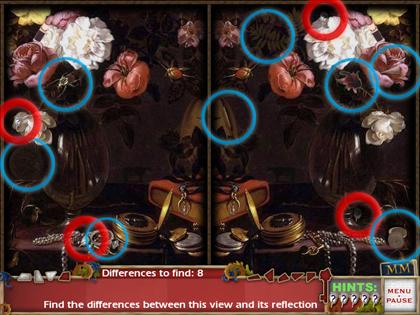
- You will need to locate the eight items that are different in each scene.
- There are also four hint mirrors located in this scene that you can collect.
- The differences are circled in blue, and the hint mirrors are circled in red, in the screenshot.
The Tower Base 2
- The hint mirror is located in the middle of the room, on the second shelf down.
- Click on the pharaoh’s mask to reveal a framed photo, and retrieve a letter.
- Find all of the objects in the item list and collect them.
The Bed Chamber 2
- Click on the box you located previously.
- Click and drag the key over the keyhole to collect the mirror shard.
- Find all of the objects in the item list and collect them.
Mini-Puzzle 12
- The correct position of each tile can be obtained with no more than three moves.
- Click each tile first on the right side, followed by the top, and then the left side.
- It may only take up to all three clicks. See screenshot for final arrangement.
Chapter 5
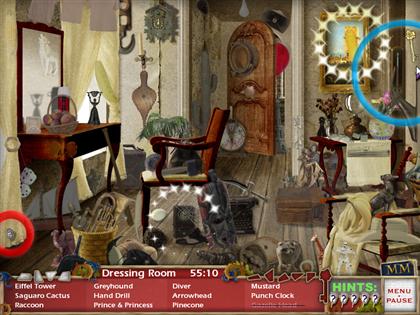
The Dressing Room 1

- The hint mirror is located in the lower left corner, at the base of the curtain.
- Find all of the objects in the item list and collect them.
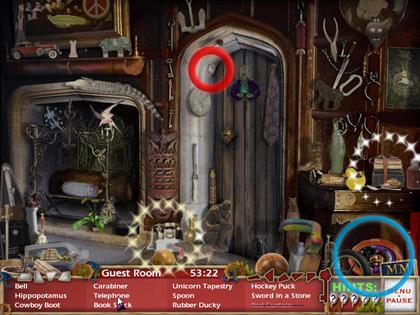
Guest Room 1
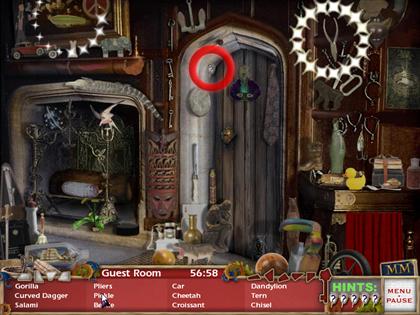
- The hint mirror is located in the upper left side of the doorway in the middle of the room.
- Find all of the objects in the item list and collect them.
Mini-Puzzle 13
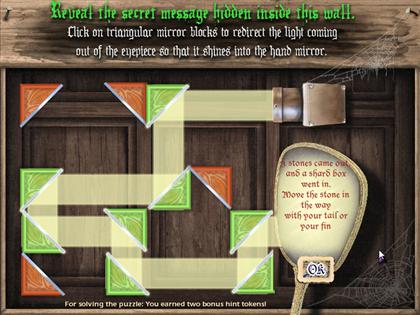
- Rotate each mirror piece by clicking on it until the light reflects in the hand mirror.
- Follow the light to the left for the first mirror piece, and reflect the light beam down.
- Follow the light to the next mirror piece, and reflect the light beam to the left.
- Follow the light to the next mirror piece, and reflect the light beam to the down.
- Follow the light to the next mirror piece, and reflect the light beam to the right.
- Follow the light to the next mirror piece, and reflect the light beam down.
- Follow the light to the next mirror piece, and reflect the light beam to the right.
- Follow the light to the next mirror piece, and reflect the light beam up.
- Follow the light to the next mirror piece, and reflect the light beam right into the mirror.
- The clue that the mirror reveals will help you find the box containing a mirror shard in the next scene.
The Moat Underwater 1
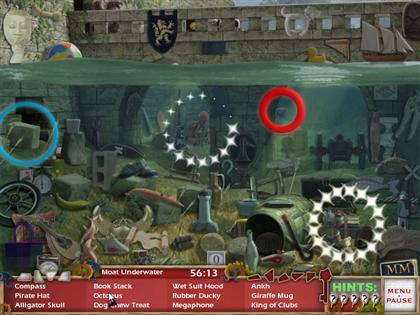
- The hint mirror is located at the left side of the arch, to the right of the scene.
- Click on the stone at the far left, near the missing stones, to reveal the mirror shard box.
- Find all of the objects in the item list and collect them.
The Dressing Room 2
- The hint mirror is located in the lower left corner, at the base of the curtain.
- Click on the gazelle in the upper right corner to reveal the key.
- Find all of the objects in the item list and collect them.
Mini-Puzzle 14

- You will need to locate the eight items that are different in each scene.
- There are also four hint mirrors located in this scene that you can collect.
- The differences are circled in blue, and the hint mirrors are circled in red, in the screenshot.
The Guest Room 2
- The hint mirror is located in the upper left side of the doorway in the middle of the room.
- Click on the red curtain in the bottom right corner to reveal a framed photo, and retrieve a letter.
- Find all of the objects in the item list and collect them.
The Moat Underwater 2
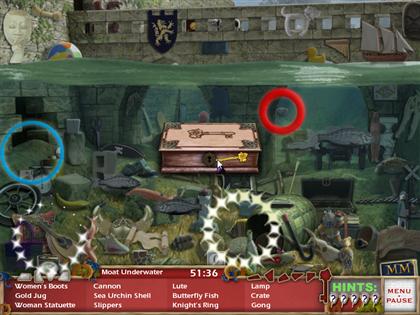
- The hint mirror is located at the left side of the arch, to the right of the scene.
- Click on the box you located previously.
- Click and drag the key over the keyhole to collect the mirror shard.
- Find all of the objects in the item list and collect them.
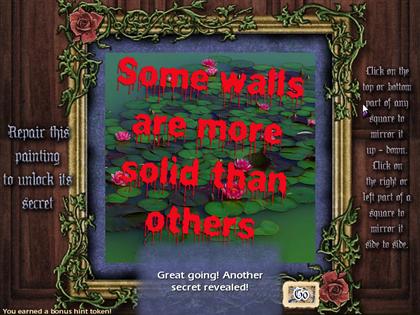
Mini-Puzzle 15
- The correct position of each tile can be obtained with no more than three moves.
- Click each tile first on the right side, followed by the top, and then the left side.
- It may take up to all three clicks to obtain the solution. See screenshot for final arrangement.
Chapter 6
The Gypsy Wagon 1
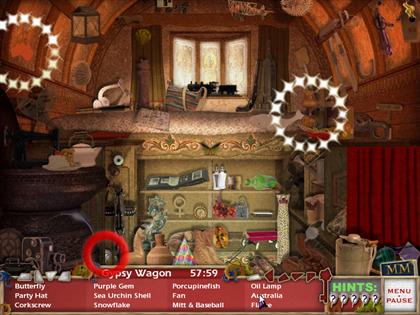
- The hint mirror is located in the bottom left corner, near the totem pole.
- Find all of the objects in the item list and collect them.
The Castle Approach 1
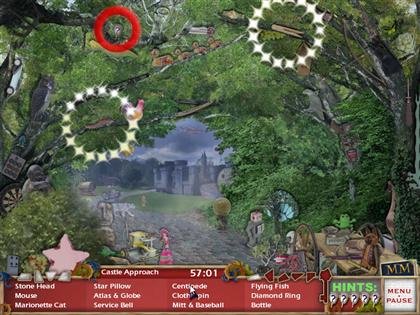
- The hint mirror is located in the top left, on the tree branch.
- Find all of the objects in the item list and collect them.
Mini-Puzzle 16
- Rotate each mirror piece by clicking on it until the light reflects in the hand mirror.
- Follow the light to the left for the first mirror piece, and reflect the light beam down.
- Follow the light to the next mirror piece, and reflect the light beam to the left.
- Follow the light to the next mirror piece, and reflect the light beam up.
- Follow the light to the next mirror piece, and reflect the light beam to the right.
- Follow the light to the next mirror piece, and reflect the light beam down.
- Follow the light to the next mirror piece, and reflect the light beam to the left.
- Follow the light to the next mirror piece, and reflect the light beam down.
- Follow the light to the next mirror piece, and reflect the light beam to the right.
- Follow the light to the next mirror piece, and reflect the light beam up.
- Follow the light to the next mirror piece, and reflect the light beam right into the mirror.
- The clue that the mirror reveals will help you find the box containing a mirror shard in the next scene.
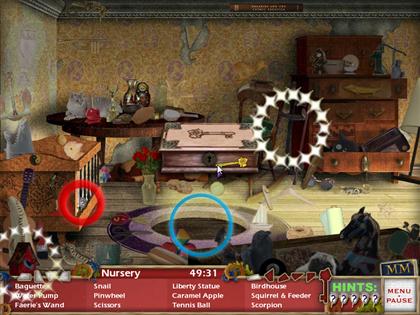
The Nursery 1
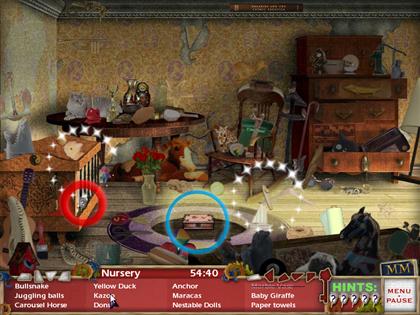
- The hint mirror is located in the crib at the lower left corner.
- Click on the bull’s eye in the middle of room to reveal the mirror shard box.
- Find all of the objects in the item list and collect them.
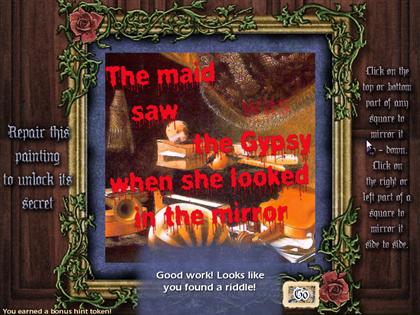
The Gypsy Wagon 2
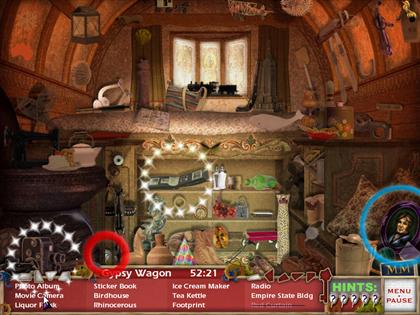
- The hint mirror is located in the bottom left corner, near the totem poll.
- Click on the red curtain in the lower right corner to reveal a framed photo, and retrieve a letter.
- Find all of the objects in the item list and collect them.
Mini-Puzzle 17
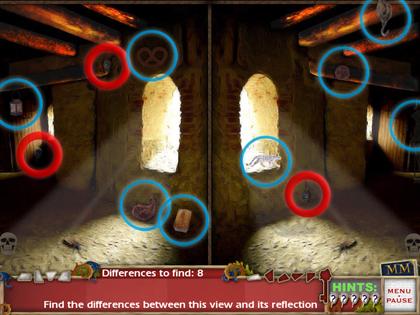
- You will need to locate the eight items that are different in each scene.
- There are also four hint mirrors located in this scene that you can collect.
- The differences are circled in blue, and the hint mirrors are circled in red, in the screenshot.
The Castle Approach 2
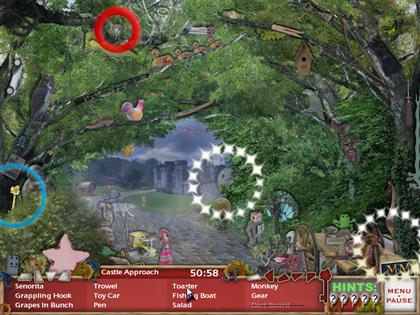
- The hint mirror is located in the top left on the tree branch.
- Click on the dartboard in the lower left near the tree to reveal the key.
- Find all of the objects in the item list and collect them.
The Nursery 2
- The hint mirror is located in the crib in the lower left corner.
- Click on the box you located previously.
- Click and drag the key over the keyhole to collect the mirror shard.
- Find all of the objects in the item list and collect them.
Mini-Puzzle 18
- The correct position of each tile can be obtained with no more than three moves.
- Click each tile first on the right side, followed by the top, and then the left side.
- It may take up to three clicks to obtain the correct position. See screenshot for final arrangement.
Chapter 7
The Courtyard 1
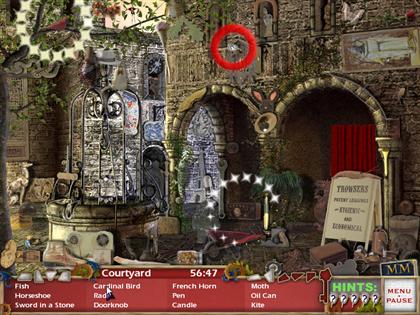
- The hint mirror is located on the coo-coo clock in the upper middle of the scene.
- Find all of the objects in the item list and collect them.
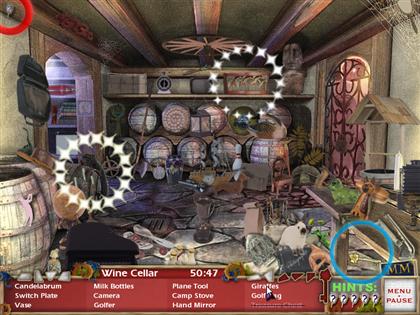
The Wine Cellar 1
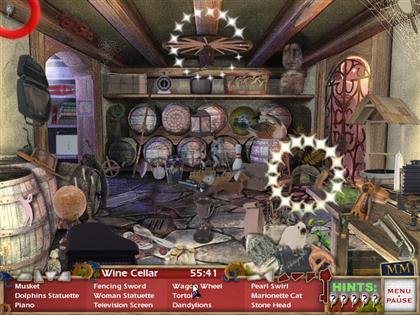
- The hint mirror is located in the top left corner.
- Find all of the objects in the item list and collect them.
Mini-Puzzle 19
- Rotate each mirror piece by clicking on it until the light reflects in the hand mirror.
- Follow the light to the left for the first mirror piece, and reflect the light beam down.
- Follow the light to the next mirror piece, and reflect the light beam to the left.
- Follow the light to the next mirror piece, and reflect the light beam down.
- Follow the light to the next mirror piece, and reflect the light beam to the right.
- Follow the light to the next mirror piece, and reflect the light beam up.
- Follow the light to the next mirror piece, and reflect the light beam to the left.
- Follow the light to the next mirror piece, and reflect the light beam up.
- Follow the light to the next mirror piece, and reflect the light beam to the right.
- Follow the light to the next mirror piece, and reflect the light beam down.
- Follow the light to the next mirror piece, and reflect the light beam right into the mirror.
- The clue that the mirror reveals will help you find the box containing a mirror shard in the next scene.
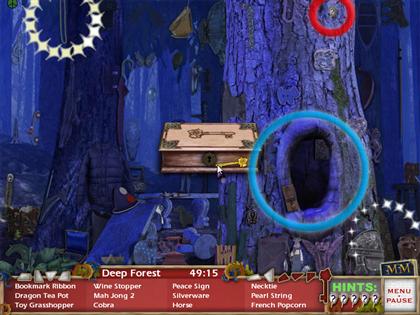
The Deep Forest 1
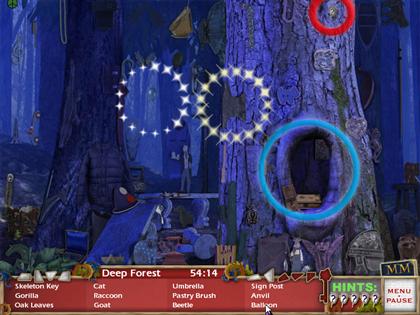
- The hint mirror is located towards the upper right corner on the tree.
- Click on the squirrel in the hole of the tree to reveal the mirror shard box.
- Find all of the objects in the item list and collect them.
The Courtyard 2
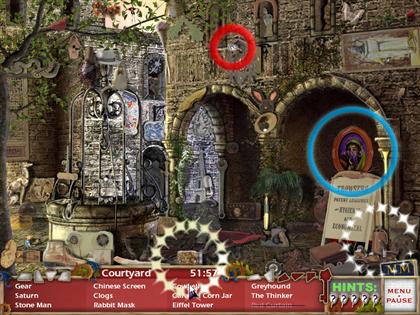
- The hint mirror is located on the cuckoo clock in the upper middle of the scene.
- Click on the red curtain, on the right side, under the arch to reveal a framed photo, and retrieve a letter.
- Find all of the objects in the item list and collect them.
Mini-Puzzle 20
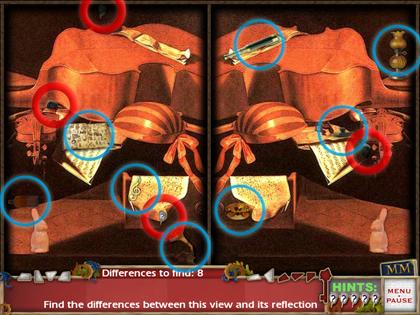
- You will need to locate the eight items that are different in each scene.
- There are also four hint mirrors located in this scene that you can collect.
- The differences are circled in blue, and the hint mirrors are circled in red, in the screenshot.
The Wine Cellar 2
- The hint mirror is located in the top left corner.
- Click on the treasure chest in the bottom right corner, under the table, to reveal the key.
- Find all of the objects in the item list and collect them.
The Deep Forest 2
- Click on the box you located previously.
- Click and drag the key over the keyhole to collect the mirror shard.
- Find all of the objects in the item list and collect them.
Mini-Puzzle 21
- The correct position of each tile can be obtained with no more than three moves.
- Click each tile first on the right side, followed by the top, and then the left side.
- It may take all three clicks to reach the correct position. See screenshot for final arrangement.
Chapter 8
The Dragon Entrance 1
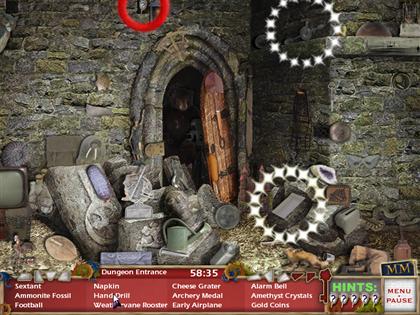
- The hint mirror is located in the top left corner, inside the window.
- Find all of the objects in the item list and collect them.
The Dragon Cell 1
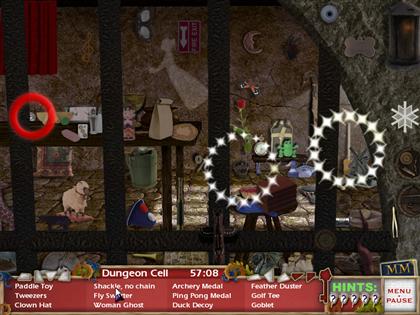
- The hint mirror is located in the upper left side of the scene.
- Find all of the objects in the item list and collect them.
Mini-Puzzle 22
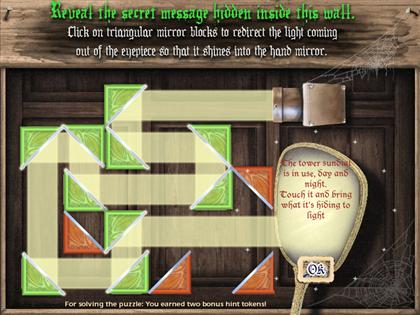
- Rotate each mirror piece by clicking on it until the light reflects in the hand mirror.
- Follow the light to the left to the first mirror piece, and reflect the light beam down.
- Follow the light to the next mirror piece, and reflect the light beam to the right.
- Follow the light to the next mirror piece, and reflect the light beam down.
- Follow the light to the next mirror piece, and reflect the light beam to the left.
- Follow the light to the next mirror piece, and reflect the light beam up.
- Follow the light to the next mirror piece, and reflect the light beam to the left.
- Follow the light to the next mirror piece, and reflect the light beam down.
- Follow the light to the next mirror piece, and reflect the light beam to the right.
- Follow the light to the next mirror piece, and reflect the light beam up.
- Follow the light to the next mirror piece, and reflect the light beam right into the mirror.
- The clue that the mirror reveals will help you find the box containing a mirror shard in the next scene.
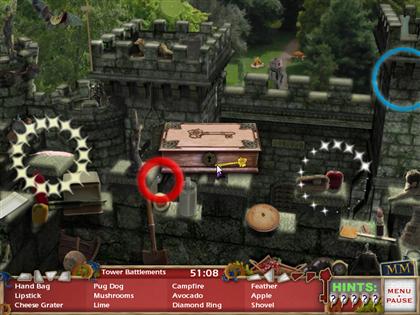
The Tower Battlements 1
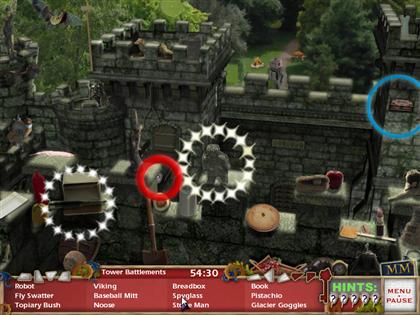
- The hint mirror is located in the middle on the left side of the scene.
- Click on the sundial, on the tower in the upper right third of the scene, to reveal the mirror shard box.
- Find all of the objects in the item list and collect them.
The Dragon Entrance 2
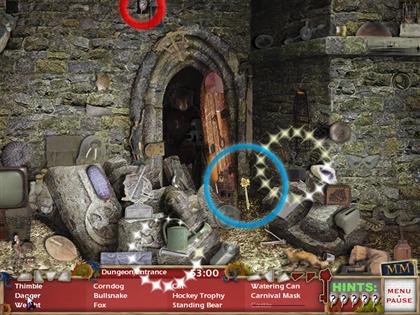
- The hint mirror is located in the top left corner, inside the window.
- Click on the castle to the right of the door to reveal the key.
- Find all of the objects in the item list and collect them.
Mini-Game 23
- You will need to locate the eight items that are different in each scene.
- There are also four hint mirrors located in this scene that you can collect.
- The differences are circled in blue, and the hint mirrors are circled in red, in the screenshot.
The Dungeon Cell 2
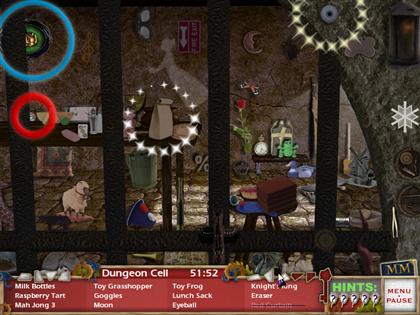
- The hint mirror is located in the upper left side of the scene.
- Click on the red curtain in the upper left corner to reveal a framed photo, and retrieve a letter.
- Find all of the objects in the item list and collect them.
The Tower Battlements 2
- Click on the box you located previously.
- Click and drag the key over the keyhole to collect the mirror shard.
- Find all of the objects in the item list and collect them.
Mini-Puzzle 24
- The correct position of each tile can be obtained with no more than three moves.
- Click each tile first on the right side, followed by the top, and then the left side.
- It may take all three clicks to reach the correct position. See screenshot for final arrangement.
Chapter 9
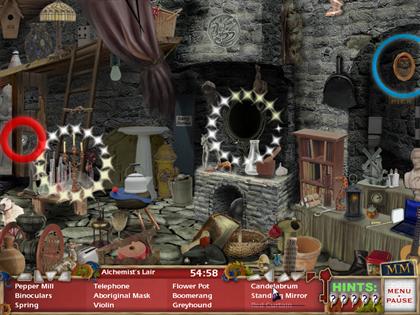
The Alchemist’s Lair 1
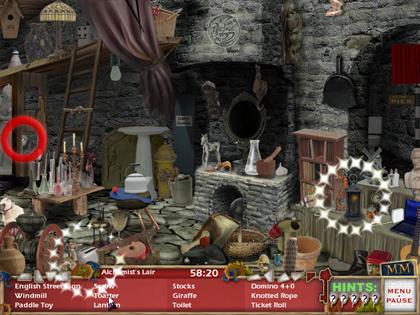
- The hint mirror is located in the middle left of the scene.
- Find all of the objects in the item list and collect them.
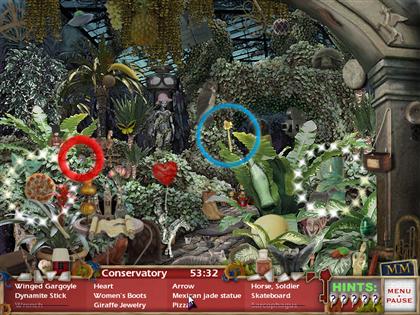
The Conservatory 1
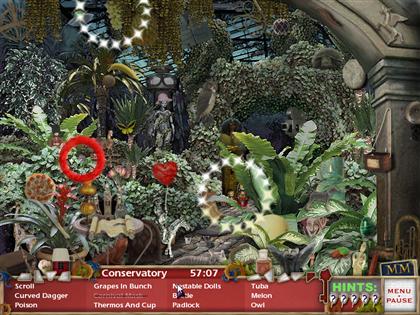
- The hint mirror is located in the bushes at the middle left of the scene.
- Find all of the listed objects in the item list and collect them.
Mini-Puzzle 25
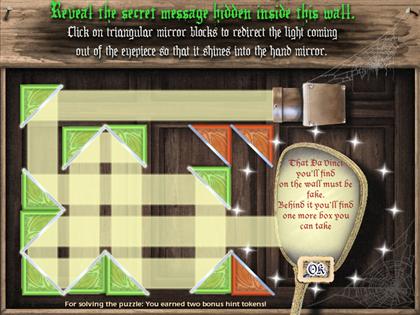
- Rotate each mirror piece by clicking on it until the light reflects in the hand mirror.
- Follow the light to the left to the first mirror piece, and reflect the light beam down.
- Follow the light to the next mirror piece, and reflect the light beam to the right.
- Follow the light to the next mirror piece, and reflect the light beam down.
- Follow the light to the next mirror piece, and reflect the light beam to the left.
- Follow the light to the next mirror piece, and reflect the light beam up.
- Follow the light to the next mirror piece, and reflect the light beam to the left.
- Follow the light to the next mirror piece, and reflect the light beam down.
- Follow the light to the next mirror piece, and reflect the light beam to the left.
- Follow the light to the next mirror piece, and reflect the light beam up.
- Follow the light to the next mirror piece, and reflect the light beam right into the mirror.
- The clue that the mirror reveals will help you find the box containing a mirror shard in the next scene.
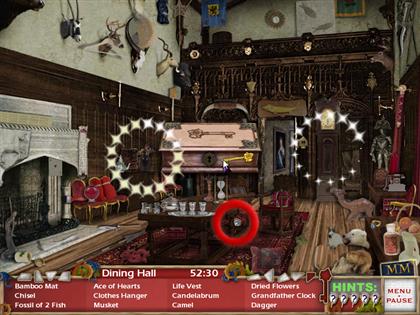
The Dinning Hall 1
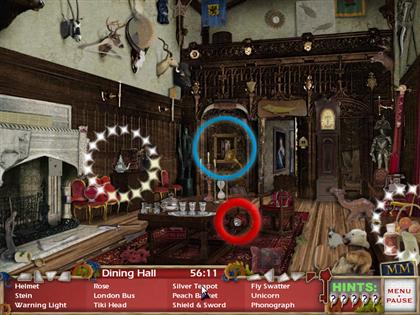
- The hint mirror is located in the middle of the scene, under the table.
- Click on the "Mona Lisa" on the wall, left of the doorway, to reveal the mirror shard box.
- Find all of the objects in the item list and collect them.
The Alchemist’s Lair 2
- The hint mirror is located in the middle left of the scene.
- Click on the red curtain in the upper right corner to reveal a framed photo, and retrieve a letter.
- The hint in this letter is important for the final room. "Love is magic as you’ve found touch the heart you spin it round."
- Find all of the objects in the item list and collect them.
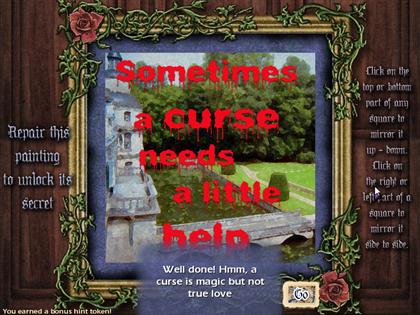
Mini-Puzzle 26
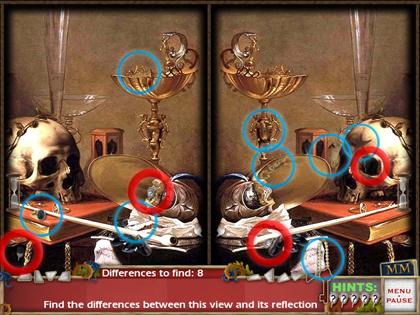
- You will need to locate the eight items that are different in each scene.
- There are also four hint mirrors located in this scene that you can collect.
- The differences are circled in blue, and the hint mirrors are circled in red, in the screenshot.
The Conservatory 2
- The hint mirror is located in the bushes in the middle left of the scene.
- Click on the sarcophagus in the middle of the scene, behind the plants, to reveal the key.
- Find all of the objects in the item list and collect them.
The Dinning Hall 2
- The hint mirror is located in the middle of the scene, under the table.
- Click on the box you located previously.
- Click and drag the key over the keyhole to collect the mirror shard.
- Find all of the objects in the item list and collect them.
Mini-Puzzle 27
- The correct position of each tile can be obtained with no more than three moves.
- Click each tile first on the right side, followed by the top, and then the left side.
- It may take all three clicks to reach the correct position. See screenshot for final arrangement.
Chapter 10
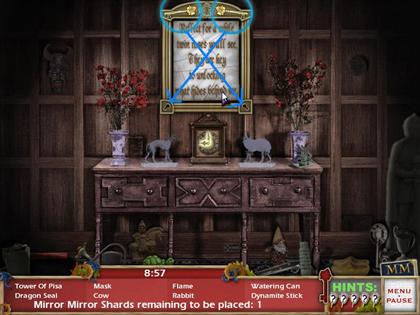
The Mirror Mirror Room
- You only have 10 minutes to complete the final location.
- You will first need to assemble all of the mirror shards.
- Click and drag them from the floor, and place them in the correct spots on the empty mirror frame.
- The shapes of the mirror shards are outlined on the mirror frame, and you can use the writing to help you place them in the correct position.
- See the screenshot for the final image.
- After assembling the mirror, click and drag the keys from the top of the mirror and place them in the keyhole on the opposite side.
- The top right key goes in the bottom left keyhole, and the top left key goes in the bottom right keyhole.
- Find and collect all of the items on the items list. See the screenshot for each object’s location.
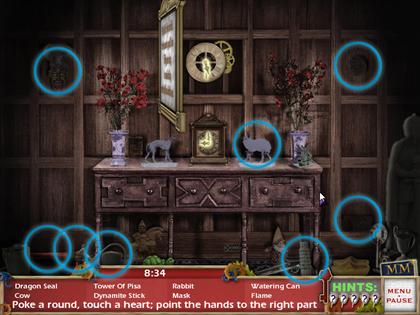
- Right-click to open the scrolls hidden behind the watering can, the dynamite stick, the cow, the Tower of Pisa, and the rabbit.
- These scrolls contain the hints you will need to solve the final riddle, and unlock the mirror.
- You need to set the clock behind the mirror. There are two buttons: one to the left side of the mirror that was behind the mask, and one to the right side that was behind the dragon seal.
- The heart button will add two and a half hours to the clock, while the other button will subtract one and a half hours.
- The main key to remember is to "mirror" the time of the clock on the table.
- The clock on the table is set to nine. You will need to set the other clock to three.
- There are several combinations that will set the clock to the correct time.
- Start with the heart button, and click it five times, adding time until the clock is at four-thirty. Then, hit the button on the right side once.
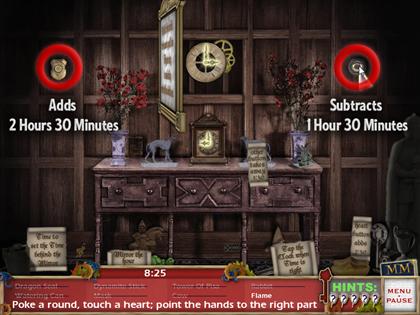
- After you have the clock set to three, click on the upper clock, and then on the deed.
Created at: 2009-04-18