

Walkthrough Menu
- General Tips
- Chapter 1: The Beginning
- Chapter 2: Save Diana's Soul
- Chapter 3: Save Janeck's Soul
- Chapter 4: Save Montague's Soul
- Chapter 5: Save Joseph's Soul
- Chapter 6: Save the Captain's Soul
- Chapter 7: Save Your Soul
General Tips
 • This is the official guide for Hidden Mysteries Return to Titanic.
• You will not need to follow the exact path of this guide; however, some actions are required before you can complete another scene.
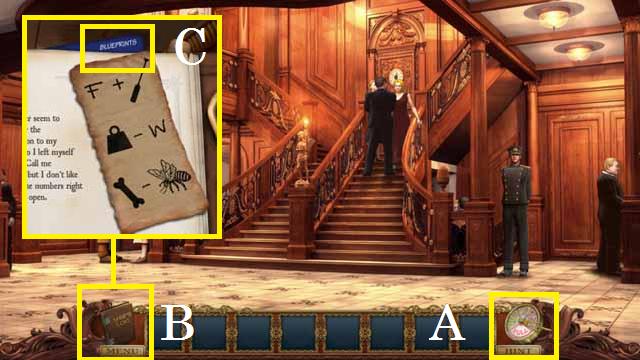
• If you get stuck in your game play you can use the Hint Button (A).
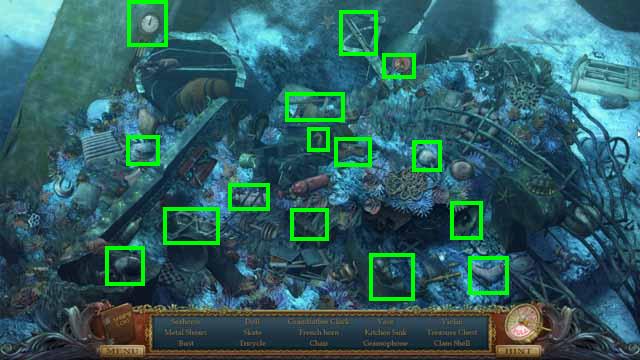
• Zoom into the sparkling areas to trigger a Hidden Object Scene. Throughout the guide, we will use the acronym 'HOS' for Hidden Object Scenes.
• All of the items in the HOS are marked in green unless otherwise noted.
• The HOS are random and the screenshots show current game play.
• The mini-games are random, the screenshot and solutions are for current gameplay.
• Make sure to pick up notes along the way for additional hints in the game.
• The notes can be viewed in the journal (B).
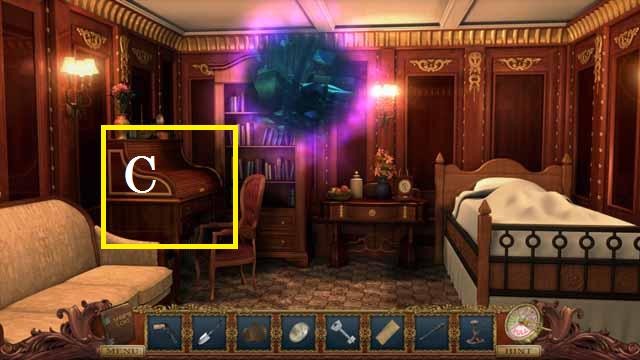
• Use the blueprint tab (C), inside the journal, for navigation help.
• During game play you will travel between two timelines, the past and present. Locations will be noted as underwater for present day and flashback for the past.
• This is the official guide for Hidden Mysteries Return to Titanic.
• You will not need to follow the exact path of this guide; however, some actions are required before you can complete another scene.
• If you get stuck in your game play you can use the Hint Button (A).
• Zoom into the sparkling areas to trigger a Hidden Object Scene. Throughout the guide, we will use the acronym 'HOS' for Hidden Object Scenes.
• All of the items in the HOS are marked in green unless otherwise noted.
• The HOS are random and the screenshots show current game play.
• The mini-games are random, the screenshot and solutions are for current gameplay.
• Make sure to pick up notes along the way for additional hints in the game.
• The notes can be viewed in the journal (B).
• Use the blueprint tab (C), inside the journal, for navigation help.
• During game play you will travel between two timelines, the past and present. Locations will be noted as underwater for present day and flashback for the past.
Chapter 1: The Beginning
 • Accept the letter from the ship steward.
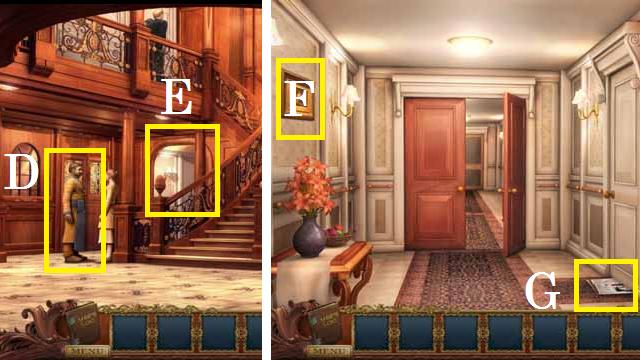
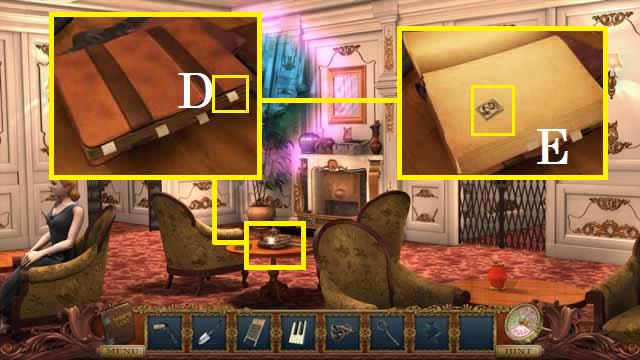
• Speak with Janeck (D).
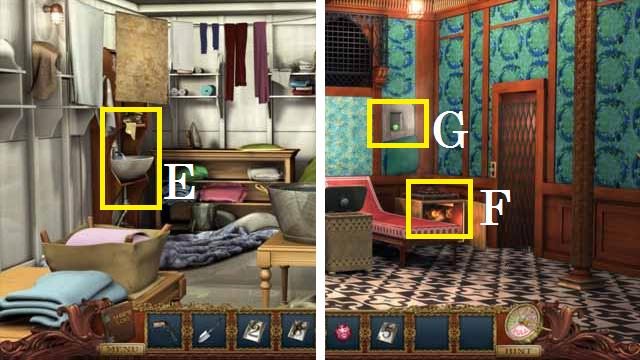
• Take the passage (E) to the First Class Passageway.
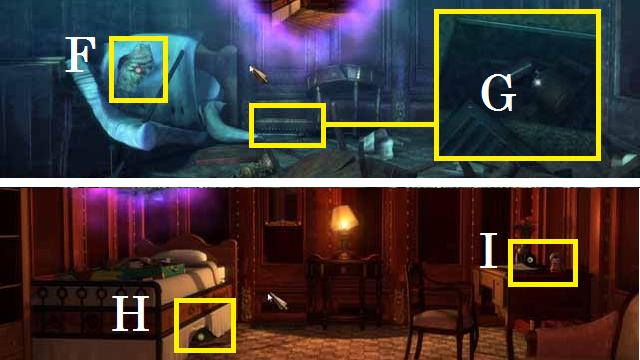
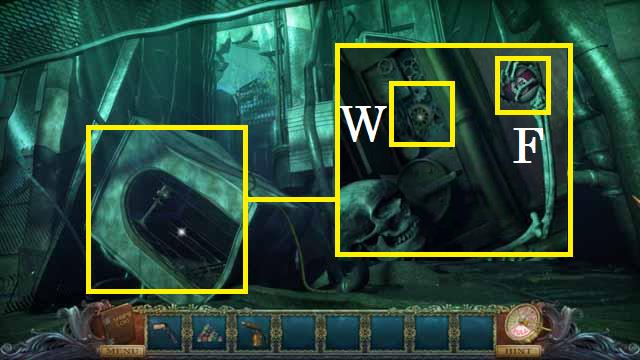
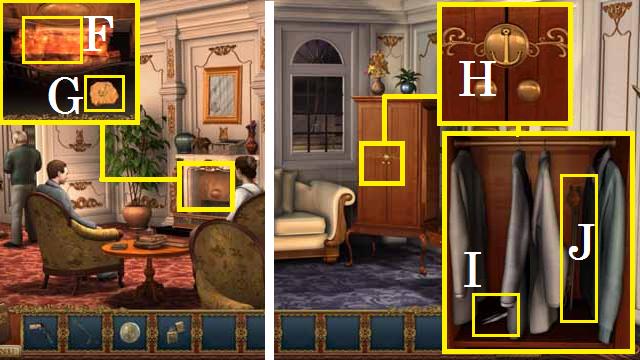
• Move the painting (F).
• Pick up the newspaper (G).
• Continue forward down the Passageway.
• Speak with Diana.
• Accept the letter from the ship steward.
• Speak with Janeck (D).
• Take the passage (E) to the First Class Passageway.
• Move the painting (F).
• Pick up the newspaper (G).
• Continue forward down the Passageway.
• Speak with Diana.
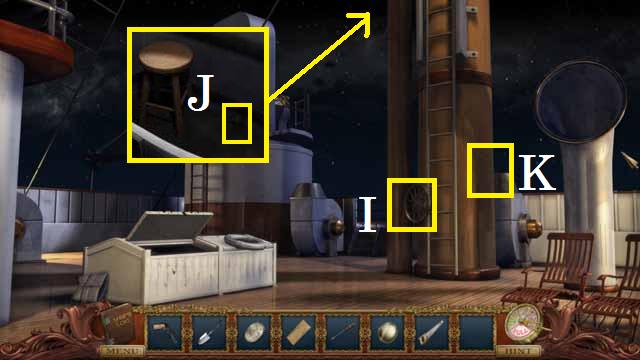
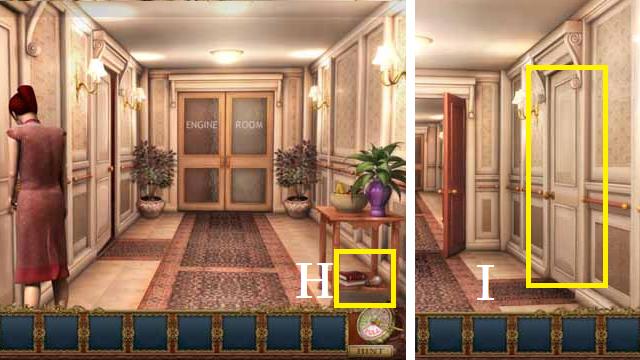 • Pick up the LIGHT BULB (H).
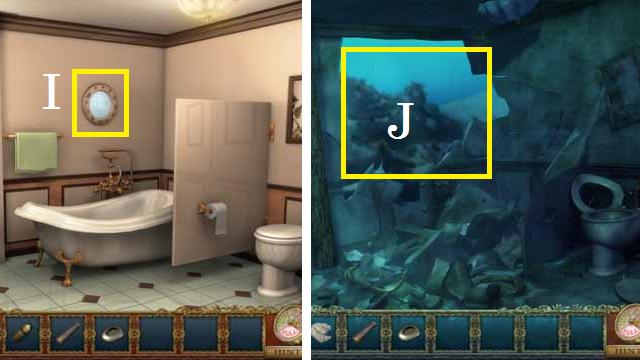
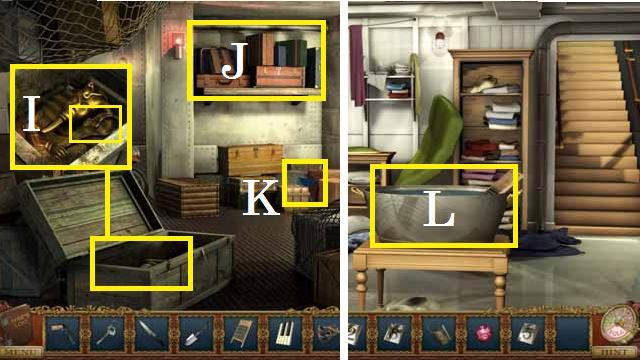
• Back up one scene and enter Your Room (I) on the right.
• Pick up the LIGHT BULB (H).
• Back up one scene and enter Your Room (I) on the right.
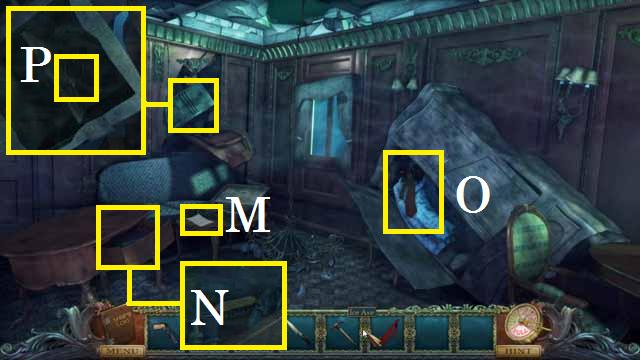
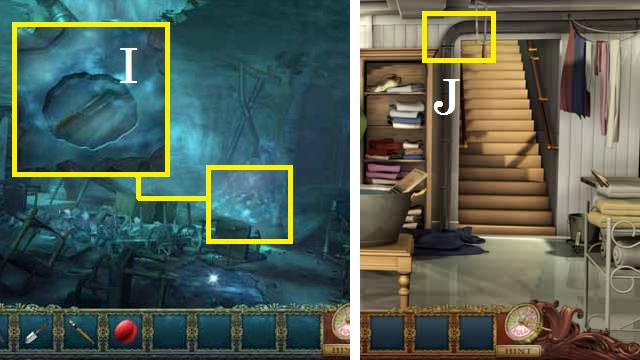
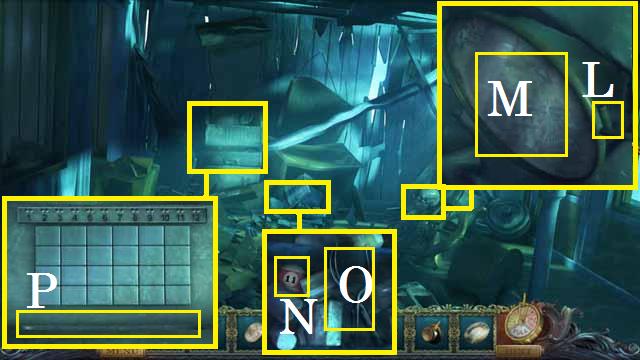
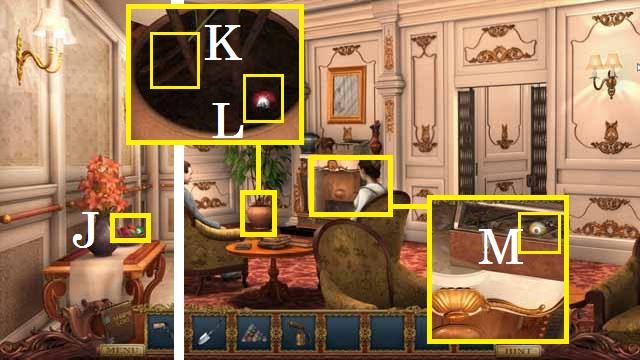
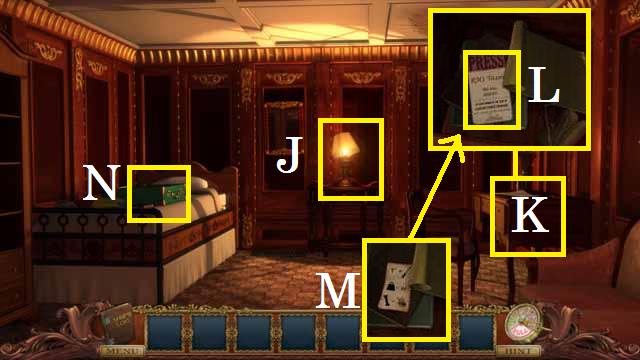 • Place the LIGHT BULB in the lamp (J).
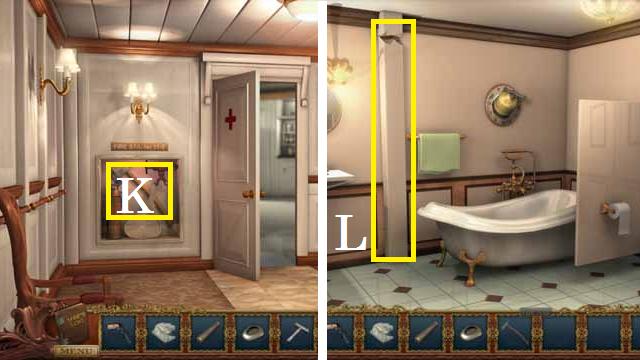
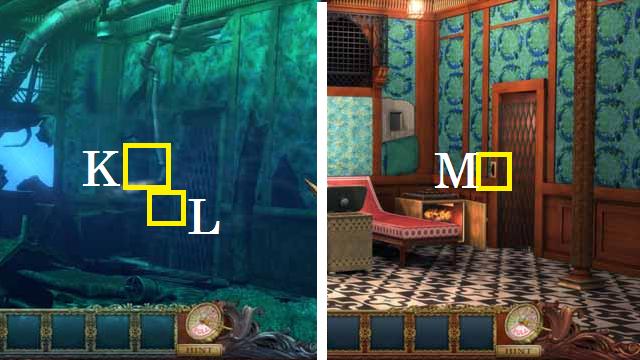
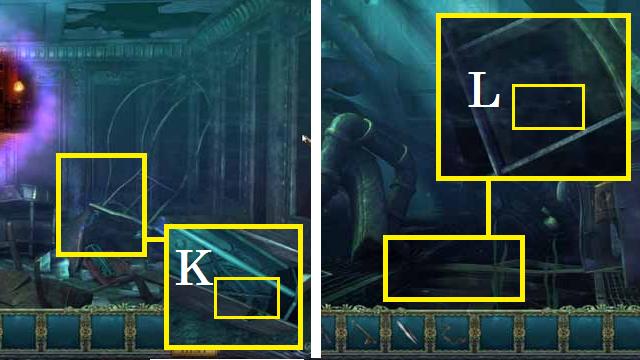
• Zoom into the desk (K) and open the drawer.
• Pick up the note press pass (L) and the note (M).
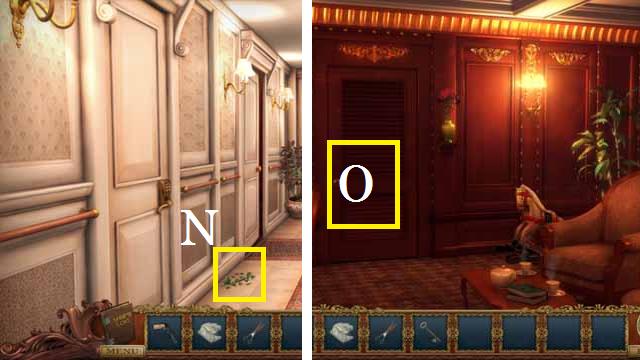
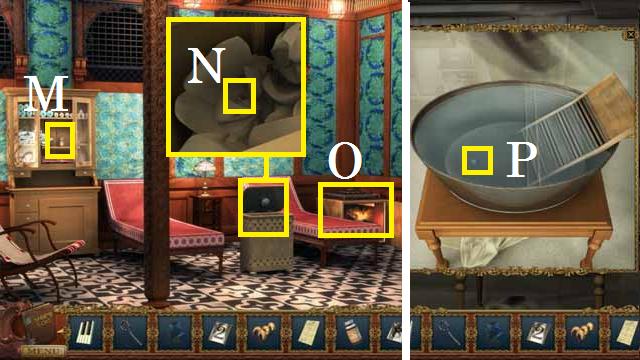
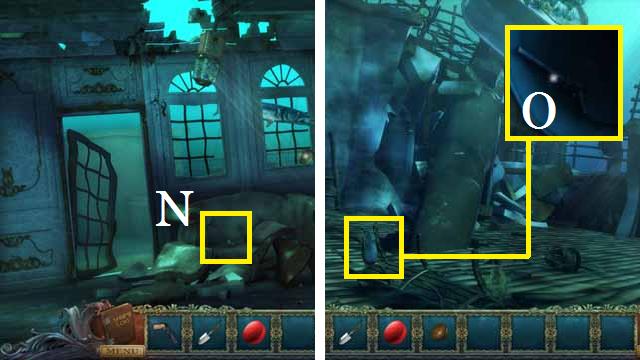
• Zoom into the suitcase (N).
• Set the locks dials to 4, 8, and 1.
• Place the LIGHT BULB in the lamp (J).
• Zoom into the desk (K) and open the drawer.
• Pick up the note press pass (L) and the note (M).
• Zoom into the suitcase (N).
• Set the locks dials to 4, 8, and 1.
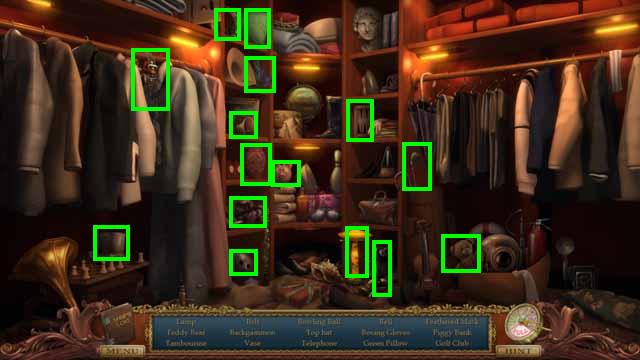
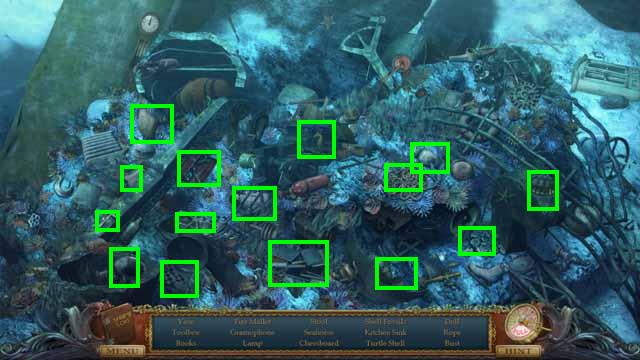
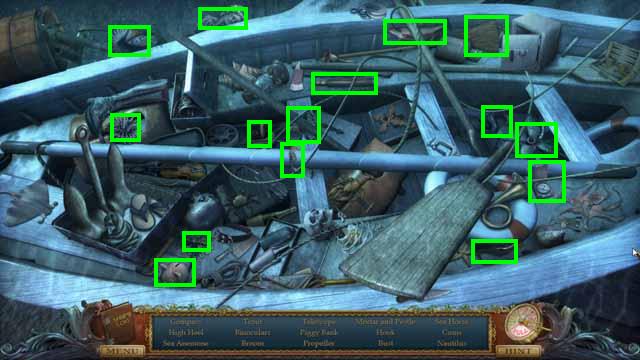
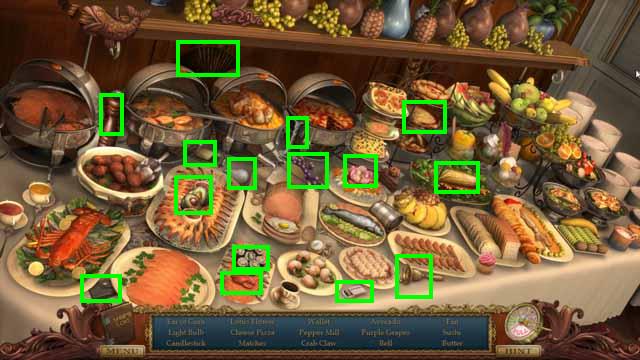
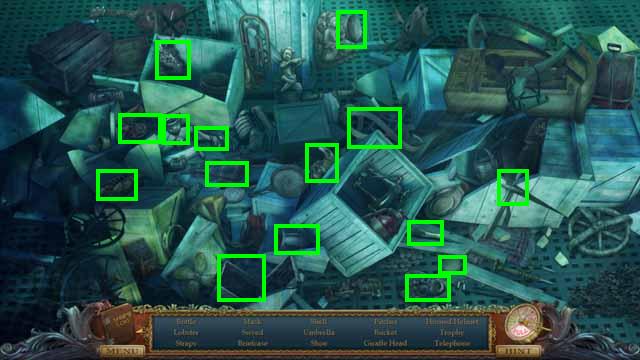
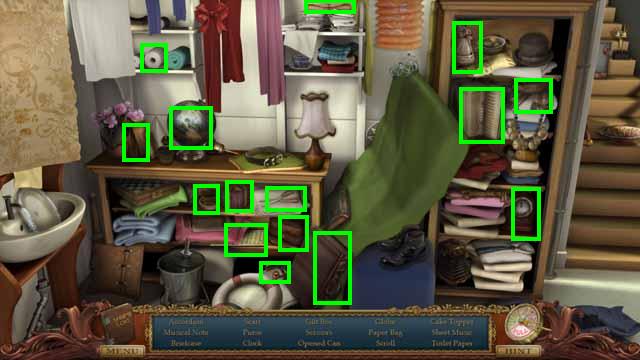
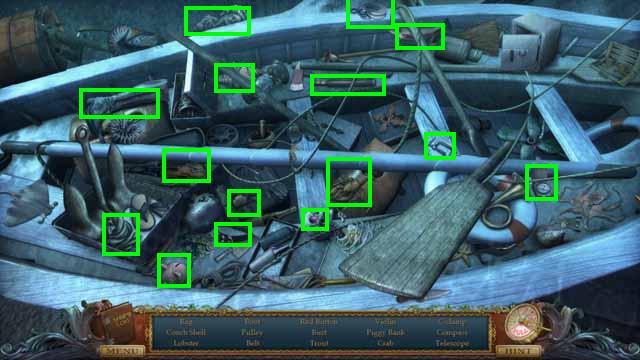
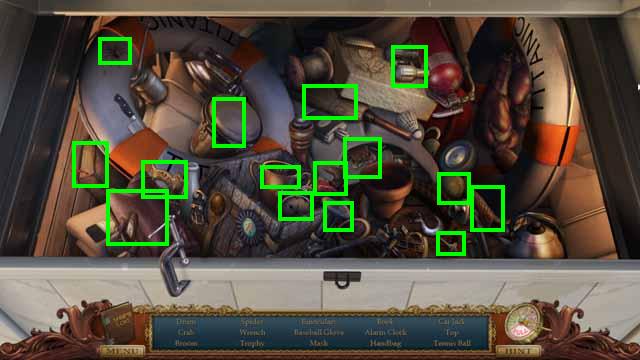
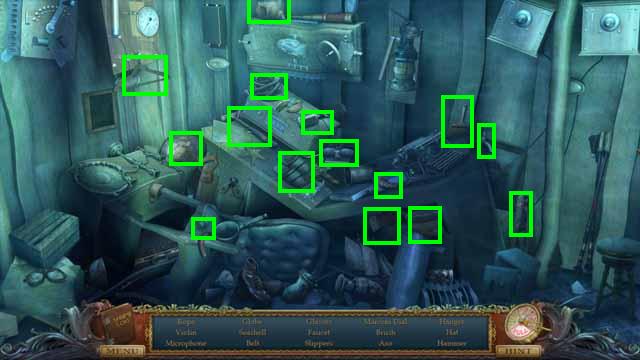
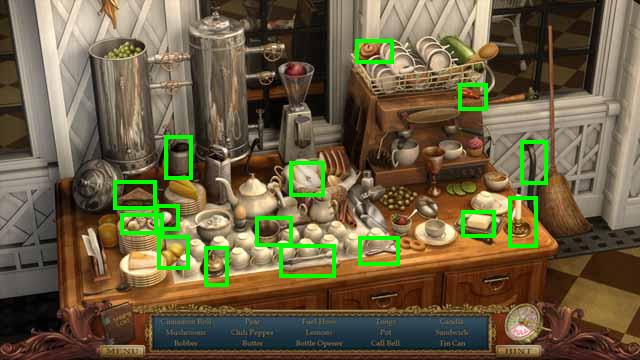
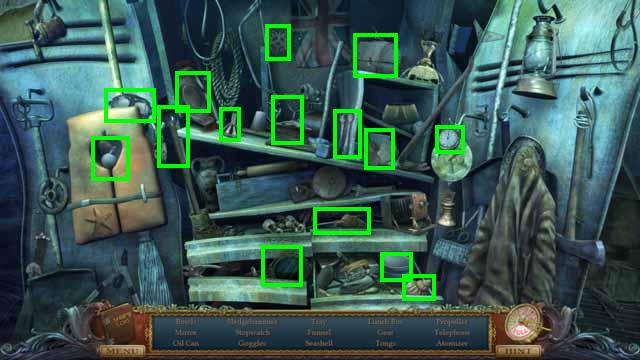
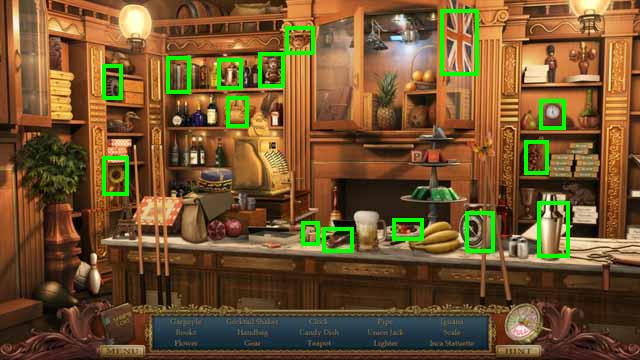
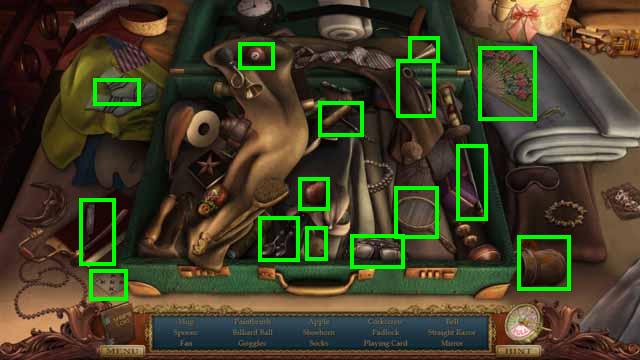 • Zoom into the sparkles to play a HOS.
• Collect all of the items, marked in green, to receive the STRAIGHT RAZOR.
• Zoom into the sparkles to play a HOS.
• Collect all of the items, marked in green, to receive the STRAIGHT RAZOR.
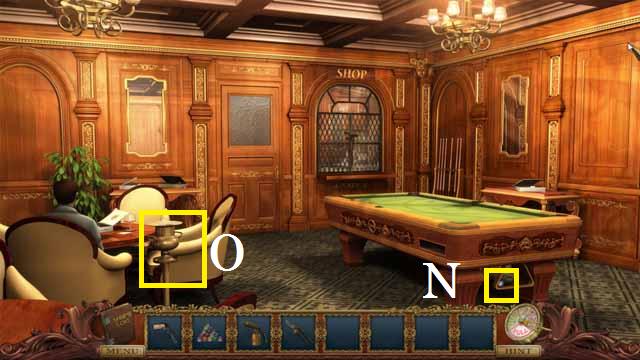
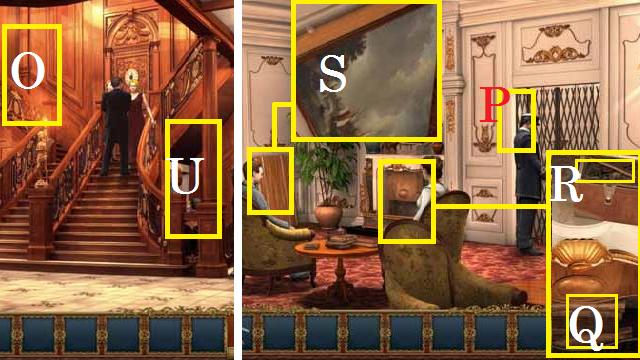 • Return to the Grand Staircase and take the stairs (O) to the Upper Lobby.
• Speak with Montague and then exit to the Forward Deck.
• Speak with the Captain and return to the Grand Staircase.
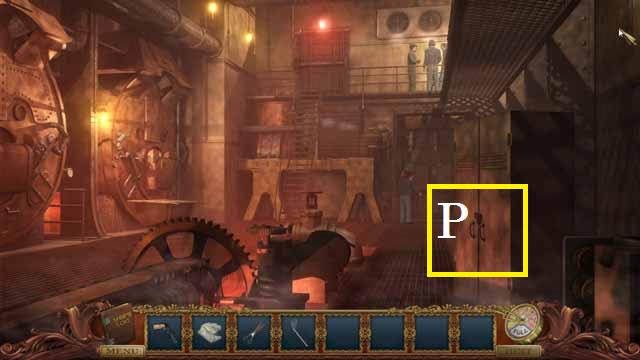
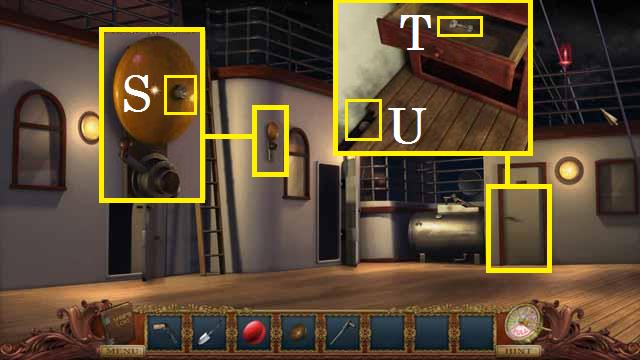
• Take the stairs down to the Lower Lobby (U).
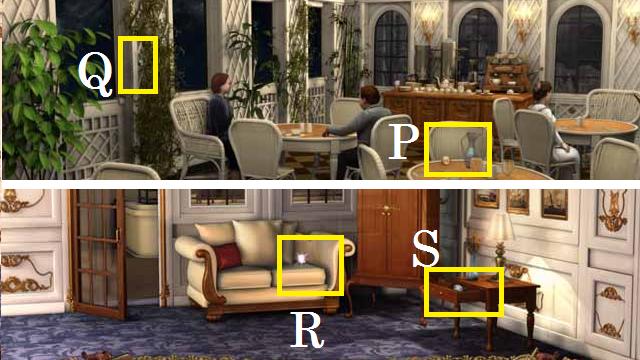
• Speak with Joseph (P).
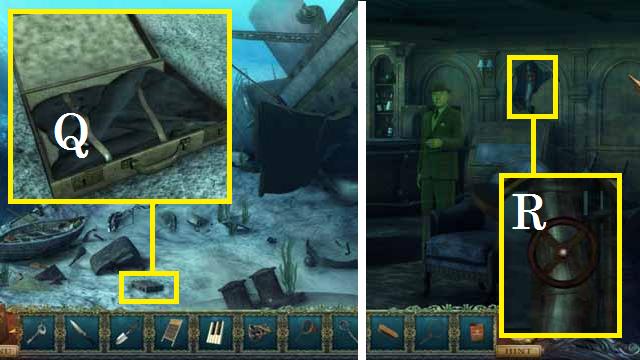
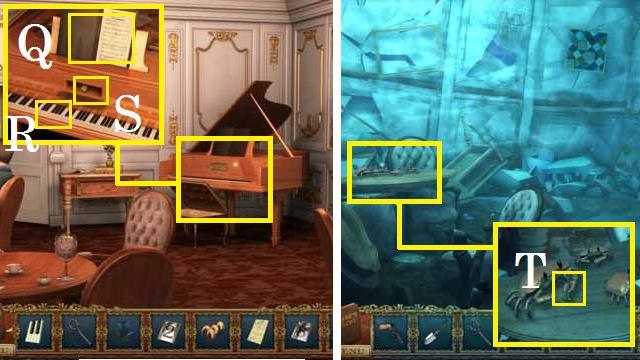
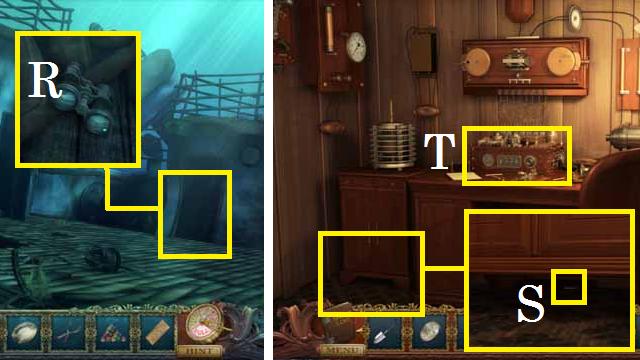
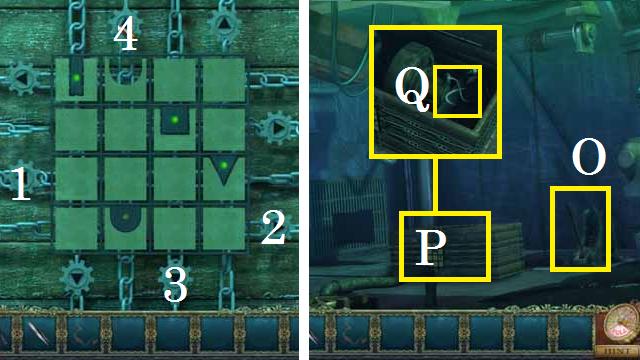
• Zoom into the fireplace; pick up the WOOD PLANKS (Q) and the CLAW HAMMER (R).
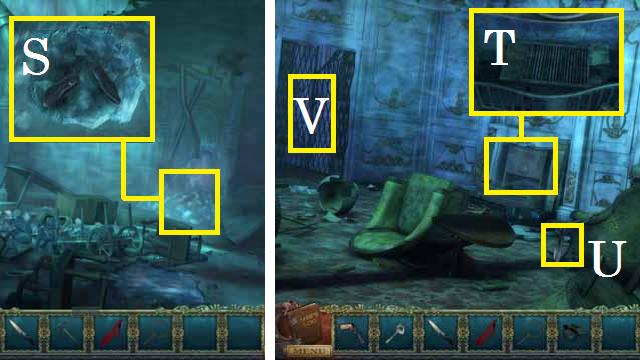
• Zoom into the paintings; slice the rope with the STRAIGHT RAZOR and collect the PAINTING (S).
• Return to the start of the First Class Passageway.
• Return to the Grand Staircase and take the stairs (O) to the Upper Lobby.
• Speak with Montague and then exit to the Forward Deck.
• Speak with the Captain and return to the Grand Staircase.
• Take the stairs down to the Lower Lobby (U).
• Speak with Joseph (P).
• Zoom into the fireplace; pick up the WOOD PLANKS (Q) and the CLAW HAMMER (R).
• Zoom into the paintings; slice the rope with the STRAIGHT RAZOR and collect the PAINTING (S).
• Return to the start of the First Class Passageway.
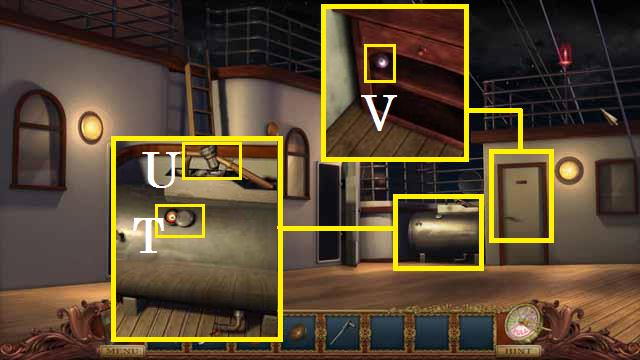
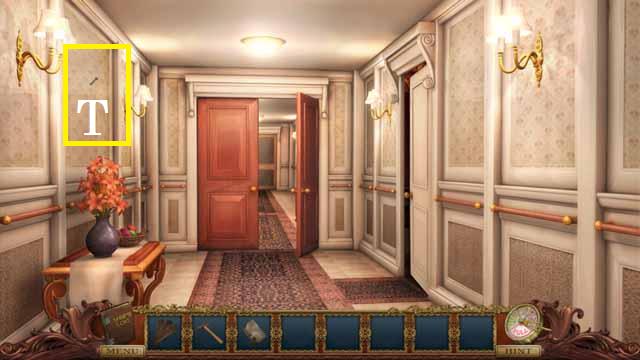 • Remove the NAILS (T) with the CLAW HAMMER.
• Return to the Grand Staircase and take the stairs to the Upper Lobby
• Remove the NAILS (T) with the CLAW HAMMER.
• Return to the Grand Staircase and take the stairs to the Upper Lobby
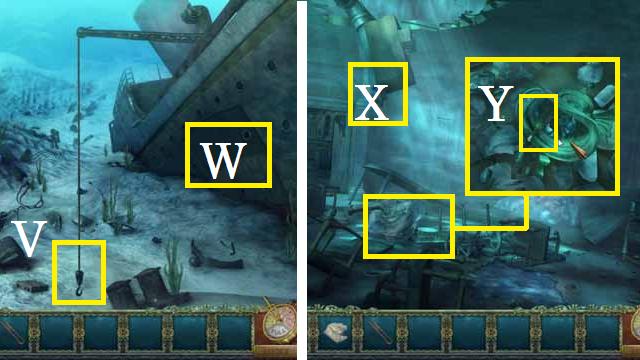
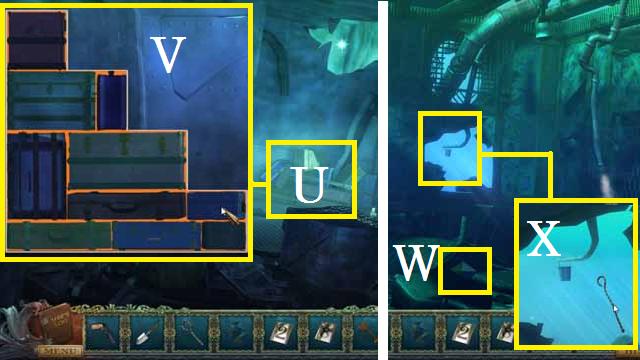
 • Pick up the note (V).
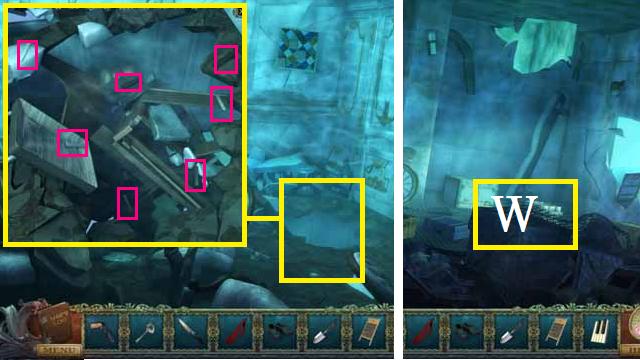
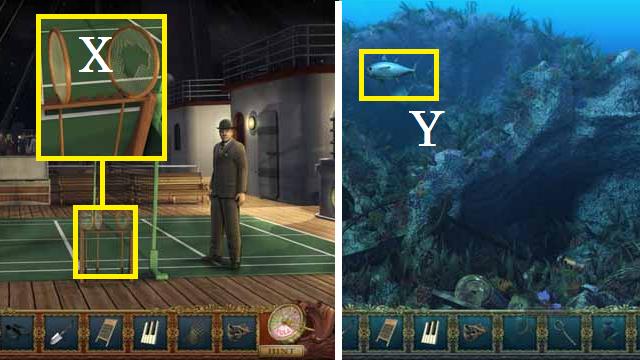
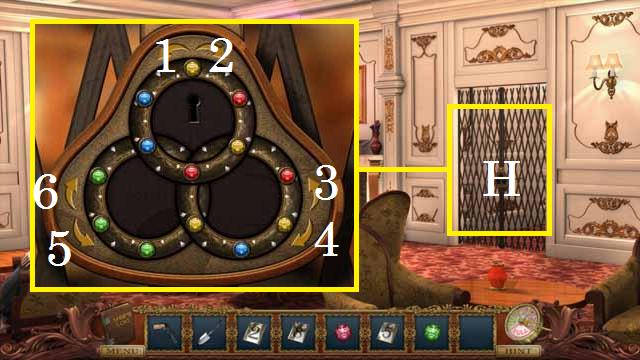
• Place the PAINTING in the empty frame (W) to trigger a mini-game.
• From the starting position shown in the screenshot you may use the following sequence to solve this puzzle: 8, 9, 6; 5, 8, 7; 4, 1, 2, 5; 8, 9, 6; 5, 8, 9; 6, 5, 4, 7, 8, and 9.
• Pick up the note (V).
• Place the PAINTING in the empty frame (W) to trigger a mini-game.
• From the starting position shown in the screenshot you may use the following sequence to solve this puzzle: 8, 9, 6; 5, 8, 7; 4, 1, 2, 5; 8, 9, 6; 5, 8, 9; 6, 5, 4, 7, 8, and 9.
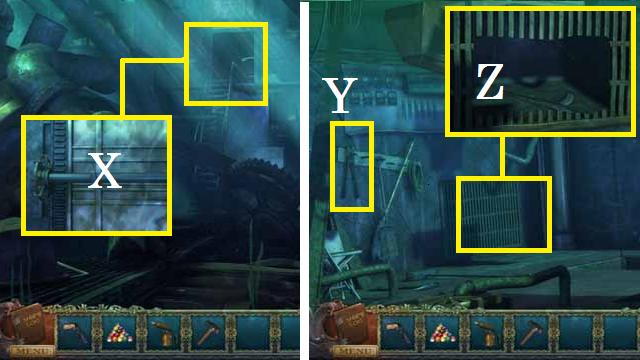
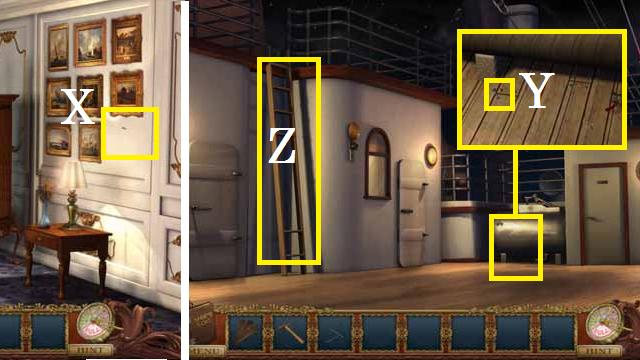 • Remove the NAIL (X) with the CLAW HAMMER.
• Continue outside to the Forward Deck.
• Zoom into the fuel tank; remove the NAIL (Y) with the CLAW HAMMER.
• Zoom into the ladder (Z); place the WOOD PLANKS and secure them with the NAILS using the CLAW HAMMER.
• Ascend the ladder and speak with Robert.
• Remove the NAIL (X) with the CLAW HAMMER.
• Continue outside to the Forward Deck.
• Zoom into the fuel tank; remove the NAIL (Y) with the CLAW HAMMER.
• Zoom into the ladder (Z); place the WOOD PLANKS and secure them with the NAILS using the CLAW HAMMER.
• Ascend the ladder and speak with Robert.
Chapter 2: Save Diana's Soul
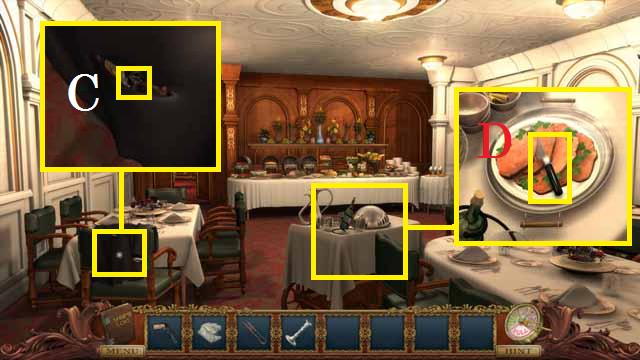
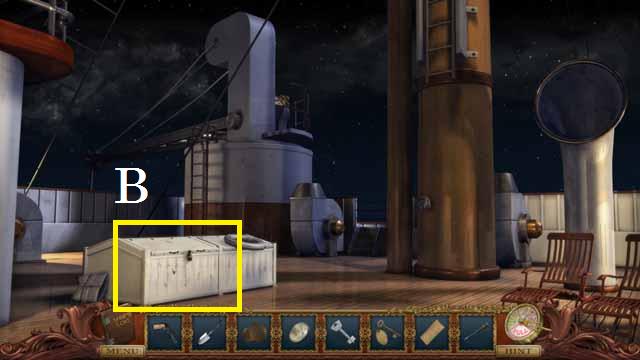
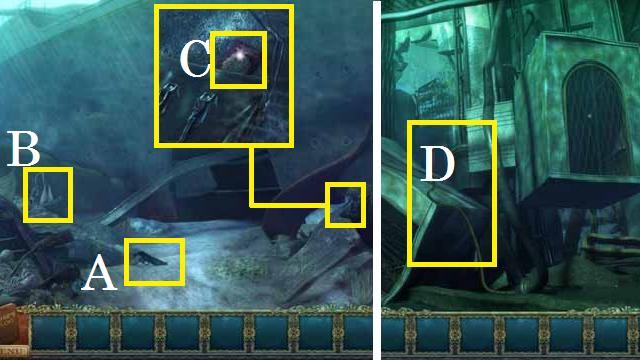 • Pick up the HANDGUN (A) and LIFEBOAT ANCHOR (B).
• Zoom into the bag; pick up the passport (C).
• Move forward into the Elevator Shaft.
• Throw the LIFEBOAT ANCHOR through the opening (D) and enter the Grand Staircase.
• Pick up the HANDGUN (A) and LIFEBOAT ANCHOR (B).
• Zoom into the bag; pick up the passport (C).
• Move forward into the Elevator Shaft.
• Throw the LIFEBOAT ANCHOR through the opening (D) and enter the Grand Staircase.
 • Speak with the Overseer.
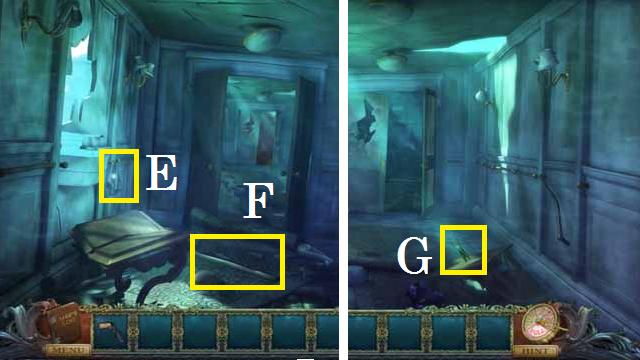
• Enter the First Class Passageway.
• Pick up the THICK RAG (E) and the LEAD PIPE (F).
• Continue down the Passageway.
• Pick up the SCISSORS (G).
• Continue forward into the Engine Room.
• Speak with the Overseer.
• Enter the First Class Passageway.
• Pick up the THICK RAG (E) and the LEAD PIPE (F).
• Continue down the Passageway.
• Pick up the SCISSORS (G).
• Continue forward into the Engine Room.
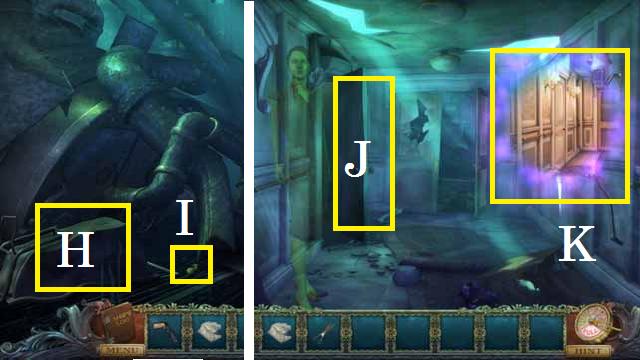 • Flip the wheel barrel (H) with the LEAD PIPE.
• Pick up the DOORKNOB (I).
• Back up one scene.
• Use the DOORKNOB to open the door (J) to the Stateroom.
• Speak with Diana's ghost.
• Travel through the portal (K). Enter the Flashback Stateroom.
• Flip the wheel barrel (H) with the LEAD PIPE.
• Pick up the DOORKNOB (I).
• Back up one scene.
• Use the DOORKNOB to open the door (J) to the Stateroom.
• Speak with Diana's ghost.
• Travel through the portal (K). Enter the Flashback Stateroom.
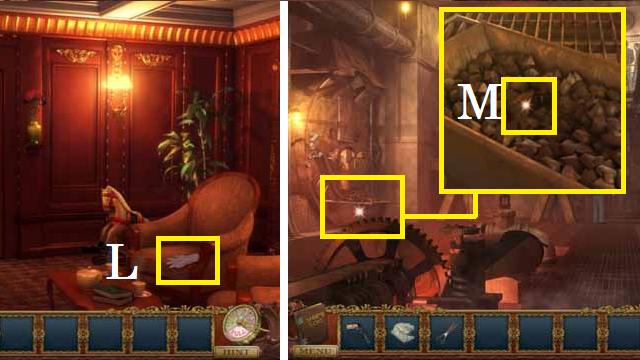 • Pick up the GLOVES (L).
• Exit back to the Passageway and enter the Flashback Engine Room.
• Zoom into the coal cart; move the hot coals with the GLOVES and pick up the BRICK (M).
• Back up one scene.
• Pick up the GLOVES (L).
• Exit back to the Passageway and enter the Flashback Engine Room.
• Zoom into the coal cart; move the hot coals with the GLOVES and pick up the BRICK (M).
• Back up one scene.
 • Smash the bottle with the BRICK; pick up the KEY (N).
• Enter the Flashback Stateroom.
• Unlock the closet (O) with the KEY.
• Smash the bottle with the BRICK; pick up the KEY (N).
• Enter the Flashback Stateroom.
• Unlock the closet (O) with the KEY.
 • Zoom into the sparkles to play a HOS.
• Receive the GOLF CLUB.
• Zoom into the sparkles to play a HOS.
• Receive the GOLF CLUB.
 • Return to the Flashback Engine Room.
• Place the GOLF CLUB in the cabinet's handles (P).
• Return to the First Class Passageway and travel through the portal. Enter the Underwater Engine Room.
• Return to the Flashback Engine Room.
• Place the GOLF CLUB in the cabinet's handles (P).
• Return to the First Class Passageway and travel through the portal. Enter the Underwater Engine Room.
 • Remove the golf club from the handles.
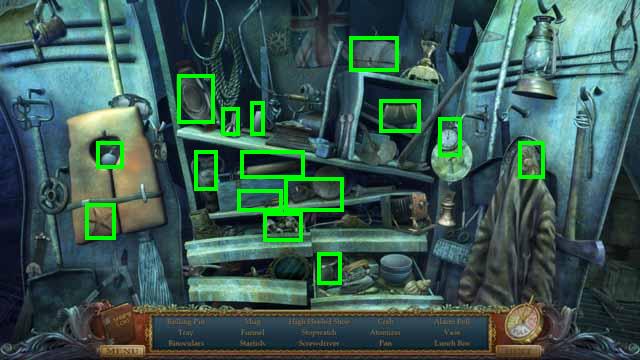
• Zoom into the sparkles to play a HOS.
• Receive the SCREWDRIVER.
• Remove the golf club from the handles.
• Zoom into the sparkles to play a HOS.
• Receive the SCREWDRIVER.
 • Return to the Flashback First Class Passageway.
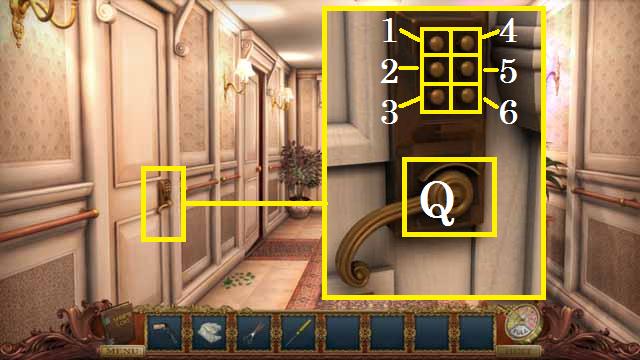
• Zoom into the door; fix the knob (Q) with the SCREWDRIVER.
• Press the buttons in the following order: 1, 2, 3, 5, 4, and 6.
• Speak with the little boy's ghost.
• Return to the Underwater First Class Passageway and speak with Diana's ghost.
• Return to the Underwater Grand Staircase and speak with the Overseer.
• Return to the Flashback First Class Passageway.
• Zoom into the door; fix the knob (Q) with the SCREWDRIVER.
• Press the buttons in the following order: 1, 2, 3, 5, 4, and 6.
• Speak with the little boy's ghost.
• Return to the Underwater First Class Passageway and speak with Diana's ghost.
• Return to the Underwater Grand Staircase and speak with the Overseer.
Chapter 3: Save Janeck's Soul.
 • Take the stairs to the Reading Room.
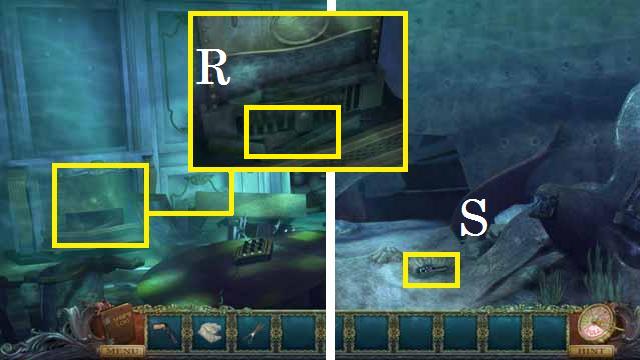
• Zoom into the fireplace; pick up the FIREPLACE SHOVEL (R).
• Exit the ship to the Stern Hull.
• Dig the sand with the FIREPLACE SHOVEL; pick up the PIPE WRENCH (S).
• Return to the Reading Room and enter the Washroom.
• Take the stairs to the Reading Room.
• Zoom into the fireplace; pick up the FIREPLACE SHOVEL (R).
• Exit the ship to the Stern Hull.
• Dig the sand with the FIREPLACE SHOVEL; pick up the PIPE WRENCH (S).
• Return to the Reading Room and enter the Washroom.
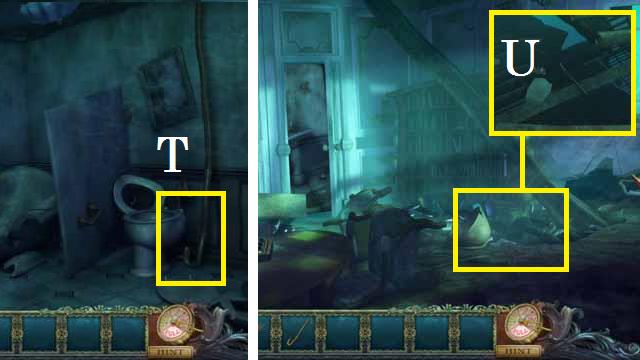 • Remove the PIPE (T) with the PIPE WRENCH.
• Move back one scene.
• Zoom into the floor; pick up the POCKET WATCH (U) with the J-SHAPED PIPE.
• Remove the PIPE (T) with the PIPE WRENCH.
• Move back one scene.
• Zoom into the floor; pick up the POCKET WATCH (U) with the J-SHAPED PIPE.
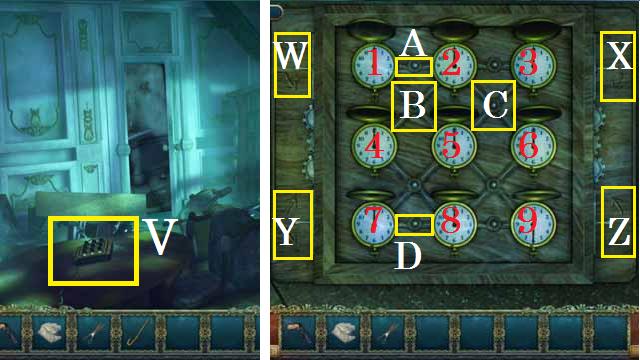 • Zoom into the table; place the POCKET WATCH on the board (V) to trigger a mini-game.
• You may use the following sequence to solve this puzzle: Illuminate connection (C). Use the (X) set of arrows to change clocks (2, 3, 5, and 6) until clock (5) shows the same time as clock (4).
• Keeping connection (C) illuminated, add connection (B). Use the (X) arrows until clock (6) is set two 12 as shown in the screenshot. Leave only the (B) connection illuminated and set clocks (4 and 5) to 12 using the (W) arrows.
• Illuminate only connections (A and D). Set clocks (2 and 8) using the (W and Y) arrows. Turn off all of the connections and set clocks (1, 3, 7, and 9) using the arrows until all clocks are set to 12.
• Speak with Janeck's ghost.
• Travel through the portal.
• You may speak with the Flashback Janeck.
• Enter the Flashback Washroom.
• Zoom into the table; place the POCKET WATCH on the board (V) to trigger a mini-game.
• You may use the following sequence to solve this puzzle: Illuminate connection (C). Use the (X) set of arrows to change clocks (2, 3, 5, and 6) until clock (5) shows the same time as clock (4).
• Keeping connection (C) illuminated, add connection (B). Use the (X) arrows until clock (6) is set two 12 as shown in the screenshot. Leave only the (B) connection illuminated and set clocks (4 and 5) to 12 using the (W) arrows.
• Illuminate only connections (A and D). Set clocks (2 and 8) using the (W and Y) arrows. Turn off all of the connections and set clocks (1, 3, 7, and 9) using the arrows until all clocks are set to 12.
• Speak with Janeck's ghost.
• Travel through the portal.
• You may speak with the Flashback Janeck.
• Enter the Flashback Washroom.
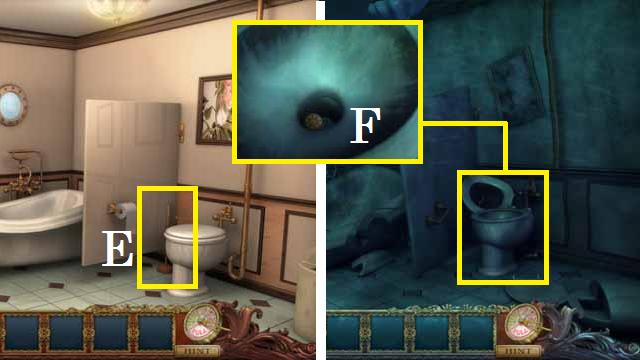 • Pick up the PLUNGER (E).
• Return to the Underwater Washroom.
• Zoom into the toilet; clear the clog with the PLUNGER and pick up the GOLD DISK (F).
• Return to the Flashback Reading Room.
• Pick up the PLUNGER (E).
• Return to the Underwater Washroom.
• Zoom into the toilet; clear the clog with the PLUNGER and pick up the GOLD DISK (F).
• Return to the Flashback Reading Room.
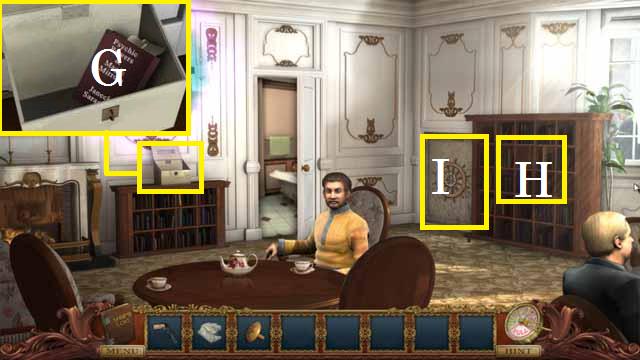 • Zoom into the box; cut the rope with the SCISSORS and pick up the BOOK (G).
• Place the BOOK on the shelf (H).
• Zoom into the revealed lock (I) and place the MEDALLION in the open slot.
• Zoom into the box; cut the rope with the SCISSORS and pick up the BOOK (G).
• Place the BOOK on the shelf (H).
• Zoom into the revealed lock (I) and place the MEDALLION in the open slot.
 • From the starting position shown in the screenshot you may use the following sequence to solve this puzzle: move the medallion in position (12) to position (X), position (3) to position (12) and (4) to (A).
• Continue with (2) to (4), (X) to (3), (1) to (2), (12) to (1), (11) to (12), (10) to (11), and (A) to (10). Finish with (6) to (W), (7) to (Z), (8) to (X), (Z) to (8), (X) to (7), and (W) to (6).
• Take the Secret Passageway.
• From the starting position shown in the screenshot you may use the following sequence to solve this puzzle: move the medallion in position (12) to position (X), position (3) to position (12) and (4) to (A).
• Continue with (2) to (4), (X) to (3), (1) to (2), (12) to (1), (11) to (12), (10) to (11), and (A) to (10). Finish with (6) to (W), (7) to (Z), (8) to (X), (Z) to (8), (X) to (7), and (W) to (6).
• Take the Secret Passageway.
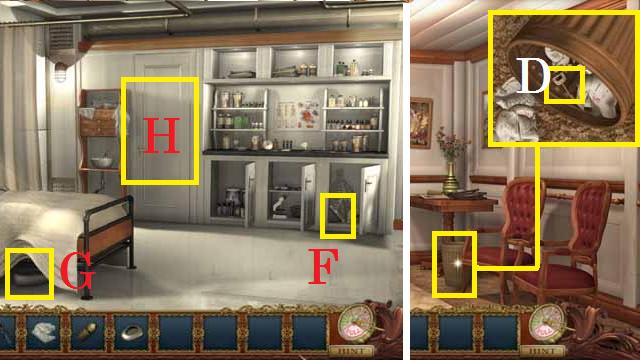 • Knock over the trashcan and zoom in; pick up the SMALL KEY (D).
• Move forward into the Flashback Infirmary.
• Open the cabinet door; pick up the FLASHLIGHT (F).
• Lift the bed sheet; pick up the BED PAN (G).
• Unlock the closet (H) with the SMALL KEY.
• Knock over the trashcan and zoom in; pick up the SMALL KEY (D).
• Move forward into the Flashback Infirmary.
• Open the cabinet door; pick up the FLASHLIGHT (F).
• Lift the bed sheet; pick up the BED PAN (G).
• Unlock the closet (H) with the SMALL KEY.
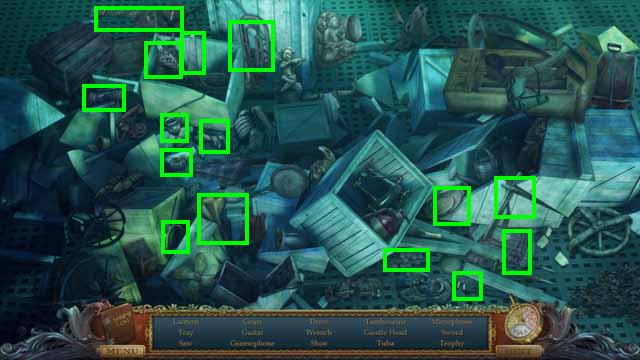
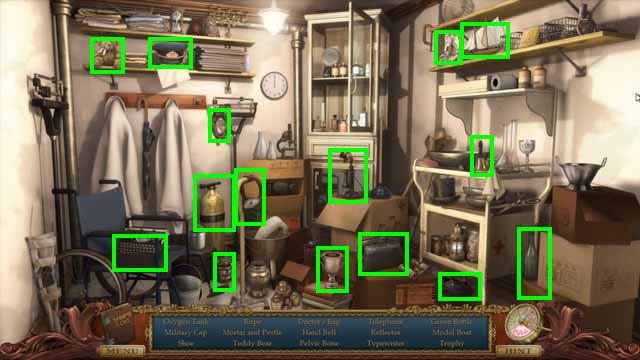 • Zoom into the sparkles to play a HOS.
• Receive the OXYGEN TANK.
• Return to the Flashback Washroom.
• Zoom into the sparkles to play a HOS.
• Receive the OXYGEN TANK.
• Return to the Flashback Washroom.
 • Place the OXYGEN TANK in the porthole (I).
• Return to the Underwater Washroom and exit the ship through the new hole (J).
• Place the OXYGEN TANK in the porthole (I).
• Return to the Underwater Washroom and exit the ship through the new hole (J).
 • Zoom into the sparkles to play a HOS.
• Receive the FIRE STATION MALLET.
• Return to the Flashback Secret Passageway.
• Zoom into the sparkles to play a HOS.
• Receive the FIRE STATION MALLET.
• Return to the Flashback Secret Passageway.
 • Break the glass with the FIRE STATION MALLET; pick up the FIRE AXE (K).
• Return to the Flashback Washroom.
• Chop the beam (L) (top and bottom) with the AXE to receive the WOOD BEAM.
• Return to the Underwater Washroom and exit through the hole.
• Break the glass with the FIRE STATION MALLET; pick up the FIRE AXE (K).
• Return to the Flashback Washroom.
• Chop the beam (L) (top and bottom) with the AXE to receive the WOOD BEAM.
• Return to the Underwater Washroom and exit through the hole.
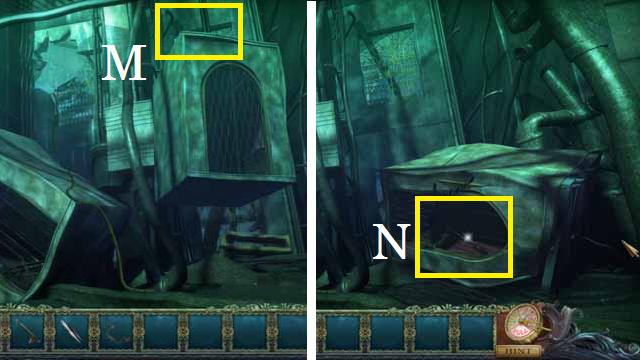
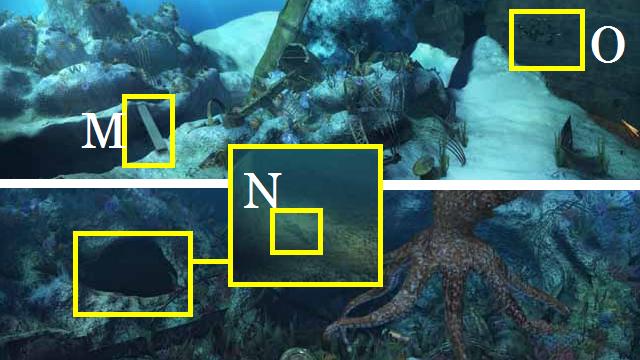 • Place the WOOD BEAM over the crevasse (M).
• Move forward to the Coral Reef.
• Zoom into the hole; place the FLASHLIGHT and pick up the PAINT SCRAPER (N).
• Back up one scene.
• Remove the MUSSELS (O) with the PAINT SCRAPER and collect them with the BED PAN.
• Cross the crevasse to the Coral Reef.
• Place the WOOD BEAM over the crevasse (M).
• Move forward to the Coral Reef.
• Zoom into the hole; place the FLASHLIGHT and pick up the PAINT SCRAPER (N).
• Back up one scene.
• Remove the MUSSELS (O) with the PAINT SCRAPER and collect them with the BED PAN.
• Cross the crevasse to the Coral Reef.
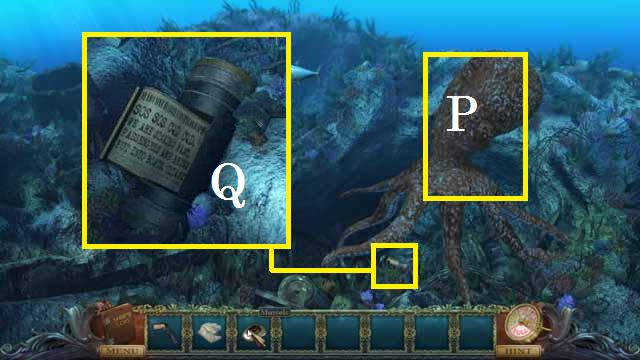 • Feed the MUSSELS to the octopus (P).
• Zoom into the canister; open it and pick up the SOS MESSAGE (Q).
• Return to the Flashback Reading Room.
• Give the SOS MESSAGE to Janeck.
• Return to the Underwater Reading Room and speak with Janeck's ghost.
• Return to the Grand Staircase and speak with the Overseer.
• Feed the MUSSELS to the octopus (P).
• Zoom into the canister; open it and pick up the SOS MESSAGE (Q).
• Return to the Flashback Reading Room.
• Give the SOS MESSAGE to Janeck.
• Return to the Underwater Reading Room and speak with Janeck's ghost.
• Return to the Grand Staircase and speak with the Overseer.
Chapter 4: Save Montague's Soul
 • Exit through the Port Hull.
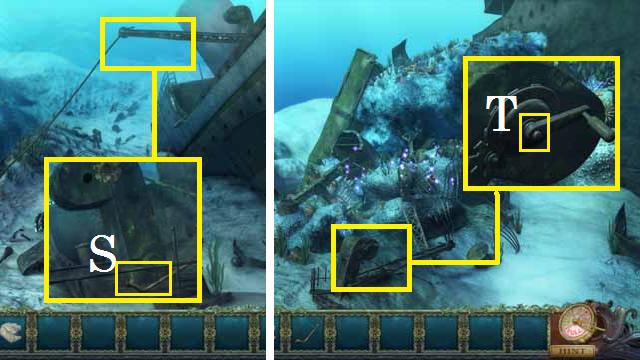
• Zoom into the crank; pick up the CROWBAR (S).
• Return to the Underwater Washroom and exit through the hole.
• Zoom into the crane; remove the bolt (T) with the CROWBAR to receive the DAVIT CRANK.
• Exit through the Port Hull.
• Zoom into the crank; pick up the CROWBAR (S).
• Return to the Underwater Washroom and exit through the hole.
• Zoom into the crane; remove the bolt (T) with the CROWBAR to receive the DAVIT CRANK.
 • Zoom into the sparkles to play a HOS.
• Receive the METAL SHEARS.
• Zoom into the sparkles to play a HOS.
• Receive the METAL SHEARS.
 • Return to the Port Hull.
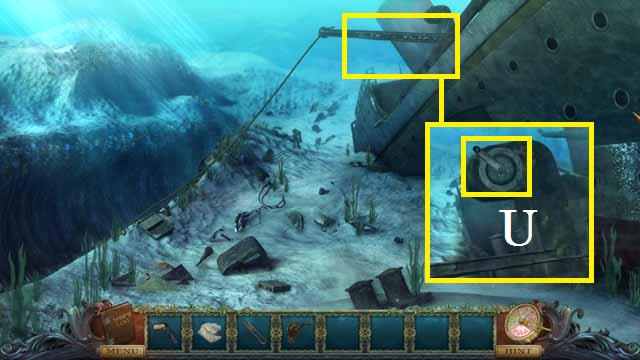
• Zoom into the crank; place the DAVIT CRANK and spin the handle (U).
• Return to the Port Hull.
• Zoom into the crank; place the DAVIT CRANK and spin the handle (U).
 • Zoom into the sparkles to play a HOS.
• Receive the DIAVIT HOOK.
• Zoom into the sparkles to play a HOS.
• Receive the DIAVIT HOOK.
 • Place the DIAVIT HOOK on the chain (V) and attach it to the ship (W).
• Zoom back into the crank and spin the handle.
• Enter the Dining Room.
• Pull the pipe (X).
• Zoom into the rubble; pick up the CHAMPAGNE (Y).
• Enter the Bar.
• Place the DIAVIT HOOK on the chain (V) and attach it to the ship (W).
• Zoom back into the crank and spin the handle.
• Enter the Dining Room.
• Pull the pipe (X).
• Zoom into the rubble; pick up the CHAMPAGNE (Y).
• Enter the Bar.
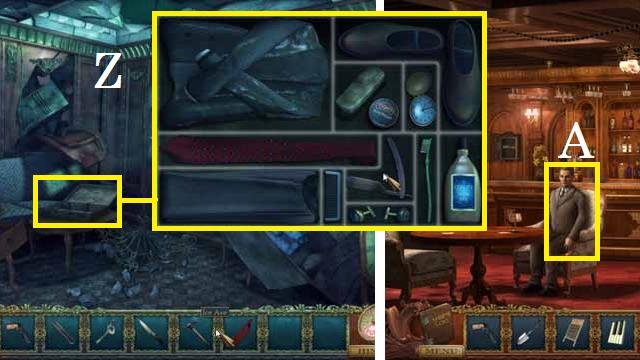
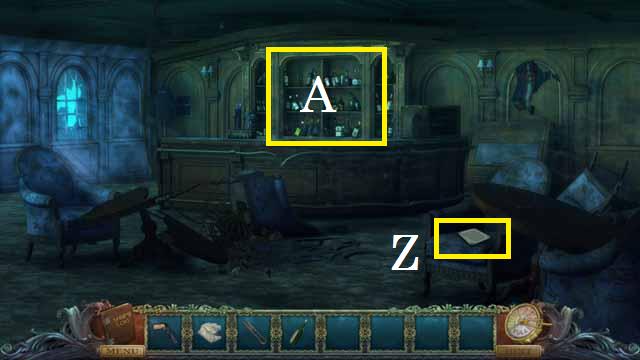 • Pick up the MENU (Z).
• Place the CHAMPAGNE on the shelf (A) to trigger a mini-game.
• Pick up the MENU (Z).
• Place the CHAMPAGNE on the shelf (A) to trigger a mini-game.
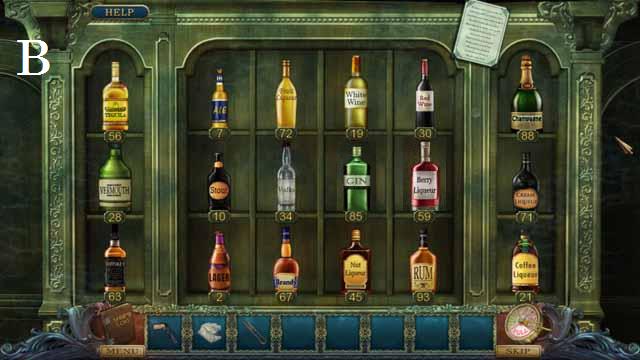 • Arrange the bottles as shown in the screenshot (B).
• Speak with Montague's ghost.
• Travel through the portal. Enter the Flashback Dining Room.
• Arrange the bottles as shown in the screenshot (B).
• Speak with Montague's ghost.
• Travel through the portal. Enter the Flashback Dining Room.
 • Zoom into the sparkles to play a HOS.
• Receive the CANDLESTICK.
• Zoom into the sparkles to play a HOS.
• Receive the CANDLESTICK.
 • Zoom into the coat; pick up the LUGGAGE KEY (C).
• Zoom into the table; remove the lid with the THICK RAG and pick up the CARVING KNIFE (D).
• Enter the Flashback Galley.
• Zoom into the coat; pick up the LUGGAGE KEY (C).
• Zoom into the table; remove the lid with the THICK RAG and pick up the CARVING KNIFE (D).
• Enter the Flashback Galley.
 • Open the cabinet; pick up the BAKING SODA (E).
• Exit to the Flashback Boat Deck.
• Speak with Montague.
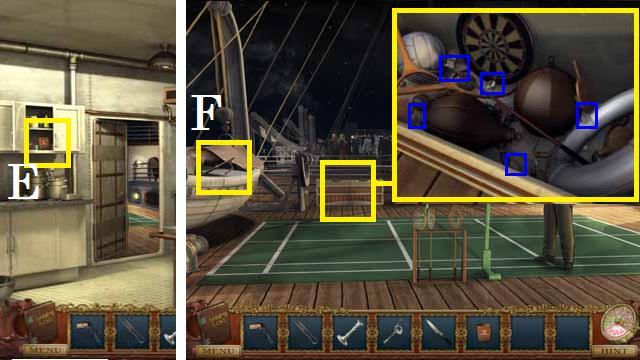
• Remove the lifeboat cover; pick up the BOAT HOOK (F).
• Zoom into the chest; pick up the five DARTS (blue).
• Return to the Flashback Bar.
• Open the cabinet; pick up the BAKING SODA (E).
• Exit to the Flashback Boat Deck.
• Speak with Montague.
• Remove the lifeboat cover; pick up the BOAT HOOK (F).
• Zoom into the chest; pick up the five DARTS (blue).
• Return to the Flashback Bar.
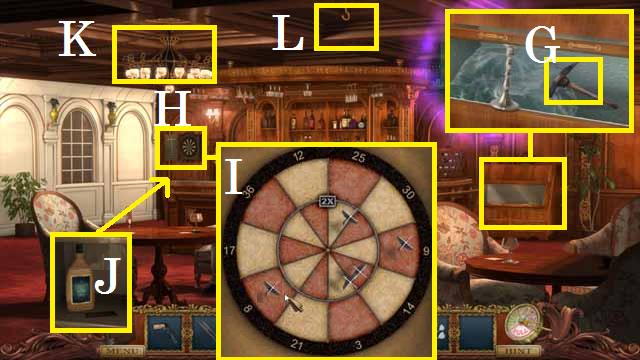 • Zoom into the ice chest; prop the door open with the CANDLESTICK and pick up the ICE AXE (G).
• Place the DARTS on the dartboard (H) to trigger a mini-game.
• Place the DARTS as shown in the screenshot (I).
• Zoom into the compartment behind the dart board; pick up the COMB AND HAIR GEL (J).
• Move the chandelier from position (K) to (L) using the BOAT HOOK.
• Travel through the portal. Enter the Underwater Montague's Stateroom through the now open hole in the ground.
• Zoom into the ice chest; prop the door open with the CANDLESTICK and pick up the ICE AXE (G).
• Place the DARTS on the dartboard (H) to trigger a mini-game.
• Place the DARTS as shown in the screenshot (I).
• Zoom into the compartment behind the dart board; pick up the COMB AND HAIR GEL (J).
• Move the chandelier from position (K) to (L) using the BOAT HOOK.
• Travel through the portal. Enter the Underwater Montague's Stateroom through the now open hole in the ground.
 • Pick up the note (M).
• Open the table drawer and zoom in; pick up the SCRUB BRUSH (N).
• Open the wardrobe door; pick up the TIE (O).
• Zoom into the locker; cut the door open with the METAL SHEARS and pick up the GATE KEY (P).
• Return to the Underwater Port Hull.
• Pick up the note (M).
• Open the table drawer and zoom in; pick up the SCRUB BRUSH (N).
• Open the wardrobe door; pick up the TIE (O).
• Zoom into the locker; cut the door open with the METAL SHEARS and pick up the GATE KEY (P).
• Return to the Underwater Port Hull.
 • Zoom into the luggage; open the lock with the LUGGAGE KEY and pick up the SUIT (Q).
• Return to the Underwater Bar.
• Zoom into the valve; pour the BAKING SODA on the valve (R) and scrub with the BRUSH.
• Spin the cleaned valve.
• Enter the Underwater Dining Room.
• Zoom into the luggage; open the lock with the LUGGAGE KEY and pick up the SUIT (Q).
• Return to the Underwater Bar.
• Zoom into the valve; pour the BAKING SODA on the valve (R) and scrub with the BRUSH.
• Spin the cleaned valve.
• Enter the Underwater Dining Room.
 • Zoom into the ice; swing the ICE AXE on the ice four times and pick up the SHOES (S).
• Return to the Underwater Lower Lobby from the Grand Staircase.
• Zoom into the fireplace; move the wood and pick up the WASHBOARD (T).
• Pick up the TROWEL (U).
• Zoom into the gate (V) and unlock it with the GATE KEY.
• Speak with the ghost to open a new portal.
• Enter the Underwater Music Room.
• Zoom into the ice; swing the ICE AXE on the ice four times and pick up the SHOES (S).
• Return to the Underwater Lower Lobby from the Grand Staircase.
• Zoom into the fireplace; move the wood and pick up the WASHBOARD (T).
• Pick up the TROWEL (U).
• Zoom into the gate (V) and unlock it with the GATE KEY.
• Speak with the ghost to open a new portal.
• Enter the Underwater Music Room.
 • Zoom into the hole; pick up the seven PIANO KEYS (pink).
• Take a right into the Underwater Luggage Room.
• Cut the NETTING (W) with the CARVING KNIFE.
• Zoom into the hole; pick up the seven PIANO KEYS (pink).
• Take a right into the Underwater Luggage Room.
• Cut the NETTING (W) with the CARVING KNIFE.
 • Zoom into the Sparkles to play a HOS.
• Receive the TIE DOWN STRAPS.
• Return to the Flashback Boat Deck through the portal in the Underwater Bar.
• Zoom into the Sparkles to play a HOS.
• Receive the TIE DOWN STRAPS.
• Return to the Flashback Boat Deck through the portal in the Underwater Bar.
 • Zoom into the racquets; place the NETTING on the broken racquet (X) to receive the RACQUET NET.
• Return to the Underwater Washroom and exit through the hole.
• Move forward to the Coral Reef.
• Catch the TUNA (Y) with the RACQUET NET.
• Return to the Underwater Montague's Stateroom.
• Zoom into the racquets; place the NETTING on the broken racquet (X) to receive the RACQUET NET.
• Return to the Underwater Washroom and exit through the hole.
• Move forward to the Coral Reef.
• Catch the TUNA (Y) with the RACQUET NET.
• Return to the Underwater Montague's Stateroom.
 • Zoom into the luggage; place the COMB AND HAIR GEL, TIE, SHOES, and the SUIT in the suitcase to trigger a mini-game.
• Arrange the luggage as shown in the screenshot (Z) to receive ROBERT'S SUITCASE.
• Return to the Flashback Bar.
• Give the man (A) ROBERT'S SUITCASE.
• Return to the Flashback Galley.
• Zoom into the luggage; place the COMB AND HAIR GEL, TIE, SHOES, and the SUIT in the suitcase to trigger a mini-game.
• Arrange the luggage as shown in the screenshot (Z) to receive ROBERT'S SUITCASE.
• Return to the Flashback Bar.
• Give the man (A) ROBERT'S SUITCASE.
• Return to the Flashback Galley.
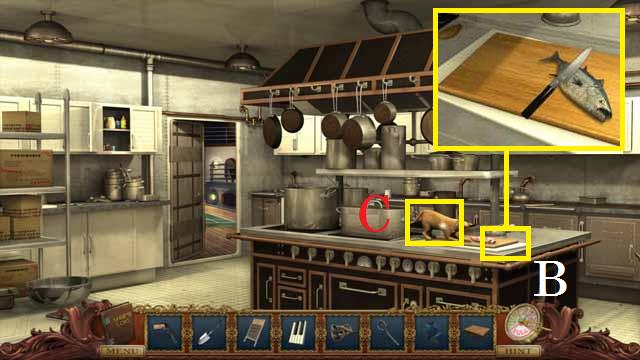 • Zoom into the cutting board (B); place the TUNA on the board and chop with the CARVING KNIFE.
• Pick up BUXLEY (C).
• Exit out onto the Flashback Deck.
• Give BUXLEY to Montague.
• Return to the Underwater Bar and speak with Montague's Ghost.
• Zoom into the cutting board (B); place the TUNA on the board and chop with the CARVING KNIFE.
• Pick up BUXLEY (C).
• Exit out onto the Flashback Deck.
• Give BUXLEY to Montague.
• Return to the Underwater Bar and speak with Montague's Ghost.
Chapter 5: Save Joseph's Soul
 • Return to the Flashback Lower Lobby.
• Zoom into the table; open the book using the top tab (D).
• Pick up the NUMBER 2 (E).
• Enter the Flashback Music Room.
• Return to the Flashback Lower Lobby.
• Zoom into the table; open the book using the top tab (D).
• Pick up the NUMBER 2 (E).
• Enter the Flashback Music Room.
 • Zoom into the piano; open the bench lid and pick up the MOSAIC TILES (F).
• Pick up the SHRIMP (G).
• Zoom into the desk; open the drawer and pick up the MATCHES (H).
• Enter the Flashback Cargo Hold.
• Zoom into the piano; open the bench lid and pick up the MOSAIC TILES (F).
• Pick up the SHRIMP (G).
• Zoom into the desk; open the drawer and pick up the MATCHES (H).
• Enter the Flashback Cargo Hold.
 • Open up the chest; zoom in and pick up the EGYPTIAN STAPH (I).
• Place the TIE DOWN STRAPS on the LUGGAGE (J).
• Pick up the MOSAIC TILES (K).
• Exit back one scene and enter the Flashback Linen Room.
• Zoom into the laundry bucket (L) and place the WASHBOARD inside.
• Open up the chest; zoom in and pick up the EGYPTIAN STAPH (I).
• Place the TIE DOWN STRAPS on the LUGGAGE (J).
• Pick up the MOSAIC TILES (K).
• Exit back one scene and enter the Flashback Linen Room.
• Zoom into the laundry bucket (L) and place the WASHBOARD inside.
 • Zoom into the sparkles to play a HOS.
• Receive the SHEET MUSIC.
• Take the stairs to the Turkish Baths.
• Zoom into the sparkles to play a HOS.
• Receive the SHEET MUSIC.
• Take the stairs to the Turkish Baths.
 • Open the cabinet; pick up the BATH SALTS (M).
• Open the hamper and zoom in; remove the towels and pick up the NUMBER 8 (N).
• Light the fire (O) with the MATCHES.
• Exit back to the Linen Room.
• Zoom into the laundry bucket; pour in the BATH SALTS and pick up the BLUE GEM (P).
• Exit back to the Flashback Music Room.
• Open the cabinet; pick up the BATH SALTS (M).
• Open the hamper and zoom in; remove the towels and pick up the NUMBER 8 (N).
• Light the fire (O) with the MATCHES.
• Exit back to the Linen Room.
• Zoom into the laundry bucket; pour in the BATH SALTS and pick up the BLUE GEM (P).
• Exit back to the Flashback Music Room.
 • Zoom into the piano; place the MUSIC SHEET (Q) and the PIANO KEYS (R). Play the piano keys.
• Pick up the YELLOW GEM (S).
• Return to the underwater Music Room.
• Zoom into the table; feed the SHRIMP to the crab and receive the HEART SHAPED KEY (T).
• Enter the Underwater Cargo Hold.
• Zoom into the piano; place the MUSIC SHEET (Q) and the PIANO KEYS (R). Play the piano keys.
• Pick up the YELLOW GEM (S).
• Return to the underwater Music Room.
• Zoom into the table; feed the SHRIMP to the crab and receive the HEART SHAPED KEY (T).
• Enter the Underwater Cargo Hold.
 • Zoom into the luggage (U) to trigger a mini-game.
• Arrange the luggage as shown in the screenshot (V).
• Climb the luggage to enter the Underwater Turkish Baths.
• Pick up the MOSAIC PIECE (W).
• Zoom into the window; use the EGYPTIAN STAPH to grab the EMPTY BUCKET (X).
• Return to the Underwater Music Room.
• Zoom into the luggage (U) to trigger a mini-game.
• Arrange the luggage as shown in the screenshot (V).
• Climb the luggage to enter the Underwater Turkish Baths.
• Pick up the MOSAIC PIECE (W).
• Zoom into the window; use the EGYPTIAN STAPH to grab the EMPTY BUCKET (X).
• Return to the Underwater Music Room.
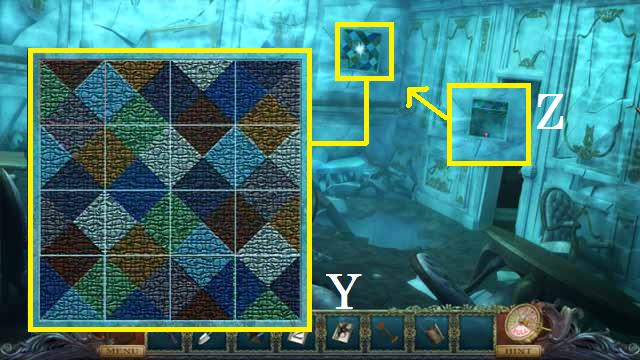 • Place the MOSAIC TILES on the board to trigger a mini-game; arrange the tiles as shown in the screenshot (Y).
• Pick up the RED GEM (Z).
• Return to the Flashback Music Room.
• Place the MOSAIC TILES on the board to trigger a mini-game; arrange the tiles as shown in the screenshot (Y).
• Pick up the RED GEM (Z).
• Return to the Flashback Music Room.
 • Zoom into the desk; open the box with the HEART SHAPED KEY and pick up the NUMBER 5 (B).
• Enter the Flashback Luggage Room.
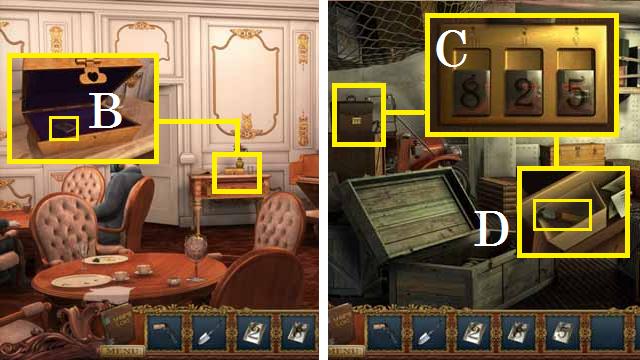
• Zoom into the briefcase; place the NUMBER 5, NUMBER 2, and NUMBER 8 as shown in the screenshot (C).
• Raise the NUMBER 5 and the NUMBER 8 to open the briefcase; pick up the GLASS CUTTER (D).
• Enter the Linen Room.
• Zoom into the desk; open the box with the HEART SHAPED KEY and pick up the NUMBER 5 (B).
• Enter the Flashback Luggage Room.
• Zoom into the briefcase; place the NUMBER 5, NUMBER 2, and NUMBER 8 as shown in the screenshot (C).
• Raise the NUMBER 5 and the NUMBER 8 to open the briefcase; pick up the GLASS CUTTER (D).
• Enter the Linen Room.
 • Turn on the sink (E) and place the EMPTY BUCKET under the faucet to receive the BUCKETOF WATER.
• Take the stairs to the Flashback Turkish Baths.
• Pour the BUCKETOF WATER over the coals (F).
• Pick up the GREEN GEM (G).
• Return to the Flashback Lower Lobby.
• Turn on the sink (E) and place the EMPTY BUCKET under the faucet to receive the BUCKETOF WATER.
• Take the stairs to the Flashback Turkish Baths.
• Pour the BUCKETOF WATER over the coals (F).
• Pick up the GREEN GEM (G).
• Return to the Flashback Lower Lobby.
 • Zoom into the gate; place the RED GEM, BLUE GEM, YELLOW GEM, and GREEN GEM in the lock (H) to trigger a mini-game.
• From the beginning positions shown in the screenshot you may use the following sequence: 1, 6, 4, 5, 2, 2, 3, 2, 2, 2, 4, and 4.
• Return to the Underwater Port Hull.
• Zoom into the gate; place the RED GEM, BLUE GEM, YELLOW GEM, and GREEN GEM in the lock (H) to trigger a mini-game.
• From the beginning positions shown in the screenshot you may use the following sequence: 1, 6, 4, 5, 2, 2, 3, 2, 2, 2, 4, and 4.
• Return to the Underwater Port Hull.
 • Zoom into the sparkles to play a HOS.
• Receive the PUSH BUTTON.
• Move to the Underwater Dining Room.
• Zoom into the sparkles to play a HOS.
• Receive the PUSH BUTTON.
• Move to the Underwater Dining Room.
 • Zoom into the floor; cut the ice with the GLASS CUTTER and pick up the HACKSAW (I).
• Return to the Flashback Linen Room.
• Remove the CURVED PIPE (J) with the HACKSAW.
• Return to the Underwater Turkish Baths.
• Zoom into the floor; cut the ice with the GLASS CUTTER and pick up the HACKSAW (I).
• Return to the Flashback Linen Room.
• Remove the CURVED PIPE (J) with the HACKSAW.
• Return to the Underwater Turkish Baths.
 • Place the CURVED PIPE (K) and pick up the GATE RELEASE LEVER (L).
• Return to the Flashback Turkish Baths.
• Place the GATE RELEASE LEVER (M) and pull it to open the gate.
• Return to the Underwater Lower Lobby and speak with Joseph's ghost.
• Return to the Underwater Grand Staircase and speak with the Overseer.
• Place the CURVED PIPE (K) and pick up the GATE RELEASE LEVER (L).
• Return to the Flashback Turkish Baths.
• Place the GATE RELEASE LEVER (M) and pull it to open the gate.
• Return to the Underwater Lower Lobby and speak with Joseph's ghost.
• Return to the Underwater Grand Staircase and speak with the Overseer.
Chapter 6: Save the Captain's Soul
 • Take the stairs to the Upper Lobby.
• Move the pillow; pick up the DRAWER KNOB (N).
• Move to the FORWARD Deck.
• Zoom into the bag; open it and pick up the SOCKET WRENCH (O).
• Enter the Captain's Quarters.
• Take the stairs to the Upper Lobby.
• Move the pillow; pick up the DRAWER KNOB (N).
• Move to the FORWARD Deck.
• Zoom into the bag; open it and pick up the SOCKET WRENCH (O).
• Enter the Captain's Quarters.
 • Zoom into the dresser; remove the board and pick up the LETTER OPENER (P).
• Return to the Upper Lobby.
• Cut the canvas with the LETTER OPENER to reveal and pick up the CREW PHOTO (Q).
• Return to the Captain's Quarters.
• Place the CREW PHOTO in the empty frame (R).
• Speak with the Captain's ghost to spawn the portal.
• Travel through the Portal. Exit the Flashback Captain's Quarters to the Flashback Forward Deck.
• Zoom into the dresser; remove the board and pick up the LETTER OPENER (P).
• Return to the Upper Lobby.
• Cut the canvas with the LETTER OPENER to reveal and pick up the CREW PHOTO (Q).
• Return to the Captain's Quarters.
• Place the CREW PHOTO in the empty frame (R).
• Speak with the Captain's ghost to spawn the portal.
• Travel through the Portal. Exit the Flashback Captain's Quarters to the Flashback Forward Deck.
 • Zoom into the bell; remove the bolt (S) with the SOCKET WRENCH and pick up the ALARM CLOCK BELLS.
• Zoom into the doorway; open the drawer, pick up the note then the DESK KEY (T).
• Remove the floorboard; pick up the QUARTER (U).
• Enter the Flashback Wheelhouse.
• Zoom into the bell; remove the bolt (S) with the SOCKET WRENCH and pick up the ALARM CLOCK BELLS.
• Zoom into the doorway; open the drawer, pick up the note then the DESK KEY (T).
• Remove the floorboard; pick up the QUARTER (U).
• Enter the Flashback Wheelhouse.
 • Pick up the STORAGE KEY (V).
• Zoom into the time clock; place and push the PUSH BUTTON (W) and receive the UNPUNCHED TIME CARD.
• Open the cupboard; pick up the CROWBAR (Y).
• Enter the Flashback Marconi Room.
• Zoom into the drawer; place the DRAWER KNOB and pick up the MINI SCREWDRIVER (A).
• Pick up the STORAGE KEY (V).
• Zoom into the time clock; place and push the PUSH BUTTON (W) and receive the UNPUNCHED TIME CARD.
• Open the cupboard; pick up the CROWBAR (Y).
• Enter the Flashback Marconi Room.
• Zoom into the drawer; place the DRAWER KNOB and pick up the MINI SCREWDRIVER (A).
 • Back up one scene to the Flashback Wheelhouse then use the door to the Bow.
• Zoom into the storage (B) and unlock it with the STORAGE KEY.
• Back up one scene to the Flashback Wheelhouse then use the door to the Bow.
• Zoom into the storage (B) and unlock it with the STORAGE KEY.
 • Zoom into the sparkles to play a HOS.
• Receive the CAR JACK.
• Zoom into the sparkles to play a HOS.
• Receive the CAR JACK.
 • Return to the Flashback Captain's Quarters.
• Unlock the desk (C) with the DESK KEY.
• Return to the Flashback Captain's Quarters.
• Unlock the desk (C) with the DESK KEY.
 • Zoom into the sparkles to play a HOS.
• Receive the MAGNIFYING LENS.
• Return to the Underwater Cargo Hold.
• Zoom into the sparkles to play a HOS.
• Receive the MAGNIFYING LENS.
• Return to the Underwater Cargo Hold.
 • Zoom into the sparkles to play a HOS.
• Receive the WOOD SAW.
• Zoom into the sparkles to play a HOS.
• Receive the WOOD SAW.
 • Lift the car with the CAR JACK; pick up the CAR TIRE RIM (E).
• Enter the Underwater Turkish Baths.
• Pry open the clamshell with the CROWBAR; pick up the PEARL (F).
• Return to the Underwater Upper Lobby.
• Lift the car with the CAR JACK; pick up the CAR TIRE RIM (E).
• Enter the Underwater Turkish Baths.
• Pry open the clamshell with the CROWBAR; pick up the PEARL (F).
• Return to the Underwater Upper Lobby.
 • Place the PEARL over the barracuda (D).
• Pick up the ALARM CLOCK BELLS (G).
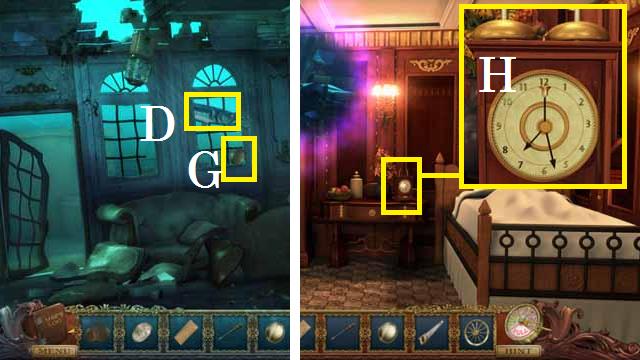
• Return to the Flashback Captain's Quarters.
• Zoom into the Clock; place the two ALARM CLOCK BELLS in it (H).
• Move to the Flashback Bow.
• Place the PEARL over the barracuda (D).
• Pick up the ALARM CLOCK BELLS (G).
• Return to the Flashback Captain's Quarters.
• Zoom into the Clock; place the two ALARM CLOCK BELLS in it (H).
• Move to the Flashback Bow.
 • Place the CAR TIRE RIM (I) and spin it to lower the ladder.
• Zoom into the top of the Crow's Nest; pick up the MARCONI TUBE (J).
• Use the WOOD SAW on the mast (K).
• Return to the Underwater Forward Deck and enter the Underwater Wheelhouse.
• Place the CAR TIRE RIM (I) and spin it to lower the ladder.
• Zoom into the top of the Crow's Nest; pick up the MARCONI TUBE (J).
• Use the WOOD SAW on the mast (K).
• Return to the Underwater Forward Deck and enter the Underwater Wheelhouse.
 • Zoom into the sparkles to play a HOS.
• Receive the MARCONI DIAL.
• Zoom into the sparkles to play a HOS.
• Receive the MARCONI DIAL.
 • Zoom into the skeleton; remove the screw (L) with the MINI SCREWDRIVER and pick up the MAGNIFYING LENS (M).
• Zoom into the first aid kit; pick up the first POOL BALL (N) and FORCEPS (O).
• Zoom into the time clock and place the UNPUNCHED TIME CARD in the slot (P) to trigger a mini-game.
• Zoom into the skeleton; remove the screw (L) with the MINI SCREWDRIVER and pick up the MAGNIFYING LENS (M).
• Zoom into the first aid kit; pick up the first POOL BALL (N) and FORCEPS (O).
• Zoom into the time clock and place the UNPUNCHED TIME CARD in the slot (P) to trigger a mini-game.
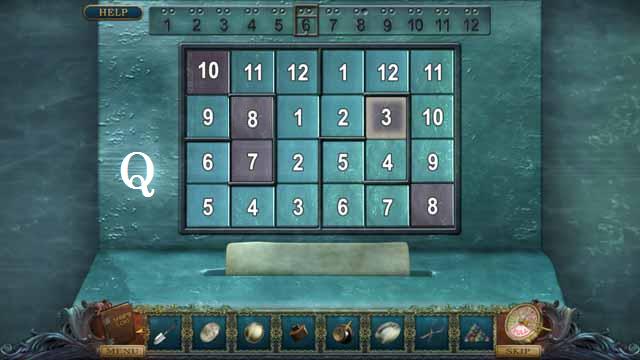 • See the screenshot (Q) for a winning solution to receive the PUNCHED TIME CARD.
• Exit to the Underwater Bridge.
• See the screenshot (Q) for a winning solution to receive the PUNCHED TIME CARD.
• Exit to the Underwater Bridge.
 • Zoom into the doorway; place the two MAGNIFYING LENSES and pick up the BINOCULARS (R).
• Return to the Flashback Marconi Room.
• Zoom into the area underneath the cabinet; pick up the QUARTER (S) with the FORCEPS.
• Place the MARCONI DIAL, and MARCONI TUBE on the Marconi device (T) to trigger a mini-game.
• Zoom into the doorway; place the two MAGNIFYING LENSES and pick up the BINOCULARS (R).
• Return to the Flashback Marconi Room.
• Zoom into the area underneath the cabinet; pick up the QUARTER (S) with the FORCEPS.
• Place the MARCONI DIAL, and MARCONI TUBE on the Marconi device (T) to trigger a mini-game.
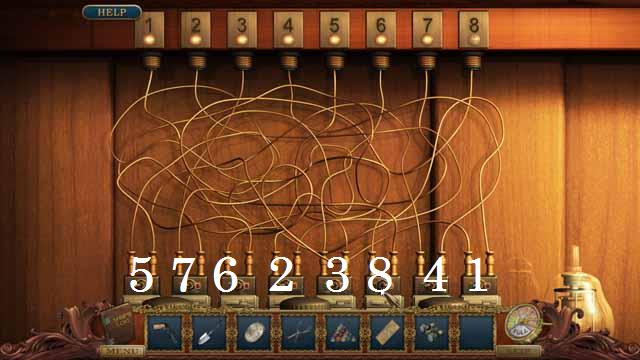 • Flip the switches in order, from 1-8, to complete this puzzle.
• Receive the MARCONI MESSAGE.
• Exit back one scene.
• Flip the switches in order, from 1-8, to complete this puzzle.
• Receive the MARCONI MESSAGE.
• Exit back one scene.
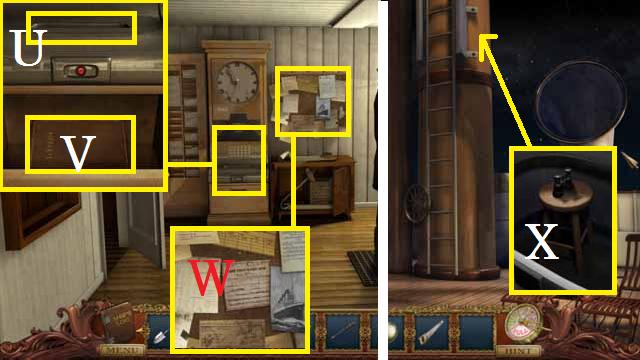 • Zoom back into the time clock and place the PUNCHED TIME CARD in the slot (U).
• Pick up the schedule (V).
• Zoom into the corkboard (W); hang the MARCONI MESSAGE.
• Move to the Flashback Bow.
• Zoom into the Crow's Nest; place the BINOCULARS on the stool (X).
• Return to the Underwater Upper Lobby.
• Zoom back into the time clock and place the PUNCHED TIME CARD in the slot (U).
• Pick up the schedule (V).
• Zoom into the corkboard (W); hang the MARCONI MESSAGE.
• Move to the Flashback Bow.
• Zoom into the Crow's Nest; place the BINOCULARS on the stool (X).
• Return to the Underwater Upper Lobby.
 • Zoom into the candy dispenser; place both QUARTERS in the slots (Y) and spin the handle (Z).
• Pick up the TOY SEAGULL (A).
• Return to the Underwater Captain's Quarters.
• Zoom into the clock; place the TOY SEAGULL on the ledge (B) and push it in.
• Pick up the CLOCK GEAR (C).
• Return to the Flashback Captain's Quarters.
• Zoom into the candy dispenser; place both QUARTERS in the slots (Y) and spin the handle (Z).
• Pick up the TOY SEAGULL (A).
• Return to the Underwater Captain's Quarters.
• Zoom into the clock; place the TOY SEAGULL on the ledge (B) and push it in.
• Pick up the CLOCK GEAR (C).
• Return to the Flashback Captain's Quarters.
 • Zoom into the clock; place the CLOCK GEAR inside and close the door. Set the bell hand to 11 as shown in the screenshot (E).
• Return to the Underwater Captain's Quarters and speak with his ghost.
• Zoom into the clock; place the CLOCK GEAR inside and close the door. Set the bell hand to 11 as shown in the screenshot (E).
• Return to the Underwater Captain's Quarters and speak with his ghost.
Chapter 7: Save Your Soul
 • Return to the Underwater Grand Staircase and speak with the overseer.
• Take the First Class Passageway and enter Your Room.
• Rip the mattress; pick up the second POOL BALL (F).
• Zoom into the floor vent; pick up the EMPTY BLOW TORCH (G).
• Travel through the portal.
• Lift the bed sheet; pick up the third POOL BALL (H).
• Move the snow globe; pick up the fourth POOL BALL (I).
• Exit the room to the Flashback First Class Passageway.
• Return to the Underwater Grand Staircase and speak with the overseer.
• Take the First Class Passageway and enter Your Room.
• Rip the mattress; pick up the second POOL BALL (F).
• Zoom into the floor vent; pick up the EMPTY BLOW TORCH (G).
• Travel through the portal.
• Lift the bed sheet; pick up the third POOL BALL (H).
• Move the snow globe; pick up the fourth POOL BALL (I).
• Exit the room to the Flashback First Class Passageway.
 • Pick up the fifth POOL BALL (J).
• Move to the Flashback Lower Lobby.
• Zoom into the plant; pick up the PRUNING SHEARS (K).
• Dig the soil with the TROWEL; pick up the sixth POOL BALL (L).
• Zoom into the fireplace; pick up the seventh POOL BALL (M).
• Enter the Flashback Smoking Lounge.
• Pick up the fifth POOL BALL (J).
• Move to the Flashback Lower Lobby.
• Zoom into the plant; pick up the PRUNING SHEARS (K).
• Dig the soil with the TROWEL; pick up the sixth POOL BALL (L).
• Zoom into the fireplace; pick up the seventh POOL BALL (M).
• Enter the Flashback Smoking Lounge.
 • Pick up the eighth POOL BALL (N) and the WINE BUCKET (O).
• Return to the Flashback Grand Staircase and enter Café Parisian.
• Pick up the eighth POOL BALL (N) and the WINE BUCKET (O).
• Return to the Flashback Grand Staircase and enter Café Parisian.
 • Zoom into the sparkles to play a HOS.
• Receive the FUEL HOSE.
• Zoom into the sparkles to play a HOS.
• Receive the FUEL HOSE.
 • Move the vase; pick up the ninth POOL BALL (P).
• Cut the vines with the SHEARS; pick up the tenth POOL BALL (Q).
• Return to the Flashback Upper Lobby.
• Move the pillow and pick up the eleventh POOL BALL (R).
• Open the drawer; pick up the twelfth POOL BALL (S).
• Exit the Upper Lobby to the Flashback Forward Deck.
• Move the vase; pick up the ninth POOL BALL (P).
• Cut the vines with the SHEARS; pick up the tenth POOL BALL (Q).
• Return to the Flashback Upper Lobby.
• Move the pillow and pick up the eleventh POOL BALL (R).
• Open the drawer; pick up the twelfth POOL BALL (S).
• Exit the Upper Lobby to the Flashback Forward Deck.
 • Zoom into the full tank; open the lid and pick up the thirteenth POOL BALL (T).
• Place the HOSE (U) and drop the EMPTY BLOW TORCH over the tank to receive the BLOWTORCH.
• Zoom into the doorway; close the drawer to pick up the fourteenth POOL BALL (V).
• Return to the Underwater Elevator Shaft.
• Zoom into the full tank; open the lid and pick up the thirteenth POOL BALL (T).
• Place the HOSE (U) and drop the EMPTY BLOW TORCH over the tank to receive the BLOWTORCH.
• Zoom into the doorway; close the drawer to pick up the fourteenth POOL BALL (V).
• Return to the Underwater Elevator Shaft.
 • Hold the elevator door open with the WINE BUCKET and zoom in; pick up the fifteenth POOL BALL (F).
• Open the panel; pick up the GEAR (W).
• Return to the Underwater Engine Room.
• Hold the elevator door open with the WINE BUCKET and zoom in; pick up the fifteenth POOL BALL (F).
• Open the panel; pick up the GEAR (W).
• Return to the Underwater Engine Room.
 • Zoom into the sparkles to play a HOS.
• Receive the SLEDGEHAMMER.
• Zoom into the sparkles to play a HOS.
• Receive the SLEDGEHAMMER.
 • Zoom into the door; place the GEAR (X).
• Enter the Maintenance Room.
• Pick up the BOLT CUTTERS (Y).
• Zoom into the grate; open it with the BLOWTORCH and pick up the HARPOON GUN (Z).
• Return to Your Room and travel through the portal.
• Zoom into the door; place the GEAR (X).
• Enter the Maintenance Room.
• Pick up the BOLT CUTTERS (Y).
• Zoom into the grate; open it with the BLOWTORCH and pick up the HARPOON GUN (Z).
• Return to Your Room and travel through the portal.
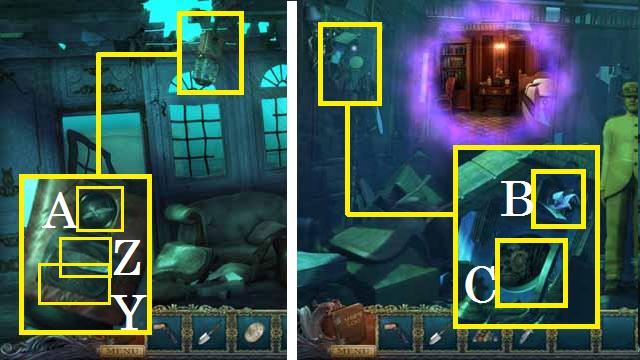
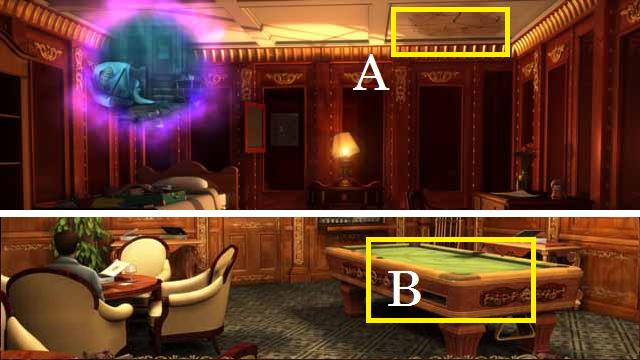 • Use the SLEDGEHAMMER on the ceiling (A).
• Move to the Flashback Smoking Lounge.
• Place the 15 POOL BALLS on the pool table (B) to trigger a mini-game.
• Use the SLEDGEHAMMER on the ceiling (A).
• Move to the Flashback Smoking Lounge.
• Place the 15 POOL BALLS on the pool table (B) to trigger a mini-game.
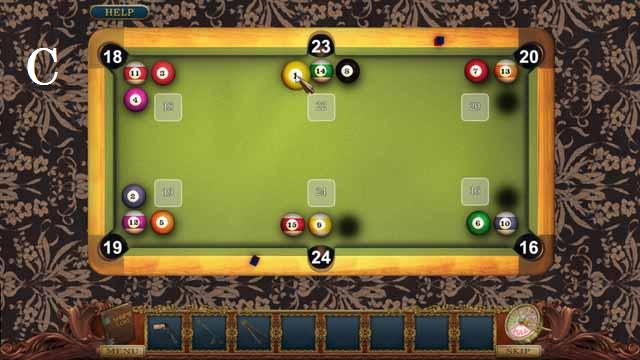 • See the screenshot (C) for a winning solution.
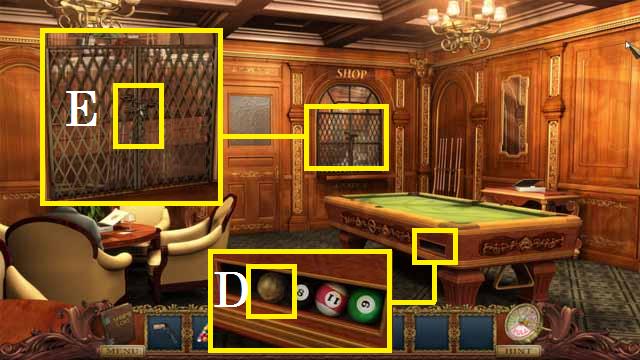 • Zoom into the ball return; pick up the WAX BALL (D).
• Zoom into the window; cut the chain (E) with the BOLT CUTTERS.
• Zoom into the ball return; pick up the WAX BALL (D).
• Zoom into the window; cut the chain (E) with the BOLT CUTTERS.
 • Zoom into the sparkles to play a HOS.
• Receive the LIGHTER.
• Return to the Flashback Lower Lobby.
• Zoom into the sparkles to play a HOS.
• Receive the LIGHTER.
• Return to the Flashback Lower Lobby.
 • Zoom into the fireplace; use the LIGHTER on the wood (F).
• Place the WAX BALL near the fire and pick up the ANCHOR TRINKET (G).
• Move to the Flashback Upper Lobby.
• Zoom into the wardrobe; place the ANCHOR TRINKET in the lock (H).
• Move the coats to the right and pick up the TWEEZERS (I).
• Move the coats to the left and pick up the REACH CLAW (J).
• Return to Your Room Underwater.
• Zoom into the fireplace; use the LIGHTER on the wood (F).
• Place the WAX BALL near the fire and pick up the ANCHOR TRINKET (G).
• Move to the Flashback Upper Lobby.
• Zoom into the wardrobe; place the ANCHOR TRINKET in the lock (H).
• Move the coats to the right and pick up the TWEEZERS (I).
• Move the coats to the left and pick up the REACH CLAW (J).
• Return to Your Room Underwater.
 • Zoom into the toolbox; pick up the HAND DRILL (K).
• Move to the Underwater Engine Room.
• Zoom into the grate; use the REACH CLAW to pick up the HARPOON SPEAR (L) to receive the completed HARPOON GUN.
• Return to the Underwater Elevator Shaft.
• Zoom into the toolbox; pick up the HAND DRILL (K).
• Move to the Underwater Engine Room.
• Zoom into the grate; use the REACH CLAW to pick up the HARPOON SPEAR (L) to receive the completed HARPOON GUN.
• Return to the Underwater Elevator Shaft.
 • Shoot the elevator (M) with the HARPOON GUN.
• Pick up the PULLEY LEVER (N).
• Return to the Underwater Machine Room.
• Shoot the elevator (M) with the HARPOON GUN.
• Pick up the PULLEY LEVER (N).
• Return to the Underwater Machine Room.
 • Place the PULLEY LEVER on the crank (O).
• Pull the Lever and zoom into the chest (P) to trigger a mini-game.
• You can use the following sequence to solve this puzzle: 1, 2, 2, 2, 3, and 4.
• Zoom into the open chest; pick up the HAND DRILL (Q).
• Return to Your Room Flashback.
• Place the PULLEY LEVER on the crank (O).
• Pull the Lever and zoom into the chest (P) to trigger a mini-game.
• You can use the following sequence to solve this puzzle: 1, 2, 2, 2, 3, and 4.
• Zoom into the open chest; pick up the HAND DRILL (Q).
• Return to Your Room Flashback.
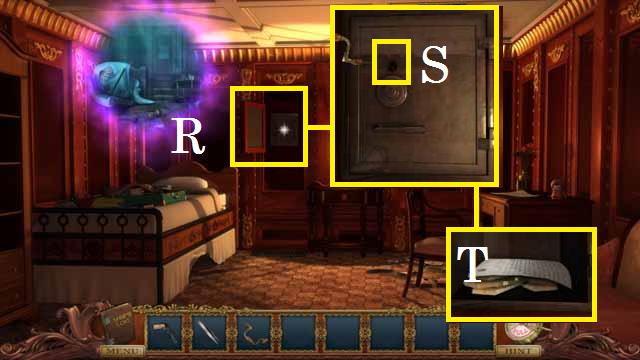 • Move the mirror to reveal the safe and zoom in (R).
• Use the HAND DRILL on the safe then use the TWEEZERS in the hole (S); pick up the note and the MONEY (T).
• Return to the Flashback Forward Deck.
• Give the MONEY to Montague.
• Climb the ladder and speak to Robert.
• Congratulations! You may not have saved your life but you saved your soul along with many others.
• Move the mirror to reveal the safe and zoom in (R).
• Use the HAND DRILL on the safe then use the TWEEZERS in the hole (S); pick up the note and the MONEY (T).
• Return to the Flashback Forward Deck.
• Give the MONEY to Montague.
• Climb the ladder and speak to Robert.
• Congratulations! You may not have saved your life but you saved your soul along with many others.Created at: 2012-04-15