

Walkthrough Menu
- General Tips
- Chapter 1: April 10th, 1912 (8:45 AM)
- Chapter 2: April 10th, 1912 (12 Noon)
- Chapter 3: Five Minutes Later
- Chapter 4: April 10th, 1912 (1:20PM)
- Chapter 5: April 10th, 1912 (3:15PM)
- Chapter 6: April 10TH, 1912 (6:00 PM)
- Chapter 7: April 14TH, 1912 (11:40 PM)
- Chapter 8: April 15th, 1912 (12:00 AM)
- Chapter 9: April 15th, 1912 (12:38 AM)
- Chapter 10: April 15th, 1912 (12:38 AM)
- Chapter 11: One Minute Later
- Chapter 12: April 15th, 1912 (1:00 AM)
- Chapter 13: April 15th, 1912 (1:15 AM)
- Chapter 14: April 15th, 1912 (1:30 AM)
- Chapter 15: April 15th, 1912 (1:45 AM)
- Chapter 16: April 15th, 1912 (2:00 AM) - Robert
- Chapter 17: April 15th, 1912 (2:00 AM) - Emma
- Bonus Level: 97 Years Later
General Tips
- The game has 16 chapters, alternate endings and a bonus level. The bonus level will be available in the main menu once you complete the game.
- Listen to what the characters are saying in the game because they may give you some good clues as to what to do next.
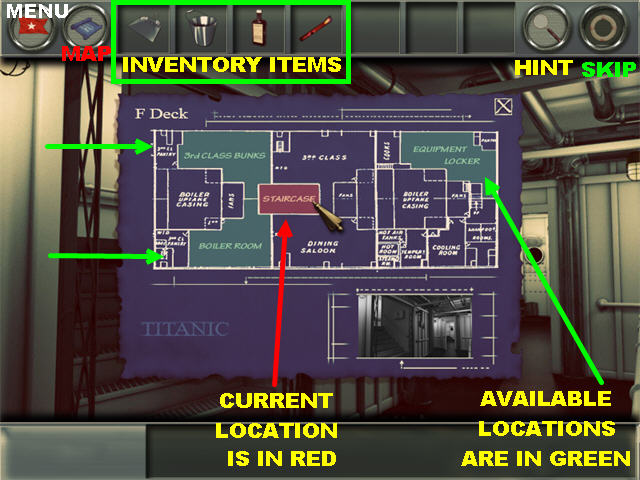
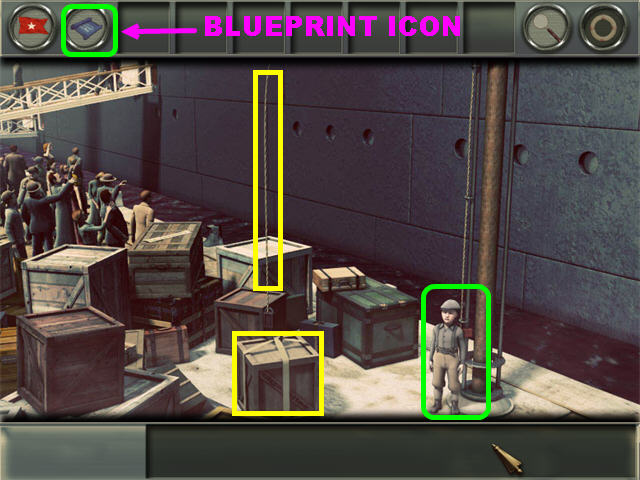
- Click on the blueprint icon in the upper left to access the map. Use the map to travel from one spot to the other.
- Use the magnifying glass icon in the upper right to obtain a hint. The hint can let you know if there is anything else left to do in a scene or it will show you where to place an inventory item.
- Click on the sparkling areas to access Hidden Object Scenes.
- You can skip puzzles or Hidden Object Scenes by clicking on the life ring icon in the upper right once it is recharged.
- Your inventory items will be stored above your screen. Grab them and place them in the spots you would like to use them in.
Chapter 1: April 10th, 1912 (8:45 AM)
1st Class Boarding
- Talk to the men in the scene and go through the conversation.
- Click on the blueprint icon in the upper left.
- Go to the 2nd and 3rd Class Boarding location on the map.
- Margie talks to her mother and her companions. Go through all the conversations.
- Go to the Baggage location in the map.
- Click on the crate and rope marked in yellow.
- Talk to the little boy George.
- Go to Ashley’s Car location in the map.
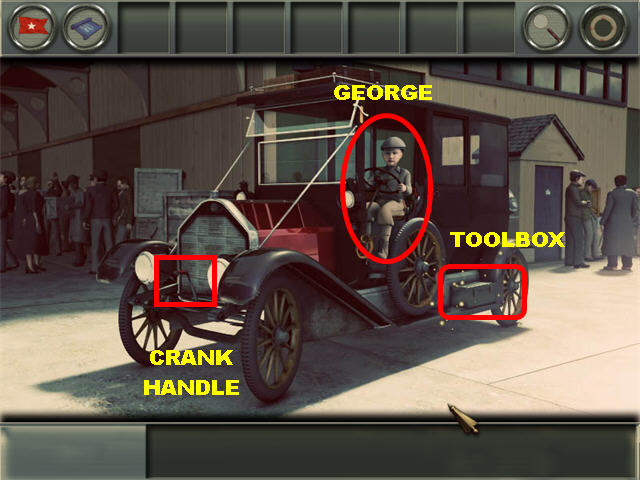
- Talk to George in the car.
- Pick up the CRANK HANDLE in front of the car to add it to inventory.
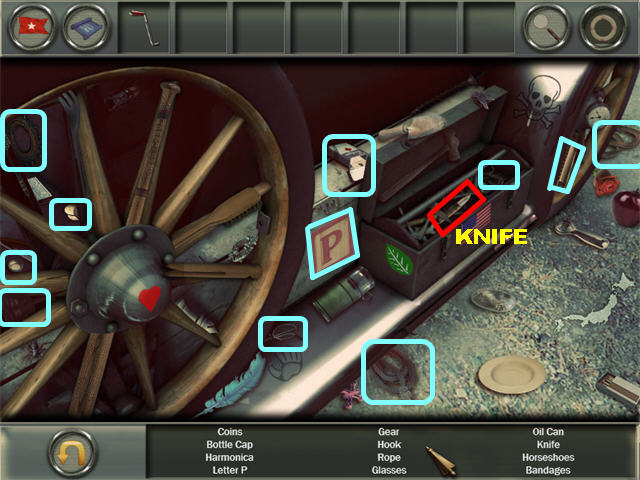
- Zoom into the toolbox in the lower right to trigger a Hidden Object Scene.
- Pick up the UTILITY KNIFE marked in red in the toolbox.
- Go to the Baggage location on the map.
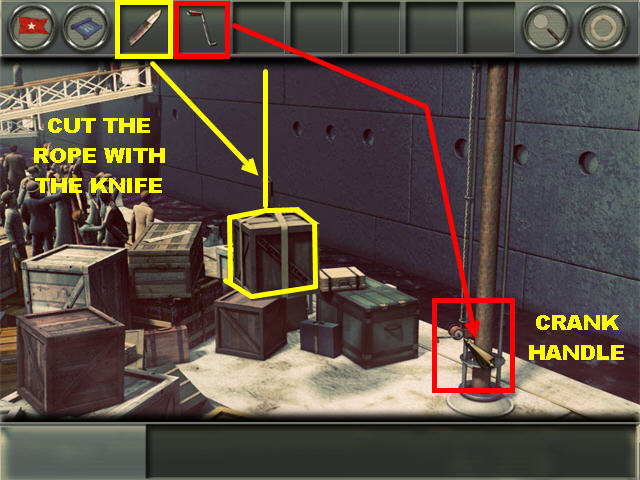
- Use the CRANK HANDLE on the crankcase attached to the pole on the right.
- Click on the crank handle to raise the box on the left.
- Cut the rope attached to the raised crate with the KNIFE in inventory. The crate falls on the ground.
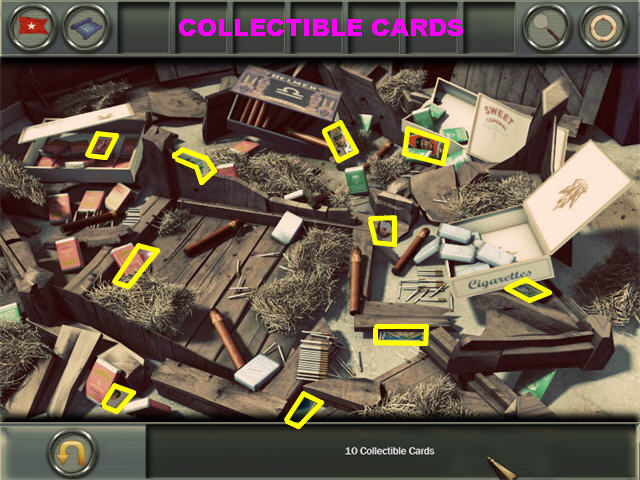
- Click on the broken crate to trigger a Hidden Object Scene.
- Pick up the 10 COLLECTIBLE CARDS in the scene.
- Go back to Ashley’s Car.

- Give the COLLECTIBLE CARDS to George.
- Go back to the 2nd and 3rd Class Boarding.
- Talk to Emma and she will hand you the BOARDING PASS at the end of the conversation.
- Go to 1st Class Boarding.
- Give the BOARDING PASS to the ship’s officer to end the chapter.
Chapter 2: April 10th, 1912 (12:00 Noon.)
Margaret’s Stateroom
- Go to Margaret’s Stateroom after the conversation ends.
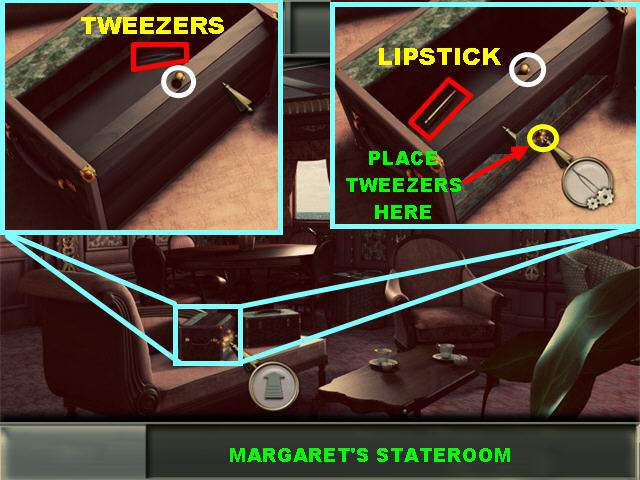
- Zoom into the boxes on the left.
- Click on the knob marked in white to open the box and pick up the TWEEZERS inside.
- Click on the knob marked in white to close the box.
- Place the TWEEZERS in hole marked in yellow.
- Click on the knob marked in white to open the box and pick up the LIPSTICK inside the box.
- Go to the Parisian Café.
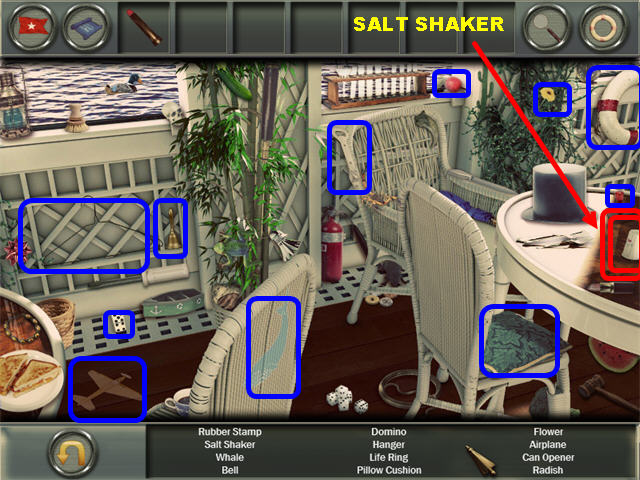
- Open the Hidden Object Scene on the left.
- Pick up the SALT SHAKER marked in red.
- Go to the Galley.
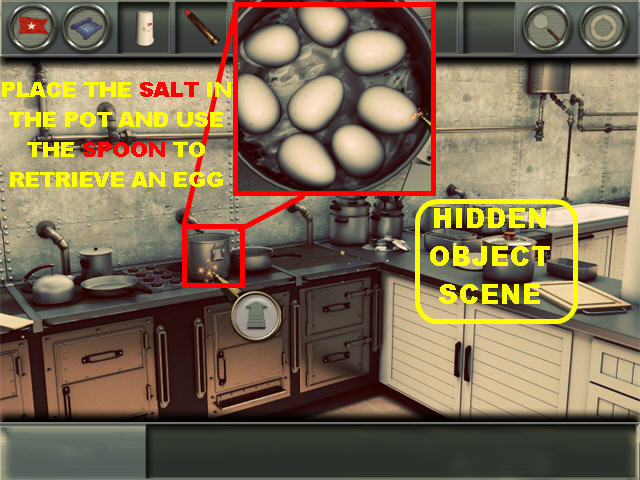
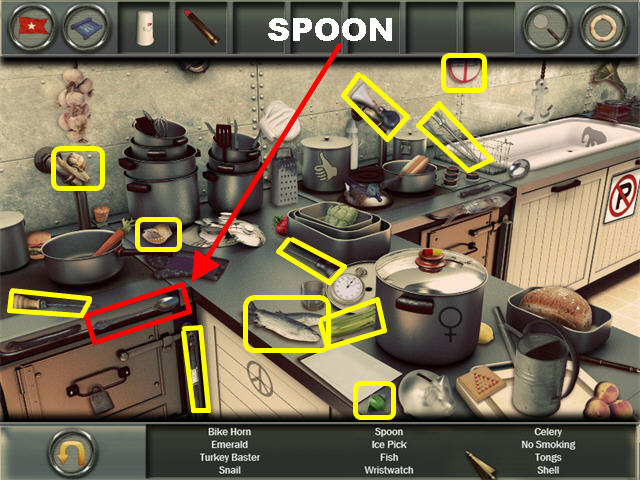
- Open the Hidden Object Scene on the right and pick up the SPOON on the lower left.
- Click on the POT on the stove for a closer look.
- Place the SALT in the water and use the SPOON to pick up a BOILED EGG.
- Go back to Robert’s Stateroom.
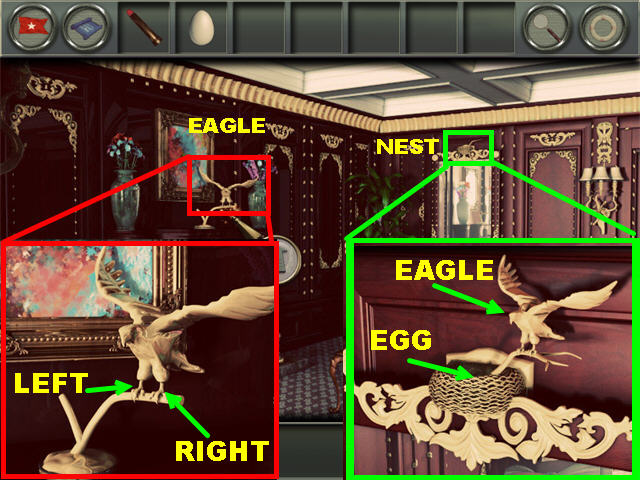
- Zoom into the EAGLE marked in red.
- Click on the eagle’s left leg to raise it.
- Place the LIPSTICK on its left leg.
- Click on the eagle’s right leg to obtain the BRONZE EAGLE. Zoom out of that view.
- Zoom into the nest marked in green on the right.
- Place the EAGLE on the branch.
- Place the BOILED EGG on the nest to end the chapter.
Chapter 3: Five Minutes Later
Shipwright’s Sanctum.
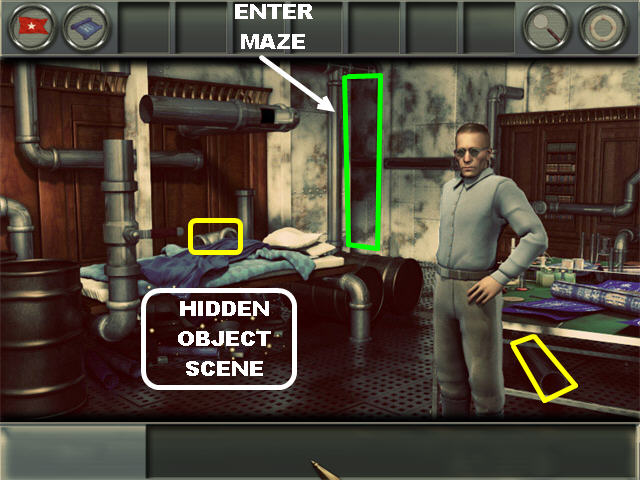
- Go through the conversation with Dean.
- Pick up the 2 PIPE SEGMENTS marked in yellow.
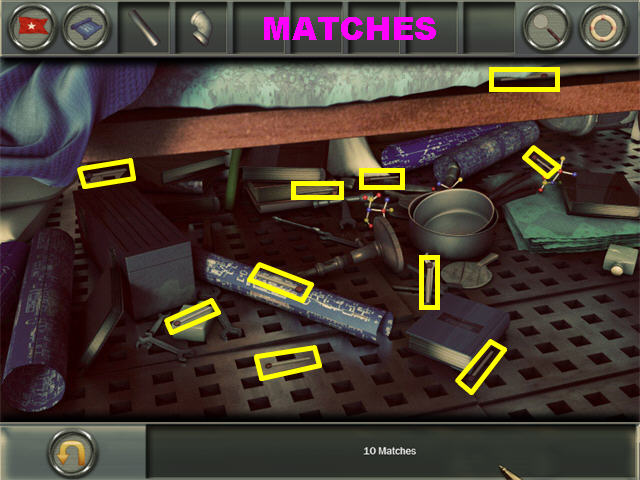
- Click below the bed to trigger a Hidden Object Scene and pick up the 10 MATCHES marked in yellow.
- Click on the area marked in green in the first screenshot to enter the maze.
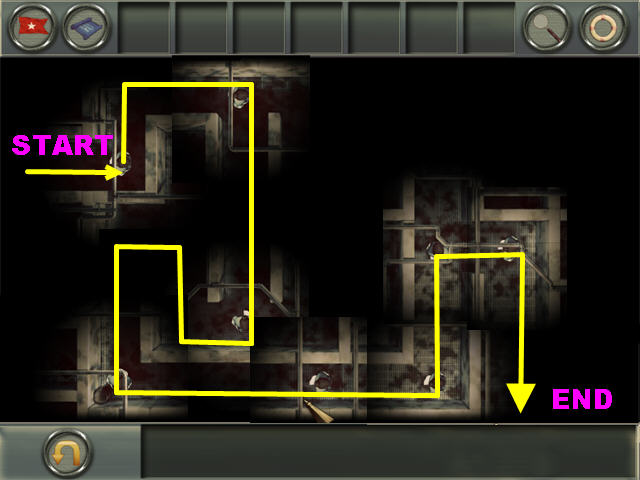
- Click on the areas you want your character to move to. You can also use the arrow buttons on your keyboard to navigate the maze.
- Follow the path marked in the screenshot to exit the maze.
- Pick up the PIPE SEGMENT marked in yellow.
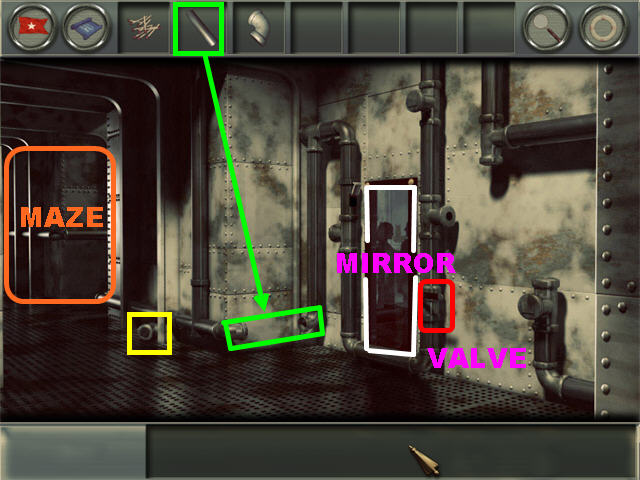
- Click on the mirror.
- Click on the VALVE marked in red to open it.
- Place the PIPE SEGMENT marked in green into the section marked in green.
- Click on the entryway marked in orange to enter the maze again.
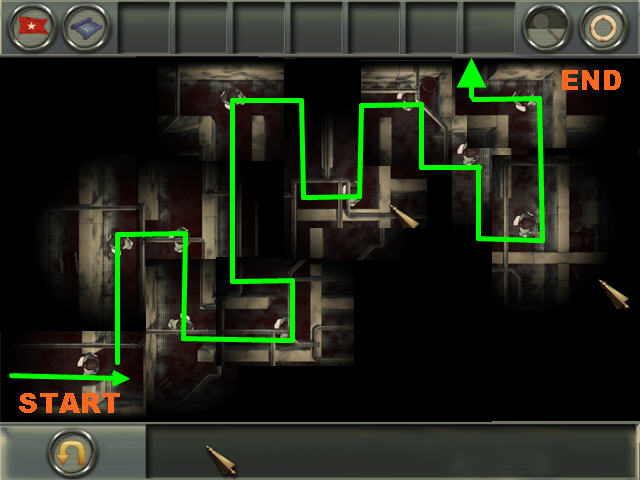
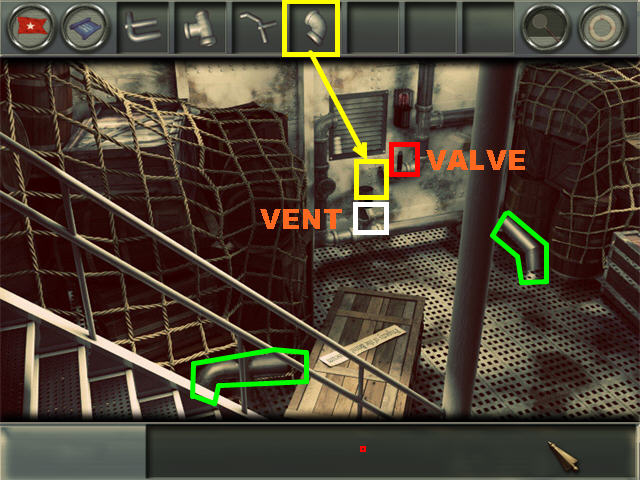
- Follow the path marked in the screenshot to enter the Baggage Hold.
- Take the 2 PIPE SEGMENT marked in green.
- Click on the VALVE marked in red to open it.
- Grab the PIPE SEGMENT marked in yellow and place it below the air duct.
- Click on the VENT marked in white to close it.
- Go back to the Shipwright’s Sanctum.
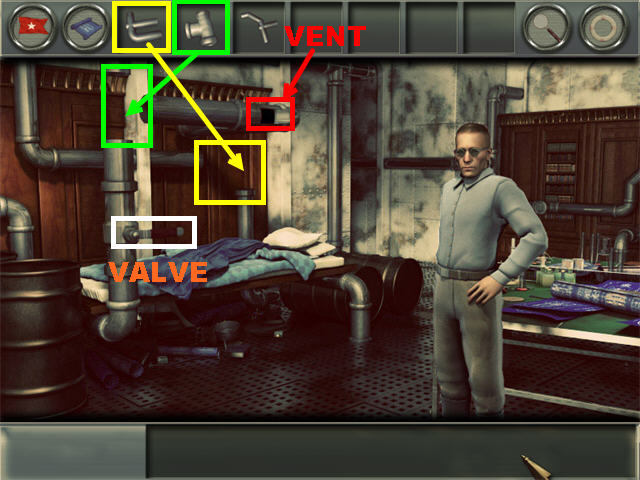
- Use the PIPE SEGMENT marked in green in the section shown on the screenshot.
- Use the PIPE SEGMENT marked in yellow in the section shown on the screenshot.
- Click on the VALVE marked in white to open it.
- Click on the VENT marked in red to close it.
- Go to the Overlook.
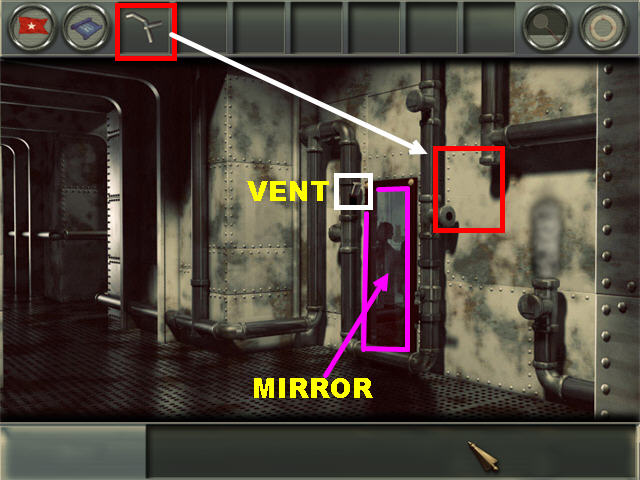
- Place the PIPE SEGMENT marked in red according to the arrow on the screenshot.
- The steam fogged up the mirror.
- Click on the fogged mirror and pay attention to the clues in the conversation.
- Click on the VENT to close it.
- Go to the Baggage Hold.
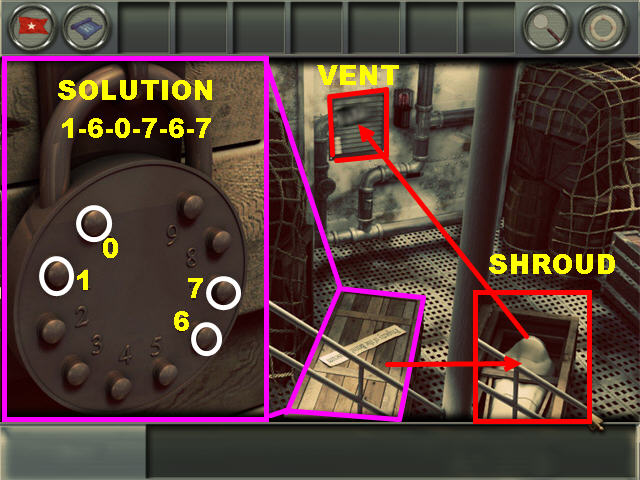
- Click on the crate marked in white.
- Click on the numbers on the lock in the following order: 1-6-0-7-6-7 to unlock it.
- Pick up the SHROUD inside the crate and place it on the VENTILATION SHAFT marked in red which sets off an alarm.
- Go back to the Overlook and click on the mirror to end the chapter.
Chapter 4: April 10th, 1912 (1:30 PM)
1st Class Lounge
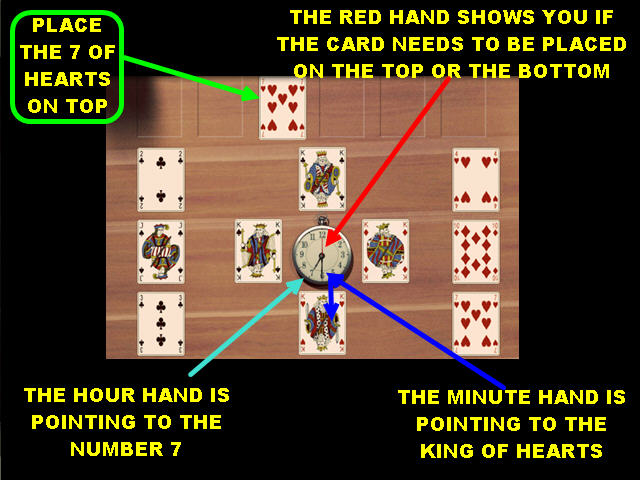
- Talk to the Odette (the woman in the chair) and go through all the conversation to make the card game pop-up.
- The goal in this card game is to move the cards to their appropriate slots according to the numbers on the clock.
- The minute hand points to one of the 4 Kings.
- The hour hand shows you the card number you need to play.
- The red hand shows you where you need to position the cards; it wil point up or down only.
- The solution to this puzzle is random. In our game the clock pointed to 7:30, so the minute hand is pointing to the King of Hearts and the hour hand is on the number 7. Place the 7 of Hearts on top.
- Our second step gives us the 2 o’clock time and the red hand is pointing downwards. Take the 2 of clubs and place it on the bottom pile.
- If the clock points towards the number 11, use the Jack card. For the number one, use the Ace card.
- Keep placing cards until you’ve filled in all the top and bottom slots.
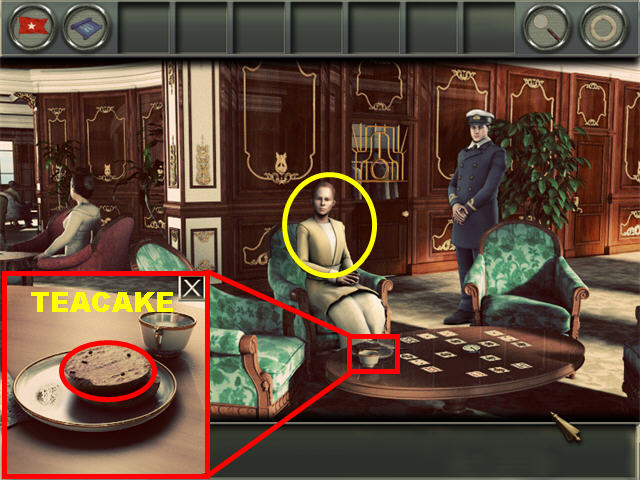
- Zoom into the plate on the table and pick up the TEACAKE on the plate.
- Go to the 1st Class Promenade.
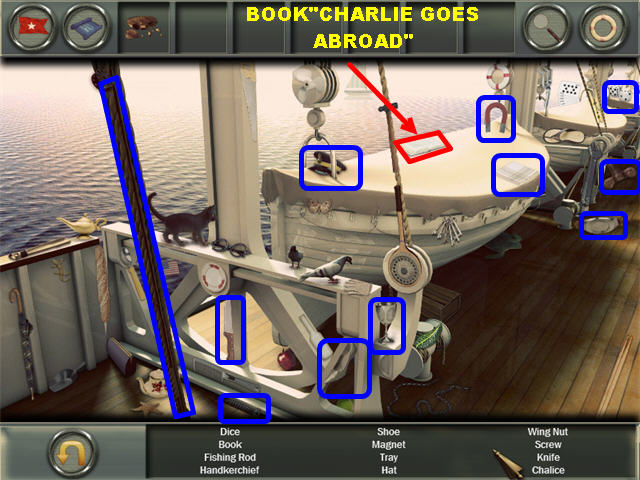
- Click on the Hidden Object Scene on the upper center.
- Pick up the BOOK: CHARLIE GOES ABROAD in the upper right.
- Go to the Reading and Writing Room.
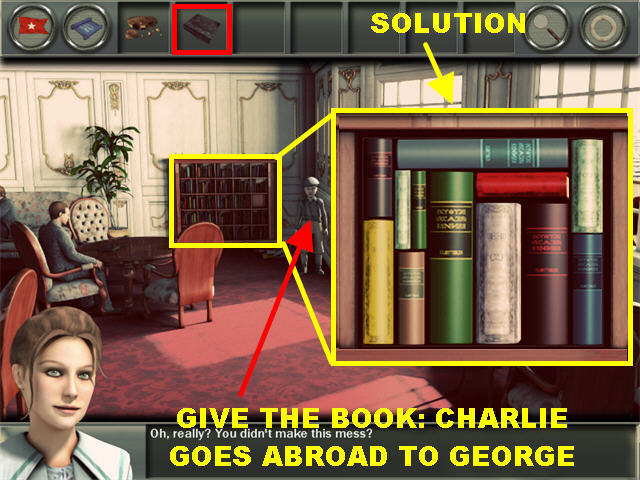
- Give George the book.
- Zoom into the bookcase.
- Place the books on the shelf so they all fit in the space provided. Please look at the screenshot for the solution.
- The LIBRARY CARD will be added to inventory.
- Go back to the 1st Class Lounge.
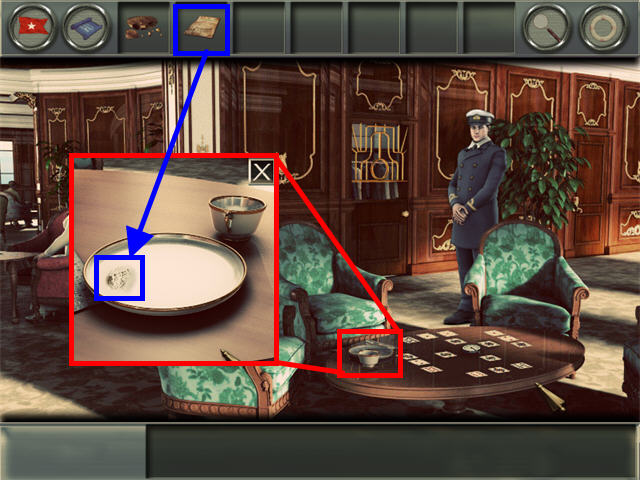
- Zoom into the plate on the table.
- Place the LIBRARY CARD on the spot on the side of the bowl to collect the POWDERED SUGAR.
- Go to the Elevator.
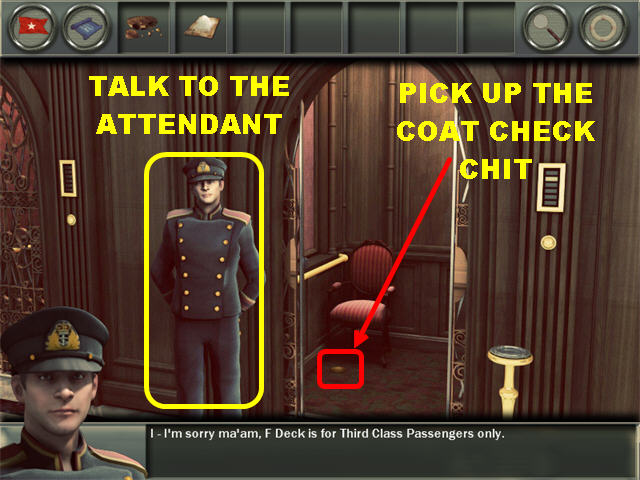
- Talk to the attendant.
- Pick up the COAT CHECK CHIT inside the elevator.
- Go to the Coat Closet.
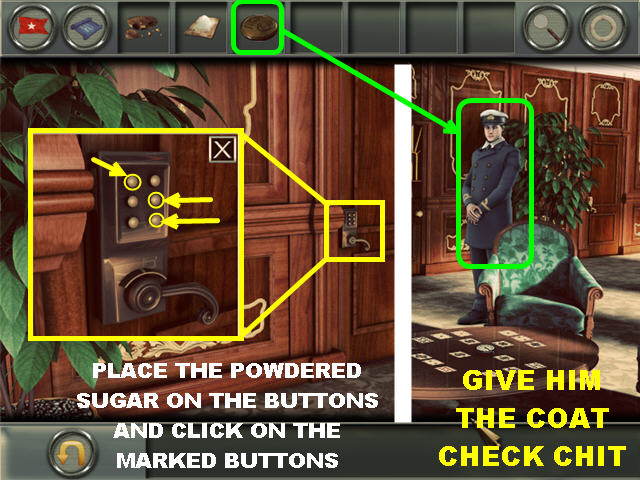
- Zoom into the doorknob and click on it to find out you don’t have the code.
- Place the POWDERED SUGAR on the keypad.
- Go back to the 1st Class Lounge.
- Give the COAT CHECK CHIT to Thomas.
- Go back to the Coat Closet.
- Zoom into the doorknob and click on the buttons marked in yellow only.
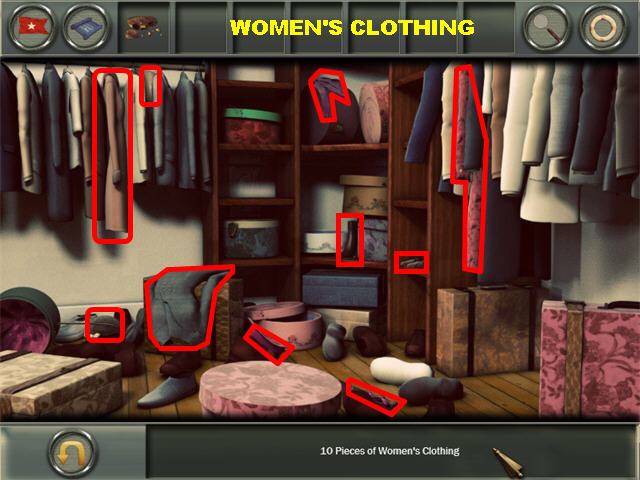
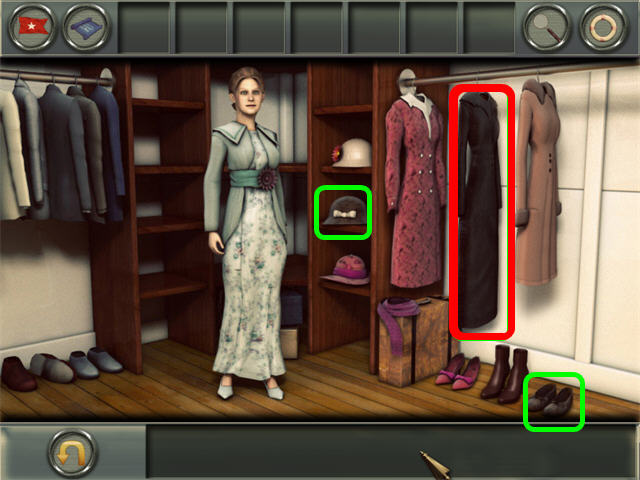
- Pick up the 10 PIECES OF WOMEN’S CLOTHING marked in red.
- Select a new outfit to disguise Margaret. Just click on the articles of clothing to place them on Margaret.
- To select a new item just click on the item in the closet you want her to wear.
- Please click on the items shown in the screenshot to disguise Margaret.
- Go back to the 1st Class Promenade.
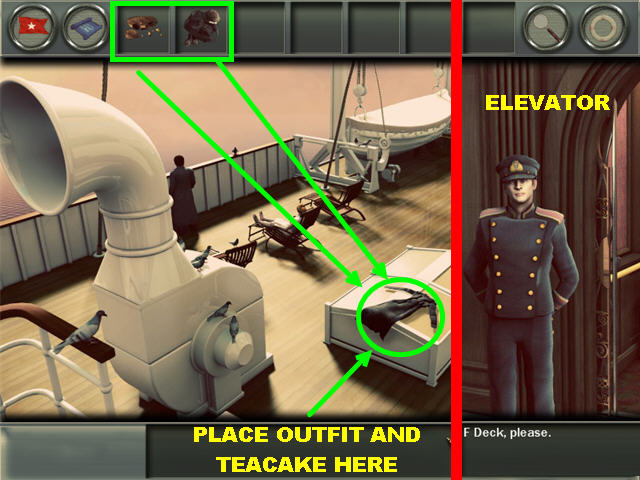
- Place the OUTFIT on the tub.
- Place the TEACAKE on the outfit and the birds will come pick at the outfit.
- The TATTERED OUTFIT goes into inventory.
- Go back to the Elevator to end the chapter.
Chapter 5: April 10th, 1912 (3:15PM)
3rd Class Bunks
- Talk to George. He tells you that he lost his game.
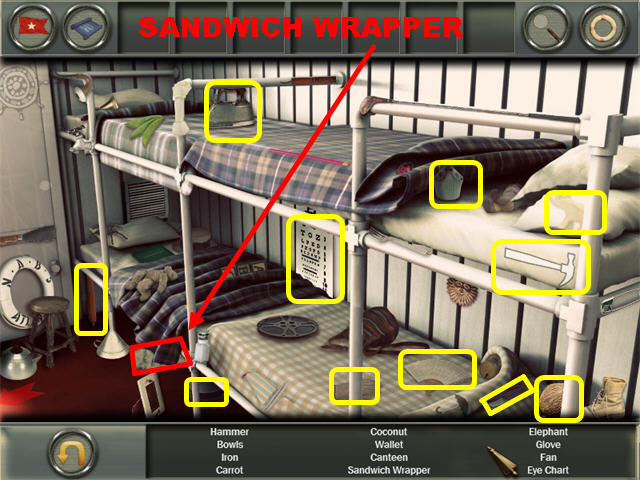
- Click on the Hidden Object Scene on the right and pick up the SANDWICH WRAPPER marked in red.
- Go to the Equipment Storage.


- Pick up the GOLF CLUB in the lower left.
- Go to the Swimming Baths.
- Zoom into the heater in the back and use the GOLF CLUB on the grate to obtain the PIECE OF COAL.
- Go back to the Equipment Storage.
- Open the drawer marked in white and click on it for a closer look.
- Place the SANDWICH WRAPPER on the writing surface.
- Place the COAL on top of the wrapper.
- The numbers 21-15-3 appear on the paper. Exit out of that view.
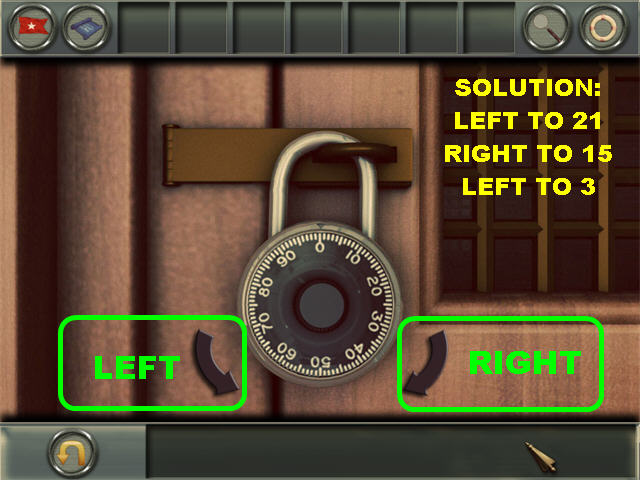
- Zoom into the lock on the locker and use the numbers you just uncovered to open the lock.
- Move the left and right arrow to spin the dial. Please move the dial in this manner to solve the puzzle:LEFT to 21 RIGHT to 15 LEFT to 3
- Click inside the locker to grab the FISHING POLE inside.
- Go to the Swimming Baths.
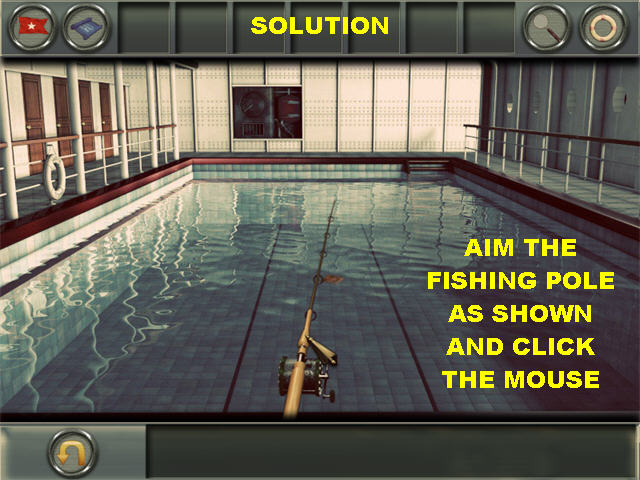
- Place the FISHING POLE on George’s Ball Game in the pool to trigger a mini-game.
- Aim the fishing pole and then click the mouse button to cast the line. Please look at the screenshot for the right spot to aim.
- The BALL GAME goes into inventory.
- Go back to the 3rd Class Bunks.
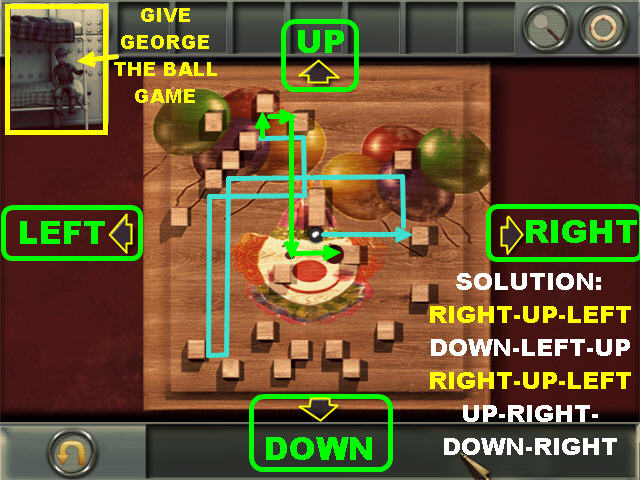
- Give the BALL GAME to George to trigger a puzzle.
- Your goal is to place the ball in the hole above the clown’s face.
- Solve the ball game by clicking on the arrows in the following manner:RIGHT-UP-LEFT-DOWN-LEFT-UP RIGHT-UP-LEFT-UP-RIGHT-DOWN-RIGHT
- The chapter ends after the puzzle has been completed.
Chapter 6: April 10TH, 1912 (6:00 PM)
1st Class Dining Room
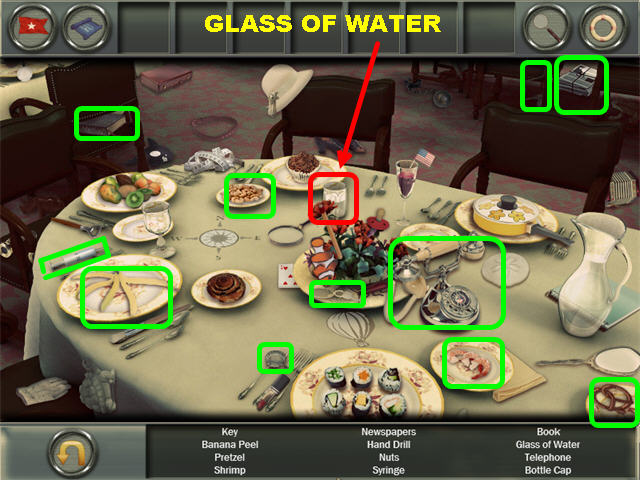
- Zoom into the table to trigger a Hidden Object Scene and pick up the GLASS OF WATER on the table.
- Go to the Cold Storage.
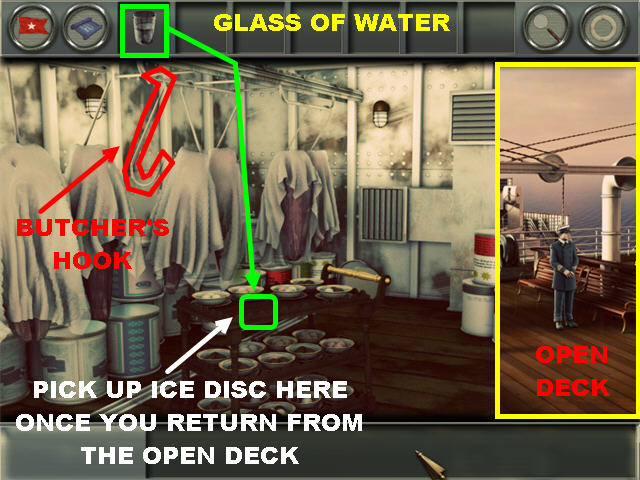
- Pick up the BUTCHER’S HOOK marked in red.
- Place the GLASS OF WATER on the space marked in green.
- Go to the Open Deck.
- Talk to the OFFICER.
- Go back to the Cold Storage.
- Pick up the ICE DISC in the same spot as you placed the glass of water.
- Go to the Shuffleboard Courts.
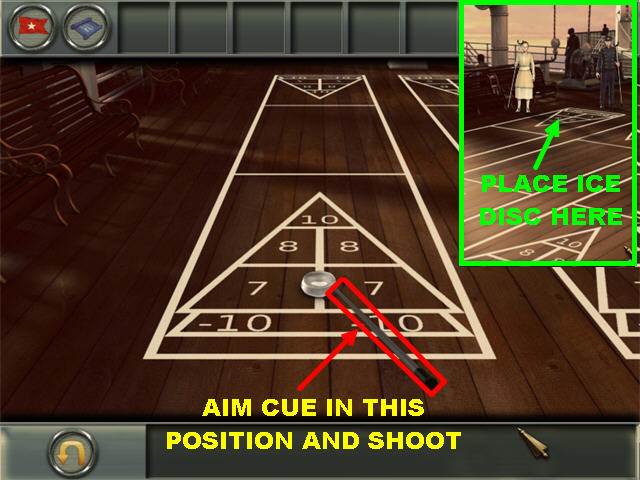
- Click on the attendant and talk to him twice.
- Place the ICE DISC on the court to trigger a puzzle. Place it on the piece shown in the screenshot.
- Aim the cue and then click on the mouse to shoot. Please look at the screenshot for the right aiming spot.
- Go to the Open Deck and talk to the attendant on the ground.
- Go to the Hospital.
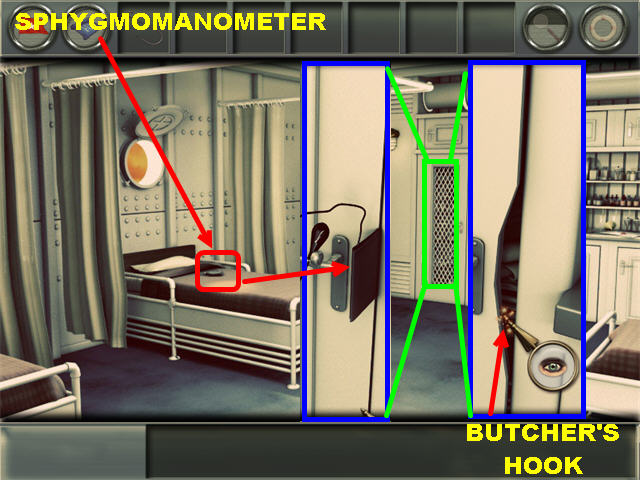
- Talk to the doctor 2 times and take the Sphygmomanometer marked in red on the bed once the doctor walks away.
- Click on the closet and place the Sphygmomanometer on the door’s handle.
- Click on the Sphygmomanometer’s pump on the handle.
- Place the BUTCHER’S HOOK on the side of the door to trigger a Hidden Object Scene.
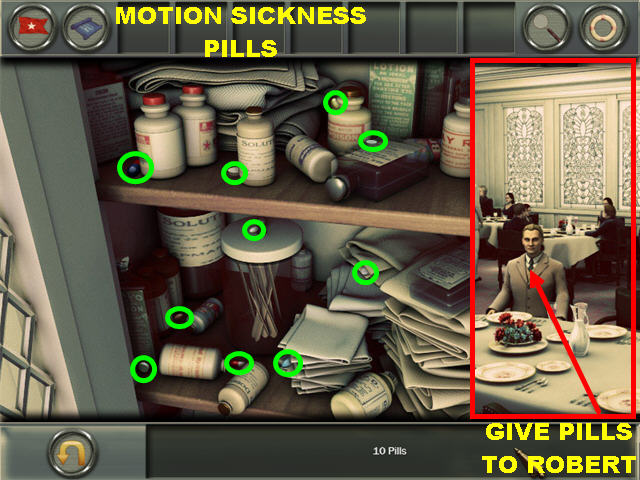
- Pick up the 10 MOTION SICKNESS PILLS marked in green in the screenshot.
- Go back to the 1st Class Dining Room.
- Give the MOTION SICKNESS PILLS to Robert to end the chapter.
Chapter 7: April 14th, 1912 (11:40 PM)
Margaret’s Stateroom
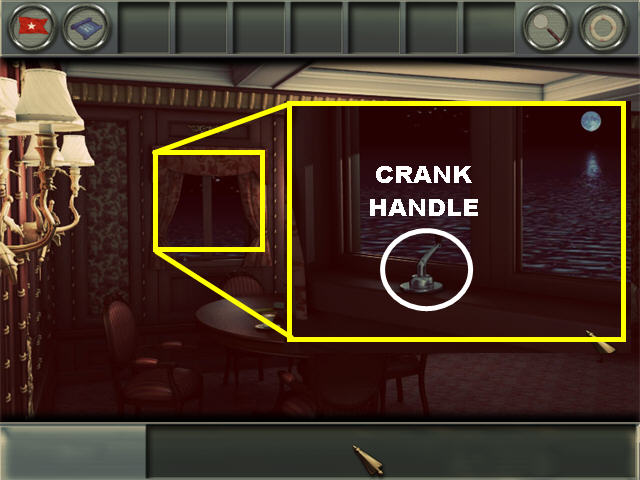
- Zoom into the left window and click on the CRANK HANDLE to enter it into inventory.
- Go to Robert’s Stateroom and click on the door.
- Go to the Montague’s Stateroom and talk to Montague.
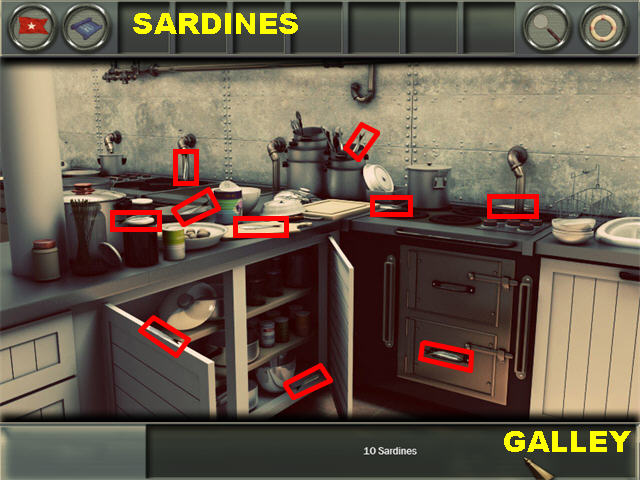
- Go to the Galley and pick up the 10 SARDINES marked in red.
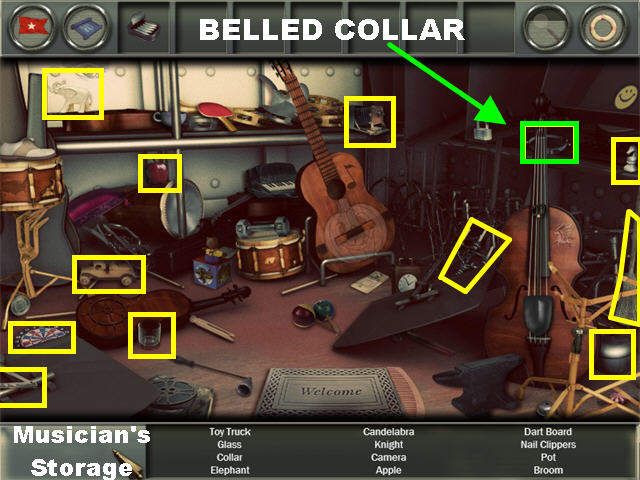
- Go to the Musician’s Storage to enter a Hidden Object Scene.
- Pick up the BELLED COLLAR in the upper right.
- Go to the Montague’s Stateroom.
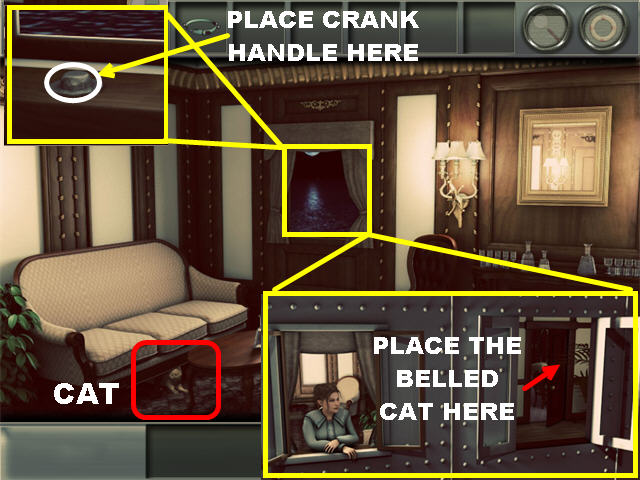
- Give the SARDINES to the cat under the couch.
- Place the BELLED COLLAR on the cat on the carpet. The BELLED BEXLEY goes into inventory.
- Click on the window and place the CRANK HANDLE on the space marked in white.
- Click on the crank to open the window.
- Place the BELLED BEXLEY on the right window. The cat goes in the room and wakes up Robert.
- Go to Robert’s Stateroom and click on the door. Talk to Robert to end the chapter.
Chapter 8: April 15th, 1912 (12:00 AM)
Wheel Room
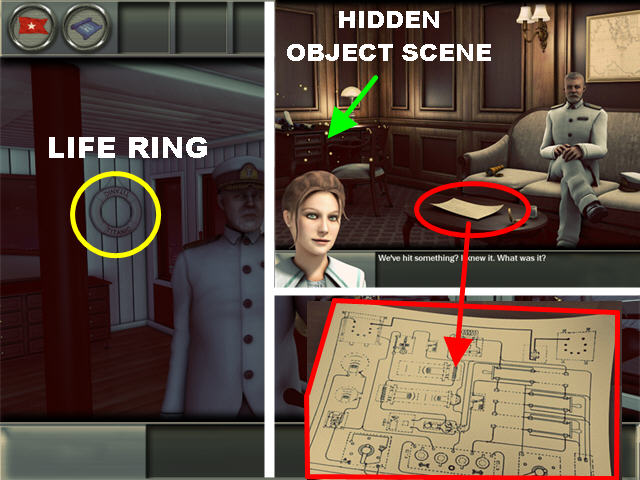
- Talk to the Captain.
- Grab the LIFE RING marked in yellow.
- Go to the Captain’s Sitting Room.
- Click on the coffee table to view a diagram. You will need this diagram to solve a future puzzle.
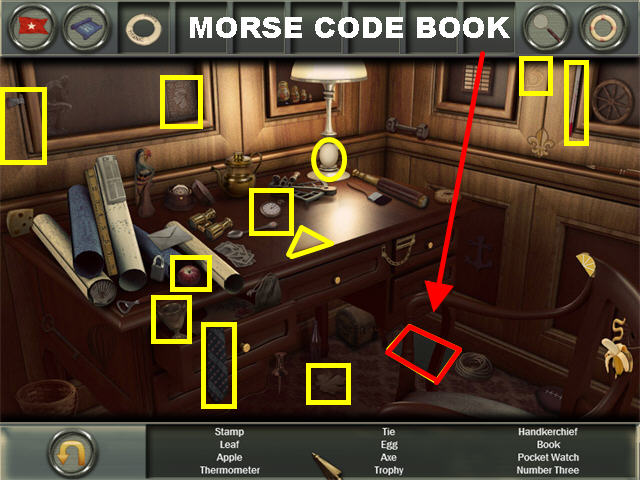
- Click on the desk on the left to trigger a Hidden Object Scene.
- Pick up the MORSE CODE BOOK on the floor.
- Go to the 1st Class Promenade.
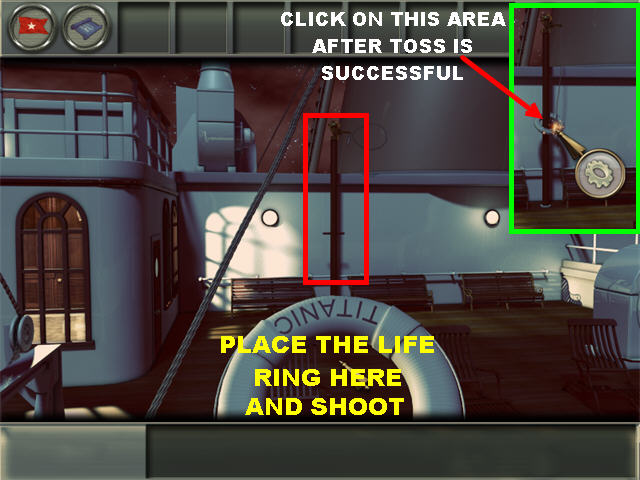
- Place the LIFE RING on the swinging rope above the pole for it to appear at the bottom of the screen.
- Position the LIFE RING in the lower center of the scene and click on your mouse to toss it.
- Once you get the LIFE RING on the pole, click on the Life Ring to set off the whistle.
- Go to the Marconi Transmitting Room.
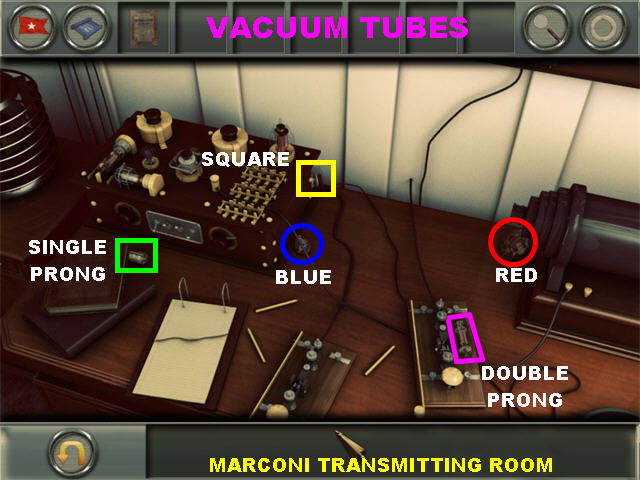
- Click on the device on the desk for a closer look and pick up the 5 VACUUM TUBES marked in the screenshot.
- Go to the Marconi Receiving Room.
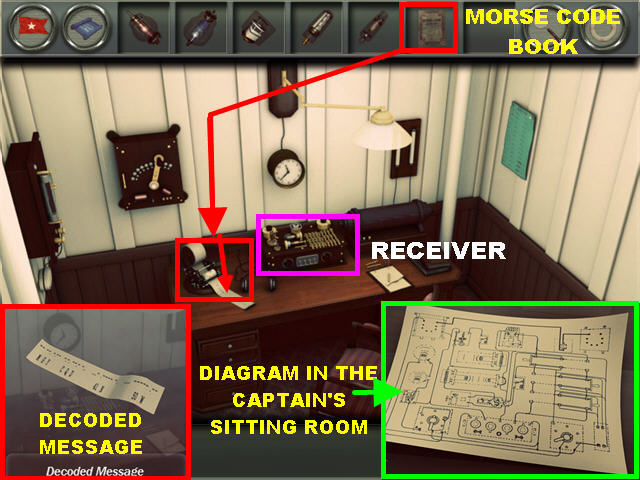
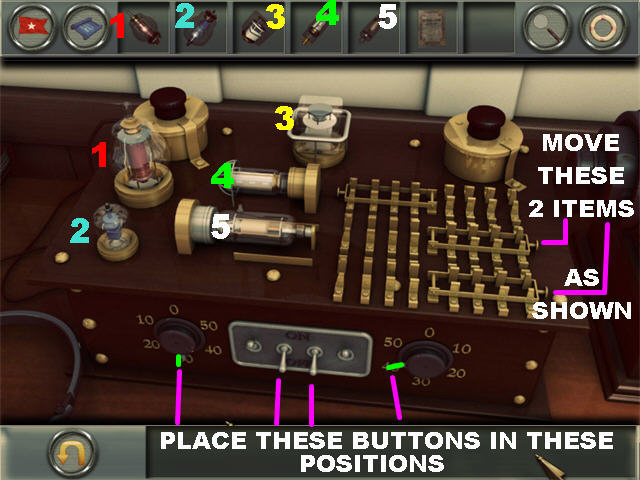
- Click on the receiver to trigger a puzzle.
- You have to adjust the controls according to the diagram in the Captain’s Sitting Room.
- Please look at the screenshot for the solution.
- Place the MORSE CODE BOOK on the paper coming out of the machine on the left side of the desk to obtain the DECODED MESSAGE.
Chapter 9: April 15th, 1912 (12:38 AM)
Shipwright’s Sanctum
- Go through the conversations at the beginning of the chapter. Mr. Tavalouris will tell you which areas to check.
- Try to click on the Squash Court section of the map but you will not be able to access it because it is flooded.
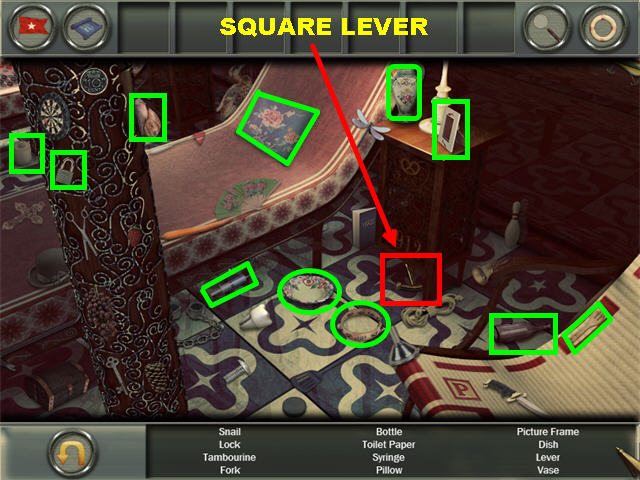
- Go to the Turkish Bath.
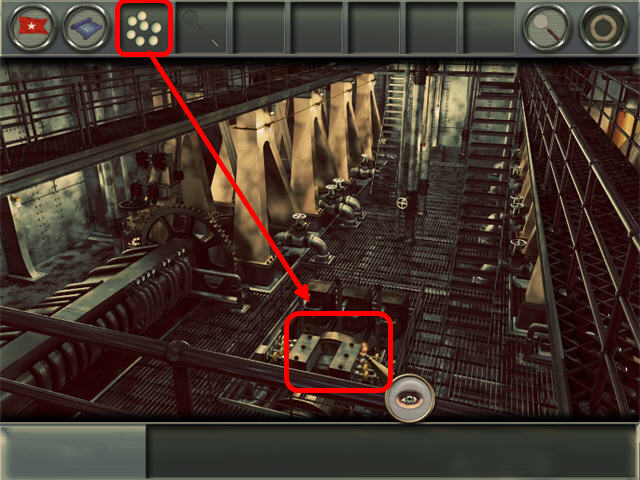
- Click on the Hidden Object Scene on the right and pick up the SQUARE LEVER.
- Go to the 3RD Class Showers.
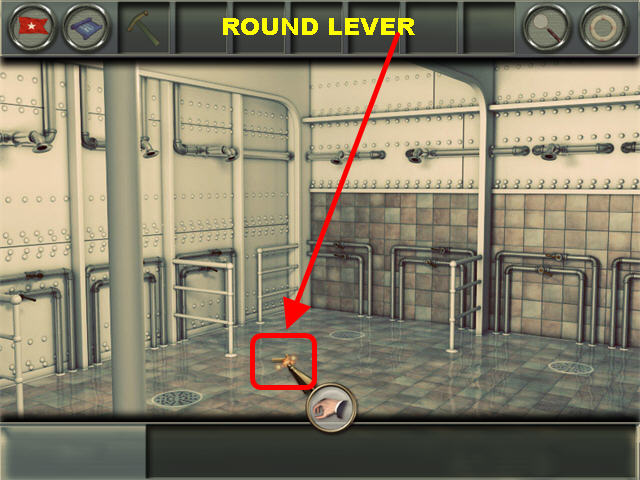
- Pick up the ROUND LEVER on the floor.
- Go to the Shipwright’s Sanctum.

- Talk to the Mr. Tavalouris.
- Click on the table to trigger a Hidden Object Scene.
- Pick up the 10 PING PONG BALLS marked in red.
- Go to the Bilge Pump Room.
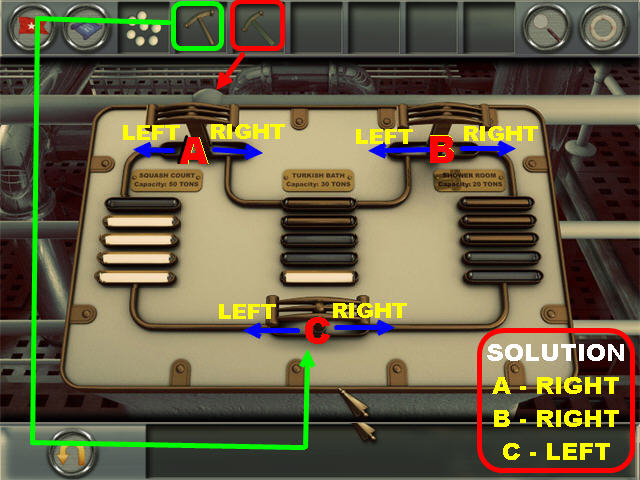
- Zoom into the control panel in the lower left.
- Put the SQUARE LEVER in the square slot in the upper left.
- Put the ROUND LEVER in the round slot in the lower center.
- Your goal is to set the levers to their proper levels.
- The levers have been marked A, B, or C on the screenshot. Click on the levers in this order to solve the puzzle:A - RIGHT B - RIGHT C - LEFT
- Go to the Squash Court.

- Take the Squash Racquet and go to the Engine Room.

- Use the PING PONG BALLS on the engine to trigger a puzzle.
- Your goal is to hit the balls into each of the 3 pipes in the scene.
- Place the center of your racquet in the path of the pipe you’re targeting.
- Go to the Shipwright’s Sanctum and talk to Mr. Tavalouris to end the chapter.
Chapter 10: April 15th, 1912 (12:38 AM)
1st Class Lounge
- Go through Margie’s and Robert’s conversation in the lounge. Robert wants a Bermuda Highball.
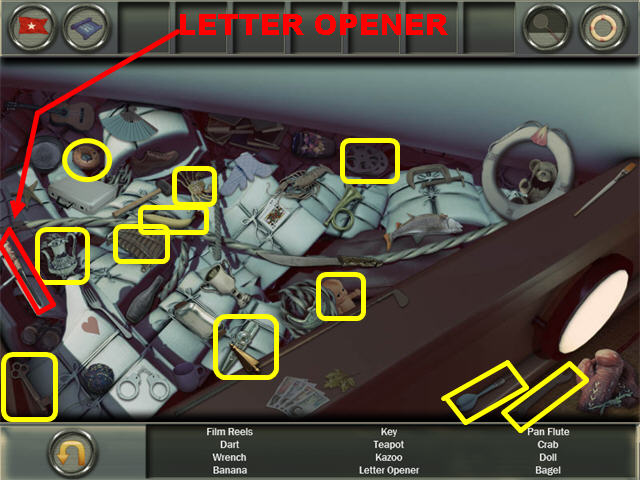
- Go to the Starboard Loading Dock.
- Click on the Hidden Object Scene on the left to obtain the LETTER OPENER.
- Go to the Port Loading Dock.

- Click on the burlap bags and use the LETTER OPENER to obtain the LIMES from the bag.
- Go to the Starboard Loading Dock.
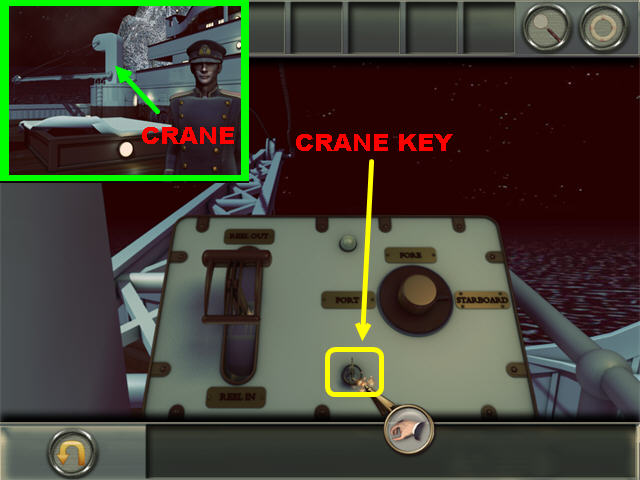
- Click on the crane in the upper left and take the CRANE KEY from the ignition.
- Go back to the Port Loading Dock.
- Zoom onto the crane on the right.
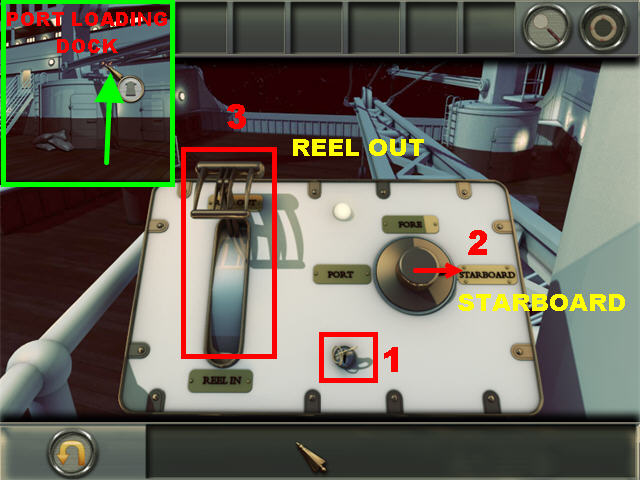
- Place the CRANE KEY (1) on the ignition.
- Click on the knob on the right and place it on the STARBOARD (2) section.
- Move the lever (3) on the left to the “Reel Out” position shown in the screenshot.
- Go to the Starboard Loading Dock.
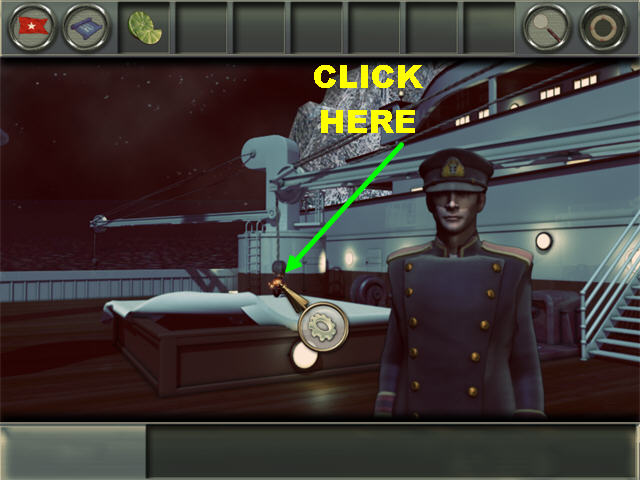
- Click on the spot shown in the screenshot.
- Go back to the Port Loading Dock.
- Zoom into the upper right.
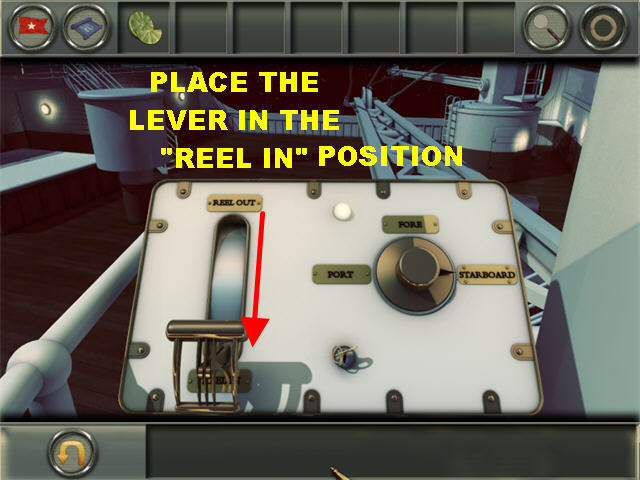
- Move the REEL LEVER to place it in the “Reel In” position.
- Go to the 1st Class Lounge.
- Click on the bar in the far left to trigger a puzzle.
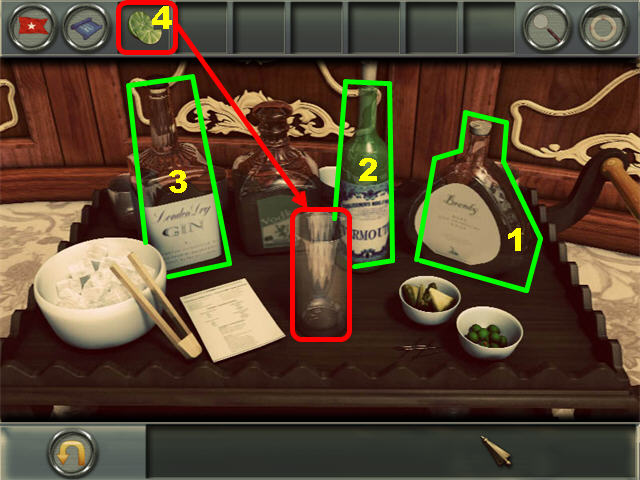
- Click on the bottles in the following order to make the Bermuda Highball for Robert:Brandy Vermouth Gin Place the LIMES on the glass.
- Give the BERMUDA HIGHBALL to Robert. If you hand Robert the wrong drink you will have to start over.
- Go to the Elevator to end the chapter.
Chapter 11: One Minute Later
Elevator
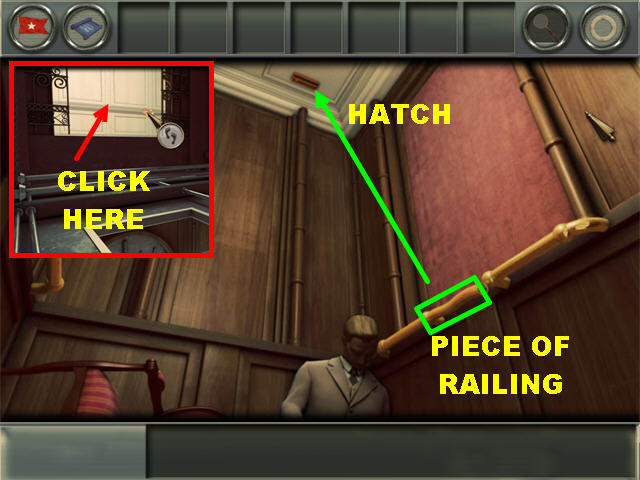
- Pick up the PIECE OF RAILING marked in green.
- Place the PIECE OF RAILING on the hatch on the ceiling and go through the hatch.
- Click on the white door once you go through the hatch and the doors will close behind you.
- Go to the Grand Staircase.
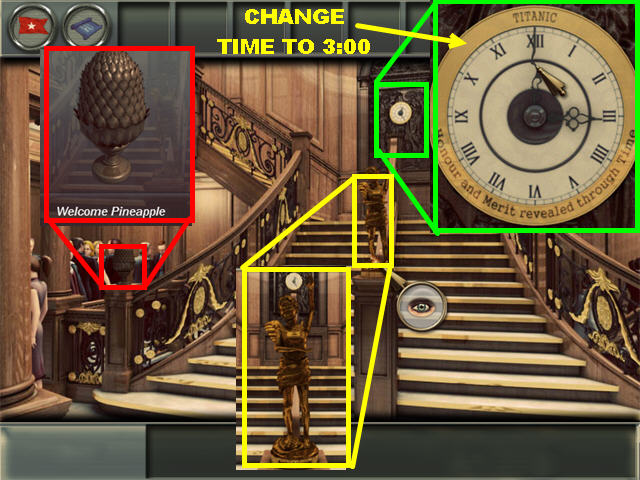
- Pick up the WELCOME PINEAPPLE on the left banister.
- Zoom into the statue on the steps.
- Zoom into the clock in the back of the room.
- Move the hands to reflect 3 o’clock.
- Go to the Hospital.
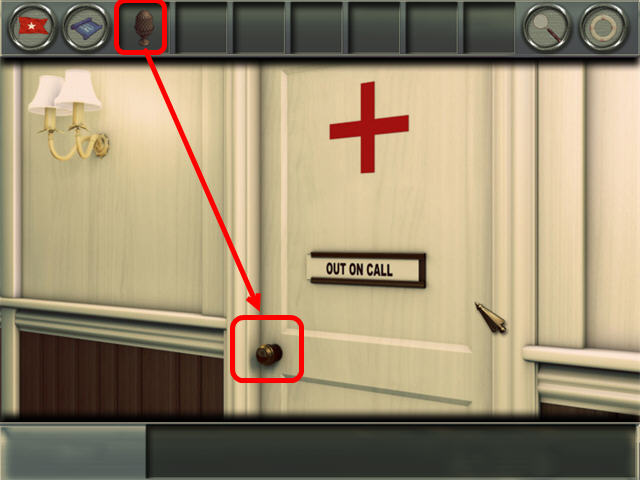
- Place the WELCOME PINEAPPLE on the doorknob to unlock the door.
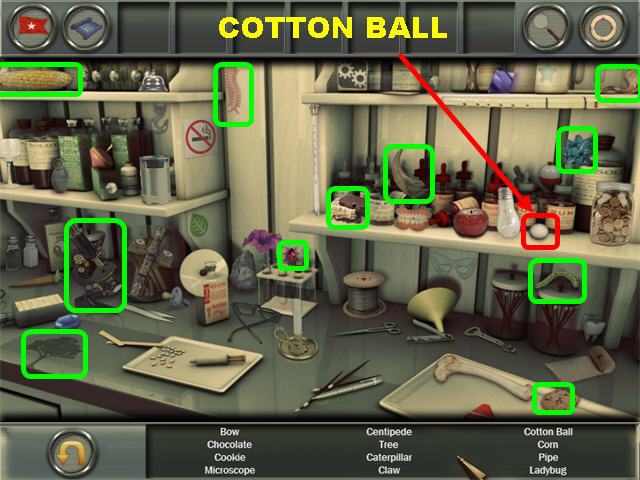
- Click on the shelves to trigger a Hidden Object Scene and pick up the COTTON BALL on the counter.
- Click on the closet on the left.
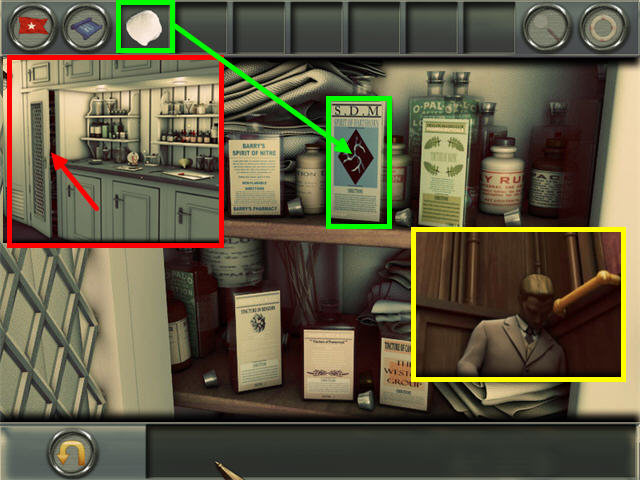
- Place the COTTON BALL on the Hartshorn bottle marked in green,
- Go to the elevator.
- Give the HARTSHORN MEDICATED COTTON BALL to Robert to end the chapter.
Chapter 12: April 15th, 1912 (1:00 AM)
3rd Class Bunks

- The doctor asks you to fetch certain items.
- Click on the closet and take the DUST PAN and the EMPTY BUCKET.
- Go to the Equipment Locker.
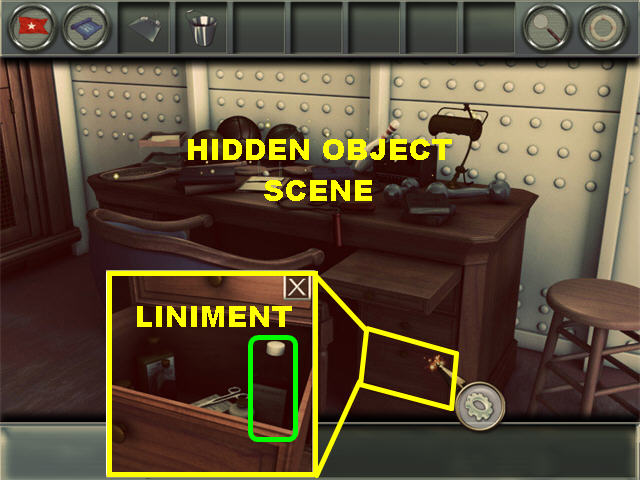
- Zoom into the lower right drawer and pick up the LINIMENT inside.
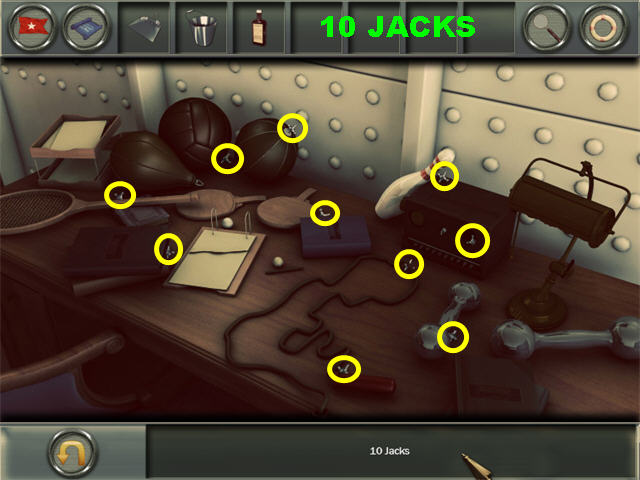
- Click on the desk to trigger a Hidden Object Scene and pick up the HANDFUL OF JACKS marked in yellow.
- Go to the Staircase.
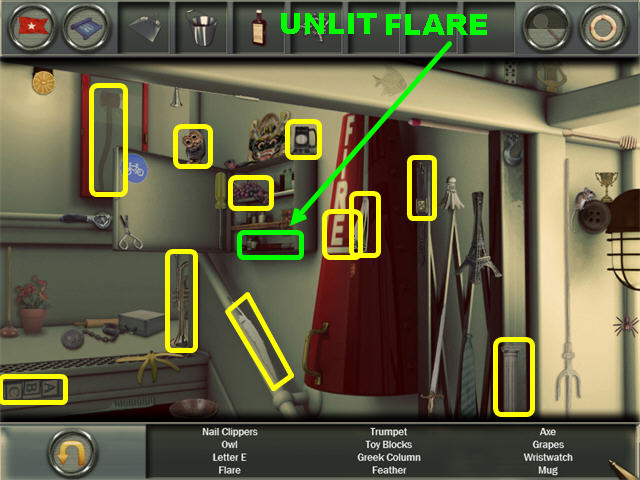
- Click on the first aid kit on the left side of the wall to trigger a Hidden Object Scene and pick up the UNLIT FLARE.
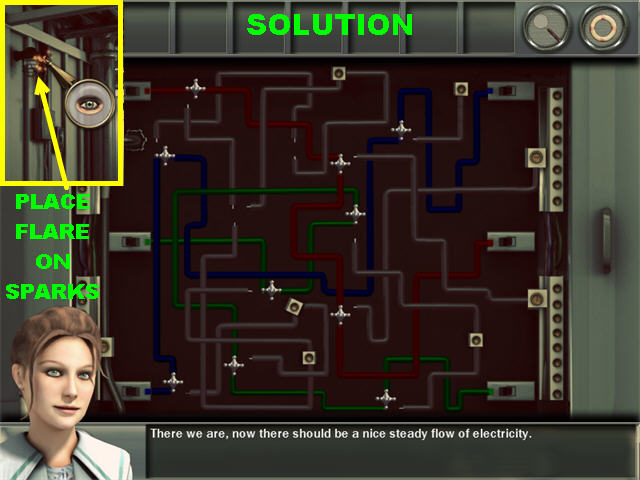
- Place the HANDFUL OF JACKS on the broken fuse box in the center to trigger a puzzle.
- Your goal is to place the jacks in the correct spots to complete the electrical circuit.
- The jacks will be automatically attached to your cursor, click on the areas in which you want to place them.
- To remove a jack, click on it and place it in a different spot.
- Please look at the screenshot for the solution. The jacks have to be placed in the exact spots or you will not solve it. Pay attention to the colored pipes running through the puzzle.
- Place the UNLIT FLARE on the sparks above the fuse box to obtain the LIT FLARE.
- Go to the Boiler Room.
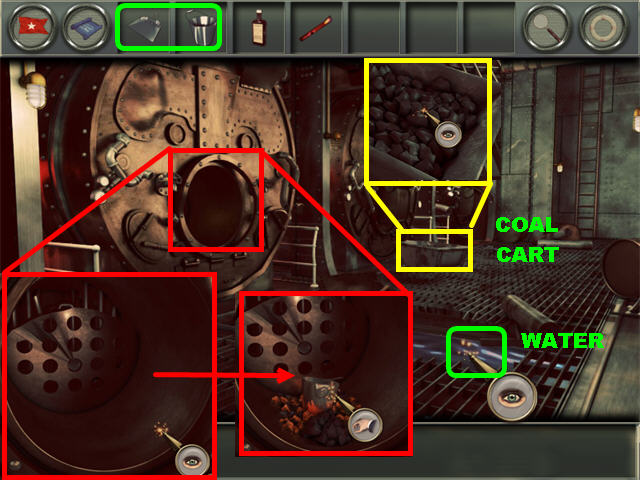
- Place the EMPTY BUCKET on the water to obtain a BUCKET OF WATER.
- Zoom into the coal cart on the right and place the DUSTPAN on the coal to obtain the PILE OF COAL.
- Zoom into the boiler and place the PILE OF COAL in the boiler.
- Place the LIT FLARE on the coal.
- Place the BUCKET OF WATER on the pile of coal.
- Zoom out of the close-up and return to it immediately.
- Pick up the BUCKET OF HOT WATER.
- Go to the 3rd Class Bunks.
- Give the LINIMENT and the BUCKET OF HOT WATER to the doctor to end the chapter.
Chapter 13: April 15th, 1912 (1:15 AM)
Baggage Hold
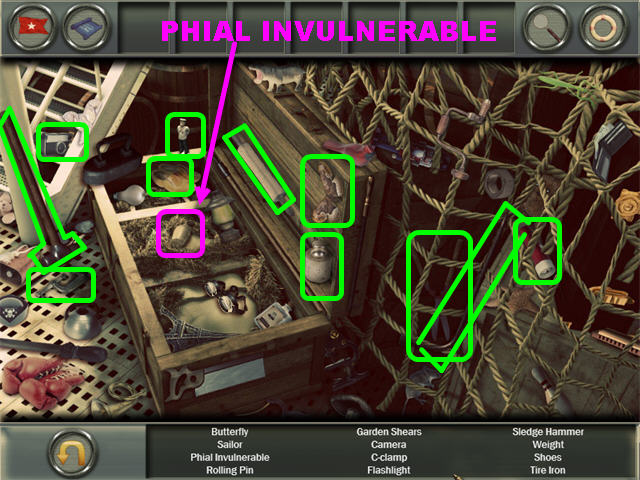
- Zoom into the crate to trigger a Hidden Object Scene and take the PHIAL INVULNERABLE.
- Go to the Potato Kitchen.
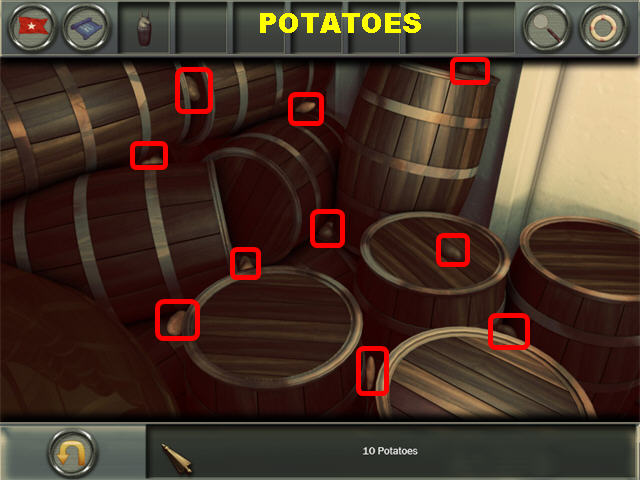
- Click on the barrels on the far left to trigger a Hidden Object Scene and pick up the POTATOES marked in red.
- Go up the steps.
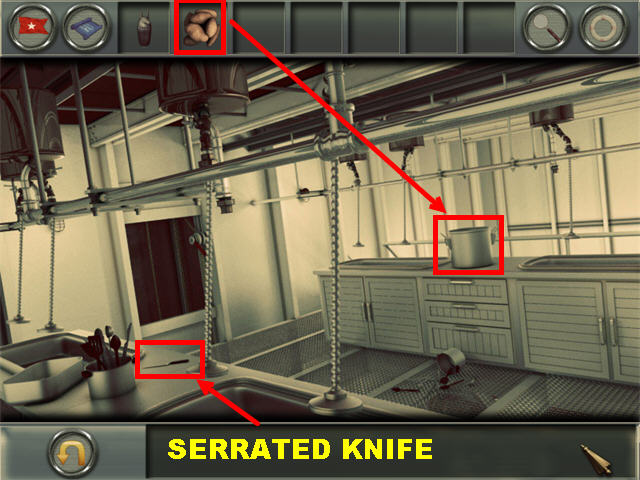
- Grab the SERRATED KNIFE in the lower left.
- Place the POTATOES on the pot on the right and click on the pot to obtain the POT OF POTATOES.
- Go back to the Baggage hold.
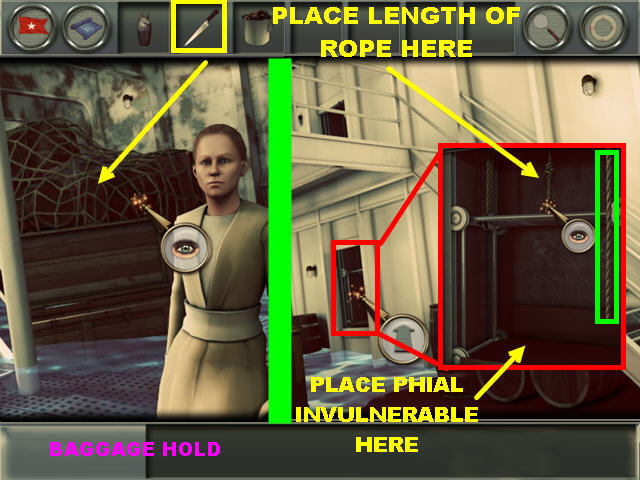
- Cut the rope in the back of the scene with the SERRATED KNIFE to obtain the LENGTH OF ROPE.
- Go back to the Potato Kitchen.
- Zoom into the dumbwaiter on the far left.
- Place the LENGTH OF ROPE in the top center.
- Click on the rope on the right to raise the dumbwaiter.
- Place the PHIAL INVULNERABLE in the spot marked with the green arrow.
- Go up the steps.
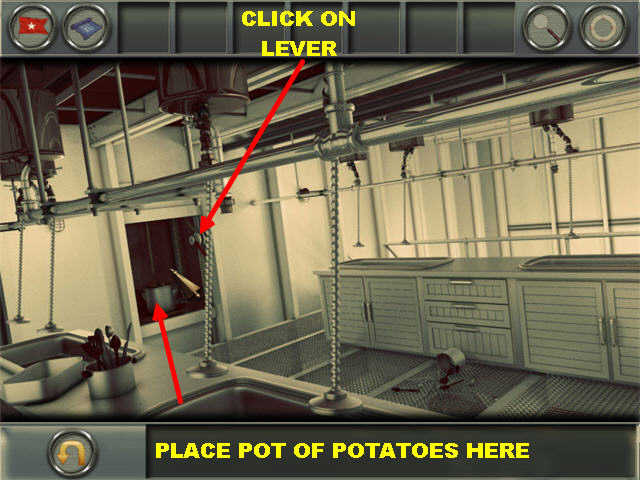
- Place the POT OF POTATOES on the dumbwaiter.
- Press the LEVER.
- Go back downstairs.
- Zoom into the dumbwaiter on the left.
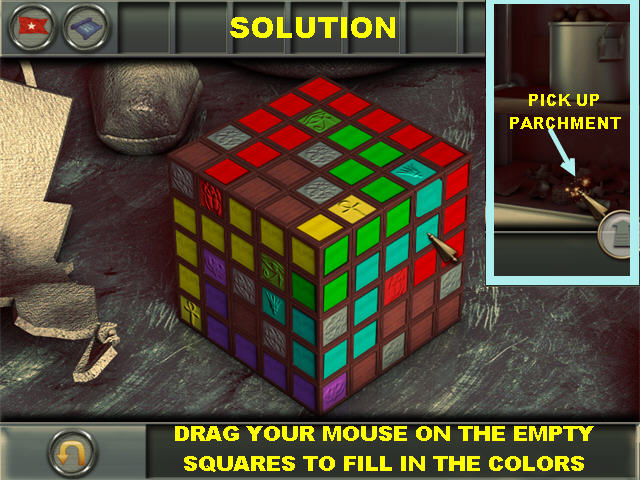
- Click on the BROKEN PHIAL to trigger a puzzle.
- Solve the cube puzzle by connecting all the matching colors without any colors overlapping.
- Click on the color you want to fill in and drag it over all the empty cubes to fill them in with colors.
- Click on the starting point of the color you want to delete so you can start over.
- The gray squares cannot be filled in.
- Please look at the screenshot for the solution.
- Pick up the PARCHMENT in the debris of the broken phial.
- Go back to the Baggage Hold.
- Give the PARCHMENT to Odette to end the chapter.
Chapter 14: April 15th, 1912 (1:30 AM)
Wine Cellar

- Talk to Montague and Odette.
- Go to the Hospital and speak to Janeck.
- Go to the Wine Cellar.
- Pick up the COLLAPSED WINE RACK on the right.
- Pick up the FAKE IVY wrapped around the columns.
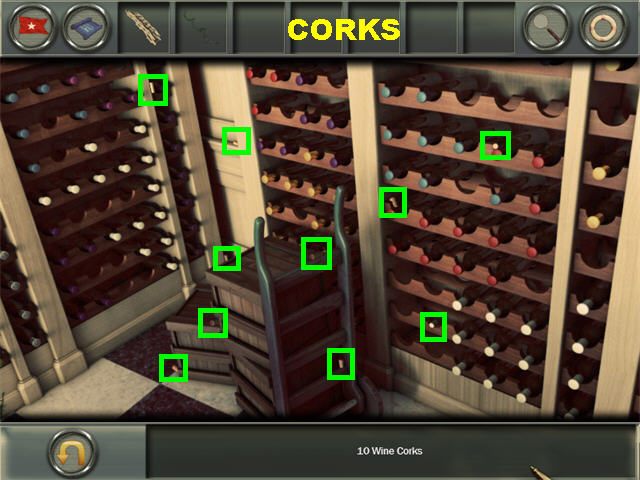
- Click on the crates to trigger a Hidden Object Scene and pick up the BUNCH OF CORKS marked in green.
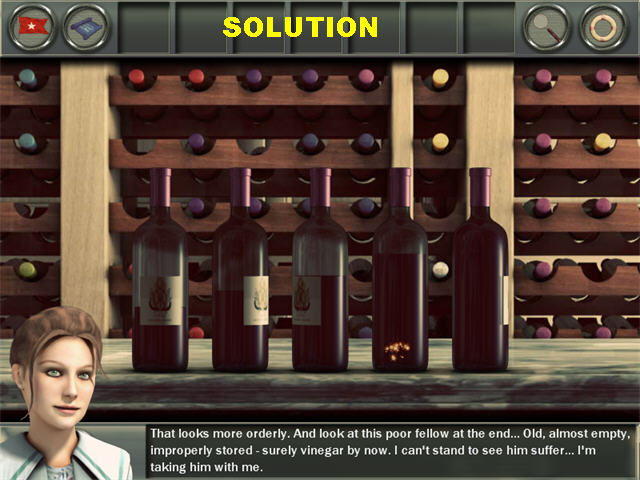
- Click on the wine bottles on the counter to trigger a puzzle.
- Your goal is to place the bottles in the correct order, from emptiest to fullest.
- Click on any 2 bottles to swap their position.
- Please look at the screenshot for the solution. The BOTTLE OF VINEGAR will go into inventory.
- Go to the Typesetter’s Office.
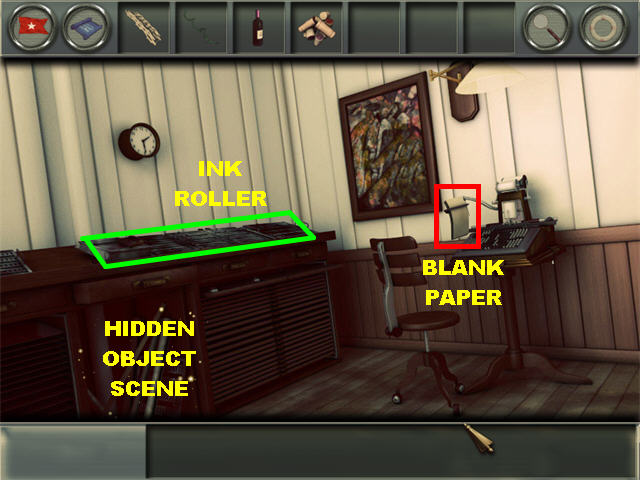
- Pick up the BLANK PAPER marked in red.
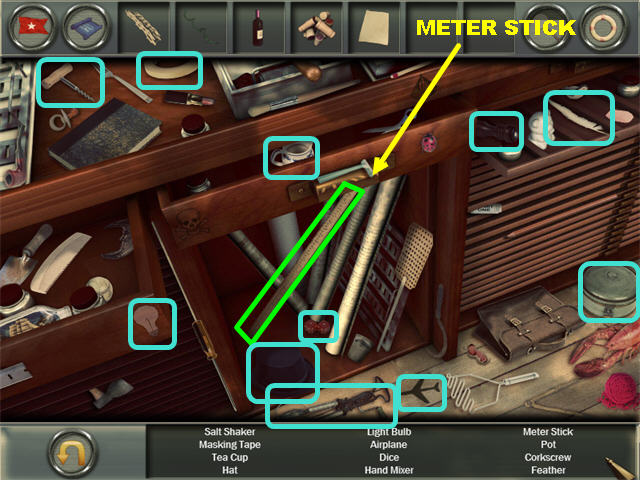
- Zoom into the lower left side of the desk to trigger a Hidden Object Scene and pick up the METER STICK.
- Click on the desk to trigger a puzzle.
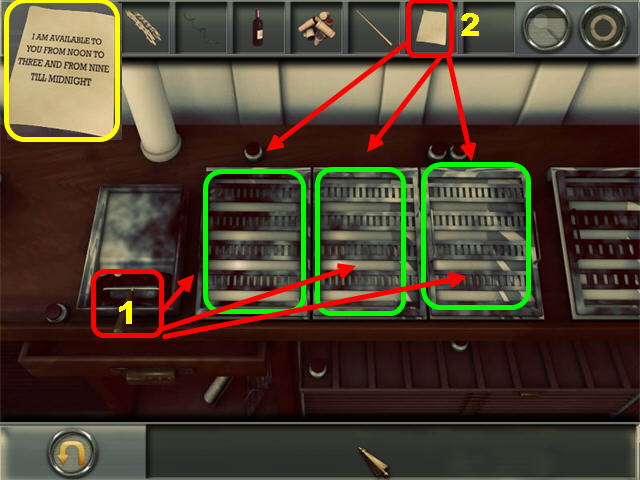
- Grab the INK ROLLER on the lower left.
- Place the INK ROLLER on all 3 trays.
- Place the BLANK PAPER on all 3 trays to receive partial messages. The final message says:”I AM AVAILABLE TO YOU FROM NOON TO THREE AND FROM NINE TILL MIDNIGHT.”
- Go to the Potato Kitchen.
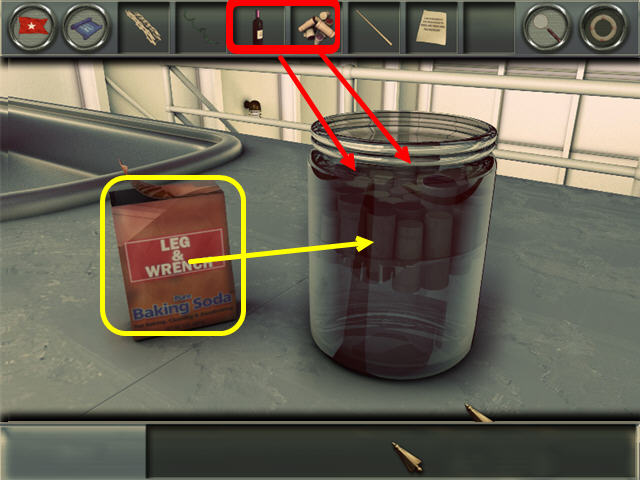
- Place the BOTTLE OF VINEGAR and the BUNCH OF CORKS on the jar.
- Pick up the BAKING SODA and place it on the jar to obtain the MAKESHIFT FIRE EXTINGUISHER.
- Go to the Hospital.
- Place the MAKESHIFT FIRE EXTINGUISHER on the fire.
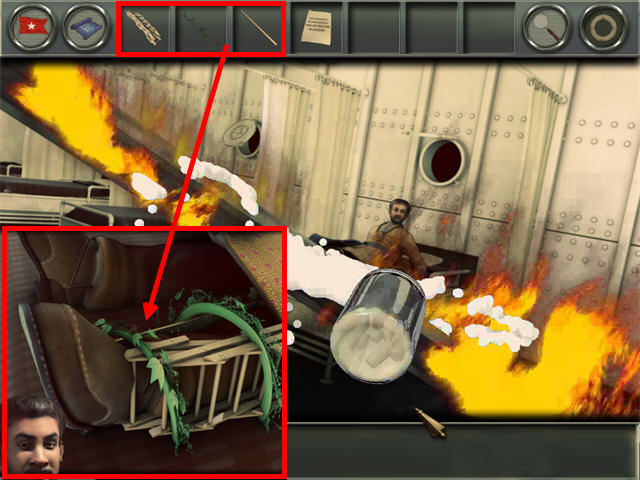
- Click on Janeck for a closer look at his leg.
- Place the METER STICK, the COLLAPSED WINE RACK and the FAKE IVY on Janeck’s leg.
- Go to the 2nd Class Staircase.
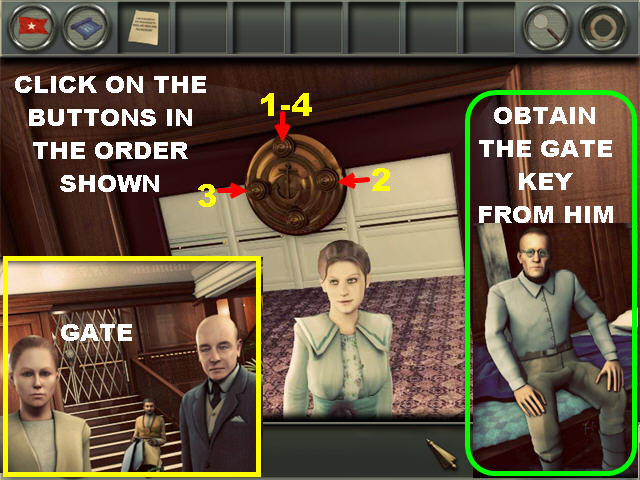
- Zoom into the mirror and click on the buttons in the order marked in the screenshot to unlock the door.
- Mr. Tavalouris will give you the GATE KEY after you talk to him behind the mirror.
- Click on the “Back Button” in the lower right to go back to the 2nd Class Staircase.
- Place the GATE KEY on the gate to end the chapter.
Chapter 15: April 15th, 1912 (1:45 AM)
1ST Class Promenade
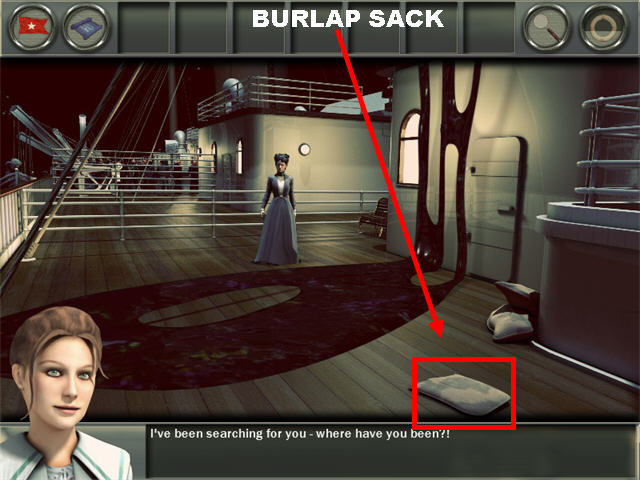
- Talk to the Vincent and go to the 1st Class Promenade.
- Pick up the BURLAP SACK in the lower right.
- Go to the Gymnasium and talk to George.
- Go to the Wheel Room.
- Talk to Thomas 2 times and zoom into the desk once he disappears.
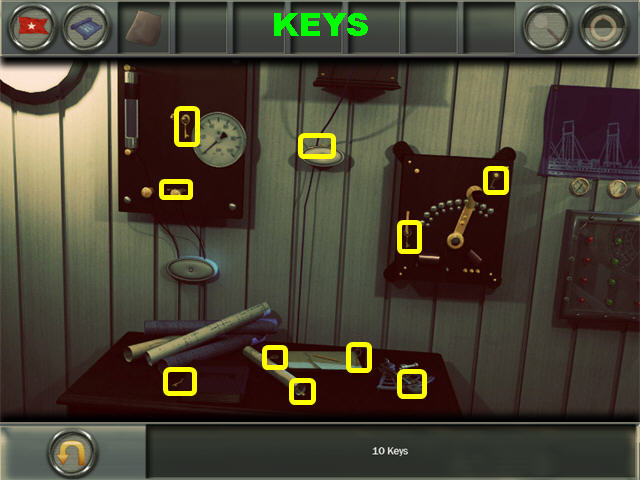
- Zoom into the desk and find the BUNCH OF KEYS marked in yellow.
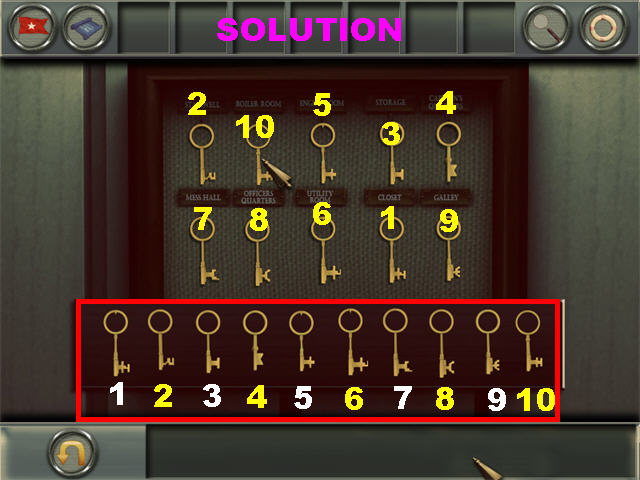
- Zoom into the pegboard below the light on the right.
- Put the keys into the appropriate pegs.
- Please look at the screenshot for the solution. The KEY TO CAPTAIN’S SITTING ROOM will be added to inventory.
- Zoom into the switches on the back wall.
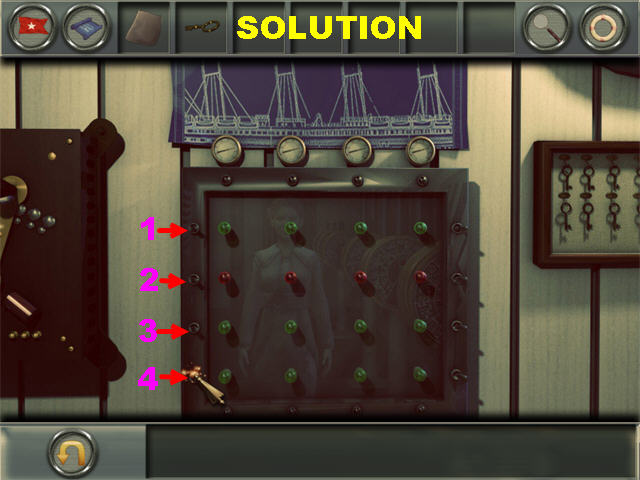
- You have to click on the switches in the correct order.
- Click on the 4 switches on the left from top to bottom. Please look at the screenshot for the solution.
- Go to the Captain’s Sitting Room.
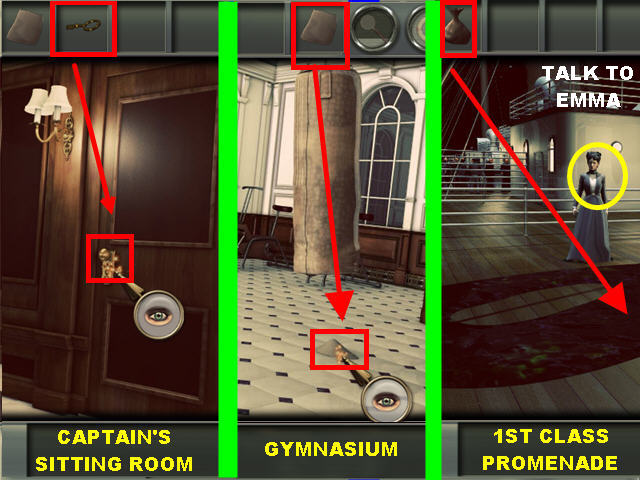
- Place the CAPTAIN’S SITTING ROOM KEY on the doorknob. Go inside and talk to Robert and the Captain.
- Go to the Gymnasium.
- Click on the punching bag.
- Place the BURLAP SACK on the sand to obtain the BAG OF SAND.
- Go to the 1st Class Promenade.
- Place the BAG OF SAND on the oil and the talk to Emma until she leaves the scene.
- Go to the Grand Staircase.
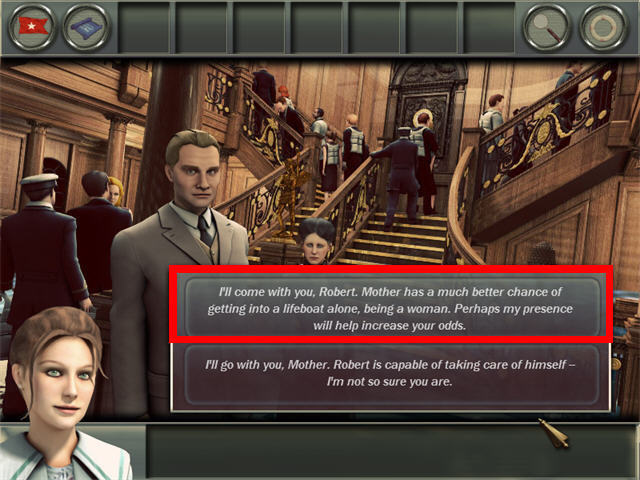
- Margie has to choose who she wants to go with.
- For the purposes of the guide we chose to go with Robert, Margie’s husband.
Chapter 16: April 15th, 1912 (2:00 AM) - Robert
Robert
- NOTE: If you chose to go with Emma in the previous chapter, please scroll down to the next section for that part of the walkthrough.
- Go to the Lifeboats and talk to Thomas and he will give you the GALLEY KEY.
- Go to the Galley.
- Place the GALLEY KEY on the door.
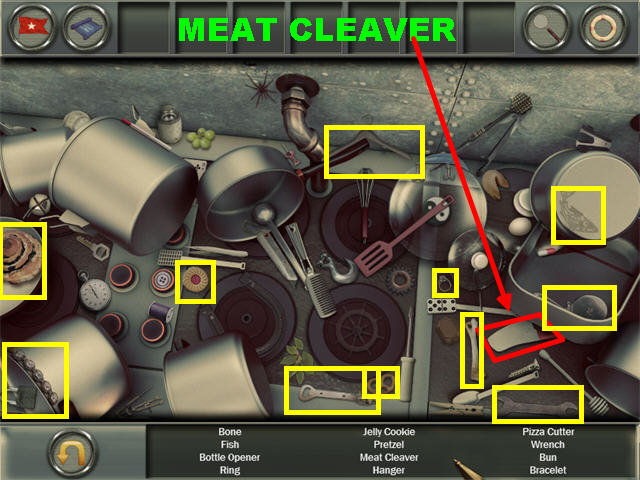
- Click on the Hidden Object scene and pick up the CLEAVER.
- Go to the Hallway Fire Station.
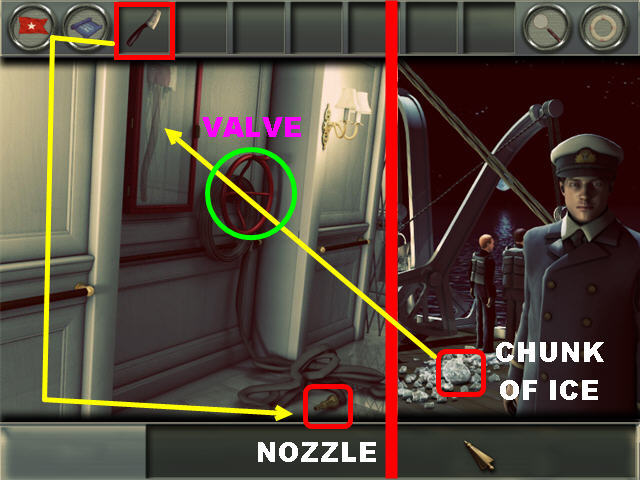
- Click on the Red Valve on the back wall to loosen the hose.
- Place the CLEAVER on the nozzle to obtain the METAL NOZZLE.
- Go to the Lifeboats.
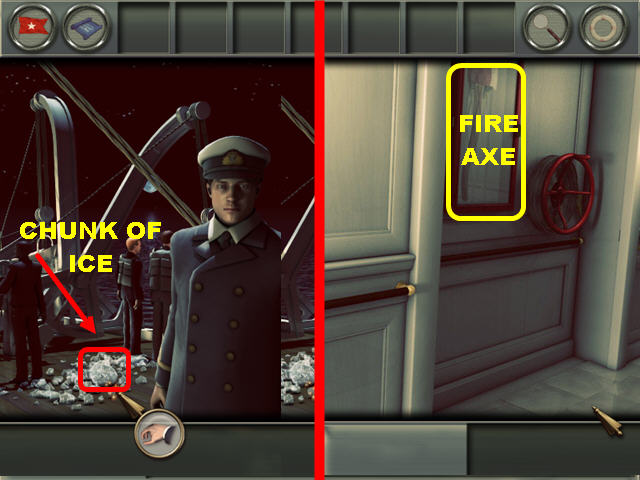
- Pick up the CHUNK OF ICE in the lower center.
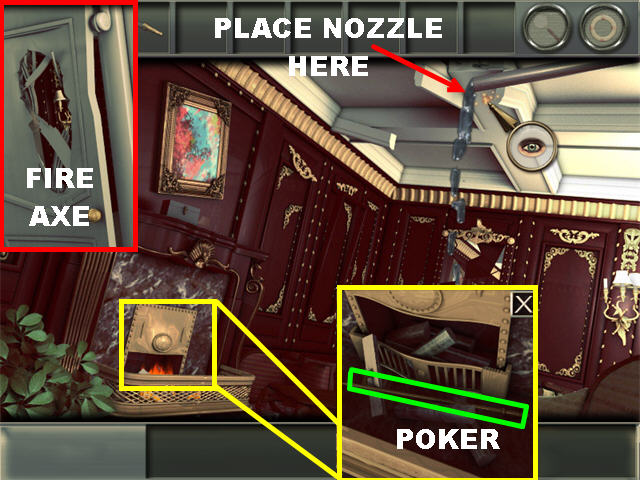
- Go back to the Hallway Fire Station.
- Place the CHUNK OF ICE on the glass case to break it. Pick up the FIRE AXE inside the case.
- Go to Robert’s Stateroom.
- Place the FIRE AXE on the door and click on the door to enter.
- Use the METAL NOZZLE on the leaking pipe in the ceiling.
- Click on the fireplace and pick up the POKER.
- Use the POKER on the lockbox above the mantle to trigger a Hidden Object Scene.
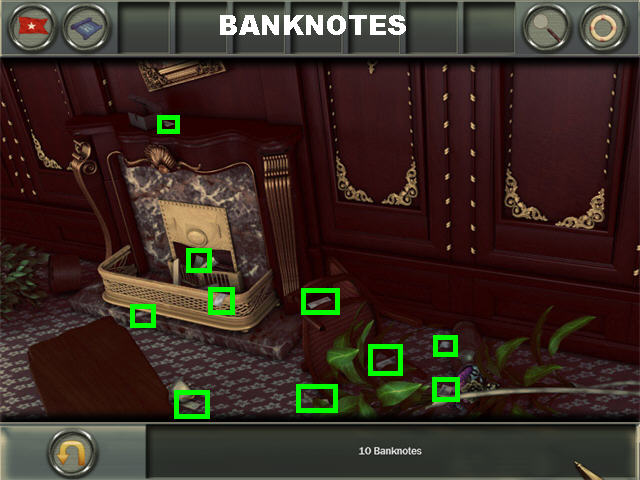
- Pick up the 10 BANKNOTES marked in red.
- Go to the Lifeboats.
- Give the Banknotes to Robert to end the chapter.
- Click on the BONUS button in the main menu to access a bonus level.
Chapter 17: April 15th, 1912 (2:00 AM) - Emma
Emma
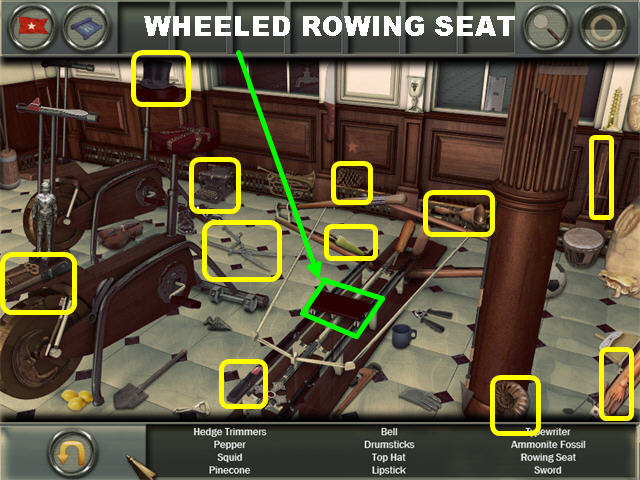
- Go to the Gymnasium.
- Click on the rowing seat in the lower left to trigger a Hidden Object Scene and pick up the WHEELED ROWING SEAT.
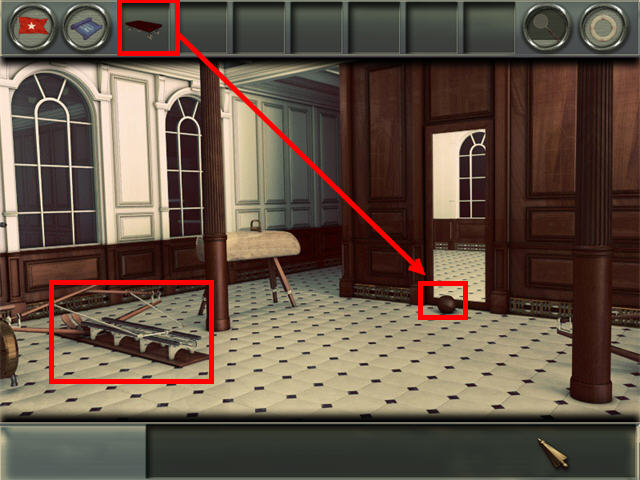
- Place the WHEELED ROWING SEAT on the medicine ball in front of the mirror.
- Click on the MEDICINE BALL 2 times so it can break the mirror.
- Click on the broken mirror to enter the tunnel.
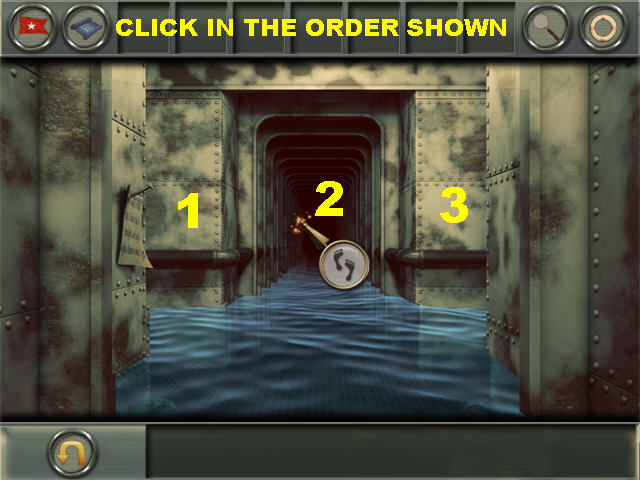
- Click on the tunnels from left to right as shown in the screenshot and you will end up in the 2nd Class Staircase.
- Go to the Lifeboats.
- Pick up the CHUNK OF ICE on the ground.
- Go to the Hallway Fire Station.
- Place the CHUNK OF ICE on the glass case to break it.
- Pick up the FIRE AXE inside the case.
- Go to the Hospital.
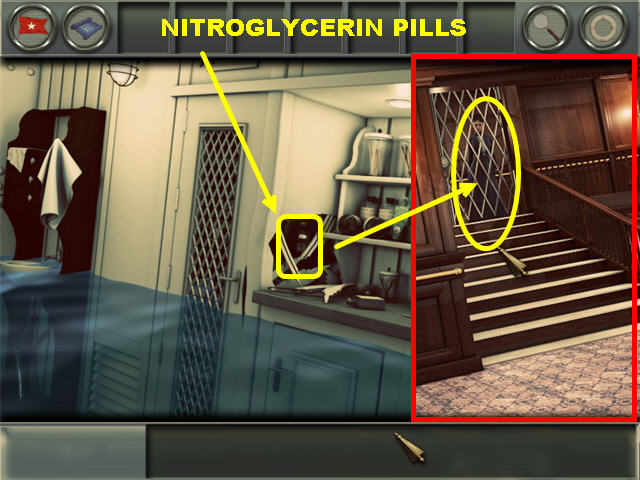
- Place the FIRE AXE on the side of the medicine cabinet.
- Take the NITROGLYCERIN PILLS from the cabinet.
- Go to the 2nd Class Staircase.
- Give the PILLS to Emma behind the gate.
- Go to the Lifeboats to end the chapter.
- Click on the BONUS button in the main menu to access a bonus level.
Bonus Level: 97 Years Later
Wheel Room
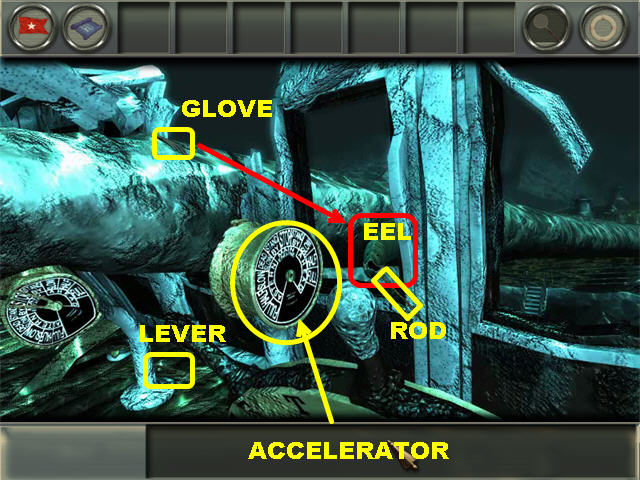
- Pick up the GLOVE in the upper left.
- Pick up the LEVER in the lower left.
- Place the GLOVE on the eel marked in red.
- Grab the rod that was below the eel.
- Place the ROD and the LEVER on the accelerator.
- Click on the lever.
- Go to the Captain’s Sitting Room.
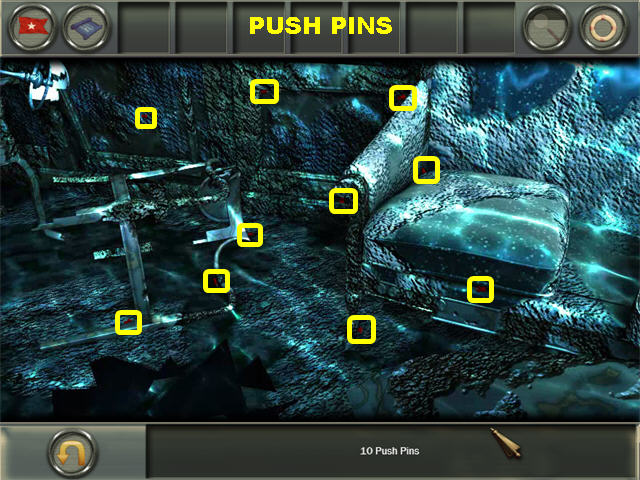
- Zoom into the Hidden Object Scene on the left and pick up the BUNCH OF PINS in the scene.
- Place the BUNCH OF PINS on the map on the back wall to trigger a puzzle.
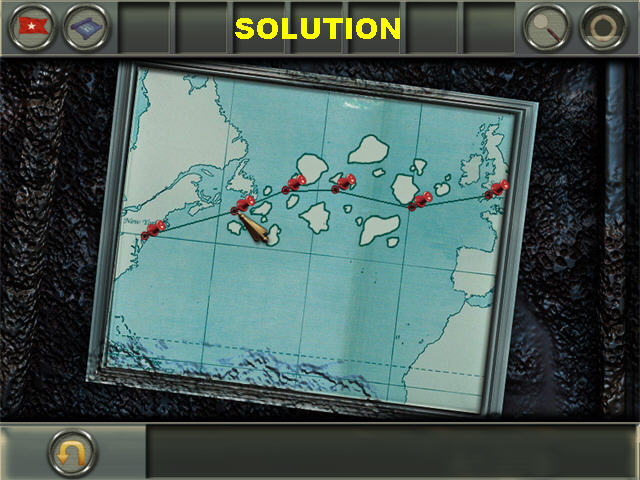
- You must chart a new course for the Titanic by placing the push pins in the right spots.
- Start with the push pin in the upper right. Click on one of the dots to place your pin.
- As you place each pin, new dots will appear, keep placing pins until you complete the course.
- Please look at the screenshot for the solution.
- Go to the Marconi Receiving Room.
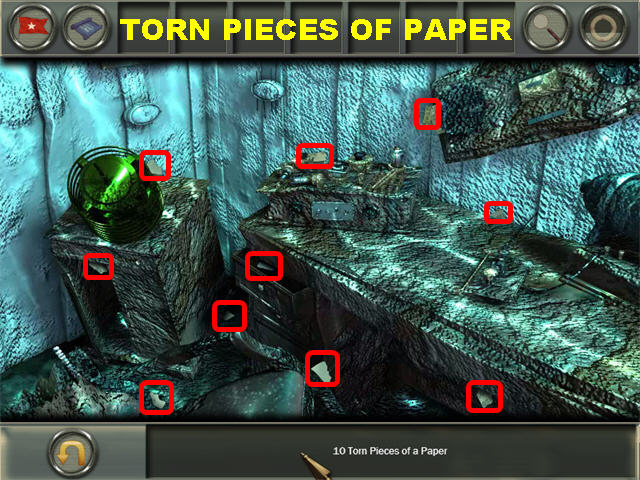
- Click on the Marconi Device.
- Pick up the 10 TORN PIECES OF PAPER in the scene and the MESSAGE will be added to inventory.
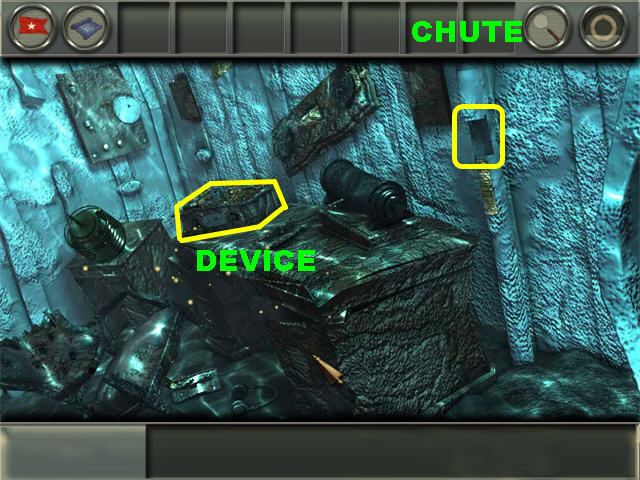
- Place the MESSAGE on the chute on the upper right.
- Go to the Baggage Hold.

- Pick up the ACETYLENE TORCH in the lower right.
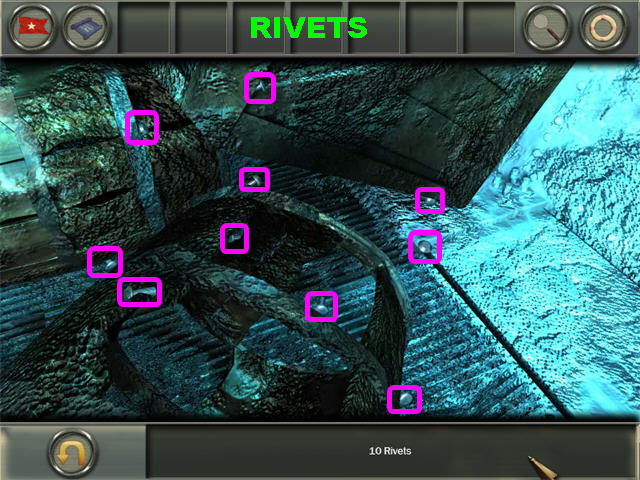
- Zoom into the crate on the lower left and find the 10 RIVETS marked in red.
- Place the RIVETS on the hull.
- Place the ACETYLENE TORCH on the hull.
- Congratulations! You’ve completed Hidden Mysteries Titanic: Secrets of the Fateful Voyage!
Created at: 2010-03-29