

Walkthrough Menu
General Tips
- This is an Adventure Game.
- Hotel is a standard point and click adventure that can be played entirely by mouse with some optional keyboard shortcuts.
- You can adjust your audio and video settings in the Settings Option in the Main Menu. There are multiple customizations you can make including turning off footsteps.
- The magnifying cursor means you can look closer and investigate an object and get more details.
- The hand cursor means you can pick up/use something. Items that are picked up will go into your inventory.
- To combine items, click on the first item and then click on the one you want to combine it with.
- A walking icon cursor means you can walk in that direction. You can speed up walking by pressing the Spacebar on your keyboard.
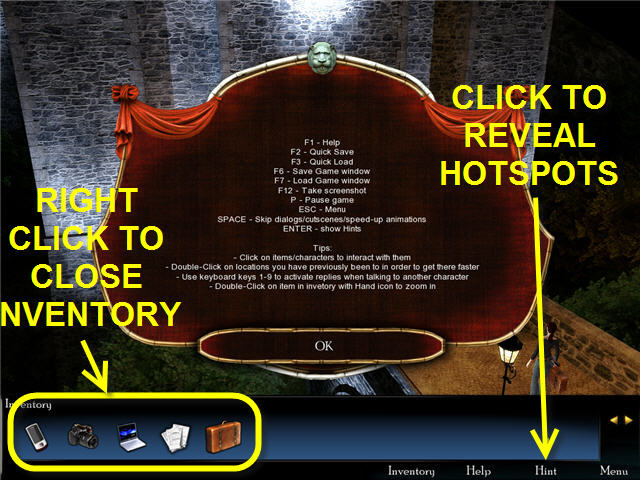
- If you have difficulty backing out of a scene, be sure the Inventory Bar is closed. Right-Click to close it.
- You can get a hint by clicking on the hint button on the bottom right or you can press the Enter key on the keyboard.
- Completed topics will appear in yellow on the conversation trees.
- Some hotspots do not show up and you’ll need to hit the Hint button to show you where something needs to be done.
- The game auto-saves on Exit and you can resume on start up or you can Save and Load games.
Day 1
- Click on and take note of the cardboard boxes full of office supplies on walkway to the castle.
Castle Gate
- Walk towards the Castle Gates and look at Lion Head to the left of the gates.
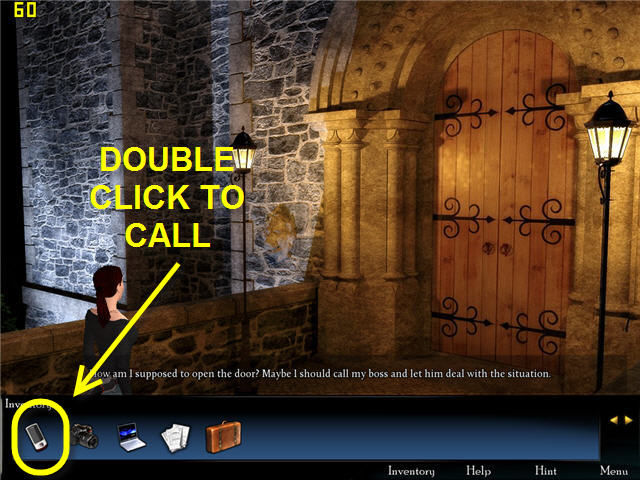
- Click on the castle gate and notice it is locked. Biggi states she should maybe call her boss.
- Open Inventory and double-click on the cell phone and Biggi will automatically dial her Boss.
- Click on the “Next” in the middle bottom of screen to advance the dialogue.
Castle Garden
- Approach the fountain and overhear a conversation regarding a missing basement key and then talk to Matisse.
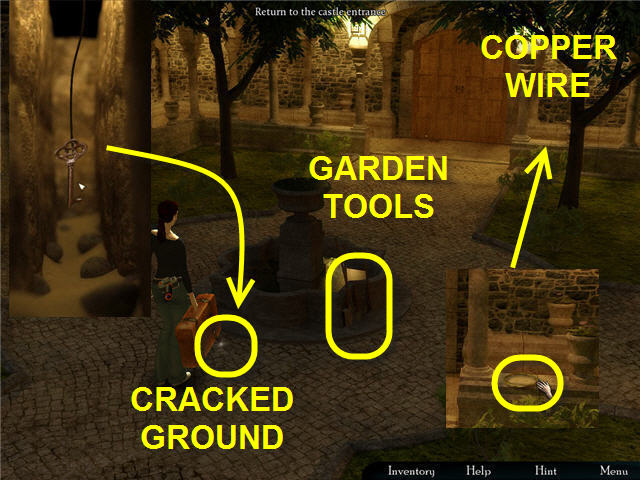
- Click on the cracked ground by Biggi’s feet and take note of an iron key stuck in there.
- Walk to the hotel entrance and pick up COPPER WIRE located to the right of the archway pillar.
- Use the LONG COPPER WIRE from inventory on the cracked ground by the fountain and hook the BASEMENT KEY. Go slowly up the middle to avoid hitting the sides and dropping the key.
- Note the garden tools to the right of the fountain.
- Enter the Hotel.
Hotel Lobby
- Walk up to the reception desk and speak to the Butler. Exhaust all conversation options.
- The Butler gives you a HOTEL MEMORABILIA in the shape of a lion head.
- After the Butler leaves, check fax machine on counter and then you can take your ROOM KEY from the cabinet behind the reception desk. Your room number is 27.
- Take the stairs on the left of the reception desk to go to your room.
Biggi’s Room
- Use ROOM KEY on Door #27 and then click to enter.
- Note the Smoke Alarm above the grandfather clock.
- Place your SUITCASE from your inventory in the wardrobe and your LAPTOP on the table next to the phone. There is no hotspot for the LAPTOP; you will need to push the Hint button to show the area.
- You can now head down to the reception area.
Fax Machine
- Speak to Matisse sitting in the lobby on the left. He tells you the fax machine is broken and he is waiting for a fax.
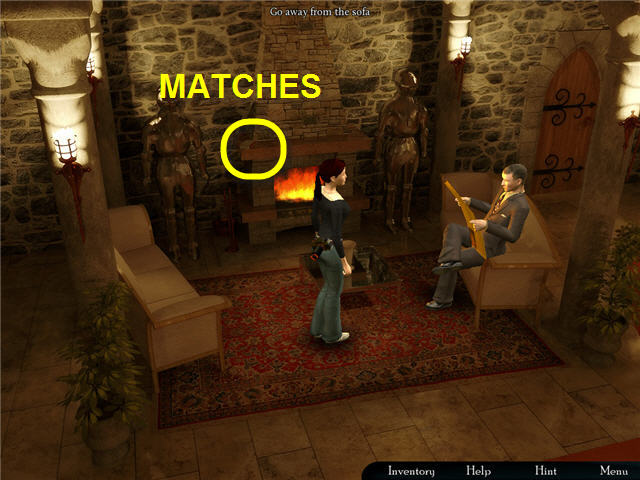
- Pick up the MATCHES on the left side of the fireplace mantle.
- Time to get the office supplies to fix the fax machine. Head out of the lobby into the fountain area and exit the castle to return to the bridge leading to the castle gate.
- Click on the boxes on the bridge to get FAX PAPER in inventory.
- Head back into the Castle and pick up the AXE from the gardening tools on the right of the fountain before proceeding on to the fax machine.
- Use FAX PAPER ROLLS from inventory on the fax machine at reception desk.
- Take the fax for Matisse from the fax machine. You will automatically have a copy for yourself in your Inventory as well as Matisse’s copy. Double-click on FAX FROM HOSPITAL in inventory to read.
- Speak to Matisse in the lobby again and you will automatically give him the FAX FROM HOSPITAL.
- Exit the lobby via the stairs on the right of the reception desk.
Basement
- There are two locked doors and one open door. Go through the open door on the right to go to the basement.
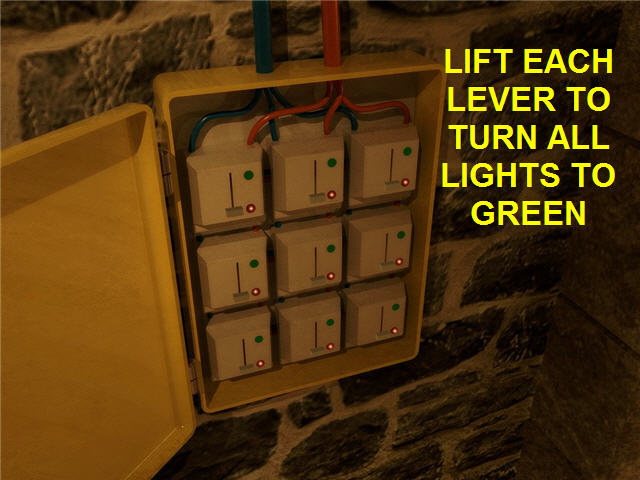
- It’s too dark to proceed so you will need to fix the circuit breakers in the fuse box on the left.
- The objective is to get all the breakers to light green. If you start at one end and just click along in order a few will go red and you need only to click them again to get all lit green at one time.
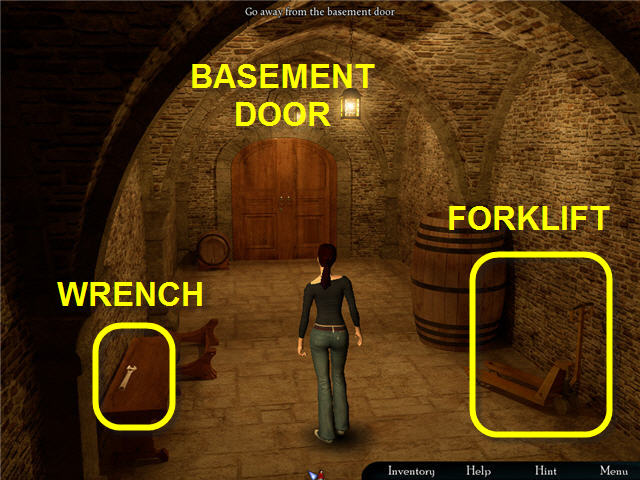
- Head down the newly lit stairs and pick up the WRENCH on the bench on the left and the FORKLIFT on the right.
- Use the BASEMENT KEY from inventory on the basement door. Click to enter and watch the cutscene.
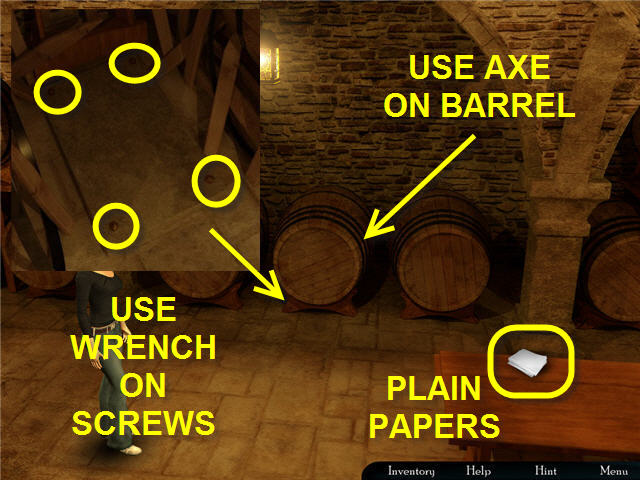
- Step forward into the room and pick up the PLAIN PAPERS from the table.
- Use your AXE from inventory on the barrel in which the vision disappeared into.
- Step forward into the space where the barrel was and look at the stone plate held down by 4 screws.
- Use the WRENCH from inventory on the 4 screws. You must repeat the process of retrieving the WRENCH from inventory for each screw.
- Use the FORKLIFT on the stone plate to reveal a symbol engraved in the stone underneath.
- Take DIGITAL CAMERA from inventory and take a photo of the engraved symbol. The PHOTO OF A SYMBOL will automatically be added to your inventory.
Biggi’s Room
- Head back upstairs to Room #27 via the staircase on the left of the reception area. You will no longer need the key to get in your room provided you stopped in there earlier.
- Use the PHOTO OF A SYMBOL on the LAPTOP and Biggi will send it off to a friend. You will be alerted when you have mail.
Crime Scene
- Exit Room 27 and head right down the hall towards you by clicking at the bottom of the screen.
- Knock on the door with the crime scene tape to speak to Matisse. You have to click on “Next” on the bottom of the screen after the *knock knock* to talk. He is removing all the evidence and you will need to stop him.
- Go back to your room and use the MATCHES from your inventory on the PLAIN PAPERS and Biggi will automatically use it on the smoke alarm above the clock. Watch Matisse run from the hotel.
- Exit room and click on the bottom of the hall and enter the now open and empty room with the crime scene tape.
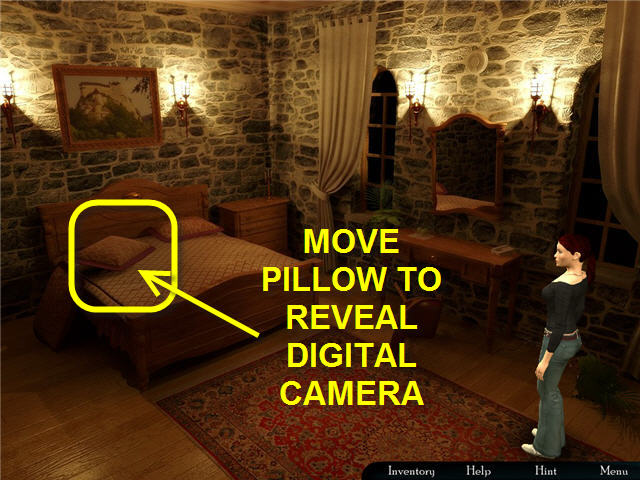
- Move the out of place pillow on the left side of the bed to reveal a DIGITAL CAMERA. Take the DIGITAL CAMERA and return to your room.
Dreams
- Take the victims DIGITAL CAMERA from your inventory and use on the laptop. Look at photo and click to exit.
- Speak with Mr. Greenleaf and then retire for the evening.
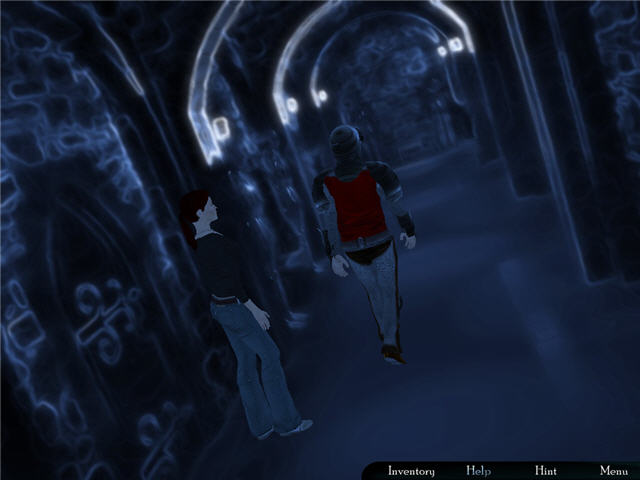
- Wake in a dream state and exit the room. You will see a ghostly vision heading down the hall. Follow him down the hallways. If you lost him and forget where he went, press the Hint button and it will guide you.
- Approach the statue and look at the glowing eyes.
Day 2
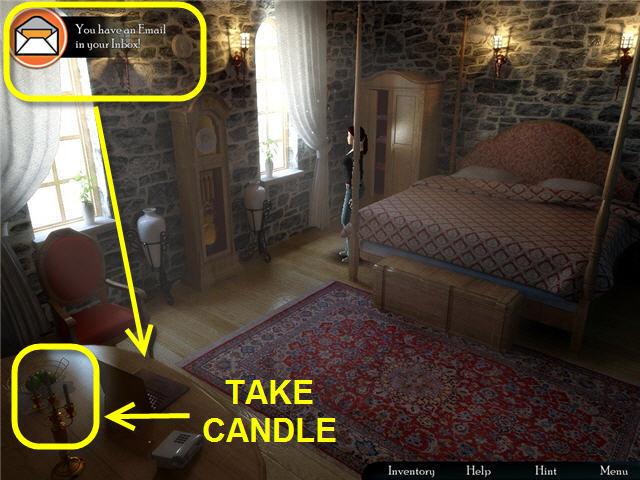
- You wake up and have an email waiting for you. Click on laptop to read your email.
- Take CANDLE from candelabra on the table behind the laptop and exit room.
- Walk down the hall following the path that the vision the night before walked. Walk towards the suits of armor and turn right.
- Approach the statue that the vision disappeared into and look at eye sockets. Note that the statue appears to be missing its eyes.
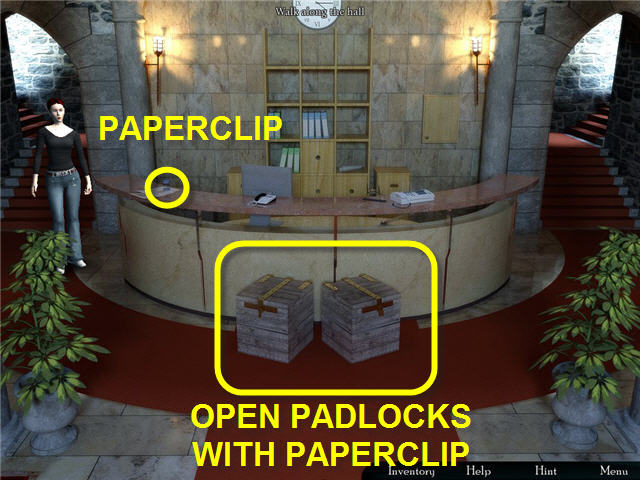
- Head down to the reception area and approach and examine the two boxes. Click on the padlocks.
- Take a PAPERCLIP from the reception desk and use the PAPERCLIP from inventory on each of the padlocks to open the boxes.
- Take the DIGITAL CAMERA from inventory and take a photo of the Egyptian plates to get PLATES PHOTO in inventory.
- Head back up to ROOM 27 and use PLATES PHOTO on the laptop.
Cellar
- Go back down to the reception area and head out to the courtyard.
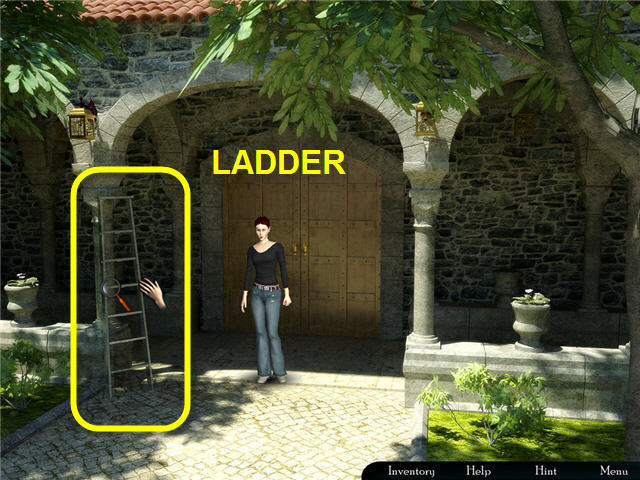
- Take the LADDER that is leaning against the arch on the left.
- Head back inside to the reception desk and go up the stairs to the right. Go through the open door to the right and head into the basement.
- Approach the table and then walk to the right to reach the wine racks.
- Click on the center wine rack and remove a BOTTLE OF WINE.
- Exit to the right and walk into the area with the engraved stone.
- Use the BOTTLE OF WINE from inventory on the engraved stone and a hole appears.
- Use the LADDER on the hole, but it’s still too dark.
- Use the MATCHES on the CANDLE in inventory to get a LIT CANDLE.
- Head down the hole and check out the cellar. You will need to move the cursor around to see in the dark.
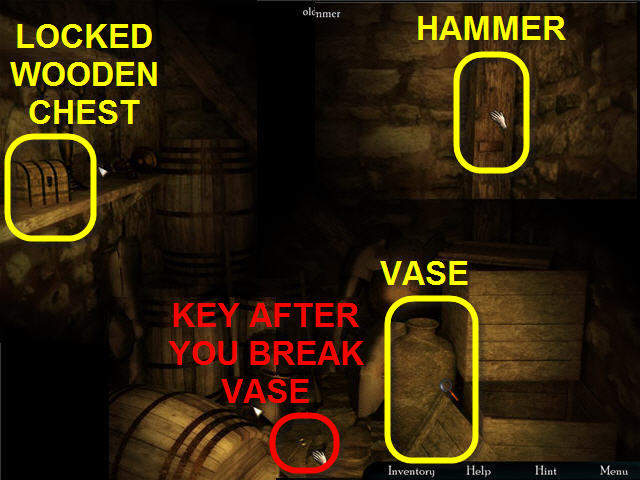
- Take HAMMER from beam on the back right wall.
- Take small chest from shelf on the left to get LOCKED WOODEN CHEST.
- Use HAMMER from inventory on old vase on the floor and get CHEST KEY from the floor near the armor.
- Use the CHEST KEY on the LOCKED WOODEN CHEST in your inventory and get a BLUE ROUND CRYSTAL.
- Climb out of the cellar by clicking on the upper left of the ladder in the back.
Statue
- Head back to the reception area and up the staircase on the left.
- Follow the path that the ghostly vision took and head right to the suits of armor and then right again and approach the statue with the missing eyes.
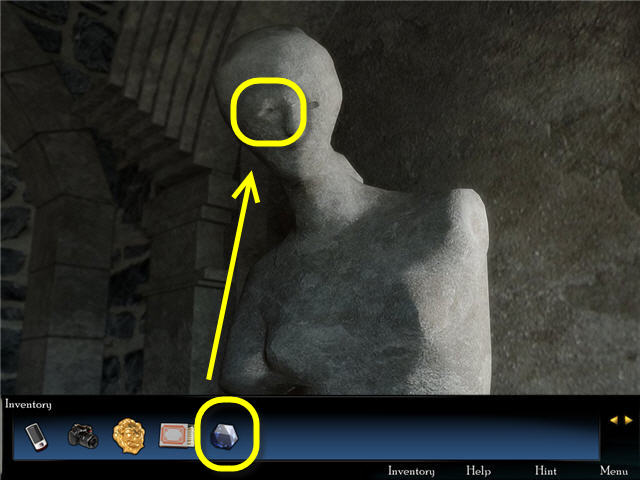
- Use the BLUE ROUND CRYSTAL from inventory on the eye socket.
- Go back down to the reception desk and speak to the Butler. Exhaust all the conversation options.
The Office
- Head up the stairwell to the right and enter the now opened owner’s office door in the middle of the fountain room.
- Exhaust all conversation options with the owner, Mr. Greenleaf.
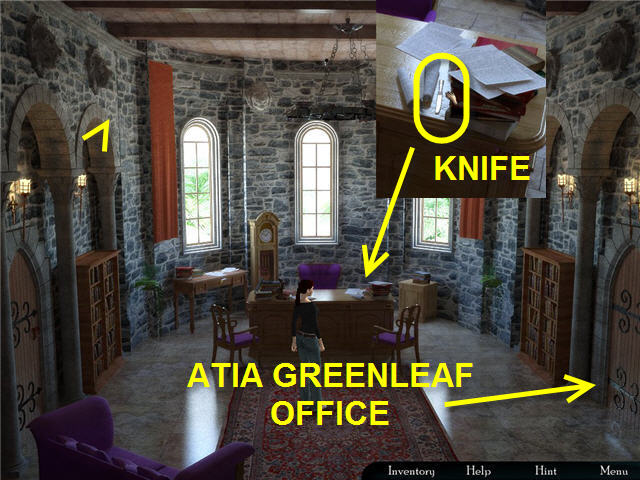
- Walk forward to the desk and take the LETTER KNIFE next to the stack of books on the right side of desk and get KNIFE in inventory.
- Back away from the desk and walk to the door on the right and enter Mr. Greenleaf’s wife’s office.

- Check out the 4 mirrors in the room, 2 on each side of the room. Note the triangular spindles with a round hole in the middle of each.
- Look above the windows at the triangular shaped decorative elements. Notice that they are pointing different directions.
- Approach the desk and use the KNIFE in inventory on the desk drawer.
- Take the WHITE MARBLES from the desk drawer and then step away from desk by clicking on the top of the screen.
- Place a WHITE MARBLE from your inventory and place in the center of each spindle under the mirrors and rotate to match the triangles above the windows.
- Starting on the left front mirror and moving clockwise. The triangles should face right, up (no need to move but place marble in the spindle anyway), down and right. See screenshot above for correct positioning,.
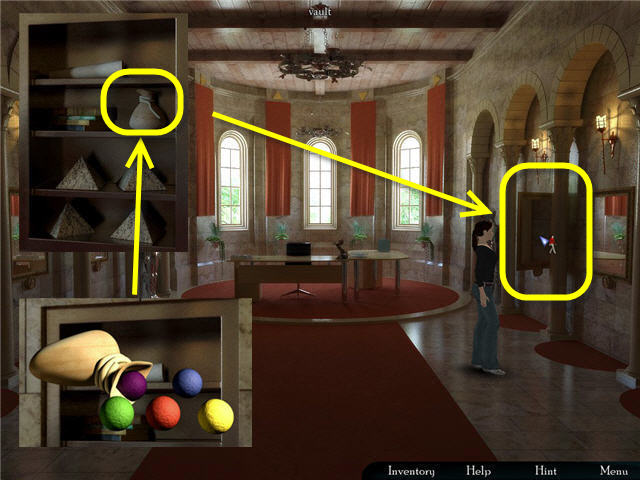
- When done correctly, a secret vault opens behind mirror #3.
- Click on the open vault and take the BAG to get a SMALL LEATHER BAG WITH 5 COLORED MARBLES IN IT in inventory. Double click on them in inventory to zoom in and get a closer look.
- Leave the wife’s office and exit through the owner’s office and encounter Matisse.
- Exhaust all conversation and you will automatically be transported to the ballroom to hear Matisse’s closure on the case.
- You have Mail! Head to your room and check your laptop. Speak to your Boss and you will automatically wake up to a new day.
Day 3
Atia
- Head down to the reception desk and speak with the Butler.
- Head up the right staircase and enter the newly opened restaurant door on the left.
- Speak with Mrs. Atia Greenleaf and exhaust all conversation options.
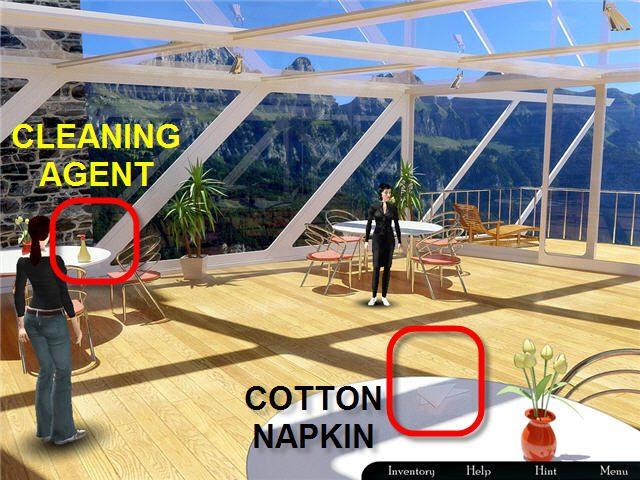
- Pick up the NAPKINS on the table closest to the bottom of the screen to get COTTON NAPKIN in inventory and then pick up CLEANING AGENT on the table on the left.
Library
- Head outside the hotel to the fountain courtyard and head to the right of the fountain on a new path to the library.
- Eavesdrop on the conversation between Mrs. Greenleaf and her henchman.
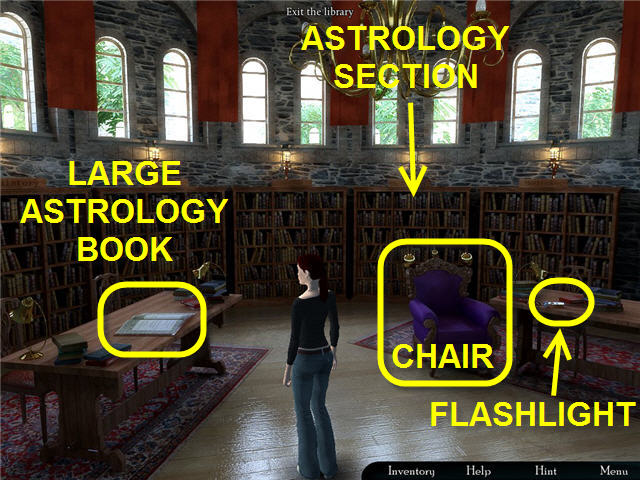
- Enter Library and approach the chair to get a golden globe puzzle.
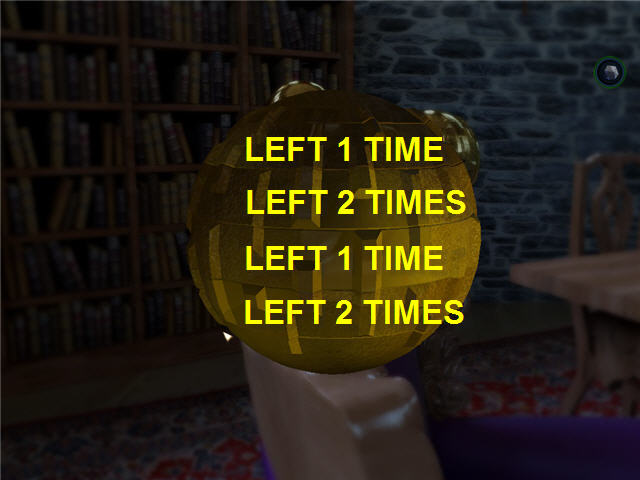
- The object is to line up the ridges on all 4 segments with the very top stationary ridge.
- Starting at the top;Rotate the first segment left 1 time The second segment left 2 times The third segment left 1 time The 4th segment left 2 times
- You will automatically get ANOTHER BLUE ROUND CRYSTAL in your inventory.
- Take the FLASHLIGHT from the table to the right of the chair.
- Look at large astrology book on the table on the left and then check out the astrology section behind the chair.
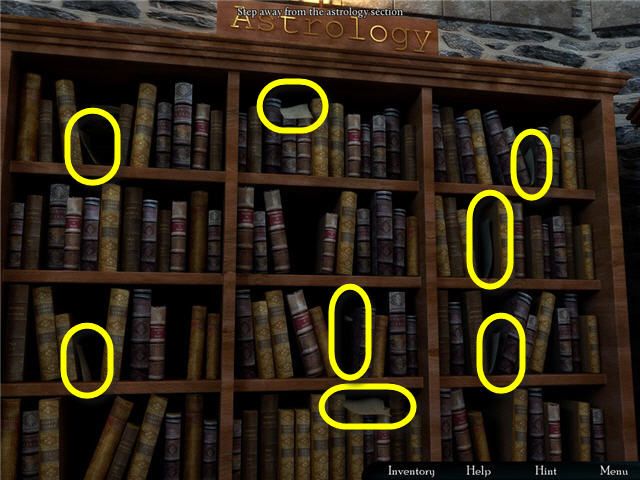
- Collect 8 pieces of PARCHMENT (pergament) hidden in the books.
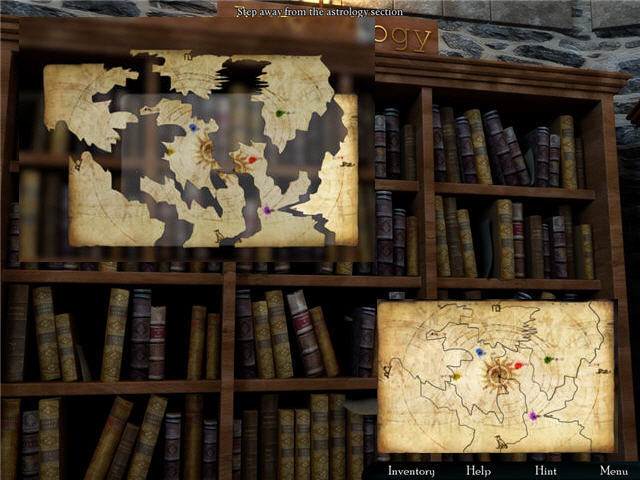
- Open your inventory and double-click on any PARCHMENT PIECE to assemble the pieces.
- Rotate the pieces by clicking on the circular arrow on each piece. They will lock into place once you have them in the correct spot.
- You now have an OLD ASTROLOGY MAP in inventory.
- Note the colors of the dots in the MAP look like the MARBLES in the bag.
Secret Passage
- Head back inside the hotel and past your room to the statue with an eye missing.
- Place the ANOTHER BLUE ROUND CRYSTAL from inventory into the empty eye socket on statue.
- A passageway opens up behind statue. If you took the FLASHLIGHT from the library you will able to proceed, otherwise if she states it’s too dark for a candle, you will need to go back to the library and get FLASHLIGHT off the table.

- Take the MACE on the floor and the OLD PLANK leaning against the beam on your left.
- Look at smudge on shield. Combine the CLEANING AGENT and COTTON NAPKIN in inventory to get WET NAPKIN.
- Use the WET NAPKIN from inventory on shield and click on inscription on shield.
- Use the OLD PLANK from inventory on the shaft and proceed forward into passage.
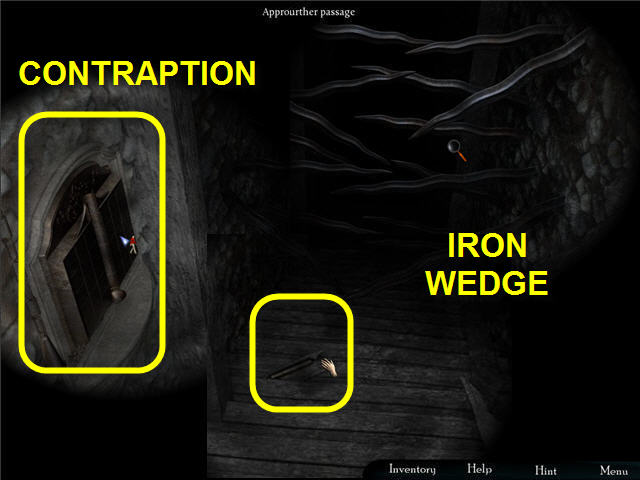
- Pick up the IRON WEDGE on the stairs in front of you.
- Approach the contraption on your left and automatically use IRON WEDGE.
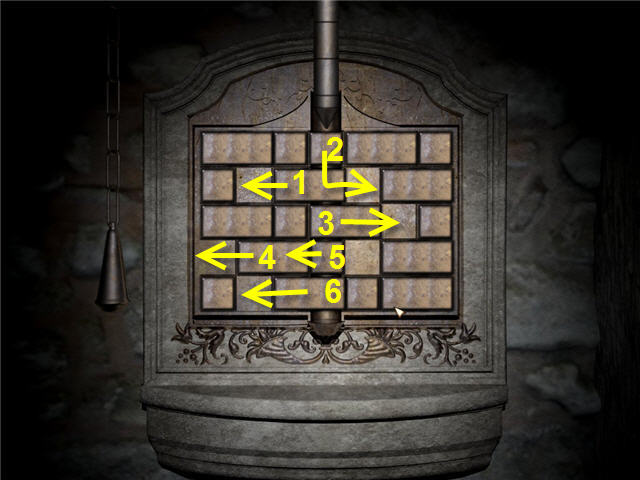
- The objective is to move the pieces out of the way of the IRON WEDGE so it can slide all the way down. You can reset the puzzle by pulling the chain on the left of the contraption. See solution in screenshot.
- Go forward and come across a wall of planks. Use the MACE in inventory on each of the 3 sets of planks to proceed.
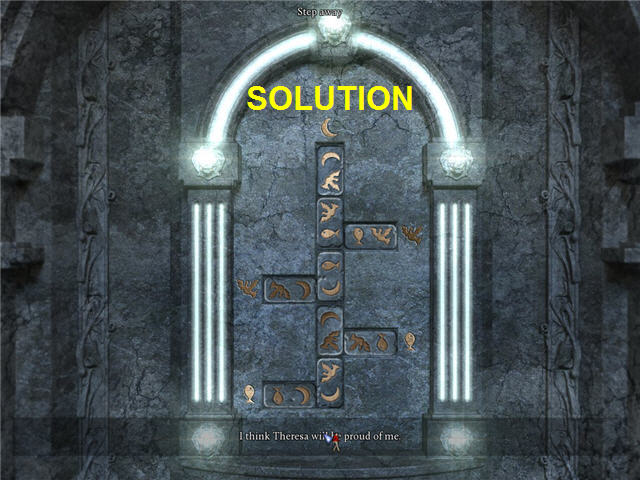
- Go forward to the mechanism in front on you.
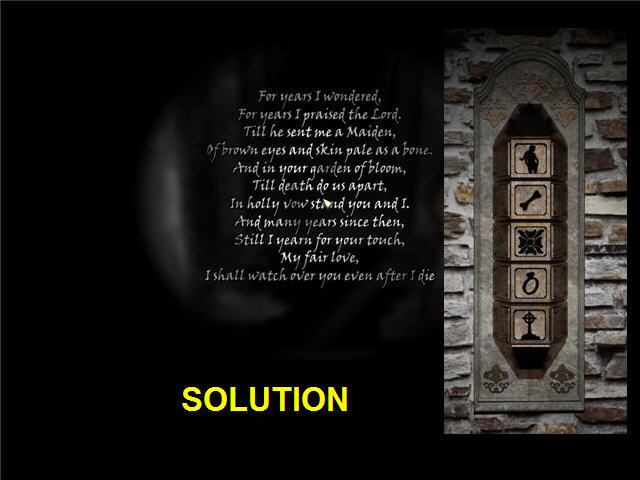
- Using the inscription from the shield in the beginning of the passage, click on the tiles to change them to correspond with the verses. The key words in the inscription are maiden, bone, bloom, love and die.
- The wall caves in and you enter the boiler room.
Boiler Room
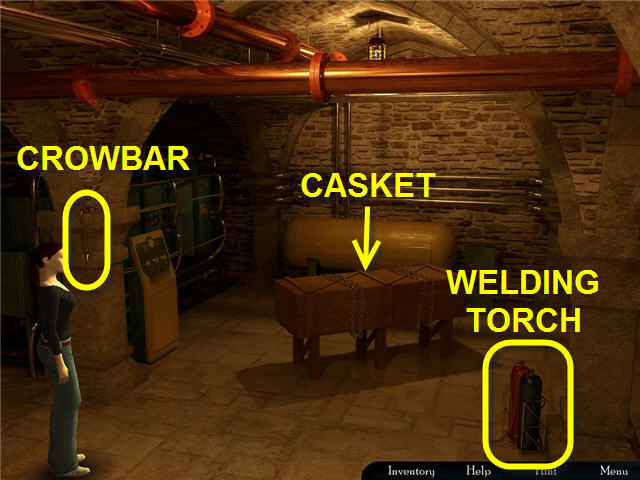
- Enter the boiler room and pick up the CROWBAR hanging on the left arch pillar.
- Pick up the WELDING TORCH on the floor next to the right arch pillar.
- Use the WELDING TORCH from inventory on the chains on the casket in the middle of the room.
- Use the CROWBAR from inventory to pop the lid open.
- Walk towards the open casket and use SMALL LEATHER BAG WITH 5 COLORED MARBLES IN IT on the plate in the middle of the sarcophagus.
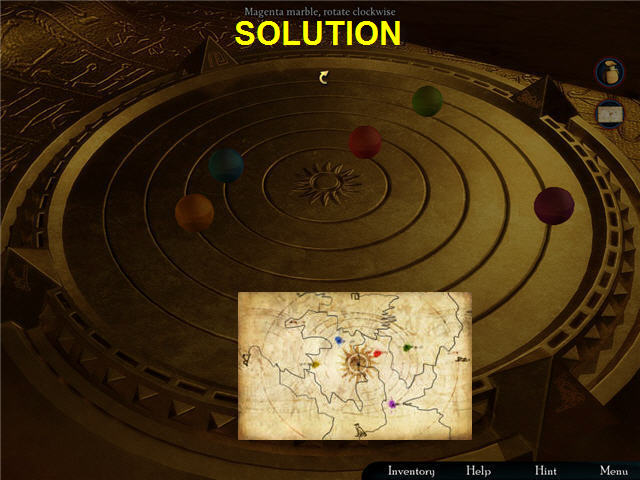
- Rotate the MARBLES on the plate to line them up as they are on the OLD ASTROLOGY MAP in inventory.
- Rotate the marbles on the plate like this:Red - Clockwise 5x Blue – Clockwise 1x Orange – stays in place Green – Clockwise 5x Pink – Counter-clockwise 4x
- Use your DIGITAL CAMERA from inventory on the mummy to get MUMMY PHOTO.
- Go back up to your room by exiting through the broken wall.
The Mummy
- Use the MUMMY PHOTO from your inventory on the laptop.
- Head down to the reception area and speak with the Butler. Exhaust all conversation options.
- Step away from the reception desk and you receive a message you have an email waiting.
- Head back to your room and check your laptop and read the email.
- Talk to Veronica, the girl who was in a coma, and learn the story behind all the strange happenings and the mummy. Exhaust all topics of conversation.
- Head down to the reception desk and talk to the Butler.
- Turn to leave the hotel and notice Matisse sitting on the couch. Talk to him and then exit the Hotel.
Wisdom, Love and Truth
The Village
- Exit the Hotel and Castle grounds and approach the Village.
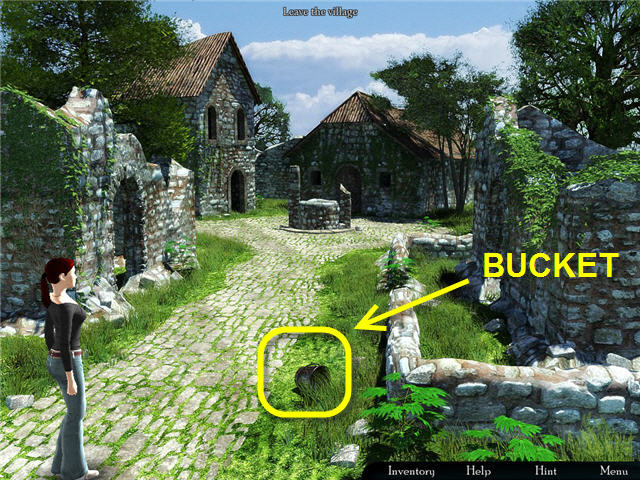
- Pick up the BUCKET on the right of the path as you enter the Village.
- Walk towards the village well and enter the old abandoned house on the right.
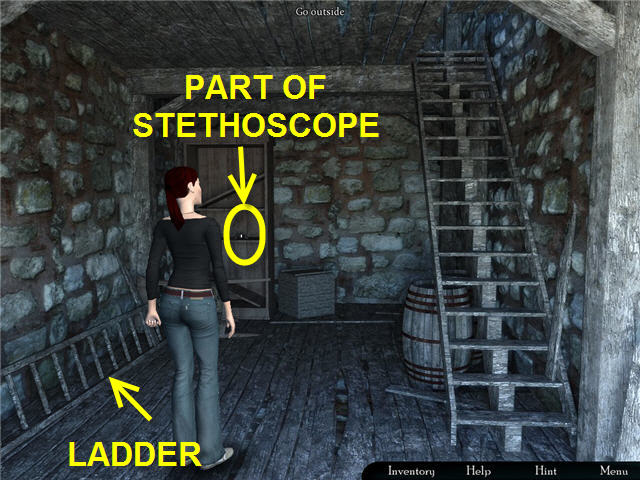
- Pick up the LADDER on the floor on the left and the PART OF STETHOSCOPE on the bookshelf.
- Head upstairs using the staircase on the right.
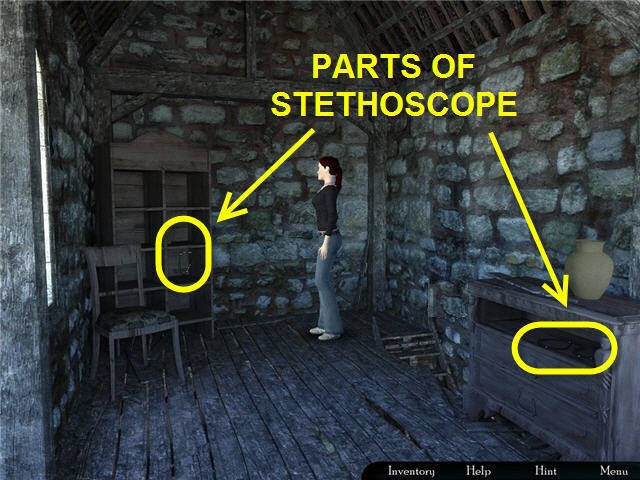
- Take PART OF STETHOSCOPE on the bookshelf in the back of the room.
- Take PART OF STETHOSCOPE from the empty niche in the dresser on the right.
- In inventory combine the three PARTS of STETHOSCOPE to get OLD STETHOSCOPE.
- Go back down the stairs and exit the building.
- Enter the old abandoned house on the left.
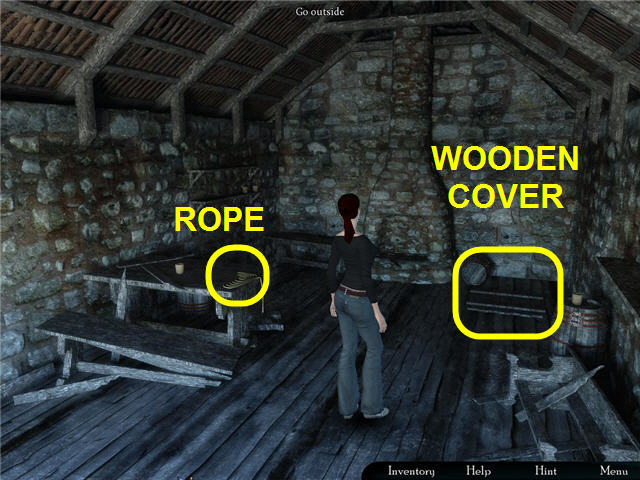
- Pick up the ROPE from the table on the left.
- Combine ROPE with BUCKET in inventory to get BUCKET ATTACHED TO ROPE.
- Lift the wooden cover on the floor to the right of the fireplace to reveal a hatch.
- Go down the hatch and look at the vault on the left side of room.
- Use the STETHOSCOPE from inventory on the vault.
- Turn the dial till you hear a loud click. When you hear the loud click, turn the dial in the opposite direction till you hear the loud click again. Biggi will tell you when it’s time to change direction if you aren’t sure.
- There are 6 correct settings needed, 3 to the right and 3 to the left, before the door will open.
- Remove the COMPASS from the vault and exit the house.
- Use the BUCKET ATTACHED TO ROPE in inventory on the village well to get BUCKET OF WATER and ROPE.
- Exit the village via the path to the left of the screen and head to the graveyard.
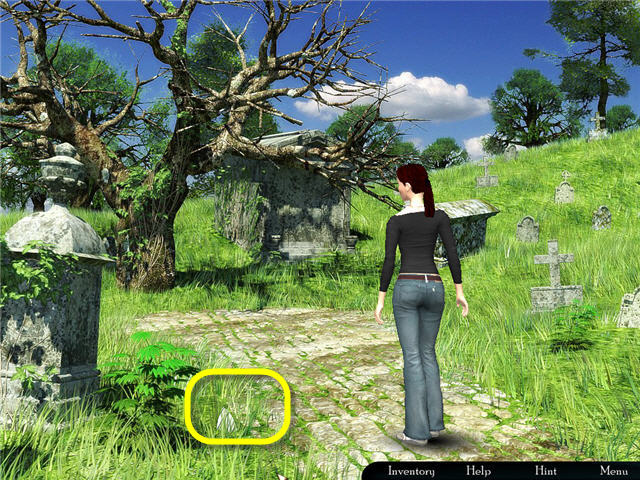
Graveyard
- Talk to Theresa and exhaust all conversation.
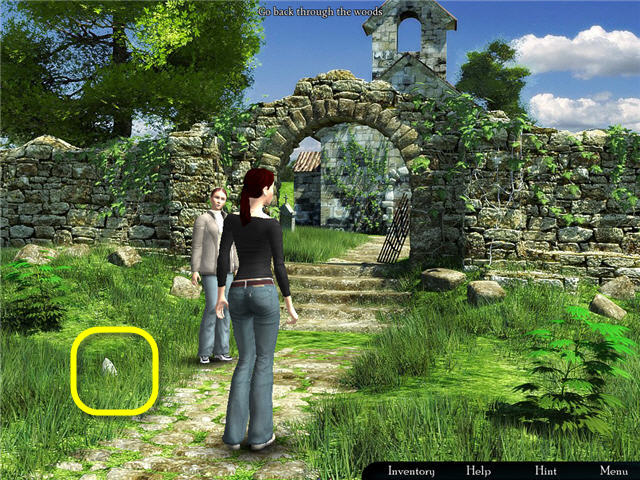
- Pick up the STONE to the left of the path and get STRANGE WHITE STONE WITH A SYMBOL ON IT in inventory.
- Go forward and enter the graveyard.
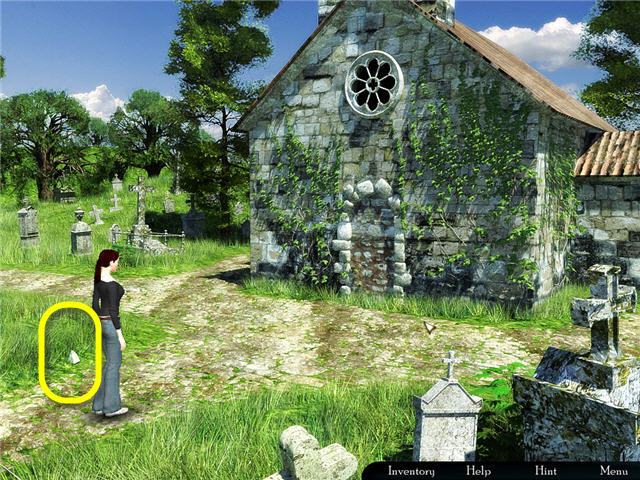
- Pick up the STONE to the left of the path and get the second STRANGE WHITE STONE WITH A SYMBOL ON IT in inventory.
- Take the path leading to the left and pick up the STONE to the left of the path and get the third STRANGE WHITE STONE WITH A SYMBOL ON IT in inventory.
- Turn back and take the left path and go behind the church.
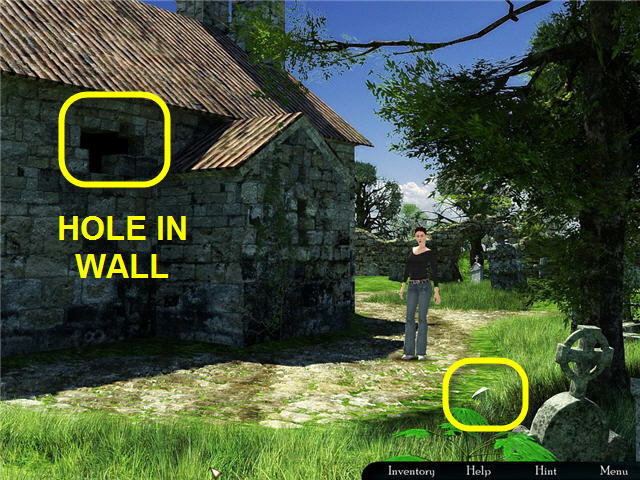
- Pick up the STONE to the right of the path and get the fourth STRANGE WHITE STONE WITH A SYMBOL ON IT in inventory.
Wisdom
- Use the LADDER from inventory on the hole in the wall on the side of the church.
- Click on the LADDER to climb up into the church.
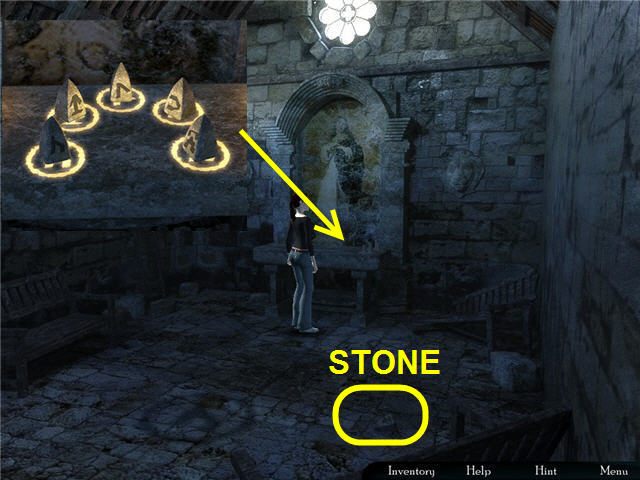
- Pick up the STONE to the front right of the room and get the fifth and last STRANGE WHITE STONE WITH A SYMBOL ON IT in inventory.
- Walk toward the altar and use the MATCHES from inventory to light the candles on the altar. See the glowing symbols on the altar.
- Place the 5 STRANGE WHITE STONE WITH A SYMBOL ON IT from your inventory on the matching glowing areas on the altar.
- Place HOTEL MEMORABILIA in the middle of the STONES.
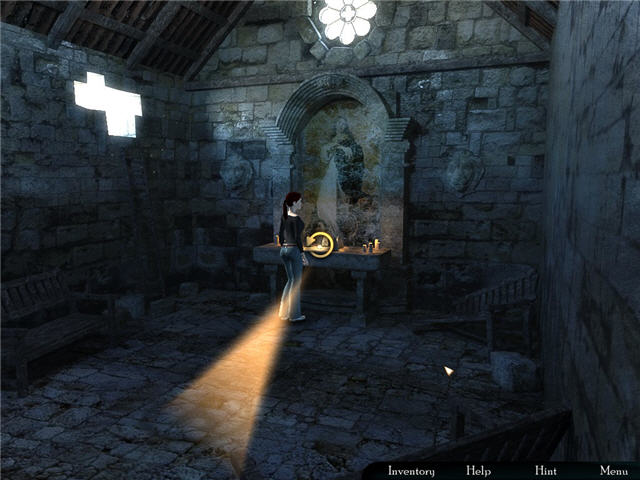
- Click on the rotate symbol on the altar and stop when the beam shines on the symbol on the brick floor. The light will intensify and break through the floor.
- Go through the broken floor to the room below.
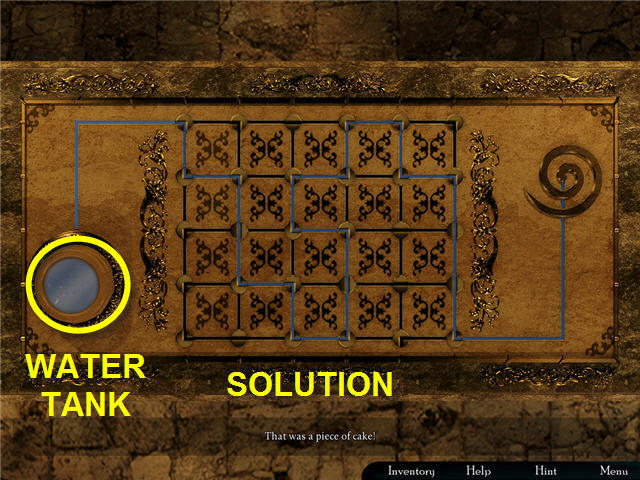
- Walk towards the sarcophagus and note the water tank on bottom left of lock.
- Take the BUCKET OF WATER from inventory and pour into the water tank.
- Your objective is to make a stream of water from the water tank to the spiral symbol on the opposite side by rotating the corners of the boxes.
- Walk into the light coming out of the sarcophagus to meet King Arthur.
- You have completed your first task of Wisdom. Speak to King Arthur and exhaust all conversation options.
Love
- Head back to the front of church and then take the path to the left to the graveyard tree and talk to Veronica.
- Meet Cleopatra and talk to her regarding your next task of finding Marc Antony.
- Cleopatra has given you a PETRIFIED SNAKE EYE that is automatically added to your inventory.
- Proceed along the path to the right and speak to Death. Exhaust all conversation options.
- Go back to see King Arthur by entering the church via the ladder and head into the hole in the floor and walk into the light.
- Speak to King Arthur completely and head back to Veronica.
- Speak to Veronica to let her know you are ready to go back.
- Proceed down the path to meet with Death and she will allow you to pass if you help her.
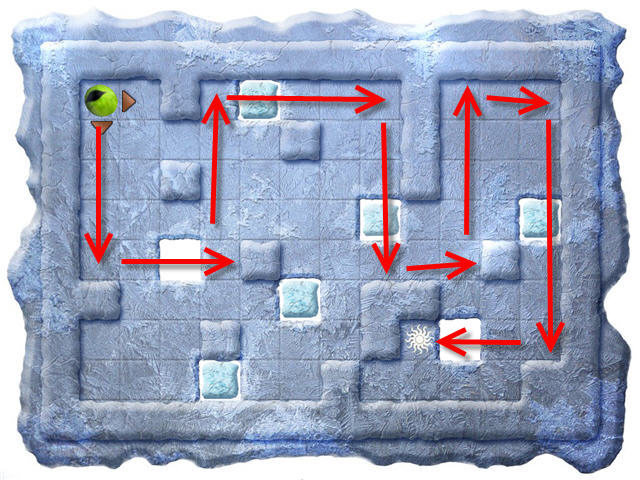
- Solve the puzzle for Death by moving the PETRIFIED SNAKE EYE (Automatically removed from inventory) from the upper left corner to the sun emblem. Be careful to not fall in the holes. One possible solution is marked in the screenshot.
- Cross the bridge and see Mark Antony sitting on the floor. Exhaust all conversation with Marc and then set out to find the lost ring.
- Go left on the screen to enter the Labyrinth, but Biggi will not enter because it feels “dead”.
- Go back to the bridge and talk to Death and she says you need an artifact of great glory and valor.
- Go back to King Arthur and speak with him.
- Take ARTHURS SWORD stuck on the ground next to him.
- Go back to the Labyrinth.
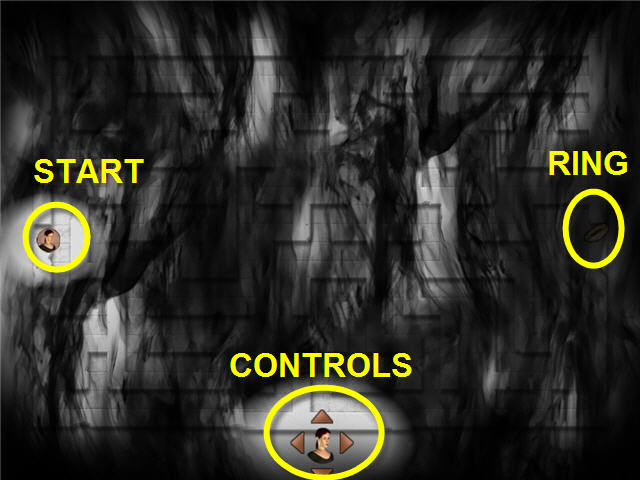
- Guide Biggi through the labyrinth to the ring on the other side with the controls on the bottom of the screen.
- The dead ends can be seen in the ring of light that follow you, so choose the paths that are open. The RING will be automatically added to your inventory.
- After you get the ring, speak to Marc Antony and watch his reunion with Cleopatra.
- Speak to Cleopatra and exhaust all conversation.
- You have passed the second task of Love.
Truth
- Head back to the entrance of the graveyard and speak to Theresa.
- Per your conversation with Theresa, head back to the Village and use ROPE from inventory on the well and climb down.
- Walk towards the stone carvings in the back of the well and arrange the tiles to match up similar ends.
- Click to rotate the tiles and hold the mouse button to drag them in place.
- Use the ROPE to exit the well and immediately hear Gunshots.
- Speak to Matisse and Cleopatra comes to your rescue.
- Speak to Veronica and find yourself back at the castle.
Finale
- Try the door and realize you are locked out of the Castle.
- Use the ROPE in inventory on the left lamp pole.
- Click on the ledge where the ROPE and ledge meet and climb off the bridge.
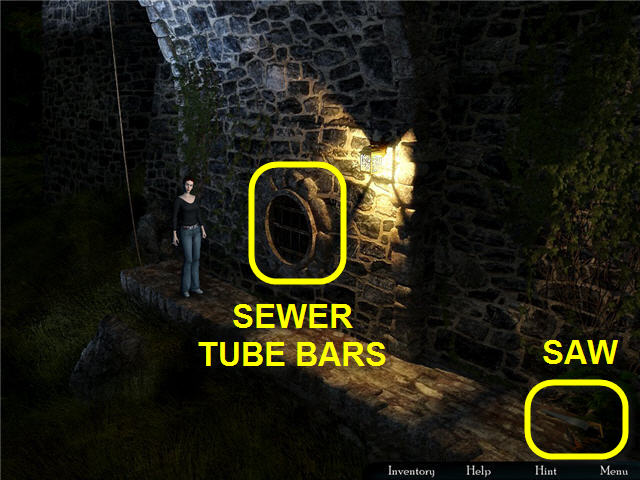
- Pick up the RUSTY SAW on the far right of the ledge to get SAW in inventory.
- Use the SAW from inventory on the bars covering the sewer tubes to your left.
- Crawl into the now open sewer tubes.
- Walk towards the tube seal to unlock it.
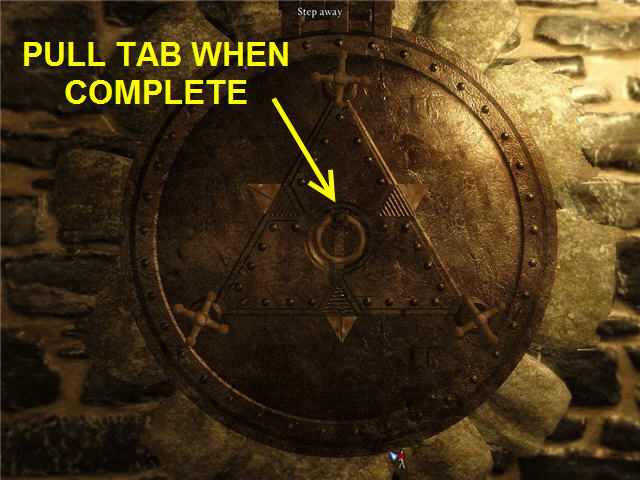
- The object is to make three triangles, one on each side, by turning the valves. When you move two shapes together, others may move apart.
- I found it easiest to turn the valves all the way to make a triangle regarding of what else moves in this order: Upper – 1st, 4th and 6th Lower left - 2nd Lower right – 3rd, 5th and 7th
- Pull the ring in the middle when all the triangles are formed. Do not back out of the screen without pulling middle ring or the puzzle will reset.
- Go through the tube and walk towards the control panel.
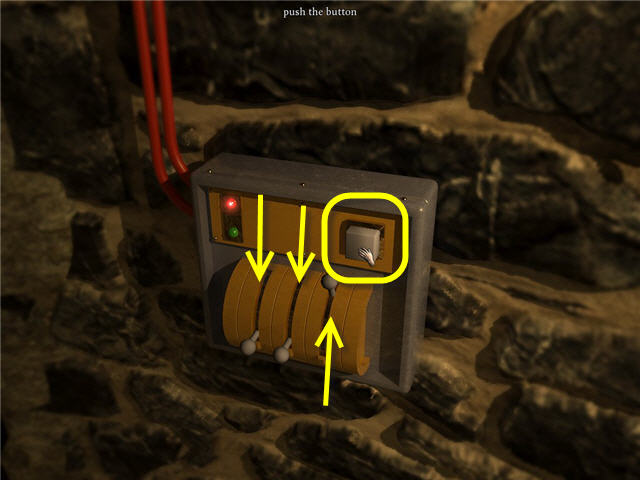
- Pull down the left and the middle lever and then push the button to get an elevator.
- Go forward into the elevator and you will go directly to Atia’s office where Veronica is waiting for you.
- Talk to Veronica and exhaust all conversation.
Library
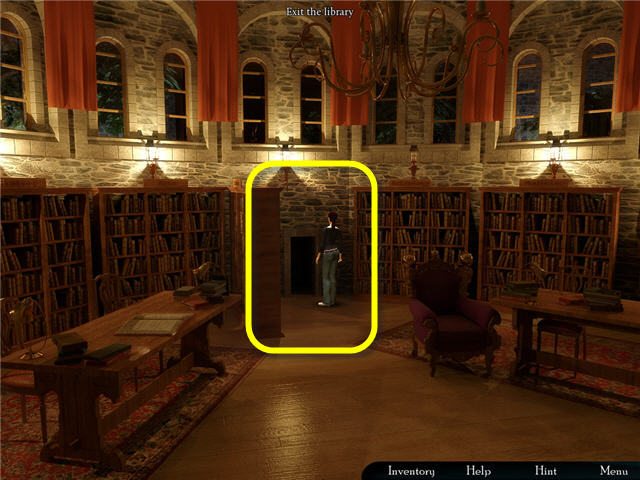
- Head out of the Hotel to the fountain courtyard.
- Go right of the fountain to the library.
- Click on the Science section to reveal a new passage.
- Enter the passage and take the unlit TORCH on the wall directly in front of you.
- Head down the passageway to the left and see the ritual has already begun.
- Exit the passage and head back into the hotel, up the left staircase to the boiler room entrance past the statue.
- Enter into the main area of the boiler room and go to the boiler gauges on your left.
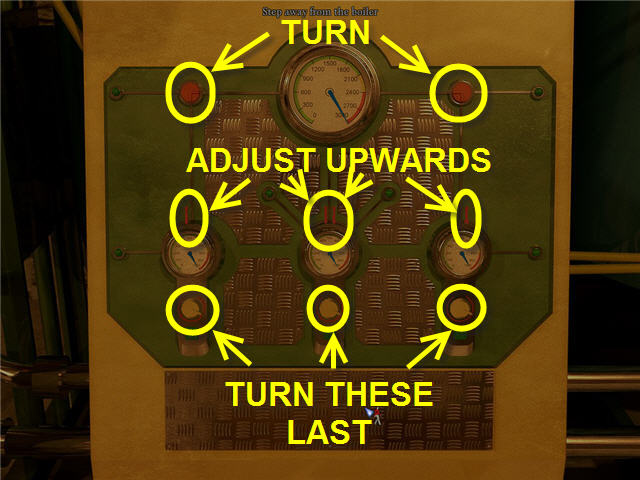
- You need to overheat the system by raising the pressure in the boiler.
- Move the two red buttons on either side of top gauge to connect to that gauge.
- Lift all 4 red levers up. You need to do this before you turn the dials or they will be too hot to touch.
- Turn all three dials to light the green lights. If done correctly the pressure gauges should all be in the red zone. If the pressure slips back down after turning a dial, turn the next one and go back to the one that went down later.
Ritual
- Leave the boiler room and hear the boiler explode and see Atia leave the ritual area.
- Leave the hotel and head back to the library and go to the ritual area through the passage.
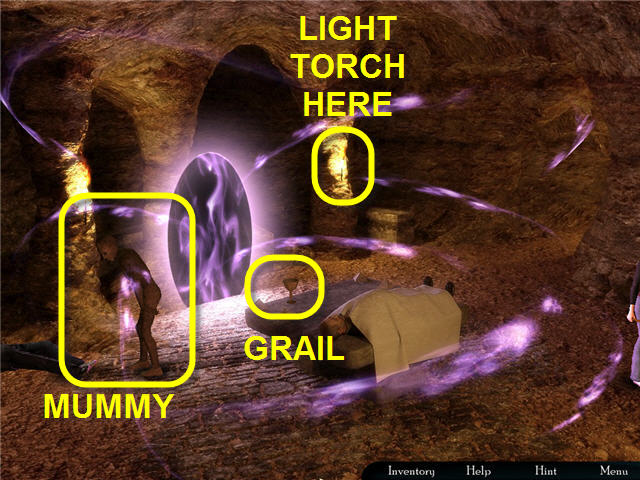
- Take the TORCH from inventory and use it on lit torch on stone pillar.
- Walk to the ritual table and take the GRAIL.
- Use your LIT TORCH on the mummy Aka’sh.
- Talk to Atia Greenleaf completely.
- Throw GRAIL from inventory into the Portal.
- Congratulations, you have completed Hotel.
Created at: 2010-05-23