
Walkthrough Menu
- General Tips
- Prologue
- Chapter One
- Chapter Two
- Chapter Three
- Chapter Four
- Chapter Five
- Chapter Six
- Artifacts and Traces of the Children
General Tips
- The hint gauge takes 60 seconds to recharge after each use.
- There is no time limit in this game, so you can play at your own leisure.
- Too many incorrect clicks will cause your mouse cursor to zip to a random location in the scene. This penalty only applies to the Hidden Object Scenes.
- You can skip over any puzzle once the snake at the bottom of your screen fully loses its color.
Exploration Scenes
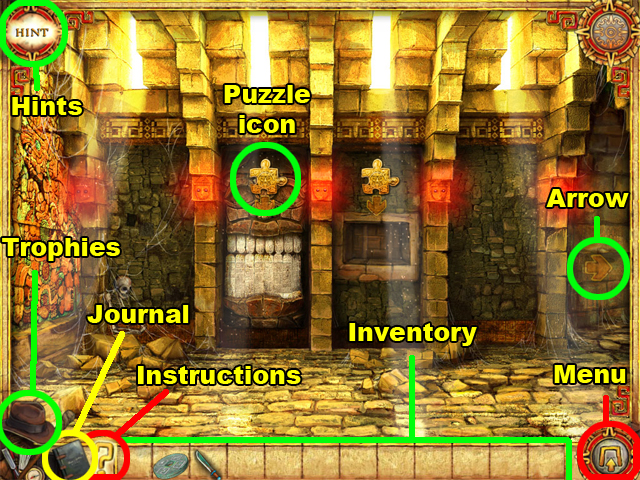
- The puzzle icons indicate that there is a puzzle in your scene that should be examined. You can either click on the puzzle icon, or examine the area below it to initiate the puzzle.
- Your inventory is what stores your action items. Click on an item from your inventory to equip it to your mouse cursor. Afterwards, you can either use the item by left-clicking in a scene, or return the item to your inventory by right-clicking.
- The arrow to the right of this screenshot is a transitional arrow. You can click on these arrows to switch between the scenes in each chapter.
- The hint button will show you what to do next after it is pressed. If it highlights an item from your inventory and an area of a scene, you should use the item in that area of the scene.
- The hint button takes 60 seconds to recharge, and there is no limit to the amount of times you can use it.
- The question mark at the bottom of your screen is the instructions button. You can use this whenever you want to view a scene’s objectives.
- The hat in the lower left corner of your screen is the trophy button. You can use this button to view your trophies at any time. Read the descriptions of the trophies if you would like to know how to earn them.
- The book in the lower left corner of your screen is the journal. The journal is where Joan writes about her experiences throughout the game. The journal does not really have any strategic value; it is really meant to provide extra details about the journey.
- The menu button in the lower right corner will take you to the menu window. From there you can go to the main menu, or adjust some of the game’s options.
Puzzle Scenes
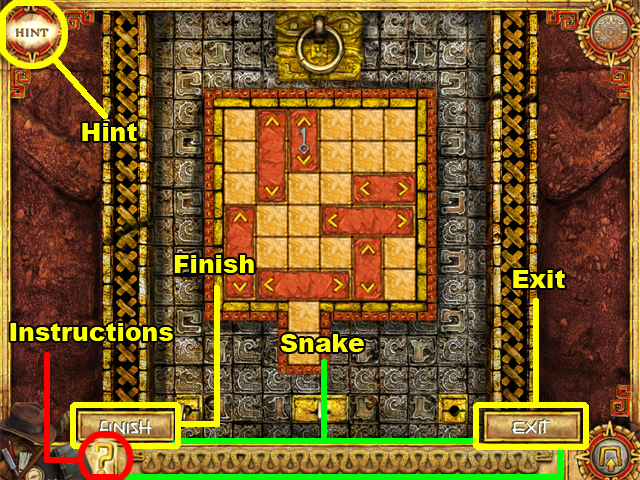
- The hint button will highlight the moves that can be made to solve your puzzle. This button is extremely helpful whenever you are stuck somewhere.
- The snake at the bottom of the screen poses as a timer. When all of the color of its body has been drained, a finish button will appear in the lower left corner of this scene.
- The finish button will allow you to skip over any kind of puzzle. Choosing this option may cause you to lose your chance at earning a trophy however.
- The instructions button will allow you to view detailed information about the puzzle on your screen. You should use this button whenever you want to learn more about the rules of a puzzle.
- The Exit button will allow you to leave the puzzle and return to the previous scene.
Prologue
Excavation
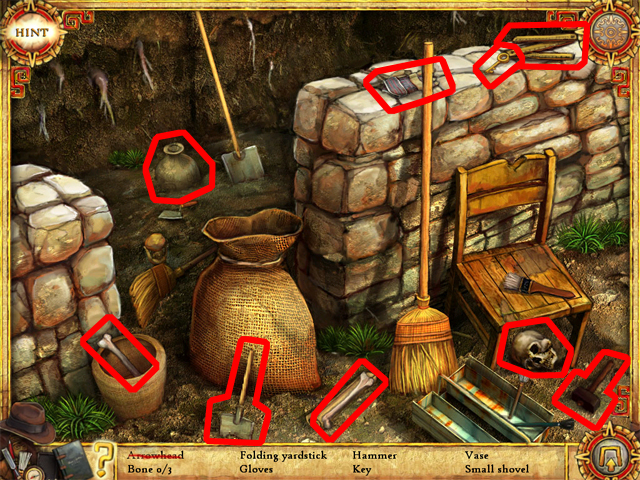
- After completing the small tutorial after the intro, you will arrive at this Hidden Object Scene.
- You will have to find the items listed at the bottom of your screen to advance. The hidden items are highlighted in red.
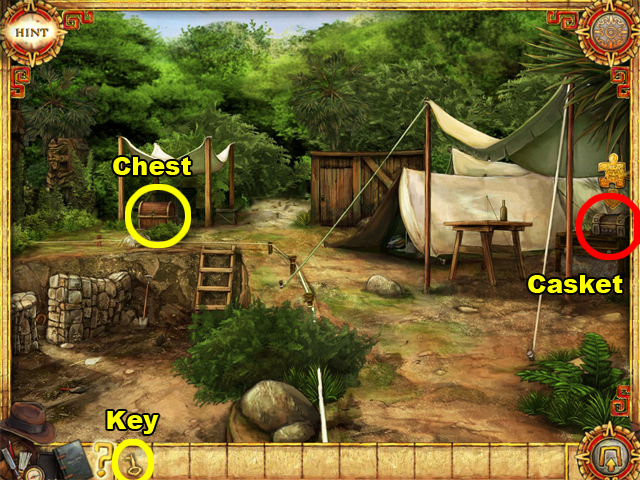
- Use the key from your inventory on the CHEST to open it. The CHEST is located under the tent in the left side of this scene.
- A MACHETE will be added into your inventory after the chest is opened.
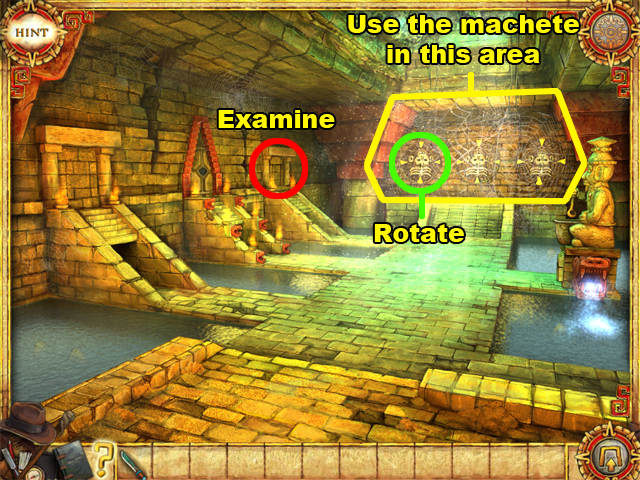
- Examine the CASKET to interact with your first puzzle. The CASKET is under the puzzle piece icon below the upper right corner of this scene.
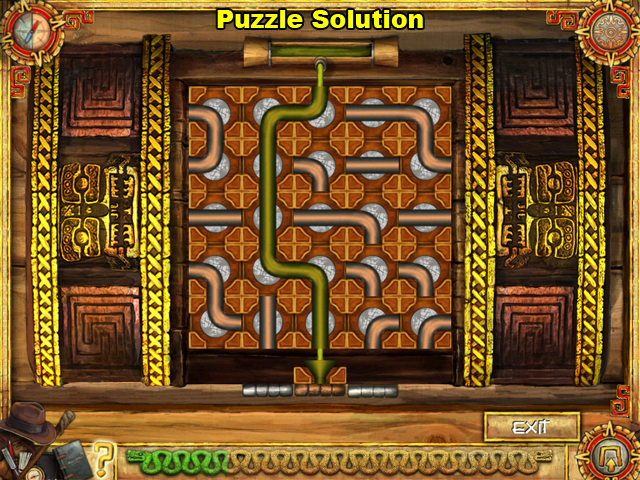
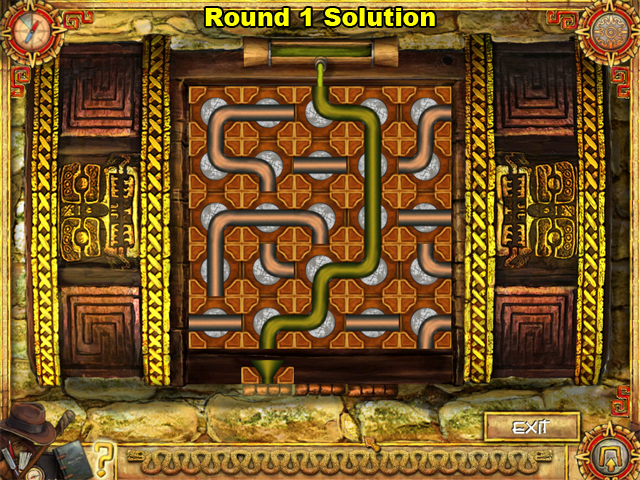
- Arrange the pipes so that the green oil from the top flows down to the funnel-shaped pipe at the bottom of this puzzle.
- Click on a pipe to rotate it by 90 degrees. A pipe will become green if it is connected to the oil tank at the top of this puzzle.
- This screenshot displays the correct path for the oil to flow in.
- When this puzzle is complete, a SHED KEY will be added to your inventory.
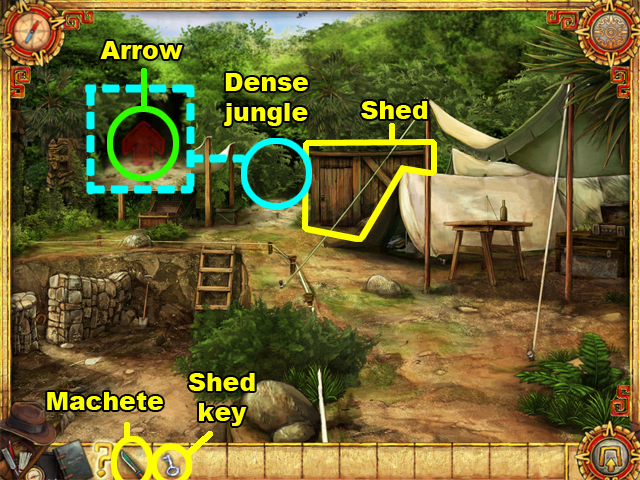
- Use the SHED KEY on the shed above the center of this scene. When the shed is opened, you will receive a TORCH. Unlike other items, this TORCH will automatically activate whenever it is needed.
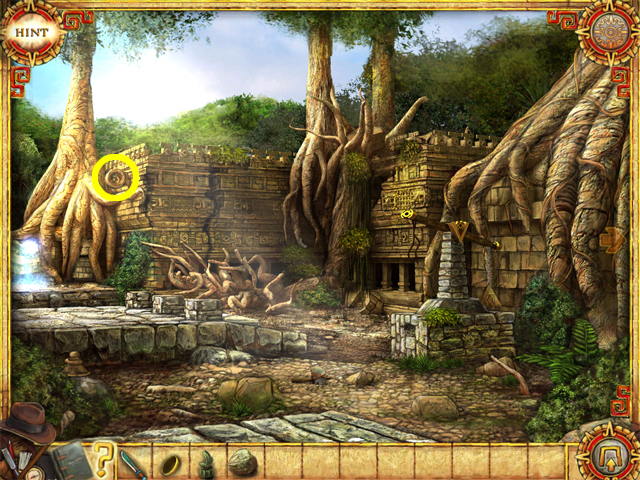
- Use the MACHETE on the dense jungle to clear a path. The dense jungle area is to the left of the shed.
- After clearing the path, examine it to proceed deeper into the jungle. A red arrow will appear in the cleared path to show you where the exit is.
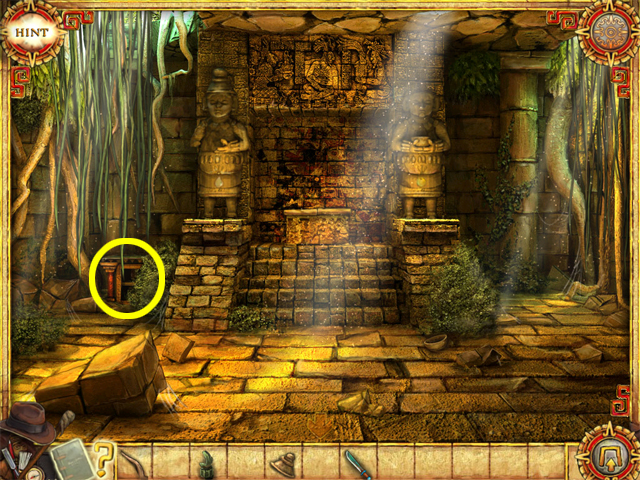
Gate of the Temple
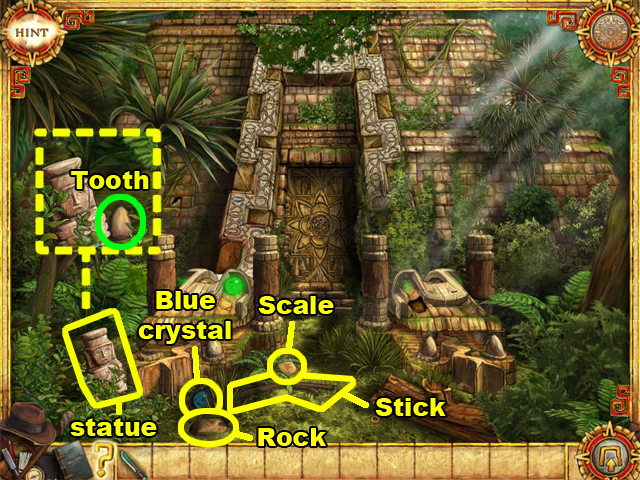
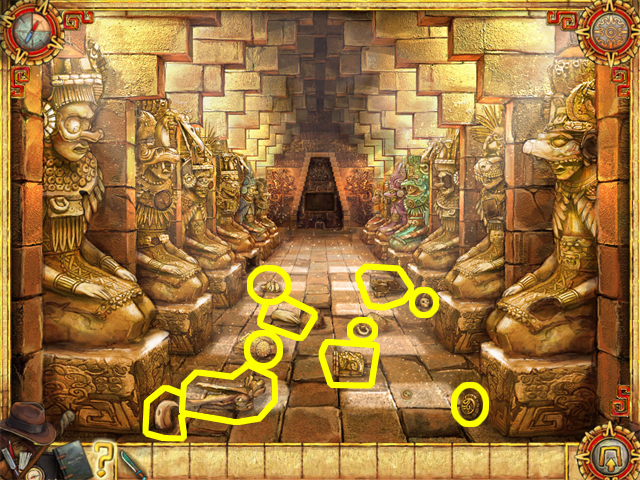
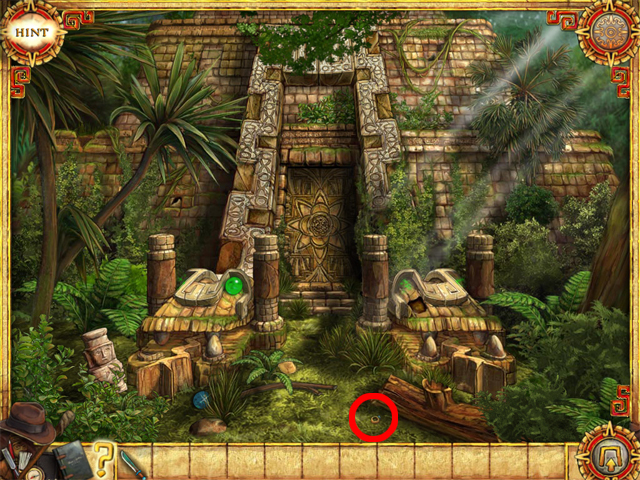
- Collect the ROCK, SCALE, STICK, and BLUE CRYSTAL in the area below the center of this scene.
- Move the small statue to reveal the TOOTH behind it. The statue is near the lower left corner of this scene.
- Collect the TOOTH that was behind the statue.
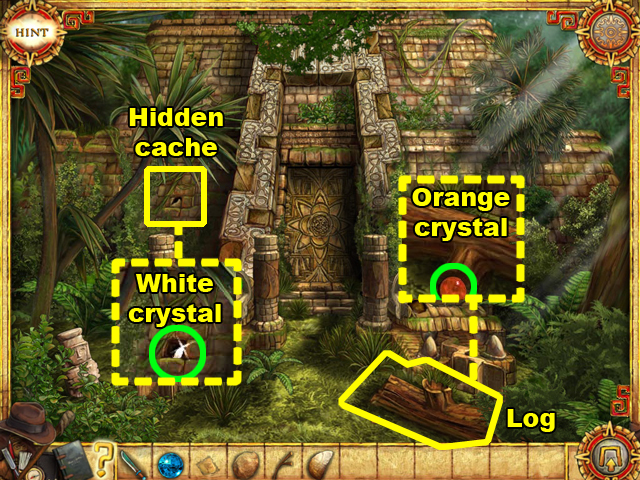
- Use the STONE on the hidden cache to break it open. The hidden cache is on the left side of the gate to the temple.
- Use the STICK on the hidden cache to expose the WHITE CRYSTAL in it.
- Click on the exposed WHITE CRYSTAL to collect it.
- Click on the log at the bottom of this scene to uncover the ORANGE CRYSTAL in it.
- Collect the ORANGE CRYSTAL that was hidden in the log.
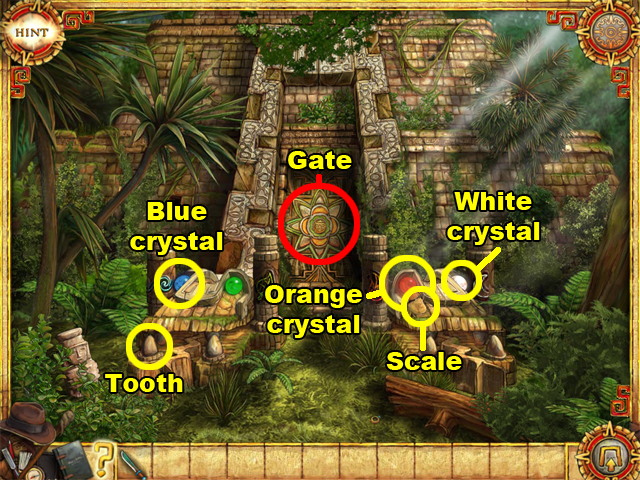
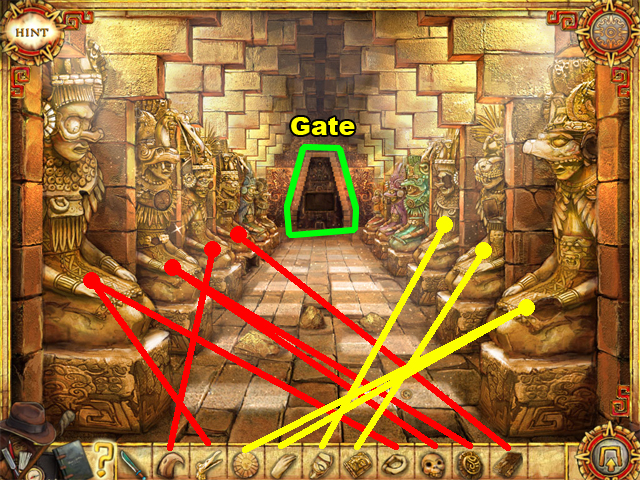
- This screenshot demonstrates where the items should be placed.
- The TOOTH and the BLUE CRYSTAL should be set into the left snake statue. Use the TOOTH before using the BLUE CRYSTAL.
- The ORANGE CRYSTAL, WHITE CRYSTAL, and the SCALE should be set into the right snake statue. Use the SCALE before using the other 2 items.
- Examine the temple’s gate after placing the items into their corresponding statues.
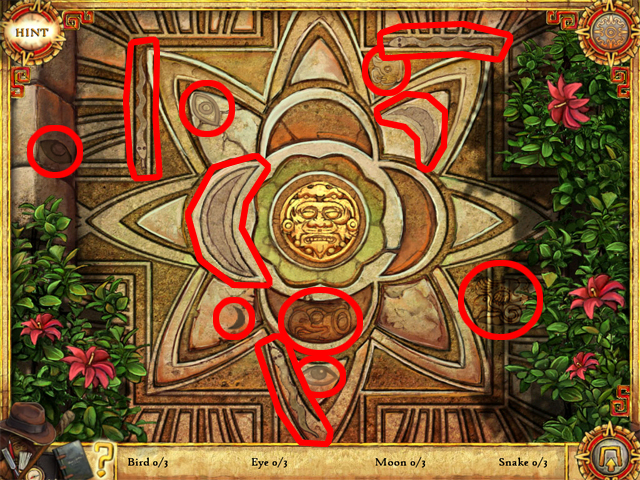
- Find the 12 items listed at the bottom of your screen to open the gate.
- The items have been highlighted in red.
- After completing this Hidden Object Scene, the gate will open. Examine the area behind the gate to initiate next puzzle.
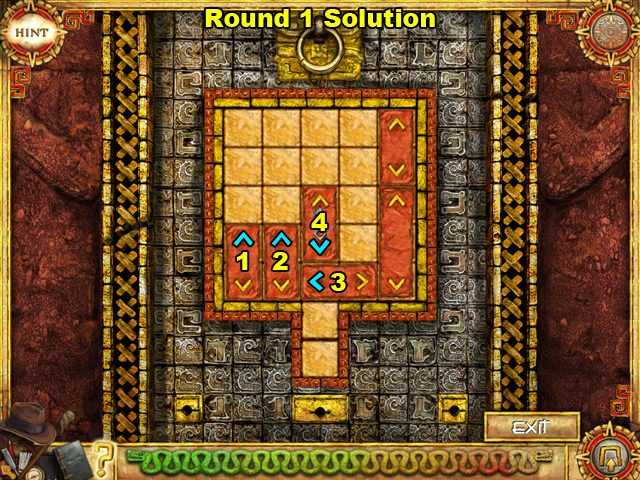
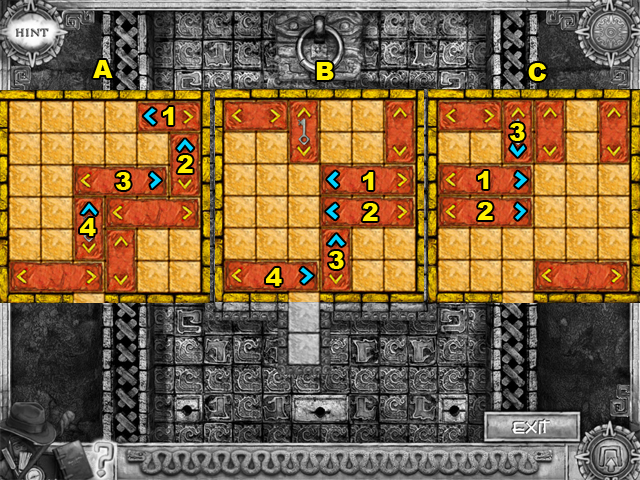
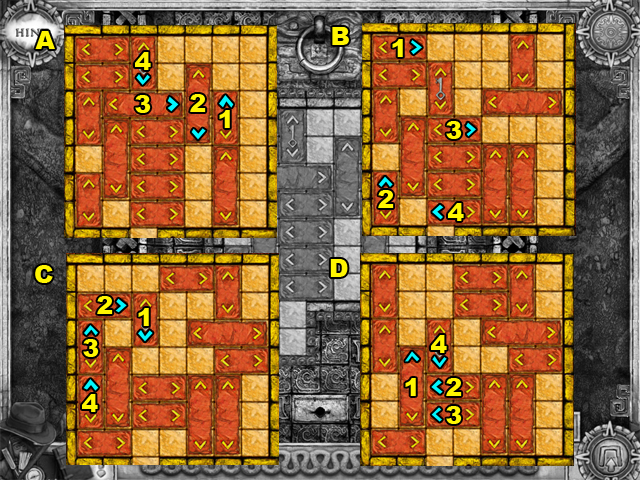
- Slide the puzzle piece with the key to the lowest section of this puzzle to advance.
- To slide a puzzle piece, click on one of its yellow arrows. The direction of the arrow pressed will determine the direction in which the puzzle piece slides.
- Four of the pieces have been labeled with a number. The numbers indicate the order in which the pieces should be slid.
- The blue arrows on the numbered pieces show which direction they should slide in. For example, piece number 1 should be slid in an upward direction.
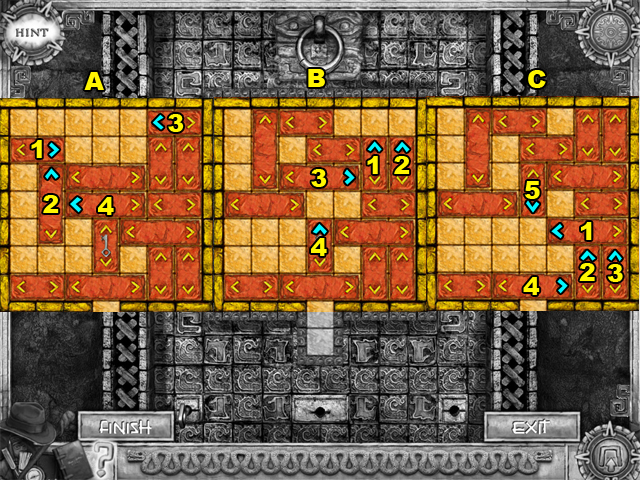
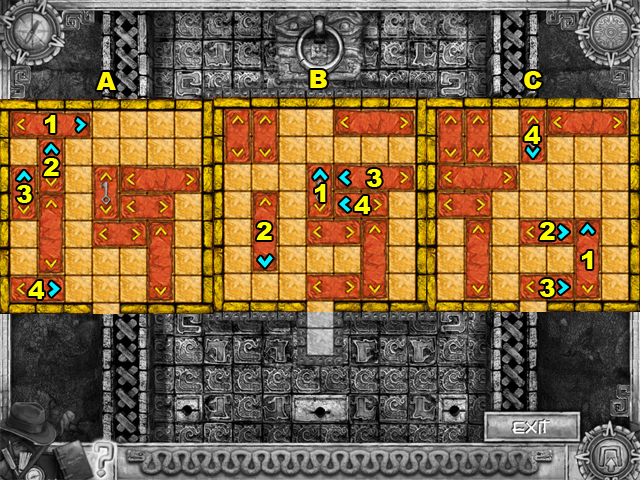
- This is the solution for the first round of this puzzle. There are 3 rounds in this puzzle to complete before advancing.
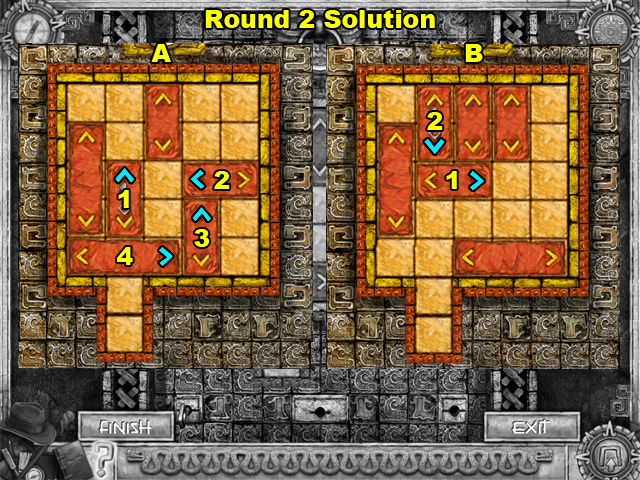
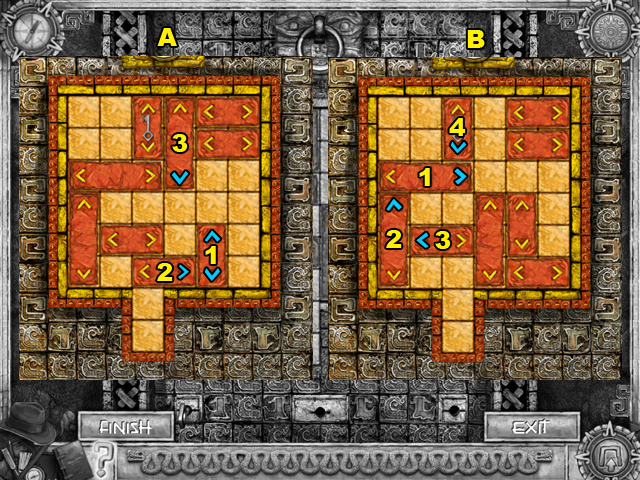
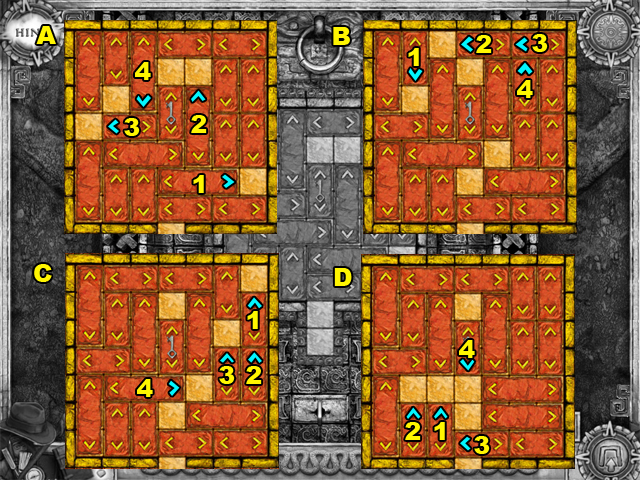
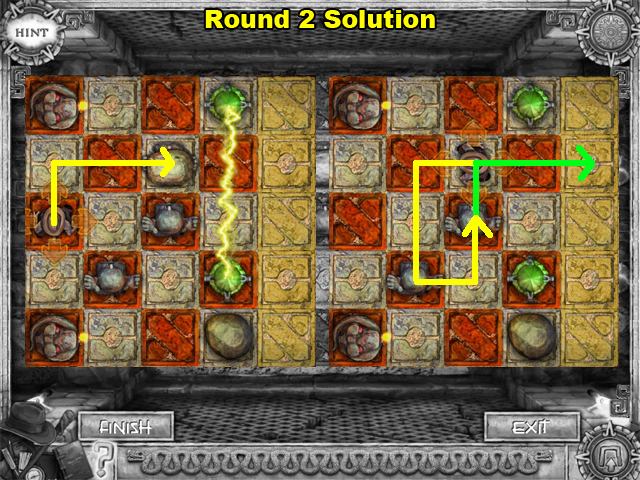
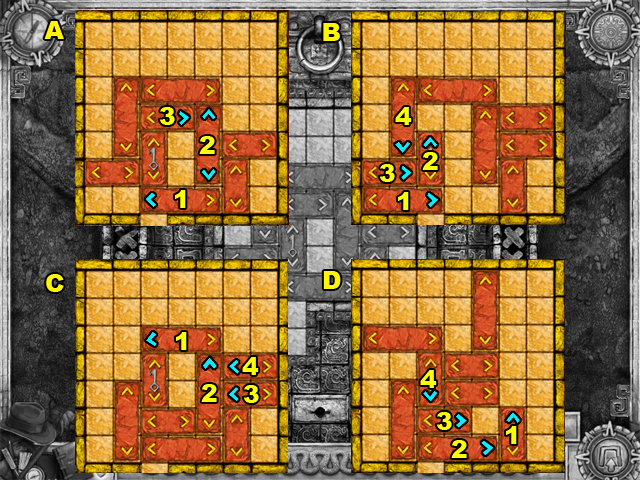
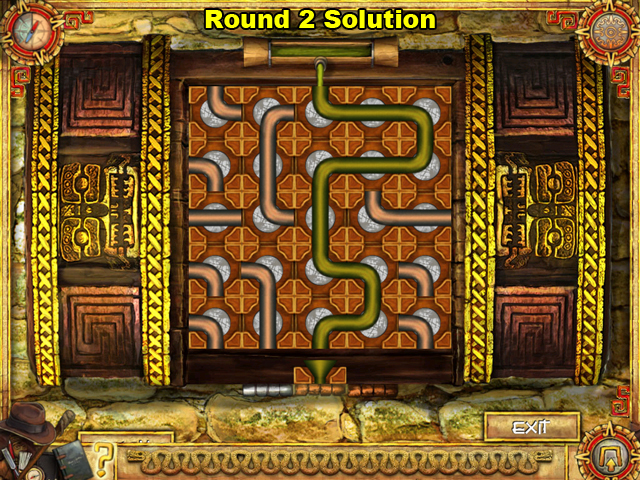
- This is the solution for round 2 of this puzzle.
- Slide the numbered pieces in numerical order. The pieces should be slid in the direction of their highlighted arrow.
- Look at the mini-screenshots alphabetically to follow this guide accurately. For example, mini-screenshot “B” should be read after mini-screenshot “A”.
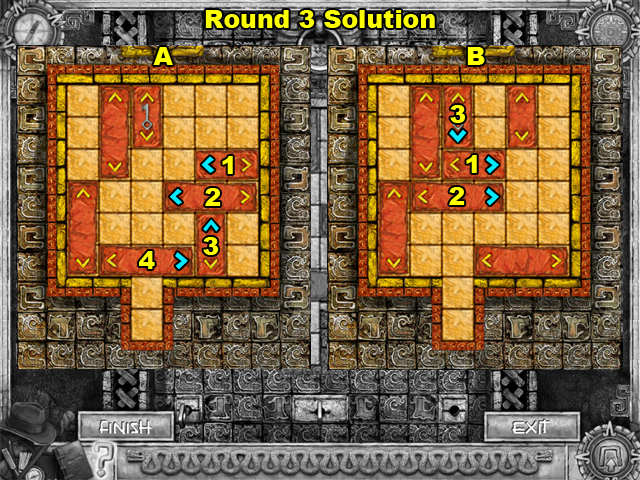
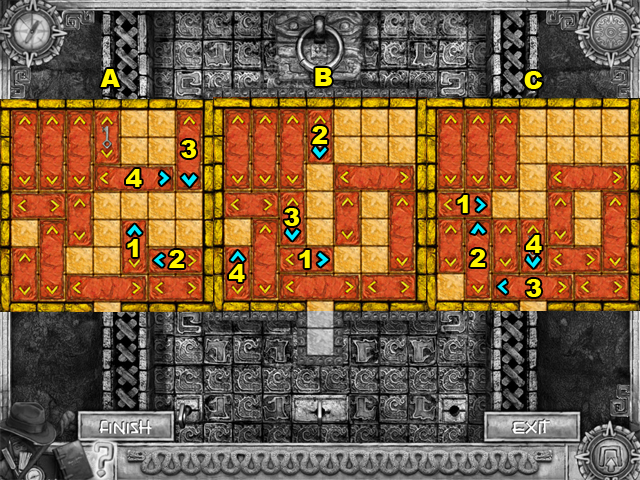
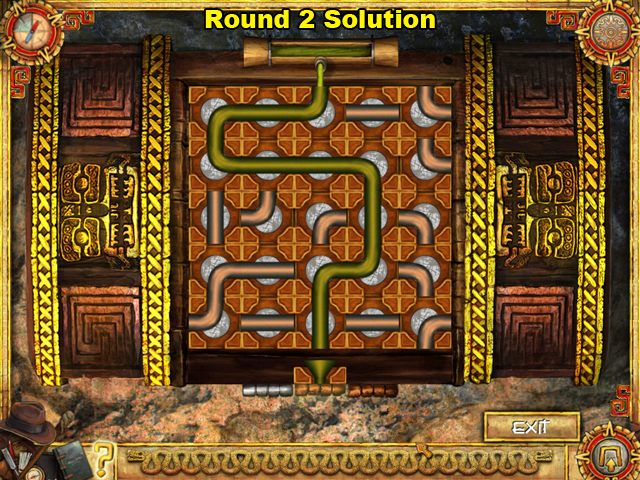
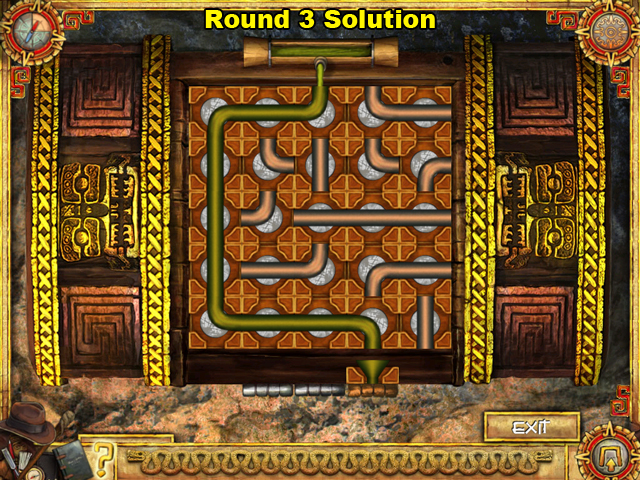
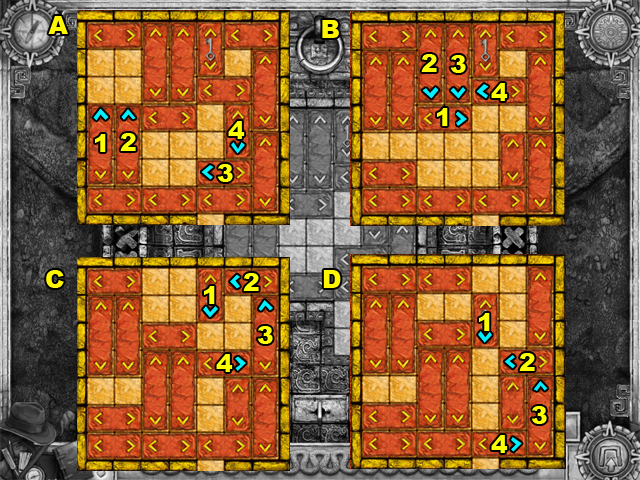
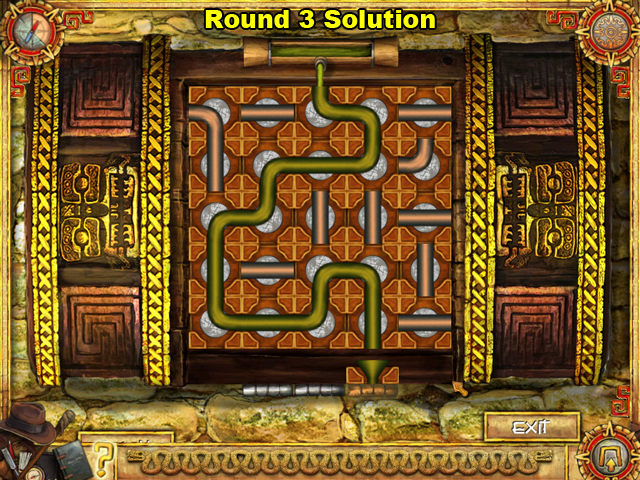
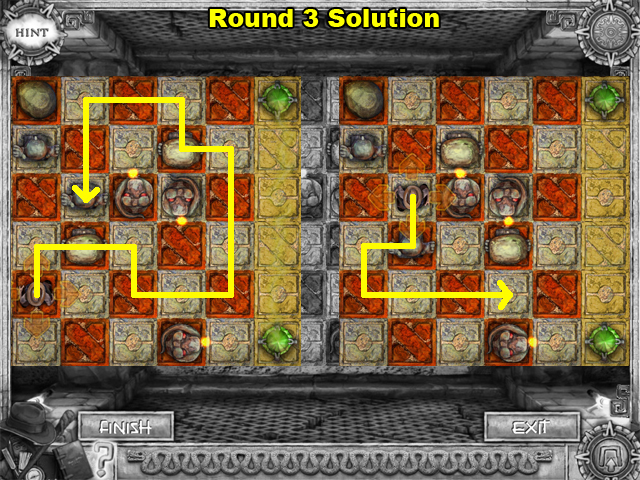
- This is the puzzle solution for the third round.
- Slide the numbered pieces in numerical order. As mention earlier, the pieces should be slid in the direction of their highlighted arrow.
- Look at the mini-screenshots alphabetically to follow this guide accurately.
- After this puzzle, click on the red arrow that appears in the center of the gate.
Chapter One
Temple Corridor
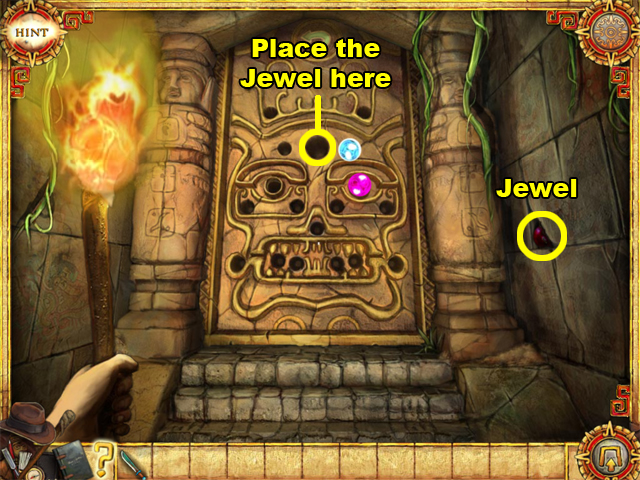
- Collect the JEWEL located in the hole of the wall to the right side of this scene.
- Place the JEWEL into the largest hole in the gate. The largest hole is located near the center of the gate.
- Examine the JEWEL after setting it into the gate to activate a puzzle.
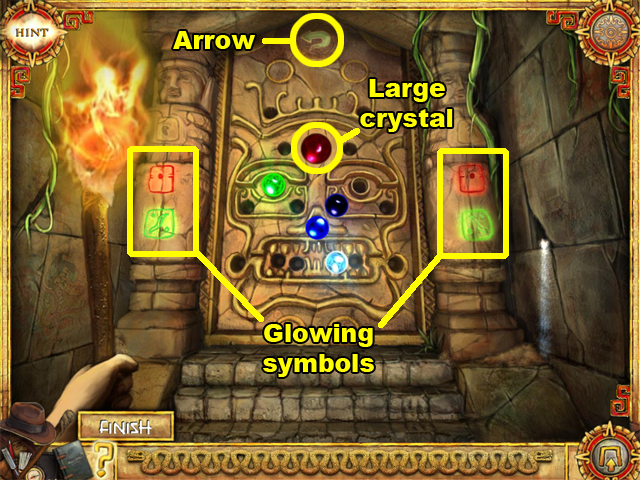
- This is a memory puzzle; you will have to remember the positions of the crystals on the gate. After memorizing the positions, click on the LARGE CRYSTAL to make the other crystals fall out of place.
- Afterwards, place the crystals back into their correct positions of the gate. If you have arranged the crystals correctly, the crystals will disappear and a new set will be added to the gate.
- Nothing will happen to the crystals if they are arranged incorrectly. Click on the LARGE CRYSTAL to locate the misplaced crystals. The misplaced crystals will emit an orange pulse of energy when the LARGE CRYSTAL is pressed.
- You can click on the green arrow above the gate to retry a round.
- There are 3 rounds to complete before the gate opens. After each round, a pair of glowing symbols will appear to the left and right of the gate.
- After completing 3 rounds, the gate will open. Examine the area behind the gate to proceed to the next scene.
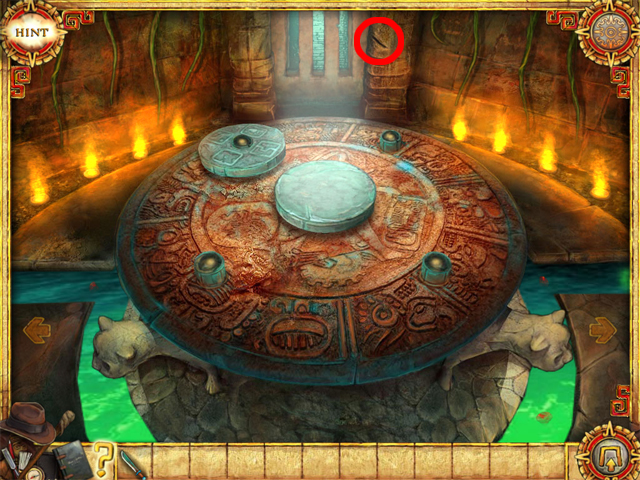
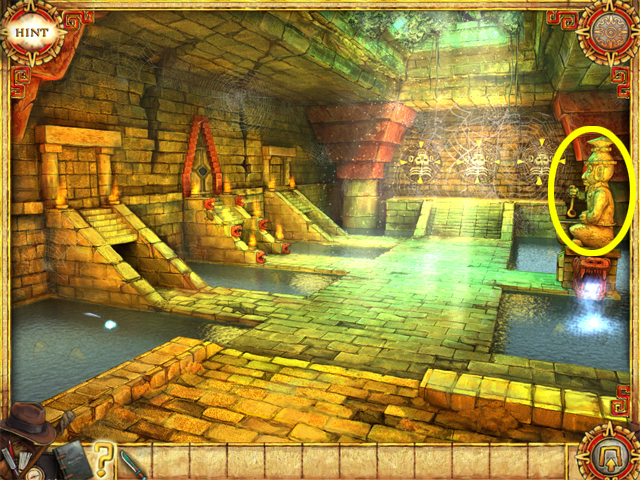
Temple Chamber
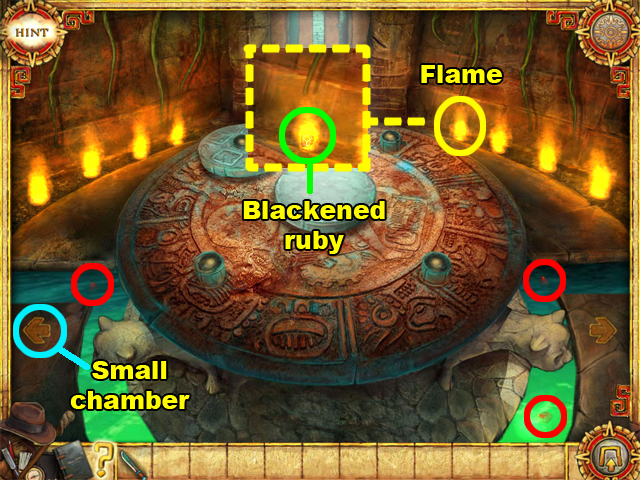
- Collect the 3 RUBIES in the pool of water surrounding the table in the center of the room. The rubies are highlighted in red.
- Place a RUBY into any of the 8 flames in the room to change it into a BLACKENED RUBY. Afterwards, use your MACHETE to retrieve it from the fire. Continue this process until you have 3 BLACKENED RUBIES.
- Enter the small chamber by clicking on the arrow near the bottom left corner of this scene.
Small Chamber
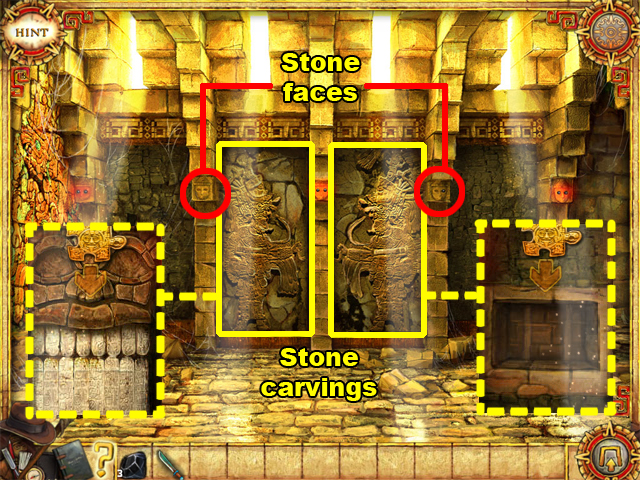
- There are 4 stone faces in this chamber, but only 2 of them have a red aura.
- Use the BLACKENED RUBIES on the 2 faces that are not glowing. The face on the left half of this scene is missing 2 rubies, and the face on the other half on this scene is missing 1 ruby.
- Afterwards, the stone carvings in the center of this room will descend into the floor. Examine the areas that appear behind the stone carvings.
- Begin with the area behind the left stone carving first.
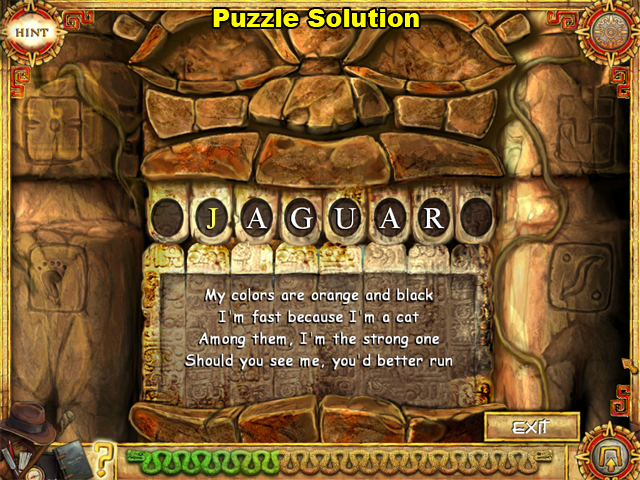
- This is a riddle puzzle; you will have to guess the correct answers to the 4 riddles to advance.
- In this screenshot the correct answer is “Jaguar”; notice how the answer matches the riddle.
- Click on the letters to change them until the answer has been spelled correctly. The first letter of every answer is always correct, so there is no need to change it.
- If you need help, you can use the hint button to correct a few of the letters in your answer. The corrected letters will become yellow.
- The answers for this puzzle are: JAGUAR, CRYSTAL, STAIRS, and DAGGER.
- After this puzzle is complete you will receive a WHEEL item.
- Examine the area behind the right stone carving to enter the next puzzle.
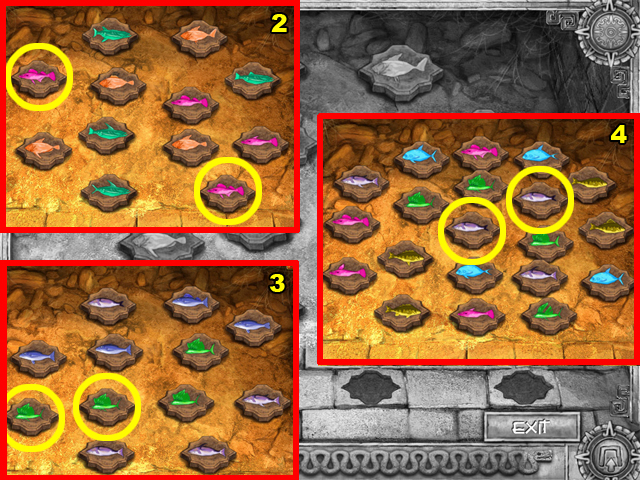
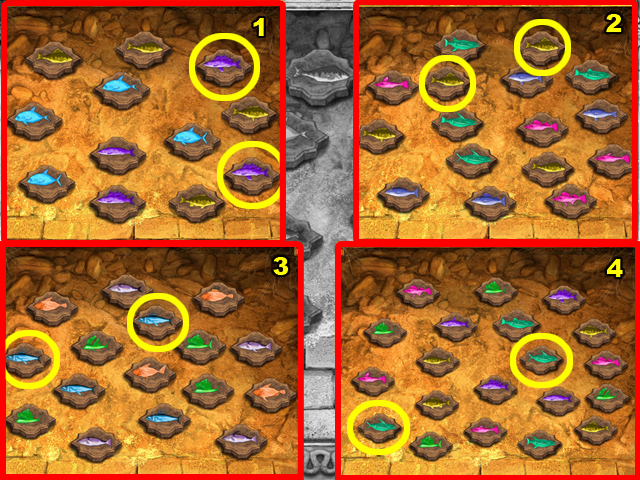
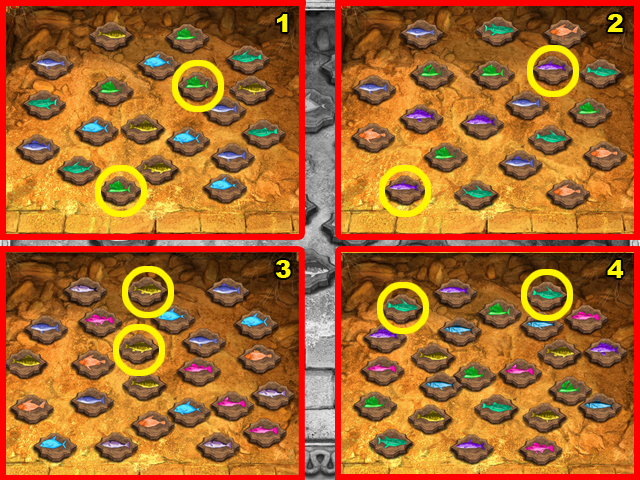
- Find the correct pairs of identical fish throughout the 4 rounds of this puzzle. Select a pair of fish that you think is identical by clicking on them.
- There is only one identical pair of fish in each round.
- Sometimes a pair of fish may appear to be a perfect match, but their tail or fin sizes may be different. Try to notice these subtle differences before selecting a pair.
- Use this screenshot to find the identical fish for each round. The identical fish are highlighted in yellow.
- The number of each mini-screenshot corresponds to the number of rounds in the puzzle. For example, the solution for round 2 is located in the mini-screenshot labeled with a number 2.
- After completing this puzzle you will receive another WHEEL.
- Head back over to the large chamber to use the 2 WHEELS you collected.
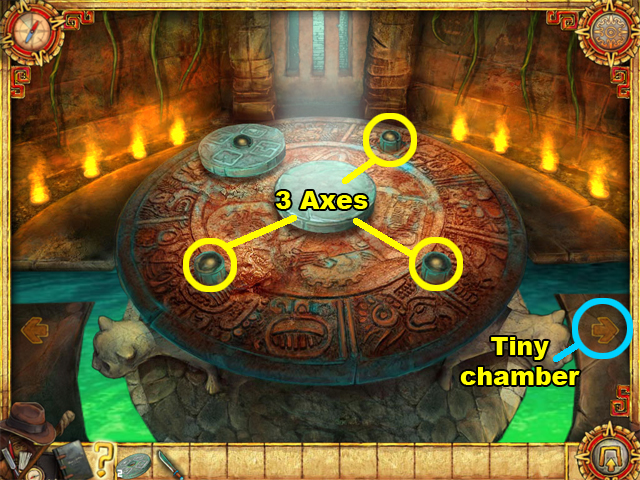
- Use the WHEELS from your inventory on any of the 3 axes on the stone table.
- Click on the arrow near the lower right corner of the room to enter the tiny chamber.
Tiny Chamber
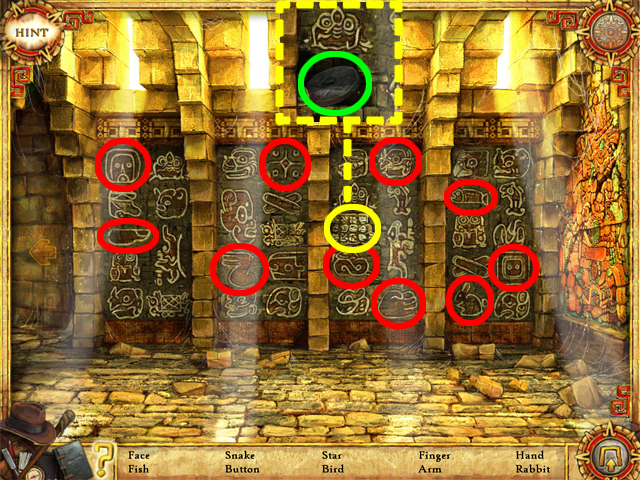
- Examine the cubby near the center of this room to initiate the Hidden Object Sequence. This cubby is highlighted in yellow.
- Find the 10 paintings on the wall that are listed at the bottom of your screen. The 10 hidden paintings are highlighted in red.
- After finding the items on your list, the cubby -highlighted in yellow- will reveal a WHEEL behind it.
- Collect the WHEEL, and then go back to the large chamber that contains the stone table. The WHEEL is highlighted in green.
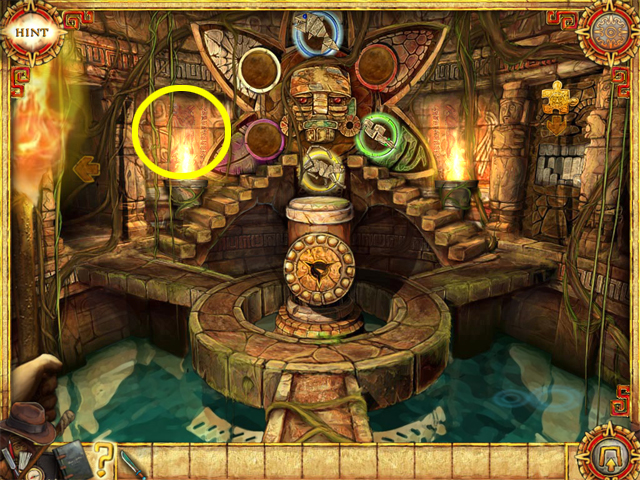
- Use the WHEEL on the final axis of the stone table, and then examine the stone table to initiate the puzzle.
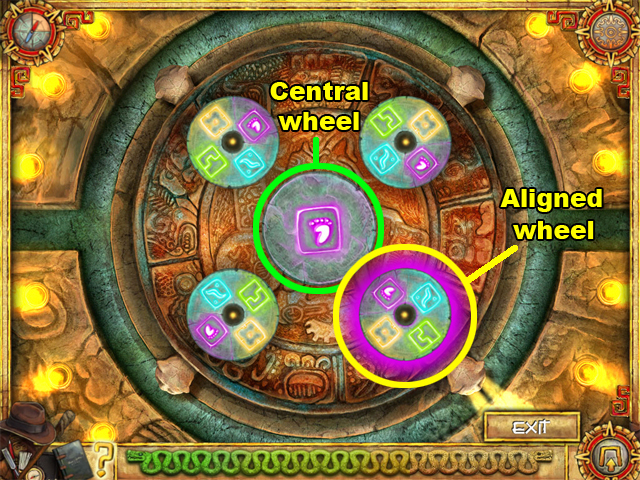
- Match the symbols of the outer wheels to the symbol of the central wheel. You will have to complete 3 rounds of this puzzle to advance.
- Click on a wheel to rotate the symbols on it by 90 degrees. Whenever you rotate a wheel, one of the other wheels will rotate as well.
- You can click on the central wheel to create a random arrangement of symbols if you would like to start over. You can use the hint button to find out which wheels should be rotated to help solve your puzzle.
- When an outer wheel has been aligned with the central wheel, it will begin to glow.
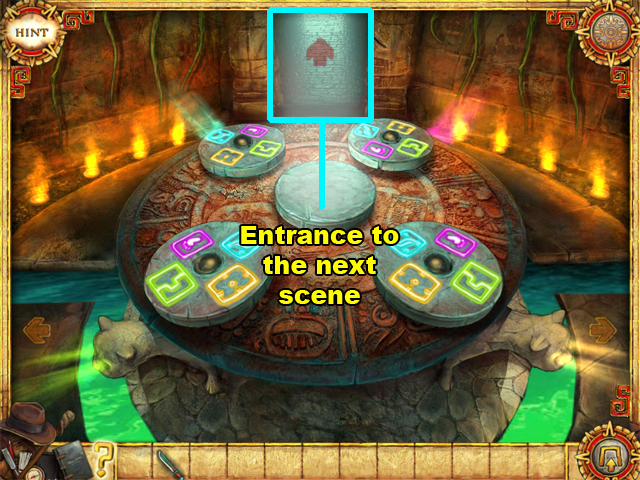
- Click on the entrance that opens above the stone table to advance to the next scene.
Chapter Two
Courtyard
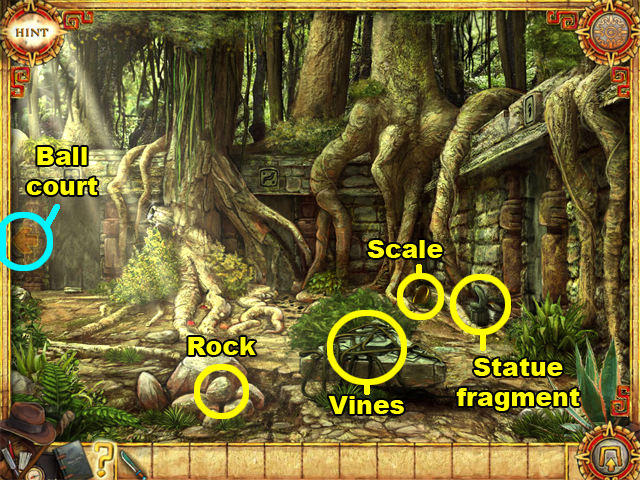
- Collect the ROCK, SCALE, and STATUE FRAGMENT. The ROCK is located to the right of the lower left corner. The SCALE and STATUE FRAGMENT are located to the right of the center of this scene.
- Use your MACHETE on the vines covering the stone table below the center of this scene.
- Click on the arrow highlighted in blue to enter the ball court. The arrow is on the left side of this scene.
Ball Court
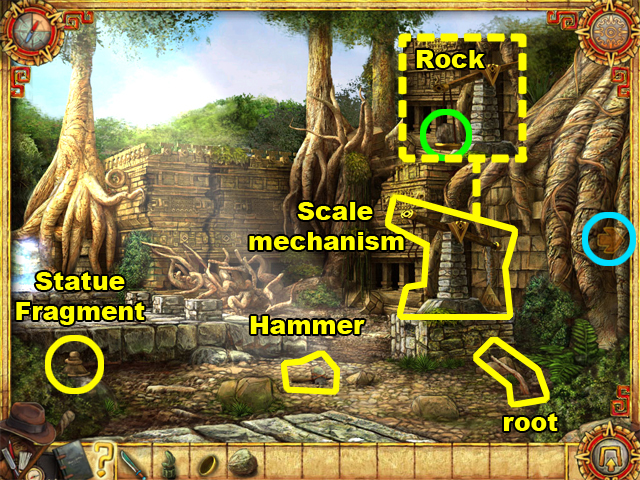
- Collect the STATUE FRAGMENT and the HAMMER. The STATUE FRAGMENT is in the lower left corner, and the HAMMER is below the center of this scene.
- Use the SCALE from your inventory on the scale mechanism. The scale mechanism is to the right of the center of this scene.
- Use the ROCK on the scale mechanism afterwards. The ROCK will outweigh the triangular weight on the right side of the scale for now.
- Use the HAMMER on the ROCK 5 times to shape it into a HEWN STONE.
- Retrieve the HEWN STONE from the scale.
- Use your MACHETE on the loose ROOT to collect it. The ROOT is in the lower right corner of this scene.
- Click on the arrow highlighted in blue to return to the courtyard. The arrow is on the right side of this scene.
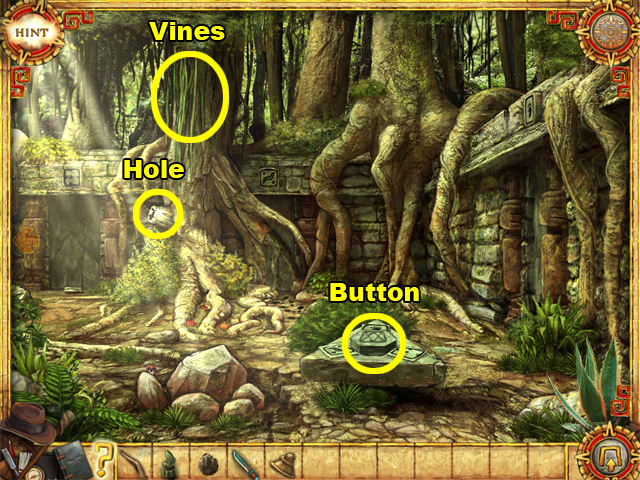
- Use the HEWN STONE on the button in the center of the stone table to activate the doors.
- Place the ROOT into the hole of the tree so that you can climb to the treetop. The tree with the hole is to the left of the center of this scene.
- Click on the vines of the tree to climb up. The vines are above the hole in the tree.
Treetop
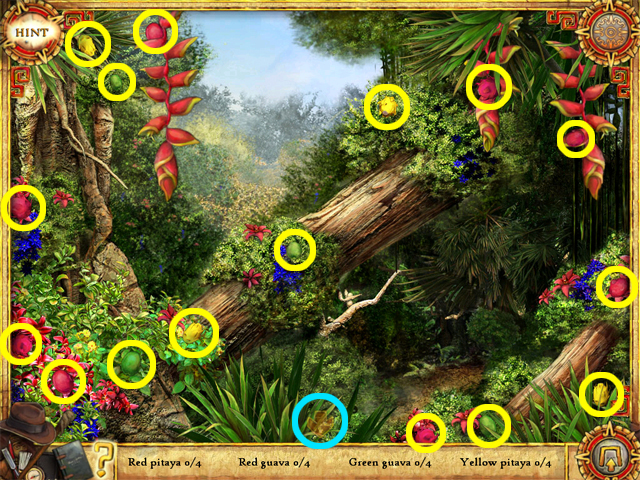
- Collect the 16 FRUITS listed at the bottom of your screen. The FRUITS are highlighted in yellow.
- Return to the courtyard scene by clicking on the arrow HIGHLIGHTED in blue at the bottom of this scene.
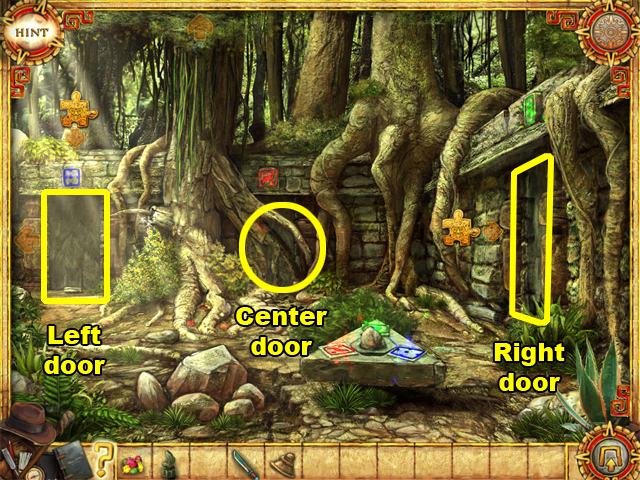
- Examine the left door of the 3 activated doors to initiate the fish matching puzzle.
- Use this screenshot to locate the identical fish in each round.
- The number of each mini-screenshot corresponds to the number of rounds in the puzzle. For example, the solution for round 2 is located in the second mini-screenshot.
- After this puzzle is complete, the left door of the courtyard will open.
- Examine the right door of the courtyard to initiate the next puzzle.
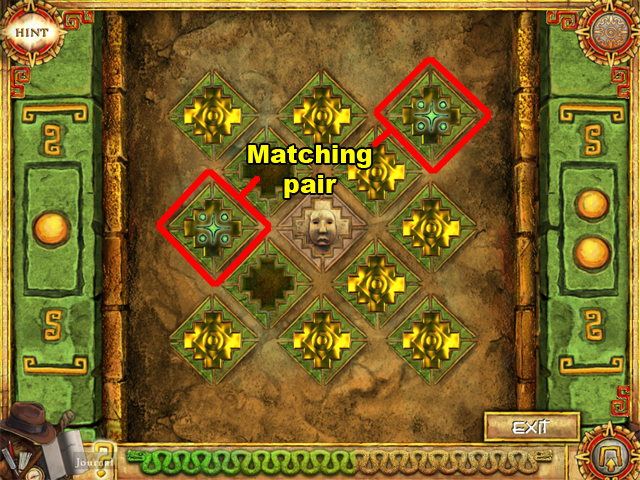
- Find the matching pair to each of the tiles in this puzzle to advance. You will have to solve 2 rounds of this puzzle to complete it.
- Click on a tile to reveal the symbol it has on its opposite side. You can only reveal 2 symbols at a time.
- If the tiles you have selected match, they will disappear from the board. If the tiles do not match, they will turn over once again to conceal their symbols.
- After this puzzle is complete, the right door in the courtyard will open.
- Enter into the left door of the courtyard.
Oratory
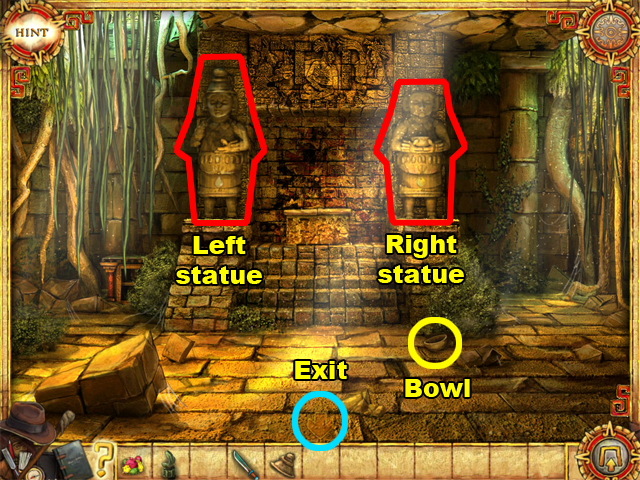
- The STATUE FRAGMENTS in your inventory belong to the 2 statues in this room.
- Place the green STATUE FRAGMENT into the left statue, and place the bronze STATUE FRAGMENT into the right statue.
- Use the FRUIT from your inventory on the right statue.
- Collect the BOWL below the right statue, and then exit the room.
- When you are in the courtyard again, click on the arrow that takes you to the ball court on the left side of the screen.
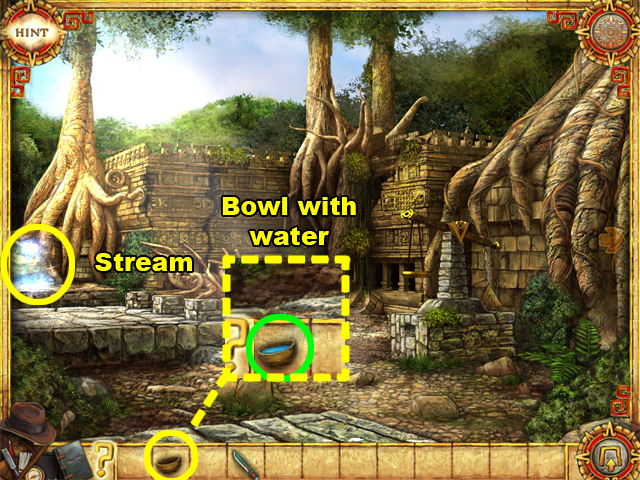
- Use the BOWL in the stream of water on the left side of this scene. The BOWL will contain water from the stream afterwards.
- Go back to the room with the 2 statues to use the BOWL.
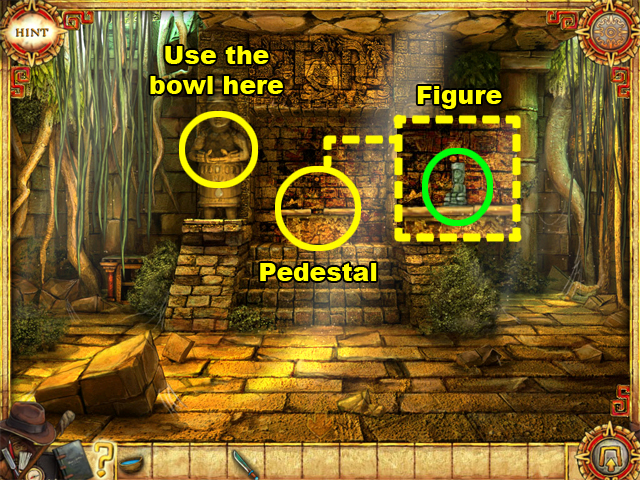
- Use the BOWL WITH WATER on the left statue.
- A FIGURE will rise up out of the pedestal between the 2 statues.
- Collect that FIGURE, and exit the room to the courtyard scene. The FIGURE is highlighted in green.
- After you get to the courtyard, enter the right door.
Store
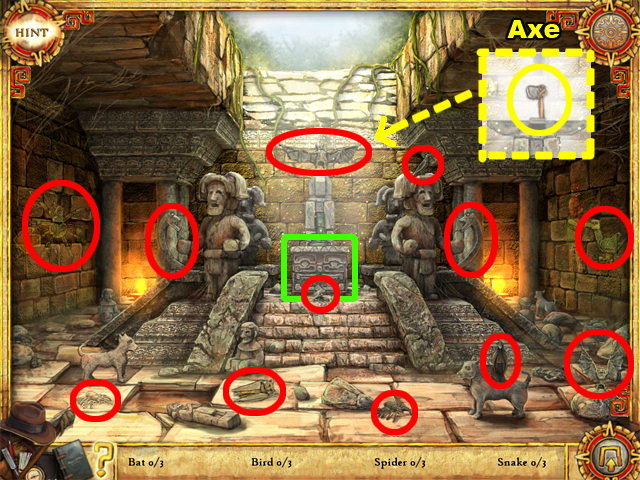
- Use the FIGURE on the pedestal in the center of this scene to initiate the Hidden Object sequence. The pedestal is highlighted in green.
- Collect the 12 items listed at the bottom of your screen. The hidden items are highlighted in red.
- An AXE will appear at the top of the pedestal after you have collected all of the items.
- Collect the AXE, and then exit this room. The arrow to exit is on the left side of the room.
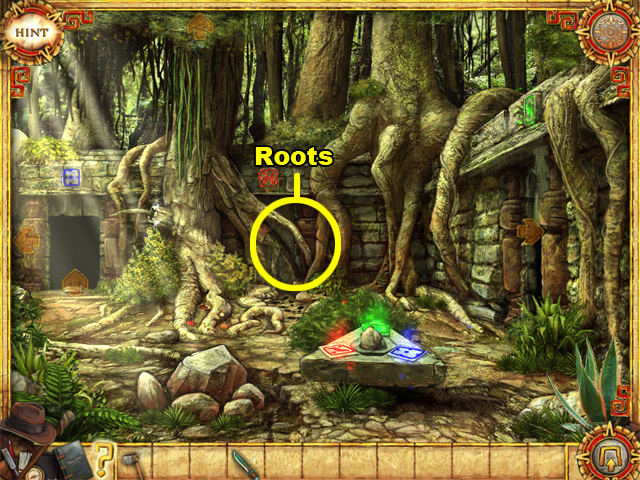
- Use the AXE 3 times on the roots that are blocking the door in the center of this scene.
- After the path to the door has been cleared, examine the door.
- Slide the numbered pieces in numerical order. The pieces should be slid in the direction of their highlighted arrow. For example, in mini-screenshot “A” piece number 3 should be slid to the right.
- Look at the mini-screenshots alphabetically to follow this guide accurately. For example, mini-screenshot “B” should be read after mini-screenshot “A”.
- This is the second round of this puzzle.
- In mini-screenshot “B”, puzzle piece number 1 will have to slide in 2 different directions.
- It must slide upwards in first, and then downwards after piece number 2 is slid to the right.
- This is the final round of this puzzle.
- After completing this puzzle, enter the center door that opens in the courtyard.
Chapter Three
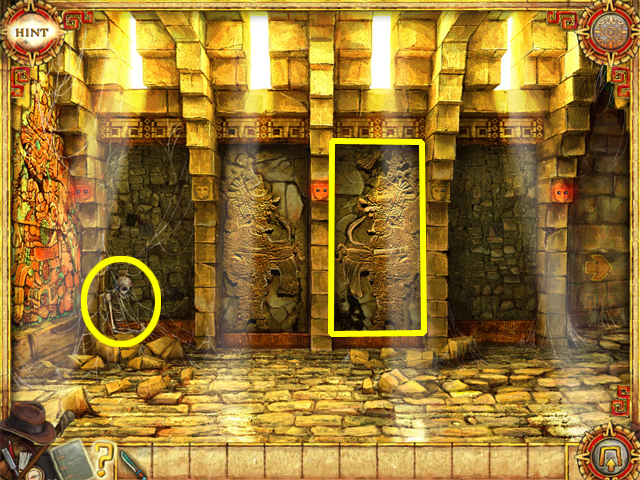
Dungeon Corridor
- There is a large spider web covering the 3 silver faces near the top of this scene. Use your MACHETE on the spider web to remove it.
- Rotate the left silver face once, to make the stairs under the cubby appear. The cubby is highlighted in red.
- Examine the cubby to initiate the riddle puzzle.
- The answers for the puzzle are: SKELETON, FEATHER, TONGUE, and BRIDGE.
- After completing the riddle puzzle you will receive a container of OIL.

- Use the OIL on the third silver face to fix it.
- Rotate the faces so that the first 2 faces are upside-down, and the last face is right side-up.
- If done correctly, the stairway under the cubby near the upper left corner of this scene should appear.
- Examine the cubby to initiate the puzzle. This cubby will have a puzzle piece icon above it.
- The number of each mini-screenshot corresponds to the number of rounds in the puzzle. For example, the solution for round 2 is located in the second mini-screenshot.
- The identical fish are highlighted in yellow.
- After this puzzle is complete, the cubby you examined earlier will open.
- Collect the SILVER KEY in the cubby you examined earlier.
- Rotate the left and right silver faces until they are upside-down. Rotate the center silver face so that it is right side up.
- A treasure chest will appear to the left of the water stream on the right side of this scene.
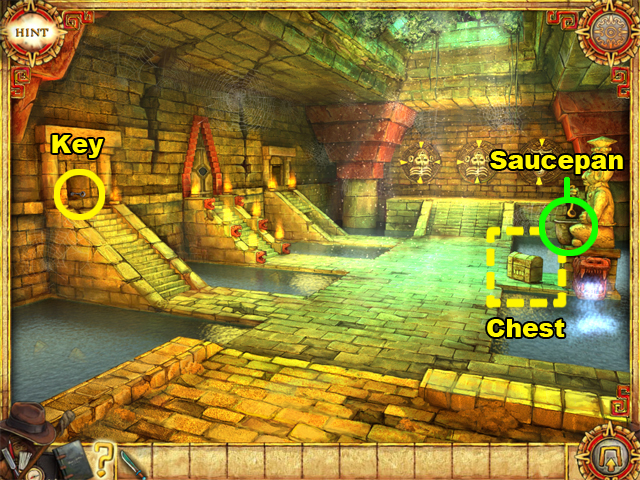
- Use the SILVER KEY on the chest to receive the BROKEN GOLDEN KEY.
- Collect the PORCELAIN SAUCEPAN from the statue above the stream of water.
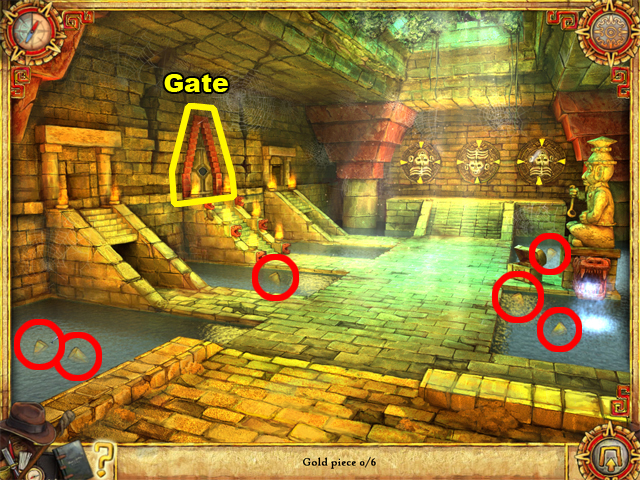
- Collect the 6 GOLD PIECES in the water to reassemble the GOLDEN KEY. The pieces are highlighted in red.
- After the 6 pieces have been collected, the BROKEN GOLDEN KEY will become a GOLDEN KEY.
- Use the GOLDEN KEY on the gate, and then click on the gate to open it. The gate is located between the 2 cubbies.
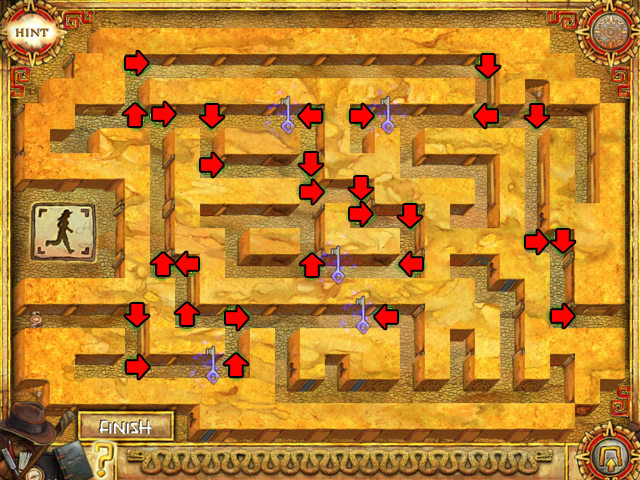
- Examine the gate after it opens to enter the maze puzzle.
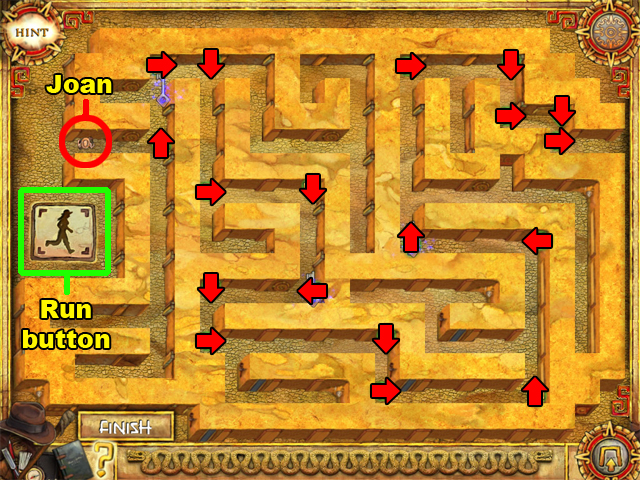
- Your goal is to guide Joan to the end of the maze on the right side of the screen. You must also guide Joan so that she collects all of the keys in the maze before reaching the exit.
- Click within an empty space in the maze to create an arrow icon. You can change the direction of an arrow by clicking on it. There is no limit to the amount of arrows you can place in this maze.
- Joan will run in the direction of whichever arrow she collides with.
- When you click the run button, Joan will run through the maze until she reaches the exit, or runs into a wall. The run button is located in the left side of your screen.
- The red arrows in this screenshot are to demonstrate where your arrows should be placed.
- After this puzzle is complete Joan will enter the gate.
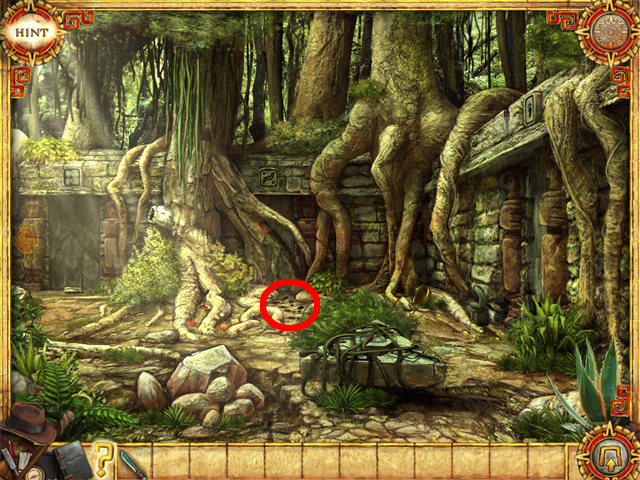
Entrance to the Caves
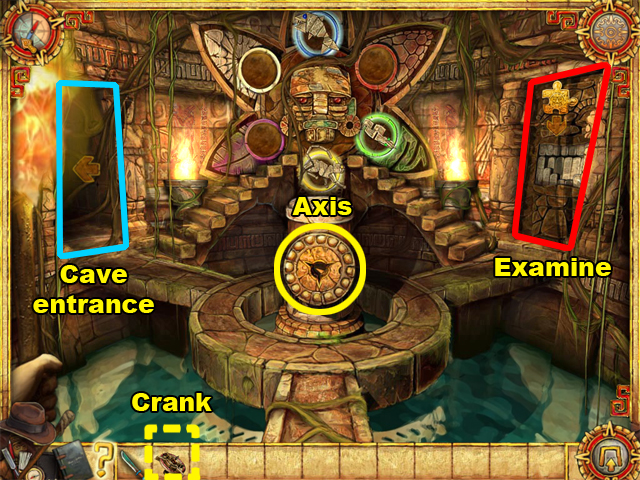
- Examine the door on the right to initiate the riddle puzzle.
- The answers are: STATUE, PYRAMID, JUNGLE, and FRUIT.
- Afterwards you will receive a CRANK.
- Use the CRANK on the axis in the center of the room to repair it.
- Click on the CRANK to activate the mechanism.
- Enter the door on the left side of this scene.
High Cave
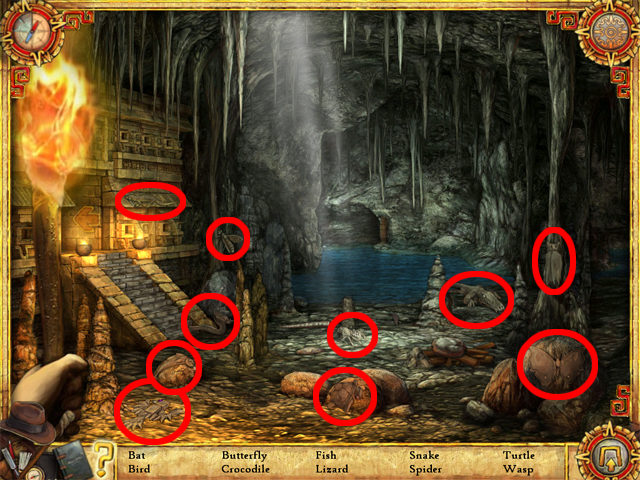
- Collect the items listed at the bottom of your screen. The hidden items are highlighted in red.
- After this puzzle, you will receive a BIRD, SPIDER, and a TURTLE.
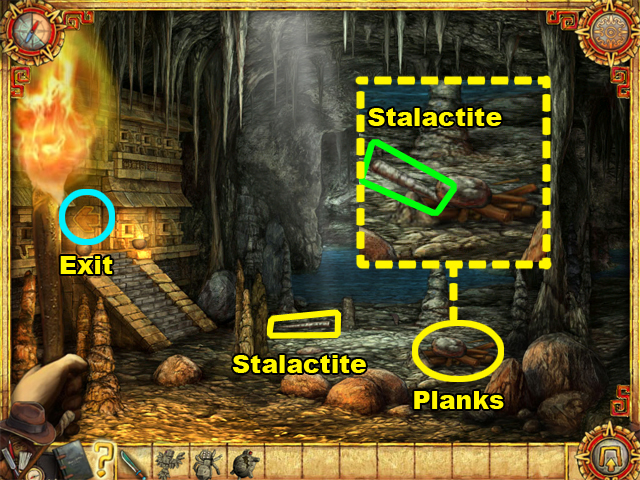
- Collect the STALACTITE near the center of this scene.
- Use the STALACTITE on the pile of PLANKS near the lower right corner of this scene. The STALACTITE will be wedged between the rock and the pile of PLANKS.
- Click on the STALACTITE to remove the rock from the planks.
- Exit the room by clicking on the arrow in the left side of this room.
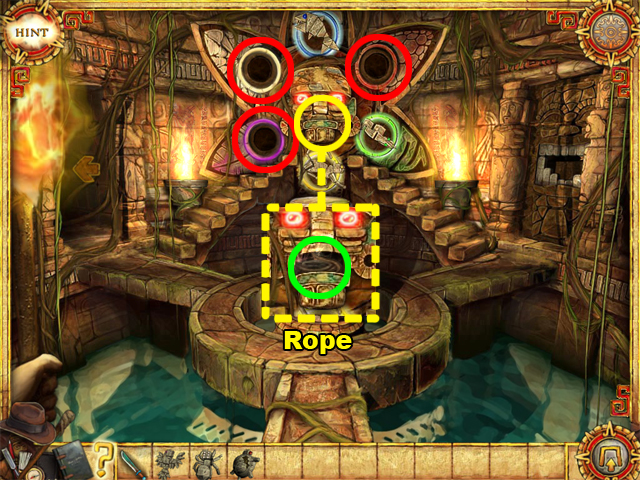
- The stone animals in your inventory must be placed into the 3 empty slots of the mechanism. The slots are highlighted in red.
- Place the TURTLE in the red slot, the SPIDER in the white slot, and the BIRD into the purple slot.
- The mouth of the statue will open and reveal a ROPE inside of it.
- Collect the ROPE and then go back to the cave. The ROPE is highlighted in green.
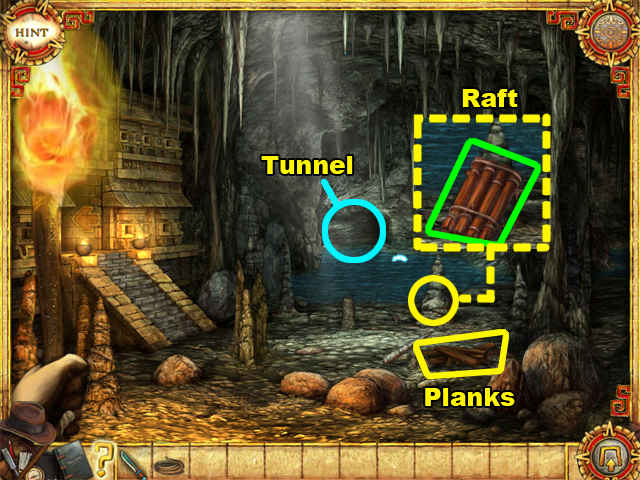
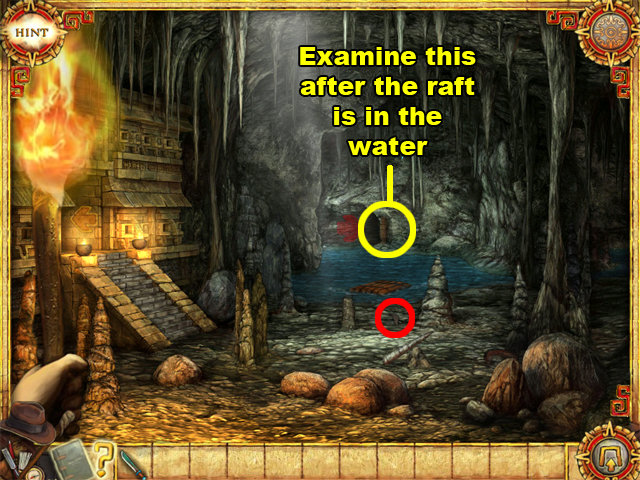
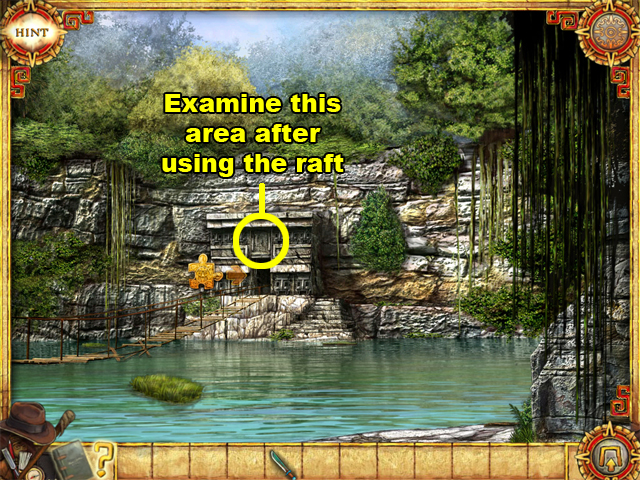
- Use the ROPE on the PLANKS to construct a RAFT.
- Click on the RAFT near the water to place it into the water. The RAFT is highlighted in green.
- Enter the tunnel area across the water. There will be a red arrow in the tunnel entrance.
Chapter Four
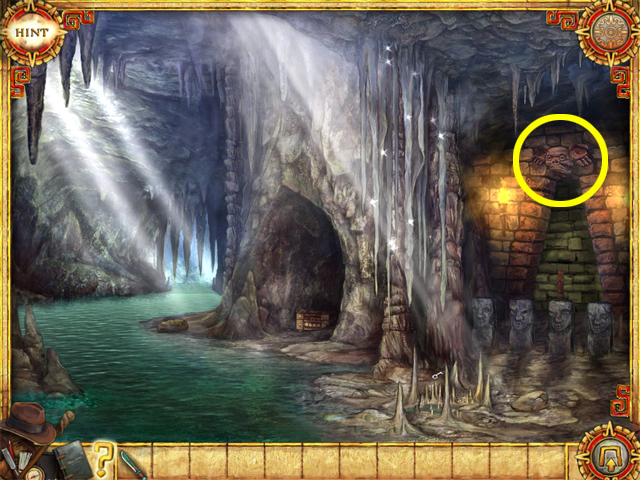
Sunken Cave

- Collect the KEY and the 2 STONES. There is a KEY and a STONE near the lower right corner of this scene. There is a STONE near the water to the left of the center of this scene.
- Use your MACHETE on the thin stalactites to initiate a puzzle. The thin stalactites are near the center of this scene.
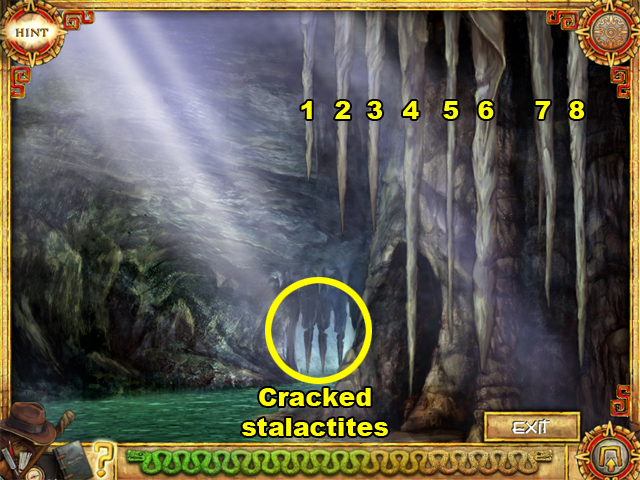
- Repeat the sequence of stalactites that vibrate to advance. There are 3 rounds of sequences to complete in this puzzle.
- Each time you complete a sequence correctly, a cracked stalactite from the left side of the scene will break off into the water.
- In this screenshot the 8 musical stalactites have been numbered to match the sequences listed below.
- The sequence for the first round is 1, 4, and 3. This means that you should click on the first, forth, and third stalactite in that specific order.
- The sequence for the second round is 5, 4, 5, and 6.
- And the sequence for the final round is 6, 4, 3, and 8.
- Enter the area where the cracked stalactites were after completing this puzzle.
- Click on the red arrow to move forward.
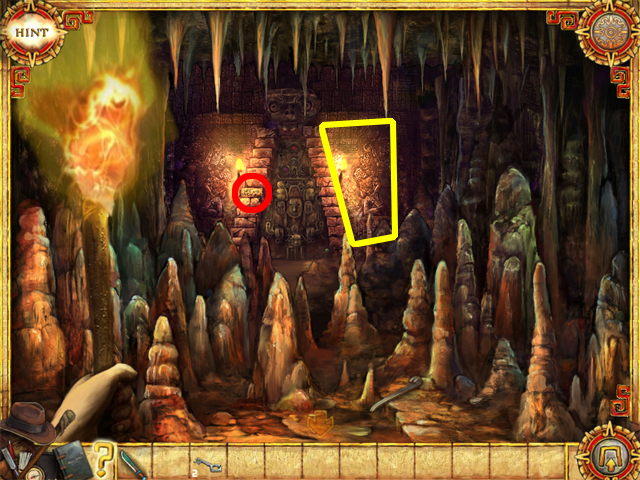
Deep Cave
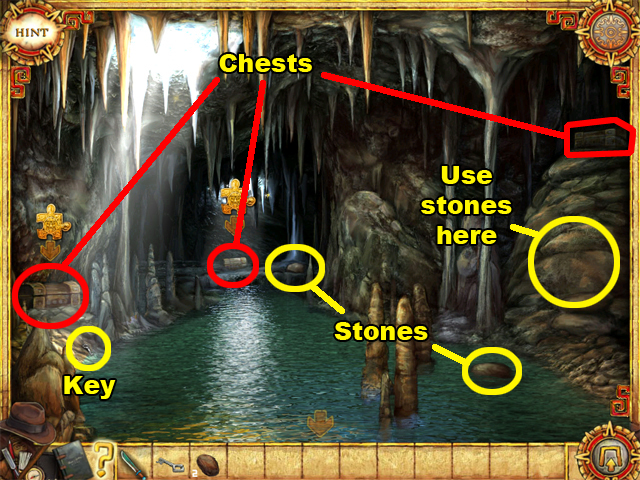
- Collect the KEY nearby the lower left corner of this scene.
- There are 3 chests in the room, but only 2 of them can be examined right now.
- Collect the 2 STONES in this scene. One is to the right of the chest near the center of this scene. The other STONE is in the water near the lower right corner of this scene.
- Use the STONES from your inventory in the area below the chest on the right side of this scene.
- The 3 chests should all have puzzle icons above them now. Each chest has a STATUE in it, so you will have to examine all of the chests.
- Examine the in the left side of this scene first. A tile matching puzzle will appear once you examine this chest.
- After completing the tile matching puzzle, examine the chest near the center of this scene.
- Slide the numbered pieces in numerical order. The pieces should be slid in the direction of their highlighted arrow. For example, in mini-screenshot “A” piece number 2 should be slid downwards.
- Look at the mini-screenshots alphabetically to follow this guide accurately. For example, mini-screenshot “B” should be read after mini-screenshot “A”.
- This is the solution for round 2 of the sliding puzzle.
- This is the solution for round 3 of the sliding puzzle.
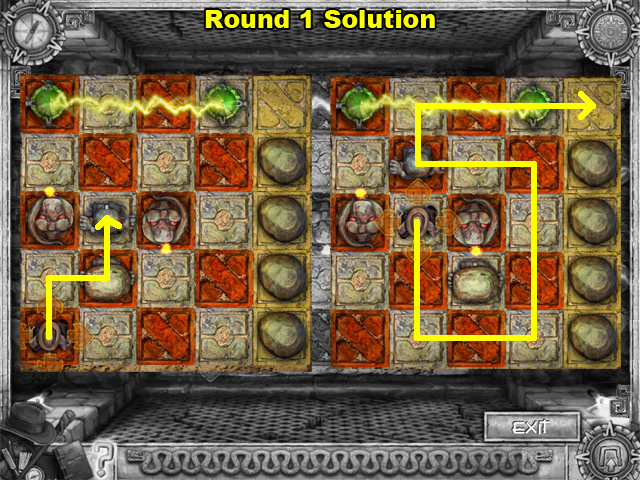
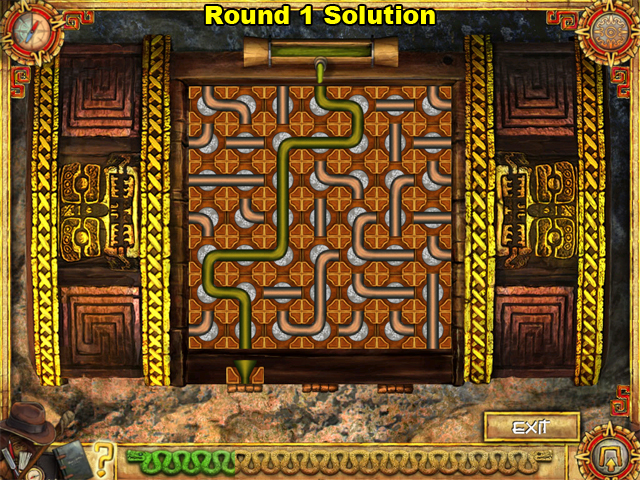
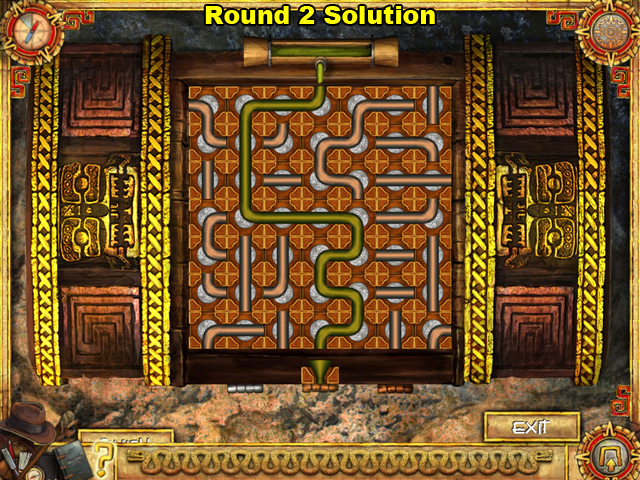
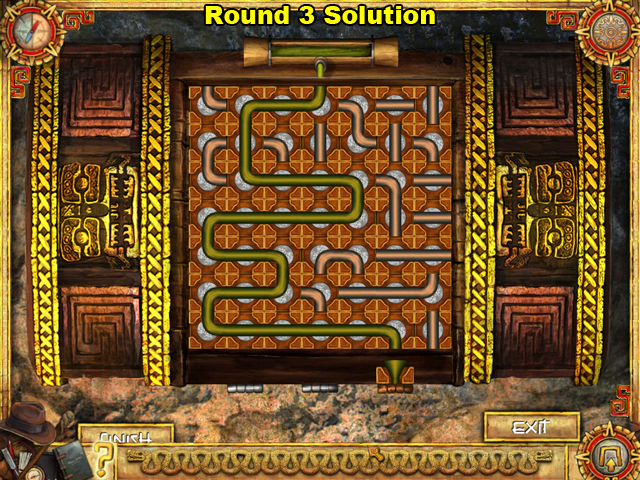
- Examine the final chest to play the pipe puzzle.

- This is the solution for round 1 of the pipe puzzle.
- This is the solution for round 2 of the pipe puzzle.
- This is the solution for round 3 of the pipe puzzle.
- Afterwards, exit back to the sunken cave. The arrow to exit is at the bottom of the scene.
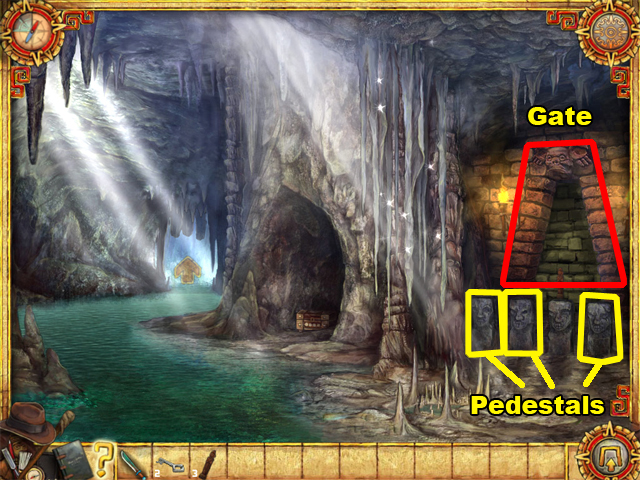
- Place each of the STATUES from your inventory onto the 3 pedestals that do not have a statue on them.
- Examine the gate behind the pedestals to move forward.
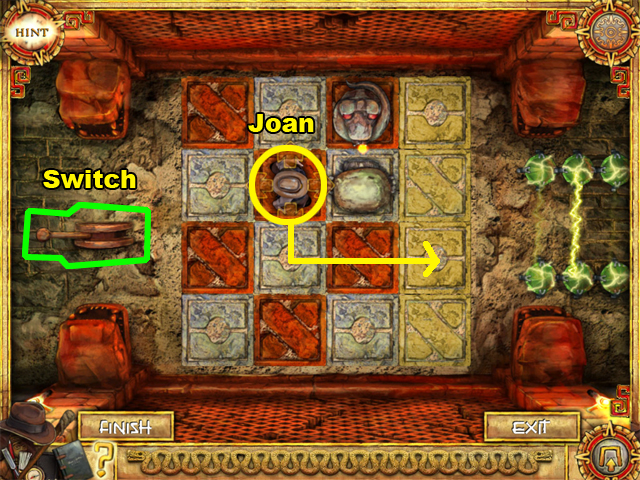
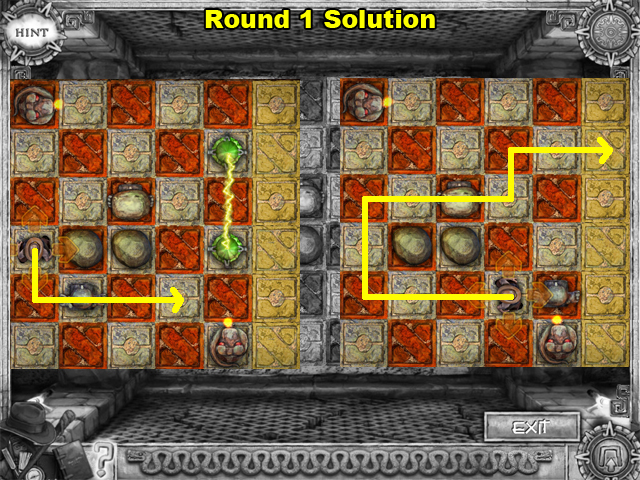
- Guide Joan to the yellow tiles while avoiding fire snakes and lightning traps.
- To move Joan, click on one of the 4 arrows surrounding her.
- A rock or statue holding a rock can stop a fire snake’s attack.
- Joan can push statues by walking into them. A movable object cannot move if there is something blocking its path however.
- Follow the path of the yellow arrow in this screenshot to guide Joan to the yellow tiles safely.
- You can restart this puzzle by clicking on the switch to the left of this puzzle.
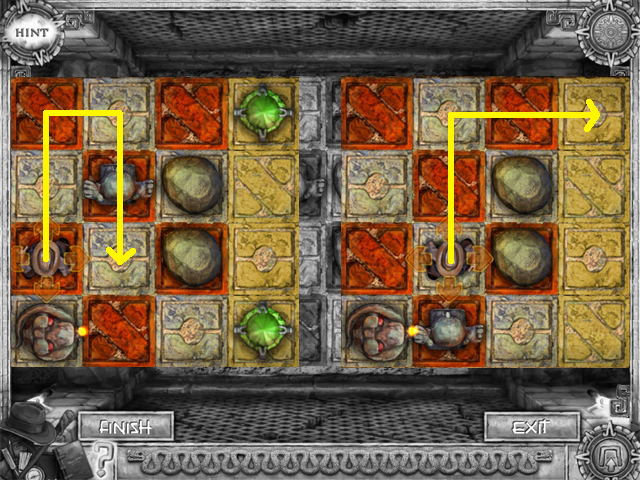
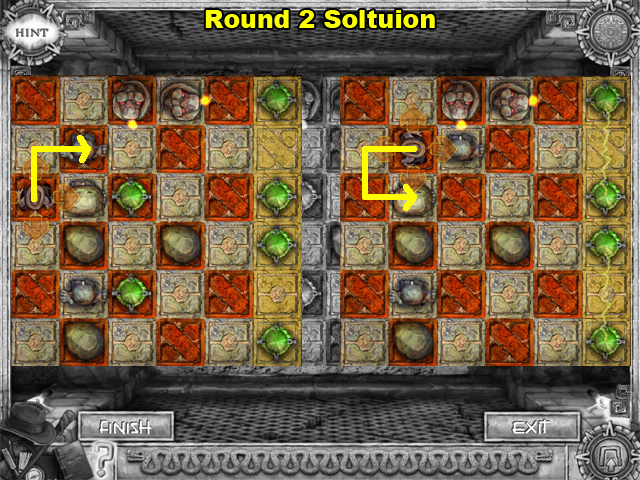
- This is the solution for the second round.
- Fire attacks travel over statues that are not holding anything. And an attack from a fire snake will destroy an electro crystal.
- In this round you will have to use this knowledge to your advantage.
- The path of the yellow arrow demonstrates the path that Joan should follow to solve this puzzle.
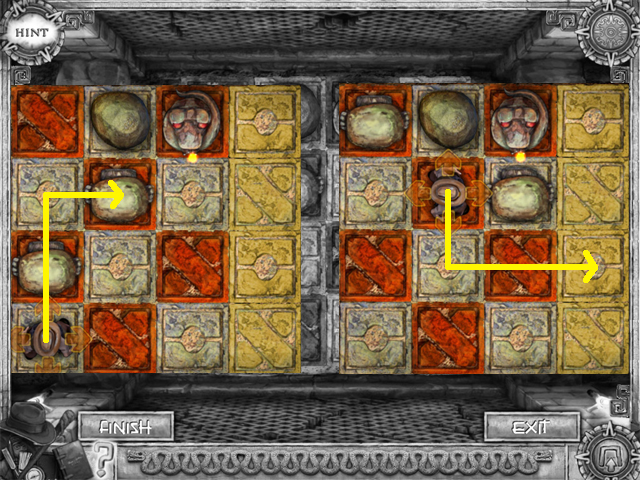
- This is the solution third round of this puzzle.
- Follow the path of the yellow arrow to guide Joan to the yellow tiles without incident.
- After this puzzle, enter the corridor behind the pedestals.
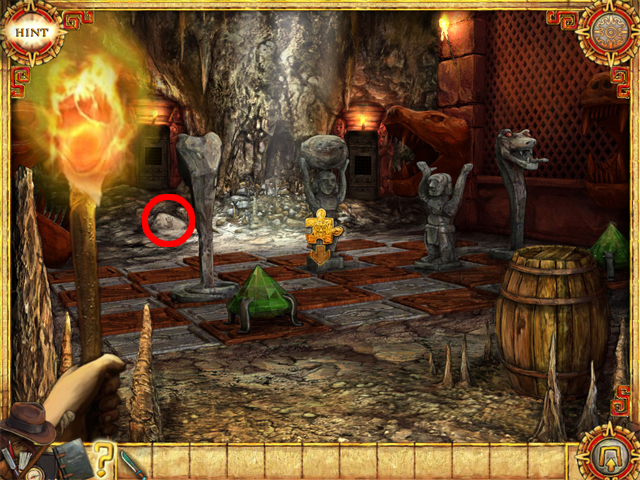
Secret Cave
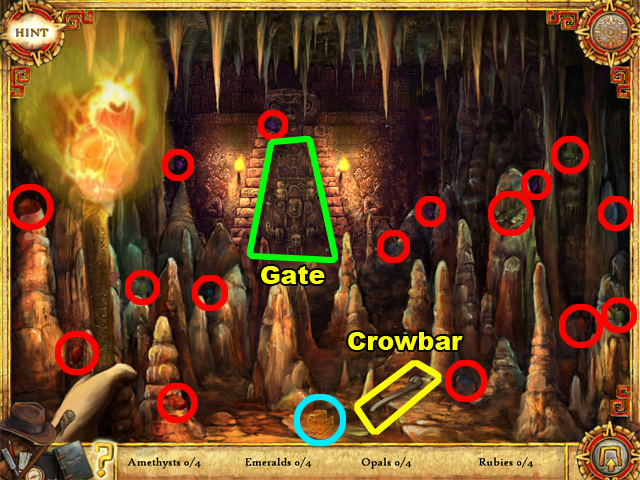
- Examine the gate to initiate the Hidden Object sequence. The gate is in the center of this scene.
- Find all of the CRYSTALS listed at the bottom of your screen. The CRYSTALS are highlighted in red.
- After collecting the CRYSTALS, collect the CROWBAR at the bottom of this scene.
- Use the CRYSTALS from your inventory on the gate.
- Use the KEYS from your inventory on the gate also.
- Exit the room by clicking on the arrow at the bottom of this scene. The arrow is highlighted in blue.
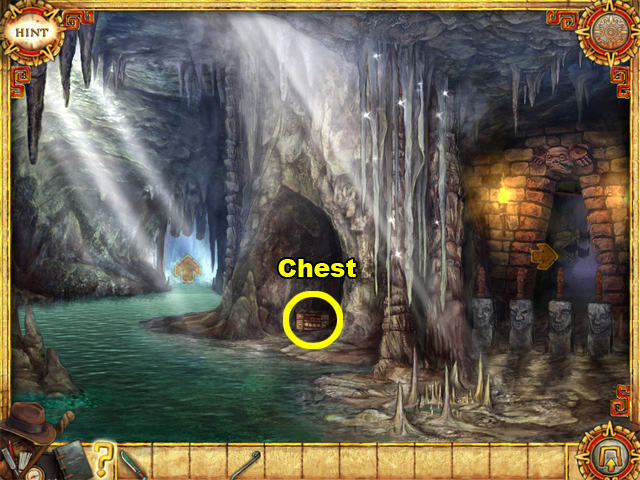
- Use the CROWBAR on the chest to obtain the last KEY. The chest is near the center of this scene.
- Go back to the previous room to use the final KEY on the gate.
- The gate will open after you use the last KEY. Enter the gate to advance to the next chapter.
Chapter Five
Sacrificial Pit
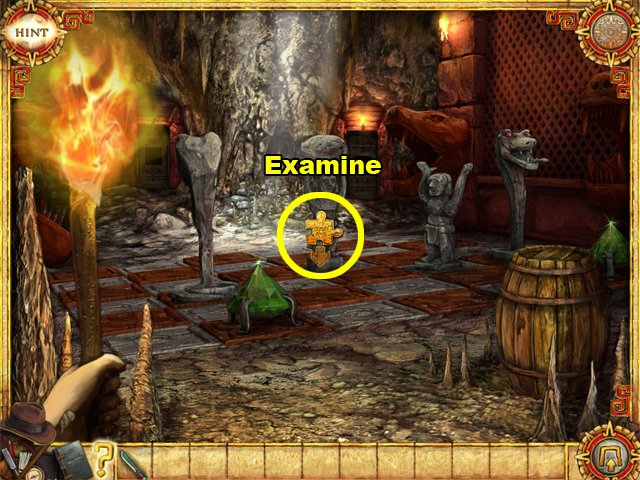
- Examine the puzzle piece icon to initiate the puzzle. The puzzle piece icon is in the center of this scene.
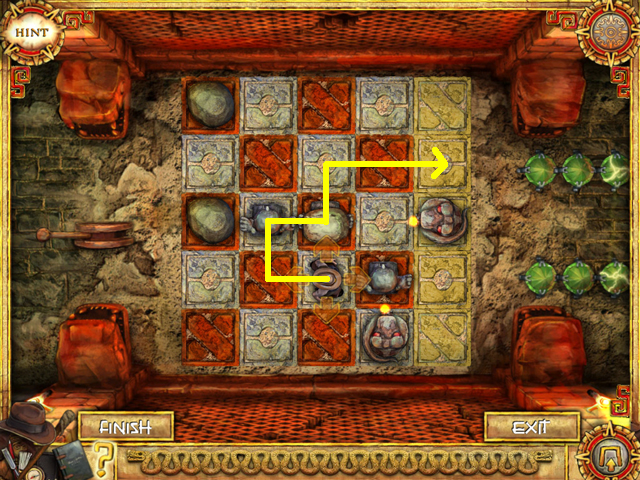
- This is the puzzle solution for round 1.
- The path of the yellow arrow demonstrates the path that Joan should follow to solve this puzzle.
- This is the solution for round 2 of this puzzle.
- The path of the yellow arrow demonstrates the path that Joan should follow to complete this puzzle.
- Follow the green arrow after the yellow arrow in the second mini-screenshot. The green arrow is an extension of the yellow arrow.

- This is the solution for the final round of this puzzle.
- Follow the green arrow after following the yellow in the second mini-screenshot.
- This is the continuation of the solution for the final round.
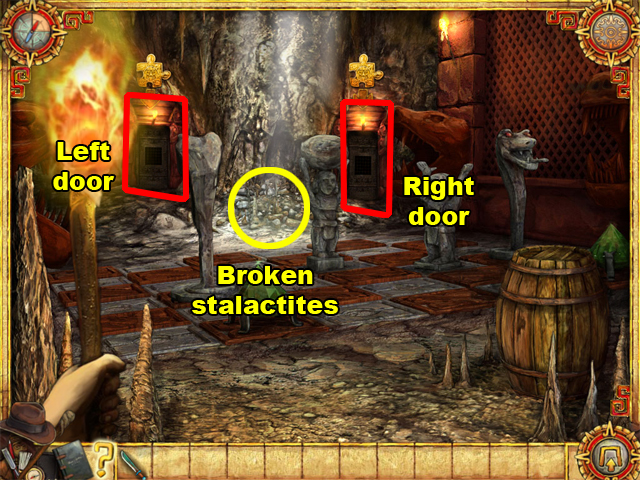
- The left and right doors can be examined, but the area between them must be examined first.
- Examine the broken stalactites in the center of this scene.
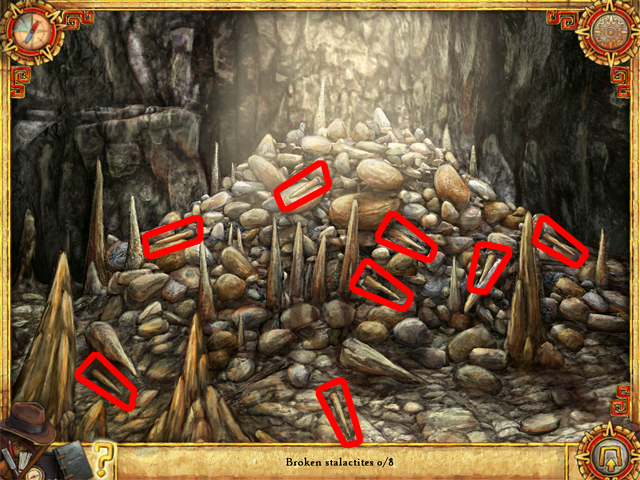
- Collect the 8 BROKEN STALACTITES in this scene. The STALACTITES are highlighted in red.
- Afterwards, examine the left door from the previous scene.
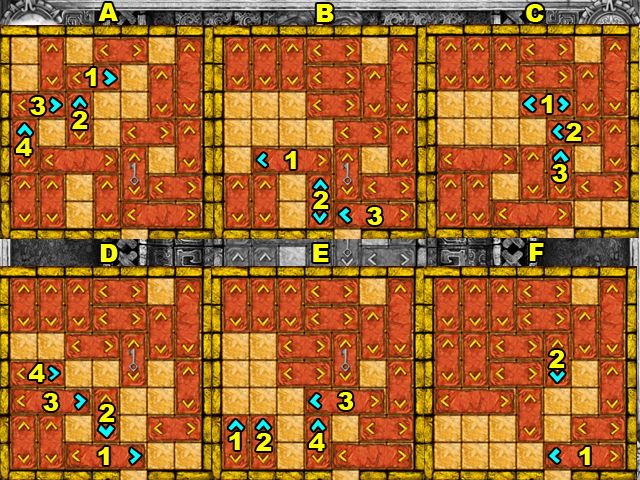
- This is the solution for the first round.
- Slide the numbered pieces in numerical order. The pieces should be slid in the direction of their highlighted arrow. For example, in mini-screenshot “A” piece number 4 should be slid to the right.
- Look at the mini-screenshots alphabetically to follow this guide accurately. For example, mini-screenshot “B” should be read after mini-screenshot “A”.
- This is the solution for round 2.
- In mini-screenshot “A”, puzzle piece number 2 needs to be slid downwards first, and then upwards later. Slide piece number 2 upwards after piece number 3 is slid to the right.
- This is the solution for the last round in this puzzle.
- In mini-screenshot “D”, puzzle piece number 1 must be slid downwards twice. It must be slid downwards in the beginning, and then again after piece number 4 is slid to the right.
- Examine the right door in the previous room after this puzzle is complete.
- This is the correct path for the first round.
- This is the solution for the second round.
- This is the solution for the final round.
- Afterwards, enter through the left door in the previous scene.
Cliff
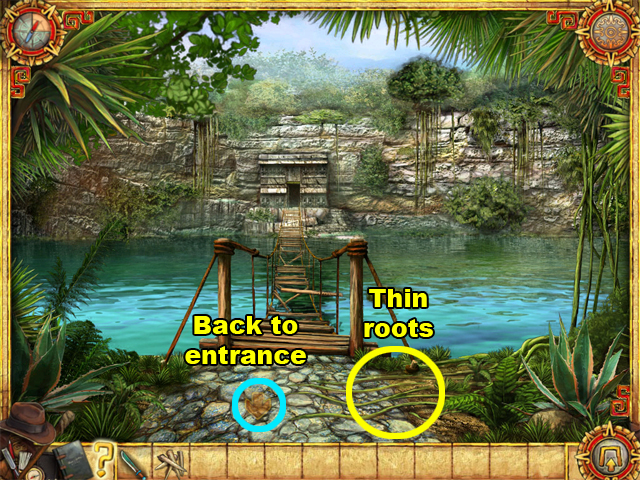
- Use your MACHETE on the THIN ROOTS to collect them. The THIN ROOTS are at the bottom of this scene.
- Return to the entrance, and then enter the right door. The arrow to exit is at the bottom of this scene.
Sacred Well
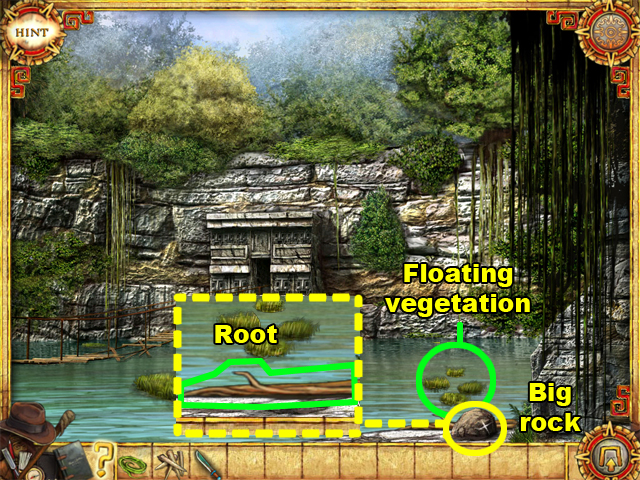
- Collect the BIG ROCK near the lower right corner of this scene.
- Use your MACHETE on the BIG ROOT to collect it. The BIG ROOT is where the BIG ROCK was.
- Use the BIG ROOT you collected on the floating vegetation in the water. The floating vegetation is near the lower right corner of this scene.

- Collect the 8 portions of floating vegetation in the water. The vegetation is highlighted in red.
- Use the BROKEN STALACTITES from your inventory on the RAFT.
- Use the THIN ROOTS on the RAFT to tie the STALACTITES together.
- Exit this scene by clicking on the arrow at the bottom of this scene.
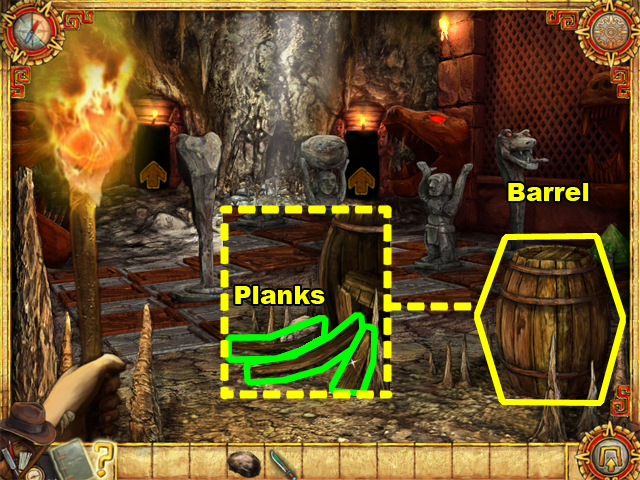
- Use the BIG ROCK on the barrel to break it. The barrel is in the lower right corner of this scene.
- Collect the 3 PLANKS beside the barrel after breaking it.
- Enter the left door to get to the bridge.
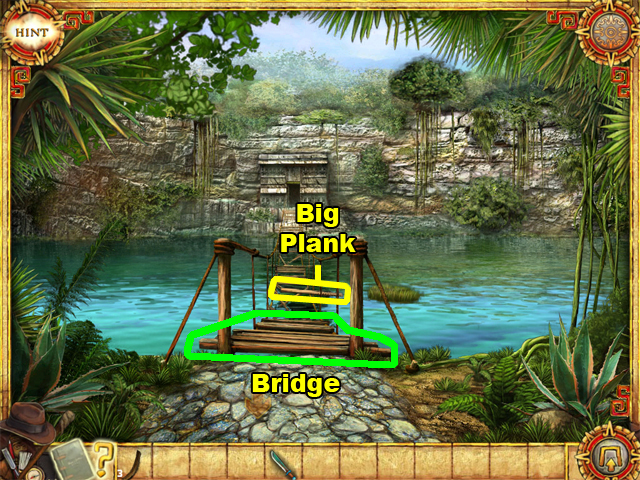
- Use the 3 PLANKS on the bridge.
- Collect the BIG PLANK on the bridge.
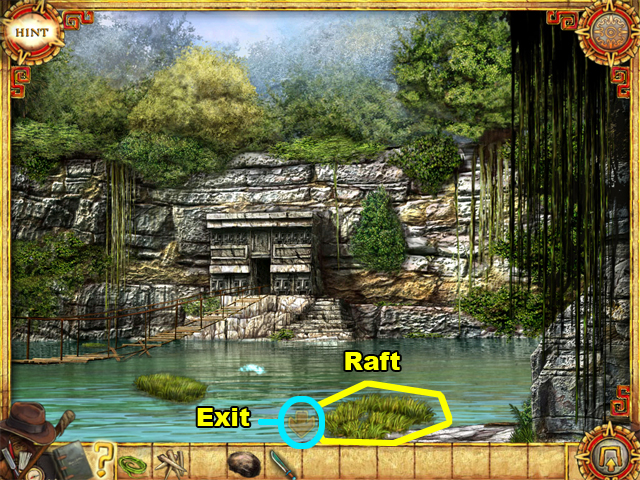
- Exit this scene, and then enter the scene with the raft you constructed.
- Use the BIG PLANK on the RAFT.
- Click on the RAFT to use it.
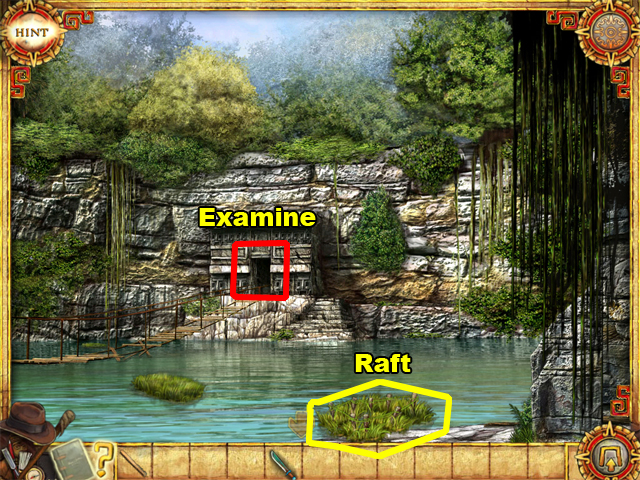
- Examine the small entrance across the bridge to play a tile matching mini-game.
- Afterwards, click on the entrance again to complete this chapter.
Chapter Six
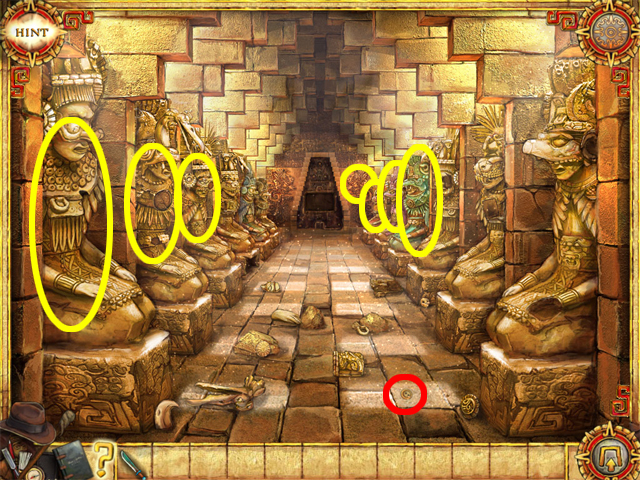
The Twelve Lords
- Collect the 10 STATUE FRAGMENTS that are highlighted in yellow.
- Each of the STATUE FRAGMENTS must be placed into one of the 7 bronze statues. Three of the statues are missing more than 1 fragment.
- The statues will regain their color once all of their parts have been returned to them.
- Each of the STATUE FRAGMENTS has a line connecting them to their corresponding statue.
- Use the red and yellow lines to find out where each of the fragments belongs.
- Examine the gate near the center of this scene after the statues have regained their color.
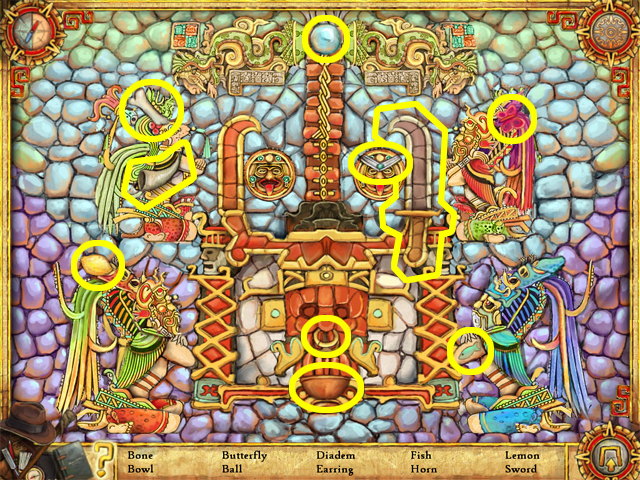
- Collect the items listed at the bottom of this scene. The hidden items are highlighted in yellow.
- The gate will open after this scene is complete; examine the gate again to initiate the next puzzle.
- The red arrows in this screenshot are to demonstrate where your arrows should be placed.
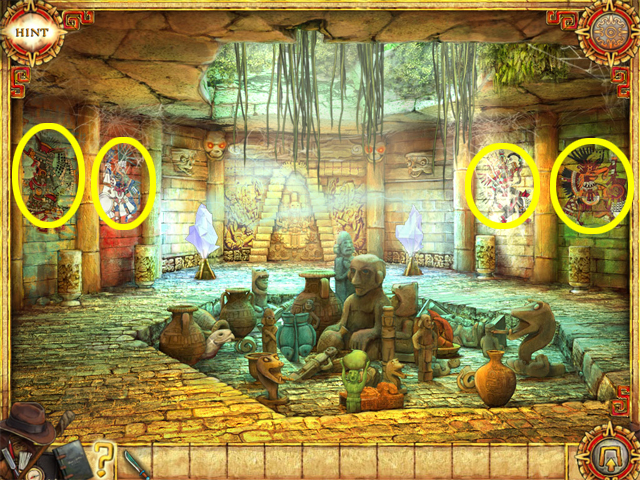
Vestibule of Xibalba
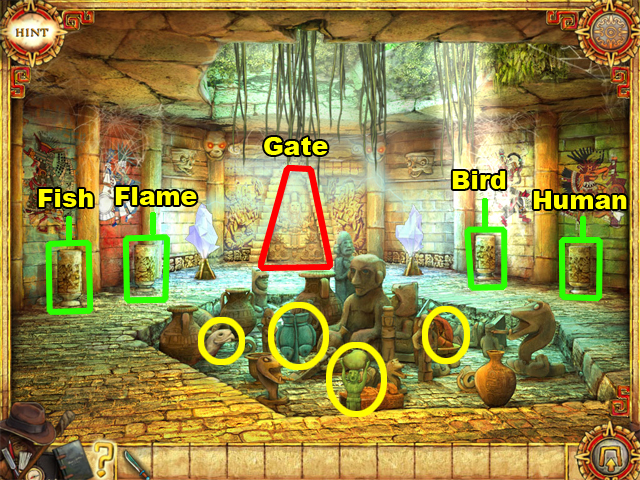
- Collect the 4 FIGURES in the center of this room. The FIGURES have been highlighted in yellow.
- Each of the FIGURES has a matching pedestal in the room.
- Each pedestal has been highlighted in green, and has been given a name to match its corresponding figure. For example, the HUMAN FIGURE should be placed onto the human pedestal.
- Examine the gate after placing the FIGURES into their proper places.
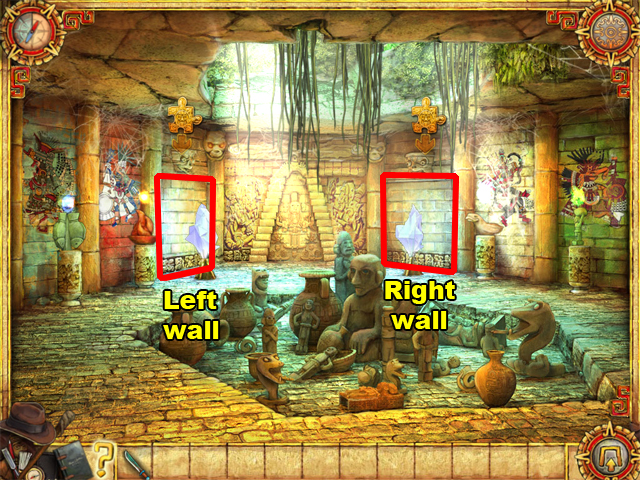
- Examine the left wall to initiate the fish matching puzzle.
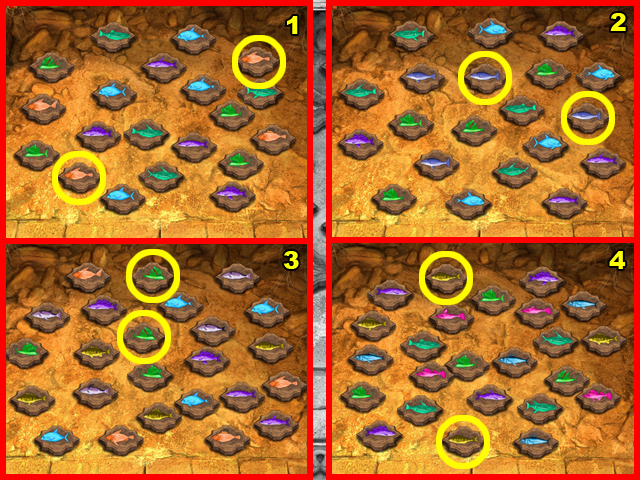
- The number of each mini-screenshot corresponds to the number of rounds in the puzzle. For example, the solution for round 3 is located in the third mini-screenshot.
- The identical fish are highlighted in yellow.
- Examine the right wall afterwards to begin the sliding puzzle.
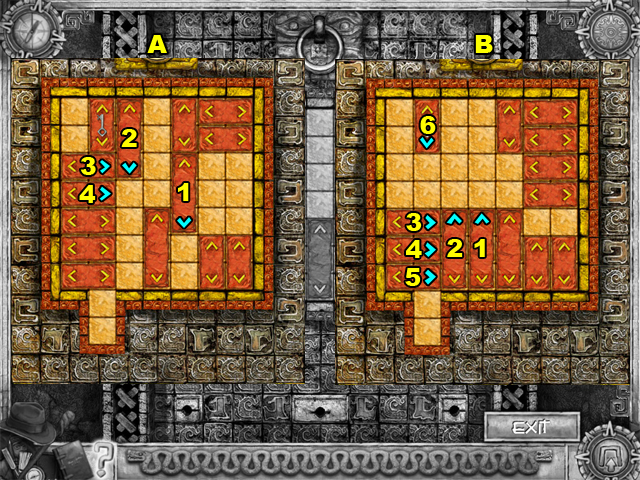
- This is the solution for the first round.
- Slide the numbered pieces in numerical order. The pieces should be slid in the direction of their highlighted arrow. For example, in mini-screenshot “A” piece number 2 should be slid downwards.
- Look at the mini-screenshots alphabetically to follow this guide accurately. For example, mini-screenshot “B” should be read after mini-screenshot “A”.
- This is the solution for the second round.
- In mini-screenshot “B” puzzle piece number 2 needs to be slid in 2 directions. Slide it upwards after piece number 1, and slide it downwards after piece number 3.
- In mini-screenshot “C” puzzle piece number 1 needs to be slid in 2 directions. Slide it to the left in the beginning, and then slide it to the right after piece number 3 is slid.
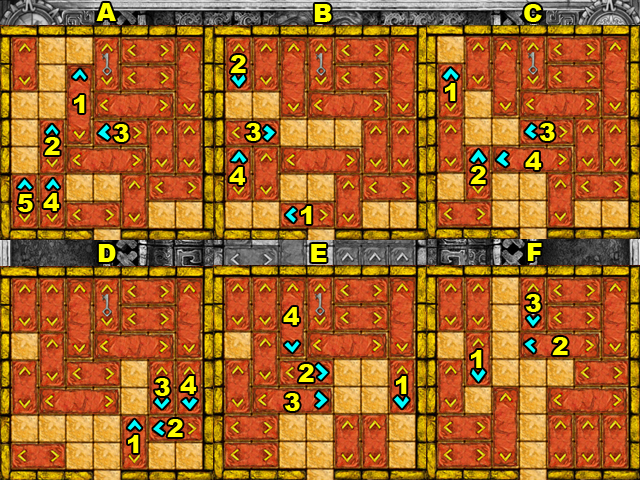
- This is the solution for the third round.
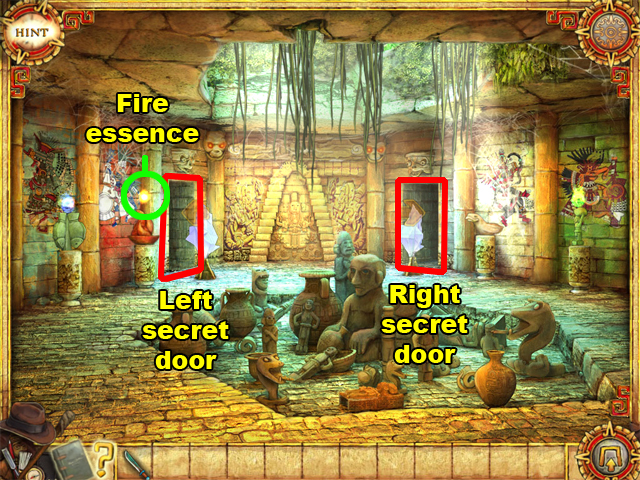
- Collect the FIRE ESSENCE above the flame pedestal. The flame pedestal is to the left of the left secret door in the room.
- Enter the right secret door in the room.
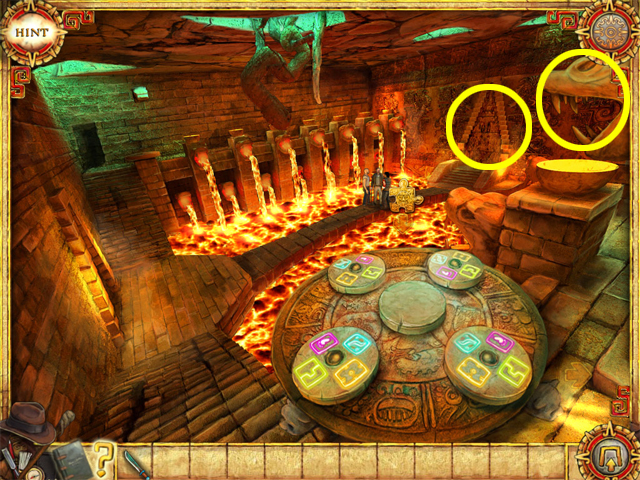
Gate of Xibalba – Right Balcony
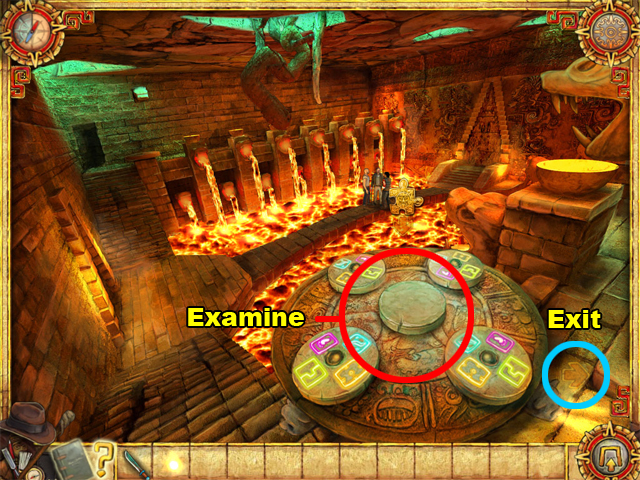
- Examine the wheel mechanism to initiate the wheel puzzle.
- After completing the puzzle, exit the room.
- Enter the left secret door in the previous room.
Gate of Xibalba – Left Balcony
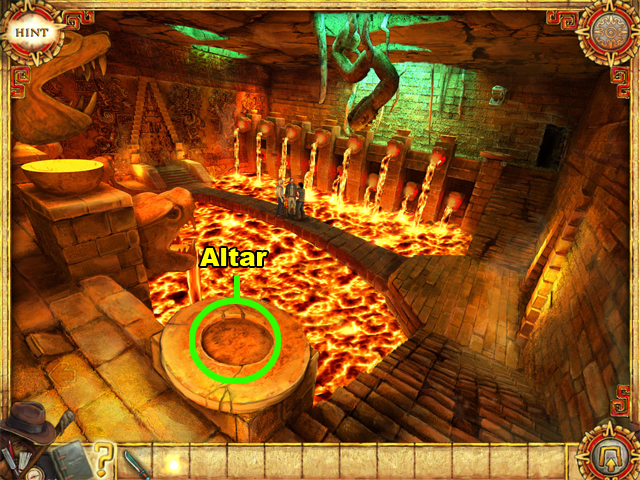
- Use the FIRE ESSENCE on the altar. The altar is at the bottom of this scene.
- After catching the kidnappers, they will tell you where your children are.
The Kidnappers Hideout
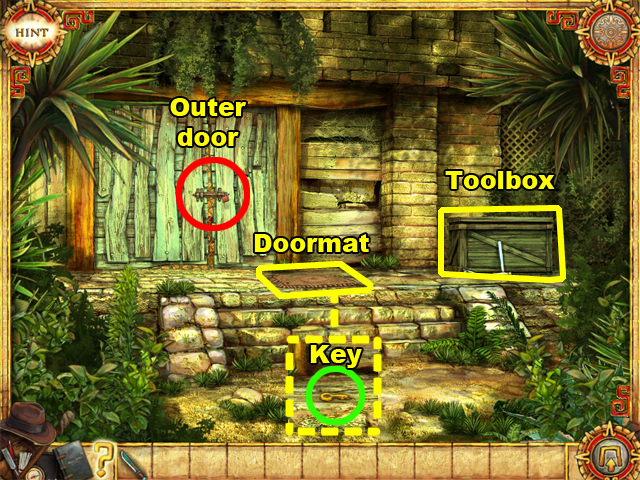
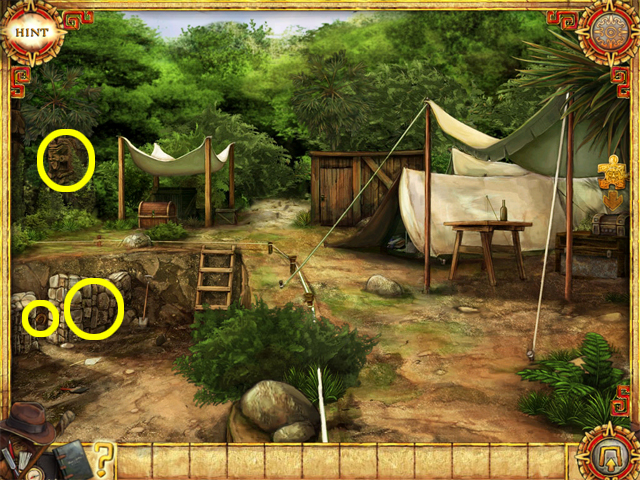
- Click on the toolbox to find the PINCERS. The toolbox is on the right side of this scene.
- Click on the doormat to uncover a KEY. The door mat is in the center of this scene.
- Collect the KEY by the doormat.
- Use the KEY on the outer door of the house to open it.
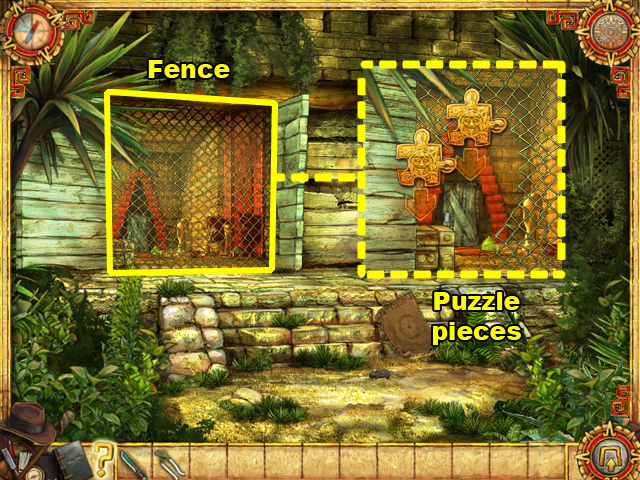
- Use the PINCERS on the fence to make a hole through it.
- There are 2 puzzle piece icons to examine behind the fence.
- Examine the left icon first.
- This is the solution for round 1.
- This is the solution for round 2.
- This is the solution for round 3.
- Afterwards you will receive a DOOR HANDLE.
- Examine the other puzzle icon to initiate the next puzzle.
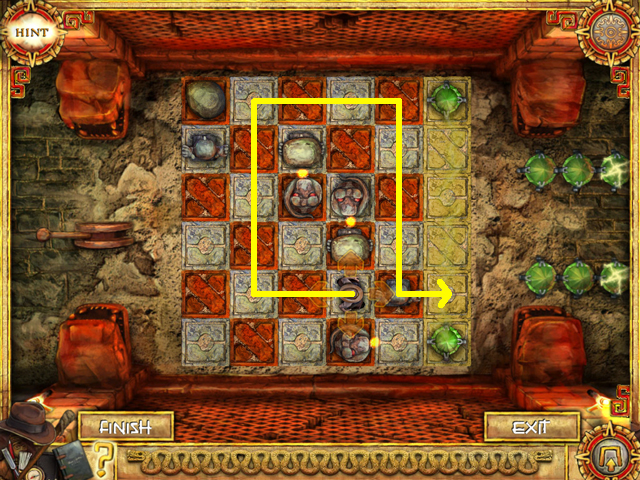
- This is the solution for the first round of this puzzle.
- The path of the yellow arrow demonstrates the path that Joan should follow to complete this puzzle.

- This is the solution for the second round of this puzzle.
- This is the solution for the final round of this puzzle.
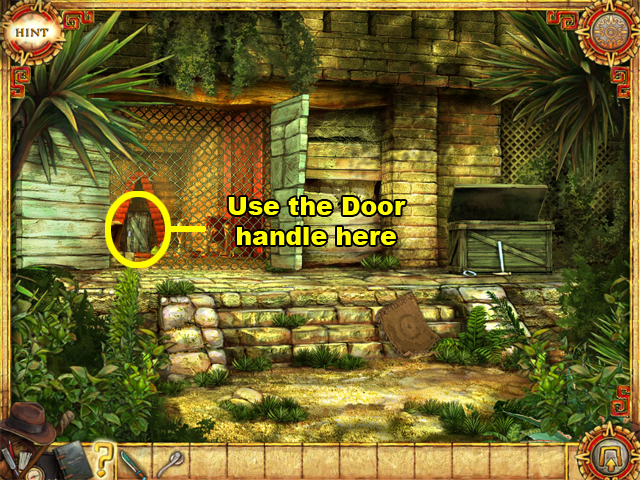
- Use the DOOR HANDLE on the inner door behind the fence.
- Enjoy this game’s final cut scenes.
Artifacts and Traces of the Children
The Hidden Treasures
- The screenshots below display all of the artifacts and traces of the children.
- The traces of the children have been highlighted in red, and the artifacts have been highlighted in yellow. Good luck attaining your trophies.
Excavation
Gate of the Temple
Temple Chamber
Small Chamber
Courtyard
Ball Court
Oratory
Dungeon Corridor
Entrance to the Caves
High Cave
Sunken Cave
Secret Cave
Sacrificial Pit
Sacred Well
The Twelve Lords
Vestibule of Xibalba
Gate of Xibalba – Right Balcony
Created at: 2010-03-17