

Walkthrough Menu
- General Tips
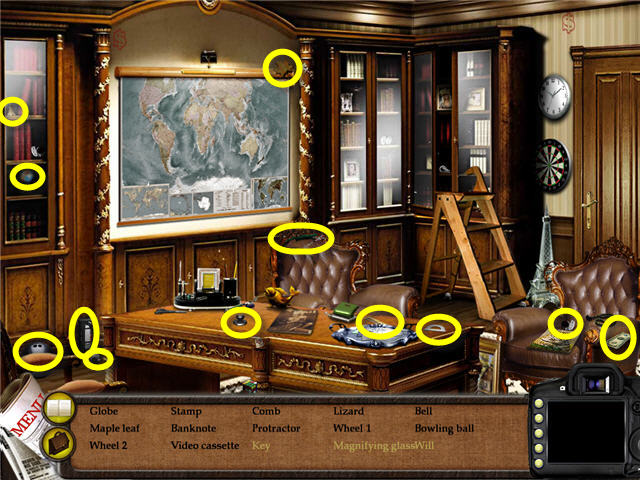
- Level 1: City Time Newspaper Office
- Level 2: Gloria’s Make-Up Room
- Level 3: Photolaboratory
- Level 4: Cabaret Manager’s Room
- Level 5: Photolaboratory 2
- Level 6: Robert’s Room
- Level 7: Photolaboratory 3
- Level 8: Frank Chezaro’s Room
- Level 9: Photolaboratory 4
- Level 10: Stephany’s Apartment
- Level 11: The Black Rose Casino
- Level 12: Photolaboratory 5
- Level 13: Gloria’s Make-Up Room 2
- Level 14: Photolaboratory 6
- Level 15: William O’Foerty’s Garage
- Level 16: Windsor Hotel
- Level 17: Photolaboratory 7
- Level 18: Albert Winford’s House
- Level 19: Martha Winford’s Room
- Level 20: Rental Apartment
- Level 21: Photolaboratory Final
General Tips
- This is an Interactive Hidden Object Game.
- Click on the Options button to adjust the Music and Sound Volume and Full Screen option.
- Click anywhere on the screen to advance the dialogues during the cutscenes.
- Click on the suitcase on the bottom left to open your inventory.
- Click on the yellow question mark in the corner of the puzzles to get the directions repeated.
- All puzzles can be skipped.
- Press Esc key to exit game.
Level 1: City Time Newspaper Office

- Find all the items on the list in black.
- Use the KEY from Inventory on the door when complete.
Level 2: Gloria’s Make-Up Room
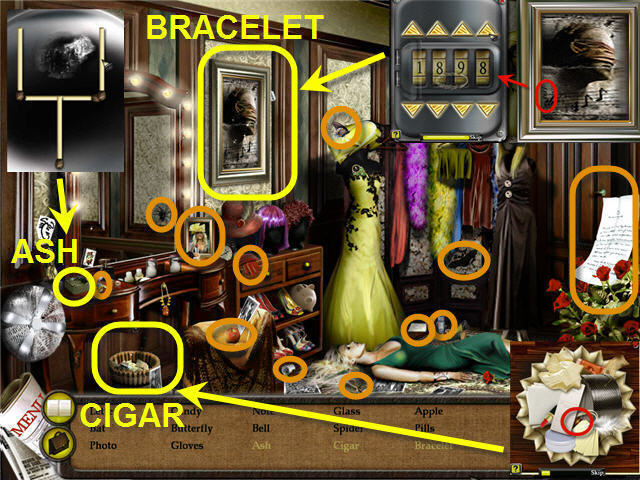
- Find all the items on the list in black.
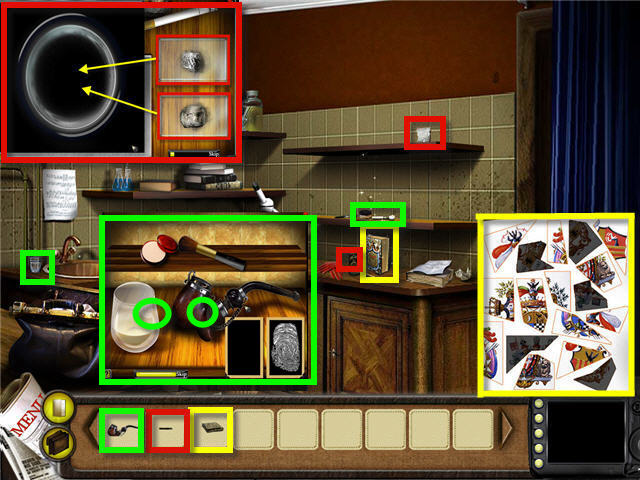
- Click on the sparkling ashtray to get the match puzzle. You only need to move 2 matches. See screenshot for solution.
- Click on the garbage can to get a closer look and take the CIGAR.
- Click on the picture to uncover a safe. The code for the safe is written on the side of the picture. Rotate the tumblers using the up or down arrow to match the code 1898.
- Get the BRACELET out of the safe.
- Exit through the door on the right.
Wings
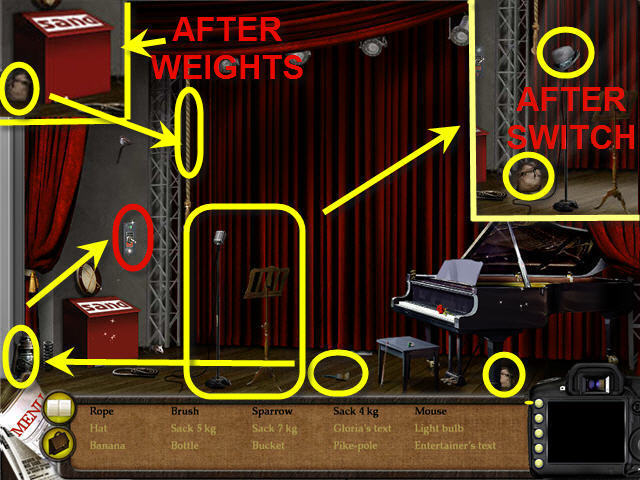
- Pick up the BRUSH.
- Get the BRUSH from inventory and dip in the oil in the lantern to get OIL-DIPPED BRUSH.
- Use the OIL-DIPPED BRUSH from inventory on the switch on the left wall.
- Pick up the SACK 7KG (seen only after flipping the switch) and the SACK 4 KG and click on the box of sand on the left side to get scale puzzle.
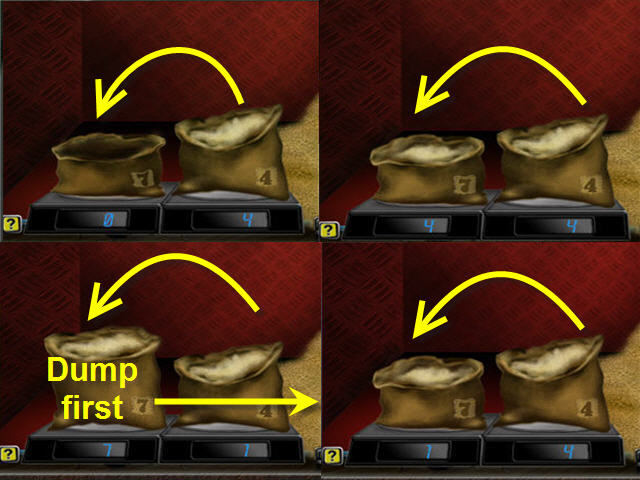
- The scales have 7 and 4 kilo bags on them to start. The objective is to get a bag of 5 kilos.
- To fill or empty bags, just click-hold and drag the bags.
- Fill the 4 kilo bag by dragging it to the sand pile on the right and then pour it into the 7kg bag.
- Fill the 4kg again and dump it in the 7 kilo bag leaving you with 1 kilo in the 4 kilo bag.
- Dump the 7kilo bag back in the sand pile and dump the 1 kg (what is left in the 4 kilo bag) into the 7 kg bag and fill the 4 kilo bag again.
- Dump the 4 kg in the 7kg bag and you now have 5kg.
- Get the SACK 5 KG sitting between the spring and the red box of sand.
- Take the SACK 5 KG from inventory and hang it on the rope hanging from the ceiling to open the curtain.
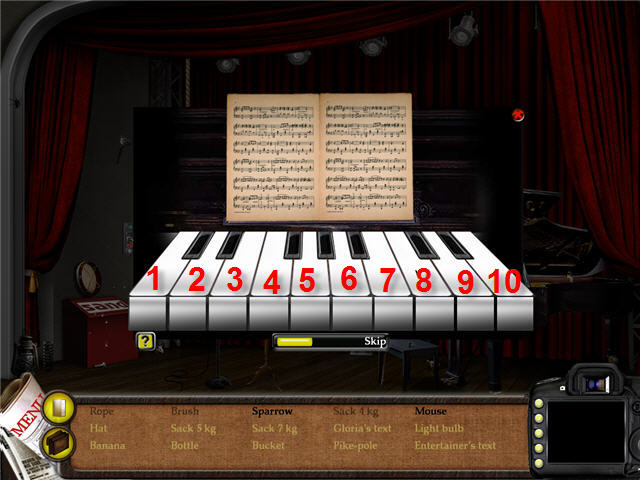
- Click on the piano to get a Piano puzzle. Click the keys, from left, 8, 7, 4 then 8,7,4,5 then 8 , 7 ,4, 5, 2.
- Take GLORIA’s TEXT from music stand on piano when finished.
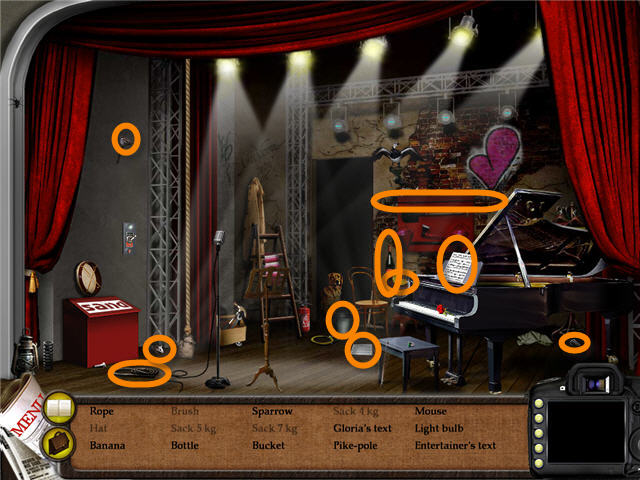
- Find the remaining objects on the list.
City Time Newspaper office - 2
- Move the curtain on the left and enter the photolaboratory.
Level 3: Photolaboratory
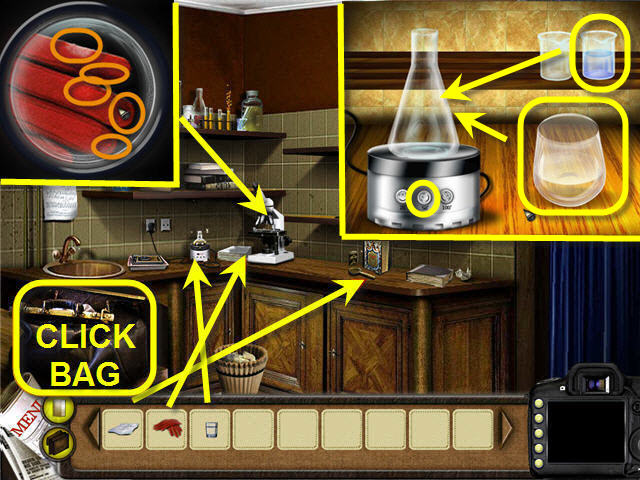
- Open the bag on the counter.
- Use the NOTE on the magnifying glass on the counter.
- Click on the song lyrics and note they were written right handed. Click on suicide note and see that it was written left handed.
- Use the GLASS on the burner.
- Add the liquid from the GLASS into the beaker and then pour the blue liquid from the shelf into the beaker. Turn it on 50 degrees and the water will turn red.
- Use the GLOVES on the microscope.
- Click on the powder, oil, lipstick, cake and wine stains. You can click-hold and drag the gloves to move them.
Level 4: Cabaret Manager’s Room
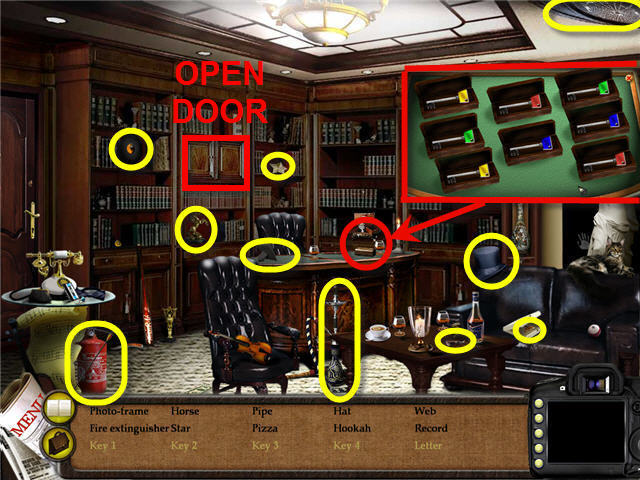
- Find all the items on the list in black.
- Click on the sparkling casket (box) on the desk. Match the keys to open all the caskets and get KEY 1, KEY 2, KEY 3 and KEY 4. You will get a brief preview of where the keys are after you start.
- Open the cabinet doors in the middle bookshelf on the left side of the room and then click again to open picture puzzle.
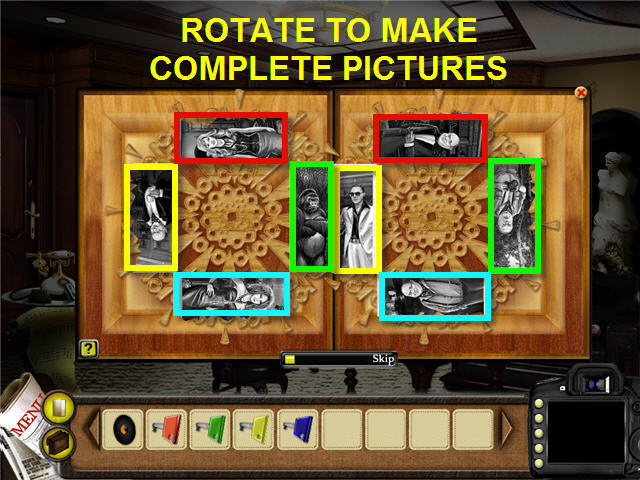
- Match the 4 photo halves by clicking on the photo wheels to rotate them. Solution in screenshot.
- Take the LETTER from cabinet after puzzle is solved.
- Exit through the door on the left.
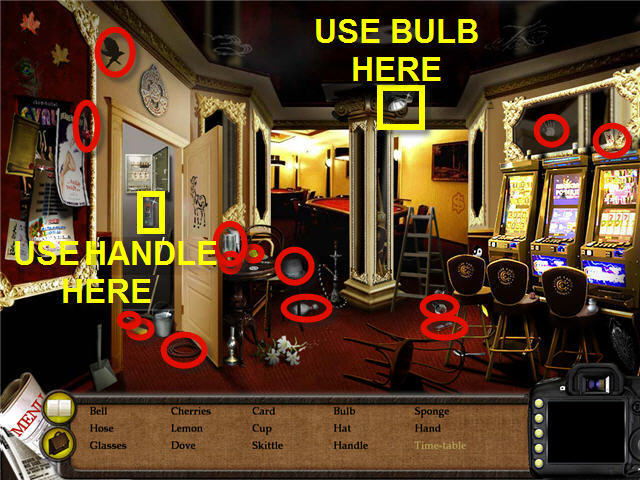
Gambling Hall
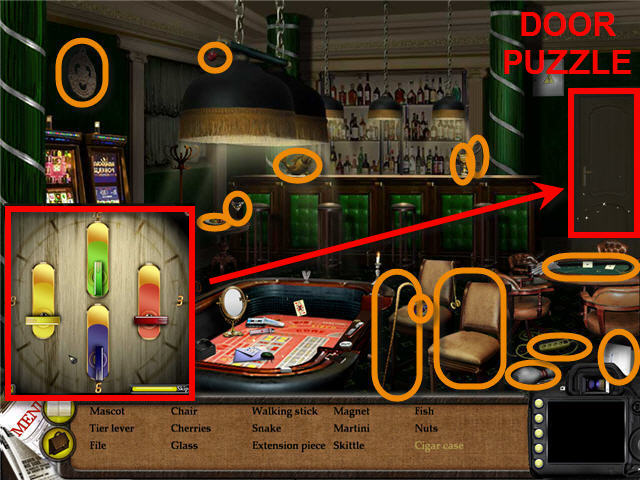
- Find all the items on the list in black.
- Click on the door to the right rear of the room to get the Key Puzzle.
- Insert KEY 1, KEY 2, KEY 3 and KEY 4 from inventory into their respective color slot. The numbers by the keys indicate the way the key needs to point. See screenshot for solution.
- Exit through the now opened door in the back of the room.
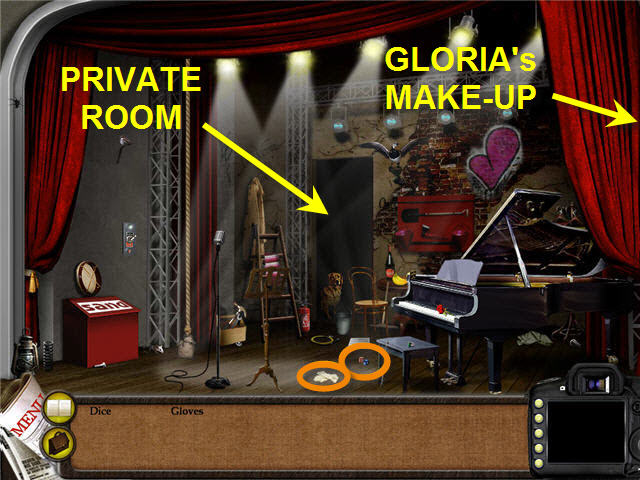
Private Room
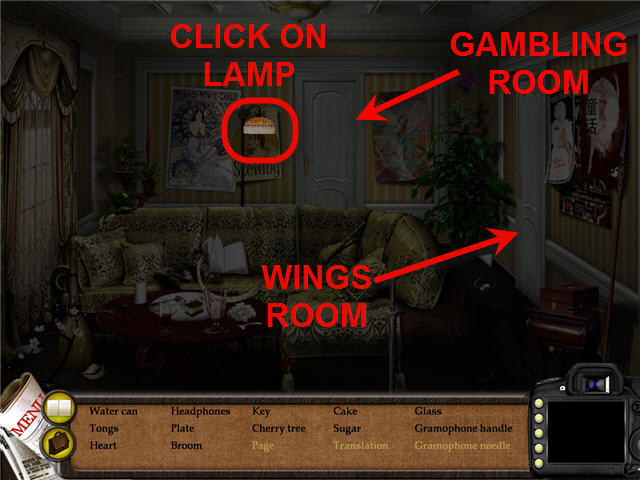
- The room is too dark, click on the lamp and make note that you need a bulb from Gloria’s make-up room.
- Click on door to the right to pass through to the Wings room.
Wings
- Find the DICE and the GLOVES and exit the room to the right.
Gloria’s Make-Up Room
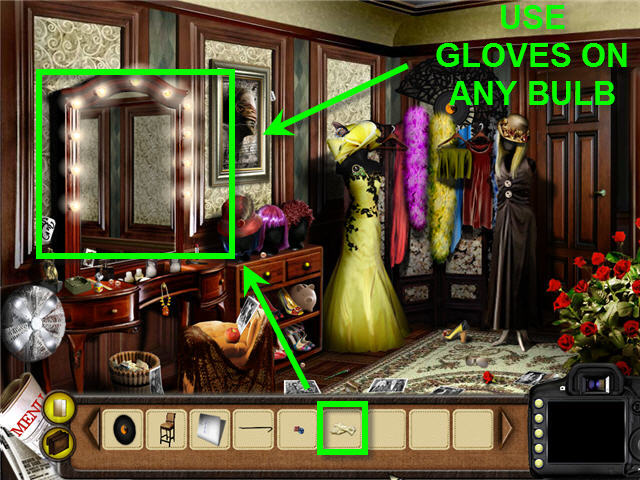
- Use the GLOVES in inventory to take off any of the bulbs that are lit around the dressing table mirror.
- Exit room and go through the door in the rear of the Wings room to get back to the Private Room.
Private Room
- Use the BULB on the lamp and note that you still need to enable the power. Exit through the door in the rear of the room to return to the Gambling Hall.
Gambling Hall
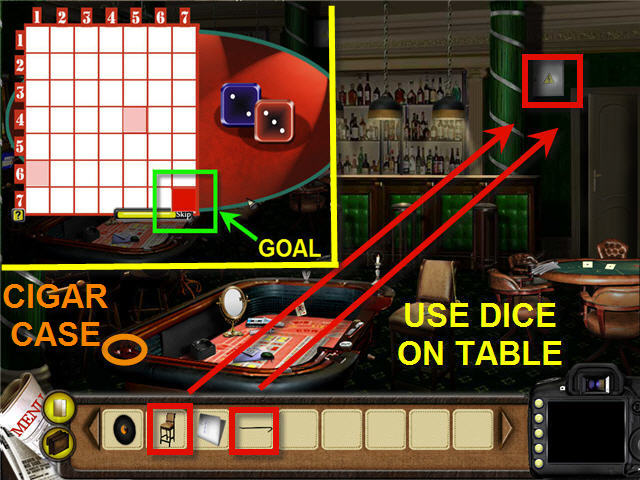
- Use the DICE in inventory on the dice table. Your goal is to reach the square with the coordinates of 7:7.
- Roll the dice and get two choices marked in pink on the board. Click on the pink square you wish to keep and roll again. You will get two choices each time. Keep going till you get a one to land on 7:7.
- Pick up the CIGAR CASE on the dice table.
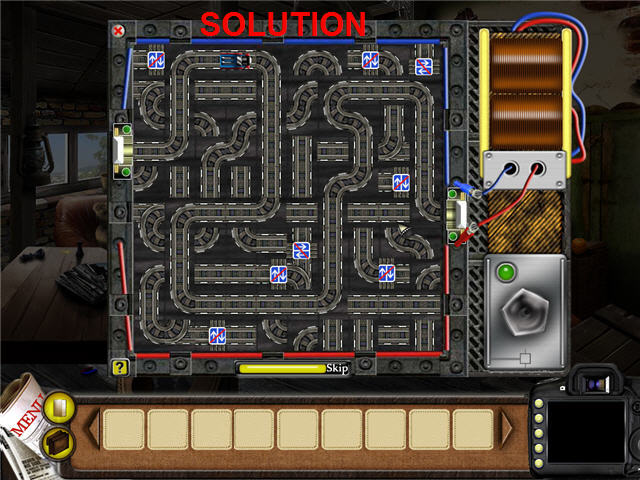
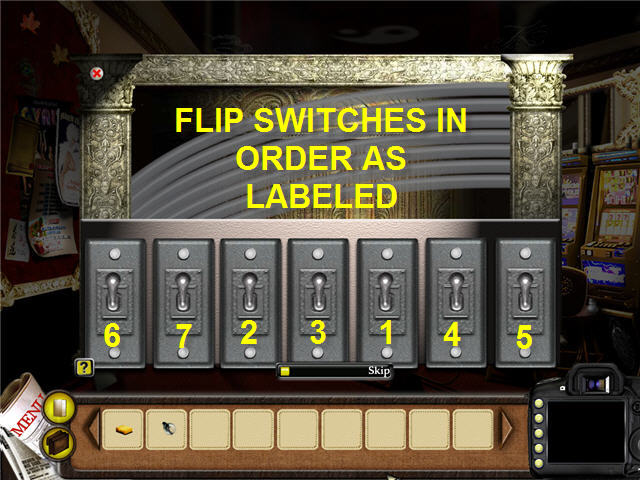
- Use the CHAIR in Inventory on the electrical box to the upper left of exit door.
- Use the TIER LEVER from Inventory on the Electrical Box.
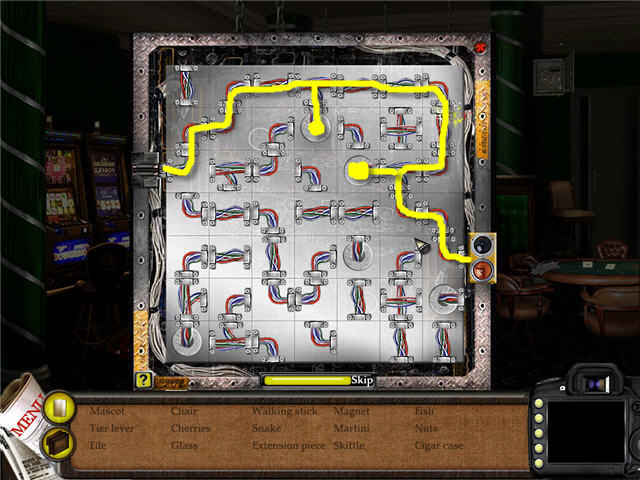
- Connect the wires to get the power in a continuous flow from the left side to the right. See the screenshot for the solution.
- Exit through the door next to the electrical box.
Private Room
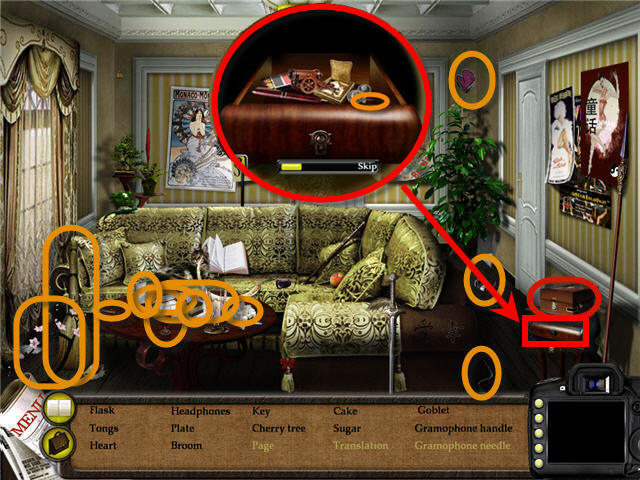
- Find all the items listed in black.
- Click on the Gramophone to open it.
- Use the GRAMOPHONE HANDLE in inventory on the opened Gramophone.
- Use the KEY in Inventory on the drawer beneath the gramophone.
- Click the opened drawer to see closeup and take the GRAMOPHONE NEEDLE.
- Use the GRAMOPHONE NEEDLE on the gramophone.
- Use the RECORD from Inventory on the gramophone and crank the handle.
- Pickup the PAGE the slid out from under the gramophone.
- Use the PAGE from inventory on the open book on the couch.
- Use the FILE from inventory to clip together the book on the couch.
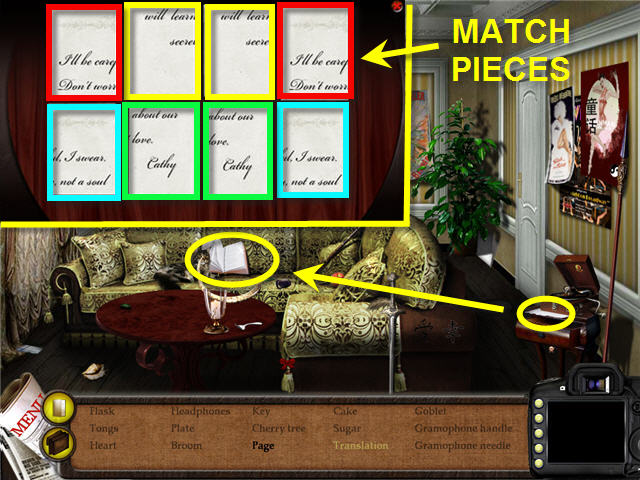
- Use the LETTER from inventory on the book on the couch.
- Match the 8 pieces of the LETTER to get the TRANSLATION.
Level 5: Photolaboratory 2
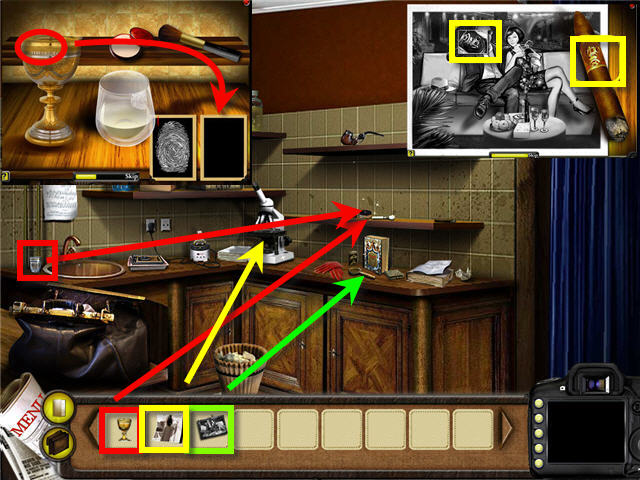
- Click on the bag to empty the contents.
- Use the CIGAR CASE on the sparkling book on the counter. Click on the pieces that belong to the crest in the book. Solution in screenshot, the dark pieces are the ones to click on.
- Use the CIGAR on the lighter next to the book on the counter to get ASH in Inventory.
- Click on the ASH on the shelf to get two in inventory.
- Use both bags of ASH in inventory on the microscope. Drag them onto the microscope to compare.
- Use the PIPE on the Fingerprint brushes on the middle shelf.
- Take the GLASS on the counter left of the sink and it will be added to Inventory.
- Take the GLASS and use on the fingerprint kit.
- Use the fingerprint brush on the powder next to it and use it on the GLASS and on the PIPE.
- Click on the dusted fingerprints on the GLASS and on the PIPE to get the fingerprints on the slides.
Level 6: Robert’s Room
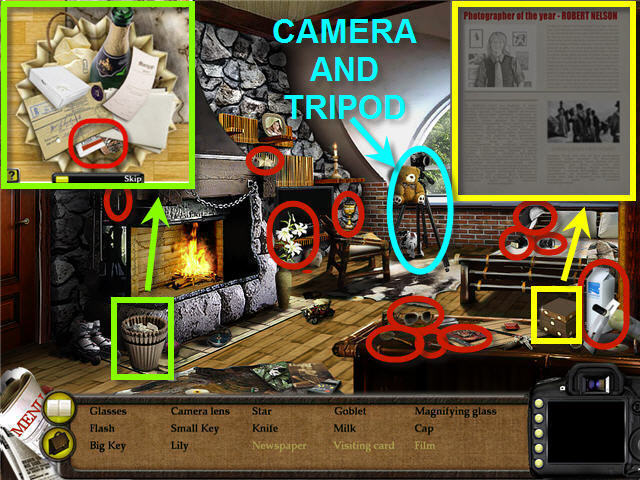
- Find all the items in black on the list .
- Use the SMALL KEY in inventory on the casket (box ) on the desk.
- Click on the open box to get newspaper puzzle.
- Rotate the pieces to put together the newspaper article. The pieces click in place when done. See screenshot for completed picture.
- Click on the waste basket and find the VISITING CARD.
- Use the CAMERA LENS and the FLASH from Inventory on the camera on the tripod on the left side of the windows.
- Click on the assembled camera and then click on the bird in the tree.
- Pick up the FILM on the floor under the camera tripod.
- Exit the room through the door on the left.
Robert’s Photo Lab
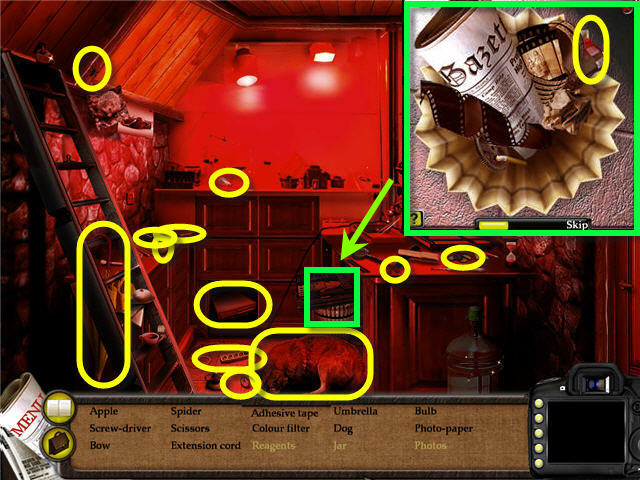
- Find all the items in black on the list.
- Click on the sparkling garbage can and get the REAGENTS from the trash.
- Click on the sparkling water jug to get water puzzle.
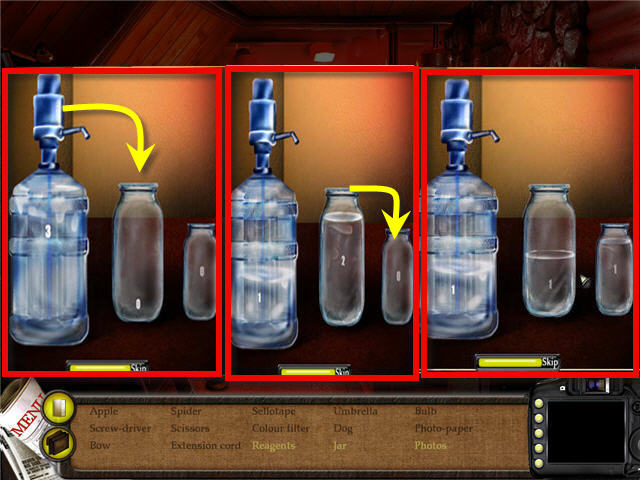
- The goal is to make all 3 water jugs equal with 1 liter in each.
- Click-hold and drag the 3 liter jug to the 2 liter jug.
- Click-hold and drag the 2 liter jug to the one liter jug. You should now have 1 liter in each.
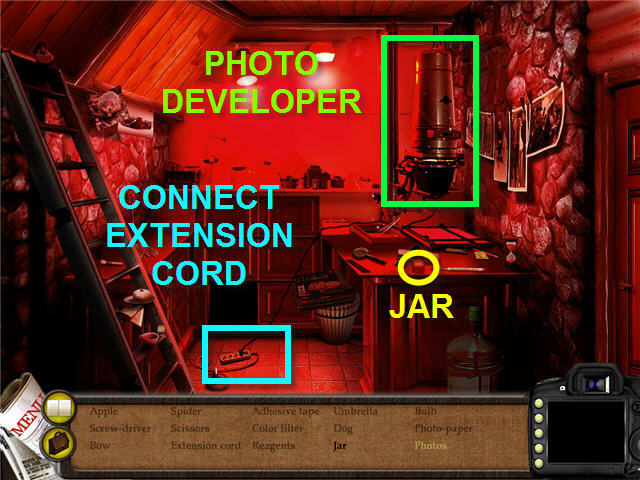
- Take the jar from the counter.
- Use the EXTENSION CORD from inventory on the cord from the photo developer dangling in the middle of the floor. It will automatically plug into the wall.

- Click on the upper section of the photo developer and use the FILM from inventory on the green strip in the upper part of the developer.
- Place the COLOR FILTER on the round clear lens on the developer.
- Use the PHOTO PAPER from inventory on the bottom middle tray.
- Click print and take the photo off the tray.
- Use the green arrows by the filmstrip to move the film to the right to center the next gray frame in the negative strip and print the second negative. You should now have 2 UNDEVELOPED FILM in your inventory.

- Click on the photo developer tray to get close-up.
- Empty the JAR and put the REGEANTS from inventory into the developing tray.
- Place the UNDEVELOPED FILM from inventory in the developer tray. Take out when the picture appears.
- Place the other UNDEVELOPED FILM in the developer tray and remove when developed.
- Use the BIG KEY on the lock on the top of the ladder and exit the room via the ladder.
Attic
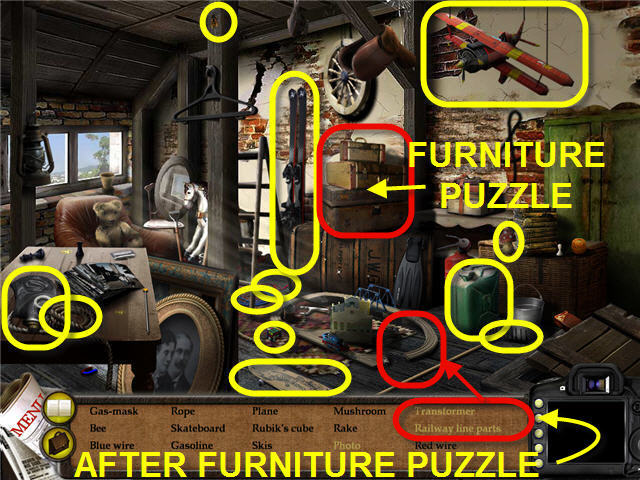
- Find all the objects listed in black.
- Click on the stack of suitcases to get furniture puzzle.
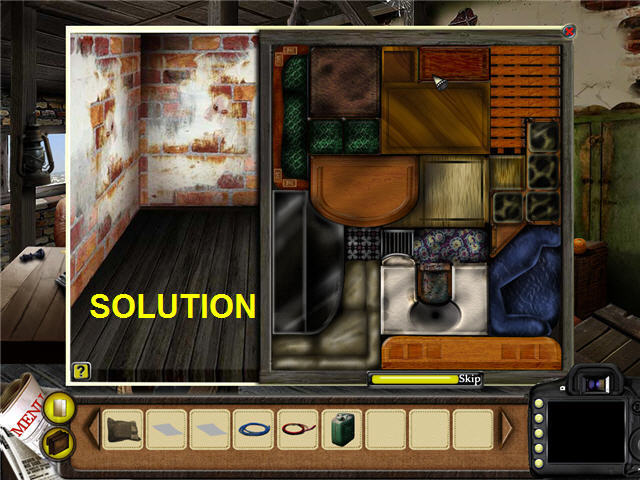
- Arrange the furniture so that all the spaces are filled. You will no longer be able to move them if they are in the correct spot. Left Click on them to rotate them.
- Pick up the TRANSFORMER and RAILWAY LINE PART on the floor when complete.
- Use RAILWAY LINE PART from inventory on model railroad track and click on sparkling rail to get a railroad puzzle.
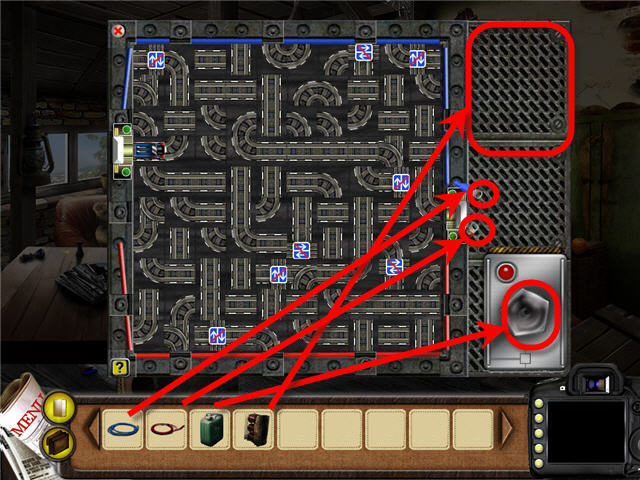
- Use the TRANSFORMER, RED WIRE, BLUE WIRE and the GAS CAN on the track as shown in screenshot.
- Connect the track from the blue train on the left to the end of the line on the right.
- Pick up the PHOTO left on the track when puzzle is completed.
- Exit via the hatch on the lower right of your screen to return to the photo lab.
- Click on the 2 photos hanging on the back wall to return to the Photolaboratory.
Level 7: Photolaboratory 3
- Open the bag to empty the contents.
- Take the GLASS from left of sink and the ASH from shelf.
- Place ROBERT’s PHOTO and the ASH on microscope.
- Slide the photo under the lens to get ashes on a slide.
- Compare the two ASH SLIDES by dragging the slides to the microscope. They are identical.
- Take the CUBE (goblet) and GLASS from Inventory and place it by the fingerprinting kit on the shelf.
- Dip the brush in the powder and use on the CUBE.
- Click on dusted fingerprint on CUBE glass to get fingerprints on the slide.
- Click the GLORIA WITH CHEZARO PHOTO on the magnifying glass to get enlarged photo. Compare the cigar crest with the cigar of the man in the photo. They are the same.
Level 8: Frank Chezaro’s Room
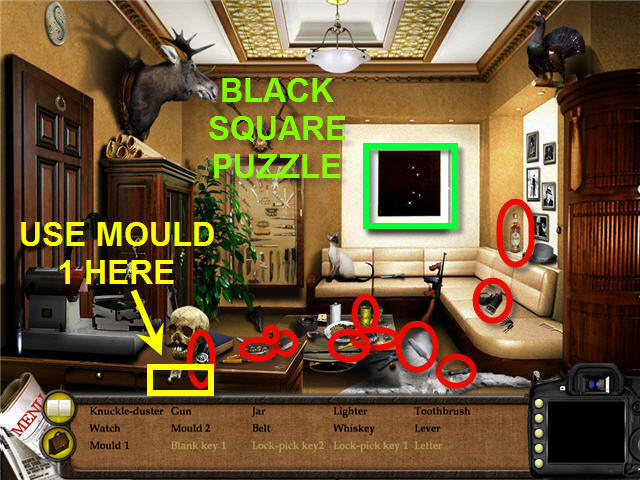
- Find all the items listed in black.
- Click on the black square on wall to get puzzle. The object is to turn and place all the pieces to form a black square. They lock in place if you have it correct.
- Use the MOULD 1 on the locked drawer under the skull to get BLANK KEY 1.
- Exit room to the right to get to the Shooting Gallery.
Shooting Gallery
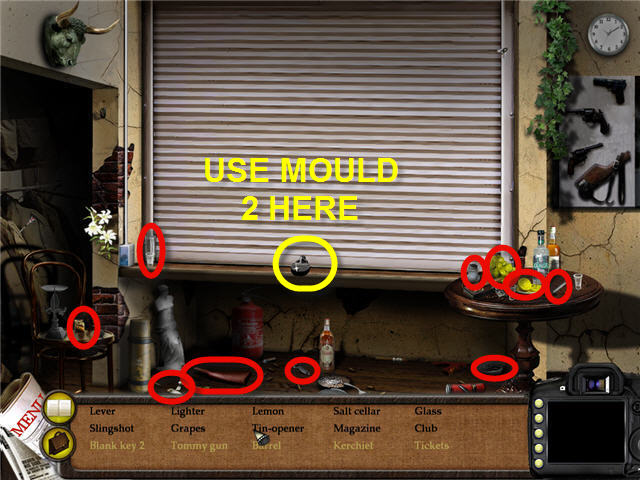
- Find all the items listed in black.
- Use the MOULD 2 on the shutter lock to get BLANK KEY 2.
- Exit room to the left to go back to Frank Chezaro’s room.
Frank Chezaro’s Room
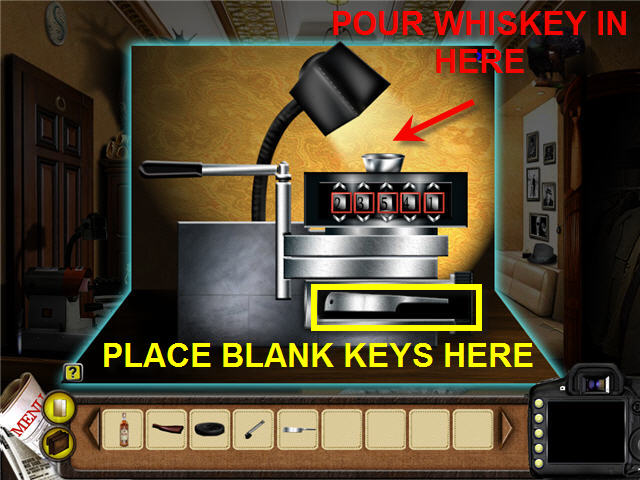
- Place the LEVER (the one without the black knob) from inventory on the key making machine on the left side of the desk and click on the machine to zoom in.
- Place BLANK KEY 1 in slot.
- Pour WHISKEY in machine.
- To get the correct code, pick any number you want and pull the lever. If correct, there will be a turquoise square around the red square surrounding the correct number.
- I made them all 1 and then changed the ones that had only red squares around them to 2’s, then 3’s and so on.
- When all are correct, pull lever one last time to cut the key.
- Take the LOCK-PICK KEY 1.
- Put the BLANK KEY 2 in the slot and click the lever to get LOCK-PICK KEY 2. No need to guess the numbers.
- Use the LOCK-PICK KEY 1 on the drawer under the skull to open it.
- Click on the drawer again to get letter puzzle.

- Assemble the letter. Left click to rotate the pieces. They will lock in place if correct.
- Exit Frank’s room to the left and continue on to the Billiard Parlour.
Billiard Parlour
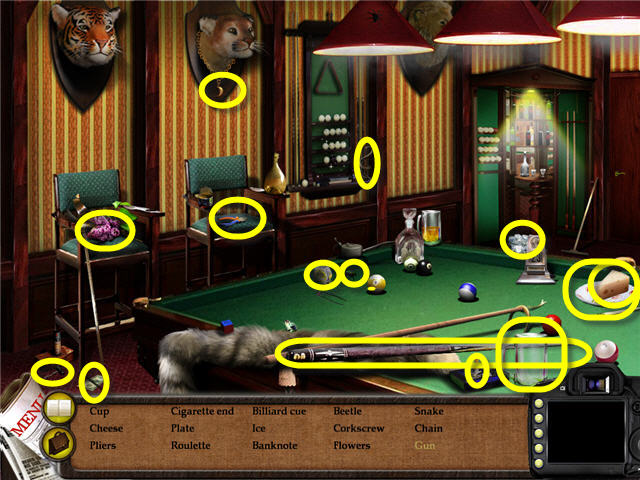
- Find all the items on the list in black.
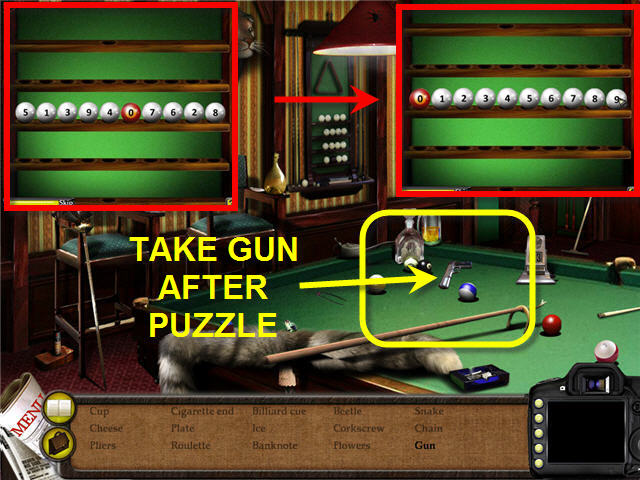
- Click on the sparkling ball rack on the wall.
- The objective is to arrange the balls on the middle rack in numerical order. You can use the top and bottom shelves to store one ball each and you can use the second and 4th shelf to line up balls in ascending or descending numerical order.
- Here is a step-by-step solution for the puzzle:8 ball – 2nd Row 2 ball – Top Row 6, 7, 8 ball - 4th Row 0 ball – Bottom Row 4 ball – 2nd Row 9 ball - 4th Row 3, 2, 1, 0 ball – 2nd Row 5 ball – Top Row 0, 1, 2, 3, 4, 5 ball – 3rd (Middle)Row 9, 8, 7 ball – 2nd Row 6, 7, 8, 9 ball – 3rd (Middle) Row
- Take the GUN from the billiard table and exit the room to the right and go through the right door in Frank Chezaro’s room and enter the Shooting Gallery.
Shooting Gallery
- Use the LOCK-PICK KEY 2 on the roller blind lock.
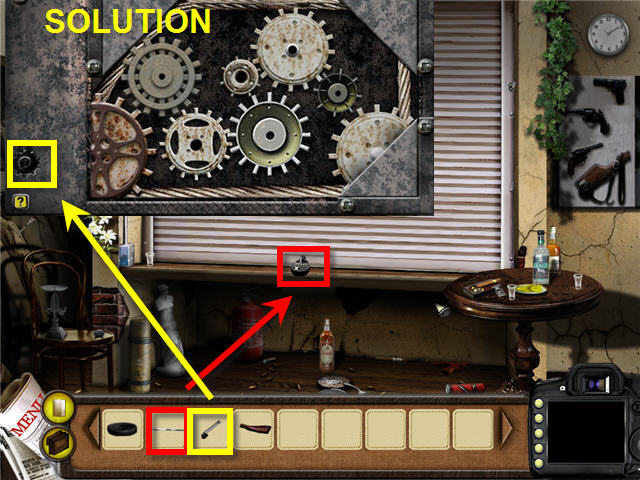
- Click on sparkling blue box on the left of the roller blind to get gear puzzle.
- Arrange the gears so that they all link together. Solution in screenshot.
- When they are in the correct position and you will get an opening to insert the LEVER from inventory.
- Click on the LEVER and roll up the roller blind.
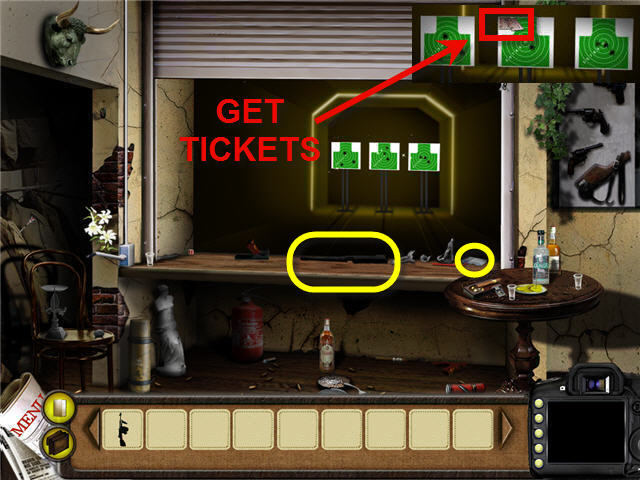
- Take the TOMMY GUN and the KERCHIEF off the counter.
- Use the TOMMY GUN on the targets.
- The object is to shoot 3 crosses on the target. The cursor will jiggle to make it difficult but you will be allowed multiple shots to get it.
- Take the TICKETS attached to the middle target.
- Automatically head to the photolaboratory.
Level 9: Photolaboratory 4
- Open the bag to empty the contents.
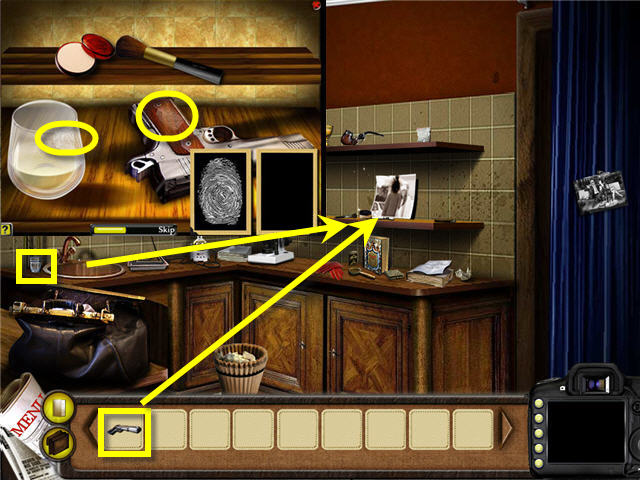
- Place the GUN by the fingerprint kit on the shelf.
- Take the GLASS from the side of the sink and place by the fingerprint kit on the shelf.
- Use the brush on the powder and use on the gun handle to get fingerprints.
Level 10: Stephany’s Apartment
- Find all the items on the list in black.
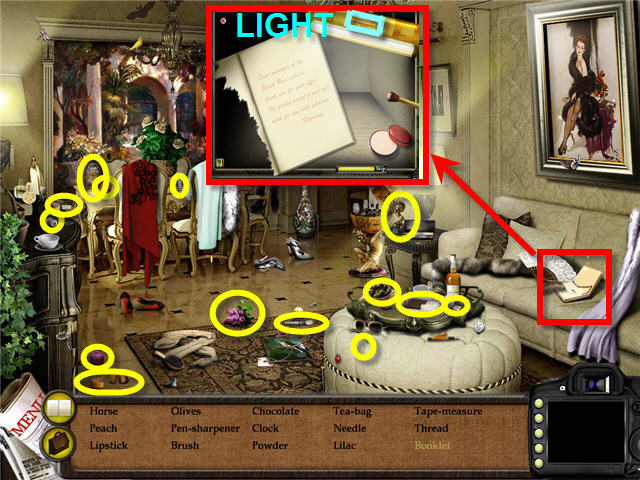
- Click on the sparkling notebook on the couch.
- Turn on light by clicking the gold button on the top of the screen.
- Use brush on the powder and brush the notebook to reveal the writing.
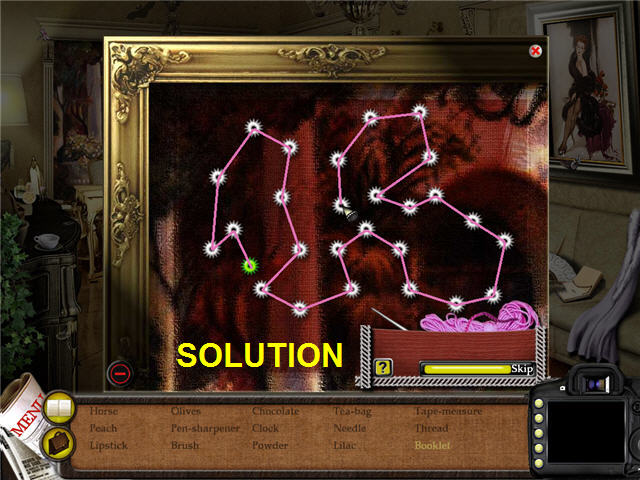
- Click on sparkling painting on the right wall to get stitching puzzle.
- You need to stitch the holes from one end to another without crossing over the thread. Click-hold the needle for each stitch, letting go on each hole. See screenshot for solution.
- Pick up the NOTEBOOK from floor when puzzle is completed.
Level 11: The Black Rose Casino
- Find all the items on the list in black.
- Use BULB on the socket in the fixture on top of the pillar.
- Use the HANDLE from inventory on the switch plate under the electrical box.
- Click on the electrical box to get the rainbow puzzle.
- Switch the levers down in this order: 5, 3, 4, 6, 7, 1, 2 to form a rainbow.
- You can now flip the switch to turn on the light but you discover it is dirty. Turn the switch back off.
- Dip the SPONGE from inventory in the bucket of water in the doorway to get a WET SPONGE and use on light fixture.
- Flip the switch again and get the TIME-TABLE.
Level 12: Photolaboratory 5
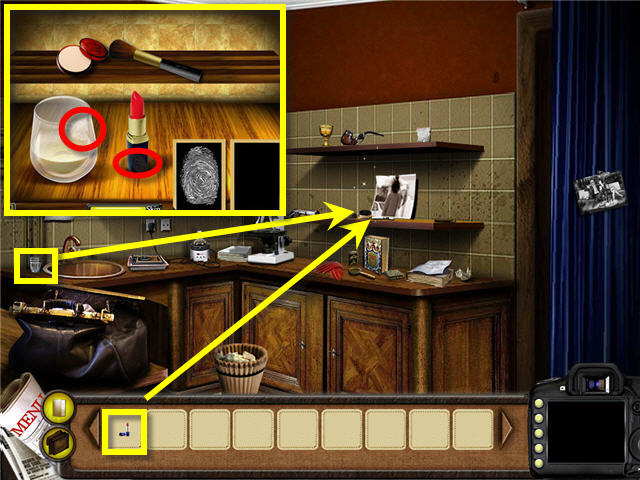
- Open the bag to empty contents.
- Place the LIPSTICK on the fingerprint kit on the shelf.
- Take the GLASS from next to the sink and place it by the fingerprint kit on the shelf.
- Use the brush on the powder and use on the LIPSTICK. Click on the fingerprint on the lipstick.
Level 13: Gloria’s Make-Up Room 2
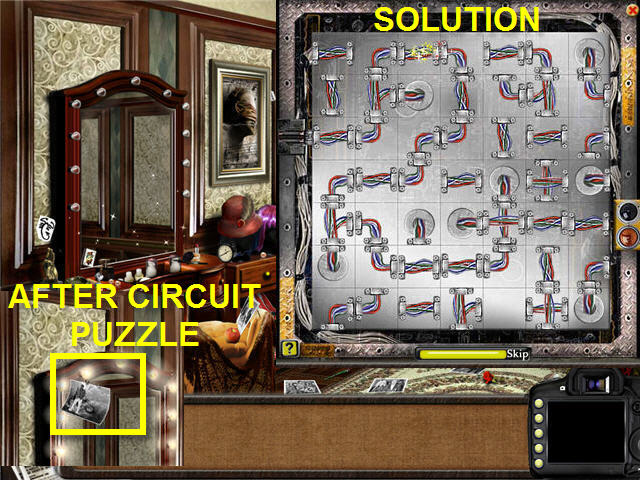
- Click on the sparkling mirror to get the circuit puzzle.
- Complete the circuit from the left to the right leaving no open ends. See the screenshot for the solution.
- Get the PHOTO taped to the mirror when complete.
Level 14: Photolaboratory 6
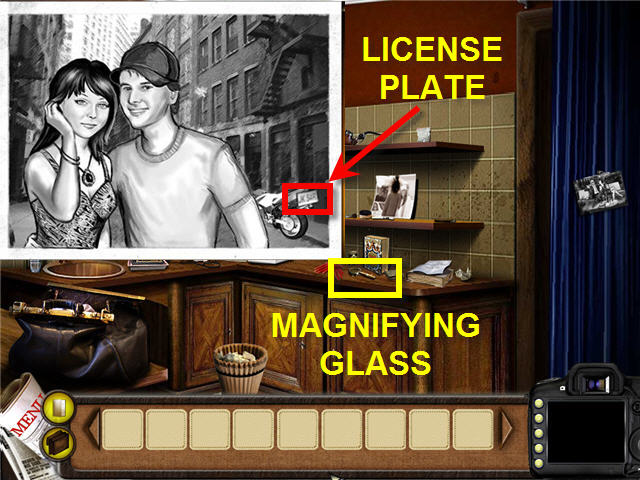
- Open the bag to empty the contents.
- Use the PHOTO on magnifying glass.
- Click on the license plate in the photo.
Level 15: William O’Foerty’s Garage
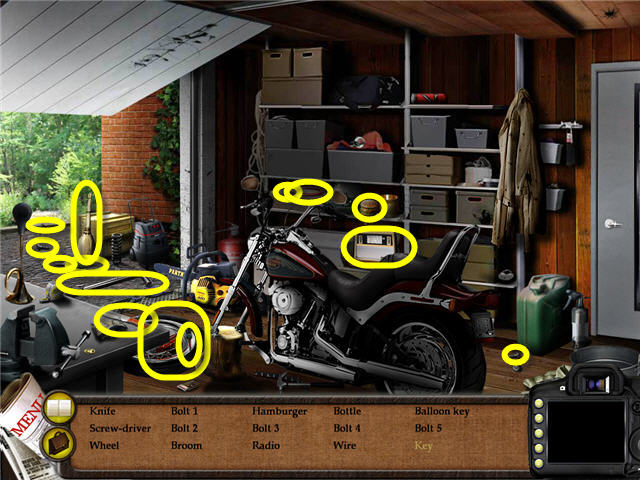
- Find all the items on the list in black.
- Use the WHEEL in inventory on the motorcycle.
- Use the 5 BOLTS on the WHEEL.
- Tighten the 5 BOLTS on the WHEEL with the BALLOON KEY.
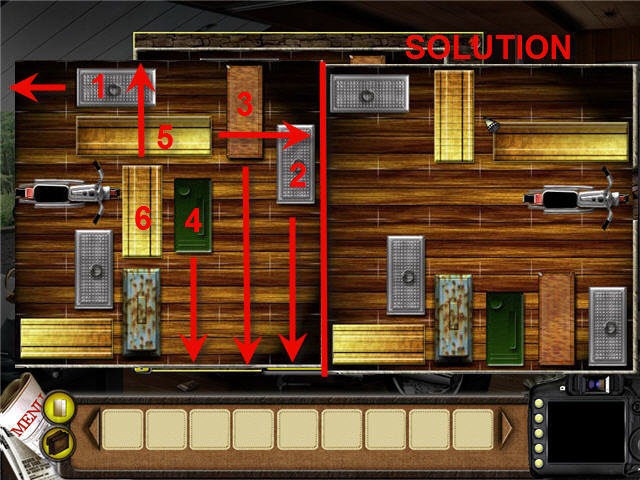
- Click on sparkling area by muffler to get slider puzzle.
- The object is to move the boxes out of the way of the motorcycle so that the motorcycle can get out. Click-Hold the boxes and slide them.
- Collect the key from the garage floor where the motorcycle was.
- Use the KEY on the door on the right back wall.
William O’Foerty’s Room
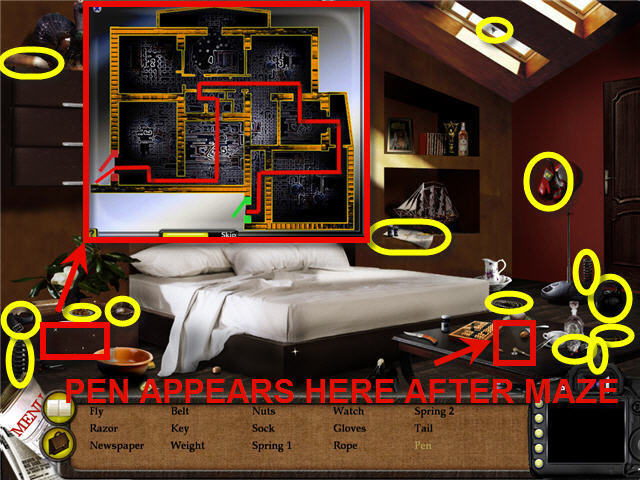
- Find all the items on the list in black.
- Click on the sparkling nightstand to get Pen Maze Puzzle.
- The objective is to make it from the green entrance all the way out of the red exit using the pen without touching sides.
- Use SPRING 1 and SPRING 2 on the bed.
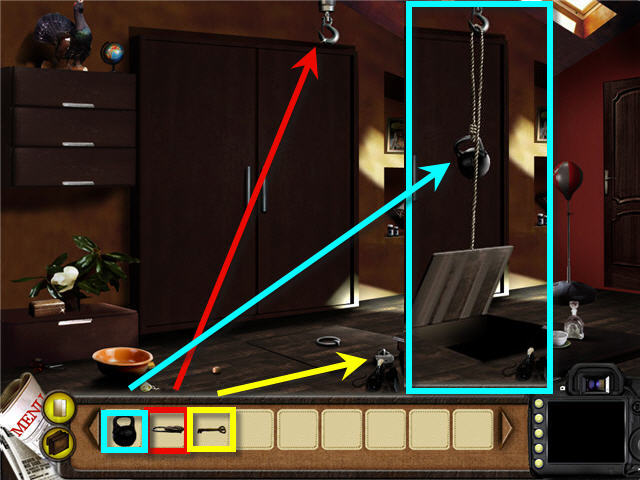
- Use the ROPE in inventory on the hook in the ceiling.
- Use the KEY from inventory on the lock on the hatch.
- Use the WEIGHT in inventory on the ROPE to open the hatch.
- Head down the hatch.
Weight Room
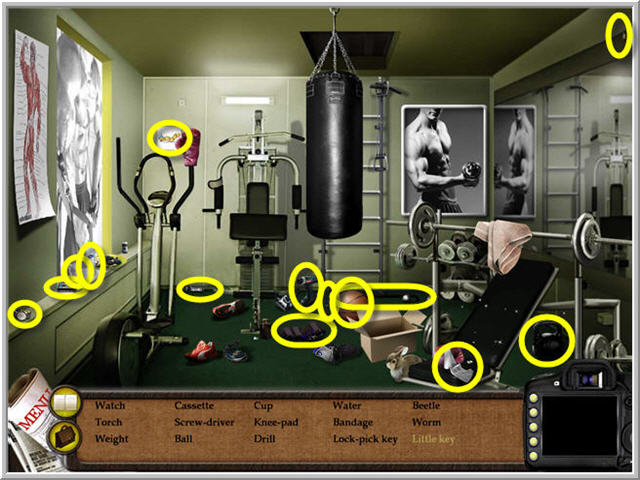
- Find all the items on the list in black.
- Click on the sparkling weights to get weights puzzle. You will see a magnifying glass on the correct spot to click.
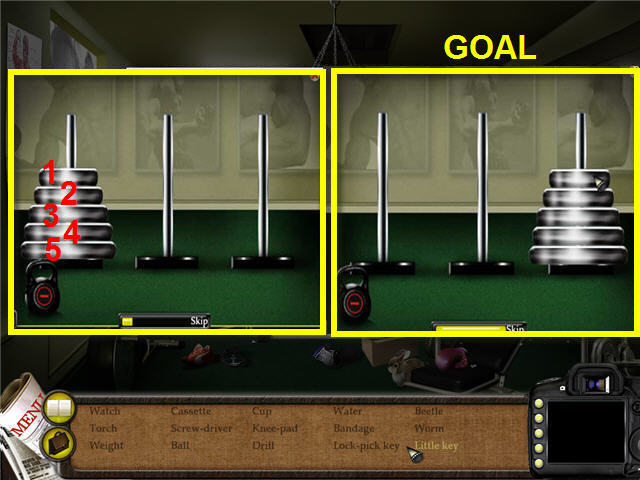
- The goal is to stack the weights in order on a peg other than the first one. You may only move a smaller one on top of a larger one in the process. Here is the solution:
- Take the LITTLE KEY from the back rest of the weight bench.
- Go back up the hatch in the ceiling.
- Use the LITTLE KEY to open the casket (box) on the nightstand. Click on the open box to get letter puzzle.
- Assemble the letter puzzle. Click to turn the pieces, once they are correct they will not move.
Level 16: Windsor Hotel
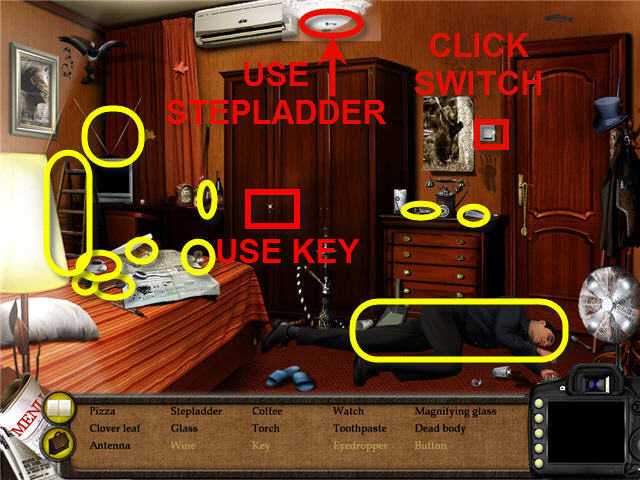
- Find all the items on the list in black.
- Click on the wall switch to see the KEY in the ceiling light fixture.
- Use the STEPLADDER in inventory on ceiling fixture to get the KEY.
- Use the TORCH under dresser to get a BUTTON.
- Use the KEY from inventory to open the locked armoire.
- Click on the medical bag to get eye dropper puzzle.
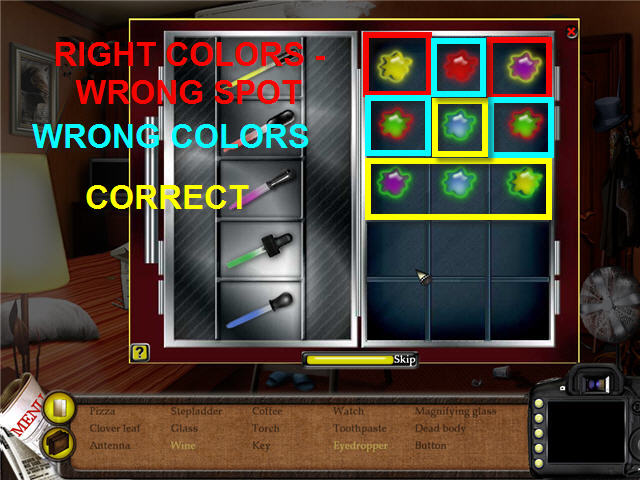
- Click-hold and drag an eyedropper to a row to the right. When a row is filled in they will each be surrounded in a color of light.
- The green means they are the correct color in the correct column, the yellow means it’s correct except not in the right column and red indicates it needs to be eliminated entirely.
- You have 5 tries to get it right.
- Use the EYEDROPPER in inventory on the wine spill on the carpet.
Level 17: Photolaboratory 7
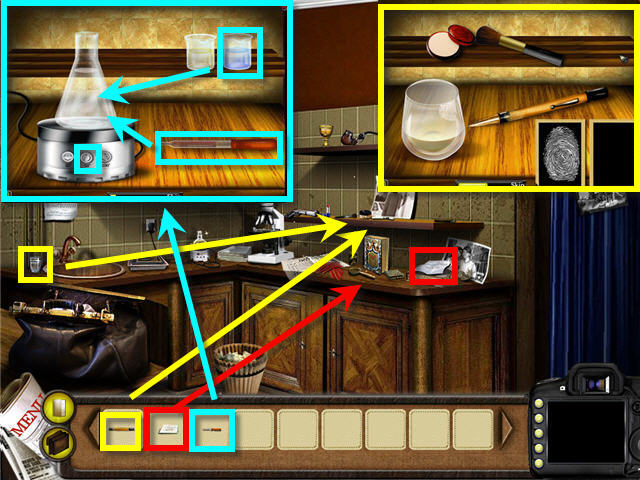
- Use the PEN on the fingerprinting kit on shelf.
- Take the GLASS from the left of sink and use on fingerprinting kit on shelf.
- Use the brush from the fingerprinting kit on powder and use on the pen. Click on the fingerprint and see they are identical.
- Use the NOTE FROM HOTEL on the magnifying glass. Compare it to the SUICIDE NOTE on the shelf to the right of the magnifying glass. Click on the notes to see they are identical.
- Use the WINE on the burner. Empty the EYEDROPPER into the beaker, add blue liquid and set to 50 degrees.
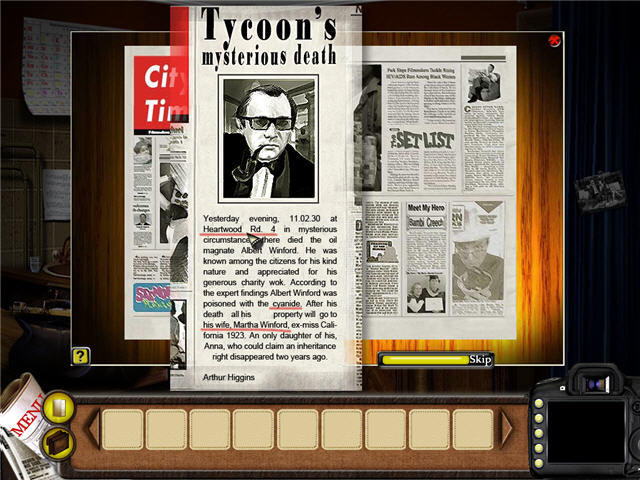
- Click on the newspaper and click on the section on the Tycoon’s Mysterious death. Underline pertinent info to the case. See screenshot for solution.
Level 18: Albert Winford’s House
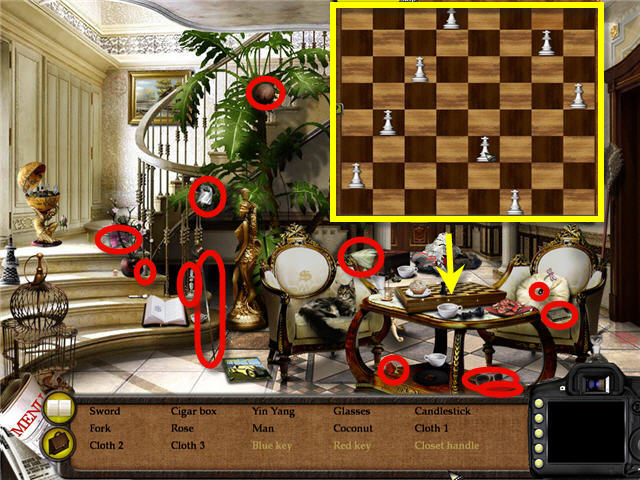
- Find all the items on the list in black.
- Click on the chess puzzle to get the 8 Queens puzzle. See Screenshot for one solution.
- Pick up the CLOSET HANDLE from the table where the chess set was located.
- Click on the painting on the right wall.
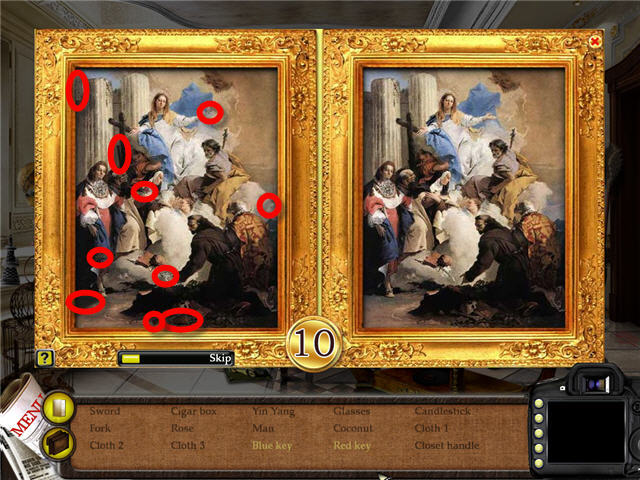
- Find ten differences in the picture.
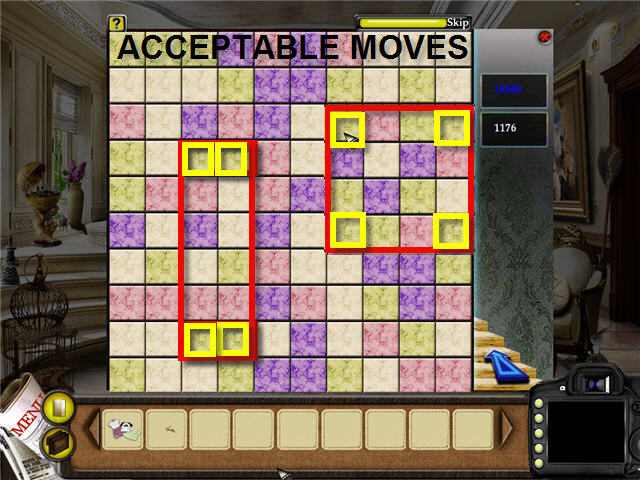
- Click on the sparkling tile area on the floor in front of the gold statue to get the tile puzzle. The object is to choose 4 same color tiles that form a square or rectangle. You must click on them in a square or rectangular order and not diagonally.
- Pick up the RED KEY on the tile floor when puzzle is complete.
- Click on the sparkling lilacs by the window to get the lilac puzzle.
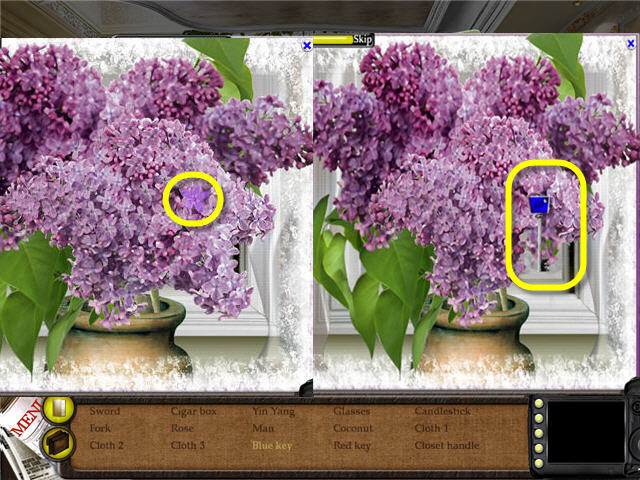
- Find the lilac with the 5 petals.
- Get the blue key from the lilacs.
- Use the CLOSET HANDLE on the closet door in the right rear of the room and open the door.
- Hang your CLOTHES from inventory in the closet and enter room.
Albert Winford’s Study
- Find all the items on the list in black.
- Click on the sparkling desk organizer to get puzzle.
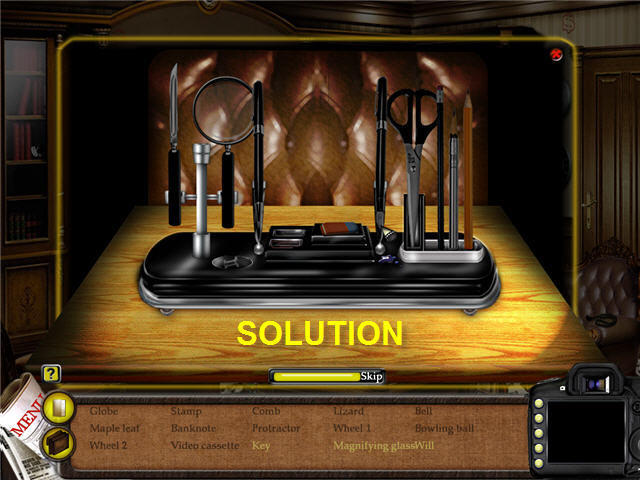
- Arrange the desk accessories on the desk in the organizer. If they are in the correct spot you will not be able to move them.
- Pick up the small KEY on the desk in front of the organizer.
- Click on the map on the wall.
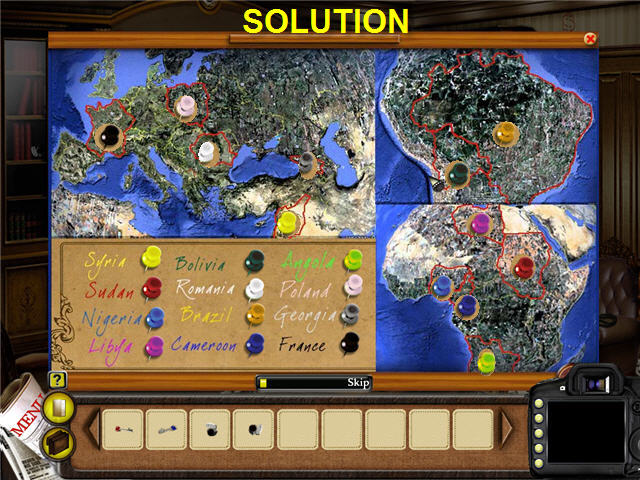
- Click-hold and drag the stickpins to the corresponding place on the maps to match the countries. See screenshot for solution.
- Click on the sparkling bookshelf to get book puzzle.
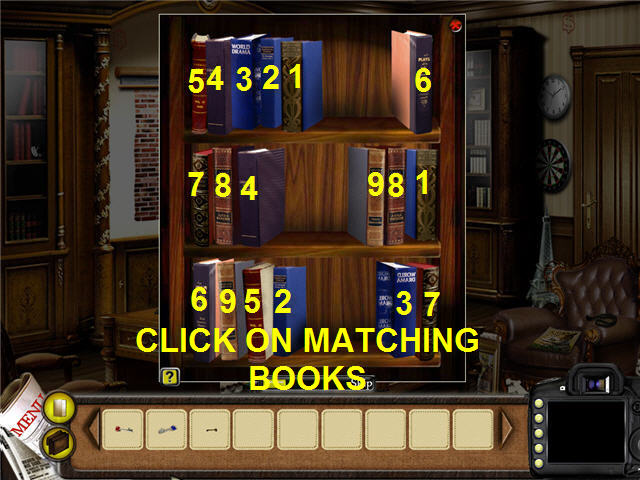
- Match the books on the bookshelf to clear the shelves.
- Push the red button to open the safe when done.
- Place WHEEL 1 and WHEEL 2 on the stepladder and it will automatically move to the brick wall behind the roll up map.
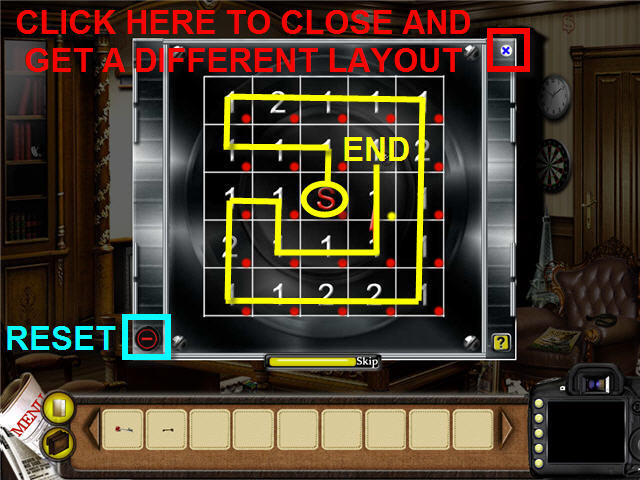
- Use the BLUE KEY on the safe to get the safe puzzle. The object is to hit all the squares starting at the S. You may not move diagonally and when you come upon a 2, you will move two squares in the direction you were going.
- If you do not like the board that you have, you can click on the X in the corner and reopen the safe to get a different one.
- Get a MAGNIFYING GLASS when complete.
- Use the MAGNIFYING GLASS on the protruding brick on the wall behind the roll-up map and uncover a hole.
- Use the RED KEY on the hole in brick.
- Pick up the WILL on the desk.
- Leave the room and then go through the door to the right in the next room to go to Anna’s Room.
Anna’s Room
- Find all the items on the list in black except the heart.
- You may not be able to get the heart till after you do the makeup puzzle even though you can see the heart.
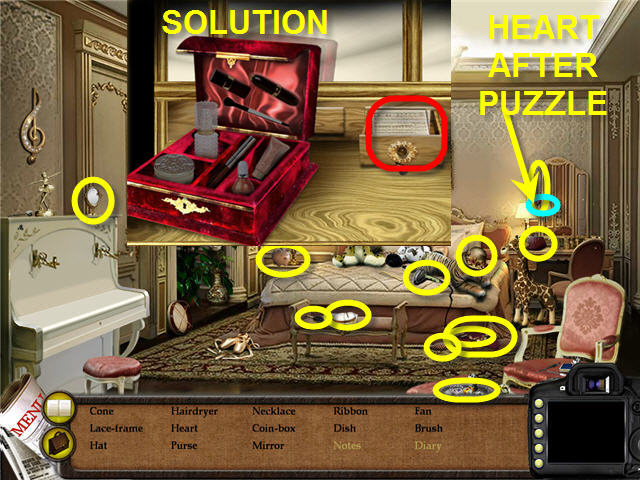
- Click on the sparkling dresser top to get makeup puzzle.
- The goal is to arrange the makeup pieces in its correct spot in the make-up case. See screenshot for solution.
- Collect the NOTES when done.
- Use the KEY in inventory on the piano.
- Use the NOTES on the piano keys.
- Click on the piano and it will play a series of notes. You need to duplicate these notes. The solution is to click the keys from left; 2, 4, 8 then 2, 4, 8, 5 and then 2, 4, 8, 5, 6.
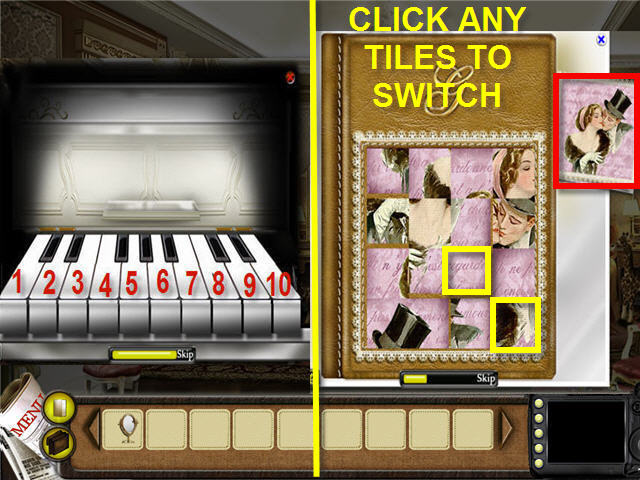
- Click on the DIARY on the keyboard to get the diary puzzle.
- The object is to switch the picture pieces to make it look like the picture in the upper right. Click on any two pieces to make them switch.
- When complete you will get a page written in mirror writing. Use the MIRROR in inventory on the page to read the note.
Level 19: Martha Winford’s Room

- Find all the items on the list in black.
- Click on the sparkling dressing table to get the casket (box) puzzle.
- Match the newspaper clippings. You will get a sneak peek at them before they close. See screenshot for solution.
- Pick up the NEWSPAPER on the bed.
- Use the FISHING ROD in inventory on the fish tank in the wall to get the KEY.
- Use the CHAIR in inventory on the map on the wall on top of the fish tank.
- Use the KNIFE from Inventory on the map to get map puzzle.
- The goal of the puzzle is to find the matching addresses on the map that are listed in the newspaper on the left.
Level 20: Rental Apartment
- Find all the items on the list in black.
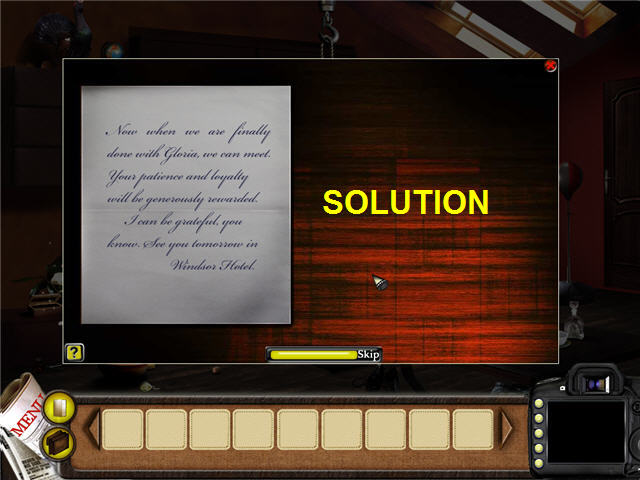
- Click on the sparkling desktop to get stamp puzzle.

- The goal is to attach the correct two stamps representing the country on the envelope.
- Read the letter after puzzle is complete.
- Use the NAIL-DRAWER on the boards across the door on the right. You need to use it on each of the 3 boards.
- Click on the door to open, Click on open door to get button puzzle.
- Click on a button on each of the 8 coats hanging in the closet.
- Click on the matching pairs of buttons. You will get a peek at them briefly to see where they are located at the beginning of the puzzle.
- Exit room to the left.
Bathroom
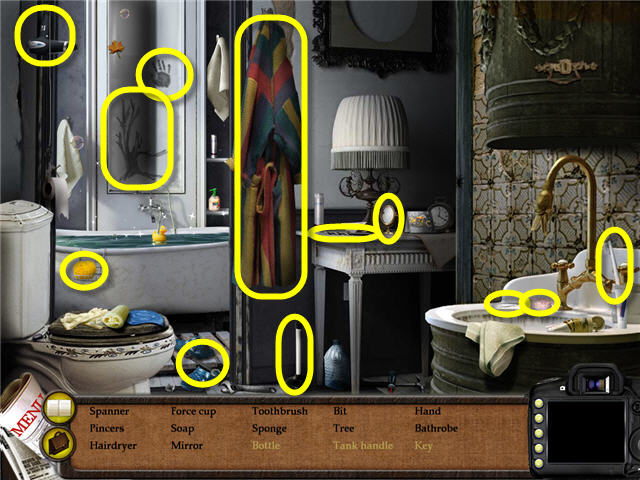
- Find all the items on the list in black.
- Click on the sparkling water in the tub to get pipe puzzle.
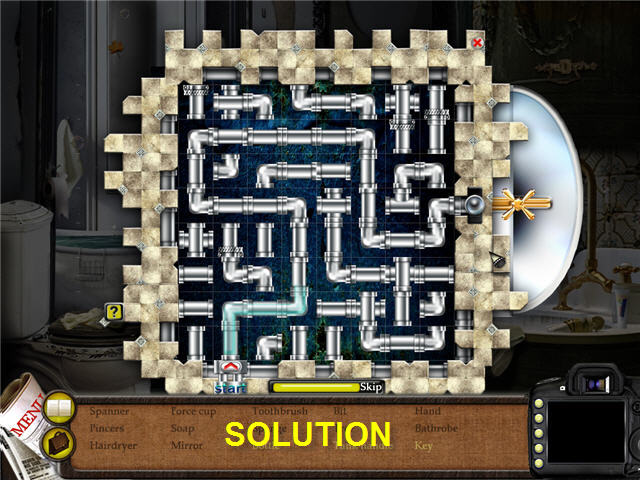
- The goal is to connect the pipes from the start on the bottom to the faucet on the middle right. See screenshot for solution.
- Use the KEY in inventory on the cabinet above the sink.
- Take the TANK HANDLE from the shelf in cabinet.
- Use the SPANNER on the toilet tank lid to open it.
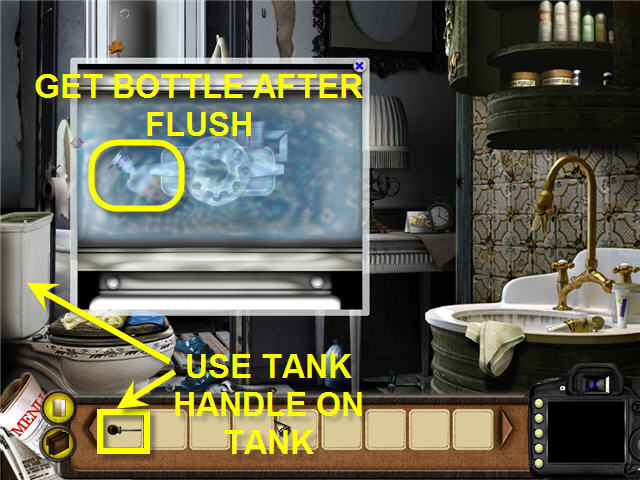
- Click on the top of the opened toilet tank to get a close up view inside the tank.
- Use the TANK HANDLE on the toilet tank to flush toilet.
- Take the BOTTLE from inside the tank.
Level 21: Photolaboratory Final
- Click on the bag to empty the contents.
- Use the BOTTLE in inventory on the burner.
- Pour the bottle into the beaker, add the blue liquid and turn it on 50 degrees.
- Watch the cutscene and click to advance the dialogues to the end.
- Congratulations! You have completed Journalistic Stories.
Created at: 2010-07-19