

Walkthrough Menu
General Tips & Information
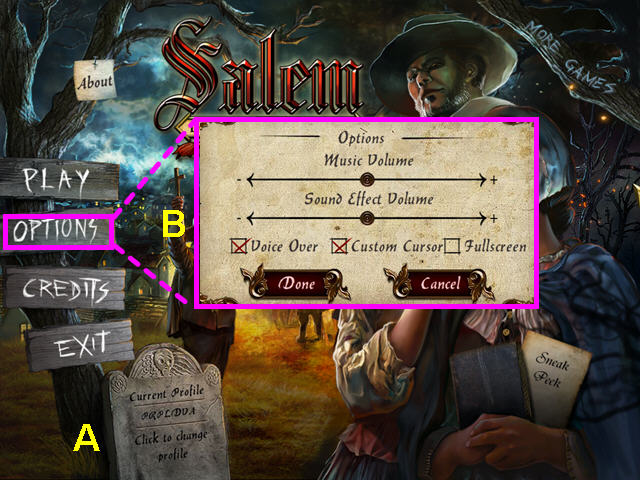
- Select 'Current Profile' on the main screen to add or delete player profiles (A).
- You may play this game in full screen or windowed mode by changing the settings in the options menu (B).
- You may adjust the volume of sounds and music in the options menu.
- The options menu is accessible from both the main screen and the in-game menu.
- Hidden object lists are random, your solutions may vary.
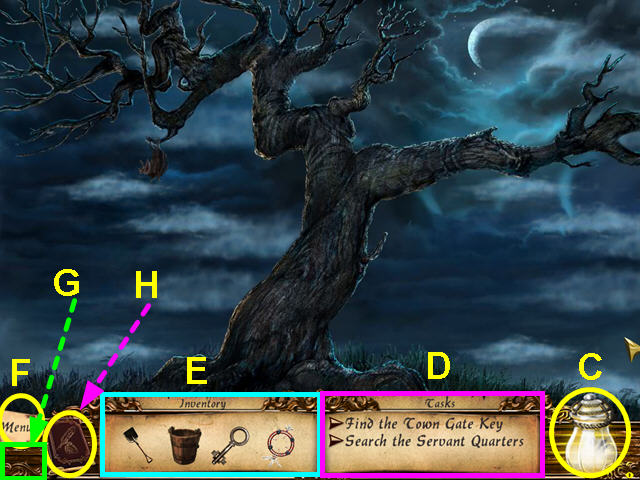
- Hints are unlimited, but you must wait for the meter to fill (C).
- Task are on the bottom right- click a task for more information (D).
- Your inventory is at the lower left (E).
- Use the scroll buttons to see all your inventory.
- Click the menu button to return to the main menu (F).
- During mini-games, a “Back” button will appear below the menu button (G).
- Select the journal to access the map, clues and other information (H).
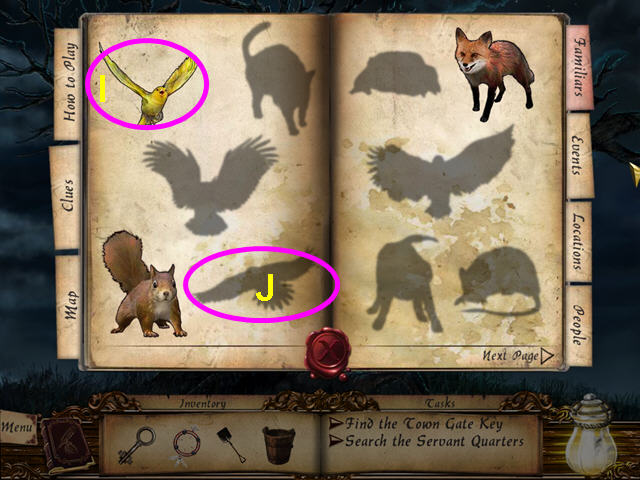
- The “Familiars” tab in the journal shows how many there are in the game.
- Colored animals indicate that you have found the familiar and used the family heirloom (I).
- Outlined animals indicate the you have yet to find this familiar (J).
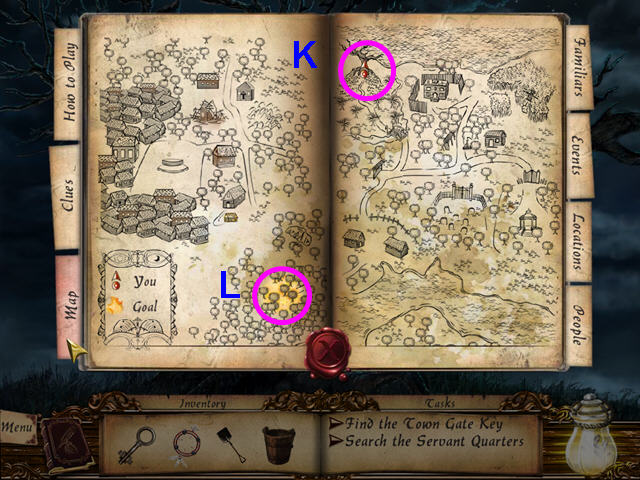
- Look at the map to show what needs to be done at each location.
- The map will show your current location (K) and highlight where goals can be accomplished (L).
Chapter One
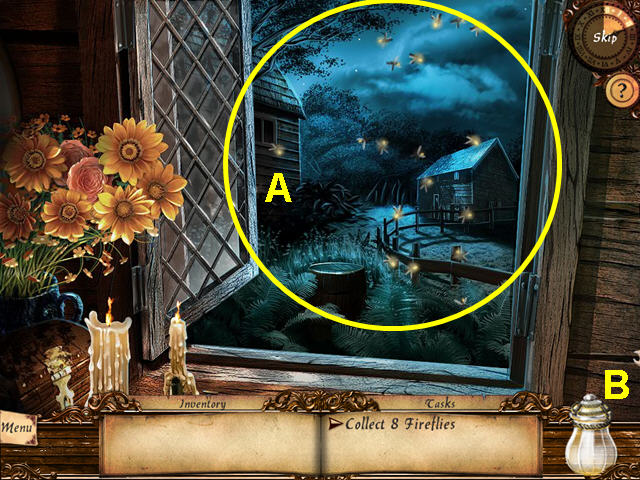
- Click on 8 fireflies (A) to capture them for your hint jar (B).
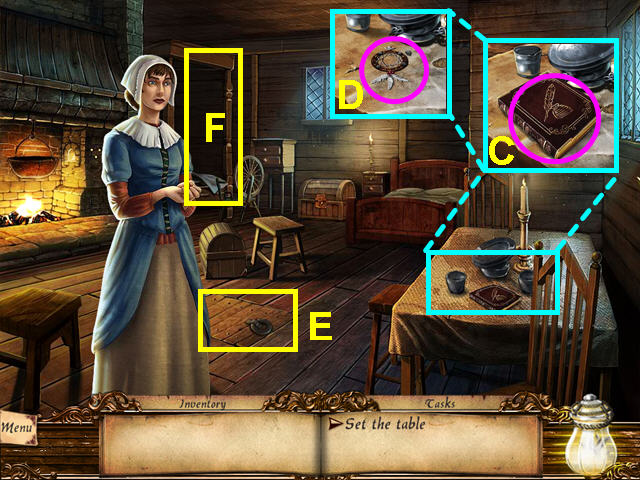
- After speaking with your mother, look at the close-up of the table.
- Take the JOURNAL (C).
- The journal will open to show a brief synopsis on the different cursors, buttons and inventory.
- Take the family HEIRLOOM that was under the book (D).
- Note the trapdoor on the floor (E).
- When your mother sends you to pack, select the bed on the left (F).
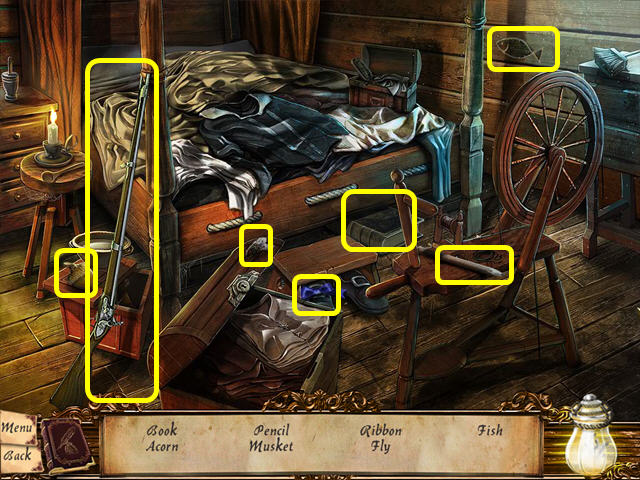
- You will only be able to locate 3 items on this hidden object list.
- Fire will intrude and force you to leave.
- Open the trapdoor in the floor and go under the house to the cellar.
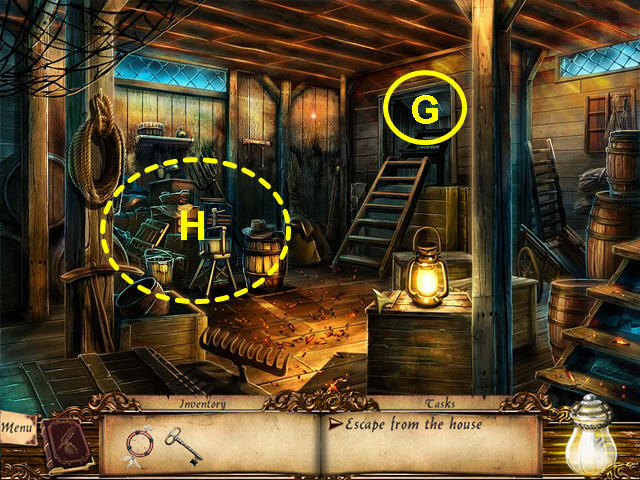
- Note the cellar door (G).
- Select the storage area for a hidden object scene (H).
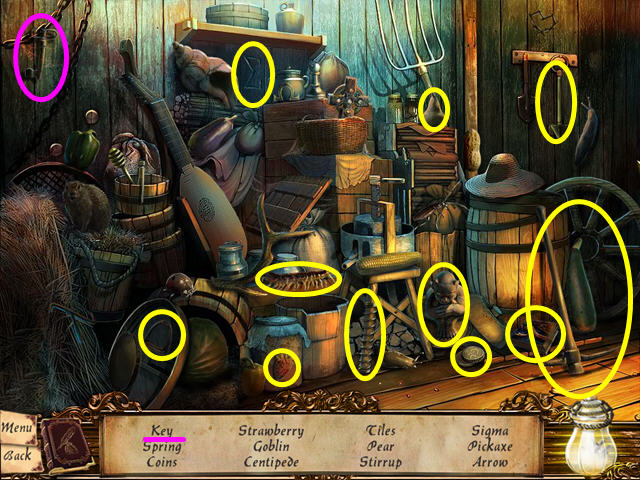
- Locate all the items on the list.
- The CELLAR KEY will go into your inventory.
- Use the CELLAR KEY on the cellar door and exit the room.
- Walk forward to the cornfields for a mini-game.

- The object is to move through the fields and avoid the men chasing you.
- Click on a firefly to move.
- The fireflies will show you the possible moves from your current position (I).
- The men move in a set position, so watch how they move before going forward.
- Move from the left, to the exit on the right (J).
- There are 3 screens to complete.
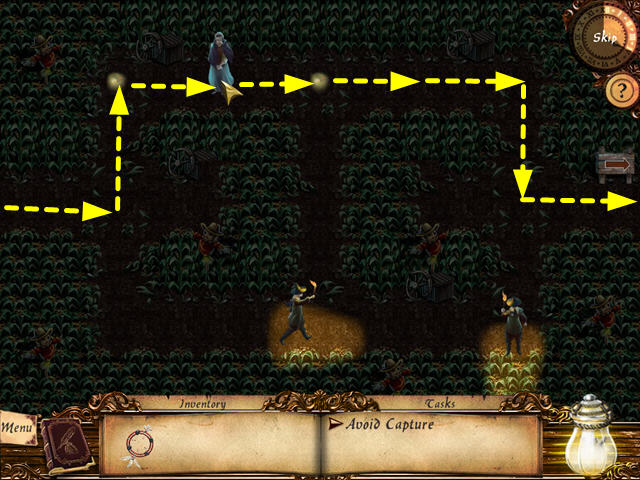
- The second screen will have two men.
- A possible path is shown.
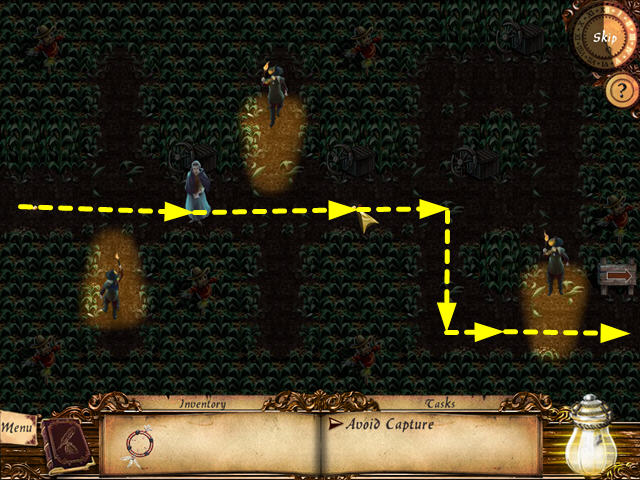
- The third screen will have three men.
- A possible path is shown.
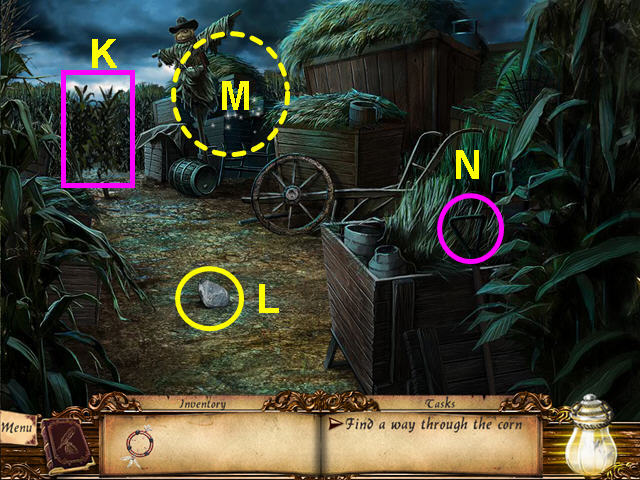
- Note the cornstalks blocking your way (K).
- Take the SMALL STONE (L).
- Select the scarecrow for a hidden object scene (M).
- Note the shovel handle (N).
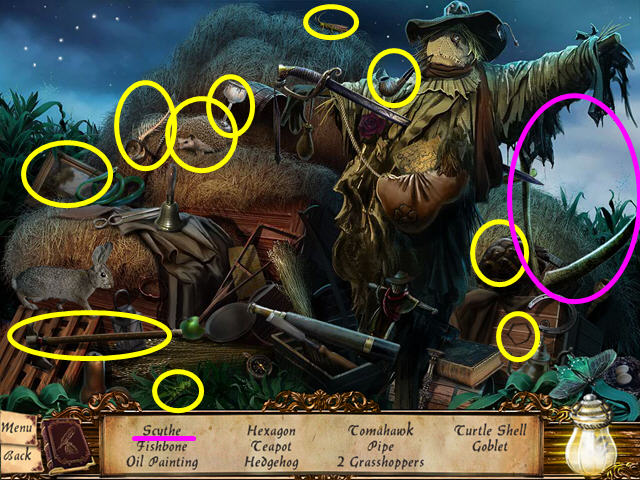
- Locate all the items on the list.
- The SCYTHE will go into your inventory.
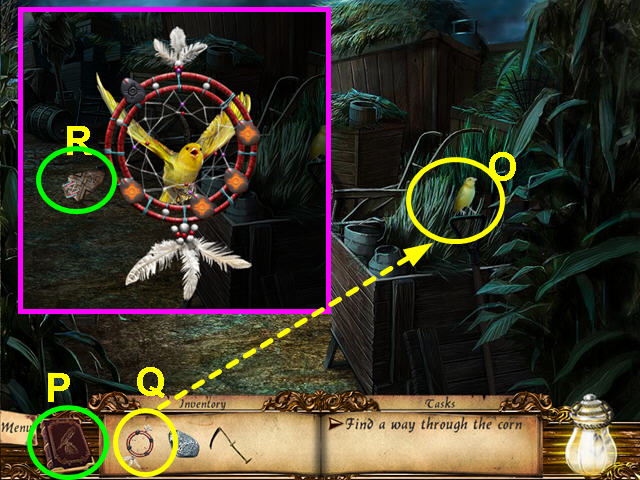
- Click on the yellow bird that lands on the shovel handle (O).
- Look in the journal for instructions oh how to scare away familiars (P).
- You also have a new tab in your journal that has the outline of the available familiars.
- You need to scare off the familiars to prevent from being accused as a witch.
- Also, each familiar that you scare away will result in the hint recharge taking one second less.
- Take the FAMILY HEIRLOOM from your inventory and use it on the bird (Q).
- As the outer arrow stone spins, click your mouse when each stone lights to keep them lit (R).
- You may click anywhere on the screen.
- Should you click at the wrong time, the FAMILY HEIRLOOM will go back into your inventory.
- Light all the stones to scare away the familiar.
- Use the scythe on the cornstalks blocking the path, then move forward.
Chapter Two
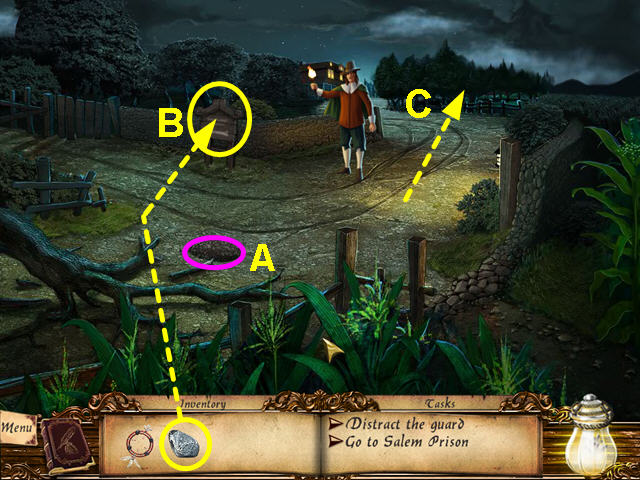
- Note the area that looks like a hole had been dug (A).
- Throw the SMALL STONE at the fragile sign to distract the guard (B).
- Walk up the right path to the prison (C).
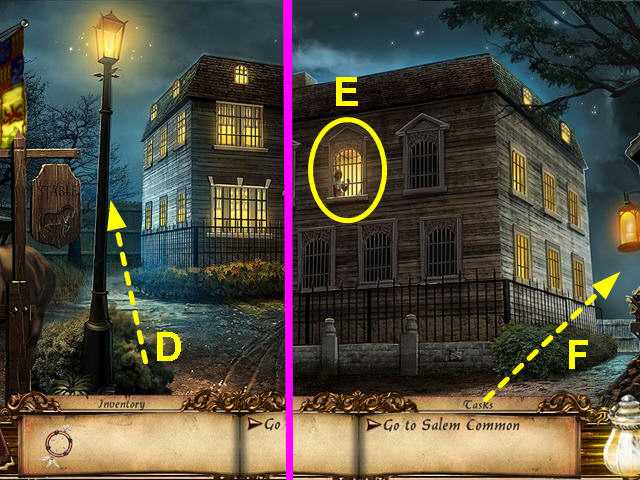
- Walk down the left side of the building to the rear of the prison (D).
- Select the lighted window to talk to the woman (E).
- Exit the rear of the prison (F).
- Leave the prison and walk down to enter the cornfields.
- Walk down twice, then enter the cellar.
- Walk down again to return to the main floor of your home.
- Take the DINNER KNIFE and the BELLOWS (G).
- Walk down to exit the house.
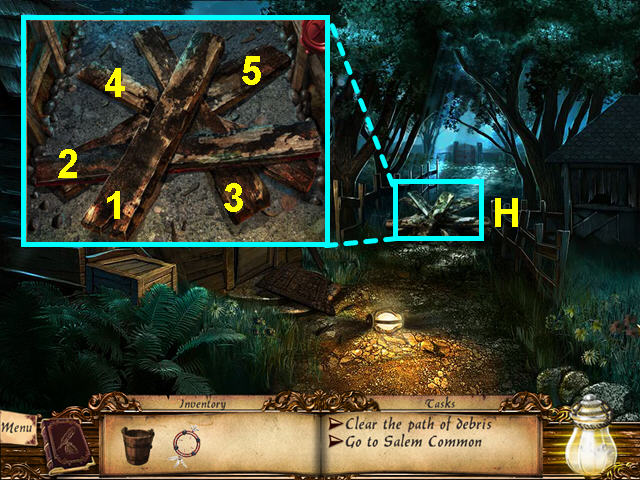
- Look at the close-up of the debris blocking the path (H).
- Click on the boards from top to bottom to remove them (1-5).
- Walk forward.
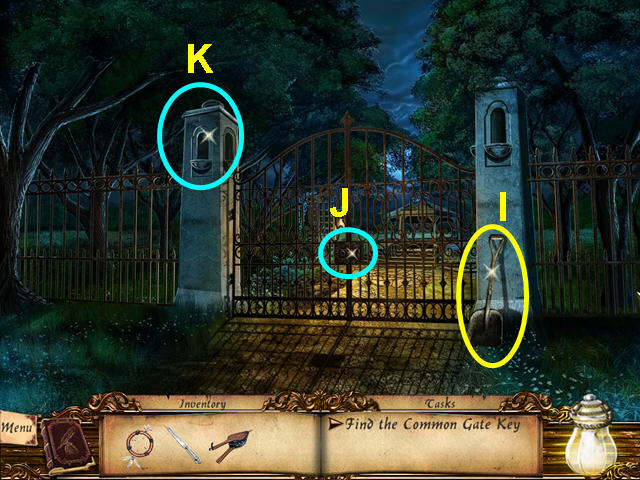
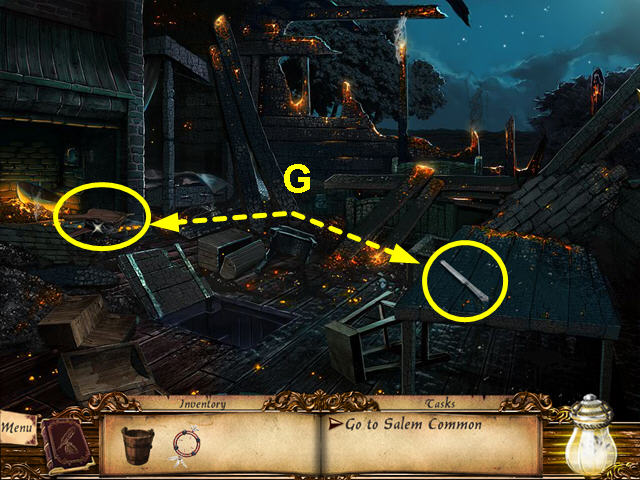
- Take the SHOVEL (I).
- Note the locked gate (J).
- Note the top of the left column (K).
- Walk down twice.
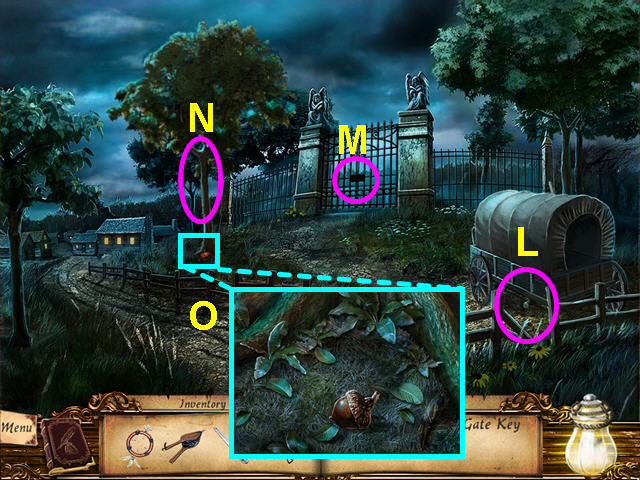
- Note the broken down wagon (L).
- Note the locked gate (M).
- Shake the tree to dislodge the acorn (N).
- Look at the close-up and take the acorn (O).
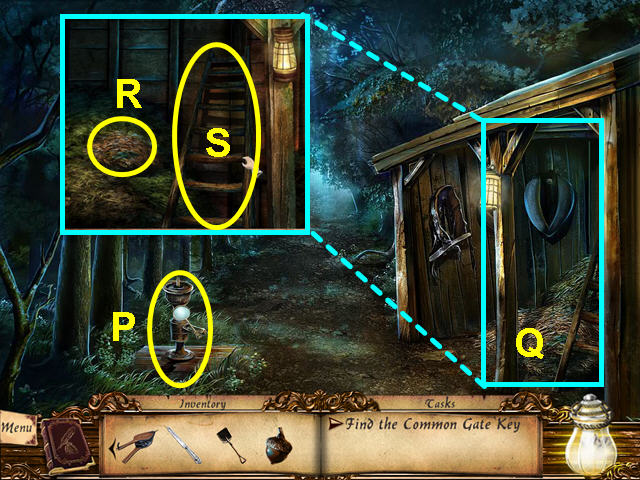
- Walk down once to the stables.
- Note the water pump (P).
- Look at the close-up of the stables (Q).
- Note the moving hay (R).
- Take the LADDER (S).
- Walk down and use the SHOVEL on the spot where a hole had been filled in and take the COMMON KEY.
- Walk left and up, then take the left path and walk past your house to the gate.
- Use the COMMON KEY to unlock the gate.
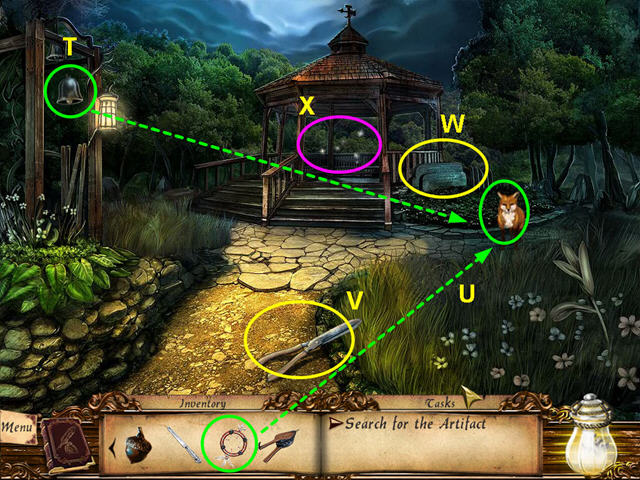
- Enter the common and ring the bell (T).
- Use the FAMILY HEIRLOOM on the fox that appears (U).
- You may need to hover your mouse over him to make him leave.
- Take the SHEARS (V).
- Note the right side of the gazebo (W).
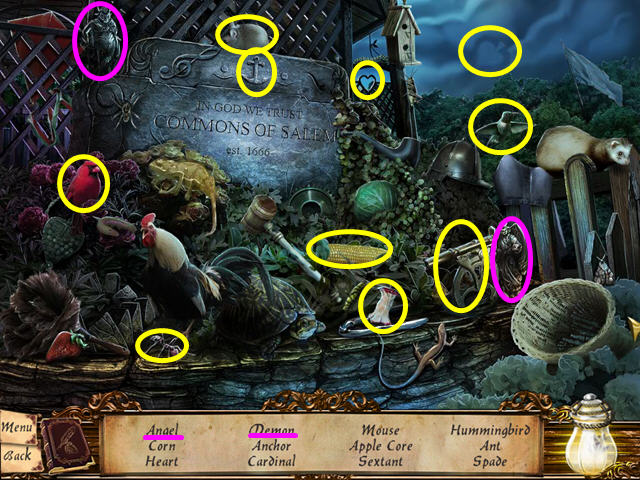
- Select the gazebo for a hidden object area (X).
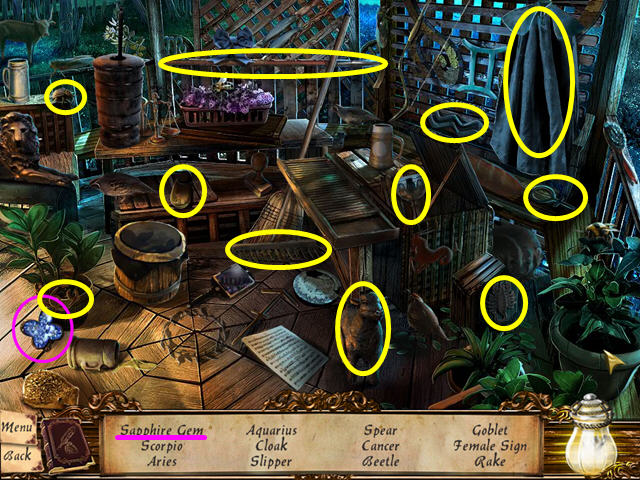
- Locate all the items on the list.
- The SAPPHIRE GEM will go to your inventory.
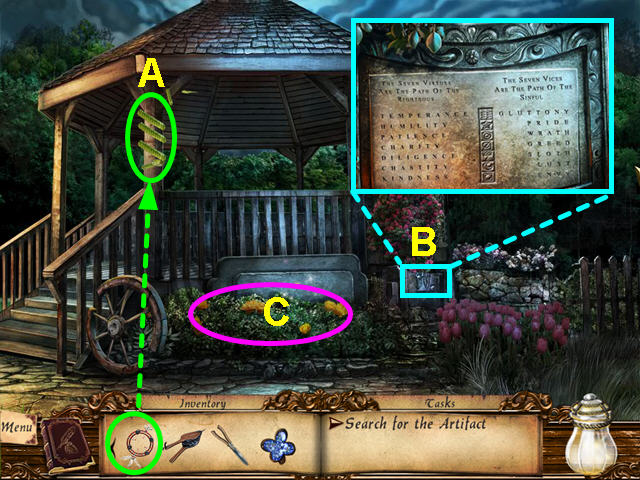
- Walk to the right side of the gazebo.
- Use the FAMILY HEIRLOOM on the snake (A).
- Look at the close-up of the plaque under the rose trellis (B).
- Click on the roses covering the plaque to reveal the entire plaque.
- Click on the plaque to read it and the information will be entered into your journal.
- Select the sparkling area by the yellow flowers for a hidden object area (C).
- Locate all the items on the list.
- The STATUETTES will go into your inventory.
- Walk down twice to exit the commons.
- Look at the top of the left gate pillar.
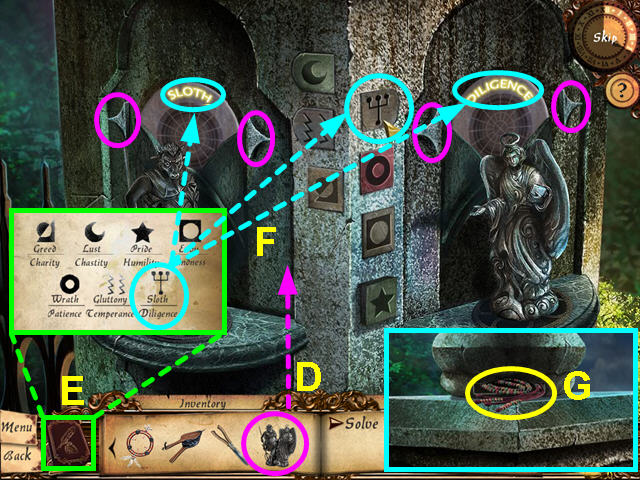
- Use the STATUETTES on the device to trigger a mini-game (D).
- Look at your journal for the list of vices and virtues and the symbol associated with each pair (E).
- Use the arrow keys to rotate each disc to a vice and virtue pair, then click on the matching symbol (F).
- The vice and virtue pair will light up when correct.
- Repeat these steps with the remaining 6 pairs until all the buttons are down.
- Take the CEREMONIAL BEADS from the secret niche (G).
- Walk down 4 times, then go up to the prison.
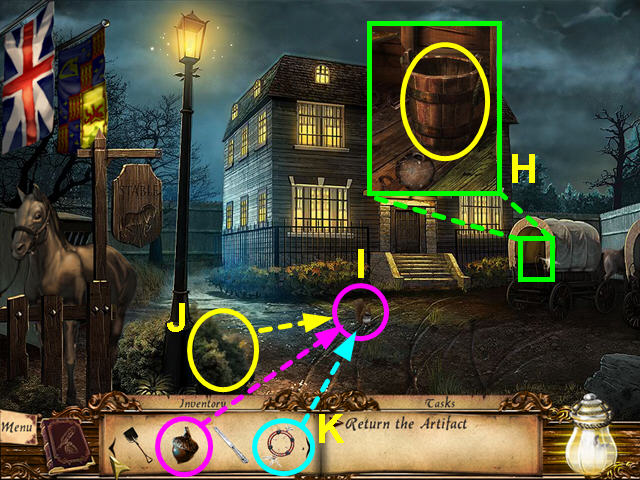
- Look in the back of the wagon and take the BUCKET (H).
- Place the ACORN on the ground (I).
- Click on the shaking bush to roust the squirrel (J).
- Use the FAMILY HEIRLOOM on the squirrel (K).
- Walk to the rear of the prison.
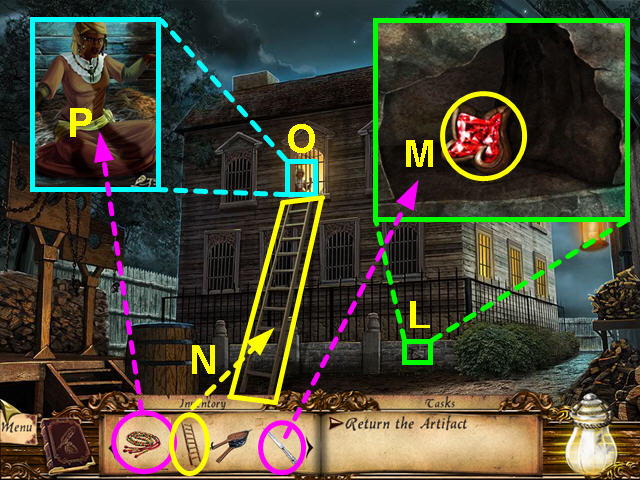
- Look at the close-up of the stone wall at the base of the prison (L).
- Use the DINNER KNIFE to pry out the stone and take the RUBY GEM (M).
- Place the LADDER against the wall of the prison (N).
- Look at the close-up of the window (O).
- Give the CEREMONIAL BEADS to Tituba (P).
- Exit the close-up and walk to the front of the prison.
- Walk down, then to the left.
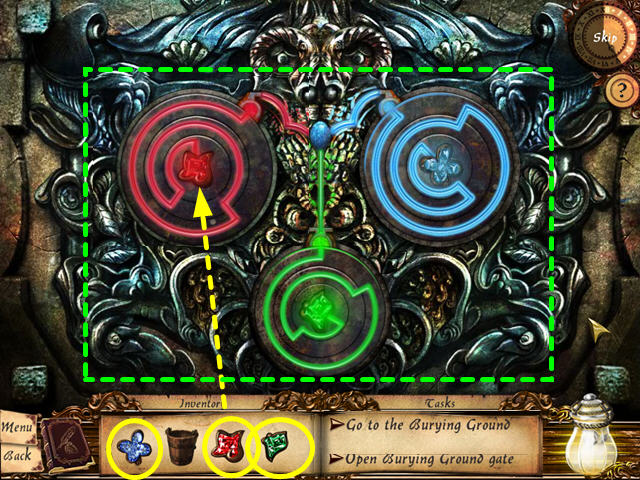
- Walk forward and look at the lock of the burying ground gate.
- Place the 3 GEMS into the slots with the same color.
- The object is to rotate the rings and align the colored paths.
- Moving some rings will affect other rings.
- The path will light when correct.
- Enter the burying ground.
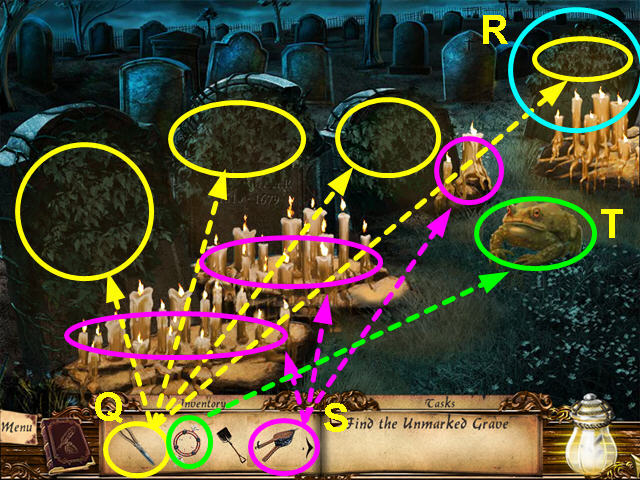
- Use the SHEARS to cut the foliage from the 4 gravestones (Q).
- Select the unmarked gravestone for a hidden object area (R).
- Use the BELLOWS on the left 3 sets of candles to make the toad appear (S).
- Use the FAMILY HEIRLOOM on the toad (T).
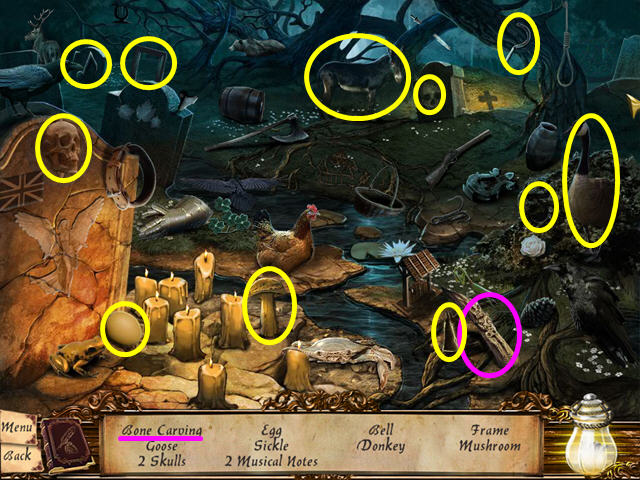
- Locate all the items on the list.
- The BONE CARVING will go into your inventory.
- Walk down 3 times, then up to return to the prison.
- Walk to the read of the prison and give the BONE CARVING to Tituba and she will give you the SERVANT'S KEY for the Parris house.
- Exit the close-up and walk to the front of the prison.
Chapter Three
- Walk down, then to the left.
- Walk forward and talk to the farmer in front of the burying ground gate.
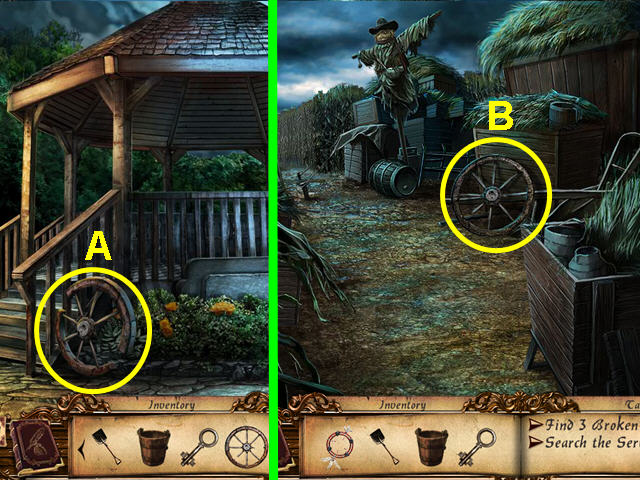
- Take the left path, then go forward three times to the gazebo.
- Take the BROKEN WHEEL (A).
- Walk down 7 times to the area with the scarecrow.
- Take the BROKEN WHEEL (B).
- Walk down to the back of the house.
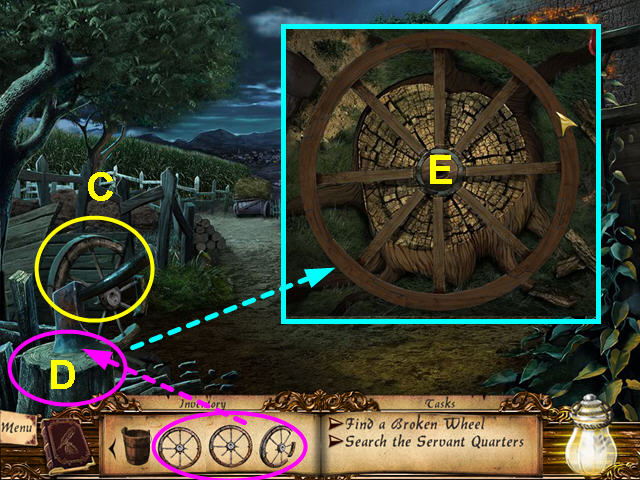
- Take the BROKEN WHEEL (C).
- Place each BROKEN WHEEL on the stump, one at a time- the axe will automatically break them apart (D).
- Look at the close-up of the stump.
- Create a wheel with the pieces.
- Left-click to take or place a piece into position (E).
- Take the completed CART WHEEL.
- Walk forward twice, then take the left path.
- Walk forward again to return to the farmer.
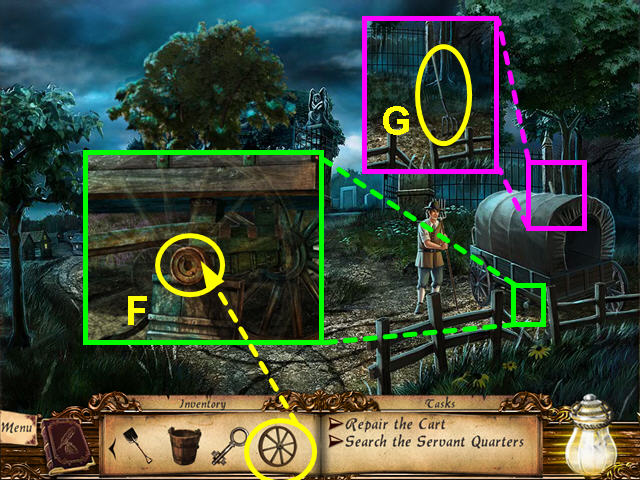
- Look at the close-up of the cart and place the CART WHEEL on the cart (F).
- Take the PITCHFORK that was hidden behind the cart (G).
- Take the right path.
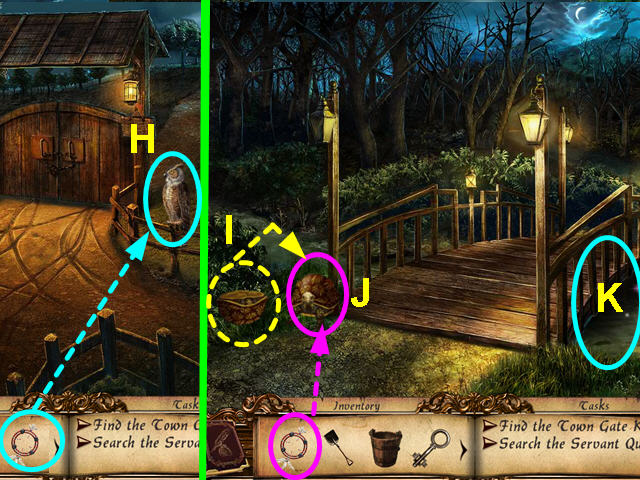
- Use the FAMILY HEIRLOOM on the owl (H).
- Take the right path.
- Click on the turtle shell to turn the turtle right side-up (I).
- Use the FAMILY HEIRLOOM on the turtle (J).
- Select the area to the right of the bridge for a hidden object area (K).
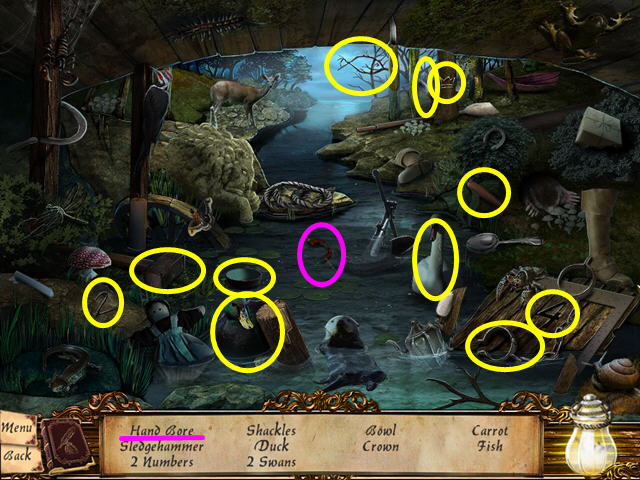
- Locate all the items on the list.
- The HAND BORE will go into your inventory.
- Walk down, then take the upper left path.
- Talk to the farmer.
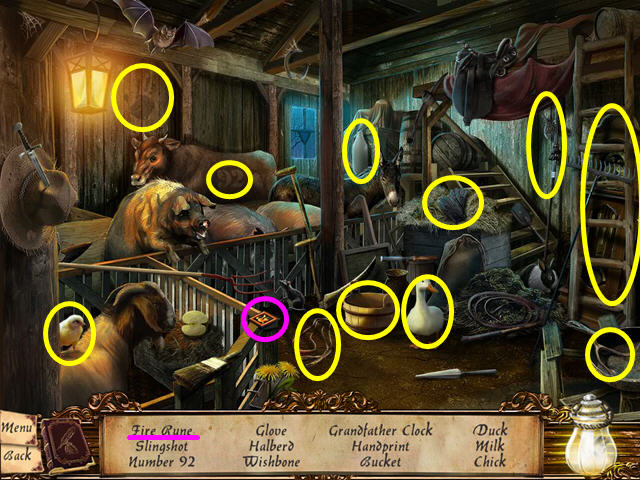
- Select the barn for a hidden object area.
- Locate all the items on the list.
- The FIRE RUNE will go into your inventory.
- Walk right to the Mill pond.
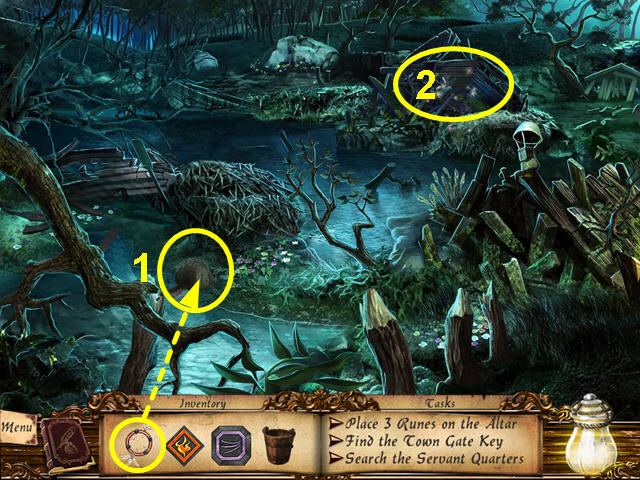
- Use the FAMILY HEIRLOOM on the beaver as it circles around (1).
- Select the debris area in the back for a hidden object area (2).
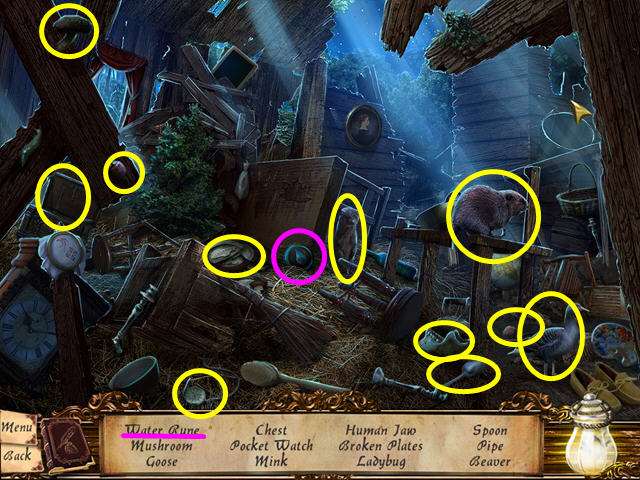
- Locate all the items on the list.
- The WATER RUNE will go into your inventory.
- Walk down, then up to the forest path.
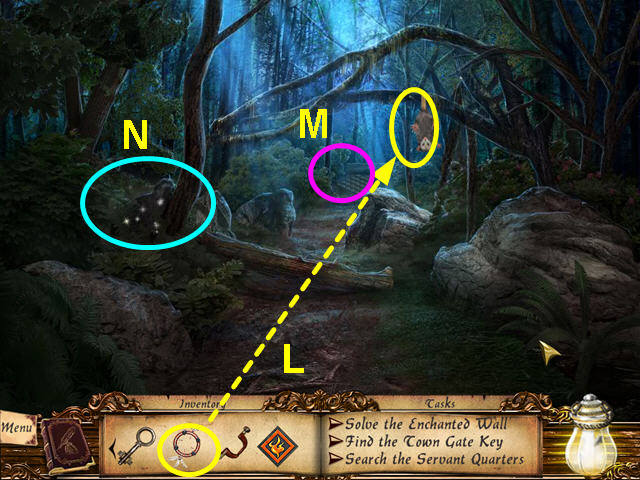
- Use the FAMILY HEIRLOOM on the opossum (L).
- Note the wall in the background (M).
- Select the area on the left for a hidden object scene (N).
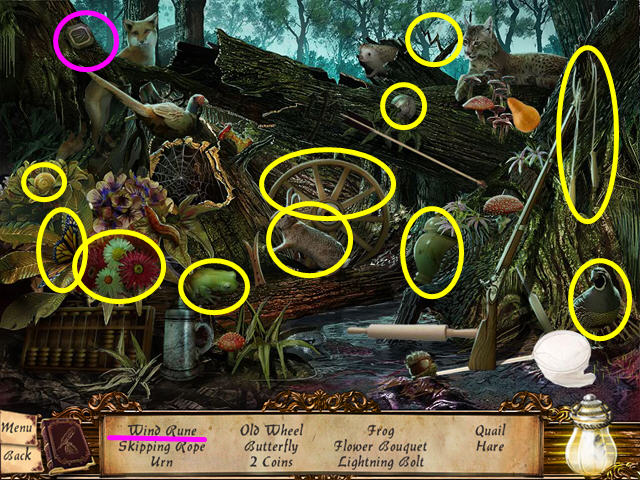
- Locate all the items on the list.
- The AIR RUNE will go into your inventory.
- Select the wall in the background for a mini-game.
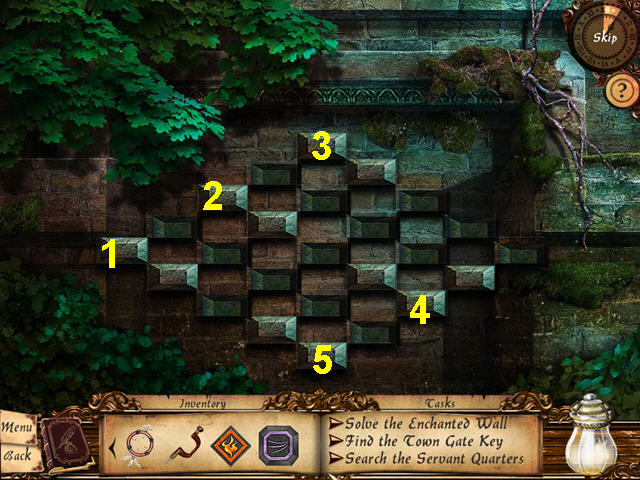
- The object is to push all the bricks into the wall.
- Pushing a brick will effect the surrounding bricks.
- Click on the bricks in numerical order (1-5).
- Walk forward and listen to the girls talk.
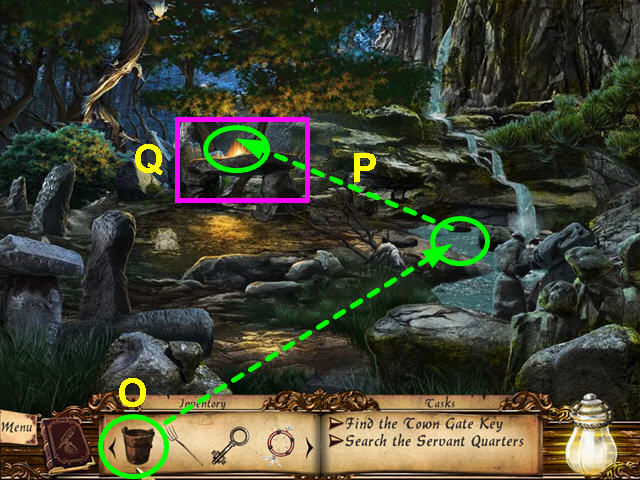
- Use the BUCKET on the stream (O).
- Pour the BUCKET of WATER onto the burning altar (P).
- Look at the altar for a mini-game (Q).
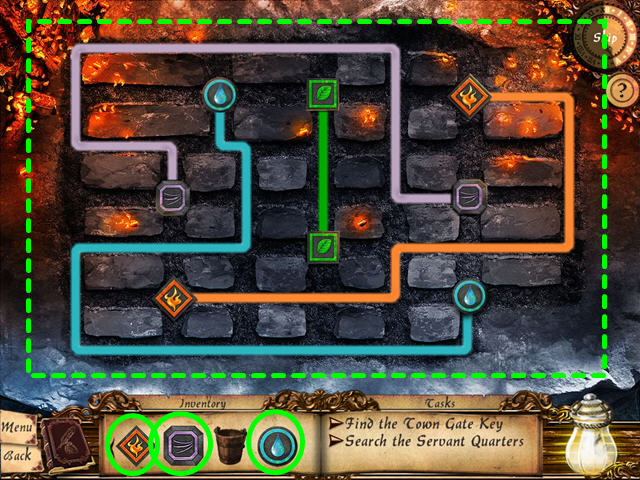
- Use the 3 RUNES on the table- they will automatically place themselves in the correct position.
- The object is to create a path between each set of runes without crossing paths.
- Click, hold and drag from one rune to the other.
- The fireflies will show your possible moves from each location.
- You will find the TOWN KEY.
- Walk down twice.
- The farmer will tell you the two girls are from Salem village.
- Walk down again and use the TOWN KEY to open the gate to the village.
- Walk through the gate.
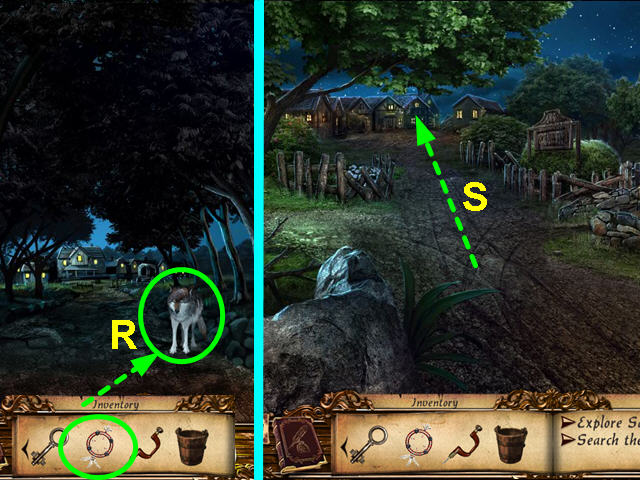
- Use the FAMILY HEIRLOOM on the wolf (R).
- Walk forward to the village.
- Walk forward again to the village center (S).
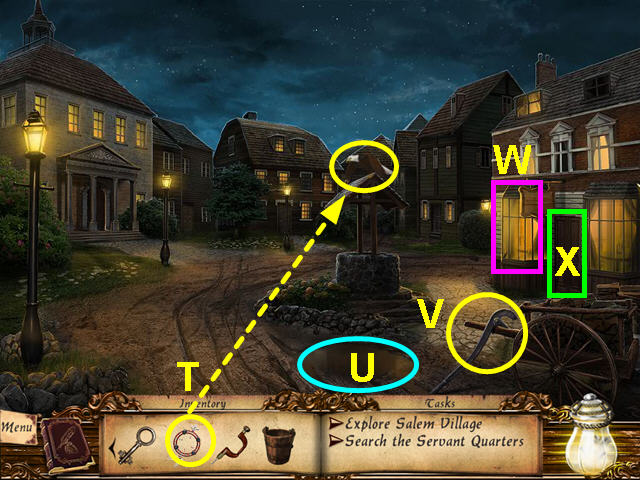
- Use the FAMILY HEIRLOOM on the eagle (T).
- Note the mud puddle (U).
- Take the PUMP HANDLE (V).
- Note the tavern windows (W).
- Enter the tavern (X).
- Talk to the tavern owner, then exit the building.
- Use the bucket on the puddle to get a BUCKET of MUD.
- Throw the BUCKET of MUD on the tavern windows.
- Walk down 3 times, then take the left path.
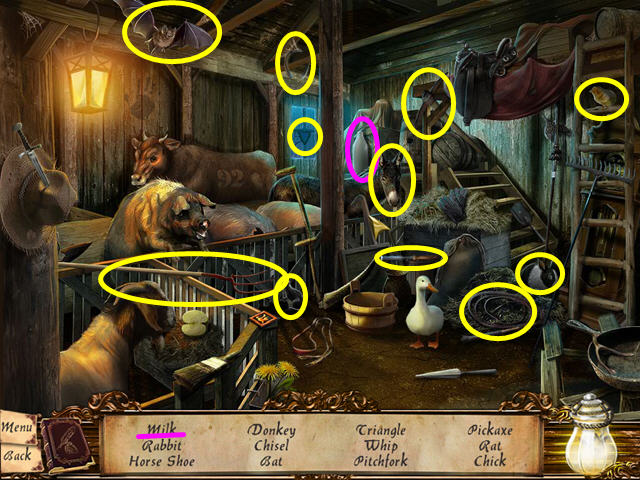
- Select the sparkling barn for a hidden object scene.
- Locate all the items on the list.
- The FRESH MILK will go into your inventory.
- Walk down, then enter the gate.
- Walk forward twice, then enter the tavern.
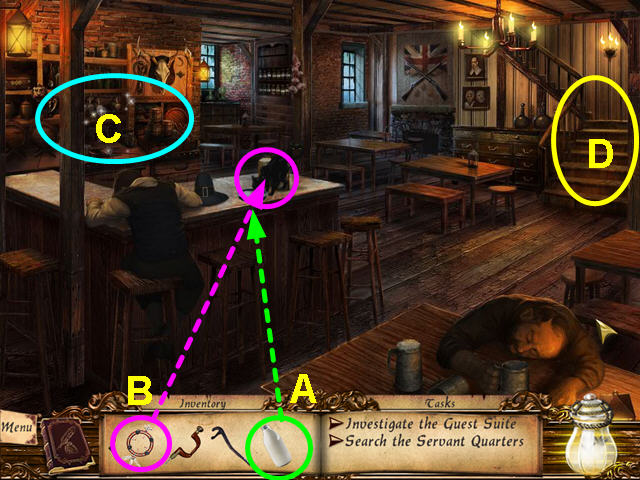
- Talk to the tavern owner and he will leave.
- Use the FRESH MILK on the bar to distract the cat (A).
- Use the FAMILY HEIRLOOM on the cat (B).
- Select the sparkling area behind the bar for a hidden object scene (C).
- Note the stairs to the second floor (D).
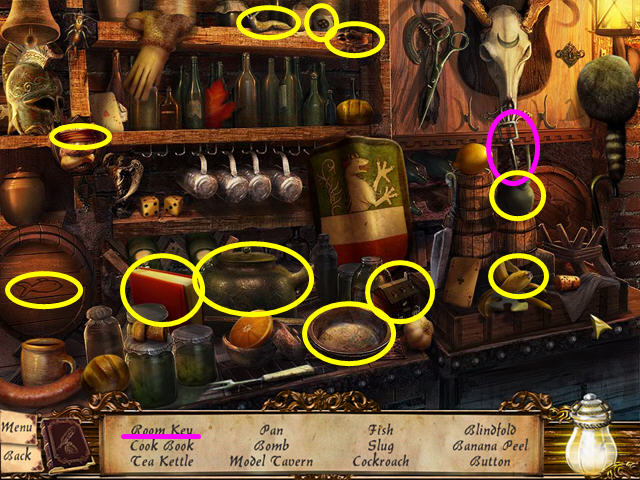
- Locate all the items on the list.
- The ROOM KEY will go into your inventory.
- Walk up the stairs.
- Use the ROOM KEY on the far door and enter the guest suite.
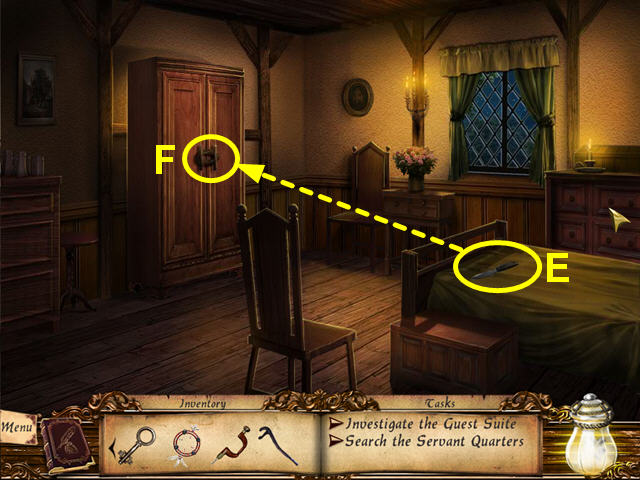
- Take the DULL KNIFE from the bed (E).
- Try the DULL knife on the ropes holding the wardrobe shut, but the blade is dull (F).
- Exit the tavern and walk down once.
- Walk to the left and select the sparkling quarry for a hidden object scene.

- Locate all the items on the list.
- The SHARPENING STONE will go into your inventory.
- Walk down 4 times and the dog will arrive in front of the burying grounds.
- Walk down once more to the stables.
- Look at the close-up of the pump (G).
- Place the PUMP HANDLE on the pump (H).
- Place the SHARPENING STONE at the base of the pump (I).
- Use the DULL KNIFE on the sharpening stone (J).
- Look at the close-up of the stable (K).
- Use the PITCHFORK on the moving hay (L).
- Use the FAMILY HEIRLOOM on the raccoon (M).
- Walk forward, then take the right path.
- Walk through the gates and go forward twice.
- Enter the tavern and return to the room on the second floor.
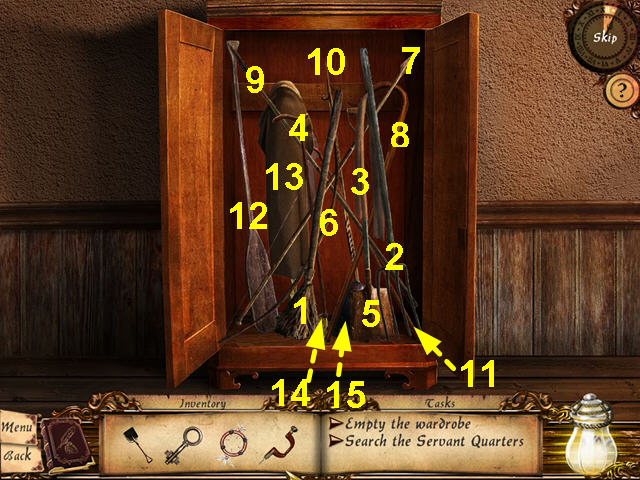
- Use the SHARP KNIFE to cut the ties on the wardrobe and look inside.
- The object is to remove all the items from the wardrobe.
- You can only remove items that do not have other items on top of them.
- Remove the items in numerical order (1-15).
- Click on the wardrobe to move it and look through the hole in the wall.
- When the conversation is over, exit the tavern.
Chapter Four
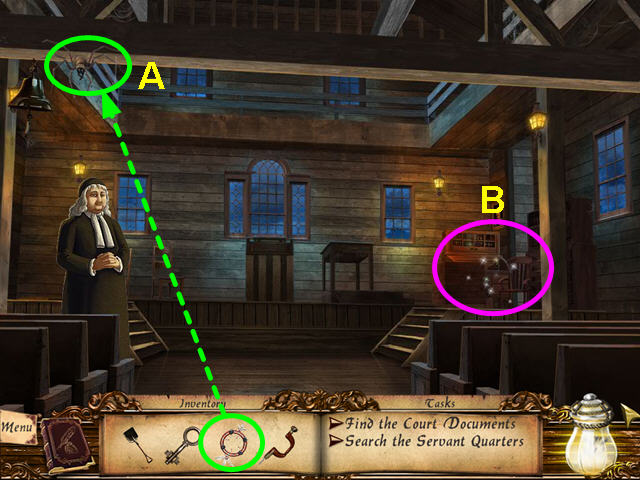
- Walk forward to the building on the left.
- After talking with Judge Sewell, use the FAMILY HEIRLOOM on the spider (A).
- Select the desk in the back for a hidden object area (B).
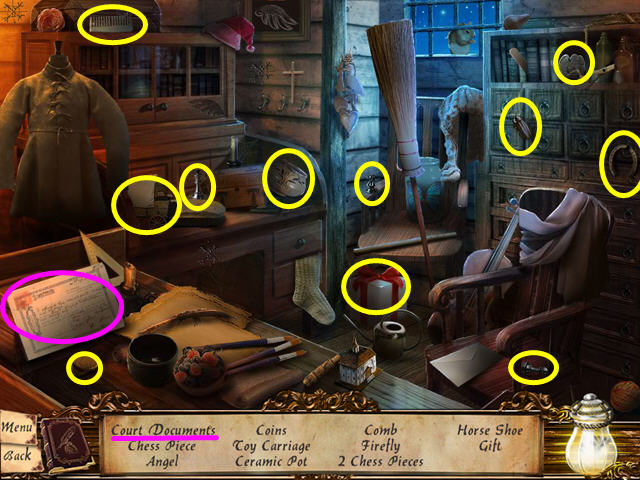
- Locate all the items on the list.
- The COURT DOCUMENT will go into your inventory.
- Give the COURT DOCUMENT to Judge Sewell.
- Select the desk area again for a mini-game.
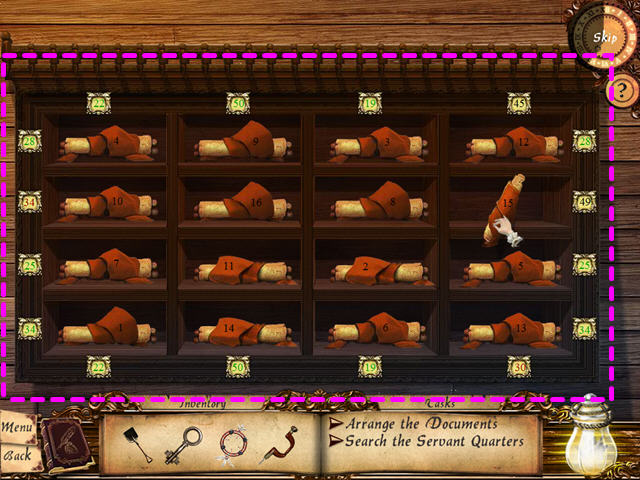
- The object is to arrange the scrolls so that the columns and rows add up to the numbers on the top and right.
- Fill the empty slots with the scrolls from the top.
- Exit the building, then walk down 4 times to the gates of the burying grounds.
- Take the left path and enter your burnt house.
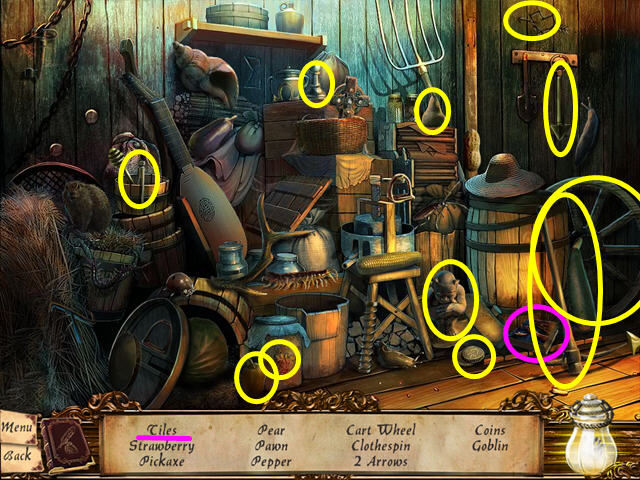
- Walk down the trapdoor and select the sparkling area for a hidden object scene.
- Locate all the items on the list.
- The LOCK TILES will go into your inventory.
- Return to the upper floor.

- Use the LOCK TILES on the chest for a mini-game (C).
- The object is to slide the tiles and restore the crest (D).
- This video show one possible way to solve the slider mini-game.
- You will find the PROPERTY DEED.
- Exit the house and walk down 3 times.
- Walk up the right path to the prison and go the rear of the building.
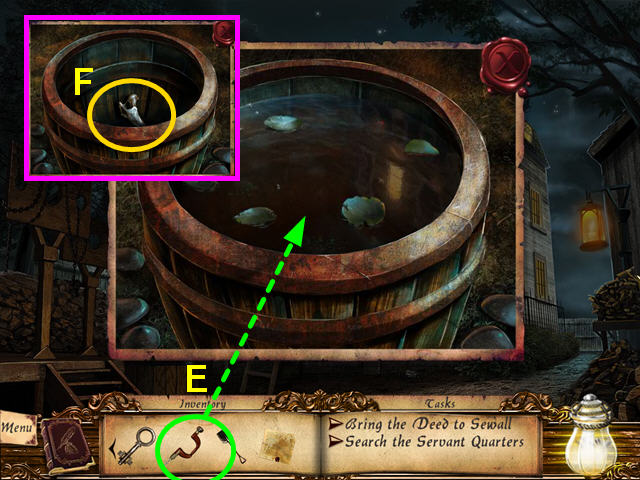
- Look at the water barrel.
- Use the HAND BORE on the barrel (E).
- Take the BONE from the barrel (F).
- Exit the rear of the prison and walk down.
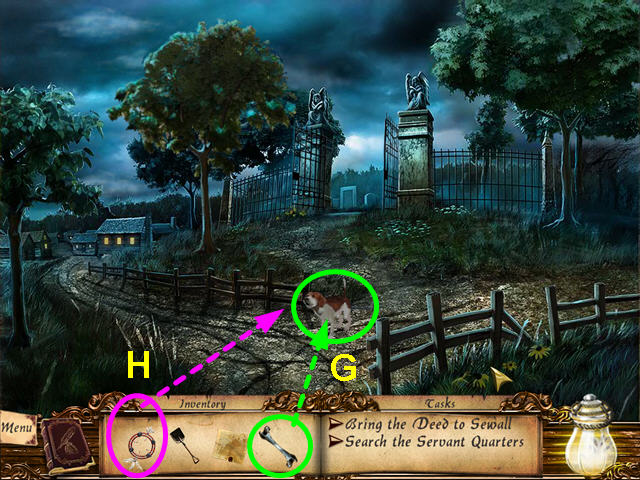
- Take the left path, then walk forward.
- Give the BONE to the dog (G).
- Use the FAMILY HEIRLOOM on the dog (H).
- Walk to the right and enter the gate.
- Walk forward 3 times to return to the Judge.
- Give the Judge the PROPERTY DEED.
- Select the desk area for a hidden object scene.
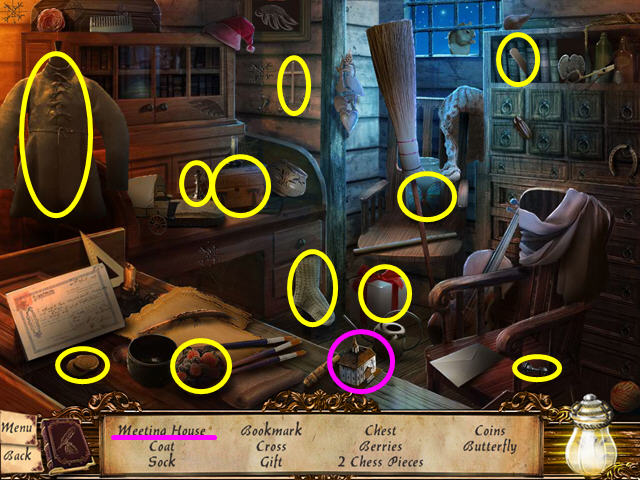
- Locate all the items on the list.
- The MODEL MEETING HOUSE will go into your inventory.
- Exit the building and enter the tavern.
- Select the area behind the bar for a hidden object scene.
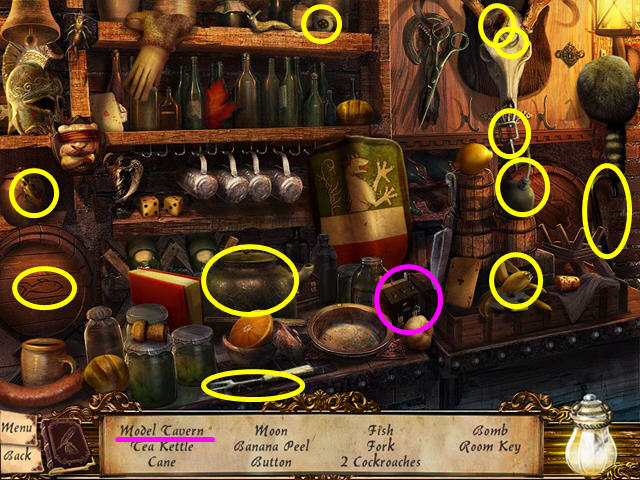
- Locate all the items on the list.
- The MODEL TAVERN will go into your inventory.
- Exit the tavern and walk down 4 times.
- Enter the burying grounds and select the unmarked tombstone for a hidden object area.
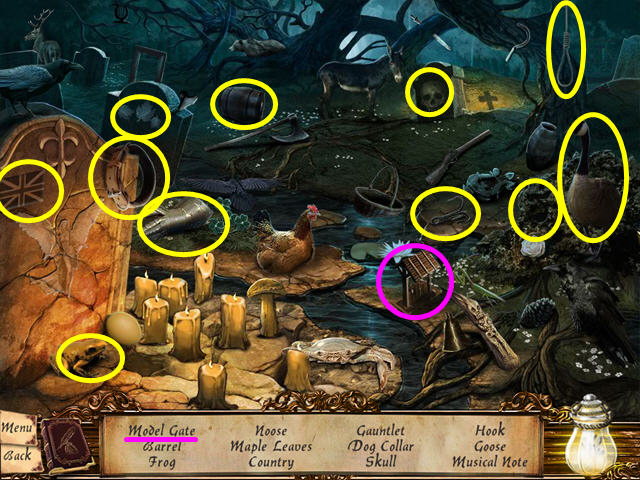
- Locate all the items on the list.
- The MODEL GATE will go into your inventory.
- Exit the burying grounds and walk down 3 times.
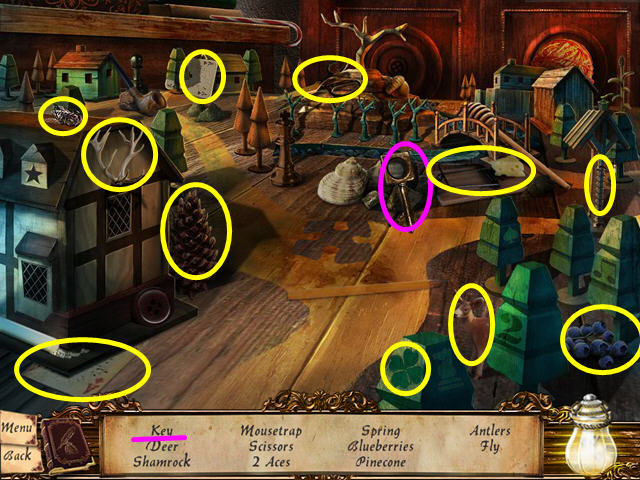
- Select the scarecrow for a hidden object scene.
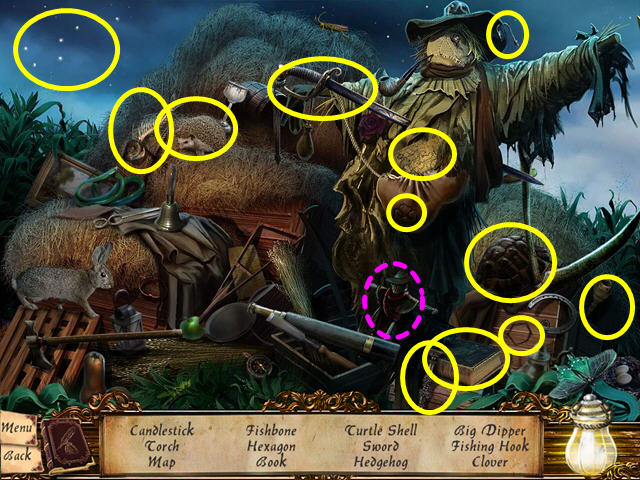
- Locate all the items on the list.
- The MODEL SCARECROW will go into your inventory.
- Walk forward, then take the left path.
- Walk forward, the take the right path and enter the gate.
- Walk forward again and take the left path to the Parris home.
- Use the SERVANT KEY on the door at the left end of the building.

- Enter the servant's quarters.
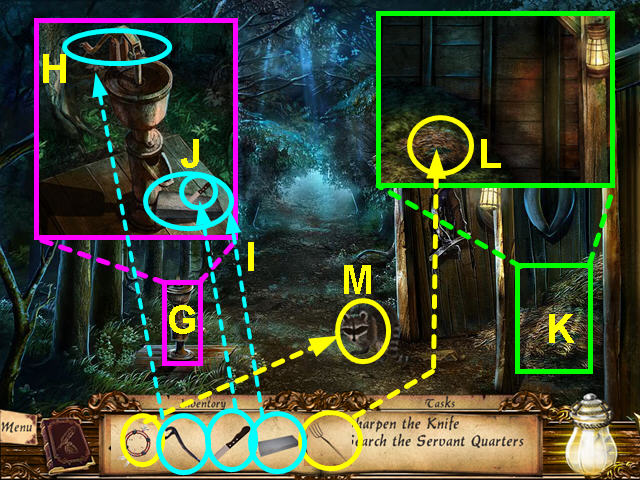
- Collect the YELLOW FEATHER on the table (I).
- Look under the bed and take the RED FEATHER and the BLUE FEATHER (J).
- Take the GREEN FEATHER from the sill (K).
- Note the cow skull (L).
- Look at the doll and use the 4 FEATHERS on the doll (M).
- Take the DOLL and use it on the ceremonial table (N).
- Select the ceremonial table for a hidden object scene.
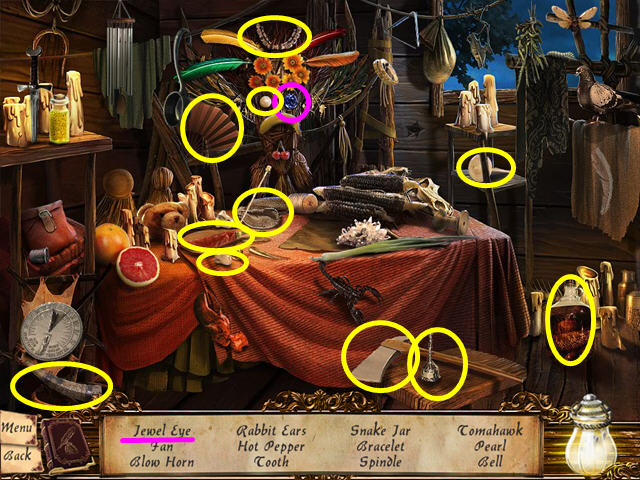
- Locate all the hidden objects on the list.
- The EYE GEM will go into your inventory.
- Use the EYE GEM on the cow skull and take the PARRIS KEY.
- Exit the servant's quarters and use the PARRIS KEY on the front door of the house.
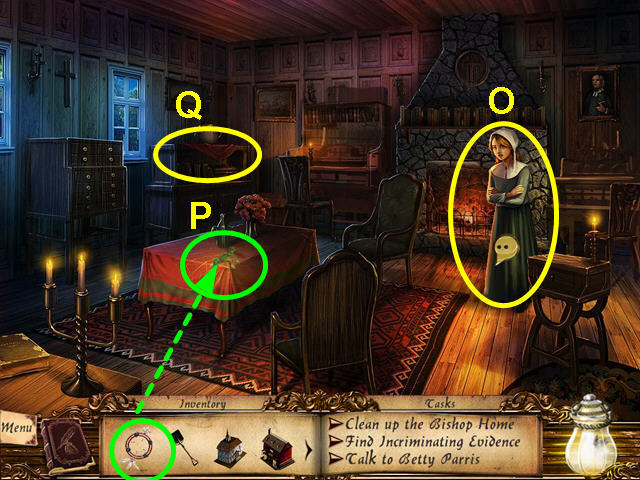
- Enter the Parris home and speak to Betty (O).
- Use the FAMILY HEIRLOOM on the lizard as it runs around (P).
- Note the cabinet (Q).
- Exit the house and walk down 3 times to the gate.
- Take the left path and walk forward to the forest path.
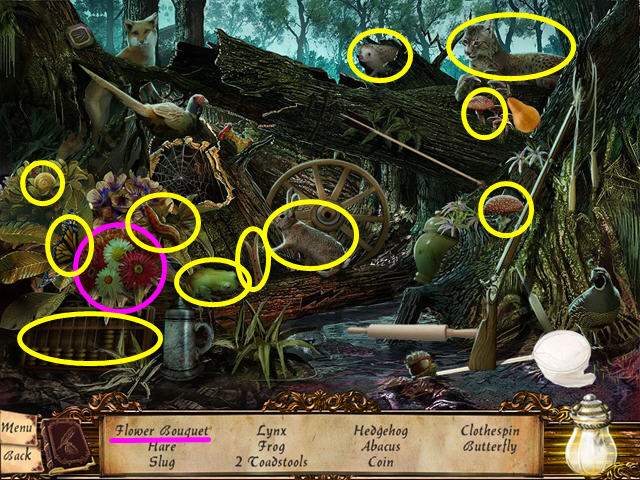
- Select the sparkling area on the left for a hidden object game.
- Locate all the items on the list.
- The FLOWER BOUQUET will go into your inventory.
- Walk down twice and enter the gate.
- Walk forward, then left to return to the Parris home.
- Give the flowers to Betty and she will tell you of a secret box.
- Check out our video solution!
- Select the left rear cabinet for a mini-game.
- The object is to restore all four tiles.
- Slide the pieces to the center slots.
- Both the upper and lower pieces rotate by clicking on the button.
- The lower piece has arrows, that you use to move the picture piece to the other slot.
- Inside you will find the PUTNAM KEY.
- Exit the house and walk down.
- Walk to the right.
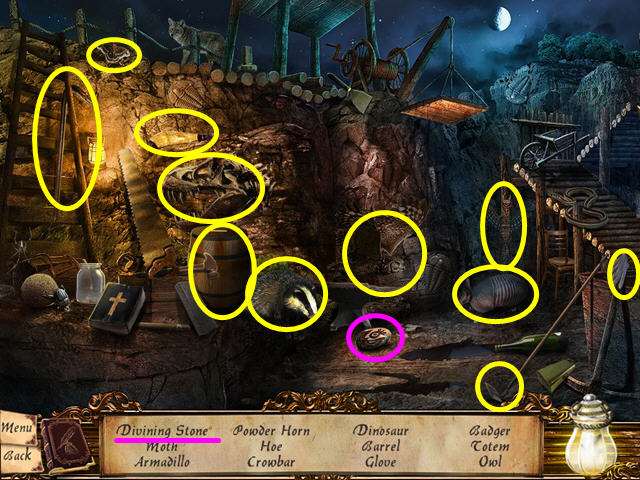
- Select the sparkling area at the quarry for a hidden object area.
- Locate all the items on the list.
- The DIVINING STONE will go into your inventory.
- Enter Bridget Bishop's house on the left.
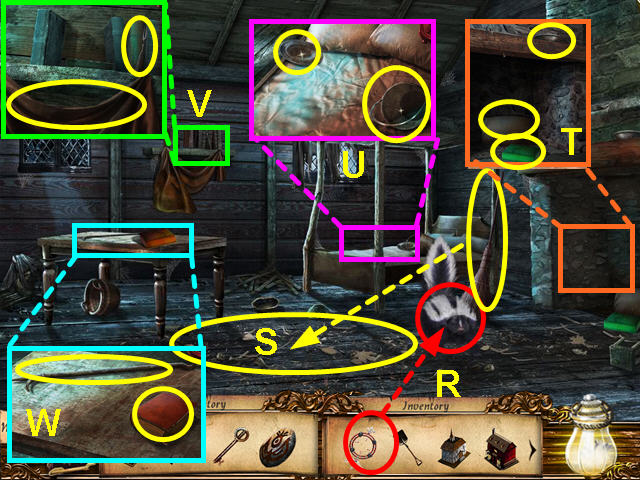
- Use the FAMILY HEIRLOOM on the skunk (R).
- Take the BROOM and use it on the floor (S).
- Look at the fireplace and take the BOWL, PILLOW, and GREEN BOOK (T).
- Look at the bed and take the POT and the PLATE (U).
- Look at the bookshelf and take the FORK and the BLANKET (V).
- Look at the table and take the RED BOOK, and the POKER (W).
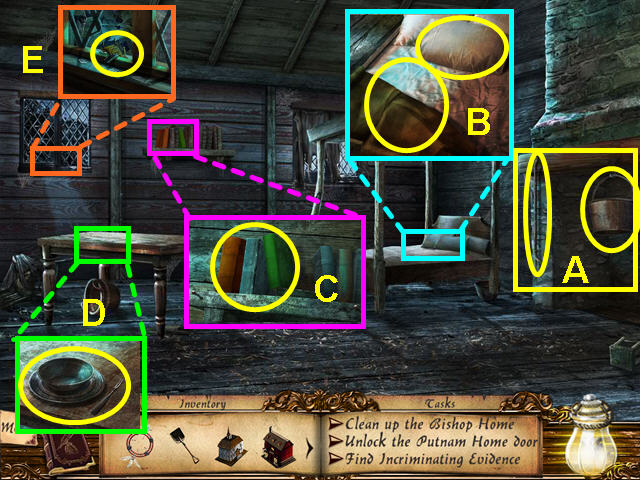
- Look at the fireplace and replace the POT and the POKER (A).
- Look at the bed and replace the PILLOW and the BLANKET (B).
- Look at the bookshelf and replace the RED BOOK and the GREEN BOOK (C).
- Look at the table and replace the PLATE, BOWL, and FORK (D).
- Once a rock is thrown through the window, take the MODEL BRIDGE (E).
- Exit the house and walk down 3 times.
- Take the left path and talk to the farmer.
- Click on the right field for a mini-game.
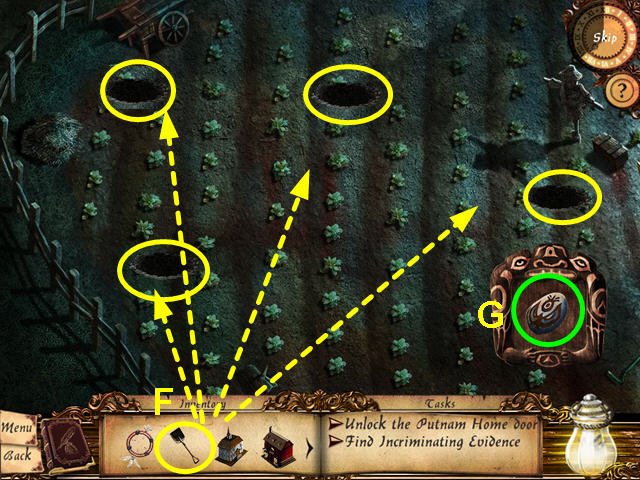
- Take the SHOVEL and move it slowly over the field (F).
- Click to use the shovel once the DIVINING STONE starts shaking (G).
- You will need to dig several holes.
- You will find the MODEL BARN.
- Walk down and enter the gate.
- Walk forward, then take the right path.
- Walk forward to the Putnam house and use the PUTNAM KEY to unlock the door.
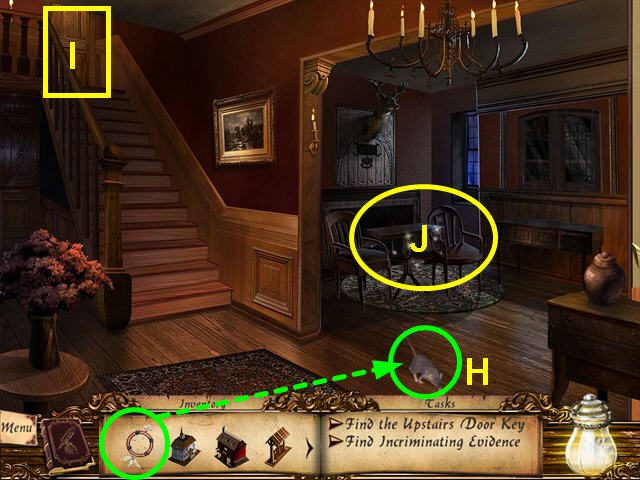
- Enter the house.
- Use the FAMILY HEIRLOOM on the rat as it circles around (H).
- Note the locked door upstairs (I).
- Select the table and chairs for a hidden object area (J).

- Locate all the items on the list.
- The STUDY KEY will go into your inventory.
- Use the STUDY KEY to unlock the door upstairs.
- Walk upstairs.
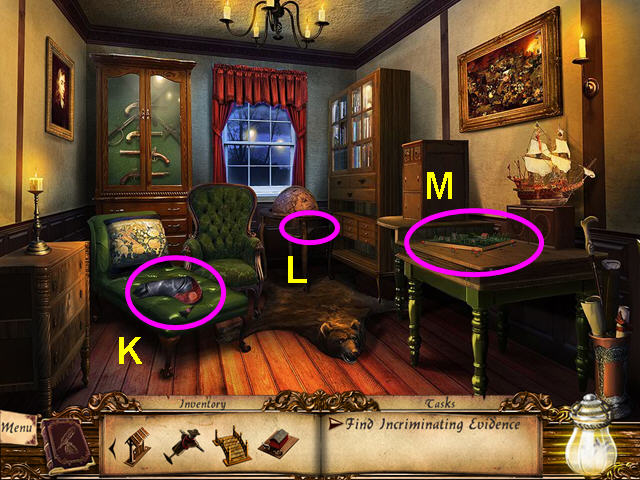
- Take the FALCONER'S GLOVE (K).
- Note the locked drawer (L).
- Look at the model town on the right table (M).
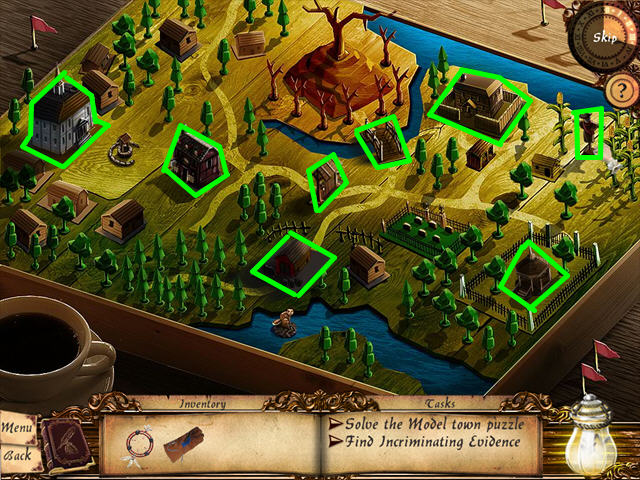
- Use the 6 MODEL pieces on the board to trigger the mini-game.
- Place the 8 model pieces in the correct slots.
- The the model town for a hidden object game.
- Locate all the items on the list.
- The DESK KEY will go into your inventory.
- Look at the drawer and use the DESK KEY.
- Inside, take the INCRIMINATING EVIDENCE.
- Exit the house and walk down.
- Use the FALCONER'S GLOVE on the scarecrow (N).
- Use the FAMILY HEIRLOOM on the falcon (O).
- Walk down, then forward twice to return to the Judge, but he is missing.
- Walk down 3 times where the mob is waiting.
- Walk to the right and select the sparkling area to the right of the bridge for a hidden object area.
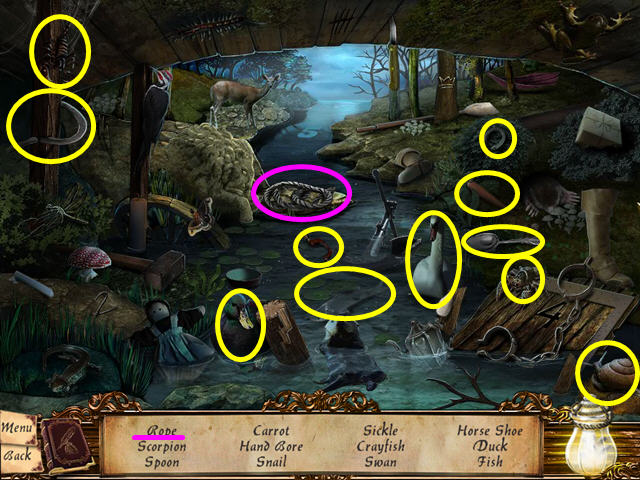
- Find all the items on the list.
- The ROPE will go into your inventory.
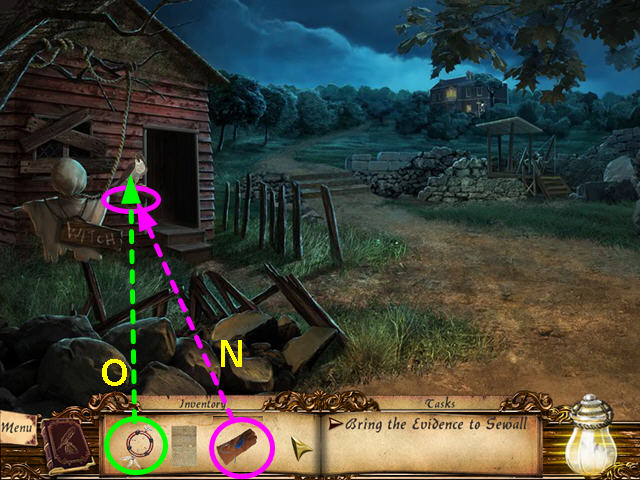
- Walk forward twice.
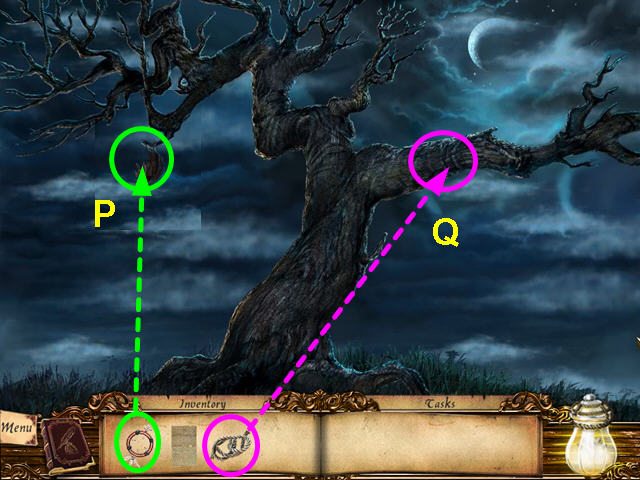
- Use the FAMILY HEIRLOOM on the bat (P).
- Use the ROPE on the branch (Q).
- Click on the rope to climb up.
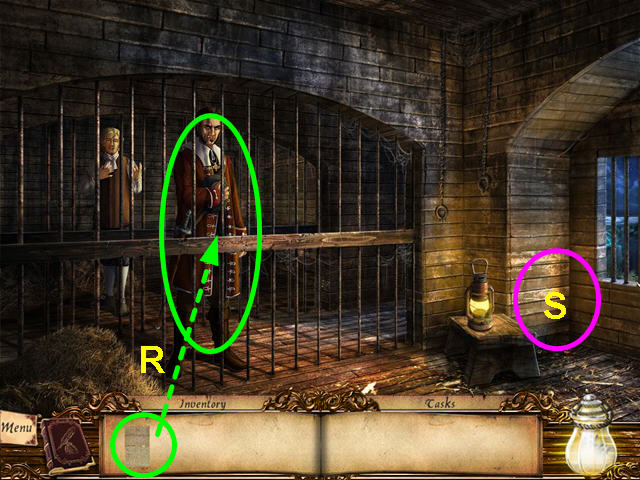
- Give the INCRIMINATING EVIDENCE to Putnam (R).
- Click in the right corner for a hidden object area (S).
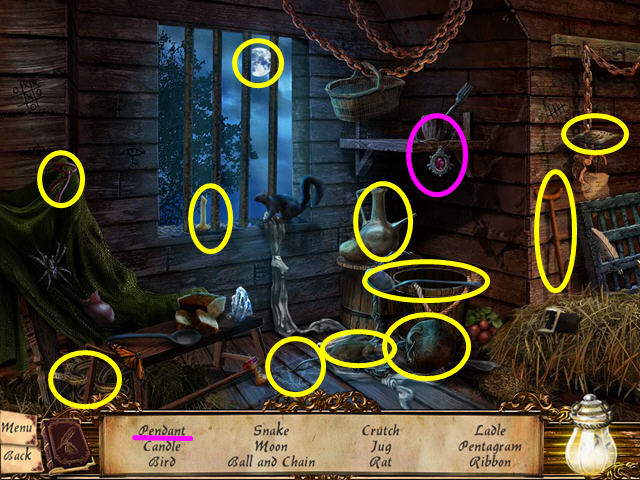
- Locate all the items on the list.
- The PENDANT will go into your inventory.
Created at: 2010-12-03