

Walkthrough Menu
- General Tips
- Chapter 1: Frozen World
- Chapter 2: The Forest Kingdom
- Chapter 3: Dragon Realm
- Chapter 4: Dwarven Realm
- Chapter 5: Sea Realm
General Tips
- You will not need to follow the exact path of this guide; however, some actions will need to be performed before you can complete another scene.
- Zoom into the sparkling areas to trigger a Hidden Object Scene. Throughout the guide, we will use the acronym 'HOS' for Hidden Object Scenes.
- Throughout the game you can pick up COINS, all are marked in blue on the screenshots unless otherwise noted. You can find coins hidden in regular scene and in HOS.
- You will also receive COINS after performing certain actions. Use the coins to purchase Trophies.
- There are two types of Item List for HOS, written and pictures.
- The written lists contain objects that require you to move another item; they are written in yellow. Your cursor will change into a pointed finger when you scroll over the object to be moved.
- The picture list will populate more objects as you collect them. You cannot pick up an object until its picture is visible.
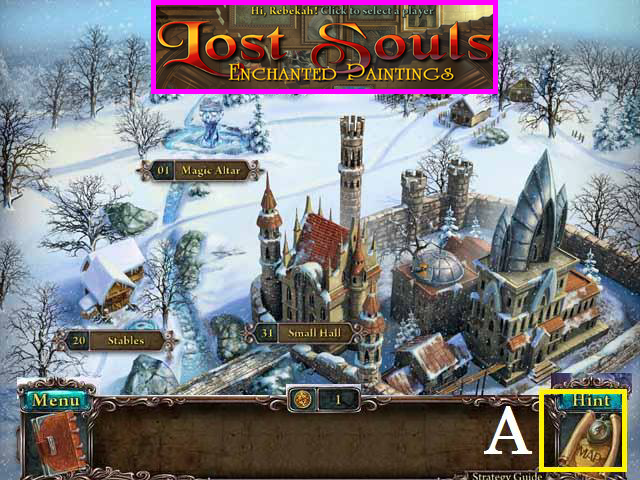
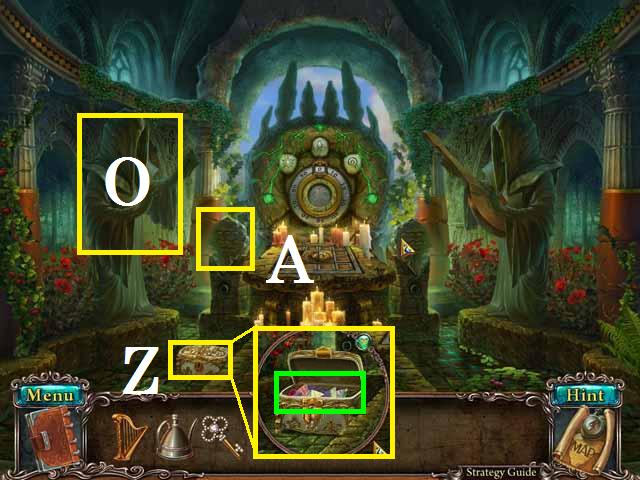
- Use the Map (A) to move from scene to scene in each chapter. The number next to the scene's name lets you know how many actions are required until the scene is complete.
- By clicking on the character in each scene you will receive information that will help you figure out the necessary steps to completing a scene or chapter.
- The game will tell you once you have completed everything in a scene but will not tell you where the coins are located.
Chapter 1: Frozen World
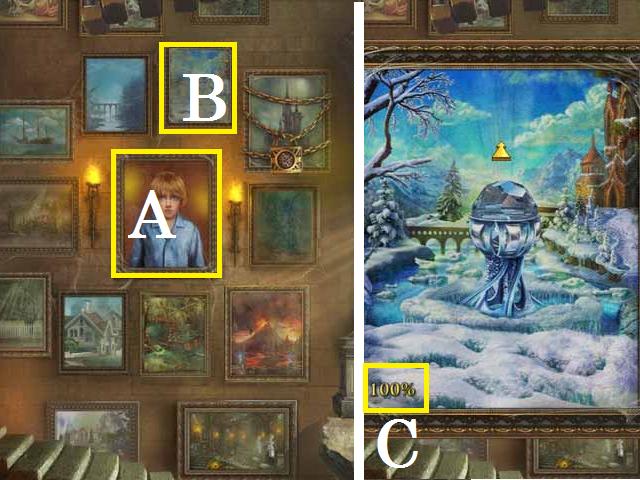
- After you choose easy or expert mode, click on the portrait (A) of your son.
- Zoom into the sparkling portrait (B); click and drag to clean the dust off until you reach a 100% (C) and enter the level.
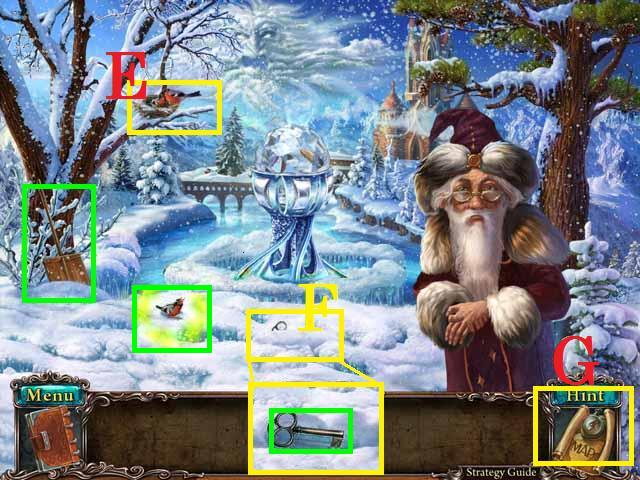
- Place the BIRD (D) in the nest (E) to receive a COIN.
- Zoom into the snowdrift (F): SHOVEL (green) and pick up the KEY (green).
- Zoom into the Map (G).
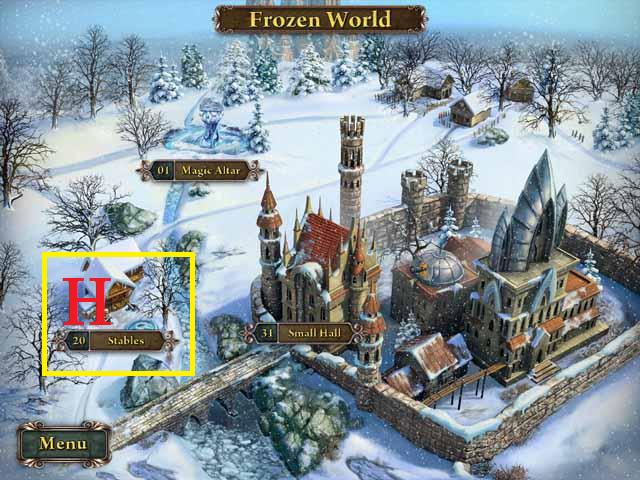
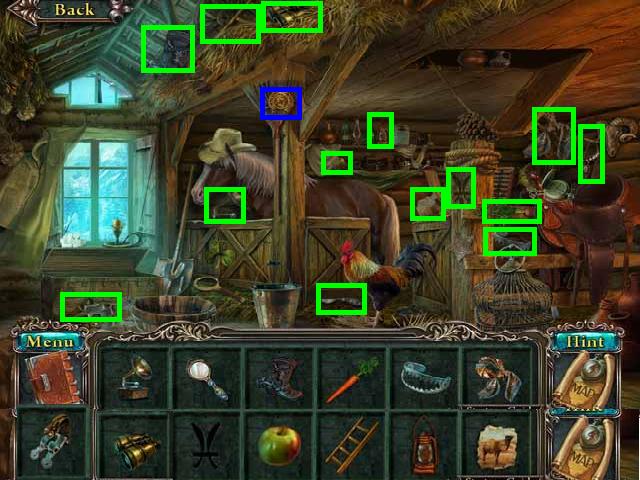
- Enter the Stables (H).
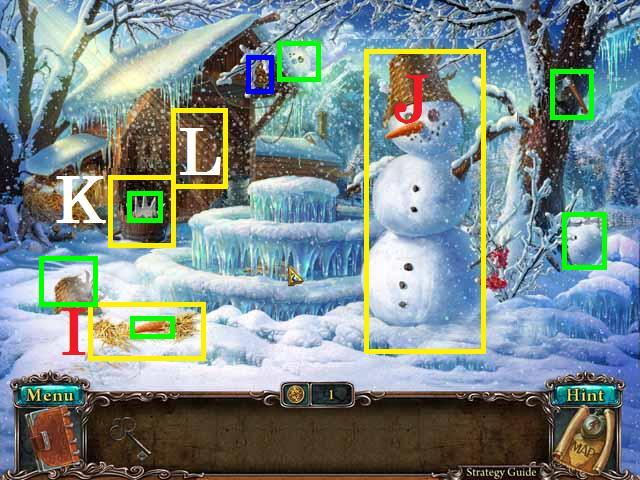
- Move the hay (I) and pick up the CARROT (green), the SNOWMAN'S HAT (green), two SNOWMAN PIECES (green), an AXE (green), and one COIN (blue).
- Assemble the snowman (J) as shown in the screenshot.
- Open the barrel (K) with the AXE; pick up the CROWN (green).
- Zoom into the door (L); unlock with the KEY (Hint: turn the key two times) and enter to play the HOS.
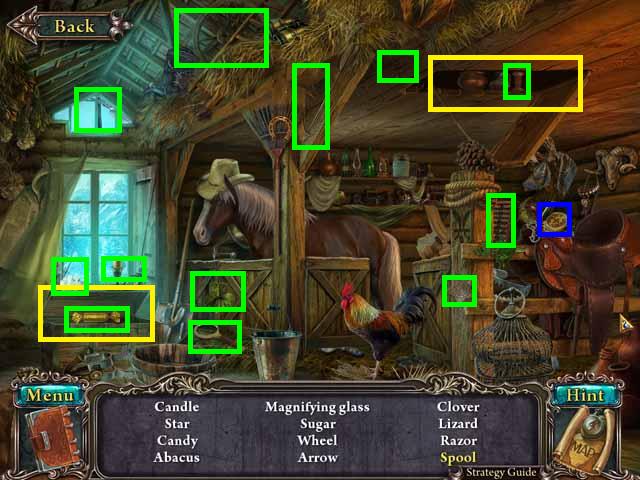
- Open the chest (yellow) and then open the hatch (yellow).
- Pick up one COIN (blue) and all of the items in your list (green).
- The CANDLE will be added to your inventory.
- Go to Small Hall.
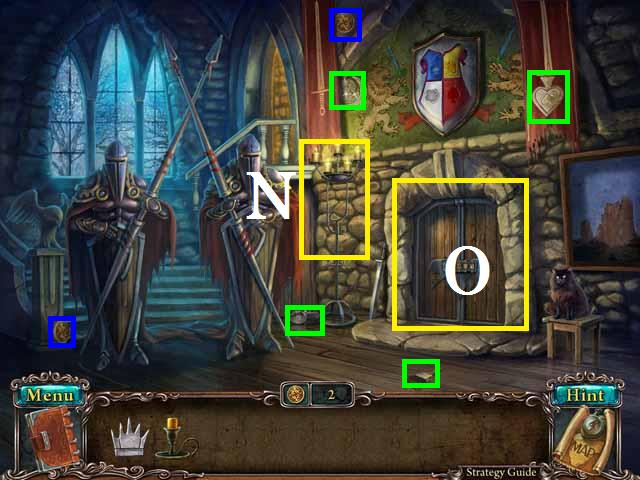
- Pick up two COINS (blue), LIGHT BULB (green), the MOON and STARS (green), the SPADE (green), and the BRUSH (green).
- Light the CANDLE with the candles (N).
- Click on the door (O) and return to the stables.
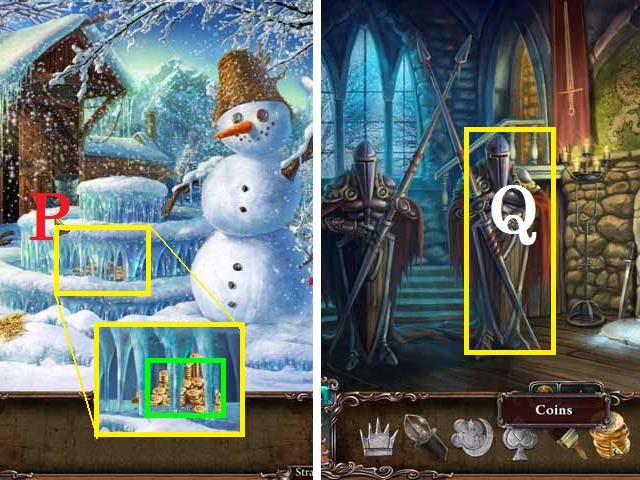
- Zoom into the fountain (P): melt the ice with the CANDLE and pick up the COINS (green).
- Return to Small Hall: pay the guards (Q) with the COINS, go upstairs.
- Pick up two COINS (blue) and the PICKAXE (green).
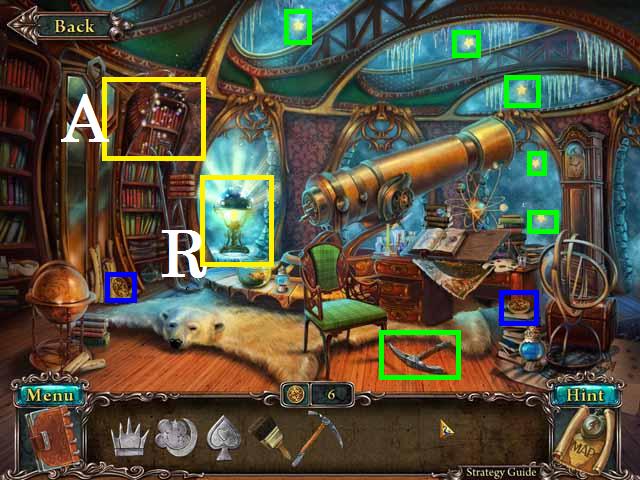
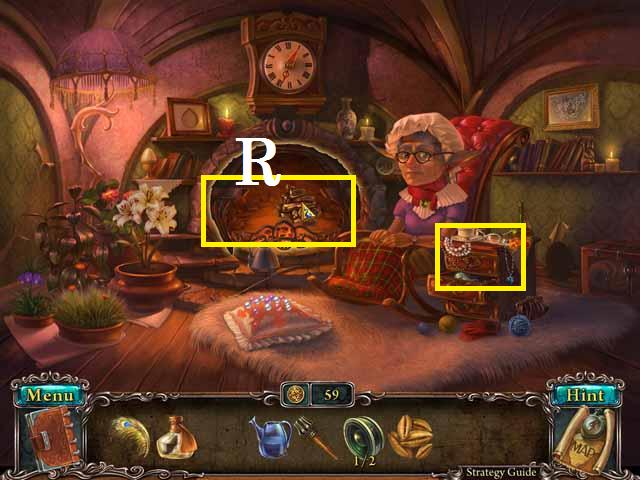
- Place the LIGHT BULB in the lamp (R).
- Pick up five STARS (green).
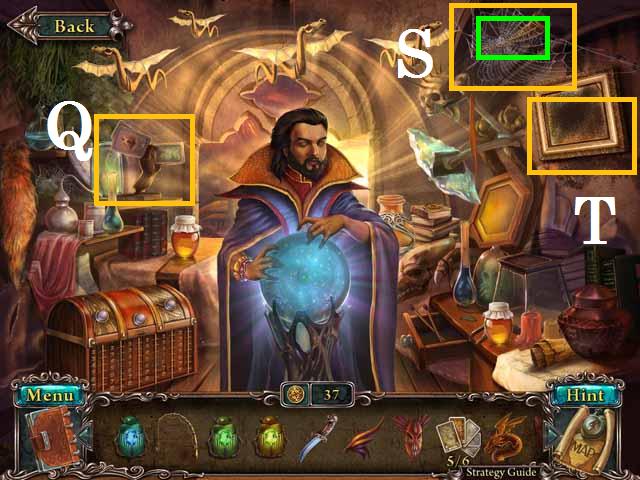
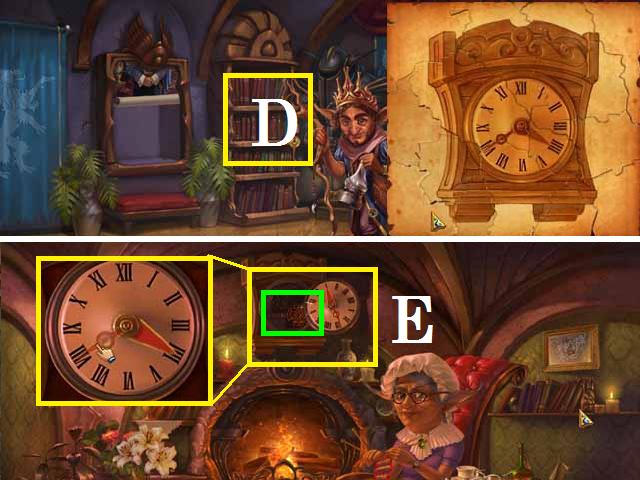
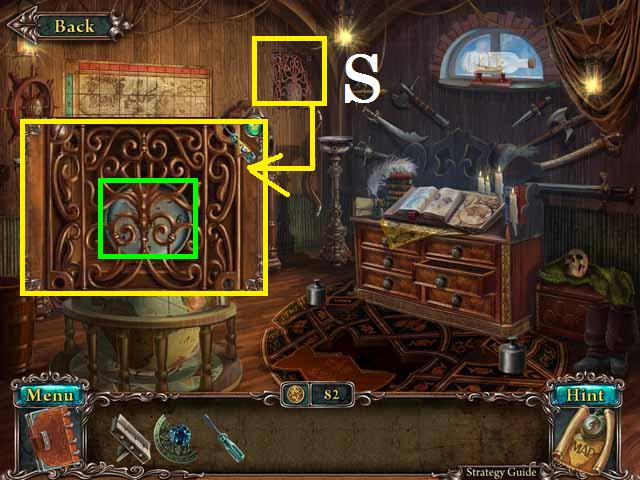
- Zoom into the shelf (A).
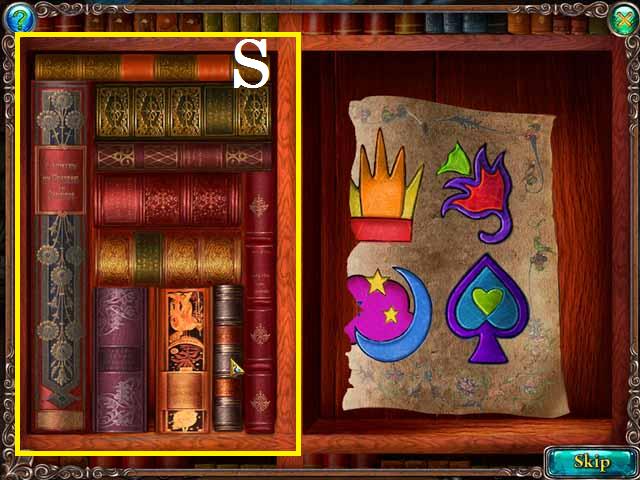
- Move all of the books to the left side as seen in the screenshot (S).
- Receive the PAGE.
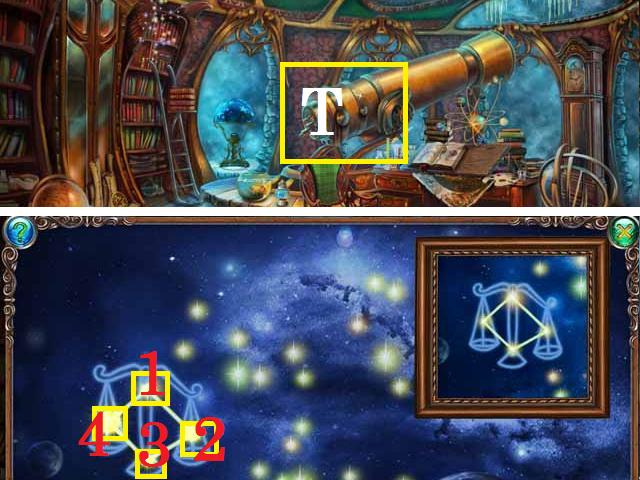
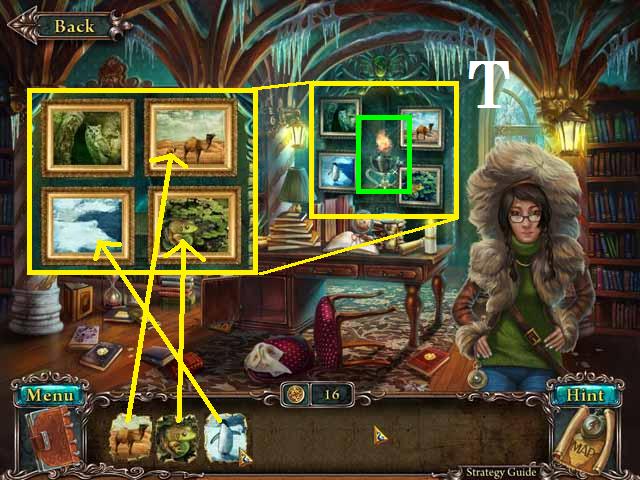
- Zoom into the telescope (T); clean it with the BRUSH.
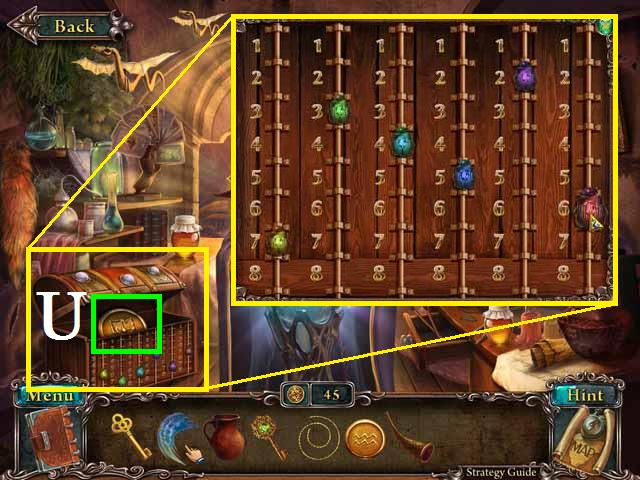
- Zoom into the telescope; click on the stars in this order: 1, 2, 3, and 4 to complete the constellation.
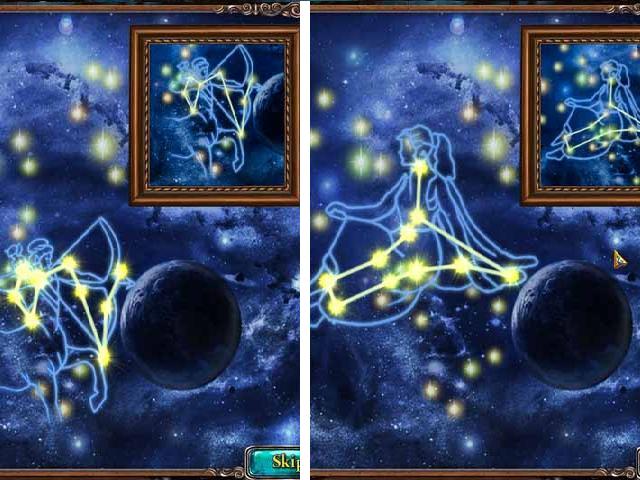
- Complete all of the constellations as shown in the screenshots.
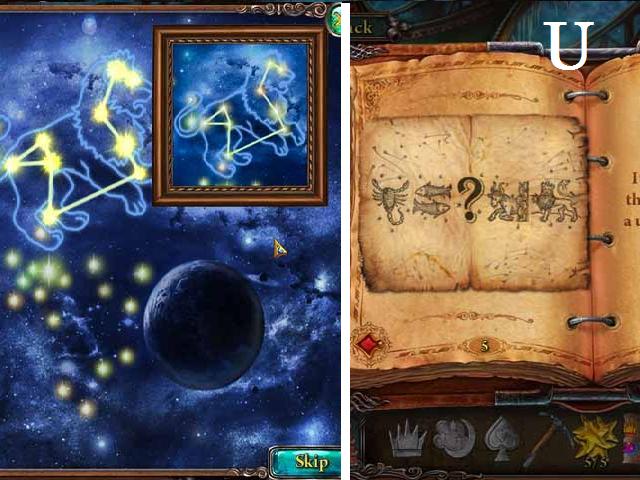
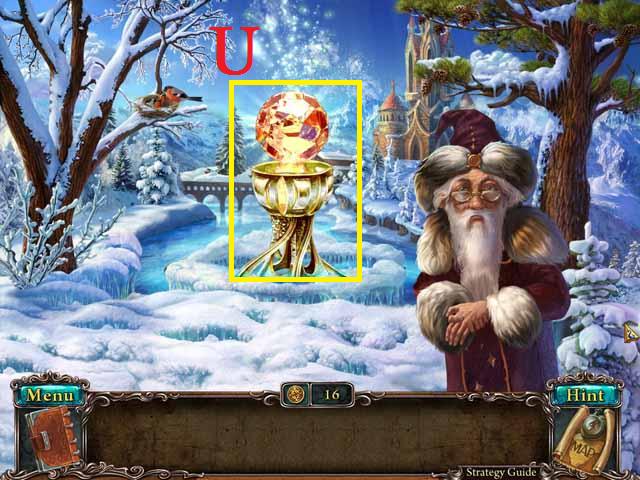
- The code (U) will be added to your Journal.
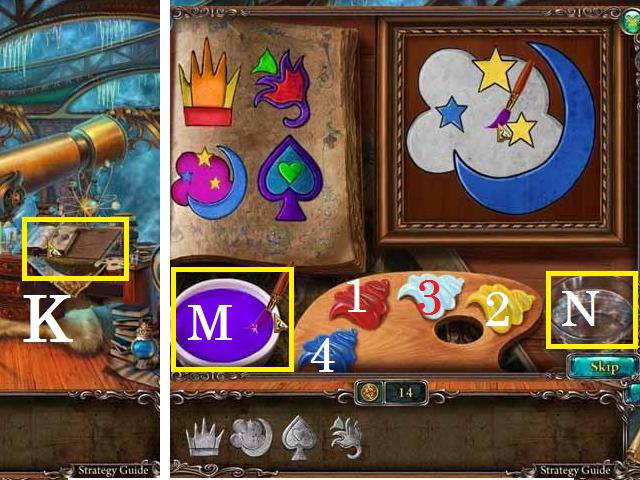
- Zoom into the desk (K); place the PAGE.
- Drop the CROWN in the frame (L); paint to match the picture on the PAGE.
- Mix red (1) and yellow (2) in the white dish (M) to get orange. Rinse the brush in the water (N).
- Paint the MOON and STARS; mix white (3) and red for the clouds; paint the SPADE.
- Mix the blue (4) and yellow to get green; blue and red for purple.
- Go back downstairs.
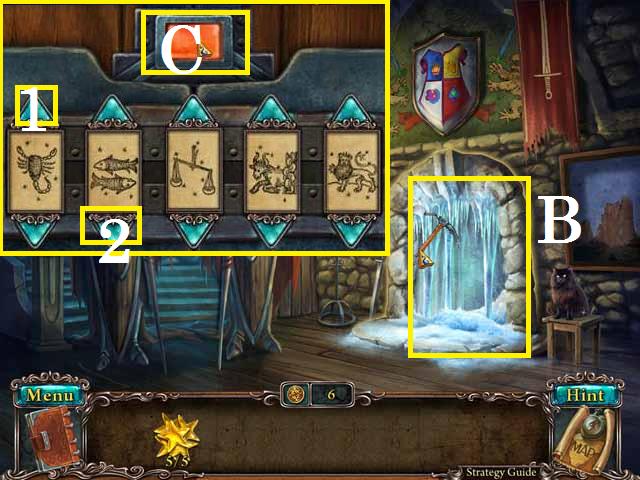
- Use the PICKAXE on the door (B) and zoom in.
- Using the arrows (1, 2) set the dials to match the code from your Journal, make the middle symbol the scales, and push the red button (C).
- Enter the back room to play the HOS.
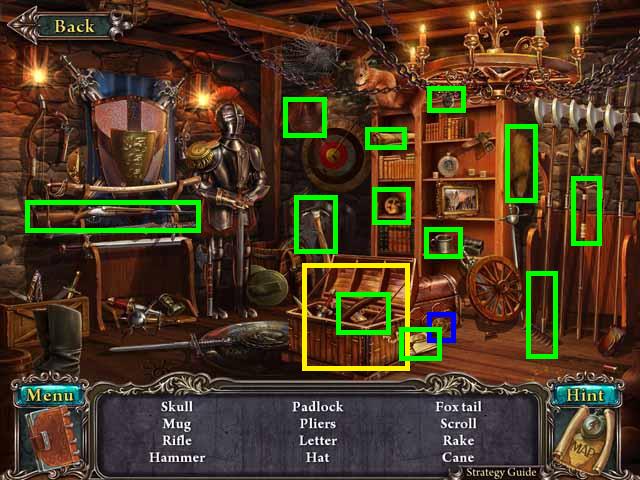
- Open the chest (yellow).
- Receive the RAKE.
- Return to the Stables; enter the shed to play a HOS.
- Receive the PIECE OF CANVAS.
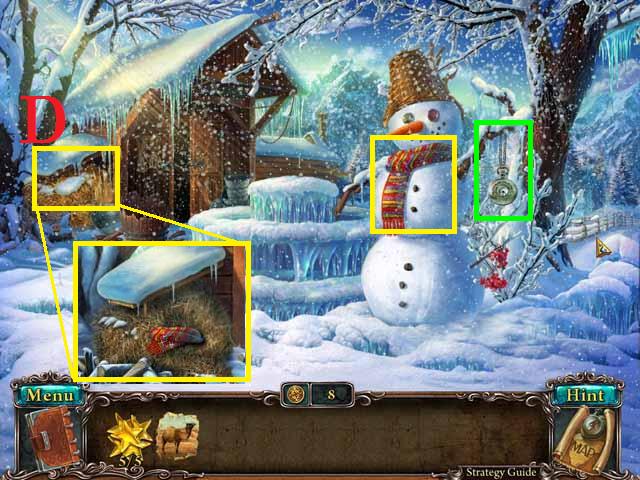
- Zoom into the straw pile (D); Use the RAKE on the pile and pick up the SCARF (green).
- Place the SCARF on the snowman and pick up the WATCH (green).
- Return to Small Hall.
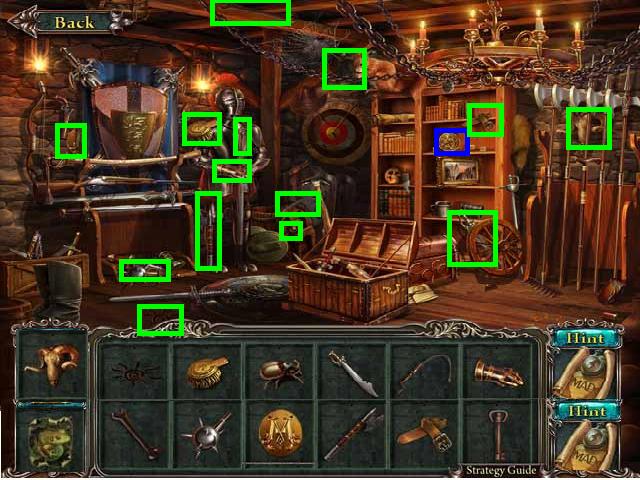
- Enter the back room to play a HOS.
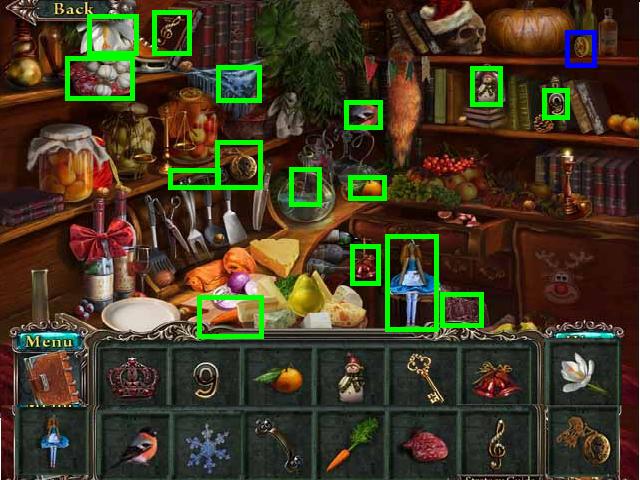
- Find the listed items.
- Receive the PIECE of CANVAS.
- Go to the Cabinet; pick up two COINS (blue).
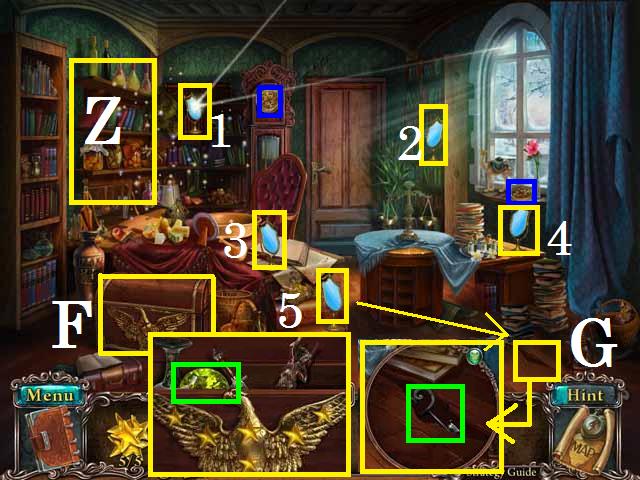
- Open the chest (F); place the STARS and pick up the JEWEL (green).
- Click the mirrors (1, 2, 4, and 5) two times and mirror (3) one time until the light shines on the crack (G).
- Zoom into the crack; pick up the KEY (green).
- Zoom into the shelf (Z) to play a HOS.
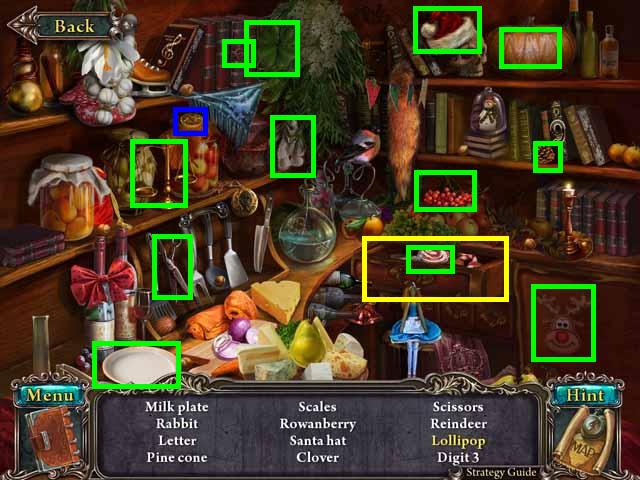
- Open the drawer (H); take the LOLLIPOP.
- Receive the PLATE of MILK.
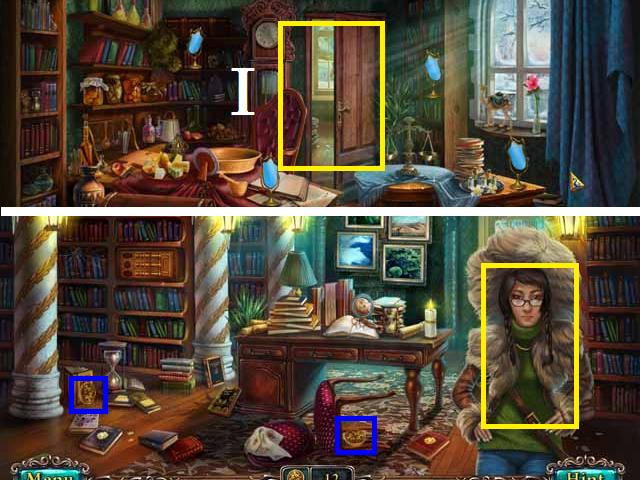
- Zoom into the door (I); place the KEY and turn once, click on the handle.
- Enter the Office.
- Give the POCKET WATCH to the girl and receive the SCREWDRIVER.
- Pick up two COINS (blue).
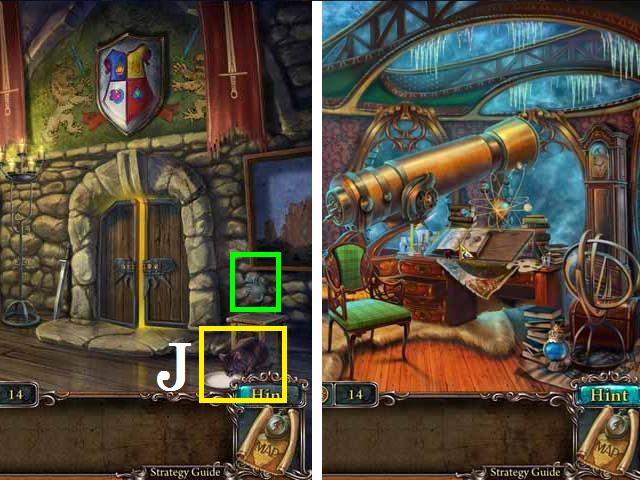
- Return to Small Hall; place the PLATE of MILK in front of the cat (J) and pick up the FLOWER (green).
- Go upstairs; paint the FLOWER and go back downstairs.
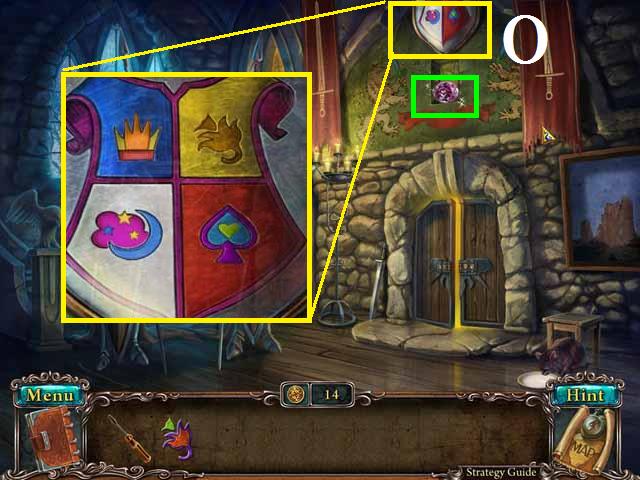
- Zoom into the Coat of Arms (O); place the CROWN, SPADE, MOON and STARS, and the FLOWER.
- Pick up the JEWEL (green).
- Return to the Cabinet; zoom into the shelf to play the HOS.
- Receive the DOOR HANDLE.
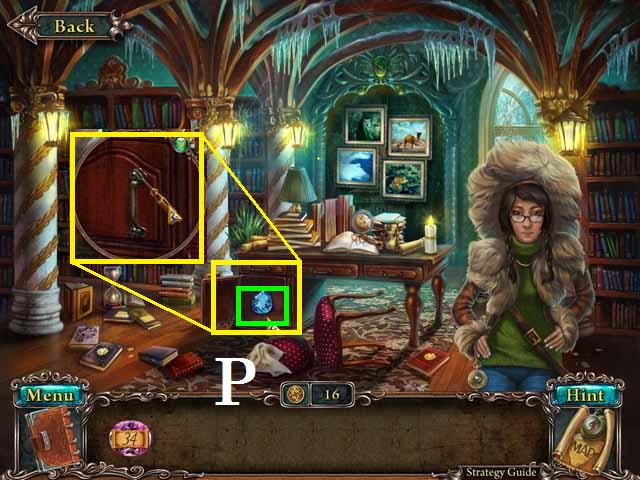
- Enter the office; zoom into the desk (P) and place the DOOR HANDLE.
- SCREW in the HANDLE and pick up the JEWEL.
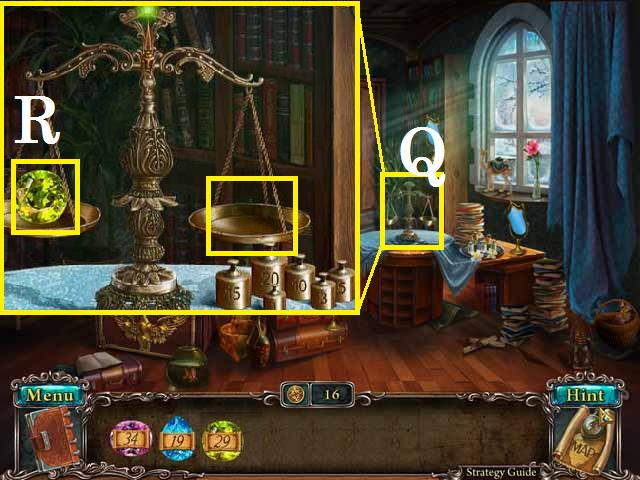
- Back out of the office; zoom into the scales (Q).
- Place the GREEN JEWEL on one side of the scale (R); place the 15lb, 10lb, 3lb, and 1lb weights on the other side to = 29.
- PURPLE JEWEL; 20lb, 10lb, 3lb, and the 1lb weights to = 34.
- BLUE JEWEL; 15lb, 3lb, and 1lb to = 19.
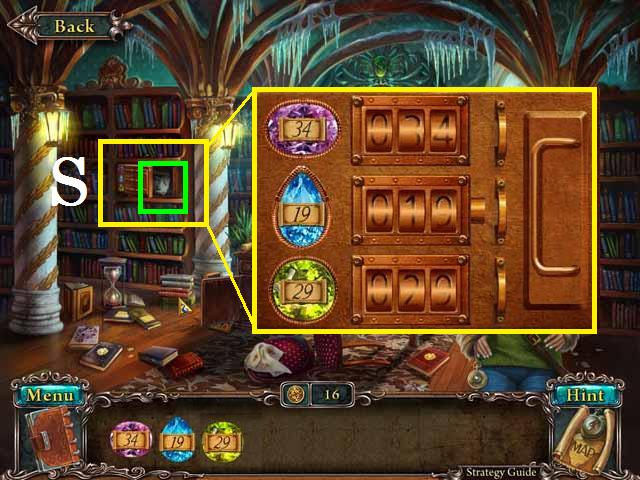
- Return to the office; zoom into the safe (S) and place the JEWELS in the matching shape slots.
- Set the combination for each post to match the number on the JEWELS; pick up the PIECE of CANVAS (green).
- Zoom into the paintings (T); place the PIECES of CANVAS, pick up the FLAME (green).
- Return to the Magic Altar.
- Place the FLAME (U).
Chapter 2: The Forest Kingdom
- Zoom into the next level painting (Hint: it is the sparkling one).
- Clean and enter the world.
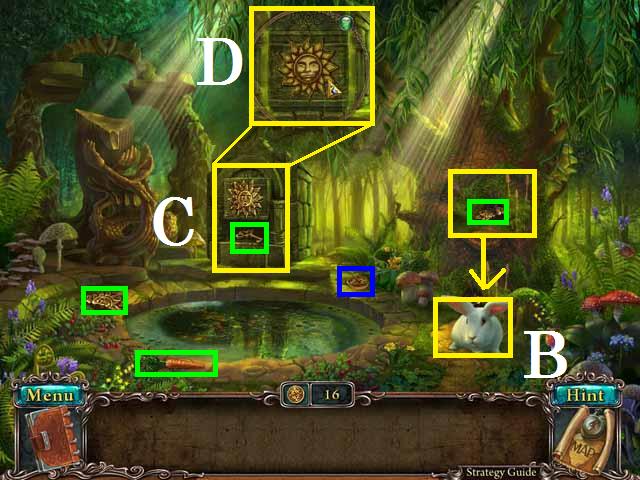
- Pick up one COIN (blue), the CARROT (green), and the HALF SUN (green).
- Feed the rabbit (B) the CARROT; pick up the other HALF SUN (green).
- Zoom into the stone podium (C); place the two HALF SUN (D), pick up the KEY (green).
- Go to the Forest Hut.
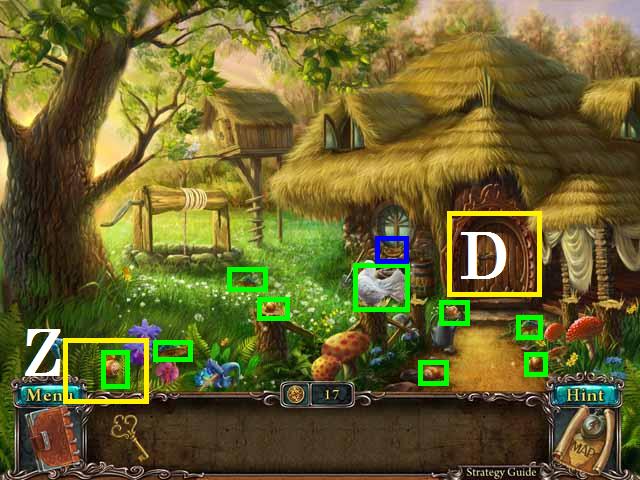
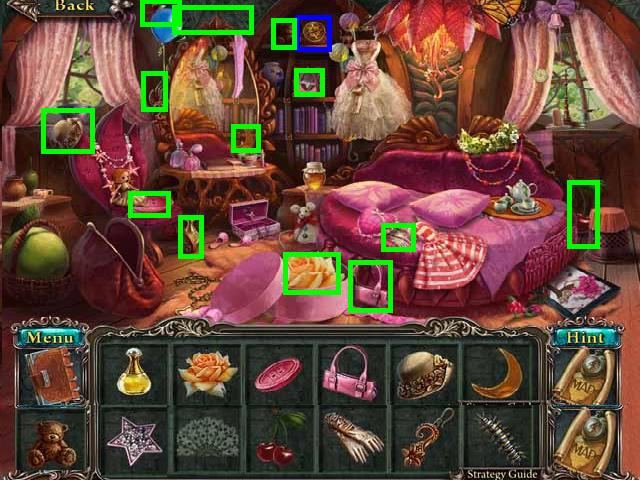
- Pick up ONE COIN (blue), four ACORNS (green), three MUSHROOMS (green), and the DOVE (green).
- Move the fern (Z); pick up the fifth ACORN (green).
- Open the door (D) with the KEY.
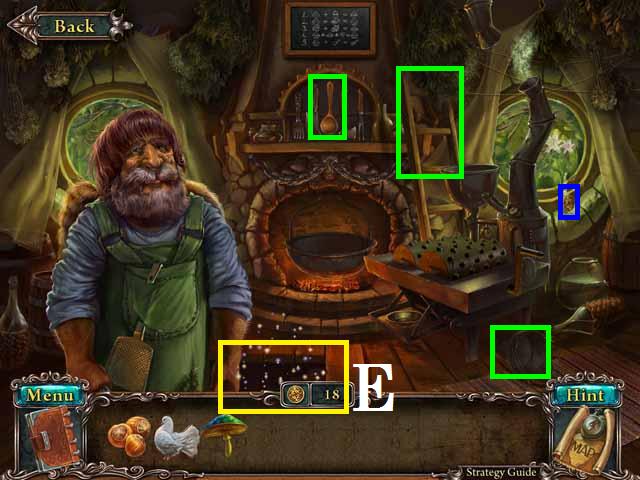
- Pick up one COIN (blue), LADDER (green), BUCKET (green), and the SPOON (green).
- Zoom into the cellar (E) to play the HOS.
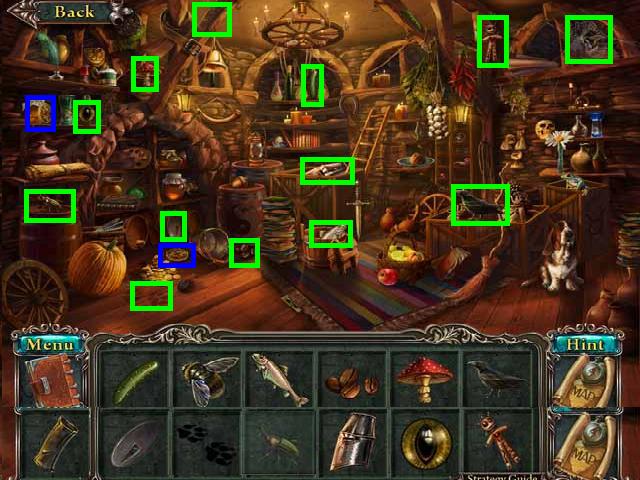
- Find the items listed.
- Receive the PIPE SEGMENT.
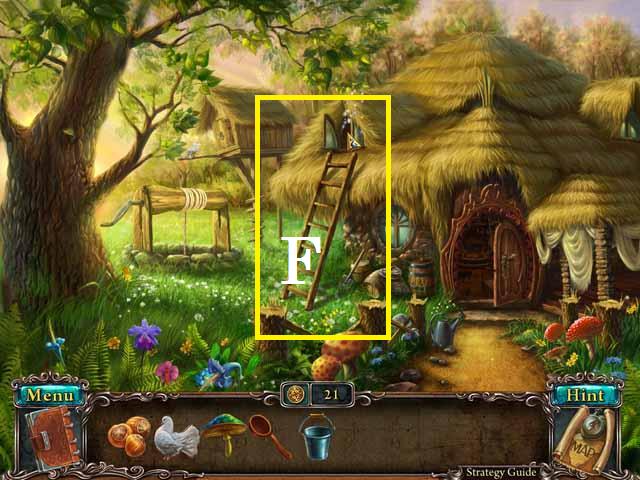
- Exit the house.
- Place the LADDER (F) on the side of the house.
- Go upstairs to play the HOS.
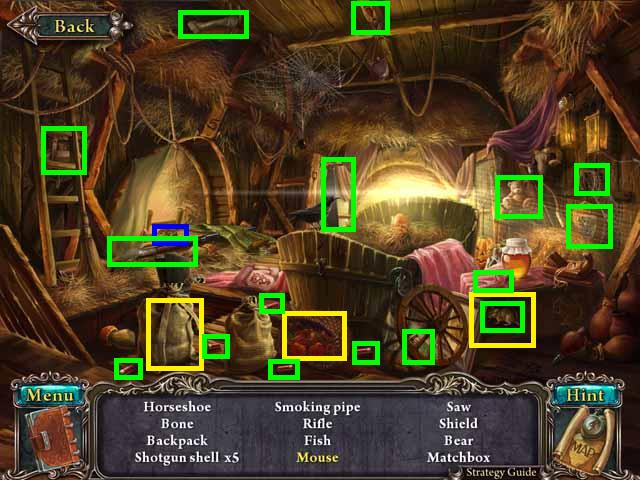
- Open the door (yellow); move the basket (yellow) and the bag (yellow).
- Receive the MATCHBOX.
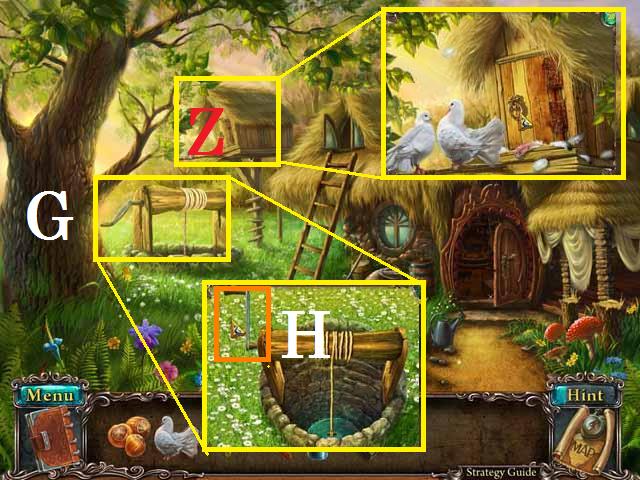
- Zoom into the well (G); place the BUCKET in the well.
- Crank the handle twice (H), collect the BUCKET of WATER.
- Zoom into the bird perch (Z) and place the DOVE.
- Enter the house.
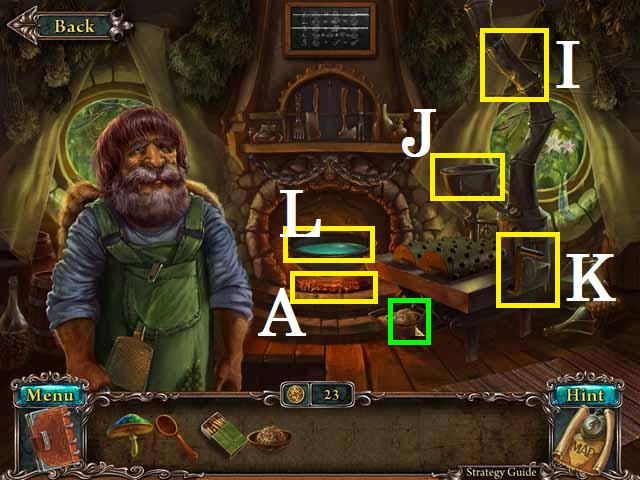
- Place the PIPE SEGMENT (I).
- Drop the ACORNS in the funnel (J) and crank the handle (K) until all of the ACORNS are ground up.
- Pick up the GROUNDED ACORNS (green).
- Pour the WATER into the kettle (L); light the fire (A) with the MATCHBOX.
- Pour in the MUSHROOMS, the GROUNDED ACORNS and scoop with the SPOON.
- Feed the SOUP to the man to receive the HARP.
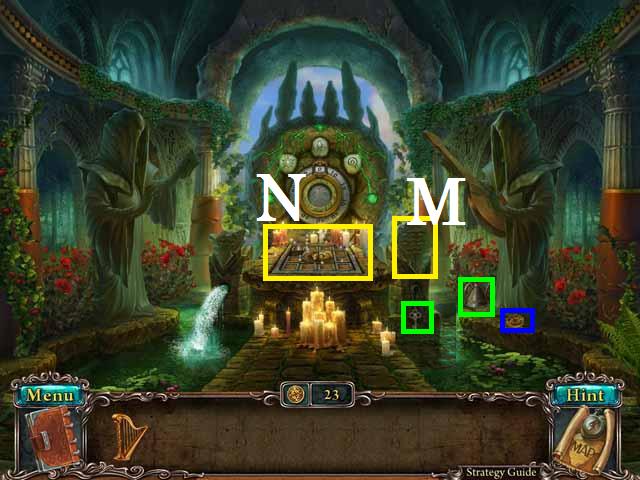
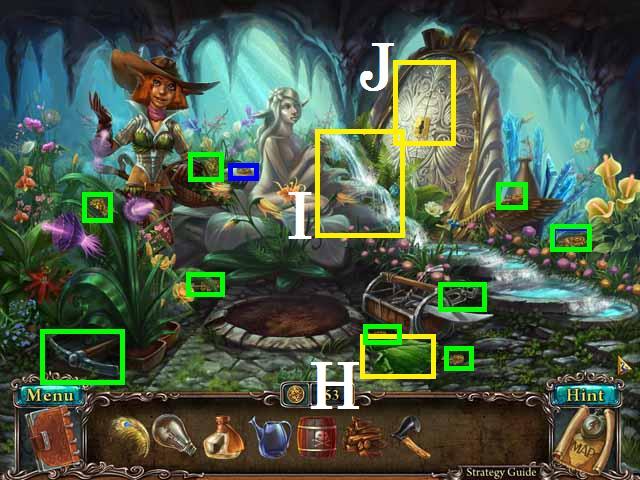
- Go to the Flower Temple; pick up two COINS (blue), and the OIL CAN (green).
- Push the stone (M) to turn off the fountain and the KEY (green).
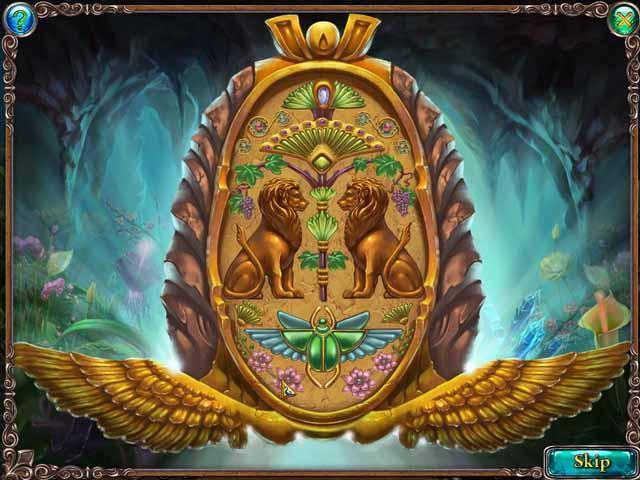
- Zoom into the stone alter (N); rearrange the tiles by sliding them into an empty space until you create the image shown in the screenshot.
- When following the solution it is very important that you do not move any of the A-D pieces unless directed to.
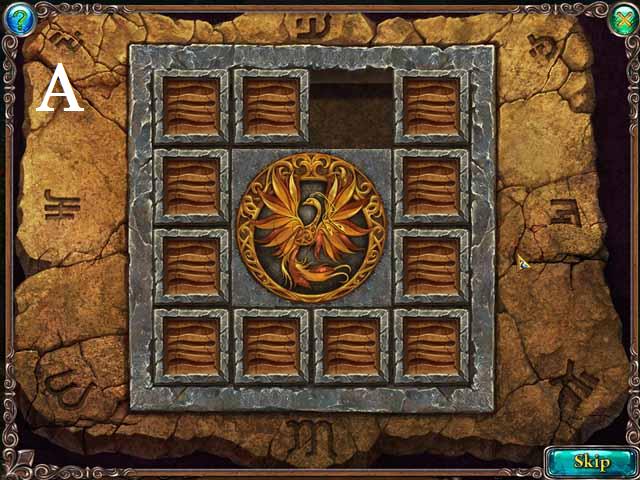
- Move tile C to position 10; tile B to position 5 and C to 9.
- Move B to 6, C to B, B to 7, A to 3, D to 4, A to 2, B to 3, D to 8, B to 4, A to 3 and C to position 10.
- See screenshot for current positions.
- Move D into position 11, A into 6 and finish with moving B into position 7.
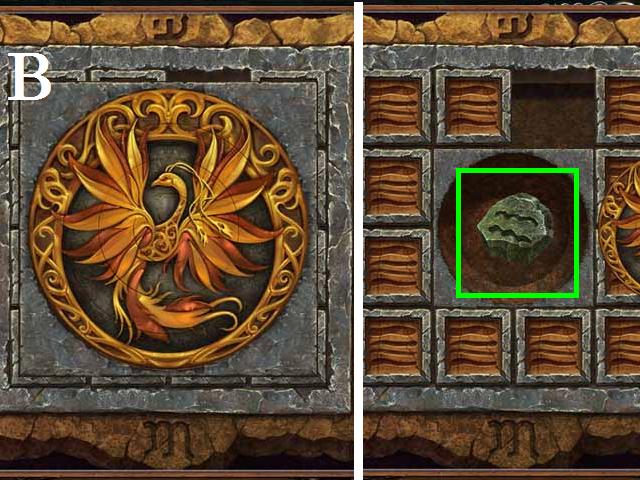
- Spin the rings to create the picture as shown in the screenshot (@). Hint: start with the outer ring.
- Receive the PIECE of STONE.
- Place the PIECE OF STONE (A); push the stone to turn off the water.
- Zoom into the jewelry box (Z); unlock IT with the KEY and pick up the MOSAIC PART (green).
- Place the HARP on the statue (O) and receive a COIN.
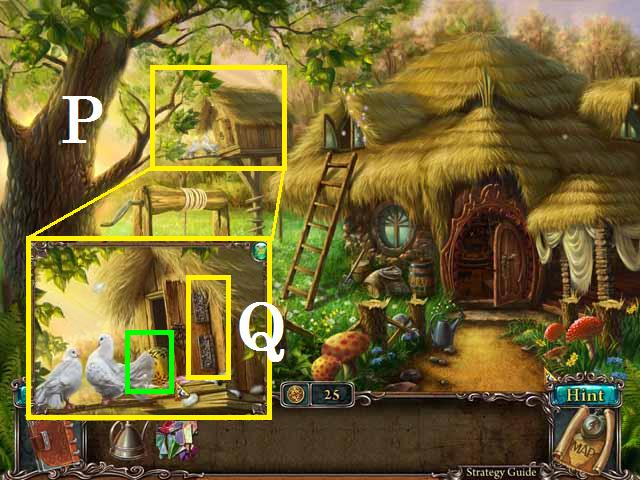
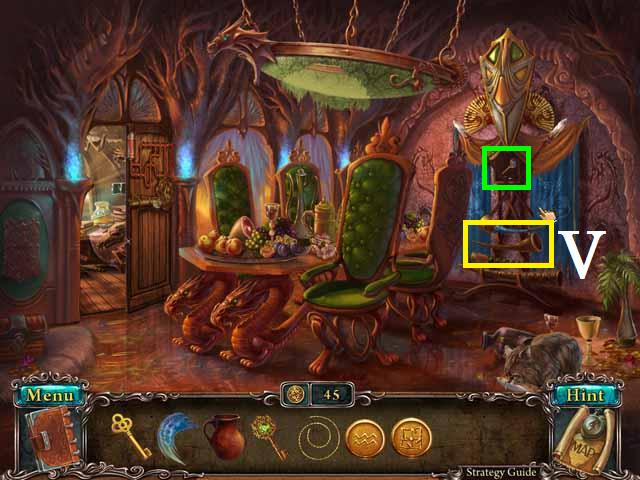
- Return to the Forest Hut; zoom into the bird perch (P).
- OIL both hinges (Q); pick up the PART OF SAFE (green).
- Go upstairs to play the HOS.
- Receive the WOODEN SQUIRREL.

- Go to the Fairy Meadow.
- Pick up one COIN (blue) and the PRUNER (green).
- Zoom into the pod (R).
- Drop the MOSAIC PART over the window and place the pieces in the empty spaces to create the picture shown in the screenshot.
- Zoom back into the pod to play the HOS (1).
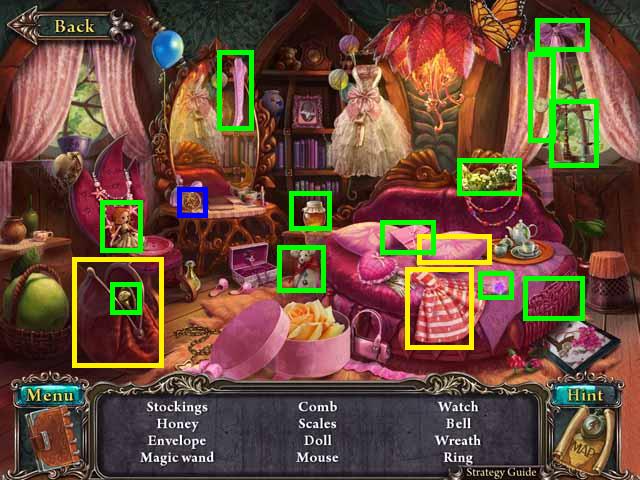
- Move the dress (yellow), and the pillow (yellow), and then open the coin purse (yellow).
- Receive the MAGIC WAND.
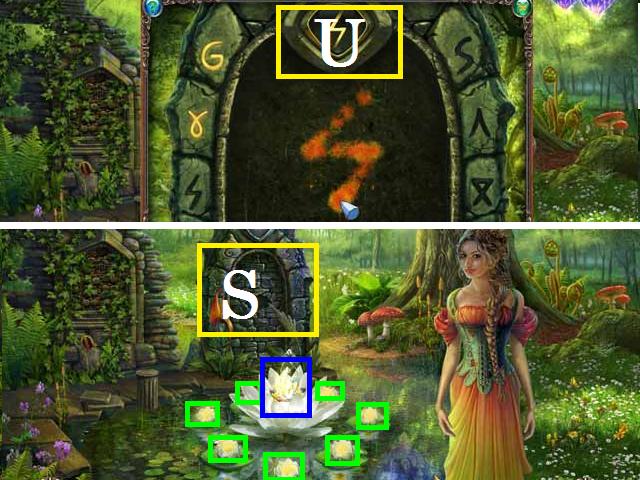
- Touch all of the little lilies (green) with the MAGIC WAND; pick up the DIADEM (blue).
- Give the DIADEM to the girl; receive the PORTAL KEY.
- Zoom into the portal (S); place the PORTAL KEY in the slot.
- Right-click, hold and drag the mouse to trace the shape of the letters as they appear in the window (U) and then release.
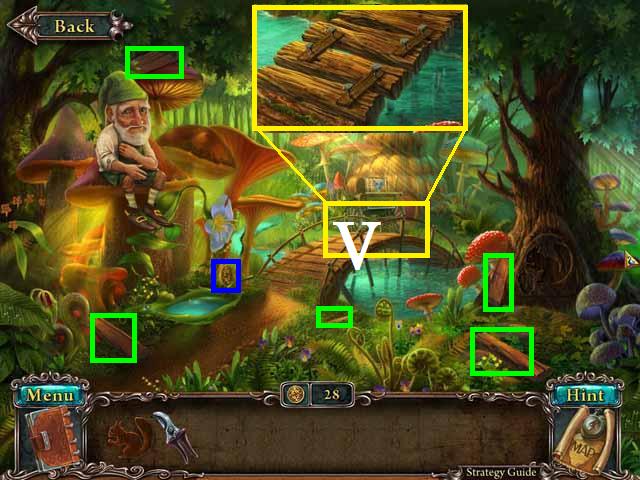
- Go through the portal; pick up one COIN (blue).
- Try to cross the bridge (V).
- Pick up five PLANKS (green); zoom into the bridge and place the PLANKS.
- Back out one scene and zoom back into the pod to play the HOS.
- Find the listed items.
- Receive the EMPTY FLASK.
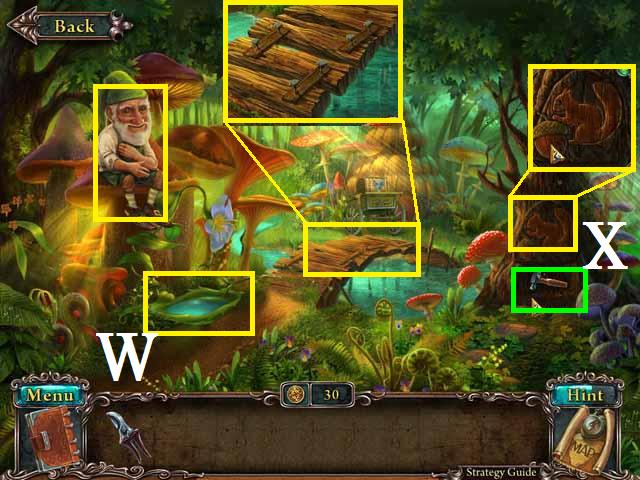
- Go back through the portal; fill the EMPTY FLASK with the WATER of BRAVERY (W). Give it to the man and receive the WOODEN ACORN.
- Zoom into the tree (X); place the SQUIRREL and the ACORN in the tree and pick up the HAMMER (green).
- Zoom into the bridge; HAMMER all of the nails.
- Back out of the scene.
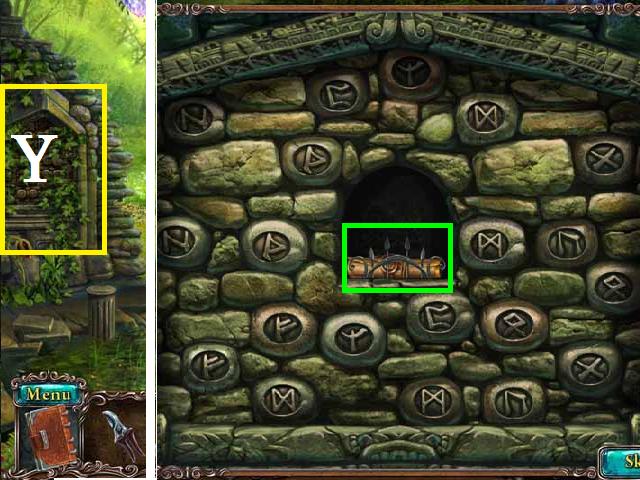
- Zoom into the stone wall (Y); remove the ivy with the PRUNER.
- Play a memory game by flipping over two stones with matching symbols.
- See the screenshot for the key.
- Receive the SAFE CODE.

- Return to the Flower Temple; zoom into the safe (Z) and place the PART of SAFE.
- Spin the dial so that the number in the ring (A) matches the number of the first symbol (B), as shown in the SAFE CODE.
- Repeat for each symbol. The sequence is: 50, 30, and 90.
- Pick up the EYE GEM.
- Return to the Fairy Meadow and go through the portal.
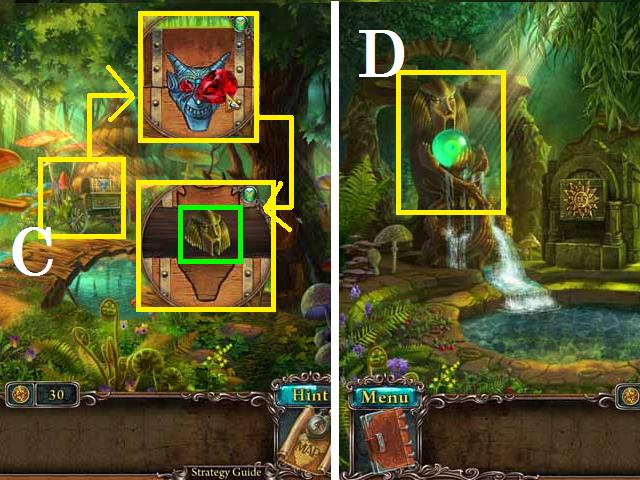
- Zoom into cart (C); place the EYE GEM and pick up the PART OF AN ALTAR.
- Return to the Magical Well; place the PART OF AN ALTAR on the altar (D).
Chapter 3: Dragon Realm
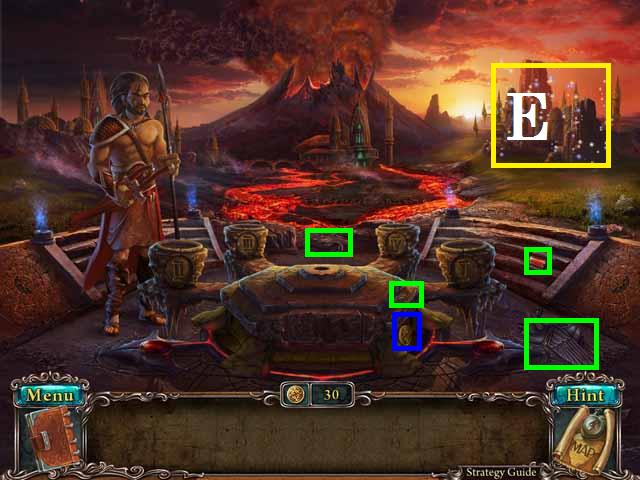
- Pick up two COINS (blue), TANK (green), and three DRAGON PARTS (green).
- Zoom into the sparkling castle (E) to play a HOS.
- Find the items listed.
- Receive the DRAGON PART.
- Zoom into the altar (F).
- Place the four DRAGON PARTS and pick up the CROWBAR (green).
- Go to the Balcony; pick up two COINS (blue), three BEETLES (green), FISHING ROD (green), COG WHEEL and the DAGGER (green).
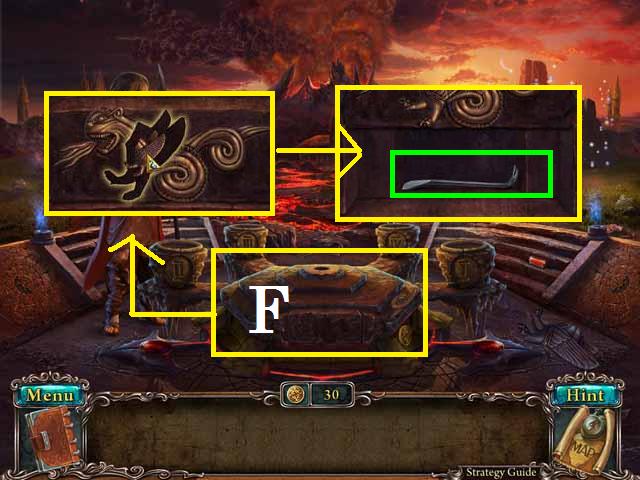
- Use the CROWBAR on the floor (G) and pick up the EAR.
- Return to the Altar.
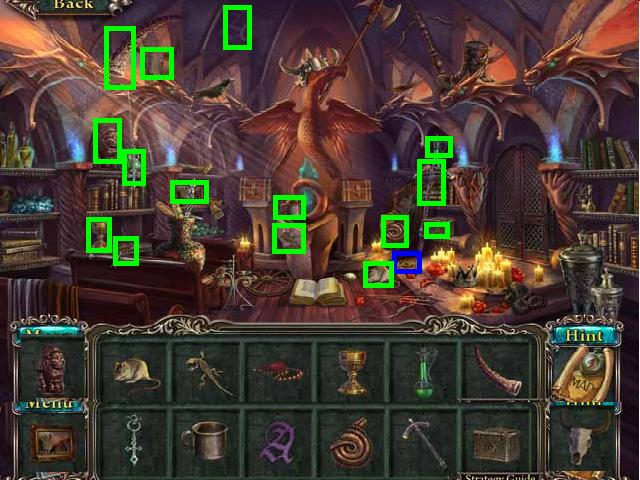
- Zoom back into the sparkling castle to play a HOS.
- Find the listed items to receive the MASK.
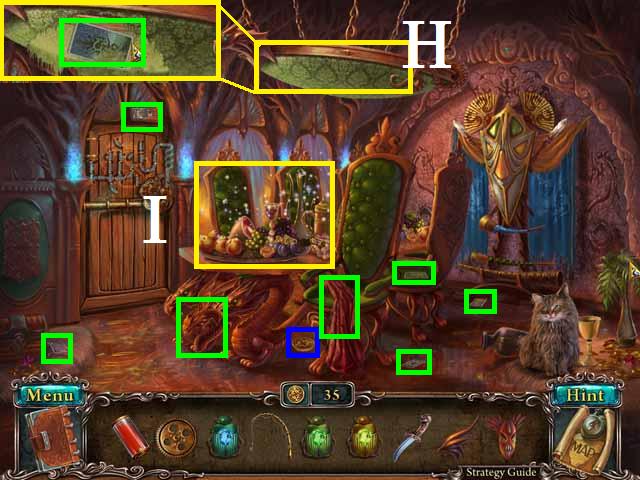
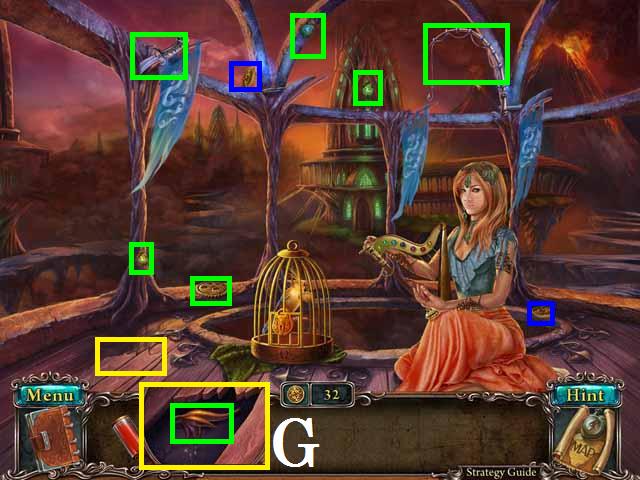
- Go to the Living Room; pick up one COIN (blue), five CARDS (green), DRAGON HEAD (green) and the CLOTH (green).
- Zoom into the light (H); cut it open with the DAGGER and pick up the CARD (green).
- Zoom into the table (I) to play a HOS.

- Move the cloth (yellow) and the lid (yellow).
- Receive the HAM.
- Go to the Treasury.
- Pick up one COIN (blue), BROOM (green), three BEATLES (green), a FLAG (green), and the PITCHER (green).
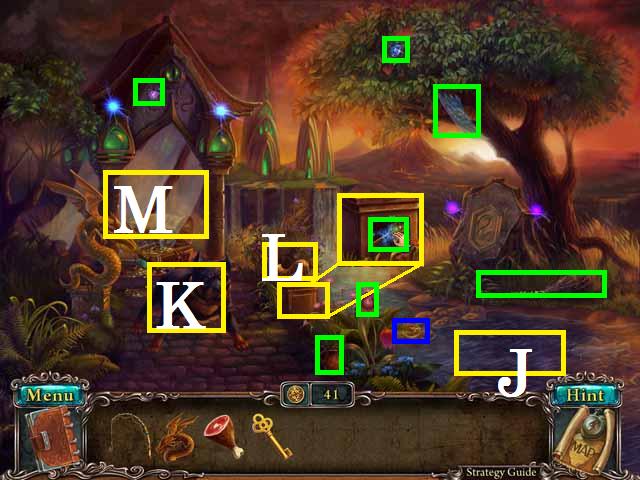
- Catch a fish (J) with the FISHING ROD and feed the HAM to the dog (K).
- Place the DRAGON HEAD on the statue (L) and pick up the KEY (green).
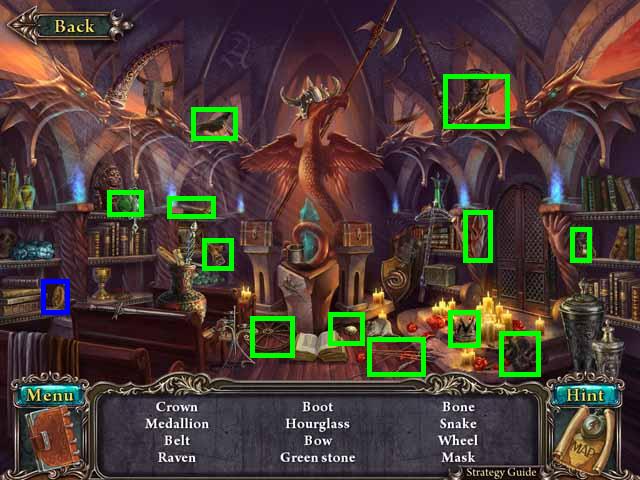
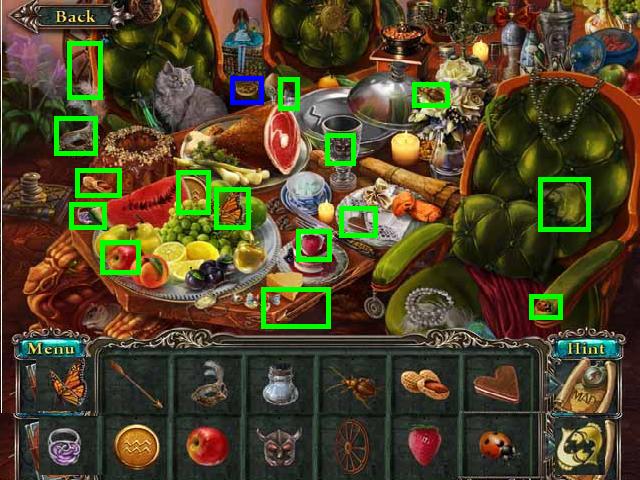
- Zoom into the temple (M) to play a HOS.
- Find the listed items.
- Open the box (yellow).
- Receive the STRING.
- Go to the Balcony; hang the FLAG (P) and receive a COIN.
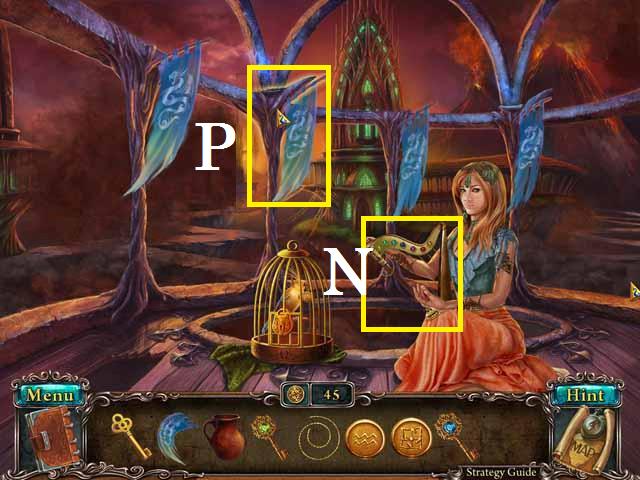
- Place the STRING on the harp (N) and zoom in.
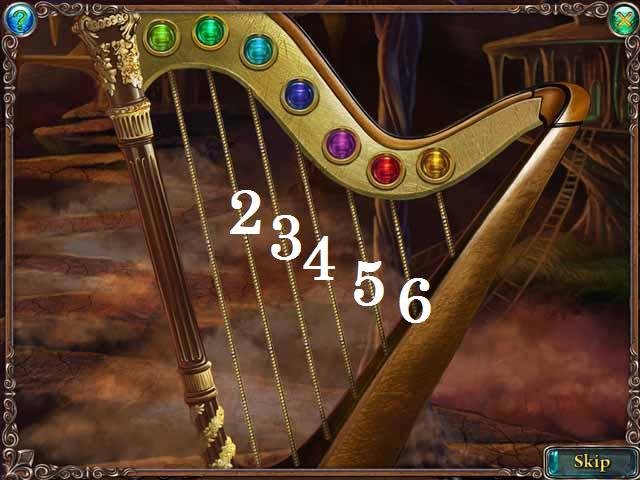
- Repeat the order of played strings.
- First- (2, 6, 6, 4), Second (2, 6, 6, 4, 5) Third (2, 6, 6, 4, 5, 4), Fourth (2, 6, 6, 4, 5, 4, 3), Fifth (2, 6, 6, 4, 5, 4, 3, 4), and Sixth (2, 6, 6, 4, 5, 4, 3, 4, 2).
- Go to the Living Room.
- Zoom into the table to play a HOS and receive the WATER AMULET.
- Feed the FISH to the cat and receive a COIN (Q).
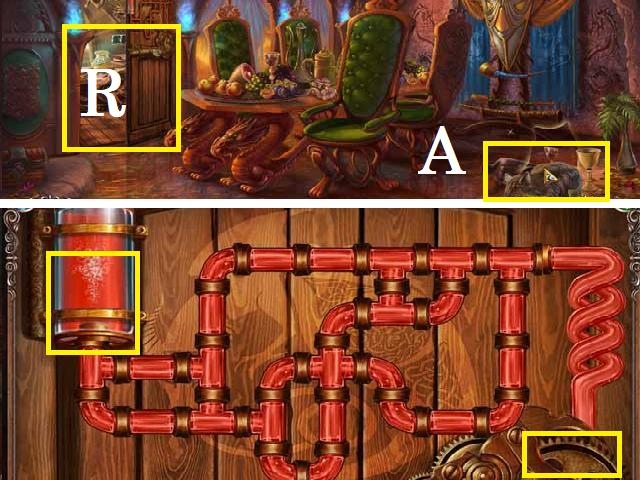
- Zoom into the door (R); place the COG WHEEL and TANK and click on the pipes to connect all of them as shown in the screenshot.
- Go through the open door: place the CARDS in the hand (Q) and receive a COIN.
- Sweep the cobwebs (S) with the BROOM and pick up the HORN (green).
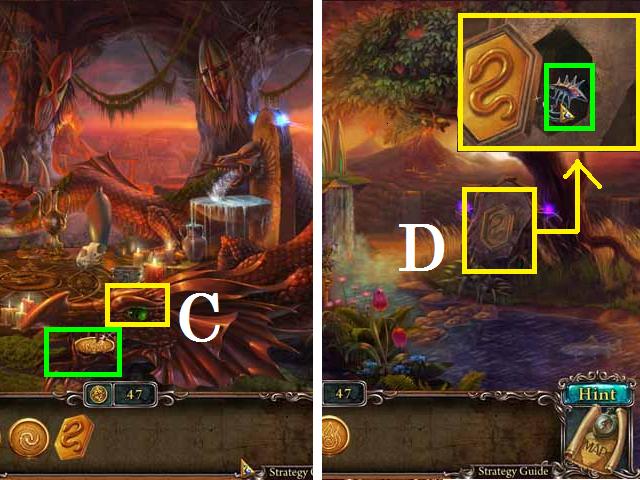
- Zoom into the painting (T); clean with the CLOTH to receive the chest combination.
- Zoom into the chest (U).
- Place the BEETLES as shown in the screenshot.
- Pick up the EARTH AMULET (green).
- Back out one room.
- Place the HORN (V) and pick up the KEY (green).
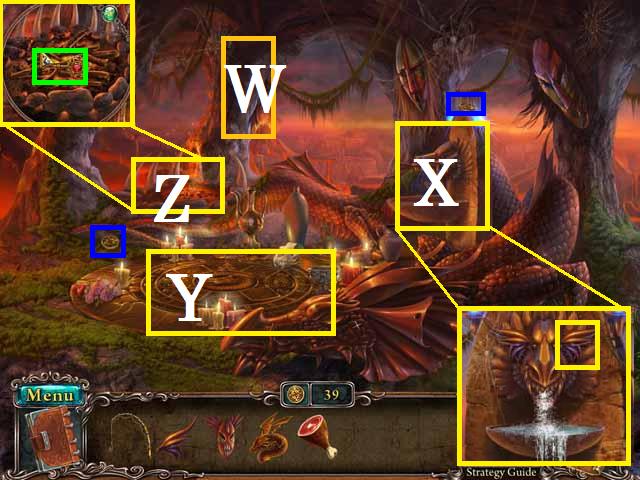
- Go to the Dragon Cave; pick up two COINS (blue).
- Place the MASK on the tree (W).
- Zoom into the fountain (X); place the EAR and click both ears.
- Fill the PITCHER from the fountain and pour on the fire (Z); pick up the KEY (green).
- Zoom into the altar (Y) to activate a puzzle.
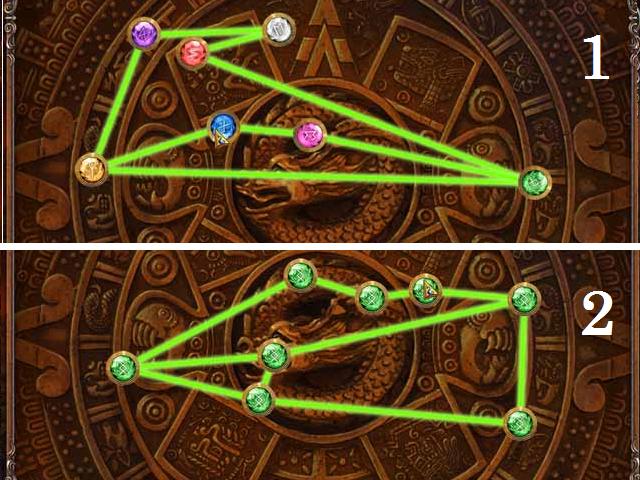
- See the screenshot sections 1 and 2 for the solutions for first 2 the line puzzles.
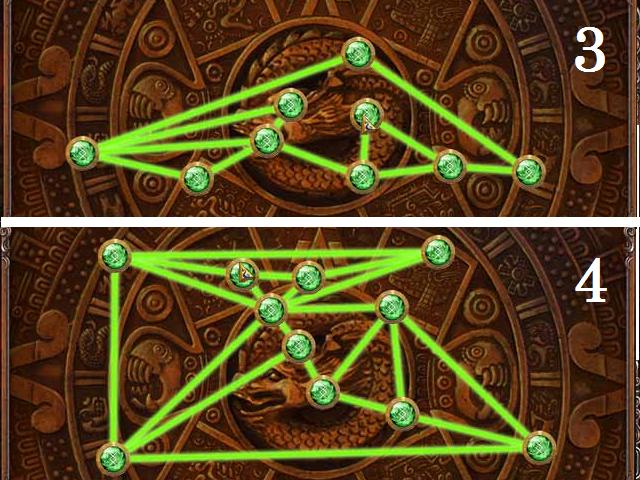
- See the screenshot sections 3 and 4 for the next 2 solutions for the line puzzles.
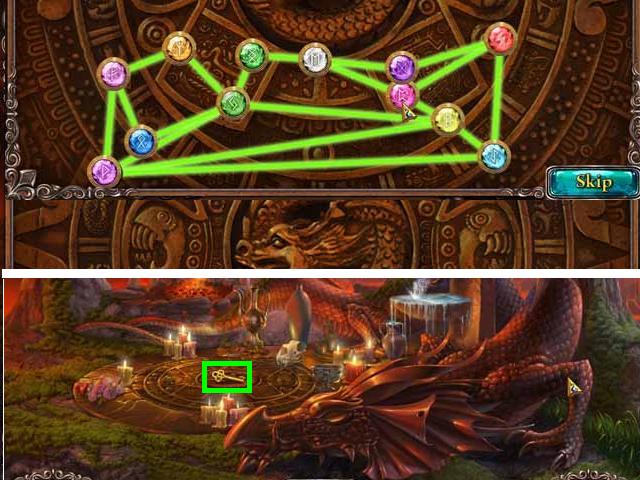
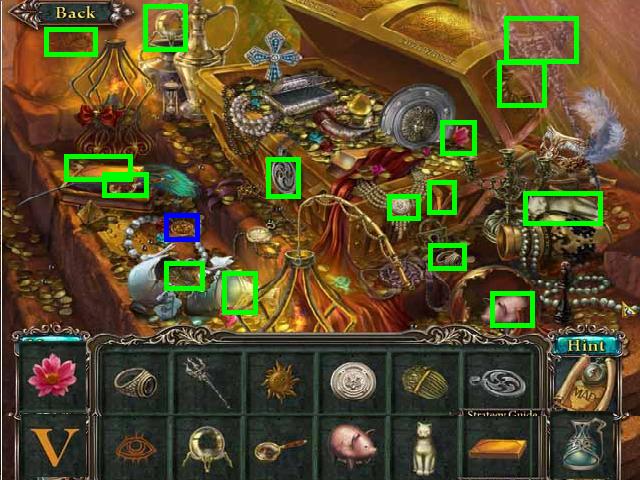
- See the screenshot section 5 for the last solution for the line puzzles.
- Pick up the KEY (green).
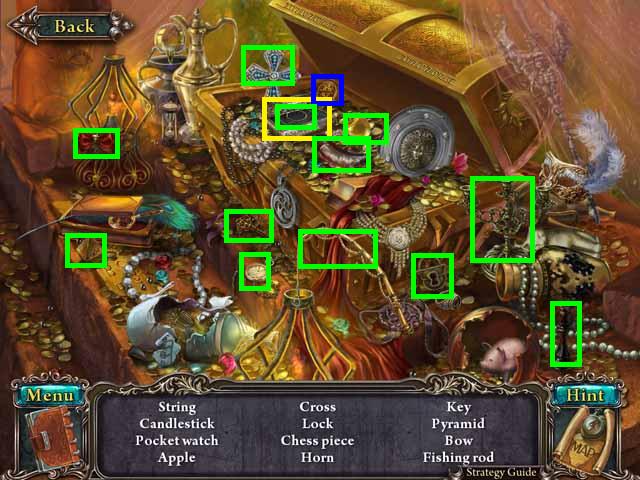
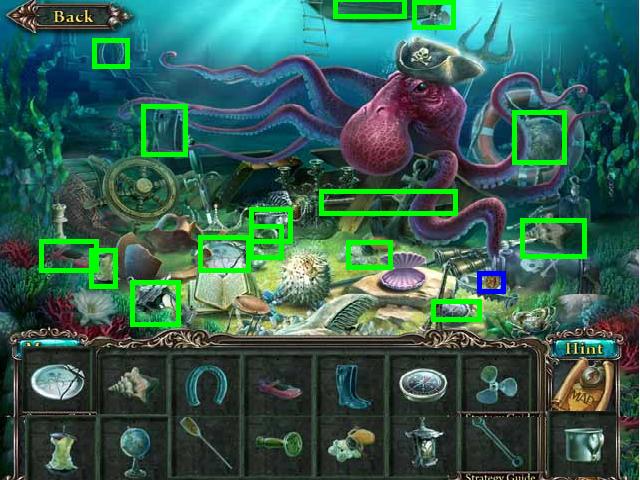
- Go back to the Treasury to play a HOS.
- Find the listed items to receive the PLATE.

- Go back to the Balcony; zoom into the hut (A) and place all three keys in the lock based on color. Turn each key.
- Pick up the DRAGON EYE (green).
- Open the cage (O) with the CELL KEY and pick up the AIR AMULET (green).
- Return to the Living Room and go to the back room; place the PLATE on the frame (B) and receive the DRAGON PLATE.
- Return to the Dragon Cave; place the EYE (C) and pick up the FIRE AMULET (green).
- Go to the Treasury; place the DRAGON PLATE (D) and pick up the MAGES AMULET (green).
- Go to the Living Room and enter the back room.
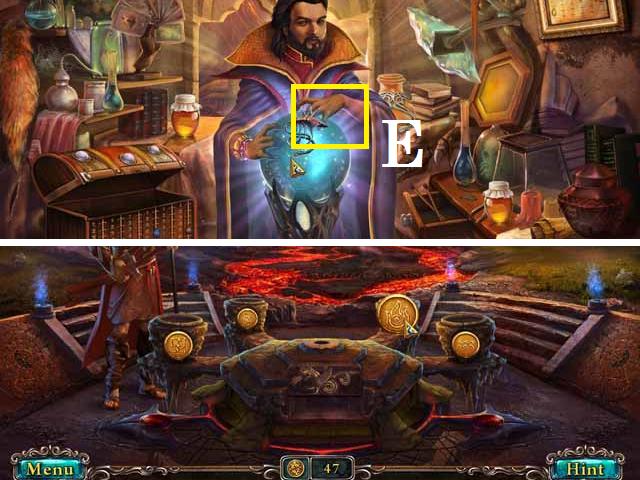
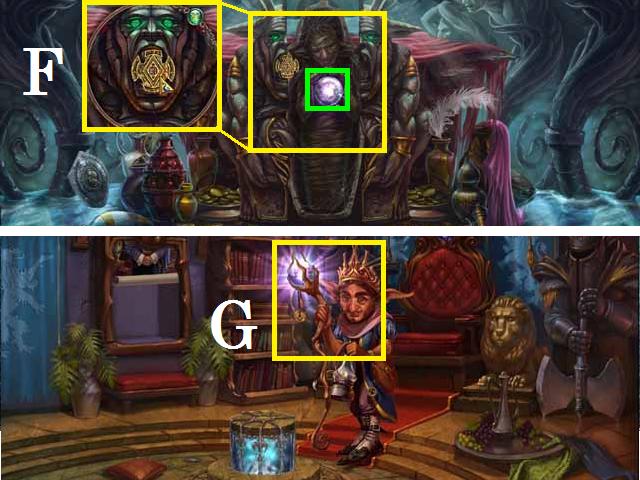
- Place the AMULET on the mages wrist (E).
- Return to the Altar.
- Place the AMULETS on the altar. From left to right: EARTH, AIR, FIRE, and WATER.
Chapter 4: Dwarven Realm
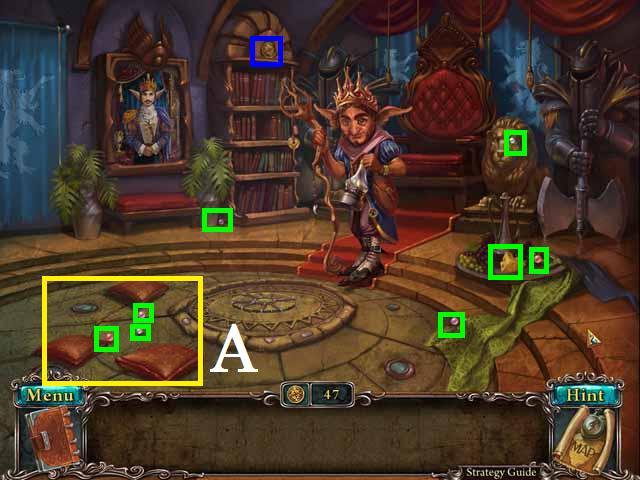
- Pick up one COIN (blue) and the CHEESE (green).
- Move the three pillows (A); pick up seven BEADS (green).
- Go to the House on the Hill; pick up the FEATHER (green), and the EMPTY BOTTLE (green).
- Feed the CHEESE to the mouse (B).
- Zoom into the hole; move the items around and pick up the KEY (green).
- Place the BEADS on the pillow (C) to receive a COIN.
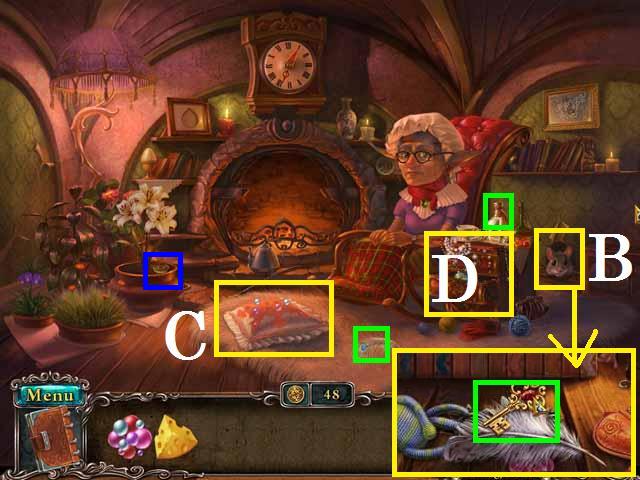
- Zoom into the end table (D) to play a HOS.
- Open the box (yellow) and letter (yellow).
- Move the picture (yellow) and the fan (yellow).
- Receive the LIGHT BULB.
- Go to the Workshop; pick up one COIN (blue), the POWDER KEG (green), FIREWOOD (green), and the WATER CAN (green).
- Unlock the door (E) with the KEY and enter to play a HOS.
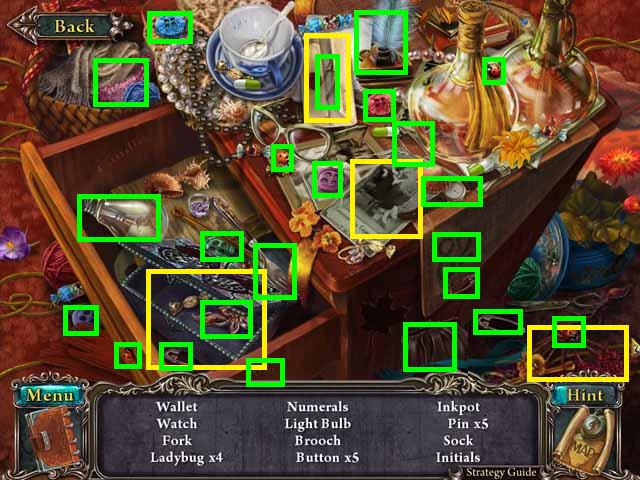
- Open the top drawer (yellow); pick up the magnifying glass (green) and close the drawer.
- Open the bottom drawer (yellow) to pick up the axe (green).
- Brush away the cobweb (yellow) to pick up the fly (green).
- After you pick up the scales (green), move the plate (yellow) to pick up the butterfly (green).
- Move the cloth (yellow) to pick up the postcard (green).
- Receive the AXE.
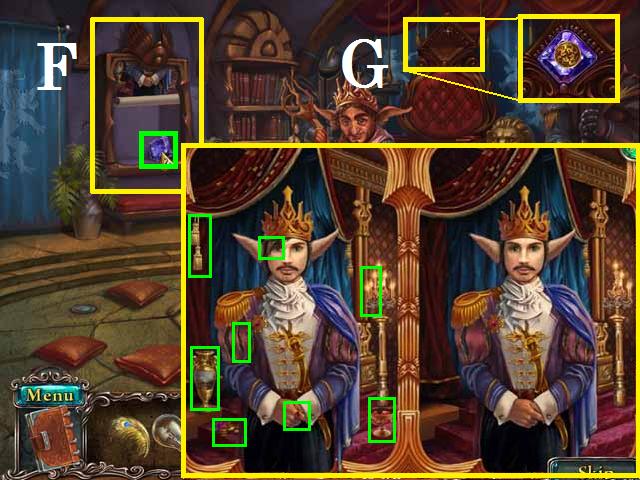
- Go to the Throne Room; zoom into the painting (F).
- Click on all of the differences (green).
- Pick up the JEWEL (green).
- Place the JEWEL over the throne (G) and receive a COIN.
- Go to the Magic Garden; move the leaf (H) then pick up one COIN (blue), a PICKAXE (green), PINCHERS (green), and seven KEY PIECES (green).
- Fill the WATER CAN from the fountain (I).
- Open the door (J) with the KEY PIECES and zoom in.
- Place all of the pieces as shown in the screenshot.
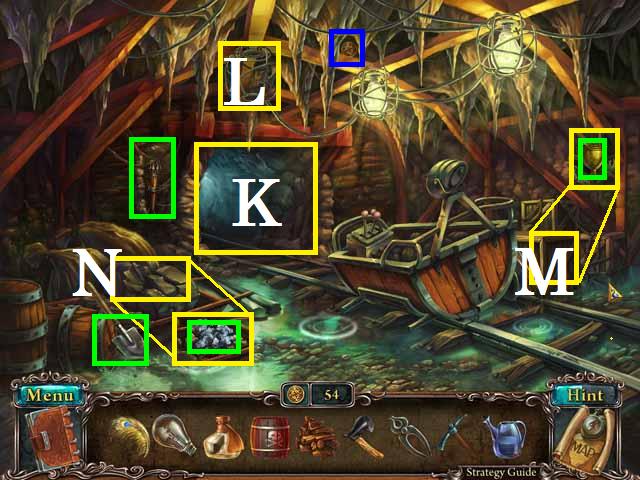
- Go to the Mine; pick up one COIN (blue) and the SHOVEL (green).
- Try to go through the tunnel (K).
- Place the POWDER KEG in front of the blocked tunnel.
- Place the LIGHT BULB in the lamp (L) and pick up the TORCH (green).
- Use the AXE on the crate (M) and pick up the CUP (green).
- Use the PICKAXE on the rocks (N) and pick up the MIRROR ORE (green).
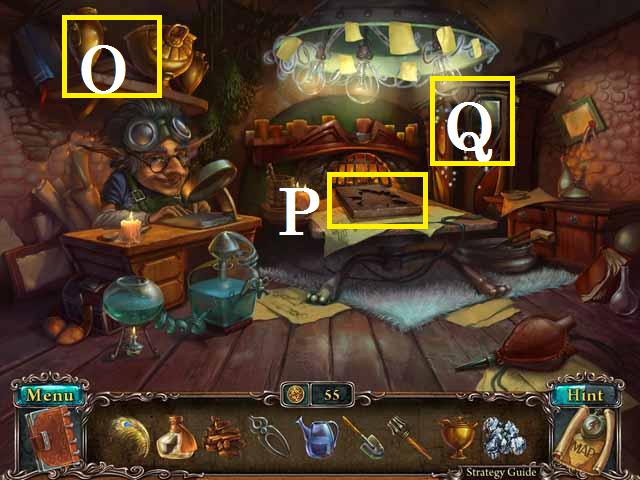
- Go to the Workshop; place the CUP on the shelf (O) to receive a COIN.
- Place the MIRROR ORE on the plate (P); pick it up with the PINCERS.
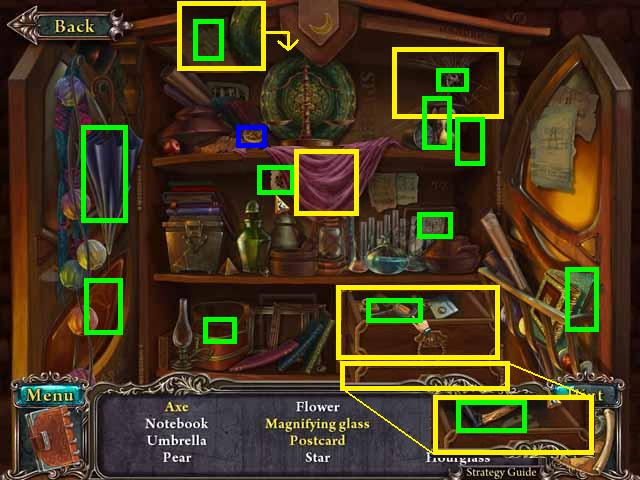
- Zoom into the cabinet (Q) to play a HOS.

- Find the listed items.
- Receive the WHEEL.
- Go to the House on the Hill; place the FIREWOOD in the fireplace (R) and light the TORCH.
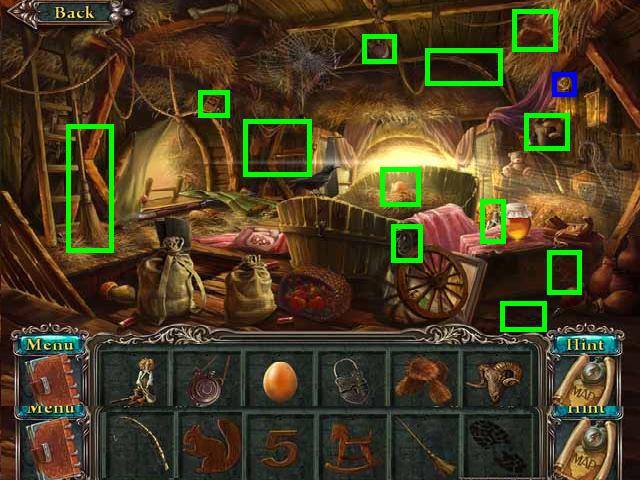
- Zoom into the end table to play a HOS.
- Find the listed items.
- Receive the SKY LILY SEEDS.
- Go to the Mine; light the POWDER KEG with the TORCH and go through the tunnel.
- Move the cloth (S); pick up two COINS (blue), eight GEMS (green), a WHEEL (green), a CRYSTAL (green), and the GARDEN SHEARS (green).
- Place the FEATHER in the jar (T) to receive a COIN.
- Go back one scene.
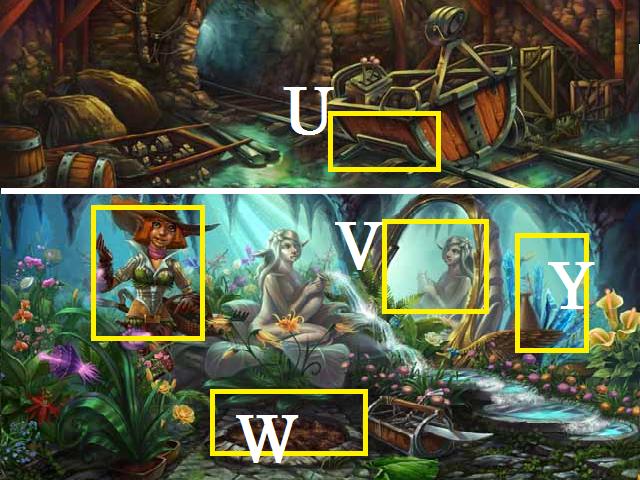
- Place the WHEELS on the cart (U) to receive a COIN.
- Go to the Magical garden; place the MIRROR PIECE on the mirror (V) and receive a COIN.
- Use the SHOVEL on the dirt (W); plant the SEEDS and WATER.
- Cut the flower with the GARDEN SHEARS; give it to the woman to receive the HERBS.
- Place the CRYSTAL with the others (Y) and receive a COIN.

- Go to the Workshop; place the GEMS on the desk (Z) and receive the PENDANT.
- Put the HERBS in the pestle and mortar (D).
- Place the CRUSHED HERBS in the beaker (A) and place the EMPTY BOTTLE under the spout (B).
- Go to the House on the Hill and give the BOTTLE of MEDICINE to the woman to receive the MAGIC BOOK.
- Place the PENDANT in the frame (C) and receive a COIN.
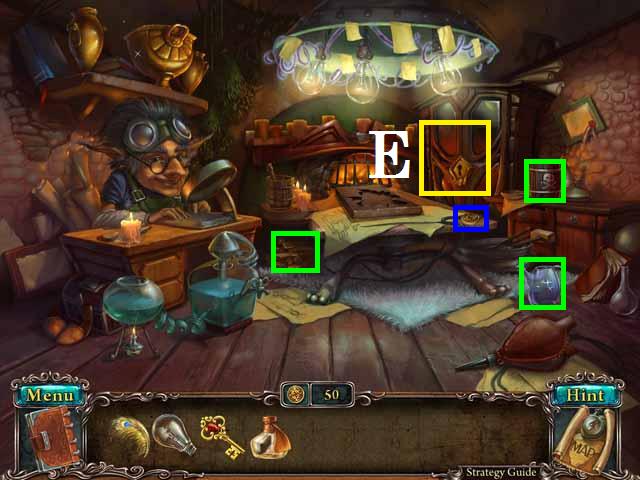
- Go to the Throne Room; place the BOOK on the shelf (D) and zoom in.
- See the screenshot for the final picture.
- Return to the House on the Hill.
- Zoom into the clock (E); set the time to 4:40 then pick up the SARCOPHAGUS KEY (green).
- Go to the Mine and down the tunnel.
- Place the SARCOPHAGUS KEY (F) and pick up the SPHERE (green).
- Return to the Throne Room and place the SPHERE on the cane (G).
Chapter 5: Sea Realm
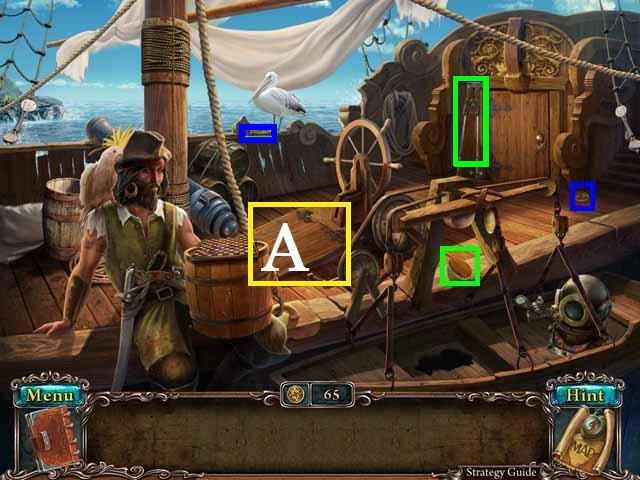
- Pick up two COINS (blue), the BRUSH (green), and PINCHERS (green).
- Go down to the boat hold (A).
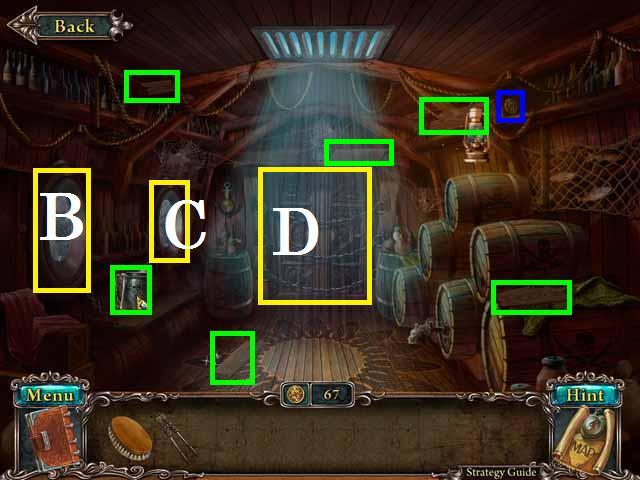
- Pick up two COINS (blue) and five PLANKS (green).
- Clean both windows (B-C) with the BRUSH and pick up the MUG (green).
- Use the PINCERS on the door (D); enter the back room to play a HOS.
- Move the two curtains (yellow).
- Receive the BUCKET of RESIN.

- Return topside.
- Zoom into the boat (E), place the PLANKS and the RESIN.
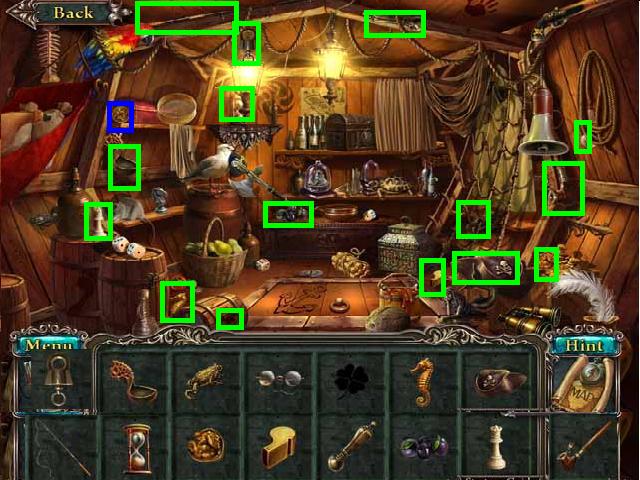
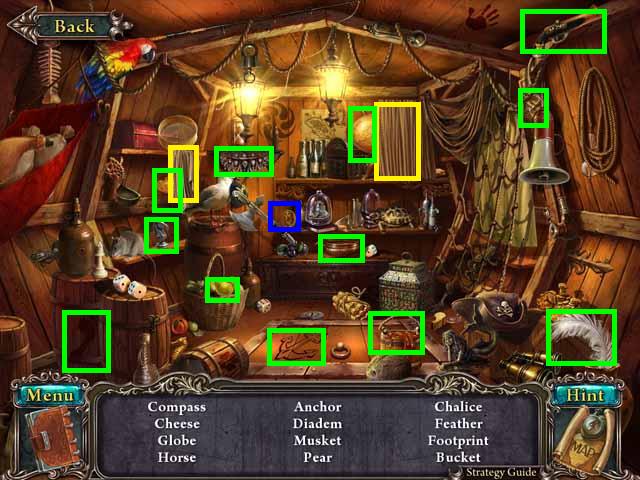
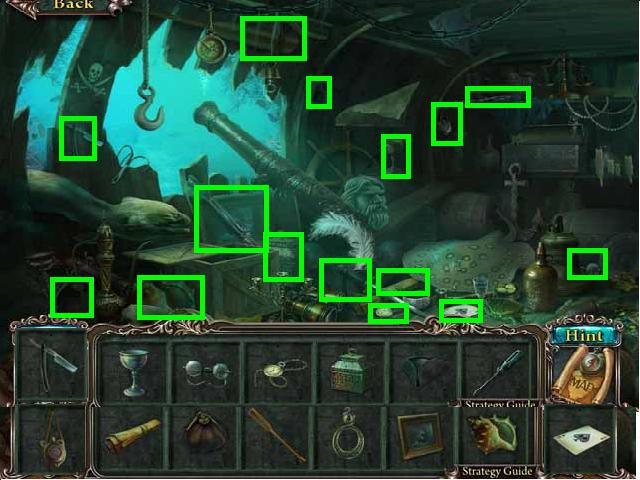
- Go to the back room downstairs to play a HOS.
- Find the listed items.
- Receive the VALVE.
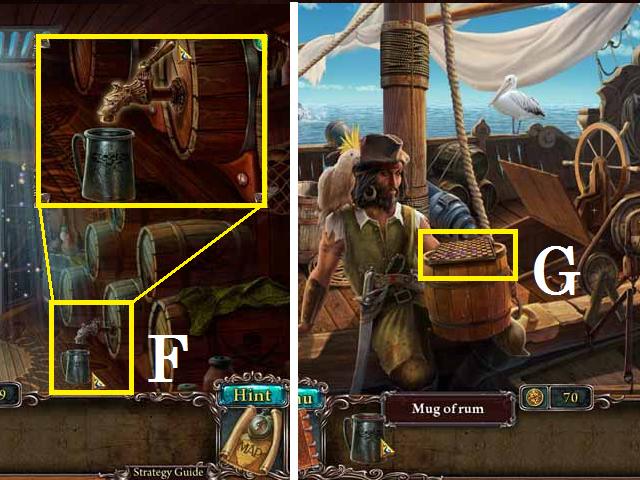
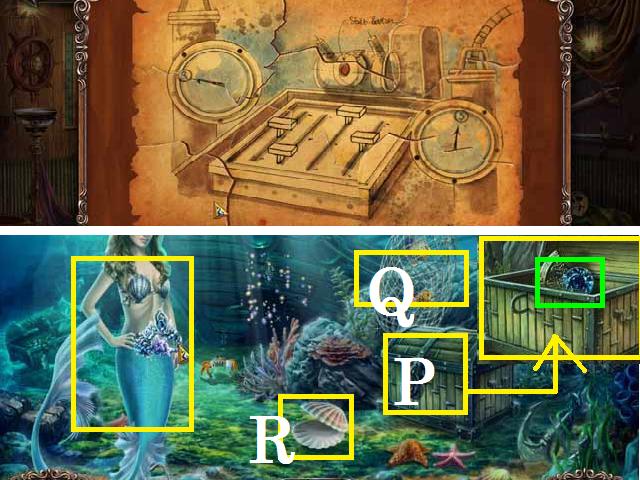
- Zoom into the rum cask (F); place the MUG and the LEVER.
- Pull the LEVER to fill the MUG and give it to the Captain.
- Zoom into the Captain's game (G). (Hint: Move your cursor around until you have the maximum amount of rocks possible. Try not to remove ones that are blocking the opponent but always go for the maximum possible removal).
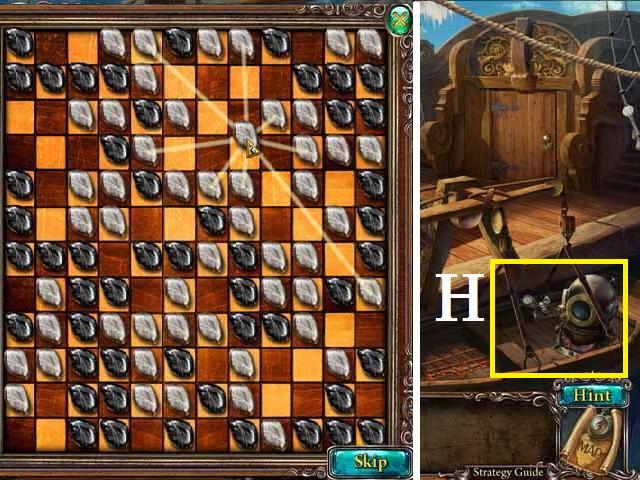
- I was able to remove eight at once for my first move then six and down.
- Receive the OXYGEN TANKS and place them with the helmet (H).
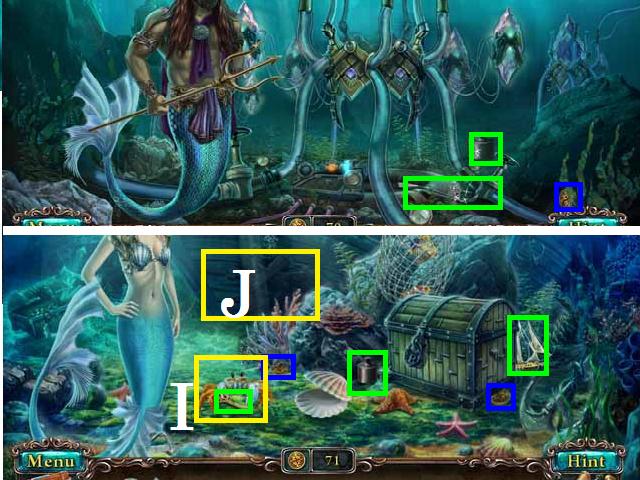
- Go to the Sea Floor; pick up one COIN (blue), a WEIGHT (green), and the CROWBAR (green).
- Go to the Sunken Ship; pick up two COINS (blue), a WEIGHT (green), and a SHIP (green).
- Move the crab (I) and pick up the KEY (green).
- Use the CROWBAR on the planks on the boat (J); enter to play a HOS.
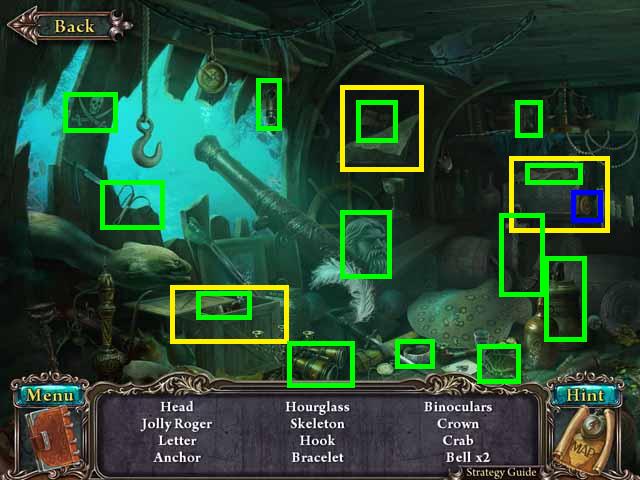
- Open the crate (yellow), chest (yellow) and move the poster (yellow).
- Receive the STATUE HEAD.

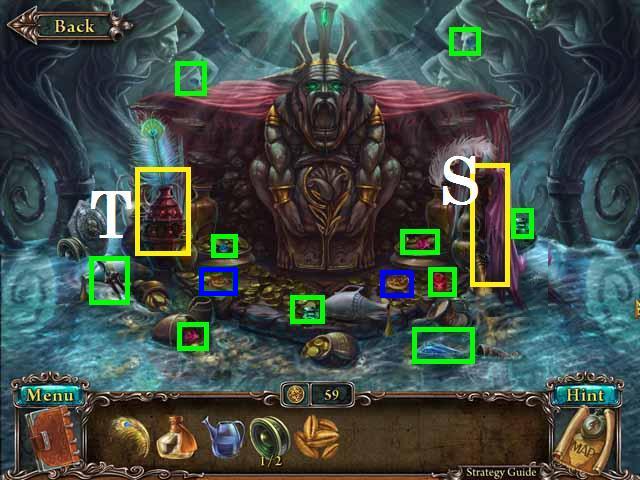
- Go to the Underwater Temple; pick up two COINS (blue), four STATUE PIECES (green).
- Assemble the statue (K) and pick up the DRAWER HANDLE (green).
- Zoom into the gate to activate a puzzle.
- Complete the correct image as shown in the screenshot (A).
- Go through the gate to play a HOS.
- Open the clam shell (yellow); break the jar (yellow).
- Receive the PEARL.
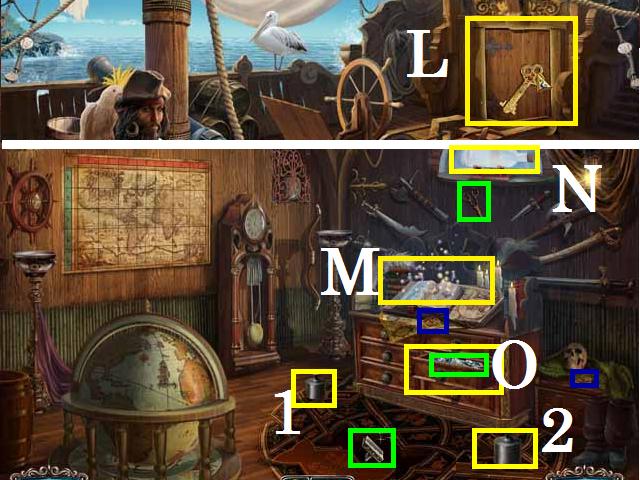
- Return to the Ship; open the door (L) with the KEY and enter the cabin.
- Pick up two COINS (green) and the SCISSORS (green).
- Place the WEIGHTS on the 'V's' (1-2) and pick up the LEVER (green).
- Place the SHIP in the bottle (N) and receive a COIN.
- Place the DRAWER HANDLE on the middle drawer (O) and pick up the JEWELRY (green).
- Zoom into the book (M).
- Assemble the picture as seen in the screenshot to receive the solution to use in the Sea Floor.
- Go to the Sunken Ship and give the JEWELRY to the woman to receive the CHEST KEY.
- Open the chest (P) with the KEY and pick up the MEDALLION PIECE (green).
- Cut the net (Q) with the SCISSORS to receive a COIN.
- Place the PEARL in the clam shell (R) to receive a COIN.
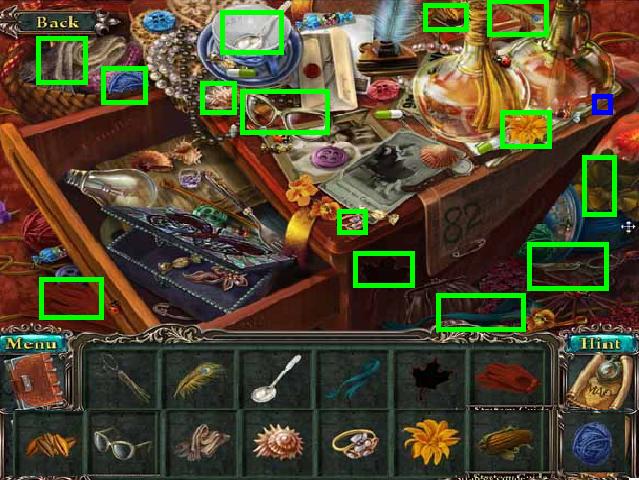
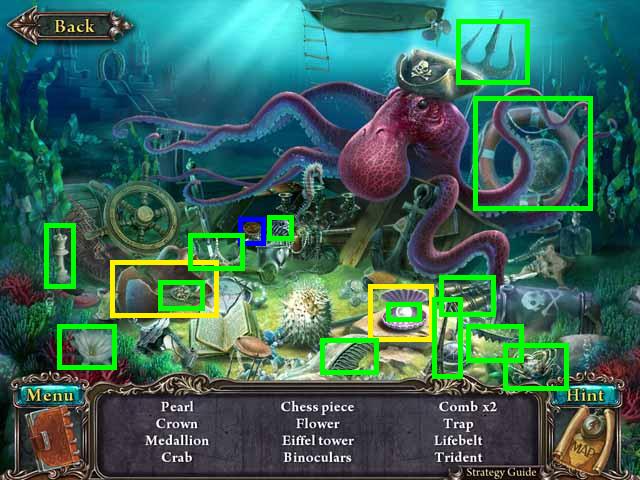
- Zoom back into the boat to play a HOS.
- Find the listed items.
- Receive the SCREWDRIVER.
- Go to the Ship and enter the cabin.
- Open the vent (S) with the SCREWDRIVER and pick up the MANOMETER (green).
- Go to the Underwater Temple.
- Go through the gate to play a HOS.
- Find the listed items.
- Receive the COMPASS.
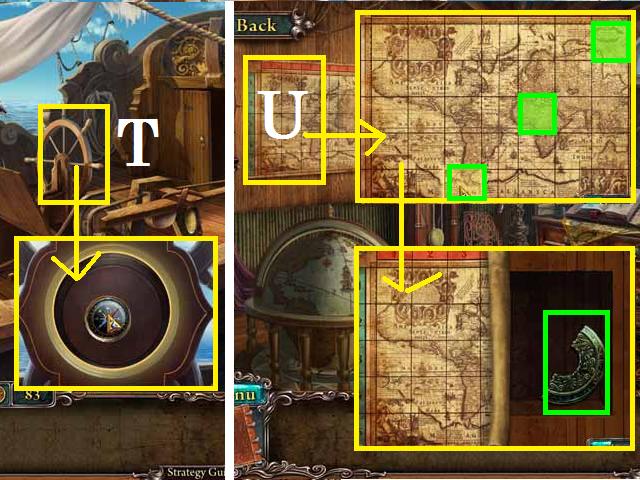
- Return to the Ship; place the COMPASS on the wheel (T) to receive the map coordinates.
- Enter the Cabin; zoom into the map (U) and click the squares as shown in the screenshot.
- Pick up the MEDALLION PIECE (green).
- Go to the Underwater Temple.
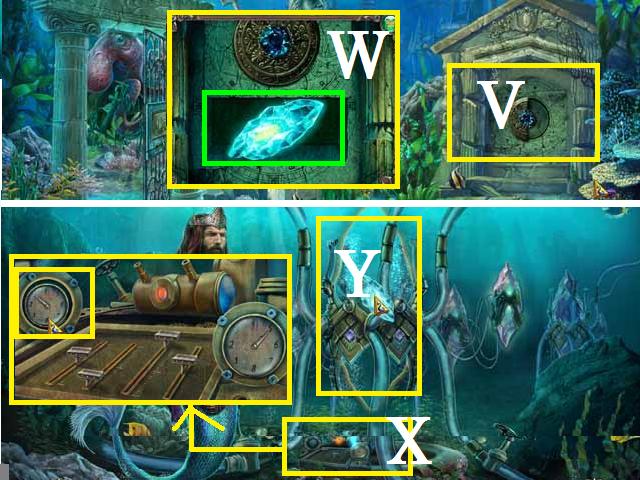
- Zoom into the door (V); place both MEDALLION PIECES (W) and pick up the CRYSTAL (green).
- Go to the Sea Floor.
- Zoom into the mechanism (X); place the LEVER and MANOMETER.
- Set the levers as shown in the screenshot.
- Place the CRYSTAL (Y).
- Congratulations you have completed Lost Souls: Enchanted Paintings!
Created at: 2011-09-28