

Walkthrough Menu
- General Tips
- Chapter 1: The Package
- Chapter 2: The First Letter
- Chapter 3: The Second Letter
- Chapter 4: The Third Letter
- Chapter 5: The Fourth Letter
- Chapter 6: the Scrapbook
- Chapter 7: the Gym
- Chapter 8: Class
- Chapter 9: the Movies
- Chapter 10: The Beach
- Chapter 11: The Carnival
- Chapter 12: The Proposal
- Chapter 13: Wedding Day
- Chapter 14: the Wedding Ceremony
- Chapter 15: Moving Day
- Chapter 16: The Apartment
- Chapter 17: The House
- Chapter 18: The Army Letter
- Chapter 19: The Medal
- Chapter 20: Beth
- Chapter 21: The Hospital
- Chapter 22: The Visit
General Tips
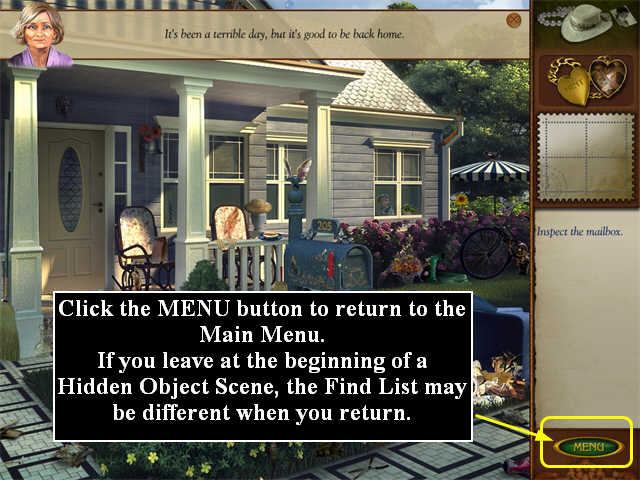
- Use the MENU button to return to the Main Menu.
- The game saves automatically.
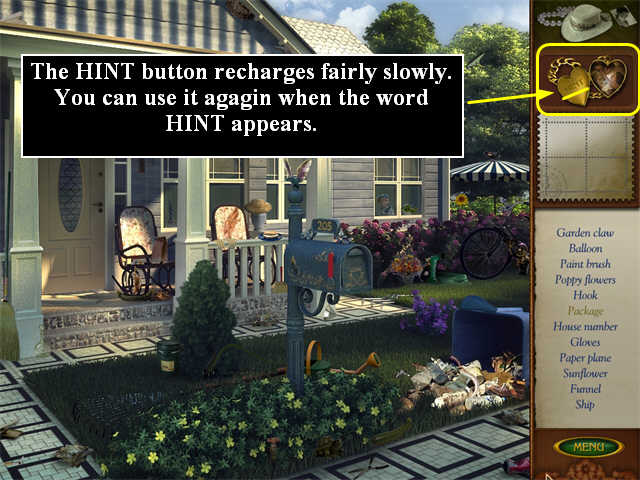
- The HINT button is the Locket in the upper right.
- You get an unlimited number of hints, but you have to wait for the HINT button to recharge each time. It recharges pretty slowly. Once it is completely recharged, the word HINT will appear on the left side of the locket.
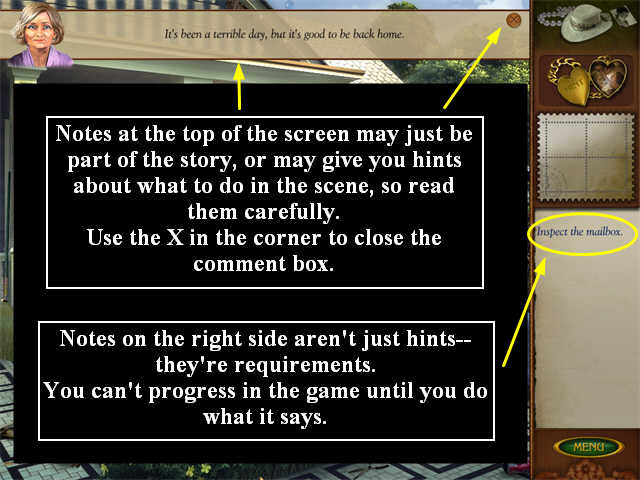
- The game also provides comment boxes at the top of the screen. Sometimes these are just part of the story, and sometimes they are hints about what to do next.
- Click on the red X in the top right corner of the comment box to close it.
- Comments printed on the right side of the screen, where the Find List goes, are not just hints; they are required actions. You must complete these before the game will let you progress.
- If you make many incorrect clicks in a row, the cursor will dance away for a few seconds. There is no other penalty for wrong clicks.
- There are several different types of mini-games that occur at the end of some chapters.
- You can skip most mini-games by clicking on the SKIP button once it has recharged.
- Some mini-games require you to click on a SUBMIT or VERIFY button, and some don’t.
- The game is divided into three parts. In the first and third part, you will work from Find Lists to find objects in a Hidden Object scene. You will be able to use some of the objects as Tools in the scene.
- In the second part, you will use objects in the scene as rebus-like clues to fill the blanks in the story.
General Tips
- The first part of the game is a Hidden Object Adventure Game in which you will find hidden objects and then use some of them to solve tasks in the scene.
- The Find List includes three kinds of items: regular items; Tools, which can be used later in the scene; and blocked items, which you will have to use Tools to access.
- In each scene you will have to find all the items on the Find List before the game will tell you which one was a Tool that you can use.
- Items written in tan on the Find List are initially blocked. They may be inside a cabinet, or behind another item, or they may require a Tool to access them. The tools may be in another room, or blocked items themselves.

- In addition, each scene has a Note. Find the Note and read it, and you will get a clue to a Scrapbook Item you can collect somewhere in the scene.
- To view Scrapbook items you’ve collected, click on the Purse in the top right corner.
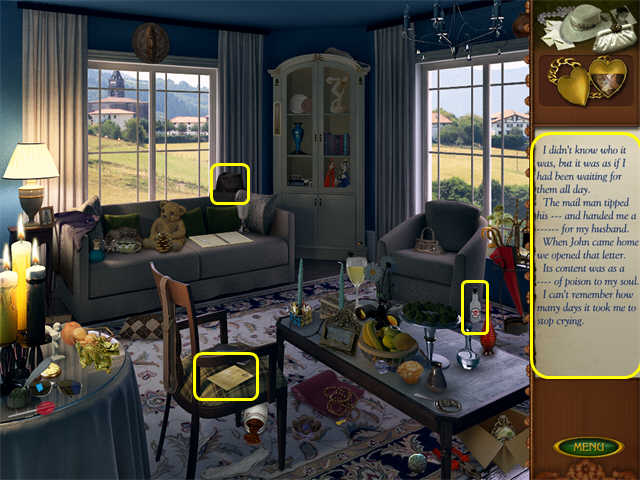
- In each chapter, your goal is to find and read one of the letters from the package. The letters are longer than the notes, and tell you more about the story of the main character’s first husband. Usually the letter will end up stuck behind something out of reach. You will have to go back and forth between several rooms in each chapter before you will be able to read the letter.
- In most chapters you will have to find the Letter, even though you can’t reach it yet, before you will get the Find List that will let you acquire Tools.
- When you read each letter, you will access a mini-game regarding the contents of the letter.
- In the second part of the game, you will put the scrapbook items back into the scrapbook, and then find items from the scene to fill in the blanks in the story.
- The first step in each scene is to put back the scrapbook item. You should be able to remember these from the first half of the game.
- Click on the item in the Scrapbook Items; then move that item around the scene until it enlarges; once it does so, click to place it.
- There will be tiny sparkles on the correct spot.
- Once you have placed the scrapbook item correctly, the first part of a story that goes with that scrapbook item will appear in the right column, but some of the words will be blanked out. Your task is to fill in the blanks by clicking on items in the scene that represent those words.
- You are not looking for an exact match (they’re more like rebus clues). For example, if you are trying to find an item to represent “watch” in the story, you might look for a wristwatch or a picture of an eye.
- A single item is commonly used to represent a plural word, so if the word you want is “chairs,” the item in the scene might be just one chair.
- In the third part of the game, you return to Hidden Object Adventure play with a Find List, just like the first part.
- The difference is that you no longer have NOTES or LETTERS to look for.
Chapter 1: The Package
- This is the introductory Chapter. You will learn that the main character’s husband, Frank, has passed away. The main character’s name is Mary. Mary is returning from a visit to the cemetery with a young woman, Beth, who was the nurse for her husband in his final illness.
- You will also learn that Mary was married once before, but her first husband, John, was declared missing in Cambodia.
- Your main task in this chapter is to find and open a PACKAGE that has been sent to Mary anonymously.
The Front Yard
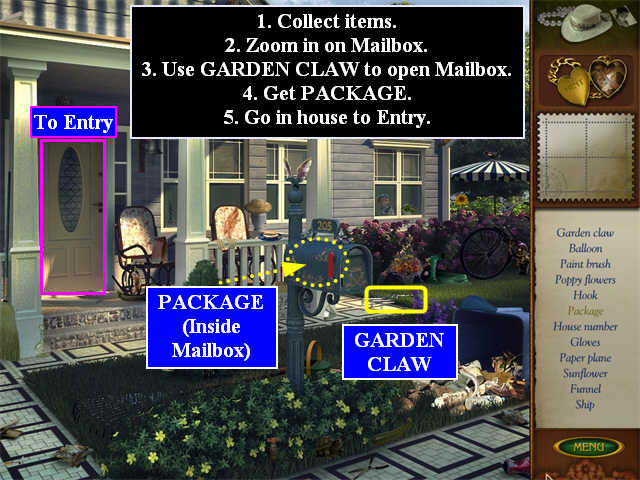
- There’s something in the Mail Box, but you need a tool to help open it.
- The Tool is the GARDEN FORK.
- Once you have collected all the items you can on the Find List, click on the Mail Box to zoom in.
- Drag the GARDEN FORK from the Tools Inventory to the Mailbox, and the Mailbox will open.
- Collect the PACKAGE inside the Mailbox.
- Click on the Door to enter the house.
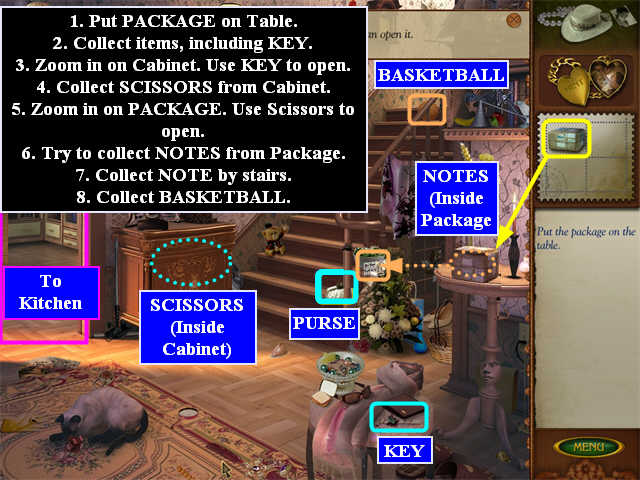
The Entry
- Begin by putting the PACKAGE on the Table on the right. Now you need something to open it.
- The Tool is the SCISSORS, but they are inside a locked Cabinet. So you must also find the KEY.
- Once you have collected all the items you can on the Find List, click on the Locked Cabinet to zoom in.
- Drag the KEY from the Tools Inventory to the Cabinet, and the Cabinet will open.
- Collect the SCISSORS inside the Cabinet. They will go into the Tools Inventory.
- Click on the PACKAGE to zoom in.
- Drag the SCISSORS from the Tools Inventor to the PACKAGE, and the PACKAGE will open, revealing a bunch of LETTERS and NOTES. The NOTES and LETTERS will blow away!
- Look around the room; you will find the first NOTE near the bottom of the Stairs. Click on it to collect it, and it will open so you can read it.
- This is a clue to the first Scrapbook Item. The item is a BASKETBALL.
- Collect the BASKETBALL from the top of the Stairs, and it will go into the Scrapbook Inventory.
- The PHONE is ringing; answer it. The PHONE is on the table under the Mirror.
- Click on the Kitchen to enter that part of the house.
Chapter 2: The First Letter
- You found a NOTE in the entry, but you haven’t found any LETTERS yet. You need to search for them.
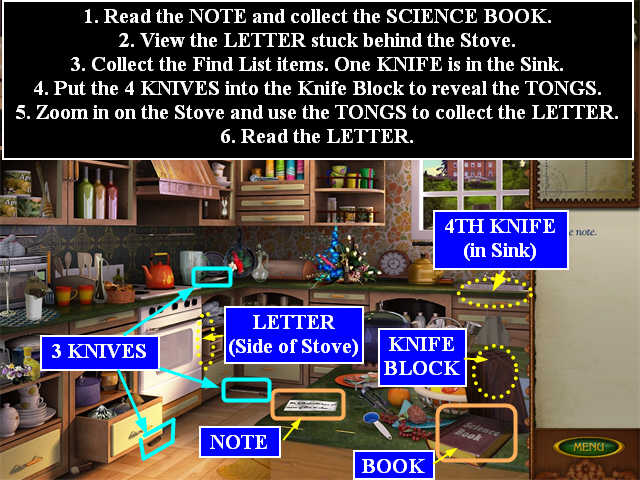
- Begin by finding the NOTE on the counter.
- The Scrapbook item is the SCIENCE BOOK on the counter to the right of the NOTE.
- Now you have to look for the LETTERS. You will find the first one stuck in the crack on the right side of the Stove, but you need something to get it out with.
- Once you have viewed the LETTER on the side of the Stove, the Find List will fill in with the items you must find.
- The 4TH KNIFE is in the Sink.
- The Muffin and the Tart Pans are in the drawer below the Stove.
- The Apron is hanging in front of the Stove.
- Once you have collected everything you can, use the 4 KNIVES by putting them back in the Knife Block.
- The Knife Block will disappear, revealing the TONGS on the counter behind the Knife Block’s former location.
- Collect the TONGS.
- Zoom in on the side of the Stove again.
- Use the TONGS to retrieve the LETTER.
- Read the LETTER. It is from John, Mary’s first husband.
- You will automatically switch to a scene from the Cambodian POW camp.
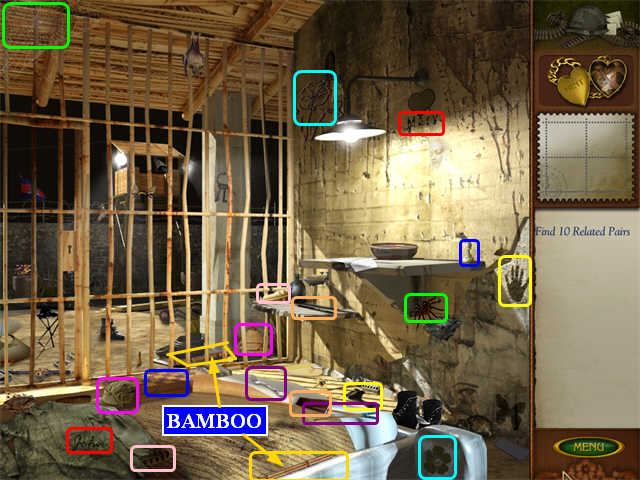
The Jail
- Begin by finding “ten related pairs.” The relationships are somewhat arbitrary, and some pairs which look obvious (like the pair of boots), don’t count.
- The only items that will count will light up when you click on them.
- You must click on one of the paired items, and then the other; both will be removed from the scene.
- Here are the pairs:Spider and Web Poppy drawn on the wall and Flower outline by the bed Fork and Chopsticks Two Feathers (one in the jacket, one on the table) John on the jacket and Mary written on the wall by the Heart The Hat on the bed and the Straw Hat just outside the cell The Chesspiece on the shelf and the Chessboard on the bed The Journal on the bed and the Pencil on the shelf The Footprint on the floor and the Handprint on the Bed The pieces of BAMBOO on the bed and the piece of BAMBOO on the ground outside the cell
- Once you have collected all of the pairs, the BAMBOO will form into a rod and go into your Tools Inventory.
- Use the BAMBOO ROD to get the KEYS. They will go into your Tool Inventory.
- Use the KEYS to open the Gate.
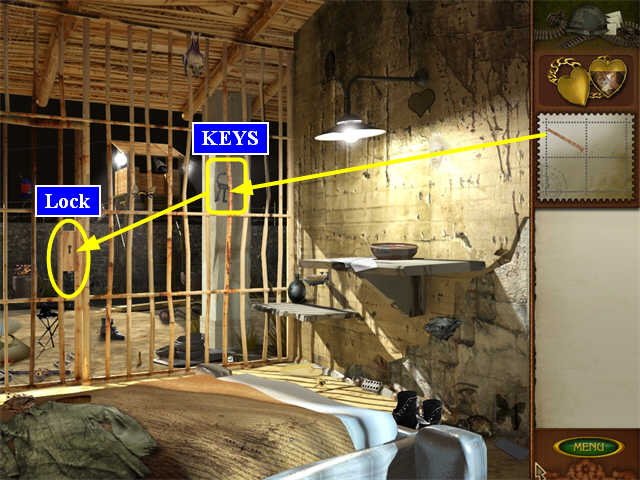
- This will trigger a mini-game.
Jail Maze Mini-game
- If you prefer, you may skip the mini-game by pressing the SKIP button.
- This is a simple maze. You just have to avoid getting caught by the spotlights.
- If you do get caught, you will be allowed to continue from the place where you were caught—just move a little out of the way this time!
- Begin by getting the KEY in the upper right.
- Once you have the KEY, you have to come back down, cross over, and go up the other side to the Gate.
- Use the KEY to unlock the Gate, and you’re done.

Chapter 3: The Second Letter
- In this Chapter, you will have to go back and forth between several rooms.
- Although you do have some choices, it is recommended that you work first in the Dining Room, then the Living Room, then the Dining Room again, then the Library, then the Living Room.
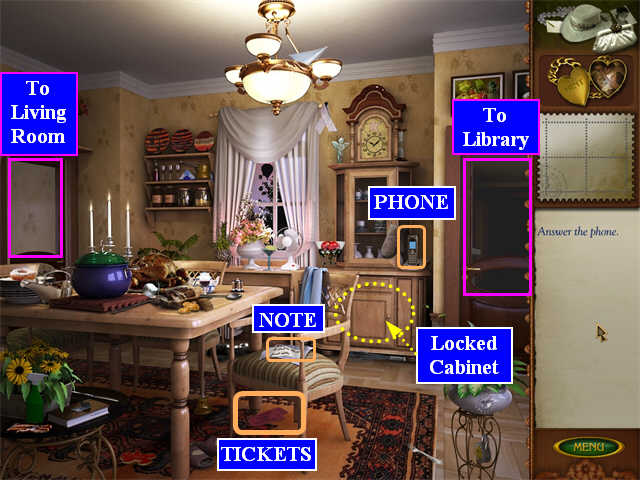
The Dining Room
- Once you get out of the maze, you will find yourself back in the house in the Dining Room.
- The phone is ringing; answer it.
- Begin by finding the NOTE which is on the Chair, on the right side of the table.
- The Scrapbook item is the pair of TICKETS on the floor under that same chair.
- Collect the items on the Find List.
- The Cabinet is locked; you will have to find the KEY in another room.
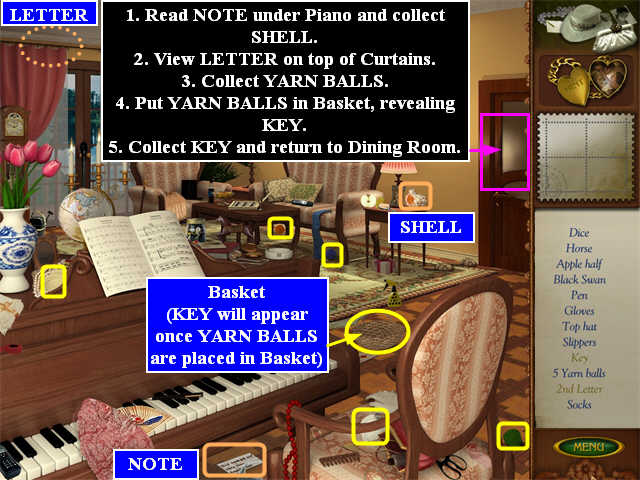
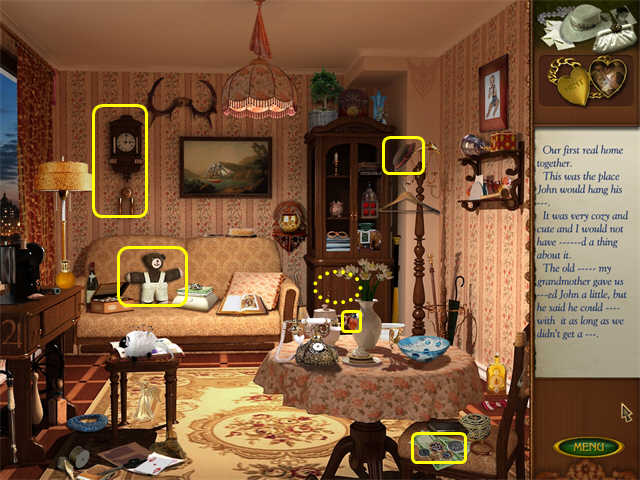
The Living Room
- Begin by finding the NOTE on the floor under the Piano.
- The Scrapbook item is the SEASHELL on the table on the right.
- Now you have to find the LETTER. It is up on the curtain rod in the back left.
- You can’t reach the LETTER yet.
- Collect the items on the Find List.
- Put the YARN BALLS in the Basket. The Basket will disappear, revealing the KEY.
- Return to the Dining Room.
The Dining Room
- Zoom in on the Cabinet next to the Library door.
- Use the KEY to open the Cabinet.
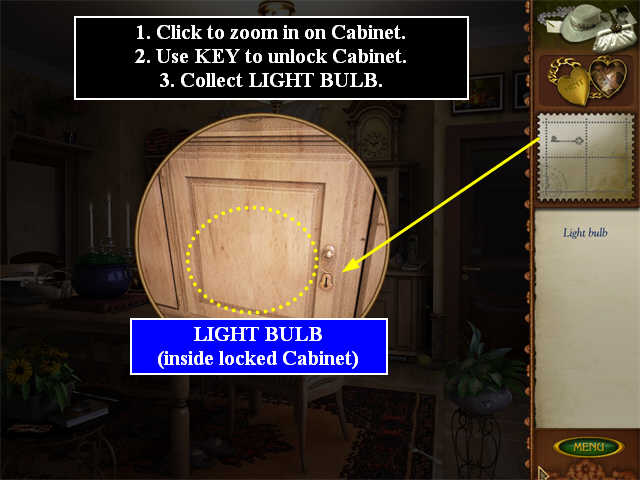
- Collect the LIGHT BULB.
- Enter the Library through the door on the right
The Library
- Start by putting the LIGHT BULB in the ceiling lamp.

- Find the NOTE lying on the floor in front of the table.
- The Scrapbook item is the TEDDY BEAR on the left chair.
- Collect the items on the Find List.
- Put the ELEPHANTS on the top Shelf on the left. A zoom scene will open, showing the FEATHER DUSTER on top of the Cabinet. Collect it.
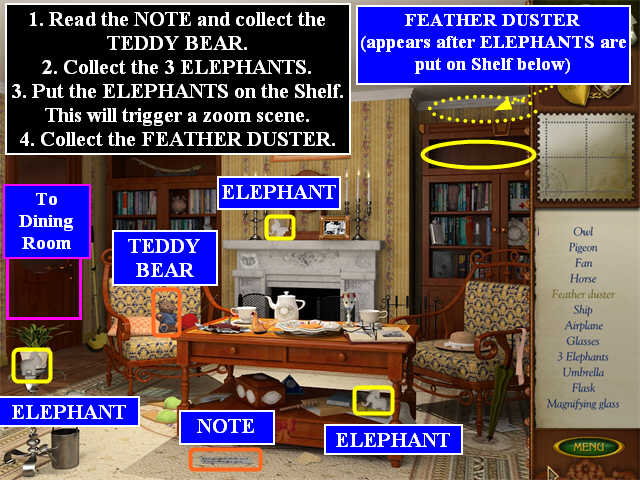
- Return to the Living Room.
The Living Room
- Click on the top of the Curtains on the left to zoom in.
- Use the FEATHER DUSTER to get the 2ND LETTER.
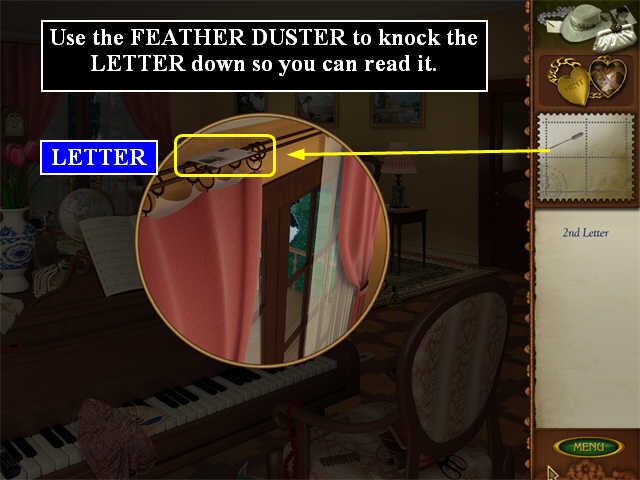
- Read the LETTER.
- You will automatically switch to a scene from Cambodia.
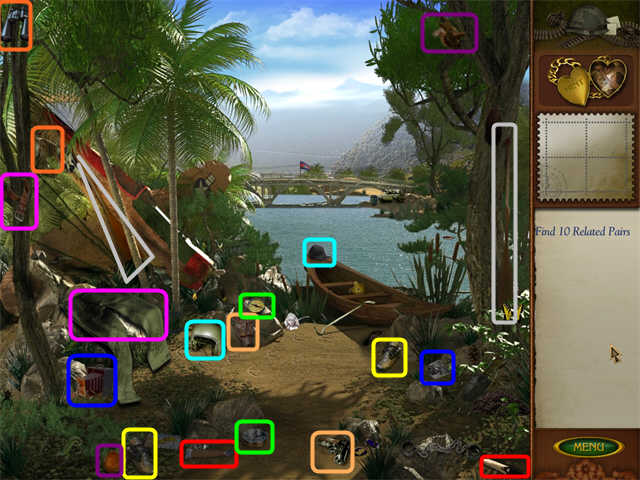
The Control Point
- Begin by finding “ten related pairs.” The relationships are somewhat arbitrary, and some pairs which look obvious (like the pair of boots), don’t count.
- The only items that will count will light up when you click on them.
- You must click on one of the paired items, and then the other; both will be removed from the scene.
- Here are the pairs:Pair of Shoes Holster and a Gun Scabbard and a Knife Two Compasses Hat and Helmet Camera and Photograph Pants and Belt Acorn and Squirrel Binoculars and Case Two Oars
- This will trigger a mini-game.
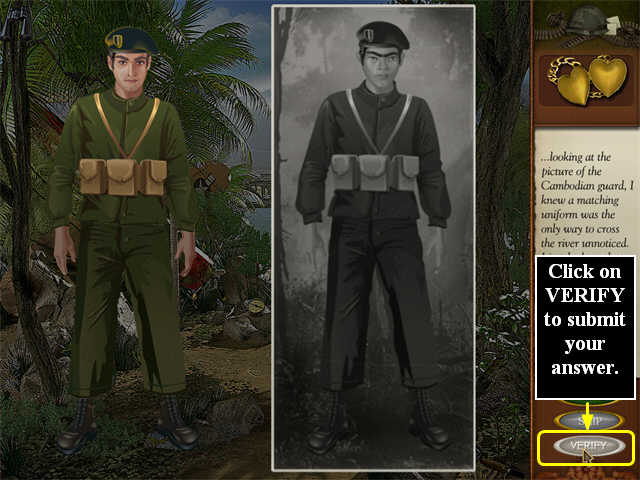
Control Point Mini-game
- You will be shown a photograph of a Cambodian soldier.
- Now you must change John’s clothes so that they match the uniform the Cambodian soldier was wearing.
- Use the arrows to scroll through the available items.
- When you have the choices you want, click on the VERIFY button to compare it to the photograph.
- Anything you have right will lock in place.
- Anything that is not right will get arrows again so you can change it.
- Solution:
- You will be returned to the house, in the Backyard.
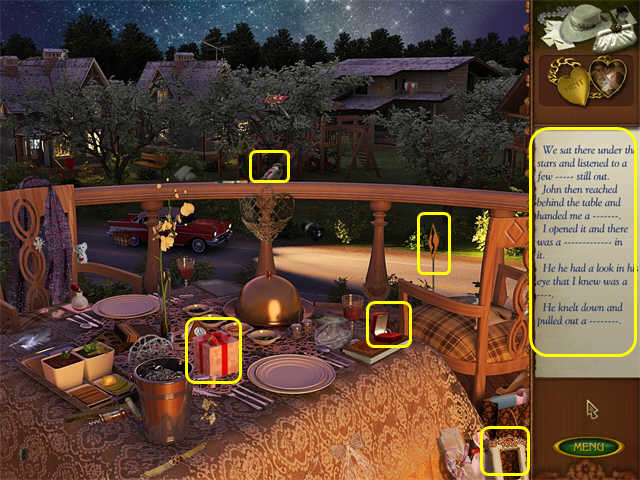
Chapter 4: The Third Letter
- In this Chapter, you will have to go back and forth between several areas.
- Although you do have some choices, it is recommended that you work first in the Backyard, then the Workshop, then the Backyard, then the Garage, then the Garden, and finally the Workshop again.
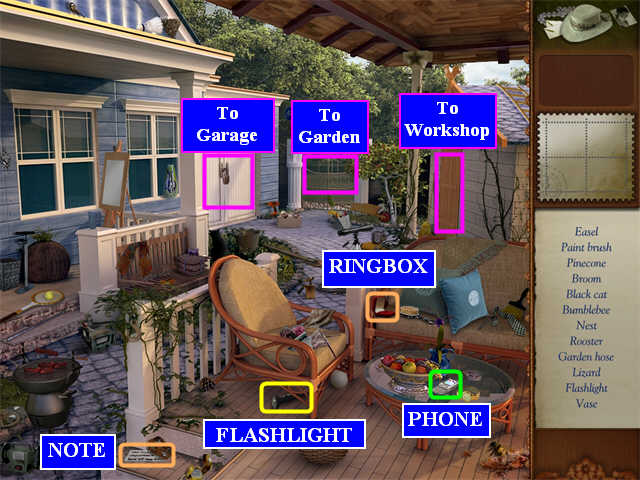
The Backyard
- Once you complete the previous mini-game, you will find yourself back in the house in the Backyard.
- The phone is ringing; answer it.
- Begin by finding the NOTE which is on the steps on the left.
- The Scrapbook item is the red RINGBOX on the loveseat.
- Collect the items on the Find List.
- The Rooster is plain wood on the top of the Workshop.
- The Black Cat looks like a smudge, since you can only see its back. It’s just to the right of the porch by the Garage door.
- The Garage is locked; you will have to find the KEY in another area.
The Workshop
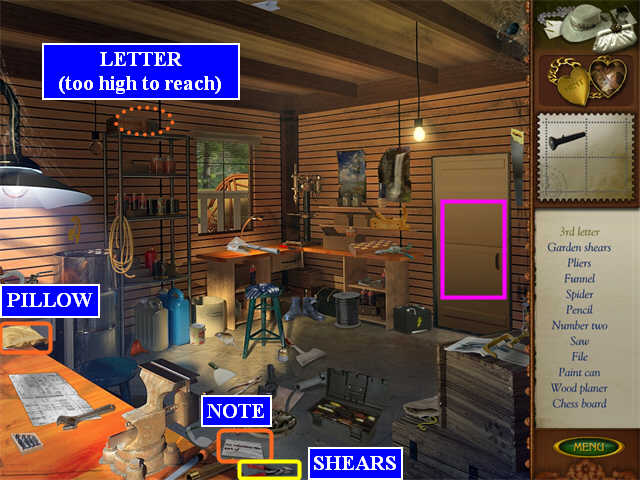
- Begin by finding the NOTE which is on the floor.
- The Scrapbook item is the PILLOW on the end of the Workbench.
- Now you have to find the LETTER. It is up on the tall shelf on the left.
- You can’t reach the LETTER yet.
- Collect the items on the Find List.
- The SHEARS are on the floor in front.
- The “2” is the gold curlicue in the lower right.
- The Spider is all the way up on the right.
- Return to the Backyard and go on through the gates to the Garden.
The Garden
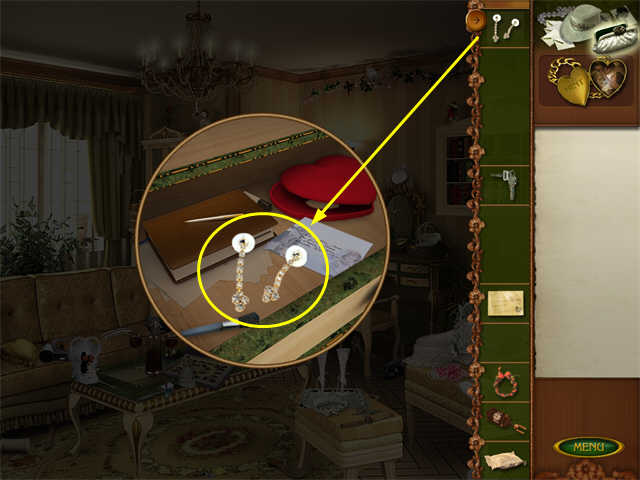
- Begin by finding the NOTE which is on the ground, to the left of the Basket.
- The Scrapbook item is the pair of EARRINGS on the right chair.
- Collect the items on the Find List.
- The two Horses can be hard to find. One is a head on the brick wall just above the Bench. The other is a seahorse on the edge of the right chair.
- The Birdhouse is on the edge of the scene on the left.
- The Feather is on the ground under the table.
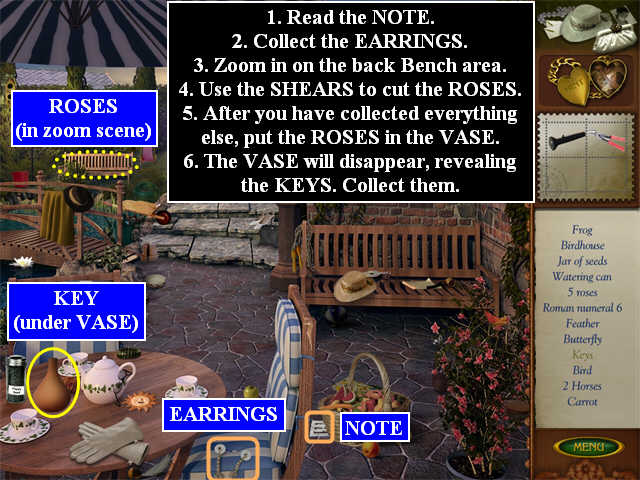
- Click the cursor when it turns into gears near the Bench in the far back to open a zoom scene.
- Use the SHEARS to cut five ROSES in the zoom scene.
- Also look for other items in the zoom scene, like the Frog.
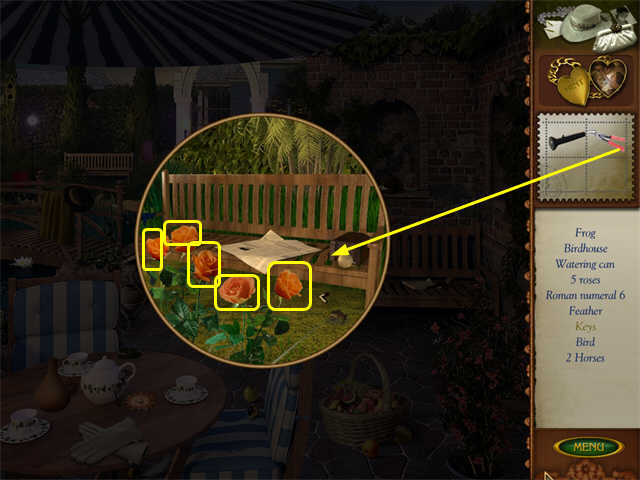
- Once you have collected everything you can, the ROSES will go into your Tools Inventory.
- Put the ROSES in the VASE on the table.
- The VASE will disappear, revealing the KEYS. Collect them.
- Return to the Backyard through the gate in the back.
The Backyard
- Click on the Garage door to zoom in.
- Use the KEYS to unlock the door.
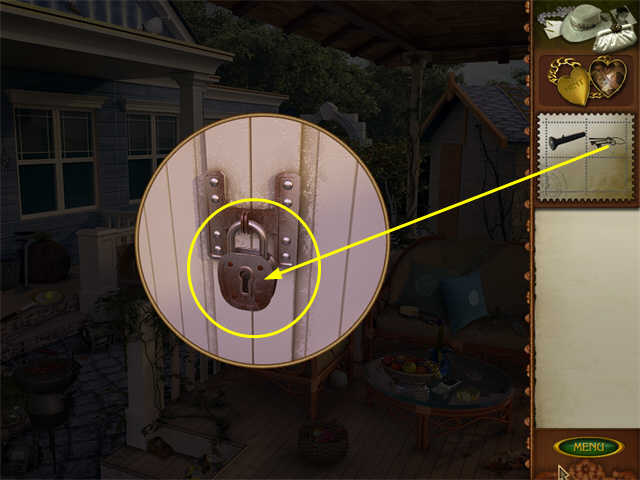
- Enter the Garage.
The Garage
- Begin by finding the NOTE on the floor, on the right.
- The Scrapbook item is the WREATH on the left side.
- Collect the items on the Find List.
- The Paint roller is on the end of the top Shelf on the right.
- The Seatbelt is hanging on the wall above the Shelf on the right.
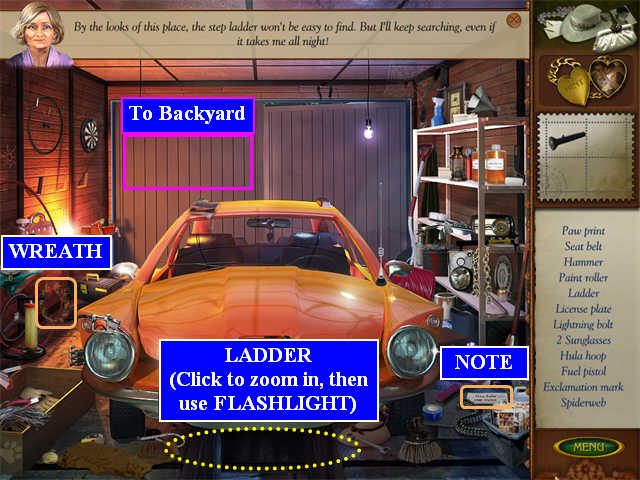
- Click underneath the front of the Car where the cursor turns into gears.
- A zoom scene will pop up, but it is completely black!
- Click on the FLASHLIGHT in your Tools Inventory. Now, when you move your cursor around the zoom scene, a small area will be illuminated.
- Collect the LADDER.

- Return to the Backyard and go on through the back door on the left.
- Re-enter the Workshop on the right.
The Workshop
- Time to get the LETTER!
- Click on the LADDER in the Tools Inventory.
- Now you have to move your cursor around the scene until the large LADDER appears, then click.
- Try the area just to the right of the blue stool.
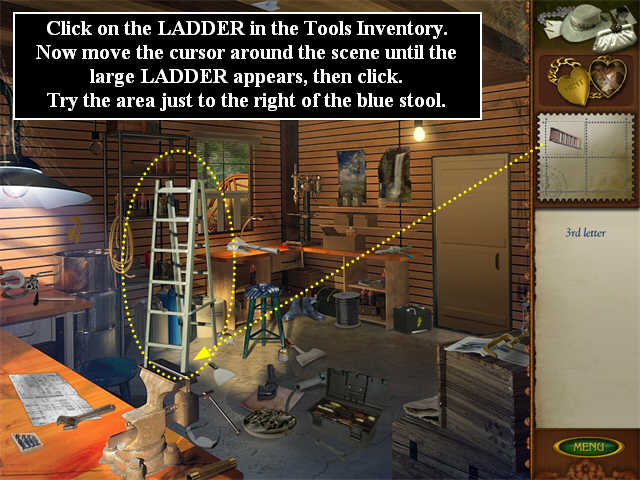
- Once you have the LADDER in the right place, the zoom scene will appear.
- Collect the 3RD LETTER from the right of the box.
- Read the LETTER.
- You will automatically switch to a scene from Cambodia.
The Base Camp
- Begin by finding “ten related pairs.” The relationships are somewhat arbitrary.
- The only items that will count will light up when you click on them.
- You must click on one of the paired items, and then the other; then both will be removed from the scene.
- Here are the first nine pairs:Empty glass and juice bottle Map and Compass Hat and Helmet Two First Aid Kits Telescope and Binoculars TNT and Grenade (on top of Helicopter) Two signs: one with an Aviator symbol, and one with an Exclamation Point Glasses and Goggles Flashlight and Searchlight
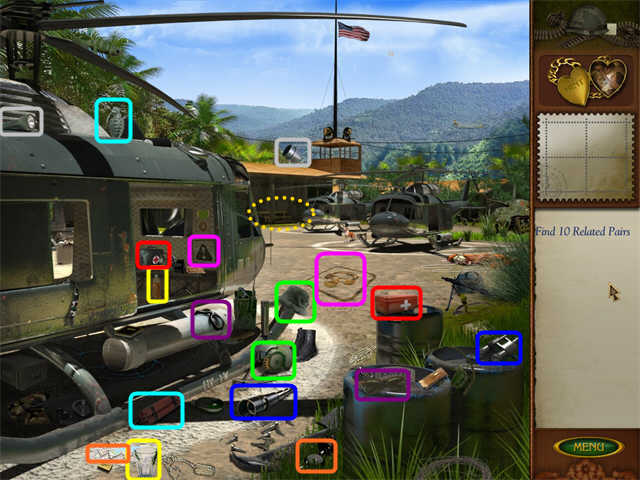
- Now click to zoom in on the table at the back left.
- The last pair is the Harmonica and the Accordion.
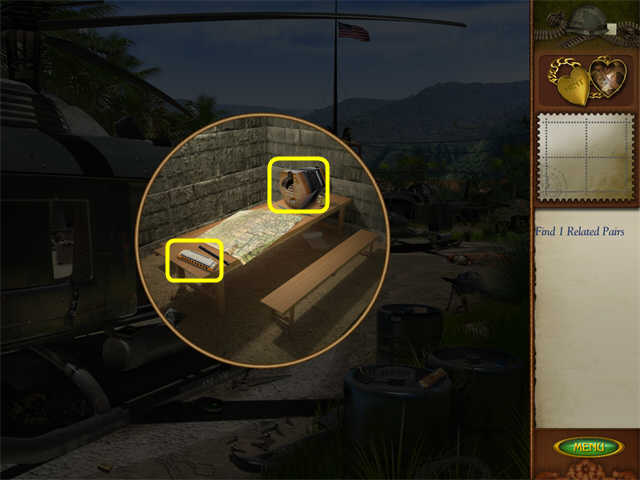
- This will trigger a mini-game.
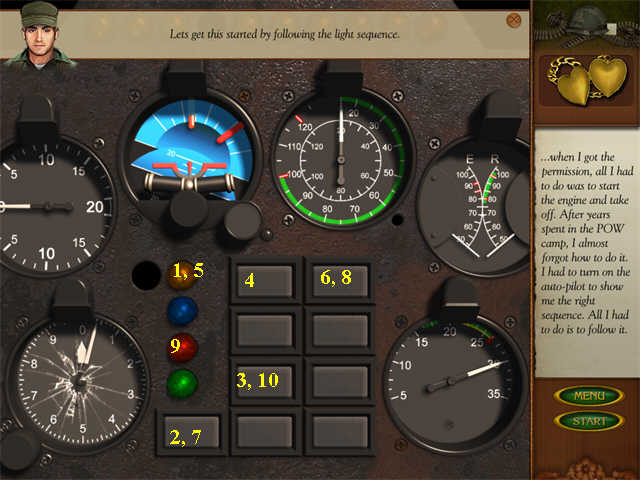
Base Camp Mini-game
- This is a repeat-the-sequence mini-game.
- Each round adds one step to the previous sequence.
- You will get two chances for each sequence.
- If you fail, you just move on to the next sequence.
- Solution:
- You will be returned to the house, in the Dressing Room.
Chapter 5: The Fourth Letter
- In this Chapter, you will have to go back and forth between several areas.
- Although you do have some choices, it is recommended that you work in the Dressing Room, then the Hallway, then the Bathroom, then the Dressing Room, and finally the Hallway again.
The Dressing Room
- Once you complete the previous mini-game, you will find yourself back in the house in the Dressing Room.
- Begin by finding the NOTE which is on the floor on the right.
- The Scrapbook item is the CLOCK on the top shelf in the closet.
- Collect the items on the Find List.
- The Tie is a Bow tie.
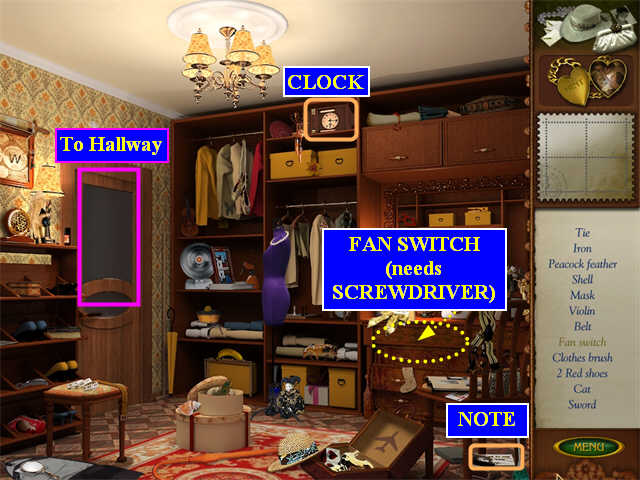
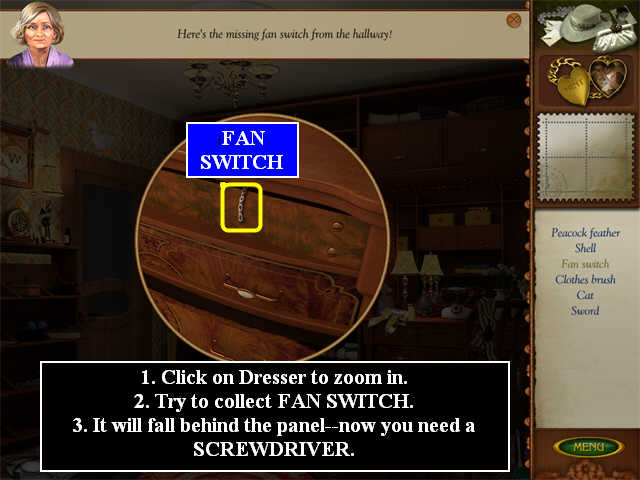
- Zoom in on the Dresser on the right.
- You can see the FAN HANDLE; try to collect it.
- It will fall behind the panel. You will have to find the SCREWDRIVER in another room.
- Once you have collected everything you can, go out into the Hallway.
The Hallway
- Begin by finding the NOTE on the floor, on the right.
- The Scrapbook item is the KEY which is hanging on the wall to the left of the Bathroom door.
- Examine the Ceiling FAN. You can’t fix it yet, but the game won’t let you proceed until you look at it.
- Collect the items on the Find List.
- The Pointer is the wooden stick on the floor.
- The Inkpot is the black bottle on the leftmost shelf.
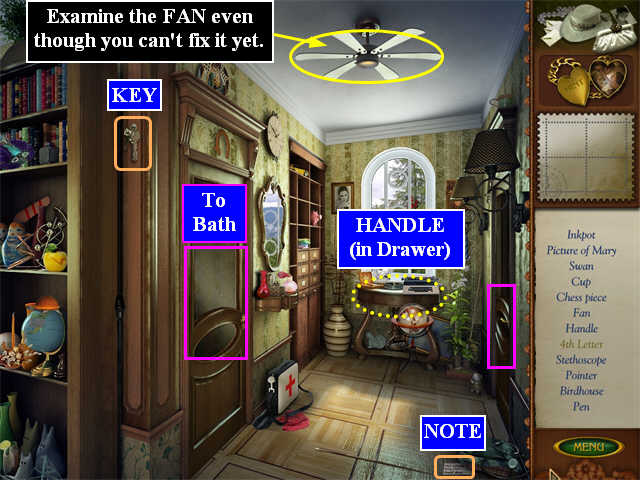
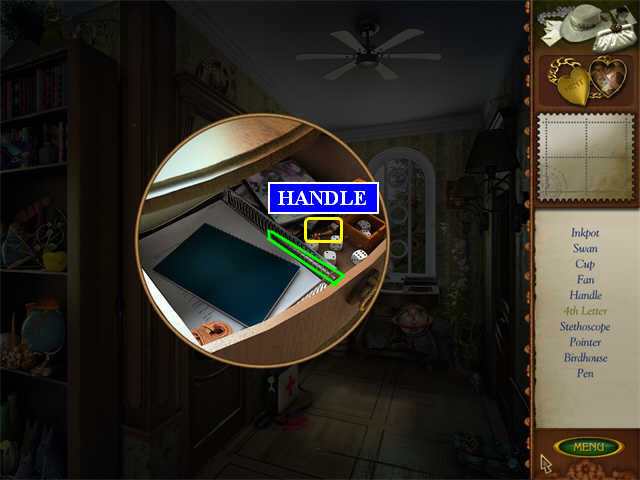
- Zoom in on the drawer in the table by the window.
- You will be able to collect the HANDLE in the zoom scene.
- Check for other items. The Pen is silver, lying next to the paper basket; you may have to click on the very end to collect it.
- Once you have collected everything, enter the Bathroom through the door on the left.
The Bathroom
- Begin by finding the NOTE on the floor, on the right.
- The Scrapbook item is the DRAFT NOTICE which is on the Stool.
- Collect the items on the Find List.
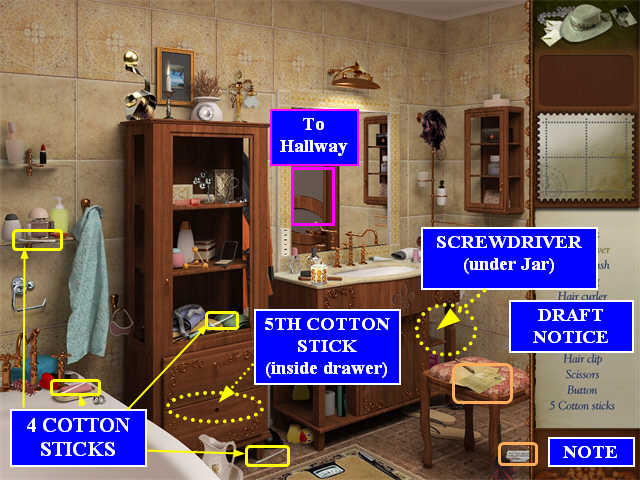
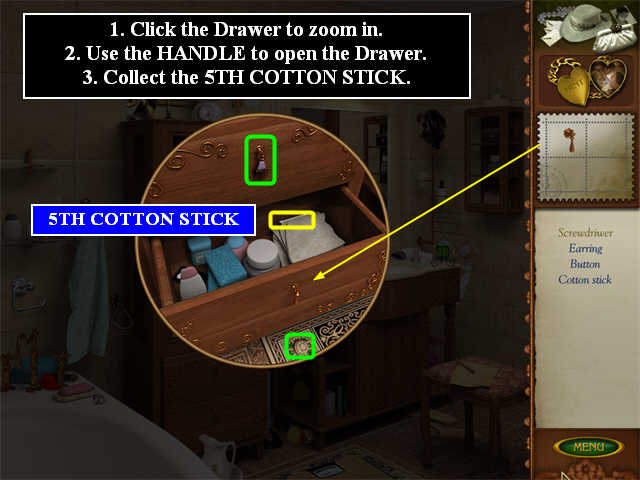
- Click on the Drawer on the left of the Sink to zoom in.
- Use the HANDLE to open the Drawer.
- Collect the 5th COTTON STICK
- Check for other items. The Earring is purple, and is hanging on the handle of the Drawer above the one you opened.
- The Button is on the floor, but you can only see it in the zoom scene.
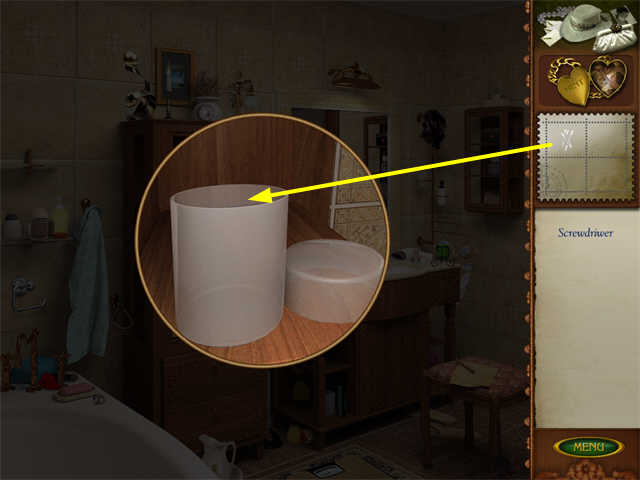
- Once you have all 5 COTTON STICKS, click on the Shelf below the sink on the right to zoom in.
- Put the COTTON STICKS in the Jar.
- The Jar will disappear, and you will see the SCREWDRIVER. Collect it.
- Once you have collected everything, exit to the Hallway by clicking on the reflection of the door in the mirror.
- Go on through the Hallway into the Dressing Room.
The Dressing Room
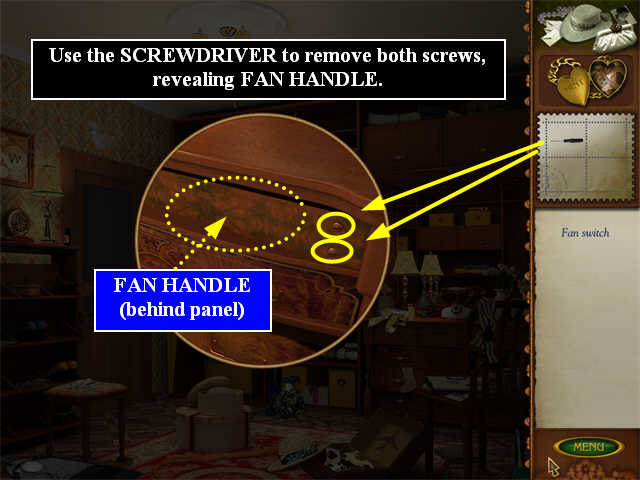
- Click on the Dresser on the right to zoom in.
- Use the SCREWDRIVER by touching its tip to each of the two screws in the zoom scene.
- Collect the FAN HANDLE.
- Return to the Hallway through the door on the left.
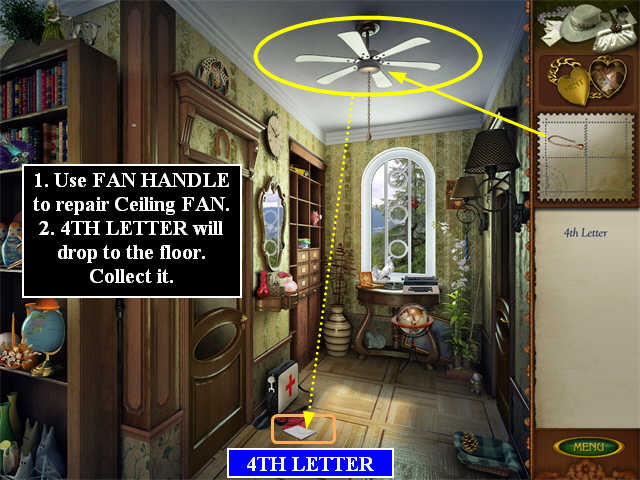
The Hallway
- Click on the FAN HANDLE in inventory; then click on the Ceiling FAN to repair it.
- The 4TH LETTER will fall to the ground. Collect it.
- You will automatically switch to Mary’s Front Yard in 1977.
The Front Yard, 1977
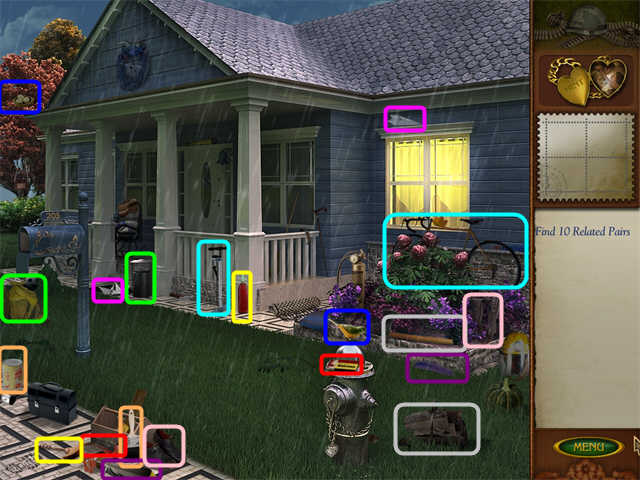
- Begin by finding “ten related pairs.” The relationships are somewhat arbitrary.
- The only items that will count will light up when you click on them.
- You must click on one of the paired items, and then the other; both will be removed from the scene.
- Here are the pairs:Trash Bags and Trashcan Paintbrush and Paint Can Shoes and Boots Bicycle Pump and Bicycle Pipe and Matches Green Bird and Nest in left tree Origami Boat and Paper Airplane Gray Feather and Purple Feather Axe and Firewood Corkscrew and Wine Bottle (looks like a Fire Extinguisher)
- You will return to the present, in the Bedroom.
Chapter 6: The Fourth Letter
- Once you complete the previous scene, you will find yourself back in the house in the Bedroom.
- The instructions tell you to “Check the Pantry,” but they just mean try to open the Cabinet door on the Corner Cabinet. It’s locked.
- Collect the items on the Find List.
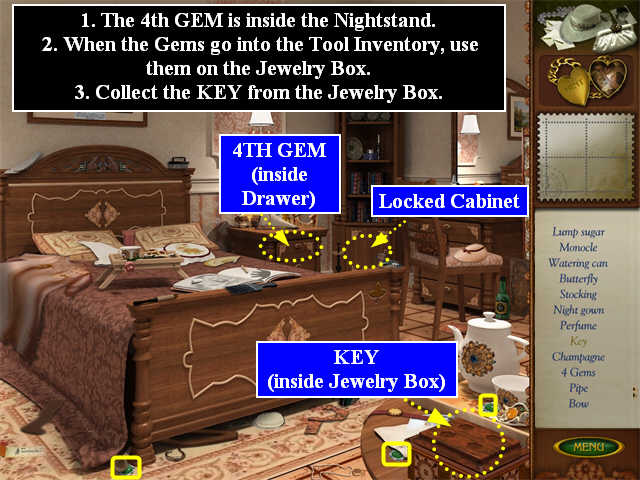
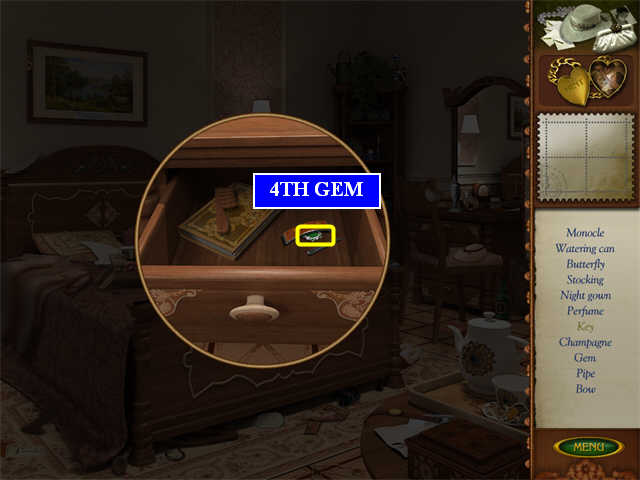
- Zoom in on the Nightstand on the right of the Bed.
- Collect the 4th GEM.
- Once you have collected everything you can, the GEMS will go into the Tool Inventory.
- Use the GEMS on the Jewelry Box in the bottom of the scene.
- The Jewelry Box will open, revealing the KEY. Collect it.
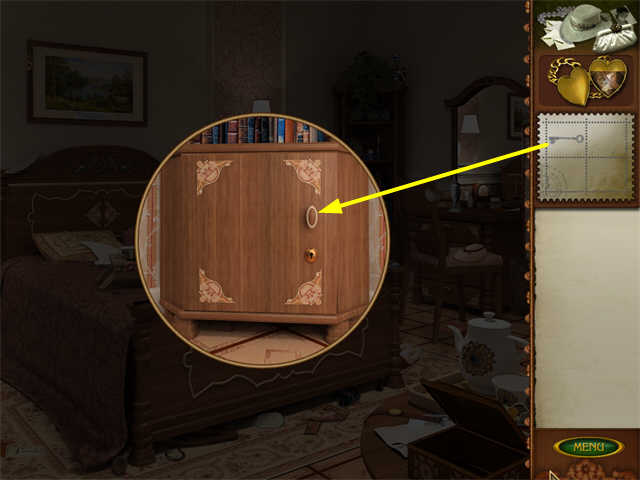
- Click on the Corner Cabinet to zoom in. Use the KEY to open it.
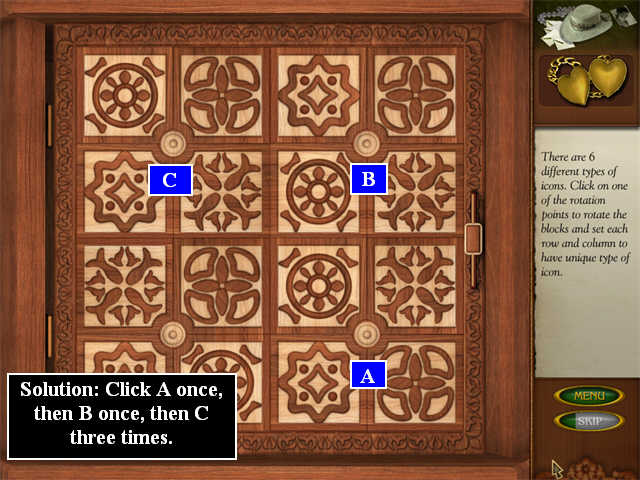
The Cabinet Puzzle
- You must push the four buttons on the puzzle in any sequence that will produce one symbol of each kind in each row and each column.
- Collect the Scrapbook.
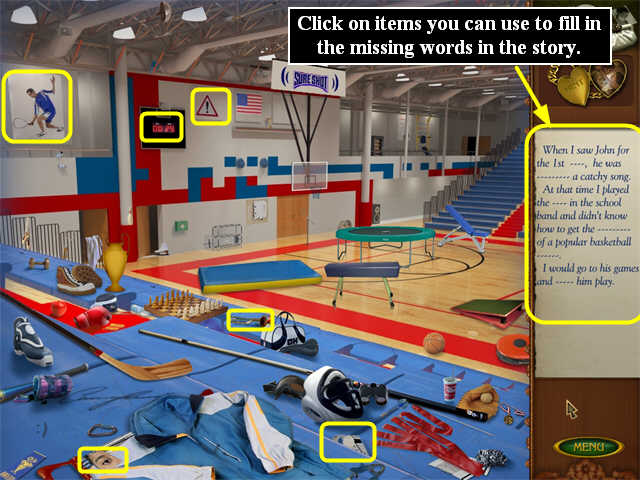
Chapter 7: The Gym
- Now you begin the second phase of the game.
- As you went through the first part of the game, every time you collected a Scrapbook item, you saw a little bit of the story of John and Mary.
- Now you are going to put the items back in the Scrapbook, and then fill in the blanks in the story by using other items on the Scrapbook page.
- Click on the BASKETBALL in the Scrapbook Items.
- Move your cursor around the scene until you see the large BASKETBALL appear. Click there to put the BASKETBALL into the scene.
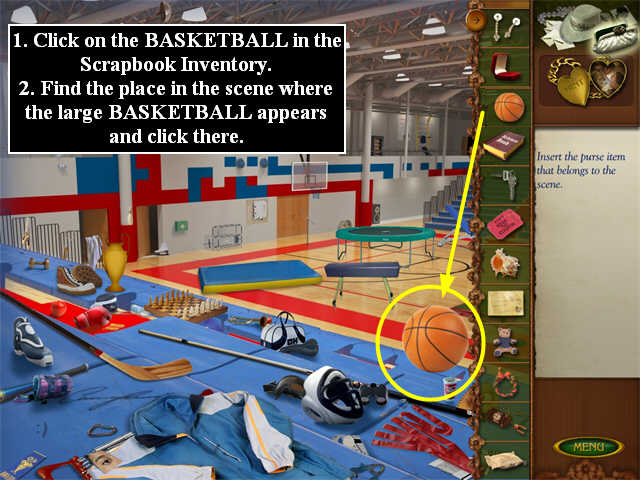
- The first part of a story will appear on the right. Search the scene for items that could fill in the blanks. You’re not looking for an exact match.
- For the first part of the story, the clues are:CLOCK for time WHISTLE for whistling HORN EXCLAMATION POINT for attention TENNIS PLAYER for player EYE for watch
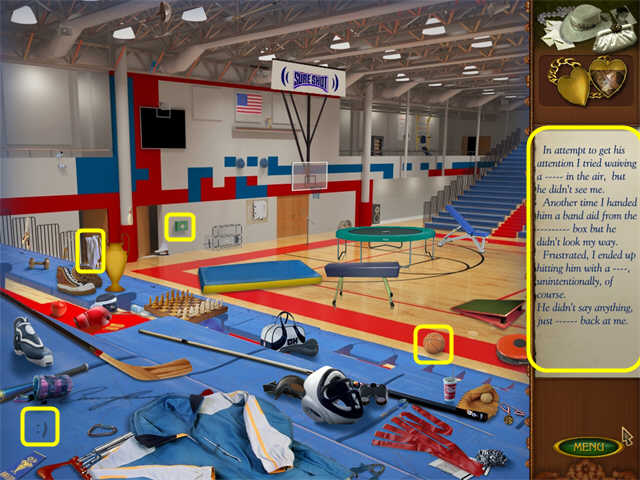
- When you complete the first part of the story, you will get the second part. Continue selecting items to fill in the blanks.
- For the second part of the story the clues are:TOWEL FIRST AID BASKETBALL SMILEY FACE for smiled
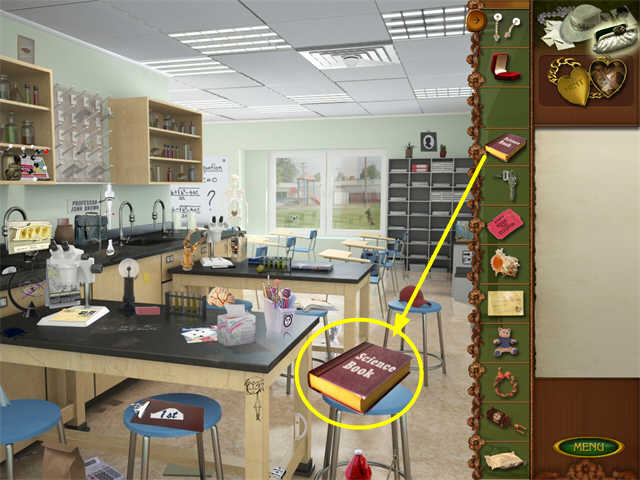
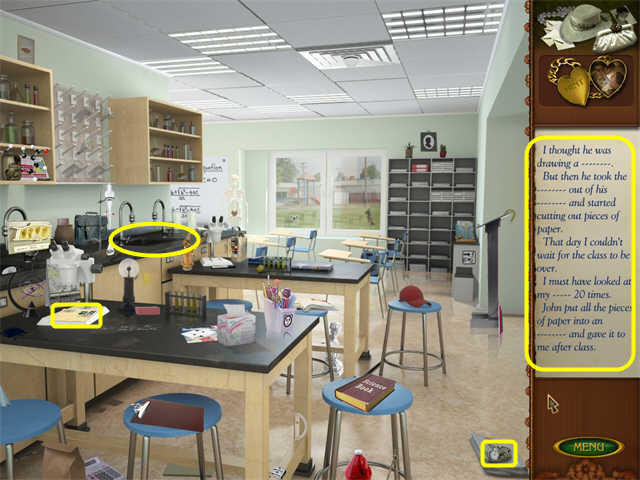
Chapter 8: Chemistry Class
- Now you are going to put the items back in the Scrapbook; then fill in the blanks in the story by using other items on the Scrapbook page.
- Click on the SCIENCE BOOK in the Scrapbook Items.
- Move your cursor around the scene until you see the large SCIENCE BOOK appear. Click there to put the SCIENCE BOOK into the scene.
- The first part of a story will appear on the right. Search the scene for items that could fill in the blanks. You’re not looking for an exact match.
- For the first part of the story, the clues are:1st JOHN BROWN BRAIN DRAWING of a girl
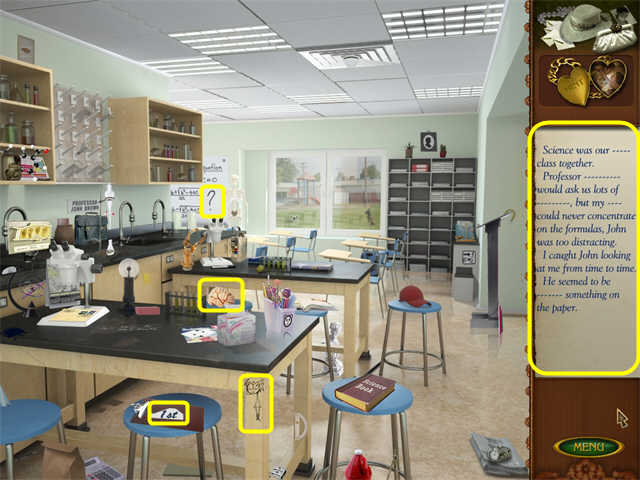
- When you complete the first part of the story, you will get the second part. Continue selecting items to fill in the blanks.
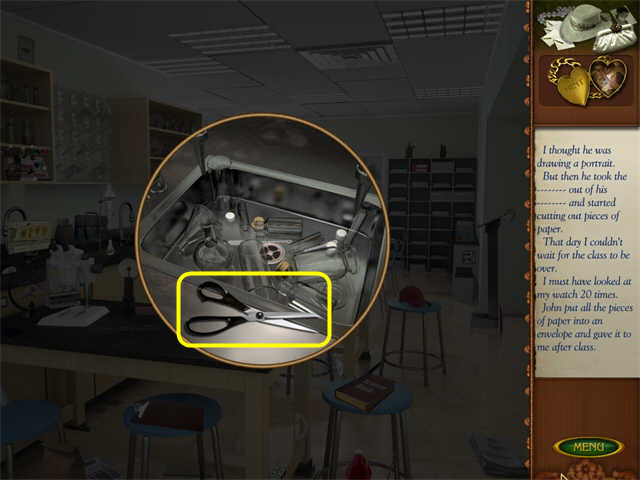
- For the second part of the story the clues are:PORTRAIT SCISSORS (in zoom scene on the left) BACKPACK WATCH ENVELOPE
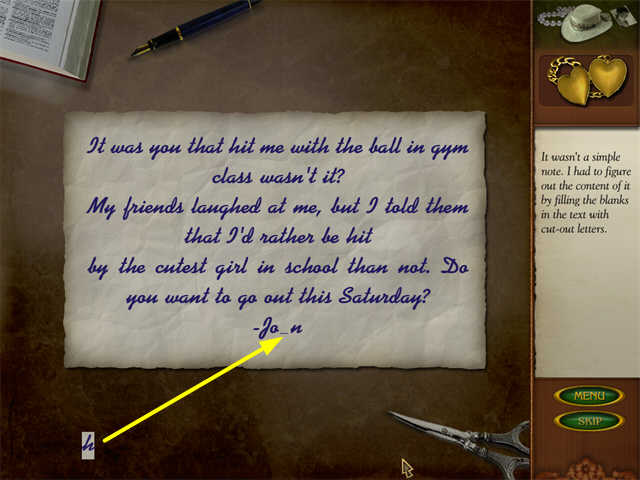
Note Mini-game
- Drag the letters to complete the note.
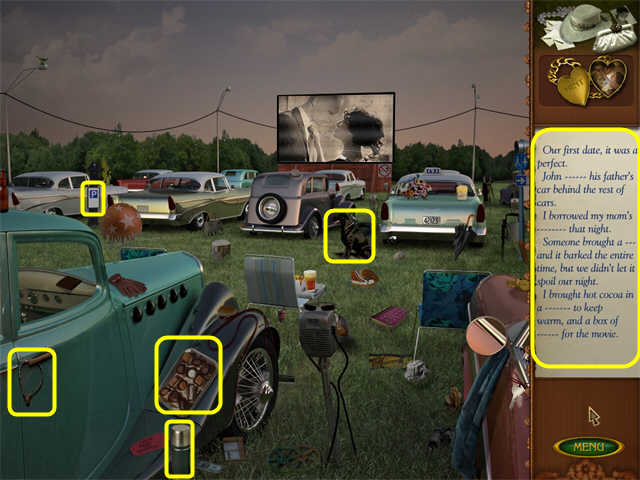
Chapter 9: The Movies
- Now you are going to put the items back in the Scrapbook, and then fill in the blanks in the story by using other items on the Scrapbook page.
- Click on the TICKETS in the Scrapbook Items.
- Move your cursor around the scene until you see the large TICKETS appear. Click there to put the TICKETS into the scene.
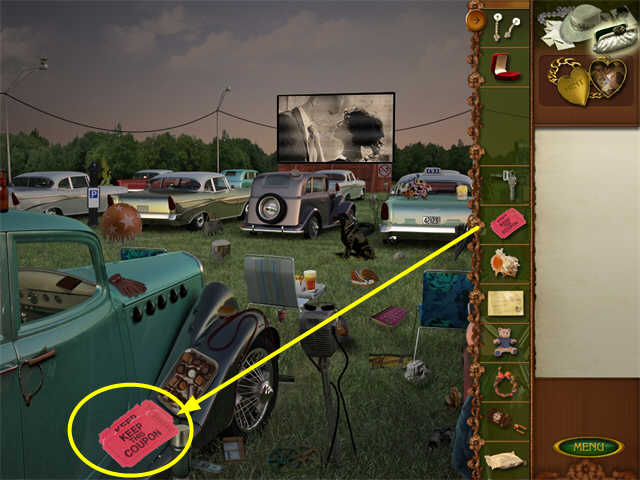
- The first part of a story will appear on the right. Search the scene for items that could fill in the blanks. You’re not looking for an exact match.
- For the first part of the story, the clues are:PARKING SIGN for parked NECKLACE DOG THERMOS SWEETS
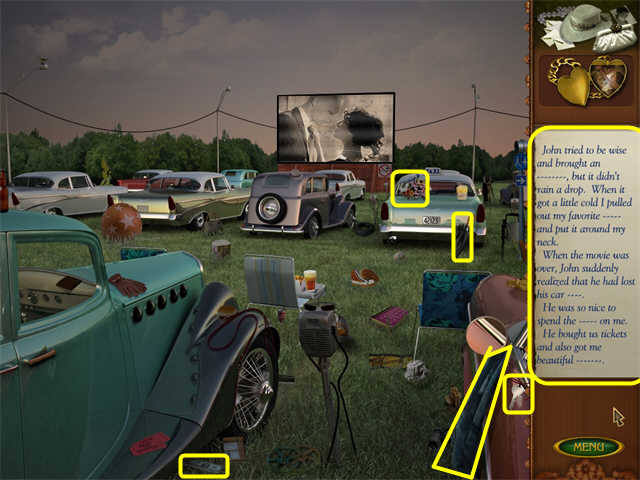
- When you complete the first part of the story, you will get the second part. Continue selecting items to fill in the blanks.
- For the second part of the story the clues are:UMBRELLA SCARF KEYS MONEY FLOWERS
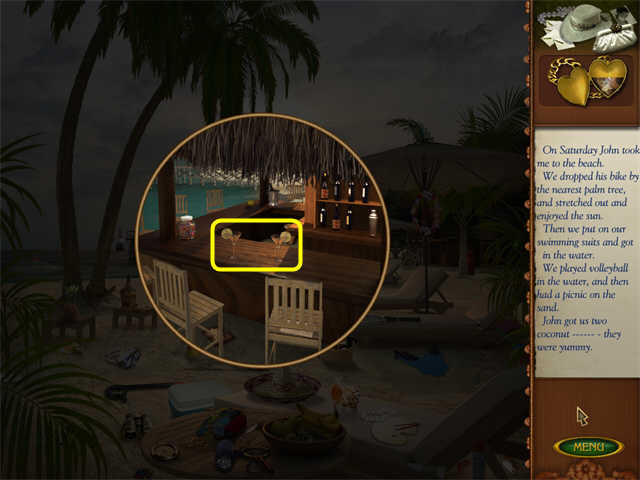
Chapter 10: The Beach
- Now you are going to put the items back in the Scrapbook, and then fill in the blanks in the story by using other items on the Scrapbook page.
- Click on the SEASHELL in the Scrapbook Items.
- Move your cursor around the scene until you see the large SEASHELL appear. Click there to put the SEASHELL into the scene.
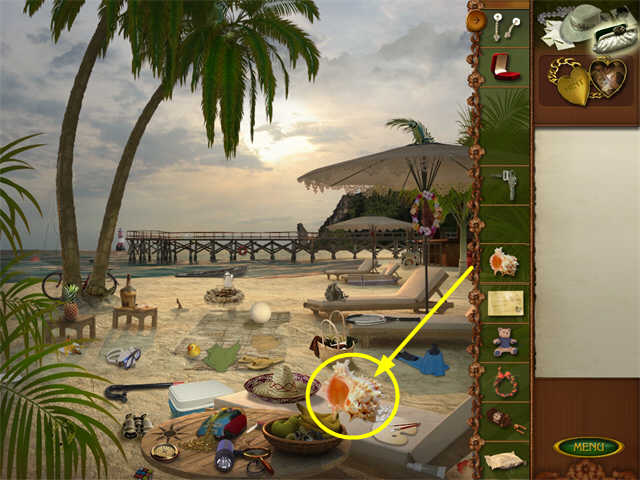
- The first part of a story will appear on the right. Search the scene for items that could fill in the blanks. You’re not looking for an exact match—more like rebus clues.
- For the first part of the story, the clues are:BIKE SUN EMBLEM for Sun SWIMMING SUIT for swimming suits VOLLEYBALL COCKTAIL GLASSES for drinks (in the zoom scene)
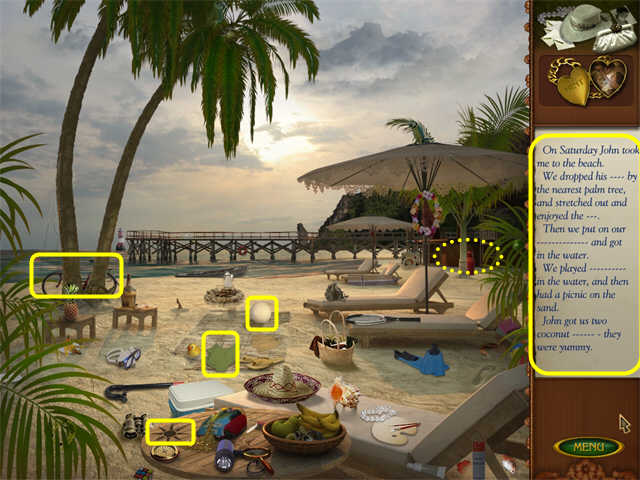
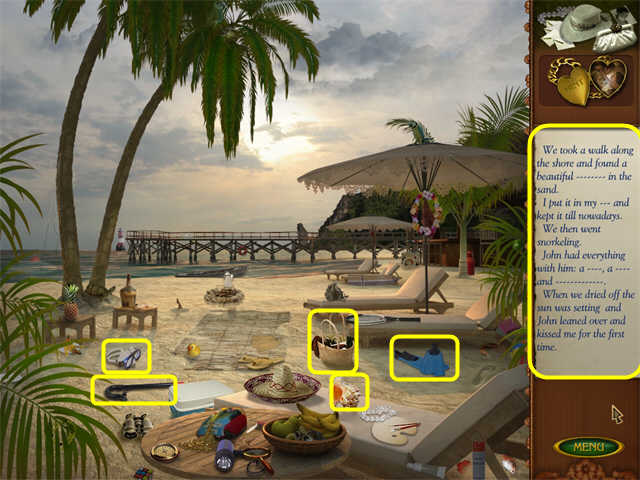
- When you complete the first part of the story, you will get the second part. Continue selecting items to fill in the blanks.
- For the second part of the story the clues are:SEASHELL BAG MASK SNORKEL for tube SWIMMING FINS
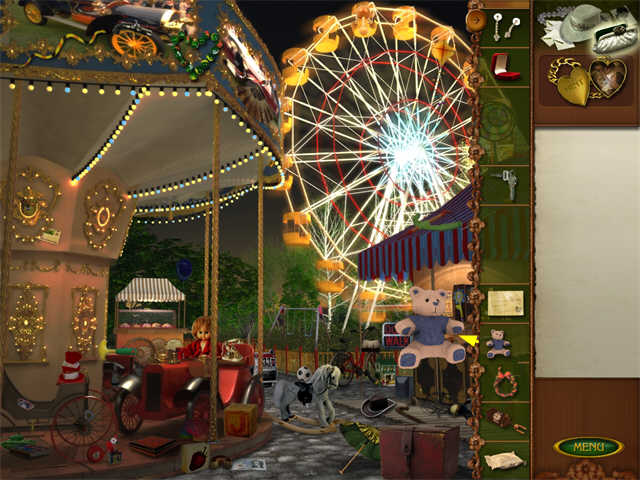
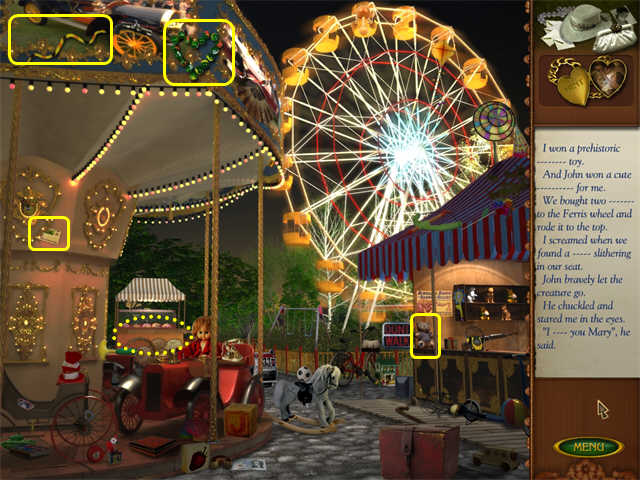
Chapter 11: The Carnival
- Now you are going to put the items back in the Scrapbook, and then fill in the blanks in the story by using other items on the Scrapbook page.
- Click on the TEDDY BEAR in the Scrapbook Items.
- Move your cursor around the scene until you see the large TEDDY BEAR appear. Click there to put the TEDDY BEAR into the scene.
- The first part of a story will appear on the right. Search the scene for items that could fill in the blanks. You’re not looking for an exact match.
- For the first part of the story, the clues are:HAT UMBRELLA MASK (in the zoom scene) BALLOON for balloons
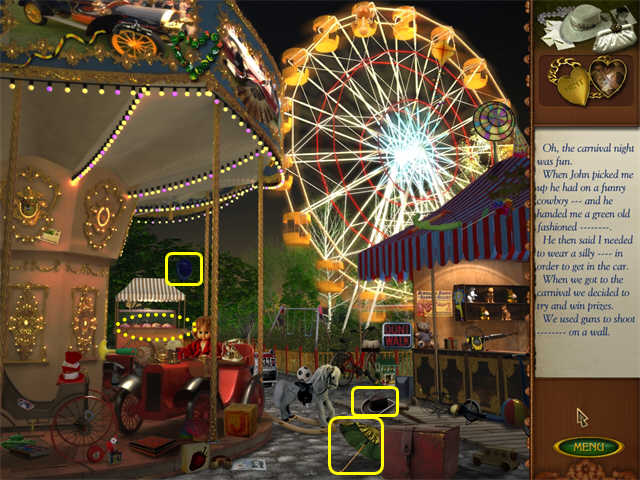

- When you complete the first part of the story, you will get the second part. Continue selecting items to fill in the blanks.
- For the second part of the story the clues are:DINOSAUR (in the zoom scene) TEDDY BEAR SNAKE TICKET for tickets HEART for love
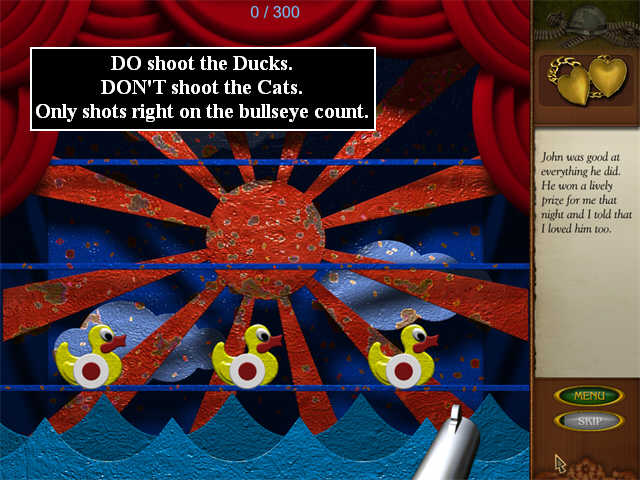
Carnival Targets Mini-game
- Position the rifle sight on the bull’s-eye and click.
- DO shoot the Ducks.
- DON’T shoot the Cats.
- There are three rounds.
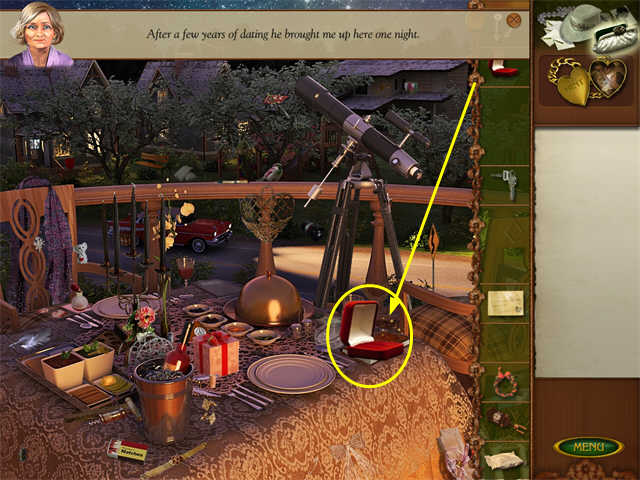
Chapter 12: The Proposal
- Now you are going to put the items back in the Scrapbook, and then fill in the blanks in the story by using other items on the Scrapbook page.
- Click on the RINGBOX in the Scrapbook Items.
- Move your cursor around the scene until you see the large RINGBOX appear. Click there to put the RINGBOX into the scene.
- The first part of a story will appear on the right. Search the scene for items that could fill in the blanks. You’re not looking for an exact match.
- For the first part of the story, the clues are:TELESCOPE WINE MATCHES CANDLES
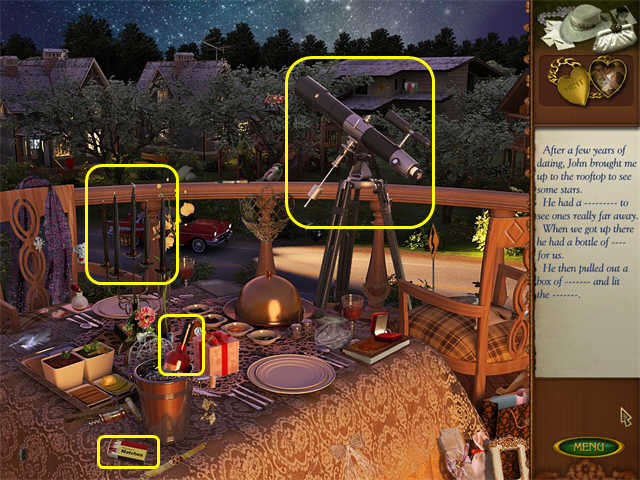
- When you complete the first part of the story, you will get the second part. Continue selecting items to fill in the blanks.
- For the second part of the story the clues are:BIRD for birds PRESENT PICTURE FRAME SIGN RINGBOX
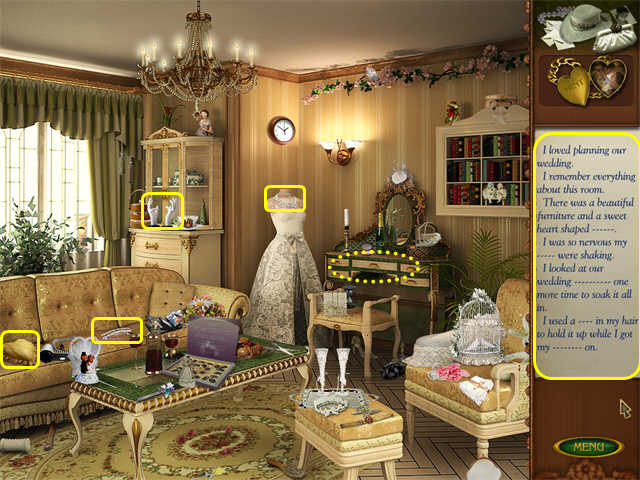
Chapter 13: Wedding Day
- Now you are going to put the items back in the Scrapbook, and then fill in the blanks in the story by using other items on the Scrapbook page.
- Click on the EARRINGS in the Scrapbook Items.
- Click on the Dressing Table to open the Drawer. Move your cursor around the zoom scene until you see the large EARRINGS appear. Click there to put the EARRINGS into the scene.
- The first part of a story will appear on the right. Search the scene for items that could fill in the blanks. You’re not looking for an exact match.
- For the first part of the story, the clues are:PILLOW HANDS CLIP INVITATION (in zoom scene) NECKLACE (on dress—click precisely on the NECKLACE to collect it)
- When you complete the first part of the story, you will get the second part. Continue selecting items to fill in the blanks.
- For the second part of the story the clues are:PRESENT SWEETS CLOCK for time MIRROR

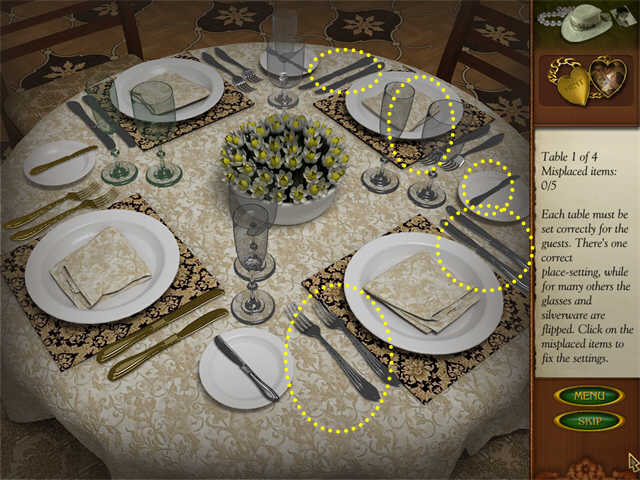
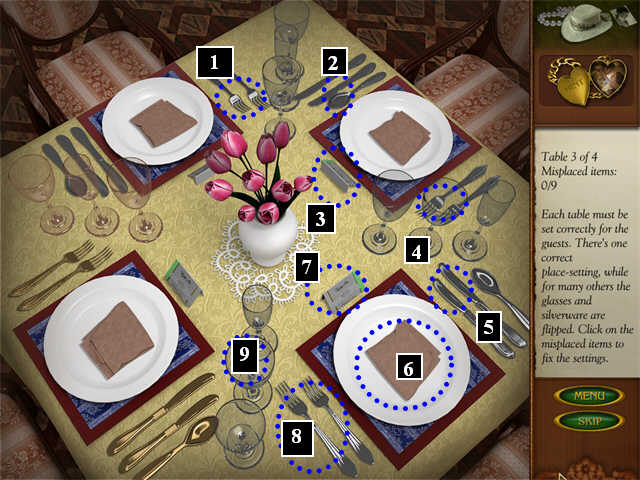
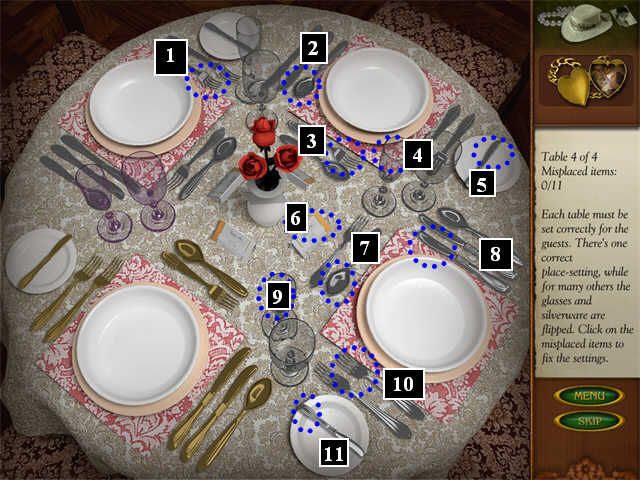
Table Mini-game
- Each round has one place setting that is gold and three that are silver.
- You must change the silver ones so they match the gold one exactly.
- Once you change something to its correct position, it will lock in place.
- Look for silverware and glassware in the wrong order, napkins with the fold on the wrong side, etc.
- HINTS are available.
- You may skip the mini-game, if you prefer, by clicking the SKIP button.
- For this one, two of the placecards have the green stripe on the right instead of the left.
- For this one, carefully note the position of the Fork and Spoon above the plate.
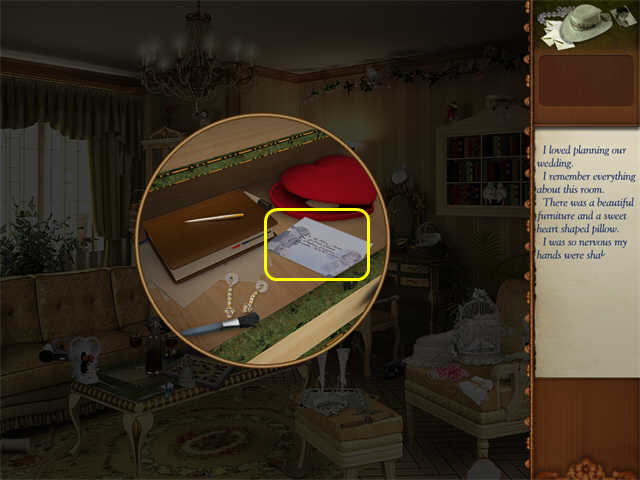
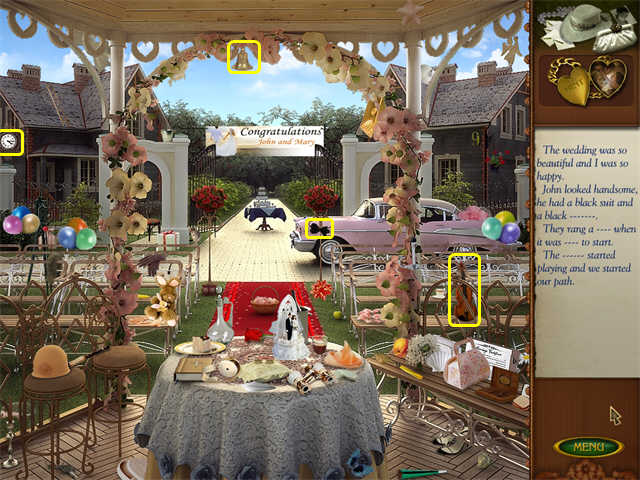
Chapter 14: The Wedding
- Now you are going to put the items back in the Scrapbook, and then fill in the blanks in the story by using other items on the Scrapbook page.
- Click on the PILLOW in the Scrapbook Items.
- Click on the Dressing Table to open the Drawer. Move your cursor around the zoom scene until you see the large PILLOW appear. Click there to put the PILLOW into the scene.
- The first part of a story will appear on the right. Search the scene for items that could fill in the blanks. You’re not looking for an exact match.
- For the first part of the story, the clues are:BOW TIE BELL CLOCK for time VIOLIN
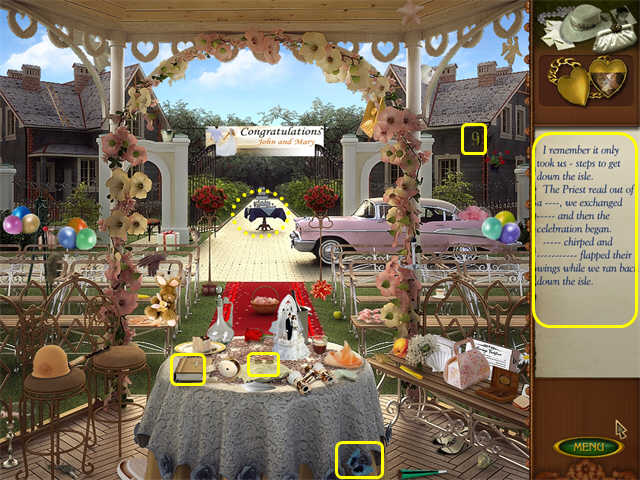
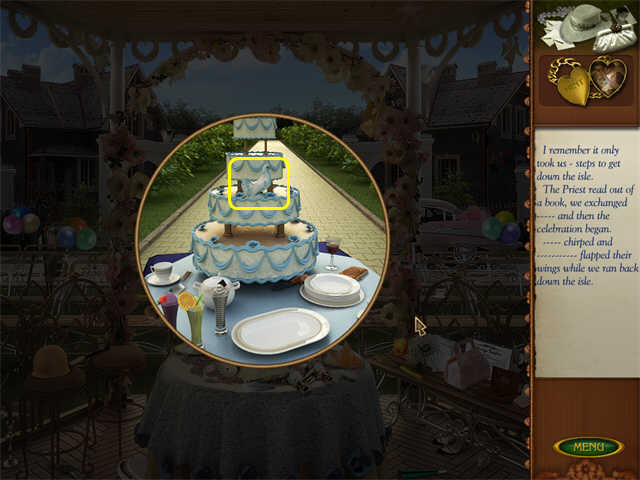
- When you complete the first part of the story, you will get the second part. Continue selecting items to fill in the blanks.
- For the second part of the story the clues are:9 BIBLE RINGS DOVE for birds (in zoom scene) BUTTERFLY for butterflies
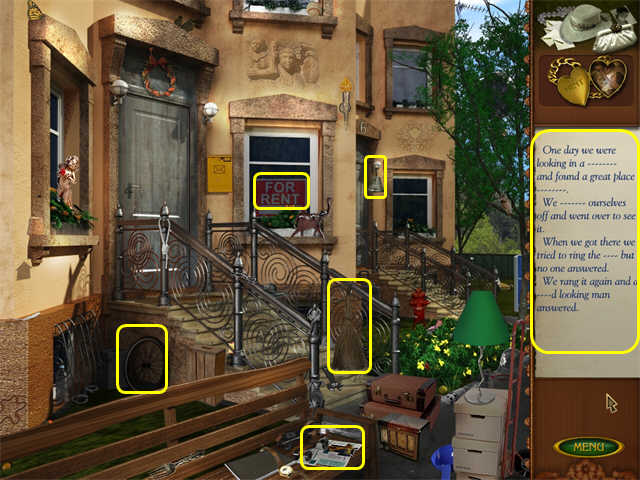
Chapter 15: Moving Day
- Now you are going to put the items back in the Scrapbook, and then fill in the blanks in the story by using other items on the Scrapbook page.
- Click on the WREATH in the Scrapbook Items.
- Click on the Dressing Table to open the Drawer. Move your cursor around the zoom scene until you see the large WREATH appear. Click there to put the WREATH into the scene.
- The first part of a story will appear on the right. Search the scene for items that could fill in the blanks. You’re not looking for an exact match.
- For the first part of the story, the clues are:MAGAZINE FOR RENT sign BROOM for brushed BELL TIRE
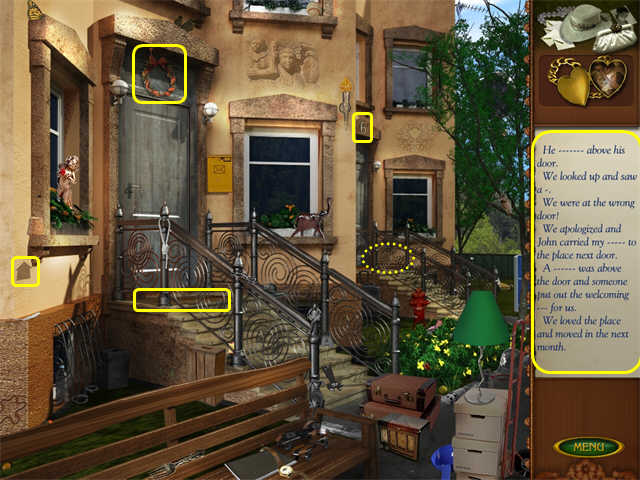
- When you complete the first part of the story, you will get the second part. Continue selecting items to fill in the blanks.
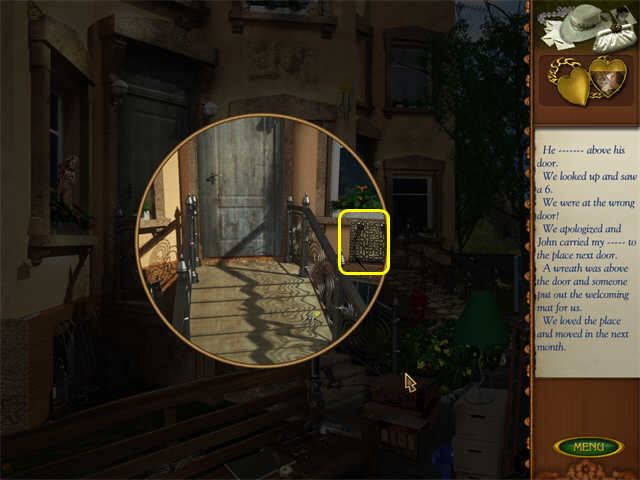
- For the second part of the story the clues are:UP ARROW for pointed 6 PURSE (in zoom scene) WREATH MAT
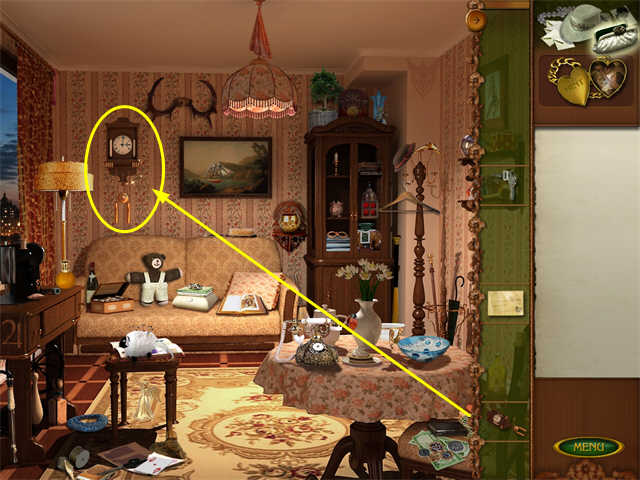
Chapter 16: The Apartment
- Now you are going to put the items back in the Scrapbook, and then fill in the blanks in the story by using other items on the Scrapbook page.
- Click on the CLOCK in the Scrapbook Items.
- Click on the Dressing Table to open the Drawer. Move your cursor around the zoom scene until you see the large CLOCK appear. Click there to put the CLOCK into the scene.
- The first part of a story will appear on the right. Search the scene for items that could fill in the blanks. You’re not looking for an exact match.
- For the first part of the story, the clues are:HAT COINS for change CLOCK BUG BEAR CAT (in zoom scene)
- When you complete the first part of the story, you will get the second part. Continue selecting items to fill in the blanks.
- For the second part of the story the clues are:BABY PLANT 7 (in zoom scene)
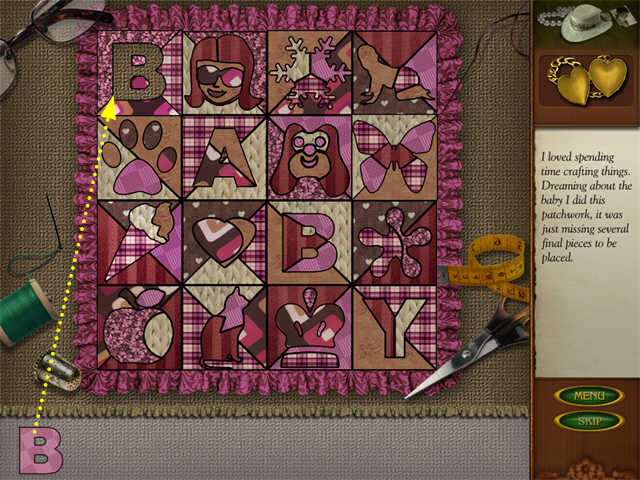
Quilt Jigsaw Puzzle
- Fill in the pieces of the quilt.
- Pieces will lock in place when set correctly.
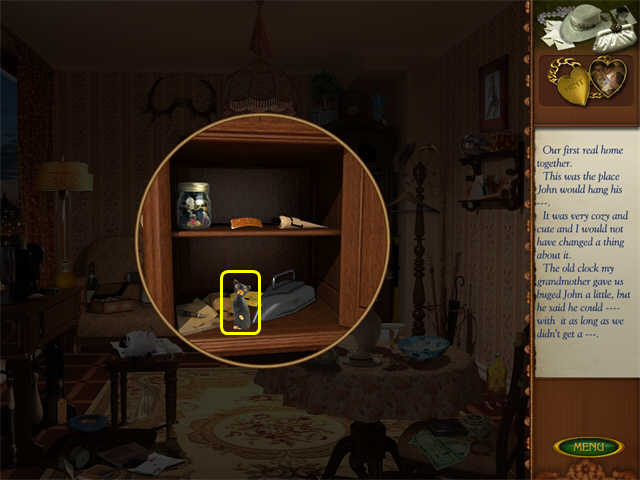
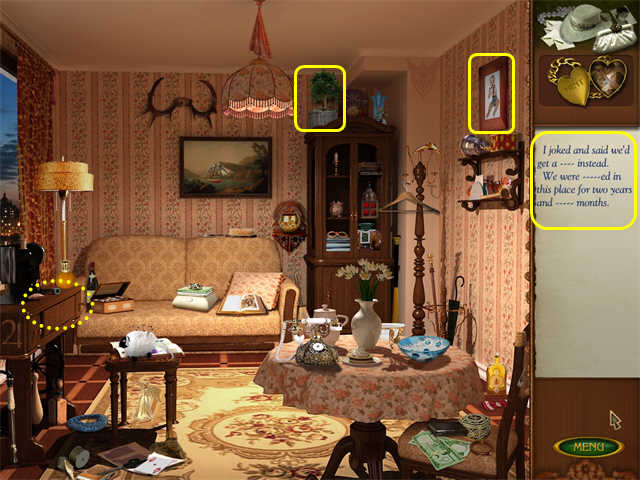
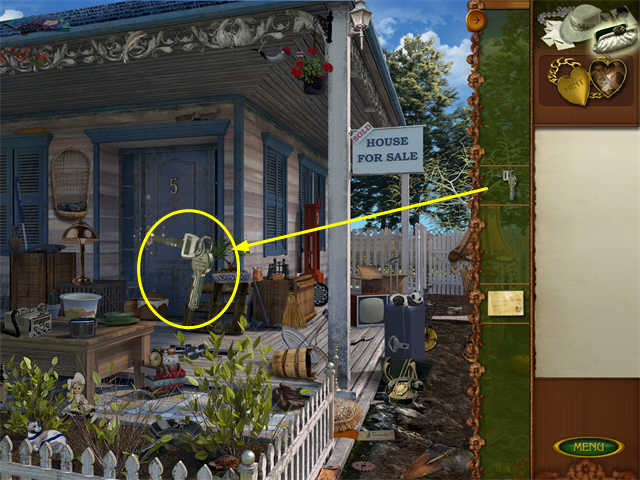
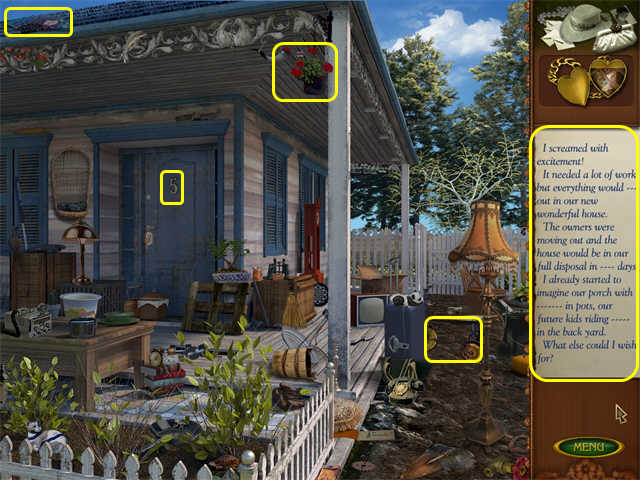
Chapter 17: The House
- Now you are going to put the items back in the Scrapbook, and then fill in the blanks in the story by using other items on the Scrapbook page.
- Click on the KEYS in the Scrapbook Items.
- Click on the Dressing Table to open the Drawer. Move your cursor around the zoom scene until you see the large KEYS appear. Click there to put the KEYS into the scene.
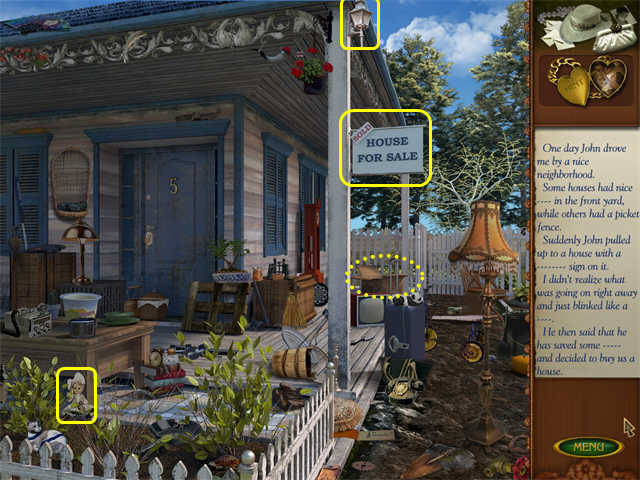
- The first part of a story will appear on the right. Search the scene for items that could fill in the blanks. You’re not looking for an exact match.
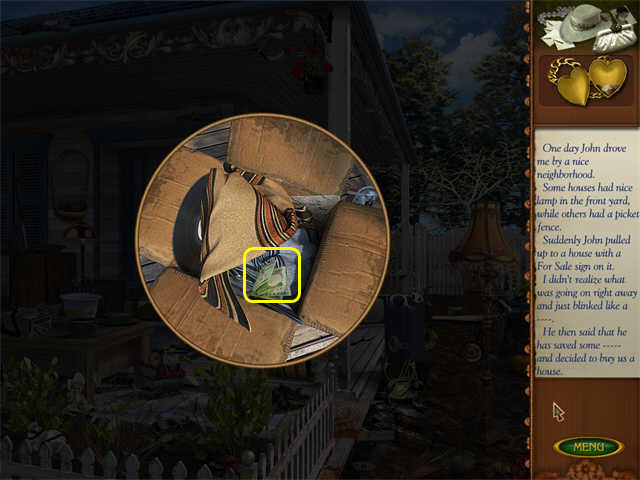
- For the first part of the story, the clues are:LAMP HOUSE FOR SALE DOLL MONEY (in zoom scene)
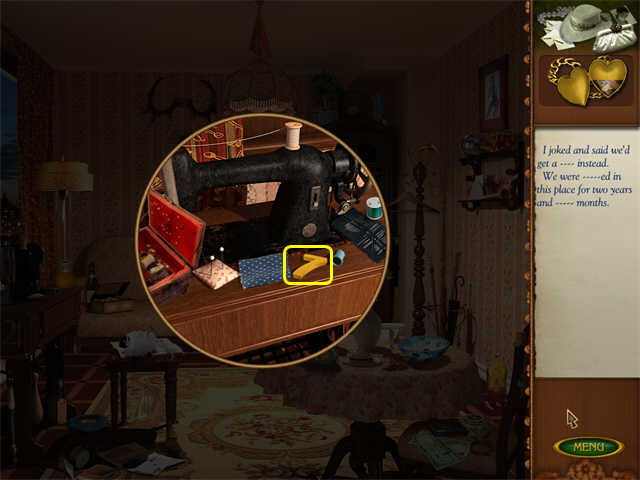
- When you complete the first part of the story, you will get the second part. Continue selecting items to fill in the blanks.
- The same translation issues occur in the second part of the story. “It needed a lot of work but everything would fan out in our new wonderful house!”
- For the second part of the story the clues are:FAN 5 FLOWERS BIKE for bikes
Chapter 18: The Army Letter
- Now you are going to put the items back in the Scrapbook, and then fill in the blanks in the story by using other items on the Scrapbook page.
- Click on the ENVELOPE in the Scrapbook Items.
- Click on the Dressing Table to open the Drawer. Move your cursor around the zoom scene until you see the large ENVELOPE appear. Click there to put the ENVELOPE into the scene.
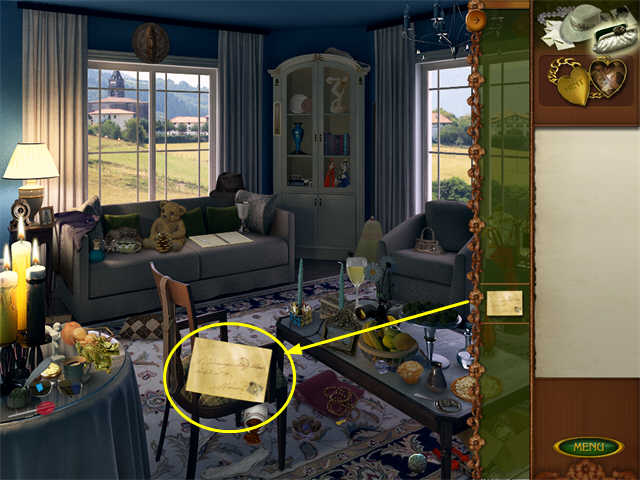
- The first part of a story will appear on the right. Search the scene for items that could fill in the blanks. You’re not looking for an exact match.
- For the first part of the story, the clues are:CLOCK BROOM POPCORN SPOON (in zoom scene) COFFEE
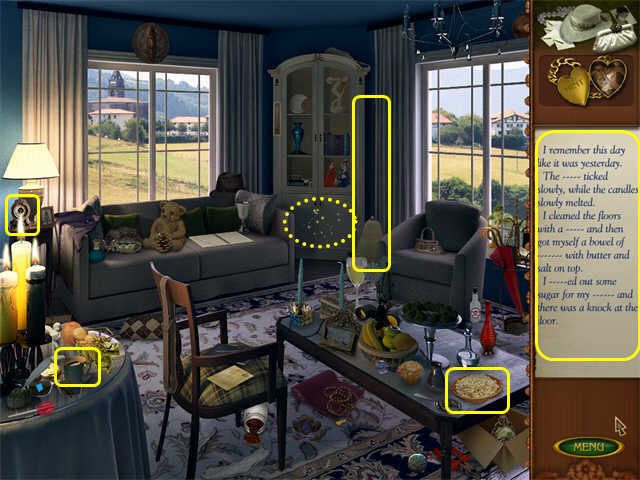
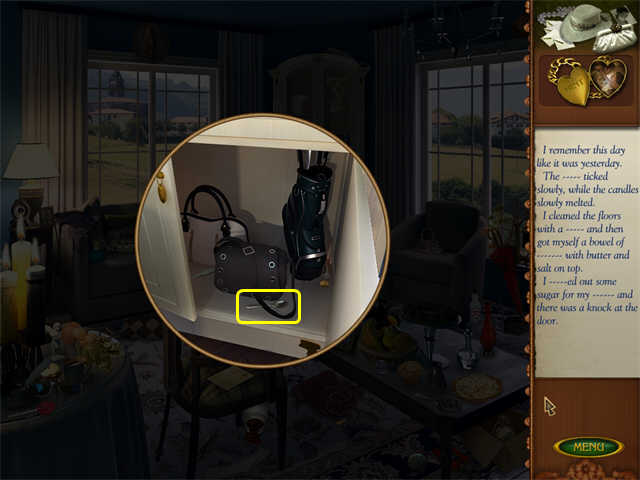
- When you complete the first part of the story, you will get the second part. Continue selecting items to fill in the blanks.
- For the second part of the story the clues are:HAT ENVELOPE VIAL
Chapter 19: The Medal
- This begins the third phase of the game. The gameplay for this phase is similar to the Hidden Object Scenes from the first part of the game, except there are no NOTES or LETTERS to search for.
- Collect the items on the Find List.
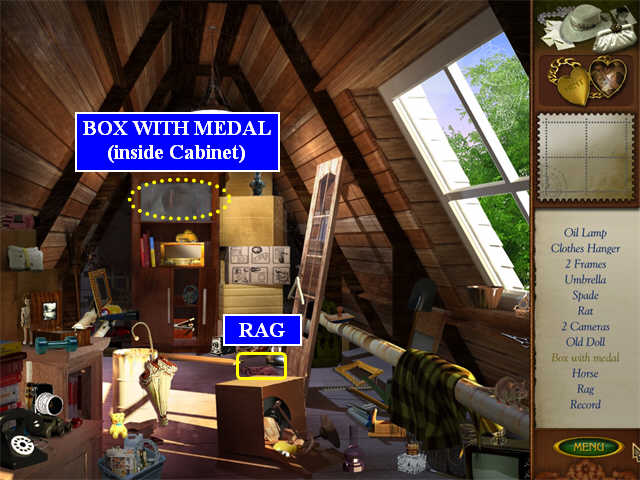
- Click on the Cabinet to zoom in.
- Use the RAG to clean the Cabinet. You will have to click twice to clean it completely.
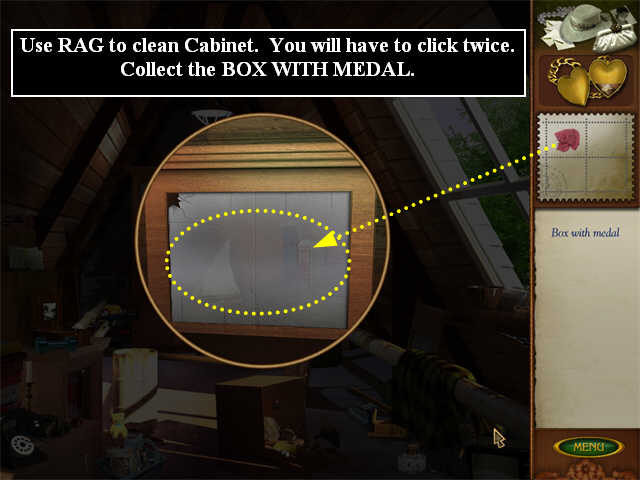
- Collect the BOX WITH THE MEDAL.
- Watch the cut scene. There was another LETTER!
- You will automatically be taken to a hospital scene.
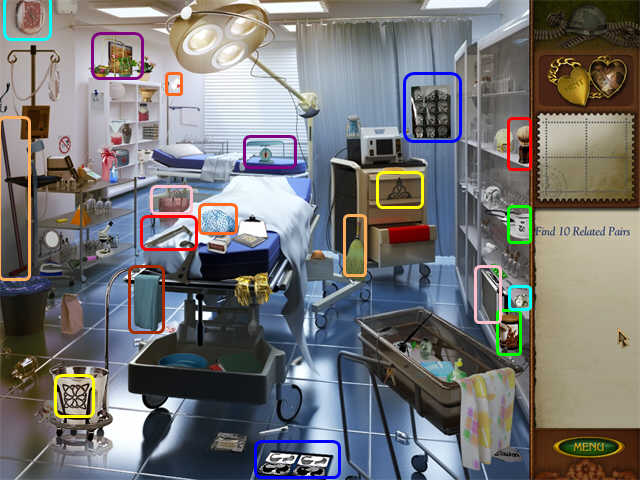
The Hospital
- Begin by finding “ten related pairs.” The relationships are somewhat arbitrary.
- The only items that will count will light up when you click on them.
- You must click on one of the paired items, and then the other; both will be removed from the scene.
- Here are the pairs:Two Symbols Two Brooms Coffee Canister and a Coffee Cup Razor and a Shaving Brush Shower Cap and a Nurse’s Cap Two sets of X-Rays Two Towels (the blue one in front and a white one on the back wall) Briefcase and a Purse Wall Clock and a Wristwatch Two Scales
- You will return to the present, in the Entry.
Chapter 20: Beth
- The gameplay for this chapter is similar to the Hidden Object Scenes from the first part of the game, except there is no NOTE to search for.
- Collect the items on the Find List.
- The Spikelet is a flower in the vase on the table on the right.
- The Tube is standing, vertically, by the bottom post on the Staircase.
- The Comb is lying on the Rug.
- The Clay Mask is hanging on the wall at the top of the Stairs.
- There is one Knife in the zoom scene. The other is a large dagger on the top shelf on the right.
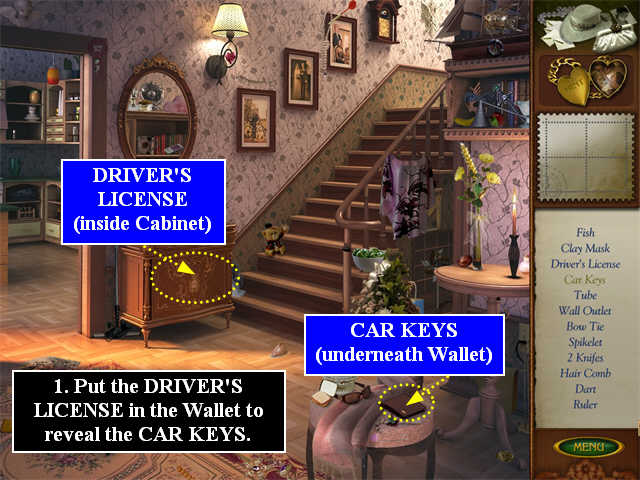
- Click on the Cabinet to zoom in and collect the DRIVER’S LICENSE.
- Put the DRIVER’S LICENSE in the Wallet. The Wallet will disappear revealing the CAR KEYS.
- You will automatically be taken to the Garage.
The Garage
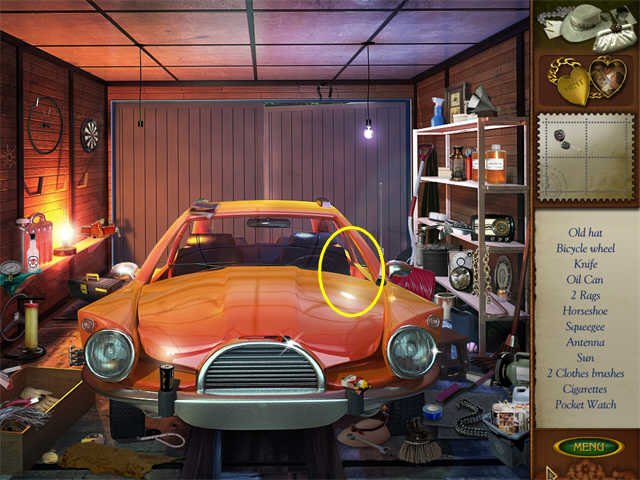
- Collect the items on the Find List.
- The Knife is the red tool lying on the front of the Car just above the grill.
- Click on the Car to zoom in. The game may generate a magnifying glass even in areas where you can’t click to zoom-in in this scene. Try to click in the area shown on the screenshot.
- Put the KEYS in the Door Lock.
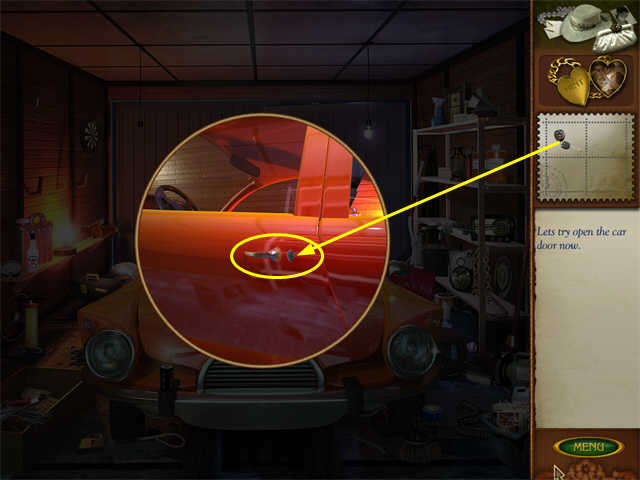
- This will trigger a mini-game.
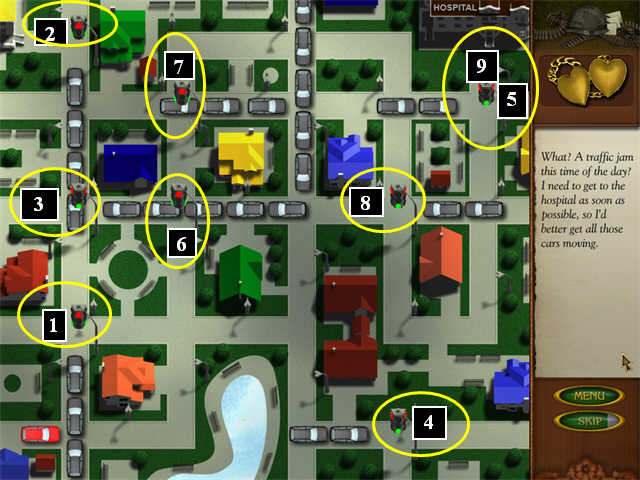
Traffic Light Mini-game
- You must click on the traffic lights to change them from red to green when you want cars to move out of your way. Here is one solution:
Chapter 21: The Hospital
- You will automatically start out in the Lobby.
- In this Chapter you have some choice about where to go. It is recommended that you work in this order: the Lobby, the Emergency Room, the Lobby, the Nurse’s Station, and then the Common Room.
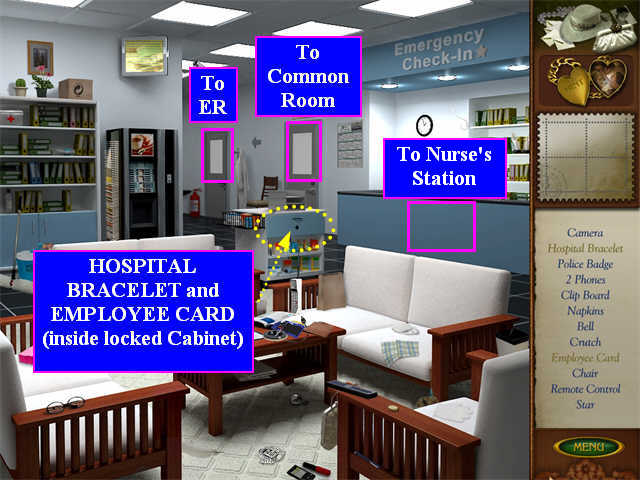
The Lobby
- Collect the items on the Find List.
- The “Crutch” is a Cane on the left end of the loveseat across from you.
- The Napkins are a pink stack on the left loveseat.
- The Camera is a white security camera to the right of the television.
- Click on the Cabinet to zoom in. It’s locked; you’ll need to find the KEY in another area.
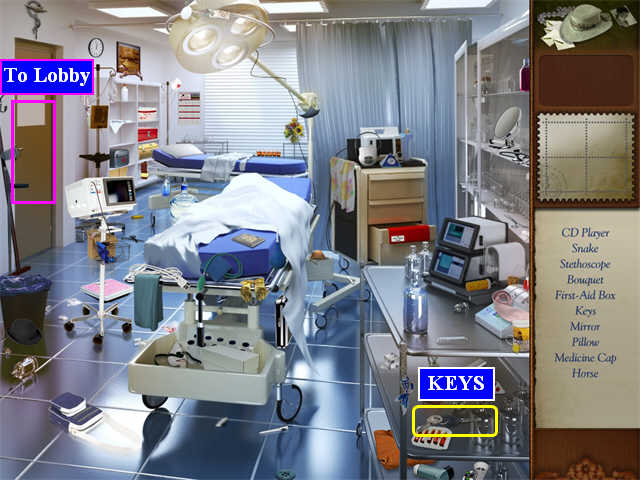
The Emergency Room
- Collect the items on the Find List.
- Return to the Lobby through the door on the left.
The Lobby
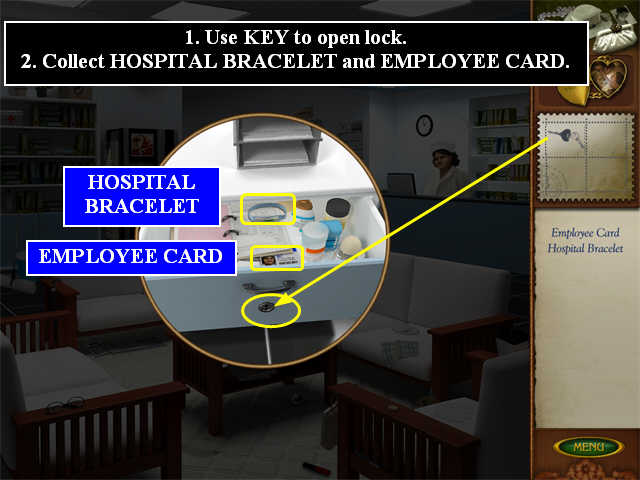
- Click on the Cabinet to zoom in.
- Use the KEY to open the lock.
- Collect the HOSPITAL BRACELET and the EMPLOYEE CARD.
- Click on the desk below where the Nurse is standing to talk to her.
- After the cut scene, she will let you into the Nurse’s Station.
Nurse’s Station
- Collect the items on the Find List.
- Make sure you look past the counter into the Lobby again, as several items are there.
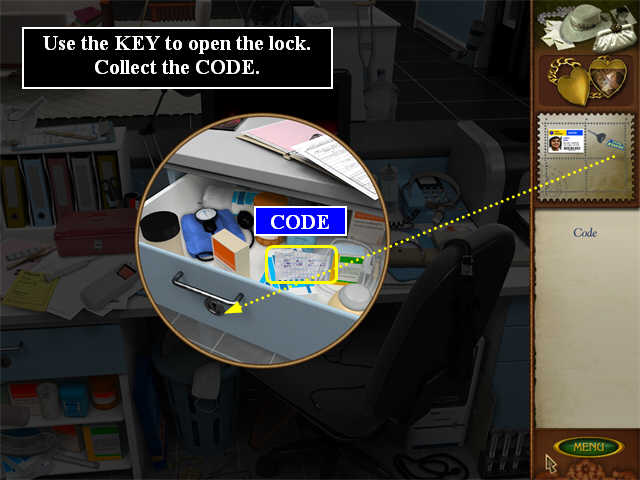
- Click on the locked Drawer to zoom in.
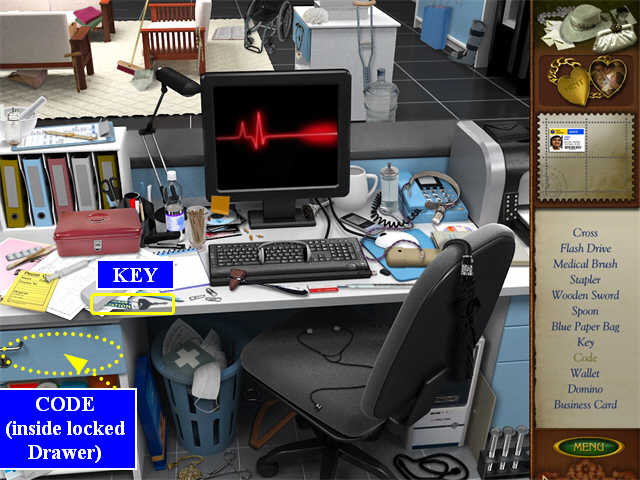
- Use the KEY to open the Drawer.
- Collect the CODE.
The Lobby
- Click on the Common Room door. This time you will get a zoom scene of the Lock.
The Common Room Lock Mini-game
- Slide the EMPLOYEE CARD down the left side.
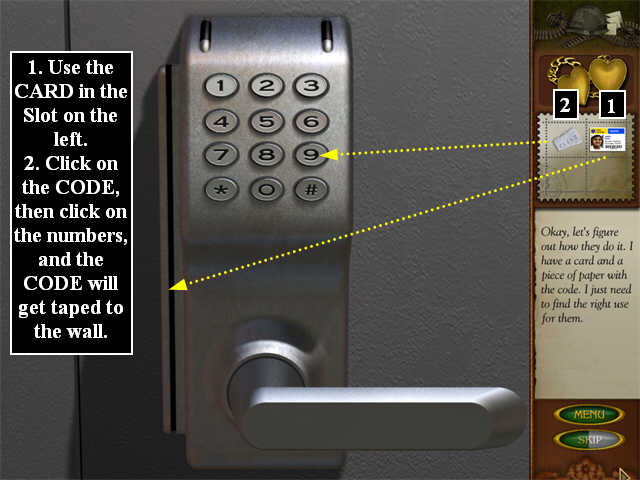
- Now click on the CODE in the Tools Inventory.
- Move the cursor over the lock until the CODE gets big; then click.
- The CODE will tape itself to the wall.
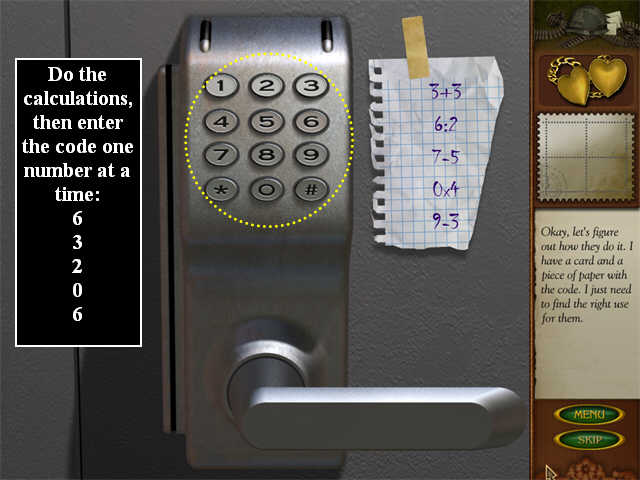
- Do the calculations and enter the CODE by clicking on each individual number: 6 3 2 0 6.
- You do not need to click on the handle; that will happen automatically.
The Nurses’ Common Room
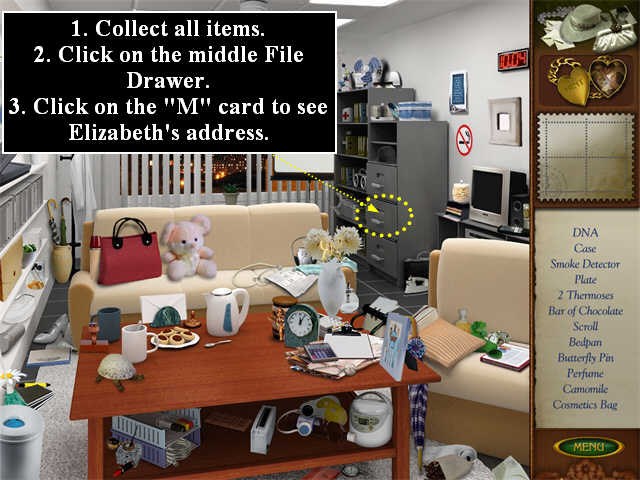
- Collect the items on the Find List.
- The Plate that counts is the white Plate standing vertically on the top left shelf.
- The “DNA” is a molecule model on the top of the bookcase on the right.
- The Scroll is the silver center part of the curtain rod.
- Once you have collected all the items, the game will tell you to look for Elizabeth’s file.
- Click on the File Drawers along the right wall. You can open more than one.
- Click on a Drawer to zoom in; then click on each letter card to see the file there. Remember you are looking for someone whose first name is Elizabeth, but the cards are filed under the last name.
- Elizabeth’s last name is McDowell, so you will find her under “M.”
- You will be automatically transferred to the old house location.
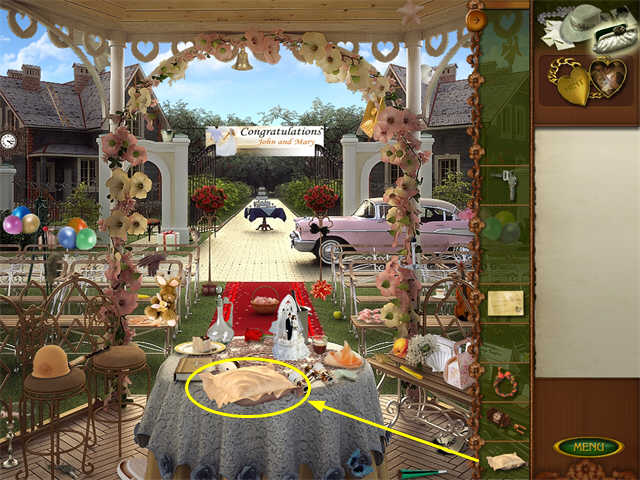
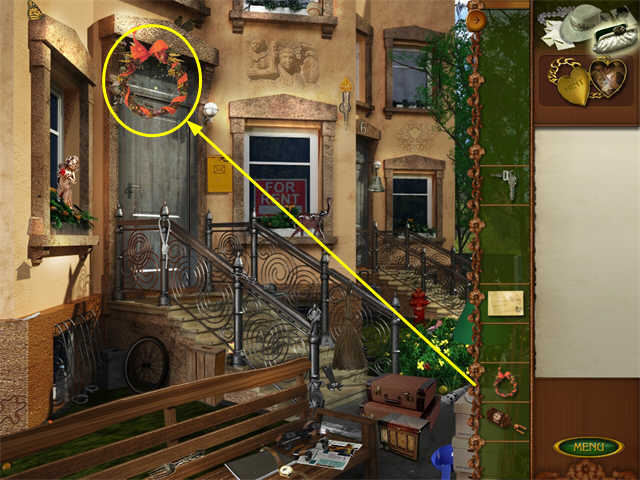
Chapter 22: The Visit
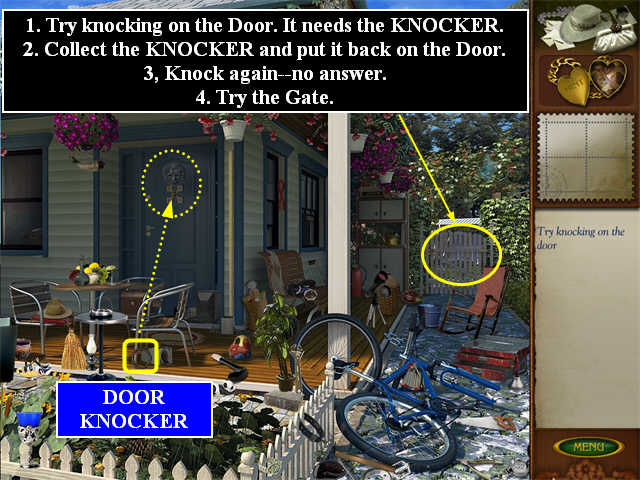
- You are standing in the front yard of your old house. Try knocking on the Door.
- The Door Knocker is broken. Look around and find the KNOCKER.
- Put the KNOCKER back on the Door and knock again.
- No answer. Try the Gate.
- The Gate is rusty; you will have to find an OIL CAN.
- Collect the items on the Find List.
- Open the Cabinet on the left of the gate to find some items like the Paintbrush.
- The “Naildrawer” is a black tool lying on the ground in front of the door. It is used to remove nails. In English this is more commonly called a “pry bar” or a “cat’s paw.”
- Once you’ve have collected everything you can on the Find List, a set of tools will go into your Tools Inventory. Put these into the Toolbox on the ground on the right.
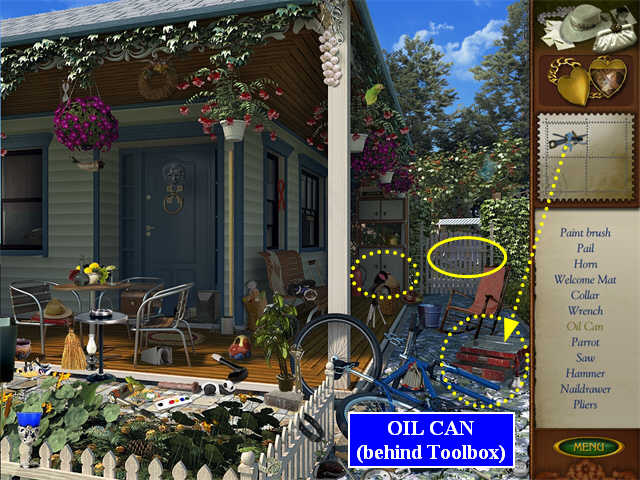
- The Tool Box will disappear, revealing the OIL CAN. Collect it.
- Now click on the Gate to zoom in. Use the OIL CAN on the rusty hinge.
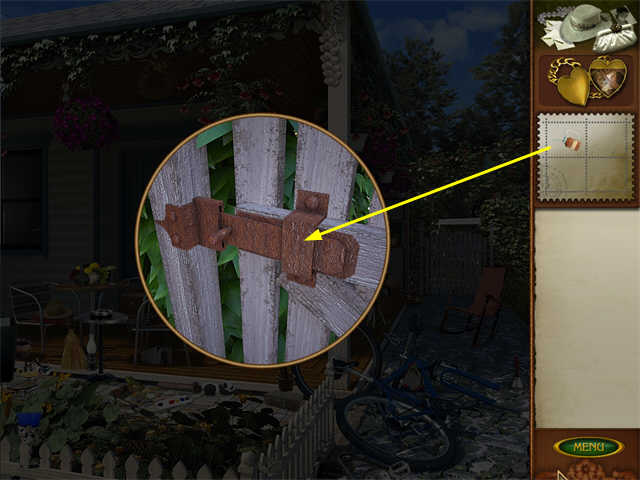
- Go through the Gate and watch the closing scene.
Created at: 2010-02-11