

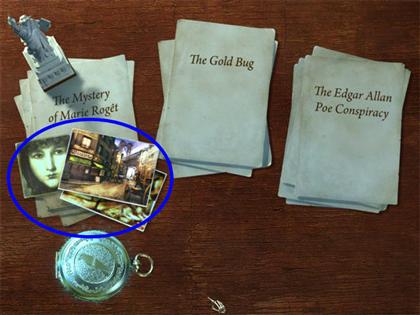
WALKTHROUGH MENU
INTRODUCTION
Game Overview
- There are six chapters in the game, all varying in length, with several puzzles added to each chapter.
- You cannot skip puzzles in this game.
- There are no timers in the game; you can play the game at your own pace.
Inventory Items/ Tools
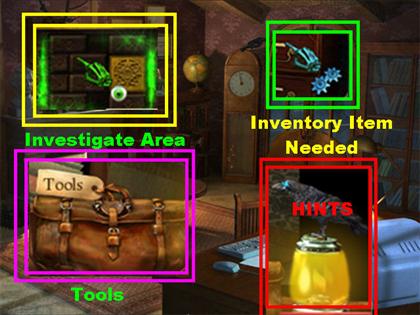
- Some of the items you pick up in the scene will go into your tool bag in the lower right side of the scene.
- You will only have access to those tools when they are needed to solve a puzzle in the scene.
- The items that are listed in blue at the bottom of the screen are items that are hidden; tool is needed to uncover them.
- You can use your tools in sections in which you see two blue gears appear. When this happens, look in your inventory items in the lower right side of the scene for the right tool to use.
- Grab an inventory item and place it over the item with the blue gears. If you see the skeleton hand turn blue, it means that you can use that inventory item in that spot.
- If you don’t see the blue hand, and you see a red hand instead, try a different inventory item in that spot.
- Some inventory items will carry over with you from scene to scene.
Hints
- The number of hints you have are shown in the lantern in the lower right side of the scene.
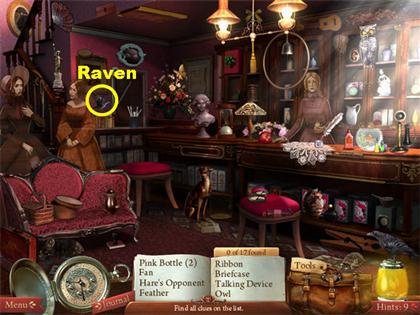
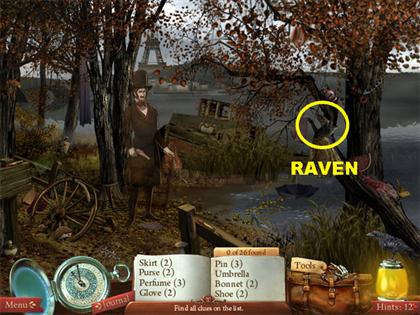
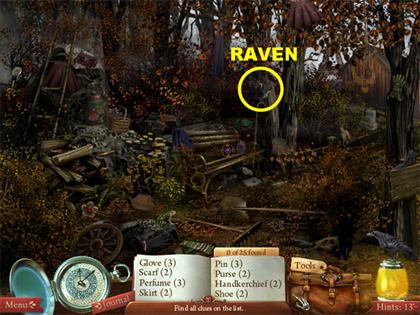
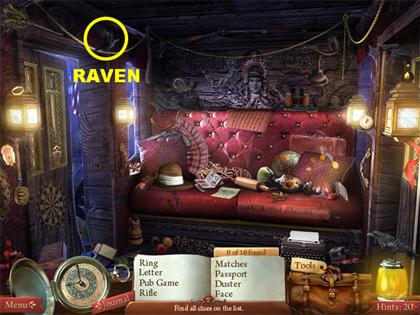
- Each Raven you find in a scene will give you one extra hint. Some scenes have two Ravens, but most of them only have one.
- If you don’t want to use a hint, you can click on an item on the list and the lantern will show you the silhouette of that item.
- If you click randomly on the screen, the Raven will take the hint lantern away and a cat will show up instead. You cannot use a hint while the cat is in the Raven’s spot in the corner.
- The cat will stay around for a few seconds before the Raven returns to its spot.
- You can accumulate your hints with you as you go from level to level.
- If you get down to zero hints, the game may give you an additional one, even if you haven’t spotted any Ravens.
CHAPTER ONE
Introduction
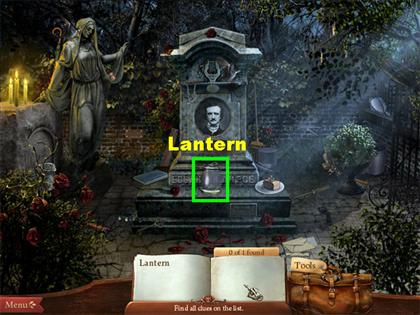
- Click on the Lantern that is in the center of the scene.
- If you click on an item on the list, the lantern will show you the silhouette of that item.
Scrub Brush

- One Raven is in the top left side of the scene, on the statue’s shoulder.
- The other Raven is on top of the gravestone.
- The Scrub Brush is on the far right side, behind the statue.
Blue Item – Dates
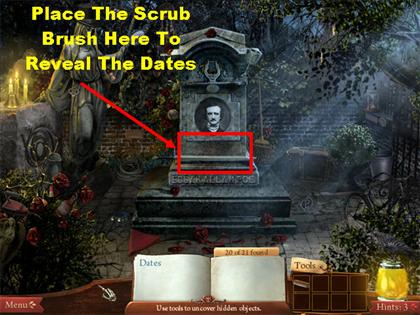
- Dates - Grab the Scrub Brush from inventory and place it below the picture on the gravestone.
- The Scrub Brush will clean off the Gravestone and reveal some dates at the bottom.
- Click on the blue sparkly area that is on the left side of the scene to go to the next location.
Outside The Gates
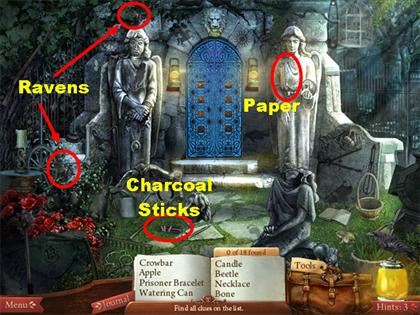
- Click on the open gates; they will close down and the statue in the lower right side will lose her head.
- The Raven is in the top left side of the scene.
- The other Raven is in the lower left side of the scene.
- The Paper is on the arm of the statue on the right side of the scene.
- The Charcoal Sticks are on the lower left side of the ground.
Blue Items – Flower & Open Book Icon
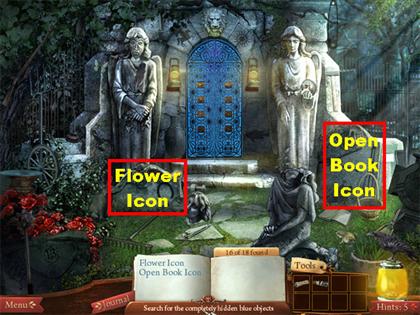
- Flower Icon – Click on the glowing stone that is on the lower left side of the scene and you will get a closer view.
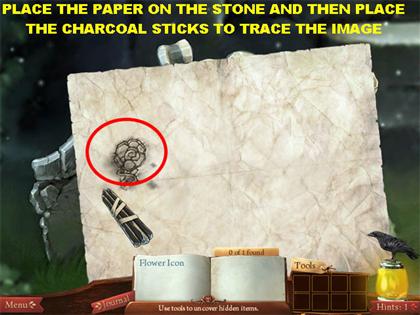
- Place the Paper on the stone; then place the Charcoal Sticks on there as well.
- The Charcoal Sticks will automatically trace the Flower Icon on the paper.
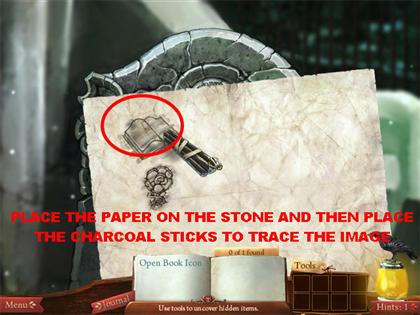
- Open Book Icon – Click on the stone that is on the right side of the scene and you will get a closer view.
- The Charcoal Sticks will automatically trace the Open Book Icon on the Paper.
- Click on the left side of the screen to exit to the next location.
Garden Shears
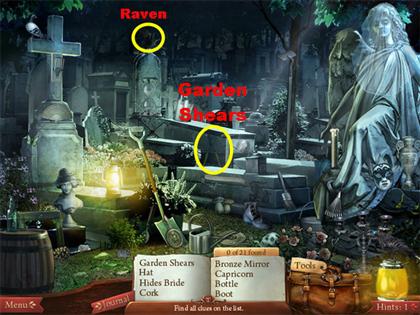
- The Raven is in the top center of the scene.
- The Garden Shears are in the center of the scene.
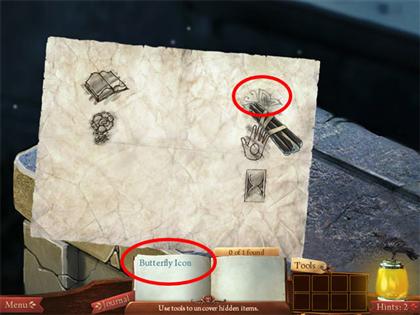
Blue Items - Angel, Butterfly, Hand & Hourglass Icon
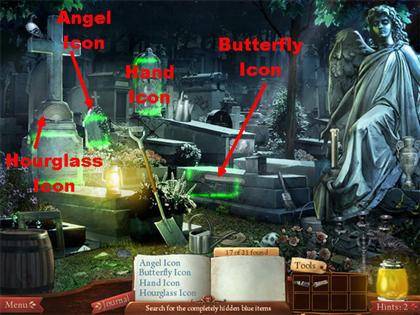
- All the areas that have a green glow around them are the areas in which you will find the icons you need in this section.
- Please look at the screenshot for the areas that you need to click on.
- Once you get a closer view of each area, place the Paper on the stone followed by the Charcoal Sticks.
Hourglass Icon
Angel Icon
Hand Icon
Butterfly Icon
- Exit the area on the left side of the scene, once all the items have been found.
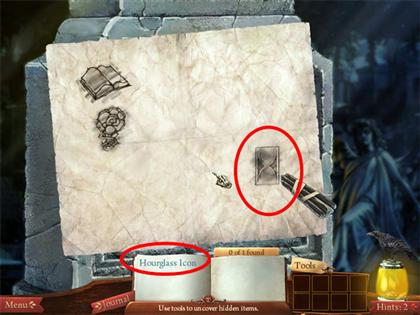
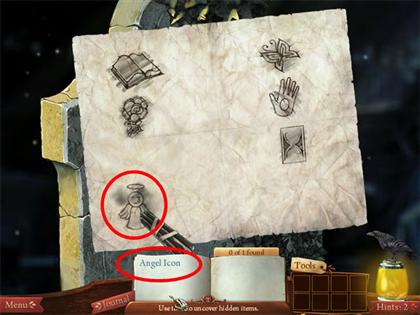
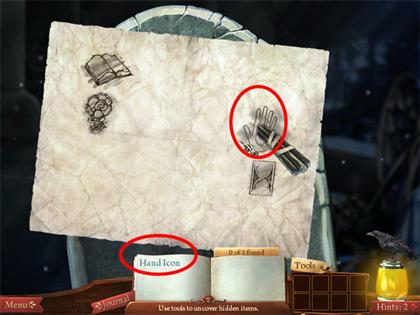
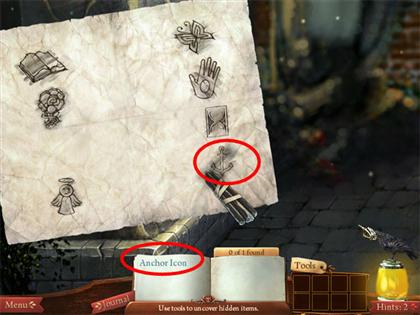
Blue Items – Anchor & Skull Icon
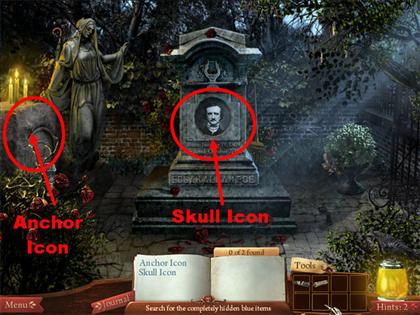
- Please look at the screenshot for the areas that you need to click on in order to copy the icons.
- Once you get a closer view of each area, place the Paper on the stone followed by the Charcoal Sticks.
- Once each icon has been drawn, the closer view will close up. Find the next area and follow the same steps as above.
Anchor Icon
Skull Icon

- Exit the area on the left side of the scene, once all the items have been found.
Crypt Door Puzzle

- Click on the door to get a closer view.
- Your goal in this puzzle is to arrange the icons on the door according to the diagram on the left side of the page.
- Click on each icon on the door until you can match up the diagrams on the page.
- The game will automatically lock the piece in when the right one has been chosen.
- The solution from top to bottom is:Left side of the door: Book, Flower, Skull, Angel Right side of the door: Butterfly, Hand, Hourglass, Anchor
- Once the right combination has been entered, the door will open. Go through the door.
CHAPTER TWO
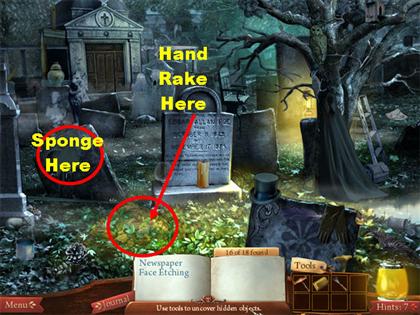
Corkscrew - Hand Rake - Sponge
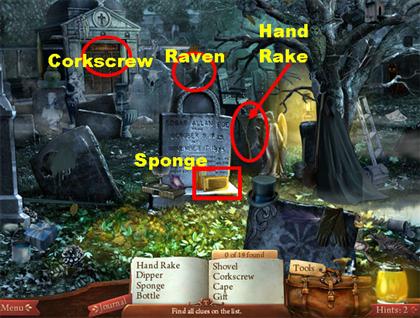
- The Raven is on top of the gravestone that is in the center of the scene.
- The Corkscrew is in the top left side of the scene.
- The Hand Rake is on the right side of the gravestone that is in the center of the scene.
Blue Items – Newspaper – Face Etching
- Newspaper – Place the Hand Rake on the leaves that are on the lower left side of the scene.
- Click on the Newspaper after the leaves have been cleared.
- Face Etching – Place the Sponge on the gravestone that is in the lower left side of the scene.
- Click on the Face Etching after the gravestone has been cleaned.
Examine Poe’s Tombstone
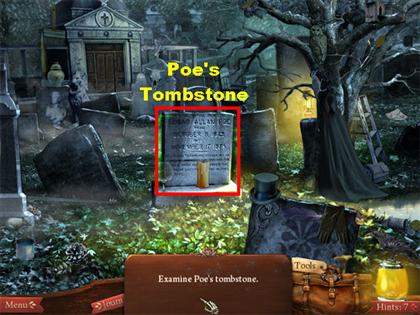
- Click on Poe’s Tombstone that is located in the center of the scene and you will get a closer view.
Stone Raven - Wire Cutters – Holds Liquid
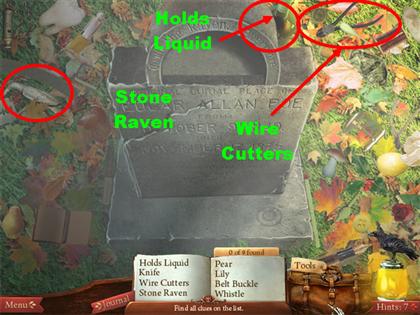
- The Stone Raven is on the top left side of the scene.
- The Wire Cutters are on the top right side of the scene.
- The “Holds Liquid” bottle is on the top right side of the scene; it is partially hidden by the tombstone.
Blue item – Wire Piece
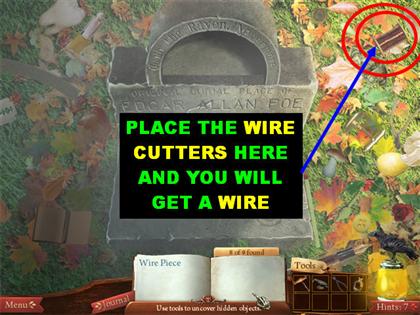
- Place the Wire Cutters on the wire spool that is on the top right side of the scene.
- The Wire will automatically go into inventory.
Find the Secret Map

- Place the “Holds Liquid” bottle at the bottom of the gravestone.
- Place the Stone Raven on top of the gravestone.
- Place the Stone Raven on the lower right side of the tombstone. The top part of the gravestone will move to the side.
- Grab the scroll that appears on top of the gravestone. Once you click on it, the map will appear on top of the page; click on it again, and it will go into inventory.
- Place the Corskscrew on the bottle, and it will open the bottle.
- Put the scroll in the bottle, and the scroll will come out of the bottle with a map. Click on the map that appears on the page, and it will go into inventory.
- You will be taken back to the cemetery; click on the glowing exit door in the back of the scene.
Weight
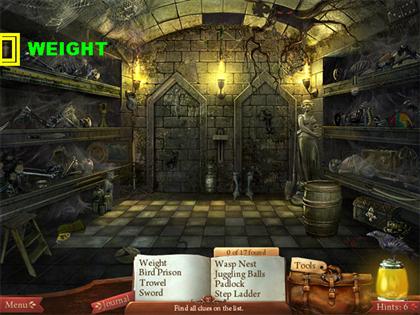
- Grab the Weight that is in the top left side of the scene.
Blue Item – Family Crest
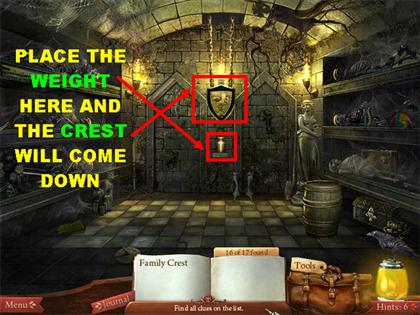
- Use the Weight on the lever that is in the center of the back wall, and the Family Crest will come down from the ceiling.
- Click on the Family Crest, and it will be taken off your list.
Examine the Skeleton
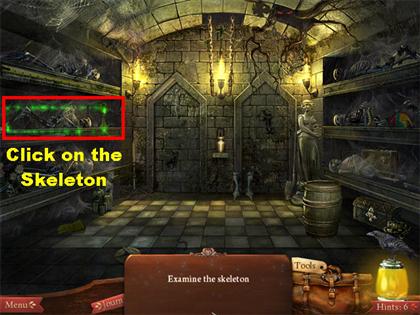
- Click on the Skeleton that is on the left side of the scene and you will be taken to a new scene.
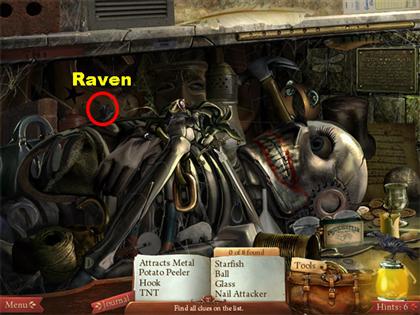
- The Raven is in the top right side of the scene.
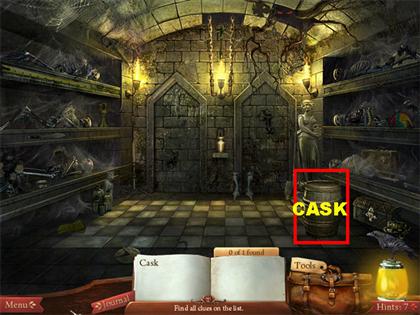
- Cask – The Cask is on the lower right side of the scene. As soon as you click on it, a puzzle will appear in which you need to find some hidden keys.
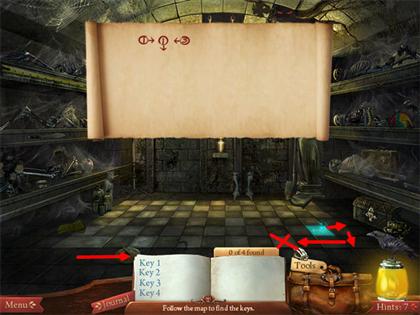
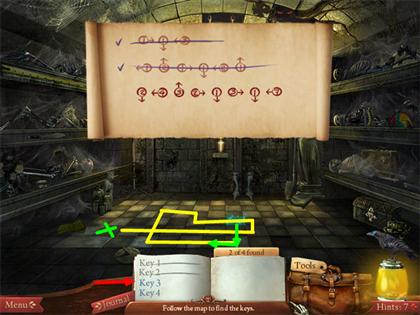
Key Puzzle
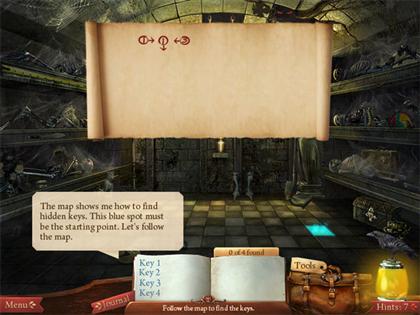
- The map that appears on top of the page shows you how to find the hidden keys.
- The blue tile on the floor shows you where you need to start. Follow the spots in the order and the direction that are shown on the map.
- If you see a ghost appear on the screen it means that you clicked on the wrong spot. If that happens, just click on a different spot.
- Please look at the next set of instructions to see the solutions for all four Keys. The “X” in the screenshot marks the spot you need to click on.
Key 1 Puzzle Solution
- Key 1 instructions:1 RIGHT 1 DOWN 3 LEFT
Key 2 Puzzle Solution
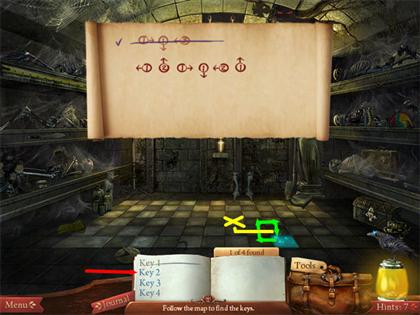
- Key 2 instructions:1 LEFT 2 UP 1 RIGHT 1 DOWN 2 LEFT 1 UP
Key 3 Puzzle Solution
- Key 3 instructions:2 DOWN 4 LEFT 3 UP 2 RIGHT 1 DOWN 3 RIGHT 1 DOWN 7 LEFT
Key 4 Puzzle Solution
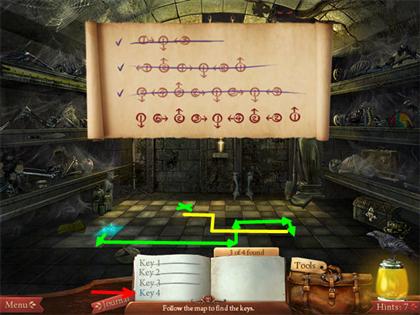
- Key 4 instructions:1 DOWN 6 RIGHT 2 UP 3 RIGHT 1 DOWN 4 LEFT 2 UP 2 LEFT 1 UP
Hammer
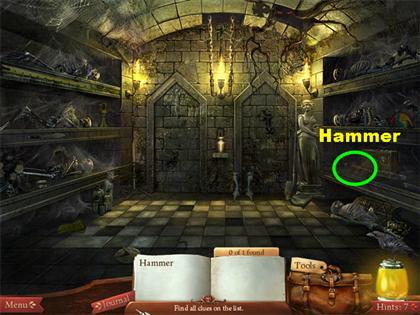
- The Hammer is on the bottom shelf that is on the right side of the room.
Fortunato Key
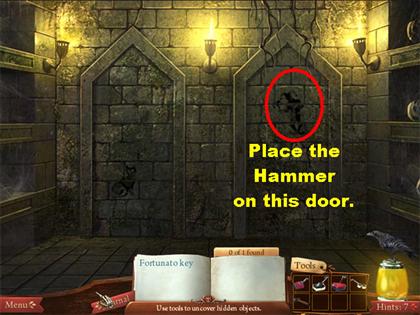
- Place the Hammer on the door on the right, and the Hammer will break down the door.
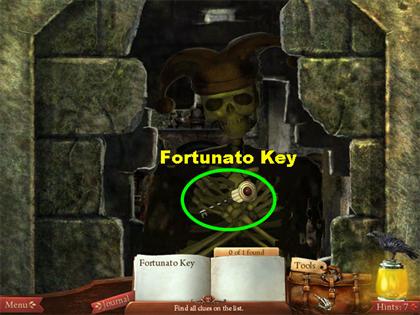
- Click on the Fortunato Key that the Skeleton is holding. The Skeleton will fall apart, and you will be taken to the Secret Room in the back of the scene.
Chimney Brush – Roller Dolly – “Monkey Food”
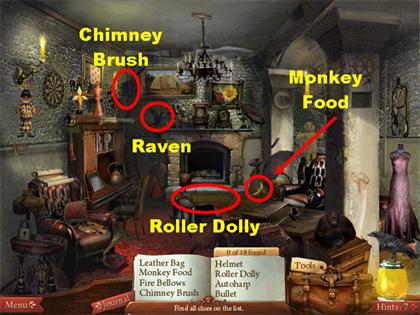
- The Chimney Brush is on the top left side of the back wall.
- The “Monkey Food” (Banana) is located on the far right side, close to the fireplace.
- The Roller Dolly is on the floor, close to the fireplace.
- The Raven is on the top left side of the fireplace.
Blue Items – Straight Jacket, Book & Trunk
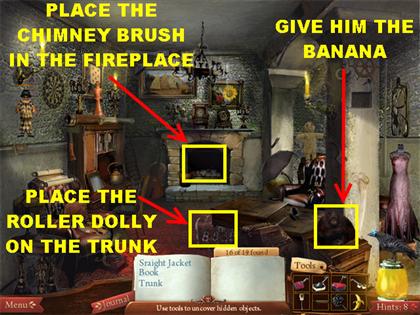
- Straight Jacket – Give the “Monkey Food” to the monkey that is sitting on top of the chest in the lower right side of the scene.
- Once the monkey gets up, click on the Straight Jacket that is inside the crate.
- Book – Place the Chimney Brush in the fireplace and a book will fall into the fireplace. Click on the book to take it off the list.
- Trunk – Place the Roller Dolly on the Trunk that is in the lower right side of the scene. Click on the Trunk once it moves into plain sight.
Open the Trunk
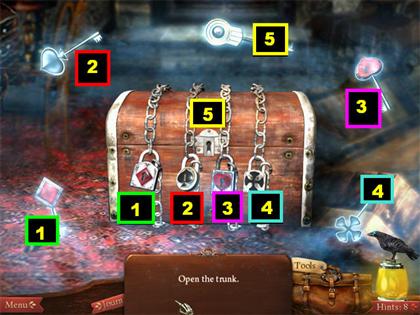
- Your goal in this puzzle is to open the lock with the keys provided in the scene.
- Just match the symbols on the key with the symbols on the locks. The last lock goes on the lock that is on top.
- You have to open the top lock last; if you try to open it before you’ve unlocked the other locks, it will not work.
- Please look at the screenshot for the solution.
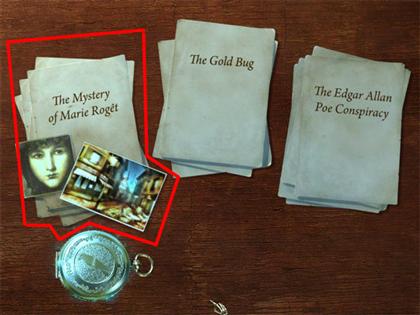
- You will be taken to a scene in which they ask you to pick a scene. This guide proceeds to the scene on the first picture.
CHAPTER THREE
Location 1 - Scissors & Gold Coin
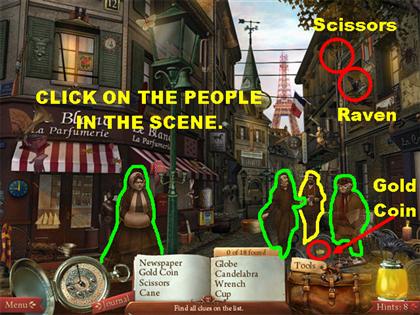
- You will be asked to talk to the people on the street. Click on them and read their statements.
- The Scissors are in the top right side of the scene.
- The Gold Coin is on the lower right side of the ground.
Blue items – Diamond Ring & Le Blanc’s Hat
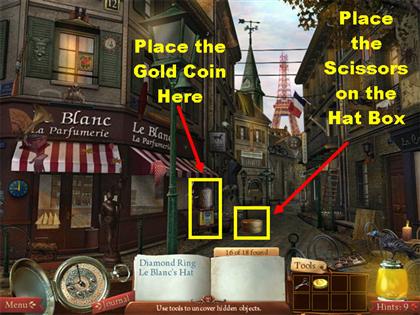
- Diamond Ring – Place the Gold Coin in the bubble gum machine that is in the back left side of the scene.
- Click on the Diamond Ring once it falls out of the bubble gum machine onto the street.
- Le Blanc’s Hat – Place the Scissors on the hat box that is on the road. Click on the hat, once the box is open.
Location 2
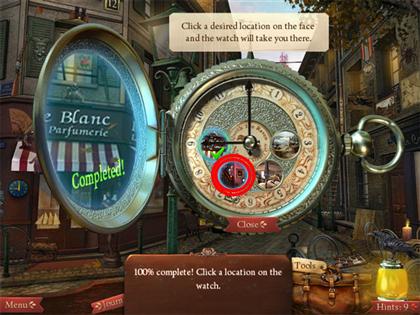
- Click on a location on the map to travel there. This walkthrough continues to the second location.
- Click on the people in the scene to talk to them.
- The Raven is in the top left side of the scene.
- Click on a location on the map to travel there. This walkthrough continues to the third location.
Location 3 - Key

- The Raven is on the top center of the scene, on the chandelier.
- The Key is on the top right side of the scene; it is on the side of the picture frame.
Blue Item – Sailing Ship
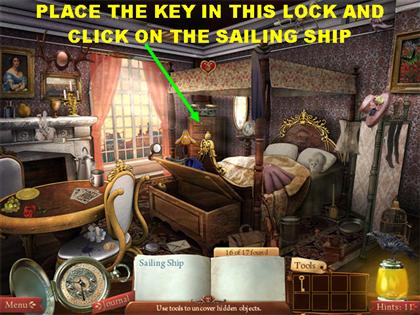
- Sailing Ship – Place the Key on the dresser that is on the left side of the bed.
- Pick up the Sailing Ship that appears inside the drawer.
Location 4
- Click on a location on the map to travel there. This walkthrough continues to the fourth location.
Corn Kernels & Fishing Pole
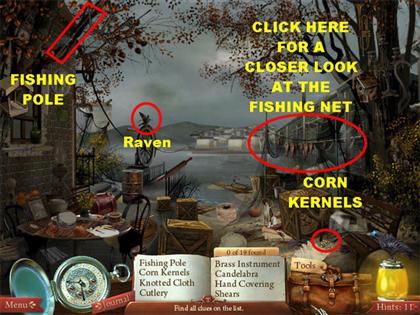
- The Raven is on the left side of the scene, on top of the wheel.
- Click on all the people in the scene so you can talk to them.
- The Corn Kernels are in the lower right side of the scene, on the ground.
- The Fishing Pole is in the top left side of the scene; it is between the trees and the building.
- Click on the right side of the scene and you will be taken to a closer view of the fishing net.
Fishing Net
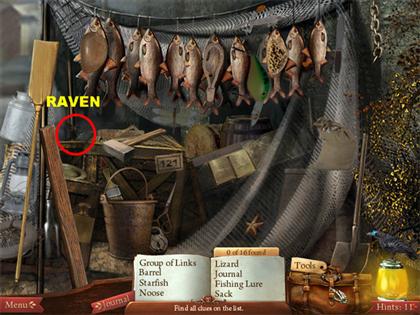
- The Raven is on the left side of the scene, below the first fish on the line.
- There are no other inventory items to pick up at this time.
Blue Items – Rudder & Necklace
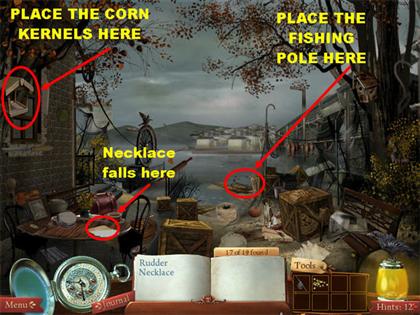
- Rudder - Place the Fishing Pole on the right side of the water, by the dock, and the Fishing Pole will find the Rudder in the water.
- Click on the Rudder that appears in the air to take it off the list.
- Necklace - Place the Corn Kernels in the birdhouse that is in the top left side of the scene.
- Pick up the necklace that falls on the table below the birdhouse.
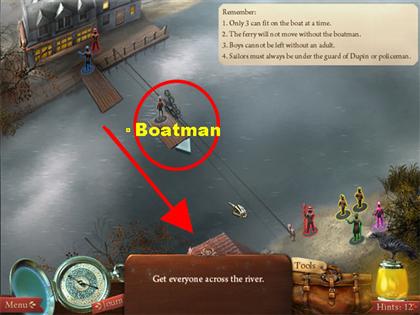
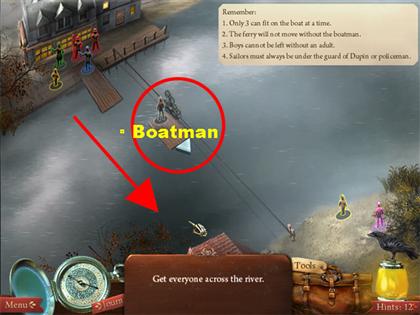
Get Everyone Across the River
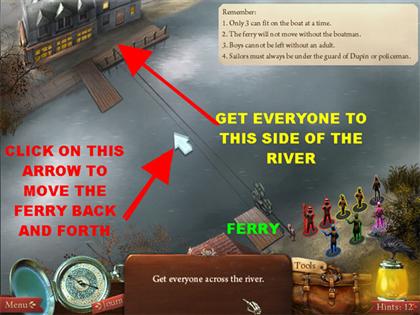
- The goal in this game is to take the people across the river by using the following four rules.
- You can only carry a maximum of three people on the boat at one time.
- The Boatman has to be on the ferry when it is picking up or dropping people off.
- The Boys cannot be left alone; they have to be with an adult at all times.
- The Sailors have to be accompanied by the Guard of Dupin, or by the Policeman.
- In order to know who the people are in the scene, you can hover your mouse over them and read a description of who they are.
- You can also look at the color of their outline to know who they are:The Boatman has a gray outline. The Boys are in yellow. The Sailors are in red. The Policeman is in blue. Detective Dupin is in green. Your character is in pink.
- Click on the person you want to move, and they will go in the ferry or get off the ferry.
- Once you have all the people on the ferry, click on the arrow that is in the water and the ferry will go in the direction of the arrow.
- The solution is as follows:

- Place the Boatman, Sailor 1, and the Policeman on the ferry. Click on the arrow to take them to the other side of the river.
- Drop off only Sailor1 and the Policeman; leave the Boatman on the ferry.
- Go back to the other side with the Boatman on the ferry by himself.
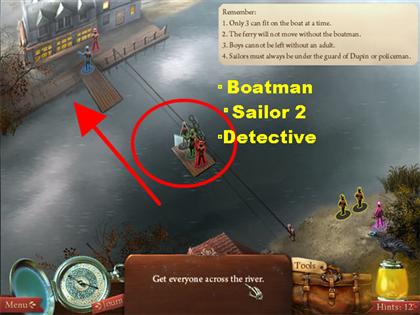
- Pick up only Sailor 2 and Detective Dupin; leave the Boatman on the ferry.
- At this point you have the Boatman, Sailor 2, and the Detective on the ferry.
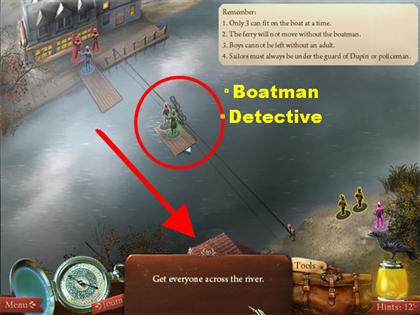
- Drop off only Sailor 2; leave the Boatman and Detective Dupin on the ferry. Take them back to the other side.
- When you get back to the starting side of the river, leave the Detective and the Boatman on the ferry; pick up only Boy 1.
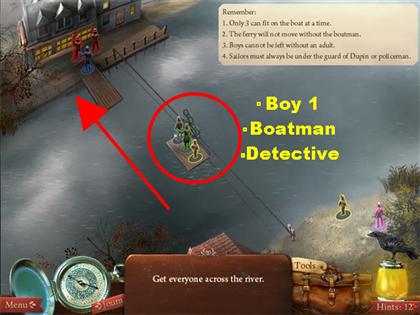
- Go back to the other side of the river and drop off Boy 1 and Detective Dupin. Leave the Boatman on the ferry.
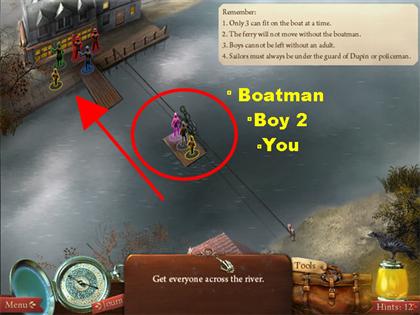
- The Boatman goes back to the starting side and picks up Boy 2, and your character.
- Go back to the other side of the river and join the rest of the people.
- Make sure that you click all the people off the ferry so you can end this round.
Raven
- The raven is in the top right side of the scene.
- After you find all the objects, click on the man standing in the middle of the scene.
Raven
- The raven is on the top right side of the scene.
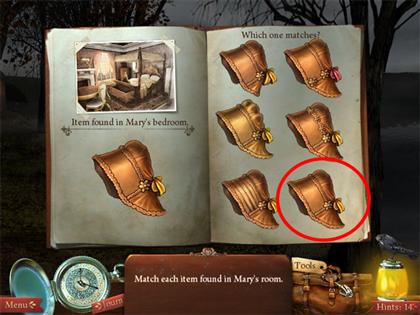
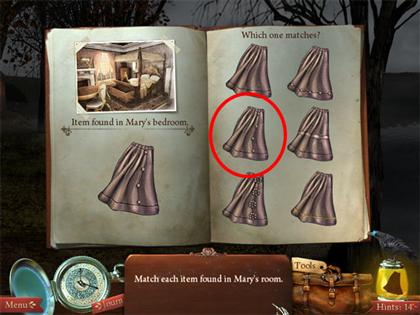
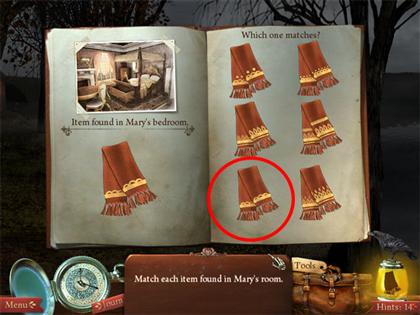
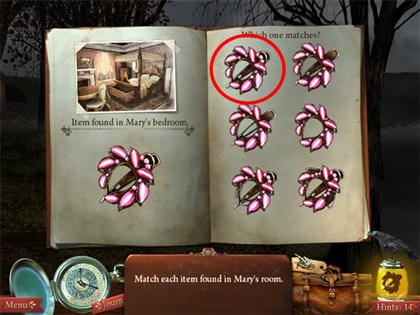
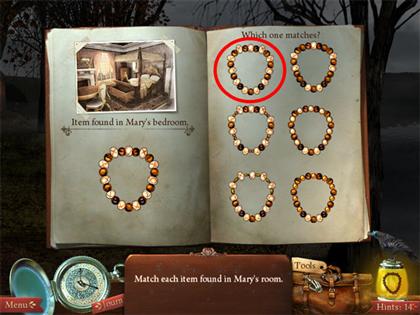
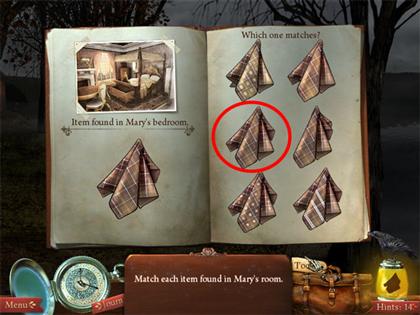
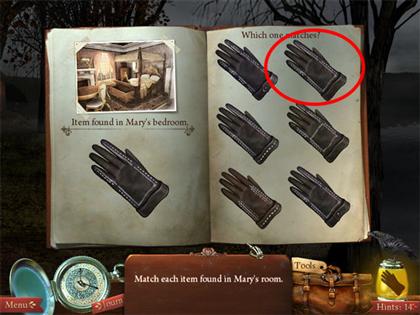
Match Each Item Found in Mary’s Room
- This next section is fairly easy, all you have to do is match the picture on the left side of the page with the one on the right side.
- Each time you make a match, you will be asked to match other types of items.
- Match all eight items to end this round.
Match the Bonnets
Match the Skirts
Match the Scarves
Match the Pins
Match Perfume Bottles

Match Bracelets
Match Handkerchiefs
Match Gloves
Key
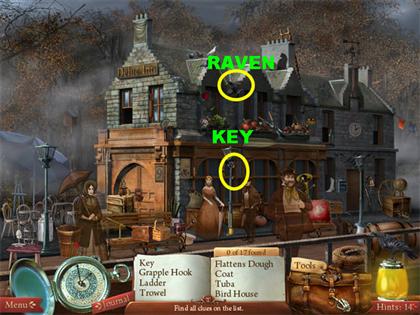
- The Raven is on the top left side of the scene.
- The key is on the street light that is in the middle of the other two street lights.
Blue Item – Letters
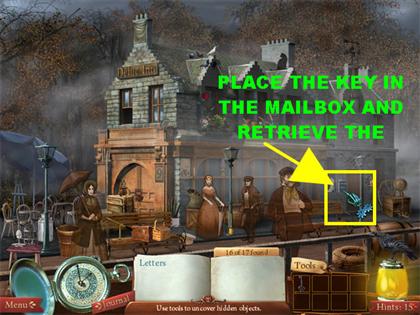
- Place the key in the mailbox that is in the lower right side of the building.
- Click on the letters once they come out of the box and fall on the floor.
- Make sure that you click on all the people on the street so you can talk to them.
Hole Digger & Rake
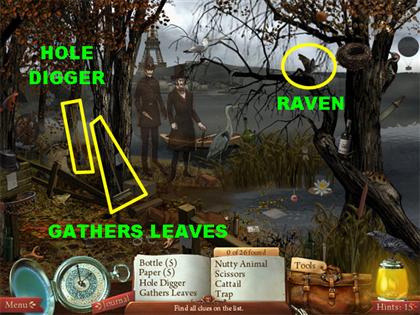
- The Raven is in the top right side of the scene, on the tree branch.
- The Hole Digger is on the left side of the scene.
- The "Gathers Leaves" Rake is on the left side of the scene.
Blue Items - Pocket Watch & Drag marks
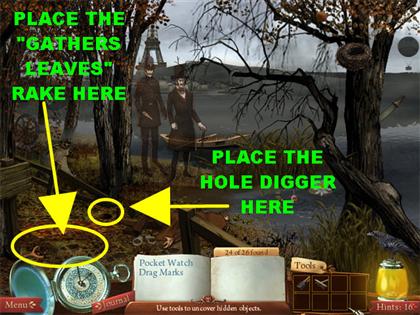
- Drag Marks - Use the "Gathers Leaves" Rake on the leaves that are on the lower left side of the scene.
- The Drag Marks will reveal themselves after all the leaves have been cleared.
- Pocket Watch - Place the Hole Digger in the hole next to the man's leg that is on the ground.
- Click on the Pocket Watch that comes out of the hole in the ground.
Get Dupin's Theory - Statue of Liberty
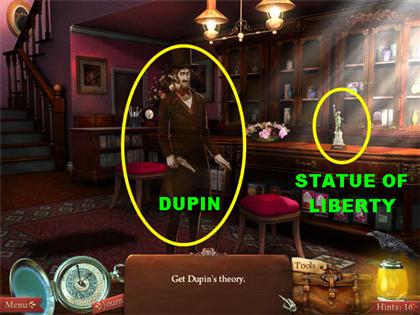
- Click on Dupin; then click on the dialogue that appears on the screen.
- You will then be asked to find the Statue of Liberty. It is on the counter, on the right side of the room.
CHAPTER FOUR
New York Location 1 – Oats & Sponge
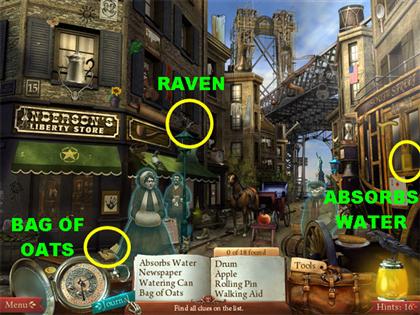
- The Bag of Oats is on the lower left side of the sidewalk.
- The "Absorbs Water" Sponge is on the right side of the scene.
Blue Items - Open Sign & Note
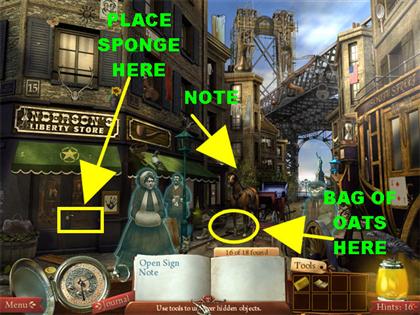
- Open Sign - Place the "Absorbs Water" Sponge on the lower left side of the scene, on the bottom of the door on the right.
- Click on the Open sign that appears over the door.
- Note - Place the Bag of Oats in front of the horse; when he bends down to eat it, click on the note that is on the wall behind him.
New York Location 2 - Key
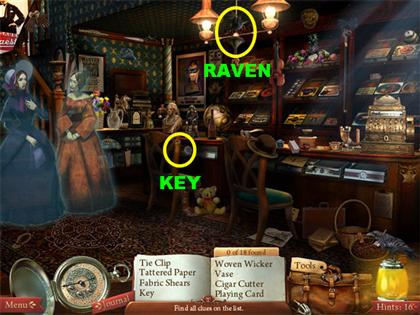
- The Raven is in the top center of the scene, in between the two light fixtures.
- The Fabric Shears are in the top left side of the scene, close to the ceiling.
- The Key is on the back of the chair that is on the left side of the scene.
Blue Items - Diamond Ring & Billing
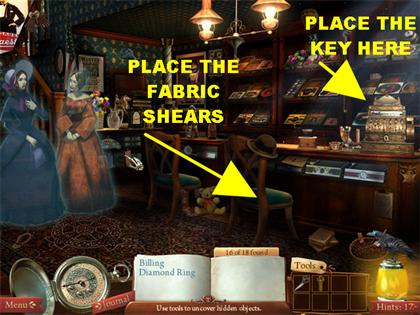
- Diamond Ring - Place the Fabric Shears on the chair that is in the lower right side of the scene.
- Click on the Diamond Ring once it falls on the ground.
- Billing - Place the key on the cash register that is on the right side of the counter.
- Click on the Billing that appears once the register is open.
New York Location 3 – Nail File
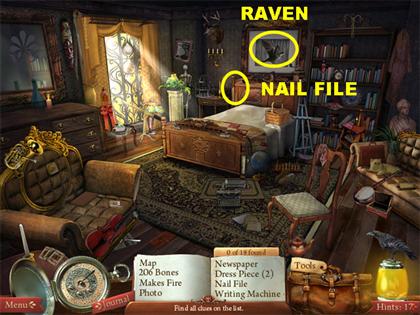
- Nail File – The Nail File is on the left side of the bed’s headboard.
- Raven – The Raven is on the back wall, in the picture frame that is above the bed.
Blue Items - Mary's Picture & Manuscript
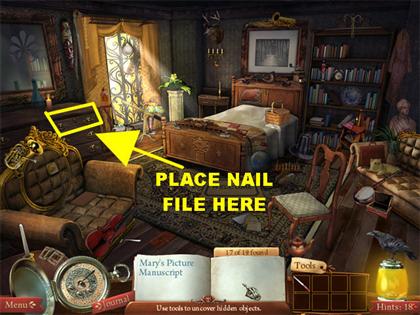
- Mary's Picture & Manuscript - Place the Nail File on the drawer that is on the left side of the scene, and the drawer will open.
- Click on Mary's Picture and the Manuscript that is inside the drawer.
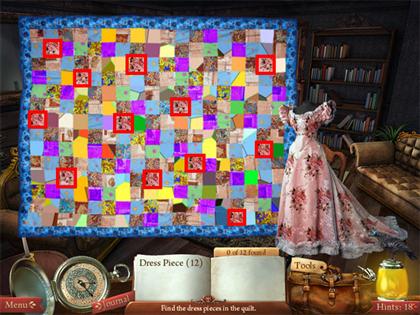
Find 12 Dress Pieces
Find 12 Paper Pieces
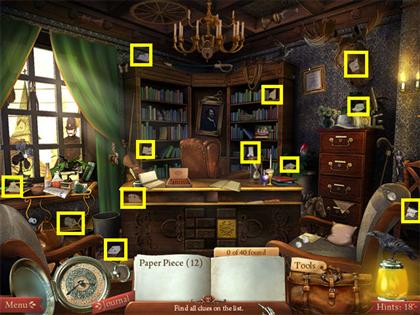
Atomizer, Policeman, Tack Pliers
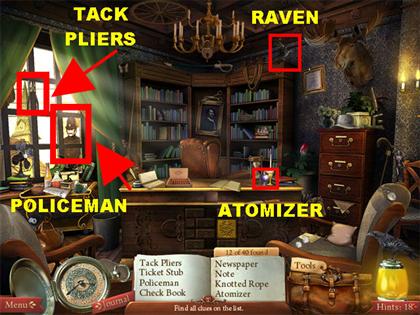
- The Raven is on the top right side of the bookcase.
- The Atomizer is on the right side of the desk.
- The Policeman is on the left side of the scene, outside the window.
- The Tack Pliers are on the top left side of the scene, on the windows.
Blue Items - 10 Handprints, Photo & Diploma
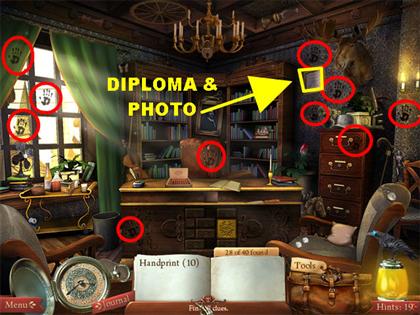
- Click the Atomizer anywhere in the room, and the Handprints will appear in different parts of the room.
- Click on all 10 handprints according to the screenshot; they are all circled in red.
- Photo & Diploma - Click on the Diploma that is on the back wall, and the Diploma will move. Click on the Photo that appears on the wall.
Blue Item - Three Papers
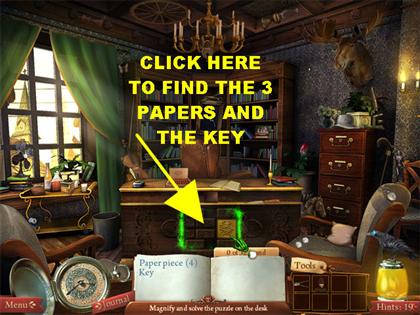
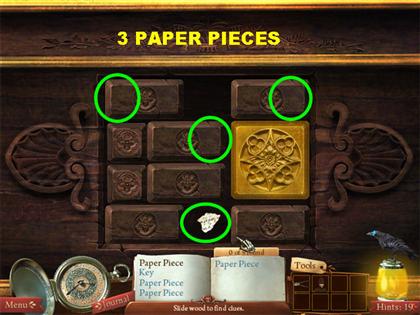
- Click on the front side of the desk and you will encounter a puzzle. Your goal is to move the blocks around and click on the items that are on the list.
- The first Paper Piece is exposed when you get a closer view of the puzzle; click on it.
- To obtain the other three Paper Pieces, drag the blocks around until you find them.
- The areas in which the papers are located are circled in green in the screenshot.
Blue Item - Key
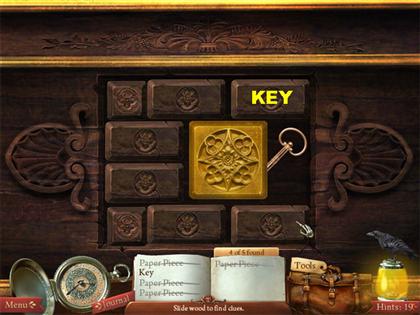
- In order to find the key, you have to move the large gold block out of the way.
- Just move the two small blocks that are on the left side of the puzzle. Move one of the blocks all the way up, and the other one all the way down.
- Once the two small blocks are out of the way, move the large gold block to the left. Click on the Key that appears behind the block.
Blue Item - Three Paper Pieces
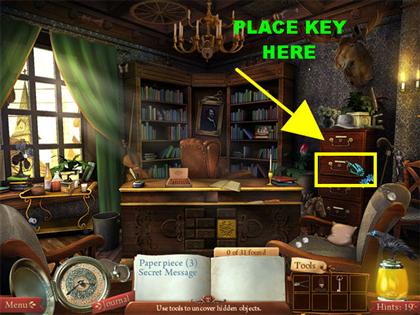
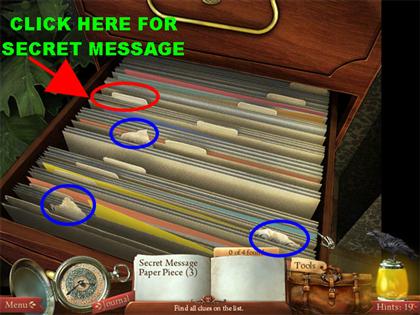
- Place the Key from inventory on the second drawer of the small cabinet, on the right side of the scene, and you will get a closer view.
- Click on the three Paper Pieces that are circled in blue in the screenshot.
- Click on the red circle in the screenshot to locate the Secret Message.
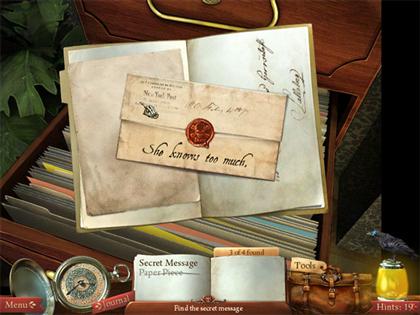
- Click on the Secret Message when it appears.
Blue Item – Money
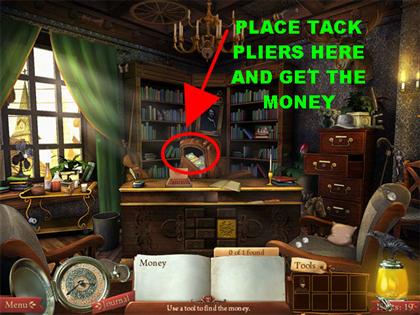
- Money - Place the Tack Pliers on the back of the chair that is behind the desk.
- Click on the money that appears behind the chair.
Assemble the Manuscript
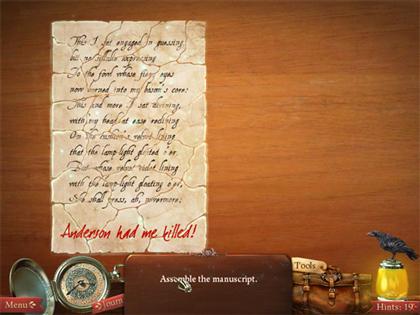
- Assemble the Manuscript by placing the right pieces together.
- Drag the pieces around the puzzle and let go of your mouse when you think they are in the right spot.
- If the piece is in the right spot, it will lock itself onto the puzzle. It will sometimes lock itself in when you are close to the area where it belongs.
- You do not have to rotate the pieces to make them fit.
Get the Police
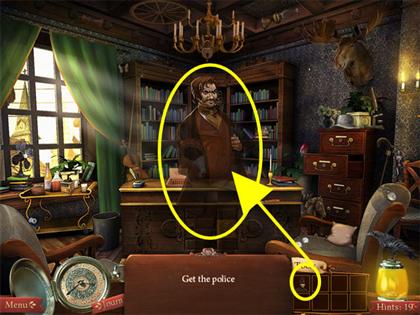
- Place the Policeman from inventory on the man that is in the middle of the room.
Handcuffs – Fire Poker – Painting – Chair
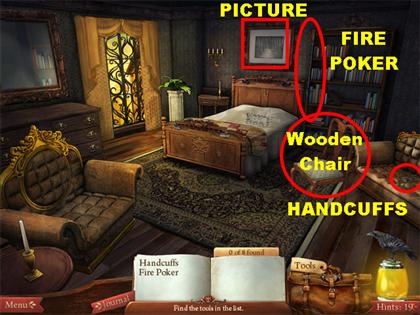
- The Handcuffs are on the couch that is on the right side of the scene.
- The Fire Poker is on the left edge of the bookcase.
- Once you find those two items, a policeman and another man will appear on the scene. A badge will flash on the screen.
- You will be asked to find a Painting. Place the badge on the Painting that is on the back wall.
- Place the badge on the Wooden Chair that is behind the policeman.
Potted Plant – Mirror – Padded Chair
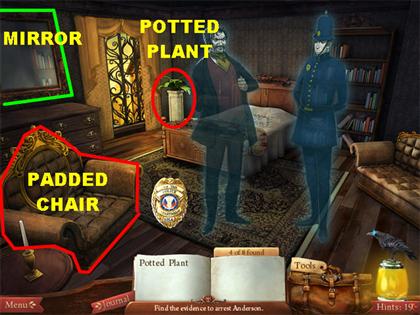
- Place the badge on the Potted Plant that is on the left side of the bed.
- Place the badge on the Mirror that is on the left side of the room.
- Place the badge on the Padded Chair that is on the left side of the room.
Blue Item – Evidence
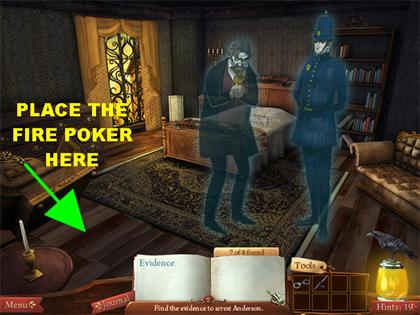
- Use the Fire Poker on the left side of the floor. Place it in the area below the Padded Chair.
- The Fire Poker lifts up part of the floor; click on all the items that were underneath the floor.
Handcuff Anderson – Newspaper
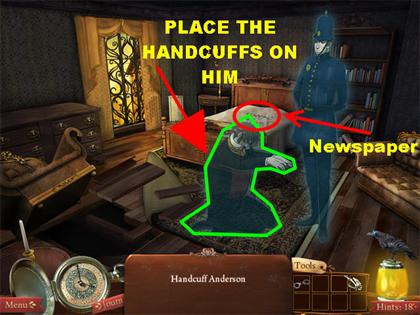
- Place the Handcuffs on Anderson, who is kneeling on the floor.
- Grab the Newspaper that is on the bed.
CHAPTER FIVE
Lantern
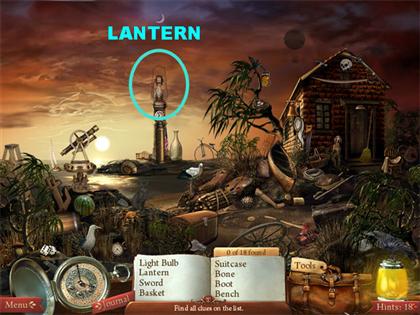
- Grab the Lantern that is on top of the tall clock, in the back of the scene.
Blue Items – Key & Bug Collection
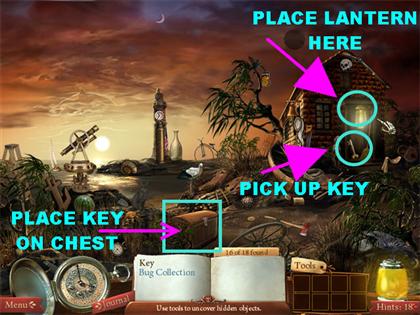
- Key - Place the Lantern on the door of the house on the right side of the scene.
- Once the Lantern goes over the door, it will shine a light on the key; click on it and it will go into inventory.
- Bug Collection – Place the Key on the chest that is in the lower center of the scene.
- Click on the Bug Collection that appears inside the chest.
Water Bottle – Spool – Pot – Key – Shovel
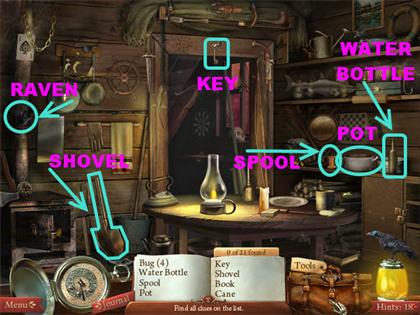
- The Raven is in the upper left side of the scene.
- The Water Bottle is on the right side of the scene, on the shelf.
- The Spool is on the right side of the scene, on the shelf.
- The Pot is on the right side of the scene, on the shelf.
- The Key is in the top center of the scene, above the doorway.
- The Shovel is on the left side of the back wall.
Blue items – Blueprint & Handprint
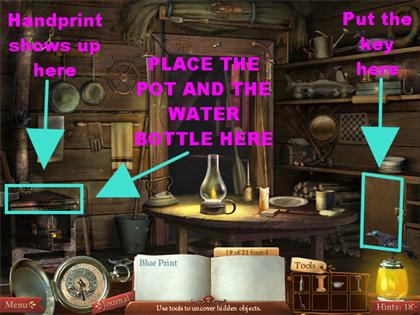
- Blueprint – Place the Key on the cupboard that is in the lower right corner of the scene. Pick up the Blueprint that appears inside the cupboard.
- Handprint – Put the pot on top of the stove located in the lower left side of the scene.
- Place the Water Bottle in the Pot, and the steam from the water will make a handprint appear on the wall above the pot; click on the handprint.
Knife

- The Raven is in the top right side of the scene.
- Pick up the Knife that is in the top right side of the scene.
Blue Item – Pearl
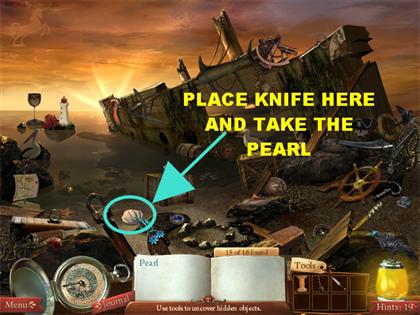
- Pearl – Place the Knife on the oyster that is on the left side of the ground.
- Click on the Pearl that appears inside the oyster.
Blue Items – Paper & Gold Scarab
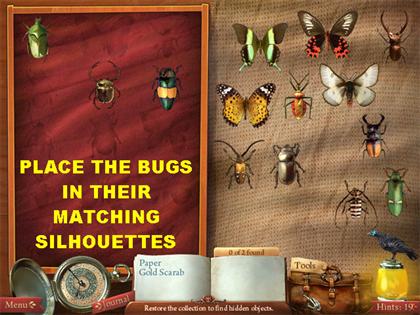
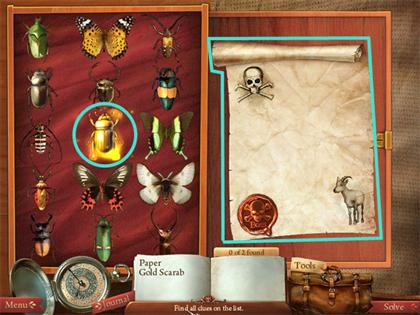
- The goal in this puzzle is to move all the bugs that are on the right side of the page onto the left side of the page.
- Just drag the pieces onto the matching silhouette on the left side of the page.
- When you place a bug in the right spot, it will lock into place.
- Once all the pieces have been placed, the Golden Scarab will appear in the middle of the page on the left.
- On the right side of the scene, a Paper will appear.
- Click on the Paper on the right, and on the Golden Scarab on the left side of the page, to end this level.
Six Wood Boards & Flint
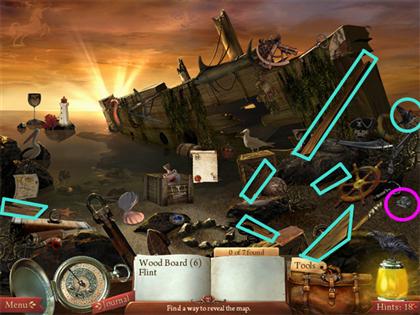
- Please look at the screenshot for the locations of the Six Wood Boards and the Flint.
Reveal the Map
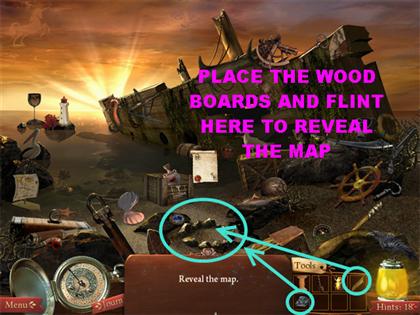
- Place the Wood Boards on the circle of stones that are in the lower center of the scene.
- Put the Flint on top of the Wood Boards; the Flint will start a fire and the map will appear on the scene. Click on the map.
Artillery – Match – Cannonball
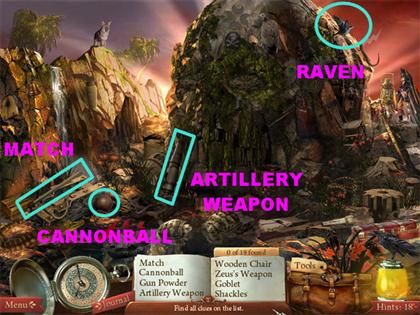
- The Raven is in the top right side of the scene.
- The Match is in the lower left side of the scene.
- The Artillery Weapon is leaning against the left side of the gigantic skull.
- The Cannonball is in the lower left side of the scene.
Blue item – Nose
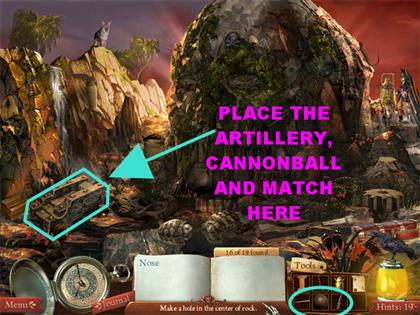
- Place the Artillery Weapon in the lower left side of the scene, on the cannon’s base, and your cannon will be complete.
- Place the Cannonball on the cannon, and the powder keg will automatically fill the cannon.
- Place the Match on the fuse that is on top of the cannon.
- The cannon will fire, putting a Nose on the gigantic skull that is in the scene.
Ship’s Wheel and Torch
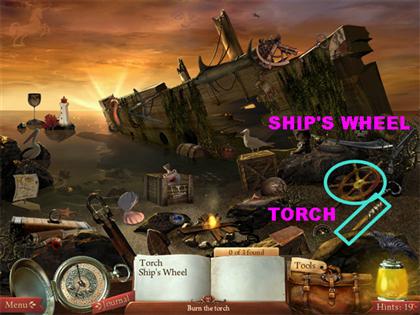
- The Ship’s Wheel is in the lower right side of the scene.
- Pick up the torch that is in the lower right side of the scene.
Blue Item – Burning Torch

- Take the Torch from inventory and place it on the fire that is in the lower center of the scene.
Two Lanterns – Peg Leg
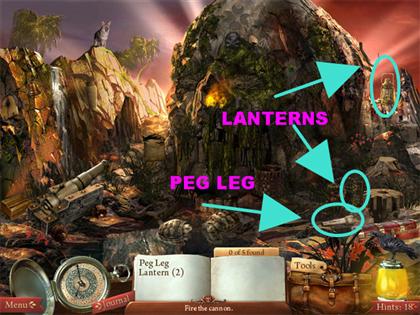
- One of the Lanterns is in the top right side of the scene.
- The other Lantern is in the lower right side of the scene.
- The Peg Leg is in the lower right corner of the scene.
Blue Item – Eyes
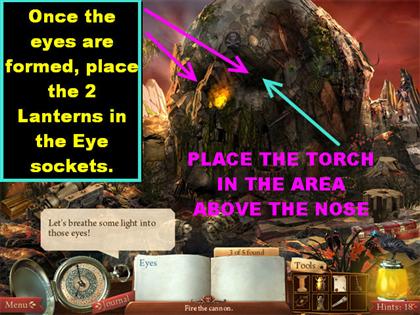
- Place the Burning Torch in the area above the nose of the gigantic skull.
- The Burning Torch will form two Eyes on the gigantic skull.
- Place the two Lanterns on both Eyes of the gigantic skull.
Blue item – Throne
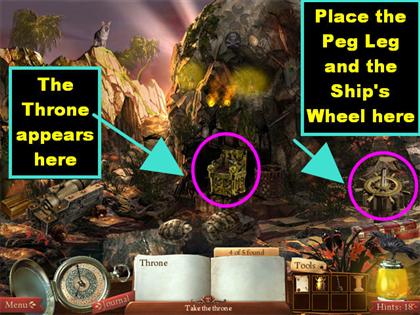
- Place the Peg Leg on the tree stump that is in the lower right side of the scene.
- Place the Ship’s Wheel above the Peg Leg in the lower right corner.
- The skull’s mouth will open revealing a throne; click on the throne.
Blue Item – Chest
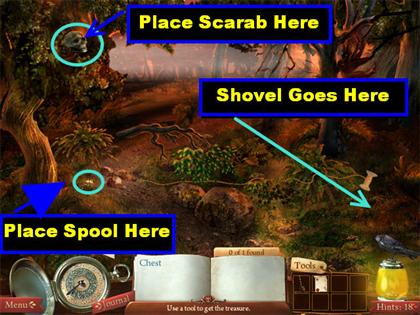
- Place the Gold Scarab on the skull that is on the top left side of the scene.
- The Gold Scarab will fall to the ground, marking the spot in which you need to place the Spool.
- Place the Spool in the area in which the Gold Scarab fell. The Spool will then unravel and land in the spot in which you need to place the Shovel.
- Take the Shovel and place it in the spot where the spool is located.
- As soon as the Chest comes out of the ground, Captain Kidd will appear on the left side of the scene.
Sign the Document
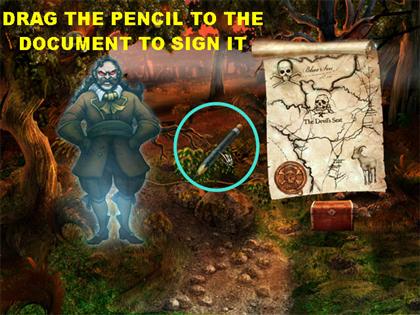
- Take the pencil and place it on the document. The pencil will automatically sign the paper, and the Chest will open revealing all of its treasures.
Collect 50 Treasures
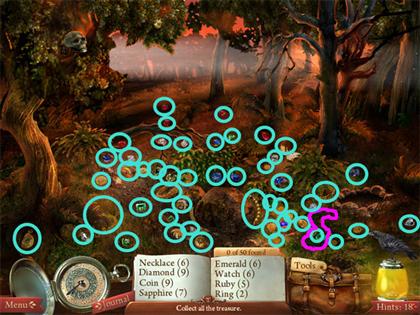
- Since there are so many items to find in this scene, we just made one screenshot to show the location of all the items on the list.
Examine the Hole
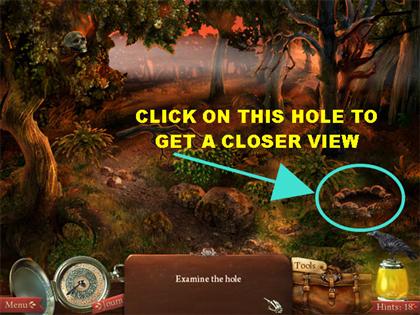
- Click on the Hole that is in the lower right side of the scene and you will get a closer view.
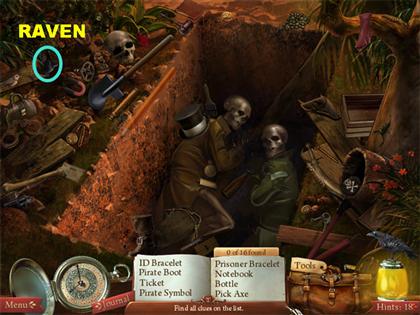
- The Raven is on the top right side of the scene.
CHAPTER SIX
Bone
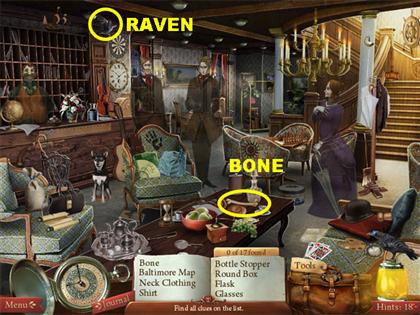
- Talk to the people in the scene by clicking on them.
- The Raven is in the top left side of the scene.
- The Bone is located on the small table that is in the center of the scene.
Blue Item - Register Book

- Give the Bone to the dog that is in front of the registration desk.
- Once the dog disappears, pick up the Register Book that appears in the spot the dog was sitting in.
- Once the Register Book opens, click on the room number.
Two Black Books – Red Book
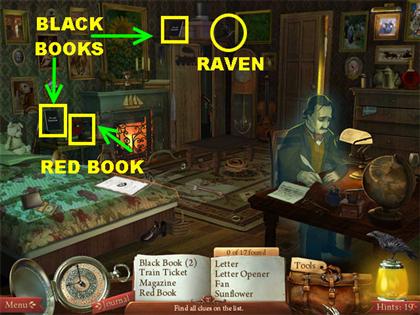
- The Raven is in the upper center of the scene.
- The Red Book is on the table that is on the left side of the fireplace.
- The Black Book is on the table that is on the right side of the bed.
- The other Black Book is in the top center of the scene, on top of the armoire.
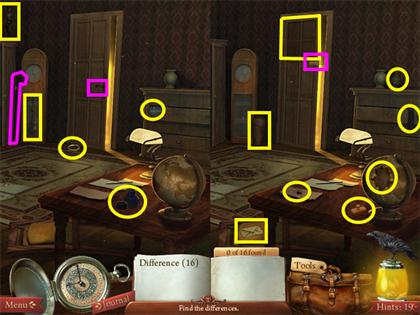
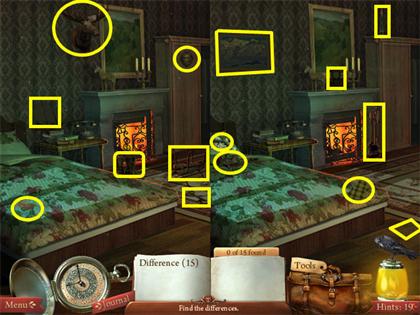
Find 16 Differences
Find 15 Differences
Two Books – Light Bulb – Wire
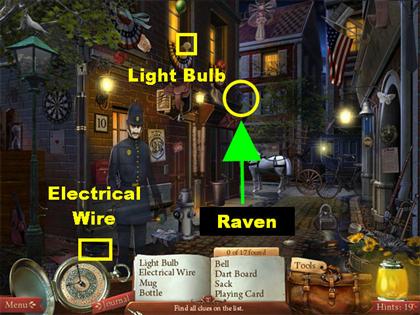
- The Raven is in the top center of the scene; it is hard to see because the image is very faint.
- The Light Bulb is in the top center of the scene, close to the first window.
- The Electrical Wire is in the lower left side of the ground.
Poe
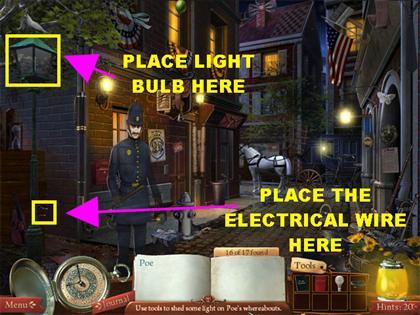
- Place the Light Bulb on the street light that is on the left side of the scene.
- Place the Electrical Wire on the lower part of that same street light.
- Once the lights comes on, Poe appears on the street.
Assist the Doctor in Examining Poe
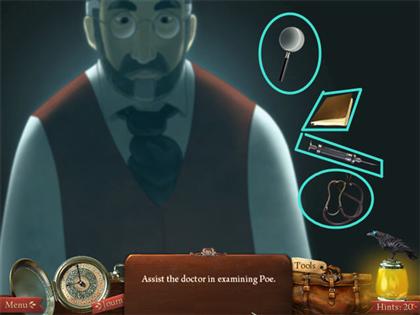
- All you have to do in this section is drag the items on the left side of the page to anywhere on Poe’s body.
- It doesn’t matter where you place the items, as long as you see the blue gears appear as you’re placing them.
- At the end of the examination, you find out that Poe has passed away.
Room
- The Raven is in the upper left side of the scene.
Poe’s Grave
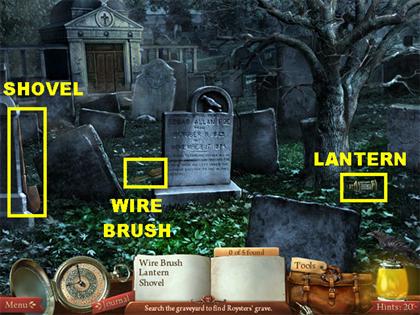
- The Wire Brush is behind Poe’s grave.
- The Lantern is on the lower right side of the ground.
- The Shovel is on the left side of the cemetery, leaning against one of the gravestones.
Blue Item - Roysters’ Grave
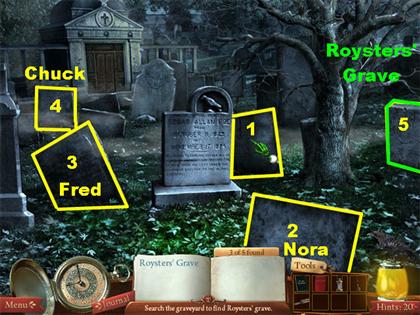
- The goal in this section is to find Roysters’ Grave.
- There are several graves to inspect in this scene; you don’t have to go through them all to find the Roysters’ Grave, but we’ve included them in the walkthrough anyway.
- Roysters’ Grave is located on the right side of the cemetery.
- Click on the gravestone that is on the right side of Poe’s grave to get a closer view.
Gone
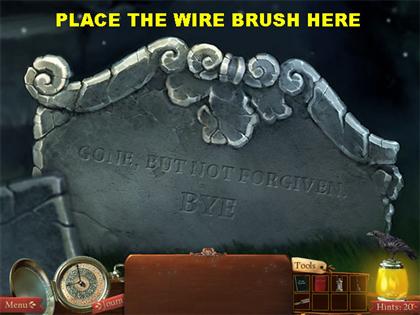
- Place the Wire Brush on the close-up view of the gravestone. The writing on the gravestone says “GONE, BUT NOT FORGIVEN, BYE.”
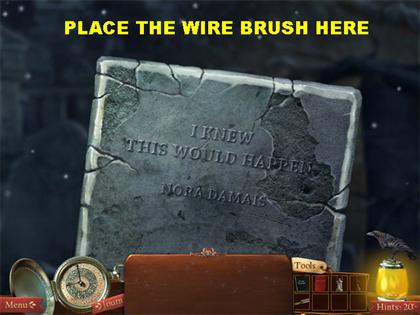
Nora’s Grave
- You will be taken back to the cemetery; click on the gravestone that is on the lower right side of the cemetery to get a closer view.
- Place the Wire Brush on the close-up view of the gravestone. The writing on the gravestone says “I KNEW THIS WOULD HAPPEN – NORA DAMAIS.”
Fred’s Grave
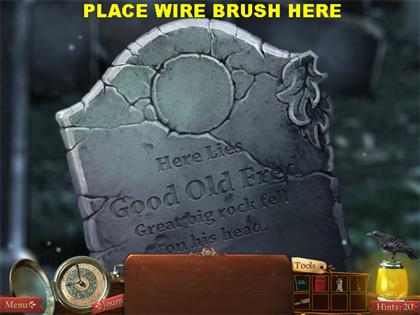
- You will be taken back to the cemetery; click on the gravestone that is on the left side of the cemetery to get a closer view.
- Place the Wire Brush on the close-up view of the gravestone. The writing on the gravestone says “Here Lies Good Old Fred – Great big rock fell on his head.”
Chuck’s Grave
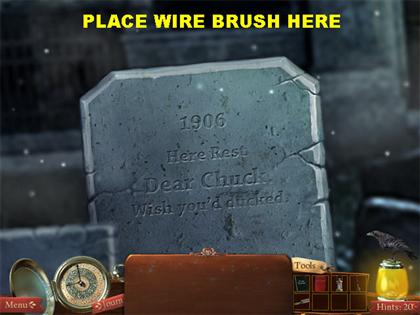
- You will be taken back to the cemetery; click on the gravestone that is on the far left side of the cemetery to get a closer view.
- Place the Wire Brush on the close-up view of the gravestone. The writing on the gravestone says “1906 Here Rest Dear Chuck. Wish you’d ducked.”
Roysters’ Grave
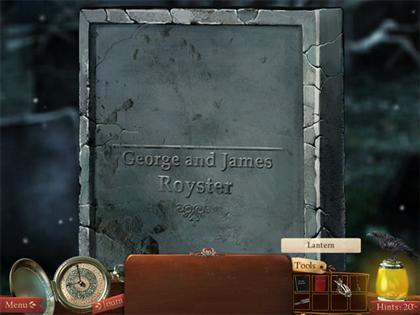
- You will be taken back to the cemetery; click on the gravestone that is on the right side of the cemetery to get a closer view.
- In this scene the Wire Brush will automatically reveal the writing on the gravestone; it says “George and James Royster.”
Blue Item - Royster Brothers
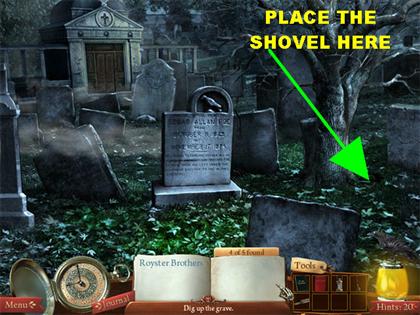
- Place the Shovel in the lower right corner of the cemetery to get a closer view.
Blue Items – Key – Two Bullet Slugs – Gun
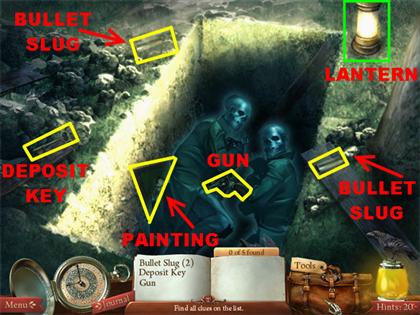
- Place the Lantern anywhere in the scene, it will land in the upper right corner and expose the bodies.
- Pick up the Bullet Slug that is on the wooden board on the right side of the scene.
- The other Bullet Slug is in the upper left side of the scene, next to the grave.
- The Gun is in the middle of the grave, between the two bodies.
- The Deposit Key is on the left side of the scene, on top of a wooden board.
- Click on the Painting that is next to the body on the left side of the scene.
Key
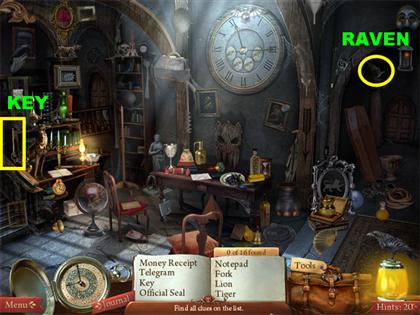
- The Raven is in the upper right side of the scene.
- The Key is on the left edge of the room.
Block the Door
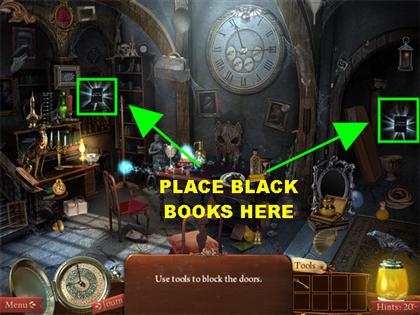
- Place the Black Book on the back door; the Black Book will hover over the back door.
- Place the other Black Book against the door that is on the top left side of the room.
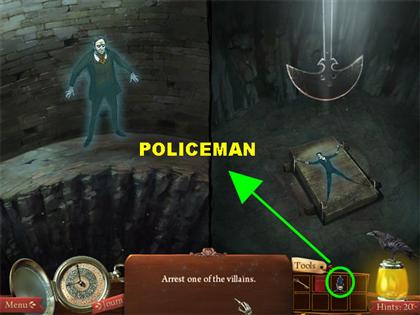
Policeman
- Click anywhere on the scene, and it will take you to another scene.
- Click on the Policeman that is on the right side of the scene. You will be automatically returned to the previous scene.
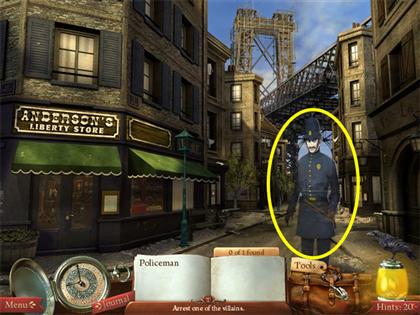
Arrest One of the Villains
- Grab the Policeman and place him on either side of the scene.
Block Tweed’s Escape
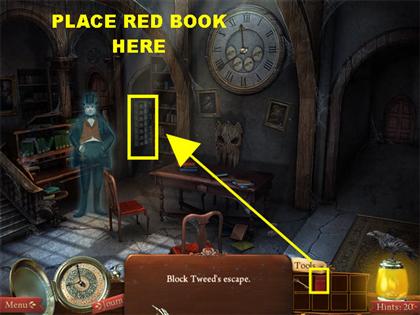
- Take the Red Book and place it on the secret panel that opened up on the left side of the room.
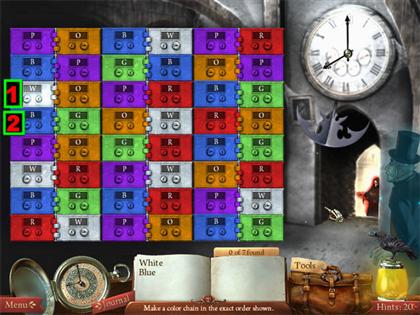
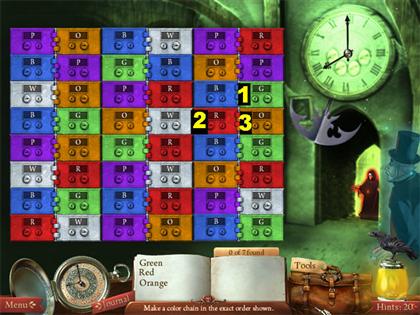
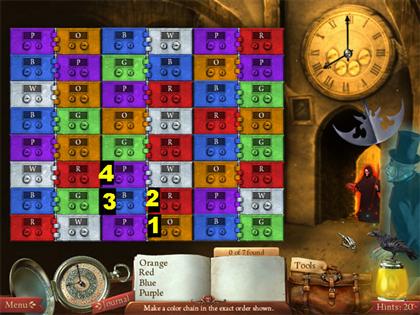
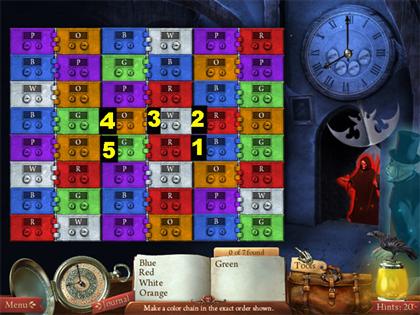
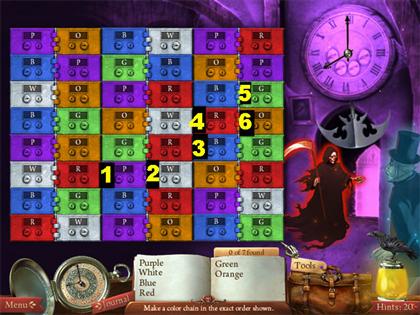
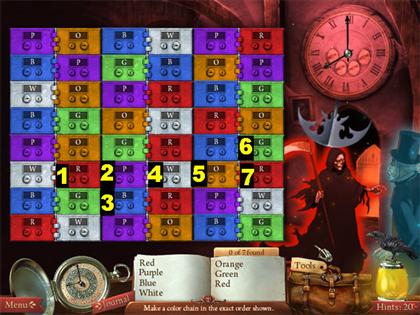
Making Chains
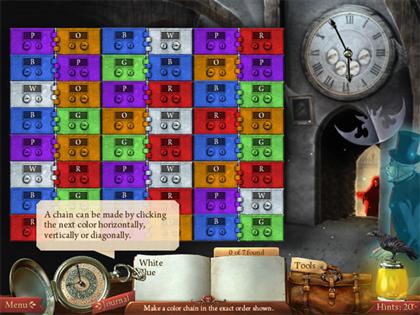
- In this section you have to make chains according to the instructions at the bottom of the page.
- The colors have to be clicked in the exact order shown.
- Click on the first color of the chain and that block will light up.
- The next number you click has to be placed horizontally, vertically or diagonally from your last block.
- If the next block you click on is incorrect, the block will not light up.
- If you want to undo a move, simply retrace your steps and click on the last block(s) you selected.
- There is more than one solution possible for this puzzle; the walkthrough shows you one of the possible solutions.
- Please look at the following screenshots to see the solutions for all these puzzles.
Solution 1
Solution 2
Solution 3
Solution 4
Solution 5
Solution 6
Open the Deposit Box
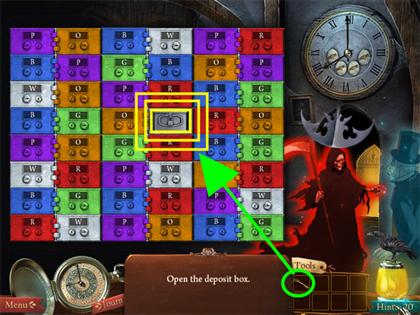
- Place the Key on the Deposit Box that is in the center of the puzzle.
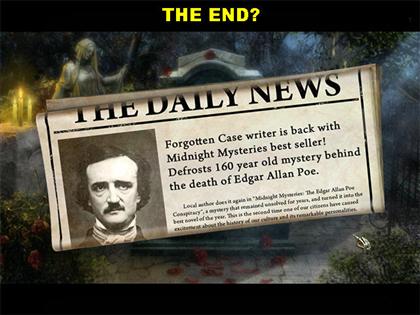
- Watch the ending scenes.
Created at: 2009-07-17