

Walkthrough Menu
- General Tips
- Act 1: Ravenhearst Grounds
- Act 2: Blackpool Hospital
- Act 3: Dalimar House
- Act 4: The Asylum
- Act 5: The Island
- Act 6: Forever Home
General Tips
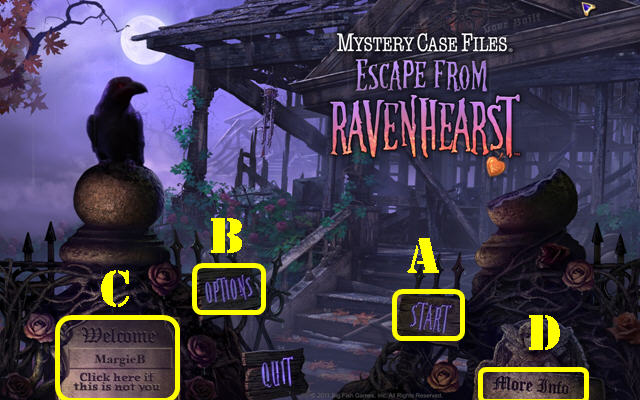
- This is the official guide for Mystery Case Files: Escape from Ravenhearst!
- Click on Start (A) to begin your adventure.
- Select between 'Master Detective' and 'Casual' Modes.
- The best way to use this walkthrough is by clicking on the 'CTRL' and 'F' keys on your keyboard to simultaneously to bring up a search box.
- Type the keyword into the search box at the bottom of your screen and click on 'NEXT' to find the section you need help with. Clicking 'NEXT' again will bring up all instances in which that keyword was mentioned in the guide.
- The Options (B) button allows you to adjust the environment volume, effects volume, music volume, sound, hardware cursor, high definition, and subtitles.
- The 'Click here if this is not you button' (C) can be used to manage your profiles in the game.
- Click on 'More Info' (D) to access Credits, Forums, and More Games.
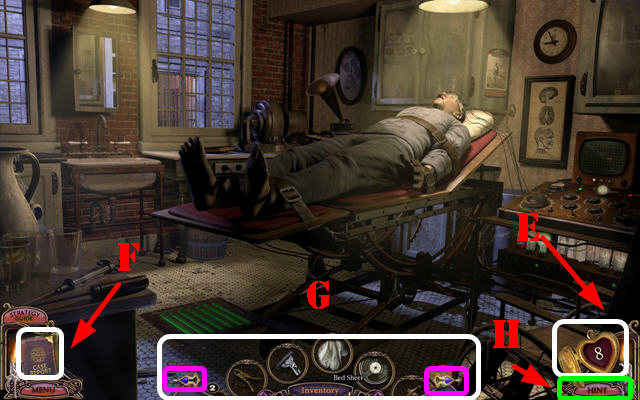
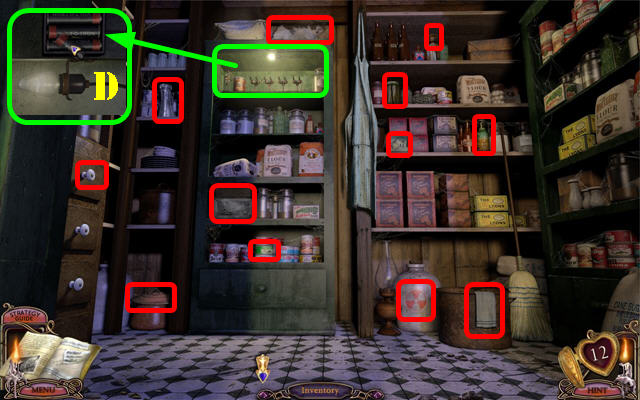
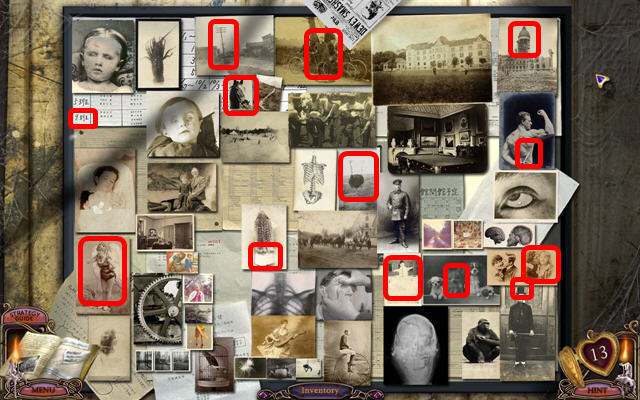
- Emma's Mysterious Locket (E) opens when there are morphing objects nearby. The number inside the locket indicates how many objects are left to find.
- In this guide we will refer to Morphing Object Scenes as MOS.
- The ghosts will point out a particular area after all the morphing objects have been found. Investigate these areas to find inventory items and clues.
- The Case Book (F) does not record the specific numbers unique to your game. Since numbers are random, it is best to keep a pen and paper handy to jot these down.
- Once an inventory item has been picked up, it will be added to your inventory wheel. Hover your mouse at the bottom of the screen to make the inventory wheel appear (G).
- Use the arrows (marked in purple) on the sides of the inventory tray to scroll through all possible options.
- The Hint (H) in the lower right can only be used in MOS and Hidden Object Scenes.
- Puzzles can be skipped by clicking on the skip button once it has been filled.
Act 1: Ravenhearst Grounds

- Open the glove compartment; take the MATCHES (1).
- You can click on Madame Fate (2) and the Horn (3).
- Exit the vehicle.
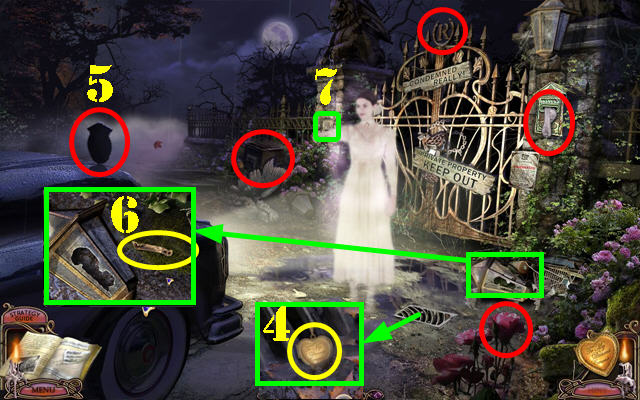
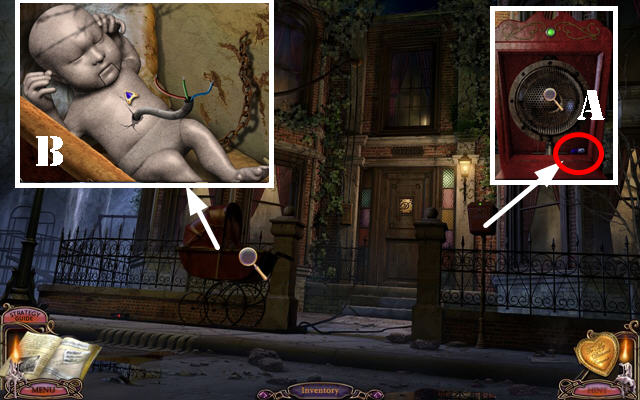
- Zoom into the grate; take EMMA'S LOCKET (4).
- Click on the morphing hood ornament Emma's ghost points to (5).
- Click on the other 4 morphing objects in the scene (red).
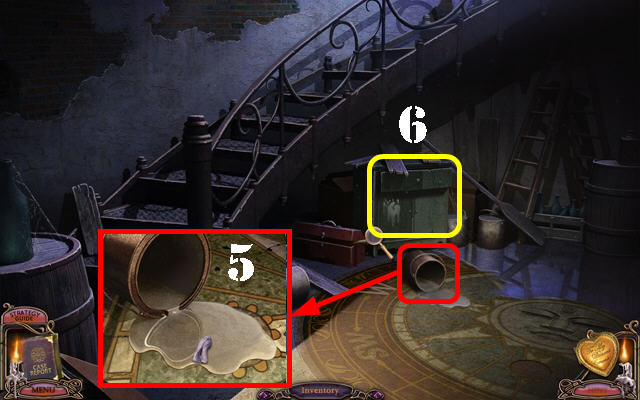
- Examine the fallen lamp; click on it and take the BOTTLE OPENER (6).
- Note the intercom (7).
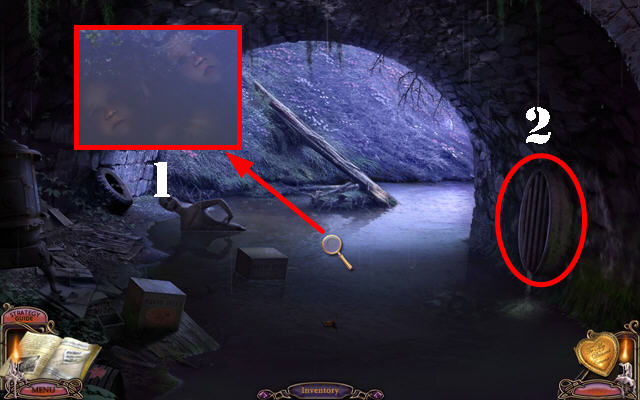
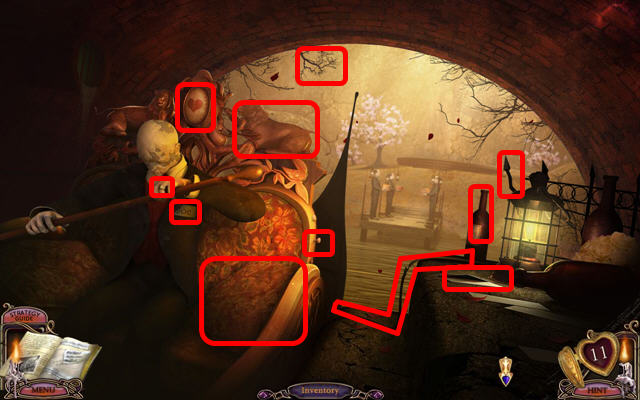
- Go left and then under the bridge.
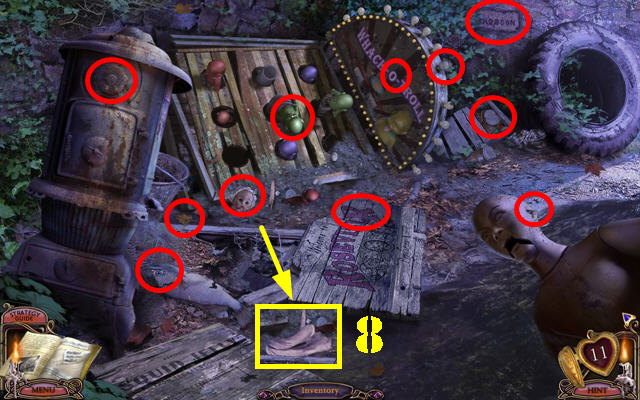
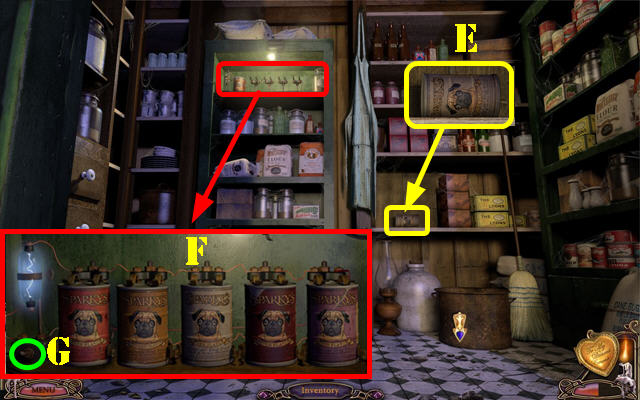
- Zoom into the left side of the scene for a MOS.
- Click on the 11 morphing objects marked in red.
- Take the RAG (8).
- Walk down twice and go forward twice (towards the lighthouse).
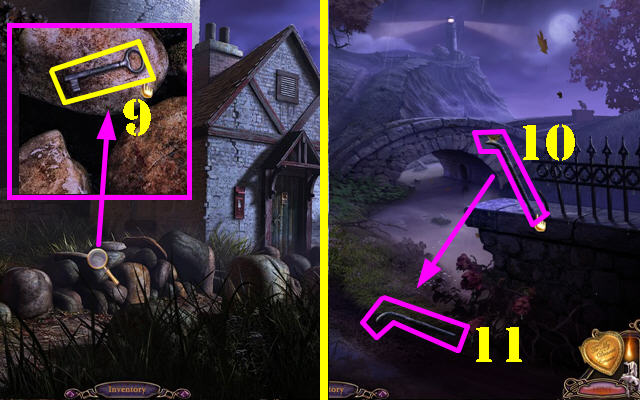
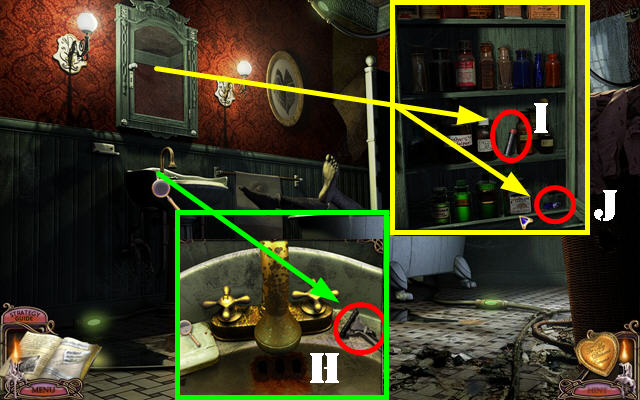
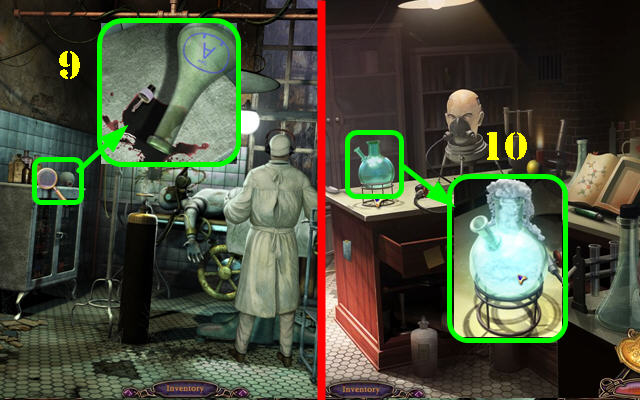
- Zoom into the rocks; use the BOTTLE OPENER on the LARGE ROCK twice to add it to inventory.
- Click on the key and it will fall in between the rocks (9).
- Walk down twice.
- Use the LARGE ROCK on the loose metal bar 3 times (10); take the METAL BAR (11).
- Go back under the bridge.
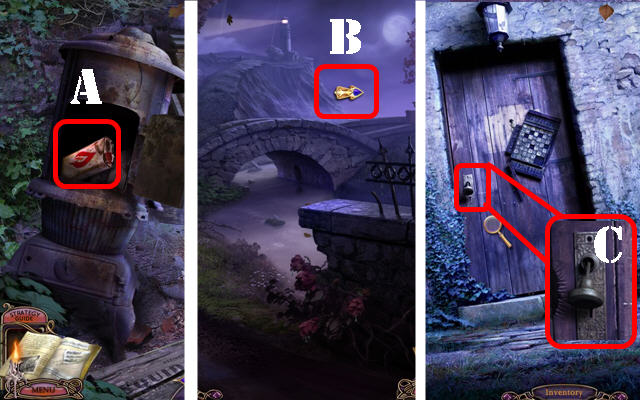
- Zoom into the left side of the water; use the METAL BAR on the rusty stove's door and take the LIGHTER FLUID (A).
- Walk down twice; go right over the bridge (B) and forward to the cottage.
- Examine the door; use the METAL BAR on the lock (C) and go through the door.
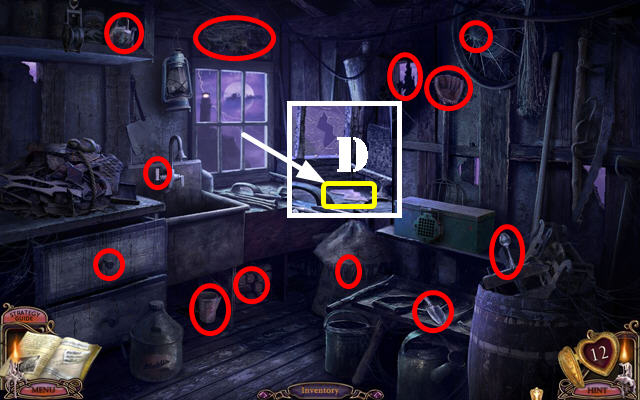
- A MOS activates as soon as you go through the door.
- Click on the 12 morphing objects marked in red.
- Examine the cracked window; click on it and take the GLASS SHARD (D).
- Walk down twice.
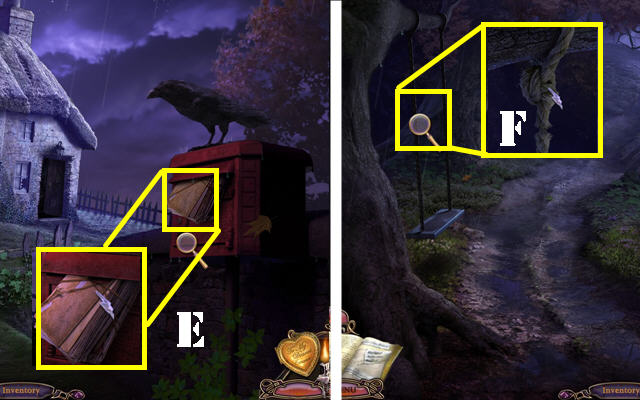
- Zoom into the mailbox; use the GLASS SHARD 4 times on the string around the letters to obtain the TWINE (E).
- Walk down.
- Zoom into the swing; cut the ROPE with the GLASS SHARD 4 times (F).

- Return to the inside of the cottage.
- Use the ROPE on the pulley (G); click on the rope and take the METAL CHAIN (H).
- Go back to the front gate.
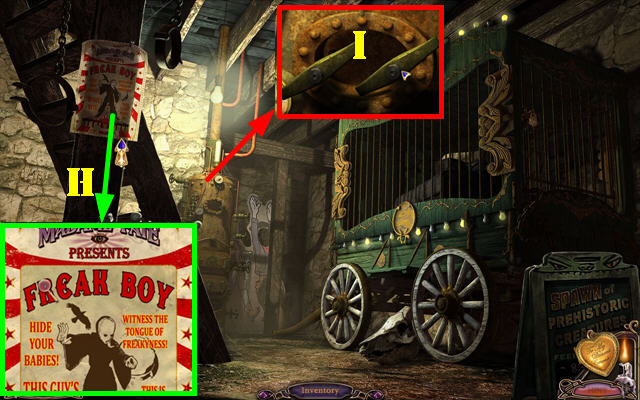
- Zoom into the gate; attach the METAL CHAIN to it (I).
- Zoom into the front of the car (J); click on the chain to attach it to the car.
- Go into the car; click on the stick shift to pull the gate down (K).
- Exit the vehicle and go through the gate.
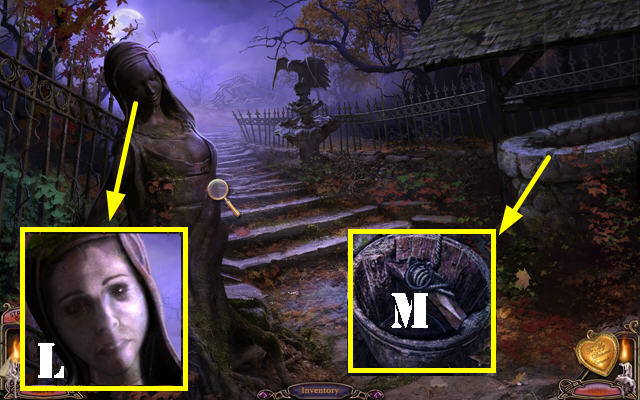
- Look at the statue's face (L).
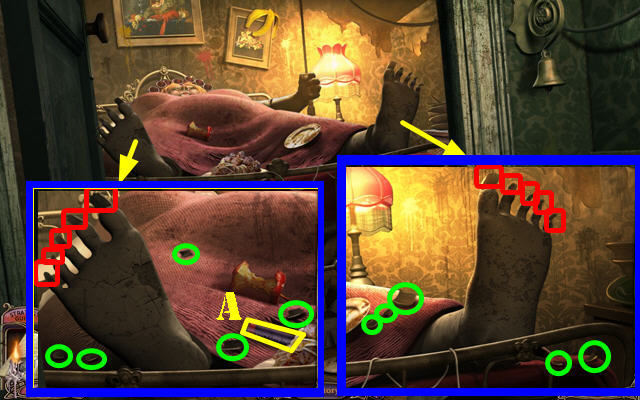
- Zoom into the well; click on the rope 4 times.
- Cut the rope with the GLASS SHARD 3 times to acquire the BUCKET (M).
- Go forward.
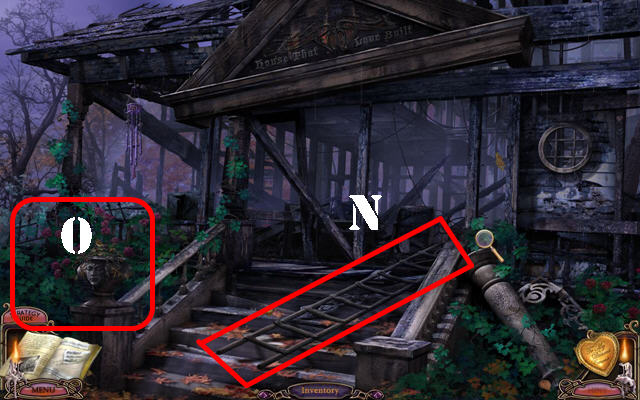
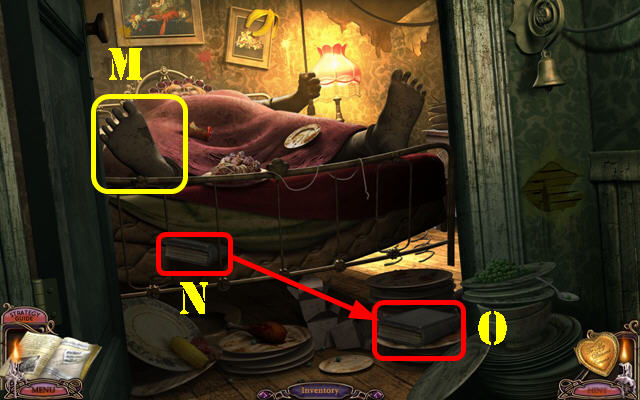
- Take the LADDER (N).
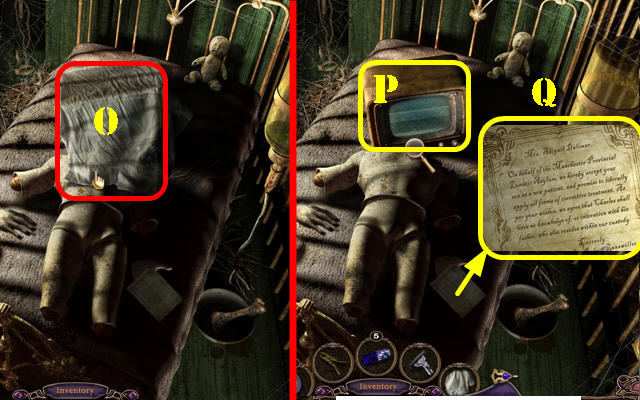
- Zoom into the left bushes to access a MOS (O).
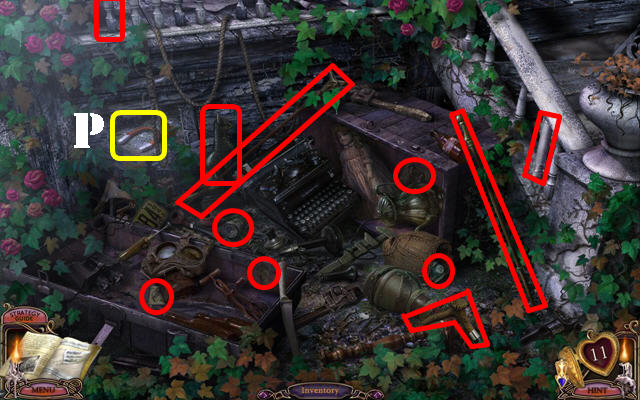
- Find the 11 morphing objects marked in red.
- Take the MAGNET (P).
- Click down and go forward.
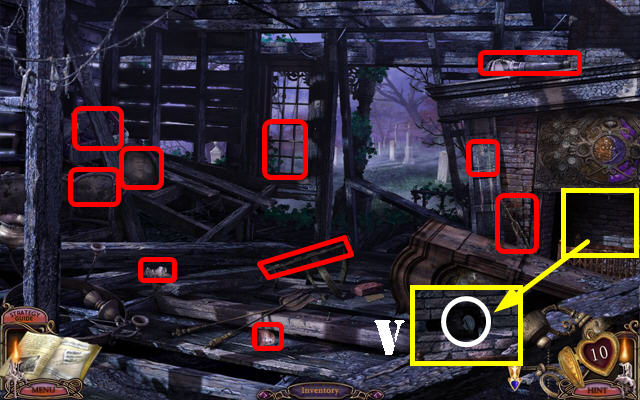
- Find the 10 morphing objects marked in red.
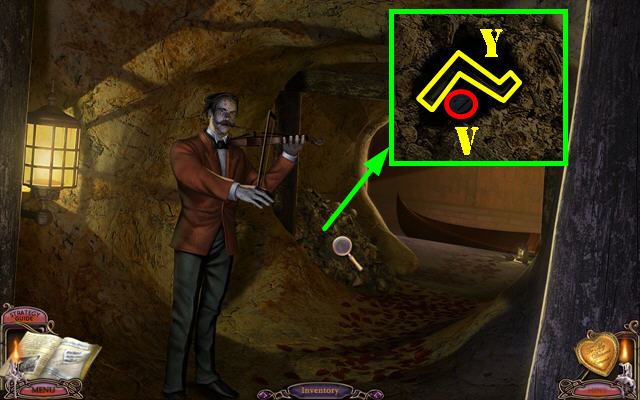
- Examine the fireplace; click on the stone and take the first V KEY (V).
- Go back under the bridge.
- Click in the center of the water; the twins will appear (1).
- Use the BUCKET in the water to acquire the BUCKET WITH WATER.
- Zoom into the drain (2) to hear voices.
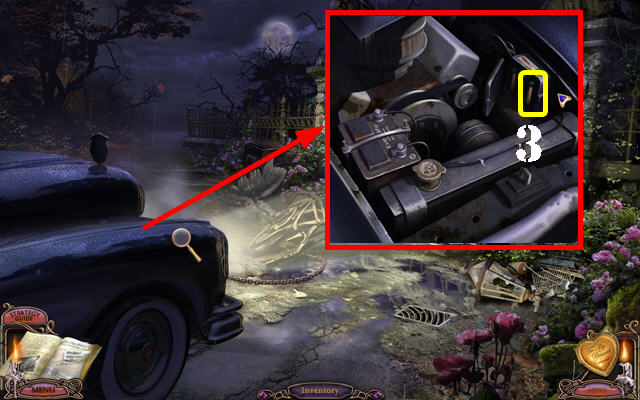
- Return to the car.
- Zoom into the hood of the car; open the hood with the RAG.
- Put the BUCKET WITH WATER on the engine; open the lid and take the CAR FUSE (3).
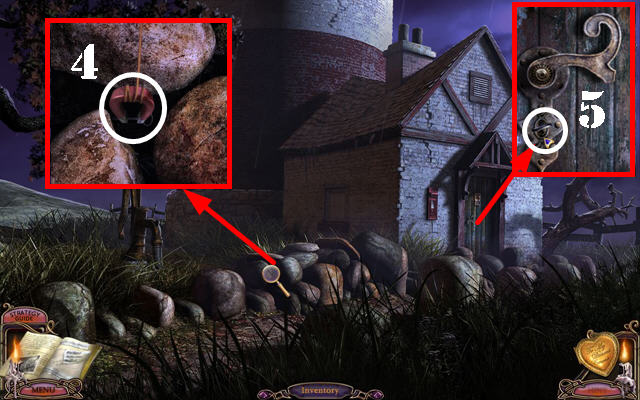
- Return to the outside of the lighthouse.
- Zoom into the rocks; use the MAGNET to try and retrieve the keys.
- Use the TWINE on the magnet; click on the magnet to acquire the LIGHTHOUSE KEY (4).
- Zoom into the door; use the LIGHTHOUSE KEY on the lock and go through the door (5).
- Examine the stove; put the LIGHTER FLUID and the MATCHES on the logs (@) to light up the room.
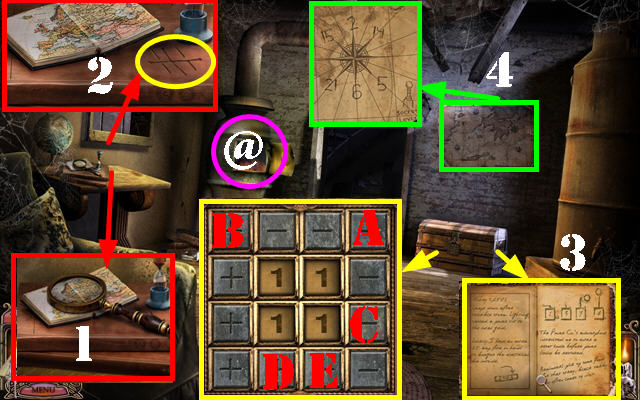
- Look at the table; take the MAGNIFYING GLASS (1). Note the numbers on the book (2).
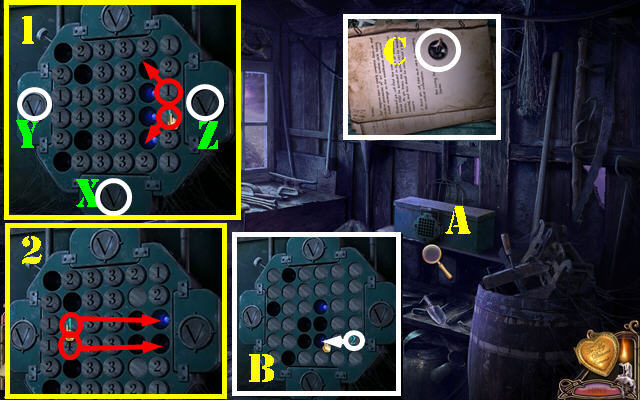
- Examine the chest to activate a puzzle.
- Using the plus and minus buttons, change the center numbers to reflect the code on the book.
- The solution is random but there are a few steps that should work for everyone. Click on the buttons in this order: A x 2, B x 2, A x 3, C x 1, and A x 2. At this point the two left button should be at 6 and the two right numbers should be at 2.
- Now click on the D button until the two left numbers are the same numbers as your solution. Press the E button until the 2 right numbers are the same as your solution to complete the puzzle.
- Examine the chest; open the book and note the code (3).
- Examine the map (4); note the secret lever on the side.
- Go through the door.
- Zoom into the spilled bucket; use the RAG on the spill 3 times (5).
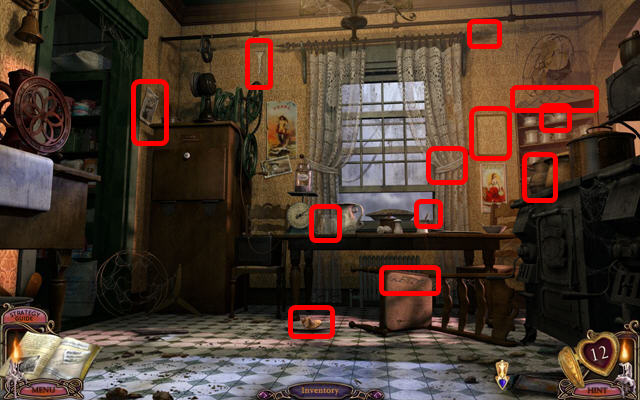
- Examine the green cabinet to access a MOS (6).
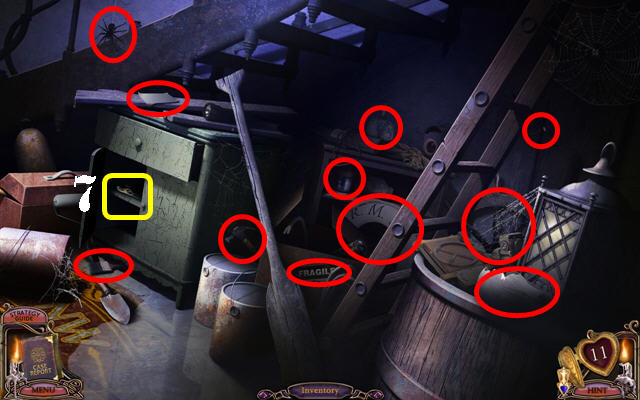
- Find the 11 morphing objects marked in red.
- Take the WRENCH (7).
- Walk down and go up the steps.
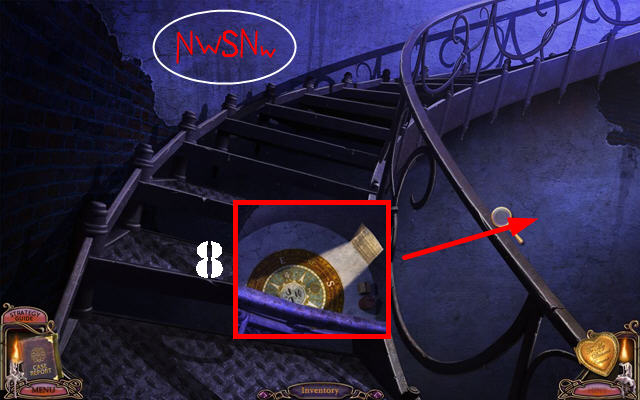
- Look on the left side of the wall; note the etchings (NWSNw).
- Look over the railing (8).
- Go up the steps.
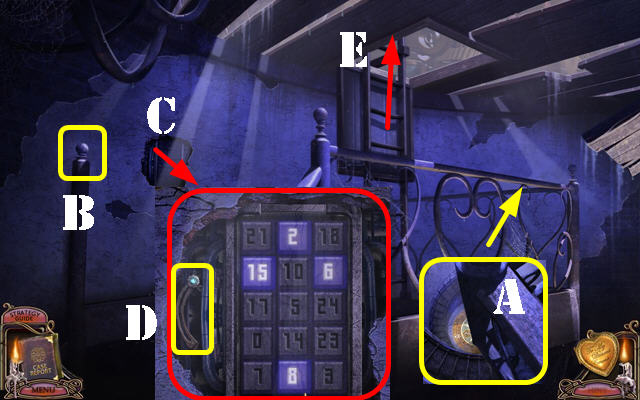
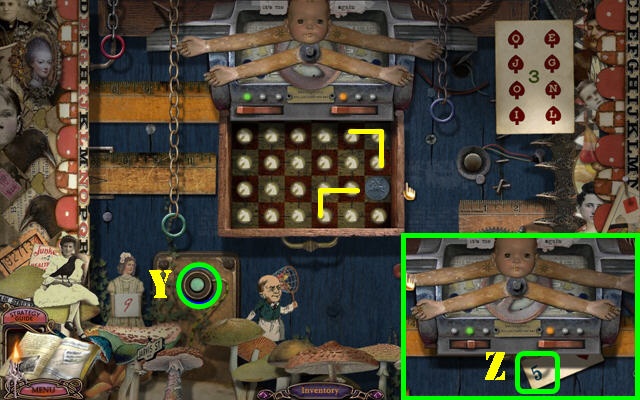
- Look over the railing (A).
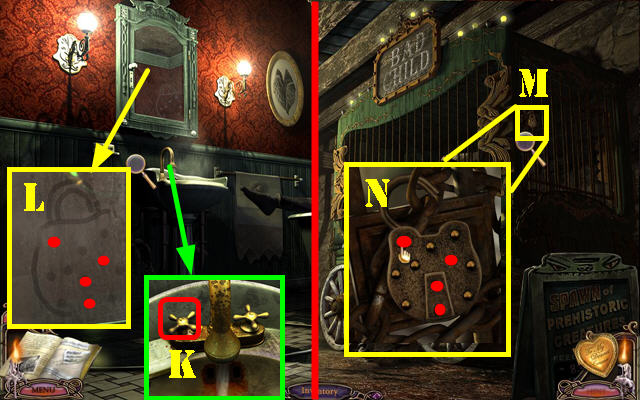
- Click on the knob (B); examine the broken wall (C).
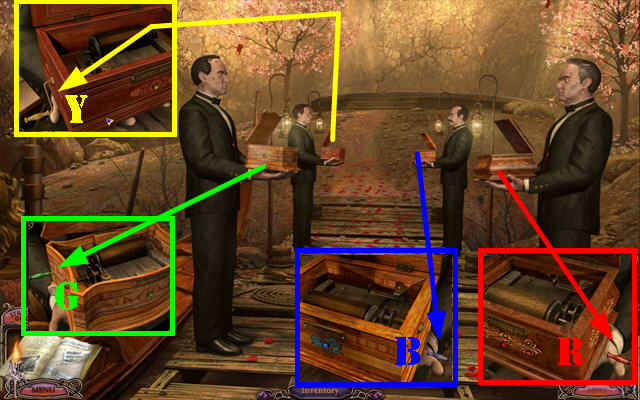
- Using the clues found in the lighthouse, enter the numbers shown on the screenshot and then click on the lever (D).
- Go up the ladder (E).
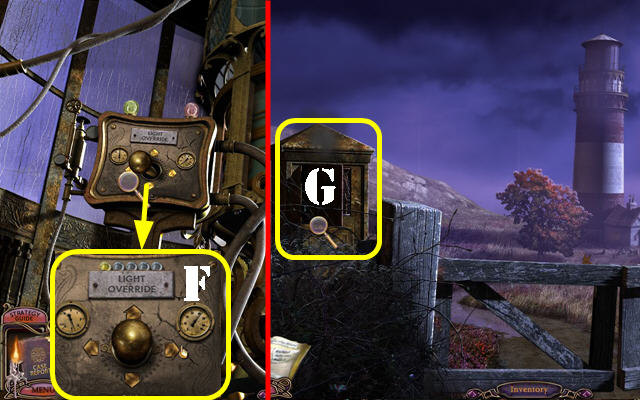
- Zoom into the controls; click on the lever 3 times in any direction (F). This action will break the mechanism.
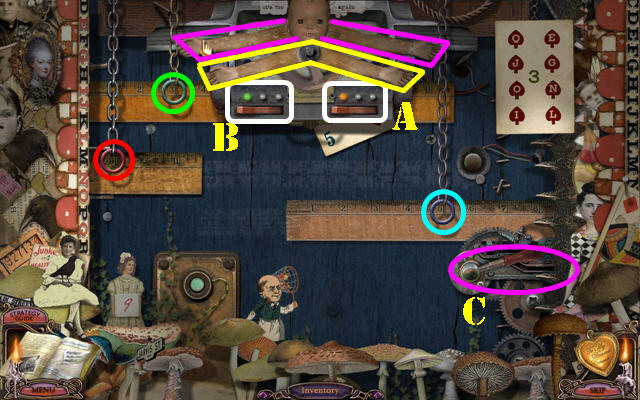
- Walk down until you reach the fuse box outside of the lighthouse (G).
- Zoom into the fuse box; put the CAR FUSE in the outlet to activate a puzzle. If you don't have the car fuse, go back to the car and take it from inside the engine (you will need the rag and the bucket of water).
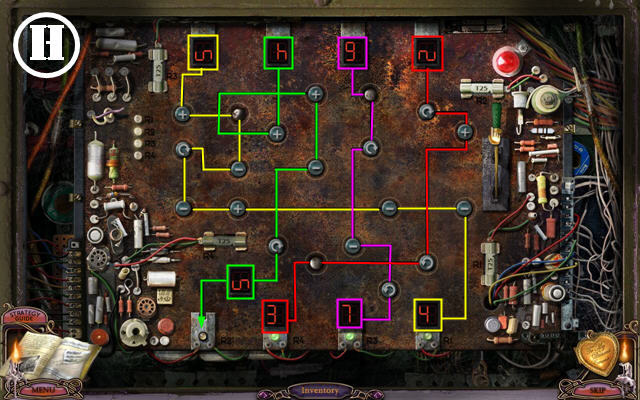
- Arrange the fuses and switches in such a way that the numbers 5374 fall into the correct slots. The beginning number is random but the solution is always 5374.
- Please look at the screenshot to view the path each number takes. If you concentrate on one number at a time, you can see how that numbers changes as it goes through the board. It can you give a better idea of how to adjust the dials.
- Solving the path one number at a time is easier than doing them all at once. Each time a number passes through the symbols, it will flip the image of that number. Your goal is to adjust the symbols correctly so the numbers fall on the right side up.
- Please look at the screenshot for a RANDOM solution (H).
- Go forward.
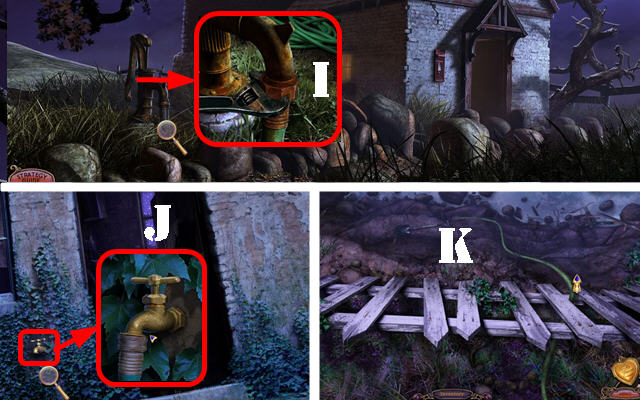
- Zoom into the pump; use the WRENCH on the bolt to acquire the GARDEN HOSE (I).
- Go back to the cottage.
- Zoom into the spigot and attach the GARDEN HOSE to it (J).
- Head right and follow the hose down (K).
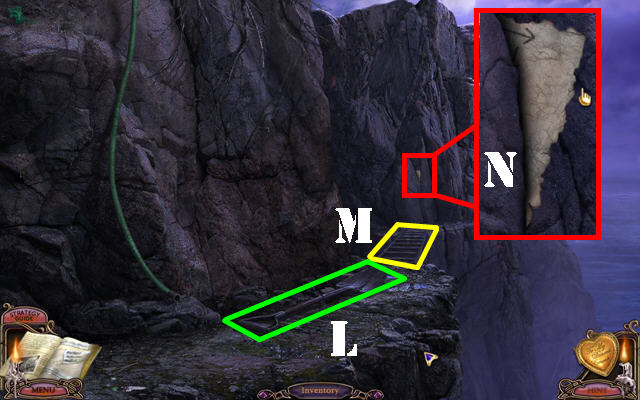
- Take the SHOVEL (L).
- Put the LADDER on the gap (M).
- Zoom into the stone and take the PAPER SCRAP (N).
- Go up the hose. Return to the main gate; go through it and go forward.
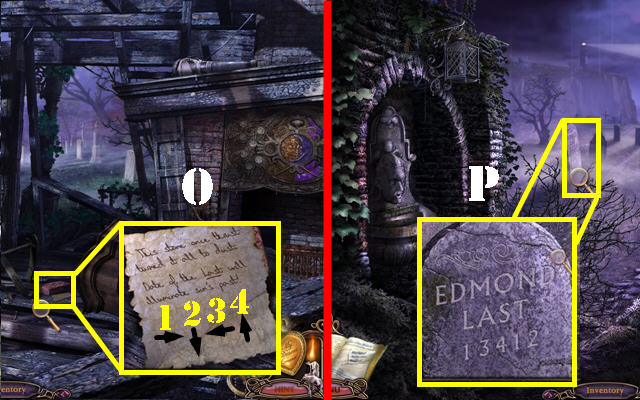
- Zoom into the brick; click on it and attach the PAPER SCRAP to the torn paper (0).
- Go forward.
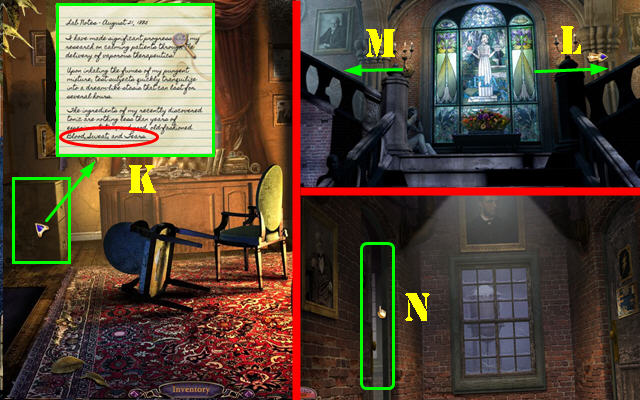
- Zoom into the left tombstone; note the numbers on the 'Edmond Last' grave. This number is random. My number was 13412 (P).
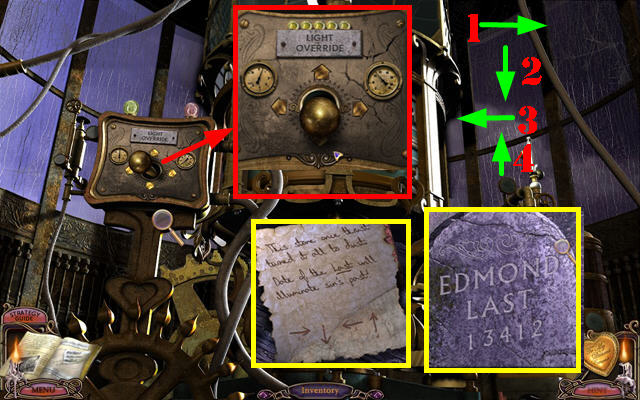
- Return to the lighthouse tower.
- Zoom into the controls; using the code etched on the tombstone, move your levers in the appropriate order. Using the code on the paper the levers are marked as follows: 1 is right, 2 is down, 3 is left and 4 is up.
- In the RANDOM solution we were given, move the levers: right, left, up, right, and down. As each move is entered correctly, a green light will light up. Enter the numbers found in your game.
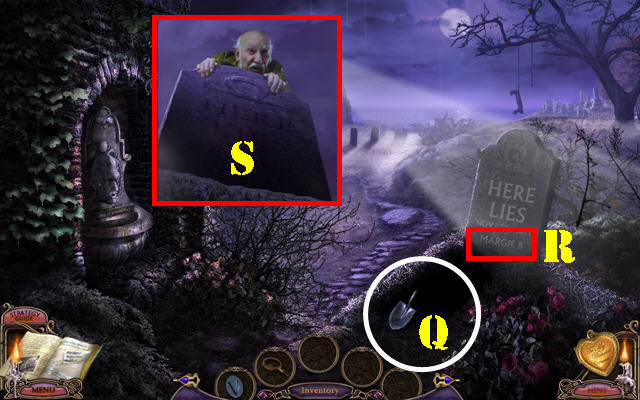
- Return to the cemetery.
- Use the SHOVEL on the ground 3 times (Q).
- Your name will appear on the gravestone (R).
- Go into the grave for a cut-scene to appear (S).
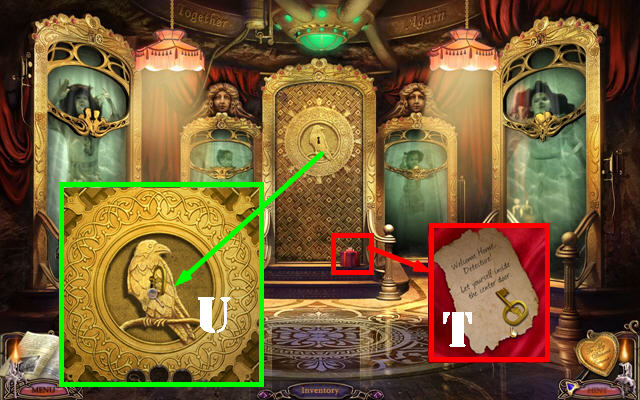
- Zoom into the red box; click on it and take the HUB KEY E (T).
- Zoom into the center door; use the HUB KEY E in the lock (U).
- Go through the hub.
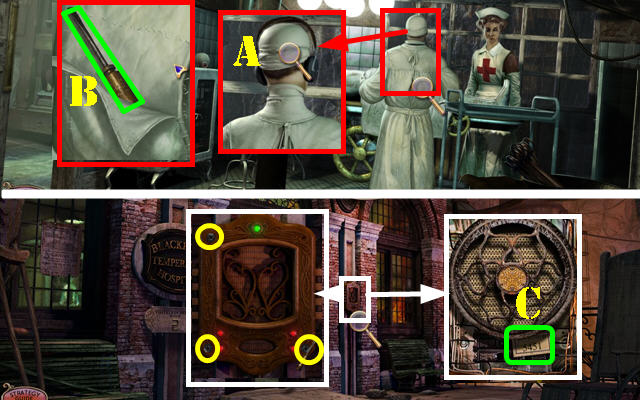
Act 2: Blackpool Hospital
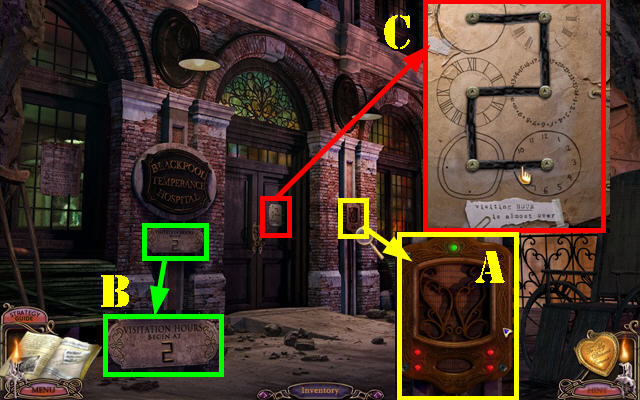
- Zoom into the intercom (A); listen to what Charles has to say.
- Examine the sign; it states that visitation hours begin at 2:00 (B).
- Zoom into the door to activate a puzzle.
- Change the clock hands so that collectively they form the number 2 (C).
- Go through the door.
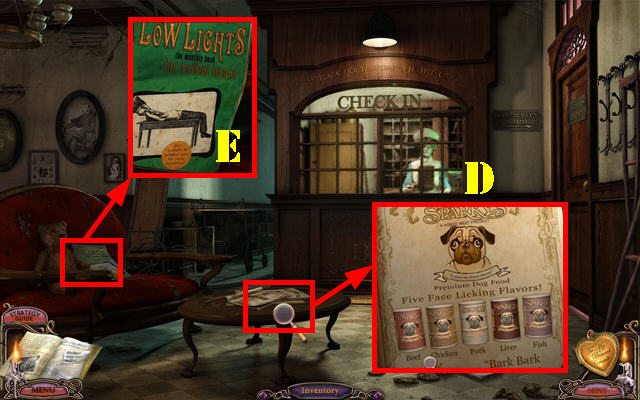
- Zoom into the table; note the dog food cans (D).
- Zoom into the Low Lights magazine on the couch (E); click on it to access a Hidden Object Scene.

- Find the 20 items on the list.
- Take the FEATHER (F).
- Go down the hallway.
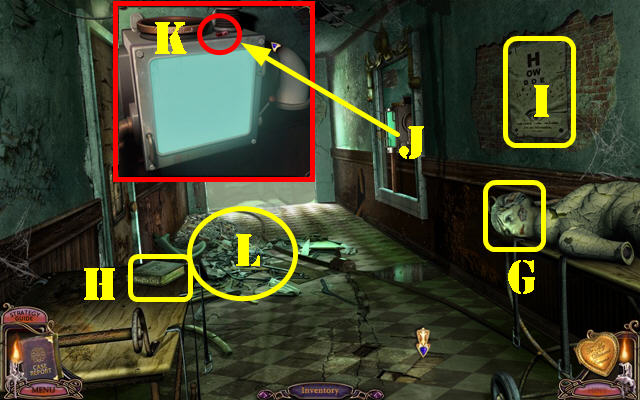
- Click on the head (G).
- Take the first PARENTING BOOK (H).
- Note the eye chart (I).
- Look at the x-ray device (J) on the right; take the RED PILL 1/4 (K).
- Zoom into the debris on the ground to activate a MOS (L).
- Find the 12 morphing objects marked in red.
- Take the WIRE CUTTERS (M).
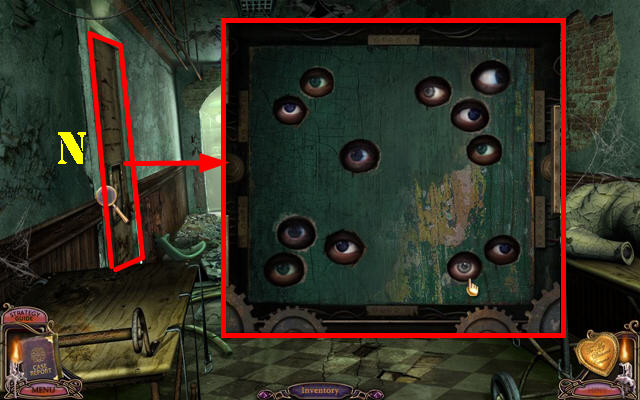
- Click on the left door (N).
- Click on the panel to expose a puzzle.
- The solution is random; you must click on 12 eyes in the correct order to solve the puzzle. If you make a mistake, the puzzle will automatically reset and you must start over with a new sequence.
- Go through the door after you complete the puzzle.
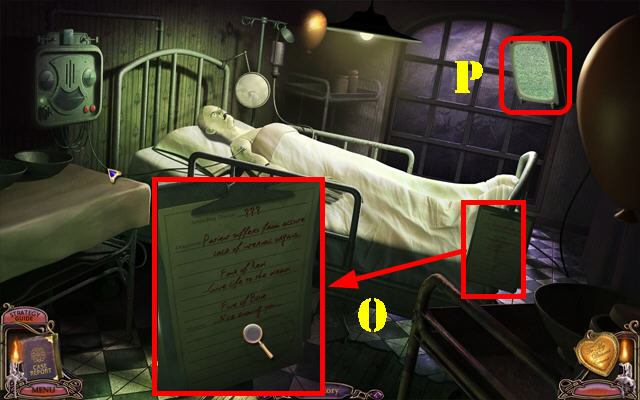
- Look at the clipboard and read the clue (O).
- Watch the TV monitor (P).
- Walk down and go forward.
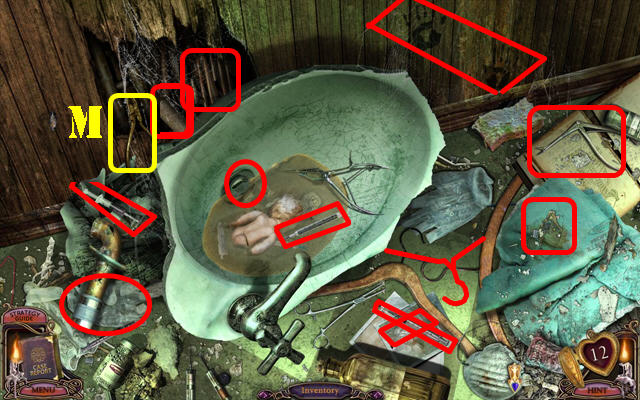
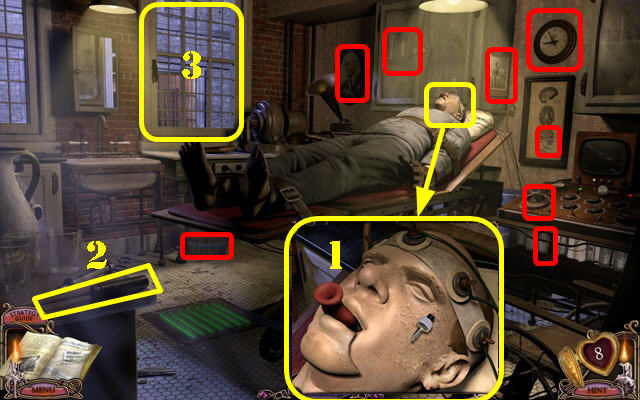
- Click on the mannequin doctor ( Q).
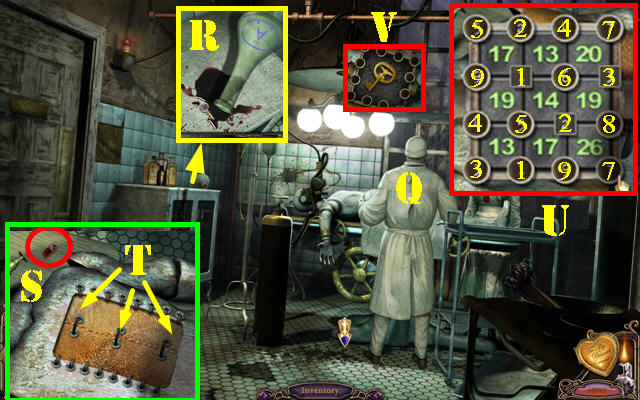
- Zoom into the top of the cabinet; note the spilled beaker of blood (R).
- Click on the patient; take the RED PILL 2/4 (S).
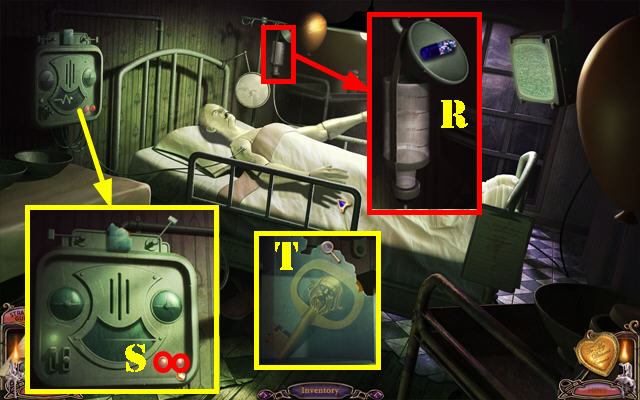
- Cut the 3 wires on the patient's back with the WIRE CUTTERS (T).
- Click on the buttons to activate a puzzle.
- Click on each round button (the square buttons are static) to change the digits to the numbers that add up to that square. Once a set of numbers has been entered correctly, the number on the square will light up.
- Please look at the screenshot for the solution (U).
- Take the STORK KEY (V).
- Open the left door and go through it.
- Examine the sink for a MOS.
- Find the 10 morphing objects marked in red.
- Take the RED PILL 3/4 (W).
- Grab the HEADPHONES (X).
- Walk down.
- Examine the mannequin doctor; put the HEADPHONES over his ears (A).
- Zoom into the back of his gown; cut the string around the pocket 3 times with the WIRE CUTTERS and take the SCREWDRIVER (B).
- Go outside.
- Zoom into the intercom; remove the 3 screws with the SCREWDRIVER (yellow).
- Note the RANDOM number on the piece of paper (C).
- Return to the morgue.
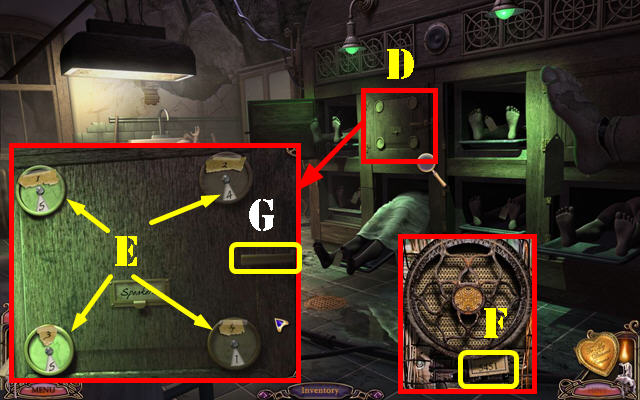
- Zoom into the freezer door (D).
- Change the numbers on the dials (E) to the code found in the intercom (F).
- Click on the handle (G) to open the freezer door.
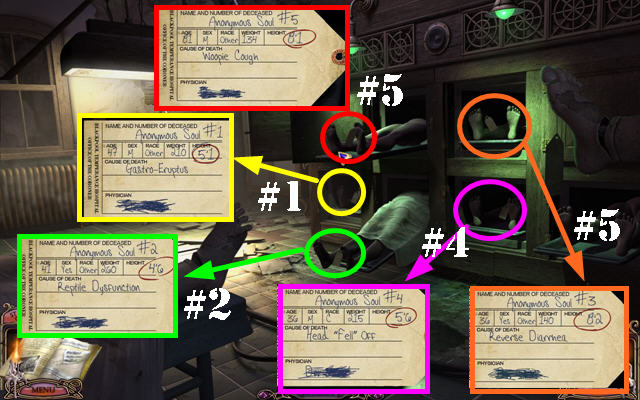
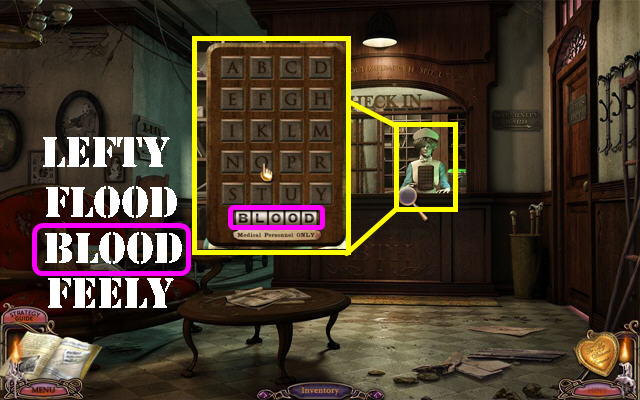
- Examine the toe tags; write down on a piece of paper the numbers circled in red (height) and whether the toe tag number is between 1 and 5. The numbers are RANDOM.
- Walk down twice.
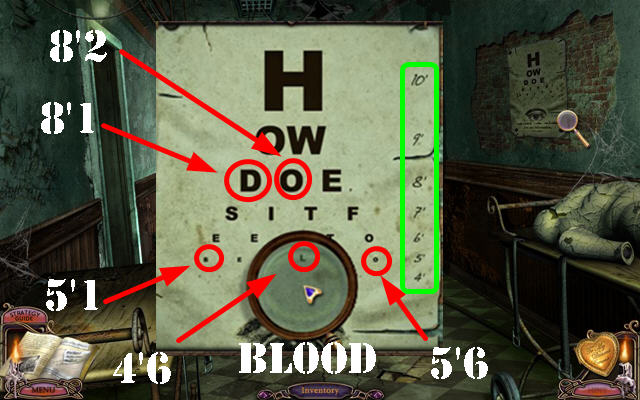
- Zoom into the eye chart.
- Using the 5 sets of RANDOM numbers found on the toe tags (circled in red), and their positions (from 1 to 5), look for the matching numbers on the eye chart.
- The first number circled in red on the toe tag represents the number on the side of the eye chart (10 through 4). This section is marked in green on the screenshot. The second number circled in red, represents its position in that row.
- For example, If your first number is 5'1 – locate the number 5 on the right side of the eye chart and then write down the 1st letter in that row which is 'B'.
- If a number is on the last line (number 4), you have to put the MAGNIFYING GLASS on the last row of the eye chart and click on it. Starting from the left, count to the number you need in that row. For example, if the toe tag says 4'6, then look for the sixth number on row number 4.
- Repeat the same process for the rest of the toe tags until you have all the letters.
- The solution is random but the most commonly used solutions are: FEELY, LEFTY, BLOOD, and FLOOD.
- Once you have your solution, walk down to return to the reception area.
- Click on the window.
- Zoom into the pad; enter the code from the eye chart that is unique to your game. The solution could be FEELY, LEFTY, BLOOD, FLOOD or something else.
- Go into the birthing room on the right.
- Look at the TV monitor.
- You have to click on the stomachs so that all of the mannequins remain pregnant. When you click twice on a non-pregnant belly, the belly of the woman to the right of her will become pregnant.
- Start on the right and work your way to the left (do not click on the very last stomach). When you get to the last lady, click on her HAND to inflate her belly.
- To solve the puzzle, click on the stomachs in this order (A is the first lady on the left and E is the next to last): E x 2, D X 2, C x 2, B x 2, A x 2, and on the hand (@).
- At this time all stomachs should be raising up and down. In order for the solution to work, all bellies must start in the flat position.
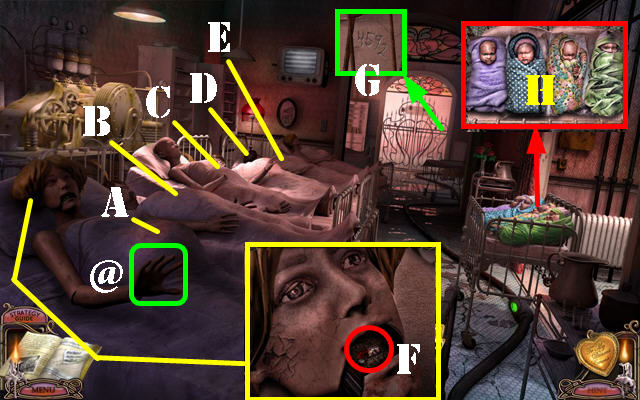
- Zoom into the first mannequin's head; take the RED PILL 4/4 (F).
- Examine the back gate; note the numbers 4592 (G).
- Examine the crib; take the BABY IN BLUE, BABY IN GREEN, BABY IN CROCHET, and BABY IN PURPLE (H).
- Return to the hallway.
- Zoom into the x-ray device on the right.
- Insert each baby into the device for a number to appear on the monitor: BABY IN BLUE (4), BABY IN GREEN (5), BABY IN CROCHET (9), and BABY IN PURPLE (2).
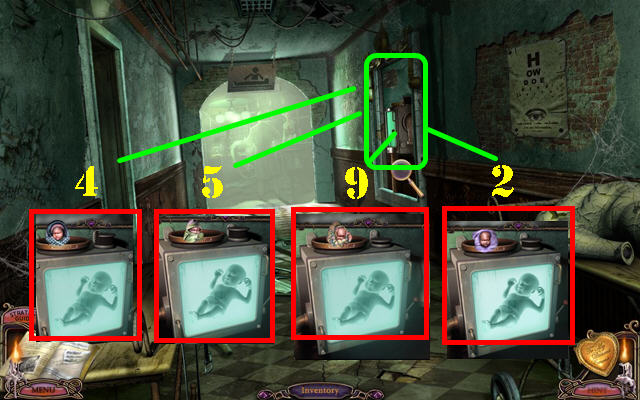
- Return to the birthing room.
- Zoom into the crib; put the babies in the correct order: BABY IN BLUE (4), BABY IN GREEN (5), BABY IN CROCHET (9), and BABY IN PURPLE (2). This action opens the back gate.
- Go through the back gate.
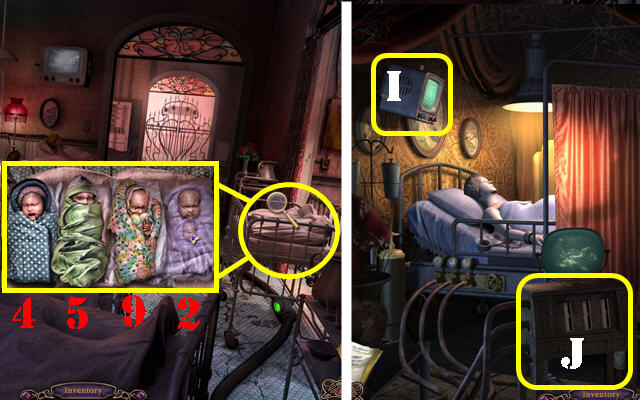
- Look at the TV monitor (I).
- Note the DNA device by the bed (J).
- Return to the hallway and go into the left room.
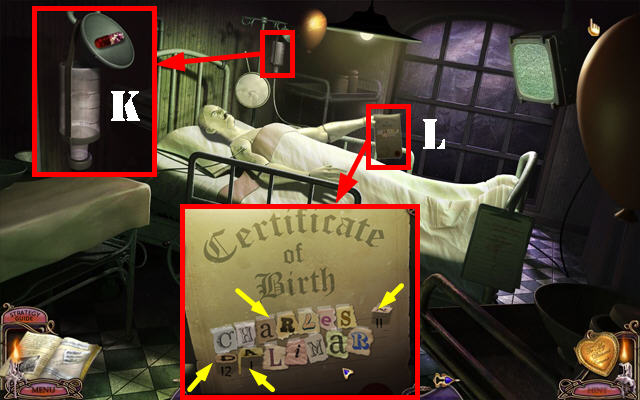
- Zoom into the plastic funnel; insert the 4 RED PILLS into the funnel (K). The first pill was located on the x-ray device. The second pill was located on the sink in the morgue. The third pill was on the patient in the operating room. The fourth pill was in the mouth of the first pregnant woman.
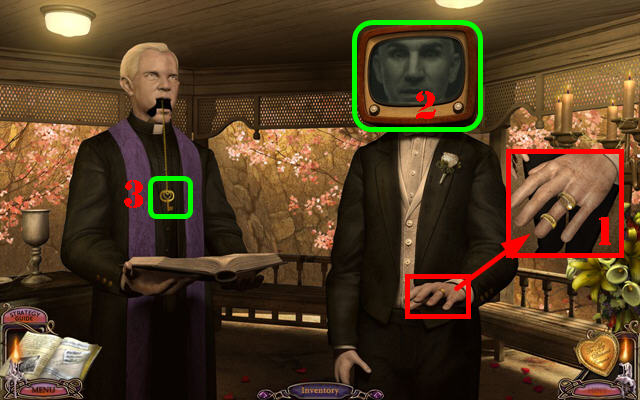
- Look at the certificate of birth the mannequin is holding (L); raise the tabs behind the letters DNA and make a note of them since the numbers are RANDOM. If you lift up a tab and it looks like a 'b' use that as a number '6'.
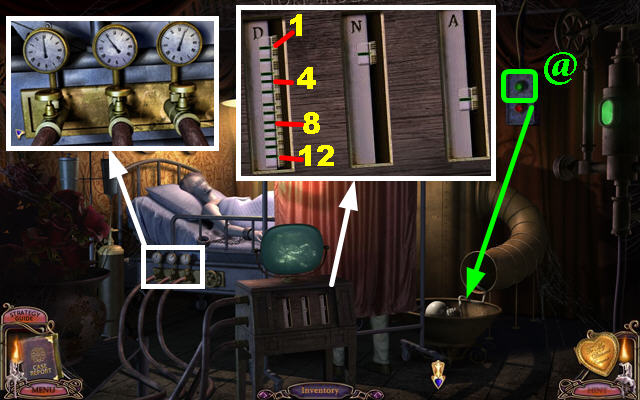
- Return to the room in the back room of the birthing room.
- Zoom into the device; slide the dials so the numbers fall on the lines you believe correspond to the numbers you found on the certificate of birth. The low numbers are on top and the highest numbers are at the bottom.
- The actual gauges don't have numbers or notches; I added notches to the screenshot where the numbers should be to give you a better idea of where they need to be placed.
- Zoom into the gauges on the left; verify that the numbers you set on the device are correct, if they are not, re-set the dials on the DNA device.
- The letter D corresponds to the left gauge. The letter N corresponds to the center gauge. The letter A corresponds to the right gauge.
- Once the gauges are in the right spots, click on the small green (@) button in the upper right for a baby to fall into the basin.
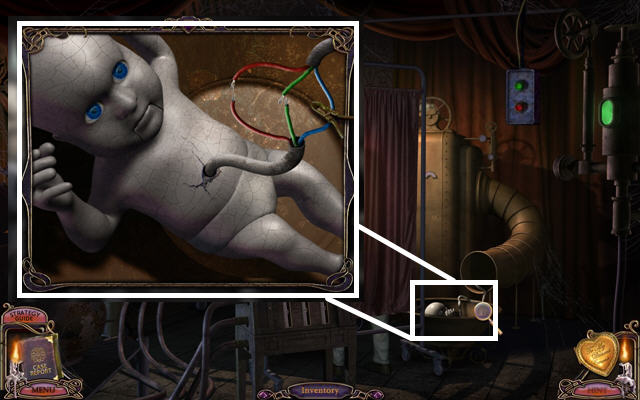
- Zoom into the baby; click on its mouth and its eyes will blink. Each time the baby blinks the eyes will either appear green, red, or blue.
- Use the WIRE CUTTERS to cut the wires in the correct order (green, red, and blue last) while the eye color is showing the right color.
- If you cut the correct wire while the baby's eyes don't match; the puzzle will reset. If this happens, click on the green button to bring back the baby. Don't worry about cutting the wires all at the same time, cut one wire and wait until the eyes turn to the right color again to cut the matching wire.
- Take BABY CHARLES after the puzzle has been solved.
- Walk down 4 times to return to the hub.
- Zoom into the second door on the left; put the STORK KEY in the lock (A).
- Go through the door.
Act 3: Dalimar House
- Zoom into and look at the mailbox; take the BLUE PILL 1/5 (A).
- Examine the baby carriage; put the BABY CHARLES in the carriage (B).
- Go through the front door and then go into the left door.
- Find the 12 morphing objects marked in red.
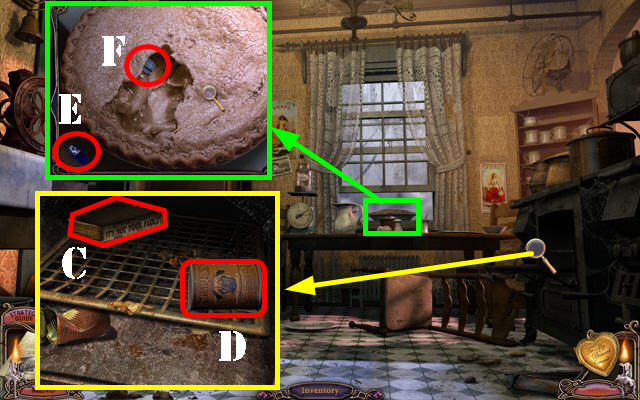
- Examine the stove; take the second PARENTING BOOK (C) and SPARKY'S CHICKEN (D).
- Zoom into the pie; take the BLUE PILL 2/5 (E).
- Click in the center of the pie 3 times; take the second V KEY (F).
- Walk Down and go up the steps.
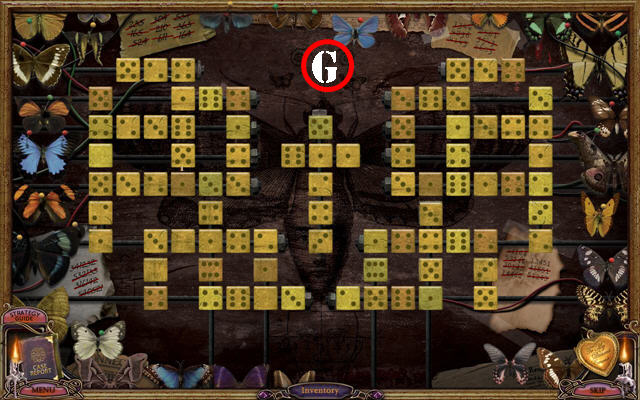
- Zoom into the right door for a puzzle to appear.
- Click on each die to rotate the numbers. You must rotate the numbers to match the numbers marked on the 4 scraps of yellow paper.
- As each set of numbers is used by you, it will be crossed off the list and the row or column of dice will light up.
- Please look at the screenshot for the solution (G).
- Go into the bathroom.
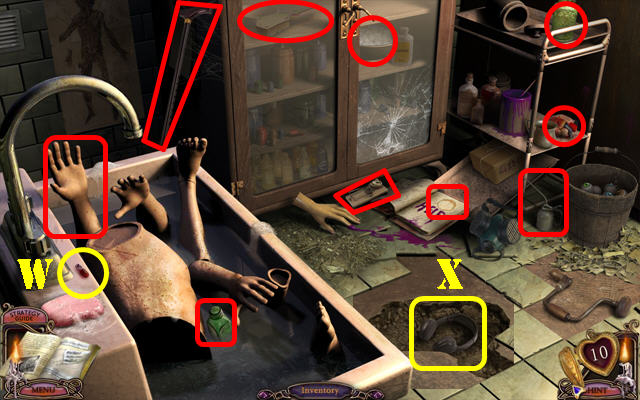
- Examine the sink; take the RAZOR (H).
- Zoom into and open the medicine cabinet; click on the bottle on the third shelf and take BATTERY 1/2 (I).
- Click on the last bottle on the bottom shelf and take the BLUE PILL 3/5 (J).
- Check out the bathtub; you need something to drain the water.
- Exit the bathroom.

- Take SPARKY'S LIVER (K) on the table.
- Click on the back door to activate a puzzle.
- The goal is to click on the symbols shown at the bottom of the screen on the board in the order shown. You must click on all the symbols without leaving a gap.
- Please look at the screenshot for the solution (L).
- Go into Abigail's room.
- Use the FEATHER on Abigail's foot (M) to release the book below her (N).
- Take the third PARENTING BOOK (O) that falls on the ground.
- Walk down twice.
- Zoom into the bookcase below the stairs; place the 3 PARENTING BOOKS on the shelves (P).
- Zoom into the area below the staircase; take the WIRE HANGER (Q) and SPARKY'S FISH (R).
- Open the book (S); take the BLUE PILL 4/5 (T).
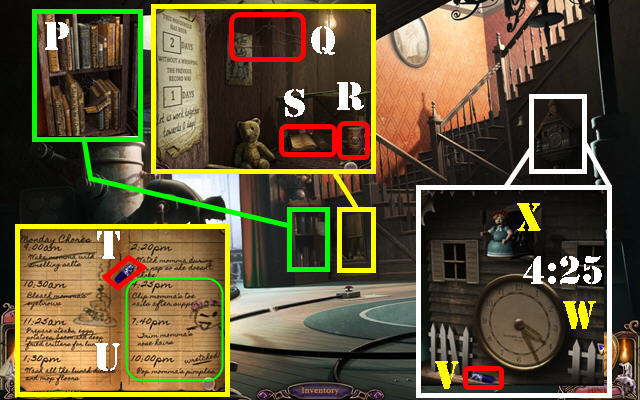
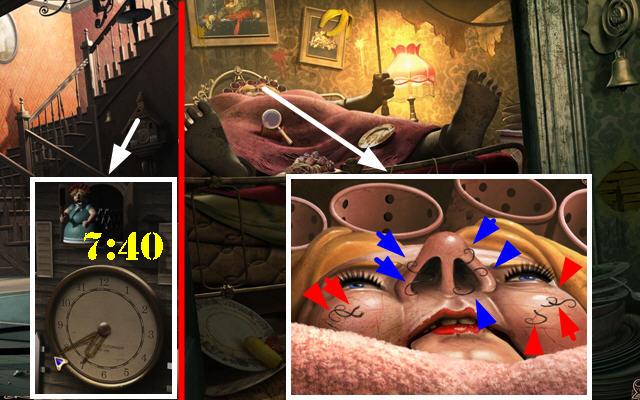
- Note the times in the journal. At 4:25 you must clip momma's toenails. At 7:40 you must trim momma's nose hairs. At 10:00 you must pop her pimples (U).
- Examine the clock on the wall; take the BLUE PILL 5/5 (V).
- Set the time to 4:25 (W). A female cuckoo (X) will appear and you will hear Abigail yelling upstairs. Make sure you adjust the hands correctly, if it's even a little bit off the cuckoo will not appear.
- Return to the bathroom.
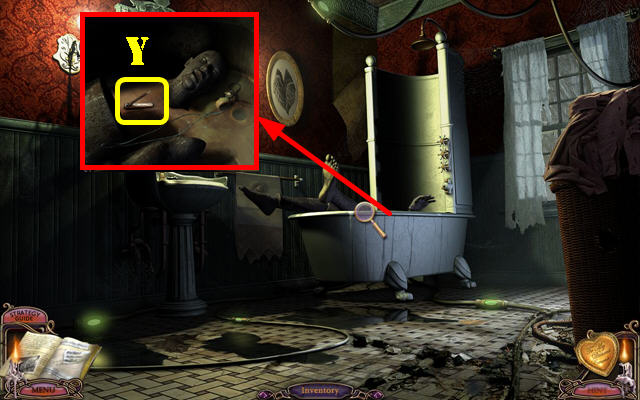
- Zoom into the bathtub; use the WIRE HANGER in the tub and take the NAIL CLIPPERS (Y).
- Go back to Abigail's room.
- Examine her left foot; take the BATTERY 2/2 (A).
- Cut the 5 toenails (red) with the NAIL CLIPPERS and then pick up all 5 NAIL CLIPPINGS (green).
- Examine the right foot.
- Cut the 5 toenails (red) with the NAIL CLIPPERS and then pick up all 5 NAIL CLIPPINGS (green).
- You should have 10 NAIL CLIPPINGS in to total.
- Go back to the clock downstairs; set the time to 7:40. The female cuckoo should appear again.
- Return to Abigail's room.
- Zoom into her face and cut the 5 nose hairs (blue arrows) and pick up the 5 NOSE HAIRS (red arrows).
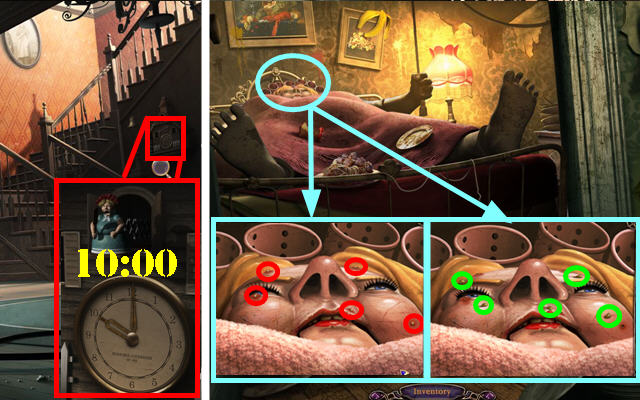
- Return to the clock downstairs; set the time to 10:00. The female cuckoo should appear again.
- Return to Abigail's room.
- Zoom into her face and click on the 5 pimples (red).
- Pick up the 5 PIMPLE PUSSES (green).
- Go back to the kitchen.
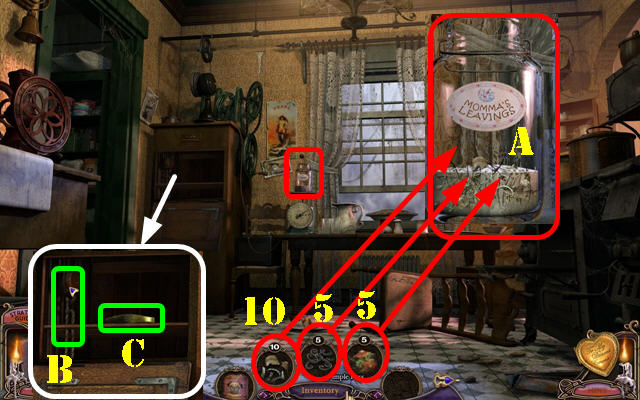
- Zoom into the jar; put the 10 NAIL CLIPPINGS, 5 NOSE HAIRS, and 5 PIMPLE PUSSES into the jar (A).
- Examine the dumbwaiter; click on the pulley (B) and take the BOILER CRANK (C).
- Go left into the pantry.
- Zoom into the device; put the 2 BATTERIES into the outlets (D). This action lights up the pantry. The first battery is in the medicine cabinet in the bathroom and the second battery is in Abigail's room, next to her left foot.
- Click down.
- Find the 12 morphing objects marked in red.
- Zoom into the shelf; take SPARKY'S PORK (E).
- Examine the device; put the cans in the slots in the following order: SPARKY'S BEEF, SPARKY'S CHICKEN, SPARKY'S PORK, SPARKY'S LIVER and SPARKY'S FISH (F).
- Click on the switch (G).
- Go into the cellar.
- Look at the poster (H).
- Examine the boiler; put the BOILER CRANK on it and turn both cranks (I).
- Return to the bathroom.
- Zoom into the sink; turn the hot water on (K).
- Zoom into the medicine cabinet and note the lock combination (L).
- Return to the cellar.
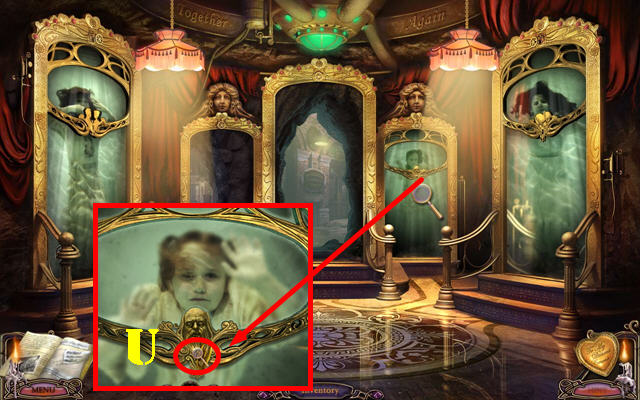
- Zoom into the lock (M).
- Click on the buttons in the order shown in the bathroom mirror (N).
- Enter the cage.
- Remove the BED SHEET (O) and click on the monitor (P).
- Look at the note (Q).
- Return to the hospital. From the cellar; click on the upper left side to exit and then click down until you reach the hub. Take the center door that leads to the hospital.
- Go to the hallway and then into the bedroom in the left.
- Examine the funnel; put the 5 BLUE PILLS in it (R). The first blue pill is in the mailbox outside Charles' house. The second pill is in the pie in the kitchen. The third pill is in the medicine cabinet in the bathroom. The fourth pill is in momma's journal below the staircase. The fifth pill is by the cuckoo clock.
- Examine the device on the wall; click on the 2 red buttons (S).
- Examine the broken glass and take the MADMAN KEY (T).
- Return to the hub.
- Zoom into the door to the right of the center door.
- Insert the MADMAN KEY in the lock (U); and go through the door.
Act 4: The Asylum
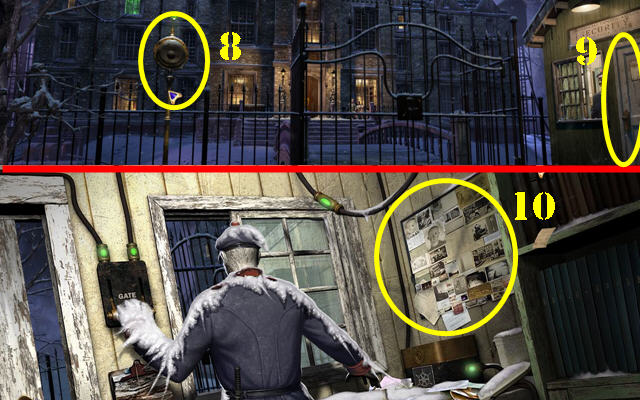
- There's a message from Charles coming from the speaker (8).
- Head right into the guard's hut (9).
- Click on the board to activate a MOS (10).
- Find the 13 morphing objects marked in red.

- Click on the gate lever by the guard (11).
- Exit the hut and go through the gates.
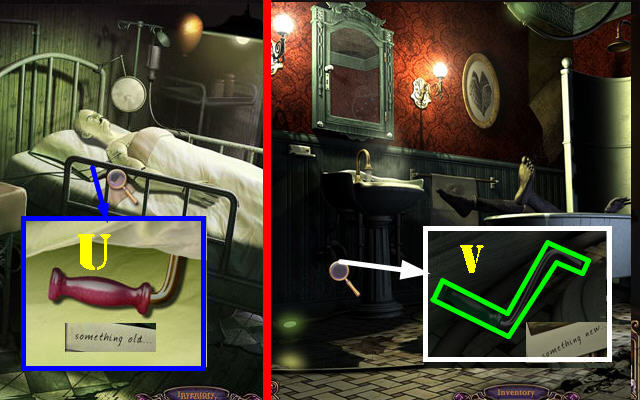
- Zoom into the paper on the knee of the mannequin on the bench; the photograph labeled 'something old 'shows an image of the hospital bed (12).
- Open the door and go through it.
- Go forward.
- Watch the TV monitor (13).
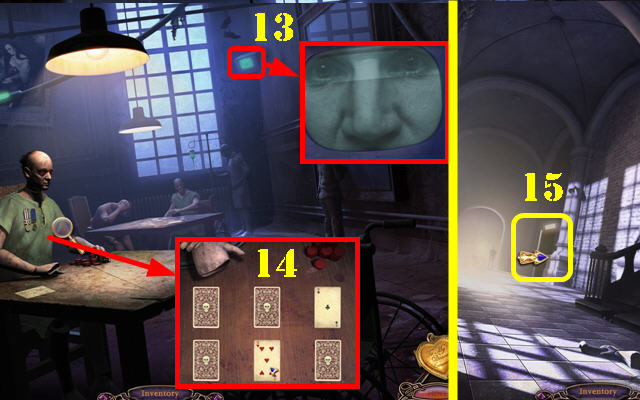
- Zoom into the card table; click on any card the mannequin has dealt. You will not be able to beat him; come back here later (14).
- Walk down and head into the room on the right (15).
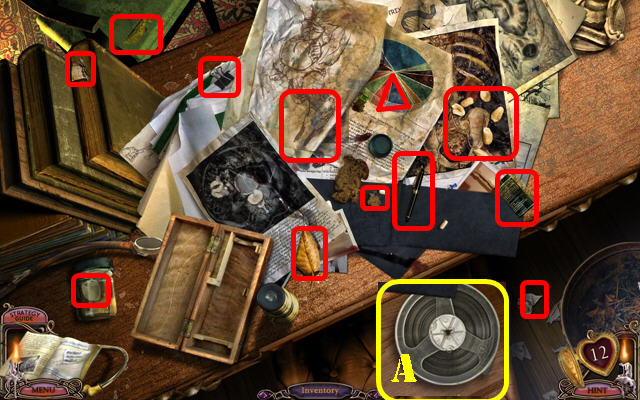
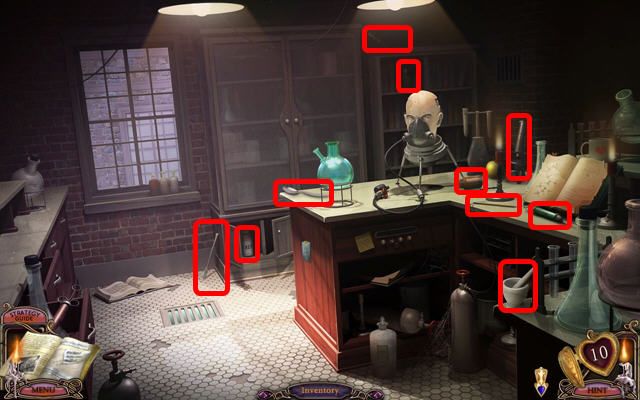
- Examine the desk to play a MOS.
- Find the 12 morphing items marked in red.
- Take the REEL in the drawer after you complete the search (A).

- Click on the candleholder/lever above the mantle to make the bookcase move out of the way (B).
- Examine the secret niche behind the bookcase (C).
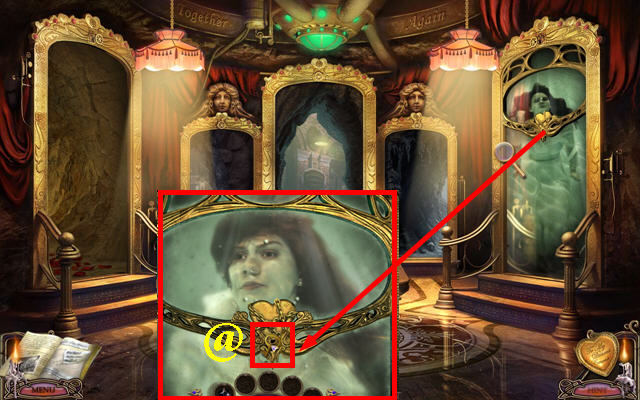
- Click on the photograph labeled 'something borrowed' (D).
- Open the door on the right and go through it to access the security office (E).
- Examine the books; take the CABINET KEY (F).
- Click on the blue book; look at the blueprint (G).
- Click on the chair; take the PICK AXE (H).
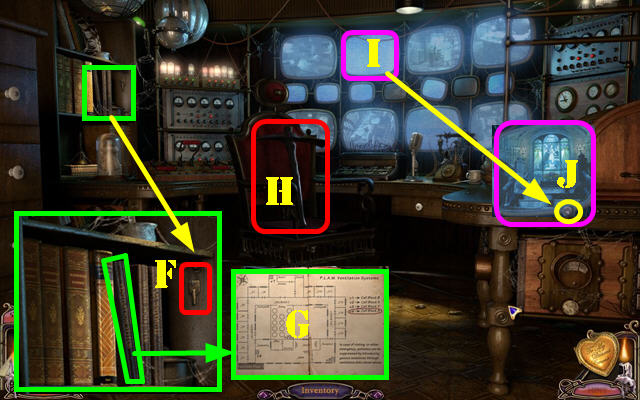
- Zoom into the monitor (I); click on the button (J) to view all the scenes.
- Walk down.
- Zoom into the filing cabinet; use the CABINET KEY in the lock.
- Examine the files and read the clue about Blood, Sweat and Tears (K).
- Walk down twice and go up the steps. Go towards the right side of the staircase and the passage will be blocked (L).
- Walk down and go left (M).
- Open the left door and go through it (N).
- A MOS is triggered as soon as you go through the door.
- Find the 10 morphing objects marked in red.
- Zoom into the book; click on the right page and take the EYEDROPPER (O).
- Look at and read the note on the side of the desk; it tells you information about the liquid nitrogen (P).
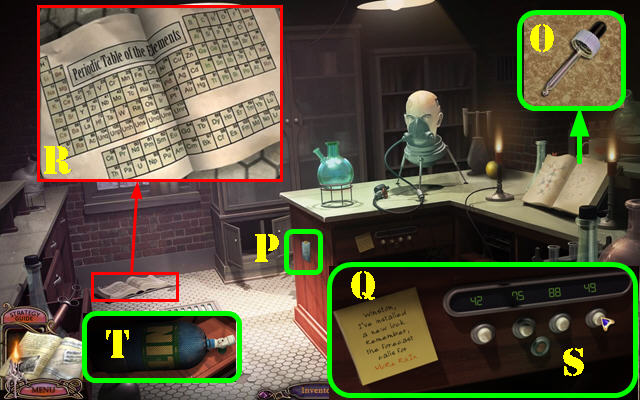
- Examine the drawer; read the note; it calls for 'MoReRaIn' (Q).
- Zoom into the periodic table of elements book on the ground (R).
- Look for the elements Mo (42), Re (75), Ra (88), In (49); which equals 'MoReRaIn'.
- Examine the drawer again. From left to right, click on each button to change them to 42, 75, 88, and 49 (S).
- Look at the drawer and take the LIQUID NITROGEN (T).
- Walk down and zoom into the door on the right to activate a puzzle.
- Click on the cards and choose the letters E, G, I, J, L, N, O, and Q in that order. The order in which the cards appear is RANDOM.
- Once you click on a spade the letter will be revealed. If you clicked on the right one, it will turn red. If you clicked on the wrong one, it will remain black and the card will flip around. Once the card flips around the letter you discovered will be in the mirror image spot on the other side of the card.
- The screenshot shows what the final image looks like (U). The number 3 will appear on the card once the puzzle has been completed.
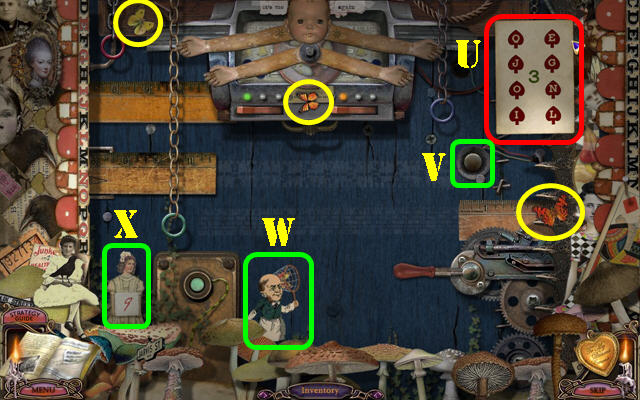
- Click on the 3 butterflies (yellow) to make them fly around the scene.
- Click on the grey button (V) in the upper right to manipulate the man with the butterfly net (W). Use the net to trap the butterflies as they get near it.
- After you catch all 3 butterflies, a girl with the number 9 will appear (X).
- Click on the green button (Y) for a board to appear. You must light up all the knights on the board by clicking on the next spot following an L-shaped pattern.
- If you make a mistake, click on the green button twice to reset the puzzle. It will start you off from the last spot you were on. You can also move to any previously lit tile but doing so will remove the light.
- Once the board is all lit, the number 5 will appear (Z).
- Click on the orange buttons in the upper right center to control the rulers (A). The left button controls the top ruler, the center button controls the center ruler and the right button controls the lower ruler.
- Use the crank in the lower right to move the items back and forth (C).
- Move the rulers to the positions shown on the screenshot.
- Lower the rings to the numbers shown on the rulers. The numbers must fall on the same numbers you discovered during the card, chess, and butterfly game: 3, 5, and 9.
- Use the upper left green buttons, along with the arms on the doll to lower and lift the rings. The top arms raise the rings and the lower arms lower the rings.
- Use the buttons on the upper left side to select the rings (B). The left button moves the red ring, the center button moves the green ring, and the last button moves the blue ring.
- Please look at the screenshot for the solution.
- Go through the door after the puzzle has been solved.
- Find the 8 morphing objects marked in red.
- Zoom into the mannequin; use the EYEDROPPER on his sweat to obtain the DROPPER OF SWEAT (1).
- Take the ICE PICK (2).
- Open the window (3); put the BED SHEET on the window and go out the window.
- Examine the manhole cover (4); use the LIQUID NITROGEN on it.
- Use the PICK AXE on the cover and go down into it.
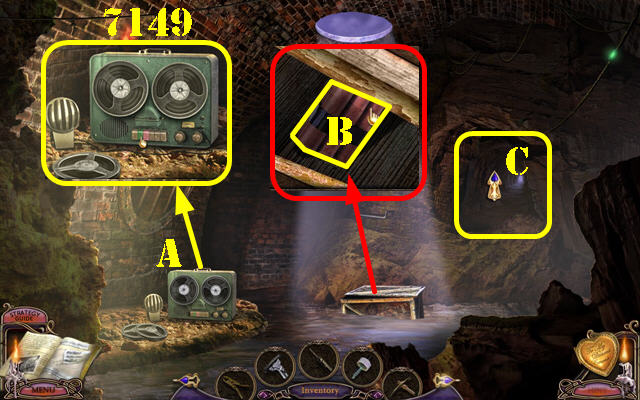
- Zoom into the player (A); click on the buttons and then on the reel to remove it.
- Put the REEL from inventory on the recorder and click on the buttons.
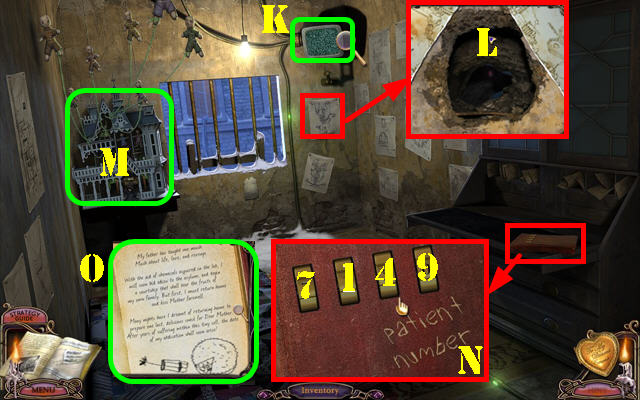
- The message states that the prisoner number is 7149.
- Look at and open the crate; take the DYNAMITE (B).
- Use the PICK AXE on the right side of the wall 3 times; go through the tunnel (C).
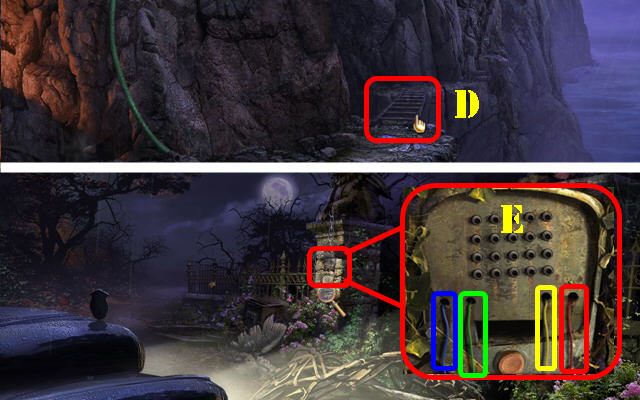
- Take the LADDER (D).
- Go up the hose to return to the cottage. From there, make your way back to the abandoned car area by clicking down until you arrive.
- Zoom into the intercom; using the WIRE CUTTERS to cut the BLUE WIRE, GREEN WIRE, YELLOW WIRE, and the RED WIRE (E).
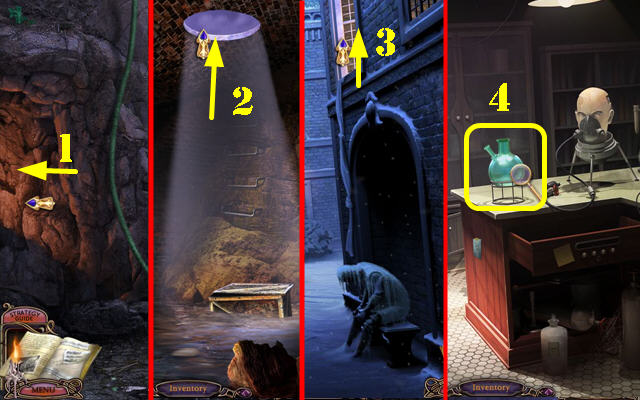
- Return to the cottage; head right and go down the rubber hose.
- Head left into the tunnel (1). Go through the manhole cover (2). Go through the window on the right (3). Walk down and go into the lab on the left.
- Zoom into the glass beaker; put the DROPPER OF SWEAT into the beaker (4).
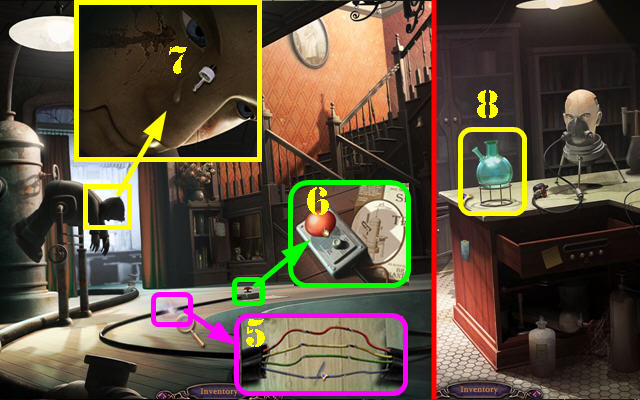
- Walk down until you reach the hub. Go through the door that leads to the Dalimar household and go into the living room.
- Zoom into the severed cable on the ground; attach the RED WIRE, YELLOW WIRE, GREEN WIRE, and BLUE WIRE to their matching cable (5).
- Look at the device; press the red button (6).
- Zoom into the boy; put the EYEDROPPER on the teardrop to obtain the DROPPER OF TEARS (7).
- Return to the lab in the asylum.
- Zoom into the glass beaker; put the DROPPER OF TEARS into the beaker (8).
- Walk down until you reach the hub. Go through the door that leads to the hospital (center door). Return to the operating room.
- Zoom into the cabinet; use the EYEDROPPER on the blood to obtain the DROPPER OF BLOOD (9).
- Return to the lab in the asylum.
- Zoom into the glass beaker; put the DROPPER OF BLOOD into the beaker.
- Take the SLEEPING POTION (10).
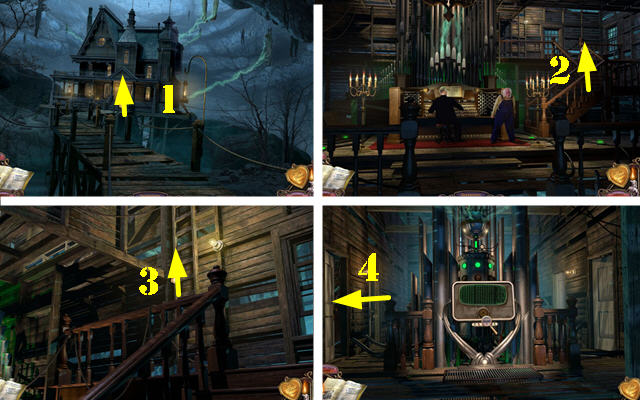
- Walk down 3 times and go forward into the recreation room in the asylum.
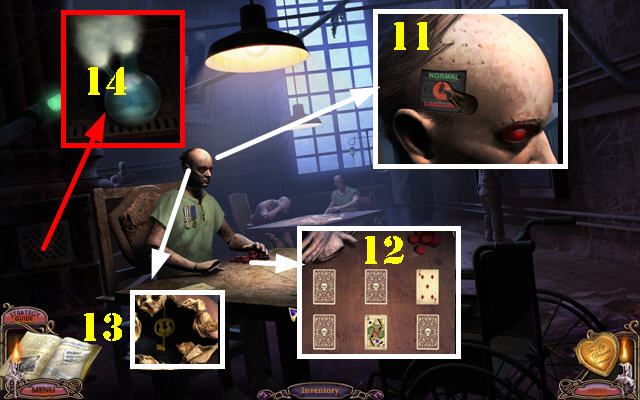
- Zoom into the head of the card-playing mannequin.
- Shave his head with the RAZOR 3 times. The razor can be found on the Dalimar bathroom sink.
- Click on the side of the head; use the ICE PICK on the hole in the center of the dial to activate the lobotomy (11).
- Zoom into the card table; pick any card; this time you will win and the mannequin's head will explode (12).
- Zoom into the mannequin's head; take the PROPOSAL KEY (13).
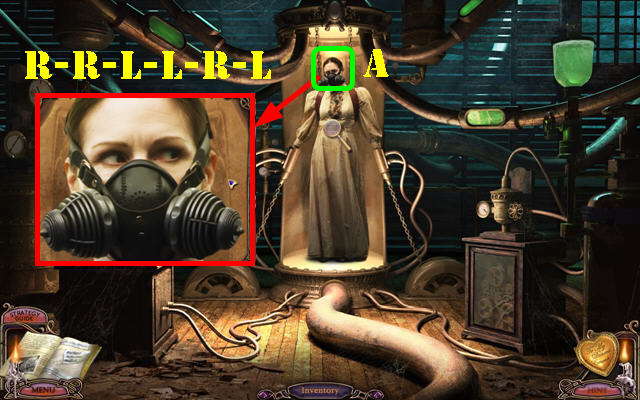
- Examine the vent cover; put the ICE PICK on the cover to remove it.
- Put the SLEEPING POTION in the vent (14). This action causes the inmates in the upstairs hallway to fall asleep.
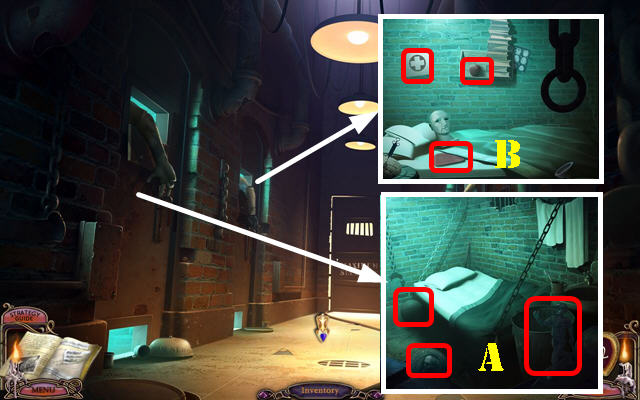
- Walk down; go up the steps and head right.
- You have to find the 12 morphing objects inside the four cells.
- Zoom into the left door; take the 3 morphing objects marked in red (A).
- Zoom into the far left door; take the 3 morphing objects marked in red (B).

- Zoom into the right door; take the 3 morphing objects marked in red (C).
- Zoom into the far right door; take the 3 morphing objects marked in red (D).
- Go through the back door.
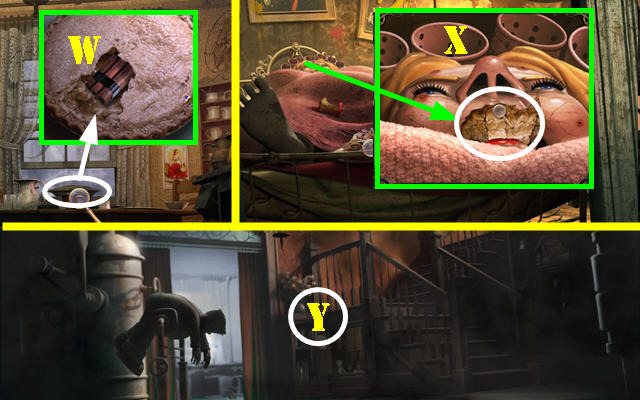
- Examine the crate; a picture labeled 'something new' appears (E). This location is under the bathroom sink in the Dalimar house.
- Look at the 2 doors with protective locks (F and G); you must find the code.
- Walk down twice; head left and go through the right door to access the shock therapy room. Go down the bed sheet in the window.
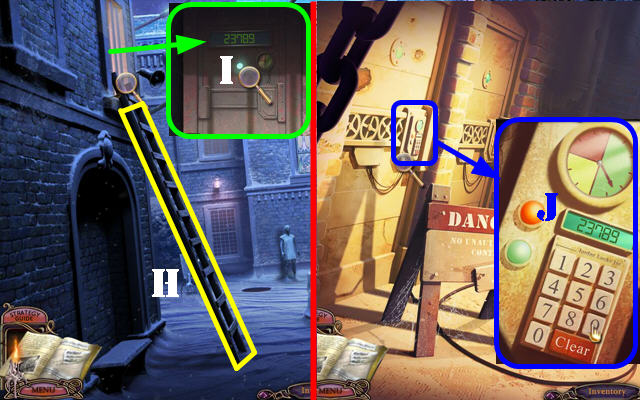
- Place the LADDER below the left window (H).
- Zoom into the window; note the RANDOM number in your game, our number was 23789. Exit out of there quickly (I).
- Go back into the hallway with the 2 maximum security doors. You must get there right away or the code will change.
- Zoom into the left door; input the 5 digit number unique to your game into the keypad (J), 23789 was our number, input your numbers.
- Go through the door.
- Watch the TV monitor (K).
- Examine the back wall; click on the sketch and a hole will appear with a crow looking through it (L).
- Look at the house (M).
- Zoom into the journal; enter the patient number heard on the REEL in the tunnel: 7149 (N).
- The journal shows the image of an exploding pie (O).
- Walk down 4 times; go into the far right door and into the right door to reach the security office.
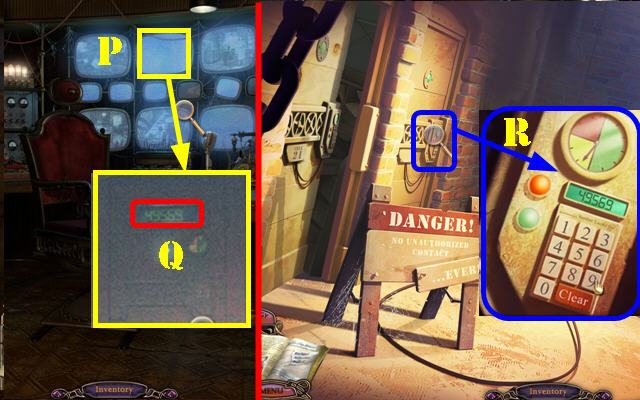
- Zoom into the TV monitor (P); click on the button to change the channels. When you reach the station with the changing code; jot down the random number on the screen, our number was 49569 (Q).
- You have one minute to make it back to the hallway with the 2 maximum security doors.
- Zoom into the right door; input the 5 digit number unique to your game, ours was 49569 (R).
- Go through the door.
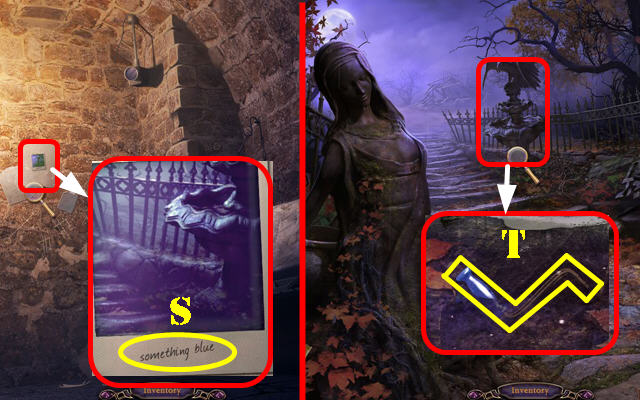
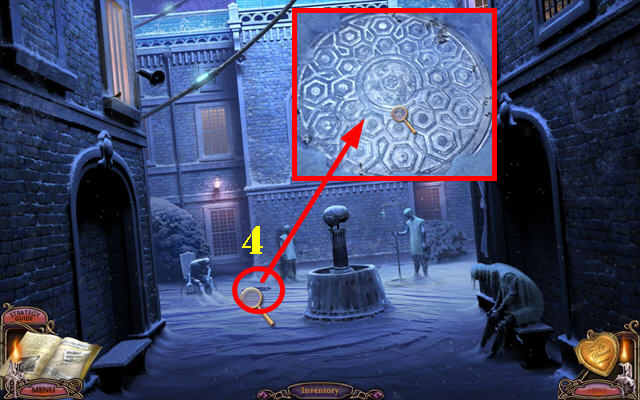
- Zoom into the photo labeled 'something blue' (S). it is located by the fountain through the main gate in the first scene.
- Let's go back and look for the 'something new', 'something old', and 'something blue'.
- Before you can find the 3 items, make sure that you found the photographs first (otherwise you cannot pick them up). There is a fourth one to find but that is located in another hub.
- The 4 photographs are: outside the asylum door (on the male mannequin), in the hidden entrance in the asylum office, through the right door of the maximum security cellblock, and directly outside of the maximum security cellblocks (in a crate).
- Go out the window in the shock therapy room; go through the manhole and the tunnel to go back outside. Go up the hose to return to the cottage. Walk down until you reach the main gate and go through it.
- Examine the fountain; take the BLUE HANDLE – 'something blue' (T).
- Go back to the cottage; head right and go down the hose. Make a left into the tunnel and go through the manhole cover. Go into the right window to get back into the asylum.
- Walk down until you reach the hub; choose the hospital door.
- Go into the left door in the hospital hallway to access the patient's room.
- Zoom into the area close to the pillow; click on it and take the RED HANDLE - 'something old' (U).
- Return to the bathroom in the Dalimar household.
- Examine the bottom of the sink and take the GREEN HANDLE – 'something new' (V).
- Return to the kitchen.
- Zoom into the pie; insert the DYNAMITE in it and take the PIE (W). You cannot perform this step until you open the journal in the maximum security cellblock first.
- Go upstairs to Abigail's room.
- Zoom into her face; put the PIE in her mouth and click on it twice (X).
- Go down to the living room (Y) so you can get away from the explosion.
- Go back to Abigail's room after the explosion.
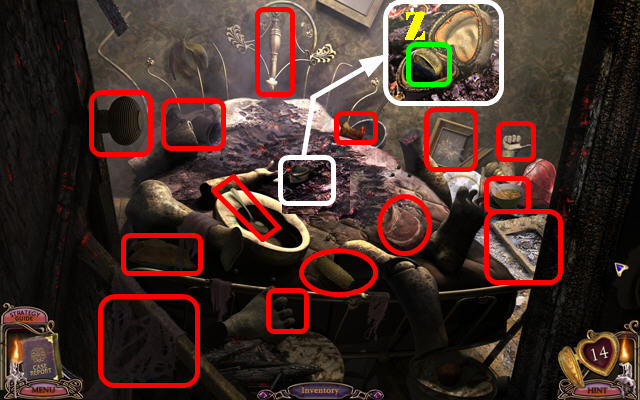
- Find the 14 morphing objects marked in red.
- Examine the center of the bed; open the box and take the WEDDING RING (Z).
- Walk down until you reach the hub.
- Zoom into the first door on the left; insert the PROPOSAL KEY into the lock (A).
- Go through the door.
Act 5: The Island
- Zoom into the pile of rocks; use the PICK AXE on it 3 times.
- Take the third V KEY (V) and the YELLOW HANDLE (Y).
- Go towards the gondola.
- Find 11 the morphing objects marked in red.
- Zoom into the boxes and insert the handles into the right ones.
- Examine the 'something new' box on the left and insert the GREEN HANDLE on the side (G).
- Examine the 'something borrowed' box on the far left and insert the YELLOW HANDLE on the side (Y).
- Examine the 'something old' box on the right and insert the RED HANDLE on the side (R).
- Examine the 'something blue' box on the far right and insert the BLUE HANDLE on the side (B).
- Go forward towards the chapel.
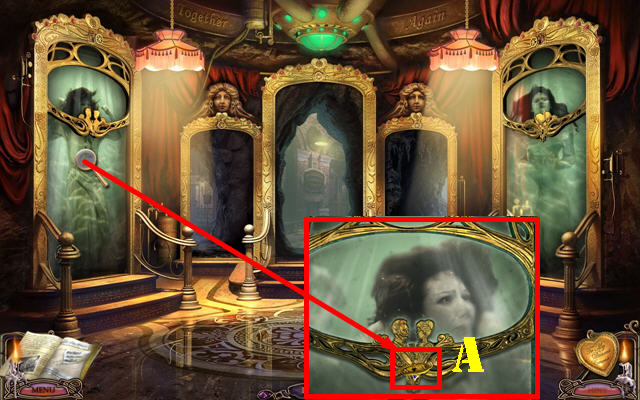
- Zoom into the groom's hand and put the WEDDING RING on the finger (1).
- Watch the TV monitor (2).
- Take the HEART KEY from the preacher's mouth (3).
- Return to the cottage. Go out the window in the shock therapy room; down the manhole, through the tunnel on the right, up the hose and enter the cottage.
- Zoom into the box (A).
- Insert the 3 V KEYS into the slots. The first key is in the burnt house (in the fireplace). The second key is in the pie in the Dalimar's kitchen. The third key is in the room with the violinist (use the pick axe to dig it up).
- Click on the V keys to change the letters until they are all in the upright position. To solve this part of the puzzle click on the V's in this order: X times 3, Y times 2, and Z times 2.
- Once the V Keys are in the correct position, you can begin the second part of the puzzle.
- Your goal in this second section of the puzzle is to move all the keys into an empty cell. Click on a numbered key and all available moves (if any) will light up with a blue dot. Move the key to one of the blue dots. If none are available, select another key.
- The best way to start is by moving the 1 keys on the right first (this allows the two 4 keys an empty cell). This is step 1 in the screenshot.
- Then move the two 4 keys all the way to the right. This is step 2 in the screenshot.
- To solve the puzzle, all numbers must be moved to an empty cell (B).
- Zoom into the box; open the notebook and take the OVERRIDE SWITCH (C).
- Return to the hub.
- Zoom into the last door; insert the HEART KEY in the lock (@).
- Go through the door.
Act 6: Forever Home
- Go forward (1). Look at the TV monitor.
- Go through the door and go right (2).
- Go up the ladder (3) and then go into the left door (4).
- Zoom into Rose's face (A).
- Note her eye movements; they move R, R, L, L, R, and L.
- Walk down and go into the right door (B).
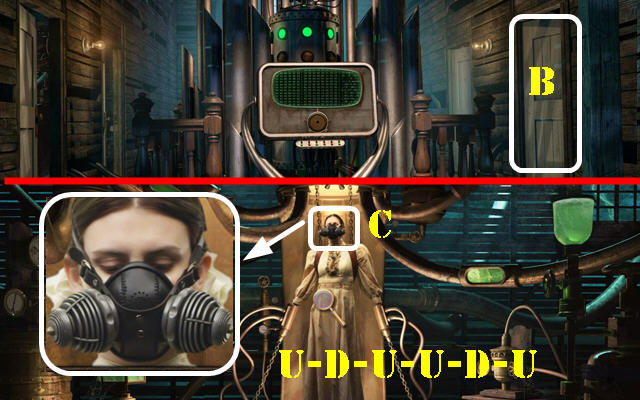
- Zoom into Emma's face (C).
- Note her eye movements; they move U, D, U, U, D, and U.

- Go into the far right door (@).
- Zoom into one of the twins' eyes. Her eyes blink in this sequence: 3, 5, and 2.
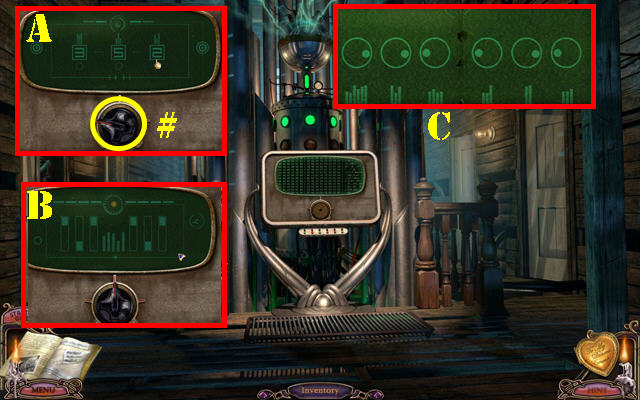
- Zoom into the device in the center; put the OVERRIDE SWITCH in the slot (#).
- Set the switch to the left; enter the numbers 3, 5, and 2 to the amount of blinks the twins were showing (A).
- Set the switch to the center; arrange the gauges as shown in the screenshot to mimic Rose's eye movements (B).
- Set the dial to the right; arrange the dials as shown in the screenshot to mimic Emma's eye movements (C).
- The dials must all be set at the same time. If you exit the device before all dials are set correctly, you must start over.
- Congratulations! You have completed Mystery Case Files: Escape from Ravenhearst Standard Edition!
Created at: 2012-01-17