

Walkthrough Menu
- General Tips
- Introduction
- Chapter 1: The Main Floor
- Chapter 2: The Basement
- Chapter 3: The Upper Floor
- Chapter 4: Finale
General Tips
- All puzzles can be skipped once the skip button has been fully charged.
- Some puzzle solutions are random in the game; the guide will note such instances when a step-by-step solution cannot be given.
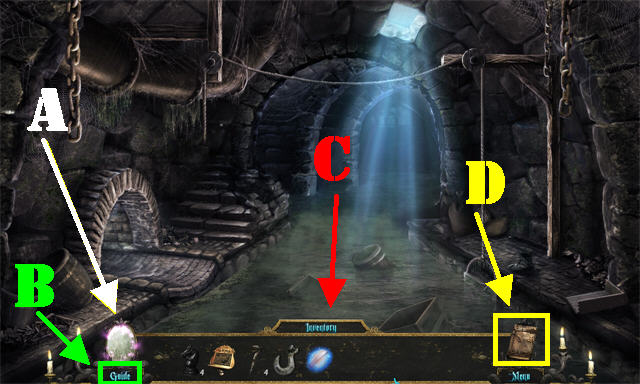
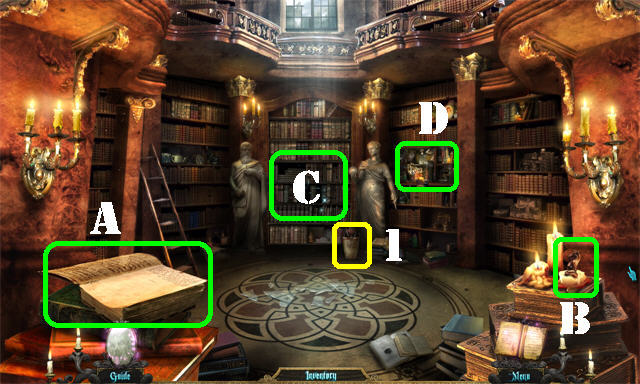
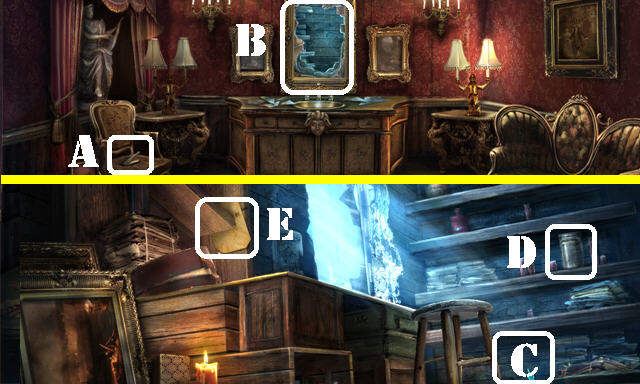
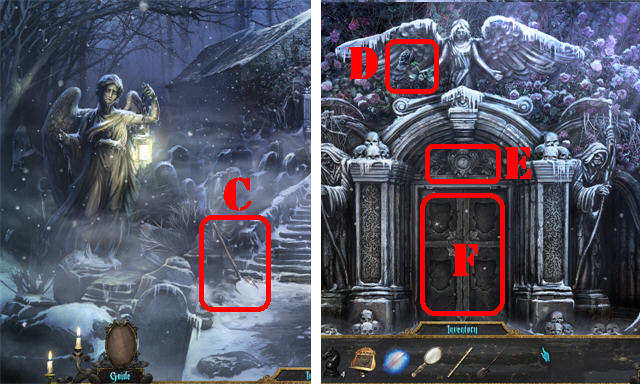
- Click on the mirror (A) in the lower left to obtain instructions for puzzles in the game or for hints during a search scene.
- Objectives are generated in the game automatically or by clicking on a trigger. The guide will make note of all the trigger locations.
- The Guide (B) button in the lower left will bring up the Objectives and General Help for the game. If you want the built-in strategy guide you can upgrade to the collector’s edition version of this game.
- Some items cannot be picked up until an objective has been unlocked. Make sure you visit an area more than once to look for unlocked items of new Hidden Object Scenes.
- Clicking randomly in a Hidden Object Scene will cause your screen to crack for a few seconds.
- Hover your mouse at the bottom of the screen to bring up the inventory tray (C).
- Open your journal in the lower right corner (D).
- Read your journal frequently; it can provide puzzle solutions.
- Journal pages can be added automatically or by picking them up in various areas throughout the game. The guide will mark all instances in which journal pages can be picked up.
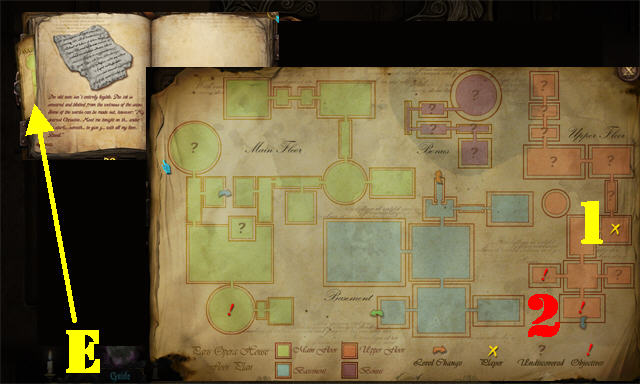
- The map is located on the left side of the journal (E).
- Open the map to find a complete layout of the game. Read the legend at the bottom of the map to learn what all the icons represent.
- A yellow X (1) symbolizes your current location and a red exclamation point (2) represents an active location with an objective.
- Hovering your mouse over a part of the map will show you the name; use this tool when you need to know where to go next.
Introduction
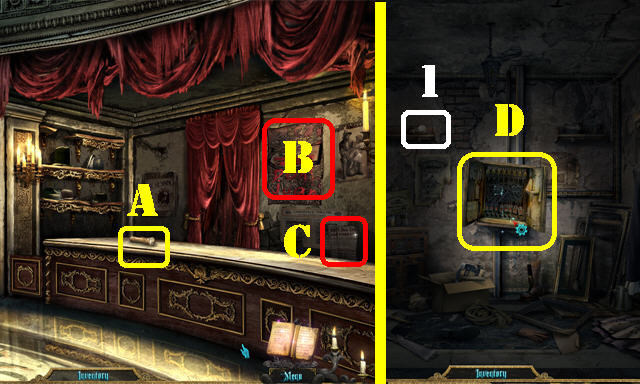
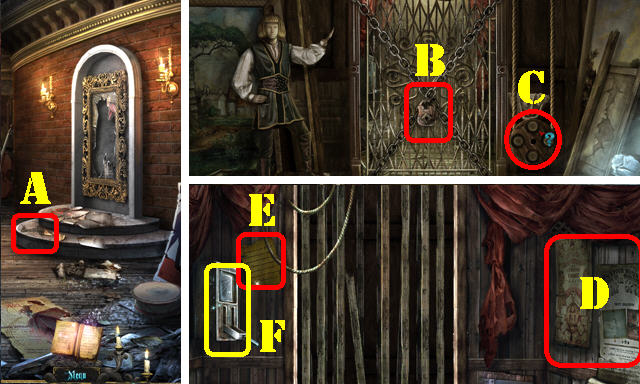
- Head right to the coat check.
- Take the ELECTRIC TORCH (A) on the counter.
- Click on the poster (B) and the newspaper clipping (C) to add 2 pages to your journal.
- Go into the cloak closet.
- Illuminate the parts of the scene with the ELECTRIC TORCH.
- Take the LIGHT BULB (1) on the back wall.
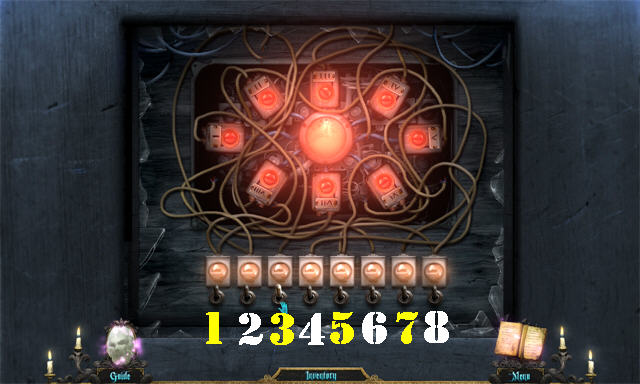
- Open the wiring box on the left to trigger a puzzle (D).
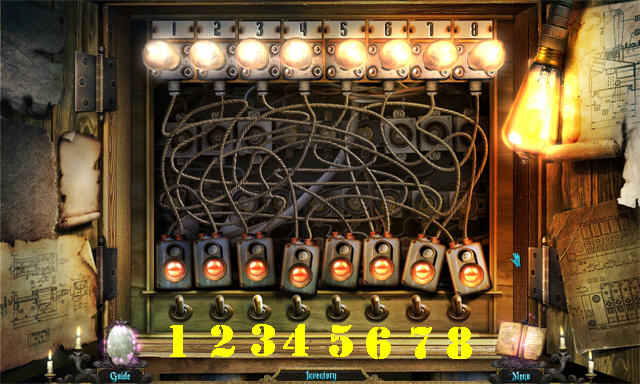
- Click on the lights in the correct order by tracing the bulb on top with the matching switch at the bottom.
- Bulbs must be lit from left to right.
- The switches have been labeled 1 to 8 from left to right. Click on the wires in this order to solve the puzzle 5, 7, 6, 4, 1, 8, 2, 3.
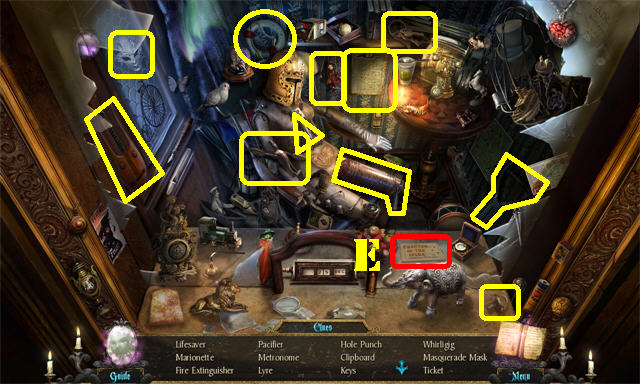
- Click down and head left.
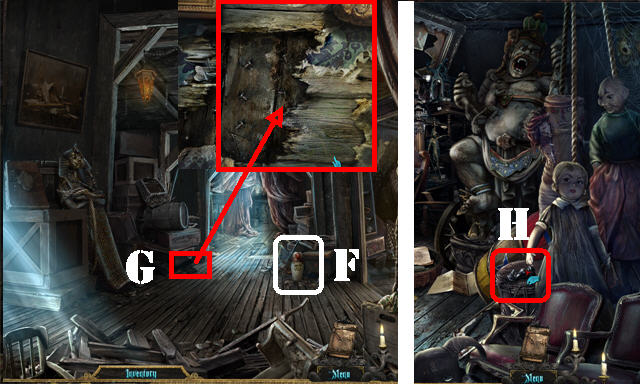
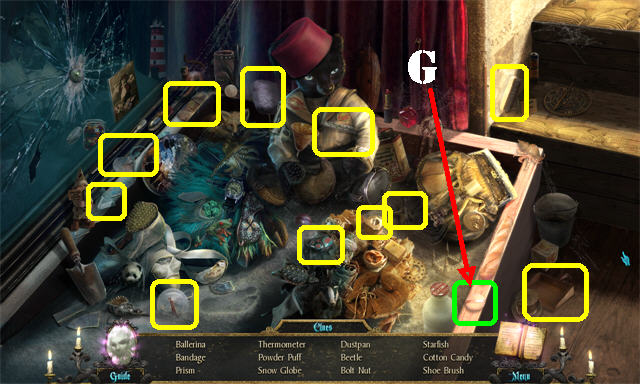
- Play the Hidden Object Scene by the ticket booth to obtain the OPERA TICKET (E).
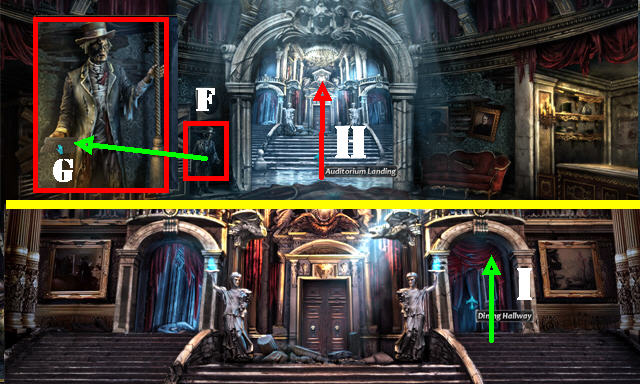
- Zoom into the usher (F); place the OPERA TICKET in his hand (G).
- Click on the curtain to make it fall.
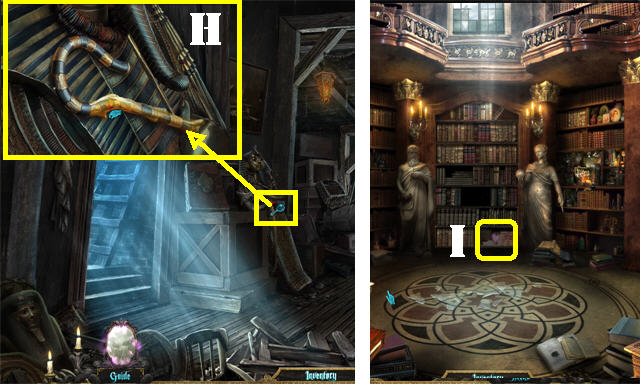
- Go forward to the Auditorium Landing (H).
- Go into the right door to reach the dining hallway (I).
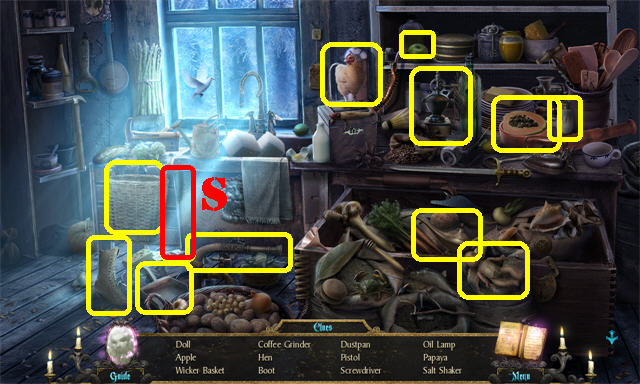
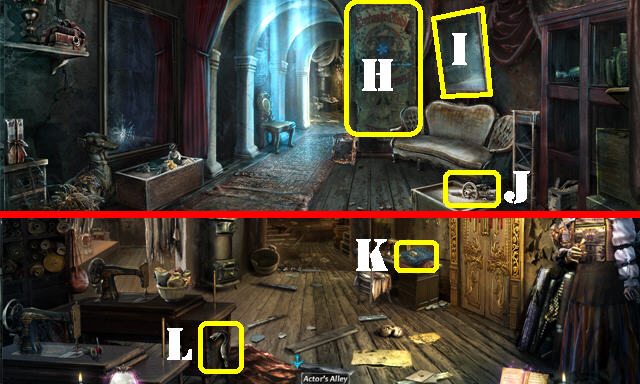
Chapter 1: The Main Floor
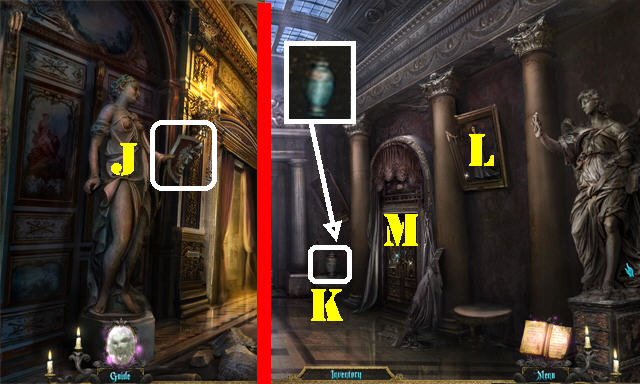
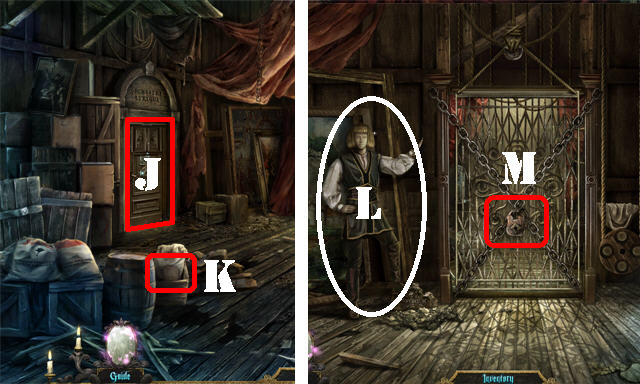
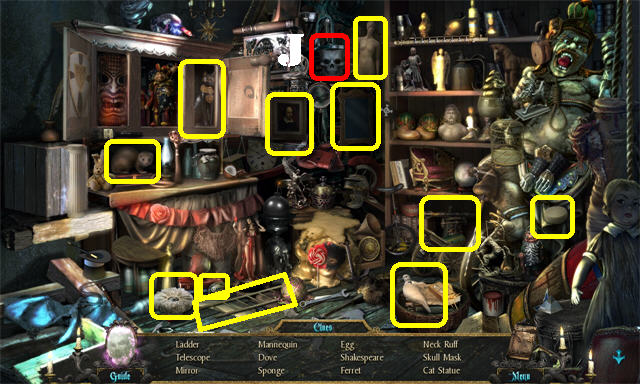
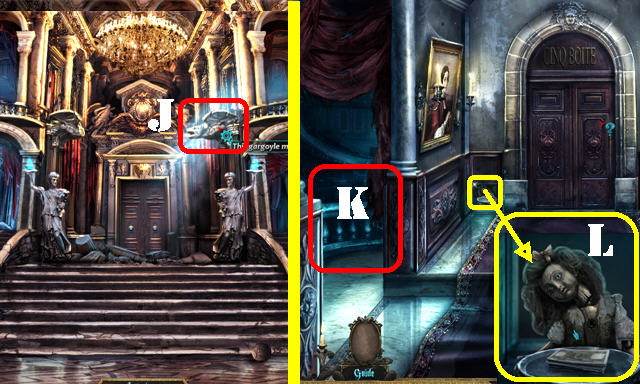
- Take the CREST FRAGMENT 1 / 2 (J) from the statue’s hand.
- Go right to enter the manager’s hallway.
- Zoom into the middle left window; look at the canopic jar outside the window.
- Take URN 1/5 (K) in the back.
- Click on the painting (L) to add a page to your journal.
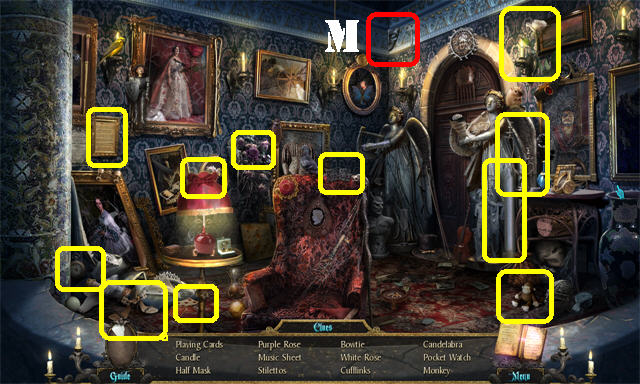
- Zoom into the door on the right to trigger a lock puzzle (M).

- Click in the outer ring of the lock to open it.
- Click on the pins in the correct order to make them stay up.
- The puzzle resets itself when an incorrect sequence has been entered.
- The solution to this puzzle is random. Try to remember the order in which the pins remained in the up position so you can get through the puzzle faster.
- Click on the center of the puzzle after all the pins have been pushed in.
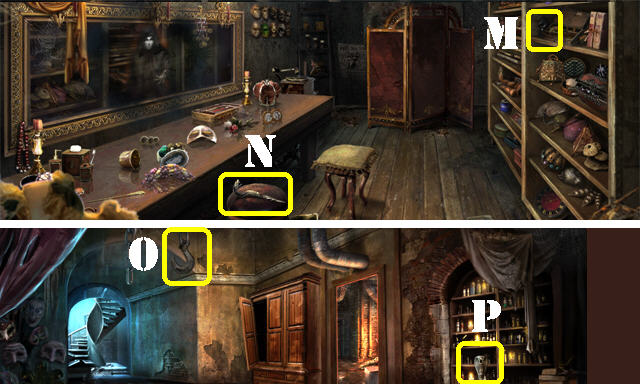
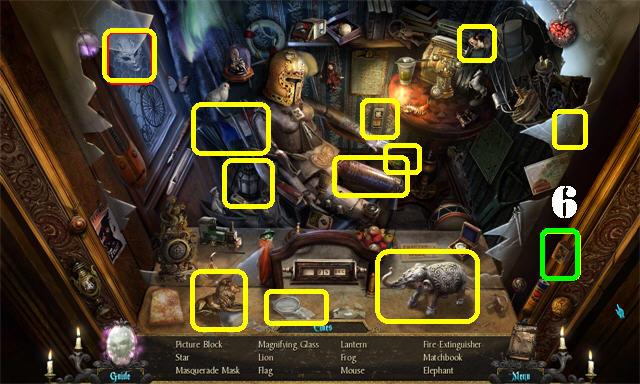
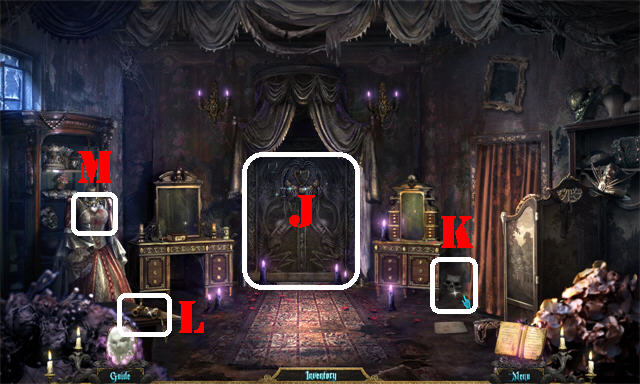
- Go through the door to access the manager’s office.
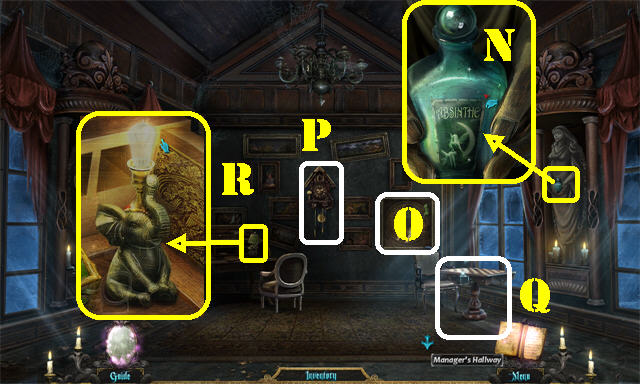
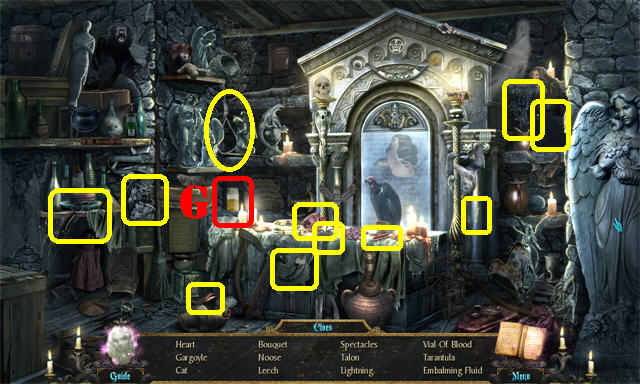
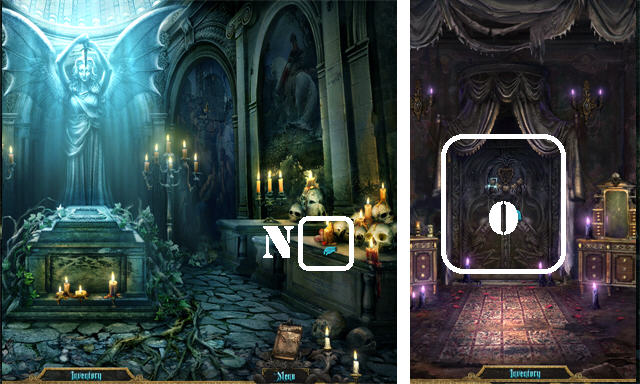
- Zoom into the right statue; take the EMPTY BOTTLE (N).
- Click on the painting (O) to add a page to your journal.
- Take a closer look at the clock (P).
- Zoom into the chess table to activate a new objective (Q).
- Zoom into the elephant lamp (R) on the left.
- Take the cover off the lamp.
- Place the LIGHT BULB in the socket to activate a search scene.
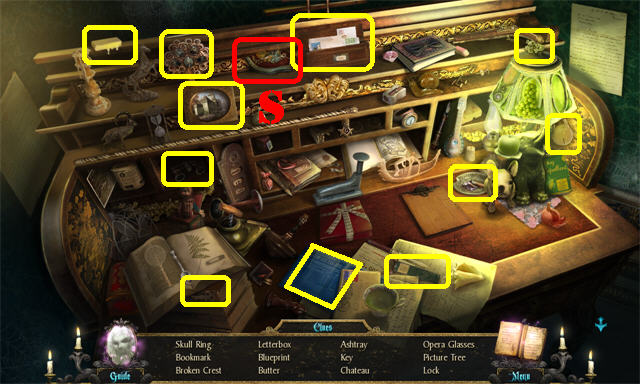
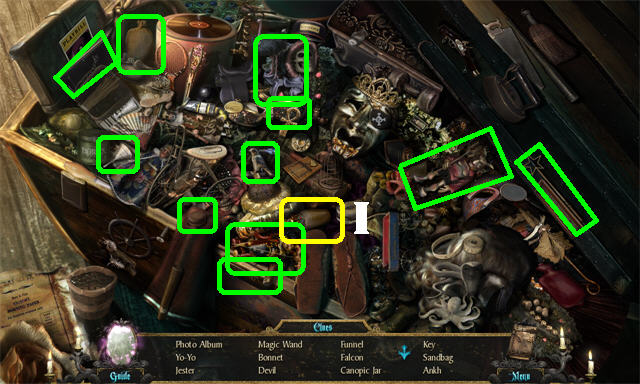
- Play the Hidden Object Scene to obtain the CREST FRAGMENT (S).
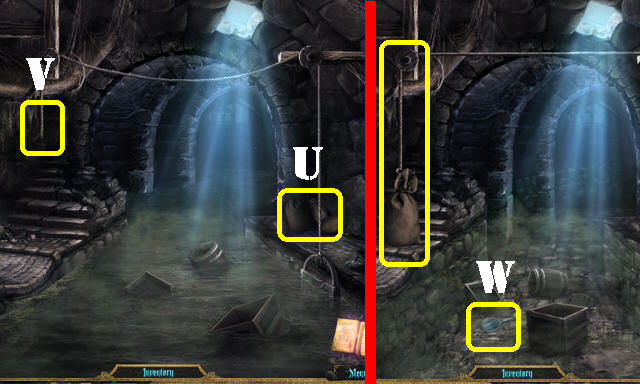
- Click down twice and go into the left door to access the dining salon.
- Take the BLACK KNIGHT 1/4 (T) on the table.
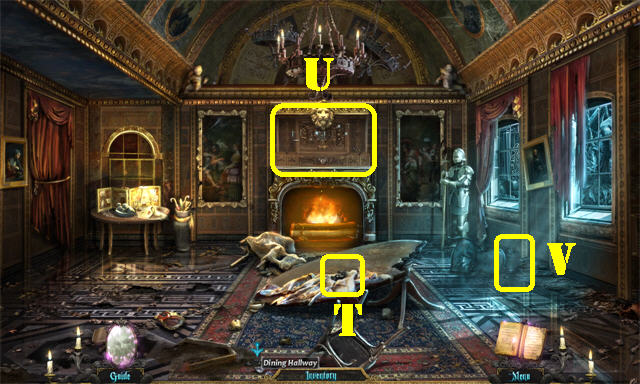
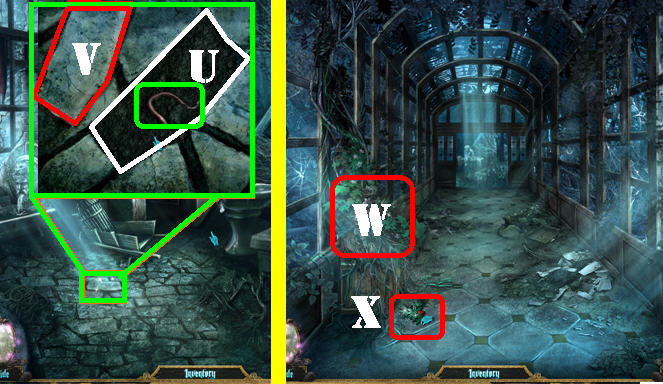
- Click on the mantle above the fireplace to activate a new objective (U).
- Move the chair by the window; take URN 2/5 (V).
- Play the Hidden Object Scene on the left to collect URN 3/5 (W).
- Exit this room, go through the right door and head forward to the Art Rotunda.
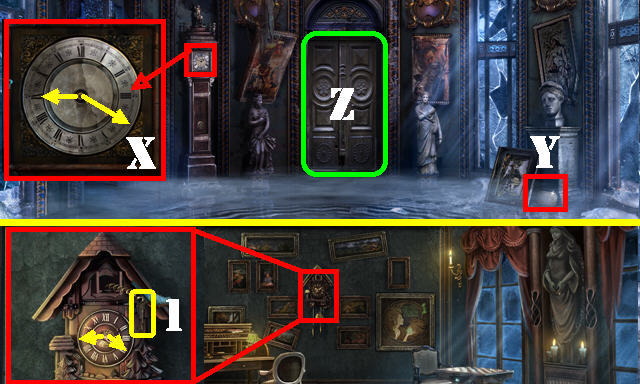
- Zoom into the clock; note the time has stopped at 9:20 (X).
- Move the painting in the lower right; take SYMBOL CARD 1/4 (Y).
- Zoom into the library door in the back to trigger a new objective (Z).
- Return to the manager’s office.
- Zoom into the cuckoo clock.
- Set the time to 9:20; take the KEY (1).
- Return to the Art Rotunda.
- Zoom into the back door (Z).
- Place the KEY in the keyhole and enter the library.
- Open the BOOK (A) in the lower left to add a page to your journal.
- Click on the UNLIT CANDLE in the lower right; take BLACK KNIGHT 2/4 (B).
- Zoom into the books between the statues to trigger a new objective (C).
- Grab the IMSETY CANOPIC JAR (1) next to the right statue.
- Click on the books by the right statue to trigger a search scene (D).
- Play the Hidden Object Scene to obtain BOOK 3 (E).
- Click down and go into the left door to access the conservatory hallway.
- Take the SANDBAG (F) on the right.
- Go forward to the conservatory.
- Take the EMPTY BUCKET (G) on the lower left.
- Click on the flute of the large statue (H) to add a page to your journal.
- Zoom into the gate; place the 2 CREST FRAGMENTS into the relief (I).
- Go through the door to reach the conservatory grounds.
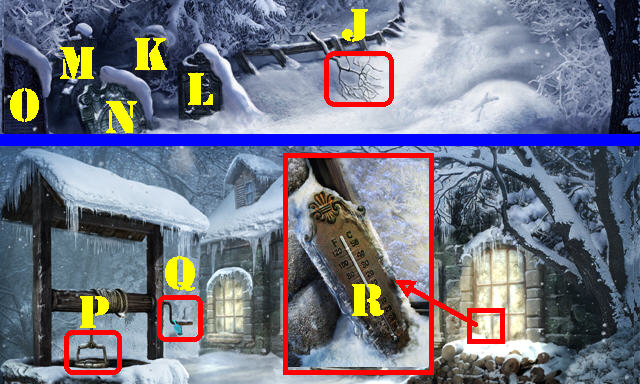
- Grab the TWIG (J) in the lower center.
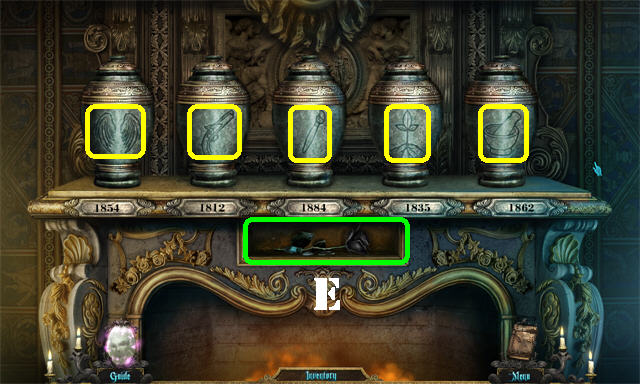
- Click on the tombstones to read the dates.
- 1812 Dubois: His aim was true (K).
- 1835 Francis: Forever in his garden (L).
- 1854 Moreau: Rest in Peace (M).
- 1862 Edmund: A man of science (N).
- 1884 Vincent: His vision lives on (O).
- Go forward to the cottage grounds.
- Place the EMPTY BUCKET in the well (P).
- Turn the handle (Q) to drop the bucket.
- Turn the handle again to raise the bucket; take the BUCKET OF ICE WATER.
- Take a closer look at the corner of the right window; take the THERMOMETER (R).
- Go inside the cottage.
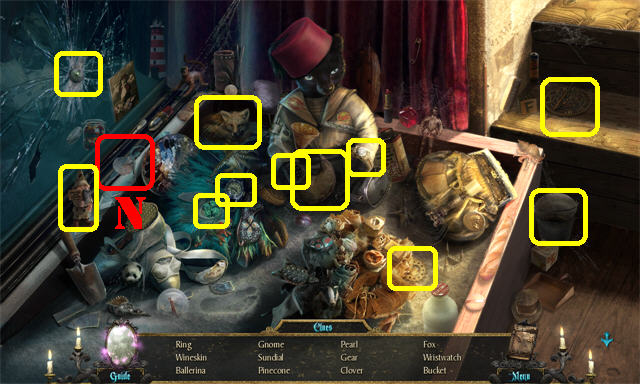
- Play the Hidden Object Scene to obtain the SCREWDRIVER (S).
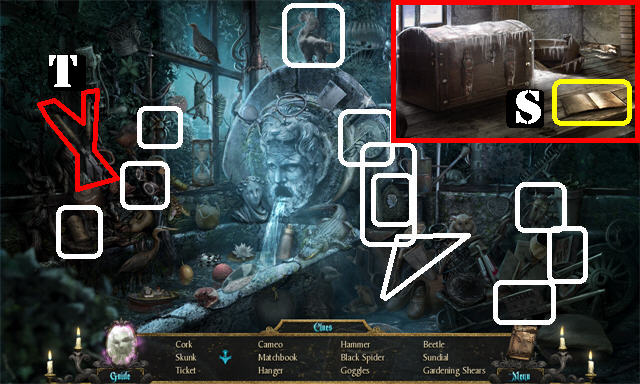
- Take the RECIPE BOOK (S) on the ground.
- Return to the Conservatory.
- Play the Hidden Object Scene to obtain the HEDGE SHEARS (T).
- Zoom into the loose tile on the ground.
- Pry the tile loose with the SCRWDRIVER.
- Take the EARTHWORM (U) and the STONE TILE (V).
- Click down to reach the conservatory hallway.
- Put the BUCKET OF ICE WATER on the wilted plant on the left (W).
- Cut the plant with the HEDGE SHEARS.
- Grab the STAR ANISE BUDS (X) that fell on the ground.
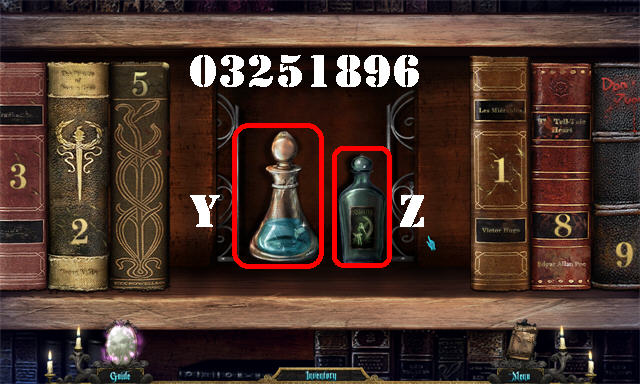
- Return to the Library.
- Zoom into the books between both statues.
- Place BOOK 3 and the RECIPE BOOK in the slots.
- Click on 2 books to swap their positions.
- Using the clue found in the coat check, arrange the books to form the numbers 0, 3, 2, 5, 1, 8, 9, and 6.
- Open the gate behind the books; take EMPTY BOTTLE 2 (Z) and the ANGEL SPIRITS (Y).
- Return to the cottage.
- Zoom into the stove.
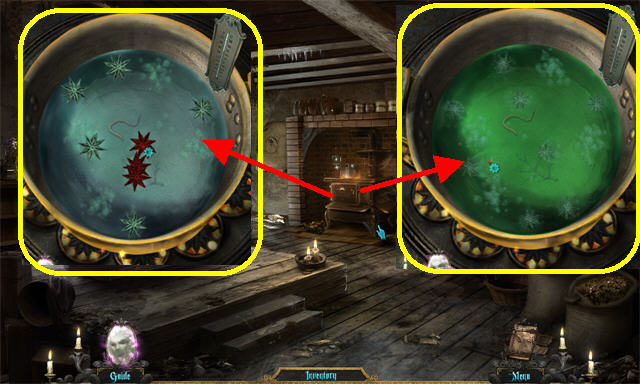
- Place the ingredients into the cauldron in this order: ANGEL SPIRITS, EARTHWORM, TWIG, THERMOMETER and STAR ANISE BUDS.
- You must keep the STAR ANISE BUDS separated by moving them away from each other. If they bump into each other they will turn red.
- The water must be completely green and the star anise buds must disappear before the brew can be used.
- Place the 2 EMPTY BOTTLES into the brew to collect the 2 BOTTLES OF ABSINTHE.
- Return to the conservatory.
- Play the Hidden Object scene to obtain the MOP (1).

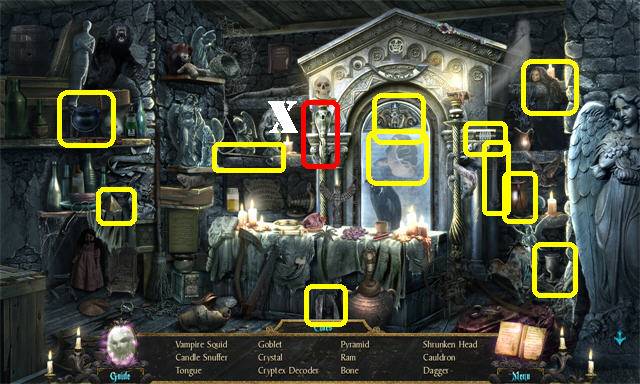
- Return to the manager’s office.
- Zoom into the left statue; place a BOTTLE OF ABSINTHE in the hands.
- Zoom into the right statue; place the other BOTTLE OF ABSINTHE in the hands.
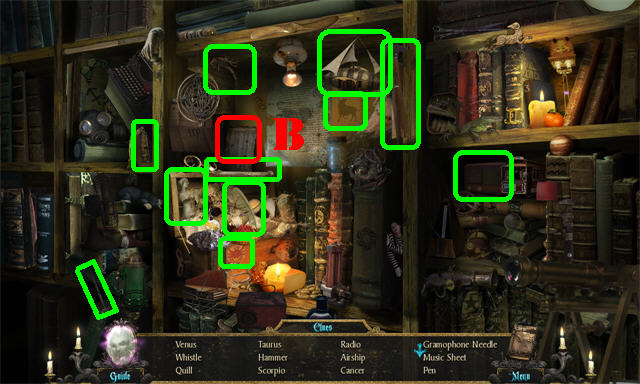
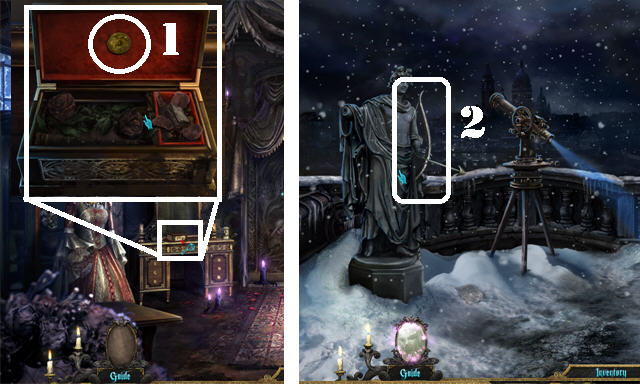
- The large painting falls on the ground; zoom into the puzzle behind the picture (2).
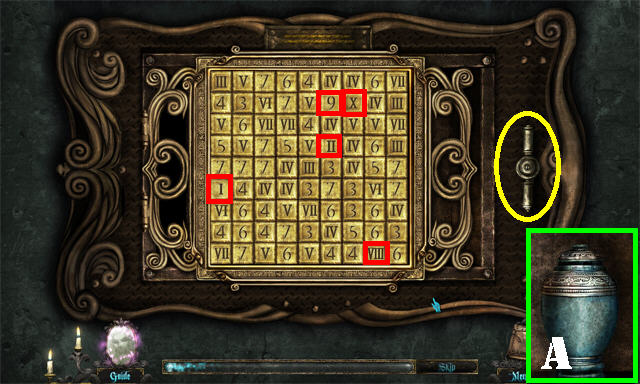
- The board is filled with numbers, all but five are repeated.
- Click on the numbers (Roman or Arabic) which are not repeated.
- The solution is random; the screenshot shows you a random solution.
- Click on the handle to enter your solution and retrieve URN 4/ 5 (A).
- Click down.
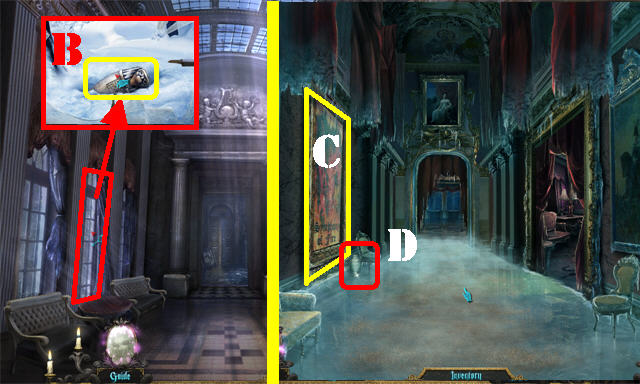
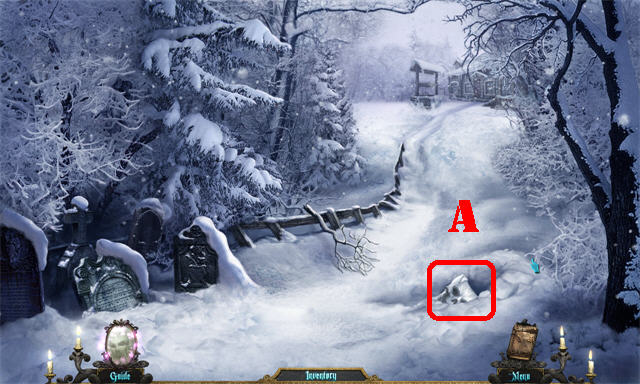
- Zoom into the middle left window.
- Break the window with the STONE TILE; take the QEBEHSENENUEF CANOPIC JAR (B) in the snow.
- Go to the auditorium landing; enter the left door.
- Place the SANDBAG on the floor.
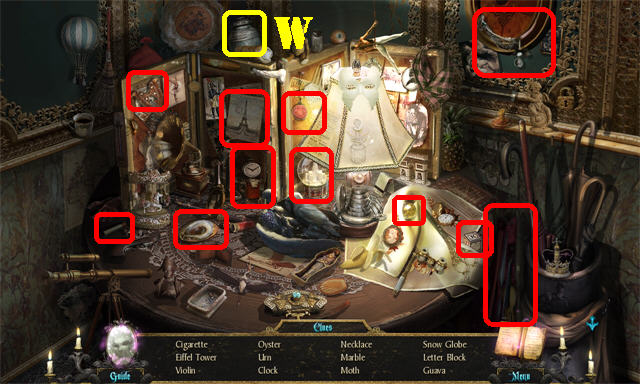
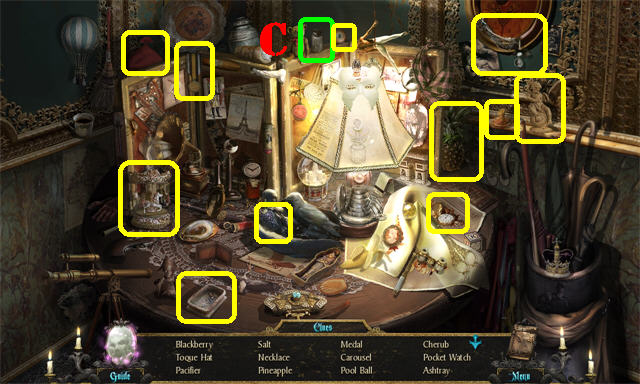
- Click on the large painting (C) on the left wall to add a page to your journal.
- Grab URN 5/5 (D) on the left.
- Return to the dining salon.
- Zoom into the mantle.
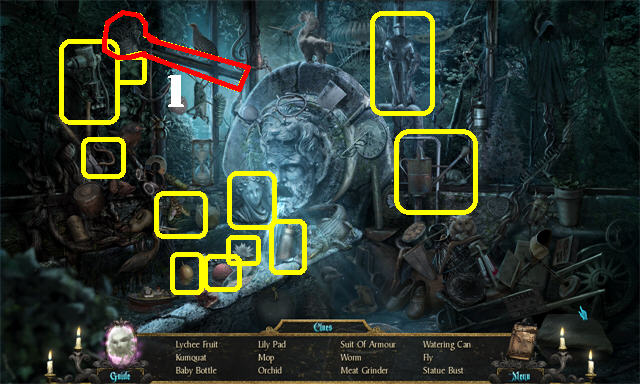
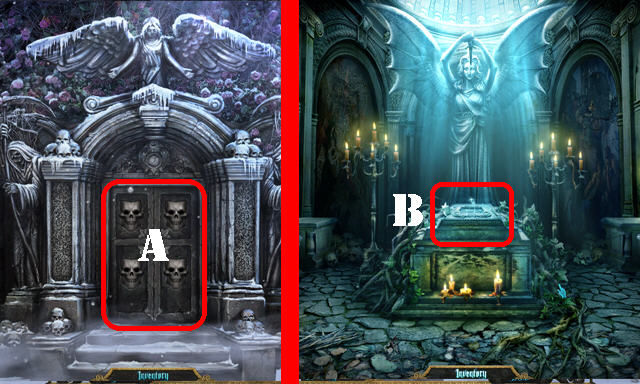
- Place the 5 URNS in any spot to activate the puzzle.
- The locations for the URNS are: behind the chair in the dining salon, Hidden Object scene in the dining salon, manager’s hallway, ballroom hallway, and the last one will be added to inventory after you solve the number puzzle in the manager’s office.
- Using the clues in the conservatory grounds and your journal, place the urns in this order: Angel Wings, Gun, Paintbrush, Sprout, Mortar and Pestle.
- Take the BLACK ROSE below the urns (E).
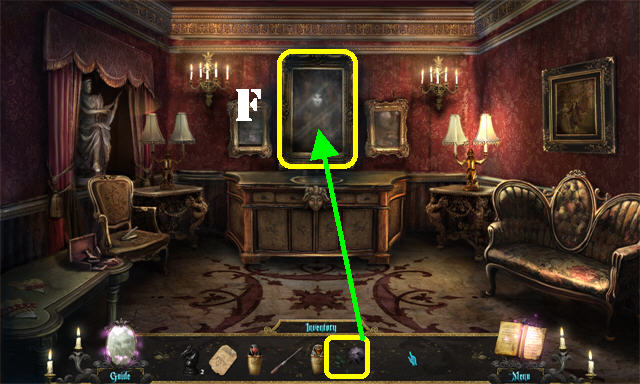
- Go to the ballroom hallway and make a right into the powder room.
- Place the MOP you found in the conservatory search scene on the floor to soak up the water.
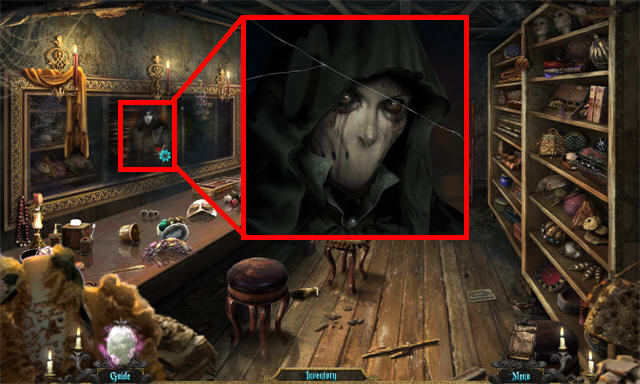
- Give the BLACK ROSE you obtained after the solving the urn puzzle to the Phantom in the mirror (F).
Chapter 2: The Basement
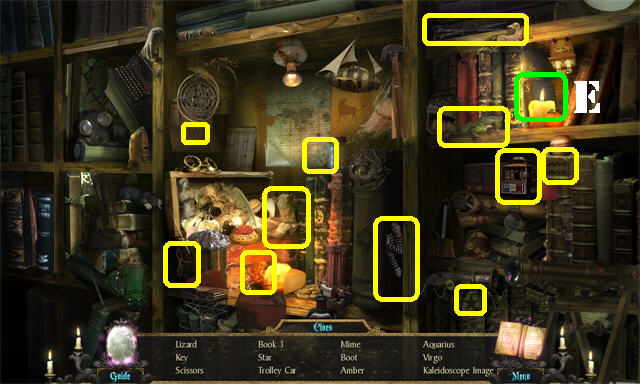
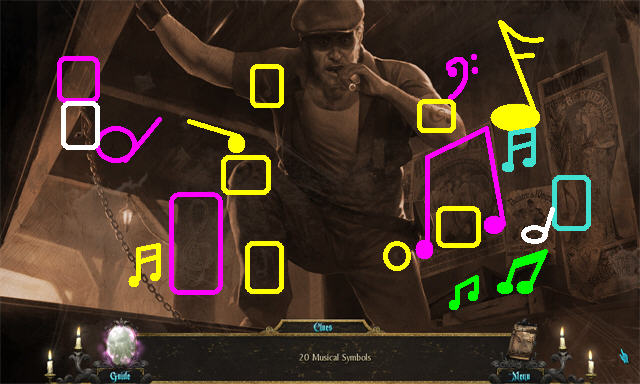
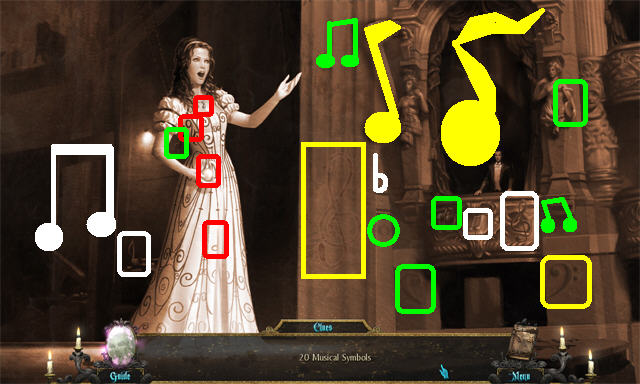
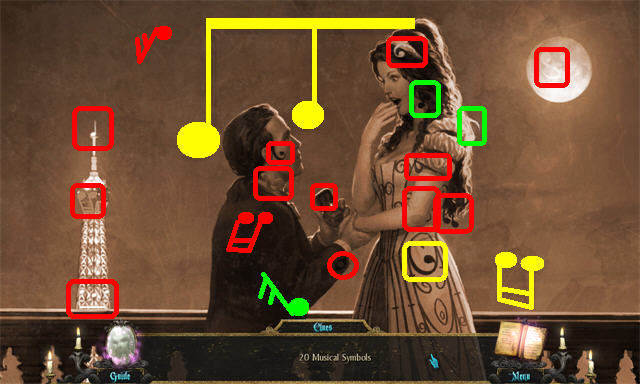
- Find the 20 MUSICAL SYMBOLS in the scene.
- Grab the NAIL CLIPPERS (A) on the left chair.
- Go through the hole in the back wall to reach the spy booth (B).
- Click on the stack of papers (C) in the lower right to add a page to your journal.
- Take the INSECT JAR (D) on the shelf.
- Click on the shelf in the upper left; take the SYMBOL CARD 2/4 (E).
- Go down the ladder to reach the understage landing.
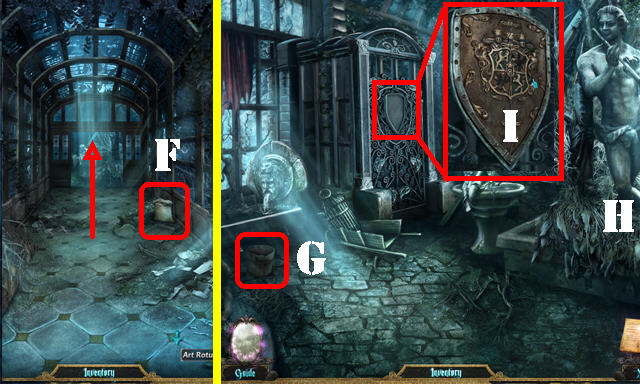
- Grab the HAPY CANOPIC JAR (F) on the right side of the floor.
- Zoom into the crack on the left side of the floor.
- Grab the ANTS using the INSECT JAR (G); the JAR OF ANTS will be added to inventory.
- Head right into the prop storage room.
- Grab BLACK KNIGHT 3/4 (H) in the lower right.
- Click down and go forward to the understage.
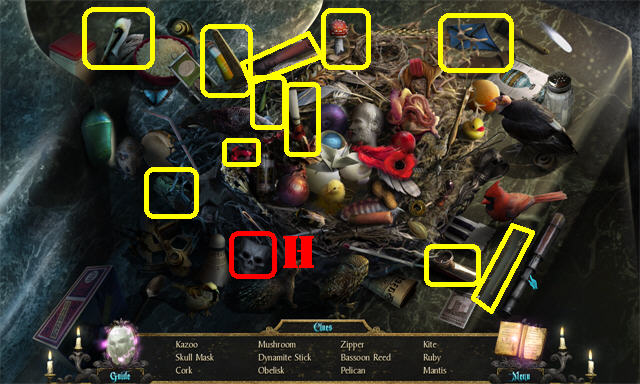
- Play the Hidden Object Scene on the right to obtain the DUAMUTEF CANOPIC JAR (I).
- Click on the left door to add a new objective (J).
- Take SYMBOL CARD 3/4 (K) in the lower left.
- Go forward to the elevator lobby.
- Click on the Hamlet mannequin (L) on the left to add a page to your journal.
- Click on the elevator gate (M) to add a new objective.
- Head right toward the stage lifts.
- Grab the CRANK (N) in the lower left.
- Return to the prop storage room.
- Cut the bear’s claws with the NAIL CLIPPERS (O).
- Put the CRANK in the Jack-in-the-box.
- Turn the crank until the box opens up.
- Take the SYMBOL CARD 4/4 (P) the small phantom is holding.
- Return to the understage.
- Zoom into the left door.
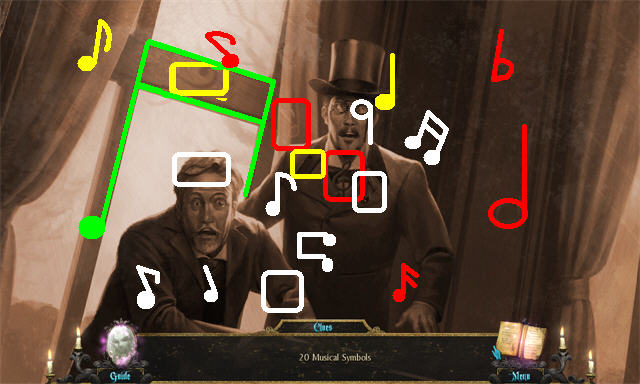
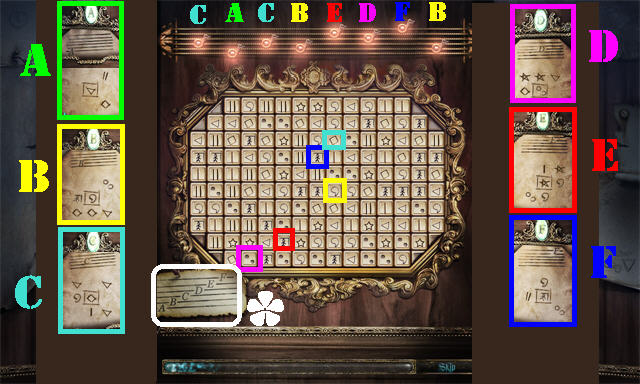
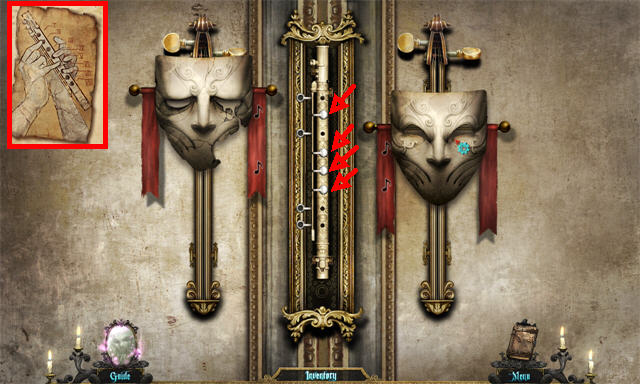
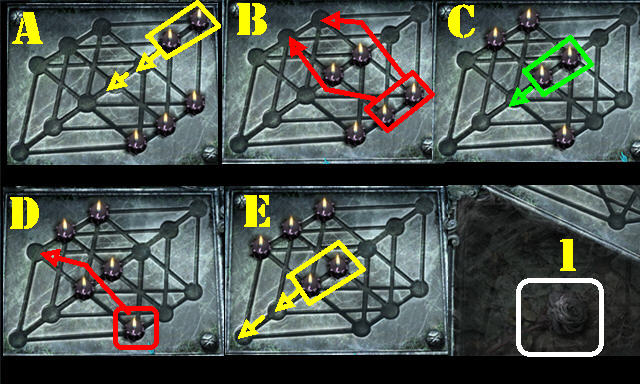
- Place the 4 SYMBOL CARDS in the C, D, E, and F slots to activate the puzzle.
- Light the musical notes on top, from left to right, using the symbols on the card in the lower left corner (*) as a guide.
- Click on each card to lift it from its slot. The symbol enclosed in a square is the one you need to click on the main board; however, that symbol must have the same symbols surrounding it as the ones on the card.
- The solution to this puzzle is random; please look at the screenshot for a sample solution.

- Enter the orchestra pit after the puzzle has been solved.
- A new objective appears as soon as you enter.
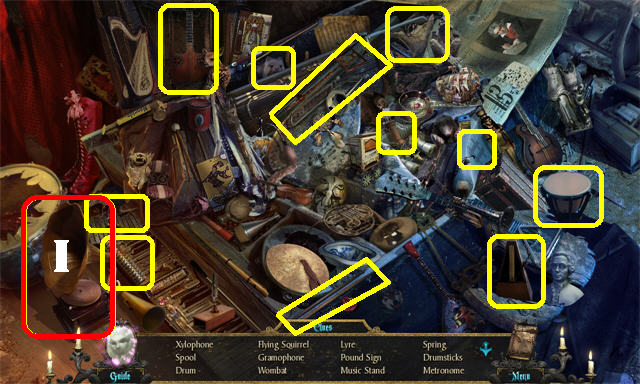
- Play the Hidden Object scene by the broken piano to obtain the STATUE OF HORUS (1).
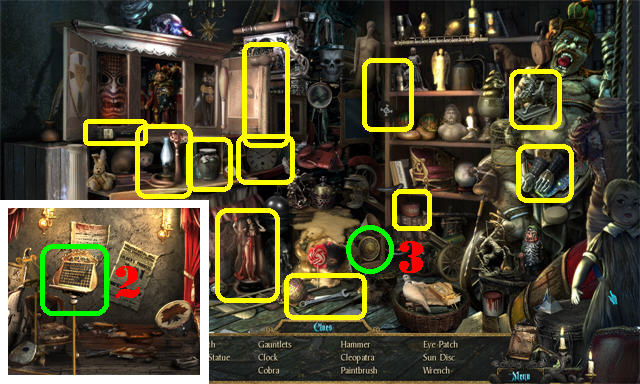
- Grab the MUSIC STAND (2) on the left.
- Go to the prop storage room.
- Play the Hidden Object scene to obtain the SUN DISC (3).
- Return to the stage lifts area.
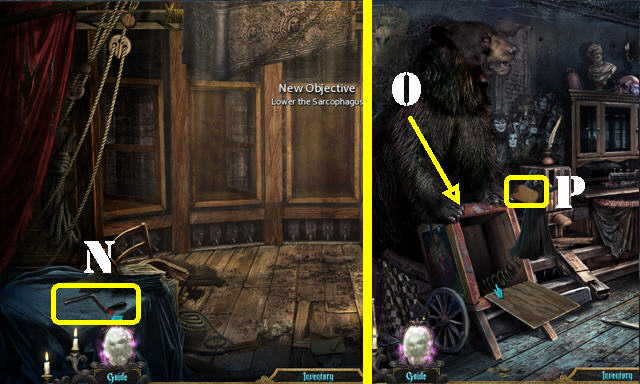
- Open the lift mechanism control panel in the lower right with the SCREWDRIVER (A).
- Place the JAR OF ANTS on the gummy gears inside the mechanism.
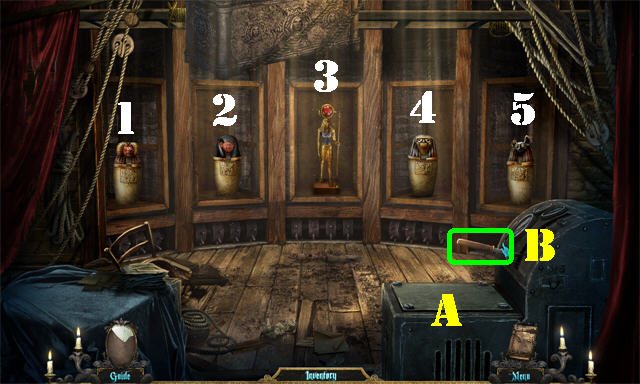
- From left to right; place the following items on the lifts; HAPY (1), IMSETY (2), STATUE OF HORUS (3), QEBEHSENUF (4), and DUAMATEF (5).
- Click on the LEVER (B) on the right to raise the lift and lower the sarcophagus.
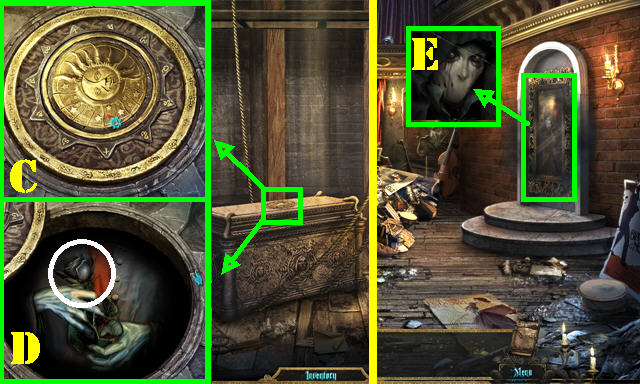
- Zoom into the sarcophagus; place the SUN DISC on top (C).
- Click on the sun disc.
- Take the BLACK ROSE (D).
- Return to the orchestra pit.
- Give the BLACK ROSE to the phantom in the mirror on the right (E).
Chapter 3: The Upper Floor
- Find the 20 MUSICAL SYMBOLS in the scene.
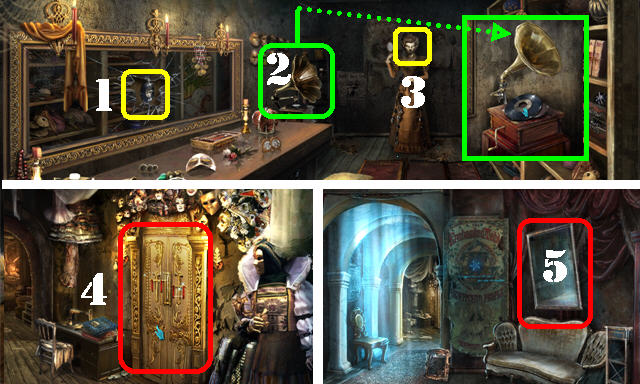
- Take the KEY below the broken mirror (A).
- Return to the elevator lobby.
- Place the KEY on the padlock attached to the gate (B).
- Click on the wheel (C) to the lower right of the gate to open the door.
- Go inside the service elevator.
- Click on the old playbills (D) on the right and the note (E) on the left to add 2 pages to your journal.
- Click on the switch (F) on the left to trigger a puzzle.
- Click on the switches in the correct order so you can light up the fuses from I to VIII.
- The switches have been labeled 1 to 8 from left to right. Click on the switches in this order to solve the puzzle: 4, 1, 5, 8, 6, 7, 2, 3.
- Click on the switch to activate the elevator.
- Go forward to the actor’s alley.
- Play the Hidden Object Scene on the left to obtain the POWDER PUFF (G).
- Click on the large poster (H) in the back to add a page to your journal.
- Click on the mirror (I) on the right to add a new objective.
- Grab the TELESCOPE in the lower right (J).
- Go forward to the costume alley.
- Click on the note (K) attached to the costumes on the right to add a page to your journal.
- Remove the cloth on the lower left; take DAGGER 1/5 (L).
- Go left into the women’s changing room to encounter the phantom once more.
- Take the BLACK KNIGHT 4/4 (M) on the shelf on the right.
- Grab DAGGER 2/5 (N) on the stool.
- Click down and go forward to the industrial alley.
- Take the HOOK (O) in the upper left.
- Grab DAGGER 3/5 (P) on the counter on the right.

- Go forward to the rooftop.
- Play the Hidden Object Scene to obtain DAGGER 4/ 5 (Q).
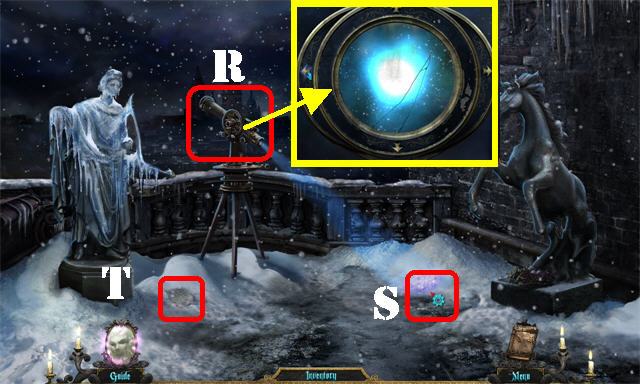
- Place the TELESCOPE on the stand (R).
- Click on the telescope to trigger a mini-game.
- Use the arrows to move the view of the telescope and search for a star.
- Once the star is in the middle of the lens, it will glow brightly.
- After the puzzle has been completed, a light from the telescope will shine on part of the snow; place the POWDER PUFF on that spot to obtain the STAR DUST (S).
- Click on the NOTE (T) on the left side of the snow to add a page to your journal.
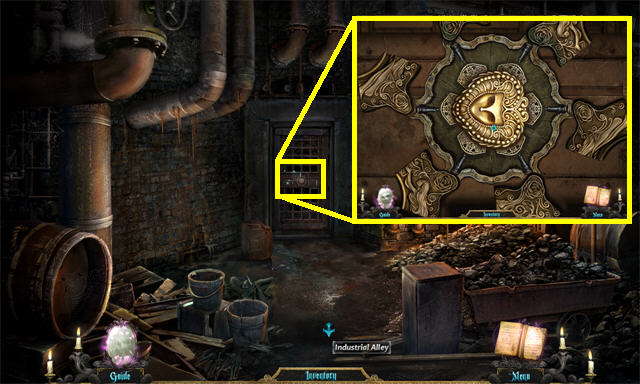
- Click down and head right into the furnace room.
- Click on the back door to trigger a puzzle.
- Click in the outer ring of the lock to open it.
- Click on the pins in the correct order to make them stay up.
- The puzzle resets itself when an incorrect sequence has been entered.
- The solution to this puzzle is random. Try to remember the order in which the pins stayed up so you can get through the puzzle faster.
- Click on the center of the puzzle after all the pins have been pushed in.
- Go through the door to access the sewers and trigger a new objective.
- Take the WEIGHTED BAG (U) in the lower right.
- Place the HOOK on the rope in the upper left (V).
- Put the WEIGHTED BAG on the hook to eliminate the water in the scene.
- Grab the HAND MIRROR (W) on the ground.
- Go forward to the worship cellar.
- Play the Hidden Object Scene to obtain DAGGER 5/5 (X).

- Take the DRY TORCH (Y) in the lower right.
- Return to the furnace room.
- Knock over the gasoline can on the left (Z).
- Place the DRY TORCH over the spilled gasoline (1).
- Put the FUEL-SOAKED TORCH into the furnace (2) to obtain the BURNING TORCH.
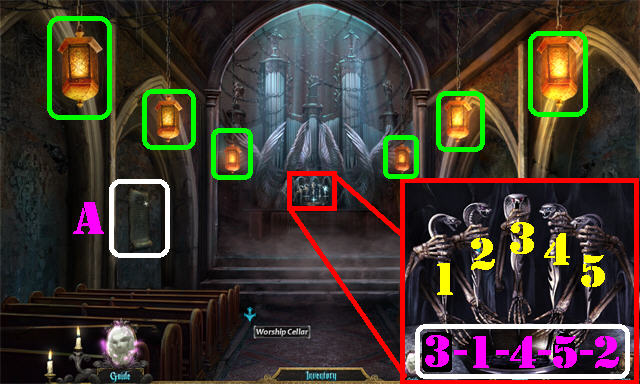
- Go forward twice and up the left steps to reach the church.
- Light the 6 lanterns marked in green with the BURNING TORCH.
- Click on the NOTE (A) on the left to add a page to your journal.
- Zoom into the skeletons in the back of the scene.
- Place the 5 DAGGERS in the raised hands.
- The daggers can be found in the costume alley, the women’s changing room, the industrial alley, the rooftop, and the church cellar.
- The daggers have been labeled 1 to 5 from left to right. Click on the daggers in this order: 3, 1, 4, 5, 2.
- Solving the puzzle opens the door to the graveyard on the right.
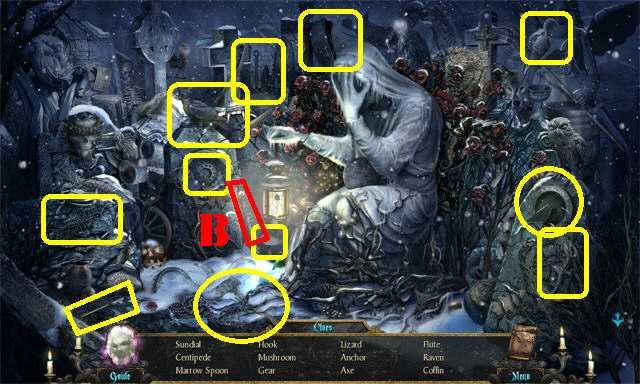
- Go to the graveyard.
- Play the Hidden Object Scene to obtain the FLUTE (B).
- Take the SHOVEL (C) on the lower left.
- Go forward to the crypt entrance.
- Knock down the BLACK ROSE (D) in the upper center using the SHOVEL.
- Click on the area above the door to add a page to your journal (E).
- Click on the door to add a new objective (F).
- Return to the worship cellar.
- Play the Hidden Object Scene to obtain the EMBALMING FLUID (G).
- Return to the rooftop.
- Play the Hidden Object Scene to obtain SKULL MASK 1/4 (H).
- Take the service elevator and return to the Orchestra Pit.
- Play the Hidden Object Scene to obtain the GRAMOPHONE HORN (I).
- Go to the prop storage room.
- Play the Hidden Object Scene to obtain SKULL MASK 2/4 (J).

- Return to the manager’s office.
- Zoom into the chess table.
- The black knights can be found in the dining salon, in the candle in the lower right at the library, on the lower right side of the prop storage room, and in the women’s changing room.
- Place the 4 BLACK KNIGHTS on the board to activate the puzzle.
- Place the black knights on the board so they are one step away from the king.
- The pieces can be moved in an ‘L’ shape formation across the board.
- Please look at the screenshot for the solution.
- Take the 20.000 FRANCS on the side of the board after the puzzle has been solved.
- To the elevator to the women’s changing room on the upper floor.
- Give the BLACK ROSE to the phantom in the mirror.
Chapter 4: Finale
- Find the 20 MUSICAL SYMBOLS in the scene.
- Take the PHONOGRAPH (1) in the broken mirror.
- Zoom into the gramophone stand (2).
- Place the PHONOGRAPH and the GRAMOPHONE HORN on the stand and the screen in the back of the scene will fall down.
- Give the HAND MIRROR to the mannequin in the back of the scene.
- Take the COMEDY MASK (3) from the mannequin’s face.
- Click down.
- Click on the right door to trigger a new task (4).
- Click down.
- Place the STAR DUST on the mirror (5) on the right to add a page to your journal.
- Take the elevator back down and go to the grand foyer.
- Play the Hidden Object Scene by the ticket booth to obtain the BOX OF MATCHES (6).
- Go to the conservatory grounds.
- Use the shovel on the white “X” on the right side of the ground to dig up SKULL MASK 3/4 (A).
- Go to the library.
- Play the Hidden Object Scene on the right to obtain the MUSIC SHEET (B).
- Go to the dining salon.
- Play the Hidden Object Scene to obtain the SALT (C).

- Go to the furnace room.
- Click on the pile of coal in the lower right; take the SKULL (D).
- Place the MUSIC STAND on the stand by the fire (E).
- Put the MUSIC SHEET on the music stand and a lit pattern will appear on the opposite side of the wall.
- Zoom into the lit pattern on the wall (F).
- Remove the stone; take the BLACK CANDLES (G).
- Go to the elevator lobby.
- Give the SKULL to the Hamlet mannequin (H).
- Take the TRAGEDY MASK off the mannequin’s face (I).
- Return to costume alley.
- Zoom into the right door.
- Place the FLUTE, COMEDY MASK, and TRAGEDY MASK into the appropriate slots to activate the puzzle.
- Position the masks as shown in the screenshot so that holes 2, 4, 5, and 6 are closed.
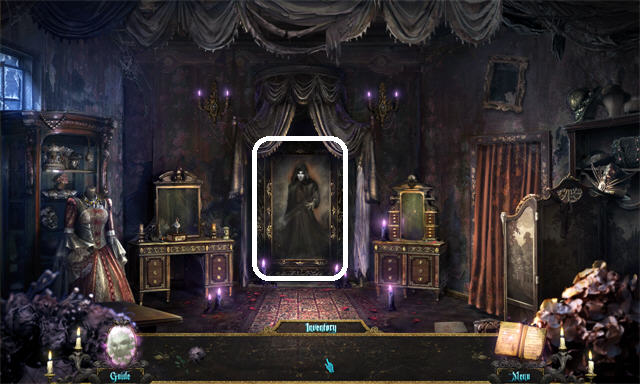
- Go through the door to access Christine’s room.
- Zoom into the back door to activate a new objective (J).
- Take SKULL MASK 4/4 (K) in the lower right.
- Grab the OPERA GLASSES (L) in the lower left.
- Take the WHITE HEART (M) on the mannequin’s chest on the left.
- Return to the actor’s alley.
- Play the Hidden Object Scene on the left to obtain the BALLERINA (N).
- Return to Christine’s room.
- Zoom into the music box by the dresser.
- Place the BALLERINA on the empty slot.
- Click on the ballerina to open the box; take the COIN (1).
- Go to the rooftop.
- Place the SALT on the left statue; take the BOW AND ARROW (2).
- Go to the crypt entrance.
- Place the 4 SKULL MASKS in the slots on the door (A).
- Open the door and enter the crypt.
- Zoom into the tomb (B).
- Place the BLACK CANDLES on the top.
- Light the candles using the BOX OF MATCHES.
- Duplicate the pattern shown in the journal by looking at the steps in the screenshot.
- Take the BLACK ROSE after the puzzle has been solved (1).
- Go to the ballroom hallway and proceed forward to enter the ballroom.
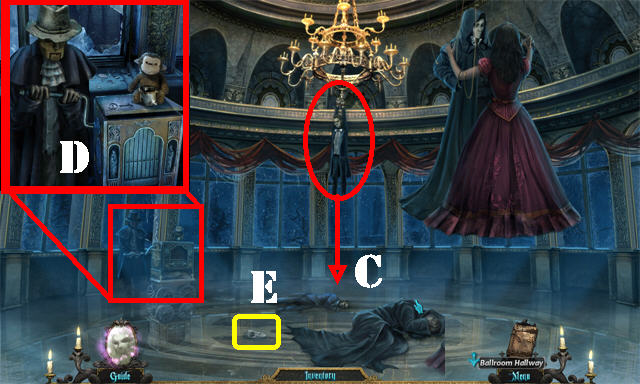
- Place the BOW AND ARROW on the puppet hanging from the chandelier.
- Zoom into the fallen puppet: take the SWORD (C).
- Zoom into the organ grinder (D); place the COIN in the monkey’s cup to lower the phantom.
- Place the SWORD on the phantom.
- Take the HALF MASK (E) that falls on the ground.
- Go to the conservatory grounds.
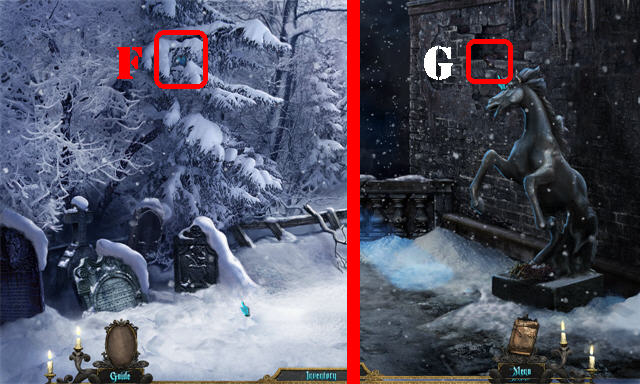
- Take the BLUE HEART (F) in the upper left.
- Go to the rooftop.
- Take the BLACK HEART (G) in the upper right.
- Go to the understage landing.
- Zoom into the sarcophagus.
- Place the EMBALMING FLUID on the hook to obtain the GRAPPLING HOOK (H).
- Go to the library.
- Take the PINK HEART (I) on the bottom shelf between the statues.
- Go to the auditorium landing.
- Place the GRAPPLING HOOK on the gargoyle in the upper right (J).
- Go up to the opera boxes.
- Place the OPERA GLASSES on the balcony to view the phantom and add a page to the journal (K).
- Zoom into the doll in the lower left side of the back door.
- Place the 20,000 FRANCS in the plate to trigger a search scene (L).
- Play the Hidden Object Scene to obtain the HALF MASK (M).
- Go to the crypt.
- Take the RED HEART (N) in the lower right.
- Return to Christine’s Room.
- Zoom into the back door (O).
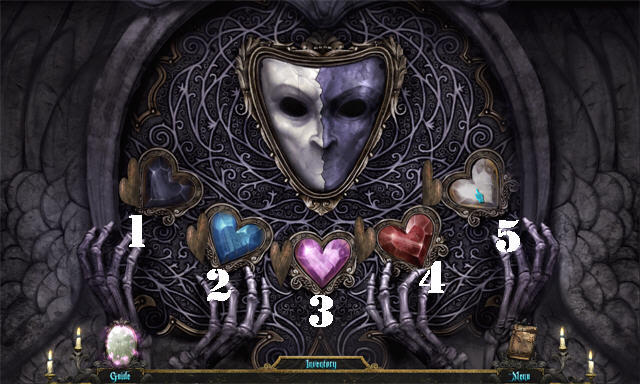
- Place the 2 HALF MASKS in the center to unlock the heart slots.
- Place the 5 HEARTS in the slots.
- Click on any 2 hearts to swap their positions.
- To unlock the door place the hearts, from left to right, in this order: BLACK (1), BLUE (2), PINK (3), RED (4), WHITE (5).
- Give the BLACK ROSE to the phantom after the puzzle has been solved.
- Find the 20 MUSICAL SYMBOLS.
- Go through the mirror.
- Congratulations! You’ve completed Mystery Legends: The Phantom of the Opera!
Created at: 2010-11-20