

WALKTHROUGH MENU
- INTRODUCTION
- CASE ONE – RACHEL VERINDER
- CASE TWO – GABRIEL BETTERIDGE
- CASE THREE – FRANKLIN BLAKE
- CASE FOUR – DRUSILLA CLACK
- CASE FIVE – GODFREY ABLEWHITE
- CASE SIX – ROSANNA SPEARMAN
- CASE SEVEN - DR. MILTON CANDY
- CASE EIGHT – RAJ GUPTA
- CASE NINE – EZRA JENNINGS
INTRODUCTION
General Tips
- Mystery Masterpiece: The Moonstone has nine cases to solve. Each case has four Hidden Object scenes to visit.
- In each case, there are certain items that go into your inventory. Those inventory items do not have to be used in the scene you found them in.
- There is no timer in the game; you can take your time and enjoy the game at your own leisure.
- There are no penalties for clicking randomly in the scenes.
- The hints in the game are unlimited, but you have to wait for a hint to recharge before you can use it again.
- When you use a hint, you will see a circle appear in a section of the scene. A random item from the list will be shown somewhere inside that circle.
- At the end of each case, you can choose to replay the chapter or go back to the suspect board.
In-Game Menu
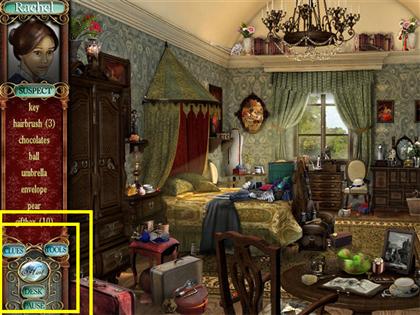
- There are several buttons in the lower left corner of each scene. Each button has a specific function in the game.
- You can click on the Clues button when you want to see the list of items that you need to search for in the room. You will mainly use this button if your tools tab is opened.
- The Tools button is used when you need to access your inventory items in the scene. Just click on the button and all the tools you collected will be available.
- Keep in mind that some tools will stay in your inventory after you’ve used them and no longer need them.
- Click on the Hint button when you’re stuck and can’t find an item in the scene.
- The desk button allows you to go back to the suspect cards area of the game. Use the Desk button if you’re stuck in a scene and wish to go to a different one.
- The Pause button allows you to pause the game. It also brings up the options, help, and main menu tabs in the game.
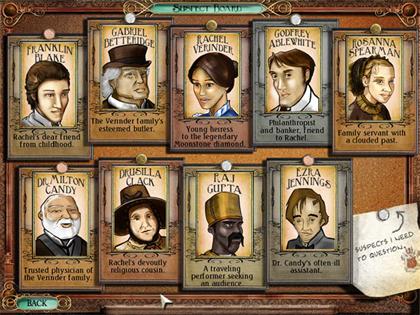
CASE ONE – RACHEL VERINDER
Rachel Verinder
- Rachel Verinder is an heiress to the legendary Moonstone Diamond.
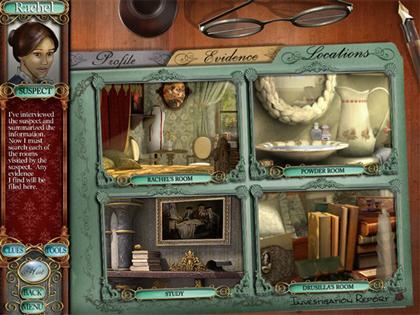
- In this section you will visit Rachel’s room, the powder room, the study, and Drusilla’s room.
Rachel’s Room – Hex Key
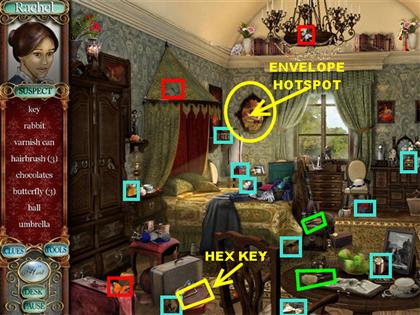
- The 10 gift boxes are highlighted in light blue in the screenshot.
- The three butterflies are highlighted in red in the screenshot.
- Two of the hairbrushes are highlighted in green in the screenshot.
- In order to locate the envelope, you have to click on the oval painting that is on the back wall next to the window.
- Once you get a closer view, you will know that you need to reassemble the letter with a special tool.
- The tool you need for that is a cotton swab. You can find the cotton swab in the study. As soon as you find it, you may return to this room to use it.
- The directions for the cotton swab usage will be described in the section after Drusilla’s Room.
- The hex key is located in the lower left side of the scene. Pick it up, and it will go into your inventory.
- You can use the hex key once you get to the powder room.
- Once you’ve collected all you can in this room, go to the powder room.
Powder Room – Hex Key Usage
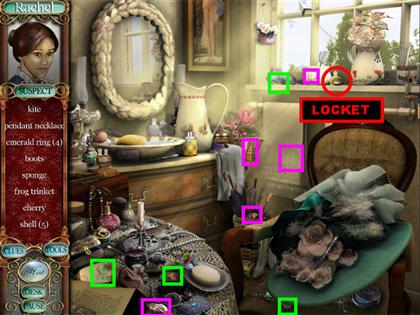
- The four rings are highlighted in green in the screenshot.
- The five shells are highlighted in lavender in the screenshot.
- The locket is in the upper right side of the scene. Click on the locket for a closer view.
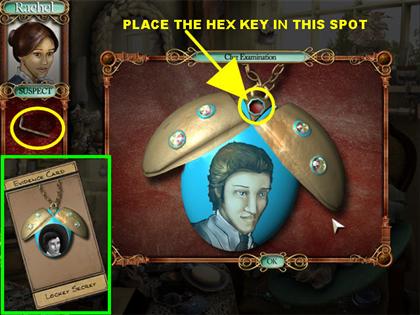
- Grab the hex key that is in your inventory.
- Place the hex key in the slot that is on top of the locket. You will know that your cursor is in the right spot when you see the area light up.
- Click on your mouse as soon as you see it light up and the hex key will attach itself to the top of the locket.
- Click on the locket seven or eight times until the locket opens up and shows you a picture of a man. Make sure that you click in the lower part of the key so it will turn correctly.
- Once the locket is opened, you will receive the Locket Secret Evidence Card.
Study – Cotton Swab
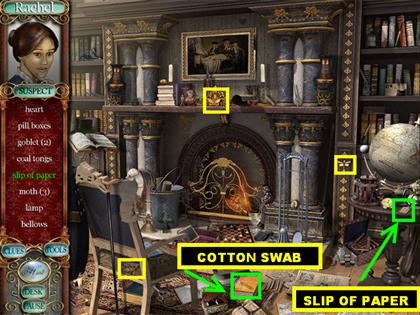
- The three moths are highlighted in yellow in the screenshot.
- The slip of paper is in the lower right side of the scene. It is on the small round table.
- The cotton swab is in the lower center of the scene. It is on top of a yellow book.
- Click on the cotton swab, and it will go into inventory.
- You will use the cotton swab in Rachel’s Room.
Drusilla’s Room – Bible
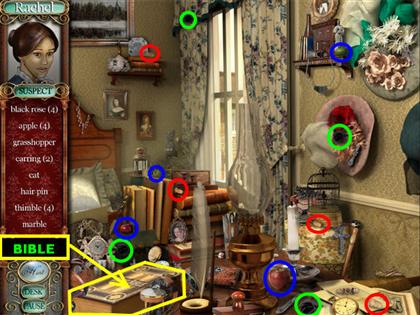
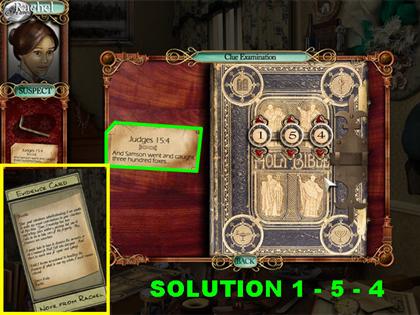
- The four black roses are in green in the screenshot.
- The four apples are in dark blue in the screenshot.
- The four thimbles are in red in the screenshot.
- Click on the bible that is in the lower left corner of the scene for a closer view.
- Place the scrap of paper from inventory on the silhouette of the paper that is on the left side of the bible. You can find the slip of paper in the study.
- The paper says “Judges 15:4” which is the clue for the combination to unlock the bible.
- Click on the red buttons that are on the top and bottom of each number on the bible. The buttons will change the numbers for you.
- You want the numbers from left to right to be “1 5 4.”
- Once the numbers have been entered correctly, the bible will open.
- You will receive the Note from Rachel Evidence Card once that puzzle is complete.
- Go back to Rachel’s Room so you can reassemble the letter, if you haven’t already done so.
Rachel’s Room – Envelope/ Cotton Swab
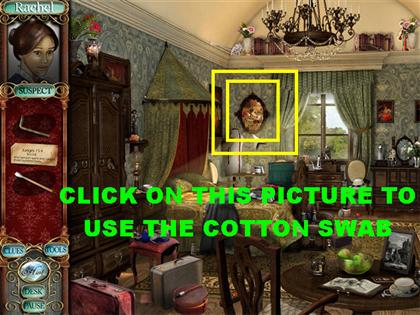
- Click on the oval picture that is in the back of the room.
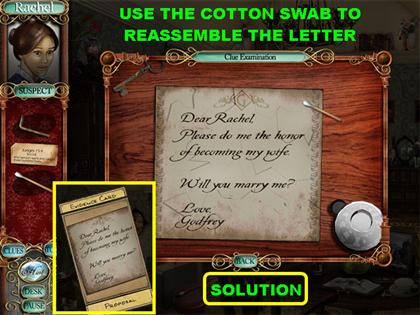
- Once you have the closer view of the picture. Grab the cotton swab from inventory and use it to reassemble the letter.
- You have to reassemble the letter within the outline in the window.
- Once a piece is in the right place, it will lock itself in.
- Please look at the screenshot for the solution.
- You will receive the Proposal Evidence Card at the end of this level.
CASE TWO – GABRIEL BETTERIDGE
Gabriel Betteridge
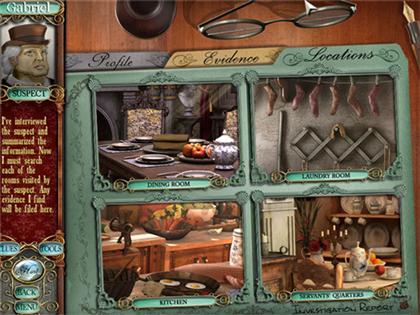
- Gabriel Betteridge is the Verinder family’s esteemed butler.
- In this section, you will visit the dining room, the laundry room, the kitchen, and the servants’ quarters.
Dining Room – Scissors
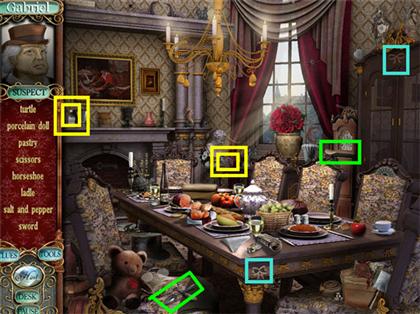
- The two spoons are highlighted in green in the screenshot.
- The two bows are highlighted in light blue in the screenshot.
- The scissors are in the center of the scene, close to the window, partially hidden behind the bust.
- Click on the dusty bottle that is on the left side of the dining room. It is on the left side of the mantle.
- When you click on the bottle, it tells you that you need to wipe it clean.
- You have to find the tool you need in the laundry room so you can clean the glass.
Laundry Room – Bowler Hat
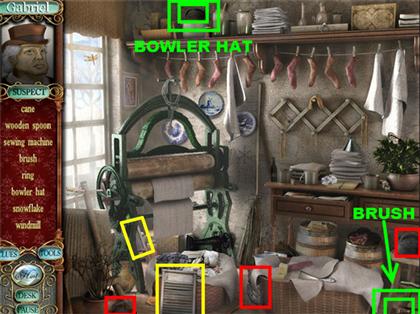
- The two washboards are highlighted in yellow in the screenshot.
- The three irons are highlighted in red in the screenshot.
- Pick up the brush that is in the lower right corner of the scene. You will use the brush in the dining room.
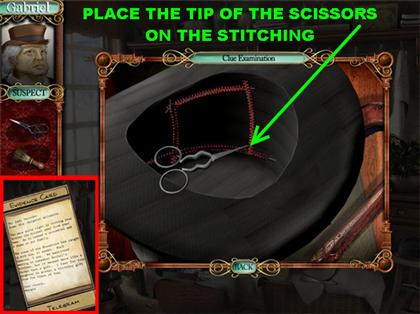
- Click on the bowler hat that is in the top left side of the scene. It is on top of a pot.
- Once you get a closer view of the hat, you will notice some stitching on top of it.
- Grab the scissors from inventory and place them on the stitching.
- Click on the stitching that is around the hat with the scissors.
- Make sure that the tip of the scissors is on the stitching; otherwise, the scissors will not cut them.
- Once the stitching has been undone, you will receive the Telegram Evidence Card.
Kitchen – Paper Scrap
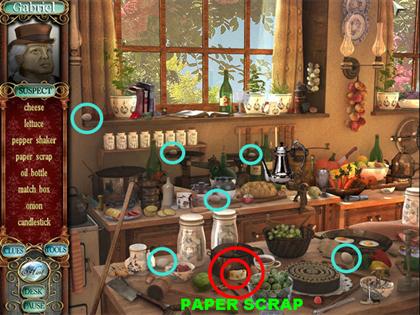
- The six eggs are circled in light blue in the screenshot.
- The paper scrap is circled in red in the screenshot. It is located on the left side of the table.
- You will use the paper scrap in the servants’ quarters.
Servants’ Quarters – Wooden Box
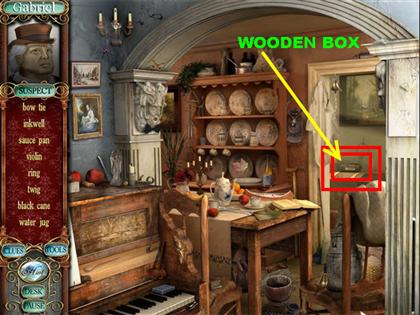

- Click on the wooden box that is on the right side of the scene. It is inside of the doorway.
- When you click on the box, you will get a closer view of it.
- Grab the paper code that is in your inventory.
- Place the paper code in the lower left side of the box, in the spot where you see a silhouette that matches the shape of the paper.
- Click on the arrows above and below the buttons so you can change the symbols on the box.
- The solution is to have the same symbols on the box as the ones on the paper.
- You will receive the Diary Page Evidence Card at the end of this puzzle.
Dining Room – Dusty Bottle
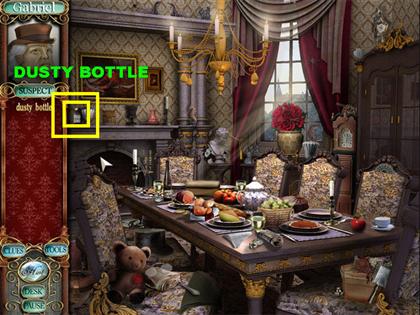
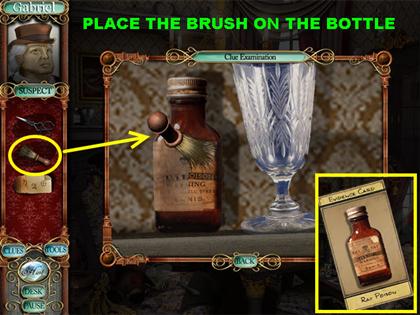
- Click on the dusty bottle that is on the left side of the mantle.
- Once you have a close-up view of the bottle, grab the brush from inventory and place it on the bottle.
- To clean the bottle properly, click on different spots of it until all the dust has come off.
- You will discover that it is a bottle of rat poison.
- You will receive the Rat Poison Evidence Card at the end of this round.
CASE THREE – FRANKLIN BLAKE
Franklin Blake
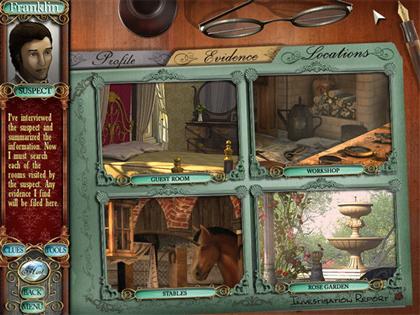
- Franklin Blake is Rachel’s dear friend from childhood.
- In this scene, you will visit the following locations: the guest room, the workshop, the stables, and the rose garden.
Guest Room
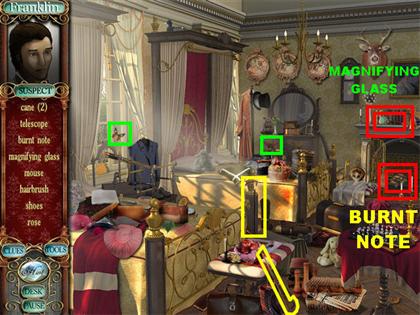
- The two canes are highlighted in yellow in the screenshot.
- The two butterflies are circled in green in the screenshot.
- Pick up the magnifying glass that is on top of the mantle on the right side of the room.
- The burnt letter is located in the fireplace. Once you click on the letter, you will be asked to reassemble it.
Workshop – Robe/ Magnifying Glass
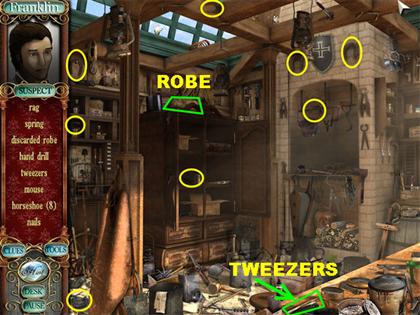
- The eight horseshoes are circled in yellow in the screenshot.
- The tweezers are in the lower right side of the scene, on the table.
- The discarded robe is in the top left side of the scene, on top of the armoire.
- Use the magnifying glass from inventory on the robe so you can read the letters on the robe.
- Use the magnifying glass on the top right side of the robe and you will see that a piece has been cut out.
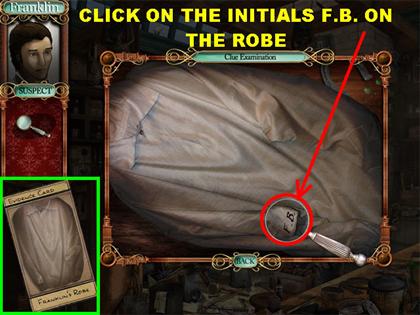
- Use the magnifying glass on the lower right side of the scene and you will be able to read the initials “FB” on the robe; click on those initials.
- You will receive the Franklin’s Robe Evidence Card after you examine the robe.
Stables – Key
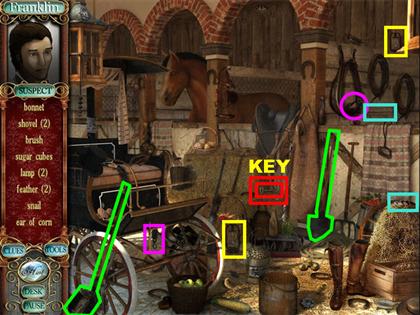
- The two shovels are circled in green in the screenshot.
- The two lamps are highlighted in yellow in the screenshot.
- The two feathers are highlighted in light blue in the screenshot.
- The two pulleys will be highlighted in lavender in the screenshot.
- The key is in the lower right side of the stable. It blends in really well with the bales of hay that are close to the wall.
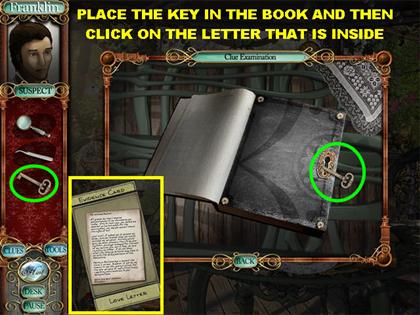
Rose Garden – Book/ Key
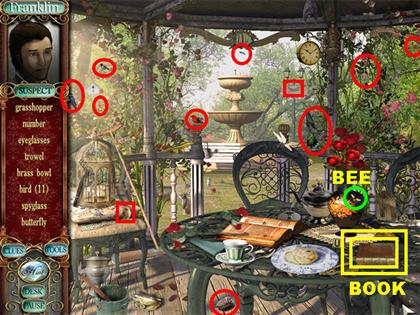
- The 11 birds are highlighted in green in the screenshot.
- The closed book is located on the right side of the table. Click on it to get a closer view.
- Click on the closed book and you will see a keyhole appear inside the book.
- Place the key from inventory on the keyhole, and the book will open.
- Click on the sealed letter that is inside the book.
- You will receive the Love Letter Evidence Card, once you’re finished with the book.
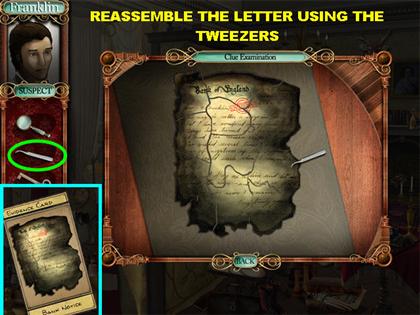
Guest Room – Burnt Note/ Tweezers
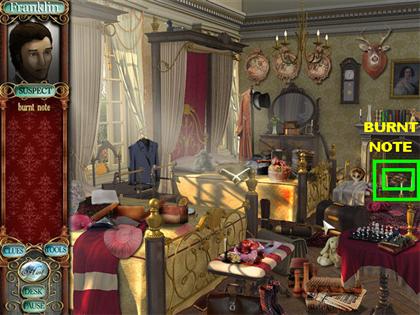
- You cannot assemble the letter until you obtain the tweezers from the Workshop.
- Click on the burnt note that is in the fireplace for a closer view.
- Click on the tweezers from inventory and place them on the pieces of the burn letter.
- The pieces will click in place, once you put them in the right place within the outline of the letter.
- You have to reassemble the letter within the outline in the window.
- Please look at the screenshot for the solution.
- Once the letter has been reassembled, it will be an overdue loan notice from the bank that belonged to Mr. Blake.
- You will receive the Bank Notice Evidence Card after the letter has been reassembled.
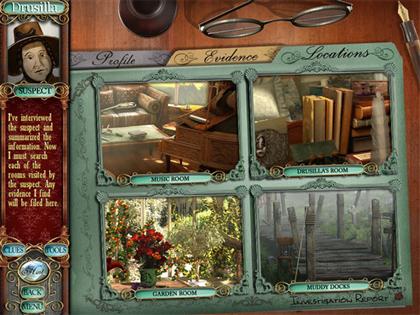
CASE FOUR – DRUSILLA CLACK
Drusilla Clack
- Drusilla Clack is Rachel’s devoutly religious cousin.
- In this section, you will visit the music room, Drusilla’s room, the garden room, and the muddy docks.
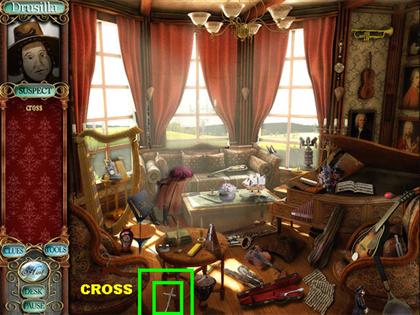
Music Room
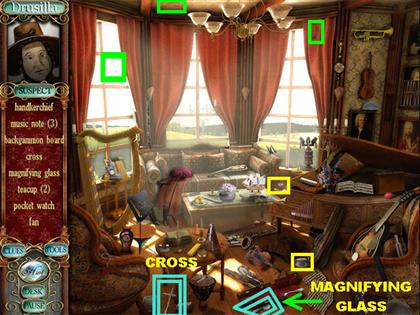
- The three music notes are highlighted in green in the screenshot.
- The two teacups are highlighted in yellow in the screenshot.
- Pick up the magnifying glass that is on the right side of the floor. It is underneath the violin case.
- The cross is located on the floor, under the coffee table.
Drusilla’s Room – Pamphlet/ Magnifying Glass
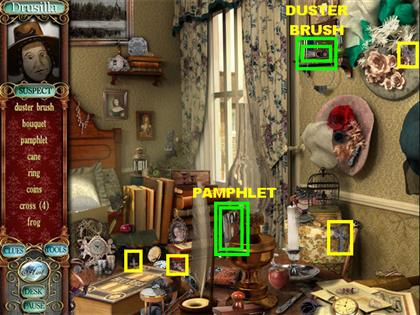
- The four crosses are highlighted in yellow in the screenshot.
- The brush is in the top right side of the wall, on the shelf next to the window.
- The pamphlet is in the lower center of the floor. It is in front of the stack of books.
- When you click on it, you will find out it’s one of Drusilla’s religious tracts.
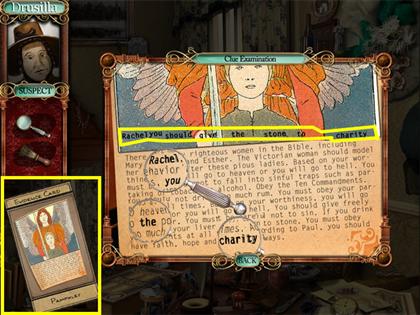
- Grab the magnifying glass from inventory and place it on the pages of the book.
- You will see the following words highlighted on the pages: “Rachel you should give the stone to charity.”
- Click on the words as they appear in the magnifying glass.
- At the end of this process you will receive the Pamphlet Evidence Card.
Garden Room – Scraper
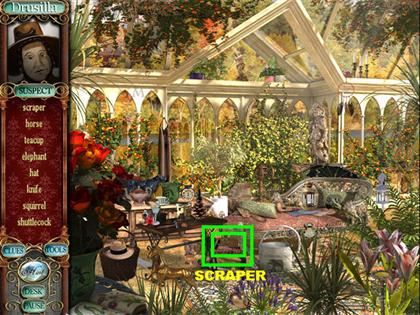
- The scraper is in the lower left side of the scene.
- You will use the scraper in the muddy docks location.
Muddy Docks – Scraper Usage
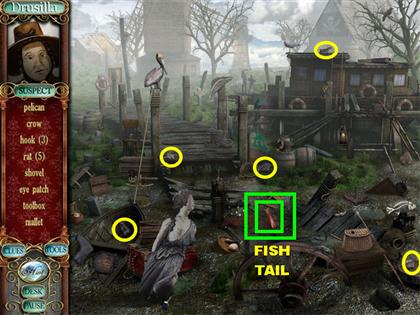

- The five rats are highlighted in yellow in the screenshot.
- Click on the fish tail that is sticking out of the center of the ground.
- Once you get a closer view, use the scraper on the mud until the whole fish becomes visible.
- At the end, you find out that it wasn’t a clue after all.
- You will get the Red Herring Evidence Card, after you discover the fish.
Music Room – Brush/ Cross
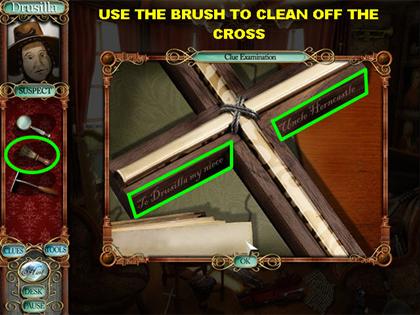
- When you click on the cross, it tells you that it is dingy and you need to clean it.
- Use the duster brush you found in Drusilla’s room to clean off the cross.
- To clean the cross, move the brush around the cross until you see bits of it being cleaned off.
- Keep brushing the cross until you see some carved words appear on the cross.
- You will receive the Cross Evidence Card once the cross is clean.
CASE FIVE – GODFREY ABLEWHITE
Godfrey Ablewhite

- Godfrey Ablewhite is a philanthropist, a banker and a friend to Rachel.
- In this section, you will visit Rachel’s room, the guest room, the powder room, and the wine cellar.
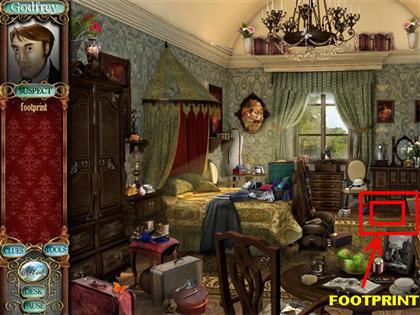
Rachel’s Room - Teapot
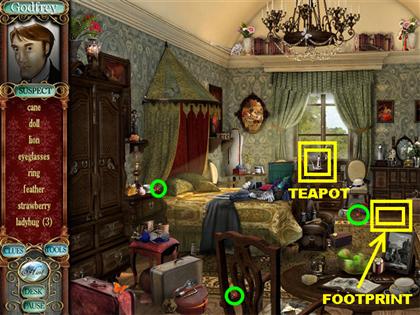
- The three ladybugs are circled in green in the screenshot.
- The footprint is on the far right side, next to the chair that is close to the window.
- You cannot make an impression of the footprint until you get the blotter from the wine cellar.
- Click on the teapot that is on top of the dresser by the window.
Guest Room – Envelope/ Teapot
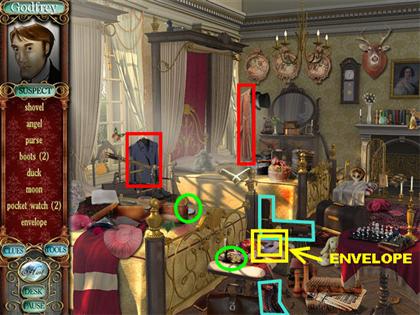
- The two pocket watches are highlighted in green in the screenshot.
- The two boots are highlighted in light blue in the screenshot.
- The two coats are in red in the screenshot.
- The envelope is on the footstool that is in front of the left bed.
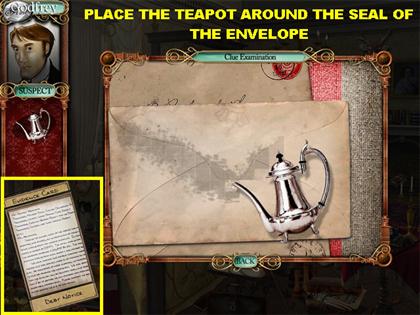
- The envelope will be sealed; use the teapot from inventory to open the letter.
- Rub the teapot all over the seal of the envelope until the letter opens up.
- You will receive the Debt Notice Evidence Card at the end of this round.
Powder Room – Brush
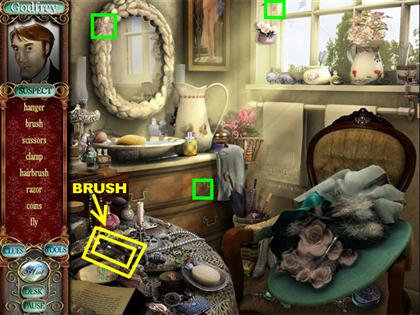
- The brush is on the table that is in the lower left side of the bathroom.
- You will use the brush once you get to the wine cellar location.
- The three stars are highlighted in green in the screenshot.
Wine Cellar – Laudanum/Brush
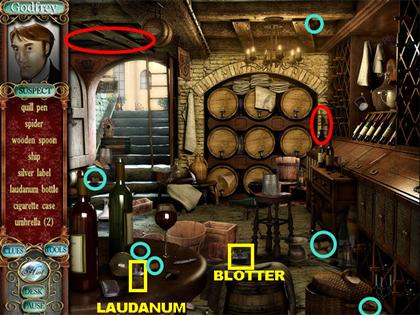
- The two umbrellas are highlighted in red in the screenshot.
- The six corks are circled in light blue in the screenshot.
- The blotter is located in the lower right side of the floor.
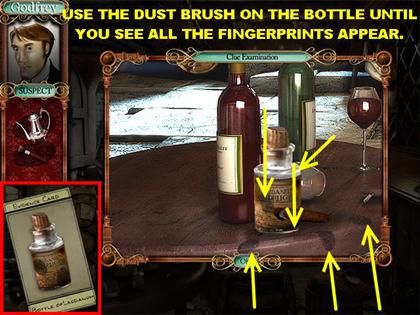
- The laudanum bottle is on the lower left side of the round table.
- Place the dust brush from inventory on the bottle until you see 5 or 6 fingerprints appear in the scene.
- Two or three (depending on your game) of the fingerprints are on the bottle and the other three are on the edges of the table.
- The yellow arrows in the screenshot show you where the fingerprints are located.
- You will receive the Bottle of Laudanum Evidence Card at the end of this puzzle.
Rachel’s Room – Footprint/ Blotter
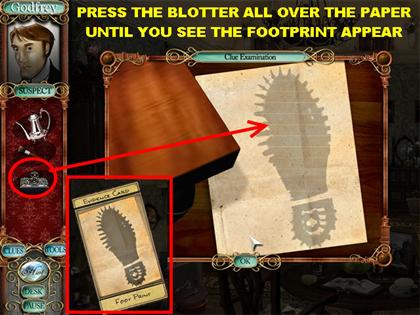
- Click on the footprint that is on the far right side of the scene. It is on the floor in front of the dresser.
- Click on the blotter, and a piece of paper will automatically appear over the footprint.
- Press the blotter all over the paper until you see the complete image of the footprint appear on the paper.
- You will receive the Footprint Evidence Card at the end of this round.
CASE SIX – ROSANNA SPEARMAN
Rosanna Spearman
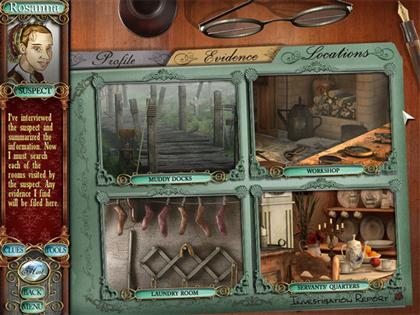
- Rosanna Spearman is a family servant with a clouded past.
- In this section, you will visit the muddy docks, the workshop, the laundry room, and the servants’ quarters.
Muddy Docks - Pencil
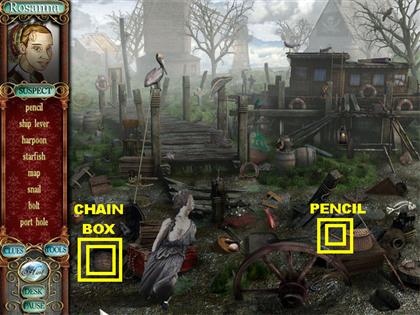
- The pencil is in the lower right side of the scene.
- The chain box is on the lower left side of the scene.
- You cannot open the chain box until you go to the workshop and obtain the axe.
Workshop - Axe
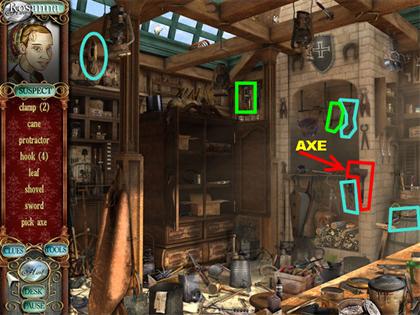
- The two clamps are highlighted in green in the screenshot.
- The four hooks are highlighted in light blue in the screenshot.
- The axe is on the right edge of the scene; it is on the brick wall.
Laundry Room – Pencil/Diary
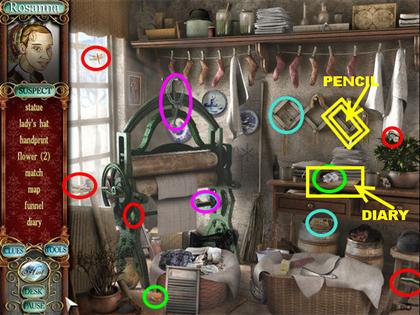
- The two flowers are circled in green in the screenshot.
- The two keys are circled in lavender in the screenshot.
- The five bugs are circled in red in the screenshot.
- The two postcards are circled in light blue in the screenshot.
- Pick up the match that is hanging on the right side of the wall.
- The diary is on the right side of the scene. When you click on it, you will find out that there is a page missing from the diary.
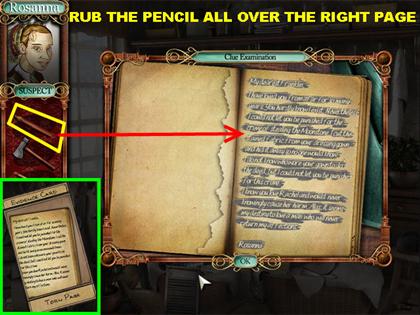
- Use the pencil from inventory on the torn page.
- Rub the pencil all over the page until you see all the words written on the page.
- To pick up the pencil just click on it once and rub it on the page. You do not have to hold down the mouse while you trace the pencil all over the book.
- You will get the Torn Page Evidence Card once you finish tracing the piece of paper.
Servants’ Quarters – Match/ Letter
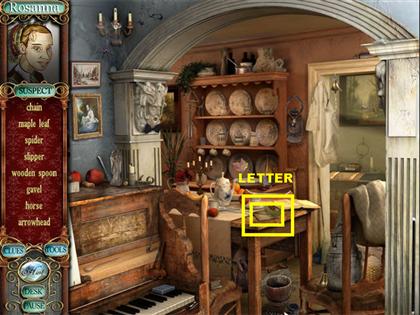

- The letter is on the edge of the table.
- Place the match on the stone that is in the lower right side of the pop-up window, and it will light the match.
- Rub the lit match all over the page until you can read the whole letter.
- You will receive the Jailbird Letter Evidence Card once you’re done with this section.
Muddy Docks – Axe/ Chained Box
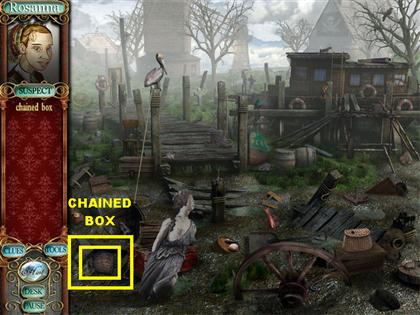
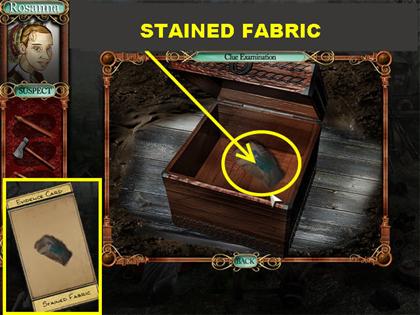
- Click on the chained box that is in the lower left side of the scene.
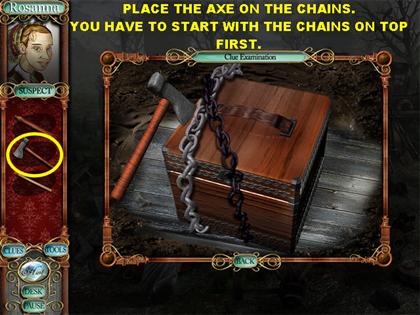
- Use the axe that you found in the workshop to open the chain box.
- The axe has to be placed on the chains on top first. If you don’t click on the chains in the correct order, they will not open.
- Once the chest is open, you will find the missing piece of Franklin’s robe inside.
- You will obtain the Stained Fabric Evidence Card once you retrieve it from the chest.
CASE SEVEN - DR. MILTON CANDY
Dr. Milton Candy
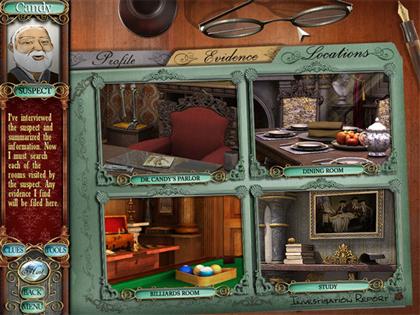
- Dr. Milton Candy is a trusted physician of the Verinder family.
- In this section, you will visit Dr. Candy’s parlor, the dining room, the billiard’s room, and the study.
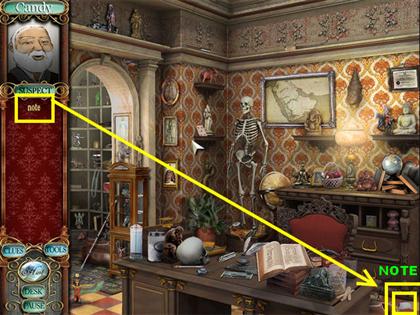
Dr. Candy’s Parlor
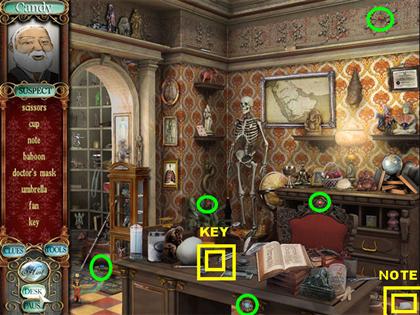
- The five jewels are highlighted in green in the screenshot.
- The key is on the left side of the table. It is black and very tiny, so it is hard to see.
- The note is on the lower right corner of the room, on the floor.
- You will not be able to read the note until you visit the dining room area in this level.
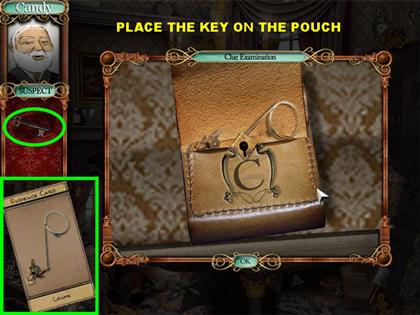
Dining Room – Leather Pouch/ Key
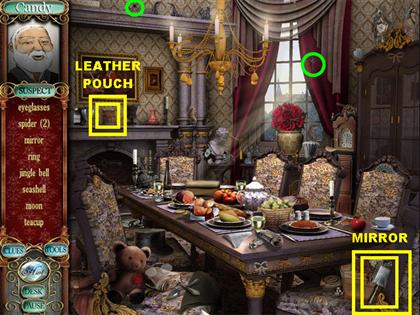
- The two spiders are circled in green in the screenshot.
- The mirror is in the lower right side of the scene.
- The leather pouch is on top of the mantle. Use the key from inventory on the lock.
- Once the pouch is opened, you will discover a jeweler’s loupe inside.
- You will receive the Loupe Evidence Card at the end of this round.
Billiards Room – Magnifying Glass
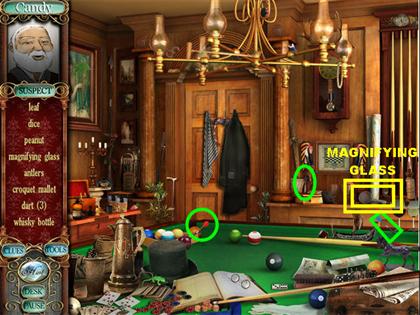
- The three darts are highlighted in green in the screenshot.
- The magnifying glass is on the lower right side of the scene, on the wooden part of the room.
- You will use the magnifying glass, once you get to the study.
Study – Magnifying Glass Usage
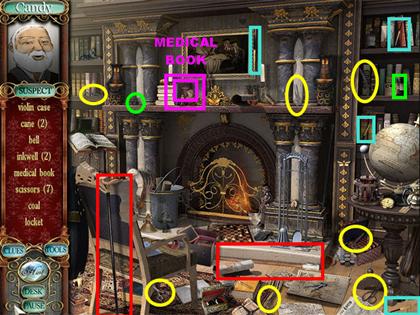
- The four pens are highlighted in light blue.
- The seven scissors are highlighted in yellow in the screenshot.
- The two inkwells are highlighted in green in the screenshot.
- The two canes are highlighted in red in the screenshot.
- The Medical Book is on top of the mantle, next to the books, under the picture.
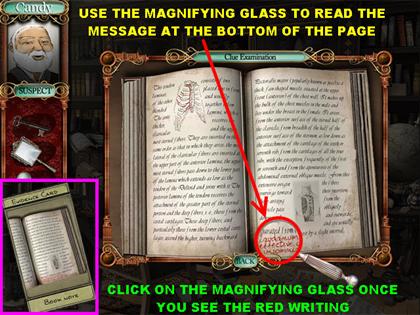
- Place the magnifying glass at the bottom of the right side of the page and you will see words written in red.
- Click on the red writing, once it is in view of the magnifying glass.
- You will receive the Book Note Evidence Card at the end of this round.
Dr. Candy’s Parlor – Mirror/ Letter
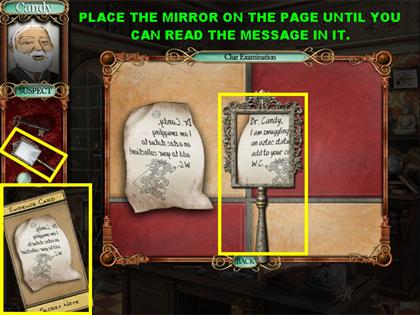
- Place the mirror you found in the dining room on the note.
- Move the mirror around until you can read the whole letter. Click on the mirror once the whole letter is legible.
- You will receive the Secret Note Evidence Card, once you decipher the letter.
CASE EIGHT – RAJ GUPTA
Raj Gupta
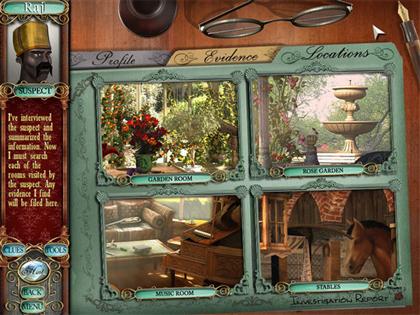
- Raj Gupta is a traveling performer seeking an audience.
- In this section, you will visit the garden room, the rose garden, the music room, and the stables.
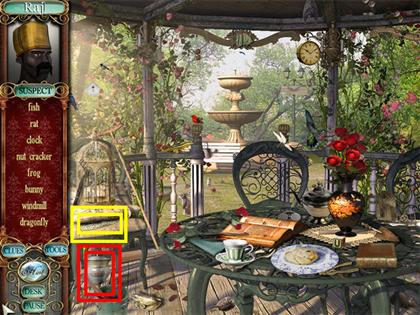
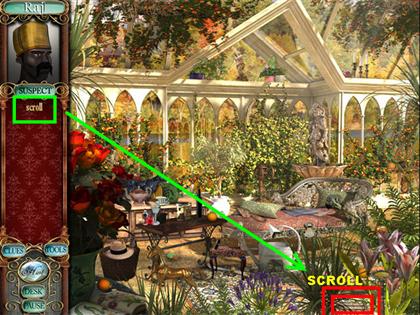
Garden Room – Scroll
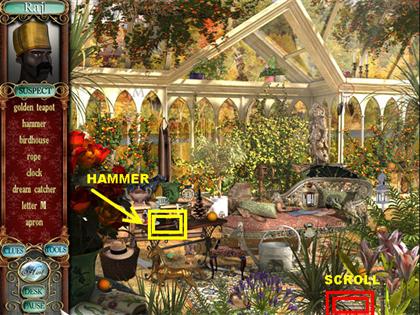
- Pick up the hammer that is on the small wooden table on the left.
- The scroll is in the lower right side of the scene. It is on the rug, partially hidden by the flowers.
- You cannot translate the note until you find the translator in the rose garden.
Rose Garden – Hammer/Urn
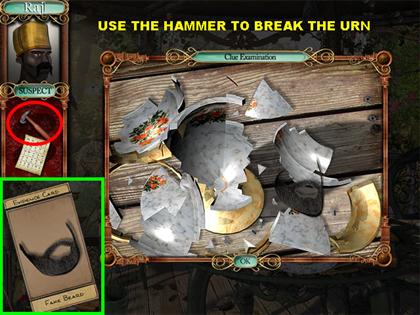
- The translator is on the chair that is on the left side of the scene. The translator will go into your inventory.
- The urn is in the lower left side of the scene.
- Place the hammer on the urn, and it will crack open the urn.
- The urn contains a false beard inside.
- You will receive the Fake Beard Evidence Card.
Music Room – Magnet

- The two tuning forks are in green in the screenshot.
- The magnet is on the round table that is on the left side of the scene.
Stables – Magnet Usage
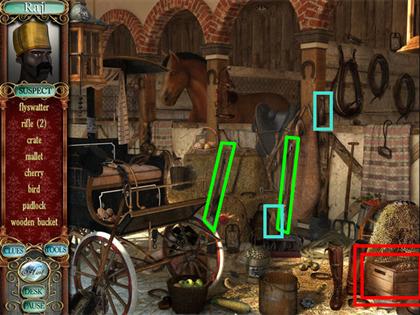
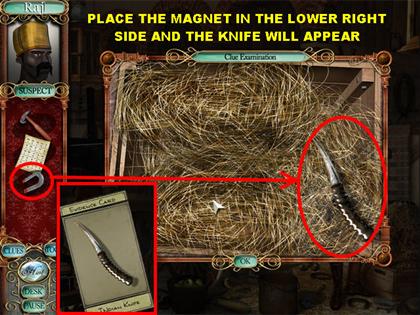
- The two rifles are highlighted in green in the screenshot.
- The two bottles are highlighted in light blue in the screenshot.
- The crate is in the lower right side of the scene.
- When you click on the crate you see “needle in a haystack?”
- Grab the magnet from inventory and place it on the lower right side of the haystack. You will find a knife in the haystack.
- You will get the Indian Knife Evidence Card after the knife has been found.
Garden Room – Translator Usage
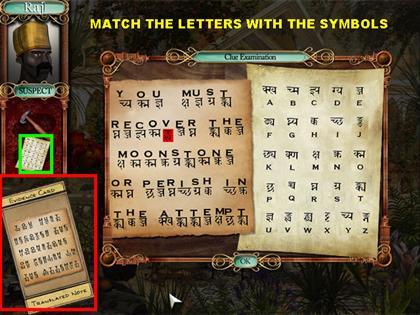
- Click on the scroll that is in the lower right side of the floor.
- When you click on the scroll, you will see a note written in Sanskrit. You need to translate the note using the translator in your inventory.
- On the right side of the page you have the symbols that are on the left side of the page, but with the letters of the alphabet underneath them.
- Click on the space on the left side of the scroll, into which you want to enter a letter, and the space will turn red.
- Then click on the letter that matches the symbol that you are trying to decipher.
- If you enter a symbol correctly, it will highlight all the areas on the scroll that contain that letter.
- The phrase should say: “YOU MUST RECOVER THE MOONSTONE OR PERISH IN THE ATTEMPT.”
- You will receive the Translated Note Evidence Card after the puzzle is solved.
CASE NINE – EZRA JENNINGS
Ezra Jennings
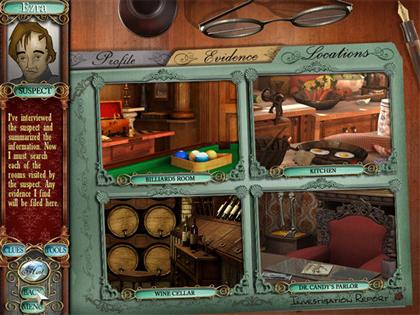
- Ezra Jennings is Dr. Candy’s often ill assistant.
- In this section you will visit the billiards room, the kitchen, the wine cellar and the Dr. Candy’s Parlor.
Billiards Room – Booklet
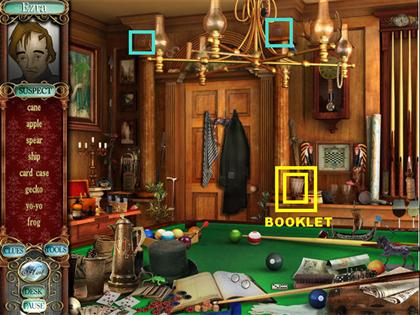
- The two shells are highlighted in light blue in the screenshot.
- The booklet is on the far right side of the scene, close to the door.
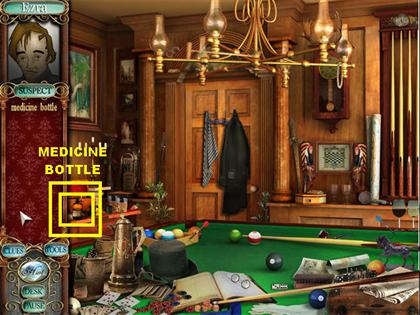
- The medicine bottle is on the lower right side of the scene.
- You cannot interact with this section until you obtain the eye dropper in the kitchen.
Kitchen – Guide/ Rolled Paper
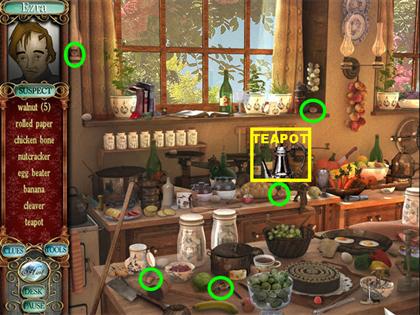
- The five walnuts are circled in green in the screenshot.
- The dropper is in the lower left corner, on top of the stove.
- The teapot is in the center of the kitchen.
- The rolled paper is on the lower right side; it is on the counter next to the bowl of carrots.
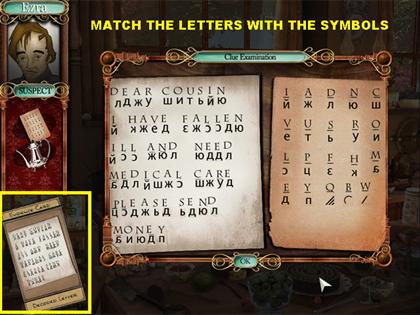
- When you click on the letter, you will learn that is written in Russian.
- Place the guide on the right side of the page.
- On the right side of the page you have the symbols that are on the left side of the page but with the letters of the alphabet underneath them.
- Click on the space on the left side of the scroll, into which you want to enter a letter, and the space will turn red.
- Click on the letter that matches the symbol that you are trying to decipher.
- If you enter a symbol correctly, it will highlight all the areas on the scroll on which that letter is located.
- The paper should read as follows: “DEAR COUSIN I HAVE FALLEN ILL AND NEED MEDICAL CARE PLEASE SEND MONEY.”
- You will receive the Decoded Letter Evidence Card after you’ve deciphered the note.
Wine Cellar - Dropper
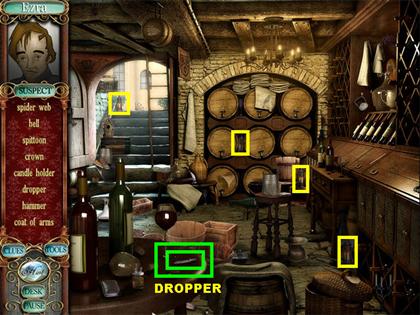
- The dropper is on the round table that is in the lower left side of the scene.
- The four lanterns are highlighted in yellow in the screenshot.
Dr. Candy’s Parlor – Teapot Usage
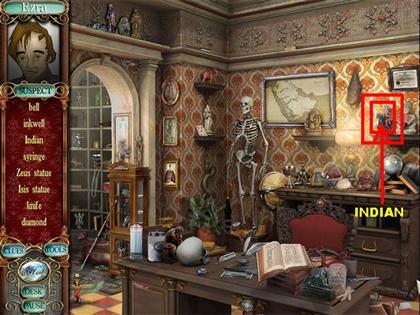
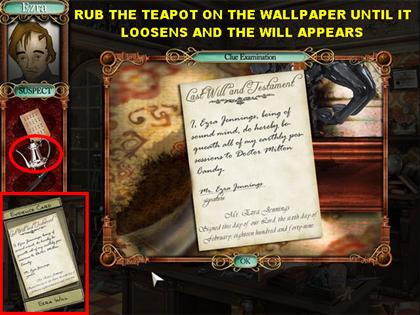
- Click on the Indian that is on the top right side of the wall.
- You will get a message that the wallpaper seems to have been deliberately ripped and re-pasted.
- Grab the teapot from inventory and rub it all over the wallpaper until you see a last will and testament appear.
- You will receive the Ezra Will Evidence Card at the end of this scene.
Billiards Room – Medicine Bottle/ Dropper
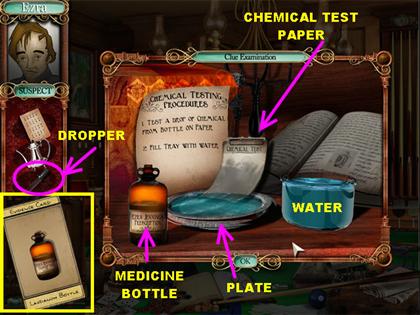
- Click on the medicine bottle that is in the lower left side of the room.
- In this section you have to do a chemical test with the items you have in the scene.
- Fill the dropper with the liquid in the medicine bottle. You have to click on the dropper three times to be able to fill it and use it.
- You will see a small black mark at the bottom of the chemical test paper.
- Grab the dropper again and place it on the water container. You have to click on the dropper a total of five times in order for the dropper to fill up.
- Place the dropper full of water into the plate that is close to the chemical test paper.
- You have to click on the dropper until it is empty and the chemical test paper is almost soaked with water.
- You will receive the Laudanum Bottle Evidence Card at the end of this round.
Name the Suspect
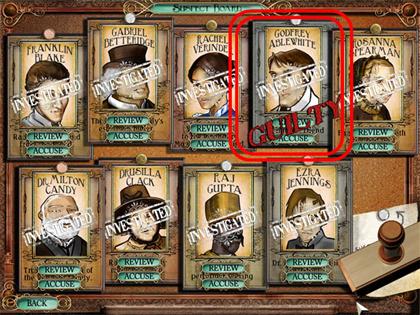
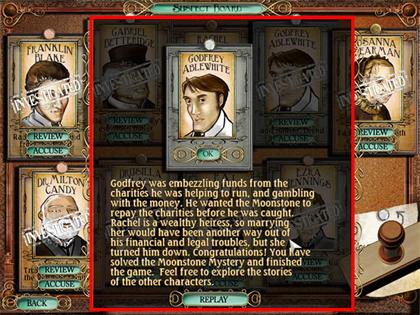
- In this section, you will be asked to name the person that you suspect stole the diamond.
- You will be given the suspect board to look over. You can click on the review button to read their bio.
- If you just want to accuse someone, simply click on the accuse button on the person’s card.
- If your guess is incorrect, a red “NOT GUILTY” stamp will appear over the suspect’s card.
- If your guess is correct, you will see a few scenes explaining what happened.
- You can choose to replay the game at this point.
Created at: 2009-07-25