

Walkthrough Menu
- General Tips
- Chapter 1: Dark Visions
- Chapter 2: Bad News
- Chapter 3: The 13th sign
- Chapter 4: Inspector Abberline
- Chapter 5: A Close Shave
- Chapter 6: An Old Friend
- Chapter 7: A Royal Affair
- Chapter 8: Docklands
- Chapter 9: Jack the Ripper
- Chapter 10: The Face of Evil
- Chapter 11: Double Murder
- Chapter 12: Dark Secrets
- Chapter 13: The Finale
General Tips
- From the main menu you can adjust settings like sound volume and full screen mode.
- You can also create and change player profiles.
- You can play the game in Casual or Challenge mode.
- In Casual mode the hidden object scenes will be denoted with red sparkles and hints are regenerated faster.
- The skip timer for puzzles is also slower in Casual mode.
- The hidden object scenes in the game are randomized, but the key objects and INVENTORY items are not randomized.
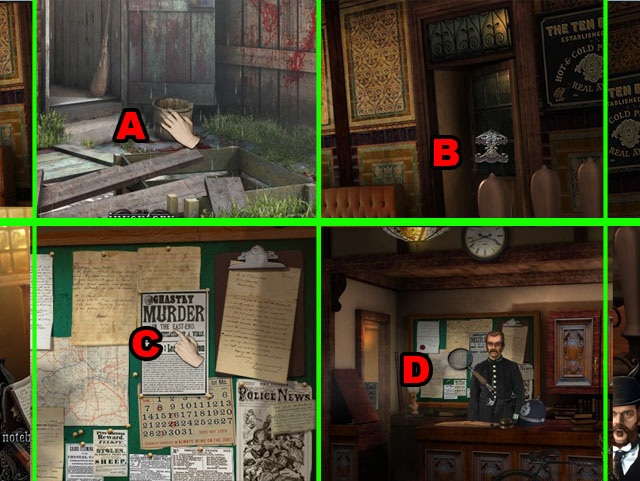
- There are 4 types of cursors in the game.
- The open hand cursor means you can pick something up (A).
- The arrow cursor shows that you can move somewhere (B).
- The finger cursor is for interacting with objects (C).
- The magnifying glass cursor is for zooming in on an object (D).
- If you get stuck, use the hints at the bottom right of the screen. They will tell you if there is nothing more to do in an area or point out what you have to do next.
- This game has multiple characters in multiple settings. Your inventory will be different for each character.
Chapter 1: Dark Visions
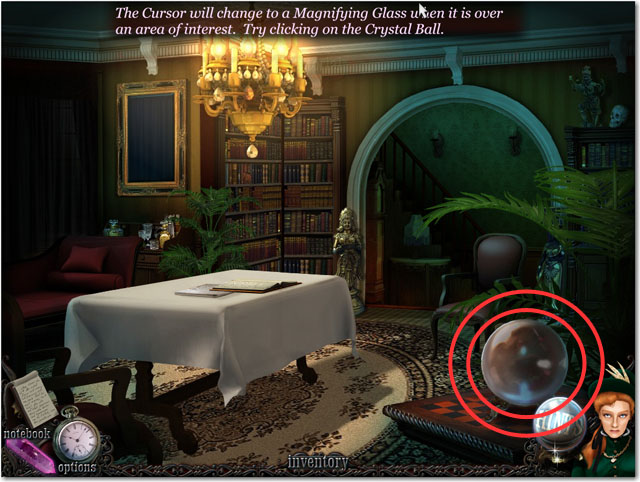
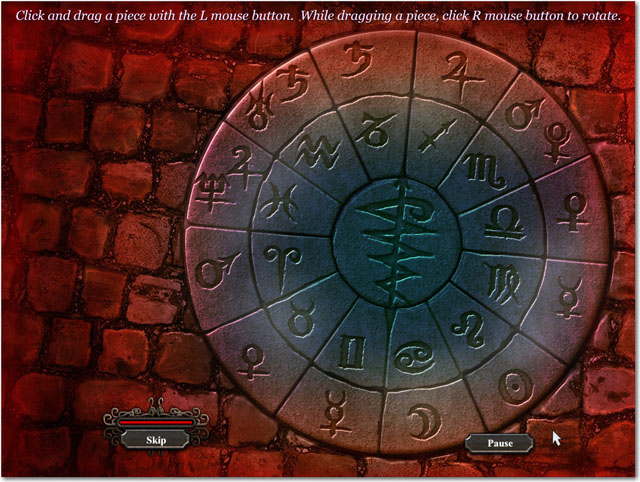
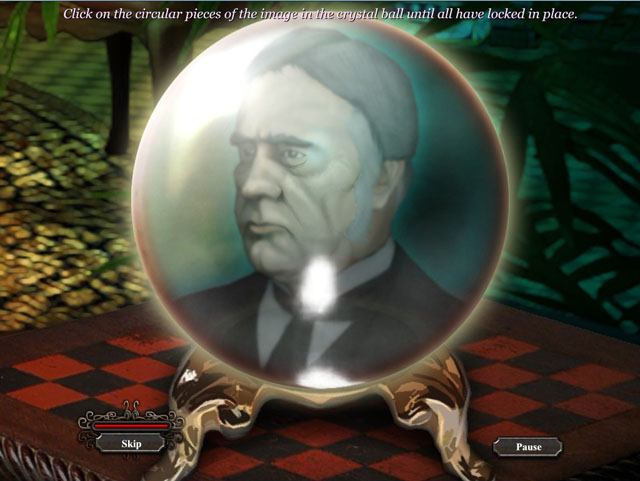
- Click on the crystal ball highlighted in red.
- Click on the crystal ball one more time.
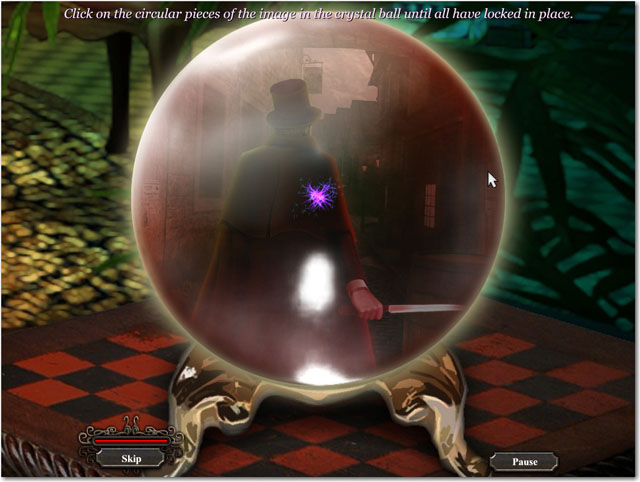
- Click on the circular disks of the image in the crystal ball until all have locked in the place.
- Clicking on the disks will rotate them a few degrees clockwise.
- Start from the center of the ball and work your way to the outside.
- Use the figure in the middle of the image to line up the puzzle.
- See the screenshot for the completed puzzle.
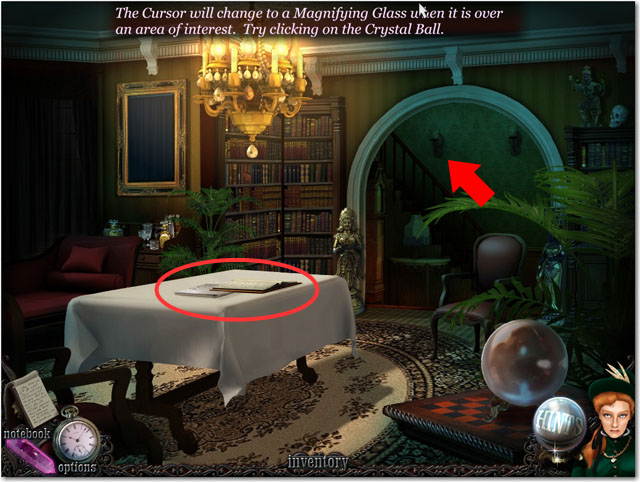
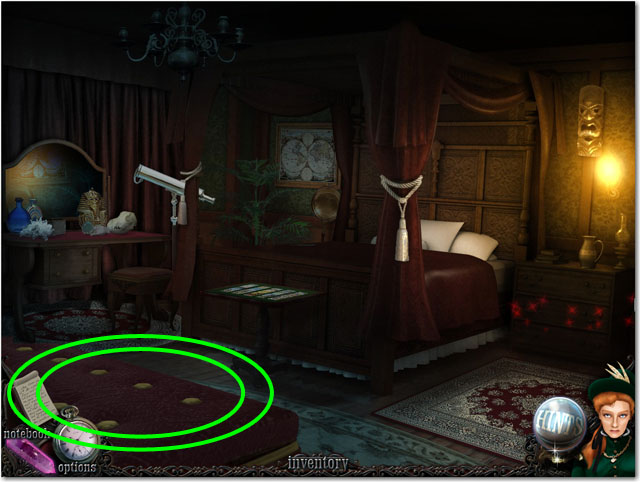
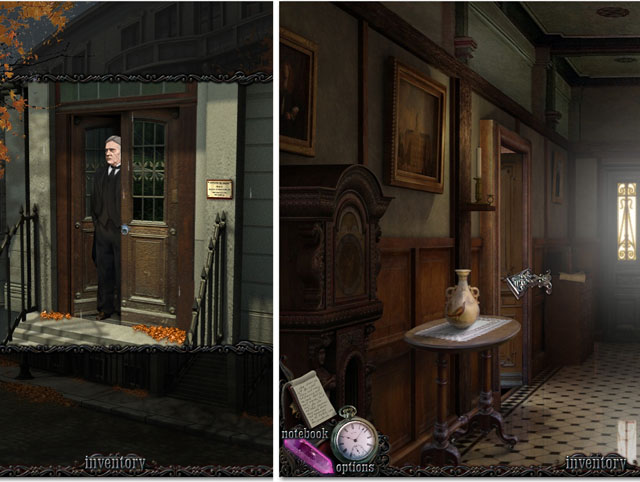
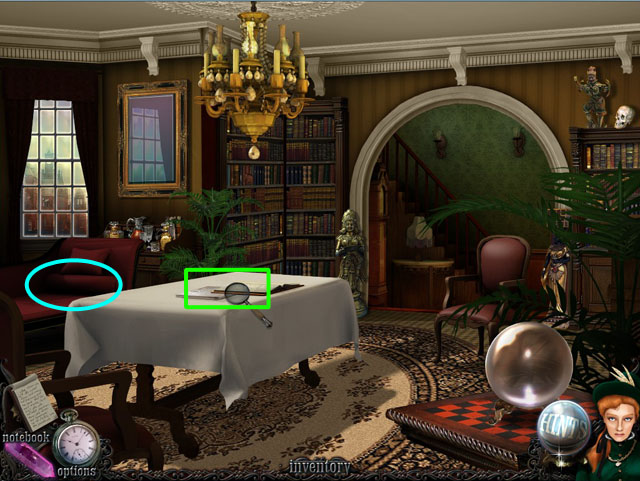
- Click on the table.
- Zoom in the newspaper.
- Enter the upstairs from the stairs.
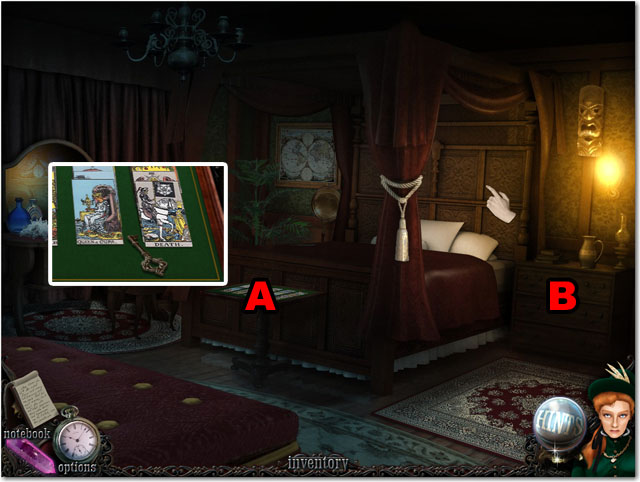
- Click on the card table (A).
- Collect the key.
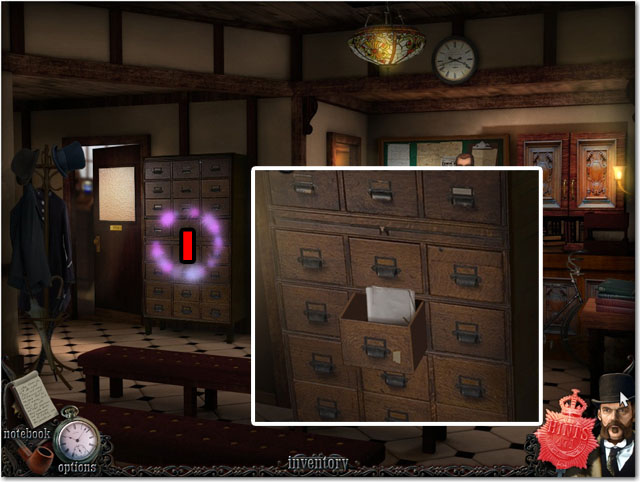
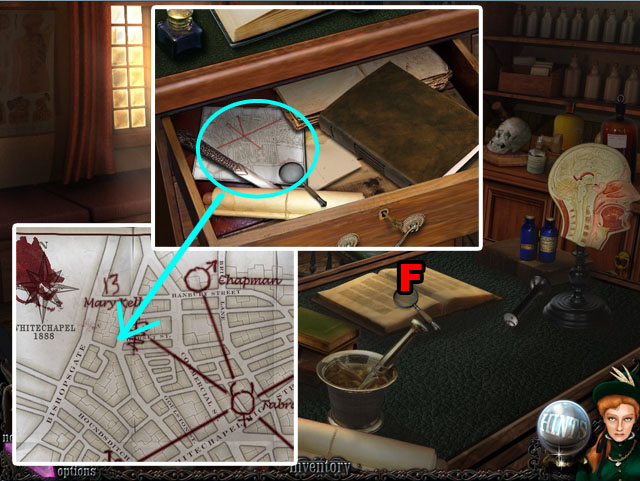
- Click on the drawer (B).
- Open the drawer with the key.
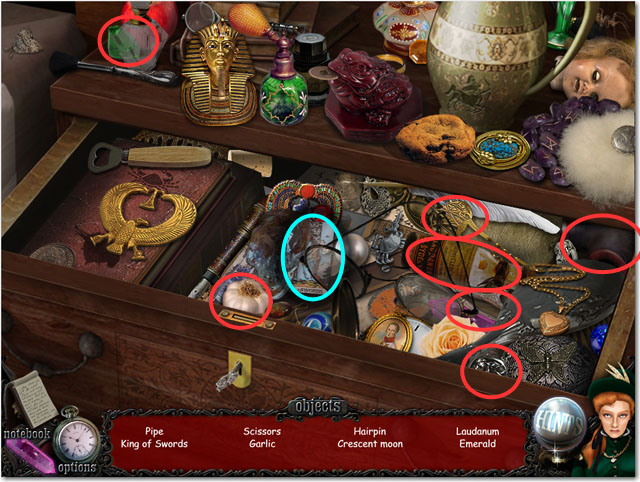
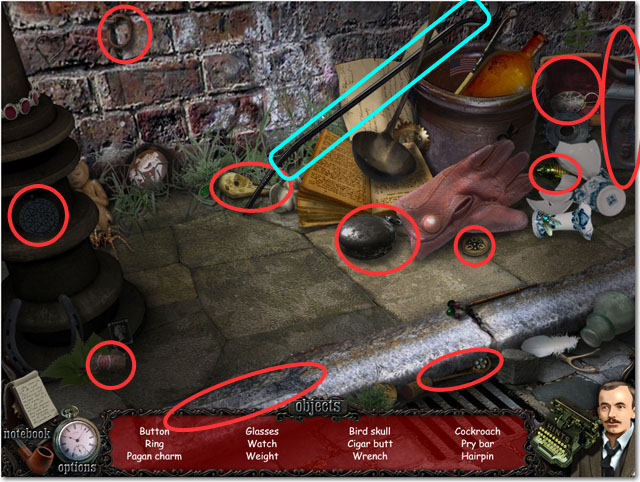
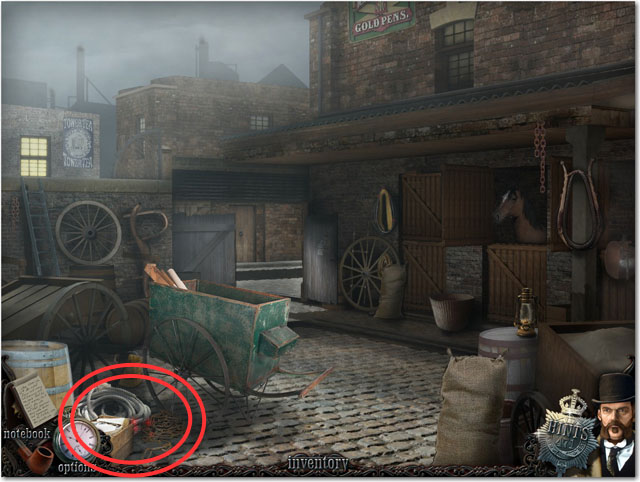
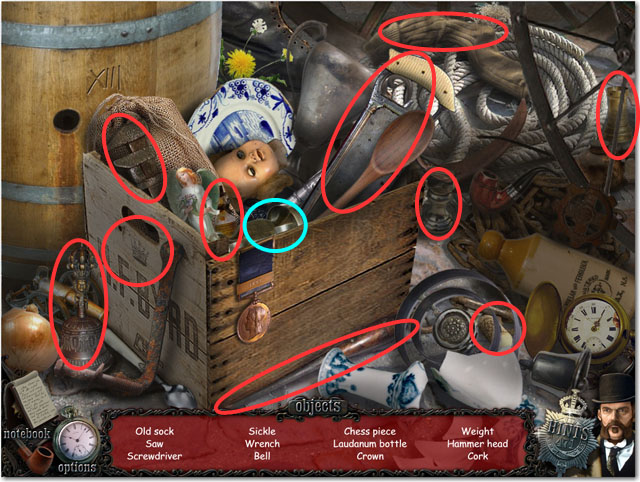
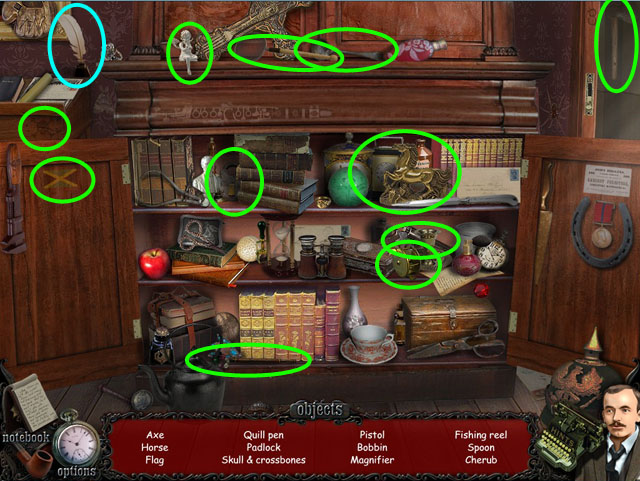
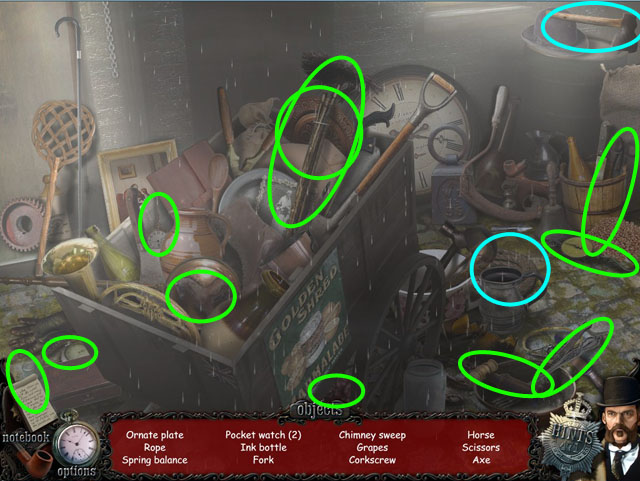
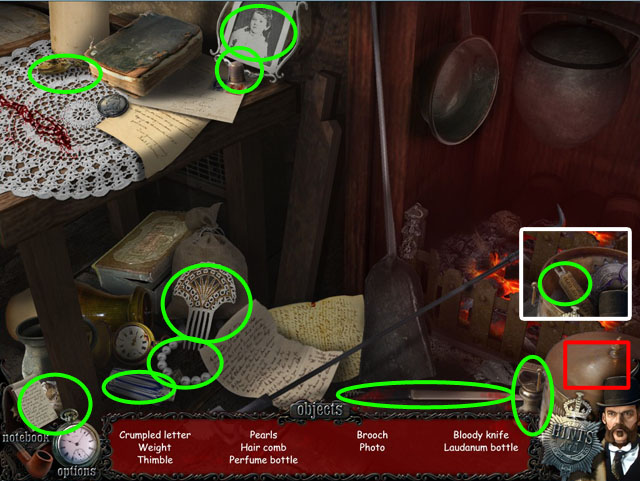
- Find hidden objects circled in red and blue.
- A few of the objects will be the same, but most will be randomized.
- Receive the King of Swords card and the Laudanum.
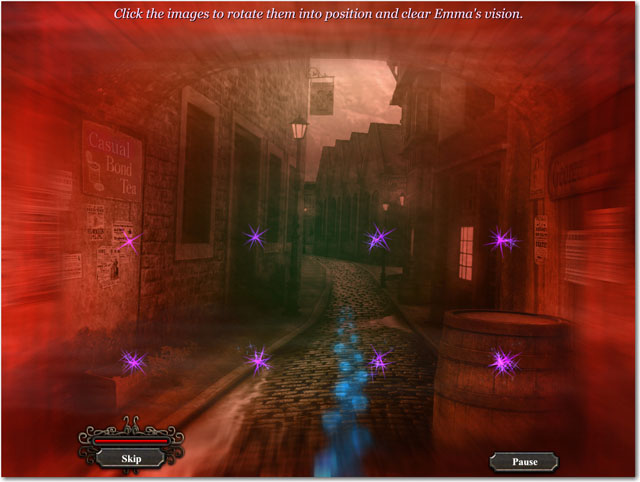
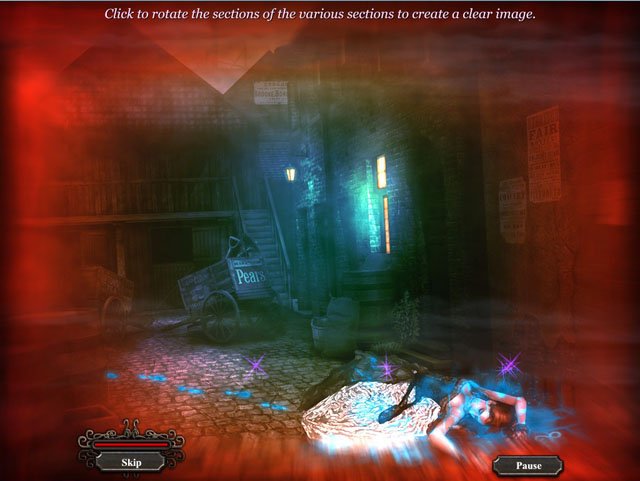
- Click the images to rotate them into position and clear the vision.
- Clicking a square will rotate it in place clockwise.
- Once it is in the correct position it will sparkle with a purple sparkle.
- Click each square until it sparkles to finish the puzzle.
- See the screenshot for the final solution.
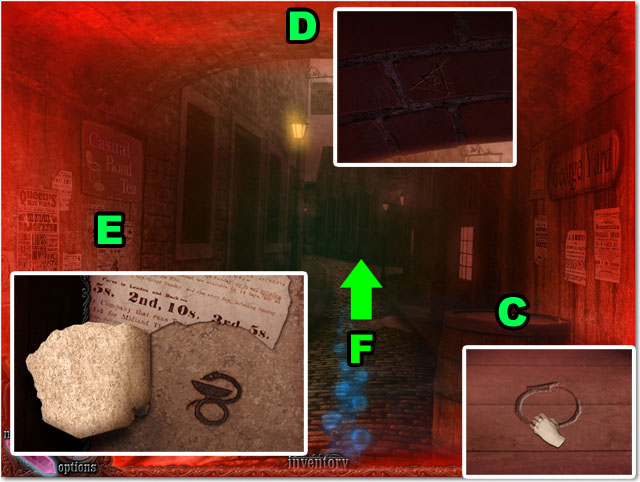
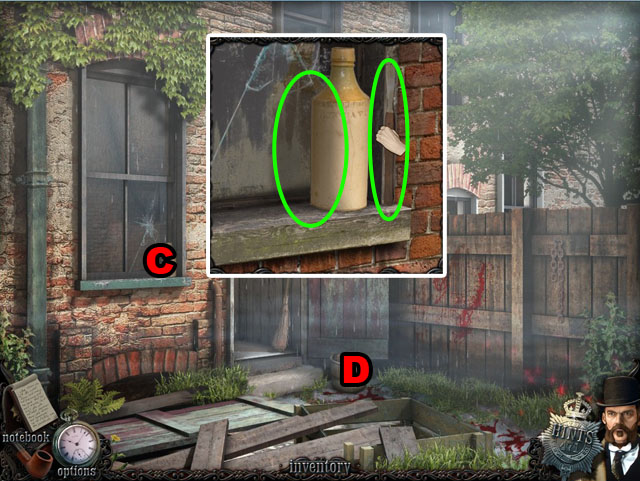
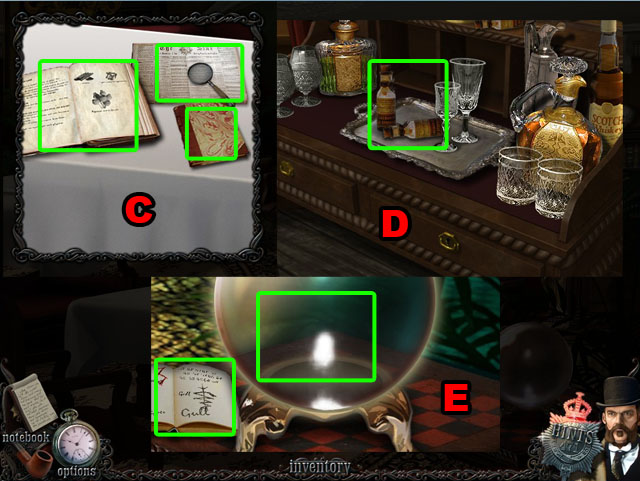
- Zoom in the barrel (C).
- Collect the SERPENT SYMBOL.
- Zoom in the ceiling (D).
- Collect the EYE SYMBOL.
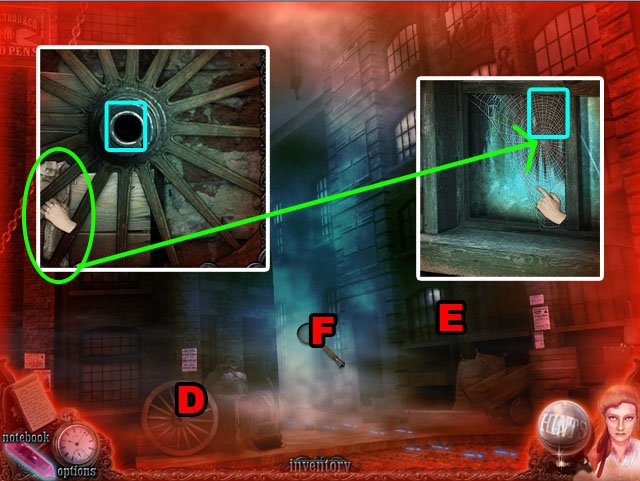
- Zoom in the poster (E).
- Click on the edge of the paper and reveal the symbol underneath.
- Collect the CHALISE SYMBOL.
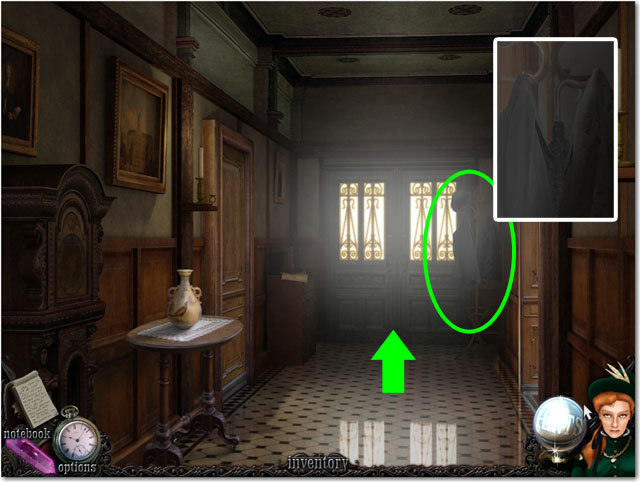
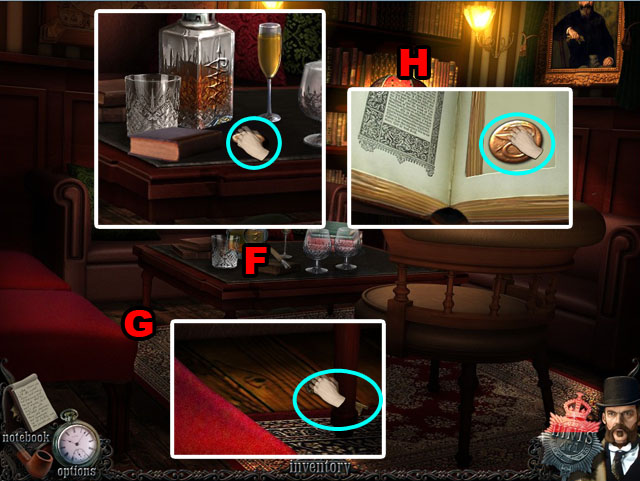
- Enter the next scene (F).
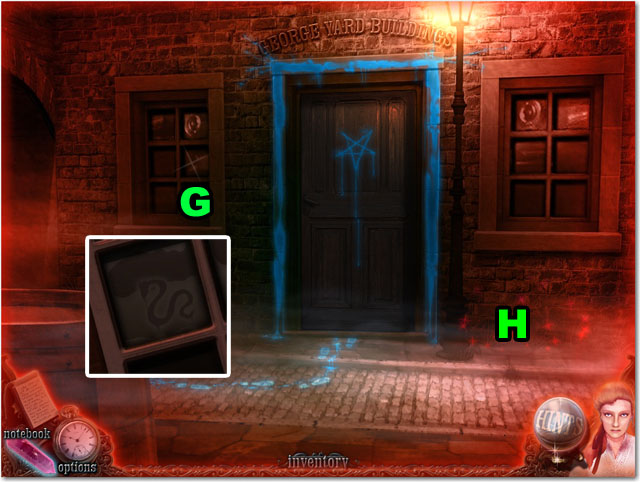
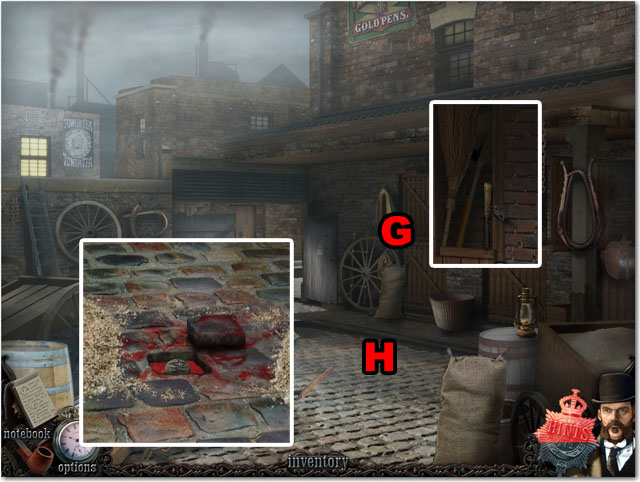
- Zoom in the left window (G).
- Collect the SNAKE SYMBOL.
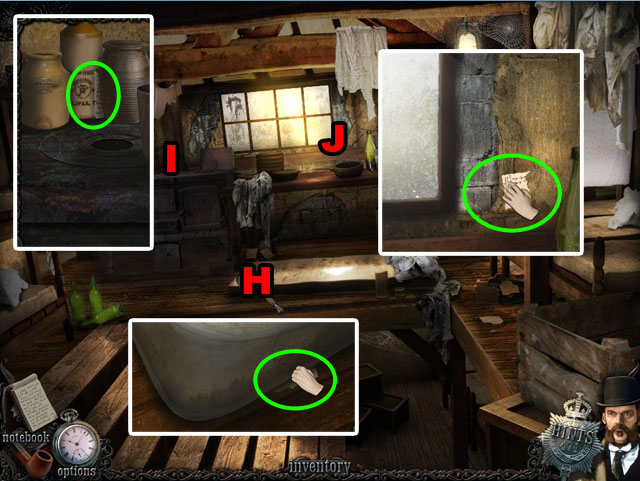
- Click on the hotspot (H) to the right of the door.
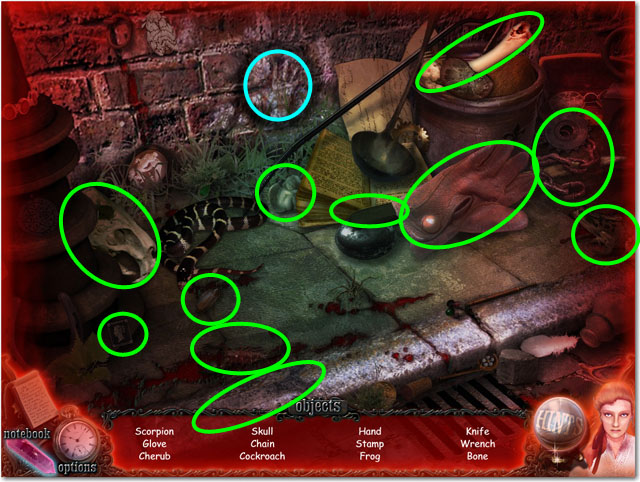
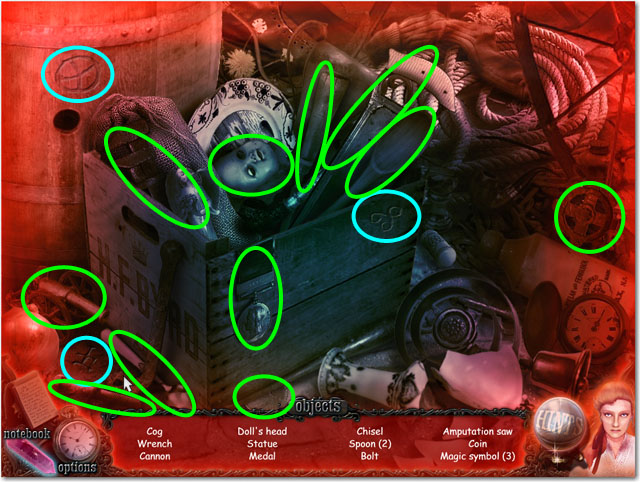
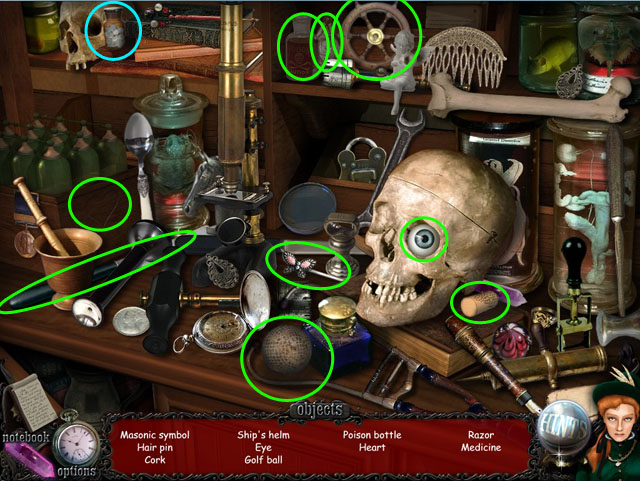
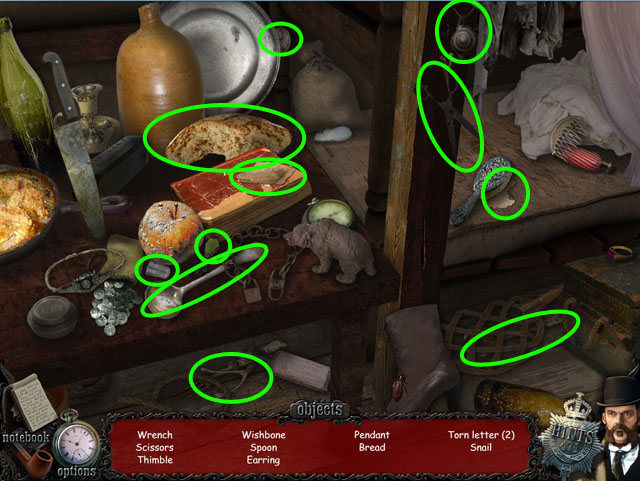
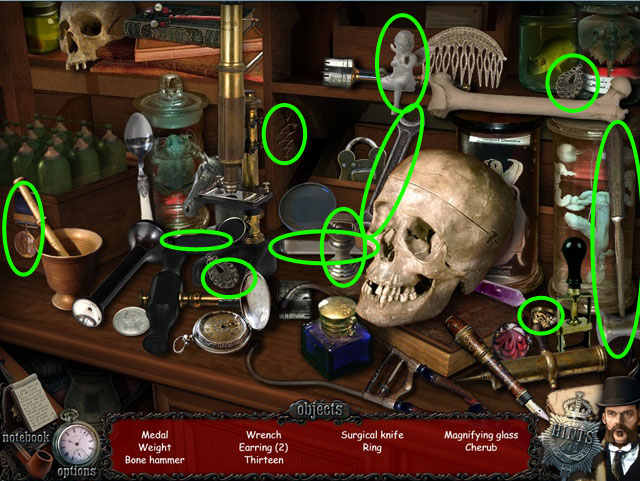
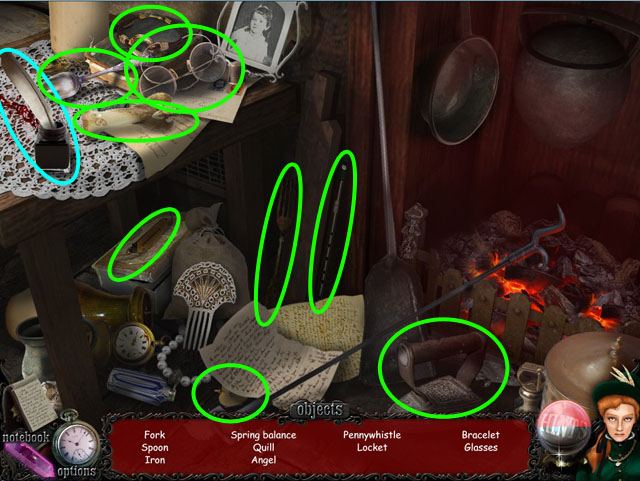
- Find hidden objects in green.
- Collect the HAND SYMBOL circled in blue. The rest of the objects are randomized.
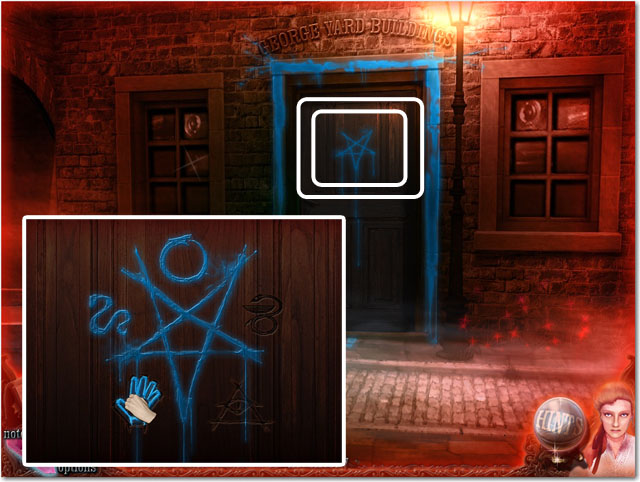
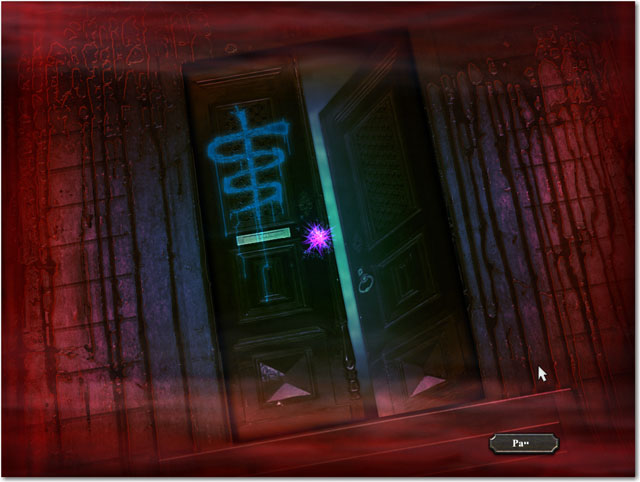
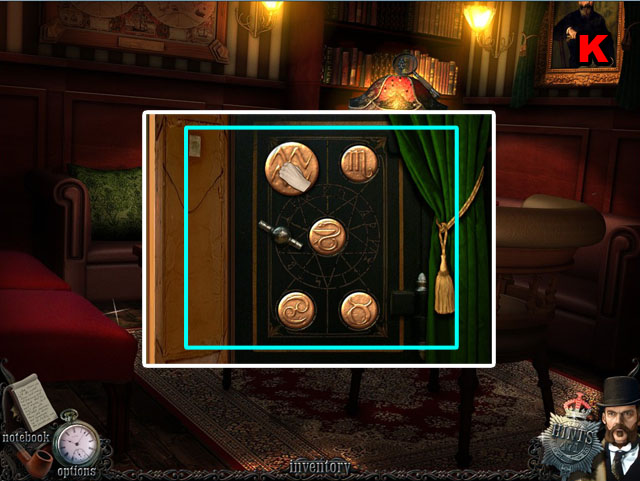
- Click on the door.
- Place all of SYMBOLS on the same shape around the upside down star.
- Click the star and then enter the door.
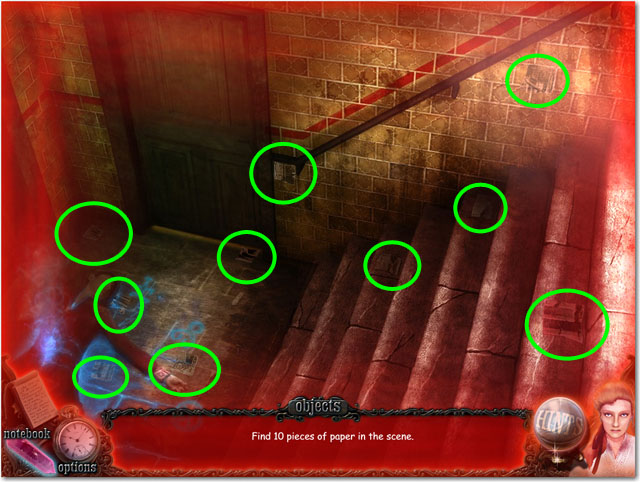
- Find 10 pieces of paper.
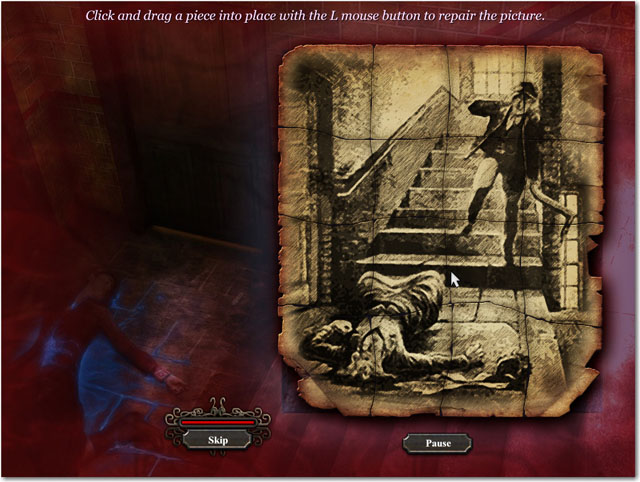
- Click and drag the pieces into place with the left mouse button to repair the picture.
- Start with the edge pieces because their distinctive shapes are easier to find.
- Use the background image to help you find the right spot.
- When placed correctly the pieces will lock in place.
- See the screenshot for the completed image.
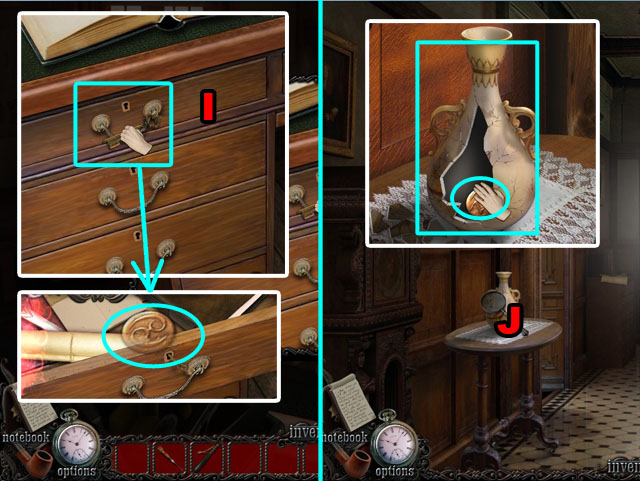
- Go downstairs.
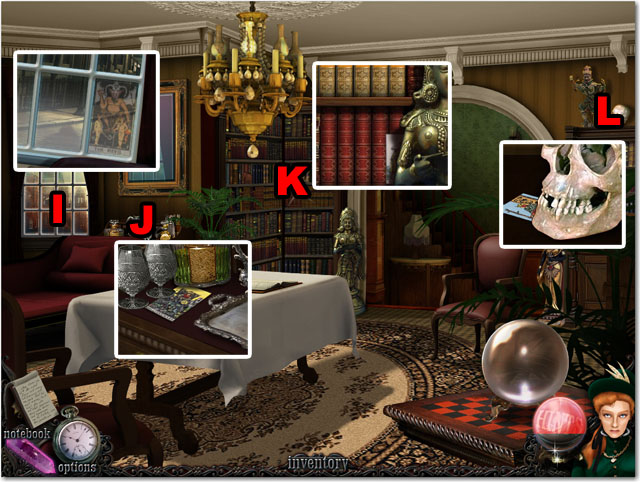
- Zoom in the window (I).
- Collect THE DEVIL.
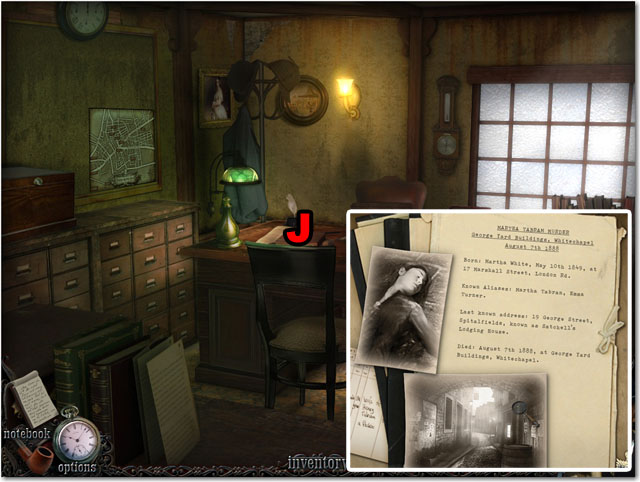
- Zoom in the serving table (J).
- Collect THE KING OF PENTICLES.
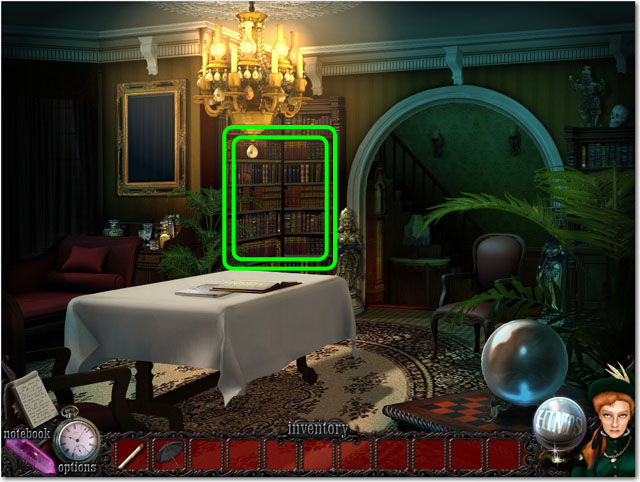
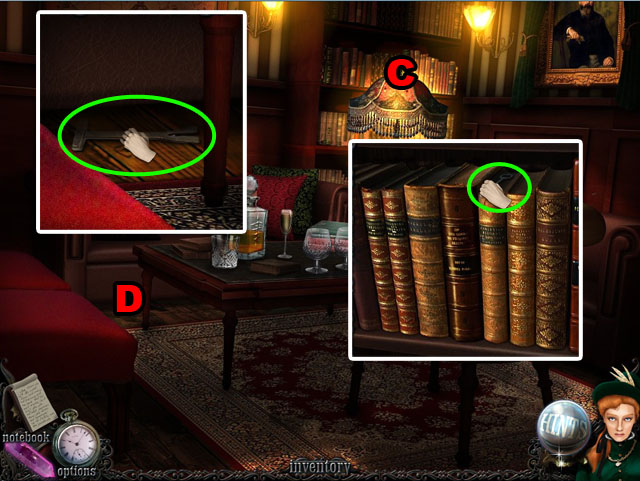
- Zoom in the book shelf (K).
- Collect THE KING OF CUPS.
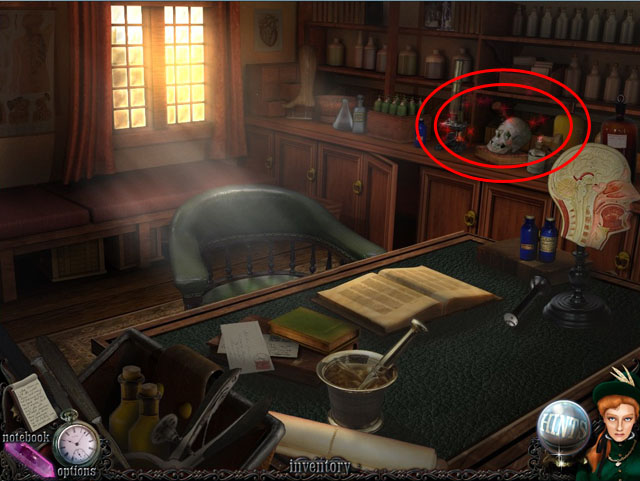
- Zoom in the skull (L).
- Collect THE KING OF WANDS.
- Return to the upstairs.
- Click on the card table.
- Place the KING OF SWORDS in the left pile.
- Place the KING OF WANDS in the second from left.
- Place the KING OF PENTICLES in the middle.
- Place the KING OF CUPS in the second from right.
- Place the DEVIL card in the right pile.
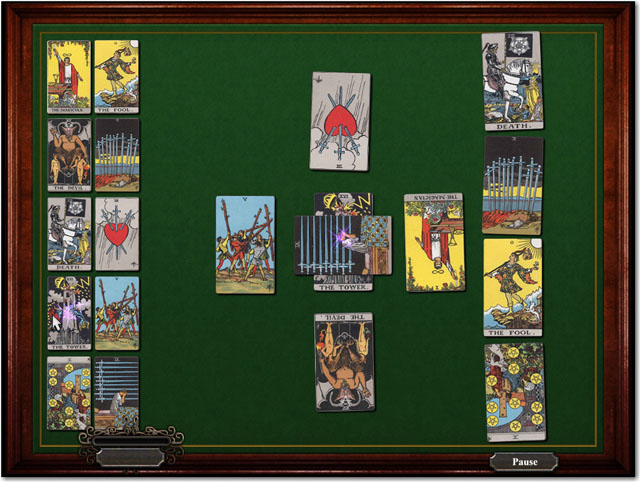
- The game that starts is memory game.
- Click two different cards - one from the left and one from the right - looking for matches.
- The cards may not be facing in the same direction so sometimes it can be difficult to tell which cards match.
- When you get a match both cards will stay up.
- Match all of the cards to win. See the screenshot for the correct solution.
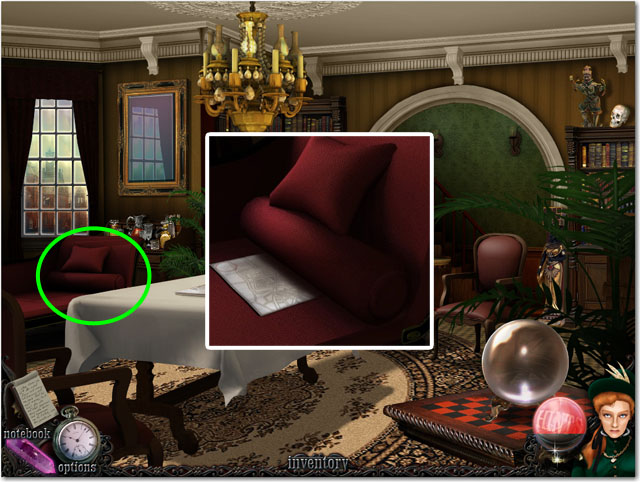
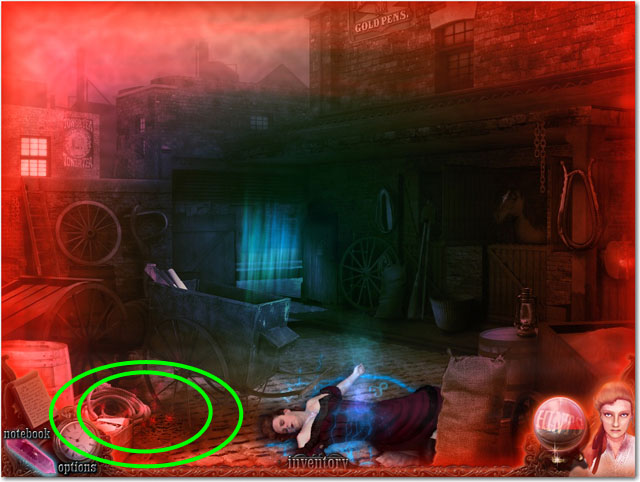
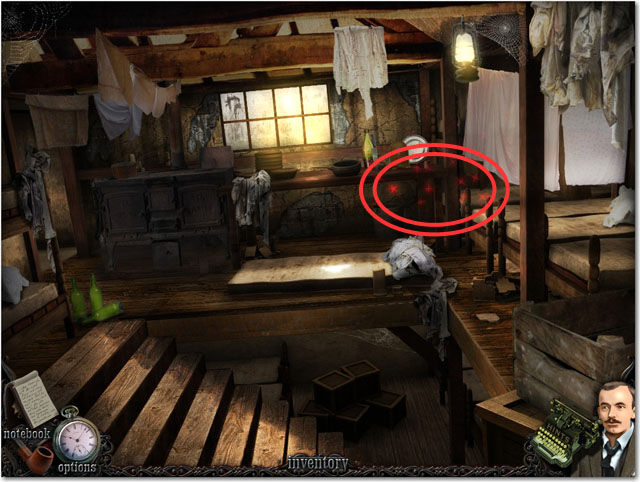
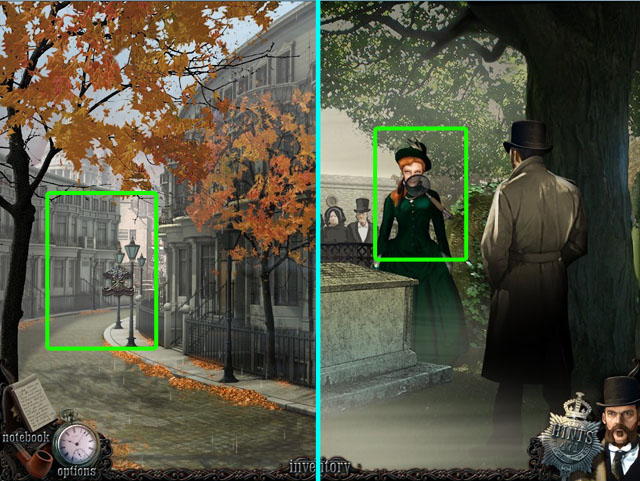
- Zoom in the couch highlighted in green.
- Click on the map.
- Click on the police station circled in red.
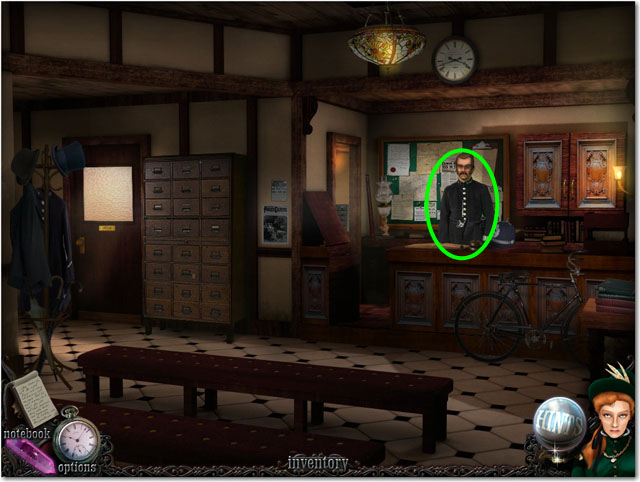
- Enter the police station.
- Talk with the officer.
Chapter 2: Bad News
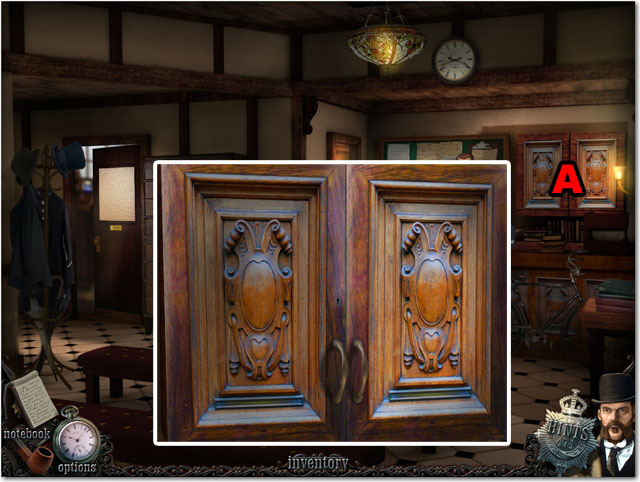
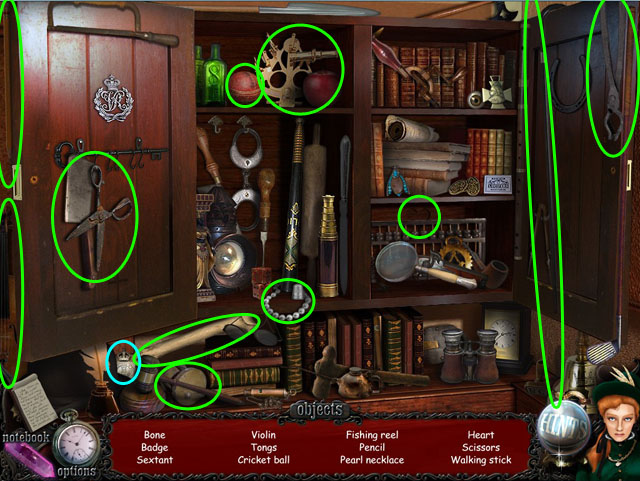
- Zoom in the board on the wall (A).
- Collect the key.
- Zoom in the cupboard (B).
- Open the cupboard with the key.

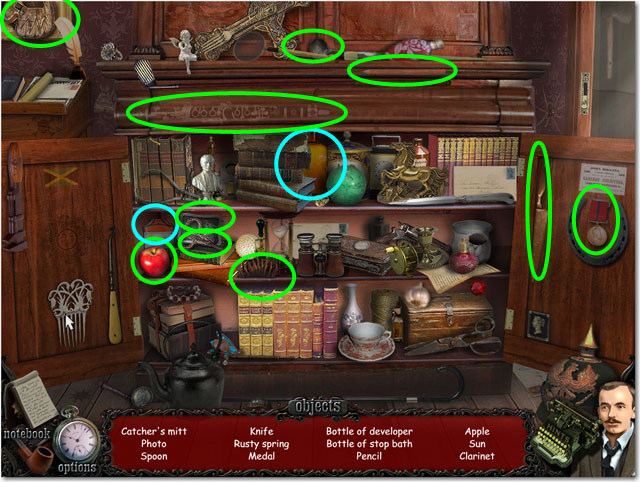
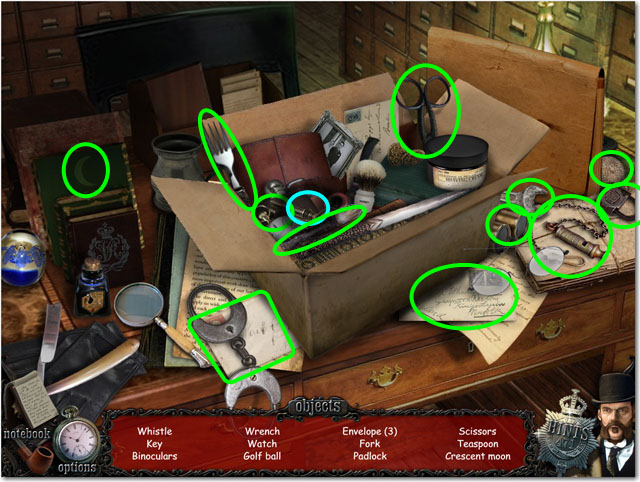
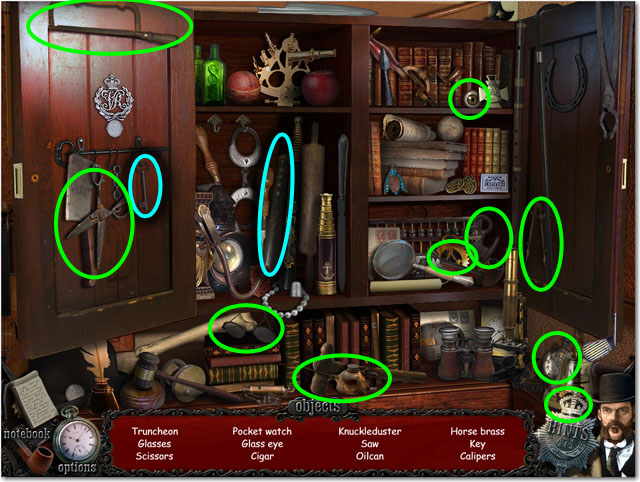
- Find hidden objects circled in green.
- Collect the HATPIN circled in blue.
- You will also receive a SCREWDRIVER and a piece of PAPER.
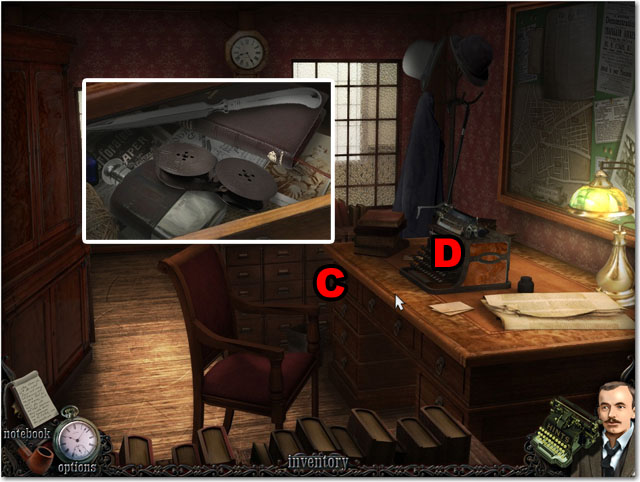
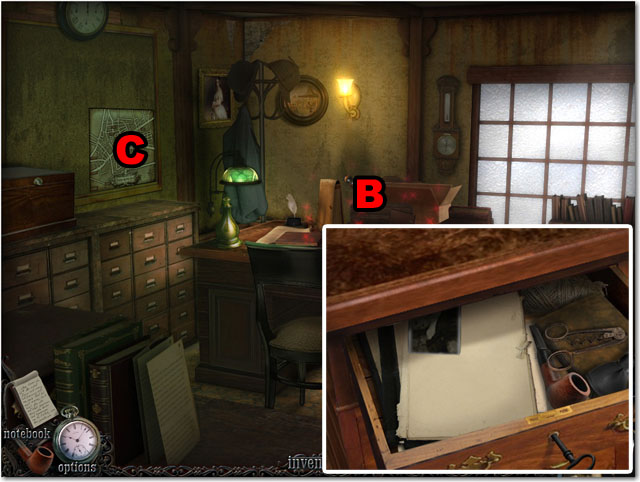
- Zoom in the drawer in the desk (C).
- Open the drawer with the SCREWDRIVER.
- Collect the RIBBON.
- Click on the typewriter (D).
- Set the PAPER and the RIBBON in the typewriter.
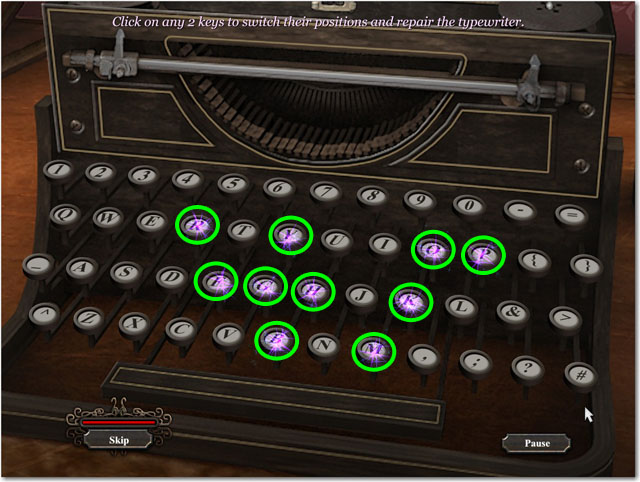
- Click on any two keys to switch their position and repair the typewriter.
- The typewriter will be repaired when the keys match that of a modern keyboard, like on your computer.
- Collect the PAPER.
- Enter the next room.
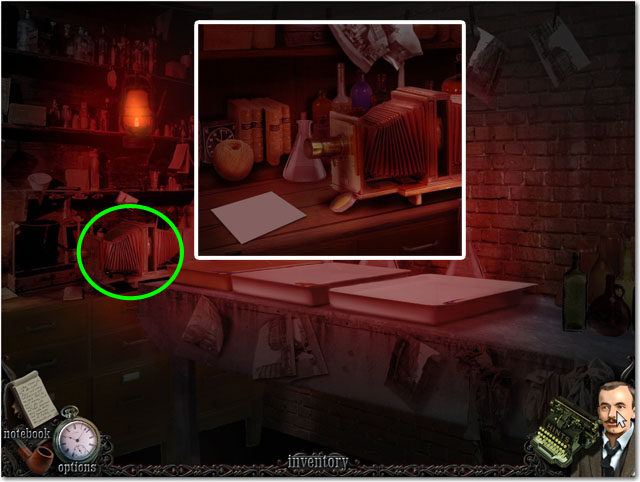
- Zoom in on the tray.
- Collect the NEGATIVE PLATES.
- Zoom in the shelf.
- Collect the CAMERA.
- Return to the previous room.

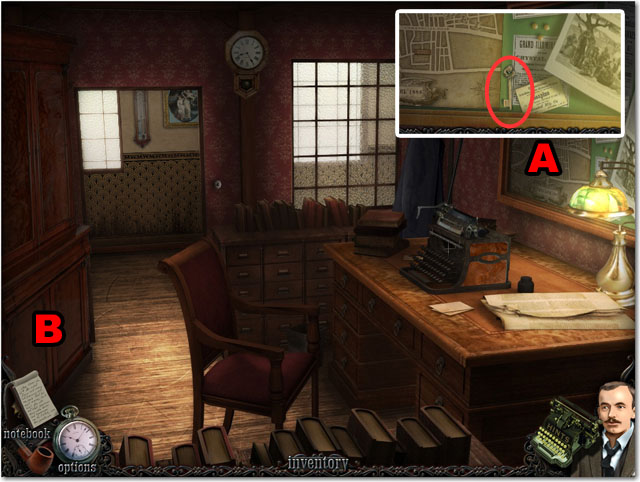
- Zoom in map on the wall.
- Click on the map.
- Click on The White Hart Pub, circled in red.
- Go through the ally.
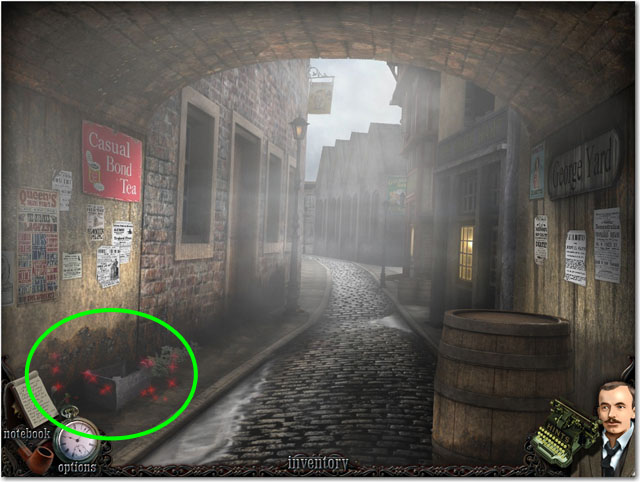
- Click on the hotspot to the bottom left.
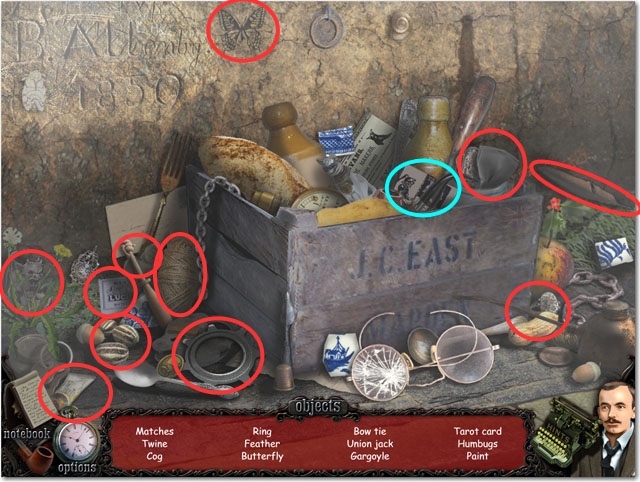
- Find the hidden objects.
- Collect the BOX OF MATCHES and the TAROT CARD.
- Enter the next scene by going forward.
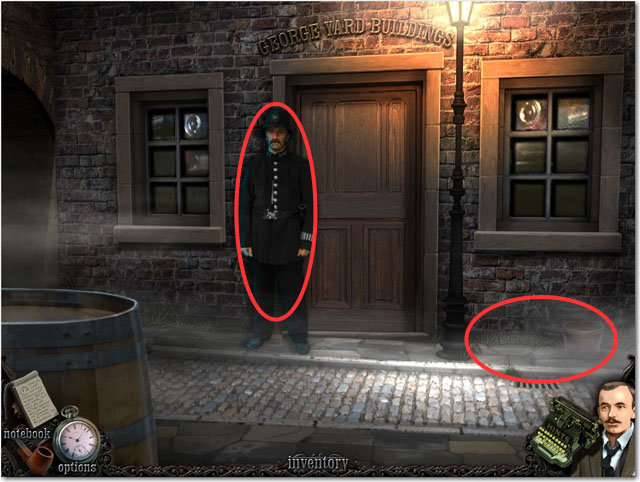
- Click on the police officer.
- Click on the hotspot to the right.
- Find the hidden objects.
- Collect the PRY BAR.
- Return to the previous scene.
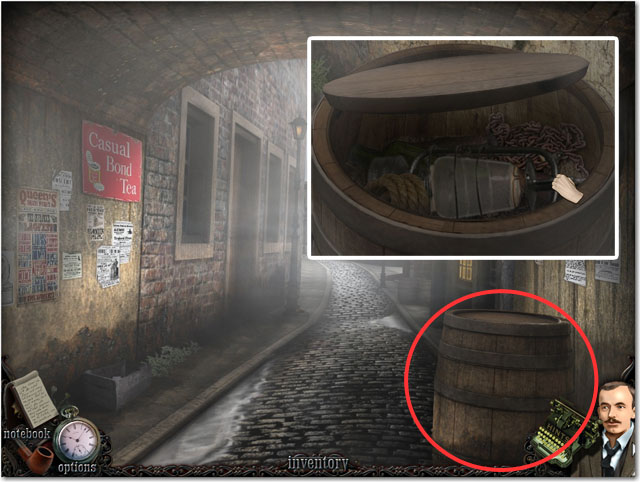
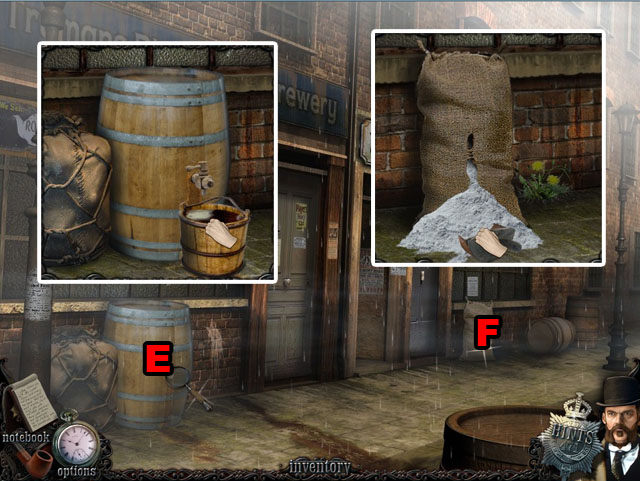
- Zoom in the barrel.
- Open the lid with the PRY BAR.
- Collect the OIL LAMP.
- Return to the first scene.
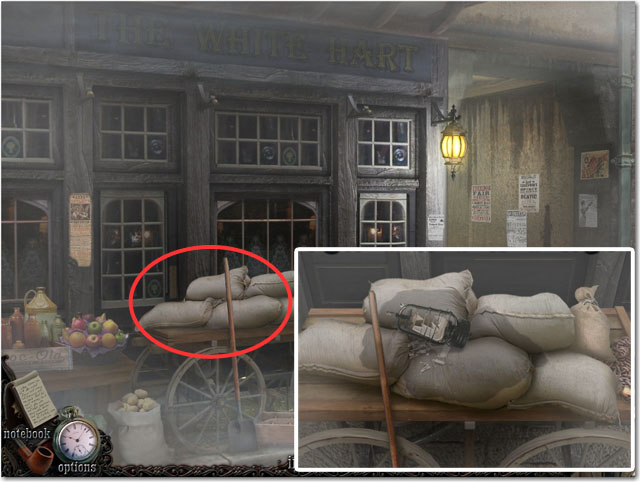
- Zoom in on the pile of sacks.
- Place the OIL LAMP on the sack.
- Light the oil with the MATCHES.
- Return to the police officer.
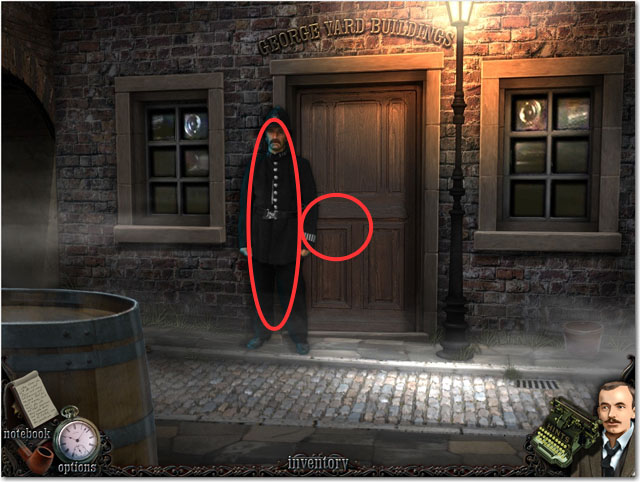
- Talk with the police officer.
- Zoom in the door and try to use the HATPIN on it. You need to bend the pin first.
- Return to the previous scene.
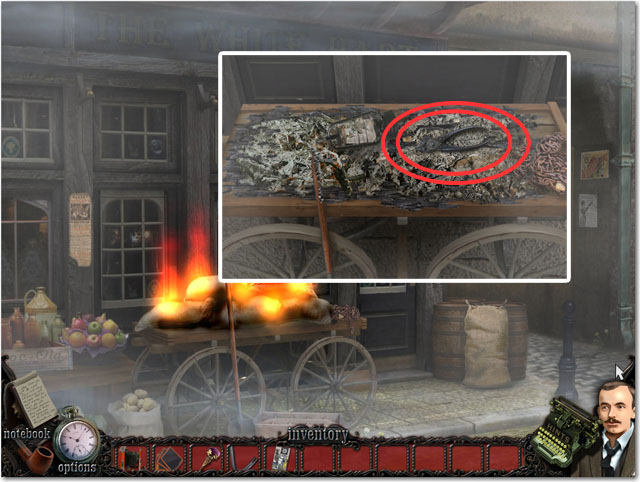
- Return to the first scene.
- Zoom in on the burned sacks.
- Collect the PLIERS.
- Return to the building with the locked door.
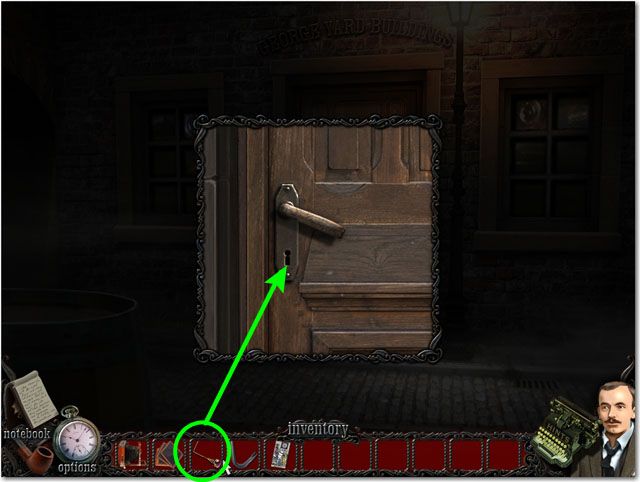
- Click and drag the PLIERS in your inventory on the HAT PIN to bend it.
- Open the door with the BENT HAT PIN.
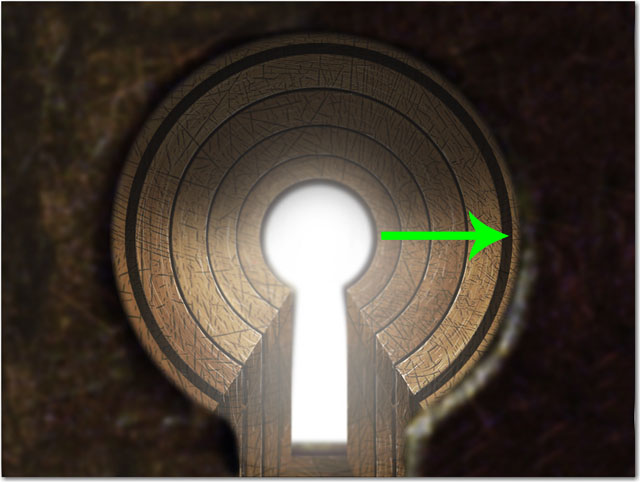
- Click the lock barrels to rotate them and line them up to pick the lock
- When you click on one ring it will rotate the ring to the outside of it.
- Click from the inside ring to the outside ring to finish the puzzle.
- First line up the first ring with the hole leading to the bottom, then the next two and the forth ring will line up automatically.
- Enter the building.
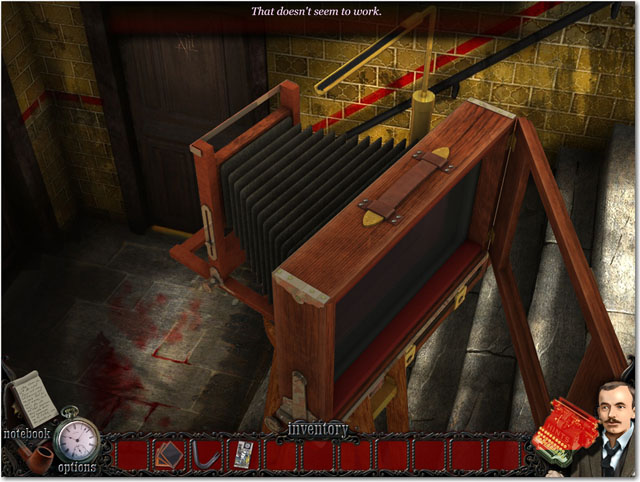
- Set the CAMERA in the middle of the scene.
- Set the PLATES in the back of the camera.
- Enter the dark room by going through the door.
- Place the CAMERA on the shelf.
- Collect the PICTURE.
- Return to the office.
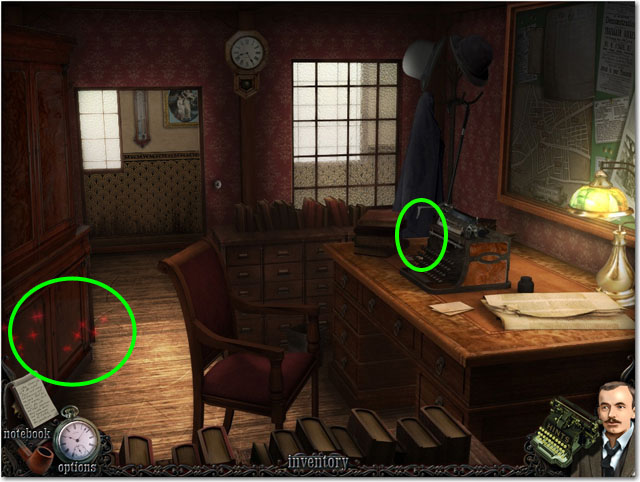
- Zoom in on the typewriter and take the bottle of FIXER to the left.
- Click on the hotspot on the cupboard.
- Find the hidden objects.
- You will receive the STOP BATH and the DEVELOPER
- Return to the dark room.
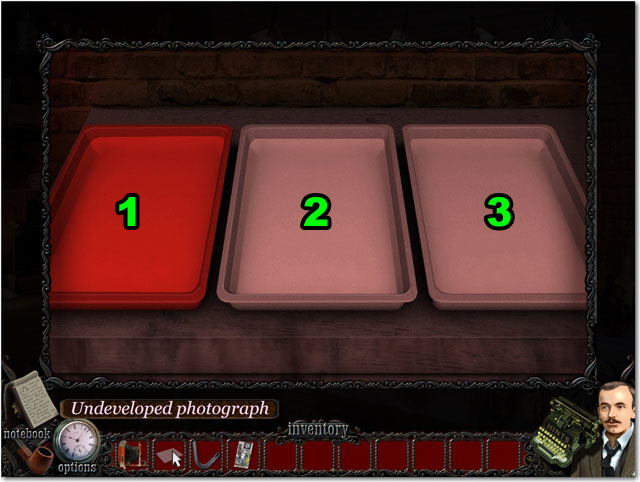
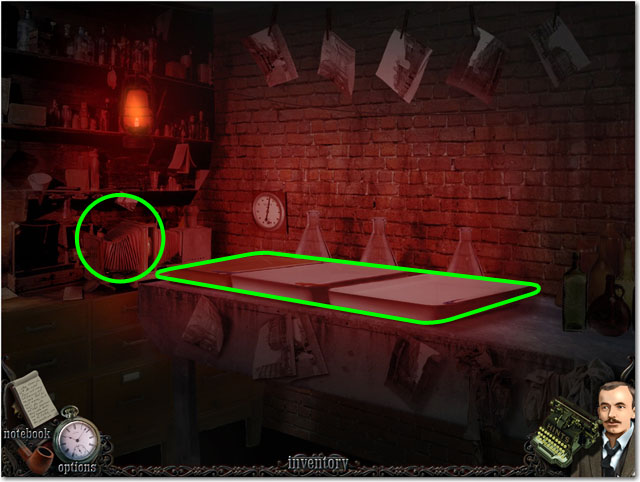
- Zoom in on the three trays.
- Pour the DEVELOPER chemical in the red tray (1).
- Pour the STOP BATH chemical in the middle tray (2).
- Pour the FIXER chemical in the right tray (3).
- Develop the PICTURE by placing it in the first tray (1).
- Collect the PICTURE.
- Do the same in the stop bath tray (2).
- Finish developing the PICTURE in the fixer tray (3).
- Collect the DEVELOPED PICTURE.
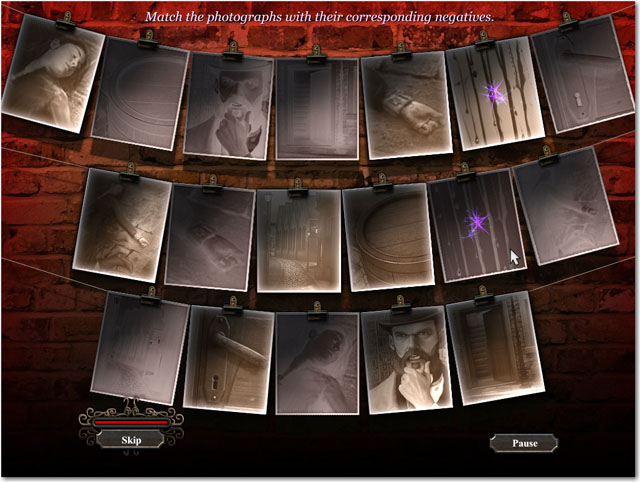
- Match the photographs with their corresponding negatives.
- Click on the white developed pictures to turn them around then click on the corresponding negative of the same picture.
- In the negatives all white areas will be black and black areas white.
- See the screenshot for the final solution.

- Hang up the DEVELOPED PICTURE on the line at the left.
- Zoom in the on the photograph
- Collect the SYMBOLS.
Chapter 3: The 13th sign
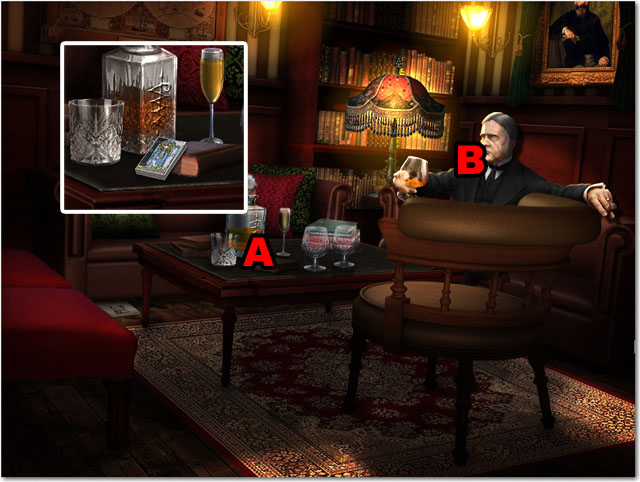
- Click on the table (A).
- Collect the PACK OF CARDS.
- Use the CARDS on the man (B).
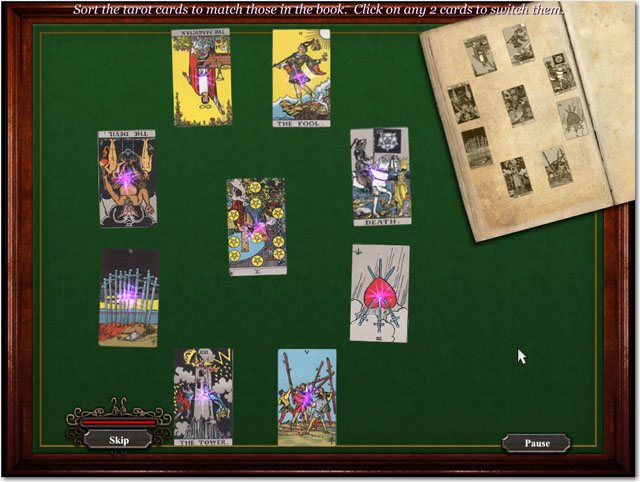
- Sort the tarot cards to match those in the book in the top right corner.
- Click on any two cards to switch their positions.
- See the screenshot for the final solution.
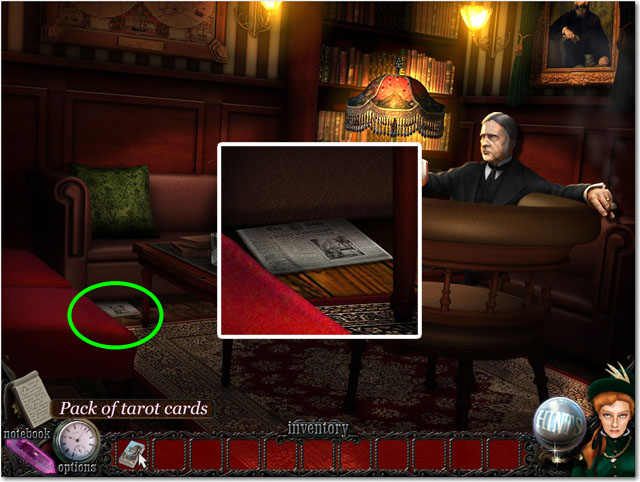
- Zoom in under the couch.
- Collect the NEWSPAPER.
- Exit the room.
- Zoom in on the coat rack.
- Collect the UMBRELLA.
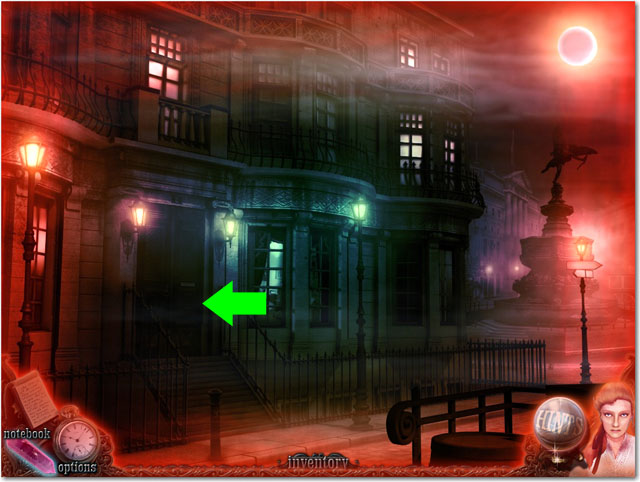
- Go to outside from the middle door.
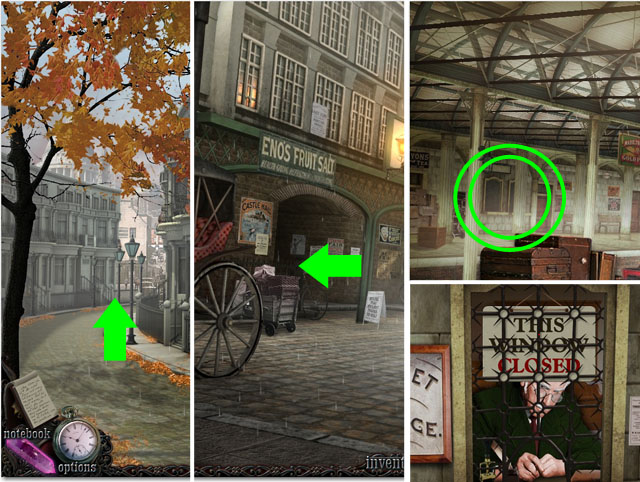
- Go to the next street.
- Enter the terminal.
- Click on the ticket counter.
- Give the NEWSPAPER to the man behind the counter.
- Go back to outside the terminal.
- Click on the hotspot.
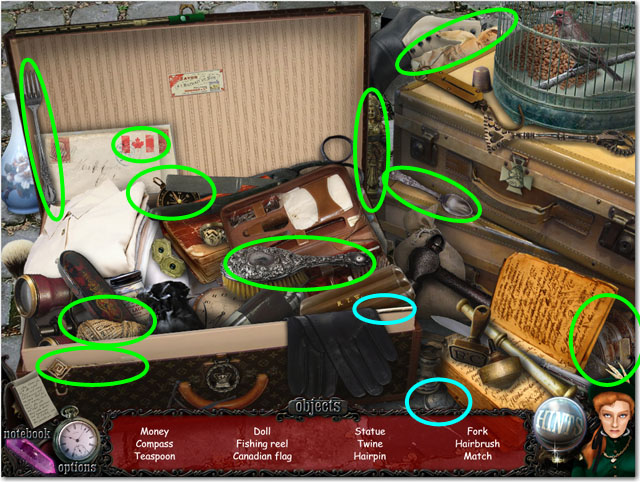
- Find the hidden objects.
- You will receive a MATCH and a COIN.
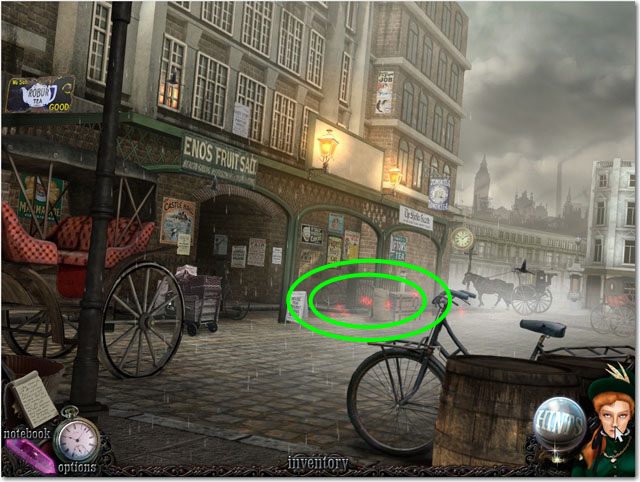
- Return to the terminal.
- Zoom in the ticket counter (C).
- Pay for the ticket with the COIN. Take the TICKET
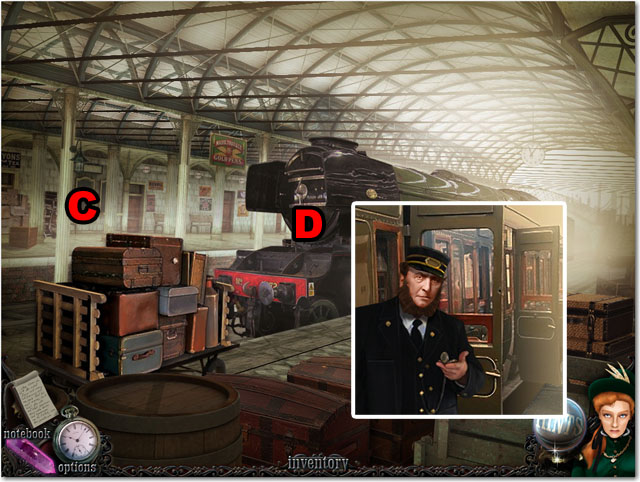
- Click on the train (D).
- Give your TICKET to the man with the watch (E).
- Click on the door.
- Click to rotate the sections of the image until you can see the door.
- Use the line of the crack in the opening door to help you line up the images.
- See the screenshot for the final solution.
- Click on the bookshelf.
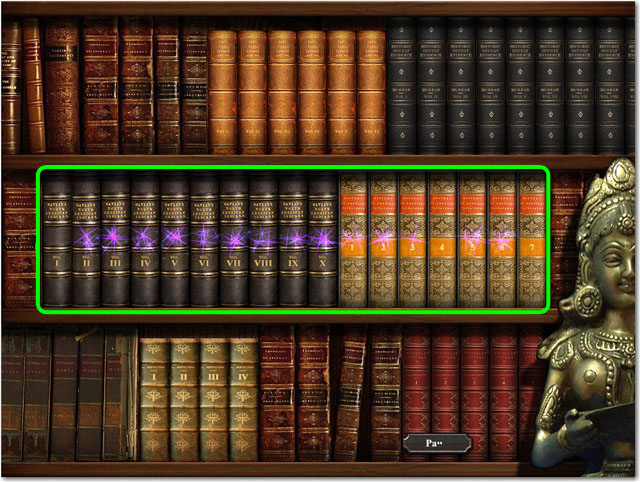
- Sort the middle row of books into the correct order.
- Click on any two books to switch them.
- Once the books are in the correct place, they cannot be moved again.
- The Roman numeral books go on the left side and the Arabic numbered books go on the right side.
- See the screenshot for the solution.
- Enter the upstairs.
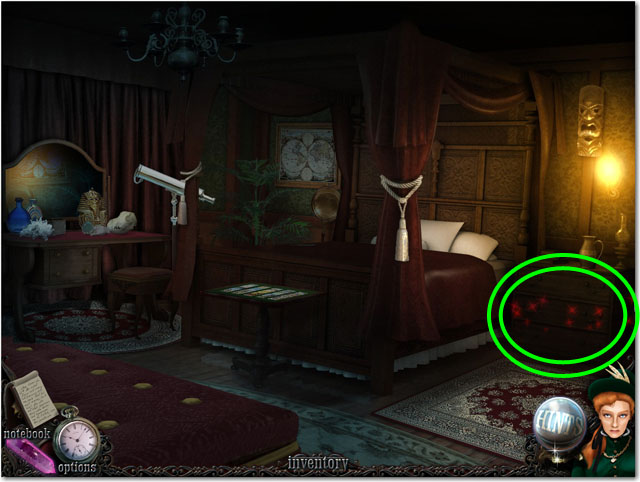
- Click on the hotspot.
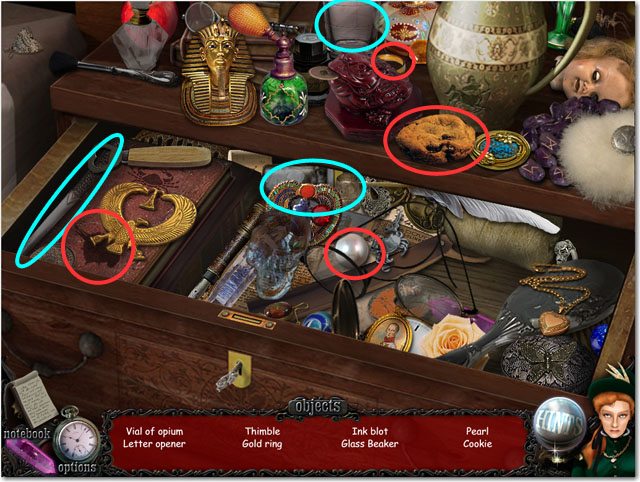
- Find the hidden objects. You will receive a LETTER OPENER, a VIAL and a GLASS BEAKER.
- Return downstairs.
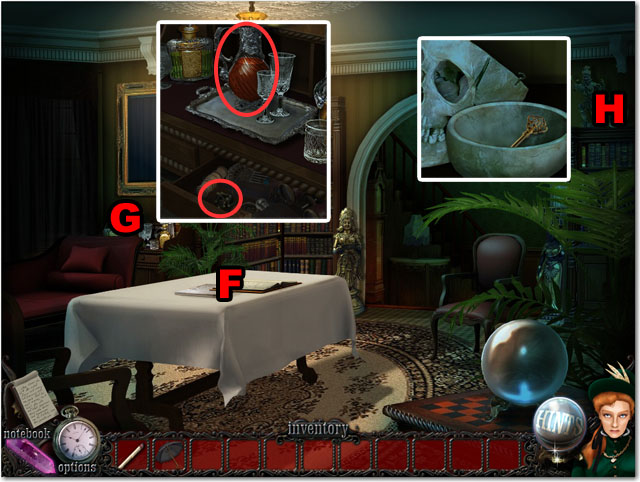
- Zoom in on the table (F).
- Click on the book and get the recipe for laudanum.
- Zoom in on the sideboard (G).
- Collect the PICTURE OF SHERRY.
- Open the drawer with the LETTER OPENER.
- Collect CLOVERS.
- Zoom in the skull (H).
- Open the skull with the LETTER OPENER.
- Collect the KEY.
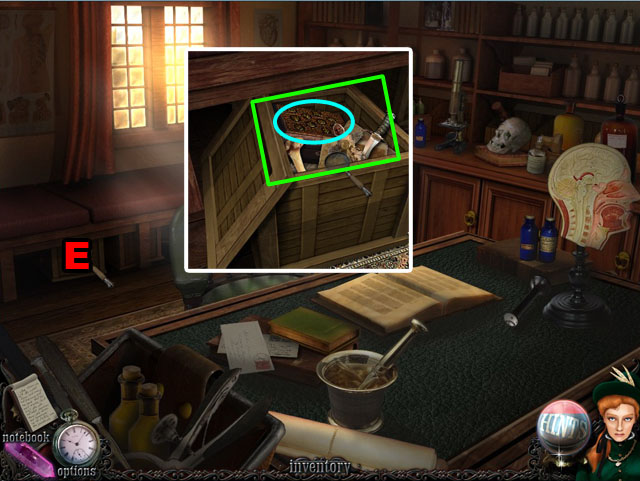
- Return to the upstairs.
- Open the chest with the key.
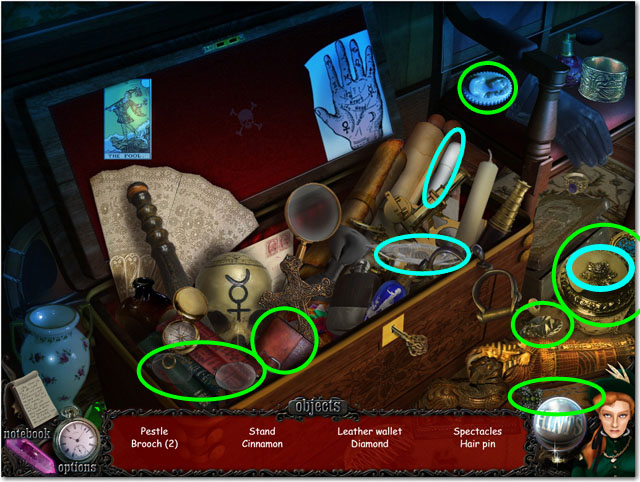
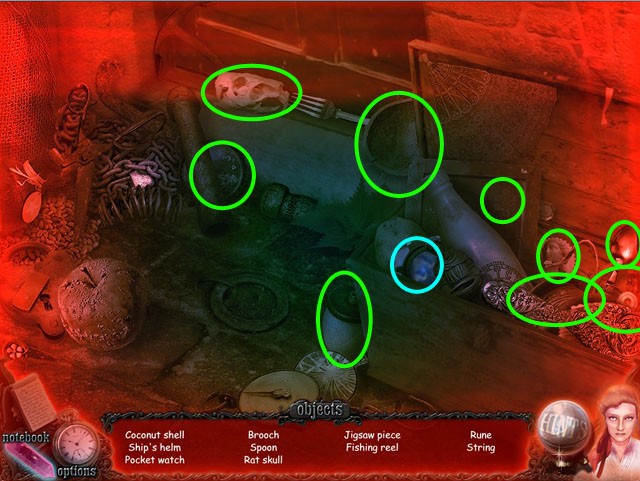
- Find the hidden objects.
- You will receive CINNAMON, a STAND and a PESTLE.

- Zoom in to the mirror.
- Place the CINNAMON and CLOVE in the white mortar (I).
- Use the PESTLE on the mortar to ground them up.
- Take the GROUND SPICES.
- Place the STAND on the oil lamp (J) after inspecting it.
- Light the oil lamp with the MATCH (K).
- Pour the SHERRY into the BEAKER (L).
- Place the BEAKER of sherry on the stand (M).
- Put the SPICES in the sherry
- Put the VIAL in the sherry.
- Collect the BEAKER of Laudanum.
- Pour the BEAKER into the bottle (N) and take the BOTTLE.
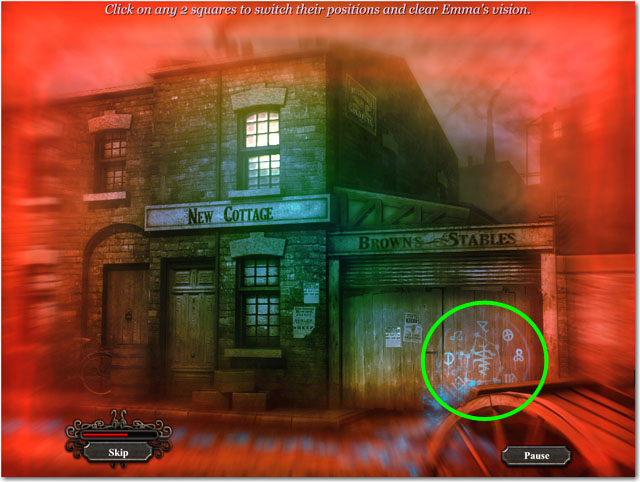
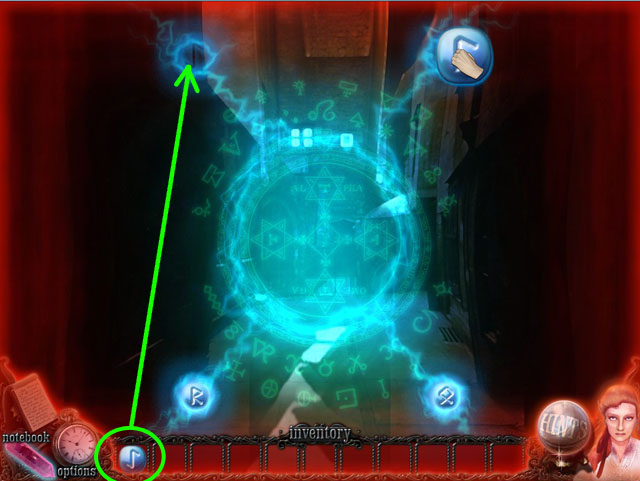
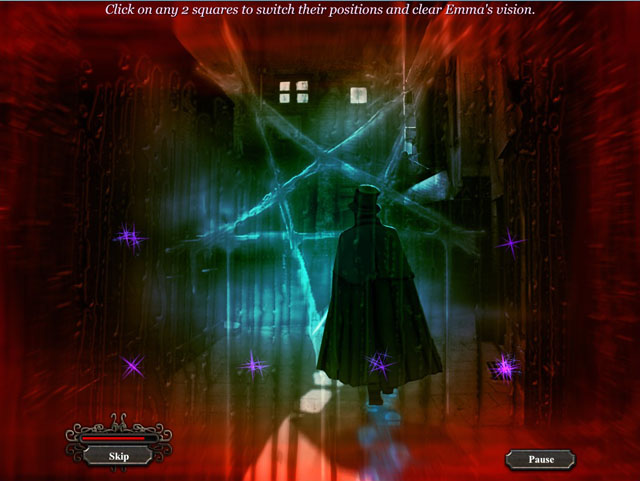
- Click on any two squares to switch their positions and clear Emma's vision.
- See the screenshot for the completed puzzle.
- Click on the symbols to collect them once you are finished.
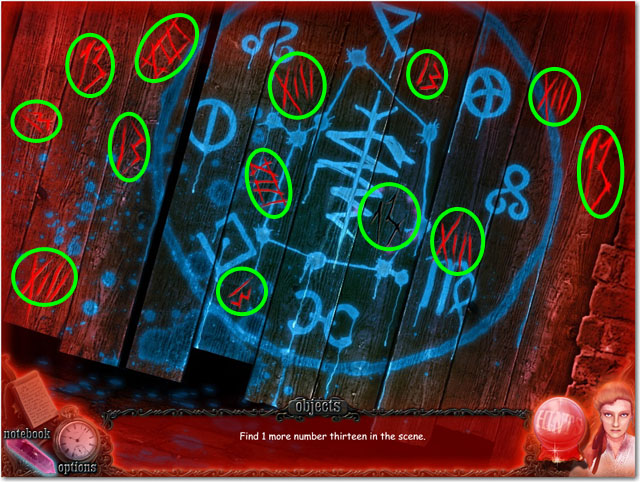
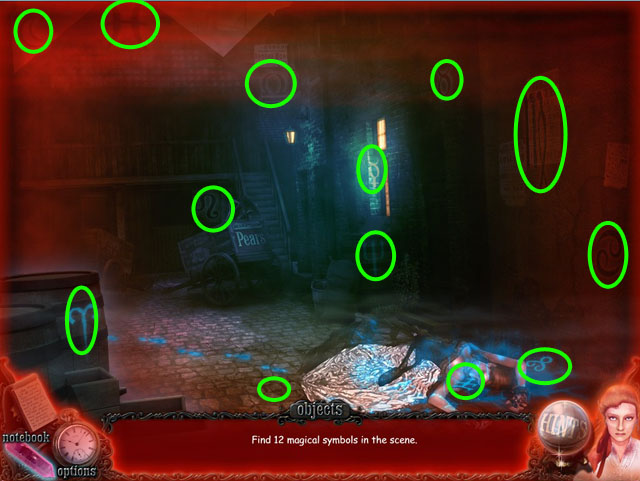
- Find 13 number 13s throughout the scene.
- Some are Arabic 13, while others are Roman numeral XIII.
- Enter the door that has just opened behind the symbols.
- Click on the hotspot.
- Find the hidden objects.
- You will receive 3 MAGIC SYMBOLS.

- Click on the woman (O).
- Place the three magic SYMBOLS on the matching symbols around her body.
- Go through the door (P).
Chapter 4: Inspector Abberline
- Enter the police station.
- Enter the room on the left.
- Click on the hotspot.
- Find the hidden objects.
- You will receive a WRENCH and a KEY.
- Return to the previous room.
- Zoom in the cabinet (A) to the right.
- Open the cabinet with the KEY.
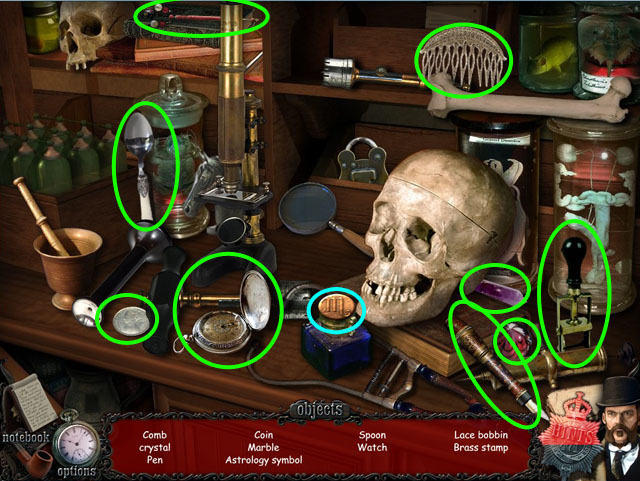
- Find the hidden objects.
- You will receive a TRUNCHEON and another KEY.
- Return to the office.
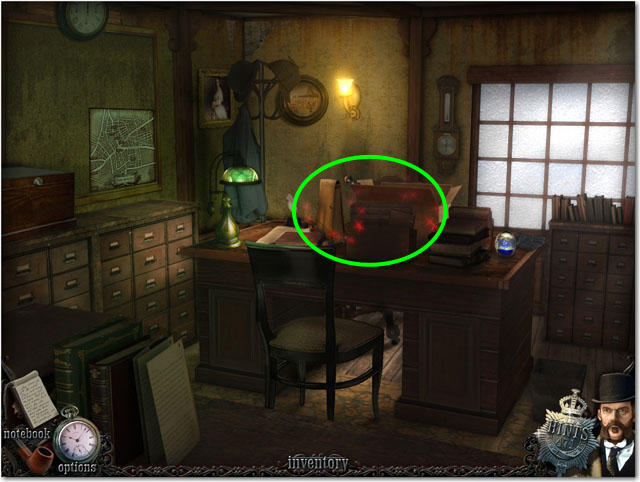
- Zoom in on the desk (B).
- Open the left drawer with the new KEY.
- Collect the NOTES and place them on the desk.
- Zoom in to the notes.
- Exit the desk scene.
- Zoom in the map (C).
- Click on the London hospital.
- Zoom in the boxes (D).
- Collect COGS.
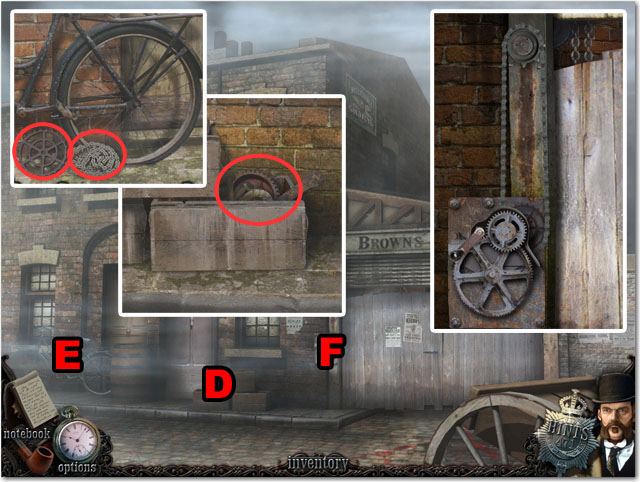
- Zoom in the bicycle (E).
- Take off the bike COG and CHAIN with WRENCH and collect them
- Zoom in the broken gate (F).
- Place the old COG, BIKE COG and CHAIN on the assembly to the left of the door.
- Enter the stable.
- Click on the hotspot.
- Find the hidden objects.
- Collect the SAW and the HAMMER HEAD.
- Zoom in on the door (G) and collect the HANDLE.
- Combine the HANDLE and the HEAD together to make a HAMMER.
- Break the lock with the HAMMER.
- Collect the CHISEL.
- Zoom in on the ground (H).
- Click on the grain to move it aside.
- Take off a brick with the CHISEL.
- Collect the STONE DISK.
- Back out to the main office.
- Zoom in the drawers (I).
- Open a drawer with the TRUNCHEON.
- Collect the CASE NOTES.
- Return to the office.
- Zoom in the desk (J).
- Place the CASE NOTES on the desk.
- Click on the notes and click on them again.
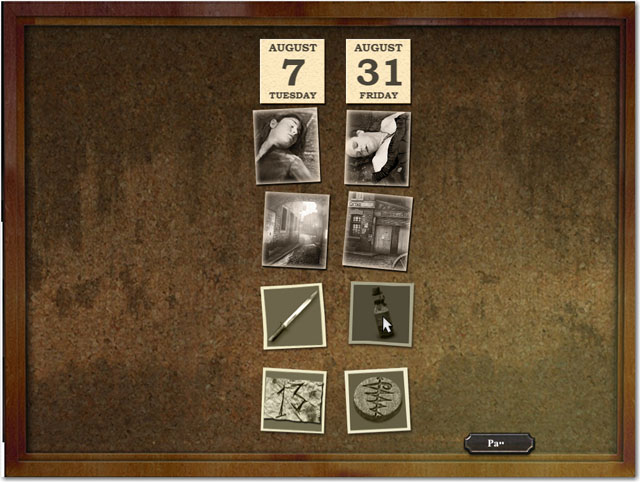
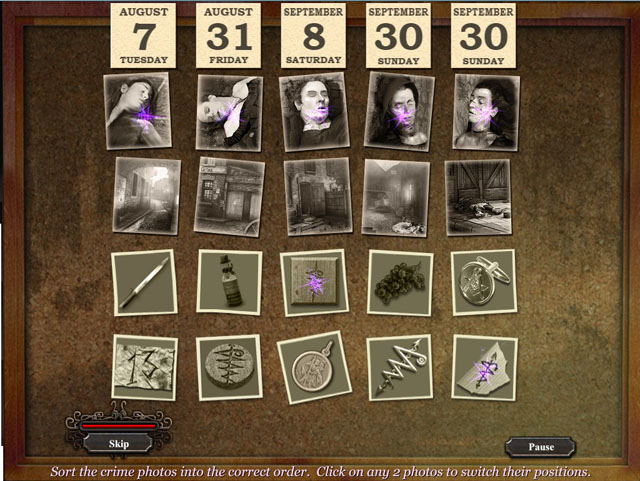
- Click and drag the photos into the correct positions for the two murders.
- Start with the date at the top, then the victim, the location, the murder weapon and finally the symbol found.
- See the screenshot for the correct solution.
Chapter 5: A Close Shave
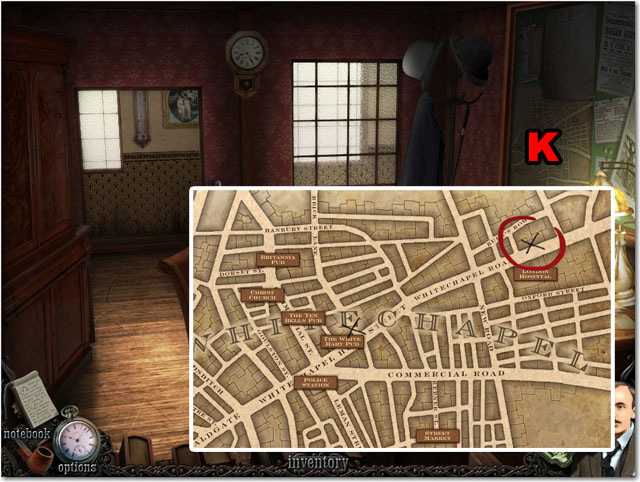
- Zoom in on the map (K).
- Click on the London Hospital.
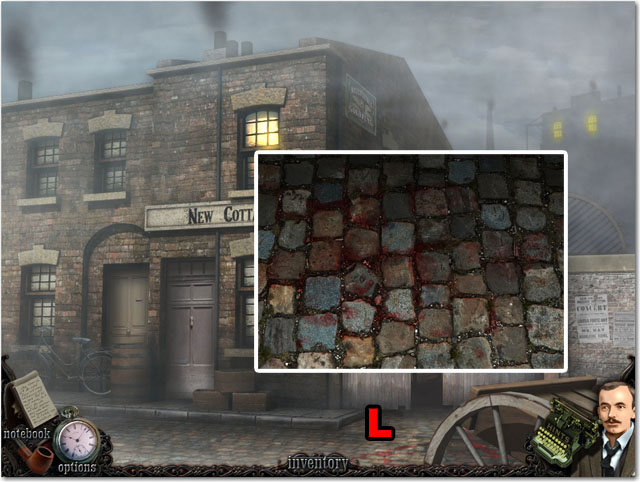
- Zoom in the ground (L).
- Place the CAMERA to take a photo.
- Enter the stable.
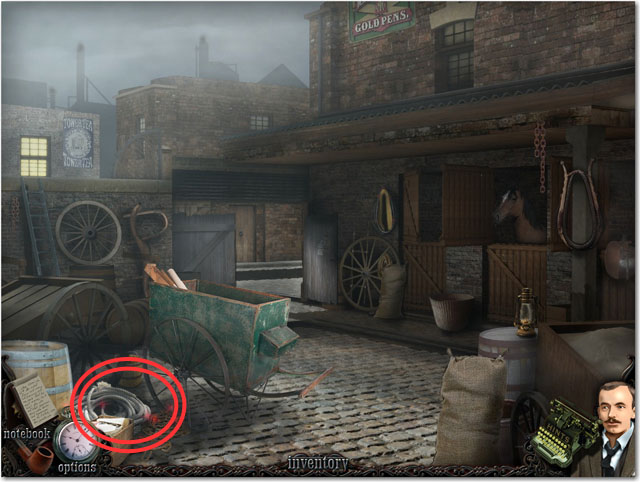
- Click on the hotspot.
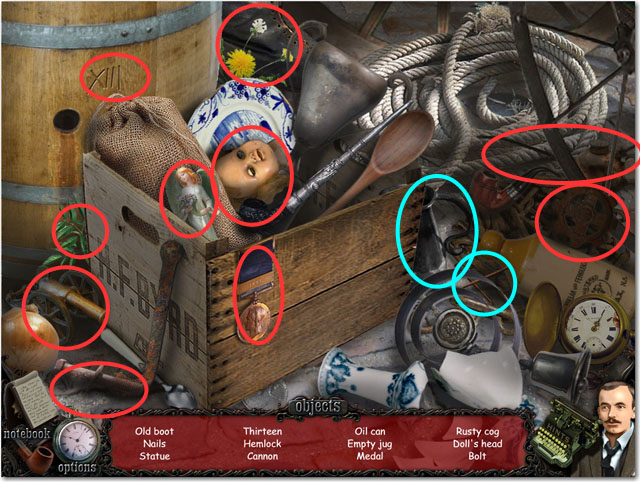
- Find the hidden objects.
- You will receive NAILS and a METAL JUG.
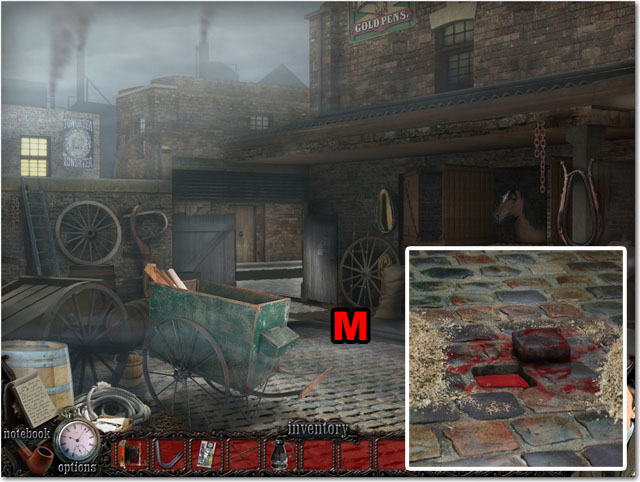
- Zoom in on the ground (M).
- Place the CAMERA to take a photo.
- Go forward to the next screen.
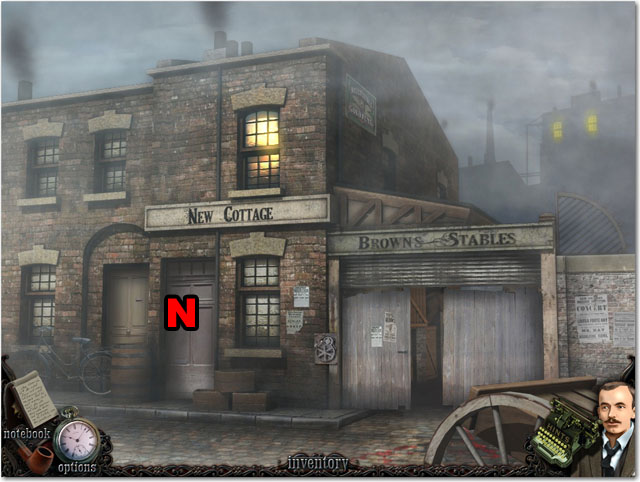
- Click on the New Cottage door.
- Open it and talk to the woman inside.
- Click on the hotspot.
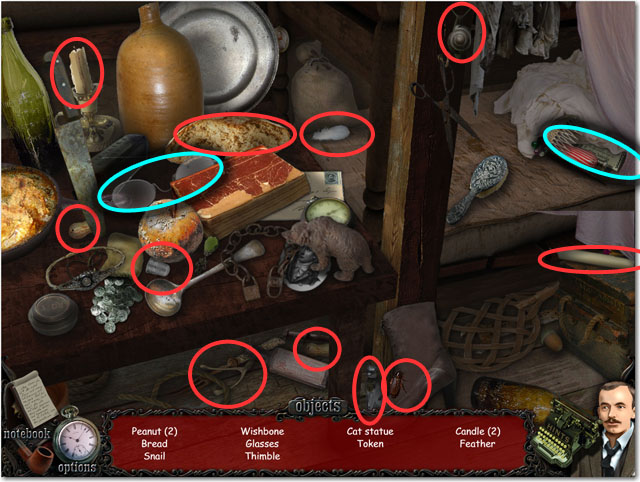
- Find the hidden objects.
- Move the sheet on the right to find the rest of the objects.
- You will receive a TOKEN and some GLASSES.
- Exit the room.
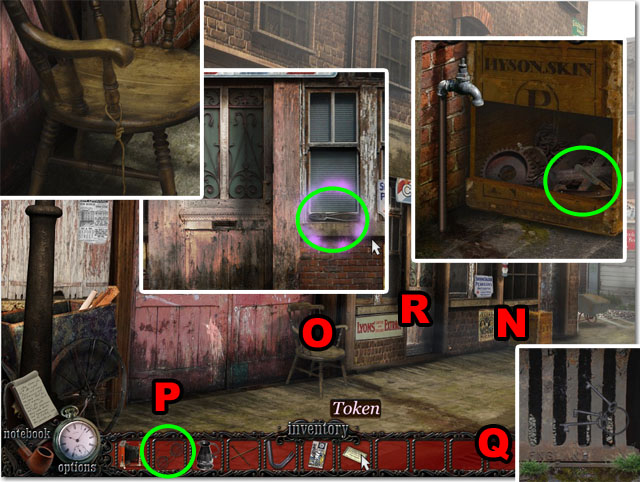
- Zoom in on the box (N).
- Open the box with the PRY BAR.
- Collect the RAZOR.
- Zoom in on the chair (O).
- Cut the TWINE with the RAZOR and collect it.
- Zoom in on the door (R).
- Collect the PLIERS.
- Cut the GLASSES with the PLIERS to make a hook.
- Combine the TWINE and HOOK (P).
- Zoom in on the hole (Q).
- Collect the KEYS with the TWINE AND HOOK.
- Open the door with the KEYS (R).
- Enter the store.
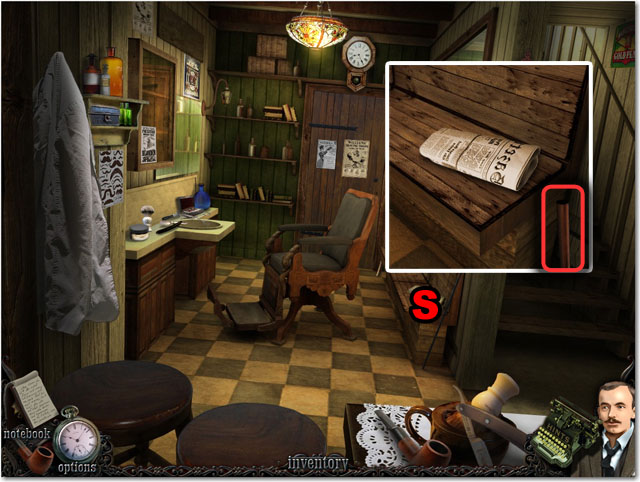
- Zoom in on the bench (S).
- Collect the IRON PIPE.
- Return to the previous scene up the stairs.

- Zoom in the box (T).
- Place the EMPTY JUG under the faucet.
- Use the IRON PIPE on the handle to turn it.
- Collect the JUG OF WATER.
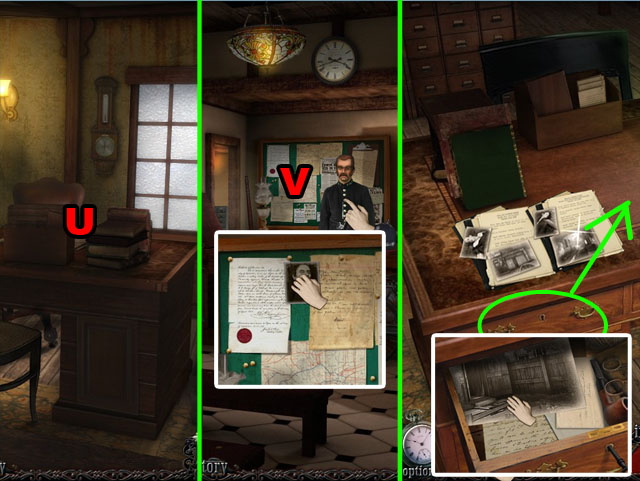
- Enter the barber shop again.
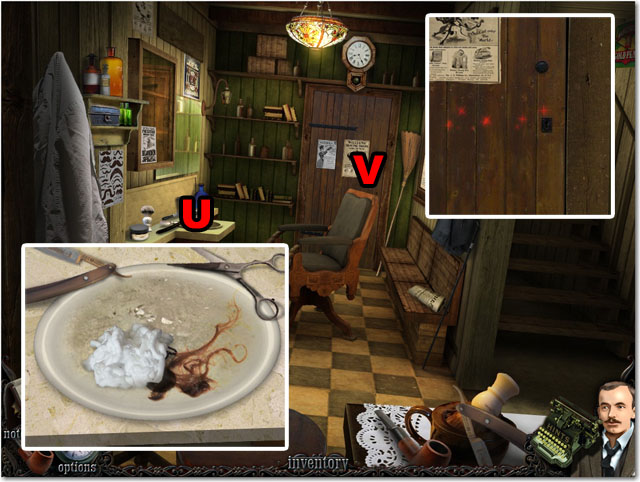
- Zoom in on the sink (U).
- Use the JUG OF WATER to clear the hair from the sink.
- Collect the KEY.
- Zoom in on the door (V).
- Open the door with the key.

- Find the hidden objects.
- You will receive a bottle of RED INK.
- Give the VOUCHER to the barber.
- In the dark room, develop the photograph as before.
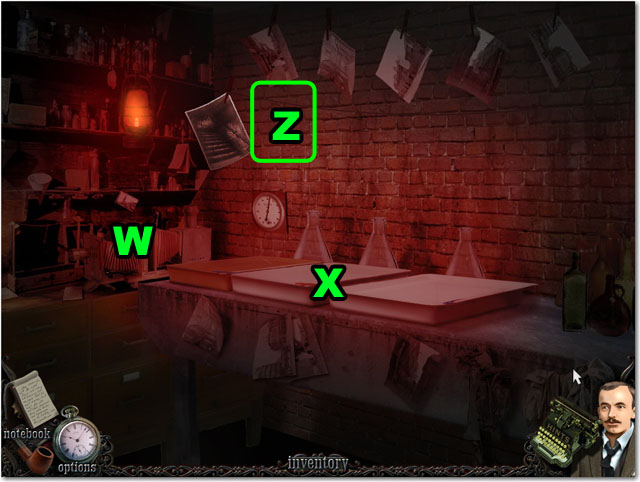
- Click on the CAMERA (W).
- Place the PHOTO in all of the trays from the left (X).
- Hang up the PHOTO to the left (Z).
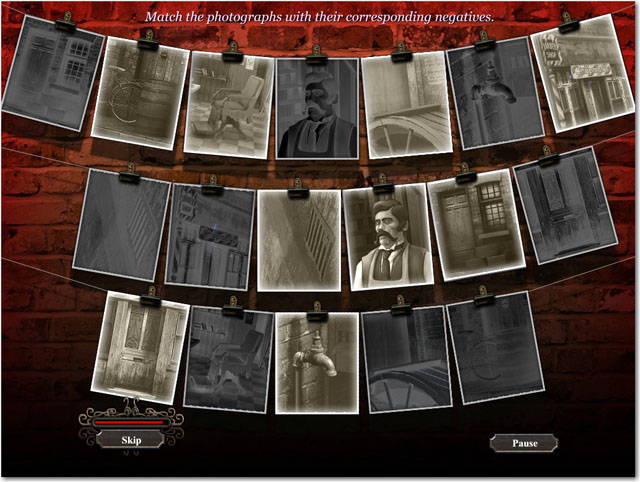
- Match the photographs with their corresponding negatives.
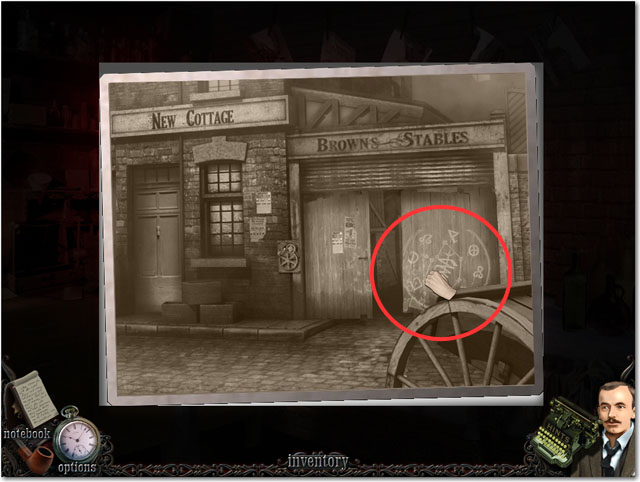
- Click on the new PHOTO that is hanging on the wire.
- Collect the symbols.
Chapter 6: An Old Friend
- Click on the table to look at the book.
- Check the wedding register.

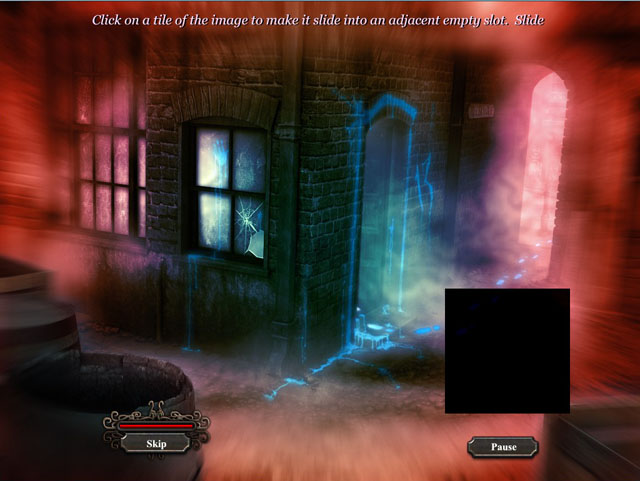
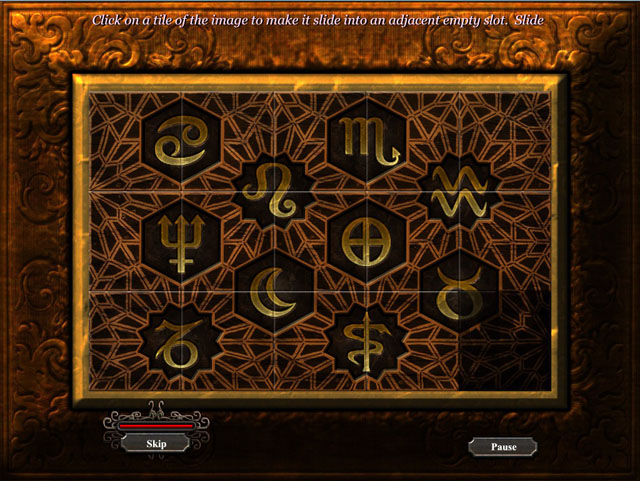
- Click on a tile of the image to make it slide into an adjacent empty slot.
- Rearrange the tiles in a way that completes the image.
- Start by putting the top row in order anywhere in the puzzle and they move them up to the top 3 positions.
- Next work on getting the left 3 squares correct without changing the top 3.
- Lastly rearrange the final 4 squares to solve the puzzle. The empty square will be in the bottom right corner.
- See the screenshot for solved puzzle.
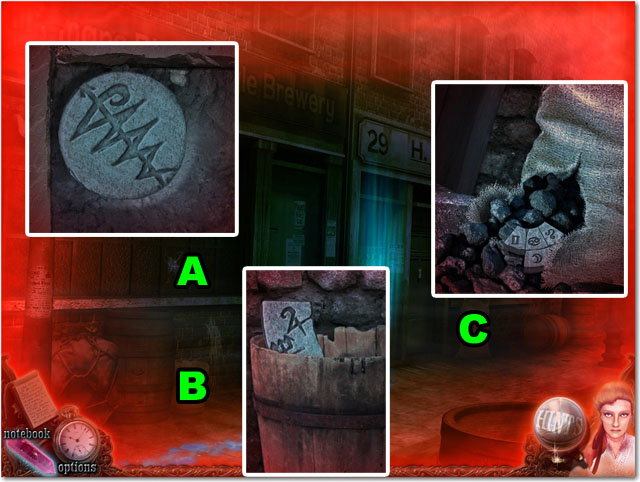
- Zoom in on the brick (A).
- Click to move away the brick and then take the STONE DISK.
- Zoom in the barrel (B).
- Collect the STONE RING.
- Zoom in the sack (C).
- Click the bag to open it and collect the last STONE DISK.
- Enter the next scene through the door in the middle, following the path.
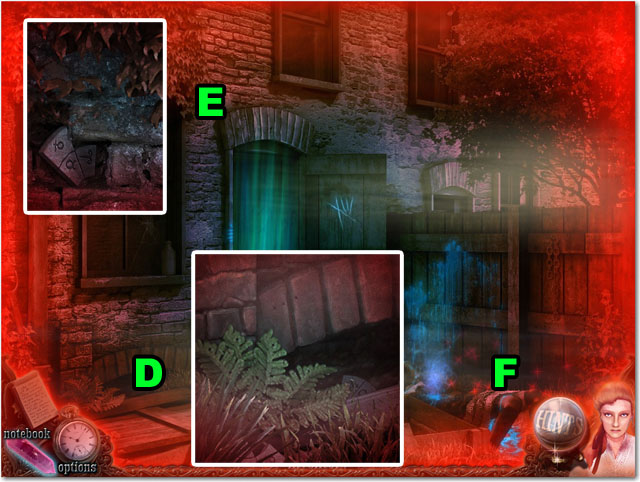
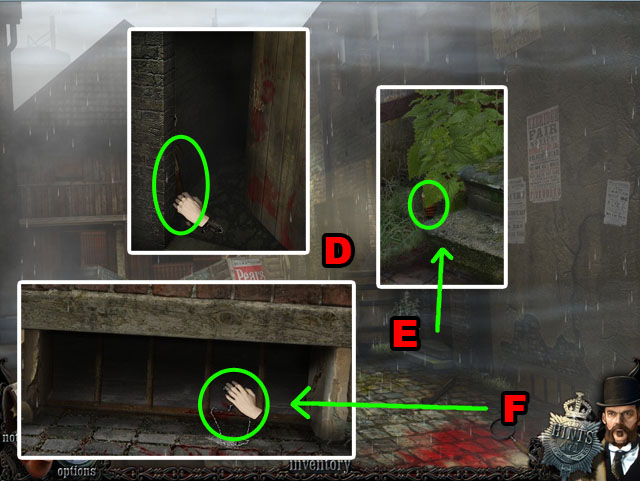
- Zoom in on the window in the ground level (D).
- Collect the 2 STONE DISKS.
- Zoom in on the foliage at the top of the window (E).
- Remove the foliage and collect another STONE DISK.
- Click on the hotspot (F).
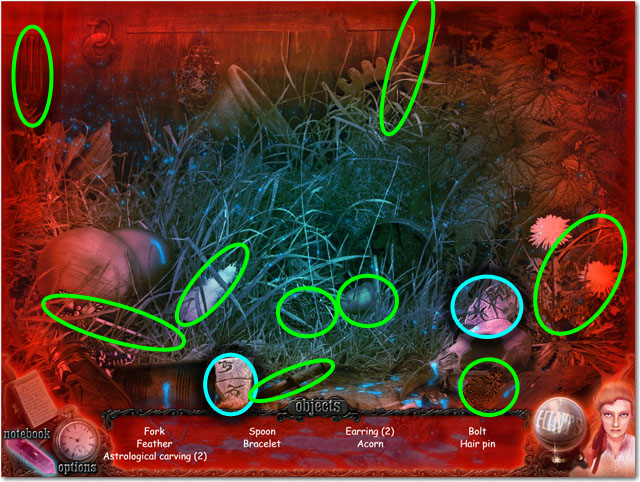
- Find the hidden objects.
- You will receive two more STONE DISKS.
- Place all of the DISKS onto the puzzle.
- Click and drag a piece with the left mouse button. While dragging a piece, click right mouse button to rotate.
- Zoom in on the door.
- Click the door again and talk to the man.
- Go in the room to the left.
- Click on the hotspot.
- Find the hidden objects.
- You will find some MEDICINE.
- After finding all of the objects you will be taken to the police station.
- Enter the police station and click on the hotspot to the right of the police officer.
- Find the hidden objects.
- You will receive a BADGE.
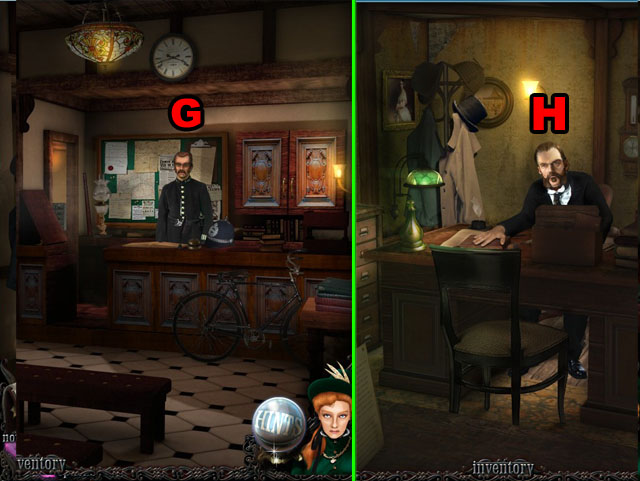
- Give the BADGE to the officer and enter the office to the left (G).
- Talk to the officer at the desk (H).
Chapter 7: A Royal Affair
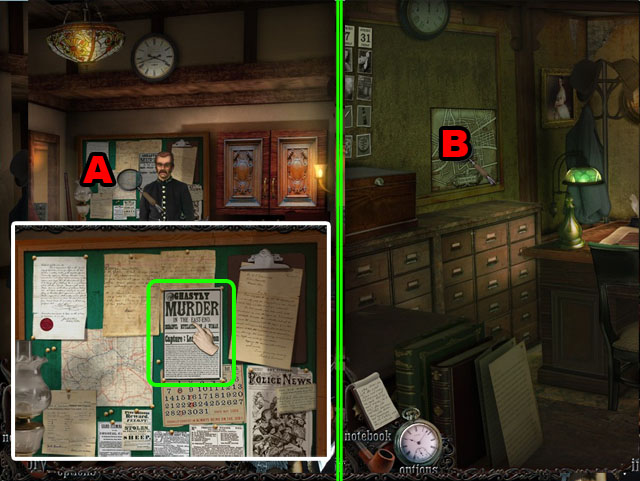
- Click on the bulletin board (A).
- Read the notice on the board (B).
- Enter the next room to the left and click on the map.
- Go to Anbury Street.
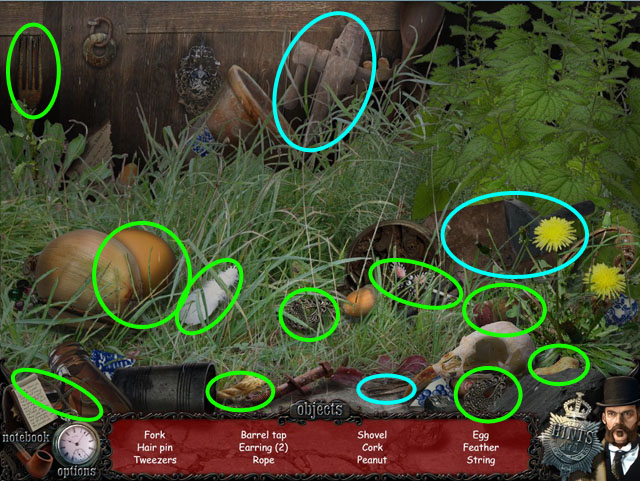
- Enter the door at H. Hardiman's and click on the hotspot after the cut scene.
- Find all of the hidden objects.
- You will receive a TAP, SCOOP and a set of TWEEZERS.
- Click on the window (C) and grab the SCALPEL and the TICKET.
- Grab the BUCKET on the ground (D).
- Leave the alley through the door.
- Click on the barrel (E).
- Use the TAP on the barrel and then use the BUCKET under the tap.
- Take the BUCKET OF BEER.
- Click on the sack of cement (F).
- Use the SCALPEL on the cement to open the back.
- Use the SCOOP on the cement and then take the SCOOP OF CEMENT.
- Return to the previous scene.
- Click on the drain below the window (G).
- Use the CEMENT on the drain.
- Use the BUCKET OF BEER on the TILE and then collect it.
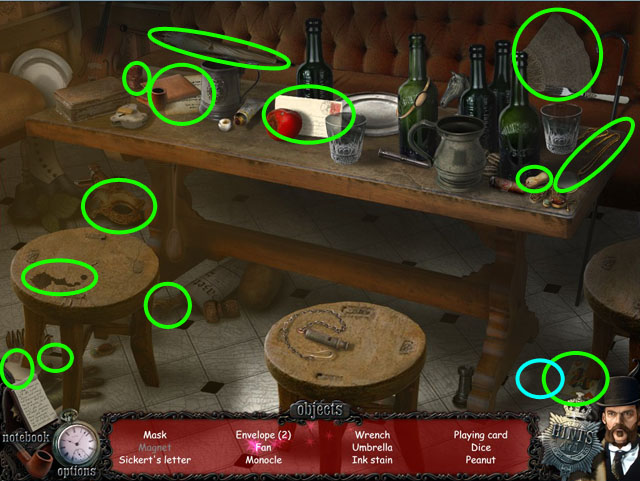
- Click on the hotspot.
- Find all of the hidden objects.
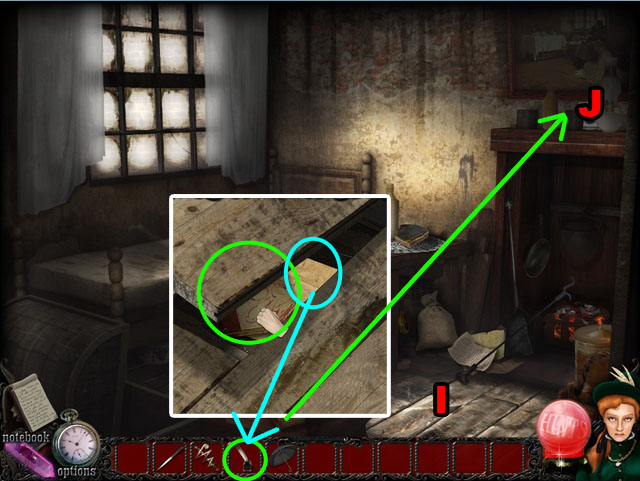
- Click on the mattress (H).
- Collect the LETTER PIECE from underneath it.
- Click on the pot (I).
- Move the pot and find the LETTER PIECE.
- Click on the window (J).
- Click the bottom of the window and find the LETTER PIECE.
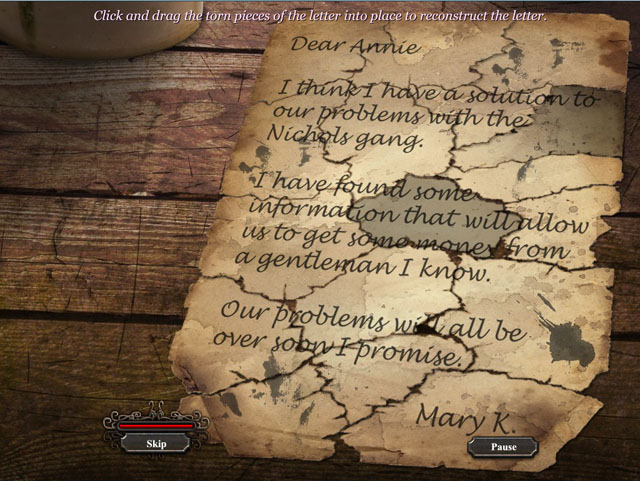
- Click and drag the torn pieces of letter to put them back together again.
- The pieces will snap in place when you have the in the correct position.
- The pieces do not rotate.
- Use the different colors of the pieces and the shapes of the edge to help you solve the puzzle.
- See the screenshot for the final solution.
- Enter the Ten Bells and click on the hot spot.
- Find all of the hidden objectsv
- You will receive a MAGNET.
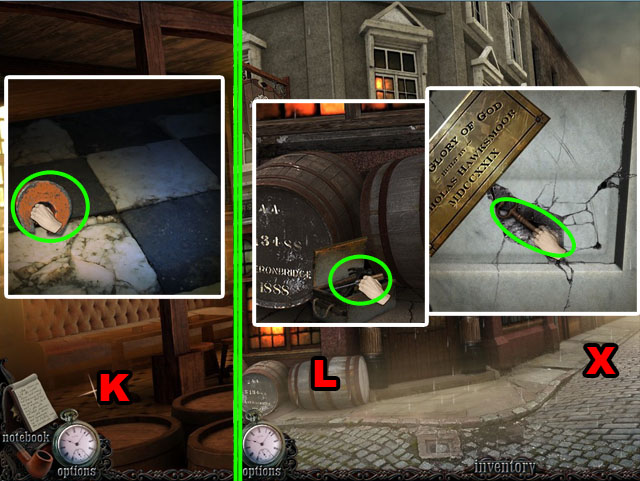
- Click on the floor in the corner of the room (K).
- Use the MAGNET to the get the HAIRPIN.
- Exit the Ten Bells and click on the barrels outside (L).
- Use the HAIRPIN to open the box and get the SCREWDRIVER.
- Zoom in on the brick to the right (X).
- Use the SCREWDRIVER to free the NECKLACE and collect it.

- Exit this area to the right.
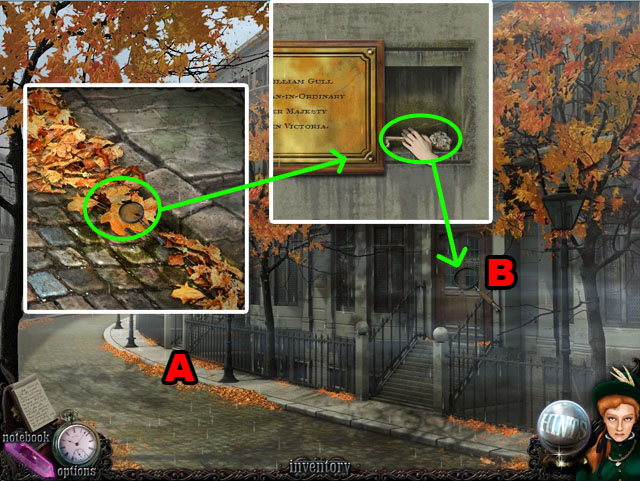
- Click on the tree to the right and see the initials carved in the tree (N).
- Click on the door and then zoom in on the plaque to the right (O).
- Use the SCREWDRIVER on the plaque and take the KEY.
- Use the KEY on the door to the right.
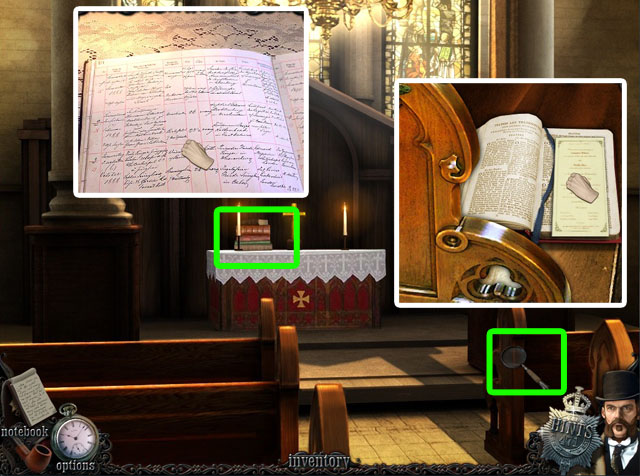
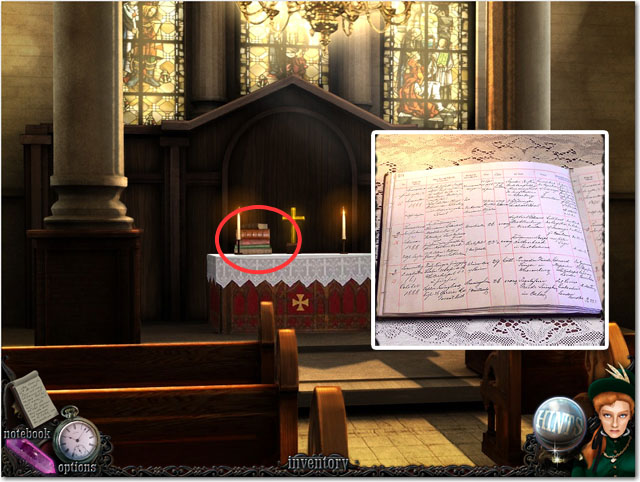
- Zoom in on the pew to the right
- Open the bible and collect the list.
- Zoom in on the table and click on the guest list.
- Exit the church and go back to the first street.
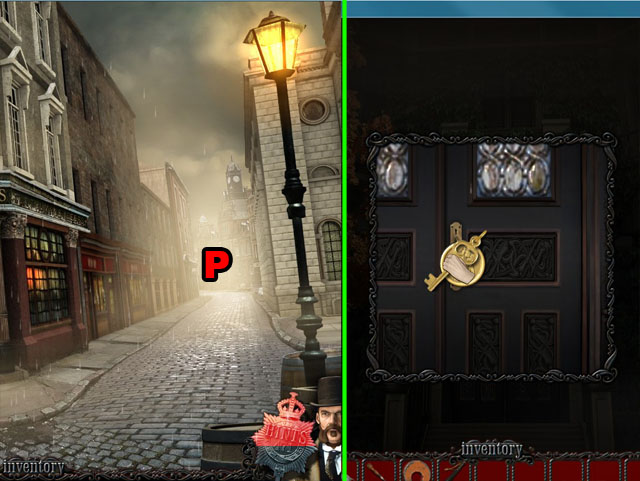
- Travel down the street to the next location (P).
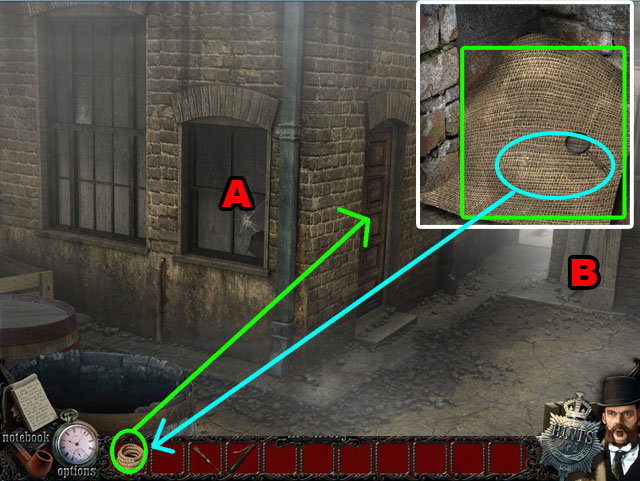
- Zoom in on the door.
- Use the NECKLACE to open the door.
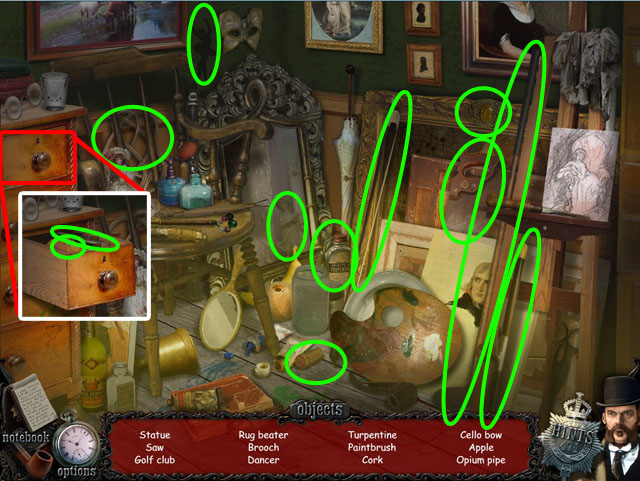
- Click on the hotspot in the corner.
- Find all of the hidden objects.
- You will receive TURPINTINE and a PAINTBRUSH.
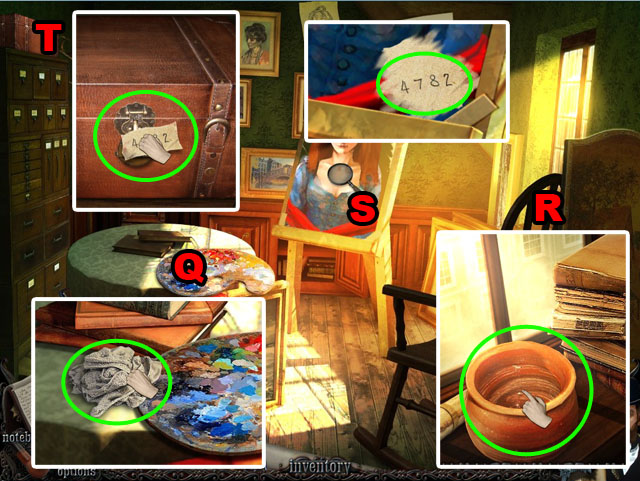
- Click on the easel (Q).
- Take the RAG and read the journal.
- Click on the window (R).
- Use the TURPINTINE on the pot and use the PAINTBRUSH in the turpentine.
- Take the TURPINETINE PAINTBRUSH.
- Zoom in on the painting (S).
- Use the PAINTBRUSH on the painting.
- Use the RAG on the painting.
- Take the CODE from the corner of the painting.
- Zoom in on the briefcase (T).
- Use the CODE on the briefcase to open it. Take the letter.
- Take the new FILE from the top of the desk (U).
- Exit the room and get the PHOTO from the bulletin board behind the police officer (V).
- Get the crime scene PHOTO from the drawer in your desk (W).
- Place them two PHOTOS on the FILE.
- Place the FILE back on the desk where you found it.
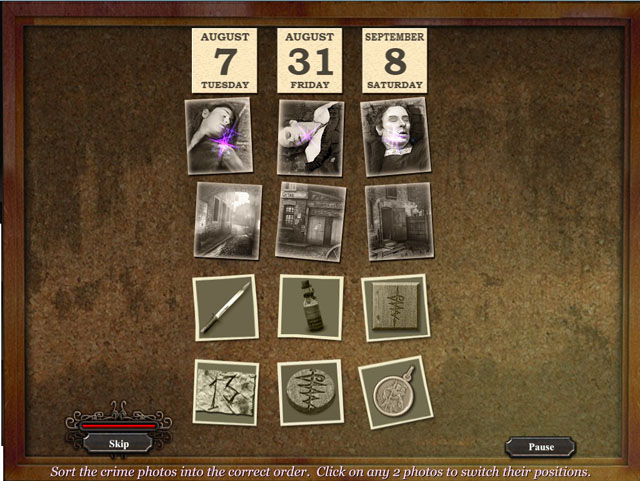
- Click and drag the photos into the correct positions for the three murders.
- The first two will be the same as the last time you did this.
- Start with the date at the top, then the victim, the location, then the other evidence found.
- See the screenshot for the correct solution.
Chapter 8: Docklands
- Click on the map.
- Collect the reward notice.
- You will be taken to the docks.
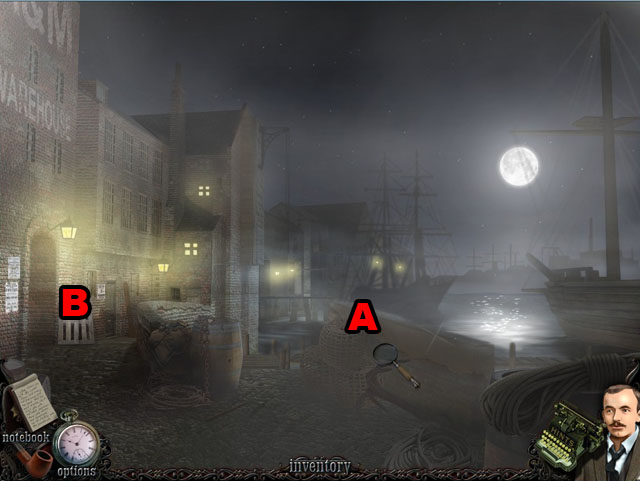
- Zoom in on the dock (A).
- Click the hotspot to find out you need boards.
- Go to the area to the left (B).
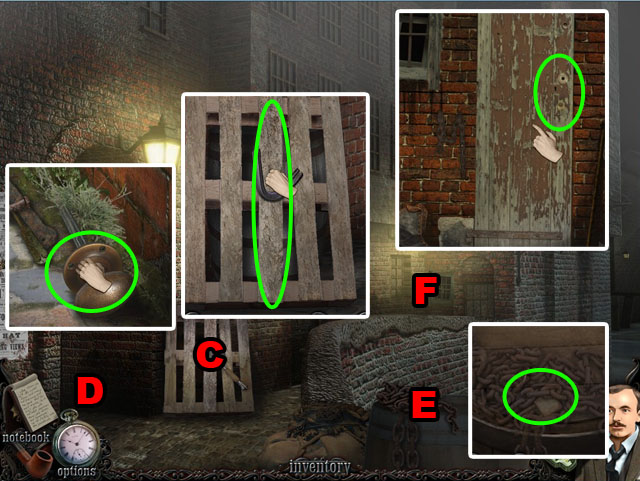
- Click on the pallet and get a BOARD with the PRY BAR (C).
- Zoom in on the alleyway (D).
- Take the DOOR KNOB.
- Zoom in on the barrel (E).
- Move the chain and take the FISHING HOOK.
- Zoom in on the door (F).
- Take the METAL BAR.
- Use the DOOR KNOB on the door. You cannot open the door because it is locked.
- Return to the previous scene.
- Zoom in on the dock again.
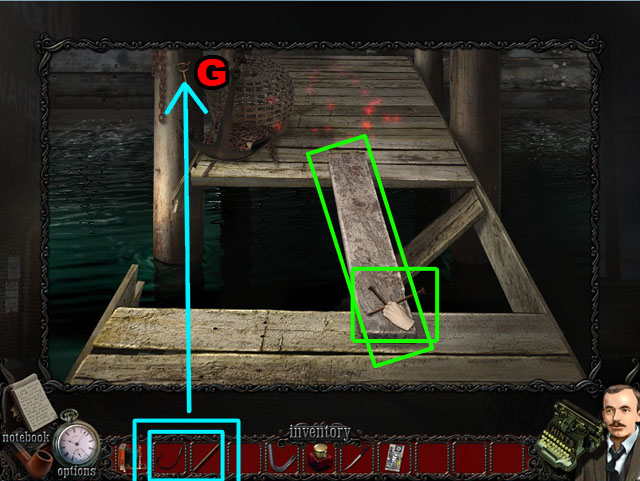
- Use the BOARD on the hole.
- Use the NAILS on the board.
- In your inventory use the METAL BAR and the HOOK together.
- Use the METAL BAR WITH HOOK on the KEY and collect it (G).
- Return to the door that you couldn't open before.

- Open the door and take the HAMER.
- Use the HAMMER on the nails on the dock.
- Click to enter the hotspot.

- Find all of the hidden objects.
- You will receive a SHIP'S MANIFEST.
- This will return you to your office.
- Click on the hotspot in the drawers.
- Find all of the hidden objects.
- You will receive a QUILL PEN.
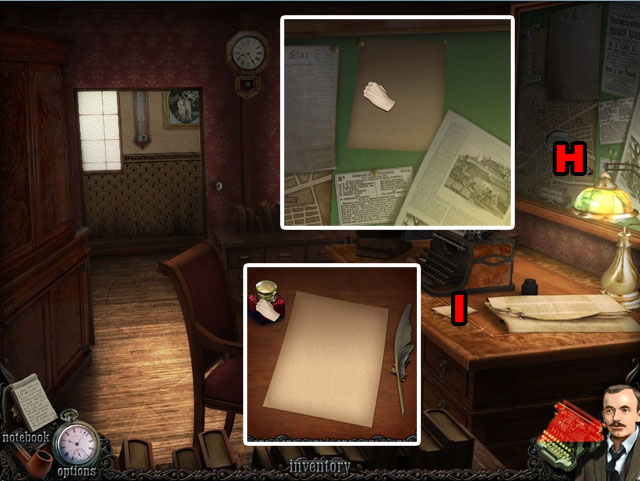
- Click on the bulletin board and collect the paper (H).
- Zoom in on the desk (I).
- Use the PAPER, QUILL and INK on the darkened spots in the desk.
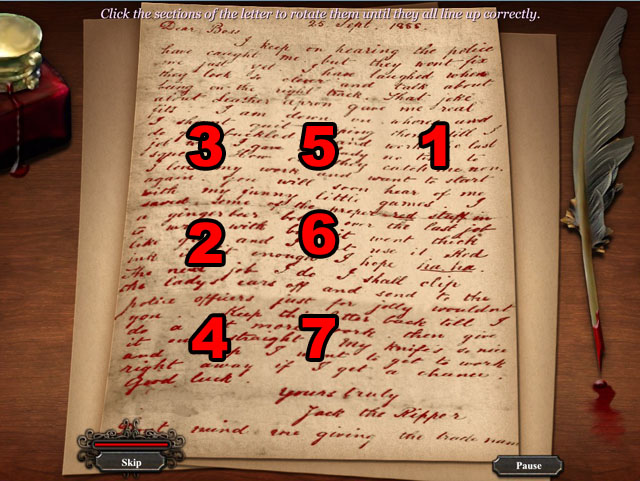
- Click the letter to rotate the squares and line up all of the writing.
- Each square you click will in turn rotate another square.
- Start from the top and rotate the top squares into place going down the line.
- When a square rotates one that you have already done, go back and rotate it again.
- Follow the order on the screenshot to complete the puzzle in the fewest moves.
Chapter 9: Jack the Ripper
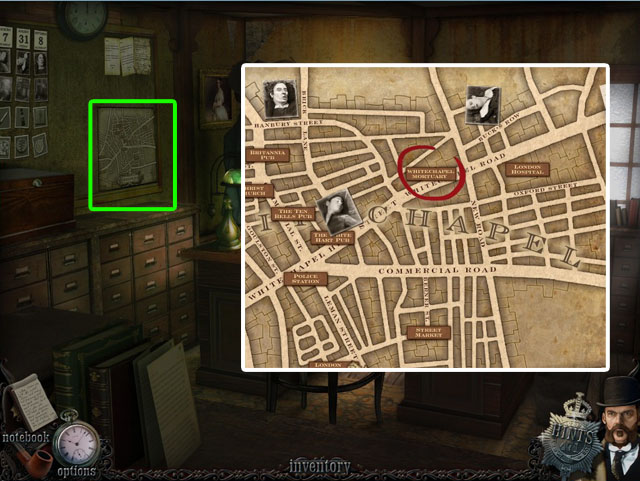
- Click on the map and go to the Whitechapel Mortuary.
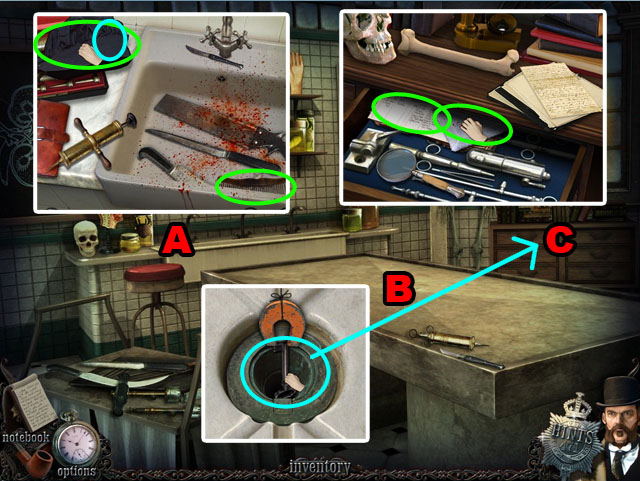
- Zoom in on the sink in the back (A).
- Take the bonnet, comb and THREAD.
- Zoom in on the hole in the middle of the table (B).
- Use the MAGNET on the THREAD and use the MAGNET WITH THREAD on the hole.
- Take the KEY.
- Zoom in on the books to the right (C).
- Use the KEY to open the drawer.
- Take the handkerchief and the coroner's report.
- You will automatically travel to the hospital.
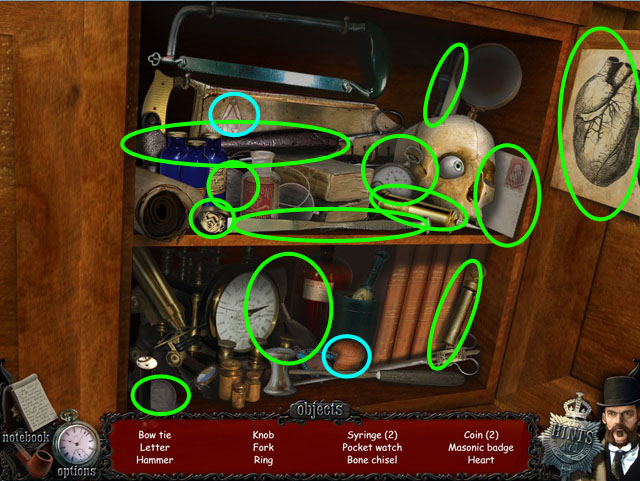
- Enter the hotspot towards the back.
- Find all of the hidden objects.
- You will receive a KNOB and a MASONIC BADGE.
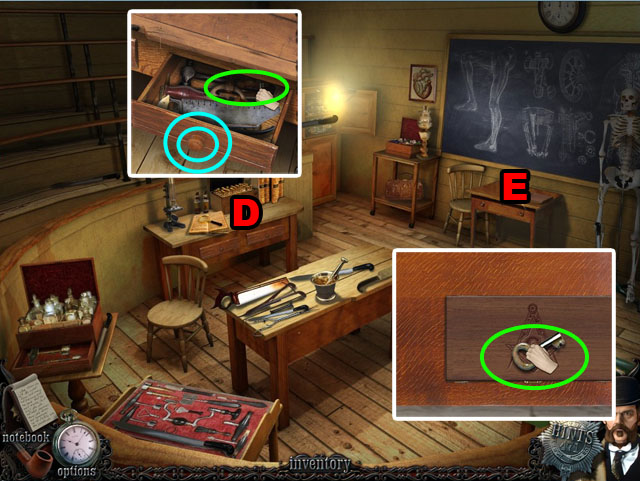
- Zoom in on the desk drawer to the left (D).
- Use the KNOB on the drawer and then open it.
- Collect the chart and the KEY.
- Zoom in on the knife case to the right (E).
- Use the KEY on the case and click on the card inside.
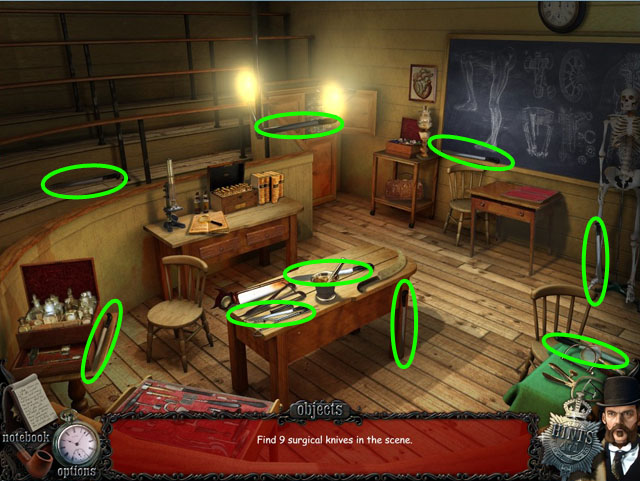
- Find all of the surgical knives in the scene.
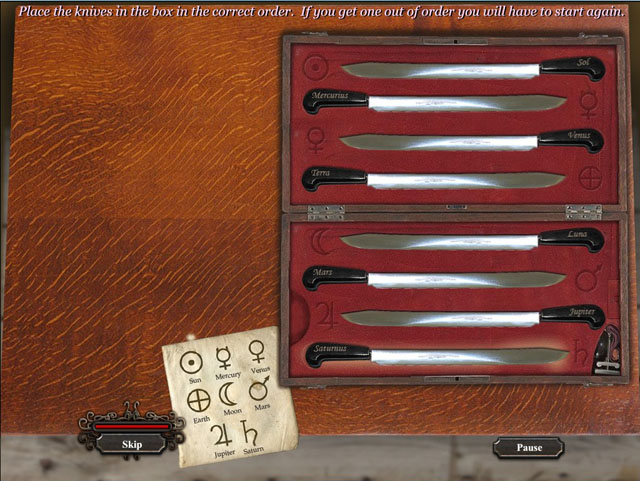
- Place the knives in order from the top to the bottom matching their symbols.
- If you pick up a knife in the wrong order you will have to start over again.
- The symbols give you a hint to the order and match the names on the handles.
- The correct order is the order of the planets in the solar system, starting with the sun and with the moon coming after the Earth: Sol, Mercurius, Venus, Terra, Luna, Jupiter, and lastly Saturnus.
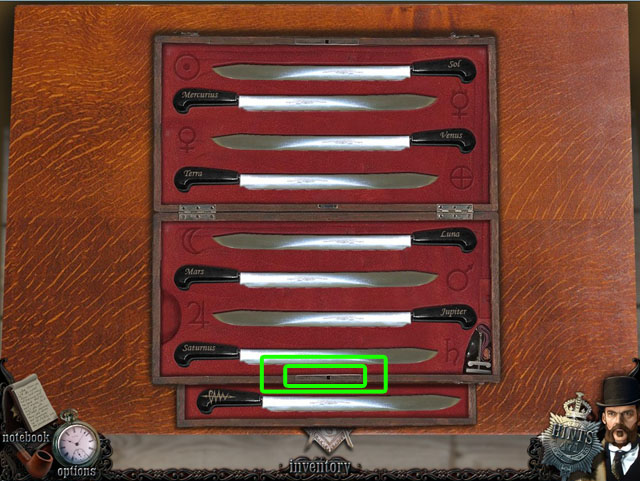
- Once finished, use the MASONIC BADGE at the very bottom of the box.
- Collect the knife.
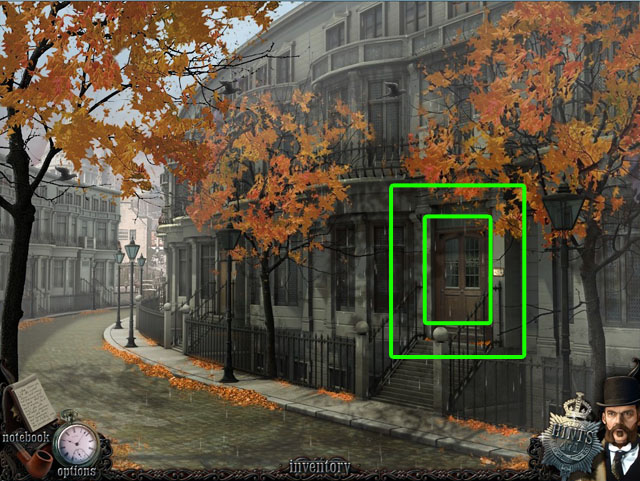
- Zoom in on the door and click it again.
- Talk to the man to be let inside.
- Click on the hotspot.
- Find all of the hidden objects.
Chapter 10: The Face of Evil
- Rotate the sections of the image to complete the picture.
- Each section that you rotate will also rotate the next section to the right or on the next line if the section is one the end.
- To solve the puzzle start in the upper left corner and work towards the right, in order, fixing the squares that are turned by the previous squares.
- See the screenshot for the solution.
- Fine 13 magical symbols.
- You will receive a magical RUNE.
- Go to the next scene.

- Zoom in on the body (A).
- Collect the magical RUNE on her chest.
- Zoom in on the curb (B).
- Click on the newspaper and the collect the WRENCH underneath it.
- Move to the left (C).
- Enter the hotspot.
- Find all of the hidden objects.
- You will receive another RUNE.
- Zoom in on the wheel to the left (D).
- Use the WRENCH to take off the hubcap.
- Take the RUNE.
- Take the RAG behind the wheel.
- Zoom in on the window (E).
- Use the RAG on the window and take the RUNE.
- Go down the alleyway (F).
- Place the 4 RUNES in the matching circles on the barrier.
- Click one square and then another to switch their places. Get all of the squares in the correct places to complete the image.
- Use the man and the upside down star to help you find the right places for the squares.When a square is in the correct place it will be locked down.
- See the screenshot for the solution.
- Travel downstairs and zoom in on the couch.
- There is also a newspaper to read on the table
- Take the map and travel to Street Market.

- Zoom in on the crates (G).
- Take the OIL.
- Zoom in on the door (H).
- Use the OIL on the mail slot, and then use the LETTER OPENER on the mail slot.
- Click on the slot to get the KEY and collect it.
- Zoom in and use the KEY on the lock (I).
- Go through the door.
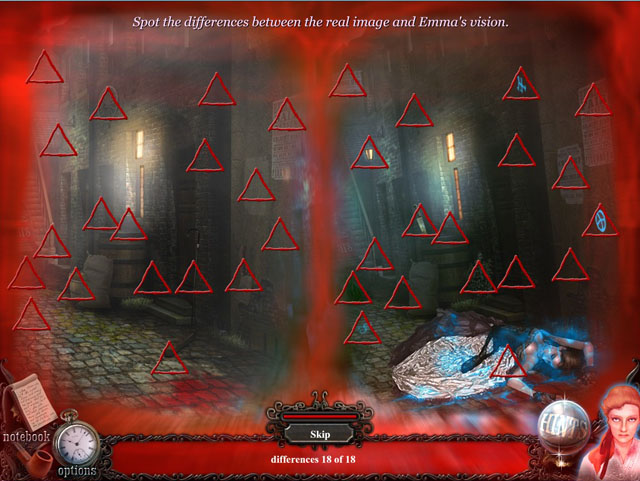
- Click on the area to the bottom right of the screen.
- Find the 18 differences between the left and the right images.
- You can click on either side of the screen to find matches.
- Exit the scene to the bottom to go to the police station.
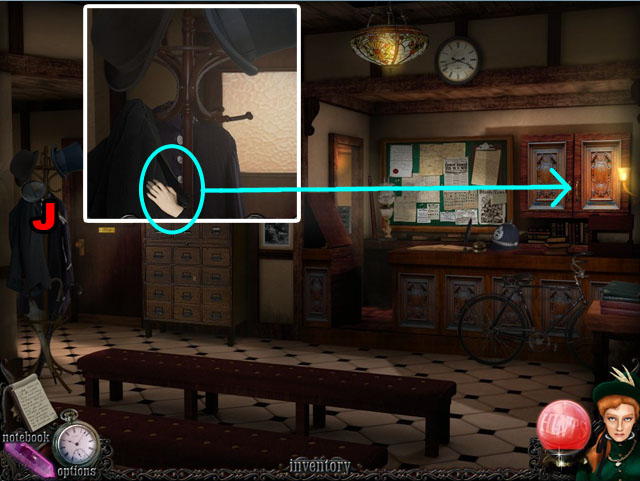
- Enter the police station.
- Zoom in on the coat rack (J).
- Take the KEY from the pocket.
- Zoom in on the cabinet and open it with the KEY.
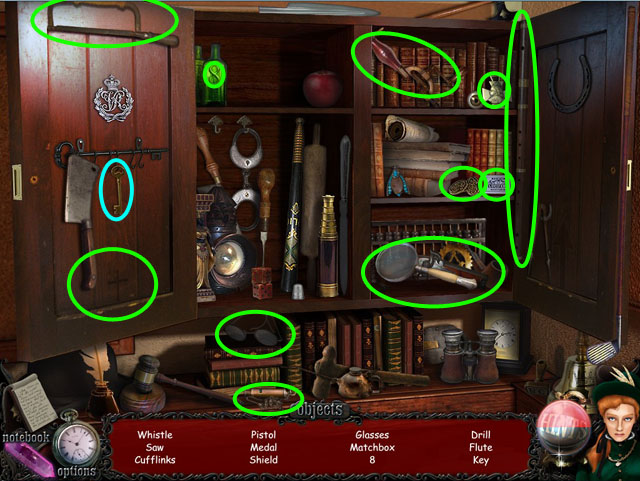
- Find all of the hidden objects.
- You will receive another KEY.
- Use the key on the door to the inspector's room and enter it.
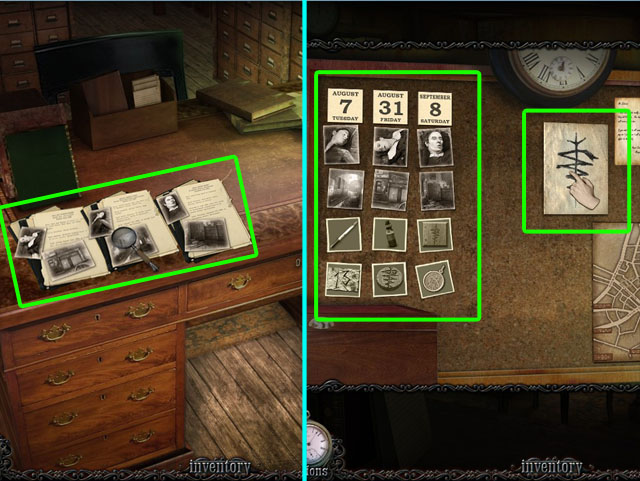
- Zoom in on the desk and inspect all the files (K).
- Zoom in to the bulletin board and inspect all the pictures and the symbol (L).
Chapter 11: Double Murder
- Zoom in on the map and go to Mitre Square.
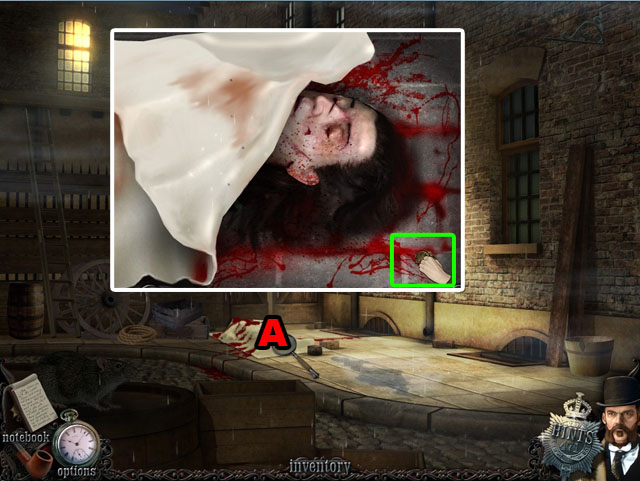
- Click on the corpse (A) to inspect it.
- Lift up the sheet and take the ring.
- Go to the left and enter the hotspot.
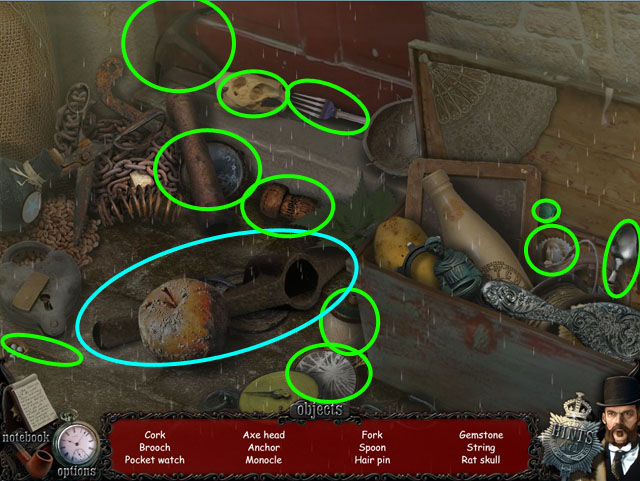
- Find all of the hidden objects.
- You will receive an AXE HEAD.
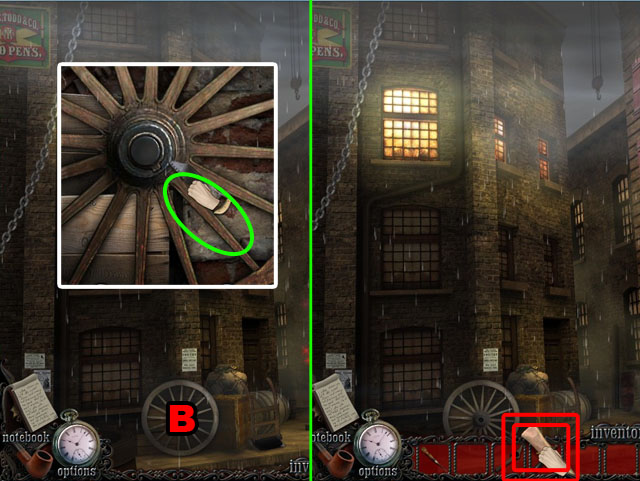
- Zoom in on the wheel (B).
- Use the SAW on the wheel. Take the WHEEL SPOKE.
- Add the SPOKE to the AXE HEAD to make an AXE in your inventory.
- Go back.
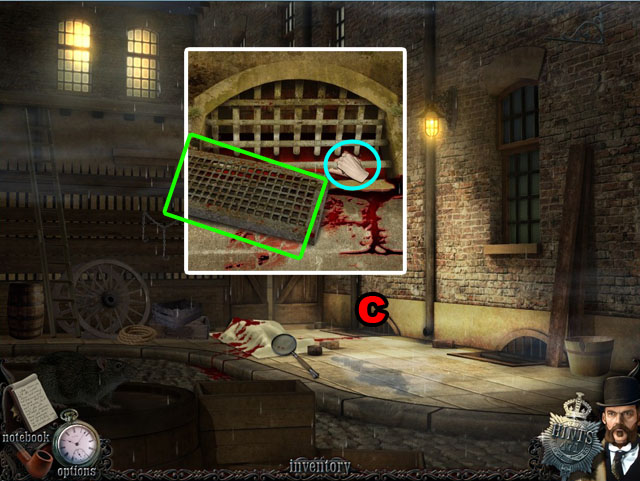
- Zoom in on the grate to the right (C).
- Use the AXE on the grate.
- Take the note.
- Enter the crime scene through the gate.
- Enter the hotspot.
- Find all of the hidden objects.
- You will receive a ROPE and an AXE.
- Zoom in on the door to the left (D).
- Use the AXE on the door and take the HOOK POLE.
- Zoom in on the stairs (E) and find the laudanum in the bushes.
- Zoom in on the grate (F)
- Use the HOOK POLE to get the necklace and collect it.
- Inspect the 2 new folders on the desk, and then exit the scene.
- You will need to reorder all of the images into the correct columns.
- Use what you remember about the first two times you order the pictures.
- See the screenshot for the correct order.
Chapter 12: Dark Secrets
- Click on a tile of the image to make it slide into an adjacent empty slot.
- Rearrange the tiles in a way that completes the image.
- Start by putting the top row in order anywhere in the puzzle and they move them up to the top 4 positions.
- Next work on getting the left 3 squares correct without changing the top 4.
- Lastly rearrange the final 5 squares to solve the puzzle. The empty square will be in the bottom right corner.
- Sometimes you will have to move things out of the way to make room. If you get stuck, mix everything up and try again.
- See the screenshot for solved puzzle.
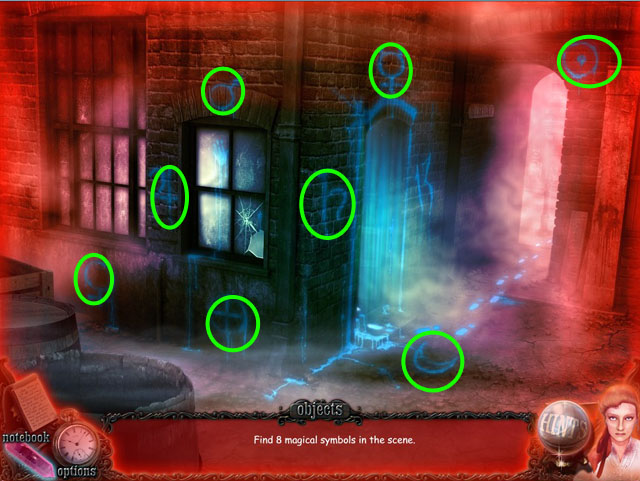
- Find the 8 magical symbols.
- Enter the house.
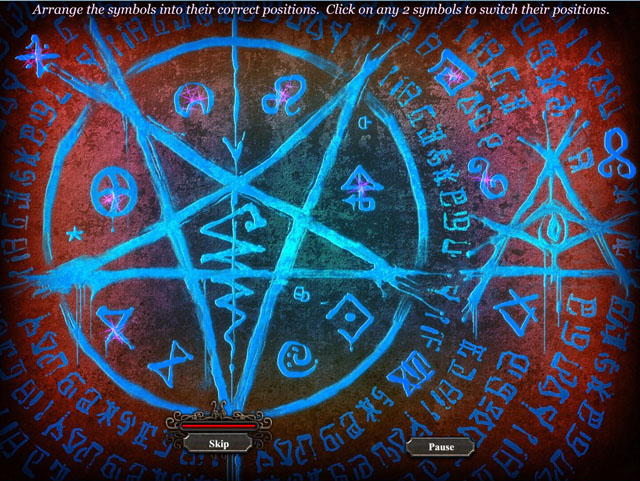
- Click on the writing on the wall to zoom in.
- Click on any two symbols to switch their locations.
- Match all of the symbols to the correct locations underneath them.
- See the screenshot for the solution.
- Click on the crystal ball
- Click on the rings to turn them and get them all in the correct rotation.
- Rotating one ring will rotate the ring inside it as well.
- To solve the puzzle start with the outermost ring and work your way toward the center.
- See the screenshot for the final solution.
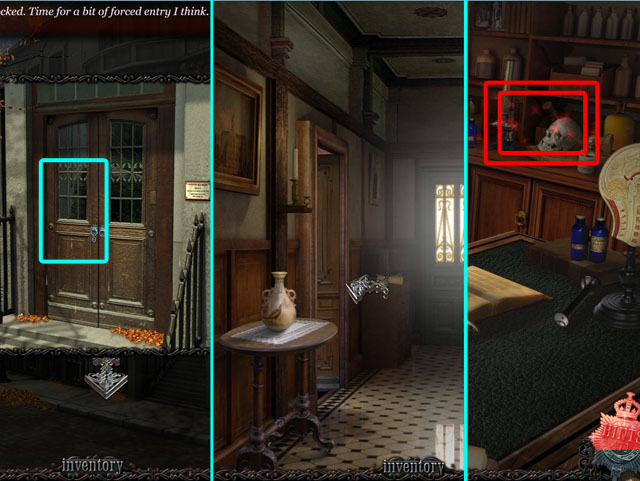
- Check the door to see that it is locked.
- Zoom in on the gutter full of leaves (A).
- Click the leaves to move them and take the NAIL.
- Zoom in on the door (B) and zoom in again on the plaque.
- Use the NAIL on the plaque and take the KEY.
- Use the KEY on the door and enter the house.
- Go towards the right in the hallway.
- Zoom in on the books and take the KEY (C).
- Zoom in under the couch and take the CRATE OPENER (D).
- Exit the room and use the KEY to get into the room across the hall.
- Zoom in on the crate (E).
- Use the CRATE OPENER to open it and click on the box.
- Click on a tile of the image to make it slide into an adjacent empty slot.
- Rearrange the tiles in a way that completes the image.
- This puzzle is like the previous puzzles, but the answer to where each piece should go is written underneath the pieces.
- Match the symbols on the top to the darker background underneath to solve the puzzle.
- The bottom right corner, as before, will be blank.
- See the screenshot for solved puzzle.
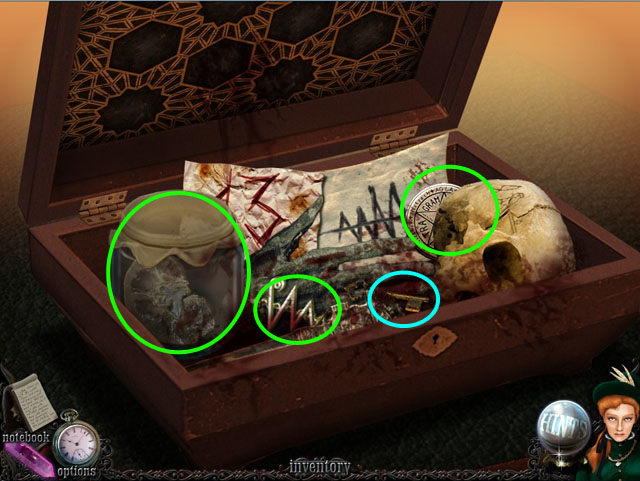
- Collect the symbol, the skull, the kidney and the KEY from inside the box.
- Zoom in on the desk (F).
- Use the KEY to open the desk.
- Look at the map
- Click on the name Mary Kelly 13 on the map to travel to that area.

- Click on the door to see that it is locked.
- Zoom in on the crate to the left (G).
- Take the BRICK.
- Zoom in on the window (H).
- Use the BRICK on the window.
- Pull aside the curtain and take the KEY.
- Use the KEY on the door and enter the house.
- Click on the hotspot in the middle of the room. Find all of the hidden objects.
- You will receive the QUIILL.
- Zoom in on the board on the ground (I).
- Use the CRATE OPENER to pry the board loose.
- Take the journal and the PAPER.
- Use the QUILL on the PAPER to write a LETTER.
- Zoom in to the mantle (J).
- Place the LETTER on the mantle.
Chapter 13: The Finale
- Enter Miller's Court.
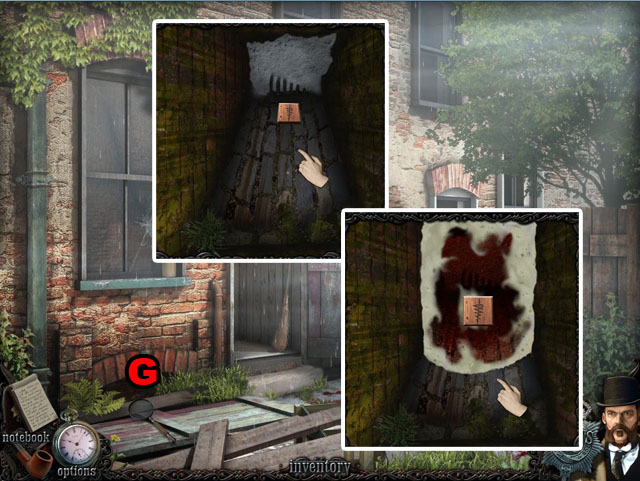
- You can look at the body through the window (A).
- Zoom in to the board on the wall (B).
- Grab the LOG from under the burlap.
- Use the ROPE on the LOG to make a RAM.
- Use the RAM on door.
- Once you are inside click on the hotspot.
- Find all of the hidden objects.
- You will receive a few pieces of evidence.
- Look on the mantle and grab the letter that you just placed there.
- Enter the house.
- Inspect everything on the table (C).
- Inspect the empty bottles on the desk (D).
- Inspect the crystal ball and the book beside it (E).
- Go upstairs and click on the sleeping woman.
- Zoom in on the door
- Use the BILLY CLUB to smash the window and go inside.
- Once inside go to the left room and enter the hotspot.
- Find all of the hidden objects.
- You will receive an ASTROLOGY SYMBOL.
- Exit the room and go to the room across the hall to the right.
- Zoom in on the bottles on the table (F).
- Take the SYMBOL from under the book.
- Zoom in under the rug (G).
- Take the KEY.
- Zoom into the bookshelf (H).
- Open the book and take the SYMBOL.
- Go back to the previous room.
- Open the desk with the KEY (I).
- Take the SYMBOL.
- Return to the hallway.
- Zoom in on the vase and smash it with your BILLY CLUB (J).
- Take the SYMBOL.
- Go to the room on the right side.
- Zoom in on the painting and remove it from the wall (K).
- Place the 5 ASTROLOGY SYMBOLS in the correct places.
- Take all of the papers and books inside the safe.
- Click on the paper that pops up on the screen.
- Exit on the street to the north.
- Talk to the woman at the funeral to finish the game.
- Congratulations! You have just finished Mystery Murders: Jack the Ripper.
Created at: 2011-09-06