

Walkthrough Menu
- General Tips
- Introduction
- Day 1: Welcome Home
- Day 2: It is Getting Personal
- Day 3: Family and Friends
- Day 4: Buried Alive
- Day 5: Under Attack
- Night…Is Paved with Good Intentions
General Tips
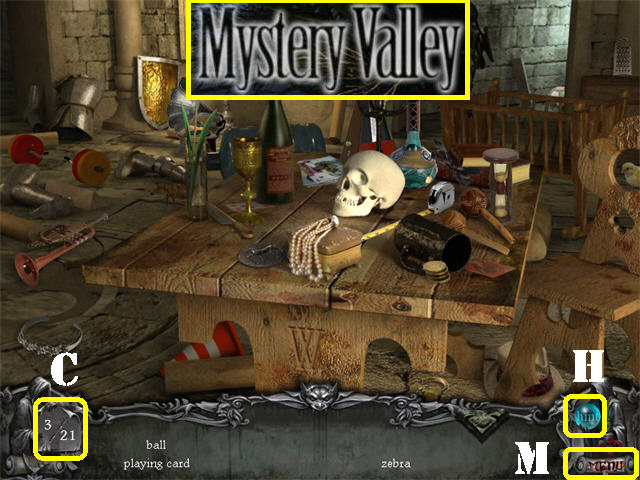
- Mini-games can be skipped once the skip button is full.
- You can view instructions for mini-games by clicking on the word “Instructions” in the lower left corner.
- The Hint (H) functionality is only available in the Hidden Object Scenes.
- Click on the MENU (M) button in the lower right corner to exit, pause or resume the game. You can also adjust your options (sound, music, and screen size).
- The counter (C) in the lower left side of each Hidden Object Scene lets you know how many objects you have to find in total and how many are left to find.
- Items written in yellow in Hidden Object Scenes need an action to be performed before they can be revealed.
- Your cursor will distort itself when you click randomly in a search scene.
- Some inventory items will merge automatically once all the components are found.
- When gears appear over an item it means you need to place another item over it.
- An open hand cursor allows you to grab items from a scene.
- Read your clue book in the lower left corner, it contains puzzle hints along with information uncovered during the game.
- Some puzzle solutions are random; make sure to read your clue book to find the correct solutions for your particular game.
- In this game certain actions trigger Hidden Object Scenes to appear or the ability of inventory items to be picked up.
Introduction
- Go forward.
- Take the KEY in the lower right.
- Place the KEY in the keyhole, turn the handle and go inside.
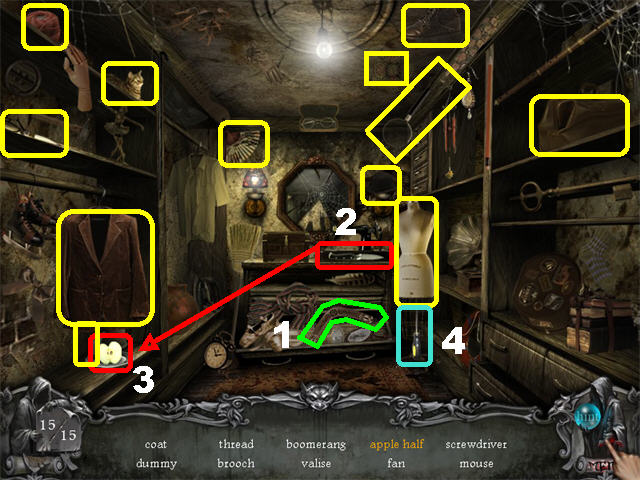
- Click on the sparkly area on left to trigger a search scene.
- Open the drawer; take the BOOMERANG (1) or whatever item is written in yellow in your game.
- Take the KNIFE (2) above the drawer, cut the apple on left and take the APPLE HALF (3).
- The SCREWDRIVER (4) will be added to inventory.
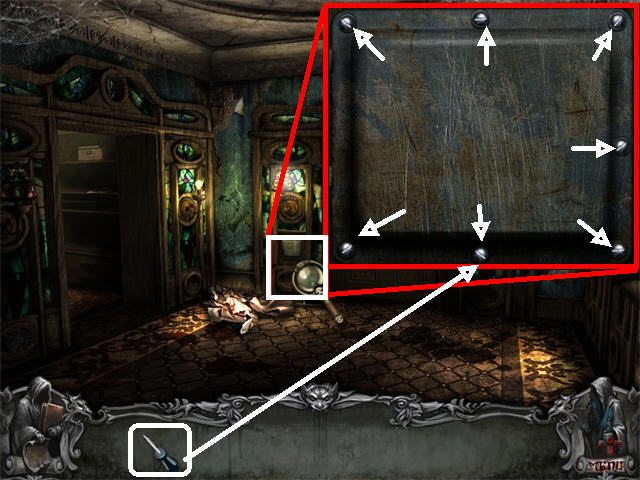
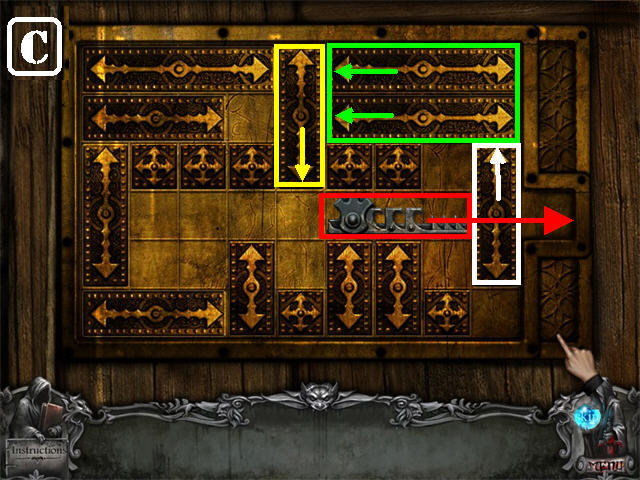
- Zoom into the panel on the left side of the door.
- Remove each of the 7 screws marked with white arrows using the SCREWDRIVER.
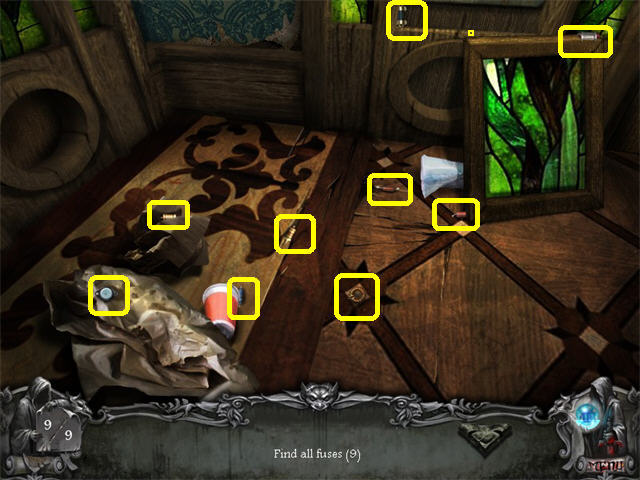
- Pick up the FUSES marked in yellow in the screenshot.
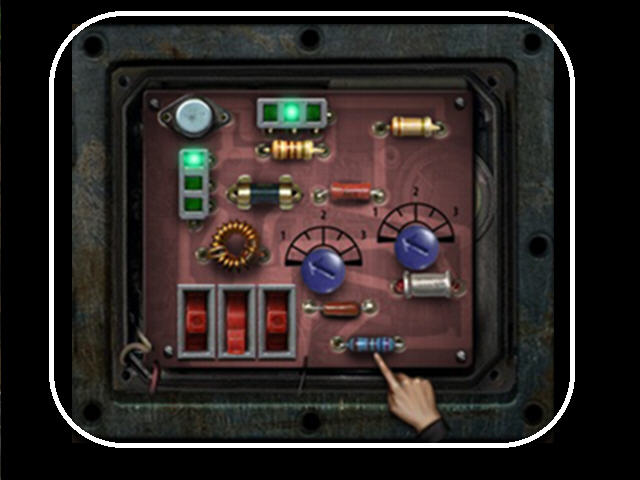
- Place the FUSES as shown in the screenshot.
- Click on the lights and the buttons to change their positions as shown in the screenshot.
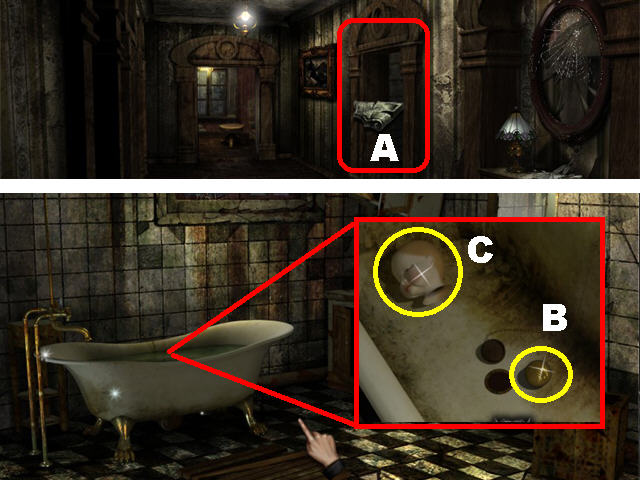
- Go through the door after the puzzle has been solved and go into right door (A).
- Zoom into the tub; click on the crack on the side of the tub to drain the water.
- Take the DOORKNOB (B) in the tub.
- Click on the doll’s head (C) to watch the short animation.
- Exit the bathroom and go forward.
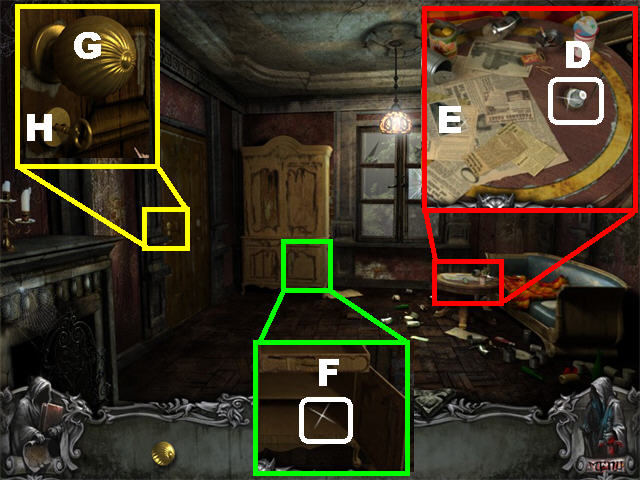
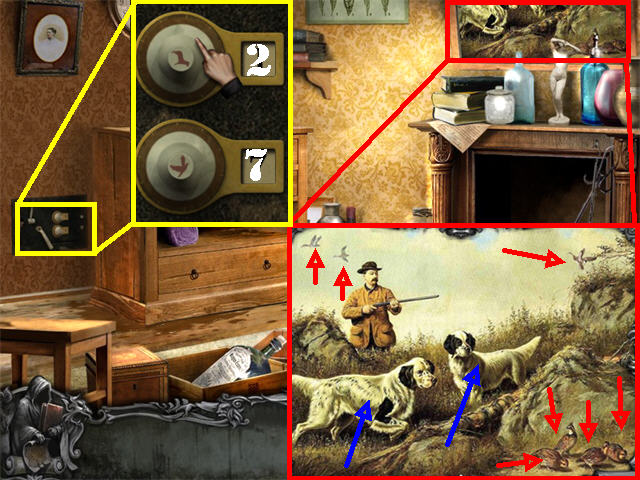
- Zoom into the coffee table; take the LOCK DIAL (D).
- Click on the PRESS CLIPPINGS on the table (E).
- Exit the zoom scene and go towards the wardrobe.
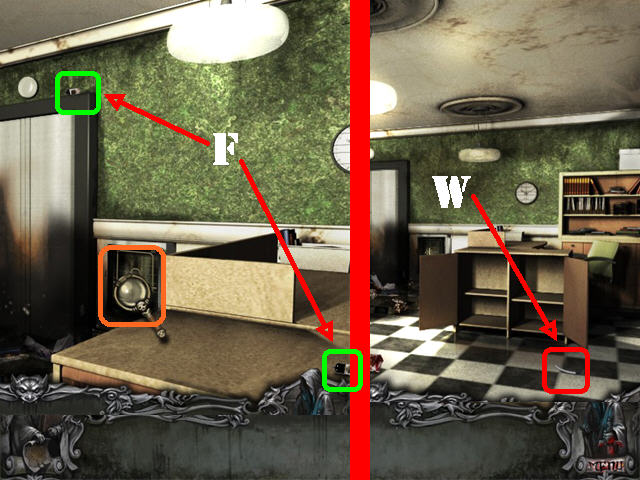
- Open all the cabinets and take the KEY (F). The KEY will be placed randomly in the game but there will be a sparkle indicating its location since it’s hard to see.
- Zoom into the door.
- Place the DOORKNOB on the door (G).
- Place the KEY in the lock (H).
- Turn the doorknob and go through the door.
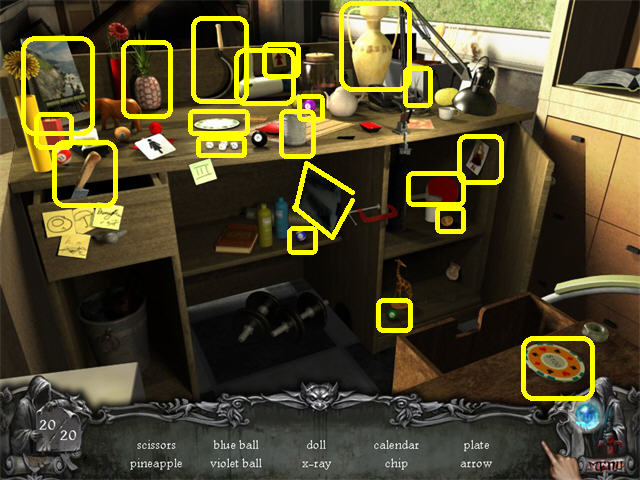
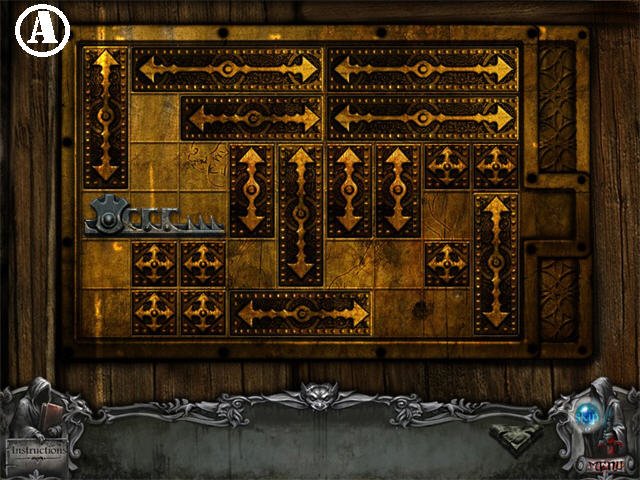
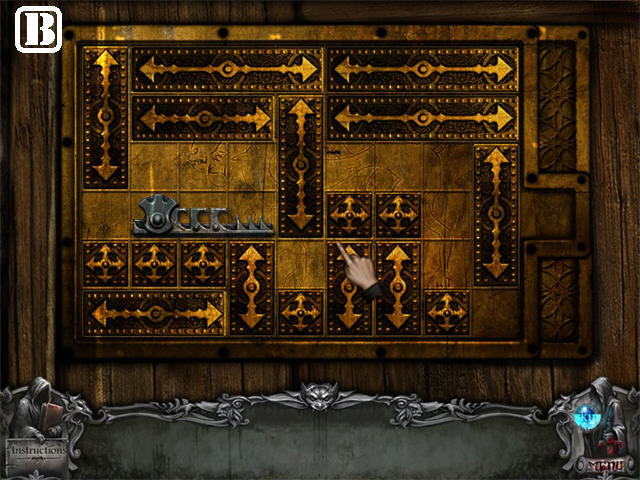
- Zoom into the desk to trigger a puzzle.
- Assemble the pieces as shown in the screenshot.
- Correct pieces will lock in place.
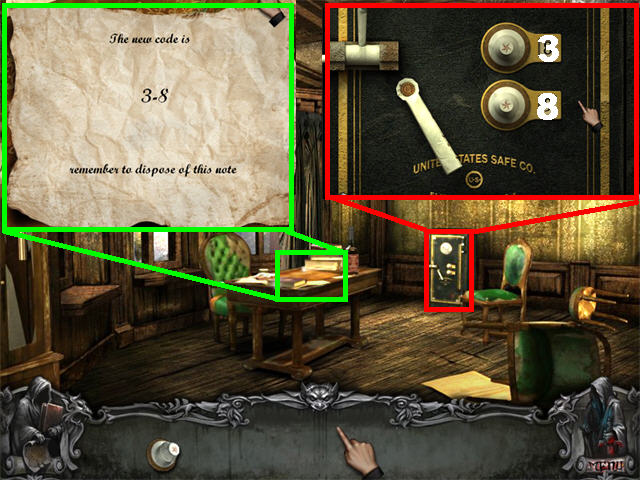
- The paper says: “The new code is 8-6 - remember to dispose of this note”.
- The number you receive is random; set the dials according to the numbers in your game.
- Zoom into the safe; place the LOCK DIAL on the safe.
- Turn the top dial to the first number on your paper and set the bottom dial to the second number on your paper to unlock the safe.
Day 1: Welcome Home
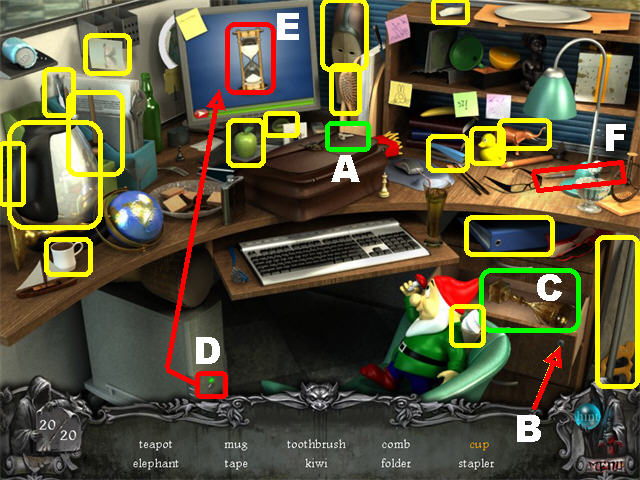
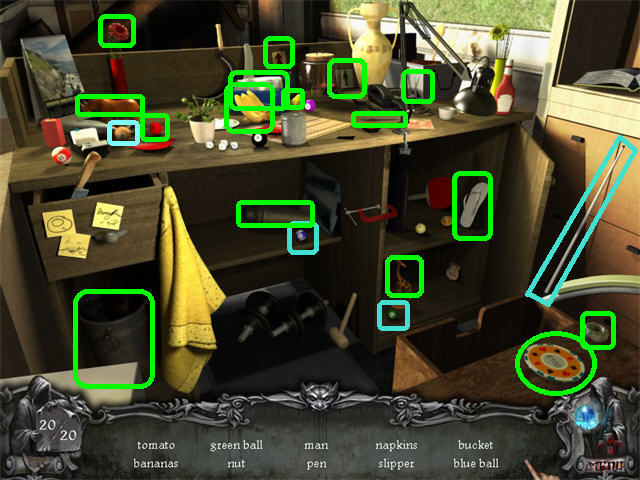
- Zoom into the sparkly desk to trigger a search scene.
- Take the KEY on top of the briefcase (A).
- Open the drawer with the KEY (B); take the CUP (C).
- Click on the computer tower (D); take the HOURGLASS (E) that appears on the monitor.
- The PAINTBRUSH (F) will be added to inventory.
- Take the COLORS (G) at the bottom of the easel.
- Go forward and talk to the cleaning lady; she asks you to find the hunting tools.
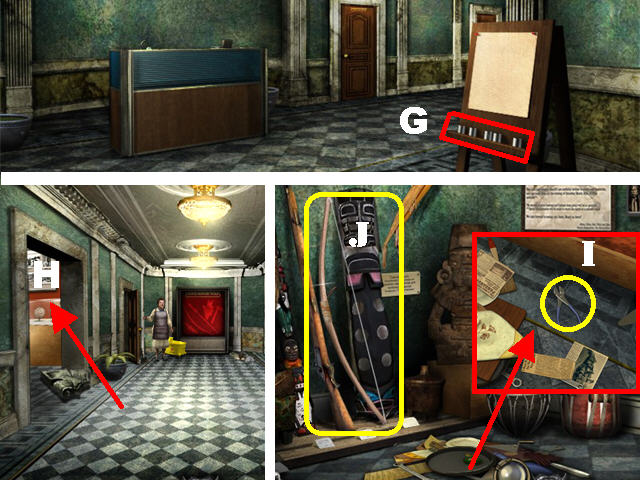
- Go into the left entryway (H).
- Zoom into the pile on the floor.
- Move all the items out of the way and take the PLIERS (I).
- Take the BOW (J) on the left side of the wall.
- Click down and go into the right entrance.
- Zoom into the teepee to trigger a puzzle.
- Drag the circles around until they form the image on the screenshot (K).
- Correct pieces will lock in place.
- The DAGGER will be added to inventory after the puzzle has been solved.
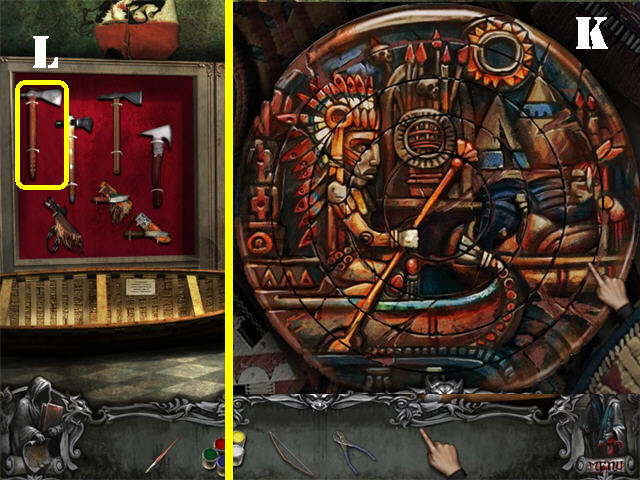
- Take the TOMAHAWK (L) on the left using the WIRE CUTTERS.
- Exit the room and go forward.
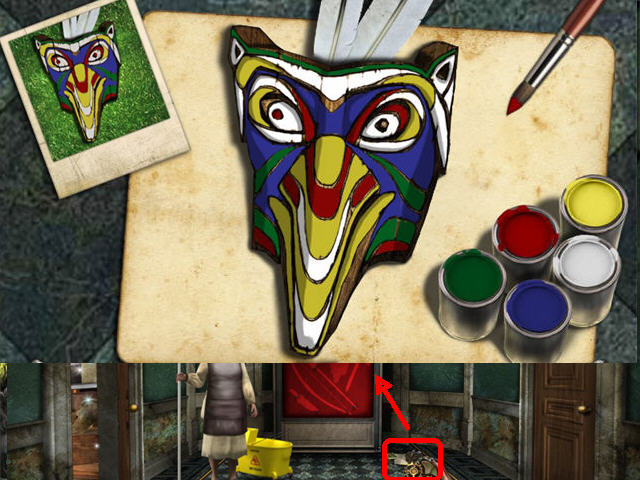
- Zoom into the mask on the floor to trigger a puzzle.
- Reproduce the image shown on the picture by painting the correct colors onto the mask.
- Dip the brush into the paint you want and then place it on the part of the mask you want to color.
- To place a new color on the brush, dip it into a different color.
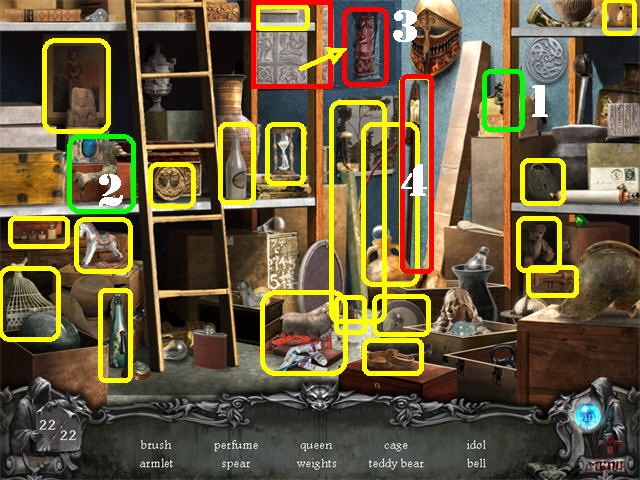
- Go into the left door to trigger a search scene.
- Drag the man (1) in the upper right and place it on the horse (2) on the left; click on the HORSEMAN.
- Move the tile in the upper right; take the IDOL (3).
- The SPEAR (4) will be added to inventory.
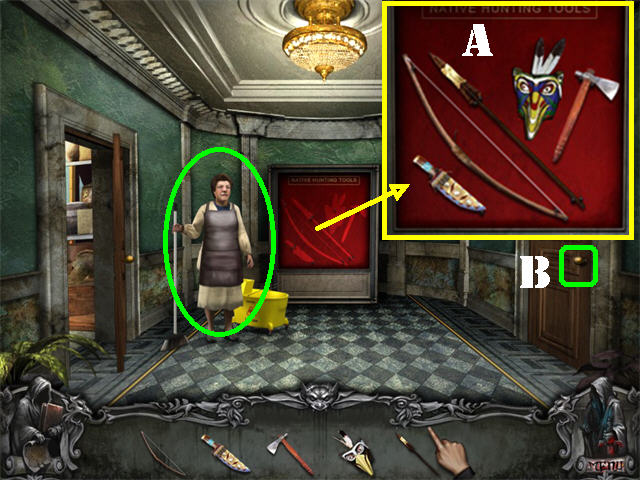
- Zoom into the glass case on the back wall.
- Place the TOMAHAWK, BOW, DAGGER, MASK, and SPEAR into their matching silhouettes (A).
- The cleaning lady will give you the KEY.
- Use the KEY to unlock the right door (B).
- Click on the lady standing in the scene and all the lights will go off.
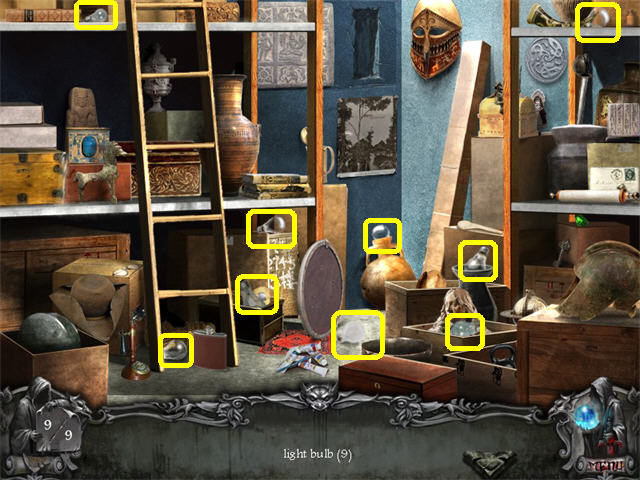
- Exit this scene and go into the left door to activate a search scene.
- Find the 9 LIGHT BULBS marked in yellow.
- Four LIGHT BULBS will be added to inventory.
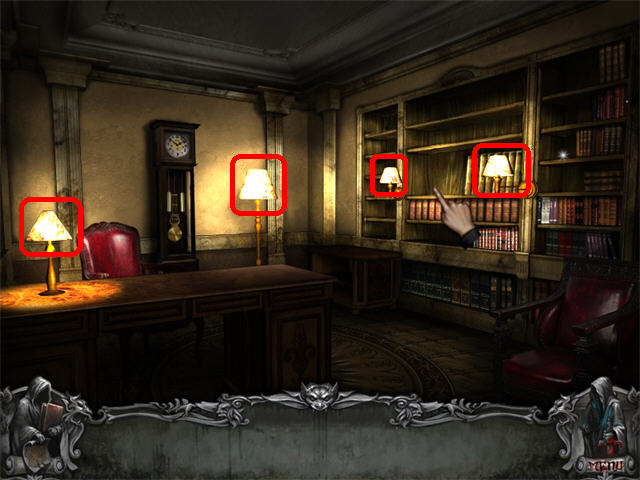
- Go into the right door.
- Place the 4 LIGHT BULBS into the 4 lamps marked in red in to end this day!
Day 2: It is Getting Personal
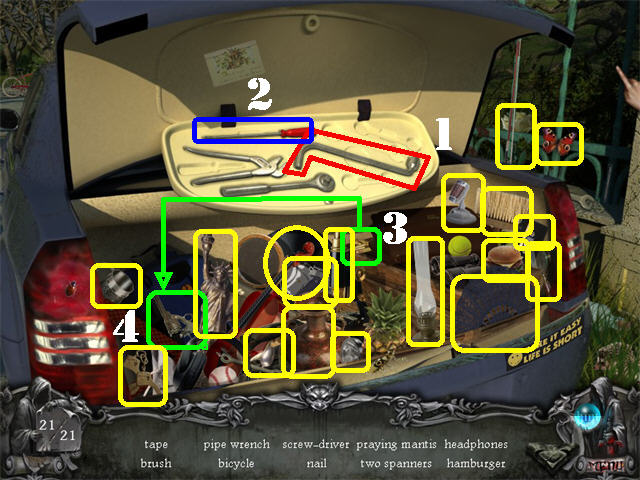
- Zoom into the sparkly car to trigger a search scene.
- Click on the trunk; take the PIPE WRENCH (1) and the SCREWDRIVER (2).
- Grab the BULLETS (3) in the center and place them in the REVOLVER (4) on the left; take the LOADED REVOLVER (5).
- The FLASHLIGHT (LAMP) will be added to inventory.
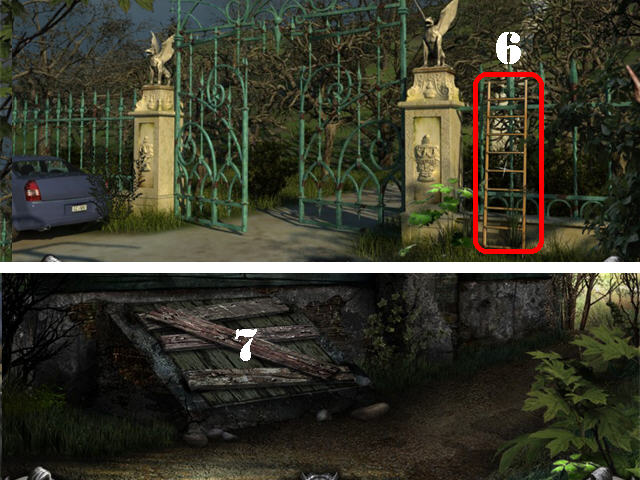
- Take the LADDER (6) on the right.
- Go through the gates and click on the door.
- Click down and head towards the right.
- Click on the basement doors (7) to trigger the crowbar search.
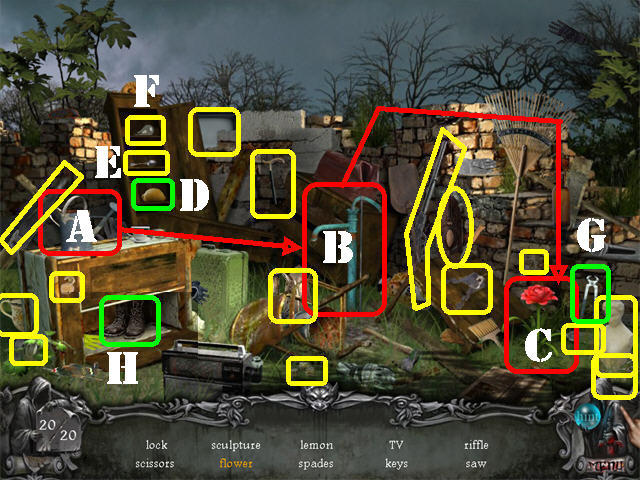
- Head right and click on the sparkly area to trigger a search.
- Drag the WATERING CAN (A) to the water tap (B) to fill it with water.
- Place the FULL WATERING CAN on the flower in the lower right; take the FLOWER (C) after it is in full bloom.
- Open the cabinet on the left; take the LEMON (D), the SPOON (E), and the LIGHT BULB (F).
- Take the PLIERS (G) in the lower right and pull the nails off the cupboard on the left; take the BOOTS (H).
- The LIGHT BULB will be added to inventory.
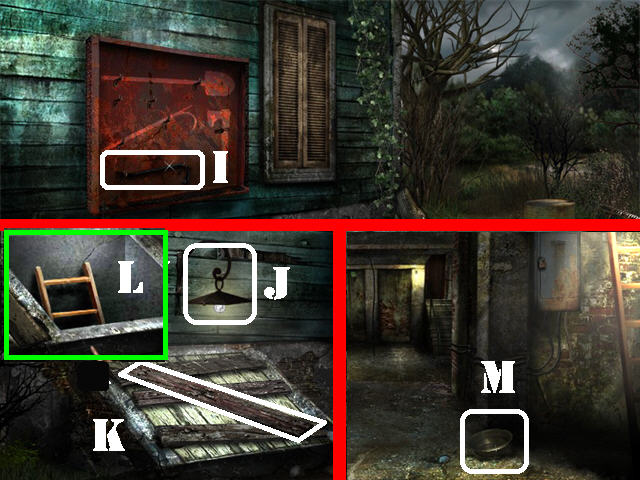
- Take the CROWBAR in the case (I).
- Click down.
- Place the LIGHT BULB in the lamp (J).
- Use the CROWBAR to remove the planks leading to the basement starting with the topmost plank (K).
- Click on the door to open it.
- Place the LADDER in the hatch and go down (L).
- Take the RECIPIENT (M) on the ground.
- Go into the 2 left entryways to activate a search scene.
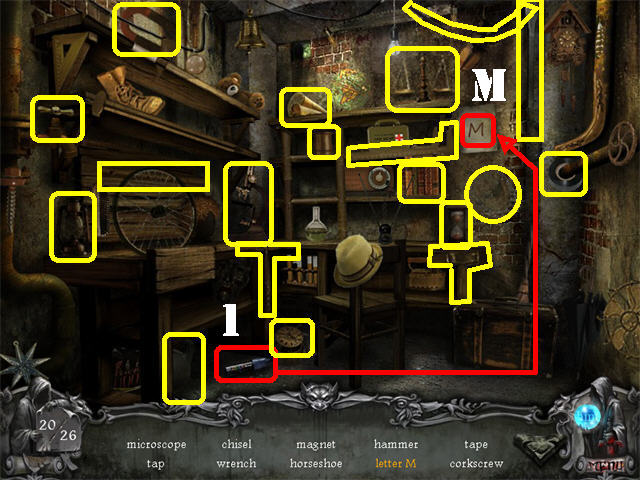
- Take the MAGIC MARKER (1) on the ground and place it on the paper in the upper right; take the LETTER M (M).
- The SCOTCH TAPE will be added to inventory.
- Exit this scene.
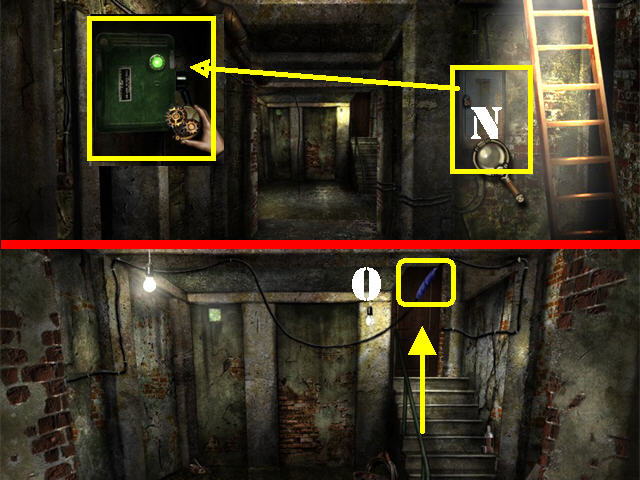
- Zoom into the electric box; open the lock with the CROWBAR (N).
- Flip the switch to turn off the lights.
- Go forward.
- Place the SCOTCH TAPE on the wire (O).
- Go back to the electric box and turn the lights back on.
- Go forward and then up the stairs.
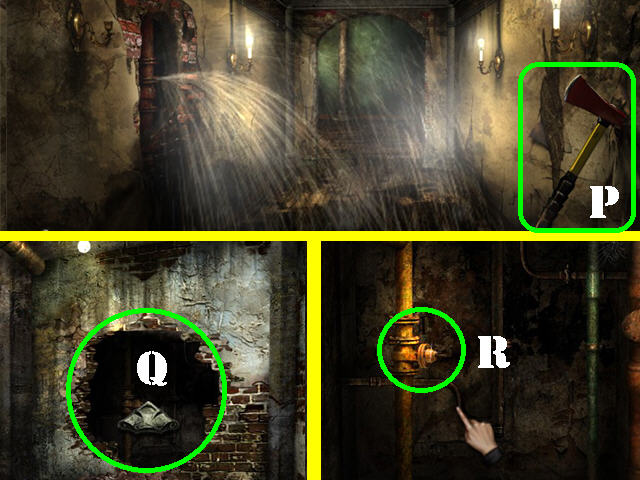
- Take the AXE on the right (P).
- Click down twice and go into the left door.
- Break the back wall with the AXE (Q).
- Go through the broken wall to activate a search scene (R).
- Click down.
- Click on the left entryway to play a Hidden Object Scene.
- Find the items in silhouette.
- The VALVE will be added to inventory.
- Go through the broken wall.
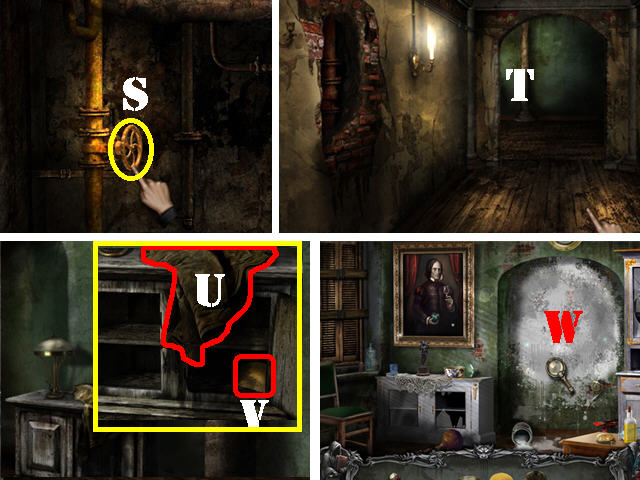
- Place the VALVE on the pipes (S).
- Go to the hallway, forward, and up the steps; the water has now been shut off (T).
- Continue forward.
- Zoom into the cupboard on right.
- Use the CROWBAR to open the lock.
- Take the STRANGE JACKET (U).
- Take the SPONGE (V) inside the cupboard.
- Exit the zoom view and go left.
- Click on the white wall to obtain a list of items you need to look for (W).

- Leave the house and head right.
- Play the Hidden Object Scene on the right to look for the 9 gloves.
- The GLOVES will be added to inventory.
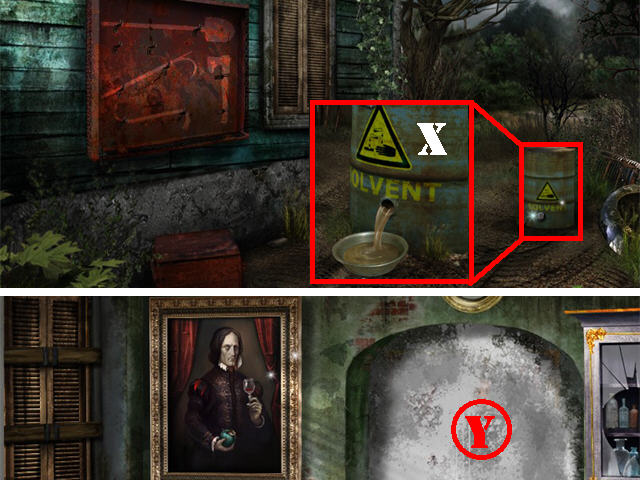
- Zoom into the solvent on the right.
- Place the RECIPIENT in front of the barrel.
- Knock the cap off with the CROWBAR.
- Take the SOLVENT and it will automatically merge with the GLOVES and the SPONGE to create the WALL CLEANING KIT (X).
- Go down to the basement and return to the room with the dirty wall up the stairs.
- Zoom into the mirror; clean it with the WALL CLEANING KIT (Y) to end the day.
Day 3: Family and Friends
- Click on the right door to trigger the KEY search.
- Go forward.
- Pull on the rope for the ladder to appear.
- Click above the ladder to trigger a search scene.
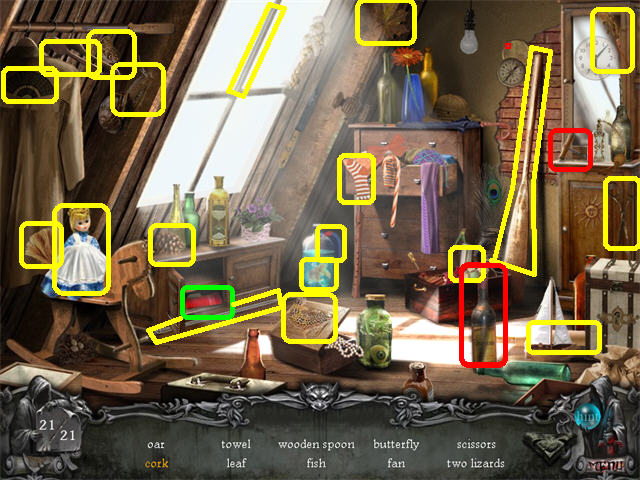
- Open the drawer in the lower left; take the TOWEL.
- Grab the corkscrew in the upper right and use it on the bottle in the lower right to obtain the CORK.
- The MAGNET will be added to inventory.
- Click down.
- Go into the left door.
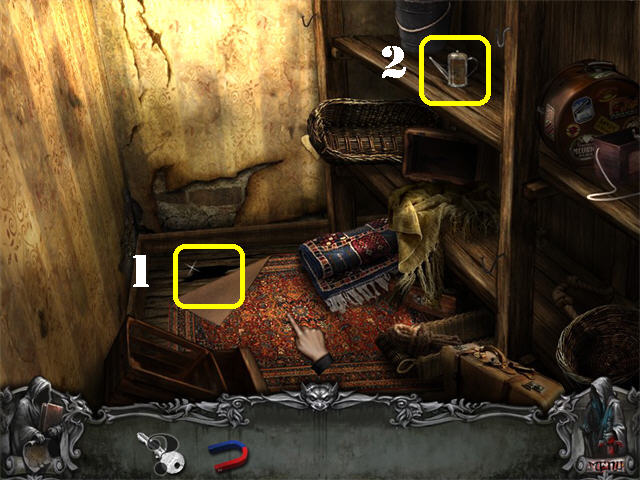
- Move the edge of the carpet.
- Place the MAGNET on the crack in the floor to obtain the KEY (1).
- Take the OIL CAN on the top shelf (2).
- Return to the hallway.
- Open the right door with the KEY and go inside.
- Zoom into the painting in the upper right.
- Note the amount of birds and dogs in the painting (it varies per game).
- Place the OILCAN on the left side of the floor (in front of the dresser).
- Click on the dresser to move it out of the way.
- Zoom into the safe behind the dresser.
- Place the amount of dogs on the top dial and the amount of birds on the bottom dial to end the day.
Day 4: Buried Alive
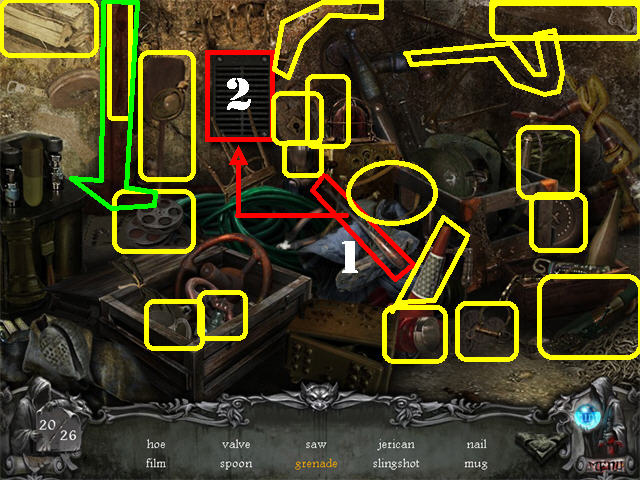
- Click on the sparkly area on the floor to trigger a search.
- Take the SCREWDRIVER (1) in the lower center and remove the grid on the back wall; take the GRENADE (2).
- The GASOLINE will be added to inventory.
- Click on the cables (3) in the upper right to trigger a wire cutter search.
- Head right.
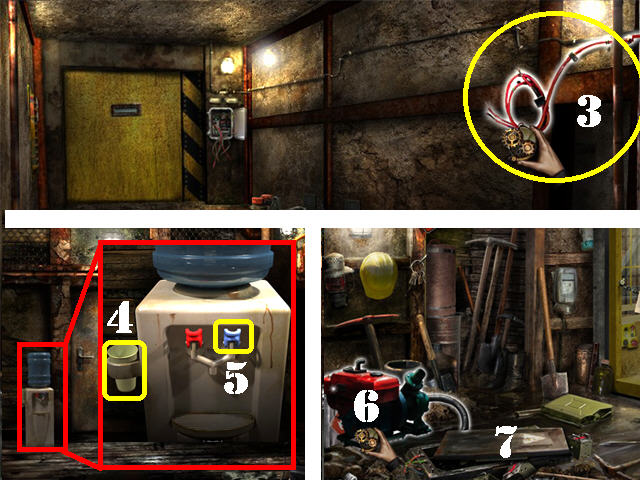
- Zoom into the water cooler; take the PLASTIC CUP (4).
- Place the PLASTIC CUP on the water cooler.
- Click on the cold water tap (5).
- Take the CUP OF COLD WATER.
- Exit the zoom scene and head right.
- Click on the letter on the right and read it.
- Put some GASOLINE on the generator on the left (6).
- Click on the electric box (7) on the ground to trigger a puzzle.
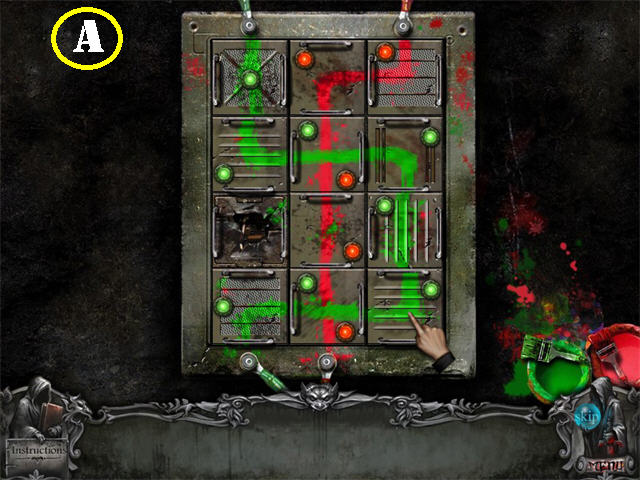
- Place the fuses back in place.
- Green and Red lights indicate correctly placed fuses. Dim lights are fuses that have been placed incorrectly.
- You must make a connection between the green and red wires at the top and bottom of the puzzle.
- Please look at the screenshot for the solution (8).
- Click on the elevator to go down.
- Give the man the CUP OF COLD WATER (9). If you have hot water instead, give it to him so you can empty the cup. Then return to the water cooler and take the cold water instead.
- You are automatically taken back upstairs.
- The man gives you the KEY TO THE STORAGE.
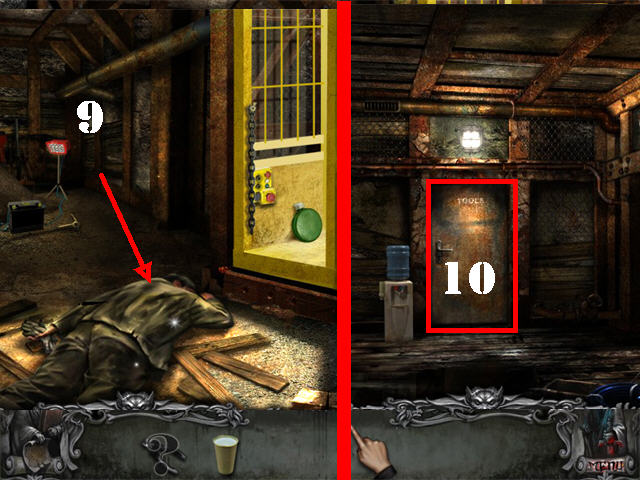
- Click down and go right.
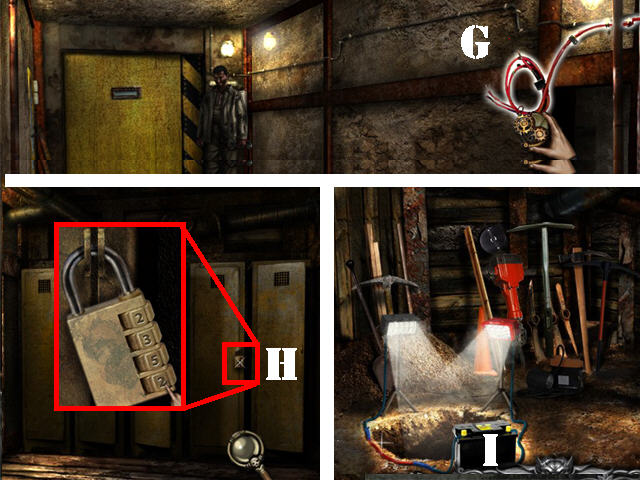
- Use the KEY on the storage door (10) in the back of the scene and go through the door.
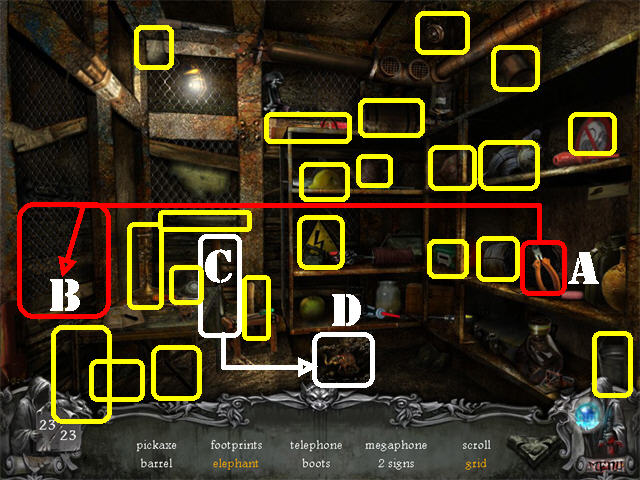
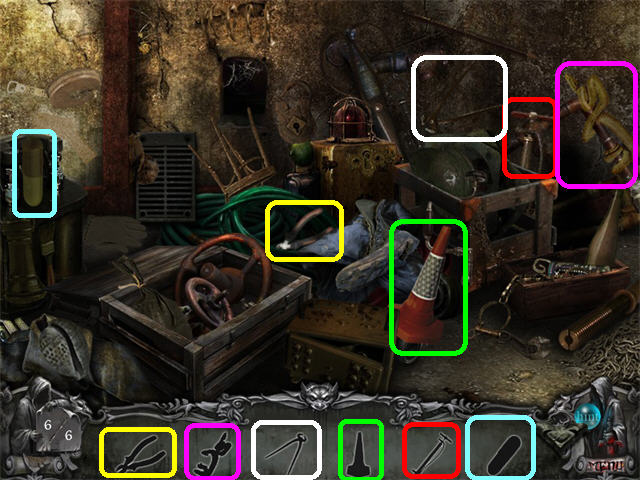
- Play the Hidden Object Scene on the left.
- Grab the WIRE CUTTER (A) on the right and place it on the GRID (B) on the left.
- Grab the SHOVEL (C) on the lower left and place it on the ground; take the ELEPHANT (D).
- The TOOLBOX will be added to inventory.
- Pick up the IRON BAR (E) in the lower right.
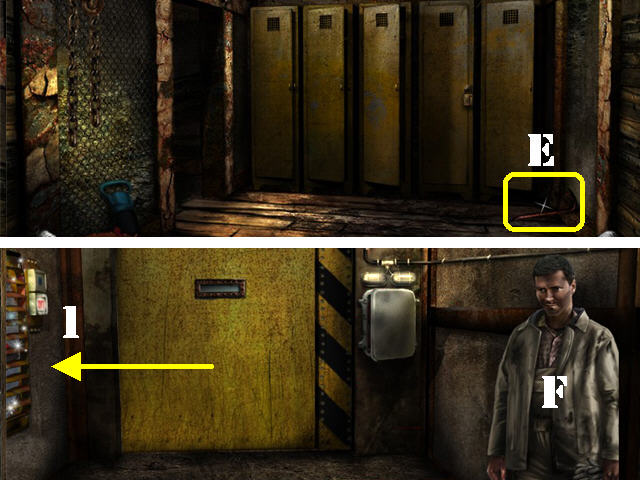
- Click down twice and go forward.
- Give the TOOLBOX to the miner (F).
- Click on the sparkly area (1) on the left to trigger a search scene in the storage room.
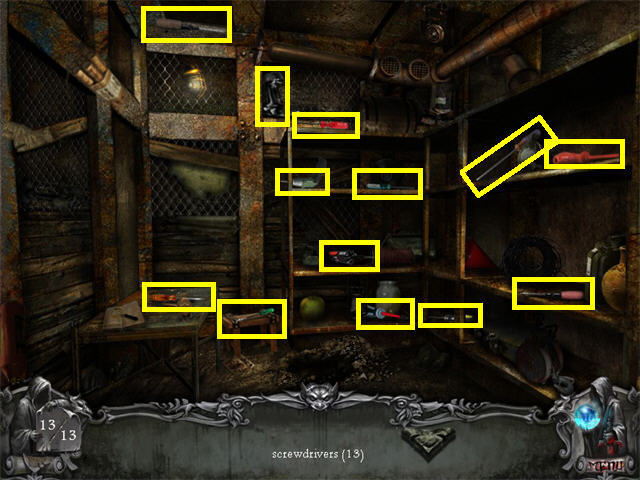
- Go to the storage room.
- Find the 13 SCREWDRIVERS.
- The ELECTRIC SCREWDRIVER will be added to inventory.
- Go back to the miner.
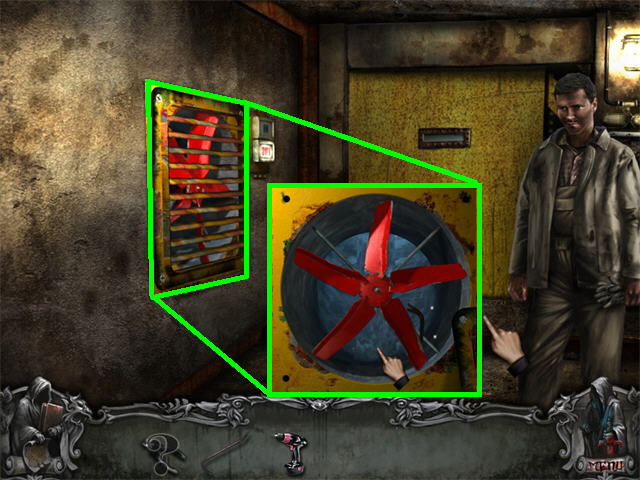
- Zoom into the fan on left.
- Remove the 4 screws around the fan with the ELECTRIC SCREWDRIVER.
- Place the IRON BAR on the fan to stop the blades.
- You will receive a random 4 digit locker code number.
- Click down.
- Click on the sparkly area to trigger a search scene.
- Find all the items in a silhouette.
- The WIRE CUTTER will be added to inventory.
- Cut the wire in the upper right with the WIRE CUTTER (G).
- Go into the storage area.
- Zoom into the next to last locker (H).
- Turn the dial to the number you received from the miner to obtain the CAMERA. (You can look in the clue book if you don’t remember the number).
- Go down the elevator and head forward.
- Place the WIRE on the battery (I).
- Take a picture of the dig site with the CAMERA.
Day 5: Under Attack

- You have to find 5 WATER BOTTLES; they are marked in red.
- Open the cabinet on the right; take the WATER BOTTLE.
- Take the other 2 WATER BOTTLES marked in red.
- Zoom into the table.
- Take the WATER BOTTLE on the couch.
- Take the WATER BOTTLE behind the right couch.
- Exit the zoom scene.
- Go forward.
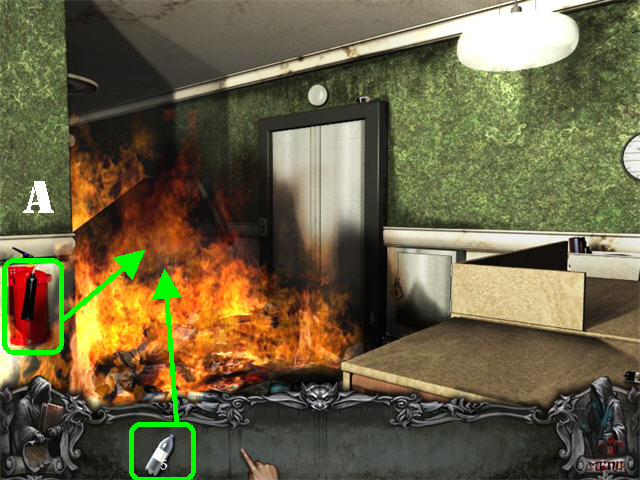
- Douse the fire with the WATER.
- Grab the FIRE EXTINGUISHER in the lower left (A).
- Use the FIRE EXTINGUISHER on the fire twice.
- Click on the elevator door and then click on the panel next to the elevator.
- Click down.
- Click on the Hidden Object Scene on the right.
- The 7 PLAYING CARDS are marked in light blue.
- The ELEVATOR KEY will be added to inventory.
- Go forward.
- Zoom into the locked box next to the elevator (A).
- Open the lock with the ELEVATOR KEY (you have to replace all the fuses and wires).
- All the fuses will be marked in green and the wires will be marked in red.
- Take the FUSE (F) in the lower right corner.
- Take the other FUSE (F) in the upper right corner of the elevator.
- Click down.
- Take the BIT OF WIRE (W) on the ground.
- Zoom into the couch.
- Take the FUSE (F) on the left couch.
- Remove the 3 cushions on the right couch; take the 2 FUSES (F).
- Zoom into the left lamp on the wall (B); click on the 2 wires attached to the lamp to trigger a search scene in the living room.
- Move the magazines on the table; take the BIT OF WIRE (W).
- Grab the BIT OF WIRE (W) in the upper right.
- Exit the zoom scene.
- Click on the bookcase to trigger a Hidden Object Scene.
- The SCISSORS will be added to inventory.
- Zoom into the couch again.
- Zoom into the left lamp on the wall.
- Cut the 2 BITS OF WIRE with the SCISSORS.
- Return to the elevator area.
- Zoom into the box next to the elevator; the wires and fuses will be attached to the box.
- Click on each wire to rotate it until you have a connection between all the fuses and the wire.
- Please look at the screenshot for the solution.
- The Day will end as soon as the puzzle is solved!
Night…Is paved with good Intentions
- Zoom into the bars in the upper left (A).
- Click on the bars again and Alex gives you a DAGGER.
- Zoom into the door.
- Remove all the screws with the DAGGER (B) to reveal a puzzle.
- Move the silver piece to the right end of the scene following the images on the screenshot.
- Check out our video solution!
- Screenshot “A” represents the beginning stage of the puzzle.
- Move all the pieces to the positions shown on screenshot “B”.
- For screenshot “C” move the pieces in the following order: yellow down, green left, white up, and take the red piece all the way to the right to complete the puzzle.
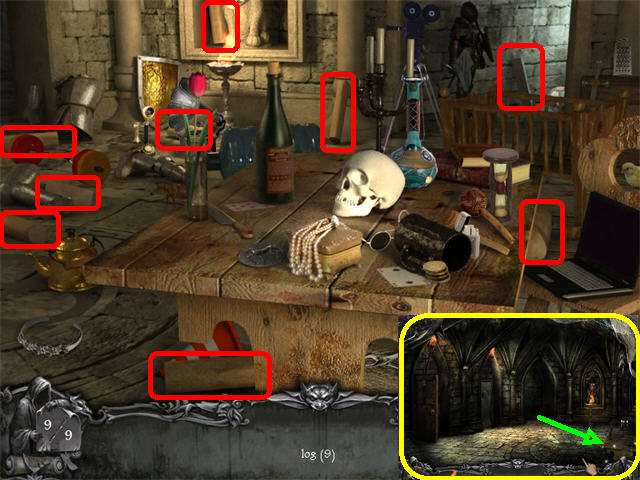
- Click on the sparkly area in the lower right to trigger a search scene.
- Grab the 3 FEATHERS marked in light blue and place them on the helmet in the lower left to obtain the GRAND HELM (1).
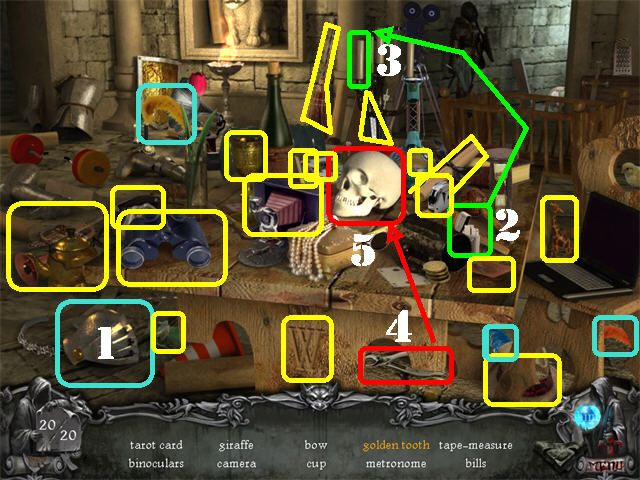
- Grab the LIGHTER (2) on the right side of the table, place it on the candle in the candelabra and click on the BURNING CANDLE (3).
- Grab the PLIERS (4) below the table and use them to take the GOLDEN TOOTH from the skull’s head (5).
- The YELLOW LIQUID will be added to inventory.
- Go forward.
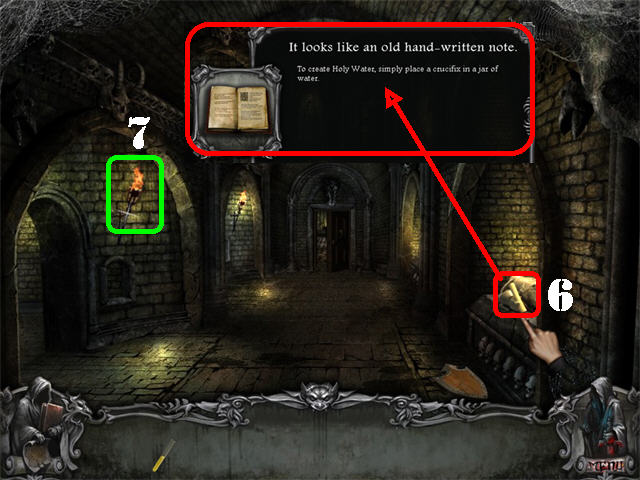
- Move the shield in the lower right; click on the handwritten note (6). It says: “To create Holy Water, simply place a crucifix in a jar of water.”
- Grab the TORCH (7) on the left side of the wall.
- Go into left door.
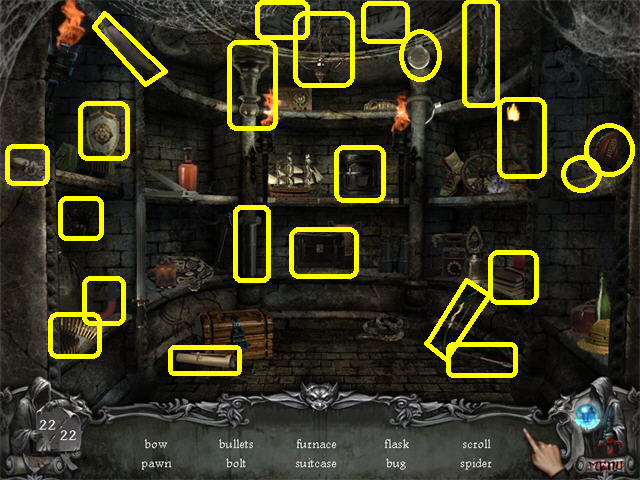
- Click on the sparkly area on the right to access a search scene.
- The FLASK will be added to inventory.
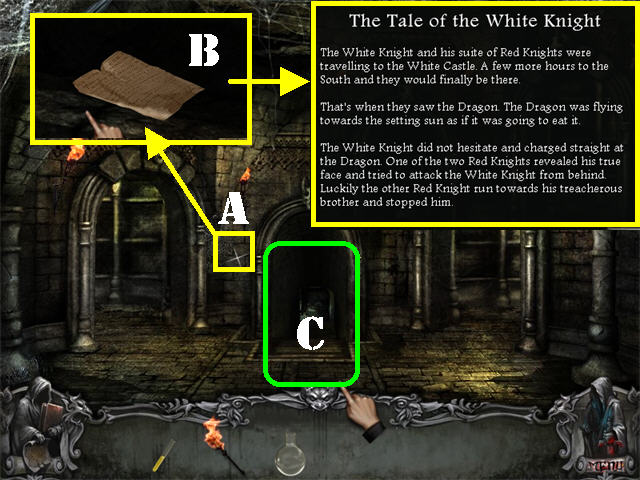
- Zoom into the upper left side of the middle entrance (A).
- Click on the stone to remove it (B); read the “The Tale of the White Knight”.‘The White Knight and his suite of Red Knights were traveling to the White Castle. A few more hours to the South and they would finally be there.That’s when they saw the Dragon. The Dragon was flying towards the setting sun as if it was going to eat it.The White Knight did not hesitate and charged straight at the Dragon. One of the two Red Knights revealed his true face and tried to attack the White Knight from behind. Luckily the other Red Knight ran towards his treacherous brother and stopped him.”
- Go into the middle entrance (C).
- Take the STONE (D) on the ground.
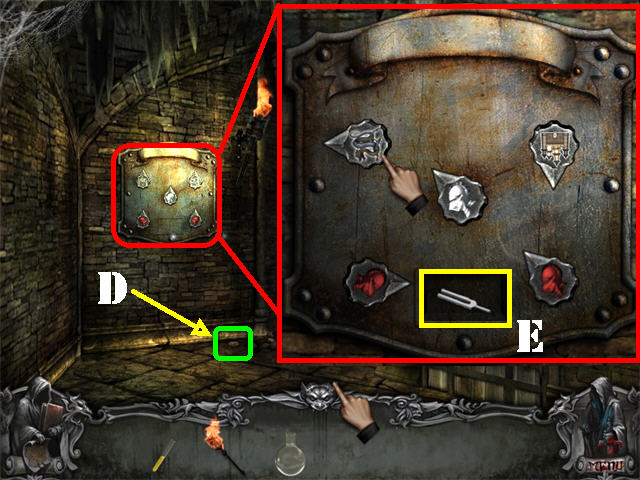
- Zoom into the puzzle on the back wall.
- Move the items as shown in the screenshot. The solution to this puzzle can be found by reading the “The Tale of the White Knight” outside this entrance (Please see previous screenshot).
- Take the TUNING FORK (E) after the puzzle has been solved.
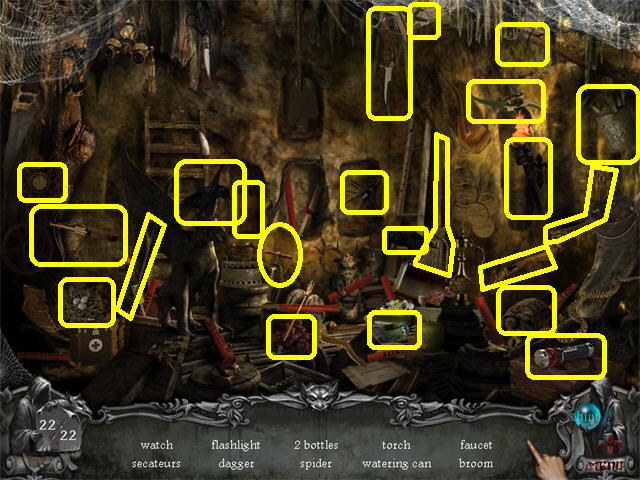
- Click on the sparkly area to access a search scene.
- The FAUCET will be added to inventory.
- Click down twice, go forward and turn left.
- Take the FIREWOOD (F) in the lower right.
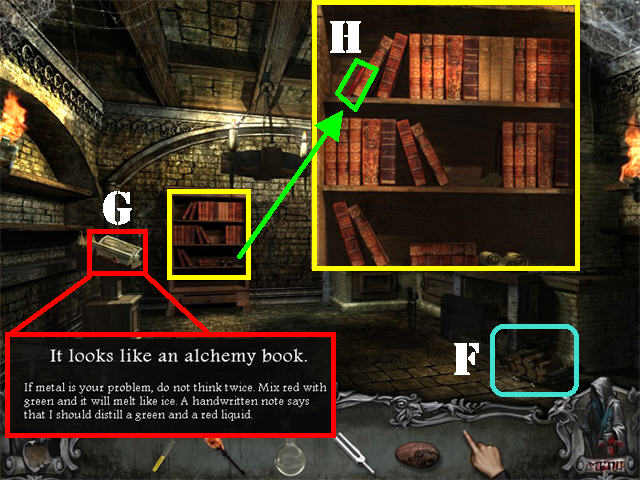
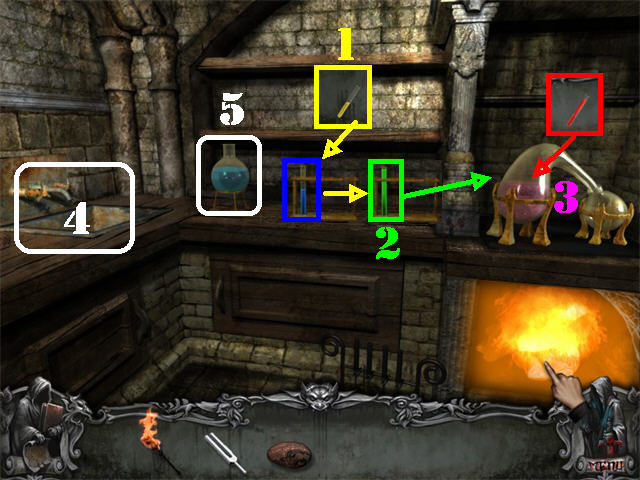
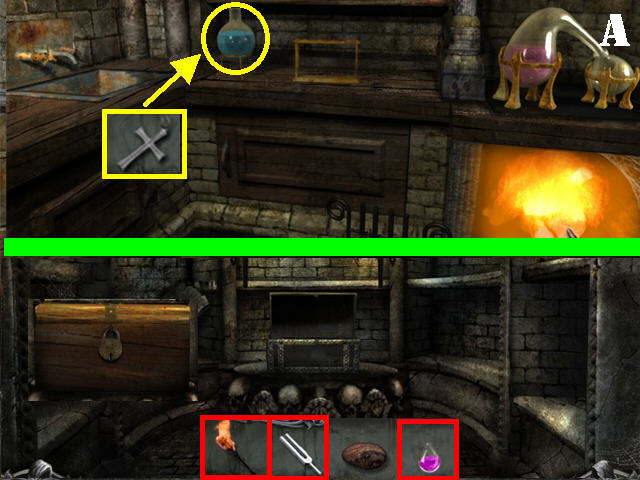
- Zoom into the pedestal (G) on the left to view the alchemy book. The books states: “If metal is your problem, do not think twice. Mix red and green and it will melt like ice. A handwritten note says that I should distill a green and a red liquid.”
- Go towards the bookcase; take the RED LIQUID (H) in the top shelf.
- Exit the zoom scene.
- Head right.
- Place the YELLOW LIQUID (1) on the BLUE TEST TUBE to obtain the GREEN LIQUID.
- Take the GREEN LIQUID (2).
- Place the RED LIQUID and GREEN LIQUID on the distiller and the liquid will turn purple (3).
- Place the FIREWOOD below the distiller.
- Place the TORCH on the FIREWOOD (you need more firewood).
- Put the FAUCET on the pipe on left (4).
- Place the FLASK over the faucet to fill it with water and it will automatically land on the table (5).
- Click down 4 times.
- Click on the sparkly area in the lower right to search for 9 logs.
- FIREWOOD will be added to inventory.
- Return to the distiller.
- Place the FIREWOOD below the distiller.
- Place the TORCH on the firewood; take the ACID (A).
- Click down 3 times, make a left and take the left entrance.
- Pour the ACID over the lock to uncover yet another chest.
- Burn the wooden lock using the TORCH to uncover another chest with a diamond lock.
- Place the TUNING FORK over the diamond lock.
- Take the CROSS inside the chest.
- Return to the distillery.
- Place the CROSS in the water to create the HOLY WATER.
- Take the HOLY WATER.
- Click down twice and go forward.
- Throw the STONE on the OLD ARMOR SET on left and the man will step towards the armor.
- Zoom into the table on the right.
- Place the HOLY WATER in the glass.
- Zoom out of the scene and the vampire will rise and drink the HOLY WATER at the table.
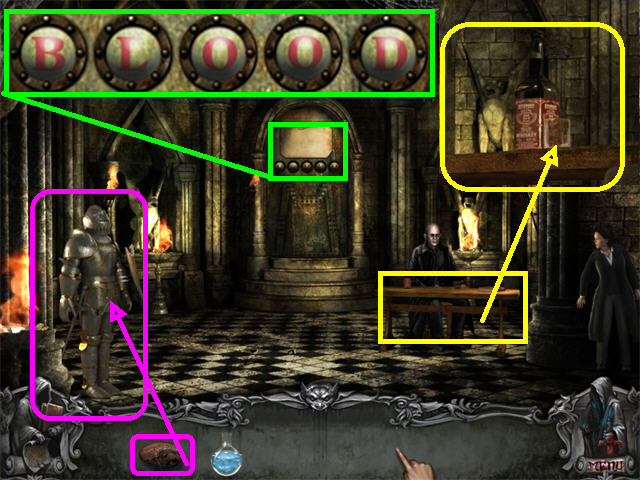
- Zoom into the altar.
- The clue reads:” We haven’t asked for it. And yet we all have it. It will dictate us who we are, as it did with our parents. As it will with our children. We do not wish to see it. And yet we’ll never want to lose it.”
- Click on the letters to change them. The solution is: BLOOD.
- Go forward after the code has been entered.
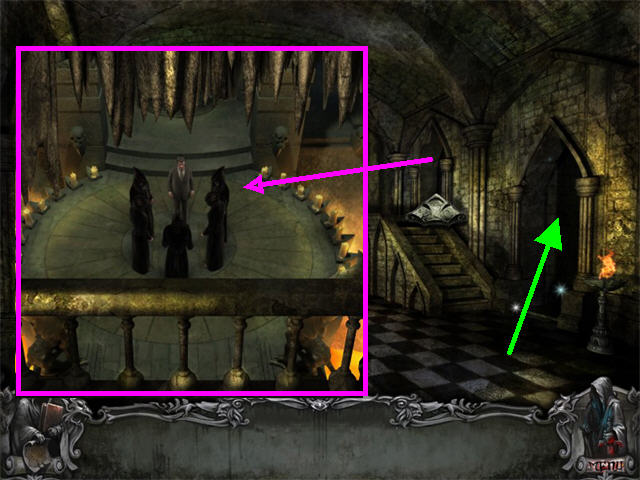
- Click on the sparkly steps.
- Click on the vampires twice to trigger a dynamite search.
- Exit the zoom scene.
- Go into the right entryway.
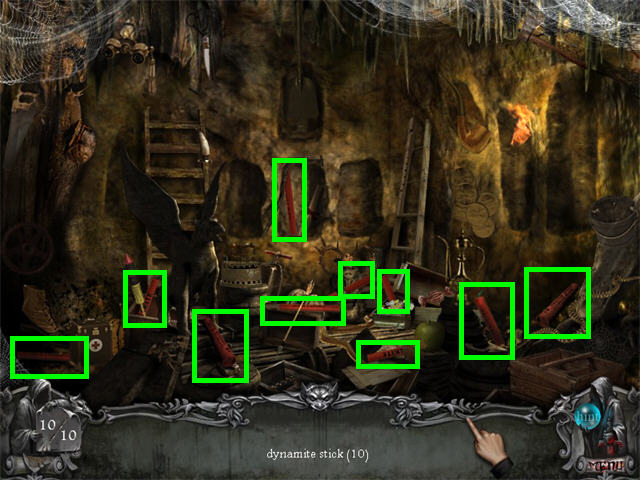
- Play the Hidden Object Scene.
- Find the DYNAMITE STICKS marked in red.
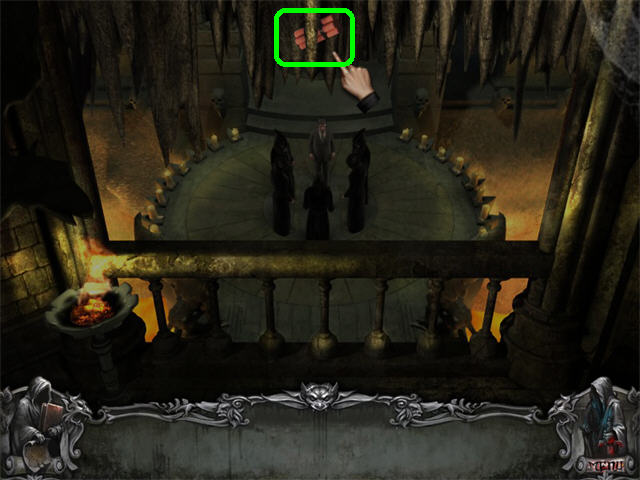
- Go through the right door and up the steps.
- Place the DYNAMITE in the upper center of the stalactites.
- Congratulations! You’ve completed the game!
Created at: 2010-10-30