

Walkthrough Menu
General Tips
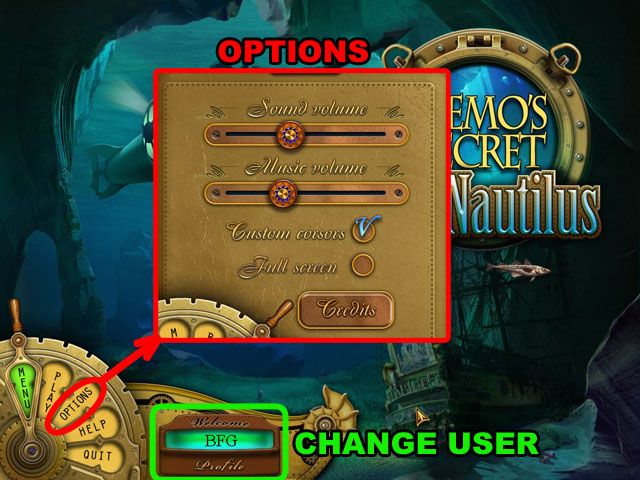
- You can pick from many options on the Main Menu screen: including Play, Options, Help, and Quit.
- You can change the current user in the bottom of the screen.
- You can adjust the volume, change the cursor, set full screen, or see the credits in the Options Menu.
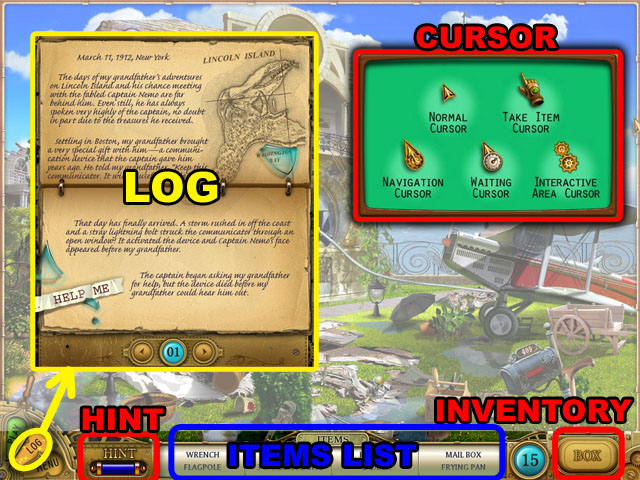
- Your log is in the bottom left corner of the screen; here all of the information in the cut scenes can be viewed.
- Finish each hidden object scene by finding all the objects in the list. Click on the objects in the list to see their shape.
- Click the Hint Button at the bottom left corner of the screen to activate a hint if you get stuck. The hints recharge slowly as you play.
- Clicking the object in your list will show you a silhouette of the object.
- Some objects that you find will go into your inventory; you can use them in later scenes.
- There are five types of cursor. When the cursor is changed to a hand, you can collect an item. The compass cursor is for navigation. The clock cursor means you have to wait for something. When the cursor is changed to two gears it means you can interact with a specific area.
- In this game, when you find hidden objects, they will not be removed from the scene; instead they will usually be cleaned up and moved into a more appropriate place in the scene.
- Many hidden objects are behind doors or inside other objects, and many times you will not be able to open the container they are in until the object is in your list.
- Look for interactive areas when you have inventory puzzles. The interactive areas tell you that an inventory item needs to be used in that spot.
- Look around the scene for more items that you may be able to use if you are stuck in an inventory puzzle and you have no more inventory items to use.
Chapter 1
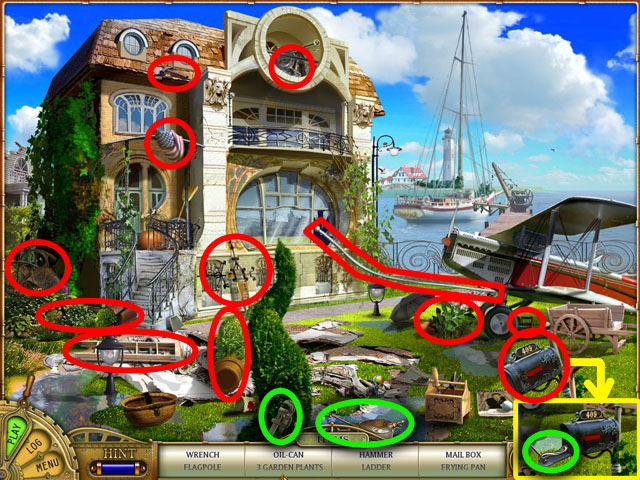
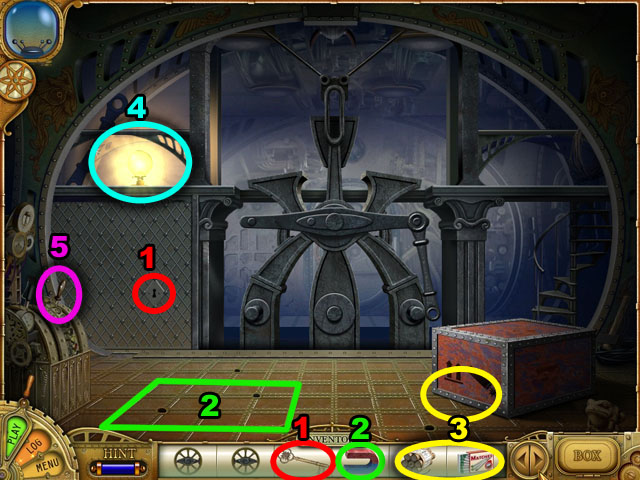
- Find the 15 hidden objects listed at the bottom of the screen, in any order, circled in red and green in the image.
- After finding the mail box, it can be opened. Inside the mail box, there is the HANDLE.
- Find the 3 inventory items among the hidden objects, the OIL-CAN, WRENCH, and HANDLE, circled in green.
- After finding all the hidden objects, click the large sparkling door to move to a new scene.
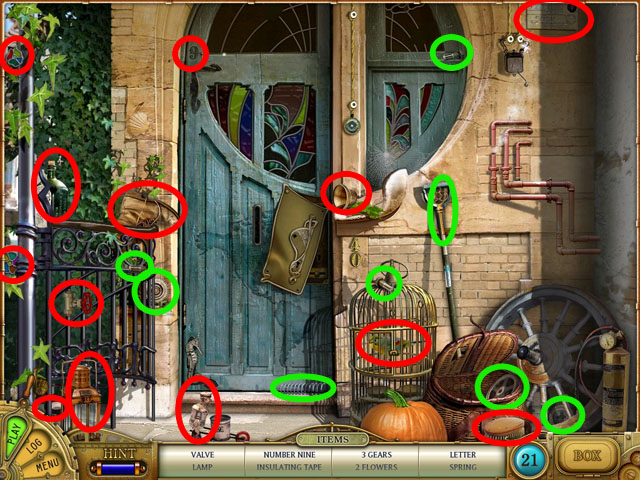
- Find the 21 hidden objects listed at the bottom of the screen, in any order, circled in red and green in the image.
- Find the 4 inventory items among the hidden objects, 3 GEARS, a SPRING, a KEY, and 3 BOLTS circled in green.
- After finding all the objects, click the sparkling broken lock in the middle of the screen.
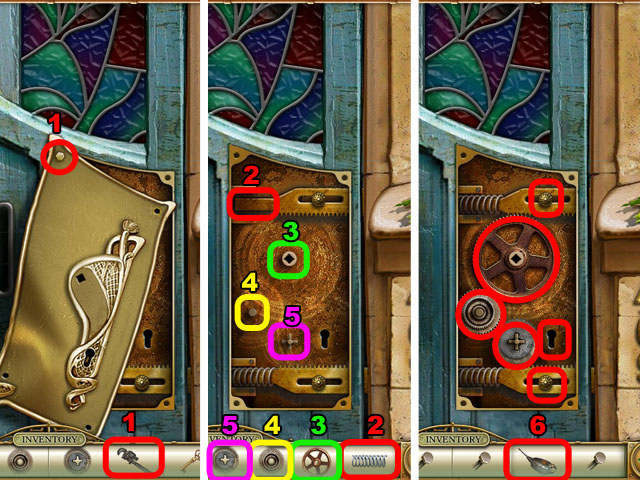
- Click and drag items from the inventory to their correct spots to solve the puzzle.
- You can skip this puzzle by clicking the Skip Button in the bottom left corner.
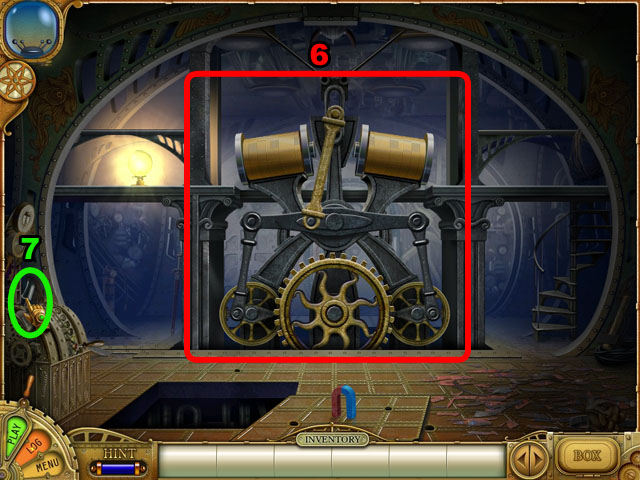
- Drag the WRENCH to the bolt on the plate (1).
- Drag the SPRING to the upper part (2).
- Put the 3 GEARS into the correct positions (3, 4, and 5).
- Click the OIL-CAN and 5 spots highlighted in red (6).
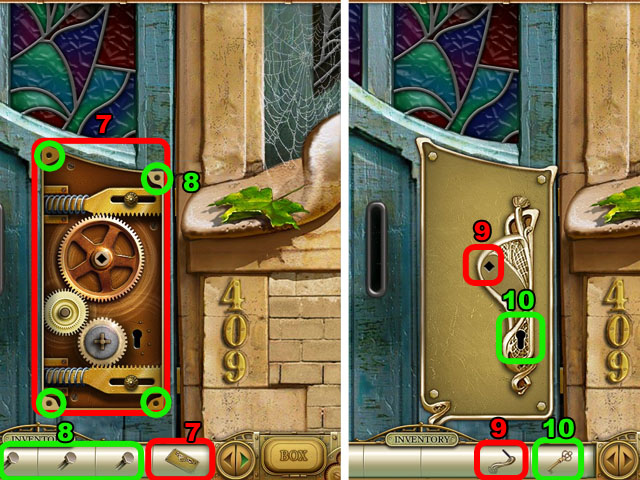
- Place the PLATE on the spot highlighted in red (7).
- Place the FOUR BOLTS onto the hole highlighted in green (8).
- Put the HANDLE into the central hole (9).
- Put the KEY into the keyhole (10).
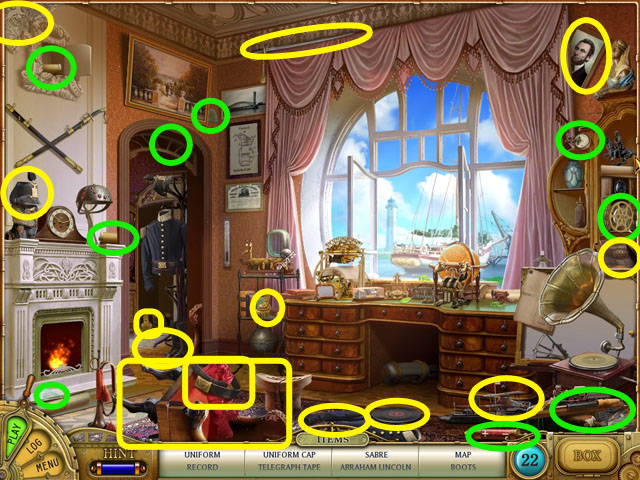
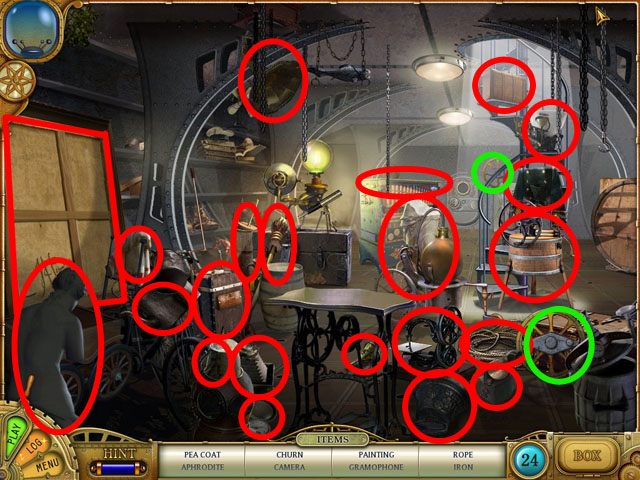
- Find the 22 hidden objects listed at the bottom of the screen, in any order, circled in red and green in the image.
- Find the 6 inventory items among the hidden objects, the TELEGRAPH TAPE, 3 GLASS SHARDS, SOLDERING IRON, 2 BOBBINS, a BATTERY, and a VOLTMETER circled in green.
- After finding uniform, cap, boot and more some items, you will be able to open the door on the left side to find the epaulettes.
- After finding one BOBBIN, open the door in the upper left corner to find the other BOBBIN.
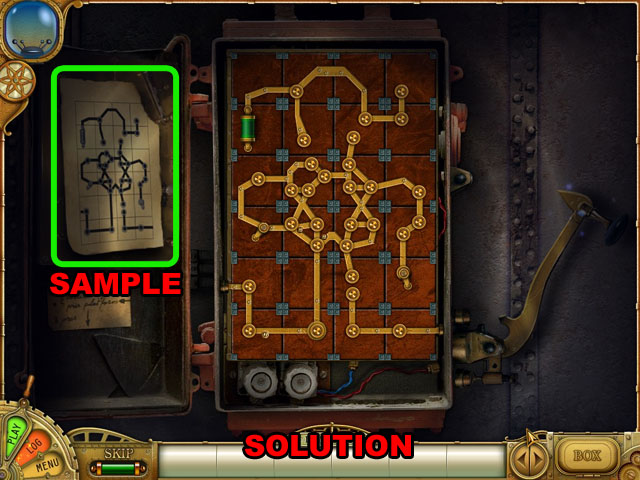
- After finding all objects, click the system highlighted with sparkles in the middle of the screen.
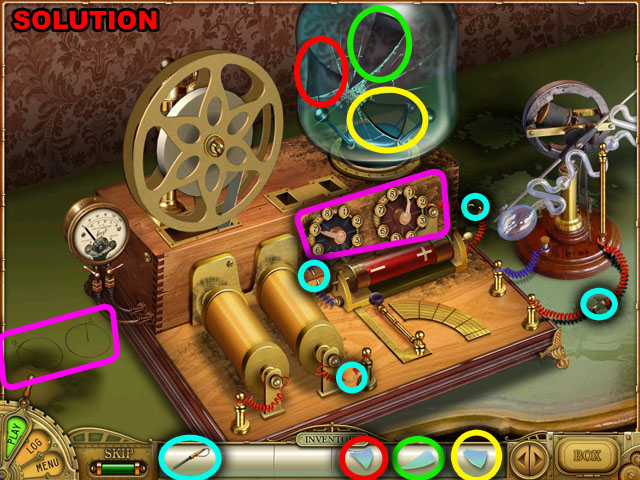
- Place the inventory items except the SOLDERING IRON to the correct spots by following the screenshot.
- With the SOLDERING IRON, fix the four wires circled in light blue in the screenshot.
- Click the dial to 1 for right dial and 7 for the left, highlighted in purple.
- Pull the lever highlighted with sparkles to solve this puzzle.
- After solving the puzzle, the Nemo hint in the upper left corner will become available. Click the Nemo hint button to get a helpful hint from captain Nemo.
- Click on the desk highlighted with sparkles to move new scene.
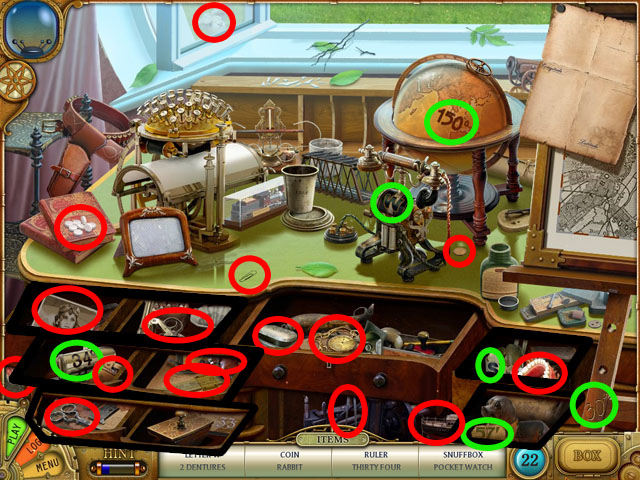
- Find the 22 hidden objects listed at the bottom of the screen, in any order, circled in red and green in the image.
- After finding some items, the globe will be able to rotate to find the ONE HUNDRED FIFTY.
- Find the 6 inventory items among the hidden objects, the THIRTY FOUR, LETTER W, FIFTY SEVEN, THIRTY, ONE HUNDRED FIFTY and LETTER S circled in green.
- After finding all the objects, click on the paper in the upper right corner to move to the next scene.
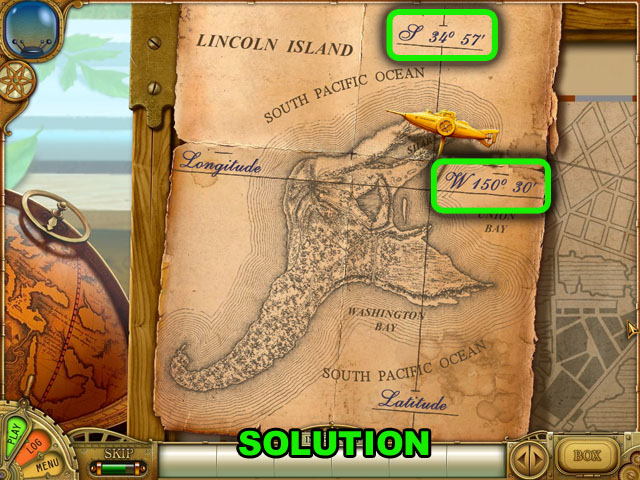
- When you place the numbers and letters in the correct spots, the map will appear darker and more detailed.
- Each piece from your inventory goes in either the top or the bottom line and will not go on the other line so there is no way to make a mistake.
- The solution is S 34 57’ in the upper blank and W 150 30’ in the lower blank.
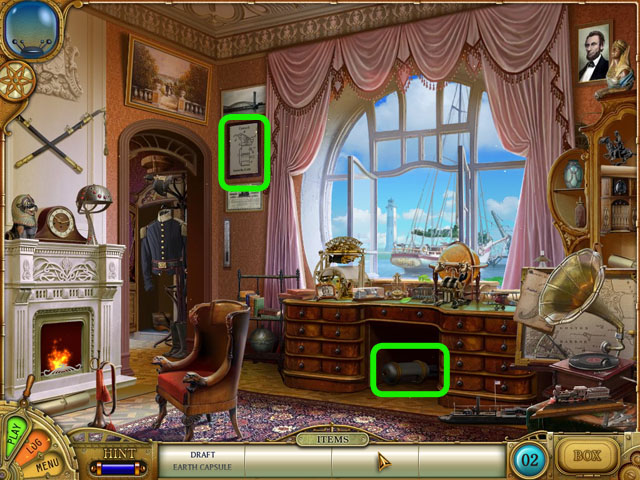
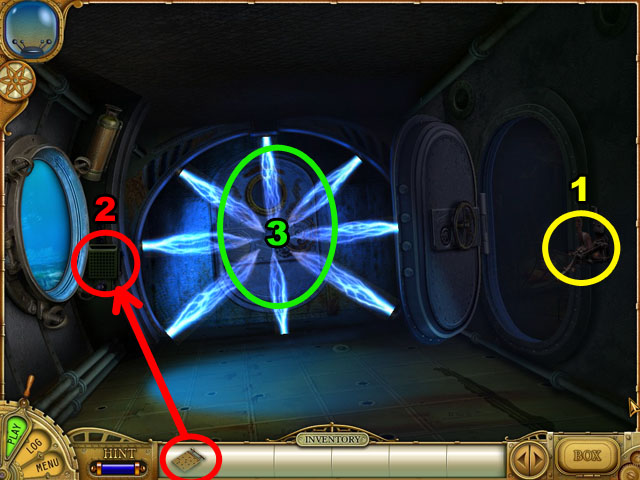
- Find the 2 hidden objects listed at the bottom of the screen, in any order, circled in green in the image.
- The 2 hidden objects are the inventory times: DRAFT and EARTH CAPSULE.
- After finding the 2 objects, click on the sparkling ship to move to the next scene.
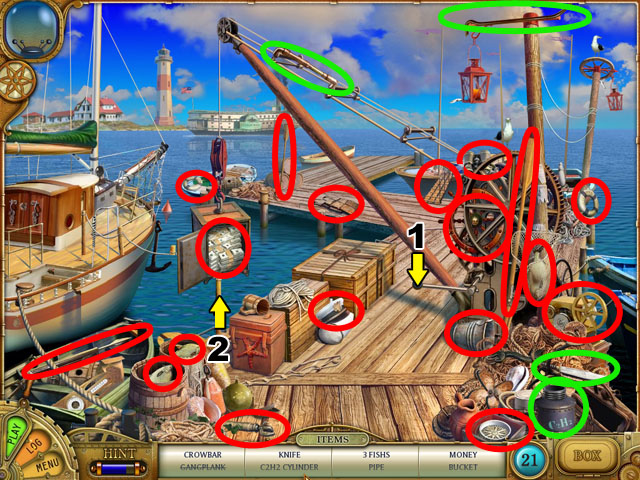
- Find the 22 hidden objects listed at the bottom of the screen, in any order, circled in red and green in the image.
- Click the lever in the middle to pull up the safe. Inside the safe there is money.
- Click the 2 barrels in the bottom corner to find 2 fish.
- Find the 4 inventory items among the hidden objects, the C2H2 CYLINDER, CROWBAR, KNIFE, and PIPE circled in green.
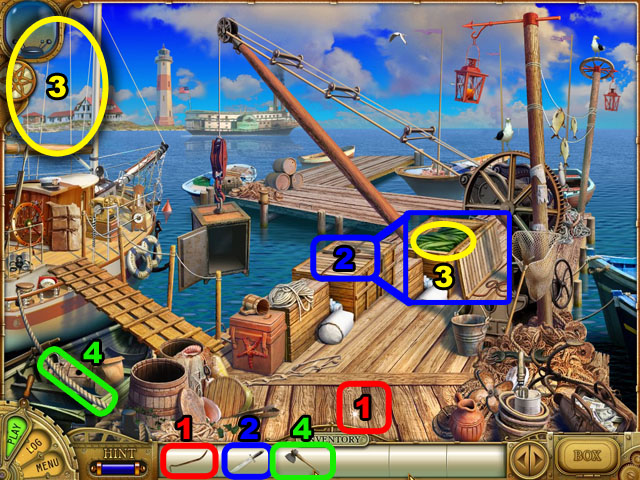
- Click at the bottom of the scene with the CROWBAR (1).
- Take the AXE.
- Cut the string in the middle with the KNIFE (2).
- Take the green SAILS.
- Place the SAILS on the pole in the upper left corner (3).
- Cut the rope in the bottom left corner with the AXE (4).
- Click the sparkling helm wheel to move to the next chapter.
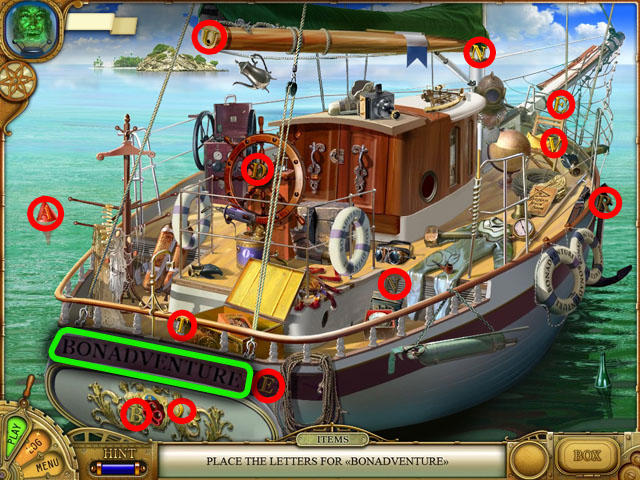
- Find the letters “BONADVENTURE” and place them on the rear of the boat.
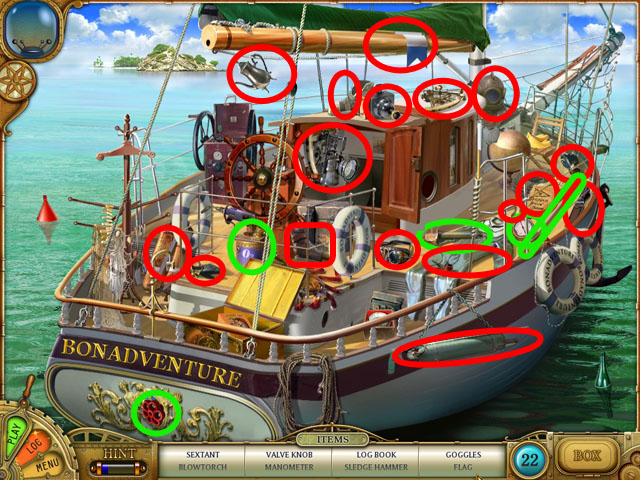
- Find the 22 hidden objects listed at the bottom of the screen, in any order, circled in red and greed in the image.
- After finding more than half the items, you will be able to open the hatch in the middle of the boat to find a lantern.
- Find the 4 inventory items among the hidden objects, the VALVE KNOB, SLEDGE HAMMER, MANOMETER, BLOW TORCH, and PIKE POLE circled in green.
- Click on the inside of the hatch in the middle after finding all the objects.
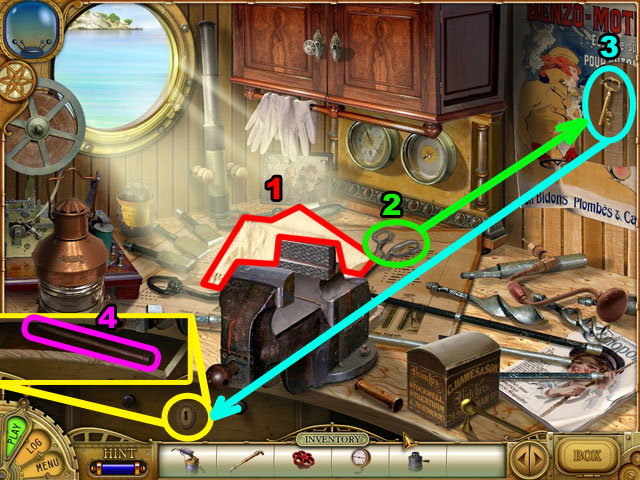
- Click the cloth in the middle (1).
- Find the SCISSORS and cut the poster in the upper right corner (2).
- Take the KEY behind the poster and open the shelf under the desk (3).
- Collect the HANDLE from the shelf (4).
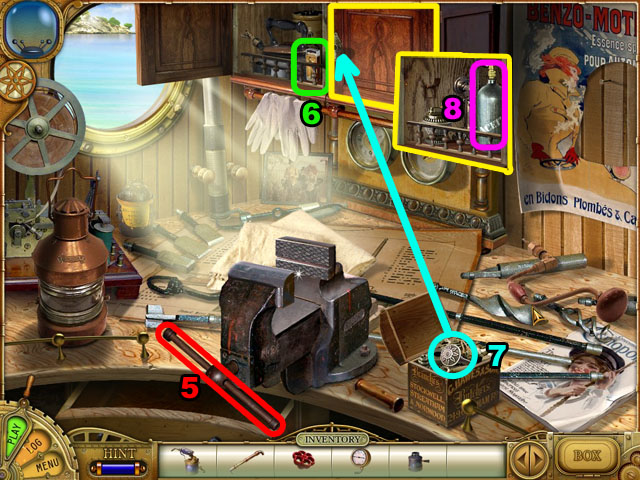
- Place the HANDLE in the vise (5).
- Open the wooden shelf at the top of the screen to find the MATCH (6).
- Click the box beside the vise and find the KNOB (7).
- Open the right side of the wooden shelf to find the TANK (8).

- Set the parts by following the screenshot (9-15).
- Place the MATCH in the middle of the screen to solve this puzzle (16).
Chapter 2
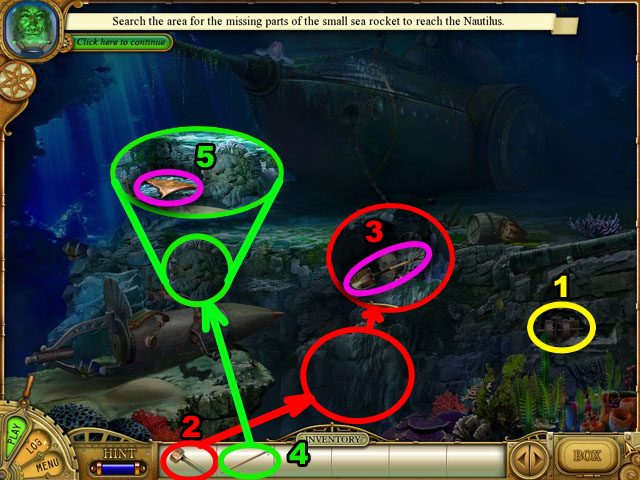
- Click on the wall in the bottom right corner to find the MORTAR (1).
- Crack the stone wall with the HAMMER from the inventory to find the SHOVEL (2 and 3).
- Click the stone with the PIKE POLE to find the FIN (4 and 5).

- Dig the sand with the SHOVEL from the inventory (6).
- Find the SCISSORS in the sand (7).
- Cut sea weed in the bottom right corner with the SCISSORS to collect the FAN (8).
- Attach all 3 parts from the inventory to the small sea rocket (9).
- Click the sparkling lever on the rocket to solve this puzzle.
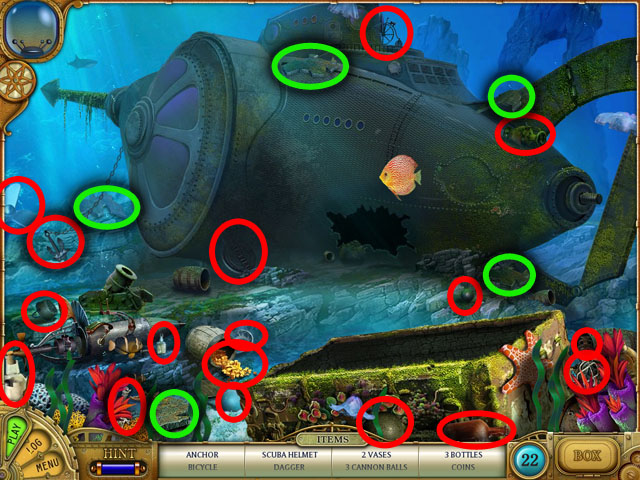
- Find the 22 hidden objects listed at the bottom of the screen, in any order, circled in red and green in the image.
- After finding some objects, click on the rocket’s fin to find the caldron.
- Find the inventory item among the hidden objects, the 5 HULL PIECES.
- Click on the middle of the screen highlighted with sparkles after finding every object to move to a new scene.
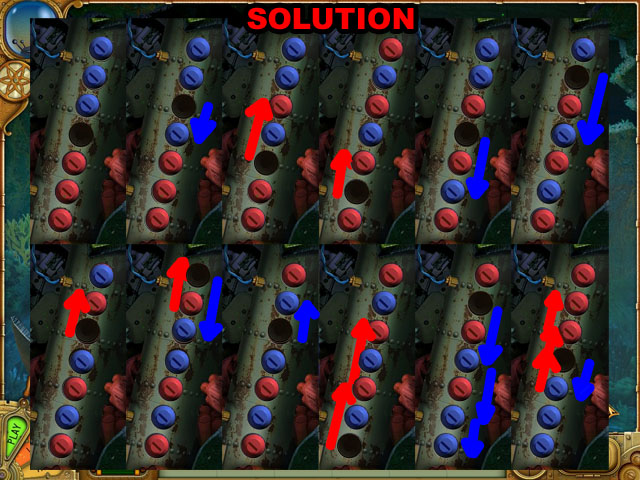
- Swap red and blue pieces to disarm the bomb.
- Clicking on a piece will move it to the empty spot.
- Movable pieces are either directly beside the empty spot, or on a piece between the empty spot and the piece you want to move.
- No piece can jump 2 other pieces, ever.
- See the screenshot for a step-by-step solution to this puzzle.
- You can skip this puzzle by clicking the skip button in the bottom left of the screen.
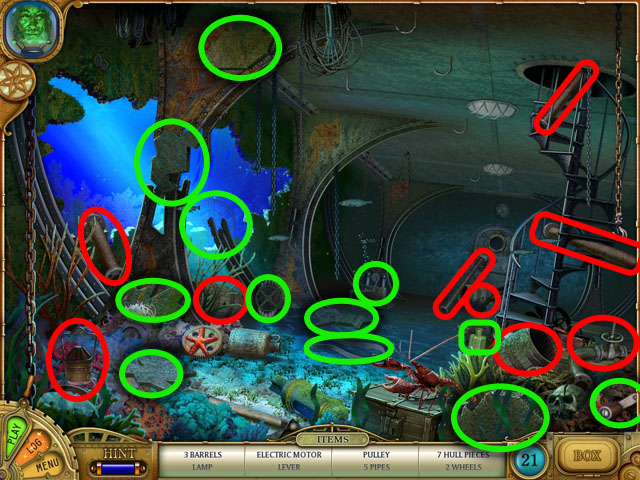
- Find the 21 hidden objects listed at the bottom of the screen, in any order, circled in red and green in the image.
- Find the inventory item among the hidden objects, the 7 HULL PIECES, LEVER, ELECTRIC MOTOR, PULLEY, and 2 WHEELS.
- Click on the outside highlighted with sparkles to move to the next scene.
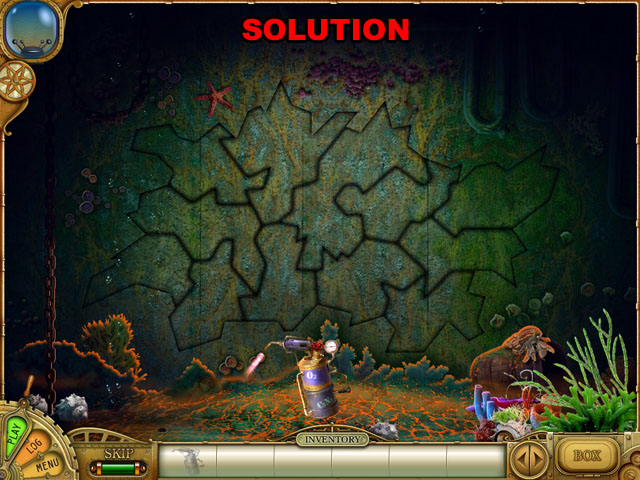
- Assemble the 7 hull pieces. Refer to the screenshot solution.
- Click every single piece with the BURNER from the inventory.
- Click on the sparkling upstairs to move to a new scene.
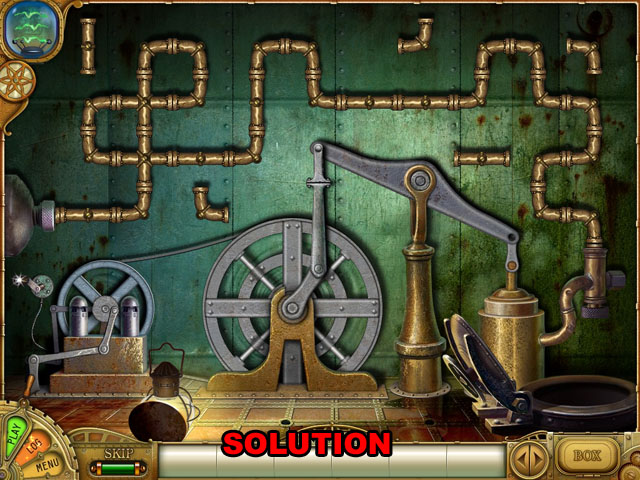
- Connect the pipe from the left edge to the right edge.
- Place the big WHEEL in the middle.
- Place the ELECTRICAL MOTOR in the bottom left corner.
- Place the smaller WHEEL into the motor.
- Place the PULLEY between the 2 wheels.
- Place the LEVER onto the ELECTRICAL MOTOR.
- Connect the pipes as in the screenshot.
- Click on the lever to activate the machine.
- Click on the sparkling spot in the bottom right corner.
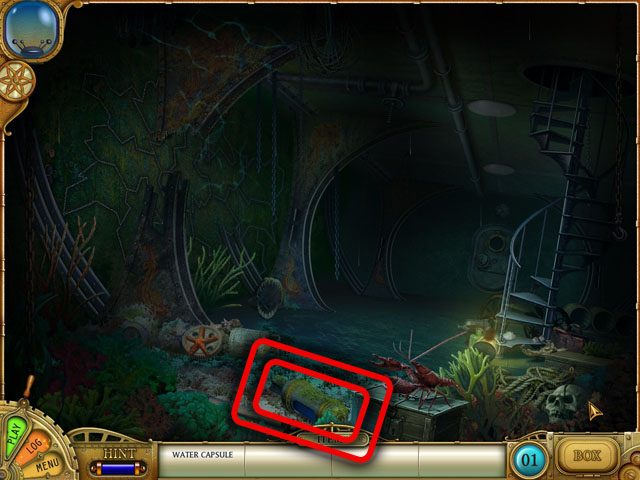
- Find the WATER CAPSULE.
- Click on the sparkling stairs to move to the next chapter.
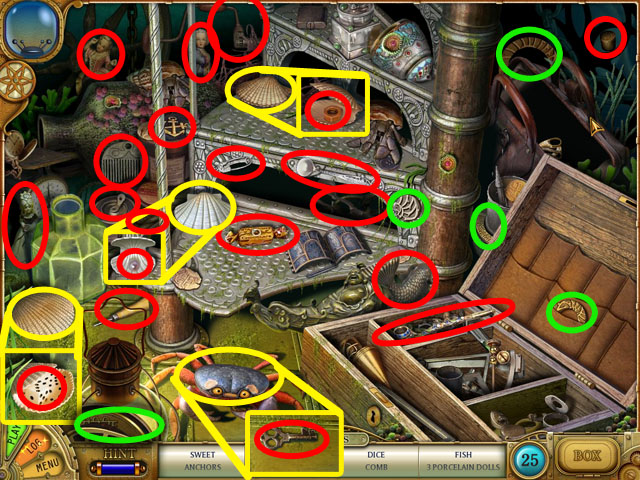
- Find the 25 hidden objects listed at the bottom of the screen, in any order, circled in red and green in the image.
- You will be able to click on the crab and cells after finding some objects. Click them to find the DICE, KEY, RUSTY NUT, and PEARL.
- Find the inventory item among the hidden objects, the 5 LOCKS RINGS.
- Click on the lantern in the bottom left corner highlighted with sparkles to move to the next scene.
- Click on the back door highlighted with sparkles to move to the next scene.
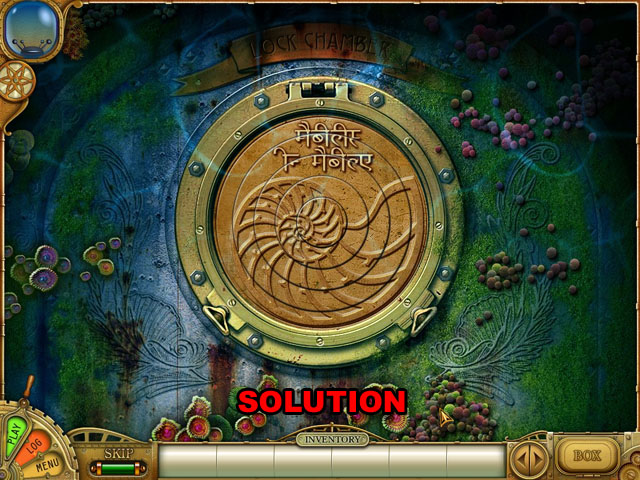
- Place the 5 LOCKS RINGS in the middle of the screen.
- Click and hold each ring; then rotate it into the correct position. When you connect with the next ring, the position of the rings will be locked.
- Refer to the screenshot for the final image.
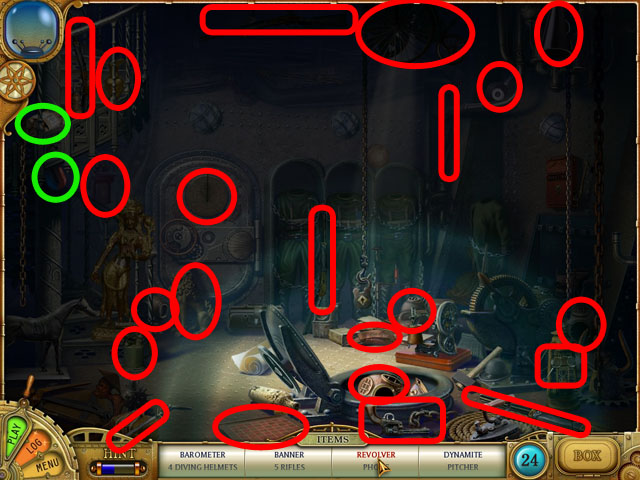
- Find the 24 hidden objects listed at the bottom of the screen, in any order, circled in red and green in the image.
- You will be available to click on the crab and cells after finding some objects. Click them to find the dice, key, rusty nut and pearl.
- Find the inventory item among the hidden objects, the MAGNET and DYNAMITE.
- Click on the sparkling red box in the right side to move to the next scene.
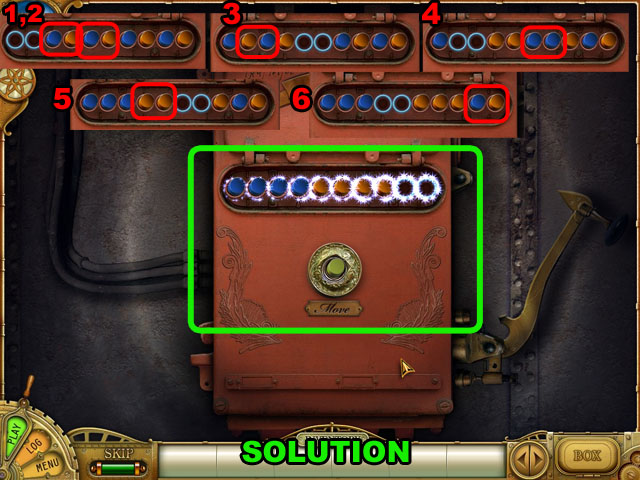
- Move the colored buttons, 2 at a time, and line the colors together to finish this puzzle.
- The final solution will have 4 of a color in a row, and 4 of another color next to it.
- Start by moving 2 colors, blue on the left to the first position.
- Start collecting the colors together by matching the left button with the button to the left of the open space.
- Once 2 of the same colors are beside each other, you can move these colors without breaking them up.
- See the screenshot for a step-by-step solution.
- Swap tiles by clicking on 1 and then another.
- There is the final image on the left side of the board. Recreate on the circuit board the pattern of the image on the left side of the board to finish the puzzle.
- Some of the pieces are very similar looking. Make sure the edges of the pieces fit exactly if you are having trouble.
- Click on the sparkling lever to move to the next scene.
- Click on the sparkling back door to move to the next scene.
Chapter 3
- Find the 24 hidden objects listed at the bottom of the screen, in any order, circled in red and green in the image.
- Find the inventory items among the hidden objects, the 2 WHEELS.
- Click the sparkling suit case in the bottom right corner to move to the next scene.
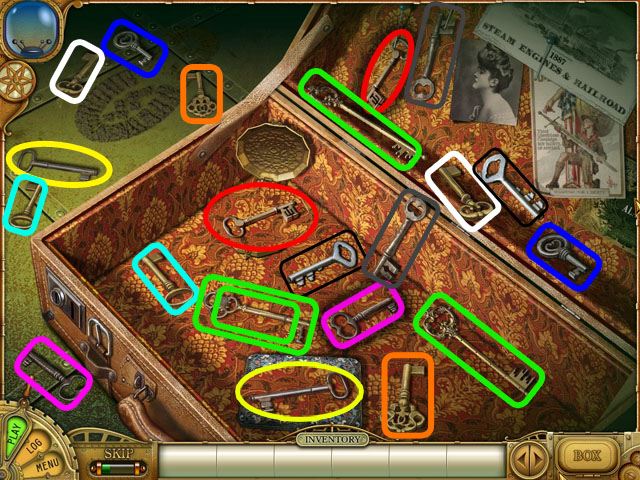
- Find match keys by clicking them. First click one key and then another to match.
- Under the clock, card, and purse, are the keys; if you move them, other keys may be covered up.
- Click on the last KEY that doesn’t have a match and it will go into your inventory.
- Click on the coat with sparkles to move to the next scene.
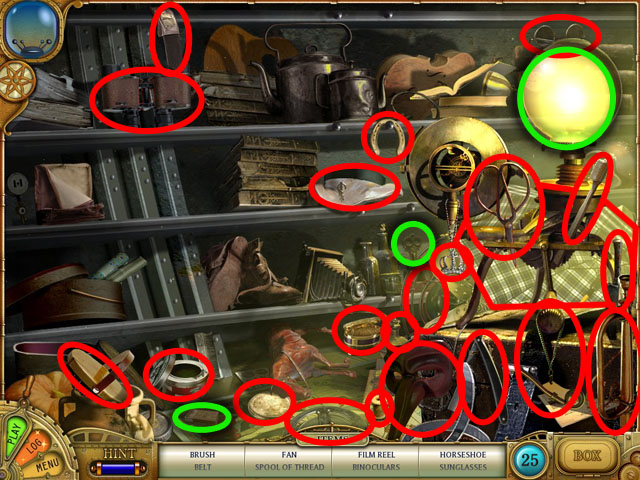
- Find the 25 hidden objects listed at the bottom of the screen, in any order, circled in green in the image.
- Sometimes you need to move the coat to find some items. Find the 2 items on the left first; then click the coat twice to get it out of the way.
- Find the inventory item among the hidden objects, the KEY, MATCH BOX, and LAMP.
- Click on the sparkling upstairs to move to the next scene.
- Open the door with the KEY from the inventory. Collect the yellow coil (1).
- Use the MAGNET from the inventory to pull up one part of the floor (2).
- Place the DYNAMITE beside the red box in the bottom right corner (3).
- Light the DYNAMITE with the MATCH from the inventory (3).
- Another yellow COIL will have appeared. Collect it.
- Place the LAMP on the table in the left side (4).
- Click the lever in the bottom left corner. The IRON ARM will have appeared from the ceiling. Collect it as an inventory item (5).
- Collect another IRON ARM from the upper left side of the screen.
- Place the rest of the items from the inventory by following the screenshot (6).
- Pull down the sparkling lever in the bottom left corner to solve this puzzle (7).
- Click on the machine in the upper left corner to move to the next scene.
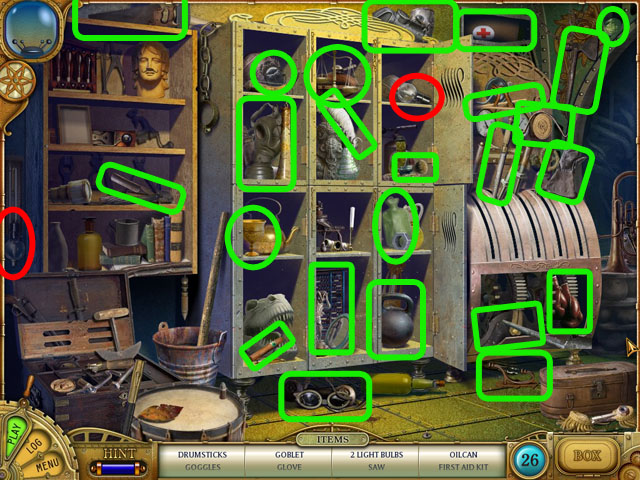
- Find the 26 hidden objects listed at the bottom of the screen, in any order, circled in red and green in the image.
- You will need to open the lockers to find many of the items and the bottom of the control case.
- Find the inventory items among the hidden objects, the 2 LIGHT BULBS.
- Click on the sparkling right to move to the next scene.
- Click the highlighted control panel in the next scene to start the gauge puzzle.
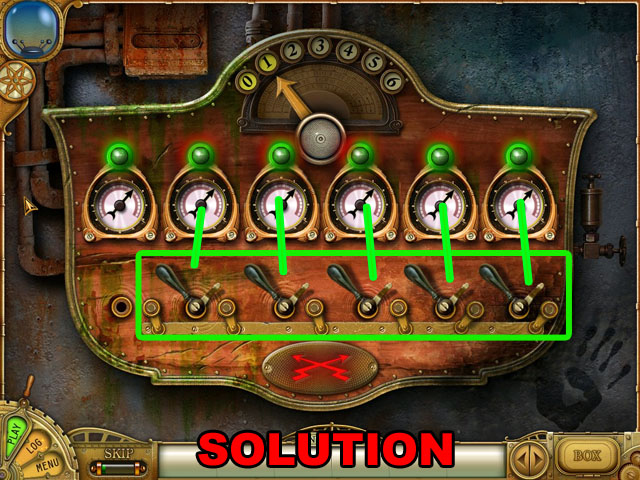
- Synchronize all of the gauges to complete this puzzle.
- The 5 levers under the 5 gauges to the right of the first reset the gauge to the top position, going to the right or left.
- Click the lever when the gauge to the left has reached the very top of its arc, going toward the right.
- Once each gauge is synchronized, the light above the gauge will turn green and you can move on to the next gauge.
- Once synchronized, the gauges never become out of synch.
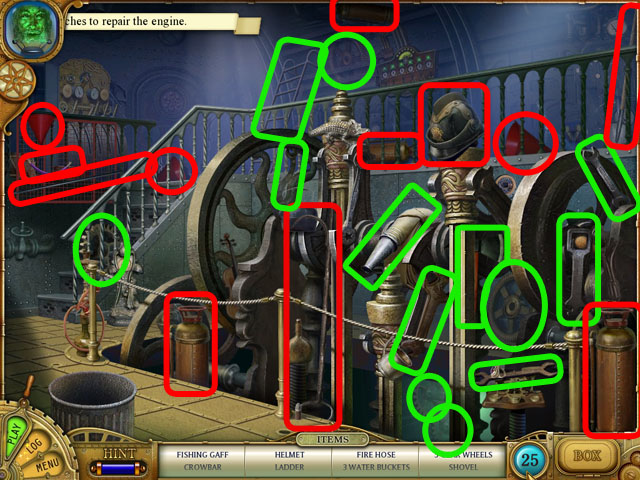
- Find the 25 hidden objects listed at the bottom of the screen, in any order, circled in red and green in the image.
- You will need to find the objects before the smoke from the fire obscures the screen.
- Find the inventory items among the hidden objects: the 3 WATER BUCKETS, 3 FIRE EXTINGUISHERS, FISHING GAFF, SHOVEL, WIRE, and CROWBAR.
- Click the highlighted area with sparkles to move to the next scene.
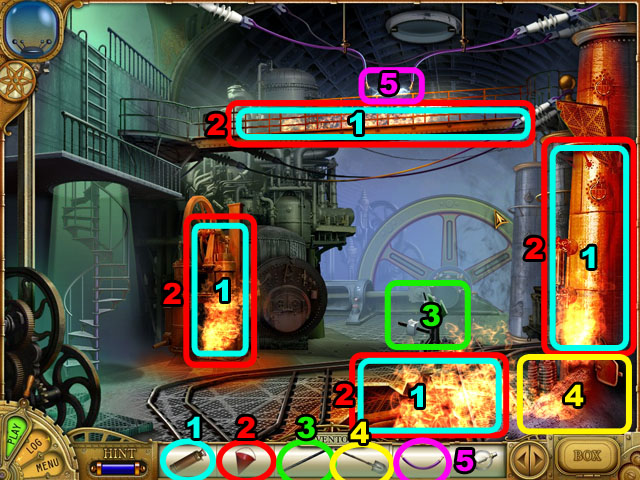
- Put out the fires with the FIRE EXTINGISHER (1).
- Use the WATER BUCKET on the same places as the FIRE EXTINGUISHER (2).
- Use the CROWBAR to move the track and bring the cart out (3).
- Use the SHOVEL to clear away the pile of dirt (4).
- Use the WIRE on the missing piece of wire at the top of the screen (5).
- Click the lever in the bottom left corner. The iron arm will have appeared from the ceiling. Collect it as an inventory item (5).
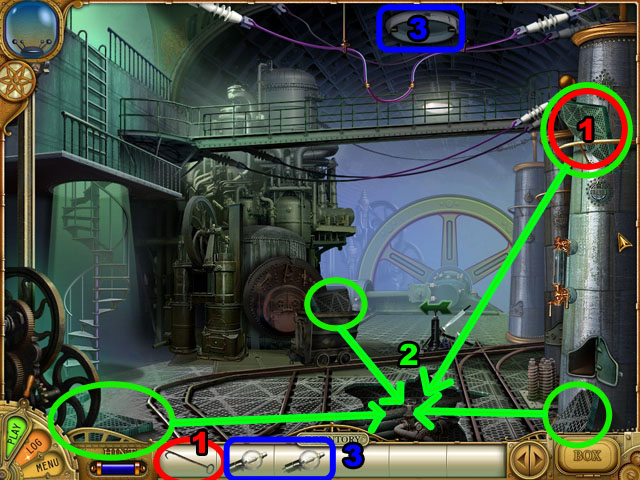
- Use the FISHERMAN’S GAFF to collect the FLOOR PIECE in the top left (1).
- Collect the rest of the FLOOR PIECES and use them one the hole in the floor (2).
- Use the 2 LIGHT BULBS on the light fixture at the very top of the scene (3).
- Click the upper right highlighted area with sparkles to move to the next scene.
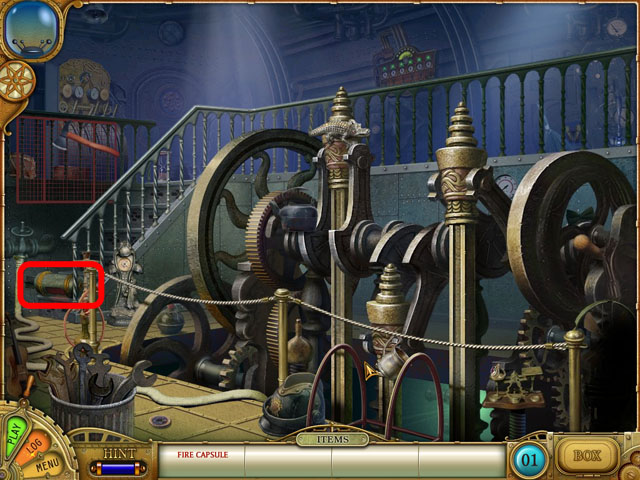
- Find the fire capsule listed at the bottom of the screen circled in red in the image.
- Click the highlighted area to the right to start the door puzzle.
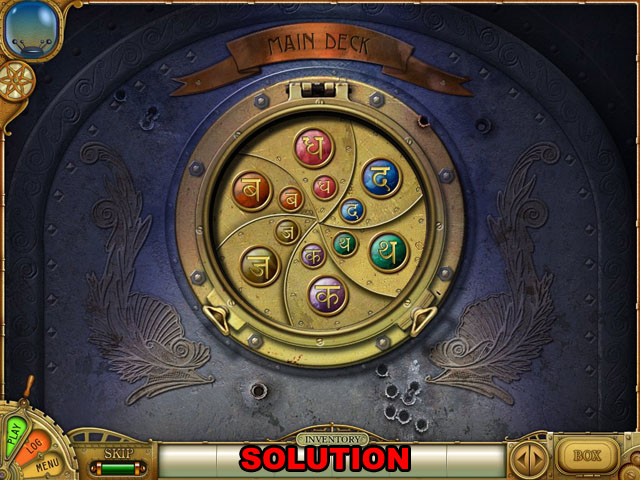
- Put the symbols that match on the same piece of the door in this puzzle.
- Click on one circle and then the next to switch their places.
- Small circles can switch only with large circles of the pieces beside them, or of the same piece.
- See the screenshot for a possible solution.
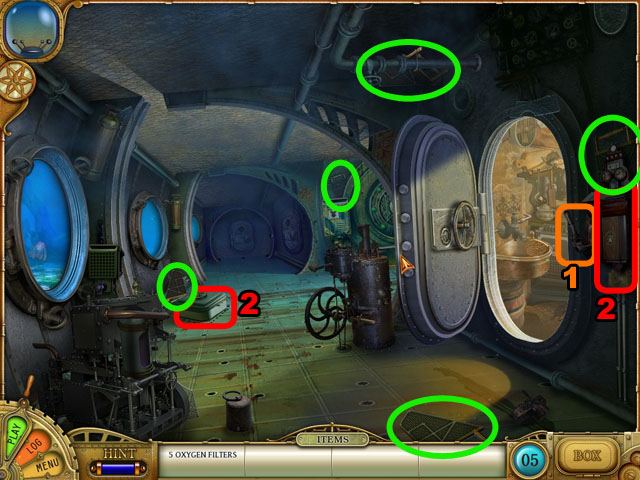
- First you will need to turn on the light switch at the right of the scene to be able to see anything (1).
- Find the 5 hidden objects listed at the bottom of the screen, in any order, circled in green in the image.
- You will need to move 2 things in the scene marked in red in order to find the objects (2).
- The OXYGEN FILTERS are marked in green and will go into your inventory when collected.
- Click the highlighted air filter system in the back to start the air filter puzzle.
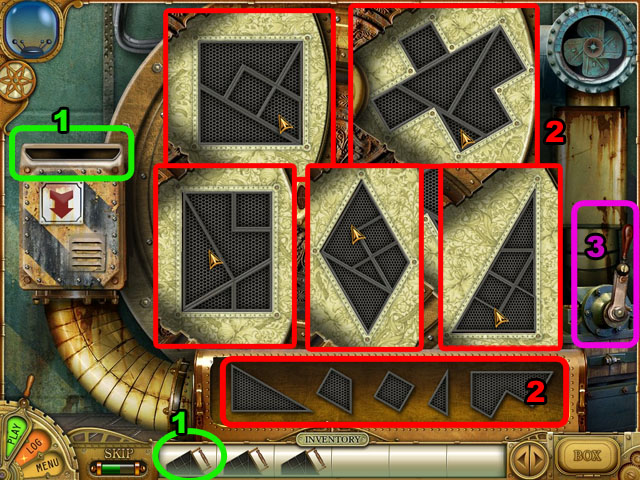
- Take one of the OXYGEN FILTERS from your inventory and put it into the slot at the right (1).
- Geometrical shapes will appear that you need to put into the space on the right correctly (2). There are always only 5 shapes and you do not need to spin them.
- Left-click to pick up the shape, right-click to cancel, and left-click to place it in the correct area.
- The 5 solutions are shown; after finishing one, put another OXYGEN FILTER in the system, as in step 1. Repeat until you run out of FILTERS.
- Click the lever on the right when you’re done to finish the puzzle (3).
Chapter 4
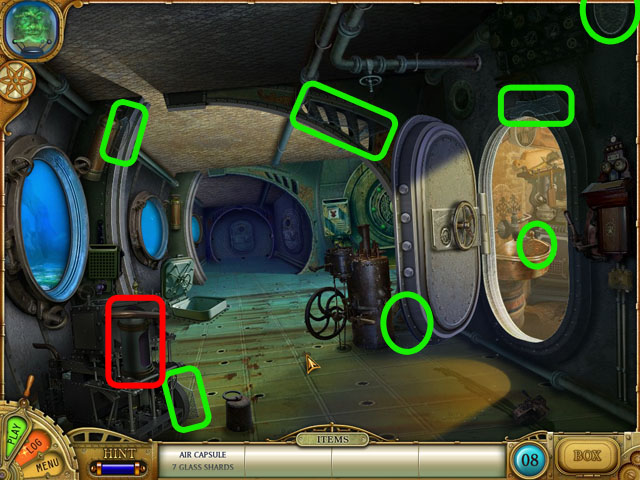
- Find the 8 hidden objects listed at the bottom of the screen, in any order, circled in green and red in the image.
- The 7 GLASS SHARDS are circled in green and the AIR CAPSULE is circled in red, both are inventory items.
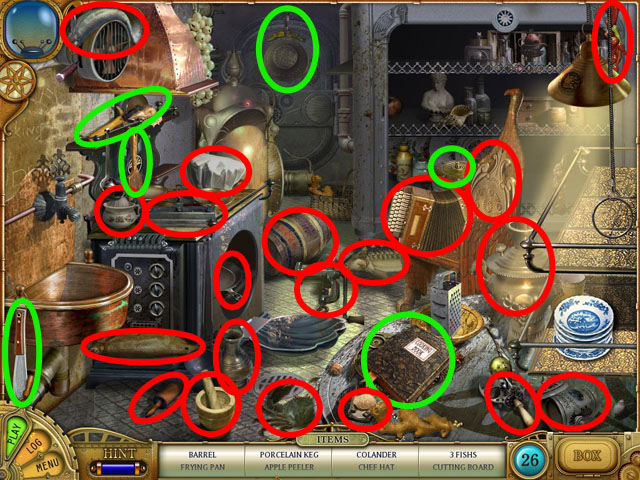
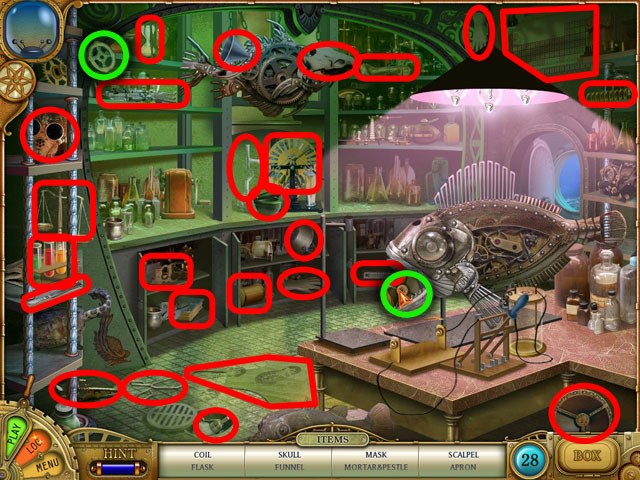
- Find the 26 hidden objects listed at the bottom of the screen, in any order, circled in red and green in the image.
- The COLANDER, COOK BOOK, JUICER, PAN, KNIFE, PIZZA CUTTER, and SPATULA are circled in green. Those are inventory items.
- Click on the sparkling refrigerator to move to the next scene.
- Open the refrigerator first to find objects.
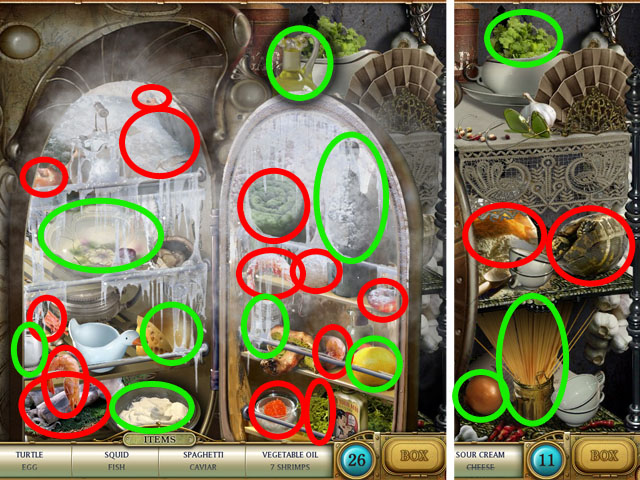
- Find the 26 hidden objects listed at the bottom of the screen, in any order, circled in red and green in the image.
- The VEGETABLE OIL, LEMON, SALT SHAKER, CHEESE, SPAGHETTI, ONION, WINE BOTTLE, PAPER SHAKER, SOUR CREAM, PLATE SHRIMPS, and PARSLEY are marked in green and will go into your inventory when collected.
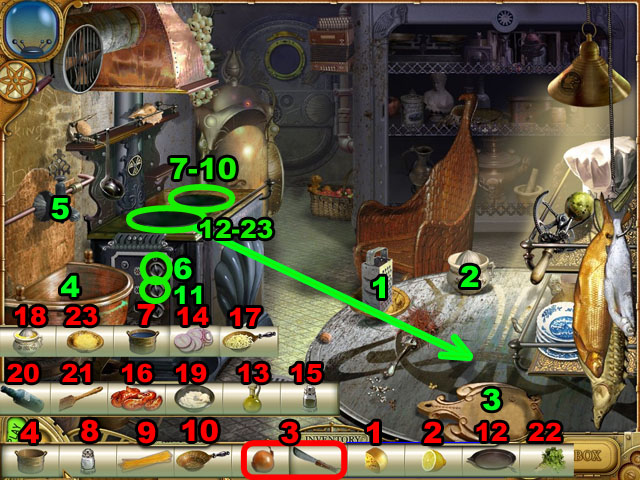
- Shred the CHEESE and collect it (1).
- Squeeze the LEMON and collect it (2).
- Place the ONION and cut it with the KNIFE; collect the cut onion (3).
- Set the PAN in the sink (4).
- Fill the PAN with water and collect it (5).
- Turn on the gas (6).
- Set the PAN with water onto the stove (7).
- Add SALT to the pan (8).
- Put the SPAGHETTI into the pan (9).
- Place the COLANDER on the PAN to get the SPAGHETTI (10).
- Turn on the gas (11).
- Set the FLYING PAN on the stove (12).
- Add ingredients in this order, VEGETABLE OIL, ONION, PAPER, SHRIMPS, SPAGHETTI, LEMON JUICE, SOUR CREAM, and WINE (13- 20).
- Stir them with the SPATULA (21).
- Add PARSLEY (22) and shredded CHEESE (23).
- Collect the food in the PAN and place it on the table in the bottom right corner; click the PAN to move to the next scene.

- Use the pizza cutter to cut the pie into 7 pieces, with one shrimp on each.
- There are dots on the outside of the pie, use the dots to line up your cuts by clicking near them on both sides.
- You cannot cut any of the shrimp.
- Cut the pieces around the middle piece so that it creates a triangle in the middle.
- See the screenshot for the solution.
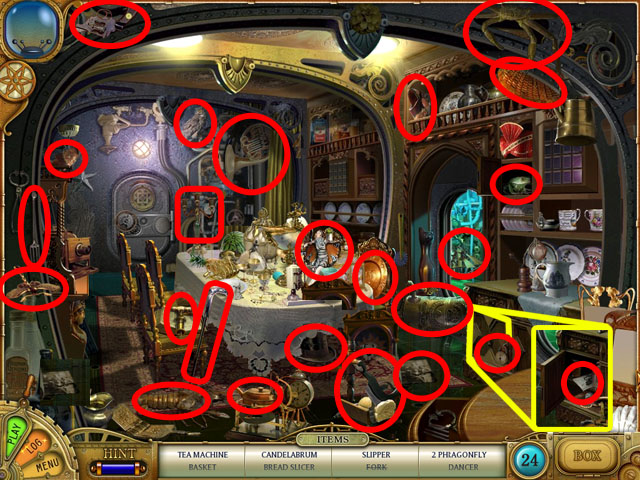
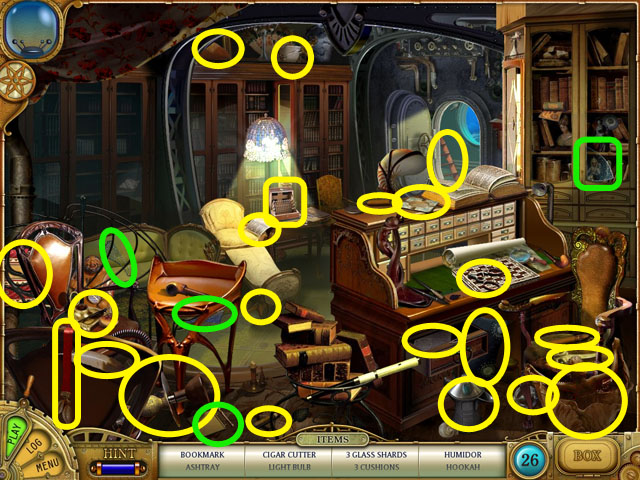
- Find the 24 hidden objects listed at the bottom of the screen, in any order, circled in red in the image.
- There are no inventory items in this scene.
- Click on the sparkling table to move to the next scene.
- Find the 27 hidden objects listed at the bottom of the screen, in any order, circled in red and green in the image.
- There are 2 more PUZZLE PIECES in this scene that will go into your inventory.
- Click on the sparkling door in the next scene to move to the next puzzle.
- Take the objects from your inventory and put them on the lock to solve this puzzle.
- The order doesn’t matter, but each piece only goes in one spot.
- See the screenshot for the solution.
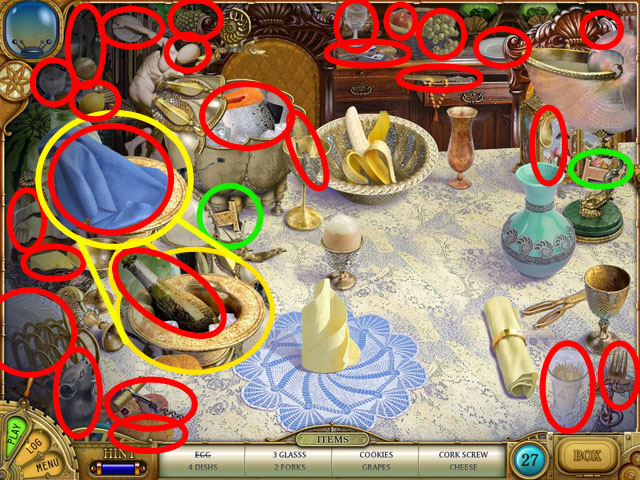
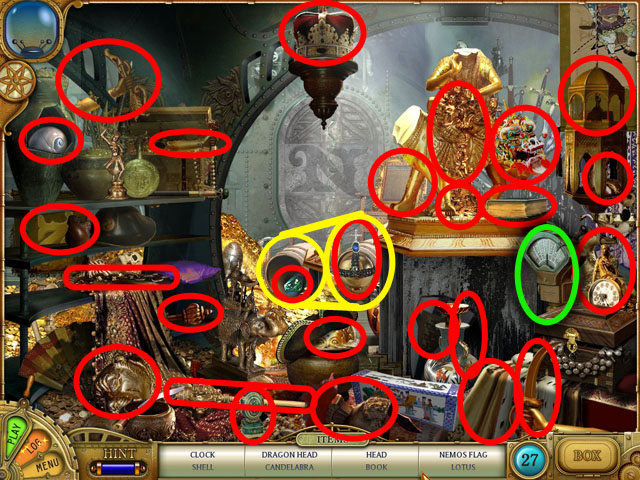
- Find the 27 hidden objects listed at the bottom of the screen, in any order, circled in yellow and green in the image.
- 3 GLASS SHADES and a COPPER PLATE are marked in green and will go into your inventory when collected.
- Click on the sparkling chessboard to move to the next scene.
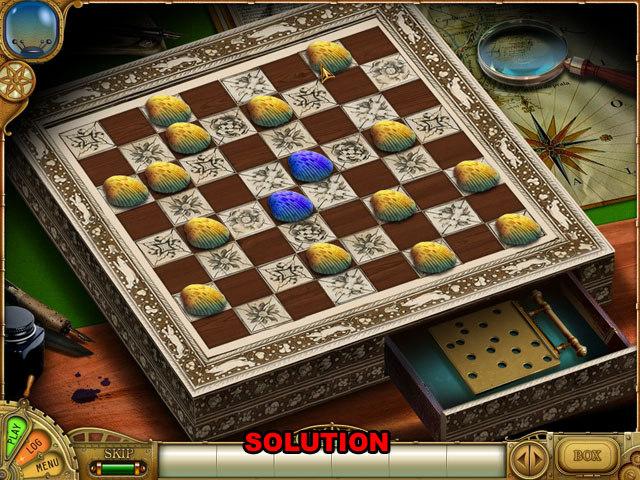
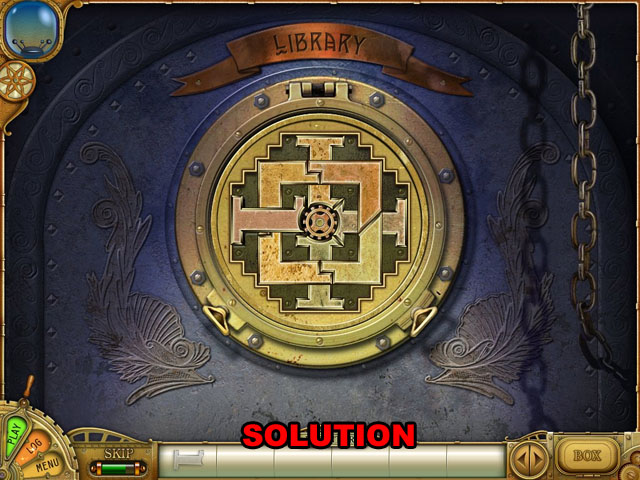
- Put the COPPER PLATE in the drawer at the bottom.
- Move the pieces around so that there are only 2 pieces per row and column.
- The blue pieces cannot be moved.
- See the screenshot for the correct solution.
- Click on the sparkling door to go to the next scene.
- Click on the lever to the right to activate the door lock on the left of the barrier.
- Use the COPPER PLATE with the holes on the door lock device to overcome the barrier will disappear.
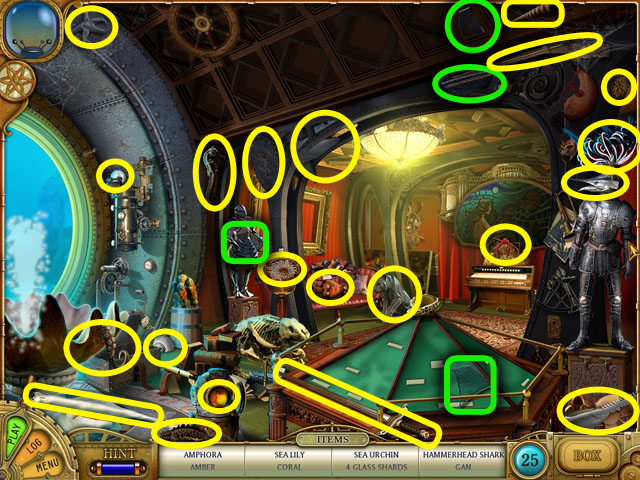
- Find the 25 hidden objects listed at the bottom of the screen, in any order, circled in yellow and green in the image.
- 4 GLASS SHADES are marked in green and will go into your inventory when collected.
- Click on the piano with sparkles to go to the next scene.
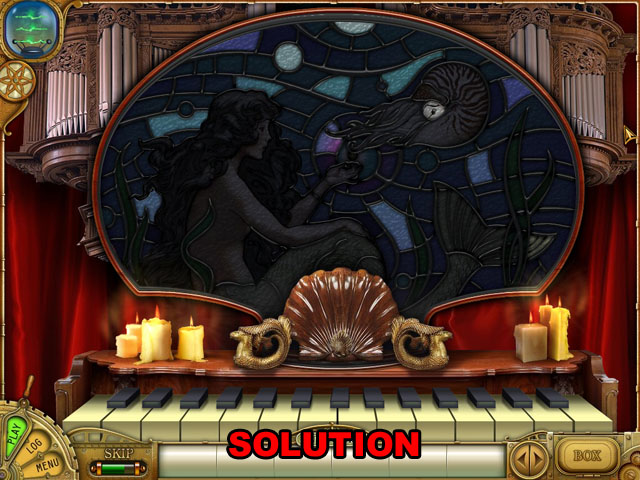
- Replace all of the missing pieces of glass in the stained glass background of the piano.
- Each piece only fits in one possible spot on the mosaic.
- See the screenshot for the completed puzzle.
- The piano will then start to play itself, remember the sequence as this is a memory game.
- You will hear normal notes if you follow the sequence correctly. If you make a mistake, you will hear the sound of a few notes being played together.
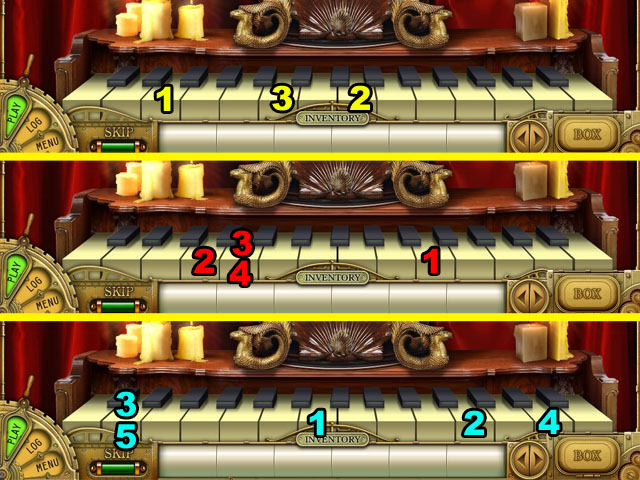
- You have to play the memory game three times in order to win this mini-game.
- Because the keys all look similar, use the inventory panel and the Main Menu as guides to help you remember which key to press.
- See the screenshot for the order of the keys you have to play.
- Click on the door to go to the next scene.
- Find the 27 hidden objects listed at the bottom of the screen, in any order, circled in red and green in the image.
- The NAUTICAL TELEGRAPH is marked in green and will go into your inventory when collected.
- As you complete the statue in the middle it will slowly lower to the ground.
- Click on the door to move to the next area.
Chapter 5
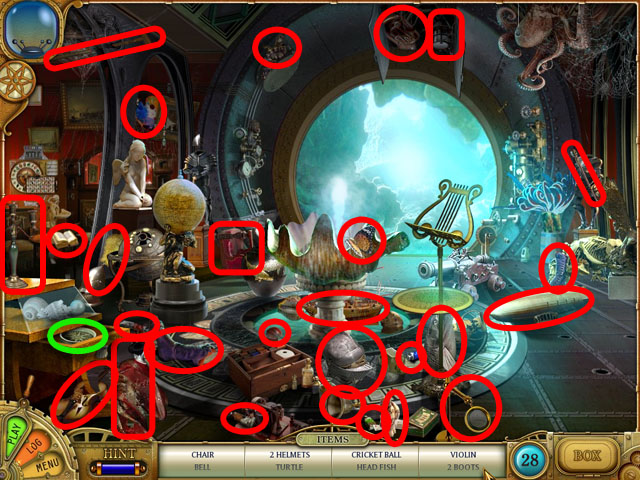
- Find the 27 hidden objects listed at the bottom of the screen, in any order, circled in red in the image.
- The bottle of WINDSHIELD CLEANSER is marked in green and will go into your inventory when collected.
- Click on the stairs in the bottom right corner to move to the next scene.
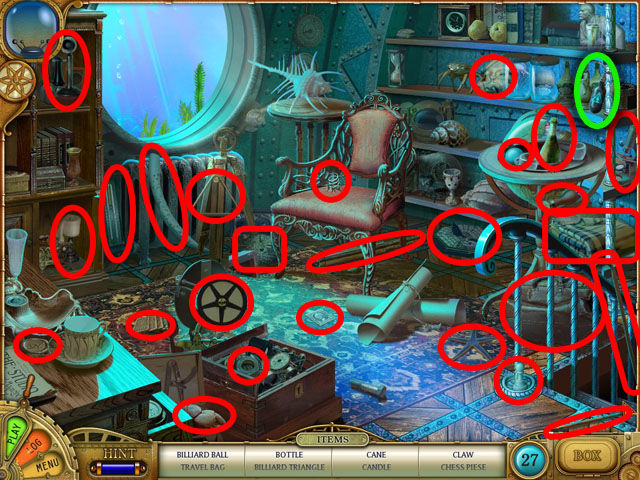
- Find the 28 hidden objects listed at the bottom of the screen, in any order, circled in red and green in the image.
- The COMPASS is marked in green and will go into your inventory when collected.
- Click on the roulette board to move to the next scene.
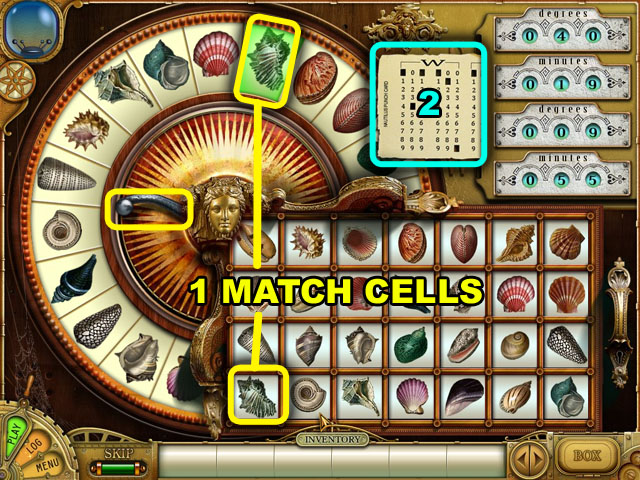
- Pull the lever in the middle to start the puzzle.
- Match one of the 12 cells highlighted in green, in the roulette wheel, with one from the list in the bottom right corner.
- There is only a limited amount of time before the piece spins out of sight. You need to find a match before then.
- The wheel’s speed gets faster and faster as you successfully match the pictures.
- Collect the card in the upper right corner after completing 12 matches.
- Mark down the numbers (you will need them later): S 040 019, W 009 055.
- Collect the PLIERS in the right side of the screen as inventory item.
- Cut the 2 chains on the door, on the left side, using the PLIERS.
- Click on the door handle to open it.
- Click inside the room to move to the next scene.
- Find the 28 hidden objects listed at the bottom of the screen, in any order, circled in red and green in the image.
- The GREEN VALVE and FLASK WITH ETHER will be marked in green and will go into your inventory when collected.
- Click on the back door, on the right side, to move to the next scene.
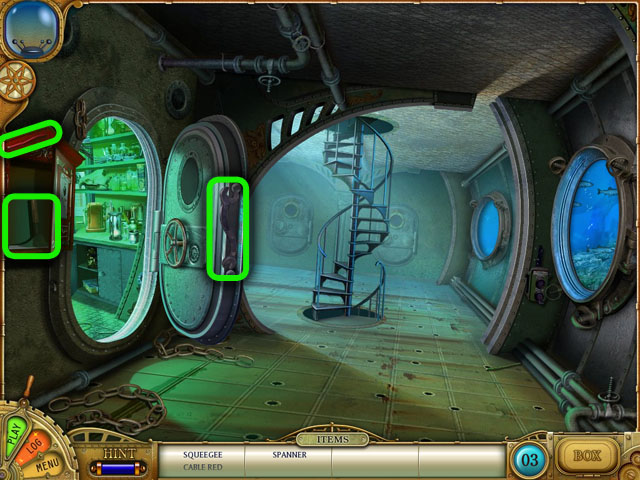
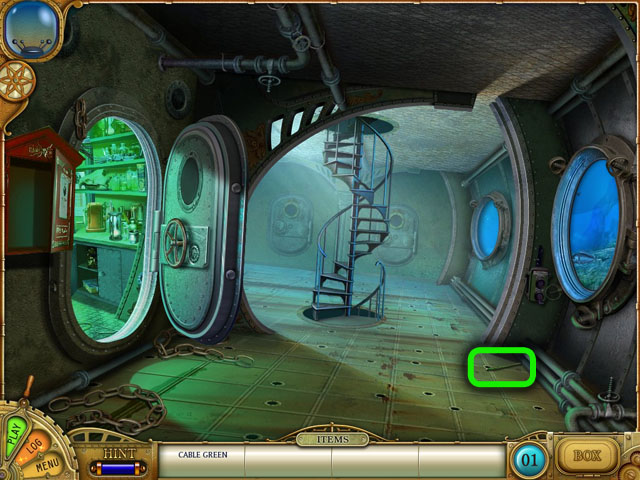
- Find the 3 hidden objects listed at the bottom of the screen, in any order, circled in green in the image. All 3 of the items will go to the inventory, SQUEEGEE, SPANNER, and CABLE RED.
- Click on the stairs in the middle to move to the next scene.
- Approach the sparkling power station in the middle.
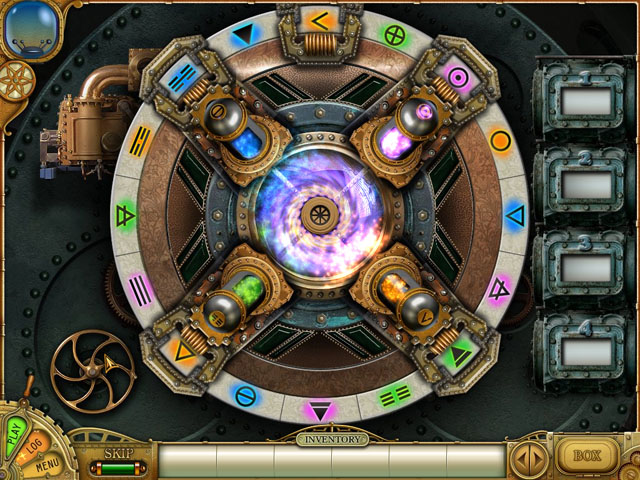
- Place the FLASK in the middle.
- Place any CAPSULE in the hole with a symbol that matches with the symbol on the top of the CAPSULE.
- The list of symbols will appear on the right side of the screen.
- Click on the symbols on the roulette following the order in the list.
- After clicking 4 symbols in a row, you can place another CAPSULE.
- Once the CAPSULE is placed, the list will fill up again.
- Repeat until all of the symbols on the wheel have been clicked and the 4 CAPSULES are in.
- Click on the ladder in the upper left corner to return to the main deck.
- Find the inventory item GREEN CABLE.
- Click on the stairs in the middle to move to the next scene.

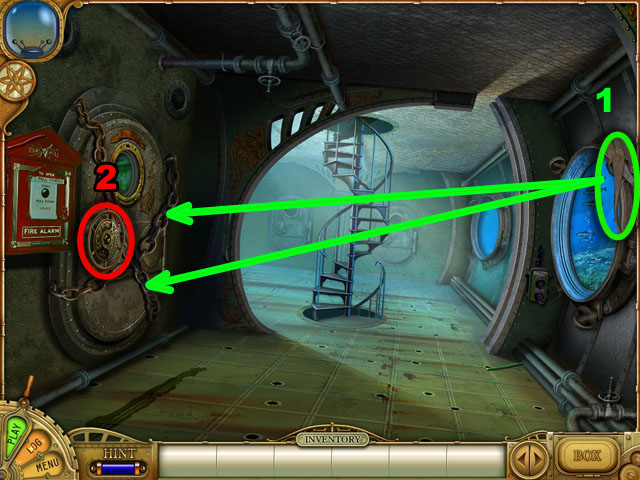
- Use the WINDSHIELD CLEANER on the left porthole; then use the SQUEEGEE on it to clean it up (1, 2).
- Open the control panel with the wrench (3).
- Add the green and red wires to the empty space in the control panel (4).
- Find the handle near the stairwell, and place it under the right porthole (5).
- Clean the right porthole like you did the left one, using the CLEANER then the SQUEEGEE (6, 7).
- Click on the control panel to go to the next puzzle.

- You must create a path with the wires that passes through every point on the panel and goes from the start to the end pieces.
- Click on a wire to pick it up, and then click again to place it down.
- Wires can go vertically or horizontally, and you can switch between them just by placing them there.
- There are a few ways to solve the puzzle but only one correct solution, shown in the screenshot.
- When the correct solution is in place, the wire at the bottom of the screen will spark.
- Pull the handle to go to the next scene.
- Click on the control panel again.
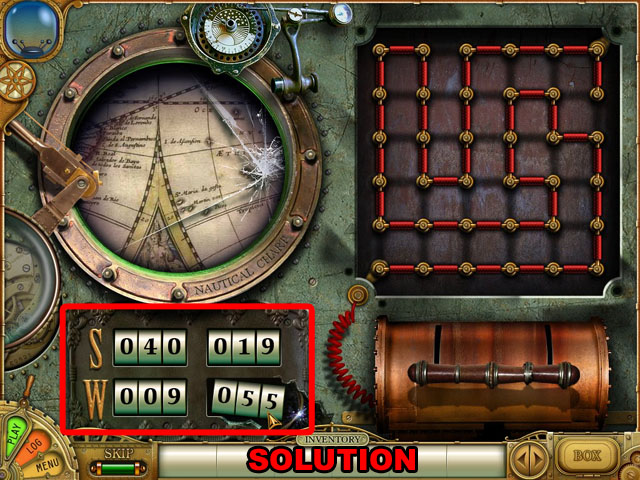
- Put in the numbers that you got before into the bottom panel.
- Click the number to change it. The numbers are not in order though; you may have to go slowly so you do not accidently go past the number and have to go around again.
- Each time you get a number correct the map will spin to a new place.
- The correct order is: S 040 019, W 009 055.
- Fix up the control room to finish the game.
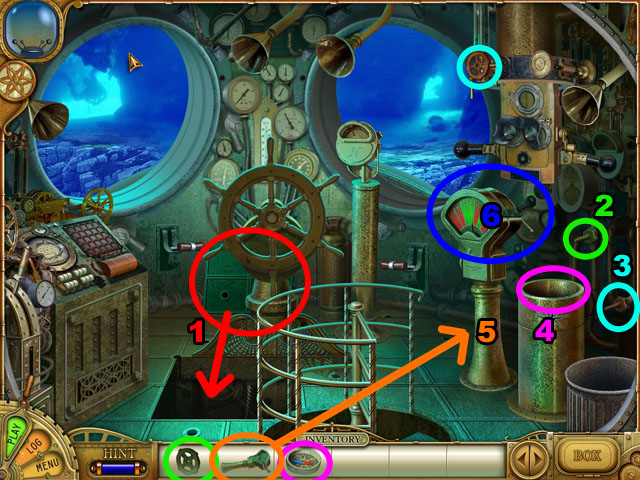
- Take the FLOOR PANEL and place it on the floor (1).
- Put the GREEN HANDLE on the green screw (2).
- Click the periscope to find the RED HANDLE and put the RED HANDLE on the red screw (3).
- Replace the COMPASS (4).
- Put the CONTROL next to the COMPASS (5).
- Click the CONTROL to start the ship on its journey home (6).
- Congratulations! You’ve completed The Secret of Captain Nemo!
Created at: 2010-07-23