

Walkthrough Menu
- General Tips & Information
- Joe's Bar
- Rose Street
- Locked Room
- ????
- Gas Station
- Dr. Morrison's Lab
- Nick's Office
- The Museum Gallery
- Joe Scribbler's Room
- The Junkyard
- Bernard's Gate
- Archive Outside
- Archive
- Joe Scribbler's Room (as Joe)
- Mary's Bedroom
- Back at Joe Scribbler's Room
- The Factory
- The Gas Station- Revisited
- The Junkyard
- The Factory
- Kitchen
- The Tunnel
- The Museum Gallery
General Tips & Information
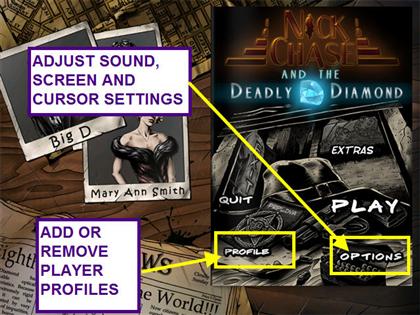
- From the main screen you may manage player profiles.
- The Options Menu allows for the adjustment of music, ambient sounds, and sounds volume.
- You may play this game in windowed or full screen mode.
- You may disable the custom cursor.
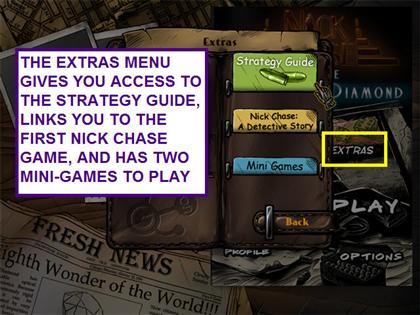
- There are three items in the extras menu.
- The first is a link to this strategy guide.
- The second will take you to the game page of Nick Chase A Detective Story, the first game in the series.
- The third link takes you to two mini-games that are similar to Pong and Breakout.
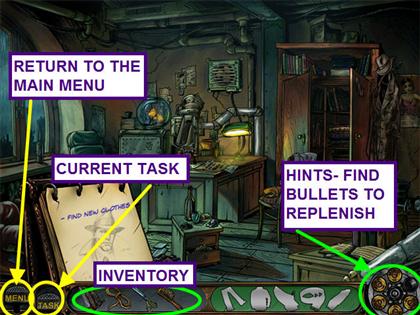
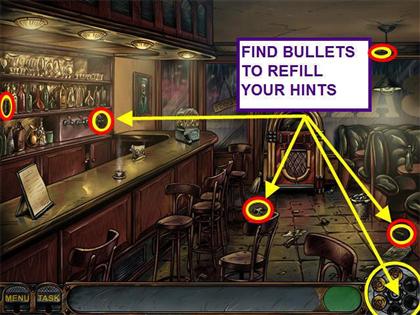
- Hints are limited; you must find bullets throughout the game to refill the revolver.
- Bullets are marked in screenshots, but please note that some locations are random.
- Find the bullets circled in yellow and red to refill your hints.
- Click on the revolver to request a hint.
- You may skip mini-games after the Skip Meter fills.
- This game is not timed.
- You have the option of having a mini-tutorial at the beginning of the game.
- Exiting the game before a chapter is complete, may lose some of your progress.
Joe's Bar
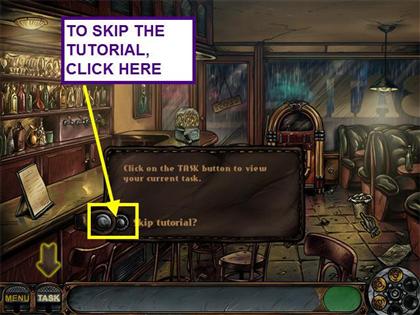
- You have the option of playing with a mini-tutorial at this point.
- Click on the snap next to “Skip Tutorial” to close the extra help.
- Find the bullets circled in yellow and red to refill your hints.
- Please note the bullet locations are random.
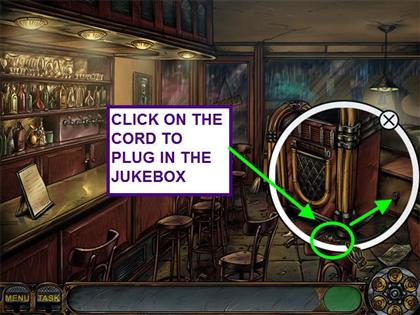
- Look at the close-up of the jukebox to see that it is unplugged.
- Click on the cord to plug in the jukebox.
- Look at the close-up of the jukebox.
- Locate the hidden objects on the list and find the COIN.
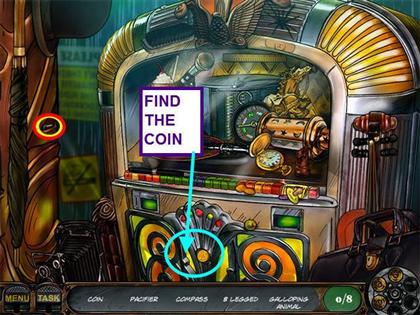
- Take the COIN from your inventory and use it on the jukebox.
- Joe tells you a package arrived.
- After opening the package, Nick drops the clay tablet.
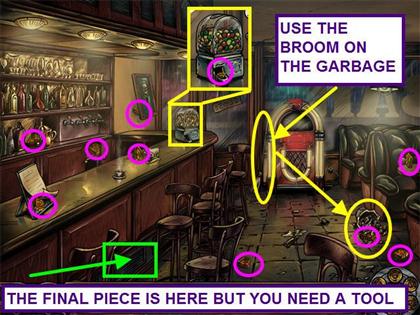
- Find the 21 TABLET PIECES.
- You will need to move items to find all the pieces.
- There are 10 TABLET PIECES visible.
- There are 11 TABLET PIECES that are hidden; you need to move the items marked in pink.
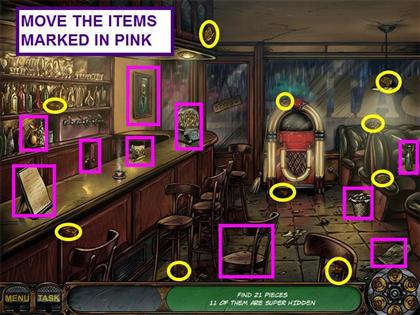
- Find the now revealed TABLET PIECES.
- Take the BROOM next to the jukebox and use it on the spilled garbage.
- Click on the grate at the base of the bar.
- The final piece is in the grate at the base of the bar, but you need a TOOL.
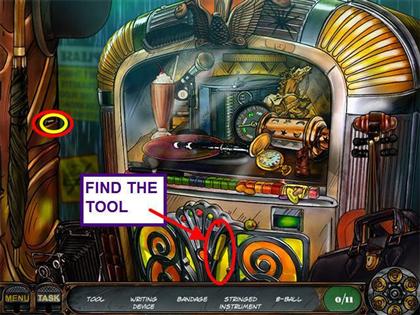
- Look at the close-up of the jukebox for a Hidden Object scene.
- Find the hidden objects on the list and take the TOOL.
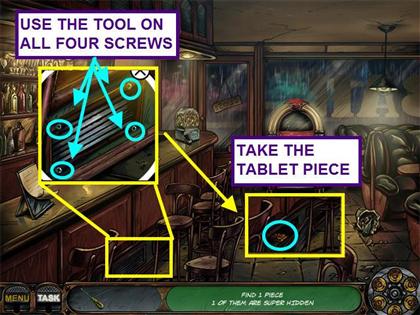
- Look at the close-up of the grate.
- Use the TOOL on all four screws.
- Take the final TABLET PIECE.
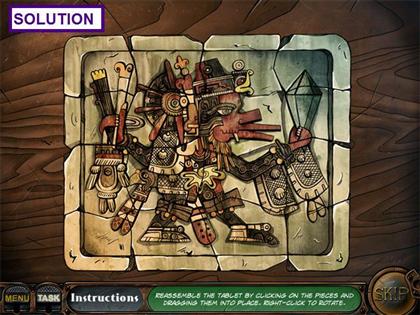
- Taking the final TABLET PIECE triggers a jigsaw style mini-game.
- Reassemble the tablet.
- Use left-click to pick up and place a piece.
- Left-click, then right-click to rotate a piece.
- Nick is sure he has seen this before.
- Nick flashes back to his office.
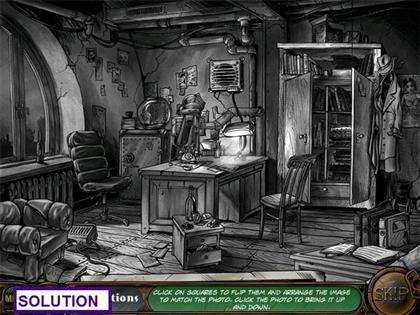
- The object of this mini-game is to flip the tiles and reconstruct the photo.
- You can refer to the original by clicking on the edge of the photograph sticking out just above the inventory area.
- Left-click on squares to flip them into place.
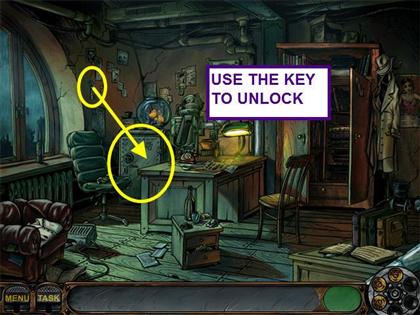
- Take the KEY hanging by the window.
- Use the KEY to unlock the safe.
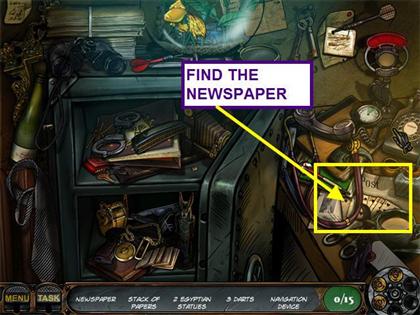
- Look at the close-up of the safe for a hidden object scene.
- Find the hidden objects on the list and take the NEWSPAPER.
- Nick realizes that someone wanted him to see the correlation between the display at the museum and the tablet he received.
- Nick heads out to the address on the back of the package.
Rose Street
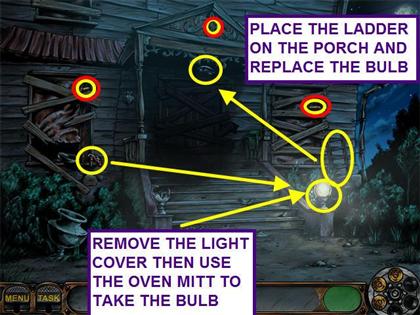
- Remove the right light cover.
- Take the OVEN MITT from the window and use it on the LIGHT BULB.
- Take the LADDER and place it on the porch.
- Place the LIGHT BULB into the light fixture.
- Take the CLIPPERS off the porch and use them on the left bushes.
- Take the CROWBAR and use it on the boards covering the door.
- Remove the boards from top to bottom.
- Click on the boards in numerical order.
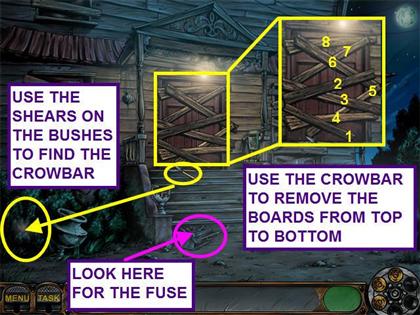
- Look at the control pad on the door to discover you need a FUSE.
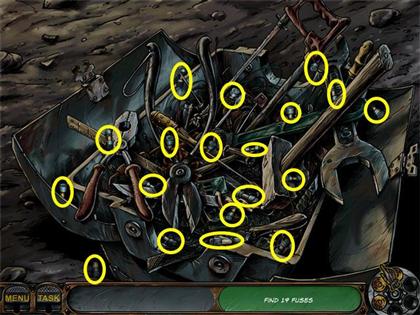
- Look in the tool box for a Hidden Object scene.
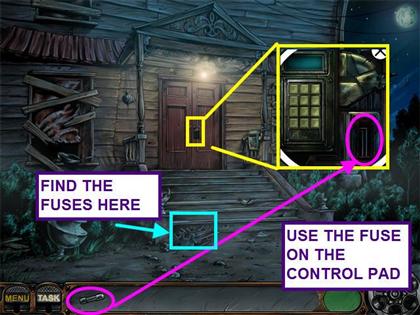
- Find the 19 FUSES.
- Look at the close-up of the control pad on the door.
- Place the FUSE into the control pad to trigger a mini-game.
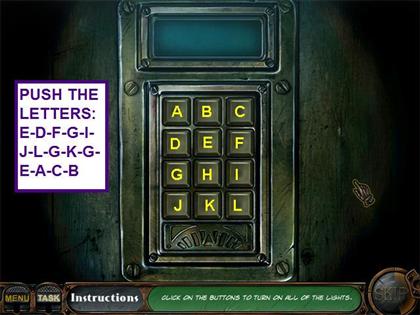
- The object of this mini-game is to turn on all the lights.
- There are many solutions to this puzzle, yours may vary.
- Lettering the buttons across and down, press the buttons: E-D-F-G-I-J-L-G-K-G-E-A-C-B.
Locked Room
- Nick enters the house and is hit on the head and tied to a chair.
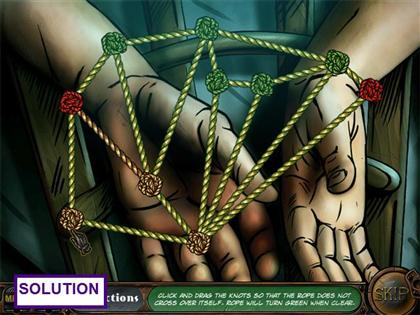
- Untangle the knots to free Nick.
- Pull the knots apart and separate them so that no rope crosses another.
- The two red knots on his wrists do not move.
- The knots and ropes will turn green if successfully undone.
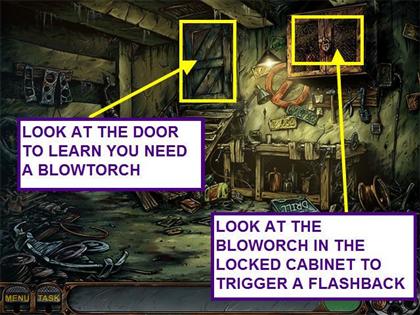
- Look at the door to learn you need a BLOWTORCH.
- Look at the locked cabinet on the wall.
- Nick has another flashback.
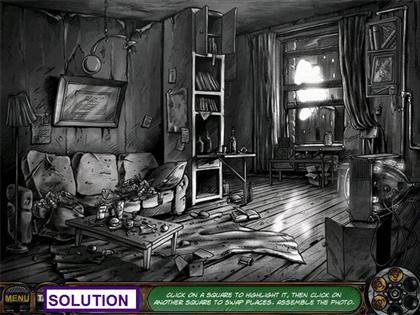
- Nick flashed back to Joe the Scribbler's room.
- The object of this mini-game is to swap squares to complete the picture.
- Left-click on two pieces to swap places.
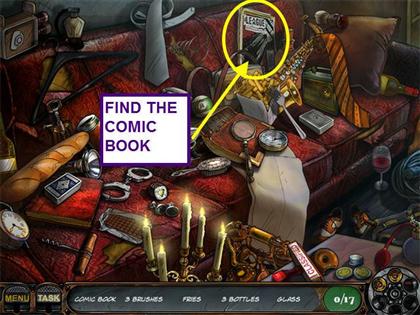
- Click on the couch to see a close-up view.
- Locate the hidden objects on the list and find the COMIC BOOK.
- The COMIC BOOK tells Nick to drill through the lock.
- With the flashback over, Nick is back in the locked room.
- Open and look at the DRILL case to see that it has no POWER CORD or DRILL BIT.
- Take the SCISSORS hanging on the wall.
- Use the SCISSORS to cut the POWER CORD.
- Use the POWER CORD on the DRILL.
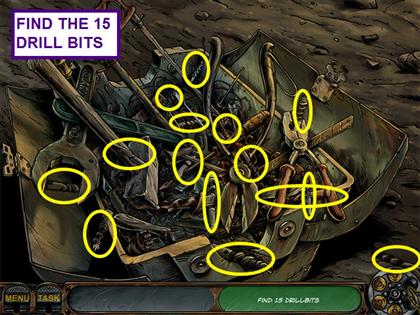
- Look at the toolbox for a Hidden Object scene.
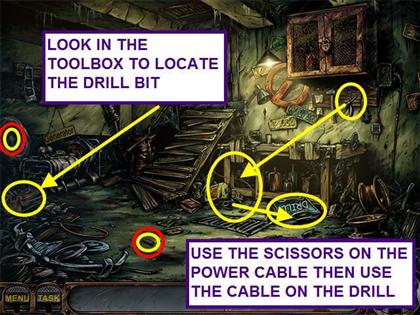
- Locate the 15 DRILL BITS.
- Use the DRILL BIT on the DRILL.
- Look at the worktable under the locked cabinet.
- Locate the hidden objects on the list and find the ELECTRICAL TAPE.

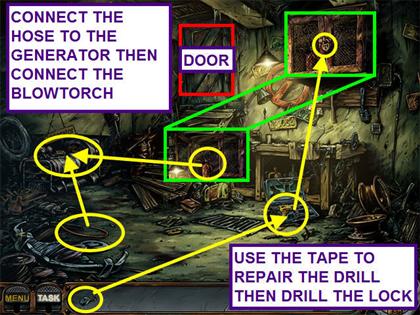
- Use the ELECTRICAL TAPE on the DRILL.
- Take the DRILL and use it on the lock.
- Take the BLOWTORCH.
- Try to use the BLOWTORCH on the door, but it is out of fuel.
- Pick-up the HOSE and use it on the generator.
- Use the BLOWTORCH on the generator.
- The BLOWTORCH will automatically return to your inventory when it is full.
- Use the BLOWTORCH on the door to trigger a mini-game.
- The object of this mini-game is to adjust the blowtorch to cut the pattern on the door.
- Pump the right handle until the ball is in the green area.
- You will need to do this several times during the mini-game to keep the pressure up.
- Turn the left handle to the right, or left, to set the length of the flame.
- Follow the pattern down the door to complete the puzzle.

????
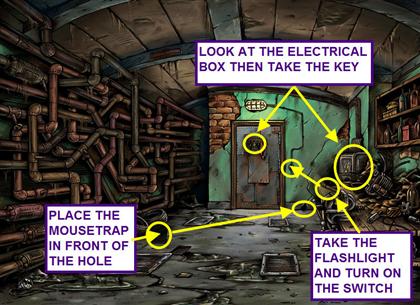
- Take the FLASHLIGHT off the table.
- Turn on the light switch.
- There is a voice at the door claiming to be your friend.
- Try to open the electrical box, but you need a KEY.
- Take the KEY hanging on the door, but you drop the KEY.
- The mouse steals the KEY.
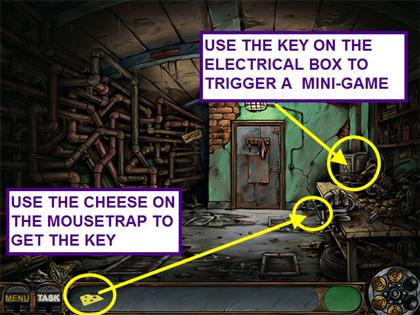
- Take the MOUSETRAP and place it in front of the mouse hole.
- Look at the MOUSETRAP to learn you need CHEESE.
- Locate all the hidden objects on the list and find the CHEESE.
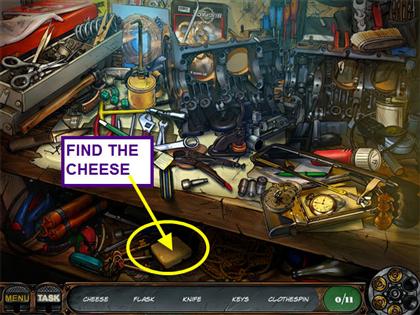
- Place the CHEESE on the MOUSETRAP and you will get the KEY.
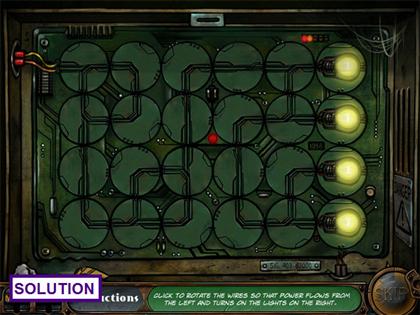
- Use the KEY on the electrical box to trigger a mini-game.
- The object of this mini-game is to light the 4 bulbs.
- Left-click on the connectors to make electricity flow to each of the 4 bulbs.
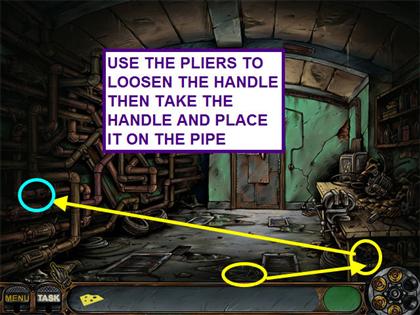
- Take the WRENCH and use it to loosen the HANDLE.
- Take the HANDLE and place it on the water pipe.
- Turn on the water.
Gas Station
- You are now playing as Big D, trying to help Nick Chase.
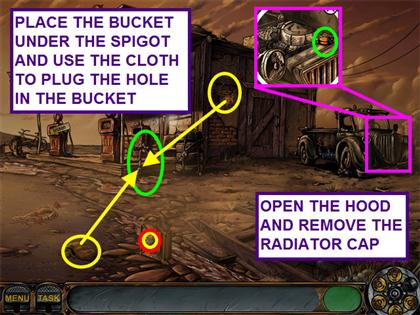
- Open the hood of the truck and remove the radiator cap.
- Take the BUCKET and place it under the faucet.
- Take the CLOTH and use it to plug the hole in the BUCKET.
- Turn on the faucet.
- The BUCKET WITH WATER will automatically be added to your inventory.
- Use the BUCKET WITH WATER on the radiator.
- Look at the close-up of the pit area.
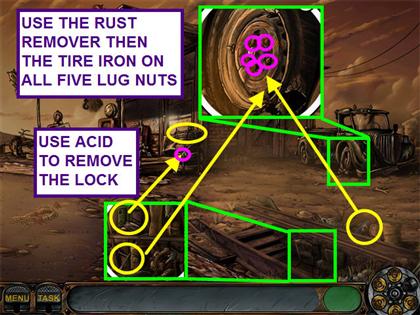
- Take the TIRE IRON and the ACID.
- Look at the close-up of the truck tire.
- Take the RUST REMOVER and use it on all 5 lug nuts.
- Use the TIRE IRON on all 5 lug nuts.
- Use the ACID on the lock at the stack of tires.
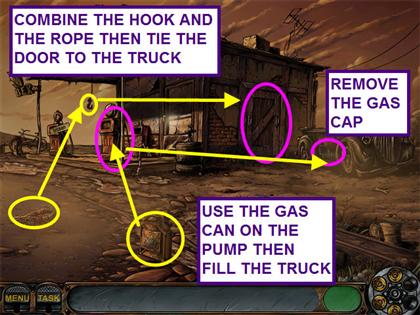
- Take a TIRE and use it on the truck.
- Remove the gas cap from the truck.
- Take the GAS CAN and use it on the gas pump.
- The filled GAS CAN will return automatically to your inventory.
- Take the ROPE and the HOOK.
- Drag the HOOK over the ROPE in your inventory to combine them.
- Use the HOOK and ROPE on the door.
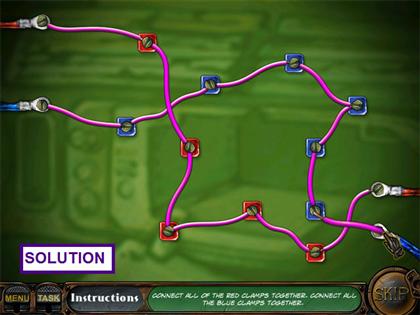
- Use the GAS CAN on the truck to trigger a mini-game.
- The object of the mini-game is to connect all the red clamps together and all the blue clamps together.
- Drag the pink wires over the connectors and release them when they fit.
Dr. Morrison's Lab
- You are now playing as Dr. Morrison.
- Fires have broken out in the lab!
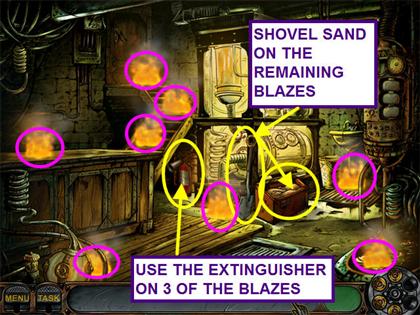
- Take the FIRE EXTINGUISHER and use it on three of the burning areas.
- Take the SHOVEL and use it on the SAND.
- Use the SHOVEL of SAND on a burning area.
- Use the SHOVEL to put SAND on the remaining burning areas.
- Open the cupboard beneath Nick and take the SYRINGE.
- Use the SYRINGE on Nick's arm to get a blood sample.
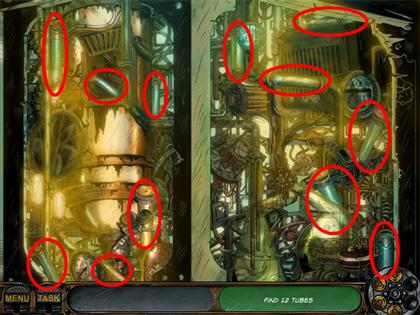
- Look at the close-up of the upper lab equipment for a Hidden Object scene.
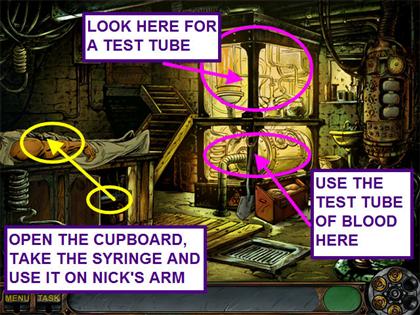
- Locate the 12 TEST TUBES in this hidden object scene.
- Combine the TEST TUBE and the SYRINGE.
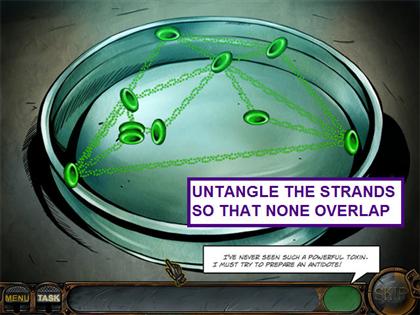
- Use the VIAL OF BLOOD on the lower lab equipment area.
- Untangle the blood cells.
- Pull the blood cells apart and separate them so that no line crosses another.
- The blood cells will turn green if in the clear.
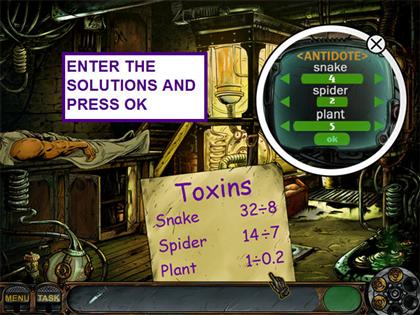
- Look at the close-up view of the antidote maker.
- Use the formula to enter the correct settings.
- For the first number: 32 divided by 8 equals 4, so enter 4 on the snake setting.
- For the second number: 14 divided by 7 equals 2, so enter 2 on the spider setting.
- For the third number: 1 divided by .02 equals 5, so enter 5 on the plant setting.
- Press OK.
- Combine the SYRINGE and ANTIDOTE in your inventory.
- Use the SYRINGE of ANTIDOTE on Nick's arm.
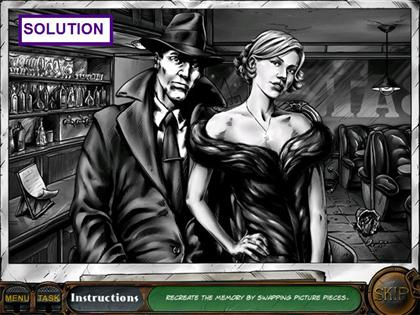
- Nick recalls another memory.
- The object of this mini-game is to swap squares to reassemble the photograph.
- Left-click on two squares to swap positions.
- You can refer to the original by clicking on the edge of the photograph sticking out just above the inventory area.
Nick's Office
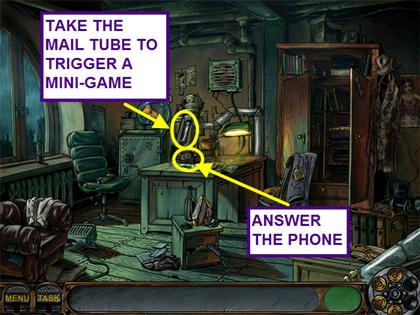
- Back at Nick's office, answer the phone.
- The caller is Mr. X, warning Nick he will not get the antidote unless he gets the diamond.
- Click on the mail tube to trigger a mini-game.
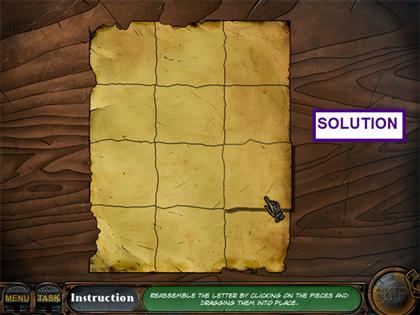
- The object of this mini-game is to reassemble the letter.
- Drag and drop pieces into place.
- Pieces will attach to adjoining pieces.
- The letter is blank.
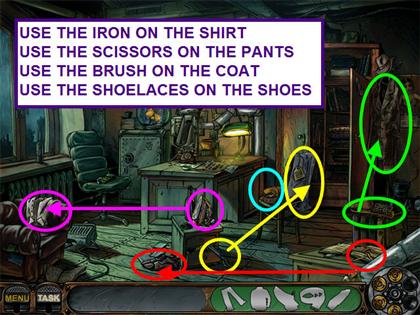
- Take the IRON and use it on the SHIRT.
- Take the SCISSORS and use them on the PANTS.
- Take the BRUSH and use it on the COAT.
- Take the SHOELACES and use them on the SHOES.
- Pick up the SHIRT, PANTS, COAT, SHOES, and BELT.
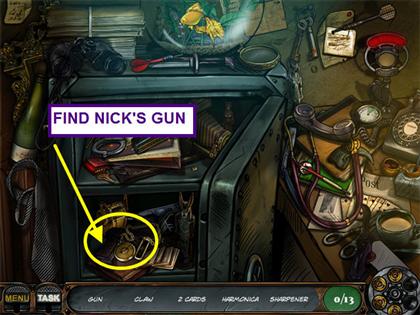
- Nick decides he may need his gun.
- Click on the safe behind the desk for a Hidden Object scene.
- Locate all the hidden objects on the list and find the GUN.
The Museum Gallery
- Read the log book behind the desk and learn that the safe code is: “Art = Life's” mirrored release date.
- Look in the fountain to see there is a PAPER BOAT at the bottom.
- Turn on the fountain using the wall switch.
- Take the PAPER BOAT.
- The PAPER BOAT is actually a MAGAZINE COVER SCRAP.
- Place the MAGAZINE COVER SCRAP on the torn magazine cover on the table.
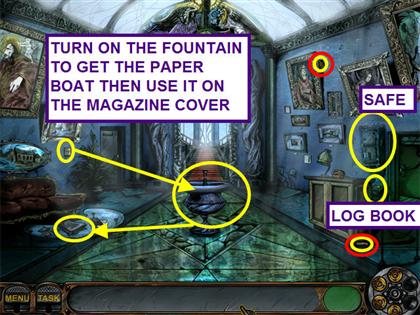
- Look at the close-up of the safe.
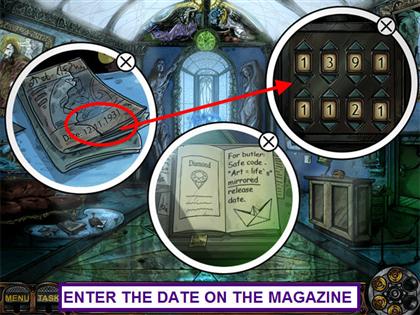
- This will open all the clues.
- Enter the date on the magazine cover into the safe in reverse.
- Push the up and down arrows to enter “1391” in the top row.
- Enter “1121” in the bottom row.
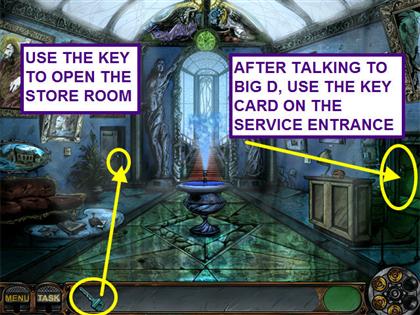
- The safe will open and a KEY will automatically go into your inventory.
- Use the KEY to open the storeroom door on the left.
- Click on the door to enter the storeroom.
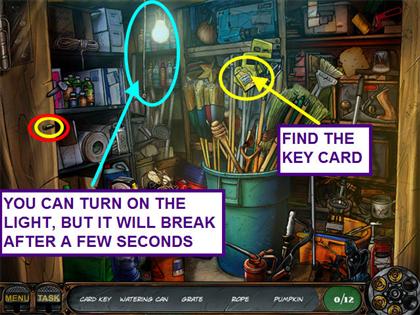
- Locate all the hidden objects and find the KEY CARD.
- You can pull the string to turn on the light, but the bulb will break after a few seconds.
- Big D arrives and tells you the way to the diamond is blocked with boxes.
- Use the key card to open the service entrance.
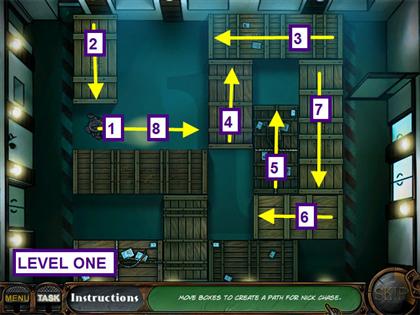
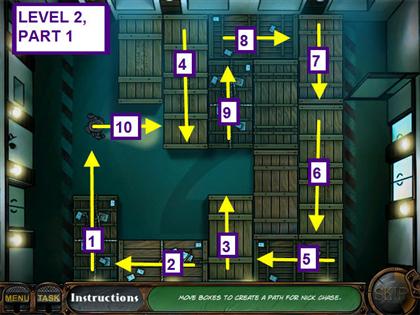
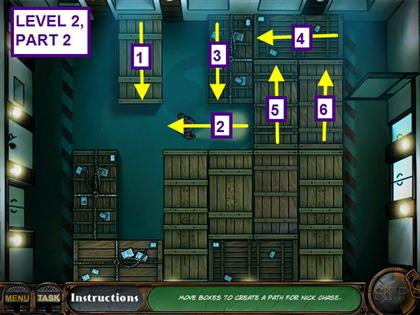
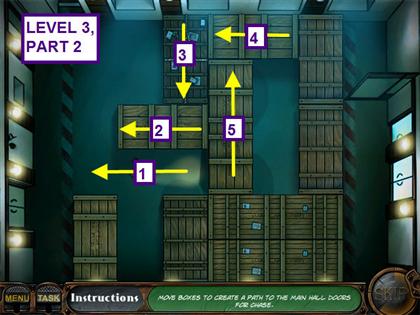
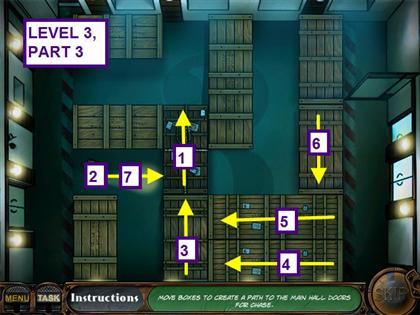
- The object of this slider mini-game is to move the boxes so that Nick can make it to the opposite side of the room.
- Please note that Nick actually takes up two spaces - one is used by the flashlight.
- Click on a box or Nick to drag into position.
- There are three levels to traverse.


- Nick overhears a guard talking about the new alarm system.
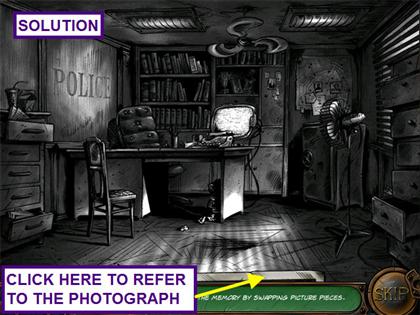
- Nick flashes back to the FB Police Station.
- The object of this mini-game is to recreate the picture.
- Left-click on two squares to swap positions.
- You can refer to the original by clicking on the edge of the photograph sticking out just above the inventory area.
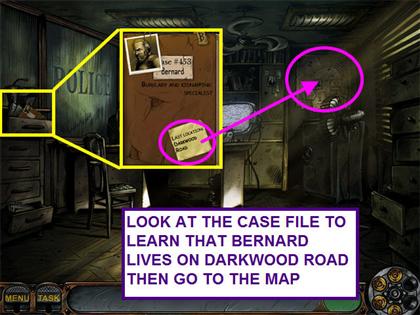
- Look at the case file to learn that Bernard lives on Darkwood Road.
- Click on the map for a close-up view.
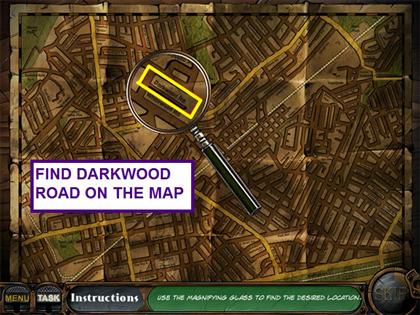
- Move the magnifying glass around the map to read the street names.
- Locate Darkwood Road and click when the magnifier is over the road.
Joe Scribbler's Room
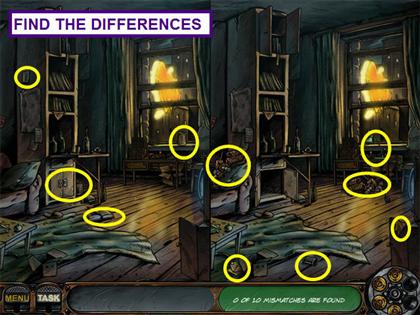
- Joe's place shows signs of a struggle.
- Find the 10 differences between the two pictures.
- You may click on either picture.
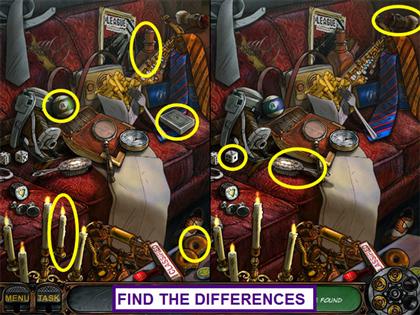
- The sofa looks like it might hold a clue.
- Find the 8 differences between the two pictures.
- You may click on either picture.
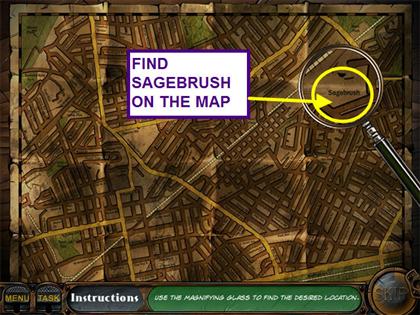
- Nick finds a note from Joe, saying he is at Sagebrush.
- Move the magnifying glass around the map to read the street names.
- Locate Sagebrush and click when the magnifier is over the road.
The Junkyard
- Joe has been put in a car about to be crushed.
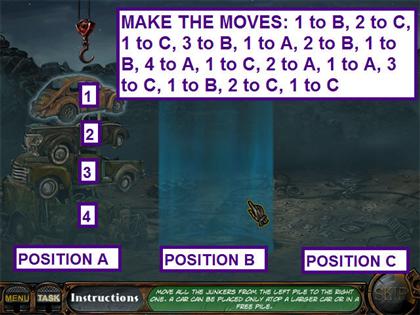
- The object of this mini-game is to move the pile of cars to the far right position.
- Move cars one at a time.
- You can only place a car on top of a larger car, or an empty position.
- Select the car you want to move; then click on the new location.
- Letter the positions A, B, and C, from left to right, and number the cars 1-4, from smallest to largest.
- Make the following moves: 1 to B, 2 to C, 1 to C, 3 to B, 1 to A, 2 to B, 1 to B, 4 to A, 1 to C, 2 to A, 1 to A, 3 to C, 1 to B, 2 to C, 1 to C.
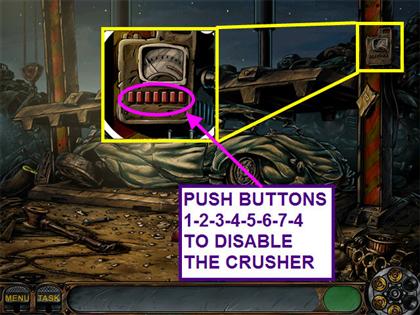
- The crusher is jammed for now, but you have to disable it!
- Click on the crusher control box on the right for a close-up view.
- Number the buttons 1-7 from left to right, push 1-2-3-4-5-6-7-4.
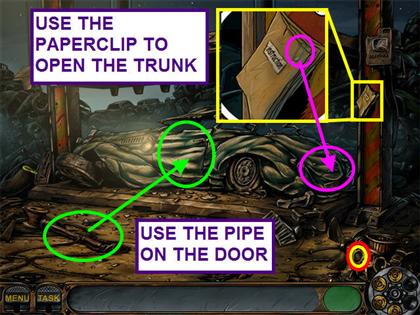
- Try to open the car door but the handle falls off.
- Take the LARGE PIPE and use it on the car door.
- You need something to prop open the door.
- Look at the instruction booklet and take the PAPER CLIP.
- Use the PAPER CLIP to open the trunk.
- Locate all the hidden objects on the list and find the CAR JACK.

- Use the CAR JACK on the car door.
- Take the SCREWDRIVER.
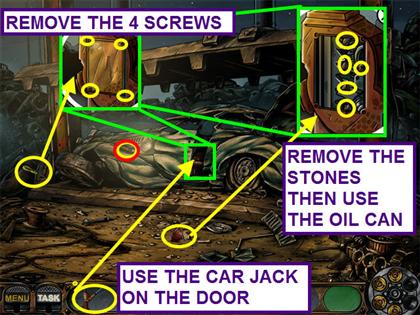
- Look at the close-up view of the CAR JACK and use the SCREWDRIVER on the 4 screws.
- Remove the 5 pieces of stone from the gears.
- Take the OIL CAN and use it on the gears.
- Click on the door to free Joe Scribbler.
Bernard's Gate
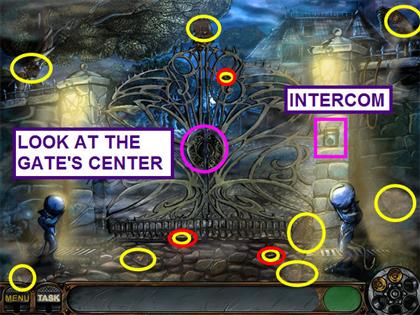
- Look at the intercom and press the button.
- Bernard invites you in if you can find a way through the gate.
- Look at the center of the gate to learn there is an ELEMENT missing from the center.
- Take the 8 pieces of ELEMENT.
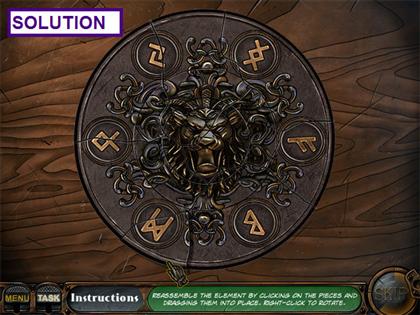
- The object of this mini-game is to repair the element.
- Use left-click to take and drop pieces and right-click to rotate pieces.
- Adjacent pieces will adhere to each other when they are properly rotated.
- Place the ELEMENT into the center of the gate.
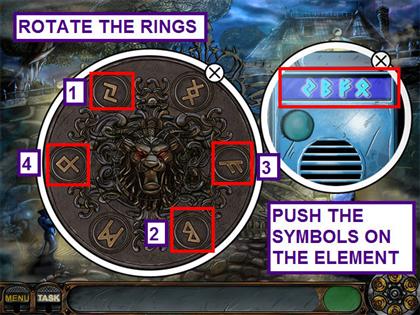
- This will trigger a mini-game.
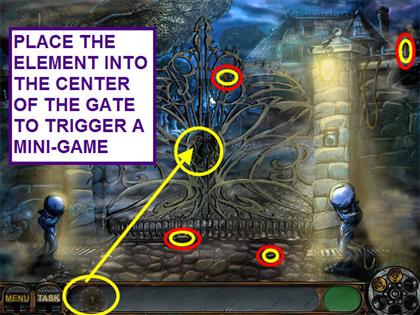
- Click on the rings to align the head and symbols.
- The ELEMENT will spin around when correct.
- Now look at the intercom and push the symbols on the element that match.
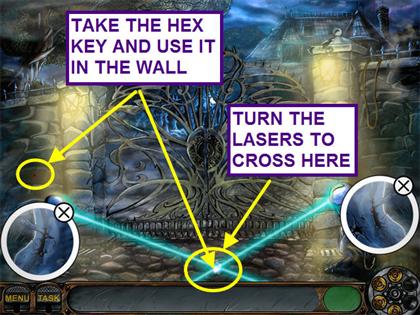
- Entering the code has activated the lasers.
- Look at the back of each statue for a lever.
- Push the left lever twice and the right lever three times so the lasers meet on a strange rock.
- Click where the lasers meet and take the HEXAGONAL KEY.
- Use the HEXAGONAL KEY in the keyhole on the left wall.
- Take the KEY out of the stone niche.
- You drop the KEY into the grate.
- Take the ROPE from the right wall.
- Take the HOOK tail from the right statue.
- Inside your inventory, combine the HOOK and ROPE.
- Use the ROPE and HOOK on the grating to retrieve the KEY.
- Use the KEY on the gate.
- Bernard says the two must go to the archives.

Archives Outside
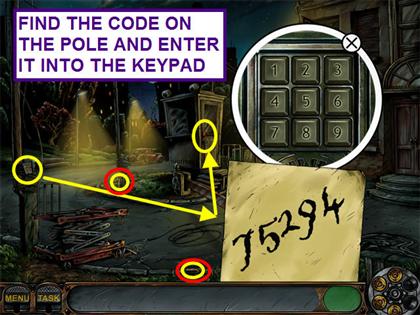
- Look at the control booth; it is locked.
- Find the CODE on the left telephone pole.
- Look at the keypad on the control booth door and enter the CODE: 75294.
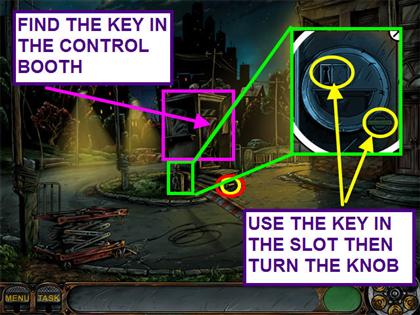
- Look inside the control booth for a Hidden Object scene.
- Locate all the hidden objects on the list and find the KEY.

- Look at the gate control and use the KEY in the slot.
- Turn the knob to raise the gate.
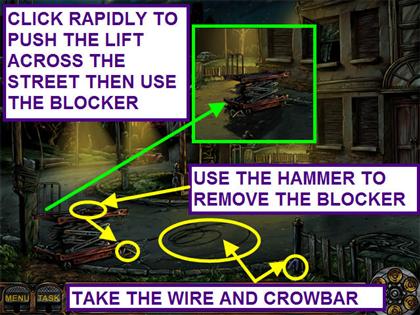
- Take the HAMMER off the lift and use it to loosen the BLOCKER from the lift.
- Take the BLOCKER.
- Pick up the WIRE and the CROWBAR.
- Left-click on the lift quickly to move it across the road.
- Once Nick says it is unstable, use the BLOCKER on the lift.
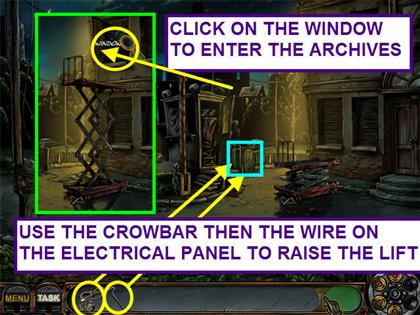
- Use the CROWBAR on the electrical panel.
- Use the WIRE on the electrical panel to power the lift.
- Click on the open window to enter the archives.
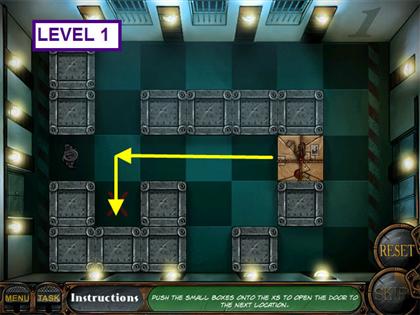
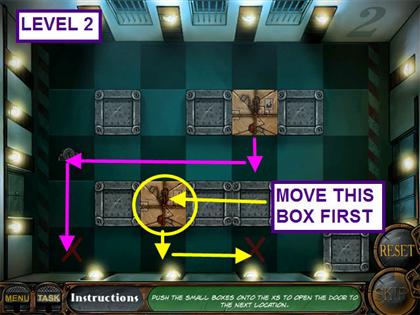
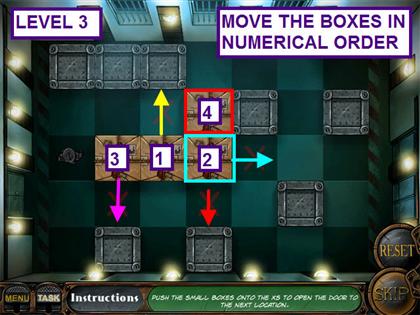
- The object of this mini-game is to push the boxes onto the “X.”
- Left-click where you want Nick to walk.
- When Nick is next to a box, he can move it one space by clicking on that box.
- Push the boxes along the marked paths to solve.
- There are three levels to this mini-game.
- If you get stuck, you can reset the level by pushing the “Reset” button.
Archive
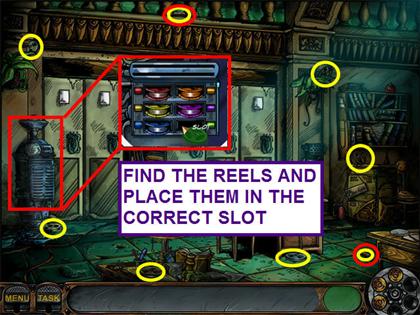
- Look at the information panel on the left to learn that the REELS are missing.
- Locate the 6 REELS in the room.
- Use the REELS on the information panel.
- Click on two REELS to swap positions until the color of the REEL matches the color of the slot.
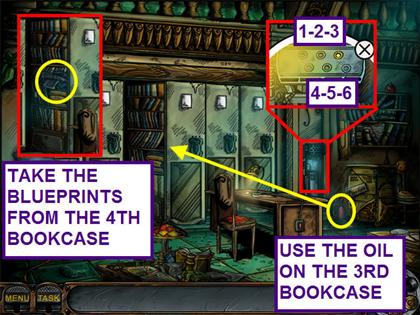
- Look at the control panel, for the bookcases, on the right.
- Press the third button on the top row to close the third shelf, but it is stuck.
- Take the OIL and use it on the third bookcase.
- Press the third button again to close the third bookcase.
- Press the first button on the second row to open the fourth bookcase.
- Take the BLUERPRINTS.
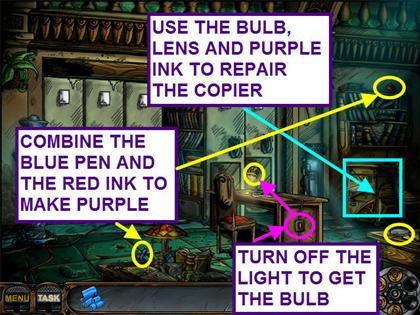
- Look at the broken copier to learn you need a LENS, BULB, and PURPLE INK.
- Find the LENS, RED INK, and BLUE PEN.
- Combine the RED INK and BLUE PEN inside your inventory to make PURPLE INK.
- Turn of the light switch on the desk and take the BULB from the lamp.
- Use the LENS, BULB, and PURPLE INK to repair the copier.
- Use the BLUEPRINTS on the copier.
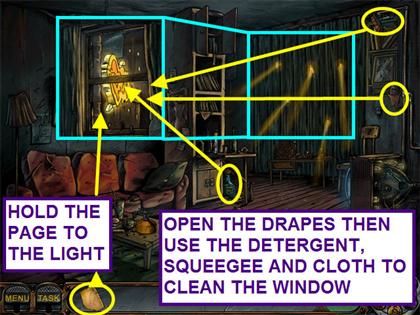
Joe Scribbler's Room
- Joe is trying to reveal the message on the blank page.
- Open the drapes.
- Take the DETERGENT, SQUEEGEE, and CLOTH.
- Spray the dirty window with the DETERGENT; then use the SQUEEGEE.
- Wipe the window with the CLOTH.
- Hold the PAGE up to the window to see if there is a watermark.
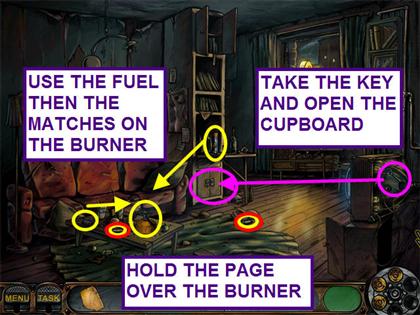
- Take the FUEL and use it on the burner.
- Take the MATCHES and light the burner.
- Hold the PAGE over the burner to see if heat will reveal the message.
- Take the KEY from the back of the television.
- Use the KEY to unlock the cupboard.
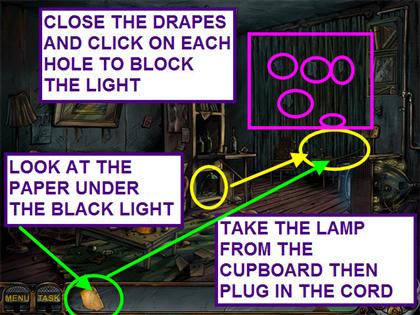
- Take the LAMP from the cupboard; it will automatically go to the table.
- Click on the cord to plug in the LAMP.
- Close the drapes.
- Click on each of the holes in the drapes to block the light.
- Turn on the lamp.
- Hold the PAPER to the light.
- The word CI-TRE-UM is revealed.
Mary's Bedroom
- You are now playing as Mary.
- Answer the telephone.
- Joe needs her to help translate the paper.
- Restore Mary's room to match the photograph.
- Place the PRESENT on the chair.
- Place the BRUSH on the dresser.
- Put the three MAGAZINES on the corner of the table.
- Hang the PAINTING on the wall and put the PILLOW on the bed.
- Open the dresser drawer and place the NIGHTIE inside; then close the drawer.
- Open the closet and hang up the GOWN and STOLE.
- Close the closet.
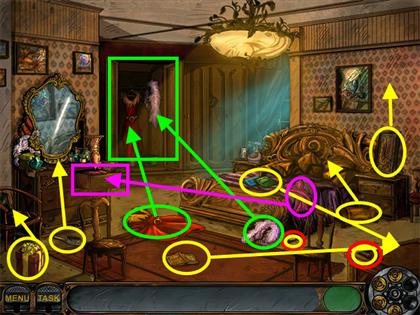
- Take the KEY that was under the NIGHTIE on the bed.
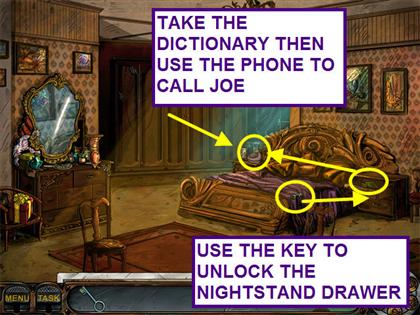
- Use the KEY to unlock the nightstand drawer.
- Take the DICTIONARY from the drawer.
- Pick up the telephone and call Joe.
- Mary tells Joe the CI-TRE-UM is Latin for lemon.
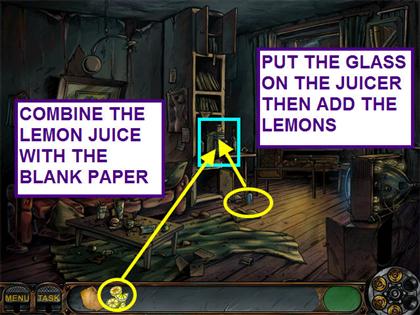
Back at Joe Scribbler's Room
- Find all the juicer parts based on the silhouettes provided.
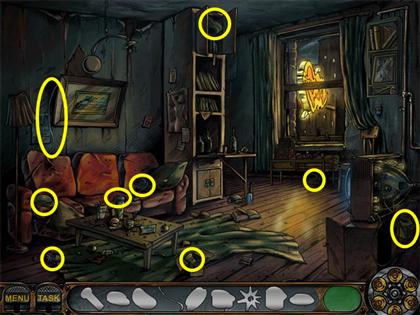
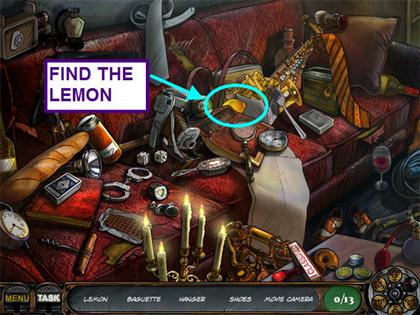
- Click on the couch for a Hidden Object scene.
- Locate all the hidden objects and find the LEMON.
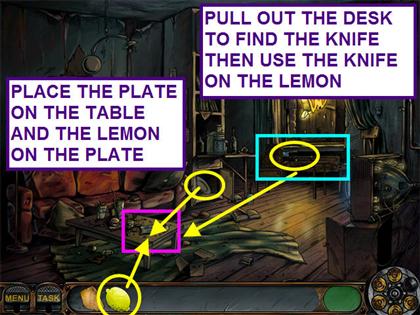
- Open the cupboard and take the PLATE.
- Place the PLATE on the coffee table.
- Put the LEMON on the coffee table.
- Pull out the desk to reveal a KNIFE.
- Take the KNIFE and use it on the LEMON.
- Pick up the LEMON SLICES.
- Pick up the GLASS and place it in the juicer.
- Add the LEMON SLICES to the juicer.
- Take the GLASS of LEMON JUICE and combine it with the blank paper.
- A drawing appears on the BLANK PAPER.
- Move the magnifying glass around the map to read the street names.
- Locate Rain Avenue on the map and click when the magnifier is over the road.

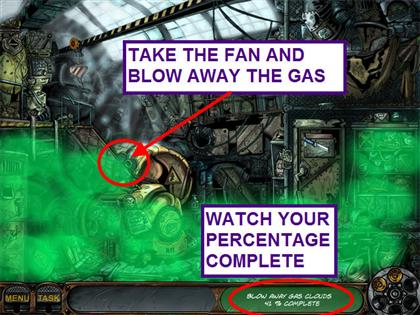
The Factory
- The factory is filled with gassy smoke.
- Take the FAN from the center left and move it over the green smoke until it is all gone.
- You will see a percentage complete at the bottom of the page.
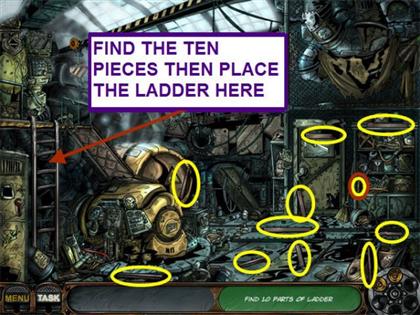
- Look at the broken ladder on the left.
- Find the 10 LADDER PIECES.
- The LADDER will go automatically into your inventory.
- Place the new LADDER over the old one.
- Look at, and open, the center of the generator.
- Take the CROWBAR and open the locker.
- Take the KEY and unlock the cabinet.
- Find the HANDLE and open the safe.
- Use the KNIFE to cut the straps on the bag.
- Locate the 9 BEARINGS.
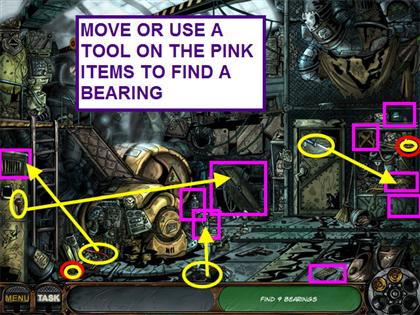
- Look at the center part of the generator and use the BEARINGS.
- The crane is now activated.
- Look at the crane controls above the ladder to learn you need a key.
- Make sure to click on the key slot.
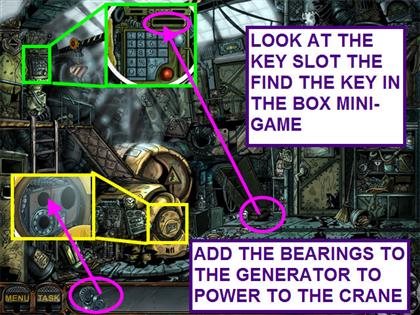
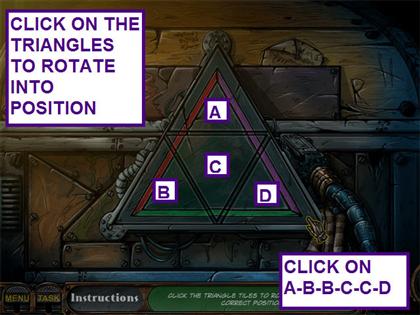
- Click on the small box with the intricate lock.
- The object of this mini-game is to rotate the triangles until all the colors match.
- Letter the top “A,” and the second row, “B, C, or D.”
- Click on: A-B-B-C-C-D.
- Use the KEY CARD in the winch controls.
- The winch will automatically lift the bridge.
- Click on the door across the bridge to finish the scene.
The Gas Station
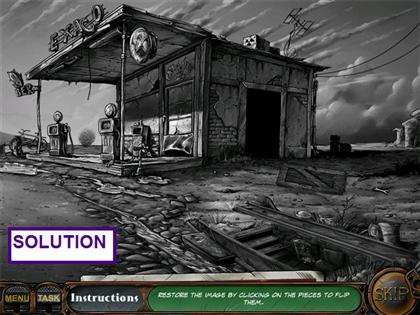
- Restore the image by clicking on pieces to flip them.
- You can refer to the photograph just above the inventory area.
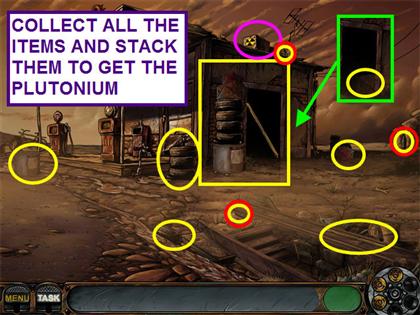
- Take the BARREL and place it next to the building.
- Take the two TIRES off the TIRE STAND.
- Place the TIRE STAND on the barrel and add the two TIRES.
- Find another TIRE in the yard and place it on the stack.
- Take the SMALL BOX, from outside the station, and the BOX just inside the door.
- Put the BOX, then the SMALL BOX, on top of the TIRES.
- Take the STICK and use it to stabilize the pile.
- Take the PLUTONIUM.
The Junkyard
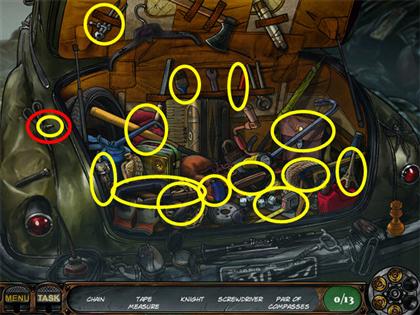
- Look at the trunk for a hidden object scene.
- You do not collect an inventory items here.
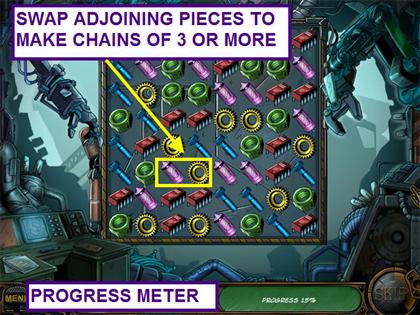
The Factory
- In this Match 3 mini-game, swap adjacent pieces to make chains of 3 or more.
- Left-click on two pieces to swap positions.
- There is a meter at the bottom of the page to show your progress.
- In this mini-game, repeat the sequences played.
- If you can read music, imagine the keyboard has black keys and you can read the solution.
- The sequences are: F-B-E, F-B-E-E, F-B-E-E-D, F-B-E-E-D-D, F-B-E-E-D-D-A.

Kitchen
- Take the HOSE from the upper right and use it on the BARREL full of liquid.
- When the BARREL is empty, push it, and the two BOXES, off of the trap door.
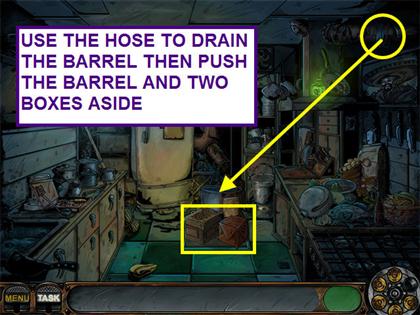
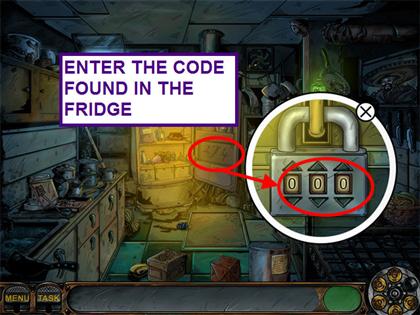
- Try to open the trap door, but there is a padlock.
- Open the refrigerator and notice the number on the inside door.
- Enter 2-7-4 into the padlock.
- Open the trap door and go downstairs.
- Notice the rats blocking the way and go back to the kitchen.
- Take the BOX and the KNIFE.
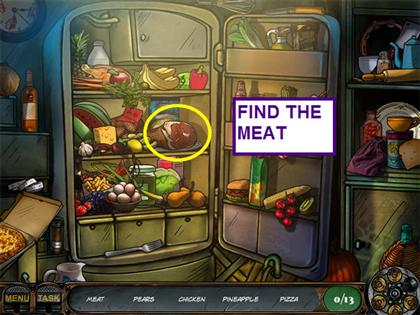
- Look inside the refrigerator for a Hidden Object scene.
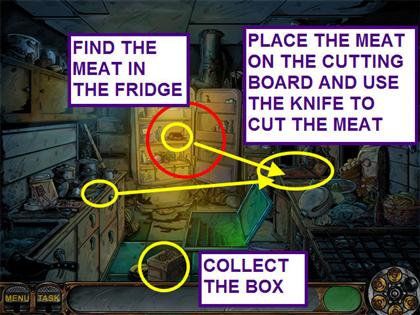
- Locate all the hidden objects on the list and find the Meat.
- Place the MEAT on the cutting board and cut it with the KNIFE.
- Return to the basement.
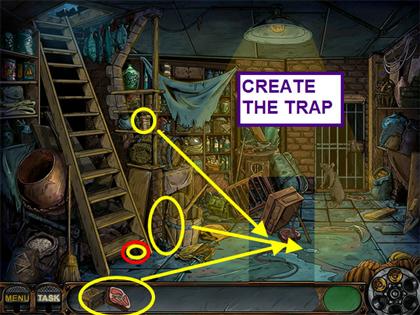
- Place the BOX in the center of the floor.
- Add the STICK, STRING, and MEAT.
- The rat takes the bait, but another rat comes and pushes the BOX to let him out.
- Look at the other rat's hole in the wall.
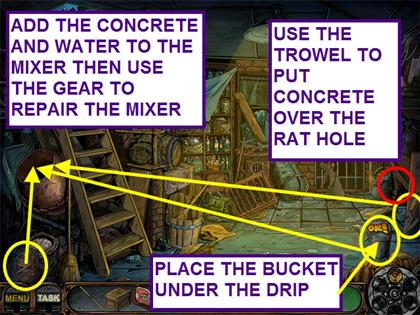
- Look at the cement mixer.
- Take a BAG of CEMENT MIX and pour it in the mixer.
- Look at the mixer to learn you will need WATER.
- Go upstairs and take the BUCKET from behind the trap door.
- Also, take the GEAR from the frying pan in the upper right corner.
- Return downstairs.
- Place the BUCKET under the water dripping from the ceiling.
- Take the BUCKET of WATER and pour it into the mixer.
- Use the GEAR on the mixer.
- Take the TROWEL and use it to take come CONCRETE from the mixer.
- Cover the second rat's hole with the CONCRETE.
- Recreate the trap in the center of the floor with the BOX, STICK, STRING, and MEAT.
- After you capture the rat, click on the grate to the tunnel.
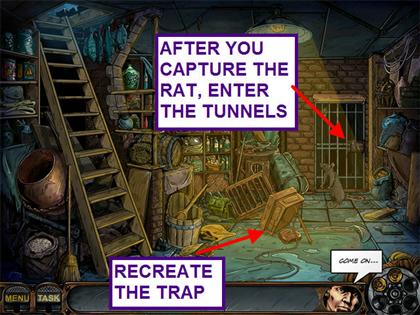
The Tunnel
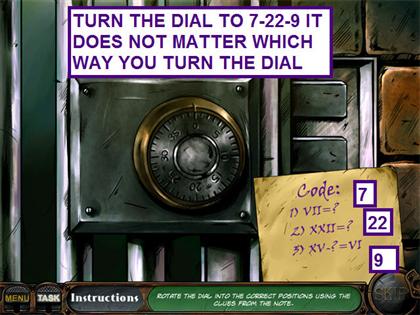
- A clue has been left to help you open the lock.
- Turn the dial to 7-22-9.
- It does not matter in which direction you turn the dial.
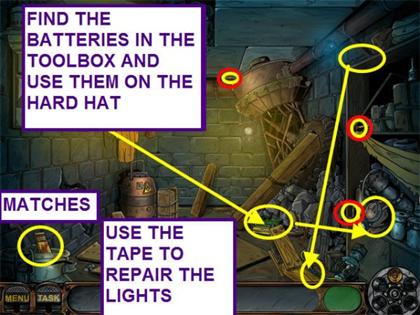
- Take a MATCH from the lower left corner and move it right to the MINING HELMET.
- It needs a BATTERY.
- Take another match and find the tool box in the center of the room.
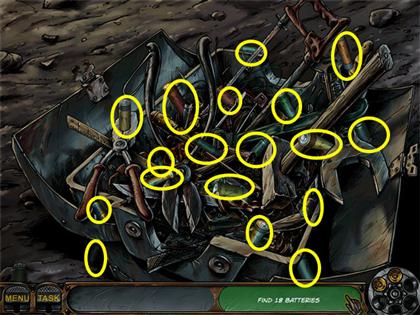
- Look in the toolbox for a Hidden Object game.
- Find the eighteen BATTERIES.
- Light a MATCH on the lower left and take the BATTERY to the hard hat.
- Light another MATCH and find the tape on the right ceiling.
- Use the TAPE on the broken WIRE to repair the lights.
- Take the PICK HEAD and combine it with the HANDLE.
- Use the PICK on the back wall.
- Look at the plans on the left wall to trigger a mini-game.

- The object of this jigsaw style mini-game is to repair the blueprints.
- Use left-click to pick up and drop the pieces, and right-click to rotate the pieces.
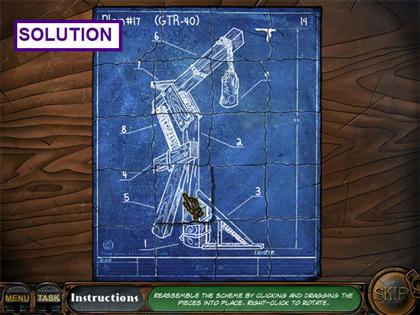
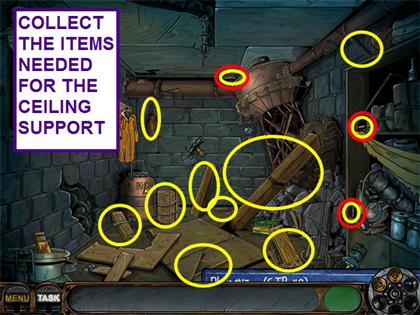
- Collect all the items needed to build the support.
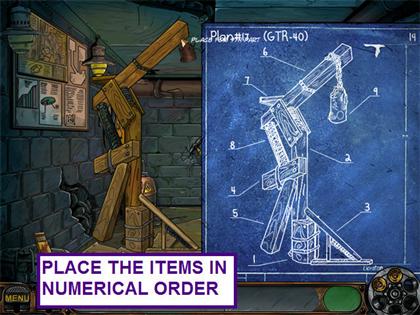
- Build the support by placing the pieces in numerical sequence.
- You can refer to the blueprint at any time.
- Use the pick to continue breaking through the wall.
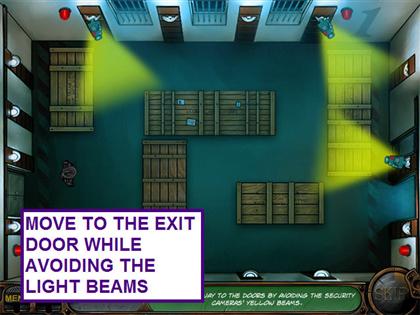
- In this mini-game you need to avoid the camera lights and get to the opposite door.
- Make note of “safe” areas.
- There are three levels to traverse.
The Museum Gallery
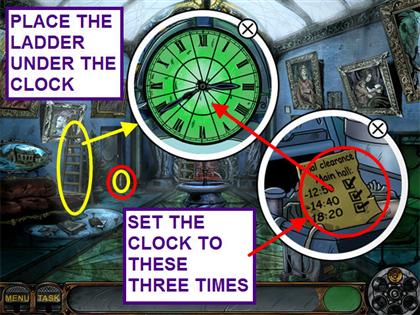
- Look at the mop bucket to see the times the main hall is cleaned.
- Try to reach the clock over the door, but it is too high.
- Take the ladder and place it under the clock.
- Turn the hands of the clock to each of the listed times.
- When the time is correct, the numbers will pop yellow.
- Note: 1440 is 2:40 and 1820 is 6:20.
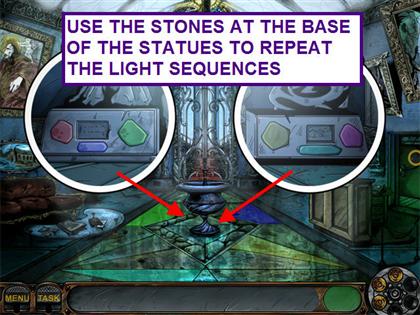
- Look at the base of each statue to see colored stones.
- Click on a few and you will see lights on the floor.
- Reproduce the light colors using the buttons on the statues.
- You will have 3 sequences to copy.
- Walk through the gate into the main hall.
- The object of this mini-game is to roll the ball to the exit hole.
- For the first level, push the following buttons: left, right x 6, left x 2, right x 4.
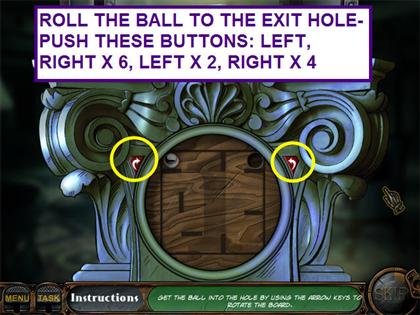
- For the second level, push the buttons: right x 7 and left x 4.
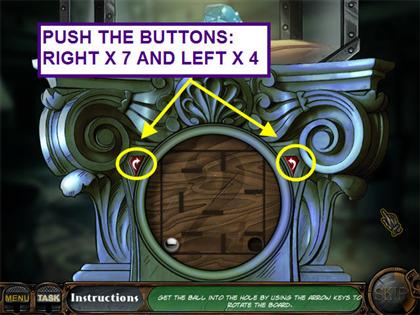
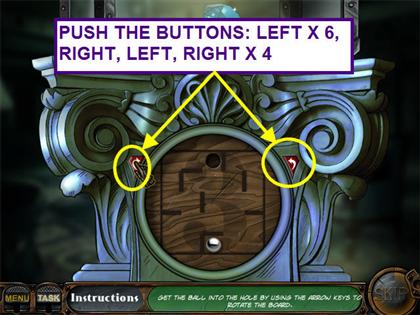
- For the third level, push the buttons: left x 6, right, left, right x 4.
- You solved the case!
- Did you earn the gold detective badge?
Created at: 2010-01-29