

Walkthrough Menu
- General Tips
- Chapter 1: Cable Car
- Chapter 2: The Courtyard
- Chapter 3: The Family Parlor
- Chapter 4: The Catacombs
- Chapter 5: The Radio Tower
General Tips
- This is the official guide for Nightfall Mysteries: Black Heart Standard Edition.
- You will not need to follow the exact path of this guide; however, some actions are required before you can complete another scene.
- Zoom into the sparkling areas to trigger a Hidden Object Scene. Throughout the guide, we will use the acronym 'HOS' for Hidden Object Scenes.
- Some items require an action before they are available in the HOS.
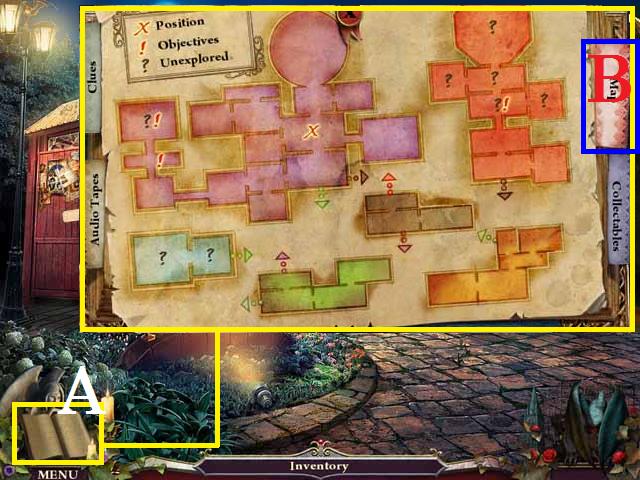
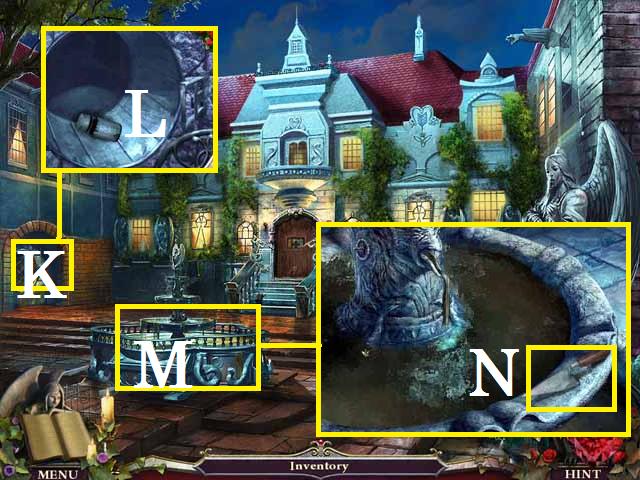
- You can review game information in your journal (A).
- Use your map (B) to track your location and to see locations with available tasks.
Chapter 1: Cable Car
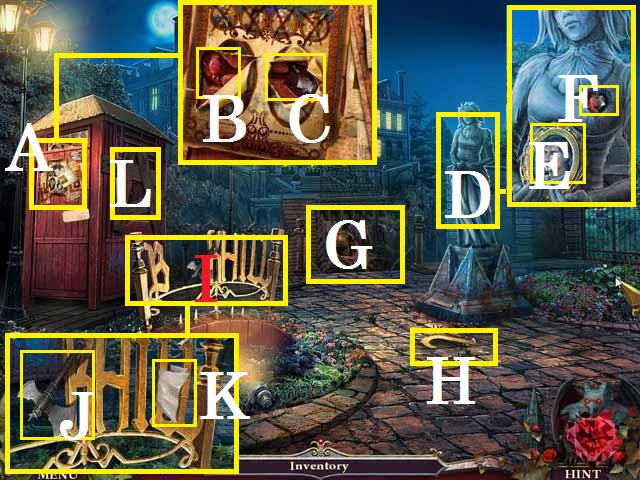
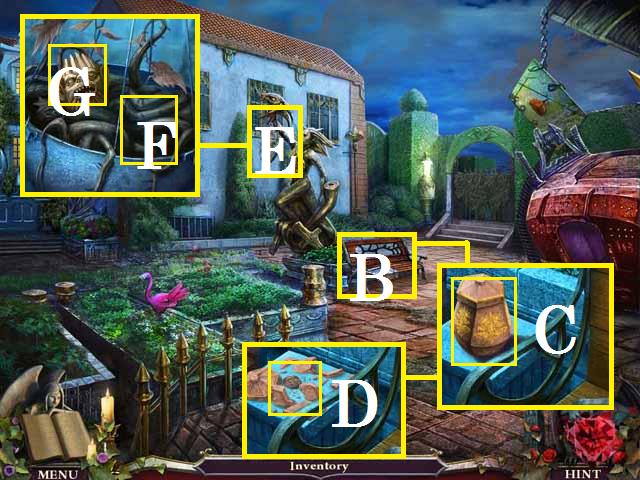
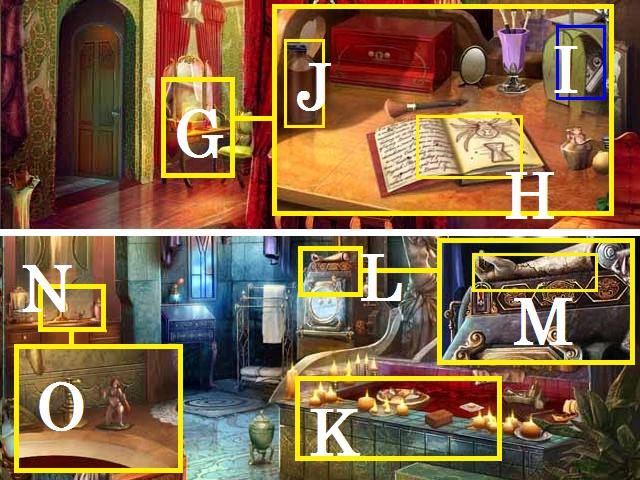
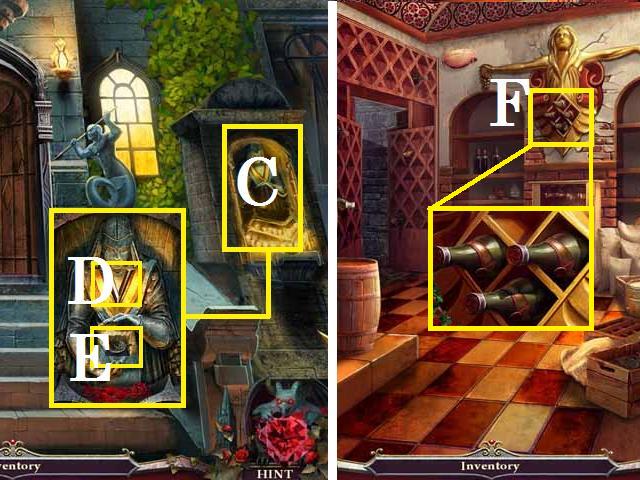
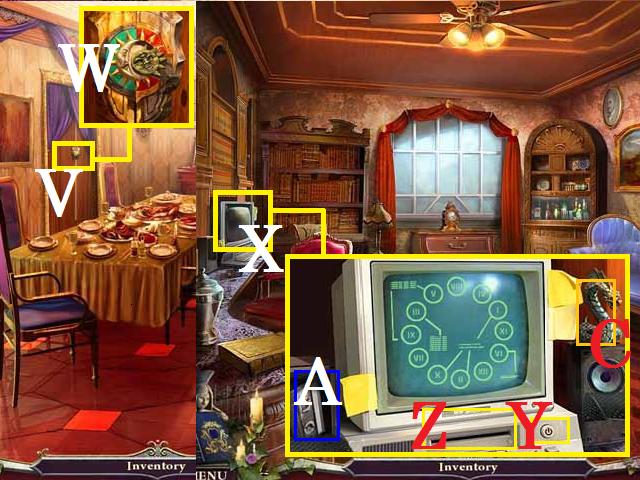
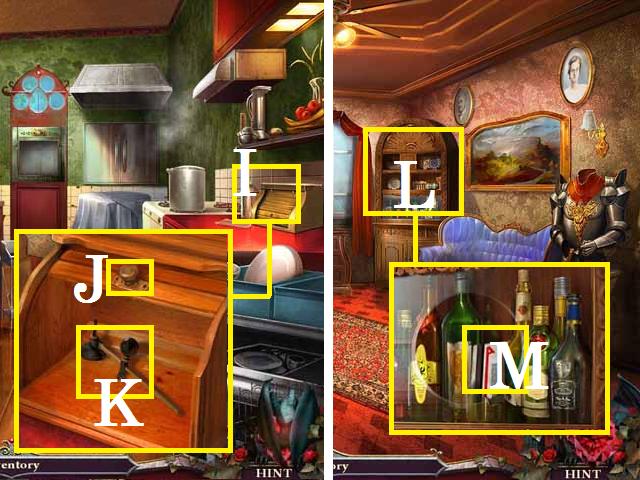
- After the dialog with Christine is over, zoom into the side of the booth (A).
- Tear the poster two times to reveal the RED HEART HALF (B) and the BLACK HEART HALF (C).
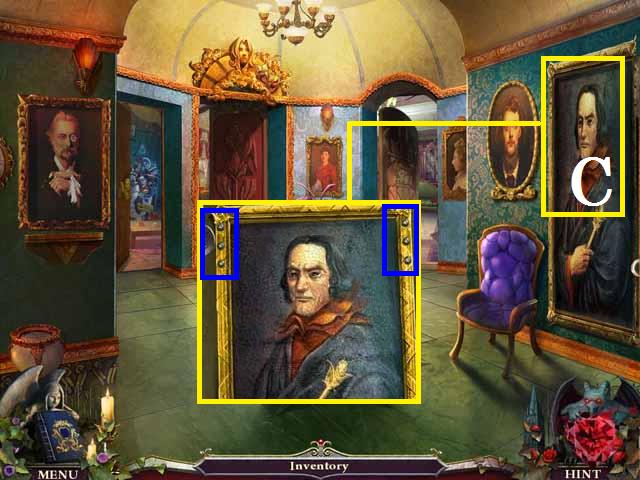
- Zoom into the statue (D). Pick up the PORTRAIT OF VIGGO (E).
- Inlay the RED HEART HALF and the BLACK HEART HALF into the statue (F).
- Pick up the two fused HEART HALFS to receive the hint button.
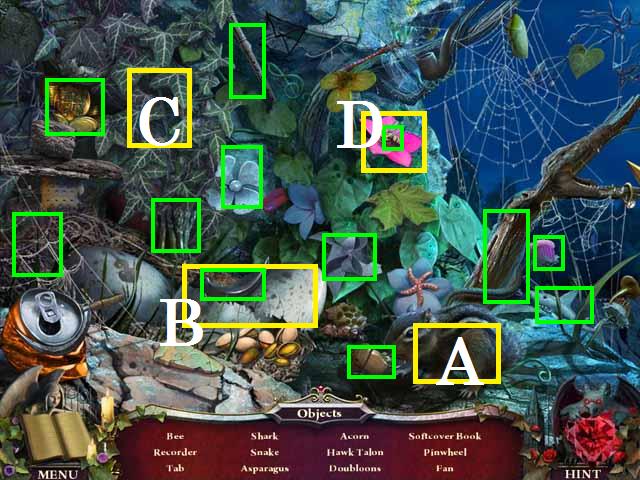
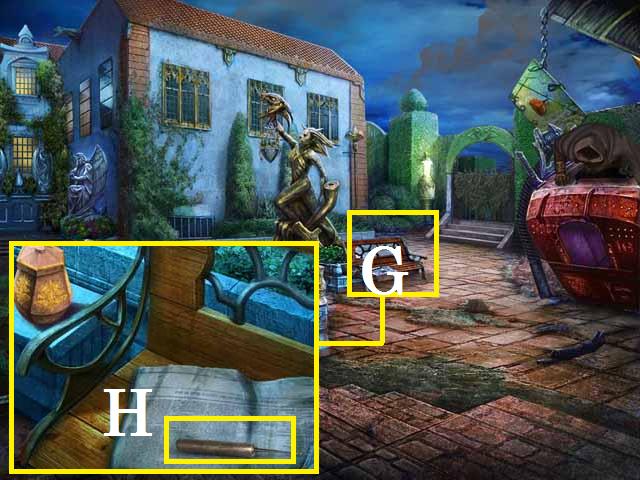
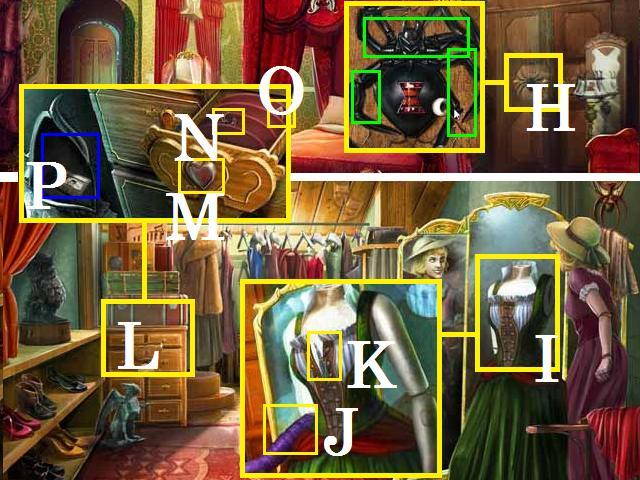
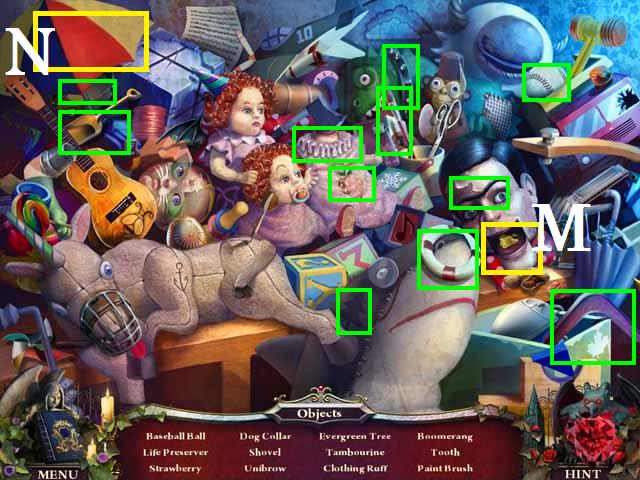
- Try to follow Christina across the bridge (G). After the bridge has blown up, pick up the METAL BAR (H).
- Zoom into the sign (I). Pick up the AXE (J) and the letter (K).
- Chop the boards (L) on the booth with the AXE.
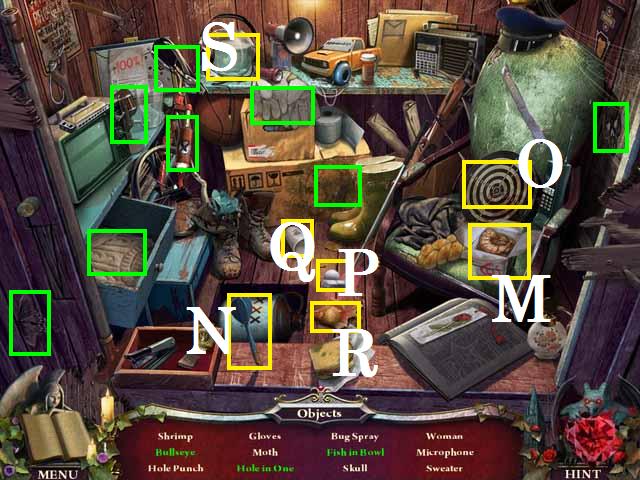
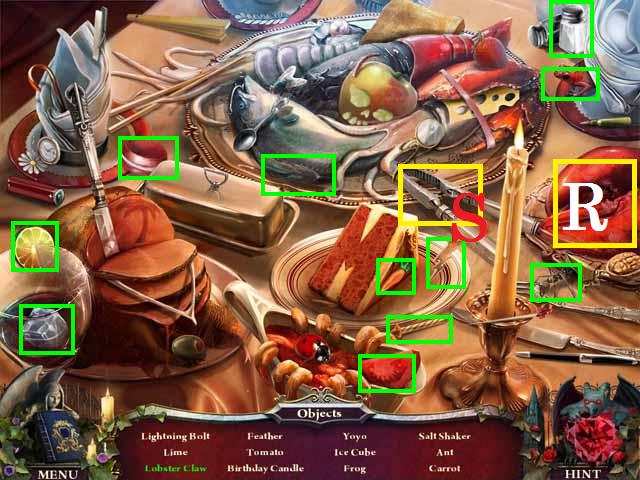
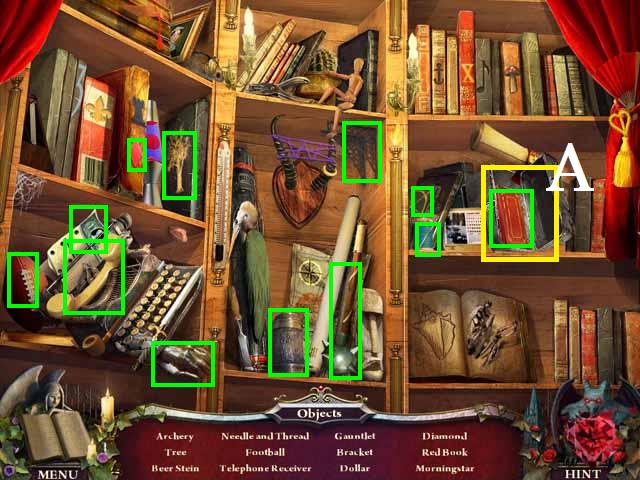
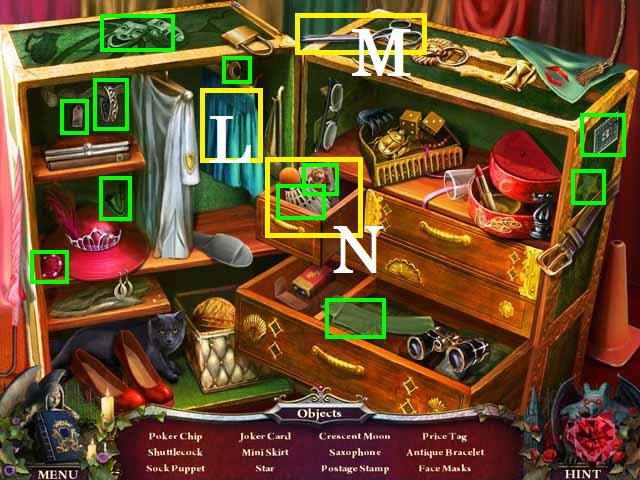
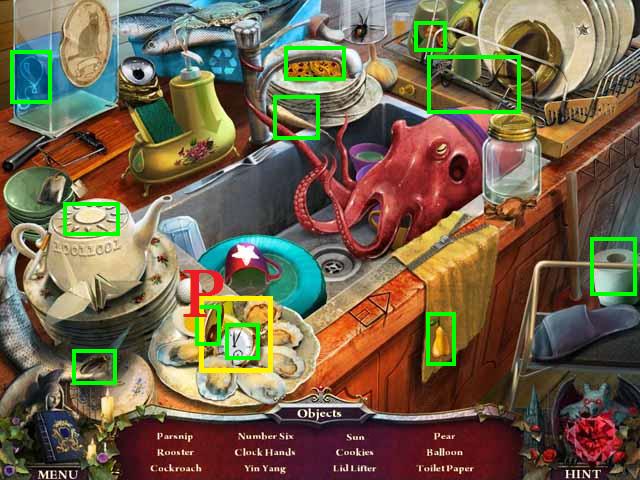
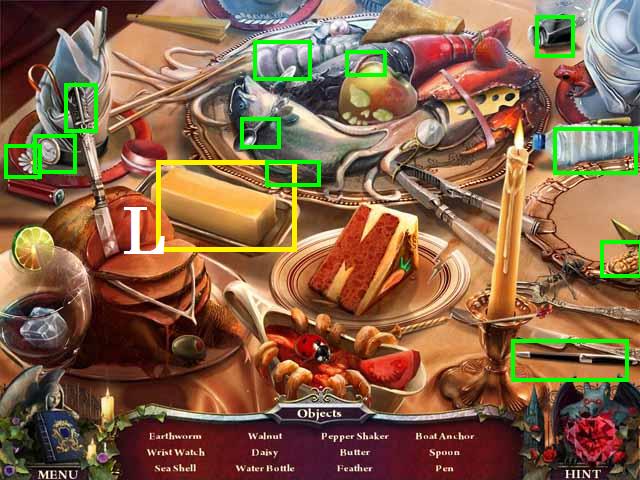
- Zoom into the sparkles to play a HOS.
- Open the food container (M) to reveal the shrimp.
- Place the dart (N) on the dartboard (O) for the bullseye.
- Place the golf ball (P) in the cup (Q) for the hole in one.
- Place the fish (R) in the bowl (S).
- Collect the remaining items and receive the BUG SPRAY.
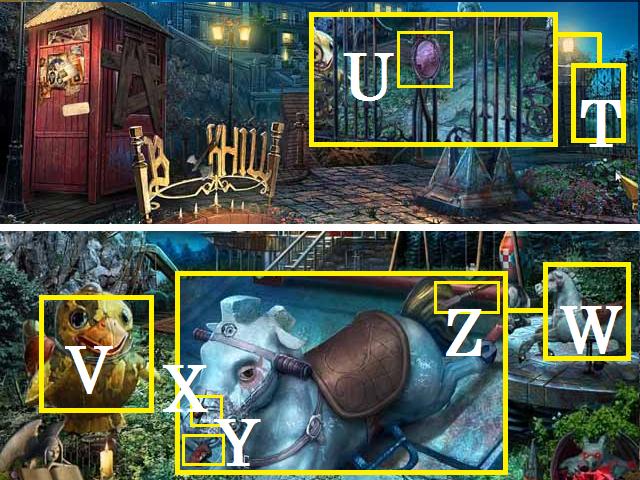
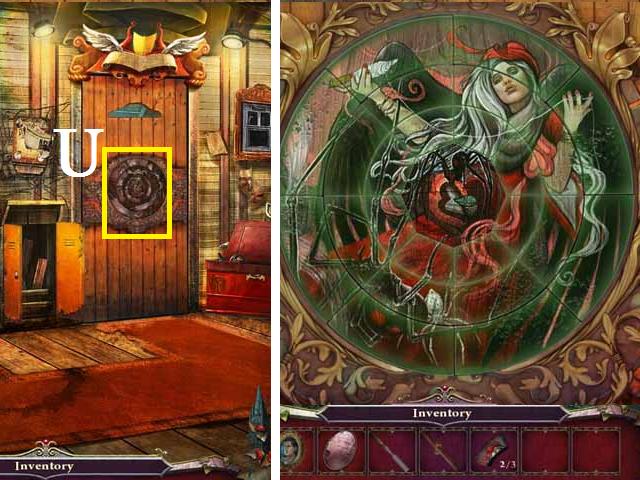
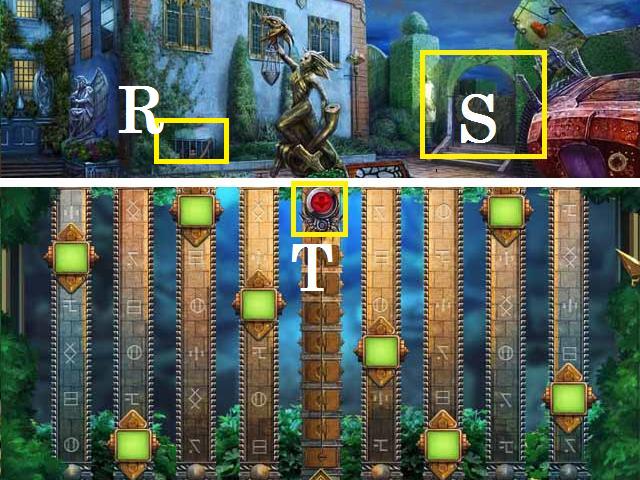
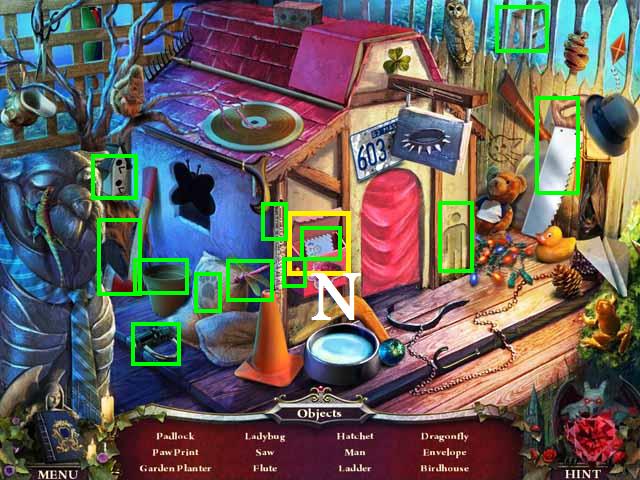
- Zoom into the gate (T).
- Pick up the COUNTESS INSIGNIA (U).
- Open the gate using the METAL BAR.
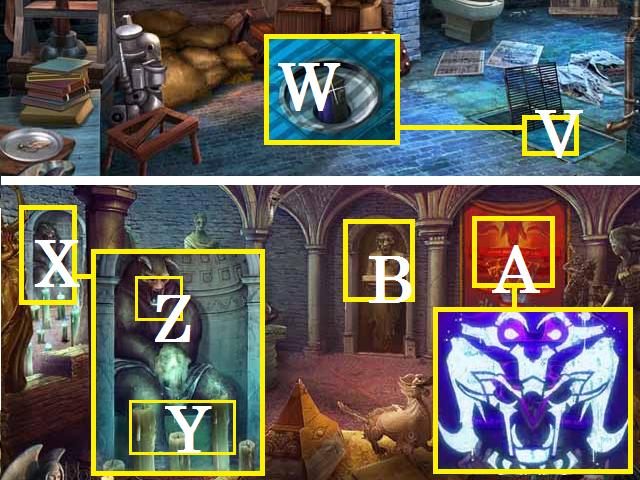
- Walk through the gate to the Abandon Playground.
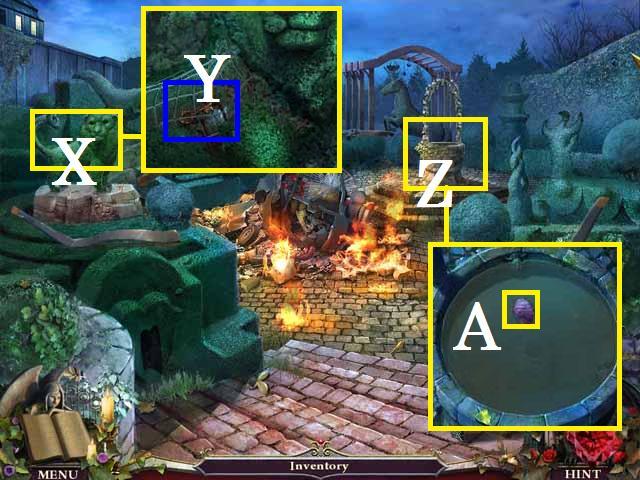
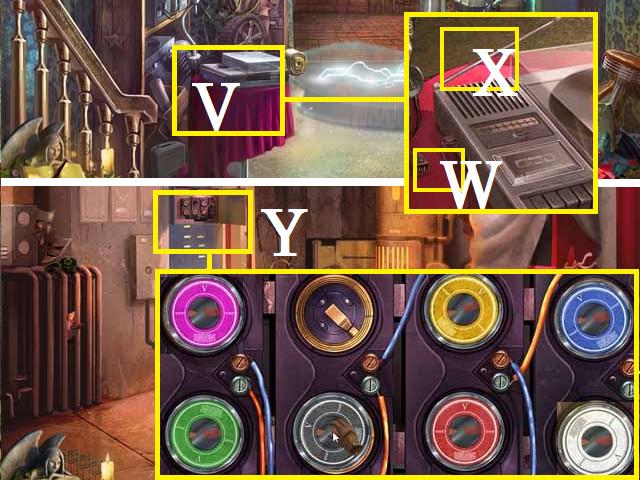
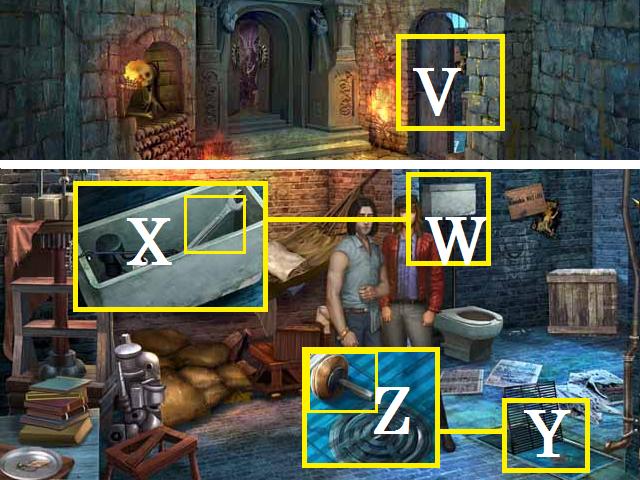
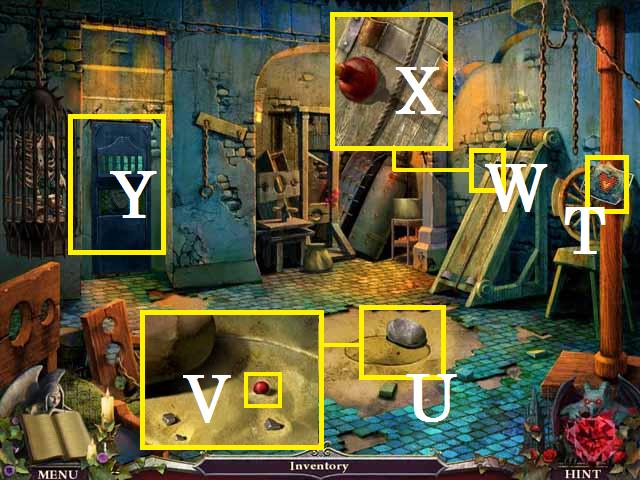
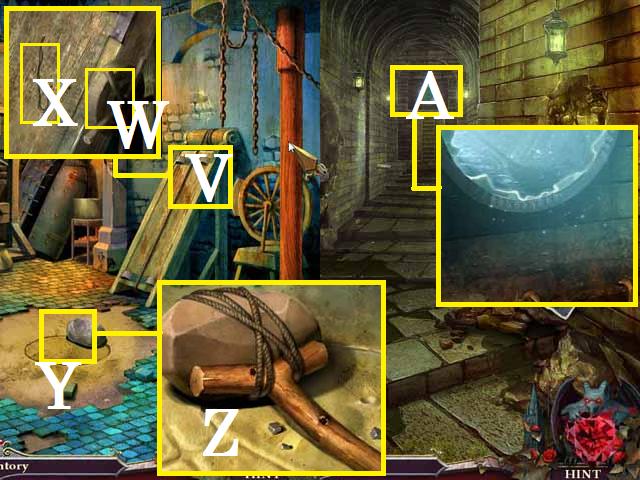
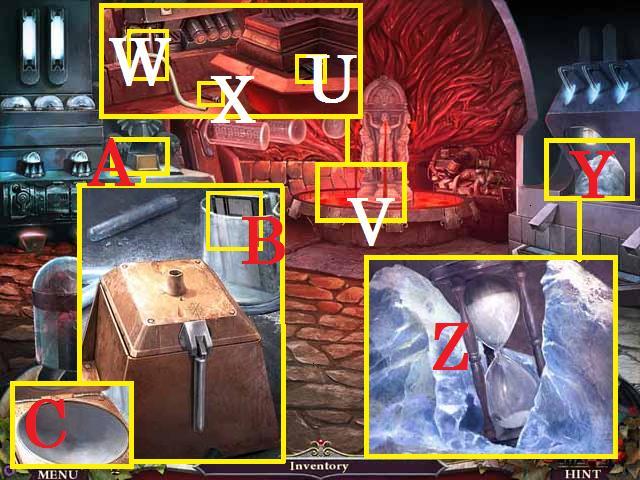
- Touch the yellow duck (V).
- Zoom into the horse (W).
- Try to pick up the WOOD CARVING (Y).
- Spray the spider (X) with the BUG SPRAY.
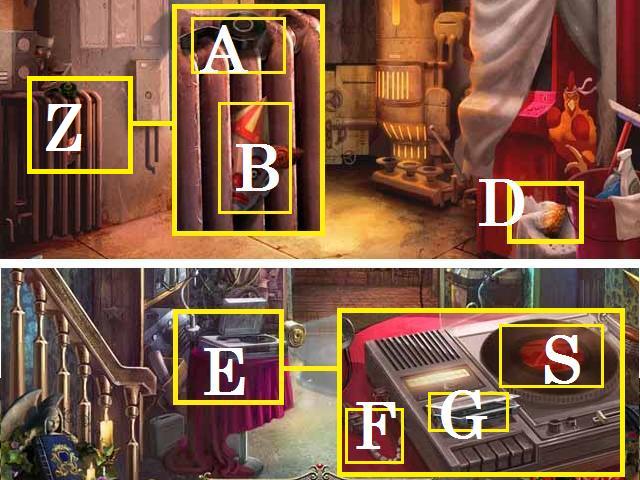
- Pick up the WOOD CARVING and the CHISEL (Z).
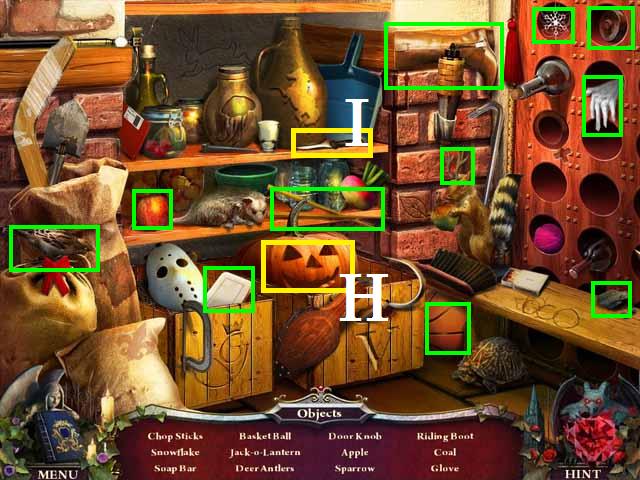
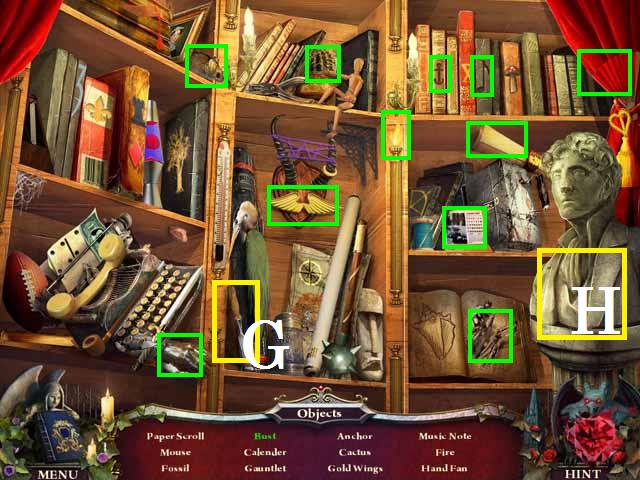
- Zoom into the sparkles to play a HOS.
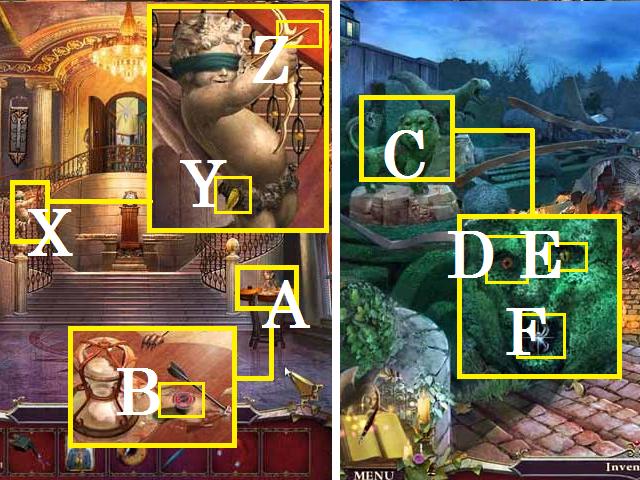
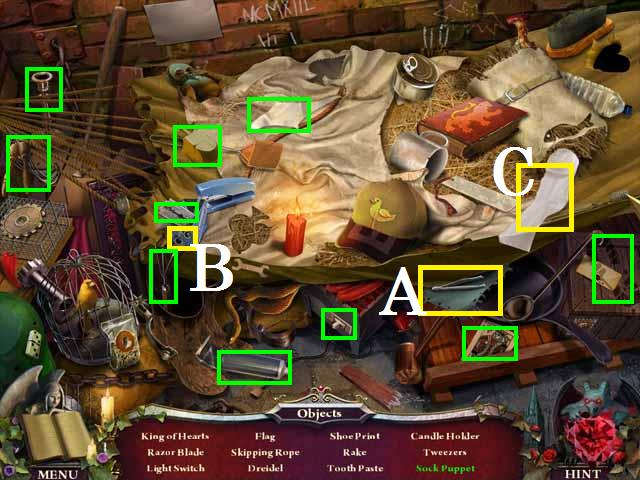
- Tickle the squirrel (A) to reveal the acorn.
- Open the egg (B) to find the hawk talon.
- Move the ivy (C) to reveal the doubloons and asparagus.
- Open the flower (D) to reveal the bee.
- Receive the HAWK TALON.
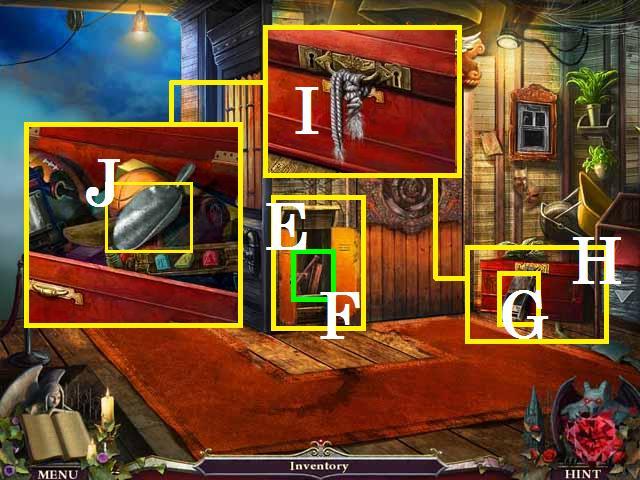
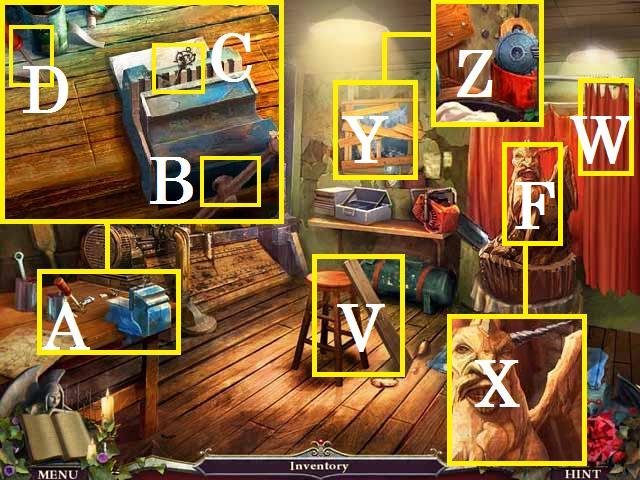
- Move forward onto the Workshop Porch.
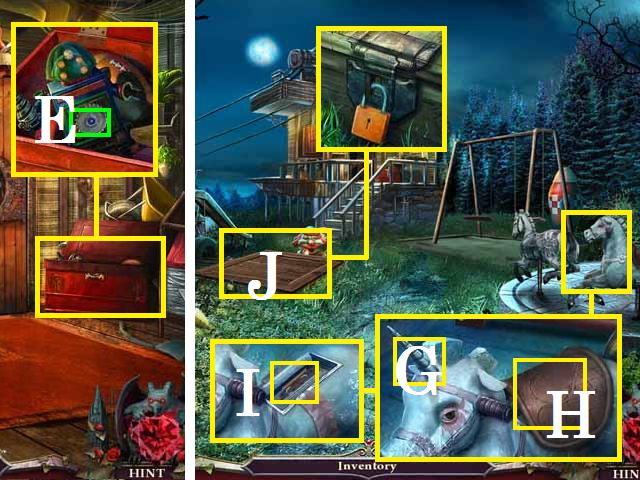
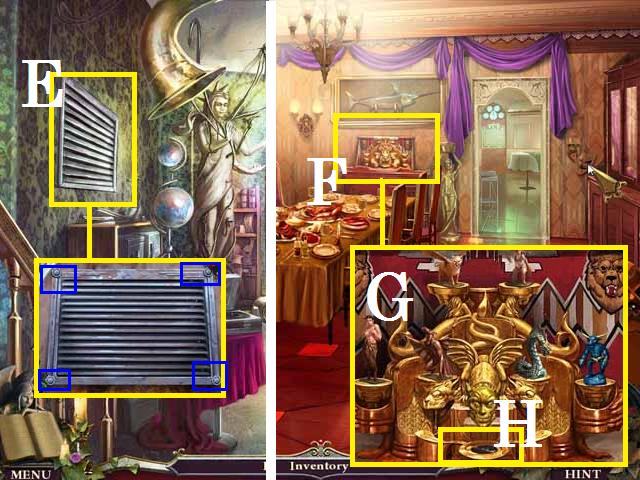
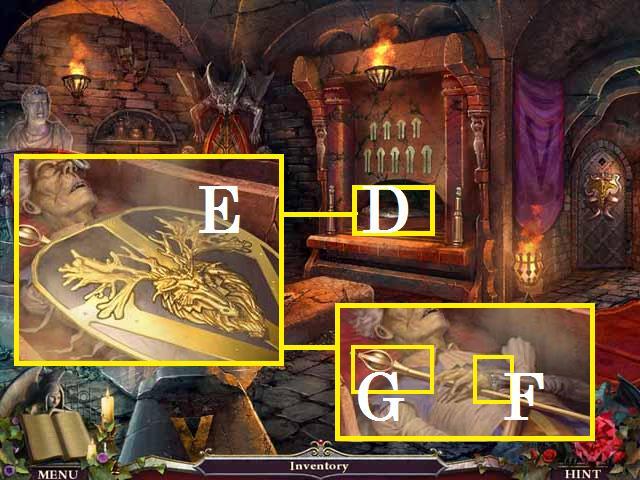
- Open the panel doors (E).
- Pick up the HANDLE (F).
- Pick up the TAPE PLAYER (G).
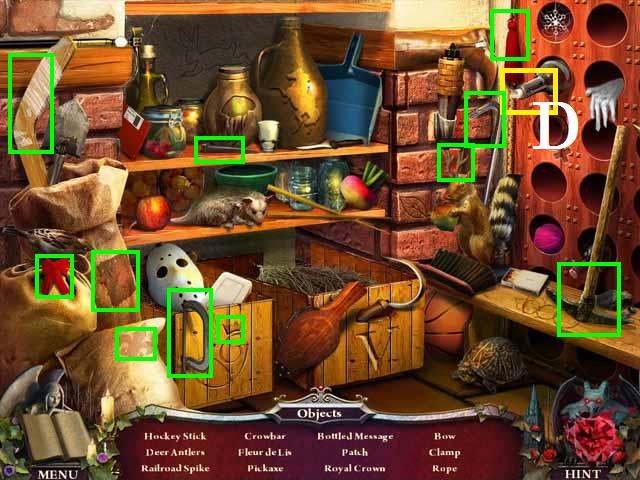
- Zoom into the trunk (H).
- Cut the ROPE (I) with the HAWK TALON..
- Pick up the ROPE and open the chest.
- Pick up the SCOOP (J).
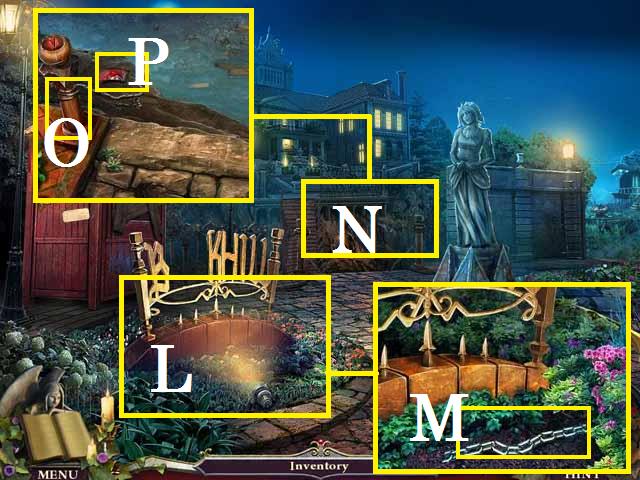
- Return to Black Hill Bridge (the first scene).
- Zoom back into the sign (L).
- Use the SCOOP to free the PIECE OF CHAIN (M) and pick it up.
- Zoom into the ledge (N).
- Tie the ROPE on the post (O).
- Pick up the WOOD CARVING (P).
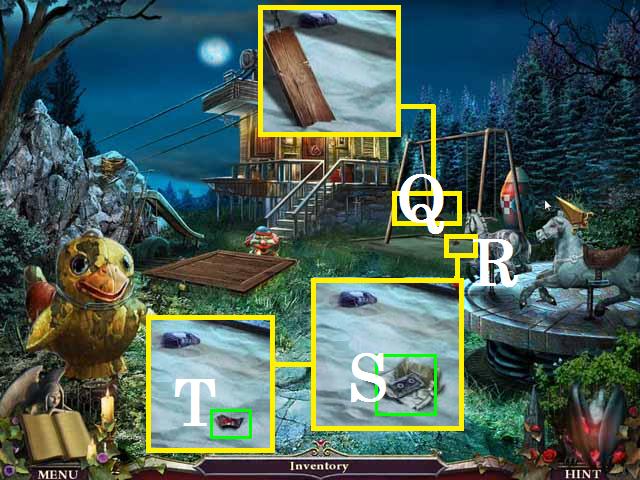
- Return to the Abandoned Playground.
- Fix the swing (Q) with the PIECE OF CHAIN.
- Push the swing to scare the bird.
- Zoom into the package (R).
- Open the package and pick up the TAPE (S) then the WOOD CARVING (T).
- Move to the Workshop Porch.
- Place the WOOD CARVINGS in the door (U).
- Swap the puzzle pieces to make the picture shown in the screenshot.
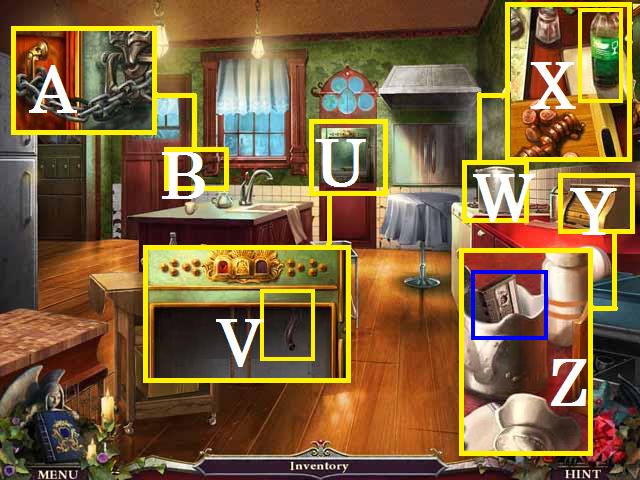
- Enter the Workshop.
- Pick up the WOOD PLANK (V).
- Open the curtain (W).
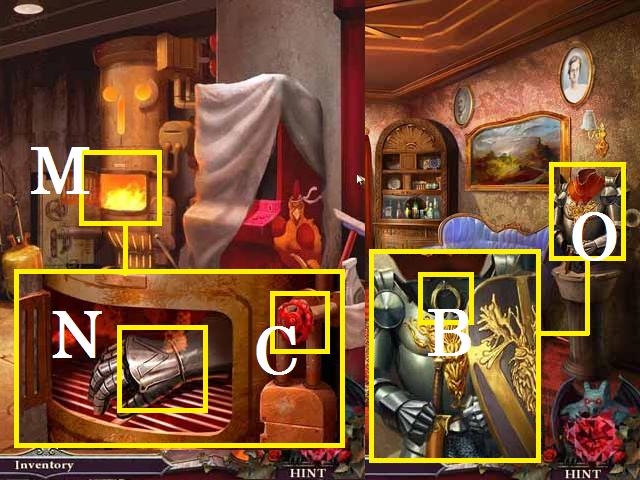
- Remove the BONE HORN (X) FROM THE CARVING (F) with the CHISEL.
- Zoom into the window (Y).
- Pick up the GEAR (Z).
- Zoom into the workbench (A).
- Place the HANDLE on the vice (B) and crank it open.
- Pick up the SANDBOX KEY (C) and the SCREWDRIVER (D).
- Return to the Porch.
- Zoom back into the chest.
- Remove the robot's glass (E) with the SCREWDRIVER.
- Pick up the GEAR (green).
- Move back to the Playground.
- Place the BONE HORN on the horse's head (G).
- Remove the saddle (H).
- Pick up the CONTROL CHIP (I).
- Unlock the sandbox (J) with the SANDBOX KEY.
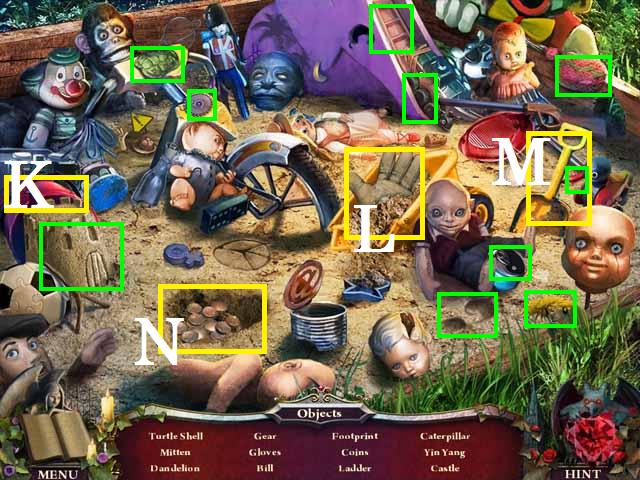
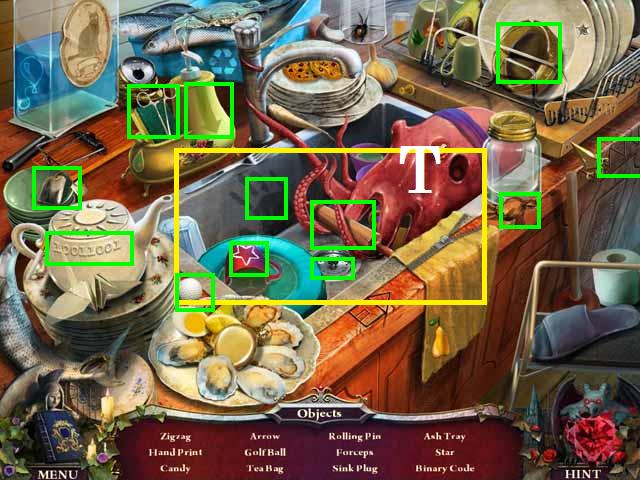
- Zoom into the sparkles to play a HOS.
- Flip over the bucket (K) to reveal the castle.
- Knock over the truck (L) to uncover the gloves.
- Using the shovel (M), dig on the 'X' (N) to uncover the coins.
- Receive the GEAR.
- Return to the Workshop.
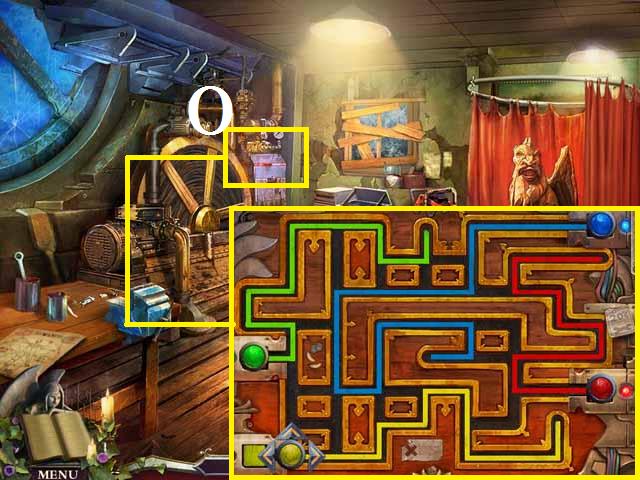
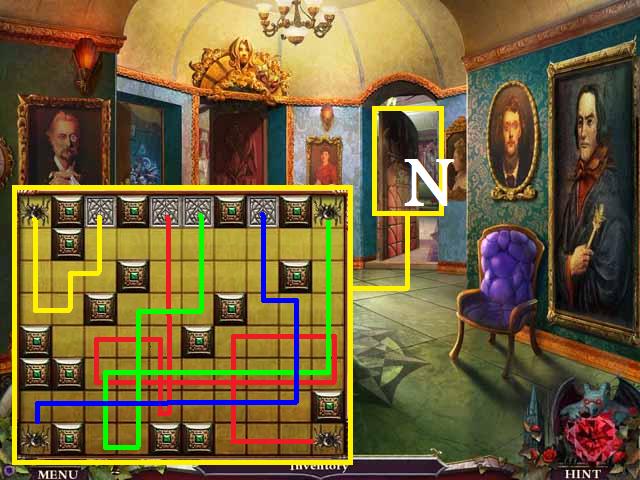
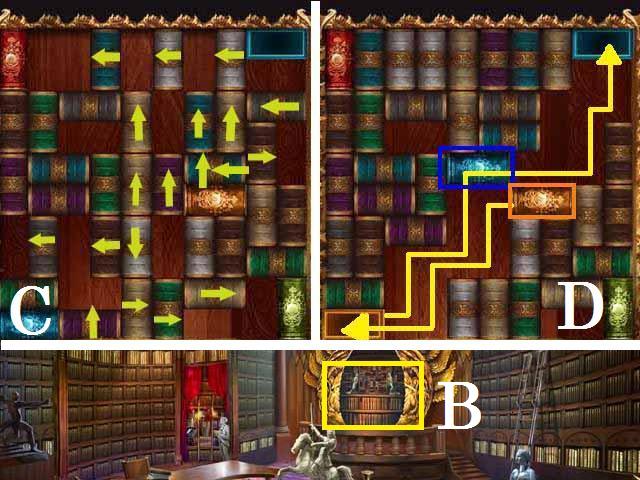
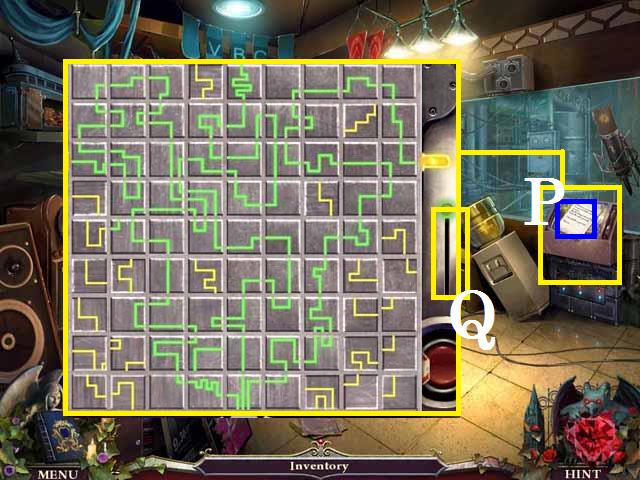
- Zoom into to the control panel (O).
- Drop the GEARS over the panel.
- Follow the pathways as marked in the screenshot.
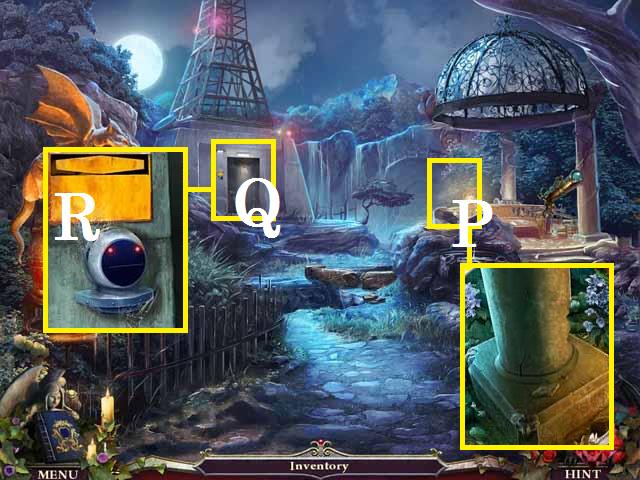
- Exit the Workshop.
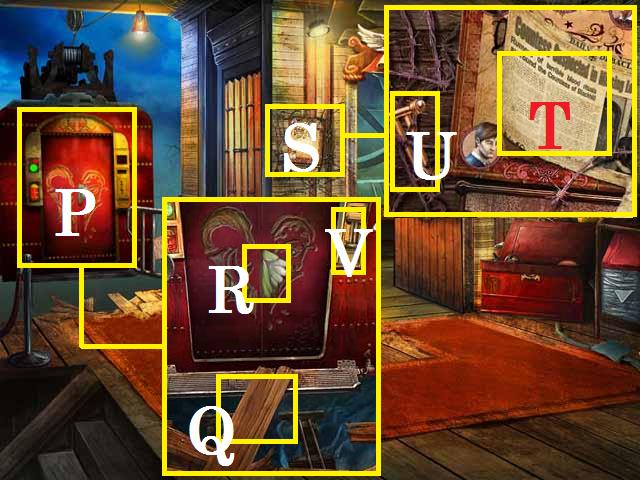
- Zoom into the Cable Car (P).
- Lay the WOOD PLANK (Q) at the entrance of the Cable Car.
- Pick up the WORK GLOVES (R).
- Zoom into the poster (S).
- Pick up the paper (T).
- Pick up the DOOR RELEASE HANDLE (U) with the WORK GLOVES.
- Place the DOOR RELEASE HANDLE on the panel (V).
- Flip the DOOR RELEASE HANDLE and enter the Cable Car.
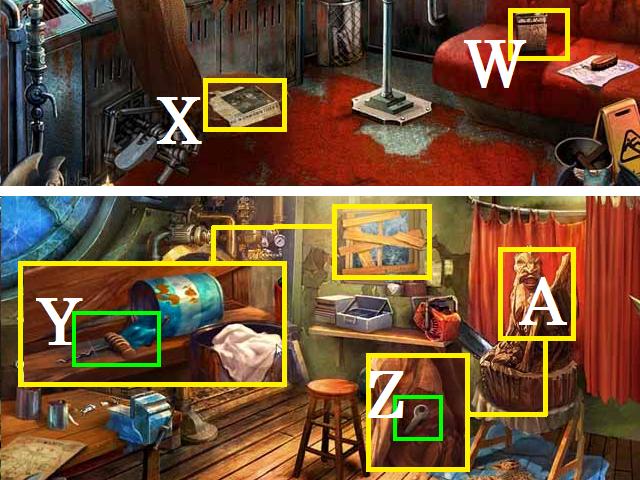
- Pick up the PAINT THINNER (W) and the paper (X).
- Return to the Workshop.
- Zoom back into the window.
- Pour the PAINT THINNER over the dried paint (Y) and pick up the CORKSCREW (green).
- Remove the cork (Z) from the carving (A) with the CORKSCREW.
- Pick up the KEY (green).
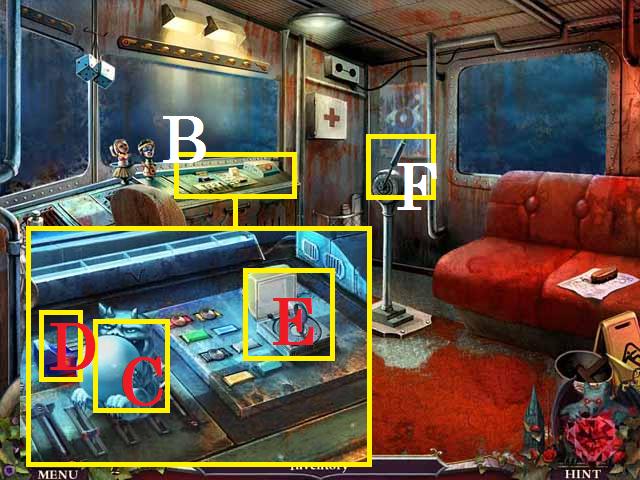
- Return to the Cable Car.
- Zoom into the controls (B).
- Pick up the NIGHT LIGHT (C).
- Insert the CONTROL CHIP in the slot (D).
- Insert the KEY (E).
- Pull the lever (F).
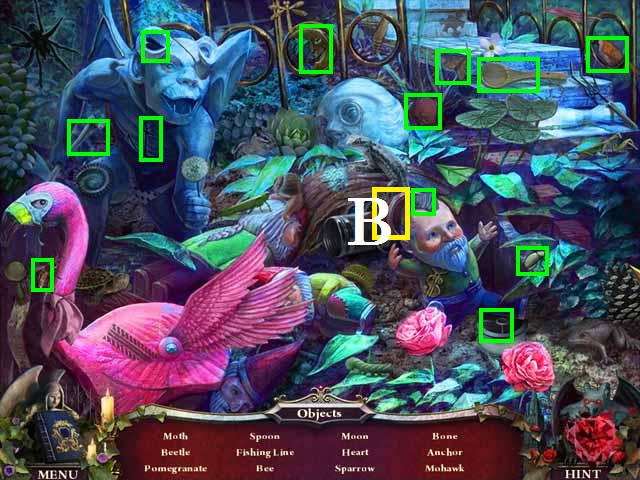
Chapter 2: The Courtyard
- Pick up the paper (G).
- Pick up the LOCK PICK (H).

- Zoom into the sparkles to play a HOS.
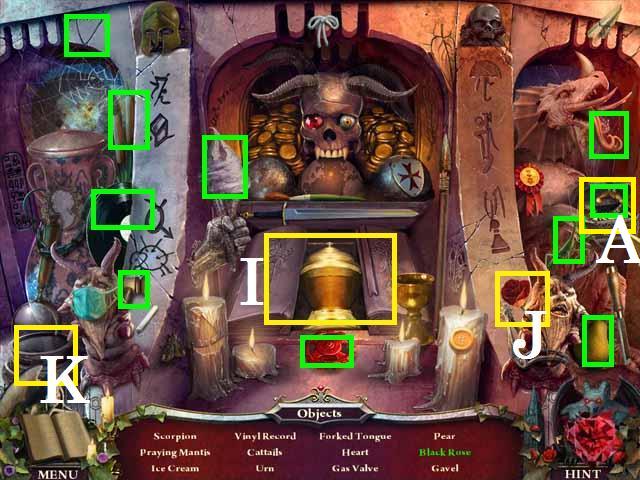
- Spread the flamingo's feathers (I) to reveal the glasses, tennis ball, and ladybug.
- Move the leaves (J) to find the black rose.
- Receive the BLACK ROSE.
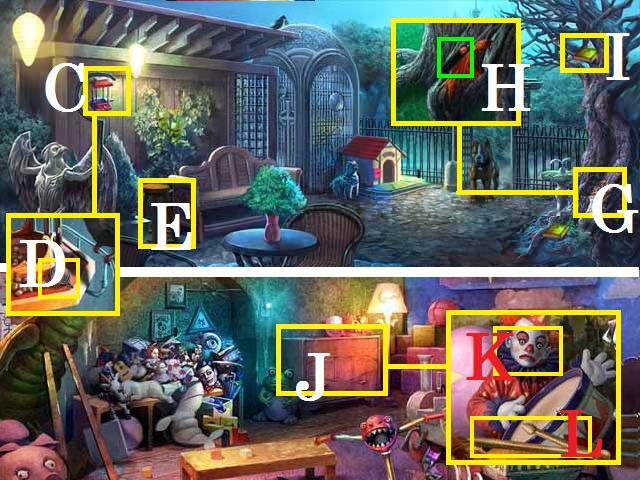
- Take a left to the Fountains.
- Open the sewer gate (K) with the LOCK PICK.
- Pick up the CLEAN WATER TABLET (L).
- Zoom into the fountain (M).
- Pick up the MASONRY TROWEL (N).
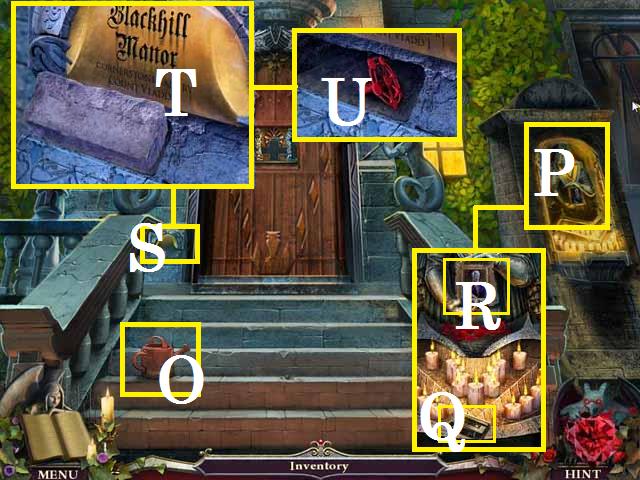
- Climb the stairs to the Front Door.
- Pick up the WATERING CAN (O).
- Zoom into the relief (P).
- Pick up the tape (Q) and the PORTRAIT OF VLADD (R).
- Zoom into the small plaque (S).
- Using the MASONRY TROWEL, remove and collect the BRICK (T).
- Pick up the VALVE WHEEL (U).
- Move back one scene.
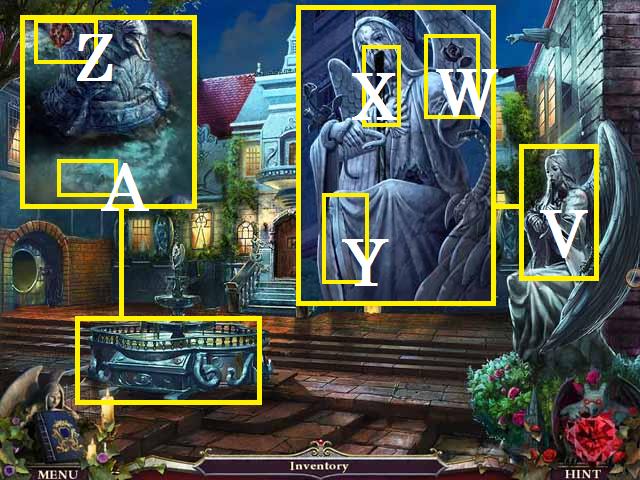
- Place the BLACK ROSE in the Statue's (V) hand (W).
- Collect the POISONOUS SUBSTANCE (X) with the WATERING CAN.
- Pick up the QUILL (Y).
- Zoom back into the fountain.
- Place and turn the VALVE WHEEL (Z).
- Pour the CLEAN WATER TABLET into the fountain.
- Pick up the ICE GARGOYLE HEAD (A).
- Return to the Courtyard.
- Zoom into the bench (B) and smash the urn (C) with the BRICK.
- Pick up the COPPER COIN (D).
- Zoom into the planter (E).
- Pour the POISONOUS SUBSTANCE over the vines (F).
- Pick up the FIRE GARGOYLE HEAD (G).
- Return to the Front Door.
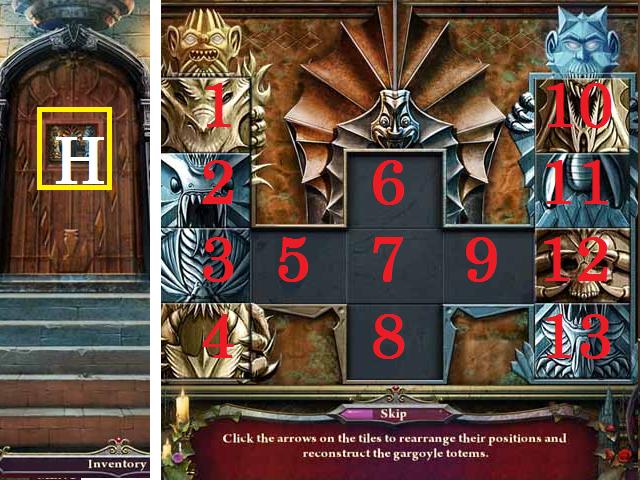
- Zoom into the door lock (H).
- Drop the FIRE and ICE GARGOYLE HEADS over the lock.
- Slide the tile in position (12) to position (6), (3) to position (12), (2) to position (8), (1) to position (9), and (4) to position (1).

- The tiles should be arranged as shown in the screenshot.
- Slide the tile in position (6) to position (4), (9) to position (2), (12) to position (3), (13) to position (5), (11) to position (13), and (10) to position (6).
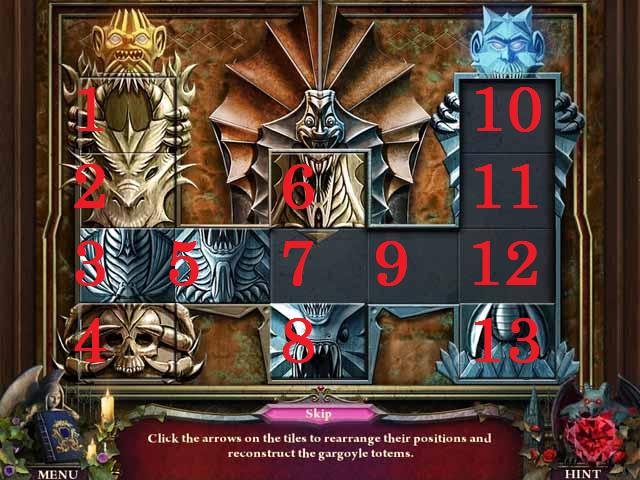
- The tiles should be arranged as shown in the screenshot.
- Slide the tile in position (8) to position (10), (5) to (11), (3) to (12) and finish with (6) to (3).
- Enter the Grand Stairs.
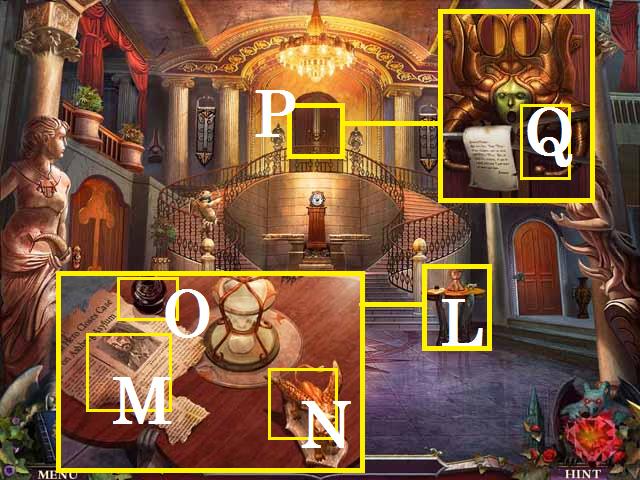
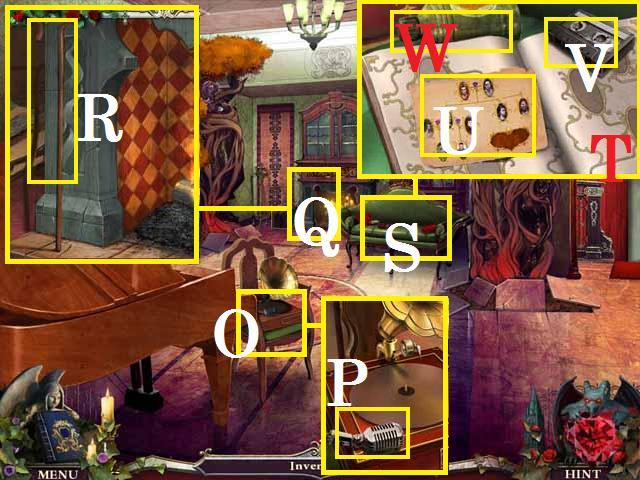
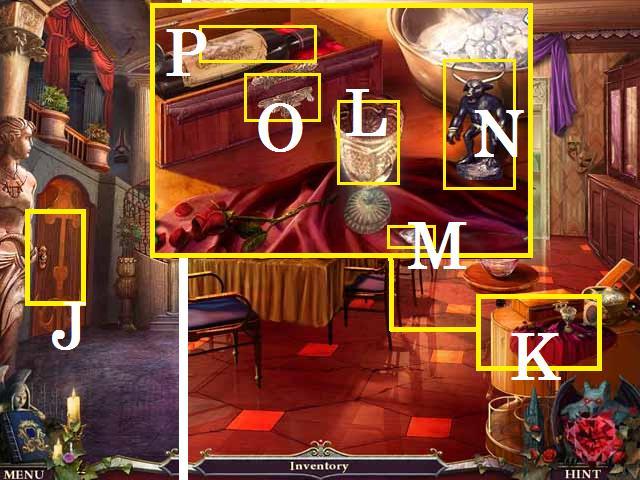
- Zoom into the table (L).
- Pick up the paper (M) and the GRIFFIN FIGURINE (N).
- Dip the QUILL in the ink (O) to receive the INKED QUILL.
- Zoom into the upstairs door (P).
- Pick up the note and the HEDGE CLIPPERS (Q).
- Return to the Courtyard.
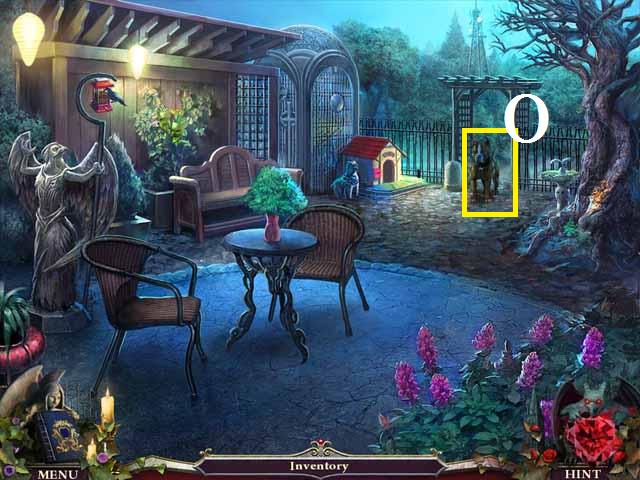
- Talk with Viggo (R) in the window.
- Zoom into the gate (S).
- Remove all of the plants with the HEDGE CLIPPERS.
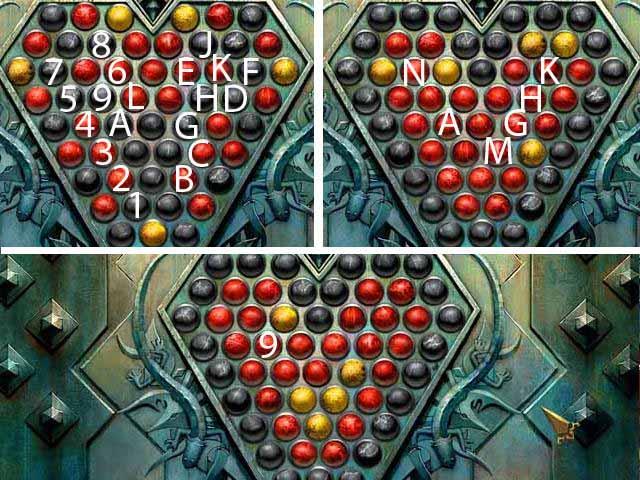
- Arrange the gears as shown in the screenshot and press the button (T). (Hint: the gears will light up yellow if you are only off by one space).
- Enter the Hedge Maze.
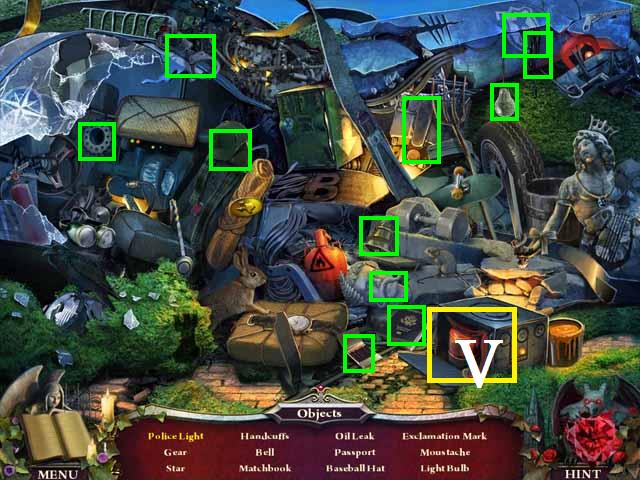
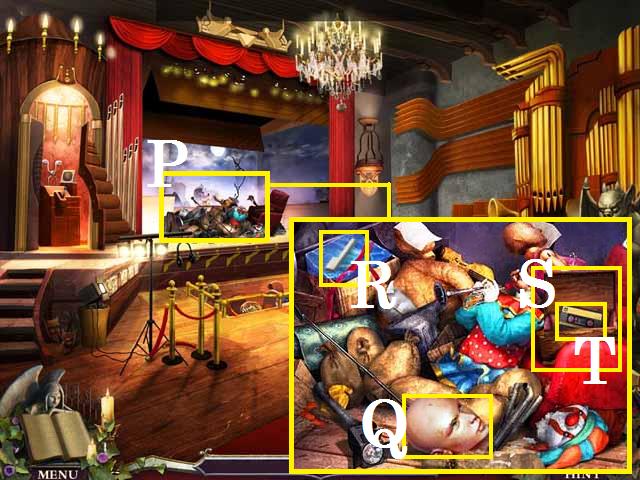
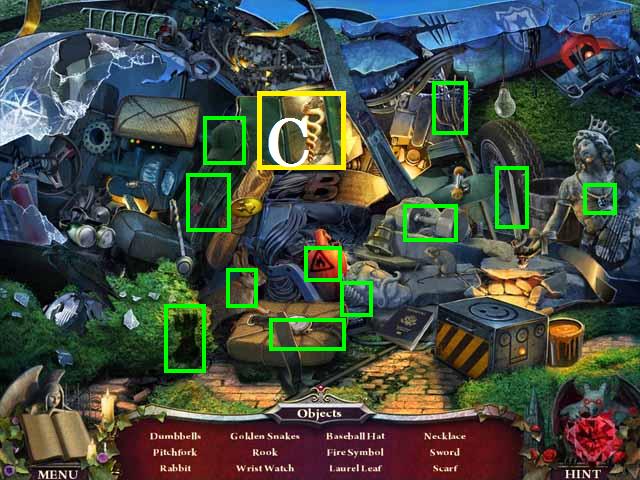
- After the crash, zoom into the sparkles to play a HOS.
- Open the box (V) to locate the police light.
- Receive the MATCHBOOK.
- Zoom into the lion hedge (X).
- Remove the leaves (Y) to reveal and pick up the SANGUINE KEY (blue).
- Throw the COPPER COIN into the well (Z).
- Pick up the COUNT INSIGNIA (A).
- Return to the Grand Stairs.
- Zoom back into the upstairs door.
- Place the COUNT INSIGNIA and COUNTESS INSIGNIA in the lock (B).
- Enter the Great Hallway.
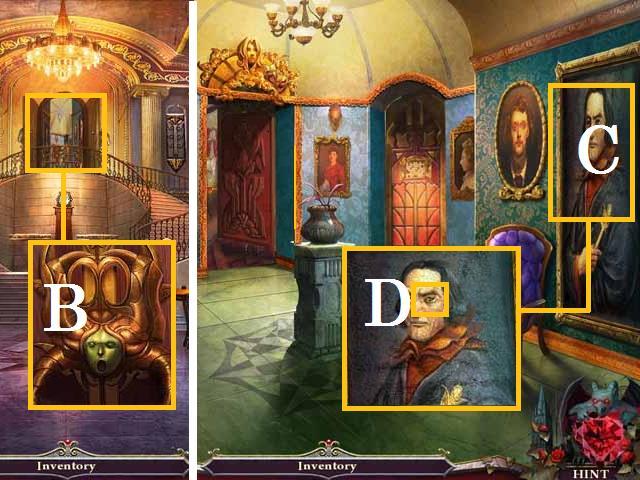
- Zoom into the painting (C).
- Pick up the SNAKE EYE (D).
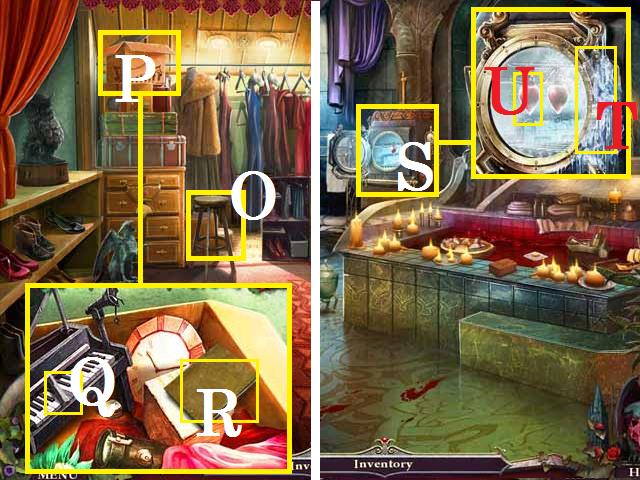
- Enter the Countess' Bedroom.
- Zoom into the desk (G).
- Open the book (H) and write in it with the INKED QUILL.
- Pick up the page from the book.
- Open the case (I) and pick up the tape (blue).
- Pick up the CLEANING SPRAY (J).
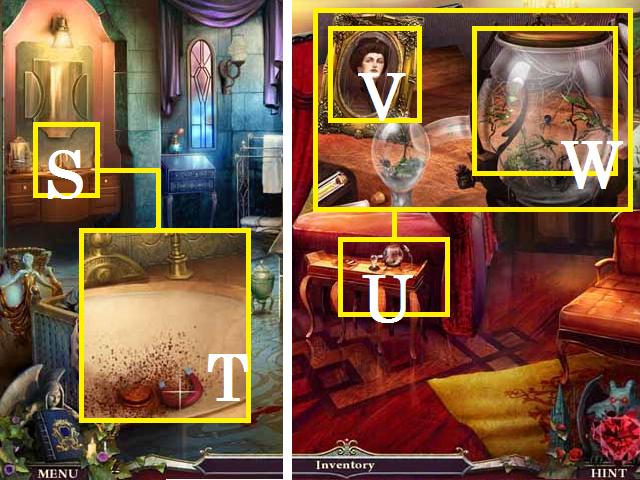
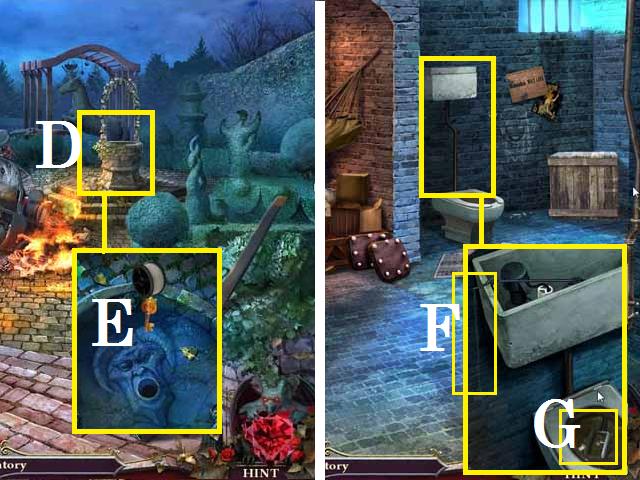
- Open the door to the Countess' Bathroom with the SANGUINE KEY.
- Enter the Bathroom and light the candles (K) with the MATCHBOOK.
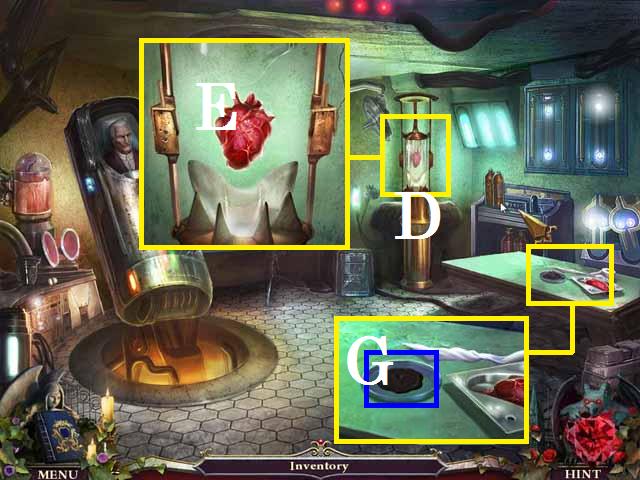
- Zoom into the machine (L).
- Pick up the MANNEQUIN ARM (M).
- Zoom into the sink (N).
- Pick up the HARPY FIGURINE (O).
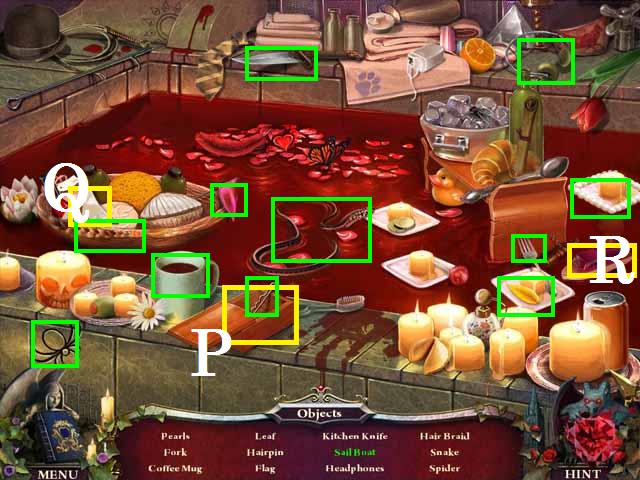
- Zoom into the sparkles to play a HOS.
- Open the box (P) to get the hairpin.
- Place the sail (Q) on the boat (R).
- Receive the HAIRPIN.

- Move back to the bedroom and zoom back into the desk.
- Open the box (S) with the HAIRPIN.
- Pick up the SPIDER PIN (green) and the NURSERY KEY (green).
- Move back into the Great Hallway.
- Zoom into the Nursery door (V).
- Place the NURSERY KEY in the locks' mouth (W).
- Turn the NURSERY KEY.
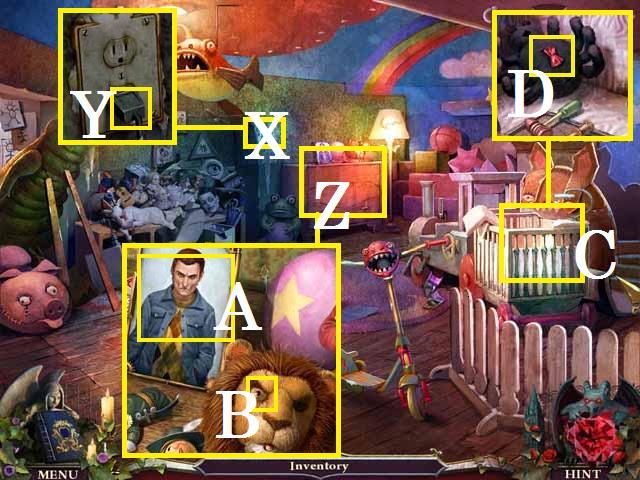
- Enter the Nursery.
- Zoom into the outlet (X).
- Remove the BROKEN POWER CORD (Y) and plug in the NIGHTLIGHT.
- Zoom into the dresser (Z).
- Pick up the PORTRAIT OF VICTOR (A) and the LION EYE (B).
- Zoom into the crib (C).
- Pick up the HOURGLASS GEM (D).
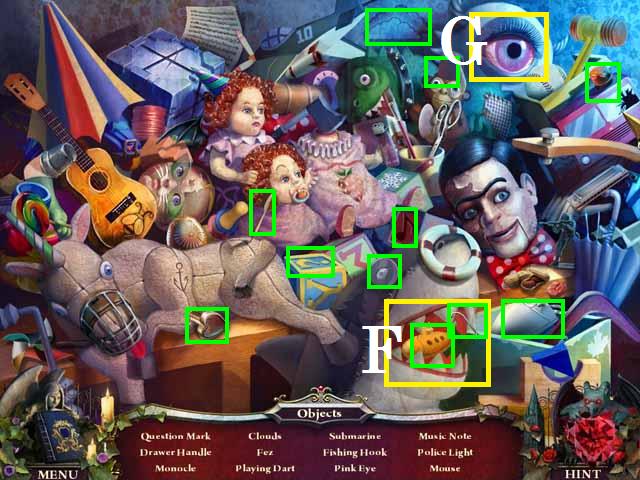
- Zoom into the sparkles to play a HOS.
- Open the shark's (F) mouth to reveal the submarine and fishing hook.
- Open the eyelid (G) for the pink eye.
- Receive the DRAWER HANDLE.
- Return to the Countess' Bedroom.
- Place the HOURGLASS GEM into the Walk-in Closet's lock (H).
- Tap each spider leg (green) once to open the door.
- Enter the Walk-in Closet.
- Place the MANNEQUIN ARM on the mannequin (I).
- Pick up the MEDICAL GLOVE (J).
- Open the mannequin's blouse and pick up the SEAM RIPPER (K).
- Zoom into the dresser (L).
- Place the DRAWER HANDLE on the drawer (M).
- Open the drawer and pick up the SPIDER PIN (N) and the HEART TIP (O).
- Open the beak (P) and pick up the tape (blue).
- Return to the Bathroom.
- Zoom back into the sink (S).
- Pull the drain plug using the MEDICAL GLOVE.
- Pick up the MAGNET (T).
- Back up one scene to the Bedroom.
- Zoom into the table (U). Pick up the PORTRAIT OF VIOLETTA (V).
- Place the MAGNET on the outside of the bowl (W) to get the SPIDER PIN.
- Return to the Grand Staircase.
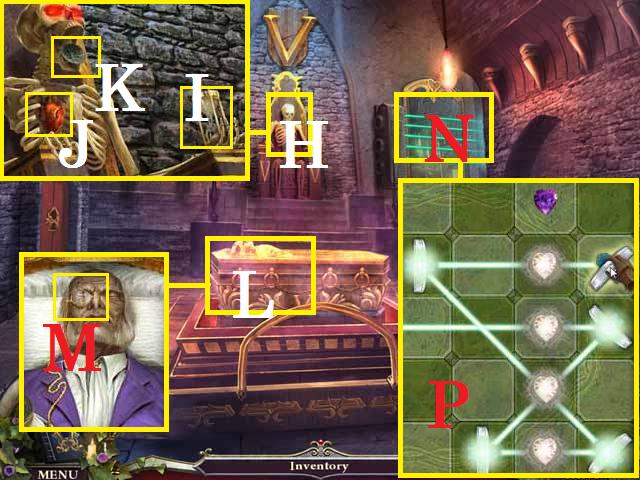
- Zoom into the cupid statue (X). Pick up the GOLD LEAF (Y).
- Place the HEART TIP on the arrow (Z).
- Zoom back into the table (A).
- Pick up the FUSE (B).
- Return to the Hedge Maze.
- Zoom back into the lion hedge (C). Place the LION EYE (D) and the SNAKE EYE (E).
- Pick up the SPIDER PIN (F).

- Return to the Nursery.
- Zoom back into the crib (G).
- Open the doll (H) with the SEAM RIPPER.
- Remove the stuffing and pick up the GOLDEN APPLE PIN (green).
- Move to the Walk-in Closet.
- Place the GOLDEN APPLE PIN on the lock (I) and pull the tongue (J) to open the chest (K).
- Zoom into the sparkles to play a HOS.
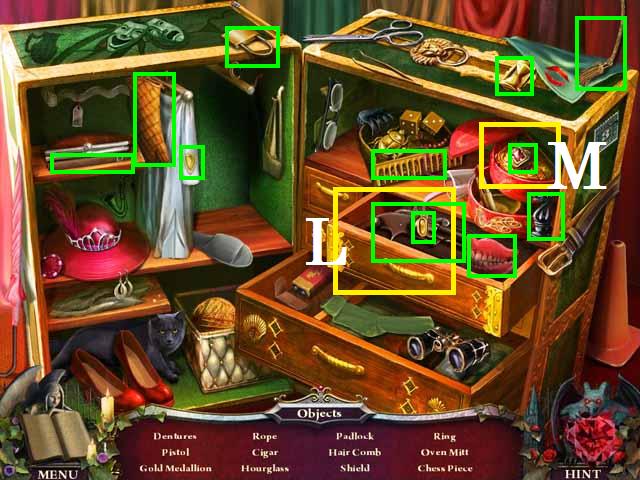
- Open the drawer (L) to reveal the dentures, pistol, and the gold medallion.
- Open the lid (M) to reveal the ring.
- Receive the OVEN MITT.
Chapter 3: The Family Parlor
- Back out to the Great Hallway.
- Zoom into the Family Parlor door (N).
- Drop the four SPIDER PINS on the lock.
- Follow the paths marked in the screenshot to move all of the SPIDER PINS into position.
- Enter the Family Parlor.
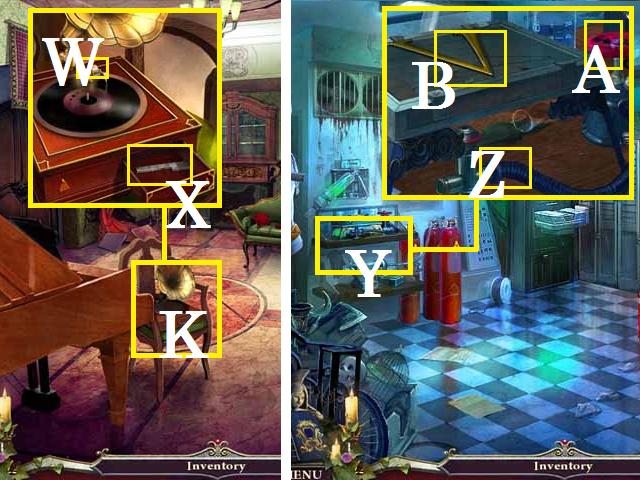
- Zoom into the record player (O).
- Pick up the MICROPHONE (P).
- Zoom into the fireplace (Q).
- Pick up the SHEPARD'S CROOK (R).
- Zoom into the couch (S).
- Open the book (T).
- Pick up the family tree paper (U), the tape (V), and the SOLVENT (W).
- Walk through the open doorway on the right to enter the Conservatory.
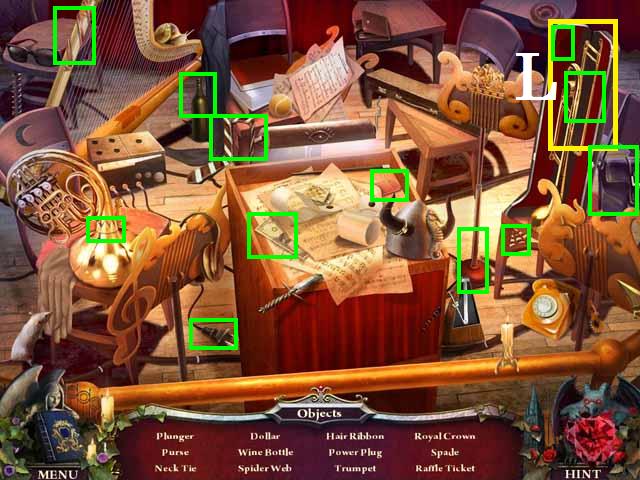
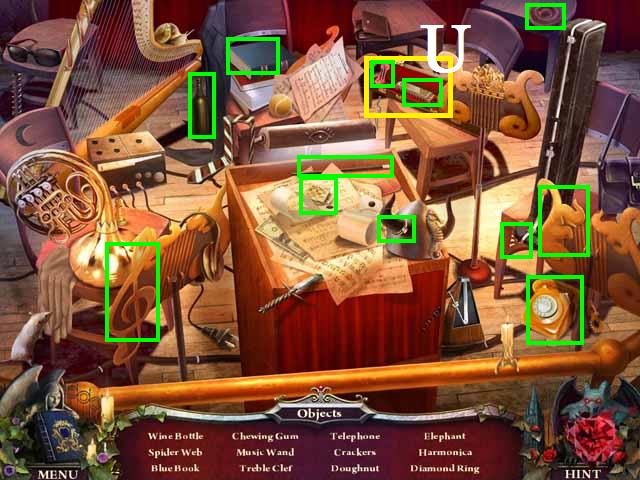
- Zoom into the sparkles to play a HOS.
- Open the case (L) to reveal the trumpet and spade.
- Receive the TRUMPET.
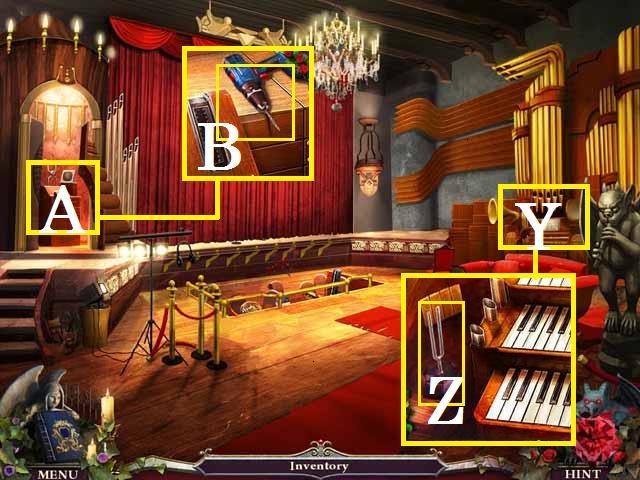
- Zoom into the organ (Y).
- Pick up the TUNING FORK (Z).
- Zoom into the curtain control (A).
- Pick up the DRILL (B).
- Return to the Great Hallway.
- Zoom into the portrait (C).
- Remove the screws (blue) with the DRILL.
- Take the hidden stairs down to Victor's Secret Room.
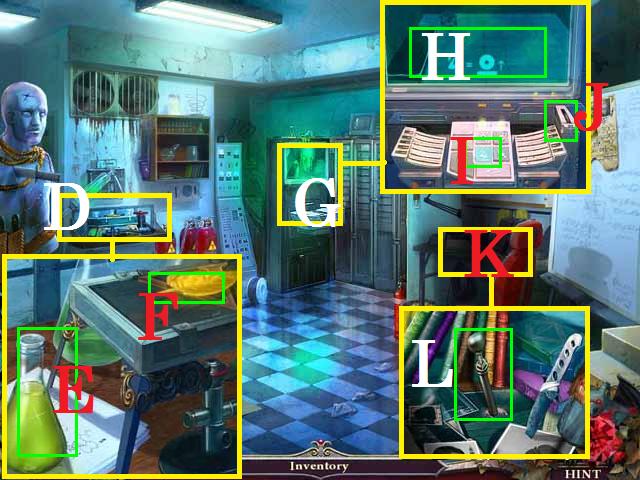
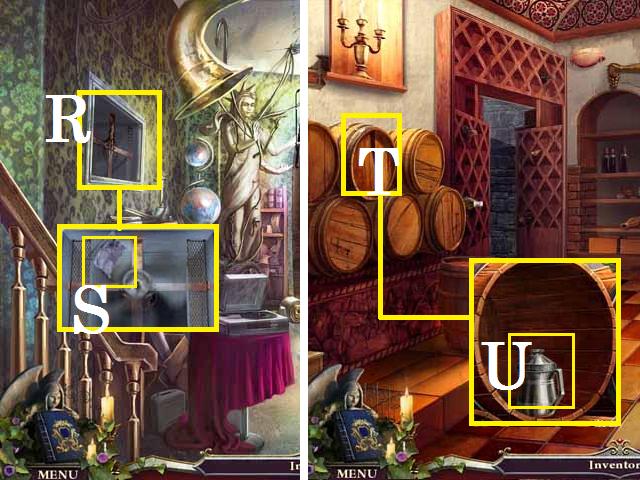
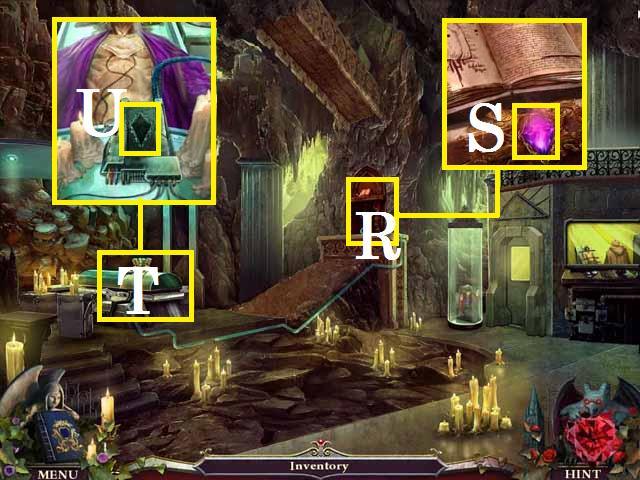
- Zoom into the shelf (D).
- Pick up the ACID (E).
- Lay the GOLDEN LEAF on the mold (F).
- Zoom into the video screen (G). Clean the glass (H) with the CLEANING SPRAY.
- Press the button (I) and then pull out the DATA DISK (J).
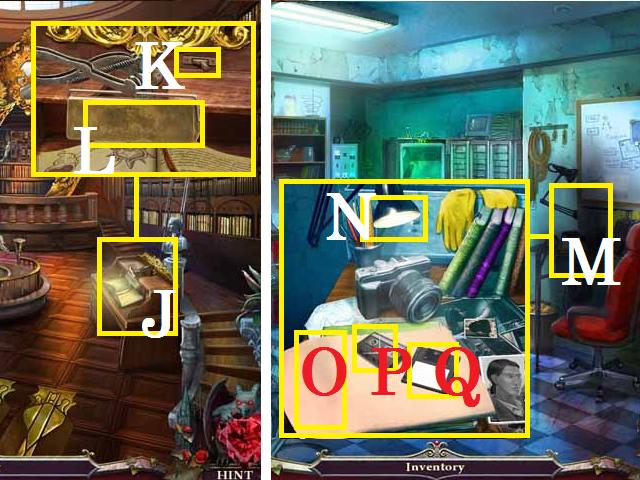
- Zoom into the desk (K).
- Pick up the CONTROL LEVER (L).
- Return to the Conservatory.
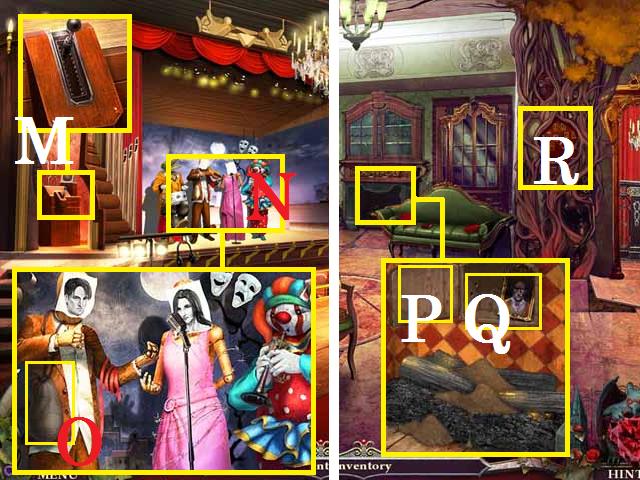
- Place, and pull, the CONTROL LEVER in the curtain control (M).
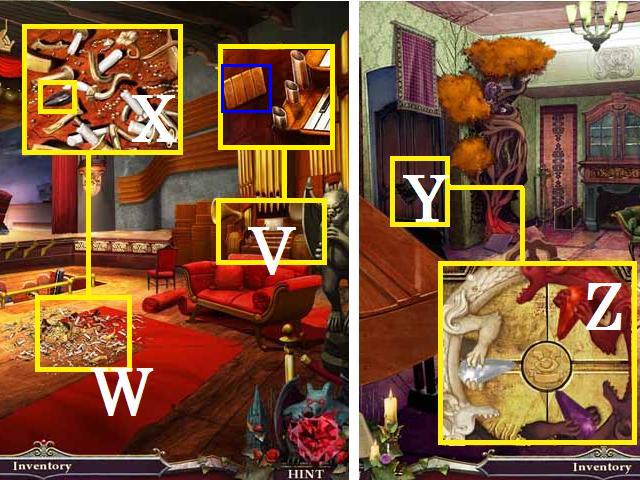
- Zoom into the musicians (N). Pick up the SANDBAG (O).
- Place the MICROPHONE and TRUMPET as shown in the screenshot.
- Back up one scene to the Family Parlor.
- Zoom in to the fireplace and use the SANDBAG to put out the fire.
- Open the hatch (P) and pick up the PORTRAIT OF VILHELM (Q).
- Zoom into the root structure (R).
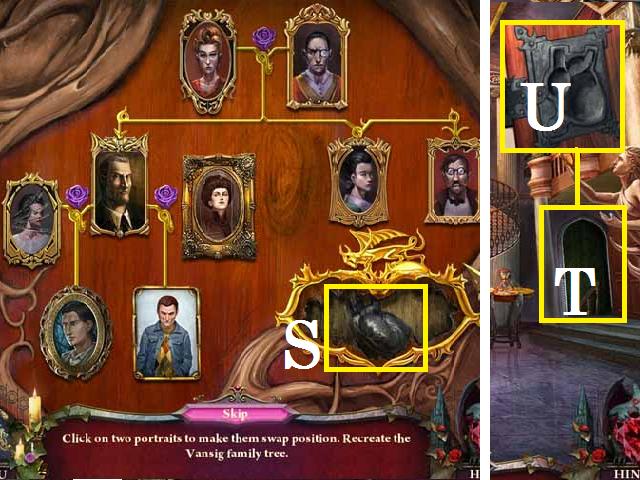
- Place the PORTRAIT OF VILHELM, PORTRAIT OF VIGGO, PORTRAIT OF VLADD, PORTRAIT OF VICTOR, and PORTRAIT OF VIOLLETA on the tree.
- See the screenshot for the correct arrangement of the PORTRAITS.
- Pick up the BLACK HEART KEY (S).
- Return to the Grand Staircase.
- Zoom into the Basement Door (T).
- Place the BLACK HEART KEY in the lock (U) to open the door.
- Enter the Basement Hallway.
- Zoom into the record player (V). Place the BROKEN POWER CORD in the plug (W).
- Pick up the ANTENNA (X).
- Go right to enter the Breaker Room.
- Place the FUSE in the fuse panel (Y).
- See the screenshot for the solution.
- Zoom into the radiator (Z). Pick up the ELECTRICAL TAPE (A).
- Using the OVEN MITT, collect the CLOWN HEAD (B).
- Pick up the BIRD SEEDS (D).
- Back up one scene.
- Zoom back into the record player (E). Fix the cord (F) with the ELECTRICAL TAPE.
- Pick up the tape (G) and the RECORD (S).
- Enter the Wine Cellar.
- Zoom into the sparkles to play a HOS.
- Carve the pumpkin (H) with the knife (I) to make a jack-o-lantern.
- Receive the DOOR KNOB.
- Move back to the Grand Staircase.
- Place the DOOR KNOB on the Dining Room door (J).
- Enter the Dining Room.
- Zoom into the dry sink (K). Break the glass (L) with the TUNING FORK.
- Pick up the PURE CRYSTAL (M) and the MINOTAUR FIGURINE (N).
- Use the SOLVENT on the box lock (O).
- Open the box lid and pick up the WINE BOTTLE (P).
- Zoom into the sparkles to play a HOS.
- Crack the lobster claw (R) with the cracker (S).
- Receive the SALT SHAKER.
- Enter the Kitchen.
- Zoom into the sparkles to play a HOS.
- Drain the sink (T) to uncover the hand print, rolling pin, sink plug, and star.
- Receive the FORCEPS.
- Zoom into the dumbwaiter (U).
- Open the door and pick up the RUBBER HOSE (V).
- Zoom into the stove (W).
- Pick up the DISH SOAP (X).
- Zoom into the breadbox (Y). Remove the canister's lid (Z) and pick up the tape (blue).
- Zoom into the back door (B) and use the ACID on the chain (A).
- Step outside onto the Back Patio.
- Pour the BIRD SEEDS into the bird feeder (C).
- Pick up the CLOCK SPRING (D).
- Pick up the STOOL (E).
- Zoom into the base of the tree (G).
- Pour the DISH SOAP over the sap (H) and pick up the BARBEQUE LIGHTER (green).
- Knock the GREEN BOOK (I) out of the tree with the SHEPARD'S CROOK and pick it up after if falls.
- Return to the Nursery.
- Zoom into the dresser (J). Place the CLOWN HEAD on the doll (K).
- Pick up the DRUM STICKS (L).
- Zoom into the sparkles to play a HOS.
- Open the mouth (M) to find the tooth.
- Open the umbrella (N) to get the tambourine and the shovel.
- Receive the TOOTH.
- Return to the Walk-in Closet.
- Place the STOOL next to the dresser (O).
- Look in the box (P).
- Pick up the ORGAN KEY (Q) and YELLOW BOOK (R).
- Move to the Countess' Bathroom.
- Zoom in to the machine (S). Melt the ice (T) with the SALT SHAKER.
- Open the door and pick up the BLOOD VIAL (U).
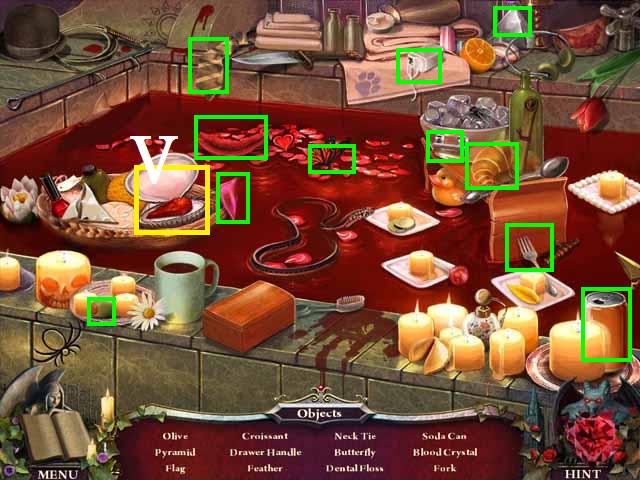
- Zoom into the sparkles to play a HOS.
- Open the clam shell (V) to reveal the blood crystal.
- Receive the BLOOD CRYSTAL.
- Return to the Family Parlor.
- Place the RECORD on the player (K).
- Lower the needle (W) and pick up the ORGAN KEY (X).
- Move to Victor's Secret Room.
- Zoom into the shelf (Y). Place the RUBBER HOSE on the burner (Z).
- Turn the valve (A) and light the burner with the BARBEQUE LIGHTER. (Hint: make sure you have placed the GOLDEN LEAF on the mold).
- Pick up the GOLDEN V (B).
- Return to the Front Door.
- Zoom into the relief (C). Place the GOLDEN V on the statue's chest (D).
- Pick up the VANSIG SEAL (E).
- Move to the Wine Cellar.
- Place the WINE BOTTLE in the rack (F).
Chapter 4: The Catacombs

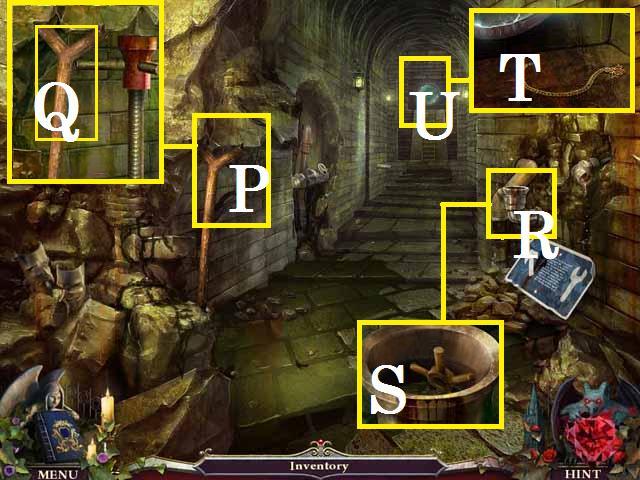
- Use the secret entrance and enter the Catacomb Halls.
- Zoom into the cubby hole (H). Light the torch (I) with the BARBEQUE LIGHTER.
- Pick up the BONE (J).
- Pull the TOOTH (K) with the FORCEPS.
- Move the paper (L) and pick up the tape (M).
- Zoom into the Cell Door (N).
- Slide open the hatch (O) to receive the VIOLIN.
- Return to the Conservatory.
- Zoom back into the stage.
- Place the VIOLIN and DRUM STICKS in the musicians' hands.
- Zoom into the rubble (P). Pick up the MANNEQUIN HEAD (Q) and the ORGAN KEY (R).
- Open the box (S) and pick up the tape (T).
- Zoom into the sparkles to play a HOS.
- Open the case (U) to find the chewing gum and the harmonica.
- Receive the BLUE BOOK.
- Drop the group of ORGAN KEYS over the organ (V) and push the button (blue).
- Zoom into the chandelier rubble (W).
- Pick up the NIGHT CRYSTAL (X).
- Back up one scene.
- Zoom into the Great Library door (Y).
- Place the NIGHT CRYSTAL, BLOOD CRYSTAL, and PURE CRYSTAL on the lock (Z).
- Enter the Great Library.
- Zoom into the sparkles to play a HOS.
- Open the box (A) to reveal the red book.
- Receive the RED BOOK.
- Place the collection of BOOKS on the shelf (B).
- There are many possible routes you can take with this puzzle.
- First clear the path to move the blue book (blue) and the yellow book (orange) into place (D).
- Slide the books in the direction marked in figure (C) to get to figure (D).
- After the path is clear move the blue book into place before moving the yellow book.
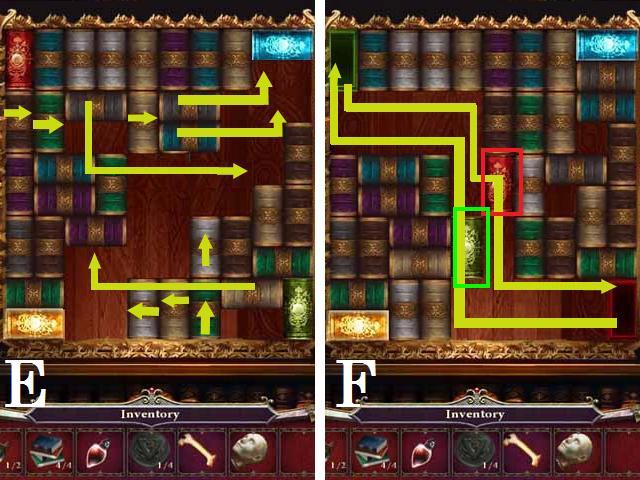
- Now clear the path to swap the red book (red) and the green book (green).
- Slide the books in the direction marked in figure (E) to get to figure (F).
- After the path is clear move the red book into the position shown in figure (F).
- Next move the green book into place and finish with the red book.
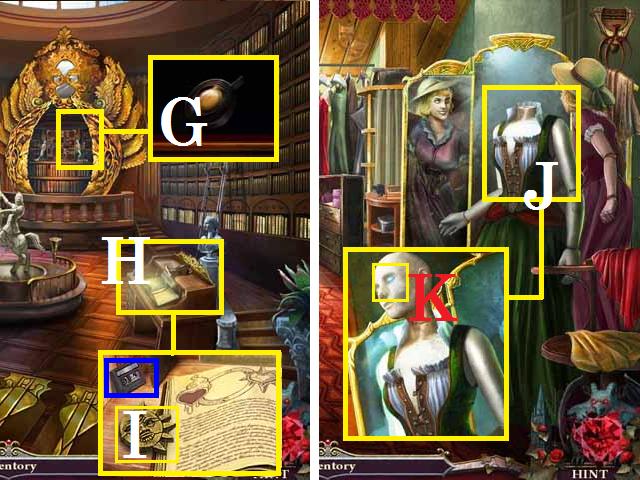
- Pick up the CLOCK SPRING (G).
- Zoom into the desk (H).
- Pick up the tape (blue) and the SUN HALF (I).
- Return to the Walk-in Closet.
- Place the MANNEQUIN HEAD on the mannequin (J) and remove the LENS (K).
- Zoom into the sparkles to play a HOS.
- Cut the skirt (L) with the scissors (M) to make it a mini skirt.
- Open the drawer (N) to locate the joker card and shuttlecock.
- Receive the ANTIQUE BRACELET.
- Return to the Back Patio.
- Give the dog (O) the BONE.
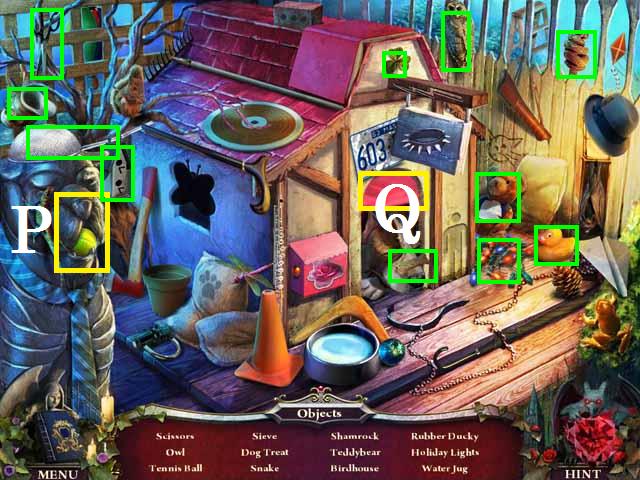
- Zoom into the sparkles to play a HOS.
- Open the statue's mouth (P) to get the tennis ball.
- Open the dog door (Q) to reveal the dog treat.
- Receive the SIEVE.
- Move forward to the Cliffside Path.
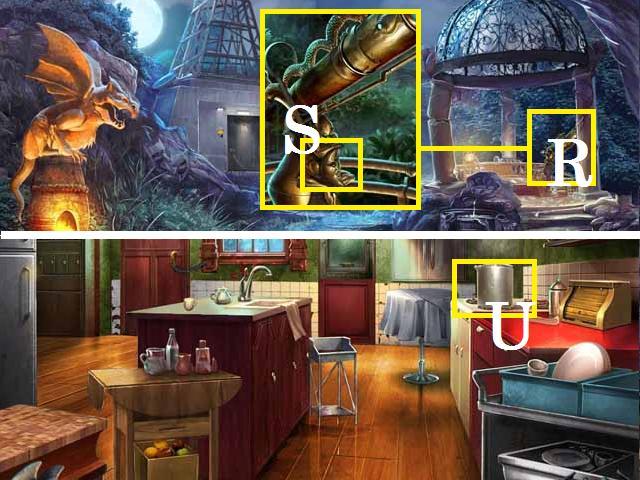
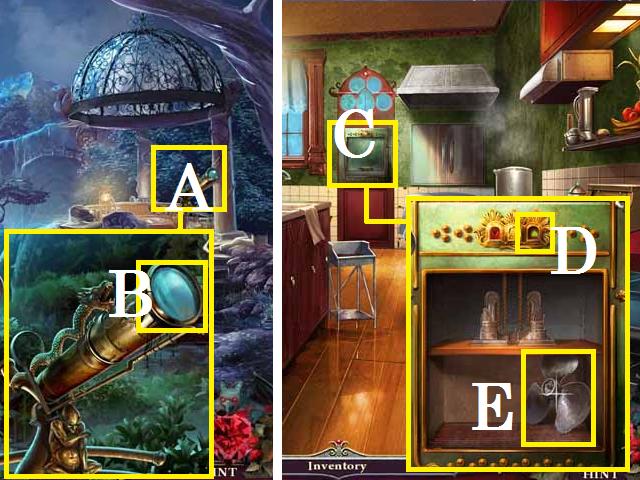
- Zoom into the telescope (R).
- Turn the telescope and pick up the MOON HALF (S).
- Return to the Kitchen.
- Fish the TOOTH out of the pot (U) with the SIEVE.
- Move to the Dining Room.
- Place the SUN HALF and MOON HALF in the door's (V) lock (W).
- Enter the Study.
- Zoom into the computer (X). Press the power button (Y) and insert the DATA DISK into the slot (Z).
- Open the speaker (A) and pick up the tape (blue).
- Pick up the BASILISK FIGURINE (C).
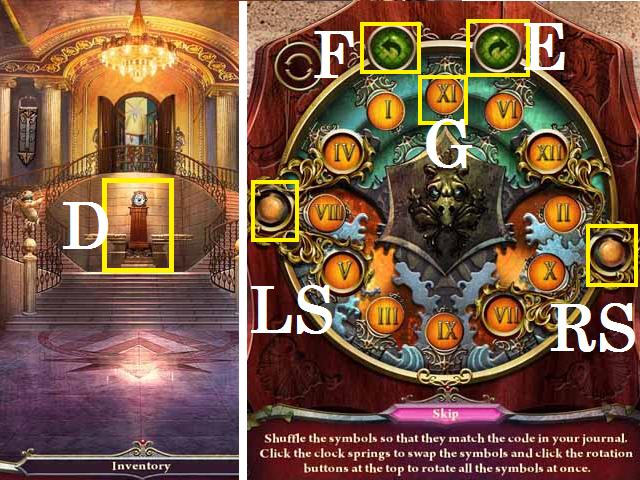
- Return to the Grand Staircase.
- Place the two CLOCK SPRINGS on the clock (D).
- Use the right arrow (E) to turn the numbers clockwise and the left arrow (F) to turn counterclockwise.
- Use the right clock spring (RS) to swap on the right and the left clock spring (LS) to swap the left side.
- Use the following sequence: E, E, LS, E x 4, RS, LS, F x 5, RS, F, LS (at this point the 11, 6, 12, and 2 should be in sequential order with the 12 in the top center position) (G).
- Continue to sequence with: F x 3, RS, E x 3, RS, E x3, LS, E x 2, LS, E x 3, RS, F x 4, LS (the 11, 6, 12, 2, 10, 7, 9, and 3 should be in order with the 5 in the top center position).
- Finish arranging the numbers in the right order with: F x 3, LS, F x 5, RS, E x 6, LS.
- E x 3 will complete the puzzle by moving the numbers into the correct position, with the 8 in the top center.
- Receive the SHADOW DIAL.
- Return to the Catacomb Halls.
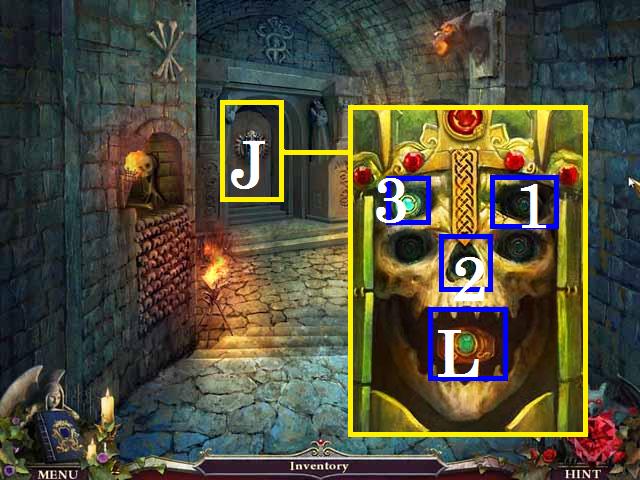
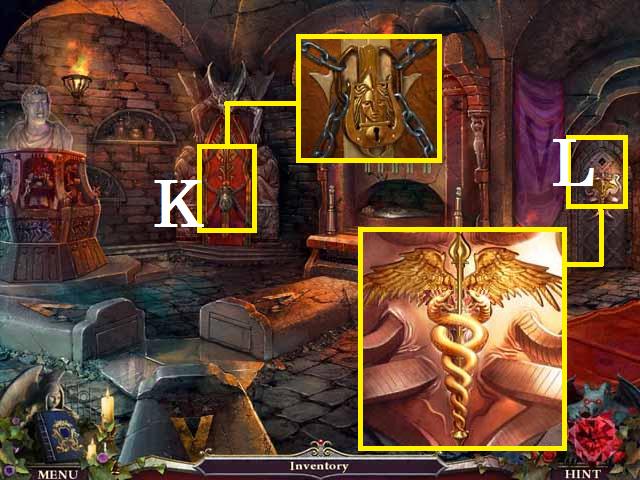
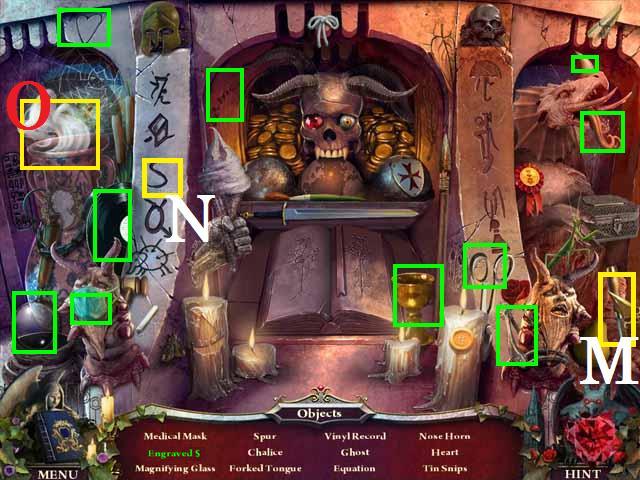
- Zoom into the Demon Reliquary door (J). Drop all the TEETH over the skull (K).
- Push the buttons in order of (1-3).
- Spin the ring (L).
- Enter the Demon Reliquary.
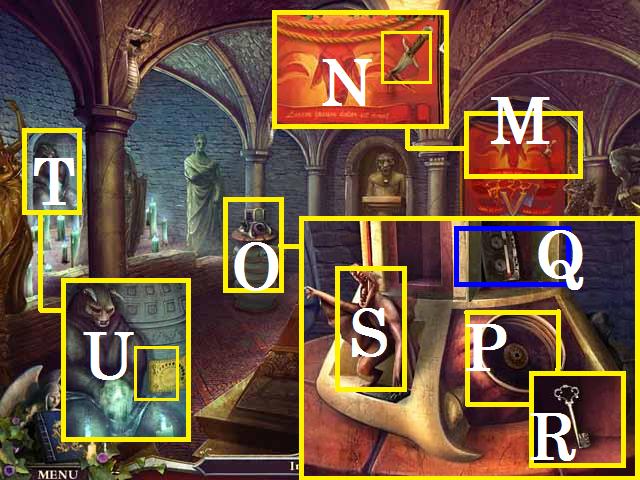
- Zoom into the tapestry (M) and pick up the DAGGER (N).
- Zoom into the snake stand (O). Place the SHADOW DIAL on the door (P).
- Open the small cabinet doors (Q).
- Pick up the CELL KEY (R), DRAGON FIGURINE (S), and the tape (blue).
- Zoom into the statue (T). Pick up the paper (U).
- Exit the Demon Reliquary.
- Unlock the cell door (V) with the CELL KEY.
- Enter Viggo's Cell.
- Remove the lid from the toilet tank (W).
- Pick up the WRENCH (X).
- Zoom into the drain (Y). Pick up the WOODEN KNOB (Z).
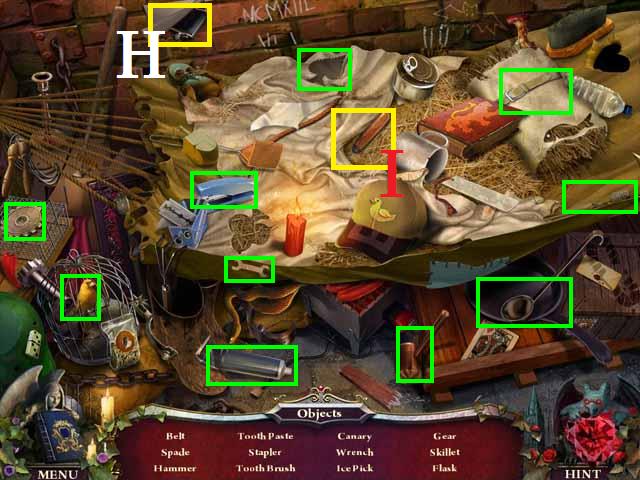
- Zoom into the sparkles to play a HOS.
- Tear the patch (A) to find the tweezers.
- Place the eyes (B) on the sock (C) to create the sock puppet.
- Receive the LIGHT SWITCH.
- Return to the Wine Cellar.
- Zoom into the sparkles to play a HOS.
- Remove the cork from the bottle (D) to get the bottled message.
- Receive the PICKAXE.
- Back up one scene.
- Remove all four bolts (blue) to the vent cover (E) with the WRENCH.
- Return to the Dining Room.
- Zoom into buffet table (F).
- Drop the GRIFFIN FIGURINE, HARPY FIGURINE, MINOTAUR FIGURINE, BASILISK FIGURINE, and the DRAGON FIGUREIN on the stand (G).
- Pick up the VANSIG SEAL (H).
- Enter the Kitchen.
- Zoom into the breadbox (I).
- Place the WOODEN KNOB on the lid (J).
- Lift the lid and pick up the GLASS CUTTER (K).
- Move back to the Study.
- Use the GLASS CUTTER on the cabinet (L) and receive a LENS.
- Pick up the KEYCARD (M).
- Exit the house on to the Back Patio.
- Zoom into the sparkles to play a HOS.
- Open the mailbox (N) for the envelope.
- Receive the SAW.
- Move forward to the Cliffside Path.
- Break the pillar (P) with the PICKAXE.
- Zoom into the Radio Tower door (Q).
- Insert the KEYCARD into the lock (R).
Chapter 5: The Radio Tower

- Enter the Radio Tower.
- Zoom into the radio (S). Place the ANTENNA (T).
- Open the side panel (U). Push the on button (V).
- Knock the UP BUTTON (W) off the radio and pick it up after it falls.
- Open the tape player (blue) and collect the tape.
- Zoom into the bust (X).
- Lower the bars until the CANDLE SNUFFER (Y) falls out.
- Pick up the CANDLE SNUFFER and the OIL CAN (Z).
- Exit the Radio Tower.
- Zoom back into the telescope (A). Pour the OIL CAN over the LENS (B).
- Collect the LENS.
- Return to the Kitchen.
- Zoom into the dumbwaiter (C).
- Place the UP BUTTON (D).
- Push the UP BUTTON and pick up the FAN BLADE (E).
- Zoom into the sparkles to play a HOS.
- Open the pocket watch (P) to find the yin yang and clock hands.
- Receive the LID LIFTER.
- Move to the Grand Library.
- Zoom into the sparkles to play a HOS.
- Take the chisel (G) to the statue (H) to make a bust.
- Receive the GOLD WINGS.
- Zoom into the desk (J).
- Place the LIGHT SWITCH (K).
- Turn the light off and pick up the LIGHT BULB (L).
- Back up two scenes and enter Victor's Secret Room.
- Zoom into the desk (M). Place the LIGHT BULB in the lamp (N).
- Open the folder (O). Pick up the tape (P) and the BOOT DISK (Q).
- Move to the Basement Hallway.
- Place the FAN BLADE in the vent (R).
- Pick up the radio tower blueprints (S).
- Enter the Wine Cellar.
- SAW open the wine barrel (T).
- Pick up the EMPTY JUG (U).
- Move to Viggos' Cell.
- Remove the drain grate (V) with the LID LIFTER.
- Pick up the BLACK LIGHT (W).
- Move to the Demon Reliquary.
- Zoom into the statue (X).
- Use the CANDLE SNUFFER on the candles (Y).
- Hold the EMPTY JUG under the statue's mouth (Z) to receive JUG OF LIQUID NITROGEN.
- Drag the BLACK LIGHT over the tapestry (A).
- Zoom into the door (B).
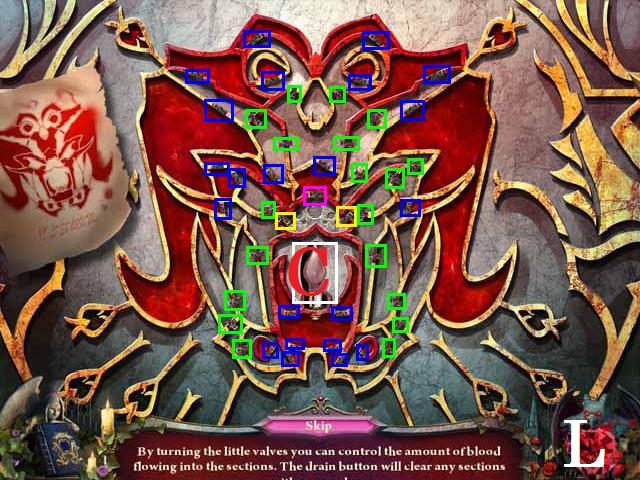
- Place the BLOOD VIAL in the center (C).
- Open all of the valves (green and blue) except for the drain valves (purple and yellow).
- Close all the valves marked (blue).
- Open the two lower drain valves (yellow).
- Close the two drain valves. The mini-game should look like the screenshot (L).

- Close the valves marked (blue).
- Open and close the three valves marked (green).
- Close the four valves marked (pink).
- Open and close the two drain valves (yellow).
- The mini-game should now look like the second screenshot (M).

- Close the three valves marked (blue).
- Open the two valves marked (green).
- See the screenshot (N) for the completed mini-game.
- Enter the Catacomb Crypt.
- Zoom into the mummy (D).
- Pick up the VANSIG SHIELD (E).
- Place the ANTIQUE BRACELET on the wrist (F).
- Pick up the GOLD STAFF (G).
- Zoom into the sparkles to play a HOS.
- Open the stone book (I) to reveal the urn.
- Dip the rose (J) in the ink (K) to turn it black.
- Open the box (A) to reveal the scorpion.
- Receive the GAS VALVE.
- Return the Dining Room.
- Zoom into the sparkles to play a HOS.
- Open the butter dish (L) to find the butter.
- Receive the WATER BOTTLE.
- Move to the Breaker Room.
- Place the GAS VALVE on the furnace (M).
- Turn the GAS VALVE (C).
- Open the cover and pick up the GAUNTLET (N).
- Walk to the Study.
- Place the GAUNTLET, DAGGER, and VANSIG SHIELD on the suit of armor (O).
- Pick up the GOLD WIRE (B).
- Exit the house and move to the Radio Tower.
- Pick up the note (P) and zoom into the circuit board (blue).
- Drop the GOLD WIRE over the circuit board and insert the BOOT DISK into the slot (Q).
- Rotate the tiles as shown in the screenshot.
- After the dialogue is over, zoom into the sparkles to play a HOS.
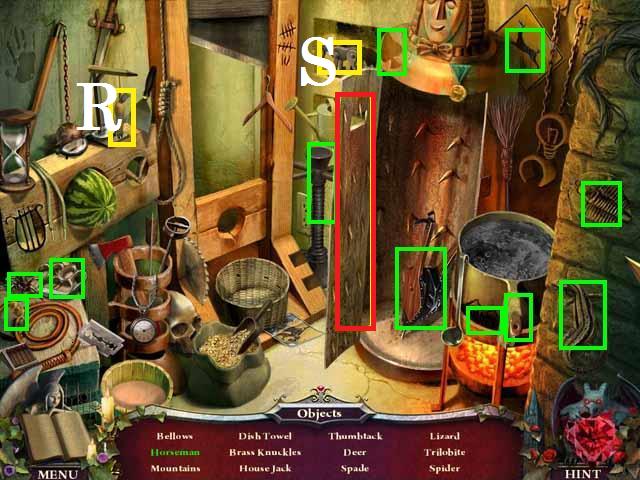
- Place the man (R) on the horse (S) for the horseman.
- Open the cabinet (red) to locate the bellows.
- Receive the HOUSE JACK.
- Pick up the paper (T).
- Zoom into the ground (U).
- Pick up the RED MARBLE (V).
- Zoom into the stretcher (W).
- Pick up the PLUNGER (X).
- Place the RED MARBLE on the doors lock (Y).
- You will want to arrange all of the black marbles along the border first.
- Start with the bottom middle and complete the left side using the following sequence: 1, 1, 2, 3, 4, 5, 5, 6, 7, 7, 7, 8, 8, 8, 9, 9, 9, 8, A, A, 9, 9, 8 and 8.
- Next complete the right side using the following sequence: B, C, C, C, D, D, E, F, F, F, E, E, G, G, G, H, J, K, K, K, and J.
- Place the last black marble on the point: A, A, L, and L.
- Next complete the yellow marbles: 9, 9, A, M, M, G, K, K, H, H, 9, A, A, N, N, and N.
- Finish the puzzle by placing the last yellow marble with: 9 and 9.
- Enter the Old Sewer.
- Zoom into the wall (P). Place the HOUSE JACK under the rock and pick up the STICK (Q).
- Use the PLUNGER on the pipe (R).
- Pick up the WOOD CRANK (S).
- Pick up the FLUSH CHAIN (T) from the blocked exit (U).
- Back up one scene.
- Zoom back into the stretcher (V). Place the WOOD CRANK (W) and pick up the TWINE (X).
- Zoom back into the ground (Y).
- Tie the STICK to the rock with the TWINE.
- Pick up the SLEDGEHAMMER (Z).
- Exit the dungeon.
- Smash the blocked exit (A) with the SLEDGEHAMMER and escape through the pipe.
- Move to the Courtyard.
- Zoom into the sparkles to play a HOS.
- Flip the gnome's hat (B) off to see the Mohawk.
- Receive the FISHING LINE.
- Enter the Hedge Maze.
- Zoom into the sparkles to play a HOS.
- Open the case (C) to locate the golden snakes.
- Receive the GOLDEN SNAKES.
- Drop the FISHING LINE down the well (D).
- Pick up the CATACOMBS KEY (E).
- Return to the Viggo's Cell.
- Place the FLUSH CHAIN on the toilet (F).
- Flush the toilet and pick up the THROW SWITCH (G).
- Zoom into the sparkles to play a HOS.
- Lift the paper (H) to find the flask.
- Move the sheet (I) to find the ice pick.
- Receive the ICE PICK.
- Return to the Catacomb Crypt.
- Unlock the door Vladd's Tomb (K) with the CATACOMBS KEY.
- Place the GOLD WINGS, GOLD STAFF, and GOLDEN SNAKES on the door (L) to the Medical Room.
- Zoom into the sparkles to play a HOS.
- Chisel (M) the stone (N) to create the engraved $.
- Open the vase (O) to see the ghost.
- Receive the SNIPS.
- Enter the Medical Room.
- Pick up the MEDICAL TUBING (Q).
- Open the casket's (R) glass.
- Use the SNIPS to cut the chain (S). Pick up the RED CRYSTAL HEART.
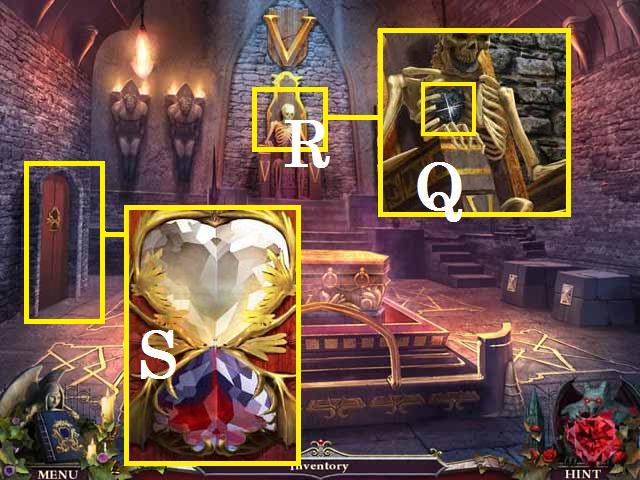
- Move to Vladd's Tomb.
- Pick up the BLACK CRYSTAL HEART (Q) from the skeleton's (R) chest.
- Place the BLACK CRYSTAL HEART and the RED CRYSTAL HEART on the lock (S) to the Blood Sanctum.
- Enter the Blood Sanctum.
- Pick up the THROW SWITCH (U) from the fountain (V).
- Place the MEDICAL TUBE (W). Pick up the SEAL STAMPER (X).
- Break the ice (Y) with the ICE PICK.
- Pick up the HOURGLASS (Z).
- Shut the molds (A) lid as shown in the screenshot.
- Pick up the tape (B).
- Fill the mold with the WATER BOTTLE, followed by the JUG OF LIQUID NITROGEN.
- Open the lid and pick up the LENS (C).
- Return to the Medical room.
- Place the two THROW SWITCHS on the incubator (D).
- Flip the THROW SWITCHS and pick up the DEMONIC HEART (E).
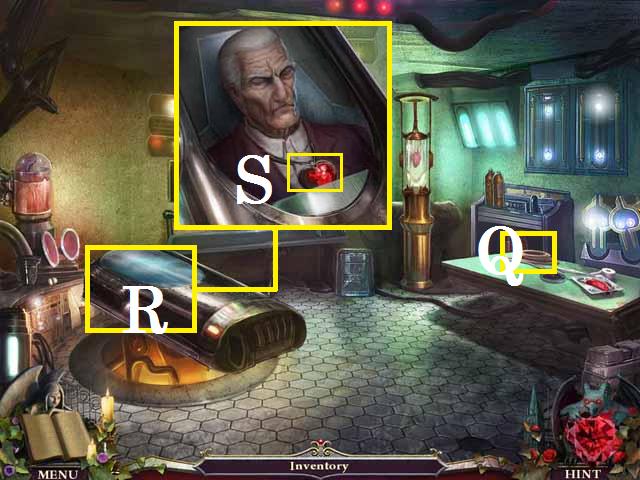
- Zoom into the table; use the SEAL STAMP on the wax (G) and pick up the VANSIG SEAL (blue).
- Return to Vladd's Tomb.
- Place the HOURGLASS in the skeleton's (H) hand (I) and the DEMONIC HEART in the chest (J).
- Pick up the VANSIG SEAL (K).
- Place the collection of VANSIG SEALS on the casket (L).
- Pick up the LENS (M).
- Zoom into the door (N) to the Inner Sanctum.
- Place the collection of LENS on the board and arrange as shown in the screenshot (P).
- Enter the Inner Sanctum.
- Zoom into the book (R). Pick up the ENERGY GEM (S).
- Zoom into the life support system (T). Place the ENERGY GEM (U) as shown in the screenshot.
- Congratulations, you have completed Nightfall Mysteries: Black Heart.
Created at: 2012-03-02