

Walkthrough Menu
- General Tips
- Chapter 1 - Prelude and Four Years Later
- Chapter 2 - The Portal
- Chapter 3 – Heart Drawing
- Chapter 4 – Frozen Landscape
- Chapter 5 – The Factory
- Chapter 6 - Underwater
- Chapter 7 – Sanityzak
- Chapter 8 – Emily
General Tips
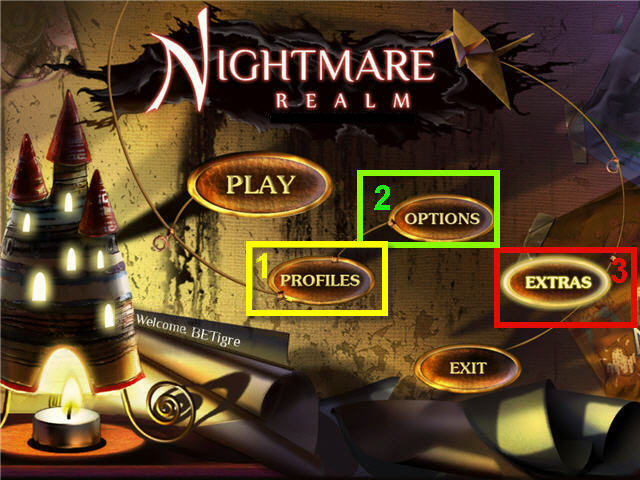
- Click on Profile (1) to enter a new profile name and choose between Casual or Expert Mode.
- Casual Mode has sparkles in places of interest, hints and skips recharge faster and a tutorial is available.
- Expert Mode has no sparkles, hint and skips take longer to recharge and there is no tutorial.
- Click on Options (2) to adjust Music Volume, Effects Volume, Environment Volume, Custom Cursor and Full Screen settings.
- Click on Extras (3) to access Extra Episode, Music, wallpapers, Origami Tutorial, Concept Art and credits.
- The cursor will change to an eye when you can look closer at something.
- The cursor will change to a hand when you can interact with something.
- The cursor will change to a mouth when you can speak to someone.
- To exit a close-up box, click on the x in the corner or click anywhere outside the box.
- Hints are available in the lower right for both Hidden Object Scenes and regular gameplay.
- Items written in yellow on the Hidden Object Find List need an extra action or two before you can acquire it.
- Items written in white on the Hidden Object Find List are easily found and those written in gray are already collected.
- If your inventory bar is full you can scroll through using the arrows on the left and right of the bar.
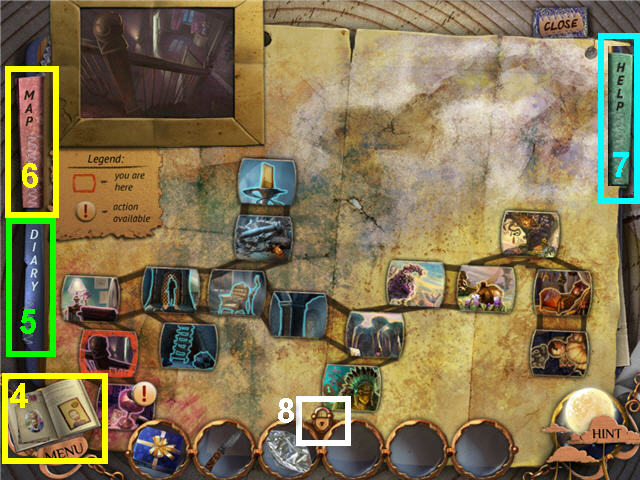
- Click on the book (4) in the lower left to access the Diary (5), Map and Help (7) Section.
- In the Map (6) section of the journal, it will show you your location and place an exclamation mark on locations that have an action available.
- You can unlock the task bar and get a full screen by clicking on the lock (8) in the center of the bar.
- Find 33 hidden origami pieces; they are marked in cyan in the screenshots.
- Find 10 hidden origami pieces to unlock the crane origami tutorial, 20 for the heart, 25 for the butterfly and 30 for the tulip.
- You can track the number of origami collected by opening your diary and looking at the bottom left.
- The game is not fully linear and certain actions in one area trigger Hidden Object Scenes in another.
- If there is a Hidden Object Scene available in the guide that you do not have, please explore other areas and come back or check the guide for what you may have missed.
- Puzzles can be skipped after a short wait.
- There is a brief delay on the Hidden Object Scenes if you excessively random click.
Chapter 1 – Prelude and Four Years Later
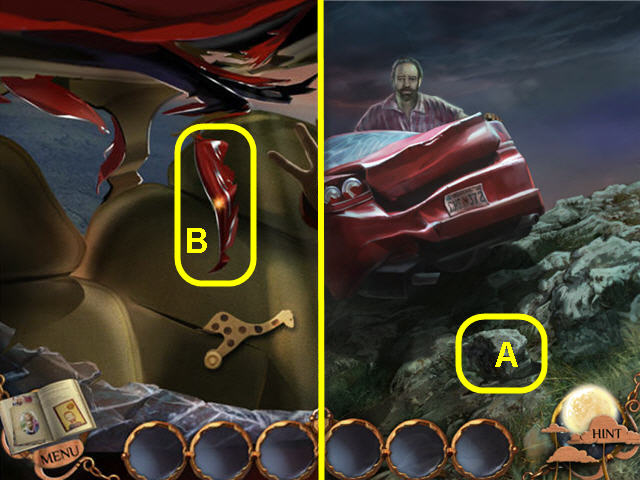
- Head forward two times to the car.
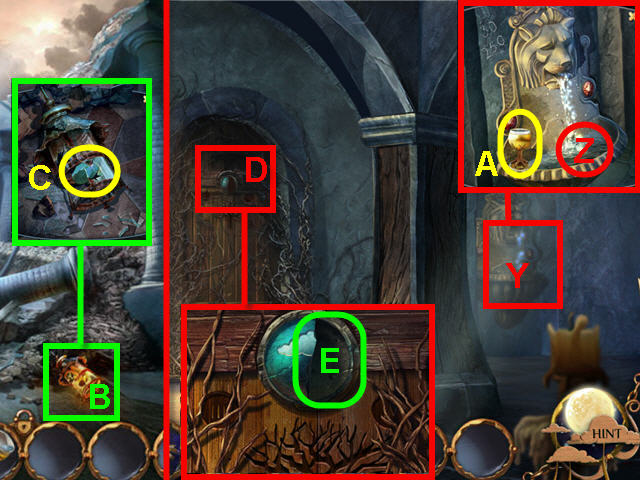
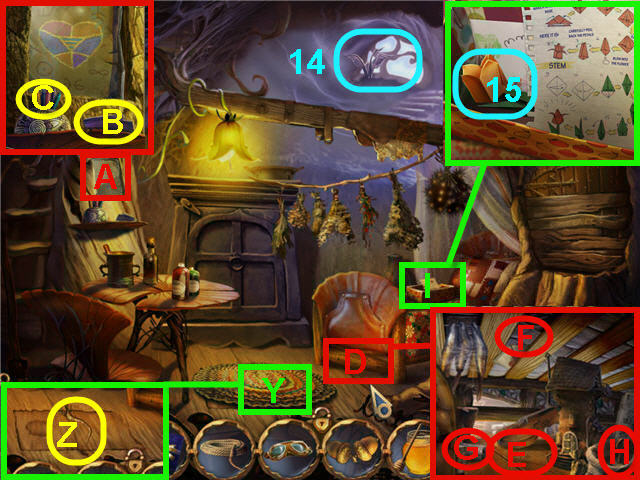
- Pick up the ROCK (A) and click on Peter.
- Look close at the back window and use the ROCK until window is gone.
- Take the SHARP METAL PIECE (B) and click on David.
- Back out two times to Emily.
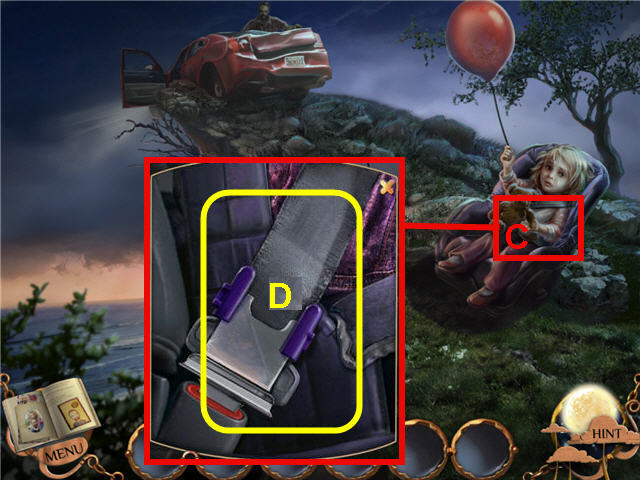
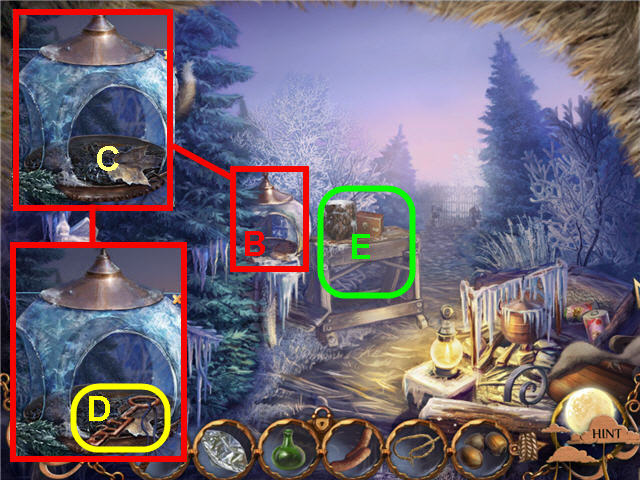
- Look close at the car seat (C).
- Use the SHARP METAL PIECE on the seat belt (D) and get a SAFETY BELT.
- Head forward one time.
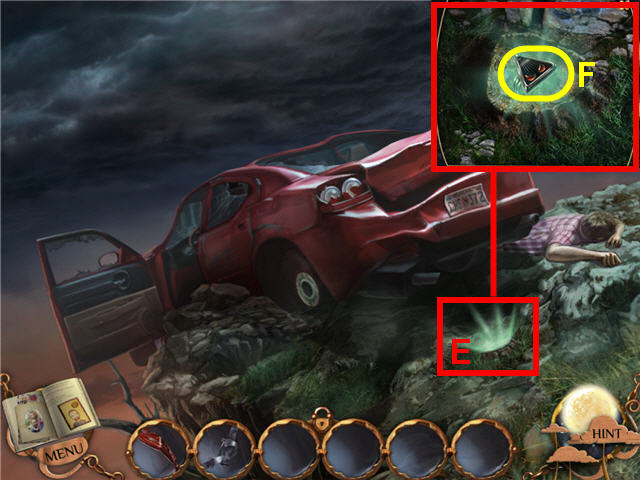
- Look close at the green glowing hole (E) and take the MYSTERIOUS RING (F).
- Look close at the back window of the car and use the SAFETY BELT on David.
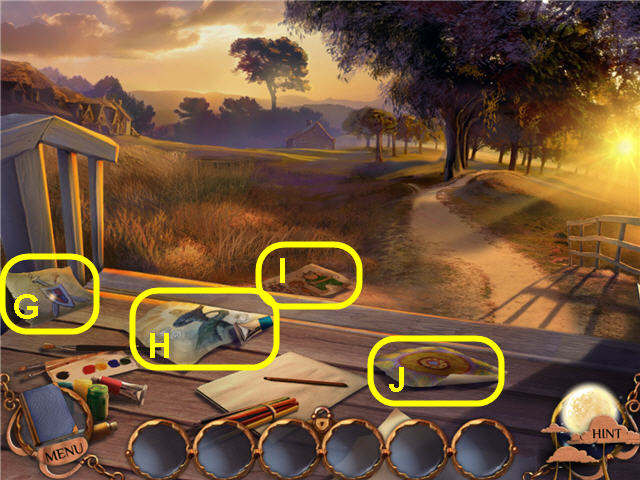
- Click on Emily and Peter and then head left out the door.
- Pick up the DRAWING OF SWORDS AND A SHIELD (G), DRAWING OF A STRANGE LOOKING PLACE (H), DRAWING OF SOME MAGIC CREATURES (I) and a DRAWING OF A SUN (J).
- Head back into the house.
- Head into the open door at the left rear of the hall.
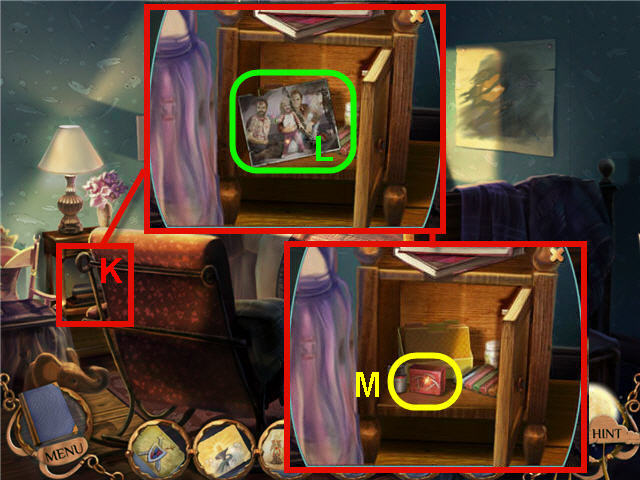
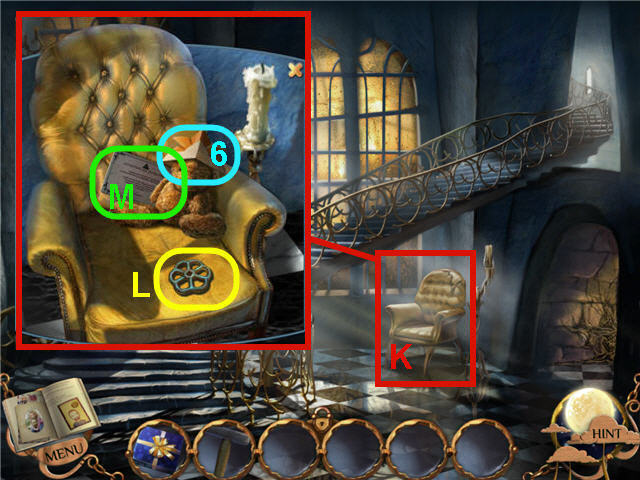
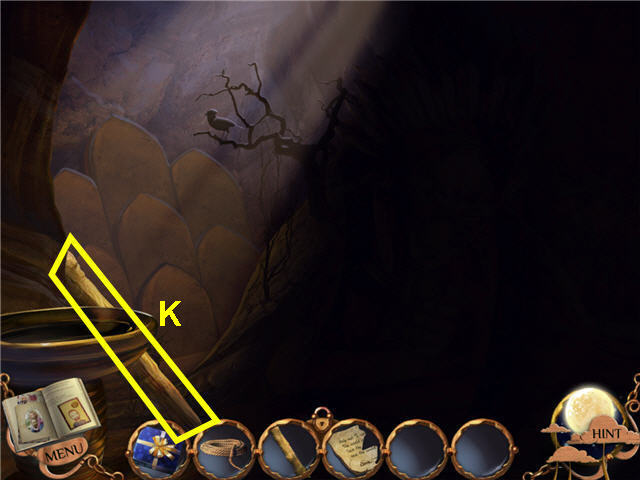
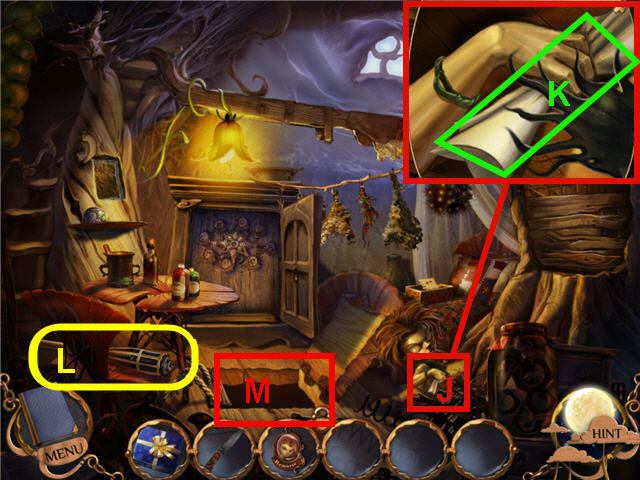
- Look close at the nightstand (K) and click to open.
- Take the photo (L) and get it added to your diary.
- Take the PUSH PINS (M).
- Back out of the room.
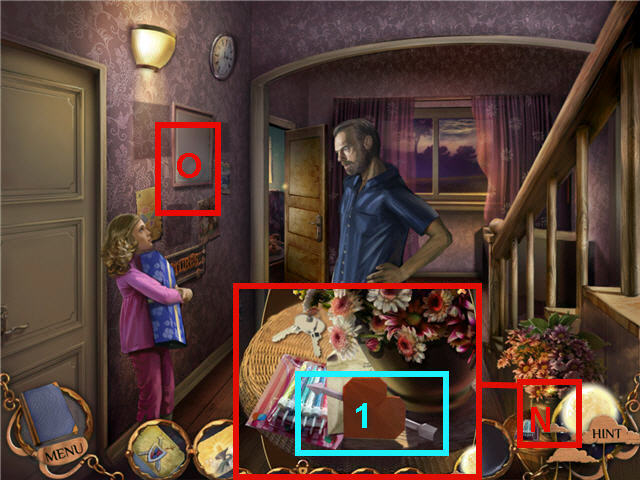
- Look close at the flowers (N) on the bottom right.
- Take the ORIGAMI (1).
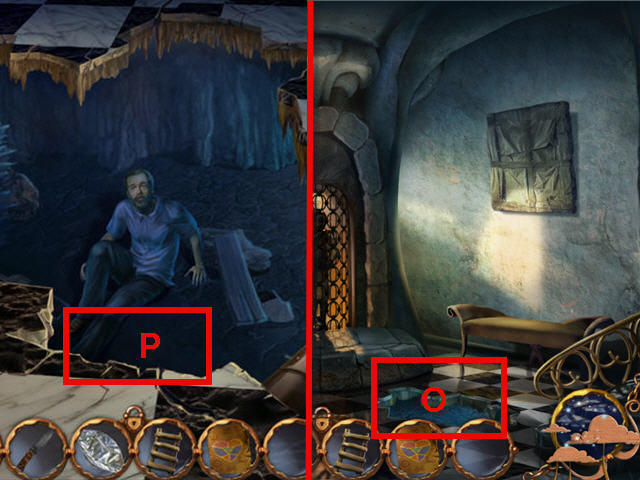
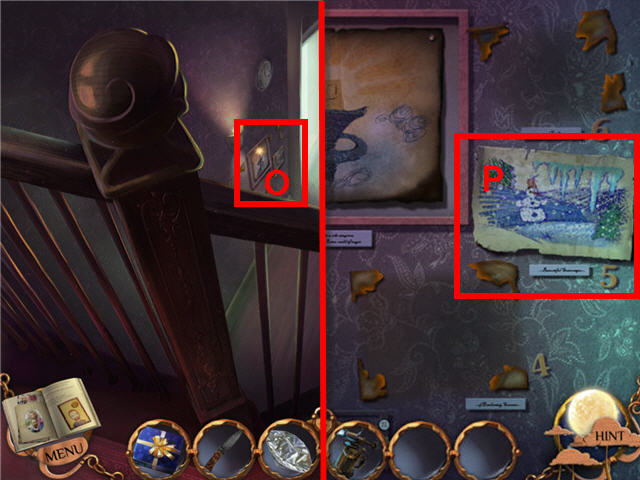
- Look close at the wall (O) next to Emily.
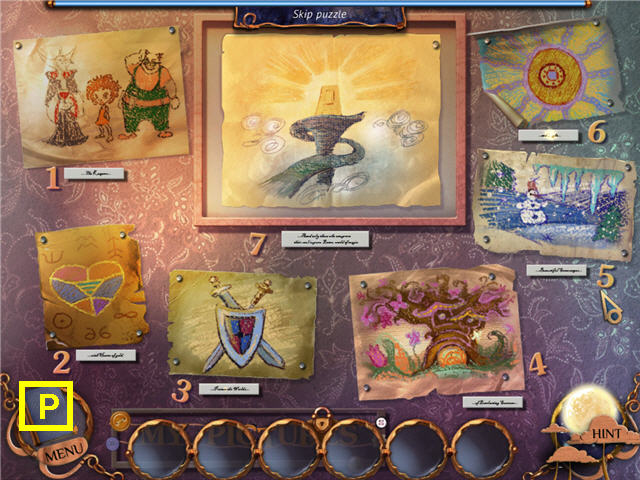
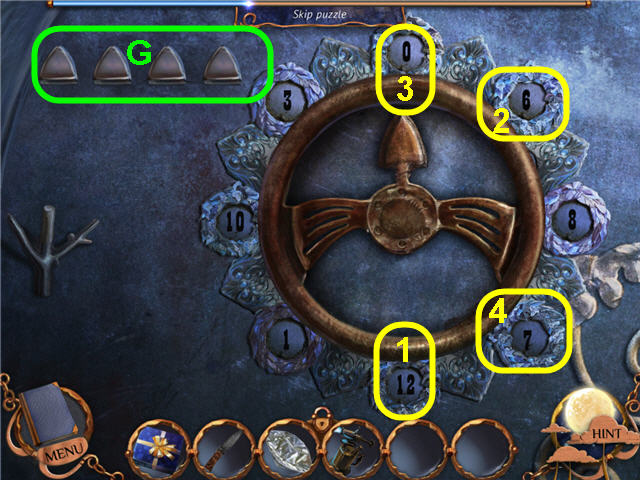
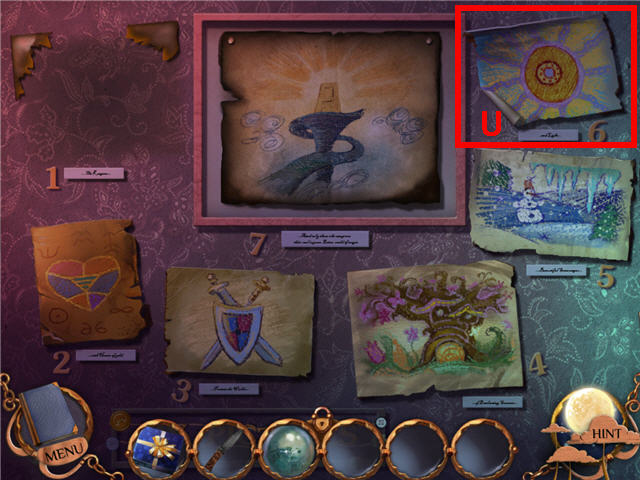
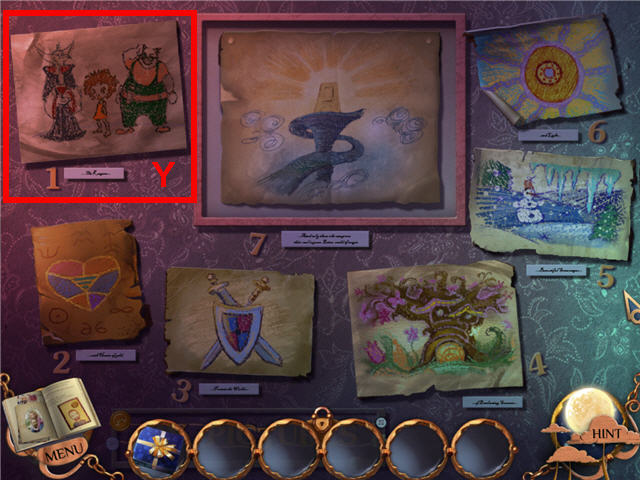
- Read the plaques next to the numbers on the wall and place the corresponding pictures in the blank spots on the wall. See screenshot for solution (P).
- Place the DRAWING OF SOME MAGIC CREATURES by the 1.
- Place the DRAWING OF SWORDS AND A SHIELD by the 3.
- Place the DRAWING OF A SUN by the 6.
- Place the DRAWING OF A STRANGE LOOKING PLACE by the 7.
- The PUSH PINS were automatically removed from inventory.
- Click on Emily and follow her into her bedroom.

- Click on Emily.
- Take the TEDDY BEAR (Q) from the chest.
- Give the TEDDY BEAR to Emily and try and turn off the lamp.
- Exit the room and head upstairs.
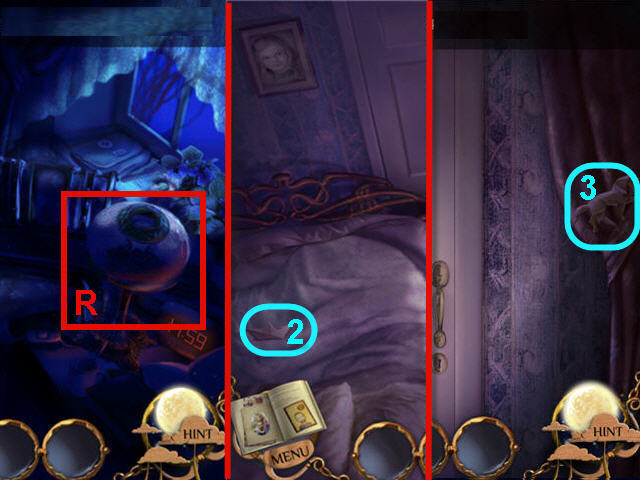
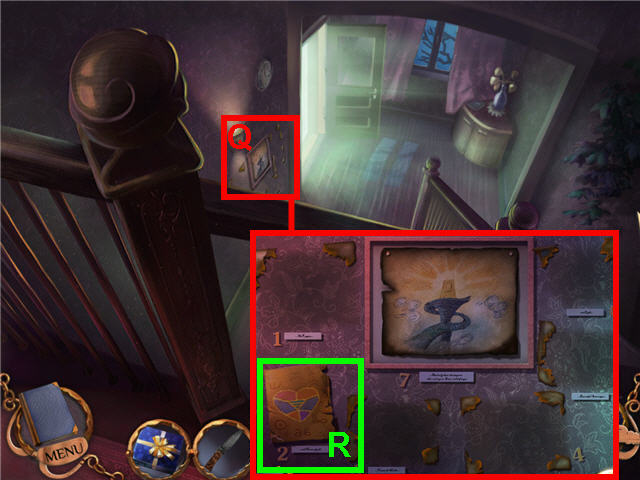
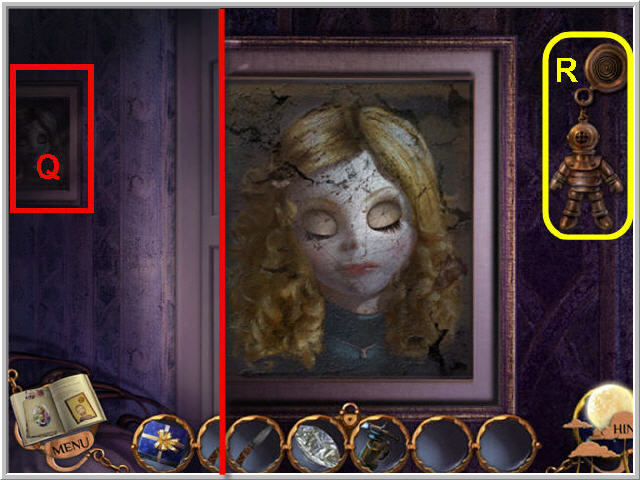
- Click on the lamp (R) on the nightstand.
- Take the ORIGAMI (2) on the bed.
- Go forward one time.
- Take the ORIGAMI (3) from the curtain on the right.
- Open the door and click on Peter and exit the room.
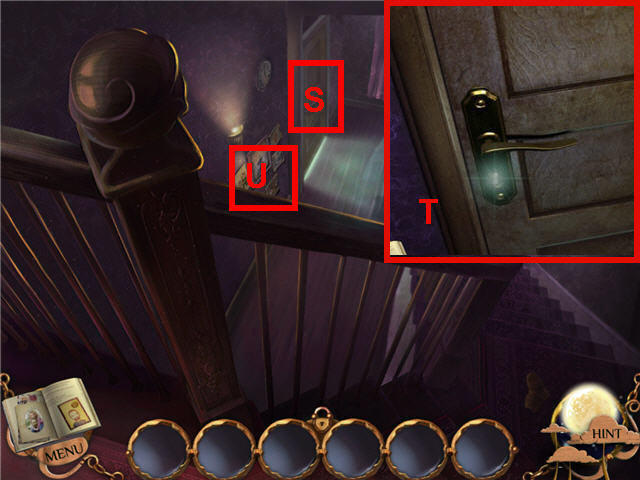
- Click on Emily’s bedroom door (S).
- Look through the keyhole (T).
- Back out one time.
- Look close at the paintings (U) burning in the hall.
- Back out one time.
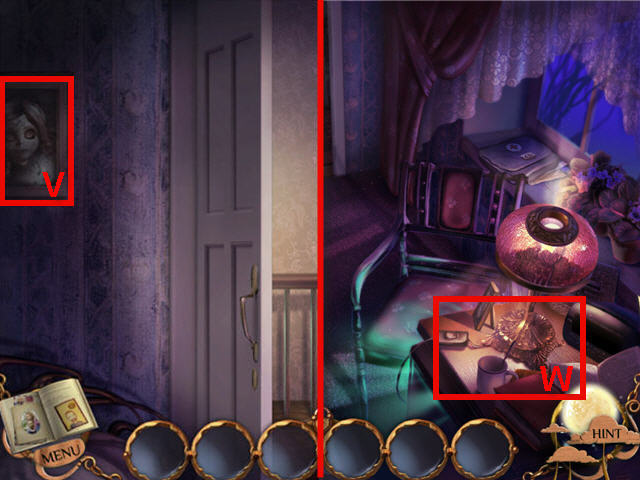
- Look close at Emily’s picture (V) on the wall to the left.
- Back out two times.
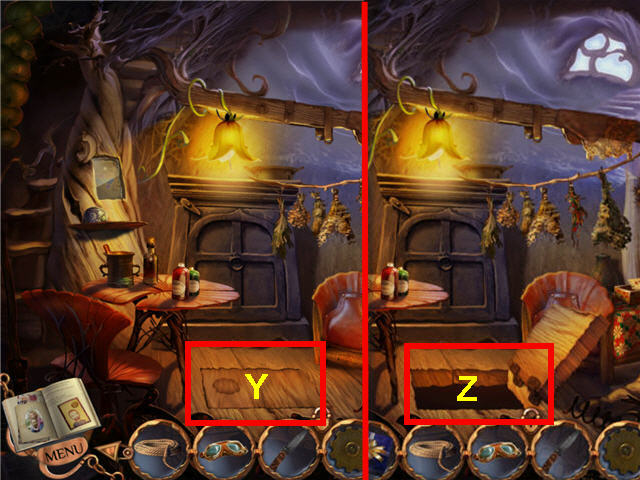
- Look close at the nightstand (W).
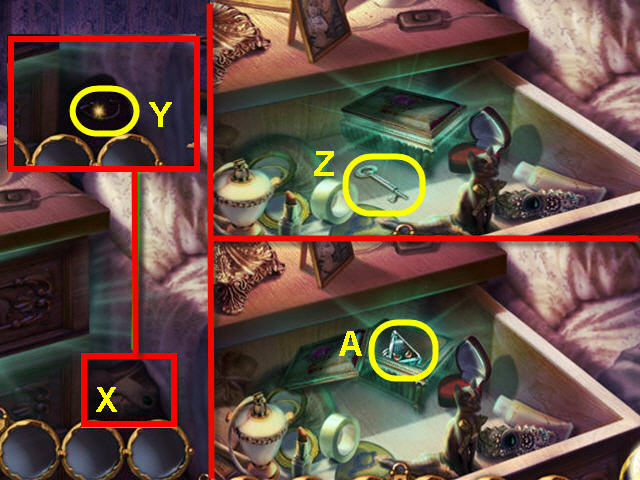
- Move the slippers (X) and pick up the DRAWER HANDLE (Y).
- Place the DRAWER HANDLE on the drawer and click the drawer handle to open.
- Take EMILY’S ROOM KEY (Z).
- Open the trinket box and take the MYSTERIOUS RING (A).
- Exit the room and head to Emily’s bedroom door.
- Use EMILY’S ROOM KEY on the keyhole.
- Enter Emily’s room.
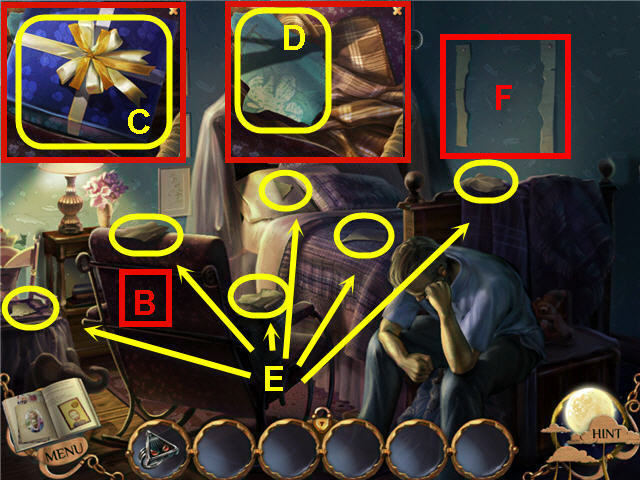
- Click on the back of the chair (B) and take EMILY’S PRESENT (C) and the PICTURE PIECE (D) underneath it.
- Pick up the remaining 6 PICTURE’S PIECES (E).
- Look close at the wall where the picture was located (F).
- Place the 7 PICTURE’S PIECES on the close-up.
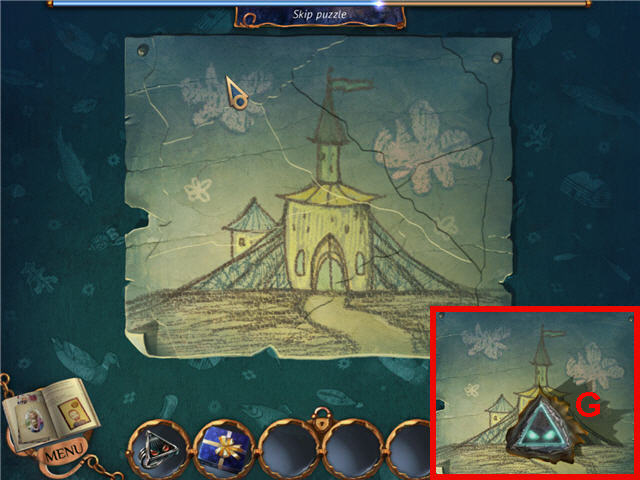
- Arrange the pieces to complete the picture.
- Right click on the pieces to turn. See screenshot for solution.
- Use the MYSTERIOUS RING on the triangular slot (G).
- Click on the portal to send Peter through.
- Click on the portal two more times to go through.
Chapter 2 – The Portal
- Note that you can return to the house via the mirror on the lower left when needed.
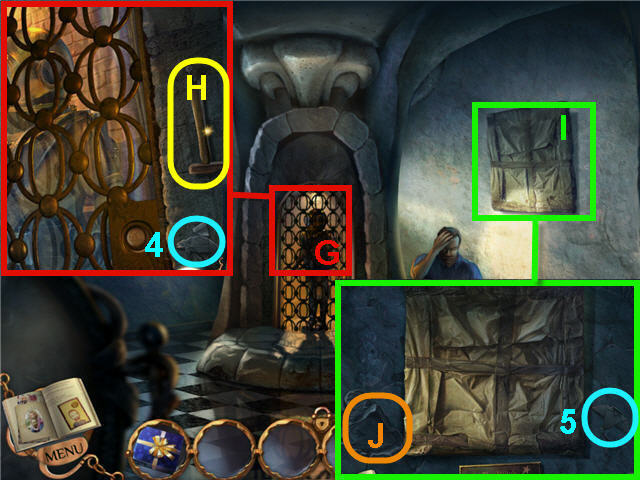
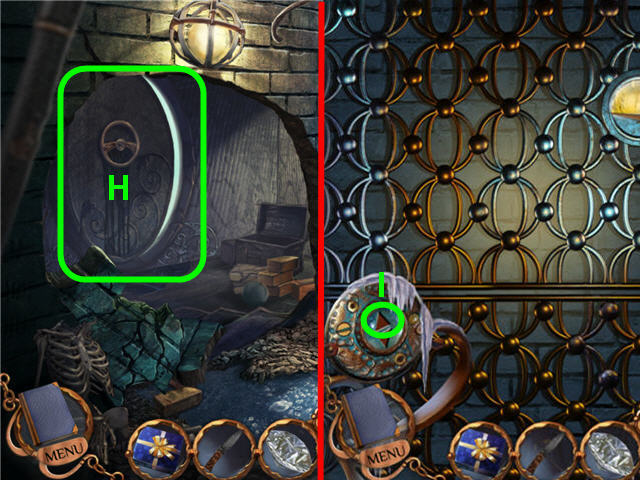
- Look close at the cage door (G) and note we need a key.
- Take the HAMMER (H).
- Take the ORIGAMI (4).
- Back out and look close at the wrapped painting (I).
- Take the ORIGAMI (5).
- Click on the loose wall (J) on the left until it falls off and press the button.
- Move through the room via the right of the screen.
- Look close at the chair (K) under the stairs.
- Take the VALVE (L).
- Take the ORIGAMI (6) from the bears head.
- Read the note (M) to get a diary update.
- Head upstairs.
- Take the ORIGAMI (7) from the upper right.
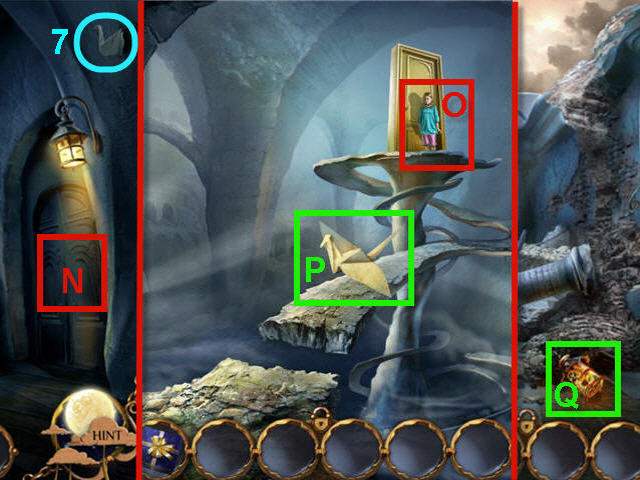
- Look close at the door (N) and note you need a key.
- Go forward one time.
- Click on Emily (O).
- Take the origami note (P) and read it. This does not count towards your origami collection.
- Click on the Extractor by the door after Emily goes through the door.
- Look close at the lantern and note you need something to pick it up.
- Back out one time and head to the right.
- Look close at the fountain (Q) and note the numbers in the corner and get a diary update.
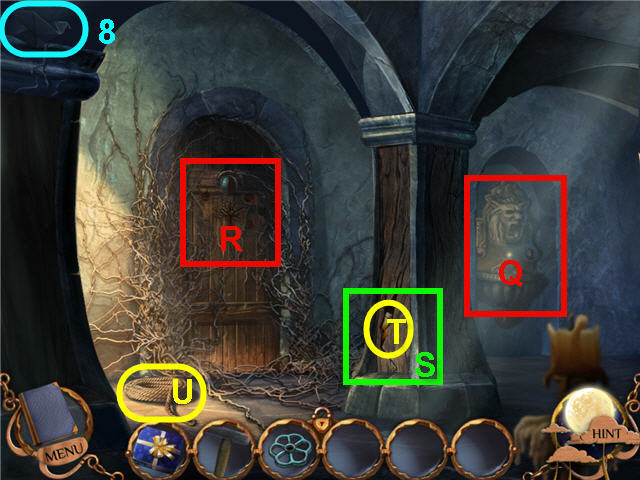
- Look close at the door (R) and note the missing piece.
- Back out one time.
- Take the ORIGAMI (8) from the upper left.
- Look close at the cracked column (S).
- Use the HAMMER four times on the crack and take the GOBLET (T).
- Take the ROPE (U).
- Head to the left two times.
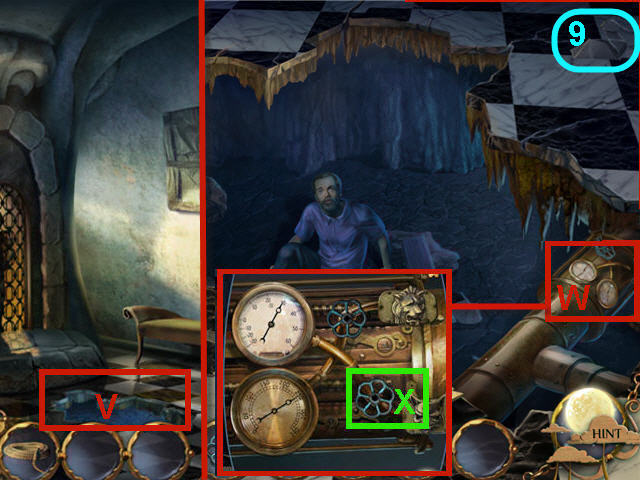
- Look close at the hole in the floor (V).
- Speak to Peter.
- Look close at the pipes (W) on the right.
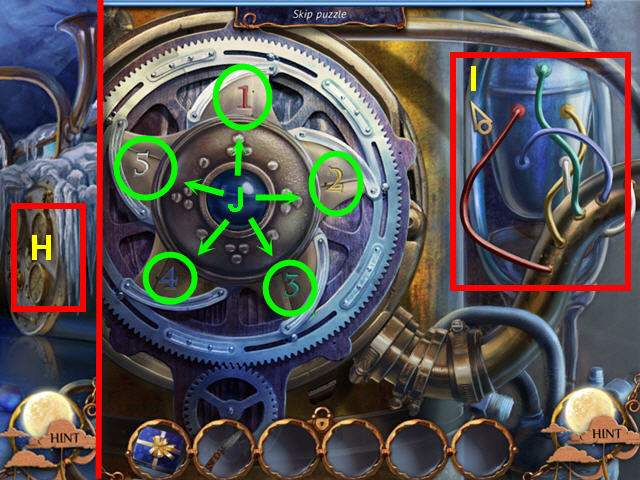
- Place the VALVE on the lower pipe (X) to trigger a puzzle.
- Rotate the valves to match the code written on the fountain that is in your diary.
- Solution; turn the bottom right valve until the top right dial is set at 30; turn the top right valve until the bottom left dial is set at 250. See screenshot for solution.
- Take the ORIGAMI (9).
- Back out and head to the right two times.
- Look close at the fountain (Y).
- Use the GLOBLET in the water (Z) and take the GOBLET WITH WATER (A).
- Head to the left and go up the stairs.
- Look close at the hot lantern (B).
- Use the GOBLET WITH WATER on the hot lantern.
- Take the ORNAMENT HALF (C).
- Back out one time and head to the right.
- Look close at the door (D).
- Place the ORNAMENT HALF on the slot on the top of the door (E) to trigger a puzzle.
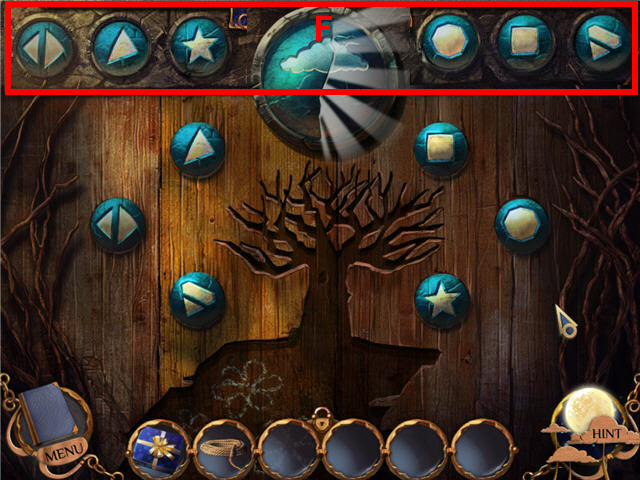
- The goal is to place the disks (F) on their corresponding slots below.
- Solution; count the points on the geometric shapes on the disks and place them with the matching Roman numerals. See screenshot for solution.
- Enter the newly-opened door.
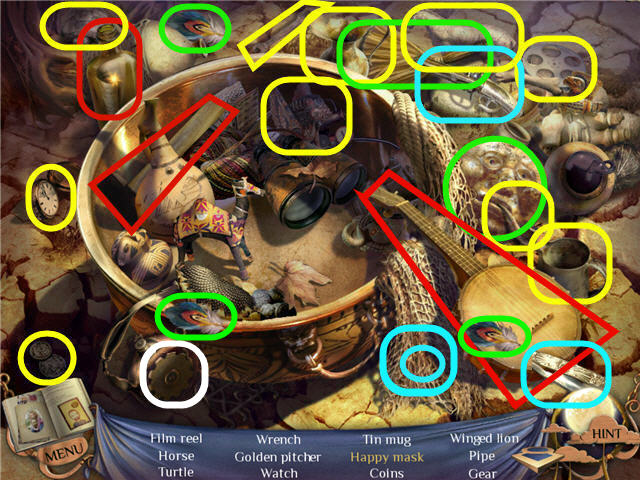
- Click on the pile of debris to the left of the path to access a Hidden Object Scene.
Chapter 3 – Heart Drawing
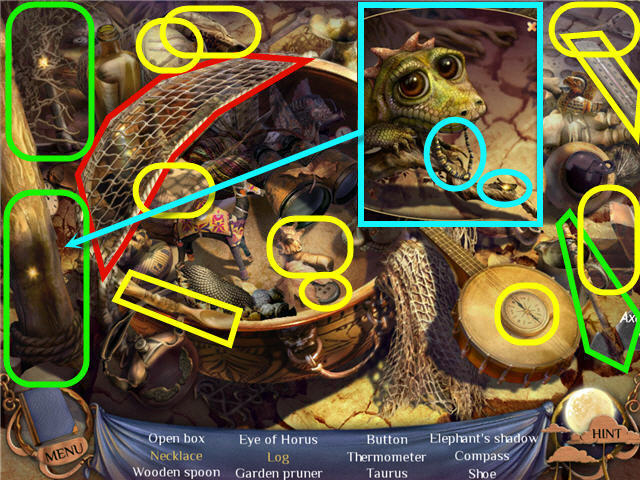
- Click on the netting (in red) to remove it.
- Marked in green; use the axe on the tangled pick to get the pick. Use the pick on the buried log to get the 1st LOG.
- Marked in cyan; look close at the lizard where the log was and use the cricket on the lizard to get the necklace.
- Find the items listed.
- Take the STONE TABLET HALF (G).
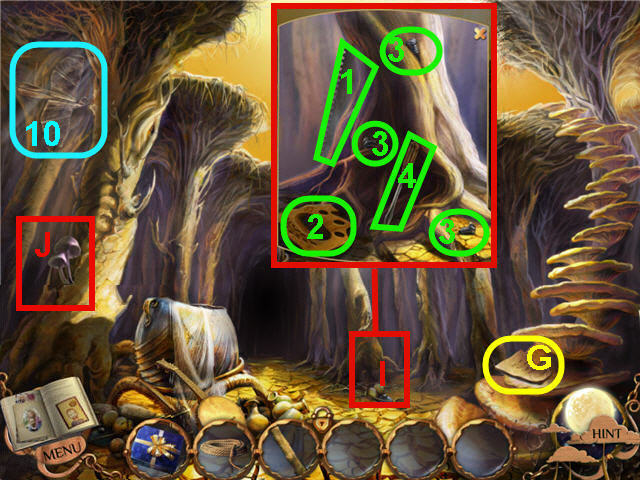
- Take the ORIGAMI (10).
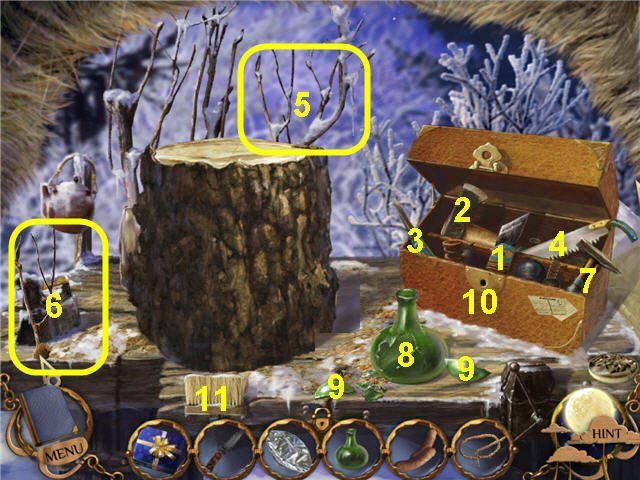
- Look close at the base of the tree (I).
- Place the saw blade (1) on the handle (2) and place the 3 screws (3) in the holes in the handle and use the screwdriver (4) to screw them in; take the SAW.
- Look close at the mushrooms (J) and note we need something to cut them.
- Head into the dark cave ahead.
- Take the 2nd LOG (K).
- Click on the pedestal and note we need something to light the oil.
- Back out one time and head up the mushroom staircase on the right.
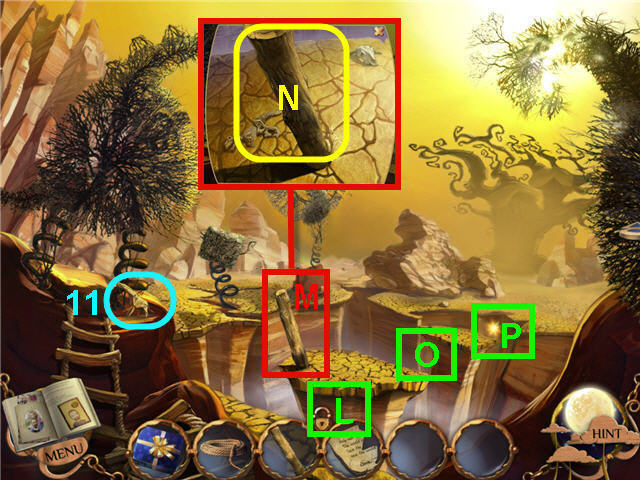
- Take the ORIGAMI (11).
- Click on the rope ladder and note we need something to cut it.
- Place a LOG on the first gap (L).
- Look close at the log (M) on the first stand.
- Use the SAW on the log and take the 3rd LOG (N).
- Place the LOG on the 2nd gap (O) and a LOG on the 3rd gap (P).
- Head straight across the ravine to the other side.
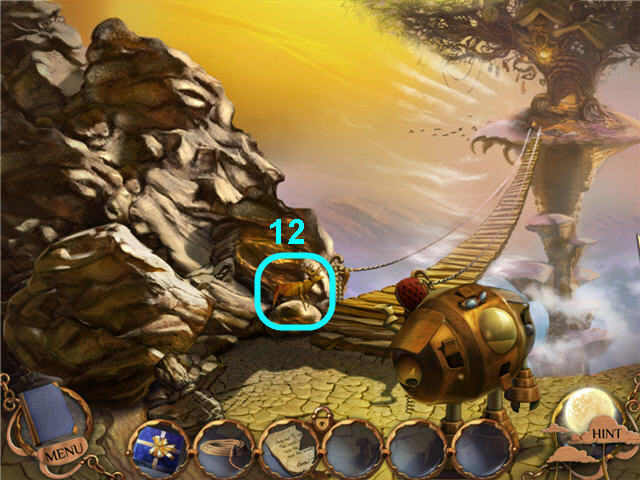
- Take the ORIGAMI (12).
- Look close at the mechanism (Q) and note the missing pieces.
- Head straight across the rope bridge.

- Take the ORIGAMI (13).
- Look close at the Elf’s hand (S) and place the STONE TABLET HALF on the tablet (T) and get a diary update.
- Take the ACORNS (U).
- Look close at the table (V) and take the HONEY (W).
- Head into the tree (X).
- Click on the tree trunk to the right to access the Hidden Object Scene.
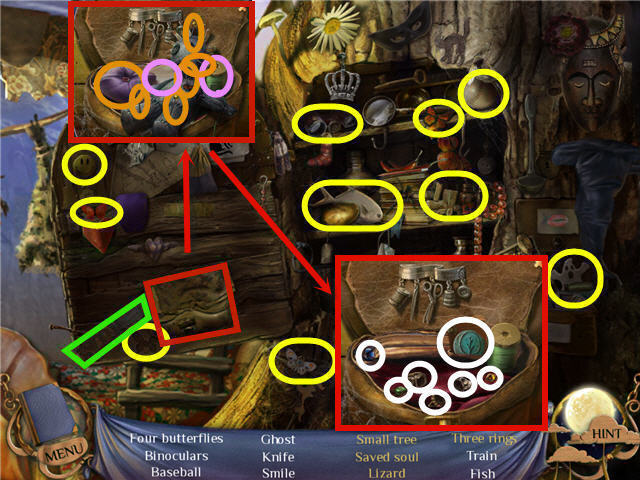
- Look close at the pouch (in red).
- Marked in orange; take the pins out of the voodoo and place them on the pin cushion to get the saved soul.
- Marked in pink; use the needle by the green thread and stitch the handkerchief to get a lizard.
- Marked in white, take the coin with the small tree on it to get the small tree and place the 3 gems on the three matching settings to get the 3 rings.
- Find the items on the list and get a KNIFE.
- Take the ORIGAMI (14).
- Move the rug (Y) and note the missing handle and take the ROOT (Z).
- Look close at the drawing under glass (A) and take the RAG (B) and the CRAYONS (C).
- Look close under the bed (D).
- Place the HONEY on the floor (E) and click on the letter stuck under the mattress slats (F), the rolled paper (G) and the wrench to get the 3 BEETLES (H).
- Look close at the box on the bed (I) and click away the papers on the left and take the origami tulip.
- Click on the tulip in the picture and get a diary update.
- When the tulip goes back into the box after appearing on the picture, take it the second time to get it added to your collection as ORIGAMI (15).
- Back out of the area four times to the mushroom area.
- Click on the pile of debris to the left to access a Hidden Object Scene.
- Marked in red; use the hammer on the bottle and take the chords and place them on the banjo.
- Marked in cyan; use the razor on the net and take the bullet; place the bullet in the pistol.
- Marked in green; use the straw brush on the unhappy face, place the three feathers on the unhappy mask and take the happy mask.
- Find the items listed and get a GEAR.
- Look close at the mushrooms.
- Use the KNIFE on the mushrooms and take the MUSHROOMS (J).
- Head up the mushroom staircase and go forward two times to the elf.
- Look close at the table (K) on the left.
- Place the ACORNS, ROOT, 3 BEETLES and MUSHROOMS in the bowl (L).
- Use the pestle (M) on the bowl.
- Use the bottle (N) on the bowl and take the MAGIC POTION (N).
- Use the MAGIC POTION on the elf.
- Speak to the witchdoctor elf (O) and get a FLINT.
- Back out two times to the ravine.
- Use the KNIFE on the rope ladder and take the LADDER (P).
- Back out one time and head into the cave.
- Use the FLINT on the pedestal with oil (Q).
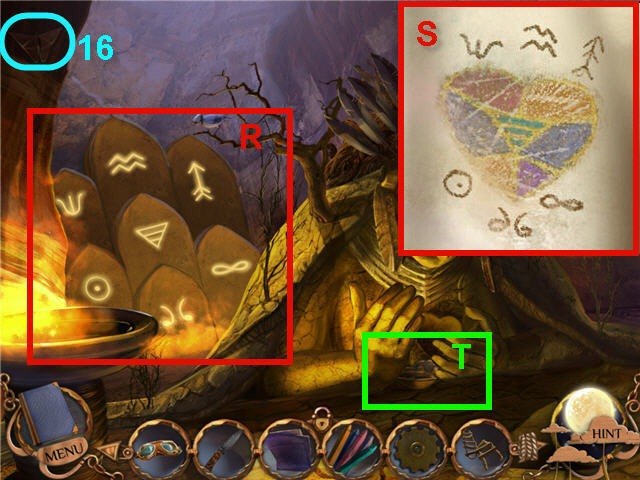
- Take the ORIGAMI (16).
- Arrange the symbols (R) to match the code from Emily’s drawing (S) in your diary.
- Click on any two symbols to switch them. See screenshot for solution.
- Look close at the ground under the hands (T) to trigger a puzzle.
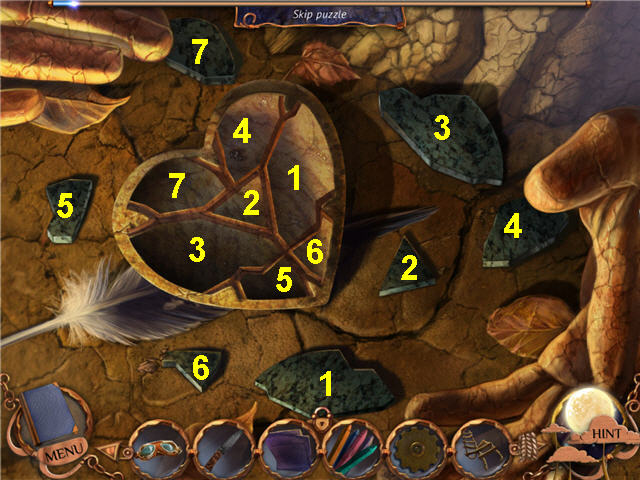
- Place the pieces into their matching slots in the heart.
- Right click to turn the pieces. See screenshot for solution.
- Place the CRAYONS and the RAG on the heart to trigger a puzzle.
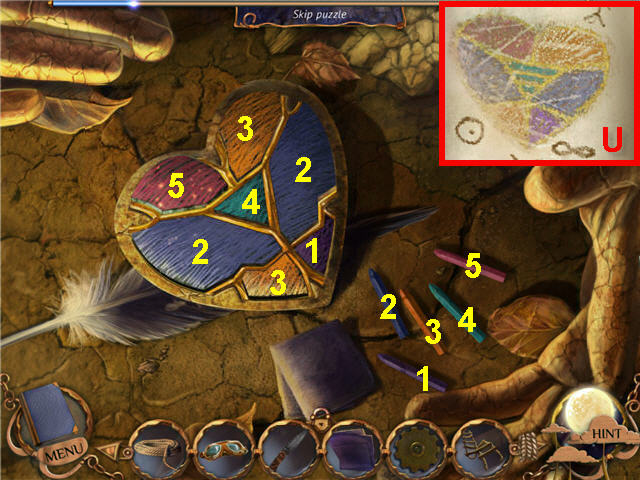
- Use the CRAYONS on the sections of the heart to duplicate the heart in Emily’s drawing (U).
- Switch colors by clicking the crayon on the crayon area to drop it.
- Use the RAG on the incorrect section if you make a mistake. See screenshot for solution.
- Get the SPIRIT’S HEART.
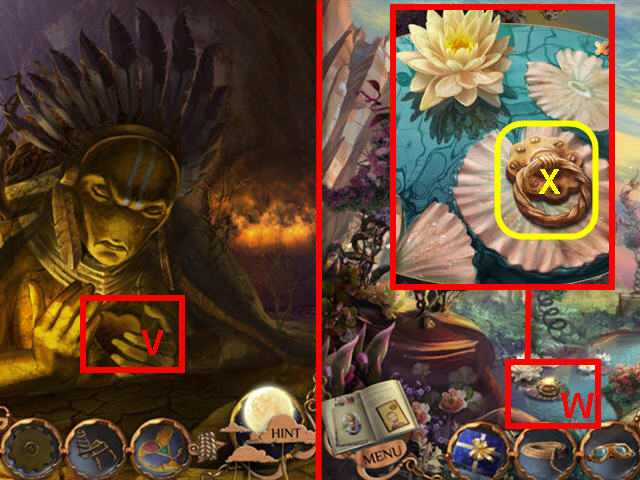
- Place the SPIRIT’S HEART in the heart (V) in the Spirit’s hand.
- Speak to the Spirit two times; once before and once after the transformation.
- Back out one time and head up the mushroom stairs.
- Look close at the lily pad (W) and take the HANDLE (X).
- Head forward twice towards the Witchdoctor.
- Speak to the Witchdoctor and get a diary update.
- Head into the tree house.
- Place the HANDLE on the cellar door (Y).
- Open the cellar door and place the LADDER in the opening (Z).
- Head down into the cellar.
- Click on the area in the upper left to access a Hidden Object Scene.

- Marked in red; open the matchbox, take a match and strike it on the box and light the candle to get the crescent.
- Marked in green; look close at the platter and take the spider and car, move the carcass to get the film.
- Find the items listed and get a GEAR WITH HANDLE.

- Take the ORIGAMI (17).
- Take the PEARL (A), (B) and (C).
- Place the GEAR (D) and the GEAR WITH HANDLE (E) on the gear mechanism.
- Turn the GEAR WITH HANDLE (E).
- Place the ROPE on the gears (D) and turn the GEAR WITH HANDLE.
- Take the MECHANICAL ARM (G).
- Back out three times to the mechanism by the bridge.
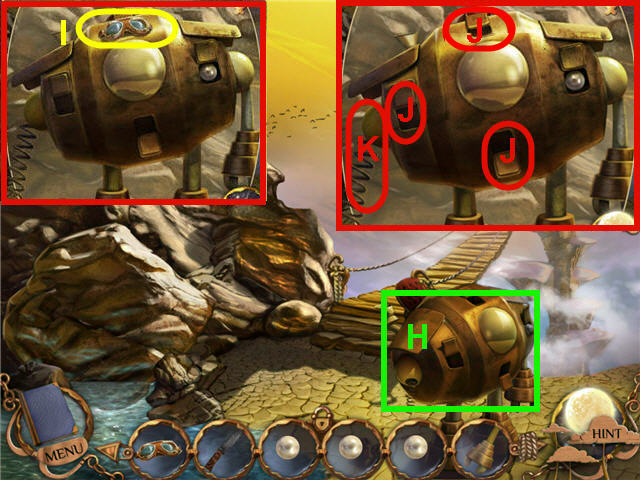
- Look close at the mechanism (H).
- Take the GOGGLES (I).
- Place the 3 PEARL into the empty slots (J).
- Place the MECHANICAL ARM on the left side of the mechanism (K).
- Click on each of the 4 PEARLS.
- Give the GOGGLES to the Witchdoctor.
- Speak to the Witchdoctor and get a DIAMOND.
- Head forward two times into the tree house.
- Click on the tree trunk on the right to access a Hidden Object Scene.
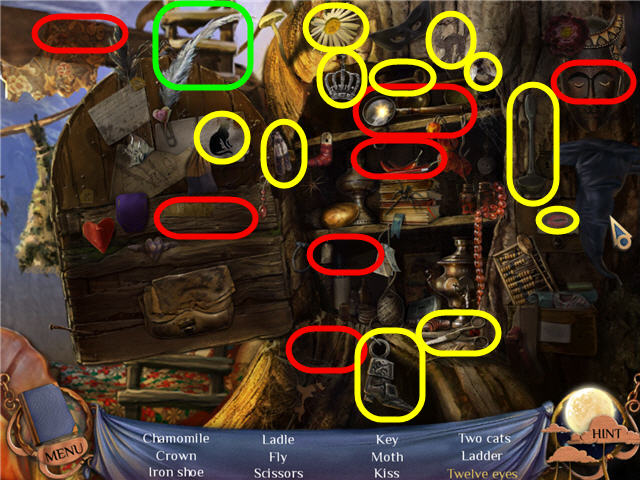
- Marked in red; use the enchanted magnifying glass and scroll around the scene to locate the 12 eyes. Click on the eyes while magnified.
- Find the items listed and get a LADDER.
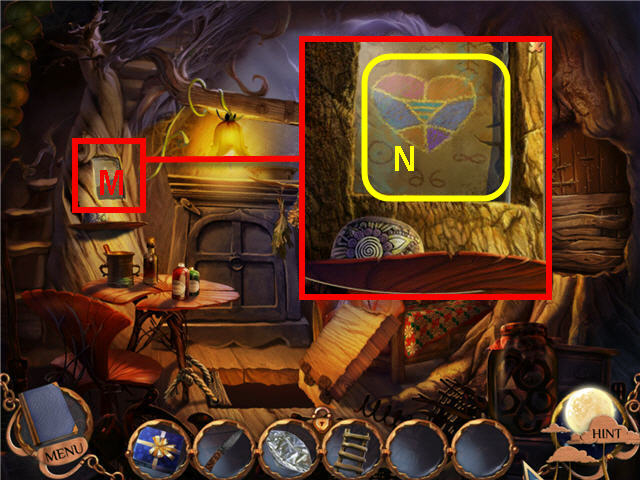
- Look close at the drawing behind the glass (M).
- Use the DIAMOND on the glass and take the DRAWING OF A HEART (N).
- Back out five times and head left two times.
- Look close at Peter in the hole (O).
- Place the WOODEN LADDER in the hole (P).
- Head down the LADDER and speak to Peter.
- Climb up the ladder and back out one time.
- Look close at the mirror on the bottom left and enter the house through the mirror.
Chapter 4 – Frozen Landscape
- Back out one time and click on the paintings in the hall (Q).
- Place the DRAWING OF A HEART in the 2nd picture spot (R).
- Back out two times.
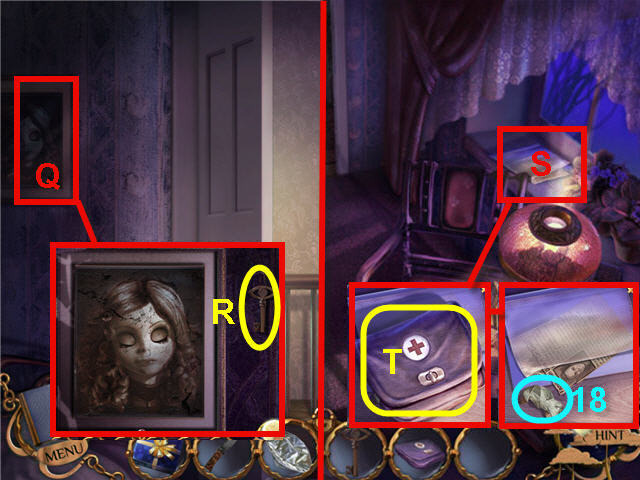
- Look close at the picture of Emily (Q).
- Take the EYE-SHAPED KEY (R).
- Back out two times.
- Look close at the first aid kit (S).
- Take the FIRST –AID KIT (T) and the ORIGAMI (18).
- Read the newspaper clipping.
- Exit the room and enter Emily’s bedroom.
- Head back into the portal in the picture in Emily’s bedroom.
- Look close at the hole in the floor and click on the ladder to get down to Peter.
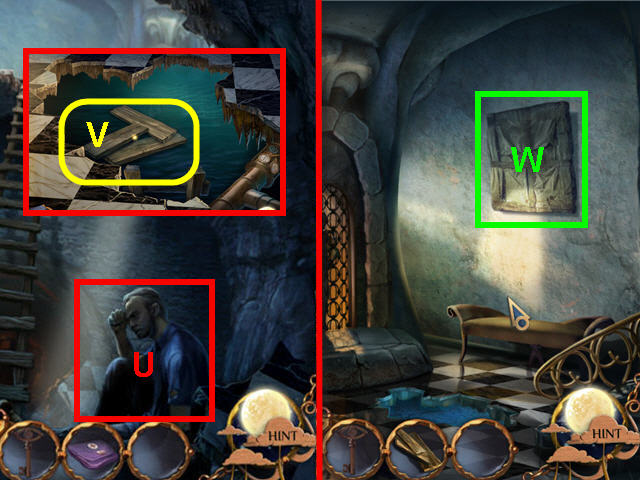
- Give the FIRST-AID KIT to Peter (U).
- Speak to Peter and try and take the drawing.
- Head up the ladder.
- Take the BOARDS (V).
- Look close at the dials on the valve on the pipes and note the pressure is unstable.
- Back out one time and look close at the wrapped painting (W).
- Use the KNIFE on the wrapping to trigger a puzzle.
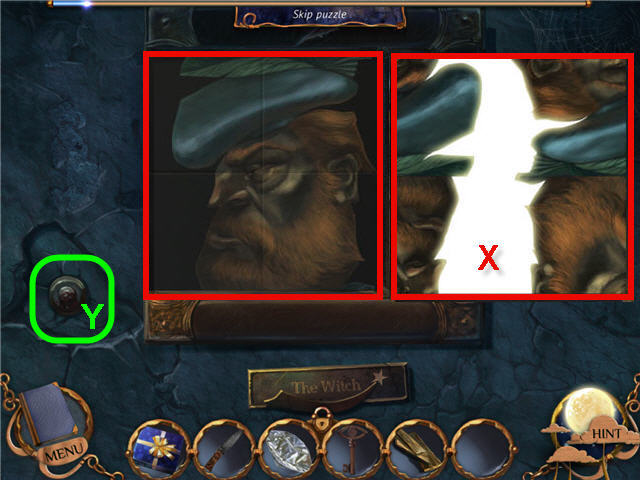
- The object is to turn the pieces to create the image of a witch as noted below the picture.
- Solution; turn all four sections of the portrait upside down (click each one two times) and the witch will be pictured in black.
- Push the button after the picture is set (Y). See screenshot for solution (X).
- Take the WARM CLOTHES from the space behind the picture.
- Head to the right one time and up the stairs.
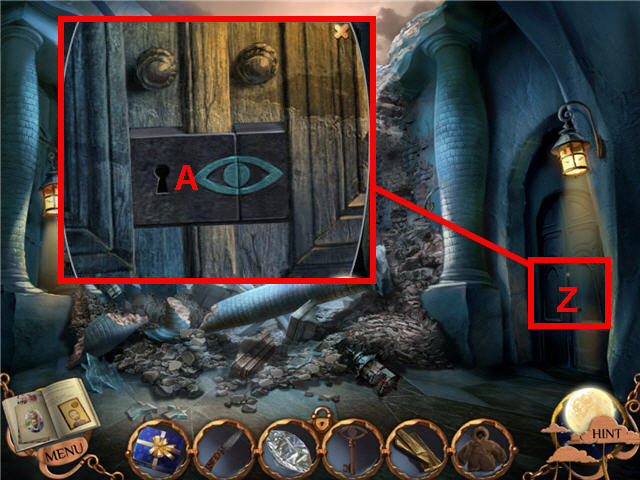
- Look close at the door (Z) to the right.
- Use the EYE-SHAPED KEY on the lock (A).
- Enter into the newly-opened door.
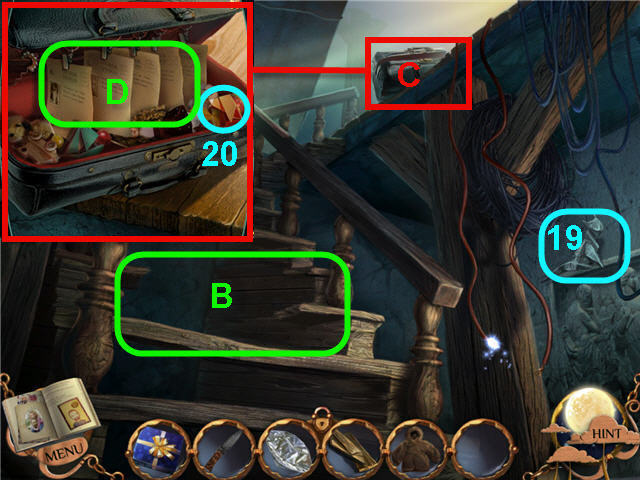
- Place the BOARDS on the broken stairs (B).
- Take the ORIGAMI (19).
- Note the sparking wires on the right.
- Look close at the bag (C) on top of the stairs.
- Take the ORIGAMI (20) and read the notes (D).
- Head upstairs.
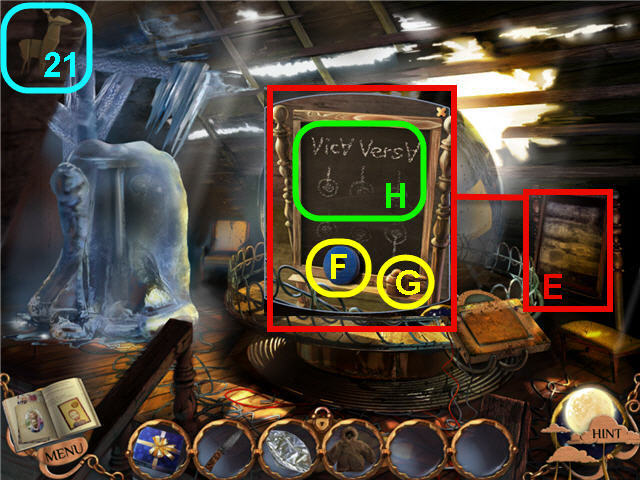
- Look close at the easel (E) on the right.
- Take the ELECTRICAL TAPE (F) and the SWITCHER (G).
- Note the writing on the blackboard (H) to get a diary update.
- Look close at the hole in the wall.
- Take the ORIGAMI (21).
- Click on the icy door on the left.
- Back out of the area one time.
- Use the ELECTRICAL TAPE on the sparking wires (I).
- Head upstairs.
- Look close at the console (J) to trigger a puzzle.
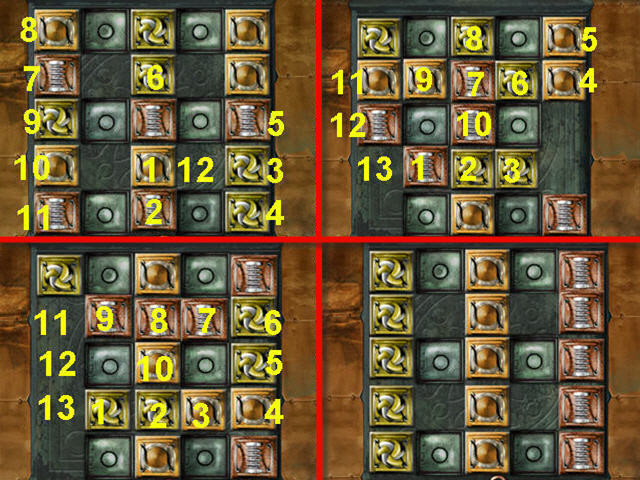
- Click the button on the left to begin.
- The goal is to line up the tiles beneath the column of the matching tile.
- You can slide a tile to any free spot not blocked by a square with a circle in it.
- It is easiest to move the matching symbols into the top and bottom rows first.
- Solution Part 1; move 1- right, 2- up and left, 12 - left and down, 3- left 2x, 4 - up and left, 5-down 2x, 6 - Right, 7-right 2x, 8 - down and right, 9 – up 2x, 10-up 2x, 11- up 2x.
- Solution Part 2 - 1- left 1, 2 – left 1, 3-left 1, 4-down 2x and left 1x, 5 – down 3x, 6-right 1 and down 1, 7 - right 2x and up 1, 8 – down 1 and right 2x, 9 – right 1 and up 1, 10 - up 1 and right 1, 11 - right 2x and down 1, 12 - up 1 and right 2x, 13 - up 2x and right 1.
- Solution Part 3 – 1 - left and down, 2 - left 2x and up 2x, 3 – left 3x and up 1, 4 - left 4x, 5 - down 1 and left 3x, 6 - down 2x and left 2x, 7 - right 1 and down 2, 8 – right 2x and down 1, 9 – right 3x, 10 – up 1 and right 1, 11 - right 2 and down 1, 12 – up 1 and right 2x, 13 - up 2x and right 1, 1 – left 1 and up 2x, 2 – left 2 and up 1, 10 - down 1 and left 2x, 7 – down 2, 9 - right 1 and down 1, 7 – left 1.
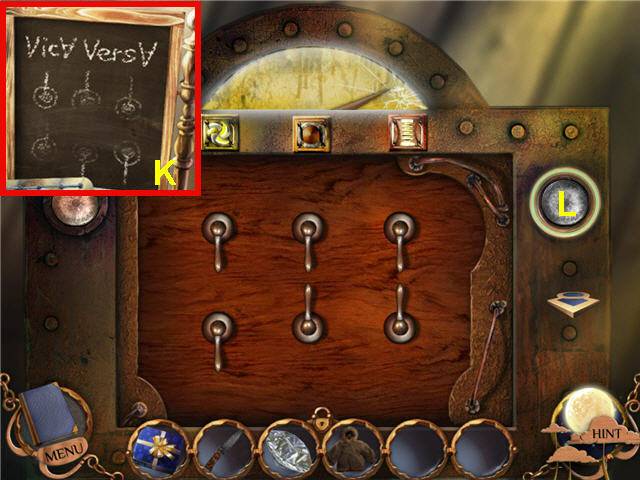
- Place the SWITCHER on the empty slot.
- Use the Vice Versa code (K) from the blackboard that is in your diary to set the switches.
- You need to set the switches opposite (vice versa) of what the diagram shows.
- Solution; flip up the two bottom right switches. See screenshot for solution.
- Push the button (L) on the upper right when complete.
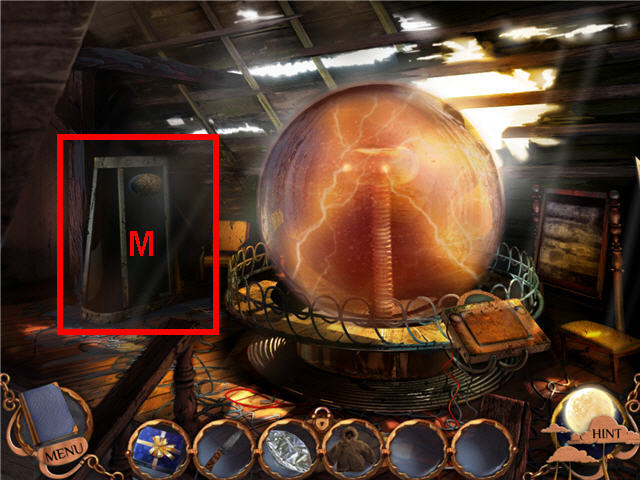
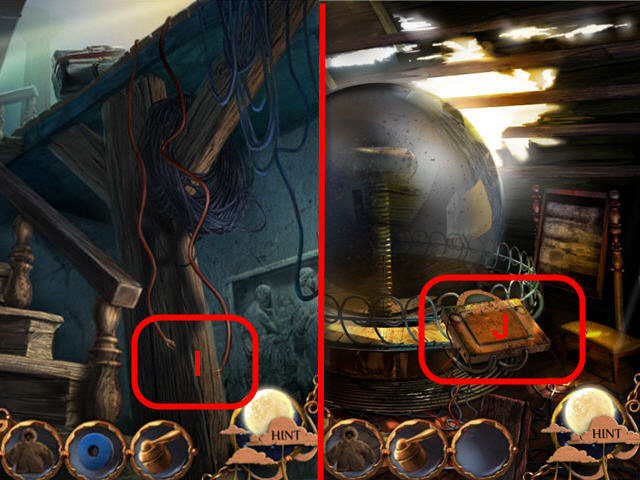
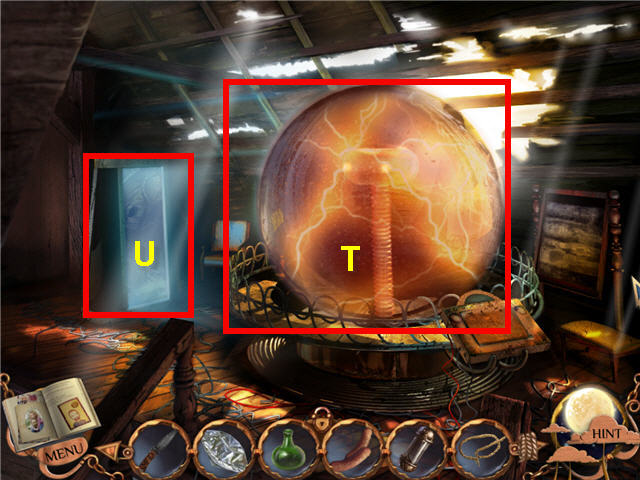
- Click on the defrosted doorway (M) on the left of the Tesla machine to trigger a puzzle.
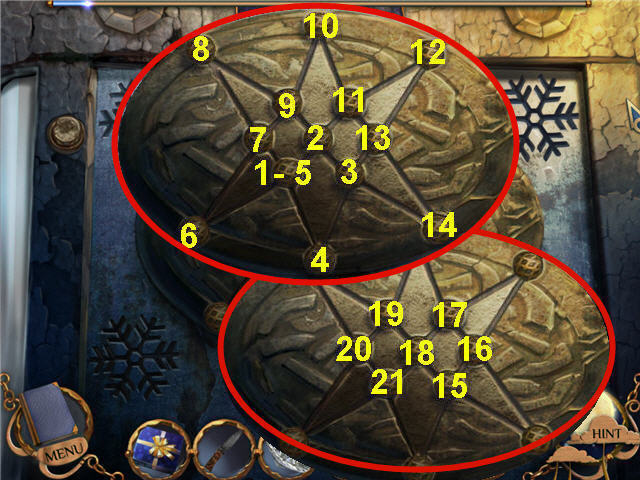
- The object is to light up all the lines on the star by clicking on all the points without using a line twice.
- You can reset the puzzle by using the button on the left. See screenshot for solution.
- Head through the newly-opened doorway.
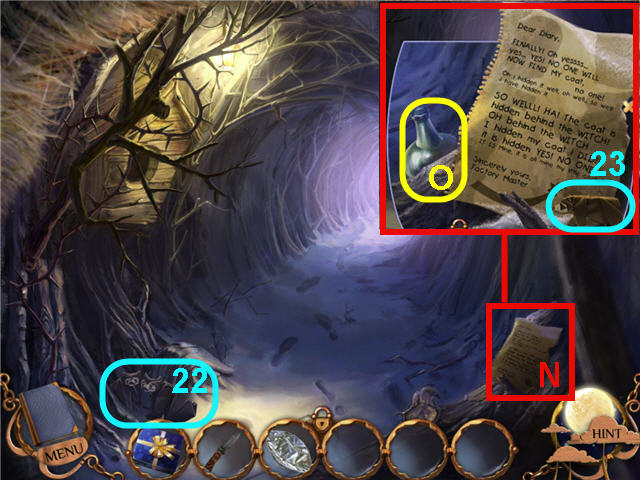
- Take the ORIGAMI (22).
- Look close at the note (N).
- Take the ORIGAMI (23).
- Take the GREEN BOTTLE (O).
- Note the birdhouse covered in thorns.
- Head straight down the passage.
- Click on the lower right to access a Hidden Object Scene.
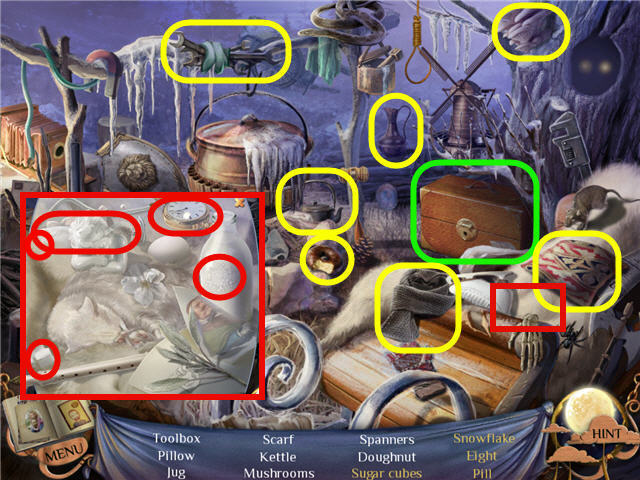
- Marked in red; look close at the area by the tarantula and click on the champagne flute a few times to get the pill; take the sugar cubes and snowflake; move the pocket watch to get the eight.
- Find the items listed and get a TOOLBOX.
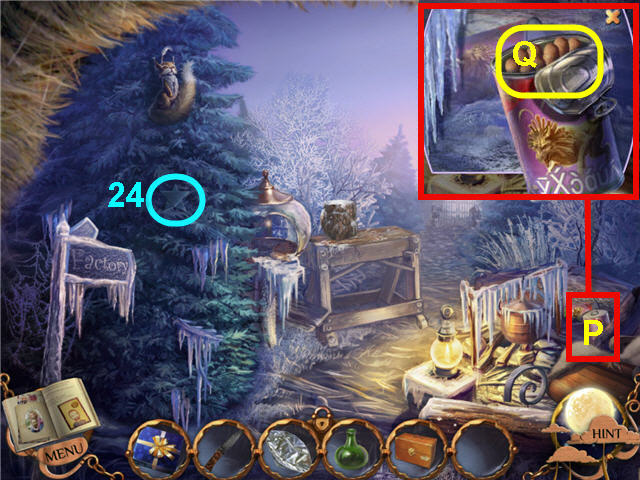
- Look close at the can (P) on the right; flip the top and take some WIENERS (Q).
- Take the ORIGAMI (24).
- Look close at the sawhorse, the bird feeder and the squirrel/cat in the tree.
- Head straight down the path.

- Look close at the guard (R) on the right and take the UNCHARGED BATTERY (S).
- Take the ORIGAMI (25).
- Head to the right one time.
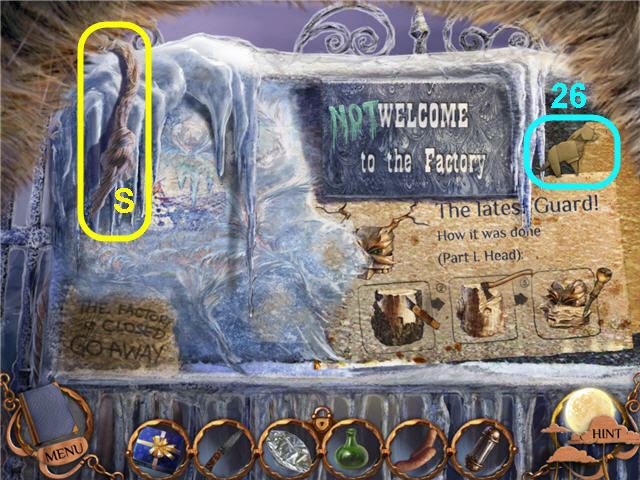
- Take the ORIGAMI (26).
- Note Emily’s drawing frozen into the board.
- Take the ROPE (S).
- Click on the directions for the guard’s head on the right to add it to your diary.
- Back out of the area four times to the Tesla machine.
- Place the UNCHARGED BATTERY on the Tesla (T).
- Get a CHARGED BATTERY.
- Head through the doorway (U) and head forward two times to the guards.
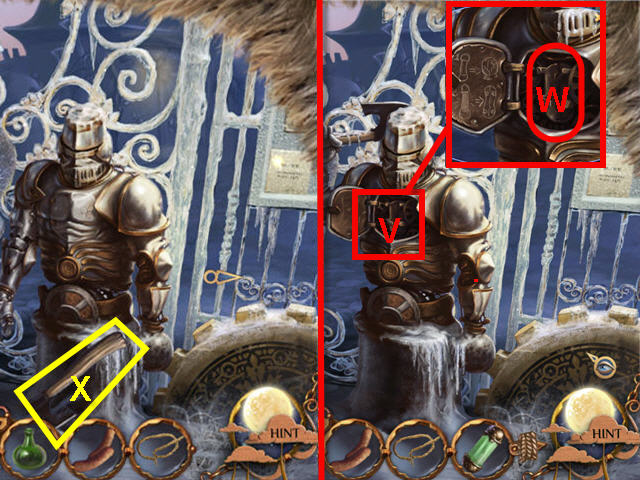
- Look close at the guard on the right (V).
- Place the CHARGED BATTERY in the compartment (W).
- Speak to the Iron Guard on the right.
- Take the AXE (X).
- Back out two times.
- Use the AXE on the thorny branch (Y).
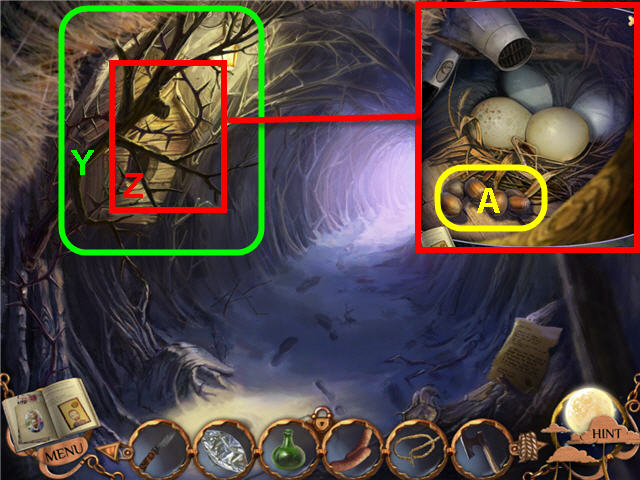
- Look close at the birdhouse (Z).
- Take the NUTS (A).
- Head forward one time.
- Look close at the feeder (B).
- Place the NUTS in the feeder (C) and exit the close-up.
- Look close at the feeder and take the TOOLBOX KEY (D).
- Look close at the tool bench (E).
- Place the TOOLBOX on the table.
- Place the GREEN BOTTLE on the table.
- Use the TOOLBOX KEY on the TOOLBOX (10).
- Use the BRUSH (11) to clean off the tree stump.
- Use the utility knife (1) to remove the bark; use until all bark is gone.
- Use the axe (2) to sculpt.
- Use the chisel (3) to smooth.
- Use the saw (4) on the thorny branch (5) to make antlers.
- Place the 2 antlers (6) on the sculpted head.
- Use the hammer (7) on the GREEN BOTTLE (8).
- Place the 2 glass eyes (9) in the eye sockets on the sculpted head.
- Take the WOODEN HEAD when complete.
- Head forward one time.
Chapter 5 – The Factory
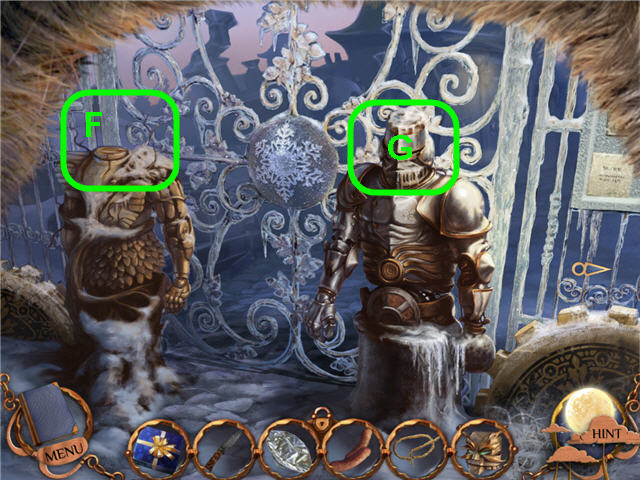
- Place the WOODEN HEAD on the left guard (F) and speak to him.
- Speak to the wooden guard again and the iron guard (G) after the gates are opened.
- Back out of the area one time.
- Click on the lower right to access a Hidden Object Scene.
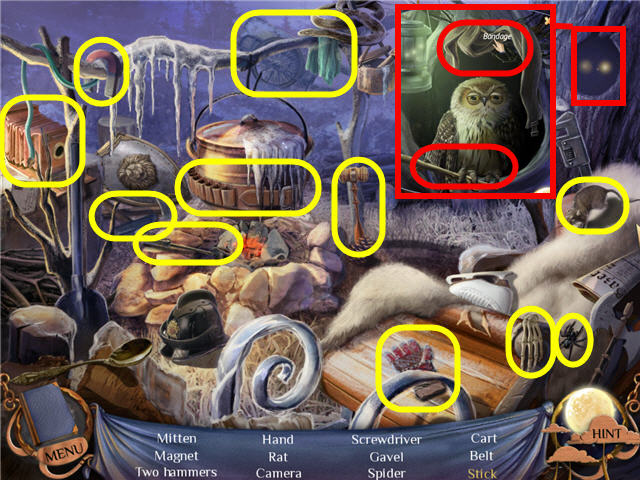
- Marked in red; look close at the hole in the tree, catch the fireflies and place them in the lantern; move the upper branches away; take the bandage and wrap the owl and take the STICK.
- Find the items listed.
- Head forward two times.
- Click on the door (H) and meet the beast (I).
- Give the beast a WIENER and then look close at the cage (J).
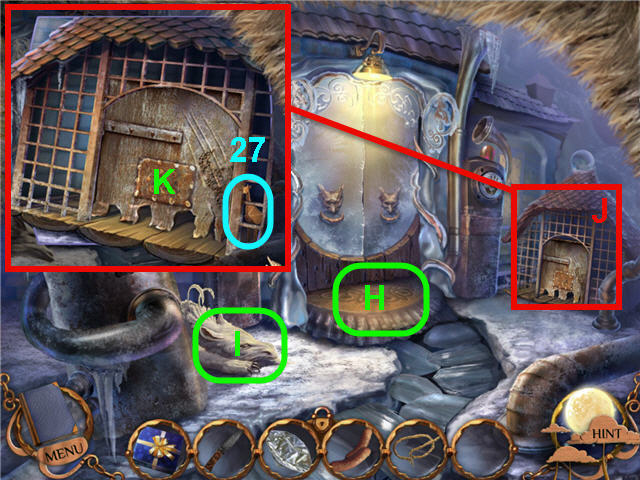
- Take the ORIGAMI (27).
- Click on the door (K) of the cage to open and place the WIENER inside.
- Click on the door again and place the STICK on the door.
- Place the ROPE on the STICK and back away.

- Pull the rope (L) when the beast goes in the cage.
- If you are too slow the beast will come out and you will need to back out two times and take more WIENERS from the can and try again.
- Click on a handprint next to the door and note you need an extra hand.
- Back out one time.
- Talk to the Wooden Guard on the left and he will give you his LEFT HAND.
- Head forward one time.
- Place the LEFT HAND on the left palm print (M).
- Click on the right palm print (N).
- Click on the doors (O).
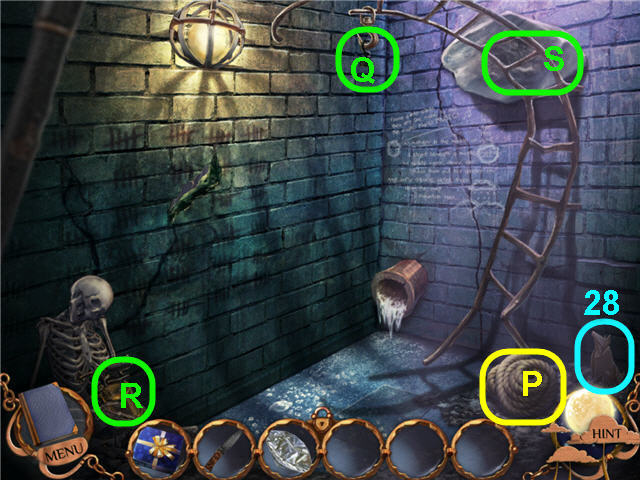
- Take the ROPE (P).
- Hang the ROPE on the hook (Q) and click on the ROPE to tie it to the rock.
- Take the ORIGAMI (28).
- Click on the skeleton lap (R) and take the BLOWTORCH and the BONE from the floor.
- Look close at the brick, drain pipe and the writing on the wall to get a diary update.
- Click on the lower pipe of the twisted ladder.
- Use the BONE on the stone (S).
- Click on the hanging stone until the wall collapses.
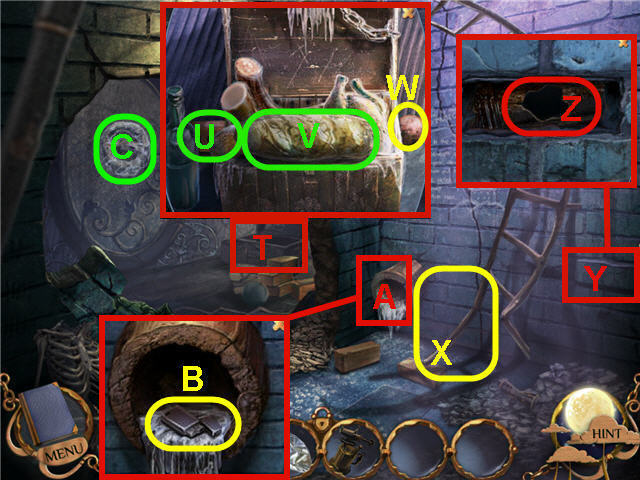
- Look close at the chest (T).
- Take the BRICK (U) and use it on the loaf of bread (V) a few times.
- Take the SMALL HANDSAW from inside the loaf of bread.
- Take the SMALL LEAD BALL (W).
- Use the SMALL HANDSAW on the lower ladder (X) and take the METAL ROD.
- Look close at the brick (Y).
- Use the METAL ROD on the brick.
- Place the SMALL LEAD BALL in the hole (Z).
- Look close at the drainpipe (A) and take the LIGHTER (B).
- Look close at the wall (C) on the left.
- Place the BLOWTORCH on the hook (D).
- Use the LIGHTER on the BLOWTORCH (E) to get a WORKING BLOWTORCH.
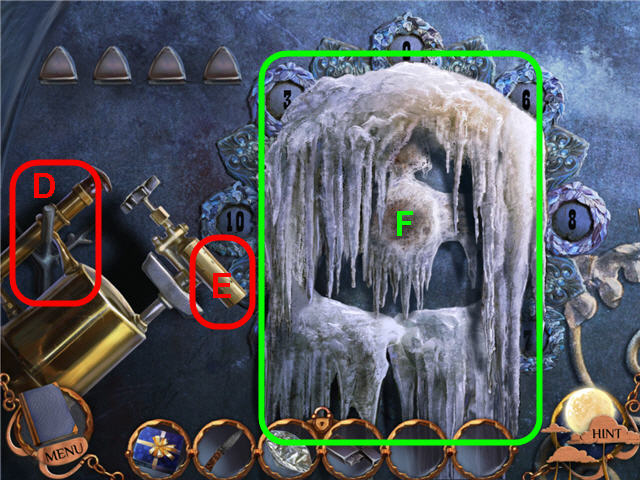
- Pick up the WORKING BLOWTORCH and melt the ice (F) until you trigger a puzzle.
- Use the poem in your diary from the wall in the room to decipher the 4 numbers needed.
- Click on the 4 numbers in the correct order to light up the green triangles (G).
- Solution; Midnight = 12, June = 6, Moon = 0, seven = 7. See screenshot for solution.
- Click on the wall (H) to access the elevator panel.
- Push the up bottom (I).
- Click on the musical ball in front to access a Hidden Object Scene.
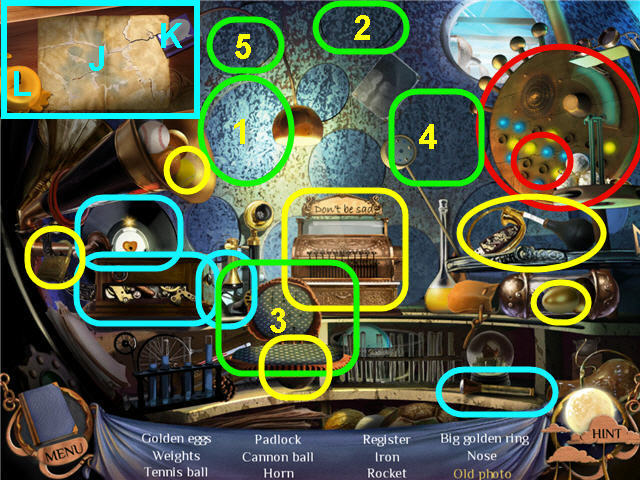
- Marked in red; click on the lighted mechanism to get the nose.
- Marked in cyan; use the gramophone handle on the gramophone, place the record on the gramophone, crank the handle and look inside the compartment on the right to access a puzzle.
- Assemble the pieces (J) and open the matchbook (K); strike the match and light the candle (L).
- Pick up the paper and click it on the burning candle.
- Click on the letter two times to get a diary update.
- Take the envelope from the opened compartment and open it; take the old photo.
- Marked in green; click on the circle (1) and take the rocket.
- Click on the circle (2) and take the weights.
- Click on chair (3) and take the cannon ball.
- Click on the circle (4) and take the big golden ring.
- Click on the circle (5) and take the iron.
- Find the items listed.
- Back out one time and head right.
Chapter 6 – Underwater
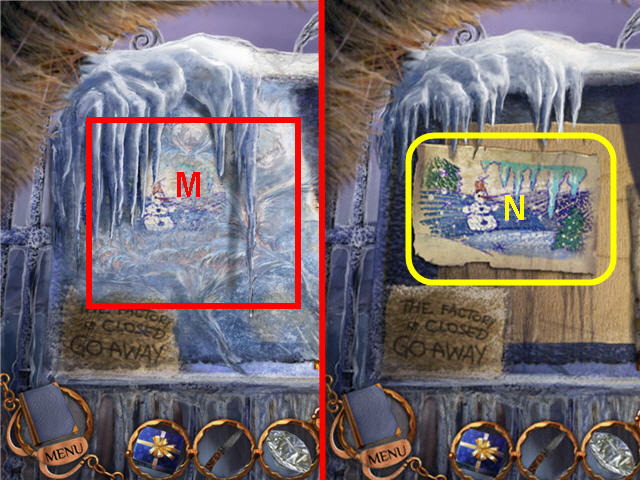
- Use the WORKING BLOWTORCH on Emily’s painting (M).
- Take the DRAWING OF A FROZEN LANDSCAPE (N).
- Back out seven times and head left.
- Look close at the mirror on the lower left and enter through it to Emily’s bedroom and back out one time.
- Click on the hallway wall (O) with the drawings.
- Place the DRAWING OF A FROZEN LANDSCAPE into the 5th picture slot (P).
- Back out two times into the upstairs bedroom.
- Look close at the picture of Emily’s (Q) on the left of the doorway.
- Take the DIVING HELM EMBLEM (R) on the right.
- Exit the room and enter Emily’s bedroom and head through the portal in the painting.
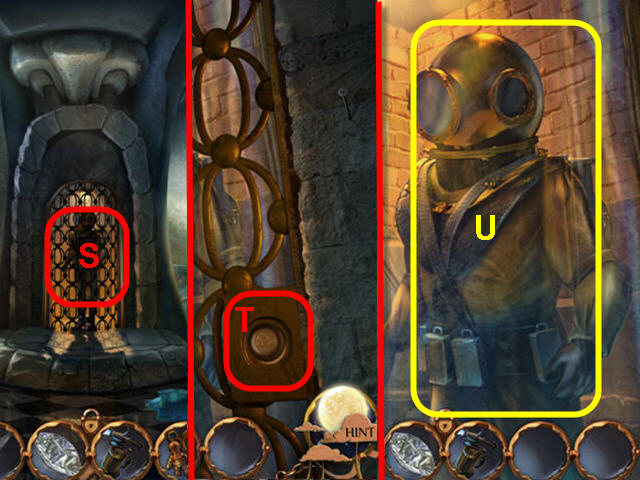
- Head forward toward the cage door (S).
- Use the DIVING HELM EMBLEM on the lock (T).
- Use the DIAMOND on the glass.
- Take the DIVING SUIT (U).
- Note the gas can in case you need fuel.
- Back out one time and look close at the hole in the floor and head down the ladder into the water.
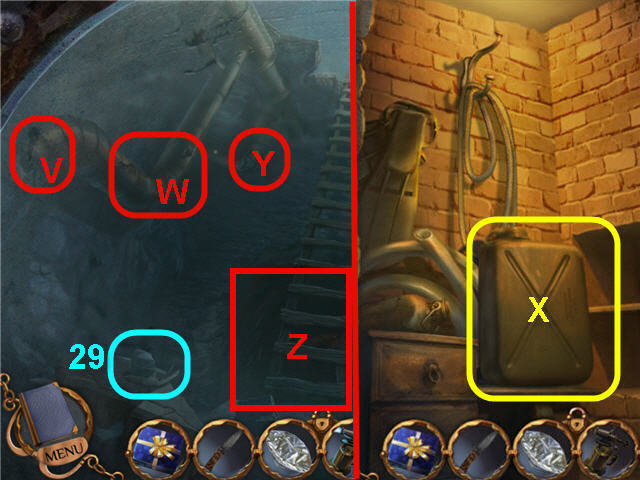
- Take the ORIGAMI (29).
- Look close at the broken pipe on the left (V).
- Use the WORKING BLOWTORCH on the hole and get an EMPTY BLOWTORCH.
- Look close at the next broken pipe (W) and attempt to use the EMPTY BLOWTORCH.
- Head up the ladder and back out and head forward to the opened cage where the diving suit was.
- Use the EMPTY BLOWTORCH on the gas can (X) and take the REFILLED BLOWTORCH.
- Back out of the cage and look close at the hole and head down the ladder.
- Look close at the 2nd broken pipe area (W) and use the REFILLED BLOWTORCH on the two holes; repeat this for the 3rd hole (Y).
- Click on the lower part of the ladder (Z) to go forward.
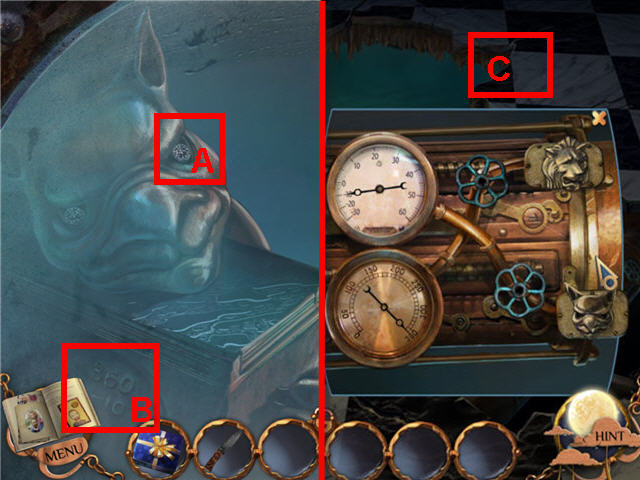
- Place the DIAMOND in the eye socket (A).
- Note the code 360 and -10 (B).
- Back out one time and head up one time.
- Look close at the valves on the pipes.
- Rotate the valves to match the code written on the pedestal in the water.
- The top right dial should be set at -10 by turning the bottom right valve; the bottom left dial should be set at 360 by turning the top right valve. See screenshot for solution (C).
- Head down into the hole and click on the bottom of the ladder to head forward.
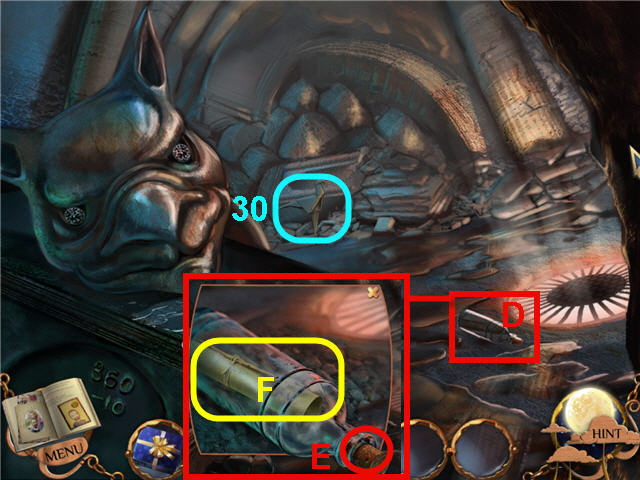
- Take the ORIGAMI (30).
- Look close at the bottle (D).
- Use the KNIFE on the cork (E).
- Click on the opened bottle and take the DRAWING OF SWORDS AND A SHIELD (F).
- Back out one time and head up the ladder, back out from the hole and head through the mirror in the lower left.
- Back out one time and look close at the drawings in the hall.
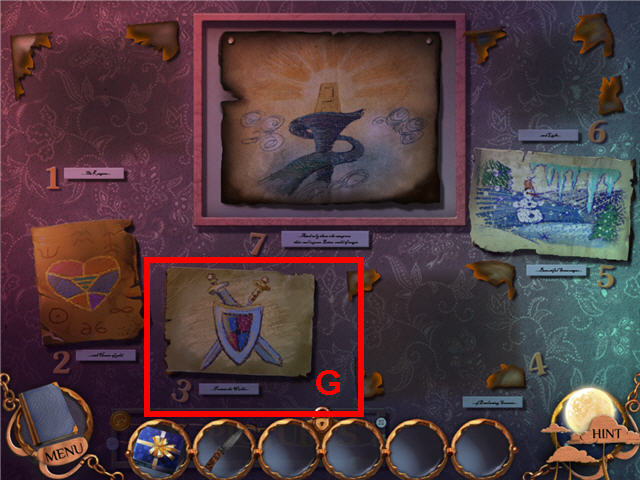
- Place the DRAWING OF SWORDS AND A SHIELD on the 3rd picture slot (G).
- Back out two times and look close at the picture of Emily on the left.
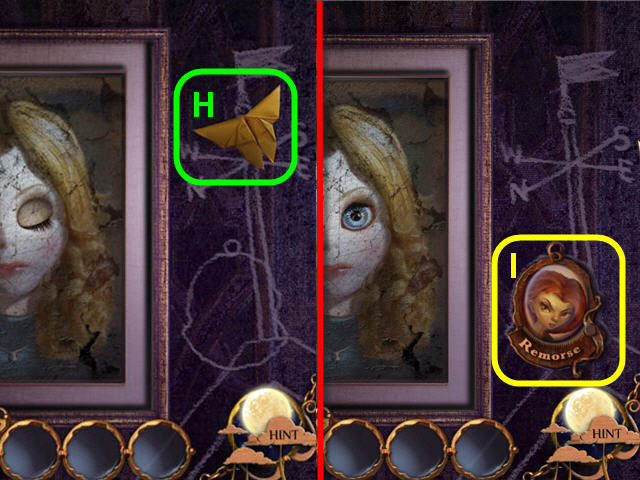
- Click on the origami (H) and click on it to read the note and get a diary update. This origami does not count towards the hidden origami.
- Take the WITCHDOCTOR TOKEN (I).
- Back out and exit the room, enter Emily’s bedroom and head through the portal.
- Head right two times, go through the door, up the mushroom staircase and forward three times.
- Click on the Witchdoctor.
- Look close at the papers in her hand (J) and click on the Sanityzak recipe (K) to get it added to your diary.
- Take the UNLIT TORCH (L).
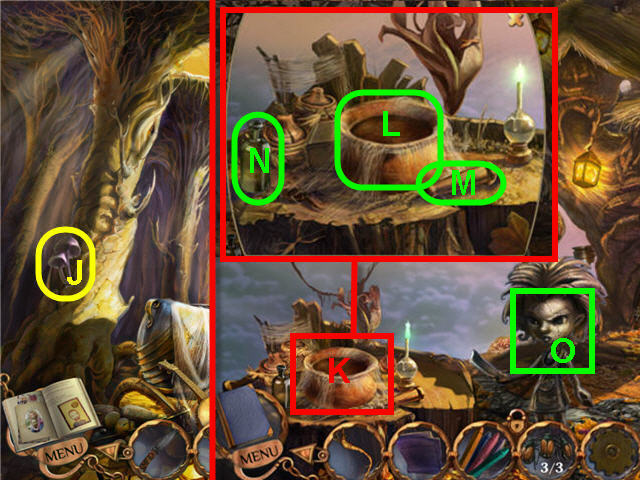
- Head down the cellar hatch (M).
- Click on the area in the upper left to access a Hidden Object Scene.
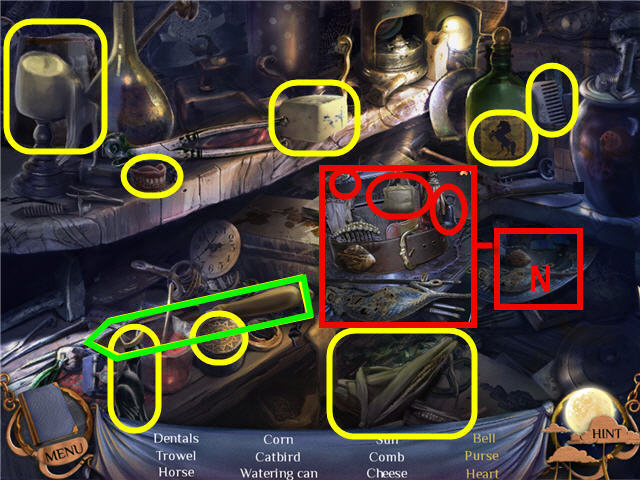
- Marked in red; look close at the silver platter (N) and take the bell, purse and heart.
- Find the items listed and get a TROWEL.
Chapter 7 – Sanityzak
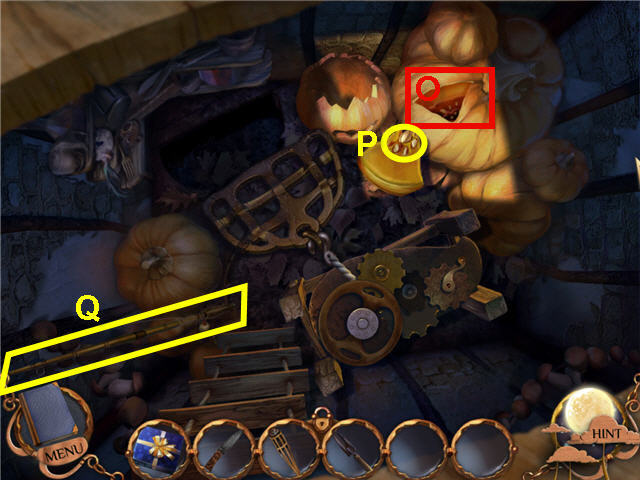
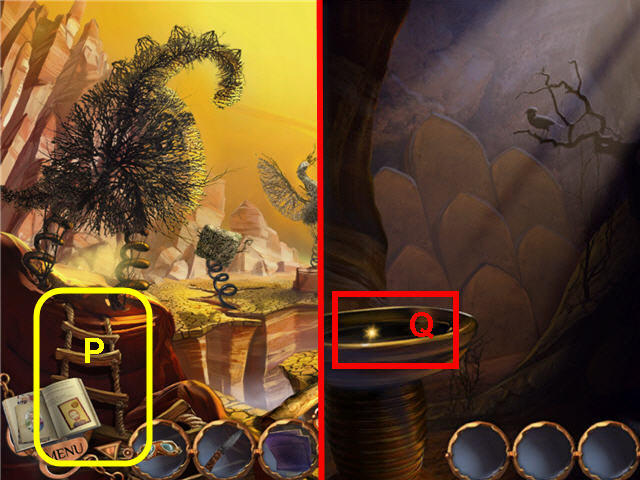
- Use the KNIFE on the pumpkin (O) and take a PUMPKIN SEED (P).
- Take the FISHING ROD (Q).
- Back out two times.
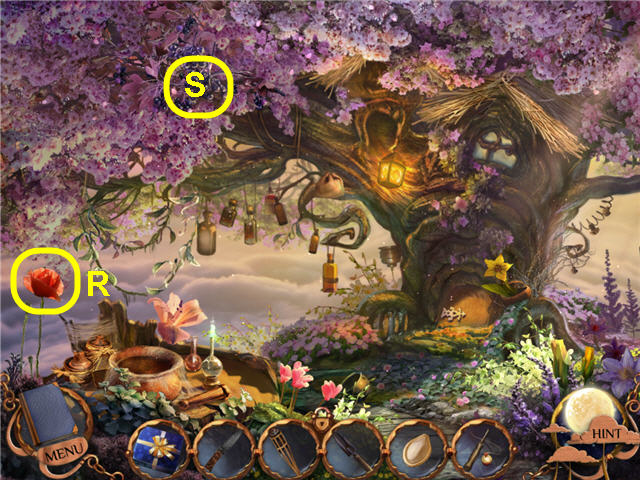
- Take the POPPY FLOWER (R).
- Take the BLACKCURRANT (S).
- Back out one time.
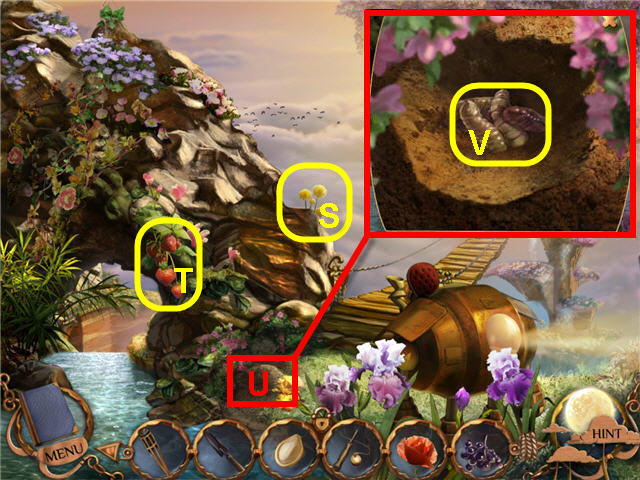
- Take the DANDELION (S).
- Take the STRAWBERRY (T).
- Look close at the dirt (U).
- Use the TROWEL on the dirt two times and take the WORMS (V).
- Back out one time.
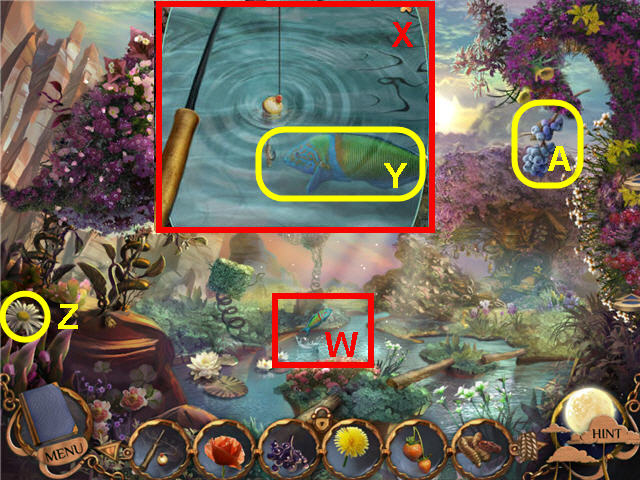
- Look close at the water (W).
- Use the FISHING ROD on the close-up (X).
- Click the line when the fish gets close and get a FISH (Y).
- Take the CAMOMILE (Z).
- Take the BLUEBERRY (A).
- Back out one time.
- Take the RASPBERRY (B).
- Take the BELL FLOWER (C).
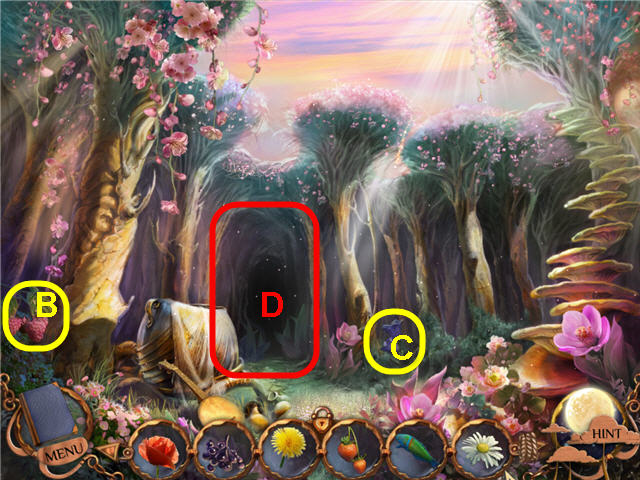
- Head forward through the cave (D).
- Look close at the pile of tears (E).
- Take the AMBER TEAR (F).
- Use the UNLIT TORCH on the blue flames (G) to get a LIT TORCH.
- Back out one time, head up the mushroom staircase and go forward 3 times.
- Look close at the door in the back of the room.
- Hang the WITCHDOCTOR TOKEN on the empty slot to trigger a puzzle.
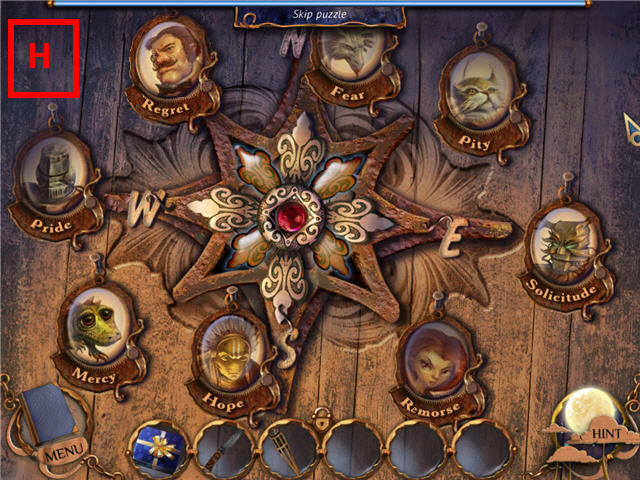
- Use the clues in the diary from the poem you received for hanging the 3rd of Emily’s painting to arrange the tokens.
- Click on any two tokens to switch them.
- Solution; Clockwise starting at the N-North; Fear, Pity, Solicitude, Remorse, Hope, Mercy, Pride and Regret. See screenshot for solution (H).
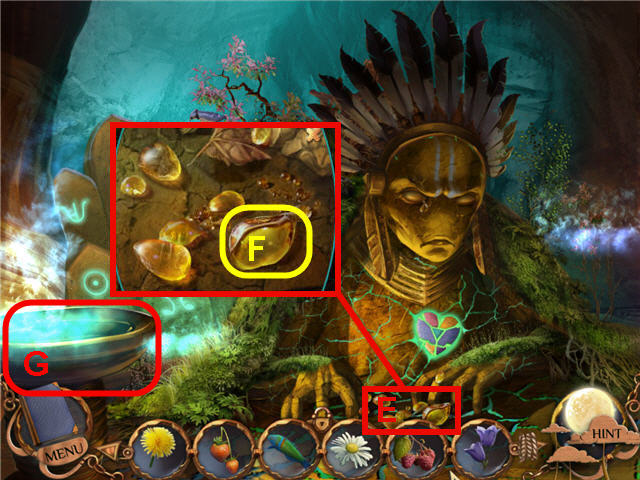
- Open the furnace door (I) and pick up the coal shovel (J) and place the coal in the furnace.
- Use the LIT TORCH on the coal in the furnace.
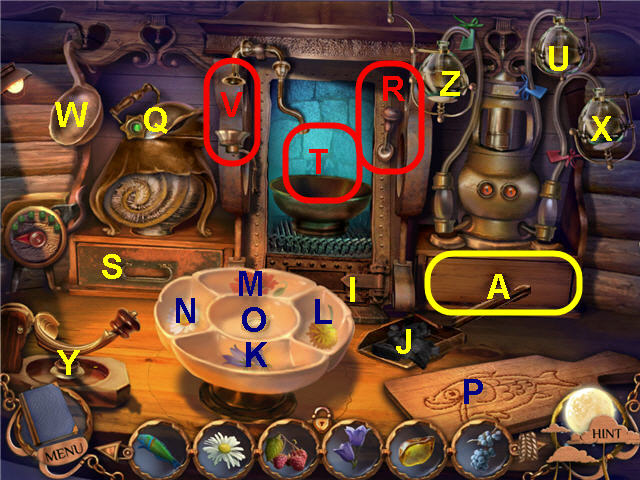
- Place the BELL FLOWER (K), DANDELION (L), POPPY FLOWER (M), CAMOMILE (N) and PUMPKIN SEED (O) in their respective section of the bowl.
- Place the FISH on the cutting board (P) and use the KNIFE on the FISH three times.
- Open the lid on the grinder (Q) on the left and place cut FISH inside.
- Click the lever (R) and place the ground fish bowl from the left drawer (S) in the steamer (T).
- Take the vial (U) and place it in the steam (V); take the captured fish steam (V) and place it back in its holder (U).
- Use the spoon (W) on the flower mixture in the bowl and place it in the grinder (Q).
- Place the flower grounds (S) in the steamer (T).
- Take the vial (X) and place it in the steam (V); take the captured flower steam and place it back in its holder (X).
- Place the AMBER TEAR in the crusher (Y) and click on the tear to crush it; place the crushed tears in the center of the bowl (O).
- Place the BLACKCURRANT (L), BLUEBERRY (K), RASPBERRY (N), and the STRAWBERRY (M) in their respective slots.
- Use the spoon (W) on the berry mixture in the bowl and place it in the grinder (Q).
- Place the berry grounds (S) in the steamer (T).
- Take the vial (Z) and place it in the steam (V); take the captured flower steam and place it back in its holder (Z).
- Take the SANITYZAK and the DRAWING OF A BLOOMING TREE from the drawer (A).
- Back out five times, head left two times.
- Look close at the mirror on the lower left and enter through.
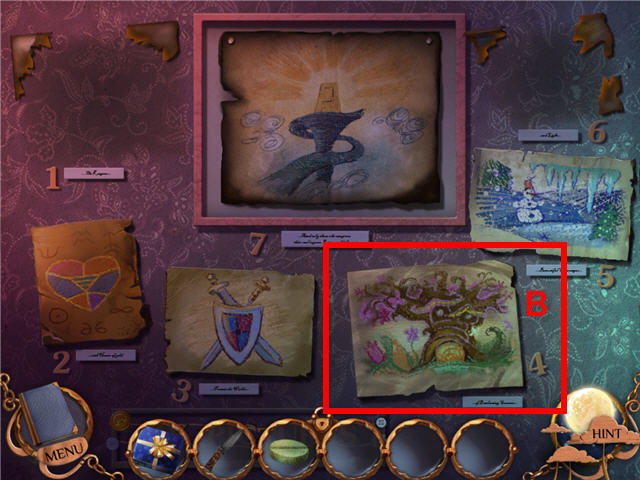
- Back out of the room and look close on the paintings in the hall.
- Place the DRAWING OF A BLOOMING TREE in the 4th slot (B).
- Back out two times and look close at the picture of Emily.
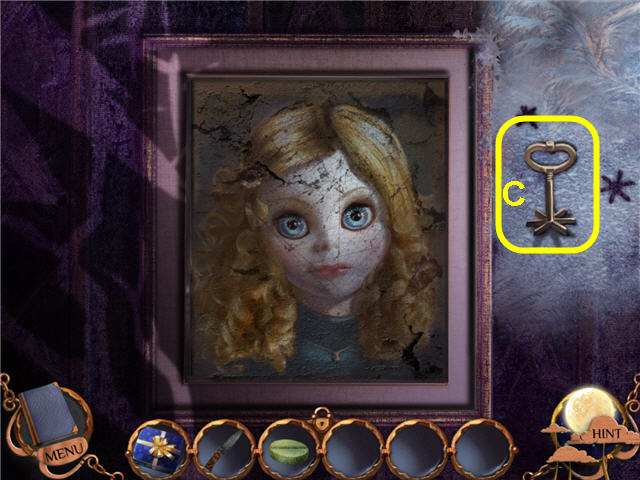
- Take the FACTORY KEY (C).
- Back out and exit the room, enter Emily’s bedroom and go through the portal.
- Head right once, up the stairs, through the door on the right, up the stairs, through the door and forward one time.
- Click on the area on the lower right to access a Hidden Object Scene.
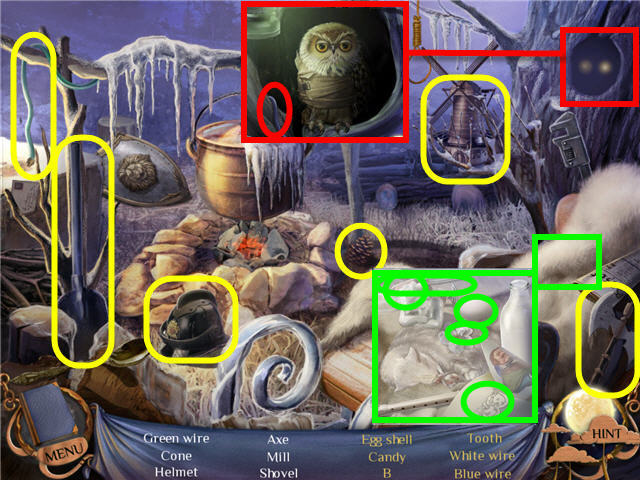
- Marked in red; look close at the hole in the tree and get the blue wire.
- Marked in green; click on the white fur and take the white wire, tooth, candy, B and click on the egg twice to break it and take the egg shell.
- Find the items listed and get the COLORED WIRES.
- Head forward two times.
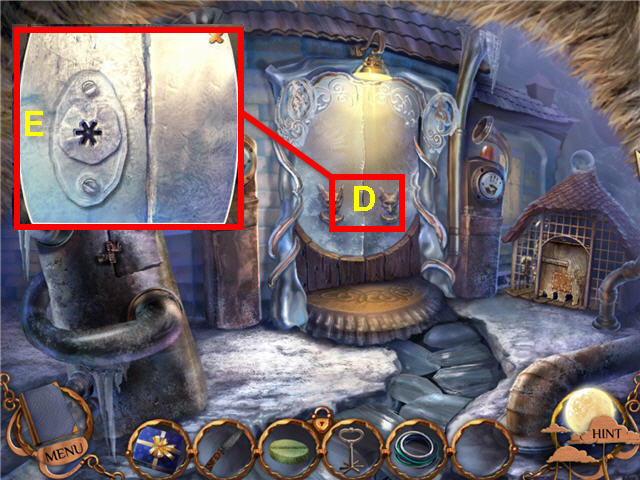
- Look close at the door (D).
- Use the FACTORY KEY on the lock (E).
- Enter into the newly-opened door.
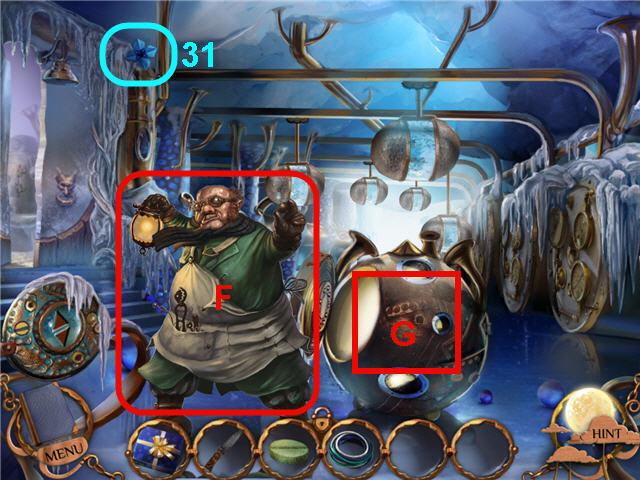
- Take the ORIGAMI (31).
- Give the SANITYZAK to the factory master (F).
- Click on the music room ball (G) to access a Hidden Object Scene.
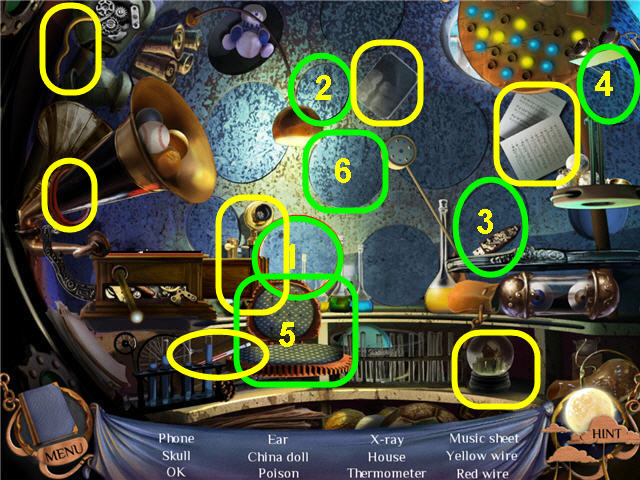
- Click on circle (1) and take the OK.
- Click on circle (2) and take the skull.
- Click on circle (3) and take the ear.
- Click on circle (4) and take the poison.
- Click on the chair (5) and take the thermometer.
- Click on the circle (6) and take the china doll.
- Find the items listed and get the second set of COLORED WIRES.
Chapter 8 – Emily
- Look close on the dials (H) on the right wall.
- Place the two sets of COLORED WIRES on the upper right (I) to trigger a puzzle.
- Note the colored numbers on the gear (J).
- Click on the colored wires in the order that is listed on the gears.
- Solution; click on the wires in this order; red, yellow, green, blue and white.
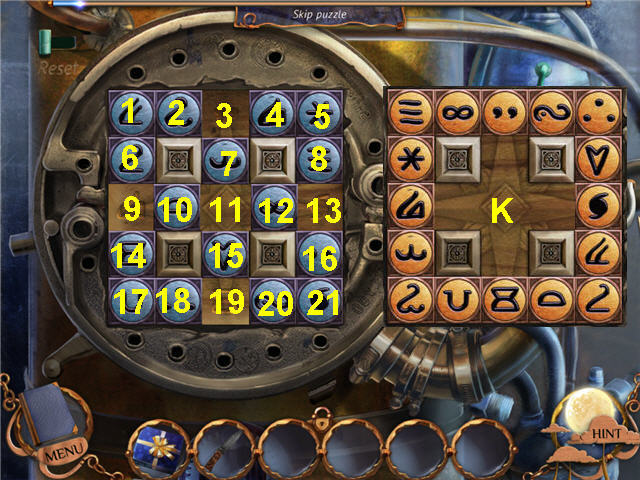
- The goal is to slide the symbols to their matching spaces.
- The symbols turn gold when in their correct spot.
- To decode the strategy guide solution, see the numbered squares on the screenshot and the letters are: R = Right, L=Left, U=Up and D=Down.
- Solution Part 1; 7-U, 12-R, 18-R, 10-R 2x, 14-U, 9-R 2X, 11-U, 6-D 2x, 1-D 2x, 9-R 2x, 14-U, 9-R, 17-R.
- Solution Part 2; 2-L, 1- D 4x, 3-L 2x, 1-D 3x, 4-L 3x, 1-D 2x, 5-L4x, 1-D, 8-U, 5-L 4x, 13-U 2x, 5-L 3x.
- Solution Part 3; 7-U, 11-U, 12-L, 16-U 3x, 21-U 2x, 13-L, 5-L, 20-R, 21-U 4x, 19-R 2x, 21-U 3x, 12-R, 11-R, 15-D, 19-R 2x, 7-D 3x, 19-R, 10-R, 11-D 2x, 12-L, 11-D.
- Solution Part 4; 3-D 2x, 13-L, 4-L, 5-L, 8-U, 21-U 3x, 12-R, 20-R, 21-U, 19-R 2x, 15-D, 19-R, 7-D 2x.
- See screenshot for solution (K).
- Speak to the Factory Master.
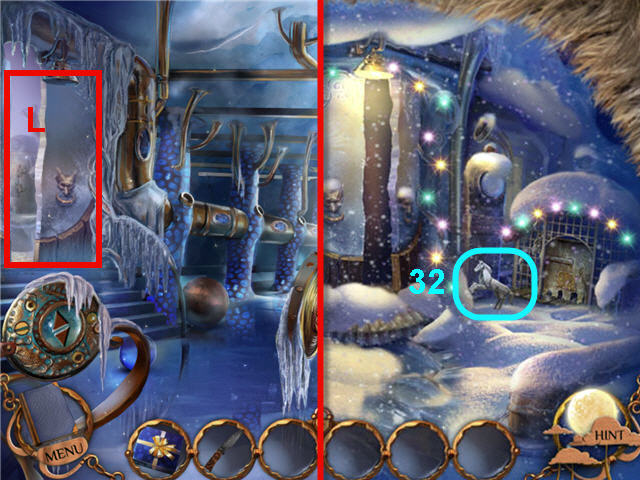
- Exit through the door on the left (L).
- Take the ORIGAMI (32).
- Back out two times.
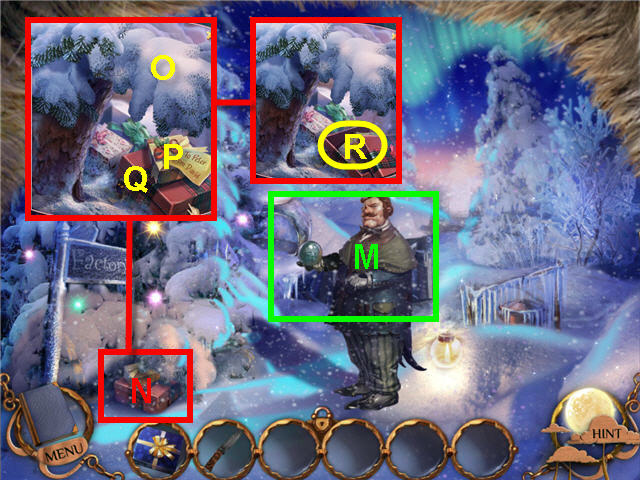
- Speak to the Factory Master (M).
- Look close under the Christmas tree (N).
- Click on the branch (O) to move it.
- Click on the package (P) to move it.
- Click on the bottom package (Q) a few times and take the DRAWING OF A SUN (R).

- Take the MYSTIC ORB (R).
- Look close at the Factory Master (S).
- Open the pocket (T) and take the note for a diary update.
- Back out five times, head left and look close at the mirror in the lower left and head through it.
- Back out one time and look close at the paintings in the hall.
- Place the DRAWING OF THE SUN on the 6th slot (U).
- Back out two times.
- Look close at the picture of Emily and note the atrium has been restored.
- Back out and exit the bedroom, head into Emily’s room, through the portal, to the right and up the stairs.
- Head forward two times.
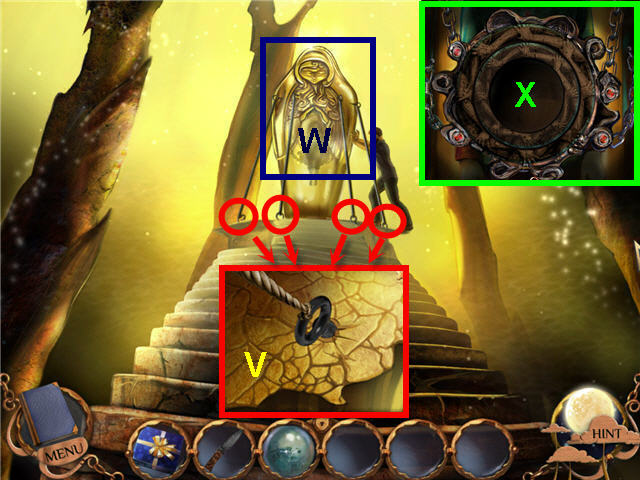
- Look close at the four ropes (V).
- Use the KNIFE on each rope.
- Click on the sarcophagus (W) to help Peter move it.
- Click on Emily and read the story.
- Place the MYSTIC ORB in the center (X).
- Click on Peter.
- You can back out of the area two times; head left and into the mirror on the lower left or wait and the Extractor will move you through.
- Scroll through the dialogue with David and open the envelope.
- Take the DRAWING OF SOME MAGIC CREATURES.
- Look close at the wall in the hall.
- Place the DRAWING OF SOME MAGIC CREATURES in the 1st slot (Y).
- Give EMILY’S PRESENT to Emily.
- Speak to Emily.
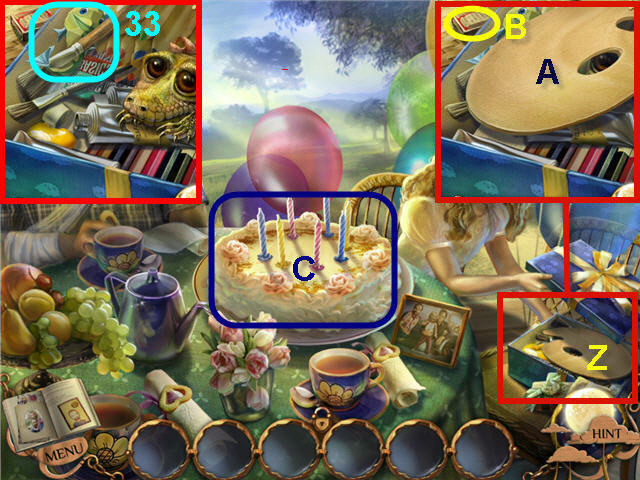
- Look close at EMILY’S PRESENT (Z).
- Click on the palette (A) to move it.
- Take the MATCHES (B).
- Take the ORIGAMI (33).
- Use the MATCHES on the cake (C).
- Click on the cake.
- Congratulations! You have successfully completed Nightmare Realm Standard Edition.
Created at: 2011-07-29