

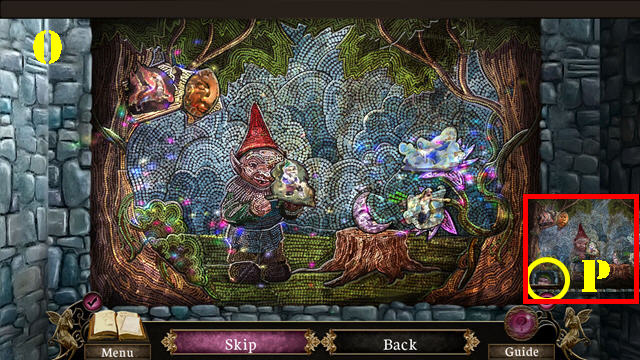
Walkthrough Menu
- General Tips
- Chapter One: The Missing Girl
- Chapter Two: The Intruder
- Chapter Three: The Monster
- Chapter Four: The Curio Shoppe
- Chapter Five: Sanctuary
- Chapter Six: The Final Battle
- Easter Eggs!
General Tips
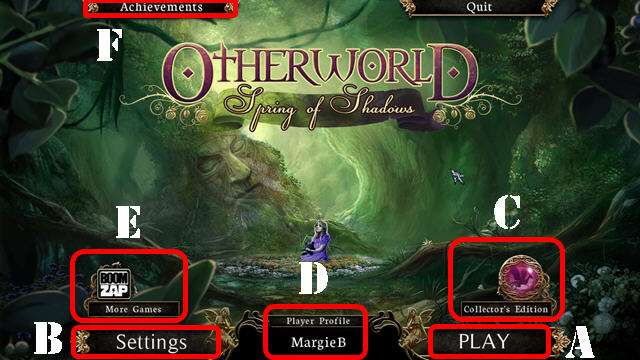
- This is the Official Guide for Shadow Otherworld: Spring of Shadows Standard Edition.
- Select Play (A) to begin your adventure. The Settings (B) Button allows you to adjust the screen size, music, cursor, and sound.
- The Collector's Edition (C) Button gives you access to a link that will take you to the purchase page for the Collector's Edition.
- The 'Player Profile' button (D) can be used to manage your profiles in the game.
- Select 'More Games' (E) to view other titles from this developer.
- Press on 'Achievements' (F) to read a description of them and to view all the ones you collected.
- There are 60 Collectibles to gather in the game; they are marked with a '@' in the guide. They can be found in quest scenes, and in close-ups.
- This guide will refer to Hidden Object Scenes as 'HOS'. In HOS and in some puzzles, certain things must be moved out of the way in order for some items to become visible.
- Items will stay in inventory until they are no longer needed.
- HOS and mini-games are often randomized - your solution may vary.
- Inside the journal you will find the clues and information you have found.
Chapter One: The Missing Girl
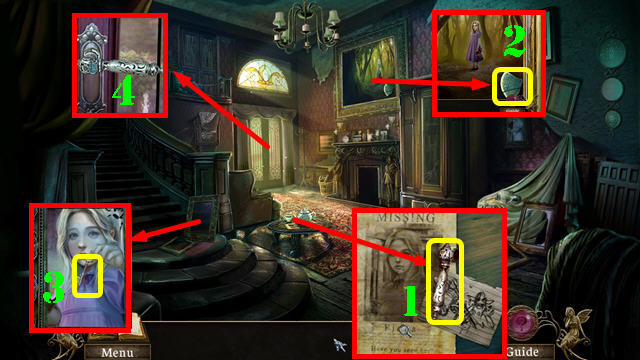
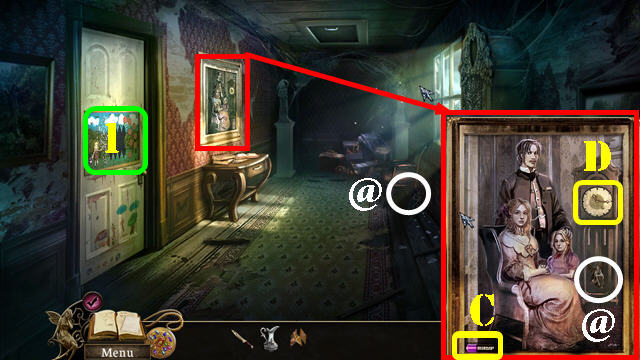
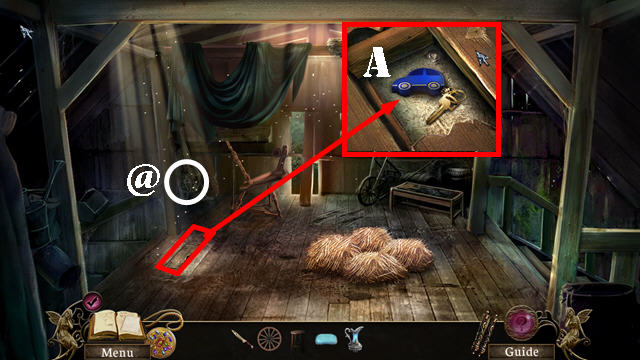
- Examine the coffee table; take the HANDLE (1).
- Look at the painting; take the STONE FRAGMENT 1/3 (2).
- Examine the mirror; take the IRON KEY (3).
- Look at the bottom door; put the HANDLE on it and press on the handle (4).
- Go through the door.
- Take the STONE FRAGMENT 2/3 (5).
- Go towards the gate.
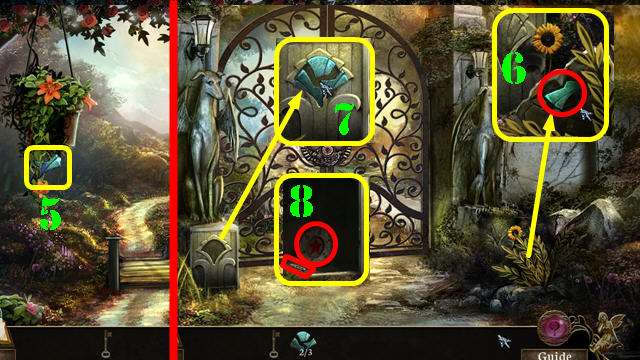
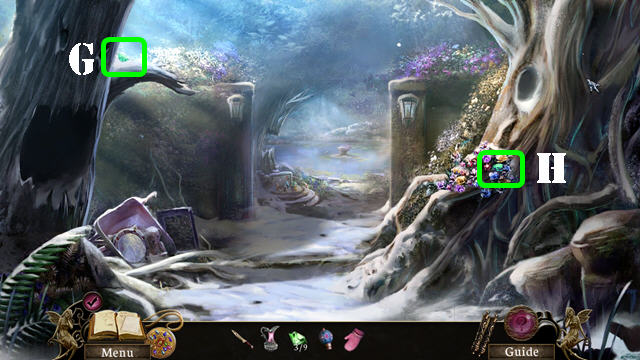
- Examine the plant; move it aside and take the STONE FRAGMENT 3/3 (6).
- Look at the base of the left statue; put the 3 STONE FRAGMENTS in the slot (7).
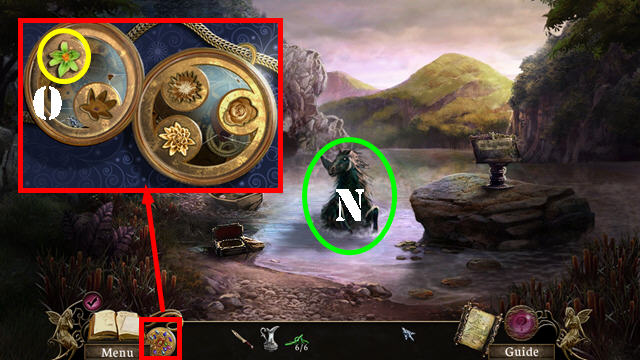
- Take the METAL PIN and the STAR DIAL (8).
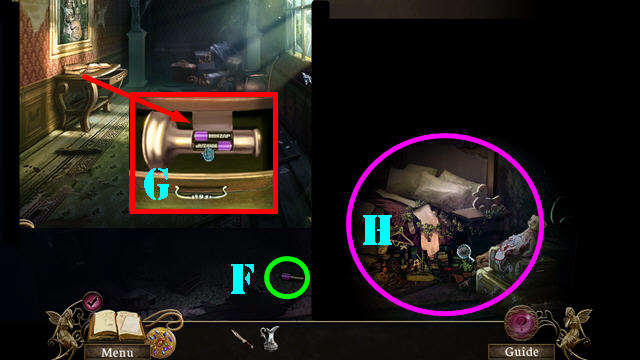
- Walk down.
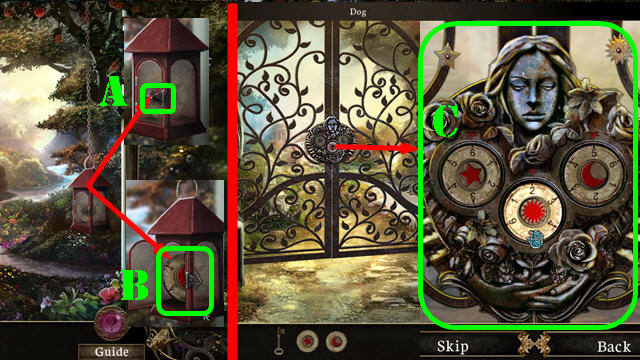
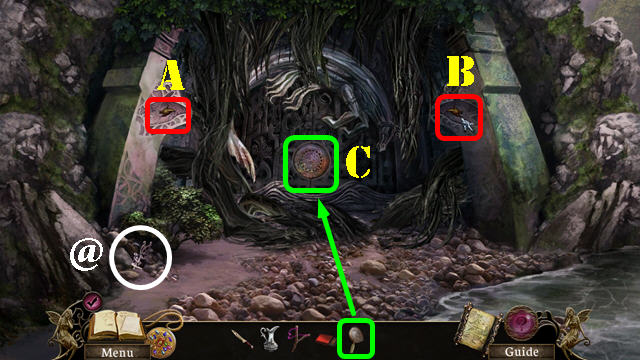
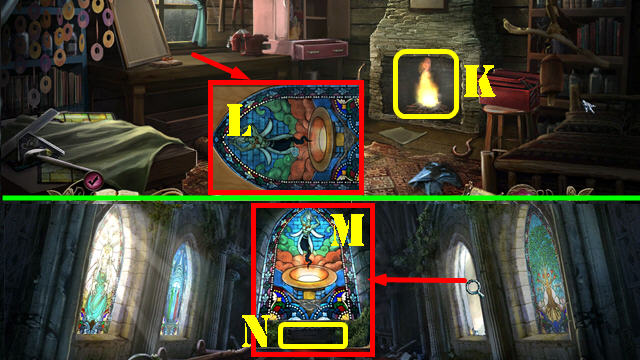
- Zoom into the lantern; use the METAL PIN in the lock (A) and take the MOON DIAL (B).
- Go back to the gate and zoom into it.
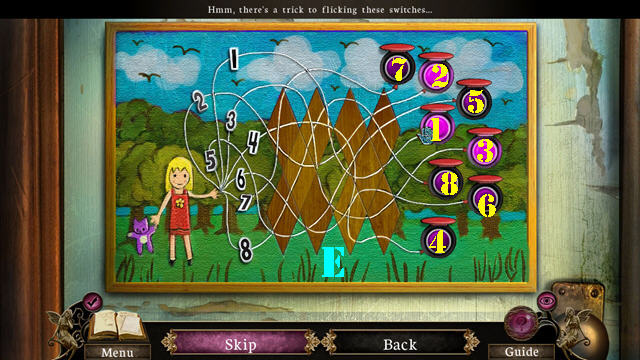
- Place the MOON DIAL and the STAR DIAL on the gate to activate a puzzle.
- Count the number of stars, moons and sun shapes on the gate. Turn the dials to the same amount of matching symbols.
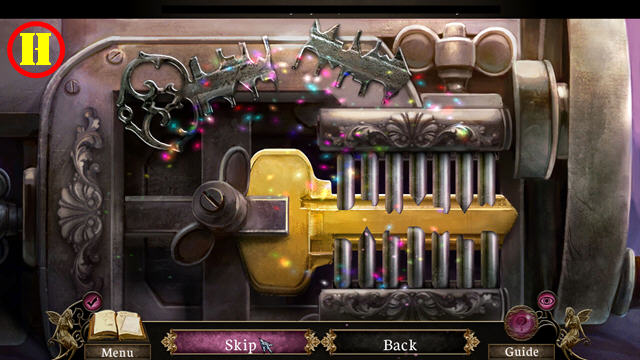
- To solve the puzzle, turn the dials to these numbers: Star to 6, Moon to 5, and the Sun to 2 (C).
- Insert the IRON KEY in the lock.
- Go through the gate to enter the garden.
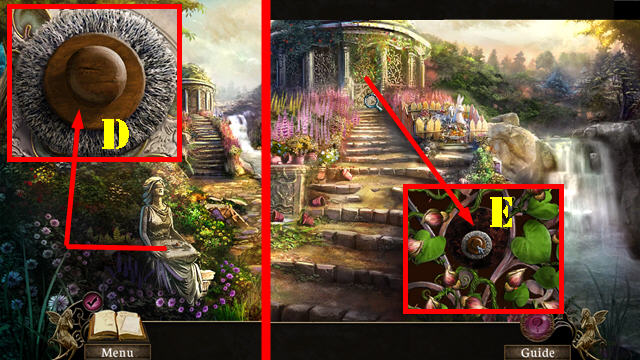
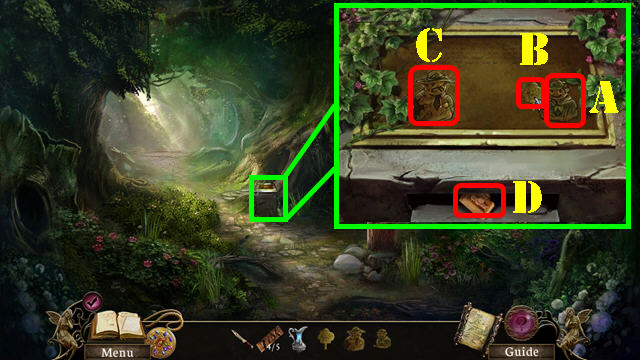
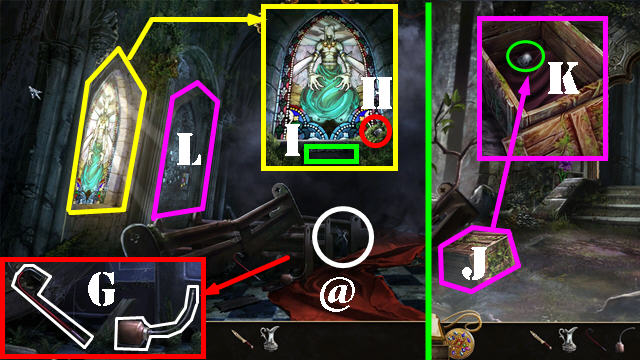
- Look at the statue and take the WIRE BRUSH (D).
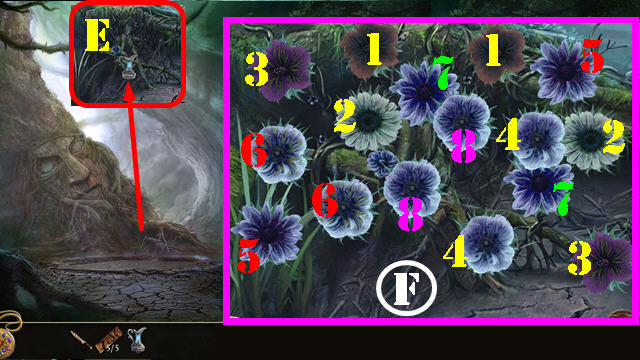
- Go forward and zoom into the gazebo gate.
- Use the WIRE BRUSH on the rusted metal 3 times to activate a puzzle (E).
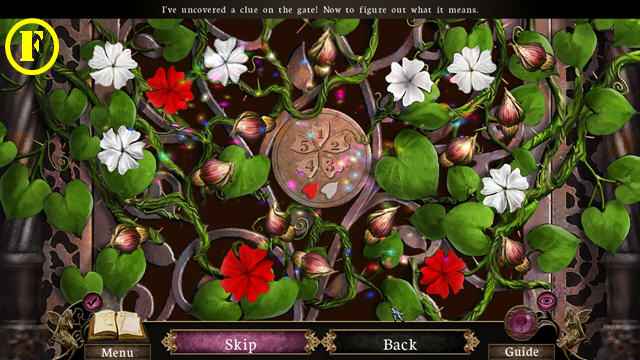
- Open each flower bud to reveal the flowers. Close any flower that does not have 5 petals and is not red or white.
- See screenshot for solution (F).
- Enter the gazebo.
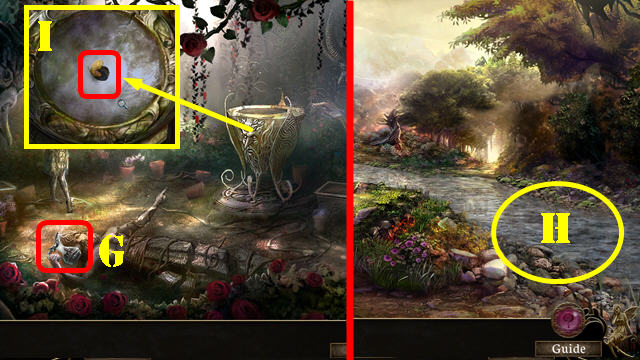
- Take the PITCHER (G).
- Walk down twice.
- Place the PITCHER in the water to create the FILLED PITCHER (H).
- Return to the gazebo.
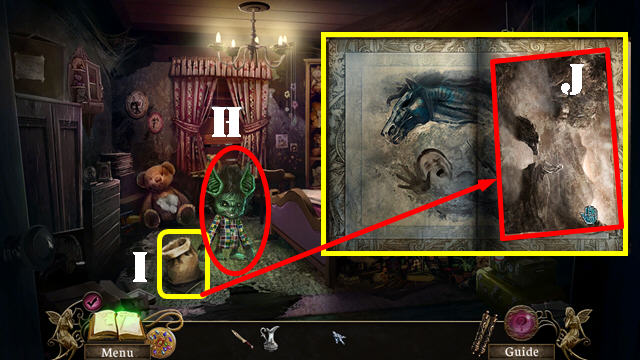
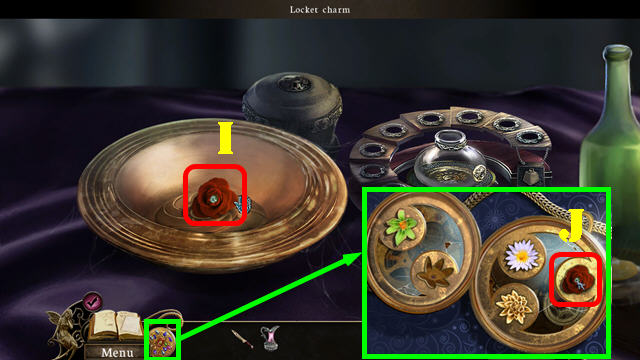
- Zoom into the basin; use the FILLED PITCHER in it and take the BUTTERFLY WING (I).
- Leave the basin and walk down.
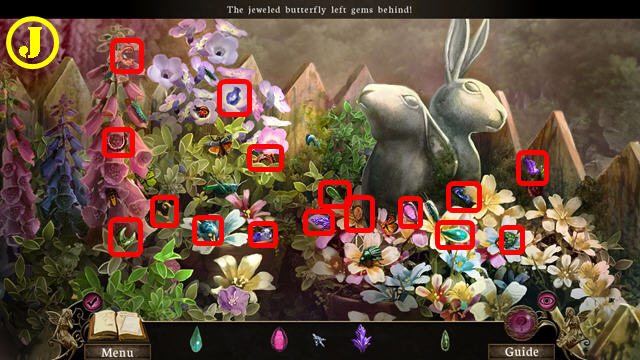
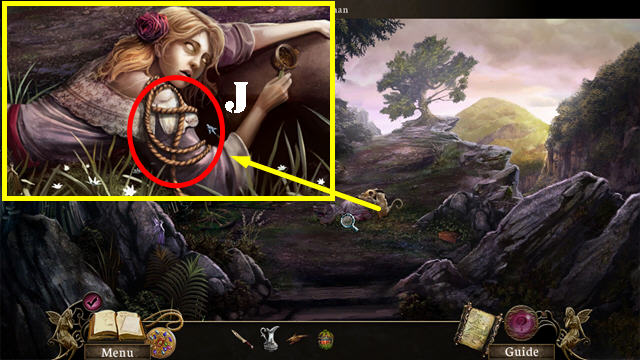
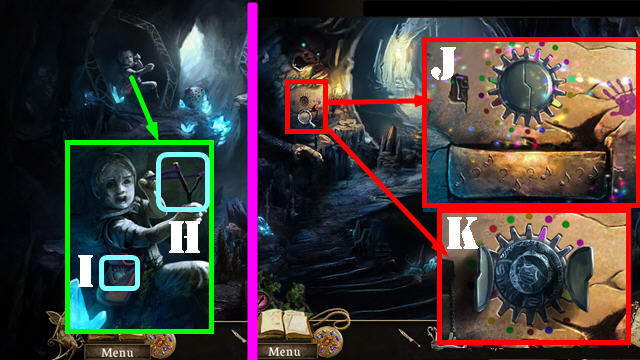
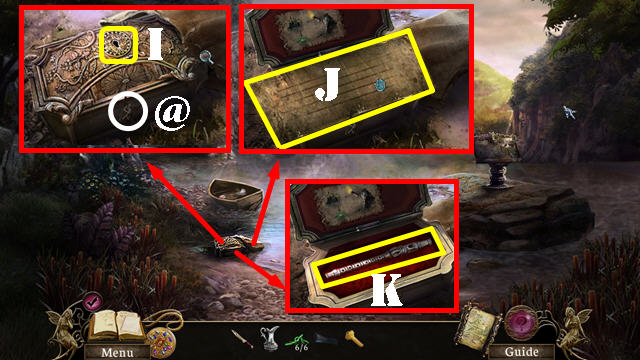
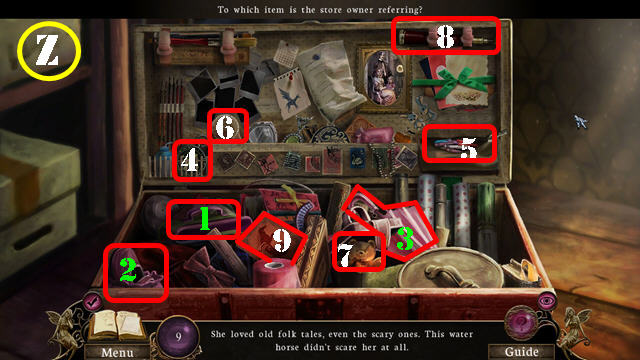
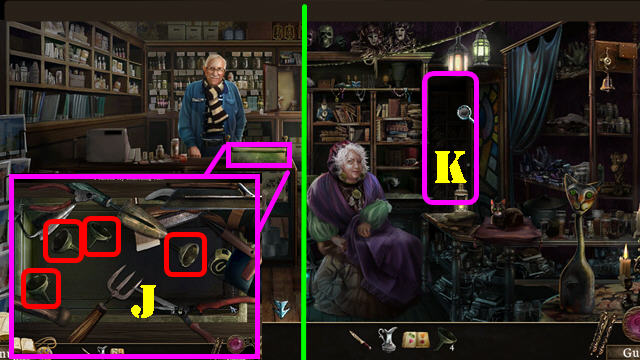
- Examine the flowerbed on the right; put the BUTTERFLY WING on the broken butterfly to activate a puzzle.
- Find the gems shown at the bottom of the screen on the scene.
- See screenshot for solution (J). Certain items need to be moved before pieces become visible.
- The LOCKET GEMS will be added to inventory.
- Walk down.
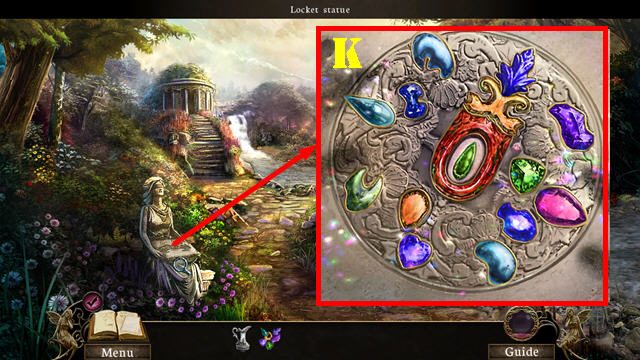
- Examine the statue; put the LOCKET GEMS in the locket to activate a puzzle.
- Place all the gems in the correct slots as shown in the screenshot (K).
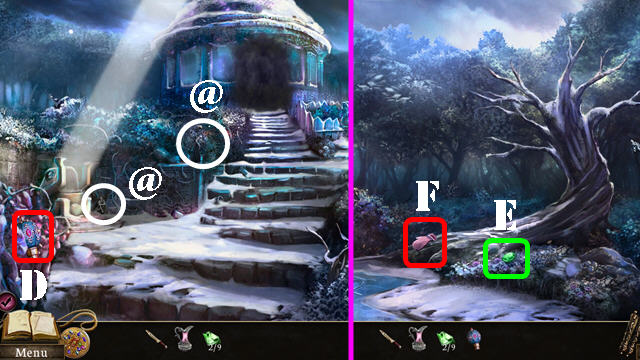
- Take the LOCKET. It will be added to the inventory next to the journal. The scenery will transform itself at this point.
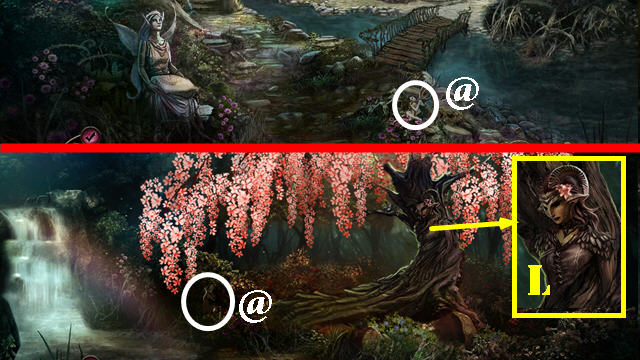
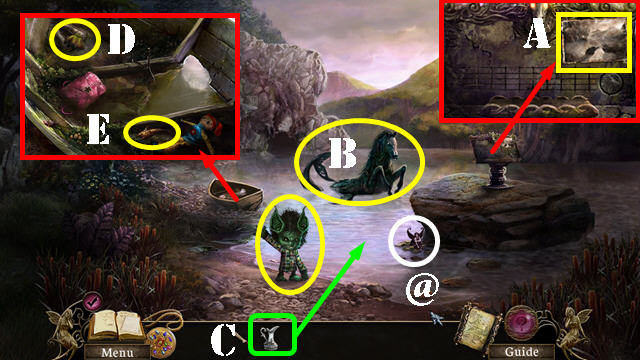
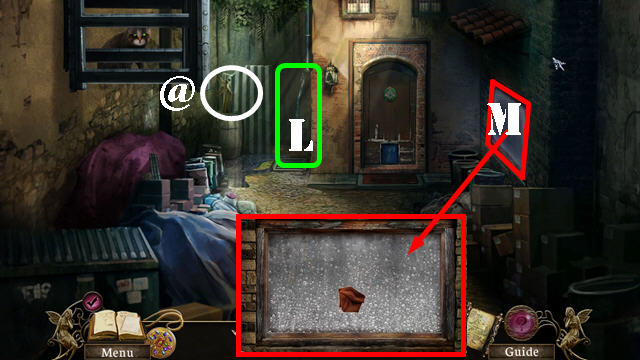
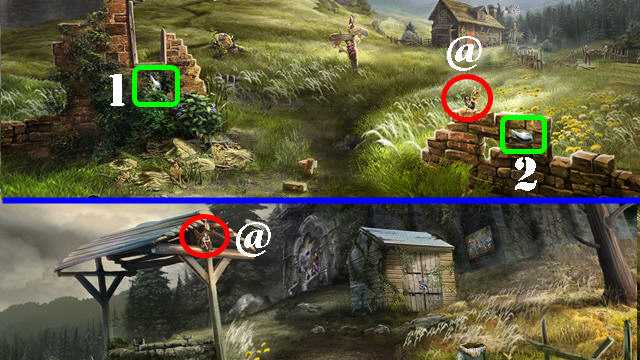
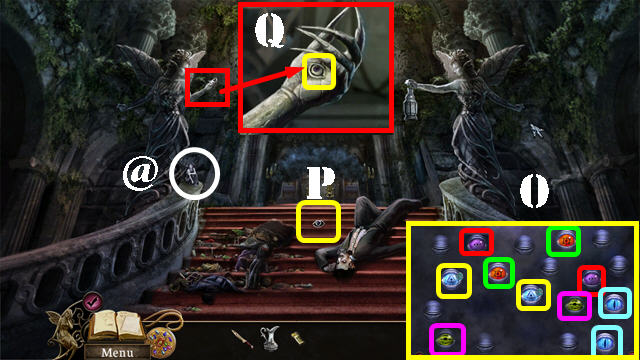
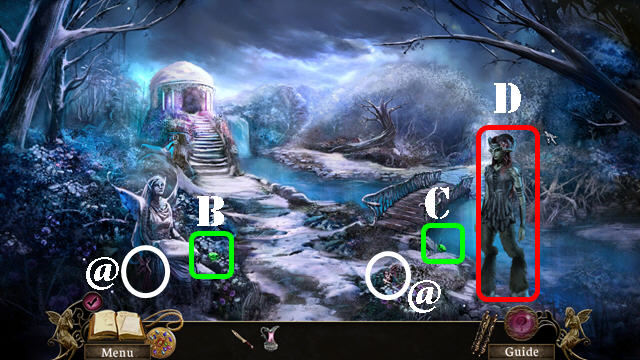
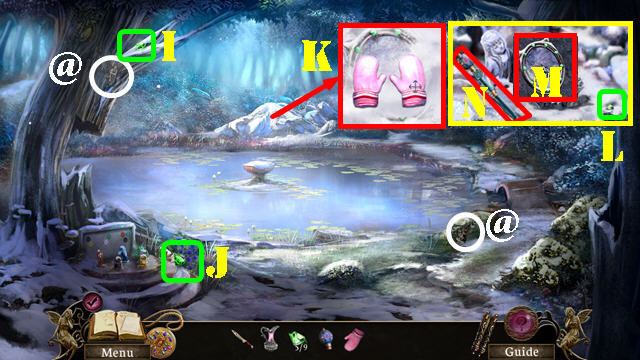
- Take Collectible 1/60 near the bridge (@).
- Go towards the cherry tree.
- Take Collectible 2/60 (@).
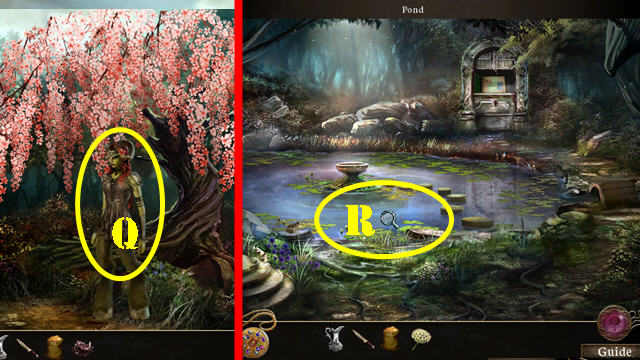
- Look at and talk to the Dryad (L).
- Exit the tree and go right towards the lily pond.
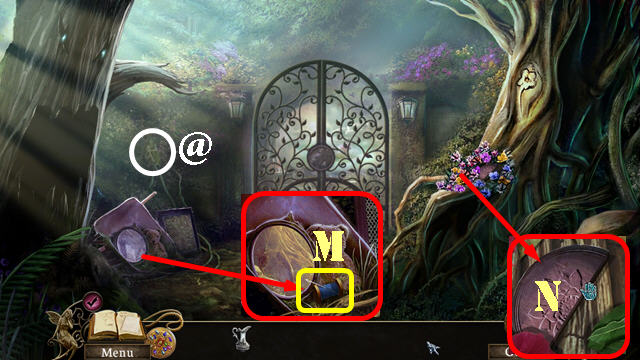
- Take Collectible 3/60 (@).
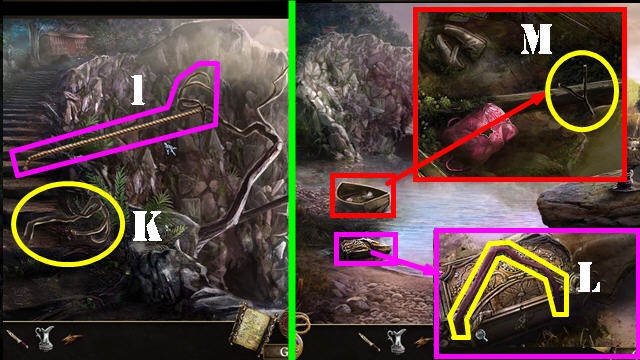
- Examine the wheelbarrow and take the NEEDLE AND THREAD (M).
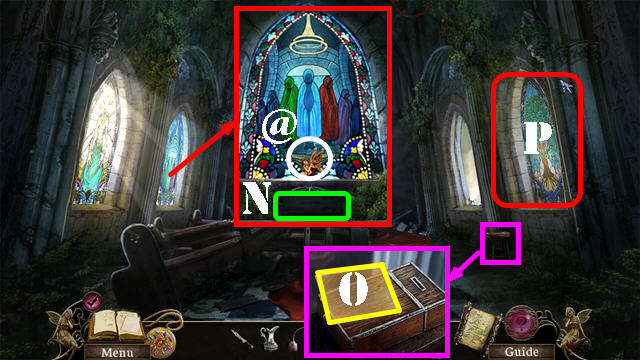
- Examine the flowers; take the DISC 1/2 (N).
- Walk down and go towards the gazebo.
- Take Collectible 4/60 (@).
- Examine the flowerbed; take the WIRE CUTTERS 1/2 (O).
- Exit the flowerbed and walk down thrice.
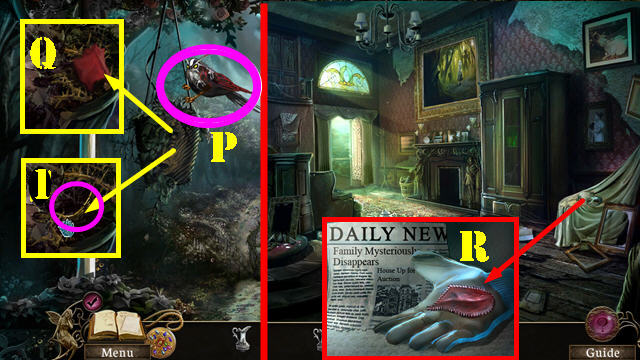
- Tap the bird (P); examine the flower pot and take the TORN CLOTH (Q).
- Walk down.
- Examine the glove on the chair; add the TORN CLOTH to it.
- Use the NEEDLE AND THREAD on the cloth and take the GARDENING GLOVE (R).
- Go to the back porch.
- Zoom into the flower pot; use the GARDENING GLOVE on the thorns and take the HANDLE (1).
- Go back into the house.
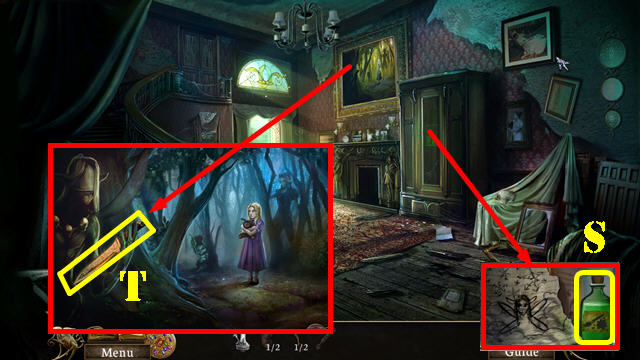
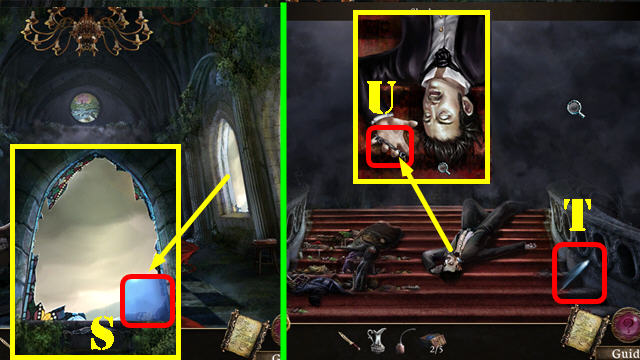
- Examine the cupboard; put the HANDLE on it and take the PAINT REMOVER (S).
- Look at the painting; put the PAINT REMOVER on it to activate a puzzle.
- Use the paint remover all over the painting to reveal the whole image.
- Take the ANCIENT KNIFE (T).
- Return to the cherry tree.
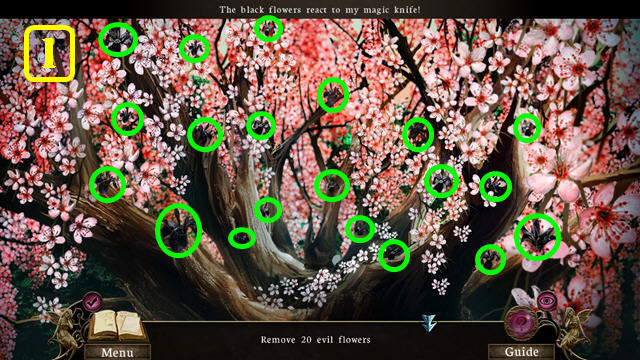
- Examine the tree; use the ANCIENT KNIFE on the tree to activate a puzzle.
- Remove the evil flowers marked in green (1).
- Talk to the Dryad; you will earn the DISC 2/2.
- Go back to the lily pond gate.
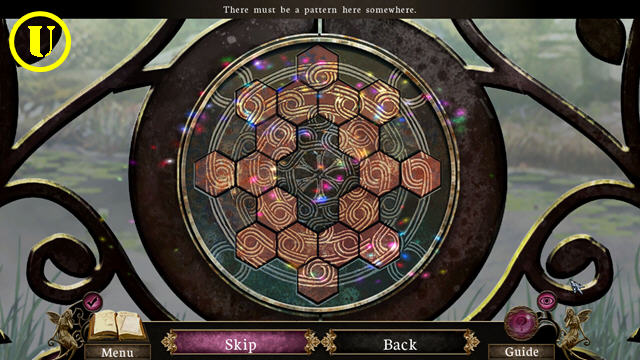
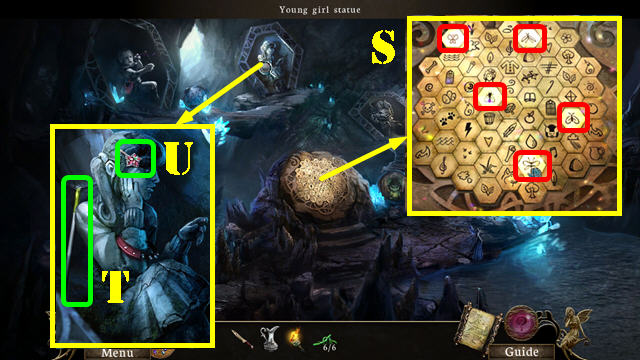
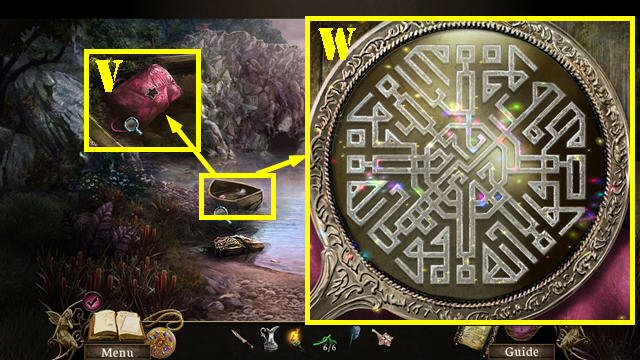
- Zoom into the gate; use the ANCIENT KNIFE on the moss 2 times.
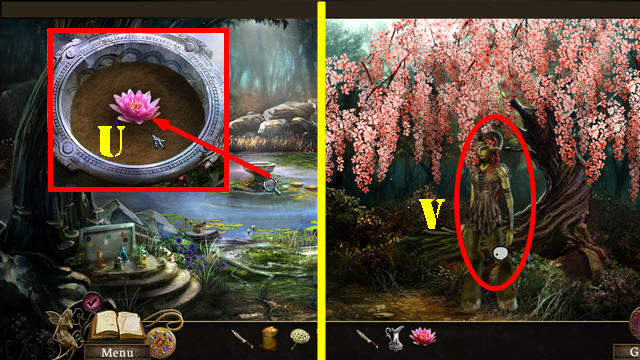
- Put the 2 DISCS in the slot to activate a puzzle.
- Rotate the hexagons into place.
- See screenshot for solution (U).
- Go through the gate.
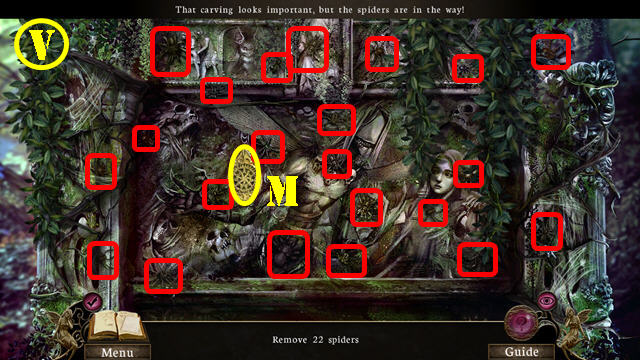
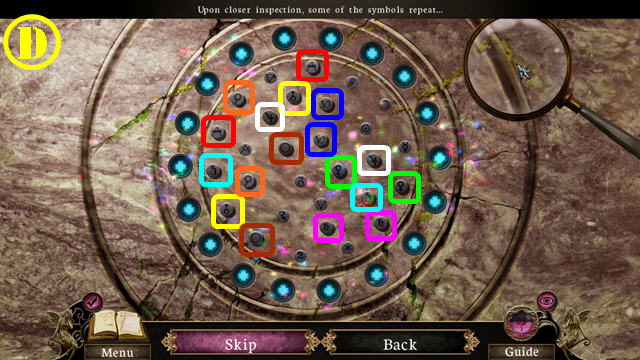
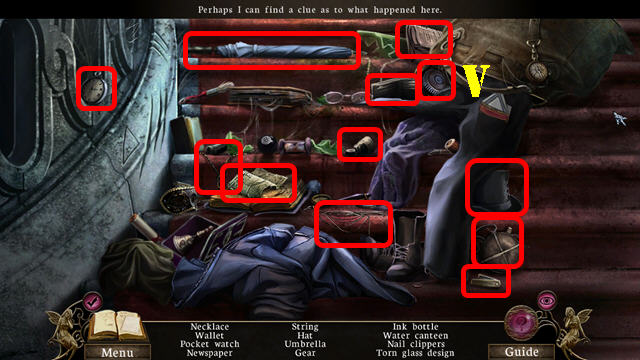
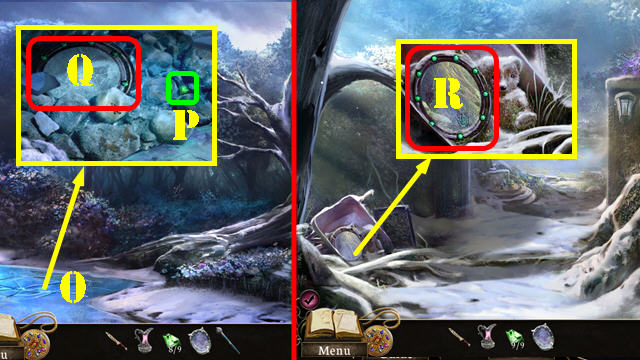
- Look at the alcove to activate a puzzle.
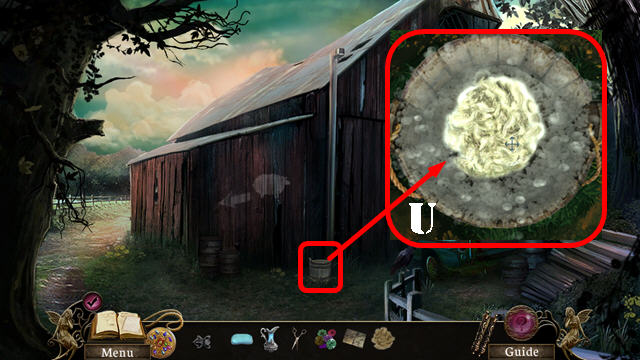
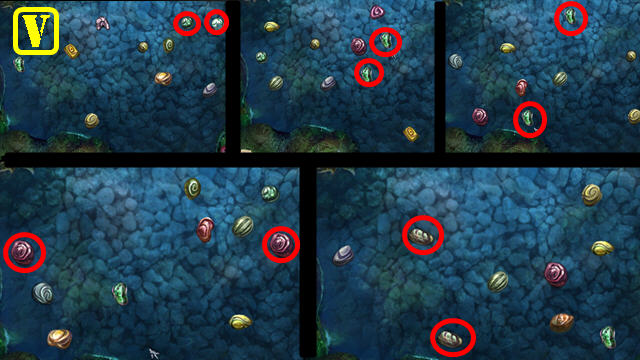
- Remove the 22 spiders in the scene. Move the 3 top vines aside to view hidden spiders.
- See screenshot for solution (V).
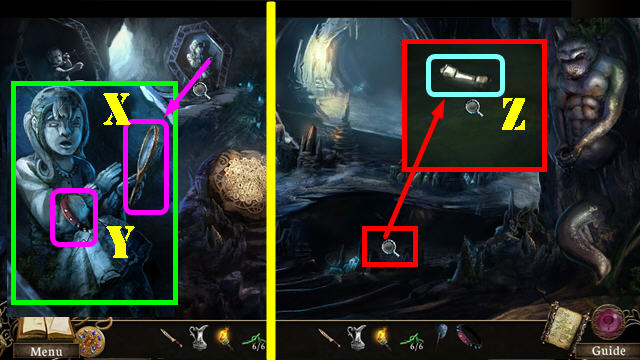
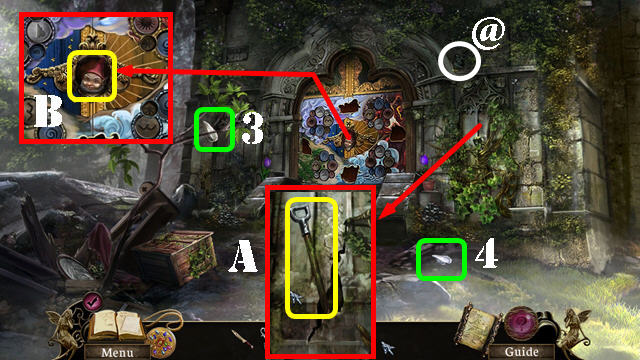
- Take the TEAR-SHAPED-CARVING (M).
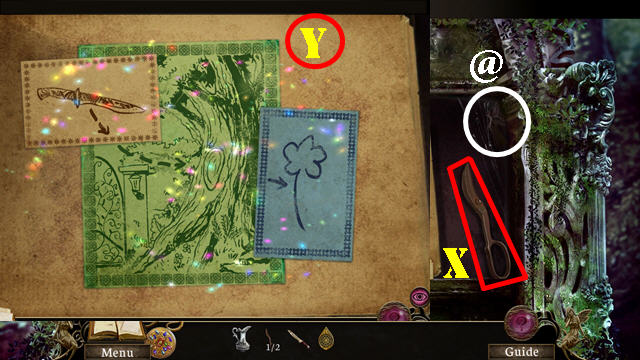
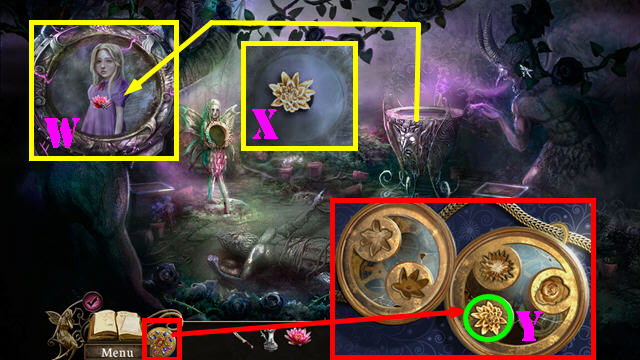
- Open the sketchbook; take the WIRE CUTTERS 2/2 to complete the WIRE CUTTERS (X).
- Take Collectible 5/60 (@).
- Select the scraps of paper to activate a puzzle.
- Arrange the sketch pieces as shown in the screenshot (Y).
- Exit the sketch.
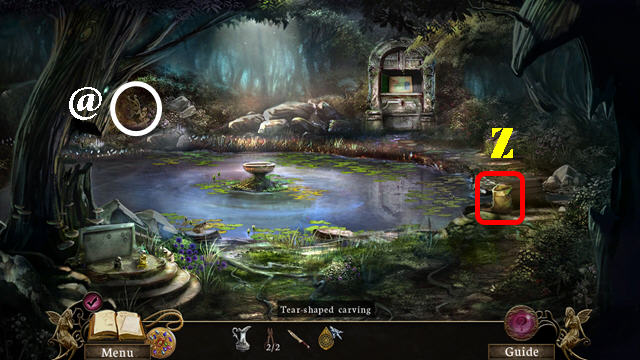
- Take the EMPTY BAG (Z).
- Take Collectible 6/60 (@).
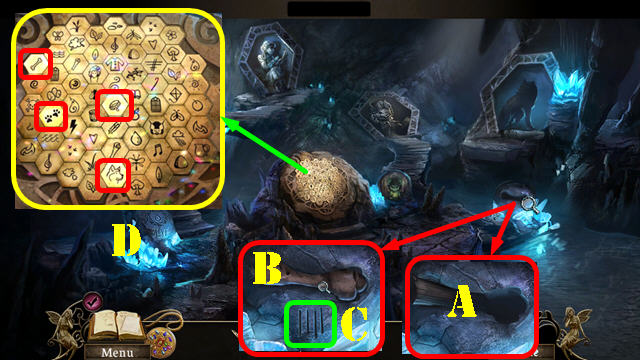
- Walk down.
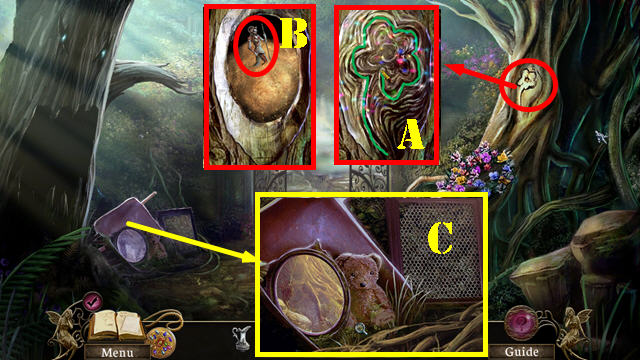
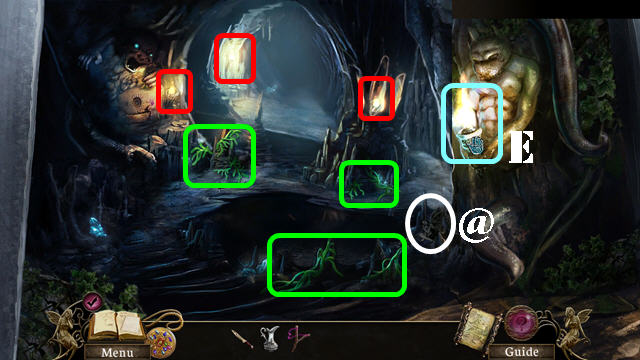
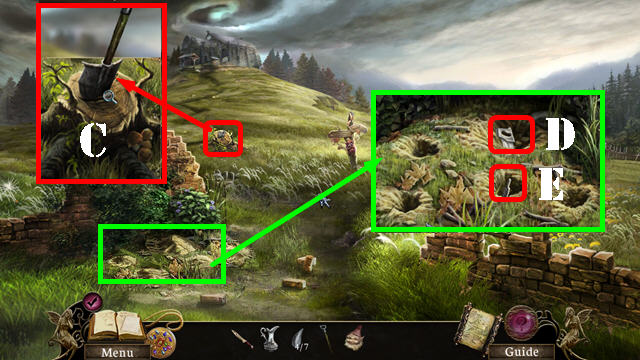
- Put the ANCIENT KNIFE on the carving on the tree to activate a puzzle.
- Without lifting the knife, trace the outline of the flower (A).
- Take the FIGURINE 1/3 (B).
- Put the EMPTY BAG on the soil to create the MAGIC SOIL.
- Look at the wheelbarrow; cut the WIRE MESH with the WIRE CUTTERS (C).
- Return to the gazebo.
- Take Collectible 7/60 (@).
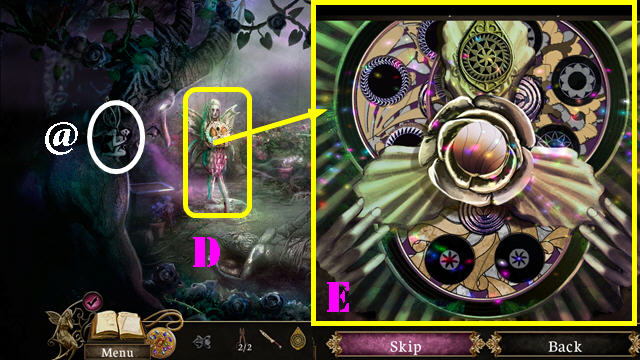
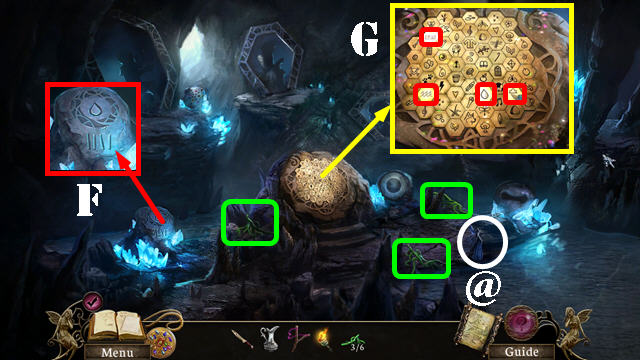
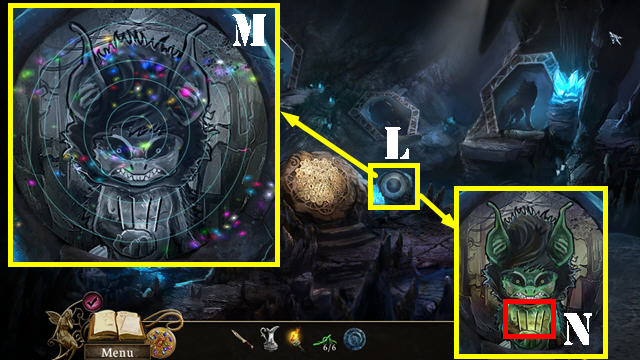
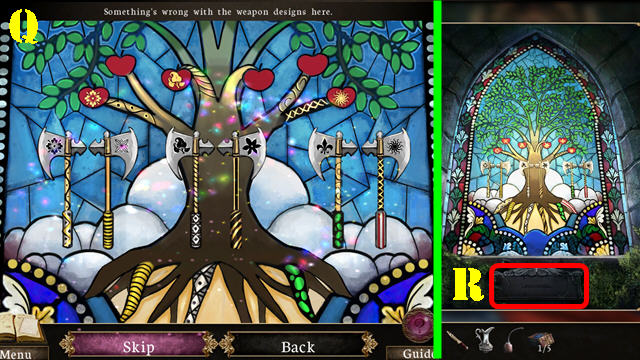
- Examine the statue (D); put the TEAR-SHAPED CARVING in the slot to activate a puzzle.
- Put the pieces into the right slots. Pieces in the correct spots will auto-lock. Not all pieces will be used.
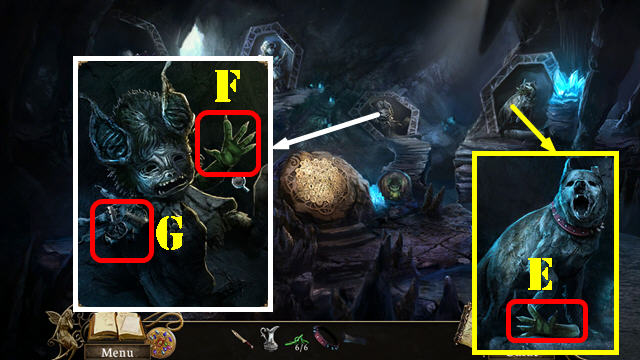
- See screenshot for solution (E).
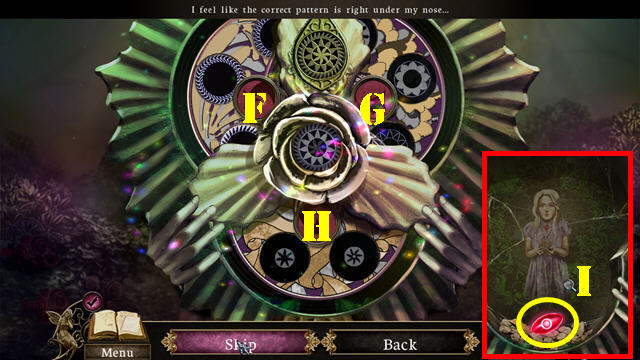
- Now, press on the arrows (F, G and H) to form the correct pattern.
- The solution is random; the screenshot shows the final image.
- Take the RUBY (I).
- Walk down.
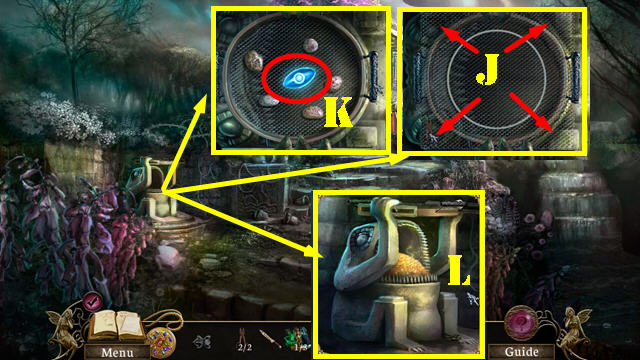
- Look at the soil sifter; put the WIRE MESH on it.
- Cut the 4 corners of the mesh with the WIRE CUTTERS (J).
- Put the MAGIC SOIL on the sifter.
- Drag the soil left and right several times. The EMPTY BAG goes back into inventory.
- Take the SAPPHIRE (K).
- Use the EMPTY BAG to collect the SIFTED SOIL (L).
- Walk down twice.
- Take Collectible 8/60 (@).
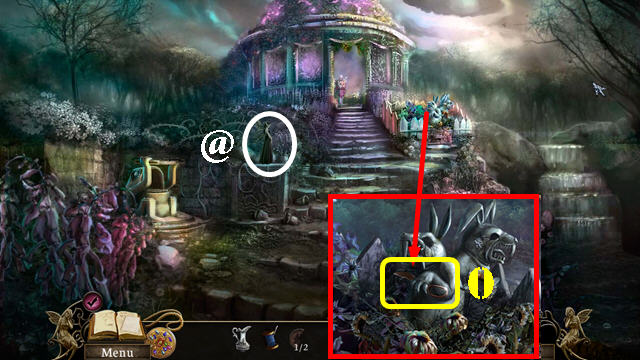
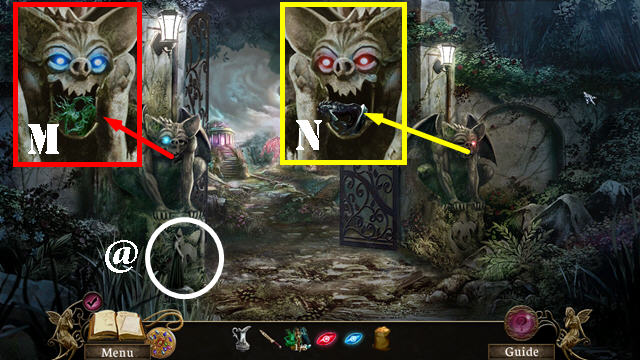
- Zoom into the left gargoyle; put the SAPPHIRE in the eye socket and take FIGURINE 2/3 (M).
- Examine the right gargoyle; put the RUBY in the eye socket and take FIGURINE 3/3 (N).
- Go back to the lily pond.
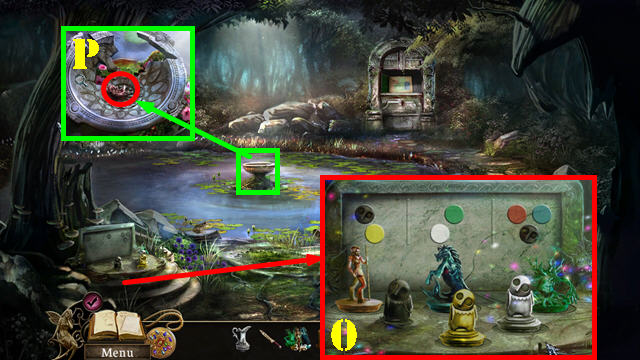
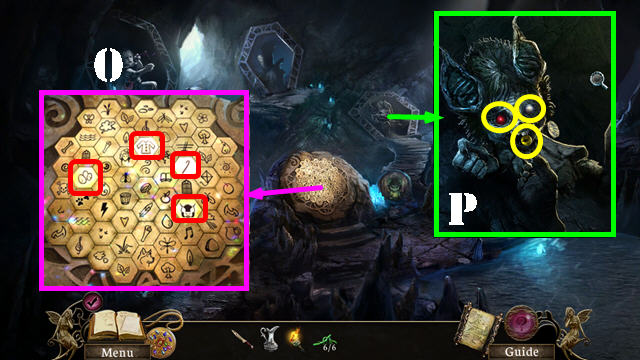
- Zoom into the pedestal in the lower left; put the 3 FIGURINES on the board to activate a puzzle.
- Arrange the statues in the correct order using the colored dots as a clue.
- See screenshot for solution (O).
- Steps will form in the water.
- Zoom into the planter; take the DEAD ETERNAL FLOWER (P).
- Return to the cherry tree.
- Zoom into the Dryad and give her the DEAD ETERNAL FLOWER to receive the SEED POD ( Q).
- Return to the lily pond.
- Zoom into the pond to activate a HOS (R).
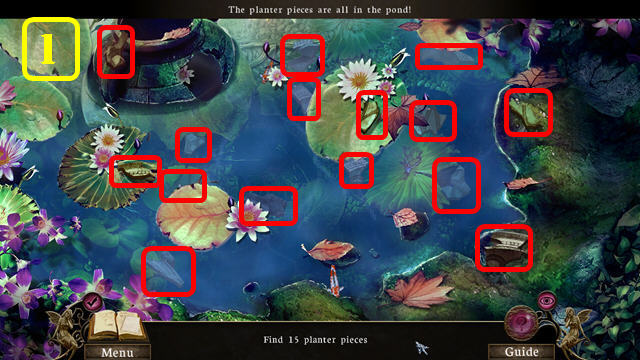
- Find the 15 planter pieces marked in red (1).
- The PLANTER PIECES will be added to inventory.
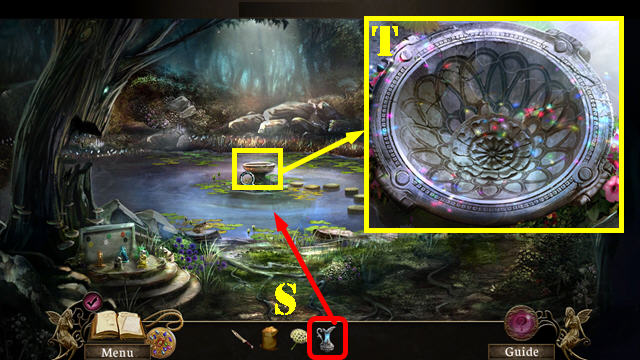
- Put the PITCHER in the water to obtain the FILLED PITCHER (S).
- Examine the planter; add the PLANTER PIECES to it to activate a puzzle.
- Reconstruct the planter by putting the pieces in the right places.
- See screenshot for solution (T).
- Examine the planter; put the SIFTED SOIL in it.
- Add the SEED POD and the FILLED PITCHER to the planter.
- Cut the ETERNAL FLOWER with the ANCIENT KNIFE (U).
- Return to the Dryad; give the ETERNAL FLOWER to her (V).
- Go back to the gazebo.
- Zoom into the basin; give the ETERNAL FLOWER to Fiona (W).
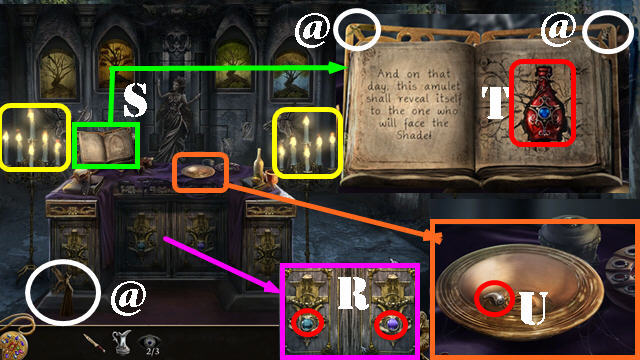
- Take the LILY CHARM (X).
- Open the locket; put the LILY CHARM in the right spot (Y).
- Exit the basin to end the chapter.
Chapter Two: The Intruder
- Examine the coffee table; take Collectible 9/60 (@).
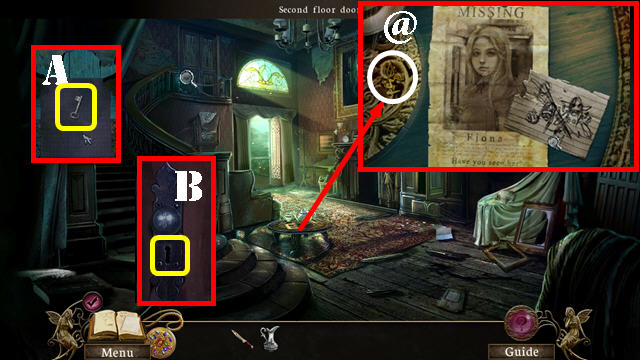
- Examine the top door; pull the rug out and take the DOOR KEY (A).
- Insert the DOOR KEY into the keyhole (B); turn the key and go through the door.
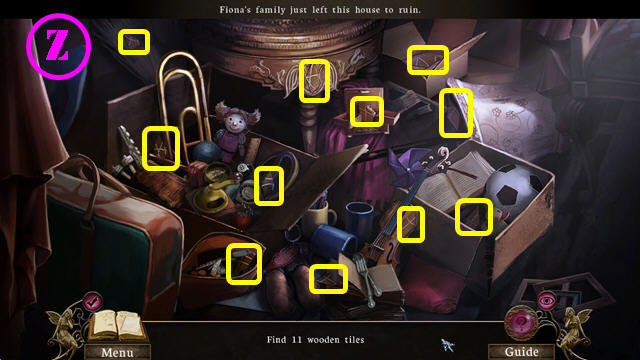
- Examine the boxes in the back for a HOS.
- Find the wooden tiles marked in yellow (Z). Open the 2 boxes, the box, and the bag to find hidden tiles.
- The WOODEN TILES will be added to inventory.
- Take Collectible 10/60 below the window (@).
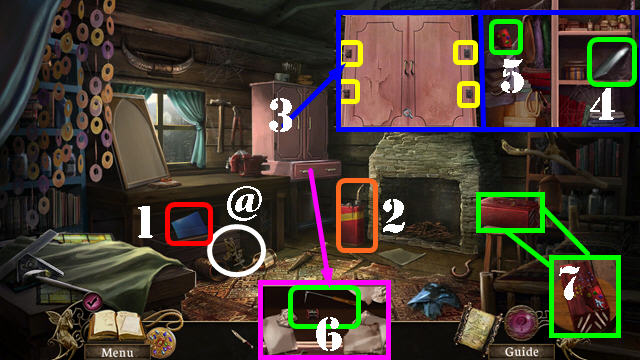
- Examine the portrait; take the BATTERY 1/2 (C).
- Take Collectible 11/60 on the clock shown in the close-up (@).
- Note the time on the clock: 11:15 (D).
- Examine the picture on the door; add the WOODEN TILES to the picture to activate a puzzle (1).
- Press on any 2 pieces to swap their positions.
- See screenshot for solution (E).
- Follow the strings and press on the buttons in numerical order (as shown in the screenshot).
- Go through the door.
- Pick up BATTERY 2/2 (F).
- Walk down.
- Zoom into the drawer; pull it open.
- Press on the flashlight's battery cover and put the 2 BATTERIES in it (G).
- Take the FLASHLIGHT.
- Return to the dark bedroom.
- Use the FLASHLIGHT in the room; look under the bed to activate a HOS (H).
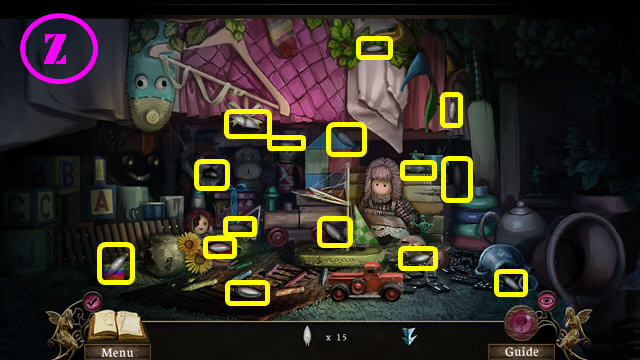
- Find the 15 bulbs marked in yellow (Z). Move items aside to find all the hidden items.
- The BULBS will be added to inventory.
- Put the BULBS on the chandelier to light up the room.
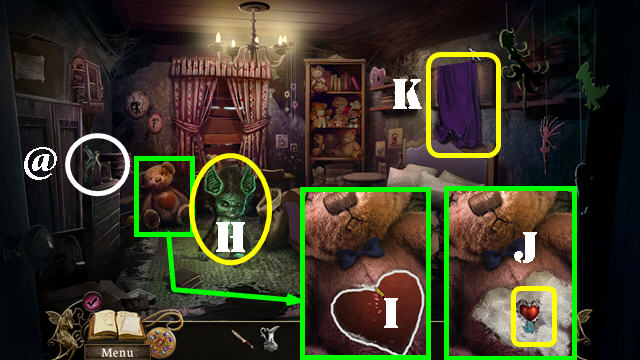
- Select the Hobgoblin (H).
- Take Collectible 12/60 (@).
- Look at the bear; use the ANCIENT KNIFE on the heart to activate a puzzle.
- Without lifting the knife, trace the outline of the heart (I).
- Press on the stuffing and take the HEART (J).
- Take the BLANKET (K).
- Walk down.
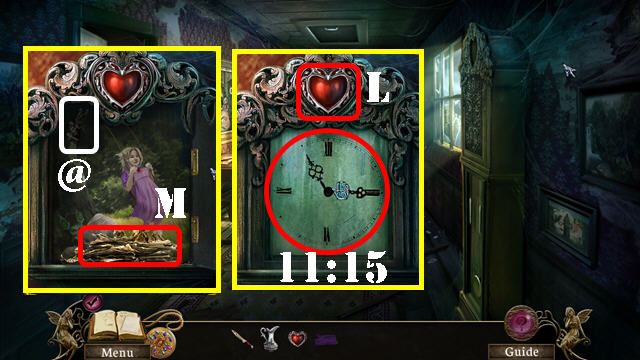
- Examine the clock; insert the HEART into the slot (L).
- Set the time on the clock to the same time shown in the painting (11:15).
- Take Collectible 13/60 inside the clock (@).
- Take the TORN SKETCH (M).
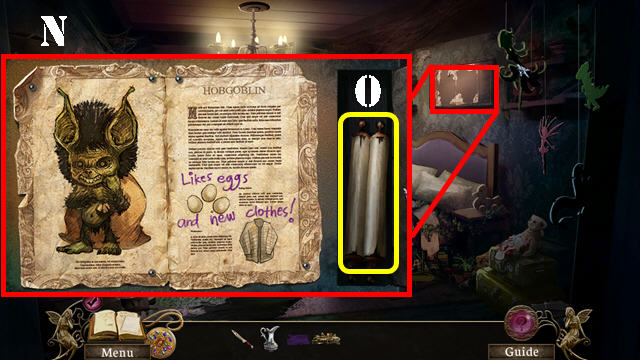
- Go to the bedroom; zoom into the bulletin board.
- Add the TORN SKETCH to the board to activate a puzzle.
- Arrange the sketch as shown in the screenshot (N).
- Take the MAP (O).
- Go to the map and select the barn.
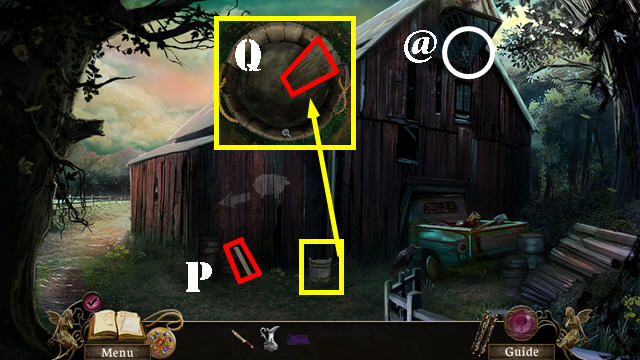
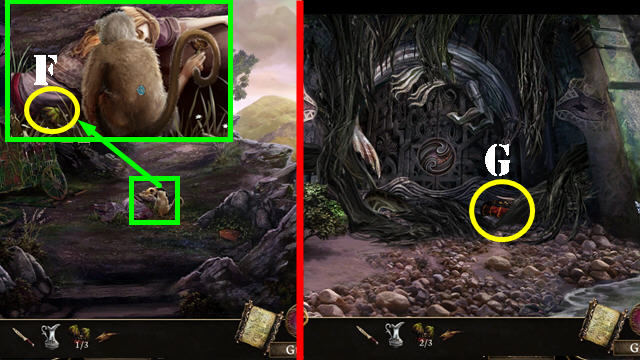
- Take Collectible 14/60 (@).
- Take STEP 1/4 (P).
- Look at the bucket; take STEP 2/4 (Q).
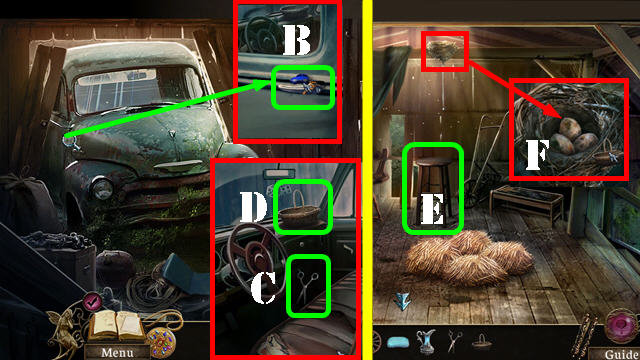
- Examine the pickup truck for a HOS.
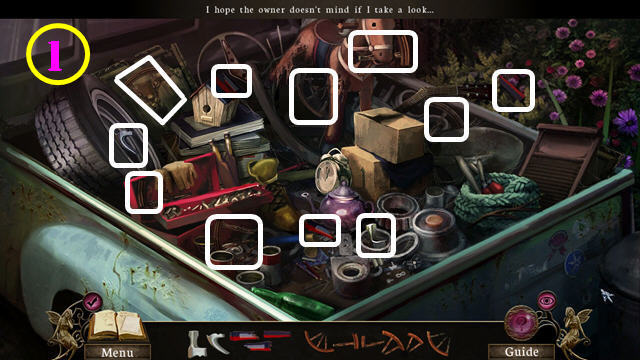
- Find the fragmented items shown at the bottom of the screen (1).
- The HAMMER and the WOODEN WHEEL will be added to inventory.
- Go left.
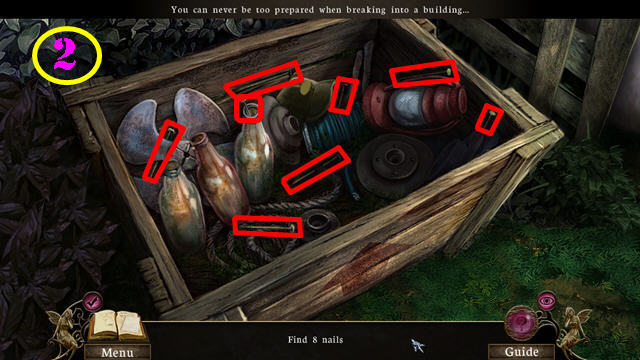
- Examine the crate; break it open with the HAMMER to activate a HOS.
- Find the 8 nails. Move items aside to find hidden nails (2).
- The NAILS will be added to inventory.
- Take Collectible 15/60 (@).
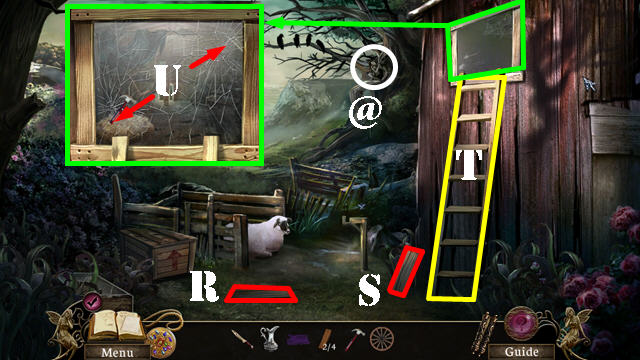
- Pick up STEP 3/4 (R) and STEP 4/4 (S).
- Put the 4 STEPS on the broken ladder, followed by the NAILS (T).
- Use the HAMMER on the nails 4 times.
- Examine the window; use the HAMMER on the 2 cracks a total of 4 times each to break the glass (U).
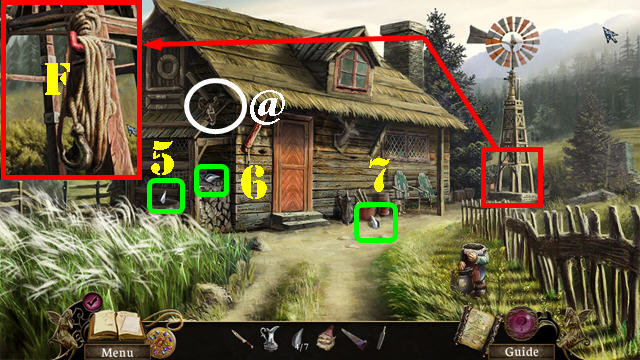
- Put the BLANKET over the broken glass; go through the window and then right to the workshop.
- Take Collectible 16/60 (@).
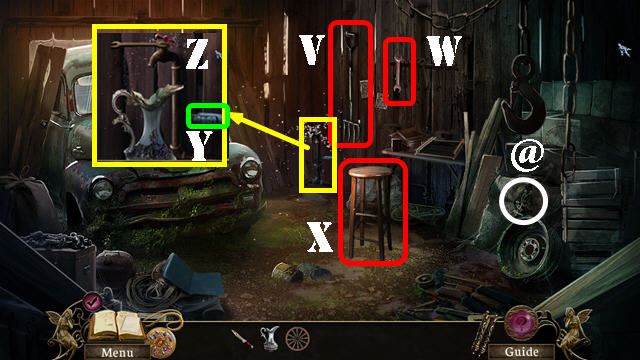
- Take the PITCHFORK (V), the WRENCH (W) and the STOOL (X).
- Look at the faucet; take the SOAP (Y).
- Put the PITCHER below the faucet; use the WRENCH on the valve (Z).
- Turn on the faucet and take the FILLED PITCHER.
- Walk down.
- Take Collectible 17/60 (@).
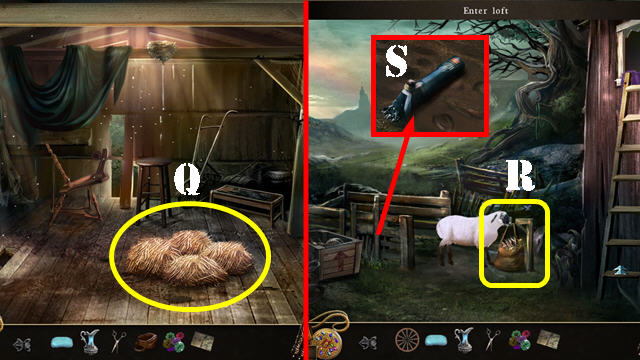
- Use the PITCHFORK on the hay 4 times.
- Examine the cracked floorboard; use the ANCIENT KNIFE on the board and take the CAR KEY (A).
- Go right.
- Examine the car door; use the CAR KEY on the lock (B).
- Take the SCISSORS (C) and the BASKET (D) from inside the car.
- Walk down.
- Put the STOOL on the ground (E).
- Select the nest and take the ROTTEN EGGS with the BASKET (F).
- Go back to second floor bedroom in the house.
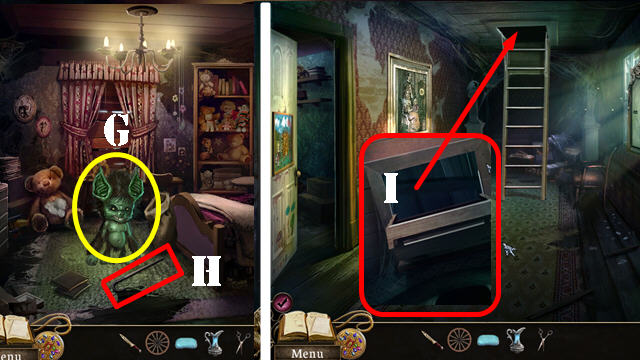
- Give the ROTTEN EGGS to the Hobgoblin (G).
- Take the CANE (H).
- Walk down.
- Examine the attic hatch; use the CANE on the hatch and pull it down twice (I).
- Enter the attic.
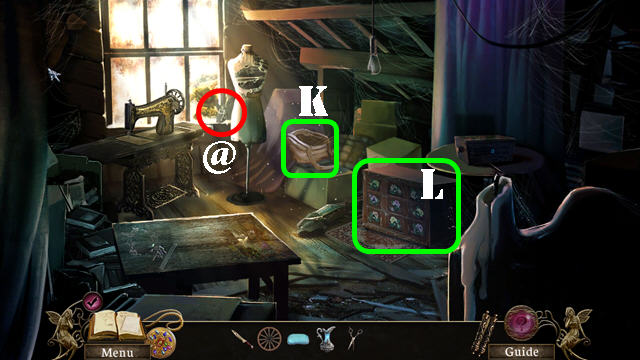
- Take Collectible 18/60 (@).
- Take the EMPTY FEED BAG (K).
- Select the chest drawer to activate a puzzle (L).
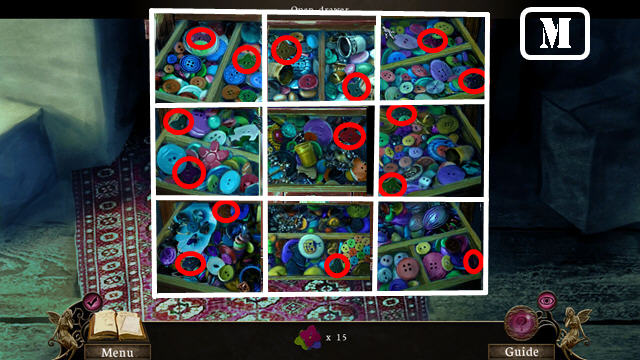
- Open the 9 drawers and take the 15 buttons circled in red (M).
- The BUTTONS will be added to inventory.
- Select the sewing box on the right (N).
- Arrange the embroidery pattern as shown in the screenshot (O).
- Open the box; take Collectible 19/60 (@) and the CLOTH PATTERN (P).
- Return to the loft in the barn.
- Put the EMPTY FEED BAG on the pile of hay to create the BAG OF HAY (Q).
- Exit the barn.
- Put the BAG OF HAY on the hook and the sheep will walk towards it (R).
- Look in the pen and take the SHEARS (S).
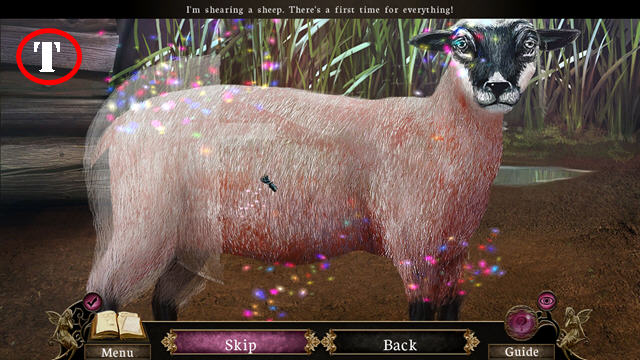
- Put the SHEARS on the sheep to activate a puzzle.
- Remove all the hair from the sheep. The best way to do it is by moving the shears up and down the sheep's wool (T).
- The DIRTY WOOL will be added to inventory.
- Walk down.
- Examine the empty bucket; put the FILLED PITCHER, SOAP, and DIRTY WOOL in the bucket (U).
- Drag the dirty wool around the bucket to wash it.
- Take the UNCARDED WOOL.
- Return to the loft.
- Zoom into the carding bench; put the UNCARDED WOOL on it.
- Drag the card left and right several times to add the FINE WOOL to inventory (V).
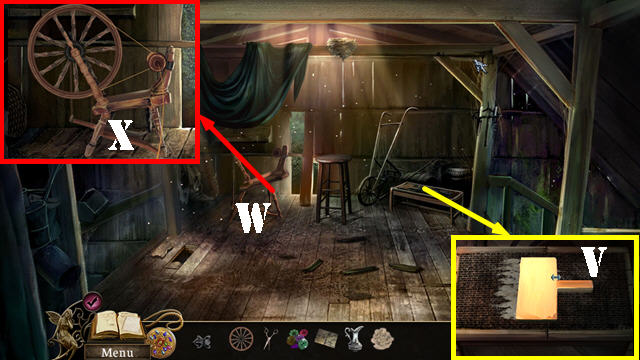
- Put the WOODEN WHEEL on the spinning wheel (W).
- Zoom into the spinning wheel and add the FINE WOOL on it.
- Step on the pedal 3 times (X) and take the YARN.
- Go right into the workshop.
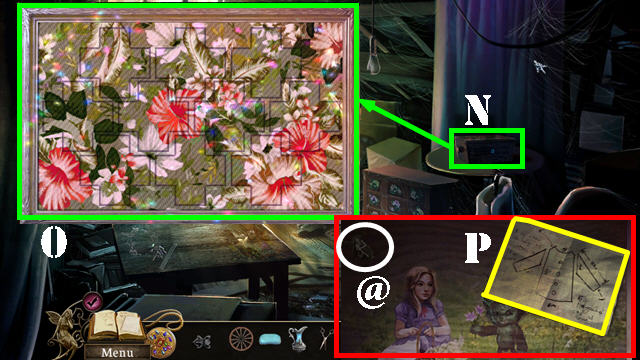
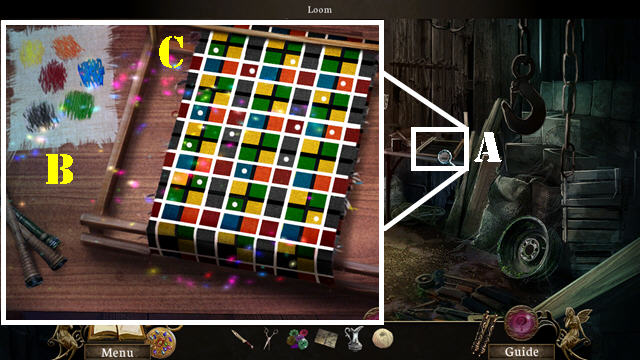
- Put the YARN on the loom to activate a puzzle (A).
- Select a color (B) and add it to the one of the white squares. To change a color with a dot on it, put another color over it.
- Fill in the colors according to the pattern in each column. On the first column on the left, the pattern is yellow, green, and blue.
- Pay attention to the pattern on the other columns and fill in the colors accordingly.
- See screenshot for solution (C).
- The UNCUT CLOTH will be added to inventory.
- Return to the attic.
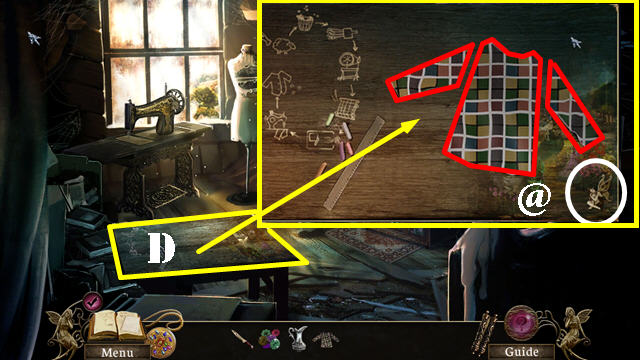
- Examine the work table; put the UNCUT CLOTH on it (D).
- Put the CLOTH PATTERN over the cloth. Put the SCISSORS on the pattern to activate a puzzle.
- Cut the cloth with the SCISSORS in the order shown on the pattern. Cut the pattern without lifting the scissors.
- Take Collectible 20/60 (@).
- Take the UNSEWN CLOTH.

- Examine the sewing machine (E); put the UNSEWN CLOTH on the table.
- Step on the pedal (F) 3 times.
- Add the BUTTONS to the coat and take the COAT (G).
- Return to the second floor bedroom.
- Give the COAT to the Hobgoblin (H).
- Zoom into the sack (I); turn the book pages twice and take the PHOTO OF FIONA (J).
Chapter Three: The Monster
- Talk to the Hobgoblin.
- Take Collectible 21/60 (@).
- Examine the pedestal; put the PHOTO OF FIONA on it (A).
- Talk to the Kelpie (B).
- Talk to the Hobgoblin in the water and a sack will appear in the water.
- Use the PITCHER in the water to create the FILLED PITCHER (C).
- Zoom into the boat; use the FILLED PITCHER in the boat to clear away the mud.
- Take the FRUIT PEELING 1/3 (D) and the DRAGON CARVING (E).
- Go up the next 2 sets of steps.
- Zoom into the dead woman; take the FRUIT PEELING 2/3 (F).
- Go forward and then left towards the mural.
- Cut off the 7 vines with the ANCIENT KNIFE (always cutting the top one first).
- Take the FRUIT PEELING 3/3 (G).
- Walk down 3 times.
- Take Collectible 22/60 in the tree (@).
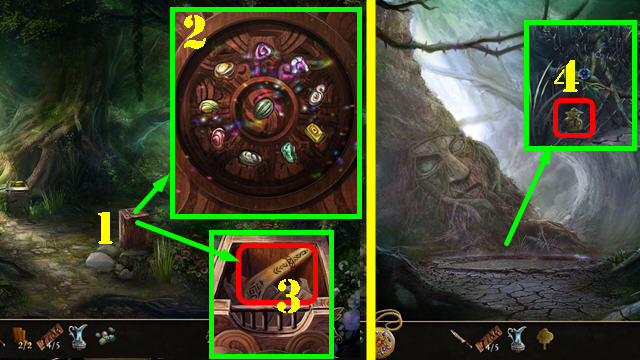
- Examine the fruits; place the 3 FRUIT PEELINGS in the lower right (H) to activate a puzzle.
- Cut all the fruits with the knife except the one that matches the fruit peel you placed in the lower right.
- See screenshot for solution (I).
- The FRUIT will be added to inventory.
- Go back to the wagon.
- Zoom into the dead woman; give the FRUIT to the monkey.
- Examine the dead woman again and take the ROPE (J).
- Walk down.
- Use the ROPE on the branch (1). Pull on the rope 3 times and take the BRANCH (K).
- Walk down.
- Use the BRANCH on the sack in the water 2 times; examine the sack and take the RUBBER STRIP (L).
- Zoom into the boat; put the RUBBER STRIP on the stick to acquire the SLINGSHOT (M).
- Go to the cliff.
- Take Collectible 23/60 (@).
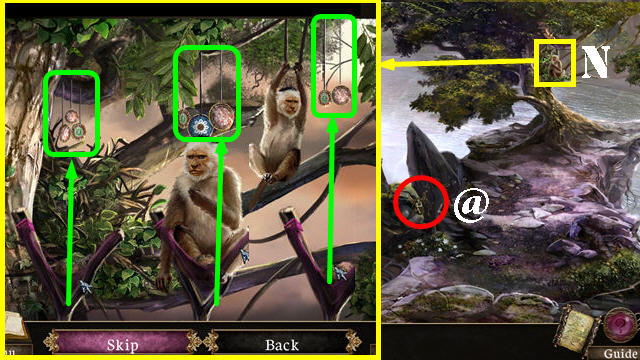
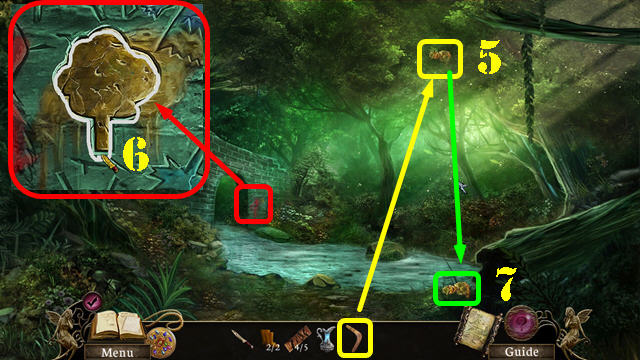
- Zoom into the monkey in the tree (N); put the SLINGSHOT on the monkey to activate a puzzle.
- Shoot at the weights with the SLINGSHOT when they are visible (green).
- The WEIGHTS will be added to inventory.
- Walk down.
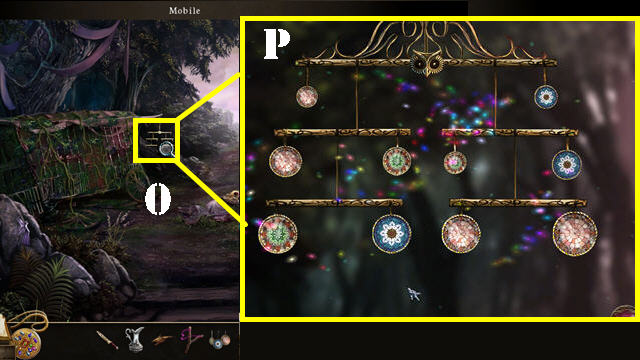
- Put the WEIGHTS on the mobile attached to the wagon to activate a puzzle (O).
- Balance the weights on both sides of the mobile. Select any 2 weights to swap their positions. The mobile will be balanced once the owl is in the center.
- See screenshot for solution (P).
- Enter the wagon.
- Examine the cabinet to activate a puzzle.
- Press on the blue buttons to change the rings in the center. Line up the rings so the colors blend in with the wood.
- Button A controls 1 and 6, Button B controls 2 and 4, Button C controls 1, 3, and 5, Button D controls 5 and 6.
- The solution is random; the screenshot shows the final image.
- Find the 10 related pairs.
- See screenshot for solution (A).
- Open the compartment (Q) and take the WINDER.
- Take Collectible 24/60 (@).
- Look at the box; take the MATCHES (R).
- Put the WINDER on the side of the box (S); turn the winder and take the LENS (T).
- Exit the wagon.
- Take Collectible 25/60 in the lower left (@).
- Zoom into the dead woman; put the LENS on the magnifying glass and take the MAGNIFYING GLASS (U).
- Take Collectible 26/60 next to the dead woman (@).
- Use the ANCIENT KNIFE on the carving to activate a puzzle (V).
- Trace the outline of the carving with your knife without lifting it (W).
- The CARVED X will be added to inventory.
- Zoom into the box; put the CARVED X on the slot (X).
- Take Collectible 27/60 (@) and Collectible 28/60 on the box (@).
- Press on the box; flip the pages 3 times and take the DRAGON CARVING (Y).
- Go to the cliff and head left towards the mural.
- Take Collectible 29/60 (@).
- Put the 2 DRAGON CARVINGS on the left and right recesses (A and B).
- Put the MAGNIFYING GLASS on the small symbols to activate a puzzle (C).
- Select 2 matching symbols until they are all gone.
- See screenshot for solution (D).
- Go through the entryway.
- Use the MATCHES on the torch, and take the TORCH (E).
- Use the TORCH to light up the 3 torches marked in red.
- Take Collectible 30/60 (@).
- Use the torch on the 3 kelpweeds marked in green. Cut the 3 KELPWEEDS marked in green with the ANCIENT KNIFE.
- Go forward.
- Use the torch on the 3 kelpweeds marked in green. Cut the 3 KELPWEEDS with the ANCIENT KNIFE.
- Take Collectible 31/60 (@).
- Examine the stone code; note the water drop and the number 4 (F).
- Zoom into the control panel to activate a puzzle.
- Select the 4 water symbols on the panel (G).
- Select the young boy statue; put the SLINGSHOT in its hand (H) and take the GEAR in the bag (I).
- Walk down.
- Examine the markings on the left; put the GEAR in the slot.
- Move the gears to the positions shown in the screenshot (J) and then pull on the left lever.
- Take the STONE DISC (K).
- Go forward.
- Zoom into the stone code on the right; put the STONE DISC in the center to activate a puzzle (L).
- Rotate the rings into place as shown in the screenshot (M).
- Note the number 4 on the Hobgoblin's chest (N).
- Zoom into the control panel.
- Select the 4 symbols which relate to the Hobgoblin on the panel (O).
- Zoom into the Hobgoblin statue; take the 3 MARBLES marked in yellow (P).

- Examine the stone code in the upper left; put the MARBLES on it to activate a puzzle.
- Put the marbles into the right slots as shown in the screenshot (Q). The marbles can only slide through the grooves they are connected to.
- Note the number 5 and the insects on the stone (R).
- Zoom into the control panel.
- Select the 5 insect symbols on the panel (S).
- Zoom into the young girl statue; take the BUTTERFLY NET (T) and JEWEL (U).
- Go back to the lake.
- Zoom into the boat; put the JEWEL on the purse and press on the mirror to activate a puzzle (V).
- Reconstruct the mirror as shown in the screenshot (W).
- The HAND MIRROR will be added to inventory.
- Go back to the cave.
- Examine the young girl statue; put the HAND MIRROR in the hand (X) and take the DOG COLLAR (Y).
- Walk down.
- Zoom into the murky water; use the TORCH on the water to illuminate it.
- Take the DOG BONE with the BUTTERFLY NET (Z).
- Go forward.
- Examine the stone code in the lower right; remove the WOOD using the ANCIENT KNIFE (A).
- Insert the DOG BONE in the recess (B); note the number 4 (C).
- Zoom into the control panel.
- Select the 4 dog-related symbols on the panel (D).
- Zoom into the dog statue; put the DOG COLLAR on the dog and take the STONE ARM (E).
- Zoom into the Hobgoblin statue; place the STONE ARM on it (F) and take the STONE KEY (G).
- Go back to the inside of the wagon.
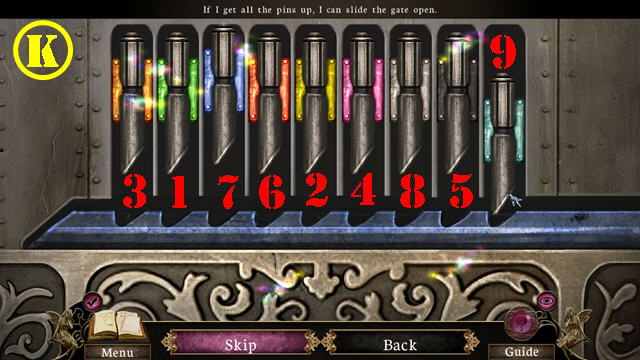
- Put the STONE KEY on the key machine on the round table to activate a puzzle.
- Select any 2 pins to swap their positions until they are all in the correct spots.
- See screenshot for solution (H).
- The NEW KEY will be added to inventory.
- Go back to the lake.
- Zoom into the sack; take Collectible 32/60 (@).
- Use the NEW KEY in the keyhole (I).
- Press on the BLANK MUSIC SHEET twice (J).
- Insert the ANCIENT KNIFE in the slot and take the FLUTE (K).
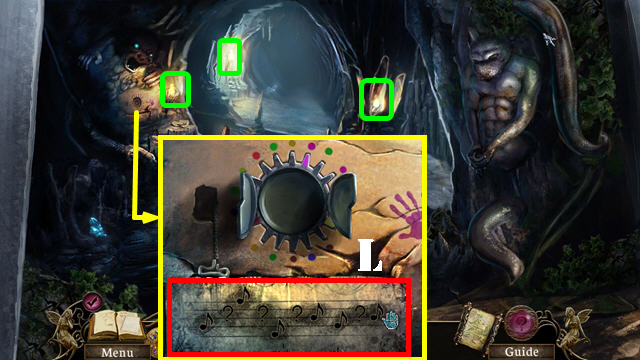
- Go back to the cave passageway.
- Put the WOOD on any of three torches (green) to create the BURNT WOOD.
- Examine the markings on the left; put the BLANK MUSIC SHEET over the notes.
- Use the BURNT WOOD on the blank music sheet.
- Drag the burnt wood left and right several times; take the MUSIC SHEET (L).
- Go back to the lake.
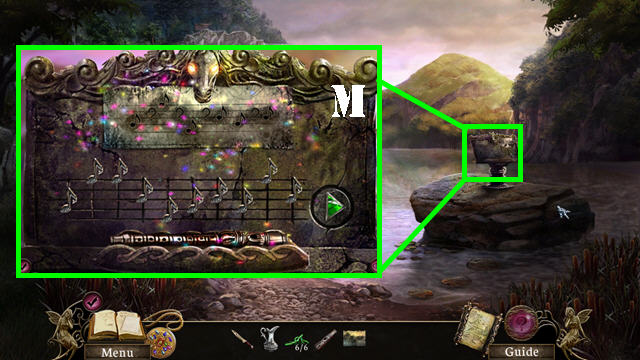
- Examine the pedestal; put the MUSIC SHEET and the FLUTE on the pedestal to activate a puzzle.
- Drag the notes up and down to put them into place. Press on the play button to check your selections. If your selections are correct the notes will appear green. Incorrect ones are red, and yellow ones are close.
- See screenshot for solution (M).
- Give the 6 KELPWEEDS to the Kelpie (N).
- You will receive the FLOWER CHARM.
- Open the locket; put the FLOWER CHARM in the right spot (O).
- Exit the locket and talk to the Kelpie to end the chapter.
Chapter Four: The Curio Shoppe
- Take the Collectible 33/60 (@).
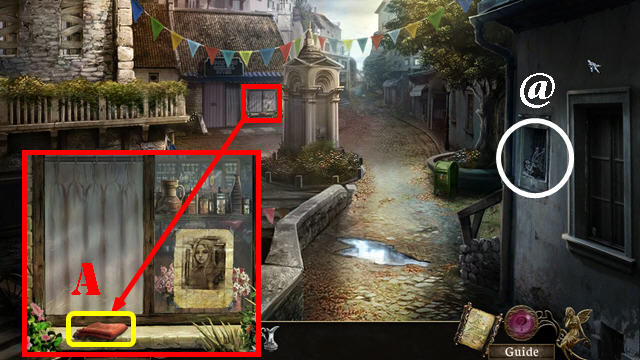
- Examine the general store window; take the RAG (A).
- Go forward.
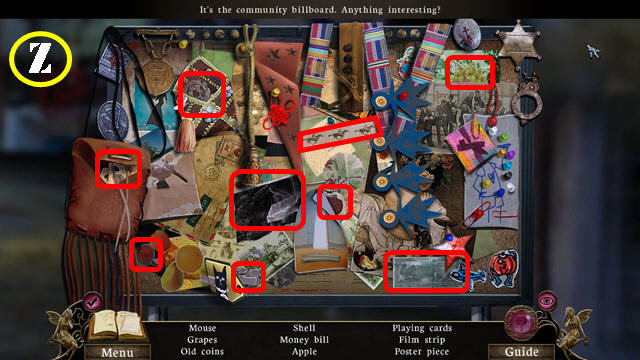
- Examine the bulletin board for a HOS.
- Find all the items on the list to receive the POSTER PIECE 1/2 (Z).
- Take Collectible 34/60 (@).
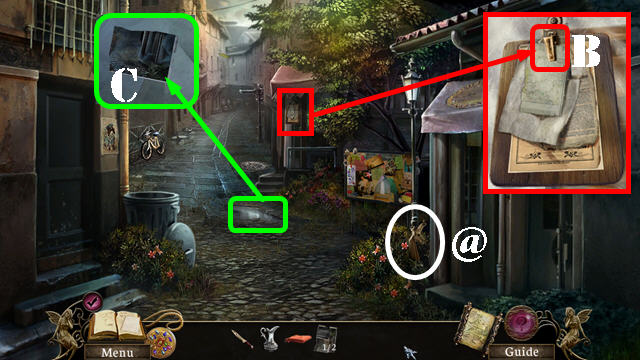
- Look at the clipboard and take the CLIP (B).
- Examine the puddle; move the papers aside and take the WET POSTER PIECE (C).
- Walk down.
- Look at the banners; put the CLIP on the line and then put the WET POSTER PIECE on the clip (D).
- Take the POSTER PIECE 2/2.
- Look at the tower; put the POSTER PIECE next to the torn piece and take the POSTER OF MAIN STREET (E).
- Go forward.
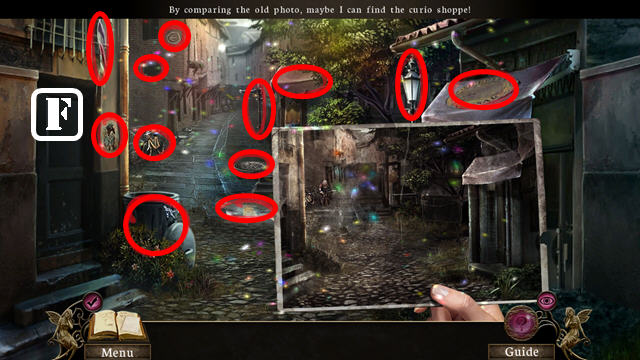
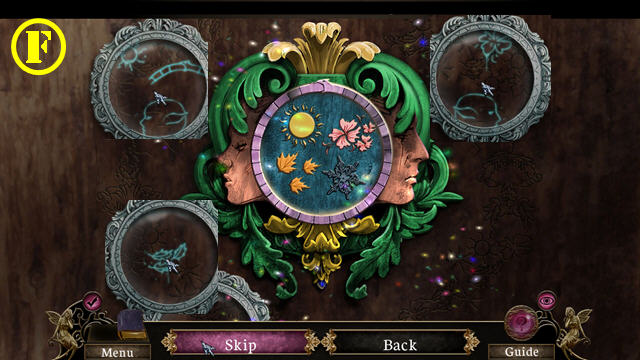
- Find the 12 differences in the picture. Note: You must have the POSTER OF MAIN STREET in inventory for this scene to appear.
- Look at the screenshot for the solution (F).
- Go forward.
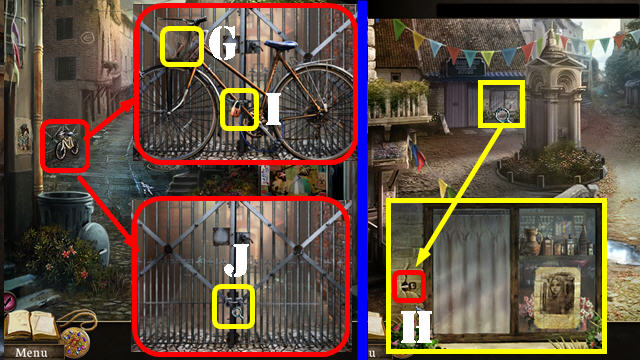
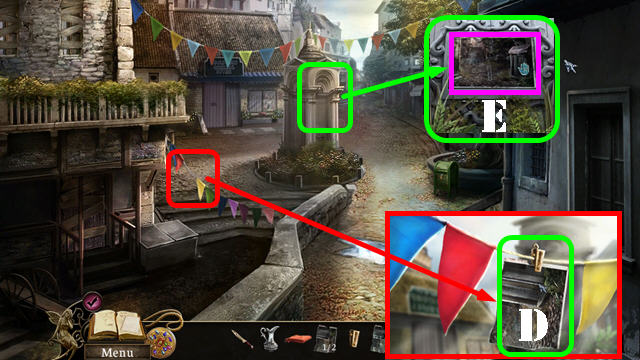
- Look at the bicycle and take the PEN (G).
- Walk down.
- Examine the general store window; use the PEN in the crack and take the SMALL KEY (H).
- Go back to the bicycle on Main Street; open the lock with the SMALL KEY and remove the lock (I).
- Use the PEN on the gate lock to activate a puzzle (J).
- Press on the pins in the right sequence so they all stay up.
- Please look at the screenshot for the correct order (K).
- Enter the back alley.
- Take the Collectible 35/60 on top of the barrel (@).
- Put the PITCHER below the burst pipe (L) to create the FILLED PITCHER.
- Zoom into the window (M); put the FILLED PITCHER on the window 3 times to create the wet window.
- Put the RAG on the wet window and wipe the window with it several times.
- Talk to the store owner. He invites you to go into the general store.
- Walk down twice and enter the general store.
- Talk to the store owner inside the store.
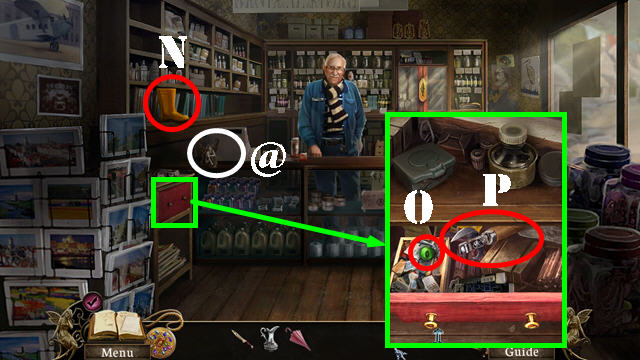
- Look at the footlocker to trigger a puzzle.
- Find the items described in the riddle at the bottom of the scene.
- The riddles are always the same but they don't always appear in the same order. The screenshot shows the solution for all 9 riddles (Z).
- The UMBRELLA will be added to inventory.
- Take the Collectible 36/60 next to the cash register (@).
- Take the GALOSHES 1/2 (N).
- Examine the side table; pull the drawers open; take the EYE (O) and the CAN OPENER (P).

- Return to the back alley.
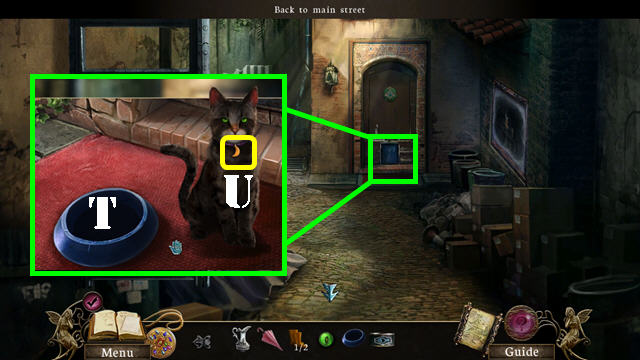
- Select the cat (Q); put the UMBRELLA on the fire escape and climb up it.
- Take the Collectible 37/60 (@) on the railing.
- Put the CAN OPENER on the can and take the CAN OF TUNA (R).
- Grab the DISH BOWL (S).
- Climb down the fire escape.
- Zoom into the door mat; put the DISH BOWL on the carpet and put the CAN OF TUNA in the bowl (T).
- Take the CHARM from the cat's collar (U).
- Walk down twice.
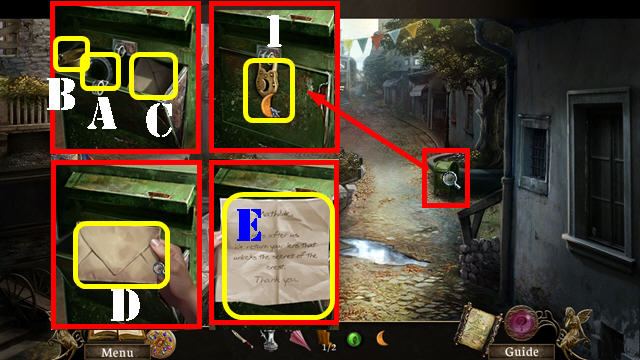
- Zoom into the mailbox; put the CHARM on the lock (1); take the CARVED GLASS (A) and the BELL (B).
- Select the envelope (C); use the ANCIENT KNIFE on the envelope (D) and read the letter (E).
- Return to the back alley.
- Zoom into the shop door; put the CARVED GLASS on the door to activate a puzzle.
- Move the lens around the edges of the door to reveal some images. Press on the images in the center to change the symbols to match what you found. Note: Don't forget to change the position of the ring as well.
- See screenshot for solution (F).
- Enter the curio shoppe.
- Take the Collectible 38/60 on the shelf (@).
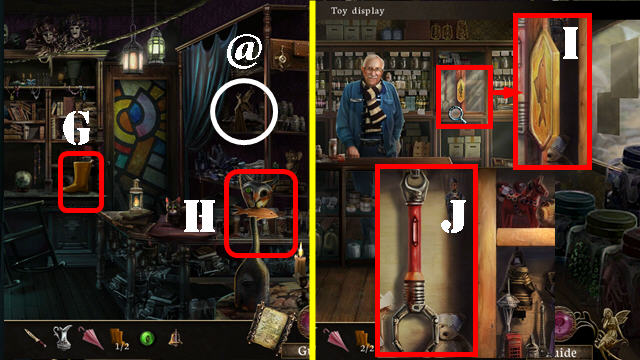
- Grab the GALOSHES 2/2 (G).
- Put the EYE on the cat statue to receive the FISH (H).
- Return to the general store.
- Examine the toy display; put the FISH in the lock (I) and take the ROBOT ARM (J).
- Return to the back alley.
- Place the UMBRELLA below the burst pipe (K).
- Examine the grate; use the ROBOT ARM to retrieve the SCREWDRIVER (L).
- Enter the curio shoppe.
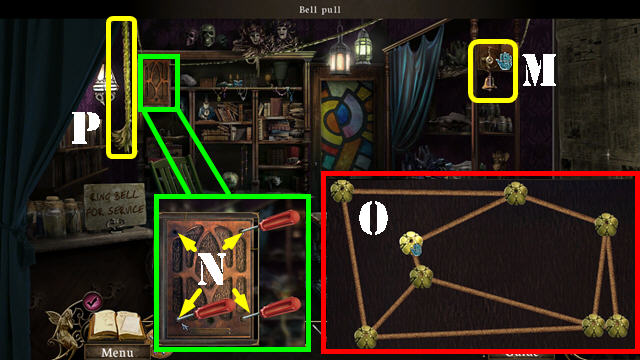
- Put the BELL on the bell pull (M).
- Examine the control box; remove the four screws with the SCREWDRIVER (N).
- Remove the cover to trigger a puzzle.
- Pull the pieces apart to untangle the strings as shown in the screenshot (O). The dark ropes are still tangled and the light ones are untangled.
- Pull the hanging rope (P).
- Talk to Mathilde.

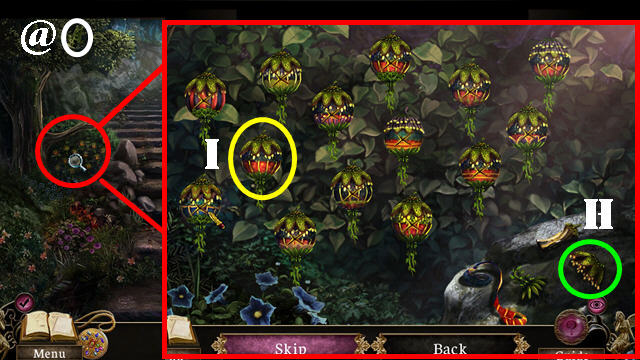
- Open the map and go to the grove.
- Take Collectible 39/60 in the lower left (@).
- Take the RECTANGULAR CODE 1/5 (Q) on the left and the RECTANGULAR CODE 2/5 (R) on the right.
- Go right.
- Take Collectible 40/60 in the lower left (@).
- Take the RECTANGULAR CODE 3/5 (S) on the left and the RECTANGULAR CODE 4/5 (T) on the right.
- Fill the PITCHER in the stream to obtain the FILLED PITCHER.
- Examine the pebbles in the water to activate a puzzle.
- Select 2 matching pebbles to eliminate them until all 5 sets of matching pebbles have been eliminated.
- See screenshot for a random solution (V).
- The PEBBLES will be added to inventory.
- Walk down.
- Select the map box (1); put the PEBBLES on it to activate a puzzle.
- Put the pebbles in the right spots. Select any two pebbles to swap their positions.
- See screenshot for solution (2).
- Take the BOOMERANG (3).
- Go left to the Treant.
- Zoom into the roots; take the PARK RANGER CUTOUT (4).
- Walk down and go right.
- Use the BOOMERANG to knock down the BOY SCOUT CUTOUT (5) in the tree.
- Take the BOY SCOUT CUTOUT on the ground (7).
- Put the GALOSHES in the water and select the graffiti on the wall.
- Put the ANCIENT KNIFE on the graffiti to activate a puzzle.
- Trace the outline of the tree with one stroke to receive the TREE CUTOUT (6).
- Walk down.
- Examine the plaque; insert the BOY SCOUT CUTOUT (A), the TREE CUTOUT (B), and the PARK RANGER CUTOUT (C) in the slots.
- Take the RECTANGULAR CODE 5/5 (D).
- Go left towards the Treant.
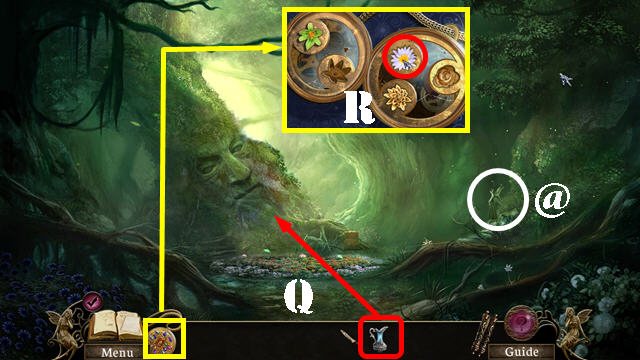
- Zoom into the roots; put the FILLED PITCHER on the roots to activate a puzzle (E).
- Select the closed buds to open them; then press on the matching flower until they are all gone.
- See screenshot for a random solution (F).
- Use the ANCIENT KNIFE on the dirty box 3 times (G).
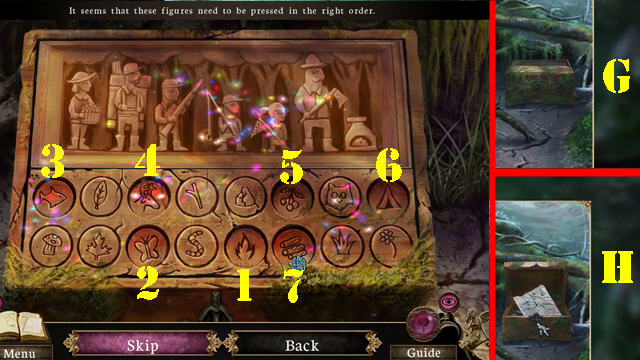
- Put the 5 RECTANGULAR CODES on the box to activate a puzzle.
- Press the buttons in the right order.
- See screenshot for the correct order. Press on the symbols in this order: Fire (1), Butterfly (2), Fish (3), Deer (4), Cherries (5), Tent (6), and Logs (7).
- Take the ENCODED TREANT GUIDE (H).
- Go back to the curio shoppe.
- Give the ENCODED TREANT GUIDE to Mathilde.
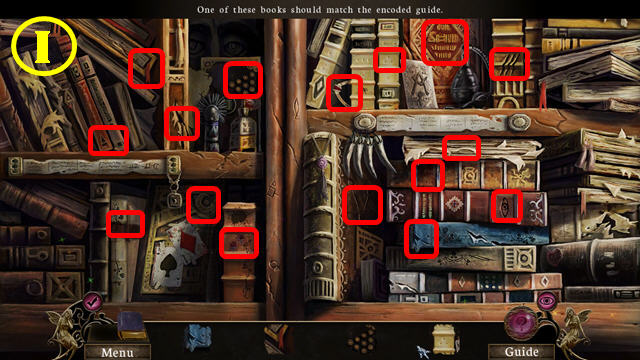
- Select the bookcase for a HOS.
- Find all the items shown at the bottom of the scene (I).
- The FAY RECIPE BOOK will be added to inventory.
- Give the FAY RECIPE BOOK to Mathilde.
- Return to the general store.
- Talk the store owner.
- Examine the box on the counter; move the items aside and select the 4 FUNNELS (J).
- Go back to the curio shoppe.
- Examine the back door (K); put the 4 FUNNELS on the flags and the FAY RECIPE BOOK on the stand to activate a puzzle.
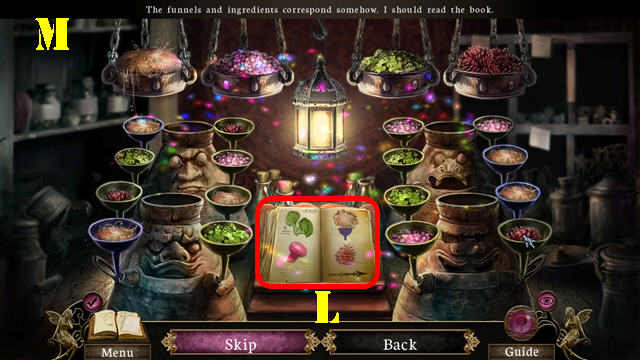
- Your goal is to place the ingredients in the funnel according to the images in the book (L). Flip the book pages to see all combinations.
- Select the ingredients in the hanging bowls and add them to the funnels.
- See screenshot for solution (M).
- The TREANT POWDERS will be added to inventory.

- Return to the stream.
- Fill the PITCHER in the stream to obtain the FILLED PITCHER (N).
- Go back to the Treant.
- Place the TREANT POWDERS on the Treant to activate a puzzle.
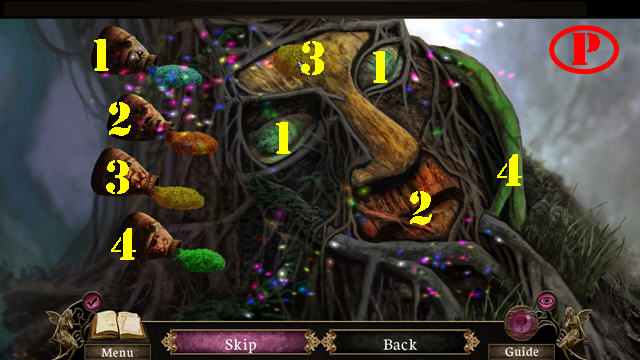
- Color in the Treant according to the colors on the tree.
- See screenshot for solution (P).
- Take Collectible 41/60 in the lower right (@).
- Give the FILLED PITCHER to the Treant to receive the LOCKET CHARM (Q).
- Open the locket; put the FLOWER CHARM in the right spot to end the chapter (R).
Chapter Five: Sanctuary
- Take Collectible 42/60 in the lower right (@).
- Take the METAL PIECE 1/7 (1) and the METAL PIECE 2/7 (2).
- Go towards the chapel.
- Take Collectible 43/60 above the well (@).
- Go towards the chapel entrance.
- Take Collectible 44/60 in the upper right (@).
- Take the METAL PIECE 3/7 (3) and the METAL PIECE 4/7 (4).
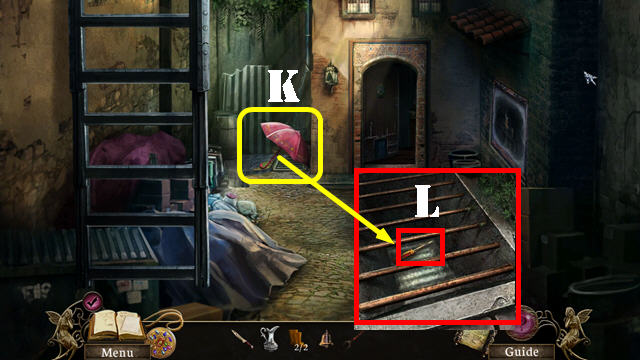
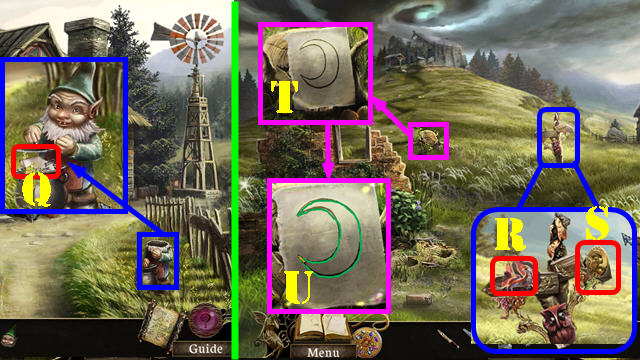
- Examine the vines on the right; cut them with the ANCIENT KNIFE 3 times and take the SHOVEL HANDLE (A).
- Examine the chapel door; take the GNOME'S HEAD (B).
- Walk down twice.
- Examine the tree stump; put the SHOVEL HANDLE on the shovel head to obtain the SHOVEL (C).
- Look at the ruined garden patch; use the SHOVEL on all the mounds several times until the shovel disappears.
- Take the BLUNT SAW (D) and the TRIANGULAR FILE (E).
- Head right towards the cottage.
- Take Collectible 45/60 on the side of the cottage (@).
- Take the METAL PIECE 5/7 (5), METAL PIECE 6/7 (6), and the METAL PIECE 7/7 (7).
- Examine the bottom of the windmill; use the ANCIENT KNIFE to cut the rope and take the ROPE WITH A HOOK (F).
- Walk down and head towards the chapel.
- Zoom into the headless gnome; add the GNOME'S HEAD to it (G).
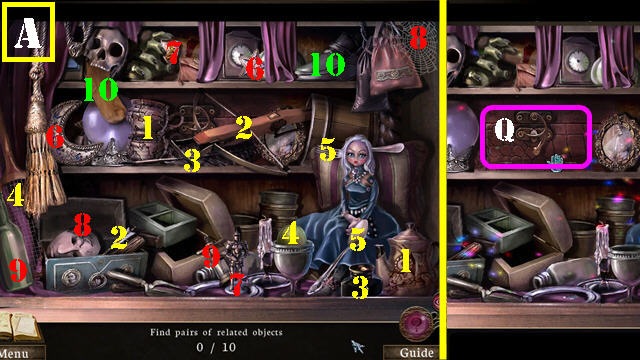
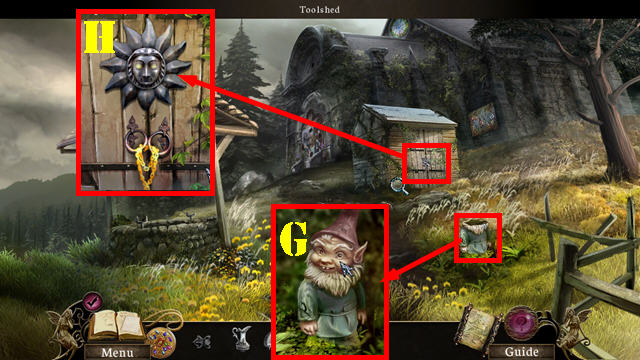
- Zoom into the toolshed; add the 7 METAL PIECES to the sun to activate a HOS (H).
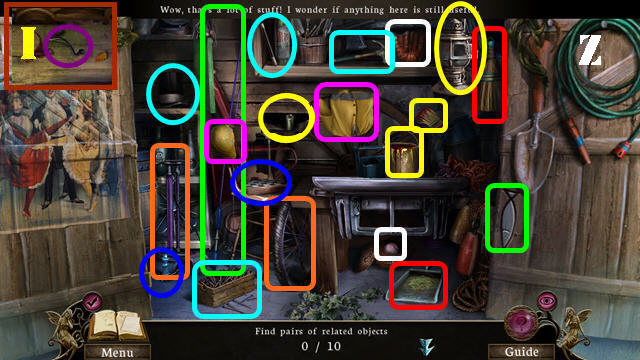
- Find the 10 related items.
- See screenshot for solution. Choose the pairs marked by color and shape.
- Take the PULLEY HANDLE (I).
- Put the BLUNT SAW on the vise (J).
- Put the TRIANGULAR FILE over the blunt saw; drag the file up and down several times to sharpen the saw and take the SAW.
- Return to the cottage.
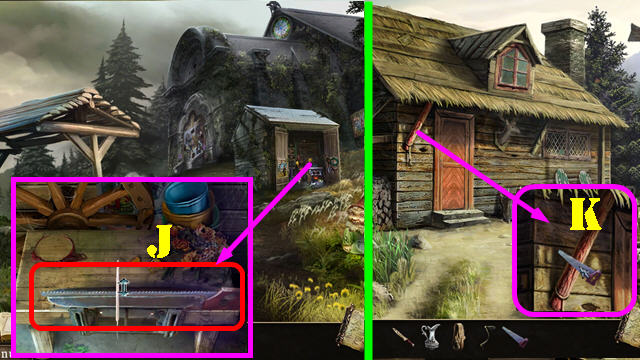
- Look at the awning by the door; cut the STICK OF WOOD with the SAW 2 times (K).
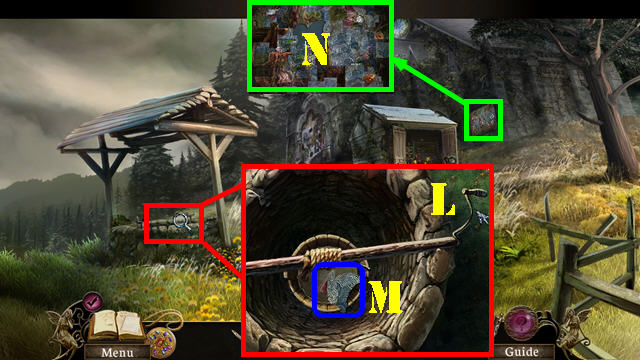
- Go back to the well.
- Zoom into the well; attach the STICK OF WOOD to the hook.
- Put the ROPE WITH A HOOK over the stick.
- Add the PULLEY HANDLE on the end of the stick (L). Press on the handle to raise the bucket.
- Take the MOSAIC SLAB (M).
- Put the PITCHER in the water to create the FILLED PITCHER.
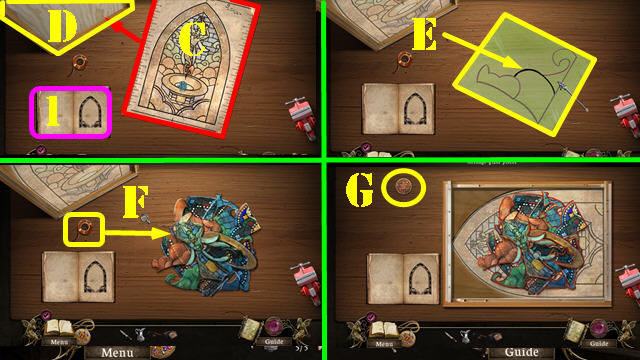
- Examine the mosaic on the side of the chapel (N); add the MOSAIC SLAB to the recess to activate a puzzle.
- Arrange the mosaic tiles to form the correct image.
- See screenshot for solution (O). The mosaic shows the location of the missing shapes.
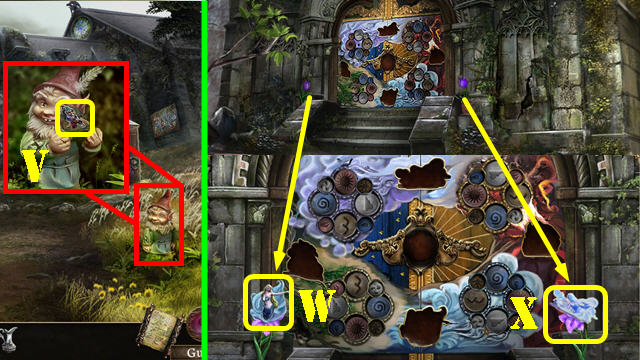
- Take the GNOME'S HEAD (P).
- Return to the cottage.
- Zoom into the headless gnome; put the GNOME'S HEAD on the body.
- Take the FEATHER and the DOOR SHAPE PATTERN (Q).
- Walk down.
- Examine the sign; cut the DOOR SHAPE 1/6 (R) and DOOR SHAPE 2/6 (S) with the SAW.
- Examine the tree stump; put the DOOR SHAPE PATTERN over it (T).
- Put the ANCIENT KNIFE over the pattern to activate a puzzle.
- Trace the moon outline with the knife in one swoop (U).
- You will obtain DOOR SHAPE 3/6.
- Return to the well.
- Zoom into the gnome.
- Give the FEATHER to the gnome; take the DOOR SHAPE 4/6 (V).
- Go to the chapel entrance.
- Zoom into the back door; use the FILLED PITCHER on the two flower buds.
- Take DOOR SHAPE 5/6 (W) and DOOR SHAPE 6/6 (X).
- Zoom into the chapel door; put the 6 DOOR SHAPES on the door to activate a puzzle.
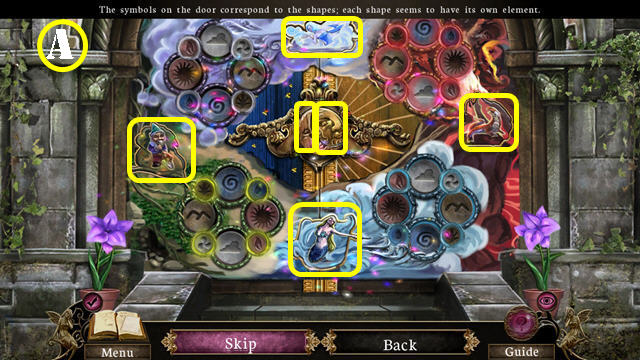
- Align the symbols in each section with their respective elements.
- Press on the 6 shapes (yellow) to align the symbols to their elements. Once elements are in the right spots, they will glow.
- The solution is random; the screenshot shows the final image.
- Enter the chapel.
- Take Collectible 46/60 on the ground (@).
- Examine the pew; take the CROWBAR and the EMPTY OIL CAN (G).
- Look at the left window; take the RUNE STONE 1/2 (H).Read the inscription at the bottom of the window (I).
- Exit the chapel.
- Break the crate with the CROWBAR (J).
- Zoom into the crate; take the RUNE STONE 2/2 and the OPEN CRATE (K).
- Go back into the chapel.
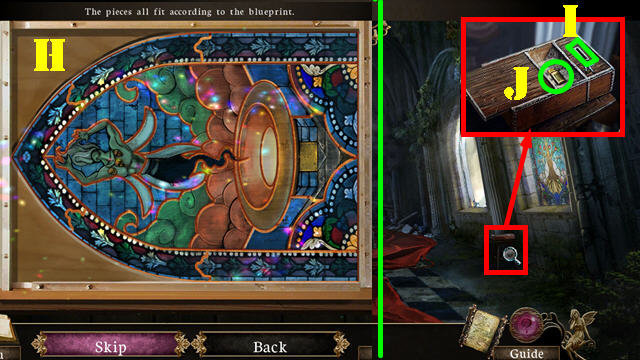
- Examine the walled-up window (L); add the 2 RUNE STONES to it to activate a puzzle.

- Select one of the stones in the lower right corner and then select one of the blanks stones to copy the design you selected.
- Use the pattern in the lower right as a clue. Press on the Reset button (1) on the left to start over.
- See screenshot for solution (M). Solving the puzzle gets rid of some of the shadows.
- Take Collectible 47/60 in the window (@). Read the inscription on the plaque (N).
- Look at the stool; take the STAINED GLASS SHEET 1/5 (O). The stained glass sheets will automatically go into the OPEN CRATE.
- Examine the right window to trigger a puzzle (P).
- Arrange the weapons according to the image in the background. When a piece has been placed correctly, it will sparkle.
- See screenshot for solution (Q).
- Read the inscription at the bottom of the window (R).
- Examine the broken window; take the STAINED GLASS SHEET 2/5 (S). Some more shadows have disappeared.
- Go towards the altar.
- Take the STAINED GLASS SHEET 3/5 (T).
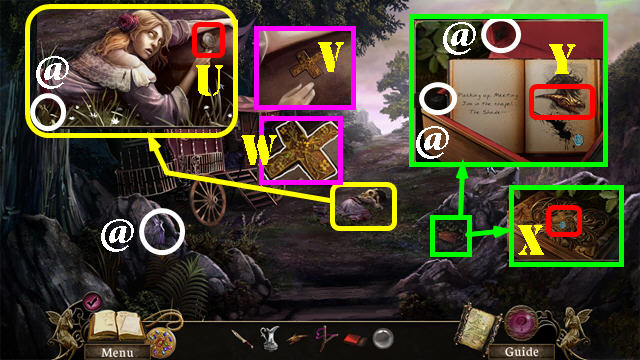
- Zoom into the dead man; take the DOOR KEY (U).
- Examine the scattered items for a HOS.
- Remove the cobweb; take the gear if it's on your list (V).
- The BLUEPRINTS will be added to inventory.
- Return to the cottage.
- Zoom into the door; use the DOOR KEY in the lock and enter the cottage.
- Take Collectible 48/60 below the table (@).
- Take the STAINED GLASS SHEET 4/5 (1).
- Put the EMPTY OIL CAN on the oil container to create the FILLED OIL CAN (2).
- Examine the cabinet (3); use the FILLED OIL CAN on the 4 hinges marked in yellow.
- Open the cabinet door; take the STAINED GLASS SHEET 5/5 (4) and the TOOLBOX PIECE (5).
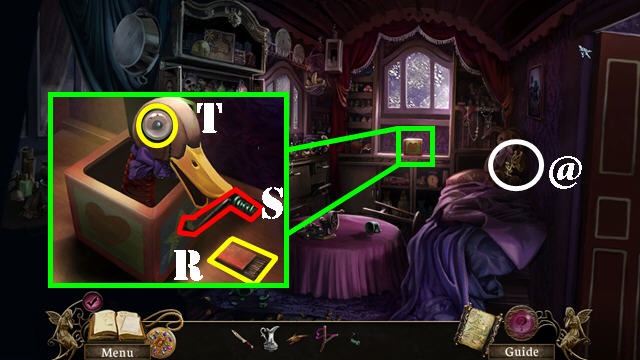
- Zoom into the drawer and pull it open. Drag the papers aside; take the SOLDERING IRON AND SOLDER (6).
- Zoom into the toolbox and add the TOOLBOX PIECE to it to activate a puzzle (7).

- Using the designs on the toolbox as a clue, arrange the pieces in the right order. Drag one piece over to another piece to swap them.
- See screenshot for solution (A).
- Take the GLASS CUTTER (B).
- Examine the work table; add the BLUEPRINTS to the incomplete one (C).
- Press on the blueprint to move it to the jig (D). Turn the pages of the book (1) to view all instructions.
- Put the 5 STAINED GLASS SHEETS on the table; use the GLASS CUTTER on the black lines.
- Keep using the glass cutter to cut all the black lines (E) that appear on the glass sheets.
- Drag the COPPER FOIL (F) to the stained glass pieces and press on it.
- Take the COIN (G).
- Press on the stained glass pieces to activate a puzzle.
- Arrange the stained glass pieces as shown in the screenshot (H).
- Return to the chapel.
- Examine the candle-vending box; insert the COIN into the slot (I) and take the LIGHTER (J).
- Return to the cottage.
- Put the LIGHTER in the fireplace (K).
- Put the SOLDERING IRON AND SOLDER into the fire to create the HOT SOLDERING IRON AND SOLDER.
- Examine the work table; use the SOLDERING IRON AND SOLDER on the stained glass (L).
- Take the COMPLETED STAINED GLASS.
- Return to the chapel.
- Zoom into the rightmost window; put the COMPLETED STAINED GLASS in it (M). Read the inscription at the bottom (N).
- Go towards the altar.
- Press on the blinking eyes to activate a puzzle.
- Find and select the matching pairs of eyes until they have all been eliminated. This action clears the shadows by the altar (O).
- Take the EYEBALL 1/3 (P) on the steps.
- Take Collectible 49/60 By the left statue (@).
- Zoom into the left statue; use the ANCIENT KNIFE to remove the EYEBALL 2/3 (Q).
- Go forward.
- Use the LIGHTER on the 2 candelabras marked in yellow.
- Take Collectible 50/60 on the ground (@).
- Zoom into the front of the altar; take the first and second GEMSTONES (R).
- Zoom into the journal (S); flip the pages 3 times and take the POTION AMULET (T).
- Take Collectible 51/60 and Collectible 52/60 on the journal stand @).
- Place your cursor on the right side of the journal screen, and press on the arrow to go to the basin. Take the CLAW (U).
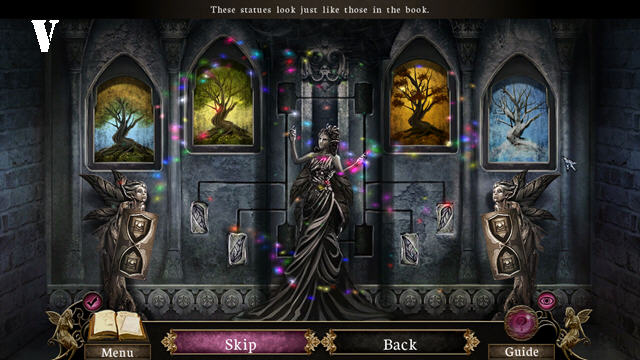
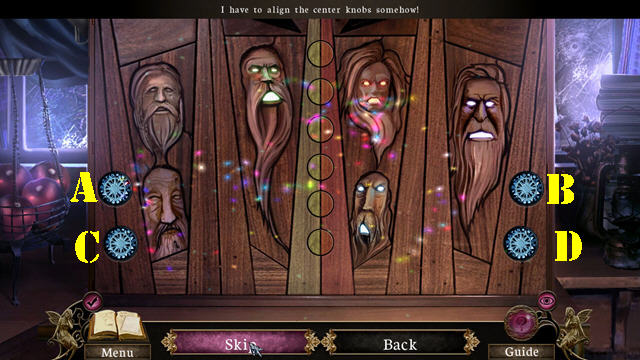
- Exit the altar and examine the wall relief to trigger a puzzle.
- For the first part of the puzzle, arrange the statue poses and the background windows according to the image in the journal.
- Press on the windows to change the background. Press on the items on the statues to change them.
- See screenshot for solution (V).
- For the second part of this puzzle, you must press on the golden squares to move the slabs.
- To solve the puzzle, press on the golden squares (A - D) in this order: A x 5 and B x 5.
- Open the vault and take the third GEMSTONE (1).
- Exit the vault and walk down.

- Zoom into the right statue; put the CLAW on the lantern to trigger a puzzle (2).
- Press on the yellow gears (W -Z) to change the eye in the center so it matches the ones on the left and right.
- The solution is random; the screenshot shows the final image.
- You will receive EYEBALL 3/3.
- Take the fourth GEMSTONE from inside the lantern (3).
- Go forward.
- Zoom into the vault.
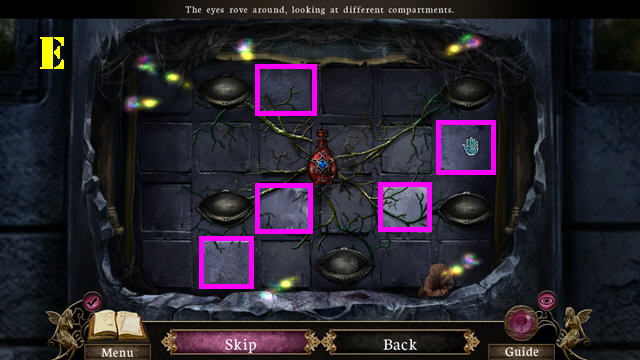
- Add the 3 EYEBALLS and the POTION AMULET on the vault to activate a puzzle.
- Hover your mouse over each square, if the eyes stop moving press on that square to light it up. If the eyes don't stop moving, keep hovering your mouse over the other squares until you find the 5 that need to be lit.
- See screenshot for solution (E).
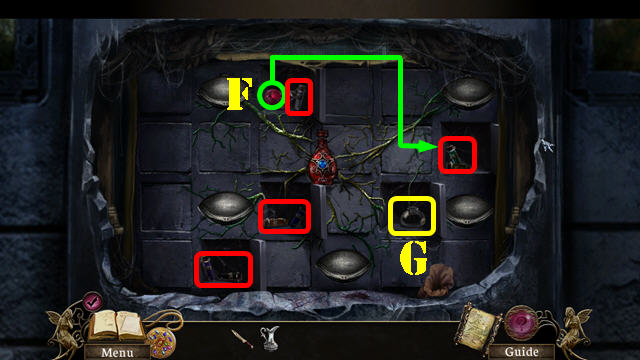
- Place the 4 GEMSTONES over the 4 gem receptacles.
- Take the fifth GEMSTONE (F) and place it on the last gem receptacle on the right.
- Take the EMPTY POTION FLASK (G), and the 4 ENCHANTED LIQUIDS marked in red.
- Examine the basin.
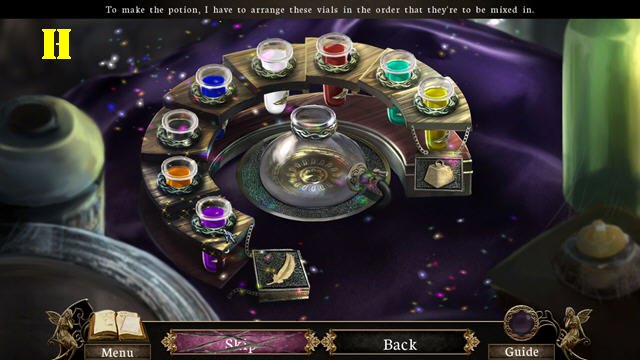
- Put the EMPTY POTION FLASK on the stand and the 4 ENCHANTED LIQUIDS in the vial racks to activate a puzzle.
- Arrange the liquids from the lightest to the heaviest. Add the liquids to the flask (maximum 3) to determine their weight.
- Select the valve on the side of the flask to flush the liquids.
- Select two vials to swap their positions. See screenshot for solution (H).
- Drag the arranged vials to the golden bowl.
- Use the PITCHER in the liquid to obtain the POTION.
- Take the LOCKET CHARM (I).
- Open the locket; put the FLOWER CHARM in the right spot to end the chapter (J).
Chapter Six: The Final Battle

- Talk to Shade.
- Take Collectible 53/60 on the left gargoyle (@).
- Take Collectible 54/60 by the right gargoyle (@).
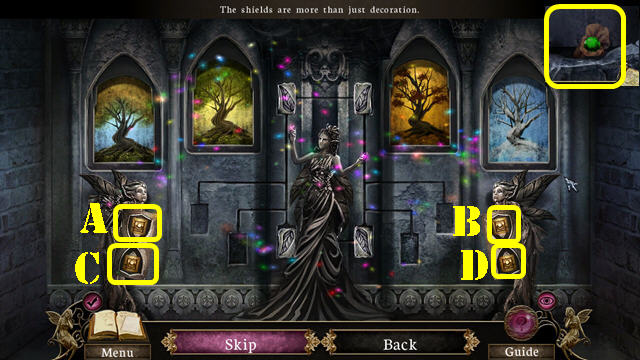
- Use the ANCIENT KNIFE on the snapping vines to activate a puzzle (A).
- Watch the color inside of the snapping mouths; once all the mouths are closed, press on the matching flower.
- Go through the gate.
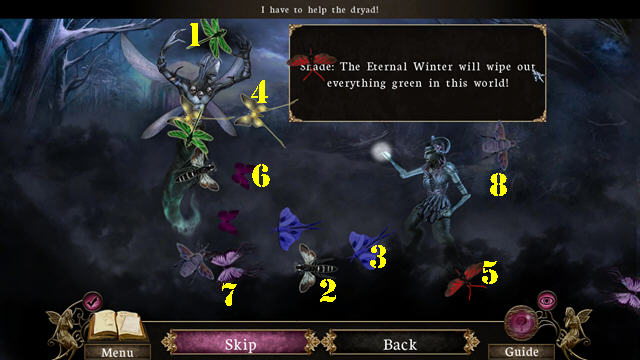
- Talk to Shade to activate a puzzle.
- Press on the insects according to the clues given by the Dryad.
- To solve the puzzle, press on the sets of insects in this order: Green (1), Black and White (2), Blue (3), Yellow (4), Red and Black (5), Small Purple Butterflies (6), Large Grey Butterflies (7), and the Wasps (8).
- Take Collectible 55/60 in the lower left (@).
- Take Collectible 56/60 in the lower right (@).
- Take the 1/9 GEM (B) and the 2/9 GEM (C).
- Talk to the Dryad (D).
- Go towards the gazebo.
- Take Collectible 57/60 by the sifter (@).
- Take Collectible 58/60 by the steps (@).
- Take the SCEPTER HEAD (D).
- Go to the cherry tree.
- Take GEM 3/9 (E) and the MITTEN (F).
- Walk down and go right.
- Take GEM 4/9 (G) and the GEM 5/9 (H).
- Go forward.
- Take Collectible 59/60 on the left tree (@).
- Take Collectible 60/60 in the lower right (@).
- Take GEM 6/9 (I) and the GEM 7/9 (J).
- Examine the rocks; put the MITTEN next to the other one (K).
- Drag the mittens back and forth until all the snow has been cleared.
- Take the GEM 8/9 (L) and the first MIRROR (M).
- Put the SCEPTER HEAD on the scepter and take the HEAVY SCEPTER (N).
- Return to the cherry tree.
- Zoom into the frozen brook; break the ice with the HEAVY SCEPTER 3 times (O).
- Take the GEM 9/9 (P) and the second MIRROR (Q).
- Walk down and go right.
- Zoom into the wheelbarrow; add the 9 GEMS to the mirror and take the third MIRROR (R).
- Walk down and go towards the gazebo.
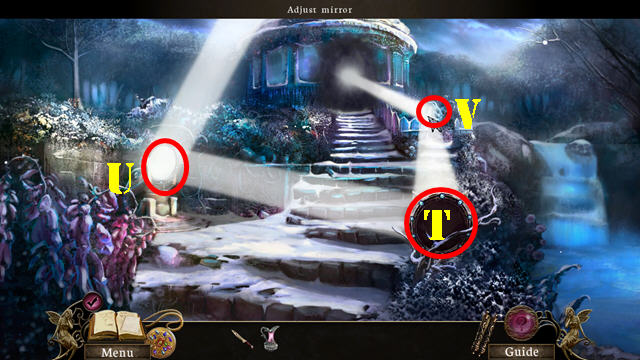
- Put the first MIRROR on the branches (T), put the second MIRROR on the soil shifter (U), and put the third MIRROR on the flowerbed (V).
- Adjust each mirror as shown in the screenshot to eliminate the evil smoke.
- Go into the gazebo.
- Talk to Shade.
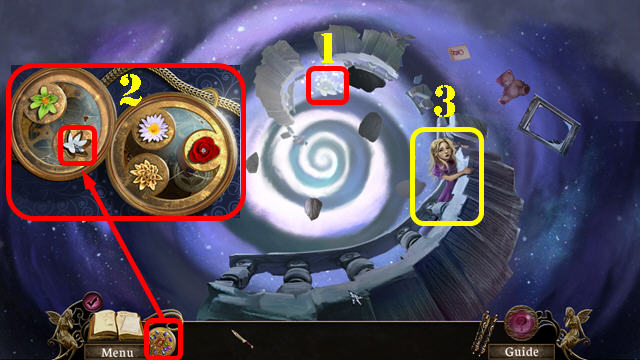
- Select the basin and press on Fiona's image to activate a puzzle.
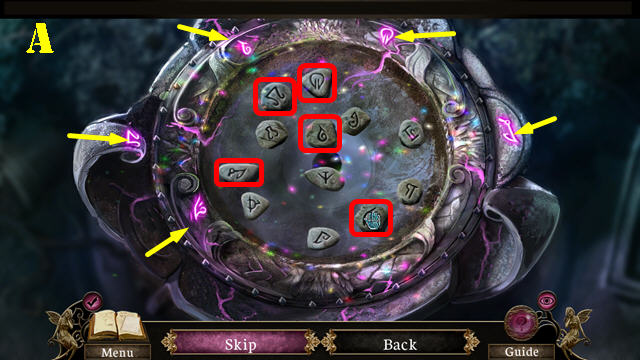
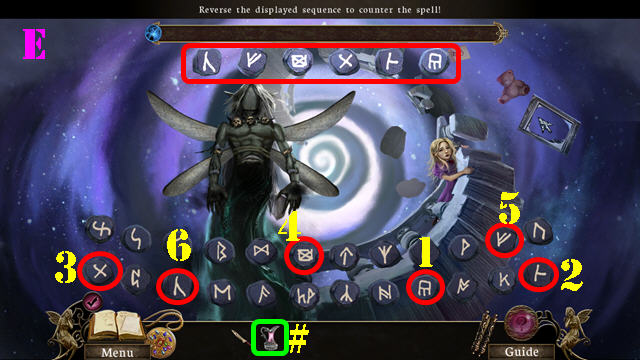
- Press on the same runes marked around the basin.
- See screenshot for solution (A).
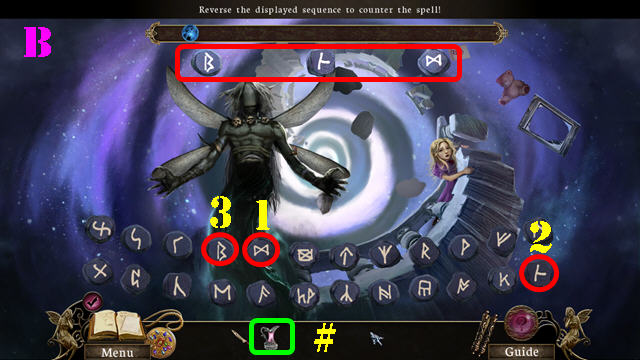
- Talk to Shade to activate a puzzle.
- Select the symbols shown on top of the screen before the timer runs out. The symbols must be selected from right to left.
- Look at the screenshot for the first random solution (B).
- Use the POTION (#) on Shade before the meter reaches the right side.
- Repeat this process 4 times to beat the game.
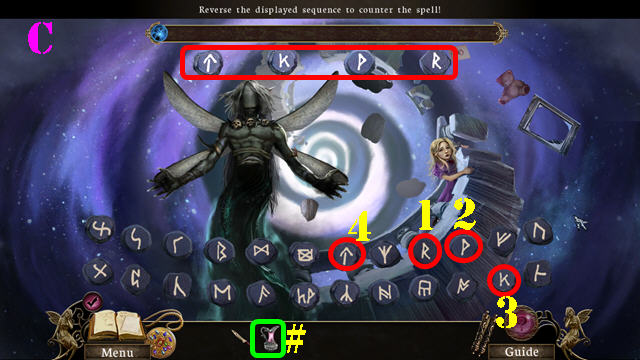
- Look at the screenshot for the second random solution (C).
- Use the POTION (#) on Shade before the meter reaches the right side.
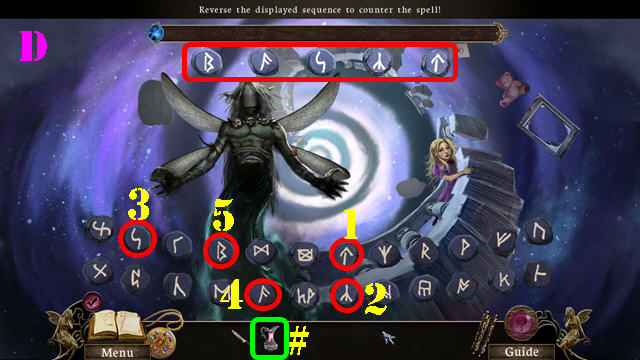
- Look at the screenshot for the third random solution (D).
- Use the POTION (#) on Shade before the meter reaches the right side.
- Look at the screenshot for the fourth random solution (E).
- Use the POTION (#) on Shade before the meter reaches the right side.
- Take the LOCKET CHARM (1).
- Open the locket; put the FLOWER CHARM in the right spot (2).
- Take the LOCKET.
- Give the LOCKET to Fiona (3).
- Congratulations! You have completed Otherworld: Spring of Shadows Standard Edition!
Easter Eggs!
- There are a lot of achievements in the game; in order to obtain them all in one playthrough you must play in Hardcore Mode and you must find all the Easter eggs.
- You can access the Achievements in-game through the menu button. Hover your mouse over each achievement to read its requirements. You can also access them through the main menu.
- This section focuses only on the Easter egg locations.
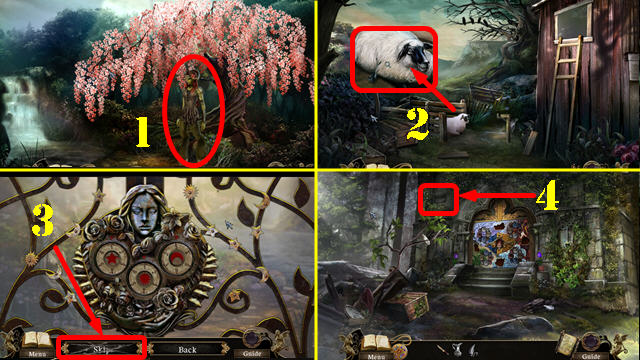
- Provocation (1) – Use the KNIFE on the Dryad (Chapter 1, while she is standing only).
- Sheepish Grin (2) - Make the sheep 'Baa' 5 times (Chapter 2, while it's seated only).
- Meanie! (2) - Use the KNIFE or HAMMER on the sheep (Chapter 2, while it's seated only).
- Silly Gamer! (3) - Press on the skip button 10 times in Hardcore mode (on one puzzle, or on several puzzles).
- Aww, Thanks! (4) - Find the Boomzap logo (Chapter 5, on the wall outside the chapel).
Created at: 2012-02-18