

WALKTHROUGH MENU
- INTRODUCTION
- TUTORIAL
- FIRST CHALLENGE
- SECOND CHALLENGE
- THIRD CHALLENGE
- FOURTH CHALLENGE
- FIFTH CHALLENGE
- SIXTH CHALLENGE
INTRODUCTION
GENERAL TIPS
- There are six chapters in this game. The game does not have a timer; you can take your time and play the game at your own pace.
- There is no penalty for clicking randomly in the scene.
- Hover your mouse over an item, and it will sparkle if you’re meant to interact with it.
- If you do not wish to read or hear the dialogue, you can click on the skip button at the bottom of the page.
- You can click on certain items and you will get a closer view. To exit out of the close-up, simply click on the "X" that is on the right side of an object.
- When you click on something and your cursor turns into a pair of feet, it means that you have a new area to access.
- When you see a black arrow appear on top of the scene, it means that you need to go back to a previous area to solve a puzzle.
INVENTORY ITEMS
- Some items will automatically go into your inventory when you click on them. To use the items from the inventory, pick them up and place them where you want them to go.
- Inventory items can be combined with each other directly from the inventory menu. Simply place one item over another to combine them.
- Some inventory items can be used more than once and will remain in your inventory until you no longer need it.
MAIN MENU
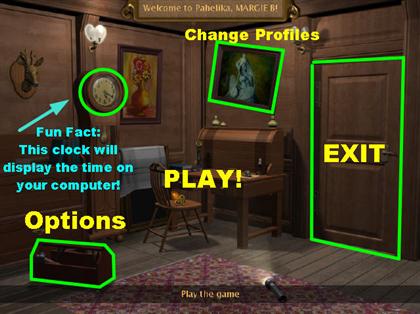
- From the main menu you can change several aspects of the game.
- To play the game, click on the chair.
- To exit the game, click on the door.
- If you want to change your profile, click on the crooked picture on the wall. You can add, delete, or rename a player.
- Click on the toolbox and you will be able to adjust the volume, screen settings, and a few other options.
TUTORIAL
STORE ROOM
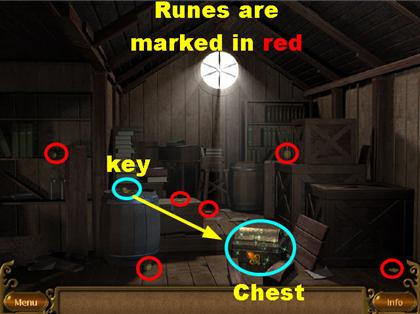
- When you first enter the scene, the game will prompt you to click on the wooden pile that is on the lower right side of the scene. You have to click on it three times in order to reveal the chest that is underneath. You cannot open the chest until you find the key.
- The key is on top of the barrel on the left side of the page. Once you click on the key it will go into the inventory. The inventory box is located at the bottom of the scene.
- Place the key on the chest. Click on the contraption that is inside the chest, and it will go into your inventory.
- Click on the contraption in the inventory and you will get a closer view. The game tells you that the contraption has empty slots. You have to exit out of there by clicking on the "X" that is on the right side of it.
- Look for the six runes that are scattered around the room. They are highlighted red in the screenshot.
PLACE RUNES IN THE CONTRAPTION
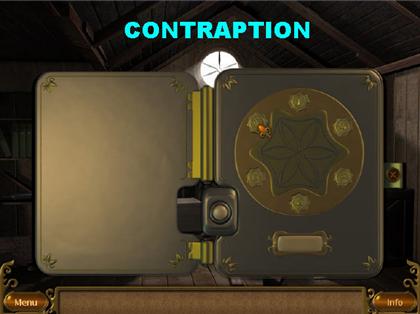
- Once you’ve collected all the runes, click on the contraption in the inventory box to get a closer view.
- Place all six runes into the empty spots. The runes will not go into an incorrect space, so you don’t have to worry about placing them in the wrong place. Once they are all in place, the contraption will close automatically.
FIRST CHALLENGE
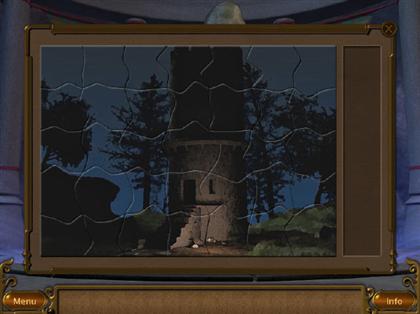
TOWER OF THE WIZARD
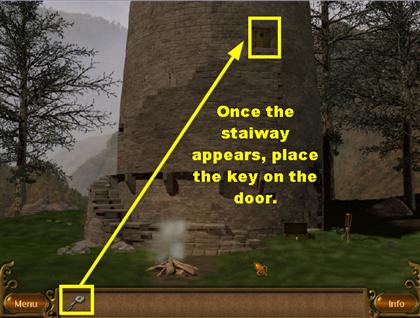
- When you start this chapter, it tells you that you have to find a way to get up to the door on top of the tower.
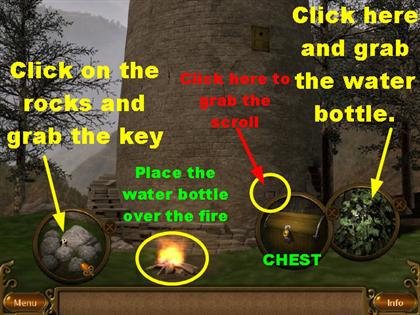
- Click on the chest and the small tree on the right side of the tower to get a closer view. You can close that view at anytime by clicking on the "X" on the right side of either of those objects. Click on the pile of rocks on the left side of the scene and you will get a closer view as well.
- Click on the pile of stones, once you have the closer view, and a key will appear. The rocks will disappear, and the key will go into the inventory.
- Click on the close-up view of the small tree and you will see a water bottle. Click on the water bottle and it will go into the inventory.
- Place the water bottle over the fire in the middle of the ground. Once the flames go out, click on the wood to get a closer view. Grab the key that is on top of the pile of wood, and it will go into the inventory.
- Place the key you just found on the chest. Once the chest is open, grab the scroll that is inside and it too will go into the inventory.
- Click on the lower right side of the tower, and a quill will appear inside the loose brick. The quill will go into the inventory.
- From the inventory box, combine the quill and the scroll and they will merge into one.
- Click on the glowing scroll, and a stairway will appear. Place the key on the door that is on top of the tower. Tiny feet will appear on the door. Click on the door to go to the next scene.
WIZARD’S STUDY
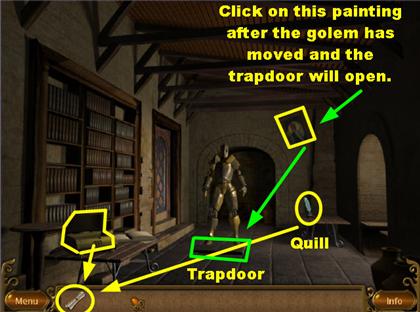
- Click on the chest in the lower left side of the scene, and a puzzle will appear. Please look at the section below for the solution to this puzzle.
- Once the puzzle has been solved, grab the scroll that is inside.
- Grab the quill that is on the small table on the far right side of the study.
- From the inventory box, place the quill over the scroll and both pieces will merge as one.
- Click on the glowing scroll, and the golem will step off of the trap door. Click on the picture that is hanging on the back wall, and the trap door will open.
- Go through the trap door.
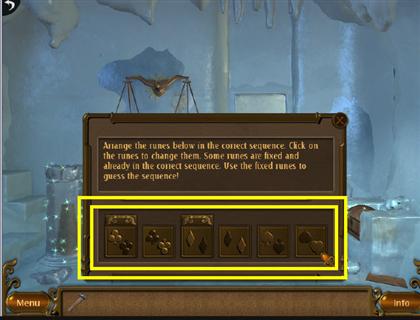
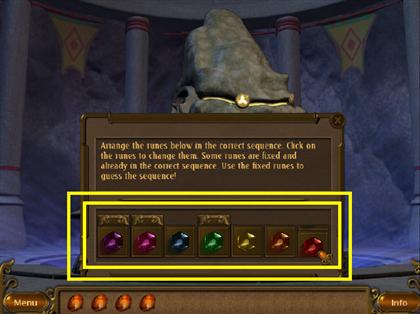
ARRANGE THE RUNES IN THE RIGHT SEQUENCE
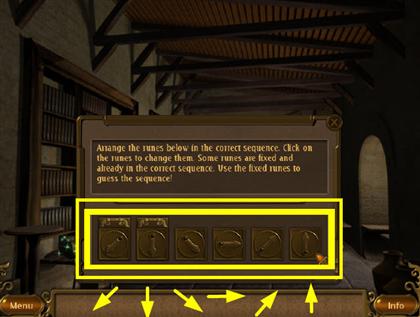
- The game prompts you to click on the chest in the lower left side of the scene. Your goal in this puzzle is to arrange the runes in the correct sequence.
- Some runes cannot be moved; use those pieces as your guide. For example, the first two cannot be moved. Notice the position they are in. The hand on the rune is actually going counterclockwise.
- Move the rest of the runes in the counterclockwise direction. Please look at the screenshot for the solution.
WIZARD’S LAB
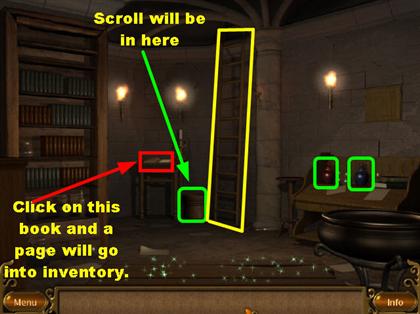
- Click on the bottles that are on the lower right side of the room, and they will both go into the inventory.
- Click on the container that is close to the ladder and you will get a closer view. Click on the scroll that is inside, and it will go into the inventory.
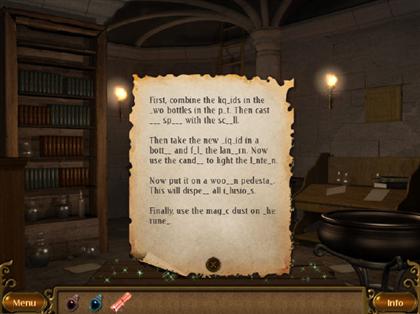
- Click on the book that is in the back of the room, and a page will go into the inventory. Click on the page from the inventory box and you will be able to read the page on the screen.
- There are a few letters missing from the letter itself, but you can still read what it says.
- The page tells you the following information:
- "First combine the liquids in the two bottles in the pot. Then cast the spell with the scroll. Then take the new liquid in a bottle and fill the lantern. Now use the candle to light the lantern. Now put it on a wooden pedestal this will dispel all illusions. Finally, use the magic dust on the runes."
DISPEL ALL ILLUSIONS – PART 1

- The following steps must be followed in the order that is described below for it to work.
- Grab the purple bottle from the inventory and place it in the pot that is in the lower right side of the scene.
- Pick up the blue bottle from the inventory and place it in the same pot as well. The water in the pot will turn blue at this point.
- Click on the scroll that is in the inventory and you will notice that a beam of light from the scroll will go over to the pot.
- Pick up the bottle that is in the lower left side of the scene. It is at the bottom of the bookcase. The bottle will go into the inventory.
- Grab the new bottle from the inventory and place it on the pot. The bottle will go back into the inventory with the new liquid inside.
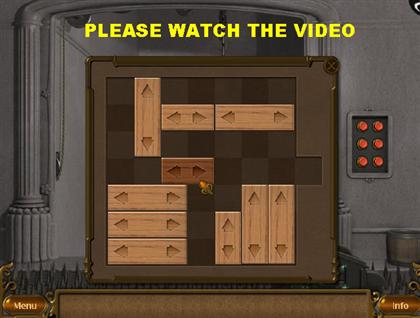
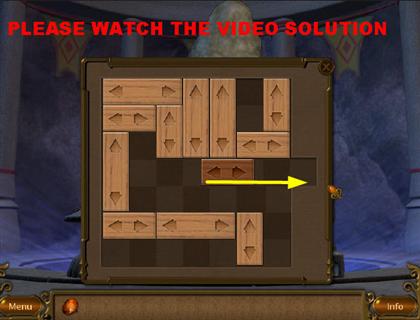
- Click on the board that is on the right side of the wall, and a slider puzzle will appear.
SLIDER PUZZLE
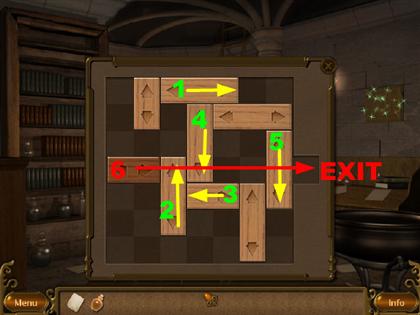
- Your goal is to slide the main block to the exit on the right.
- The blocks can only be moved in the direction that they are pointing to.
- You can look at the screenshot to follow along with these directions:
- Slide #1 all the way to the right.
- Slide # 2 all the way up.
- Slide # 3 all the way to the left.
- Slide #4 all the way down.
- Slide #5 all the way down.
- Slide #6 all the way to the exit on the right side.
DISPEL ALL ILLUSIONS - PART 2
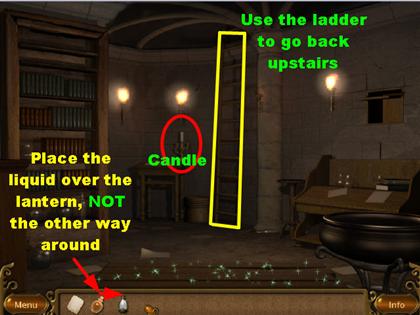
- Once the slider puzzle is solved, grab the lantern that appears in the spot where the slider puzzle was found. The lantern will go into the inventory.
- From the inventory box, combine the lantern and the liquid. The liquid has to be placed over the lantern, not the other way around, or it will not work.
- Click on the candle that is in the back of the room, close to the steps.
- Place the candle over the lantern, NOT the other way around, or it will not work. The candle will now be lit.
- Click on the ladder so you can go upstairs. Place the lit lantern on the pedestal that is on the lower left side of the scene. The cupboard on the left side of the wall will open.
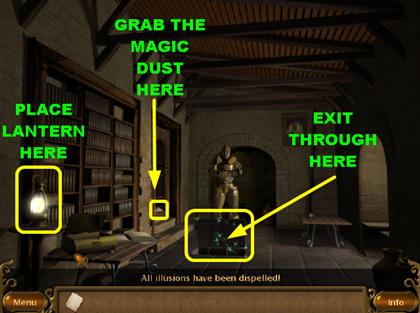
- Click on the lantern again and it will go back into the inventory. Once in a while an item from the inventory can be used more than once. You can use the lantern more than once in this level.
- Click on the magic dust that is at the bottom of the cupboard. It will go into the inventory. Click on the trapdoor so you can go back down to the Wizard’s Lab.
WIZARD’S LAB
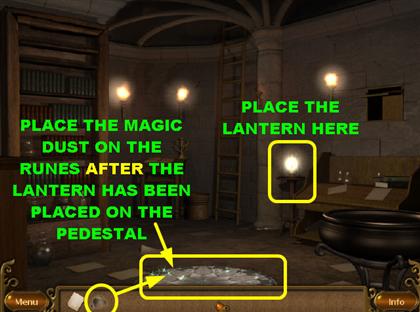
- Once you’re back in the Wizard’s Lab place the lantern on the pedestal that is on the right of the ladder.
- Once the lantern is on the pedestal, the magic runes will appear on the ground.
- Place the magic dust on the runes, and the portal will be activated. Click on the portal to exit the scene.
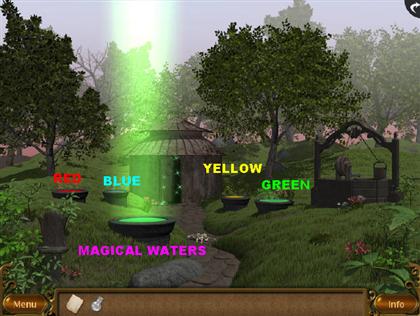
TELEPORTER
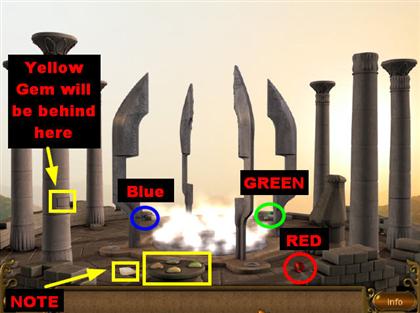
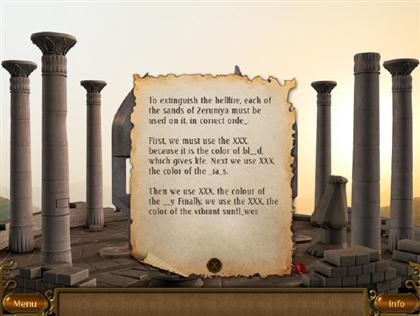
- Pick up the note that is on the lower left side of the scene, and it will go into the inventory.
- The note tells you the following:
- "To extinguish the hellfire, each of the sand of Zeruniya must be used on it in the correct order. First, we must use the XXX, because it is the color of blood {red} which gives life. Next we use XXX, the color of the grass {green}. Then we use XXX, the color of sky {blue}. Finally, we use the XXX, the color of the vibrant sunflower {yellow}."
- You can view the letter at anytime by clicking on it from the inventory box.
- The red, green, and blue gems are highlighted in the screenshot. They are circled in their respective colors.
- Click on the loose brick that is on the pillar on the left. The yellow gem will be inside the pillar; click on it.
- Grab the four colored rocks on the pedestal in the lower center of the scene.
PLACE THE GEMS ON THE TELEPORTER
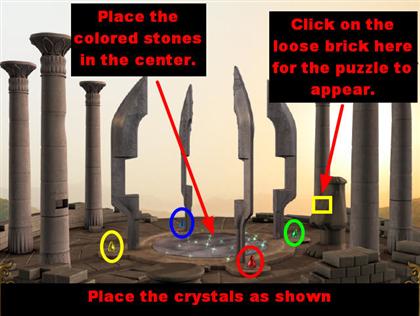
- Place the red gem on the right side of the teleporter.
- The green gem goes on the right side of the teleporter.
- The yellow gem goes on the left side of the teleporter.
- Place the colored stones in the following order in the center of the teleporter. Once you place the colored stone, put it back into the inventory and pick up the next one.
- The red one goes first.
- The green one goes next.
- Place the blue one third.
- The yellow one goes last.
- At this point the hellfire will be extinguished.
- Place the blue stone on the far left side of the teleporter.
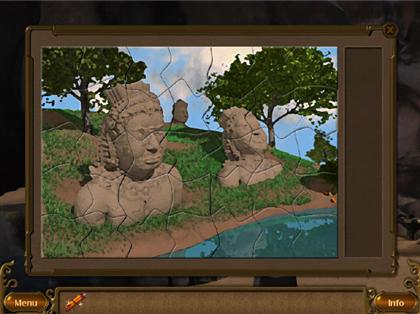
- Click on the loose brick of the short statue on the right side of the page, and a puzzle will appear.
JIGSAW PUZZLE
- Grab the puzzle pieces on the left side of the puzzle and place them in the center.
- You can right-click on the pieces if you want to rotate them.
- Since you can see the puzzle in the background, use that as your guide to place the pieces.
- A piece will not stick to the puzzle unless it’s in the right spot.
- Please look at the screenshot for the solution.
- Once the puzzle is complete, please take the scroll that appears inside the statue.
- Click on the scroll to activate the teleporter. Click on the teleporter again to go to the next location.
SECOND CHALLENGE
THE PUZZLE HOUSE
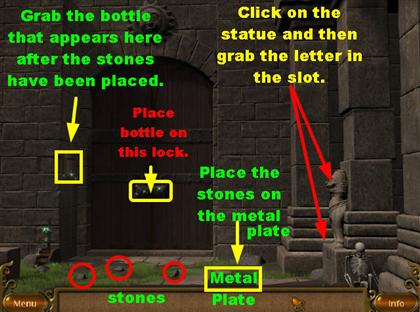
- Pick up the three stones that are on the ground.
- Click on the lion statue that is carved on the right side of the scene. A slot will open underneath. Click on the paper that shows up in the open slot. The paper will go into the inventory.
- Click on the paper from the inventory and you will get a closer view. The paper says the following:
- "And then Vetal said to Vikram: O’ King, answer these three questions, and you shall know what you seek: What is the number of fingers on your left hand? How many directions are there? And lastly, how many eyes does a person have? And then Vikram said: Thank you, wise Vetal, I understand now."
- Place the three stones from the inventory onto the metal plate that is on the lower center of the scene.
- Once the three stones are on the plate, a bottle will appear in the loose brick on the left side of the wall. It is close to the left side of the door.
- Place the bottle from the inventory on the lock that is on the door. Click on the lock, and a lock puzzle will appear. Please read the solution for the lock in the next section.
- Once the door lock puzzle is solved, the lock will fall to the ground.
- Place the bottle from the inventory on the lever that is on the left side of the scene. Click on the lever, and the door will open. Go through the door to enter the next scene.
DOOR LOCK PUZZLE
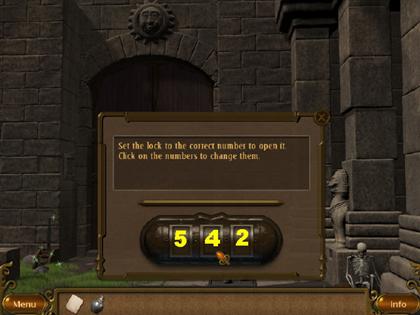
- Place the bottle from the inventory on the lock of the door. Click on the lock again and a puzzle will appear.
- Your goal is to figure out the right combination for the lock. To find the answer you have to read the letter:
- What is the number of fingers on your left hand? 5
- How many directions are there? 4
- How many eyes does a person have? 2
- The answer is: "5-4-2"
THE GREAT HALL OF STONE FACES
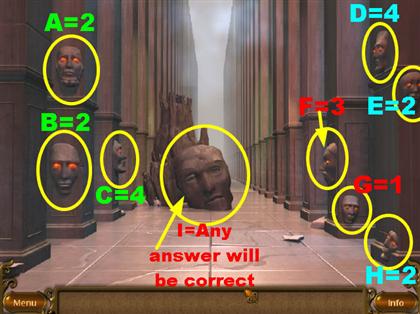
- There are nine heads in the hall. When you click on each head, you will be asked a question. Your goal is to choose the correct answer for each head. Click on the head and then select the correct answer from the multiple choices. Once the answer is correct, click on "goodbye" to go to the next question.
- If the answer is incorrect, you will have to choose again.
- From left to right the statues have been labeled from A to I:
- Head A question: "Life is a journey, but what is its destination?"
- Answer # 2: "The judgment day, the day we will all be judged."
- Head B question: "A journey of thousand miles is completed by taking a single step at a time. But which step is most important?"
- Answer # 2: "The first, since it is the first step."
- Head C question: "What is the hardest thing to do?"
- Answer #4: "Changing oneself"
- Head D question: "Who is better: The king, the cobbler, or the learned priest?
- Answer #4: "All are equal, all are humans."
- Head E question: "How may you obtain a pearl?"
- Answer #2: "Plunge the depths of the ocean in search of one."
- Head F question: "Why do some people achieve everything, while some people lavish in nothingness?"
- Answer # 3: "They are motivated from within."
- Head G question: "It is said that to truly shine, gold must be tried by fire. Should we then put everyone through a trial by fire?"
- Answer # 1: "No, what is gained by such a trial?"
- Head H question: "What is courage?"
- Answer #2: "Fighting your fears."
- Head I question: "Does God exist?"
- Answer: "All answers are correct."
- Once the large head disappears, click on the tiny steps that appear by the rock.
UNDERGROUND CAVERN
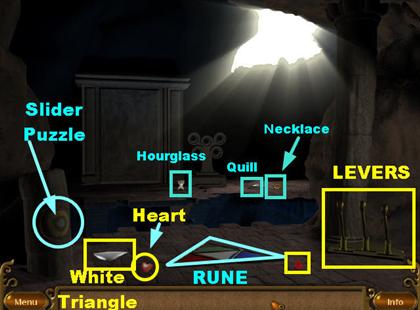
- Pick up the white triangle that is on the left side of the ground. It will go into the inventory.
- Grab the red heart that is on the left side of the floor.
- Pick up the red gem that is on the lower right side of the scene.
- There are three levers on the lower right side of the scene.
- Click on the left lever one time, and a green triangle will fall on the ground. Click on the triangle and it will go into the inventory.
- Click on the lever in the middle once and then the lever on the right once. Click on the first lever one more time, and a red triangle will appear.
- Place the levers in the following position to make the blue triangle appear. From left to right: BACK, FORWARD, and BACK.
- Pick up the blue triangle, and it will go into the inventory.
- There is a triangular rune in the middle of the floor; place the triangles in the rune in the following order: White, Green, Red, and Blue. The rune will begin to sparkle.
SLIDER PUZZLE
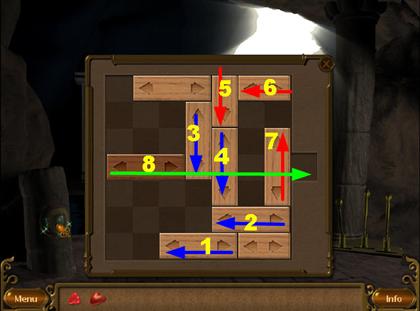
- Click on the glowing target on the left side of the page, and a slider puzzle will appear.
- Please look at the screenshot and click on the blocks in the following order:
- Slide 1 and 2 all the way to the left.
- Slide 3 and 4 all the way down.
- Slide 5 one space down.
- Slide 6 one space left.
- Slide 7 all the way up.
- Slide 8 all the way to the right until you get to the exit.
ARRANGE THE ITEMS IN THE SLOTS

- Once you’re done with the slider, click on the scroll that appears where the slider puzzle was located. Click on the scroll, and a bridge will appear over the water.
- Pick up the hourglass, the necklace, and the quill that is in the back of the scene.
- There is a structure in the back of the scene that has five holes in it. Your goal is to place the items in the inventory into the correct holes.
- The solution is as follows:
- The necklace goes on the middle slot, on top of the structure.
- The hourglass goes on the lower right side.
- The quill goes in the top left side.
- The heart goes in the top right side.
- The red gem goes in the lower left side.
- Once everything is in place, the door in the back will open, exit through the door.
COMPASS ROOM
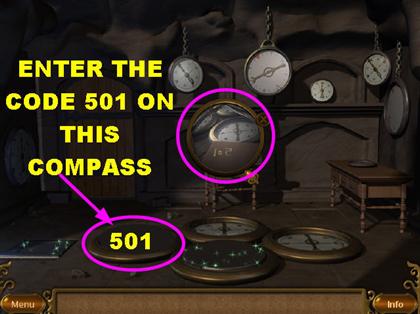
- Click on the mirror in the back of the scene and you will see a closer view. When you look closely at the image you will see the number 501 scribbled backwards on the wood.
- Click on the covered compass on the left side, and a lock will appear.
- Enter the number "5-0-1" on the dials. The cover will be removed from the compass.
COMPASS ROOM – PART 2
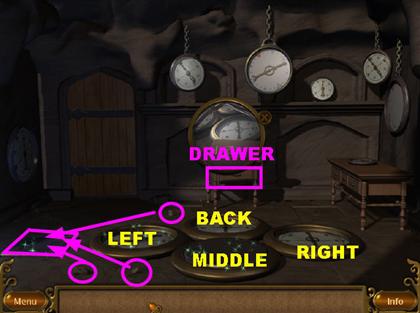

- Pick up the three stones that are on the ground; they will go into the inventory.
- Place the stones on the square plate on the lower left side of the scene, and the last covered compass will be revealed.
- Click on the drawer that is in the back of the room, and it will open. Grab the scroll that is inside of the drawer. Click on the letter so you can read it. The letter says:
- "North or south, east or west, you cannot rest, are you the best? When the west is south and the south is north, the north is east and east is west, only then will you pass the test."
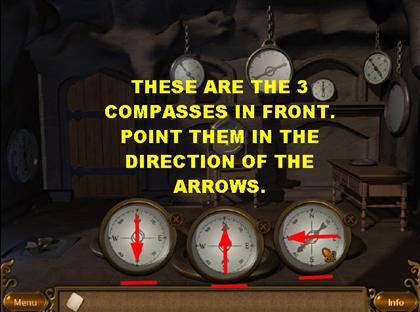
- There are four compasses on the floor. Click on the three front ones, and they will flip up on the screen. Your goal is to point them in the right direction. The solution is as follows:
- Face the arrow on the one on the left going south (down).
- Face the arrow of the compass in the middle going north (up).
- The compass on the right should be facing west (left).
- You have to get to the compass in the back, so you need to lower the one in the middle. Click on the "X" on the side of the compass to lower it.
- Click on the compass in the back; make it face east (right).
- The door in the back will open; exit through there.
- If any of this is confusing, please look at the screenshots for a clearer view.
UNDERGROUND CAVERN WITH A TELEPORTER
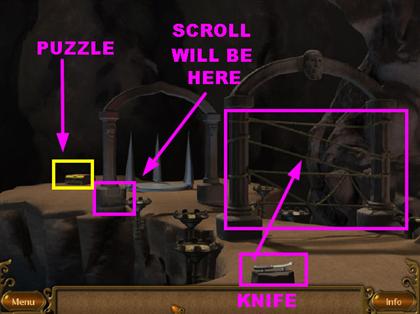
- Pick up the knife in the lower center of the scene. The knife will go into the inventory. Grab the knife and use it to cut the rope around the arch.
- Click on the lower left side of the arch in the back of the scene and you will get a pop-up window. Click on the window, and a scroll will appear; click on the scroll.
- Click on the chest that is in the back of the scene, and a puzzle will appear. Please look at the screenshot for the solution.
- Please look at the screenshot for the solution of the jigsaw puzzle.
- Pick up the package that is in the chest, once you get it open. Click the package onto each of the six braziers in the scene. Once all the braziers are lit, click on the guardian on top of the pillar.
- You will see a message appear on the screen. The message says that each guardian has three questions to ask you. You have to answer all questions correctly to pass.
TALKING TO THE GUARDIANS

- Click on the Wind guardian on top of the arch and answer the following questions as described below.
- Question 1: "I am the Wind guardian. Which element is the most powerful: Wind, Fire, or Water?"
- Answer #3: "The omnipresent wind."
- Click on the guardian again.
- Question 2: "Which element is the most important for life: Air, Sunlight, or Water?"
- Answer #3: "Air."
- Click on the guardian again.
- Question 3: "Which is the most elegant creature: Tiger, Eagle, or the Whale?"
- Answer #3: "The soaring eagle."
- The guardian tells you that you can use the portal.
- Click on the Water guardian located on the right side of the arch in the back.
- Question 1: "I am the Water guardian. Which element is the most powerful: Wind, Fire, or Water?"
- Answer #1: "The unfathomable Water."
- Question 2: "Which element is the most important for life: Air, Sunlight, or Water?"
- Answer #1: "Water."
- Question 3: "Which is the most elegant creature: Tiger, Eagle, or the Whale?"
- Answer #3: "The majestic whale."
- Click on the Fire guardian located on the left side of the arch in the back.
- Question 1: "I am the Fire guardian. First question, which is the most powerful element: Wind, Fire, or Water."
- Answer # 2: "The glorious fire."
- Question 2: "Which element is the most important for life: Air, Sunlight, or Water?"
- Answer # 2: "Sunlight."
- Question 3: "Which is the most elegant creature: Tiger, Eagle, or the Whale?"
- Answer #1: "The fiery tiger."
- You have now been given permission by all three guardians.
- Click on the scroll that is in the inventory, and it will activate the portal. Click on the portal to move on to the next level.
THIRD CHALLENGE
OUTSIDE THE LEGENDARY FAIRY GARDEN – PART 1

- Pick up the yellow, orange, and red gems that are circled with blue in the screenshot.
- Pick up the bottle that is in the lower right side of the scene.
- Pick up the pot that is on the left side of the water.
- Click on the patch of grass on the trunk of the tree on the right side of the page. A pop up window appears; click on the bottle that has something red in it.
- Click on the paper that is in the lower left side of the scene. Click on the paper from the inventory box to read what it says:
- "Chwinki’s Journal! Tanya blocked the gate with big stone! It is too heavy to move, unless you drink a strength potion. And, I know how to make one! We need leaves of 2 plants: Kandali, and Tulsi. Then we also need an oak branch! Also, we need a magical scroll. Something else is also needed but I cannot remember!"
- Place the pot on the round rune in the middle of the ground.
- Click on the trapdoor in the lower right side of the scene and solve the puzzle.
ARRANGE THE RUNES PUZZLE
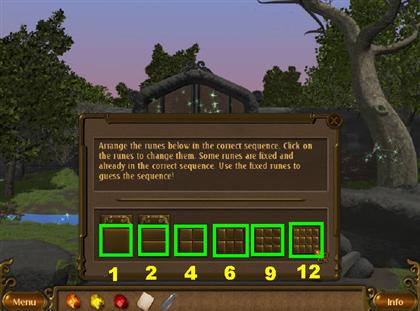
- Your goal is to arrange the runes in the right order. Some runes are locked in place. Use those runes to help you figure out how to place the other ones.
- Click on each rune to change the images around. Once you find the one you think is in the right place, move on to the next one.
- Please look at the screenshot for a visual solution. The solution is as follows:
- From left to right, the runes should be placed with the following squares on them: 1-2-4-6-9-12.
- Go through the trapdoor once it opens.
UNDERGROUND STOREROOM
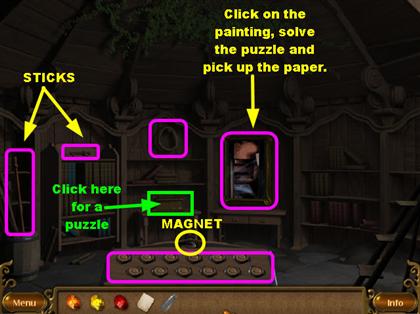
- There is a panel at the bottom of the scene that has a lot of buttons. Click on the buttons until they all turn brown. The buttons should look like the same color of the wood around them.
- Once the buttons have all been pressed correctly, the secret compartment will open. Pick up the magnet that appears above the buttons you just pushed.
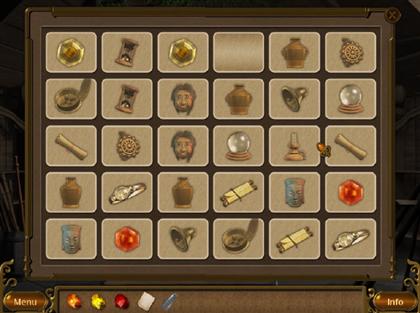
- Click on the painting in the back of the room, and a memory mini-game will appear.
- All you have to do in this mini-game is find the matching items in the scene. When you find two like items, click on them and those tiles will stay exposed. Match all the images to win the game.
- Once the puzzle is complete, the painting will disappear. Click on the wooden panel that appears in the back of the scene. Click on the paper that appears in the secret compartment.
- Click on the note. The note says the following: "ERIF SI DROW EHT." If you read that backwards, it says: "THE WORD IS FIRE."
- Pick up the fishing line that is on the back wall. It is a round reel on the back wall.
- Pick up the long stick in the lower left side of the scene. It is sticking out of the barrel.
- Pick up the short stick on top of the bookshelf on the left.
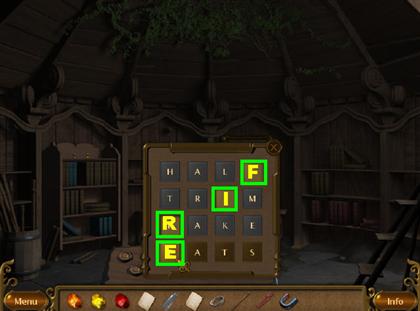
- Click on the chest that is on the middle bookcase. A puzzle will appear. All you have to do in this puzzle is spell out the word "FIRE" from top to bottom. Just click on one letter on each row to spell out the word.
- Once you’re done with that puzzle, pick up the key that appears inside.
- If your inventory is full, go up the steps and unload some of your inventory items. You can come back and pick up the key.
- Click on the steps on the right to go back to the garden.
OUTSIDE THE LEGENDARY FAIRY GARDEN – PART 2
- At this point you have a lot of items in your inventory. You need to combine some items in your inventory with each other.
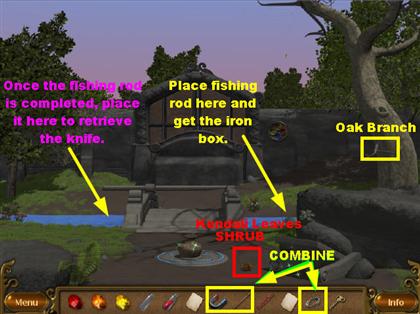
- From the inventory box, combine the fishing reel and the long stick in the inventory and both pieces will merge.
- From the inventory, combine the magnet and the fishing rod. Now all three pieces will be merged. The items that need to be combined are highlighted in yellow in the screenshot.
- Place the fishing rod on the LEFT side of the water, and a knife will go into your inventory.
- Place the fishing rod on the RIGHT side of the water and retrieve the iron box. The iron box will land on the ground, in front of the water.
- Place the knife on the oak branch that is on the tree on the right. The oak branch will go into the inventory.
- Place the knife on the shrubs (Kendali Leaves) located close to the trapdoor.
OUTSIDE THE LEGENDARY FAIRY GARDEN – PART 3
- Grab the bottle with the red liquid and place it in the pot.
- Grab the Tulsi leaves in the lower right side of the scene. They will go into the inventory. Place the Tulsi leaves in the pot that is in on the round rune.
- Place the oak branch in the pot that is in the middle of the ground.
- Grab the Kendali Leaves from the inventory and place it in the pot.
- From the inventory box, combine the knife and the hollow stick. Both pieces will merge. These pieces are highlighted in green in the inventory box.
- Click on the stick and knife combination, and a scroll will appear. Click on the scroll, and it will cast a spell on the pot.
- Grab the empty bottle from the inventory and place it on the pot that’s in the middle of the ground. The bottle will go back into the inventory as a potion. Click on the potion to drink it. The potion will disappear from the inventory.
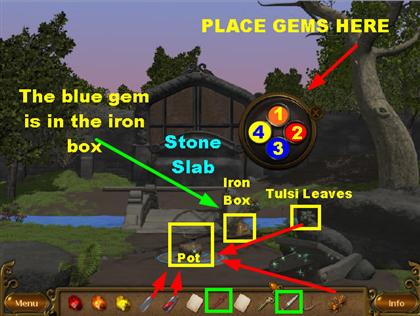
- Click on the iron box that appears on the far right side of the scene. Once you get a closer view of the box, place the key from the inventory on it. Grab the blue gem that appears inside. The gem will go into the inventory.
- Click on the round object that is on the right side of the back wall. Once you have the closer view, place the gems in the following order: Orange, Red, Blue, and Yellow.
- Click on the stone slab in the back of the scene. The slab will move aside, and the door will open. Go through the door.
INSIDE THE LEGENDARY FAIRY GARDEN – PART 1
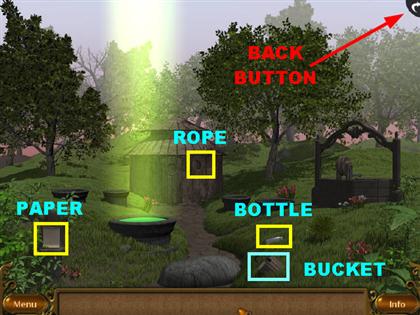
- When you first enter the scene, a message will pop up that tells you to go back to the previous area. Ignore that message for now and pick up the following items:
- Pick up the bottle and the bucket in the lower right side of the scene.
- Pick up the rope that is on the side of the hut.
- Pick up the paper that is in the lower left side of the page. Click on the paper from the inventory so you can read it. The note says the following:
- "Chwinki’s Journal! Tanya’s going to put a ward on the door! She says that the ward cannot be removed until the 4 forces of nature: Lava, Water, Sun, and Forest are in balance. Wow, that must be difficult! The person who can do that must be very smart!"
- Click on the back button in the upper right side of the scene so you can go back to the previous area.
OUTSIDE THE LEGENDARY FAIRY GARDEN – PART 4
- Place the empty bottle on the pot that has the potion you made earlier. The bottle will go back into the inventory filled with potion.
- Go back through the doors.
INSIDE THE LEGENDARY FAIRY GARDEN – PART 2
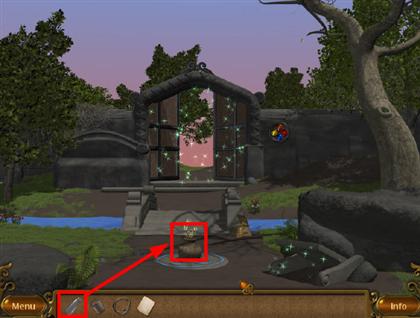
- Click on the potion so you can gain some strength. Click on the boulder at the bottom of the scene so you can move it.
- Underneath the bolder you will find the scroll; pick it up.
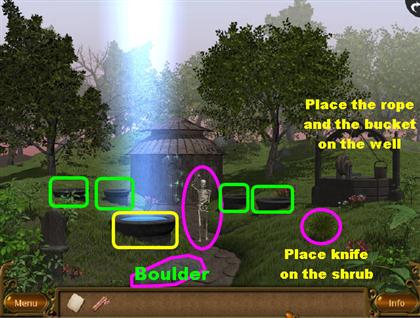
- Place the bucket from the inventory, and the rope, on the well. Click on the well twice, and a skeleton will appear in the middle of the scene.
- Click on the scroll, and it will hit the skeleton making it break into pieces on the ground.
- Click on the skeleton, and a knife will appear in your inventory.
- Place the knife on the small shrub in the lower right side of the scene. Click on the bottle that appears in that spot, and it will go into the inventory.
FILL THE SMALL POOLS WITH MAGICAL WATERS
- In the next few steps you have to fill the small empty pools with water from the magical waters. The magical water can be found in the largest pool that keeps changing colors.
- The bottle has to be filled after each time you fill an empty pool. The key is that you have to fill the pools when the large pool has the right color.
- If you fill the pool with the wrong color, you can simply fill the bottle with the right color and add it to the pool.
- From left to right, I will name the pools 1 through 4. Please look at the screenshot for a clearer view.
- Pool 1: Wait until the water turns red and fill the bottle. Place the red liquid on pool 1.
- Pool 2: Wait until the water turns blue and fill the bottle. Place the blue liquid on pool 2.
- Pool 3: Wait until the water turns yellow and fill the bottle. Place the yellow liquid on pool 3.
- Pool 4: Wait until the water turns green and fill the bottle. Place the green liquid on pool 4.
- The door to the hut will open, go through the door.
THE BRAZIERS
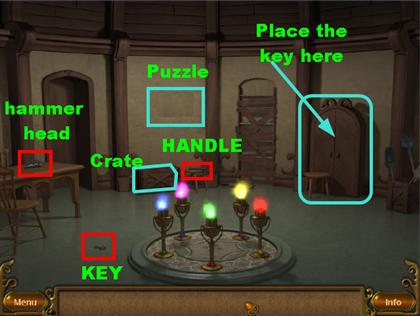
- Pick up the key in the lower left side of the floor.
- Pick up the handle that is in the back of the scene, on top of the stool.
- Grab the hammer head that is on the table on the left side of the room.
- From the inventory box, combine the hammer head and the handle, and a hammer will be formed in the inventory.
- Click on the crate in the back of the room and you will get a closer view. Place the hammer on the crate and pick up the small star inside.
- Place the key from the inventory on the almirah (cabinet) in the back of the room. Pick up the wand that appears inside the cabinet.
JIGSAW PUZZLE
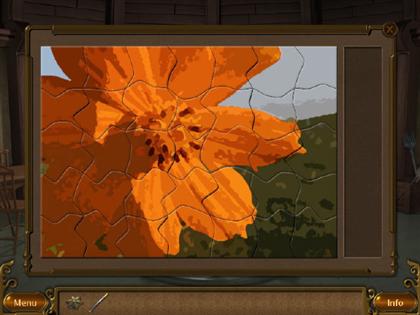
- Click on the panel in the back of the room, and a puzzle will appear.
- Please look at the screenshot for the puzzle solution. Once the puzzle is complete, pick up the star that appears in the hole in the wall.
MATCH THE BRAZIERS
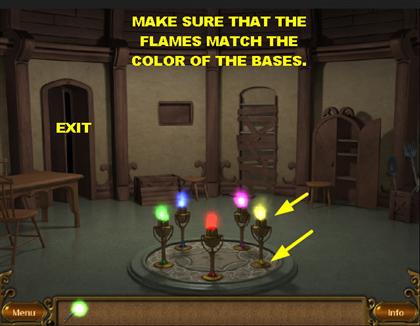
- From the inventory box, combine the two stars and the wand. The wand will activate itself.
- If you look closely, the bases of the braziers have different colors at their bases than they do on their tops. Your goal is to change the color of the flames, using the wand, to match the colors of the bases.
- The wand is green when you start. You want to use the wand on the base of the brazier that is green. That brazier has a blue flame to it, but it will turn green once the wand is placed on the flame.
- Now the wand is blue, place the blue wand on the blue base. The wand will now turn purple.
- Place the purple wand on the purple base, and the wand will turn yellow.
- Place the yellow wand on the yellow base, and it will turn red.
- Place the red wand on the red base.
- Once all the braziers have matching colors, the door will open. Go through the door.
STUDY
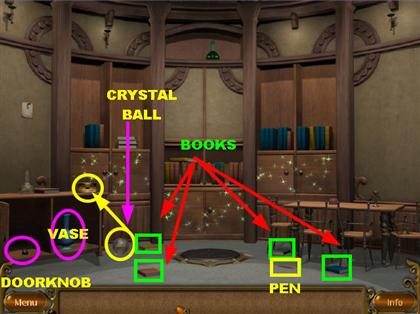
- Open the cupboard on the lower left side, and a blue vase and a doorknob will be inside; pick them both up.
- Pick up one yellow book, one brown book, and the two blue books on the floor. The books are highlighted in green in the screenshot.
- Pick up the ink pen and the crystal ball on the floor as well.
- Place the crystal ball on the base located on top of the cupboard. It is in the lower left side of the scene.
PLACING ITEMS IN THE STUDY
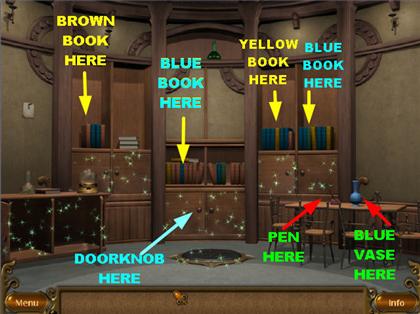
- The next thing you have to do is place the books in the right spots. Please look at the screenshot for the exact location of all the books.
- Place the pen on the ink stand on the table, located on the right side of the study. Place the blue vase on the same table.
- The doorknob goes on the flap of the cupboard located in the lower center of the scene.
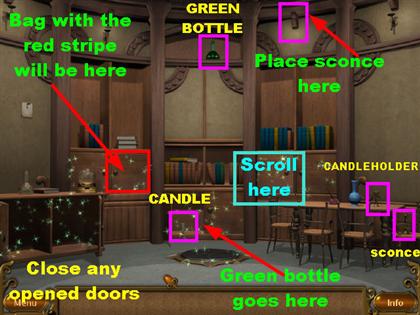
- Pick up the green bottle that is in the top center of the study.
- Click on the cupboard in the lower center and grab the candle that is inside. Place the candle on the candleholder located on the table on the right.
- Take the green bottle from the inventory and place it in the cupboard from which you originally took the candle.
- Pick up the sconce on the last chair next to the table. Place the sconce in the upper right side of the wall.
- Close any opened cabinets by clicking on them. Make sure that you close the cabinet with the green bottle. When you do that, it unlocks another cabinet.
- Open the cabinet on the top left side and pick up the bag with the red stripe.
- Open the cabinet on the top right side and pick up the scroll that is inside.
- Place the bag on the teleporter and then click on the scroll. The teleporter will be activated. Click on the teleporter to exit the room.
FOURTH CHALLENGE
WOOD CABIN
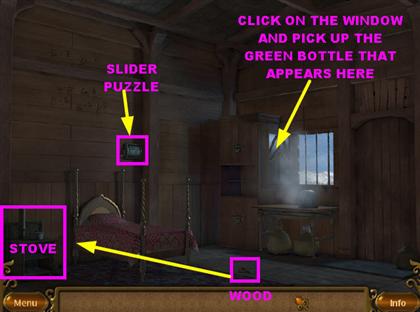
- Click on the window to close it. Pick up the green bottle that appears behind the window.
- Place the green bottle in the stove located n the lower left side of the scene.
- Pick up the wood pieces that are on the floor.
- Place the wood in the oven, and the fire will start. Click on the lock that is on the wall, above the bed, and a slider puzzle will appear.
SLIDER PUZZLE
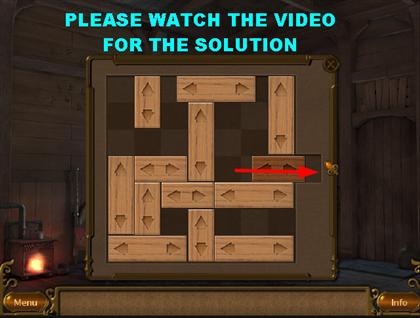
- Watch Video on Big Fish Games Tips YouTube Channel
- Please click on the link above to watch a video solution for this slider puzzle.
UNLOCKING THE SAFE
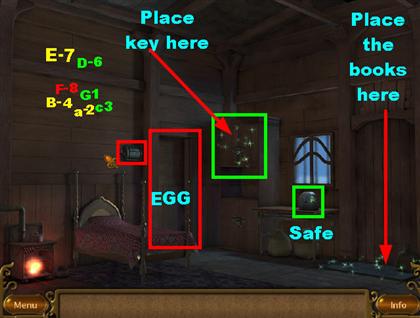
- There are some numbers carved on the wall above the bed. Those numbers are clues which will help you open the next lock.
- If you look at the door by the bed, you will see the word "EGG" carved in it. Look for those letters on the wall and look for their numeric value.
- The letter E=7, the letter G =1. That makes the code "7-1-1."
- Click on the safe that is under the window and you will see a lock appear. Enter the number: "7-1-1." Pick up the key that appears inside.
- Place the key on the top part of the almirah (cabinet). Click on the three books that appear inside the cabinet, and they will all go into the inventory.
- Take the books and place them on the mat in front of the door in the following order: Yellow, Brown, and Blue.
- The door next to the bed will open. Exit through the door.
ROOM MADE OF ICE
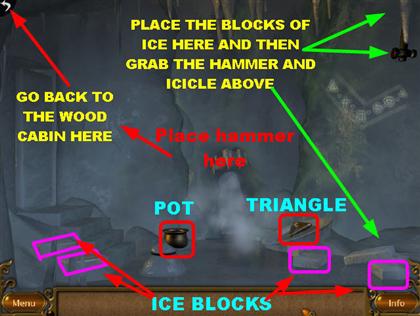
- Pick up the brass pot in the lower center of the scene, and it will go into the inventory.
- Click on the triangle that is on the lower right side of the scene.
- Pick up the four blocks of ice that are in the scene. Two of them are in the lower right side, and two are in the lower left side of the scene. They are highlighted in purple in the screenshot.
- You will notice a sparkly spot in the lower right side of the scene. Place the four blocks of ice in that corner and then grab the hammer and the icicle above. Both pieces will go into the inventory.
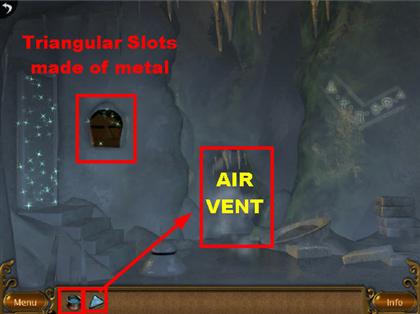
- Place the hammer on the thin piece of ice that is in the top left side of the scene, and a piece will chip off. It reveals three triangular slots made of metal.
- From the inventory box, combine the hammer and the icicle, and the hammer will break the ice.
- From the inventory box, combine the pot and the icicle pieces. The ice will go inside the pot.
- You need to go back to the wood cabin by clicking the arrow in the upper left corner.
WOOD CABIN
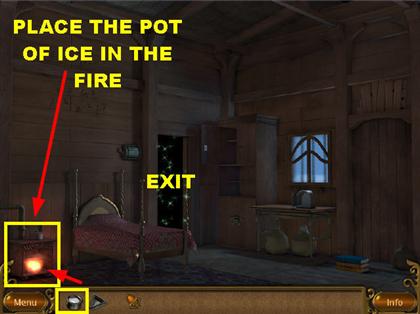
- Place the pot of ice in the stove, and the ice will melt. You will now have a pot filled with water in your inventory.
- Go back to the room of ice by clicking on the open door.
ROOM MADE OF ICE
- From the inventory box, combine the pot filled with water and the triangle pieces. You have to place the pot of water on the triangle, not the other way around, or it will not work.
- Place the triangle filled with water on the air vent that is in the back of the scene. The water in the triangular mould will freeze and return to the inventory.
- Click on the triangular mould, and the ice from inside will go into the inventory without the mould.
- Place the triangular piece of ice in one of the three triangular metal slots.
- Repeat the same process of freezing the ice two more times and place those pieces of triangular ice into the slot in the wall.
- An ice pillar will rise to the surface. Pay attention to the symbols on the upper right side of the wall.
ICE PILLAR PUZZLE

- Watch Video on Big Fish Games Tips YouTube Channel
- Click on the ice pillar until you see the triangle shape appear on the side of the ice pillar. Then press the circle that is at the bottom of the ice pillar.
- Keep rotating the ice pillar until you get to the second symbol on the wall; click the circle and repeat the same steps for the next symbols.
- Keep in mind that the last triangle is sideways, but you still click the triangle shape on the ice pillar.
- The shapes are, Triangle, Cross, Square, Eight, Pentagon, Triangle.
- Once all the symbols have been entered correctly, the door on the left will open.
MASSIVE HALL – PART 1
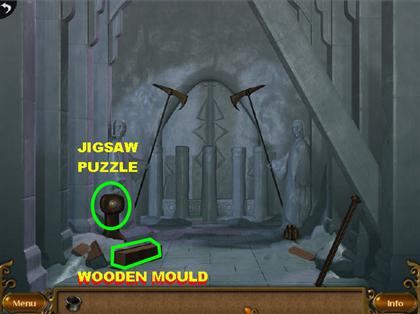
- Pick up the wooden mould on the lower left side of the scene, and it will go into the inventory.
- Click on the small structure in the far left side, and a jigsaw puzzle will appear.
JIGSAW PUZZLE
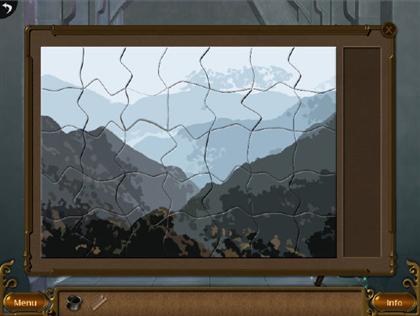
- Please look at the screenshot for the solution of the jigsaw puzzle.
- Once the puzzle is complete, part of the structure in the middle will collapse.
MASSIVE HALL – PART 2
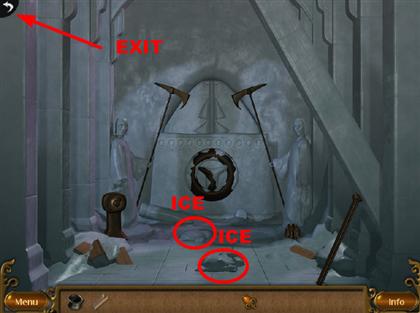
- Pick up the two pieces of ice that fall on the center of the floor. The second piece of ice can be hard to see, so make sure to pick both of them up.
- From the inventory box, combine one of the ice pieces and the pot. The ice will go into the pot.
- Use your arrow in the top left side of the page to go back to the ice room.
- From the ice room, you have to click on the arrow in the top left side to get to get to the wooden cabin.
WOODEN CABIN

- Place the pot filled with ice into the stove and it will melt the ice.
- The pot will go back into the inventory full of water.
- Click on the open door to go back to the ice room.
- To exit the ice room, click on the door on the left side of the scene.
MASSIVE HALL
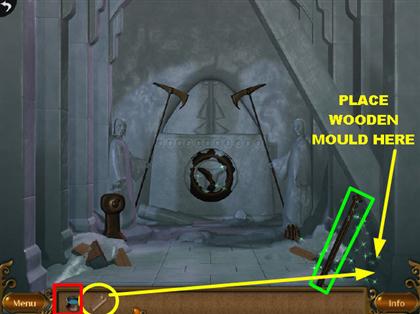
- Place the wooden mould from the inventory against the metal rod that on the lower right side of the scene.
- Place the pot of water on the wooden mould and it will empty the pot.
- You have to repeat the same process again in order to fill the wooden mould with water.
- Use your arrow in the top left side of the page to go back to the ice room.
- From the ice room, you have to click on the arrow in the top left side to get to back to the wooden cabin.
WOODEN CABIN
- From the inventory box, combine the piece of ice with the pot.
- Place the pot filled with ice into the stove and it will melt the ice.
- The pot will go back into the inventory full of water.
- Click on the open door to go back to the ice room.
- To exit the ice room, click on the door on the left side of the scene.
- From the ice room, click on the door on the left to enter the hall.
MASSIVE HALL
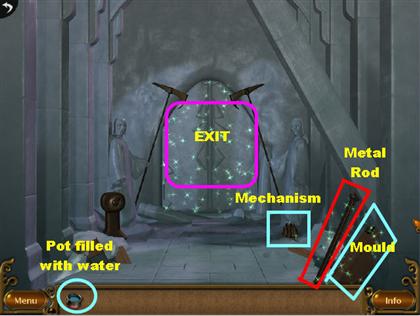
- Place the pot filled with water on the wooden mould in the lower right side of the scene.
- The water solidifies the ice and strengthens the support. Click on the metal rod, and it will go into the inventory.
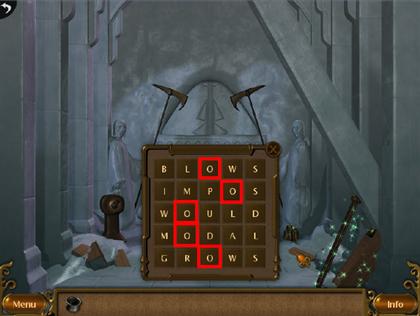
- Click in the center of the scene, and a puzzle will appear.
- Click on the letter "O" that appears in every column.
- The ice block descends, clearing the path.
- Take the metal rod from the inventory and place it on the mechanism that is in the lower right side of the scene.
- Click on the metal rod, and the door will open. Exit through the door.
UNDERGROUND ICE ROOM
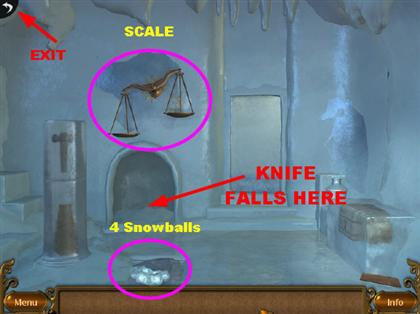
- Pick up the four snowballs that are on the floor. You have to click on them one by one until all four pieces are in the inventory.
- Place the snowballs on the scale that is hanging on the wall. Once all four snowballs have been placed, the scale will balance out.
- A knife falls below the scale, pick it up and it will go into the inventory.
- You have to go back to the wooden cabin. Click on the back arrow in the upper left corner.
- From the massive hall, click on the arrow in the upper left corner.
- From the ice room, click on the arrow in the upper left corner.
WOODEN CABIN
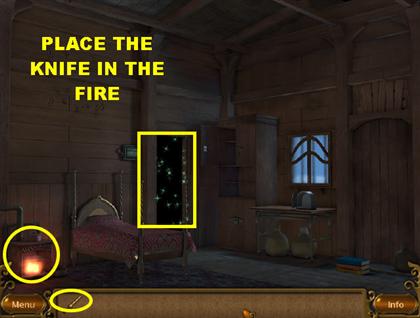
- Place the knife from the inventory in the fire. The knife becomes red hot.
- Go through the open door.
- From the ice room, click on the open door.
- From the massive hall, click on the open door.
UNDERGROUND ICE ROOM

- Use the red hot knife on the hammer that is on the left side of the room. The knife cuts through the ice, and the hammer goes into the inventory, frozen.
- Go back to the wooden cabin by repeating the steps detailed in the sections above.
- Place the frozen hammer in the fire and return to the underground ice room.
- Place the thawed hammer on the chest in the right side of the scene. Click on the chest, and a puzzle will appear. Place the runes in the puzzle according to the screenshot.
- Place the hammer on the pedestal two times. All the ice will not break off at this time.
- Click on the chest once the puzzle has been solved, and the golden fork will go into the inventory.
- Place the fork on the pedestal encased in ice. Then place the hammer on the pedestal as well. A loud noise will be heard. Ice shards will appear on the far right side of the scene.
- Place the hammer on the ice shards and click on the door to exit.
TELEPORTER
- Click on the stones in the lower right side of the scene, and a pop-up window will appear.
- Click inside the window, and a hammer will appear; click on the hammer and it will go into the inventory.
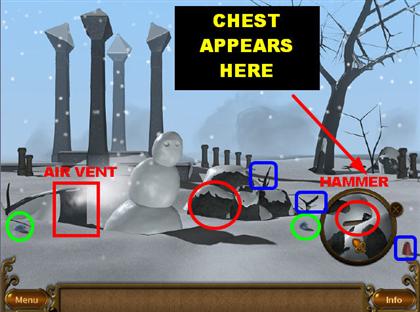
- Pick up the snowball on the lower right side of the scene. Pick up the other snowball on the lower left side of the scene.
- Click on the rock that is next to the snowman until you see a glimmer. Place the hammer on that spot. Click on it again and pick up the piece that chips off.
- Place the piece of rock on the air vent that is on the left side of the snowman.
- Pick up the two sticks that are on the right side of the page.
- Pick up the carrot that is on the lower right corner of the scene.
- Place the two sticks on the side of the snowman.
- Place the snowballs in the eye sockets of the snowman.
- Place the carrot on the snowman’s nose.
- A chest will appear in the back of the scene; click on the chest and solve the puzzle.
CHEST PUZZLE
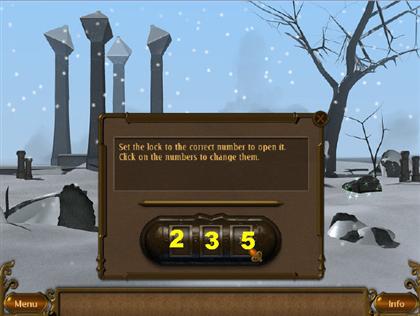
- The combination to open the locks can be found by looking at the groups of pillars in the scene.
- Set the code to "2-3-5."
- Pick up the scroll that appears inside the chest. Click on the scroll and it will go into the inventory.
- Click on the scroll from the inventory, and the teleporter will be activated. Click on the teleporter to exit.
FIFTH CHALLENGE
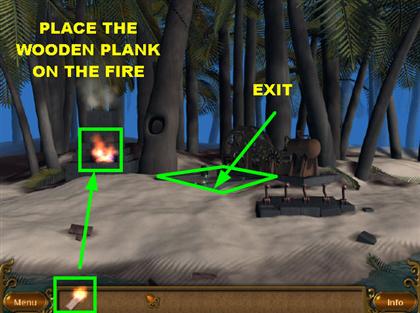
THE MACHINE ISLAND
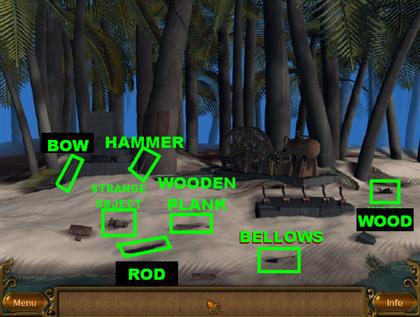
- Pick up the strange object on the left side of the sand.
- Grab the wooden plank that is on the left side of the sand.
- Click on the rod that’s on the left side of the sand.
- Pick up the bellows on the right side of the sand.
- Click on the wood piece that’s on the far right side of the sand.
- Pick up the hammer that is leaning against the largest tree on the left side of the scene.
- Grab the bow that’s leaning against the pile of coal in the lower left side of the scene.
THE MACHINE ISLAND – PART 2
- From the inventory box, combine the wood piece you found on the far right side of the island with the strange object. Take the pieces you just joined and combine them with the bow from the inventory. This will complete the fire starter.
- From the inventory box, combine the fire starter with the wooden plank. The combined pieces will burst into flames.
- Place the lit piece of wood on the coal that is encased in the structure on the left side of the scene. The coal will catch on fire.
- Put the bellows on the fire, and the fire will burn even hotter than before.
- Place the iron rod from the inventory into the fire. The pole will go back into the inventory very hot.
- From the inventory box, combine the hammer and rod. The hot rod will now have a sharp point.
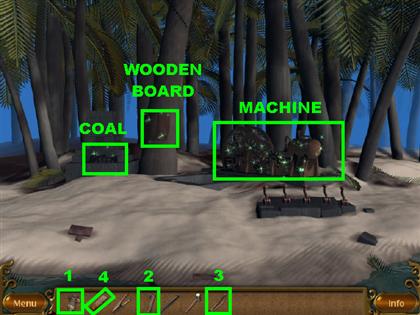
- Place the hot rod on the wooden board in the back of the scene. Click on that spot, and a gear will go into the inventory.
- Place the gear on the machine that’s on the right side of the scene.
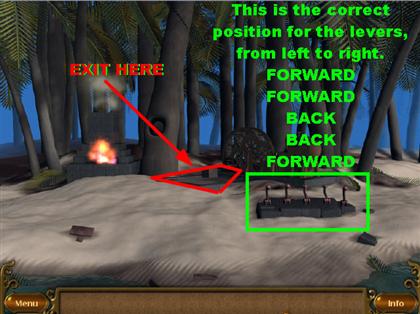
- Click on the levers located on the right side of the island. They need to be in the following positions, from left to right.
- FORWARD, FORWARD, BACK, BACK, FORWARD.
- The mechanical lift will be activated at this point. Go through the lift to enter your next location.
DREADED GALLERY OF MANY DEATHS – PART 1
- Click on the lower right side of the scene and a slider puzzle will appear. Please look at the section below for the solution.
SLIDER PUZZLE
- Watch Video on Big Fish Games Tips YouTube Channel
- Please watch the video solution for this puzzle.
- Once the slider puzzle is solved, the first set of metal spikes will disappear from the ground.
DREADED GALLERY OF MANY DEATHS – PART 2
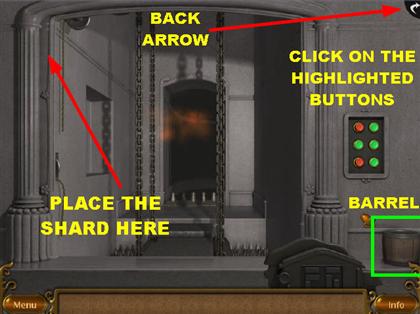
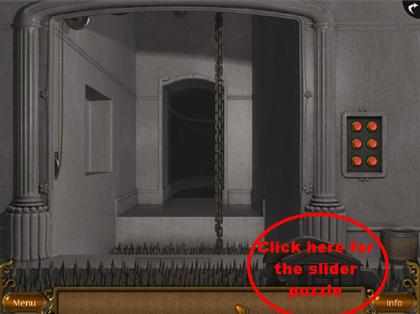
- Click on the barrel in the lower right side of the scene, and you will get a closer view. Pick up the shard that’s inside, and it will go into the inventory.
- Place the shard on the rope that is on the left side of the wall, and the flame trap will be triggered.
- You have to click on the buttons on the left side of the scene in the correct order in order to extinguish the fire. Please click on the buttons in the following order:
- On the left side, click on the button in the middle.
- On the right side, click all three buttons.
- Exit through the door in the back.
ANCIENT MACHINERY ROOM
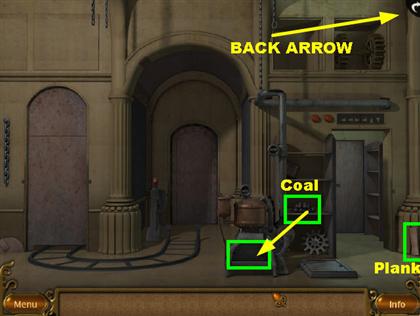
- Pick up the coal pieces located on the shelves on the right side of the scene.
- Grab the wooden plank on the lower right side of the scene.
- Place the coal from the inventory at the bottom of the boiler.
- Use your back arrow in the top right side of the scene to go back to the ancient machinery room.
- From the ancient machine room, click on the back arrow in the top right side of the scene. That will take you back to the island.
THE MACHINE ISLAND
- Place the wooden plank in the fire. Once the plank catches fire, return it to the inventory box.
- Leave the island by going through the exit in front of the machine.
- From the Dreaded Gallery of Many Deaths, go through the sparkly door and you will be back in the ancient machine room.
ANCIENT MACHINE ROOM
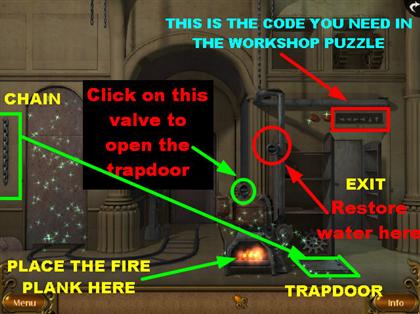
- Place the plank of fire on the coal that is in the boiler.
- Grab the metal iron chain that is on the left side of the wall.
- Click on the top valve to restore the water supply. Please look at the screenshot to see the location of the valve.
- Place the iron chain on the trapdoor. Click on the valve, and the machine will be activated.
- The trapdoor next to the boiler will open up. Click on the button underneath the trapdoor. The door on the right side of the scene will open. Exit through that door.
WORKSHOP

- Pick up the two tools that are hanging on the right side of the wall.
- Pick up the spring that is on top of the iron vault.
- Pick up the two pipes that are on the left side of the floor.
- Grab the golden key that is on the right side of the floor, underneath the arch.
- Place the two pipes from the inventory on the machine that’s on the left side of the workshop. Click on the switch that’s at the bottom of the machine, and it will lower the machine; grab the tool that is on top of the machine.
- Place that key on the iron vault, on the right side of the workshop. Click on the red button that appears inside the vault and something strange happens.
- Place the three tools that you have in the inventory on the hooks that are on the left side of the workshop. Start with the smallest tool first. The compartment underneath the tools will open up.
- Click on the yellow button in the secret compartment, and another secret compartment will open next to the cabinet. Click on it to reveal a puzzle.
PUZZLE
- Place the spring on the left side of the machine to activate it.
- The answer for this puzzle is located above the door on the right in the ancient machine room.
- Click on the buttons in the following order:
- LEFT, LEFT, RIGHT, LEFT UP AND DOWN.
- Once the code has been entered correctly, click on the spring and it will go into the inventory.
- Go back to the ancient machine room by exiting through the door on the left.
ANCIENT MACHINE ROOM
- When you return to this room, there will be a robot standing on the left side of the room.
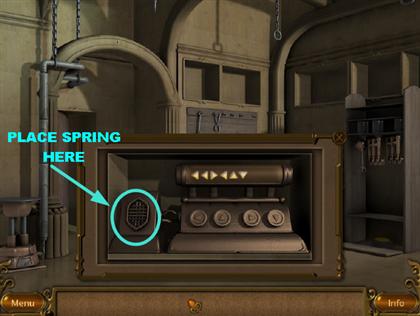
- Place the spring from the inventory in the center of the robot. The spring has to be fully wound in order for the robot to accept it.
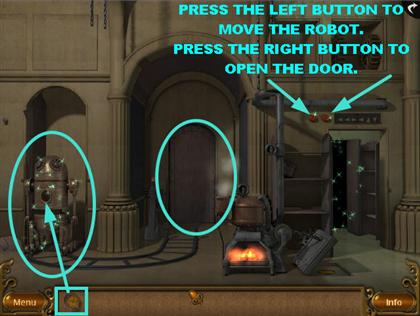
- On the top right side of the wall, there are two red buttons.
- Press the red button on the left, and the robot will move towards the door.
- Press the red button on the right to open the door. Click on the door to exit.
HUGE MACHINE ROOM
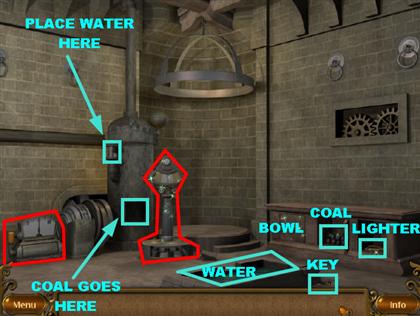
- Click on the center cabinet on the right side of the room. Click on the pieces of coal that are inside the cabinet.
- Click on the drawer on the right, and a puzzle will appear. Please look at the screenshot for the solution to the jigsaw puzzle.
- Once the jigsaw is complete, the lighter will appear in the cupboard.
- Pick up the key that’s on the lower right side of the room. Place the key on the first cupboard. Grab the bowl that appears inside.
- Place the coal at the bottom of the furnace.
- Put the lighter on the coal, and it will start to burn.
- Place the bowl on the water that is in the lower center of the scene. Pour the water from the bowl onto the left side of the water tank. You have to fill the bowl with water one more time and place it on the side of the tank again.
- Click on the panel of the machine in the lower left side of the room, and a puzzle will appear.
RUNE PUZZLE

STEAM PRESSURE MACHINE
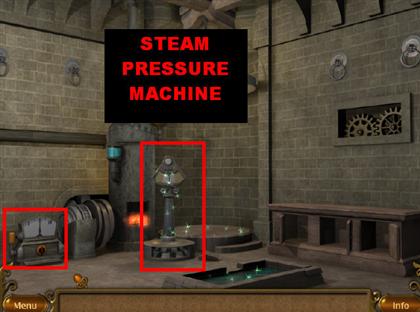
- Watch Video on Big Fish Games Tips YouTube Channel
- Click once on the dial of the small machine on the lower left side of the scene. The dial will move towards the left.
- Click on the lever one time.
- Click on the dial and place it on the numeral III. Click on the lever one time.
- Click on the dial and place it on the center position; click on the lever.
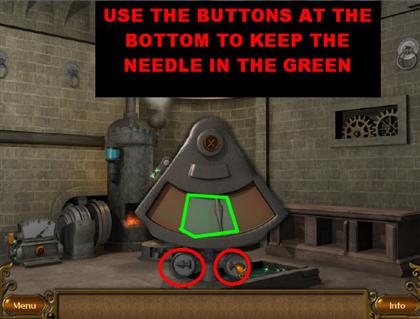
- Now click on the steam pressure machine and keep clicking on the left and right arrows so you can keep the arrow in the green area.
- If you fail to stabilize the machine, you will have to start the process over.
- If you’re successful, the transporter will be activated. Click on the transporter to move on to the final chapter.
SIXTH CHALLENGE
ROPEWAY
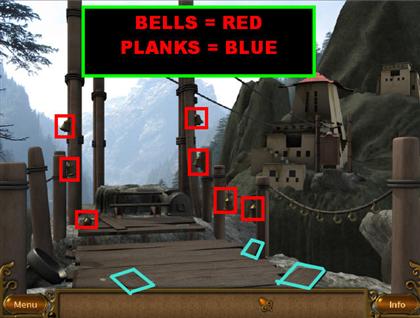
- Pick up the three planks that are in the scene. They are highlighted blue in the screenshot.
- Place the planks on the gap that is in the back of the bridge.
- Pick up the seven bells that are scattered in the scene. They are highlighted red in the screenshot.
- Put the bells on the hooks that are on the left side of the ropeway.
- Click on them in the order shown in the screenshot.
- Once it is done correctly, the trolley will be called.
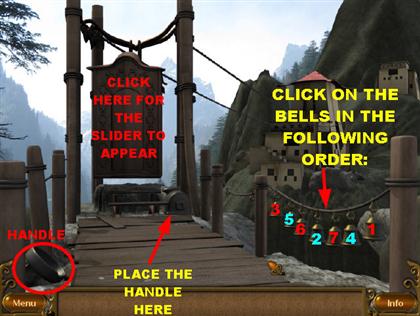
- Click on the wooden door, and a slider puzzle will appear. Please look at the section below for the solution to the slider puzzle.
- Once you solve the slider puzzle, click on the round container that is on the lower left side of the scene. Pick up the handle that is inside.
- Place the handle on the piece that is on the lower right side of the door.
- Click on the handle three times. Go through the door on the trolley.
SLIDER PUZZLE
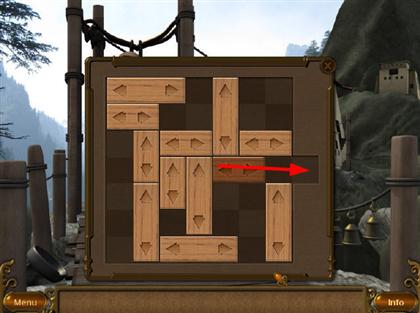
- Watch Video on Big Fish Games Tips YouTube Channel
- Please watch the video solution for the slider puzzle.
HUGE SUSPENDED ROCK
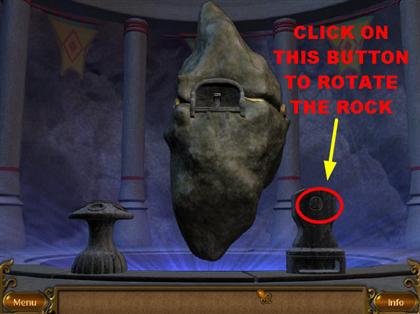
- Click on the button located on the rock on the right side of the room. The rock will rotate. Click on the beige button, and a jigsaw puzzle will appear.
JIGSAW PUZZLE
- Complete the jigsaw puzzle and click on the gem that appears below the rock on the right.
SLIDER PUZZLE
- Watch Video on Big Fish Games Tips YouTube Channel
- Click on the button again to rotate the rock. Click on the beige button with the crescent moon. A slider puzzle will appear.
- Once the slider puzzle is complete, pick up the gem that appears at the bottom.
MEMORY GAME
- Click on the button one more time and then click on the beige button. A memory game will appear. Solve the memory game and pick up the gem below.
QUIZ
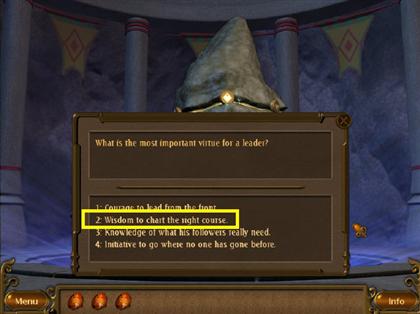
- Press the button on the rock that is on the right side of the scene.
- Click on the beige button. A question will appear.
- Question: "What is the most important virtue for a leader?"
- Answer #2: "Wisdom to chart the right course."
- Pick up the gem at the bottom of the right rock.
RUNE SEQUENCE PUZZLE
- Click on the button of the rock on the right. Click on the beige button.
- Solve the puzzle and pick up the gem at the bottom of the rock.
PICK UP PAHELIKA!

- Rotate the huge rock by clicking on the button of the rock on the right.
- Click on the rock in the lower left side of the scene, and you will get a pop-up window. Place the five gems in the empty slots.
- Some steps will appear in front of the huge rock. Grab Pahelika at the top of the rock.
- The ancient magical book, Pahelika, will be in your possession.
Created at: 2009-05-23