

Walkthrough Menu
- General Tips
- Chapter 1: The Cemetery
- Chapter 2: The Cathedral
- Chapter 3: The General Store
- Chapter 4: Underground Garage
- Chapter 5: The Toy Store and the Saloon
- Chapter 6: The Mansion
- Chapter 7: The Roof
- Chapter 8: Amusement Park Arrival
- Chapter 9: Ferris Wheel and Arcade
- Chapter 10: The CarouseL
General Tips
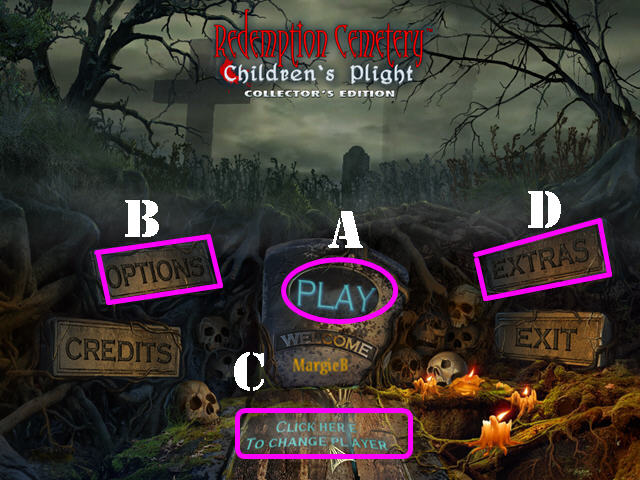
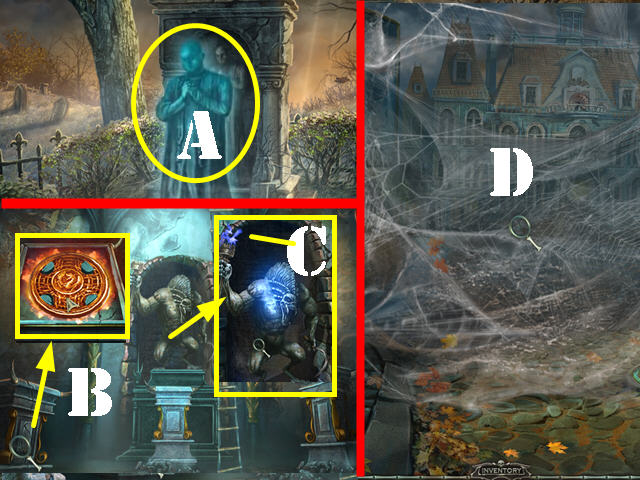
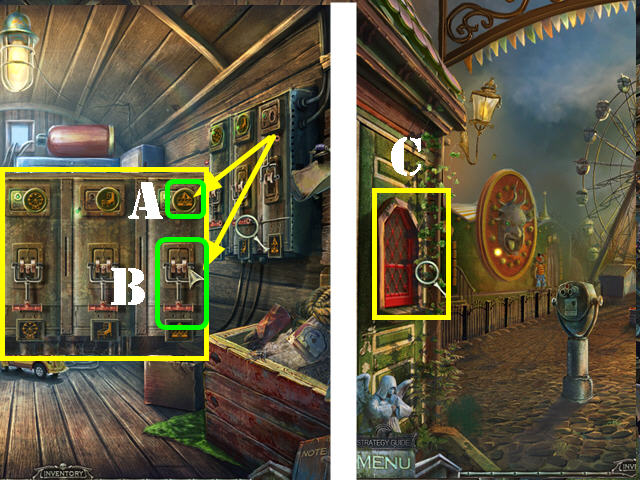
- Click on 'PLAY' (A) to access the main chapters in the game.
- The 'OPTIONS' (B) button allows you to adjust the screen size, music, cursor, and sound.
- The 'CLICK HERE TO CHANGE PLAYER' button (C) can be used to add or delete a new player.
- The 'EXTRAS' (D) button grants you access to the Bonus Content after you complete the game.
- Items written in blue in Hidden Object Scenes are hidden; you must open or click on something to make the hidden items appear.
- The items in the Hidden Object Scenes are random with the exception of the inventory items and some items marked in blue.
- To access the built-in guide, click on the 'STRATEGY GUIDE' button in the lower left corner of each scene.
- The Hint button is in the lower right corner of each scene.
- Pass your mouse over the bottom of the scene to access your Inventory Tray. Use the arrows in your inventory tray to scroll through all the items you've collected.
- The Journal (J) is in the lower left; read it to find clues and read part of the story.
- You can skip a puzzle once the 'SKIP' button fills.
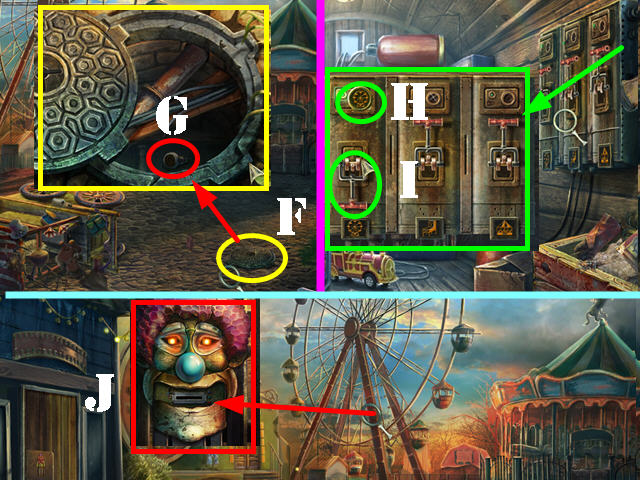
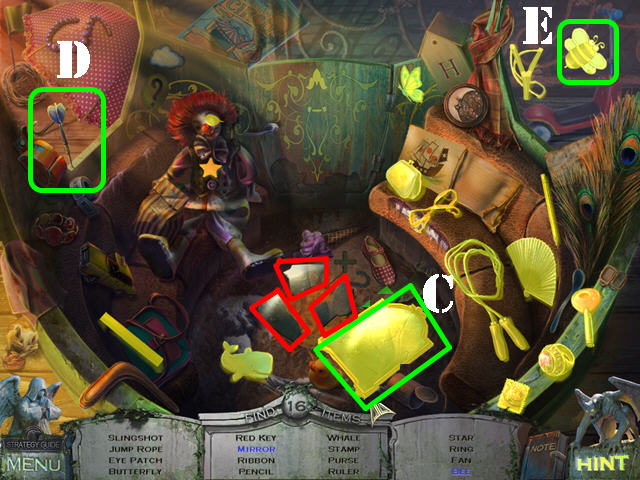
Chapter 1: The Cemetery
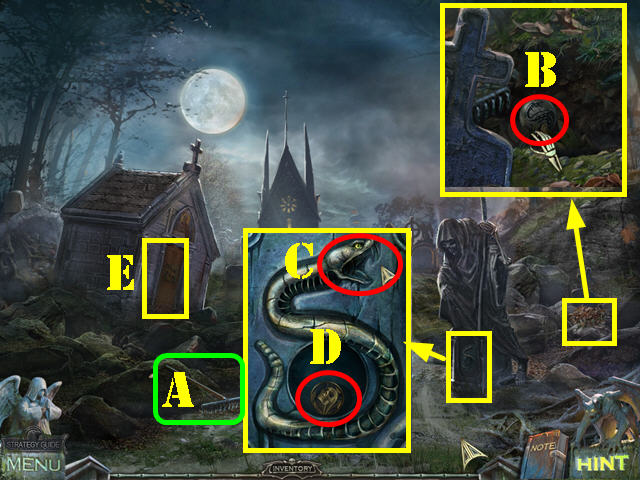
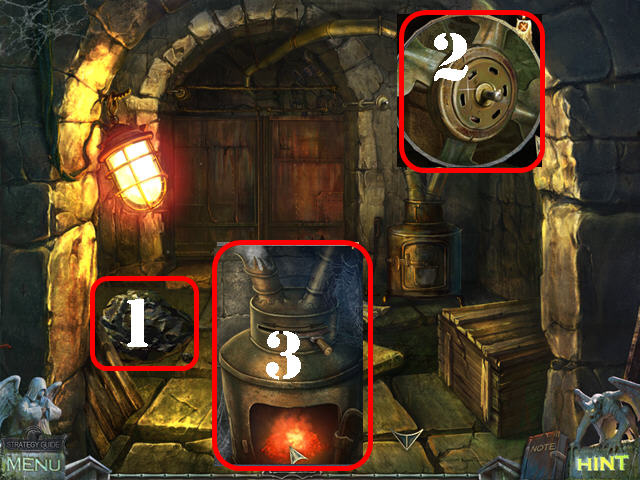
- Take the RAKE (A) on the ground.
- Examine the leaves in the lower right; use the RAKE on the leaves and take the SPHERE (B).
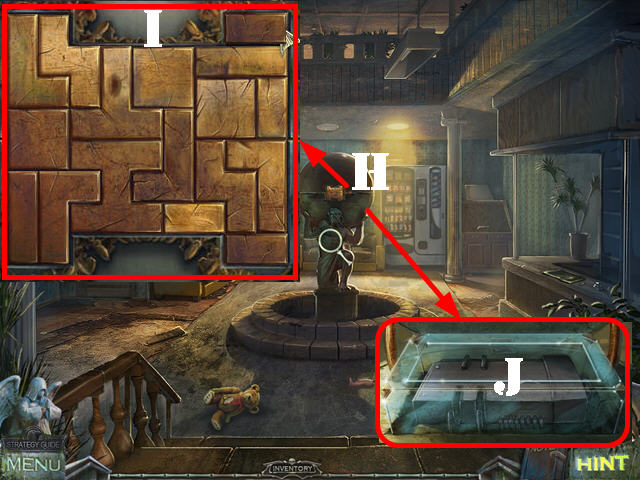
- Examine the base of the statue; place the SPHERE in the snake's mouth (C) and take the PUZZLE PIECE (D).
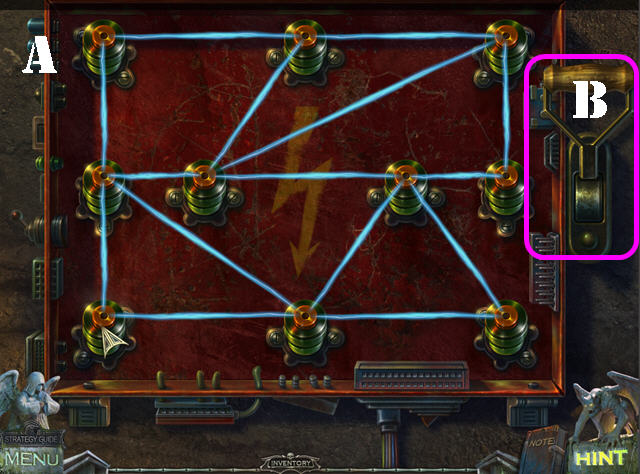
- Zoom into the door on the left; place the PUZZLE PIECE on the door to activate a puzzle (E).
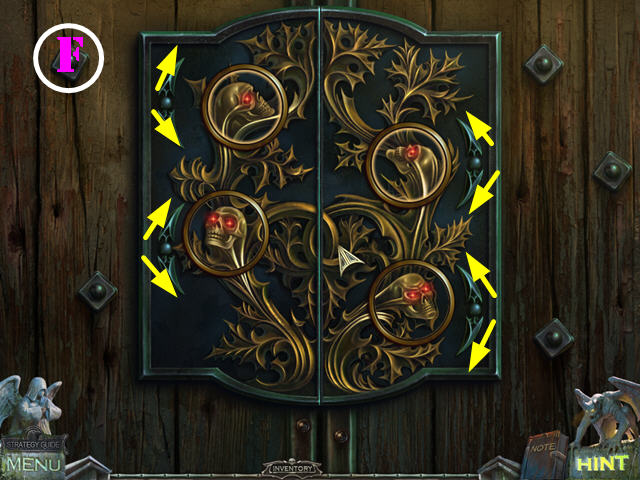
- Click on any 2 skulls to swap their positions.
- Use the arrows marked in yellow to rotate the skulls into the correct positions.
- Please look at the screenshot for the solution (F).
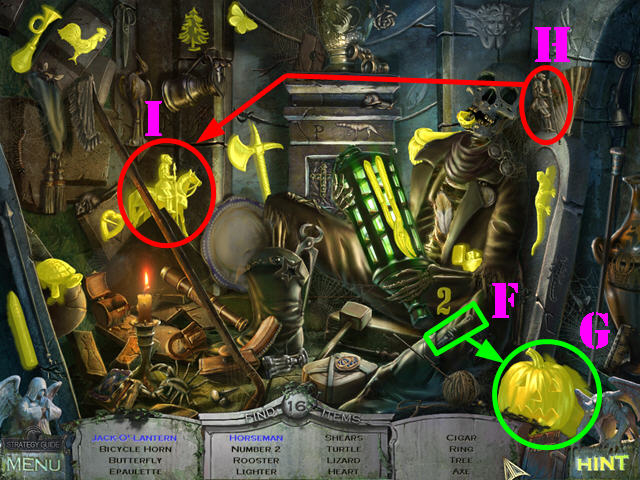
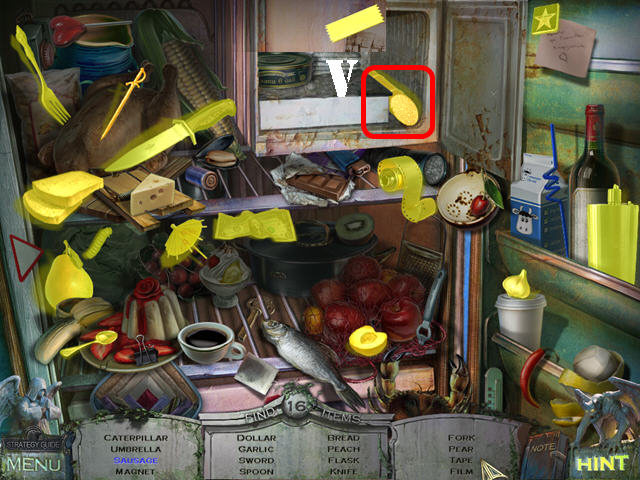
- Play the Hidden Object Scene.
- Use the KNIFE (F) on the PUMPKIN and take the JACK-O-LANTERN (G).
- Drag the SOLDIER (H) to the HORSE and collect the HORSEMAN (I).
- The SHEARS will be added to inventory.
- Head forward.
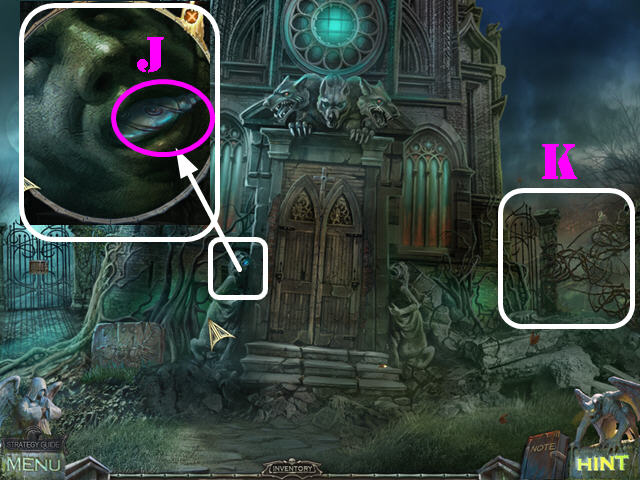
- Examine the statue to the left of the door; take the EMPTY BOTTLE (J).
- Examine the thorny branches on the right; cut them with the SHEARS twice (K).
- Head right.
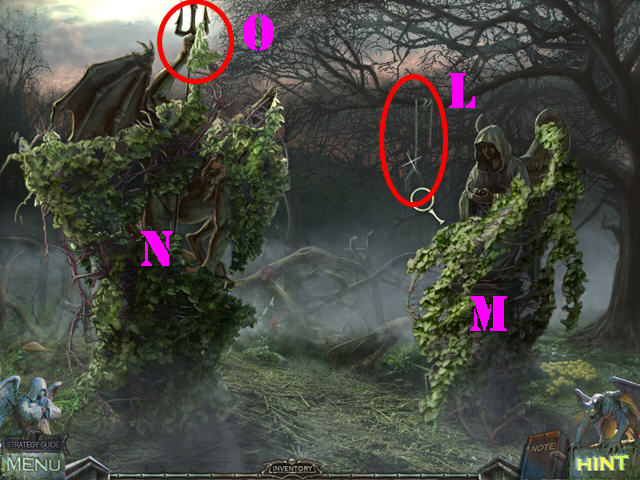
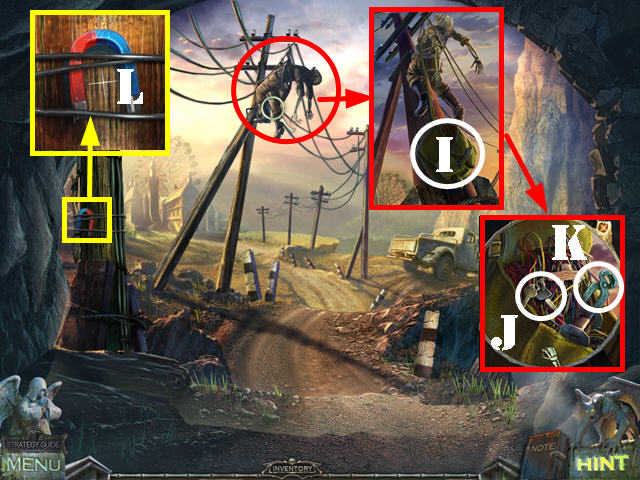
- Take a closer look at the NOOSE and take it (L).
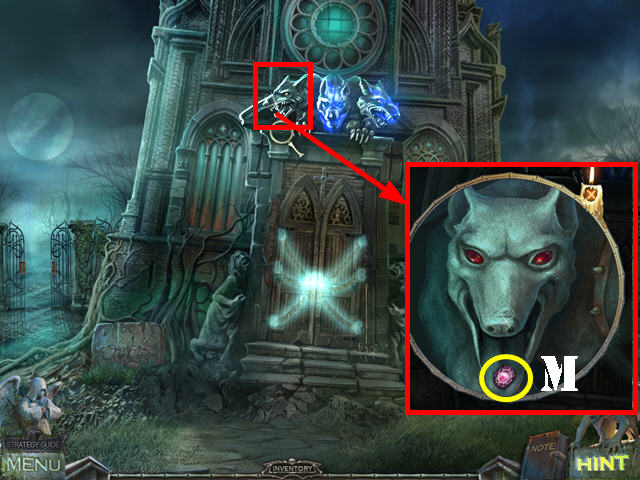
- Use the SHEARS on the ivy covering the right statue twice (M) and on the left statue 3 times (N).
- Take the TRIDENT (O) from the left statue.
- Click down.
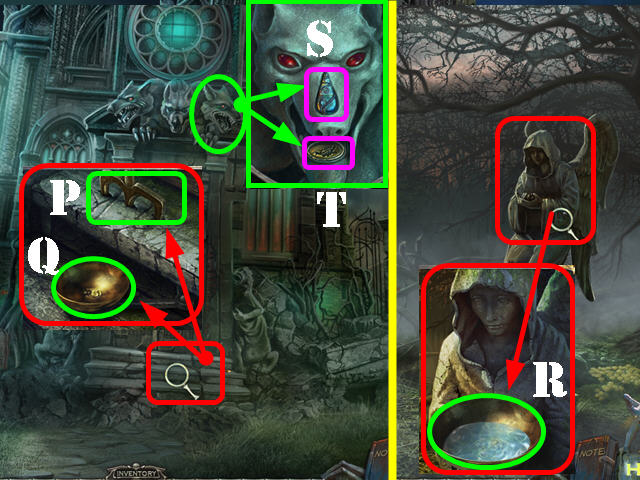
- Zoom into the steps; place the TRIDENT on the 3 small slots (P) and take the BOWL (Q).
- Head right.
- Zoom into the right statue; place the BOWL in its hands and the bowl will fill with the angel's tears (R).
- Use the EMPTY BOTTLE in the bowl to create the TEARS OF CERBERUS.
- Click down.
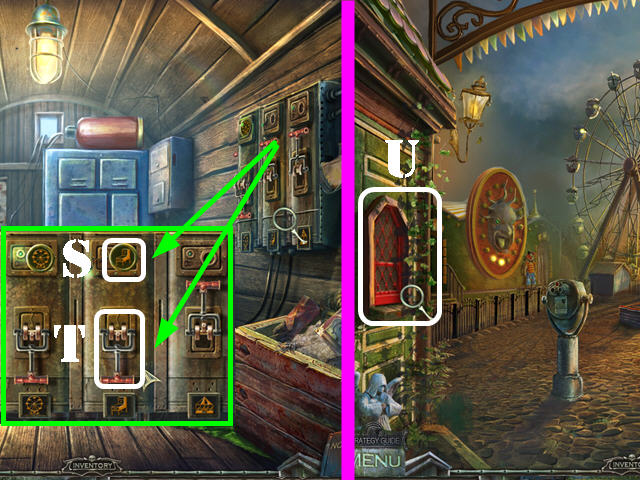
- Examine the Cerberus head on the right; place the TEARS OF CERBERUS where the nose should be (S) and take the PUZZLE PIECE (T).
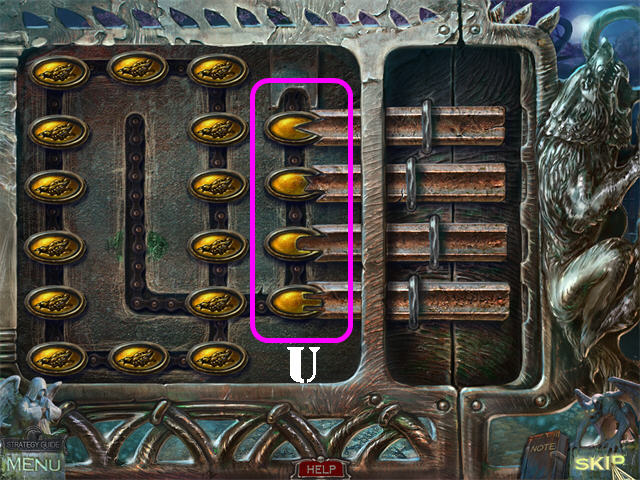
- Examine the gate on the left; place the PUZZLE PIECE on it to activate a puzzle.
- Drag the lock pieces around the board until the four shapes match the grooves of the lock on the right.
- Please look at the screenshot for the solution (U).
- Go through the gate after the puzzle has been solved.
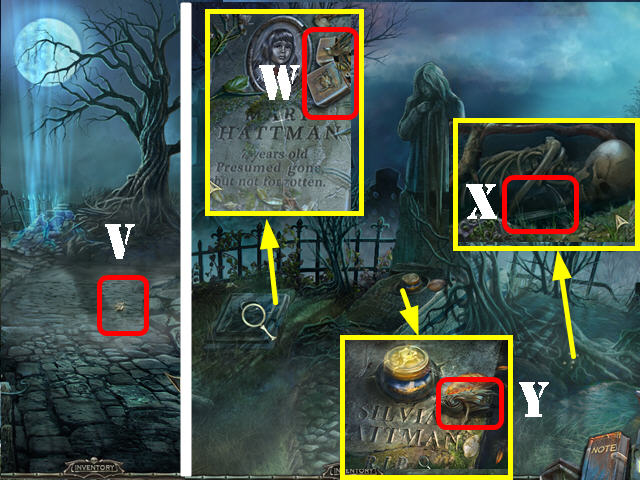
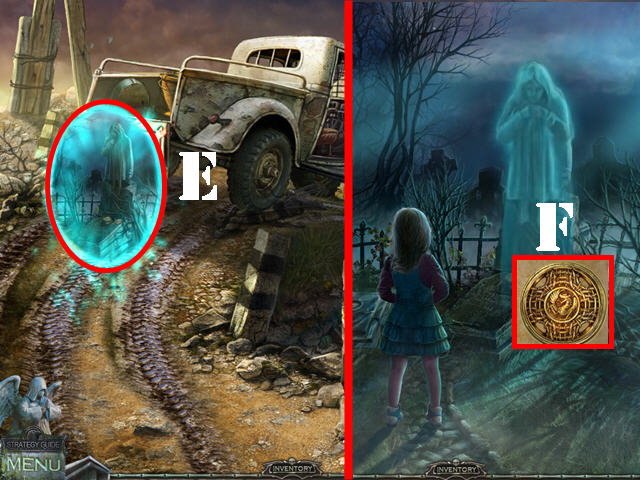
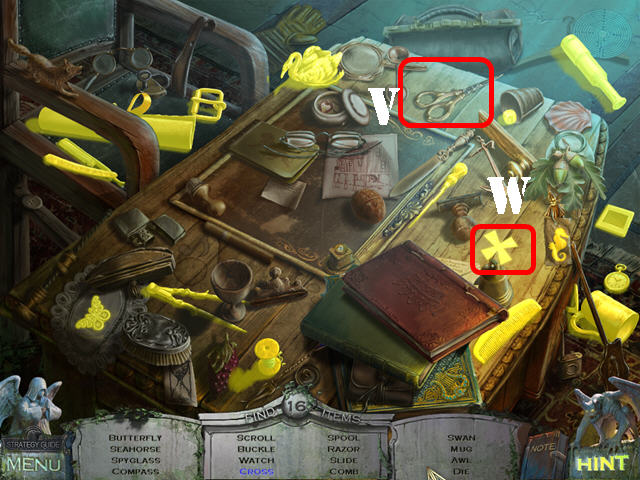
- Click on the crow that lands on the ground; take the HYDRA HEAD it drops on the ground after it flies away (V).
- Head left.
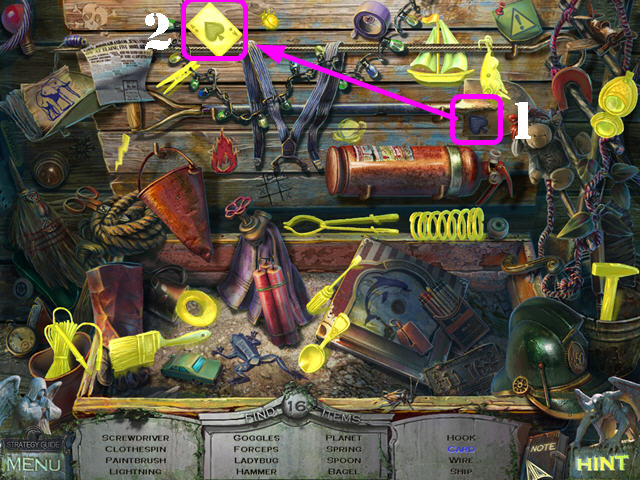
- Zoom into the grave on the lower left; take the LIGHTER (W).
- Examine the lower right side of the ground; click on the skull and take the WARHAMMER (X).
- Zoom into the grave at the base of the statue and take the second HYDRA HEAD (Y).
- Click down.
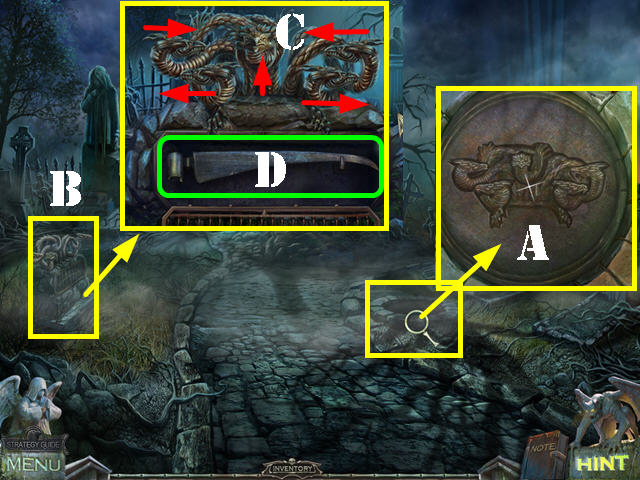
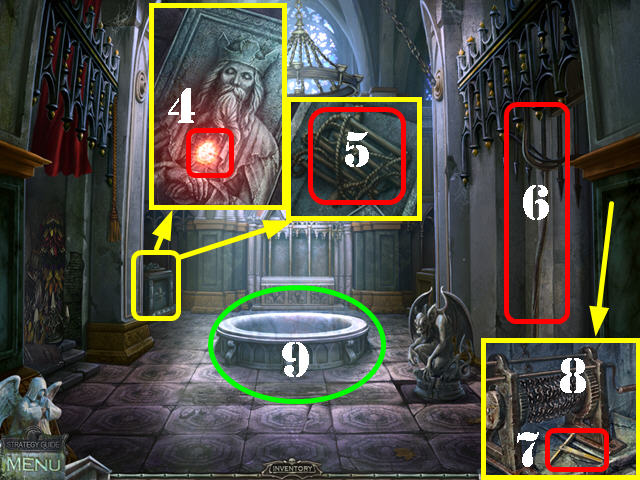
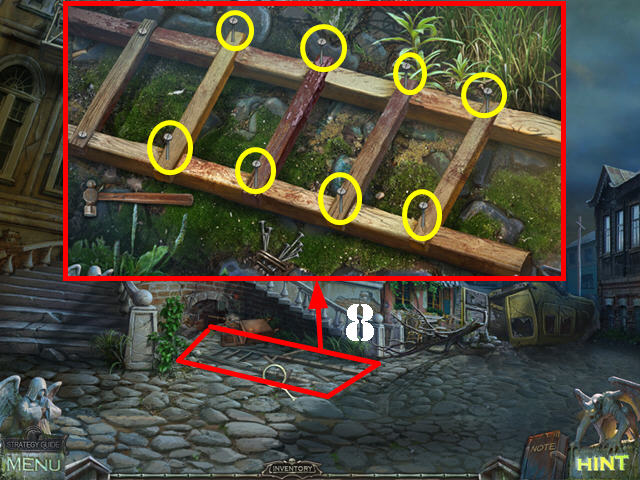
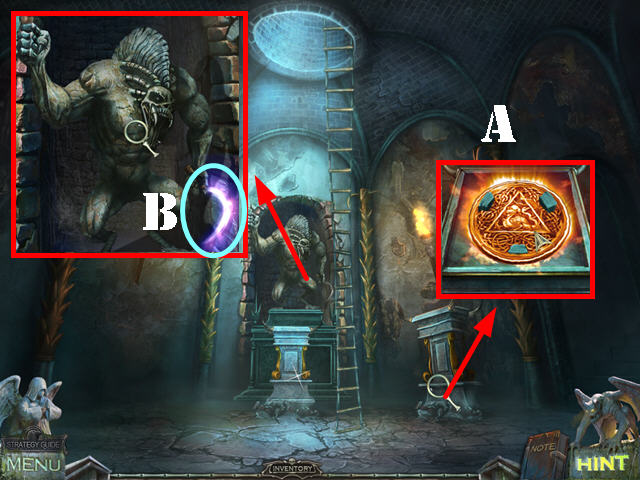
- Examine the well; place the NOOSE on the hook; note the hydra heads engraving (A).
- Zoom into the statue in the lower left; place the 2 HYDRA HEADS on it (B).
- Click on the heads to reposition them as shown on the well cover (C).
- Take the SCYTHE BLADE (D) after the puzzle has been solved.
- Click down; the little girl appears through the cathedral door but the Warlock comes and gets her.
- Click down.
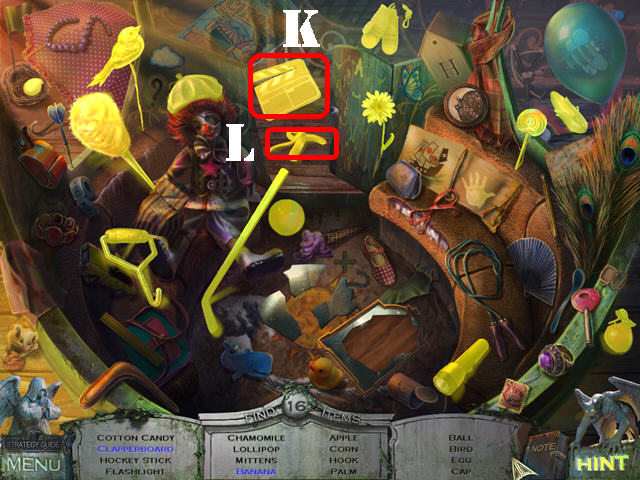
- Play the Hidden Object Scene on the left.
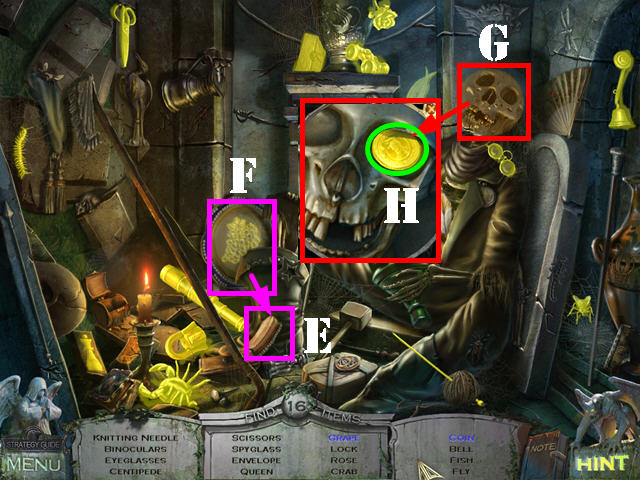
- Use the BRUSH (E) on the dirty tray and take the GRAPES (F).
- Zoom into the SKULL (G) and take the COIN (H).
- The NEEDLE will be added to inventory.
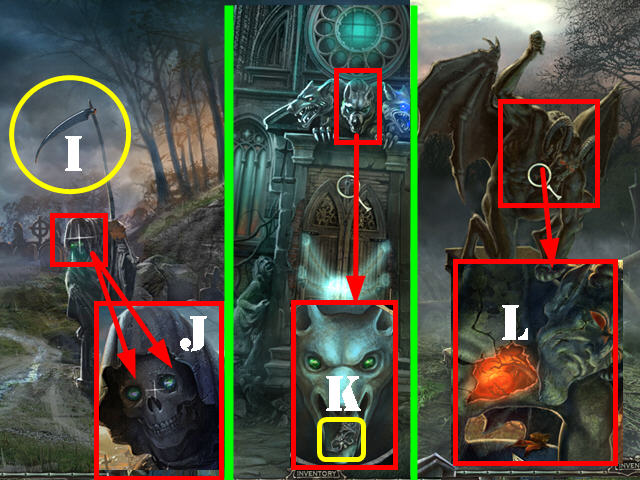
- Place the SCYTHE BLADE on the Grim Reaper's handle (I).
- Zoom into the Grim Reaper's skull; remove the EYES OF CERBERUS with the NEEDLE (J).
- Head forward.
- Zoom into the center Cerberus above the door; place the EYES OF CERBERUS in the eye sockets and take the AMULET FRAGMENT (K).
- Head right.
- Zoom into the left statue; use the WARHAMMER on the chest and take the HEART OF CERBERUS (L).
- Click down.
- Zoom into the left Cerberus above the door; place the HEART OF CERBERUS in the mouth and take the GEM (M).
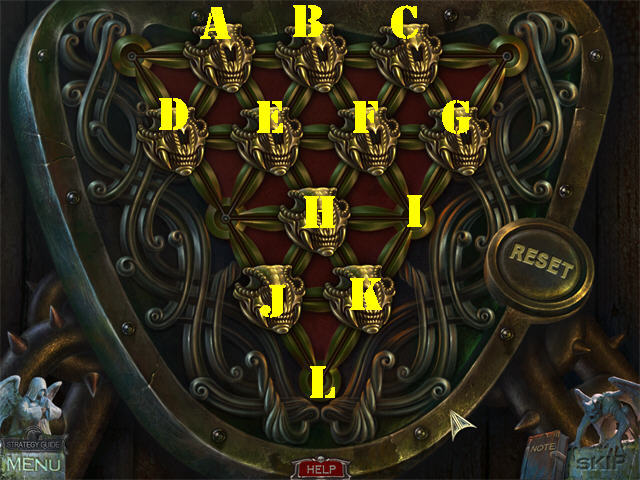
- Zoom into the cathedral's door to activate a puzzle.
- Jump the skulls over each other to eliminate them until only one remains on the board..
- To solve the puzzle move the skulls in this order: the first letter refers to the first skull you pick up and the second letter refers to the spot you place it in: BI, DF, KE, AH, GE, JF, CH, EK, and IL.
Chapter 2: The Cathedral
- Enter the Cathedral.
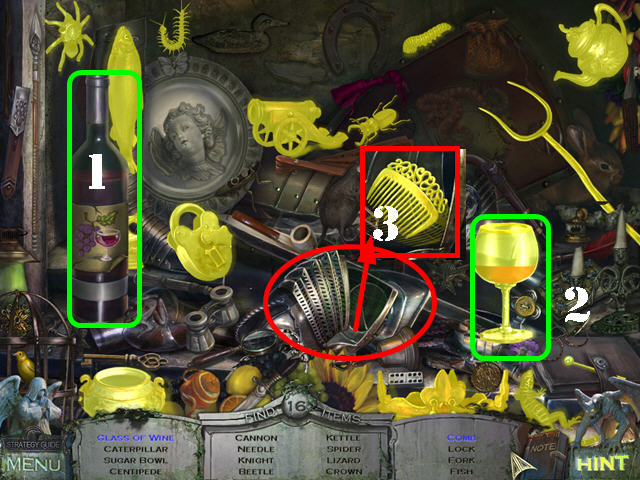
- Click on the tassel on the left to raise the curtain and activate a Hidden Object Scene; play it.
- Drag the WINE BOTTLE (1) to the glass and take the GLASS OF WINE (2).
- Click on the helmet; zoom into it and take the COMB (3).
- The FORK will be added to inventory.
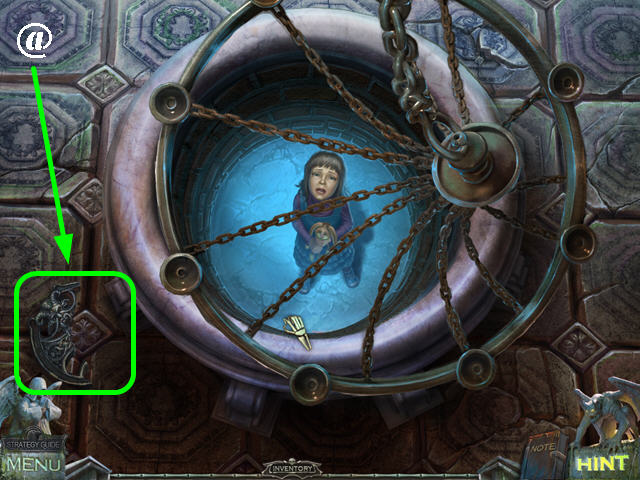
- Examine the fallen chandelier; click on the well and take the second AMULET FRAGMENT (@).
- Click on the chandelier and the little girl will be taken away.
- Click down.
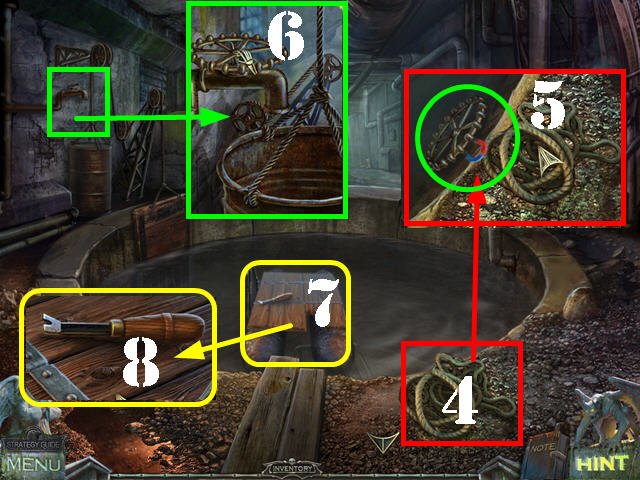
- Examine the coffin on the left; place the GEM in the recess (4) and take the ROPE LADDER from inside the coffin (5).
- Click on the gargoyle.
- Place the FORK under the gate (6).
- Click on the gargoyle again.
- Zoom into the niche in the wall; take the KEY (7).
- Click on the winch to raise the chandelier (8).
- Zoom into the well; place the ROPE LADDER inside and go into the well (9).
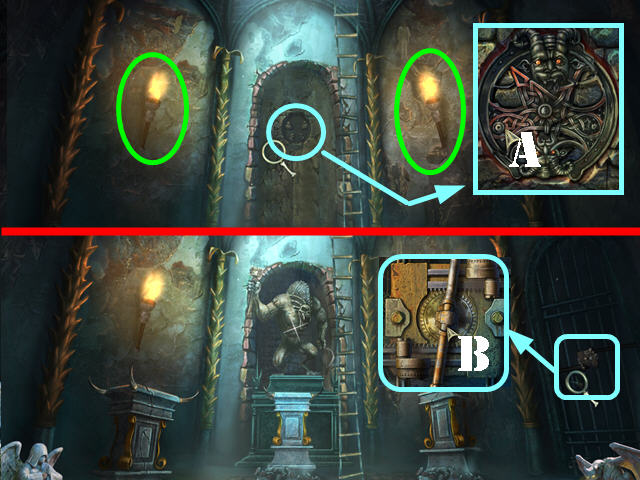
- Light the 2 torches marked in green with the LIGHTER.
- Examine the back wall; place the 2 AMULET FRAGMENTS in the slot (A).
- Listen to what the Warlock has to say.
- Examine the gate on the right; unlock it with the KEY (B).
- Go through the gate.
- Click on the crow.
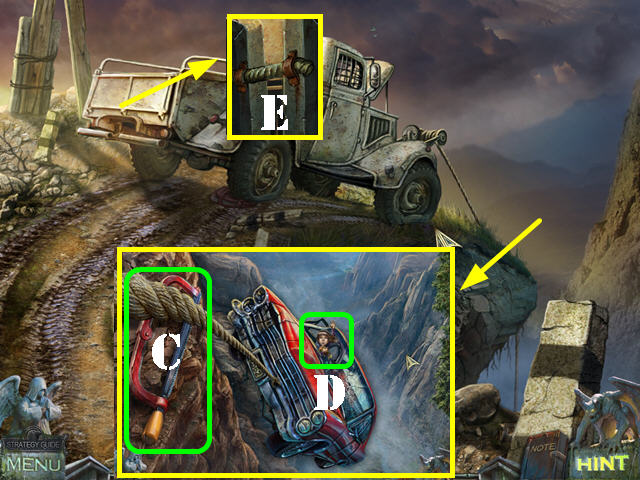
- Head towards the truck and then click on the right.
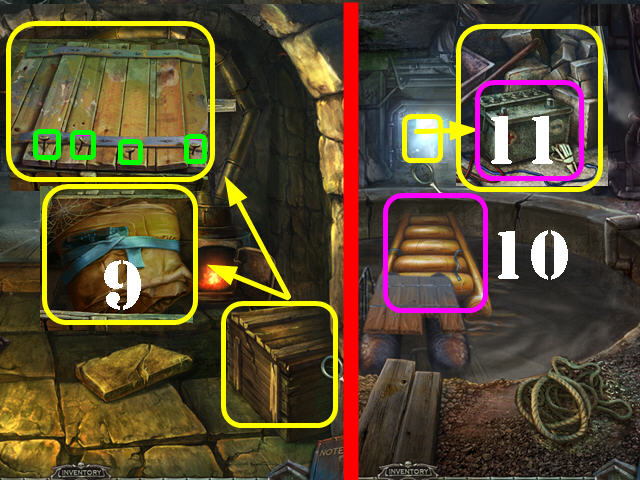
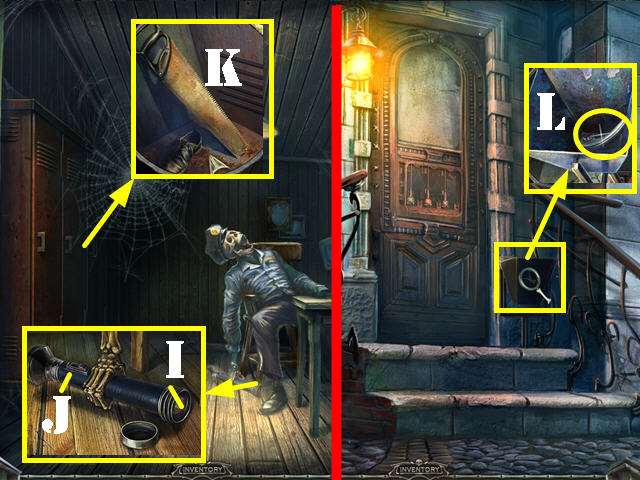
- Take the SAW (C).
- Click on the little girl in the car (D).
- Click down twice.
- Zoom into the back of the truck. Cut the latch with the SAW to activate a Hidden Object Scene; play it (E).
- Drag the AXE HEAD (F) to the AXE HANDLE (G). Use the AXE on the piece of wood and take PINOCCHIO (H).
- The GAFF HOOK will be added to inventory.
- Click down.
- Zoom into the hanging corpse; use the GAFF HOOK on the bag (I).
- Open the bag; take the KEYS (J) and the PINCERS (K).
- Examine the power line on the left; cut the wires with the PINCERS and take the MAGNET (L).
- Head left.
- Click anywhere on the scene for the Warlock to appear.
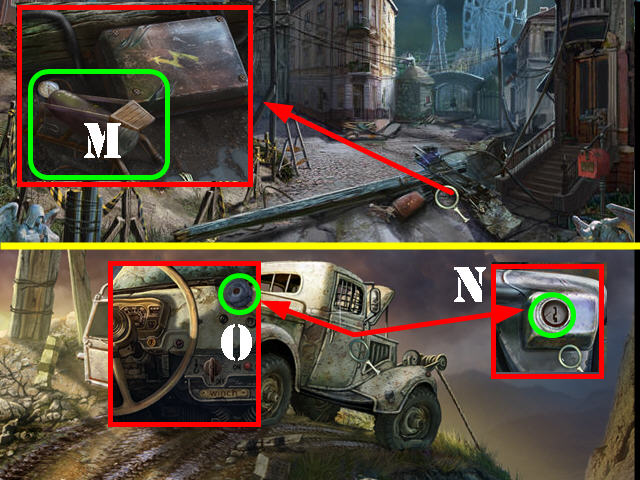
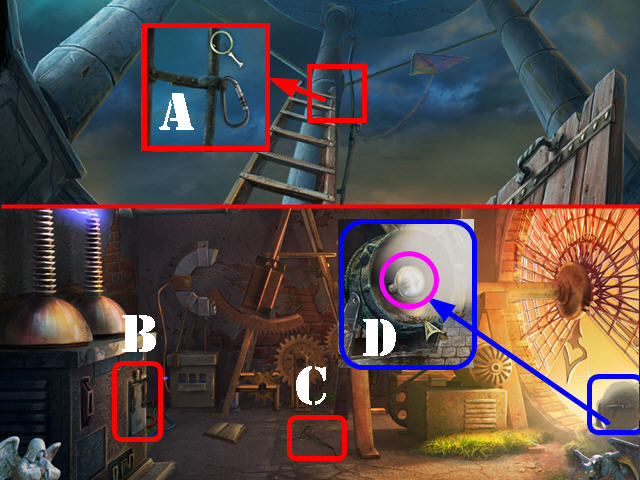
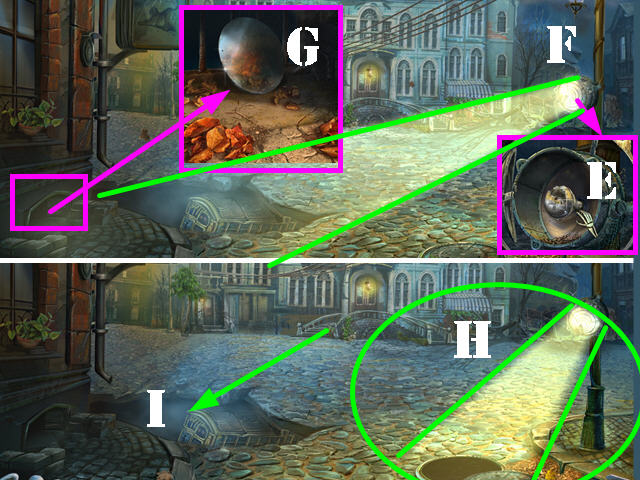
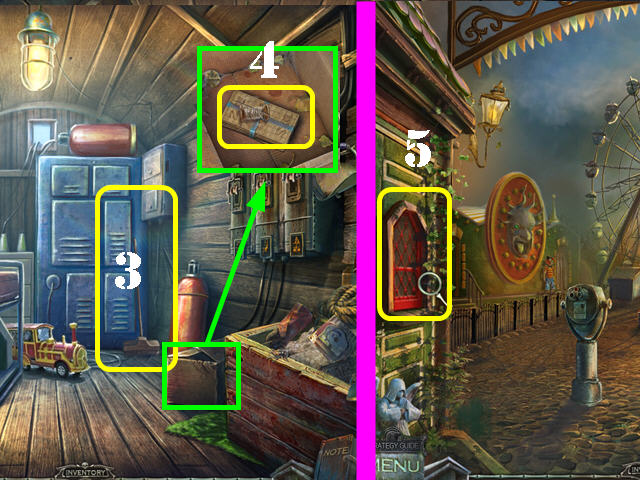
- Zoom into the fallen power line; take the PUMP (M) and note that the electrical box needs a screwdriver.
- Return to the truck on the road.
- Zoom into the passenger door; open the lock, place the KEYS in the lock and turn the key (N).
- Examine the door; take the ELECTRICAL TAPE (O).
- Exit the truck door.
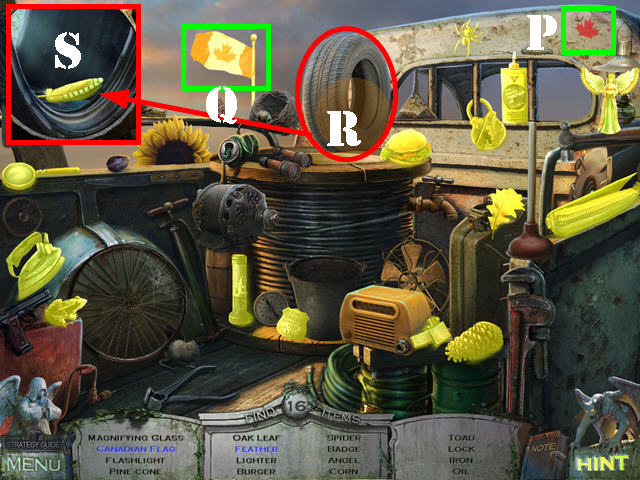
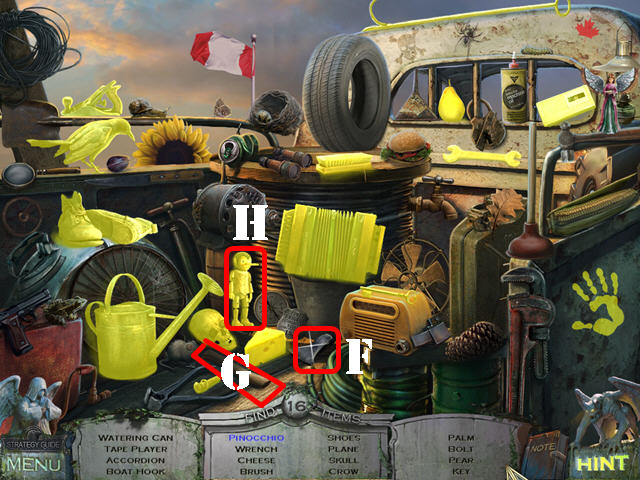
- Play the Hidden Object Scene in the back of the truck.
- Drag the MAPLE LEAF (P) to the FLAG (Q) and take the CANADIAN FLAG.
- Look inside the tire (R) and take the FEATHER (S).
- The ANGEL will be added to inventory.
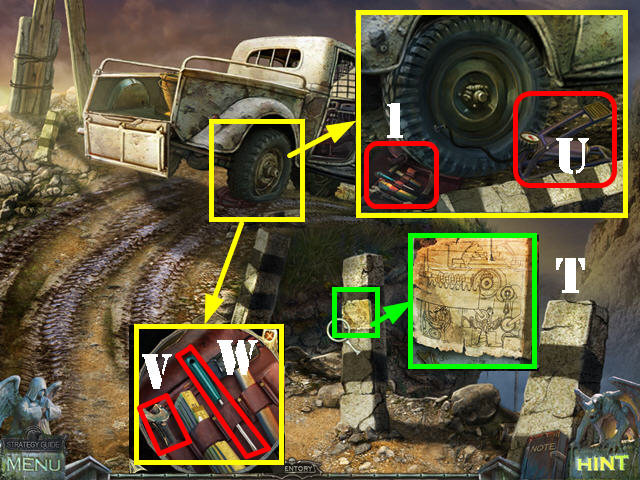
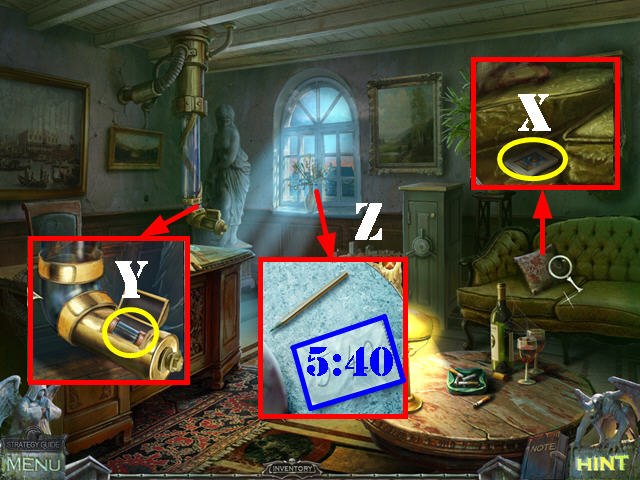
- Take a closer look at the diagram on the center post (T).
- Examine the back tire; place the PUMP on the tire and click on it 4 times (U).
- Examine the tools (1); take the WRENCH (V) and the SCREWDRIVER (W).
- Click down and head left.
- Zoom into the fallen power line; use the SCREWDRIVER on each of the 4 screws on the electrical box.
- Remove the cover on the electrical box; click on it to activate a puzzle.
- Drag the fuses out of the way and into one of the plugs.
- Please look at the screenshot for the solution (A). Make sure all fuses are firmly attached into the plugs or the puzzle will not be solved.
- Click on the lever (B) after you solve the puzzle.
- Play the Hidden Object Scene on the center building.
- Drag the CHERRY (C) to the CUPCAKE (D) and take the CHERRY CUPCAKE.
- Use the FLYSWATTER (E) on the FLY (F) and take the DEAD FLY.
- The BEAR will be added to inventory.
- Zoom into the window in the lower left; take the HORSE (G).
- Exit the window and take the LADDER (H).
- Examine the mailbox; open it and take the KEY (I).
- Take a closer look at the door on the right; place the BEAR (J), ANGEL (K), and HORSE (L) on the lock.
Chapter 3: The General Store
- Enter the general store.
- Take the PICKAXE (M).
- Examine the small drawers; open the second one and take the WING NUT (N).
- Place the LADDER on the shelves (O).
- Zoom into the briefcase on the top shelf (P); use the KEY on both locks to open the briefcase.
- Take the EMPTY GAS TORCH (Q).
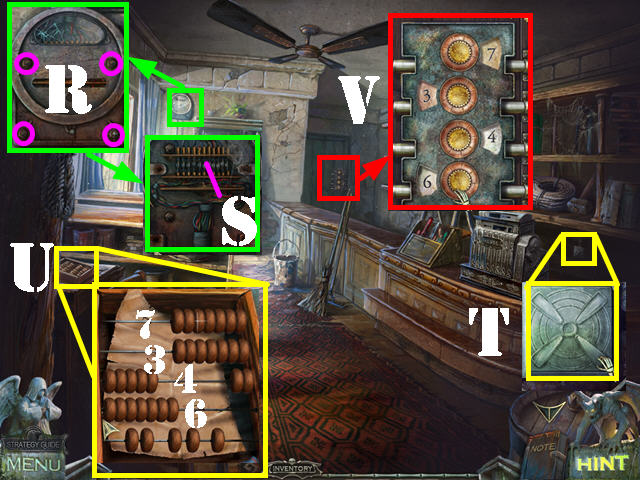
- Zoom into the electrical box in the upper left; remove the 4 nuts with the WRENCH (R).
- Use the ELECTRICAL TAPE on the wires (S).
- Zoom into the switch (T). Click on it and a blade will come towards you.
- Take the FAN BLADE.
- Examine the abacus (U); push the beads aside to reveal the numbers: '7346'.
- Examine the locked door in the back; change the code on the dials to:'7346' (V).
- Zoom into the closet to activate a puzzle.
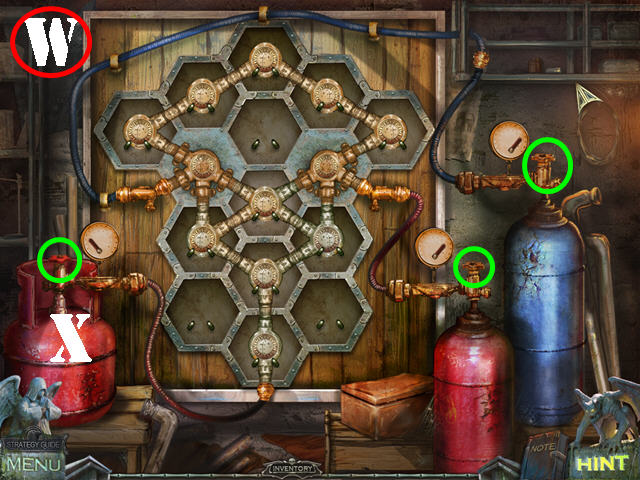
- Move the pipes to the correct slots. Click on any 2 pipes to swap their positions.
- Please look at the screenshot for the solution (W).
- Click on the 3 valves marked in green attached to the tanks.
- Place the EMPTY GAS TORCH on the red tank on the left (X).
- The FUELED GAS TORCH will be added to inventory.
- Click down.
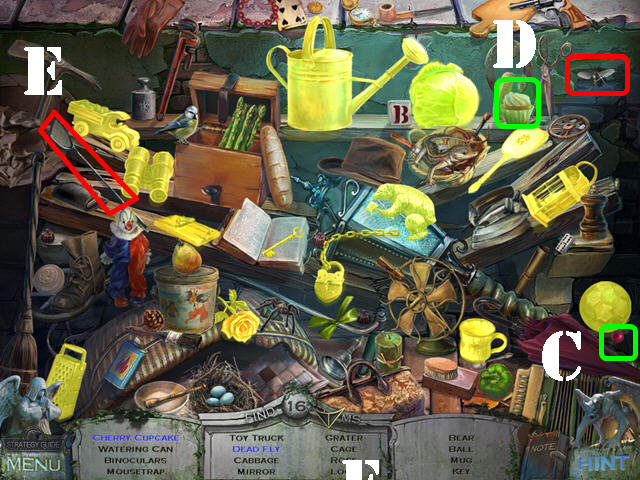
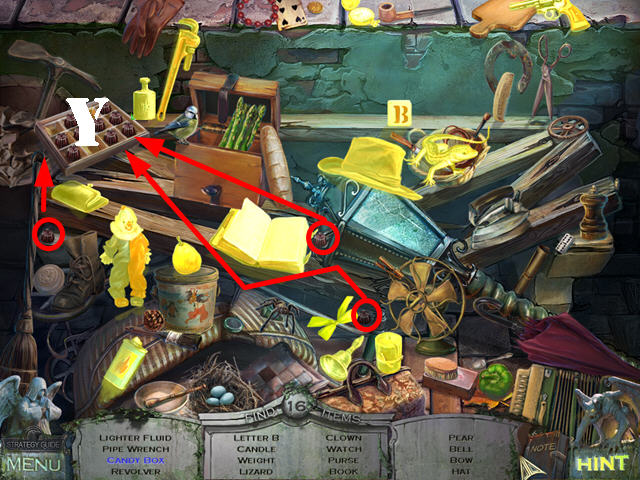
- Play the Hidden Object Scene by the center building.
- Drag the 3 CHOCOLATE PIECES marked in red to the candy box; take the CANDY BOX (Y).
- The LIGHTER FLUID will be added to inventory.
- Examine the window in the lower left; use the FUELED GAS TORCH on the 10 sections marked in yellow on the bars.
- Go through the window.
- Use the PICKAXE on the chunk of coal and take the COAL (1).
- Examine the mechanism in the upper right; place the FAN BLADE on it (2).
- Use the WING NUT on the FAN BLADE.
- Examine the furnace; open the door and place the COAL inside (3).
- Pour the LIGHTER FLUID over the coals.
- Use the LIGHTER on the coals.
- Click on the lever to turn on the fan and open the door; go through it.
- Examine the rope on the ground (4); place the MAGNET over it and take the VALVE (5).
- Take a closer look at the faucet on the left; place the VALVE on it and turn it once to fill the well with water (6).
- Use the GAFF HOOK on the raft to pull it closer (7).
- Zoom into the raft and take the NAIL PULLER (8).
- Click down.
- Examine the crate in the lower right; remove the 4 nails marked in green with the NAIL PULLER.
- Remove the lid and take the RAFT (9).
- Go forward.
- Place the RAFT in the water and zoom ahead (10).
- Click on the battery to remove the wires; take the BATTERY (11).
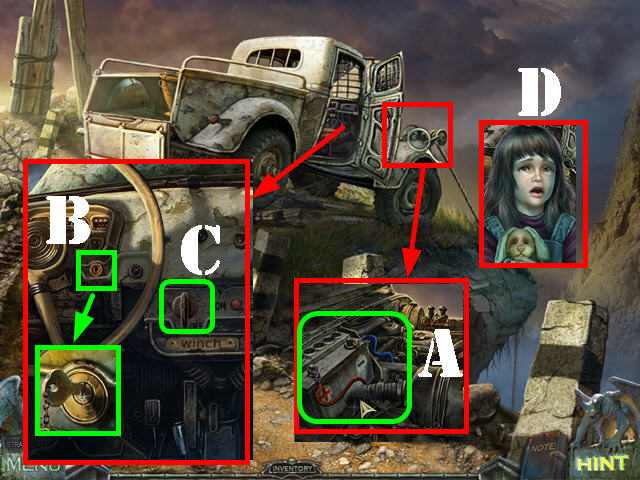
- Return to the truck on the cliff.
- Examine the hood of the car; place the BATTERY in it (A).
- Click on the red and the blue cables to attach them to the battery.
- Go to the truck; zoom into the ignition, use the KEYS in the ignition and turn the key once (B).
- Turn the key on the winch control to pull the little girl's car up from the cliff (C).
- Talk to the little girl (D).
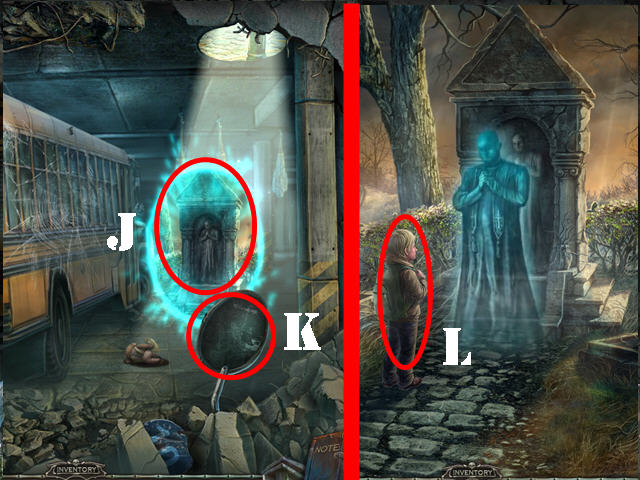
- Go through the portal; the little girl will be reunited with her mother (E).
- The AMULET will be added to inventory once ghost stops talking (F).
- Click on the little girl. Click down.
Chapter 4: Underground Garage
- Head right in the cemetery after the tombstone appears; talk to the ghost of Gordon Rayn (A).
- Return to the cathedral and go down the well.
- Examine the left altar; place the AMULET on it (B).
- Zoom into the statue; take the TORCH (C).
- Head right and head left twice.
- Burn the web with the TORCH (D).

- Click on the crow and follow it into the hole in the ground (E).
- Go through the right door.
- Examine the table; take the CLIP (F).
- Zoom into the monitor (G).
- Click down.
- Click on the monkey; zoom into it and click on the zipper pull.
- Use the CLIP on the zipper; open the zipper and take the BATTERIES (H).
- Go through the right door.
- Examine the skeleton's hand on the ground; remove the flashlight cover (I).
- Place the BATTERIES inside the flashlight.
- Click on the cover to replace it and click on the switch (J) to turn it on.
- Open the locker door; examine it and take the SAW (K).
- Click down twice to go outside. Go towards the left side of the building.
- Examine the garbage can; take the FRIDGE HANDLE (L).

- Click down and go towards the center of the mansion.
- Play the Hidden Object Scene.
- Use the BRUSH on the stone (M); take the HANDPRINT (N).
- Drag the KNIFE (O) to the APPLE; take the 2 APPLE HALVES (P).
- Find the listed items to obtain the WHISKEY.
- Examine the broken branch; cut it with the SAW (Q). Open the door and go through it.
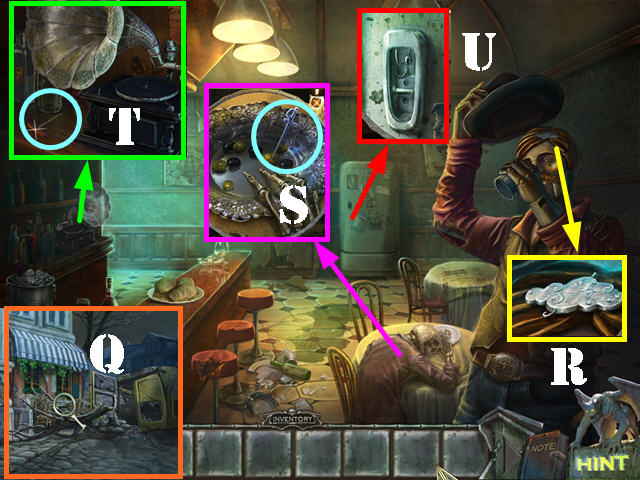
- Pour the WHISKEY into the cowboy's glass.
- Zoom into the cowboy's head; take the CLOUD (R).
- Examine the skeleton; take the BLUE SWORD (S).
- Examine the gramophone; take the CORKSCREW (T).
- Zoom into the refrigerator; place the FRIDGE HANDLE on the door (U).
- Click on the FRIDGE HANDLE to activate a Hidden Object Scene; play it.
- Open the freezer door; take the SAUSAGE (V).
- The RED SWORD will be added to inventory.
- Click down twice. Go towards the left side of the mansion.
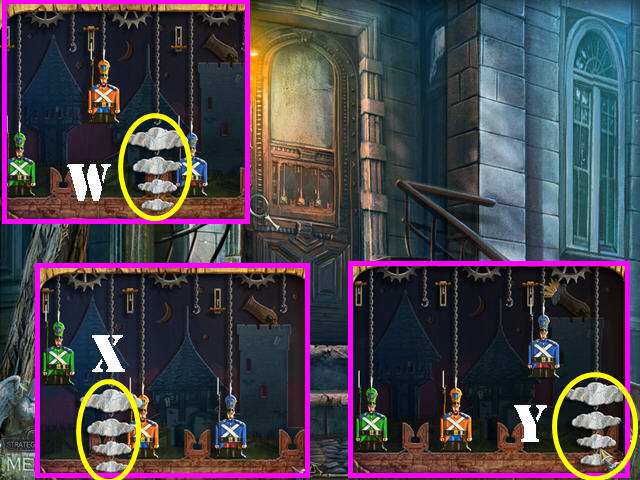
- Zoom into the door and place the CLOUD on the hook to activate a puzzle.
- Move the set of 4 clouds onto each hook, from biggest to smallest, in order for the bayonets to trip the switches.
- You will have to repeat the same steps for each hook (W, X, and Y).
Chapter 5: The Toy Store and the Saloon
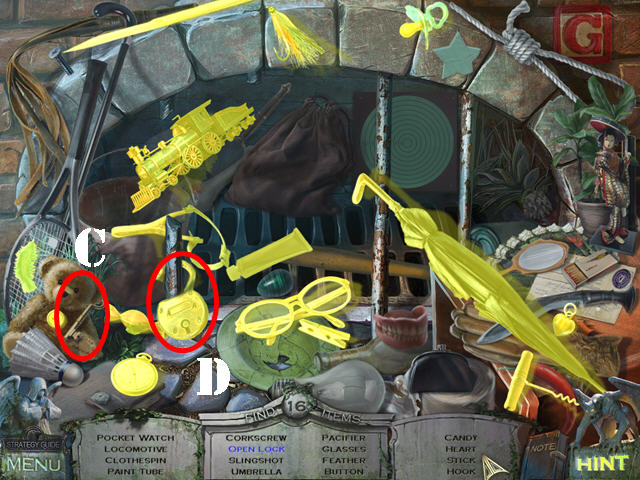
- Enter the Toy Store.
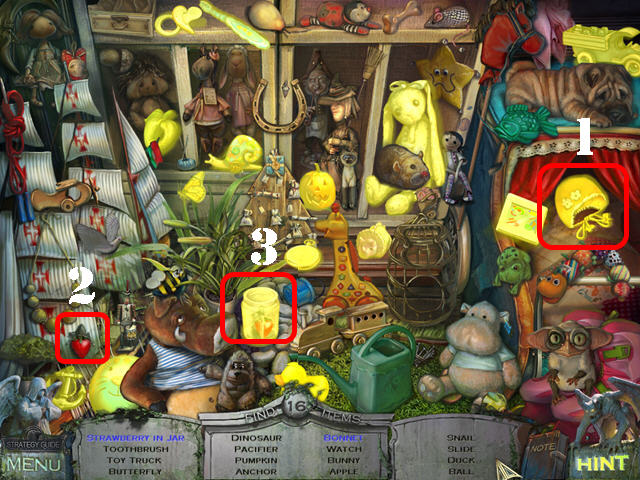
- Play the Hidden Object Scene.
- Open the red curtains; take the BONNET (1).
- Drag the STRAWBERRY (2) to the jar; take the STRAWBERRY IN JAR (3).
- The SLIDE will be added to inventory.
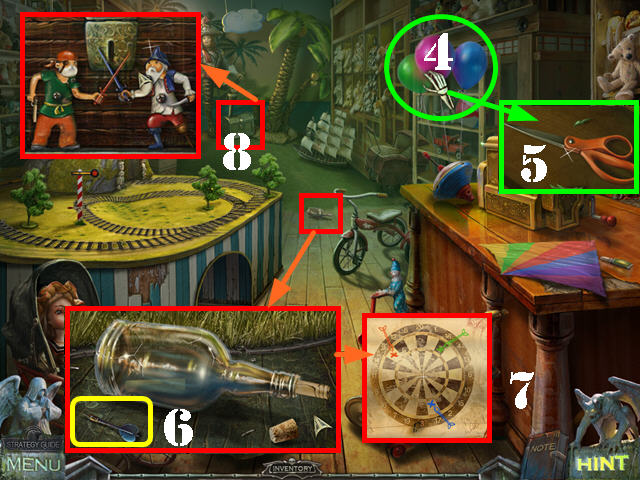
- Click on the balloons to pop them (4); zoom into the shelf and take the SCISSORS (5).
- Zoom into the bottle; take the BLUE DART (6).
- Zoom into the bottle again. Use the CORKSCREW on the bottle and look at the diagram. The green dart is on 18, the red dart is on 9, and the blue dart is on 17. Exit the bottle (7).
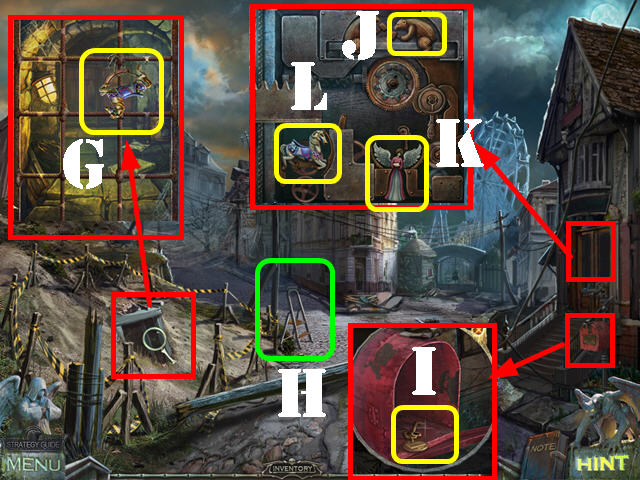
- Examine the chest (8); give the BLUE SWORD and the RED SWORD to the pirates.
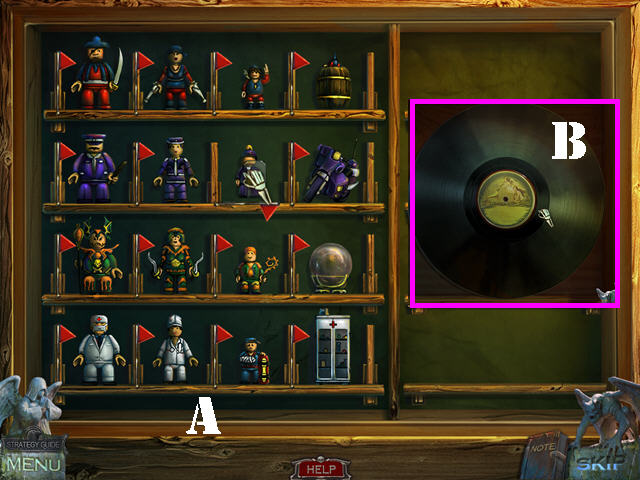
- Zoom into the chest to activate a puzzle.
- Place the toys on the shelf using the permanent pieces as a guide (A).
- A piece placed correct will lock in place and the red flag will rise up.
- Take the RECORD (B) after the puzzle has been solved.
- Click down twice and head towards the center of the mansion.
- Play the Hidden Object Scene.
- Drag the KEY (C) to the lock; take the OPEN LOCK (D).
- The LOCOMOTIVE will be added to inventory.
- Return to the saloon.
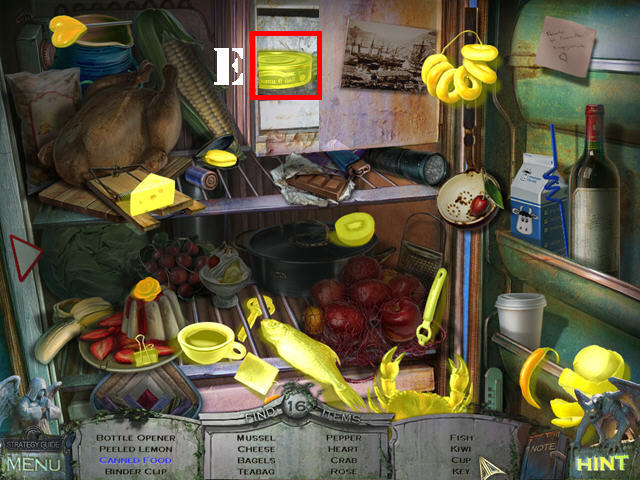
- Play the Hidden Object Scene.
- Open the freezer door; take the CANNED FOOD (E).
- The TRAIN KEY will be added to inventory.
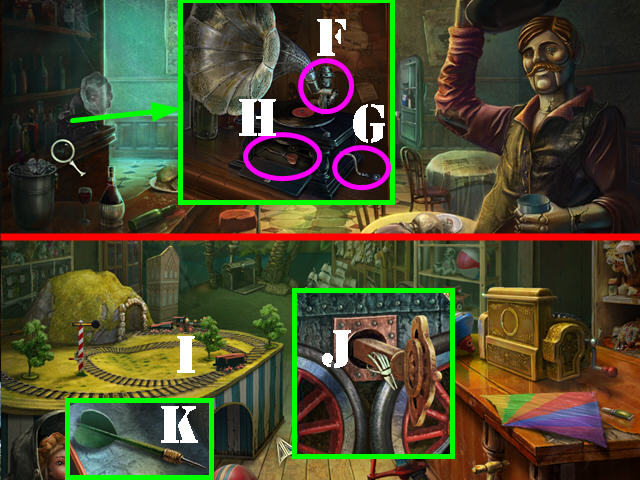
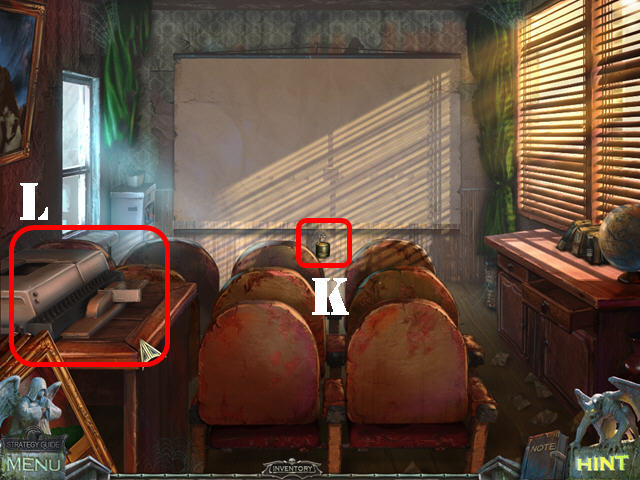
- Zoom into the gramophone; place the RECORD on it.
- Move the NEEDLE (F) onto the record and crank the HANDLE (G).
- Take the RED DART (H).
- Return to the Toy Store.
- Place the LOCOMOTIVE on the tracks (I).
- Zoom into the locomotive; use the TRAIN KEY in the lock (J). Click on the key once to start the train.
- Examine the train car once it stops moving; take the GREEN DART (K).
- Return to the saloon.
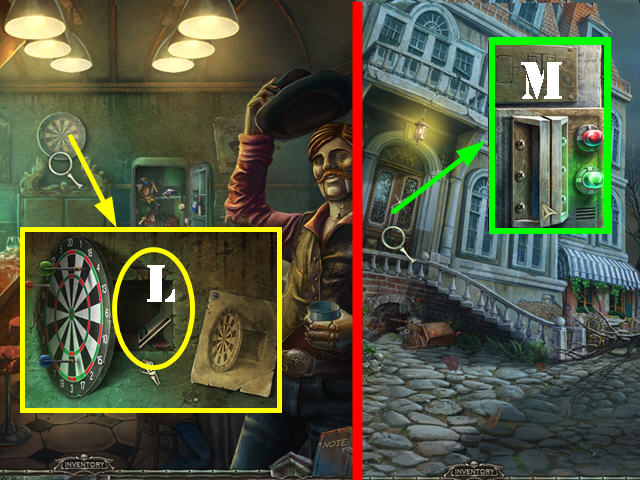
- Examine the dartboard.
- Place the green dart on 18, the red dart on 9, and the blue dart on 17.
- Take the COIN and the MAGNETIC CARD behind the dartboard (L).
- Click down and zoom into the door.
- Use the MAGNETIC CARD in the slot and enter the mansion (M).
Chapter 6: The Mansion
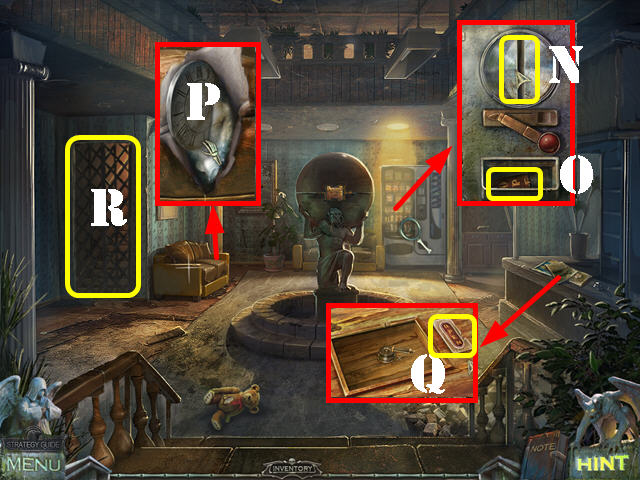
- Zoom into the vending machine; use the COIN in the coin slot (N) and take the HALF TOKEN (O).
- Zoom into the couch; cut the strings with the SCISSORS and take the CLOCK FACE (P).
- Examine the desk; remove the items and place the HALF TOKEN in the slot (Q). Click on the token then click the lever to unlock the left door; go through it (R).
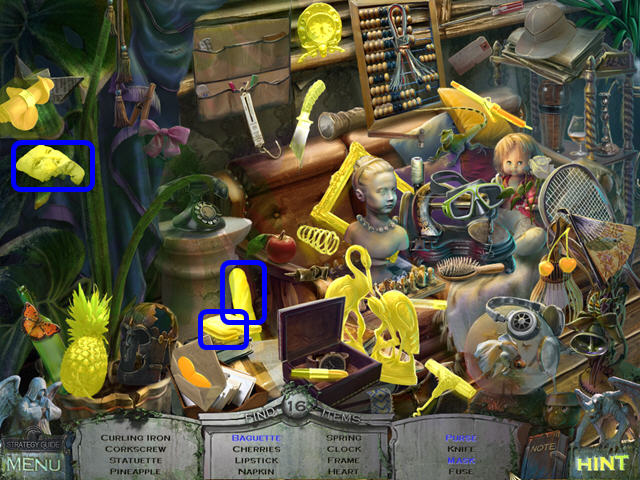
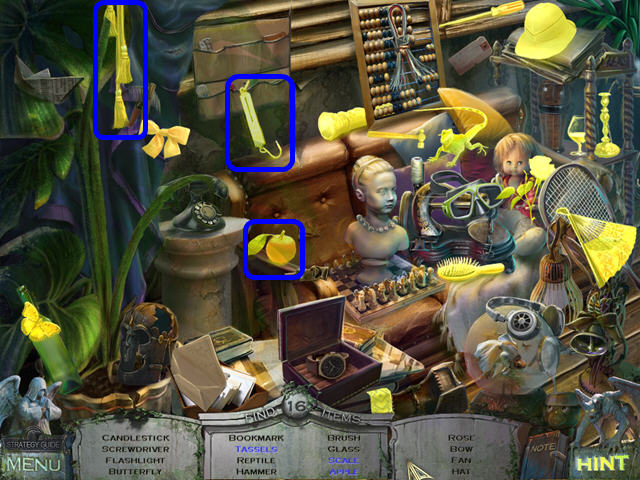
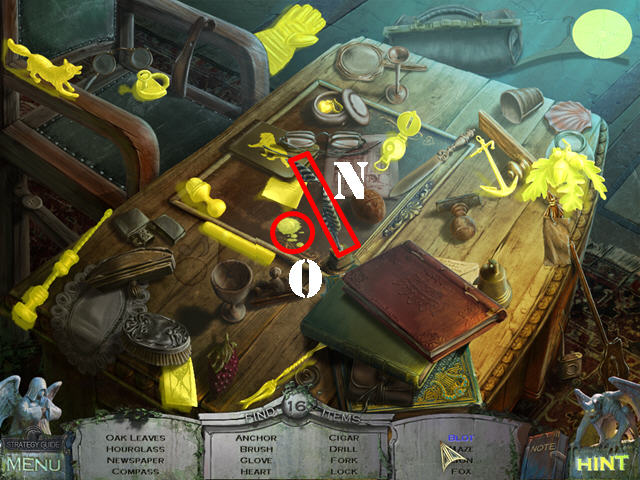
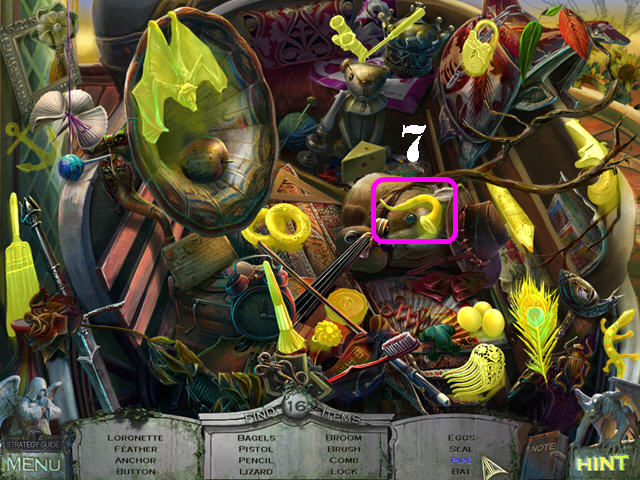
- Play the Hidden Object Scene.
- Move the leaves and pick up any items written in blue on your list.
- The FUSE will be added to inventory.
- Take the BOX WITH PUZZLES (S).
- Zoom into the pipe; open the cover and take the BOBBIN (T).
- Head forward.
- Zoom into the bucket and take the SOLVENT (U).
- Go out the window and go through the right doors to access the Mayor's Office.
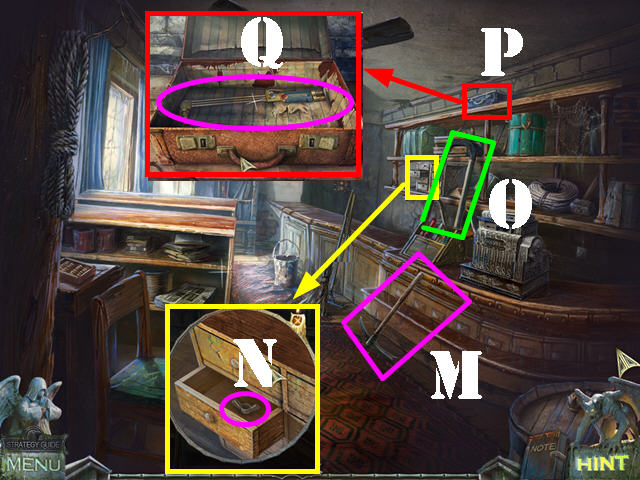
- Play the desk Hidden Object Scene.
- Drag the SCISSORS (V) to the cloth; take the CROSS (W).
- The SLIDE will be added to inventory.
- Zoom into the couch; lift the cushion and take the SLIDE (X).
- Zoom into the pipe and take the CANISTER (Y).
- Examine the window sill; note the 5:40 time (Z).
- Click down.
- Play the couch Hidden Object Scene.
- Move the leaves out of the way and pick up any items written in blue on your list.
- The HAMMER will be added to inventory.
- Examine the pipe; place the CANISTER in it (A).
- Go through the left door.
- Examine the water cooler and take the SLIDE (B).
- Open the right drawer; examine it and take the GLASS CUTTER (C).
- Use the SOLVENT on the glue and take the CLOCK HAND (D).

- Return to the Mayor's Office.
- Zoom into the pipe; open the cover and take the CLOCK HAND (E).
- Examine the clock and zoom into it; place the CLOCK FACE and the 2 CLOCK HANDS on it (F).
- Change the time to 5:40 and take the WEIGHT (G).
- Click down twice.
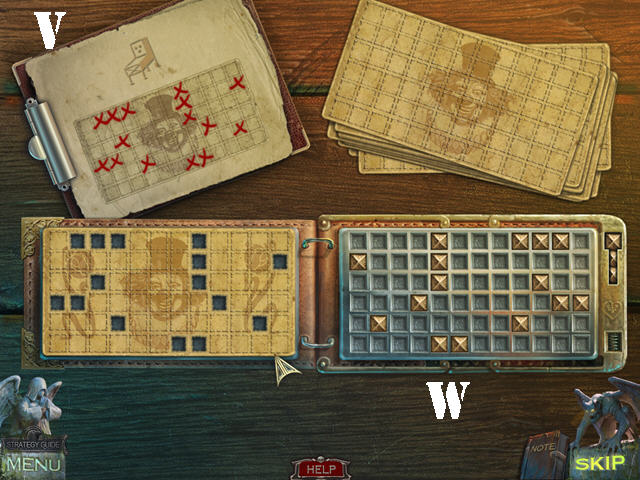
- Zoom into the globe; place the BOX WITH PUZZLES on the board to activate the puzzle. (H).
- Drag the pieces into the box until they all fit without overlapping. Use the static pieces as clues.
- Please look at the screenshot for the solution (I).
- Examine the globe after the puzzle has been solved; cut the glass with the GLASS CUTTER and take the PROJECTOR (J).
- Return to the projector room.
- Use the WEIGHT on the screen to keep it down (K).
- Place the PROJECTOR on the left table (L).
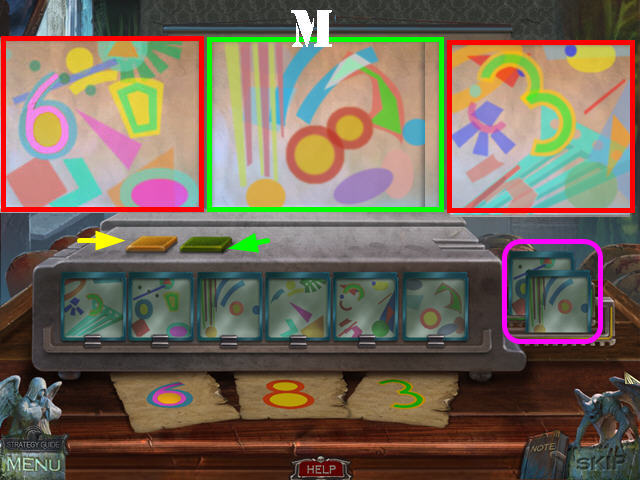
- Zoom into the projector; place the 4 SLIDES in the slots.
- Click on the green and yellow buttons to open the slide compartments.
- Place the slides in pairs into the projector and click on the green and yellow buttons to insert them. You must find the correct sets of slides which will show the numbers on the screen.
- The numbers 6, 8, and 3 will appear on the screen when the 2 correct slides are placed into the projector.
- The solution to this puzzle is random; the screenshot shows the correct number formations (M).
- Return to the Mayor's Office.
- Play the desk Hidden Object Scene.
- Drag the QUILL (N) to the desk; take the BLOT (O).
- The FUSE will be added to inventory.
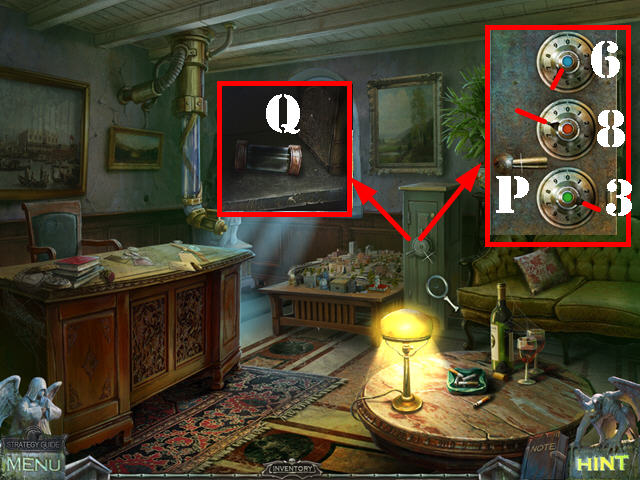
- Zoom into the safe.
- Turn the dials according to the number and colors shown on the projector puzzle.
- The blue dial should be turned to 6, red to 8, and green to 3.
- Turn the safe handle (P) and take the FUSE inside (Q).
- Return to the Toy Store.
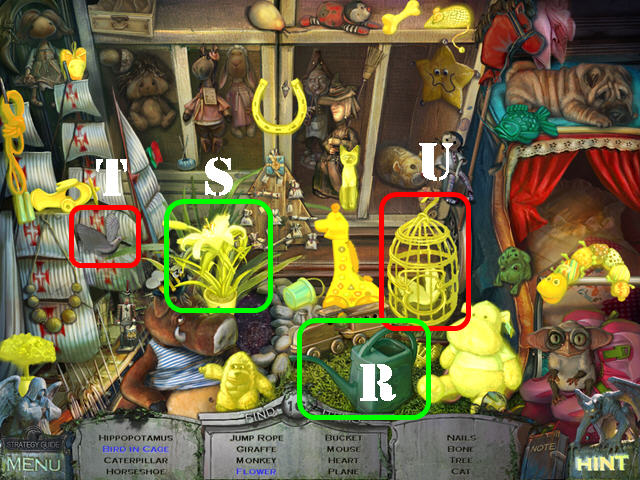
- Play the Hidden Object Scene.
- Drag the WATERING CAN (R) to the plant and take the FLOWER (S).
- Drag the BIRD (T) to the cage; close the cage and take the BIRD IN CAGE (U).
- The NAILS will be added to inventory.
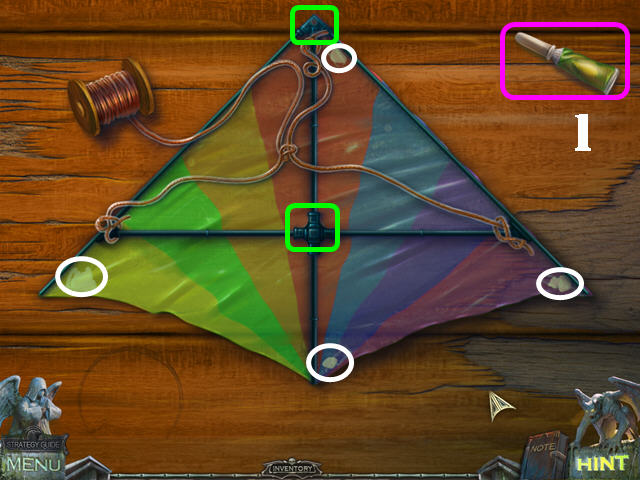
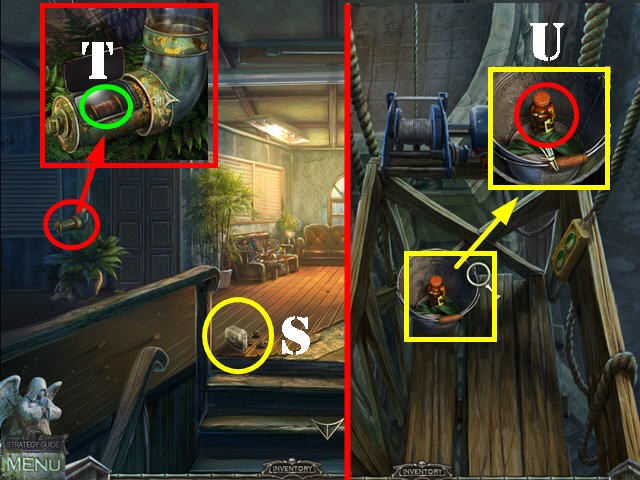
- Zoom into the kite and place the BOBBIN on the table.
- Right-click on a piece to rotate it.
- Place the 2 BLACK PIECES marked in green on the kite first.
- Drag the frame pieces as shown in the screenshot.
- Open the glue bottle (1).
- Drag the glue pieces in the 4 corners marked in white.
- Place the BOBBIN on the KITE; take the KITE.
Chapter 7: The Roof
- Go into the mansion; go up the left steps, and head forward.
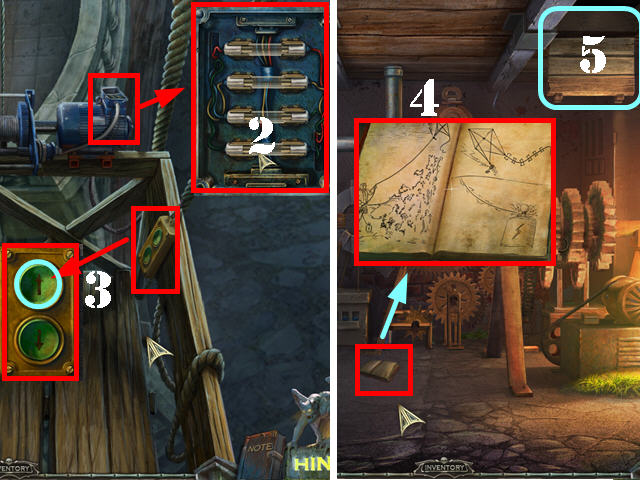
- Zoom into the fuse box; place the 3 FUSES in the empty slots (2).
- Examine the controls and press on the Up Button (3).
- Go through the left window.
- Examine the book on the ground; it contains instructions for charging the clock mechanism with the kite (4).
- Go through the attic (5).

- Click anywhere on the scene and the Warlock will knock the ladder down.
- Take the GLOVE (6).
- Take the scaffolding back down by clicking on the down button (7).
- Go through the window and click down twice.
- Examine the broken ladder; place the NAILS and the HAMMER on the ground (8).
- Drag the 4 ladder rungs onto the ladder.
- Place 8 NAILS in the spots circled in yellow.
- Take the HAMMER and place the cursor on each nail 3 times.
- Take the LADDER.
- Take the scaffolding back up. Go through the window and up the attic.
- Lean the LADDER against the center pole.
- Zoom into the top of the ladder.
- Put the KITE on the carabiner. Lightning will strike the kite (A).
- Click down.
- Zoom into the controls in the lower left; flip the switch (B).
- Take the SEWER HOOK on the ground (C).
- Examine the light in the lower right corner; open the cover and take the SPOTLIGHT BULB with the GLOVE (D).
- Take the scaffolding back down. Go through the window and click down 3 times.
- Zoom into the light below the lamppost; open the cover, remove the bulb and replace it with the SPOTLIGHT BULB (E).
- Click on the light so it shines in the hole in the lower left (F).
- Zoom into the hole and take the MIRROR (G).
- Lift the manhole cover with the SEWER HOOK. Shine the spotlight into the manhole cover (H).
- Go down the hole on the left (I).
- Place the MIRROR in the frame (J) and the light from outside will get rid of all the spiders.
- Go through the portal (K).
- The kid's uncle will give you the AMULET as soon as he's done talking.
- Talk to the little boy (L).
- Click down and head forward. Talk to the ghost.
Chapter 8: Amusement Park Arrival
- Return to the cathedral and go down the well.
- Examine the right altar; place the AMULET on it (A).
- Zoom into the statue; take the SICKLE (B).
- Go through the right door; head left on the road and then head right towards the gate.
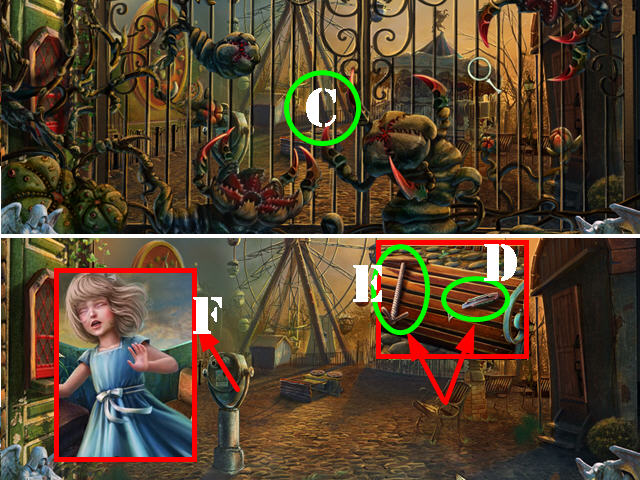
- Use the SICKLE on the gate to remove all the creatures (C).
- Click anywhere on the scene for the Warlock to appear.
- Click on the crow.
- Examine the chair; take the KNIFE (D) and the HAND KEY (E).
- Examine the viewfinder; a little girl will appear after you click on it (F).
- Head forward.
- Play the Hidden Object Scene.
- Click on the doll; take the MATRYOSHKA (G).
- Drag the PAINTBRUSH (H) to the car; take the GREEN CAR (I).
- The CANISTER OF GASOLINE will be added to inventory.
- Click down and go into the right door to enter the electrical room.
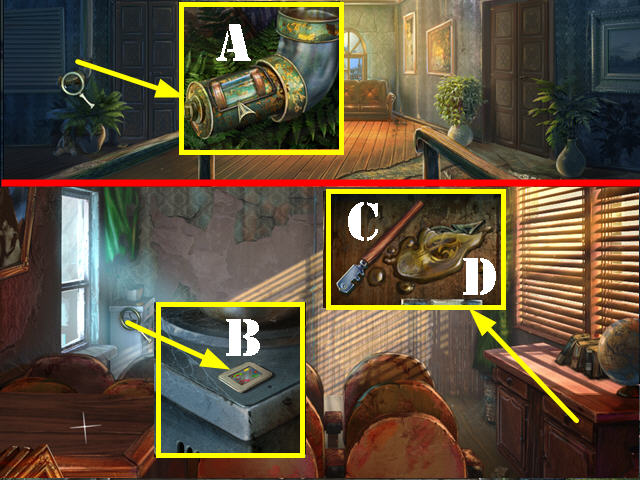
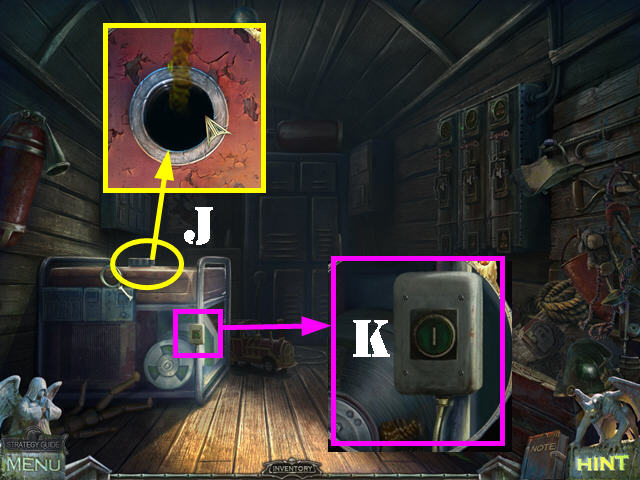
- Zoom into the generator; remove the cap and use the CANISTER OF GASOLINE (J).
- Examine the switch on the side of the generator; flip the switch (K) to turn on the lights.
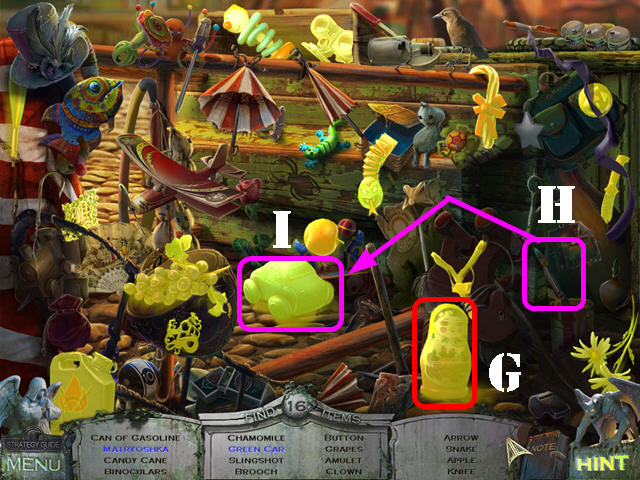
- Play the Hidden Object Scene.
- Drag the SPADE (1) to the CARD; take the CARD (2).
- The FORCEPS will be added to inventory.
- Take the MOP (3).
- Zoom into the box; cut the tape with the KNIFE.
- Open the box; take the NEEDLE AND THREAD and the TICKETS (4).
- Click down and zoom into the ticket booth (5).
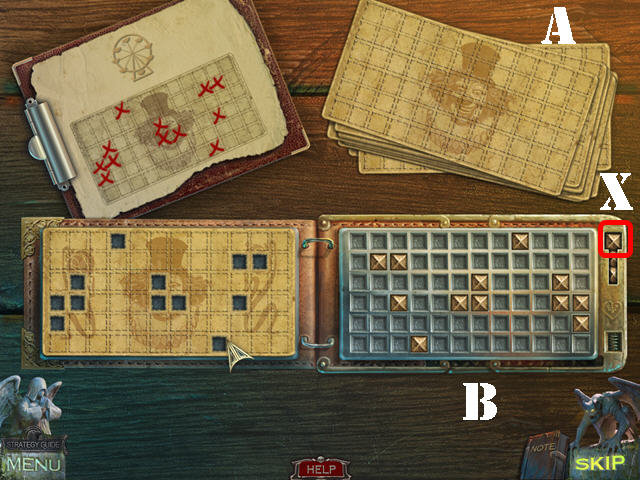
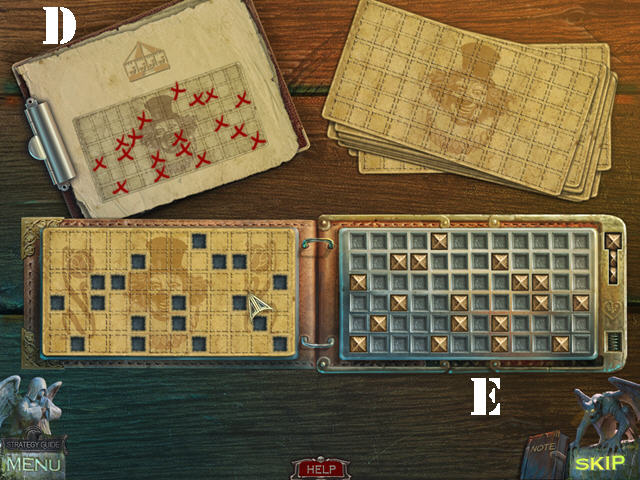
- Place the TICKETS on the right to activate the puzzle (A).
- Take the gold plugs (X) and place them in the correct spots on the board on the right. Use the image in the upper left as a clue. Make sure you place the gold X's as a mirror image of the diagram on the left.
- Please look at the screenshot for the solution (B).
- You will receive the FERRIS WHEEL TICKET.
- Go forward.
- Play the Hidden Object Scene.
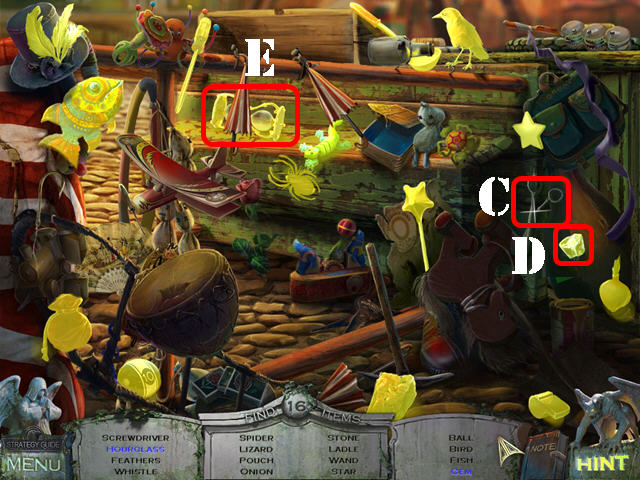
- Use the SCISSORS (C) on the cloth; take the GEM (D).
- Close the UMBRELLA; take the HOURGLASS (E).
- The STONE will be added to inventory.
- Zoom into the manhole cover; use the HAND KEY in the lock and turn the key (F).
- Grab the FERRIS WHEEL FUSE with the FORCEPS (G).
- Return to the electrical room.
- Zoom into the switches; place the FERRIS WHEEL FUSE (H) above the first switch and flip the switch (I).
- Click down and go forward.
- Zoom into the Ferris wheel; use the FERRIS WHEEL CARD in the slot (J).
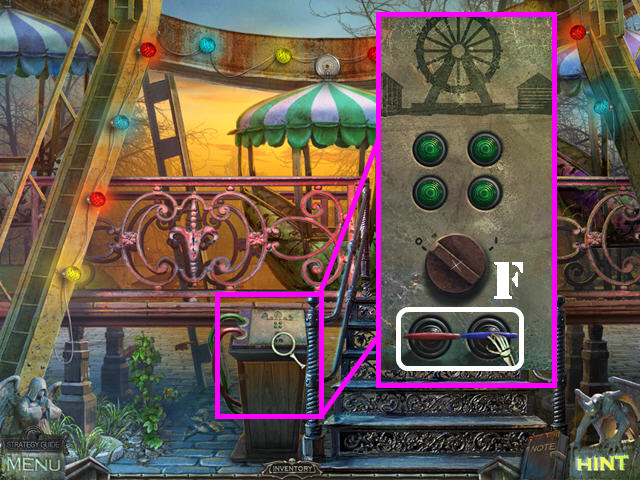
Chapter 9: Ferris Wheel and Arcade
- Go towards the Ferris wheel.
- Play the Hidden Object Scene.
- Open the door; take the CLAPPERBOARD (K) and the BANANA (L).
- The HOOK will be added to inventory.
- Zoom into the seat; click on the loop (M).
- Zoom into the loop; use the NEEDLE AND THREAD on it (N).
- Pull on the loop and take the ARCADE FUSE (O).
- Go up the left side of the Ferris wheel.
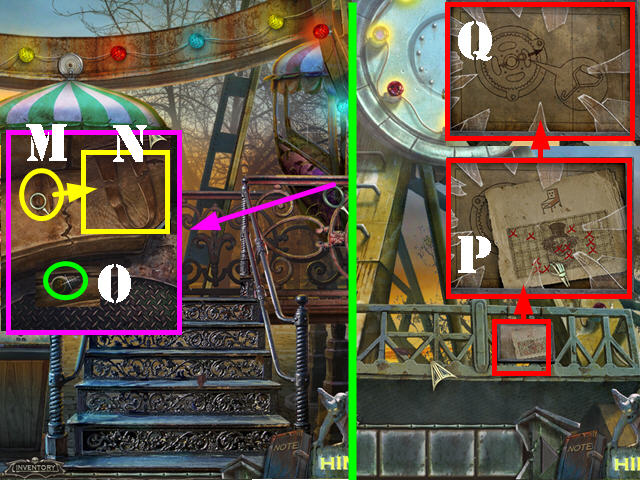
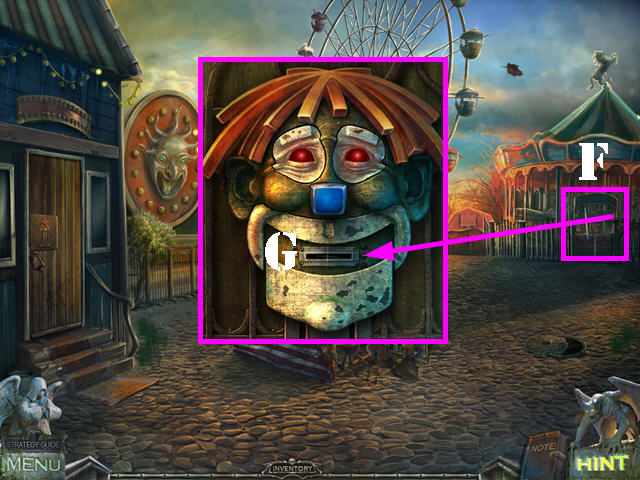
- Examine the sign; break the glass with the STONE 3 times and take the ARCADE PATTERN (P).
- Look at the repair instructions for the gear (Q).
- Return to the electrical room.
- Play the Hidden Object Scene.
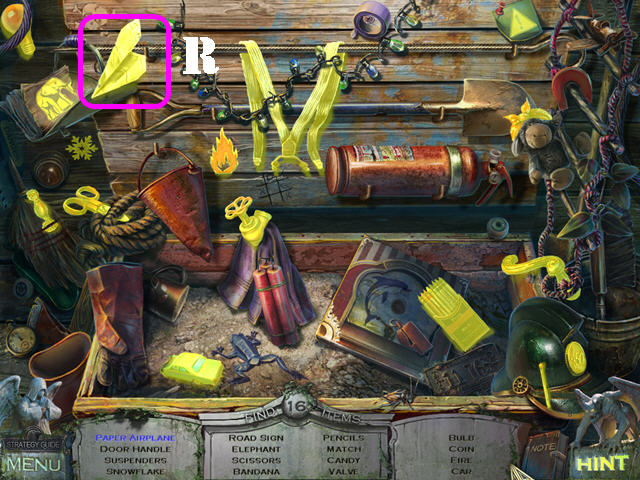
- Click on the newspaper; take the PAPER AIRPLANE (R).
- The COIN will be added to inventory.
- Zoom into the switches; place the ARCADE FUSE above the second (S) switch and flip the switch (T).
- Click down; zoom into the ticket booth (U).
- Place the ARCADE PATTERN on the clipboard (V).
- Take the gold plugs and place them in the correct spots on the board on the right. Use the image in the upper left as a clue. Make sure you place the gold X's as a mirror image of the diagram on the left.
- Please look at the screenshot for the solution (W).
- You will receive the ARCADE TICKET.
- Go forward.
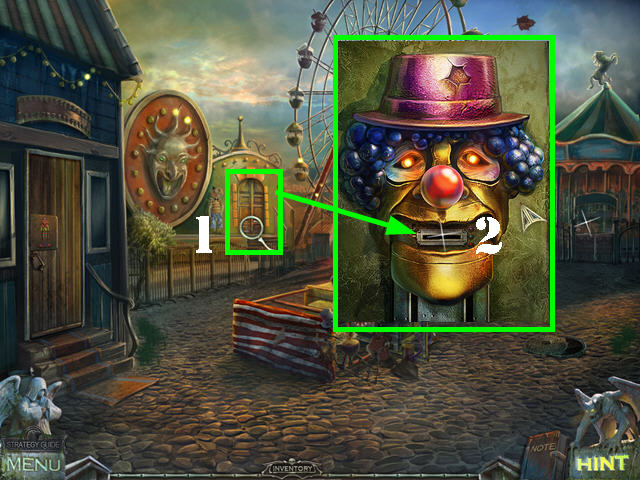
- Zoom into the arcade (1); use the ARCADE TICKET in the slot (2).
- Enter the Arcade.
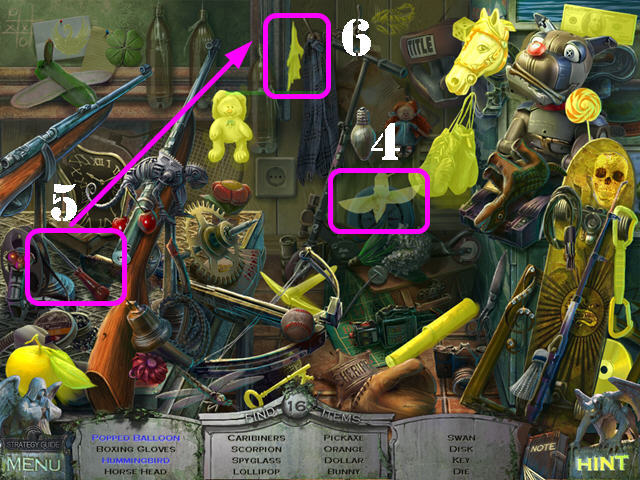
- Play the Hidden Object Scene.
- Open the suitcase; take the HUMMINGBIRD (4).
- Drag the ICE PICK (5) to the balloon; take the POPPED BALLOON (6).
- The HORSE HEAD will be added to inventory.
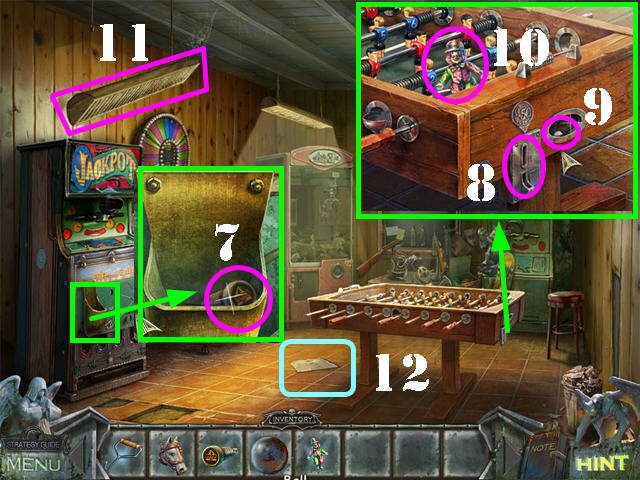
- Examine the jackpot machine; take the CAROUSEL FUSE (7).
- Examine the foosball machine; insert the COIN in the slot (8) and take the BALL (9) and the CLOWN (10).
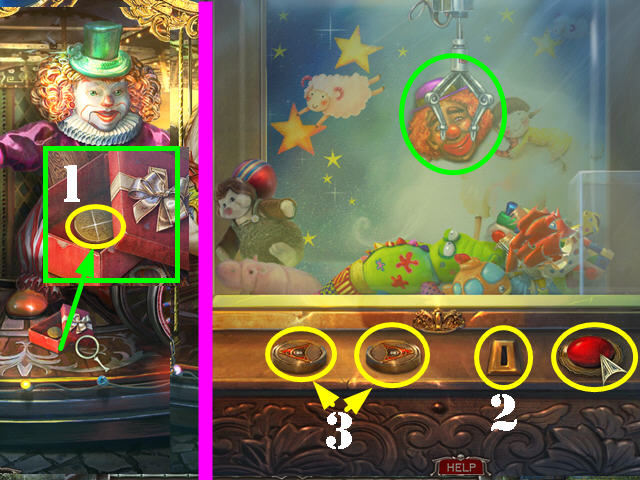
- Use the MOP on the light fixture (11); take the CAROUSEL PATTERN that falls on the floor (12).
Chapter 10: The Carousel
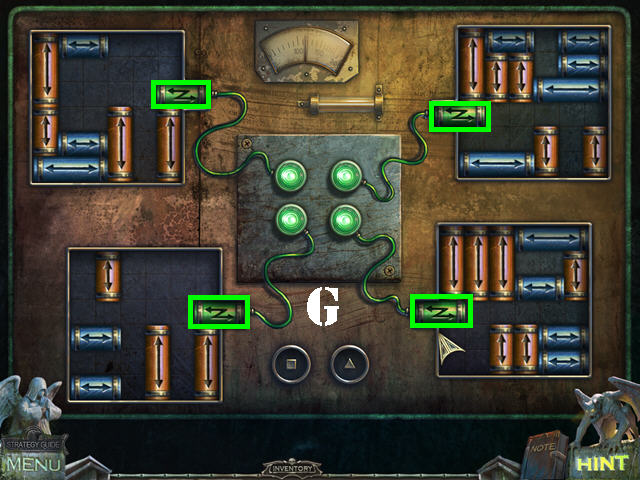
- Return to the electrical room.
- Zoom into the switches; place the CAROUSEL FUSE above the third switch (A) and flip the switch (B).
- Click down; zoom into the ticket booth (C).
- Place the CAROUSEL PATTERN on the clipboard (D).
- Take the gold plugs and place them in the correct spots on the board on the right. Use the image in the upper left as a clue. Make sure you place the gold X's as a mirror image of the diagram on the left.
- Please look at the screenshot for the solution (E).
- You will receive the CAROUSEL TICKET.
- Go forward.
- Zoom into the carousel (F); use the CAROUSEL TICKET in the slot (G).
- Go towards the carousel.
- Play the Hidden Object Scene.
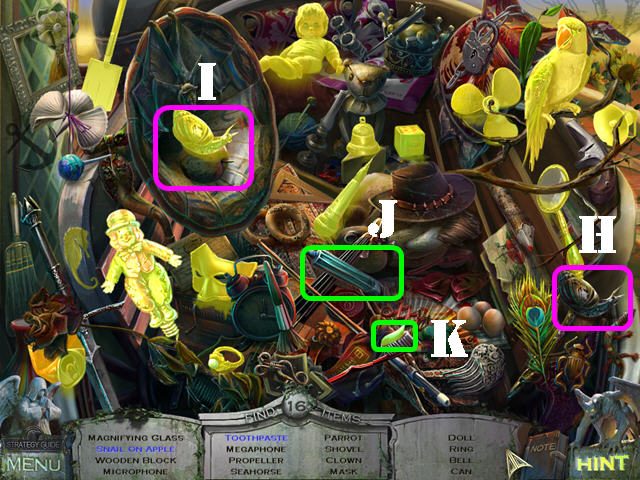
- Drag the SNAIL (H) over to the apple; take the SNAIL ON APPLE (I).
- Drag the TOOTHPASTE TUBE (J) over the toothbrush; take the TOOTHPASTE (K).
- The CLOWN will be added to inventory.
- Return to the Arcade.
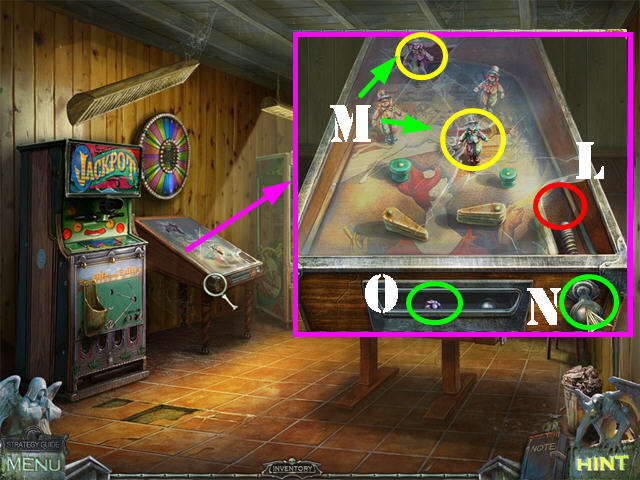
- Zoom into the pinball machine; insert the BALL (L) and the 2 CLOWNS (M) into the machine.
- Pull the lever (N).
- Take the VIOLET BUTTON in the slot (O).
- Play the Hidden Object Scene.
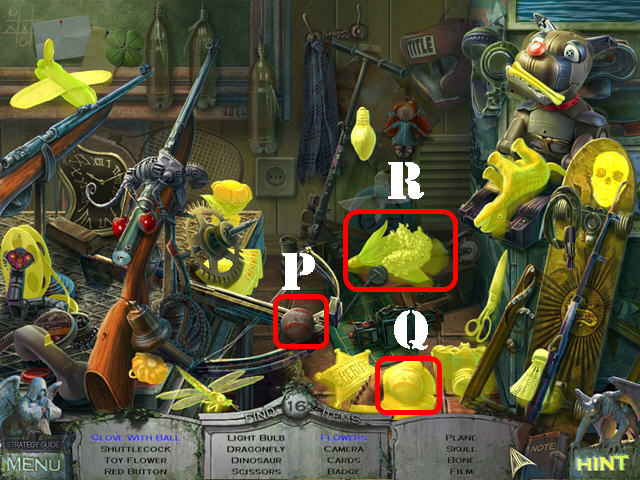
- Drag the BASEBALL (P) to the glove; take the GLOVE WITH BALL (Q).
- Take the FLOWER from the suitcase (R).
- The RED BUTTON will be added to inventory.
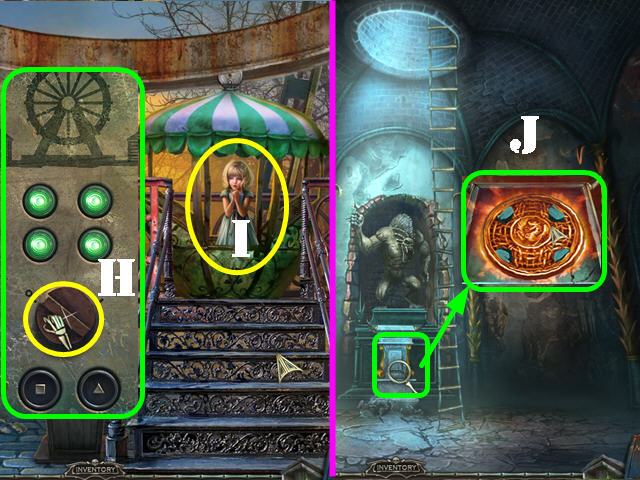
- Return to the carousel and click on the left side.
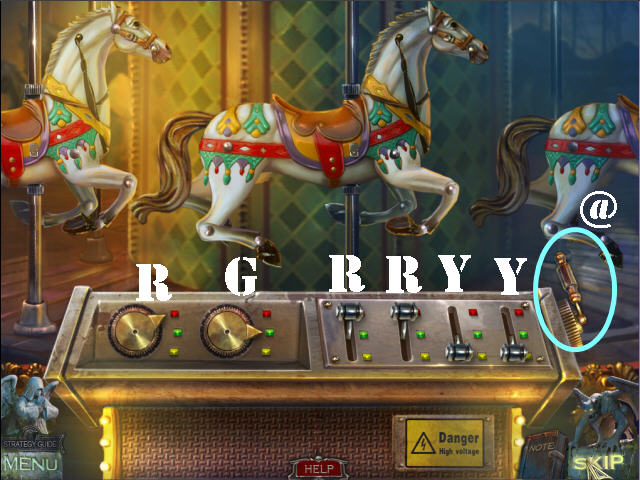
- Place the HORSE HEAD on the headless horse to activate the puzzle.
- You must reposition the limbs of the horse in the center to resemble the horse parts on each side.
- Use the knobs to reposition the parts.
- The far left knob controls the tail. The second knob controls the head.
- The far left lever controls the rear right leg. The second lever controls the rear left leg. The third lever controls the front left leg. The far right lever controls the front right leg.
- Changes made to any of these controls will not be visible until you pull the lever found on the right side of the control panel.
- The correct solution, from the furthest left knob control to the furthest right lever is: RED, GREEN, RED, RED, YELLOW, YELLOW.
- Pull the side lever to complete the puzzle (@).
- Zoom into the box; take the GOLDEN TOKEN (1).
- Return to the Arcade.
- Zoom into the machine in the back.
- Insert the GOLDEN TOKEN into the slot to activate the puzzle (2).
- Read the in-game instructions.
- Move the sailboat, train, and giraffe out of the way with the arrows (3). Then, pick up the clown head and drop it all the way to the right.
- Take the CLOWN HEAD on the side of the machine.

- Click down.
- Zoom into the left door; place the CLOWN HEAD on the body.
- Click on the clown's joints to move them until they resemble the image in the right corner.
- Please look at the screenshot for the solution (4).
- Examine the door; zoom into the case and take the CHAIN (5).
- Remove the cloth and take the GEAR (6).
- Return to the carousel.
- Play the Hidden Object Scene.
- Move the hat and take the PIPE (7).
- The ORANGE BUTTON will be added to inventory.
- Examine the clown; place the RED BUTTON, VIOLET BUTTON, and the ORANGE BUTTON on the clown's shirt (8).
- Take the BLUE KEY (9).
- Return to the Ferris wheel.
- Go up to the left.
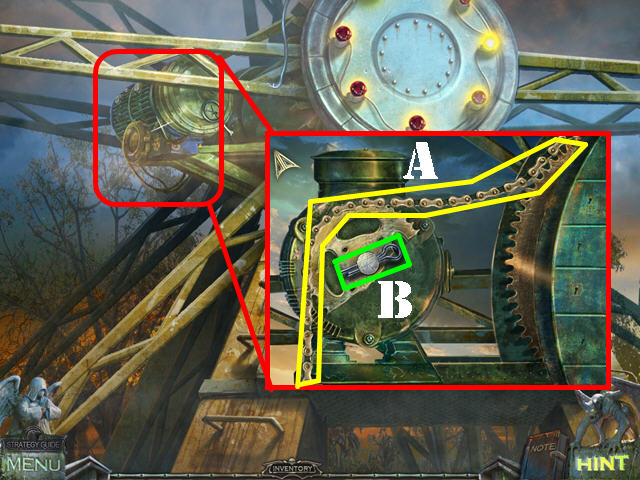
- Zoom into the wheel on left; remove the broken chain (A).
- Click the LINCHPIN; use the HOOK to remove the LINCHPIN (B).
- Remove the broken gear.
- Place the GEAR on the wheel.
- Use the LINCHPIN on the GEAR.
- Place the CHAIN on the wheel.
- Click down.
- Play the Hidden Object Scene.
- Put the 3 glass shards marked in red on the broken mirror; take the MIRROR (C).
- Use the DART (D) to pop the balloon; take the BEE (E).
- The RED KEY will be added to inventory.
- Zoom into the controls.
- Place the RED KEY on the left and the BLUE KEY on the right (F).
- Turn both keys to activate a puzzle.
- Move the batteries aside so that all the green batteries can connect to the right.
- Please look at the screenshot for the solution (G).
- Turn the lever (H).
- Click on the girl once she comes down from the carousel (I).
- Go through the portal.
- The ghost will give you the amulet.
- Talk to the little girl.
- Return to the cathedral and go down the well.
- Examine the center altar; place the AMULET on it (J).
- Congratulations! You have completed Redemption Cemetery: Children's Plight!
Created at: 2011-09-09