

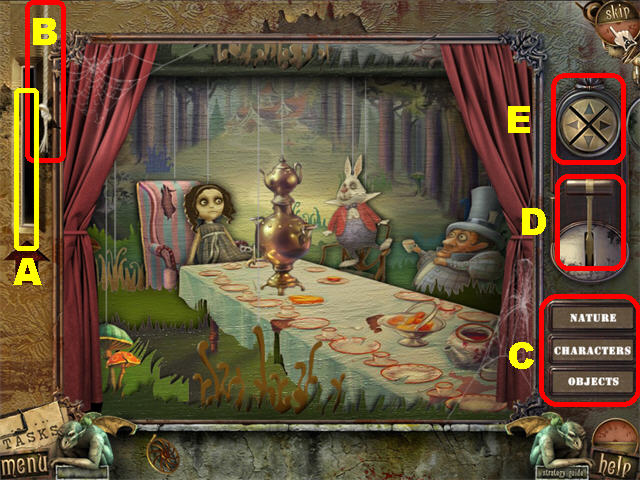
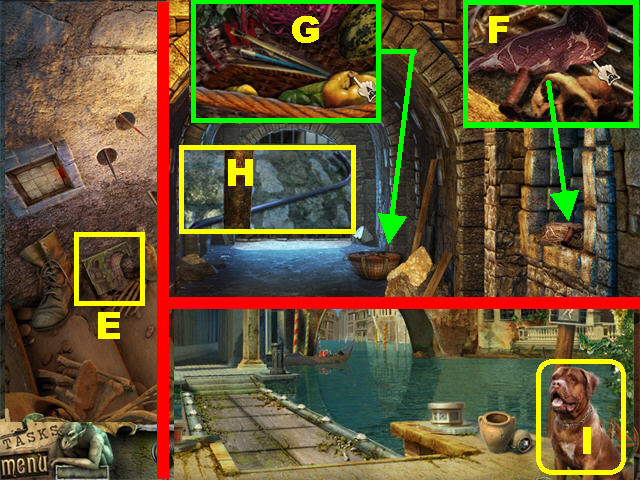
Walkthrough Menu
General Tips
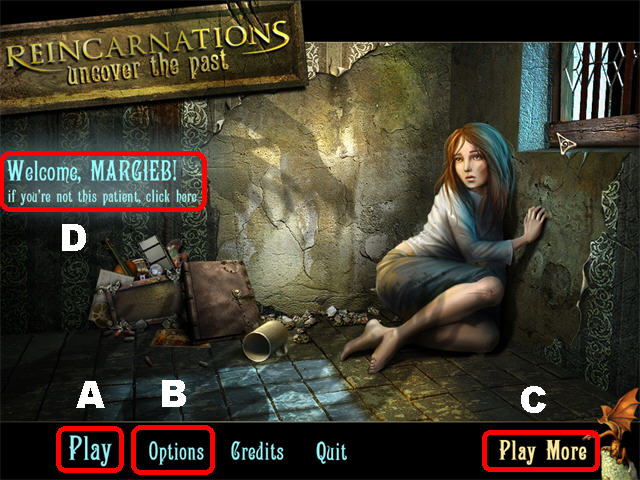
- Click “Play” (A) to play the regular adventure. The “Play” button will become “Continue,” after the game begins.
- The “Options” (B) button allows you to adjust screen size, volume, and cursor.
- Click the “Play More” button to play other games from this developer.
- To change players, click on “if you’re not this patient, click here” sign in the upper left (D).
- Your cursor will freeze when you click randomly in a Hidden Object search.
- Click on the “Help” button in the lower right when you need instructions for a puzzle.
- You can skip a mini-game once the “Skip” button becomes available.
- Most puzzles can be reset by exiting out of them. Some puzzle solutions may be random.
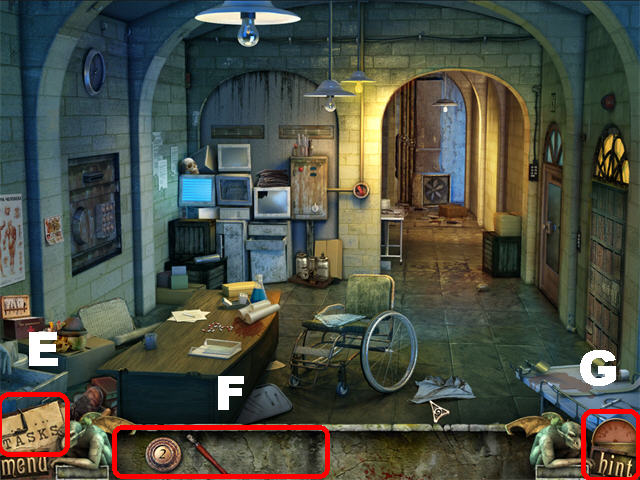
- View your current task list (E) in the lower left corner of each scene.
- Your inventory items will be stored in the tray (F) at the bottom of the screen. Use the arrows at each end to scroll through any inventory items possessed, but not currently displayed.
- Click on the “Hint” (G) button in any Hidden Object Scene to find a random item from your list.
- The hints are unlimited, but must recharge between uses.
- Orange list items in Hidden Object Scenes can only be found after other actions have been performed.
Introduction
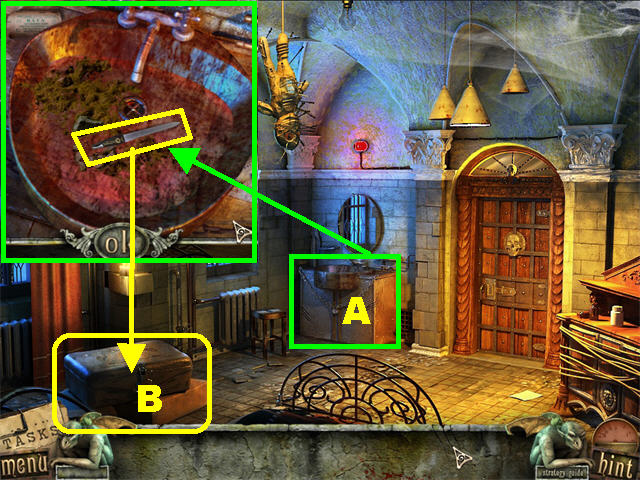
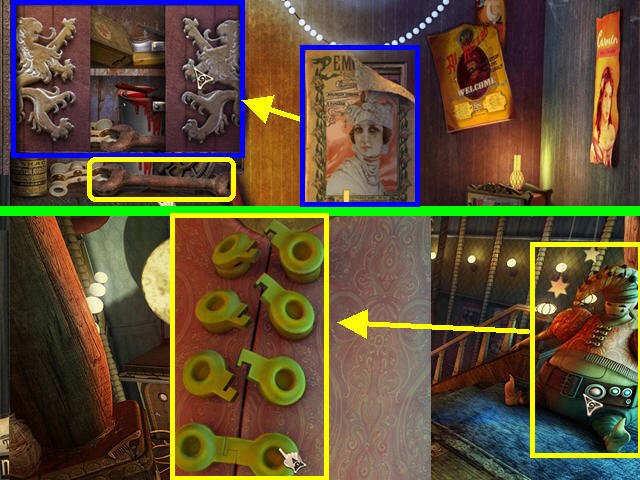
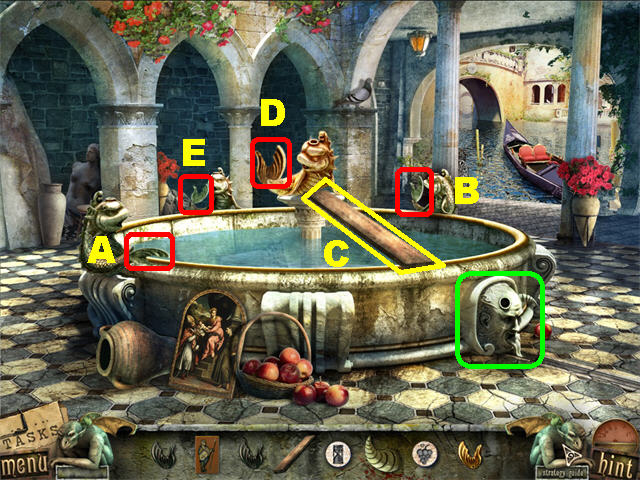
- Zoom into the locked box; pull the plug by the sink and take the EMERY BOARD (A).
- Zoom into the suitcase; open it with the EMERY BOARD to trigger a Hidden Object Scene (B).
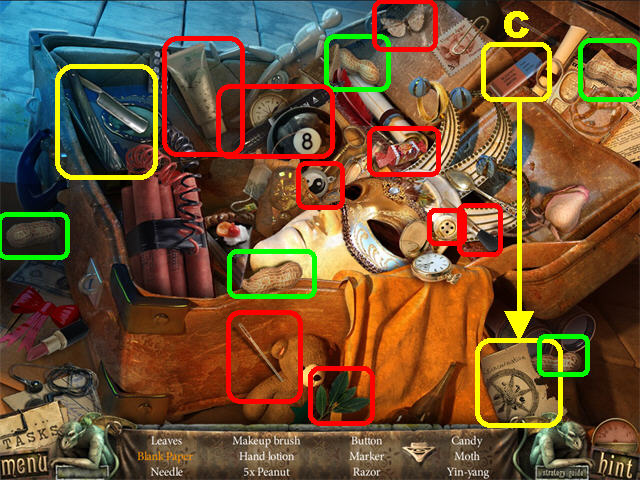
- Take the eraser and rub it against the paper; take the blank paper (C).
- The RAZOR will be added to inventory.
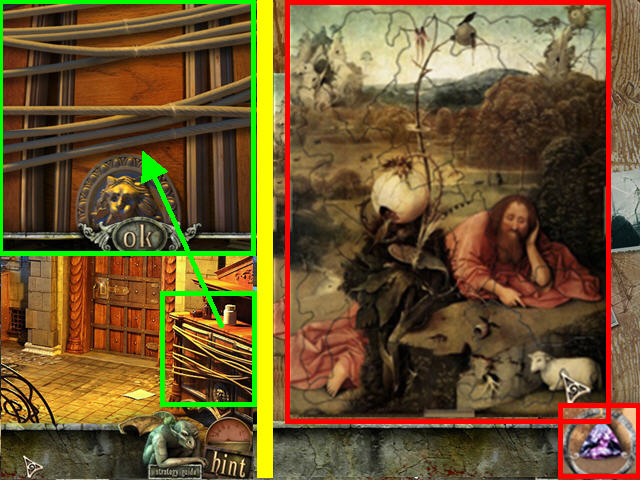
- Take a closer look at the desk on right; cut the rope with the RAZOR.
- Open the cabinet to trigger a puzzle.
- Arrange the puzzle pieces, as in the screenshot, by dragging them onto the board.
- Move the papers out of the way after the puzzle has been solved; take the pendant.
Chapter 1: Theater Emotion
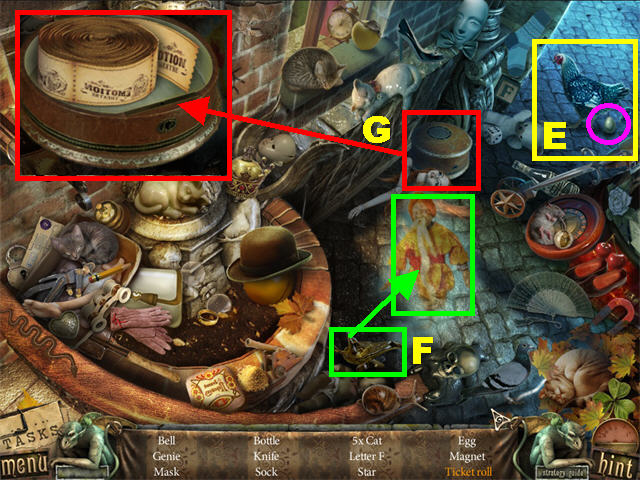
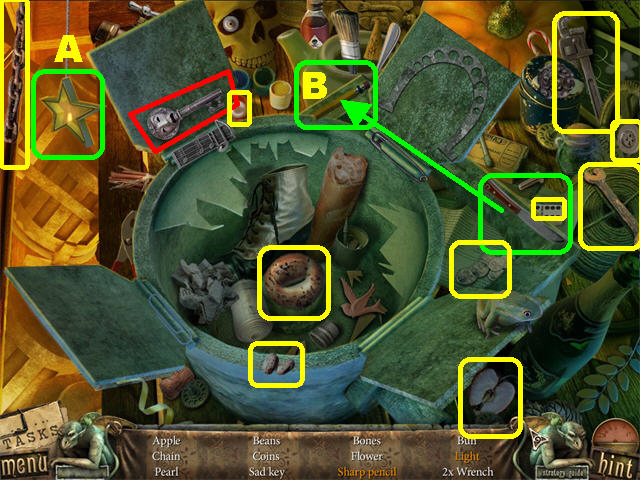
- Play the Hidden Object Scene.
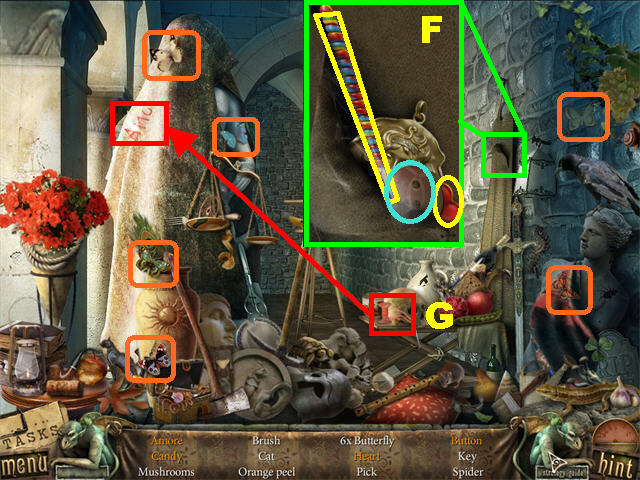
- Click on the chicken and take the egg it lays (E).
- Click first on Aladdin’s Lamp and then on the genie (F).
- Click on the round box, circled in red, and take the ticket roll (G).
- The TICKET ROLL will be added to inventory.
- Take a closer look at the roof; click on the plug in the lower right to turn off the lights.
- Go back down.
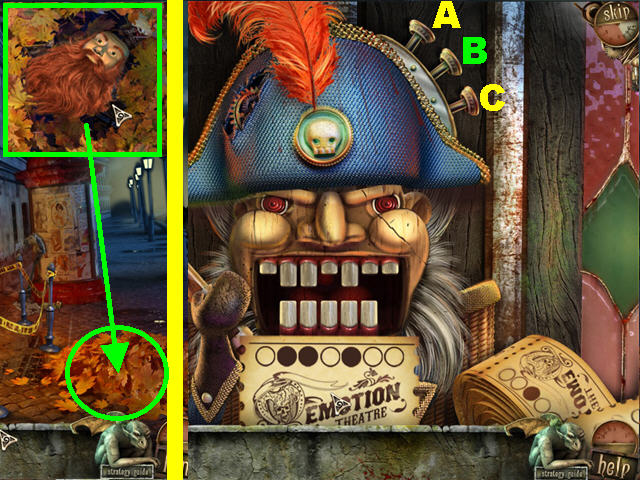
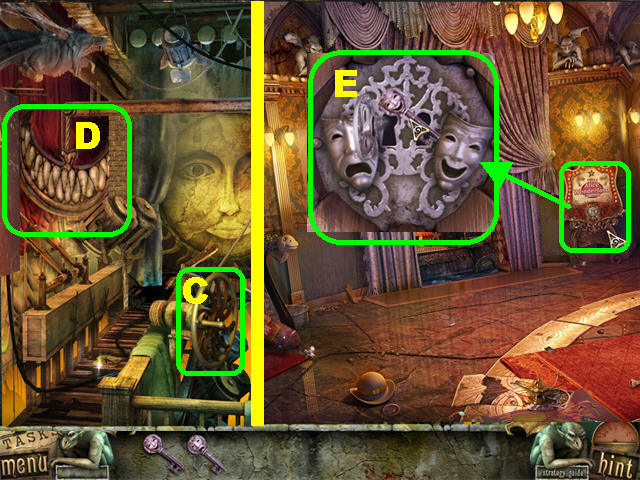
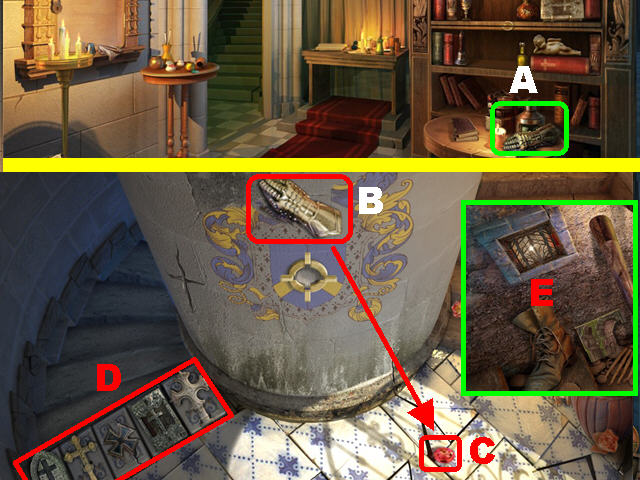
- Zoom into the pile of leaves in the lower right; move them aside and take the THEATER KEEPER’S MASK.
- Zoom into the front door; give the theater guard the TICKET ROLL to open its mouth.
- Click on the buttons above the guard’s head to change the position of the teeth to the pattern shown on the ticket, on the right.
- Click on buttons C, B, A, and B.
- Place the TICKET in the guard’s mouth to have it punched.
- Go inside the theater.
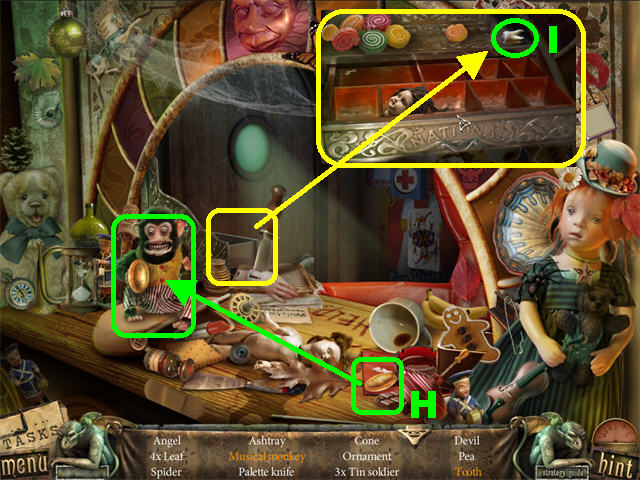
- Play the Hidden Object Scene on the left.
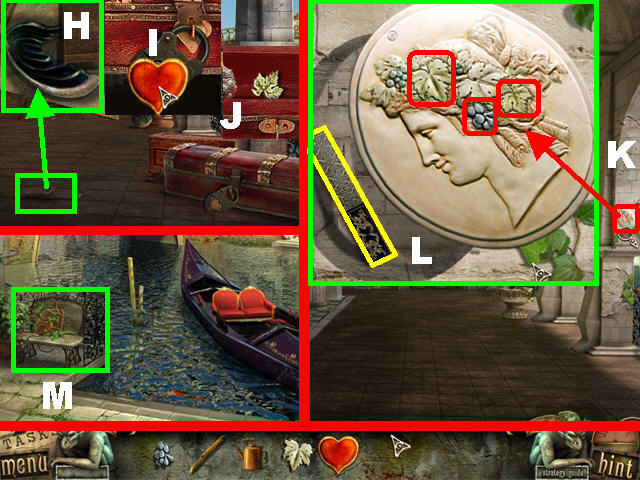
- Give the cymbal to the monkey; click on the monkey (H).
- Zoom into the cash register; take the tooth (I).
- The PALETTE KNIFE will be added to inventory.
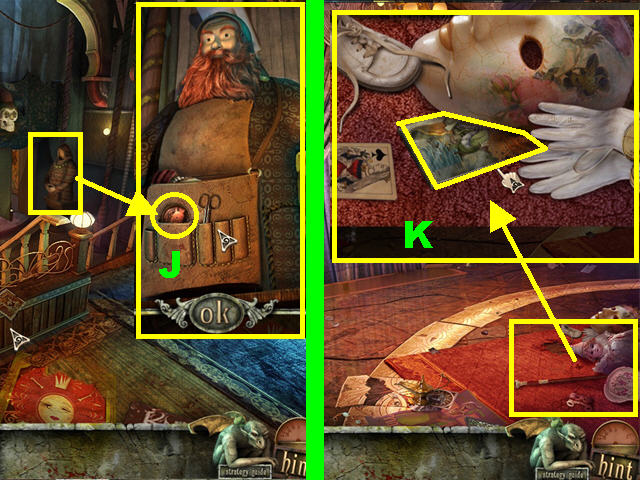
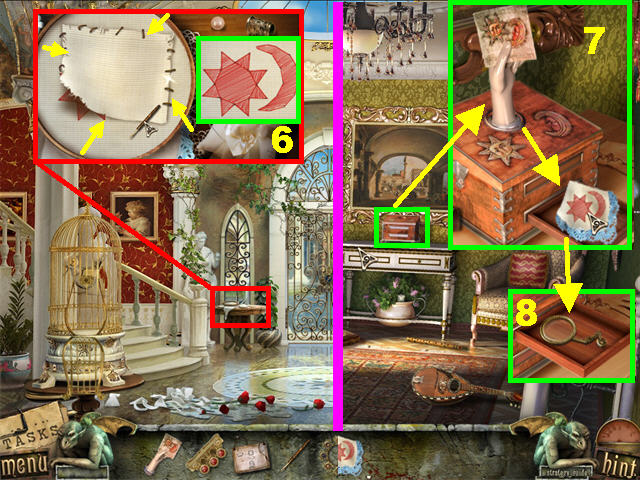
- Zoom into the keeper; place the THEATER KEEPER’S MASK on his face and take the AMULET from its bag (J).
- Go through the entrance next to the keeper.
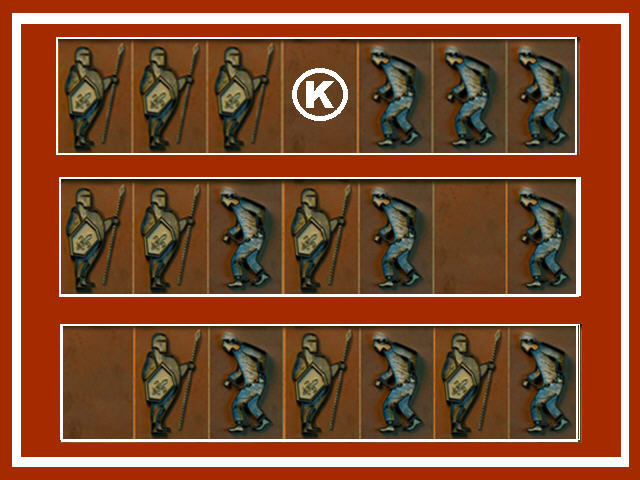
- Zoom into the carpet in the lower right; move all the items aside and take the BACKDROP (K).
- Go through the hallway.
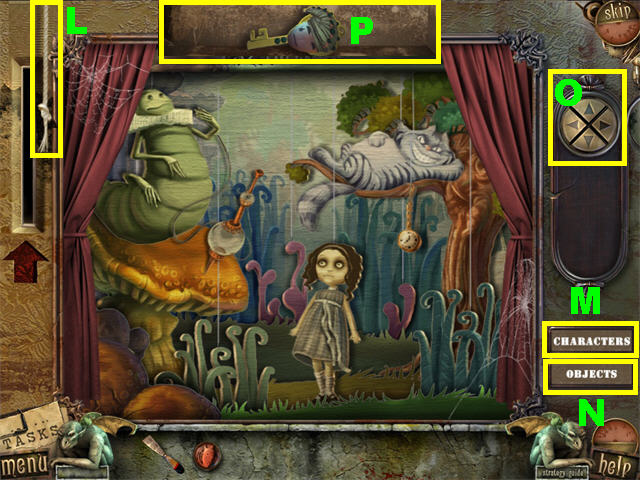
- Take a closer look at the tiny puppet theatre on the right.
- Place the BACKDROP in the left slot to activate the puzzle.
- Duplicate the image on the backdrop on the set by placing all the items in the right spots.
- Use the ROPE (L) on the left to zoom in and out of the backdrop.
- Click on the “CHARACTERS” (M) button and the “OBJECTS” (N) button on the right to make those items appear on the scene.
- Use the arrows on the right (O) to move the pieces until into the correct spots.
- Take the PLUMP PUPPET KEY (P) after the puzzle has been solved.
- Go left.
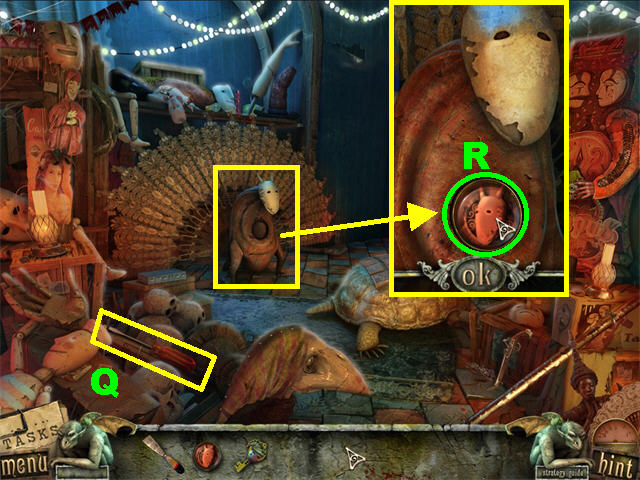
- Take the SCREWDRIVER (Q) in the lower left.
- Zoom into the peacock-looking creature (R).
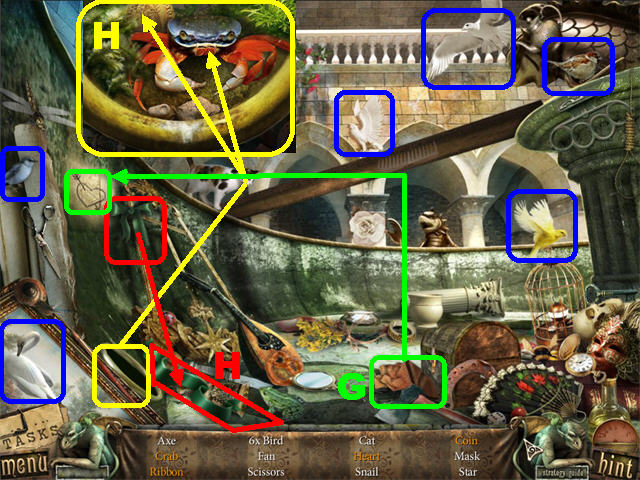
- Place the AMULET in the center to trigger a Hidden Object Scene.
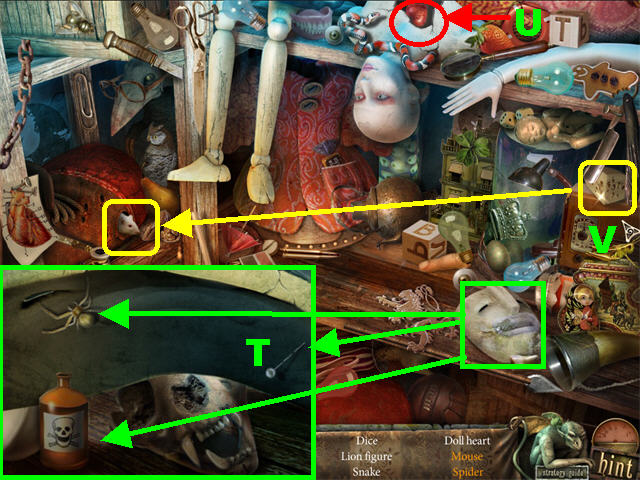
- Zoom into the mask in the lower right and take the Poison, Pin, and Spider (T).
- Click on the doll’s chest in the upper center and take the heart (U).
- Place the cheese near the mouse and click on the mouse once it nears (V).
- The LION FIGURE will be added to inventory.
- Click down.
- Click on the tapestry on the back wall to remove it.
- Zoom into the frame and place the LION FIGURE in the empty slot.
- Take the WRENCH.
- Click down twice.
- Zoom into the puppet on the right; undo the four buttons.
- Place the PLUMP PUPPET KEY in the keyhole to trigger a Hidden Object Scene.
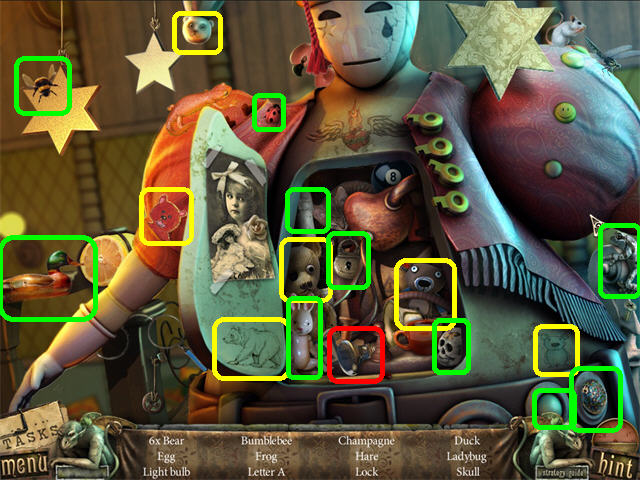
- The Bears are marked in yellow.
- The LIGHT BULB will be added to inventory.

- Go outside the theater.
- Zoom into the playbills; remove them with the PALETTE KNIFE.
- Unscrew the bolts marked in yellow with the WRENCH; take the DOOR KEY.
- Zoom into the roof; place the LIGHT BULB on the lights to repair them.
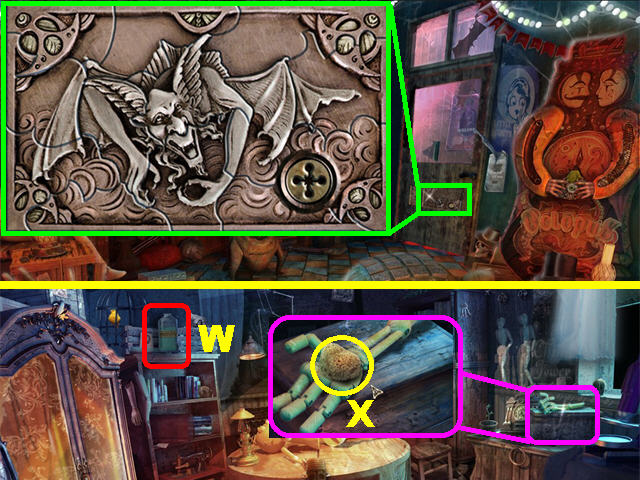
- Take a closer look at the gargoyle marked in red; take the HAMMER (1).
- Enter the theater, go forward, right, and then left.
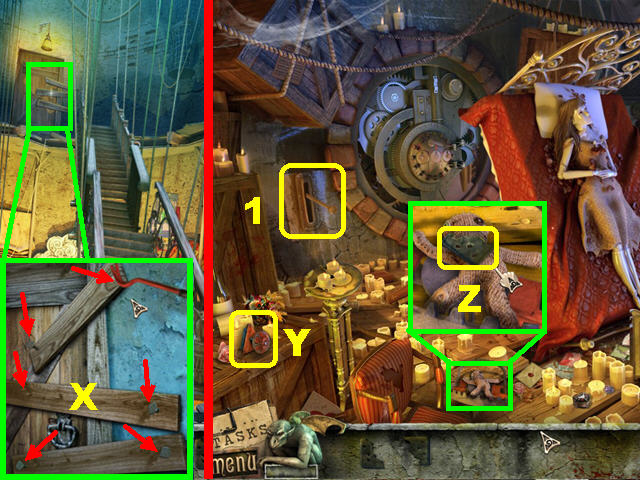
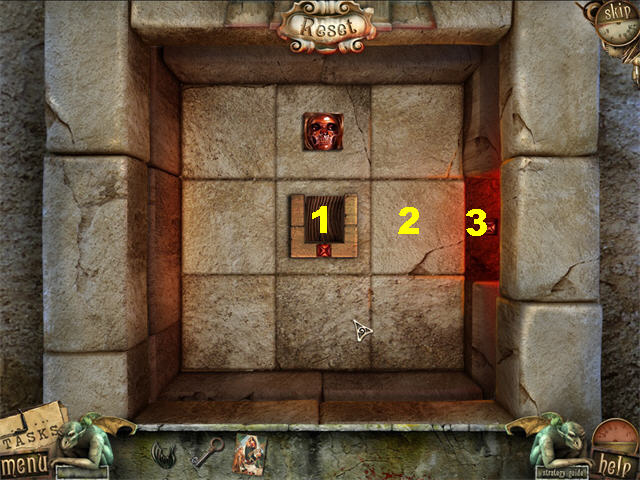
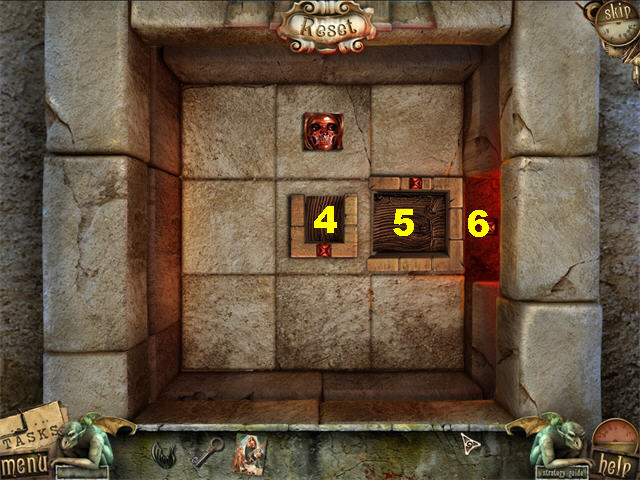
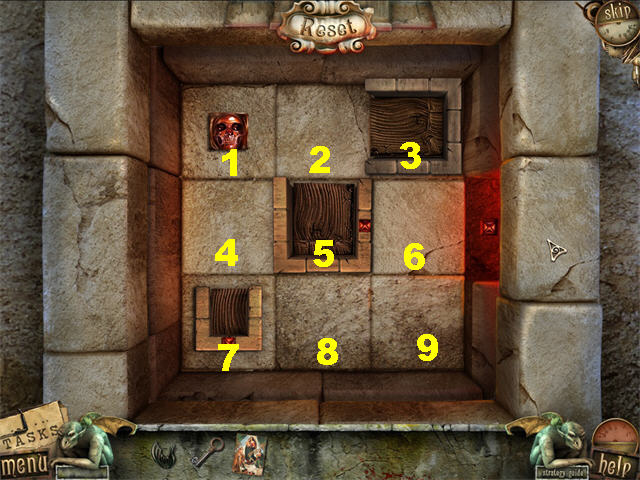
- Zoom into the back door to trigger a puzzle.
- Assemble the pieces as shown in the screenshot by dragging the pieces onto the board.
- Place the DOOR KEY in the keyhole and go through the door.
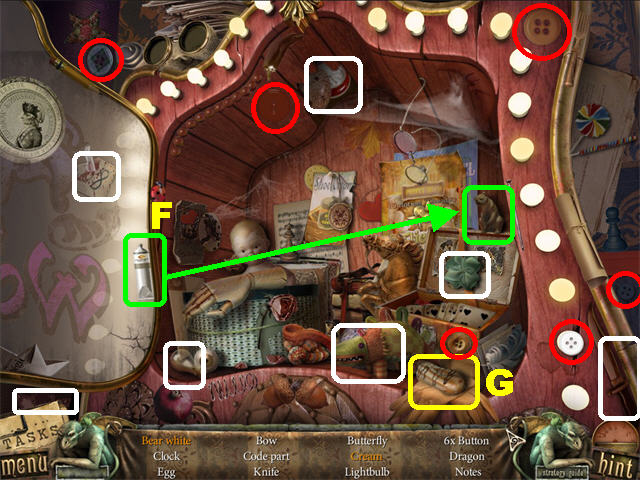
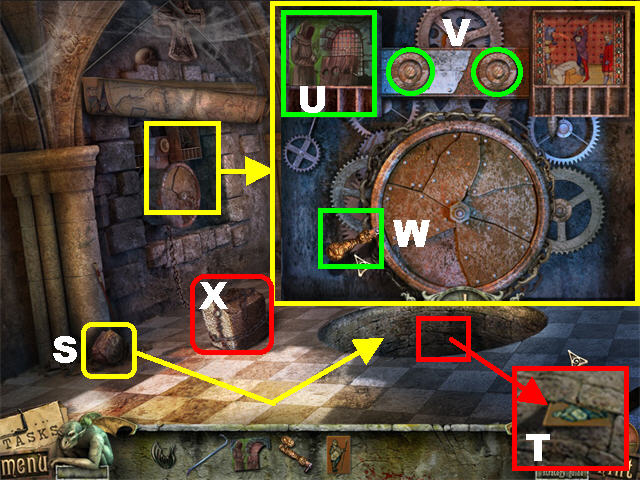
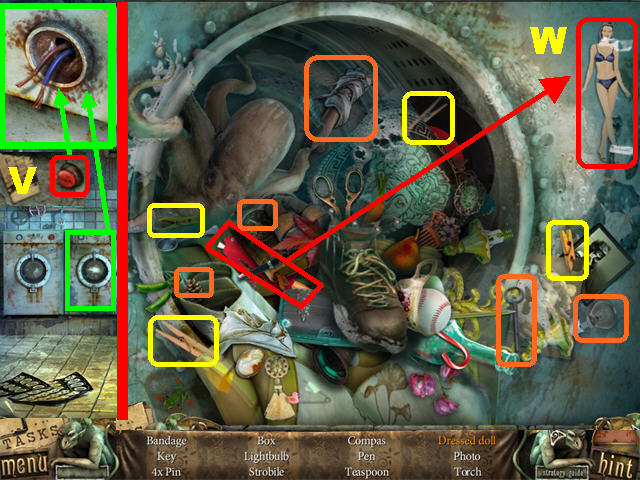
- Take the ELECTROLYTE BOTTLE in the upper left (W).
- Zoom into the box by the window; open the hand and take the SPONGE (X).
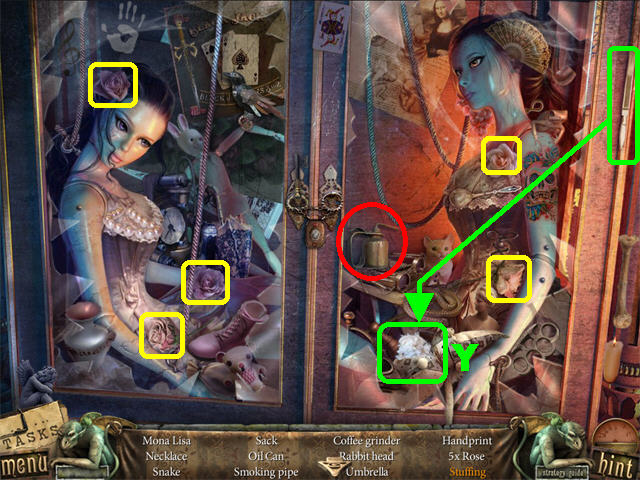
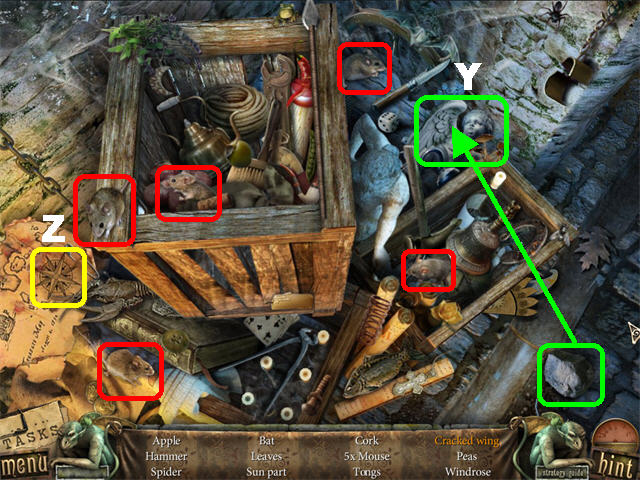
- Place the HAMMER on the left cabinet to trigger a Hidden Object Scene.
- Cut open the doll with the knife and take the stuffing (Y).
- The Roses are marked in yellow.
- The OIL CAN will be added to inventory.
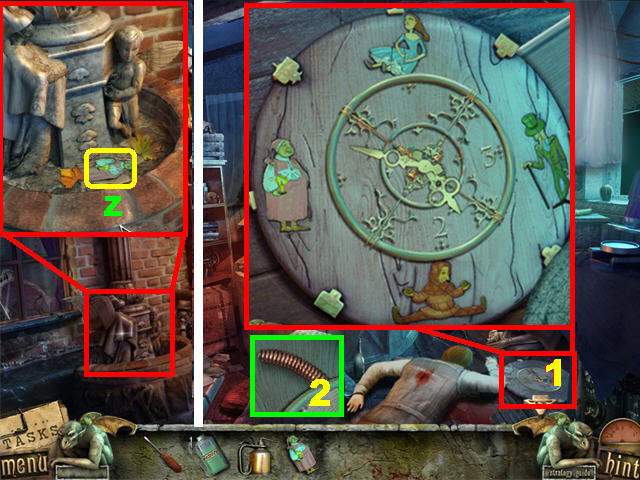
- Go outside the theater; zoom into the fountain in the lower left.
- Place the SPONGE in the fountain; take the CLOCK ORNAMENT (Z).
- Go to the back room.
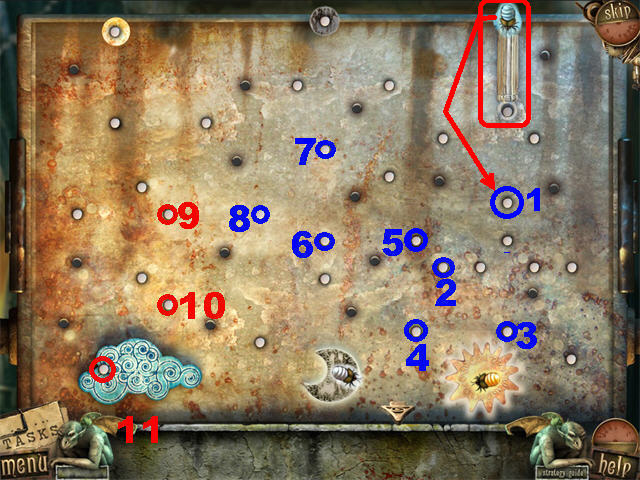
- Zoom into the clock in the lower right; place the CLOCK ORNAMENT on the clock to activate a puzzle (1).
- Place the pieces from the side tray onto the appropriate clock slots.
- Correct pieces will lock into place.
- Take the SPRING in the center of the puzzle (2).
- Click down.
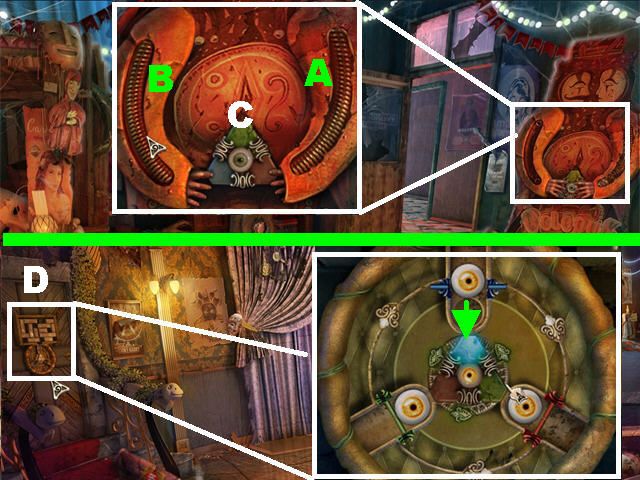
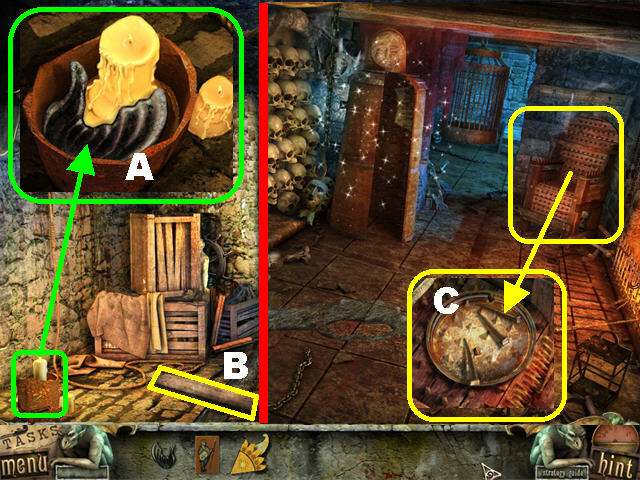
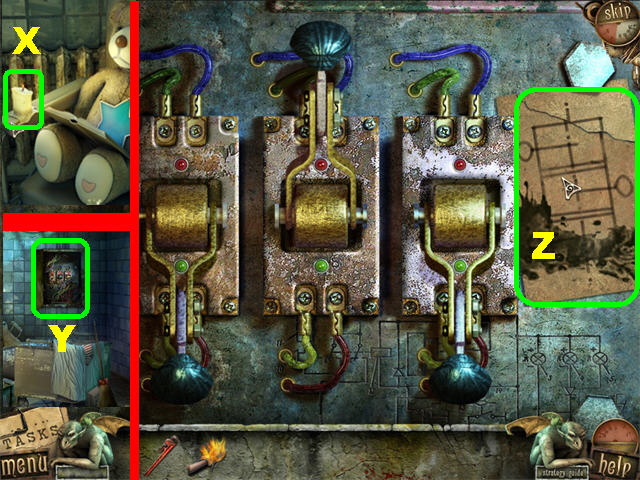
- Zoom into the mechanical twins on the right.
- Place the OIL CAN on the layer of rust on the right (A).
- Place the SPRING in the left slot (B); take the TRIANGLE (C).
- Click down twice.
- Zoom into the puzzle on the left (D).
- Place the TRIANGLE in the center of the puzzle to activate it.
- Move the eyeballs into slots by turning the triangle and the circle.
- Go through the door after the puzzle has been solved.
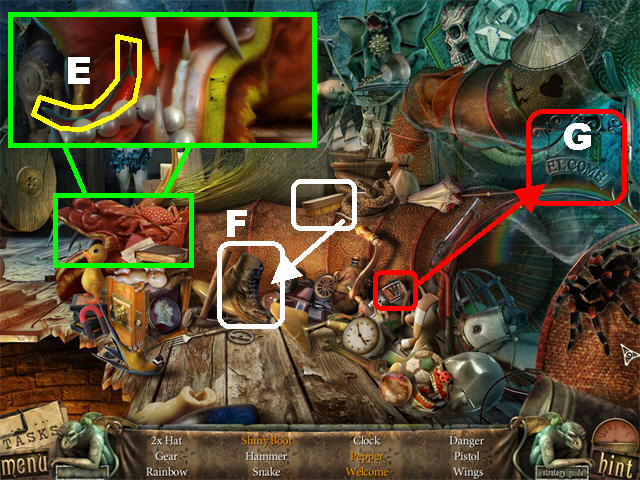
- Play the Hidden Object Scene on the left.
- Zoom into the dragon on the left; take the pepper (E).
- Clean the boot with the brush and click on the shiny boot (F).
- Take the “w” and place it next to “elcome” in the upper right; click on “welcome” (G).
- The GEAR will be added to inventory.
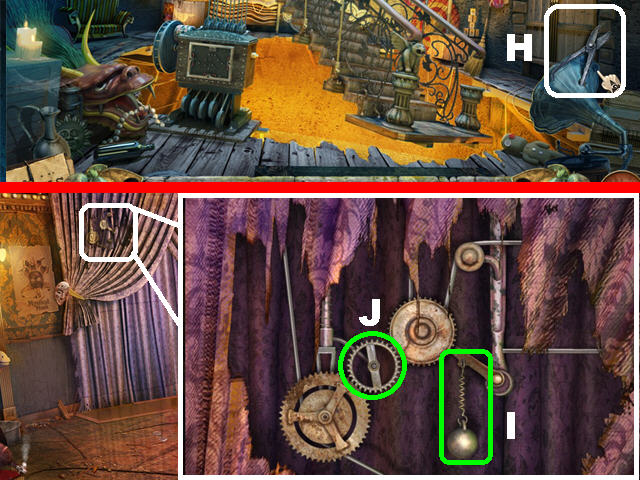
- Take the PLIERS in the lower right (H).
- Click down.
- Zoom into the upper left side of the curtains.
- Move the ball below the right gear as shown in the screenshot (I).
- Place the GEAR on the left wire (J).
- Go through the curtains.
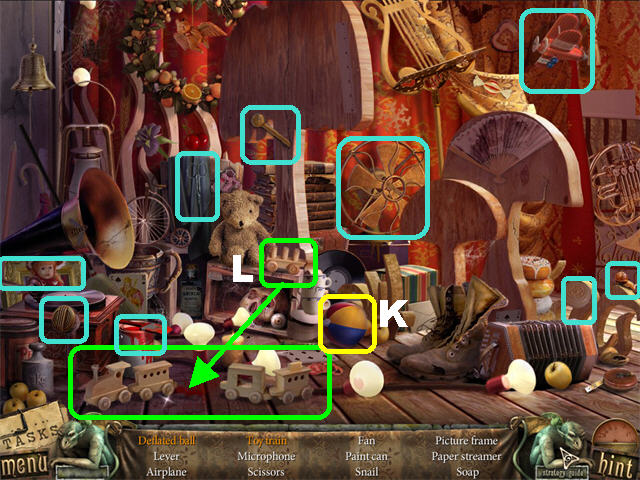
- Play the Hidden Object Scene.
- Click on the beach ball to deflate it (K).
- Take the train part marked in green and place it on the other train (L).
- The LEVER will be added to inventory.

- Take CODE PIECE 1/2 from the gold curtains (M).
- Go to the back room.
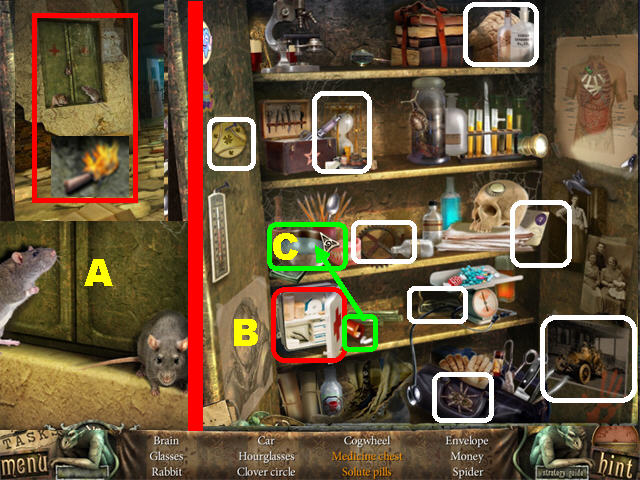
- Zoom into the large round crate in the center; place the SCREWDRIVER on each of the screws to remove the lock plate (N).
- Remove the hinges with the PLIERS to trigger a Hidden Object Scene.
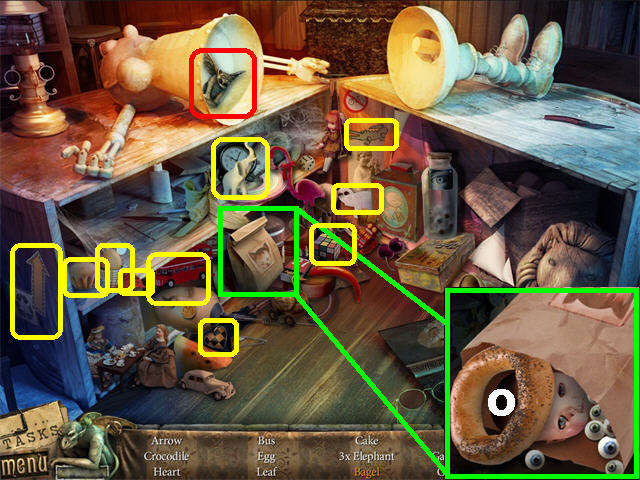
- Open the bag marked in yellow and take the bagel (O).
- The GARGOYLE STATUE will be added to inventory.
- Click down three times and then go through the left door.
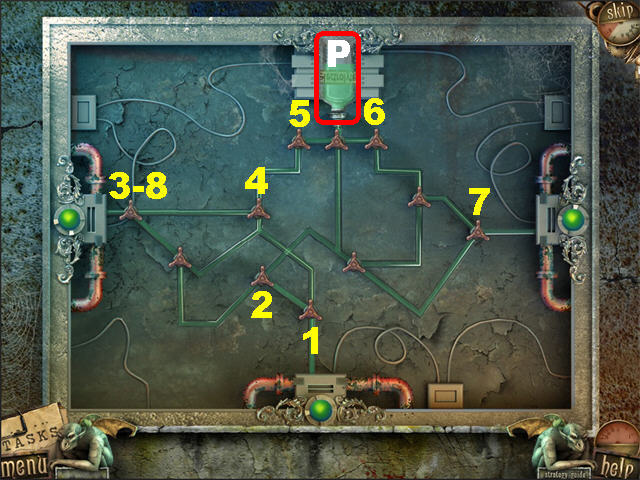
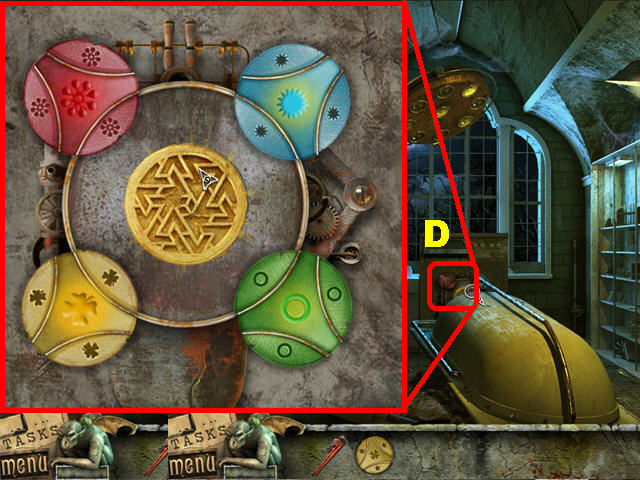
- Zoom into the device in the lower left.
- Place the ELECTROLYTE BOTTLE (P) in the upper center to activate the puzzle.
- Twist the valves until fluid runs through every pipe.
- Click on the valves in the sequence shown in the screenshot to solve the puzzle.
- Place the GARGOYLE STATUE (Q) on the right column at the bottom of the steps.
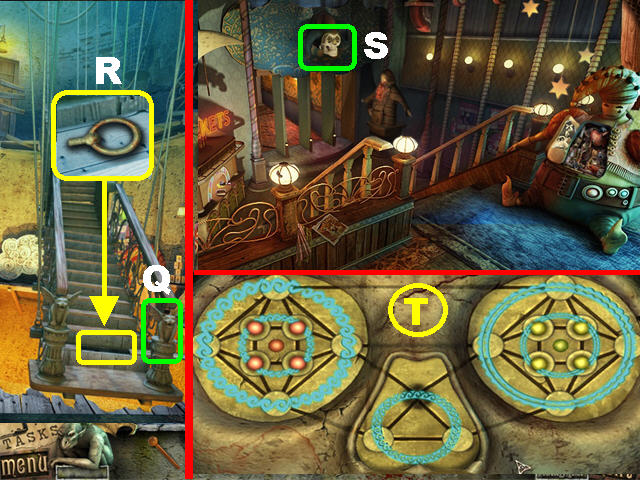
- Zoom into the bottom step; Take the RING OPENER (R).
- Click down twice.
- Zoom into the skull on the back wall (S).
- Place the RING OPENER on the skull and then click on it to activate the puzzle.
- Move the pieces along the tracks until they are all in the right spots.
- Please look at the screenshot for the solution (T).
- Take the DEFLATED BALLOONS after the puzzle has been solved.
- Go through the entryway below the skull.
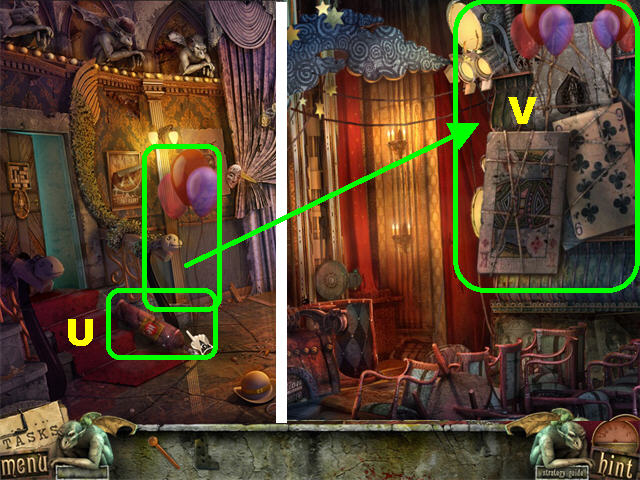
- Place the DEFLATED BALLOONS on the tank to create the BALLOONS (U).
- Go through the curtains.
- Place the BALLOONS on the giant playing cards to trigger a Hidden Object Scene (V).
- The Cards are marked in yellow.
- Open the shell on the counter and take the pearl (W).
- The CROWBAR will be added to inventory.
- Click down and then go through the left door.
- Zoom into the top door.
- Remove the nails with the CROWBAR (X).
- Go through the door.
- Take the HANDLE in the lower left (Y).
- Zoom into the voodoo doll in the lower center; open the trap and take CODE PIECE 2/2 (Z).
- Place the LEVER on the slot on the back wall (1).
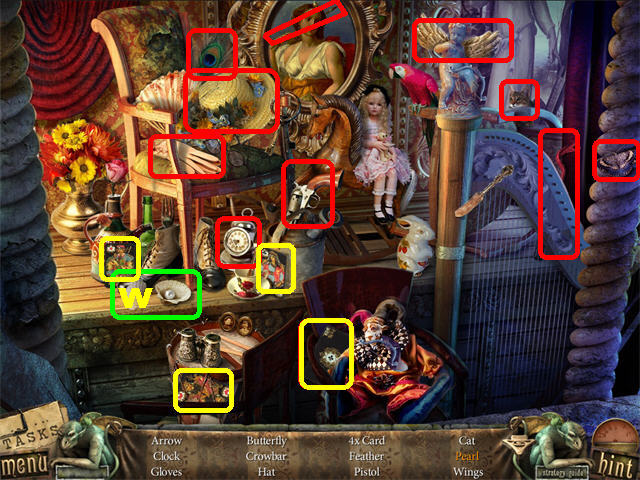
- Pull the lever to activate a Hidden Object Scene.
- Find all the items on the list.
- The Peppers are marked in green.
- The Glasses are marked in blue.
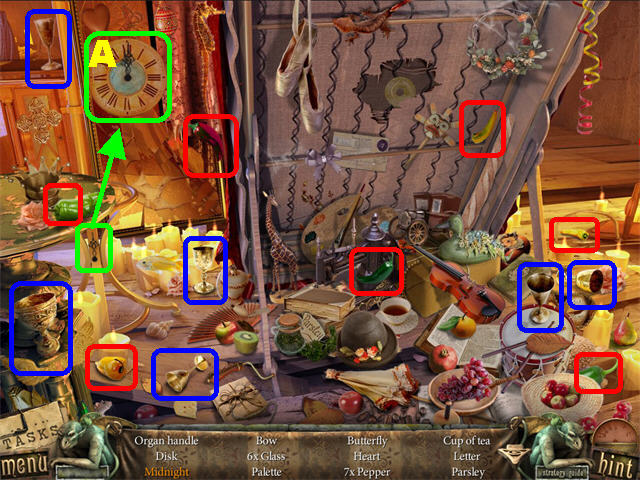
- Take the clock hand below the round table and place it on the clock in the upper left. Click on the clock once the hands reach midnight (A).
- The CRANK will be added to inventory.
- Click down.
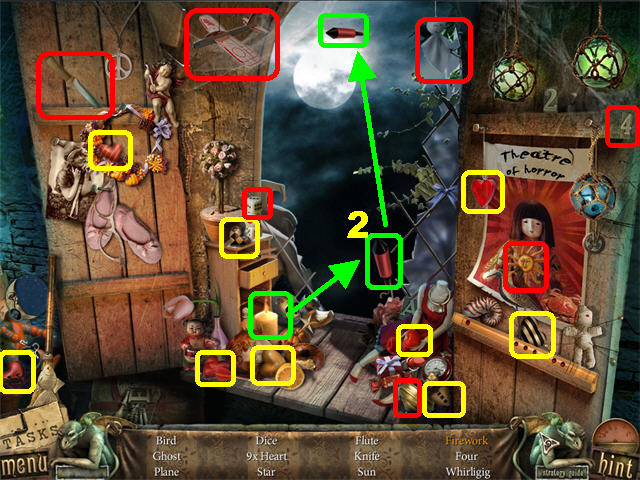
- Zoom into the right door; place the CODE PIECES on the door to trigger a Hidden Object Scene.
- The Hearts are marked in yellow.
- Place the lit candle on the rocket (2); click on the fireworks in the sky.
- The KNIFE will be added to inventory.
- Go through the top door.
- Cut the screens on the right with the KNIFE.
- Zoom into the screen; take the ELEVATOR PANEL (3).
- Click down twice; go through the curtains.
- Zoom into the box by the stage; place the CRANK on the side, turn it and take the BACKDROP (4).
- Zoom into the elevator by the red curtains (5).
- Place the ELEVATOR PANEL over the wires to activate the puzzle.

- Place the color indicators into the right slot (6).
- Use the green arrow (7) to push the indicators into the puzzle.
- Use the yellow arrows to switch the color of the slides (8).
- The arrows attached to the circle move it around (9 and 10).
- Play the Hidden Object Scene below the elevator.
- Find all the items on the list.
- The HAND VALVE will be added to inventory.
- The Feathers are marked in yellow.
- Exit, go through the left door and then through the top door.
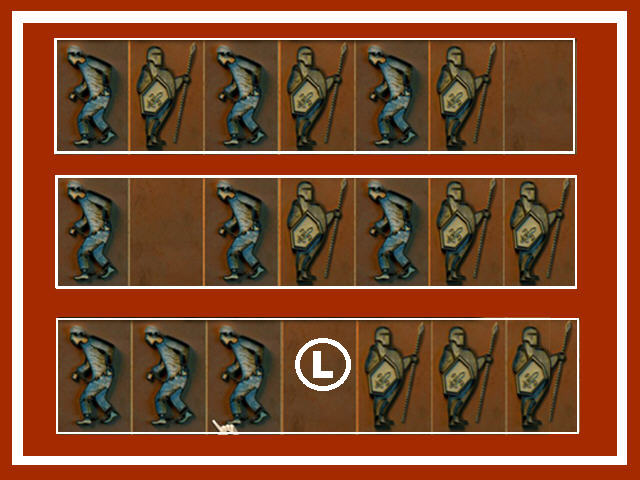
- Click on the tiny stage by the bed.
- Place the BACKDROP in the slot to activate the puzzle (A).
- Duplicate the image on the backdrop on the set by placing all the items in the right spots.
- Use the ROPE (B) on the left to zoom in and out of the backdrop.
- Click on the “CHARACTERS,” “OBJECTS,” and “NATURE” buttons to make those items appear on screen (C).
- Use the lever (D) in the upper right to move the items in the scene.
- Use the arrows on the right (E) to move the pieces into the correct positions.
- Take the JOYFUL KEY the puzzle has been solved.
- Click down twice, go through the curtains and take the elevator.
- Play the Hidden Object Scene.
- Click on the star cover to remove it; click on the light inside the star (A).
- Sharpen the pencil with the knife; take the sharp pencil (B).
- The MOURNFUL KEY will be added to inventory.
- Zoom into the mechanism in the lower center; place the HAND VALVE in the slot.
- Turn the wheel to make the teeth prop appear (C).
- Zoom into the teeth prop; take the TORTOISE TILE (D).
- Click down twice.
- Zoom into the machine on the right; place the MOURNFUL KEY in the left lock and the JOYFUL KEY (E) on the right to trigger a Hidden Object Scene.
- The Buttons are circled in red.
- Place the white tube of paint on the bear; click on the polar bear (F).
- Squeeze the pastry in the lower right; take the cream (G).
- The CODE PIECE will be added to inventory.
- Go through the hallway and make a left.
- Zoom into the large turtle; place the TORTOISE TILE in the empty spot to activate the puzzle.
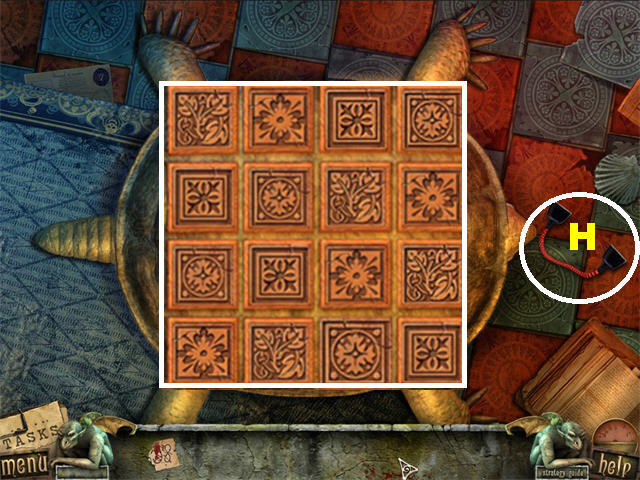
- Click on the signs to swap their positions.
- Position the signs so that no two images are repeated in any 4-tile column, row, or diagonal.
- Take the WIRE (H) after the puzzle has been solved.
- Return to the bedroom upstairs.
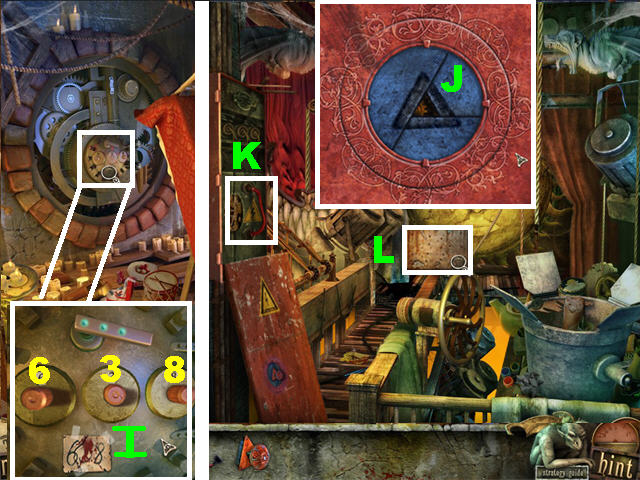
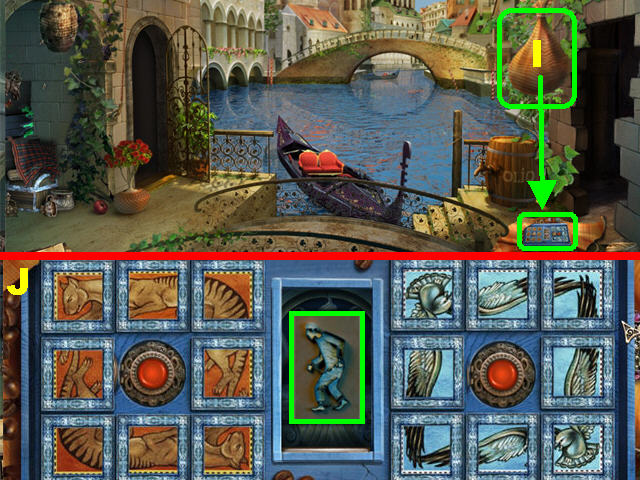
- Zoom into the device in the back wall; place the CODE PIECE on the device.
- From left to right turn the dials to 6, 3, and 8.
- Click on the handle (I).
- Take the TORUS inside the device.
- Take the elevator.
- Zoom into the red box; place the TORUS in the center and click on it six times (J).
- Place the HANDLE in the center of the device to remove the panel.
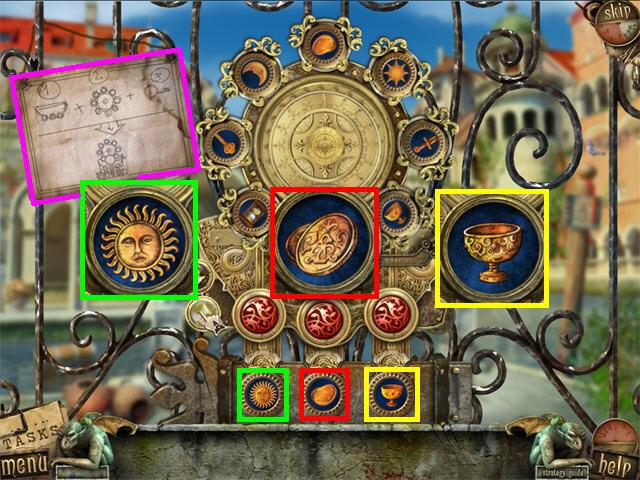
- Put the WIRE (K) inside the panel for a puzzle to appear in front of the sun image; click on it to activate the puzzle (L).
- Move the lightning bugs to their matching objects at the bottom of the screen.
- Drag the ends of the rods to one of the white dots on the board; the lightning bug will slide to the end.
- The white dots will turn green when a legitimate move is made.
- Click on the bugs to slide them through the bar.
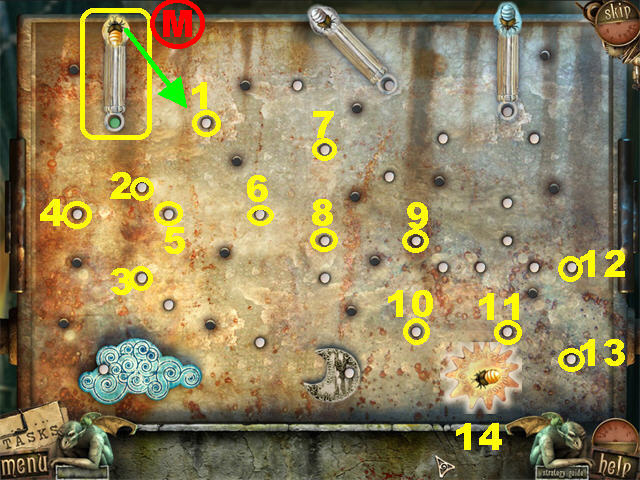
- Please look at the screenshot for a step-by-step solution for the yellow lightning bug puzzle (M).
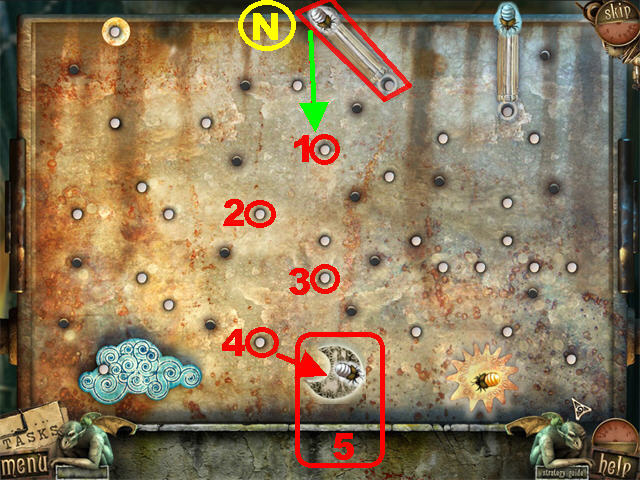
- Please look at the screenshot for a step-by-step solution for the white lightning bug puzzle (N).
- Please look at the screenshot for a step-by-step solution for the blue lightning bug puzzle (O).
Chapter 2: Venice
- Play the Hidden Object Scene on the right.
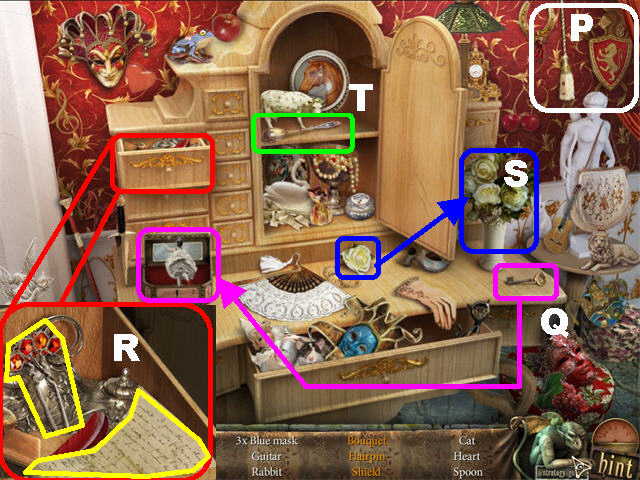
- Pull on the tassel in the upper right and take the shield (P).
- Unlock the music box with the key and click on the ballerina (Q).
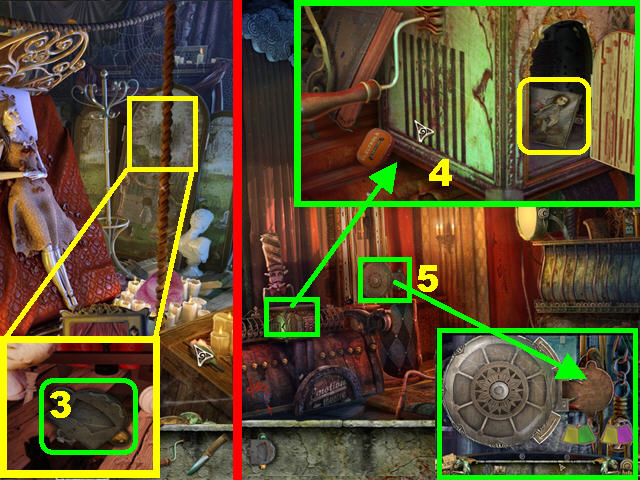
- Zoom into the top left drawer; take the hairpin and the letter (R).
- Click on the white rose on the desk to add it to the bouquet; then click on the bouquet (S).
- Open the center cabinet; take the spoon (T).
- The HAIRPIN will be added to inventory.
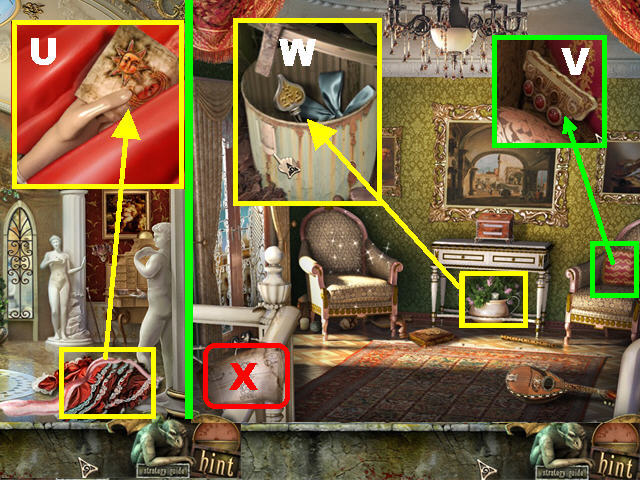
- Zoom into the red dress in the lower right; take the HAND (U).
- Go up the steps.
- Zoom into the right chair; take the BUTTON PANEL (V).
- Take a closer look at the potted plant; open it with the HAIRPIN and take the CAGE KEY (W).
- Take the LOCK INSTRUCTIONS in the lower left (X).
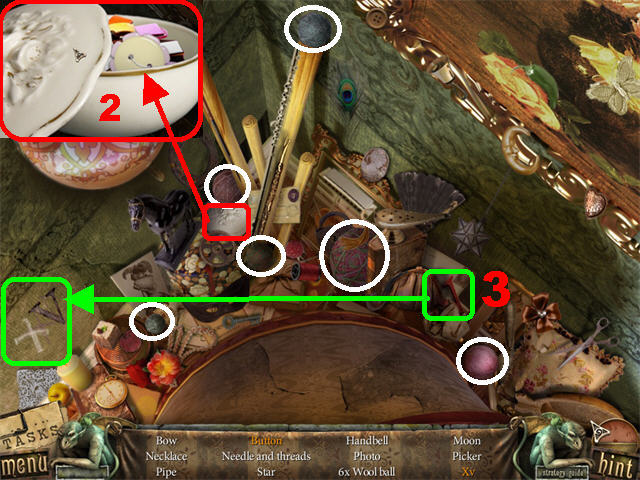
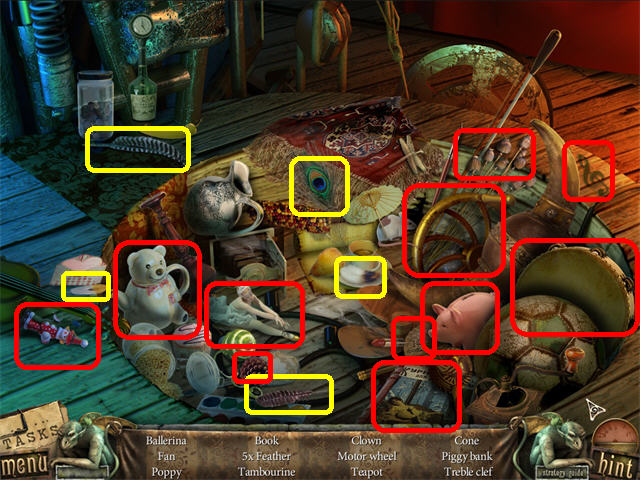
- Play the Hidden Object Scene.
- Zoom into the white bowl; take the button (2).
- Take the “V” on the lower right and place it next to the “X” in the lower left; click on “XV” (2).
- The Wool Balls are marked in white.
- The SEAM RIPPER will be added to inventory.
- Click down.

- Take the red cloth off the cage on the left (3).
- Zoom into the cage; open it with the CAGE KEY and click on the cage to trigger a puzzle.
- Click on the wing to activate the puzzle.
- Place the gears into the mechanism using the solution in the screenshot (4).
- Take the GEAR from the bird’s mouth (5).
- Zoom into the small table by the gate; use the SEAM RIPPER to take off the stitches on all sides.
- Take the HANDKERCHIEF (6).
- Go on the steps.
- Zoom into the box above the dresser; place the HAND in the slot and the drawer will open up (7).
- Place the HANDKERCHIEF inside the drawer and take the MONOCLE (8).
- Click down.
- Zoom into the gate; place the LOCK INSTRUCTIONS on the gate.
- Put the BUTTON PANEL on the panel along with the GEAR and the MONOCLE to activate the puzzle.
- Use the arrows on the left to rotate the symbols until one of the symbols at the bottom of the puzzle appears in the loupe.
- Click on the red button above each symbol when the correct image is in the loupe to lock in your selection.
- The solutions are random. Repeat the same process until the images shown in your game have been entered.
- Go through the gate.
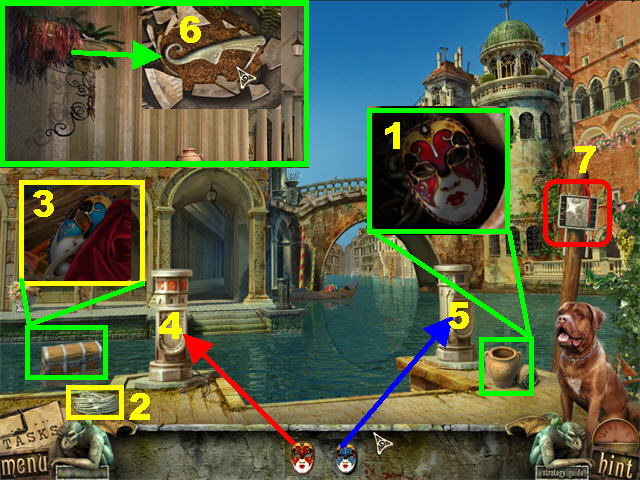
- Zoom into the pots in the lower right; take the RED MASK (1).
- Click on the rope (2) in the lower left. Then click on the opposite end of the rope to drag the treasure chest closer to the edge.
- Zoom into the chest; take the BLUE MASK (3).
- Place the RED MASK in the slot in the lower left (4).
- Place the BLUE MASK in the slot in the lower right (5) and a bridge will appear. Go forward.
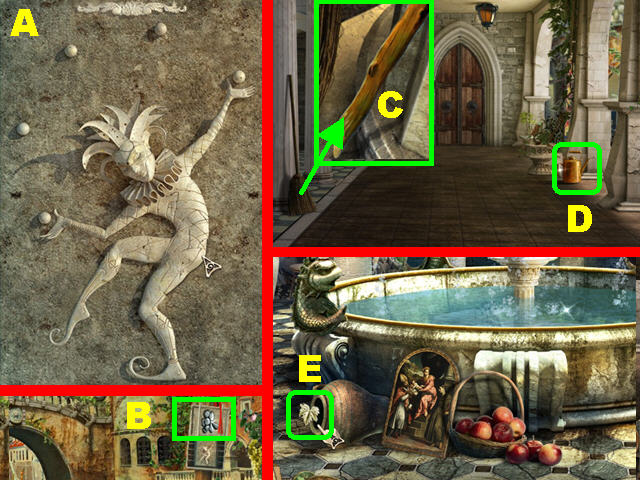
- Zoom into the potted plant in the upper left; click on the dirt several times and take the HARLEQUIN PART (6).
- Return to the previous scene.
- Zoom into the post on the right (7).
- Place the HARLEQUIN PART in the empty slot.
- Put the parts into the puzzle, as in the screenshot (A).
- Take the GRAPES from the post (B).
- Go forward twice.
- Take a closer look at the broom on the left; Take the STICK (C).
- Take the EMPTY OILCAN on the right (D).
- Go left.
- Take the GRAPE LEAF in the pot in the lower left (E).
- Play the Hidden Object Scene.
- The Butterflies are marked in orange.
- Zoom into the cloth on the right wall; take the button, candy, and heart (F).
- Take the red thread on the small table and place it next to “AMO” on the large cloth on the left; click on the word “amore” (G).
- The HEART KEY will be added to inventory.
- Exit this scene and click down.
- Zoom into the broken tile on the ground; remove TAIL FIN using the STICK (H).
- Take a closer look at the red chest in the lower right; place the HEART KEY (I) in the lock.
- Move the items out of the way and take GRAPE LEAF (J).
- Go forward.
- Zoom into the Dionysus Relief on the right column; place the GRAPES, and the 2 GRAPE LEAVES into their appropriate slots (K).
- Take the LOCK PICK (L).
- Go to the far right.
- The KEY will be added to inventory after the monk finishes talking.
- Zoom into the bench on the left to trigger a puzzle (M).
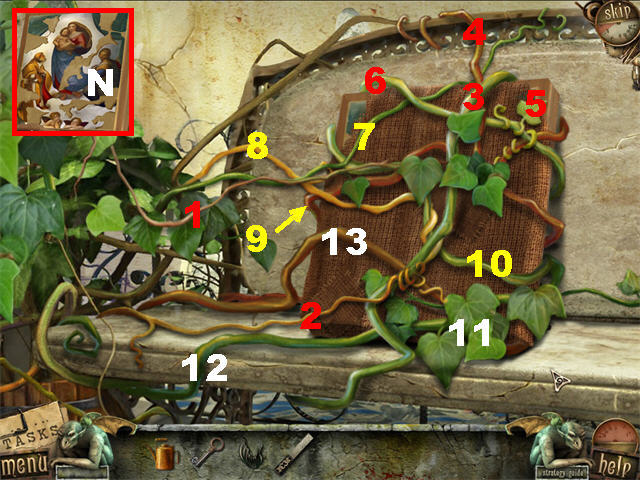
- Remove the ivy twigs by clicking the topmost twig each time.
- Please look at the screenshot for a step-by-step solution.
- Take the PAINTING (N) from the vines.
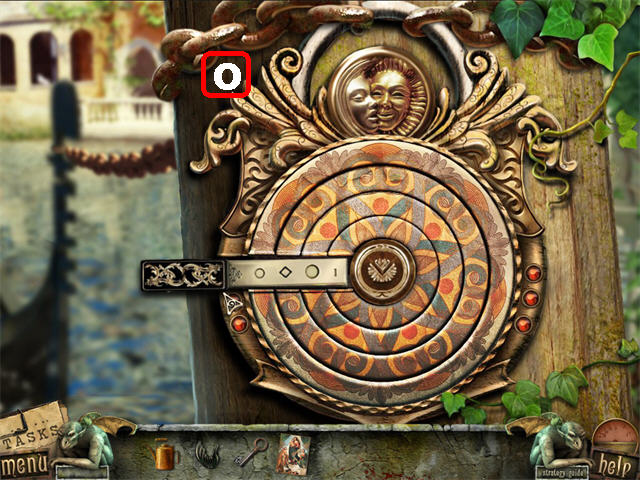
- Zoom into the right post.
- Place the LOCK PICK into the left slot to activate the puzzle. The LOCK PICK will return to inventory after use.
- Click on the red buttons, on the right, to rotate the wheels and arrange the rings of the puzzle.
- The solution is random but the screenshot shows you the final image.
- Place the LOCK PICK into the left slot after the puzzle has been solved (O).
- Click on the gondola to move it.
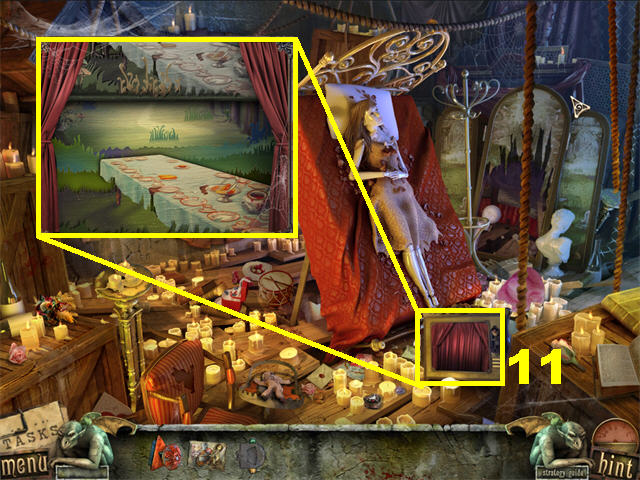
- Play the Hidden Object Scene.
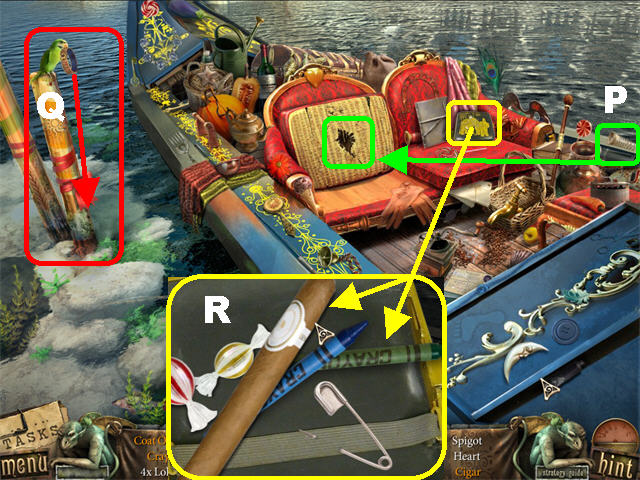
- Place the nail into the cushion on the left chair; take the coat of arms (P).
- Click on the bracelet the parrot is holding; take the bracelet that falls below (Q).
- Zoom into the case on the right seat; Take the cigar and the crayons (R).
- The SPIGOT will be added to inventory.
- Go through the tunnel.
- Zoom into the barrel on the right; place the SPIGOT in the hole.
- Place the EMPTY OILCAN below the spigot; take the FULL OILCAN (S).
- Take CROSS in the lower left (T).
- Zoom into the left door; place the FULL OILCAN on the hinges to unlock the door (U).
- Go through the door.
- Take the CROSS from the lower right (V).
- Go up the steps.
- Take the CROSS from the lower right (W).
- Play the Hidden Object Scene.
- The Crosses are marked in red.
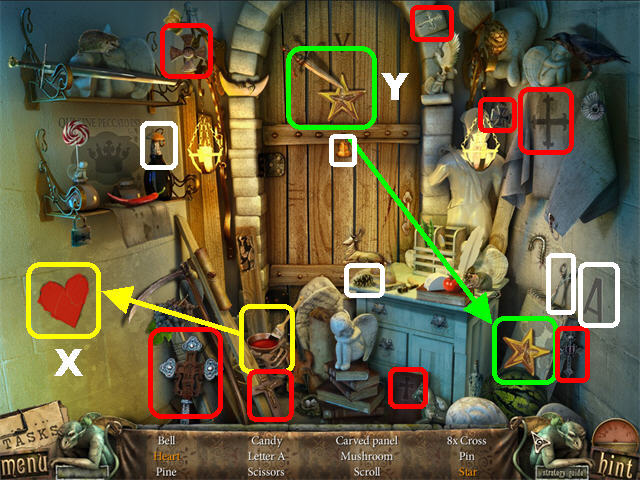
- Paint the heart with the red paintbrush and take the heart (X).
- Click on the dagger on the door; take the star that falls in the lower right (Y).
- The CARVED WOOD PANEL will be added to inventory.
- Go through right door.
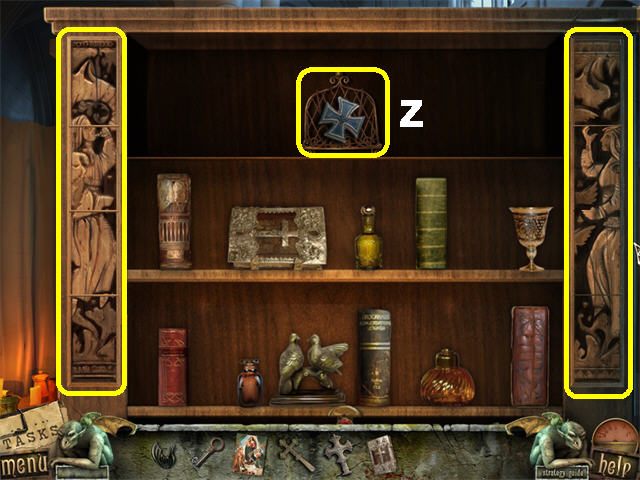
- Zoom into the bookcase; place the CARVED WOOD PANEL in the empty slot.
- Click on any two panels to swap their positions until they match the image in the screenshot.
- Take the CROSS from the upper shelf after the puzzle has been solved (Z).
- Take the GAUNTLET (A) from the lower right.
- Exit and go down the steps.
- Place the GAUNTLET (B) on the wall; take the RED GEM (C) that falls on the ground.
- Place the 4 CROSSES in the ground for the steps to appear (D).
- Go down the steps.
- Zoom into the left gate; place the RED GEM into the slot to trigger a puzzle (E).
- Place the skull into the small gold gates, and then put the small gates into the big gold gates.
- Move both gates together to the exit on the right.
- Click on the box to drop the skull into it (1).
- Click on the empty tile to the right of the skull in the box (2).
- Click on the exit to complete the first part of the puzzle (3).
- Click on the center box on the left wall to trigger the second part of the puzzle.
- Click on the small gold box to place the skull into it (4).
- Click on the large gold box to place the small box with the skull into it (5).
- Click on the exit to complete the puzzle (6).
- Click on the last box on the left wall to trigger the last part of the puzzle.
- Move the skull into the small box and then move the small box to position 9.
- Take the skull out of the small box, move it to position 6 and then click on the large gold box to move it left.
- Place the skull into the small gold box and then move it to position 8.
- Place the skull into the large wooden box and then move it to position 9.
- Click on tile 8 to push the small box to position 7.
- Place the skull into the large gold box and move it to position 5.
- Move the skull into the small gold box, and then move the gold box with skull into the large wooden box.
- Move the small gold box within the large wooden box to position 3.
- Move the small gold box with the skull into the large gold box and take it to the exit.
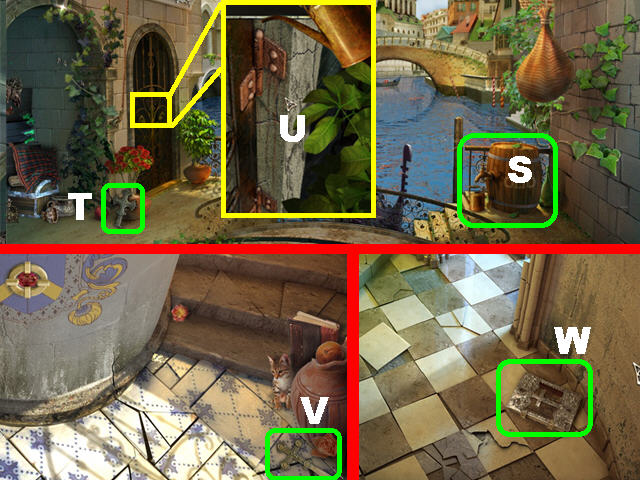
- Take the TORN PICTURE (E) from the steps.
- Go down the steps.
- Zoom into the niche on the right wall; move the items out of the way and take the MEAT (F).
- Zoom into the basket on the right; open it, move the vegetables aside, and take the PAINTBRUSHES (G).
- Zoom into the back gate; take the CROWBAR (H).
- Return to the bridge.
- Give the MEAT to the dog (I) to trigger a Hidden Object Scene.
- The Acorns are marked in red.
- Take the hair off the head and click on the bald head (J).
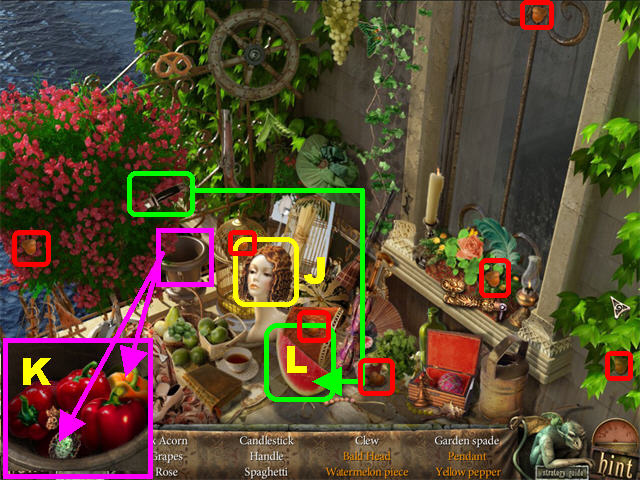
- Zoom into the pot on the left; take the pendant and yellow pepper (K).
- Cut the watermelon in the lower center with the knife on the left; take the watermelon piece (L).
- The CHAIN HANDLE will be added to inventory.
- Return to the chapel.
- Zoom into the frame’s lock on the left wall (M).
- Open the lock with the KEY (N).
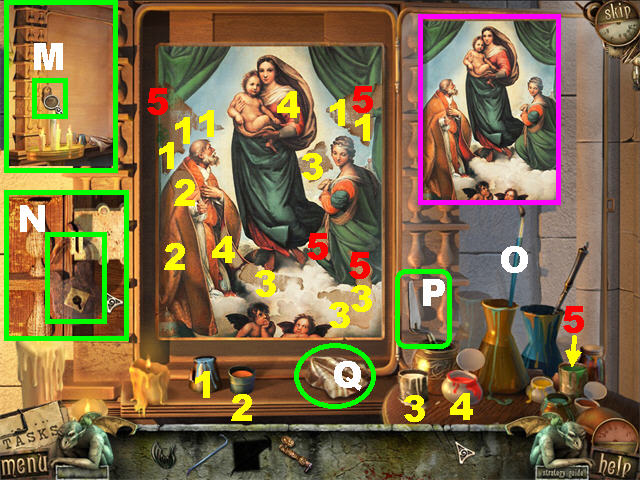
- Place the PAINTING on the wall; zoom into the picture.
- Place the BRUSHES in the gold vase to activate the puzzle (O).
- Use the correct paint colors on the cracked paint spots.
- The TIP of the palette knife (P) in the small gold vase can be used to remove incorrect paint.
- To change the paint color, clean it with the cloth (Q); then choose a new color.
- Take the SECRET ROOM HINT above the picture.
- Return to the gondola area.
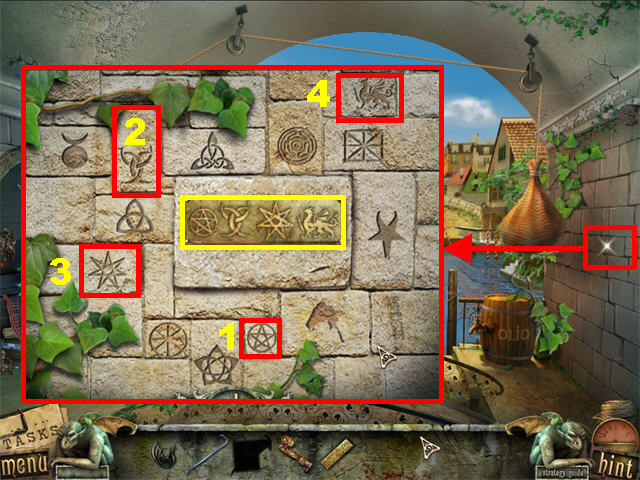
- Remove the four vines on the right wall.
- Zoom into the wall; place the SECRET ROOM HINT in the slot.
- Click on the stone tiles in the order shown on the hint.
- Please look at the screenshot for the solution (R).
- Go through the wall.
- Take the STONE in the lower left (S).
- Place the STONE on the carpet.
- Zoom into the hole in the floor; take the GUARD (T).
- Click on the map on the wall; zoom into the mechanism on the left wall.
- Place the TORN PICTURE in the left box (U).
- Click on the two buttons to activate the gears (V).
- Place the CHAIN HANDLE on the side of the large wheel; click on the handle (W).
- Click on the chain to attach it to the large stone.
- Move the large stone with the CROWBAR to raise the grid and open the casemate (X).
- Return to the dungeon, go through the open gates, and enter the far left door.
- Play the Hidden Object Scene.
- The Mice are marked in red.
- Crack the angel’s wings with the stone; take the cracked wings (Y).
- Open the map in the lower left; click on the windrose (Z).
- The SUN PIECE will be added to inventory.
- Zoom into the candles in the lower left; take TAIL FIN (A).
- Take the WOODEN PLANK on the ground (B).
- Exit this scene and go forward.
- Zoom into the chair; take the NAILS (C).

- Play the Hidden Object Scene.
- Zoom into the lower right; take the KEY (D).
- Crack the nut next to the mask with the nutcracker on the right (E).
- Click on the large mask to remove it; click on the smile (F).
- The HOURGLASS TOKEN will be added to inventory.
- Click down, go through the left door.
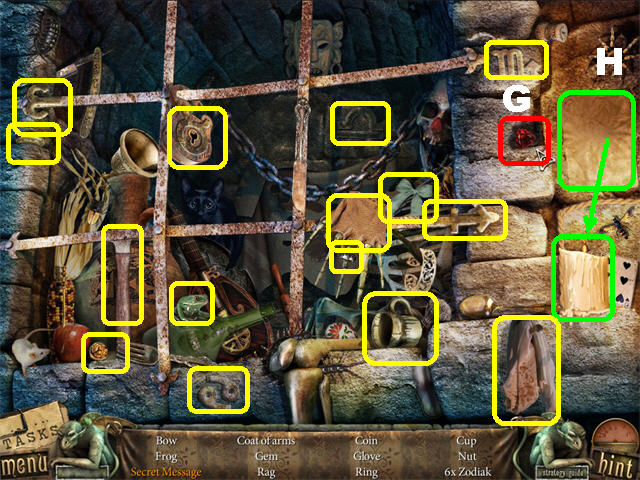
- Play the Hidden Object Scene.
- Remove the stone in the upper right; take the gem (G).
- Place the paper over the candle; click on the secret message (H).
- The RAG will be added to inventory.
- Exit and go forward.
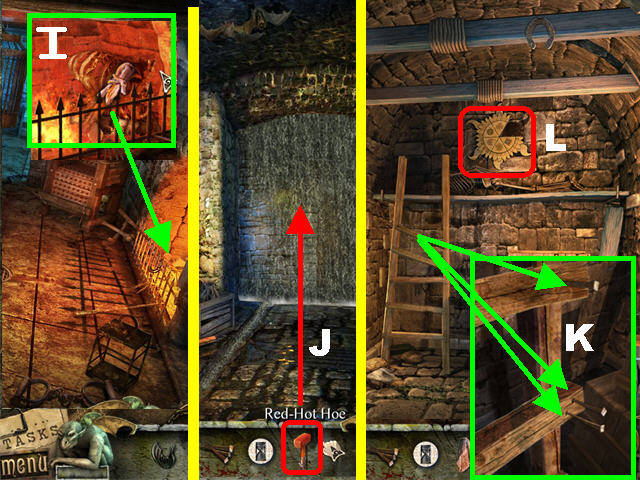
- Zoom into the fireplace on the right; take the RED-HOT HAMMER with the RAG (I).
- Exit and go through the far left door.
- Place the RED HOT HAMMER in the water to create the SLEDGEHAMMER (J).
- Exit and go through the left door.
- Zoom into the ladder; place the NAILS on the board.
- Place the SLEDGEHAMMER on the nails to repair the ladder (K).
- Zoom into the sun ornament in the upper center (L).
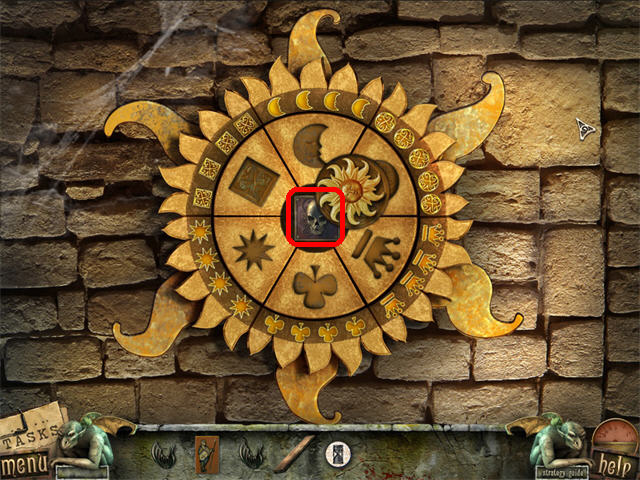
- Place the SUN PIECE into the empty slot to activate the puzzle.
- Click on the sun rays to move the pieces until the inside and outside symbols match.
- Please look at the screenshot for the solution.
- Take the SKULL in the center of the puzzle.
- Exit and go forward.
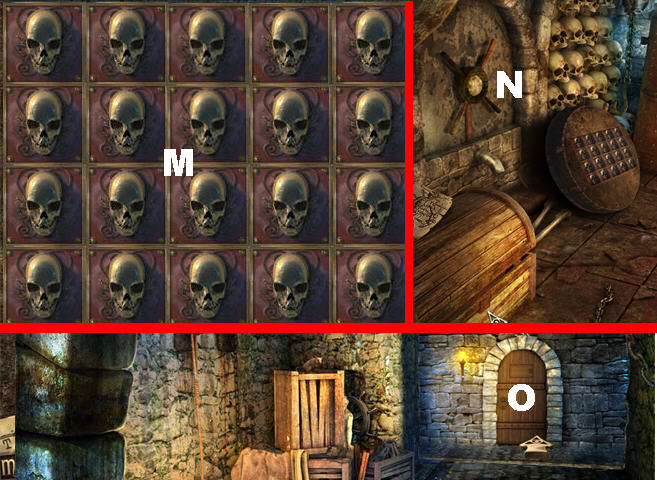
- Zoom into the small skulls on the left wall.
- Place the SKULL in the empty slot to activate the puzzle.
- Click on the tiles until all the skulls are flipped to the front.
- The solution is random; please look at the screenshot for final arrangement (M).
- Click on the wheel (N) on the wall to shut off the water after the puzzle has been solved.
- Exit and enter the far left door. The door in the back is now open; go through it (O).
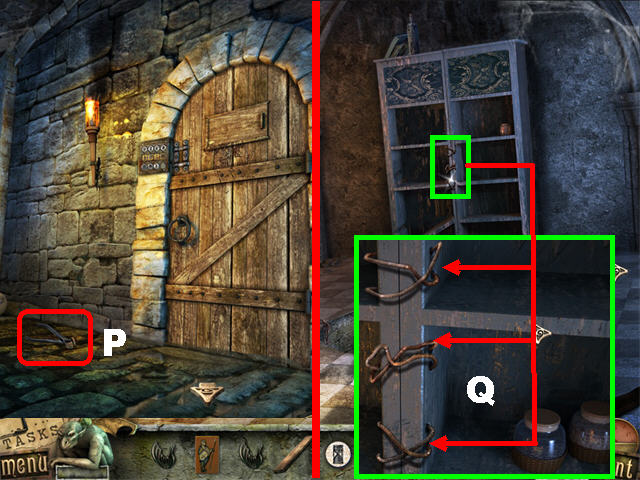
- Take the WIRE CUTTERS on the ground (P).
- Go outside and enter through the right wall.
- Zoom into the bookcase; remove the wires (Q) with the WIRE CUTTERS to trigger a Hidden Object Scene.
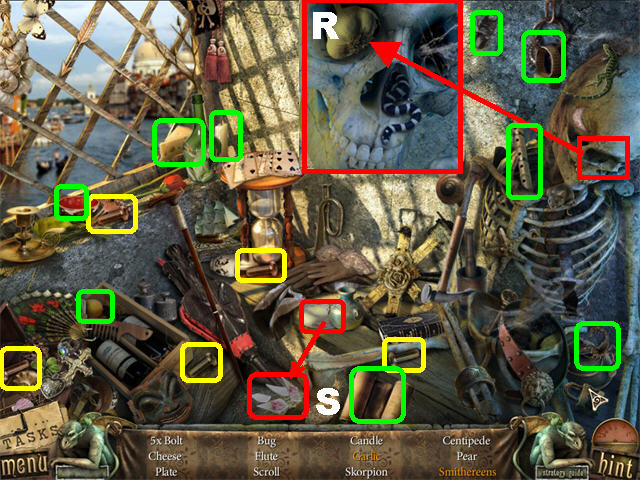
- The Bolts are marked in yellow.
- Zoom into the skull; click on the garlic (R).
- Click on the plate to break it, take the broken pieces on the floor(S).
- The SCROLL will be added to inventory.
- Return to the chapel.
- Zoom into the table.
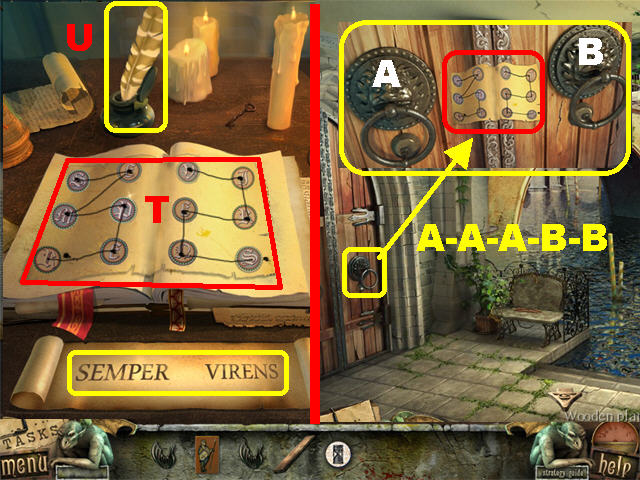
- Place the SCROLL on the table.
- Trace the words “SEMPER VIRENS” across both pages (T) in the book using the feather (U).
- Click on a letter with the feather to select it; click on it again and select the next letter in order to connect both letters. Continue this process until both words have been entered correctly.
- Take the SECRET COMBINATION from the book (T).
- Go outside and click down twice.
- Zoom into the left door; place the SECRET COMBINATION on the door.
- To unlock the door, click on doorknockers A, A, A, B, and B.
- Enter the wine cellar.
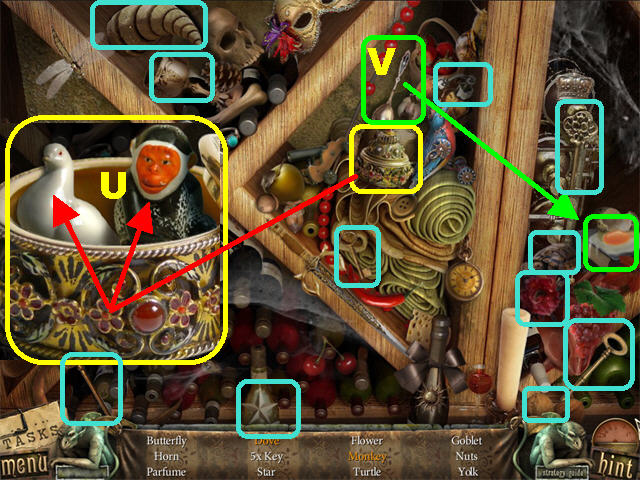
- Play the Hidden Object Scene.
- Open the porcelain box; take the monkey and the dove (U).
- Crack the egg with the spoon; take the yolk (V).
- The HORN will be added to inventory.
- Click on the bag in the lower right until you can take MAIN FISH TAIL (W).
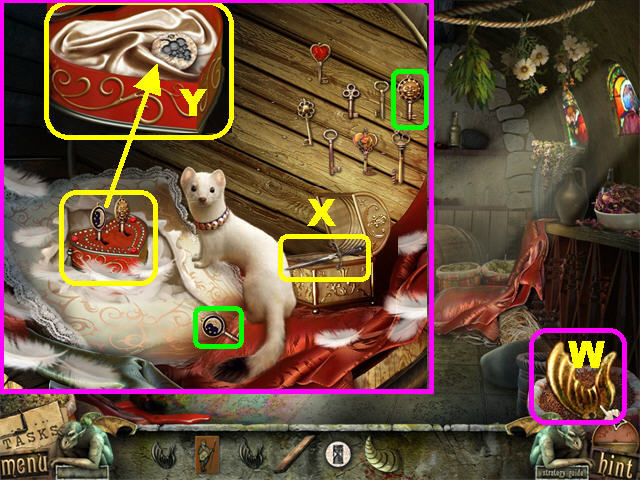
- Zoom into the open barrel on the left to trigger a puzzle.
- Open the gold box; take the dagger and cut a hole in the pillow to reveal a red box (X).
- Click on the ferret and the feathers will scatter around.
- Grab a feather and tickle the ferret until it drops the key.
- Place the SUN KEY from the wall and the MOON KEY dropped by the ferret in the heart box.
- Zoom into the heart box; take the GRAPE PICTURE (Y).
- Go to the fish fountain.
- Place the TAIL FIN (A) on the left fish. Click on the tail to shut off the water.
- Place the TAIL FIN (B) on the right fish.
- Put the WOODEN PLANK (C) in the fountain so you can reach the center fish.
- Place the MAIN FISH TAIL (D) on the center fish.
- Click on the four fish tails to shut off the water (A, B, D, and E).
- Zoom into the stone devil head marked in green.
- Place the HORN on the devil to trigger a puzzle.
- Place the pictures in order according to the stages for creating wine.
- Click on any two symbols to swap their positions.
- Please look at the screenshot for the solution (F).
- Click on the Hidden Object Scene in the fountain.
- Take a closer look at the golden pot; take the crab and the coin.
- Clean the left side of the wall with the rag; take the heart (G).
- Click on the green bow on the left; take the ribbon that falls on the ground (H).
- The BIRDS are marked in blue.
- The SCISSORS will be added to inventory.

- Exit this scene, go right, and then forward twice.
- Cut the bag on the right with the scissors (I).
- Click on the puzzle that falls on the floor to activate it.
- Click on two adjacent tiles to swap their positions.
- Please look at the screenshot for the solution; then click on the red buttons (J).
- Take the PRISONER FIGURE.
- Return to the dungeon.
- Zoom into the box in the lower left; place the PRISONER FIGURE on the right.
- Place the GUARD on the left to activate the puzzle.
- Click on two figures to swap their positions. The figures can only jump into an empty slot and move in the direction they are facing.
- Follow the steps in the screenshots to solve the puzzle (K and L).
- Take the SACK after the puzzle has been solved.
- Go outside.
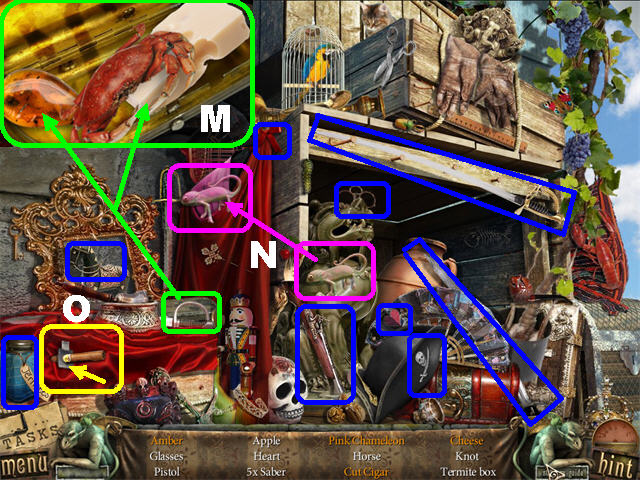
- Put the SACK over the hornets’ nest to trigger a Hidden Object Scene.
- Zoom into the case by the mirror; take the cheese and the amber (M).
- Place the chameleon on the pink sheet; click on the pink chameleon (N).
- Click on the cigar cutter; take the cut cigar (O).
- The TERMITE JAR will be added to inventory.

- Go to the dungeon, through the gate, through the far left door and through the back door.
- Zoom into the mechanism by the door.
- Place the HOURGLASS TOKEN and the GRAPE PICTURE in the empty slots.
- Click on any two images to swap their positions.
- Pictures must be arranged so that causes are opposite of consequences.
- Please look at the screenshot for the solution (P).
- Go through the door after the puzzle has been solved.
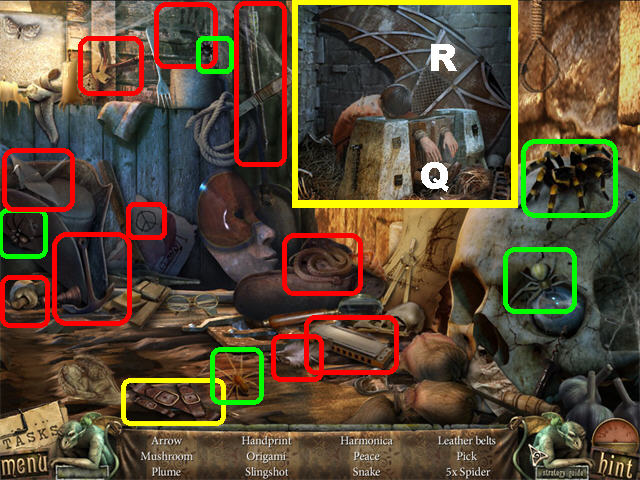
- Play the Hidden Object Scene.
- The Spiders are marked in green.
- The SET OF LEATHER BELTS will be added to inventory.
- Zoom into Fabio’s shackles; get rid of them using the TERMITE JAR (Q).
- Zoom into the wings in the back wall; place the SET OF LEATHER BELTS on them to free Fabio (R).
Chapter 3: Psychiatric Ward
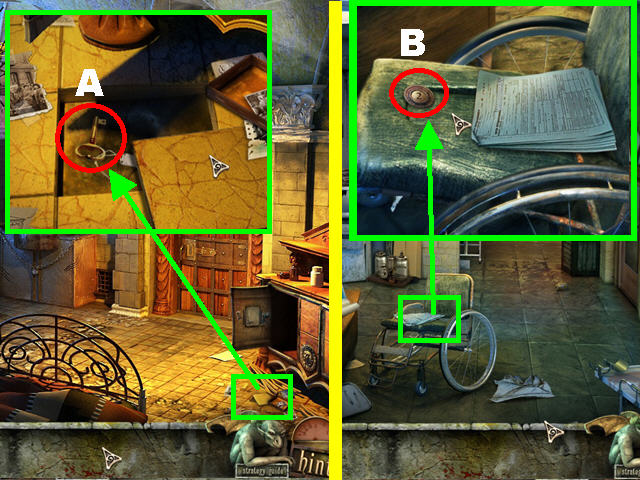
- Zoom into the lower right; move the loose tile and take the DOOR KEY (A).
- Zoom into the door; open it with the DOOR KEY and go through the door.
- Zoom into the wheelchair; move items aside and take the PANEL BUTTON (B).
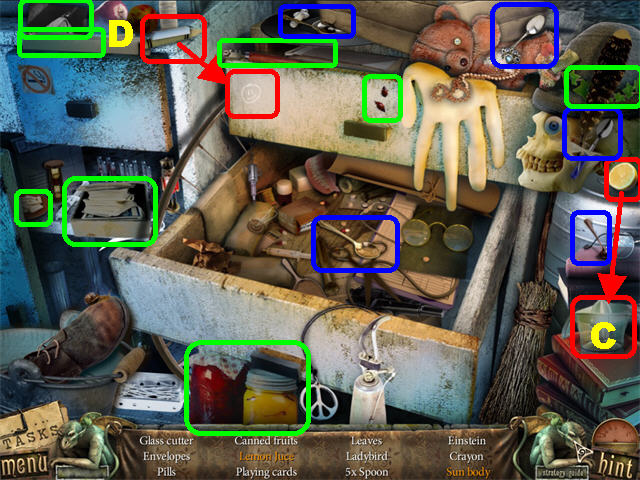
- Play the Hidden Object Scene.
- The Spoons are marked in blue.
- Place the lemon in the juicer; take the lemon juice (C).
- Place the chalk on the sun sketch; take the sun body (D).
- The GLASS CUTTER will be added to inventory.
- Zoom into the far right door; cut the glass with the GLASS CUTTER (E). Click on the glass and the knob inside to enter.
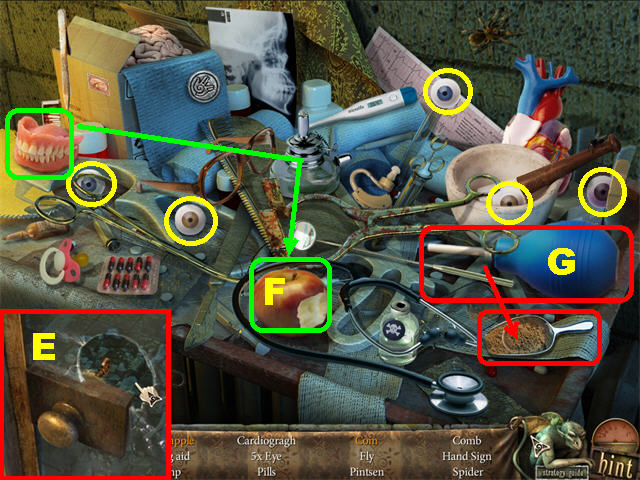
- Play the Hidden Object Scene.
- The 5 Eyes are marked in yellow.
- Place the dentures on the apple; take the bitten apple (F).
- Blow the air off the scoop with the blue blower; take the coin (G).
- The HAND SIGN will be added to inventory.

- Zoom into the tray in the lower right; take the PANEL BUTTON (H).
- Exit and go through the back door.
- Zoom into the back door; place the HAND SIGN in the upper slot to activate the puzzle.
- The square images belong under their matching round picture.
- Please look at the screenshot for the solution (I).
- Go through the back door to enter the laundry room.
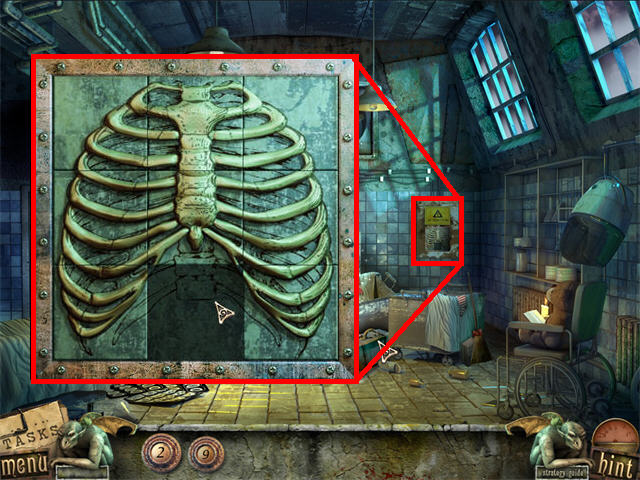
- Zoom into the x-ray machine to trigger a puzzle.
- Slide the pieces around until they form the image shown on the screenshot (C).
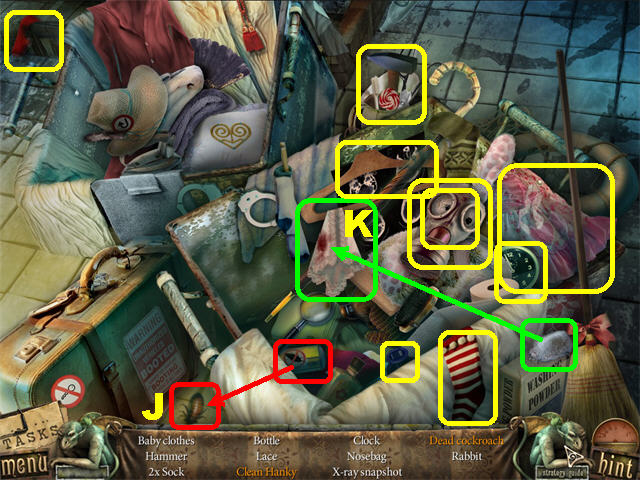
- Play the Hidden Object Scene.
- Kill the cockroach with the bug spray; take the dead cockroach (J).
- Place the bar of soap on the dirty hanky to clean it (K).
- The HAMMER will be added to inventory.
- Click down twice.
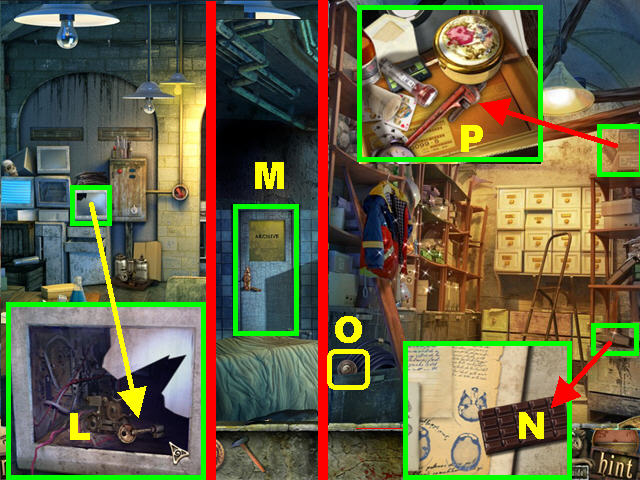
- Zoom into the broken monitor in the back; crack the screen with the HAMMER (L).
- Take the ARCHIVE KEY.
- Go to the laundry room.
- Zoom into the back door (M); place the ARCHIVE KEY in the lock and enter.
- Zoom into the bottom shelf of the bookshelf; take the CHOCOLATE (N).
- Take the PANEL BUTTON from the bottom cabinet (O).
- Zoom into the box in the upper right; move items out of the way and take the PIPE WRENCH (P).
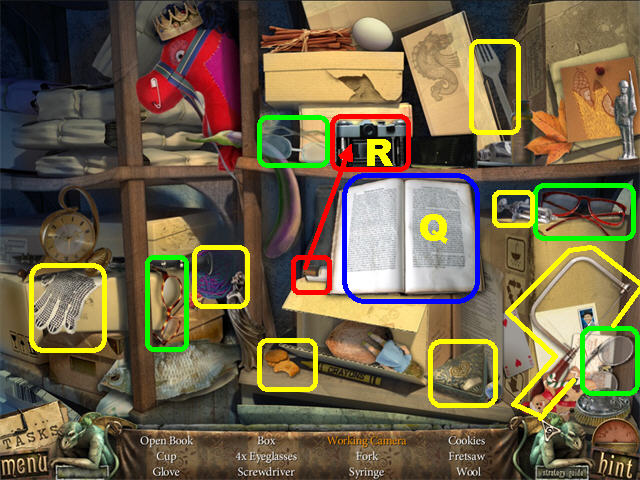
- Play the Hidden Object Scene.
- The Eyeglasses are marked in green.
- Click on the purple book to open it; take the open book (Q).
- Place the film in the camera; take the working camera (R).
- The GLOVE will be added to inventory.
- Click down three times, and go through the right door.
- Zoom into the glass shards by the window.
- Move the glass shards out of the way with the GLOVES; take the PANEL BUTTON (S).
- Exit this scene.
- Zoom into the panel on the left.
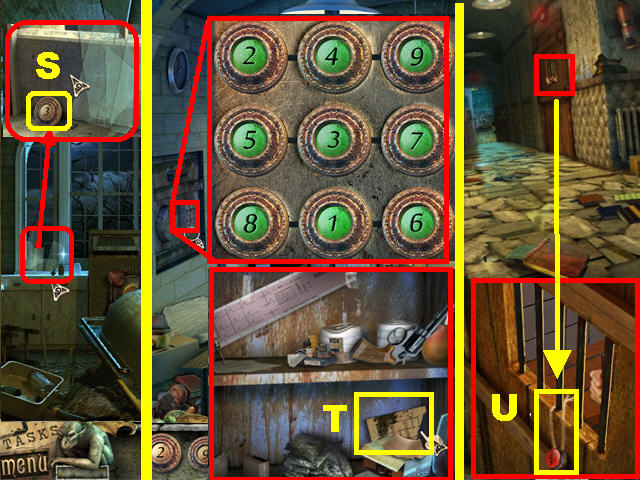
- Place the 4 PANEL BUTTONS into the empty slots to activate the puzzle.
- Place the buttons so each row adds up to 15. Click on two buttons to swap their positions.
- Place buttons 2, 4, and 9 in the top row.
- Place buttons 5, 3, and 7 in the center row.
- Place buttons 8, 1, and 6 in the bottom row.
- Zoom into the safe; take the SCHEMATIC (T).
- Go forward.
- Zoom into the right door; give the man the CHOCOLATE on the right door.
- Take the STOP BUTTON (U) from the bars.
- Go into the laundry room.
- Zoom into the second machine; place the STOP BUTTON over the wires and press it to activate a Hidden Object Scene (V).
- The Pins are marked in yellow.
- Place the red dress on the doll (W).
- The TORCH will be added to inventory.
- Zoom into the chair; place the TORCH on the candle to create the BURNING TORCH (X).
- Zoom into the panel (Y) on the back wall; place the SCHEMATIC (Z) in the upper right to activate the puzzle.
- Set the levers into the down, up, and down positions, from left to right, by clicking the blue knobs.
- Exit.
- Zoom into the rats on the left; place the BURNING TORCH (A) on the rats. Open the cabinet to trigger a Hidden Object Scene.
- Click on the first aid kit; take the medicine chest (B).
- Place the pills in the bowl of water; click on the bowl (C).
- The CLOVER CIRCLE will be added to inventory.
- Click down; enter the right door.
- Click on the panel below the window (D).
- Place the CLOVER CIRCLE into the slot to activate the puzzle.
- Click on the center circles and the smaller circles to rotate the pieces until each circle has all the same colors.
- Play the Hidden Object Scene after the puzzle has been completed.
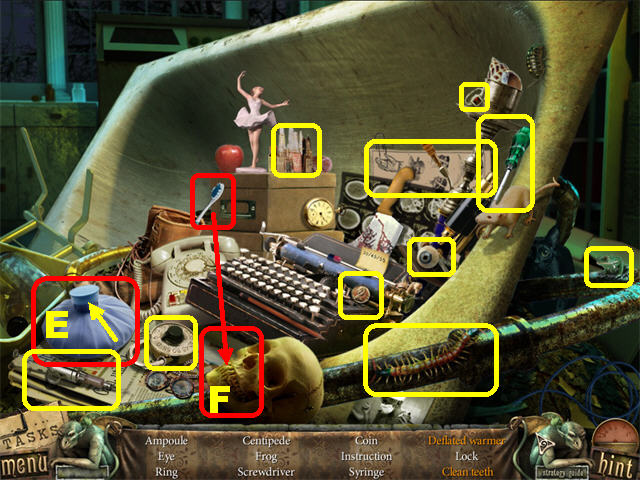
- Click on the hot water bottle cap; take the deflated warmer (E).
- Place the toothbrush on the skull’s teeth; take the clean teeth (F).
- The SCREWDRIVER will be added to inventory.
- Exit and go forward.
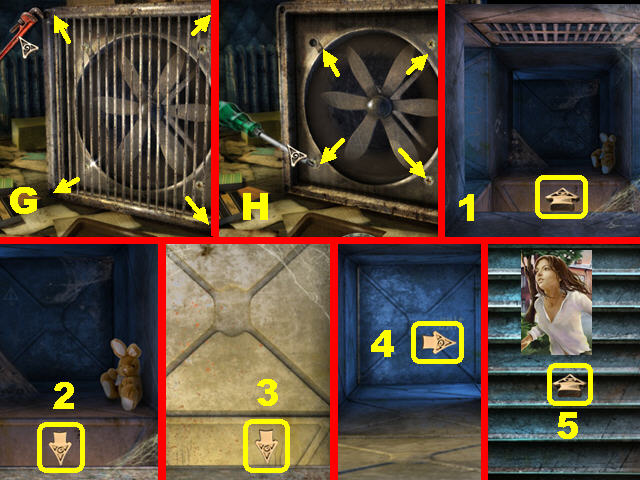
- Zoom into the fan; loosen the bolts with the PIPE WRENCH (G).
- Loosen the screws with the SCREWDRIVER (H).
- Go through the air vent.
- Go forward, down twice, right and through the vent to escape (see the screenshot for a visual step-by-step).
- Congratulations! You have completed Reincarnations: Uncover the Past!
Created at: 2010-09-18