

Walkthrough Menu
General Tips
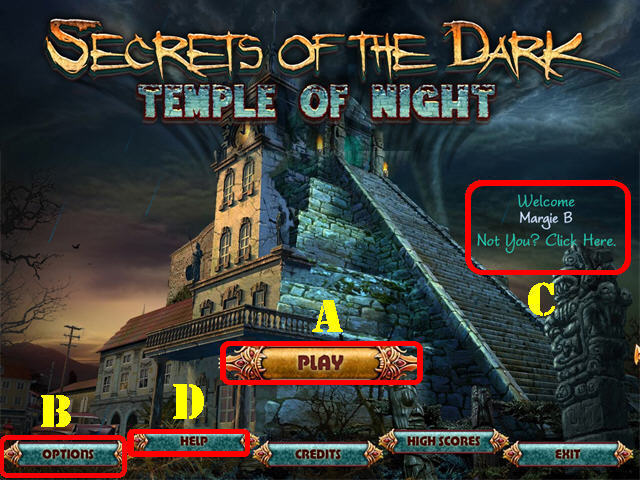
- Click on 'PLAY' (A) to access the main chapters in the game.
- The 'OPTIONS' (B) button allows you to adjust the screen, music, cursor, and sound.
- The 'Not You? Click Here.' button (C) can be used to add or delete a new player.
- Click on the 'HELP' (D) button to view general tips for playing the game.
- In several rooms you will have to change the illumination of the room by either opening or closing curtains or windows. This allows you to view the room in a previous era.
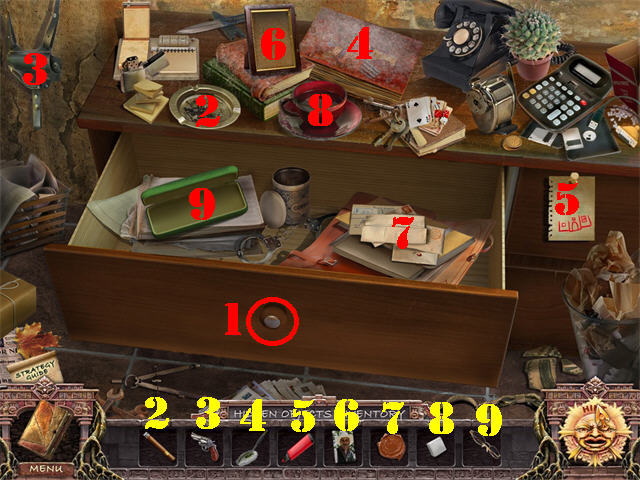
- This game contains reverse Hidden Object Scenes. Take the items from the inventory tray and place them into the correct spots in the scene.
- In the guide we will abbreviate the words 'Hidden Object Scene' with the acronym'HOS'.
- In the HOS you can hover your mouse over an item in inventory to read its description.
- Items written in yellow in Hidden Object Scenes require an extra step before they can be obtained.
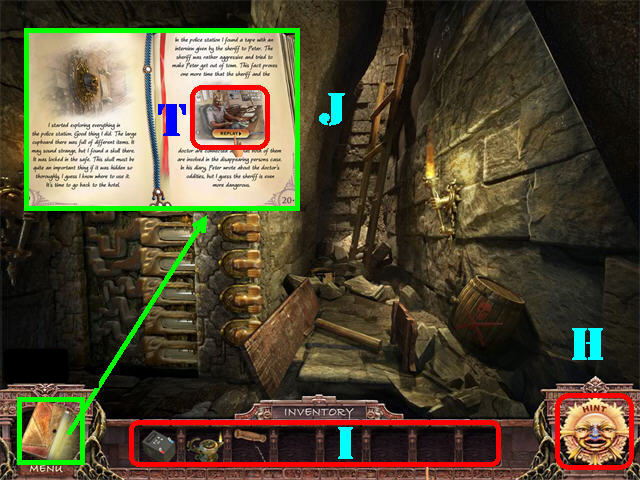
- Collect TAPES in order to view valuable information regarding the game. You can replay the TAPES in the journal (T). The journal is in the lower left corner of each scene (J).
- You can skip a puzzle once the 'SKIP' button fills below the 'HINT' button; doing so will add 30 additional minutes to your playing time.
- The built-in guide can be accessed by clicking on the words 'Strategy Guide' in the lower left corner (SG).
- The Hint (H) Idol is in the lower right corner of each scene.
- You have unlimited Hints in the Hidden Object Scenes and in Quest Scenes, but you must wait for them to recharge between uses.
- Inventory items (I) will appear at the bottom of the scene. Use the arrows in your inventory tray to scroll through all the items you've collected.
- To use an inventory item, select it and drag it to the desired location; click it into the spot in which you want it used.
Chapter 1: Saguaro Hotel
- Go into the left door.
- Click on the glowing spot on right to change the illumination of the room.
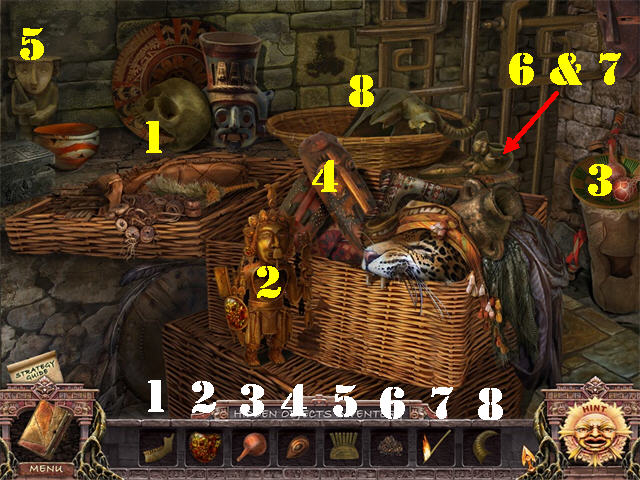
- Click on the sparkly area on left to access a HOS.
- Place the items back into the spots shown in the screenshot.
- The SAPPHIRE KEY will be added to inventory.
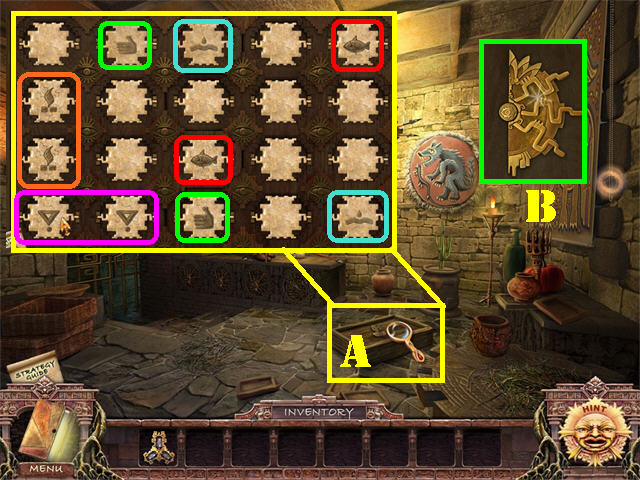
- Zoom into the crate on the ground (A).
- Place the SAPPHIRE KEY in the lock to activate a puzzle.
- Click on 2 matching tokens to eliminate them from the board. Make an incorrect choice and the 2 tokens will reshuffle.
- The solution for this puzzle is random.
- Take the HALF OF SUN after the puzzle has been solved (B).
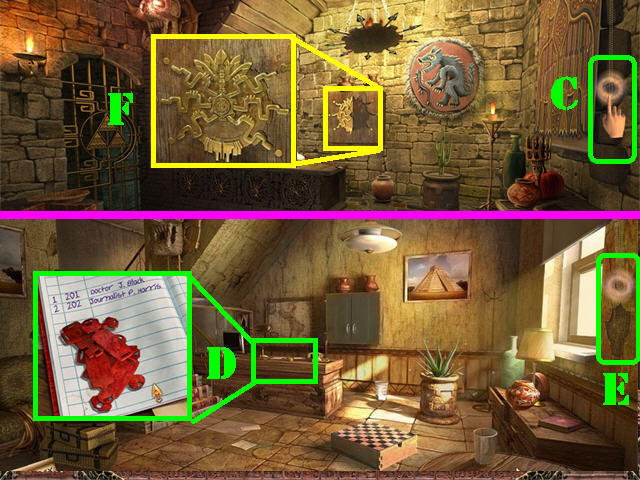
- Change the illumination of the room by opening the curtains (C).
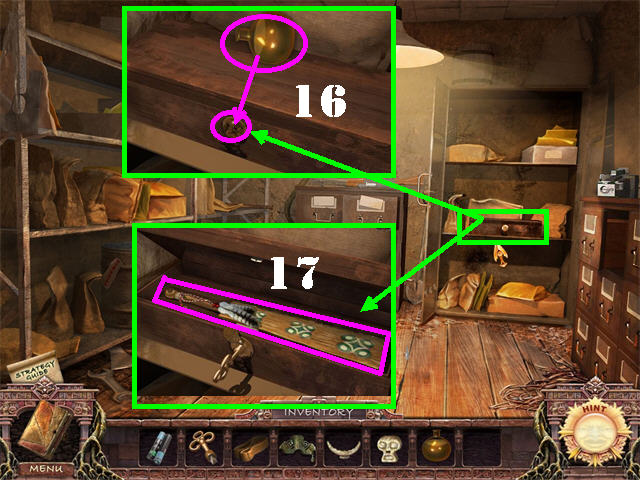
- Zoom into the desk; take the KEY TAGS (D).
- Close the curtains (E).
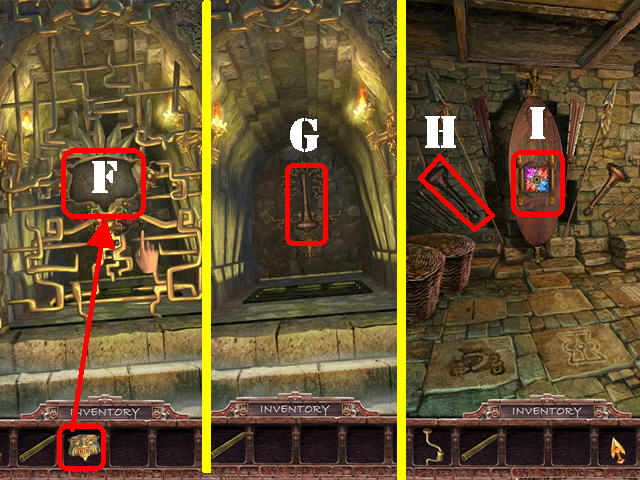
- Zoom into the cabinet on the back wall; place the HALF OF SUN on it (F).
- Open the curtains.
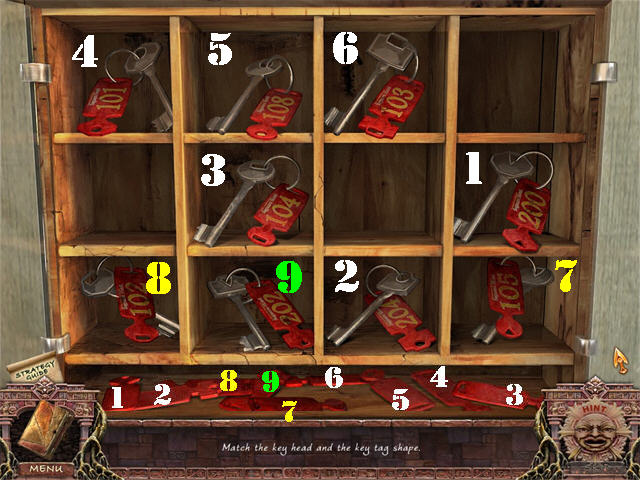
- Zoom into the cubbyhole on the back wall; place the KEY TAGS in them to activate a puzzle.
- Match the shapes of the hole in the key tags to those on the key.
- Please look at the screenshot for a solution.
- The ROOM 202 KEY will be added to inventory.
- Go up the steps.
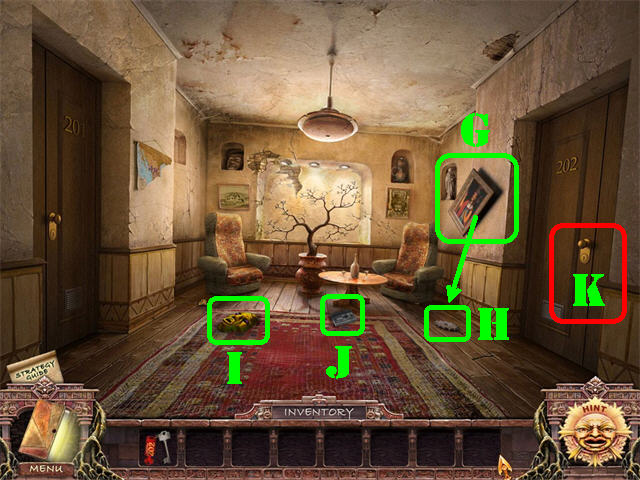
- Click on the picture on the right side of the wall (G); take the GEAR that falls on the ground (H).
- Take the MASK (I) on the floor.
- Grab the TAPE (J) on the carpet to automatically play it.
- Place the ROOM 202 KEY on the lock on the right door; go through the door (K).
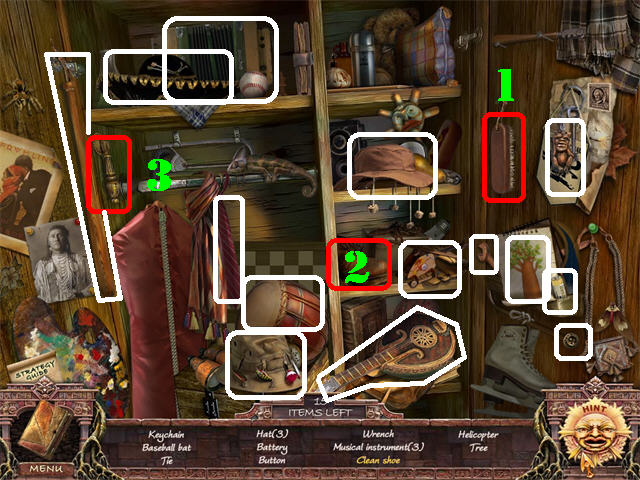
- Play the HOS in the closet.
- Take the BRUSH (1) and place it on the SHOE (2); take the CLEAN SHOE.
- Grab the HANDLE (3) in the upper left.
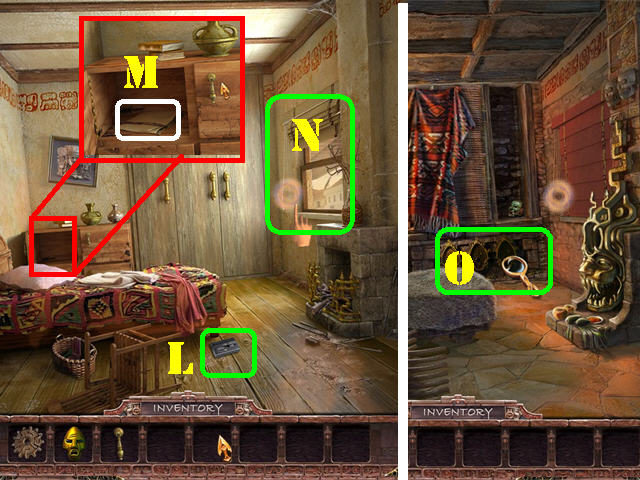
- Play the TAPE (L) on the floor.
- Examine the dresser; place the HANDLE on the door and take the ROMAN SHADE (M).
- Place the ROMAN SHADE over the window. Pull on the shade to change the room's illumination (N).
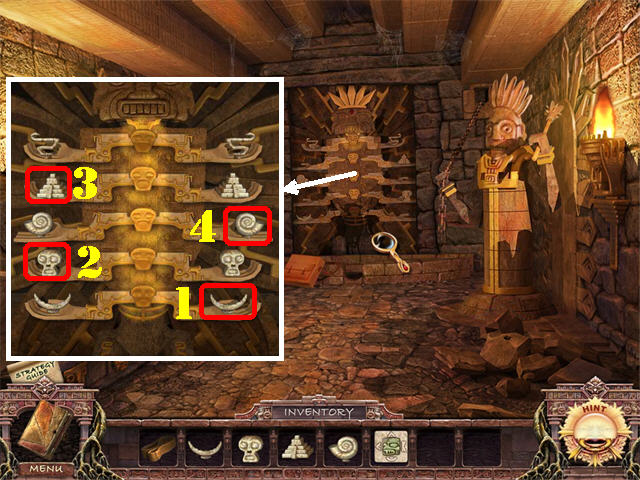
- Zoom into the bottom of the closet; place the MASK from inventory next to the others to activate a puzzle (O).
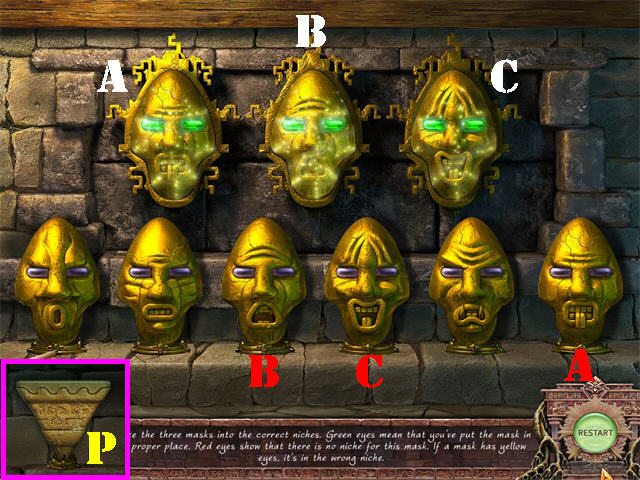
- Put the masks into their correct spots.
- After 3 masks have been placed, their eyes will light up. Red means the mask does not belong, green means it's in the right spot and yellow means it needs to be switched to a different spot.
- Place the masks in the order shown on the screenshot.
- Take the STONE PYRAMID after the puzzle has been solved (P).
- Open the shades; click down twice and close the shades.
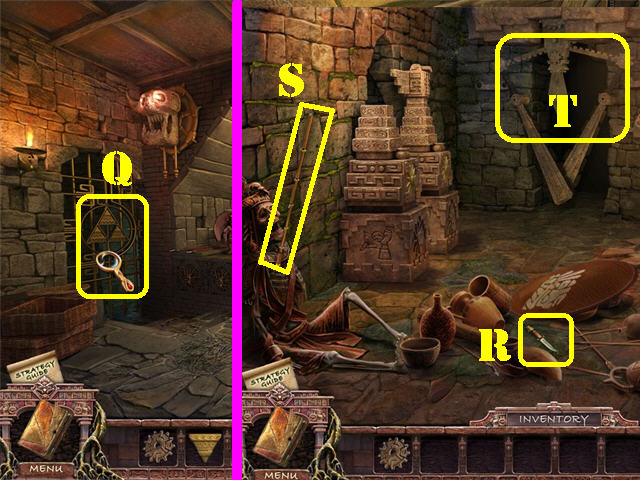
- Zoom into the gate on left (Q).
- Place the STONE PYRAMID on the gate; go through the gate.
- Move the items on the ground out of the way; take the KNIFE (R).
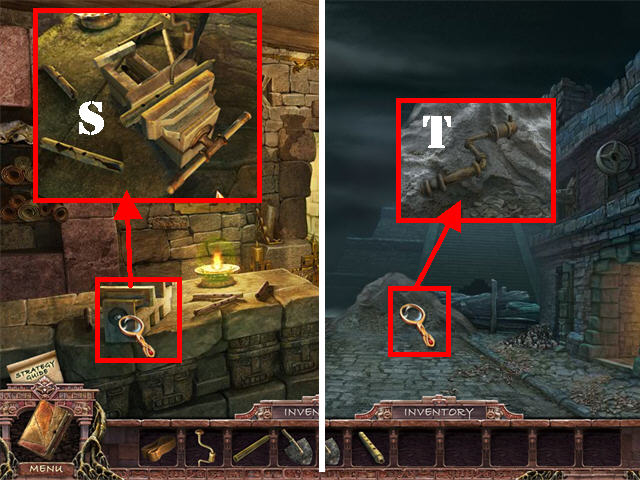
- Take the SPEAR on the left (S).
- Zoom into the back wall; place the GEAR into the mechanism (T).
- Go through the hole in the back wall.

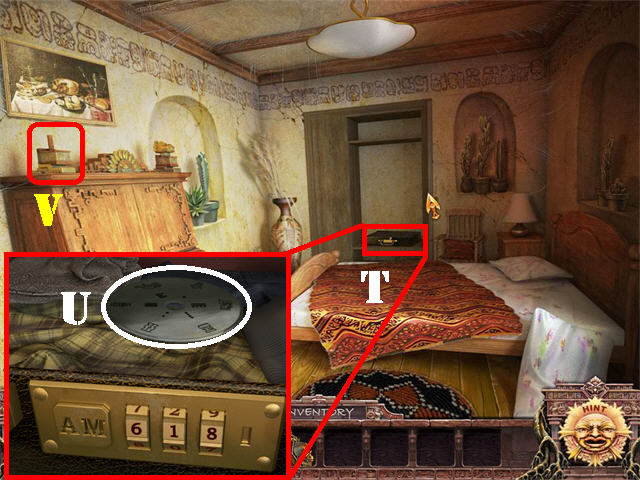
- Examine the satchel on the back wall; take the PHOTO (U) to add it to your journal.
- Place the SPEAR on the coffin on the left; take the MACE from inside the coffin (V).
- Give the MACE to the statue on the right; the back wall will open up (W).
- Look at the back wall; you need to find the symbols needed for that wall (X).
- Click down twice; open the curtains.
- Go up the steps.
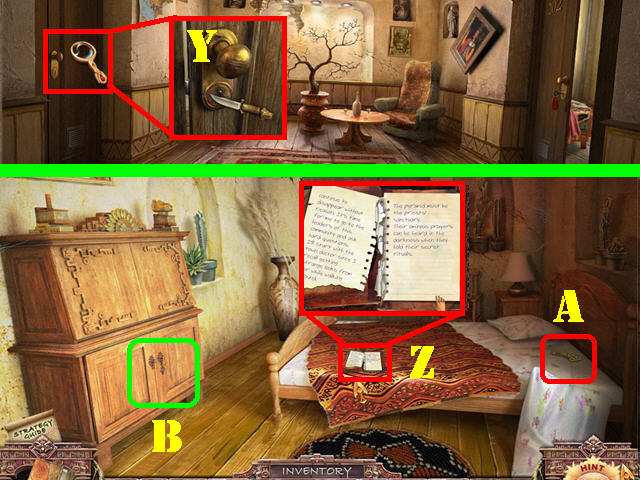
- Examine the left door; open it with the KNIFE and go through the door (Y).
- Zoom into the journal on the bed; click on the page to add it to the journal (Z).
- Click on the pillow 3 times; take the ESCRITOIRE KEY (A).
- Zoom into the escritoire; unlock it with the ESCRITOIRE KEY (B) to activate a puzzle.
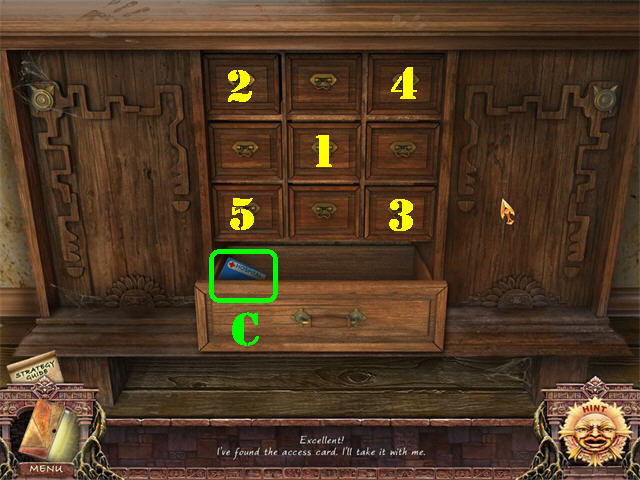
- Click on the drawers in the correct order until they are all open.
- To solve the puzzle click on them in the order shown in the screenshot.
- Take the ACCESS CARD (C) in the bottom drawer.
- Click down 3 times to go back outside.
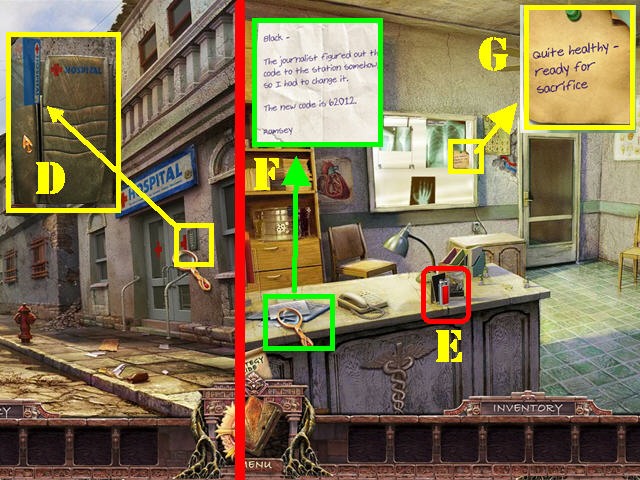
- Zoom into the right door; open it with the ACCESS CARD (D) and enter the hospital.
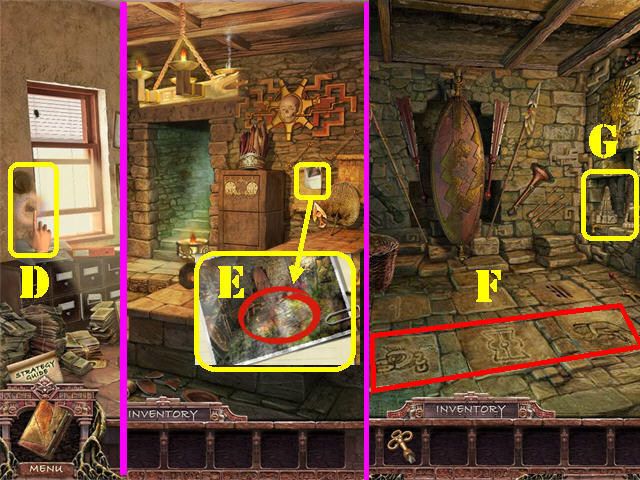
- Take the LIGHTER (E) on the counter.
- Zoom into the papers on the counter; take the NOTE (F) to add the code 62012 to the journal.
- Examine the x-ray board; take the NOTE (G).
- Exit the hospital; go into the hotel on left, up the steps and into the room on the right.
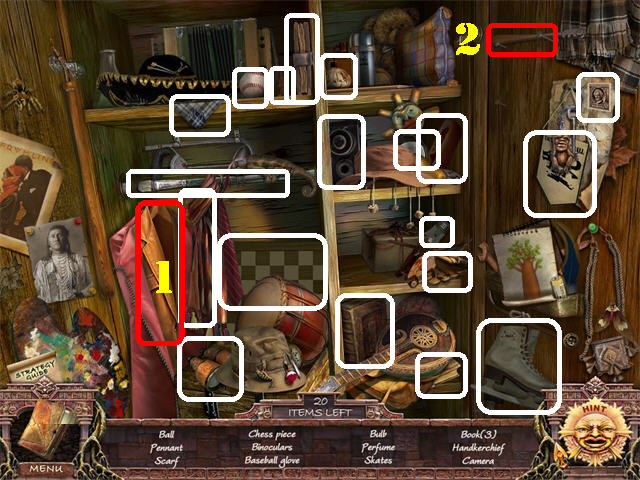
- Play the HOS in the closet.
- Find all the items on the list.
- Unzip the garment bag; take the JACKET (1).
- Take the GLASSCUTTER (2) in the upper right.
- Return to the hospital.
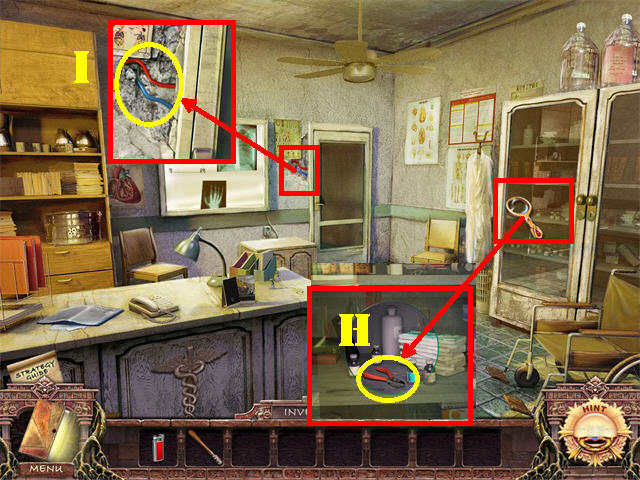
- Examine the glass cabinet on the right; cut the glass with the GLASSCUTTER and take the WIRE CUTTER (H).
- Zoom into the wires by the door; cut them with the WIRE CUTTERS and go through the door (I).
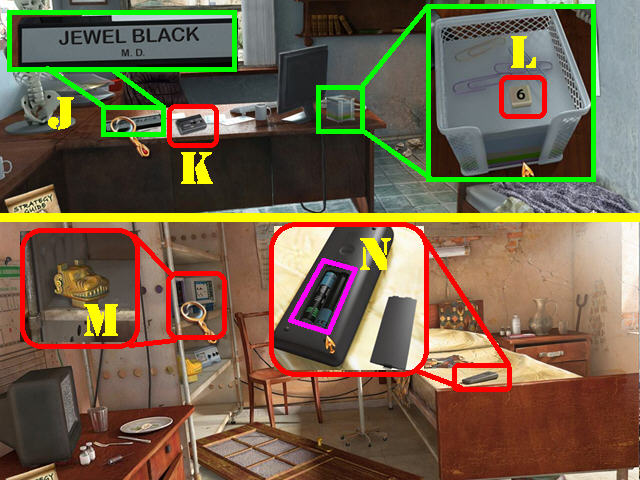
- Look at the nameplate on the desk (J).
- Play the TAPE (K) on the desk.
- Examine the note holder on the desk; take the BUTTON (L).
- Go through the right door.
- Examine the shelves; take the ESCRITOIRE PART (M).
- Examine the remote control on the bed; open the back cover and take the BATTERIES (N).
- Exit the building and go forward.
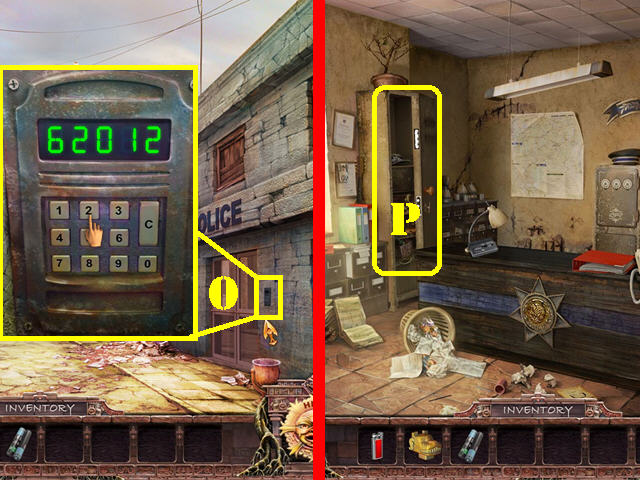
- Zoom into the police station door on the right; place the BUTTON on the keypad.
- Enter the code '62012' into the keypad and enter the station (O).
- Play the HOS in the locker (P).
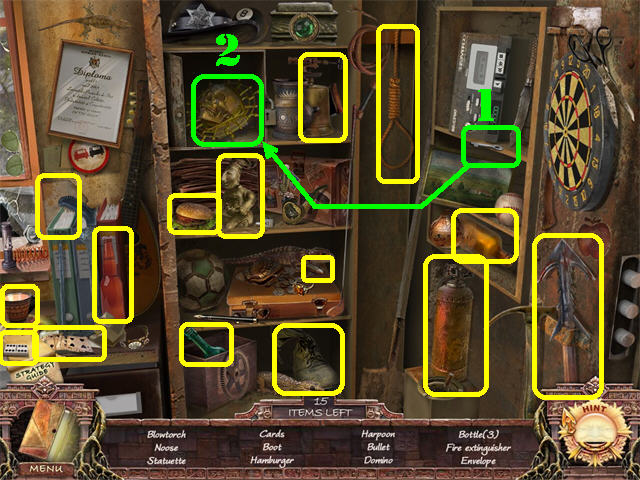
- Find all the items on the list.
- Grab the KEY (1) on the right shelf and use it to open up the lock on the iron box; take the SKULL (2).
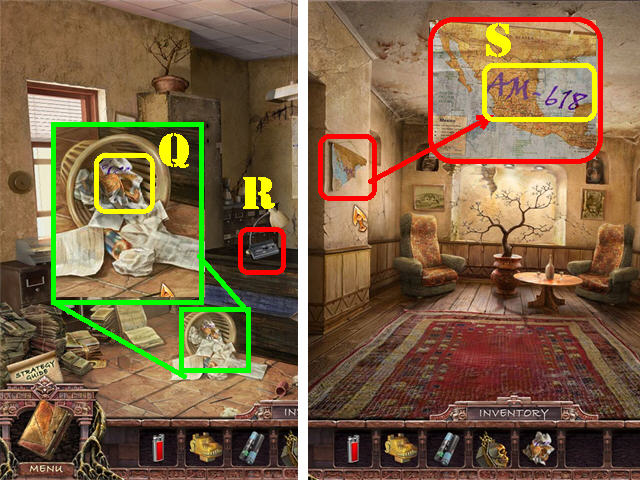
- Examine the wastebasket on the floor; take the MAP PIECE (Q).
- Play the TAPE (R) on the desk.
- Return to the hotel's second floor.
- Zoom into the ripped map on the wall; place the MAP PIECE on the wall to view the code 'AM-618' (S).
- Go into the left door.
- Open the closet door; zoom into the briefcase (T).
- Enter the code '618' on the lock; take the DISC FOR MECHANISM (U).
- Place the ESCRITOIRE PART above the escritoire (V).
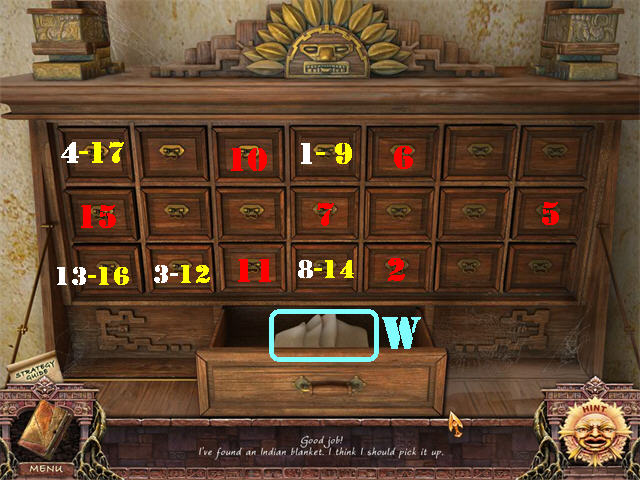
- Zoom into the escritoire to activate a puzzle.
- Click on the drawers in the correct order to solve the puzzle.
- Please follow the steps on the screenshot to solve the puzzle.
- Take the CURTAIN (W) in the bottom drawer.

- Click down and go into the right door.
- Place the LIGHTER in the fireplace (X).
- Close the shades.
- Take the RUBY (Y) on the fireplace.
- Place the SKULL on the bas-relief on the wall (Z).
- Open the shades.
- Take the CRANK HANDLE on the left side of the wall (A).
- Return to the doctor's office in the hospital.
- Place the CURTAIN on the window; close the curtains.
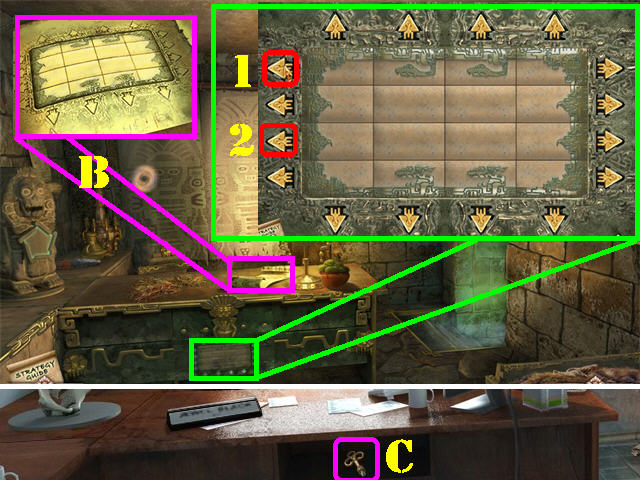
- Look at the scroll on the desk; it's a puzzle solution (B).
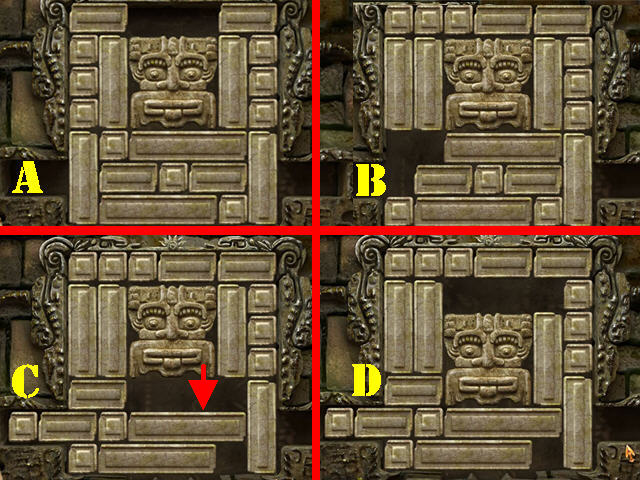
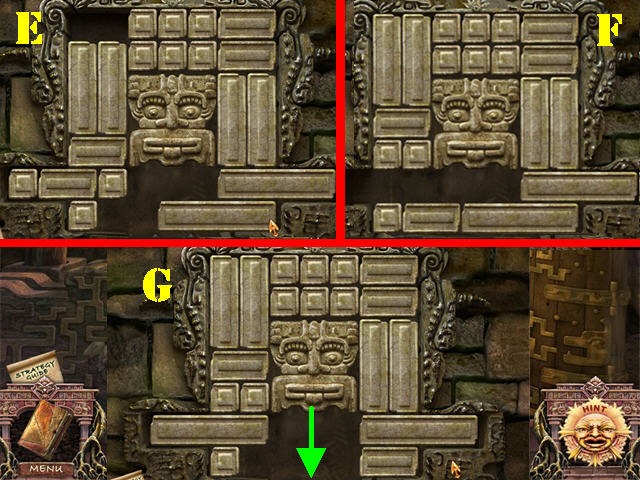
- Zoom into the front of the desk to activate a puzzle.
- Use the arrows to move the squares around until you form the image shown in the screenshot.
- Click on the 2 arrows marked in red once to solve the puzzle.
- Open the curtains; take the TRIANGULAR KEY from in front of the desk (C).
- Return to the police station.
- Place the CRANK HANDLE next to the blinds; click on the handle to close the blinds (D).
- Examine the scroll on the back wall; take the PHOTO (E).
- Go through the steps.
- Note the pattern on the floor; you need that to solve the puzzle in the next room (F).
- Examine the puzzle on the far right side (G).
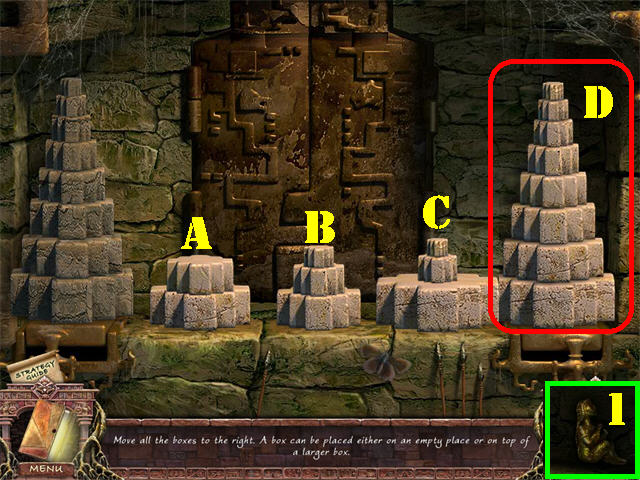
- Move the blocks over to the right pedestal in the same order as the example on left.
- To solve the puzzle follow the steps below. If the step says 'CB' then move the block on pedestal 'C' over to the pedestal 'B'.
- CB, CA, CD, AD, AC, DC, AD, BA, BC, BD, AC.
- DA, BD, CD, CB, CA, DB, CD, AC, AD, CD, BA, BD, AD.
- Take the GOLDEN IDOL (1).
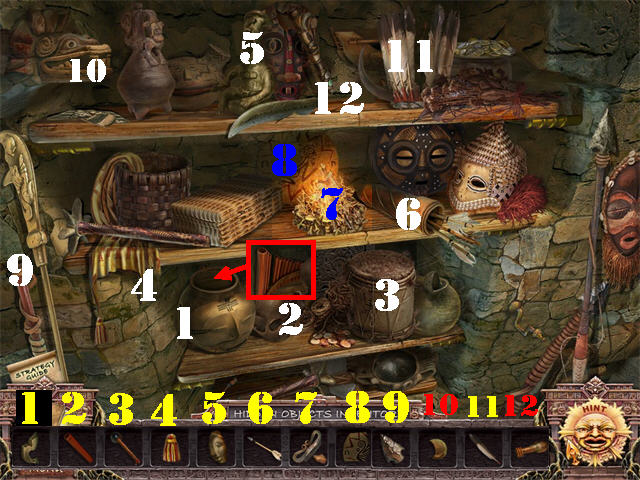
- Play the HOS on the left.
- Put the misplaced items back as shown in the screenshot.
- Place the HANDLE (1) on the side of the vase and it will crack; place the FLUTE TUBE on the PAN FLUTE (2) that appears behind the broken vase.
- The DRIVE BELT will be added to inventory.
- Click down.
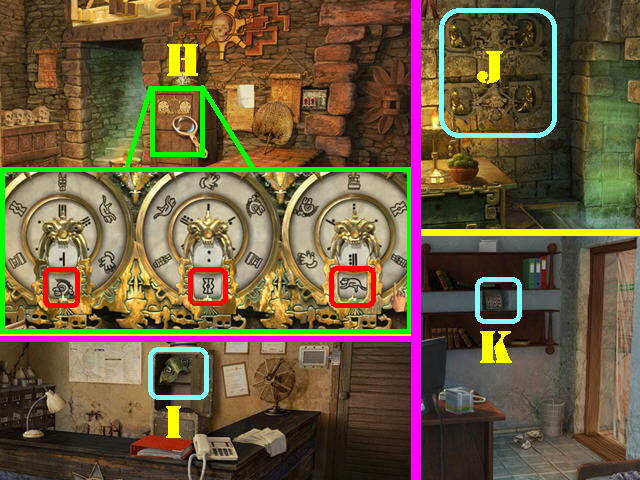
- Zoom into the locker (H); place the DISC FOR MECHANISM on the puzzle to activate it. This puzzle will only activate if you've entered the next room.
- Turn the dials so the lower 3 symbols in the next room appear at the bottom of the disc as shown in the sections marked in red in the screenshot.
- Open the shades; take the GOLDEN HELMET (I) inside the locker.
- Return to the office in the hospital.
- Close the drapes; zoom into the shelves on the back wall.
- Place the GOLDEN IDOL in the recess (J).
- Open the shades; take the KEYBOARD on the back wall (K).
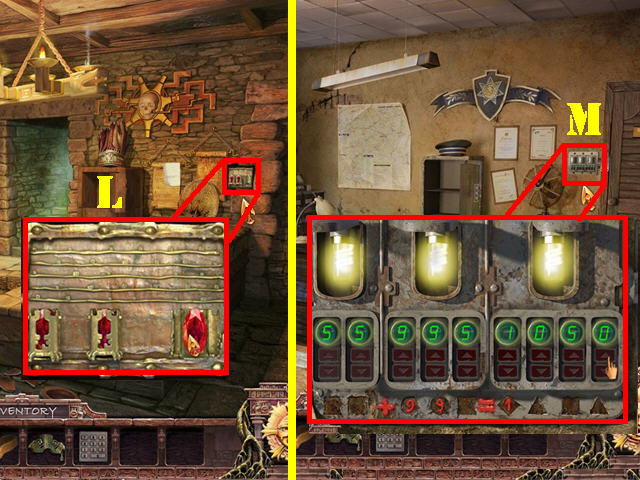
- Return to the police station; close the shades.
- Examine the mechanism on the right side of the wall; place the RUBY on the right (L).
- Open the shades; zoom into the panel next to the door to activate a puzzle (M).
- Figure out the correct combination using the clue etched at the bottom and the intensity of the light in the bulb.
- The solution is 55 plus 995 equals 1050.
- Go into the right door after the puzzle has been solved.
- Play the HOS on the right and put all the items back in their place.
- Put the HANDLE (1) on the drawer first so you can open it and look for the items inside.
- The FINGERPRINT BRUSH will be added to inventory.
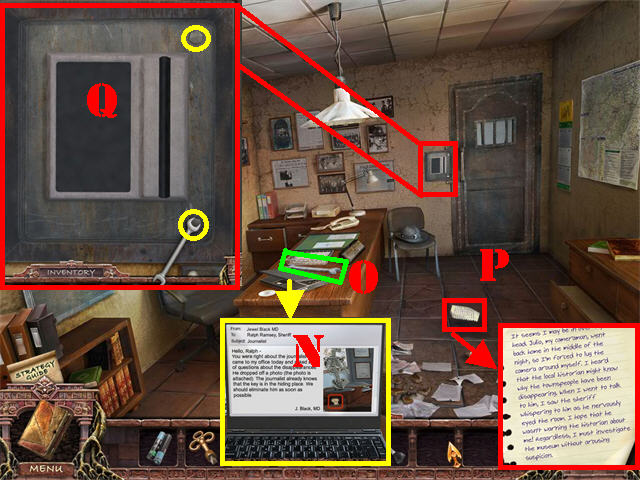
- Zoom into the laptop on the desk to add a journal entry (N).
- Take the WRENCH behind the laptop (O).
- Examine the LETTER on the floor; click on it to add a journal entry (P).
- Zoom into the panel next to the door; remove the bolts with the WRENCH (Q).
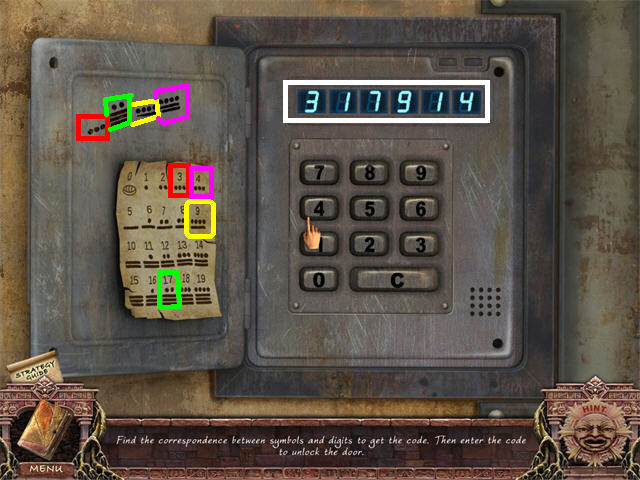
- Place the KEYBOARD on the panel to activate a puzzle.
- To obtain the code look at the symbols etched in the upper left and find the same symbols on the paper.
- To solve the puzzle enter the code: '317914'.
- Go through the door.

- Take the VALVE on the floor (R).
- Examine the barrel on left; place the VALVE (S) on it and take the KNIFE SWITCH from inside the barrel (T).
- Examine the NEWSPAPER on the ground and click on it to add it to the journal (U).
- Click down twice.
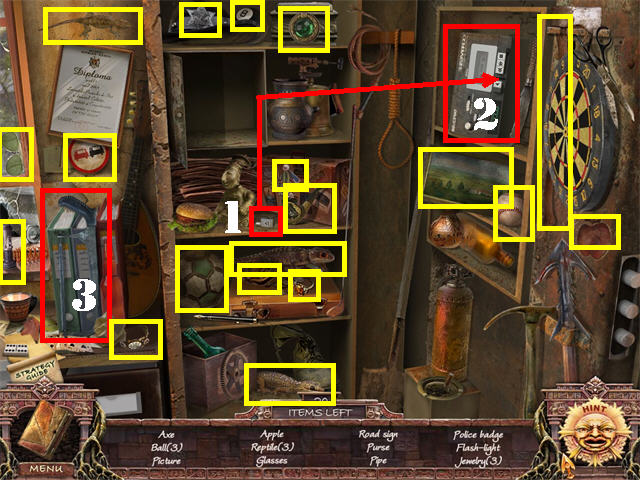
- Play the HOS in the locker.
- Grab the EJECT BUTTON (1) on the shelf; place it on the TAPE RECORDER (2).
- Click on the EJECT BUTTON and then click on the TAPE RECORDER.
- Grab the HACKSAW (3) on the left.
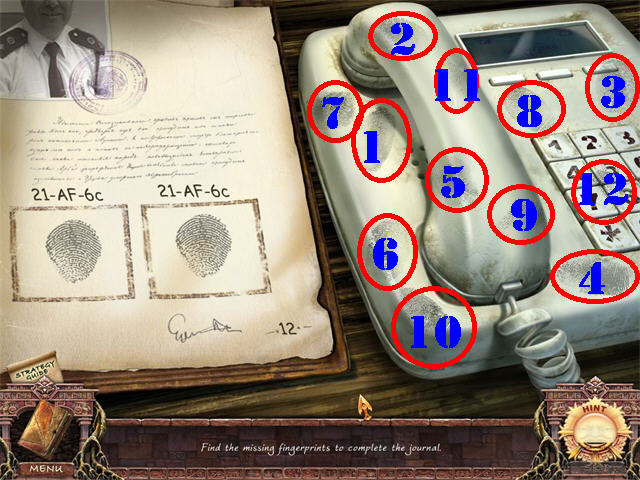
- Examine the phone on the desk.
- Place the FINGERPRINT BRUSH on the telephone to activate the puzzle.
- Drag the matching fingerprint from the telephone to the right page on the journal. You must match 12 fingerprints to solve the puzzle.
- Please look at the screenshot for the solution. The fingerprints have been marked in order of appearance.
- Take the last FINGERPRINT you placed on the journal (12).
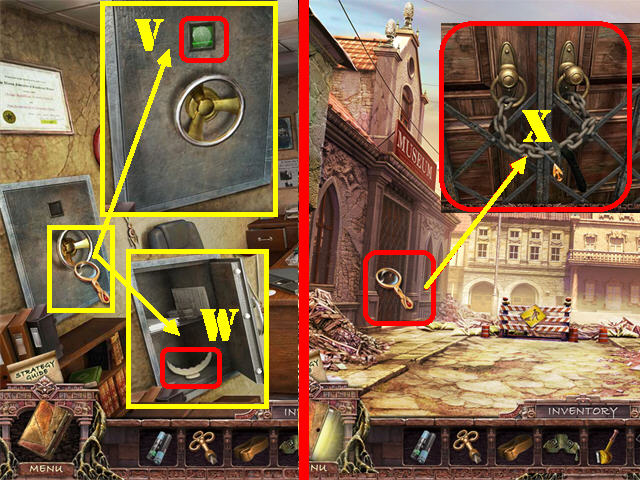
- Go through the right door.
- Zoom into the safe on left; place the FINGERPRINT on the fingerprint scanner (V).
- Take the MOON SYMBOL from inside the safe (W).
- Exit the police station.
- Examine the museum door on the left; cut the chains with the HACKSAW (X).
- Enter the museum.
Chapter 2: The Museum
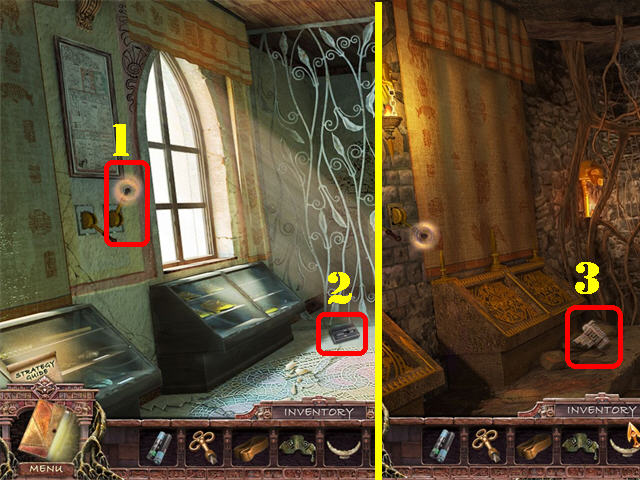
- Play the TAPE (1) on the ground.
- Put the KNIFE SWITCH next to the window; click on the KNIFE SWITCH to close the curtains (2).
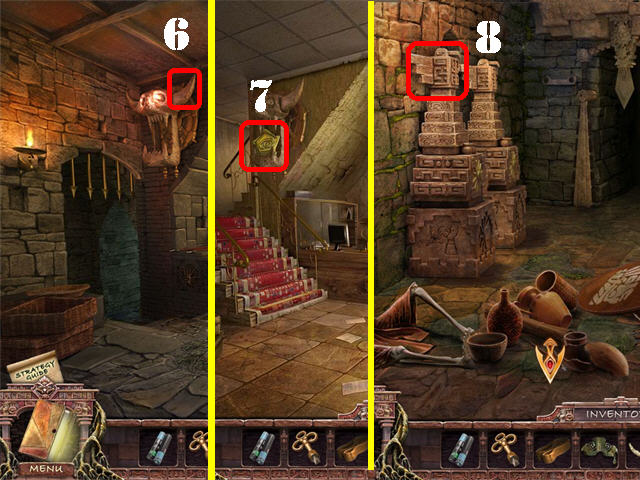
- Take the STONE EAGLE (3) on the ground.
- Open the curtains in the museum.
- Return to the doctor's office in the hospital. Close the curtains and go into the room on right.
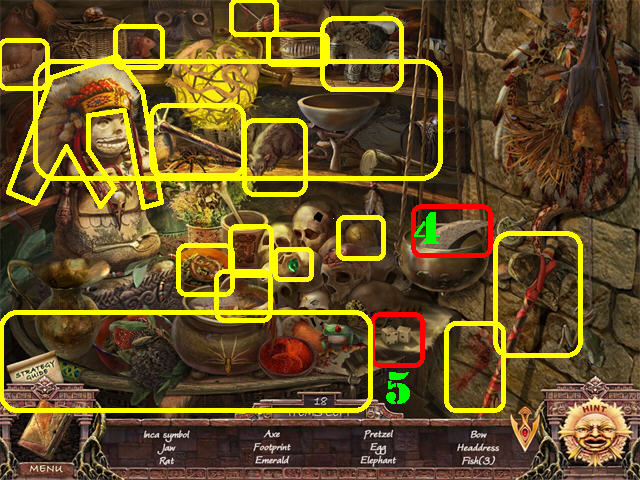
- Play the HOS on left.
- Click on the dice on right; take the FIVE (5).
- Take the HORN (4) on the right.
- Click down; open the curtains.
- Return to the hotel. Close the shades.
- Place the HORN on the skull above the entryway (6).
- Open the shades and take the PLATE (7) from the skull's mouth.
- Close the shades and head into the basement.
- Place the STONE EAGLE on the structure on left (8) to trigger a HOS; play it.
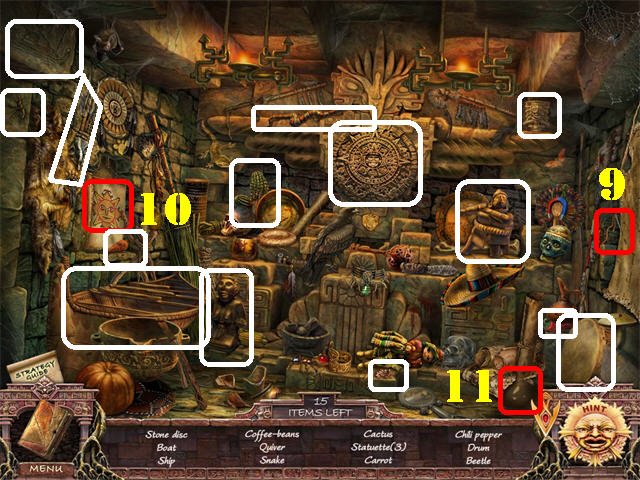
- Take the NEEDLE AND THREAD (9) and place it on the embroidered cloth on left; take the SUN (10).
- Grab the BEAKER (11) in the lower right.
- Click down. Open the curtains in the hotel lobby.
- Return to the doctor's office in the hospital and close the curtains.
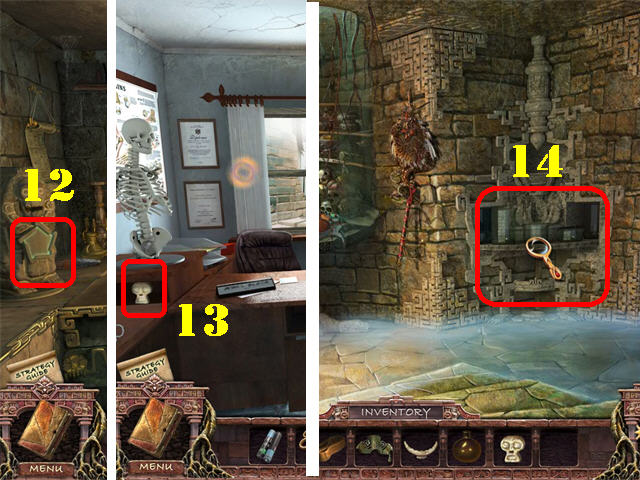
- Place the PLATE on the statue on the left (12).
- Open the curtains; take the SKULL SYMBOL below the skeleton (13).
- Close the curtains and head right.
- Examine the device on the back wall; place the BEAKER on the device to trigger a puzzle (14).
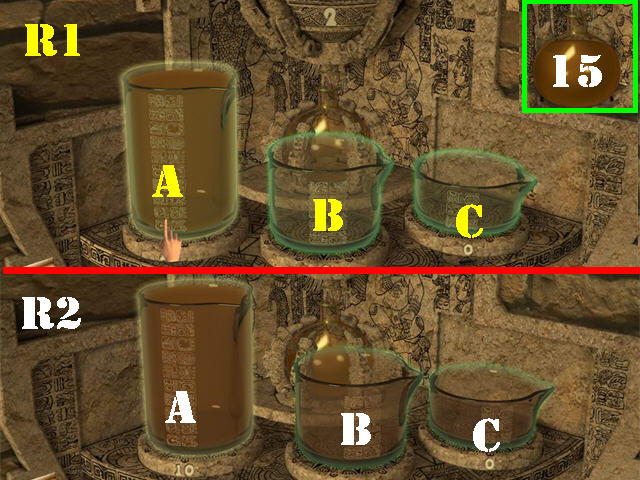
- Your goal is to fill one of the beakers with the amount of liquid shown on the shelf indicator in the upper center.
- Click on the beaker you want to pour the liquid out of and then click on the next beaker you wish to transfer the liquid to.
- The lines on the front of the beakers correspond to one unit of liquid.
- Solution for Round 1 (R1): Pour A into B, and Pour A into C.
- Solution for Round 2 (R2): Pour A into B, Pour A into C, Pour B into A, Pour C into B and Pour A into C.
- Take the ANTI-RUST LIQUID (15).
- Click down; open the curtains in the doctor's office.
- Return to the police station; go through the 2 back doors.
- Open the locker doors; zoom into the box on the shelf and place the ANTI-RUST LIQUID on the lock (16).
- Place the TRIANGULAR KEY on the lock and take the OBSIDIAN SWORD (17).
- Return to the museum; close the shades.
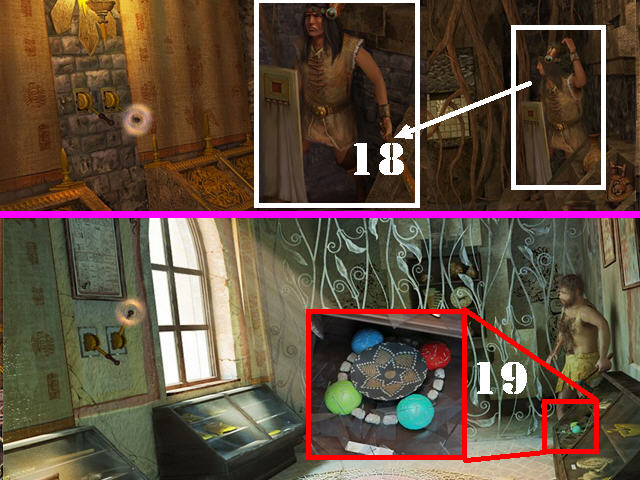
- Examine the statue on the right; place the OBSIDIAN SWORD in its hand (18).
- Open the shades.
- Zoom into the display case on right; take the GLASS BEADS (19).
- Return to the doctor's office; close the curtains and head into the right door.
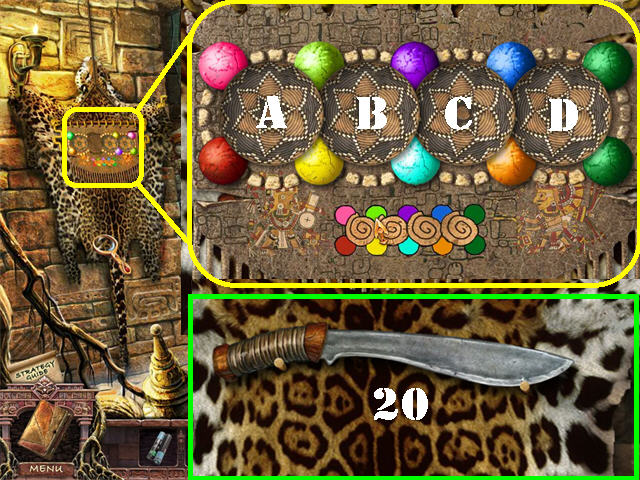
- Examine the jaguar skin on left; place the GLASS BEADS on it to activate a puzzle.
- Reproduce the image at the bottom by rotating the decorations.
- To solve the puzzle follow these steps: B – C – D – A – B – B – C – C – B – B – B – C –C – B.
- Take the MACHETE after the puzzle has been solved (20).
- Click down and open the curtains.
- Return to the museum and close the shades.
- Cut the vines with the MACHETE.
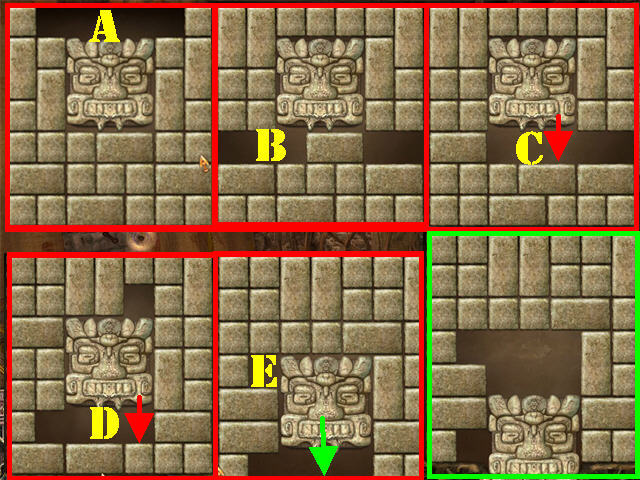
- Zoom into the puzzle on the back wall.
- Your goal is to move the blocks aside so you can slide the head all the way down.
- Move the blocks as shown in the screenshot to solve the puzzle.
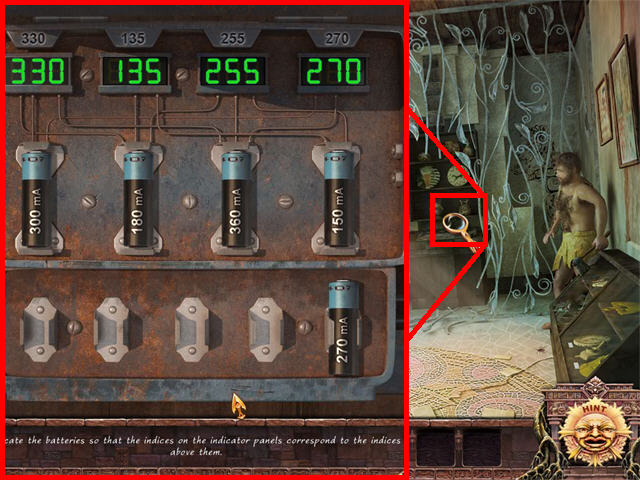
- Open the shades; examine the back wall and place the BATTERIES into the empty slots to activate a puzzle.
- Move the batteries to the right slots until you get the right combination that adds up to the number above it.
- To solve the puzzle place these batteries on the board from left to right: 300, 180, 360, and 150.
- Go through the back wall.
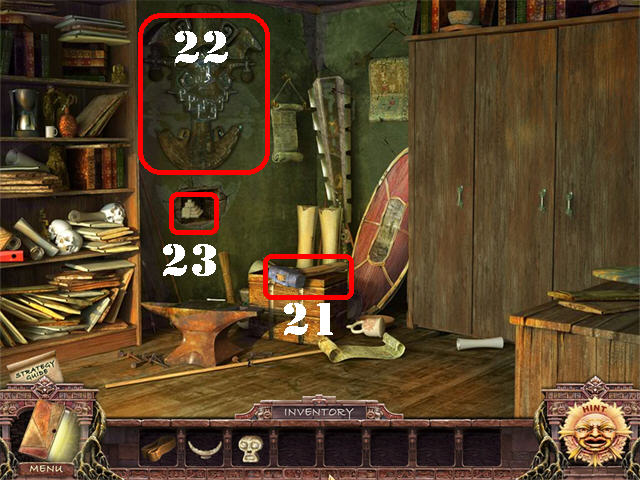
- Take the HAMMER on top of the chest (21).
- Place the GOLDEN HELMET on the deity (22); take the PYRAMID SYMBOL from the niche in the wall (23).
- Return to the hotel; close the shades and go down to the basement.
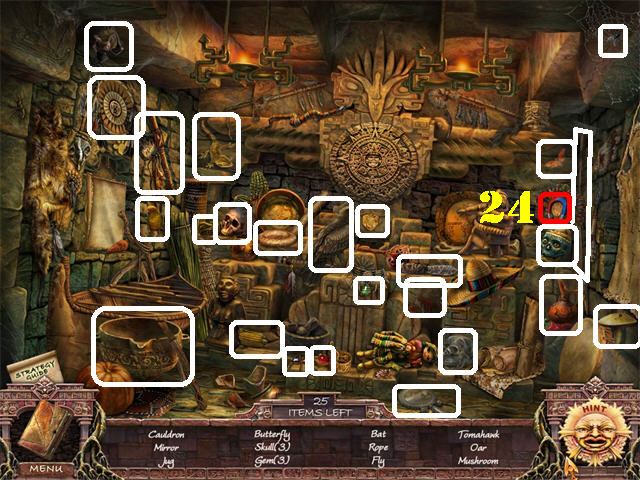
- Play the HOS on the left.
- Take the MAGNET (24) in the upper right.
- Click down and open the shades. Return to the museum and go through the back door.
- Open the left locker door; the screwdriver will fall into the crack in the ground.
- Zoom into crack in the floor.
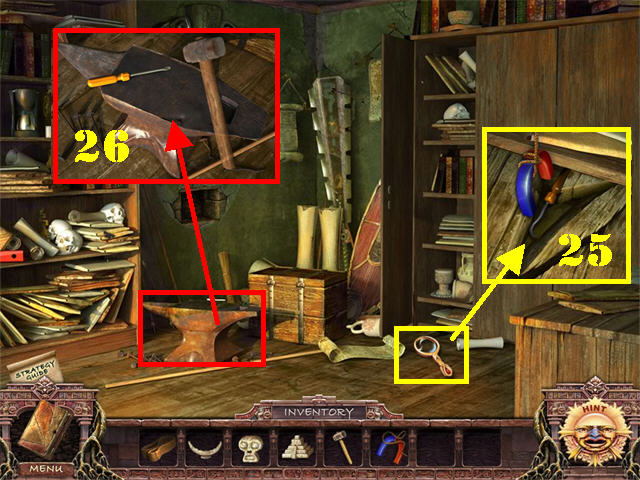
- Retrieve the SCREWDRIVER using the MAGNET; take the BROKEN SCREWDRIVER (25).
- Examine the anvil; place the BROKEN SCREWDRIVER on it.
- Straighten out the BROKEN SCREWDRIVER with the HAMMER and take the SCREWDRIVER (26).
- Return to the hospital room.
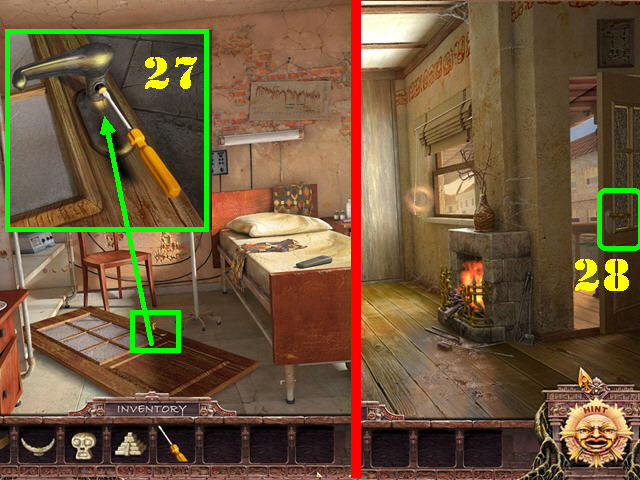
- Zoom into the door on the ground; remove the screw on the HANDLE with the SCREWDRIVER (27).
- Take the BALCONY HANDLE from the door.
- Return to the second floor in the hotel and go into the right room.
- Place the BALCONY HANDLE on the right door; go through it to access the balcony (28).
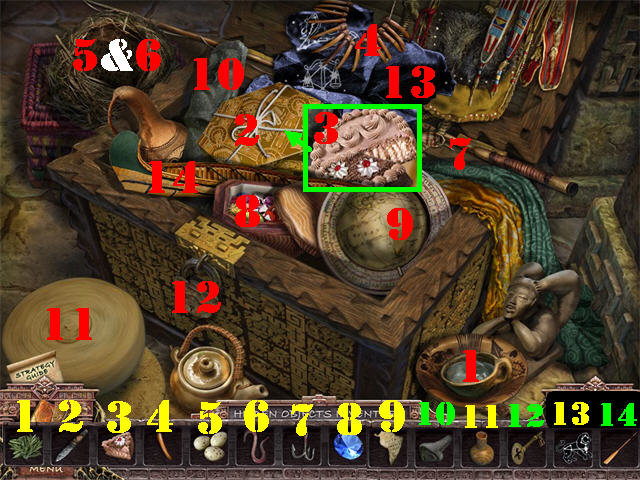
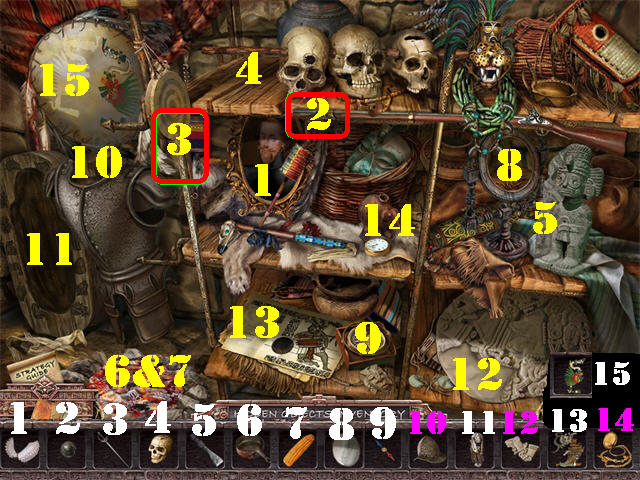
- Play the reverse HOS in the trunk.
- Put all the items back in their place as shown in the screenshot.
- Cut the string around the box with the KNIFE (2). Then put the CAKE slice next to cake after the box opens (3).
- Place the EGGS (5) in the nest and then feed the birds with the WORMS (6).
- T he ROPE LADDER will be added to inventory.
- Place the ROPE LADDER over the broken rope ladder on the right and then go down the ladder.
Chapter 3: Night Secrets

- Take the PLATE WITH PASSWORD on the ground (A).
- Go back up the rope ladder (B).
- Zoom into the box on the left; place the PLATE WITH PASSWORD on the left to activate the puzzle (C).
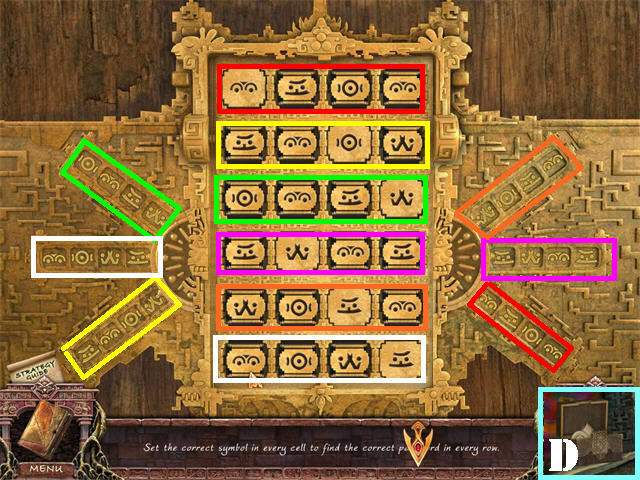
- Click on each cell in the center rows to change the symbols in the same order as one of the bars on the side of the puzzle.
- Use the permanent symbols as guides to complete the puzzle.
- Each time a row has been set correctly the matching bar on the side of the puzzle will disappear.
- Please look at the screenshot for the solution.
- Take the SHELL SYMBOL (D).
- Go down the rope ladder and head right into the hospital.
- Play the reverse HOS on the right.
- Put the pieces back in their place as shown in the screenshot.
- Place the FRYING PAN (6) on the hot rocks and then place the CORN (7) into the frying pan.
- The PLATE WITH HIEROGLYPHIC will be added to inventory.
- Return to the hotel basement and go through the back door.
- Examine the statue on the back wall; place the MOON SYMBOL (1), SKULL SYMBOL (2), PYRAMID SYMBOL (3), and the SHELL SYMBOL (4).
- Go through the passageway.
- Examine the puzzle on the back wall.
- Move the stone head all the way down.
- Follow the steps in both screenshots to solve the puzzle.
- Go up the steps after the puzzle has been solved.
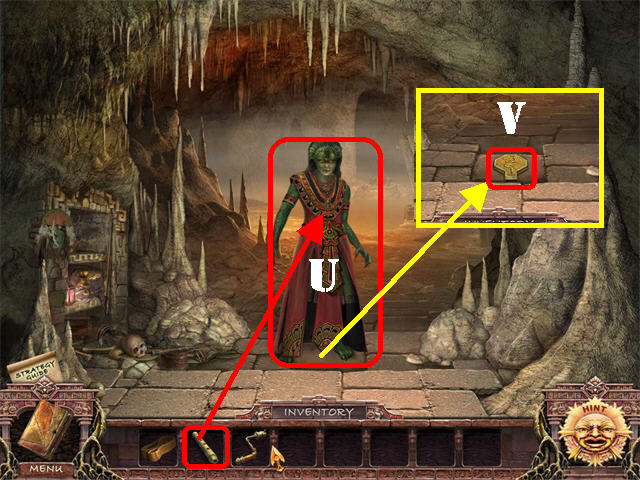
- Open the jacket and take the TWO-HANDLED LEVET (5).
- Go further up the steps.
- Take the CROWBAR (6) on the right.
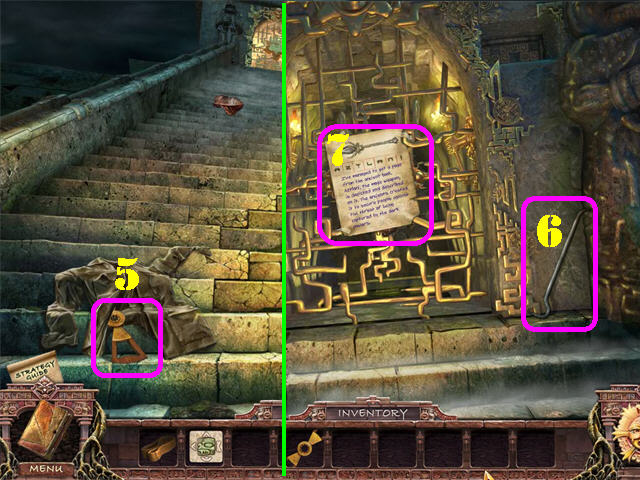
- Look at the note on the door; take it (7).
- Click down twice.
- Zoom into the sarcophagus on the right; open it with the CROWBAR (8).
- Take the PLATE WITH HIEROGLYPHIC (9).
- Return to the museum.
- Examine the back wall; place the TWO-HANDLED-LEVET on the mechanism (10).
- Go forward.
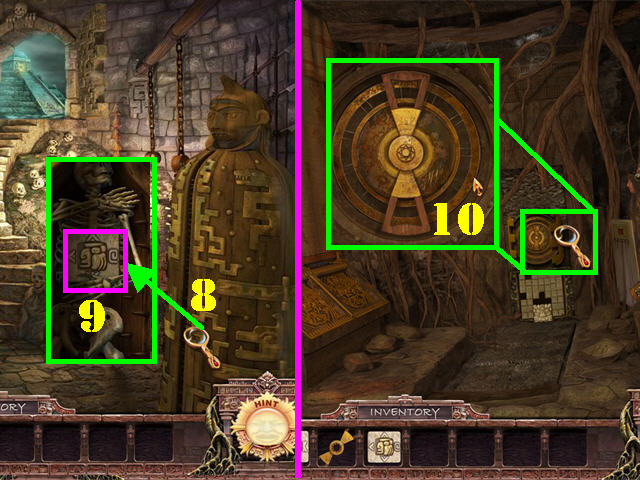
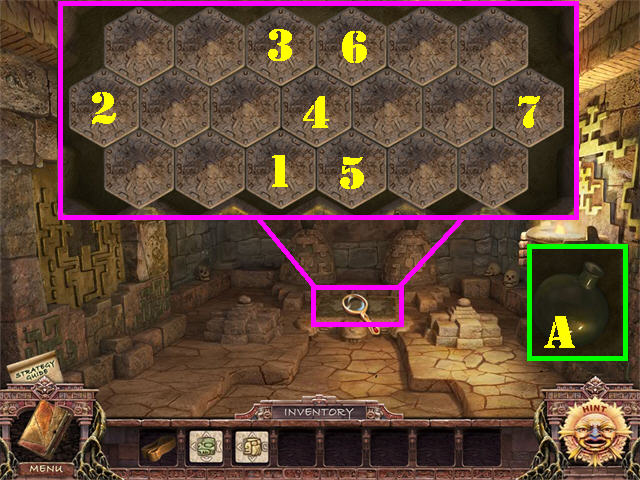
- Zoom into the altar to activate a puzzle.
- Click on the hexagonal plates until all the patterned plates are facing up.
- Follow the steps on the screenshot to solve the puzzle.
- Take the BEAKER (A) after the puzzle has been solved.

- Return to the hospital ward.
- Play the HOS on left.
- Take the DRILL in the upper left (B).
- Zoom into the mechanism on the right side of the wall.
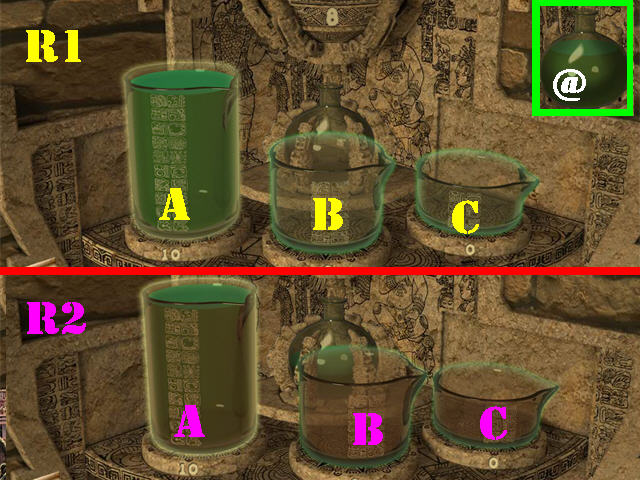
- Place the BEAKER on the mechanism to activate the puzzle.
- Click on the beaker you want to pour the liquid out of and then click on the next beaker you wish to transfer the liquid to.
- The lines on the front of the beakers correspond to one unit of liquid.
- Solution 1 (R1): Pour A into C, Pour C into B, Pour A into B, Pour B into C, Pour C into A.
- Solution 2 (R2): Pour A into C, Pour C into B, Pour A into C, and Pour C into B.
- Take the GROWING ESSENCE (@).
- Return to the hotel lobby.
- Place the GROWING ESSENCE on the plant.
- Take the CANE (D) on the plant.
- Go through the left door and head forward 4 times.
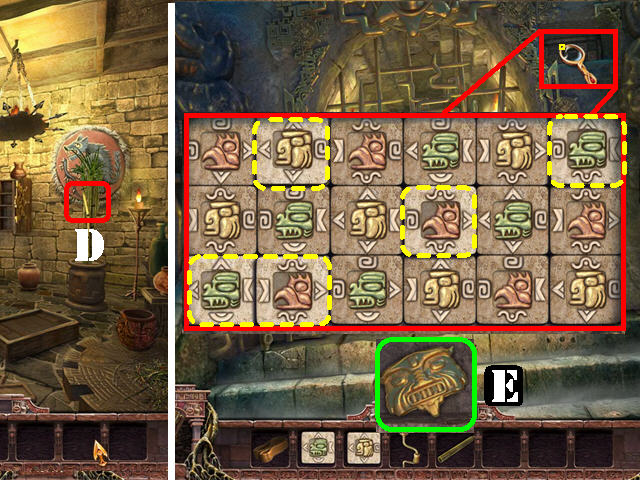
- Zoom into the puzzle in the upper right; place the 2 PLATES WITH HIEROGLYPHICS on the board to activate the puzzle.
- Place the tiles in the same order as the screenshot.
- Take the GOLDEN HEAD (E).
- Place the GOLDEN HEAD on the gate (F).
- Take the ANCIENT MACE (G).
- Return to the police station and go into the back room.
- Place the ANCIENT MACE on the left side of the back wall (H); take the ANCIENT CRYSTAL on the back wall (I).
- Return to the hotel. Go through the left door and head forward 3 times.
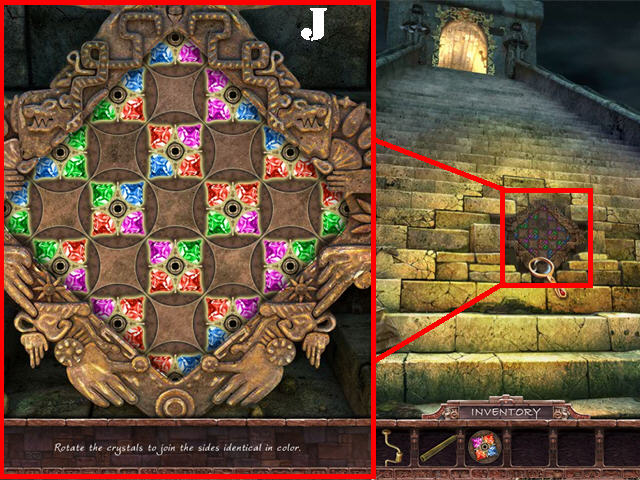
- Zoom into the puzzle on the steps and place the ANCIENT CRYSTAL on the board to activate the puzzle.
- Rotate the tiles so that all matching colors are adjacent.
- Please look at the screenshot for the solution (J).
- Go through the hole in the steps.
- Take the SPADE on the right (K).
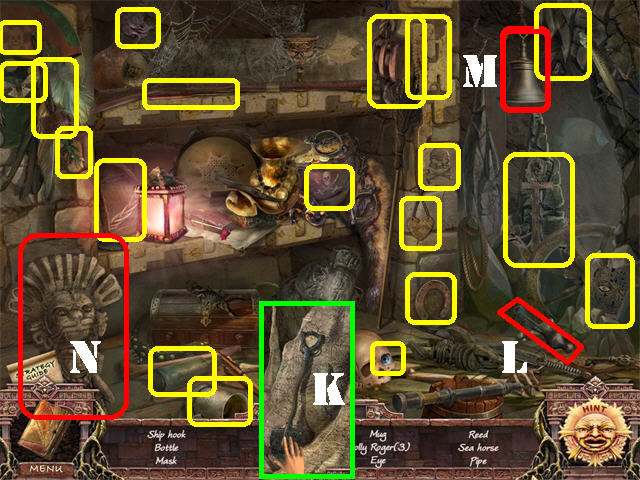
- Play the HOS on the left.
- Grab the BELL CLAPPER (L) in the lower right and place it on the BELL (M) in the upper right; take the BELL TOLL.
- Take the STONE STATUE (N) in the lower left.
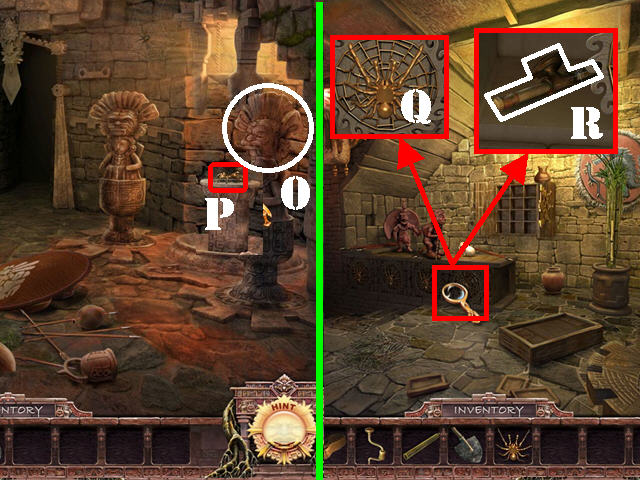
- Click down 4 times.
- Place the STONE STATUE on the pedestal on the right (O); take the GOLDEN SPIDER (P).
- Click down.
- Zoom into the front of the desk; place the GOLDEN SPIDER (Q) in the niche and take the VICE HANDLE (R).
- Return to the hospital.
- Zoom into the vice grip on the table (S).
- Place the VICE HANDLE on the vice grip.
- Place the CANE in the vice.
- Put the DRILL on the CANE and take the REED PIPE.
- Click down and go forward.
- Zoom into the pile of dirt ahead; scoop it up with the SPADE and take the WINCH (T).
- Return to the hotel. Go through left door; forward 3 times and go through the hole in the steps.
- Place the REED PIPE on the snake (U).
- Take the SNAKE AMULET (V) on the ground.
- Go forward. The wolf will not let you through, click down.
- Play the HOS on left.
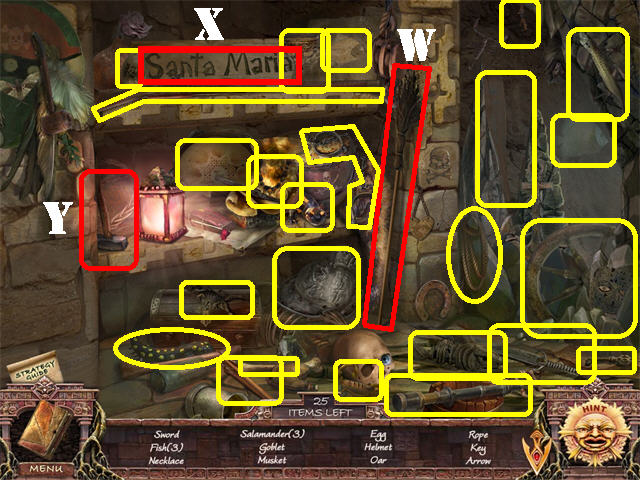
- Place the BROOM (W) on the right over the cobwebs in the upper left; take the SANTA MARIA (X).
- Take the BIG HAMMER on the middle shelf (Y).
- Click down twice.
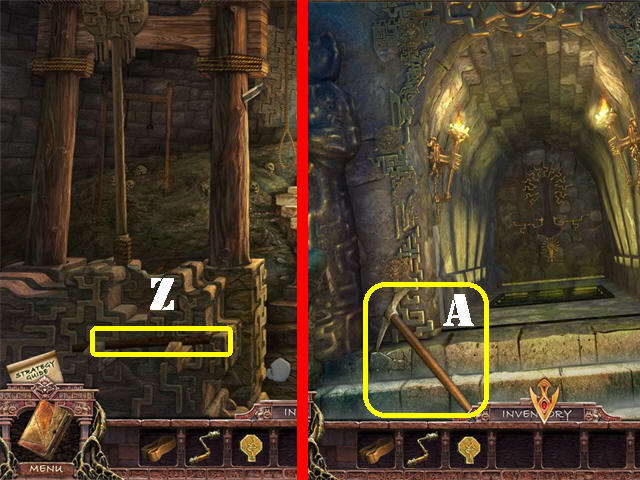
- Place the BIG HAMMER on the guillotine; take the SHORTCUT POLE (Z).
- Head forward and up the steps.
- Place the SHORTCUT POLE on the axe handle; take the PICKAXE (A).
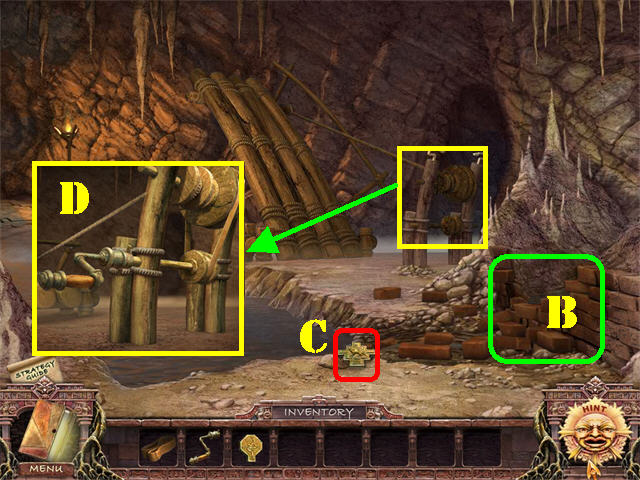
- Click down; go through the hole in the steps and go forward.
- Break the brick wall with the PICKAXE (B).
- Take the WOLF AMULET (C).
- Examine the bridge mechanism; place the WINCH and the DRIVE BELT on the mechanism in order to lower the bridge (D).
- Cross the bridge.
- Take the CUP WITH WATER (E) in the lower right.
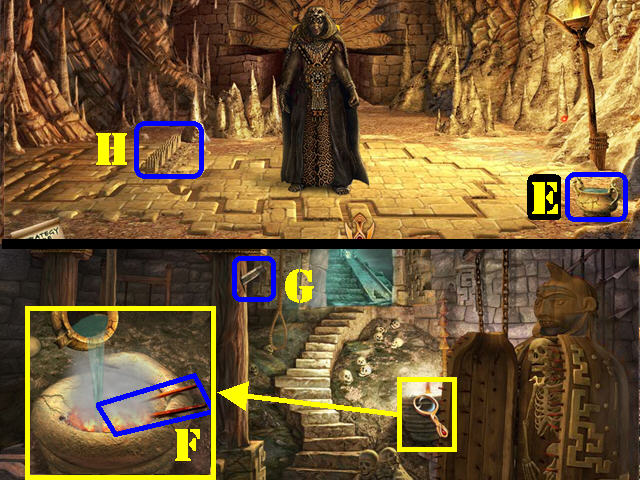
- Click down 4 times.
- Zoom into the fire on right; place the CUP WITH WATER over the fire and take the TORTURE PINCERS (F).
- Use the TORTURE PINCERS to loosen the CHISEL on the pole and take the CHISEL (G).
- Go forward; through the steps, forward again and cross the bridge.
- Zoom into the left side of the ground (H).
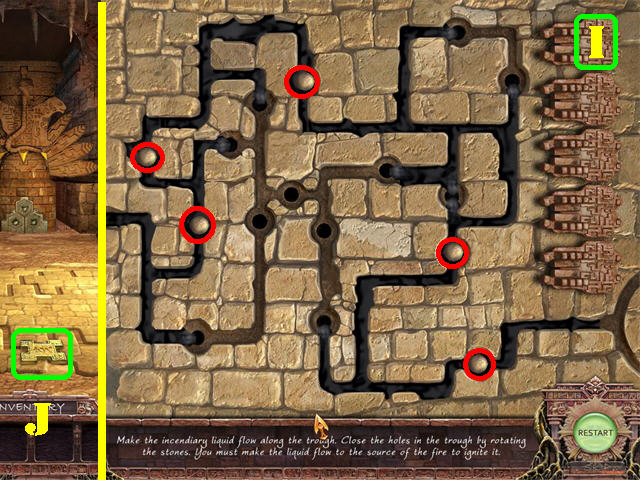
- Place the CHISEL on the ground to activate a puzzle.
- Put the balls into the right holes so the oil flows into the lower right corner.
- Please look at the screenshot for the solution (I).
- Take the JAGUAR AMULET on the ground (J).
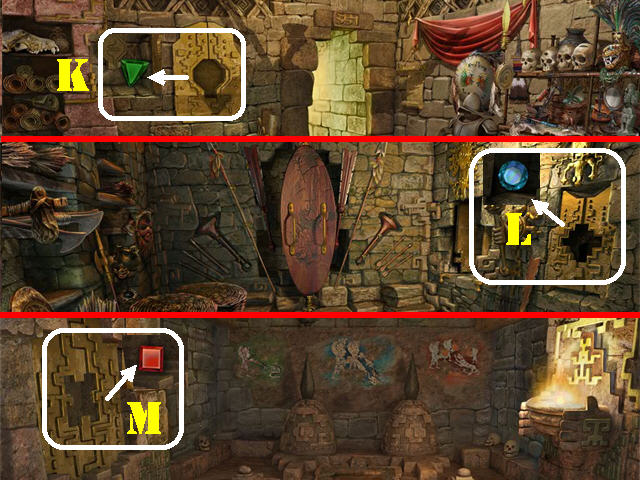
- Return to the hospital.
- Place the SNAKE AMULET on the gold stand on the left wall; take the GREEN AMULET (K).
- Return to the police station and go into the back room.
- Place the WOLF AMULET on the gold stand on the right wall; take the BLUE AMULET (L).
- Return to the back room in the museum.
- Place the JAGUAR AMULET on the left side of the wall; take the RED AMULET (M).
- Return to the hotel. Go through left door, forward 3 times, through the steps, forward, and cross the bridge.
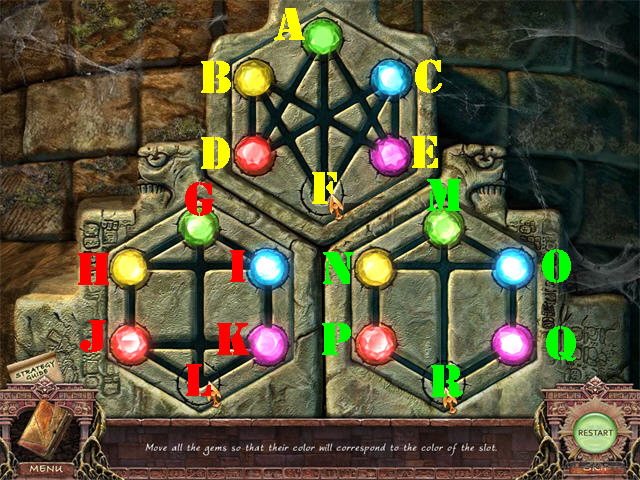
- Zoom into the back wall; place the RED AMULET, BLUE AMULET and the GREEN AMULET into their appropriate spaces to trigger a puzzle.
- Move the gems to their matching spots.
- Solve 3 rounds to beat the puzzle.
- Top Solution: A – E – B – F – C – D – B – F.
- Left Solution: J – H – G – L – K – J - L – G – H – I – G – L.
- Right Solution: M – O – Q – R – M – O – N – P – R.
- Go forward after the puzzle has been solved.
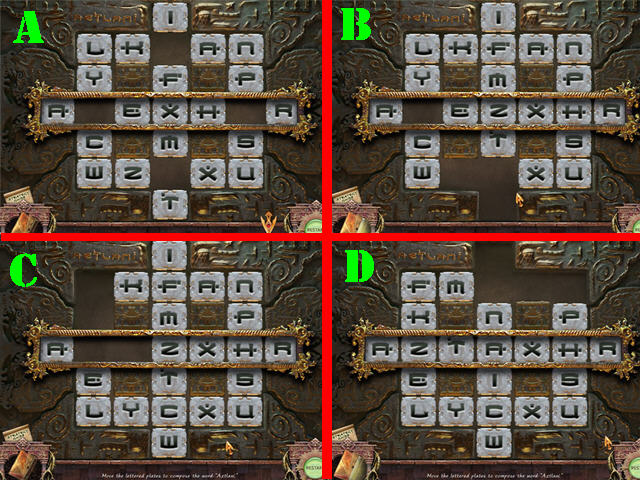
- Zoom into the lower right corner to activate a puzzle.
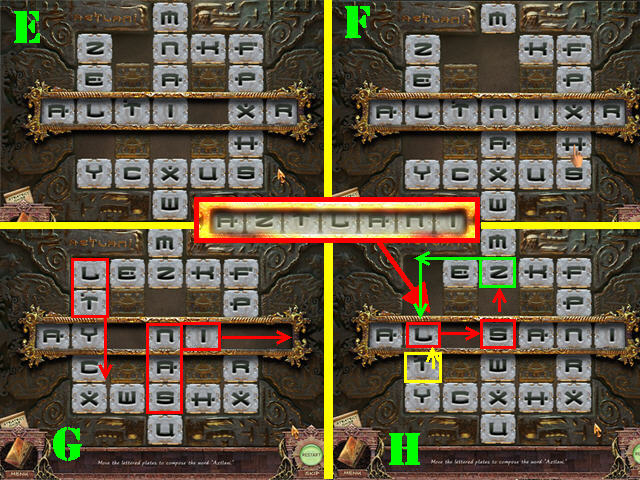
- Form the word 'Aztlani' on the board.
- The screenshot shows some steps to solve this puzzle but there are many other ways to do it.
- Take the AZTLANI after the puzzle has been solved.
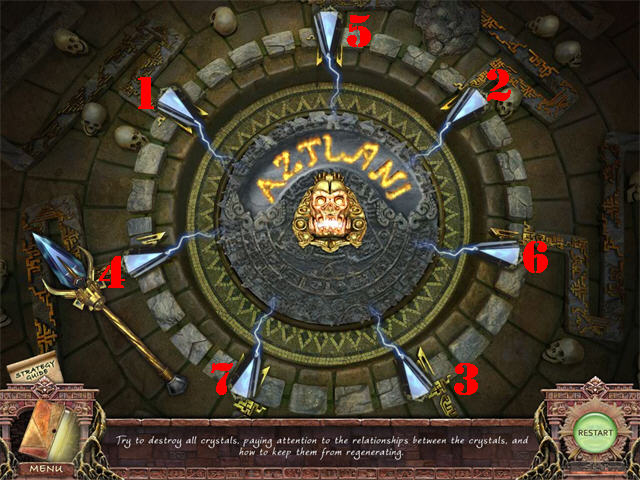
- Click on the lower center of the scene to activate a puzzle.
- Place the AZTLANI on one of the gems on the puzzle to activate it.
- You must destroy the crystals in a particular order to solve the puzzle.
- Please look at the screenshot for the solution.
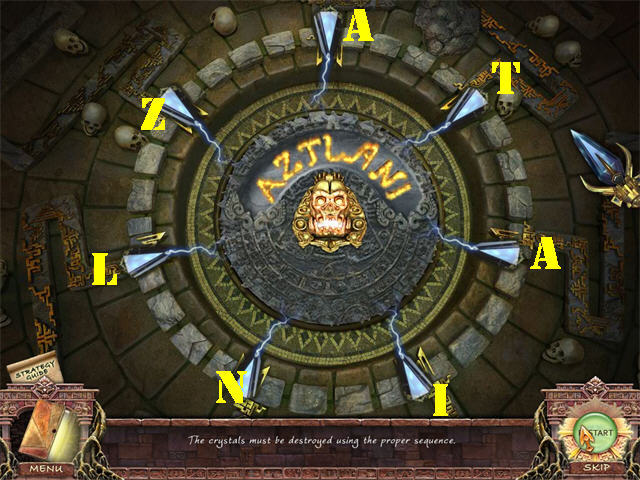
- After you solve the previous puzzle it will regenerate itself.
- Pay attention to the letters that appear on the board; click on the correct crystals so you can spell the word 'AZTLANI'.
- Please look at the screenshot for the solution.
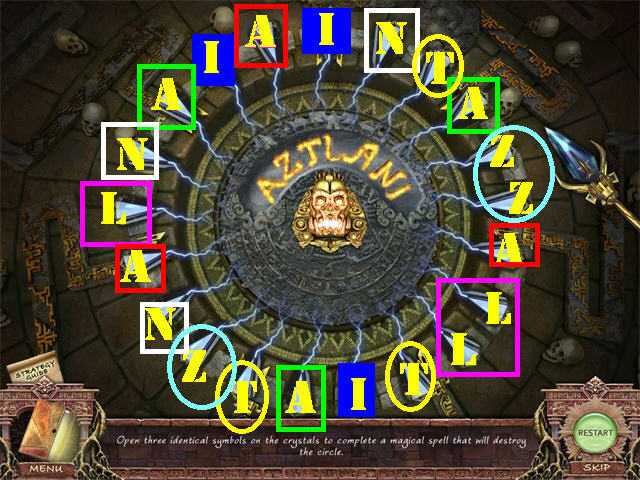
- The crystal will regenerate one last time.
- In this section you must match 3 identical letters at a time until the board is clear.
- Please look at the screenshot for the solution.
- Congratulations! You have completed Secrets of the Dark: Temple of Night Standard Edition!
Created at: 2011-07-30