

Walkthrough Menu
- General Tips
- Prologue: New York
- Chapter 1: Grandfather’s House, Paris
- Chapter 2: Pitigliano, Italy
- Chapter 3 : Grandfather's House, Paris
- Chapter 4: Mont Palu Express to Venice
- Chapter 5: Grandfather’s House, Paris
- Chapter 6: Venice, Italy
- Chapter 7: The Temple of Isis
- Chapter Overview and Awards
General Tips
- Click on Options for Music, Environment and Sound Volume.
- Click on Options for Full Screen, Show Help and Cursor options.
- In Casual Mode you get sparkles in interactive areas, the hint button recharges faster and the skip button for the mini games activates sooner.
- In Advanced Mode you will only get sparkles in hidden object scenes, your hint button will recharge slower and the skip button in mini games will take longer to activate.
- Click on the Hint Button in the lower left if you are stuck. The number in the center is the number of hints you have and you can find special items to increase the number.
- Special items will be marked in green in the screenshots.
- Collecting all Special Items in a Chapter will earn you a two hint bonus.
- Inventory items are marked in yellow on the screenshots.
- Hints for finding hidden objects can be obtained by clicking on the name of the item in the list; this will however lower your available hints.
- Random clicking will cause you to lose control of your cursor.
- Click on the journal in the lower right and click on the chapters tab to see your progress.
- Click on the journal and choose the map tab to jump to other locations.
- Your inventory can be found in the suitcase above the journal in the lower right.
- Click on the magnifying glass on certain items in your inventory to get a closer look.
- Items in blue on the hidden object lists will require you to use an inventory item in the scene or open a drawer etc. to find it.
- A gear cursor indicates you can use an inventory item there.
- A magnifying glass cursor indicates you can look closer.
- You can skip the puzzles after 10 seconds in casual mode and one minute in Advanced Mode.
- Skipping the puzzles will add 20 minutes to your game time at the end.
- To advance through the dialogue click anywhere on the screen.
- Click outside the close-up boxes to close them.
- To pick up items you may need to click multiple times to get through the dialogue first.
- To exit, click on Menu in the lower right and then click on exit to main menu.
Prologue: New York
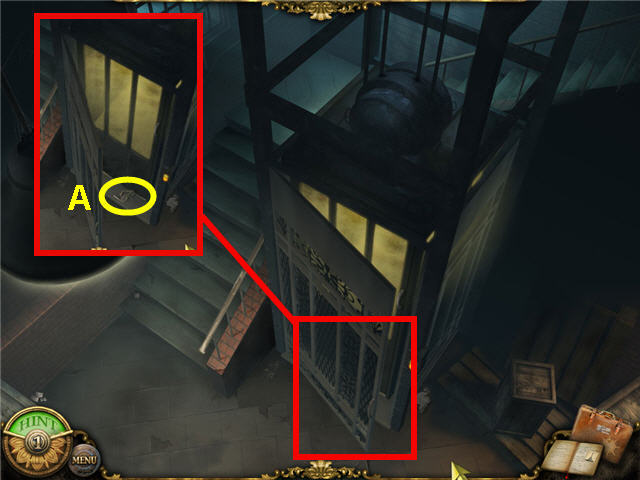
- Click on the elevator door and click on the glasses (A) a few times to get PENROY’S BROKEN GLASSES.
- Head up the stairway to Penroy’s office.
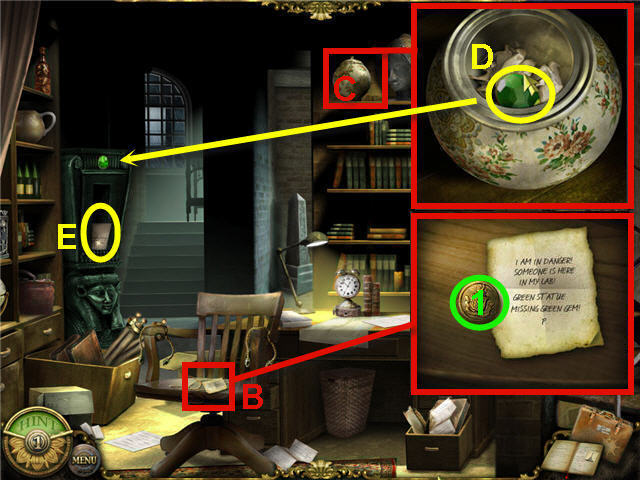
- Click on the chair (B) and read the note.
- Click on the gold button to collect your first SPECIAL ITEM #1.
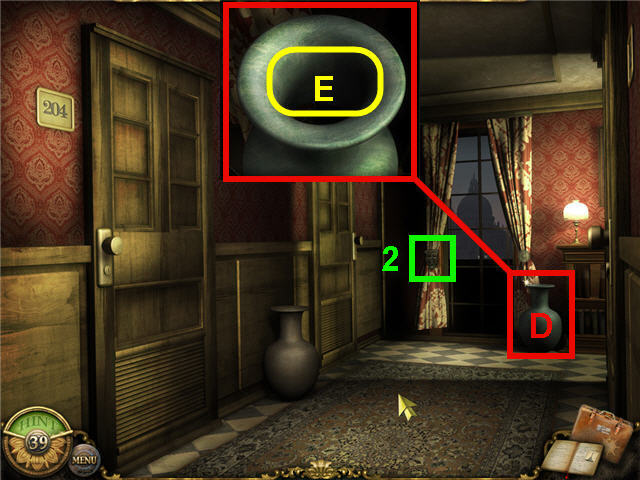
- Click on the jar (C) and click on the top two times to open.
- Take the GREEN GEM (D).
- Click on the suitcase in the lower right to access your inventory and click on the GREEN GEM.
- Place the GREEN GEM on the green statue and take the LETTER FROM PENROY (E) from the opened slot in the statue.
- Click on the desk top to access a hidden object scene.
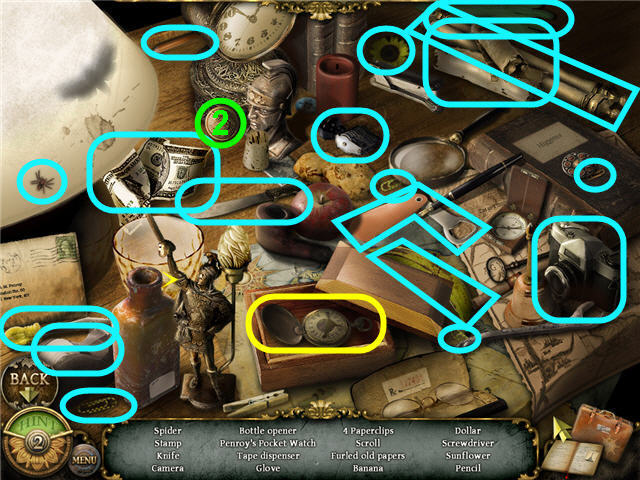
- Find the SPECIAL ITEM #2.
- Find the items listed and get PENROY’S POCKET WATCH.
- Click on the Central Park location on the map.
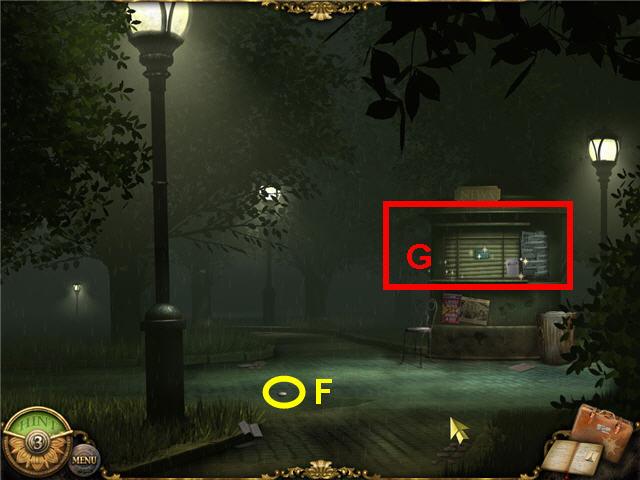
- Pick up the COIN (F) on the ground.
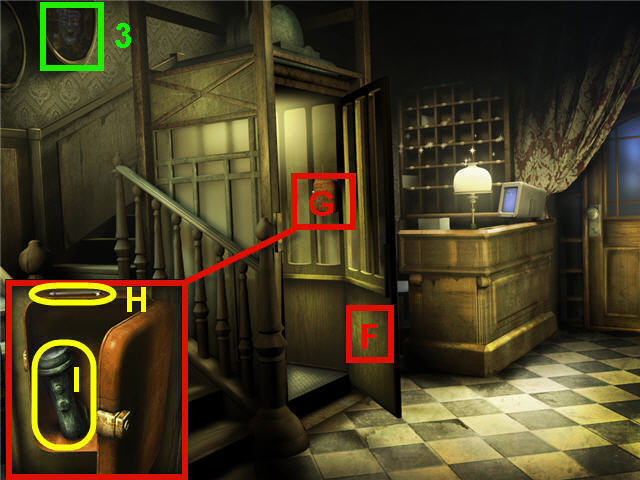
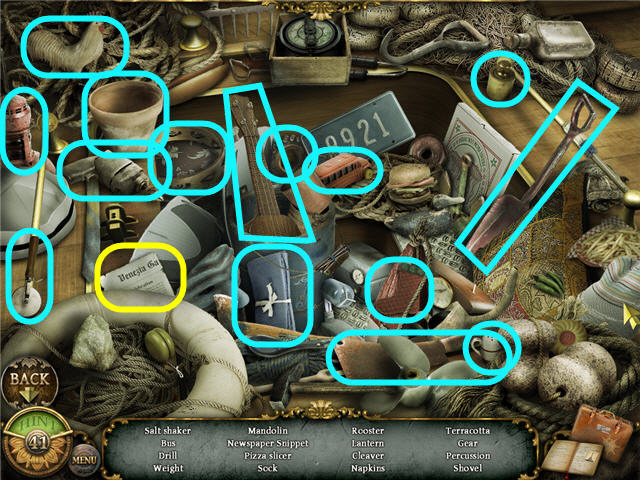
- Click on the newsstand (G) to access a hidden object scene.
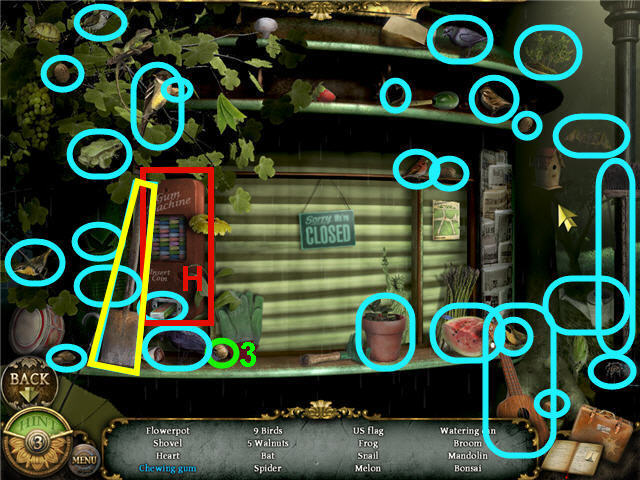
- Take the SPECIAL ITEM #3.
- Find the items listed and get a SHOVEL.
- Use the COIN in inventory on the gum machine (H) and take the chewing gum.
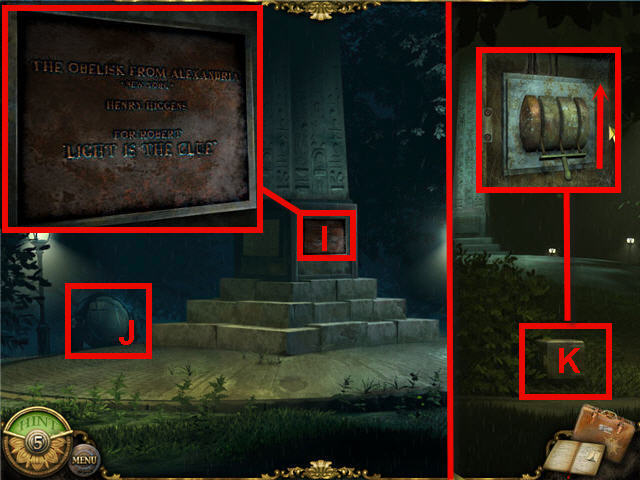
- Click on the Obelisk to head up the stairs.
- Click on the memorial plate (I) a couple times and note the inscription.
- Click on the spotlight (J).
- Head downstairs via the right side of the screen and click on the power switching unit (K).
- Click on the lever so that it goes to the up position.
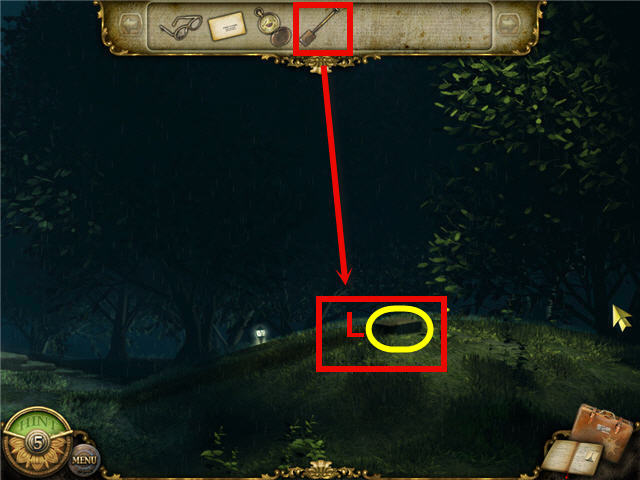
- Head back up to the obelisk and automatically head to a hill on the right.
- Use the SHOVEL on the box (L) and click a few times to get a WOODEN SWORD.
Chapter 1: Grandfather’s House, Paris
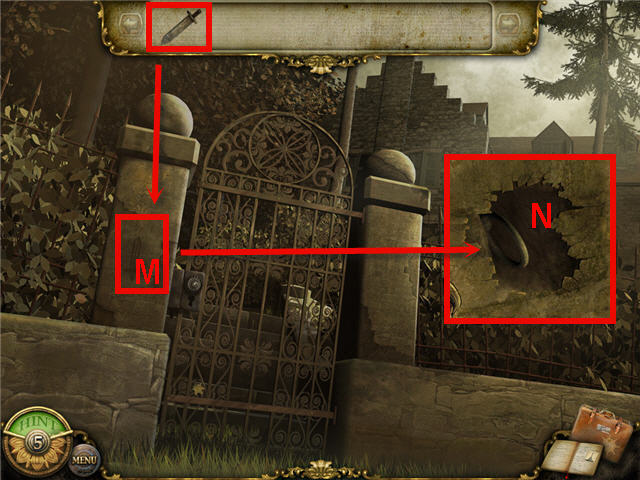
- You begin this chapter with a WOODEN SWORD in inventory.
- Use the WOODEN SWORD on the outline of the sword (M) on the left of the gate.
- Pull the handle (N) and then click on the gate a couple times to enter.
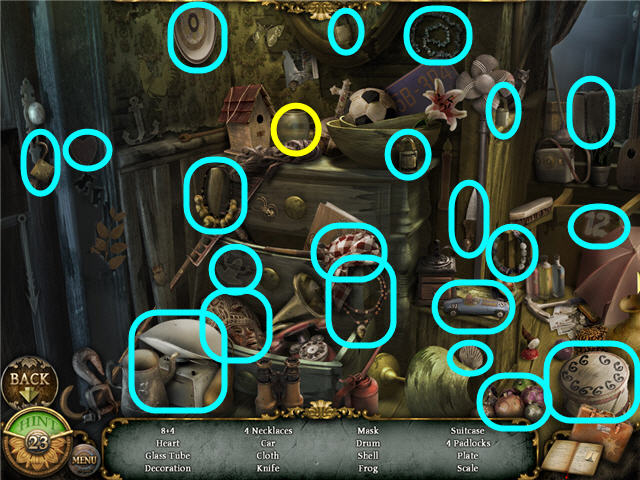
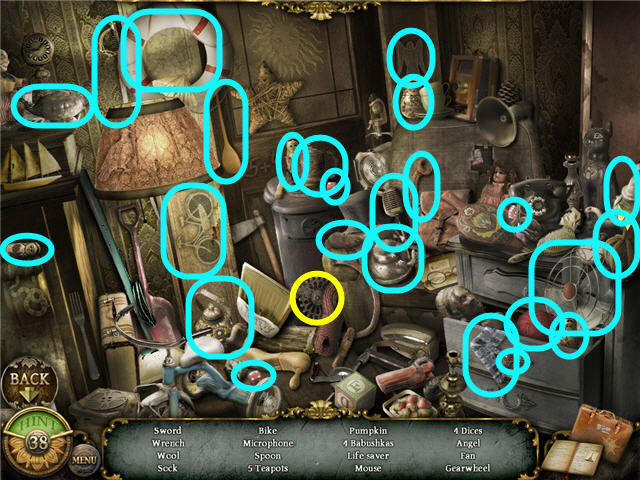
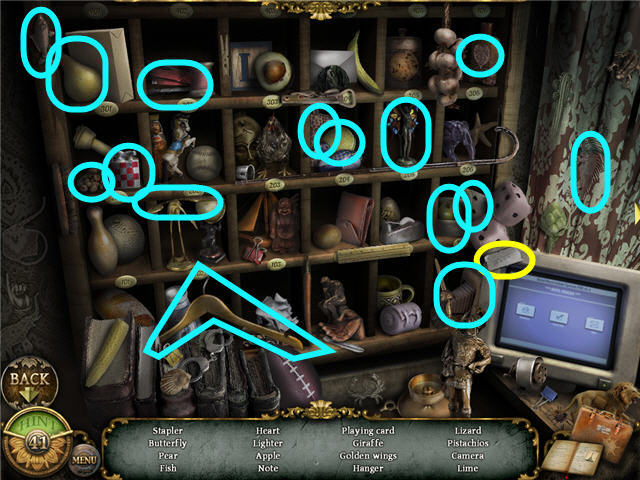
- Click on the shelves on the left of the door to access a hidden object scene.
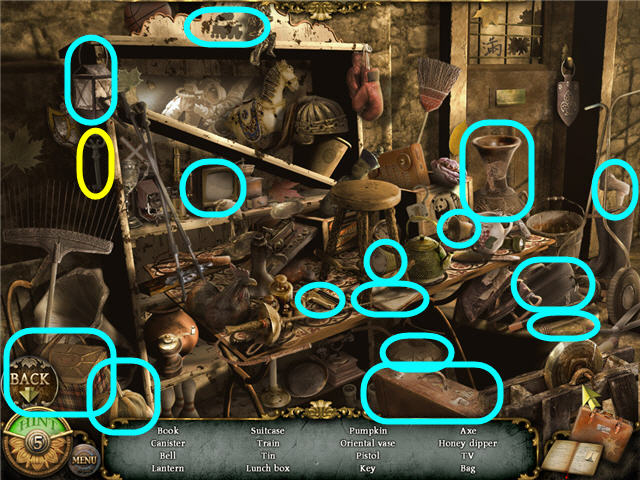
- Find the items listed and get a KEY.
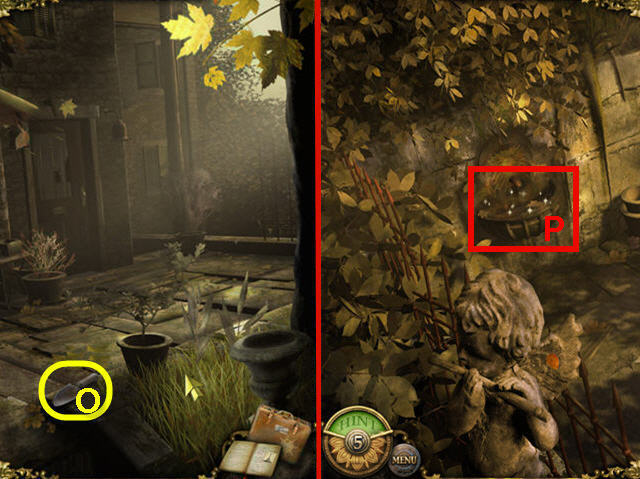
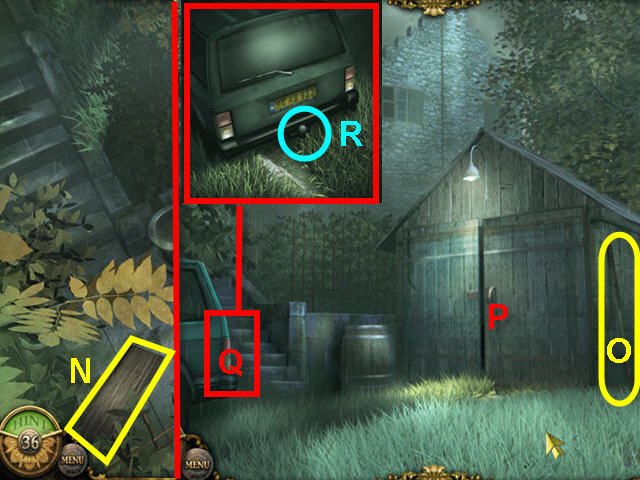
- Pick up the SHOVEL (O).
- Click on the backyard to the left and note you need to find the light switch.
- Head to the right and go down the garden pathway.
- Check out the metal box on the floor to get a jigsaw, but you cannot complete it yet.
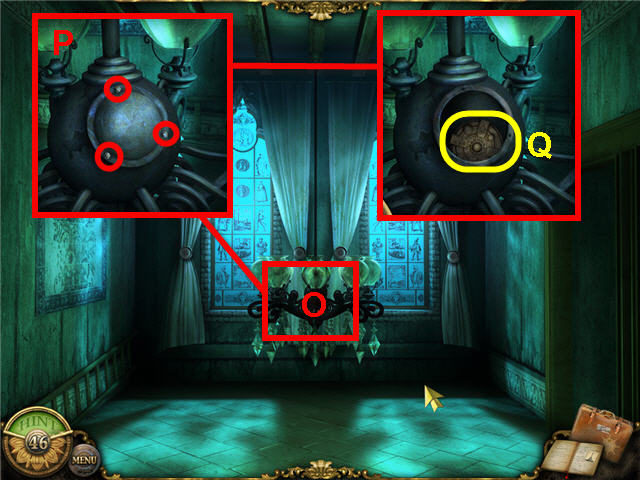
- Click on the fountain (P) to access a hidden object scene.
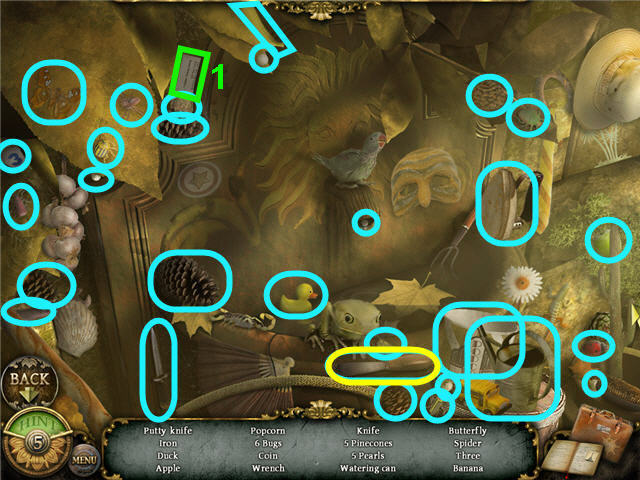
- Find the SPECIAL ITEM 1.
- Find the items listed and get a PUTTY KNIFE.
- Head upstairs to the terrace and click on the door to get a close-up.
- Use the KEY on the door.
- Click on the doorknob to turn it and enter the room.
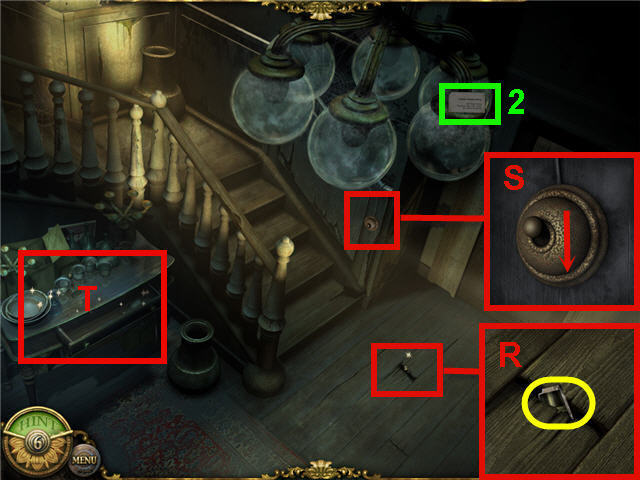
- Take the SPECIAL ITEM #2 from the chandelier.
- Click on the floor plank (R) to get a close-up.
- Use the PUTTY KNIFE on the floor board and take the PHOTO PIECE.
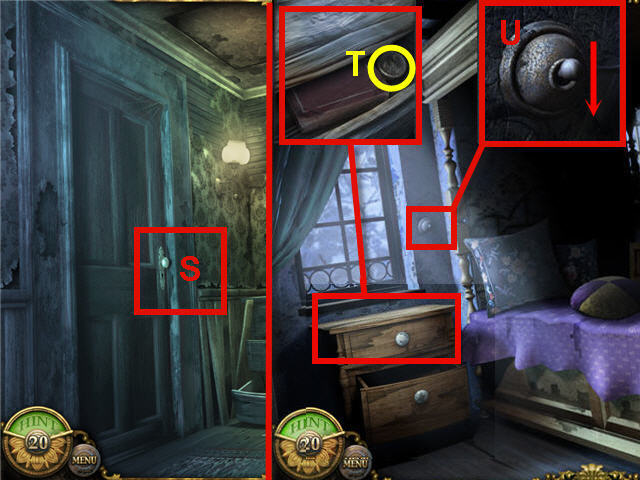
- Click on the switch (S) to get a close-up and flip the switch to turn on the light outside.
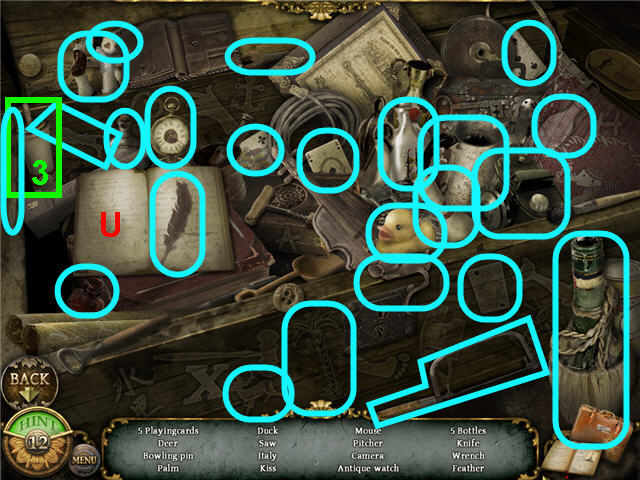
- Click on the desk (T) to the left of the banister to access a hidden object scene.
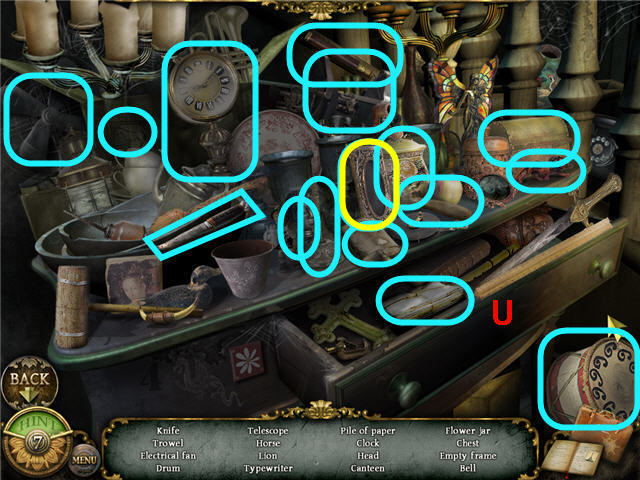
- Find the items listed and get an EMPTY FRAME.
- Click on the drawer (U) and get the items listed in blue.
- Exit the room via the bottom of the screen.
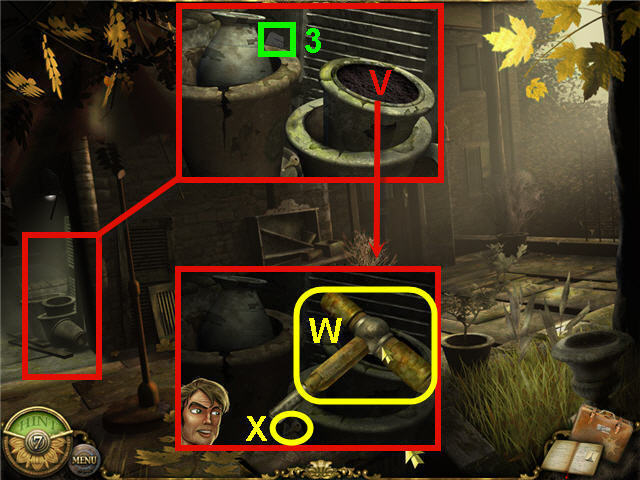
- Click on the backyard to the left.
- Use the SHOVEL on the pot (V) on the right and take the T-KEY (W).
- Take the SMALL KEY (X).
- Take the SPECIAL ITEM #3.
- Exit the close-up and enter the house and head through the door to the right.
- Click on the bottom drawer on the right bookshelf to access a hidden object scene.
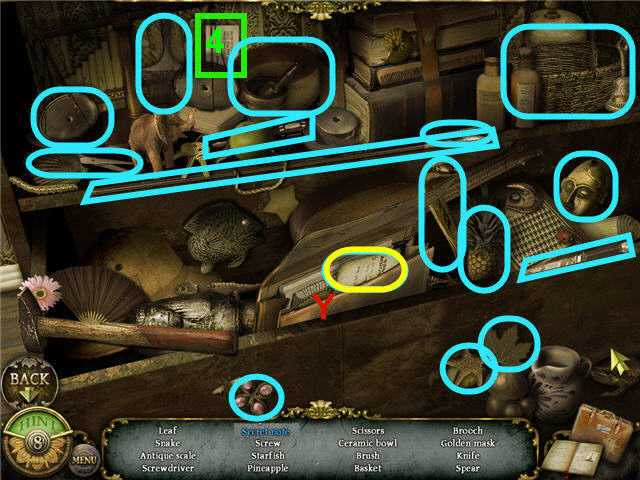
- Find the SPECIAL ITEM #4.
- Find the items listed.
- Use the SMALL KEY on the bag (Y) to get the SECRET NOTE.
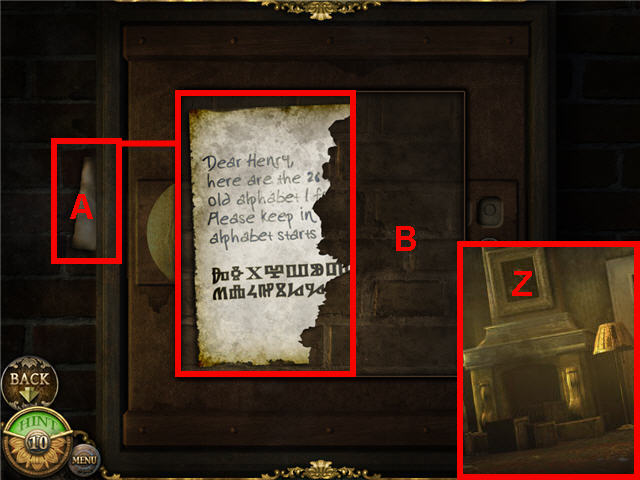
- Click on the painting (Z) above the fireplace.
- Click on the safe to get a close-up and click on the note (A) in the corner.
- Place the SECRET NOTE from inventory by the missing half of torn note (B).
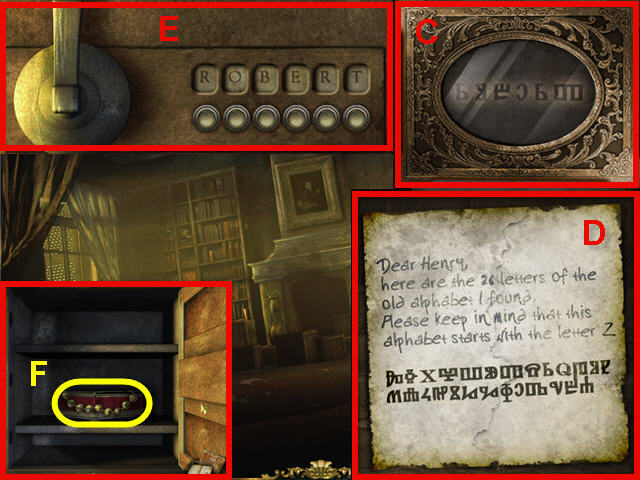
- Open the EMPTY FRAME (C) in inventory by clicking on the magnifying glass.
- Use the alphabet on the SECRET NOTE (D) to decipher the password code in the EMPTY FRAME; note that the alphabet code starts with Z.
- Enter the password ROBERT (E) by clicking on the buttons under each letter.
- Click on the handle of the safe to open and take the NECKLACE (F).
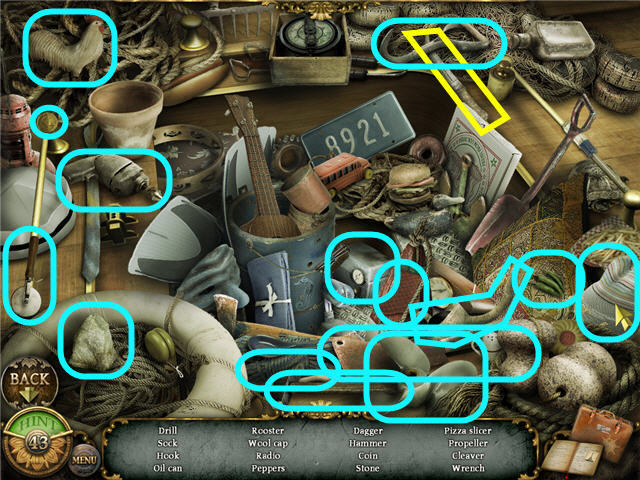
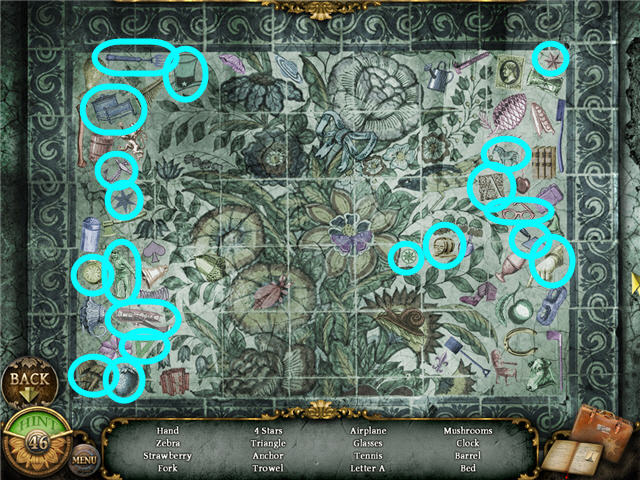
- Click on the fireplace to access the hidden object scene.
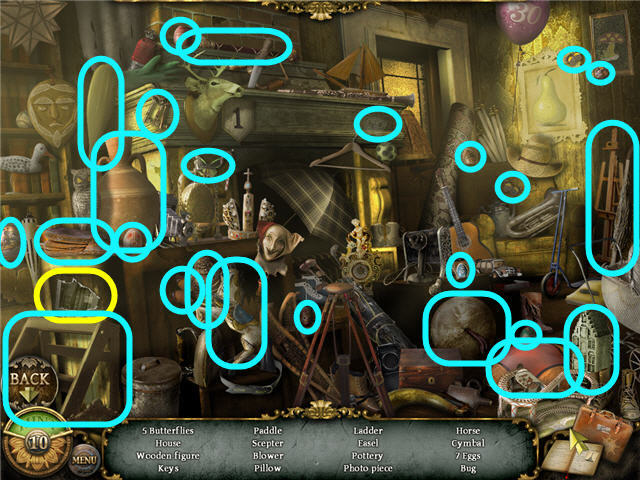
- Find the items listed and get the second PHOTO PIECE.
- Access the map and click on the terrace.
- Click on the shelves to the left of the door to access a hidden object game.
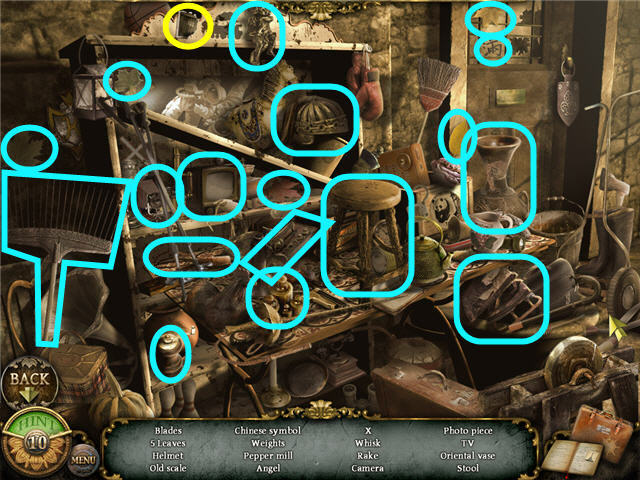
- Find the items listed and get the third PHOTO PIECE.
- Click on the right to go to the garden pathway.
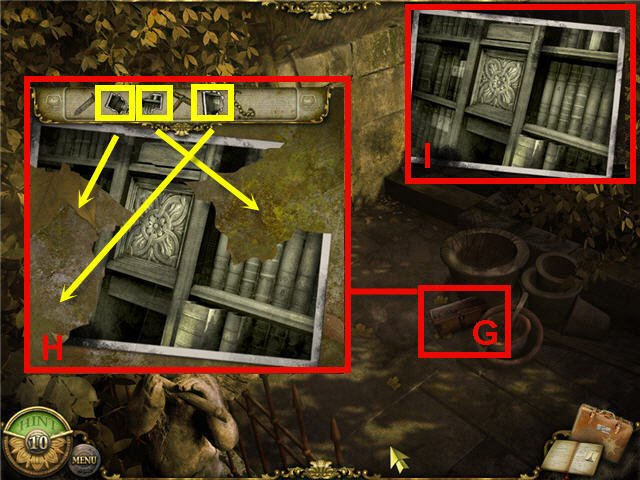
- Click on the metal chest (G) to trigger a puzzle.
- Assemble the photo (H) and notice the 3 missing pieces.
- Use the 3 PHOTO PIECES from inventory to complete the photo (I) and get a PHOTO OF BOOKSHELF.
- Access the map and click on the living room.
- Click on the dusty bookshelf to the left of the fireplace.
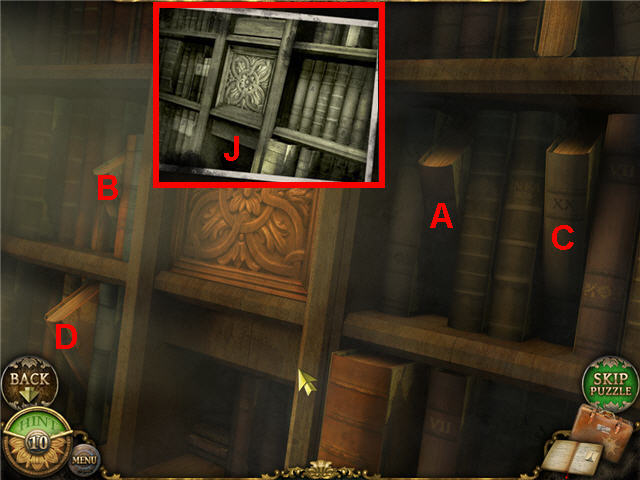
- Click on the panel in the center of the bookshelf and the books.
- Click on the magnifying glass on the PHOTO OF BOOKSHELF in inventory (J).
- Note the books labeled A, B, C and D on the PHOTO OF BOOKSHELF.
- Click the books in order according to the ABC’s on the PHOTO OF BOOKSHELF. See screenshot for solution.
- When the correct books have been pulled out the center will reveal another puzzle.
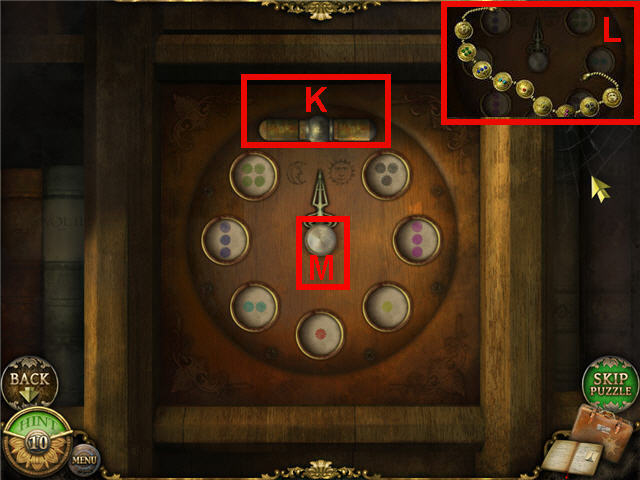
- Use the T-KEY on the keyhole (K) on the top of the mechanism.
- Click on the magnifying glass on the NECKLACE in inventory (L).
- Note the order of the beads from left to right; 4 green dots, 3 blue dots, 2 cyan dots, 1 red dot, 1 yellow dot, 3 pink dots and 3 black dots.
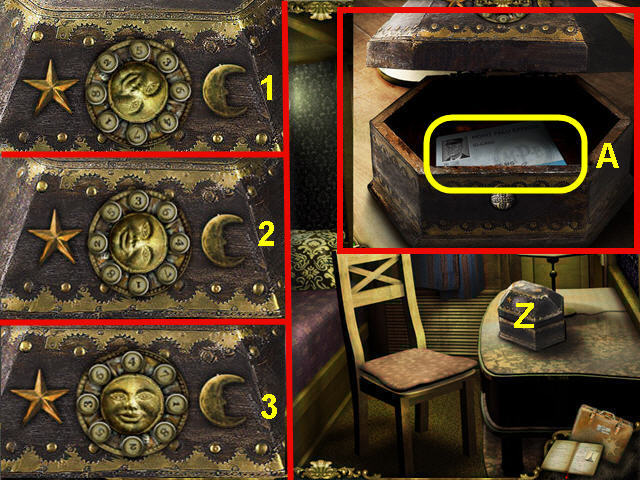
- Click on the button in the center connected to the arrow (M) to turn it.
- Turn the arrow to face the first element (the circle with the dots in it) to the left of the moon and click on the element until it has the 4 green dots as shown in the order on the NECKLACE.
- Continue through to each element by clicking on the center button, stopping at each element and changing them to match the necklace. See screenshot for solution.
- When completed, turn the arrow to face straight up and click on the T-KEY (K).

- Click on the shield on the bottom of the stairs to get a WOODEN SHIELD (N).
- Click on the stone table to get a close-up.
- Place the WOODEN SWORD in the slot (O).
- Click on the chest above the sword slot to open it.
- Take the OLD BOOK (P).
- Click on the envelope in the book a few times to read the letter.
- Look at the bookstore ticket in the upper left of the open book.
- Continue clicking on the book until you get the ENVELOPE and OLD BOOK.
Chapter 2: Pitigliano, Italy
- You start the chapter with an ENVELOPE and an OLD BOOK in inventory.
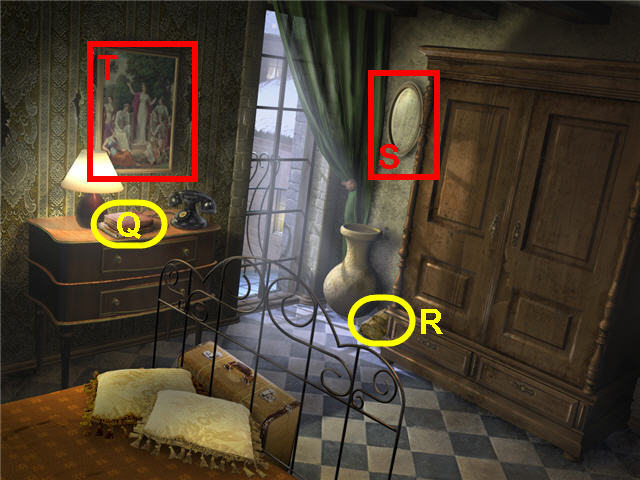
- Click on the books (Q) and read the paper and get the OLD NEWSPAPER.
- Take the PIECE OF WOOD (R).
- Click on the mirror (S) until the dialogue is exhausted and sparkles appear on the painting.
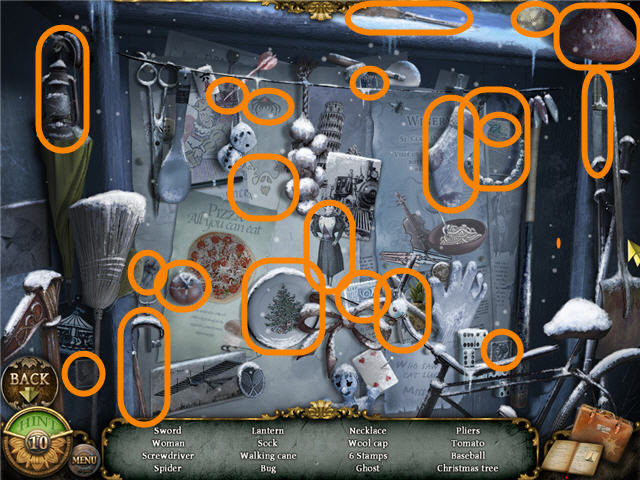
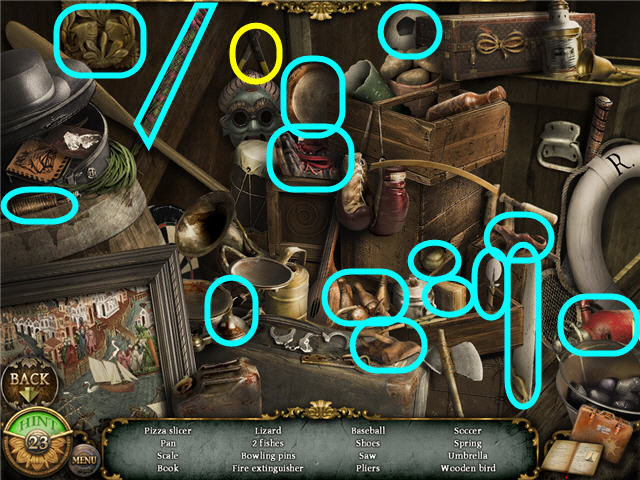
- Click on the painting (T) to access a hidden object scene.
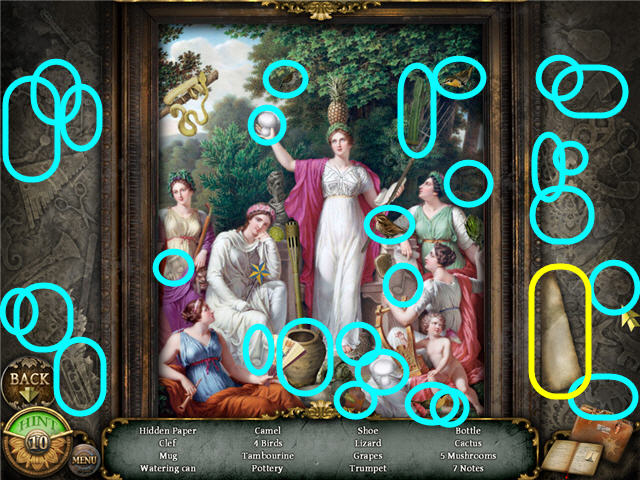
- Find the items listed and get a HIDDEN PAPER.
- Exit via the bottom of the screen and talk to the monk.
- Click on the bulletin board on the wall at the bottom of the stairs.
- Find the items listed and get a WINE COUPON.
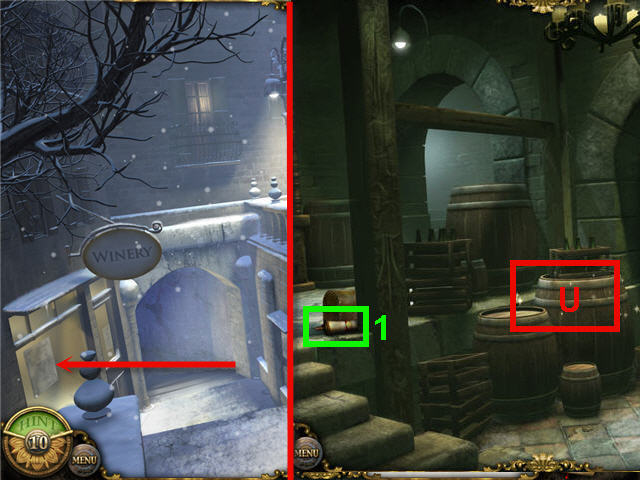
- Click on the winery on the left to enter.
- Pick up the SPECIAL ITEM #1.
- Click on the barrels (U) to trigger a hidden object scene.
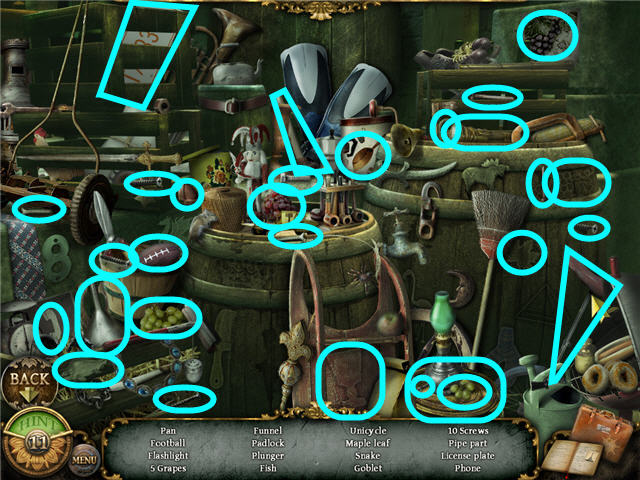
- Find the items listed.
- Get a WINE BOTTLE from the monk and exit the winery.
- Head up the stairs on the right and click on the fountain.
- Click on the doorway straight ahead.
- Take the WOODEN STICK (V) from the landing.
- Head up the street to the church.
- Click on the stained glass window of the church a few times.
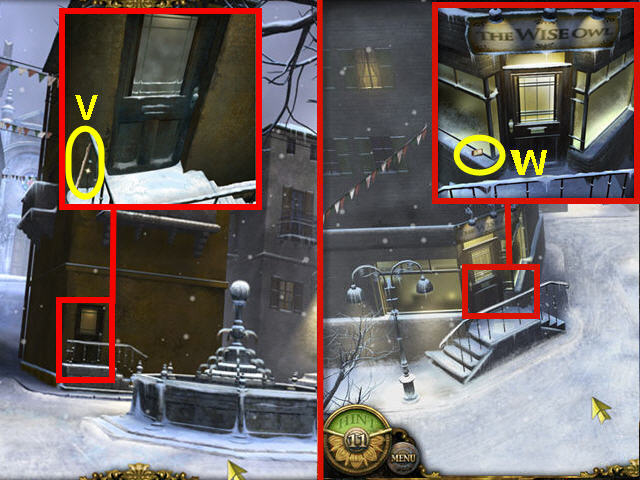
- Click on the entrance to the Wise Owl Bookstore.
- Take the BOX OF MATCHES (W) and enter the bookstore.
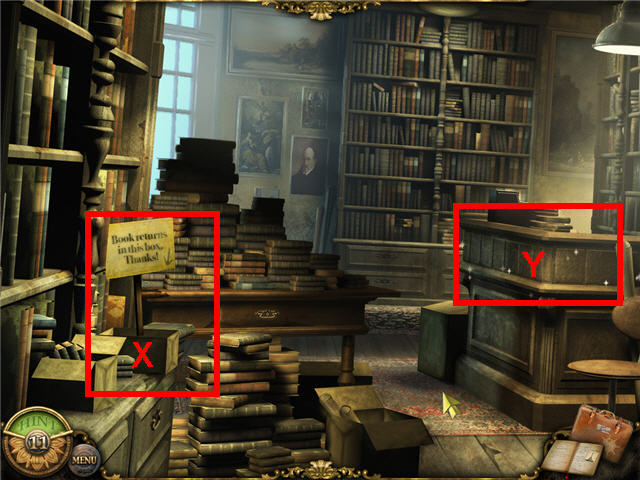
- Click on the counter and the bookseller will stop you.
- Place the OLD BOOK in the return box (X).
- Click on the counter (Y) to access a hidden object scene.
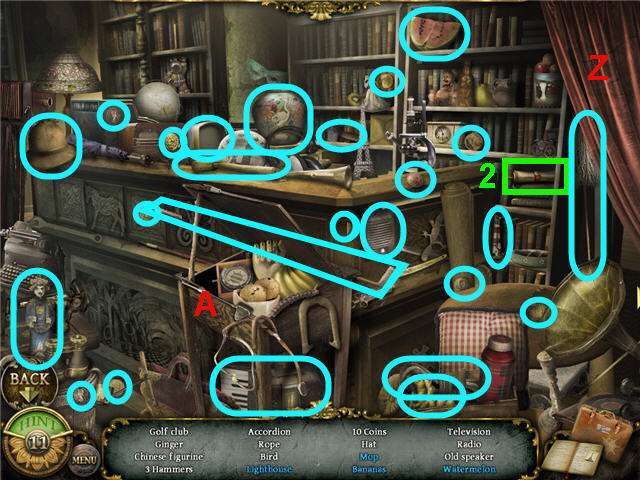
- Click on the curtain (Z) to reveal the blue hidden items.
- Use the WOODEN STICK on the school desk (A) to reveal blue hidden items.
- Find the SPECIAL ITEM #2.
- Find the items listed and get a KEY.
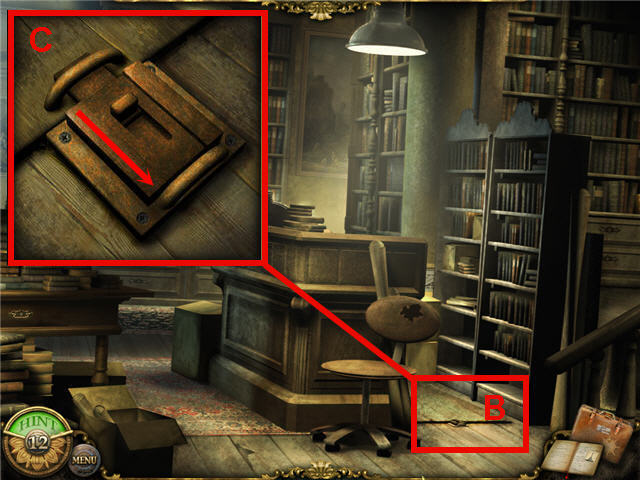
- Click on the trap door (B) and unlock the latch (C).
- Try and access the room to the right but the bookseller will stop you.
- Access the map and click on the fountain place.

- Click on the door to the bookseller’s house (D).
- Use the KEY on the door and then click to enter.
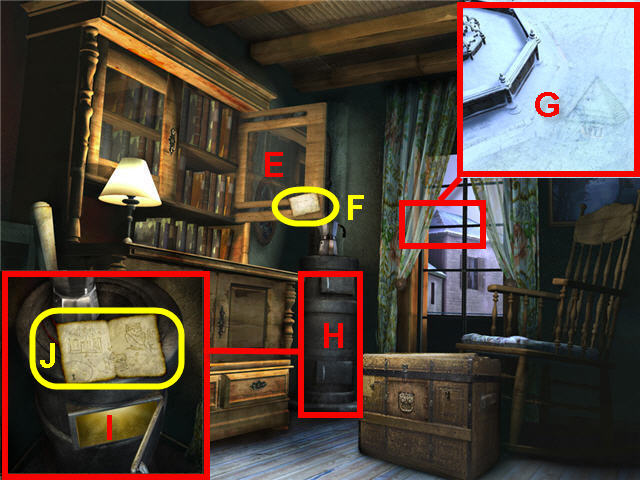
- Click on the cabinet (E) to open the door and take the SECRET NOTE (F).
- Click on the window and look at the pyramid in the snow.
- Click on the pyramid (G) until you get a PYRAMID PHOTO.
- Click on the wood stove (H) to get a close-up.
- Click on the oven door to open.
- Place the PIECE OF WOOD in the oven (I).
- Use the BOX OF MATCHES on the wood in the oven to light it.
- Place the HIDDEN PAPER on the oven top and take the SECRET MAP (J).
- Click on the chest to trigger a puzzle.
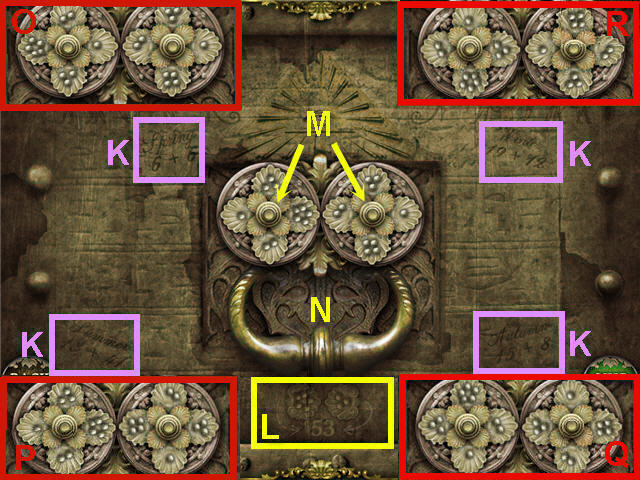
- To complete the puzzle, look at the codes written in the 4 corners (K) surrounding the handle mechanism and the example of how to enter them (L) on the bottom of the lock.
- Enter the correct code by clicking the center of the middle dials (M) until the shells with the pearl counts that you want is facing the middle and then pull the handle (N) after each correct input.
- The 4 codes are in the correct order are; Spring (O) 6+6=12 = 1 pearl left – 2 pearls right, Summer (P) 13+41 = 54 = 5 pearls left – 4 pearls right, Autumn (Q) 15+8 =23 = 2 pearls left – 3 pearls right, Winter (R) 19+12 = 31 = 3 pearls left – 1 pearl right.
- You do not yet have the object needed to open the trunk but it is necessary to have completed this to trigger other areas.
- Access the map and click on the Winery.
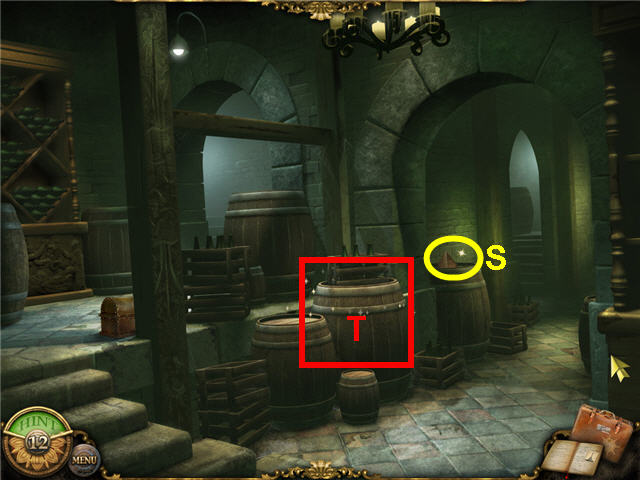
- Take the PYRAMID (S) from the top of the barrel.
- Click on the barrels (T) to access a hidden object scene.
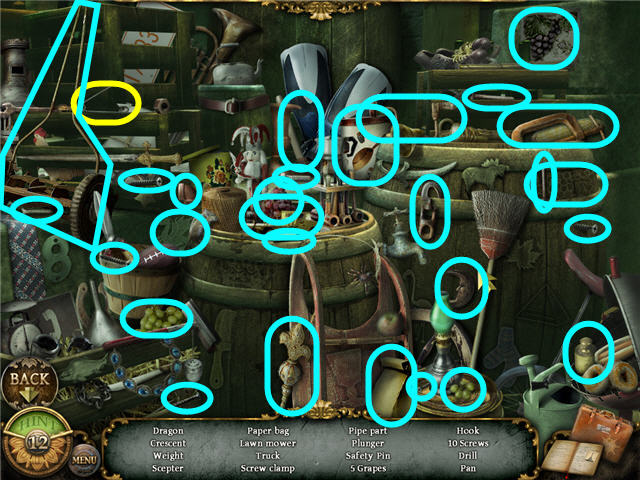
- Find the items listed and get a SAFETY PIN.
- Access the map and click on fountain place.
- Click on the bookseller’s room door to enter.
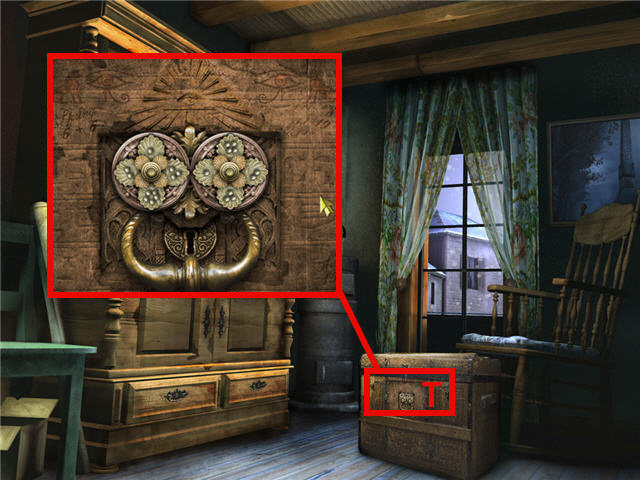
- Click on the chest (T).
- Use the SAFETY PIN on the lock to access a hidden object scene.
- Take the SPECIAL ITEM # 3.
- Find the items listed and get a BOOK.
- Open the green book (U) to find the item in blue.
- Access the map and click on church place.
- Enter The Wise Owl Bookstore and speak to the bookseller.
- Enter the church on the right.
- Take the SPECIAL ITEM #4.
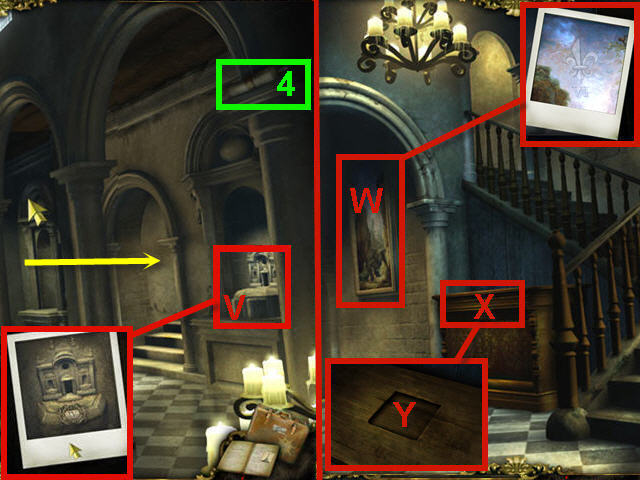
- Examine the portal (V) on the right and click on the close-up to get a PHOTO.
- Head down the hall on the right and click on the painting (W).
- Click on the fleur-de-lis in the painting close-up and get a PHOTO.
- Examine the chest (X) and note the cavity in the top.
- Place the PYRAMID on the cavity (Y) to open the secret path.
- Exit down the secret path and click on the door with the owl on it.
- Go up the staircase on the right.
- Take the SPECIAL ITEM #5.
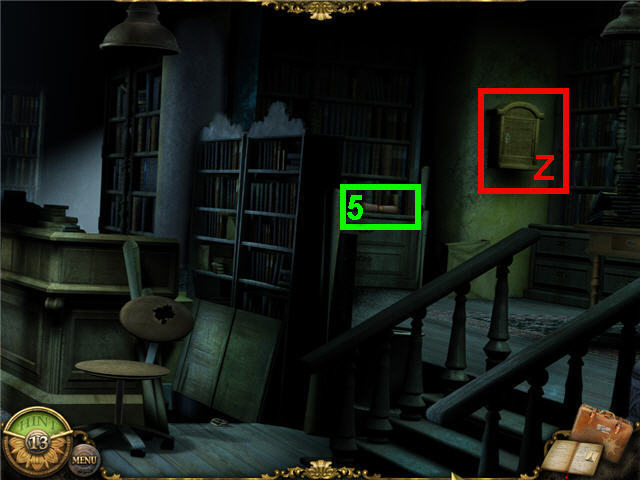
- Click on the small cabinet (Z) to trigger a puzzle.
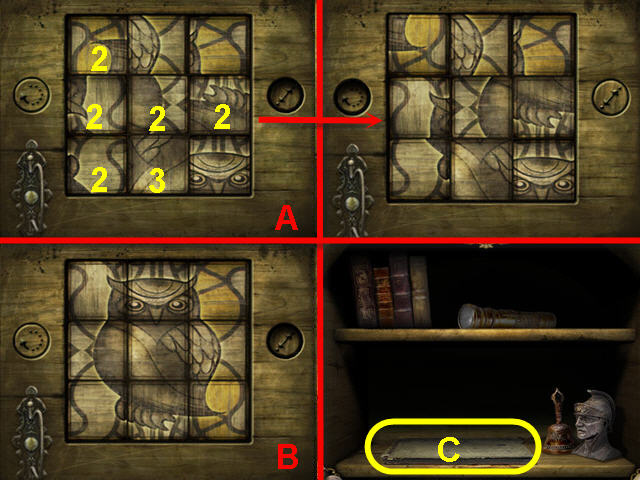
- Note the writing “I am a Wise” on the top.
- The goal is to complete the saying with a picture of an owl.
- Push the button on the left to rotate the tiles.
- Push the button on the right to swap tiles by clicking on any two tiles.
- Your tiles may be in a different position to start than mine were and therefore you will need to adjust my instructions accordingly.
- Step one of the solution; click on the button on the left and then click on the tiles to rotate them the number of times indicated in the screenshot (A).
- Step two of the solution; click on the button on the right and then swap any two tiles to place them in their appropriate spot. See screenshot for solution (B).
- When the photo is complete, click on the handle to open the cabinet.
- Click on the postmark book (C) and take the POSTMARKS.
- Access the map and click on the church.
- Head down the hallway to the right and go upstairs.
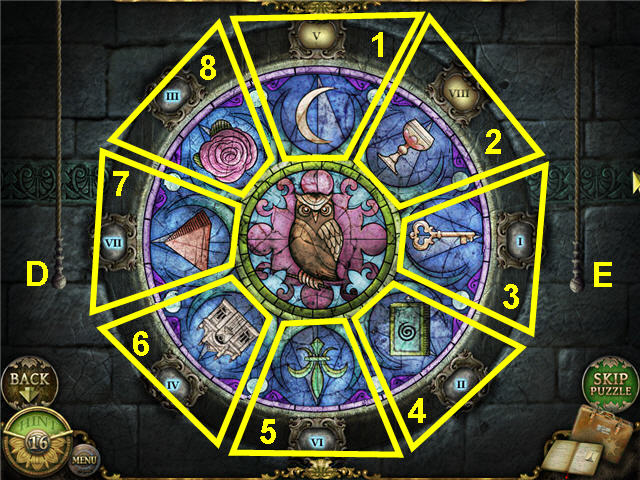
- The goal is to match up the correct icon with the Roman numeral that is highlighted in blue.
- Your clues for matching the icons with the numerals can be found in the POSTMARKS, PHOTO of painting, PHOTO of portal in church, BOOK, SECRET MAP, PYRAMID PHOTO and the SECRET NOTE.
- To rotate the center icons, pull the rope on the left (D).
- To register the correct combo, pull the right rope (E).
- The Roman numeral slot will turn gold when complete and the next one will highlight in blue. These must be done in order.
- Follow the next 8 steps to solve the puzzle:
- Pull left rope until moon is on top, pull the right rope (1).
- Pull left rope until the challis is at the two o’clock position; pull right rope (2).
- Pull left rope until key is at 3 o’clock position; pull right rope (3).
- Pull left rope until the helix symbol is at the 5 o’clock position; pull right rope (4).
- Pull left rope until fleur-de-lis is at the 6 o’clock position; pull right rope (5).
- Pull left rope until building is at the 7 o’clock position; pull right rope (6).
- Pull left rope until pyramid is at the 9 o’clock position; pull right rope (7).
- Pull left rope until flower is at 10 o’clock position; pull right rope (8).
- Enter the newly opened owl door to the left.
- Get the BLUE CAPSULE.
Chapter 3: Grandfather's House, Paris
- You start the chapter with no inventory but you get a FLASHLIGHT after the first scene.
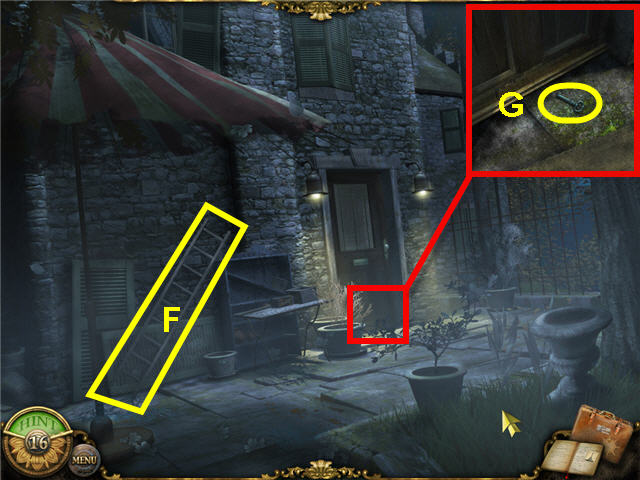
- Take the LADDER (F).
- Click on the door and get a close-up.
- Click on the doormat in the close-up to move it and take the KEY (G).
- Head down the garden path to the right.
- Take the CROWBAR (H).
- Examine the pots and note you need gloves.
- Click on the door and note the door lock.
- Back out of the puzzle and exit via the bottom of the screen.
- Click on the front door and use the KEY; turn the doorknob and enter.
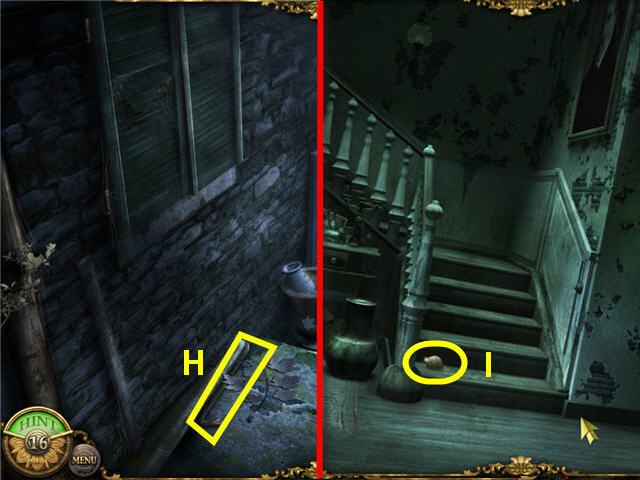
- Pick up the STONE (I) and try to go upstairs.
- Click on the desk on the left of the staircase to access a hidden object scene.
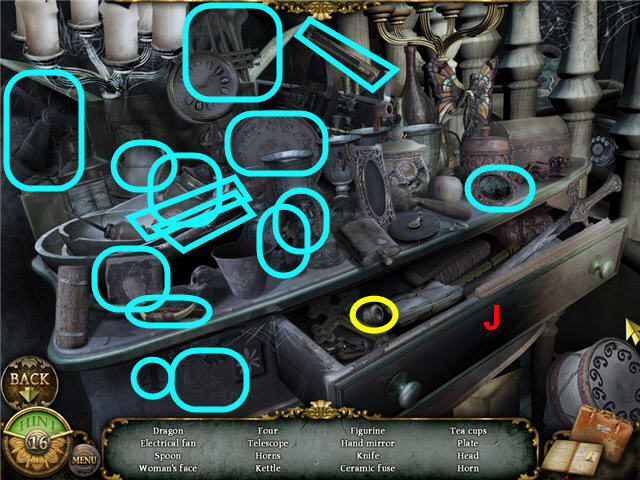
- Find the items listed and get a FUSE.
- Click on the drawer (J) to find the items in blue.
- Head through the door on the right to the living room.
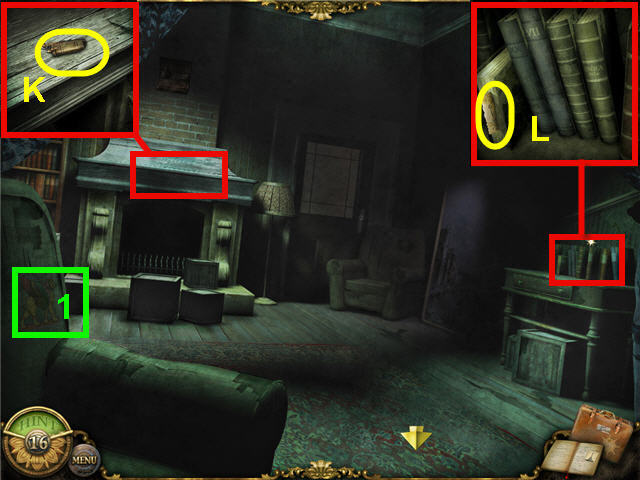
- Take the SPECIAL ITEM #1.
- Click on the lamp and note it has no light bulb.
- Click on the chimney and take the LIGHTER (K).
- Click on the books on the desk on the right and take the SECRET NOTE (L).
- Access the map and click on the backyard.
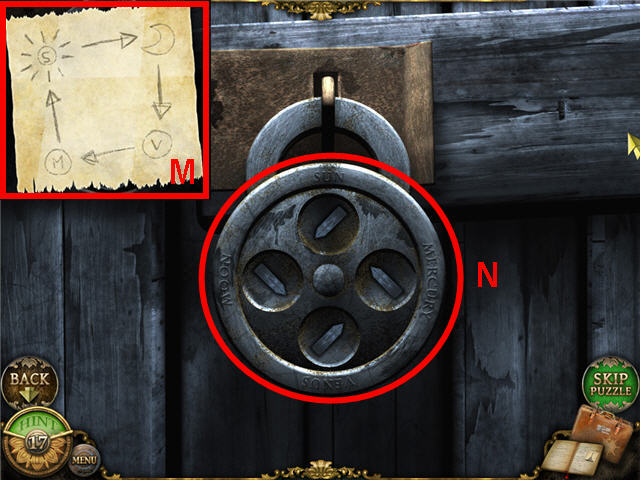
- Click on the door to access a lock puzzle.
- Click on the magnifying glass on the SECRET NOTE (M) in inventory to see the lock solution.
- Click on the 4 arrows to turn them to face the correct symbol.
- Click on the center button when they are set to open the door. See screenshot (N) for solution.
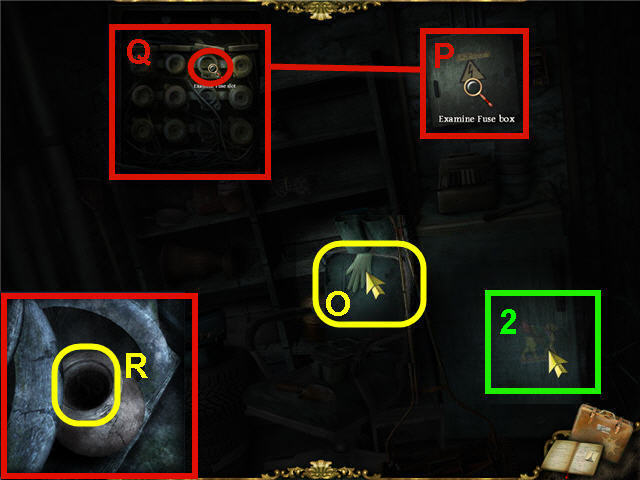
- Use your FLASHLIGHT to see.
- Take the GARDENING GLOVE (O).
- Click on the fuse box (P) to get a close-up.
- Place the FUSE in the top slot (Q) under the 2nd Floor column.
- Take the SPECIAL ITEM #2.
- Exit via the bottom of the screen.
- Click on the pots (R) on the left.
- Use the GARDENING GLOVE on the pot to get a RUSTY KEY.
- Access the map and click on the entrance.
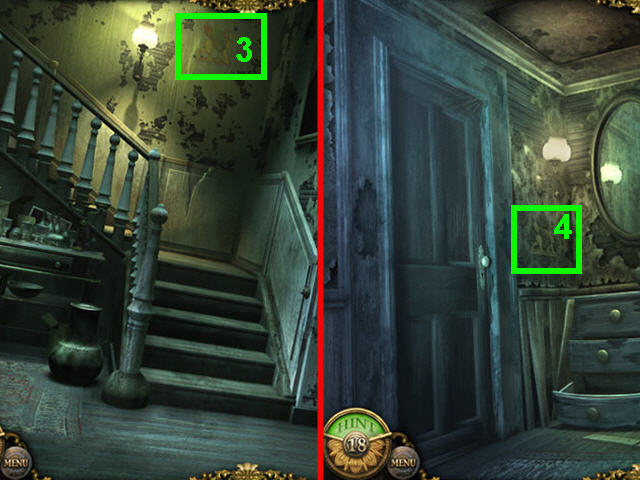
- Take the SPECIAL ITEM #3.
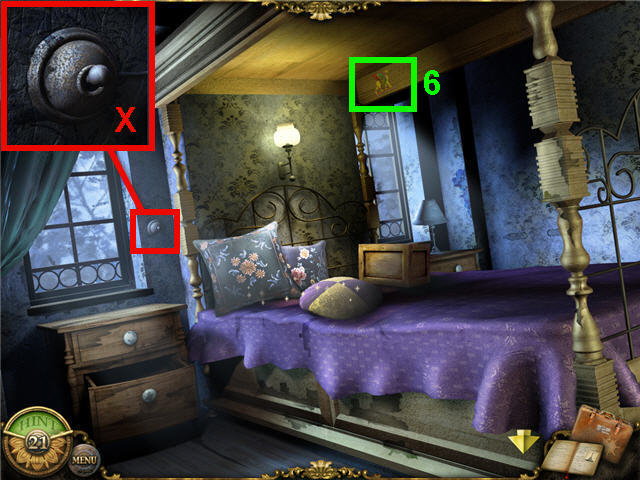
- Head up the stairs and take SPECIAL ITEM #4.
- Click on the dresser to access a hidden object scene.

- Find the items listed and get a LIGHT BULB.
- Use the RUSTY KEY on the door on the left (S) and enter the bedroom.
- Click on the upper drawer of the nightstand.
- Click on the drawer and take the OIL LAMP PART (T).
- Click on the switch (U) next to the bed to get a close-up and flip the switch.
- Flip the switch a few times until you see a cutscene with binoculars.
- Access the map and click on the living room.
- Use the LIGHT BULB on the lamp.
- Click on the chair to access the hidden object scene.
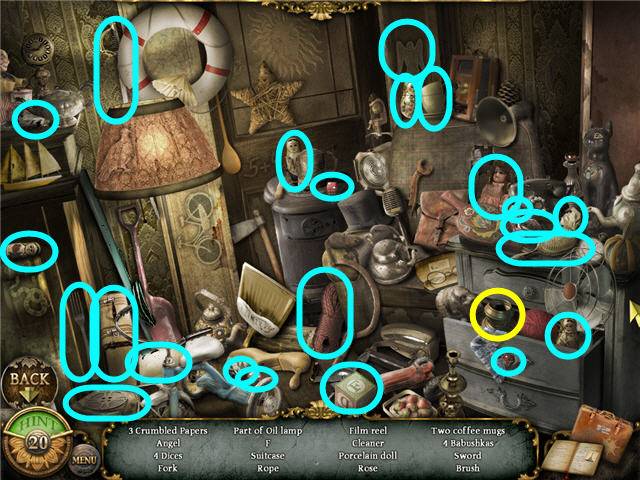
- Find the items listed and get an OIL LAMP BOTTOM.
- Head through the door next to the lamp.
- Click on the oven to access a hidden object game.
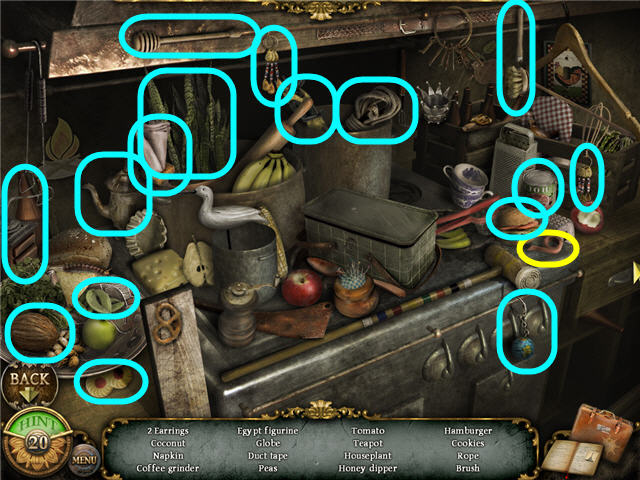
- Find the items listed and get DUCT TAPE.
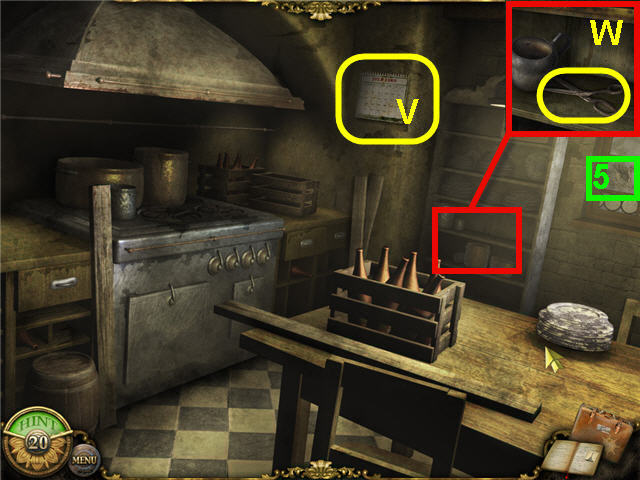
- Take the OLD CALENDAR (V).
- Click on the shelves.
- Take the SCISSORS (W).
- Take the SPECIAL ITEM #5.
- Try to open the oven, but note it is stuck.
- Access the map and click on the upper floor.
- Head into the bedroom on the left.
- Click on the switch (X) to get a close-up place the DUCT TAPE on the switch.
- Take the SPECIAL ITEM #6.
- Click on the bed to access a hidden object scene.
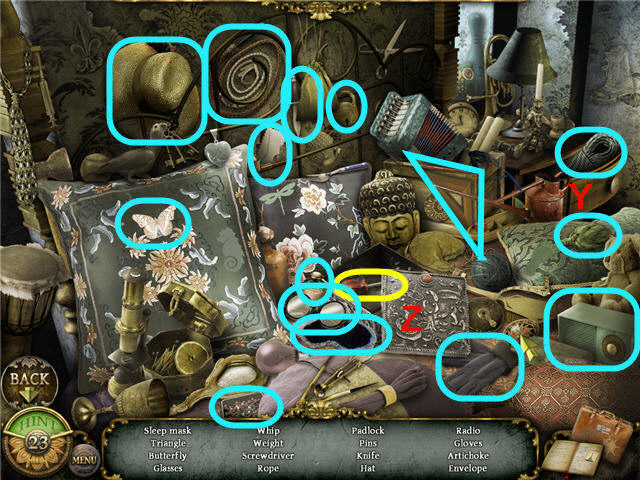
- Find the items listed and get a SCREWDRIVER.
- Click on the drawer (Y) and the metal case (Z) to find items in blue.
- Access the map and click on the kitchen.
- Click on the oven to access a hidden object scene.
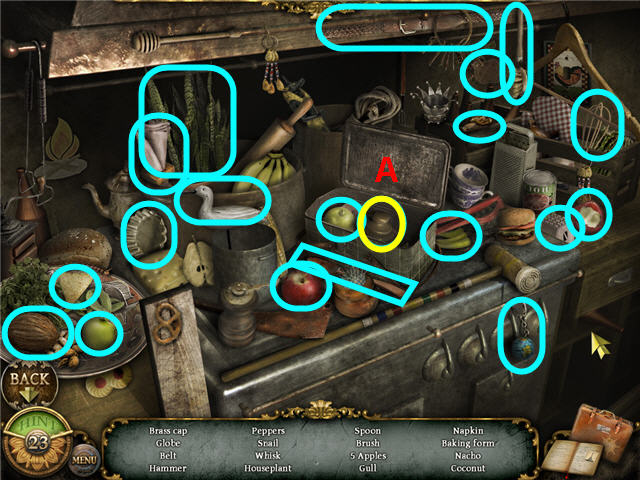
- Find the items listed and get an OIL LAMP TOP.
- Use the SCISSORS on the tin box (A) to find the items in blue.
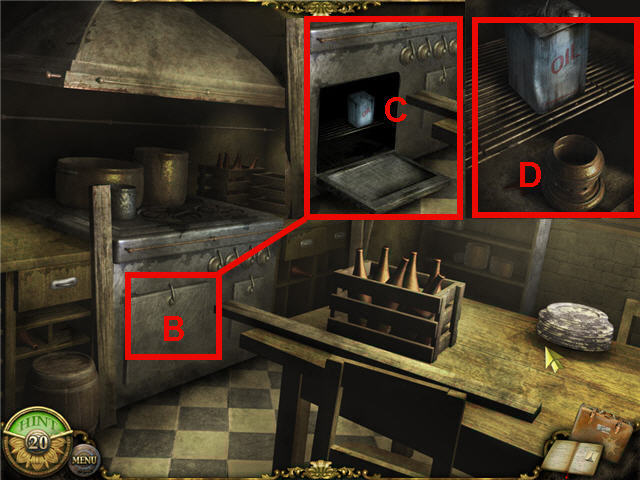
- Use the SCREWDRIVER on the oven door (B).
- Click on the oil can (C) in the oven.
- Use the OIL LAMP BOTTOM on the dripping oil (D).
- Access the map and click on the upper floor.
- Click on the dresser to access a hidden object scene.
- Find the items listed and get an OIL LAMP GLASS.

- Click on the mirror but it won’t come off.
- Use the STONE on the mirror (E).
- Click on the broken mirror to access a puzzle.
- Use the stone a few times until you remove the jagged edges of the broken mirror.
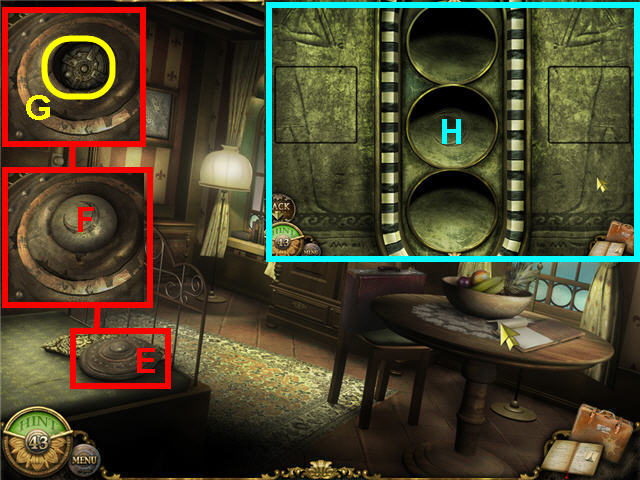
- Click on the magnifying glass on the OLD CALENDAR in inventory to decipher the puzzle.
- The goal is to push the symbols to the date that corresponds with the date on the calendar for that activity.
- The solution is; 4-shaking hands, 5-lion, 9-eye, 16-tree, 17-key, 21-scroll, and 30-book. See screenshot (G) for solution.
- You will automatically open the trapdoor when exiting the puzzle.
- Access the map and head to the kitchen.
- Click on the oven and take the OIL LAMP BOTTOM.
- Access the map and click on the upper floor.
- Use the LADDER on the opened trap door (H).
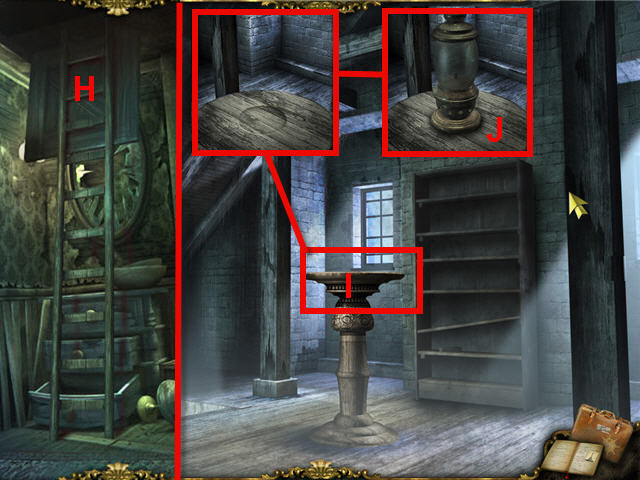
- Click on the open trap door to access the attic.
- Click on the table (I) in the center of the room.
- Assemble the oil lamp on the cavity in the center of the table in this order; OIL LAMP BOTTOM (be sure you have filled it with oil), OIL LAMP PART, OIL LAMP GLASS and OIL LAMP TOP.
- Use the LIGHTER on the assembled lamp (J).
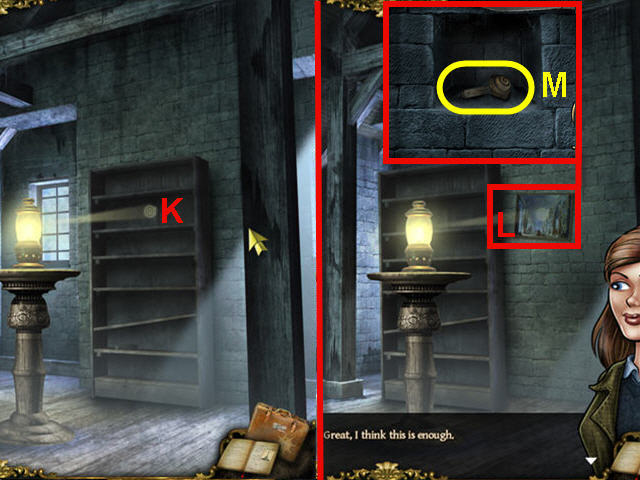
- Use the CROWBAR on the bookshelf multiple times to move it over and expose a painting.
- Click on the painting (L).
- Use the SCISSORS on the painting and take the MYSTERIOUS KEY (M).
Chapter 4: Mont Palu Express to Venice
- You start the chapter with PENROY’s NOTE and PENROY’S GLASSES in your inventory.
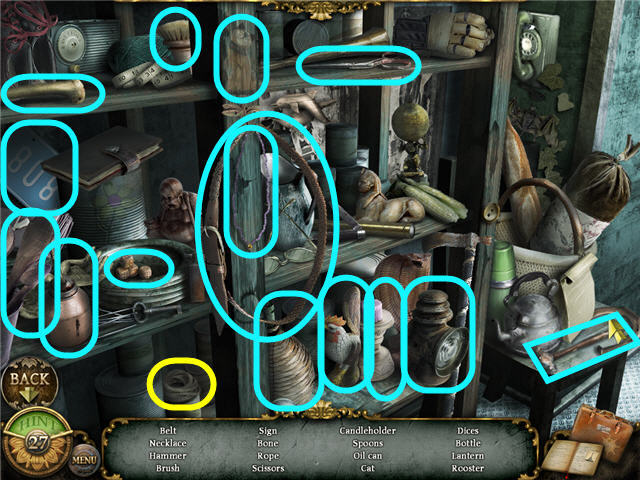
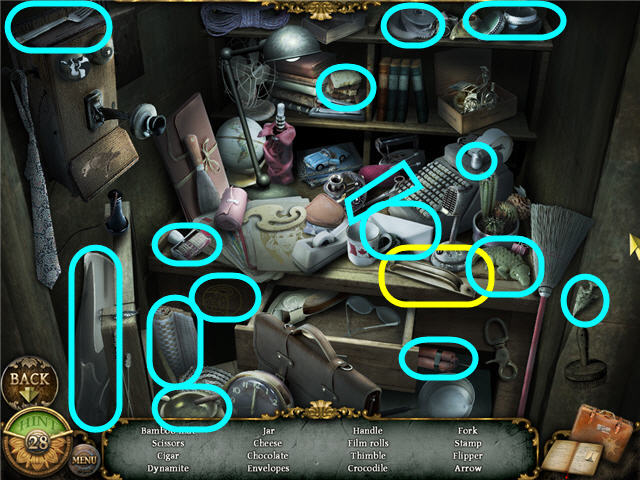
- Click on the boxes to access a hidden object scene.
- Find the items listed and get PLIERS.
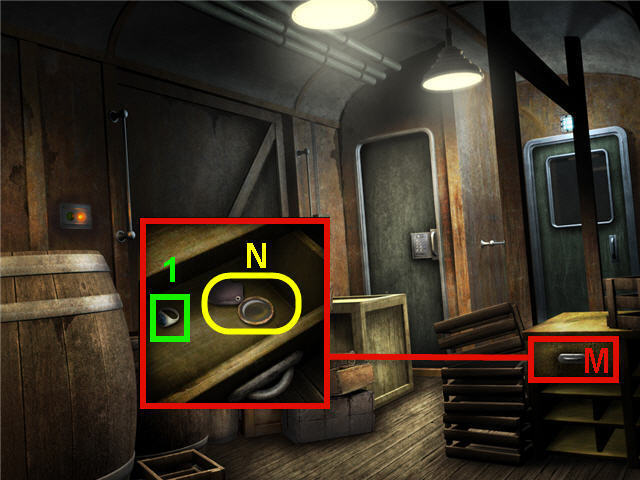
- Click on the drawer (M) to get a close-up.
- Take the LOUPE (N) from the drawer.
- Take the SPECIAL ITEM #1.
- Head through the door on the right to the kitchen cart.
- Enter the storage room 21 on the right.
- Click on the fridge to access a hidden object scene.
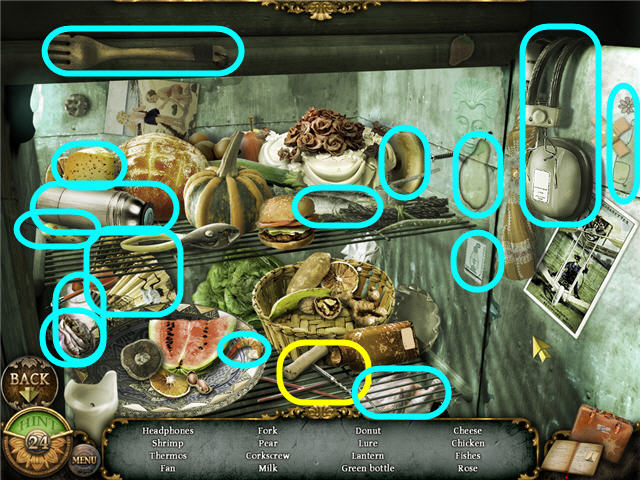
- Find the items listed and get a CORKSCREW.
- Take the SPECIAL ITEM #2.
- Exit the room via the bottom of the screen.
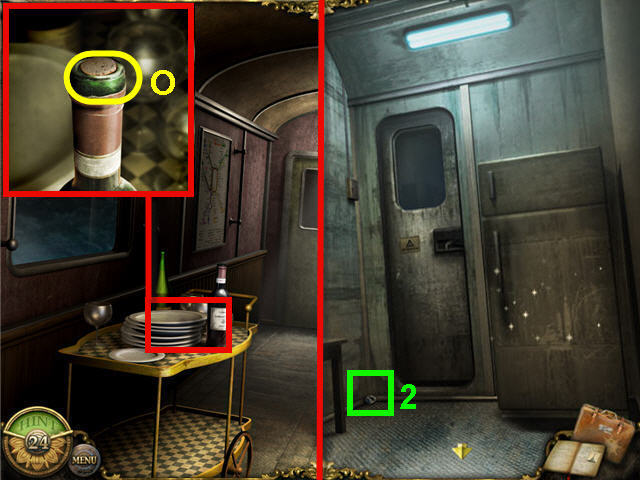
- Click on the service cart to get a close-up.
- Use the CORKSCREW on the bottle to get a CORK (O).
- Click on the door to the dining coach.
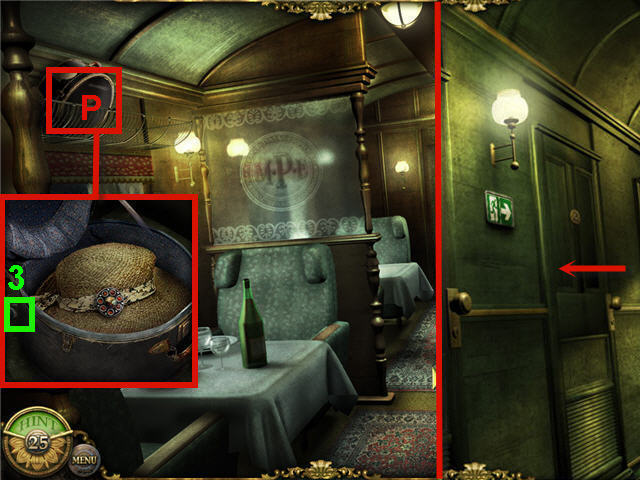
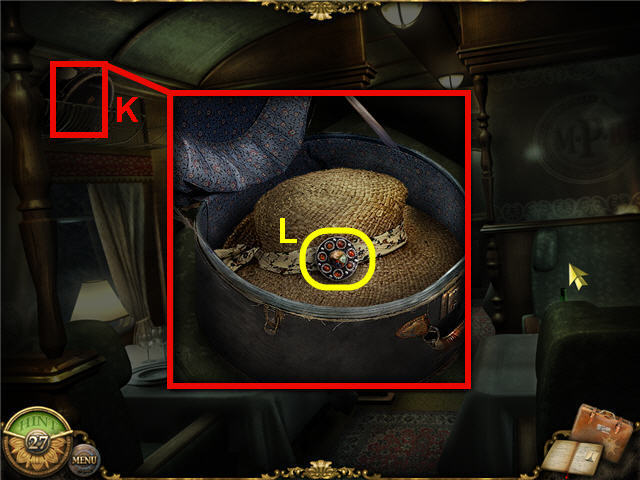
- Click on the hat case (P) to get a close-up.
- Note the brooch.
- Take the SPECIAL ITEM #3.
- Head through the door up the aisle to cabin coach 1.
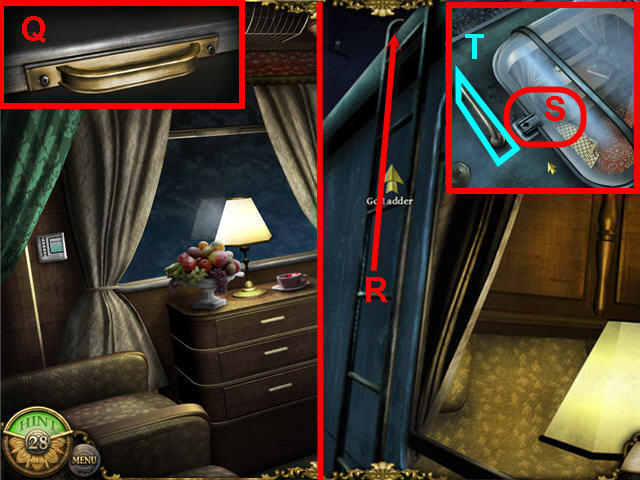
- Enter Cabin 2 on the left.

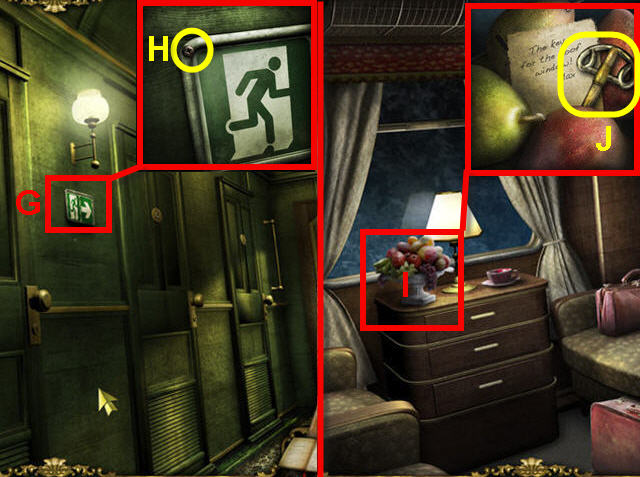
- Click on the sign (Q).
- Click on the window and note the handle is missing.
- Click on the drawer to get a close-up.
- Click on the book (R) and take the GLOVE (S).
- Exit the cabin and look close at the sign outside the door (T) and note the screws.
- Exit via the bottom of the screen or access the map to get to the dining car.
- Click on the table on the left to access a hidden object scene.
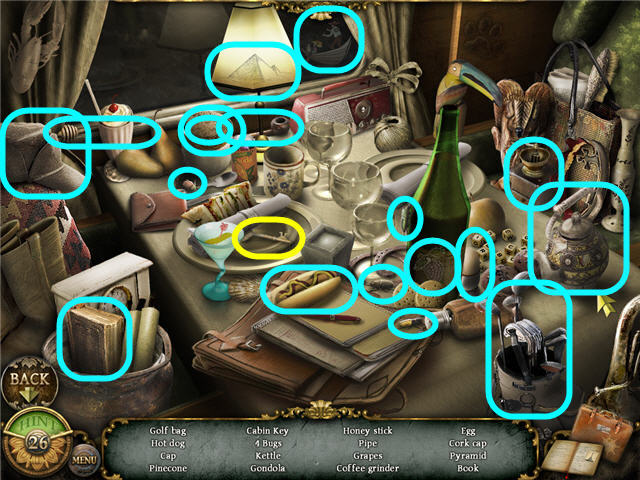
- Find the items listed and get a CABIN KEY.
- The pinecone is in the cup under the cork cap if this is on your list.
- Head straight through the train 2 times to Cabin Coach 2.
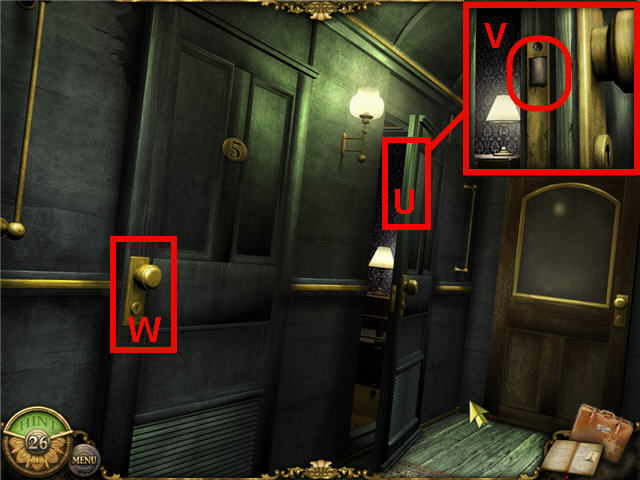
- Click on the open door (U) to get a close-up.
- Use the CORK on the latch (V) on the door.
- Use the CABIN KEY on Cabin #5 (W).
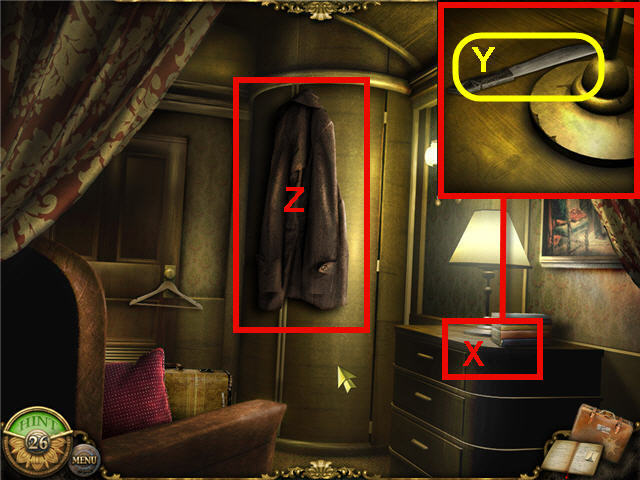
- Click on the cabinet (X) to get a close-up.
- Take the KNIFE (Y).
- Click on the coat (Z).
- Click on the lock on the bathroom and note you need a key.
- Exit the room via the bottom of the screen and go through the main door on the right to the conductor’s office.
- Click on the desk to access a hidden object scene.
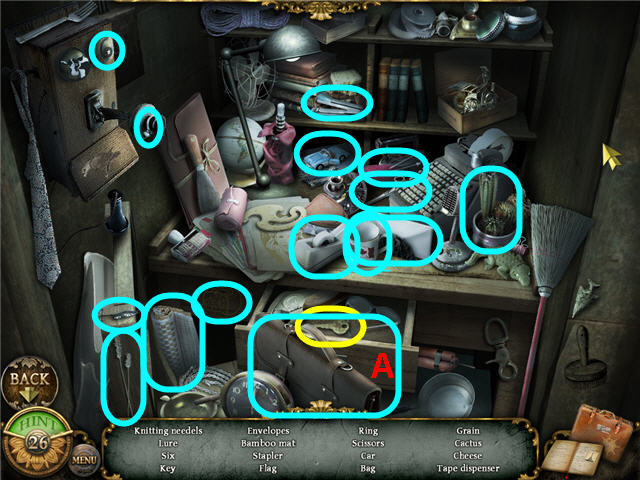
- Find the items listed and get a KEY.
- Open the drawer (A) to find the items listed in blue.
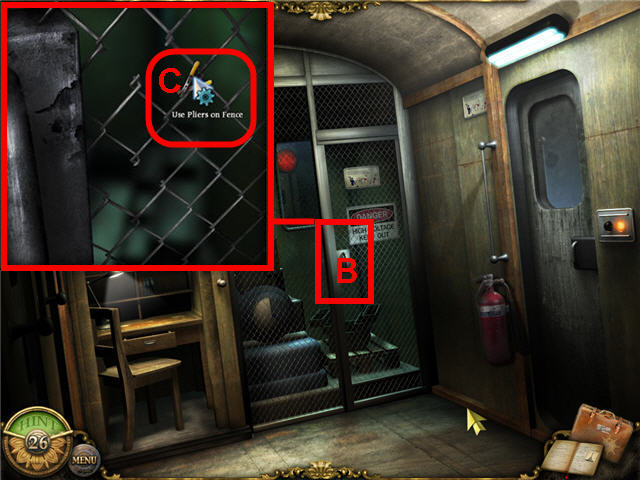
- Click on the high voltage area (B) to get a close-up.
- Use the PLIERS on the links to make a hole.
- Move your cursor around the links and cut everywhere you get a blue gear (C).
- Click on the toolbox behind the opened gate to access a hidden object scene.
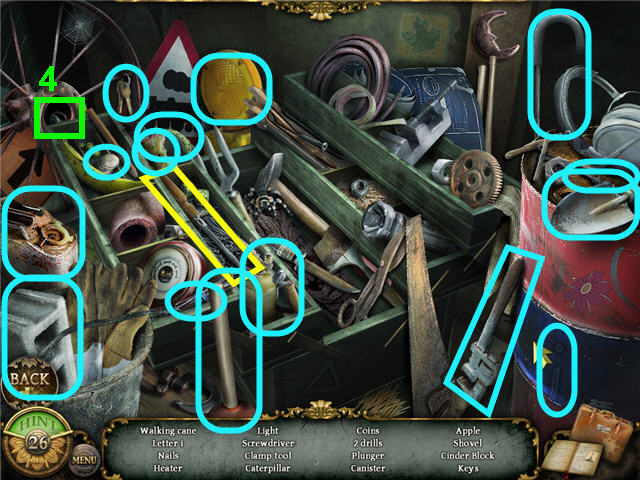
- Take the SPECIAL ITEM #4.
- Find the items listed and get a SCREWDRIVER.
- Exit the room and enter cabin 5.
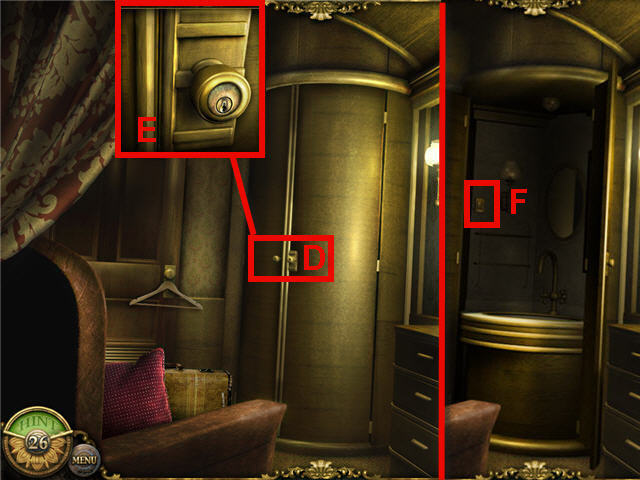
- Click on the bathroom door (D) to get a close-up of the lock.
- Use the KEY on the lock (E).
- Push the light switch (F) to turn on the light.
- Click on the bath tub to access a hidden object scene.
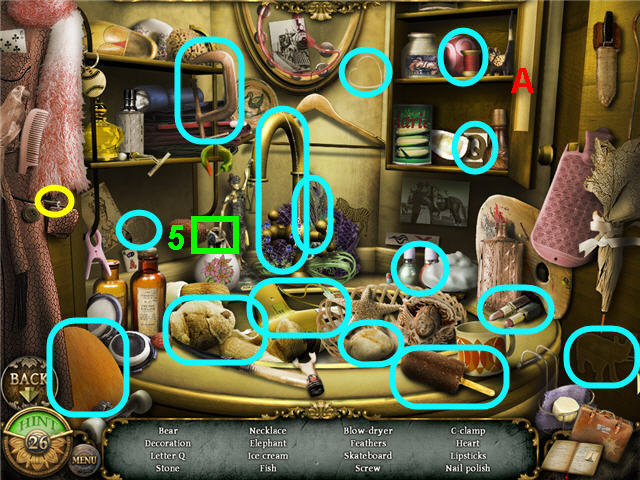
- Take the SPECIAL ITEM #5.
- Find the items listed and get a SCREW.
- Click on the cabinet door (A) to find the items listed in blue.
- Access the map and click on cabin coach I.
- Click on the sign (G) to get a close-up.
- Use the SCREWDRIVER on the screw and get the second SCREW (H).
- Enter cabin # 2 next to the sign.
- Click on the fruit bowl (I) and take the ROOF KEY (J).
- Access the map and click on the kitchen cart.
- Enter the storage room on the right.
- Click on the shelves to access a hidden object scene.
- Find the items listed and get a ROPE.
- Access the map and click on the dining cart.
- Click on the hat case in the upper rack (K).
- Use the KNIFE on the BROOCH (L) and take it.
- Access the map and click on cabin coach II and enter cabin #6.
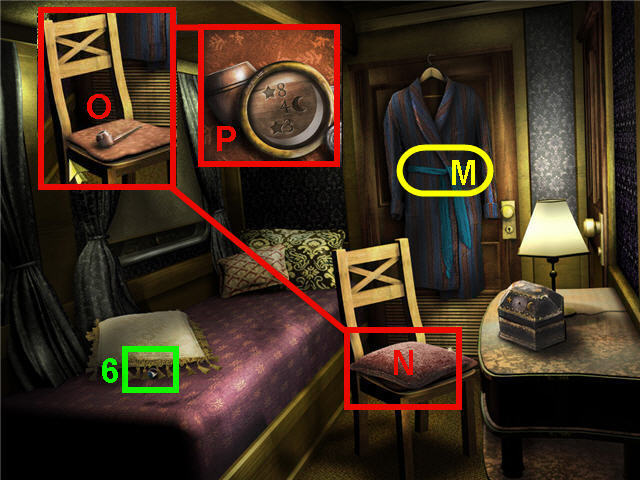
- Take the SPECIAL ITEM #6.
- Use the KNIFE on the robe’s belt to get a BELT (M).
- Click on the pillow (N) on the chair to move it and expose a pipe.
- Click on the pipe (O) and use the LOUPE on it.
- Click on the strange symbols (P) and get a NOTE.
- Examine the chest on the table and note the missing piece.
- Access the map and click on the conductor’s office.
- Click on the desk to access a hidden object scene.
- Find the items listed and get a HANDLE (4).
- Access the map and click on cabin coach I.
- Enter cabin #2.
- Click on the window to get a close-up.
- Place the HANDLE (Q) on the close-up.
- Place the SCREW and SCREW on the holes in the HANDLE.
- Use the SCREWDRIVER on both of the SCREWS.
- Click on the window a few times until you can access the ladder (R).
- Head up the ladder and go forward one time.
- Check out the handle (T) and note that it is strong.
- Use the ROOF KEY on the lock (S).
- Place the ROPE on the handle (T) and enter the cabin.
- Click on the painting to access a hidden object scene.
- Find the items listed and get JASILIS NOTE.
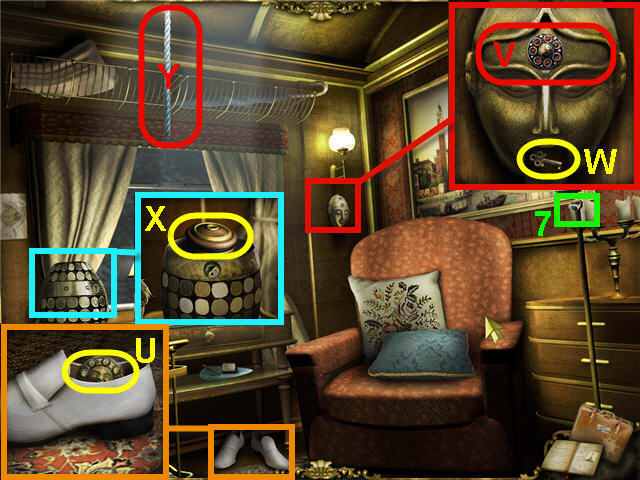
- Click on Jassilis shoes and take the SUN BROOCH (U).
- Take the SPECIAL ITEM #7.
- Click on the mask to get a close-up.
- Use the BROOCH on the forehead (V) of the mask and take the KEY (W).
- Click on the vase.
- Use the KEY on the keyhole and click on the top of the vase above the keyhole to remove it.
- Take the CAPSULE 2 (X).
- Click on the rope (Y) hanging from the ceiling.
- Use the BELT on the rope (Y).
- Use the GLOVE on the BELT/Rope.
- From the roof of the train, access the map and click on cabin coach II.
- Enter cabin 6.
- Click on the chest (Z) on the table.
- Place the SUN BROOCH between the star and the moon.
- Using the NOTE as your clue;
- Turn the brooch/dial so that the 8 is facing the star and click the button underneath (1).
- Turn the dial so that the 4 is facing the moon and click the button underneath (2).
- Turn the dial so that the 3 is facing the star and click the button underneath (3).
- Take the ID CARD (A) from inside the now opened chest.
- Access the map and click on the luggage cart.
- Click on the door on the left to get a close-up.
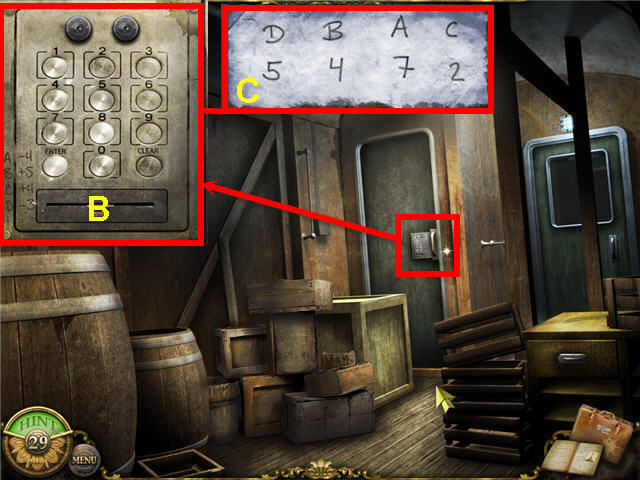
- Place the ID CARD in the slot (B) under the keypad.
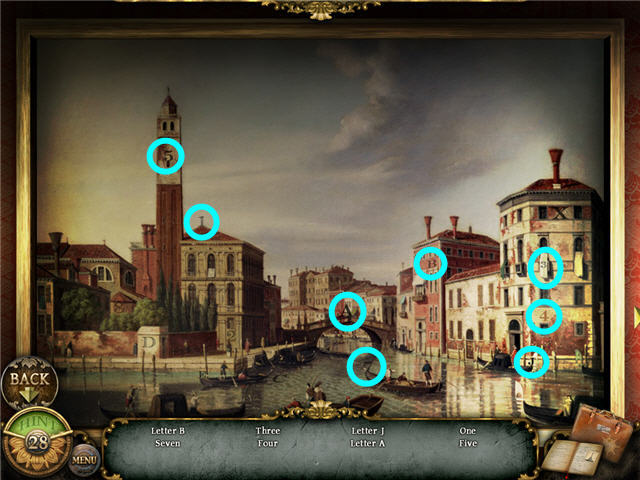
- Add/Subtract the numbers from JASILIS NOTE (C) with the letter/number combo on the bottom left of the keypad as your clue and key in the 4 digit code.
- Press the enter key on the bottom left on the keypad when you have entered the code.
- The solution is; A is 7-4=3, B is 4 +5=9, C is 2+4=6, D is 5-3=2. The code is 3962.
Chapter 5: Grandfather’s House, Paris
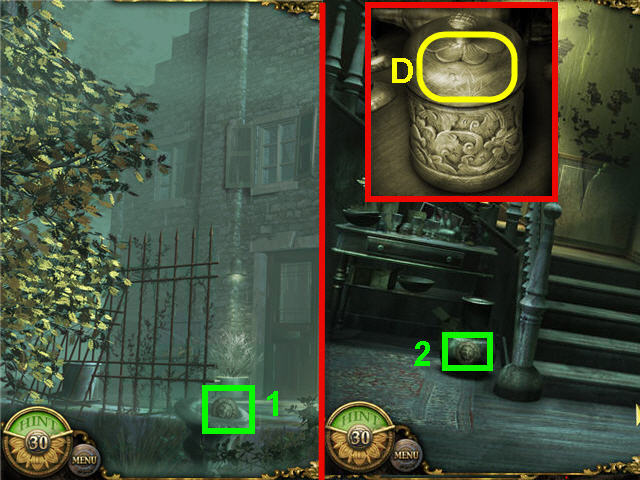
- Take the SPECIAL ITEM #1.
- Enter the house and click on the desk to get a close-up.
- Click on the container lid (D) and take the CYAN GEM.
- Take SPECIAL ITEM #2.
- Head up the stairs.
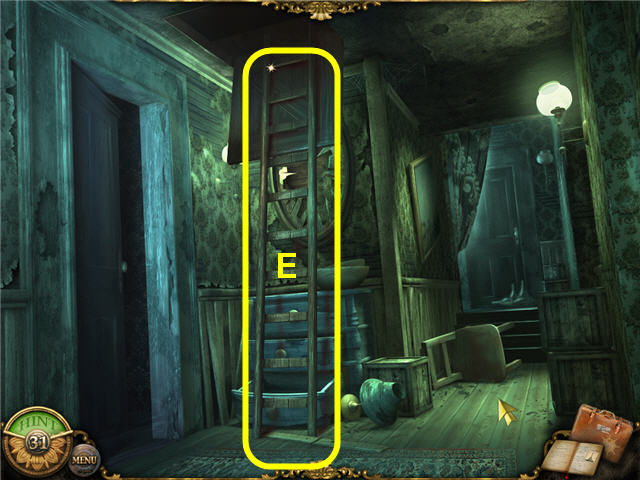
- Take the LADDER (E).
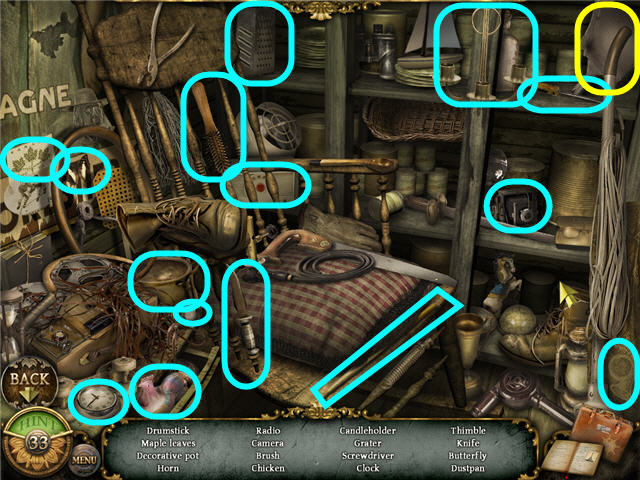
- Click on the dresser to access a hidden object scene.
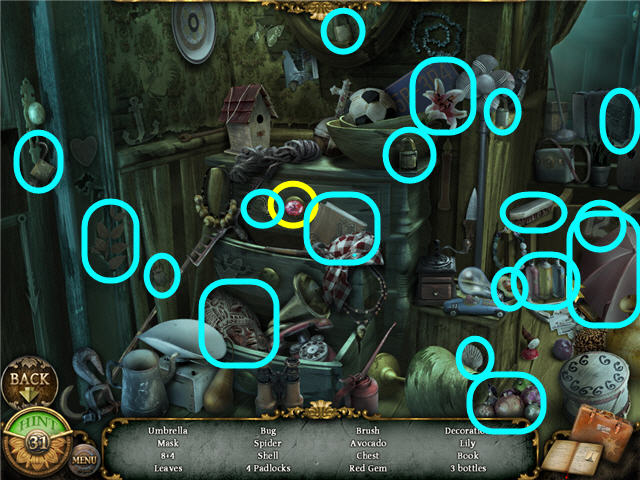
- Find the items listed and get a RED GEM.
- Enter the bedroom on the left.
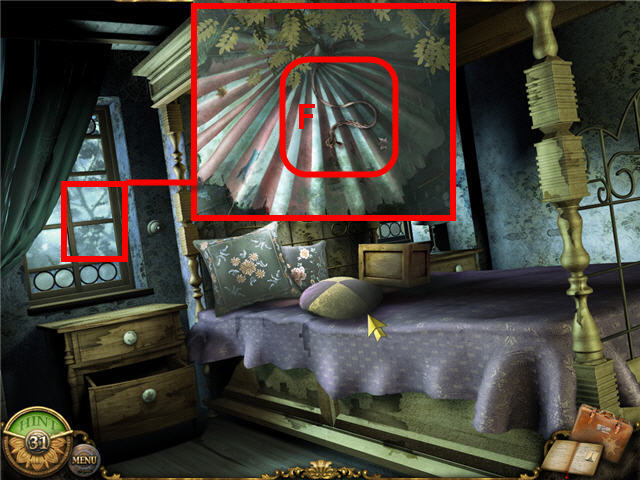
- Click on the window to open it and click again to look outside.
- Click on the rope (F) on the umbrella but you can’t reach it yet.
- Head back inside the window.
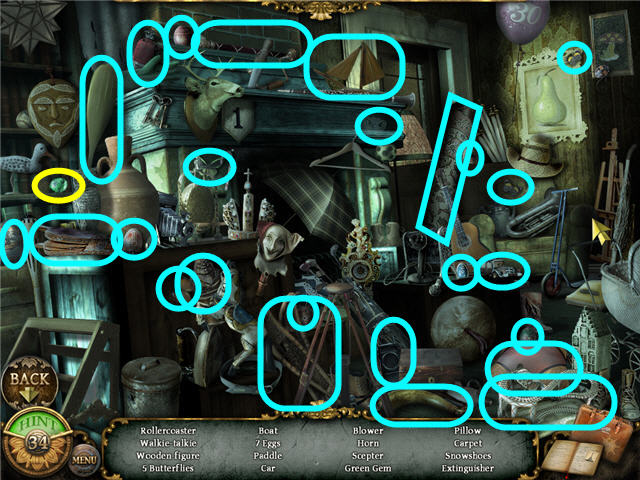
- Click on the bed to access the hidden object scene.
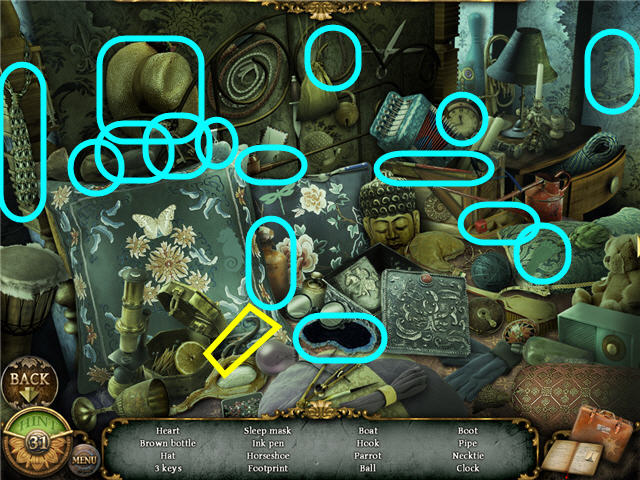
- Find the items listed and get a HOOK.
- Click on the window and use the HOOK on the rope but it is too short.
- Exit the room and head up the hall to the upper floor east.
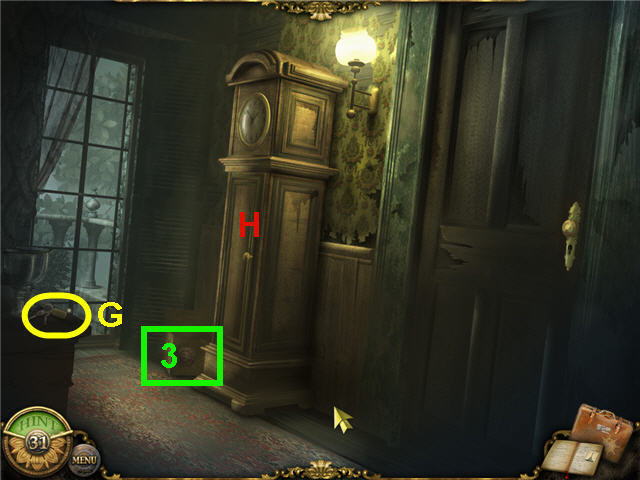
- Take the CAR KEYS (G) from the top of the cabinet.
- Take the SPECIAL ITEM #3.
- Click on the grandfather clock (H) to open it and click again to note the missing gears.
- Back out of the puzzle and click on the door to the right but note it is locked.
- Click on the doors to the balcony to exit.
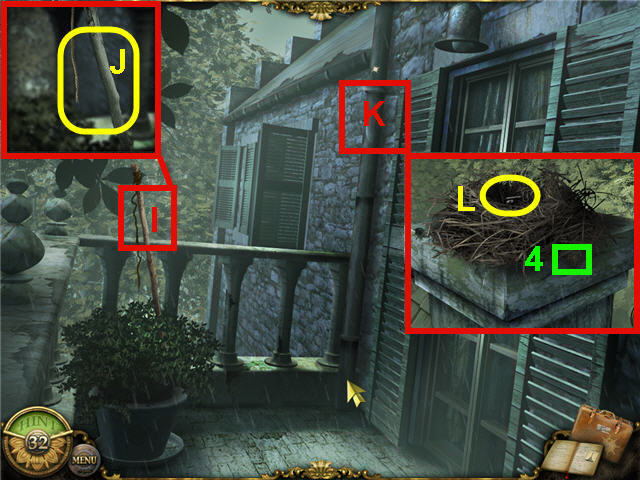
- Click on the fishing angle (I).
- Use the HOOK on the rope (J) from the fishing angle to get a FISHING ANGLE.
- Click on the rain pipe and use the LADDER on it (K).
- Climb the LADDER and take the KEY (L) from the nest.
- Take the SPECIAL ITEM # 4.
- Exit via the bottom of the screen.
- Enter in from the balcony and use the KEY on the door to the right of the grandfather clock.
- Click on the chair to access a hidden object scene.
- Find the items listed and get a DUSTPAN.
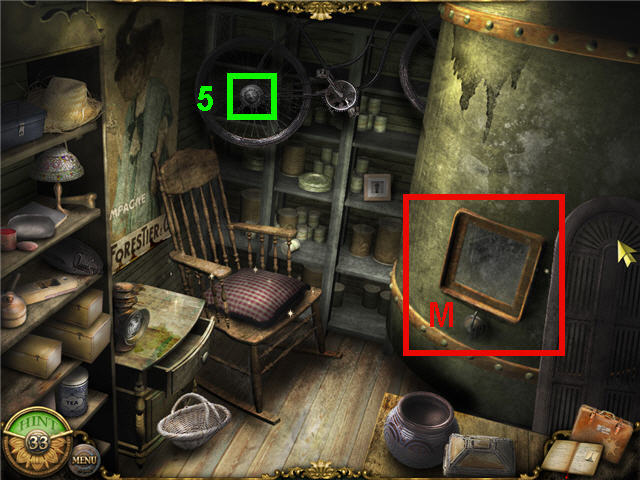
- Take the SPECIAL ITEM #5.
- Click on the boiler window (M) and see a key.
- Access the map and click on upper floor west.
- Enter the bedroom on the left and click on the window.
- Use the FISHING ANGLE on the rope on the umbrella and get the ROPE.
- Access the map and click on the entrance.
- Head right into the living room.
- Click on the chimney to access a hidden object scene.
- Find the items listed and get a GREEN GEM.
- Access the map and click on the terrace and go right to the backyard.
- Pick up the PLANK (N).
- Click on the domed birdbath to get a close-up.
- We don’t have everything we need to place the gems yet, so we’ll get back to this.
- Head down the stairs to the right towards the garage.
- Take the ROD (O).
- Click on the garage door (P) and note it’s stuck.
- Use the ROPE on the garage door; it will also stay in your inventory.
- Click on the car (Q) and use the ROPE on the trailer coupling (R) and watch the cut scene.
- Enter the opened garage.
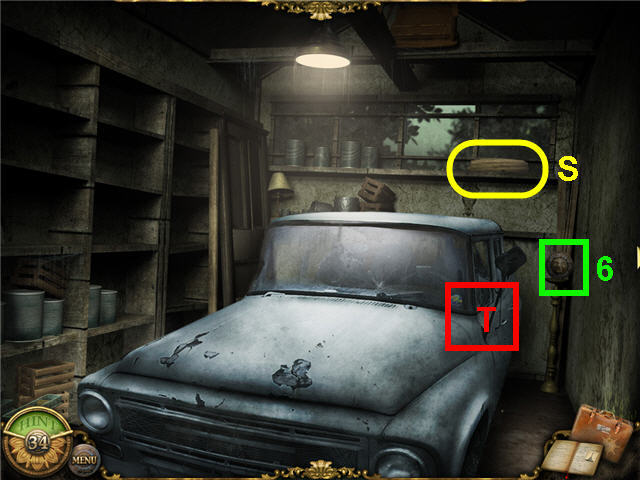
- Take the SPECIAL ITEM # 6.
- Take the PIECE OF WOOD (S).
- Use the CAR KEYS on the car door (T).
- Click on the unlocked car door to access a hidden object scene.
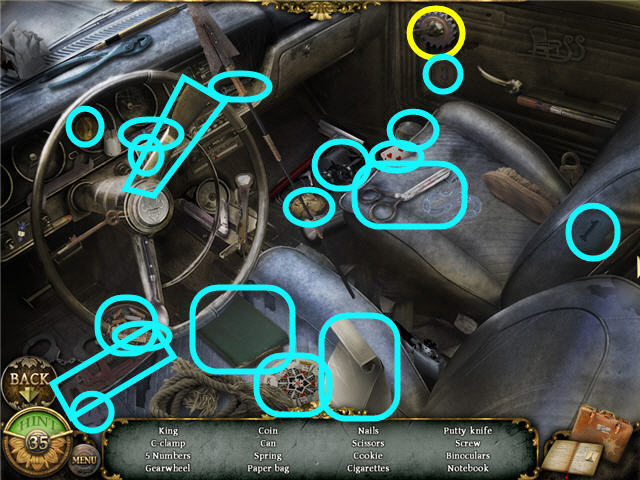
- Find the items listed and get a GEARWHEEL.
- Exit the garage and head to the right of the garage to go to the garden.
- Take the SPECIAL ITEM #7.
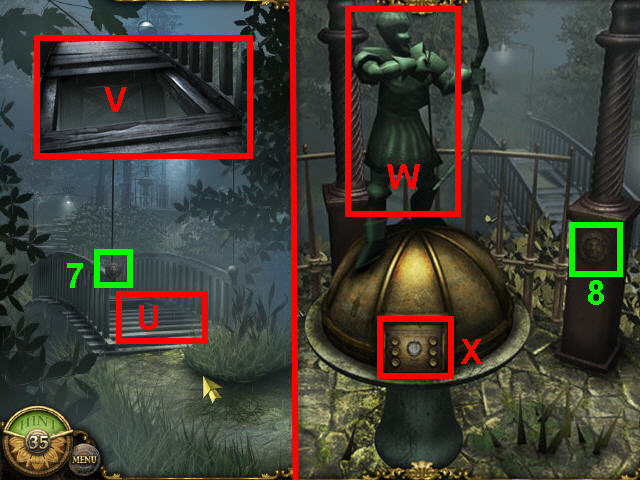
- Head towards the bridge on the left.
- Click on the hole in the bridge (U) and place the PLANK over the gap (V).
- Head forward two times.
- Take the SPECIAL ITEM #8.
- Click on the archer (W) and note he is missing his arrow.
- Note the control panel (X).
- The clue for the domed birdbath is written in the control panel; note the words in capital letters -RED, BLUE, GREEN).
- Back out of the puzzle and access the map and click on the backyard.
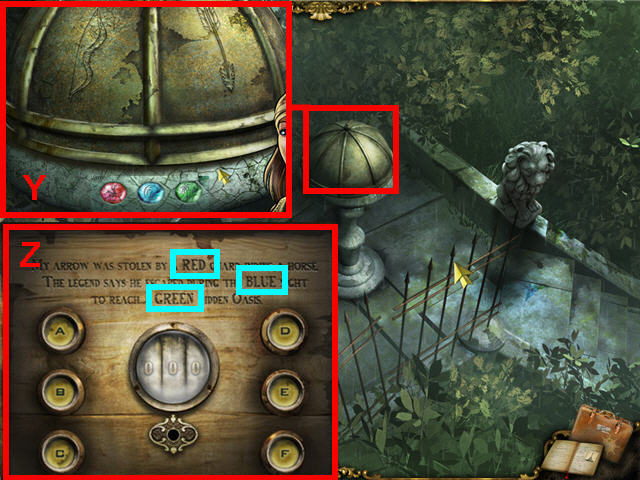
- Click on the domed birdbath (Y).
- Using the clue from the control panel of the archer (Z), place the 3 GEMS on the cavities on the base of the dome.
- The correct order from left is; RED GEM, CYAN GEM and GREEN GEM. See screenshot for solution.
- Click on the now opened dome to access a hidden object scene.
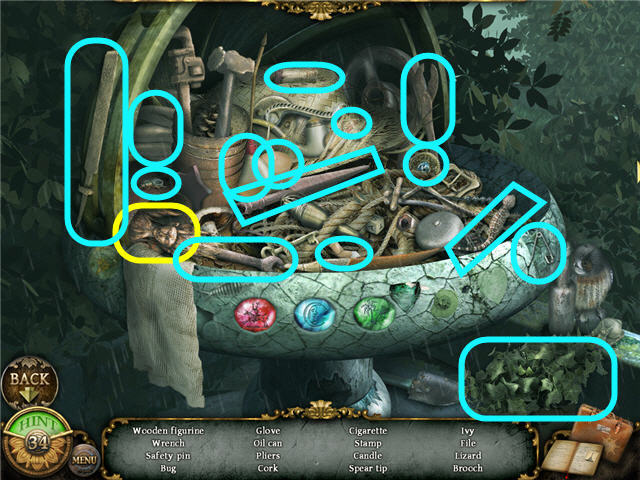
- Find the items listed and get a WOODEN FIGURINE.
- Access the map and head to the garden.
- Head to the right toward the graveyard.
- Take the 2nd GEARWHEEL (A).
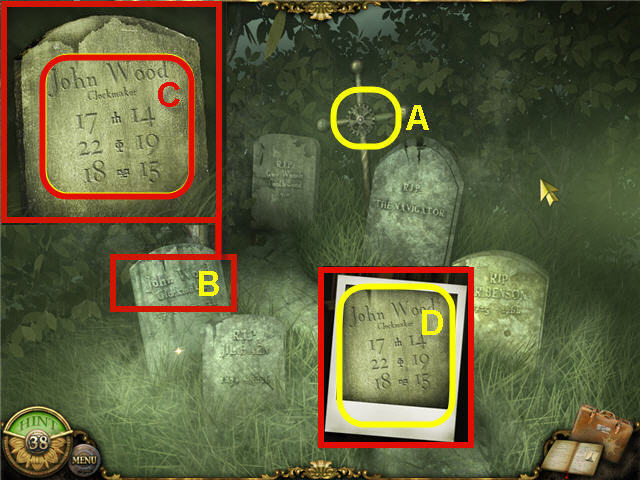
- Click on the tombstones.
- Click on the gravestone of John Wood (B) to get a close-up.
- Click on the inscription (C) a few times until you get a GRAVE PHOTO (D).
- Access the map and click on the living room.
- Click on the fireplace to get a close-up.
- Place the PIECE OF WOOD in the fireplace (E).
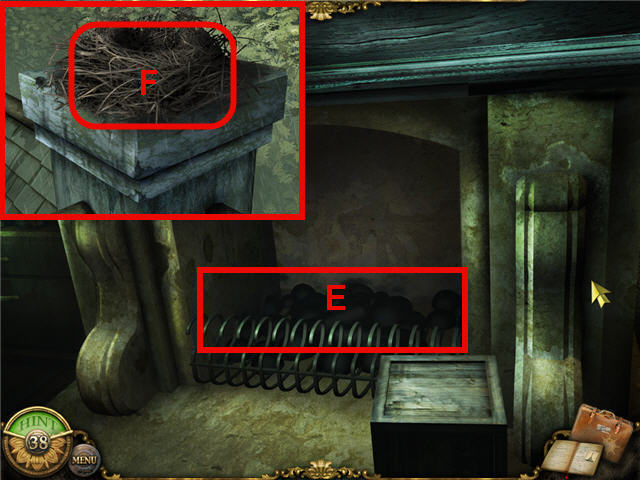
- Try and use the LIGHTER on the PIECE OF WOOD in the fireplace and note the nest is blocking the chimney.
- Access the map and click on the upper floor east.
- Exit through the French doors to the balcony.
- Climb up the ladder to the top of the chimney and use the DUSTPAN on the nest (F).
- Access the map and click on the living room.
- Click on the fireplace and use the LIGHTER on the PIECE OF WOOD.
- Use the WOODEN FIGURINE on the fire.
- Click on the chair in the corner of the room to access a hidden object scene.
- Find the items listed and get the 3rd and larger GEARWHEEL.
- Access the map and click on the upper floor east.
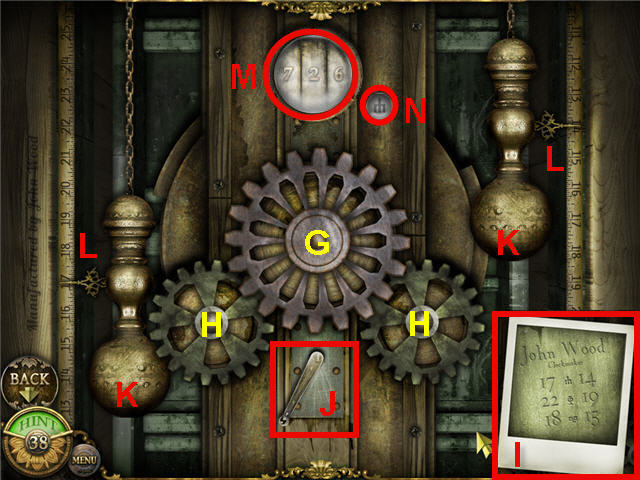
- Click on the grandfather clock to access a puzzle.
- Place the largest GEARWHEEL (G) on the center.
- Place the two remaining GEARWHEELS on the two spots (H) under the larger gear.
- The 2 lower GEARWHEELS will only go on a certain slot but there is no way to distinguish them, so if they do not work on one, place on the other.
- Use the GRAVE PHOTO (I) as your guide on how to set the weights and lever.
- Use the handle (J) on the bottom to change symbols (N).
- Use the weights (K) and the rulers (L) on the left and the right to set the numbers.
- If you pull the one on the left too far down, pull on the one on the right weight to pull it back up.
- Solution: with the handle on the bottom pointing left, pull the left weight down to 17 and the right will automatically be at the 14.
- Move the handle (J) to the middle position, pull left weight to the 22 and the right will be at 19.
- Move the handle to the right, and pull the left weight to 18 and the right will be at 15.
- When all 3 have been set correctly, the numbers at the top should state 726 (M).
- Click on the handle on the bottom to finish and get a SECRET NUMBER.
- Click on the storage room door to the right of the grandfather clock.

- Click on the boiler window (O) and use the ROD on the window (P).
- Take the SMALL KEY (Q).
- Access the map and click on the living room.
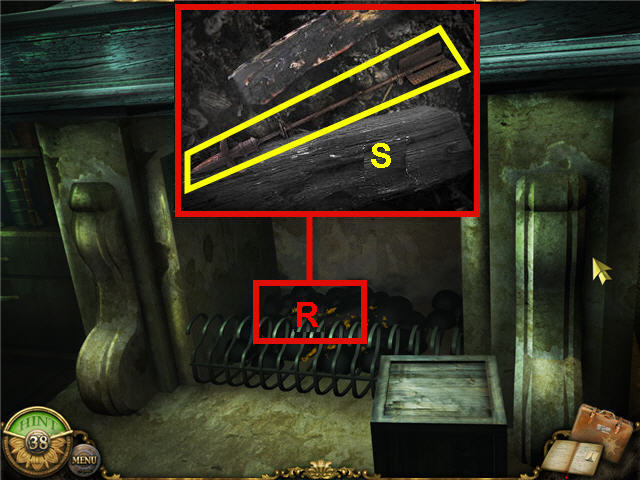
- Click on the fireplace to zoom in and click again to get a close-up.
- Take the ARROW (S).
- Access the map and click on the garden.
- Head forward over the bridge two times to the gazebo.
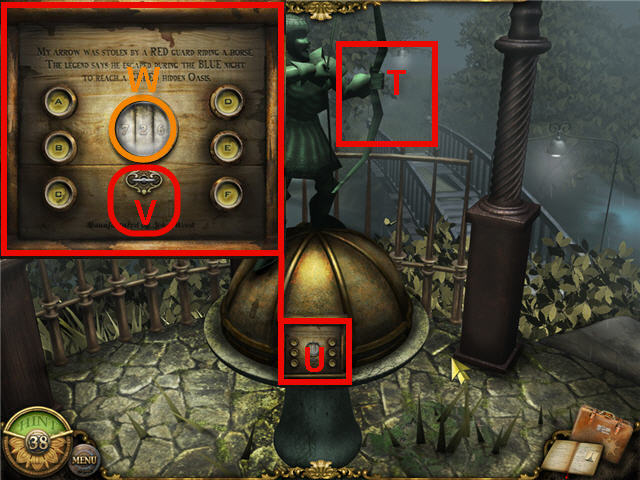
- Place the ARROW on the archer (T).
- Click on the control panel (U) and place the SMALL KEY in the keyhole (V).
- You can reset the puzzle anytime by clicking on the key.
- Each letter button increases the number in the center by a different amount.
- Use the SECRET NUMBER from the clock puzzle as your clue.
- Solution; Click the F button 16 times until the number in the center is 688.
- Click the E button 1 time until the number is 710; click the D button 3 times until the number is 725.
- Click the A button 1 time until you are equal to the SECRET NUMBER 726 (W).
- Turn the SMALL KEY and watch the cut scene.

- Access the map and click on the garden.
- Head to the right to the graveyard.
- Click on the gravestone by the arrow (X) and then click on the gravestone (Y) to trigger a cutscene.
Chapter 6: Venice, Italy

- You start the chapter with the WOODEN SWORD in inventory.
- Take the SPECIAL ITEM #1.
- Note the map of Venice on the left wall and the notebook on the table.
- Click on the books (Z) to the left of the cabinet to get a close-up.
- Take the SMALL KEY (A).
- Use the SMALL KEY on the cabinet (B).
- Click on the opened cabinet to get a close-up and take the PLIERS (C).
- Click on the shield on the bed and note the moon the in the center.
- Exit the room to the hall.
- Take the SPECIAL ITEM #2.
- Click on the vase (D) on the far end of the hall to get a close-up.
- Click on the close-up of the vase and get an ALLEN KEY (E).
- Turn right down the hall by clicking on the upper right of the screen.
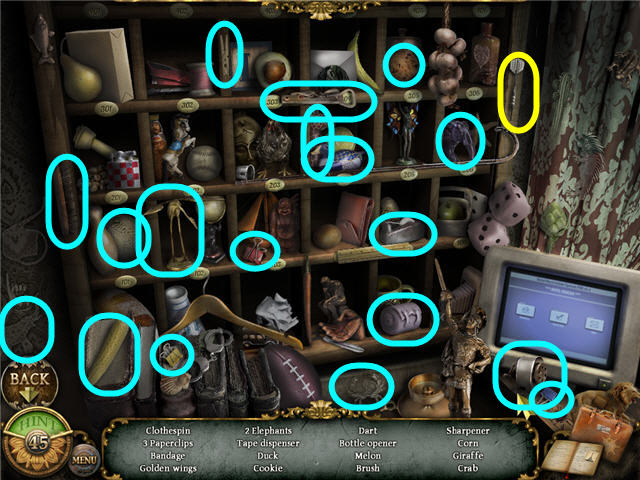
- Click on the mail slots to access a hidden object scene.
- Find the items listed and get a PASSWORD HINT.
- Take the SPECIAL ITEM #3.
- Click on the elevator door (F) and click on the control box (G).
- Use the ALLEN KEY on the box.
- Take the PENCIL (H) on the top of the control box and take the FLASHLIGHT (I) from inside the opened box.
- Click on the computer to get a close-up and click on booking. Note a password is needed.
- Exit the hotel via the door on the right to get to the alley.
- Go left over the bridge and click on the boat to access a hidden object scene.
- Find the items listed and get the NEWSPAPER SNIPPET.
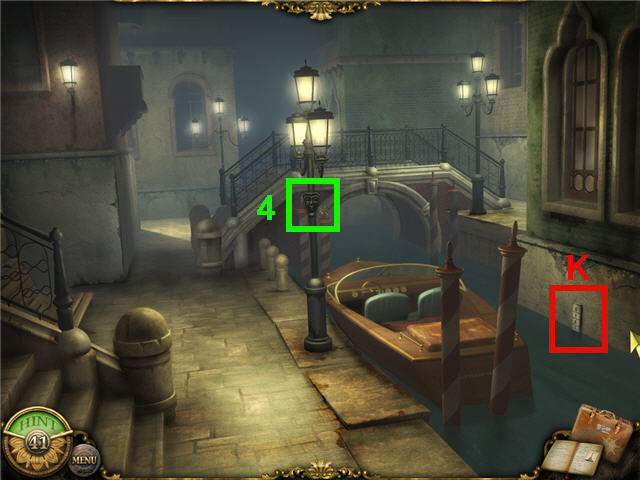
- Take the SPECIAL ITEM #4.
- Click on the water level (K) to note the level.
- Access the map and click on the hotel.
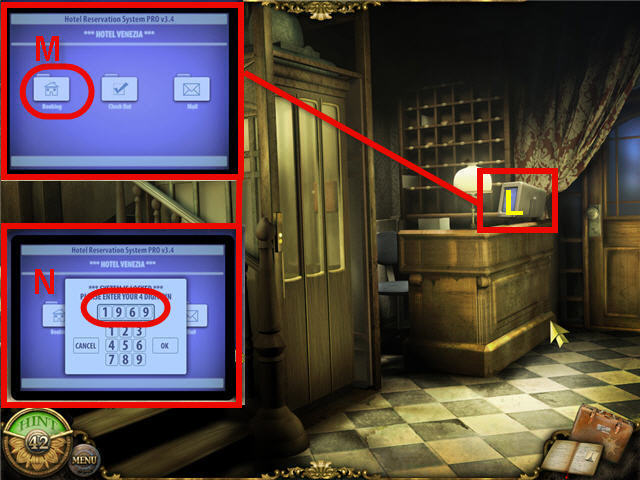
- Click on the computer (L) and click on booking to access the password panel.
- Using the 2 clues; PASSWORD HINT (year of birth) and NEWSPAPER SNIPPET (born in the year 1969) enter the password and click OK when complete.
- The solution is 1969 (N).
- Click on the Room 204, Viktor Jassili on the computer screen a couple times to trigger a conversation.
- Head upstairs and go into room 205.
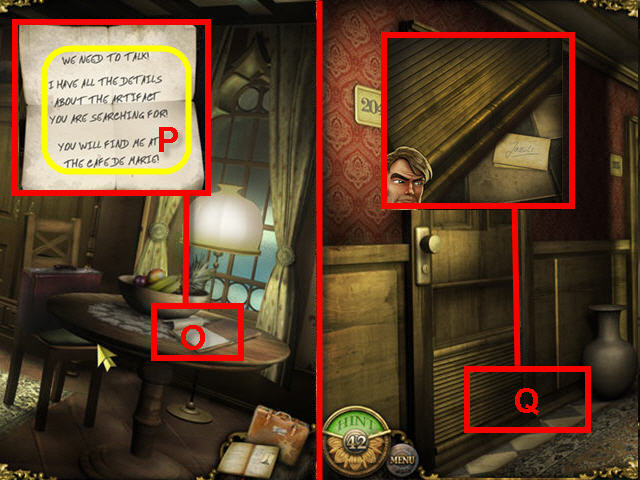
- Use the PENCIL on the notepad (O) on the table to get a LETTER FOR JASSILI (P).
- Exit the room to the hall.
- Place the LETTER FOR JASSILI on the bottom of the door (Q) on Room 204 and watch the cutscene.
- Access the map and click on hotel.
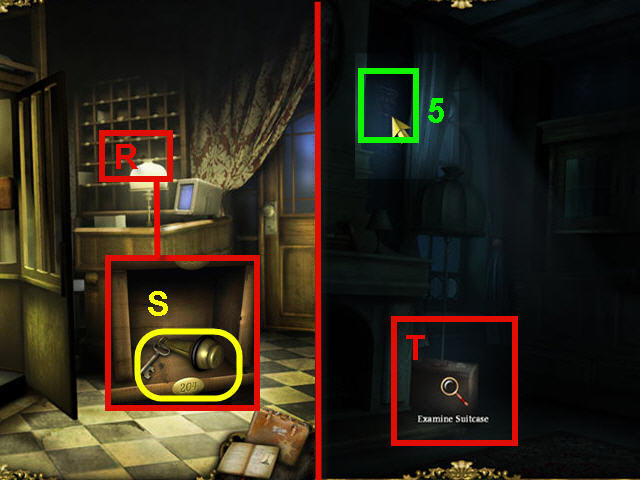
- Click on the mail slots (R) by the counter and take JASSILI’S KEY (S).
- Head upstairs and use JASSILI’S KEY on the door of Room 204.
- Take the SPECIAL ITEM #5.
- Click on the suitcase (T) to trigger a puzzle.
- The goal is to duplicate the placement of the 2 symbols in each of the 4 patterns (U) on the bottom in the same order by rotating the two knobs (V) on the left and right.
- After you have the symbols in the middle matching the placement of the one on the bottom, push the sliding lock (W) on the top and repeat for the next symbol.
- When complete the suitcase will open and you can access a hidden object scene.
- You will use a flashlight to find the objects.
- Find the items listed and get SOPHIE’S FAX.
- Exit the room to the hall.
- Enter Room 205 and converse with the professor.
- Click on the map of Venice on the wall to trigger a hidden object scene.
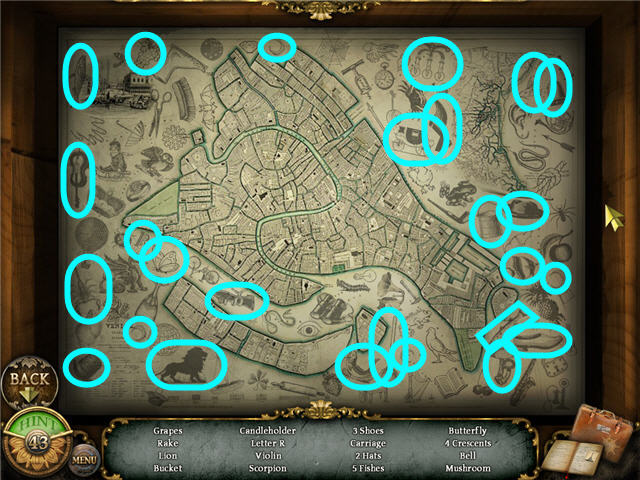
- Find the items listed and get a map entitled SUNS.
- Access the map and click on the alley.
- Click on the boat to trigger a conversation.

- Click on the water level (X) to the right of the boat and note it is on 7 (Y).
- Head straight ahead to the water gates.
- Note that the gate ID above the light is 12 (Z).
- Click on the control panel (A) on the left of the wall.
- Click on the left switch to adjust the water level to the level by the boat and click on the right switch to adjust it to the gate ID on the wall.
- Note that the shorter end of the dial is the one that needs to point in the direction of the number you want.
- The solution is water level – 7; Gate ID – 12.
- Push the button in the upper middle when you have the dials set correctly to lower the gate. See the screenshot (B) for solution.
- Exit via the bottom of the screen to the boat area.
- Enter the church.
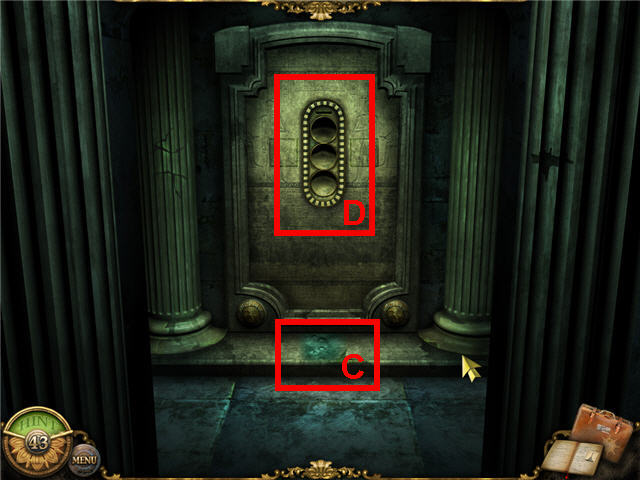
- Click on the floor (C) and note the engravings.
- Click on the slots in the door (D) and click on the moon in the center.
- Access the map and click on the alley.
- Click on the boat after docking to access a hidden object scene.
- Find the items listed and get a DAGGER.
- Access the map and click on the hotel.
- Head upstairs and left into Room 205.
- Click on the shield (E) and use the DAGGER on the center of the shield (F).
- Take the STONE DISK (G).
- Access the map and click on San Barnaba.
- Head into the church and click on the ornament/slots to get a close-up.
- Place the STONE DISK in the center slot (H) and unlock the location library.
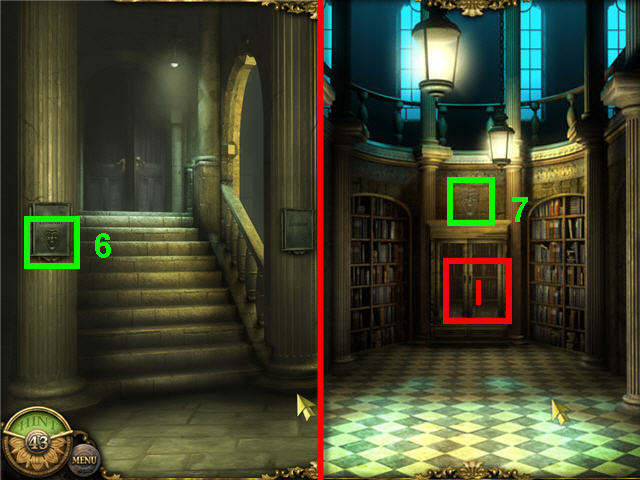
- Take the SPECIAL ITEM #6.
- Enter into the library.
- Take the SPECIAL ITEM #7.
- Click on the cabinet (I), click again on the lock and note you need a way to open the lock.
- Access the map and click on the hotel.
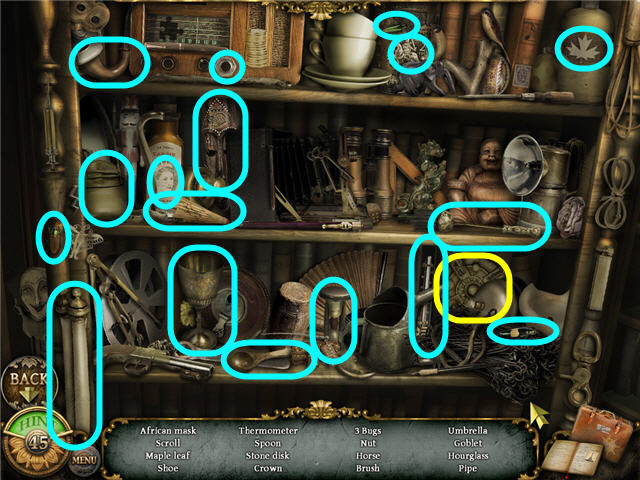
- Click on the mail slots to access a hidden object scene. .
- Find the items listed and take the DART.
- Head upstairs.
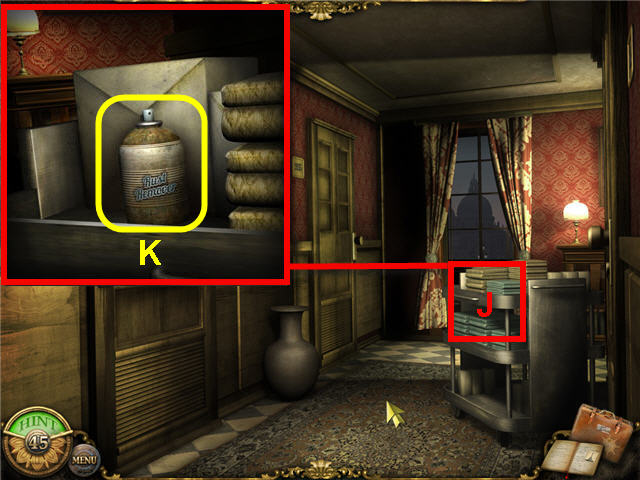
- Click on the housekeeping cart (J) to get a close-up.
- Take the RUST REMOVER SPRAY (K).
- Access the map and click on the library.
- Enter up the stairs into the library.
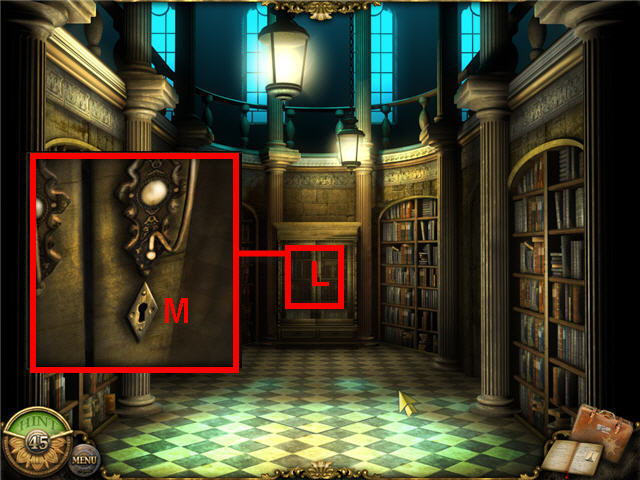
- Click on the cabinet (L) to get a close-up; use the DART on the lock (M).
- Find the items listed and get a STONE DISK.
- Access the map and click on San Barnaba.
- Enter the church.
- Click on the ornament/slots and place the STONE DISK on the bottom slot.
- Head to the Old Palazzo.
- Take the SPECIAL ITEM #8.
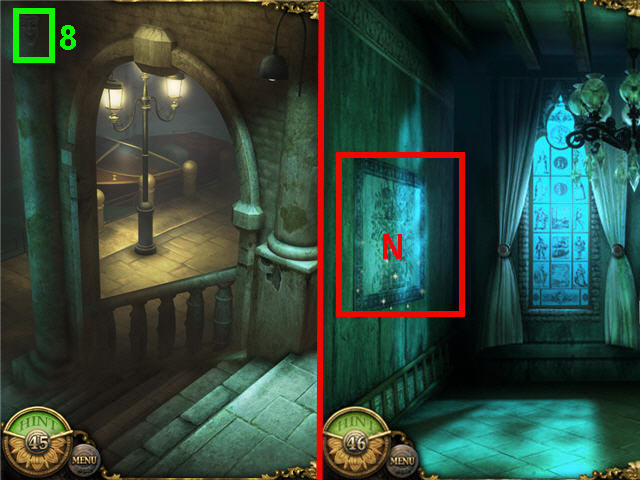
- Enter the Palazzo Fiscarini.
- Click on the tile wall (N) on the left to access a hidden object scene.
- Find the items listed and get a WALL TILE.
- Click on the lowered lamp (O) to get a close-up.
- Use the RUST REMOVER SPRAY on each of the 3 nuts (P).
- Use the PLIERS on each of the 3 cleaned nuts and take the STONE DISK (Q).
- Access the map and click on San Barnaba.
- Enter the church.
- Click on the ornament/slot in the center and place the STONE DISK on the top slot.
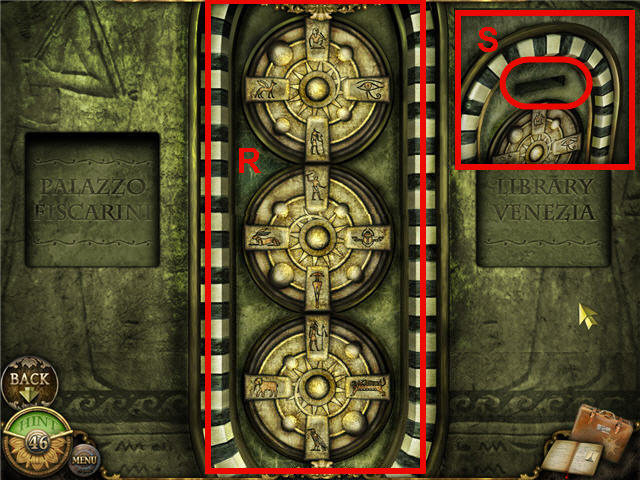
- Rotate the disks by clicking on the centers until all of the glyphs on the 4 corners of each are upright. See screenshot (R) for solution.
- Back away from the wall and click on the stone disks again to get a close-up of the slot above the disks.
- Place the WOODEN SWORD in the slot (S) and watch the cutscene.
- Walk down the newly opened tunnel.
- Automatically get a RED CAPSULE in inventory.
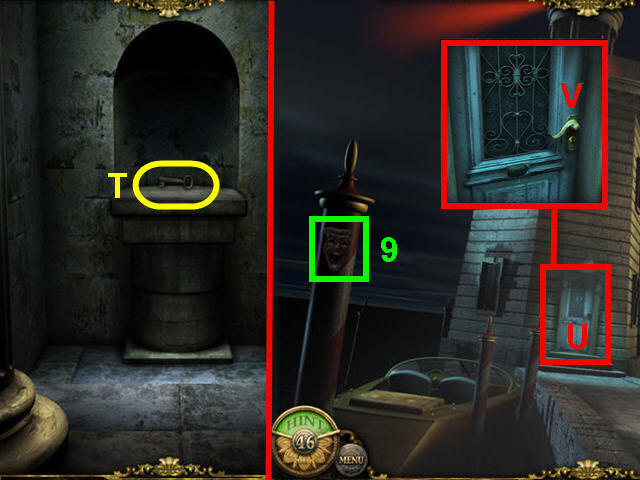
- Take the KEY (T) and automatically head to the lighthouse.
- Take the SPECIAL ITEM #9.
- Click on the door (U) to the lighthouse and use the KEY on the keyhole (V).
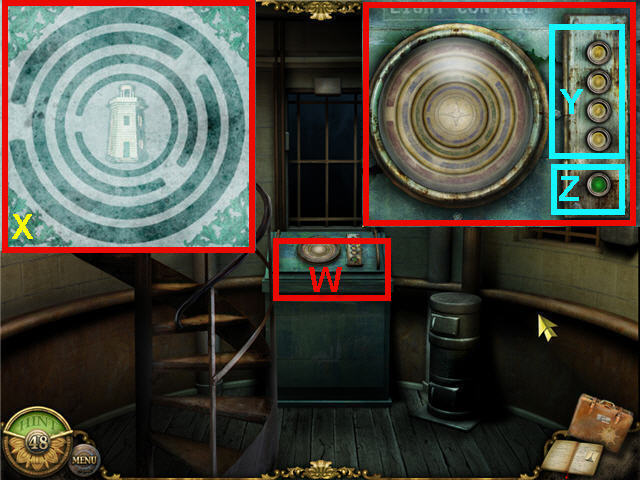
- Click on the control panel (W) to access a puzzle.
- Use the WALL TILE (X) in inventory as your guide.
- Note where the gaps in the rings are in the WALL TILE and use the buttons (Y) on the right of the control panel to rotate the rings to match.
- The solution is; Push the top button 2 times; Push the 2nd button 5 times; Push the 3rd button 7 times; Push the 4th button 2 times.
- When the rings in the control panel are in the same position as the one on the WALL TILE, click the green button (Z) and watch the cutscene.
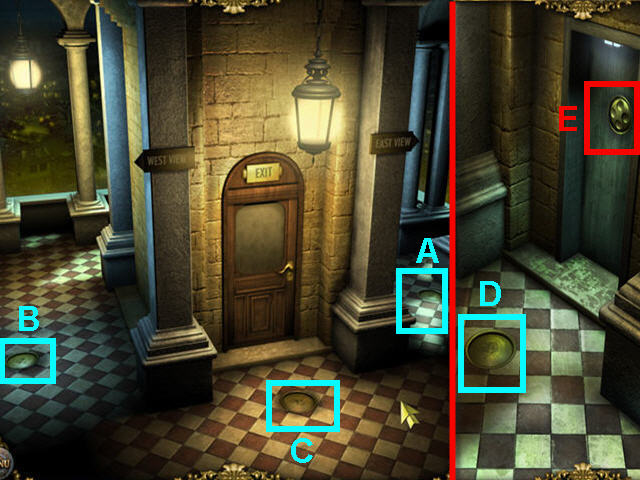
- Click on the medallions inlaid on the floor on the East (A), West (B), South (C) and North (D) which can be accessed by clicking down the west corridor.
- While in the north position, click on the door (E) to get a close-up.
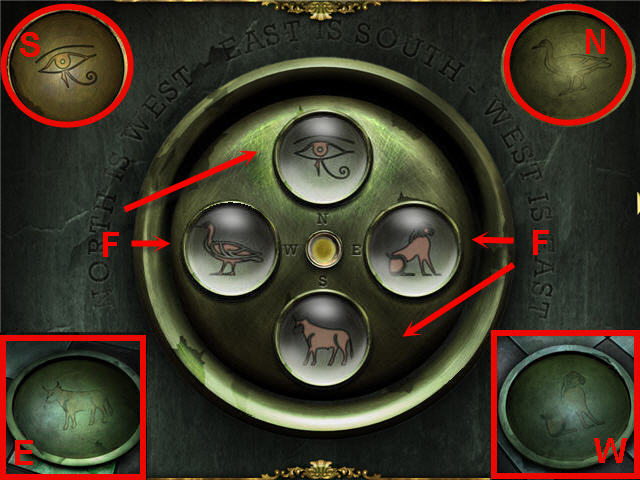
- Use the 4 floor medallions (marked in the screenshot N-S-W-E as they were on the floor) as your guide to solve the puzzle.
- Note the 2nd clue on the inscription around the center that states “North is West, East is South, West is East”.
- Click on any circle (F) to activate it and then click on the gold center button to change the picture. Do this for the north, south, east and west buttons.
- The finished circle will not be activated with a glyph while you are working on the next one.
- The solution is; South is the bull, West is the duck, North is the eye and East is the lion. See screenshot for solution.
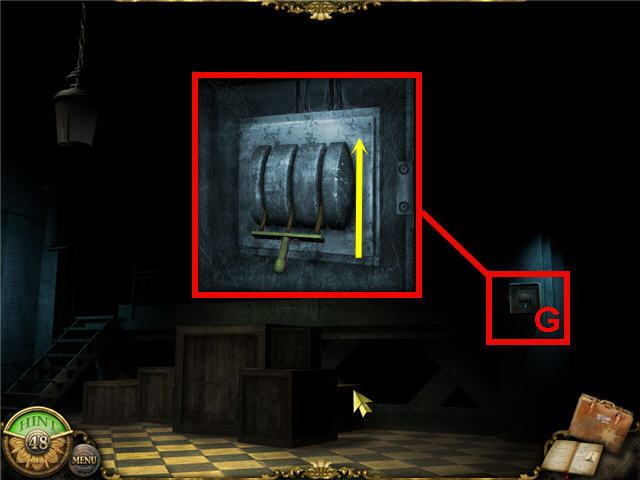
- Head up the winding stairs.
- Click on the switch (G) and flip the switch up.
- Enter the airship and get a POCKET WATCH from the professor.
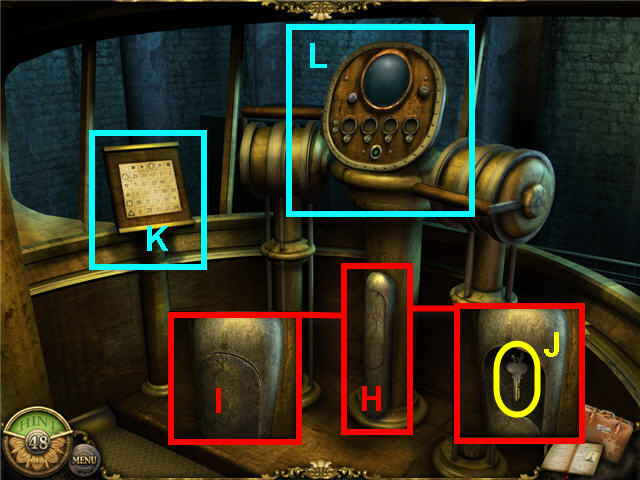
- Click on the slot (H) under the control panel.
- Click on the panel (I) in the front to open it and take the ENGINE KEY (J).
- Click on the instructions on the left (K).
- Click on the control panel (L) to get a close-up.
- Insert the ENGINE KEY in the ignition (M).
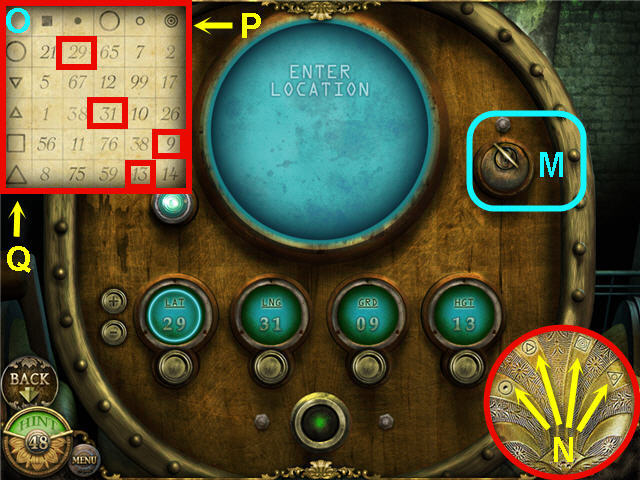
- Use the 4 inscriptions (N) on the POCKET WATCH and the instruction panel (O) to the left of the control panel as your guide to find the right coordinates.
- The inscriptions on the POCKET WATCH are comprised of two symbols; one inner and one outer.
- The inner symbol needs to be matched with a symbol on the top row (P) of the instructions and the inner symbol needs to be matched with the left column (Q) on the instructions.
- The number that is located where the column and row meet is the correct coordinate.
- Enter the 4 coordinates into the control panel in the order of the symbols on the POCKET WATCH, not the order of the columns in the instruction panel.
- Click on the button under the dial that you wish to change in order to activate it and then use the +/- signs on the left to enter the number. Repeat for all 4 dials.
- The solution from left to right is; 29-31-9-13.
- Click the green button on the bottom of the control panel after the coordinates have been entered and watch the cutscene.
Chapter 7: The Temple of Isis
- You begin the chapter with a BLUE CAPSULE, GREEN CAPSULE, RED CAPSULE, and a MYSTERY KEY in your inventory.
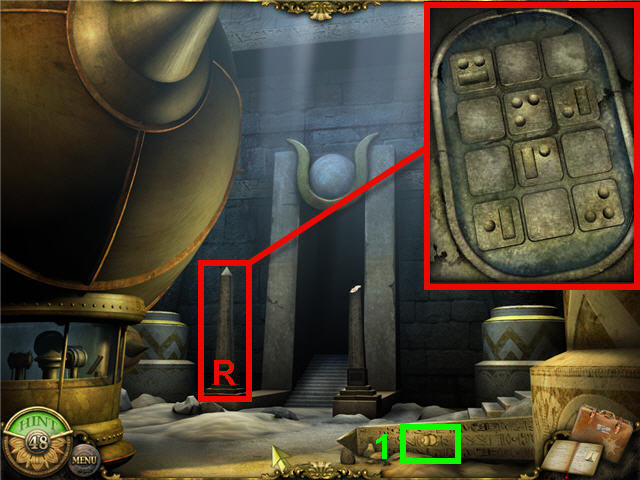
- Take the SPECIAL ITEM #1.
- Click on the Obelisk (R) on the left of the entranceway two times to get a PHOTO.
- Enter into the temple.
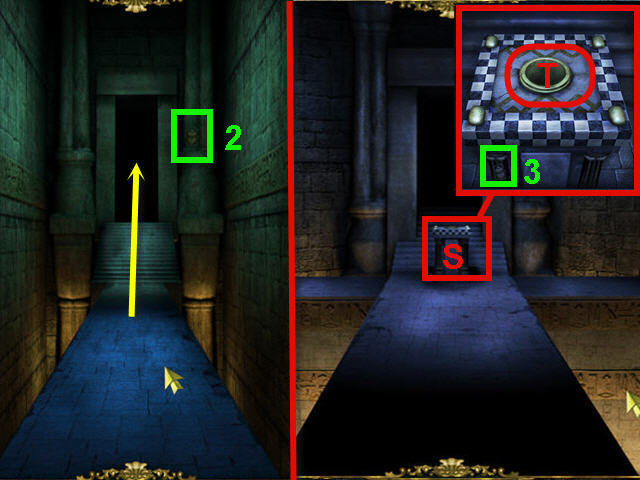
- Take the SPECIAL ITEM #2.
- Head straight through to the next room.
- Click on the table (S) to get a close-up and take the SPECIAL ITEM #3.
- Place the BLUE CAPSULE in the center of the table (T) and watch the cutscene.
- Enter down the hall to the left.
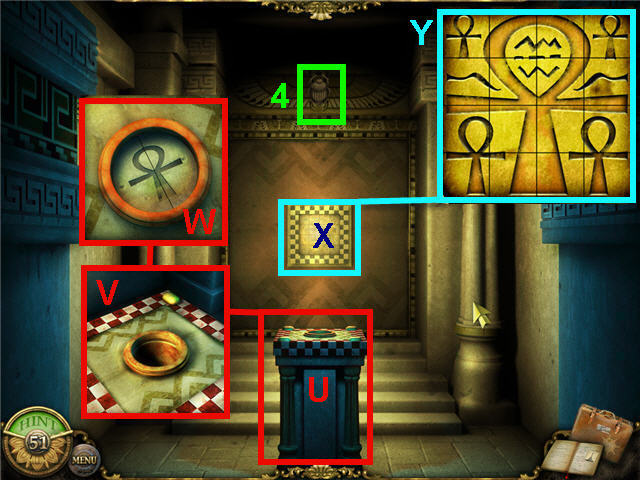
- Take the SPECIAL ITEM #4.
- Click on the table (U) in the center of the room and place the RED CAPSULE in the center (V).
- Note the ankh that appears (W).
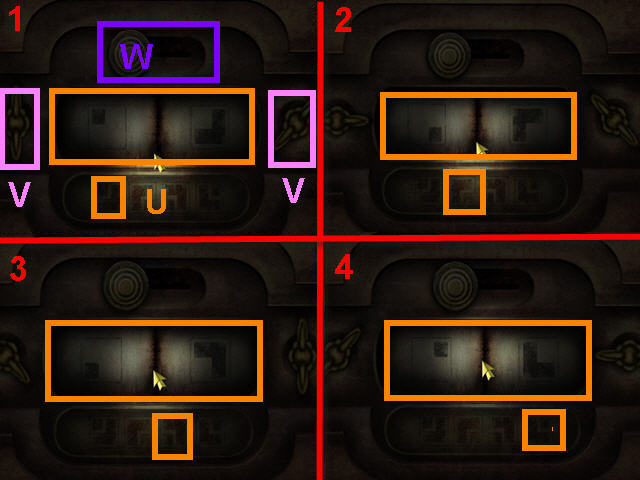
- Click on the tiles (X) on the back wall to trigger a puzzle.
- The goal is to click on the individual tiles to complete the picture.
- The tiles do not switch positions; you only need to click on them until you get the desired tile in that spot. See screenshot (Y) for solution.
- Exit the room via the bottom of the bottom of the screen.
- Enter down the hall to the right.
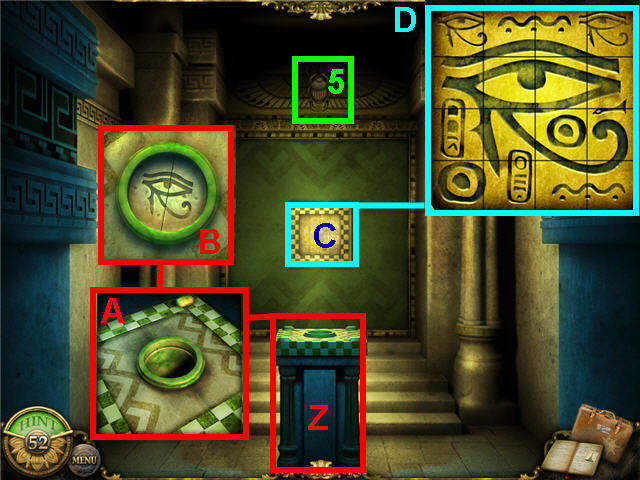
- Take the SPECIAL ITEM #5.
- Click on the table (Z) in the center of the room to get a close-up.
- Place the GREEN CAPSULE in the center (A).
- Note the Eye of Ra (B) that appears.
- Click on the tiles (C) on the back wall to trigger a puzzle.
- The goal is to click on the individual tiles to complete the picture.
- The tiles do not switch positions; you only need to click on them until you get the desired tile in that spot. See screenshot (D) for solution.
- Exit the room via the bottom of the bottom of the screen.
- Head straight into the blue hallway.
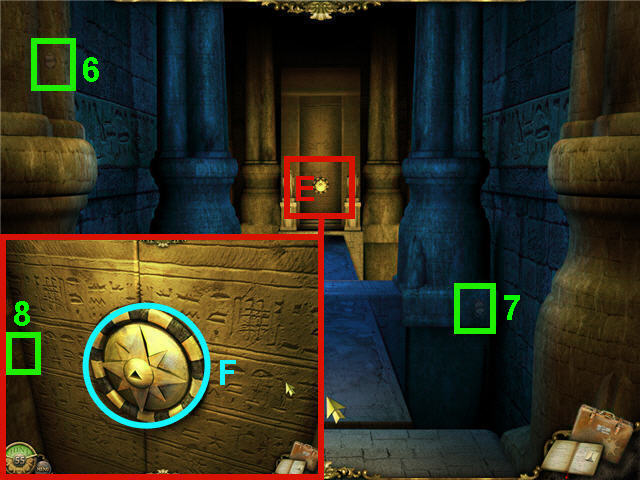
- Take the SPECIAL ITEM #6 and SPECIAL ITEM #7.
- Head straight towards the door (E).
- Take the SPECIAL ITEM #8.
- Use the MYSTERY KEY on the lock (F) and watch the cutscene.
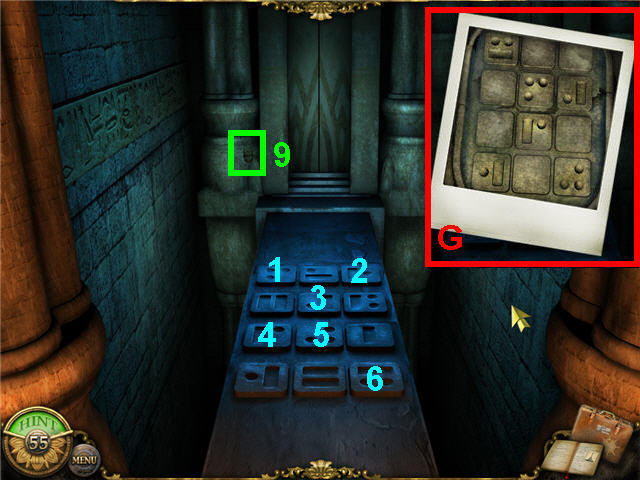
- Take the SPECIAL ITEM #9.
- The object is to push the correct stones to open the door.
- Use the PHOTO (G) as your guide as to what tiles to push.
- Note that the photo is a mirror image. See screenshot for solution.
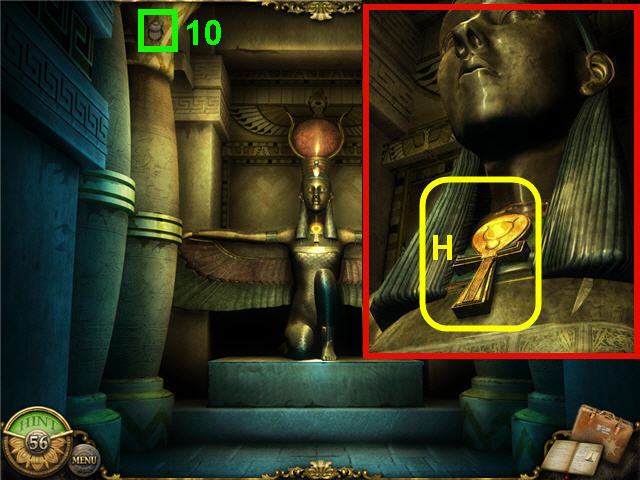
- Take the SPECIAL ITEM #10.
- Click on the statue of Isis to get a close-up and take the ANKH (H).
Chapter Overview and Awards
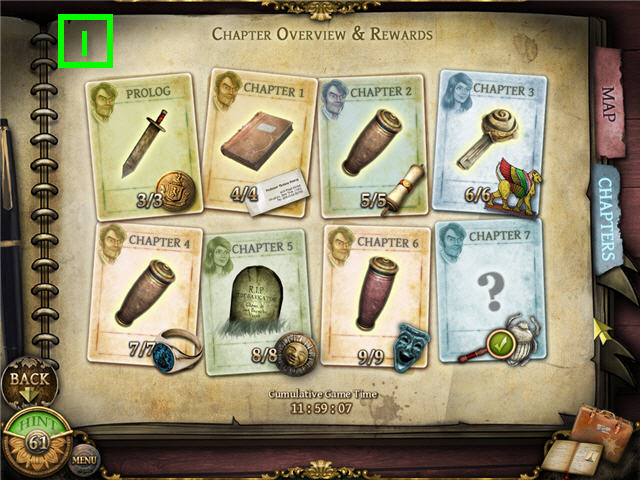
- See screenshot (I) for the special items collected.
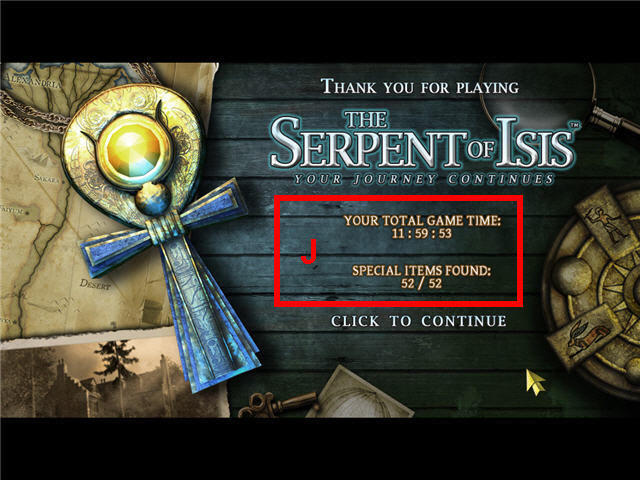
- See screenshot (J) for the overview on your game time and special items score.
- Congratulations! You have successfully completed The Serpent of Isis: Your Journey Continues.
Created at: 2011-02-27