

Walkthrough Menu
- General Tips
- Chapter 1: Arrival at Gordon Creek
- Chapter 2: Inside the House
- Chapter 3: The Hospital
- Chapter 4: The Island
- Chapter 5: The Church
General Tips
- This is the Official Guide for Shiver: Vanishing Hitchhiker!
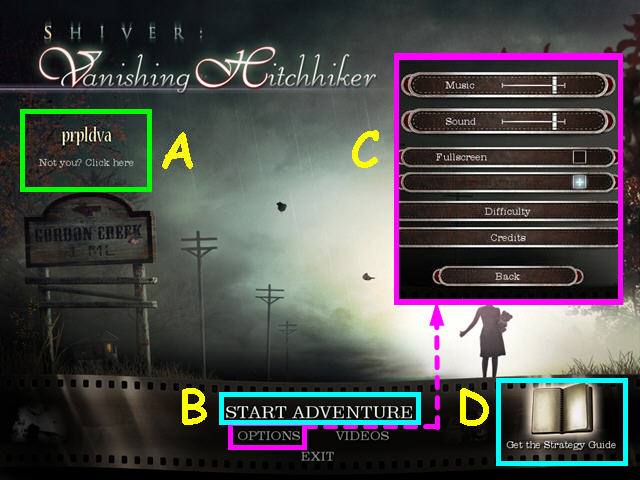
- Click on 'Not you? Click Here' on the main screen to add or delete player profiles (A).
- Select 'Start Adventure' to begin or continue your game (B).
- The first time you select play, you will need to chose the level of difficulty.
- You will have the option of a brief tutorial at the start of the game.
- Casual mode has faster recharge times on the hint and skip buttons, and the active zones are highlighted with sparkles.
- Advanced mode has a slower recharge time and active zones are not highlighted.
- You may play this game in full screen or windowed mode by changing the settings in the Options menu (C).
- You may adjust the volume of effects and music in the Options menu.
- The Options menu is accessible from both the main screen and the in-game menu.
- Select the 'Get the Strategy Guide' to link directly to the download and purchase page (D). The Strategy Guide is only integrated into the Collector's Edition!
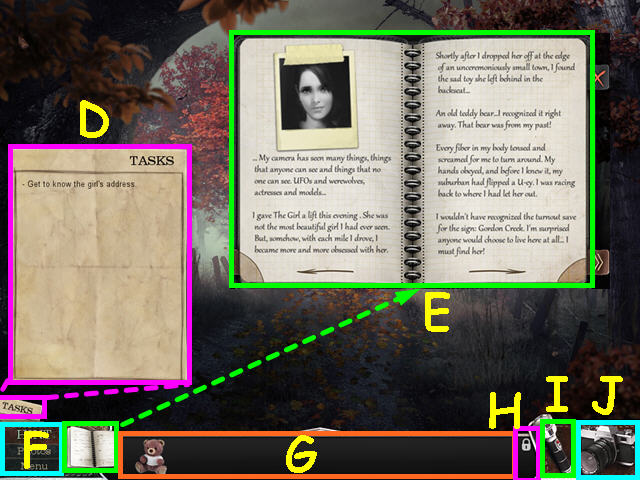
- Select 'Tasks' for a list of current objectives (D).
- Read the journal for a recap of events and clues (E).
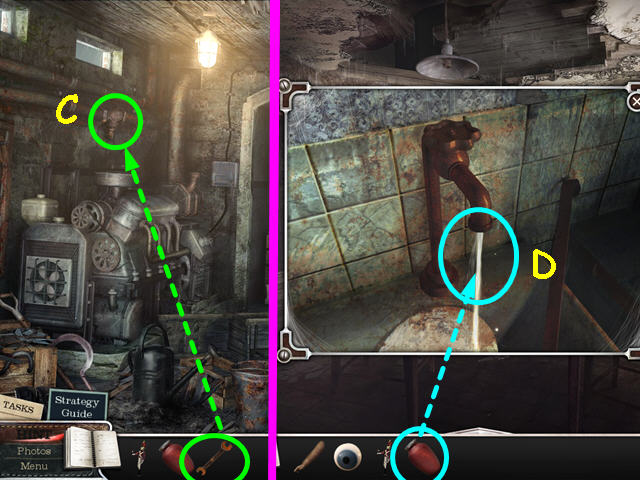
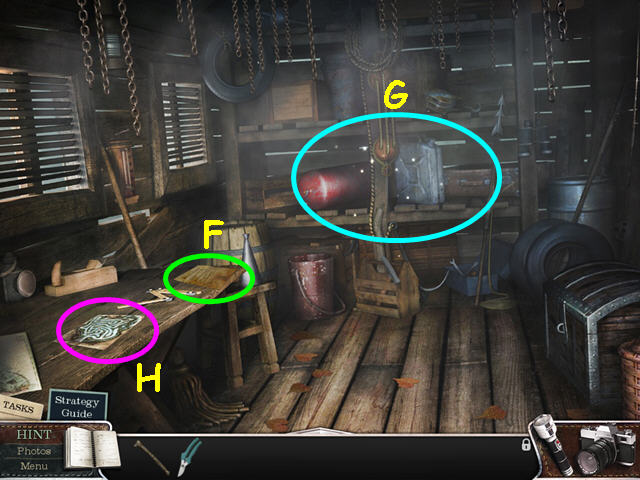
- The 'Hint' button is in the lower left corner along with the 'Photos' and 'Menu' buttons (F).
- Hints are unlimited, but you must wait for the timer to refill.
- Select the 'Photos' button to view the snapshots you have taken in the game.
- Hidden objects shown in yellow text are hidden inside or behind other items, you must open or move things to find all the items.
- Some items must be combined to create certain hidden objects.
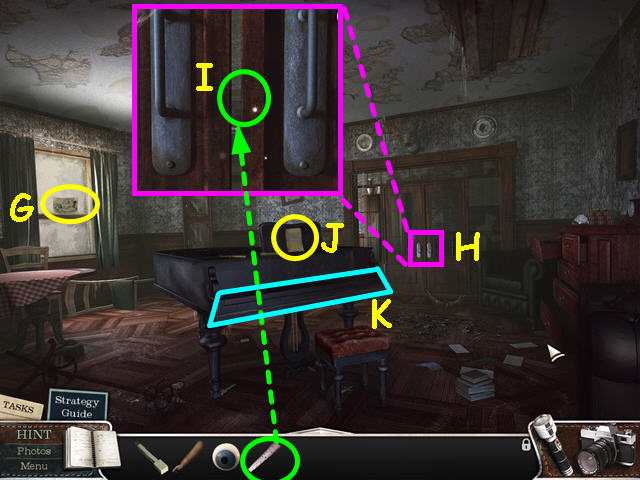
- Your Inventory is located at the bottom, center of the screen (G).
- Click on the lock to allow your inventory to auto-hide if desired (H).
- Use the flashlight to illuminate dark areas (I).
- Use the camera to take snapshots during the game (J).
- The camera will flash when it is important to take a snapshot.
- You must click through dialog to advance, it will not advance automatically.
- This walkthrough will assume that you have advanced through any dialog.
Chapter 1: Arrival at Gordon Creek
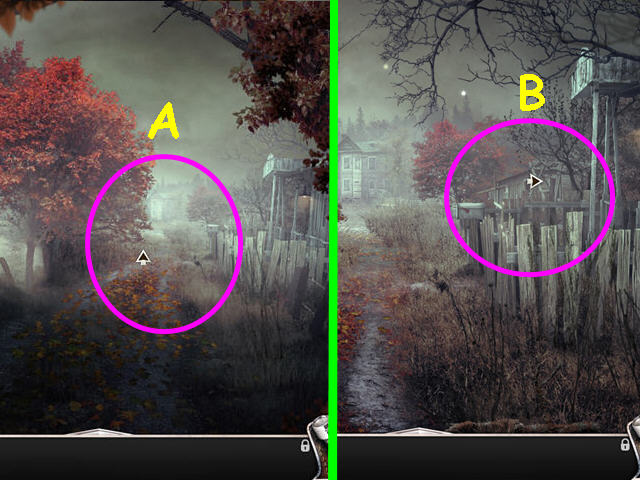
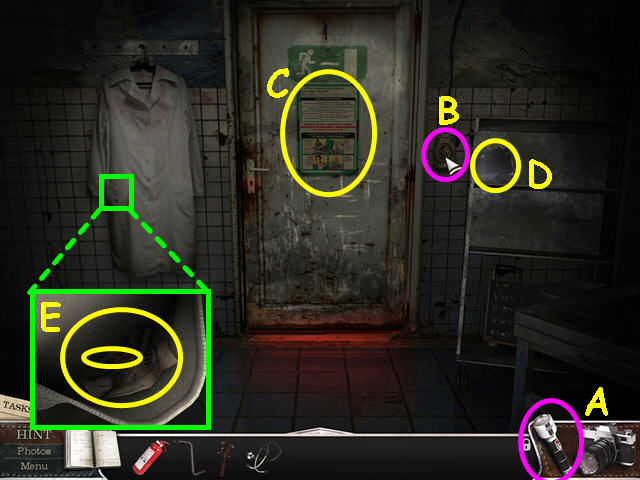
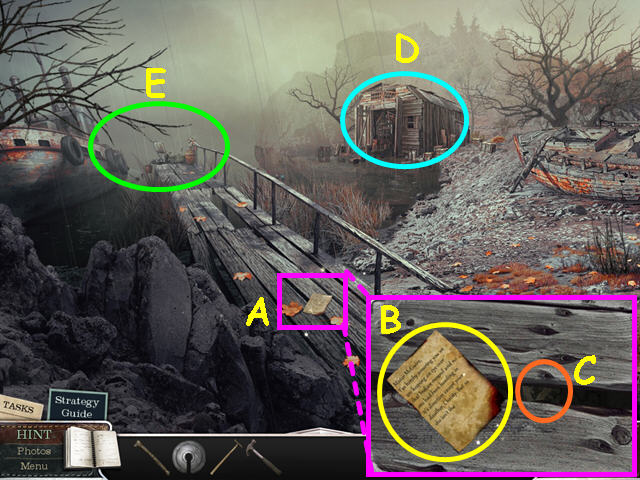
- Walk forward towards the buildings (A).
- Walk right to the house (B).
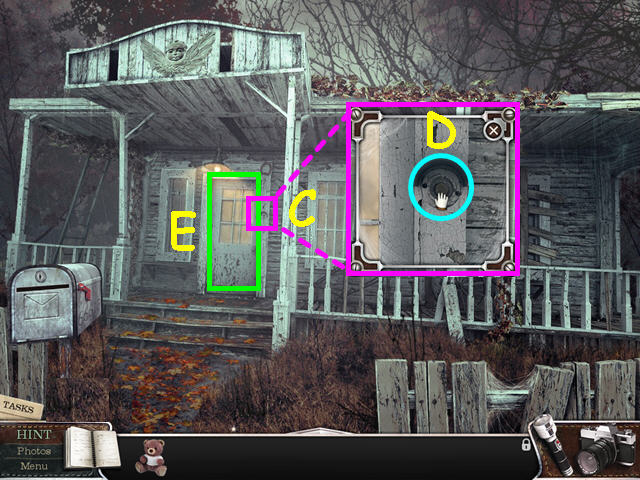
- Look at the close-up of the door (C).
- Press the doorbell (D).
- Click through the dialog. This walkthrough will assume that you have clicked through all subsequent dialog instances.
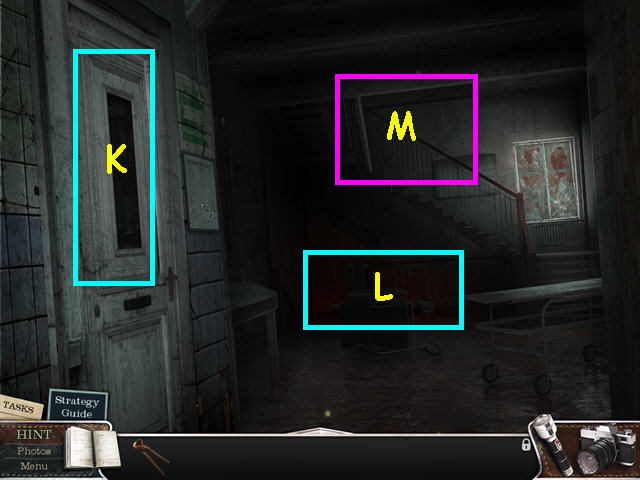
- Click on the door to open it, then go inside (E).
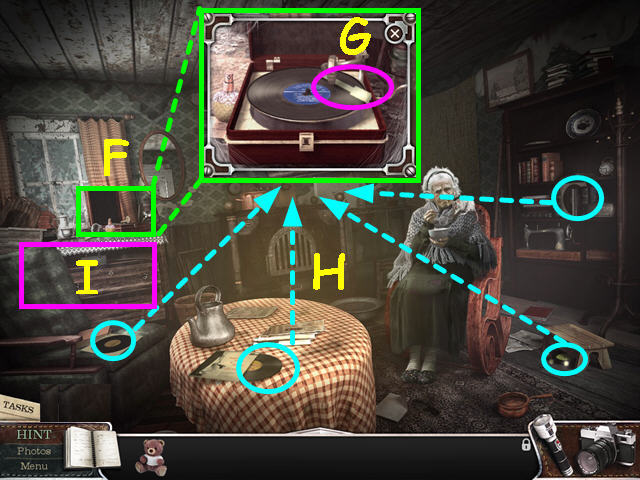
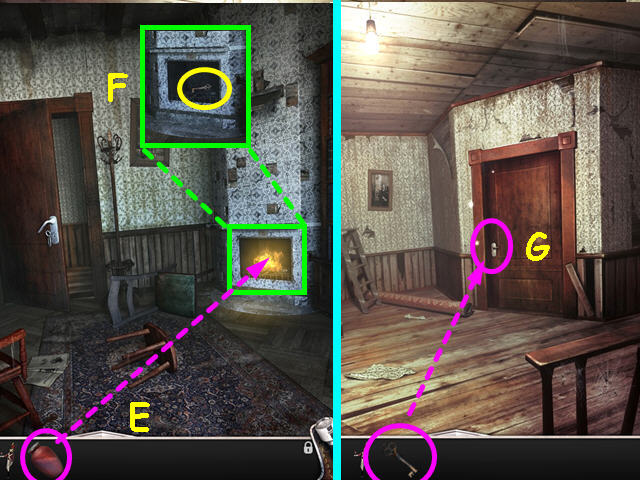
- Look at the close-up of the phonograph (F).
- Take the PIANO KEY (G).
- Place the records onto the phonograph until you find the one the woman wants (H).
- She will accept the 2nd record you choose.
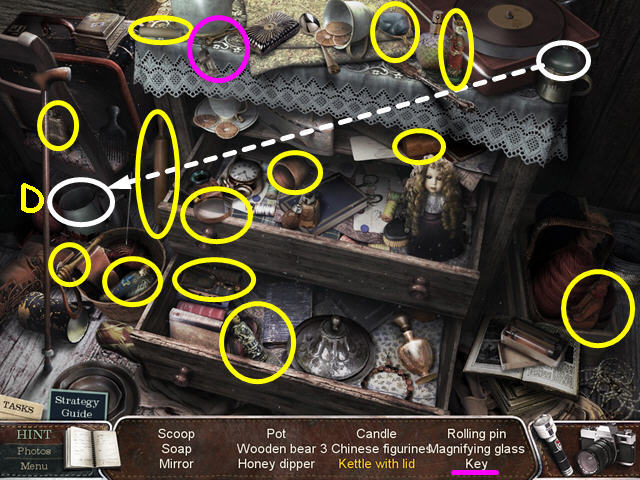
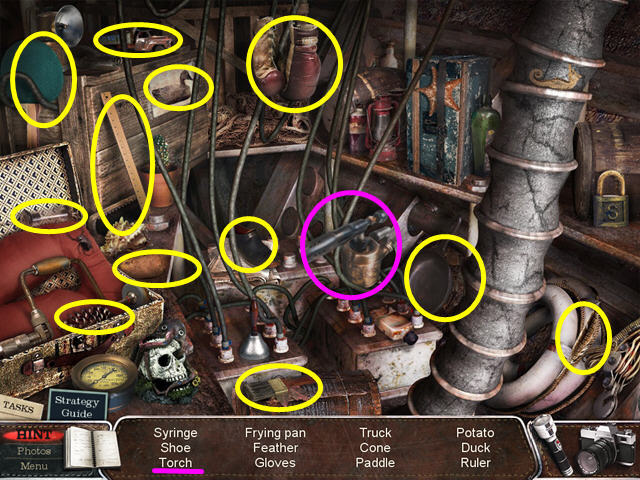
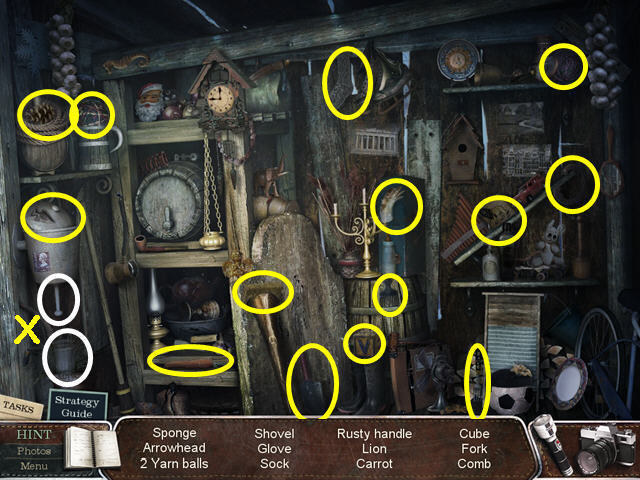
- Select the drawers for a hidden object scene (I).
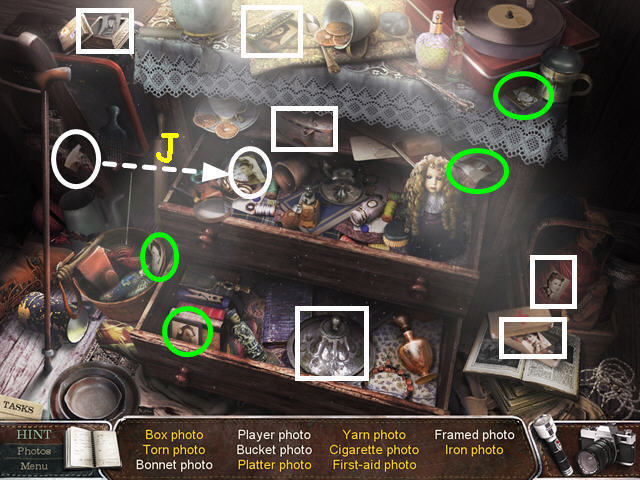
- Look at the close-up, open, or combine all the items marked in white.
- Combine the torn photo pieces (J).
- Locate all the items on the list.
- You will earn the PHOTO.
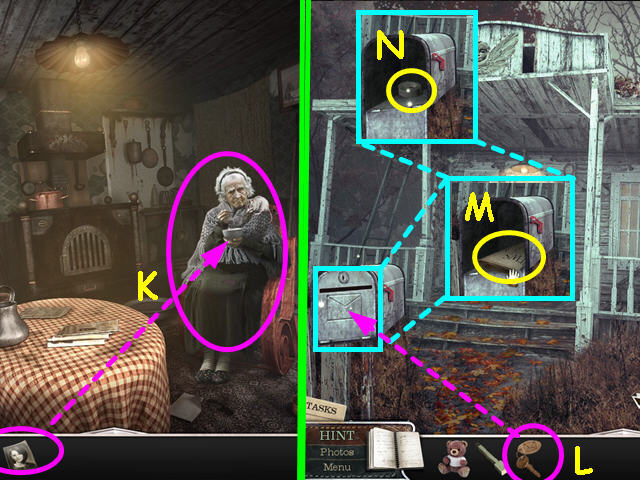
- Give the PHOTO to the woman (K).
- She will give your the MAILBOX KEY and ask you to get her mail.
- Walk down, the use the MAILBOX KEY to open the mailbox (L).
- Take the OLD NEWSPAPER (M).
- Take the STICKY TAPE (N).
- Reenter the house and give the NEWSPAPER to the woman.
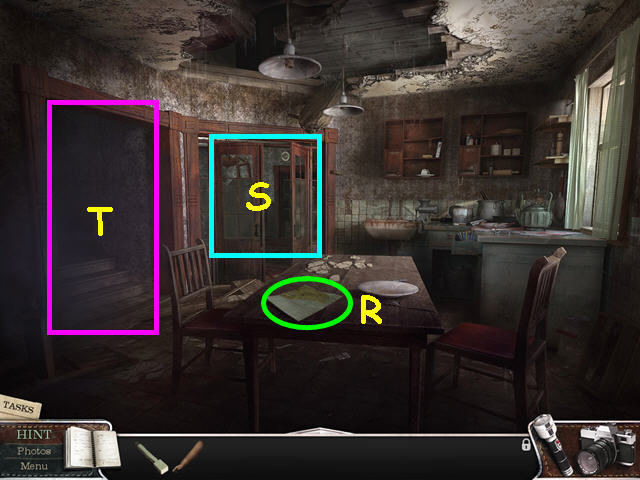
- Walk down twice, then go forward to see the burning house.
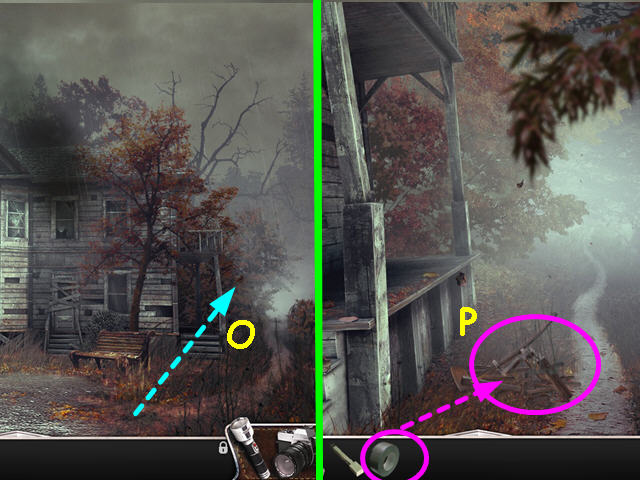
- Walk to the right side of the house (O).
- Use the STICKY TAPE to repair the CHAIR (P).
- Take the CHAIR.
- Walk down, then to the left.
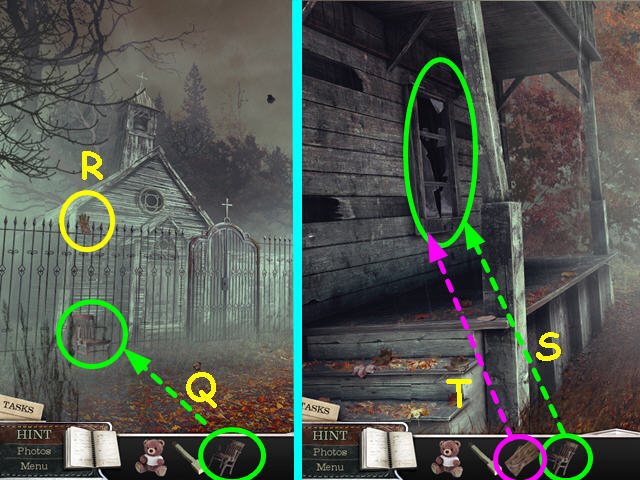
- Place the CHAIR against the fence (Q).
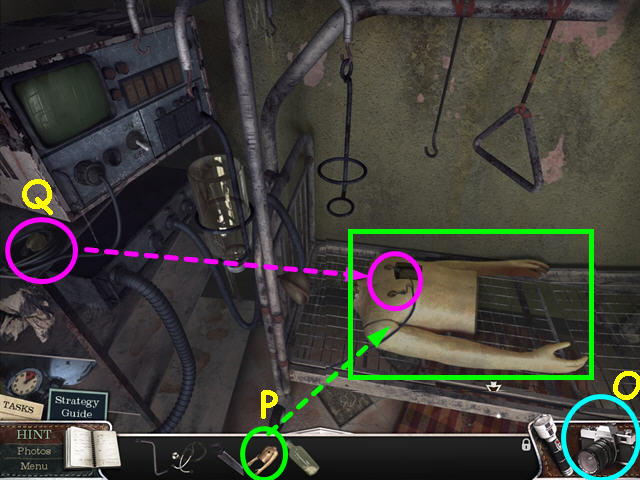
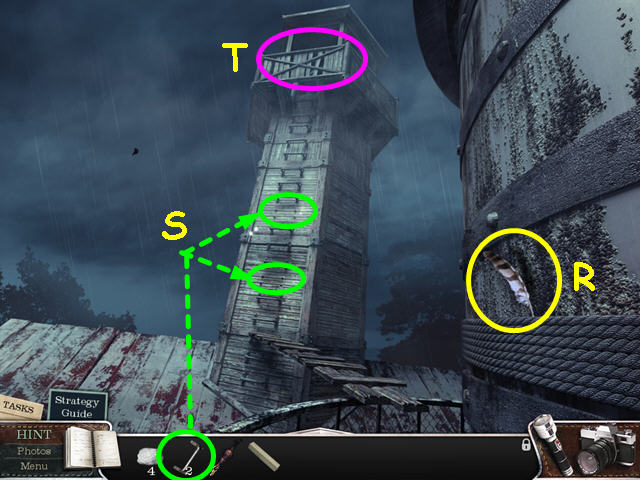
- Take the GLOVE (R).
- Take the CHAIR.
- Walk to the right twice to return to the side of the house.
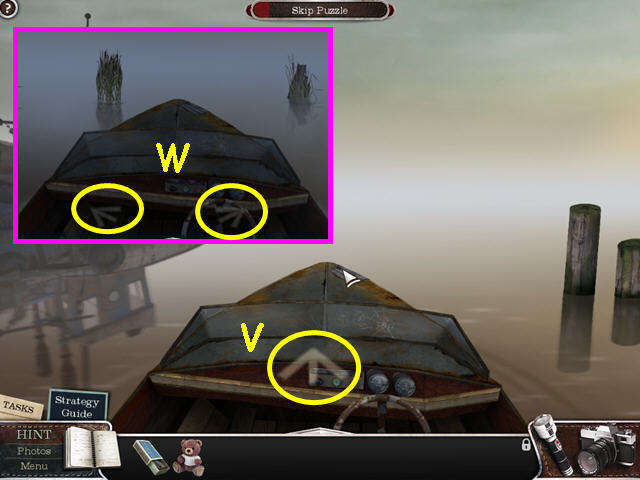
- Use the CHAIR on the window 3 times (S).
- Use the GLOVE on the window (T).
- Enter the house through the window.
- Walk forward to the door and you will fall through the floor to the basement.
Chapter 2: Inside the House
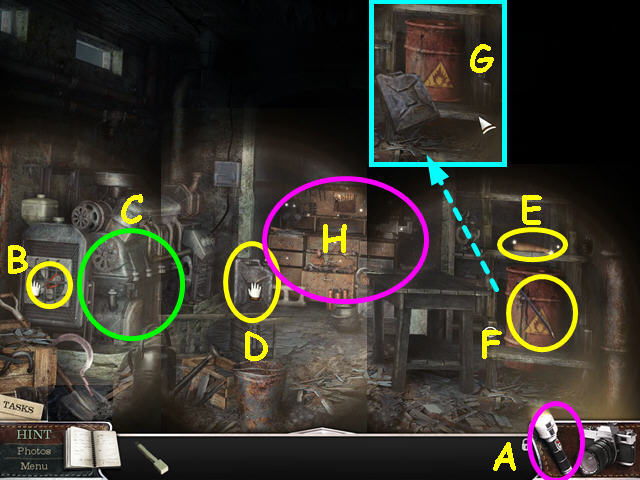
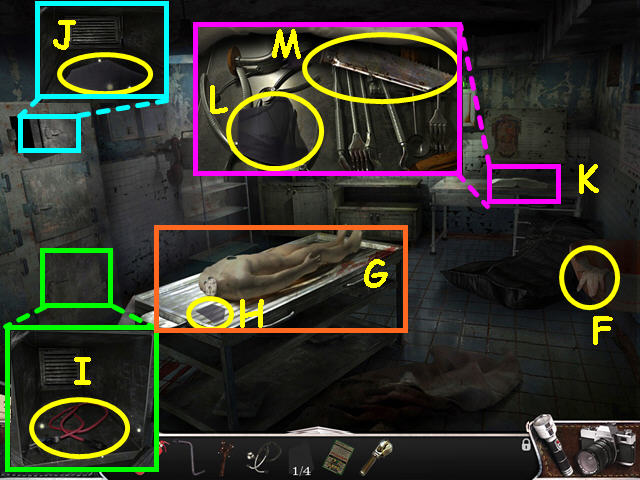
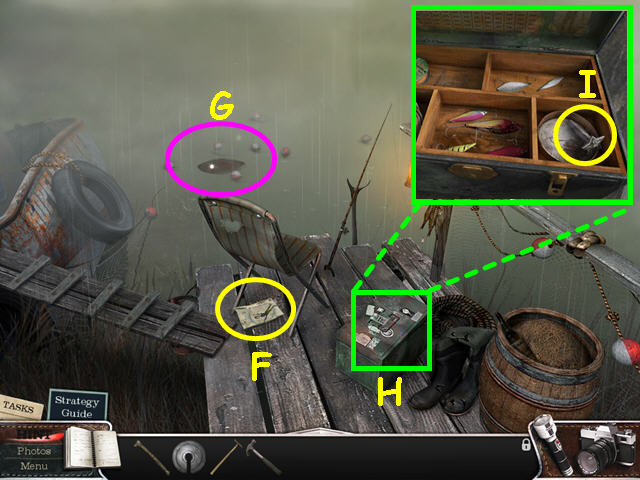
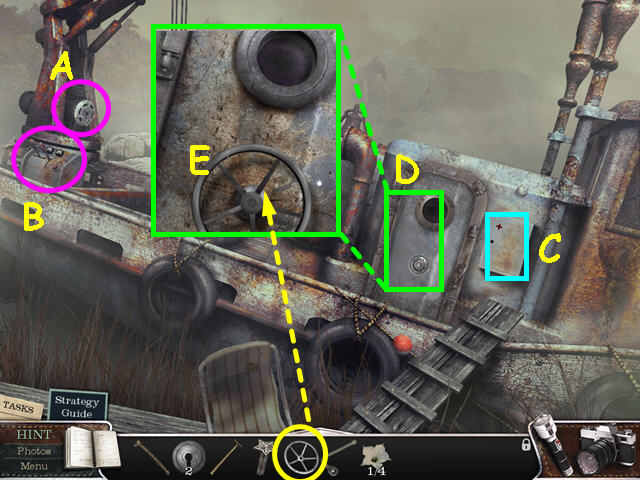
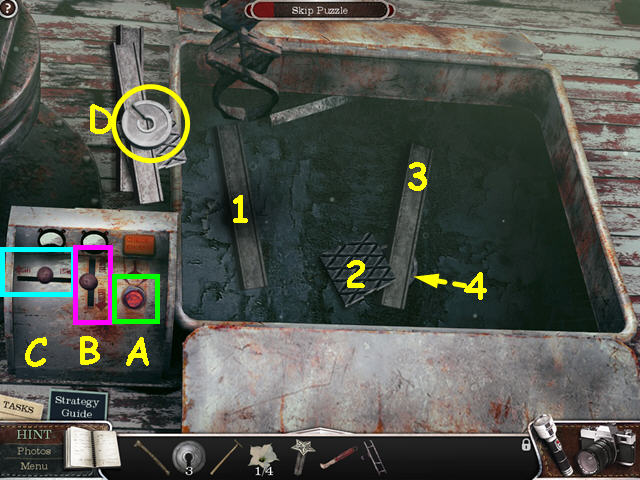
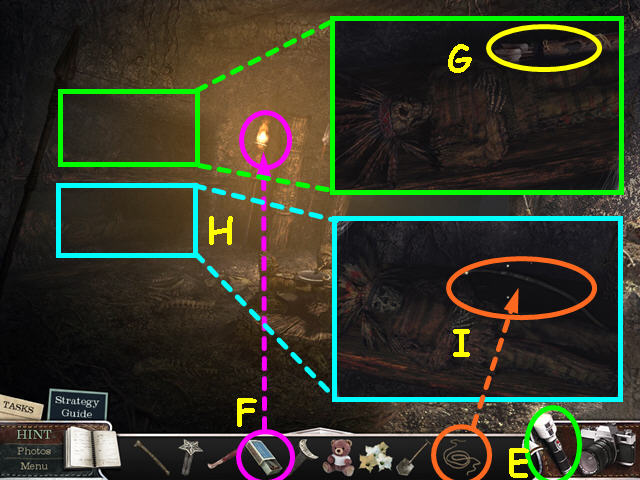
- Select your flashlight from the lower right (A).
- Take the PLIERS (B).
- Make note of the generator (C).
- Take the EMPTY CAN (D).
- After the rat drops it, take the DOLL ARM (E).
- Take the CROWBAR from the fuel barrel (F).
- Use the EMPTY CAN on the fuel barrel to get the CAN with FUEL (G).
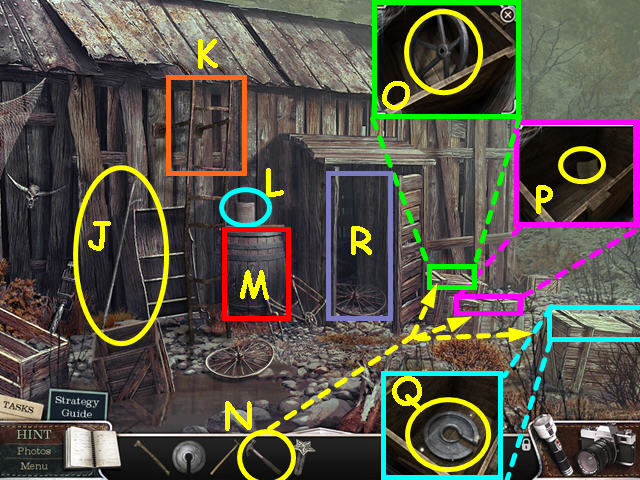
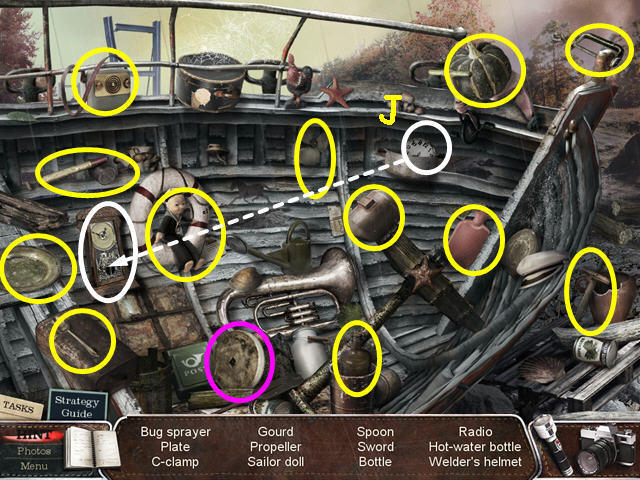
- Select the work bench for a hidden object scene (H).
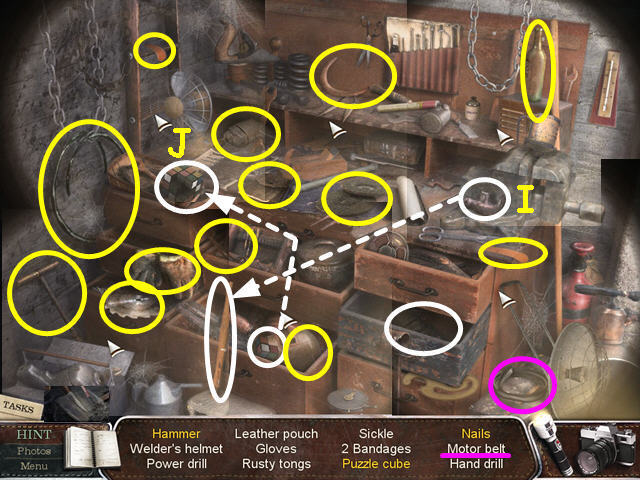
- Look at the close-up or open all the items marked in white.
- Locate all the items on the list.
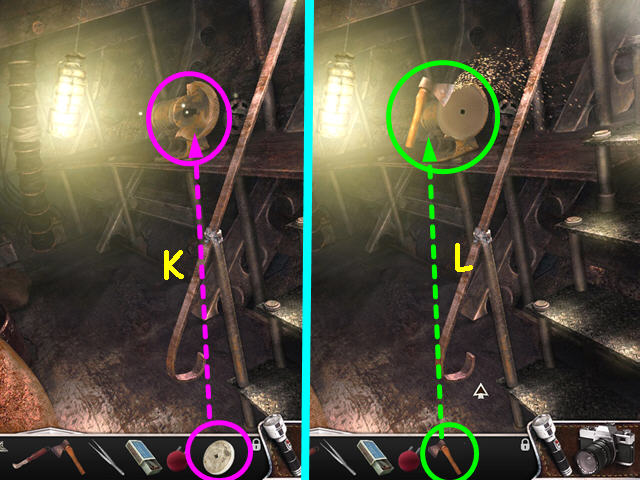
- Combine the hammer pieces (I).
- Combine the puzzle cube pieces (J).
- You will earn the DRIVE BELT.
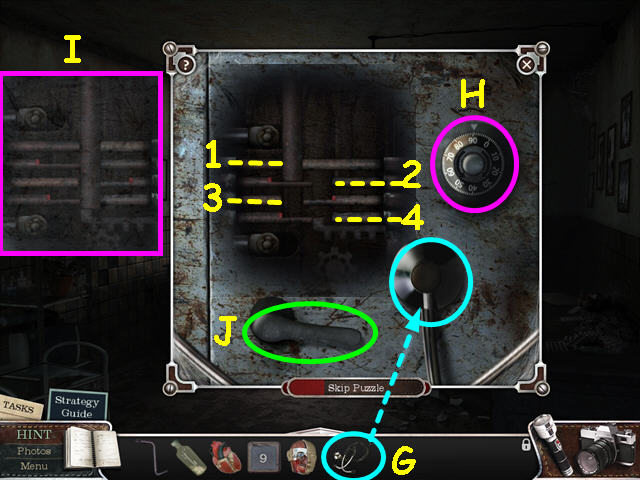
- Look at the close-up of the generator.
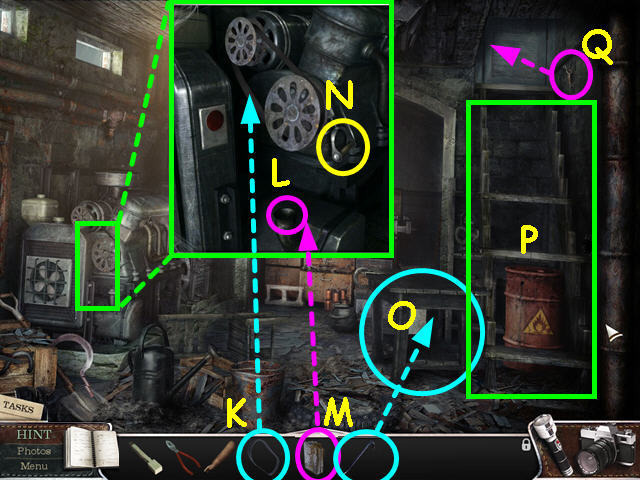
- Place the DRIVE BELT on the wheels (K).
- Click on the fuel tank lid to open the tank (L).
- Use the CAN with FUEL On the hole (M).
- Pull the handle 3 times (N).
- Use the CROWBAR on the table 3 times (O).
- Take the PLANKS.
- Starting at the bottom, place the PLANKS where steps are missing (P).
- Take the BASEMENT KEY (Q).
- Look at the close-up of the door and use the KEY in the lock.
- After the key breaks, use the PLIERS on the keyhole to unlock the door.
- Walk upstairs.
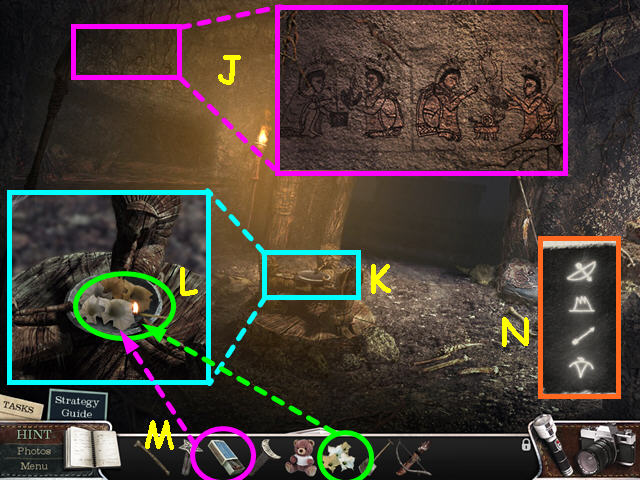
- Take the map from the table- it will go automatically into your journal (R).
- Note the entrance to the music room (S).
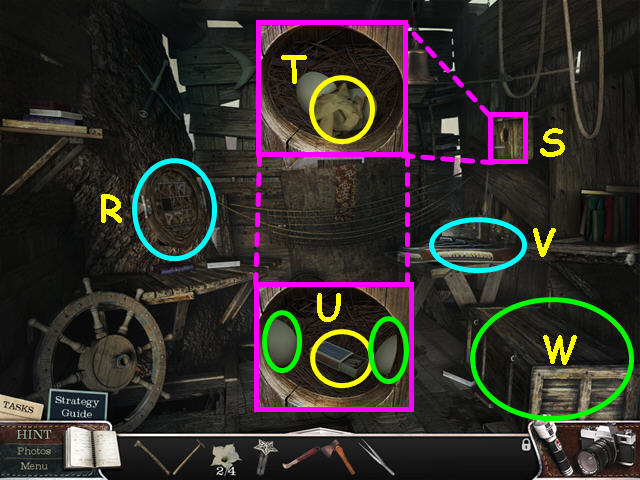
- Walk left up the stairs (T).
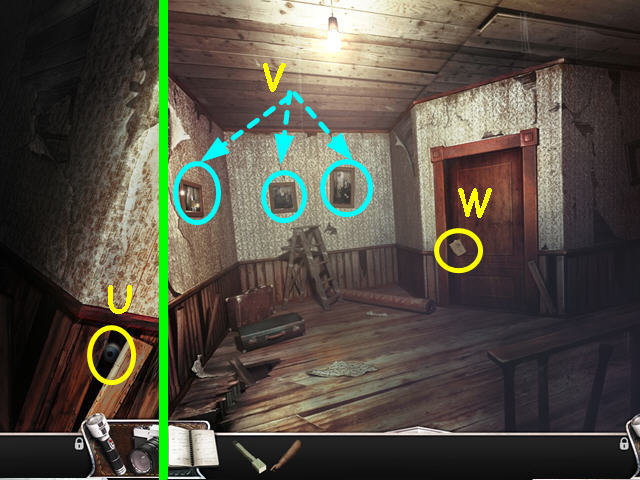
- Turn to the left.
- Take the EYE that is stuck in the wall (U).
- Turn back to the right.
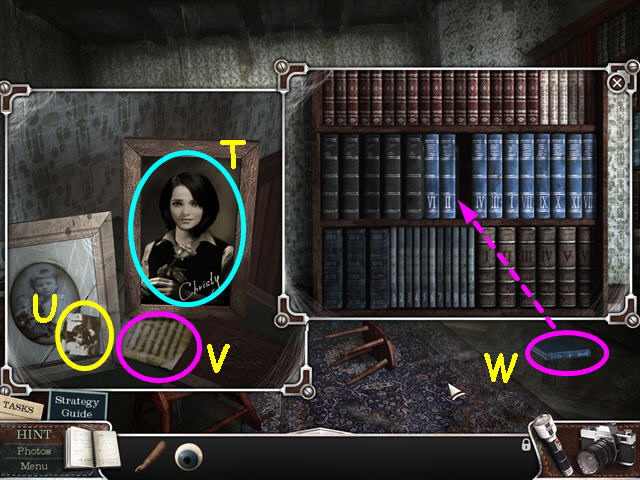
- Look at the 3 photographs on the wall (V).
- Take the note from the door (W).
- Walk to the right.
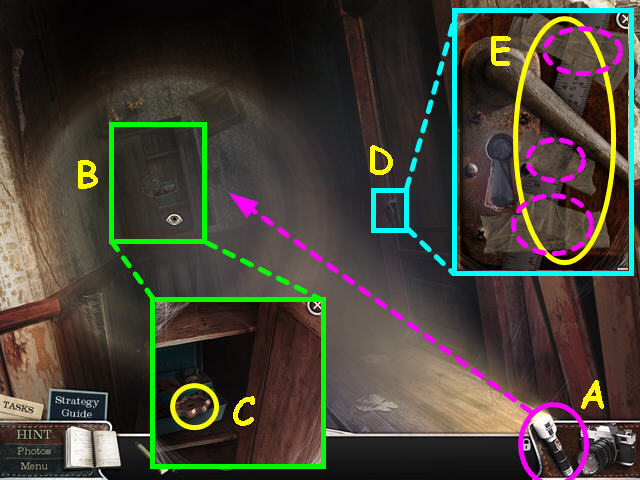
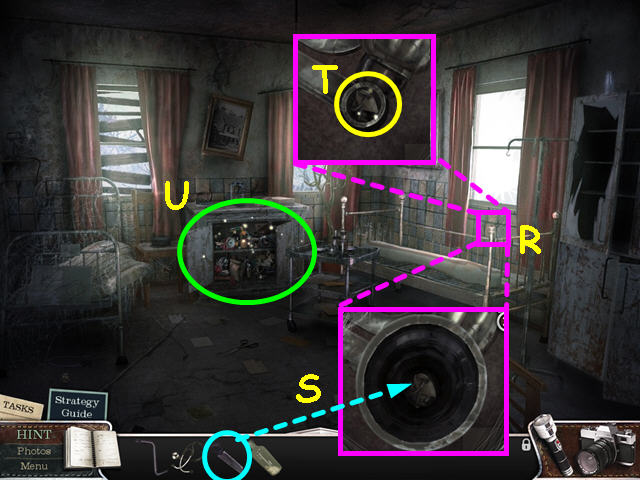
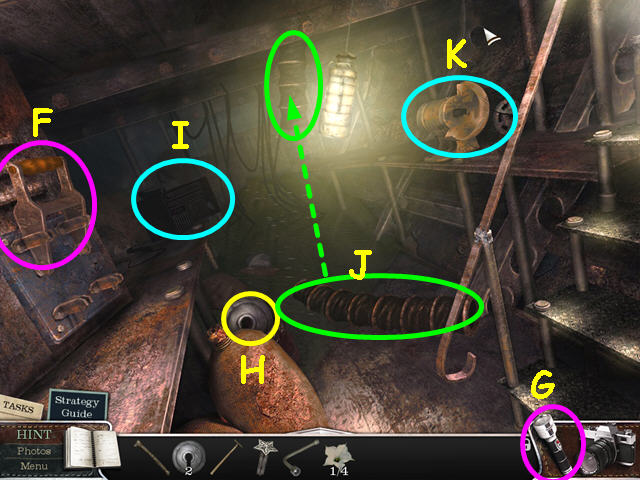
- Use the flashlight on the darkened area (A).
- Click on the cabinet twice to see the close-up (B).
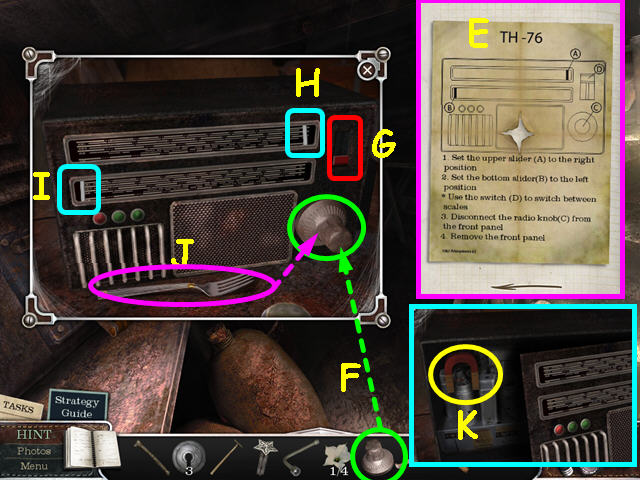
- Take the FLYWHEEL (C).
- Look at the close-up of the keyhole (D).
- Remove the 5 pieces of tape then take the RULER (E).
- Walk down twice to return to the kitchen.
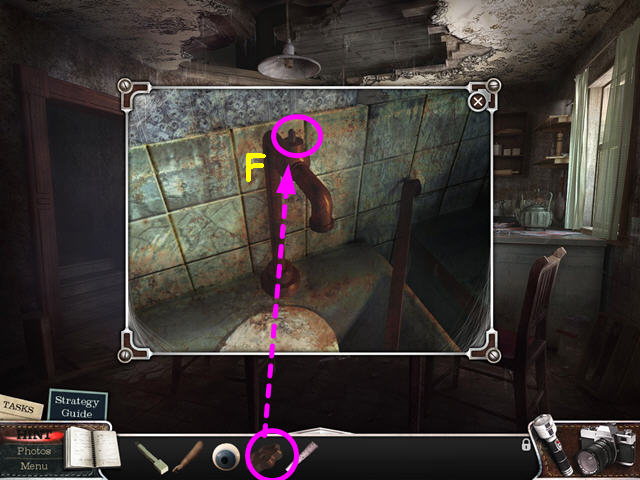
- Look at the close-up of the sink.
- Use the FLYWHEEL on the faucet (F).
- Click on the valve to turn on the faucet.
- You learn that the water valve is shut in the basement.
- Walk forward to enter the music room.
- Take the drawing from the window (G).
- Look at the close-up of the double doors (H).
- Use the RULER to unlock the doors (I).
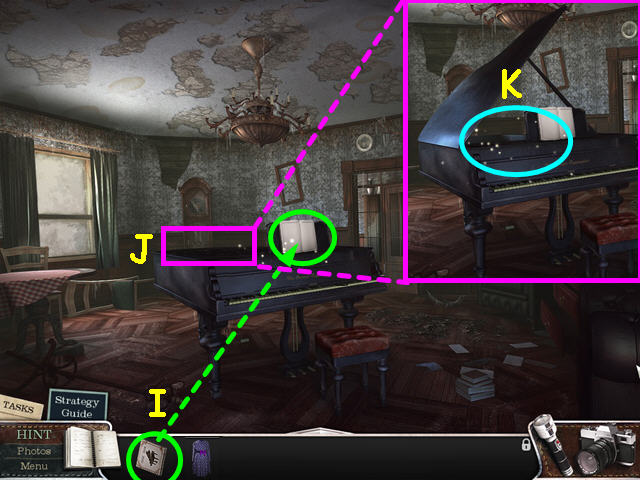
- Take the note from the piano's music stand (J).
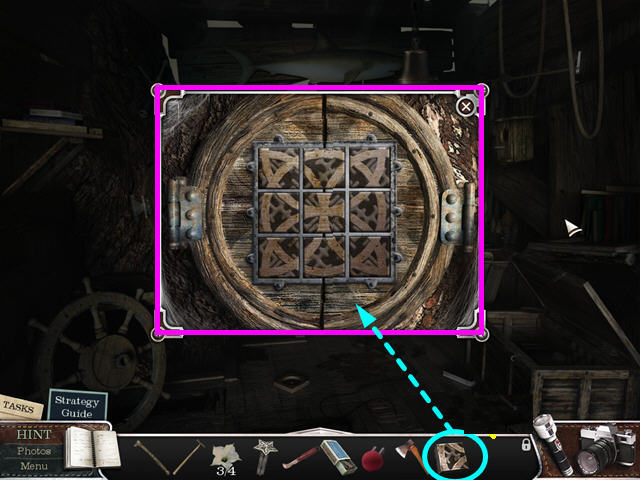
- Click on the keyboard cover to open the piano (K).
- Look at the close-up of the piano keyboard.
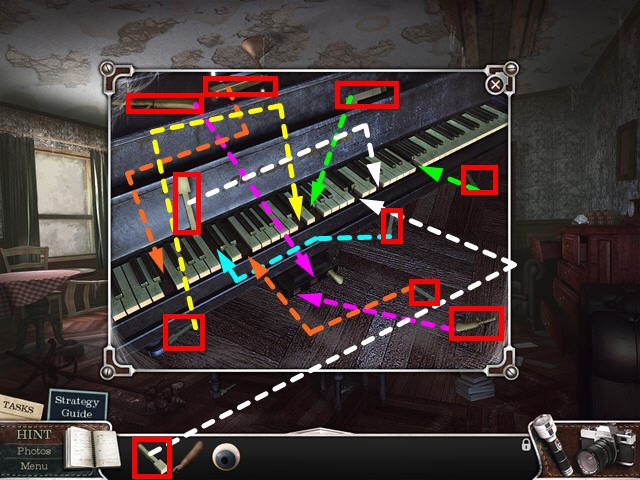
- You must replace all the piano keys and pedals.
- Pieces will pulse when over a correct position.
- Place the pedals and keys into the spots indicated.
- Walk forward through the double doors.
- Use the camera to take a picture (L).
- Click on the photo and it will go into your journal.
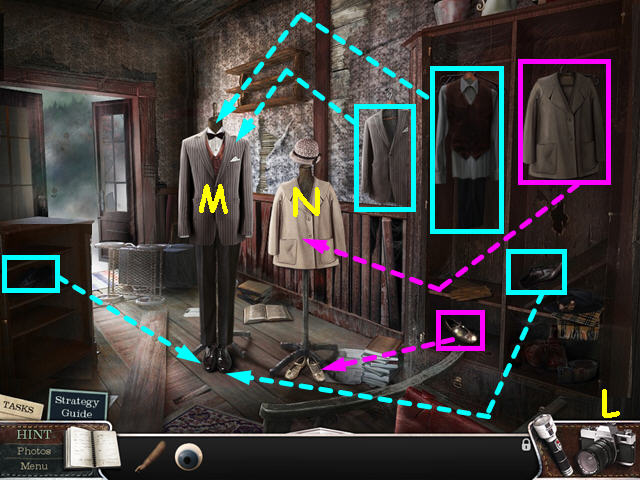
- Open the cupboard on the left and open the 2 cabinet doors on the right.
- Place the man's coat, suit, and 2 man's shoes on the larger mannequin (M).
- Place the girl's coat and shoe on the smaller mannequin (N).
- From the picture in our journal, it seems we still need the man's hat and the girl's dress.
- Walk forward through the double doors.
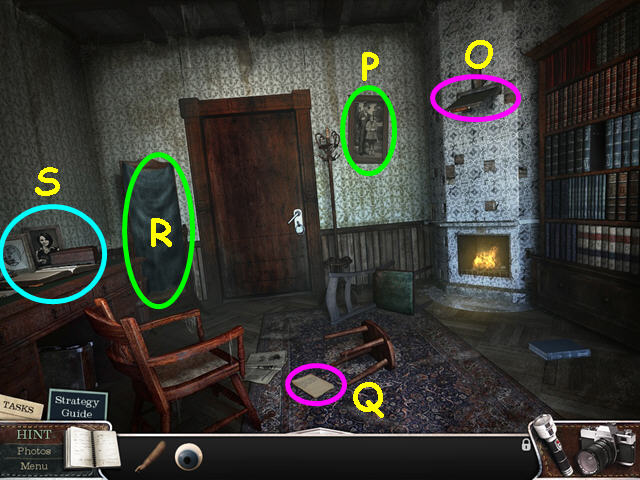
- Pull open the chimney flue to remove the smoke in the room (O).
- Look at the photo on the wall (P).
- Take the note from the floor (Q).
- Remove the drape from the mirror (R).
- Look at the close-up of the desk (S).
- Look at the photo on the right (T).
- Take the TORN PHOTO (U).
- Take the newspaper clipping (V).
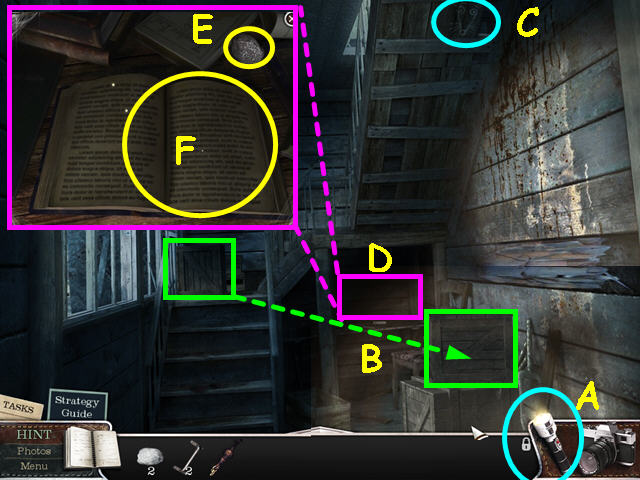
- Take the book from the floor and place it in the bookcase (W).
- Exit the close-ups.
- Unlock the door and walk forward to exit the room.
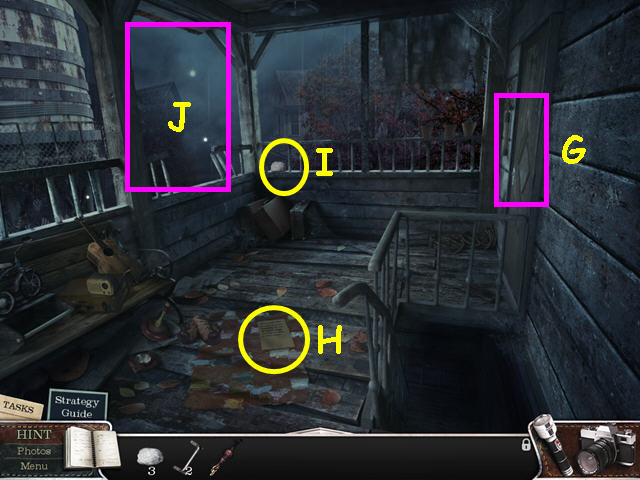
- Walk down to the stairway area.
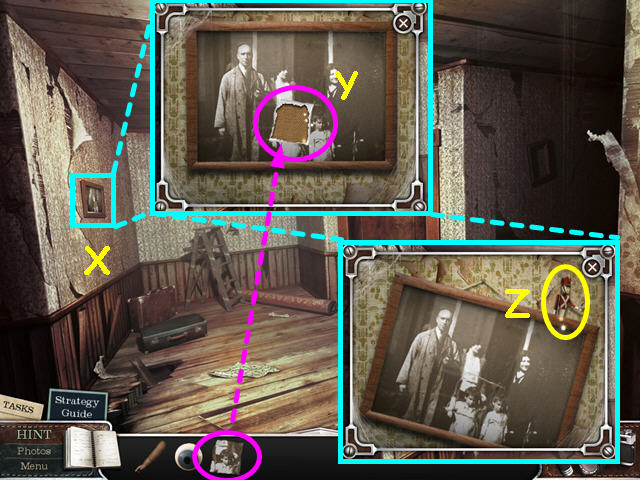
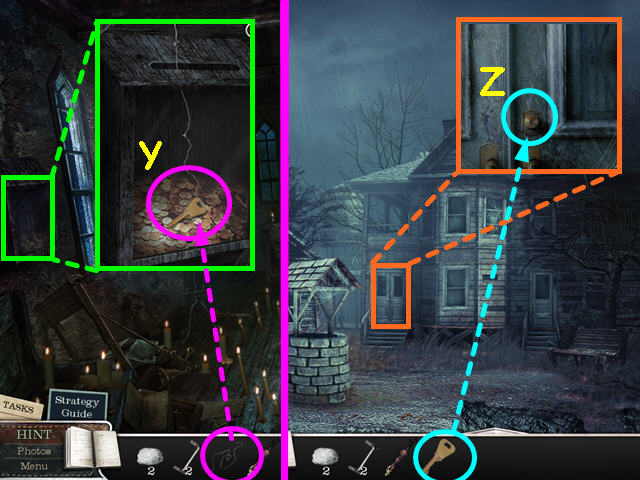
- Look at the photograph on the left wall (X).
- Place the TORN PHOTO into the hole (Y).
- Take the TOY SOLDIER (Z).
- Walk down the stairs.
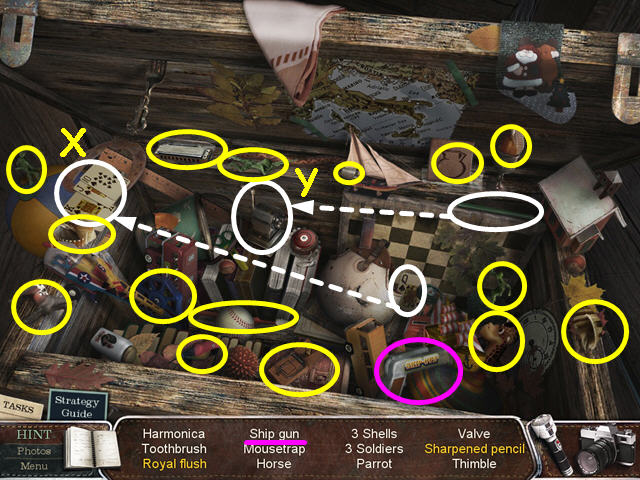
- Look at the counter for a Hidden Object Scene.
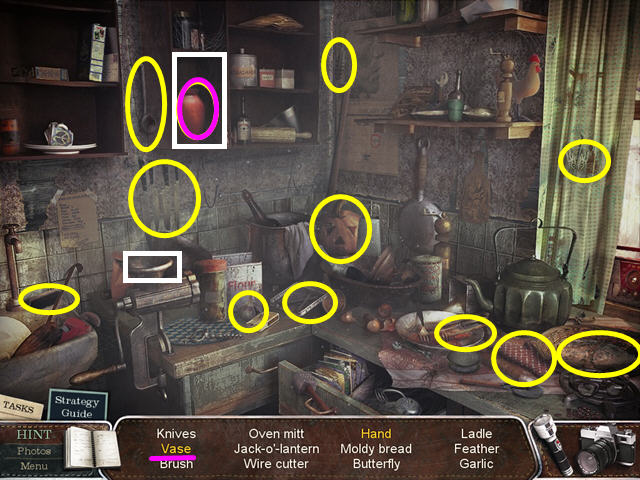
- Look at the close-up, open, or combine all the items marked in white.
- Locate all the items on the list.
- You will earn the EMPTY VASE.
- Walk down to return to the basement.
- Select the workbench for a hidden object scene.
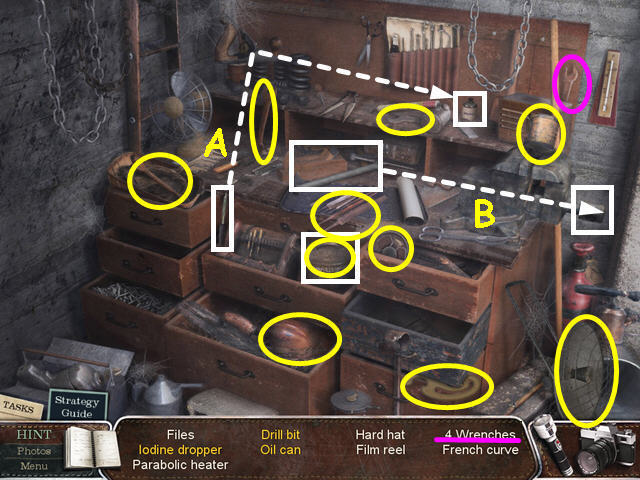
- Look at the close-up, open, or combine all the items marked in white.
- Use the dropper on the iodine bottle (A).
- Use the lever on the vice to free the oilcan (B).
- Locate all the items on the list.
- You will earn the WRENCH.
- Use the WRENCH on the pipe under the window to turn on the water (C).
- Walk up the stairs.
- Look at the sink and use the EMPTY VASE on the water to get the VASE with WATER (D).
- Walk forward 3 times to return to the study.
- Use the VASE with WATER on the fireplace (E).
- Take the KEY from the fireplace (F).
- Walk forward, then down to return to the stairs area.
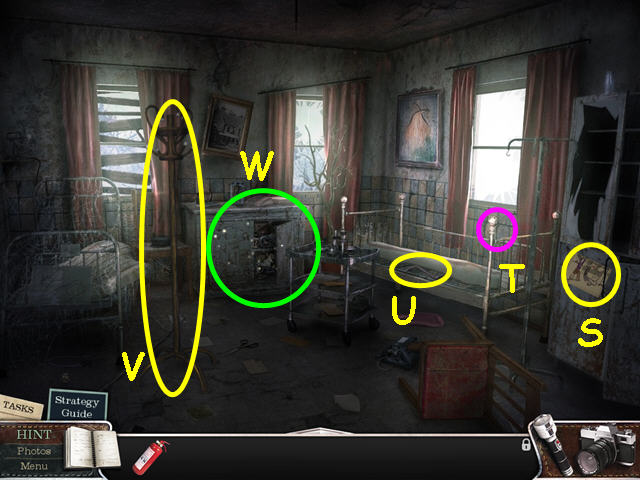
- Use the KEY on the bedroom door, then enter (G).
- Use your camera to take a photo (G).
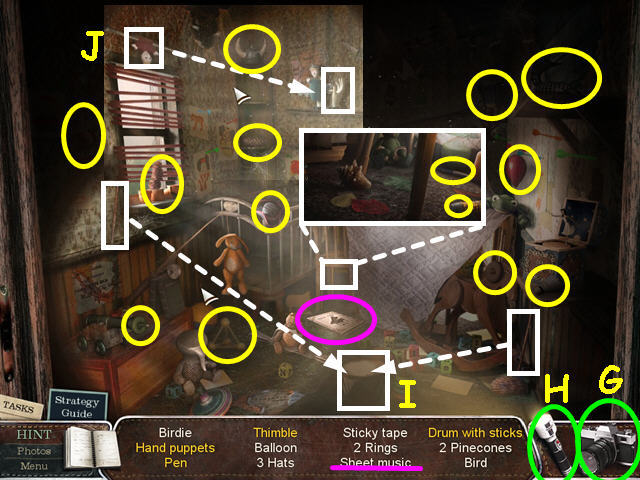
- Click anywhere in the scene to trigger a hidden object scene.
- Select your flashlight for more light (H).
- Look at the close-up, open, or combine all the items marked in white.
- Place the 2 sticks on the drum (I).
- Place the puppet on the hand (J).
- Locate all the items on the list.
- You will earn the EMPTY MUSIC BOOK.
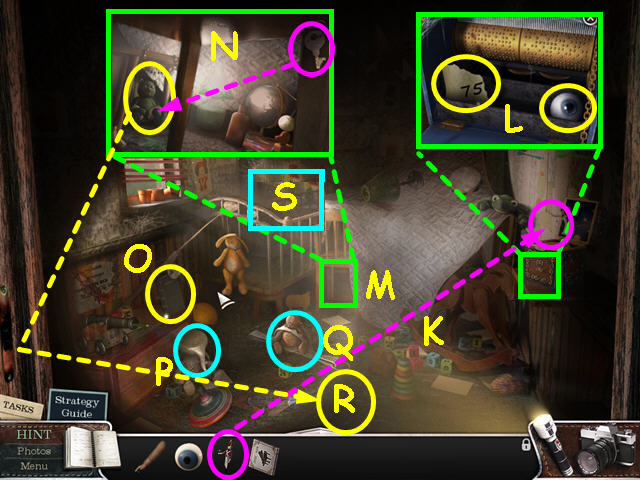
- Place the TOY SOLDIER on the music box (K).
- Look inside the music box and take the scrap of paper and the EYE (L).
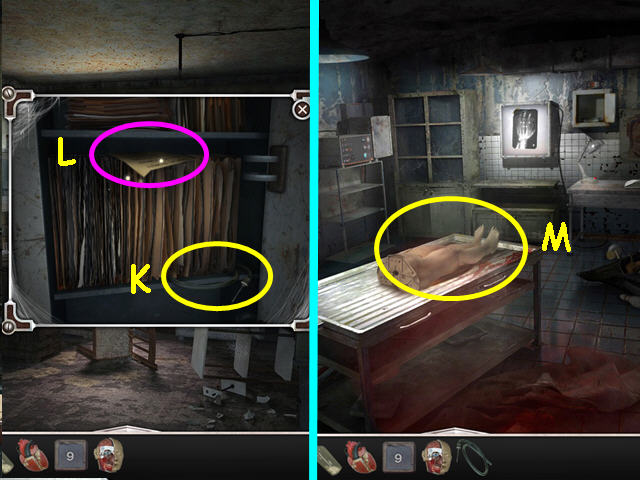
- Look under the bed (M).
- Use the key on the handcuffs, then take the BEAR (N).
- Take the BOOK (O).
- Remove the pot from the bear's head (P).
- Remove the bear from the trap (Q).
- Place the BEAR from under the bed to the right of the bear in the trap (R).
- Look at the close-up of the crib (S).
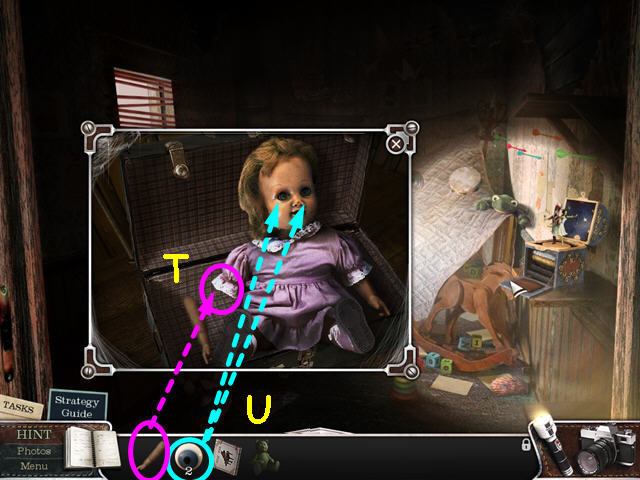
- Use the DOLL ARM on the doll and learn you need glue (T).
- Place the 2 EYES into the doll's eye sockets (U).
- Exit the close-up and walk down to exit the bedroom.
- Walk to the right and enter the study.
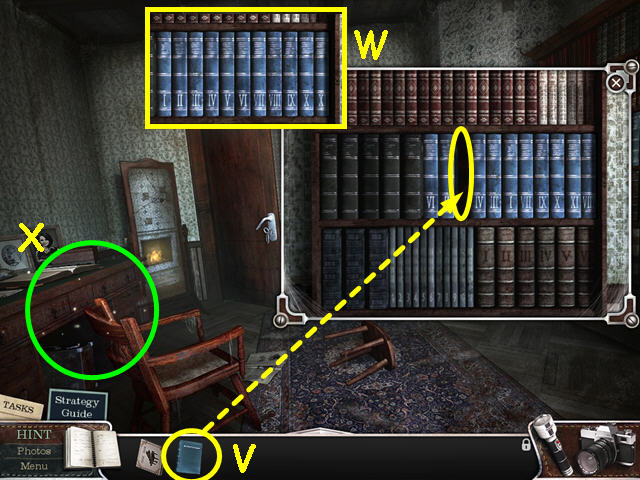
- Look at the bookcase and place the BOOK in the empty slot (V).
- Put the books into numerical order- click on two books to swap position (W).
- Exit the close-up of the safe.
- Select the desk on the left for a hidden object scene (X).
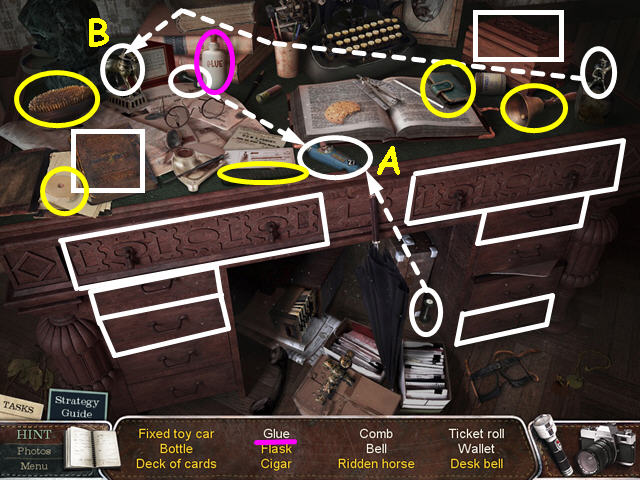
- Look at the close-up, open, or combine all the items marked in white.
- Place the 2 wheels on the toy car (A).
- Place the man on the horse (B).
- Locate all the items on the list.
- You will earn the GLUE.
- Walk forward, then down to the stairs area, then enter the bedroom.
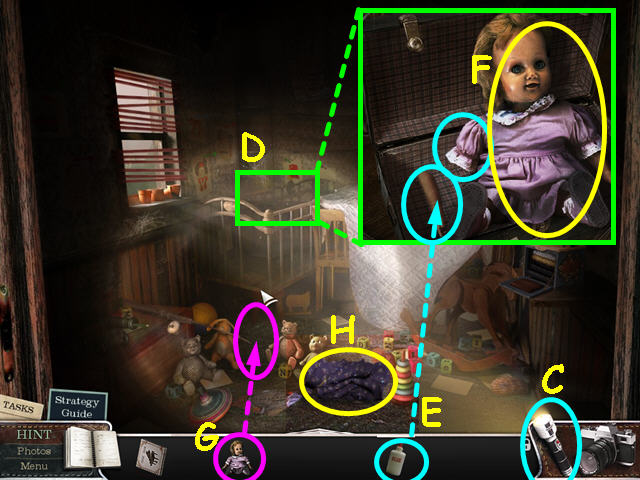
- Select your flashlight (C).
- Look at the close-up of the crib (D).
- Use the GLUE on the arm (E).
- Place the arm on the doll, then take the DOLL (F).
- Place the DOLL in the center of the bears (G).
- Take the DRESS that is left behind (H).
- Walk down twice to the kitchen, then go forward to the music room.
- Place the EMPTY MUSIC BOOK on the piano music stand (I).
- Click on the piano to open the lid (J).
- Select inside the piano for a hidden object scene (K).
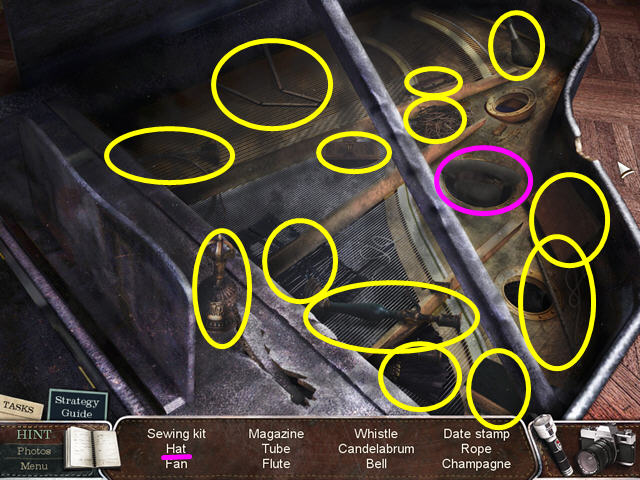
- Locate all the items on the list.
- You will earn the HAT.
- Go down twice to return to the kitchen.
- Select the counter area on the right for a hidden objects scene.
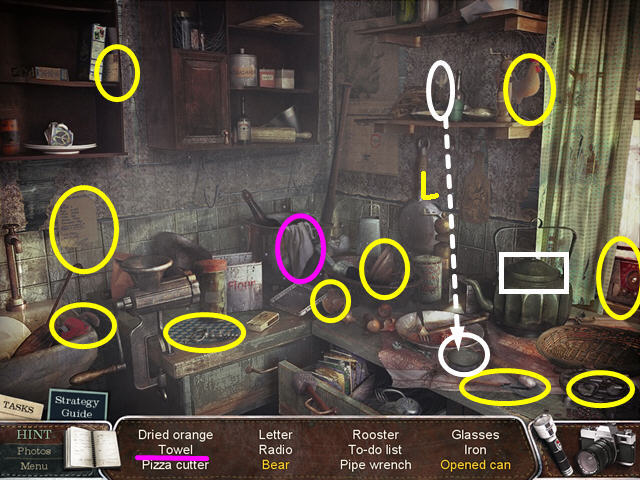
- Look at the close-up, open, or combine all the items marked in white.
- Use the can opener to open the can (L).
- Locate all the items on the list.
- You will earn the TOWEL.
- Look at the sink and use the TOWEL on the water to get the WET TOWEL (M).
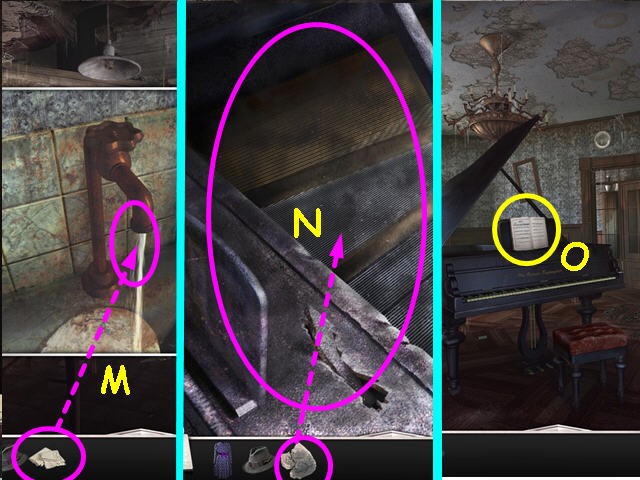
- Walk forward to the music room.
- Look inside the piano.
- Use the WET TOWEL to dust the piano (N).
- Click, hold and drag the towel over the entire area until it is taken from you.
- After the cut-scene, take the SHEET MUSIC (O).
- Walk forward through the double doors.
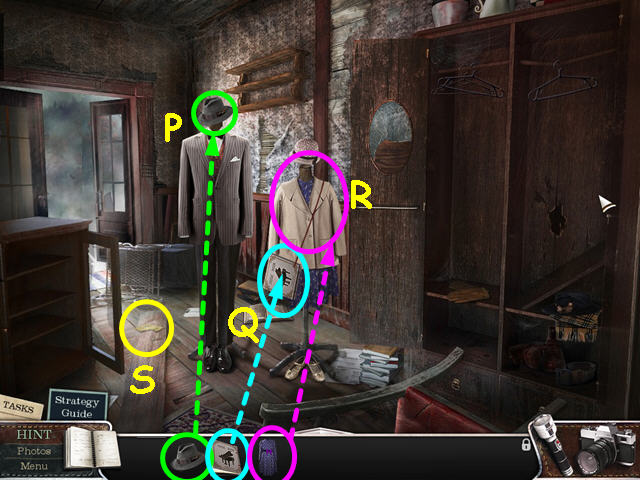
- Place the HAT on the male mannequin (P).
- Place the SHEET MUSIC on the girl mannequin (Q).
- Place the DRESS on the girl mannequin (R).
- Take the scrap of paper that has fallen to the floor (S).
- Walk forward to the study.
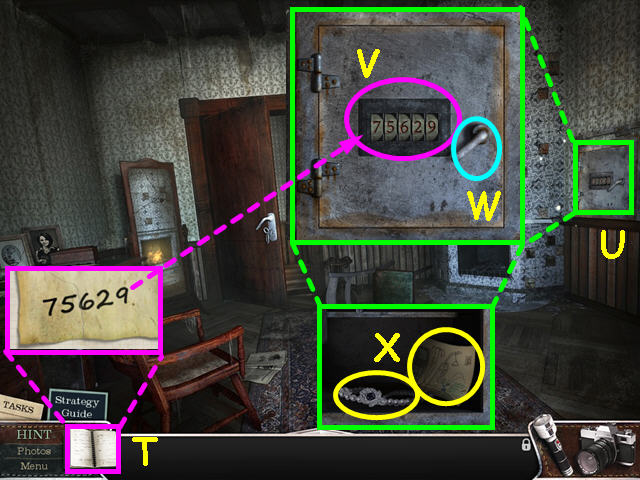
- Look at your journal to see the complete code of 75629 (T).
- Look at the close-up of the safe (U).
- Enter the code by clicking on the numbers (V).
- Turn the handle (W).
- Take the drawing and the NECKLACE (X).
- Walk forward, go down twice, then walk forward twice.
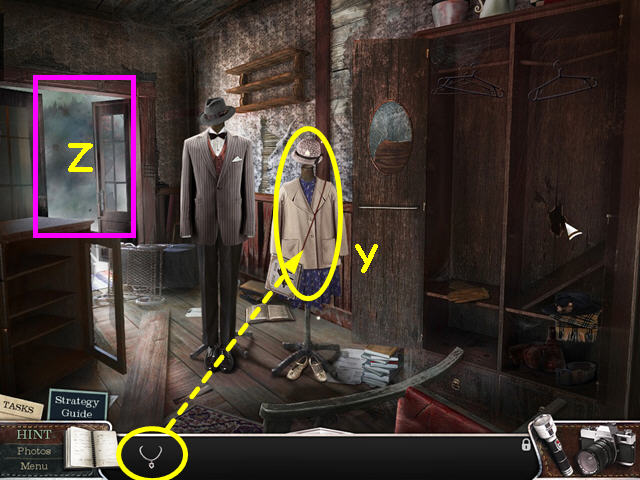
- Place the NECKLACE on the girl mannequin (Y).
- Walk forward to exit the house (Z).
Chapter 3: The Hospital
- Walk down, left, then forward to return to the woman's house.
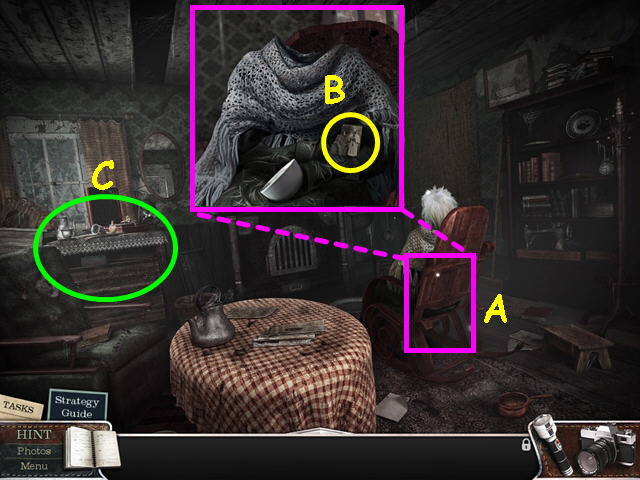
- Click on her chair to turn it around (A).
- Take the PART of a PHOTO (B).
- Select the chest of drawers for a hidden object scene (C).
- Look at the close-up, open, or combine all the items marked in white.
- Place the lid on the kettle (D).
- Locate all the items on the list.
- You will earn the HOSPITAL KEY.
- Walk down twice to return to the road.
- Walk forward, left, then forward again to reach the hospital gate.
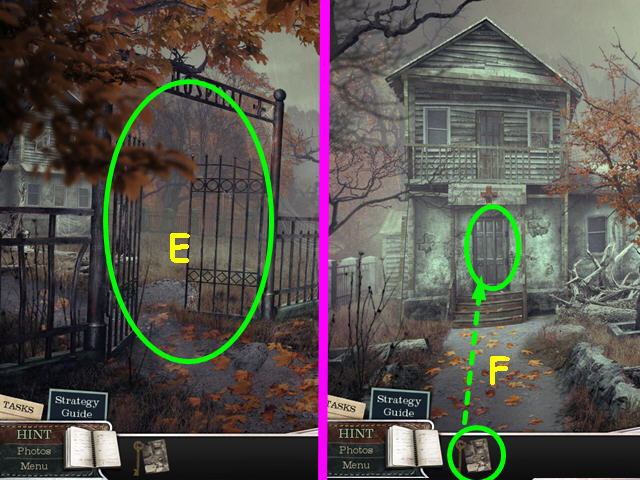
- Walk left through the gate (E).
- Use the HOSPITAL KEY on the door (F).
- Enter the hospital.
- Open the cabinet and note the safe inside (G).
- Note the fire house (H).
- Select the junk pile on the left for a hidden object scene (I).
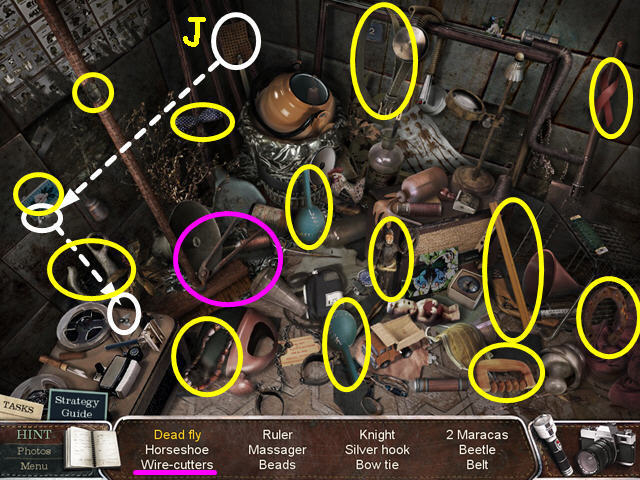
- Look at the close-up, open, or combine all the items marked in white.
- Use the flyswatter on the fly (J).
- The fly will fall down on the tape machine.
- Locate all the items on the list.
- You will earn the WIRE CUTTERS.
- Walk to the right.
- Note the door to the resuscitation ward (K).
- Note the stairs to the basement (L).
- Walk upstairs (M).
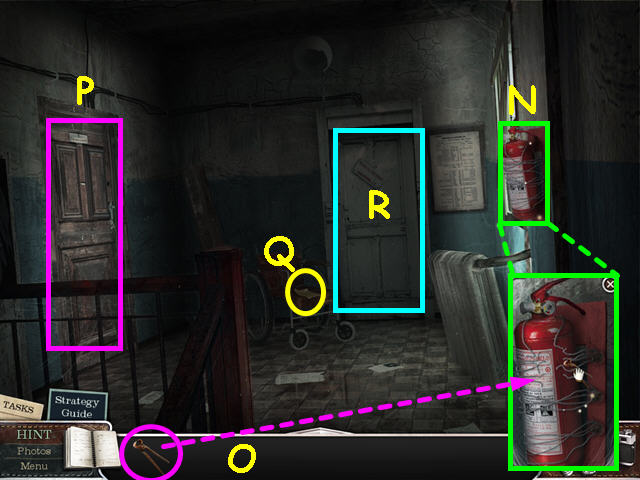
- Look at the close-up of the fire extinguisher (N).
- Use the WIRE CUTTERS 3 times to cut the wires (O).
- Take the FIRE EXTINGUISHER.
- Note the Doctor's locked door on the left (P).
- Read the note on the wheelchair (Q).
- Walk forward through the right door (R).
- Take the drawing from the cabinet (S).
- Remove the knob from the bedpost and look inside (T).
- Move the mattress and take the WINCH HANDLE (U).
- Take the CLOTHES RACK (V).
- Select the short cabinet for a hidden object scene (W).
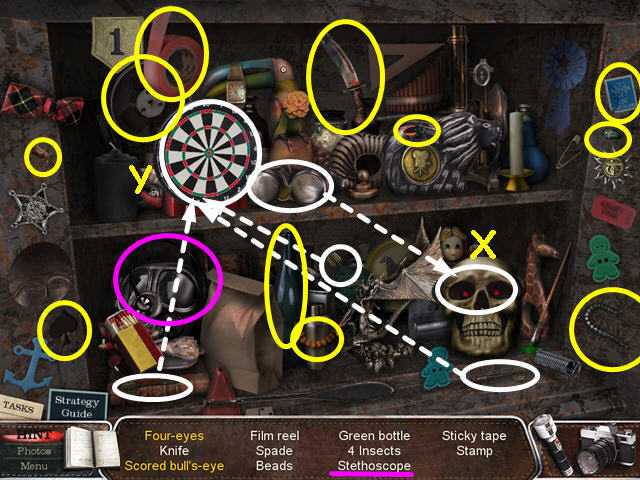
- Look at the close-up, open, or combine all the items marked in white.
- Place the goggles on the skull (X).
- Use the 3 darts on the target (Y).
- Locate all the items on the list.
- You will earn the STETHESCOPE.
- Walk down twice, then take the stairs to the basement.
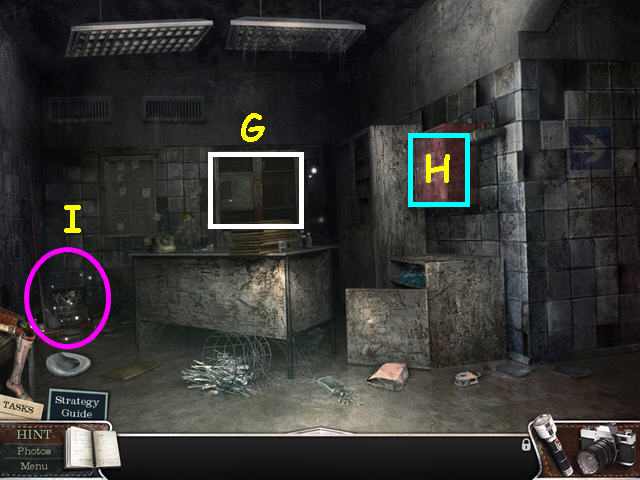
- Open the door and walk forward.
- Turn on your flashlight (A).
- Walk down to turn around.
- Turn on the lights with the switch (B).
- Take the POSTER from the door (C).
- Look in the pocket of the lab coat (D).
- Take the ZIPPER LOCK and the drawing (E).
- Walk down to turn around.
- Take the SURGEON'S GLOVE (F).
- Remove the cover from the gurney (G).
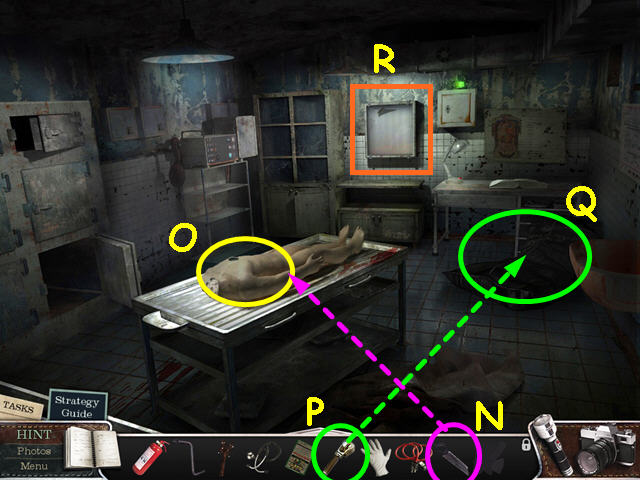
- Take the X-RAY PHOTO PART (H).
- Open the bottom door and take the POWER CABLE (I).
- Open the top door and take the X-RAY PHOTO PART (J).
- Look at the close-up of the table (K).
- Take the X-RAY PHOTO PART (L).
- Take the BONE SAW (M).
- Use the BONE SAW on the mannequin (N).
- Take the MANNEQUIN TORSO (O).
- Look at the body bag and use the ZIPPER LOCK on the zipper (P).
- Note the body bag is now a hidden object area (Q).
- Look at the x-ray machine for a mini-game (R).
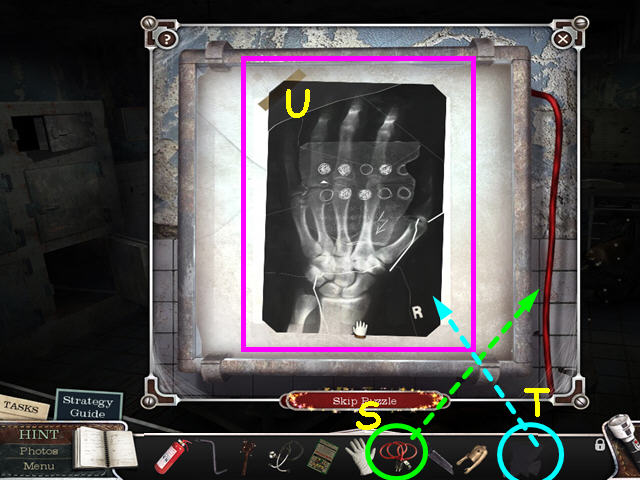
- Use the POWER CABLE on the x-ray machine (S).
- Place the X-RAY PHOTO PIECES onto the white screen (T).
- Rearrange the pieces to form an x-ray (U).
- Left-click to take a piece, click again to rotate a piece.
- Exit the close-up, then select the body bag.

- Look at the close-up, open, or combine all the items marked in white.
- Place the sword into the sheathe (V).
- Place the cigarette into the case (W).
- Locate all the items on the list.
- You will earn the SWISS KNIFE.
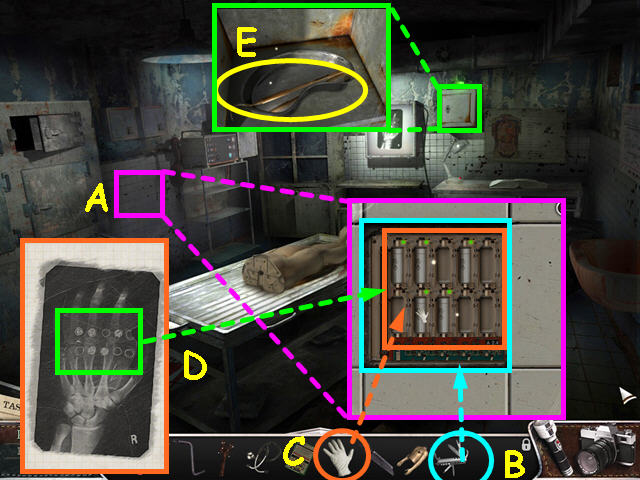
- Look at the tile wall on the left (A).
- Use the SWISS KNIFE top remove the tile cover (B).
- Use the SURGICAL GLOVE to touch the fuses (C).
- Place the fuses in the order indicated on the x-ray- this information is in your journal (D).
- Look at the safe and take the DENTAL HOOK (E).
- Walk down to turn and face the door.
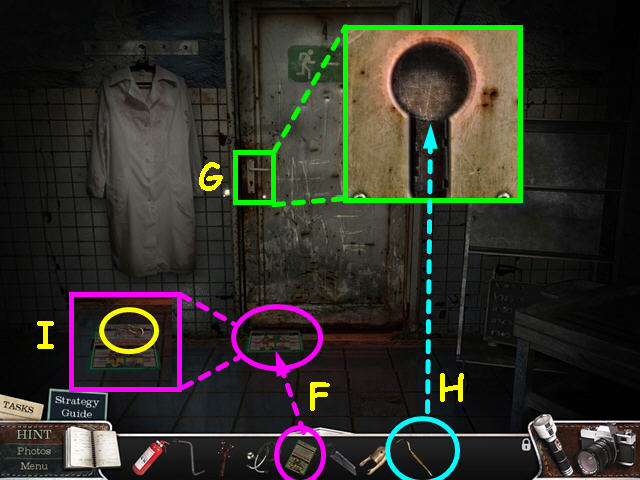
- Slide the POSTER under the door (F).
- Look at the close-up of the keyhole (G).
- Use the DENTAL HOOK on the keyhole (H).
- Pull the poster out and take the MORGUE KEY (I).
- Use the MORGUE KEY to unlock the door and walk forward.
- Walk up the stairs.
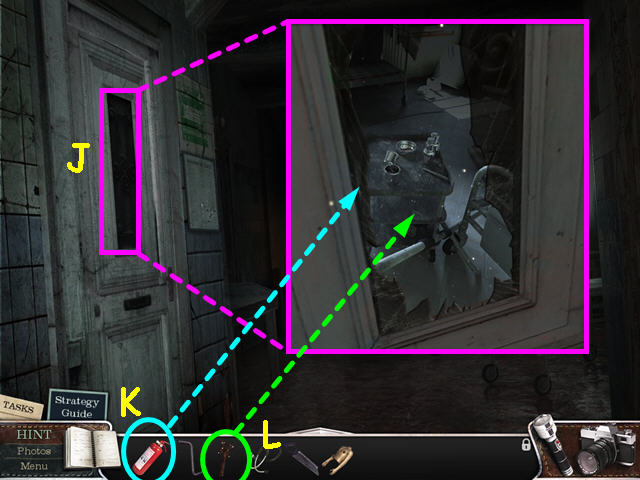
- Look at the Resuscitation Ward door (J).
- Use the FIRE EXTINGUISHER on the glass twice (K).
- Use the CLOTHES RACK to push the debris away (L).
- Walk left to enter the Ward.
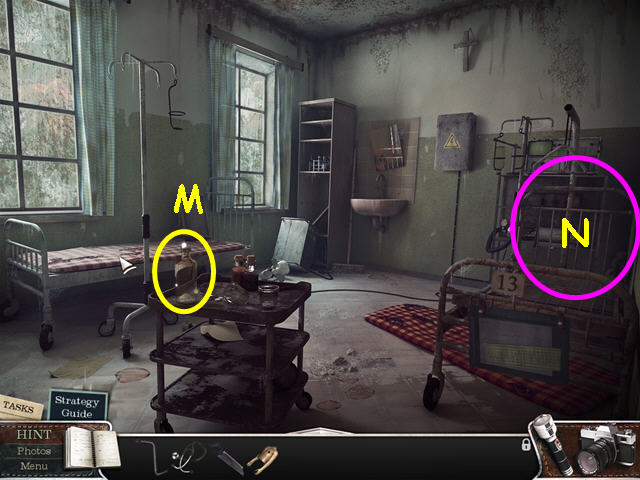
- Take the EMPTY BOTTLE (M).
- Look at the head of bed 13 (N).
- Use the camera to take a photograph (O).
- Place the TORSO on the cot (P).
- Take the leads and place them on the torso (Q).
- Walk down twice to return to the hall.
- Walk upstairs, then go forward into the patient quarters.
- Look at the close-up of the bedpost (R).
- Use the BONE SAW on the bedpost (S).
- Take the KEY (T).
- Select the short cabinet for a hidden object scene (U).
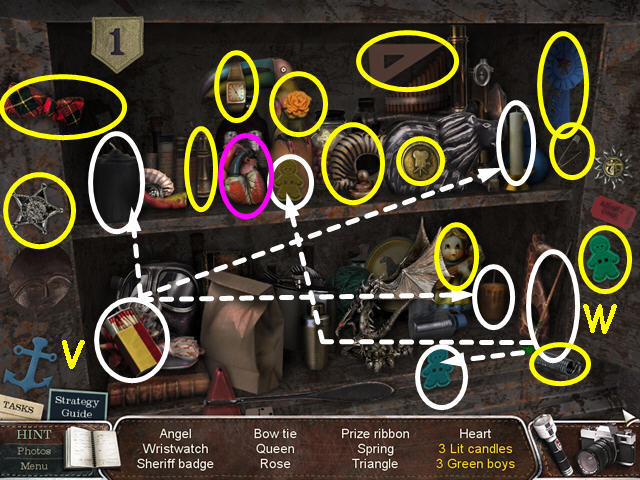
- Look at the close-up, open, or combine all the items marked in white.
- Take a match, strike it on the matchbox, then use the match on the 3 candles (V).
- Use the paintbrush on the 2 boys (W).
- Locate all the items on the list.
- You will earn the MANNEQUIN HEART.
- Walk down to exit the room.
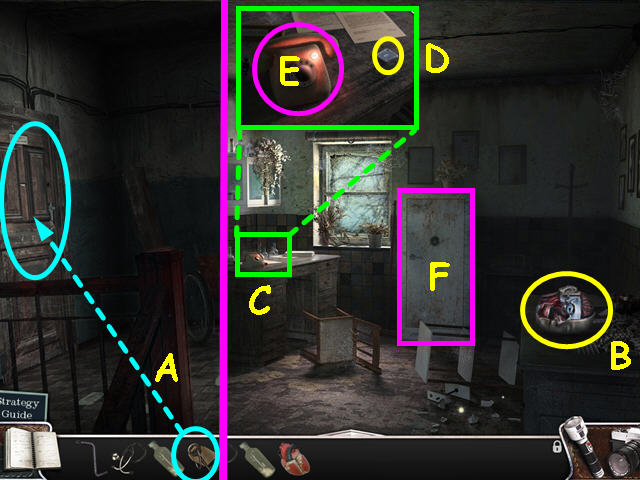
- Use the KEY to open the Doctor's office (A).
- Walk left to enter the office.
- Take the MANNEQUIN HEAD (B).
- Look at the close-up of the table (C).
- Take the BUTTON 9 from the desk (D).
- Click on the phone when it rings, click again to hang-up (E).
- Look at the safe for a mini-game (F).
- Use the STETHESCOPE on the safe (G).
- Turn the safe dial (H) to the right until you see the bar drop through the first tumbler (1).
- Turn the dial to the right again until the bar drops through the second tumbler (2).
- Turn the dial to the left for the third tumbler (3).
- Turn the safe dial to the right again for the fourth tumbler (4).
- Once the bar is through all 4 tumblers (I), click on the handle to open the safe (J).
- Inside the safe, take the DROPPER HOSE (K).
- Take the safe clue (L).
- Walk down twice, then go down the basement stairs.
- Walk forward to return to the morgue.
- Take the MANNEQUIN LEGS from the table (M).
- Walk down, then right to return to the stairs area.
- Walk down 4 times, then go right to reach the well.
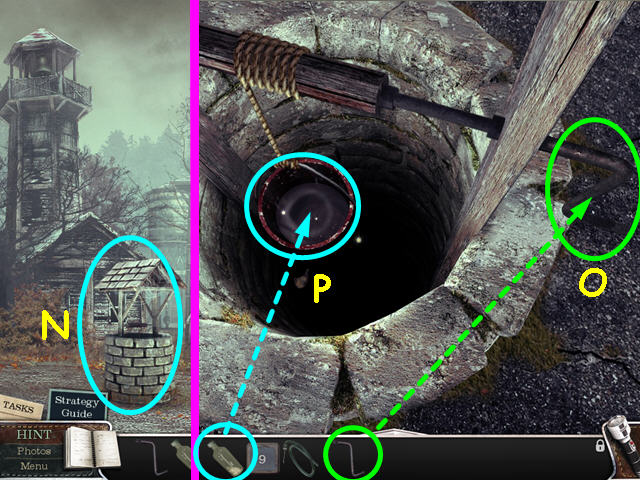
- Look at the close-up of the well (N).
- Use the WINCH HANDLE on the right side of the well (O).
- Click on the handle to raise the bucket.
- Use the EMPTY BOTTLE on the bucket (P).
- The BOTTLE and the DROPPER HOSE will combine to make the DROPPING BOTTLE.
- Walk down, then go left.
- Walk forward to the hospital gate.
- Walk right through the gate, then enter the hospital.
- Walk to the right, then go left to return to the Resuscitation Ward.
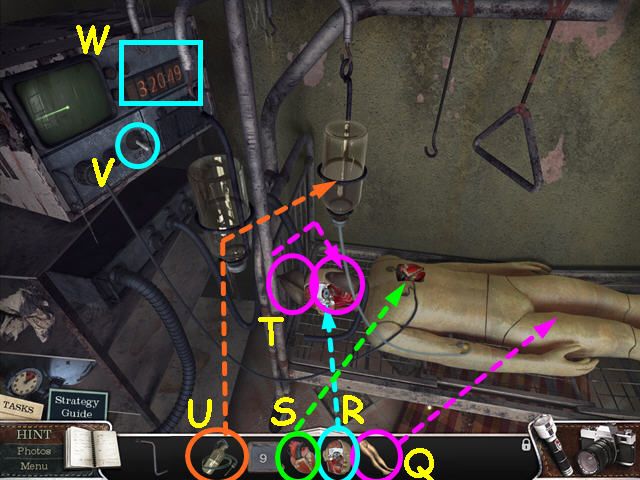
- Look at bed 13 on the right.
- Place the MANNEQUIN LEGS on the bed (Q).
- Place the MANNEQUIN HEAD at the top of the torso (R).
- Place the MANNEQUIN HEART into the torso (S).
- Place the oxygen mask on the head (T).
- Place the DROPPING BOTTLE into the holder (U).
- Click the switch to turn on the monitor (V).
- Once the cut scene is over, the time of death will be noted in your journal (W).
- Walk down 3 times to return to the lobby.
- Select the junk pile for a hidden object scene.
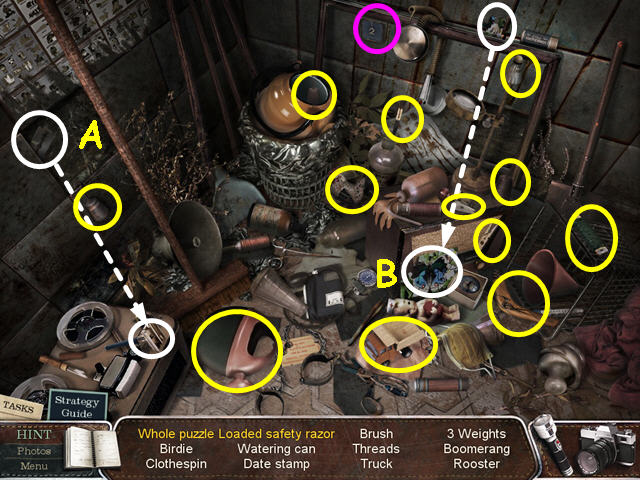
- Look at the close-up, open, or combine all the items marked in white.
- Place the blade into the razor (A).
- Place the puzzle piece in the puzzle (B).
- Locate all the items on the list.
- You will earn the BUTTON 2.
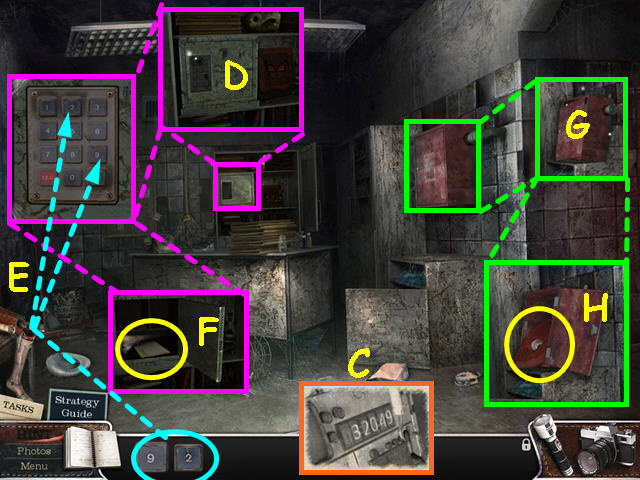
- Look in your journal tor the safe code- 32049 (C).
- Look at the close-up of the safe and click on the number pad (D).
- Place the BUTTON 9 and BUTTON 2 into the number grid (E).
- Press 3-2-0-4-9-Enter.
- Take the BONE from the safe (F).
- After the tremors, the fire hose box will slip and crack (G).
- Click on the lid to open it and take the FIRE HOSE (H).
- Walk down 3 times, then go to the right twice to return to the side of the house.
- Walk forward to the broken steps.
Chapter 4: The Island
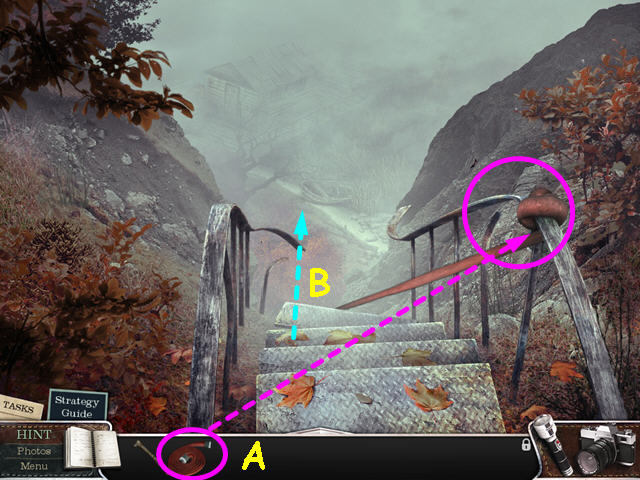
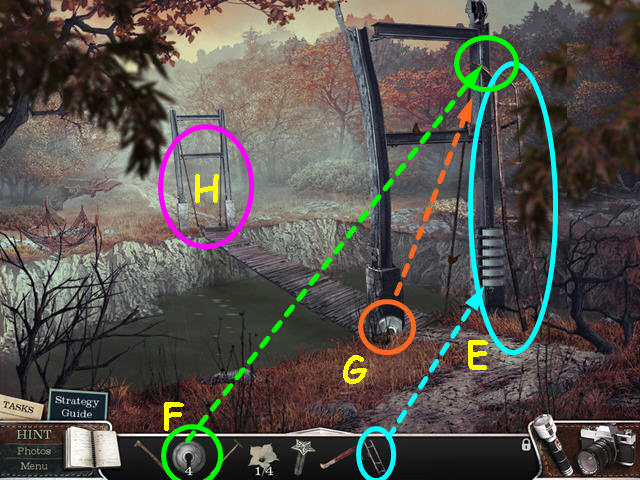
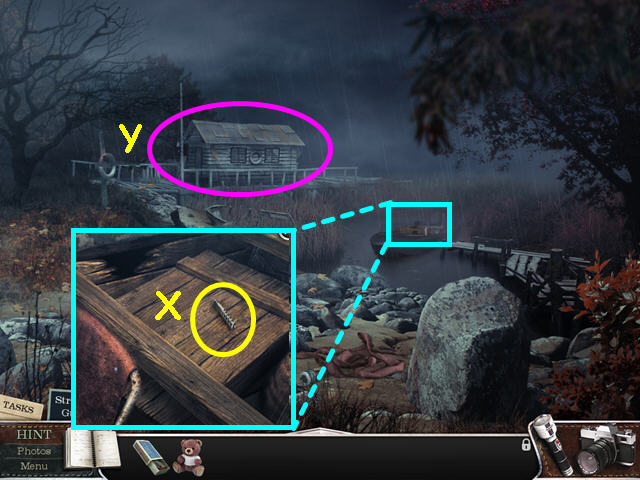
- Tie the FIRE HOSE to the railing (A).
- Climb down the fire hose to the shore (B).
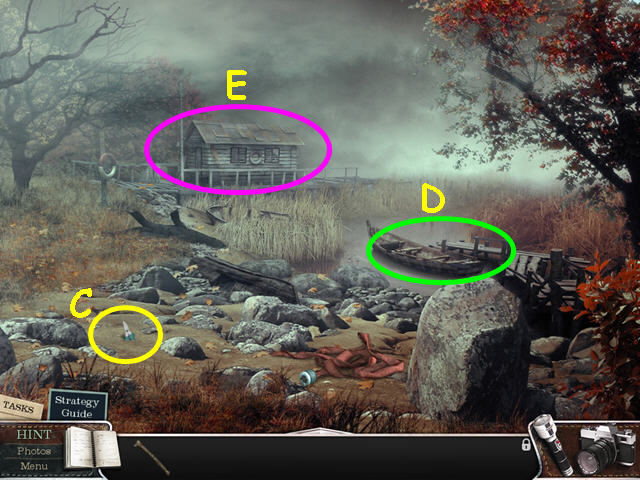
- Take the GARDEN SHEARS (C).
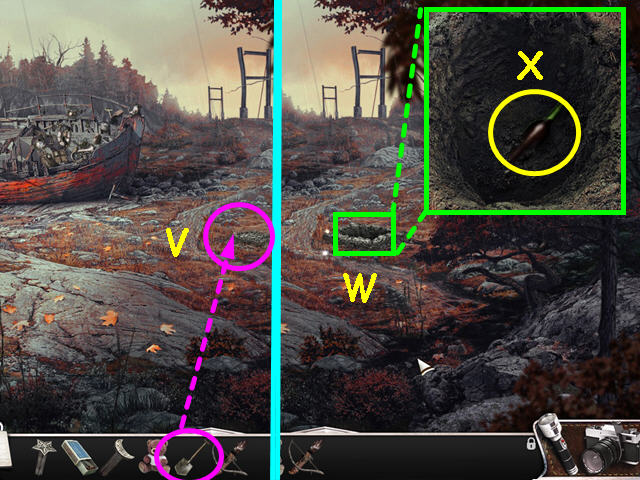
- Make note of the boat (D).
- Walk forward to the shack (E).
- Read the note on the table (F).
- Note the hidden object area in the back (G).
- Look at the map for a mini-game (H).
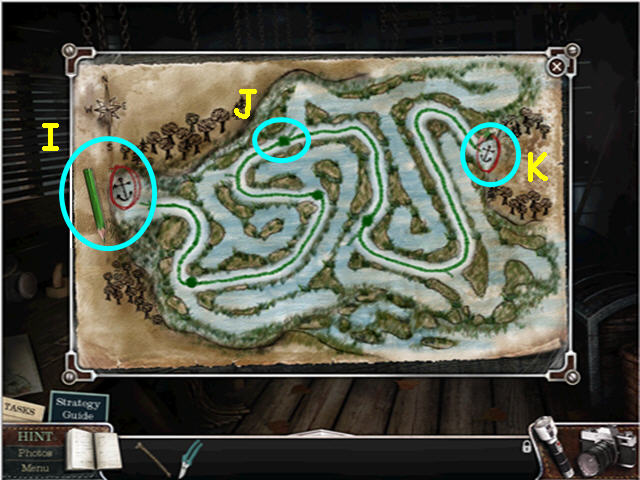
- The object of this mini-game is to draw a path from the anchor on the left to the shore on the right.
- Take the green pencil and start drawing from the anchor (I).
- Keep the tip of the pencil on the green line.
- Should your pencil touch the sides, you must start over.
- The green dots are save points (J).
- Once you see the anchor on the right, you have completed the mini-game (K).
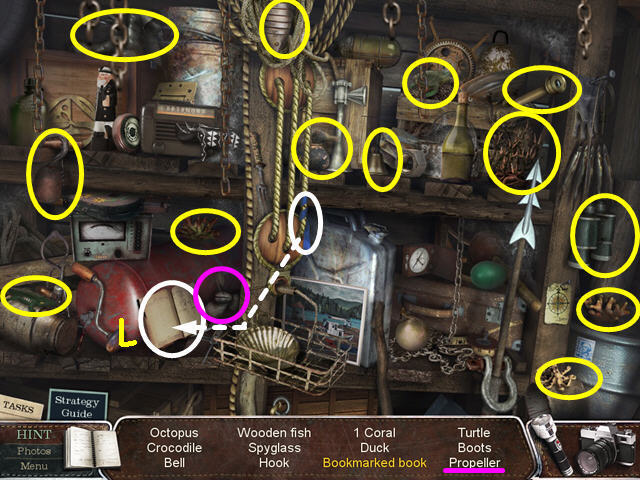
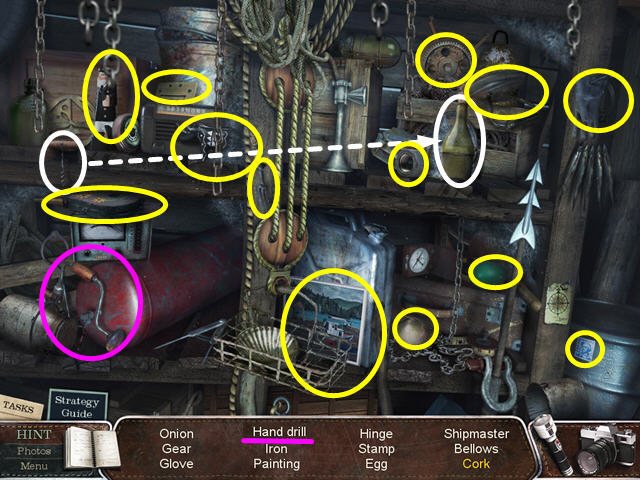
- Look at the close-up, open, or combine all the items marked in white.
- Place the ribbon on the book (L).
- Locate all the items on the list.
- You will earn the SCREW PROPELLER.
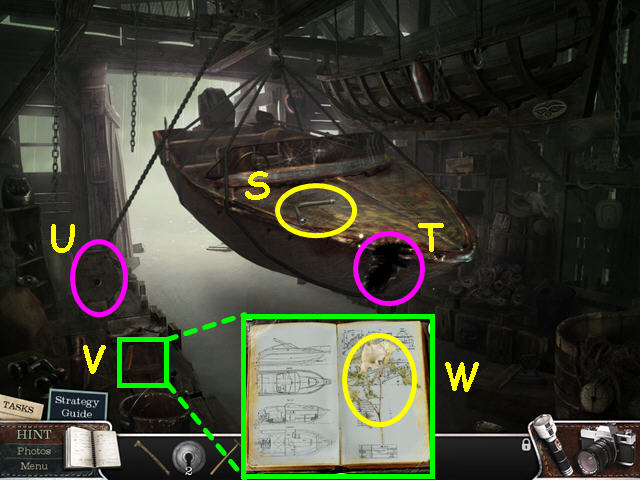
- Walk down to exit the shack, then look at the close-up of the boat.
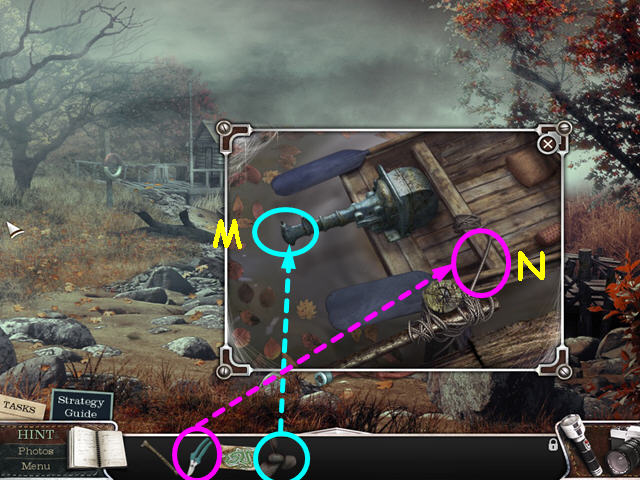
- Use the SCREW PROPELLER on the motor (M).
- Use the GARDEN SHEARS to cut the rope (N).
- Enter the boat for a mini-game.
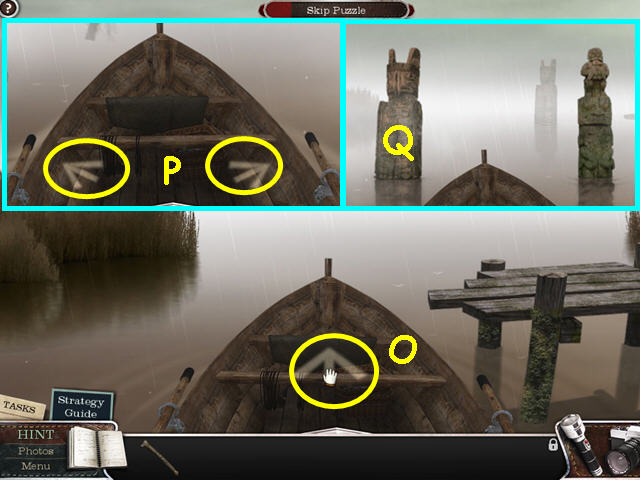
- The object of this mini-game is to navigate to the island.
- Start by clicking on the forward arrow (O).
- Use the left and right arrows to steer around obstacles (P).
- You are getting close to the island when you see the carved pillars (Q).
- Should you hit an obstacle, the boat will back up a bit and you can try again.
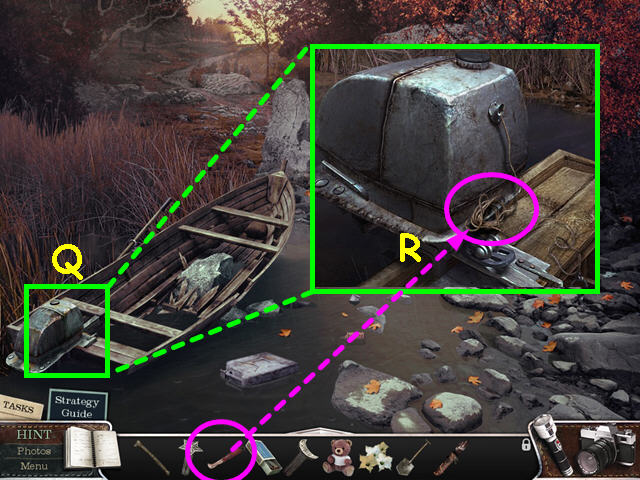
- Take the WEIGHT (R).
- Note the fuel can and the outboard motor (S).
- Walk forward.
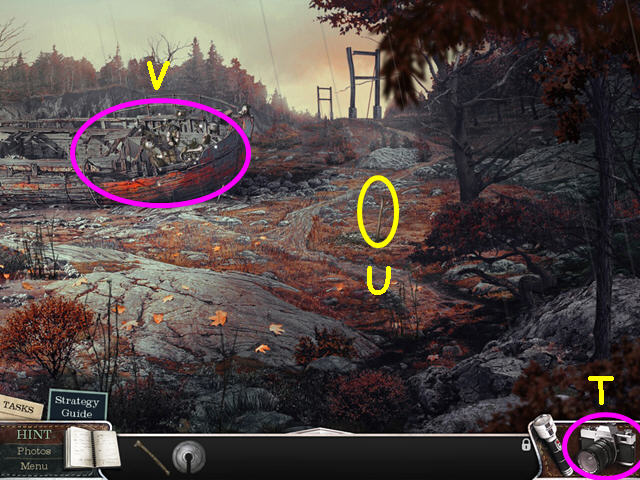
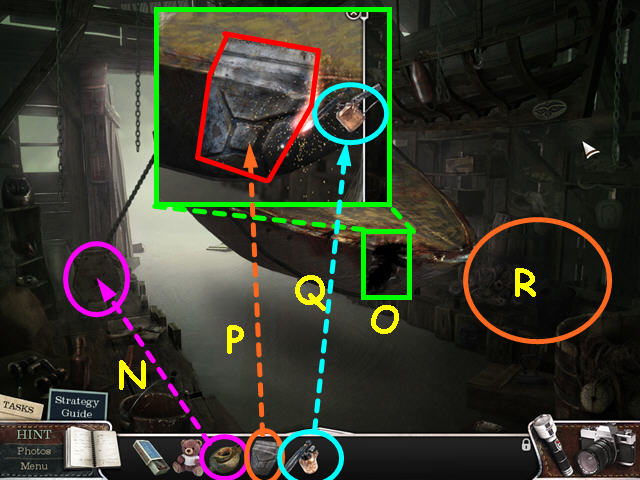
- Use the camera to take a photo (T).
- Take the SHAFT (U).
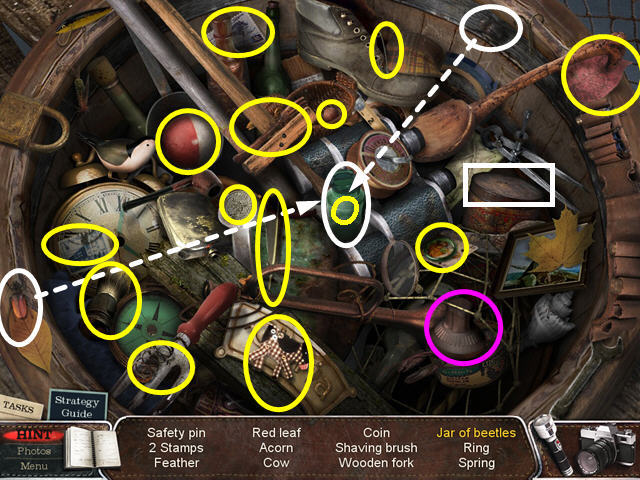
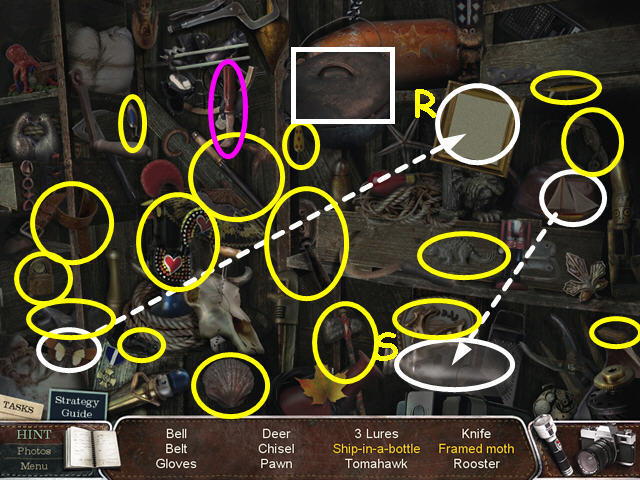
- Select the wrecked hull for a hidden object scene (V).
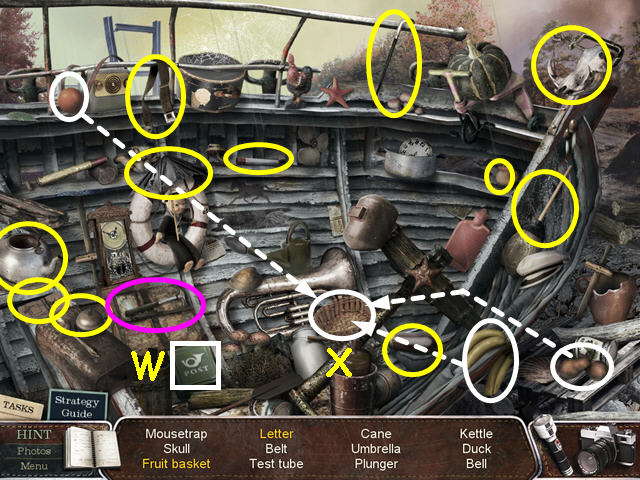
- Look at the close-up, open, or combine all the items marked in white.
- Look inside the post box (W).
- Place the 3 fruits into the basket (X).
- Locate all the items on the list.
- You will earn the HAMMER.
- Walk to the left.
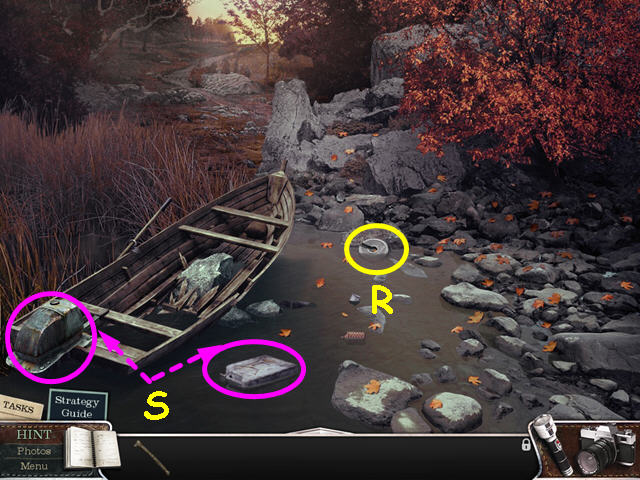
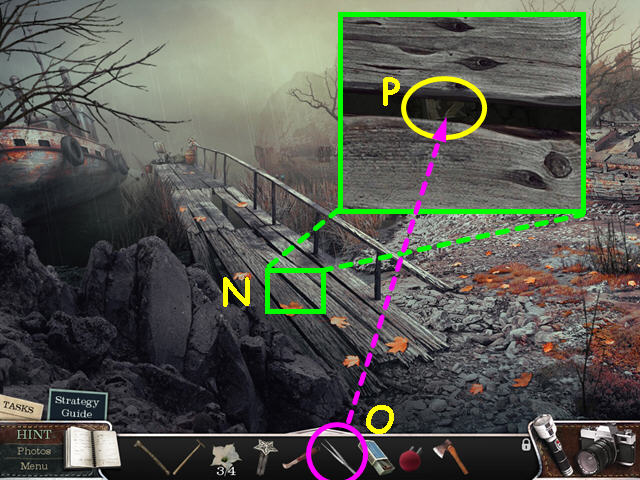
- Look at the close-up of the dock (A).
- Take the note (B).
- Note there is something unreachable under the dock (C).
- Exit the close-up.
- Note the shack on the right (D).
- Walk to the end of the dock (E).
- Take the drawing (F).
- Note the object floating in the water (G).
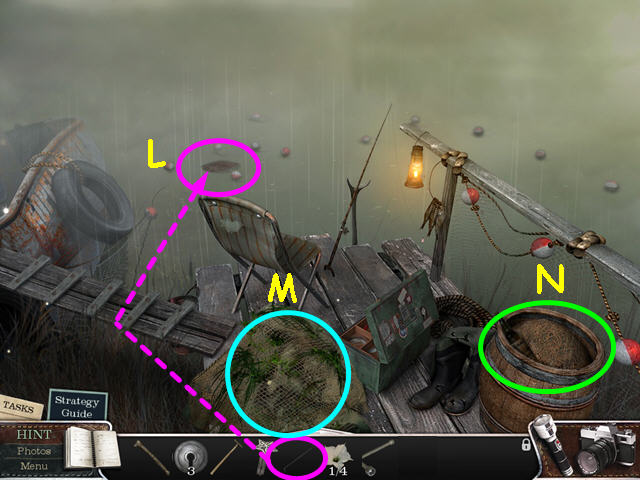
- Click on the tackle box to open it, then look inside (H).
- Take the STAR KEY (I).
- Walk down, then go to the shack.
- Take the FIRE HOOK (J).
- Look at the ladder to learn you need a screwdriver (K).
- Try to take the box, but you knock it into the barrel (L).
- Look inside the barrel to learn you need a magnet (M).
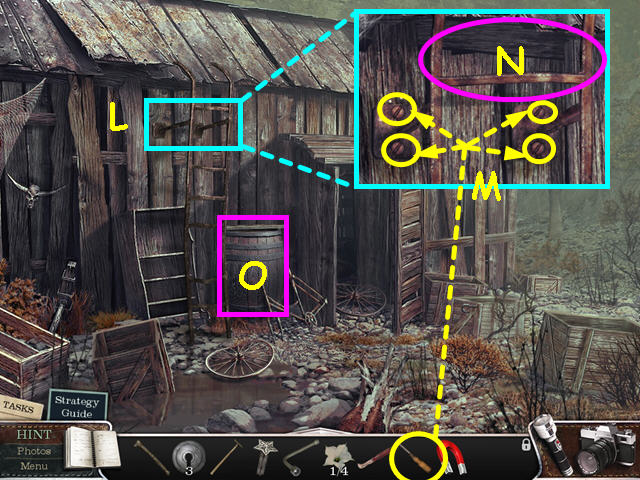
- Use the HAMMER to open the 3 crates (N).
- Look inside each of the crates and take the VALVE (O), the note (P), and the WEIGHT (Q).
- Enter the shack (R).
- Take the WRENCH (S).
- Look at the hole in the boat (T).
- Look at the winch to see it is rusty and needs a handle (U).
- Look at the book (V).
- Click on the cover, then the pages until you find the WHITE FLOWER (W).
- Walk down twice to return to the dock area.
- Walk forward to the end of the dock, then go to the left.
- Note the winch motor is missing a power cord and bolts (A).
- Note the winch controls (B).
- Note the locked first aid box (C).
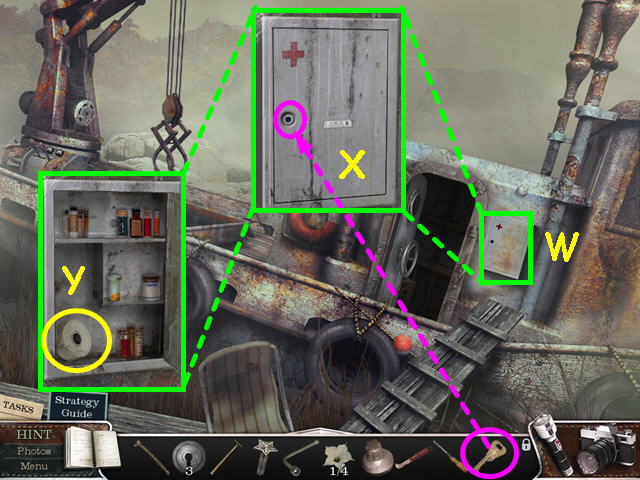
- Look at the close-up of the door (D).
- Use the VALVE on the door, then click on it to open the door (E).
- Enter the ship.
- Turn off the power switch (F).
- Turn on the flashlight (G).
- Take the weight (H).
- Look at the radio to learn you need a knob (I).
- Take the tube and use it on the hanging piece (J).
- You will need something to seal the joint between the tubes.
- Note the grinder is missing discs (K).
- Walk to the right to exit the boat.
- Walk down to return to the end of the dock.
- Use the FIRE HOOK on the floating object (L).
- Look at the netting to learn you need a knife (M).
- Look in the barrel for a hidden object scene (N).
- Look at the close-up, open, or combine all the items marked in white.
- Place the 2 beetles into the jar (O).
- Locate all the items on the list.
- You will earn the CONTROL KNOB.
- Walk down, right, then forward to reach the bridge area.

- Take the radio instructions (P).
- Note that the counterweight it too high to reach (Q).
- Walk down, then left.
- Walk to the shack boathouse and go inside.
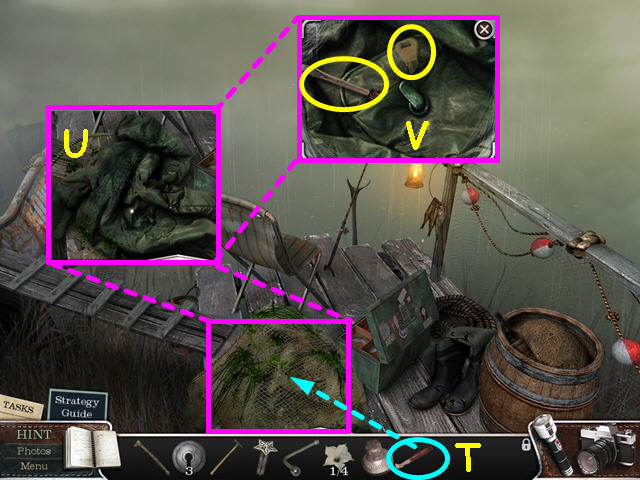
- Select the area to the right of the boat for a hidden object scene.
- Look at the close-up, open, or combine all the items marked in white.
- Place the moth in the frame (R).
- Place the ship in to the bottle (S).
- Locate all the items on the list.
- You will earn the KNIFE.
- Walk down twice, then go forward to the end of the dock.
- Use the KNIFE to cut the netting (T).
- Look at the close-up of the jacket (U).
- Take the SCREWDRIVER and the KEY (V).
- Walk left to the ship.
- Look at the first aid box (W).
- Use the KEY to unlock the box (X).
- Take the STICKY TAPE (Y).
- Enter the ship.
- Note- if you turned the power back on, push the switch down to turn it off (A).
- Turn on the flashlight.
- Use the STICKY TAPE on the joint between the tubes (B).
- Turn the power back on.
- Note the hidden object area below the tubes (C).
- Look at the radio (D).
- You can refer to the radio instructions in your journal (E).
- Place the CONTROL KNOB on the radio (F).
- Put the red switch in the up position (G).
- Click the control knob until the upper white bar is all the way to the right (H).
- Move the red switch to the down position.
- Click the control knob until the lower white bar is all the way to the left (I).
- Use the fork on the control knob to remove the cover (J).
- Take the MAGNET from inside the radio (K).
- Play the Hidden Object Scene.

- Locate all the items on the list.
- You will earn the power cable.
- Exit the ship, then walk down twice.
- Walk to the shack boathouse.
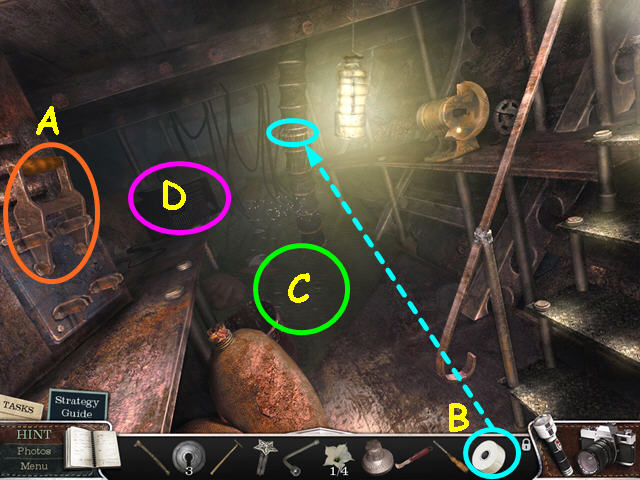
- Look at the close-up of the ladder (L).
- Use the SCREWDRIVER on all 4 screws (M).
- Take the LADDER (N).
- Look in the barrel for a mini-game (O).
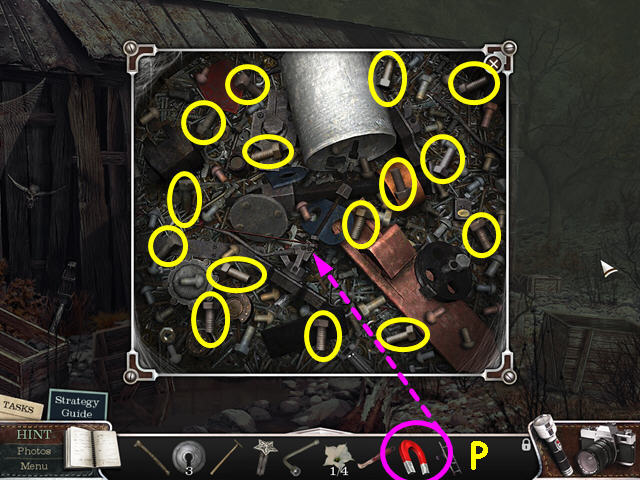
- Use the MAGNET to determine which bolts to collect (P).
- Move the magnet over the bolts until you see one shake then click to take the bolt.
- Collect the 15 bolts to earn the BOLTS in your inventory.
- Walk down, forward on the dock, then left to return to the ship.
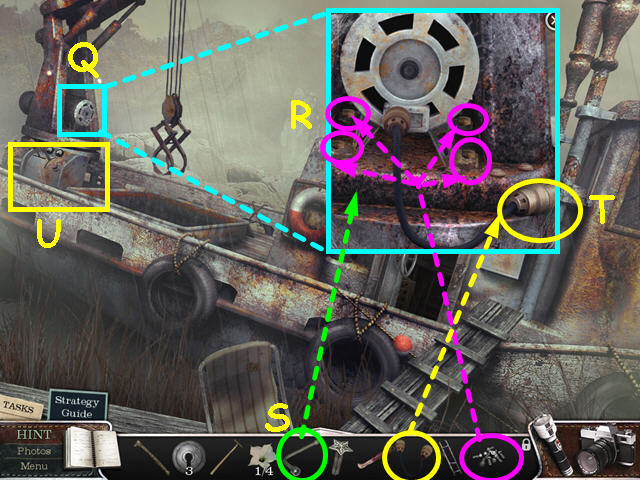
- Look at the close-up of the motor (Q).
- Use the BOLTS on the 4 holes (R).
- Use the WRENCH on each of the 4 bolts (S).
- Attach the POWER CABLE to the outlets (T).
- Look at the winch controls for a mini-game (U).
- The object of this mini-game is to remove the items from the hold and get the weight.
- Press the red button (A) to remove a beam (1).
- Once the winch resets, move the center lever down by clicking just below the center knob (B).
- Next, move the left lever to the right 2 times by clicking to the right of the center knob (C).
- Press the red button to remove the tile (2).
- For the next beam (3), move the left control to the right 3 times, then press the red button.
- Once the winch resets, move the left lever to the right 3 times and the center lever down once.
- Press the red button to pick up the weight (4).
- Once it drops, take the WEIGHT (D).
- Walk down 3 times to return to the dock area.
- Walk to the right, then up to return to the bridge area.
- Place the LADDER on the right side of the bridge support (E).
- Place the 4 WEIGHTS on the upper right side of the bridge support (F).
- Take the 5th weight from the grass and add it to the other weights (G).
- Walk forward across the bridge (H).
- Look at the close-up of the leaf pile (I).
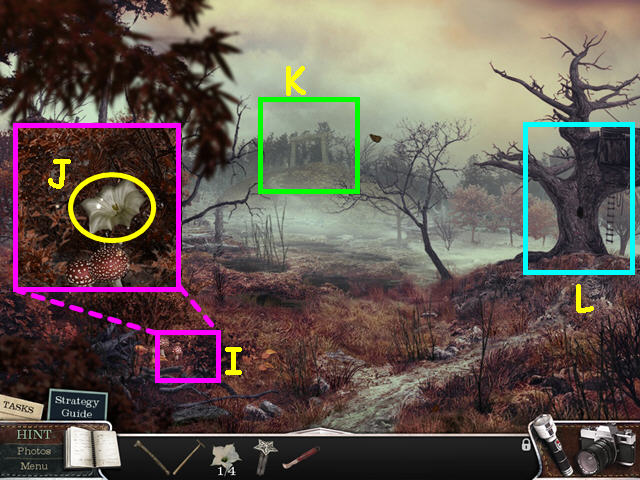
- Click twice to remove the leaves, then take the WHITE FLOWER (J).
- Note the monument on the hill (K).
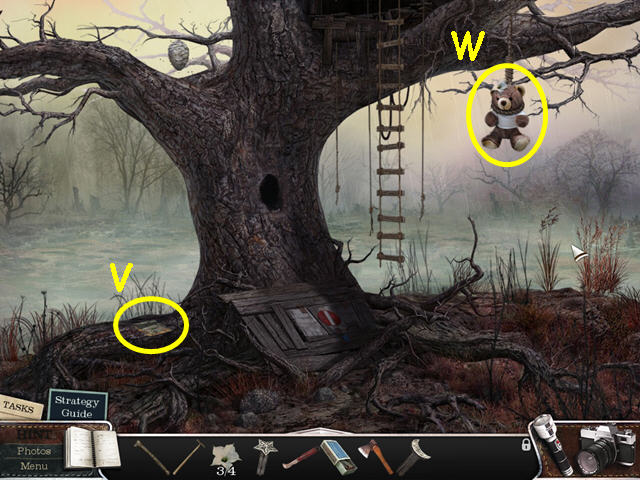
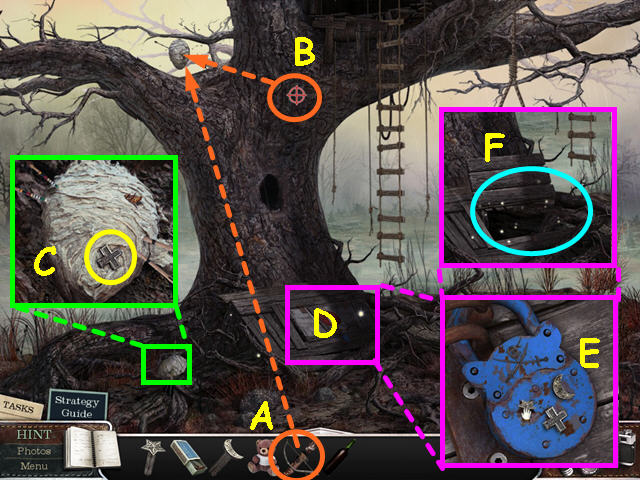
- Walk to the tree-house on the right (L).
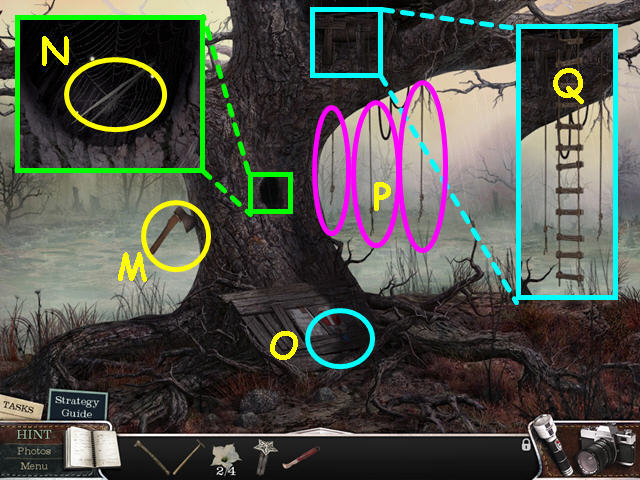
- Take the RUSTY AXE (M).
- Look in the hole and take the TWEEZERS (N).
- Note the lock on the root cellar (O).
- Pull the 3 ropes to bring down the ladder (P).
- Note- it does not matter the order, the 3rd rope will trigger the ladder.
- Climb up the ladder (Q).
- Note the mini-game on the left is missing a piece (R).
- Look in the birdhouse (S).
- Take the note (T).
- Push the 2 eggs aside and take the MATCHBOX (U).
- Note the mini-game on the right is missing a piece (V).
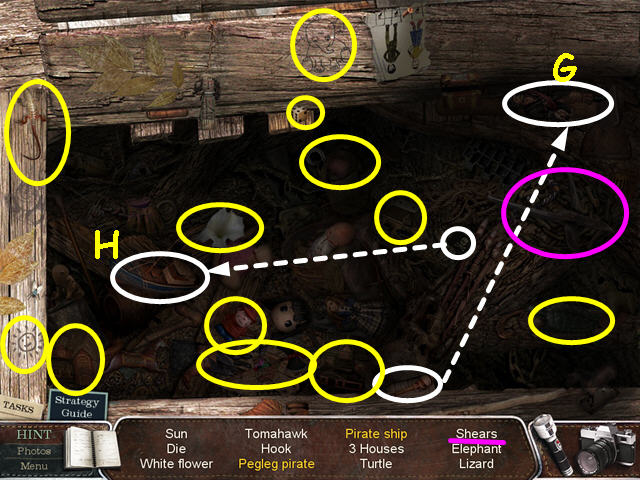
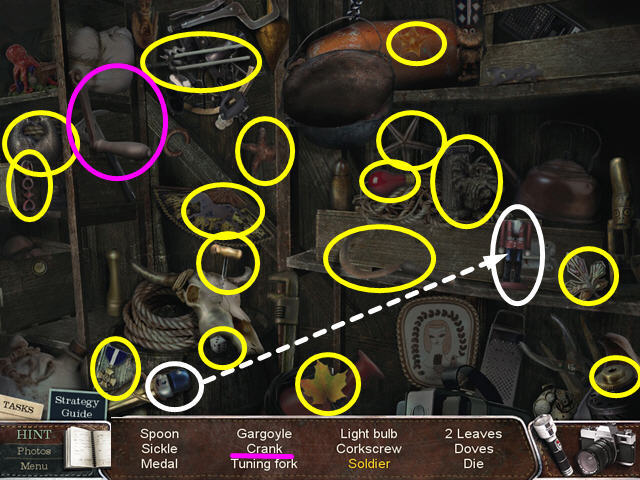
- Click on the lid of the chest to open it, then look inside for a hidden object scene (W).
- Look at the close-up, open, or combine all the items marked in white.
- Move the queen to the hand of cards (X).
- Place the pencil in the sharpener (Y).
- Locate all the items on the list.
- You will earn the SHIP-GUN.
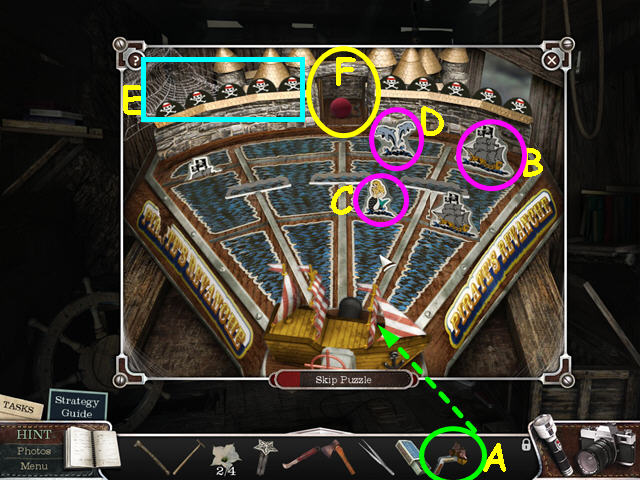
- Look at the mini-game on the right.
- Use the SHIP-GUN to activate the mini-game (A).
- The object is to hit all the pirate ships (B) while avoiding the mermaids (C) and dolphins (D).
- Point and click with your mouse to fire.
- There are 10 pirate ships to sink- keep track with the skull and crossbones at the top of the game (E).
- A skull and crossbones will disappear for each ship sunk, but one will reappear if you hit a mermaid or dolphin.
- Once all the ships are sank, take the CLOWNISH NOSE from the compartment (F).
- Walk down twice, then go forward.
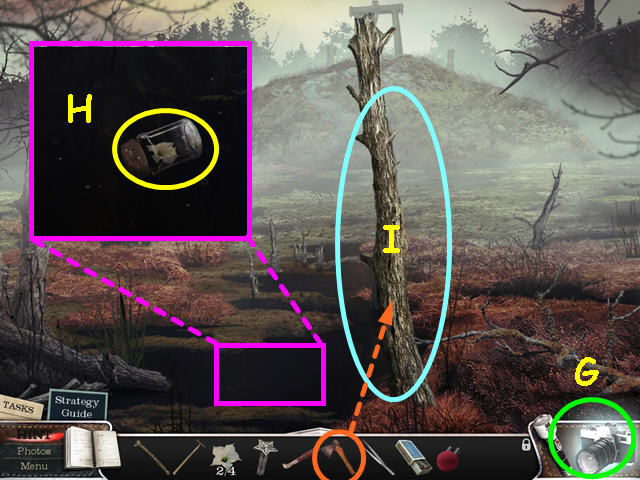
- Use your camera to take a photo (G).
- Look at the water until a jar appears- take the WHITE FLOWER (H).
- Try the RUSTY AXE on the tree, but it is too dull (I).
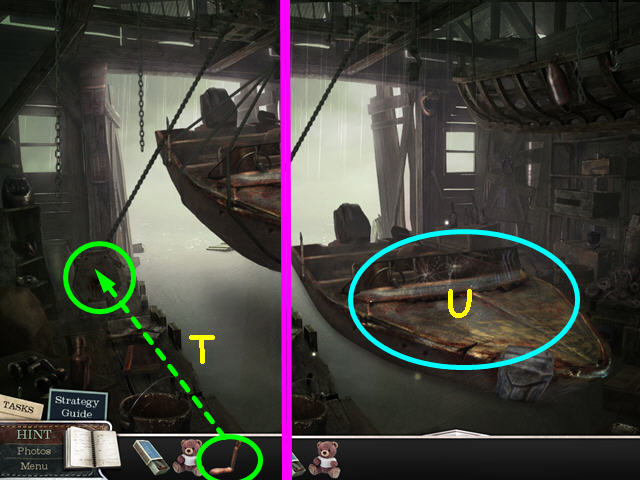
- Walk down 3 times, then select the derelict hull for a hidden object scene.
- Look at the close-up, open, or combine all the items marked in white.
- Place the face into the clock (J).
- Locate all the items on the list.
- You will earn the GRINDING WHEEL.
- Walk to the left, up and left again.
- Enter the ship.
- Place the GRINDING WHEEL on the grinder (K).
- Use the RUSTY AXE on the grinder (L).
- You will now have a SHARPENED AXE.
- Exit the ship, then walk down twice.
- Look at the close-up of the dock (N).
- Use the TWEEZERS (O) to grab the TILE (P).
- Walk to the right, then walk down.
- Look at the close-up of the outboard motor (Q).
- Use the KNIFE to cut a piece of CORD (R).
- Walk forward 3 times.
- Walk to the tree-house, then climb the ladder.
- Look at the mini-game on the left.
- Place the TILE into the grid to trigger the mini-game.
- The object of this mini-game is to restore the pattern in the tiles.
- Click on two adjacent tiles to swap positions.

- Look inside the niche that was hidden by the mini-game and open the carved box (S).
- Place the CLOWNISH NOSE on the head (T).
- Take the CRESCENT KEY from the clown's head (U).
- Walk down to exit the tree-house.
- Take the drawing that floats to the ground (V).
- After the cut-scene, take the BEAR and the WHITE FLOWER (W).
- Walk down, then go up.
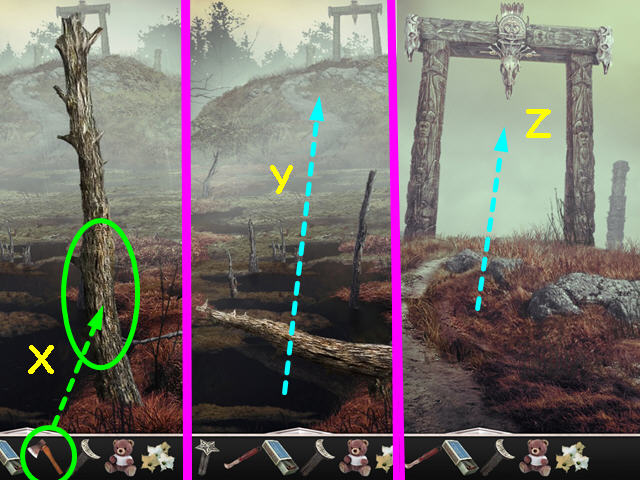
- Use the SHARPENED AXE on the tree 3 times (X).
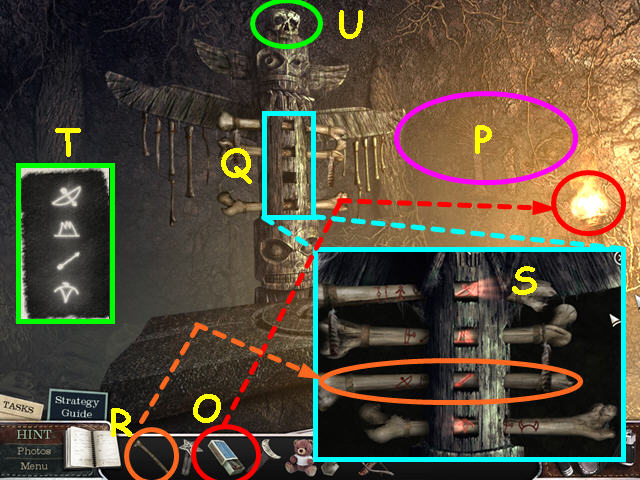
- Walk forward, up the hill (Y).
- Walk through the carved gate (Z).
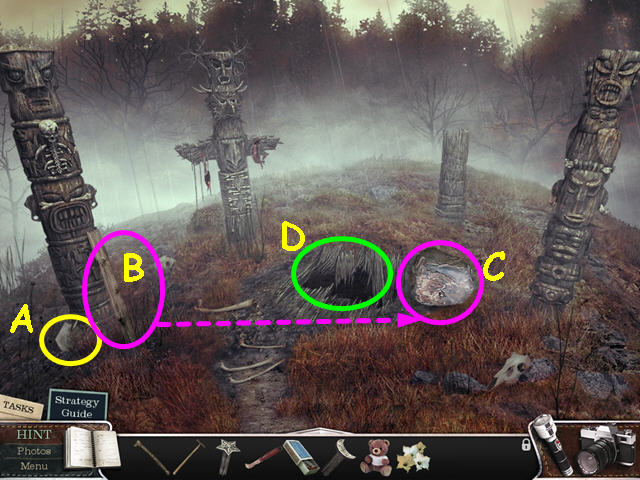
- Take the SPADE HEAD (A).
- The SPADE HEAD will automatically combine with the SHAFT to make the SPADE.
- Take the log (B) and use it on the stone (C) twice so it falls in the hole (D).
- Enter the hole.
- Turn on your flashlight (E).
- Use the MATCHBOX on the torch (F).
- Look at the upper mummy and take the QUIVER (G).
- Look at the lower mummy (H).
- Use the CORD on the bow piece, then take the BOW (I).
- The QUIVER will automatically combine with the BOW PIECE to make the BOW.
- Look at the mural on the wall over the mummies (J).
- Look at the dais in the center of the room (K).
- Place the WHITE FLOWERS into the bowl (L).
- Use the MATCHBOX on the white flowers (M).
- Your journal will note the symbols that appear in the smoke (N).
- Walk forward.
- Turn on the flashlight.
- Use the MATCHBOX to light the torch (O).
- Look at the wall mural on the right (P).
- Look at the close-up of the totem (Q).
- Place the BONE into the empty spot (R).
- Slide the bones left or right so the symbols from the smoke appear in the carved holes (S).
- Refer to your journal for the correct order (T).
- Look at the skull at the top of the totem to learn it needs blood (U).
- Walk down and to the right to exit the temple.
- Walk down 5 times.
- Use the SPADE on the spot where someone had been digging previously (V).
- Look inside the hole (W).
- Take the RED WINE (X).
- Walk up twice, then go to the tree-house.
- Use the BOW on the beehive for a mini-game (A).
- The object is to hit the beehive twice with arrows.
- The red cross-hair is constantly moving (B).
- When you can get it over the beehive, click to fire.
- Once the beehive drops, look at the close-up and take the CROSS KEY (C).
- Look at the lock on the root cellar (D).
- Use the STAR, CRESCENT, and CROSS KEYS in the lock (E).
- Select the cellar for a hidden object area (F).
- Look at the close-up, open, or combine all the items marked in white.
- Place the peg-leg on the pirate (G).
- Place the pirate flag on the ship (H).
- Locate all the items on the list.
- You will earn the SHEARS.
- Walk down, then go forward 3 times.
- Enter the hole in the ground, then walk forward.
- Look at the close-up of the skull, then pour the RED WINE (I).
- Once the lid opens, look inside the sarcophagus (J).
- Take the note and the OIL CAN (K).
- Walk down and right to exit the temple.
- Walk down 6 times to return to where the boat crashed.
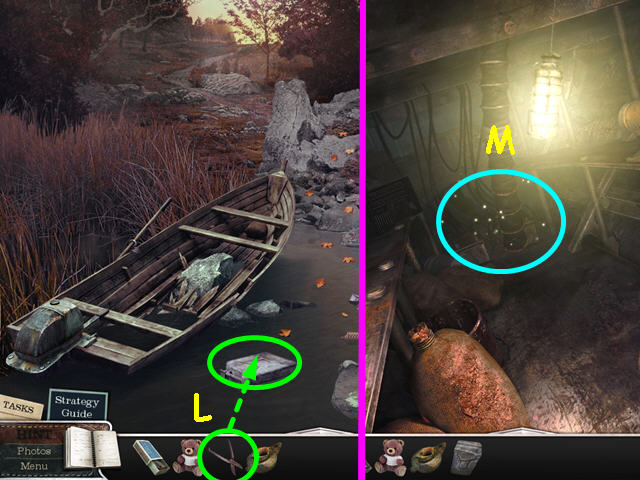
- Use the SHEARS on the fuel tank to get the CAN (L).
- Walk forward, left, then forward on the dock.
- Walk to the left and enter the ship.
- Look at the floor area for a hidden object scene (M).
- Locate all the items on the list.
- You will earn the TORCH.
- Walk right, then down twice.
- Walk forward to the shack boathouse, then go inside.
- Use the OIL CAN on the winch (N).
- Look at the hole in the boat (O).
- Place the CAN over the hole (P).
- Use the TORCH to weld the metal- trace the edge of the can until it is sealed (Q).
- Select the area to the right of the boat for a hidden object scene (R).
- Look at the close-up, open, or combine all the items marked in white.
- Place the head on the soldier (S).
- Locate all the items on the list.
- You will earn the HANDLE.
- Use the HANDLE on the winch (T).
- Click on the handle to lower the boat.
- Select the boat for a mini-game (U).
- The object of this mini-game is to navigate from the island to town.
- Start by clicking on the forward arrow (V).
- Use the left and right arrows to steer around obstacles (W).
- Should you hit an obstacle, the boat will back up a bit and you can try again.
- Look at the boat and take the DRILL BIT (X).
- Walk to the shack (Y).
- Select the shelves for a hidden object scene.
- Look at the close-up, open, or combine all the items marked in white.
- Use the corkscrew on the bottle (Z).
- Locate all the items on the list.
- You will earn the HAND DRILL.
- The DRILL BIT will automatically combine with the HAND DRILL.
- Walk down, then to the left.
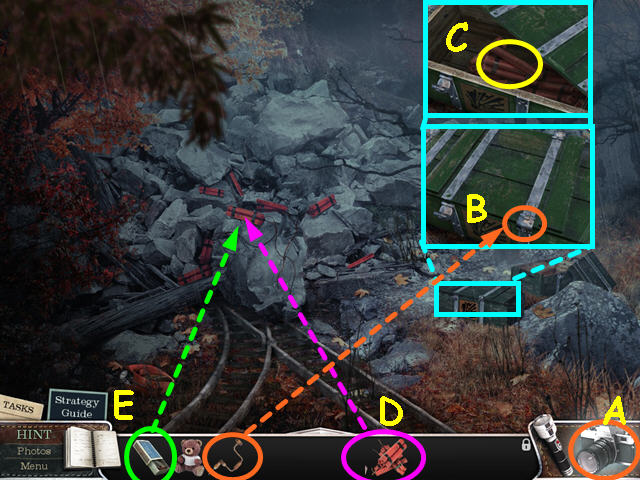
- Use the camera to take a photo (A).
- Look at the close-up of the crate and use the HAND DRILL on the right hinge (B).
- Take the DYNAMITE (C).
- Place the DYNAMITE on the rock pile (D).
- Use the MATCHBOX on the dynamite (E).
- Walk to the right.
- After the explosion, walk to the left then enter the mine.
- Turn on the flashlight (F).
- Look at the close-up of the cart (G).
- Place the bearing on the axle, followed by the wheel (1-2).
- Remove the 2 stones (H).
- The WHITE STONE will go into your inventory.
- Take the RUNG (I).
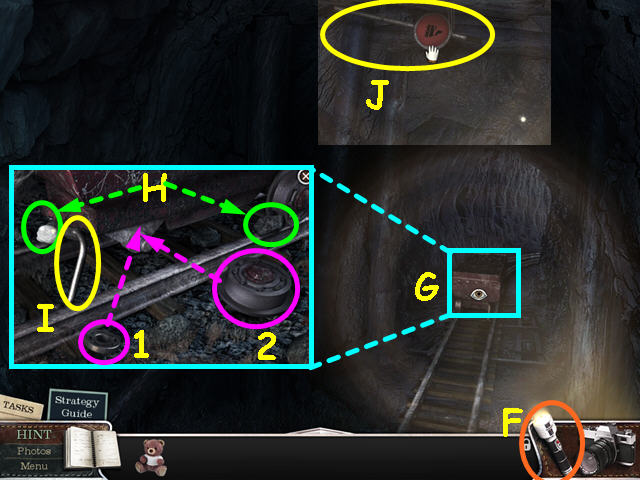
- Click on the cart to push it on the track.
- Take the SHAFT (J).
- Walk down to exit the mine.
- Look at the close-up of the control (K).
- Place the SHAFT into the device (L).
- Click on the shaft to move the track.
- Take the GRAPPLING HOOK (M).
- Enter the mine and walk forward.

- Once you reach the well, look up (N).
- Use the GRAPPLING HOOK on the well opening (O).
- Climb up, then walk down to exit the well.
Chapter 5: The Church
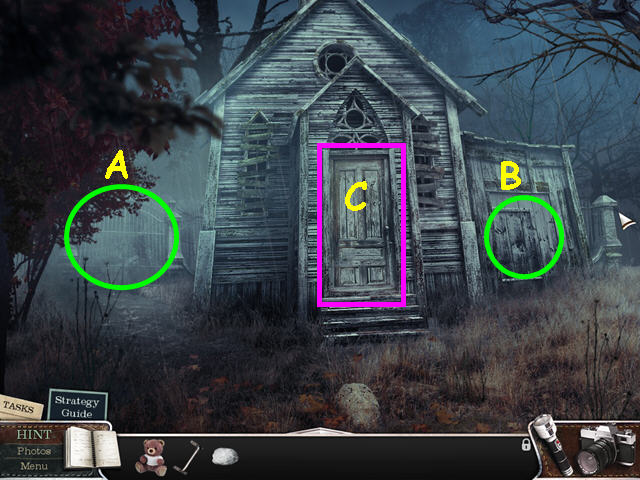
- Walk left, then enter the gate to the church.
- Note the gate to the left of the church (A).
- Note the locked shed on the right of the church (B).
- Open the church door and walk inside (C).
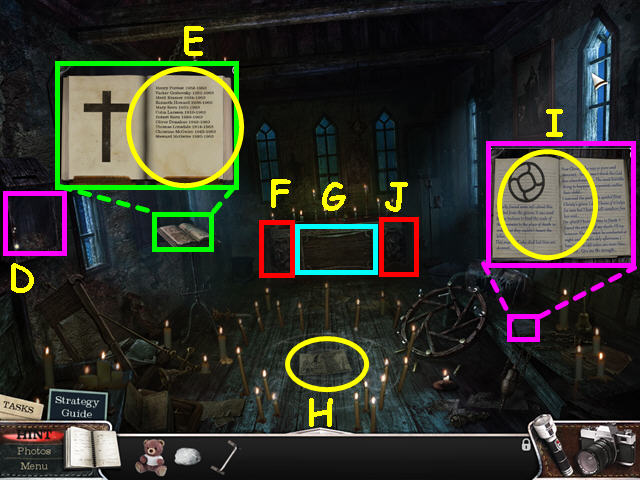
- Look at the alms box to see the key stuck inside (D).
- Look at the book and take the list of names (E).
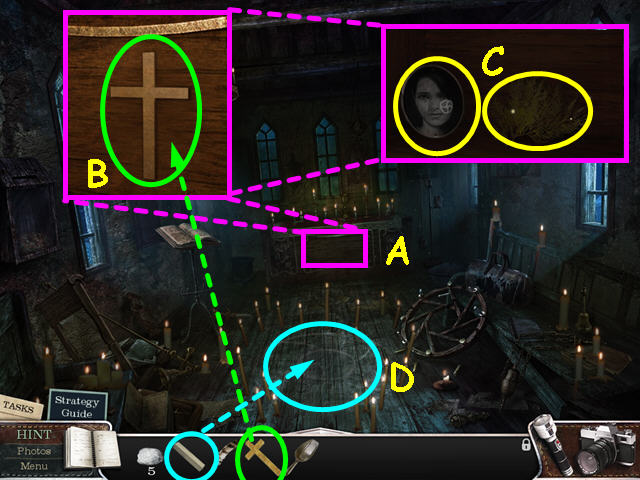
- Look at the left side of the altar to see a fresco (F).
- Look at the center front of the altar to see there is a cross missing (G).
- Take the drawing from the circle (H).
- Look at the book on the right pew and take the notes (I).
- Select the right side of the altar for a mini-game (J).
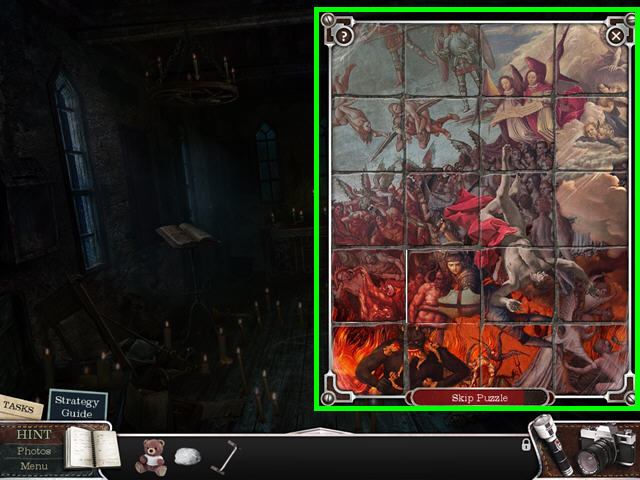
- The object of this mini-game is to recreate the fresco from the left side of the altar.
- Click on 2 tiles to swap location.
- Walk down to exit the church, then go left.

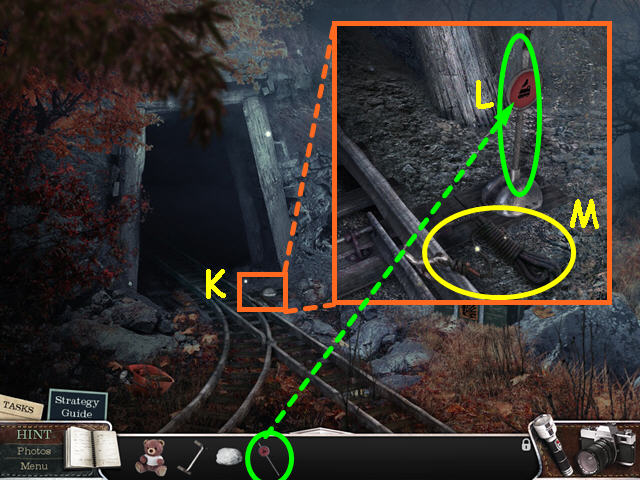
- Look at the fence on the right (K).
- Click on the ROD 3 times to break it from the fence (L).
- Click on the gate to open it, then walk forward (M).
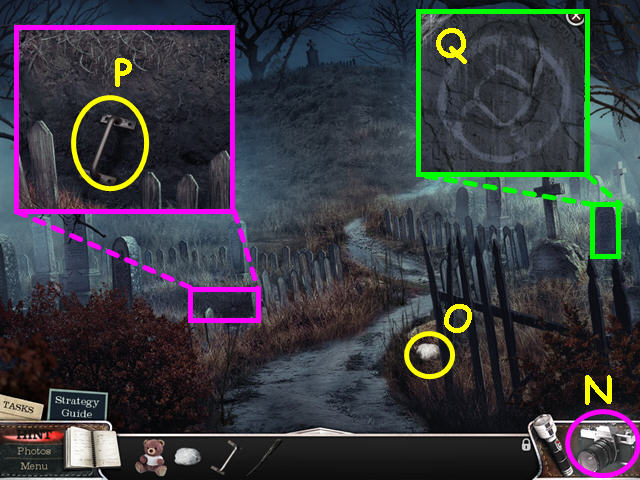
- Use the camera to take a photo (N).
- Take the WHITE STONE (O).
- Look in the open grave and take the RUNG (P).
- Look at any of the tombstones to see they all have the same symbol (Q).
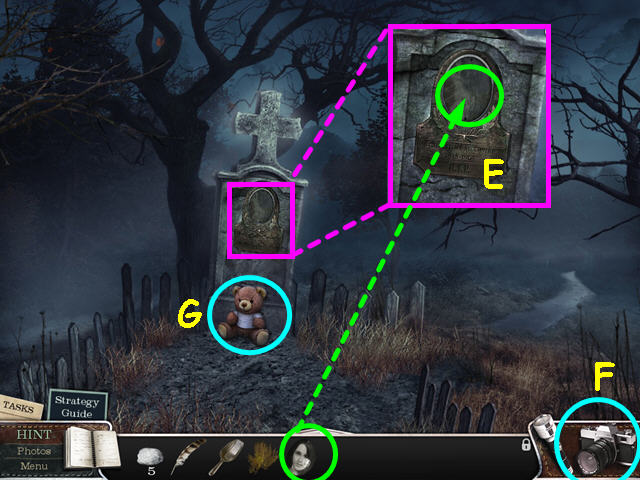
- Walk forward up the hill.
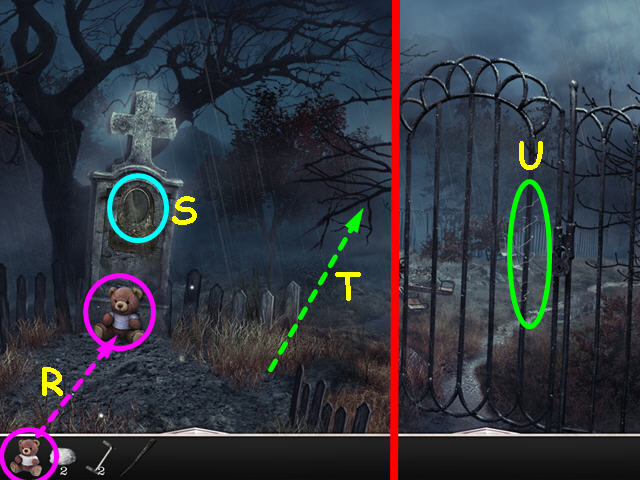
- Place the BEAR on the grave (R).
- Note the plaque is missing (S).
- Walk forward on the right (T).
- Take the WIRE from the gate (U).
- Walk down 4 times.
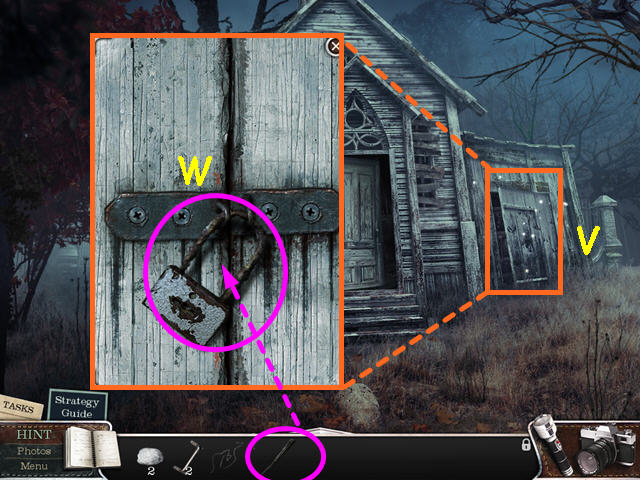
- Look at the close-up of the shed door (V).
- Use the ROD to break the lock (W).
- Select the shed for a hidden object scene.
- Look at the close-up, open, or combine all the items marked in white.
- Click the dispenser twice to fill the glass below (X).
- Locate all the items on the list.
- You will earn the CLAPPER.
- Enter the church.
- Look at the alms box and use the WIRE to get the HOUSE KEY (Y).
- Walk down twice, the go to the right.
- Look at the door on the house and use the HOUSE KEY on the lock (Z).
- Enter the house.
- Turn on the flashlight (A).
- Place the crate under the stairs (B).
- Note the chalk under the stairs (C).
- Look at the space under the stairs (D).
- Take the WHITE STONE (E).
- Read the book on rituals (F).
- Walk up the stairs.
- Peek through the keyhole to see the second floor hallway (G).
- Take the note (H).
- Take the WHITE STONE (I).
- Look at the tower (J).
- Walk down twice, then go to the left.
- Walk forward to the Hospital gate, then enter on the left.

- Look at the debris pile (K).
- Take the CRATE (L).
- Move the 3 pieces of debris (M).
- Take the LADDER (N).
- Walk down 3 times, then go to the right.
- Enter the house.

- Place the CRATE on the stack of crates (O).
- Take the CHALK (P).
- Walk up the stairs.
- Look out the balcony and use the LADDER to make a path to the bell tower (Q).
- Walk left to the tower.
- Take the FEATHER (R).
- Use the 2 RUNGS to replace the missing rungs on the ladder (S).
- Climb up to the bell tower (T).
- Look at the close-up of the bell and hang the CLAPPER inside (U).
- Click on the clapper to ring the bell.
- Take the CROSS that the crow drops (V).
- Take the WHITE STONE (W).
- Walk down twice.
- Select the bench on the left for a hidden object game.
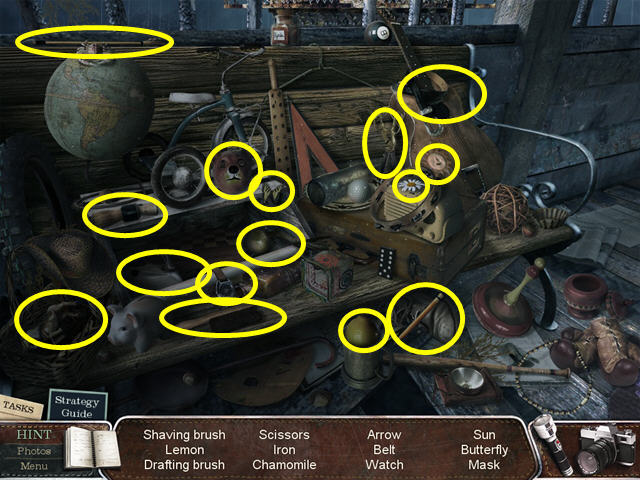
- Locate all the items on the list.
- You will earn the SCOOP.
- Walk down twice, then go to the left.
- Walk forward twice.
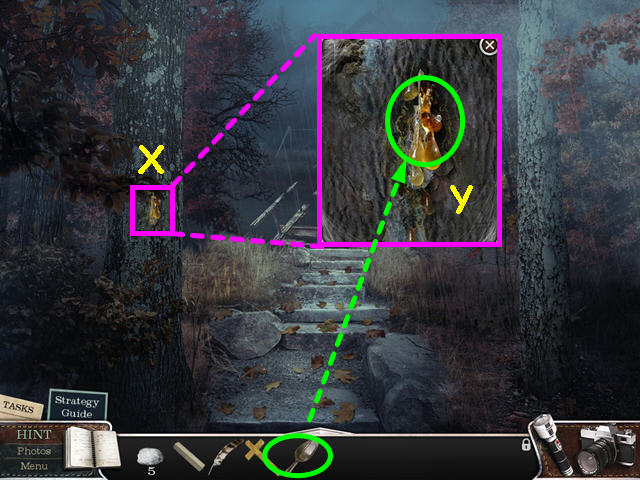
- Look at the close-up of the sap on the tree (X).
- Use the SCOOP to collect the sap and you will now have TAR (Y).
- Walk down twice, then go left through the church gate.
- Enter the church.
- Look at the close-up of the altar's center (A).
- Place the CROSS in the slot, then click on it to open the compartment (B).
- Take the GRAVE PLATE and the JUNIPER (C).
- Use the CHALK to redraw the ritual circle (D).
- Walk down, then go to the cemetery gate on the left.
- Walk forward twice.
- Look at the close-up of the tombstone and place the GRAVE PLATE into the oval (E).
- After the cut-scene, use the camera to take a photo (F).
- Look at the bear to learn something is inside (G).
- Walk down 2 times.
- Select the shed on the right for a hidden object scene.

- Look at the close-up, open, or combine all the items marked in white.
- Click on the clock-face until the cuckoo comes out (H).
- Locate all the items on the list.
- You will earn the RAZOR.
- Walk forward to the left of the church.
- Walk forward twice.
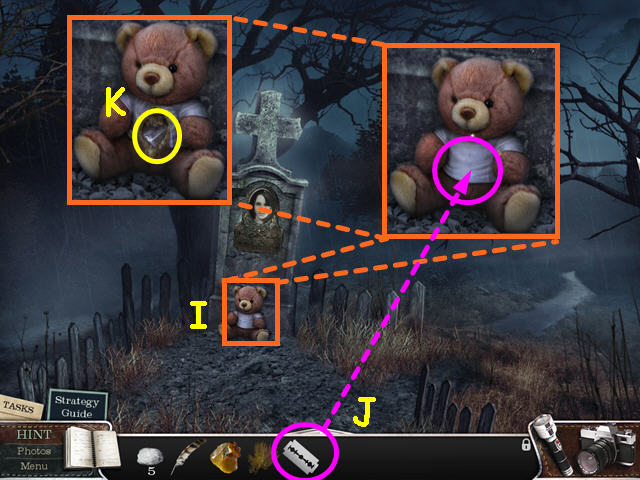
- Look at the close-up of the bear (I).
- Use the RAZOR on the bear (J).
- Take the MYSTERIOUS OBJECT from the bear's stomach (K).
- Walk down 3 times, then enter the church.
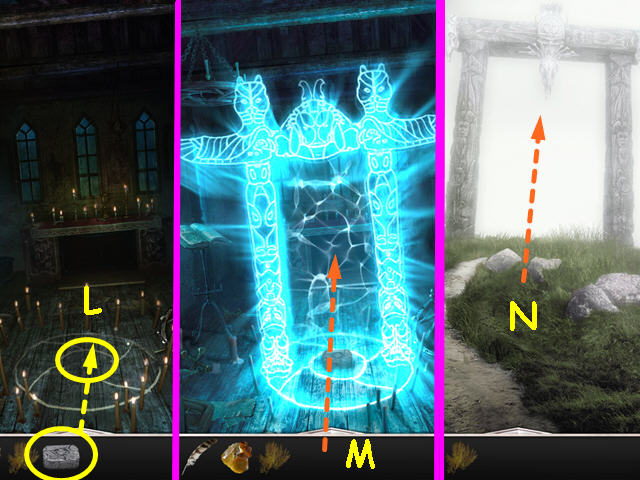
- Place the MYSTERIOUS OBJECT in the center of the chalk symbol on the floor (L).
- Walk through the light gate (M).
- Walk forward through the carved gate (N).
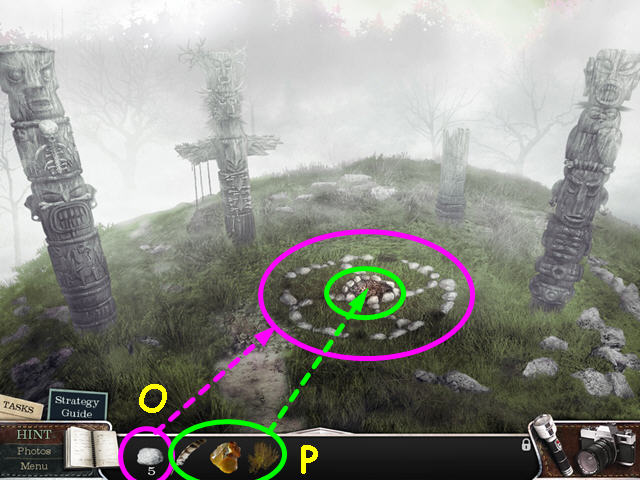
- Place the 5 WHITE STONES around the circle of stones (O).
- Place the FEATHER, TAR, and JUNIPER into the center fire (P).
- Congratulations! You have completed Shiver: Vanishing Hitchhiker!
Created at: 2011-04-30