

Walkthrough Menu
- General Tips
- Chapter 1 – The Inn
- Chapter 2 – Train Station
- Chapter 3 – The Belfry
- Chapter 4 – Count Dubois
- Chapter 5 – The Millhouse
- Chapter 6 – Underground
- Chapter 7 – The Mansion
- Chapter 8 – The Plan
- Chapter 9 – The Recipe
General Tips
- Select Options to adjust the Music and Sound Effects. You may also adjust Widescreen Correction, Custom Cursor, and Extra Brightness.
- You may choose between Casual and Challenge Modes.
- Throughout the guide, we will use the acronym 'HOS' for Hidden Object Scenes.
- The items listed in red in the find lists require extra steps to locate.
- Puzzles may be skipped. Select the Help button in the upper right to get the instructions for the puzzles.
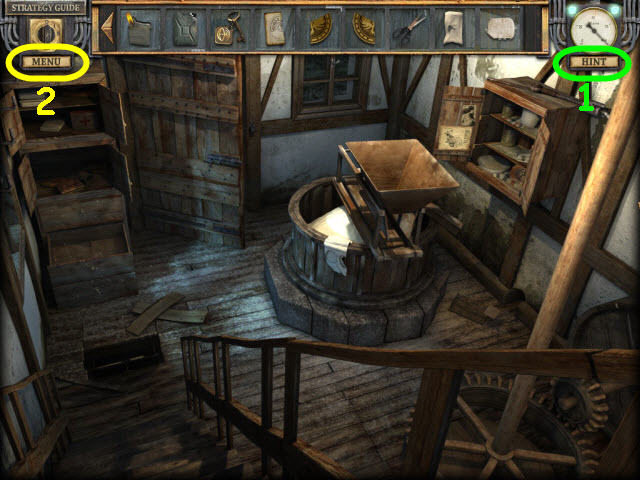
- Select the Hint button (1) in the upper right to get a hint in either the Hidden Object Scenes or regular gameplay.
- Select Menu (2) to exit or access options.
- This game is not linear and you may do things in a different order as the guide. If you cannot do an action when stated in the guide, please check the previous entries to see if you missed something.
Chapter 1 – The Inn
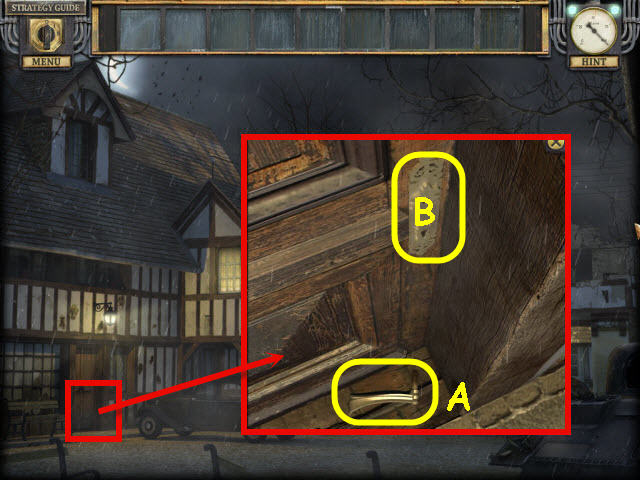
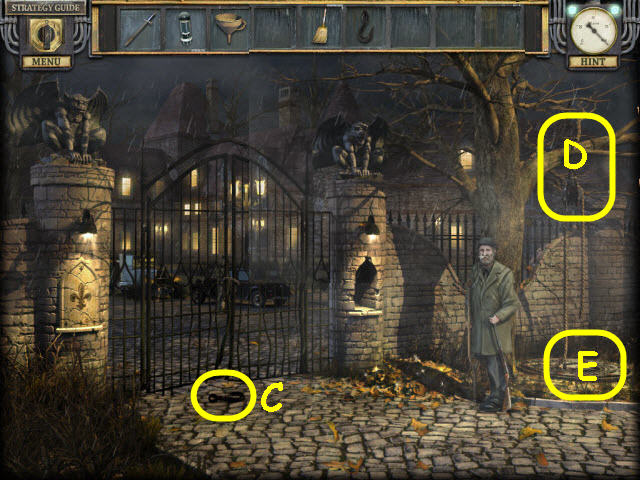
- Examine the door; pick up the HANDLE (A); use the HANDLE on the lock plate (B).
- Enter the newly-opened door to the Inn.
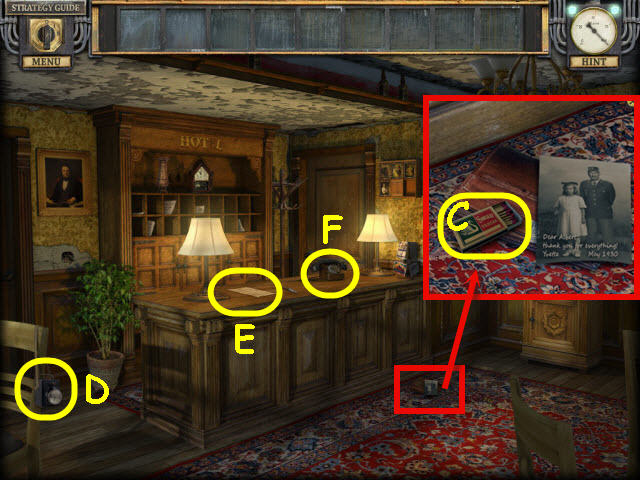
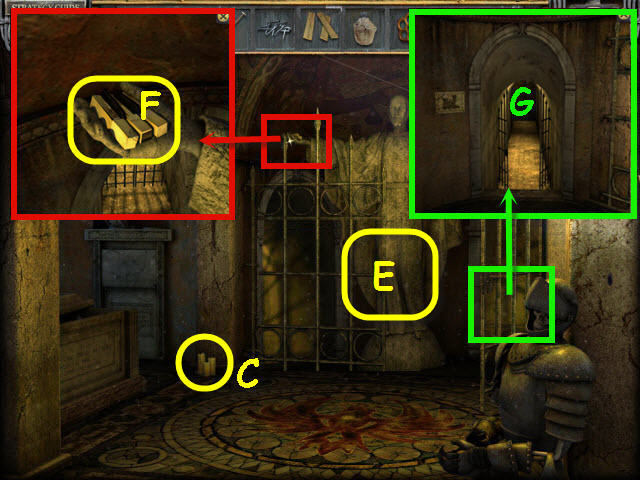
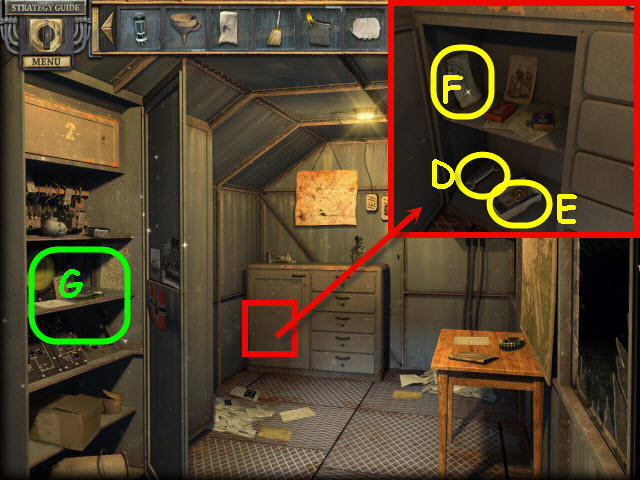
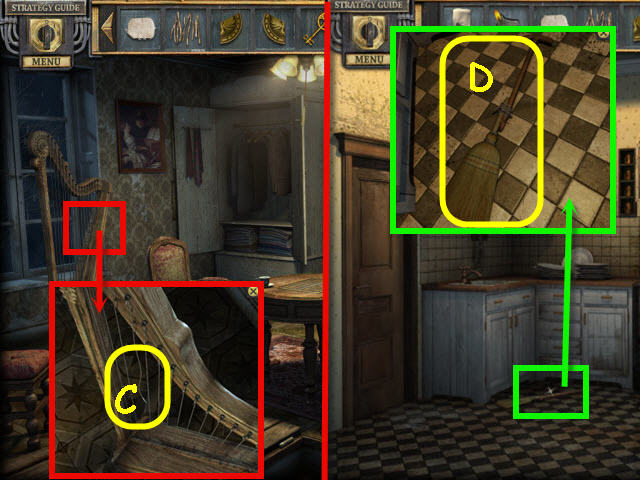
- Examine the wallet; take the MATCHES (C).
- Take the FLASHLIGHT (D).
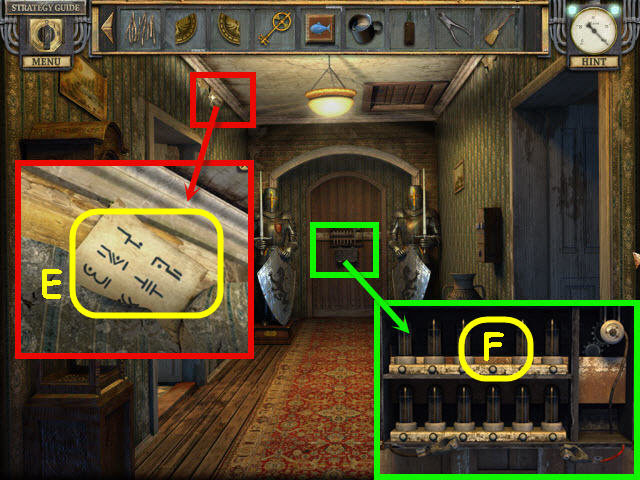
- Examine the note on the desk (E) to trigger the phone ringing.
- Answer the phone (F).
- Back out.
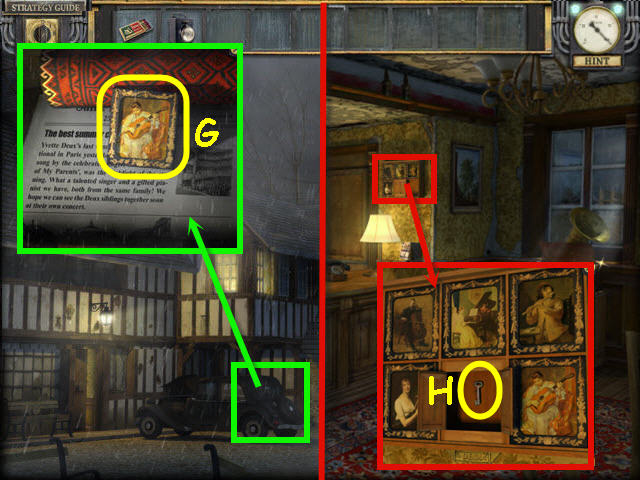
- Examine, open, and use the FLASHLIGHT on the car trunk; take the PORTRAIT (G).
- Enter the Inn.
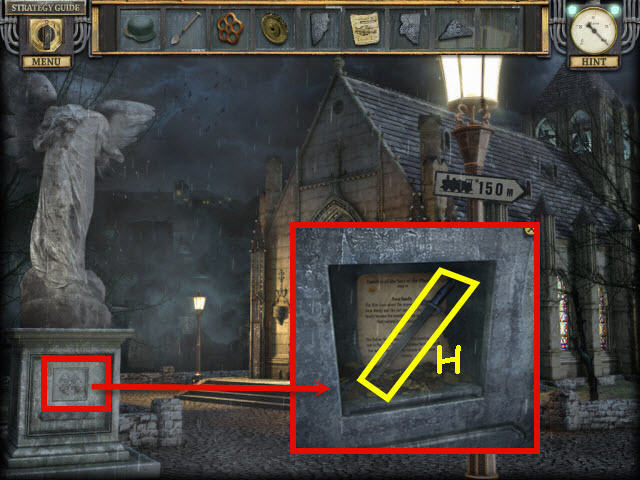
- Examine and place the PORTRAIT on the frame; take the KEY (H).
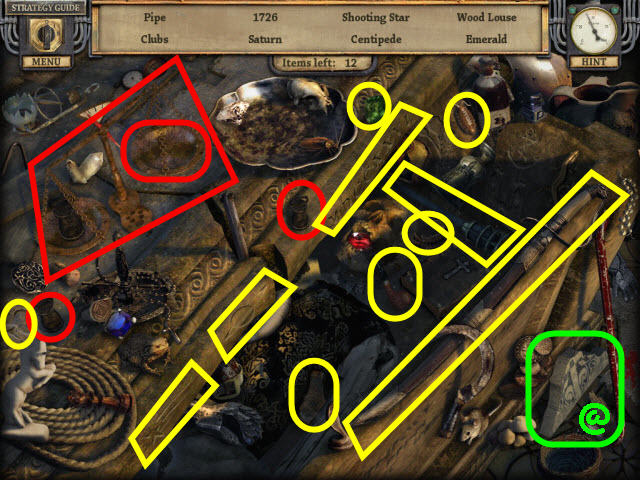
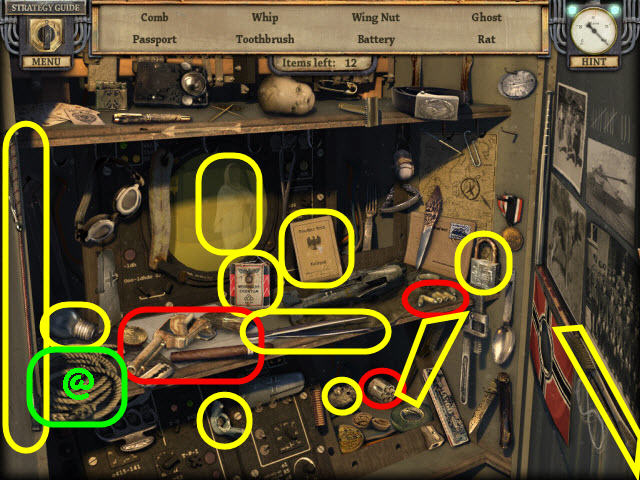
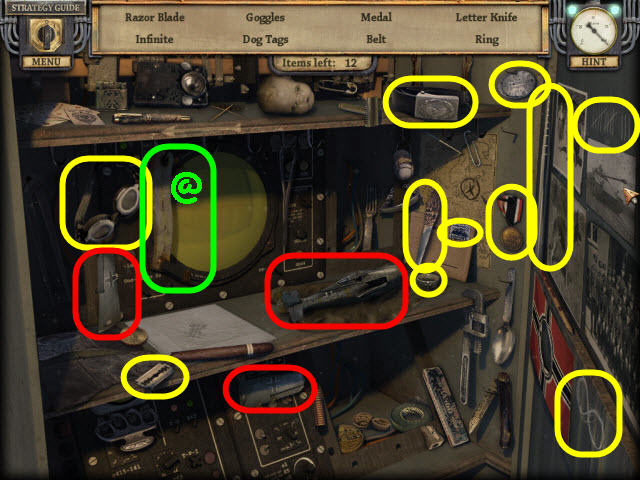
- Examine the mail slots to access a HOS.
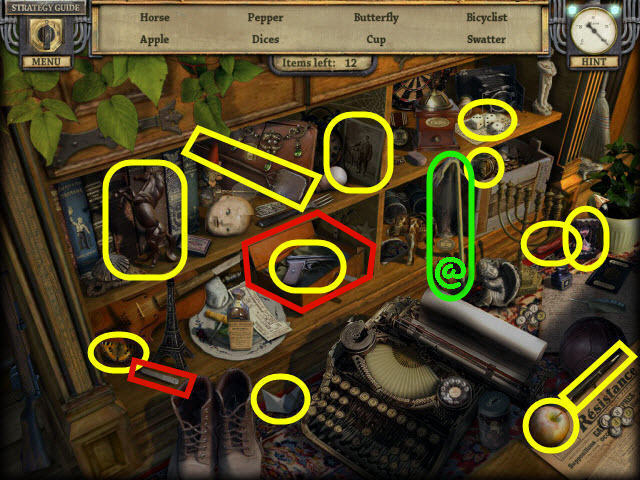
- Find the items listed.
- Marked in red: use the lock pick on the chest to get the pistol.
- Find the CROWBAR (@).
- Back out.
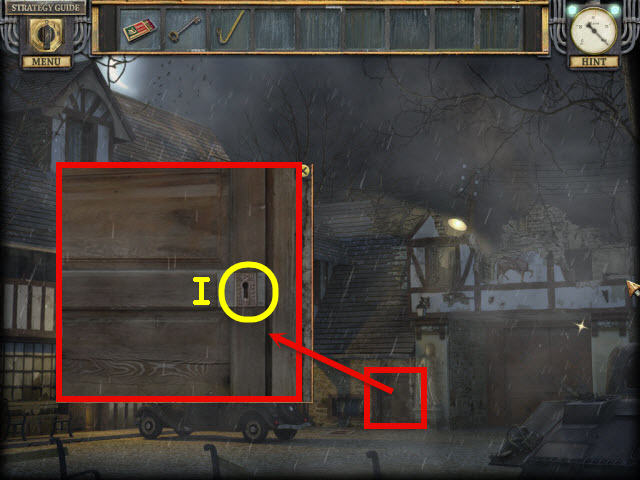
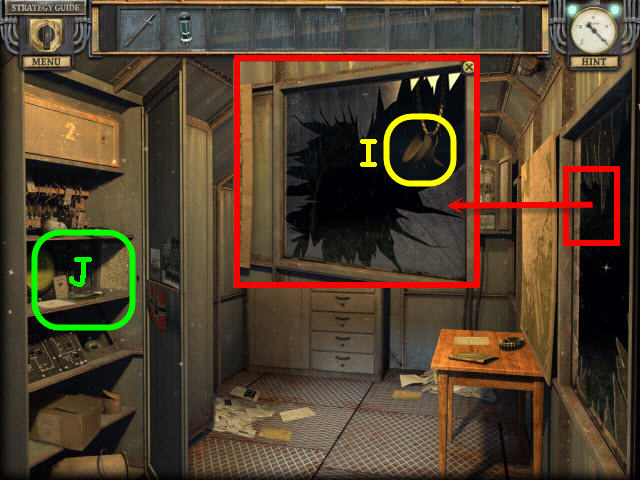
- Examine the door; use the KEY in the keyhole (I).
- Enter the newly-opened door to the cellar.
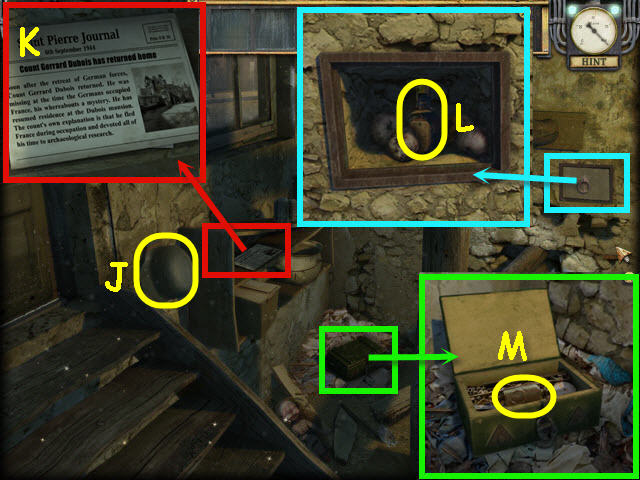
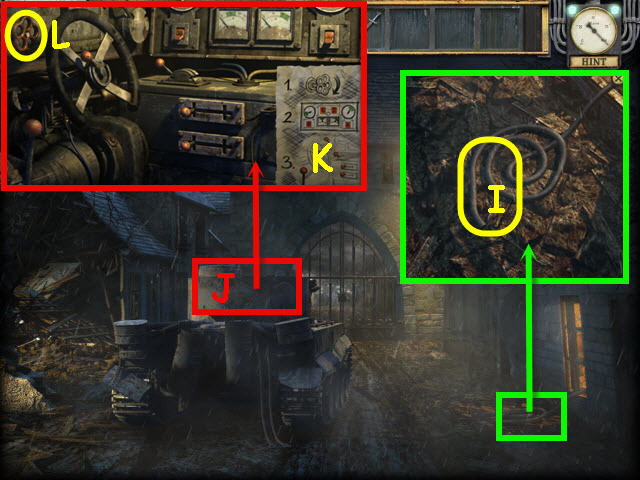
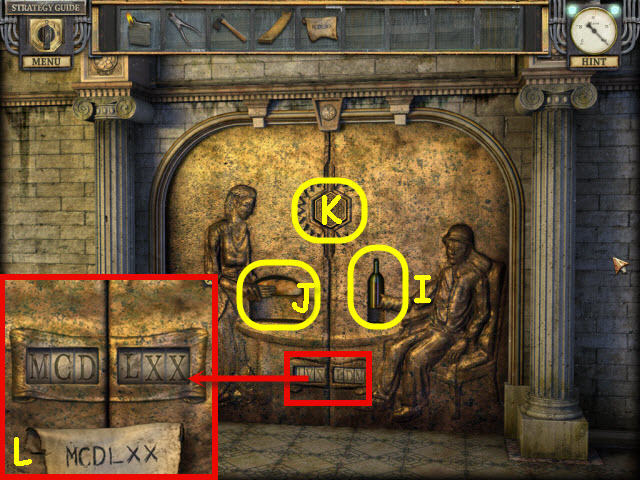
- Take the HELMET (J).
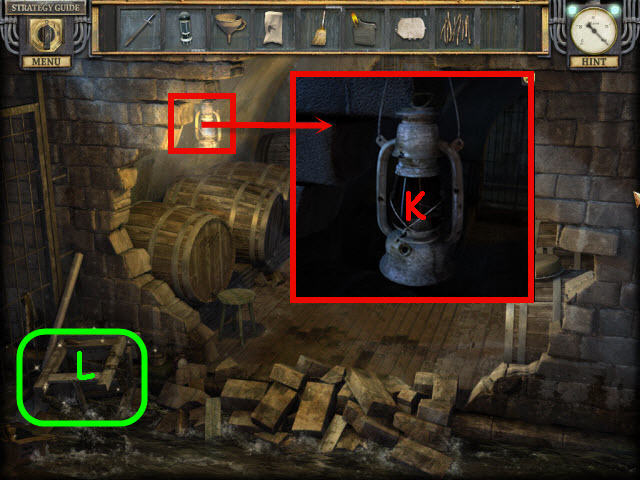
- Examine and take the NEWSPAPER (K).
- Examine and open the wall compartment; take the WHISKEY (L).
- Examine and use the CROWBAR on the box; take the RUST REMOVER (M).
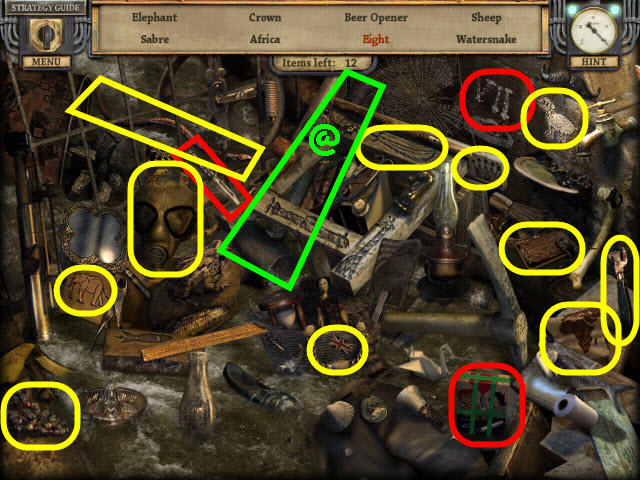
- Examine the stairs to access a HOS.
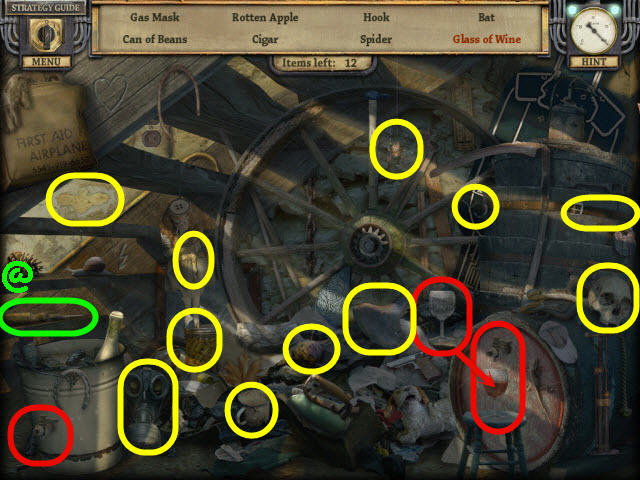
- Find the items listed.
- Marked in red: place the goblet on the stool and place the spigot on the barrel to get the glass of wine.
- Find the SCREWDRIVER (@).
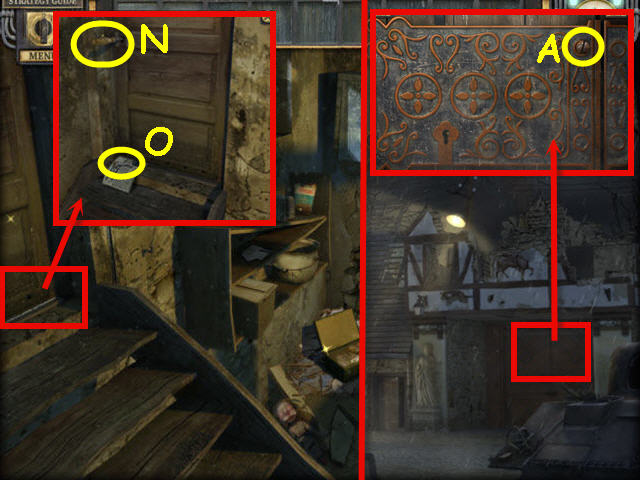
- Examine and place the NEWSPAPER under the door; place the SCREWDRIVER in the keyhole.
- Take the SCREWDRIVER (N); pull out the newspaper; take the CELLAR KEY (O).
- Use the CELLAR KEY on the door lock.
- Exit the cellar.
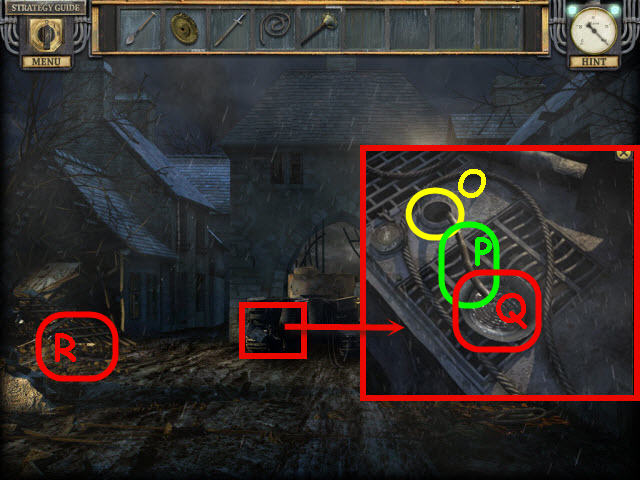
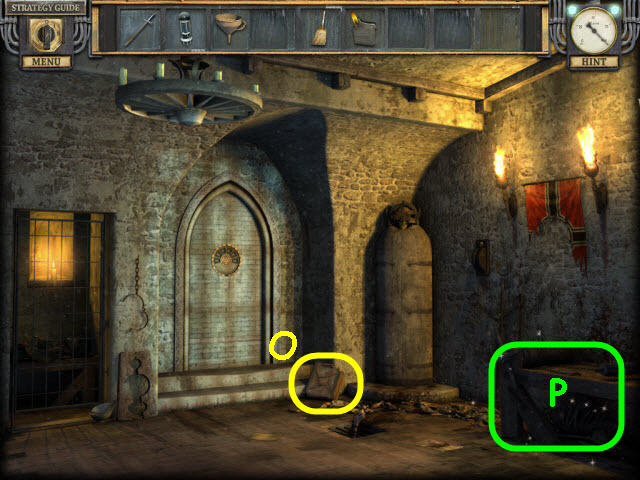
- Examine the gate; use the RUST REMOVER and SCREWDRIVER on the screw (A) to trigger a puzzle.
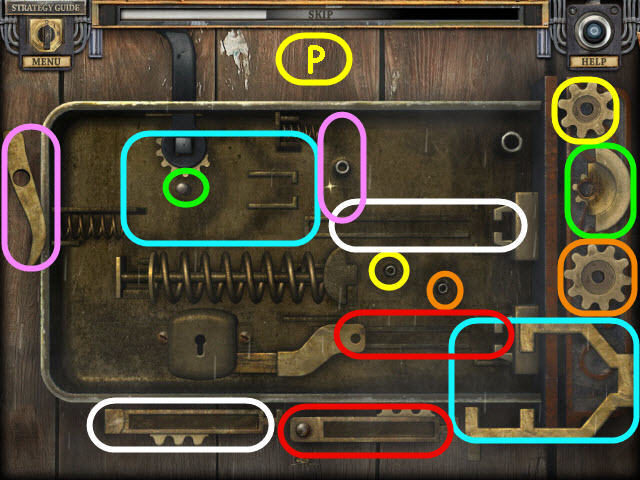
- Assemble the lock pieces to activate the lock.
- See screenshot (P) for solution.
- Go through the opened gate.
Chapter 2 – Train Station
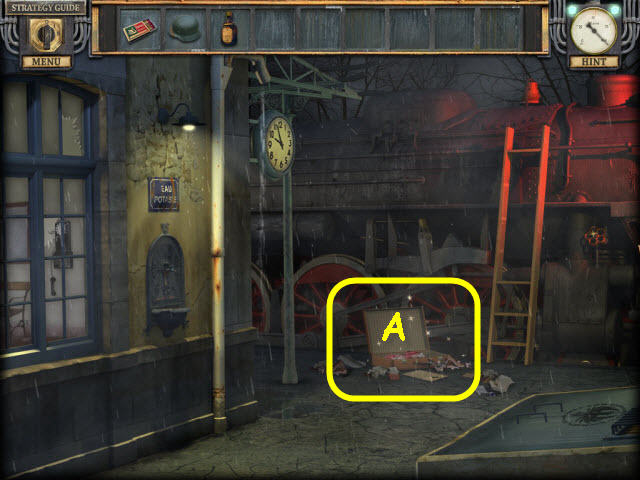
- Go right of the church to the train station.
- Examine the suitcase (A); read the note to trigger a HOS.
- Examine the suitcase to access a HOS.
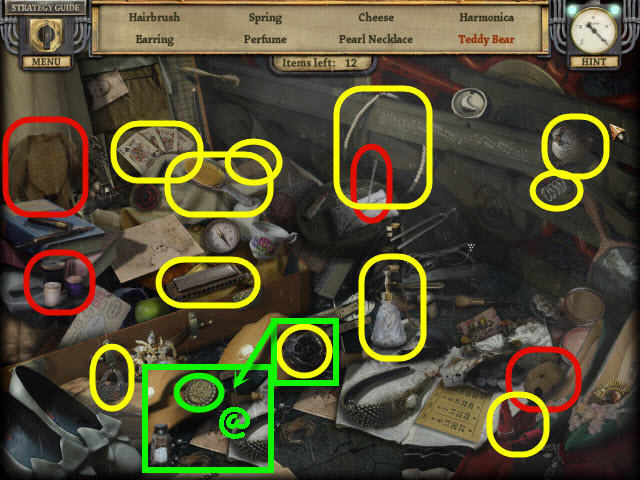
- Find the items listed.
- Marked in red: place the bear head on the bear body; use the thread on the needle; use the threaded needle to sew the bear and get a teddy bear.
- Find the PHOENIX MEDAL (@).
- Back out.
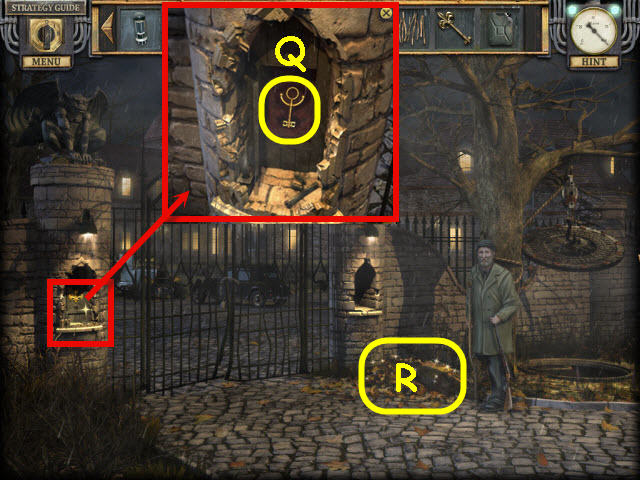
- Speak to Uncle Albert.
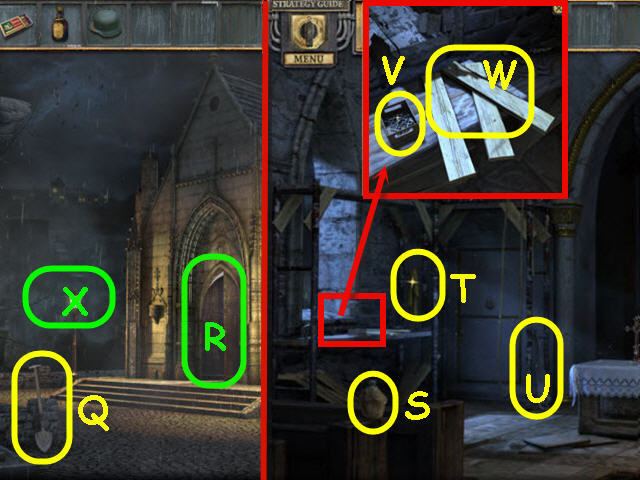
- Take the SPADE (Q).
- Go into the church (R).
- Take the EMPTY CANTEEN (S), RAG (T), and SAW (U).
- Examine the scaffolding; take the NAILS (V).
- Use the SAW on the boards (W); take the WOOD STRIPS.
- Back out; go left of the church (X).
- Examine the debris on the left to access a HOS.
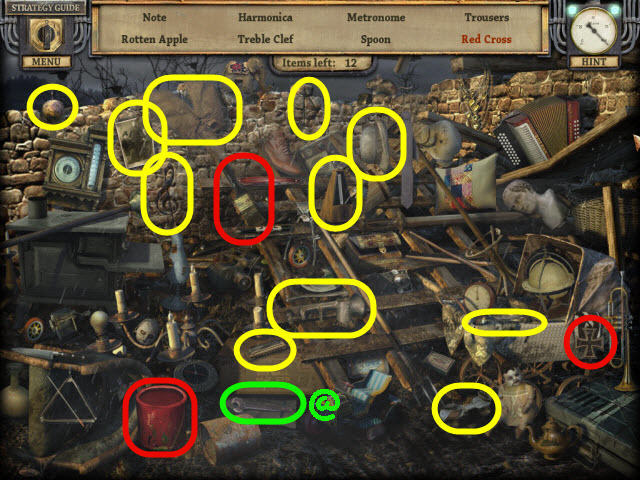
- Find the items listed.
- Marked in red: dip the brush in the paint can and use the dipped brush on the cross to get the red cross.
- Find the WRENCH (@).
- Back out; go right of the church.
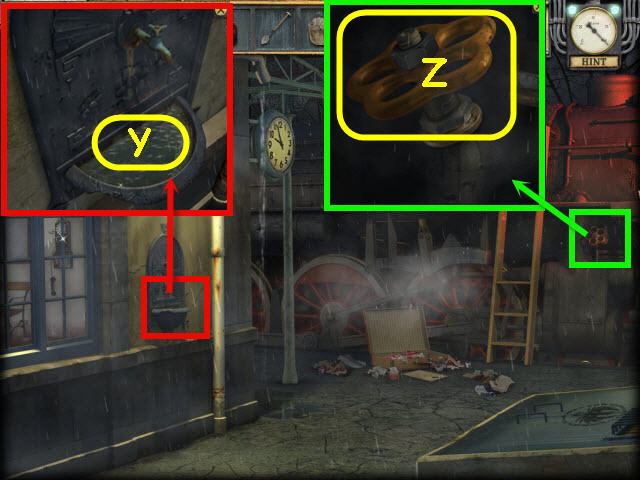
- Examine and use the EMPTY CANTEEN on the fountain bowl (Y); get a FULL CANTEEN.
- Examine and use the WRENCH on the valve; take the VALVE (Z).
- Back out and enter the church.
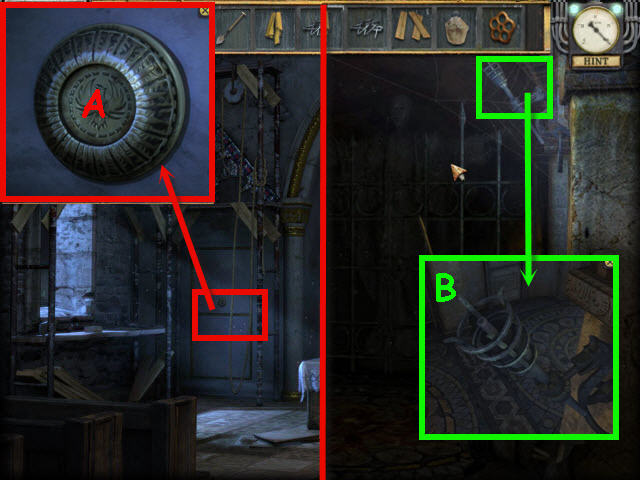
- Examine and place the PHOENIX MEDAL on the door panel (A).
- Go through the newly-opened door.
- Examine and use the RAG, WHISKEY, and MATCHES on the torch (B).
- Examine the crypt on the left to access a HOS.

- Find the items listed.
- Marked in red: place the quill in the inkwell; use the dipped quill on the scroll to get a will.
- Find the CRYPT GATE KEY (@).
- Take the CANDLE (C).
- Examine and use the CRYPT GATE KEY on the gates (E).
- Examine the right hand of the statue; take the ORGAN KEYS (F).
- Examine and go straight through the secret passage (G).
- Back out.
- Speak to Uncle Albert.
- Enter the church.
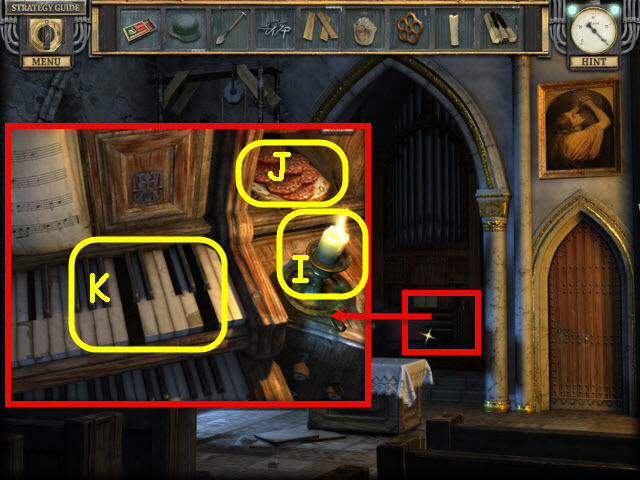
- Examine the organ.
- Place the CANDLE in the candle holder; use the MATCHES on the CANDLE (I).
- Take the SANDWICH (J).
- Place the ORGAN KEYS on the keyboard (K) to trigger a puzzle.
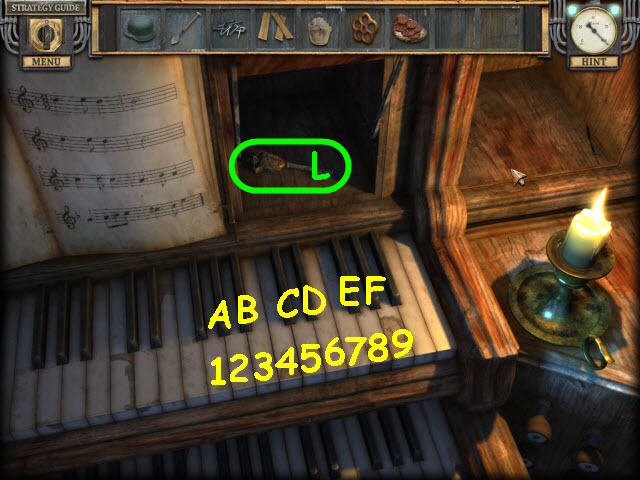
- Repeat the sequence that the organ plays.
- Round 1 Solution: 5, 6, 5, and B.
- Round 2 Solution: 5, 6, 5, and B.
- Round 3 Solution: 4, 5, 4, 2, B, and 2.
- Round 4 Solution: 1, 2, B, 4, C, and 6. See screenshot for key markings.
- Take the BELL-SHAPED KEY (L).
- Back out of the close-up.
Chapter 3 – The Belfry
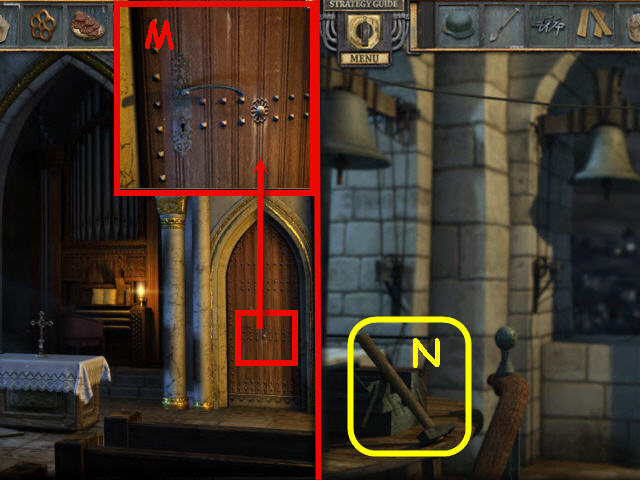
- Examine and use the BELL-SHAPED KEY on the belfry door lock (M).
- Go through the newly-opened door.
- Take the HAMMER (N).
- Back out twice; go right.
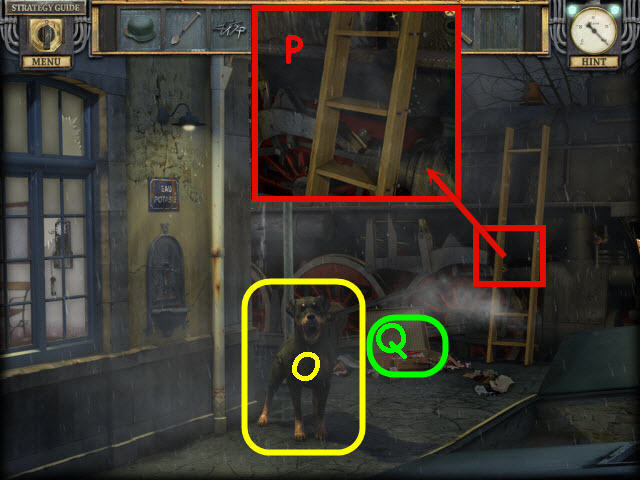
- Give the SANDWICH to the dog (O).
- Examine and use the WOOD STRIPS, NAILS and HAMMER on the ladder (P); take the LADDER.
- Examine the suitcase (Q) to access a HOS.
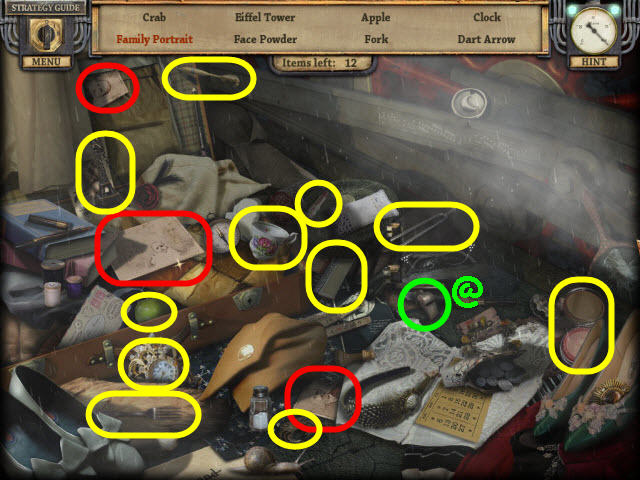
- Find the items listed.
- Marked in red: place the picture pieces on the picture to get a family portrait.
- Find the WHISTLE (@).
- Back out; enter the church and through the door on the right to the belfry.
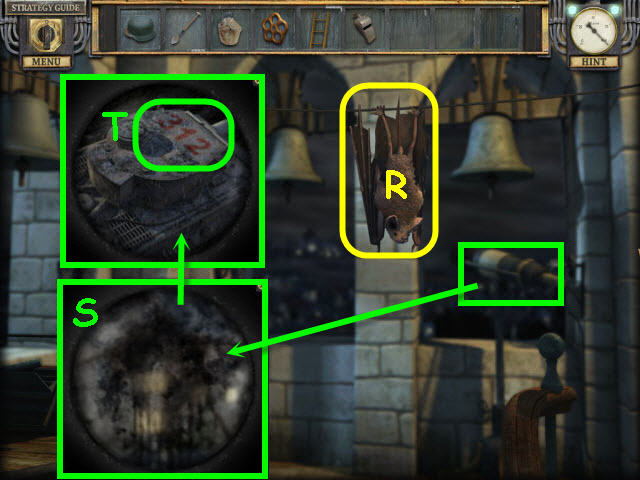
- Use the WHISTLE on the bat (R).
- Examine and use the FULL CANTEEN on the telescope (S).
- Press on the lens twice to see the three different scenes.
- Note the tank numbers 312 (T).
- Back out three times.
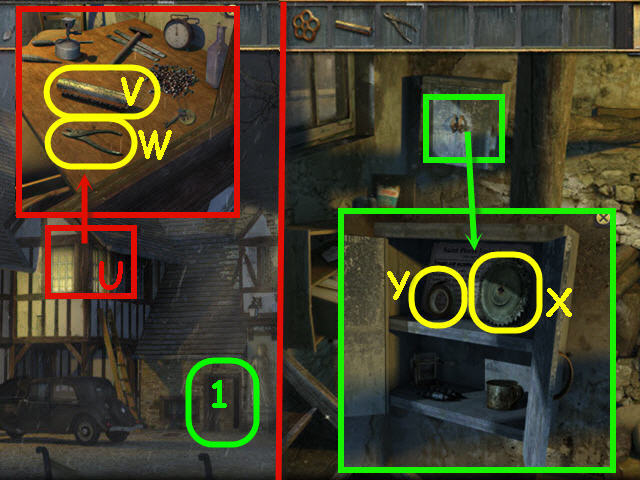
- Use the LADDER on the second floor window (U).
- Examine the window; take the MUSIC BOX CYLINDER (V) and PLIERS (W).
- Go straight into the cellar (1).
- Examine and use the PLIERS on the cabinet latch; take the GEAR (X) and ELECTRICAL TAPE (Y).
- Examine the stairs to access a HOS.
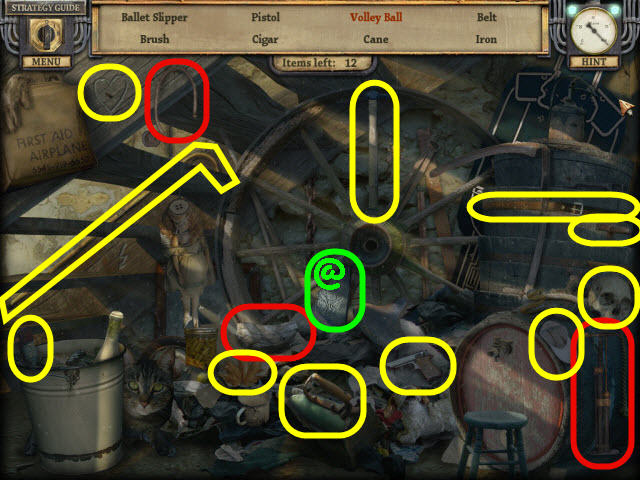
- Find the items listed.
- Marked in red: use the hose on the pump; use the pump on the deflated ball to get the volleyball.
- Find the STONE PLATE PIECE (@).
- Go left twice into the Inn.
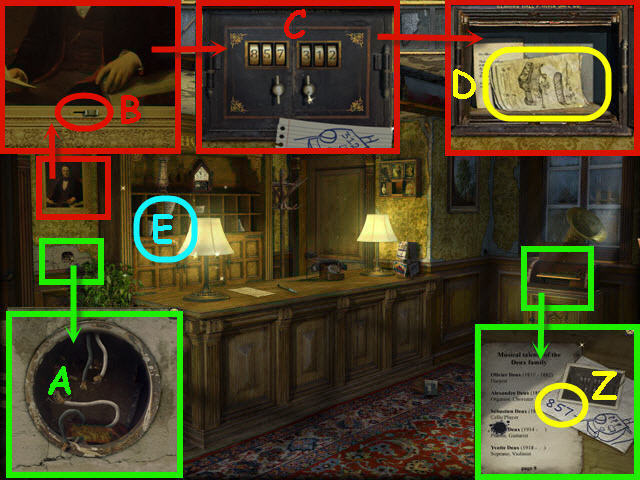
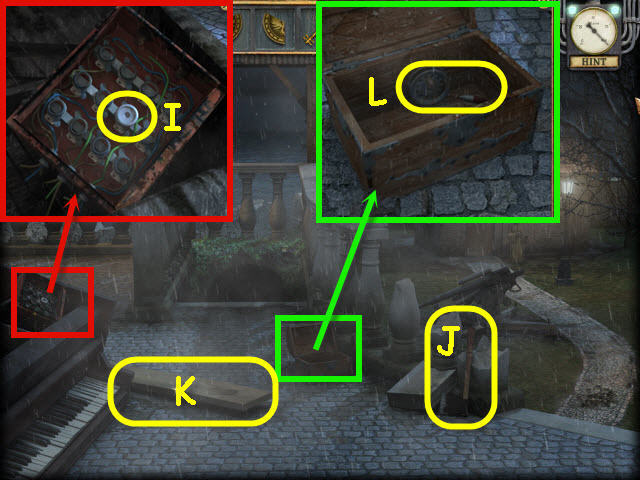
- Examine, open, and place the MUSIC BOX CYLINDER on the music box; note the safe code 857 (Z).
- Examine and use the ELECTRICAL TAPE on the wires (A).
- Examine the portrait; slide the lever (B) to access the safe.
- Enter the code from the music box and the tank 857-312 on the safe (C); take the TANK MANUAL (D).
- Examine the mail slots (E) to access a HOS.
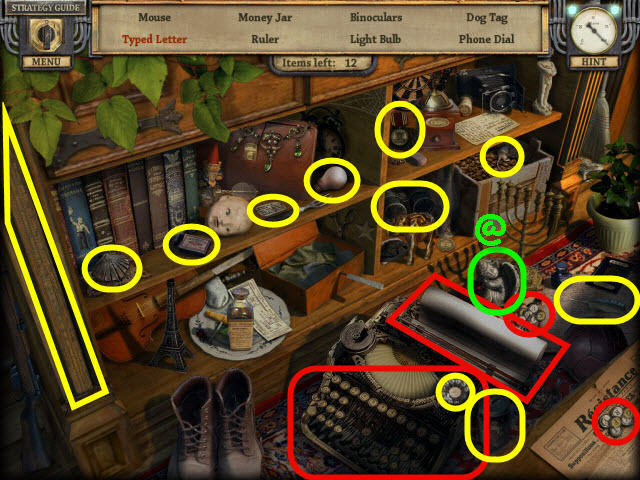
- Find the items listed.
- Marked in red: place the typewriter keys on the typewriter keyboard to get a typed letter.
- Find the ANGEL STATUE (@).
- Back out; go straight through the gates, enter the church and go through the left rear door.
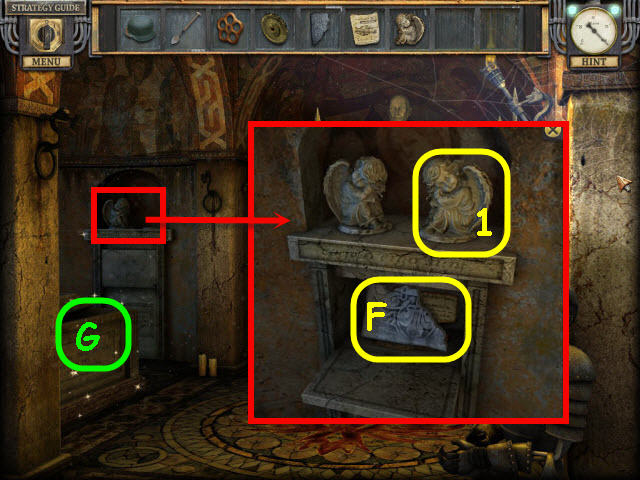
- Examine and place the ANGEL STATUE on the empty plate in the alcove (1); take the 2nd STONE PLATE PIECE (F).
- Examine the crypt (G) to access a HOS.
- Find the items listed.
- Marked in red: place the two weights on the scale to get equilibrium.
- Find the 3rd STONE PLATE PIECE (@).
- Back out twice.
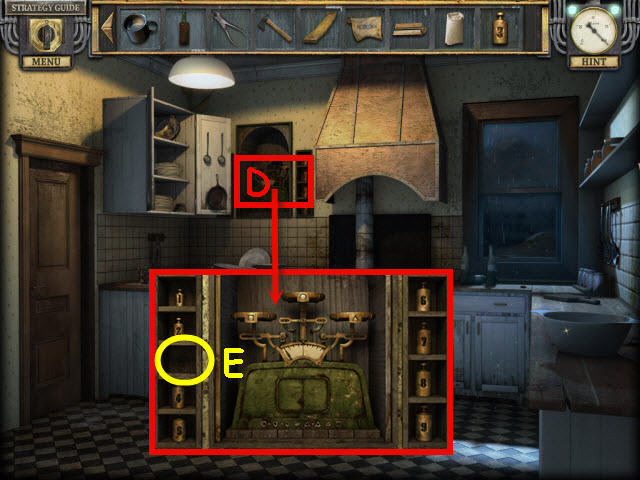
- Examine and place the 3 STONE PLATE PIECES on the statue base; take the BAYONET (H).
- Go left of the church.
- Examine and use the BAYONET on the hose; get a RUBBER TUBING (I).
- Examine the turret (J) to enter the tank.
- Place the TANK MANUAL by the control panels (K); place the VALVE on the stem (L) to trigger a puzzle.

- Turn the VALVE (M) to start.
- Flip the switches (N) above and below the dials to stop the arrows in the green zone of the dial.
- Flip the switches by the fastest moving dials first.
- Pull the levers in the proper sequence. See screenshot for order of the levers (1-6).
- Examine and place the HELMET on the tank.
- Place the RUBBER TUBING on the hole (O); take the RUBBER TUBING (P) and HELMET FULL OF GASOLINE (Q).
- Examine the debris (R) to access a HOS.
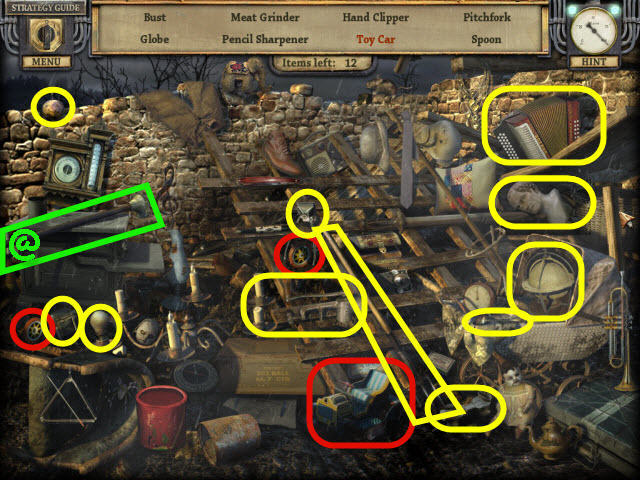
- Find the items listed.
- Marked in red: place the two wheels on the car to get a toy car.
- Find the AXLE (@).
- Go straight through the arch.
Chapter 4 – Count Dubois
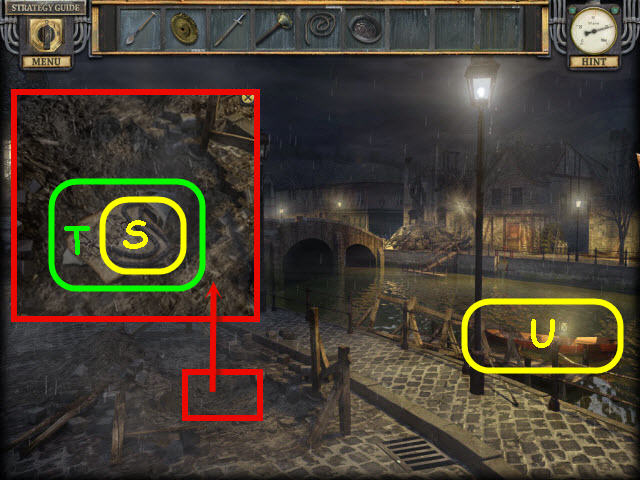
- Examine and use the SPADE on the broken ground; take the CHAIN (S) and MOTORBOAT MANUAL (T).
- Examine and place the CHAIN, AXLE, and GEAR on the boat (U) to trigger a puzzle.
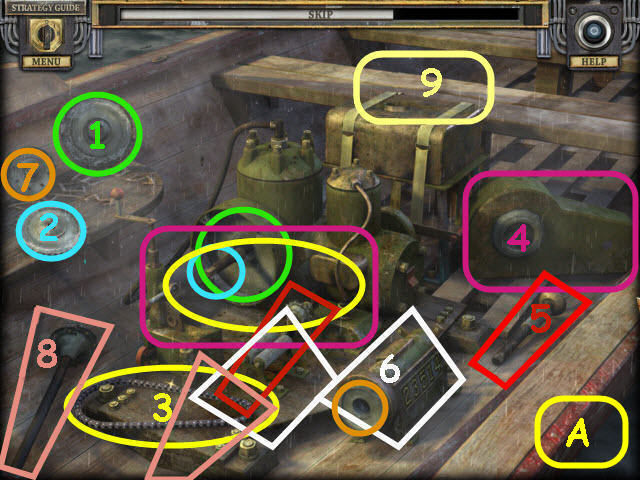
- Assemble the parts of the engine. See screenshot (A) for order and placement.
- Place the HELMET FULL OF GASOLINE and RUBBER TUBING on the tank (9).
- Place the MOTORBOAT MANUAL on the engine to trigger a puzzle.
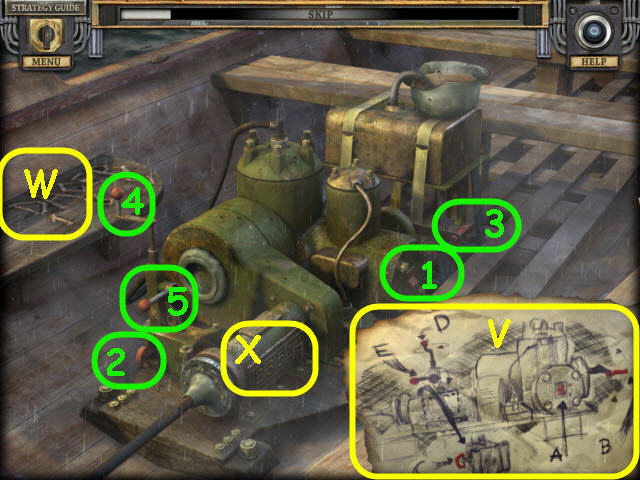
- Start the engine by flipping the switches in the correct order (1-5).
- Use the letters on the MOTORBOAT MANUAL (V), the code on the bench (W), and the serial number (X) on the engine as your guide.
- See screenshot for correct order.
- Examine the water wheel on the left to access a HOS.
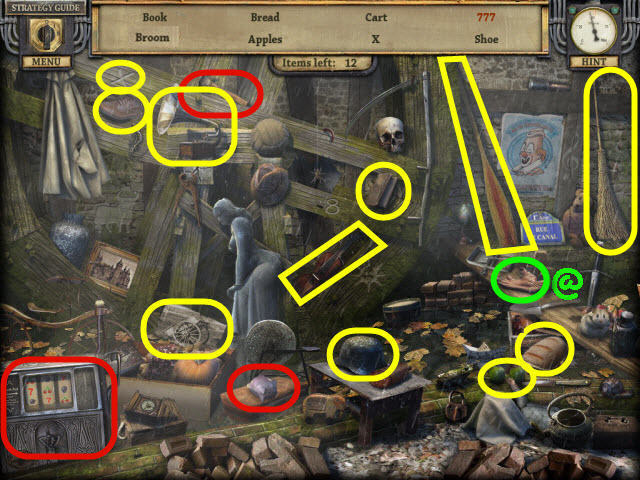
- Find the items listed.
- Marked in red: use the hammer on the piggybank; use the coin from the piggybank on the slot machine to get 777.
- Find the GLOVE (@).
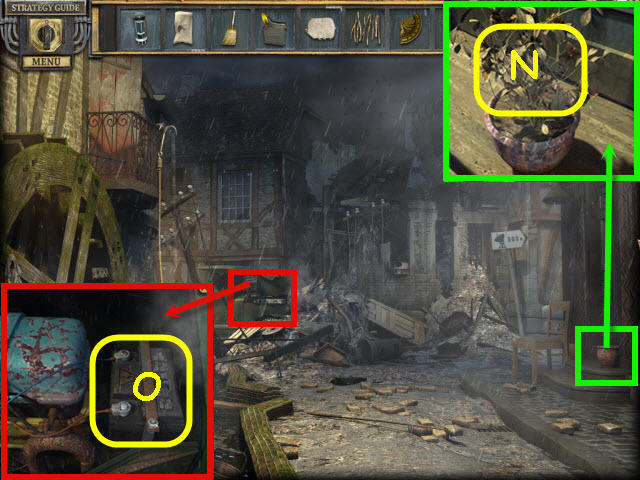
- Examine the fishing pole; take the GLUE (Y).
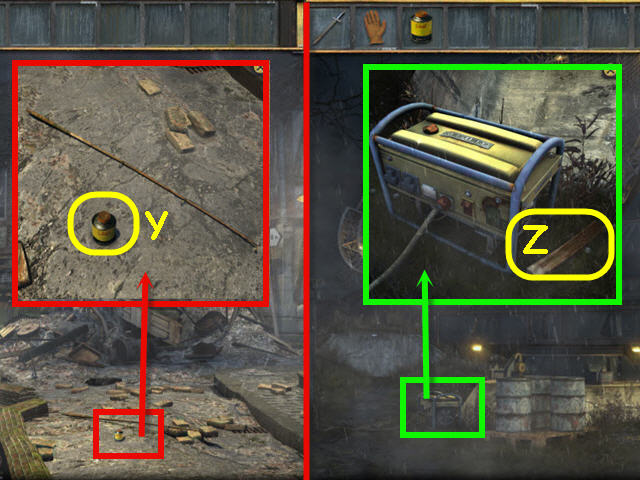
- Go right down the street.
- Examine the generator; take the CHAIR LEG (Z).
- Enter the trailer.
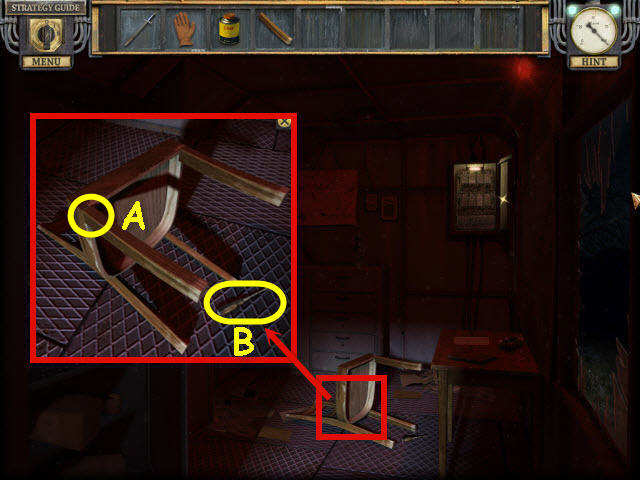
- Examine and place the GLUE and CHAIR LEG on the broken chair (A); take the CHAIR and the SCREWDRIVER (B).
- Back out twice.
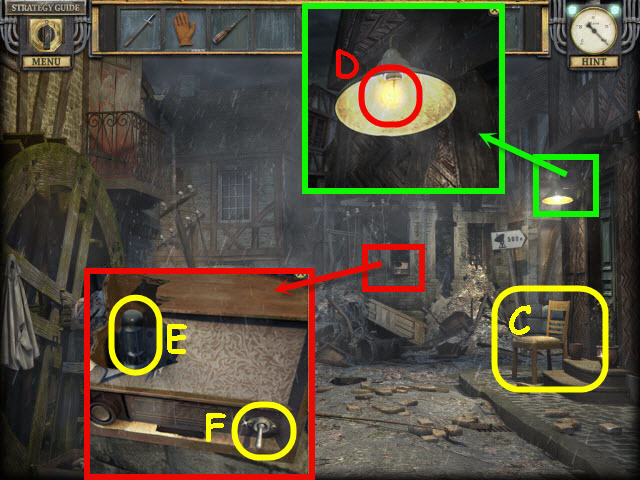
- Place the CHAIR on the ground under the lamp (C).
- Examine the lamp; use the GLOVE to get a LIGHT BULB (D).
- Examine the radio; take the VACUUM TUBE (E).
- Use the SCREWDRIVER to get the SWITCH (F).
- Go right and enter the trailer.
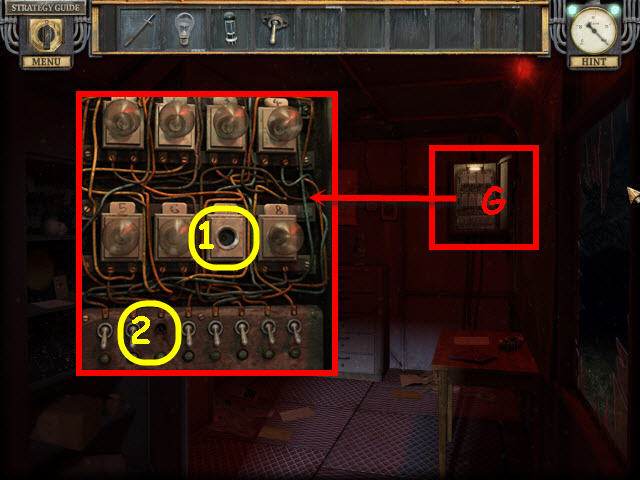
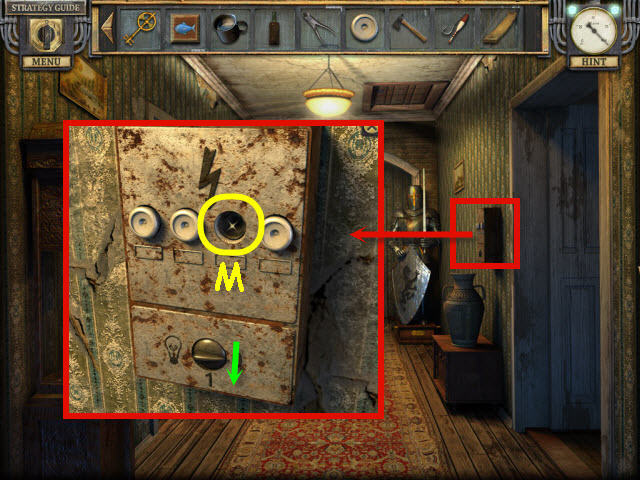
- Examine the electrical panel (G).
- Place the LIGHT BULB (1) and the SWITCH (2) on the panel to trigger a puzzle.
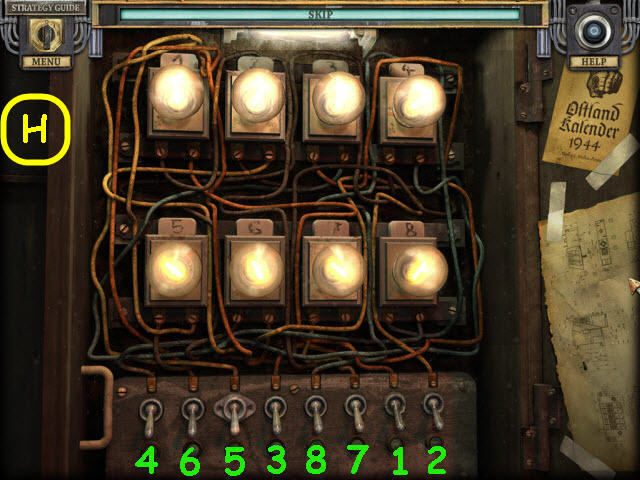
- Flip the switches in the correct order to light all the bulbs (1-8).
- See screenshot (H) for solution.
- Examine the window; take the FUNNEL (I).
- Examine the cabinet (J) to access a HOS.
- Find the items listed.
- Marked in red: place the barrel and bullets on the gun to get a loaded gun.
- Find the ROPE (@).
- Back out twice.
Chapter 5 – The Millhouse

- Examine and use the ROPE on the hook; take the GRAPPLING HOOK (K).
- Use the GRAPPLING HOOK on the railing (L).
- Go through the door on the upper level (M).
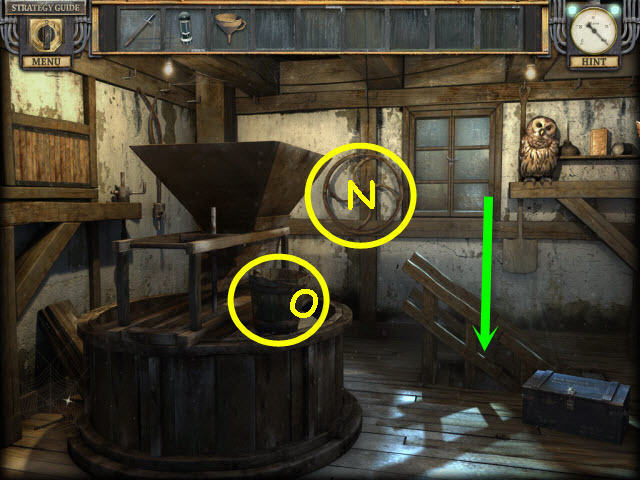
- Take the WELL WHEEL (N) and BUCKET (O).
- Go down the stairs.
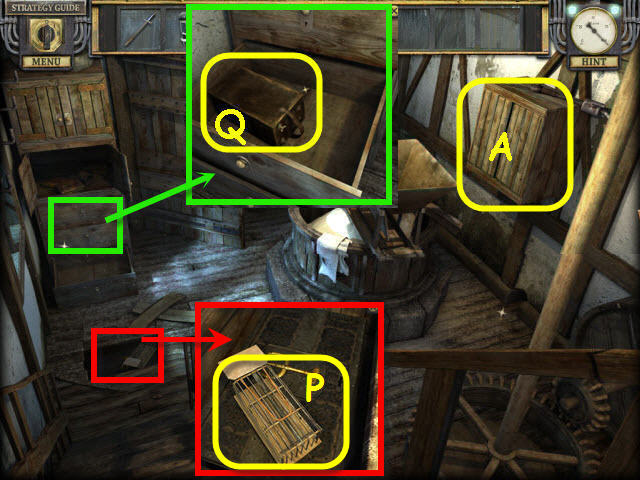
- Use the BAYONET on the floorboards; examine the area; take the MOUSETRAP (P).
- Examine and use the BAYONET on the middle drawer; take the DETONATOR (Q).
- Open the cabinet (A) to trigger a HOS.
- Examine the cabinet to access a HOS.
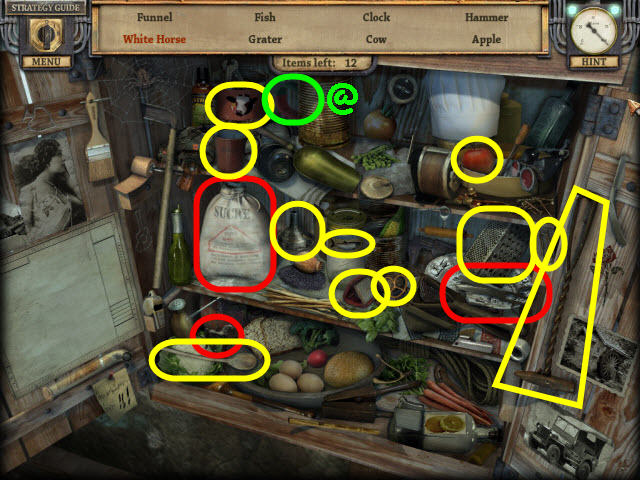
- Find the items listed.
- Marked in red: use the scissors on the sack of sugar; knock over the sack to get a white horse.
- Find the MAGNET (@).
- Go forward out the door.
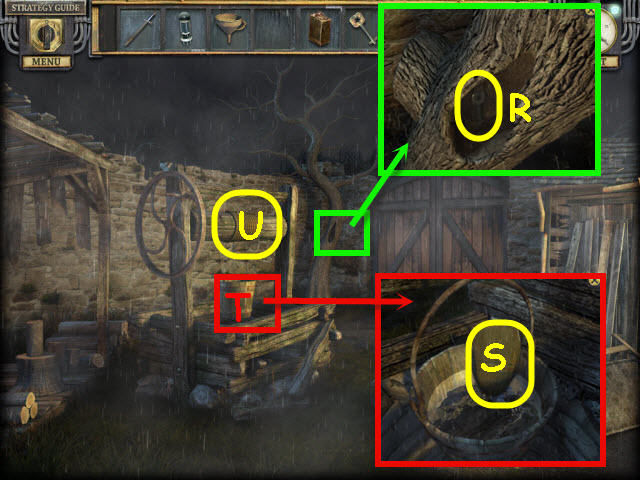
- Examine and use the MAGNET in the tree hole to get a FOOTLOCKER KEY (R).
- Place the BUCKET and WELL WHEEL on the well; examine the bucket; take the SHORT BROOM (S).
- Take the BUCKET OF WATER (T) and ROPE (U).
- Back out twice.
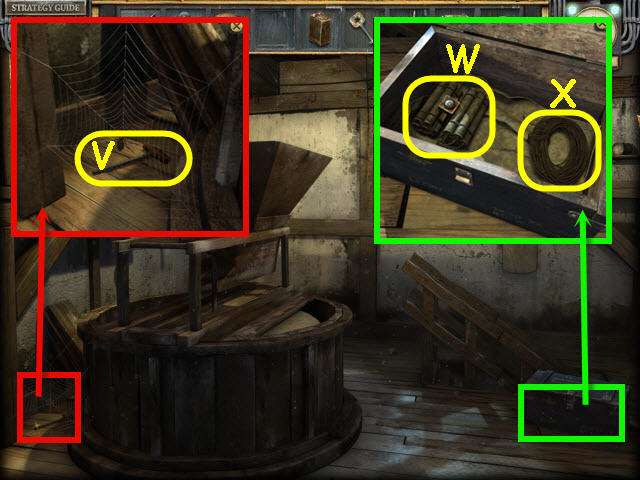
- Examine and use the SHORT BROOM on the spider web; take the DETONATOR LEVER (V).
- Examine and use the FOOTLOCKER KEY on the footlocker; take the DYNAMITE (W) and FUSE (X).
- Go down the stairs and through the door.
- Examine the gate.
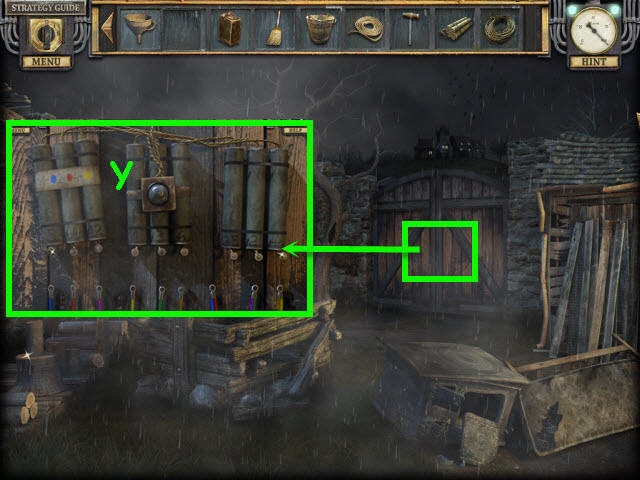
- Place the DYNAMITE and FUSE on the gate (Y) to trigger a puzzle.
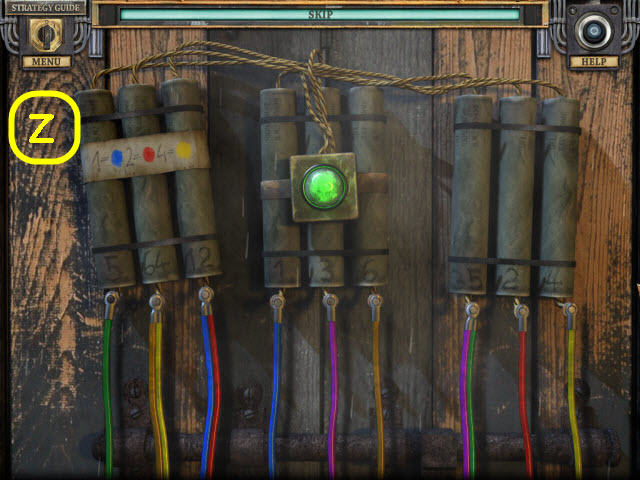
- Arrange the wires according to the code on the dynamite.
- Solution: 1=Blue, 2=Red, 3=purple, 4=yellow, 5=green, and 6=orange (Z).
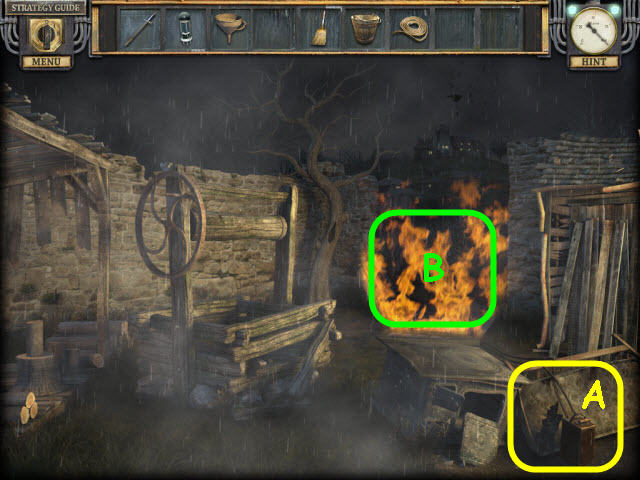
- Place the DETONATOR and DETONATOR LEVER on the right; press the DETONATOR (A).
- Use the BUCKET OF WATER on the fire (B).
- Go forward through the gates.
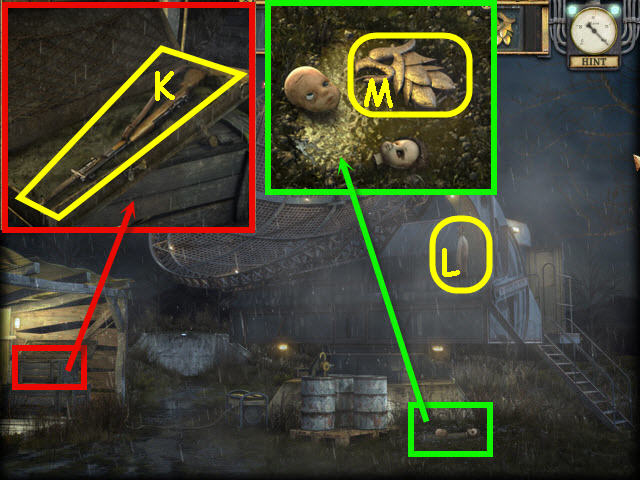
- Examine the pile of leaves left of Uncle Albert to access a HOS.
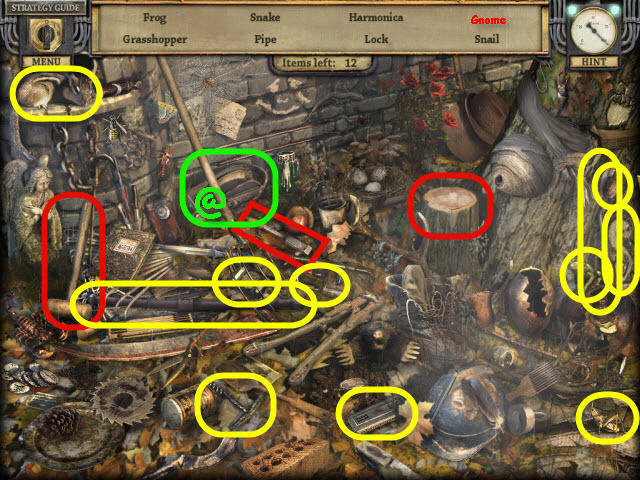
- Find the items listed.
- Marked in red: use the chisel on the tree stump; use the hammer on the chisel to get a gnome.
- Find the PULLEY (@).
- Take the HOOK (C).
- Use the PULLEY and ROPE on the tree branch (D).
- Use the HOOK on the sewer grate (E).
- Go down the sewer.

- Examine and use the BAYONET on the cheese; get the CHEESE (F).
- Back out three times.
- Examine and place the MOUSETRAP and CHEESE by the mouse hole; take the MOUSE (G).
- Examine the cabinet (H) to access a HOS.
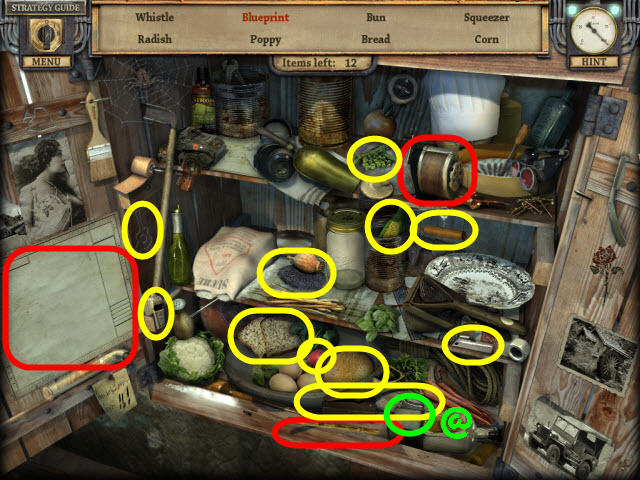
- Find the items listed.
- Marked in red: sharpen the pencil in the sharpener; use the sharpened pencil on the paper to get a blueprint.
- Find the LIGHTER (@).
- Back out.
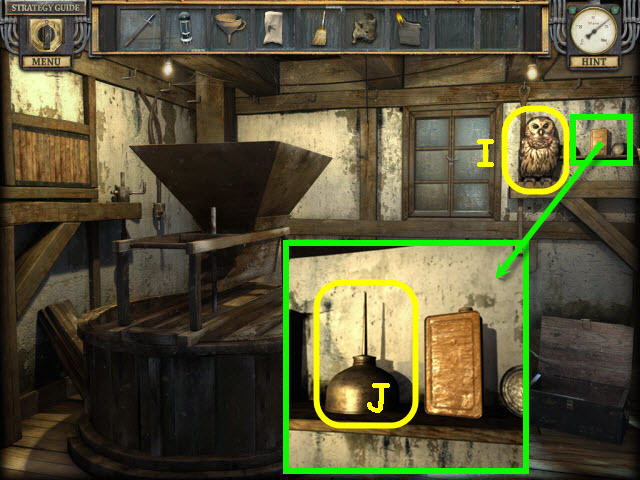
- Give the MOUSE to the owl (I).
- Examine the shelf; take the OIL CAN (J).
- Go down the stairs and through the door. Go through the gate and go down the sewer.
- Examine and use the OIL CAN on the hole and the LIGHTER in the center of the lantern (K).
- Examine the debris (L) to access a HOS.
- Find the items listed.
- Marked in red: use the knife on the ribbon on the box and take a chalk. Use the chalk on the seven on the wall to get an eight.
- Find the SLEDGEHAMMER (@).
- Back out.

- Examine and use the SLEDGEHAMMER on the stone; take the ACID (M).
- Go down into the sewer.
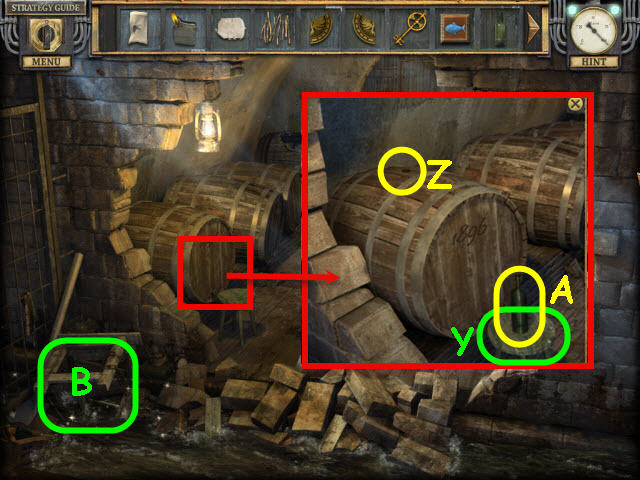
- Examine and use the SLEDGEHAMMER on the barrel (A).
- Important Note: You can smash the barrel with the SLEDGEHAMMER or with the AXE. If you don't smash the barrel before you break the gate, you can smash it later when you have the AXE.
- Examine and use the ACID and SLEDGEHAMMER on the lock (N).
- Go straight through the gates.
Chapter 6 – Underground
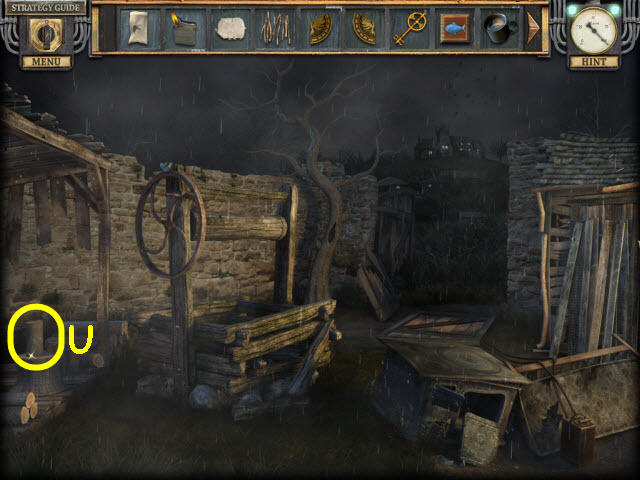
- Take the EMPTY GAS CAN (O).
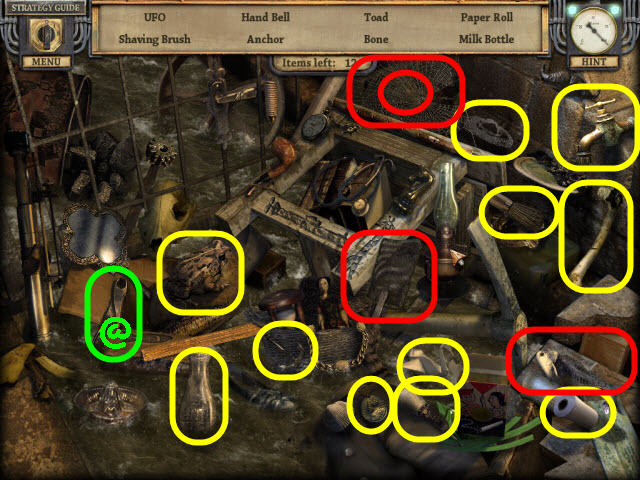
- Examine the torture table (P) to access a HOS.
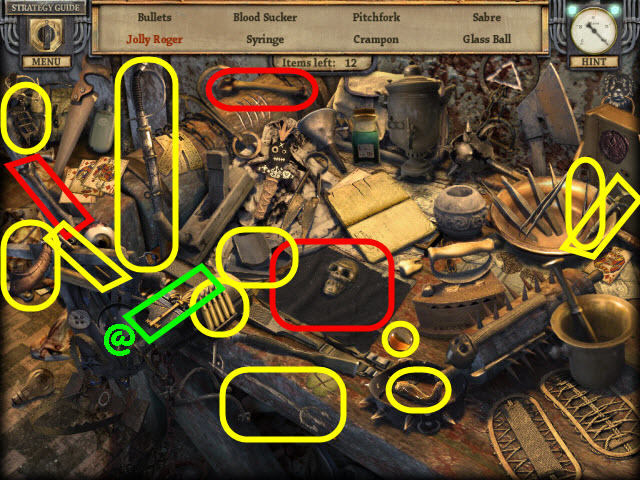
- Find the items listed.
- Marked in red: place the 2 bones on the flag to get a Jolly Roger.
- Find the FLEUR-DE-LIS KEY (@).
- Back out twice.
- Examine and use the FLEUR-DE-LIS KEY on the stone; take the ROUNDKEY (Q).
- Examine the leaf pile (R) to access a HOS.

- Find the items listed.
- Marked in red: use the glue on the broken vase. Place the pottery piece on the glued vase. Use the pruners on the rose bush; place the cut roses in the repaired vase to get a rose vase.
- Find the BOLT CUTTERS (@2).
- Go down the sewer; go forward.
- Examine the torture table to access a HOS.
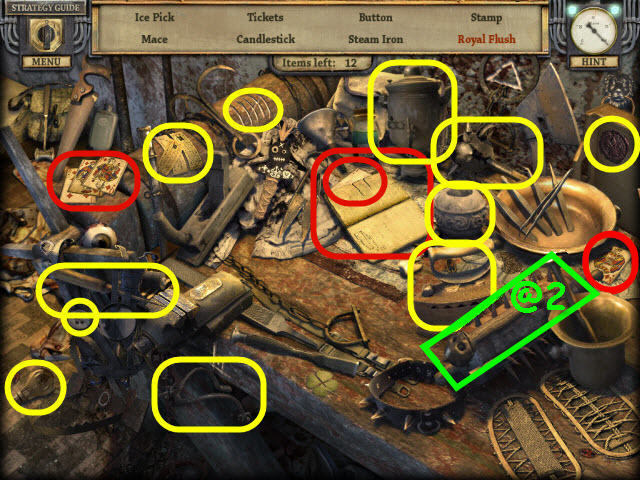
- Find the items listed.
- Marked in red: turn the page in the book. Put the ace playing card and the king playing card on the deck to get a royal flush.
- Find the SKULL HANDLE (@2).
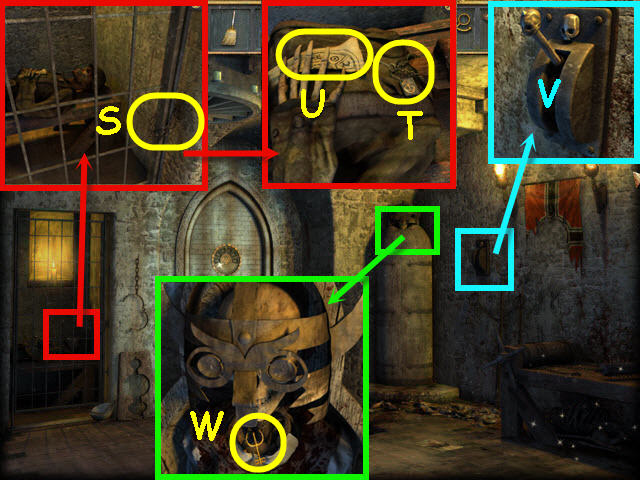
- Examine the cell door; use the BOLT CUTTERS on the chain (S).
- Take the KEY WITH RADAR SYMBOL (T) and CODE PAPER PIECE (U).
- Examine and place the SKULL HANDLE on the holder; pull the SKULL HANDLE (V).
- Examine the sarcophagus; take the TRIDENT KEY (W).
- Back out four times.
- Examine and use the TRIDENT KEY on the chest; read the note and take the WING OF PHOENIX (Z).
- Examine and use the OIL CAN on the cabinet; take the SCISSORS (A).
- Examine the mill; take the SACK WITH HOLES (B).
- Use the SCISSORS on the remaining sack; get a TEXTILE PATCH (C).
- Back out two times; go right and go into the trailer.
- Examine and use the KEY WITH RADAR SYMBOL on the cabinet; take the WRENCH (D), TERRA KEY (E), and 2nd CODE PAPER PIECE (F).
- Examine the cabinet (G) to access a HOS.
- Find the items listed.
- Marked in red: place the two plane wings on the fuselage to get a plane.
- Find the GAS PUMP LEVER (@).
- Back out.

- Examine and place the EMPTY GAS CAN on the barrels; place the GAS PUMP LEVER on the pump and take the FULL GAS CAN (H).
- Examine and use the FUNNEL and FULL GAS CAN on the generator (I).
- Flip the switch (J).
- Examine and use the BAYONET on the case padlock; place the BAYONET on the rifle and take the RIFLE WITH BAYONET (K).
- Use the RIFLE WITH BAYONET on the sack (L).
- Examine the droppings from the sack; take the PHOENIX HEAD (M).
- Back out.
- Examine and use the SCISSORS on the plant; get DRY BRANCHES (N).
- Examine the truck engine; use the WRENCH on the bolt; take the BATTERY (O).
- Go up the second floor balcony; go down the stairs and forward twice. Go down the sewer and then go straight.
Chapter 7 – The Mansion

- Examine and place the 2 CODE PAPER PIECES on the symbols; press on the symbols until they match the code (P).
- Place the PHOENIX HEAD on the phoenix (Q).
- Go into the newly-opened doorway.
- Examine the wardrobe to access a HOS.
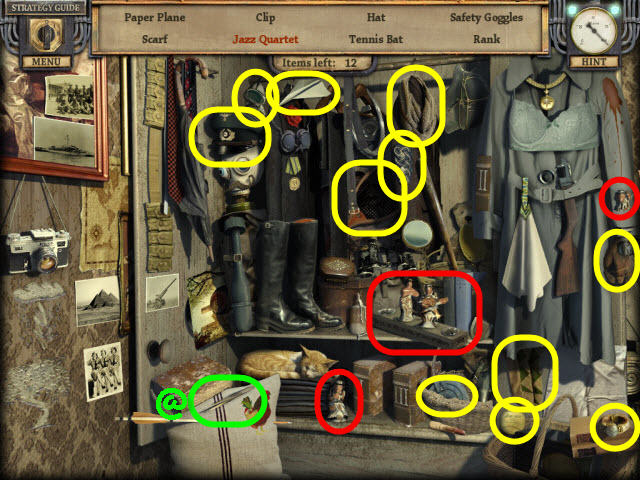
- Find the items listed.
- Marked in red: place the two jazz players on the stand to get a jazz quartet.
- Find the TWEEZERS (@).
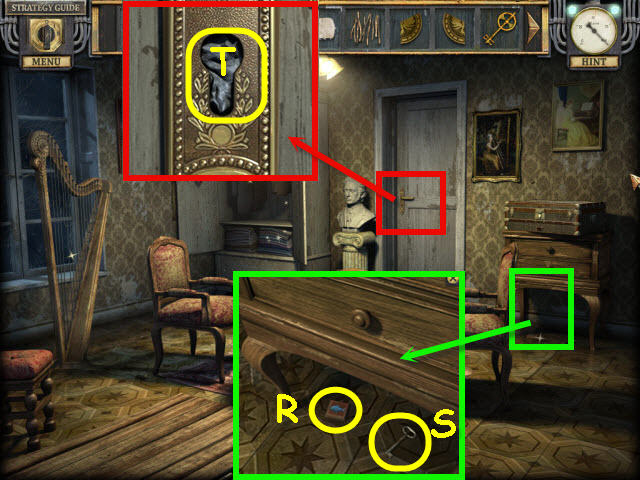
- Examine the underside of the hall table; take the BOARD GAME TILE (R) and the DOOR KEY (S).
- Examine the door; use the TWEEZERS on the keyhole (T). Use the DOOR KEY in the lock.
- Go through the newly-opened door and into the left door.
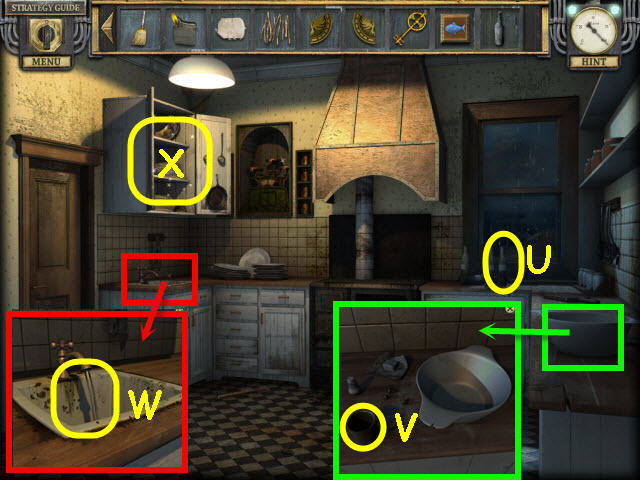
- Take the DIRTY BOTTLE (U).
- Examine the bowl; take the EMPTY MUG (V).
- Examine the sink and turn on the tap. Wash the DIRTY BOTTLE in the water (W) to get a CLEAN BOTTLE.
- Use the EMPTY MUG on the water; get a FULL MUG.
- Examine the left cabinet (X) to access a HOS.
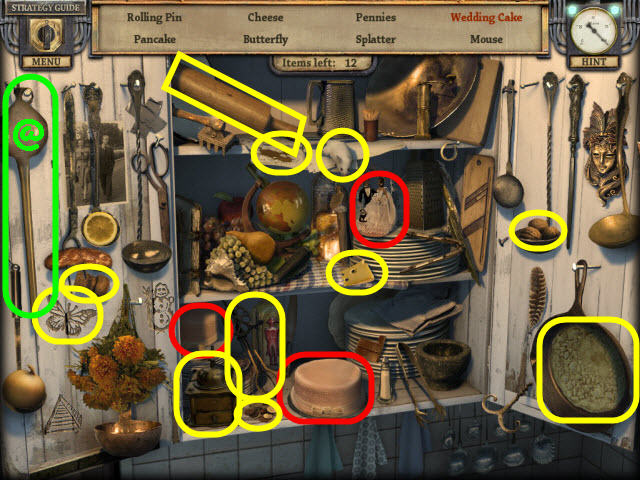
- Find the items listed.
- Marked in red: place the top layer of the cake on the bottom layer; place the bride and groom on the top layer to get a wedding cake.
- Find the EMPTY WINE THIEF (@).
- Back out four times.
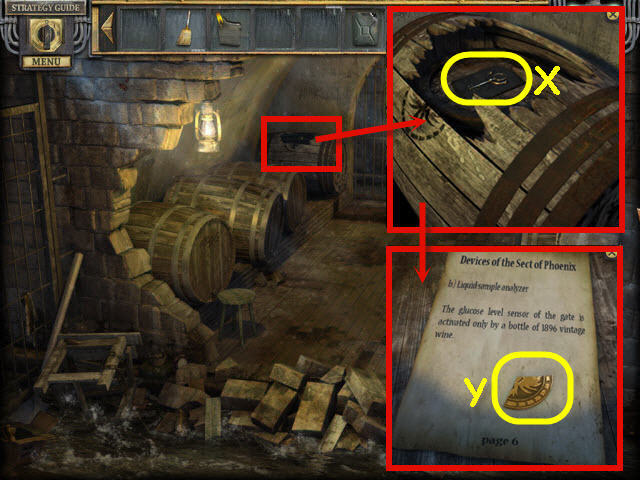
- Examine the barrel; place the CLEAN BOTTLE on the stool (Y).
- Place the EMPTY WINE THIEF on the hole (Z) to get a FULL WINE THIEF.
- Use the FULL WINE THIEF on the CLEAN BOTTLE; take the BOTTLE OF WINE (A).
- Examine the debris (B) to access a HOS.
- Find the items listed.
- Marked in red: use the flyswatter on the fly flying by the dead fish; place the fly on the web to get the spider.
- Find the PLIERS (@).
- Go forward and through the doorway.
- Examine and use the PLIERS on the broken harp string to get a HARP STRING (C).
- Go straight and left through the doors.
- Examine and place the SHORT BROOM and HARP STRING on the broken handle; take the LONG BROOM (D).
- Back out.
- Examine and use the LONG BROOM on the torn wallpaper; get a CODE PAPER (E).
- Examine the door; place the VACUUM TUBE on the empty slot (F); place the BATTERY on the bottom.
- Place the CODE PAPER on the right to trigger a puzzle.
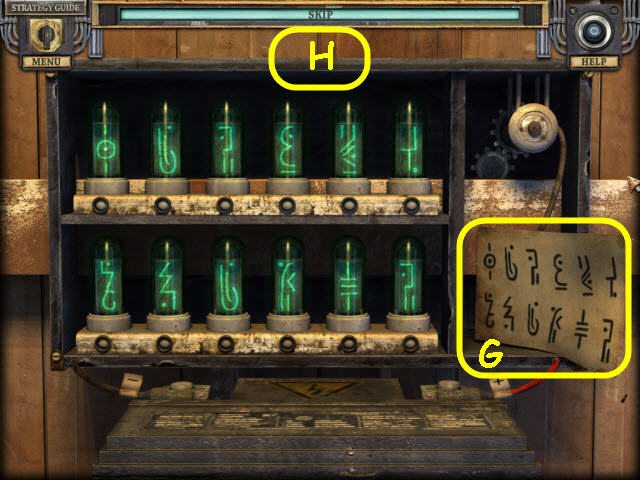
- Select the vacuum tube when the correct symbol for the tube flashes.
- Use the CODE PAPER (G) as your guide. Continue until all the tubes have the correct symbol.
- See screenshot (H) for solution.
- Go forward.
Chapter 8 – The Plan
- Examine and take a FUSE from the fuse box (I).
- Take the AXE (J) and the LONG BOARD (K).
- Examine the box; take the FISHING TACKLE (L).
- Back out four times.
- Examine and use the AXE on the barrel; if you used the SLEDGEHAMMER earlier you can skip the AXE.
- Use the ROUND KEY on the lock (X).
- Read the note and take the 2nd WING OF PHOENIX (Y).
- Go forward three times through the doors.
- Examine and place the FUSE on the electrical panel (M); rotate the dial to the 1.
- Go into the door on the right.
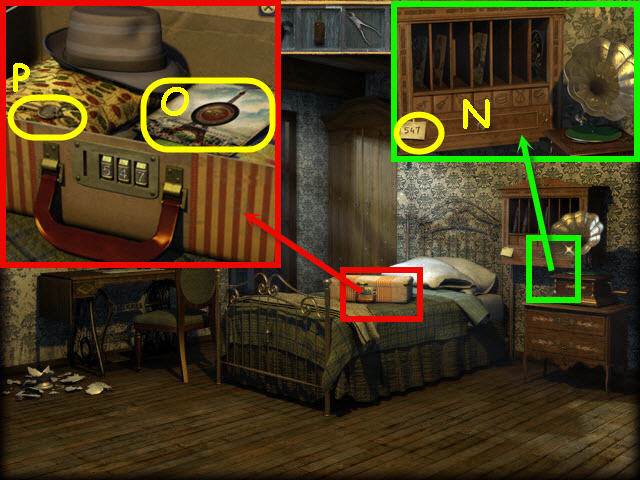
- Examine the phonograph; note the code 547(N).
- Back out of the close-up.
- Examine and use the code from the phonograph on the suitcase; 547; take the RECORD (O) and the CHEST KEY (P).
- Back out twice.
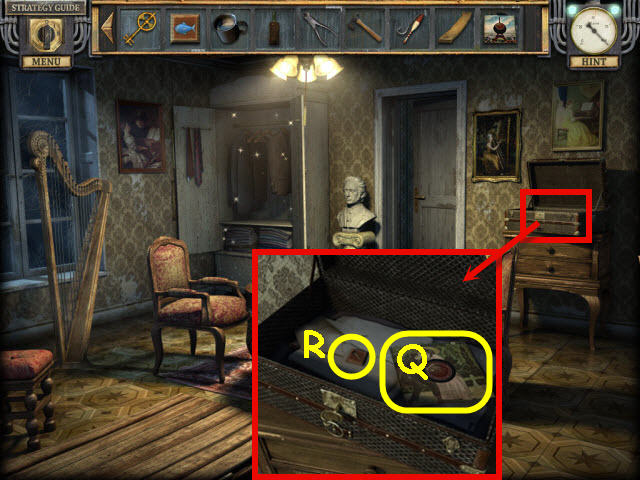
- Examine and use the CHEST KEY on the chest; take the 2nd RECORD (Q) and 2nd BOARD GAME TILE (R).
- Examine the wardrobe to access a HOS.

- Find the items listed.
- Marked in red: use the glue on the torn book; place the book binding on the glued book; place the repaired book in between the 2 books to get a trilogy.
- Find the3rd RECORD (@).
- Go forward and right through the door.
- Examine and place the 3 RECORDS in the empty cubby holes by the phonograph to trigger a puzzle.
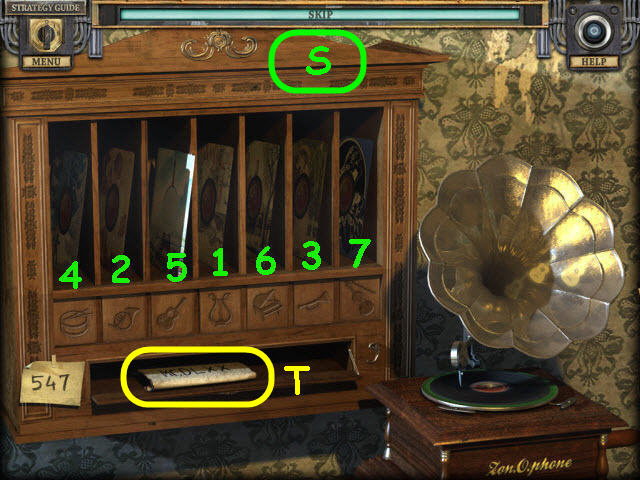
- Set the instruments under the albums to match the music on the albums.
- Some of the bottom panels change other panels; change those first.
- See screenshot (S) for the order to change and the solution.
- Take the ROMAN NUMERAL CODE (T).
- Back out six times.
- Use the AXE on the log (U); take the FIREWOOD.
- Back out three times.
- Examine the water wheel on the left to access a HOS.
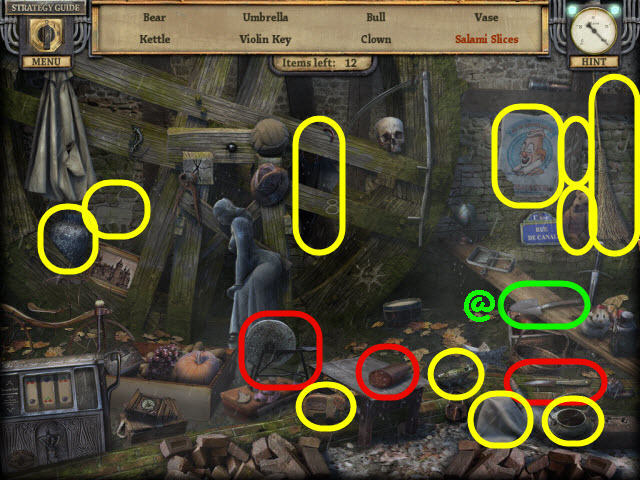
- Find the items listed.
- Marked in red: use the knife on the sharpener; use the sharpened knife on the salami to get salami slices.
- Find the HAND SPADE (@).
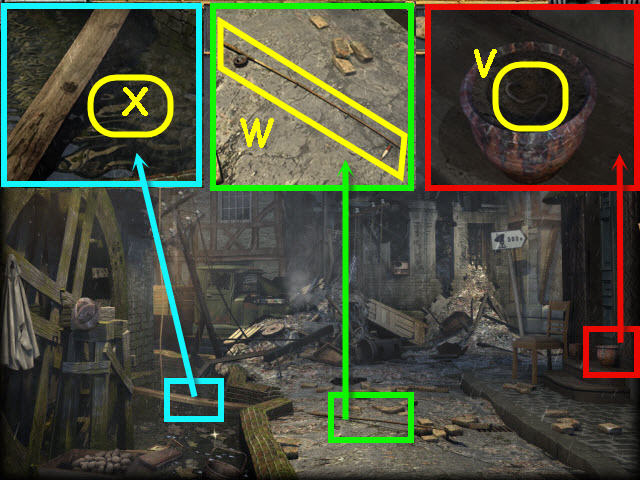
- Examine and use the HAND SPADE on the pot; take the WORM (V).
- Examine and place the FISHING TACKLE on the fishing pole; place the WORM on the hook; take the FISHING ROD (W).
- Examine and use the FISHING ROD on the water (X); get a FISH.
- Go left onto the upper deck and go down the stairs. Go forward twice; go down the sewer and forward four times through the doors.
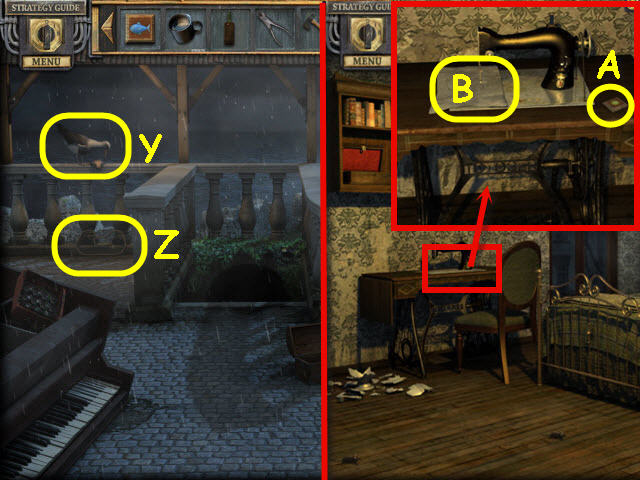
- Give the FISH to the seagull (Y); take the SEWING MACHINE BELT (Z).
- Back out and go right.
- Examine the SEWING MACHINE; take the 3rd BOARD GAME TILE (A).
- Place the SEWING MACHINE BELT on the right side of the sewing machine.
- Place the SACK WITH HOLES on the sewing machine; place the TEXTILE PATCH on the SACK WITH HOLES; take the EMPTY SACK (B).
- Back out seven times.
Chapter 9 – The Recipe
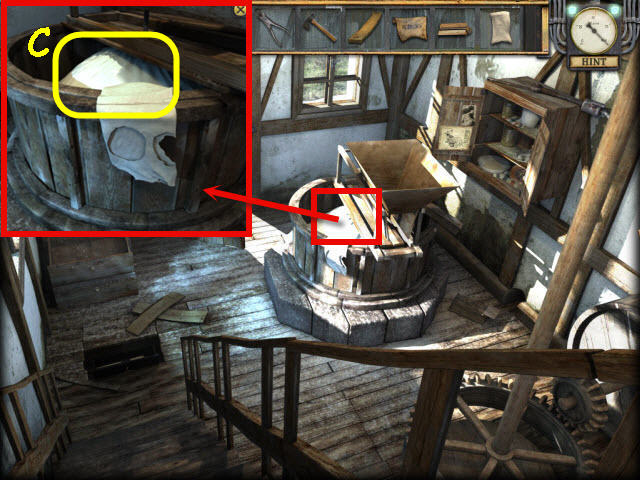
- Examine and use the EMPTY SACK on the mill (C); get a SACK FULL OF FLOUR.
- Go forward twice; go down the sewer; go forward three times and go left.
- Examine the left cupboard to access a HOS.

- Find the items listed.
- Marked in red: use the scissors on the marigolds; place the marigolds from the ladle in the mortar; use the pestle in the mortar to get the marigold powder.
- Find the MEASURE WEIGHT (@).
- Examine the scale (D).
- Place the MEASURE WEIGHT in the slot (E) to trigger a puzzle.
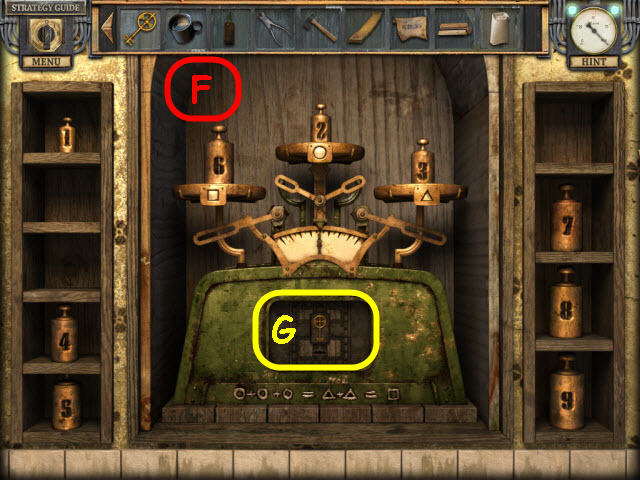
- Place the correct weights on the scales to complete the equation on the bottom of the scale.
- The solution, starting from the left is: 6, 2, and 3 (F).
- Examine and use the TERRA KEY on the center panel (G); take the HEAD OF PHOENIX.
- Back out of the close-up.
- Back out twice.
- Examine and place the 3 BOARD GAME TILES on the center table to trigger a puzzle.
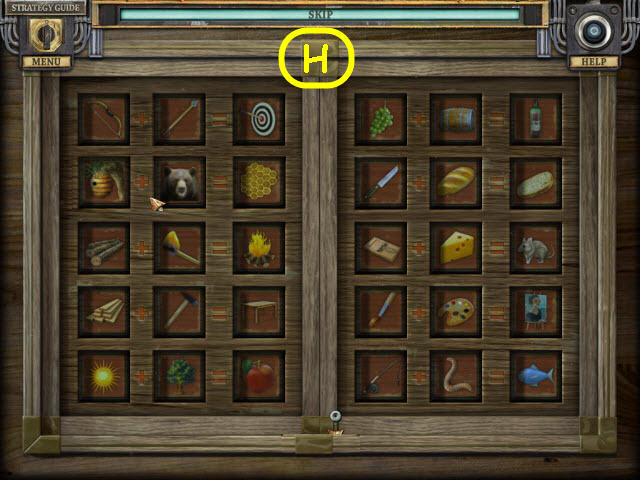
- Arrange the tiles to complete the equations.
- The tiles will recess when an equation is correct.
- See screenshot (H) for solution.
- Place the 2 WINGS OF PHOENIX and the HEAD OF PHOENIX on the book; take the STAR EMBLEM and read the page.
- Back out of the close-up.
- Go forward and go left through the doors.
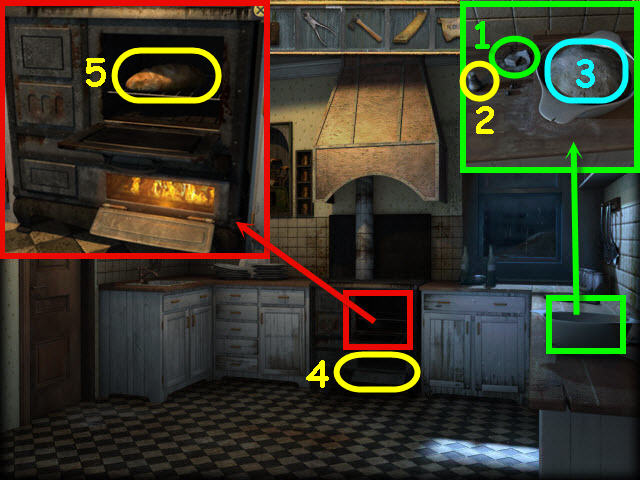
- Examine and place the SACK FULL OF FLOUR, FULL MUG, YEAST (1), and SALT SHAKER (2) in the bowl.
- Knead the dough twice; take the DOUGH (3).
- Examine the oven; place the FIREWOOD and DRY BRANCHES in the burner (4); use the LIGHTER on the wood.
- Open the oven; place the DOUGH in the oven; close the oven door; take the BREAD (5).
- Back out; go forward twice.
- Place the BOTTLE OF WINE on the right (I), the BREAD on the left (J), the STAR EMBLEM in the center (K).
- Examine and place the ROMAN NUMERAL CODE on the Roman numerals Turn the numerals to match the code: MCDLXX (L).
- Attempt to go forward after the cutscene.
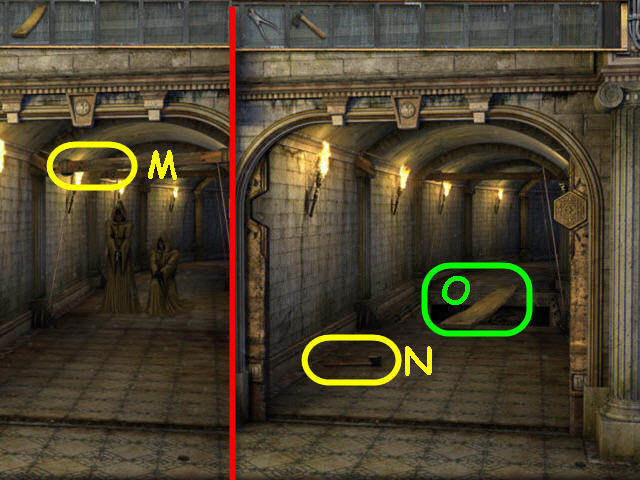
- Throw the AXE on the beam (M).
- Take the AXE (N).
- Place the LONG BOARD across the chasm (O).
- Go forward.
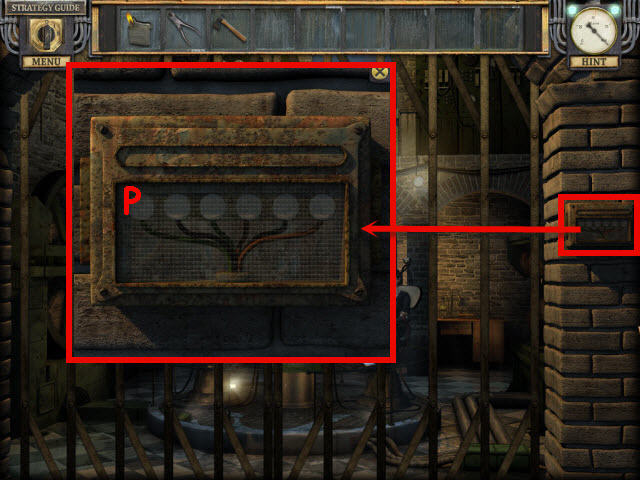
- Examine and use the AXE on the control panel (P) glass.
- Use the PLIERS on the wires.

- Examine and open the compartment; take the WRENCH (Q).
- Use the WRENCH on the gears (R).
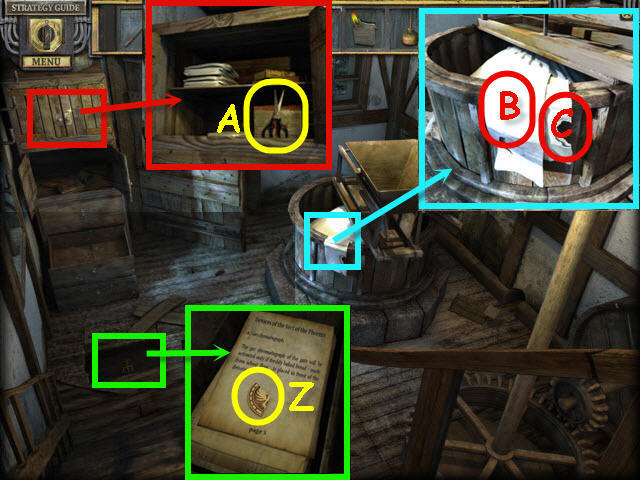
- Examine the desk; open the drawer and take the SCREWDRIVER (S).
- Open the cabinet on the desk; take the EMPTY BEAKER (T); place the EMPTY BEAKER on the coaster.
- Use the lighter on the burner (U); take the BEAKER FULL OF ACID (V).
- Examine and use the BEAKER FULL OF ACID on the pipes (W).
- Examine the center console (B); use the SCREWDRIVER on the screw to trigger a puzzle.
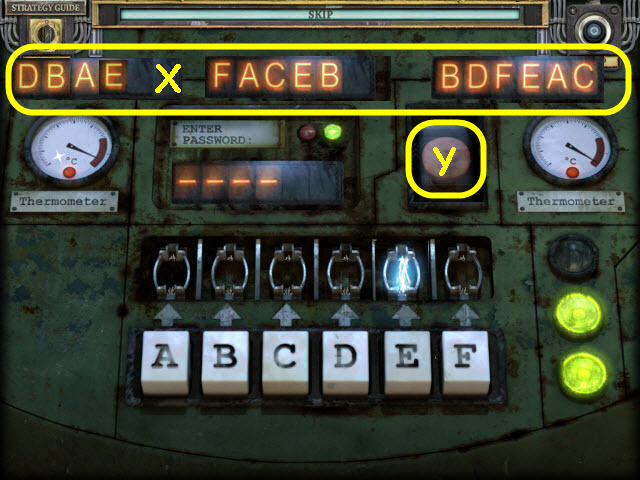
- Press the letters that light up in the allotted time to enter the passwords.
- Solution: DBAE, FACEB, and BDFEAC (X).
- Press the big red button (Y).

- Pick up the KEY BUNCH (Z).
- Examine Yvette's arm; use the KEY BUNCH on the shackle (A).
- Congratulations! You have successfully completed Silent Nights: The Pianist Standard Edition.
Created at: 2012-04-13