

Walkthrough Menu
- General Tips
- Chapter 1: The Escape
- Chapter 2: My Baby Sarah
- Chapter 3: Dangerous Route
- Chapter 4: Expelled From Paradise
- Chapter 5: The Dark Past
- Chapter 6: Trapped!
- Chapter 7: Saving Sarah
- Bonus Chapter
General Tips
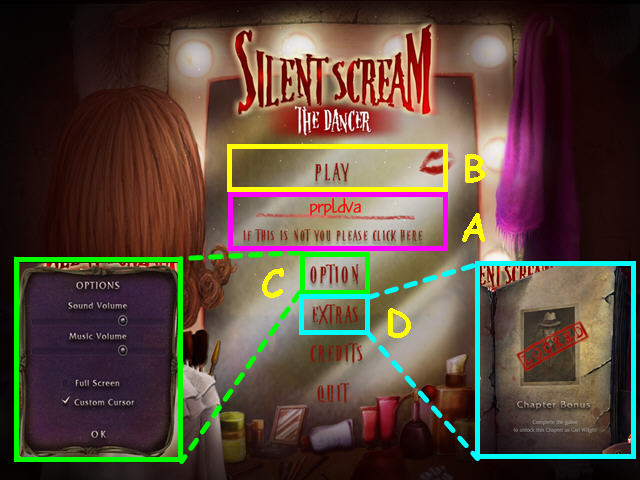
- Click on 'If this is not you please click here' on the main screen to add or delete player profiles (A).
- Select 'Play' to begin or continue your game (B).
- You may play this game in full screen or windowed mode by changing the options in the Options menu (C).
- You may adjust the volume of effects and music in the Options menu.
- You may also revert to the system cursor from the Options menu.
- The Options menu is accessible from both the main screen and the in-game menu.
- After you complete the game, go to the Extras Menu for a bonus chapter (D).
- The best way to use this walkthrough is by clicking on the 'CTRL' and 'F' keys on your keyboard to simultaneously bring up a search box.
- Type the keyword into the search box at the bottom of your screen and click on 'NEXT' to find the section you need help with. Clicking 'NEXT' again will bring up all instances in which that keyword was mentioned in the guide.
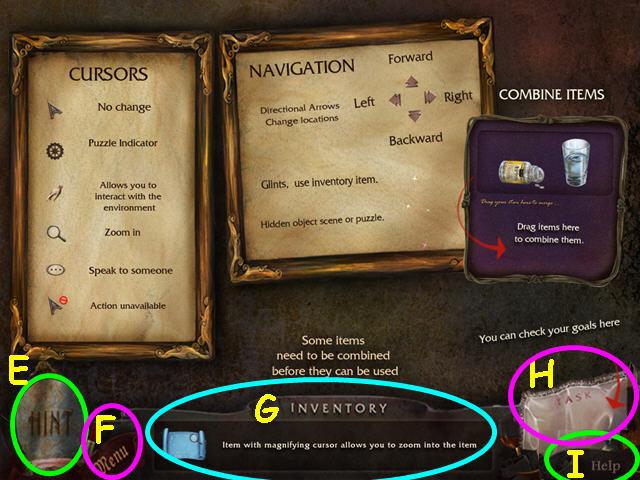
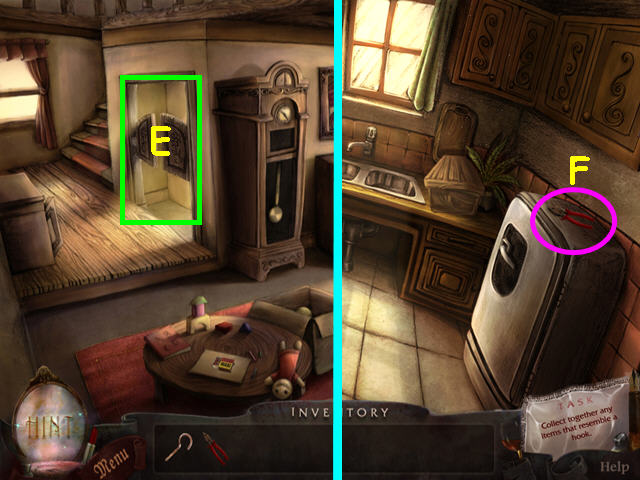
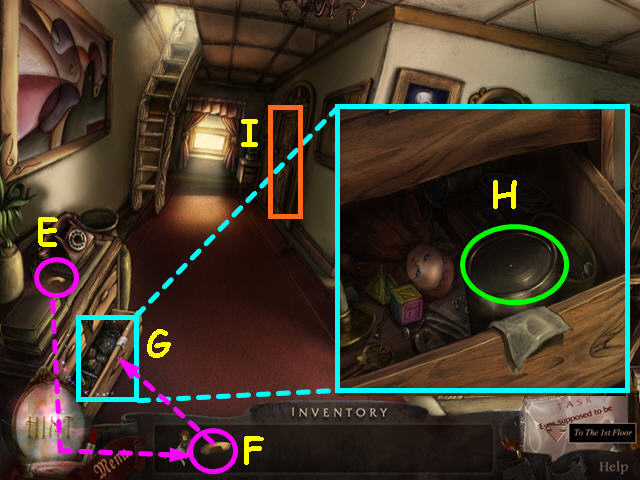
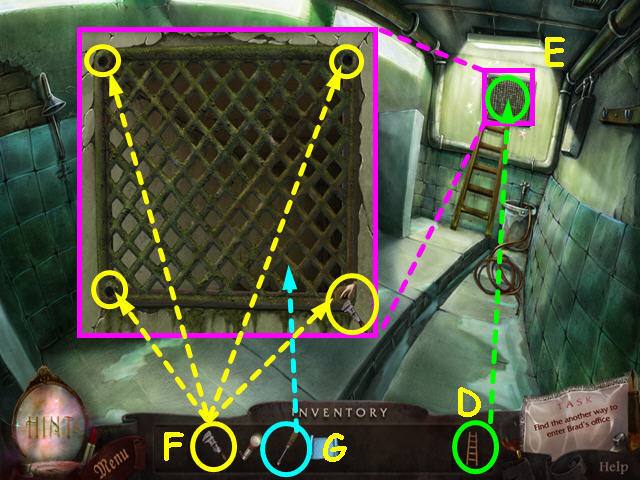
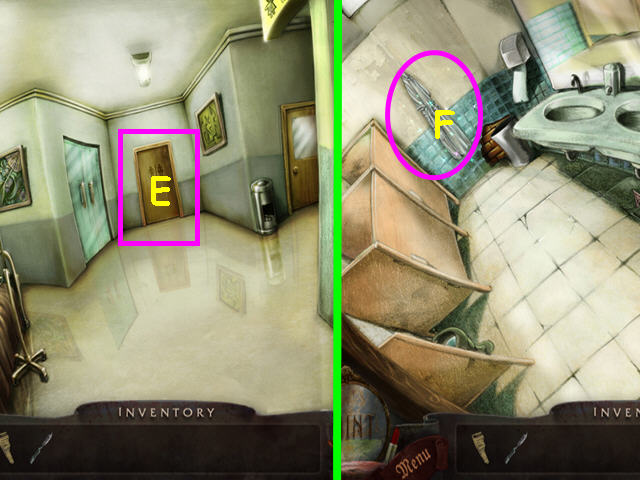
- Hints are unlimited, but you must wait for the meter to re-fill (E).
- Click the menu button to access the settings menu (F).
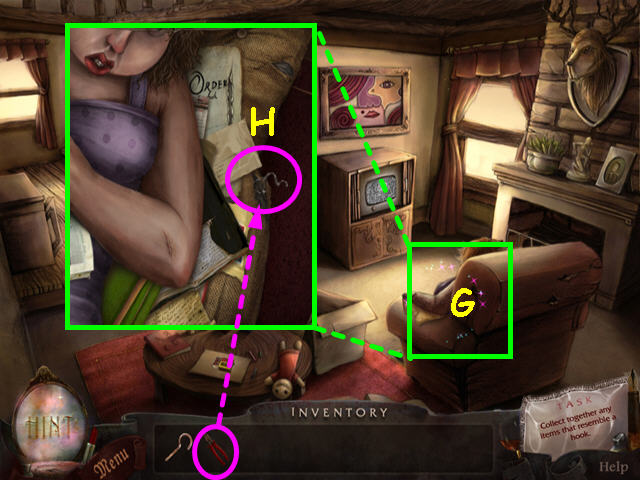
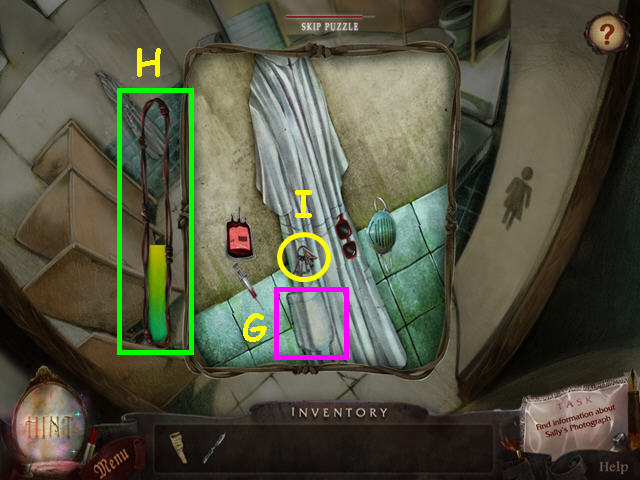
- Your inventory is in the bottom panel (G).
- Items that have a magnifying glass cursor allow you to look closer.
- Your current goal will display on the task list (H).
- Click on the help button in the lower right to view this help screen with a cursor legend and other help (I).
Chapter 1: The Escape
- There will be a brief tutorial when using the Casual difficulty level.
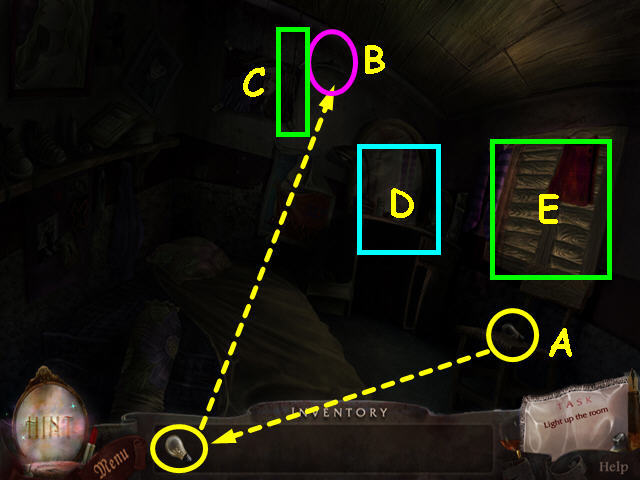
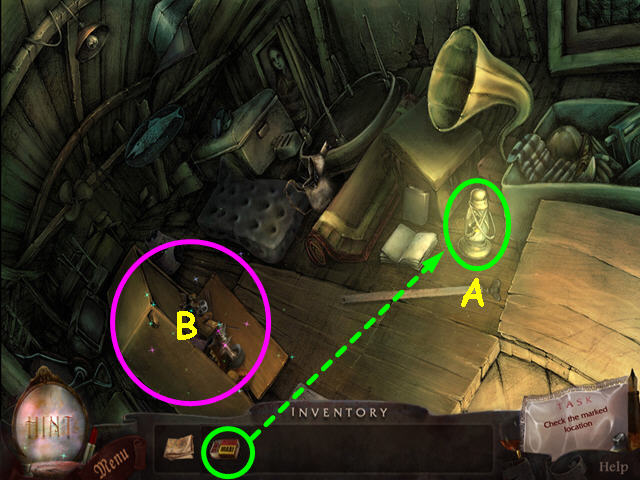
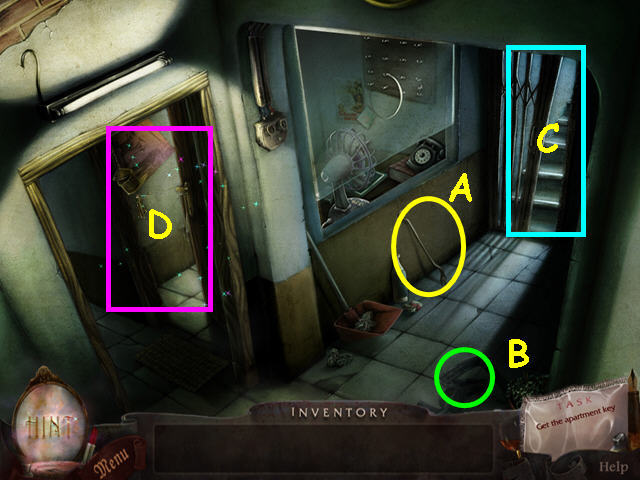
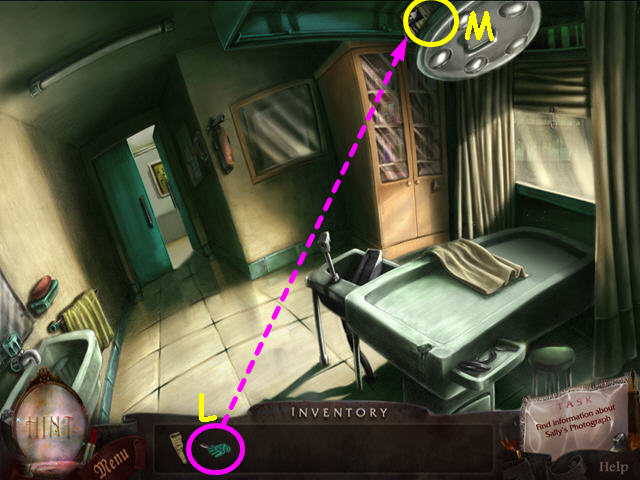
- Take the BULB from the chair (A).
- Place the BULB into the lamp (B).
- Pull the lamp's string (C).
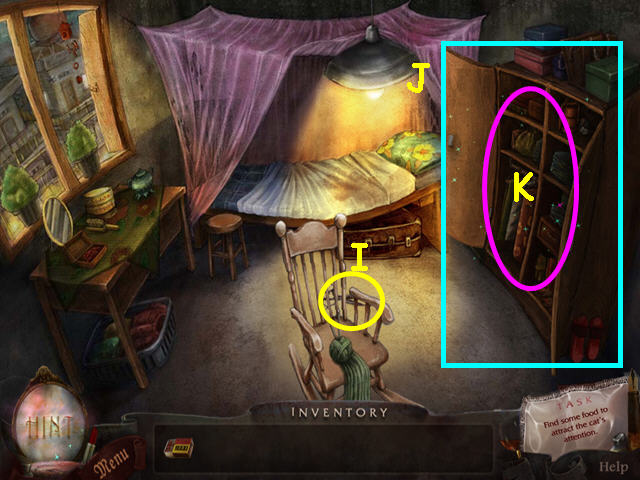
- Make note of the dresser/vanity (D).
- Click on the window blinds for a mini-game (E).
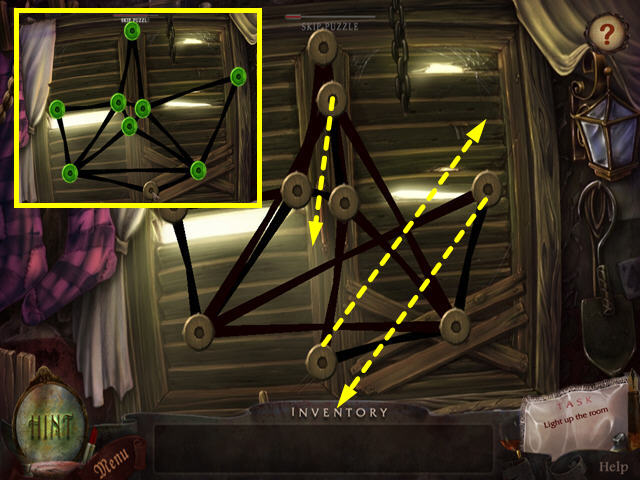
- The object of this mini-game is to untangle the ropes so that none are touching.
- Drag the buttons into position.
- There are numerous solutions to this mini-game.
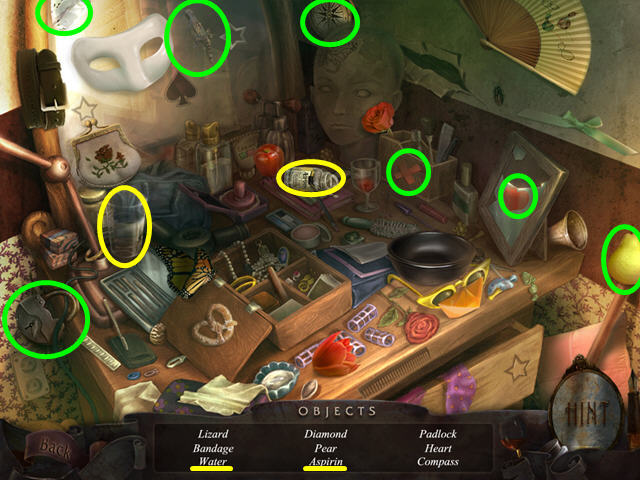
- Select the dresser/vanity for a Hidden Object Scene.
- Locate all the items on the list.
- You will earn the ASPIRIN and the WATER.
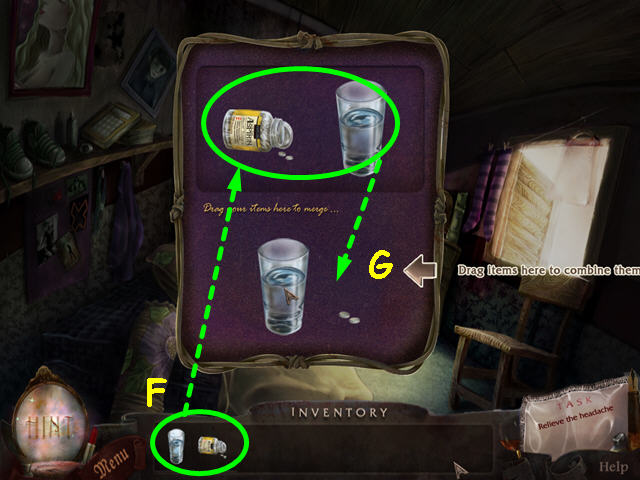
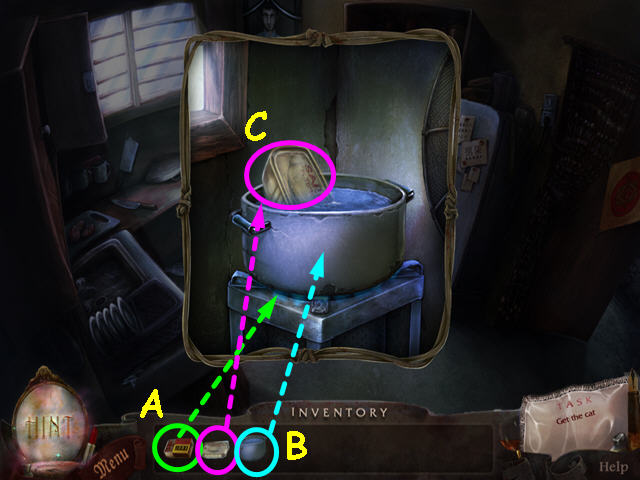
- Certain items will need to be combined.
- Click on an item in your inventory and the combining screen will open.
- Click on the ASPIRIN and the WATER in your inventory (F).
- Drag each item to the lower half of the combining area (G).
- You will automatically take the aspirin, but in some cases, the combined item will go into your inventory.
Chapter 2: My Baby Sarah
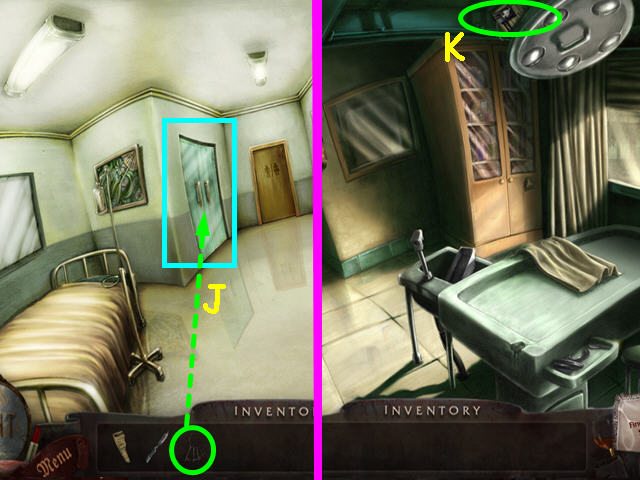
- Walk forward to enter the day care center (A).
- Walk up to the second floor (B).
- Look at the the hatch door to the attic to learn you need a hooked instrument (C).
- Take the HOOK (D).
- Walk down to return to the first floor.
- Enter the kitchen (E).
- Take the pliers (F).
- Exit the kitchen.
- Look at the woman in the chair (G).
- Use the PLIERS to cut the WIRE (H).
- Walk down to go outside.
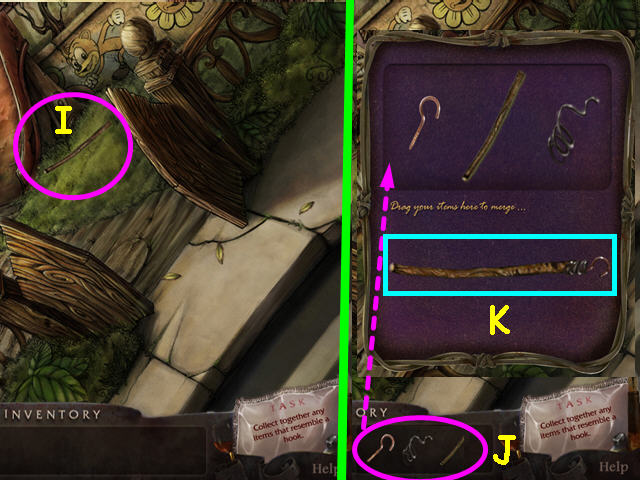
- Take the STICK (I).
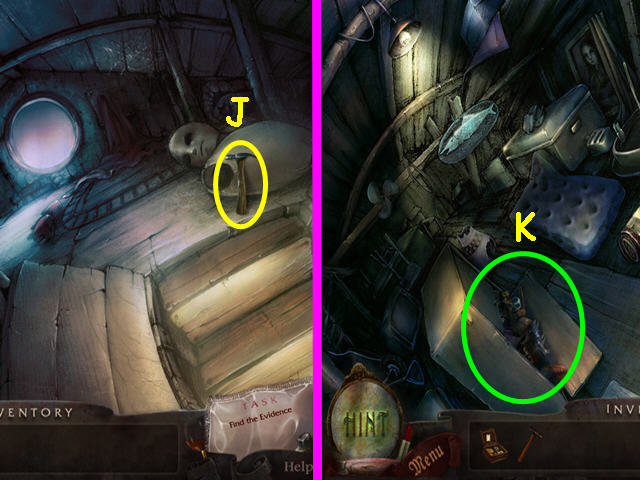
- Select the STICK, WIRE and the HOOK in your inventory (J).
- Combine the STICK, WIRE and the HOOK to make the HOOK on a stick (K).
- Walk forward to enter the house, then walk up the stairs.
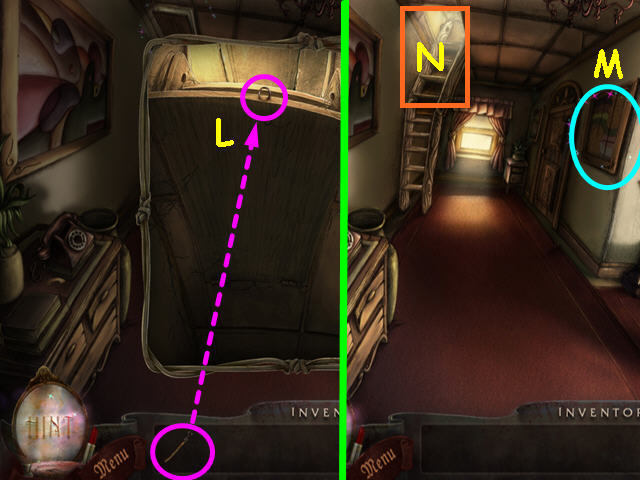
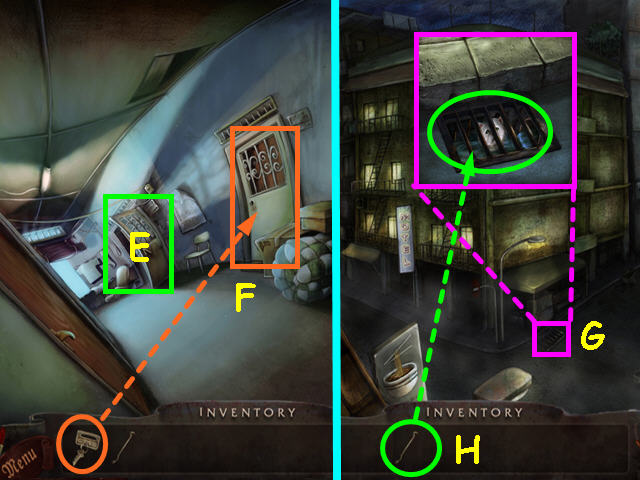
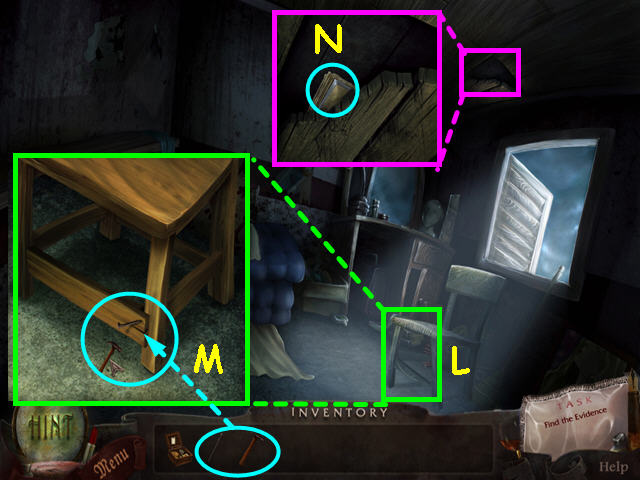
- Look at the close-up of the hatch to the attic and use the HOOK on the ring in the door (L).
- Make note of the painting (M).
- Climb up to the attic (N).
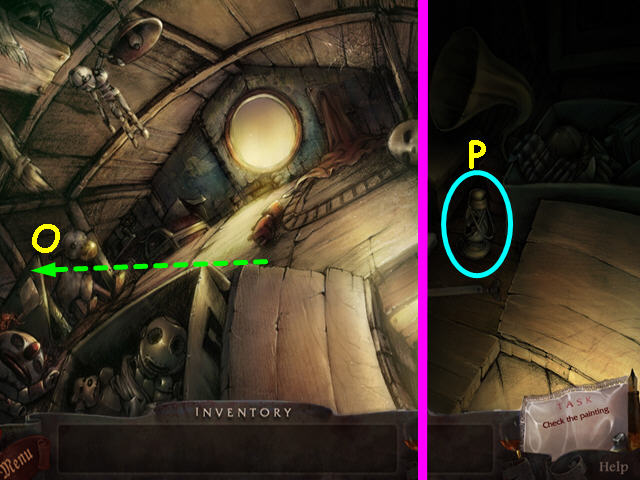
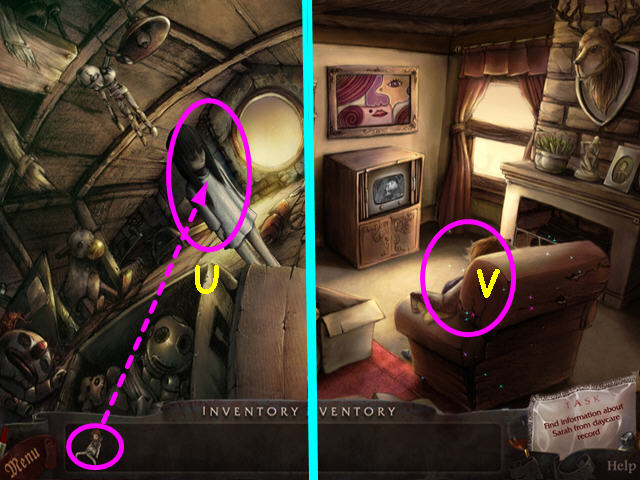
- Walk left to the back of the attic (O).
- Look at the lantern to learn you need matches (P).
- Walk to the right, then go down to exit the attic.
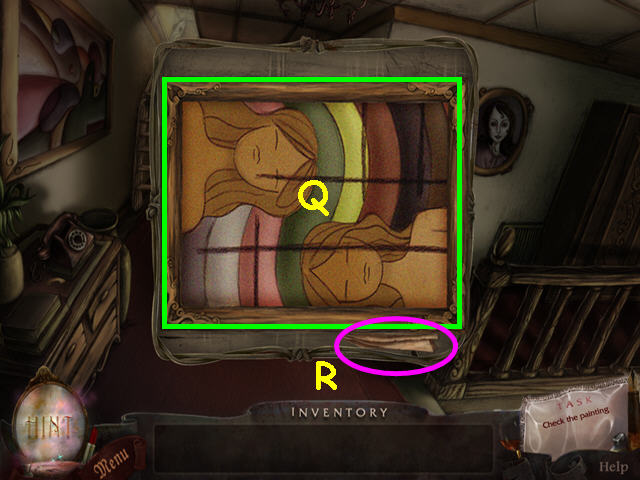
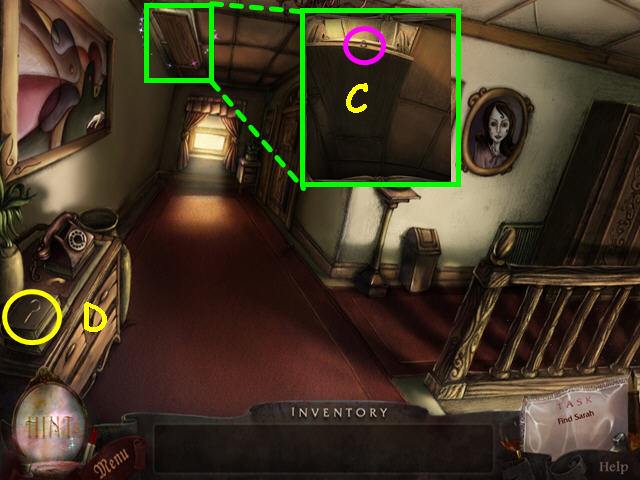
- Look at the close-up of the painting.
- Click on the painting to dislodge a hidden paper (Q).
- Take the MAP (R).
- Look at the MAP in your inventory to learn it needs cleaning.
- Walk downstairs.
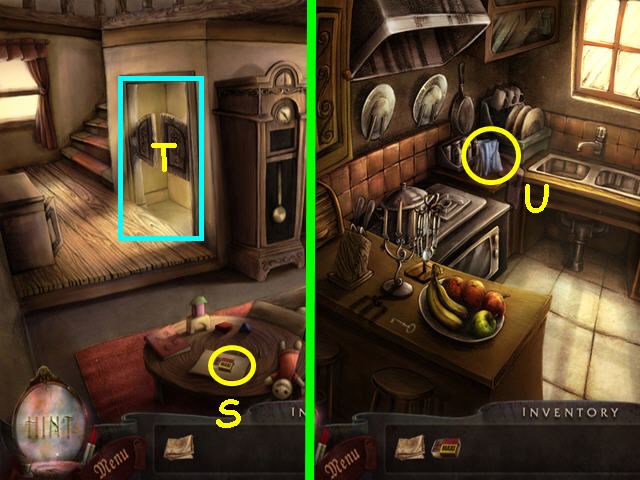
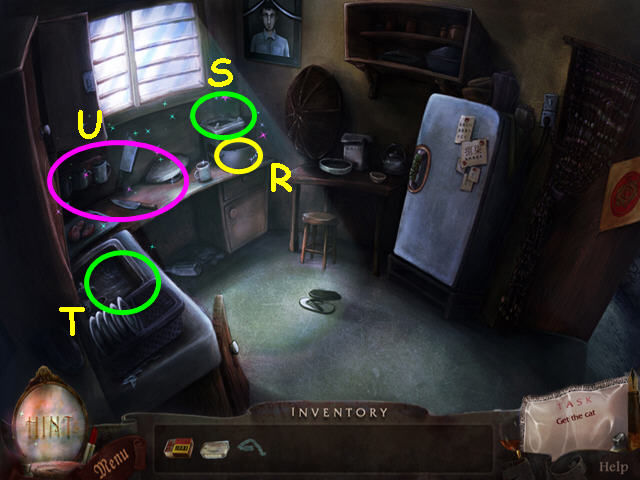
- Take the MATCHES (S).
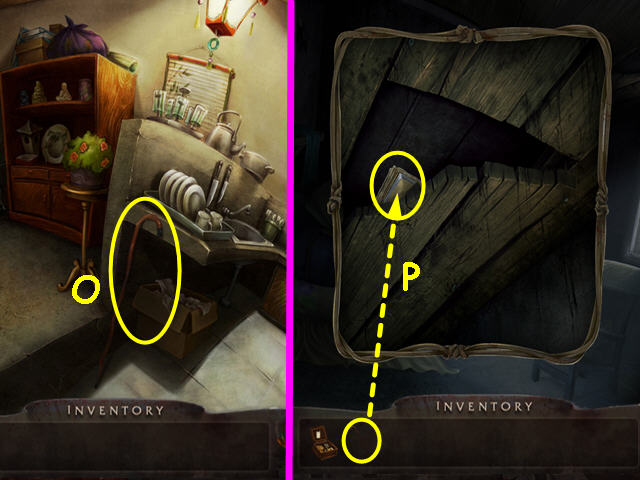
- Enter the kitchen (T).
- Take the RAG (U).
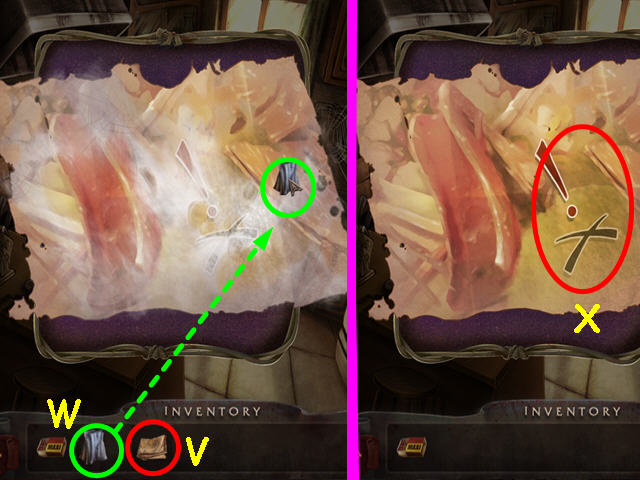
- Look at the MAP in your inventory (V).
- Use the RAG on the MAP several times (W).
- Note the location of the X on the map (X).
- Exit the MAP and the kitchen.
- Walk upstairs, then up to the attic.
- Walk left to the back of the attic.
- Use the MATCHES on the lantern (A).
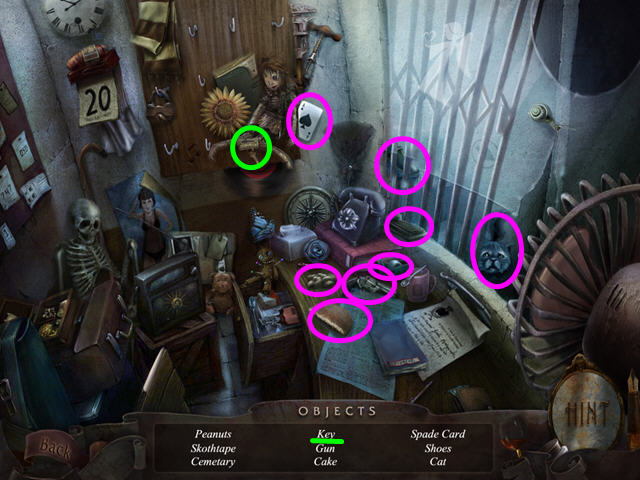
- Select the toy box for a Hidden Object Scene (B).
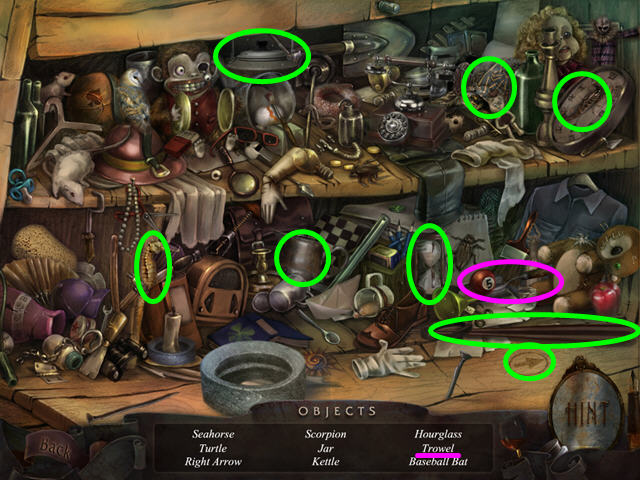
- Locate all the items on the list.
- You will earn the TROWEL.
- Walk right, then walk down 3 times to return to the yard.
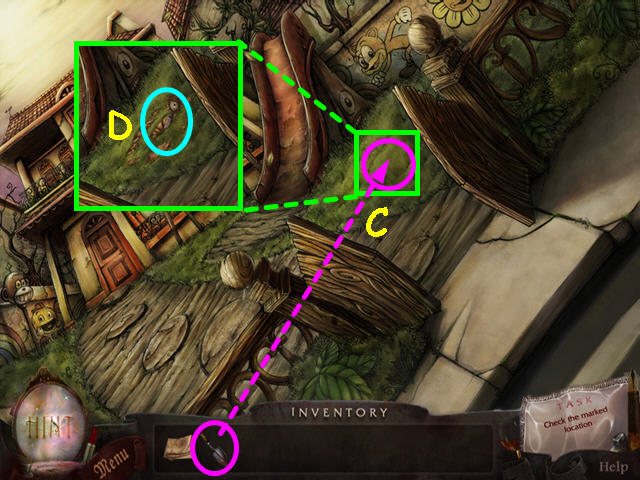
- Use the TROWEL 3 times on the ground near the slide (C).
- Take the DOLL (D).
- Look at the DOLL in your inventory to learn it is missing an eye.
- Walk forward to enter the house.
- Walk up the stairs.
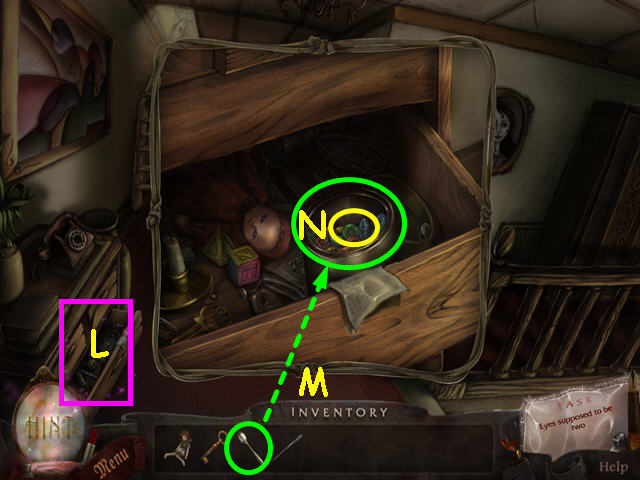
- Take the HANDLE (E).
- Place the HANDLE on the drawer (F).
- Click on the drawer to open it, then click inside the drawer (G).
- Look at the can to learn you need something that will pry it open (H).
- Try the bedroom door to learn you need a key (I).
- Walk up to the attic.
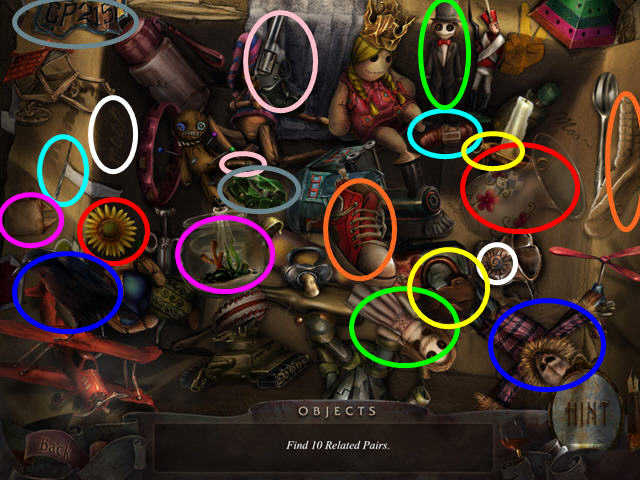
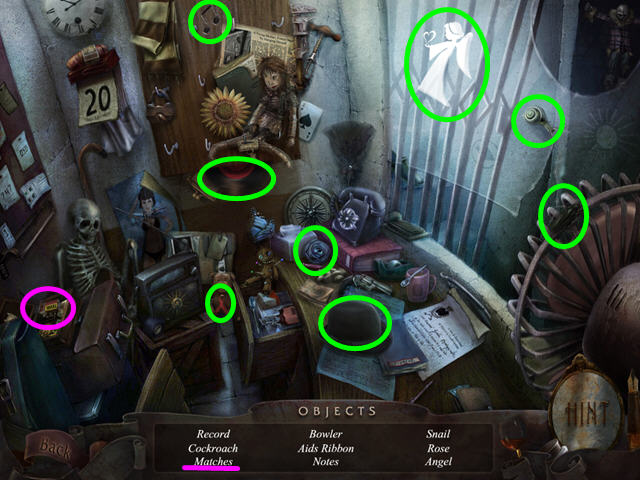
- Select the toy box just to the left of the attic stairs for a Hidden Object Scene.
- Locate all the related pairs of items.
- These are common pairings like- bread and butter, up and down, or boy and girl.
- You will earn the NEEDLE.
- Walk down twice, then enter the kitchen.
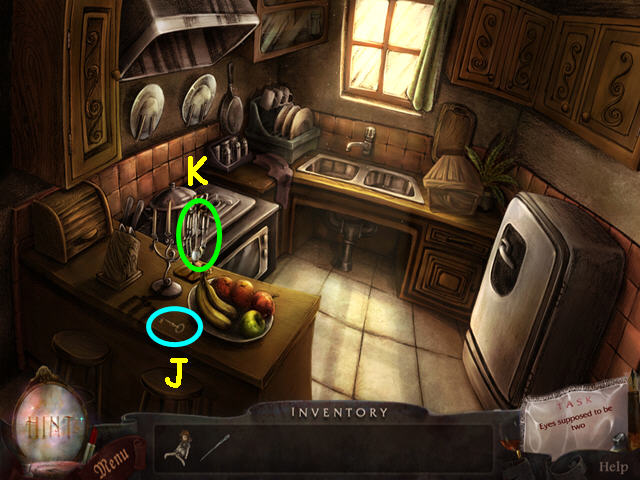
- Take the KEY (J).
- Take the SPOON (K).
- Exit the kitchen, then walk upstairs.
- Look inside the drawer (L).
- Use the SPOON to open the can (M).
- Take a BUTTON from the can (N).
- Use the KEY on the bedroom door.
- Enter the bedroom.
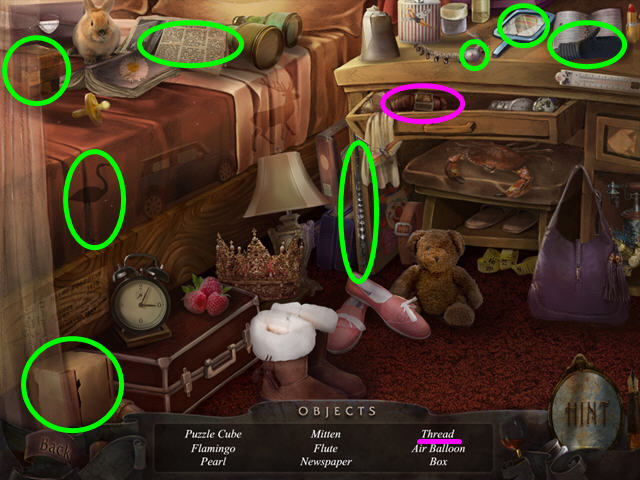
- Select the vanity for a Hidden Object Scene.
- Locate all the items on the list.
- You will earn the THREAD.
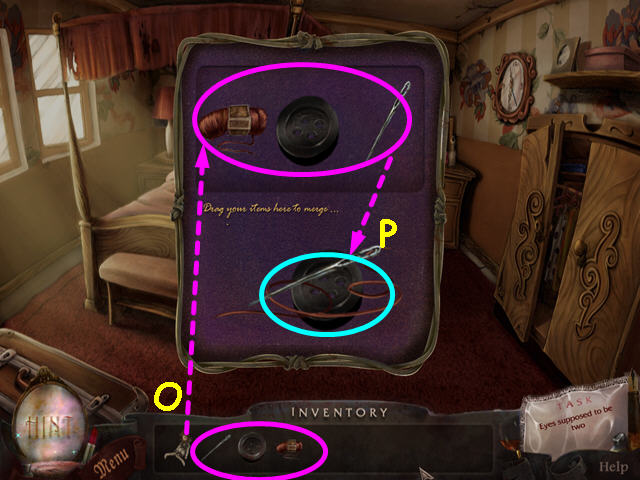
- Select the NEEDLE, THREAD, and the BUTTON from your inventory (O).
- Place the NEEDLE, THREAD, and the BUTTON in the combining area to get the NEEDLE and THREAD (P).
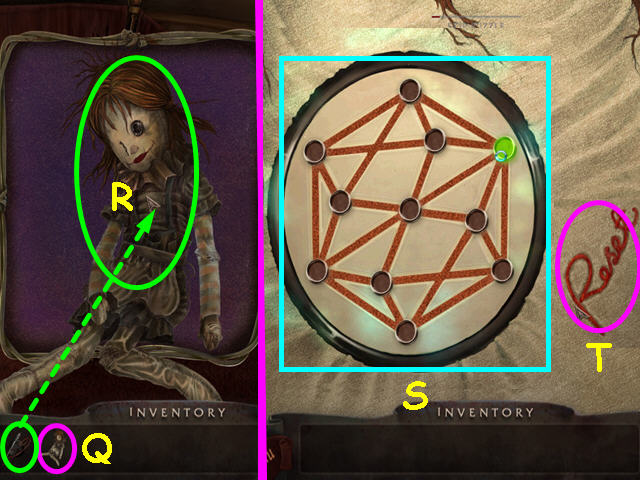
- Look at the DOLL in your inventory (Q).
- Use the NEEDLE and THREAD on the doll for a mini-game (R).
- The object of the mini-game is to draw a line that will visit every path once (S).
- Click on the circles to draw the line.
- Should you get stuck, press the rest button (T).
- There are many solutions to this mini-game.
- Check out our video solution.
- Exit the close-up of the doll.
- Walk down to exit the bedroom.
- Walk up the steps to the attic.
- Give the DOLL to the girl (U).
- Walk down twice to return to the living room.
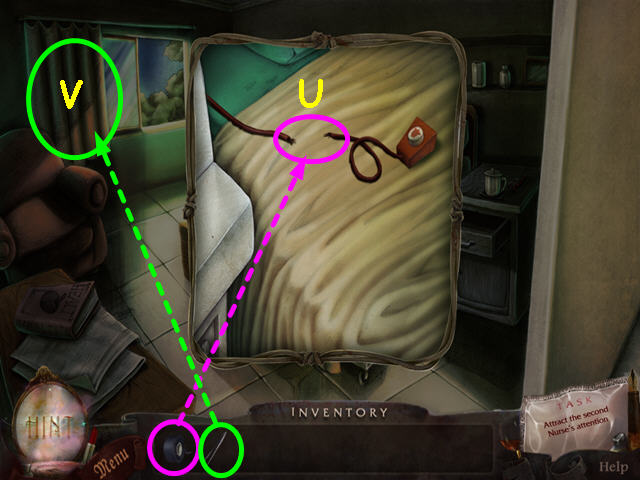
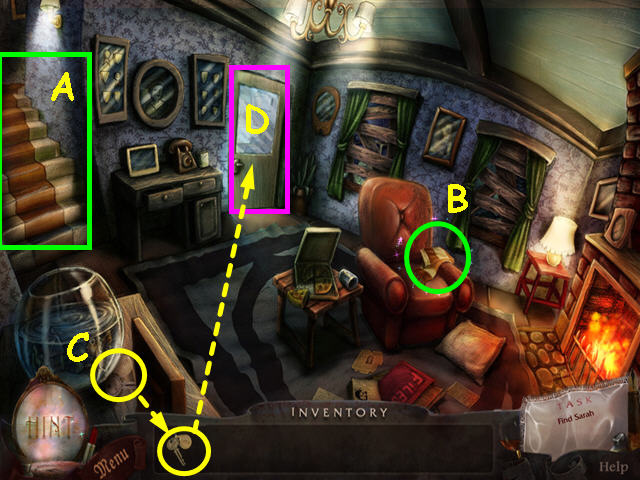
- Select the woman sleeping in the chair for a mini-game (V).
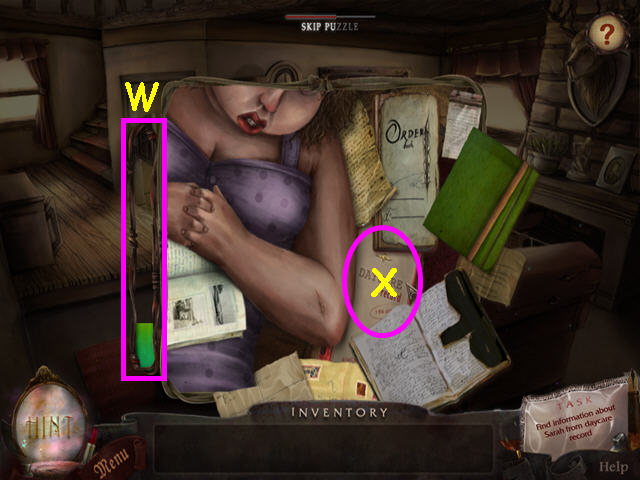
- The object of this mini-game is to get the day care record book without waking the woman.
- Drag the other items slowly out of the way.
- Watch the meter on the left to make sure you don't move too fast (W).
- If the meter hits red, you will have to start again.
- Take the day care record (X).
Chapter 3: Dangerous Route
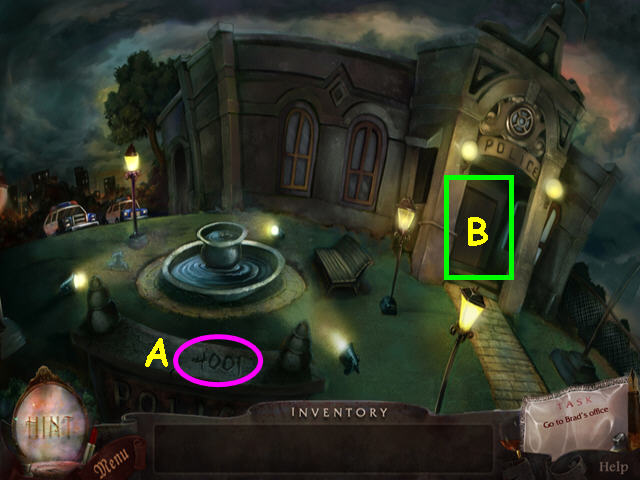
- Look at the code scratched into the fence (A).
- Enter the Police Station (B).
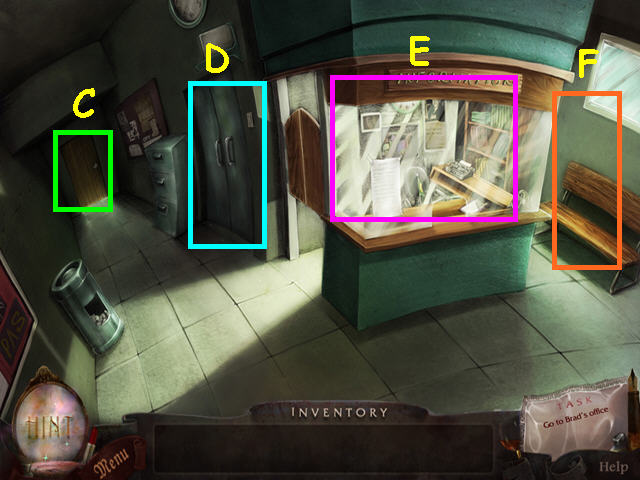
- Look at the door to Brad's office to learn it is locked from inside (C).
- Look at the door to the Evidence room to learn it is locked (D).
- Look at the information booth (E).
- Walk down the hall to the outside of the interrogation hall (F).
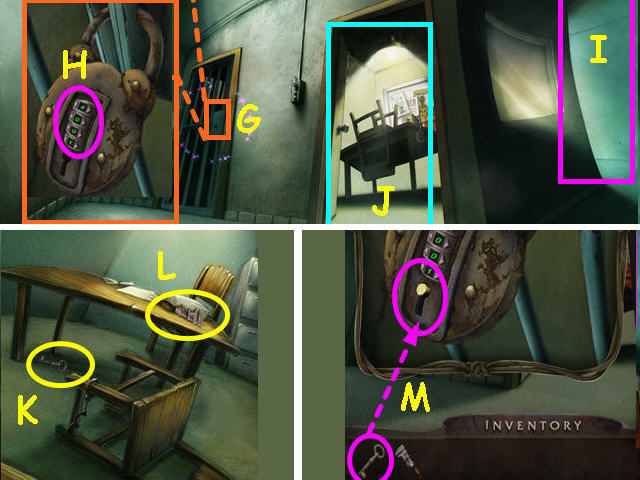
- Look at the lock on the outer cell door (G).
- Enter the code from the fence- 4001 (H).
- Look at the lock to learn you need a key.
- Note the hall to the lockers (I).
- Enter the interrogation room (J).
- Take the KEY (K).
- Take the WRENCH (L).
- Exit the interrogation room and look at the lock on the outer cell door.
- Use the KEY on the lock (M).
- After the cut-scene, look at the lock again to learn you need a saw.
- Exit the close-up and walk to the lockers.
- Walk forward through the locker room to the toilet (showers).
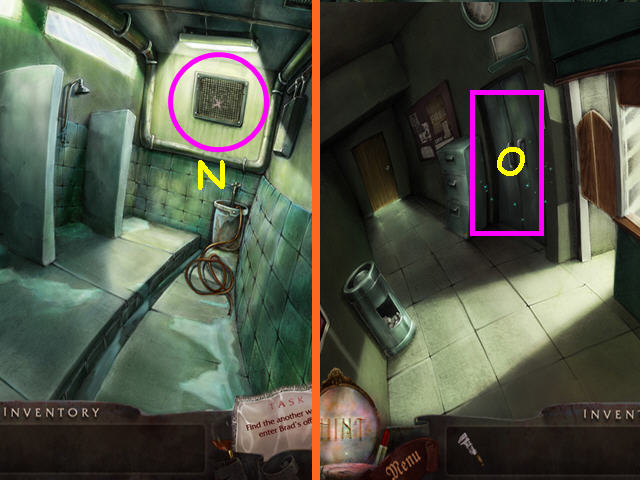
- Look at the vent to learn you need a ladder (N).
- Walk down 3 times to return to the information area.
- Select the door to the evidence room for a mini-game (O).
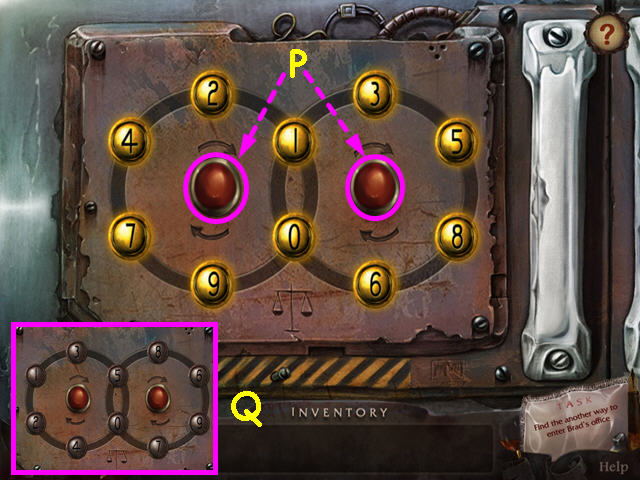
- The object of this mini-game is to make both wheels have the same total.
- Rotate the left and right wheels by pushing the center buttons (P).
- From the start position (Q), click right-left-right-left to solve.
- If you get stuck, exit to the main menu to reset the mini-game.
- Take the LADDER (R).
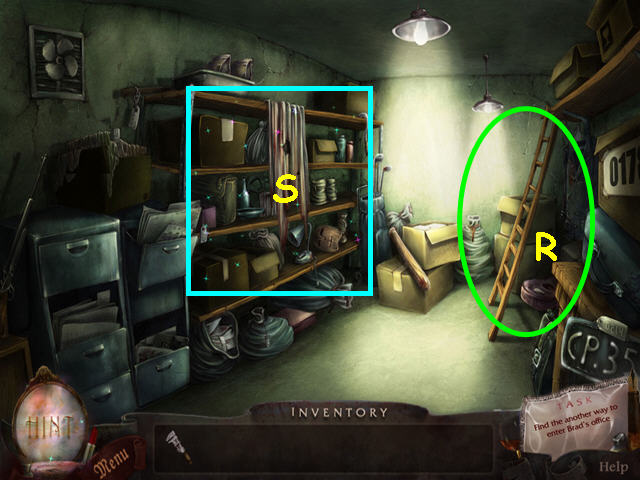
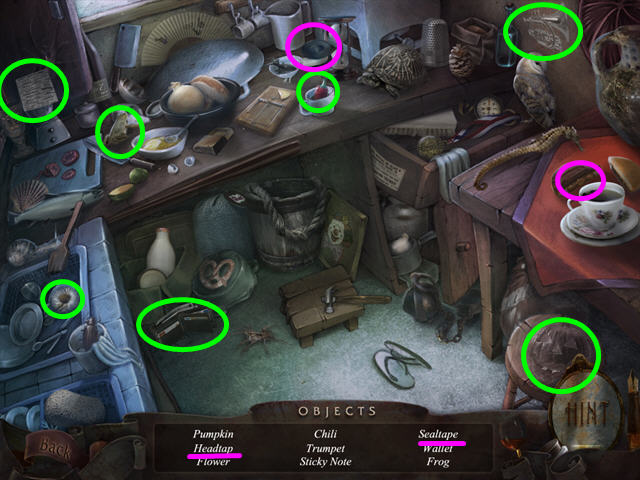
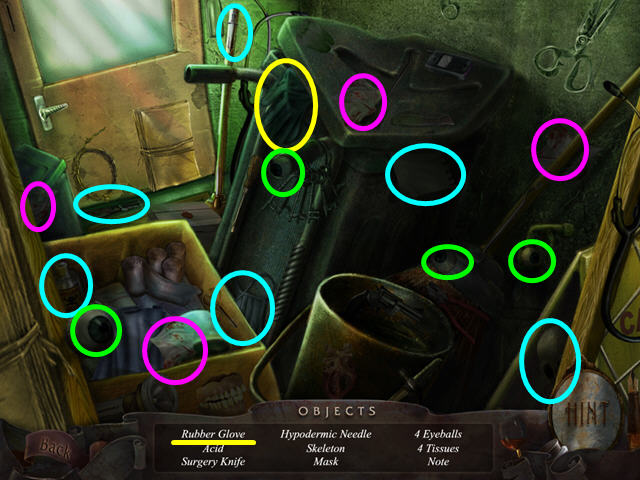
- Select the shelving on the left for a Hidden Object Scene (S).
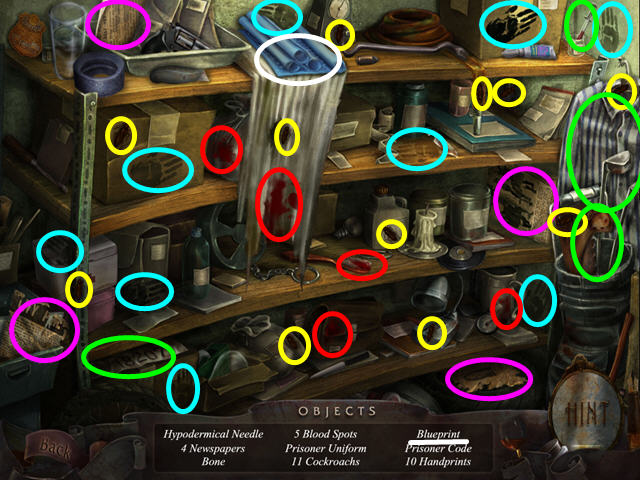
- Locate all the items on the list.
- You will earn the BLUEPRINT.
- Walk down 3 times to reach town.
- Walk right to return to the day care center.
- Enter the house, then go upstairs twice to return to the attic.
- Walk left to the back of the attic.
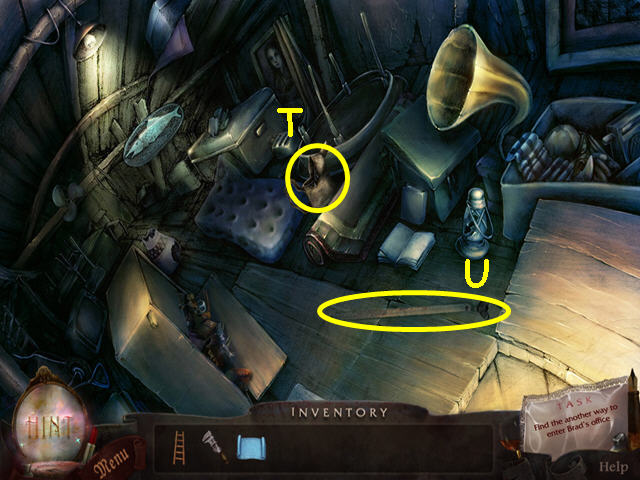
- Take the OIL (T).
- Take the SAW BLADE (U).
- Walk right, then down to exit the attic.
- Enter the bedroom.
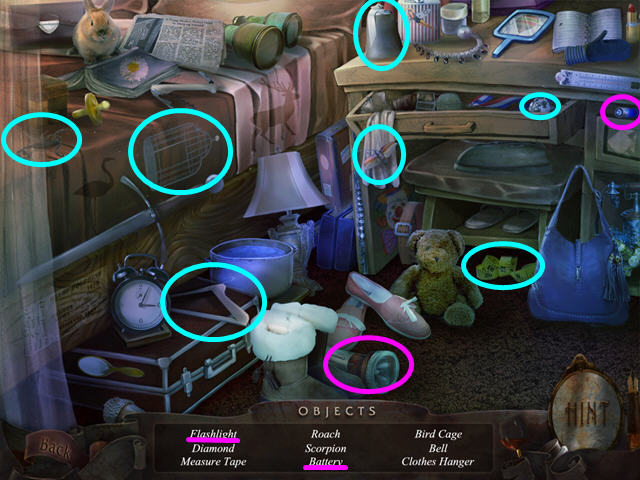
- Select the vanity for a Hidden Object Scene.
- Locate all the items on the list.
- You will earn the FLASHLIGHT and the BATTERY.
- Combine the FLASHLIGHT and the BATTERY to get the FLASHLIGHT ON.
- Walk down twice, then enter the kitchen.
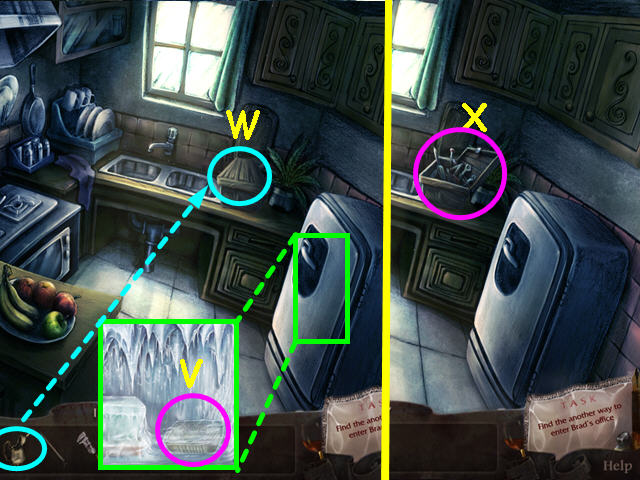
- Open the refrigerator and look at the sardine can (V).
- Exit the refrigerator.
- Use the OIL on the toolbox (W).
- Look in the toolbox for a Hidden Object Scene (X).
- Locate all the items on the list.
- You will earn the SAW HANDLE.
- Combine the SAW BLADE and the SAW HANDLE to get the SAW.
- Walk down 3 times to return to town.
- Walk left to the police station, then enter the building.
- Walk down the right hallway to the interrogation room area.
- Look at the lock on the outer cell door(A).
- Use the SAW on the upper part of the lock (B).
- Enter the outer cell door.
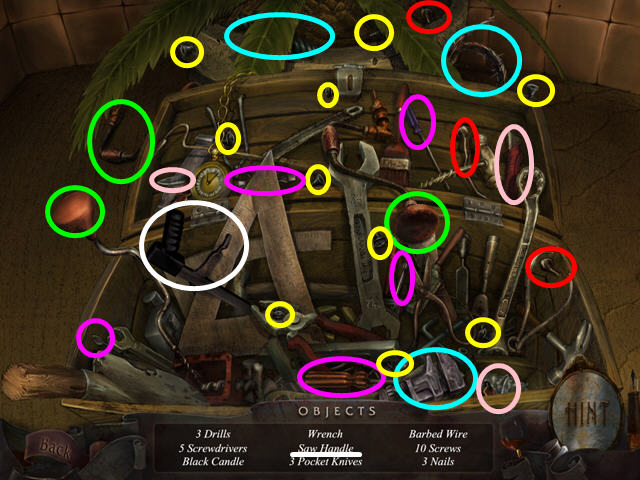
- Select the cell for a Hidden Object Game (C).
- Locate all the items on the list.
- You will earn the SCREWDRIVER.
- Walk left to exit the cell area.
- Take the right hall to the lockers, then enter the showers.
- Use the LADDER on the grate (D).
- Look at the close-up of the grate (E).
- Use the WRENCH on each of the 4 bolts (F).
- For best results, click when the hand is over the bolt.
- Use the SCREWDRIVER on the grate (G).
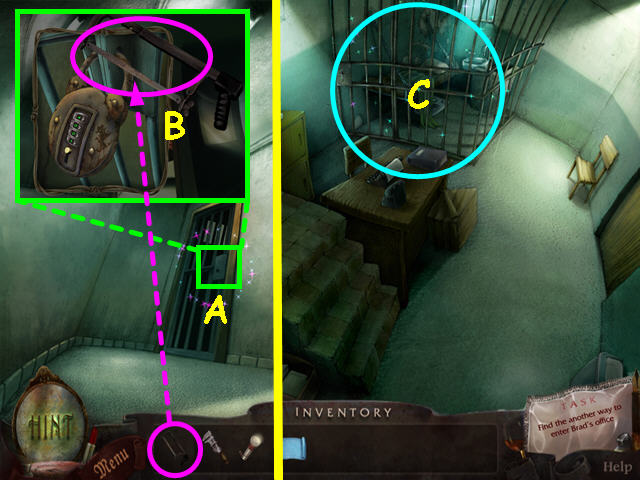
- Enter the grate for a mini-game.
- You will not be able to progress here if you have not picked up the FLASHLIGHT or the BLUEPRINT.
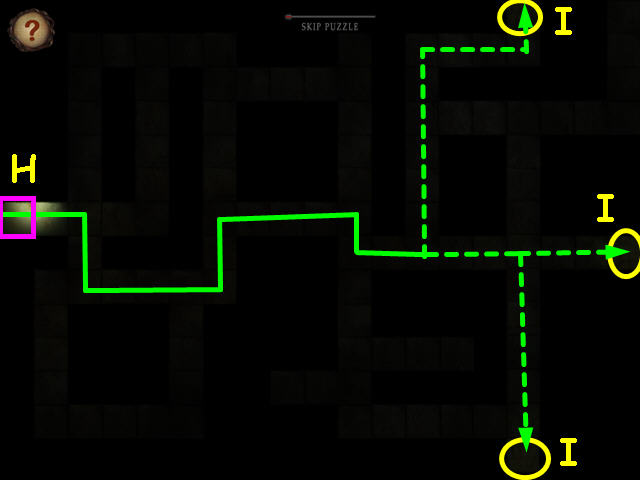
- The object of this mini-game is to move through the vents to Brad's office without seeing anything scary.
- Move your cursor next to the light at the start position (H).
- Move your mouse slowly, so that the light follows and the heartbeat does not get too fast.
- If the heartbeat gets too fast you will see a monster flash and will stop in place for a moment.
- There are 3 possible locations for the office (I).
- Two locations will have fans, the third will be the office.
- Click on the vent cover twice to enter the office.
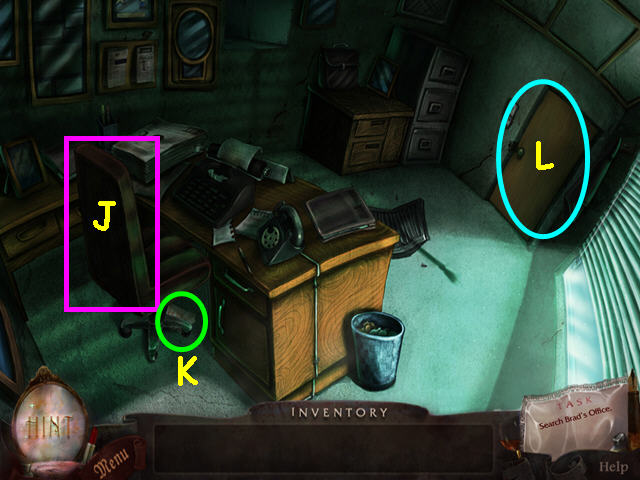
- Push the chair back from the desk (J).
- Take the note (K).
- Exit through the door (L).
- Walk down twice to return to town.
- Enter the apartment building (M).
Chapter 4: Expelled From Paradise
- Take the CROWBAR (A).
- Note the rubber tie (B).
- Make note of the stairs (C).
- Select the office for a Hidden Objects Scene (D).
- Locate all the items on the list.
- You will earn MY KEYS.
- Walk up the stairs.
- Note the door to granny's apartment (E).
- Use MY KEYS on the apartment door (F).
- Walk down twice to exit the building.
- Look at the close-up of the drain grate (G).
- Use the CROWBAR to remove the grate (H).
- Exit the close-up and enter the building.
- Select the office for a Hidden Objects Scene.
- Locate all the items on the list.
- You will earn the MATCHES.
- Walk up the stairs and enter granny's apartment.
- Walk to the left to enter the bedroom.
- Take the DULL SCISSORS (I).
- Open the wardrobe (J).
- Select the open wardrobe for a Hidden Object Scene (K).
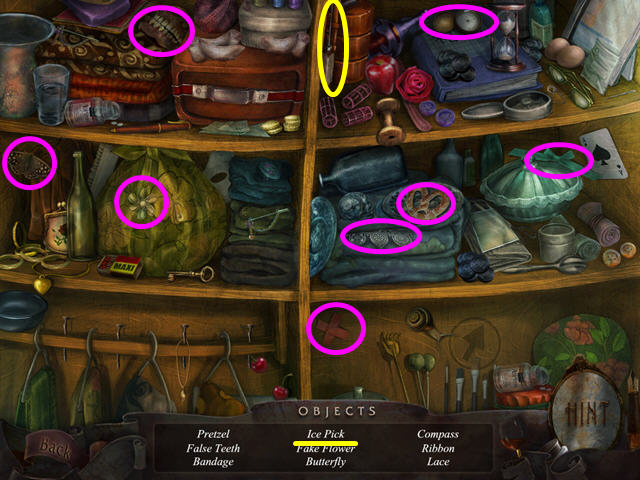
- Locate all the items on the list.
- You will earn the ICE PICK.
- Walk down 4 times to exit the building.
- Walk right to return to the day care center.
- Enter the house, then walk to the kitchen.
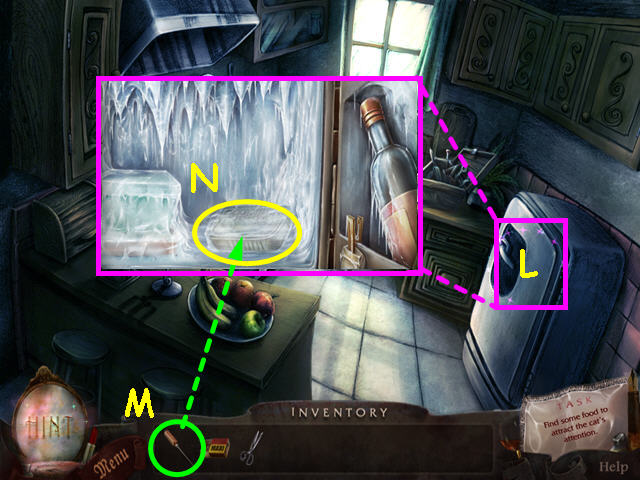
- Open the refrigerator (L).
- Use the ICEPICK on the can of sardines (M).
- Take the FROZEN SARDINES (N).
- Walk down to exit the kitchen.
- Walk up the stairs twice to return to the attic.
- Walk left to the back of the attic.
- Select the toy box for a Hidden Object Scene.
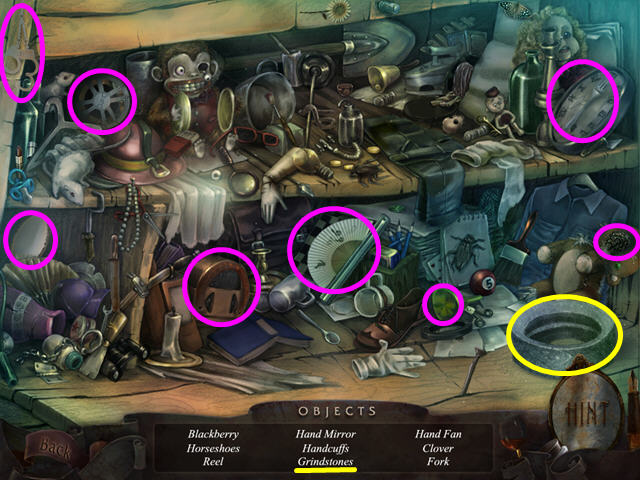
- Locate all the items on the list.
- You will earn the GRINDSTONES.
- Combine the DULL SCISSORS with the GRINDSTONES to get the SCISSORS.
- Walk to the right then walk down 4 times to return to town.
- Enter the apartment building.

- Use the SCISSORS to cut a piece of the RUBBER TIE (O).
- Walk up the stairs (P).
- Enter the apartment (Q).
- Take the EMPTY POT (R).
- Note the cooker (S).
- Note the sink (T).
- Select the counter for a Hidden Objects Area (U).
- Locate all the items on the list.
- You will earn the SELLOTAPE and the TAP HANDLE.
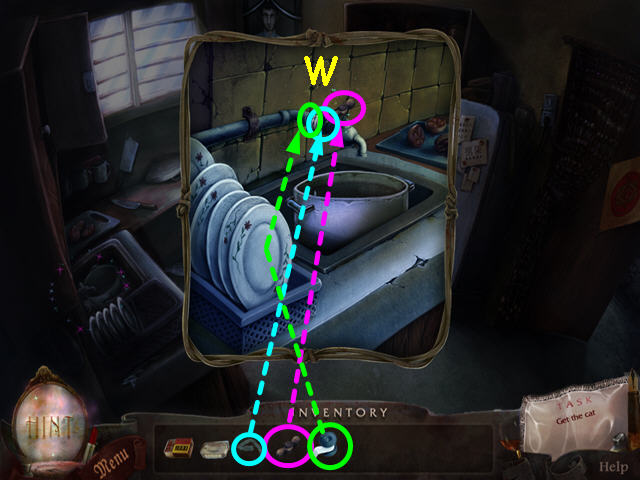
- Place the EMPTY POT into the sink and look at the close-up.
- Use the TAP HANDLE, RUBBER TIE, then the SELLOTAPE to repair the tap (V).
- Click on the tap for a mini-game (W).
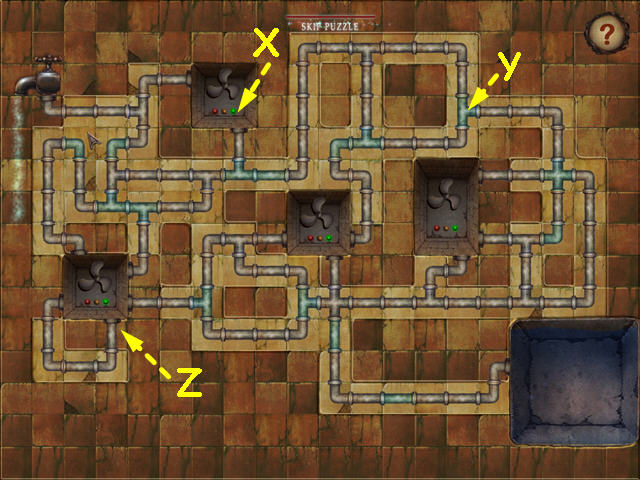
- The object of this mini-game is to connect all the water pipes so that the fans have a green light (X).
- The blue-green pipes can be rotated in place by clicking on them (Y).
- The pipes in the brown squares are not moveable (Z).
- Click on 2 gray pipes in the tan tiles to swap their positions.
- Take the POT WITH WATER from the sink.
- Look at the close-up of the cooker.
- Use the MATCHES to light the cooker (A).
- Place the POT WITH WATER on the cooker (B).
- Place the FROZEN SARDINES into the pot (C).
- The SARDINES will go automatically into your inventory.
- Walk down 3 times to return to the town.
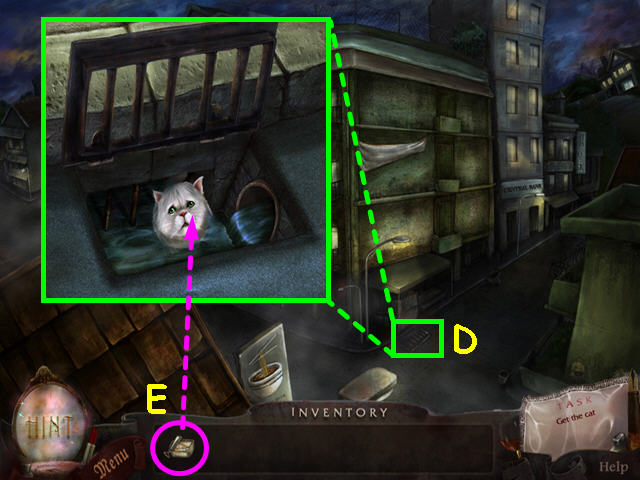
- Look at the grate where the cat is stuck (D).
- Use the SARDINES on the cat (E).
- GRANNY'S CAT will go automatically into your inventory.
- Enter the apartment building and walk up the stairs.
- Give GRANNY'S CAT to Granny.
- Walk down to exit the building.
- Walk up on the right to go to the hospital.
Chapter 5: The Dark Past
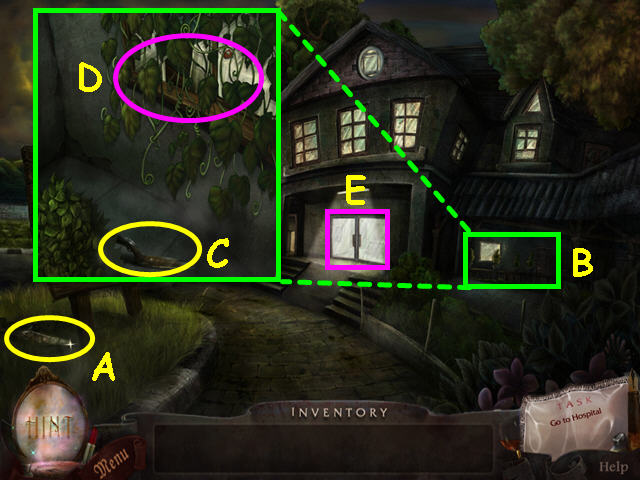
- Take the SHEAR 1 (A).
- Look at the close-up of the window (B).
- Take SHEAR 2 (C).
- Note the vines blocking your view (D).
- Exit the close-up and enter the hospital (E).
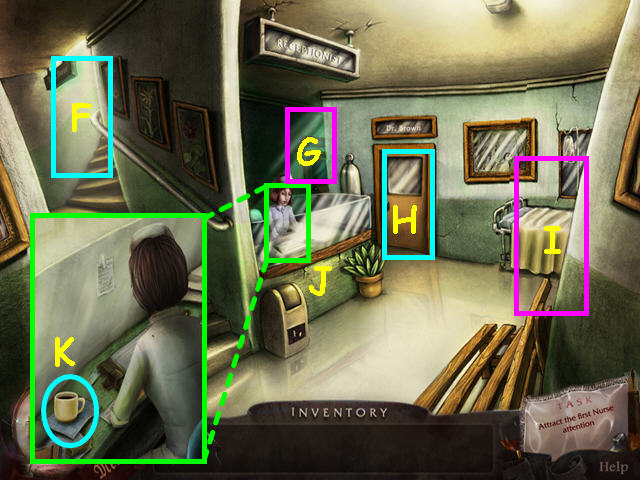
- Note the stairs to the 2nd floor (F).
- Note the hall to the waiting room (G).
- Note the door to the doctor's office (H).
- Note the path to the lounge (I).
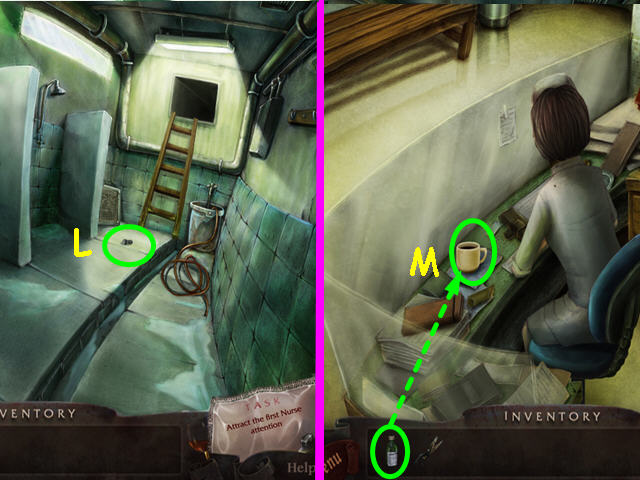
- Look at the reception desk (J).
- Look at the nurse's coffee cup (K).
- Walk down 3 times to return to town.
- Enter the apartment building and walk upstairs.
- Enter your apartment.
- Walk forward to the bedroom and select the vanity for a Hidden Object Scene.
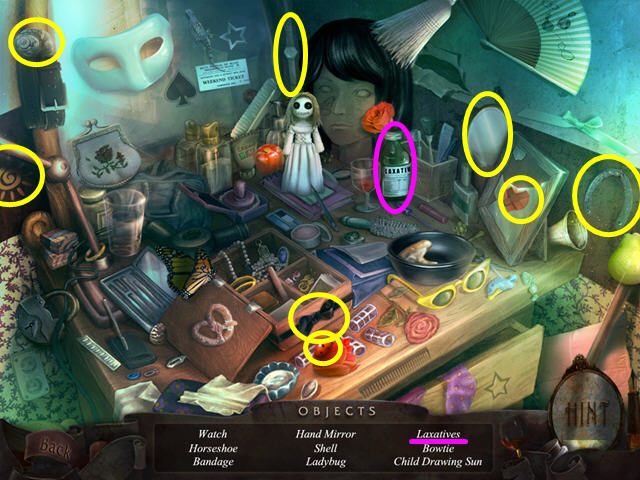
- Locate all the items on the list.
- You will earn the LAXATIVES.
- Walk down 4 times to exit the building.
- Walk left to the police station and enter the building.
- Talk the right hall to interrogation.
- Take the right hall to the lockers, then enter the showers.
- Take the BOLT (L).
- Combine the BOLT, SHEAR 1, and SHEAR 2 to get the SHEARS.
- Walk down 5 times to return to town.
- Walk up on the right to the hospital and enter the building.
- Look at the reception desk, then place the LAXATIVES into the coffee cup (M).
- After the cut-scene, walk right, then down to exit the hospital.
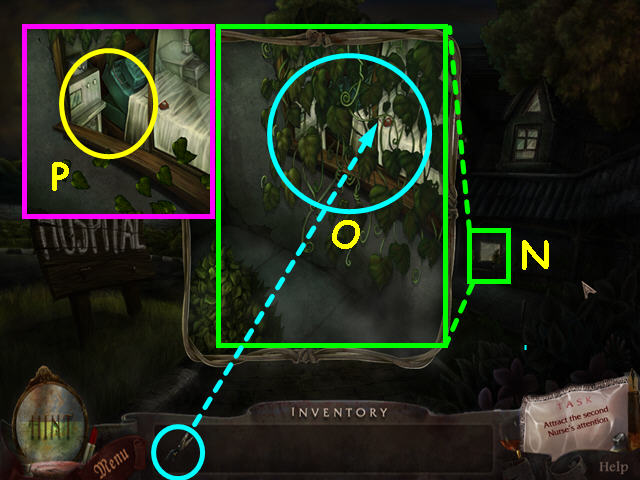
- Look at the close-up of the window (N).
- Use the SHEARS 3 times to cut away the vines (O).
- Enter the open window (P).

- Take the TWEEZERS from the drawer (Q).
- Look at the close-up of the call button (R).
- Click on the broken wire to learn that you need something to repair the wire (S).
- Exit through the window (T).
- Walk down to return to town, then enter the apartment building.
- Select the office for a Hidden Object Scene.
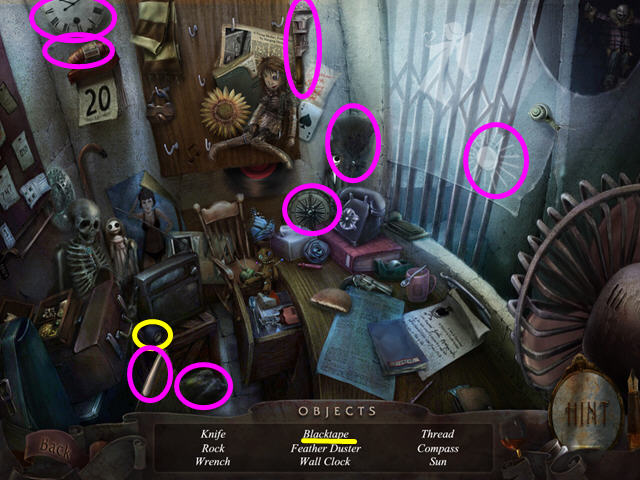
- Locate all the items on the list.
- You will earn the BLACKTAPE.
- Walk down to exit the building, then walk up on the right to return to the hospital.
- Look at the close-up of the window, then enter the window.
- Look at the close-up of the call button.
- Use the BLACKTAPE to repair the wire (U).
- Exit the close-up.
- Use the TWEEZERS on the curtains (V).
- Press the call button on the bed.
- After the cut-scene, walk down to reception, then enter the doctor's office.
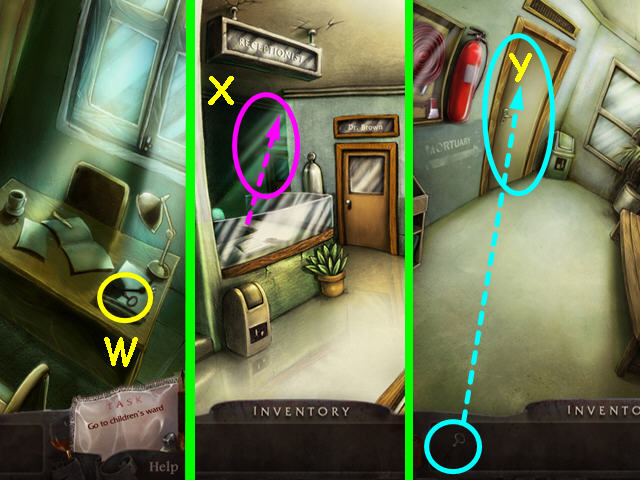
- Take the MORTUARY KEY from the desk (W).
- Exit the office, then walk to the waiting room area (X).
- Use the MORTUARY KEY to unlock the door (Y).
- Enter the Mortuary.
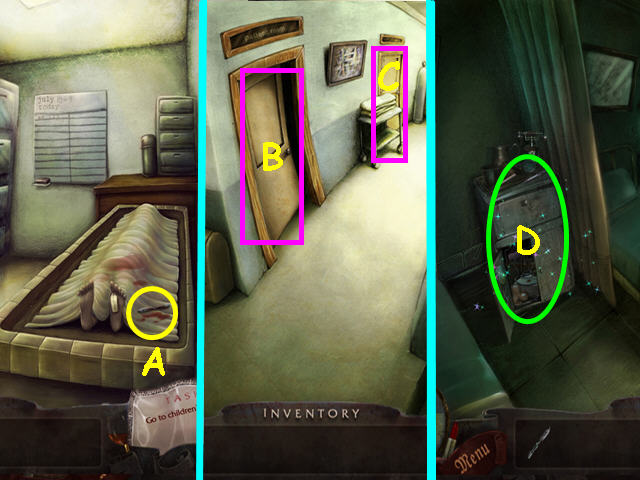
- Take the SCALPEL (A).
- Walk down, then go right to reception.
- Walk up the stairs.
- Note the patient room (B).
- Enter the children's ward (C).
- After the cut-scene, exit the ward, then enter the patient room.
- Select the nightstand for a Hidden Object Scene (D).
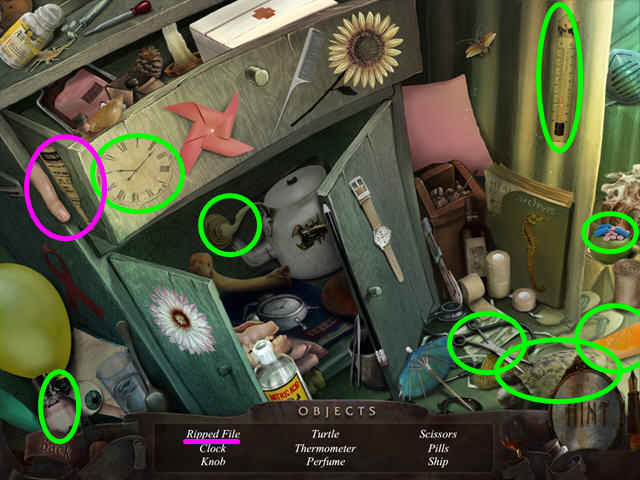
- Locate all the items on the list.
- You will earn the DOCUMENT 1.
- Exit the room.
- After the cut-scene, enter the toilet (E).
- Select the nurse's jacket for a mini-game (F).
- The object of the mini-game is to remove the keys from the pocket without alerting the nurse.
- Remove the items from the pocket until you find the keys (G).
- Drag each item slowly up , then to a side without making the motion sensor reach the upper red area (H).
- If the meter hits red, you will have to start again.
- The mini-game will end once you remove the SURGERY KEYS from the pocket (I).
- Exit the toilet, then use the SURGERY KEYS on the left door (J).
- Look at the file stuck in the lamp to learn you need rubber gloves (K).
- Exit the surgery then walk down to reception.
- Walk up the stairs and select the storage cage on the left for a Hidden Object Scene.
- Locate all the items on the list.
- You will earn the RUBBER GLOVE.
- Combine the RUBBER GLOVES and the SCALPEL to get the RUBBER with SCALPEL.
- Walk down the stairs.
- Walk right to the lounge area, then enter the surgery.
- Use the RUBBER with SCALPEL on the light (L).
- Take the DOCUMENT 2 from the light (M).
- Combine DOCUMENT 1 and DOCUMENT 2 to make the FILE.
- Exit the surgery, then walk down 3 times to return to town.
- Walk up on the left to go to Adam Street.
Chapter 6: Trapped!
- Note the stairs to the 2nd floor (A).
- Look at the scarf (B).
- Take the KEY (C).
- Use the KEY on the office door (D).
- Enter Carl's office.

- Look at the photo on the desk (E).
- Exit the office and walk up the stairs.
- Note the door to the bedroom on the left (F).
- Note the flower pot (G).
- Note the door to the toilet on the right (H).
- Look at the family portrait (I).
- Click on the portrait until it falls and reveals the safe.
- Look at the close-up of the flower pot.
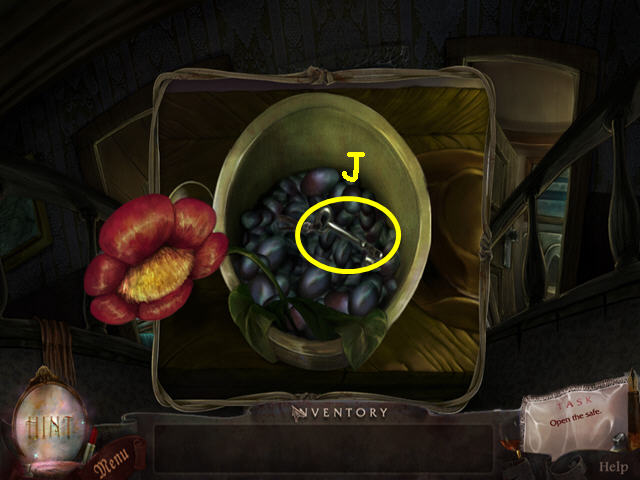
- Drag the stones around to uncover the key.
- Take the SAFEBOX KEY (J).
- Note- if you went to the safe and used the key but do not have the stethoscope, exit to the main menu to escape the game.
- Walk down twice to exit the house.
- Walk to the left to return to town.
- Walk up on the right to the hospital, then enter the building.
- Walk up the stairs, then enter the patient room.
- Select the night table for a Hidden Object Scene.
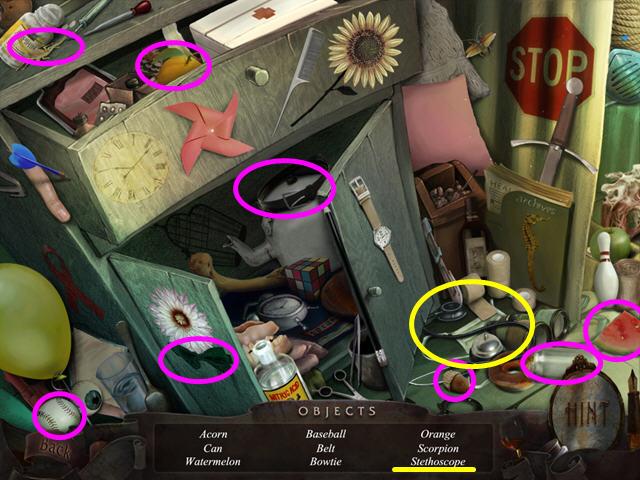
- Locate all the items on the list.
- You will earn the STETHOSCOPE.
- Exit the room and walk down the stairs.
- Walk down twice to return to town.
- Walk up on the left to Adam Street then enter the house.
- Walk up the stairs and look at the close-up of the safe.
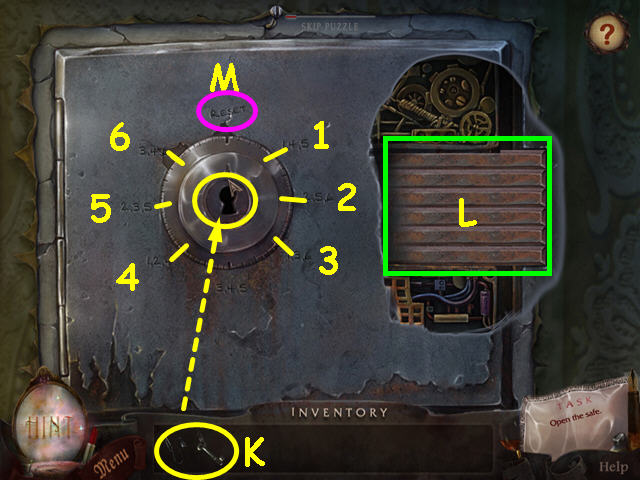
- Use the SAFEBOX KEY on the keyhole, followed by the STETHOSCOPE to trigger a mini-game (K).
- The object of this mini-game is to move all the bars to the left (L).
- Rotate the dial with your cursor so that the tic mark points to a set of numbers.
- There are several solutions to this mini-game.
- Move the dial to point to 1-6.
- Move the dial to reset at the top if you make a mistake (M).
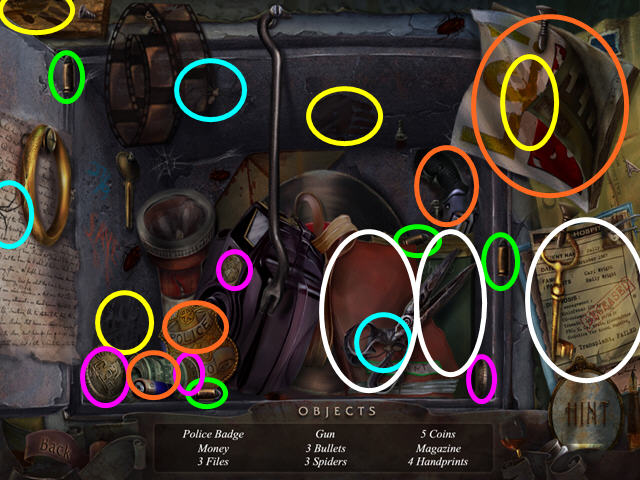
- Locate all the items on the list.
- You will earn CARL'S DOCUMENTS.
- Look in the safe and read both newspaper clippings (N).
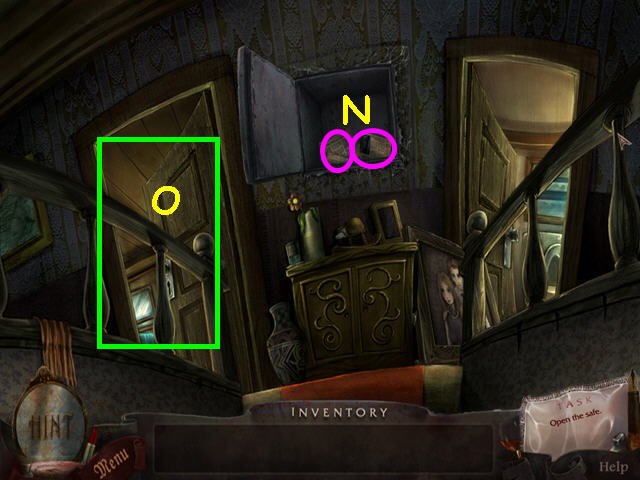
- Enter the bedroom on the left (O).
- After the cut-scene, walk up the stairs and enter the bedroom on the left.
- Select the wardrobe on the left for a Hidden Object Scene.
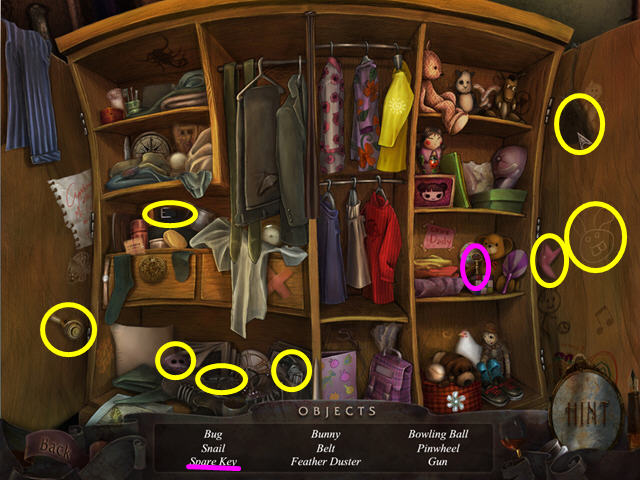
- Locate all the items on the list.
- You will earn the SPARE KEY.
- Walk down 3 times to see the door lock.
- Use the SPARE KEY on the door lock.
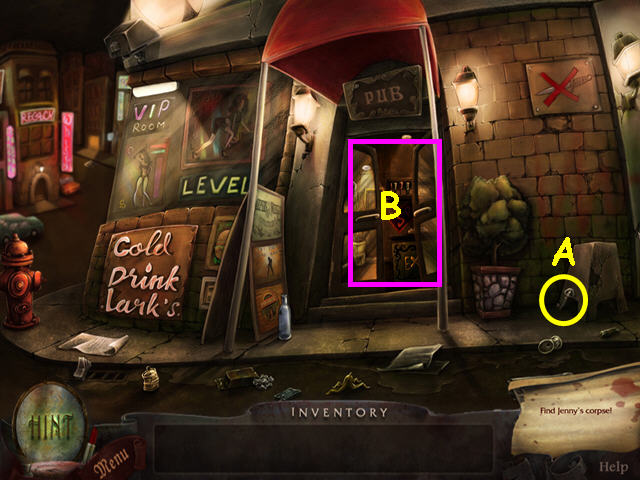
- Walk up on the right to go to the pub.
Chapter 7: Saving Sarah
- Try to walk forward to the stage to learn you need a disguise.
- Walk down and then to the left to return to town.
- Enter the apartment building and walk upstairs.
- Enter your apartment and walk to the bedroom.
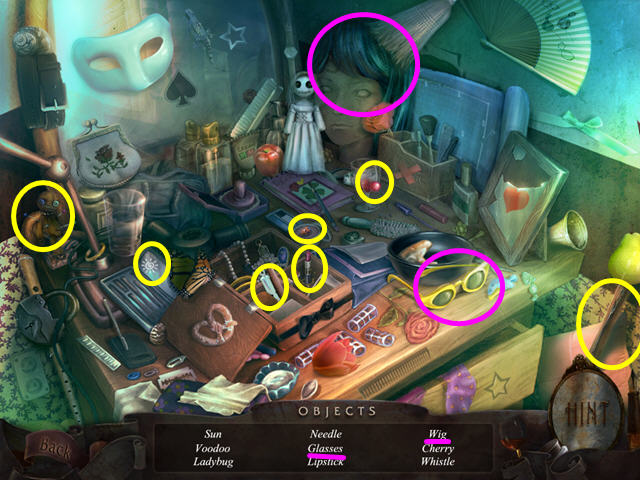
- Select the vanity for a Hidden Object Area.
- Locate all the items on the list.
- You will earn the GLASSES and the WIG.
- Walk down 4 times to exit the building.
- Walk up on the left to return to Adam Street.
- Walk up on the right to go to the pub.
- Enter the stage.
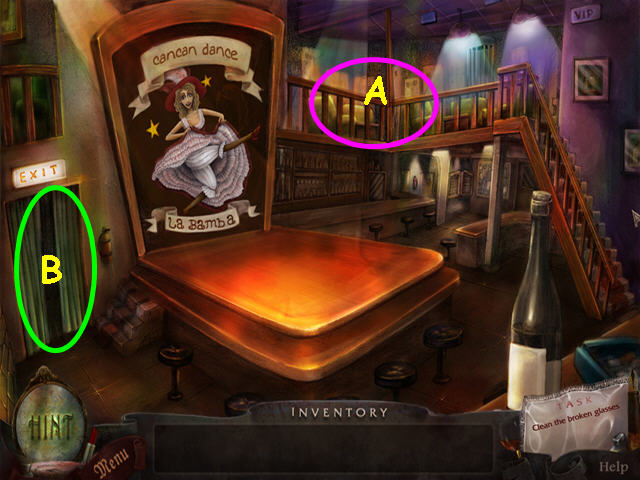
- Note the 2nd floor of the pub (A).
- Walk through the exit on the left to the corridor (B).

- Note the door to the alley (C).
- Note the door to the make-up room (D).
- Take the BROOM (E).
- Use the BROOM on the broken glass for a mini-game (F).
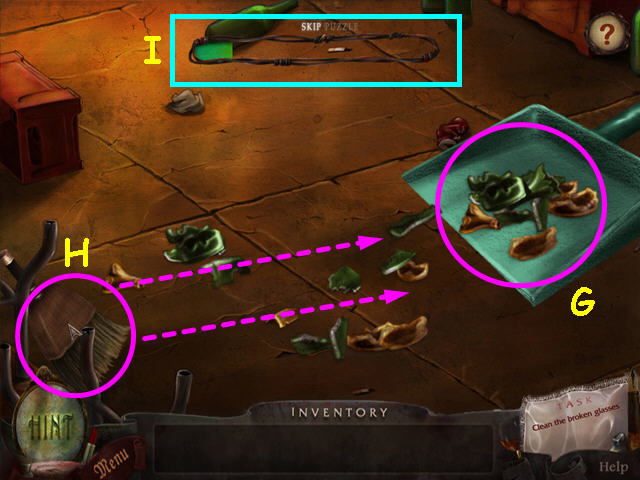
- The object of this mini-game is to sweep the broken glass into the dustpan (G).
- Move the broom slowly over the pieces to move them (H).
- Make sure you keep the noise meter out of the red zone (I).
- If the meter hits red, you will have to start again.
- Enter the make-up room.
- Select the vanity for a Hidden Object Scene.
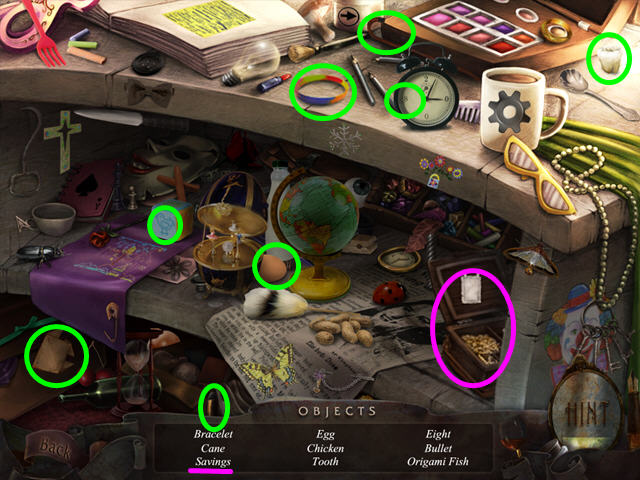
- Locate all the items on the list.
- You will earn MY SAVINGS.
- Exit the room and walk down 3 times to Adam Street.
- Walk to the left, then go right to the day care.
- Enter the building and go up the stairs twice to the attic.
- Take the HAMMER (J).
- Walk to the left and select the toy box for a Hidden Object Scene (K).

- Locate all the items on the list.
- You will earn the NAIL.
- Walk to the right, then down 4 times to return to town.
- Enter the apartment building and walk upstairs.
- Enter your apartment, then walk to the bedroom.
- Look at the close-up of the chair (L).
- Use the NAIL, then the HAMMER to repair the chair (M).
- Look at the hiding place to learn you need a hook to reach the evidence (N).
- Exit the close-up and walk down twice.
- Enter Granny's apartment.
- Take the CANE (O).
- Walk down to exit Granny's apartment.
- Enter your apartment and go to the bedroom.
- Look at the hiding place in the ceiling.
- Use the CANE to get the EVIDENCE (P).
- Walk down to exit the room.
Bonus Chapter
- Select 'Extras' from the main menu.
- Select 'Chapter Bonus' for additional game play.
- Take the KEY (A).
- Enter the pub (B).
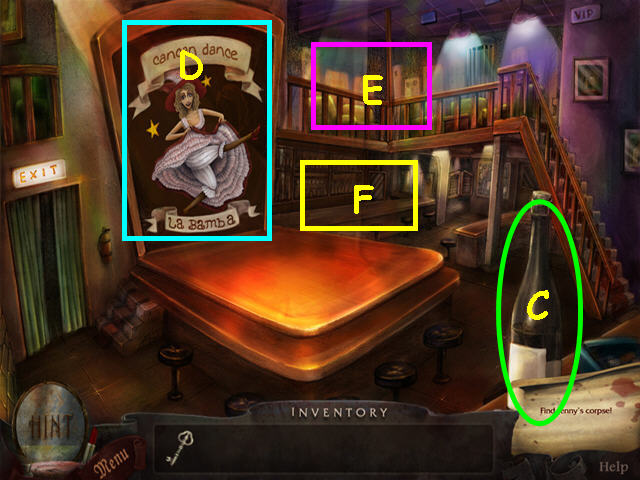
- Look at the wine bottle to learn you need an opener (C).
- Look at the close-up of the backdrop to learn you need tools to remove the backdrop (D).
- Note the 2nd floor area (E).
- Note the bar area (F).
- Walk through the exit to the corridor.
- Walk forward through the exit door to the alley.
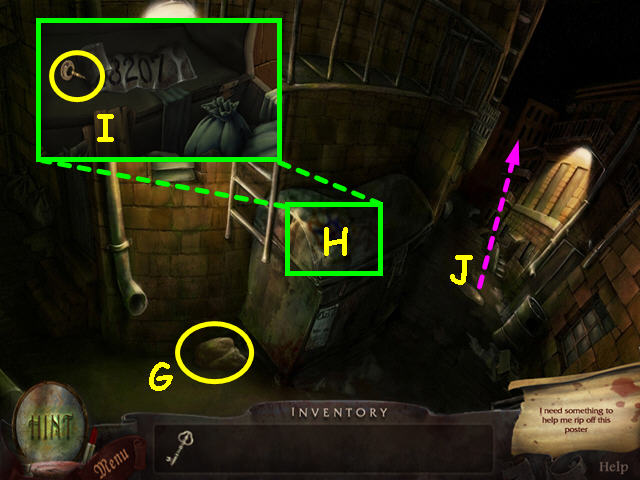
- Take the ROCK (G).
- Look inside the dumpster (H).
- Peel the sticker to find a KEY (I).
- Walk up on the right to exit the alley (J).
- Enter the pub and select the bar for a Hidden Object Scene.
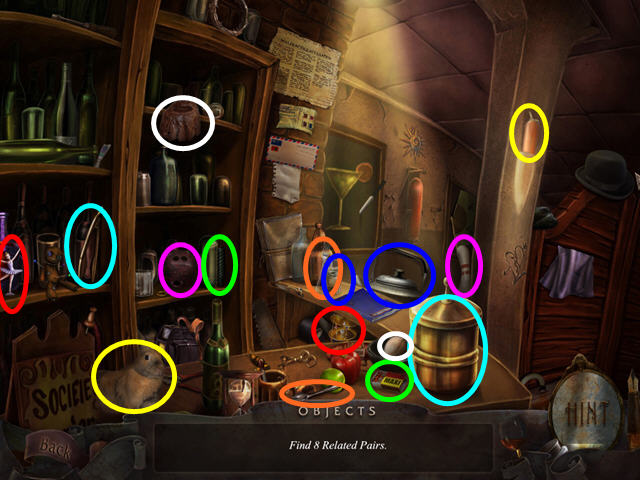
- Find all the related pairs.
- These are common pairings like- bread and butter, up and down, or boy and girl.
- You will earn the TONGS.
- Select the bar again for another Hidden Object Scene.
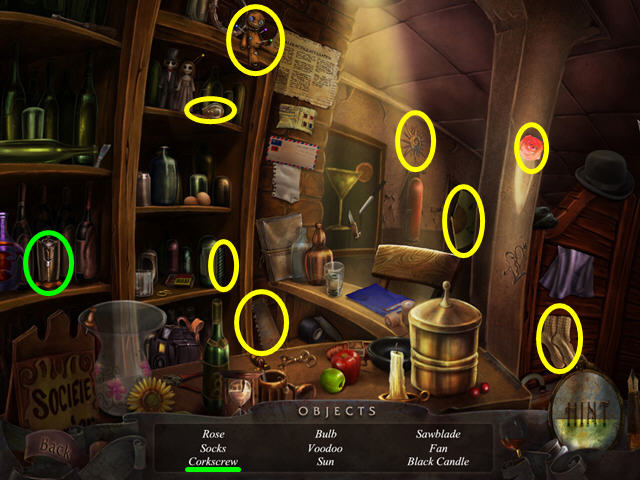
- Locate all the items on the list.
- You will earn the CORKSCREW.
- Walk up to the 2nd floor.
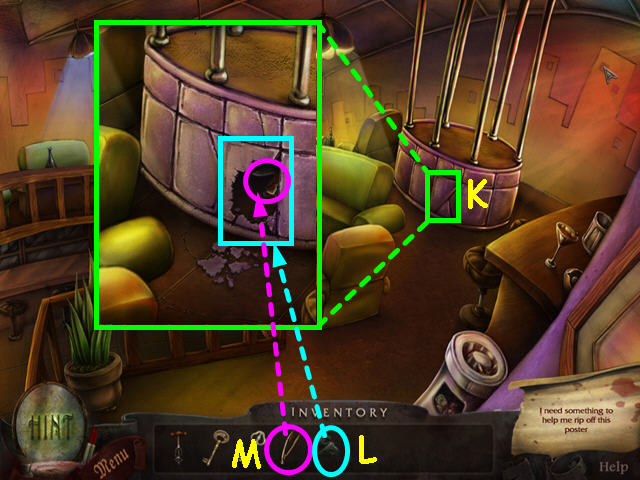
- Look at the close-up of the panel on the mini stage (K).
- Use the ROCK to break open the panel (L).
- Use the TONGS to take the POCKET KNIFE (M).
- Walk down to the stage area.

- Use the CORKSCREW on the wine bottle to get a gold KEY (N).
- Look at the close-up of the backdrop (O).
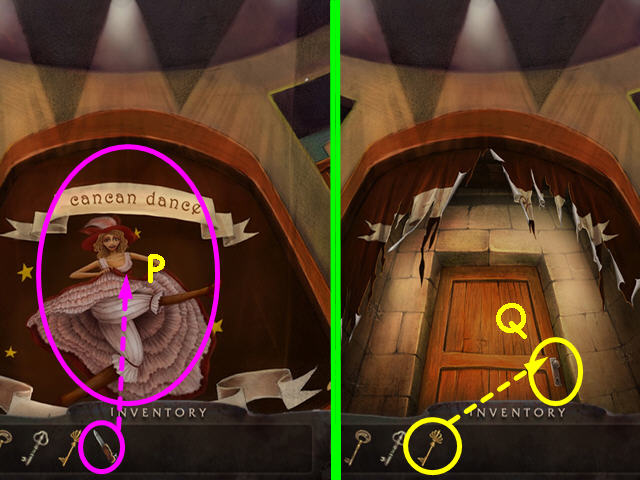
- Use the POCKET KNIFE on the back drop several times (P).
- Use the gold KEY to unlock the door (Q).
- Congratulations! You have completed Silent Scream: The Dancer.
Created at: 2011-04-25