

Walkthrough Menu
- General Tips
- Chapter 1: Grandma's House
- Chapter 2: The Portal
- Chapter 3: Getting into the Castle
- Chapter 4: Inside the Castle
- Chapter 5: The Royal Quarters
- Chapter 6: The Garden
- Chapter 7: The Finale
General Tips
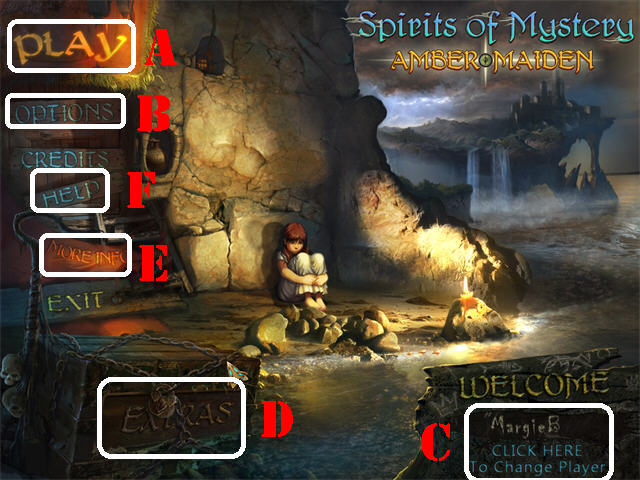
- Click on 'PLAY' (A) to access the main chapters in the game.
- The 'OPTIONS' (B) button allows you to adjust the screen, music, cursor, and sound.
- The 'CLICK HERE To Change Player' button (C) can be used to add or delete a new player.
- The 'EXTRAS' (D) button grants you access to the Bonus Content only if you are playing the Collector's Edition.
- Click on the 'MORE INFO' (E) button to access the purchase link for the Strategy Guide and the Big Fish Games forum for this game.
- Click on the 'HELP' (F) button to view general tips for playing the game.
- Click on the Magnifying Glass Icon, when it appears, to take a closer look at a section, or to read information regarding the game.
- You can skip a puzzle once the 'SKIP' button fills. The 'SKIP' button only appears in puzzle sections; it is located in the lower right corner.
- The built-in guide can be accessed by clicking on the words 'Strategy Guide' below the HINT only if you are playing the Collector's Edition.
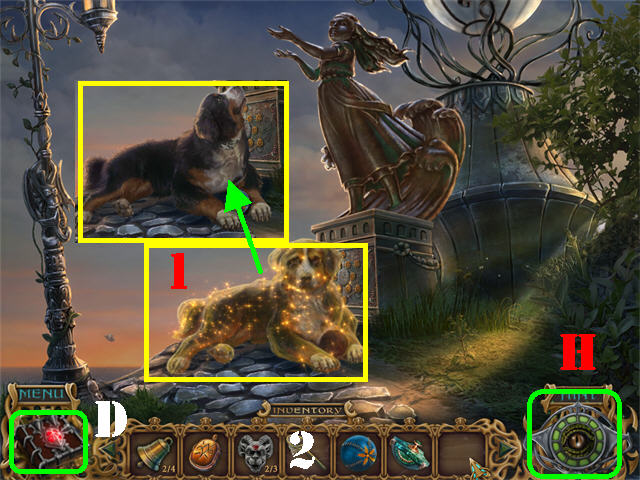
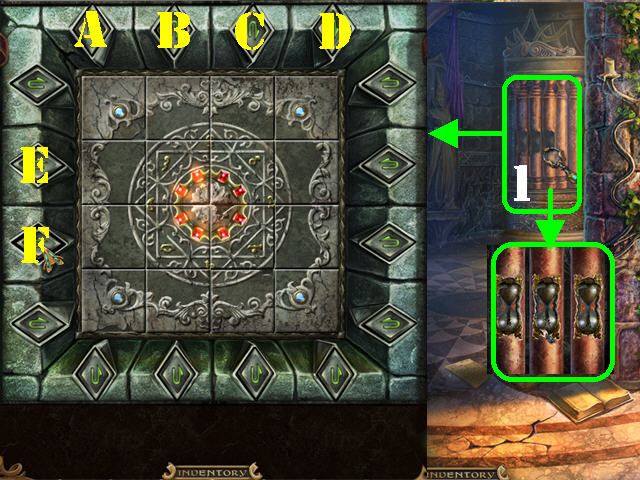
- You will find many cursed characters (1) throughout the game; the curses must be removed in order to progress in the game. You can remove these curses by giving them the right objects.
- The Hint (H) button is in the lower right corner of each scene.
- You have unlimited Hints in the Hidden Object Scenes and in Quest Scenes, but you must wait for them to recharge between uses.
- A cluster of sparkles indicates a Hidden Object Scene which will grant an inventory item upon completion.
- Items written in yellow in Hidden Object Scenes are hidden; you must open or click on something to make the hidden items appear.
- Pass your mouse over the bottom of the scene to access your Inventory Tray (2).
- Inventory items will appear at the bottom of the scene. Use the arrows in your inventory tray to scroll through all the items you've collected.
- The Diary (D) is in the lower left; read it to find clues and read part of the story.
- To use an inventory item, select it and drag it to the desired location; click it into the spot in which you want it used.
Chapter 1: Grandma's House

- Grab the ELK ROOT (1) in the upper left.
- Zoom into the cabinet on right; take STONE PUZZLE PIECE 1/6 (2).
- Grab the PENDANT (3) on the ground.
- Zoom into the box on the table; open it and read the scroll (4).
- Place the PENDANT on the frame inside the box and take the AMULET (5).
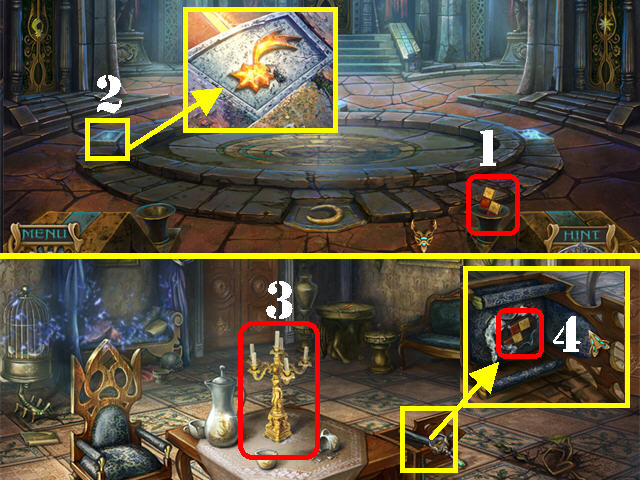
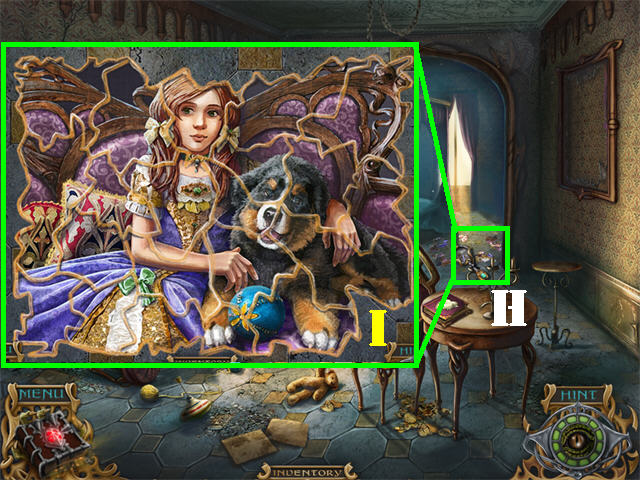
- Place the AMULET into the fireplace to activate a puzzle (6).
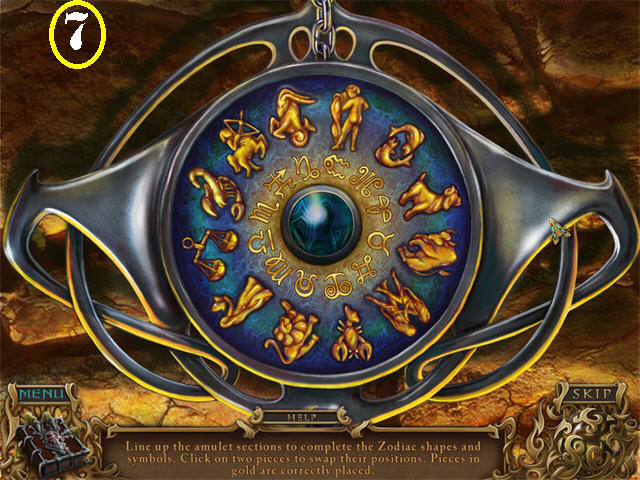
- Click on two pieces within the same circle to swap their positions.
- A bottom piece placed correctly will lock in place. Both correct pieces will light up gold.
- Please look at the screenshot for the solution (7).
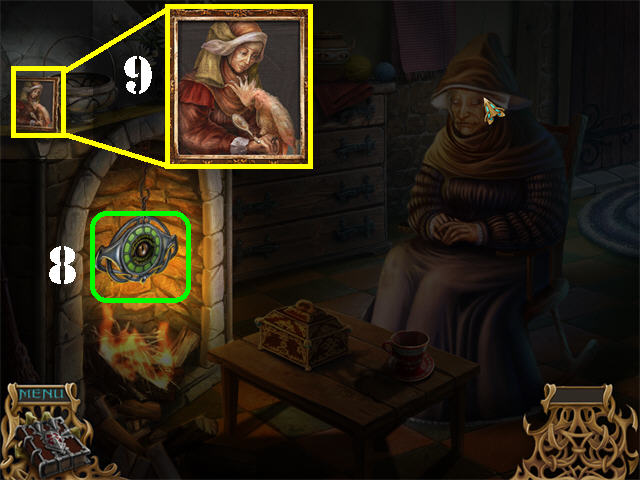
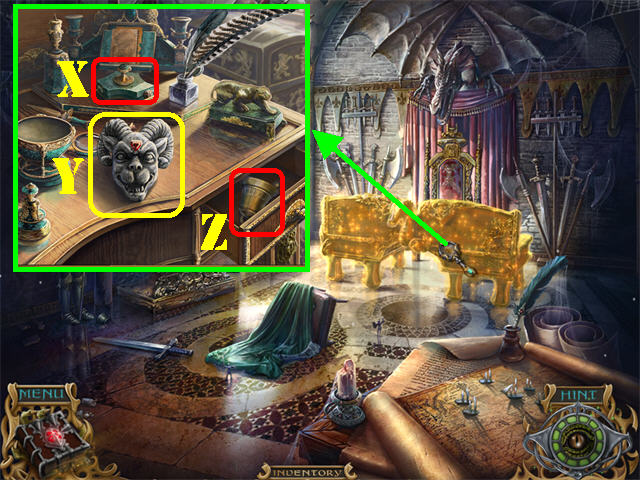
- Grab the EYE OF OMNISCIENCE from the fireplace (8).
- Click on the PICTURE (9) above the fireplace. An entry will be added to the Diary.
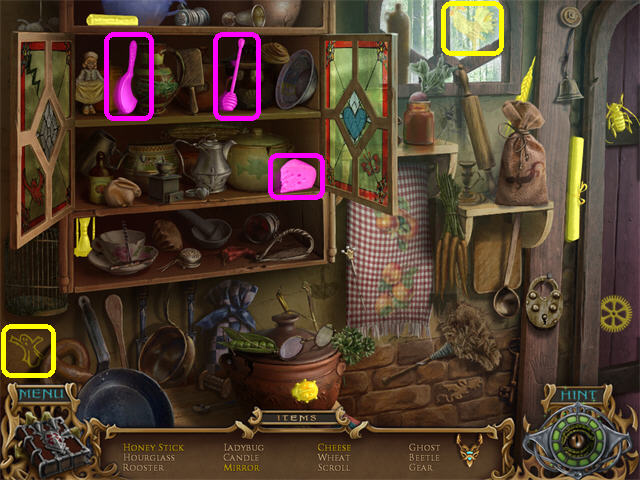
- Play the Hidden Object Scene in the upper left.
- Open the cabinets and take the items listed in yellow.
- The MIRROR will be added to inventory.
- Go through the right door.
- The room will remain dark until the OWL in the window flies away.
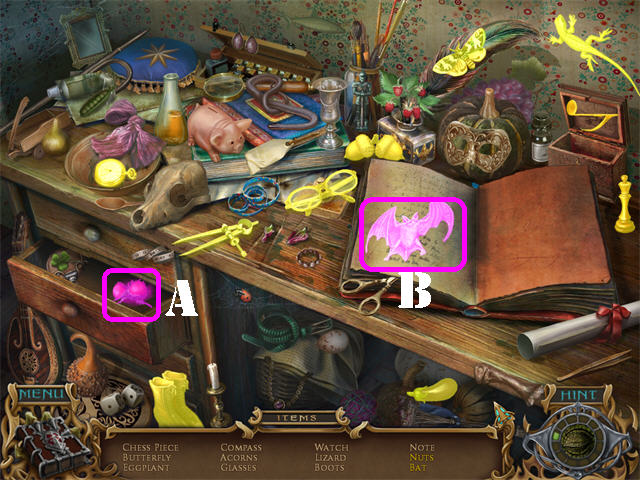
- Play the Hidden Object Scene.
- Open the left drawer; take the NUTS (A).
- Click on the left page of the book; take the BAT (B).
- The NUTS will be added to inventory.
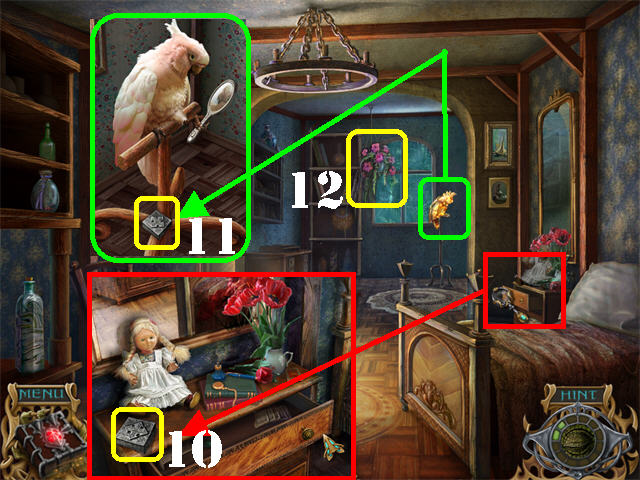
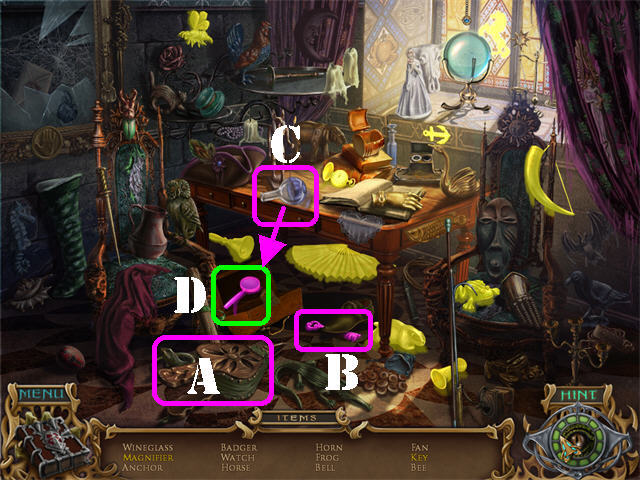
- Zoom into the drawer on right; take STONE PUZZLE PIECE 2/6 (10).
- Take a closer look at the cursed parrot; give it the MIRROR and take STONE PUZZLE PIECE 3/6 (11).
- Take the FLOWERS (12) in the upper center.
- Click down and go through the front door.
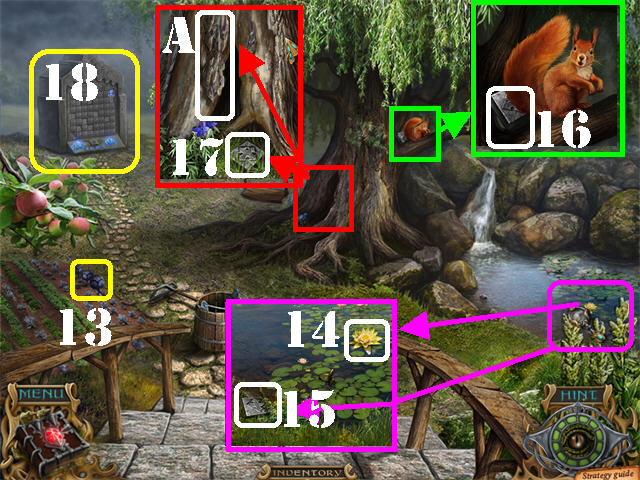
- Grab the BLUE CABBAGE (13) in the lower left.
- Zoom into the edge of the water; take the GOLDEN LILY (14) and STONE PUZZLE PIECE 4/6 (15).
- Zoom into the squirrel; give it the NUTS and take STONE PUZZLE PIECE 5/6 (16).
- Zoom into the tree hollow.
- Take the BARK OF WEEPING WILLOW (A) and STONE PUZZLE PIECE 6/6 (17).
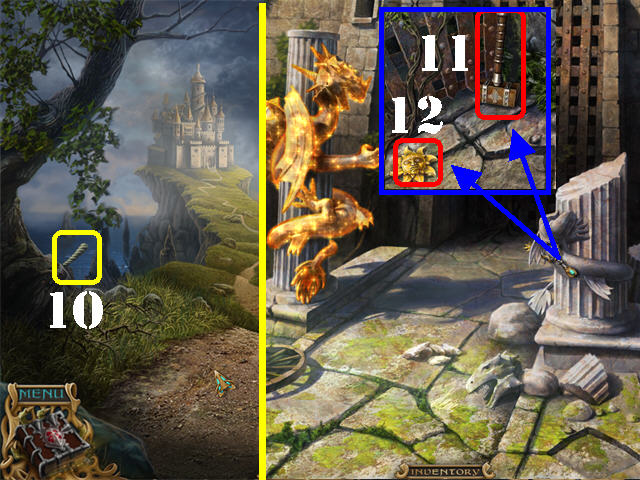
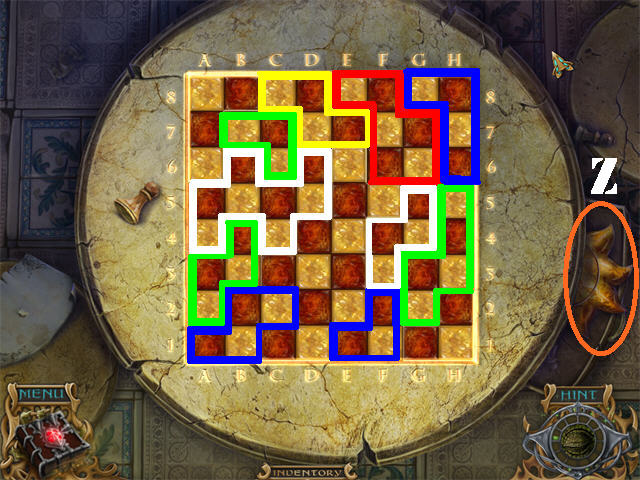
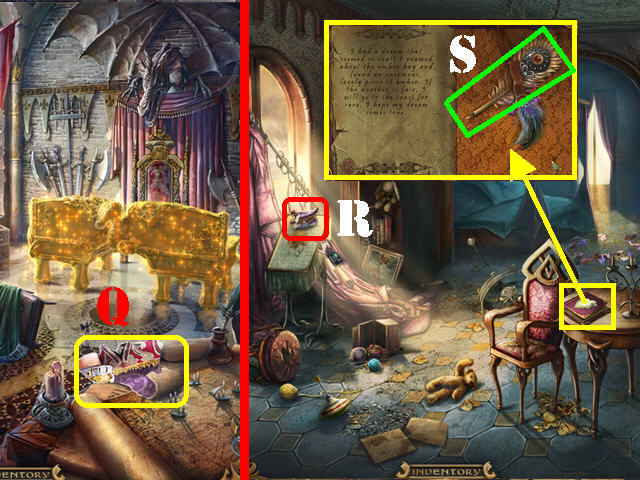
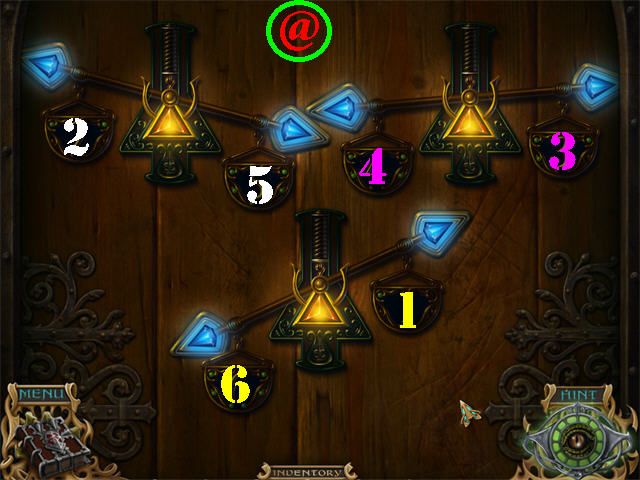
- Zoom into the stone Portal in the back to access a puzzle (18).
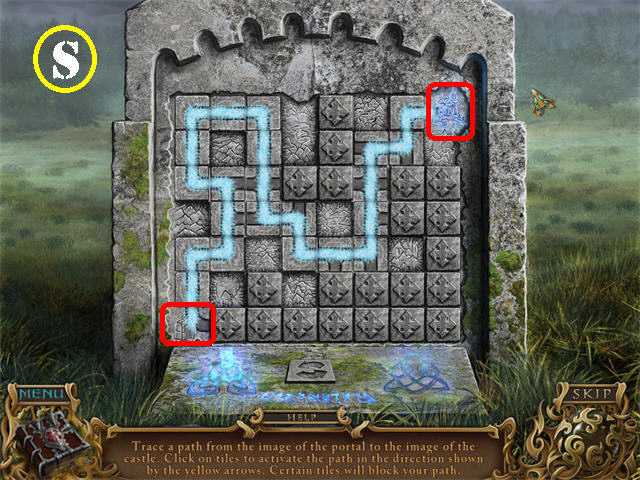
- Place the 6 STONE PUZZLE PIECES on the stone to activate a puzzle.
- Click on a stone for arrows to appear. Click on the arrow in the direction you want to go to.
- Trace the path from the portal to the castle as shown in the screenshot (S).
- Go through the Portal after the puzzle has been completed.
Chapter 2: The Portal
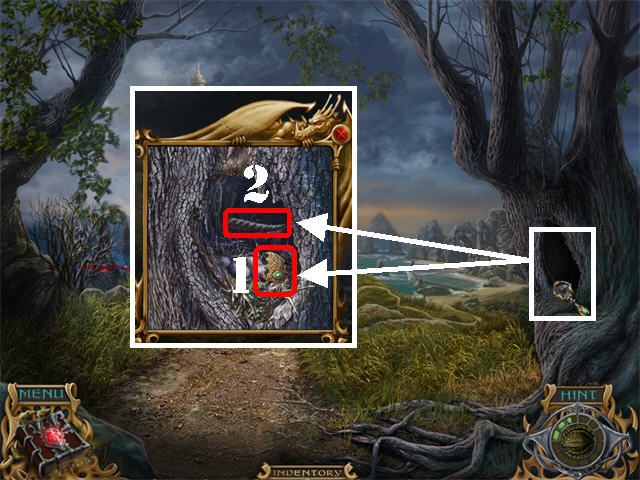
- Zoom into the tree hollow.
- Take the METAL BAT EMBLEM (1) and the DRAGON'S HORN 1/3 (2).
- Head right.
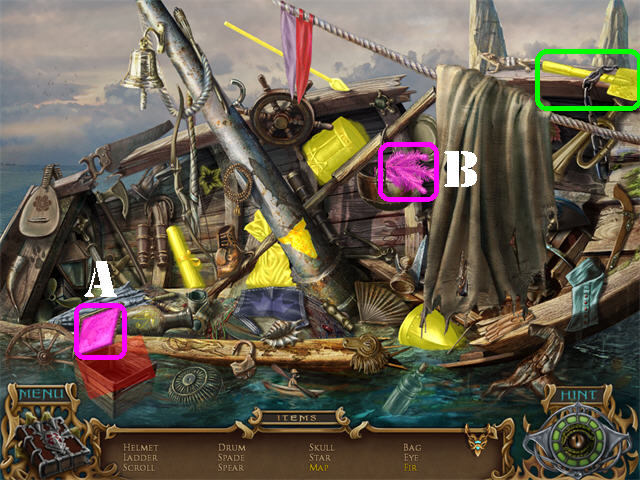
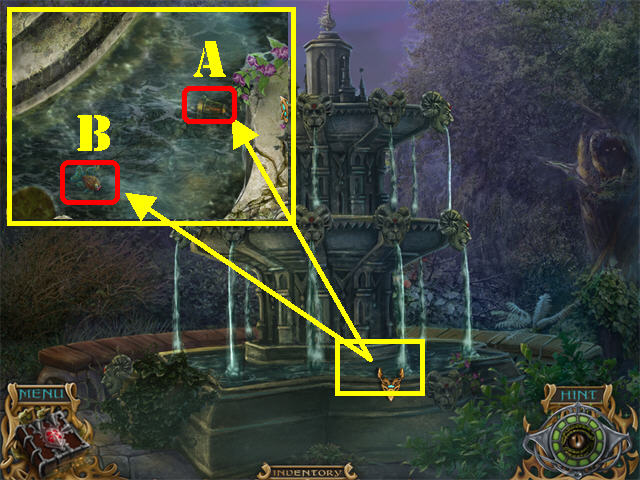
- Play the Hidden Object Scene by the boat.
- Open the box in the lower left; take the MAP (A).
- Move the curtain; take the FIR (B) if it's on your list or any item listed in yellow.
- The SPADE will be added to inventory.
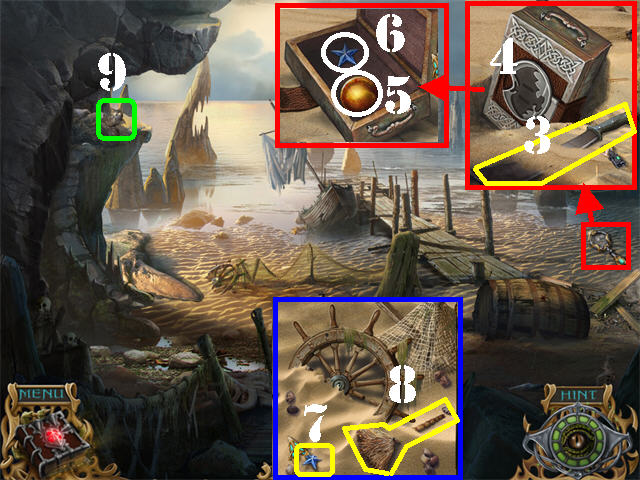
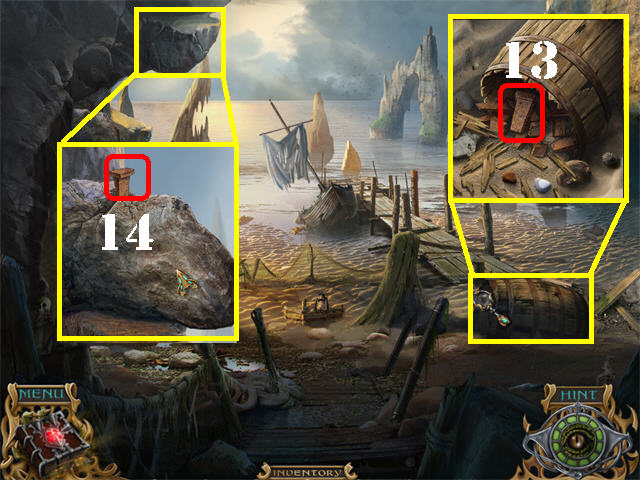
- Zoom into the right side of the sand; take the MACHETE (3).
- Use the SPADE on the box in the sand.
- Click on the box; place the METAL BAT EMBLEM on the box (4).
- Open the box and take the AMBER SPHERE (5) and the STAR 1/5 (6).
- Zoom into the buried wheel on left; take STAR 2/5 (7) and the BRUSH (8).
- Click on the OWL (9) in the upper left and it will fly away.
- Zoom into the boulder in the upper left; note that it is cracked.
- Click down.
- Cut the thorny bush in the lower left with the MACHETE; take the DRAGON'S HORN 2/3 (10).
- Head towards the Castle.
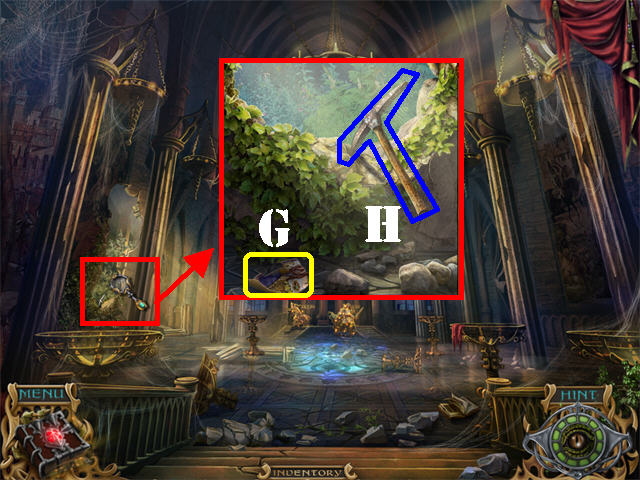
- Zoom into the broken pedestal; take the HAMMER (11) and the GOLDEN SUN (12).
- Return to the beach.
- Zoom into the barrel; crack it open with the HAMMER and take the WEDGE (13).
- Zoom into the boulder in the upper left.
- Place the WEDGE on the boulder (14).
- Place the HAMMER on the WEDGE to crack the boulder.
- Head in the upper left direction.

- Zoom into the nest; take the DRAGON'S HORN 3/3 (15).
- Click on the EGG in the nest; take STAR 3/5 (16).
- Place the MACHETE on the vines on the back wall.
- Place the AMBER SPHERE in the hole on the stone door for the girl to appear (17).
- Grab the POTION RECIPE (18) on the ground after she stops talking.
- Take the MAGIC CHALICE (19) on the ground after she stops talking a second time.
- Click down.
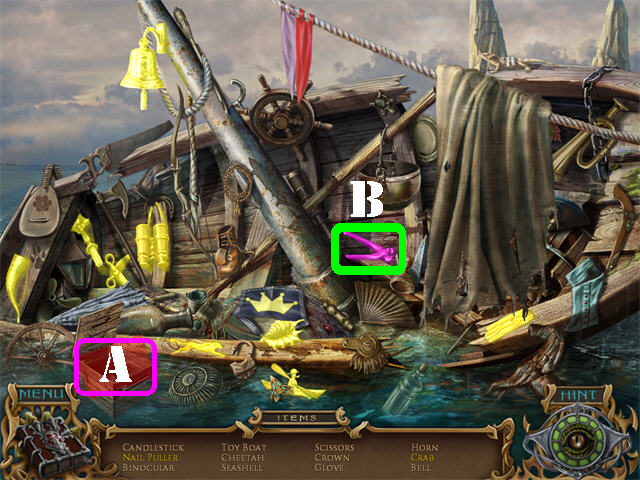
- Play the Hidden Object Scene by the boat.
- Open the box in the lower left; take the CRAB (A).
- Pull the curtain; take the NAIL PULLER (B).
- The NAIL PULLER will be added to inventory.
- Return to grandma's house.
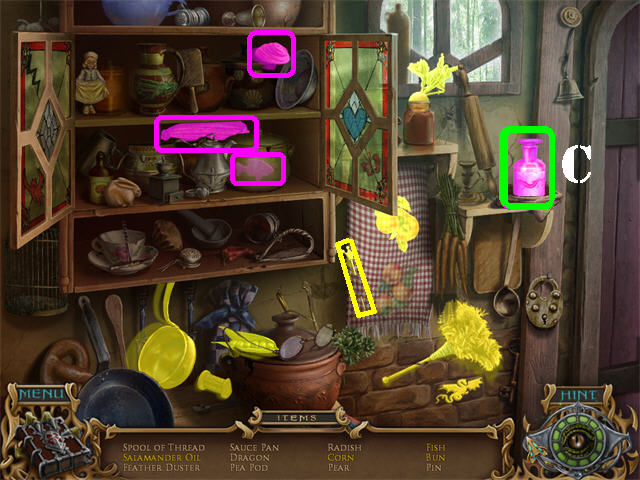
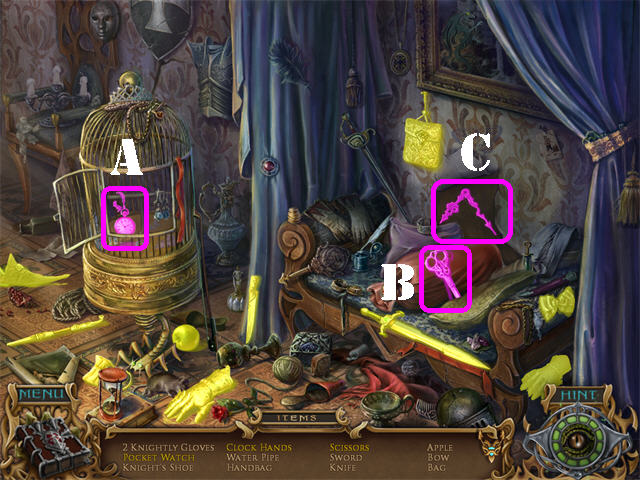
- Play the Hidden Object Scene on left.
- Click on the bag; take the SALAMANDER OIL (C).
- Open the cabinets; take the items listed in yellow.
- The SALAMANDER OIL will be added to inventory.
- Go into the bedroom.
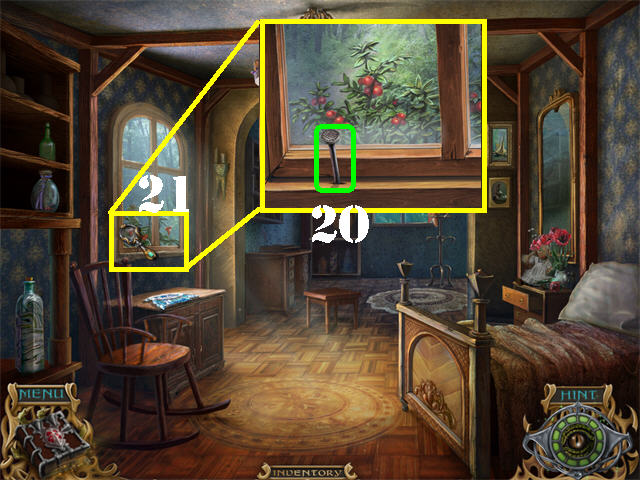
- Zoom into the window; pull the NAIL using the NAIL PULLER (20) to open the window.
- Take the FIRETHORN BERRIES (21) from the open window.
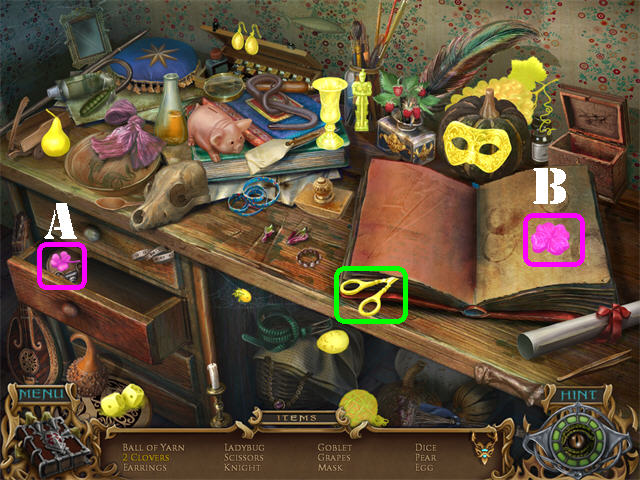
- Play the Hidden Object Scene by the desk.
- Open the lower left drawer; take the CLOVER (A).
- Click on the right page of the book; take the other CLOVER (B).
- The SCISSORS will be added to inventory.
- Click on the OWL by the window; take STAR 4/5 (22) that falls on the ground.
- Click down.
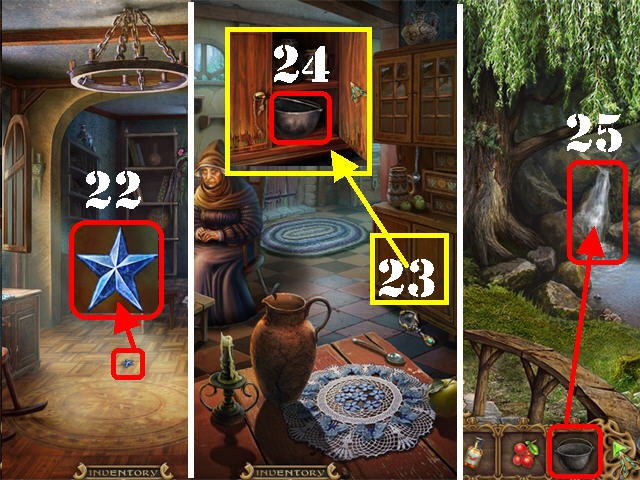
- Zoom into the cabinet door by the back door (23).
- Cut the strings with the SCISSORS.
- Take the EMPTY CAULDRON from inside the cabinet (24).
- Go outside.
- Place the EMPTY CAULDRON in the water stream (25).
- The CAULDRON WITH WATER will be added to inventory.
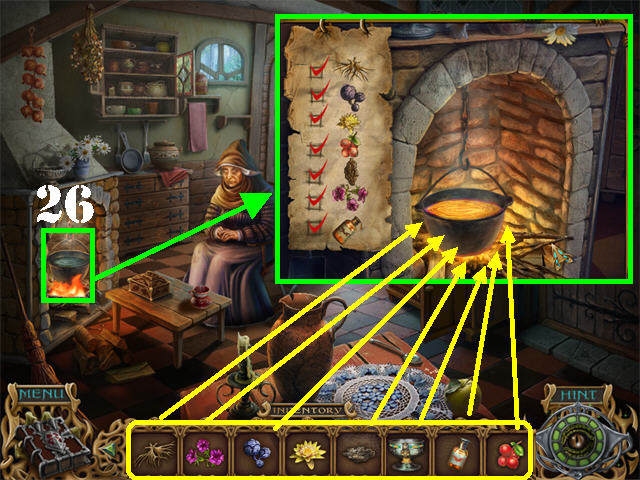
- Go back inside grandma's house.
- Place the CAULDRON WITH WATER into the fireplace (26).
- Zoom into the cauldron and place the following items inside of it; FLOWERS, ELK ROOT, BARK OF WEEPING WILLOW, GOLDEN LILY, BLUE CABBAGE, SALAMANDER OIL, and the FIRETHORN BERRIES.
- Place the MAGIC CHALICE in the cauldron to automatically receive the MAGIC CHALICE WITH POTION.
- Return to the area with the girl.
- Give the girl the MAGIC CHALICE WITH POTION (27).
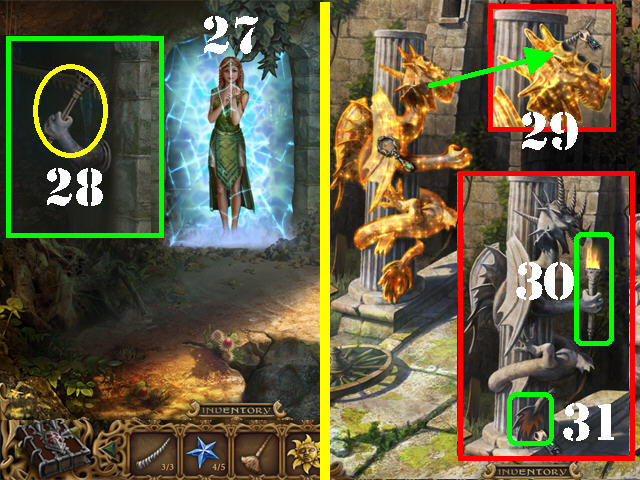
- Take the TORCH (28) in the cave.
- Click down twice and head towards the castle.
- Zoom into the cursed dragon.
- Place the 3 DRAGON'S HORNS on the head (29).
- Place the TORCH in the dragon's hand (30).
- Click on the DRAGON'S TAIL (31) to ignite the torch.
- Take the BURNING TORCH.
- Return to the cave entrance.
- Place the BURNING TORCH in the holder to illuminate the cave (28).
- Go into the cave.

- Clean the cobweb on the right with the BRUSH to reveal a lever (29).
- Click on the lever to lift the torch and light up the rest of the cave.
- Take SHELL 1/6 (30) in the lower left.
- Take STAR 5/5 (31) on the ground.
- Zoom into the moon on the back wall.
- Place the 5 STARS on the back wall; the image will change (32).
- Place the GOLDEN SUN over the sun silhouette (33).
- Go through the back door.
Chapter 3: Getting into the Castle
- Click on the OWL in the lower left.
- Enter the cabin.
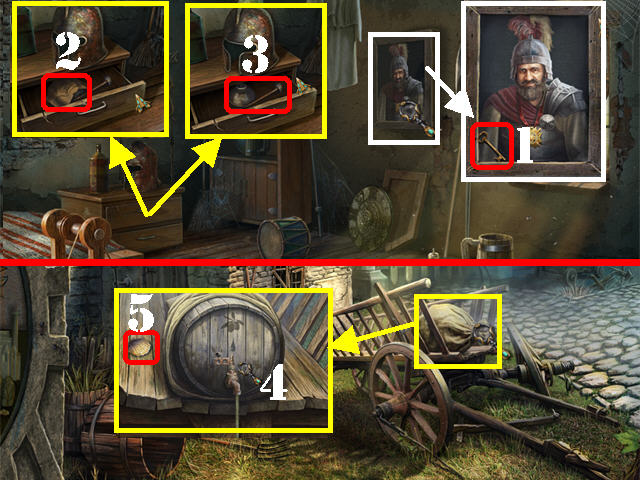
- Zoom into the painting; take the KEY (1).
- Zoom into the drawer; open it and look at the shield sketch (2).
- Take the EMPTY OILER from inside the drawer (3).
- Click down.
- Zoom into the sack on the cart; click on the sack to untie it.
- Click on the barrel's tap; place the EMPTY OILER on the dripping oil (4).
- The OILER WITH OIL will be added to inventory.
- Take SHELL 2/6 (5).
- Head towards the right.
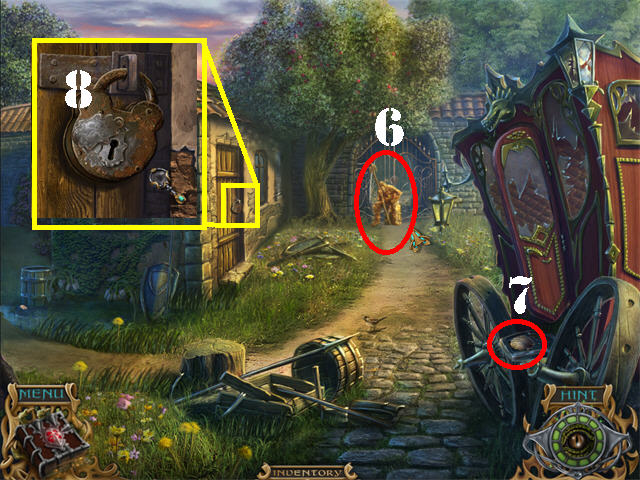
- Note the cursed soldier in the back (6).
- Take SHELL 3/6 (7) in the lower right.
- Zoom into the left door; place the OILER WITH OIL on the lock (8).
- Click on the metal cover on the lock.
- Place the KEY in the lock; turn the key to activate a Hidden Object Scene; play it.
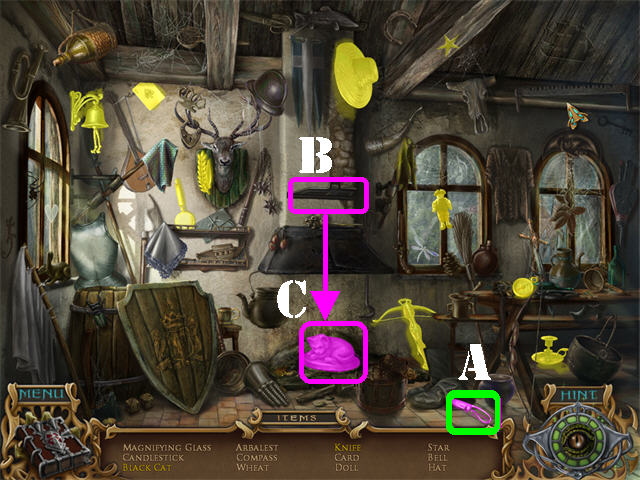
- Click on the BOOTS in the lower right; take the KNIFE (A).
- Click on the TRAY (B) in the center; take the BLACK CAT (C) below.
- The KNIFE will be added to inventory.
- Head left.
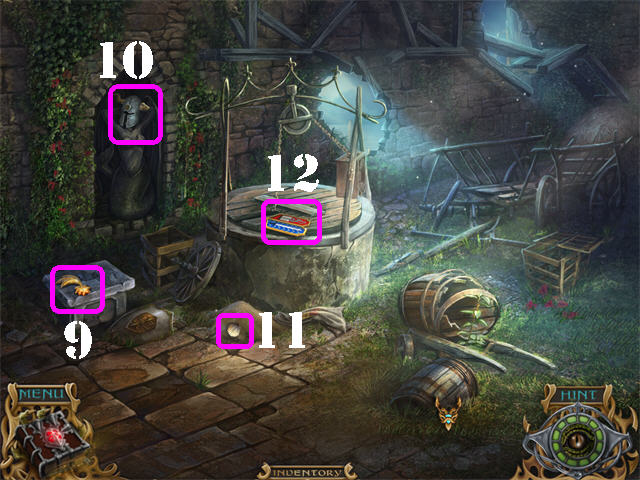
- Take the AMBER COMET (9) in the lower left.
- Grab the HELMET (10) on the left.
- Cut the BAG on top of the well with the KNIFE.
- Grab SHELL 4/6 (11) in the sand on the ground.
- Click on the bag to make it fall on the ground; take the COAT OF ARMS (12).
- Click down twice and enter the cabin.
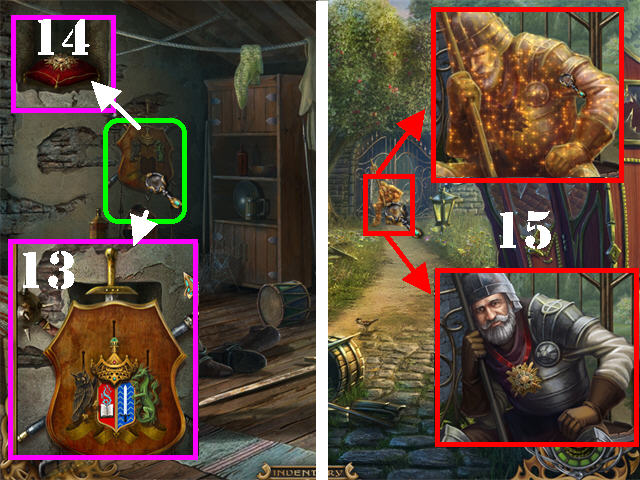
- Zoom into the shield on the wall; place the COAT OF ARMS in the center of the shield (13).
- Click on the 3 weapons on the shield to reveal a niche in the wall.
- Take the MEDAL (14) from the niche.
- Click down and head right.
- Zoom into the cursed soldier in the back; give him the MEDAL (15).
- Open the gate and go through it.
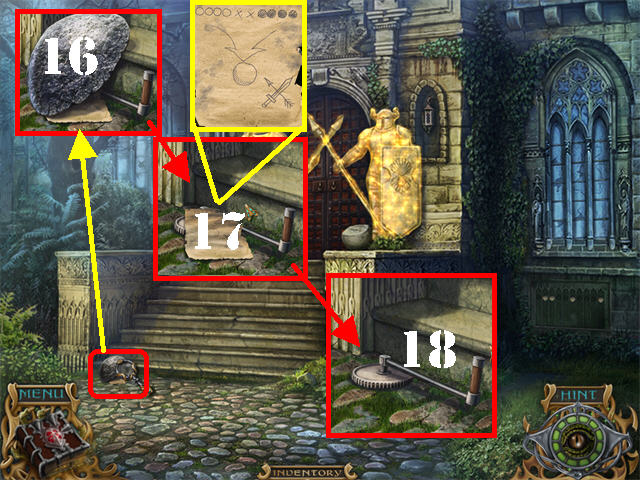
- Zoom into the rock in the lower left; remove the rock (16).
- Look at the sketch that was below the rock; it is a puzzle solution (17).
- Take the HANDLE (18) below the sketch.
- Click down.
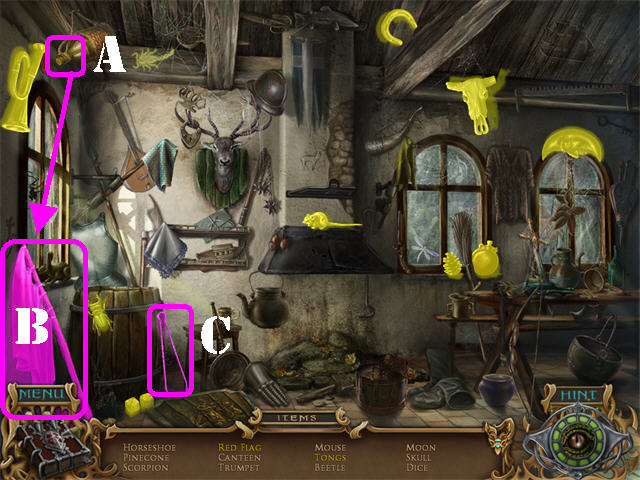
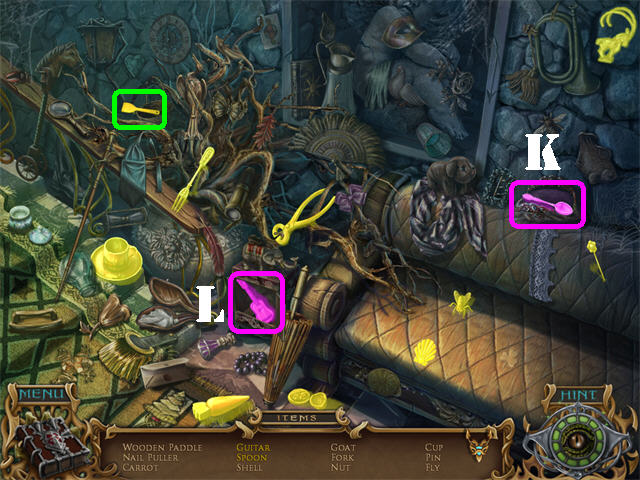
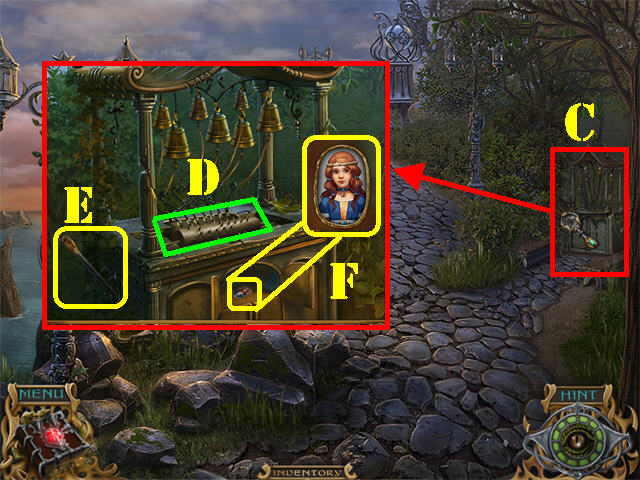
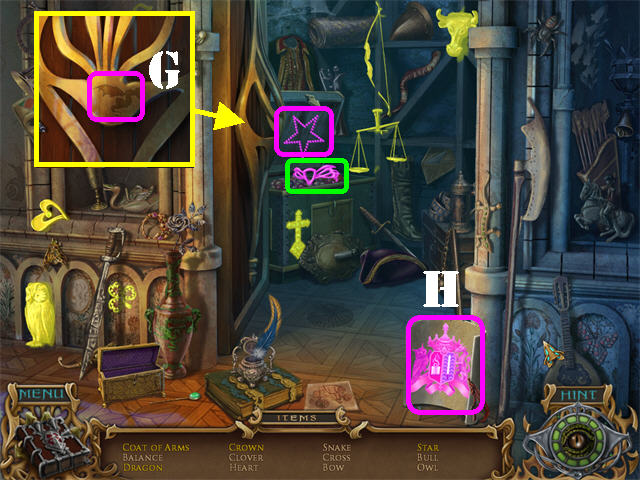
- Play the Hidden Object Scene.
- Click on the cork of the red wine bottle (A) in the upper left; take the RED FLAG (B) in the lower left.
- Click on the SHIELD; take the TONGS (C).
- The TONGS will be added to inventory.
- Head left.
- Remove the well cover.
- Zoom into the mechanism on the right side of the well; place the HANDLE on it (19).
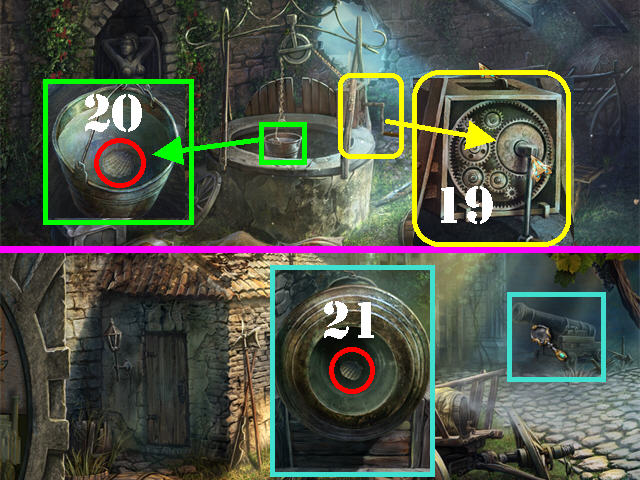
- Click on the HANDLE; take SHELL 5/6 (20) in the bucket of water.
- Click down twice.
- Zoom into the cannon in the upper right.
- Remove SHELL 6/6 (21) with the TONGS.
- Head right and then forward.
- Zoom into the puzzle below the right window.
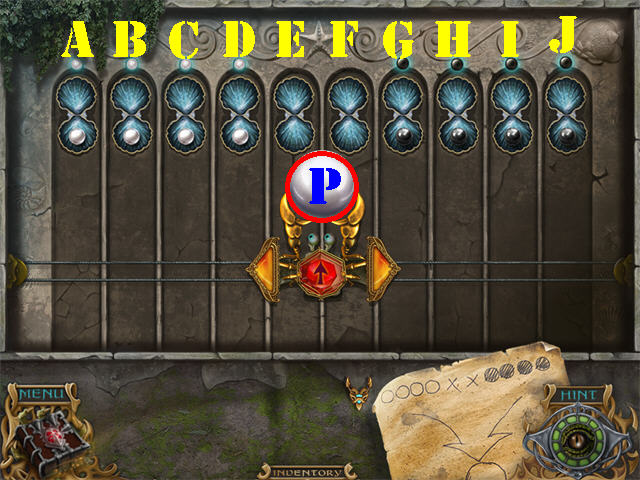
- Place the 6 SHELLS on the board to activate the puzzle.
- Use the orange arrows to move the crab left and right.
- Use the red arrow to reach up and grab the pearls or to release them into spots.
- To solve the puzzle place the white pearls on the left and the black ones on the right.
- Follow these steps to solve the puzzle:
- Grab F and G and place them in spots A and B.
- Grab B and C and place them in spots F and G.
- Grab H and I and place them in spots B and C.
- Grab C and D and place them in spots H and I.
- Grab I and J and place them in spots C and D.
- Grab E and F and place them in spots I and J.
- Grab the PEARL (P) after the puzzle has been solved.
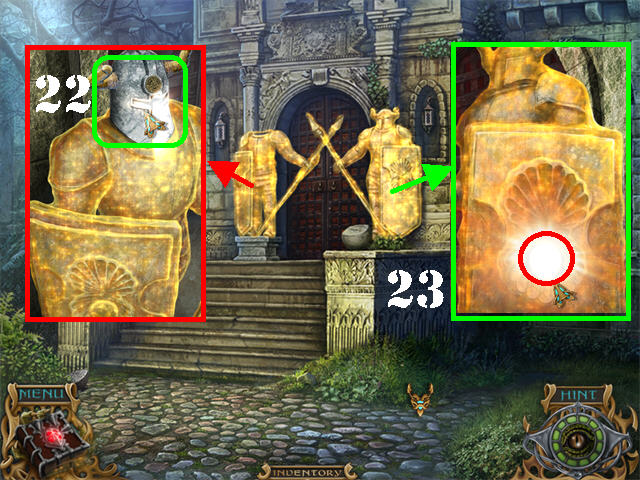
- Zoom into the left statue; place the HELMET on the armor (22).
- Zoom into the right statue; place the PEARL on the shield (23).
- Go through the gate after the Dark Queen disappears to enter the Castle.
Chapter 4: Inside the Castle
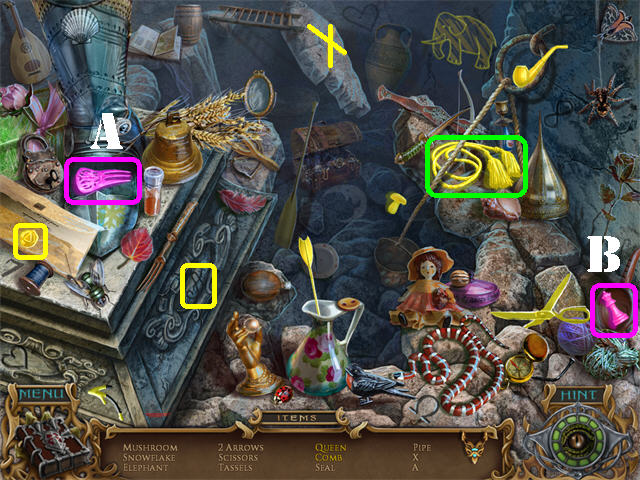
- Play the Hidden Object Scene in the far right.
- Click on the armor boots; take the COMB (A).
- Click on the pan on right; take the QUEEN (B).
- The TASSELS will be added to inventory.
- Grab CHESSBOARD PIECE 1/9 (1) in the lower right.
- Zoom into the plaque on the left side of the ground; place the AMBER COMET in the recess to unlock the left door (2).
- Go through the left door to access the Living Room.
- Take the CANDELABRA on the table (3).
- Zoom into the fallen chair; tear the seat cushion and take CHESSBOARD PIECE 2/9 (4).
- Play the Hidden Object Scene on the left.
- Open the cage; take the POCKET WATCH (A).
- Click on the yellow pillow on the couch; take the SCISSORS (B).
- Tear the wallpaper on the back wall; take the CLOCK HANDS (C).
- The CLOCK HANDS will be added to inventory.

- Go through the left door.
- Play the Hidden Object Scene below the table.
- Click on the curtain; take the items listed in yellow.
- Ring the bell in the upper right (D); take the SPIDER (E) that falls below the bell.
- Open the book in the lower right; take the COMB (F).
- The GEAR will be added to inventory.
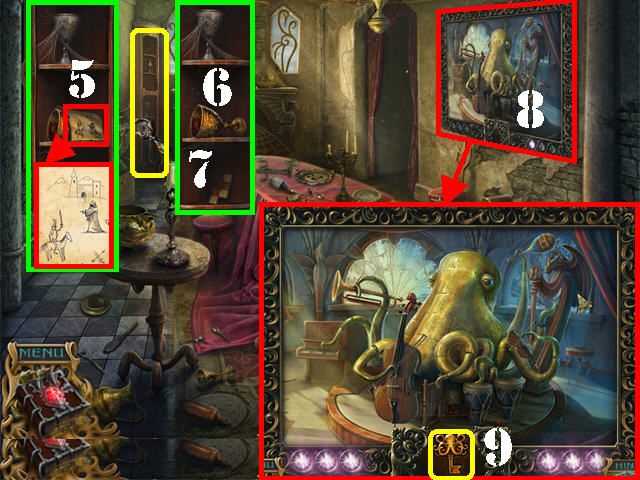
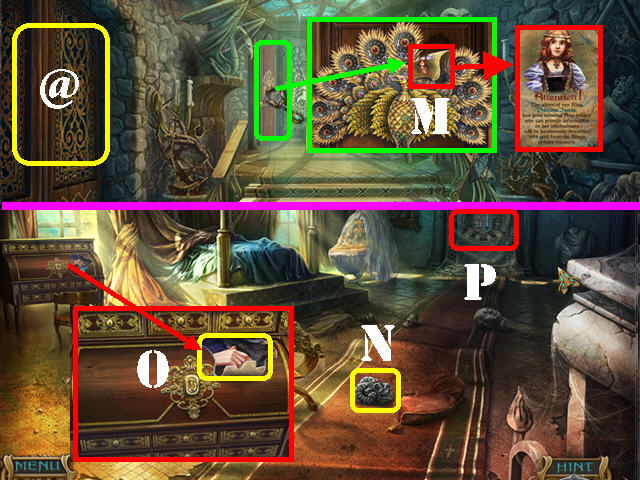
- Zoom into the shelf on left.
- Look at the scroll; click on it again to add it to the Diary (5).
- Grab the GOBLET (6) and CHESSBOARD PIECE 3/9 (7) on the shelf.
- Examine the picture on the right to activate a puzzle (8).
- Duplicate the 6 musical sequences demonstrated by the octopus by clicking on the instruments in the same order.
- The solution to this puzzle is random.
- Take the CLOCKWORK KEY (9) after the puzzle has been solved.
- Click down and go through the right door.
- Click on the OWL above the chandelier.
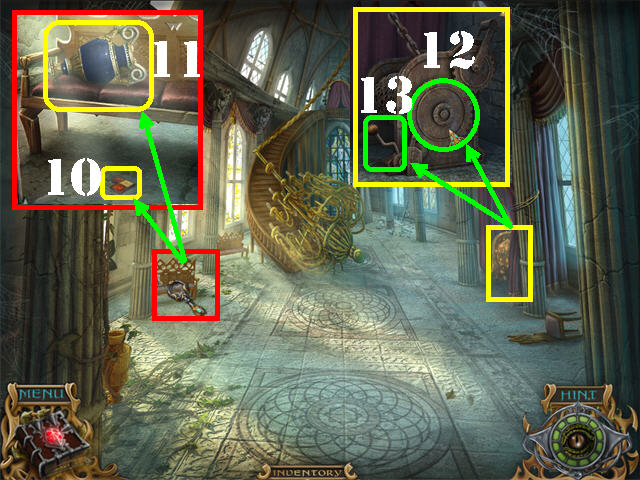
- Zoom into the left bench; take CHESSBOARD PIECE 4/9 (10) and the VASE (11).
- Place the TASSELS on the curtain on right to keep them open.
- Zoom into the lift mechanism behind the curtains; place the GEAR on it (12).
- Click on the LEVER (13) to lift the chandelier.
- Go up the steps.
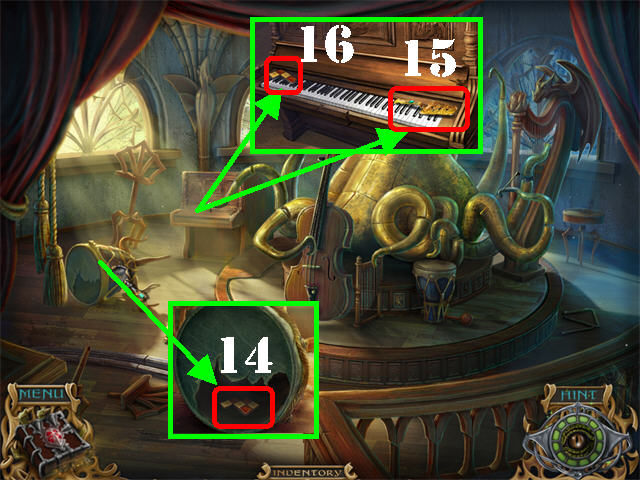
- Zoom into the drum on left; take CHESSBOARD PIECE 5/9 (14).
- Zoom into the piano; lift the cover.
- Take the CAKE KNIFE (15) and CHESSBOARD PIECE 6/9 (16) on the keyboard.
- Return to the dining room and head into the far right entryway.
- Zoom into the back cupboard; take CHESSBOARD PIECE 7/9 (A).
- Click on the creamer's lid; take the PIN (B) inside the creamer.
- The following actions will remove the curse from the left side of the wall.
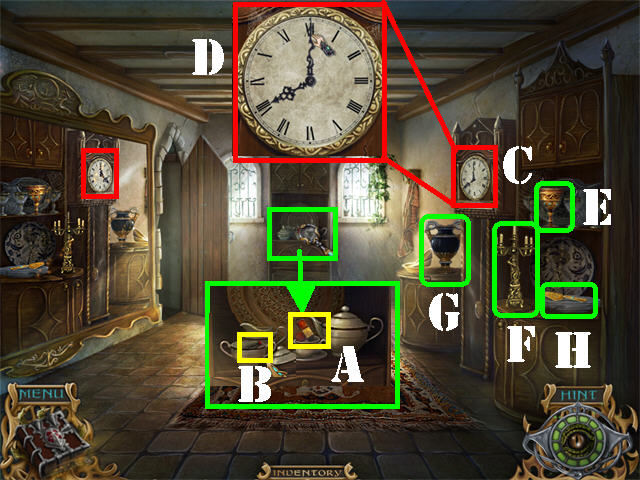
- Zoom into the clock on right (C).
- Place the CLOCK HANDS on the clock.
- Change the clock hands to reflect the mirror image time displayed on the left clock; change it to 8:00 (D).
- Place the GOBLET (E), CANDELABRA (F), VASE (G), and CAKE KNIFE (H) as shown in the screenshot to take off the rest of the curse.
- Go through the left door to access the kitchen.
- Play the Hidden Object Scene in the back of the kitchen.
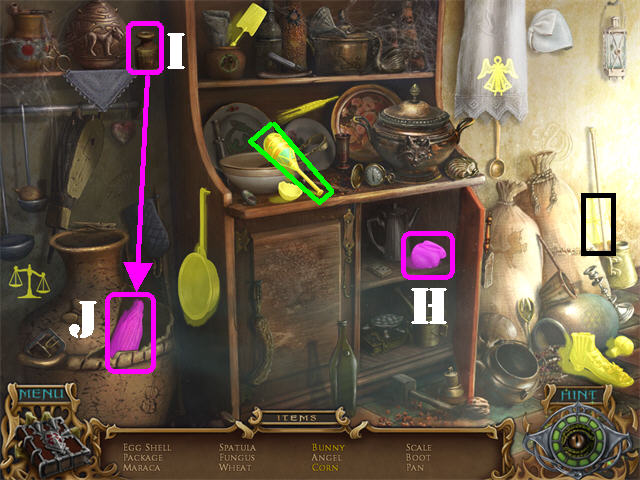
- Open the bottom right cabinet; take the BUNNY (H).
- Click on the WEIGHT (I) in the upper left; it will fall and break the vase below it.
- Grab the CORN (J) from inside the broken vase.
- The MARACA will be added to inventory.

- Zoom into the back door to activate a puzzle.
- Click on any 2 tiles in the 2 lowest rows to swap their positions.
- The top row is stationary.
- Place the correct items in the middle or bottom rows that will result in the bottom image.
- For example: The blank paper combined with the quill and ink will result in a written letter. An egg placed in a frying pan will result in a fried egg. The sun and a magnifying glass will result in fire.
- A correct combination will remove the bar above it.
- Please look at the screenshot for the solution (S).
- Go through the door after the puzzle has been completed to access the cellar.
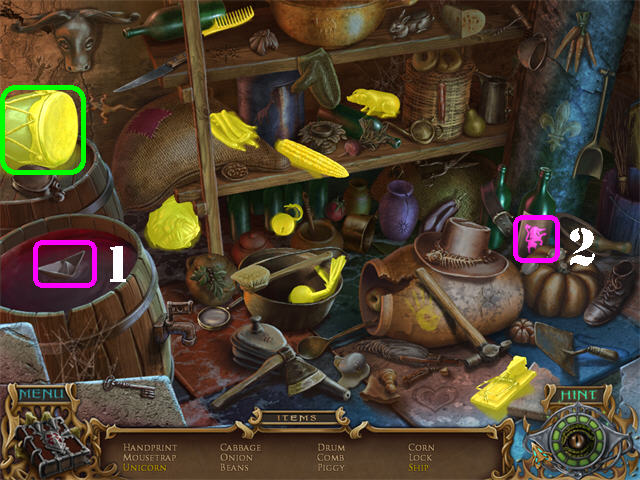
- Play the Hidden Object Scene on left.
- Open the barrel lid; take the SHIP (1).
- Click on the wine bottle; take the UNICORN (2).
- The DRUM will be added to inventory.
- Zoom into the cursed boy; note the pie image in the book. Zoom out of that view (3).
- Examine the box on the right; place the PIN in the keyhole.
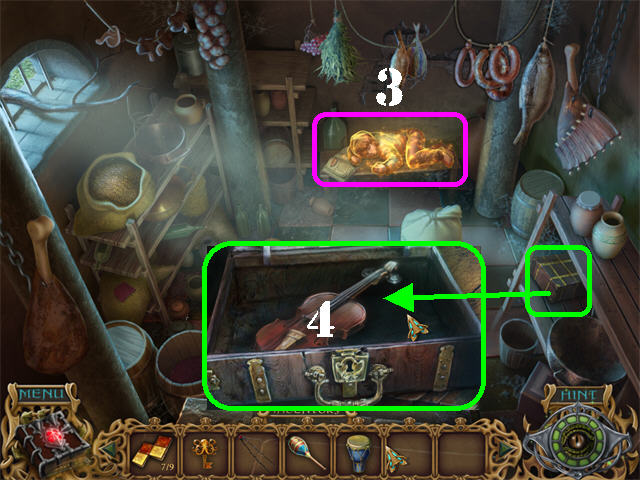
- Open the box and take the VIOLIN (4).
- Return to the dining room.
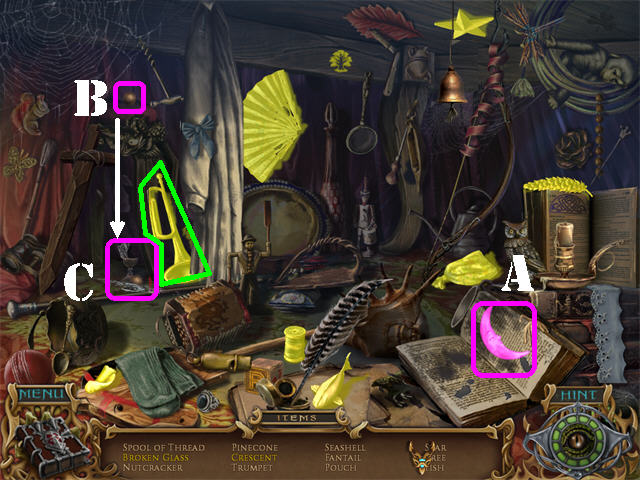
- Play the Hidden Object Scene.
- Open the book in the lower right; take the CRESCENT (A).
- Click on the metal ball (B) in the upper left; take the BROKEN GLASS (C) below it.
- The TRUMPET will be added to inventory.
- Click down to return to the living room.
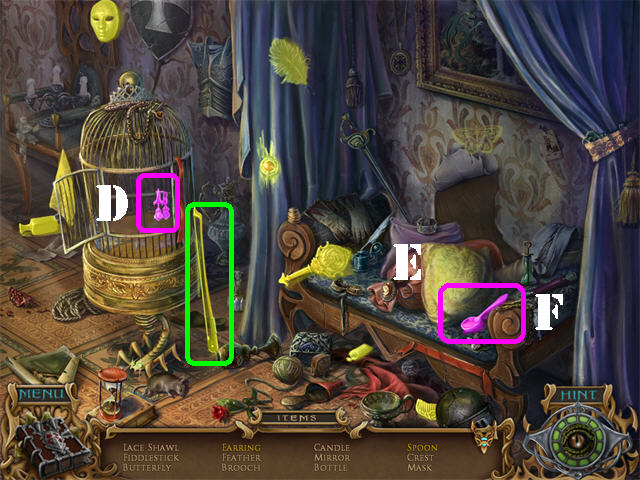
- Play the Hidden Object Scene on left.
- Open the cage; take the EARRING (D).
- Click on the yellow pillow (E) on the bench; take the SPOON (F).
- The BOW will be added to inventory.
- Go through the right door and then up the stairs.
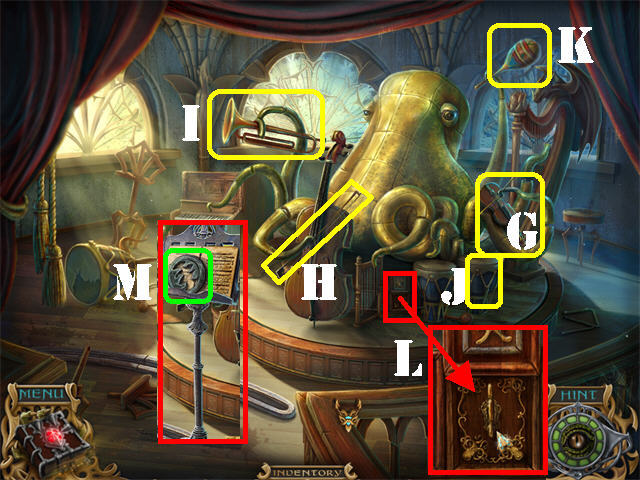
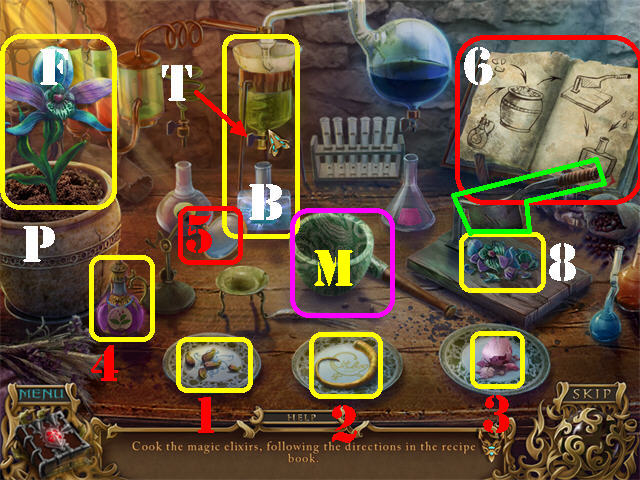
- Place the VIOLIN (G), BOW (H), TRUMPET (I), DRUM (J), and MARACA (K) into the spots shown in the screenshot.
- Place the CLOCKWORK KEY in the keyhole next to the drums (L).
- Turn the key once for the octopus to play and the music stand to appear.
- Take the CAST IRON DISC (M) on the music stand.

- Return to the kitchen.
- Zoom into the stove; place the CAST IRON DISC on the stove to remove the curse (N).
- This action activates a Hidden Object Scene in the kitchen; play it.
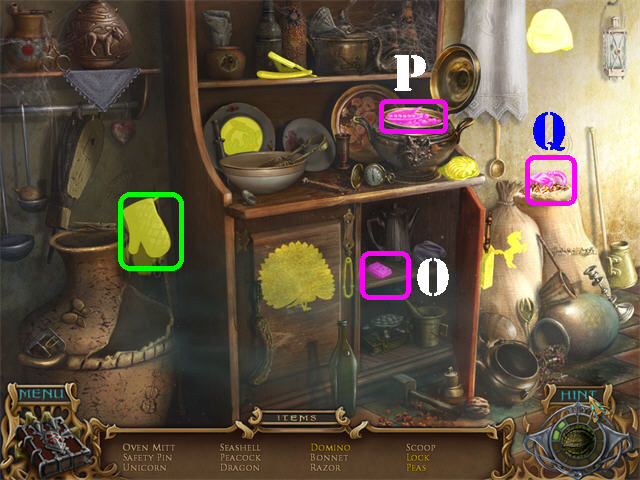
- Open the bottom right door; take the DOMINO (O) or any item listed in yellow.
- Open the lid; take the PEAS (P).
- Untie the sack on the right; take the LOCK (Q).
- The OVEN MITT will be added to inventory.
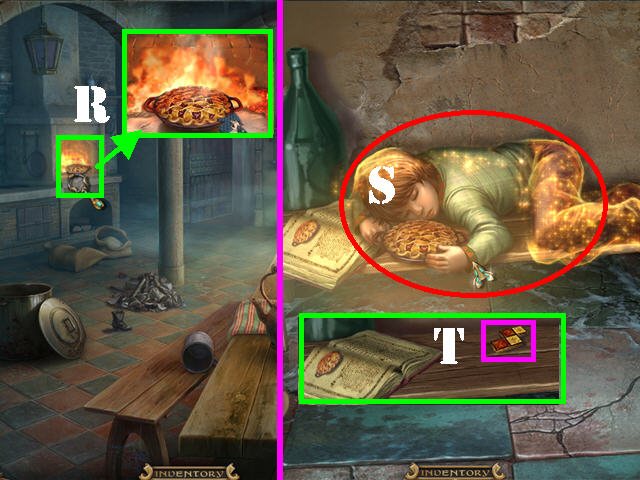
- Zoom into the oven.
- Remove the PIE with the OVEN MITT (R).
- Go into the back door.
- Zoom into the boy; give him the PIE (S).
- Take CHESSBOARD PIECE 8/9 (T) on the bench after the boy leaves.
- Play the Hidden Object Scene that was just triggered in the cellar.
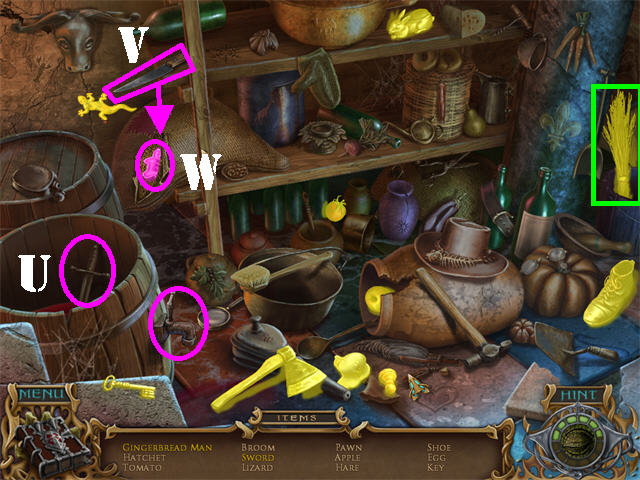
- Click on the spigot attached to the barrel; take the SWORD (U) in the barrel.
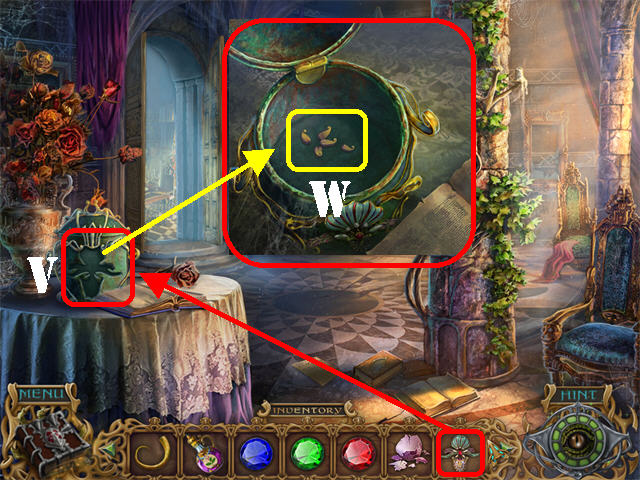
- Click on the KNIFE (V) and it will cut the bag below it; take the GINGERBREAD MAN in the sack (W).
- The BROOM will be added to inventory.
- Click down.
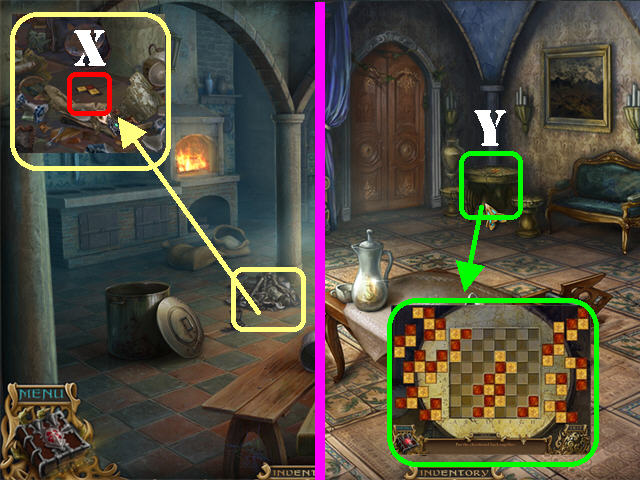
- Zoom into the pile of garbage on the ground.
- Remove the garbage with the BROOM; take CHESSBOARD PIECE 9/9 (X).
- Return to the living room.
- Zoom into the chessboard (Y).
- Place the 9 CHESSBOARD PIECES on the board to activate the puzzle.
- Drag the CHESSBOARD PIECES onto the board so that all the pieces fit without overlapping.
- Please look at the screenshot for the solution.
- Take the AMBER SUN (Z) after the puzzle has been completed.
- Click down.

- Zoom into the recess on the ground facing the back door.
- Place the AMBER SUN in the recess to unlock the back door (1).
- Go through the back door.
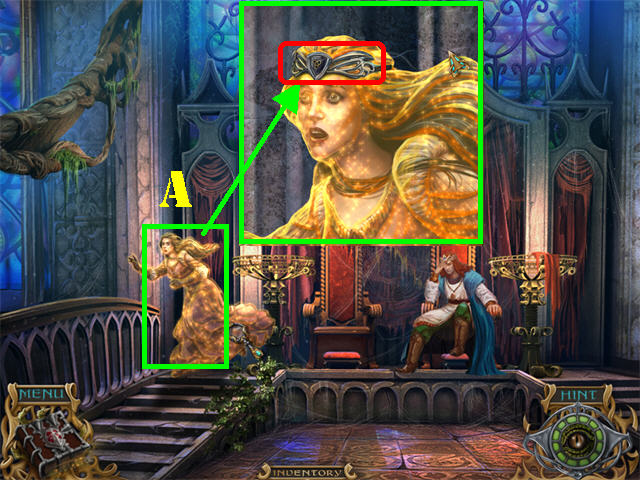
Chapter 5: The Royal Quarters
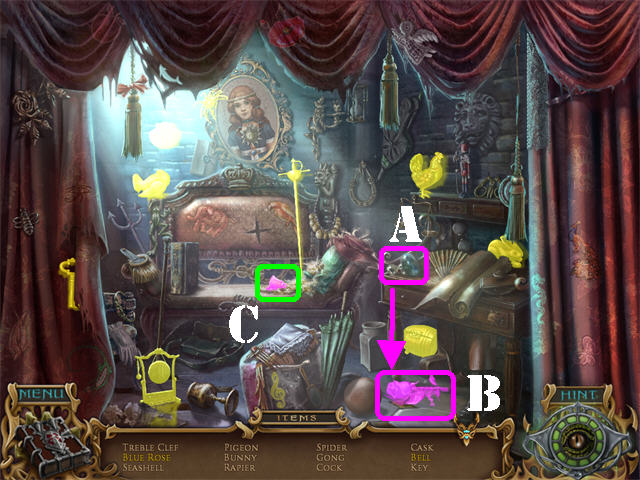
- Play the Hidden Object Scene on left.
- Click on the bottle of ink on the desk and it will spill (A); take the BLUE ROSE (B) below it.
- Click on the feathers on the couch; take the BELL (C).
- BELL 1/4 will be added to inventory.
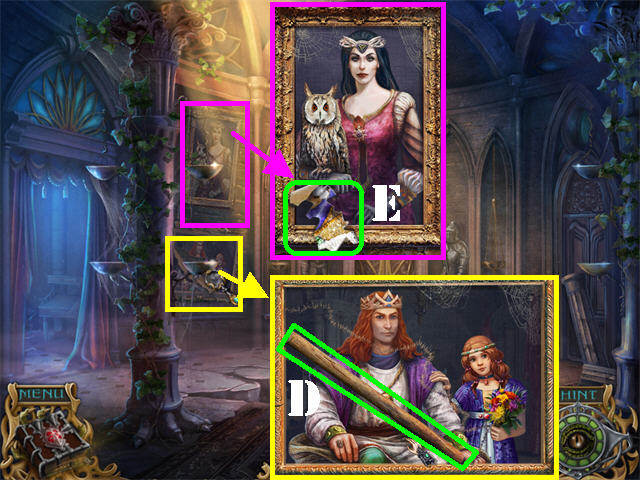
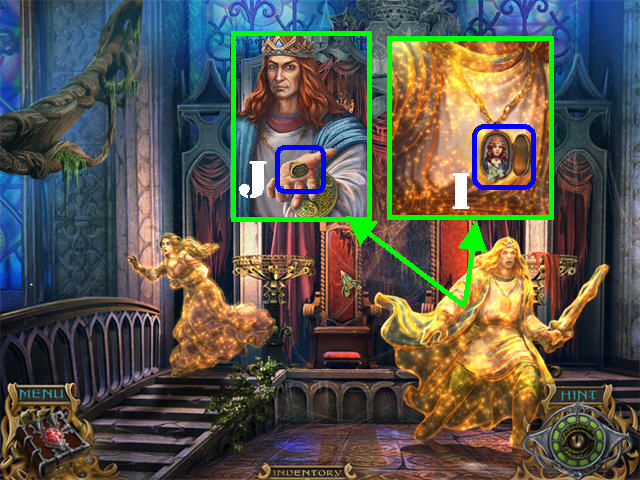
- Zoom into the lower left portrait; click on the painting and take the CUDGEL (D).
- Zoom into the upper left portrait; take PAINTING FRAGMENT 1/9 (E).
- Go through the back door to encounter the Dark Queen.
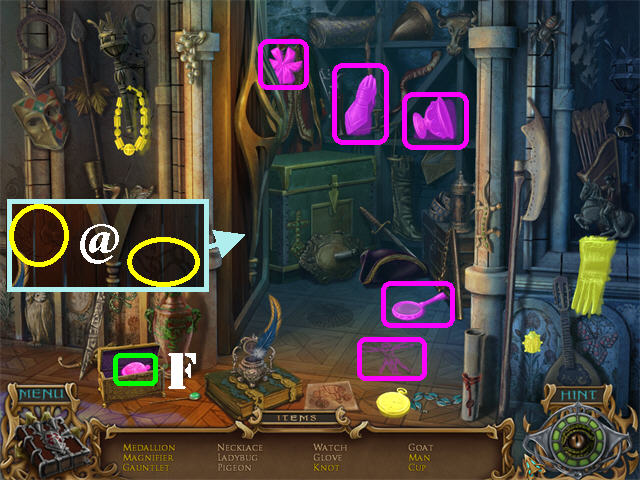
- Play the Hidden Object Scene on the right.
- Take the items on your list from the closed door (@).
- Open the door; take all the items listed in yellow.
- Open the box in the lower left; take the MEDALLION (F).
- The MEDALLION will be added to inventory.
- Click on the OWL in the lower left.
- Zoom into the vines in the lower left; take PAINTING FRAGMENT 2/9 (G).
- Place the CUDGEL on the PICK HEAD; take the PICK (H).

- Go forward.
- Take PAINTING FRAGMENT 3/9 (I) on the left railing.
- Note the cursed King and Queen.
- Click down twice.
- Zoom into the column on the right; break it with the PICK (J).
- Go through the door.
- Play the Hidden Object Scene on the right.
- Open the purse; take the SPOON (K).
- Open the box; take the GUITAR (L).
- The WOODEN PADDLE will be added to inventory.
- Zoom into the far left door; read the scroll attached to the peacock (M).
- Go into the left door (@).
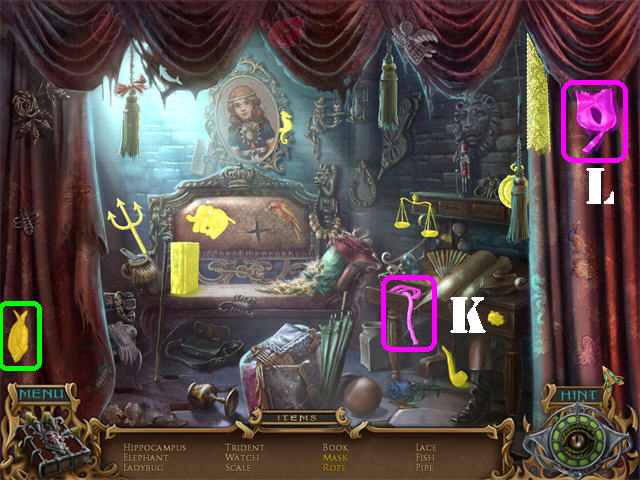
- Click on the red pillow on the carpet; take MASK 1/3 (N).
- Zoom into the secretary; take PAINTING FRAGMENT 4/9 (O).
- Remove the tapestry on the back wall (P); click on the back door to reveal a puzzle.
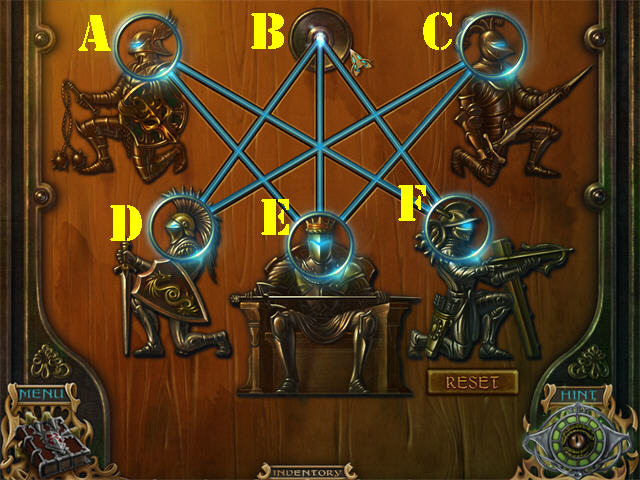
- Click on a helmet so it can move to an empty spot.
- Correct pieces will light up with a small blue light.
- Click on the helmets in this order to solve the puzzle: E- C – D – B – E – A - F and B.
- Go through the door after the puzzle has been solved.
- Take PAINTING FRAGMENT 5/9 (Q) on the ground.
- Click down twice and head into the right door.
- Take PAINTING FRAGMENT 6/9 (R) by the fallen curtain.
- Zoom into the book on the table.
- Flip the pages twice and take the FEATHER (S).
- Close the pop-up view.
- Click down to return to the hallway.
- Zoom into the far left door.
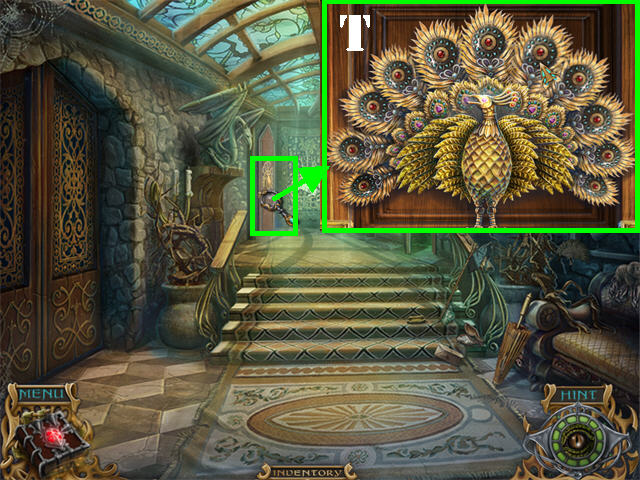
- Place the FEATHER on the peacock to unlock the door (T).
- Go through the door to access the garden.
Chapter 6: The Garden
- Play the Hidden Object Scene on left.
- Open the lantern; take the CANDLE (A).
- Click on the duck in the lower right; take the EGG (B).
- The NET will be added to inventory.

- Zoom into the tree hollow; scrape the RESIN with the WOODEN PADDLE (C).
- Click on the owl in the tree; follow it (D).
- Zoom into the fountain on the right.
- Take PAINTING FRAGMENT 7/9 (E) in the lower left.
- Exit the fountain.
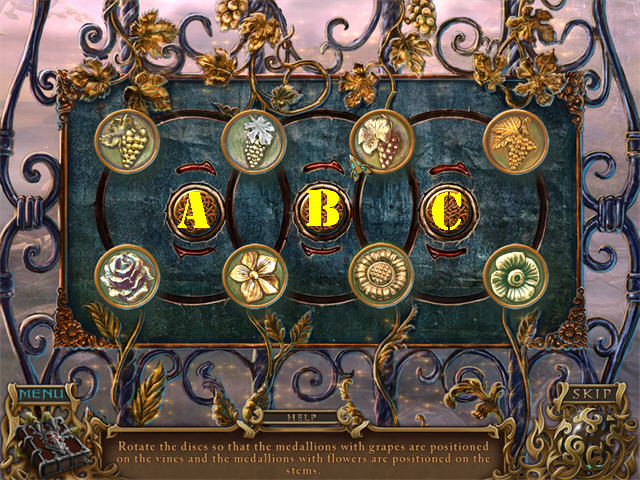
- Zoom into the gate on left to activate a puzzle.
- Arrange the tokens so the grapes are on top and the flowers are at the bottom using the buttons in the middle to rotate the tokens.
- Follow these steps to solve the puzzle: A-A-B-C-B-C-B-B-C.
- Go through the gate after the puzzle has been solved.

- Zoom into the stand on the right.
- Take PAINTING FRAGMENT 8/9 (F).
- Head forward.
- Take PAINTING FRAGMENT 9/9 from the statue's arm (G).
- Click down 3 times; head into the right door.
- Zoom into the painting fragments on the ground (H).
- Place the 9 PAINTING FRAGMENTS on the board to activate the puzzle.
- Left-click on a piece to place it on the board and right-click it to rotate it.
- Correct pieces will lock in place when placed into the right spots on the board.
- Please look at the screenshot for the solution.
- Place the RESIN on the completed picture.
- Take the PICTURE (I).
- Place the PICTURE in the frame on the right side of the wall (J).
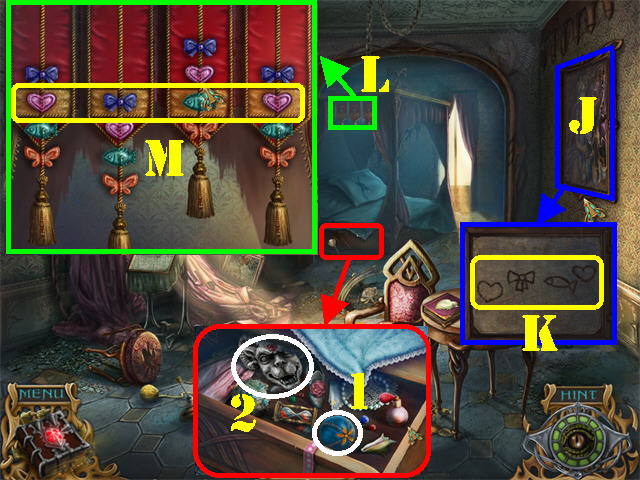
- Click on the framed picture to see the back of it; note the symbols on the back of the picture (K).
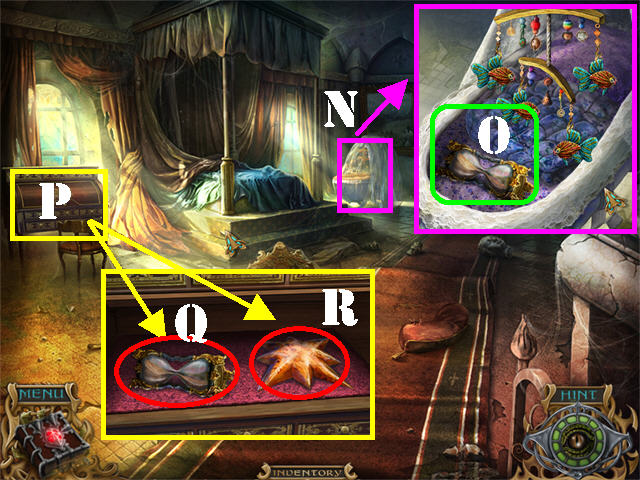
- Zoom into the tassels hanging above the bed (L).
- Using the images on the back of the picture place the symbols in the same order on the yellow strip. Pull on each tassel to move the symbols.
- Please look at the screenshot for the solution (M).
- View the drawer below the bed; take the BALL (1) and MASK 2/3 (2).
- Return to the hallway.
- Play the Hidden Object Scene on right.
- Open the bench (N); take the items listed in yellow.
- The GARDEN PRUNER will be added to inventory.

- Return to the garden.
- Play the Hidden Object Scene on left.
- Open the drawer; take the PAPERWEIGHT (O).
- Click on the red berries in the upper right; take the RED GLOVE (P).
- The PAPERWEIGHT will be added to inventory.

- Go through the left gate.
- Zoom into the bushes on left; cut them with the GARDEN PRUNER and take BELL 2/4 (Q).
- Head forward.
- Give the BALL to the dog (R).
- Take TOY FISH 1/3 (S) on the ground after the dog leaves.

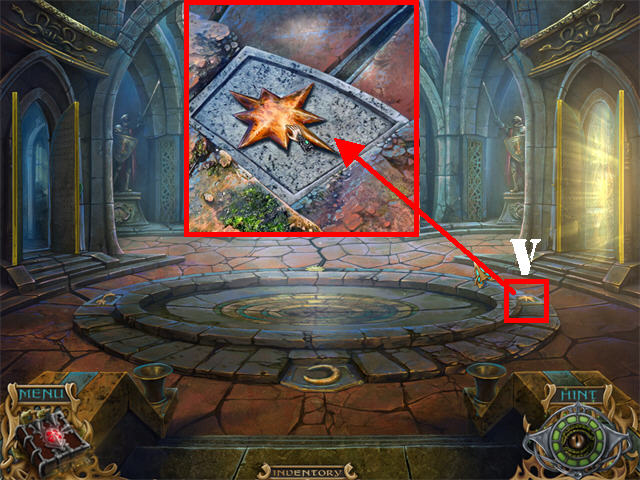
- Zoom into the base of the statue.
- Click on any 2 medallions to view what is underneath. Match 2 identical pieces and they will remain face up.
- Each time you click on two incorrect medallions they will rotate on the board.
- Match all the medallions to win the game. The solutions are random.
- Take the SEA HORSE after the puzzle has been solved (T).
- Return to the hallway; go into the left door and then through the back door.
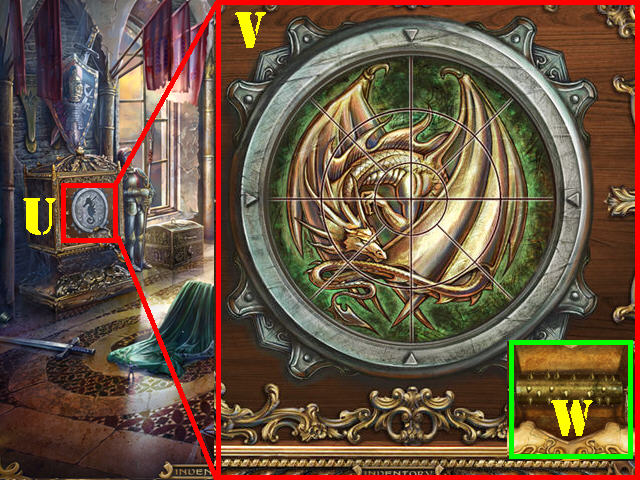
- Zoom into the cabinet on the left (U).
- Place the SEA HORSE in the center of the cabinet to activate a puzzle.
- Click on any 2 pieces within the same ring to swap their positions.
- Once all rings are complete you can rotate them to the right angle. The rings will lock in place when done correctly.
- Please look at the screenshot for the solution (V).
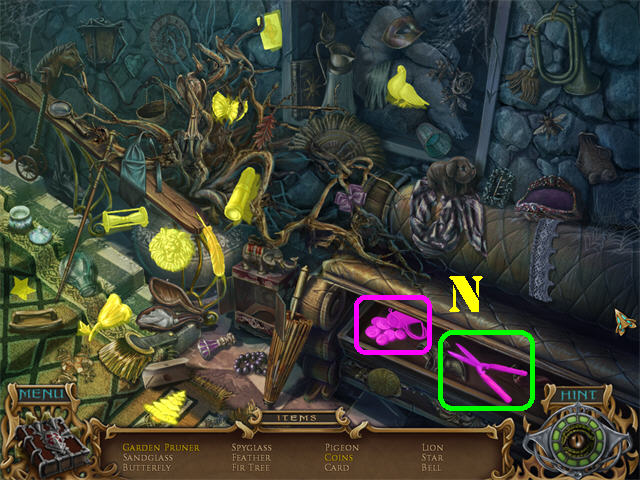
- Take the ROLLER from inside the cabinet (W) after the puzzle has been completed.
- Zoom into the cursed table.
- Place the PAPERWEIGHT in the hole to remove the curse (X).
- Take MASK 3/3 on the table (Y).
- Open the drawer; take BELL 3/4 (Z).
- Return to the fountain outside.
- Place the 3 MASKS on the fountain to remove the curse.
- Zoom into the water.
- Remove BELL 4/4 (A) and TOY FISH 2/3 (B) with the NET.
- Click down and go through the gate.
- Zoom into the stand on the right (C).
- Place the 4 BELLS on the stand.
- Place the ROLLER in the center (D).
- Click on the LEVER to activate the bells (E).
- Take the PORTRAIT at the bottom of the machine (F).
- Return to the hallway; click down, and go forward.
- Play the Hidden Object Scene on the right.
- Take the DRAGON on the front of the door (G).
- Open the door (if needed), and then open the chest; take the items listed in yellow.
- Click on the scroll in the lower right; take the COAT OF ARMS (H).
- The QUEEN'S CROWN will be added to inventory.
- Head forward.
- Zoom into the King; Place the MEDALLION on his chain.
- Place the PORTRAIT in the medallion (I).
- Take the DRAGON RING (J) the King hands you.
- Click down twice.
- Play the Hidden Object Scene on the left.
- Open the drawer; take the ROPE (K).
- Click on the upper right side of the curtain; take the MASK (L).
- TOY FISH 3/3 (M) will be added to inventory.
- Go Through the right door and then through the left door.
- Zoom into the cradle; place the 3 TOY FISH on the mobile (N).
- Click on the covers; take HOURGLASS 1/3 (O).
- Zoom into the secretary on left (P); place the DRAGON RING on the lock.
- Take HOURGLASS 2/3 (Q) and the AMBER STAR (R).
- Click down 3 times.

- Play the Hidden Object Scene on the far right.
- Click on the left drawer; take the HOURGLASS (S) and the THIMBLE (T).
- Click on the bucket in the lower right; take the MOUSE (U).
- HOURGLASS 3/3 will be added to inventory.
- Zoom into the recess facing the right door (V).
- Place the AMBER STAR in the recess to unlock the right door; go through it.
Chapter 7: The Finale
- Play the Hidden Object Scene on the right.
- Click on the bellows (A); take the KEY below the shoe (B).
- Click on the beaker (C); take the MAGNIFIER (D) inside the case.
- The MAGNIFIER will be added to inventory.
- Zoom into the column in the back; place the 3 HOURGLASSES on the column (1).
- Zoom into the column to activate a puzzle.
- Recreate the picture by clicking on the arrows in order to rotate the squares.
- You can reset the puzzle by clicking on the double arrows on the right.
- Follow these steps to solve the puzzle: A-D-B-B-C-C-E-E-E-F.
- Go through the door after the puzzle has been solved.
- Play the Hidden Object Scene by the fireplace.
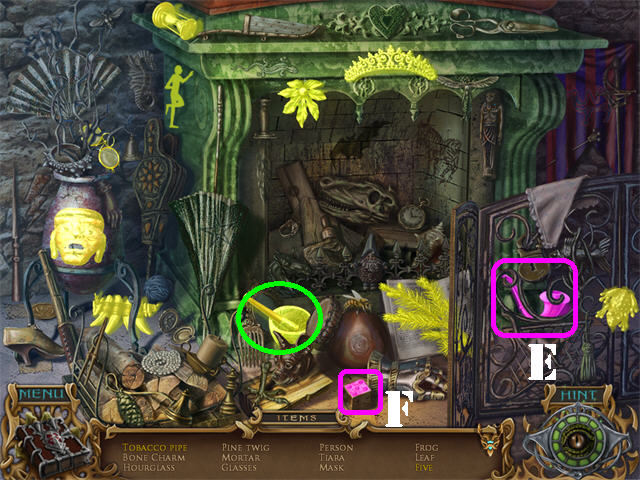
- Click on the right gate; take the TOBACCO PIPE (E).
- Click on the dice; take the FIVE (F).
- The MORTAR will be added to inventory.
- Go through the door.
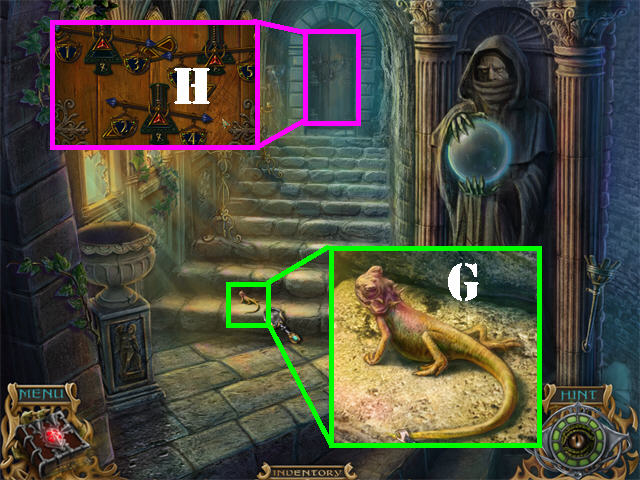
- Zoom into the steps.
- Click on the lizard; take the TAIL (G).
- Examine the back door to activate a puzzle (H).
- Click on any 2 weights to swap their positions in order to balance the crystals to line up inside the frames.
- The sum of both weights must add up to 7.
- Please look at the screenshot for the solution (@).
- Go through the back door after the puzzle has been completed.
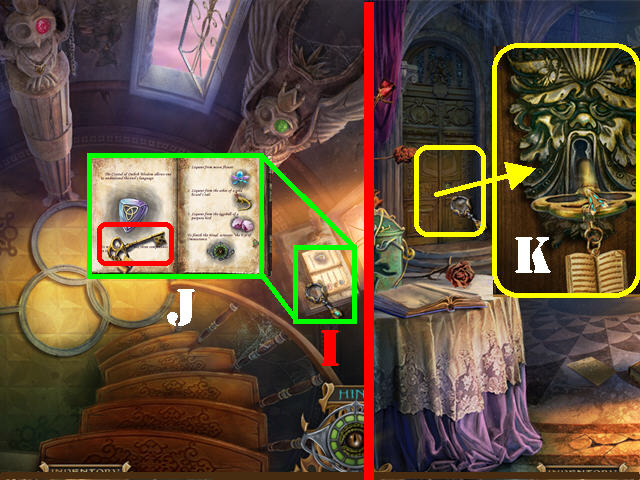
- Zoom into the book on the right (I); take the KEY (J).
- Note the ingredients needed to mix the crystal; exit the book close-up.
- Click down 3 times.
- Zoom into the left door; place the KEY in the lock (K).
- Go through the door.
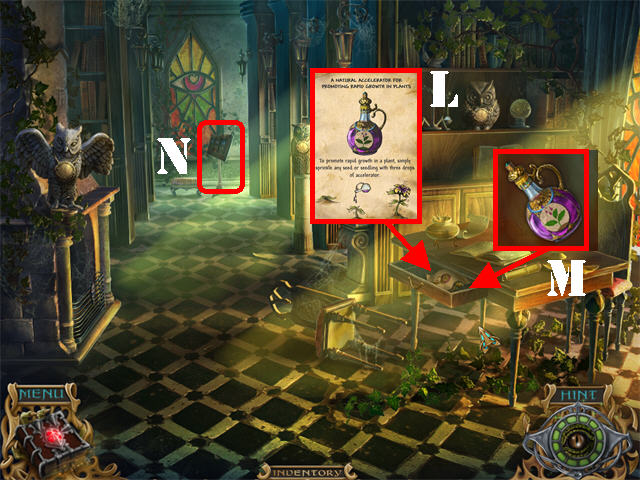
- Open the desk drawer; read the recipe (L).
- Take the ACCELERATOR (M) from inside the drawer.
- Zoom into the pedestal in the back to activate a puzzle (N).
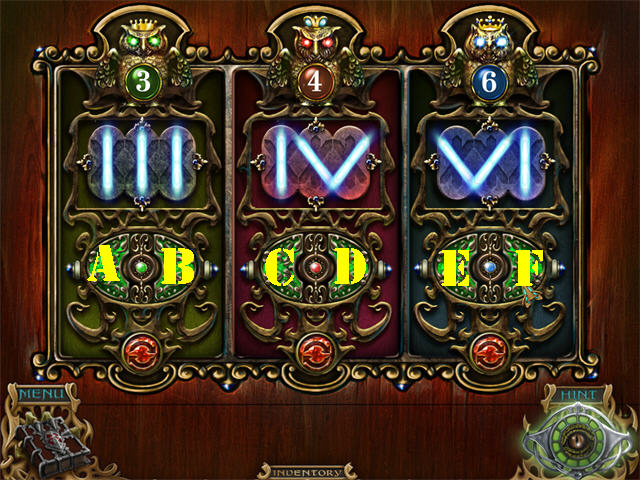
- Use the left and right side of the green buttons to change the symbols above them. Recreate the shapes so the correct roman numerals are formed.
- Follow these steps to solve the Roman numeral 3puzzle: B-B-A-A.
- Follow these steps to solve the Roman numeral 4puzzle: D-C-D.
- Follow these steps to solve the Roman numeral 6puzzle: E-E-F.
- Solving the puzzle activates the gems on the owls.
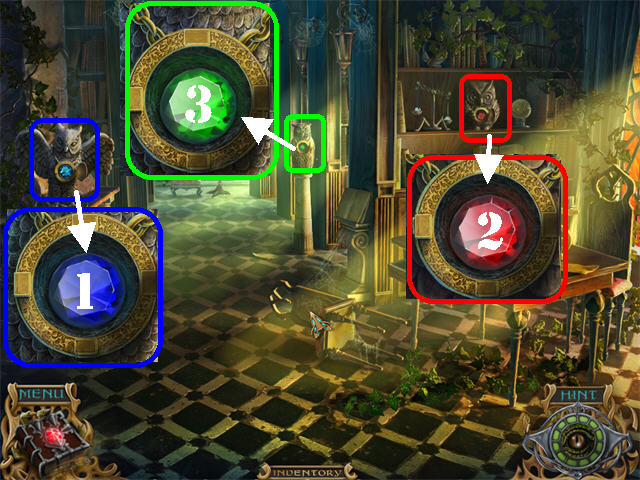
- Zoom into the 3 owls and take the BLUE JEWEL (1), RED JEWEL (2), and GREEN JEWEL (3).
- Click down.
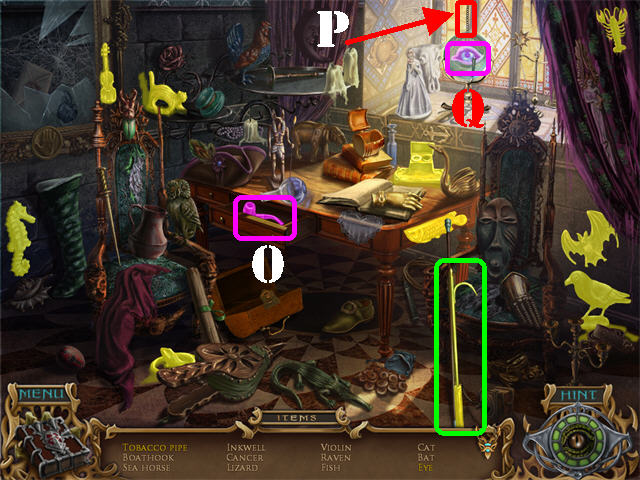
- Play the Hidden Object Scene on right.
- Open the drawer; take the TOBACCO PIPE (O).
- Pull the string (P) by the window; take the EYE (Q).
- The BOAT HOOK will be added to inventory.
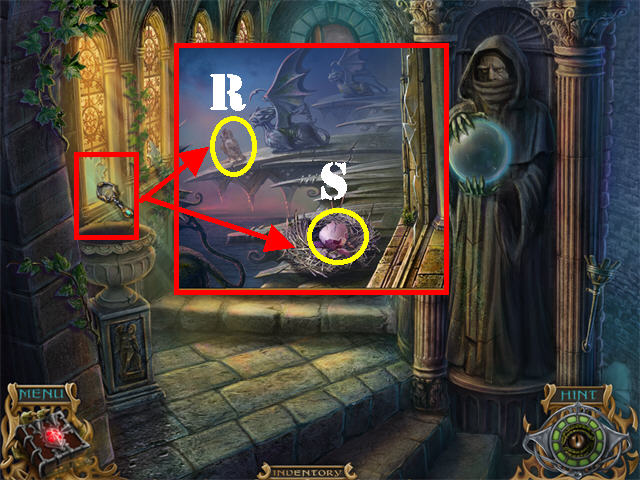
- Go through the back door and head forward.
- Zoom into the left window; click on the owl (R).
- Use the BOAT HOOK to pull the nest closer; take the EGGSHELL (S).
- Click down.
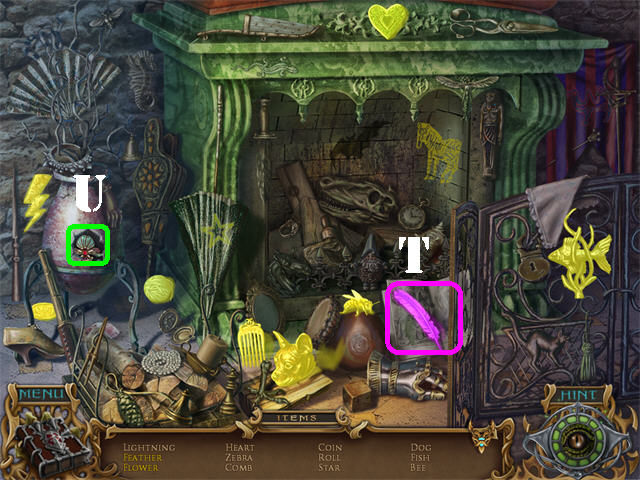
- Play the Hidden Object Scene by the fireplace.
- Turn the page; take the FEATHER (T).
- Click on the vase; take the FLOWER (U).
- The FLOWER will be added to inventory.
- Click down.
- Place the FLOWER on the vase in the lower left (V).
- Zoom into the vase; take the SEEDS (W).
- Go forward.
- Zoom into the left table.
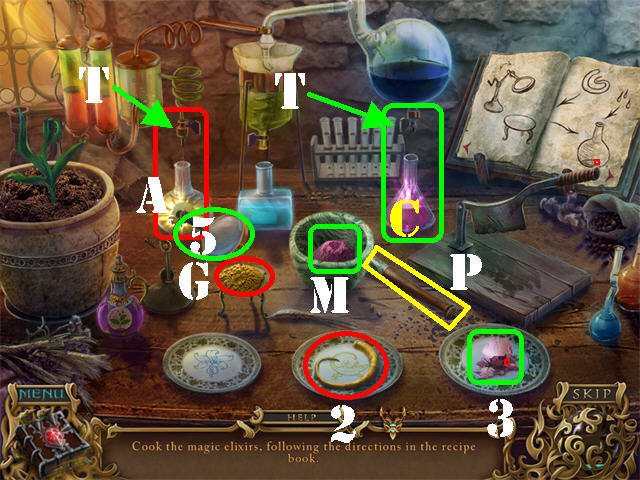
- Place the SEEDS (1), TAIL (2), EGGSHELL (3), ACCELERATOR (4), MAGNIFIER (5) and MORTAR (M) as shown in the screenshot to activate a puzzle.
- Follow the instructions shown in the book; click on the pages to flip through them (6).
- Drag the SEEDS (1) into the POT (P).
- Drag the ACCELERATOR (4) to the POT (P) for a flower to grow.
- Take the FLOWER (F) that grew in the pot and drag it to the CUTTING BOARD (8).
- Click on the KNIFE attached to the board to chop the FLOWER.
- Place the CHOPPED FLOWER into BEAKER B (B); click on the TAP (T) above BEAKER B to add the liquid.
- Turn the page.
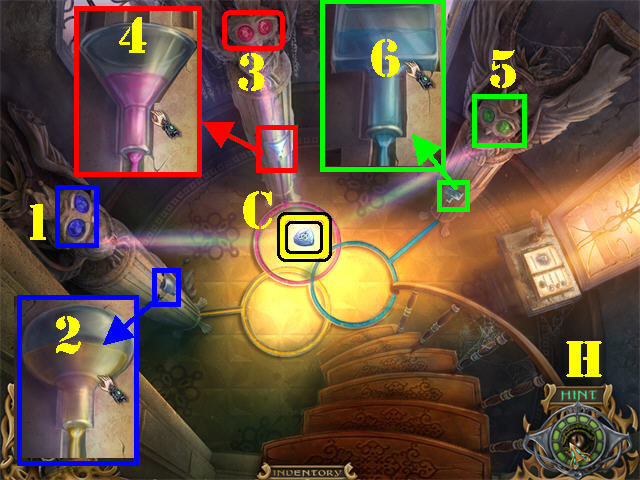
- Drag the TAIL (2) to the GOLD PLATE (G).
- Click on the MAGNIFIER (5) to pulverize the tail.
- Place the PULVERIZED TAIL into BEAKER A (A); click on the TAP (T) above BEAKER A to add liquid.
- Turn the page.
- Place the EGGSHELL (3) in the MORTAR (M).
- Drag the PESTLE (P) to the MORTAR (M) to crush the EGGSHELL.
- Place the CRUSHED EGGSHELL into BEAKER C (C); click on the TAP (T) above BEAKER C to add the liquid.
- The THREE ELIXIRS will be added to inventory.
- Go forward twice.
- Place the BLUE JEWEL on the left owl's empty eye socket (1); zoom into the base; place the matching elixir on the base (2).
- Place the RED JEWEL on the center owl's empty eye socket (3); zoom into the base; place the matching elixir on the base (4).
- Place the GREEN JEWEL on the right owl's empty eye socket (5); zoom into the base; place the matching elixir on the base (6).
- Click on the EYE OF OMNISCIENCE (Hint Button) to complete the ritual (H).
- Take the CRYSTAL OF OWLISH WISDOM (C).
- Click down 4 times and go forward 3 times.
- Zoom into the Queen (A).
- Place the QUEEN'S CROWN on her head.
- Put the CRYSTAL OF OWLISH WISDOM in the crown.
- Congratulations! You have completed Spirits of Mystery: Amber Maiden!
Created at: 2011-05-28