

Walkthrough Menu
- General Tips
- Chapter 1 – The Lightning Man
- Chapter 2 – The Invisible Man
- Chapter 3 – The Burning Man
- Chapter 4 – The Ice Man
- Chapter 5 – The Wolf Man
- Chapter 6 – Dr. Dagon
General Tips
- Click on Options for Sound, Music, Full, Wide Screen and Custom Cursor settings.
- Move your cursor around each scene to find interactive areas by watching the cursor change.
- The cursor will change to a magnifying glass when you can look closer at something.
- The cursor will change to a hand when you can pick something up.
- Random clicking in a Hidden Object Scene will cause you to lose control of your cursor for a few seconds.
- Skipping the puzzles will add 30 minutes to your total game time.
- Inventory items are marked in cyan throughout the walkthrough.
- Objects in red on a Hidden Object list will require you to do an action before you can get the item.
- Click on paintings, skeletons and other inanimate objects to get interesting reactions.
- The game has many areas to explore and is not fully linear. Since the Hidden Object Scenes are triggered by other actions you may or may not have access to them when the walkthrough states depending on what you have done prior.

- You can scroll through your inventory (A) by using the arrows on the left and right of the inventory bar.
- Click on the Notebook (B) in the lower left and choose the Story tab (C) to look over clues and notes or choose the Goals tab (D) to check on your objectives.
- Clicking on the Anomalous Activity Detector (E) in the lower right will highlight areas that you may obtain a hint.
- Click on the area that the ‘AAD’ has highlighted to get a picture of what you need to complete the task.
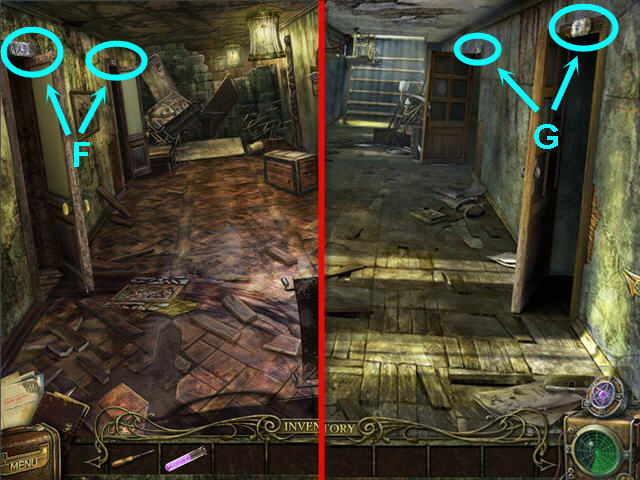
- Click on the Top Secret files (F) in the lower left to access the experiments conducted.
- Click on the photos in the Top Secret Files to replay the cutscenes.
- There are 6 Top Secret Files hidden in the game; they are marked with green squares in the walkthrough.
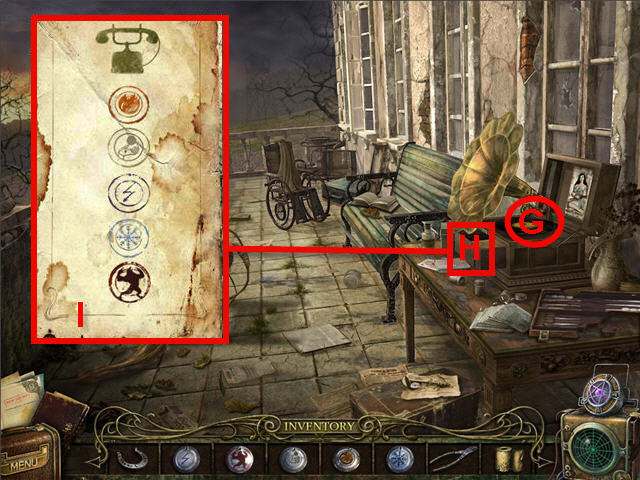
- The Nexus (G) is located above the ADD in the lower right.
- You will need to locate 5 Nexus tubes in the game.
- Click on the X in the corners of the pop-up boxes to close them.
- To exit, click on Menu in the lower left and then click on exit to main menu.
Chapter 1 – The Lightning Man
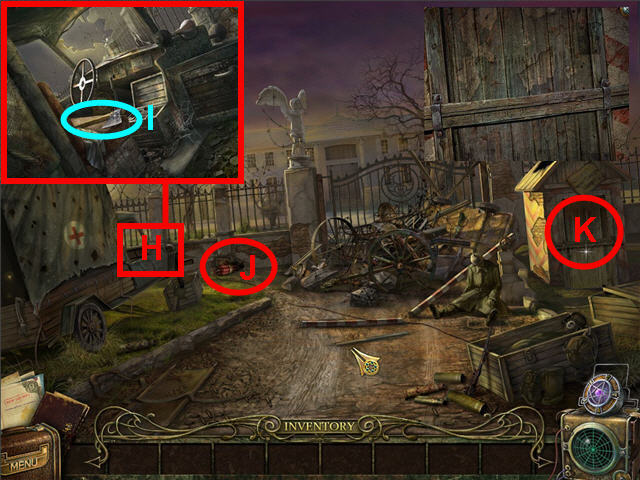
- Click on the truck door (H) and take the AXE (I).
- Click on the dynamite (J) by the wall and note it needs a detonator.
- Click on the sentry shack (K) and use the AXE on the door 3 times until the door opens.
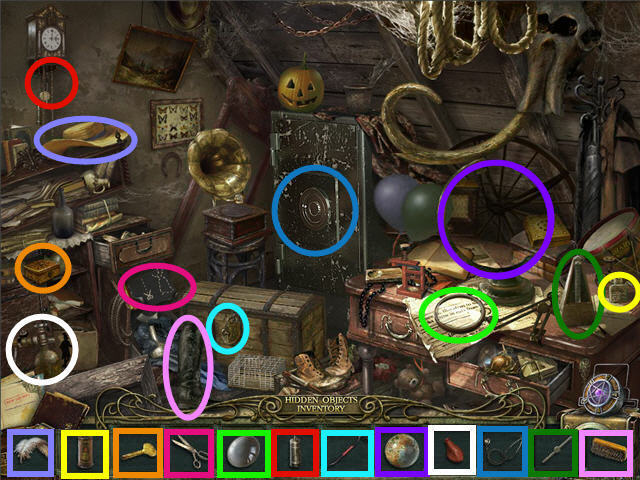
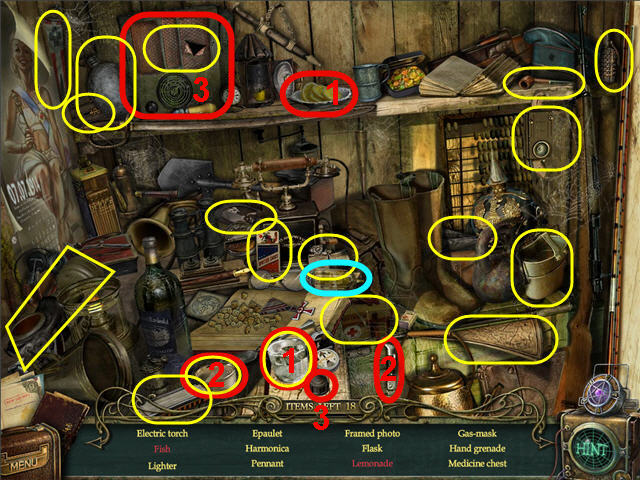
- Click on the opened shack to access a Hidden Object Scene.
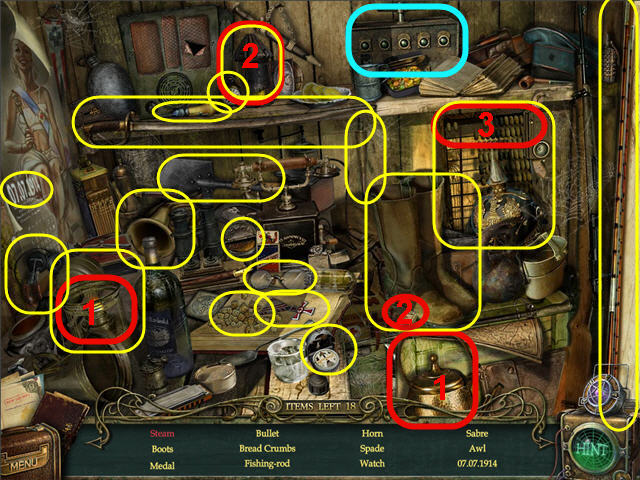
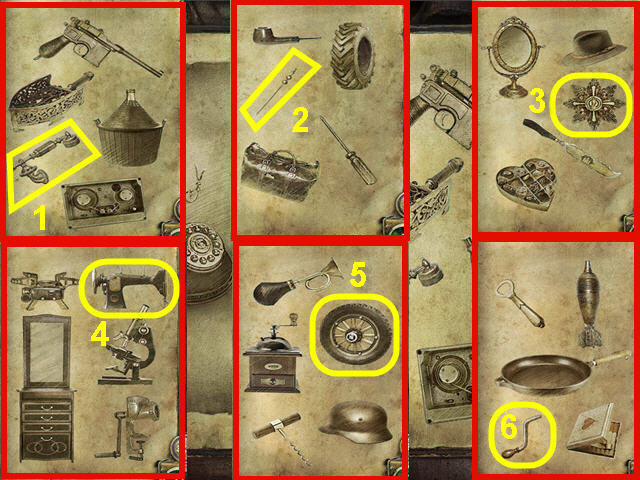
- Find the items listed and get a DETONATOR.
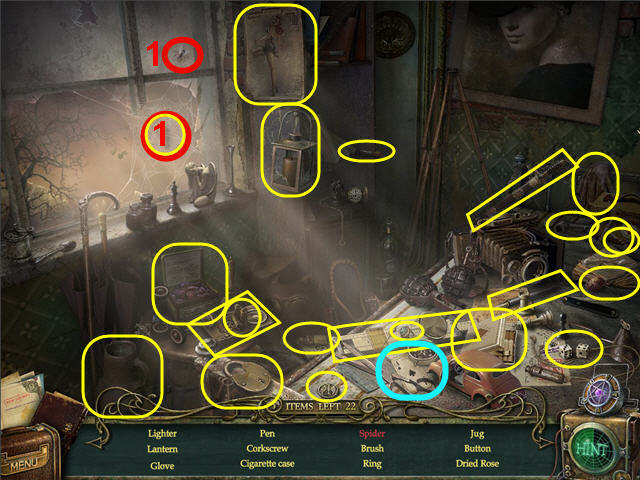
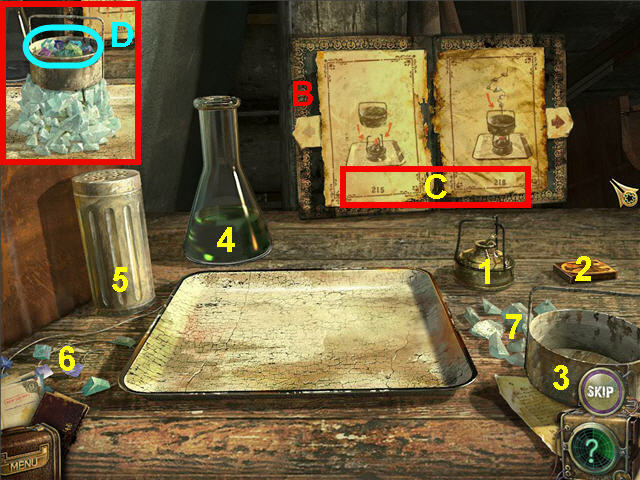
- Place the kettle on the burner to get the steam (1).
- Use the matches on the lantern to get a lit lantern (2).
- Move 5 beads to the left on the abacus and then click on the 5 beads together to get the 5 (3).
- Click on the dynamite along the wall left of the gate and place the DETONATOR on it.
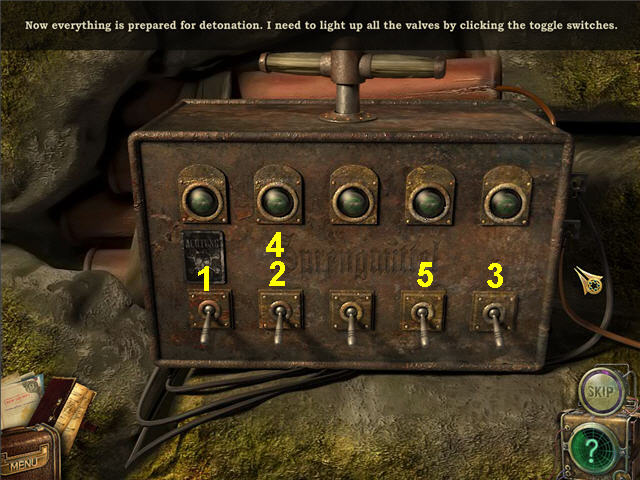
- The object is to turn all the lights above the switches green.
- Flipping one switch will turn off or on others.
- Flip the switches in the order shown in the screenshot.
- Head through the hole in the wall.
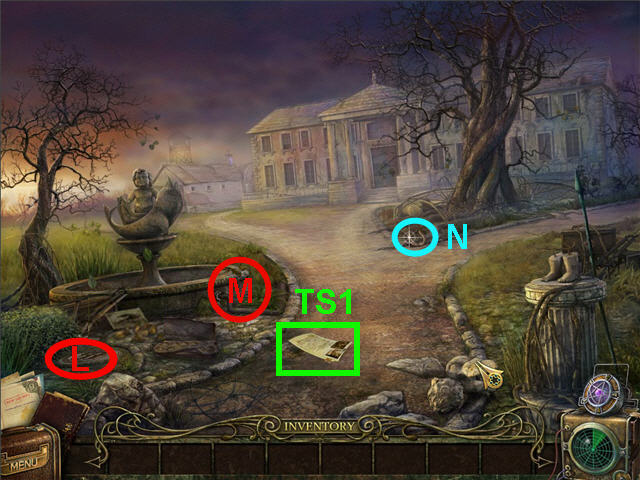
- Pick up the TOP SECRET PAGE 1 (TS1).
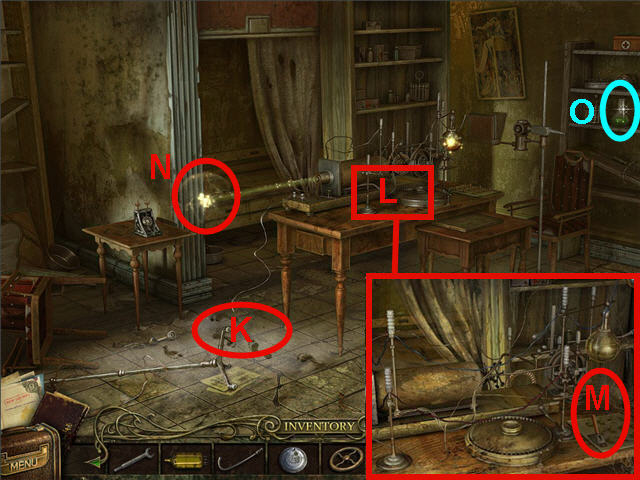
- Click on the grate (L) and the valve (M) and note the items needed.
- Pick up the HORSESHOE (N) by the crossroads.
- Head forward to the hospital and head to the area on the left.
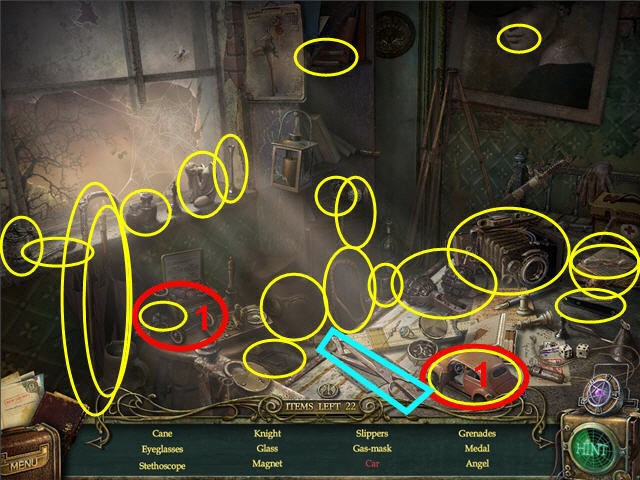
- Click on the bench to access a Hidden Object Scene.
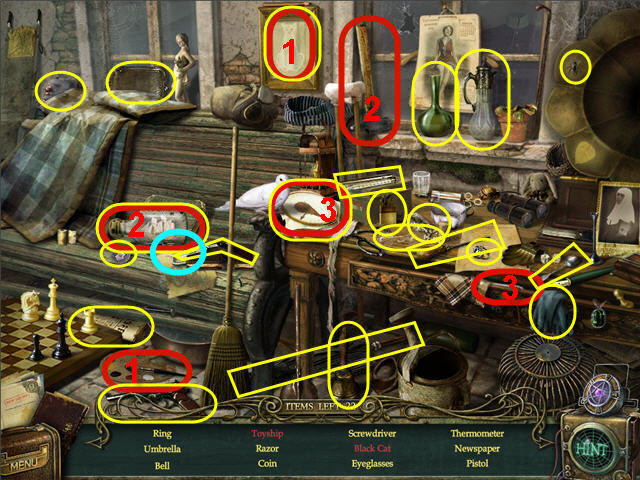
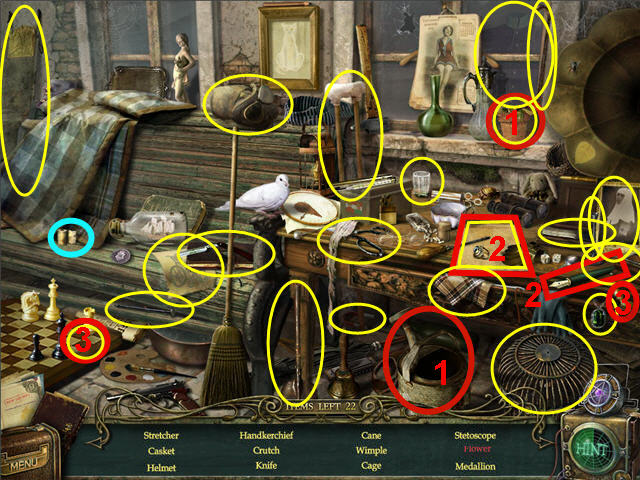
- Find the items listed and get a GRAMOPHONE HANDLE.
- Use the paintbrush on the white cat to get a black cat (1).
- Use the hammer on the ship in the bottle to get a toy ship (2).
- Use the needle and thread on the embroidery hoop to get a heart (3).
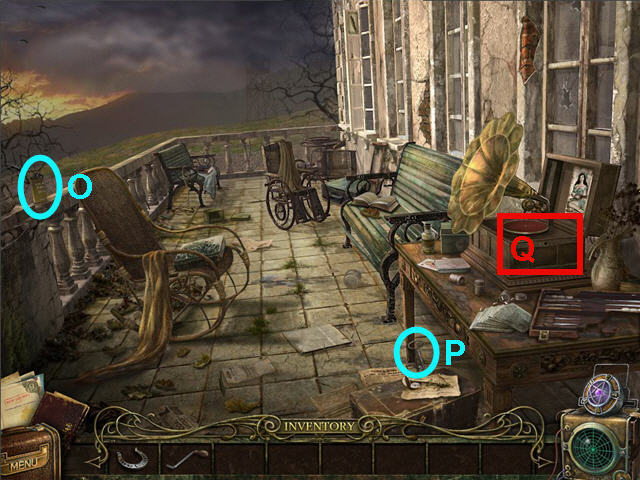
- Pick up the SMOKE GRENADE (O).
- Take the KEY (P).
- Place the GRAMOPHONE HANDLE on the gramophone (Q).
- Back out of the area two times and head down the path on the right.
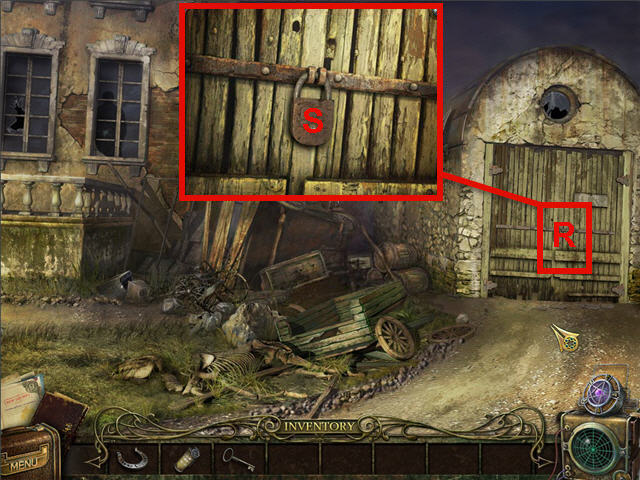
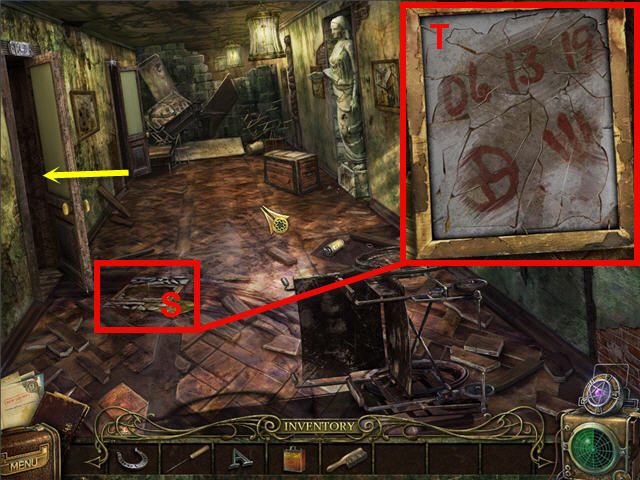
- Click on the shed door (R) and use the KEY on the padlock (S).
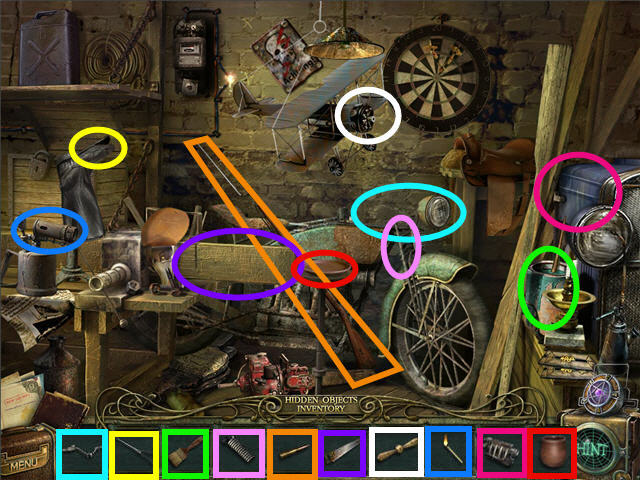
- Enter the garage and click on the far left corner of the room to access a Hidden Object Scene.
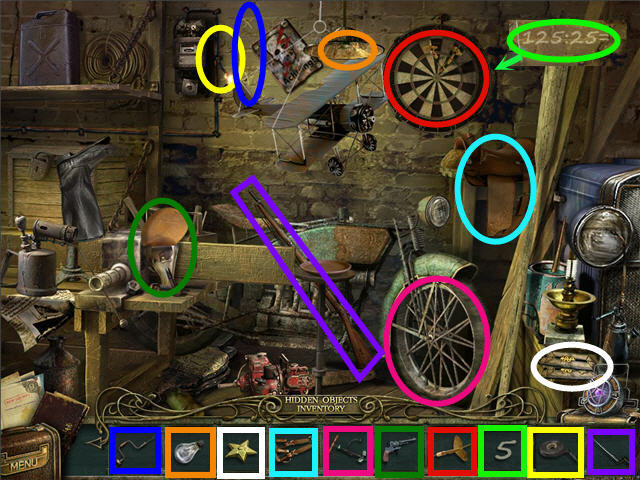
- Place the objects into the scene where they belong.
- The LOCKPICK will be added to inventory.
- Click the car on the right and note the gas leaking out.
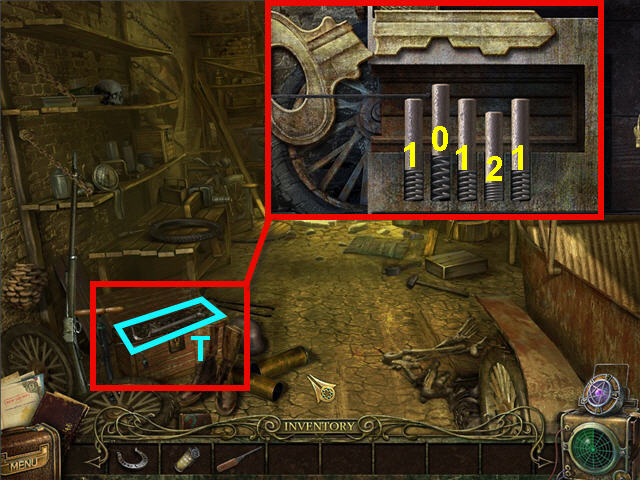
- Click on the chest on the left to trigger a lock puzzle.
- Use the LOCKPICK on the tumbler to activate.
- The goal is to arrange the tumblers to fit the key on the top.
- Click the tumblers from left to right the number of times listed; 1, 0, 1, 2, 1. See screenshot for solution.
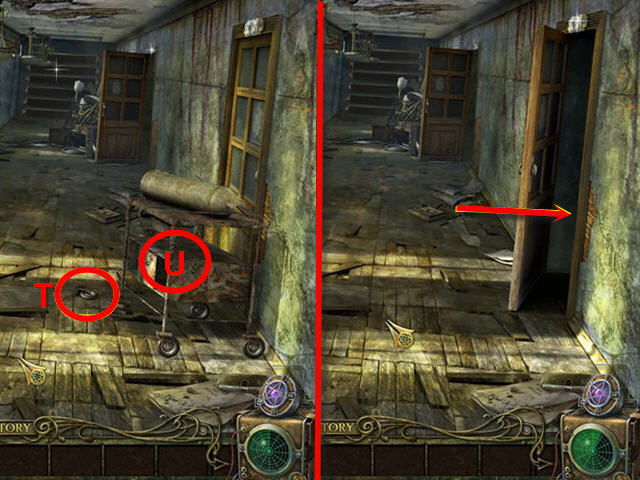
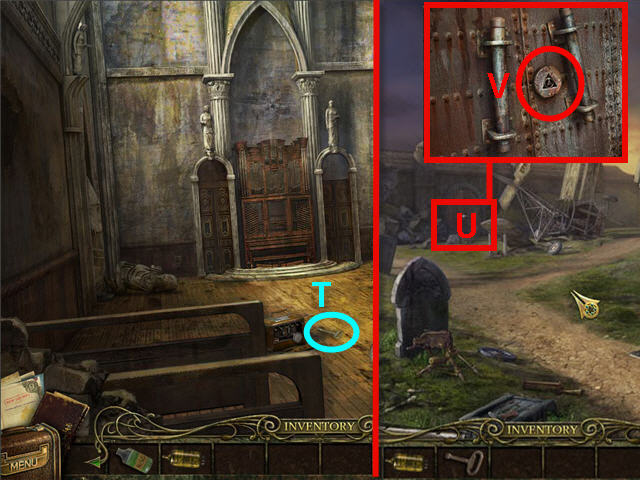
- Take the CROWBAR (T) from the opened chest.
- Back out of the area two times to the fountain area.

- Use the CROWBAR on the grate (U).
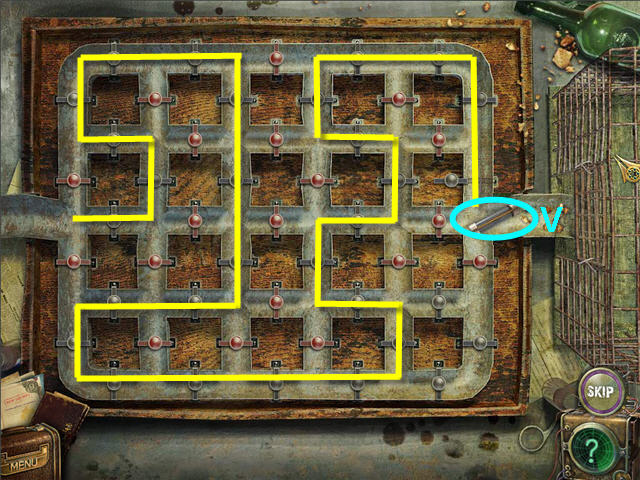
- Click on the opened grate to trigger a pipe puzzle.
- Place the pipes on the grid to complete the flow.
- The pipe will appear faded if placed in an incorrect area. See screenshot for solution (V).
- Head straight to the hospital entrance.
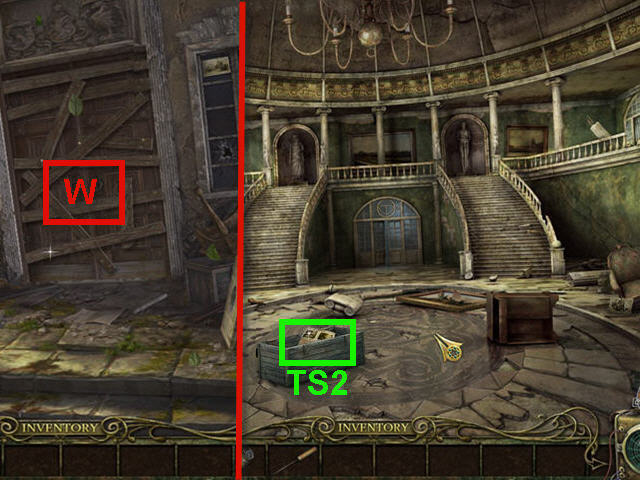
- Use the CROWBAR on the planks (W) a few times until the door opens.
- Enter the hospital.
- Click on the crate and take the TOP SECRET PAGE 2 (TS2).
- Check out the upper and lower corridors on the left.
- Look at the padlock on the upper right hallway.
- Head straight into the door between the staircases.
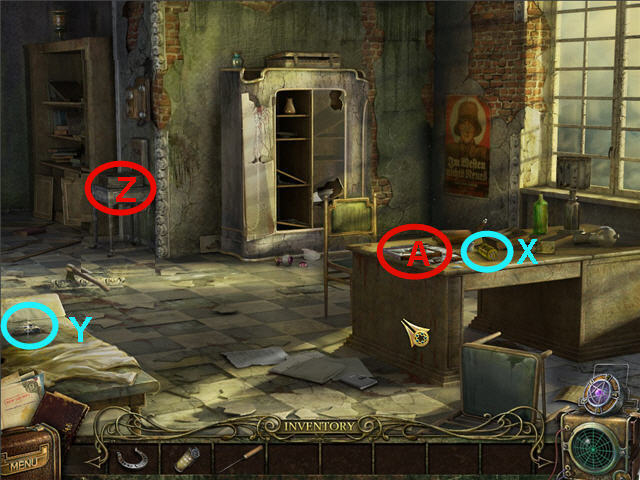
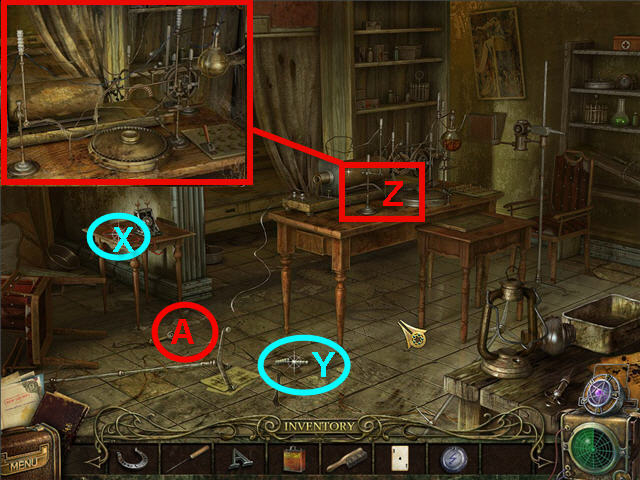
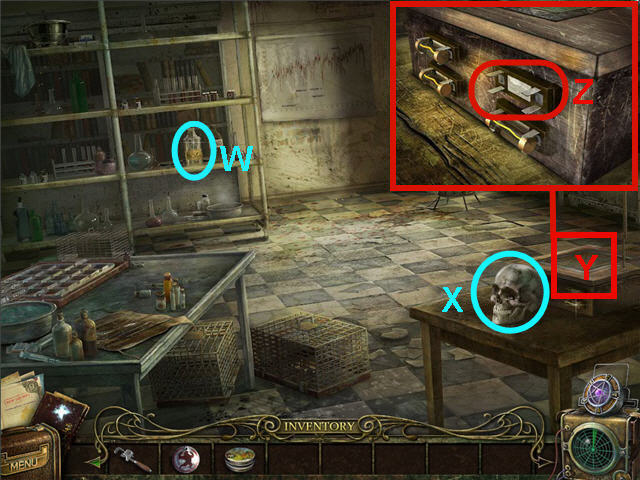
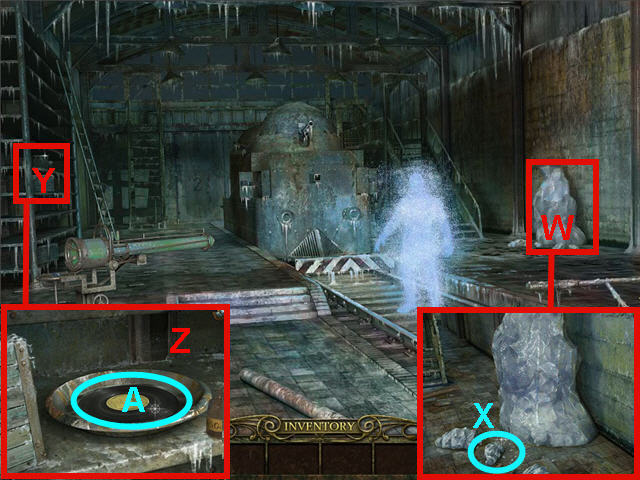
- Take the NEXUS TUBE (X) from the desk.
- Pick up the METAL LETTER ‘A’ (Y).
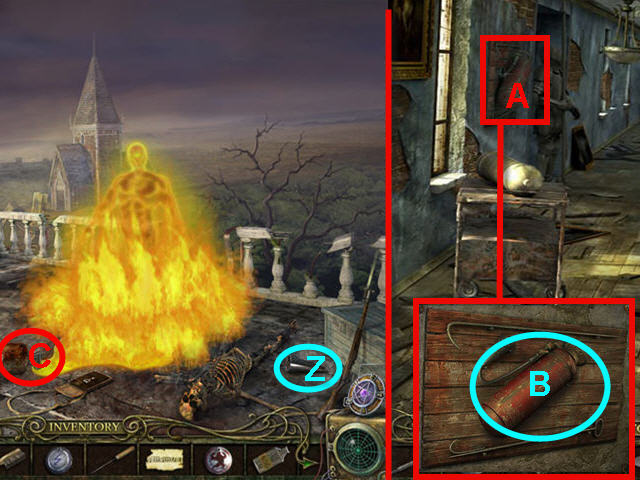
- Click on the device (Z) on the wall and note it needs a paper roll.
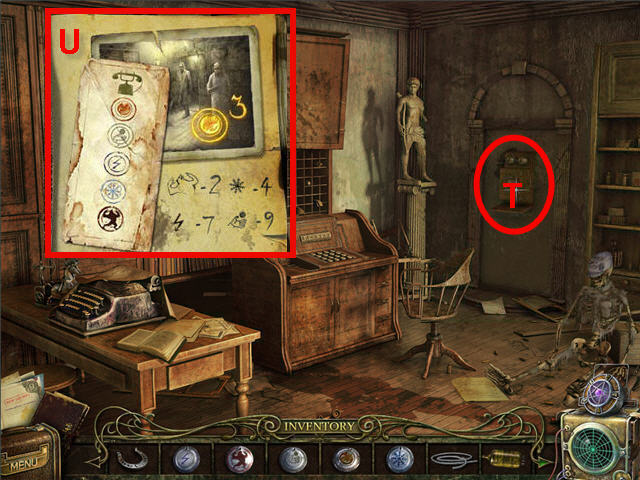
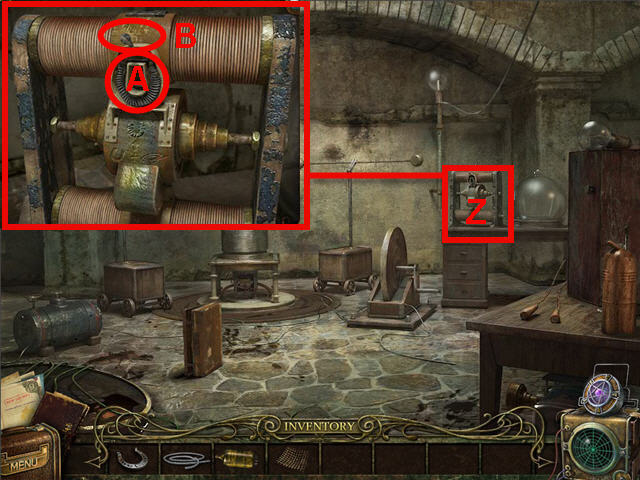
- Click on the photo (A) on the desk to trigger a puzzle.
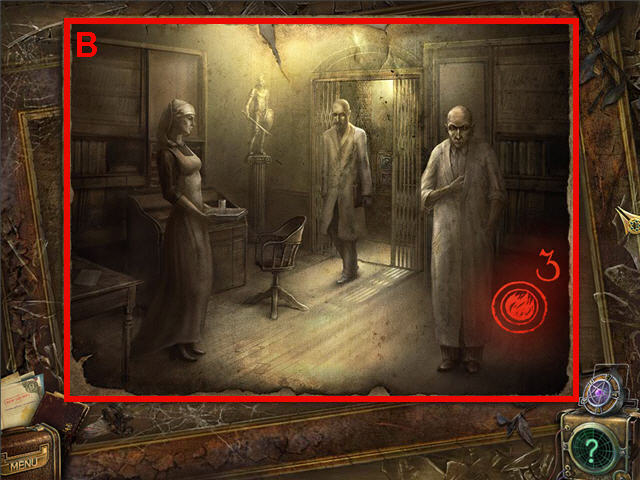
- Swap any two grayed out pieces of the photo until the photo is completed.
- The pieces will turn brownish and will lock in place once correctly placed.
- Note the code in the bottom right of the completed photo. See screenshot for solution (B).
- Back out of the area three times to the fountain and head down the path to the left.
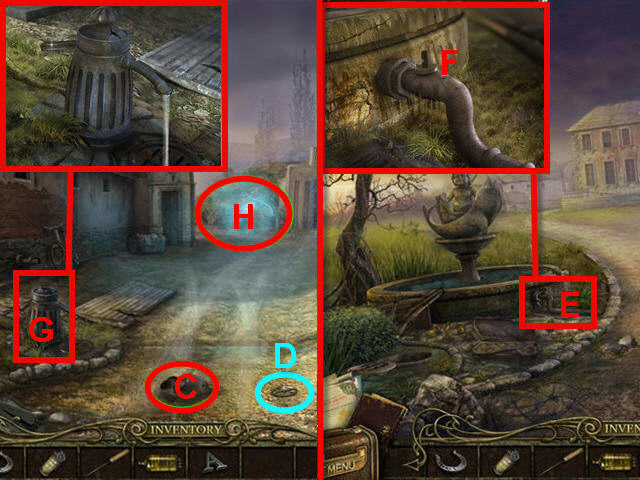
- Click on the shoe (C) to move it and take the VALVE (D).
- Back out one time and click on the water pipe (E) by the fountain.
- Place the VALVE on the stem (F) and click to turn it.
- Head down the path to the left.
- Click on the water pump (G) on the left and pump the handle.
- Use the NEXUS TUBE on the energy (H) of the lightning man.
- Enter the building on the left.
Chapter 2 – The Invisible Man
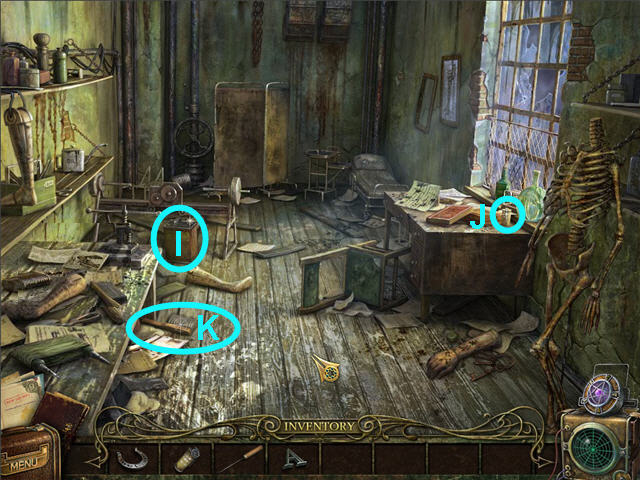
- Take the TANK FOR GASOLINE (I) from the floor.
- Take the BATTERY (J) from the desk top.
- Take the BRUSH (K) from the floor.
- Click on the skeleton on the right and note the missing skull.
- Back out of the area one time and head straight into the morgue.
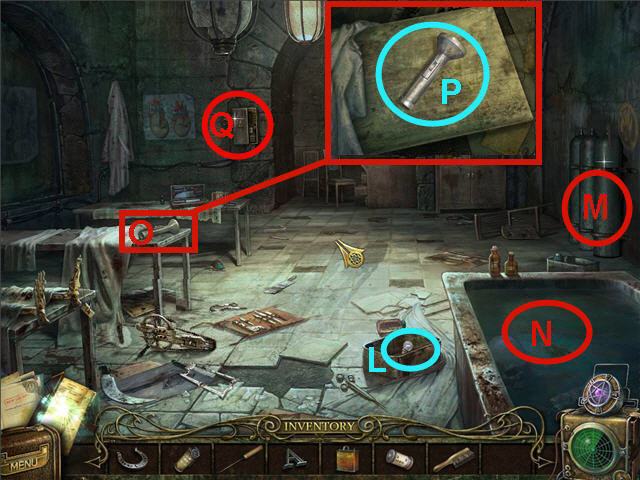
- Take the LANTERN BULB (L) from the container.
- Check the cylinders (M) along the right wall.
- Click on the tub (N) and note the key.
- Place the BATTERY and LANTERN BULB on the flashlight (O).
- Take the LANTERN (P).
- Click on the fuse box (Q) on the left of the alcove to access a fuse puzzle.
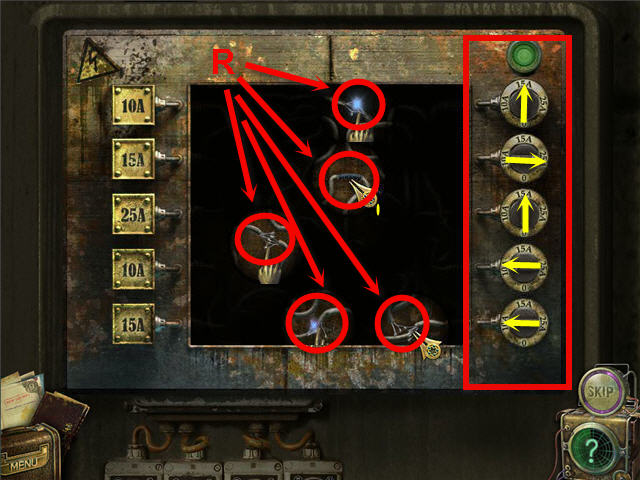
- Click the LANTERN on the wire panel in the center and move it around to find and repair the broken wires.
- Click on the broken wires (R) to repair them; the light in the upper right will turn yellow when all are repaired. See screenshot for solution.
- After repairing the wires, follow the wires with the lantern beam from the left to their connecting dials on the right.
- Click on the dials on the right to match the same amps as the connecting wire on the left after tracing the wires.
- The solution from top is; 15, 25, 15, 10, 10.
- Back out of the area two times to the fountain and head forward into the hospital.
- Head into the upper left hallway.
- Throw the SMOKE GRENADE into the room to scare away the invisible man.
- Look close at the plaques on the top of the two doorways to the left.
- Click on the broken glass (S) on the floor to trigger a puzzle.
- Place the glass pieces in the frame to complete the picture. See screenshot for solution (T).
- Enter the bedroom on the left.
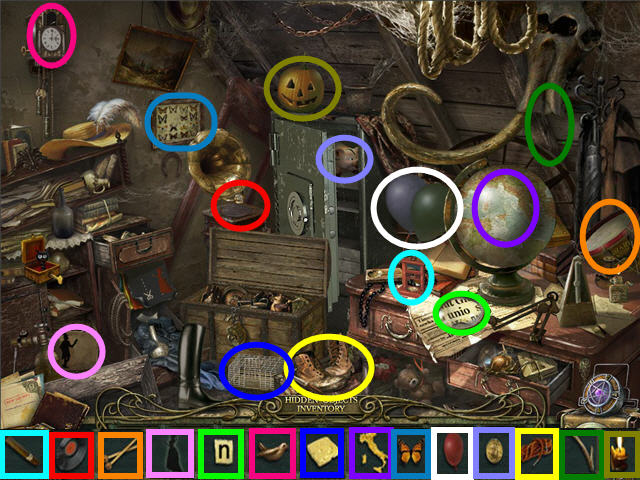
- Click on the bookshelf to the right of the window to access a Hidden Object Scene.
- Find the items listed and get a PLAYING CARD.
- Place the fly on the web to get the spider (1).
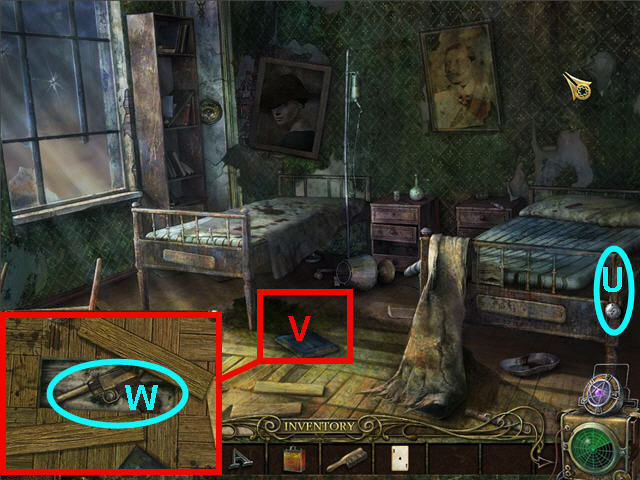
- Take the MEDAL (U) hanging on the bed frame.
- Click on the floorboard (V) by the blue book a couple times and take the PISTOL (W).
- Exit the room and head into the second room on the left down the hall.
- Take the WIRE SCRAP (X) from the table on the left.
- Take the INSULATORS (Y) from the floor.
- Click on the X-Ray device (Z) on the table.
- Place the INSULATORS and the WIRE SCRAP on the X-Ray device.
- Click on the floor (A) and note we need something to help detect footprints.
- Click on the lamp on the lower right table and the green beaker on the right shelf.
- Back out of the area four times to the fountain and head down the right path into the garage.
- Click on the car (B) and use the TANK FOR GASOLINE on the leaking gas (C).
- Automatically get a GASOLINE-FILLED TANK.
- Head straight through the hole in the garage.
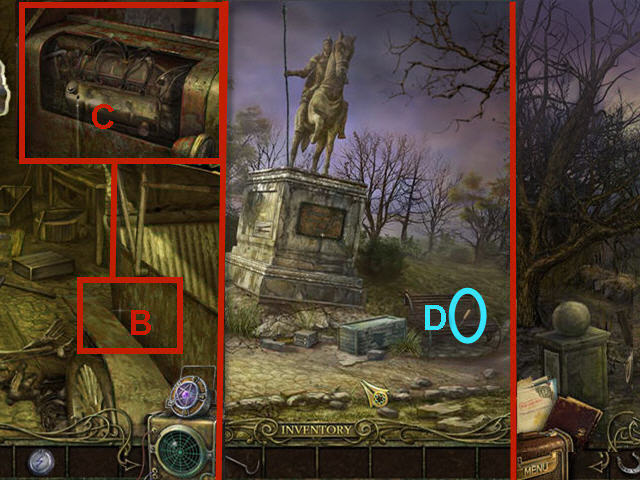
- Take the ICE PICK (D) from the bench.
- Click on the plaque on the base of the statue and note the missing letters.
- Head to the right and click on the rowboat and the motor two times.
- Back out of the area four times to the fountain and head into the hospital.
- Enter the upper left hallway.
- Head into the second door on the far left.
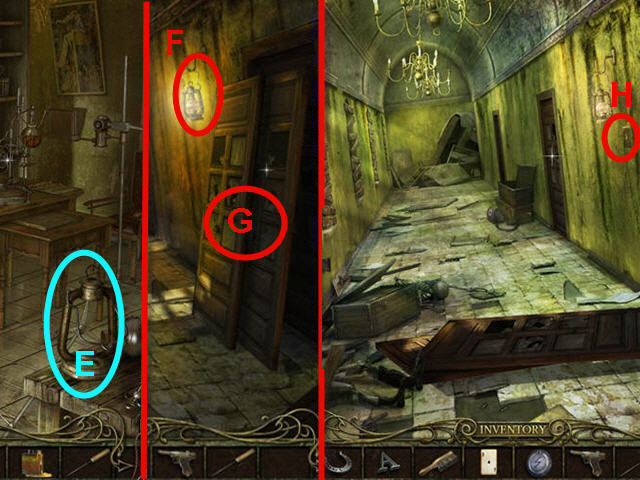
- Use the GASOLINE-FILLED TANK on the lamp (E) and take the CHARGED KEROSENE LAMP.
- Back out of the area two times.
- Head into the lower left hallway.
- Hang the CHARGED KEROSENE LAMP on the hook (F) on the right.
- Click on the leaning doors (G) to move them.
- Click on the switch (H) to the right of the lamp and flip it up.
- Enter the newly-opened door on the right.
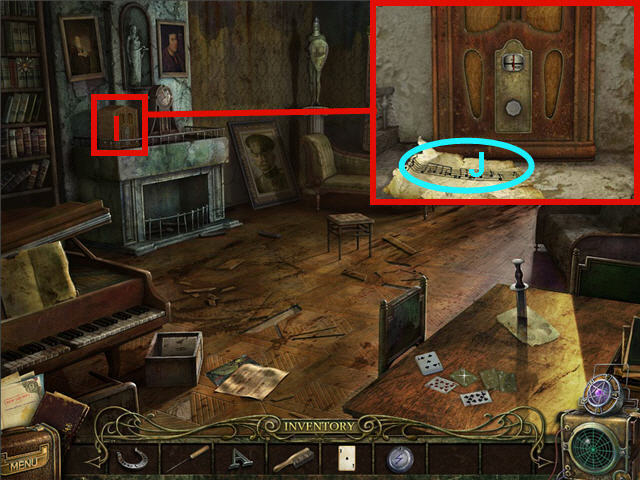
- Click on the radio (I) on the mantle.
- Click the dial 3 times until the notes are jotted down; take the NOTES (J).
- Click on the playing cards on the table.
- Place the PLAYING CARD on the table to activate the puzzle.
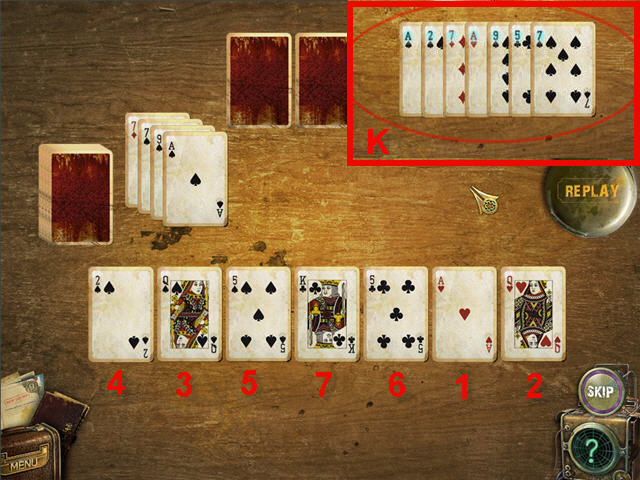
- The goal is to utilize all the cards laid out on the bottom to complete the series of the cards that are face up above them by matching either the suit or value.
- Click and drag the lower cards to the ones above.
- The solution is; Ace of Hearts, Queen of Hearts, Queen of Spades, 2 of Spades, 5 of Spades, 5 of Clubs, and King of Clubs. See screenshot for solution.
- Note the code that you receive when complete (K).
- Head through the doorway on the right.
- Click on the table by the left window to access a Hidden Object Scene.
- Place the objects into the scene where they belong.
- You will obtain a CUPBOARD HANDLE.
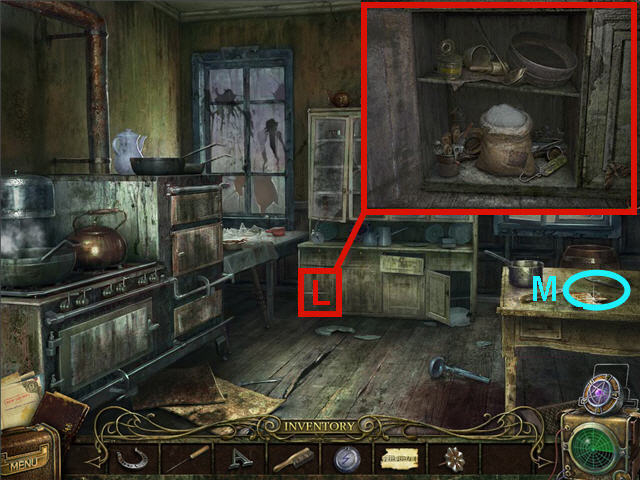
- Click on the lower left cabinet door (L) and place the CUPBOARD HANDLE on the door.
- Look at the sack of flour.
- Take the slice of bread on the table to get CRUMBS (M).
- Back out of the area three times to the foyer.
- Click on the area on the upper right.
- Use the PISTOL on the padlock and take the HOOKED CHAIN.
- Go into the upper right hallway.
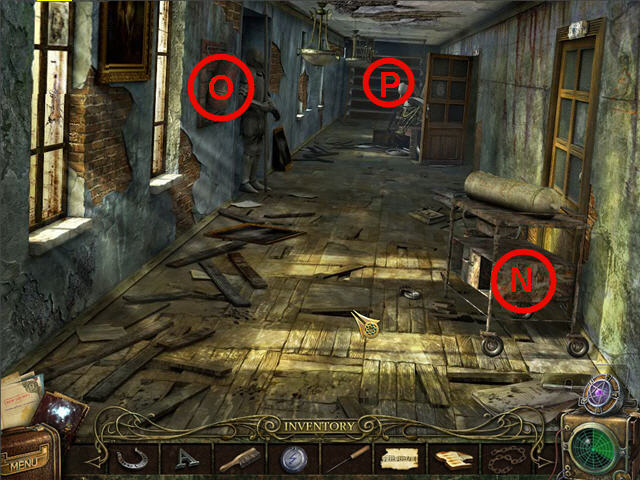
- Click on the cart (N).
- Click on the fire extinguisher (O) on the left wall and note the missing pieces.
- Look close at the plaques on the top of the doorways.
- Click on the ladder (P) at the end of the hall and note you need a wheel.
- Head into the second room on the right.
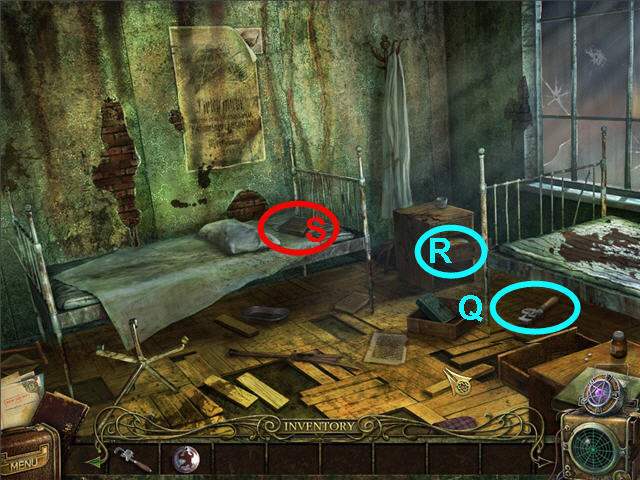
- Take the WRENCH (Q) from under the bed.
- Click on the bottom drawer of the nightstand and take the EMPTY TIN BOX (R).
- Click on the pillow to move it and click on the diary (S) to trigger a puzzle.
- Place the phone receiver (1) on the phone cradle.
- Place the hatpin (2) on the hat.
- Place the brooch (3) on her bodice.
- Place the sewing machine (4) on the cabinet.
- Place the wheel (5) on the car.
- Place the crank (6) on the gramophone.
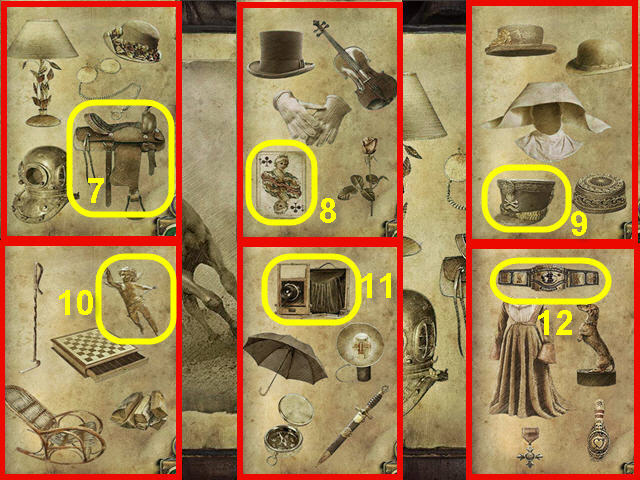
- Place the saddle (7) on the horse.
- Place the playing card (8) on the table.
- Place the military cap (9) on the soldier.
- Place the cupid (10) on the clock.
- Place the camera (11) on the tripod.
- Place the championship belt (12) on the weight lifter.
- Take the MEDAL from the back of the book.
- Exit to the hall.
- Use the WRENCH on the wheel (T) by the cart.
- Click the cart (U) to roll it away.
- Enter the newly-opened door on the right.
- Click on the mouse maze on the table on the left to get a puzzle.
- Place the CRUMBS on the exit ramp on the right.
- Move the mouse through the maze by clicking on the little gates in the maze.
- If they turn red, you need to find another path. See screenshot for solution.
- Take the PROJECTOR DETAIL (V).
- Take the BOTTLE FOR ACID (W) from the shelves.
- Take the SKULL (X) on the table to the right.
- Click on the projector(Y) and place the PROJECTOR DETAIL on the empty slot (Z).
- Exit the area two times to the foyer and head into the lower left hallway.
- Head right into the first doorway on right and then into the kitchen.
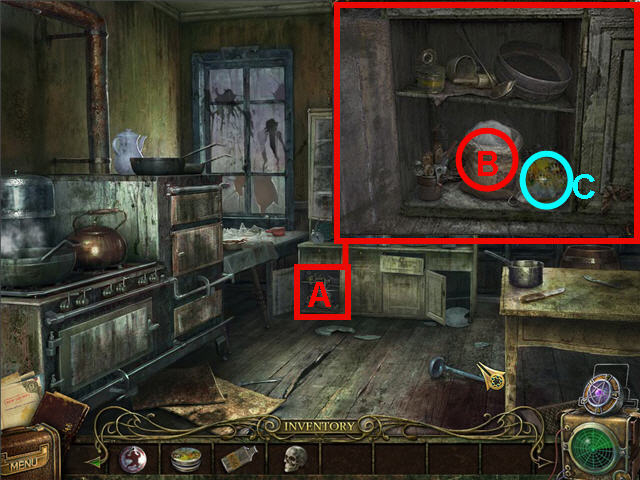
- Click the lower left cabinet door (A) to get a close-up.
- Use the EMPTY TIN BOX on the sack of flour (B).
- Take the FLOUR-FILLED BOX (C).
- Back out of the area five times to the fountain and head down the path to the left.
- Head into the building on the left.
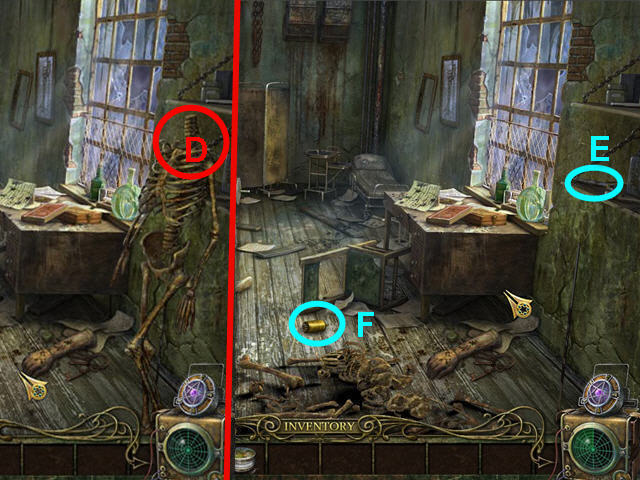
- Place the SKULL on the skeleton (D).
- Take the HEX-NUT WRENCH (E) from the shelf on the right.
- Take the NEXUS TUBE (F).
- Exit the building and head into the morgue straight ahead.
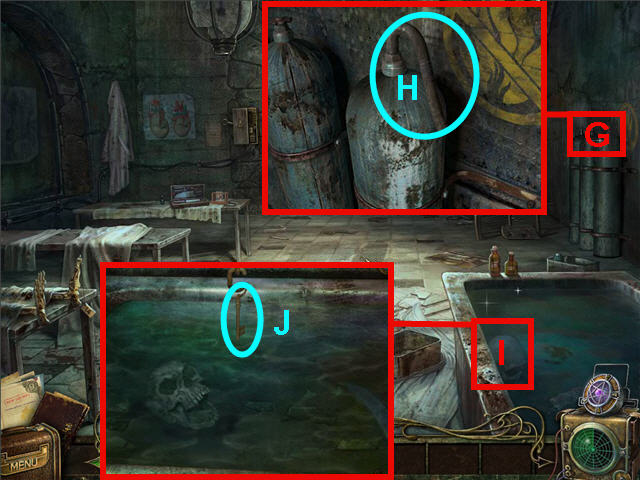
- Click on the tanks (G) along the right wall to get a close-up.
- Use the WRENCH (not the hex nut wrench) on the top of the right tank and take the HOSE (H).
- Click on the tub (I) and use the HOOKED CHAIN on the key.
- Take the KEY (J).
- Back out of the area two times to the fountain and head into the hospital.
- Head into the upper hall on the left.
- Enter the second door on the left.
- Place the FLOUR FILLED BOX on the floor (K). Make sure you placed the INSULATORS and the WIRE SCRAP on the X-Ray device first as stated earlier in the guide.
- Click on the X-Ray machine (L) and flip the switch (M) to turn it on.
- Use the NEXUS TUBE on the energy of the invisible man (N).
- Take the DISTILLED WATER (O) from the bookshelf.
- Back out of the area two times to the foyer and head into the lower hall on the left.
- Click on the second door on the right and use the KEY; go through the door.
Chapter 3 – The Burning Man
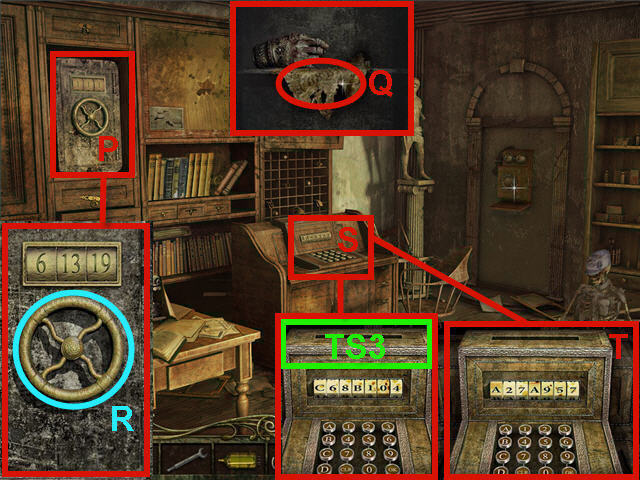
- Click on the safe (P) and enter the code on the dials from the glass puzzle, located in your notebook.
- The solution is 6-13-19; get the code (Q) from inside the safe.
- Take the SAFE HANDLE (R) from the safe door when complete.
- Click on the document device (S) to get a close-up.
- Using the keypad, enter the code you received from the card game which is now located in your notebook, and press OK.
- The solution is A27A957; take the MEDAL. See screenshot for solution (T).
- Click on the document device (S) again to get a close-up.
- Using the keypad, enter the code from the safe which is now located in your notebook, and press OK.
- The solution is C68B104; automatically get the TOP SECRET PAGE 3 (TS3).
- Back out of the area two times to the foyer and head to the upper right hallway.
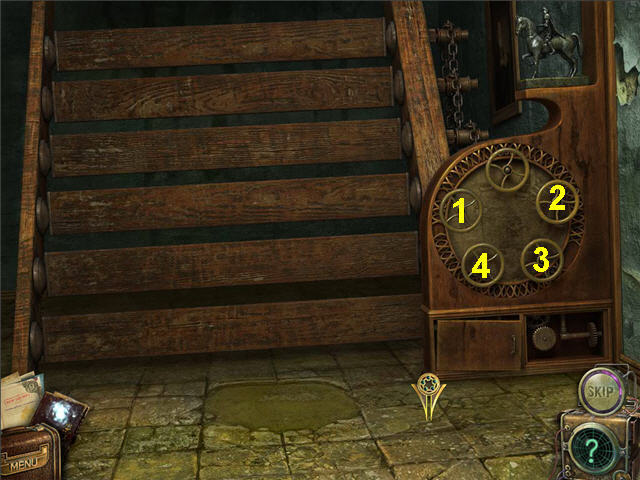
- Look close at the far end of the hall and place the SAFE HANDLE on the peg without a wheel on the right.
- The object is to turn the wheels so that all the steps are turned parallel to the floor.
- See screenshot for the order to turn the wheels.
- Head up the stairs at the end of the hall.
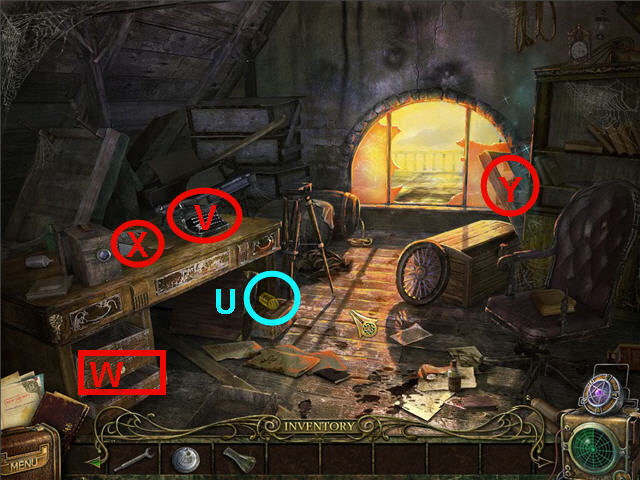
- Pick up the NEXUS TUBE (U).
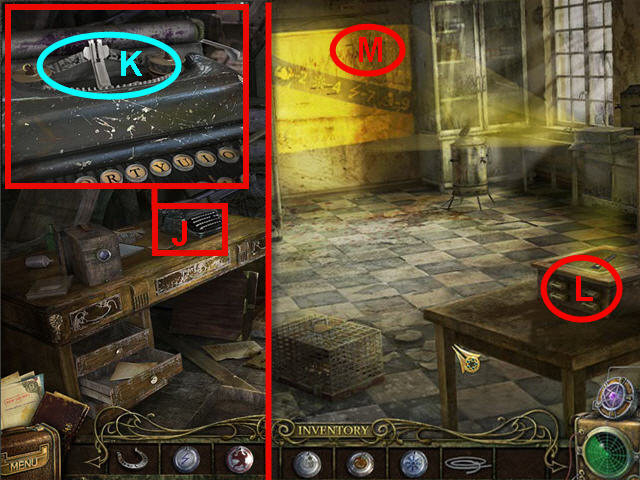
- Click on the typewriter (V) and note you need scissors.
- Open the bottom left drawer (W) and look close at the record cleaning directions.
- Click on the desktop (X) to the left of the typewriter and note you need water, an alcohol lamp and ice.
- Click on the right window panel (Y) to access a Hidden Object Scene.
- Place the objects into the scene where they belong and get a GRIME-COVERED RECORD.
- Go through the broken window after you’ve completed the search scene.
- Click on the burning man.
- Take the CONE (Z) to the right of the burning man.
- Back out of the scene two times and zoom into the fire extinguisher (A).
- Place the HOSE and the CONE on the extinguisher and take the EXTINGUISHER (B).
- Head up the stairs at the end of the hall and out the window.
- Use the EXTINGUISHER on the burning man.
- Click on the tank (C) by the flames and note it is missing a valve.
- Back out of the area three times to the foyer and head into the lower left hall.
- Enter the first door on the right and right again into the kitchen.
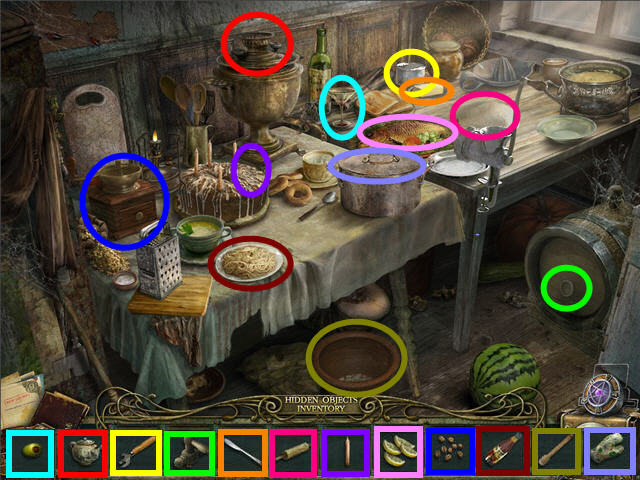
- Click on the table in front of the left window to access a Hidden Object Scene.
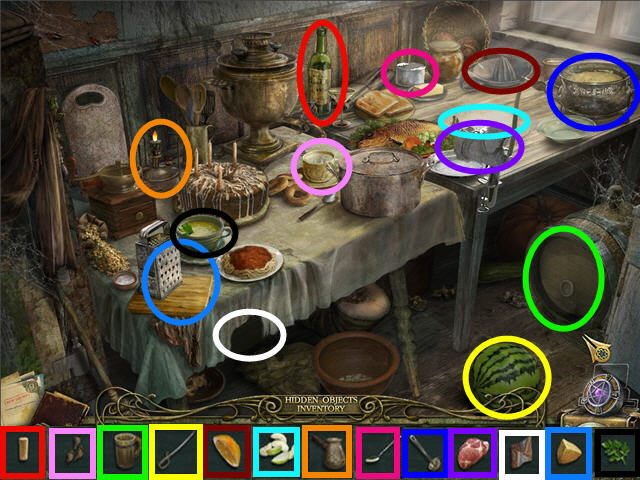
- Place the objects into the scene where they belong and get a PRIMUS GOVERNOR.

- Back out of the area three times to the foyer and head into the upper right hallway.
- Head up the stairs and out the window.
- Click on the tank (D) on the ground by the flames.
- Use the PRIMUS GOVERNOR on the tank (E).
- Use the NEXUS TUBE on the energy (F) of the burning man.
- Head down through the opening of the guard rail to the graveyard.
- Click on the grave stone in the shape of a cross to access a Hidden Object Scene.
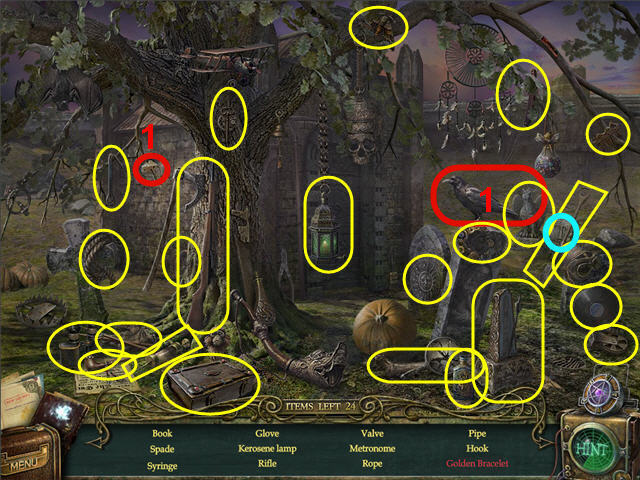
- Find the items listed and get METAL LETTER ‘T’.
- Use the cheese with the crow to get the golden bracelet (1).
Chapter 4 – The Ice Man
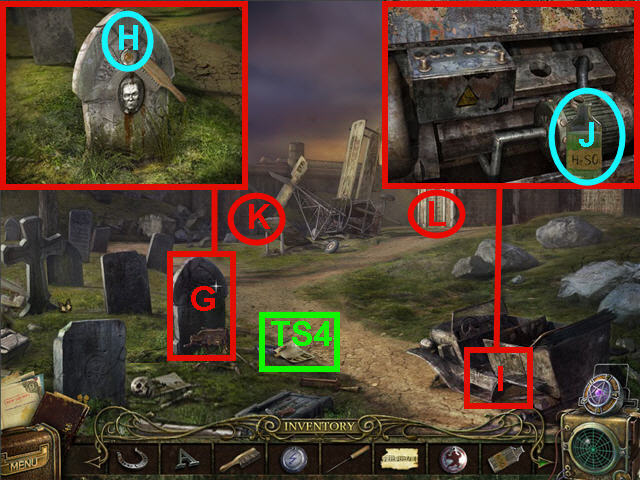
- Click on the grave (G) next to the path and use the BRUSH on the gravestone face.
- Take the MEDAL (H) from the cleaned gravestone.
- Pick up the TOP SECRET PAGE 4 (TS4).
- Click on the car chassis (I) on the bottom right to get a close-up.
- Use the BOTTLE FOR ACID on the dripping fluid to get an ACID-FILLED BOTTLE (J).
- Click on the hangar doors (K) and note you need a special key.
- Click on the chapel doors (L) to access a lock puzzle.
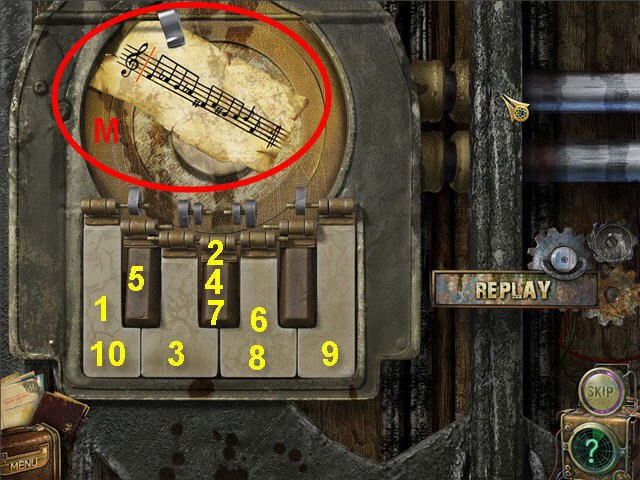
- Place the NOTES (M) above the keyboard.
- Click replay if you wish to hear the tune, the keys do not move when it plays.
- Making a mistake will require you to start over, but the tune will remain the same.
- Click the keys in the order of the notes on the sheet music. See screenshot for solution.
- Enter the chapel.
- Click on the lantern (N) and use the HEX-NUT WRENCH on the nuts.
- Take the NEXUS TUBE (O).
- Take the METAL LETTER ‘B’ (P).
- Click on the organ and note the roller is missing.
- Back out of the area seven times to the fountain; head to the right twice and forward through the hole.
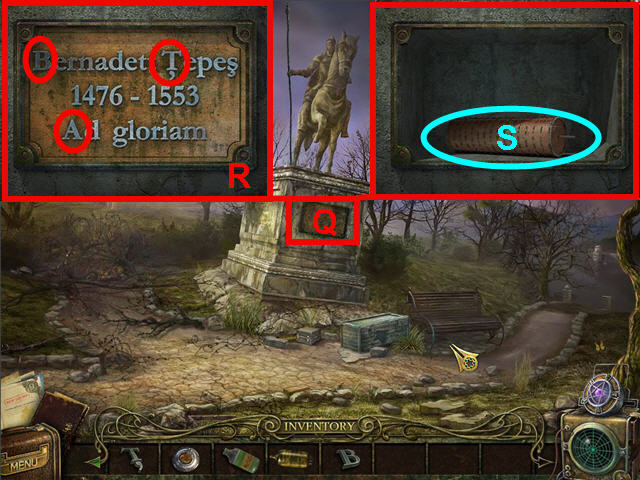
- Click on the plaque (Q) on the statue base.
- Use the METAL LETTERS B, T and A on the correct spaces to complete the plague. See screenshot (R) for solution.
- Take the PINNED CYLINDER(S).
- Back out of the area three times to the fountain and head into the hospital.
- Head to the upper right hallway, go forward up the stairs to the garret, out the window, down the opening and into the chapel.
- Click on the organ.
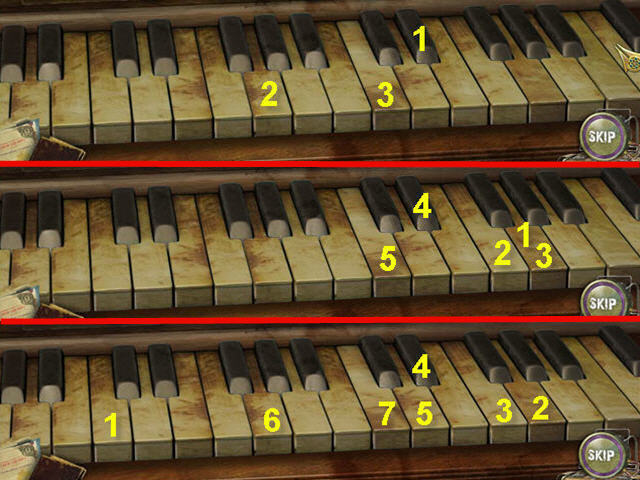
- Place the PINNED CYLINDER on the upper middle.
- The goal is to replay the tune; click on replay to watch the keys.
- There are 3 tunes; see screenshot for solution.
- Pick up the HANGAR KEY (T) from the floor.
- Back out of the chapel and click on the hangar doors (U) straight ahead.
- Use the HANGAR KEY on the special lock (V) and enter the hangar.
- Click on the block of ice (W) along the right wall.
- Use the ICE PICK on the block of ice and pick up the ICE BRICK (X).
- Click on the boxes (Y) on the shelves to the left.
- Place the GRIME-COVERED RECORD in the tin (Z).
- Place the ACID-FILLED BOTTLE on the GRIME-COVERED RECORD and take the RECORD (A).
- Back out of the area three times to get to the garret and click on the right window pane to access a Hidden Object Scene.
- Place the objects into the scene where they belong and get an ALCOHOL LAMP.
- Click on the tray on the desk between the typewriter and the camera.
- Place the ICE BRICK, DISTILLED WATER, and ALCOHOL LAMP on the tray area.
- Use the recipe book (B) as your guide; note the pages numbers (C) are out of order and you will need to turn the pages using the arrows on the left and right of the pages.
- Click on the items around the tray in the order of the recipe ALCOHOL LAMP, matchbook, pot, DISTILLED WATER, salt, crystals on a string and ICE BLOCK.
- Take the CRYSTALS (D).
- Exit through the window, down the opening and into the hangar.
- Click on the gun (E) and place the CRYSTALS in the opening.
- Arrange the crystals in the center so that they all fit without spaces or overlapping. See screenshot for solution (F).
- Click on the gun (E) after the crystal puzzle is completed.
- Use the NEXUS TUBE on the energy of the Ice Man and pick up the MEDAL (F).
- Exit out of the hangar and click on the cross shaped tombstone to access a Hidden Object Scene.
Chapter 5 – The Wolf Man
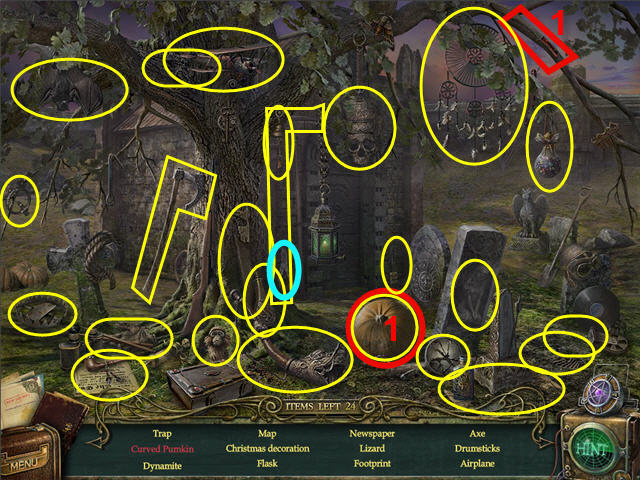
- Find the items listed and get a WIRE CUTTER.
- Use the knife on the pumpkin to get the carved pumpkin (1).
- Back out of the area five times to the front porch of the hospital.
- Head to the left and click on the bench to access a Hidden Object Scene.
- Find the items listed and get a PAPER ROLL.
- Use the watering can on the wilted plant to get a flower (1).
- Use the pen on the paper to get a P.S. (2).
- Place the pawn on the chessboard to get the chess queen (3).
- Place the RECORD on the gramophone (G).
- Look close at the note in the drawer (H) and click on the code (I) to get it added to your notebook.
- Back out of the area one time and head into the hospital.
- Head to the upper left hall and into the first room on the left.
- Click on the bookcase to the right of the window to access a Hidden Object Scene.
- Find the items listed and get SCISSORS.
- Place the axles on the chassis to get a car (1).
- Exit out of the area two times and head to the upper right hallway.
- Head straight up the stairs to the garret.
- Click on the typewriter (J) and use the SCISSORS on the ribbon (K).
- Take the ribbon after cutting to get the RIBBON WITH TEXT PRINTS (K).
- Back out of the area one time and enter the first room on the right.
- Place the RIBBON WITH TEXT PRINTS on the projector (L).
- Click on the code (M) on the wall to get it added to your notebook.
- Back out of the area two times and head straight into the office.
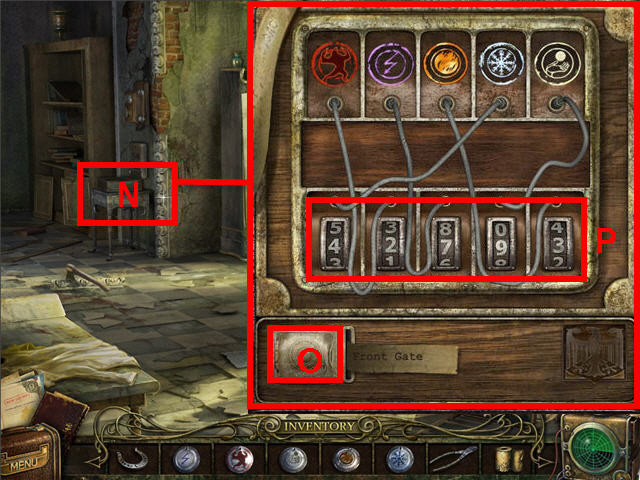
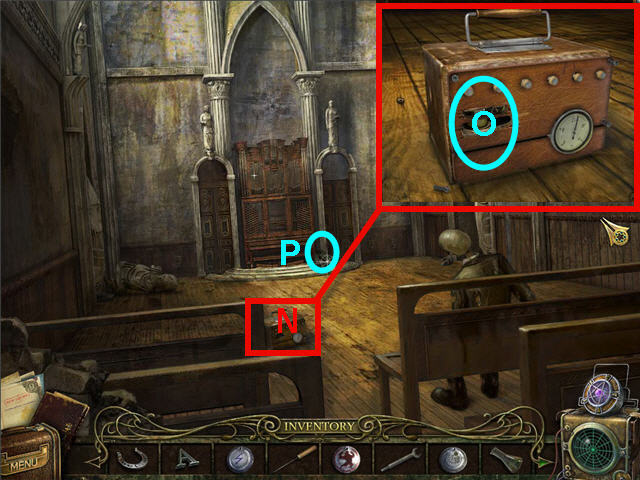
- Click on the device (N) on the wall under the phone.
- Place the PAPER ROLL on the slot (O) in the lower left.
- Use the code from the projector and the picture on the office desk, now stored in your notebook, to decipher the code.
- Follow the wires from the symbol on the top row to the numbers on the dial.
- The solution is; Werewolf – 2, Lightning – 7, Fire -3, Ice – 4, Telekinesis – 9 which should be entered from left to right as 42793. See screenshot for solution (P).
- Back out of the area four times to the front gate and click on the sentry station to access a Hidden Object Scene.
- Find the items listed and get a NEXUS TUBE.
- Place the lemon slice in the glass to get lemonade (1).
- Use the knife on the can to get fish (2).
- Place the knob on the radio to get music notes (3).
- Head forward to the fountain, and go right into the garage.
- Click on the far left corner of the garage to access a Hidden Object Scene.
- Place the objects into the scene where they belong and get an OAR.
- Head forward and to the right to get to the boat area.
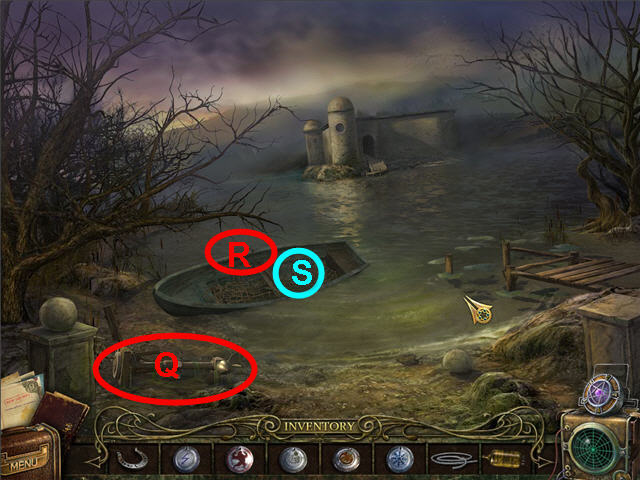
- Use the WIRE CUTTER on the motor (Q) and get a STEEL WIRE.
- Use the OAR on the boat (R) and take the FISHING NET (S).
- Back out of the area four times to the fountain and head forward into the hospital.
- Head into the lower left hall and turn right into the second doorway.
- Click on the phone (T) on the wall to get a close-up.
- Dial the phone in the order of the list from the gramophone and using the number decoder from the projector and the photo from the office (U).
- The phone # to dial is 3-9-7-4-2.
- Enter into the elevator.
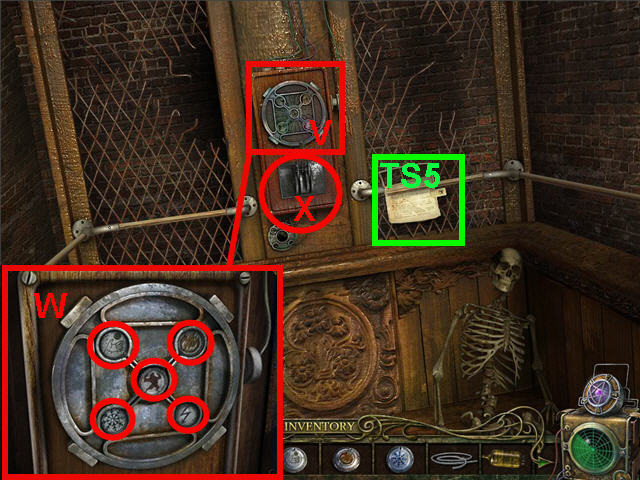
- Take the TOP SECRET PAGE 5 (TS5).
- Click on the panel (V) above the lever and place the 5 MEDALS in their matching slots (W).
- Pull the lever (X) after the medals are in place.
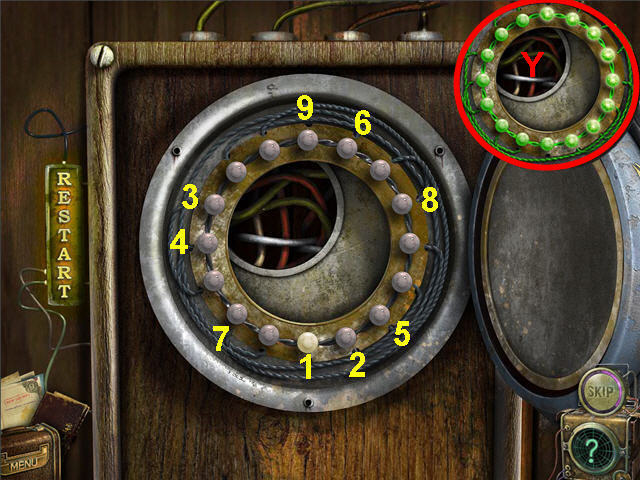
- The goal is to turn all the lights green (Y).
- Start by clicking on the bottom highlighted lamp and then you will get two more choices of highlighted lamps.
- Choose one of the two highlighted lamps and look for your next choices.
- Look at the wires connected to the lamp that you wish to push and see what it will affect.
- You will have to start over if you hit a dead end. See screenshot for order of lamps to push.
- Back out of the elevator after puzzle is complete.
- Click on the device (Z) next to the glass dome on the right.
- Place the HORSESHOE and the STEEL WIRE on the device (A).
- Click on the lever (B) above the horseshoe.
- Throw the FISHING NET on the werewolf.
Chapter 6 – Dr. Dagon
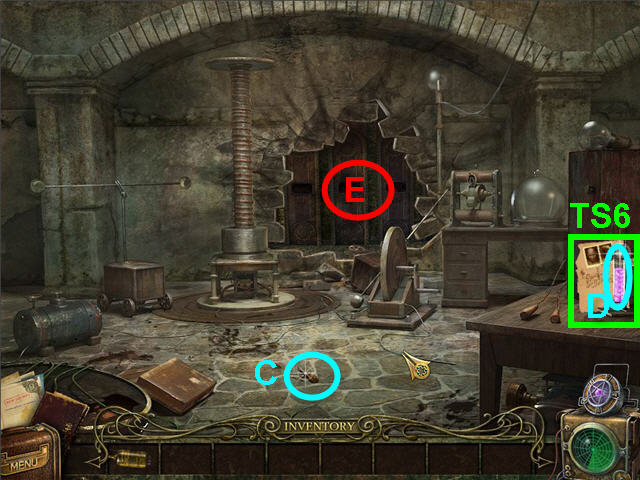
- Pick up the SCREWDRIVER (C).
- Take the TOP SECRET PAGE 6 (TS6).
- Take the ECTOPLASM TUBE (D).
- Use the NEXUS TUBE on the broken back wall (E).
- Look close at the broken wall and note the missing nameplates.
- Exit the room and flip the switch in the elevator.
- Back out of the area 3 times to the main hall.
- Head into the upper left hallway.
- Click on the plaques above the 2 doors on the left and use the SCREWDRIVER on both of them and take the 2 NAMEBOARDS (F).
- Back out of the hallway and head to the upper right hall.
- Click on the plaques above the 2 doors on the right and use the SCREWDRIVER on both of them and take the 2 NAMEBOARDS (G).
- Back out of the area one time and head to the lower left hall.
- Head into the second door on the right and enter the elevator.
- Flip the lever in the elevator and back out after you go down.
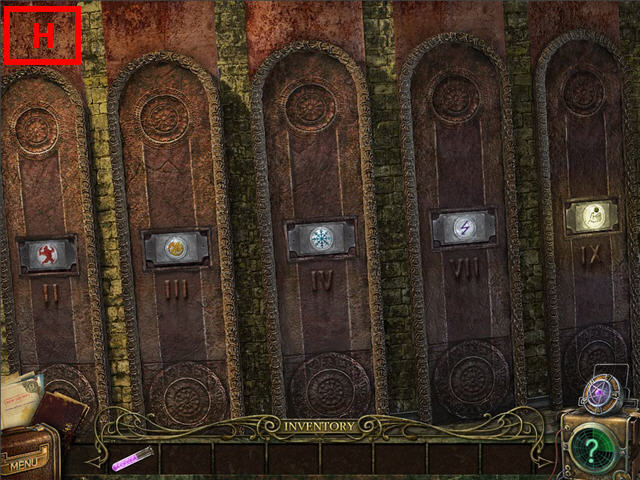
- Click on the back wall and place the NAMEBOARDS in their correct slot.
- The clue can be located in your notebook by the individual nameplate photos.
- The solution is; Werewolf – II, Ice – IV, Lightning –VII, Telekinesis – IX. See screenshot for solution (H).
- Head through the hole in the wall.
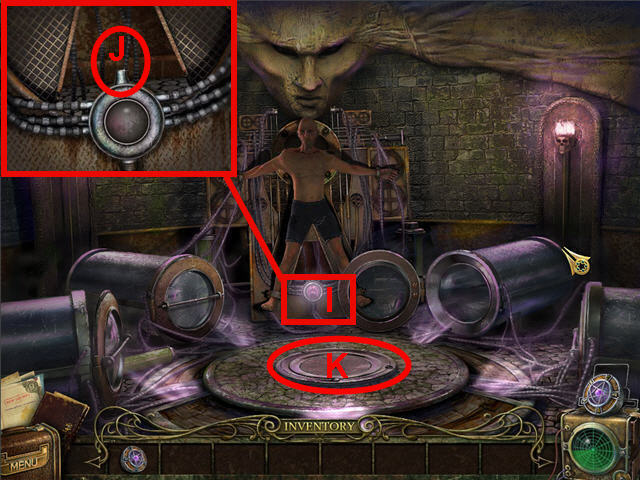
- Click on the receptacle (I) under Dr. Dagon and pour the ECTOPLASM TUBE in the opening (J).
- Place the NEXUS on the altar (K) in the center.
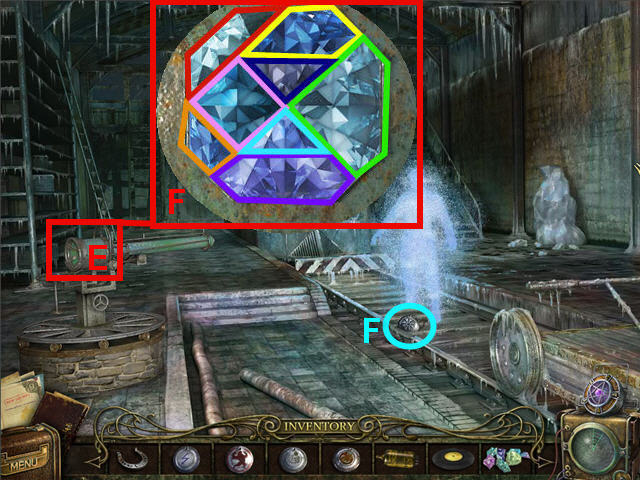
- Click on the NEXUS in the center to trigger the final puzzle.
- The first goal is to light up all the lights around the center.
- They need to be lit using a star pattern. See screenshot (L) for solution.
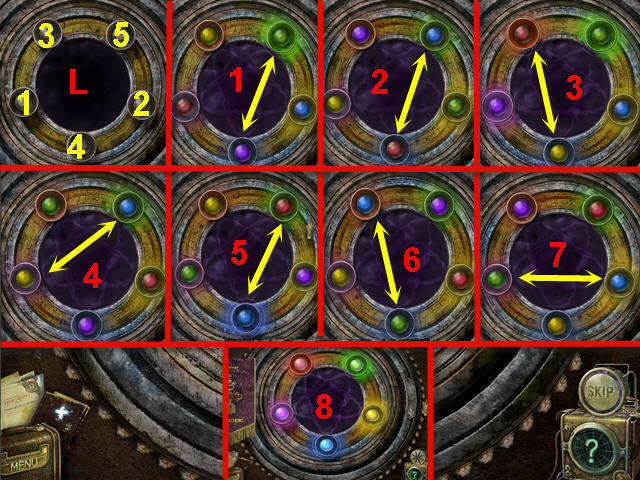
- The second goal is to move the colored lights to their matching colored location on the ring.
- Switch any two bulbs that are connected by clicking on them.
- The sphere will turn one time after each move. See screenshot for solution.
- Congratulations! You have successfully completed The Agency of Anomalies: Mystic Hospital.
Created at: 2011-05-13