
Walkthrough Menu
- General Tips
- Chapter 1 – Motel
- Chapter 2 – Diner
- Chapter 3 – Dolin's Place
- Chapter 4 – Military Base
- Chapter 5 – Lara
- Chapter 6 – Los Angeles
- Chapter 7 – The Formula
General Tips
- Select Options to adjust the Music and Sound Volume, Mute, Full screen and Custom Cursor.
- In Options, you may set your difficulty level and choose between Casual, Expert or Challenge.
- Select Instructions to learn the features of the Tablet and gameplay.
- Most Puzzles can be skipped.
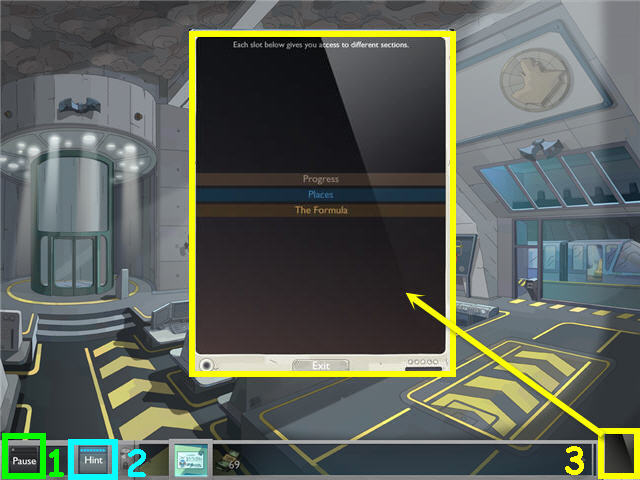
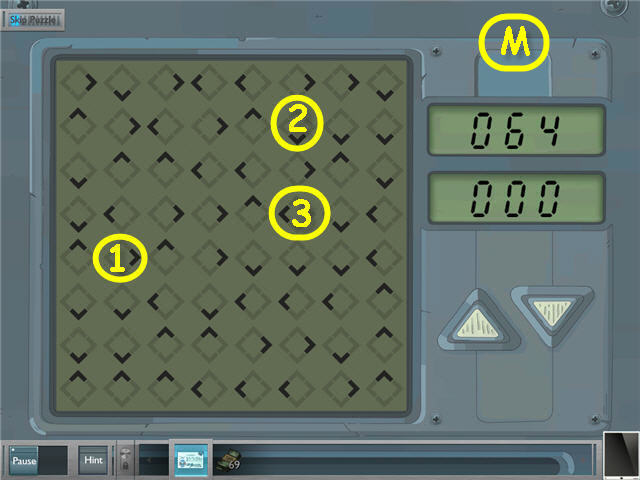
- Select the Pause button (1) to access Options, Help and Quit.
- Select the Hint (2) button in the lower left to get a hint.
- The Tablet (3) at the bottom right of the screen contains all important game info.
Chapter 1 – Motel
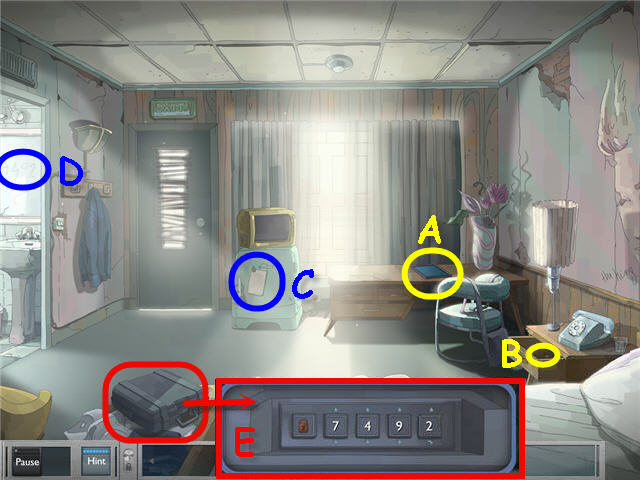
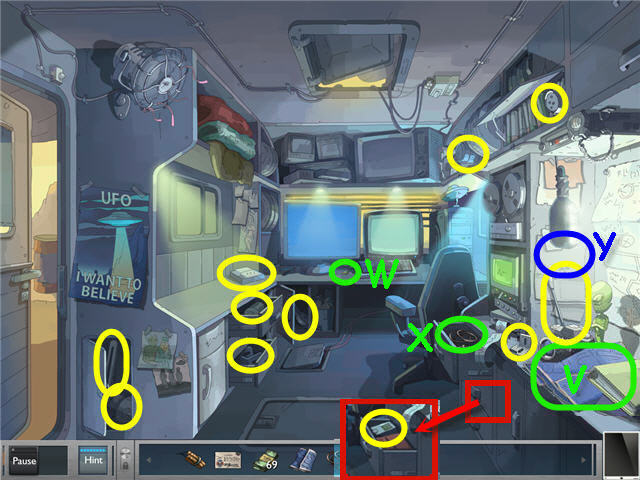
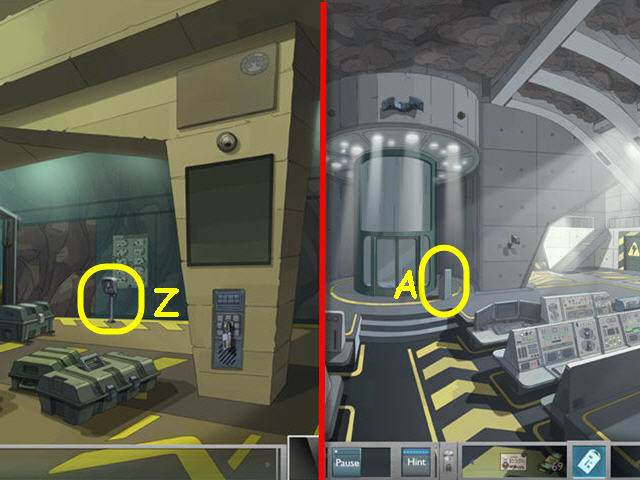
- Select the tablet (A).
- Open the nightstand drawer; take the QUARTER (B).
- Examine the brochure (C) on the mini bar.
- Open the bathroom door; turn on the tap to get a code (D) on the mirror.
- Examine the suitcase; use the code from the mirror; 7-4-9-2 on the lock (E).
- Examine the bomb to trigger a puzzle.
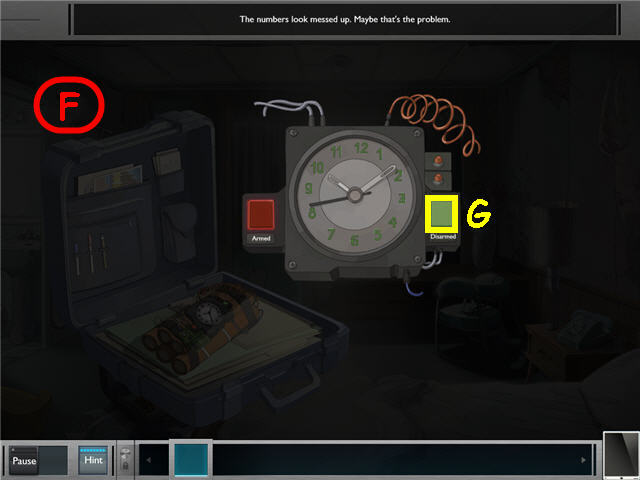
- Drag the numbers on the clock face to their correct positions.
- The numbers will turn green when correctly positioned. See screenshot (F) for solution.
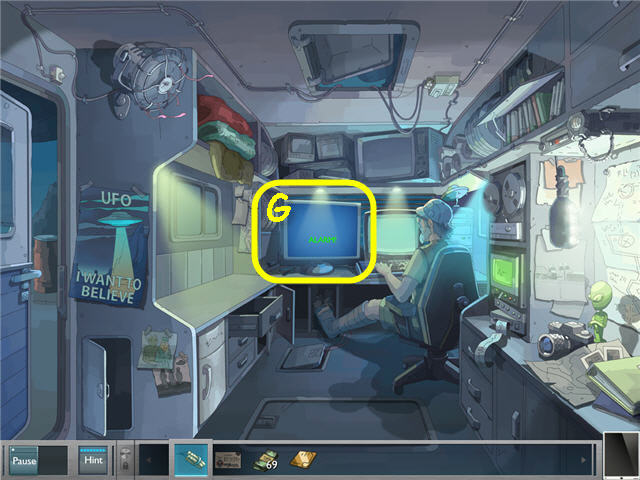
- Press the green button (G) when complete; automatically get the DYNAMITE.
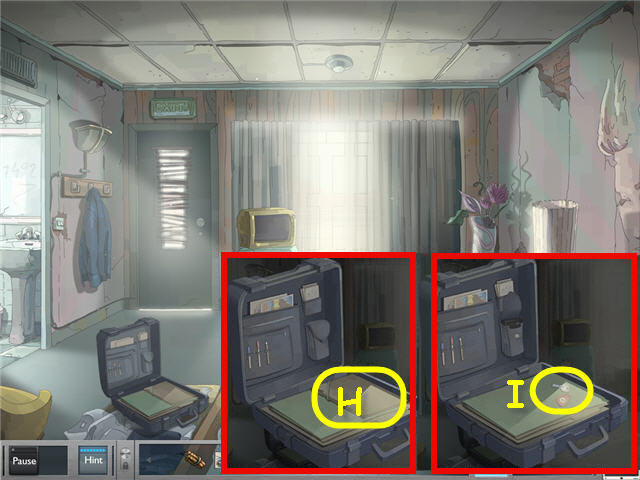
- Open the Top Secret folder; get an INVITATION (H).
- Take the KEY (I).
- Use the KEY on the door and exit the room.
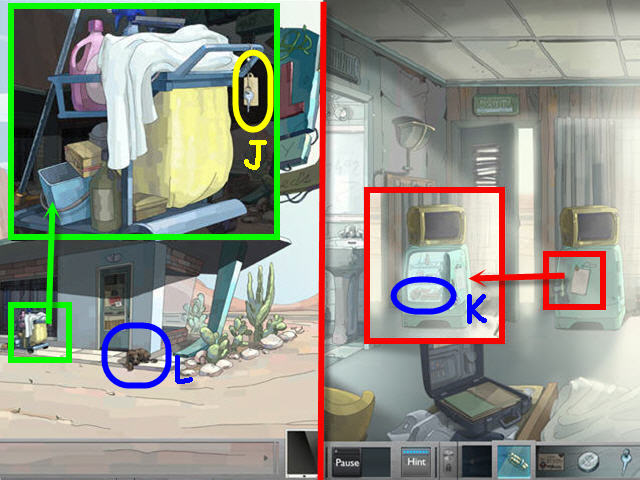
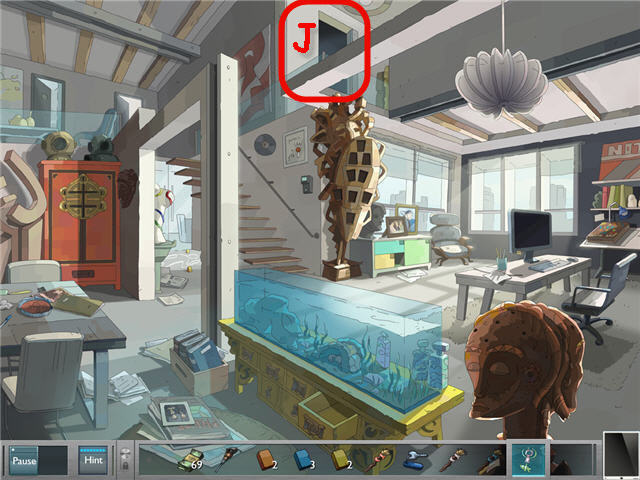
- Examine the cart; take the MINI BAR KEY (J).
- Go into the motel room 13 behind the car.
- Use the MINI BAR KEY on the mini bar lock; take the BEEF JERKY (K).
- Exit the room.
- Attempt to enter the office; give the BEEF JERKY to the dog (L).
- Enter the office.
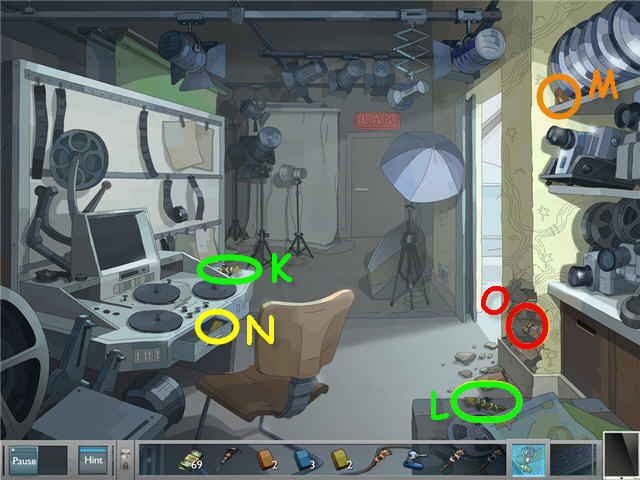
- Open the swinging door; take the FUSE (M).
- Open the door behind the counter.
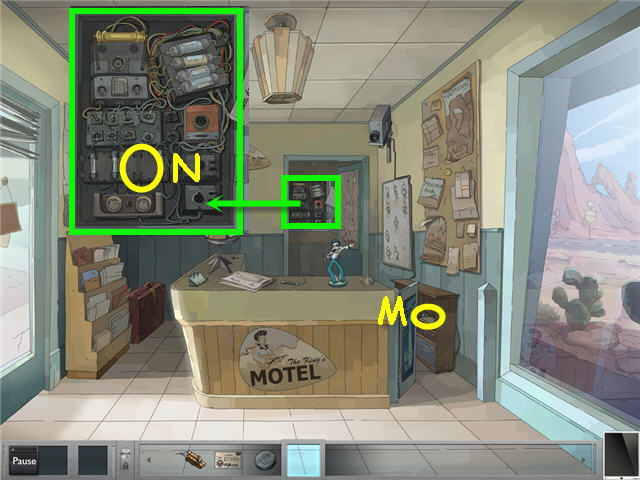
- Examine the fuse panel; place the FUSE in the empty slot (N).
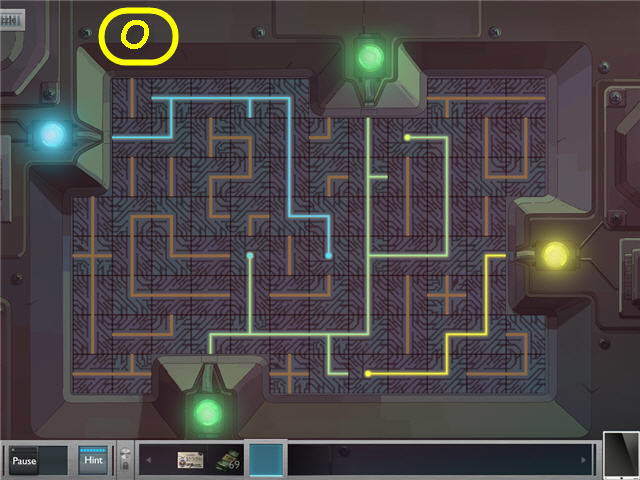
- Automatically trigger a vision puzzle.

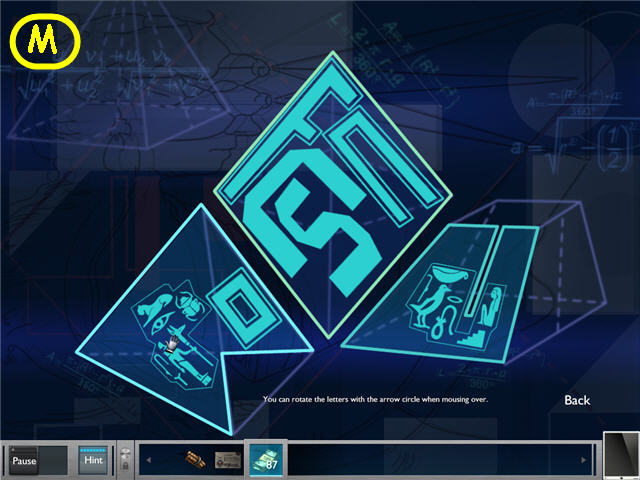
- Position the scattered letters inside the triangle so they all light up.
- Wave your cursor over the letters to get either a hand to move them with or a circular arrow signaling you can now rotate them.
- You may exit out of these vision puzzles at any time and can access them in your tablet under the formula tab to complete them at a later time.
- See screenshot (O) for solution.
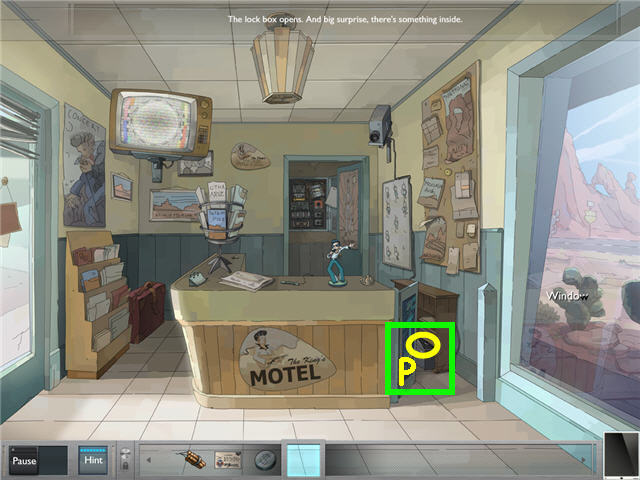
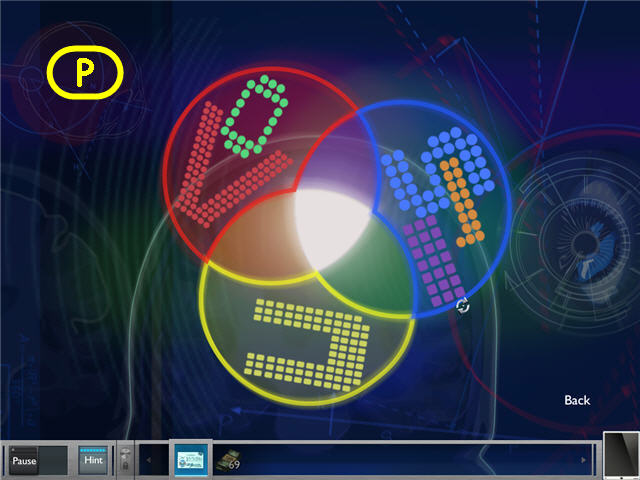
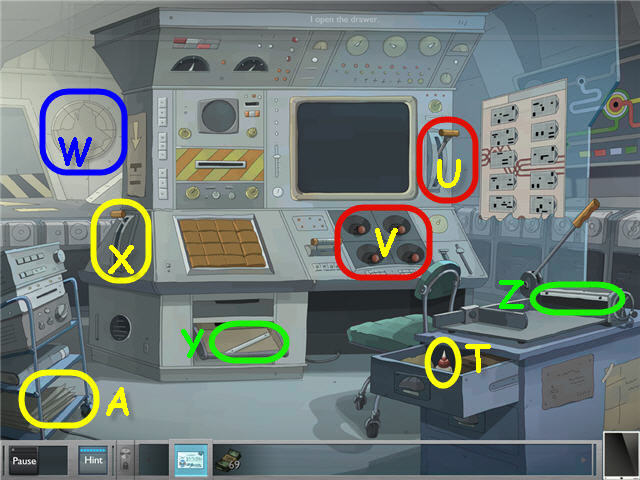
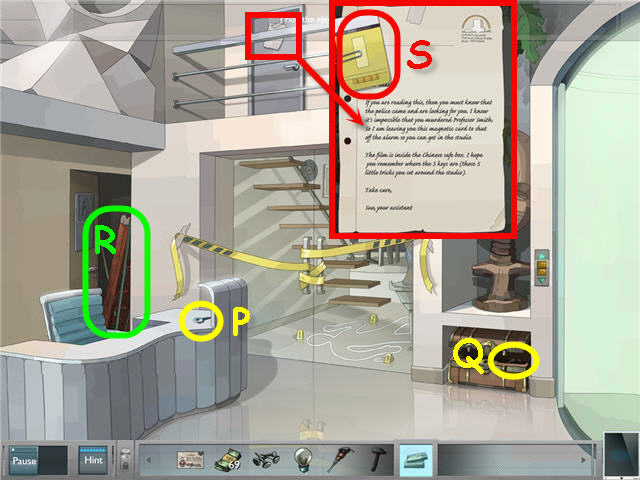
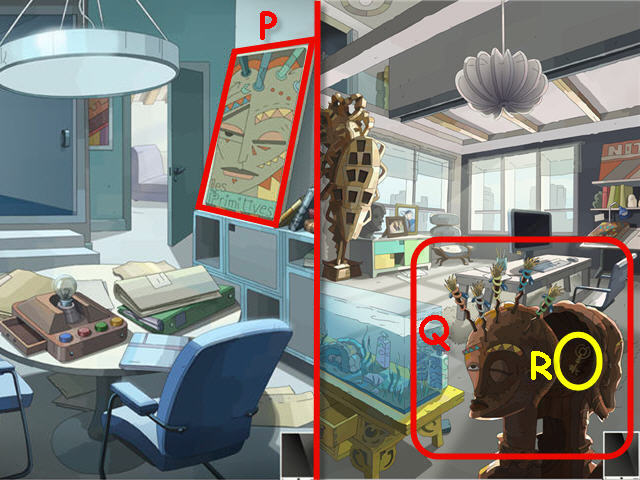
- Open the safe; take the CAR KEY (P).
- Exit the office.
- Use the CAR KEY on the car; get in the car.
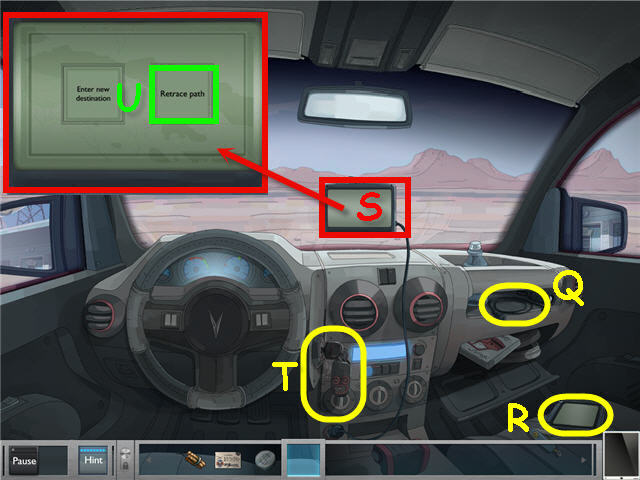
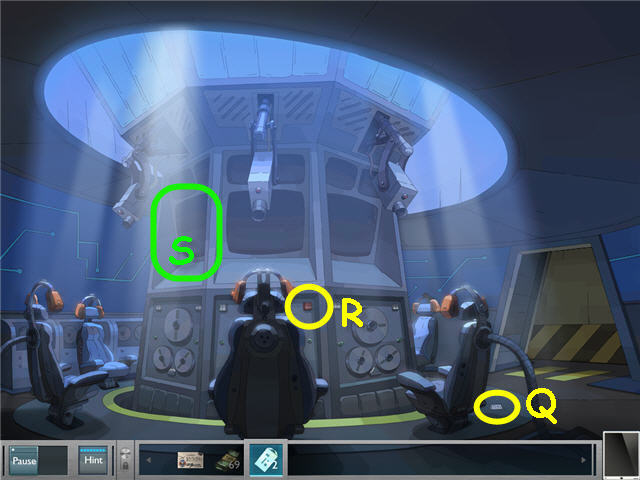
- Take the CABLE (Q) and GPS DEVICE (R).
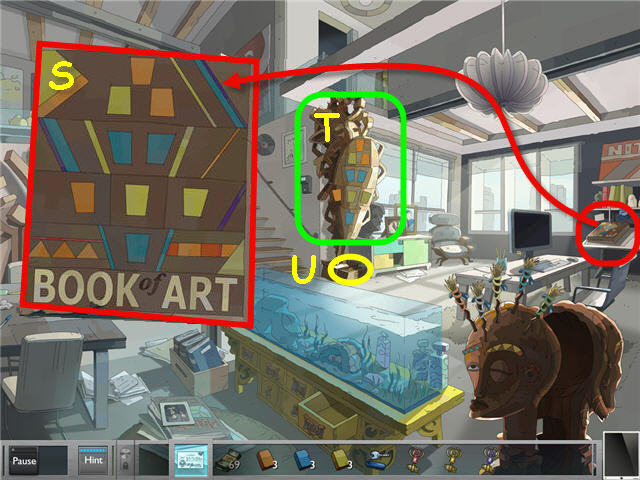
- Place the GPS DEVICE on the holder (S).
- Place the CABLE on the GPS DEVICE.
- Place the CAR KEY in the ignition (T).
- Examine the GPS DEVICE and select the retrace path button (U).
Chapter 2 – Diner
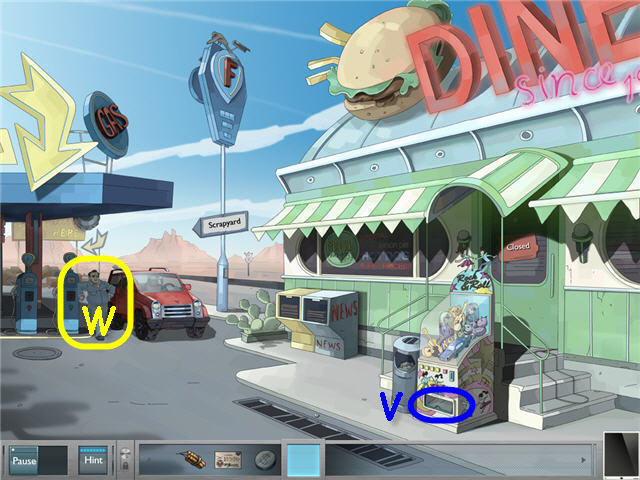
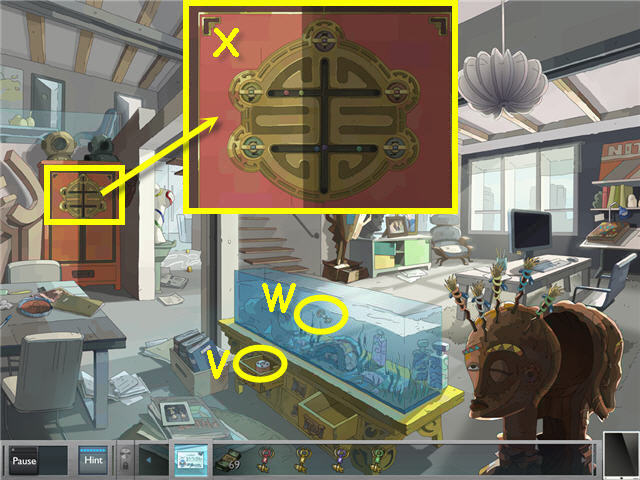
- Use the QUARTER on the coin slot of the vending machine; take the ROCK AND ROLL DOLL (V).
- Talk to the gas station attendant (W); exhaust all conversation until you need cash for gas.
- Go into the Diner.
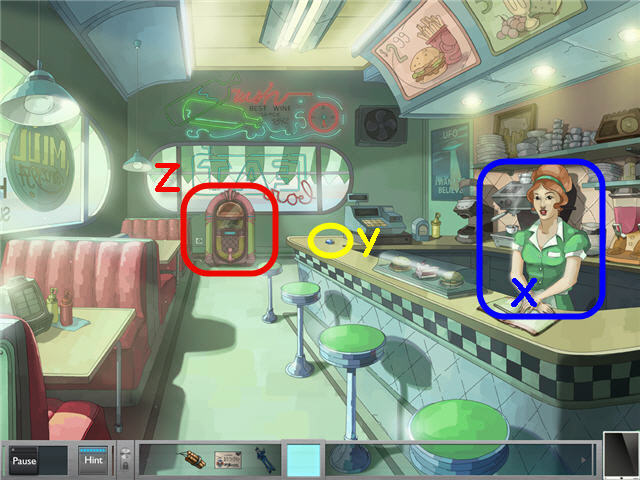
- Speak to Rachel (X).
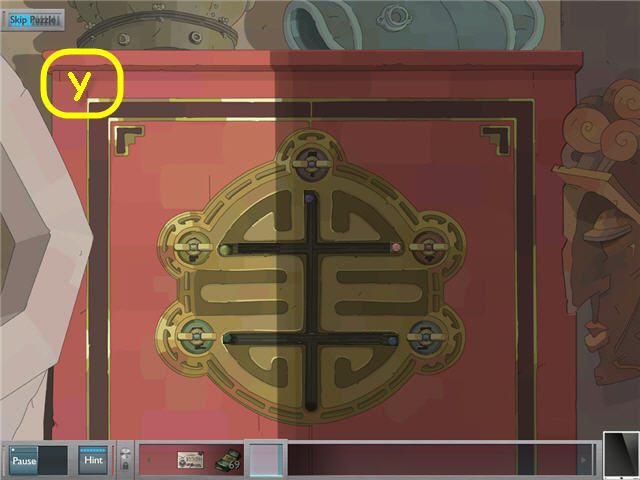
- Take the PLUG (Y).
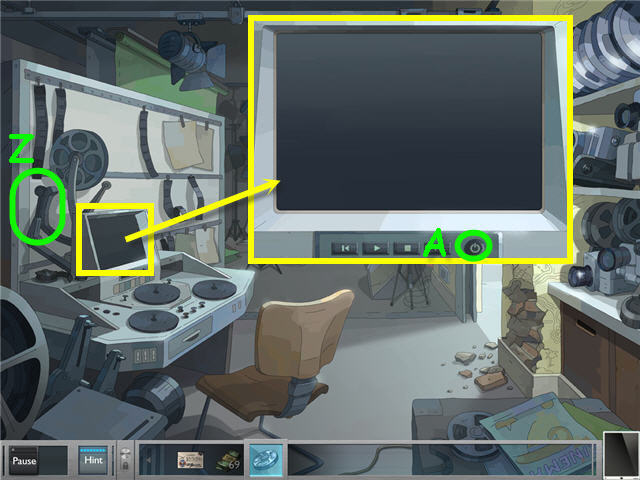
- Use the PLUG on the jukebox (Z).
- Open the front of the jukebox and zoom in.
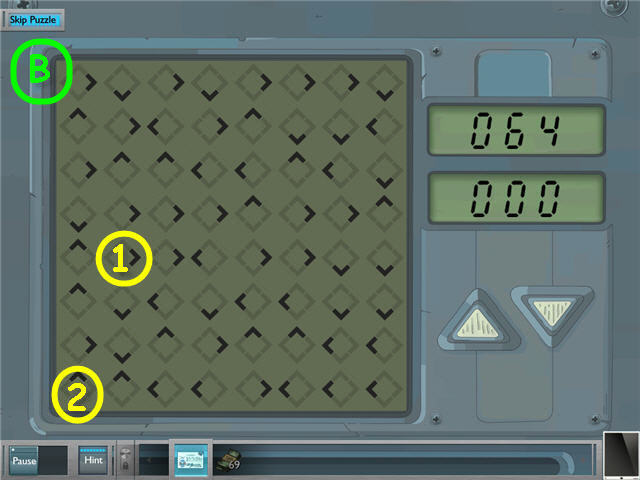
- Place the ROCK AND ROLL DOLL on the center platform to trigger a puzzle.
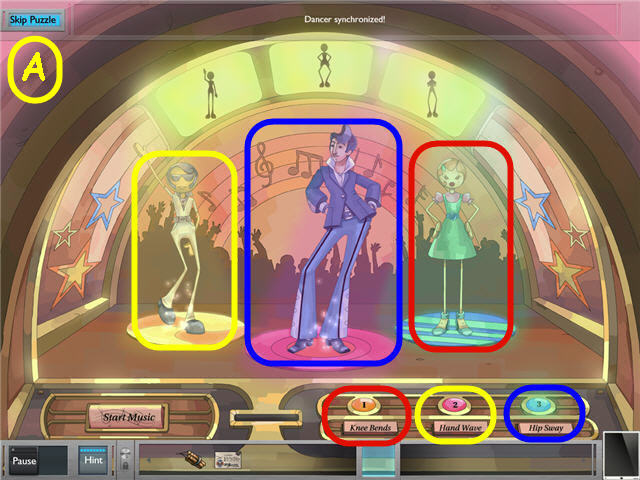
- The goal is to synchronize the dancers with the figures behind them.
- Press the Start Music button to begin; then choose the button with the matching action of the first dancer in the back.
- When the timing is correct you will automatically move on to the next figure.
- Solution: This puzzle is random. My solution was; left – hand wave, center – hip sway, right – knee bends. See screenshot (A) for my solution.
- The waitress will give you 200 DOLLARS.
- Exit out of the diner.
- Give the 200 DOLLARS to the attendant (B); get 157 DOLLARS back.
- Speak to the attendant after the crash.
- Attempt to open the hood of the car (C).
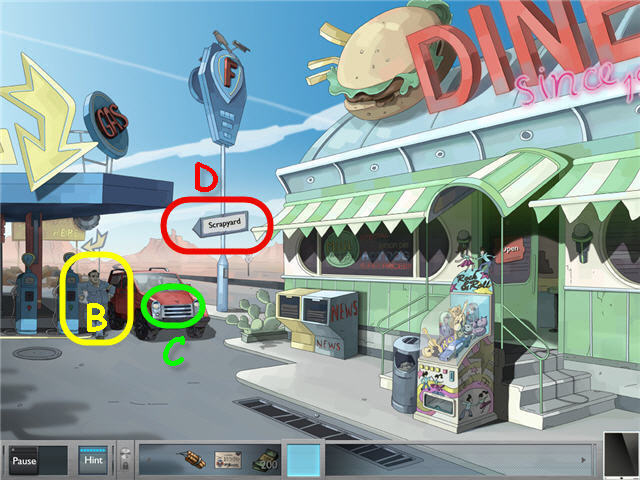
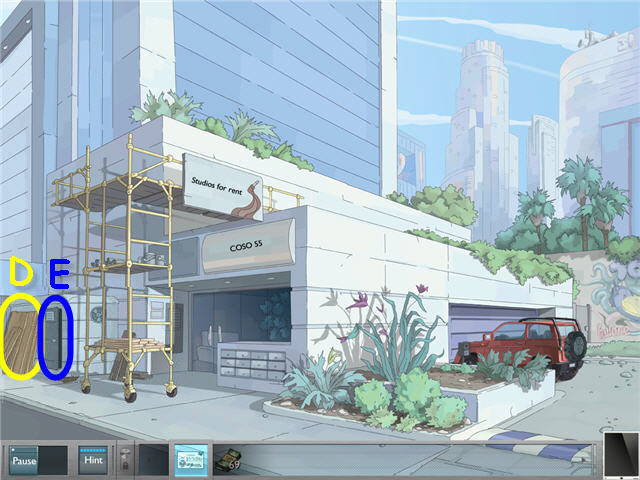
- Go to the scrap yard (D) behind the car.
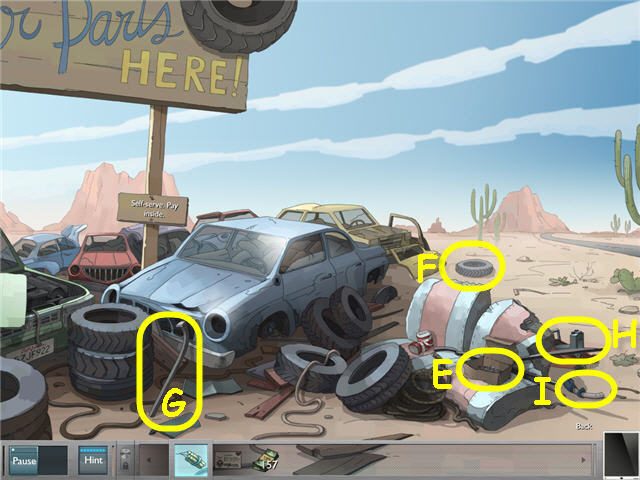
- Take a fuse from the box and get 2 RED FUSES, 2 YELLOW FUSES and 2 GREEN FUSES (E).
- Take the WHEEL (F), CROWBAR (G), JACK (H) and HOSE (I).
- Back out.
- Use the JACK and WHEEL on the front driver's side of the car.
- Use the CROWBAR on the hood.
- After the attendant speaks, zoom into the engine.
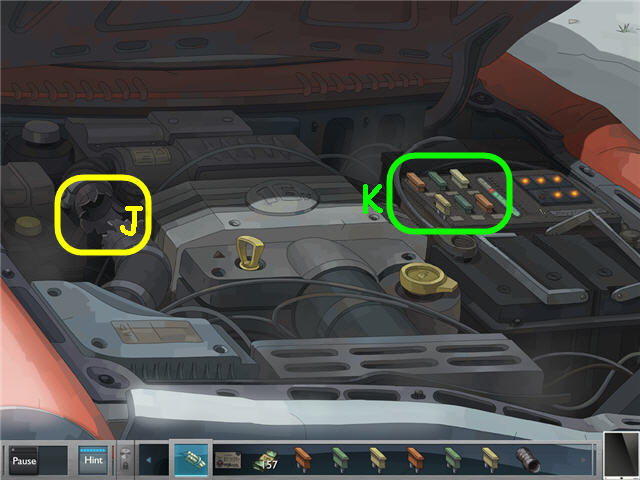
- Place the HOSE in the gap (J).
- Remove the old fuses.
- Place the 2 GREEN FUSES, 2 YELLOW FUSES and 2 RED FUSES in the slots in the correct order.
- Solution: Back row, from left; red, green, yellow; front row from left – yellow, green, red. See screenshot (K) for solution.
- Give the 157 DOLLARS to the attendant; get 87 DOLLARS back.
- Speak to the attendant.
- Go into the diner and speak to Rachel; exhaust all conversation.
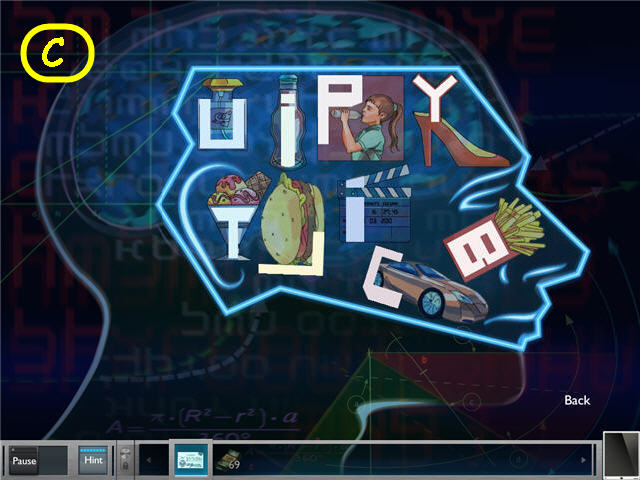
- Examine the checkbook on the counter in front of her to trigger a puzzle.
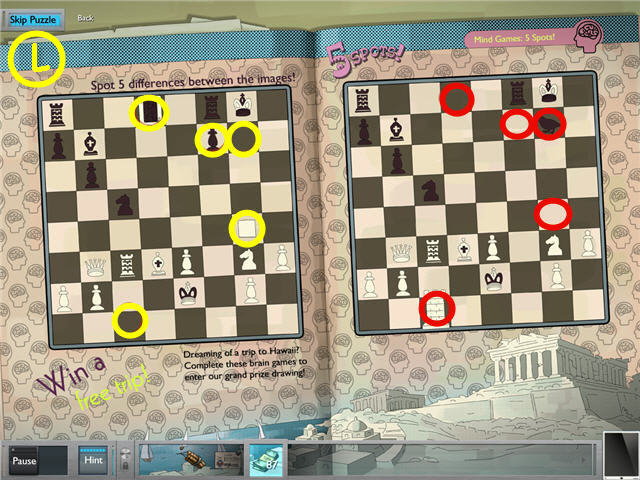
- Find the 5 differences.
- This puzzle is random. See screenshot (L) for my solution.
- Automatically trigger a vision puzzle.
- Position the scattered letters inside the shapes so they all light up.
- See screenshot (M) for solution.

- Find the 5 differences.
- This puzzle is random. See screenshot (N) for my solution.
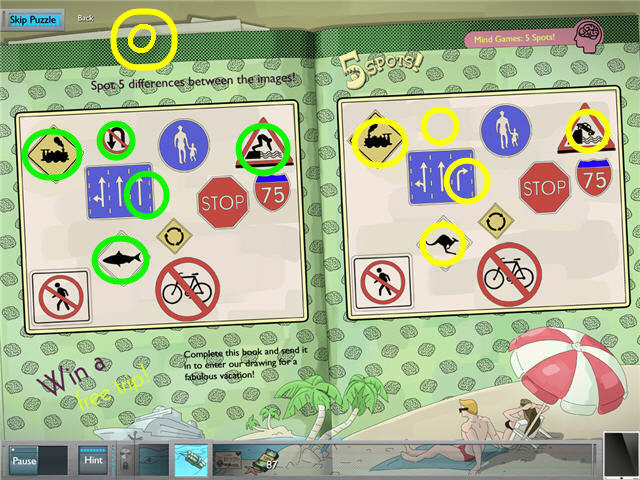
- Find the 5 differences.
- This puzzle is random. See screenshot (O) for my solution.
- Speak to Rachel and exhaust all conversation.
- Back out of the Diner and get in the car.
Chapter 3 – Dolin's Place
- Speak to Dolin and exhaust all conversation.
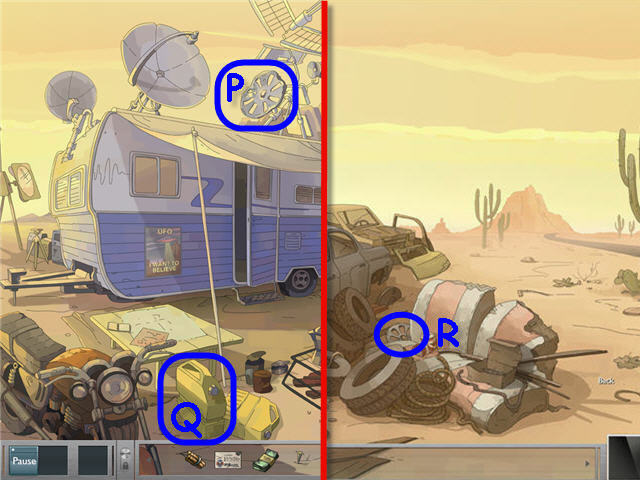
- Take the BROKEN SATELLITE DISH (P) and EMPTY GAS DRUM (Q).
- Go into the car.
- Speak to the attendant and give him the EMPTY GAS DRUM; get a FULL GAS DRUM.
- Speak to the attendant.
- Give the BROKEN SATELLITE DISH to the attendant.
- Go to the scrap yard behind the car.
- Take the HUBCAP (R).
- Back out via the right side of the screen.
- Give the 87 DOLLARS to the attendant; get 69 DOLLARS back.
- Go into the car.
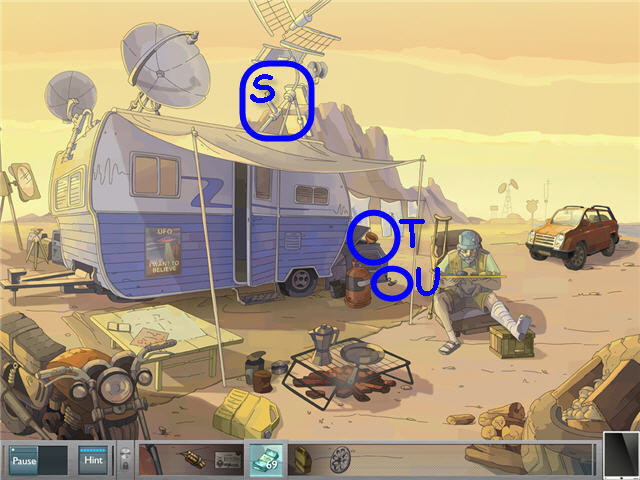
- Place the HUBCAP on the antenna (S).
- Use the FULL GAS DRUM in the engine (T); pull the cord (U).
- Speak to Dolin.
- Go into the trailer.
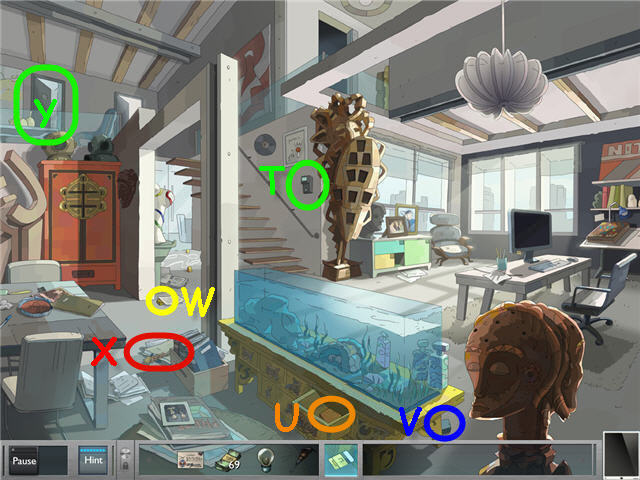
- Take the SKETCH (V) and the COMPUTER MEMORY CARD (W).
- Open the top drawer; take the WIRES (X).
- Examine and note the code (Y) for the camera.
- Collect 100% of the PIECES: See screenshot for objects circled in yellow. You will need to open drawers and cabinets as shown.
- Exit the trailer.
- Place the SKETCH on the table.
- Examine and place the 100% of the PIECES on the table to trigger a puzzle.
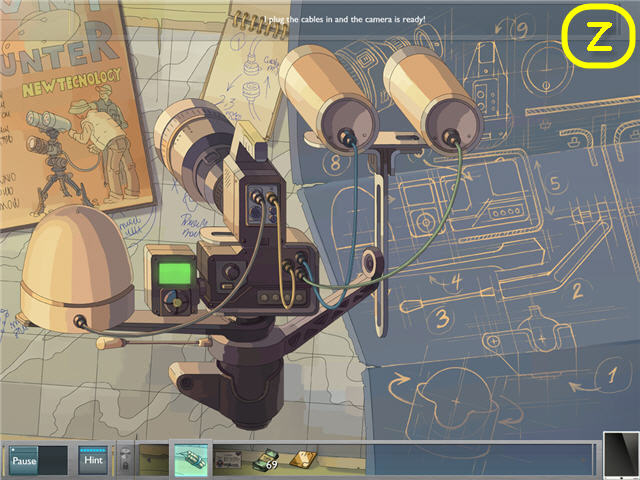
- Assemble the pieces per the blueprint.
- See screenshot (Z) for solution.
- Place the WIRES on the assembled camera; get a HIGH SPEED CAMERA.
- Back out via the bottom right of the screen.
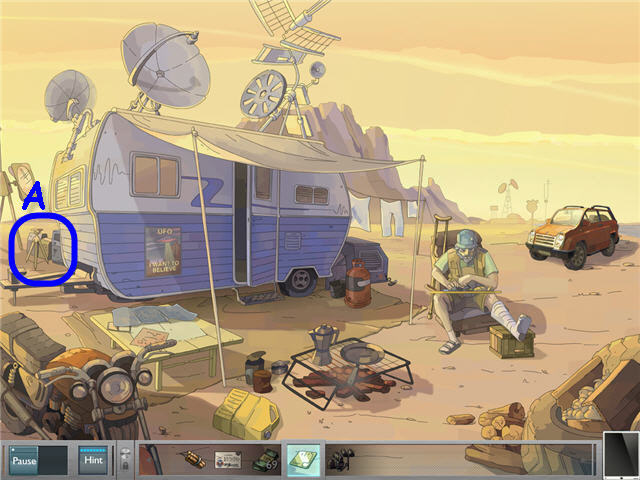
- Place the HIGH SPEED CAMERA on the tripod (A).
- Follow Dolin into the trailer.
- Speak to Dolin.
- Exit the trailer.
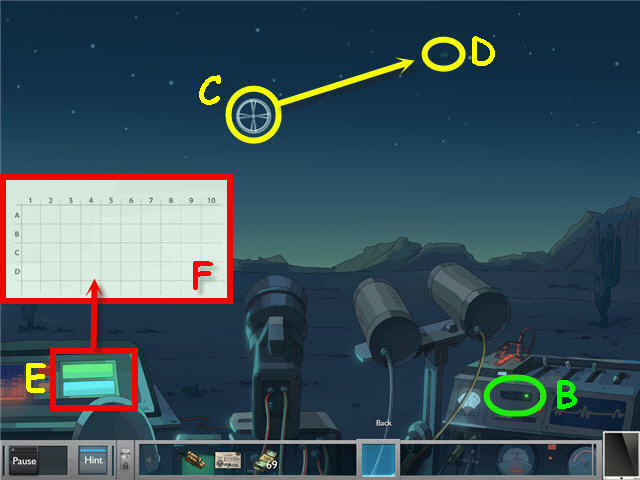
- Examine the tripod and place the COMPUTER MEMORY CARD in the slot (B) to trigger a puzzle.
- Capture the UFO's by placing them in the crosshairs (C) and using the left mouse over them to snap a picture.
- The UFO's will appear as 3 dots (D).
- The display (E) will start flashing numbers when a UFO is about to appear. Use the code (F) from the trailer to know where the UFO will appear.
- You will need to capture 3 perfect pictures, so you have to do this numerous times until you get the COMPUTER MEMORY CARD back and he says he has enough photos.
- Back out and go into the trailer.
- Give the COMPUTER MEMORY CARD to Dolin.
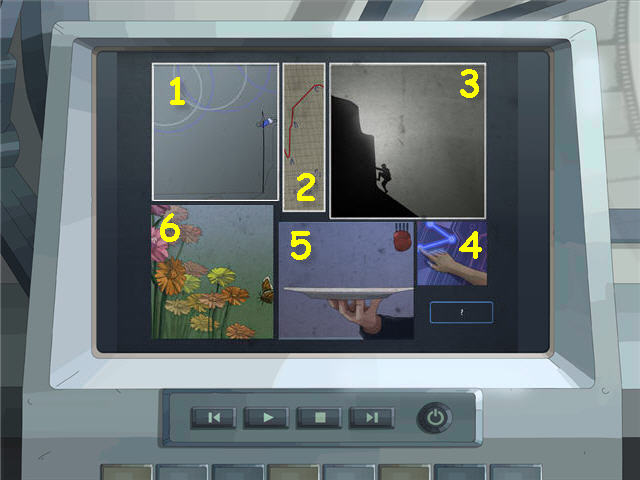
- Examine the computer monitor (G); press the Play button to trigger a puzzle.
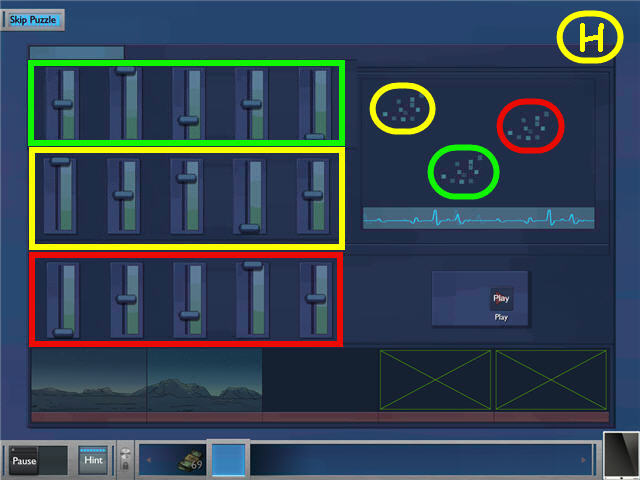
- Select an image on the right.
- Move the levers to complete the patterns on the screen.
- See screenshot (H) for the position of the levers to complete the three images. The levers on the left are color coded to the images on the right in the screenshot.
- Exhaust all conversation with Dolin.
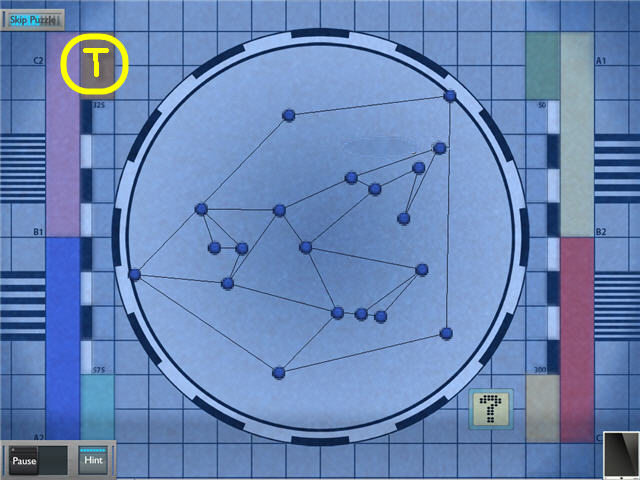
- Exit the trailer and trigger a vision puzzle.
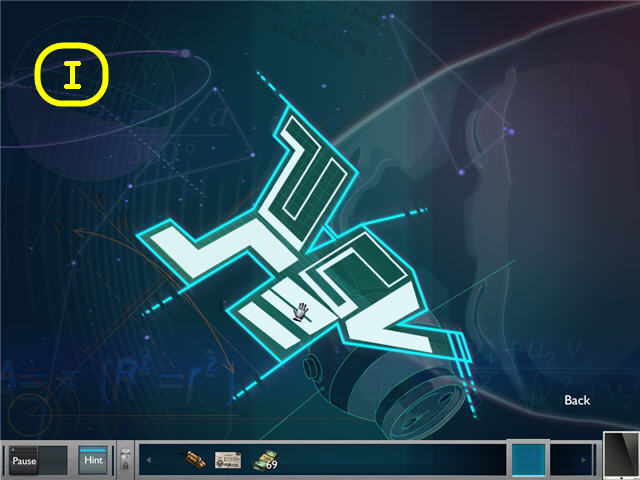
- Position the scattered letters inside the triangle so they all light up.
- See screenshot (I) for solution.
- Go into the car.
Chapter 4 – Military Base
- Press anywhere to get some sleep.
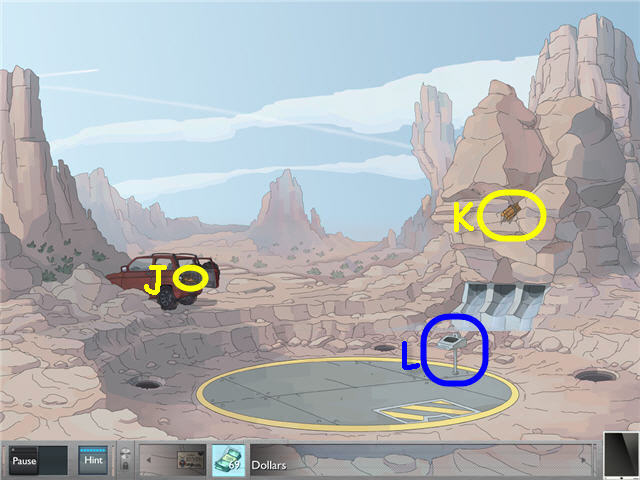
- Open the trunk of the car; take the LIGHTER (J).
- Place the DYNAMITE on the rocks (K); use the LIGHTER on the DYNAMITE.
- Examine the keypad (L) on the platform to trigger a puzzle.
- Collect all the arrows in three moves or less.
- See screenshot (M) for solution.

- Press anywhere in the room.
- Examine the door (N) to trigger a puzzle.
- Connect the colored circuit so that they light up the lights.
- The green lights will require both yellow and blue on the same circuit.
- See screenshot (O) for solution.
- Automatically trigger a vision puzzle.
- Position the letters inside the shapes so that they all light up.
- See screenshot (P) for one solution.

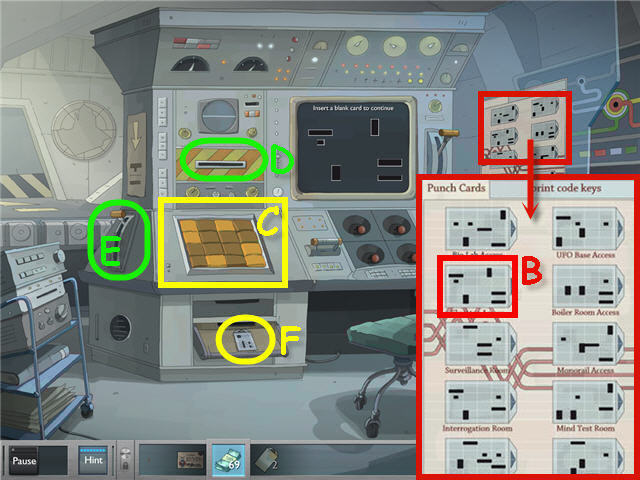
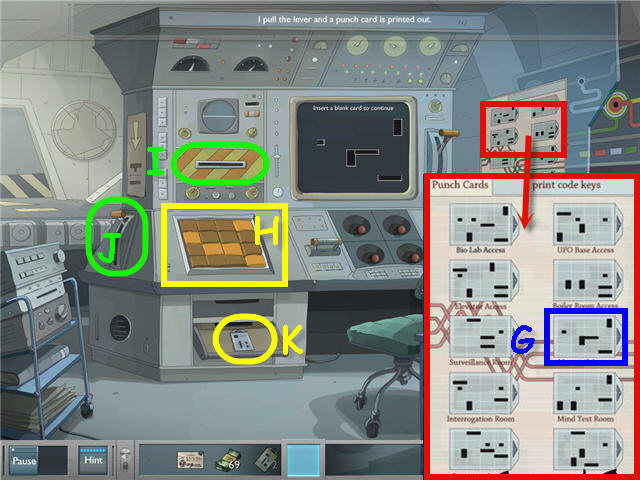
- Notice the card readers by the monorail (Q) and elevator (R).
- Examine the computer area (S).
- Open the drawer; take the OIL (T).
- Pull the lever (U) on the right side of the screen.
- Using the 4 levers (V) below the screen, change the picture to match the one on the wall (W).
- Solution: Pull each of the 4 levers two times so that they are all in the down position.
- Use the OIL on the left lever (X).
- Take the BLADE (Y); place the BLADE on the paper cutter (Z).
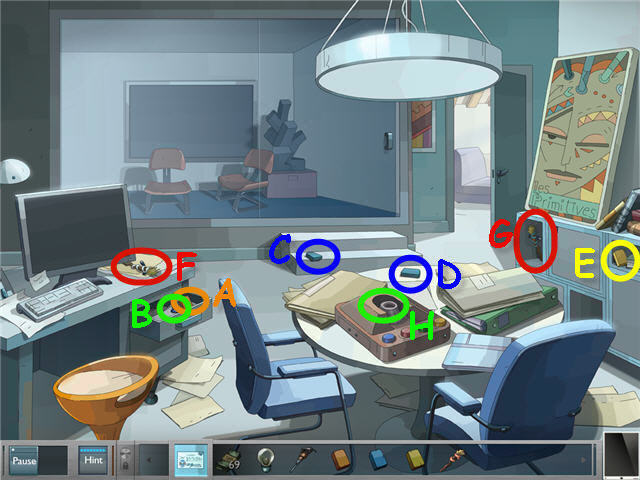
- Take the CARD STOCK PAPER (A).
- Place the CARD STOCK PAPER in the paper cutter and pull the handle; get a BLANK CARD.
- Take another CARD STOCK PAPER and repeat the cutting process to get a 2nd BLANK CARD.
- Examine the poster (B).
- Duplicate the card punches for the elevator pass by pushing in the corresponding buttons on the panel. See screenshot (C) for solution.
- If you make a mistake you can take more cards and cut them as needed.
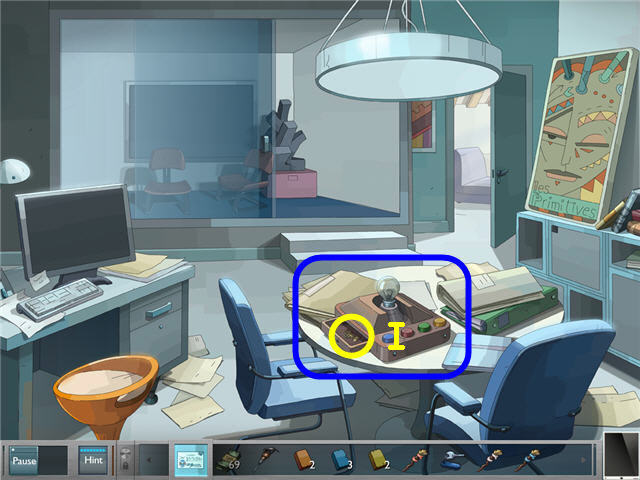
- Place a BLANK CARD in the slot (D); pull the left lever (E).
- Take the ELEVATOR PUNCH CARD (F).
- Examine the poster (G).
- Duplicate the card punches for the monorail access pass by pushing in the corresponding buttons on the panel. See screenshot (H) for solution.
- Place a BLANK CARD in the slot (I); pull the left lever (J).
- Take the MONORAIL PUNCH CARD (K).
- Back out of the area.
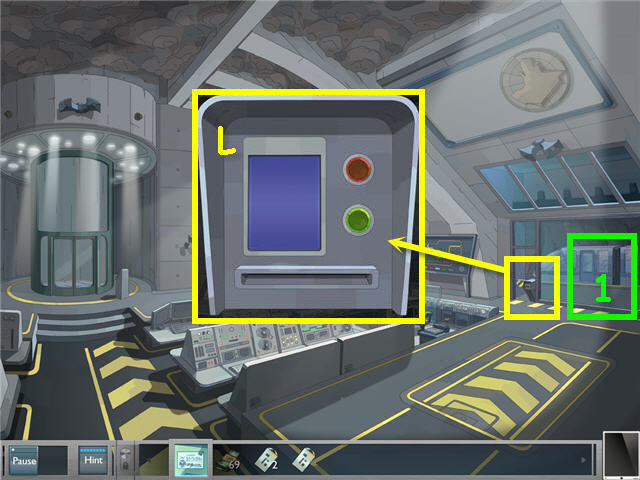
- Examine and use the MONORAIL PUNCH CARD on the access panel (L).
- Board the monorail (1).
Chapter 5 – Lara
- Pick up the STRANGE-SHAPED KEY (M).
- Examine and use the STRANGE-SHAPED KEY on the panel (N).
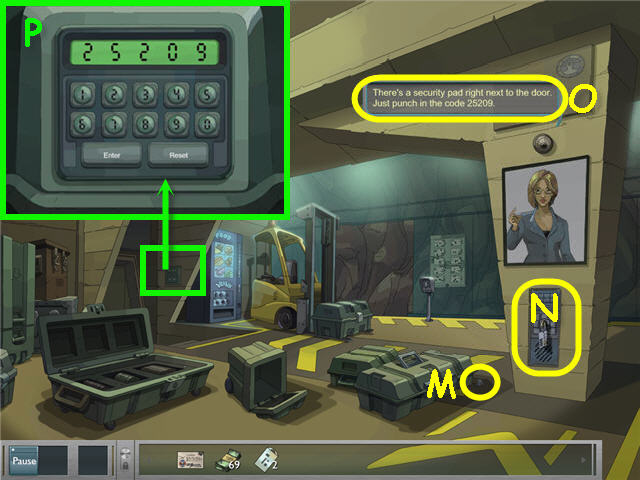
- Exhaust all conversation with Lara; get the code (O) for the door.
- Examine the code panel; enter the code 25209 and press enter. See screenshot (P) for solution.
- Go left into the testing room.
- Pick up the MONORAIL PUNCH CARD (Q).
- Press the red button in front of the middle chair (R).
- Examine the left screen (S) to trigger a puzzle.
- Select and drag the balls to untangle the lines.
- See screenshot (T) for one solution.
- Examine the center monitor to trigger the second test.
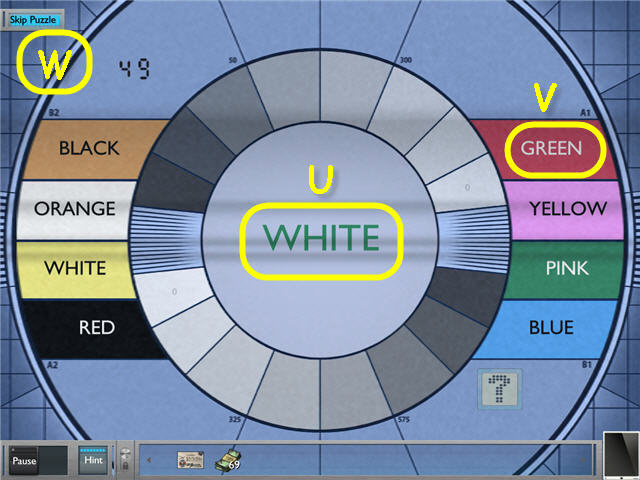
- Look at the color of the letters in the center word (U), and then choose the actual word that spells out the color (V).
- The test is random. See screenshot (W) for example.
- Examine the monitor on the right to trigger the final test.
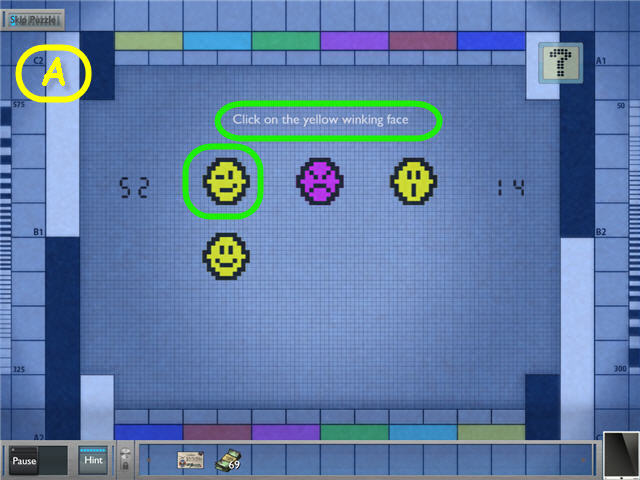
- Select whatever the text tells you to choose.
- Tips: For the arrows, north is up, east is right, west is left, and south is down.
- The test is random. See screenshot (A) for example.
- You will automatically trigger a vision puzzle.

- Position the letters inside the shapes so that they all light up.
- See screenshot (Y) for one solution.
- Open the door and exit to the right.
- Speak to Lara and exhaust all conversation.
- Examine and use the MONORAIL PUNCH CARD on the card reader (Z).
- Enter the monorail.
- Examine and use the ELEVATOR PUNCH CARD on the card reader (A).
- Enter the elevator to trigger a puzzle.
- Collect all the arrows in three moves or less.
- See screenshot (B) for solution.
- Examine the mailboxes to the right of the doors to trigger a vision puzzle.
- Position the letters inside the shapes so that they all light up.
- See screenshot (C) for one solution.
- Back out of the close-up.
Chapter 6 – Los Angeles
- Move the wood boards (D).
- Open the door and enter the shed (E).
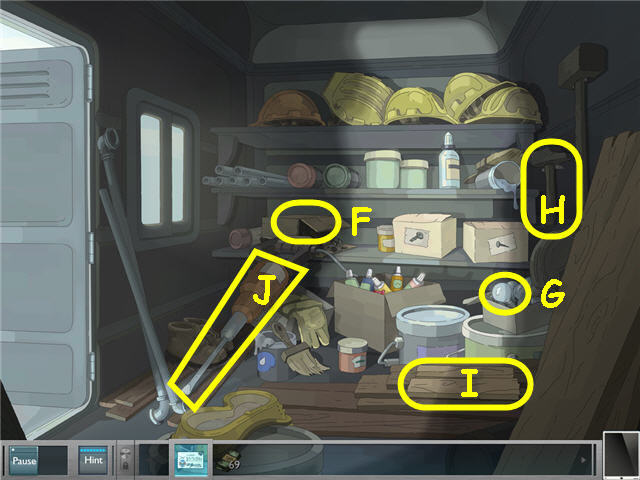
- Take some NAILS (F) from the box.
- Take a BULB (G), HAMMER (H), WOOD BOARD (I) and the JACKHAMMER (J).
- Exit the shed.
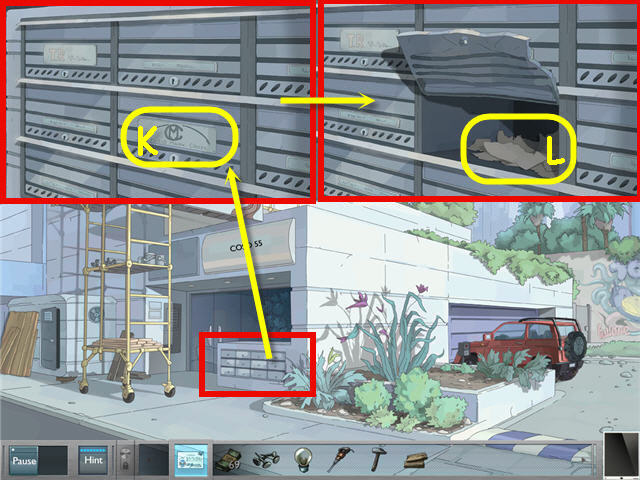
- Examine the mailboxes to the right of the building entrance.
- Use the HAMMER on the mail slot that says Marc Cross (K).
- Open the box; take the PIECES OF PAPER (L) to trigger a puzzle.
- Assemble the pieces of the puzzle.
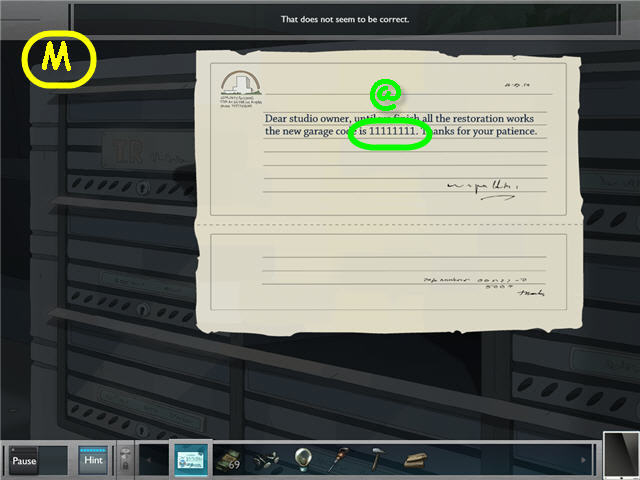
- See screenshot (M) for solution.
- Note the code (@) for the garage door.
- Back out of the close-up.
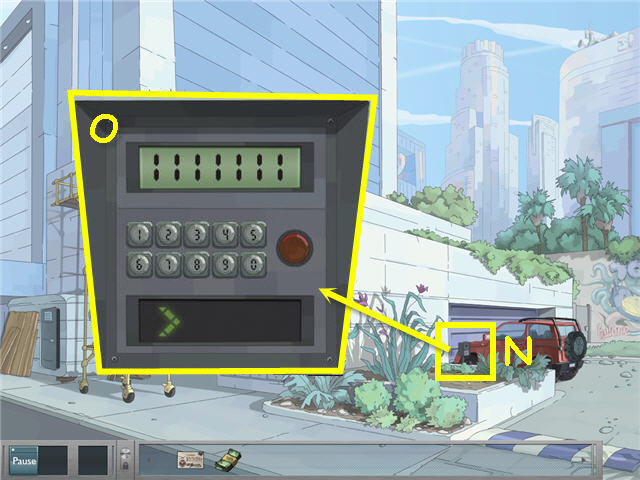
- Examine the garage door opener (N).
- Solution: Enter the code from the mailbox; 1111111.
- See screenshot (O) for solution.
- Pick up the KEY (P).
- Use the KEY on the chest; take the KEY (Q).
- Use the KEY on the janitor closet; move the ladder (R).
- Use the WOOD BOARD, NAILS and HAMMER on the broken ladder.
- Select the repaired ladder to move it the desk.
- Examine the note on the door; exit out of the close-up and get a CARD-ITEM (S).
- Enter the room upstairs.
- Use the CARD-ITEM on the alarm pad (T).
- Open the drawer; take the ORANGE PIECE (U).
- Pick up the BLUE PIECE (V) and YELLOW PIECE (W).
- Take the ORANGE STICK (X).
- Go into the room upstairs (Y).
- Automatically trigger a vision puzzle.

- Position the letters inside the shapes so that they all light up.
- See screenshot (Z) for one solution.
- Open the drawer; take the 2nd ORANGE PIECE (A) and KEY (B).
- Pick up the 2nd BLUE PIECE (C), 3rd BLUE PIECE (D) and 2nd YELLOW PIECE (E).
- Take the GREY STICK (F) and BLUE STICK (G).
- Place the BULB in the device (H) to trigger a puzzle.
- Push any button on the device to begin.
- Your goal is to push the buttons in the correct sequence.
- Push each buttons and note how many times the bulb flashes; push the buttons in numerical order of the bulb flashes. You will need to push all of them first before entering the correct sequence.
- Solution: red, yellow, blue, green.
- Take the PINK KEY (I).
- Exit the room.
- Go into the room on the upper floor.
- See screenshot (J) for position to place cursor.
- Pick up the YELLOW STICK (K) and GREEN STICK (L).
- Take the 3rd ORANGE PIECE (M).
- Open the drawer; take the 3rd YELLOW PIECE (N).
- Use the JACKHAMMER on the treasure chest on the wall; take the YELLOW KEY (O).
- Exit the room.
Chapter 7 – The Formula
- Arrange the ORANGE STICK, GREY STICK, BLUE STICK, YELLOW STICK and PINK STICK in the warrior statue head so that the facial expression matches that of the picture (P) in the testing room.
- Solution: From left; ORANGE STICK, GREY STICK, YELLOW STICK, BLUE STICK, GREEN STICK. See screenshot (Q) for solution.
- Take the VIOLET KEY (R).
- Place the 3 ORANGE PIECES, 3 BLUE PIECES, and 3 YELLOW PIECES in the sculpture in the same order as found in the art book (S).
- Solution - From the top, left to right: orange, yellow, orange, blue, blue, orange, yellow, yellow and blue. See screenshot (T) for solution.
- Take the GREEN KEY (U).
- Use the KEY on the drawer; take the FOOD (V).
- Place the FOOD in the tank; take the BLUE KEY (W).
- Examine the wardrobe; place the keys clockwise from the top; VIOLET KEY, PINK KEY, BLUE KEY, GREEN KEY, YELLOW KEY in the corresponding colored slots (X) to trigger a puzzle.
- Move the colored balls to the slots by the corresponding colored keys by turning the keys.
- Solution: The starting position of the balls is random. Turn the keys until you move the matching colored ball into the hole by the key. The balls can pass over each other. See screenshot (Y) for solution.
- Take the FILM REEL.
- Back out via the bottom right of the screen.
- Go into the film room above the sculpture.
- Place the FILM REEL on the sprocket (Z).
- Examine the monitor; push the button (A) to trigger a puzzle.
- Using the play and stop buttons, complete the series of animations.
- The active screen is the one with 4 corners flashing, completed screens have white borders.
- Solution: Press the stop button when the pen is at the bottom left and before the line is being drawn on screen 2 is at the bottom.
- Press play when the pole vaulter is at the top of screen 1.
- Press stop when the man climbing is at the very top with just a foot showing on screen 3.
- Press play when the red line is at the top of screen 2 to start the man climbing down.
- Press stop while the finger in screen 4 is at the top.
- Press play when the climber is at the top of the last incline.
- Press stop when the cherry is up on the fork in screen 5.
- Press play when the blue line in screen 4 is at the third dot.
- Press stop when the butterfly is at the bottom right of screen 6 or just after it flies away on the top left.
- Press play when the cherry is ready to fall off the plate on the left.
- Automatically trigger a vision puzzle when complete.
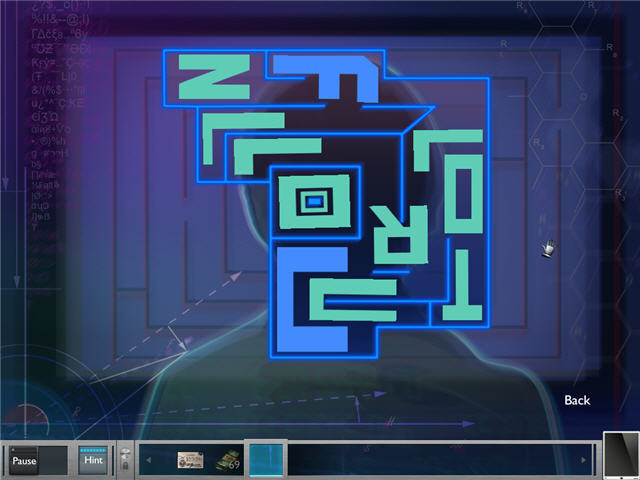
- Position the letters inside the shapes so that they all light up.
- See screenshot for one solution.
- Congratulations! You have successfully completed The Cross Formula.
Created at: 2012-02-01