

Walkthrough Menu
- General Tips
- Introduction: Antique Shop
- Chapter 1: Barbados
- Chapter 2: The Spanish Galleon
- Chapter 3: Peru
- Chapter 4: Island
- Chapter 5: Pirates Island
- Chapter 6: Ship Isabel
General Tips
- You can choose to play in Casual Mode: hints recharge faster, glints and puzzle hints are enabled. Advanced Mode has no puzzle hints and the hint button recharges slower.
- Mini-games can be skipped once the skip button is full.
- You can view instructions for mini-games by clicking on the question mark in the upper right corner.
- The “HINT” button (H) will show you where a hidden object is in your current scene, or suggest you look in another scene.
- If an item appears in the inventory box with a lock over it, you must look in a different location. You may need to zoom in on an object or move to a new scene.
- Click on the “MENU” button (M) in the upper right corner to exit, pause, or resume the game. There you can also adjust your options (sound, music, and screen size).
- Clicking on the “TASKS” button (T) in the lower left corner of the screen will tell you what your next task is.
- Use the “TREASURE” button (A) to see the trophies you have been awarded.
- Some inventory items will merge automatically once all the components are found.
- When gears appear over an item it means you need to place another item over it.
- When a magnifying glass appears over an item you can zoom into that space.
- When your cursor changes to an eyeball you will receive important information.
- In many scenes you will first need to zoom in or click on these items to unlock inventory items in the game.
- Between chapters you can hit next to move the storyline ahead or skip it altogether.
- Each time you play a Hidden Object Scene the items in the inventory list may change. The screenshots in this walkthrough show the items listed during a specific play through and may differ from your item lists.
Introduction: Antique Shop
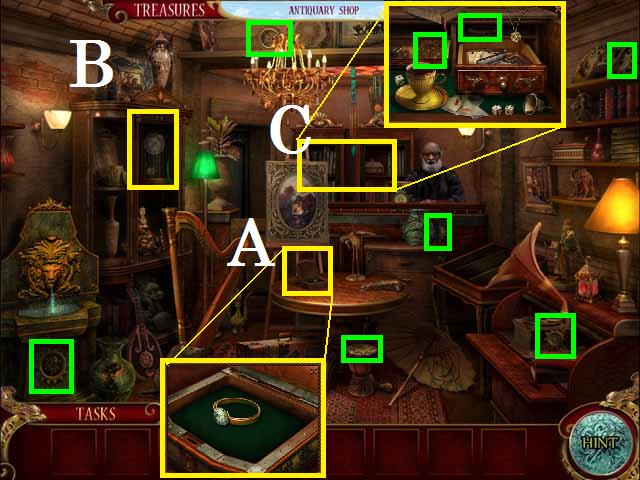
- Zoom in on the table and pick up the RING (A).
- Zoom into the clock on the shelf (B).
- Zoom into the curio cabinet behind the desk (C); open the left drawer and pick up two GEARS marked in green.
- Pick up the six remaining GEARS marked in green in the screenshot.
- Zoom in to the clock (B) and drag the GEARS to it.
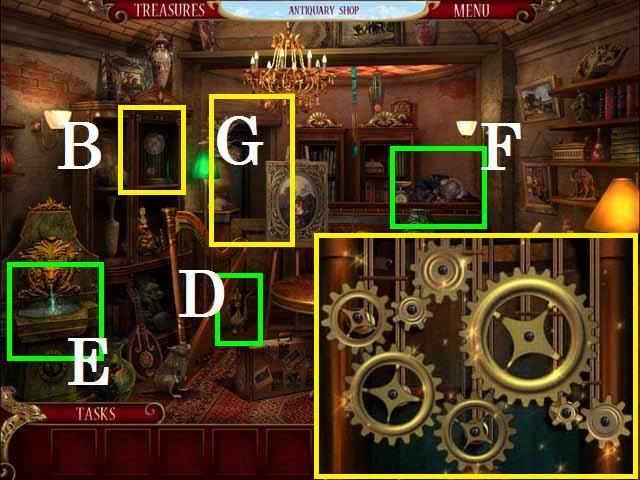
- Place the GEARS in the correct positions to receive the CLOCK of ETERNITY ( place the gears one by one next to a spinning gear, if it spins it is in the correct position). See the screenshot for correct configuration.
- Fill the JUG (D) with water from the fountain (E) and pour it over the Shopkeeper (F).
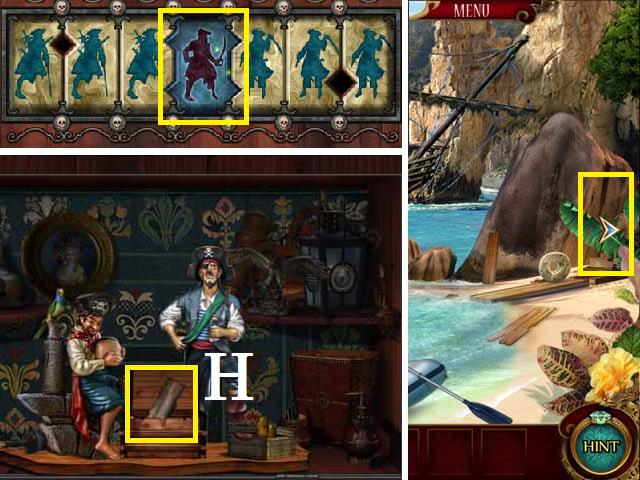
- Enter the back room through the door (G) behind the desk to trigger a Hidden Object Scene.
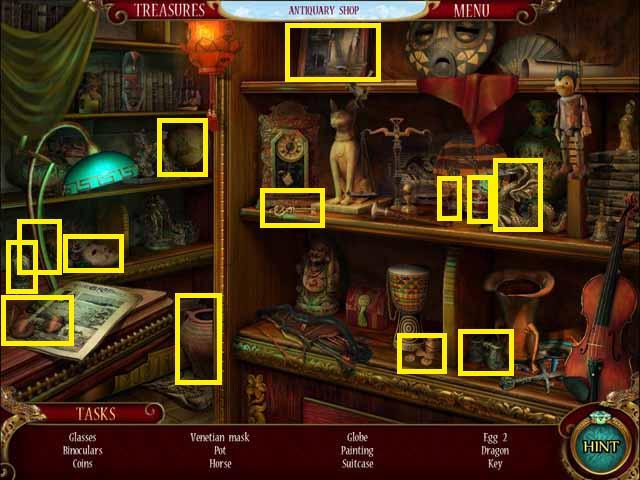
- Pick up all of the items in the inventory list to receive the KEY. The inventory items are different every play through; see examples in the screenshot.
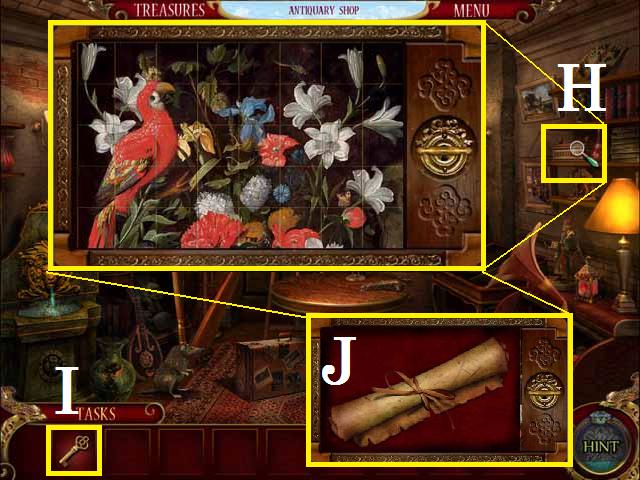
- Zoom into the box (H) on the shelf and place the KEY (I) in the keyhole.
- Rotate each tile by clicking on them until they are orientated correctly. See the screenshot for the final orientation.
- Turn the KEY and click the map (J) inside.
Chapter 1: Barbados
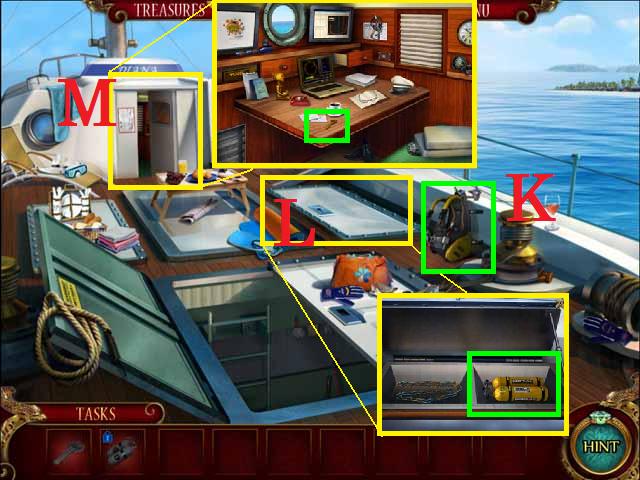
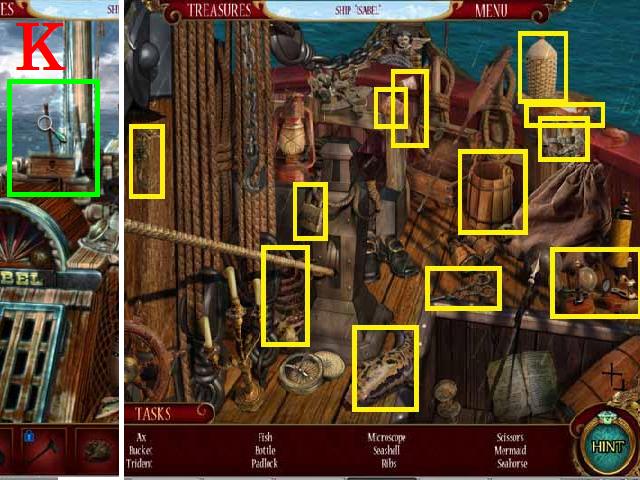
- Click on the AQUALUNG (K) and then the right door hatch (L).
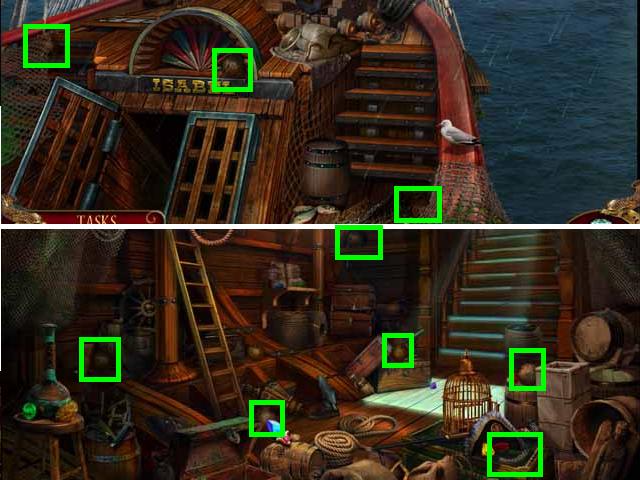
- Zoom into the back room (M) and pick up the KEY marked in green in the screenshot.
- Open the hatch with the KEY and pick up the OXYGEN CYLINDER marked in green.
- Drag the OXYGEN CYLINDER to the AQUALUNG.
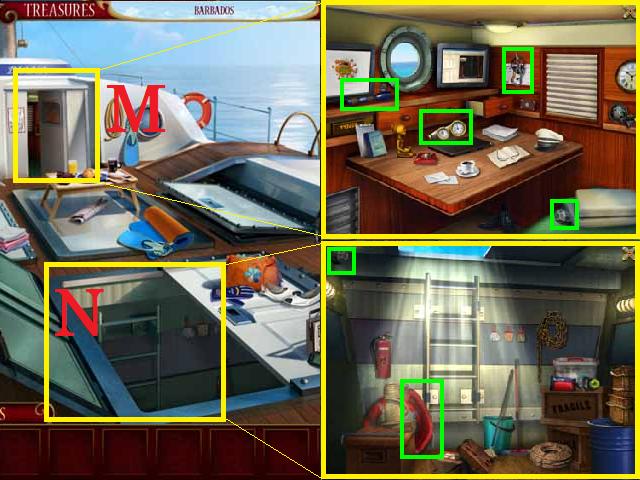
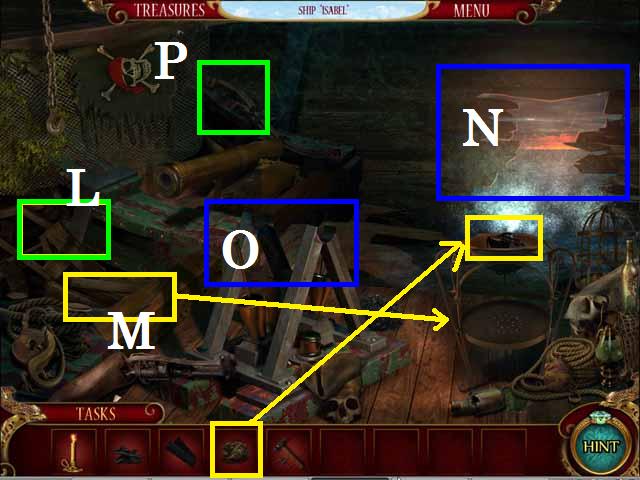
- Zoom into the back room (M) and close the laptop. Collect the four items marked in green in the screenshot.
- Zoom into the room below deck (N) and collect the two items marked in green in the screenshot.

- Pick up the DISPLAY (O) on the deck.
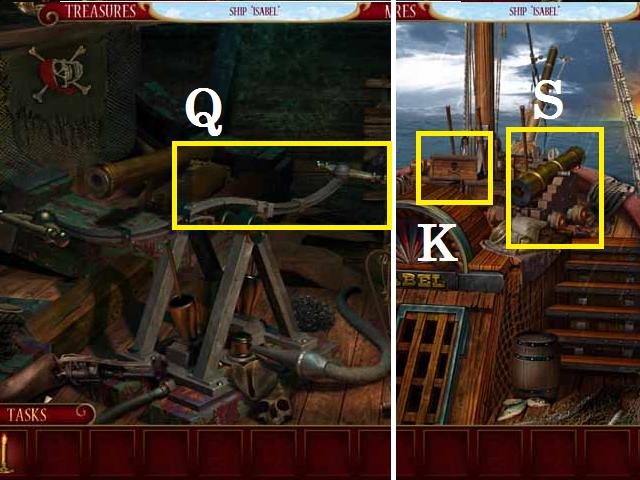
- Assemble the AQUALUNG as seen in the screenshot.
- Rotate the tiles, four at a time, to unscramble the map. The beginning positions of the tiles will not always be the same. One solution is to rotate the upper right tiles (1) once, the lower left tiles once (2), and the upper left tiles twice (3). See the screenshot for the correct orientation.
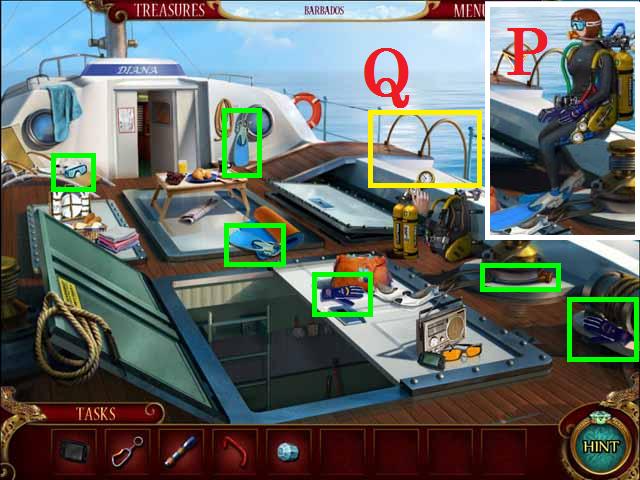
- Pick up two GLOVES, two FINS, the MOUTH PIECE, and the MASK for DIVING all marked in green in the screenshot.
- Put all of the Items on the diver (P) and enter the water using the ladder (Q).
Chapter 2: The Spanish Galleon
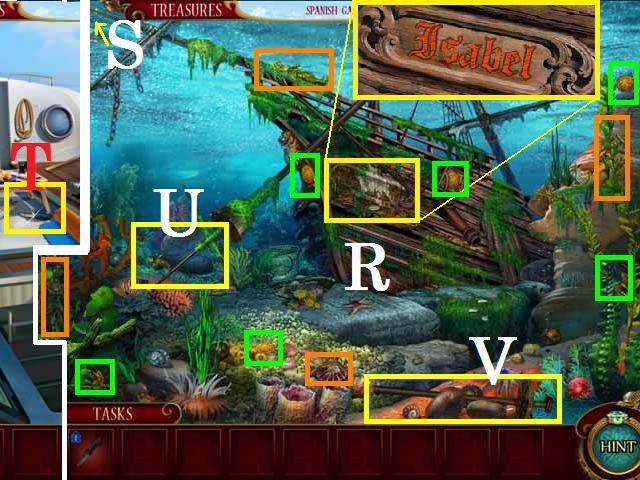
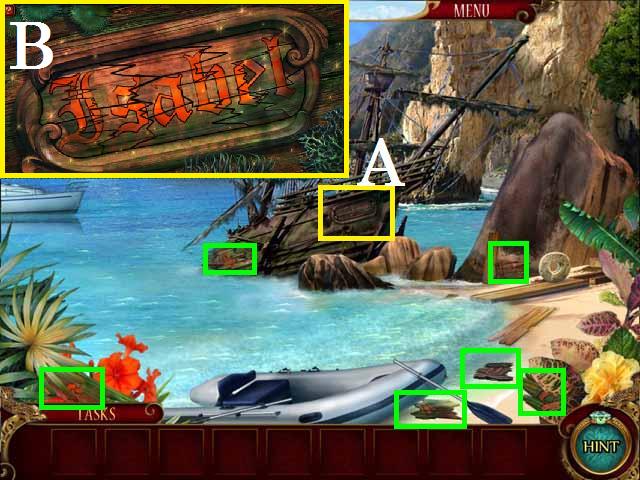
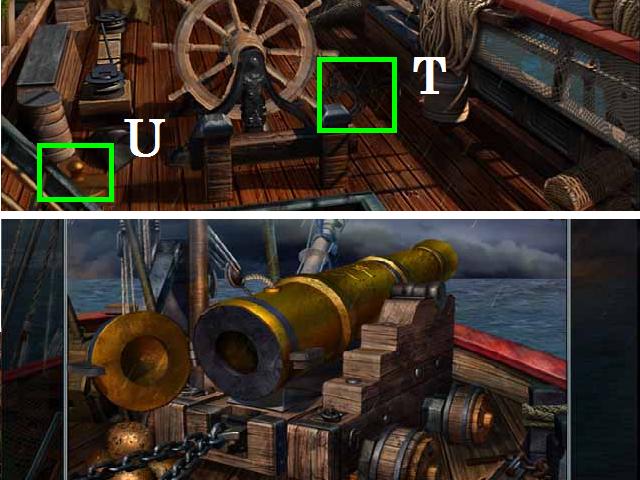
- Click on the shipwreck (R) where the name should be and then return to the top, using the ladder (S) in the top left to pick up the KNIFE (T).
- Return to the shipwreck and use the KNIFE to completely scrape the muck off of the name.
- Pick up six COINS marked in green in the screenshot.
- Pick up the SHELL and three of the FIGURES all marked in orange.
- Click on the last FIGURE (U) under the rock.
- Move the rock with the MAST PIECE (V) and pick up the FIGURE.
- Place the COINS, FIGURES, and SHELL on the box as seen in the screenshot; you will then receive the ARTIFACT of POSEIDON.
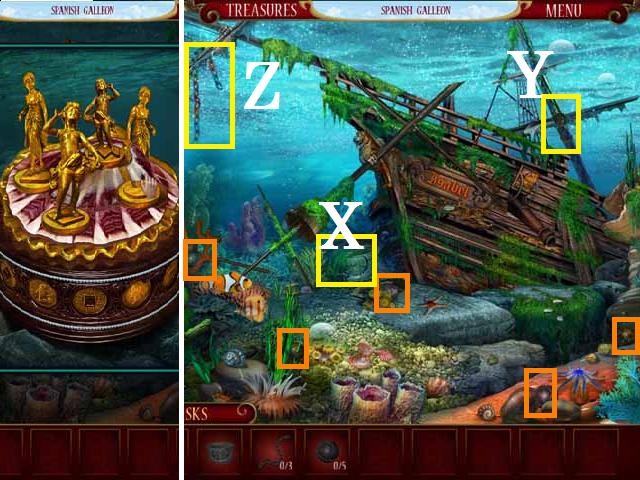
- Click on the cannon (W).
- Pick up five CANNON BALLS all marked in orange in the screenshot.
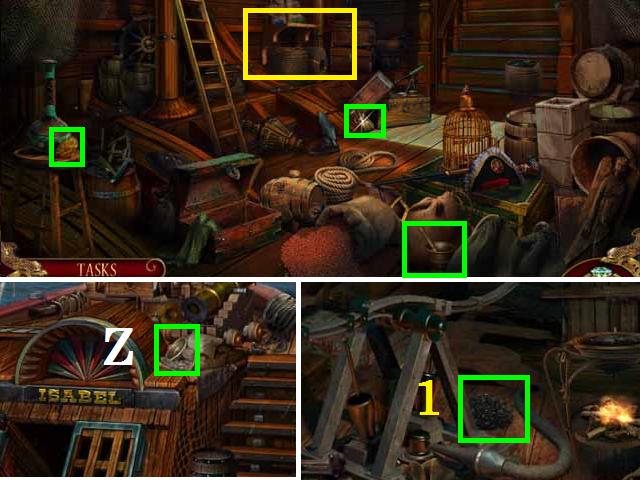
- Pick up one CHAIN (Z).
- Pick up the METAL BASKET (X) and the HOOK (Y).
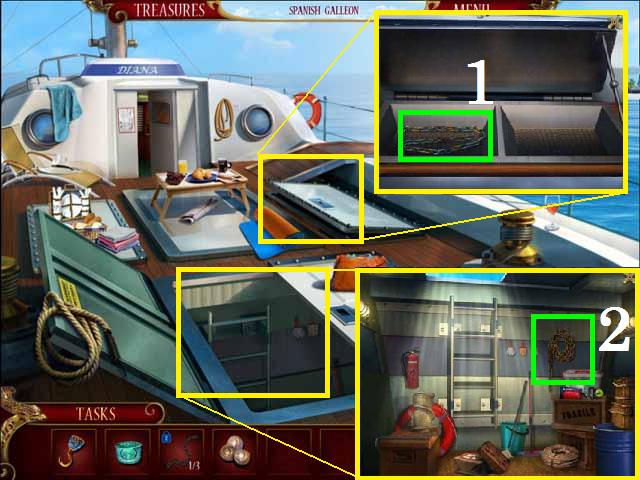
- Return to your boat.
- Zoom into the right door hatch and pick up a CHAIN (1).
- Zoom into the room below deck and pick up a CHAIN (2).
- Place the HOOK on the cannon (W) followed in order by the CHAINS, the BASKET, and the CANNON BALLS.
- Enter the shipwreck through the porthole.
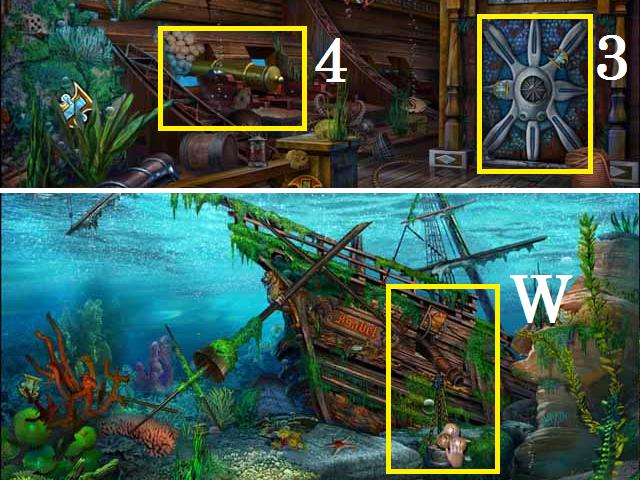
- Click on the door (3).
- Zoom in on the cannon (4) to trigger a Hidden Object Scene.
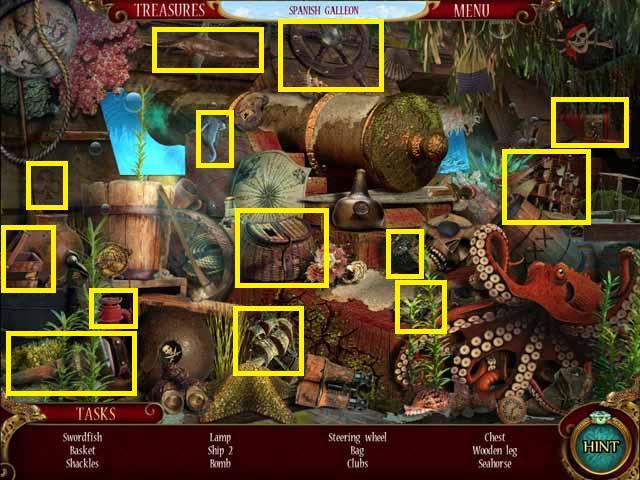
- The SEAHORSE will be added to your inventory after the search.
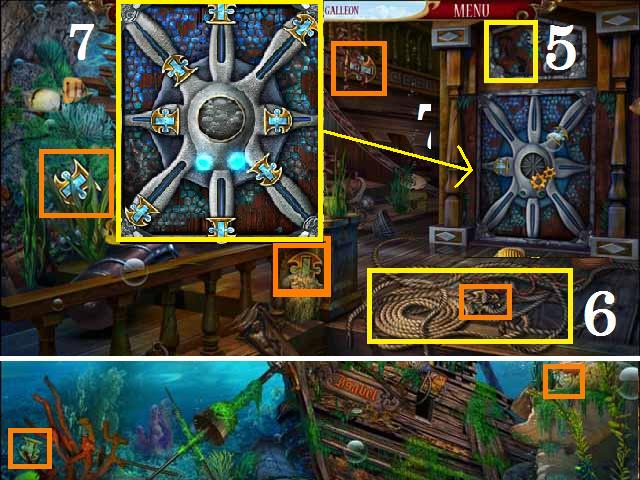
- Place the SEAHORSE above the door (5).
- Click on the pile of ropes (6); remove each, one by one, in order. Your cursor will change into a hand when you are on the correct rope in the sequence.
- Pick up the four PUZZLE PIECES marked in orange then use the stairs to go back outside.
- Pick up the two other PUZZLE PIECES marked in orange and return to the inside of the ship wreck.
- Drag the PUZZLE PIECES over the door and position the levers to open the lock (7). See the screenshot for correct positions.
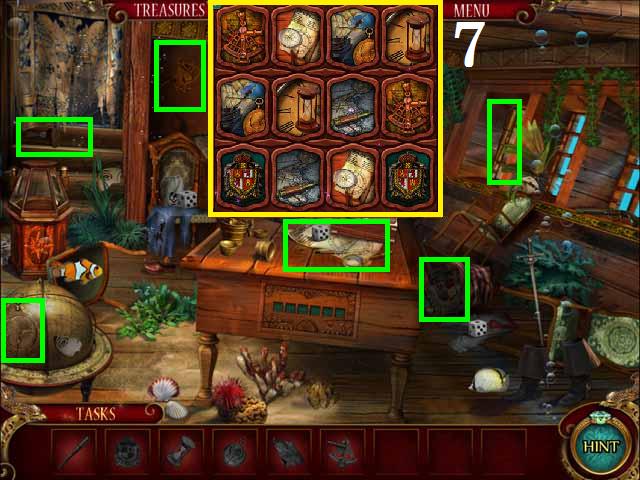
- Enter the door and pick up the TELESCOPE, COAT of ARMS, HOURGLASS, ASTROLABE, SEXTANT, and the MAP marked in green in the screenshot.
- Flip the cards two at a time and match the pairs; see the screenshot for the solution (8).
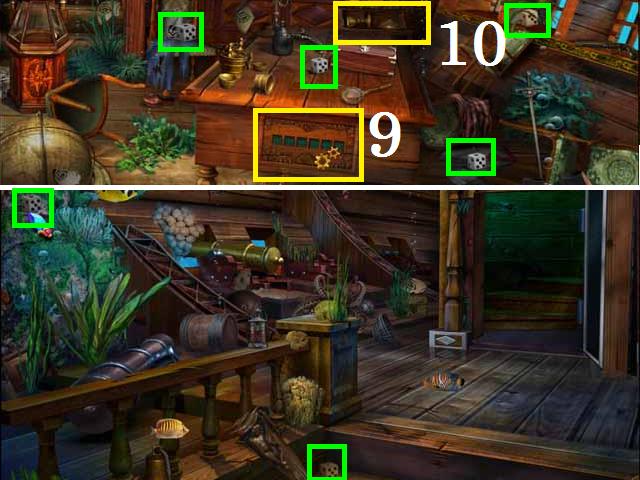
- Click the drawer (9) on the end of the table then pick up four of the six DICE marked green in the screenshot.
- Go back to the main cabin and pick up the two remaining DICE marked in green.
- Return through the door and drag the dice over the drawer.
- Zoom into the shelf (10) behind the table to trigger a Hidden Object Scene.
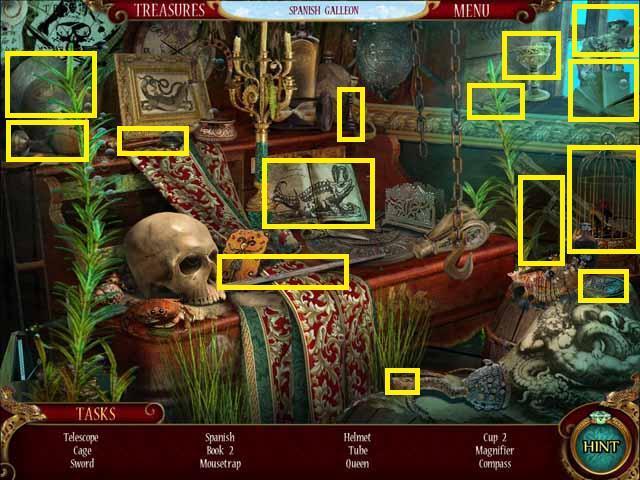
- The COMPASS will be added to your inventory after the search.
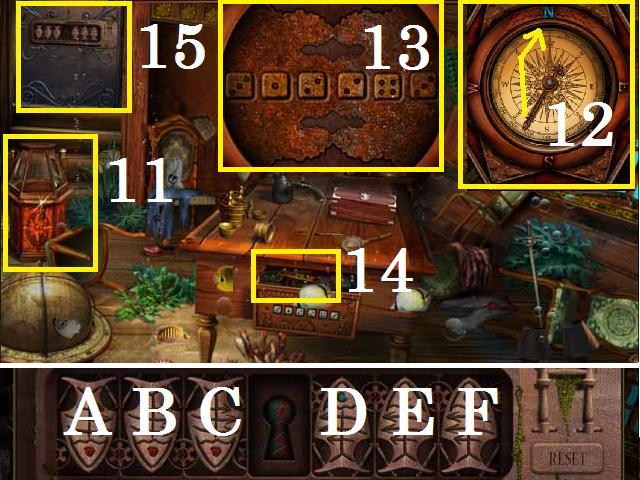
- Place the COMPASS in its case (11) and move the arrow to point north (12).
- Flip the dice (13) to open the drawer using the revealed sequence and pick up the KEY (14).
- Remove the tapestry hanging in the upper left corner and zoom in (15).
- Swap the sides of the chips by moving one at a time. Swap them in the following order C, D, E, C, B, A, D, E, F, C, B, A, E, F, A, as marked in the screenshot, for a winning sequence.
- Unlock the door with the KEY, and go inside the captain’s cabin.
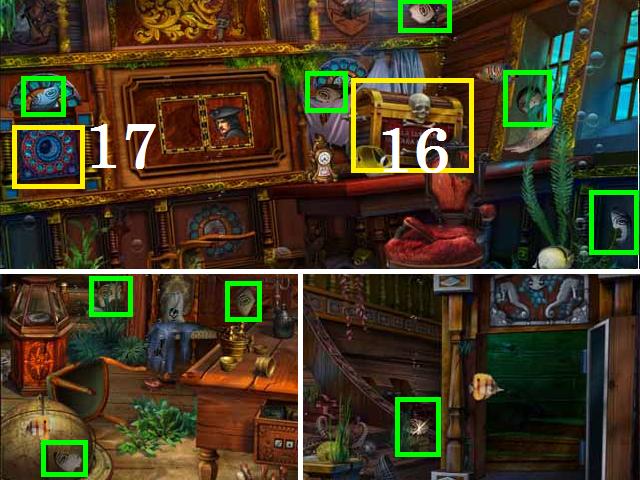
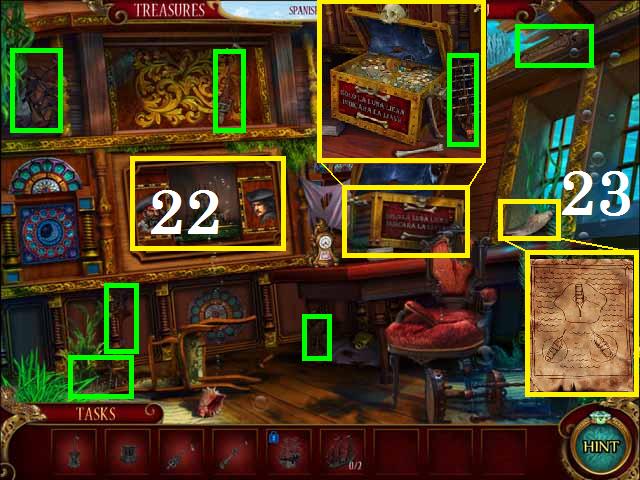
- Zoom into the chest (16) then close the window.
- Click on the lunar calendar (17) and pick up five of the MOON PIECES as marked in green in the screenshot.
- Go back one room and collect three more MOON PIECES marked in green.
- Go back one more room to pick up the last MOON PIECE marked in green.
- Return to the captain’s cabin and drag the MOON PIECES over the lunar calendar.
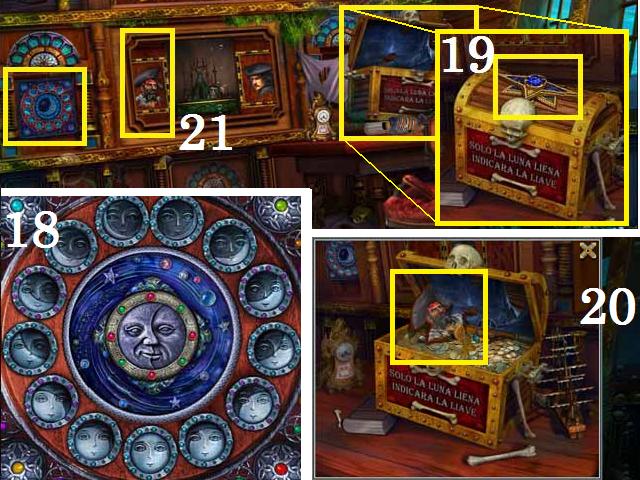
- Arrange the MOON PIECES in the correct order as seen in the screenshot (18) and pick up the KEY (19).
- Zoom in on the chest; drag the KEY over the top and pick up the PIRATE PORTRAIT (20).
- Place the PORTRAIT in the wall panel (21) and click on the castle model.
- Pick up the four WOODEN TOWERS, and the two SHIPS marked green in the screenshot.
- Zoom into the chest to pick up the third SHIP.
- Zoom into the castle model (22) and drag all of the collected items to it (place TOWERS before SHIPS).
- Close the window and click on the paper (23) in the window seal.
- Rotate the BOATS to match the instructions: click the top BOAT twice to position it, and then click the lower BOAT right once followed by the left BOAT.
- Pick up the LOG BOOK CASE and return to the boat.
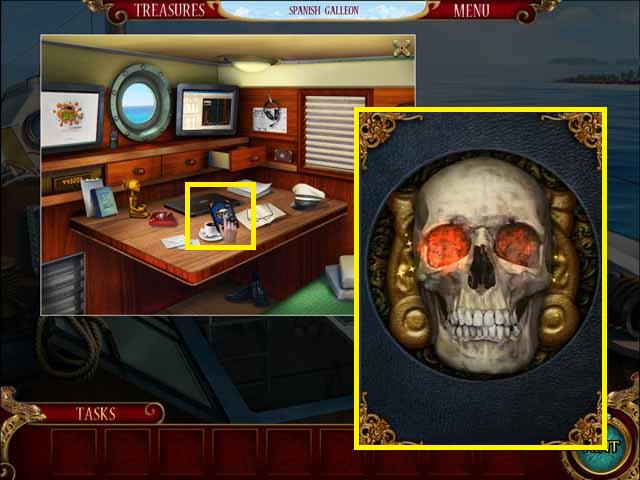
- Go into the cabin and place the LOG BOOK CASE on the desk.
- Open the CASE by rotating the rings one by one to create a skull picture and pick up the BOOK, the rings starting positions vary; see the screenshot for the final image.
Chapter 3: Peru
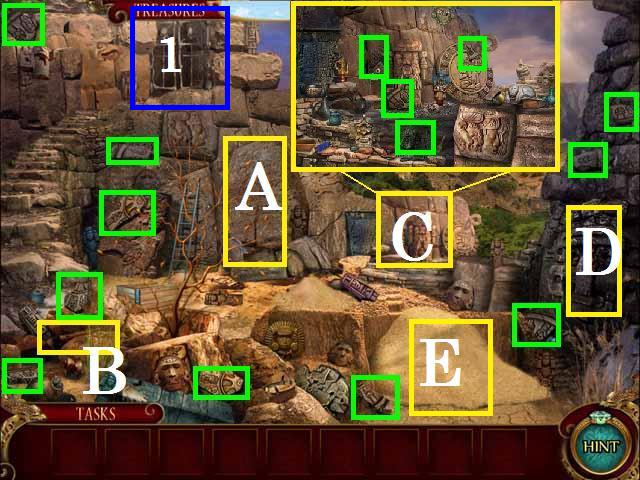
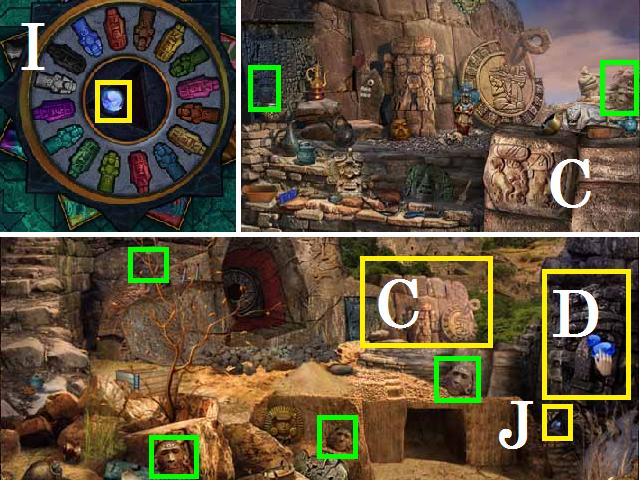
- Click on the large stone (A) covering the small cave below the stairs.
- Break the stone with the PICKAXE (B) and zoom in.
- Pick up PIECES OF MOSAIC marked in green in the screenshot.
- Zoom into the area (C) to the right of the small cave and pick up four MOSAIC PIECES.
- Click the stone face (D) and a pile of sand (E).

- Zoom back into the small cave, drag the MOSAIC PIECES over and assemble the puzzle (F). See screenshot for final image.
- Enter the temple up the stairs (1) and zoom into the panel (H) on the back wall.
- Zoom into the floor (G) and solve the puzzle; then close the window.
- Enter the room to the left (I) to trigger a Hidden Object Scene.

- The SHOVEL will be added to your inventory after the search.
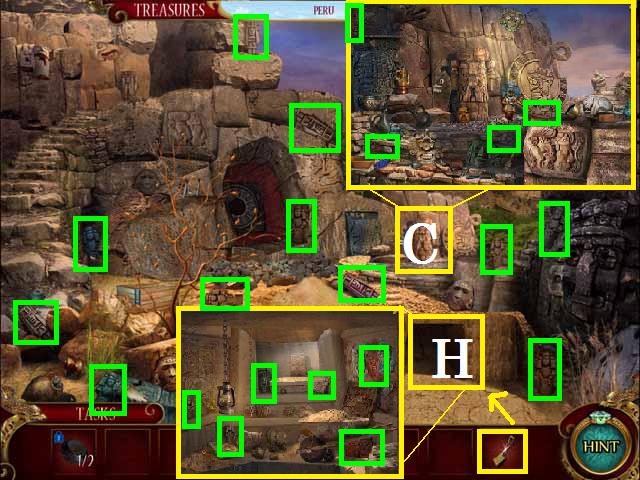
- Exit the temple; SHOVEL the sand pile and zoom into the tunnel (H).
- Pick up four STATUES and two FIGURES all marked in green in the screenshot.
- Zoom into the area to the right of the cave (C) and pick up two STATUES and two FIGURES marked in green.
- Pick up the remaining STATUES and FIGURES all marked in green.
- Zoom into the floor in the temple and arrange the STATUES and FIGURES as seen in the screenshot (I).
- Pick up the GEM and close the window.
- Exit the temple and pick up the second GEM (J).
- Drag the GEMS to the stone face (D) and zoom in.
- Close the window and pick up four MASKS marked in green.
- Zoom into the area to the right of the cave (C) and pick up two MASKS.
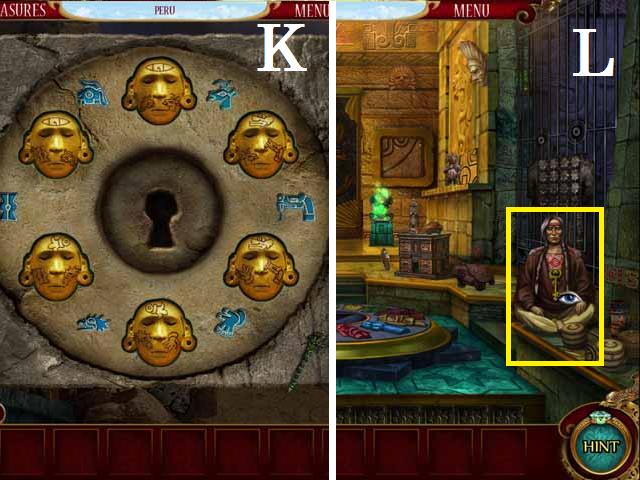
- Drag the MASKS to the stone face and place them in the correct positions (K); then close the window.
- Enter the temple; click the Indian (L) and enter the room to the left to trigger a Hidden Object Scene.

- The PEACE PIPE will be added to your inventory after the search.
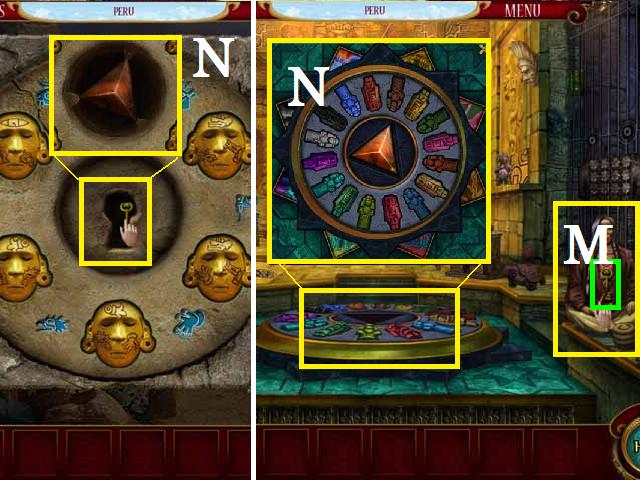
- Give the PIPE to the Indian and receive the KEY (M).
- Outside, zoom into the stone face and use the KEY on the lock to receive another KEY (N).
- Return to the temple; zoom into the floor and place the KEY (N) in the hole and receive the MAGIC LOUPE.
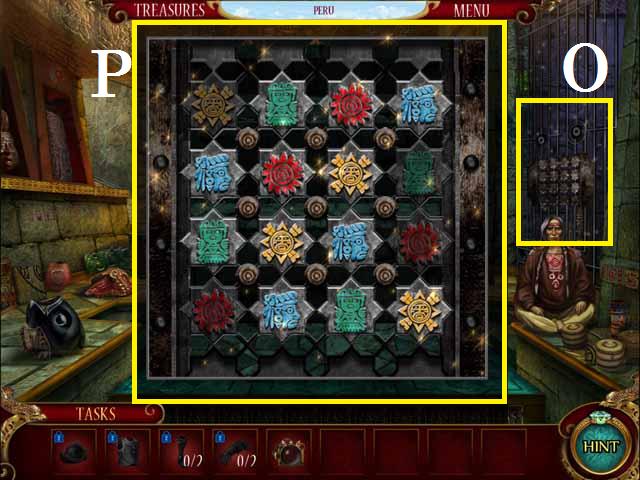
- Zoom into the gate (O).
- Click on each space and choose the correct symbol as seen in the screenshot (P).
- Enter the gate into the forge.
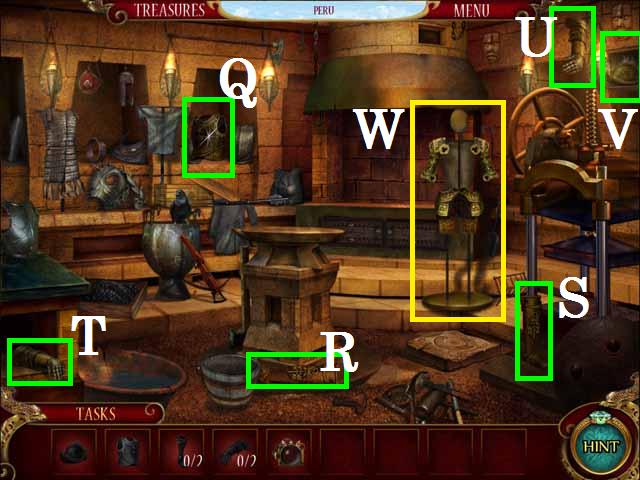
- Pick up the ARMOR (Q), two LEGGINGS (R, S), two GLOVES (T, U), and the HELMET (V).
- Place the armor pieces on the suit of armor (W).
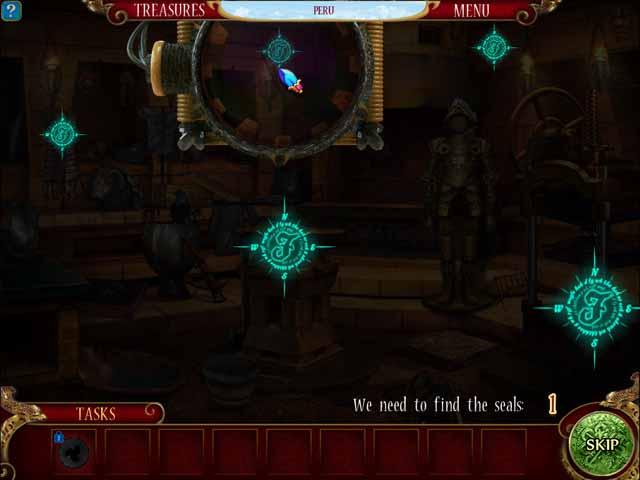
- Use the MAGIC LOUPE (X) to find the five SEALS as seen in the screenshot.
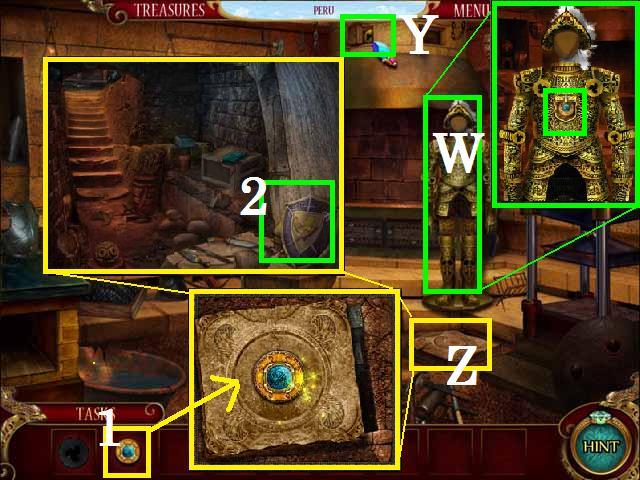
- Pick up the ARMOR PIECE (Y) and place it on the suit of armor, pick up the MEDAL (W) to receive the MAGIC ARMOR.
- Zoom into the floor tile (Z) and place the MEDAL (1) there.
- Zoom into the hole and pick up the SHIELD (2).
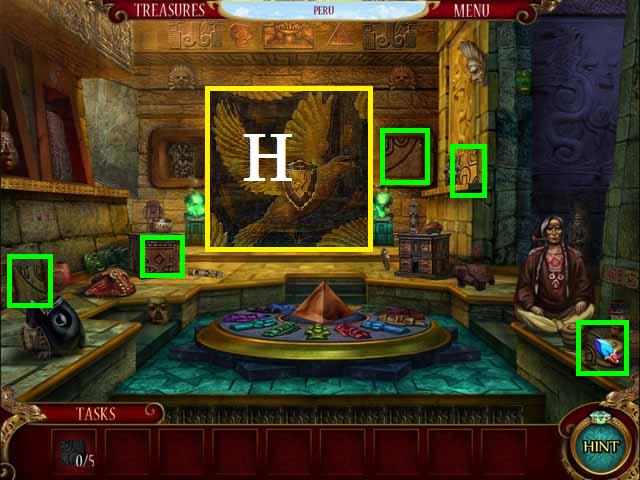
- Return to the main room and place the SHIELD on the back wall (H).
- Pick up the five MOSAIC PIECES, marked in green in the screenshot, and place them on the back wall.
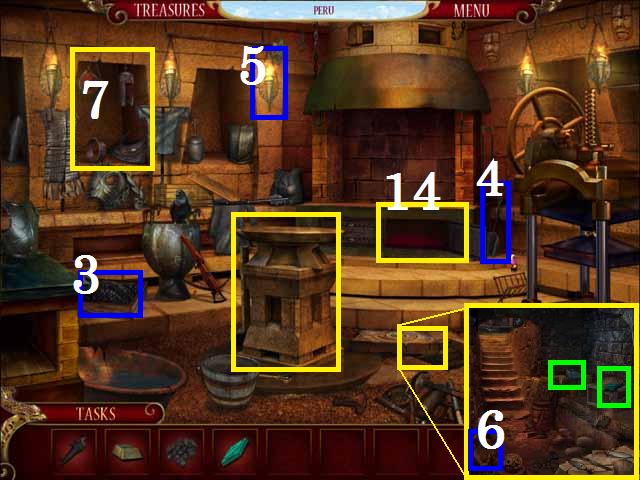
- Return to the forge and zoom into the hole.
- Pick up the INGOT and MOLD marked in green in the screenshot.
- Open the door to the oven (14).
- Click the COAL (3) and then SHOVEL (4) it.
- Place the CHARCOL in the oven (14).
- Light the oven with any of the TORCHES (5).
- Zoom into the hole and pick up the BELLOWS (6) to stoke the fire.
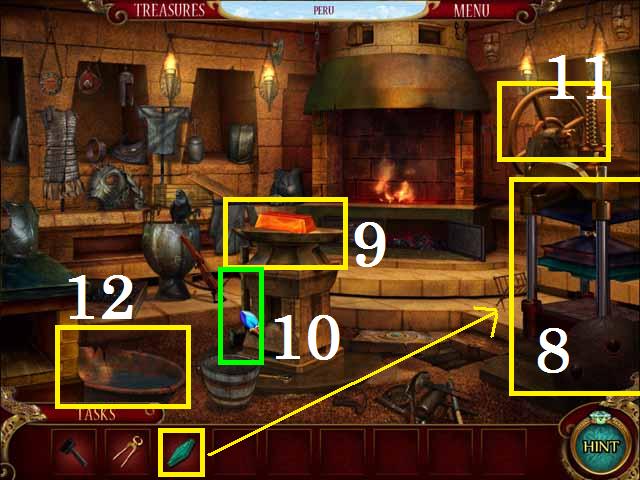
- Place the INGOT on the oven.
- Zoom into the middle alcove (7) to trigger a Hidden Object Scene.
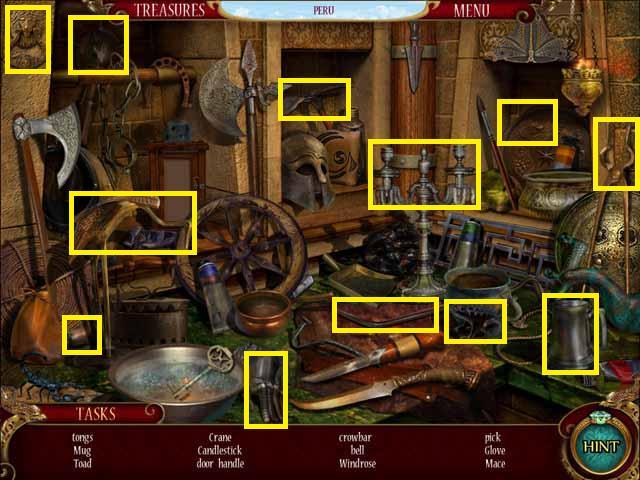
- The TONGS will be added to your inventory after the search.
- Place the MOLD on the press (8).
- Using the TONGS, move the INGOT to the anvil (9).
- SLEDGE HAMMER (10) the INGOT and move it to the press with the TONGS.
- Spin the wheel (11) and move to the water (12); pick up the MOSAIC PIECE.
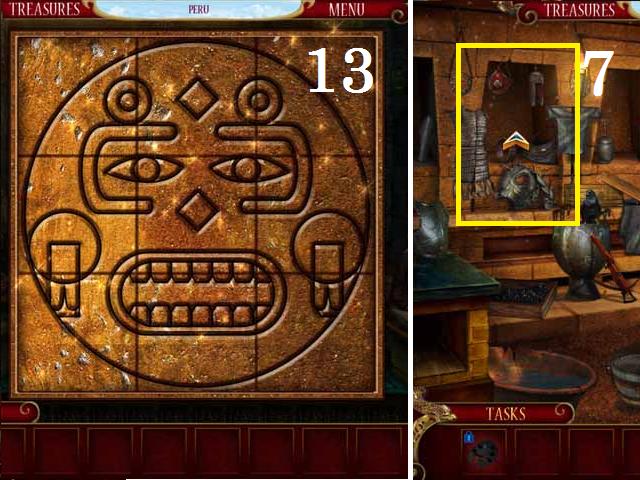
- Return to the main room and place the MOSAIC PIECE on the back wall; solve the puzzle as seen in the screenshot (13).
- Zoom into the painting.
- Return to the forge and zoom into the middle alcove to trigger a Hidden Object Scene.
- The PALETTE will be added to your inventory after the search.
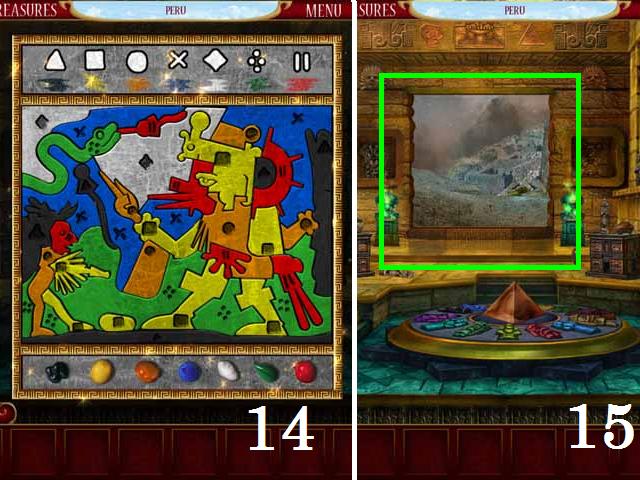
- Return to the main room; zoom into the back wall and drag the PALETTE to the painting.
- Fill in the painting by matching color to shape and filling in the diagram as seen in the screenshot (14).
- Exit through the back wall (15).
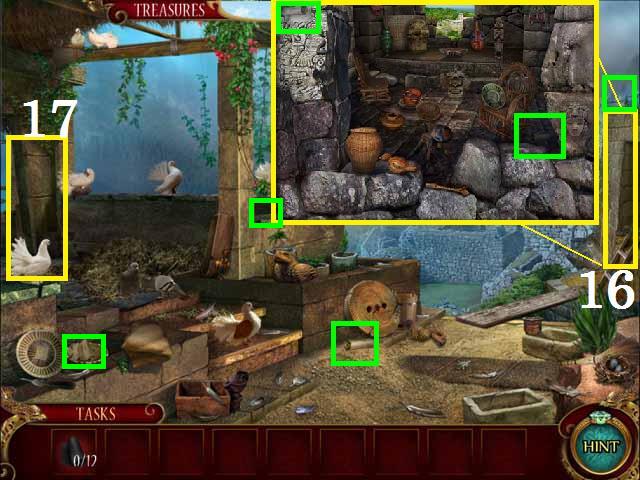
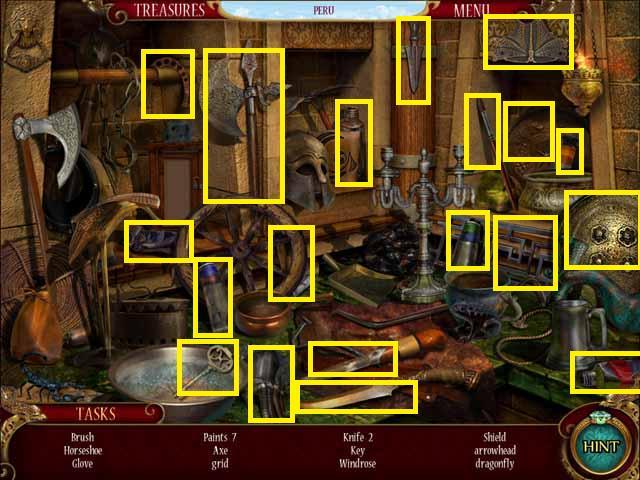
- Pick up four SCROLLS as marked in green in the screenshot.
- Zoom into the doorway (16) on the right and pick up two SCROLLS.
- Enter the room to the left (17) and pick up three SCROLLS marked in green.
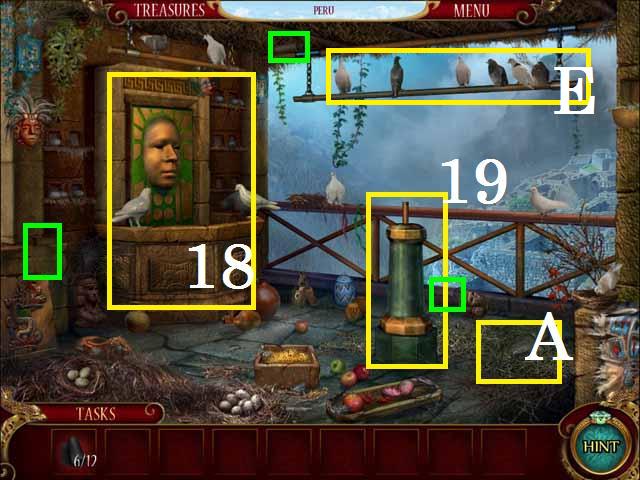
- Click on the pigeons on the line (E).
- Click on the fountain (18), the pump (19), and a pile of straw (A).

- Go outside and pick up the FOUNTAINS VALVE (20).
- Zoom into the ledge (21) to trigger a Hidden Object Scene.
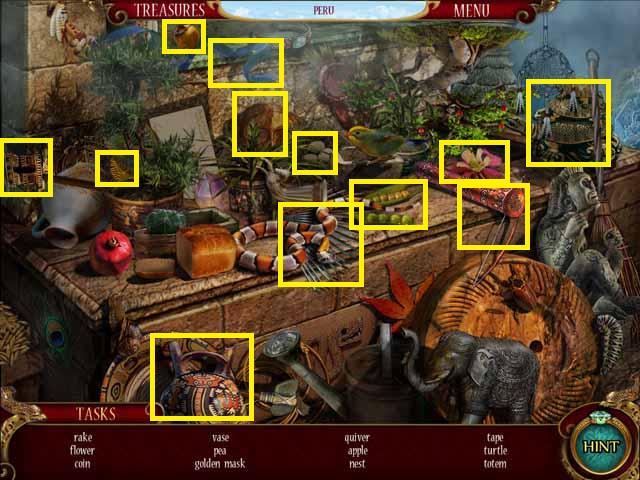
- The RAKE will be added to your inventory after the search.
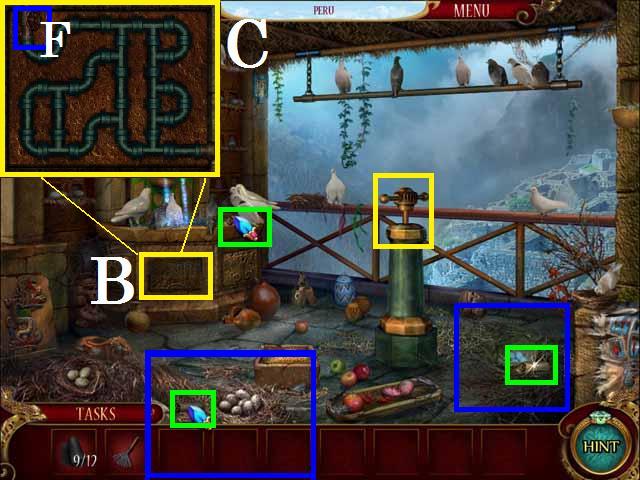
- Inside, RAKE the two piles of straw marked in blue.
- Place the VALVE on the pump and push it.
- Zoom into the panel on the fountain (B) and solve the puzzle by spinning each pipe piece until both ends are connected (C) and then spin the handle (F).
- Pick up the remaining SCROLLS marked in green in the screenshot.
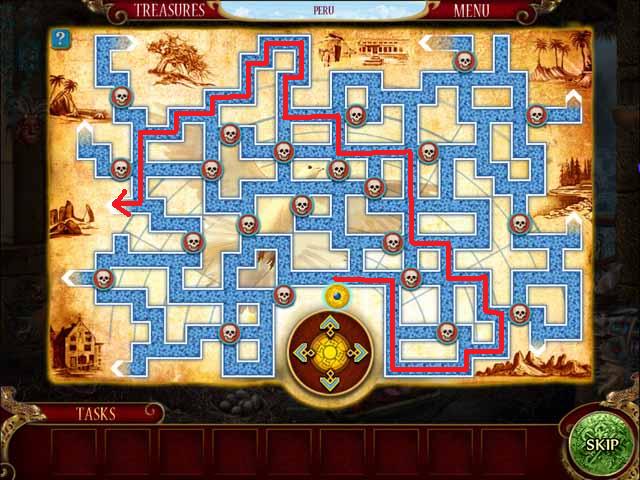
- Using the arrows (D), move out of the maze following the path as seen in the screenshot.
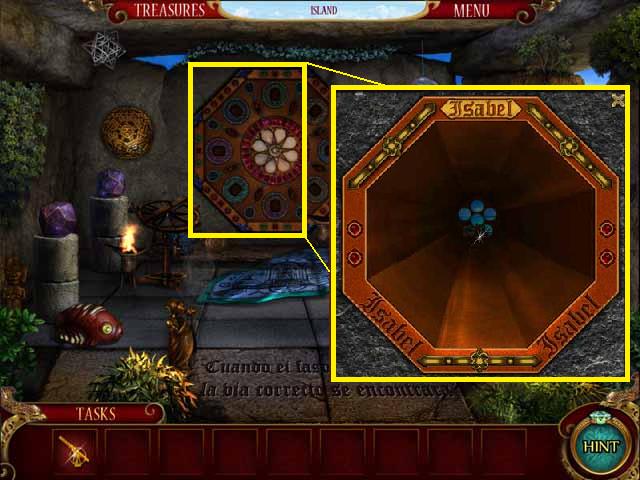
Chapter 4: Island
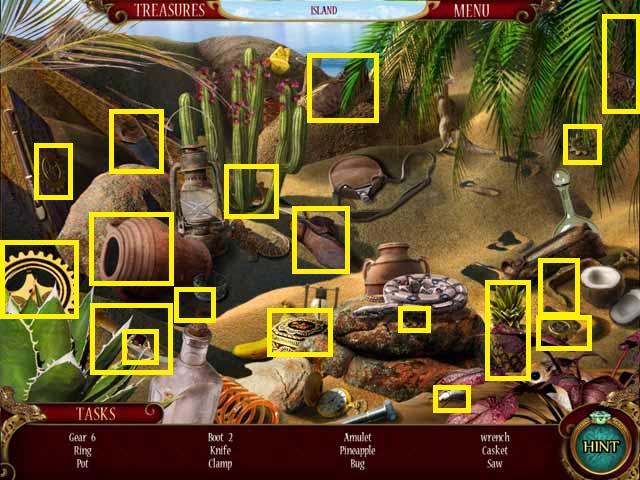
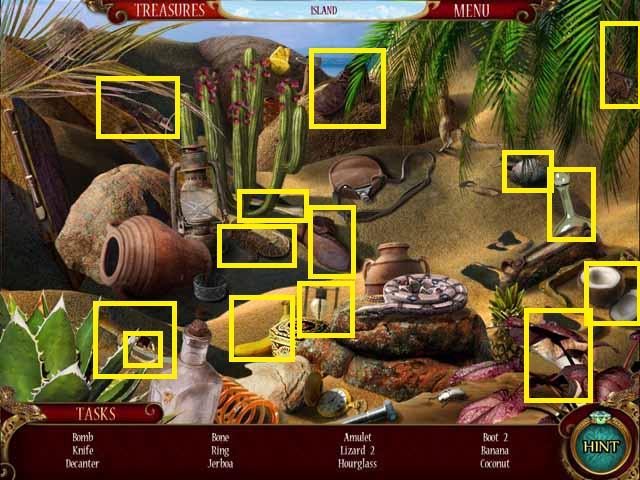
- Click on the shipwreck (A) and then pick up all of the MOSAIC PIECES marked in green in the screenshot.
- Drag the PIECES over the ship and assemble the puzzle (B).
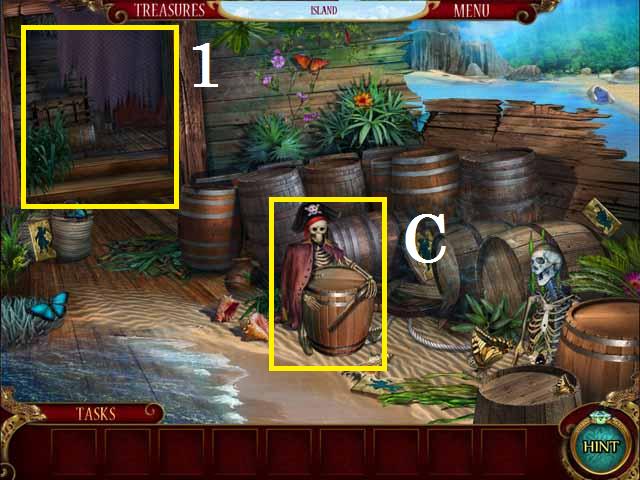
- Enter the shipwreck and click the barrel (C) the skeleton is hugging.
- Go through the doorway (1) to trigger a Hidden Object Scene.
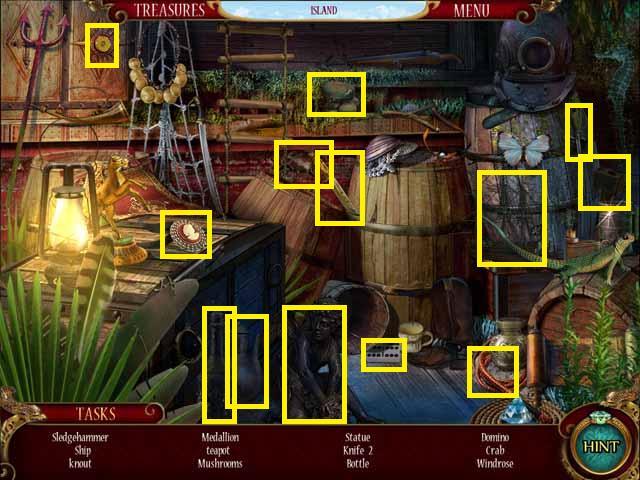
- The SLEDGE HAMMER will be added to your inventory after the search.
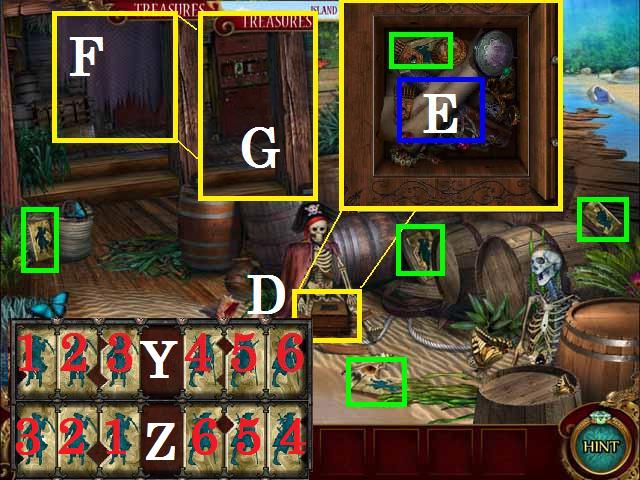
- SLEDGE HAMMER the barrel.
- Zoom into the jewelry box (D); click the upper left dial once, followed by the upper right and the lower left dials to open the box.
- Zoom into the map (E) and close the window.
- Move the curtain (F) in the doorway and try to zoom in.
- Pick of four DIES marked in green in the screenshot.
- Zoom into the jewelry box for the fifth DIE.
- Drag the DIES over the cabinet (G) in the doorway.
- Rearrange the DIES by moving one at a time. First you need to swap tiles 1 with 3 and 6 with 4 (Y). Move in order 4, 6, 5, 4, 6, 5, 4, 5, 6 to swap 4 and 6.
- Move in order 3, 1, 2, 3, 1, 2, 3, 2, 1 to swap 3 and 1.
- Now swap the sides of each tile (Z). Move in order 1, 6, 5, 1, 2, 3, 6, 5, 4, 1, 2, 3, 5, 4, and 3, as marked in the screenshot, for a winning sequence.
- Go through the doorway to trigger a Hidden Object Scene.
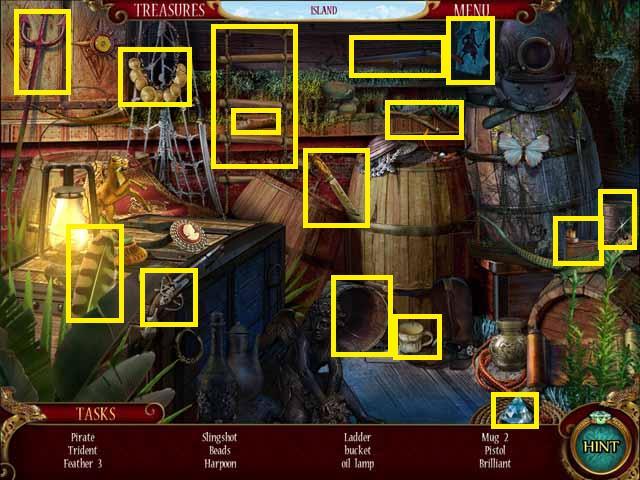
- The last die or KEY (also noted as PIRATE in the Hidden Object Scene) will be added to your inventory after the search.
- Zoom in to the cabinet and replace the KEY.
- Click on the map (H) in the middle and receive the Pirate’s Luck.
- Exit the shipwreck and then click the right side of the screen to go to a new location.
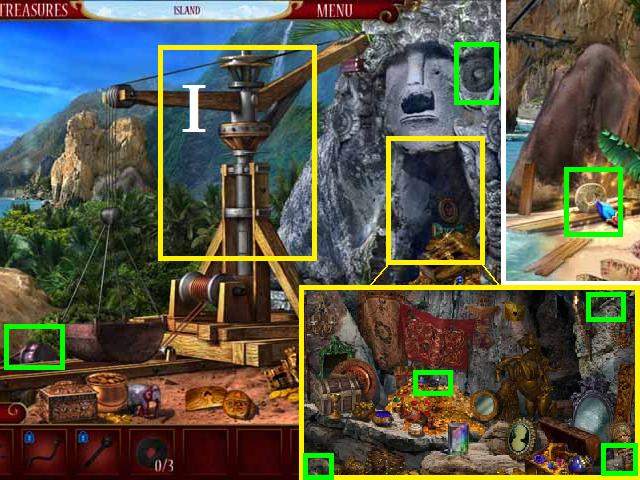
- Click the crane (I).
- Zoom into the cave opening and pick up the HANDLE, the WINCH HANDLE, BUCKET HANDLE, and a LOAD STONE, all marked in green.
- When the window shuts, pick up the WINCH and another LOAD STONE marked in green.
- Return to the beach and pick up the last LOAD STONE marked in green.
- Return to the crane and repair it with all of the parts.
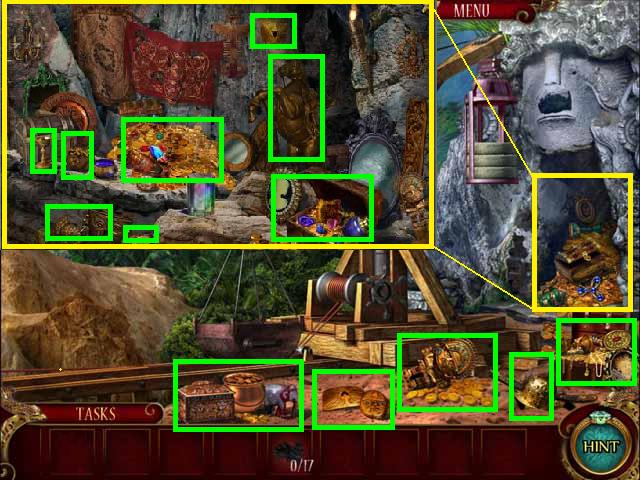
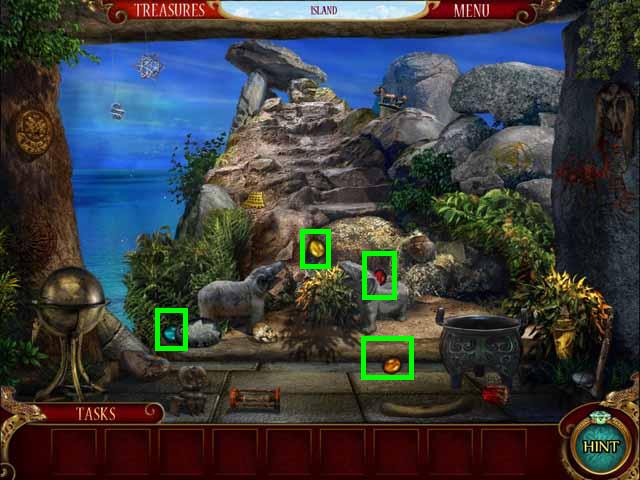
- Pick up five piles of GOLD marked in blue in the screenshot.
- Zoom into the cave and collect the rest of the GOLD marked in blue.
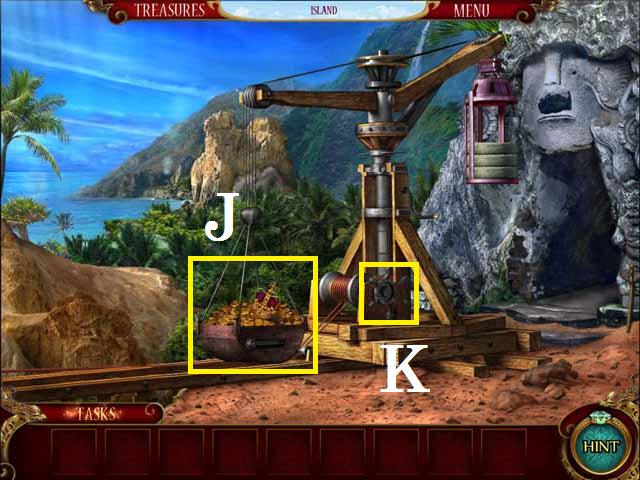
- Place all of the gold in the crane’s basket (J) and turn the WINCH HANDLE (K).
- Zoom into the ocean to trigger a Hidden Object Scene to receive the missing GEARS.
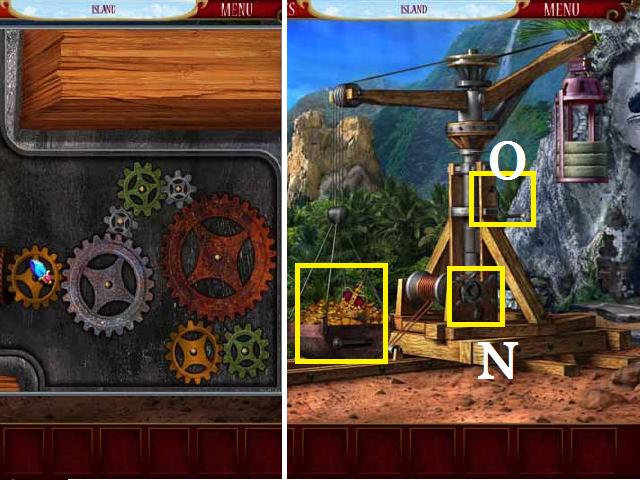
- Drag the GEARS (L) to the open panel (M) on the crane and solve the puzzle. See the screenshot.
- Turn the HANDLE (N); click the basket, then the WINCH HANDLE (O).
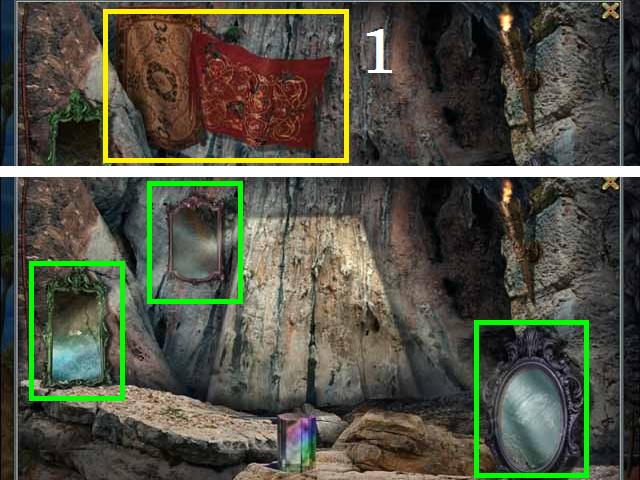
- Zoom into the cave and remove the two hanging tapestries (1).
- Position the three mirrors, marked in green in the screenshot, by clicking each one once, until they illuminate the hidden passage.
- Zoom into the ocean to trigger a Hidden Object Scene and receive a BOMB.
- Zoom into the cave, light the BOMB with the TORCH (P) to blow up the wall.
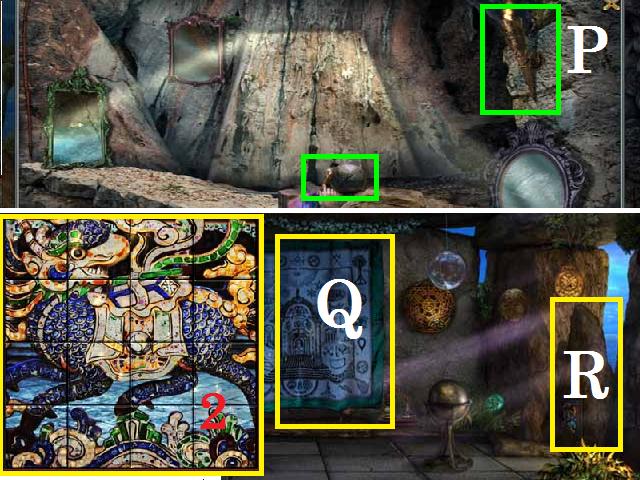
- Go down the path, move the tapestry (Q) hanging on the rear wall and zoom in.
- Zoom in on the large stone (R) blocking the doorway on the left.
- Solve the puzzle by moving the tiles to an empty square until you have the correct orientation. See screenshot for the final image (2).
- Go through the doorway and pick up four STONES marked in green and then return to the previous room.
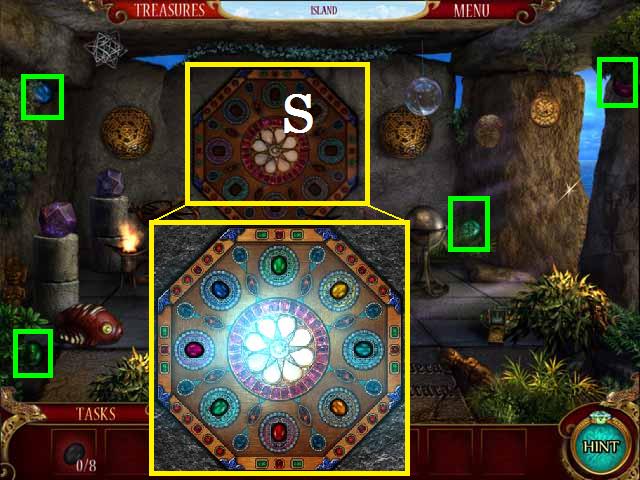
- Pick up four more STONES marked in green and zoom into the window (S). Place the STONES in their corresponding holes as seen in the screenshot.
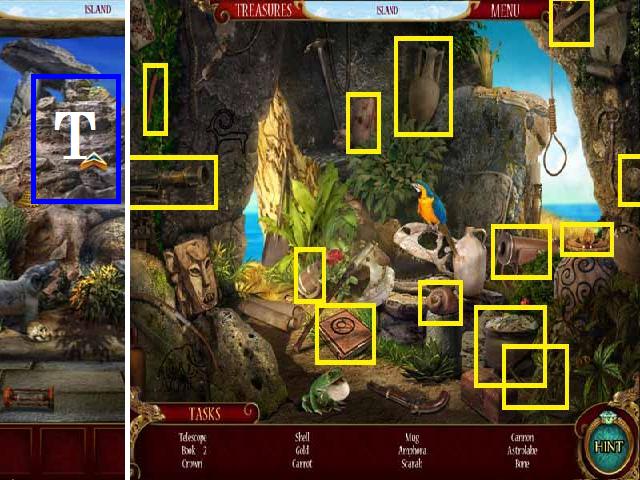
- Go through the doorway on the left and zoom into the rocks (T) to trigger a Hidden Object Scene to receive the TELESCOPE.
- Go back one room; zoom into the window and place the TELESCOPE there.
Chapter 5: Pirates Island
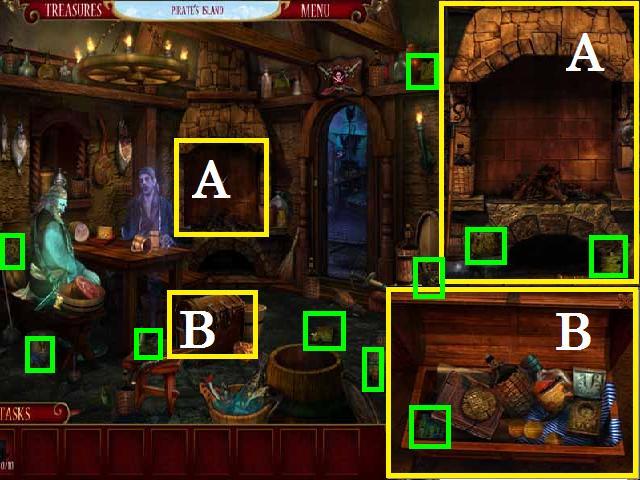
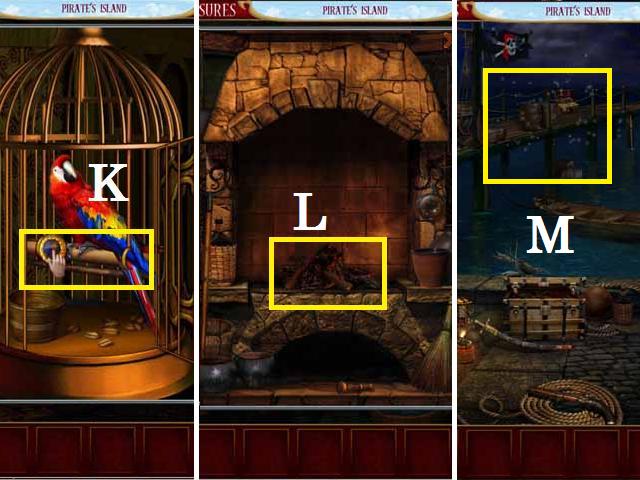
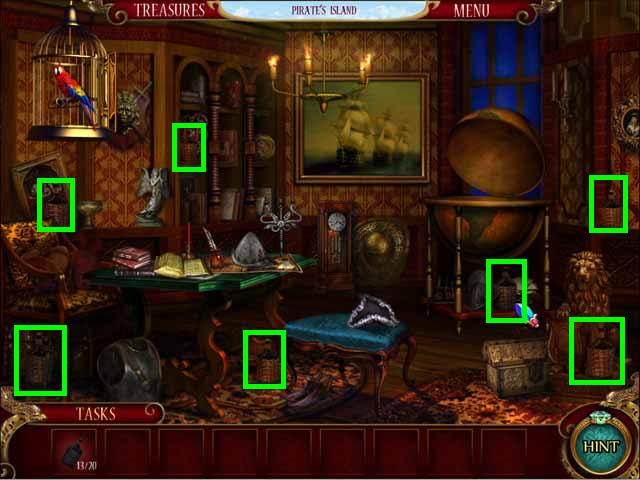
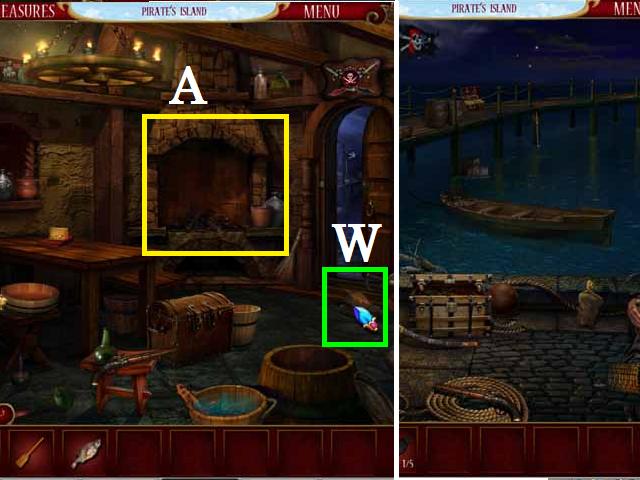
- Zoom into the fireplace (A) and pick up two MOSAIC PIECES marked in green in the screenshot.
- Zoom into the chest (B) and pick up a PIECE marked in green.
- Pick up the remaining PIECES all marked in green.
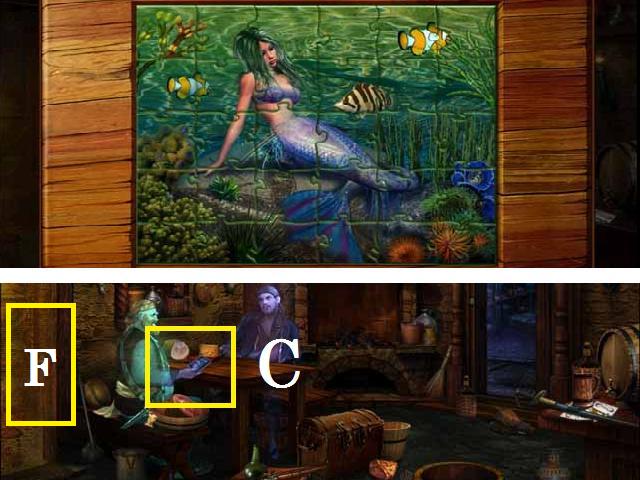
- Solve the puzzle, as seen in the screenshot, and receive the PICTURE.
- Place the PICTURE in the pirate’s hands (C).
- Move the curtain (F) hanging behind the pirate.
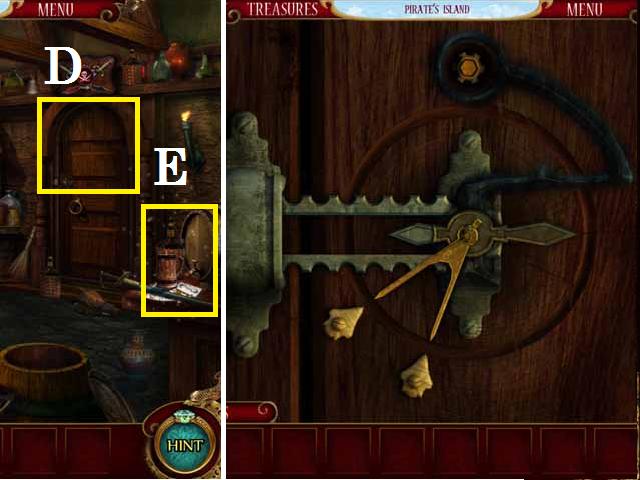
- Zoom into the door (D) to the dock and open it by moving the three lock details until it opens, as seen in the screenshot.
- Zoom into the table (E) to trigger a Hidden Object Scene.
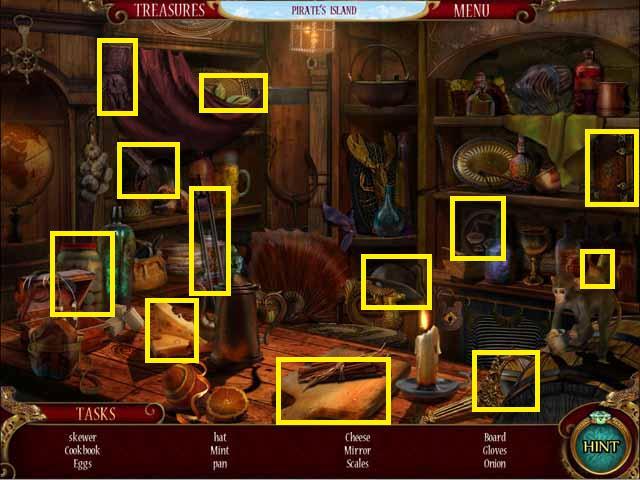
- The KEY will be added to your inventory after the search.
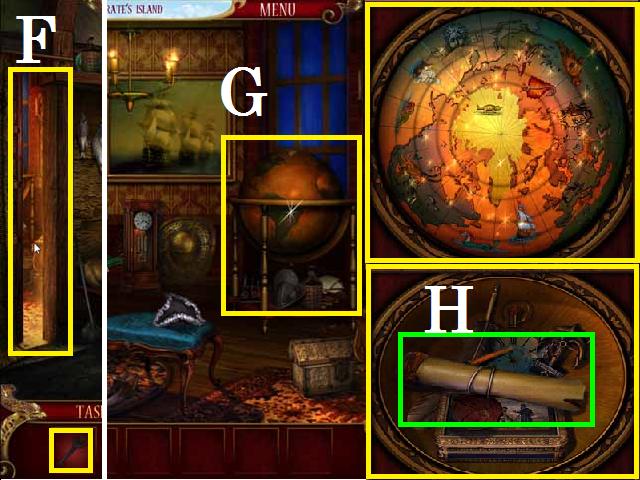
- Open the door to the captain’s room (F) with the KEY.
- Zoom into the globe (G) and solve the puzzle.
- Click on the revealed scroll (H) and then close the window.
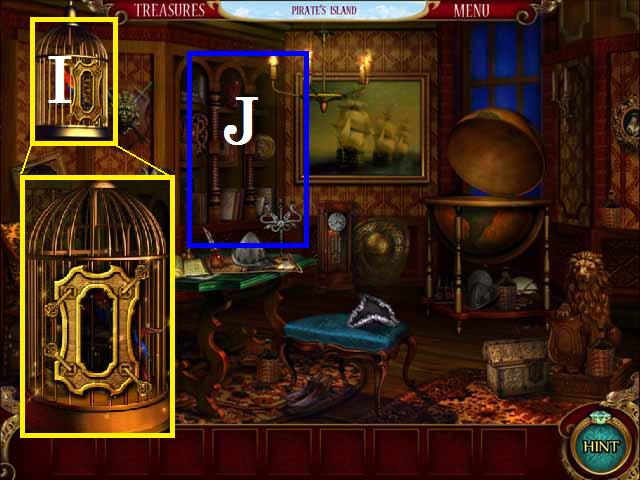
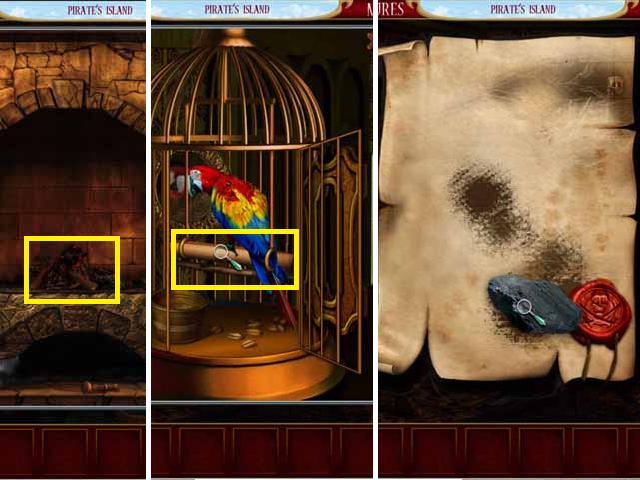
- Zoom in on the cage (I); click on the two left keys to open the cage as seen in the screenshot.
- Click the scroll in the parrot’s claws and then close the window.
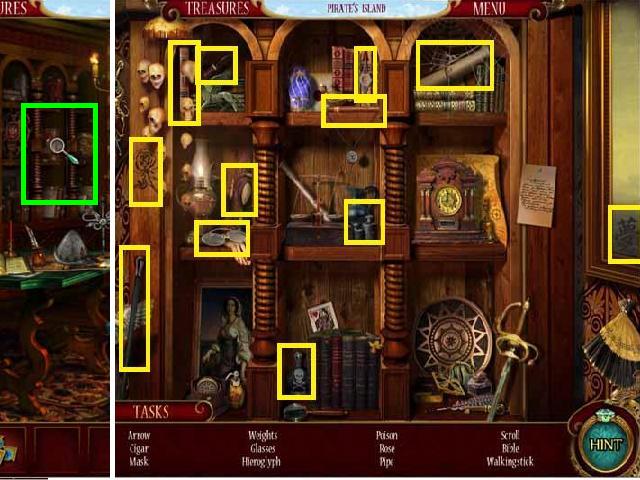
- Zoom into the bookshelf (J) to trigger a Hidden Object Scene.
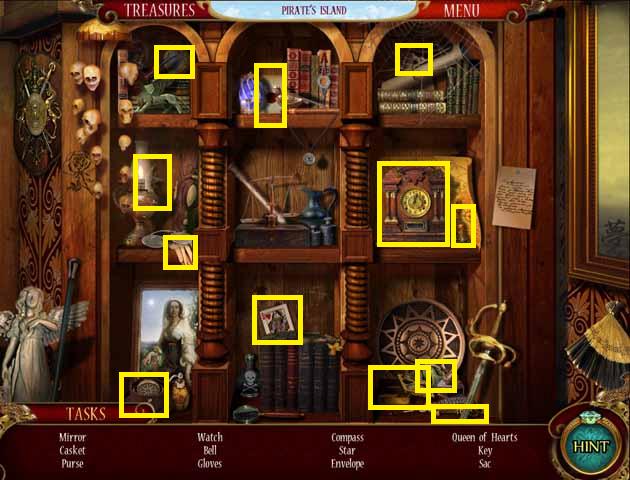
- The MIRROR will be added to your inventory after the search.
- Place the MIRROR in the cage and click the scroll (K).
- Return to the main room; zoom in on the fire place and click the COALS (L).
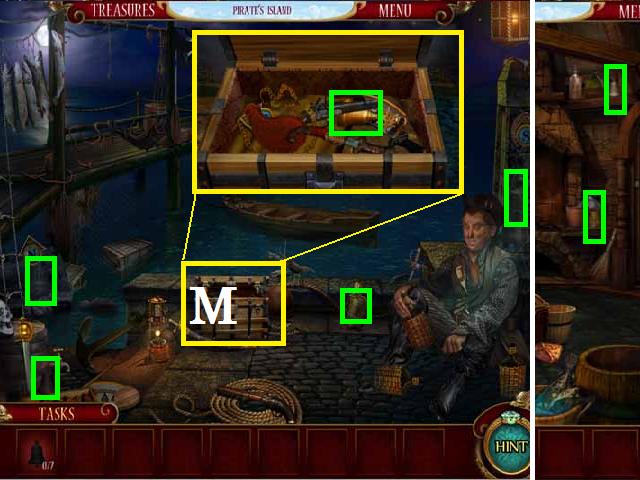
- Go to the dock and zoom in on the treasure chest (M) to trigger a Hidden Object Scene.

- The SCOOP will be added to your inventory after the search.
- Zoom into the fireplace in the main room and SCOOP up the COAL.
- In the Captain’s Room, zoom in on the cage and drag the COAL over the scroll until the map is fully revealed.
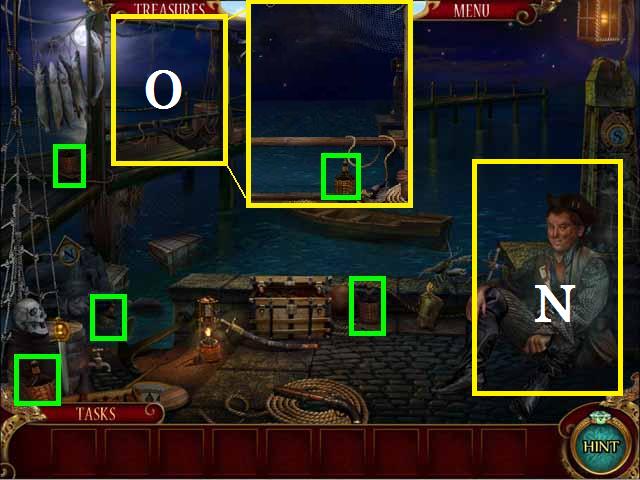
- Exit to the dock and click on the pirate (N).
- Pick up four RUM BOTTLES marked in green in the screenshot.
- Zoom into the area above the posts (O) on the dock and pick up a RUM BOTTLE.
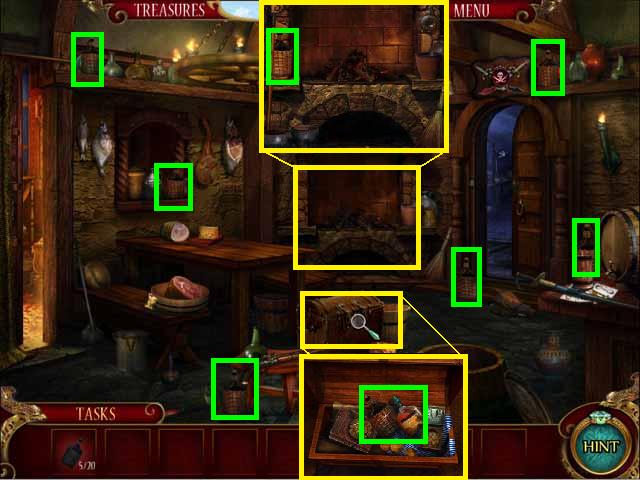
- Return to the main room and zoom in on the chest (P) to pick up a RUM BOTTLE.
- Zoom in on the fireplace (A) to pick up a RUM BOTTLE.
- Pick up six more RUM BOTTLES all marked in green in the screenshot.
- In the Captain’s Room, pick up the remaining RUM BOTTLES all marked in green.
- Give the RUM to the Pirate.
- Zoom into the chest (M) and pick up a BELL marked in green.
- Pick up four more BELLS, all marked in green.
- Pick up the last two BELLS in the main room and return to the dock.
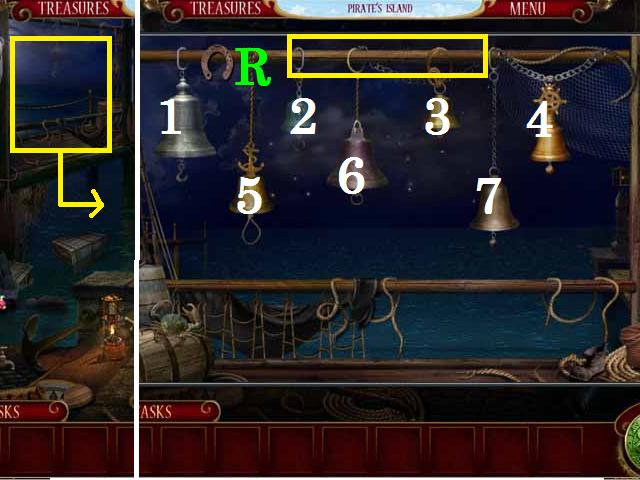
- Zoom into the area above the posts on the dock and hang the BELLS from the top post (R).
- Repeat the sequence of ringing bells. First, ring bells 1, 4, 6; then, ring bells 7, 5, 3, 2, 1; and finally, ring bells 5, 7, 5, 7, 1, 2, 3, 4, 6.
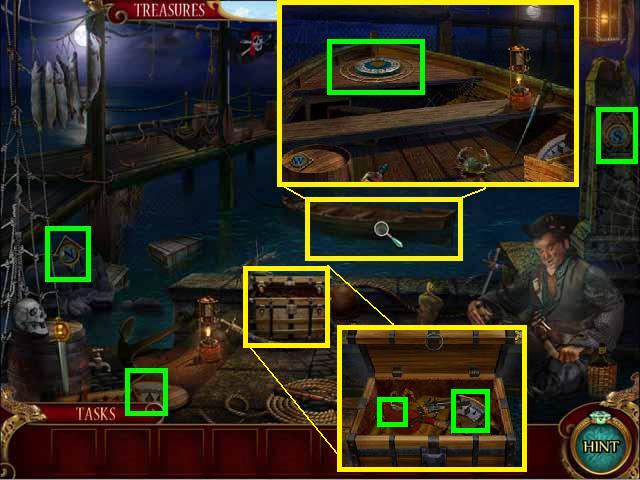
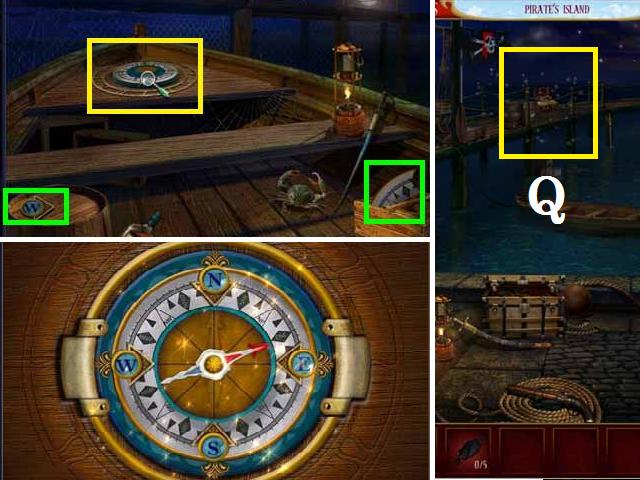
- Zoom in on the boat (S), remove each rope and then click on the compass (T).
- Zoom in on the chest; pick up one LETTER and one DIAL PIECE marked in green.
- Pick up the LETTERS and DIAL PIECES marked in green.
- In the Captain’s Room, zoom in on the bookshelf to trigger a Hidden Object Scene to receive the ARROW.
- Return to the dock; zoom into the boat and pick up one LETTER and one DIAL PIECE marked in green.
- Repair the compass, as seen in the screenshot, and receive the MAGIC COMPASS.
- Zoom in on the chest (Q) on the far dock to trigger a Hidden Object Scene.
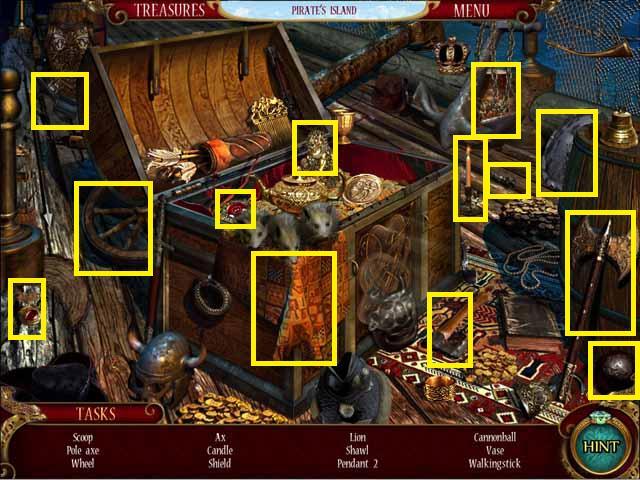
- The WATER SKIN will be added to your inventory after the search.
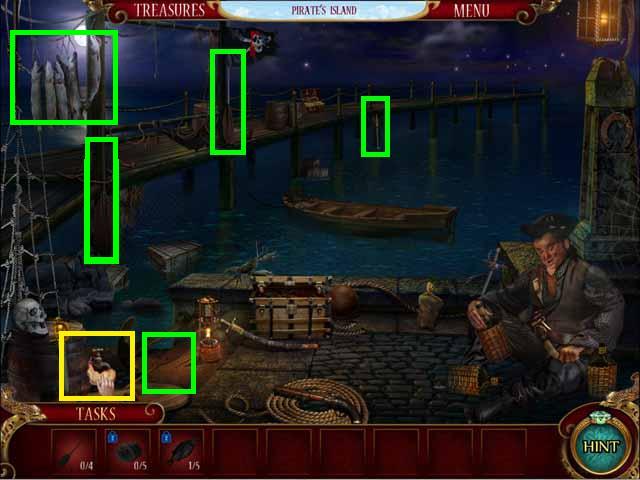
- Fill the WATER SKIN from the barrel (U) to the left and pick it back up.
- Pick up four OARS marked in green in the screenshot.
- Pick up the FISH marked in green.
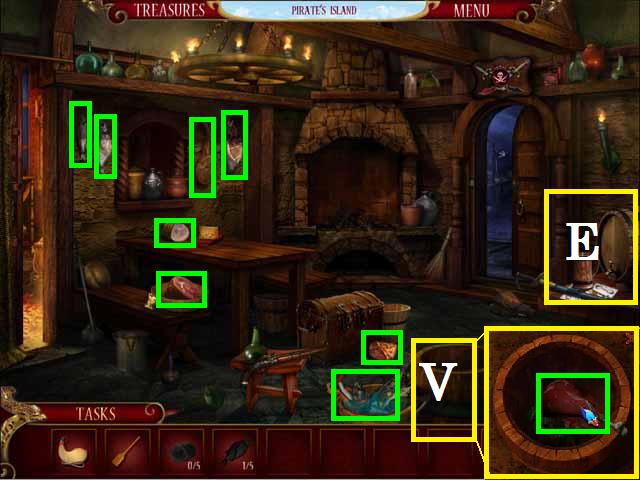
- In the main room, zoom into the open barrel (V) to pick up MEAT.
- Pick up the remaining MEAT and FISH, all marked in green.
- Zoom into the table (E) to trigger a Hidden Object Scene.

- The SKEWER will be added to your inventory after the search.
- Pick up the BELLOWS (W).
- Zoom into the fireplace (A) and place the SKEWER, the MEAT, and the BELLOWS there.
- Pick up the COOKED MEAT.
- Load all of the items onto the boat.
Chapter 6: Ship Isabel
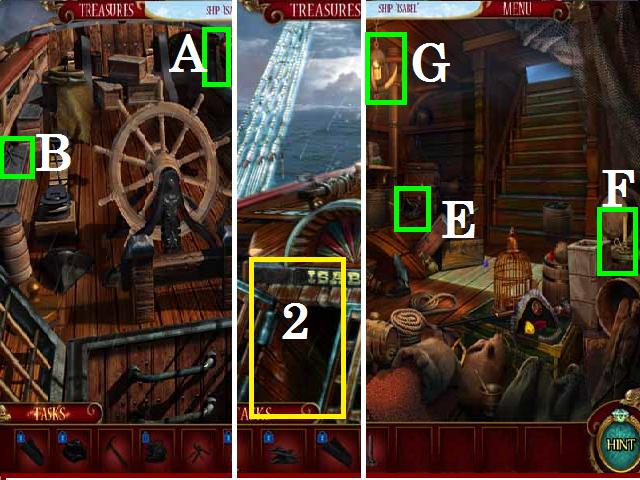
- Pick up the HAMMER (A) and NAILS (B).
- Move to the rear of the boat to the right and enter the cabin (2).
- Pick up the RESIN (E) and CANDLE (F).
- Light the CANDLE with the hanging lamp (G).
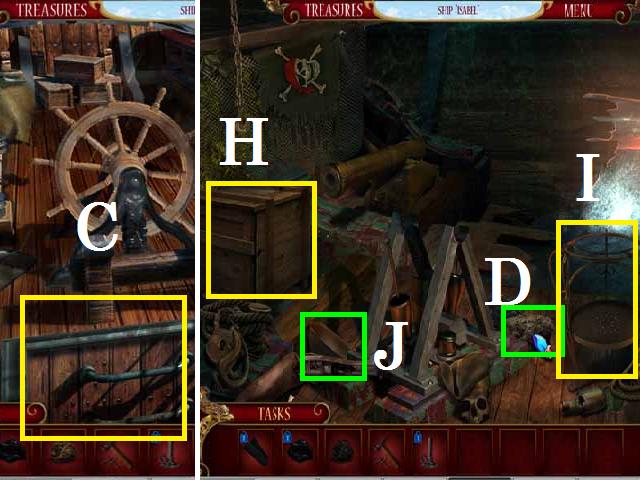
- Click on the wooden crate (H) and then the POT stand (I).
- Place the POT (J) and the RESIN on the stand.
- Pick up the OAKUM (D).
- Return to the rear of the boat.
- Zoom in on the wooden box with the skull and crossbones (K) to trigger a Hidden Object Scene and receive the AXE.
- Return to the ship’s hold and break the wooden crate with the AXE.
- Pick up the WOOD BOARDS (L) and the WOOD CHIPS (M).
- Light the WOOD CHIPS under the pot with the CANDLE.
- Use the OAKUM to soak up the melted RESIN.
- NAIL the BOARDS over the hole (N).
- Fill the cracks with the OAKUM.
- Click on the pump (O) in the middle and pick up the ROCKER (P).

- Return topside and pick up two HOSES marked in green.
- Go to the rear and pick up two HANDLES and the AXEL, all marked in green.
- Return to the hold and place the HOSES, AXLE, ROCKER, and HANDLES, in order, on the pump.
- Click the ROCKER (Q).
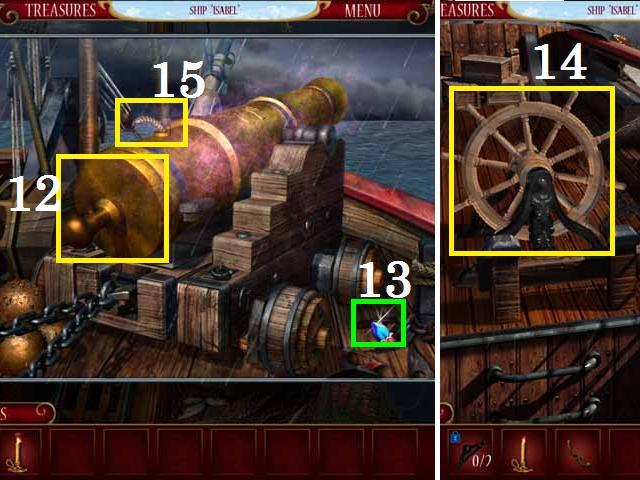
- Zoom in on the cannon (S) at the rear of the boat.
- Zoom into the wooden box (K) to trigger a Hidden Object Scene.
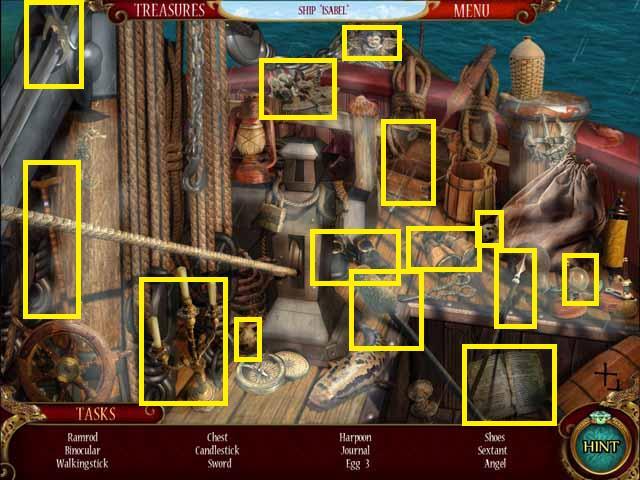
- The RAMROD will be added to your inventory after the search.
- Pick up three CANNON BALLS, marked in green.
- In the cabin, pick up the remaining CANNON BALLS and the FUSE, all marked in green.
- Pick up the CHAIN (T) and BOLT (U) from the front of the boat, and then return to the rear.
- Place the CANNON BALLS, BOLT, RAMROD, and CHAIN on the cannon.

- In the cabin, zoom in on the shelf (V) under the hanging lamp and click on the book.
- Pick up the GEMS marked in green.
- Zoom back into the shelf and drag the GEMS over the book.
- Rearrange the gems, to place them in the matching color holes, in the following order: B, P, G, B, R, Y, P, G, B, R.
- Pick up the SULFUR, MORTAR, and SALTPETER, all marked in green in the screenshot.
- Pick up the BOWL (Z) from the rear of the boat and then go to the boat’s hold.
- Pick up the PILE OF CHARCOAL (1).
- Return to the cabin; zoom in on the shelf and place the GATHERED INGREDIENTS there.
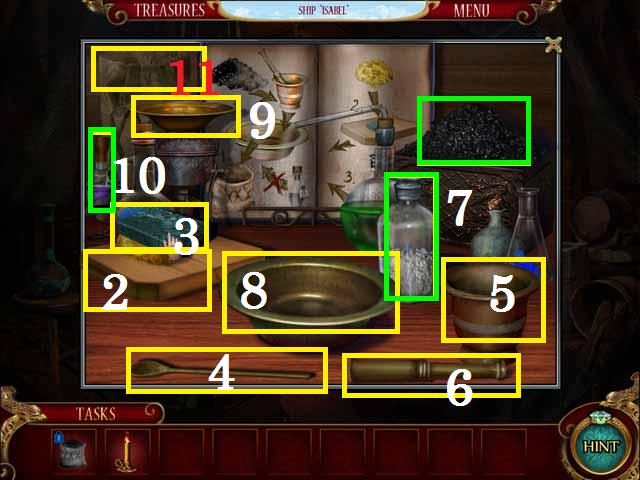
- Grind the SULFUR on the board (2) with the BAR (3).
- SPOON (4) some CHARCOAL into the MORTAR (5) and grind it with the PESTLE (6).
- Pour the CHARCOAL, followed by the SULFUR and SALTPETER (7), into the BASIN (8).
- Stir the mixture.
- SPOON some of the GUN POWDER (mixture) onto the gold plate (9) and light it with the CANDLE.
- Put the PURPLE POTION (10) in the mixture.
- Pick up the BAG (11); fill it with the GUN POWDER and go outside.
- Put the GUN POWDER in the cannon and close the BOLT (12).
- Place the DOWEL (13) in the BOLT.
- Go to the front of the boat and spin the wheel (14).
- Return and light the cannon’s wick (15) with the CANDLE.
- Congratulations! You’ve Completed The Curse of the Ring!
Created at: 2011-01-01