

Walkthrough Menu
- General Tips
- Chapter 1: Dragonfang
- Chapter 2: Mortenland
- Chapter 3: Steam City
- Chapter 4: Skyline
- Chapter 5: Dragon's Castle
General Tips
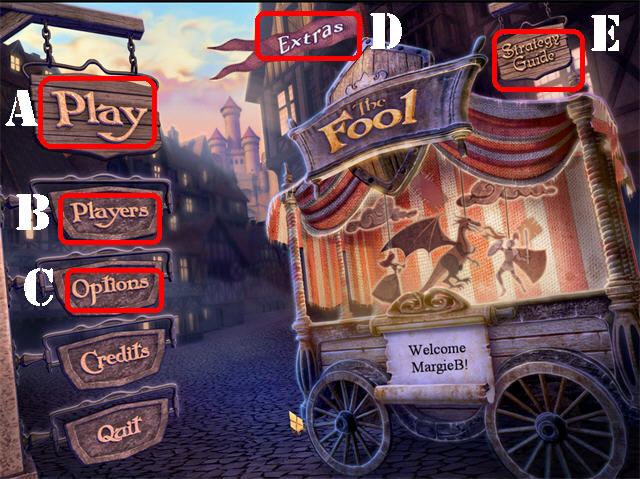
- Click on 'Play' (A) to begin your adventure.
- The 'Players' (B) sign allows you to manage your profiles in the game.
- Click on 'Options' (C) to adjust sounds, environment, screen size, and cursor.
- Click on 'Extras' (D) to view other games by this developer.
- The 'Strategy Guide' (E) Button takes you to the page that allows you to buy the guide for this game.
- Items written in Orange in Hidden Object Scenes require you to perform other actions before that item can be revealed.
- All mini-games can be skipped once the Skip button has been recharged.
- Click on the question mark symbol in the puzzle scenes for instructions.
- Click on the Hint Owl during a Hidden Object Scene and then click on any item from your list to view its location.
- At the end of each Hidden Object Scene you will either receive an inventory item or an article of clothing.
- Talks to the people in town, some of them are pretty funny and others give you insight into the story or the game.
- In order to gain access to certain areas in the game you must wear a particular outfit. Some outfits can have one piece or several pieces that you must collect.
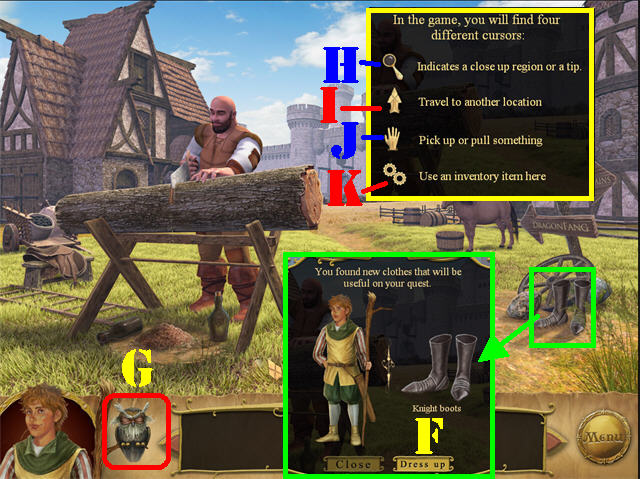
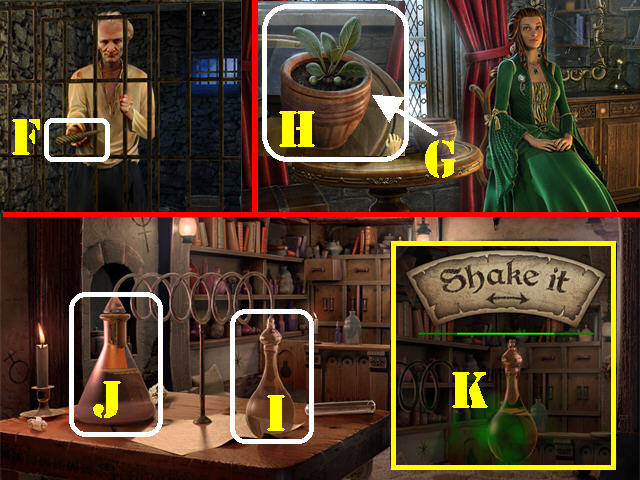
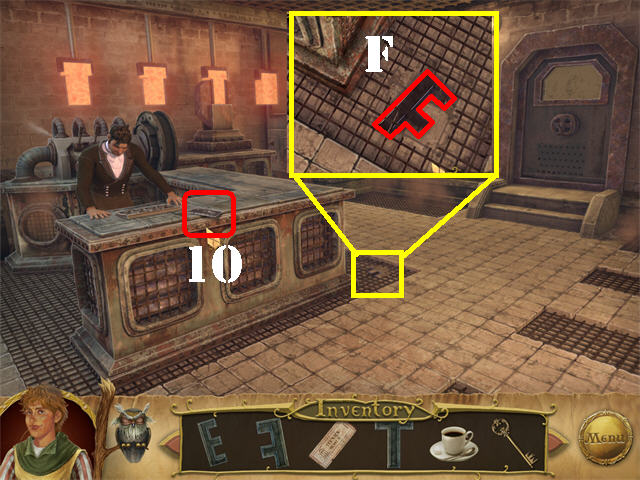
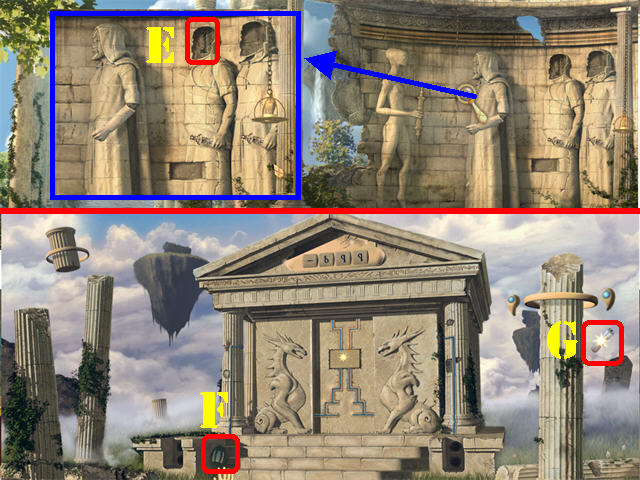
- Each time a costume piece is collected you will have to put it on by clicking on the 'dress up' button (F).
- The Hint Owl is located in the lower left corner of each scene but will only be activated in Hidden Object Scenes (G).
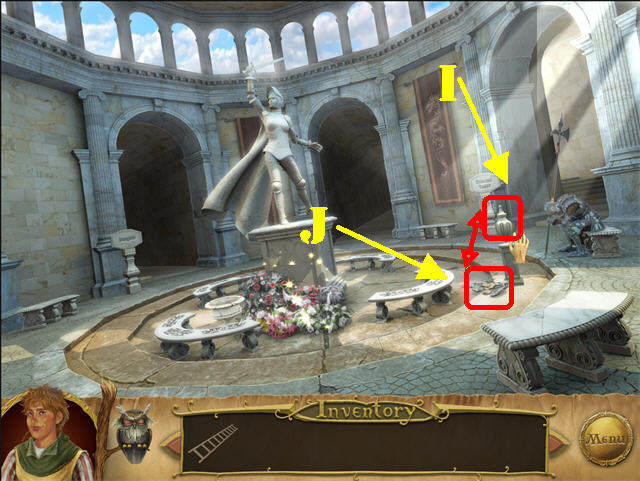
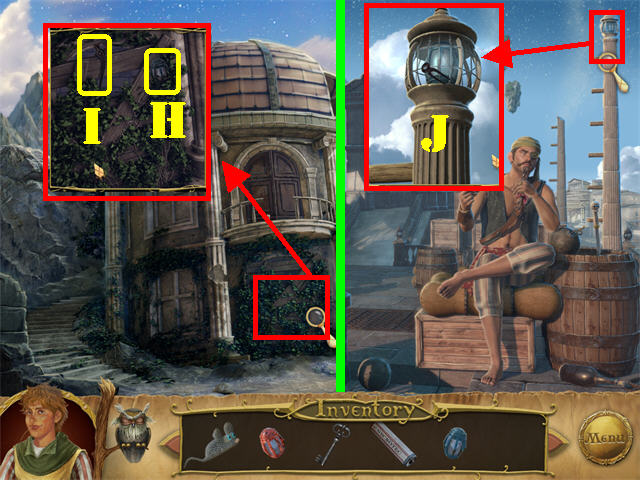
- The MAGNIFYING GLASS ICON allows you to zoom into an area or find out information regarding different aspects of the game (H).
- The ARROW ICON allows you to travel to other scenes (I).
- The HAND ICON allows you pick up or pull items (J).
- Use Inventory Items in sections in which a GEAR ICON is present (K).
Chapter 1: Dragonfang
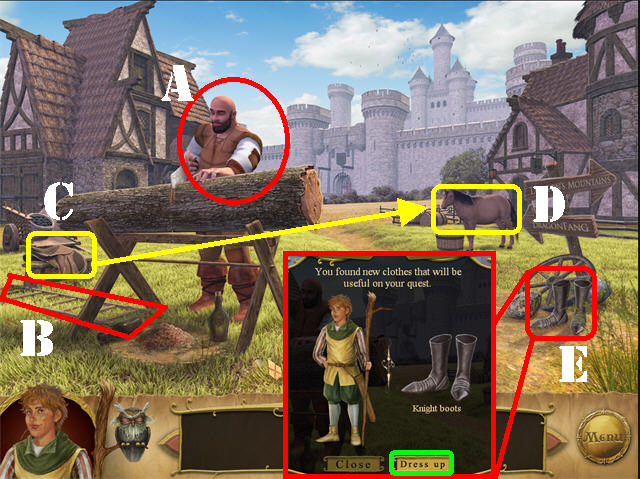
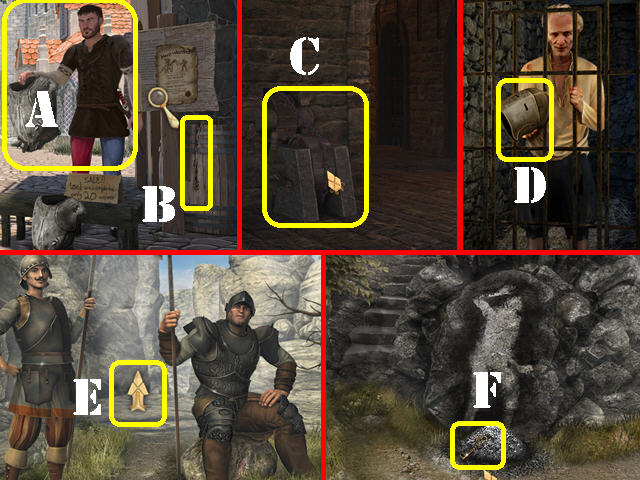
- Talk to the lumberjack; he wants some fresh ale (A).
- Take the LADDER in the lower left (B).
- Grab the SADDLE on the left (C). You will only be able to pick up the SADDLE if you chose to view the tutorial.
- Place the SADDLE on the horse on the right (D).
- Grab the KNIGHT BOOTS in the lower right (E). Click on 'Dress up' to add the clothes to the boy.
- Go forward.
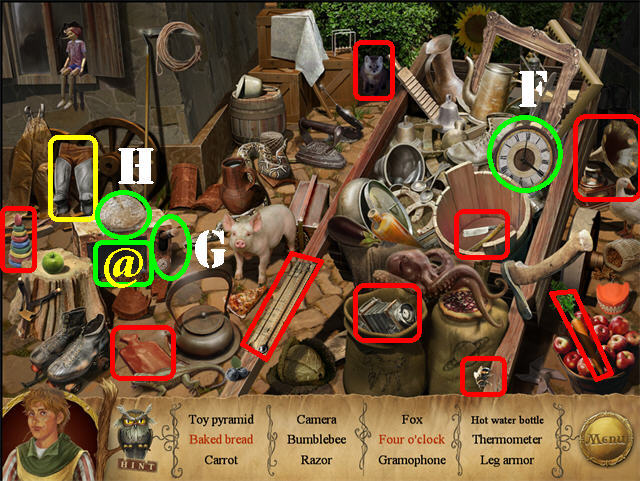
- Play the Hidden Object Scene on the left.
- Click on the clock 4 times; take four o'clock (F).
- Open the oven door (@); Place the BREAD in the OVEN (H).
- Close the oven door; click on the lever to bake the bread (G).
- Open the oven door and take the BAKED BREAD.
- The LEG ARMOR will be added to inventory.
- Click on 'Dress up' to add the clothes to the boy.
- Go forward twice.
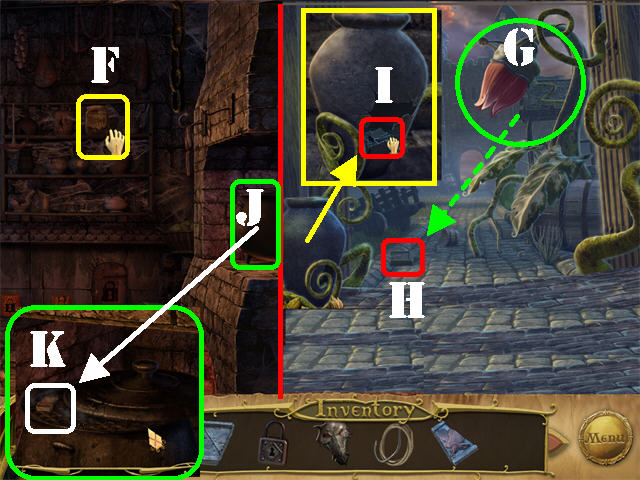
- Click on the VASE on right to break it (I).
- Take 6 GOLDEN COINS (J) on the ground.
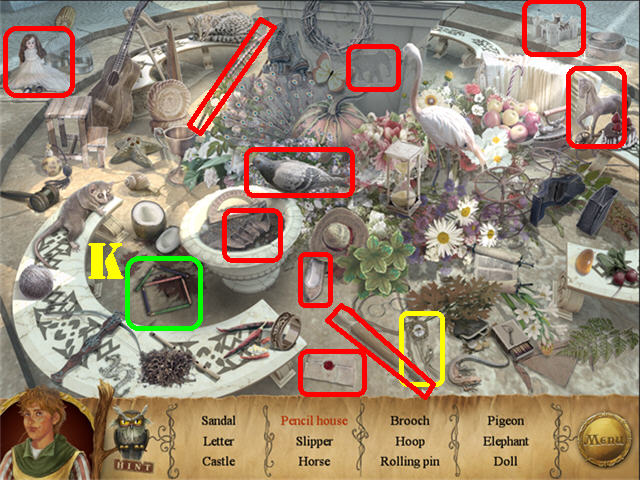
- Click on the base of the statue to play a Hidden Object Scene.
- Click on the PENCILS on the left to change their positions until they form the shape of a house; take the PENCIL HOUSE (K).
- The BROOCH will be added to inventory.
- Go through the left entrance.
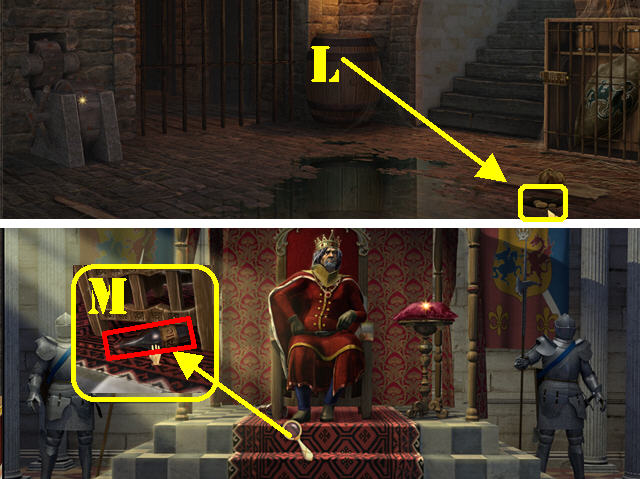
- Move the board on the right; take 4 GOLDEN COINS in the ground (L).
- Exit this scene and go into the center entrance.
- Zoom into the bottom left side of the chair; take the ROOT ALE (M).
- Exit this scene; go into the right entrance.
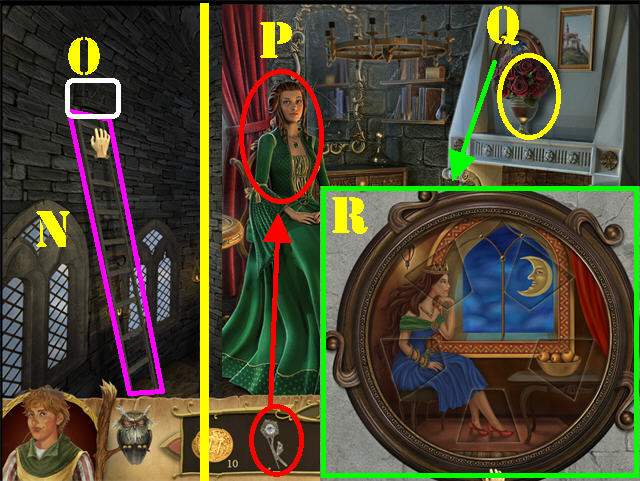
- Place the LADDER in between the 2 left windows (N).
- Click on the area above the ladder twice to take the SILVER COIN (O).
- Go through the door.
- Give the BROOCH to the Princess (P).
- Click on the vase to move it aside and zoom into the mirror behind it (Q).
- Click on any of the 5 handles to change the image in the mirror until it resembles the one shown in the screenshot (R).
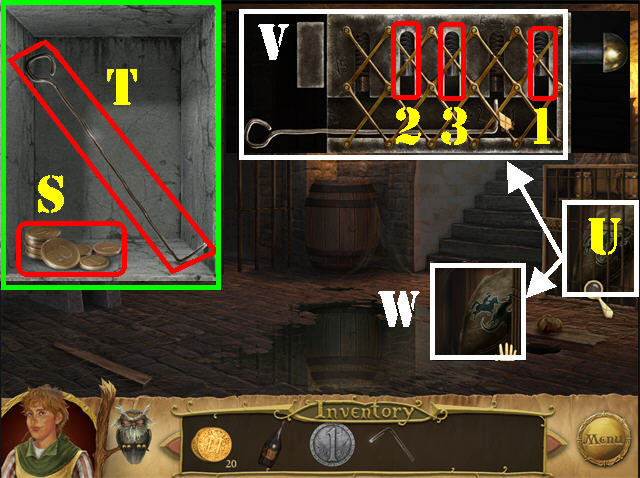
- Take the 10 GOLDEN COINS (S) and the LOCK PICK (T) behind the mirror.
- Return to the Prison.
- Zoom into the locked gate in the lower right (U).
- Place the LOCK PICK on the lock to activate a puzzle.
- Place the LOCK PICK below one of the tumblers and click on it to raise the pin.
- The pins have to be clicked in a certain order. Look at the equations around the puzzle to figure them out. For example: 2 x 2 + 1 equals 5; 5 minus 3 equals 2, and the root of 9 is 3.
- To solve the puzzle push the pins in the order shown in the screenshot (V).
- Take the KNIGHT'S SHIELD from inside the cage (W).
- Exit this scene and click down 3 times.
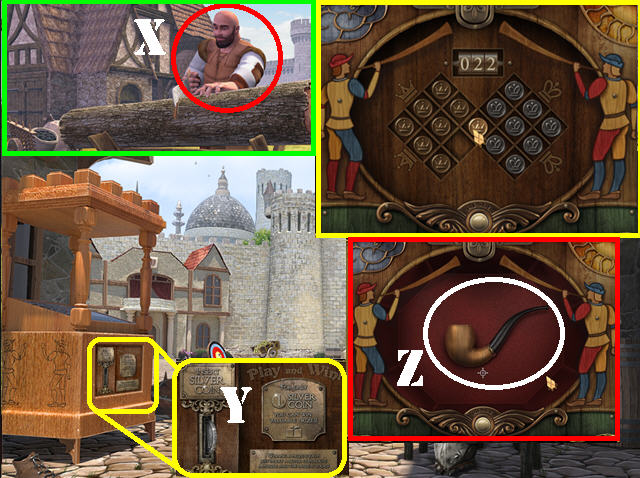
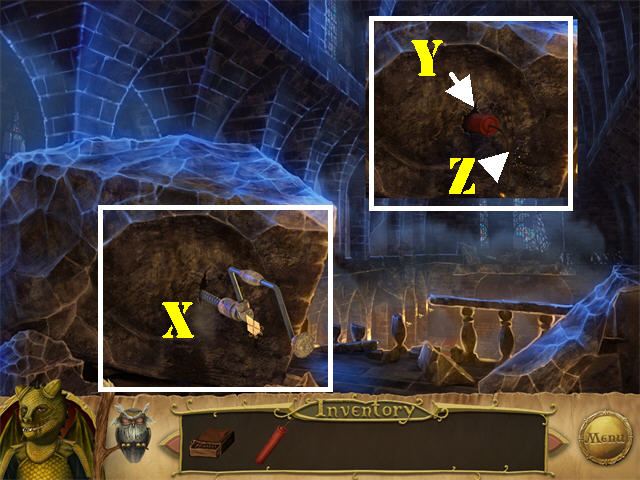
- Give the ROOT ALE to the lumberjack; take the SAW on the log (X).
- Go forward twice.
- Zoom into the machine on left (Y); place the SILVER COIN into the coin slot to activate a puzzle.
- Move all the gold and silver coins to the opposite side of the board in the least amount of moves. The gold pieces should all be on the left and the silver ones on the right.
- A chess piece can only jump into an empty hole. If you run out of moves you will have to start over.
- Check out our video solution for Easy Mode!
- Check out our video solution Hard Mode (61 Moves)!
- Take the SMOKING PIPE after the puzzle has been solved (Z).
- Give the 20 GOLDEN COINS to the merchant on the right to receive the KNIGHT BREASTPLATE (A).
- Dress up in the outfit.
- Take the CHAIN (B) on the side of the barrel.
- Return to the Jail Cell.
- Place the CHAIN on the mechanism on the left and click on it to unlock the left gate (C).
- Go through the left gate.
- Give the SMOKING PIPE to the prisoner and he will hand you the KNIGHT'S HELMET.
- Take the KNIGHT'S HELMET (D) from the prisoner; dress up in it.
- Exit the jail, click down 3 times and head right.
- The guards will let you pass now that you have on the complete outfit; head forward past the guards (E).
- Take the IRON KEY on the rock in the lower center (F).
- Head up the steps.
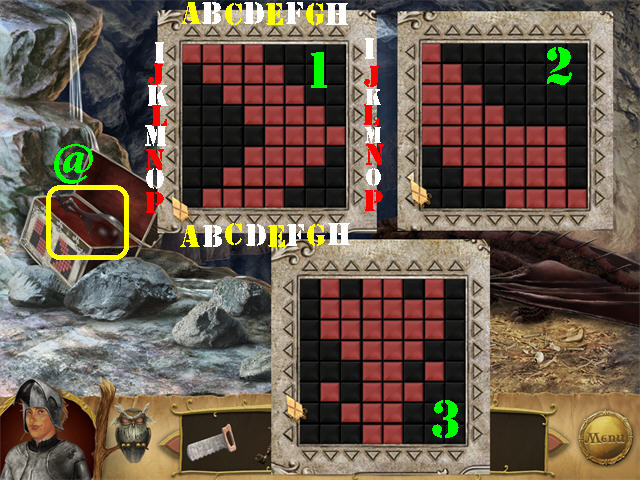
- Click on the chest to activate a puzzle.
- Using the arrows on the board form the same pattern as shown on the right.
- You must complete 3 rounds to beat this puzzle.
- To solve the first puzzle click on the arrows in this order : RIGHT SIDE - J x1, K x 2, L x 3. LEFT SIDE - N x 1, O x 2, and P X 3.
- To solve the second puzzle; click on the arrows in this order: BOTTOM SIDE – B x 1, C x 2, D x 3; LEFT SIDE – M x1, N x1, and O X 1.
- Check out our video solution for the second round!
- Screenshot 3 shows the final solution for the third round.
- Check out our video solution for the third round!
- Take the POTION FLASK (@) from inside the chest after the puzzle has been solved.
- Click down 3 times, and forward once.
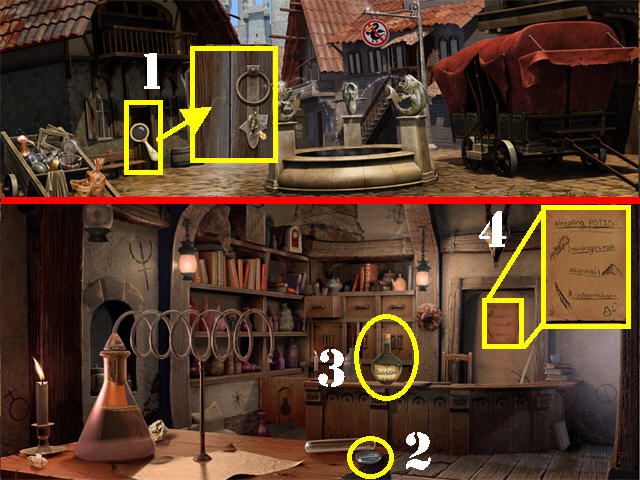
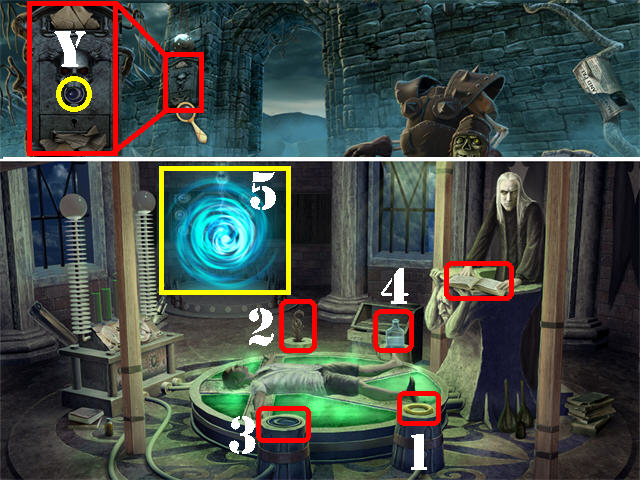
- Zoom into the left door; place the IRON KEY in the lock and enter the Lab (1).
- Take the SILVER COIN (2) on the table.
- Take the QUIK GROW POTION (3) on the shelf.
- Zoom into the SLEEPING POTION RECIPE on the right; you will need a MANDRAGORA ROOT, STARDUST, and a UNICORN HORN (4).
- Exit the Lab.
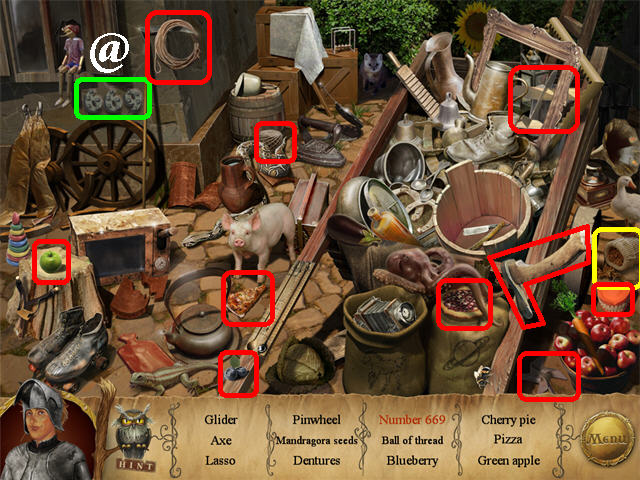
- Play the Hidden Object Scene by the cart on the left.
- Click on the set of numbers in the upper left until they form '669' (@); take it.
- The MANDRAGORA SEEDS will be added to inventory.
- Head forward.
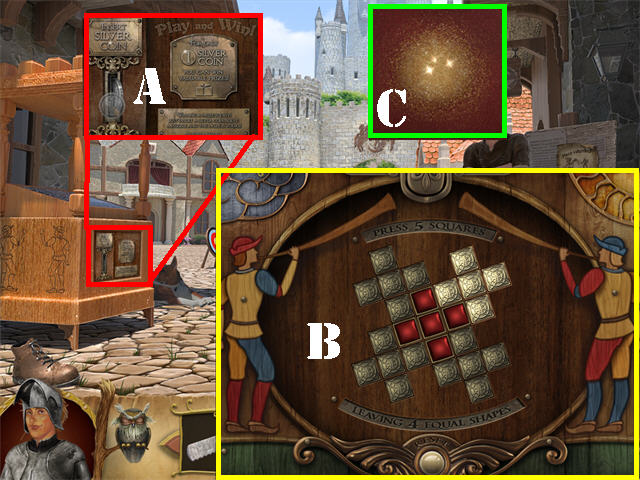
- Zoom into the machine on left (A); place the SILVER COIN in the coin slot to activate a puzzle.
- You have to press on 5 correct squares so you can form 5 identical shapes on the board.
- Please look at the screenshot for the solution (B).
- Take the STARDUST (C) after the puzzle has been solved.
- Head forward.
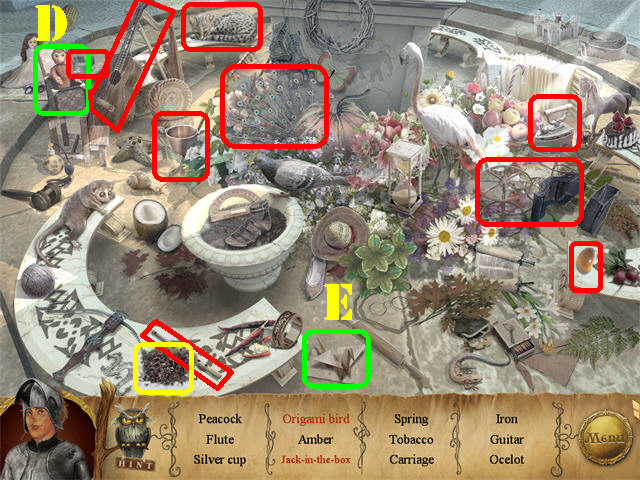
- Play the Hidden Object Scene at the base of the statue.
- Click on the box in the upper left; take the JACK-IN-THE-BOX (D).
- Click on the paper in the lower center 4 times; take the ORIGAMI BIRD (E).
- TOBACCO will be added to inventory.
- Return to the Prison.
- Give the TOBACCO to the prisoner and he will give you the UNICORN'S HORN (F).
- Exit the Prison; go into the right entrance and through the back door to access the Princess.
- Zoom into the pot on the table (G).
- Place the MANDRAGORA SEEDS into the pot followed by the QUIK GROWTH POTION.
- Take the MANDRAGORA ROOT that grew in the pot (H).
- Return to the Lab.
- Place the POTION FLASK on the table (I).
- Put the MANDRAGORA ROOT, STARDUST, and the UNICORN'S HORN into the flask on the left (J).
- Grab the POTION FLASK and shake it with your mouse until the green bar above it is filled (K).

- Click down twice; head right, forward, and up the steps.
- Place the SLEEPING POTION in the water (L) by where the dragon is drinking.
- The dragon will drink the water and fall asleep.
- Click down and head into the right cave.
- Zoom into the sleeping dragon.
- Place the SAW on the DRAGON TOOTH; move the saw left and right until it comes off (M).
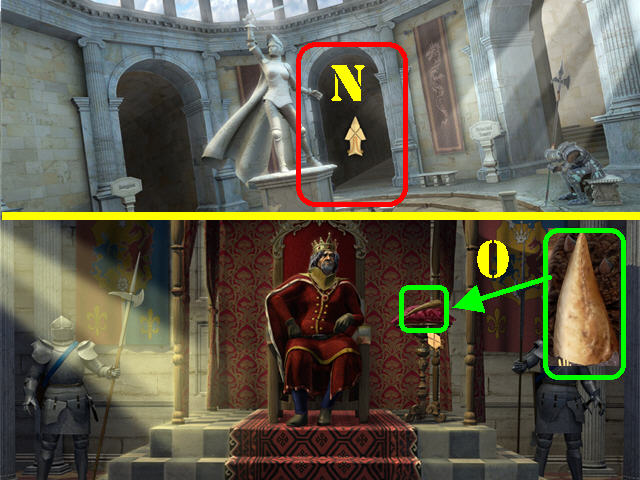
- Return to the Courtyard and go through the center entrance to access the King (N).
- Place the DRAGON'S TOOTH on the red pillow next to the King (O).
Chapter 2: Mortenland
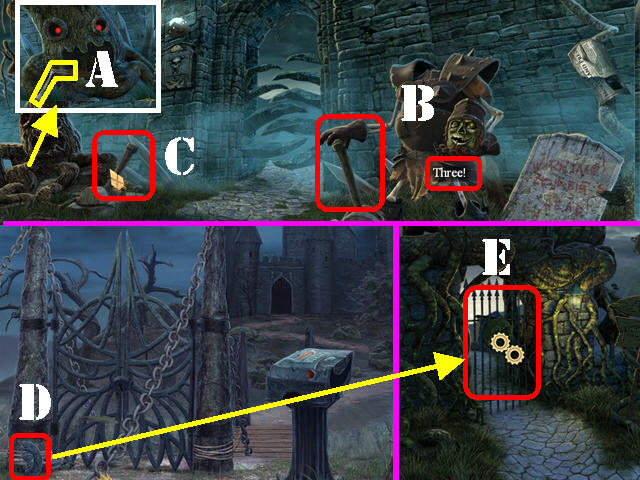
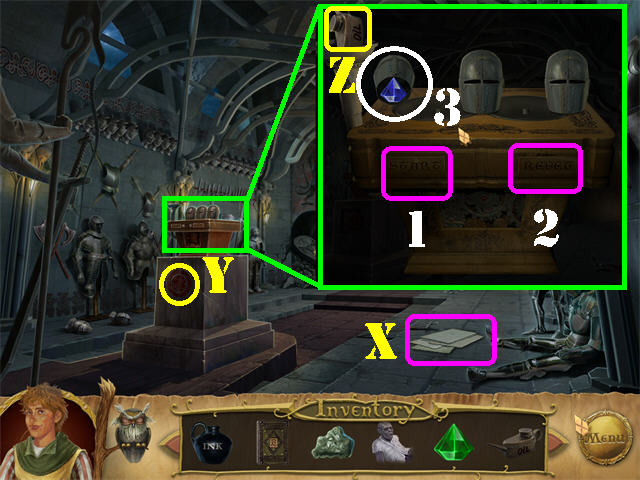
- Zoom into the tree on left; take the SKELETON HAND (A).
- Place the SKELETON HAND on the headless monster on right (B).
- Pull the LEVER (C) on left as soon as the headless monster counts to three.
- Go through the gate and head forward.
- Take the SUN DISK (D) in the lower left corner.
- Click down.
- Place the SUN DISK on the left gate; go through the gate (E).

- Zoom into the casket on right; take the INK (F).
- Grab the HEADPHONES on left (G).
- Go forward.
- The dog will not let you through. Coming to this scene activates a Hidden Object Scene (H).
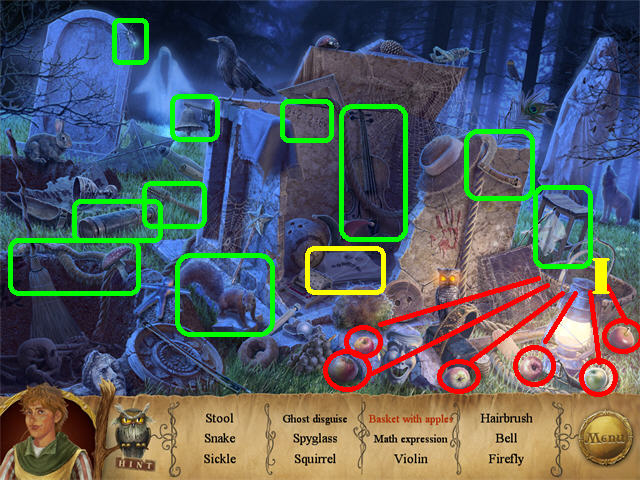
- Click down and a Hidden Object Scene will be activated; play it.
- Find the items on the list.
- Click on the 6 APPLES marked in red to automatically enter the apples into the basket; take the BASKET WITH APPLES (I).
- The GHOST DISGUISE will be added to inventory; dress up with it.

- Head forward.
- Place the HEADPHONES on the dog.
- Click on the SHOVEL (J) 4 times to add it to inventory.
- Grab the MAGICAL CLAY (K) in the lower left.
- Take the SHAPE SPELLS (L) in the far left.
- Click down twice and head towards the right side of the screen.
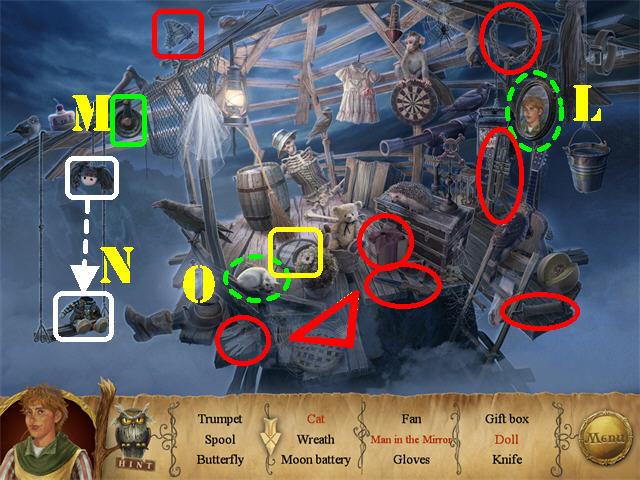
- Play the Hidden Object Scene in the upper right.
- Click on the mirror in the upper right; take the MAN IN THE MIRROR (L).
- Click on the crank (M) 4 times to lower the doll's head; take the DOLL (N).
- Remove the BLACK HAT; take the CAT (O).
- The MOON BATTERY will be added to inventory.
- Place the MOON BATTERY on the device by the gate to activate a puzzle.
- You must move the red numbers to the right in the correct order. Numbers placed correctly will turn green.
- The solution is as follows:
- Grab the 4 and 5 and place them in 3rd and 4th slots on the right.
- Move the 4 up to the first slot on right. Grab the 4 with the top part of the hook.
- Move the 5 to the 4th slot on right.
- Move the 4 to the second slot on right and then to the 3rd slot on right using the bottom hook.
- Grab the 4 and 5 and place them in the last 2 slots on right.
- Move the 2 and 3 into the last 2 slots on left.
- Move the 2 into the 3rd slot on left.
- Move the 3 into the 2nd slot on right and then again to the third slot on right with the bottom hook.
- Move the 1 to the 4th slot on left.
- Move the 1 and the 2 to the top 2 slots on the right to complete the puzzle.
- Check out our video solution!
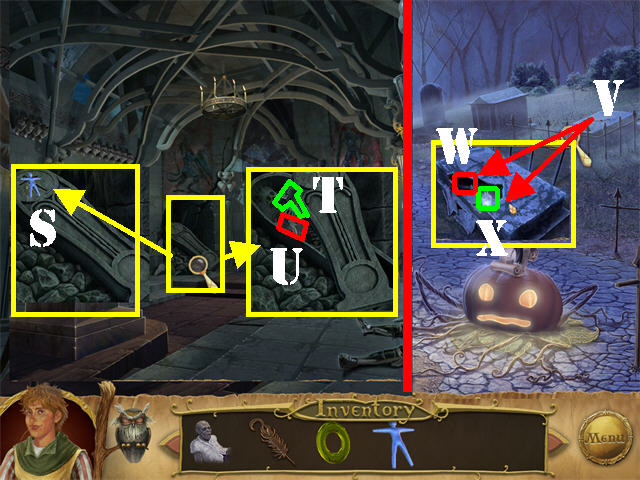
- Take the DIGGING PERMIT (@) from the machine after the puzzle has been completed.
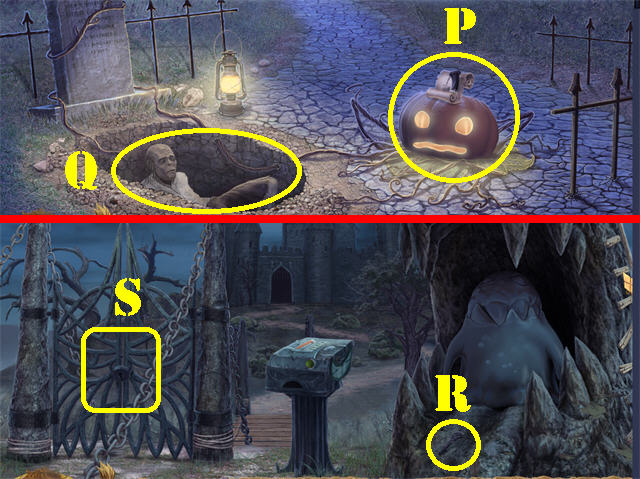
- Return to the Cemetery.
- Give the DIGGING PERMIT to the pumpkin (P).
- Place the SHOVEL on the lower left side of the ground 4 times; take the UNRESURRECTED ZOMBIE (Q).
- Click down and head forward.
- The monster wants you to have the KEY now that you have the UNRESURRECTED ZOMBIE.
- Take the SKULL KEY (R) on the rock.
- Zoom into the gate; unlock it with SKULL KEY (S).
- Go through the gate.
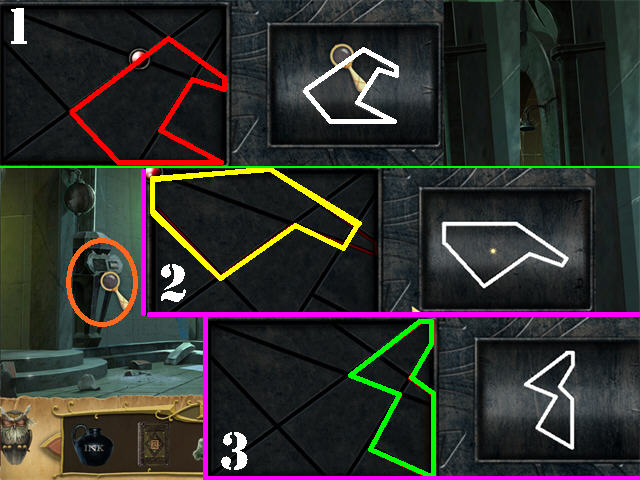
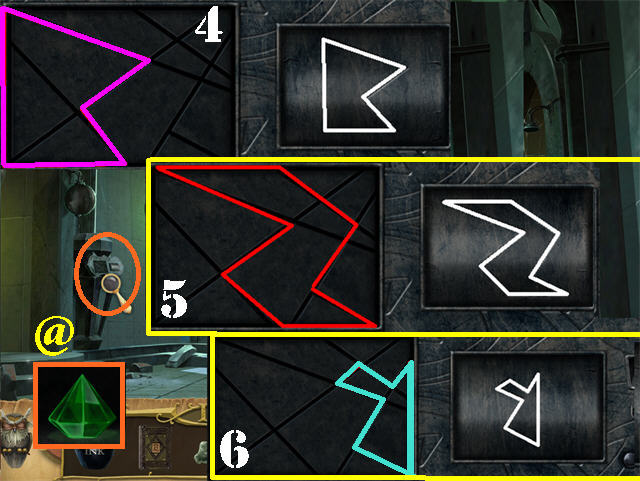
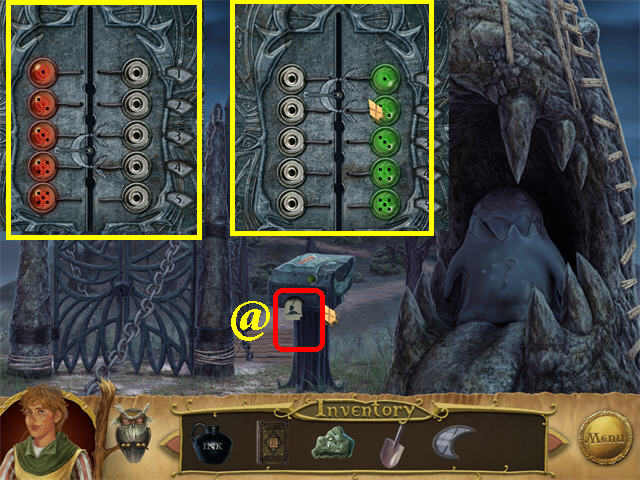
- Zoom into the device next to the left entrance to activate the Necrotic Puzzle.
- Grab the RED PIN on the right and place it on the left side of the board.
- Drag the RED PIN through the correct lines on the left side of the board until you duplicate the shape on the right.
- You must solve 6 rounds of this puzzle. Please look at the 2 screenshots for the solutions.
- Take the GREEN DIAMOND (@) after the puzzle has been solved.
- Head left.
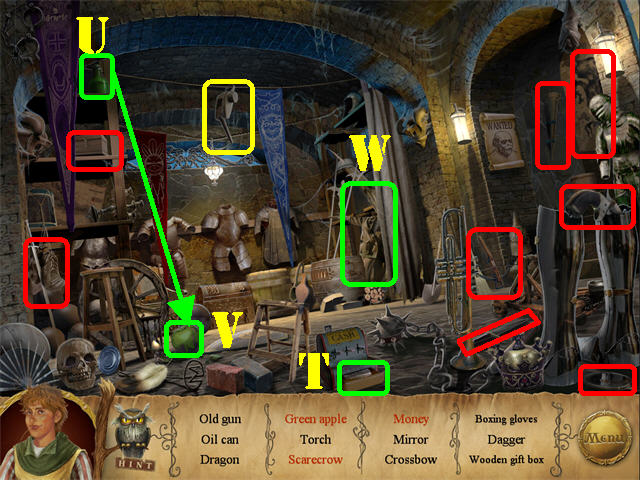
- Play the Hidden Object Scene in the back.
- Open the cash register; take the MONEY (T) in the drawer.
- Click on the GREEN BOTTLE (U) in the upper left to make it fall; take the GREEN APPLE (V) in the lower left.
- Move the curtain; take the SCARECROW (W).
- The OIL CAN will be added to inventory.
- Grab the BLANK PAPERS on the ground (X).
- Click on the round symbol on the pedestal for a device to appear (Y).
- Zoom into the device; place the OIL CAN into the funnel (Z) to activate the puzzle.
- Click on 'START' (1) so the helmets will begin shuffling. Once the helmets stop moving, click on the one you think has the gem below it.
- You can click on 'RESET' (2) if you need to start over.
- Take the BLUE DIAMOND (3) after the puzzle has been solved..
- Click down thrice.
- Zoom into the printing press; place the PAPER on the tray (A).
- Place the INK into the container on left (B).
- Click on the HANDLE 7 times to print all the papers (C).
- Take the COLOR SPELLS (D) from the printing machine.
- Return to the Castle and head right.
- Zoom into the shelf on left; take the MATERIAL SPELLS (E) from the left shelf.
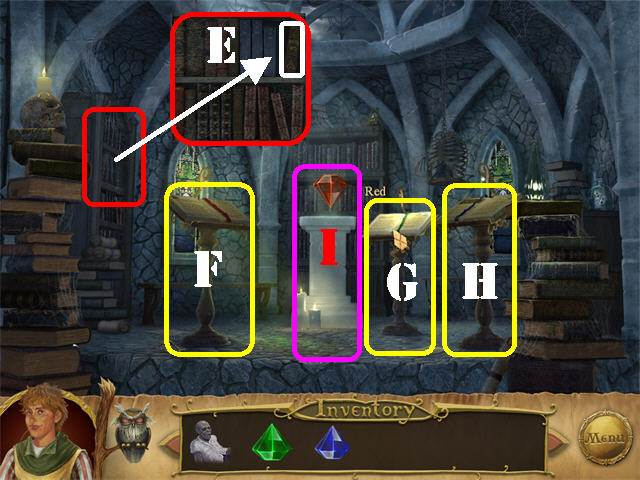
- The books can be placed in any order; here is how we placed them.
- Put the SHAPE SPELLS on the left pedestal (F).
- Place the COLOR SPELLS on the center pedestal (G).
- Place the MATERIAL SPELLS on the right pedestal (H).
- The MAGICAL CLAY belongs on the white pedestal (I).
- Click on the SHAPE SPELLS (F) book until the rock changes into a GEM.
- Click on the COLOR SPELLS (G) until the GEM turns RED.
- Click on the MATERIAL SPELLS (H) until the gem changes into a CRYSTAL.
- The RED DIAMOND will be added to inventory.
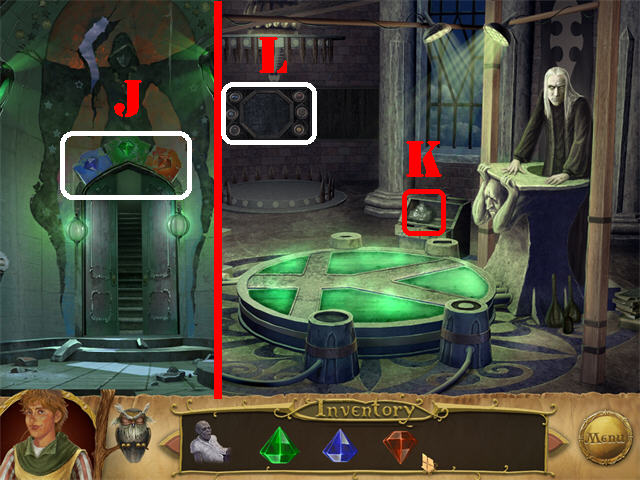
- Click down.
- Place the RED, GREEN, and BLUE DIAMOND into the matching spots above the door (J).
- Open the door and go through it.
- Take the MAGICAL CLAY (K) below the window.
- Zoom into the puzzle on the back door (L).
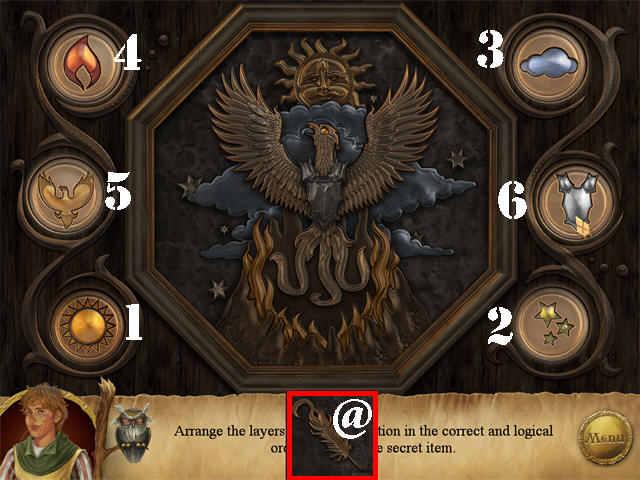
- Click on the components in the correct order so the layers of the scene are correct.
- The solution is: SUN-STARS-CLOUD-FLAME-PHOENIX-BREASTPLATE.
- Take the PHOENIX FEATHER (@) after the puzzle has been solved.
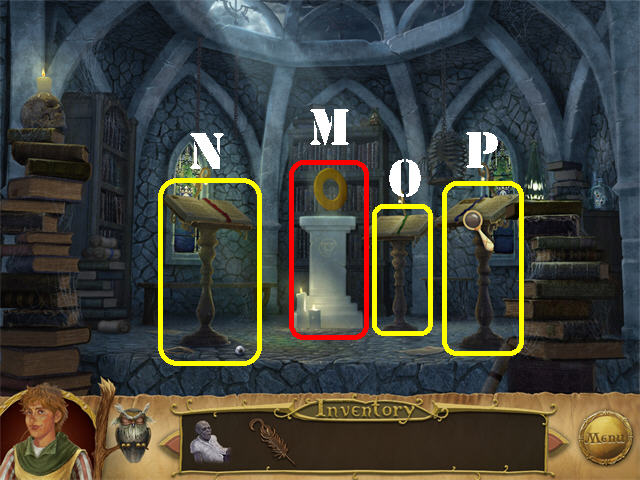
- Return to the spell room by clicking down and then right.
- Place the MAGICAL CLAY on the white pedestal (M).
- Click on the SHAPE SPELLS book until the clay changes into a RING (N).
- Click on the COLOR SPELLS until the GEM turns GOLD (O).
- Click on the MATERIAL SPELL until the gem changes into a METAL (P).
- The GOLDEN RING will be added to inventory.
- Return to the Cemetery.
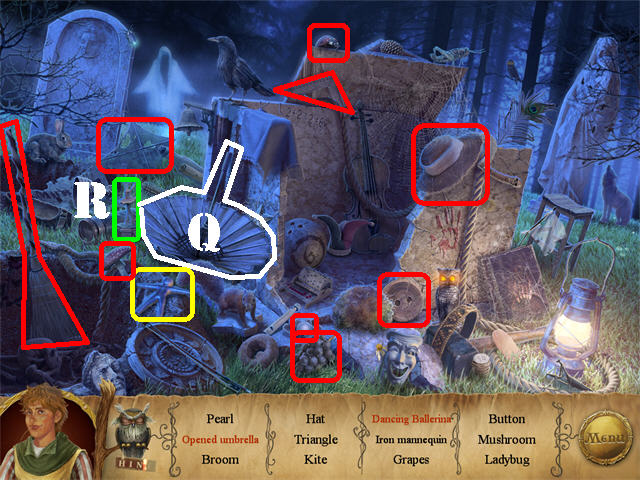
- Play the Hidden Object Scene.
- Click on the UMBRELLA on left; take the OPENED UMBRELLA (Q).
- Click on the music box's key until the ballerina starts to spin; take the DANCING BALLERINA (R).
- The IRON MANNEQUIN will be added to inventory.
- Go into the Castle and head left.
- Zoom into the casket in the far left; place the IRON MANNEQUIN on the recess above the casket (S).
- Take the MALLET (T) and the NECRONOMICON (U) from inside the casket.
- Return to the Cemetery.
- Zoom into the coffin on the far right (V).
- Break part of the coffin with the MALLET.
- Take the FISHING KNIFE (W) and the HOLY WATER (X) from inside the casket.
- Click down twice.
- Zoom into the mailbox on left; loosen the SIGN OF THE MOON (Y) with the KNIFE and then grab it.
- Return to the Castle and go into the center door.
- Place the UNRESURRECTED ZOBIE on the green circle.
- Place the GOLDEN RING (1), PHOENIX FEATHER (2), SIGN OF THE MOON (3), and the HOLY WATER (4) into the spots shown in the screenshot.
- Give the NECRONOMICON to the wizard.
- Go through the Portal (5).
Chapter 3: Steam City
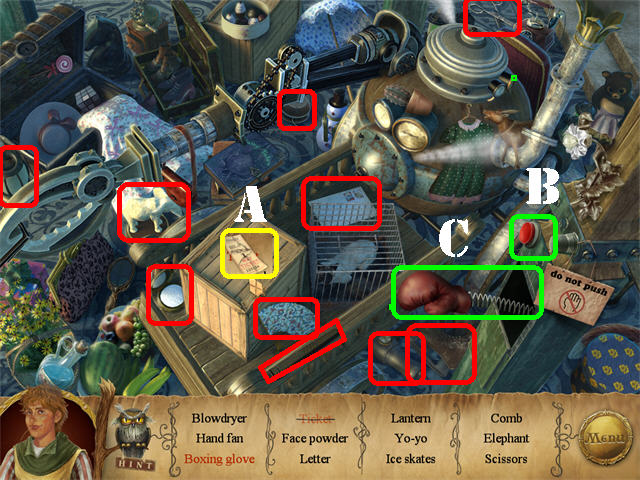
- Play the Hidden Object Scene by the robot.
- Click on the 5 torn ticket pieces to mend them; take the TICKET (A).
- Push the RED BUTTON on right (B); take the BOXING GLOVE (C).
- The ONE-WAY TICKET will be added to inventory.
- Give the ONE-WAY TICKET to the attendant (1).
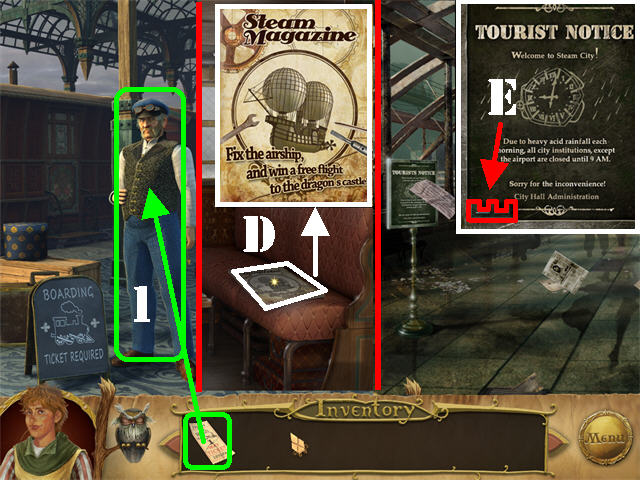
- Enter the train; look at the NOTE (D) on the bench.
- Once the train stops you will be automatically on a different platform.
- Zoom into the sign on the left side of the platform; take the LETTER E (E).

- Head forward.
- Click on the Factory Guard and he will tell you that you cannot pass until 9 a.m. (1).
- Go forward twice.
- The clock will change to 9 a.m. as soon as you enter the scene. All city institutions are now open (2).
- Zoom into the blackboard; take the LETTER F (F) and the FACTORY PASS (3).
- Click down twice.
- Go into the door below the clock to reach the Seamstress' place (4).
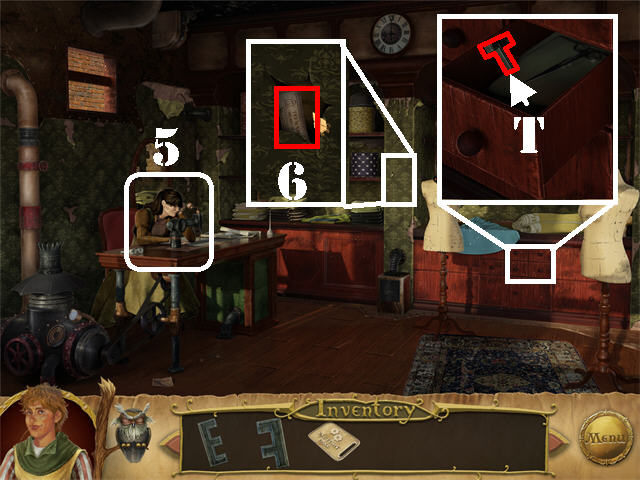
- Click on the Seamstress; she wants coffee (5).
- Zoom into the center column; click on it to tear off the paper and take the MUSEUM TICKET (6).
- Examine the bottom drawer; take LETTER T (T).
- Exit the Seamstress' place.
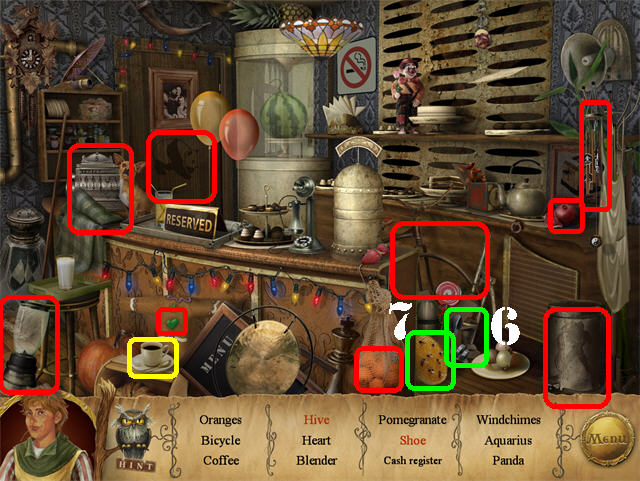
- Play the Hidden Object Scene by the Café door.
- Open the swinging doors by the bar; take the SHOE (6) and the HIVE (7).
- The COFFEE will be added to inventory.
- The Guard will now let you pass since it is 9 a.m.: go through the gate.
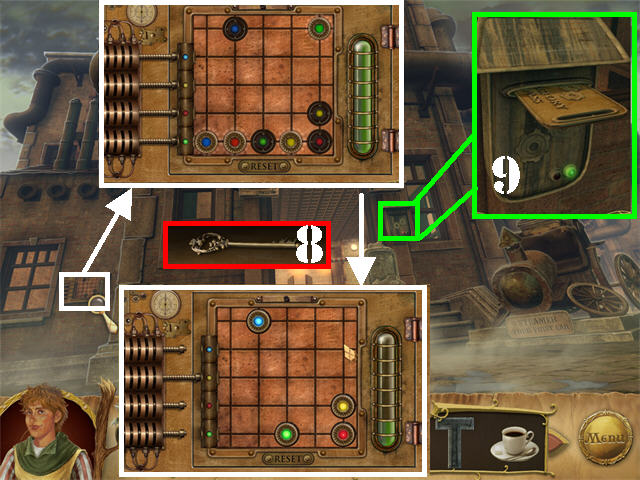
- Zoom into the mechanism on the lower left side of the building.
- Place the colored tokens over their matching spots.
- Click on a token and arrows will appear; click on the arrow that is pointing to the direction you want to go.
- If you get stuck press on the RESET button to start over.
- The solution is as follows:
- Move the YELLOW BUTTON up.
- Move the GREEN BUTTON down and then left.
- Move the RED BUTTON up, right, and down, right, and down.
- Move the BLUE BUTTON right and then up.
- Move the YELLOW BUTTON right, and then down to complete the puzzle.
- Check out our video solution!
- Take the KEY (8) after the puzzle has been solved.
- Zoom into the keypad to the right of the door; place the FACTORY PASS in the slot and go inside the Factory (9).
- Take the TRAIN PASS (10) on the counter.
- Zoom into the floor area besides the lower right part of the desk; take the LETTER F (F).
- Go through the right door to activate a Hidden Object Scene outside the factory.
- Exit the Factory.
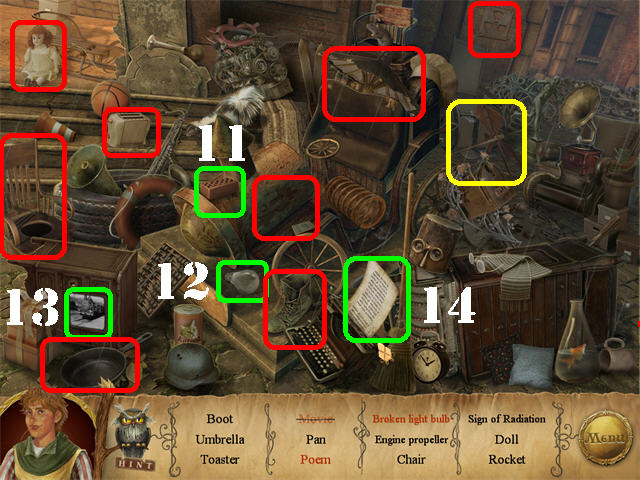
- Play the Hidden Object Scene.
- Click on the BRICK (11); take the BROKEN LIGHT BULB (12) that crashes to the floor.
- Click on the TV screen twice; take the MOVIE (13).
- Click on the TYPEWRITER 3 times; take the POEM (14).
- The ENGINE PROPELLER will be added to inventory.
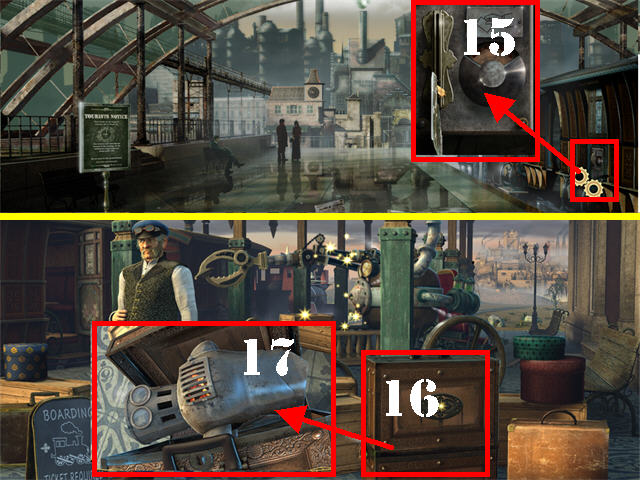
- Return to the train platform.
- Zoom into the keypad on right (15); swipe the TRAIN PASS in the slot.
- The train will stop at the other platform.
- Zoom into the case in the lower right (16).
- Open the case with the KEY; zoom into it and take the ROBOT COSTUME (17).
- Dress yourself with the ROBOT COSTUME.
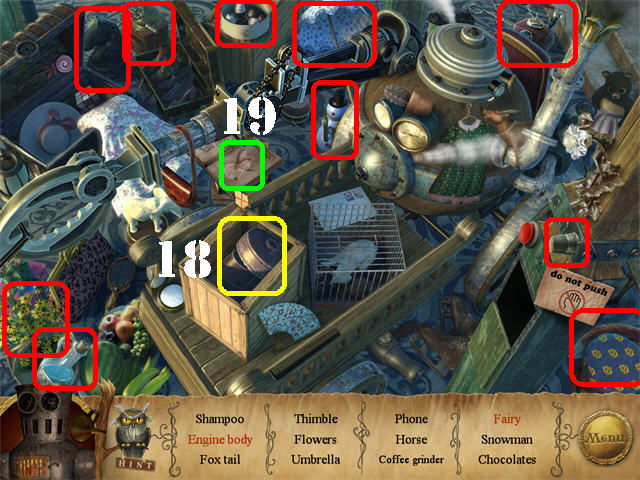
- Play the Hidden Object Scene by the robot in the back.
- Click on the case twice to open it; take the ENGINE BODY (18).
- Open the BOOK; turn several pages and take the FAIRY (19).
- The ENGINE BODY will be added to inventory.

- Get on the train.
- Go forward, and then towards the left once you arrive to the other side. Then enter the club on the right now that you have the ROBOT COSTUME on (20).
- Click on the little girl; she wants ice cream (21).
- Zoom into the RADIO; take the LETTER F (F).
- Go through the back door.
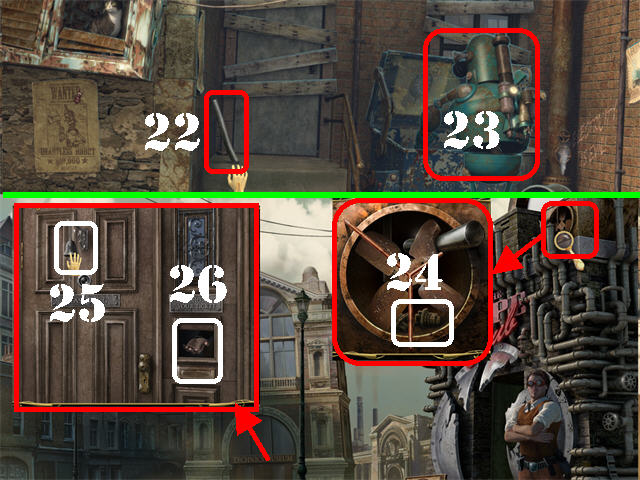
- Grab the STEEL PIPE on the steps (22).
- Click on the Robot; he wants a pocket watch (23).
- Exit the club.
- Zoom into the FAN in the upper right.
- Place the STEEL PIPE on the blades to block them; take the ENGINE BOLTS (24).
- Zoom into the Museum door.
- Ring the bell (25) and slide the MUSEUM TICKET into the right slot (26).
- Enter the Museum.
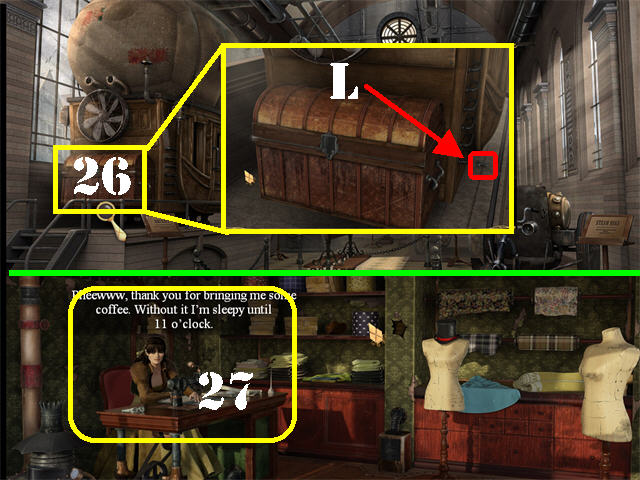
- Zoom into the chest on the platform (26).
- Take the LETTER L (L) on the right.
- Return to the Seamstress's place.
- Give her the COFFEE and she says she will sew anything for you (27). This action activates a Hidden Object Scene outside.
- Click down.
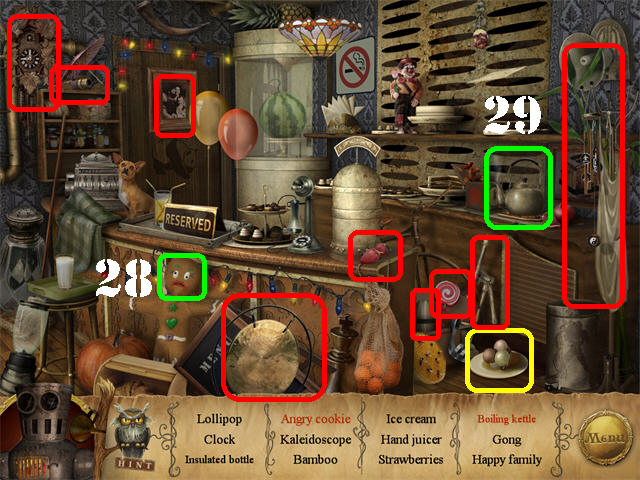
- Play the Hidden Object Scene by the Café door.
- Click on the GINGERBREAD COOKIE'S FACE; take the ANGRY COOKIE (28).
- Click on the STOVE KNOB; take the BOILING KETTLE (29).
- The ICE CREAM will be added to inventory.
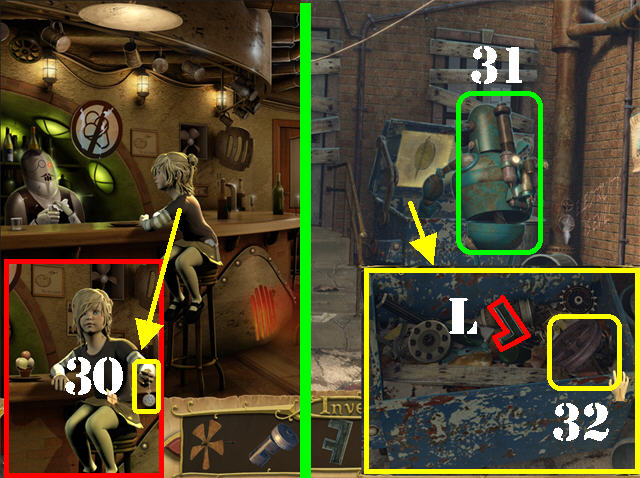
- Return to the club.
- Zoom into the little girl at the bar.
- Give the ICE CREAM to the little girl; take the WATCH from her hand (30).
- Go to the back.
- Give the WATCH to the robot (31).
- Zoom into the garbage container; take the LETTER L (L) and the ENGINE ROTOR (32).
- Go to the inside of the Factory and go into the right door.
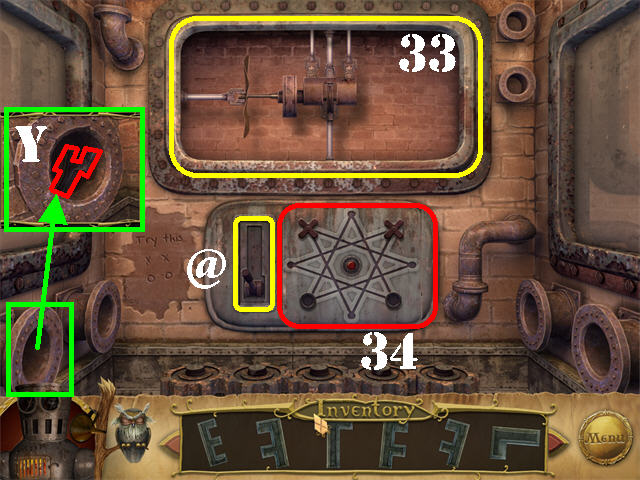
- Zoom into the tube in the lower left; take the LETTER Y (Y).
- Place the ENGINE ROTOR, ENGINE BODY, ENGINE PROPELLER, and the ENGINE BOLTS into the upper center mechanism (33).
- Look at the scheme on the lower left side of the wall; you must move the pieces to the right of it to the same positions.
- Check out our video solution!
- Please look at the screenshot for the final solution (34).
- Click on the LEVER (@) to automatically drop the ASSEMBLED ENGINE into inventory.
- Return to the Museum.
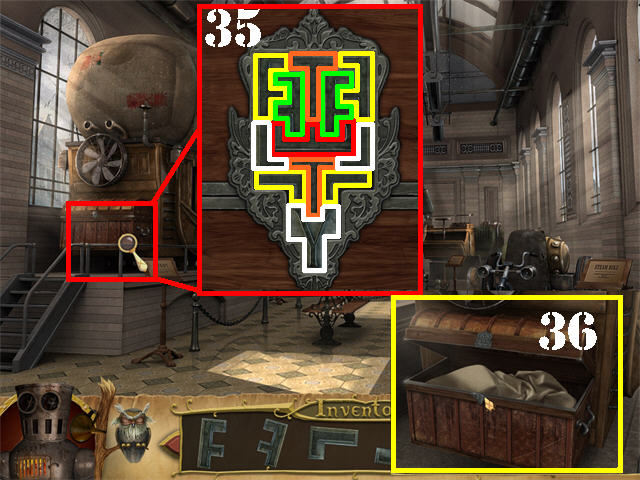
- Zoom into the chest on the left.
- Place the 2 LETTER L's, the 3 LETTER F's, the LETTER T, the LETTER E, and the LETTER Y on the board.
- If you don't have all the pieces needed for the puzzle, here are their locations:
- In Museum; zoom into the chest on left and take LETTER L.
- The train platform on the Steam City side; zoom into sign on left and take LETTER E.
- By the broken airship; zoom into the blackboard and take the LETTER F.
- In the Factory; zoom into the bottom right side of the desk and take LETTER F.
- In the back of the Factory; zoom into the tube in the lower left and take the LETTER Y.
- In the Seamstress' place, zoom into the bottom right drawers and take the LETTER T.
- In the club; zoom into the RADIO and take the LETTER F.
- In the garbage container behind the club; take the LETTER L after the robot has been handed the pocket watch.
- Place the LETTERS so that they all fit onto the board.
- Please look at the screenshot for the solution (35).
- Take the RESISTANT MATERIAL (36) from inside the trunk.
- Go back up to the Seamstress' place.
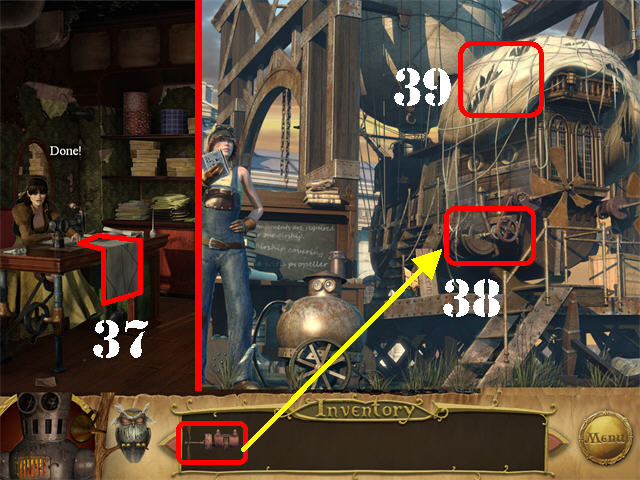
- Place the RESISTANT MATERIAL on the sewing machine.
- Take the AIRSHIP COVERING after she is done sewing (37).
- Exit the Seamstress' place, head right by the Museum and then forward.
- Place the ASSMBLED ENGINE on the bottom of the airship (38).
- Place the AIRSHIP COVERING on top of the airship (39).
Chapter 4: Skyline
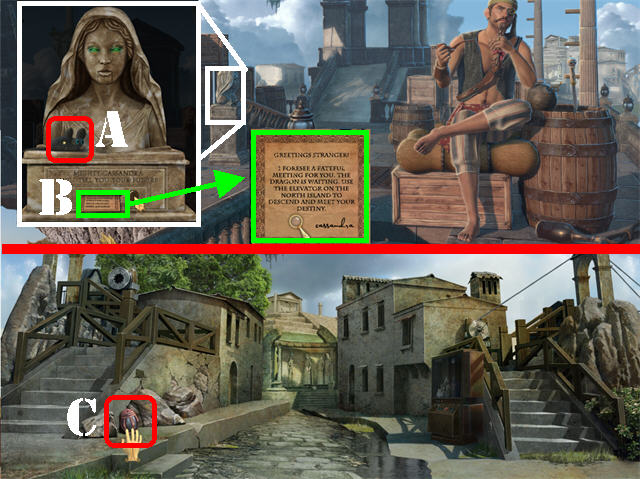
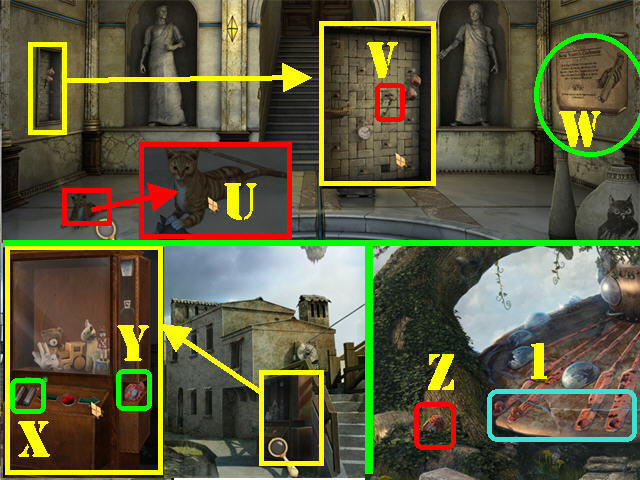
- Zoom into the bust on left; take the TOY MOUSE (A).
- Push the button; click on the note that appears in the slot below (B).
- Go forward.
- Move the rock in lower left; take the RED DIODE (C).
- Go forward.
- Zoom into the bas-relief on the back wall; take the SILVER KEY on the second head (E).
- Head left.
- Take the BLUE DIODE (F) by the left side of the steps.
- Grab the BATTERY (G) in the upper right.
- Click down twice and head right.
- Zoom into the vines covering the Observatory door.
- Take the BLUE DIODE (H) and the NIPPERS (I).
- Click down twice.
- Zoom into the beacon in the upper right.
- Cut the WIRES with the NIPPERS and take the BLUE DIODE (J).
- Head forward, right, and go up the left steps.
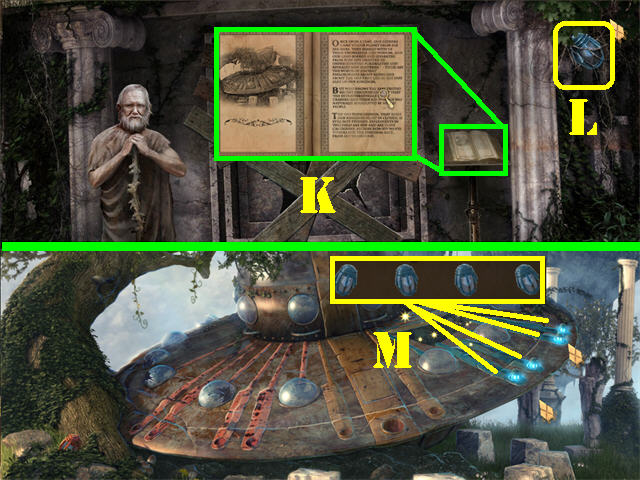
- Read the BOOK on the right (K).
- Grab the BLUE DIODE (L) in the upper right.
- Click down and head right.
- Place the 4 BLUE DIODES on the right side of the spaceship (M) to activate a Hidden Object Scene; play it.
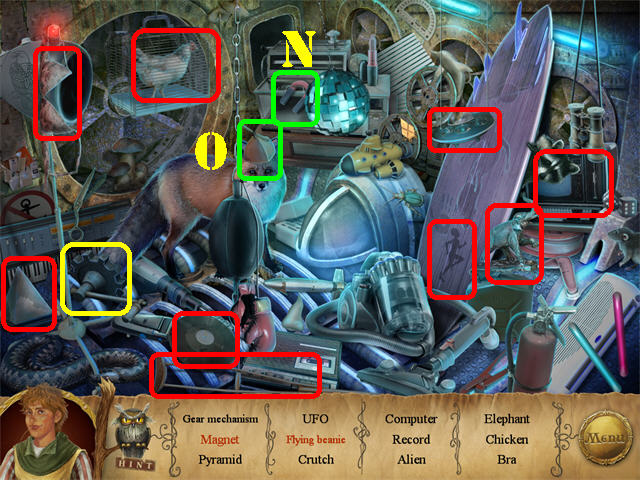
- Click on the DISCO BALL to move it aside; take the MAGNET (N).
- Click on the BEANIE (O) 3 times; take the FLYING BEANIE.
- The GEAR MECHAMISM will be added to inventory.

- Click down twice.
- Zoom into the winch on left; place the GEAR MECHANISM on the winch (P).
- Click on the gear to raise the bridge.
- Cross the bridge.
- Take the RED DIODE (Q) on the left.
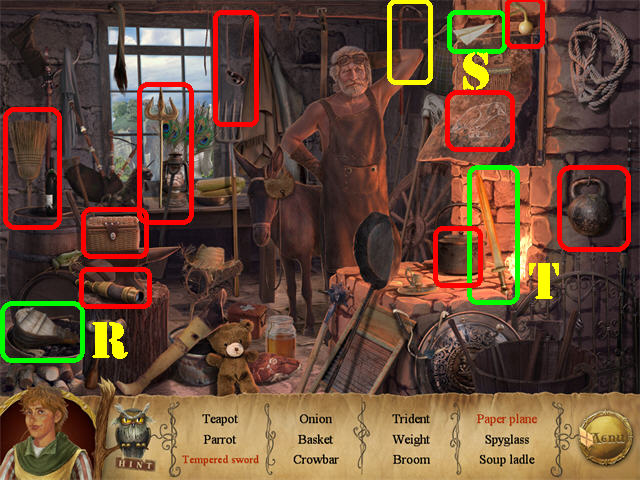
- Play the Hidden Object Scene on left.
- Click on the BELLOWS (R) in the lower left; take the PAPER PLANE (S) that flies into the upper right side of the scene.
- Place the SWORD into the fireplace; take the TEMPERED SWORD (T).
- The CROWBAR will be added to inventory.
- Head forward.
- Zoom into the cat; give it the MOUSE and take the BATTERY (U).
- Zoom into the alcove on left; take the GOLDEN KEY (V).
- Read the note (W) on right.
- Click down twice.
- Zoom into the machine on the right.
- Place the 2 BATTERIES on the left side of the machine (X).
- Click on the RIGHT ARROW twice, the RED BUTTON once, and thrice on the RIGHT ARROW.
- Take the RED DIODE in the right slot (Y).
- Head right.
- Take the RED DIODE (Z) on the lower left.
- Place the 4 RED DIODES on the left side of the flying saucer (1) to activate a Hidden Object Scene; play it.
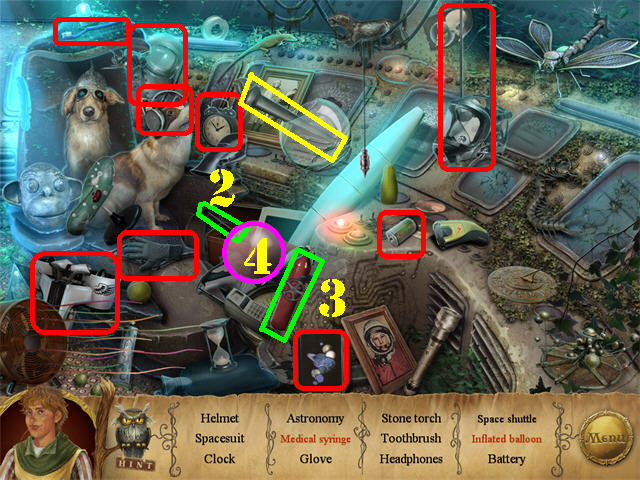
- Open the FIRST-AID KIT (2); take the MEDICAL SYRINGE.
- Click on the PUMP (3); take the INFLATED BALLOON (4).
- The STONE TORCH will be added to inventory.
- Click down twice and head left.
- Zoom into the statue on the right; give it the STONE TORCH (5).
- Go through the door.
- Take the YELLOW DIODE in the upper right (6).
- Return to the top of the Observatory.
- Remove all the boards with the CROWBAR (7).
- Enter the Observatory.
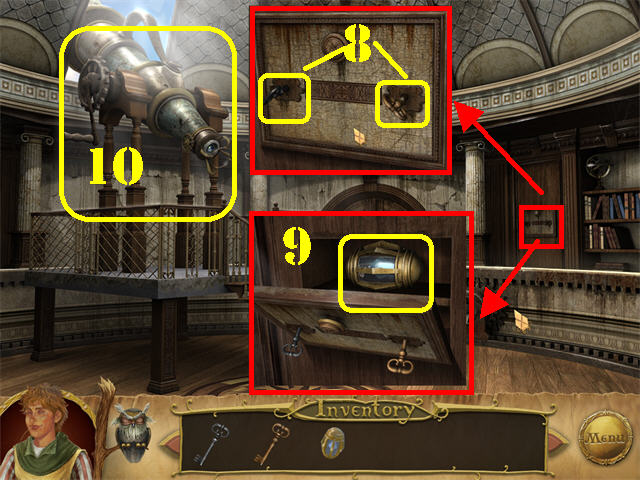
- Zoom into the safe on the right.
- Place the SILVER KEY and the GOLD KEY into the keyholes (8).
- Take the YELLOW DIODE (9) inside the safe.
- Zoom into the telescope and click on it to activate a puzzle (10).
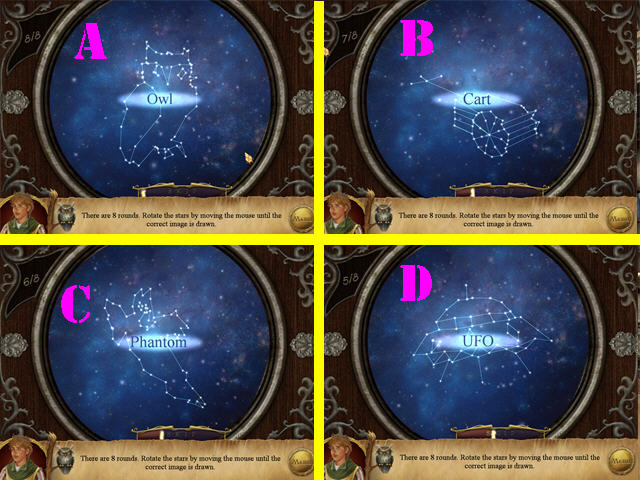
- Place your cursor in the center and move it all around so you can rotate the images.
- If you are playing in windowed mode you should be able to click on your desktop to rotate the constellation if you are having trouble rotating it.
- The first screenshots shows the first 4 constellations (A, B, C, and D).
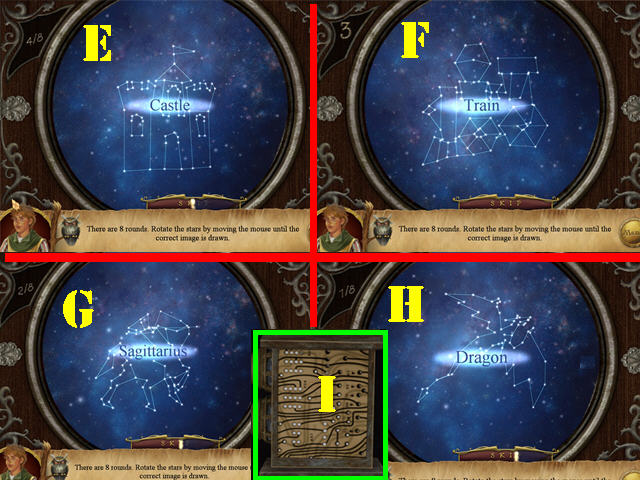
- The second screenshot shows the last 4 constellations (E, F, G, and H).
- Take the POWER UNIT (I) after the puzzle has been solved.
- Exit the Observatory, click down and head left.
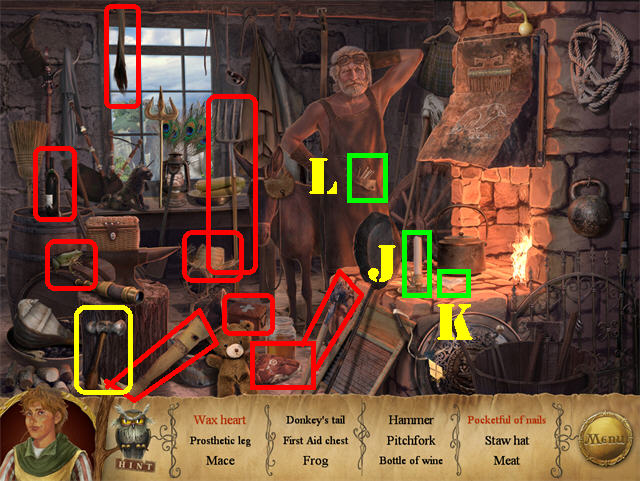
- Play the Hidden Object Scene.
- Knock down the CANDLE (J); take the WAX HEART (K).
- Click on the blacksmith's pocket; take the POCKETFUL OF NAILS (L).
- The HAMMER will be added to inventory.
- Head right.
- Place the HAMMER on the bell so the noise it makes shatters the glass (M).
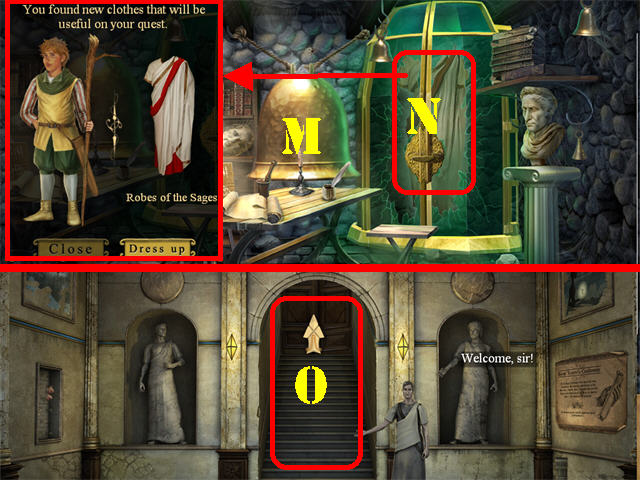
- Grab the ROBES OF THE SAGES inside the broken case; put the outfit on (N).
- Click down and go forward.
- You are now able to pass through the building since you look like a wise man. Go up the steps to activate a puzzle (O).
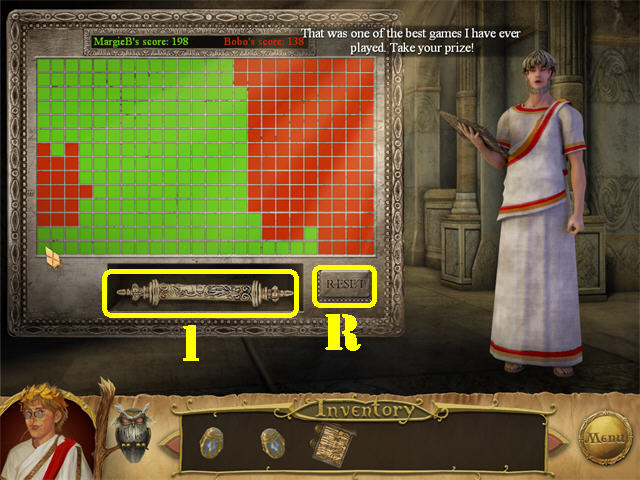
- Click on a cell on the board to fill in the board with green cells; Bobo's squares are red.
- Each time you click on a cell of a particular shade, all matching cells attached to your filled cells will also change.
- Defeat Bobo by having more cells filled in than him.
- Please look at the screenshot for a random board.
- If you fail, click on the 'RESET' (R) button to start over.
- Take the ANCESTOR'S MANUSCRIPT (1) after the puzzle has been solved.
- Click down 2 times and head forward.
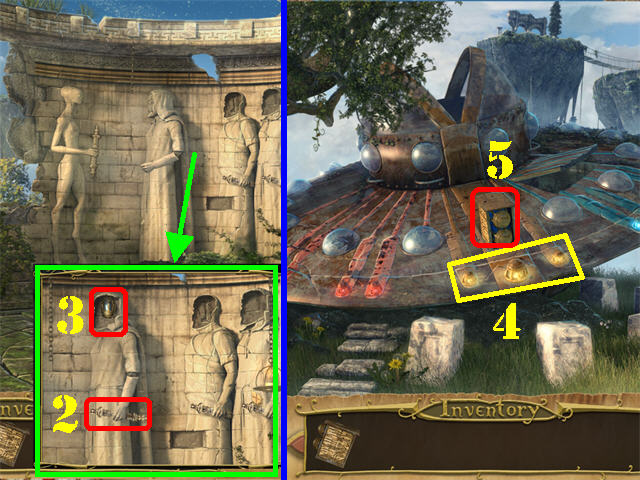
- Zoom into the bas-relief on the back wall.
- Give the ANCESTOR'S MANUSCRIPT to the statue on the left (2).
- Take the YELLOW DIODE (3).
- Return to the flying saucer.
- Place the 3 YELLOW DIODES on the flying saucer (4); take the POWER UNIT (5).
- Click down twice, head forward and then left.
- Place the 2 POWER UNITS in the lower right and lower left sides of the temple.
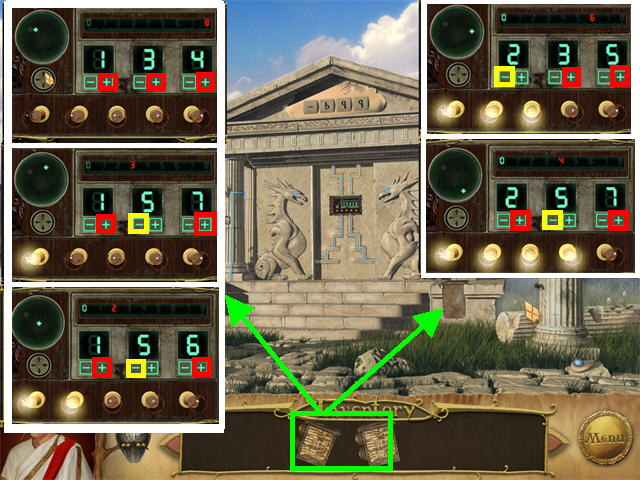
- Zoom into the puzzle that appears on the back wall.
- Use the arrows to move the control to one of the dots for an equation to appear.
- Click on the plus and minus signs below each blue number so the right equation makes the needle reach the voltage indicated by the red number.
- The solutions are as follows:
- (2,3,5) plus 5, plus 3, minus 2 .
- (2,5,7) plus 7, minus 5, plus2 .
- (1,5,6) plus 6, minus 5, plus 1 .
- (1,5,7) plus 7, minus 5, plus1 .
- (1,3,4) plus 1, plus 3, plus 4 .
- Go through the door after the puzzle has been solved.
- Click on the LEVER (1) on left to activate the elevator.
- Once the elevator stops try to go out the door (2); you will not be able to do so.
- Click on the LEVER again to activate the elevator (3).
- Go through the door (4).
Chapter 5; Dragon's Castle
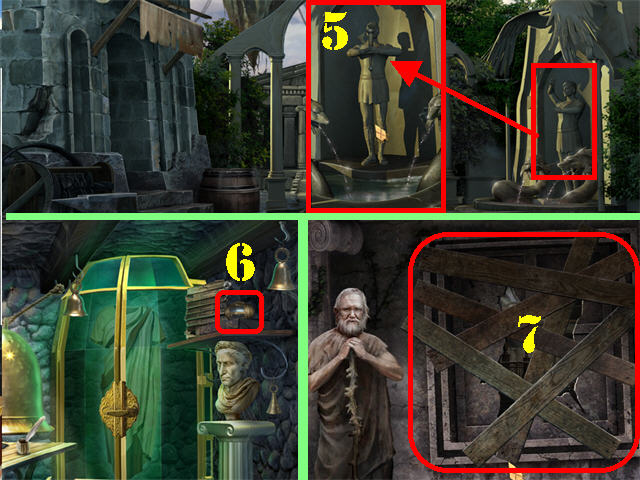
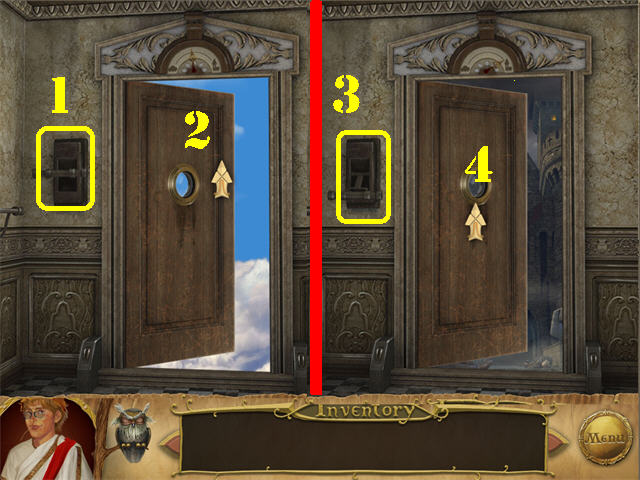
- Take the EAGLE TABLET PART 1 of 3 (A) in the lower left.
- Head forward.
- Take LOCK 1 of 3 (B) in the lower left.
- Go through the right entrance to access the Dining Room.
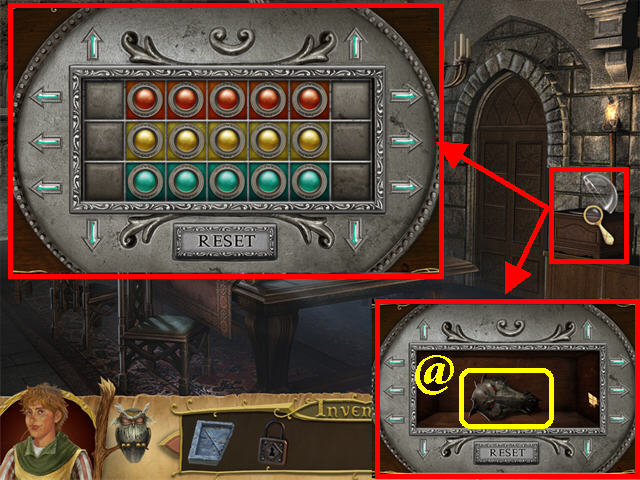
- Open the dome on the right and click on it to activate a puzzle.
- Place the colored balls into their matching backgrounds.
- Use the arrows to shift the balls around.
- Please look at the screenshot for the final solution.
- Check out our video solution!
- Take the SIGN OF THE DRAGON (@) after the puzzle has been solved.
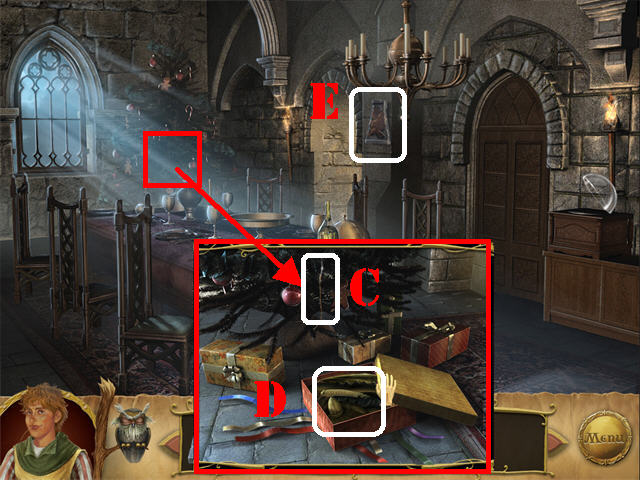
- Zoom into the Christmas tree.
- Take the HOOK WITH ROPE (C) on the tree.
- Click on the large gift box until you remove all the bows.
- Take the DRAGON BABY SUIT from inside the gift box; put it on (D).
- Take the EAGLE TABLET PART 2 of 3 (E) in between both doorways.
- Go through the right door.
- Take the BLACK PEPPER (F) on the top shelf.
- Return To the Dining Room and go into the far right entrance.
- Give the BLACK PEPPER to the plant (G).
- Take the EAGLE TABLET PART 3 of 3 (H) the plants spits out.
- Zoom into the vase in the lower left; take the WET MATCHES (I).
- Return to the Kitchen.
- Open the pot on right; place the WET MATCHES on the hot cauldron (J).
- Take the DRY MATCHES from the cauldron (K).
- Return to the hallway.
- Zoom into the balcony door.
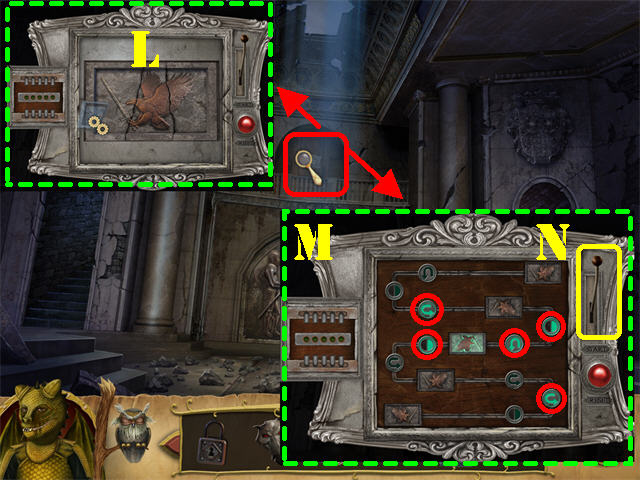
- Place the 3 EAGLE TABLET PARTS into the board to activate a puzzle (L).
- Click on the symbol to change the direction of the leaf tablet so once it passes over the next leaf on the board it is facing the same way.
- Check out our video solution!
- Please look at the screenshot for the solution (M) and press the buttons marked in red only. Then click on the LEVER (N) on right to enter your selection.

- Go through the door after the puzzle has been solved.
- Take the LOCK (O) in the lower right.
- Click down.
- Zoom into the lower door; place the SIGN OF THE DRAGON on the door (P).
- Go through the door.

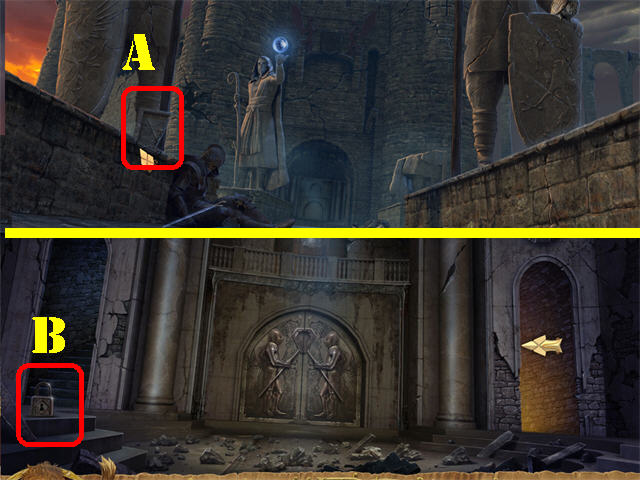
- Take the DRILL (Q) in the lower right.
- Examine the left side of the water.
- Place the HOOK WITH ROPE into the water.
- Move the hook up, down, or left to right to retrieve LOCK (R) 3 of 3 at the bottom of the water.
- Return to the Kitchen.
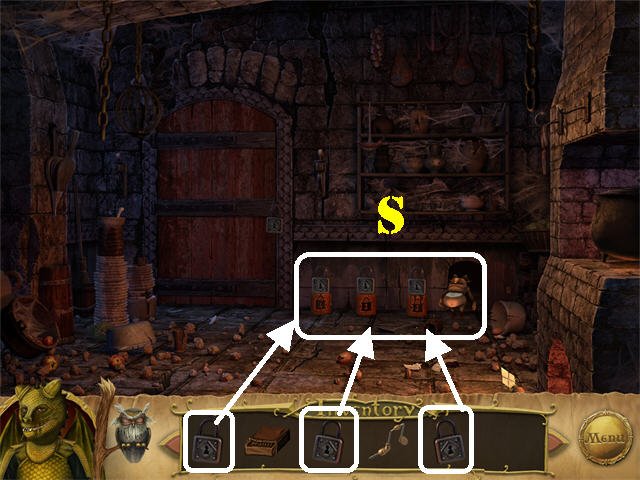
- Place the 3 LOCKS on the small pedestals (S).
- A small monster will come and activate a Hidden Object Scene by the door; play it.
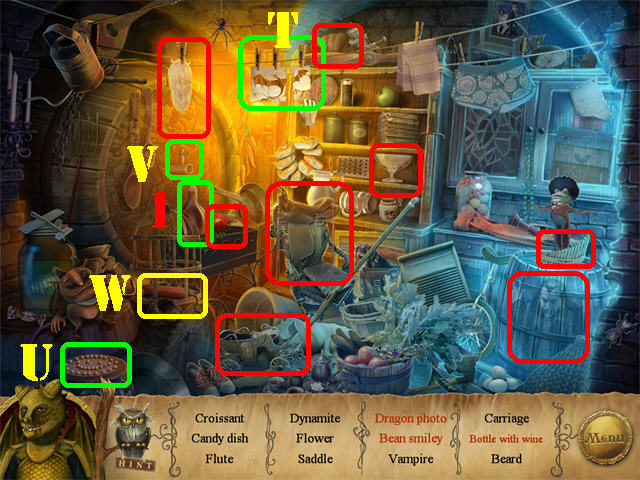
- Drag the DRAGON PHOTO PIECES hanging on the line together; take the DRAGON PHOTO (T).
- Click on the COFFEE BEANS in the lower right until they form a face; take the BEAN SMILEY (U).
- Click on the TAP (V); take the BOTTLE WITH WINE (1).
- The DYNAMITE (W) will be added to inventory.
- Click down twice and head left.
- Place the DRILL on the large boulder. Click on the drill several times to use it. The DRILL will disappear once drilling is complete (X).
- Place the DYNAMITE in the hole (Y).
- Light the FUSE with the DRY MATCHES (Z).
- Congratulations! You have completed The Fool!
Created at: 2011-04-01