
WALKTHROUGH MENU
- GENERAL TIPS
- CHAPTER ONE
- CHAPTER TWO
- CHAPTER THREE
- CHAPTER FOUR
- CHAPTER FIVE
- CHAPTER SIX
- CHAPTER SEVEN
- CHAPTER EIGHT
- CHAPTER NINE
- CHAPTER TEN
- CHAPTER ELEVEN
GENERAL TIPS
THINGS TO KNOW
- Hidden keys are highlighted in green.
- Most Hidden enchanted objects are highlighted in red.
- In this game the hidden object list you receive will be randomized, so it is likely that everyone will have a different variation of objects.
NEW GAME
- Click the “Play” button to start a new game.
- When you start a new game there are four modes to choose from; two of them are primary and the other two are secondary.
- At first you will be asked to choose the "Casual," or "Apprentice" mode (these are the primary choices). Selecting "Casual" lets you play without a timer, while "Apprentice" applies a timer to all of your puzzles.
- Second, you will be asked to choose between the "Short and Sweet,” or “Long and Complete" modes (these are your secondary choices). "Short and Sweet" will cut the story down quite a bit; the "Long and Complete" will tell the story will more detail.
- You have to choose one of the primary and secondary choices before you can start your game. You will only be asked these questions in the beginning of your game.
- Later on, after you complete this game, you will gain access to the "Magician" mode. In this mode there is a smaller time limit and only three names from the object list are visible at any given time.
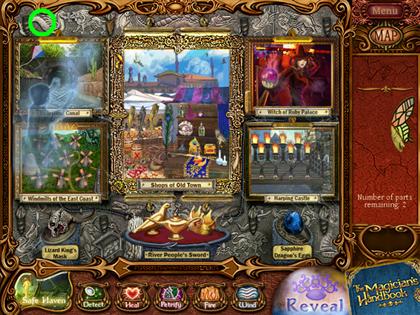
MAP SCREEN
- The map menu is where you go to plan out where you would like to go next. From here you can move to any place that is available.
- By placing your wand over a location you can check the amount of hidden objects, and hidden keys in that particular location.
- From here you can also go to the "Safe Haven" to open a Treasure Chest.
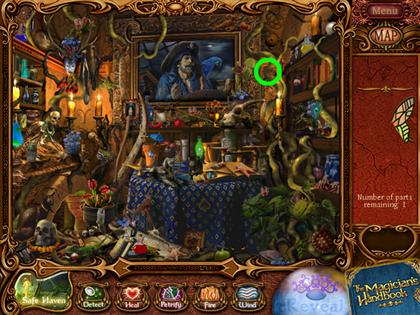
LOCATION SCREEN
- After choosing a location from the map screen, you end up here at a location screen.
- From here you should be able to see a list of hidden objects on the right side of your screen.
- The "Map" button located at the upper-right side of your screen lets you go back to the Map Screen instantly.
- Those 3 keys at the bottom of your screen show you the amount of keys you have for each type.
- The "Safe Haven" button at the bottom-left-corner of your screen lets you go to the safe haven where you can find Treasure Chests.
- The "Magician's Handbook" at the bottom-right-corner of your screen allows you to change the wand you are using; it also allows you to restart the chapter you are on.
- The "Menu" button at the top-right-side of your screen allows you to change the volume of your game, exit to the Main Menu Screen, and read a helpful Guide for your game.
- At the bottom-right side of your screen there is a "Reveal" button. The Reveal button gives you the location of a random object from your object list.
FINDING OBJECTS
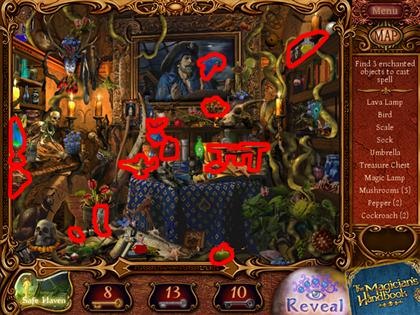
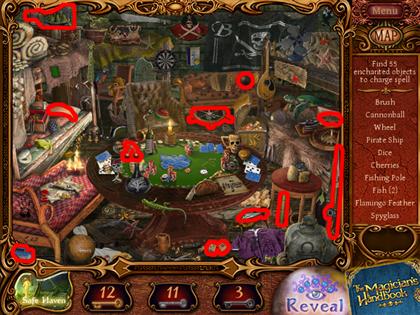
- At the beginning of each Chapter your mission will be to find a set amount of enchanted objects.
- On the right side of your Location Screen there will be a list of enchanted objects; finding all of the listed objects in a room will take you back to the Map screen to choose another location to complete.
- If you are having too much trouble finding an object, try clicking the Reveal button for some help.
- At the beginning of each Chapter, the Reveal button starts with five stones around it. The number of stones around the eye of the Reveal button indicates the number of reveals you have left. If you run out of these, another reveal will appear within exactly two minutes.
KEYS & CHESTS
- There are three varieties of keys: Gold, Silver, and Black.
- These three keys open up the Treasure Chests that are found in the "Safe Haven."
- Treasure Chests can only be opened up with the proper key, and the correct amount of that key. For example: a Treasure Chest may need seven Gold keys to be unlocked.
- Some Treasure Chests have special Wands inside of them, as well as temporary spells.
- There are four wands to collect; however, only three of these wands can be found in Treasure Chests. The last Wand is awarded to the Person who beats this game with an “A” grade average.
GRADES
- You will be graded at the end of each chapter on a few different factors.
- The amount of Objects found, the number of Reveals remaining, and the number of "Quickfinds" in that chapter will determine your score.
- A "Quickfind" point is awarded to you when you find one or more enchanted objects in quick succession.
- The opposite of "Quickfinds" are "Mis-clicks;" if you click a space without an object in it too many times in quick succession, the outcome of your grade will be penalized. This does not happen if you have a spell equipped, or if you are solving a puzzle.
SPELLS
- There are two types of spells; there is one you can use forever, and one that is for single use only.
- The spells you can use forever are spells like Wind, and Fire. These spells are only gained after completing a certain type of puzzle. Once gained, they will help you solve difficult puzzles.
- The temporary spells that are for single use only are spells like the Increase Reveal, or the Repel Magic. Spells like those can only be found in the Treasure Chests at "Safe Haven." These spells give you assistance in certain situations.
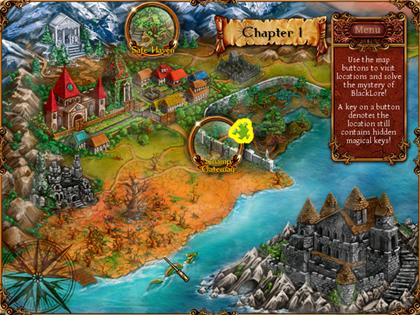
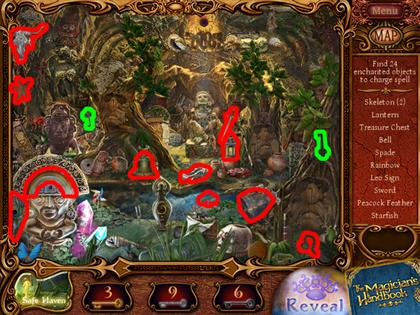
CHAPTER ONE
CHAPTER GOALS
- Find 16 enchanted objects.
- Learn the Wind spell.
MAP SCREEN

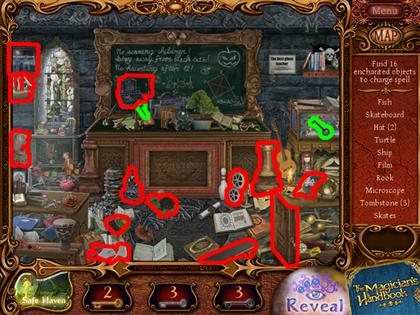
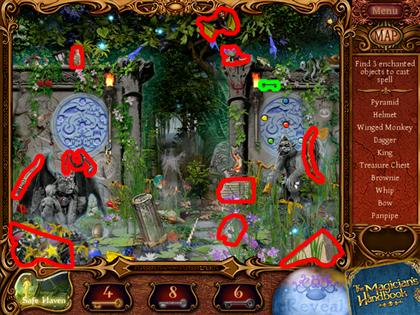
- After you have read the story, click on the "Magical Library" icon; here you can find a gold key, and a black key.
- Now that you are in the "Magical Library," click on the "Map" icon in the upper-right corner of your screen. This will take you back to the map screen; now click on the Magical Library one last time to go inside.
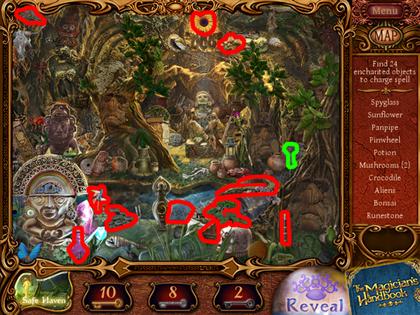
INSIDE THE MAGICAL LIBRARY
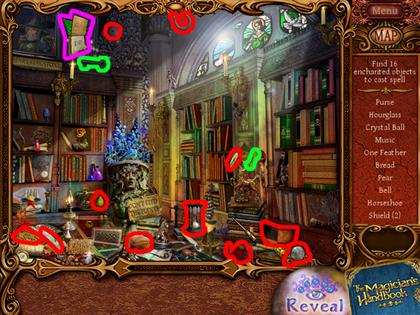
- Now this time the fairy will say something about how she forgot to mention the "Keys" earlier. Use the screenshot to find the keys in this location, they are highlighted in green. The book highlighted in purple has no effect on the game at all; it is just there to distract you. There will be other creatures and things to distract you in other locations.
- Be sure to collect the keys first and collect the Enchanted objects last, otherwise you risk losing those keys after completing a location goal.
- After collecting all of the Enchanted objects on your list, go to the location labeled "Swamp Gateway."
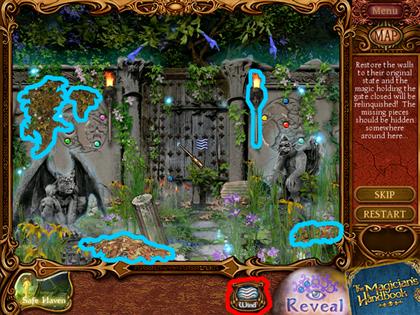
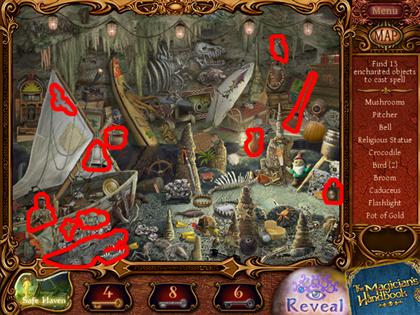
INSIDE THE SWAMP GATEWAY 1-4
- Collect the keys you see highlighted in green first; then collect the objects on your list.
- After collecting six objects from this room, you will have completed your goal of collecting 16 objects in this chapter. You will be given a choice on whether you would like to continue finding Enchanted objects in this room, or if you would like to get your spell now.
- The number of Enchanted objects that you find in a chapter will effect your grade, so try choosing wisely when you are given these choices.
- If you chose the first option, after finding the remaining Enchanted objects you will be taken into the puzzle room automatically.
- If you chose the second option, then you have already been taken to the puzzle room where you find your first spell.
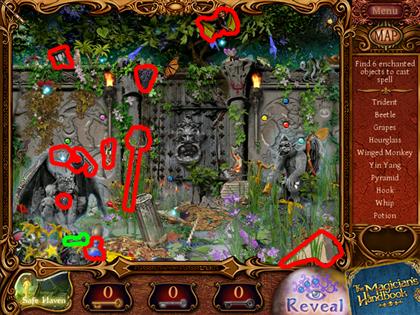
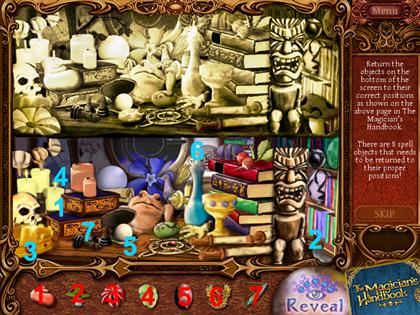
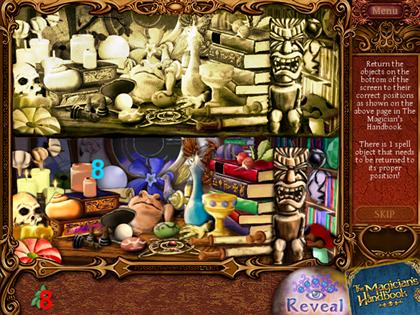
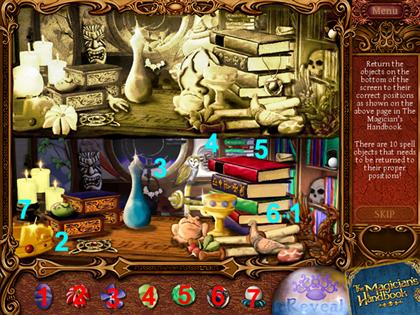
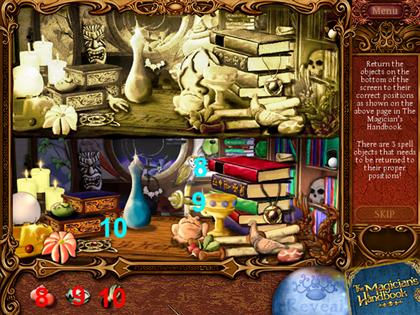
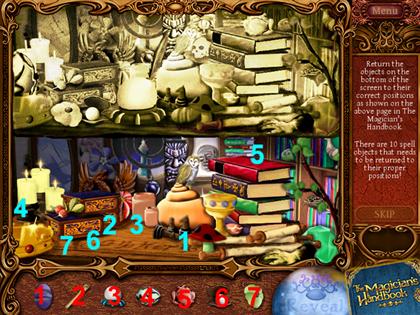
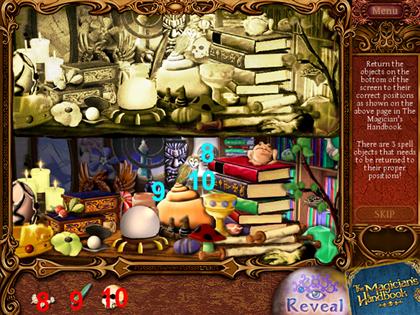
FIRST SPELL PUZZLE
- At the very start of this puzzle, a tutorial will begin showing you how this puzzle should be solved.
- After that tutorial is finished take a look at the screenshot.
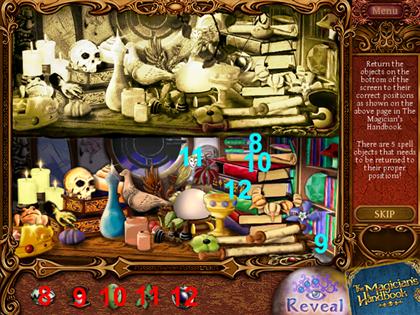
- There are seven objects at the bottom of your screen that need to be placed correctly into the second picture.
- In the screenshot, the bird labeled with the red 1 belongs at the position of the blue 1.
- By taking all of the objects with red numbers to their matching blue numbers you are returning them to their proper positions.
- Not every puzzle will have the set of objects at the bottom of their screen. If that is the case with you, then try comparing the top, and bottom pictures together to find which objects are missing in the bottom picture. And once you find the locations of the missing objects, try placing the objects from the bottom of the screen onto those locations.
- If you are having too much of a hard time, try using the Reveal magic to help out.
- After completing this puzzle, you will be awarded the "Wind" spell. This spell will allow you to blow gusts of wind by clicking your wand on certain objects.
MAP SCREEN PUZZLE PIECE
- If you take a look at your Map you will find that there is a puzzle piece on the Swamp Gateway location. This means that there will be a use for the spells you have learned at that location.
- Click on the Swamp Gateway location to get started.
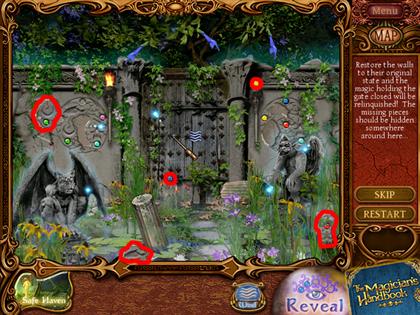
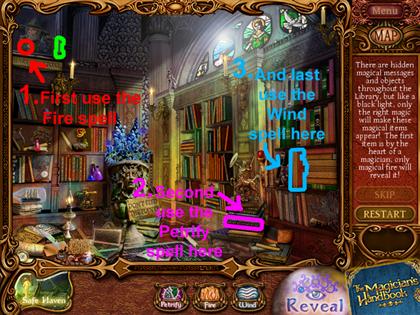
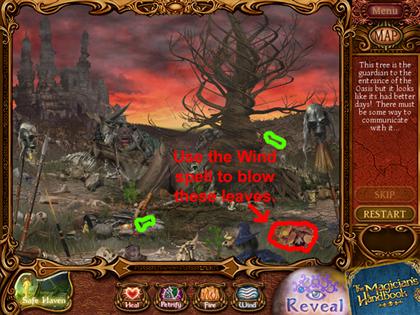
INSIDE THE SWAMP GATEWAY 2-4
- As you start at this location there will be another quick tutorial on how to use the Wind spell.
- After the tutorial is over, use the screenshot to check what areas you will have to use the Wind spell on. Click on the Wind spell icon at the bottom of your screen to attach the spell to your wand.
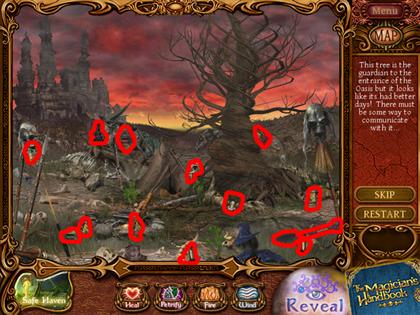
INSIDE THE SWAMP GATEWAY 3-4
- After you have used the Wind spell on the required parts of this location, use the screenshot to collect several important puzzle pieces.
INSIDE THE SWAMP GATEWAY 4-4
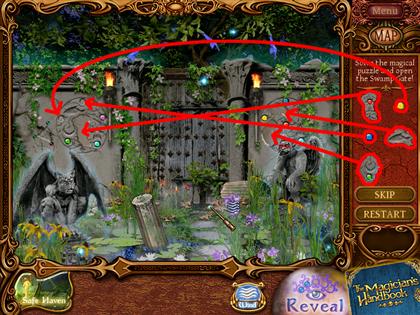
- After you have collected all five of the missing puzzle pieces, use the screenshot to place them in their proper places.
- Each collected object has been highlighted and has an arrow pointing in the spot where it belongs.
- Click once to pick up an object and click again to drop it into its proper location.
- After you are finished here, the gate in the back will open up and this will conclude chapter one.
CHAPTER TWO
CHAPTER GOALS
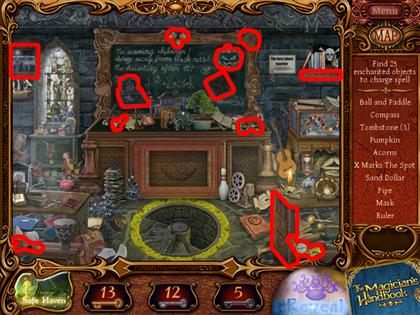
- Find 25 enchanted objects.
- Learn the Fire spell.
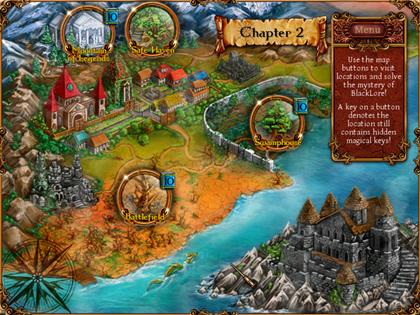
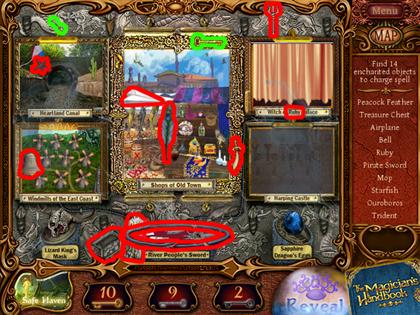
- As you can see in the screenshot, new locations have appeared on the Map screen. The Map screen will change every Chapter.
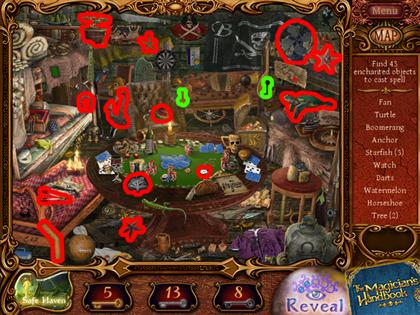
SWAMP HOUSE
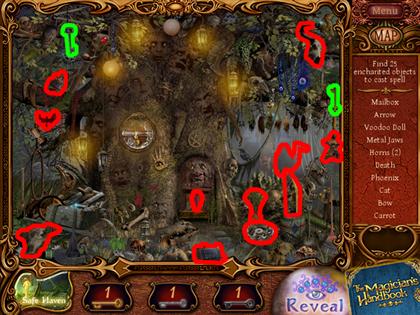
- Use the screenshot to find the two keys in this location.
- Also, use the screenshot for assistance in finding enchanted objects.
BATTLEFIELD
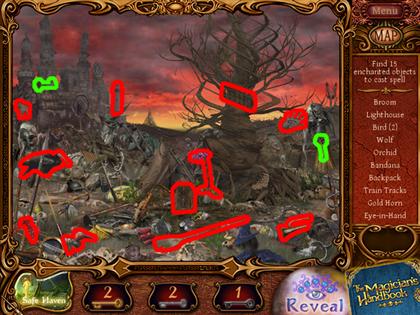
- Use the screenshot to find the two keys in this location.
- Also, use the screenshot for assistance in finding enchanted objects.
MOUNTAIN OF LEGENDS
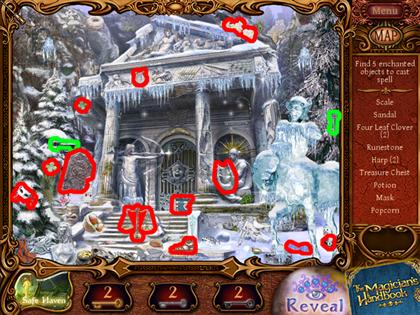
- Use the screenshot to find the two keys in this location.
- Also, use the screenshot for assistance in finding enchanted objects.
FIRE SPELL PUZZLE
- This time there are eight objects that need to be placed into their proper positions.
- Just like before, follow the same procedure to place these misplaced objects into the correct positions.
- In this screen there are seven objects, but it is missing the eighth object. Please check the screenshot for the eighth object.
- Remember; take the objects with red numbers to their matching Blue numbers to return the objects to the proper places.
- After completing the puzzle, you will be awarded the Fire spell.
- Now head over to the Mountain of Legends for another puzzle.
MOUNTAIN OF LEGENDS PUZZLE
- Use the screenshots and follow these steps to complete this puzzle.
- Use your Fire spell on the highlighted areas as seen in the screenshot.
- Now pick up the two objects that have been highlighted to add them to your inventory.
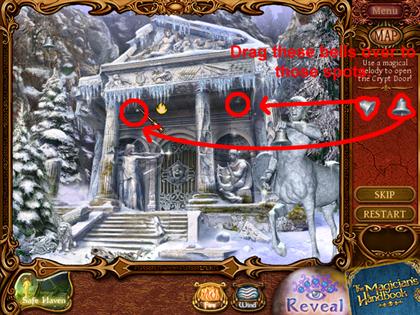
- As seen in the screenshot, drag the bells over to the bell hooks.
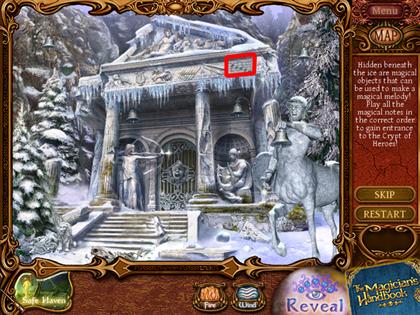
- Click the spot that has been highlighted in this screenshot to hear the song you need to play using the bells.
- Notice how the song goes from high pitched to low pitched.
- The sounds that the bells make have been randomized, so you will need to use your hearing to complete this puzzle, instead of a screenshot.
- You must use your Wind spell to ring these bells. Ring each bell to listen to how high each pitch is, and how low each pitch is.
- Ring the bells in order, from highest pitch to lowest pitch, to complete this puzzle.
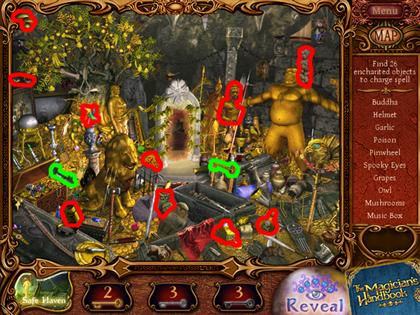
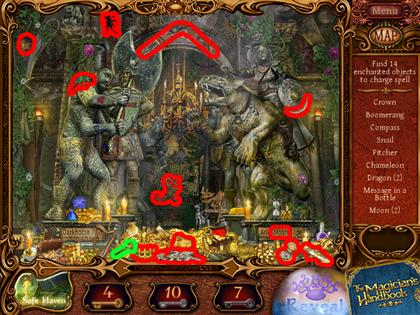
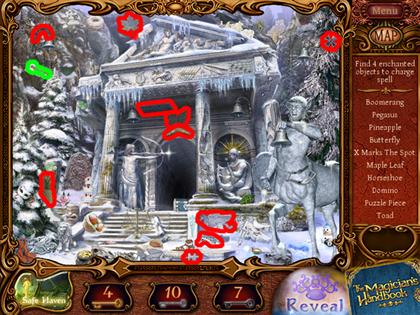
CHAPTER THREE
CHAPTER GOALS
- Find at least 26 objects.
- Find a Fairy scroll.
- In this Chapter you will not be finding a Spell.
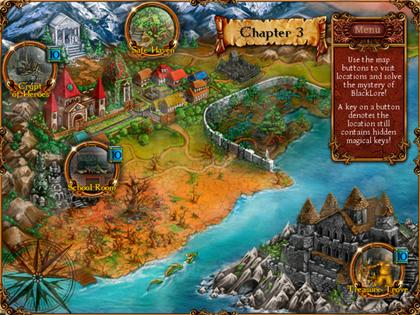
- Treasure Cove can be difficult to find, so look at the bottom-right side of your Map screen to find it.
TREASURE COVE
- Use the screenshot to find the two keys in this location.
- Also, use the screenshot for assistance in finding enchanted objects.
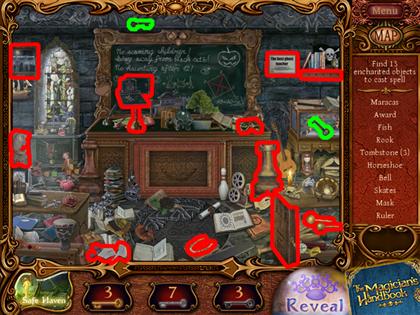
SCHOOL ROOM
- Use the screenshot to find the two keys in this location.
- Also, use the screenshot for assistance in finding enchanted objects.
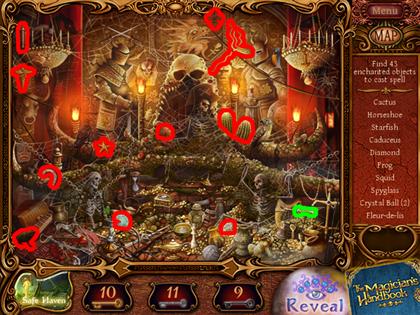
CRYPT OF HEROES
- Use the screenshot to find the two keys in this location.
- Also, use the screenshot for assistance in finding enchanted objects.
SWAMP HOUSE PUZZLE
- Head over to the Swamp House to begin the puzzle.

- Use this screenshot to find the Wood you need for this puzzle. Click on it once to add it to your inventory and then follow the next step.
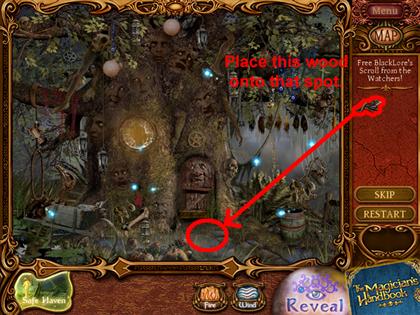
- Place the wood on the spot that is directly below the Tree's door. The spot below the door has been highlighted in the screenshot.
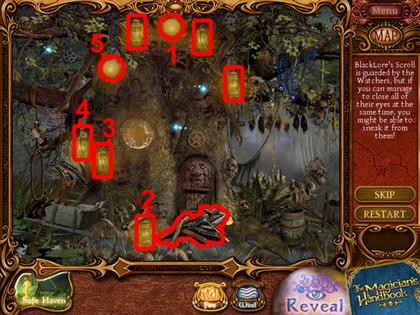
- To complete this puzzle, you will need to find a way to turn on all of the Tree's Lanterns.
- The Lanterns have been highlighted in the screenshot.
- When you use a Fire spell on an unlit Lantern, the Lantern turns on. And when you use a Fire spell on a lit Lantern, the Lantern turns off. Most of the time, when you use the Fire spell on a Lantern, other Lanterns on the tree are also affected.
- Your job is to find the patterns of these Lanterns whenever you use a Fire spells on them to somehow get all the Lanterns lit at the same time.
- After you light all of the Lanterns, light the Wood with your Fire spell to complete the puzzle.
- In the screenshot there is a correct way to light all of the Lanterns at once. But this puzzle has also been randomized, so you may not get the desired result.
- Five of the Lanterns that have been lit in the screenshot have been numbered. If you light the Lanterns in numerical order, you could end up with all of the Lanterns lit.
- Do not forget to light the Wood once you are finished lighting all of the Lanterns.
- Now that you have finished the puzzle, and have been awarded with the Fairy Scroll, go to BlackLore's Cove.
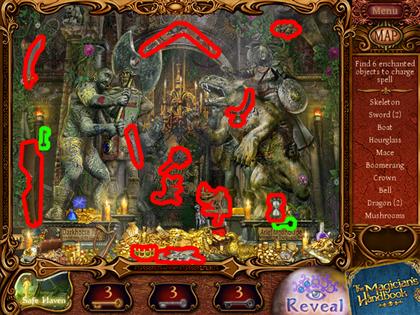
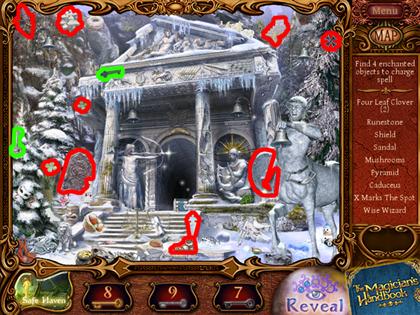
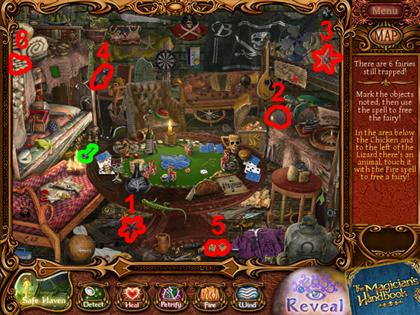
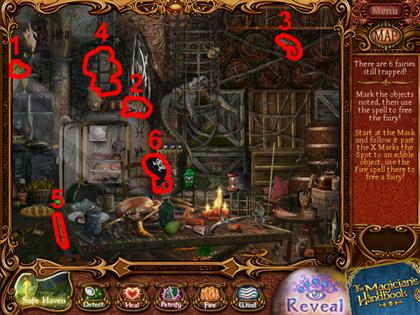
BLACKLORE'S COVE
- After entering this location, you will receive a very helpful tutorial on how to rescue a Fairy.
- After that tutorial, you will still have five more Fairies to rescue.
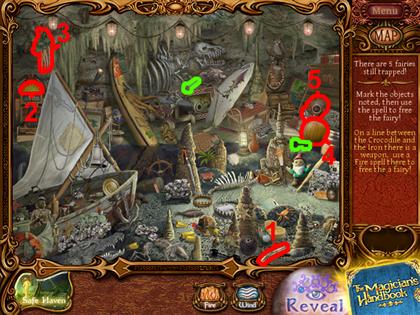
- These are five random locations of Fairies that came up. The highlighted objects in the screenshot have been numbered to match the numbers of the clues below. So "Clue #1" will match the object in the picture with a "1" attached to it.
- Clue #1: On a line between the Crocodile and the Iron there is a weapon, use a Fire spell there to free the fairy!
- Clue #2: Start at the Trap and follow it past the Record Player to an edible object; Wind will reveal a fairy!
- Clue #3: Follow the Trap past the Pot of Gold to the star; the Wind will free the fairy there!
- Clue #4: Above the Scale and to the right of the Paddle is an edible object; Fire will free a trapped fairy there!
- Clue #5: Follow a line starting at the Cheese past the Hat to a piece of headgear; Fire will reveal a fairy!
- Do not forget the Reveals are there to help you.
- After freeing all of the Fairies, Chapter Four will begin.
CHAPTER FOUR
CHAPTER GOALS
- Find at least 33 enchanted objects.
- Learn the Petrify Spell.
THRONE ROOM
- Use the screenshot to find the two keys in this location.
- Also, use the screenshot for assistance in finding enchanted objects.
LIVING QUARTERS
- Use the screenshot to find the two keys in this location.
- Also, use the screenshot for assistance in finding enchanted objects.
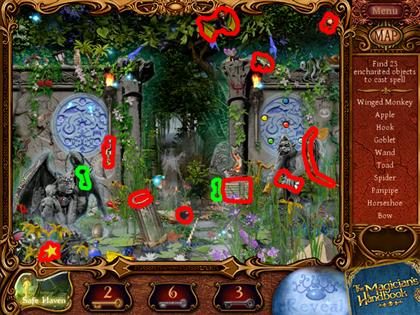
BLACKLORE'S COVE
- There are no keys in this location right now.
- Also, use the screenshot for assistance in finding enchanted objects.
SWAMP GATEWAY
- Use the screenshot to find the key in this location.
- Also, use the screenshot for assistance in finding enchanted objects.
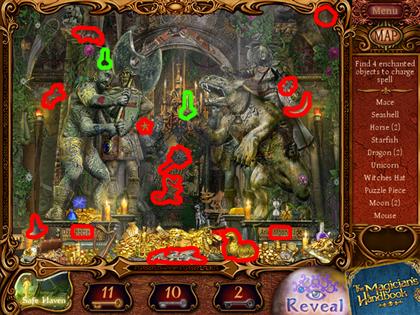
PETRIFY PUZZLE
- Just like the Spell puzzles before this one, you must take the objects from the bottom of the screen and place them into their proper positions.
- There are 10 misplaced objects in this puzzle this time. The first screenshot has seven, and the second has three.
- Drag the objects with red numbers to their matching Blue numbers to return the objects to the proper places.
- Now that you have the Petrify spell, go over to the Library of Magic for the next puzzle.
LIBRARY OF MAGIC PUZZLE
- Follow the step by step instructions you see in the screenshot.
- Also, follow these step by step instructions as shown in the screenshot.
- That should conclude Chapter Four.
CHAPTER FIVE
CHAPTER GOALS
- Find at least 34 enchanted objects.
- Free six Fairies.
SWAMP HOUSE
- There are no keys available for this room right now.
- Also, use the screenshot for assistance in finding enchanted objects.
BATTLEFIELD
- Use the screenshot to find the two keys in this location.
- Also, use the screenshot for assistance in finding enchanted objects.
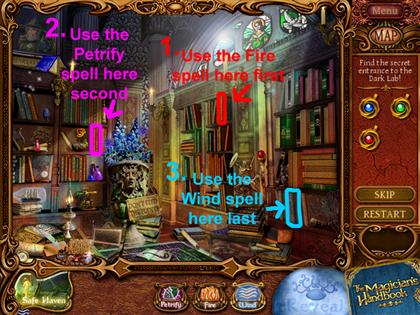
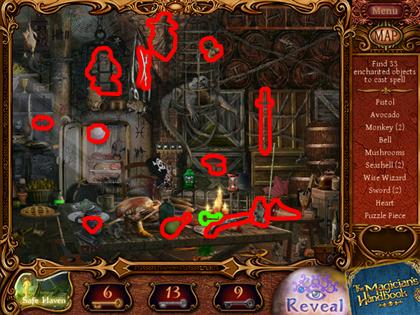
DARK MAGICIAN'S LAB
- Use the screenshot to find the two keys in this location.
- Also, use the screenshot for assistance in finding enchanted objects.
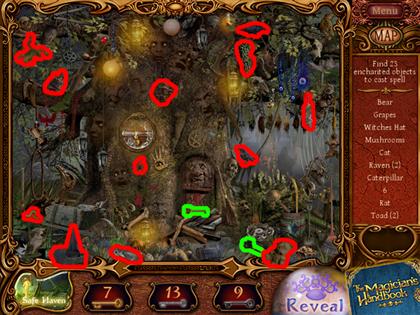
MOUNTAIN OF LEGENDS
- Use the screenshot to find the two keys in this location.
- Also, use the screenshot for assistance in finding enchanted objects.
- Afterwards head to the Crypt of Heroes.
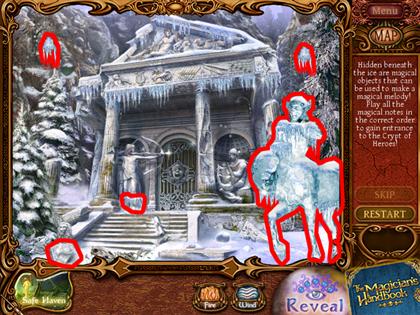
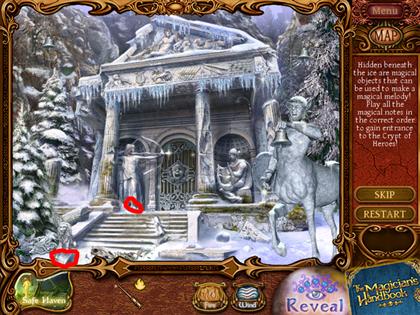
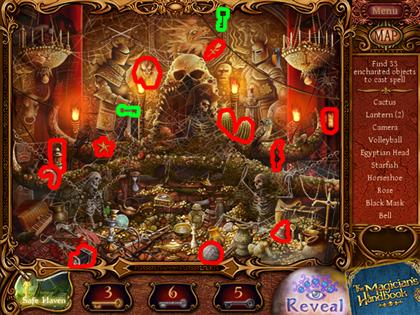
CRYPT OF HEROES PUZZLE
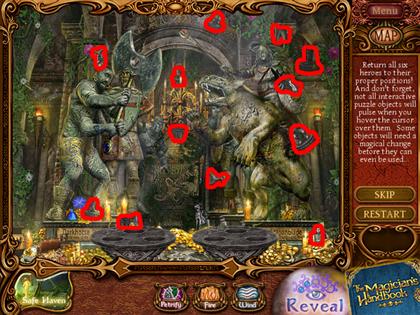
- Pick up all of the objects you see highlighted in the screenshot.
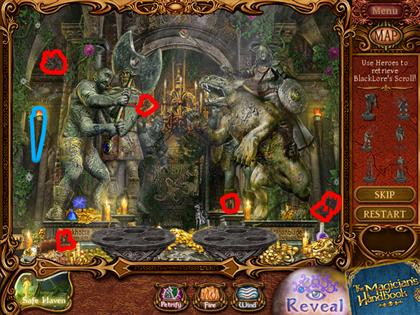
- Use your Petrify spell objects highlighted in red, and add them to your inventory.
- Then use your Wind spell on the torch highlighted in blue to reveal another object which you will need to use your Petrify spell on. The object is behind the torch's flame.
- After using your Petrify spell on the object hiding behind the torch, add it to your inventory.
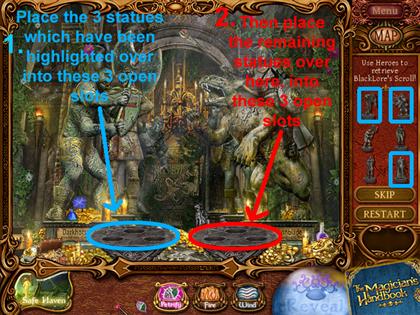
- Use the same three statues you see highlighted in the screen to place on the scale to the left. Then, use the remaining statues to place on the scale to the right.
- Remember, it takes a precise combination of statues to make both sides of the scale drop all the way to the floor.
- Now that you have been awarded a Fairy scroll, go to the Treasure Cove.
TREASURE COVE
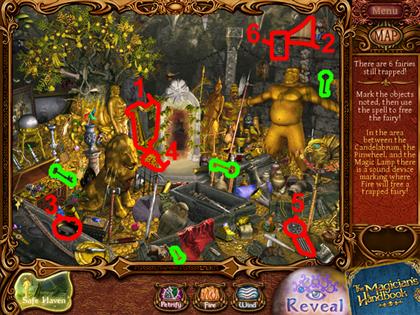
- There are four keys in this location that will show up on the screenshot.
- There are six Fairies in this room that must be freed before you can move on.
- The highlighted objects in the screenshot have been numbered to match the numbers of the clues below. So "Clue #1" will match the object in the picture with a number "1" attached to it.
- Clue #1: In the area between the Candelabrum, the Pinwheel, and the Magic Lamp there is a sound device marking where Fire will free a trapped fairy!
- Clue #2: In the area above the Snake and to the right of the Wise Wizard there is a sound device where Wind will reveal a trapped fairy!
- Clue #3: In the space between the Watch, the Shield, and the Spyglass there is an object of royalty; Wind will free the fairy there!
- Clue #4: On the line between the Music Box and the Green Potion, there is an edible object; if touched by the Wind spell a fairy will be freed!
- Clue #5: Follow the Puzzle Piece in a straight line past the Beetle and you will find a sound device where Fire will free a fairy!
- Clue #6: In the area right of the Traffic cone and left of the Panpipe, but above the position of the Snake, there is a light device where Fire will free a fairy!
CHAPTER SIX
CHAPTER GOALS
- Find at least 43 enchanted objects.
- Learn the Heal spell.
THRONE ROOM
- Use the screenshot to find the key in this location.
- Also, use the screenshot for assistance in finding enchanted objects.
GRAND FEAST

- Use the screenshot to find the two keys in this location.
- Also, use the screenshot for assistance in finding enchanted objects.
SWAMP GATEWAY
- Use the screenshot to find the two keys in this location.
- Also, use the screenshot for assistance in finding enchanted objects.
SCHOOL ROOM
- Use the screenshot to find the two keys in this location.
- Also, use the screenshot for assistance in finding enchanted objects.
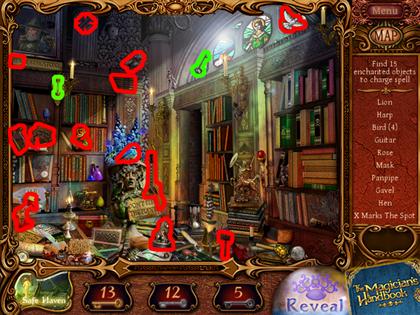
LIBRARY OF MAGIC

- There are currently no keys at this location.
- Also, use the screenshot for assistance in finding enchanted objects.
HEAL SPELL PUZZLE
- Take the objects from the bottom of the screen and place them in their proper places to complete this puzzle.
- In the screenshot, the objects at the bottom of the screen have been numbered with red numbers. And if you look towards the lower half of the screen, you will find blue numbers.
- Drag the objects with red numbers to the positions of their matching blue numbers to return the objects to the proper places.
- There are 10 misplaced objects that need to be returned to their proper positions.
- In the first screenshot, there are seven of the 10 objects. To find the other three remaining objects, look at the second screenshot.
- After completing this puzzle, you will be rewarded with the Heal spell.
- Next go to the Battlefield.
BATTLEFIELD PUZZLE
- Use the Wind spell to blow the leaves you see in the screenshot.
- Collect all of the objects you see highlighted in this screenshot.
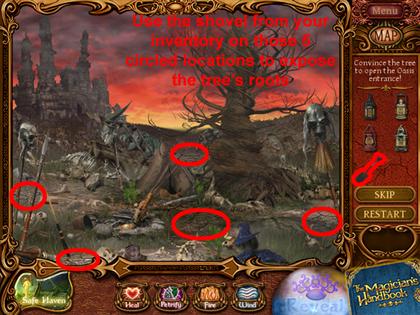
- Use the Shovel you picked up earlier to dig holes in the ground. Doing this will expose the Tree's hidden roots. Use the screenshot to find the spots that need digging.
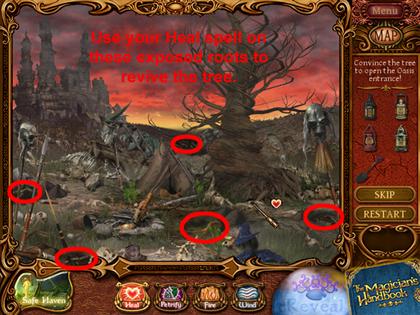
- Use your Heal spell on the Tree's roots to revive the tree.
- Be sure to use the Heal spell on all five exposed roots.
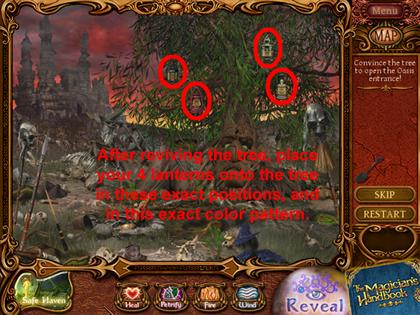
- Now place the four lanterns in your possession onto the tree in the same exact order as what is shown in the screenshot.
- That should conclude Chapter six.
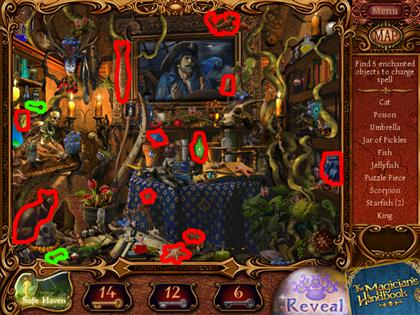
CHAPTER SEVEN
CHAPTER GOALS
- Find at least 44 enchanted objects.
- Free six trapped Fairies.
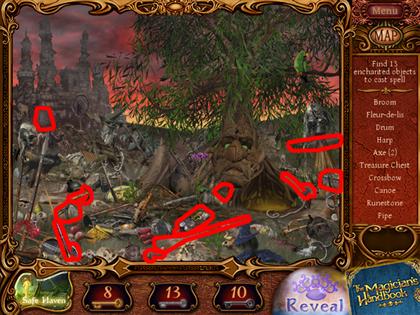
TREASURE COVE

- There are no keys in this location.
- Also, use the screenshot for assistance in finding enchanted objects.
BLACKLORE'S COVE
- Use the screenshot to find the key in this location.
- Also, use the screenshot for assistance in finding enchanted objects.
OASIS
- Use the screenshot to find the two keys in this location.
- Also, use the screenshot for assistance in finding enchanted objects.
CRYPT OF HEROES
- Use the screenshot to find the key in this location.
- Also, use the screenshot for assistance in finding enchanted objects.
MOUNTAIN OF LEGENDS
- Use the screenshot to find the key in this location.
- Also, use the screenshot for assistance in finding enchanted objects.
DARK MAGICIAN'S LAB PUZZLE
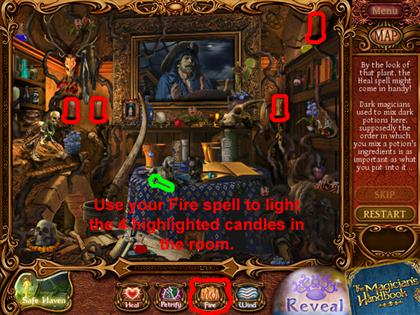
- First you need to use your Fire spell on those four Candles in the room before you can move on to the next step.
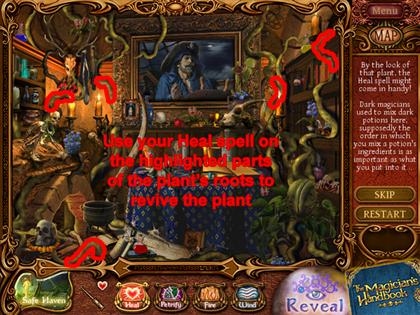
- Now use your Heal spell on the parts of the roots which have been highlighted in the screenshot.
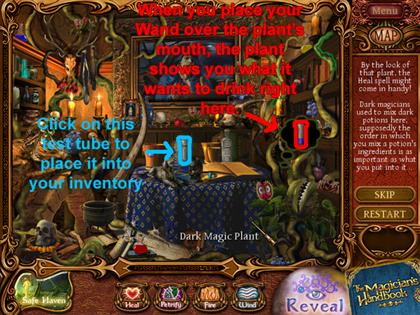
- Click on the object highlighted in blue to add it to your inventory.
- The object you just picked up is a Test Tube; you will need it later to feed the Plant.
- Try moving your wand over the Plant's mouth, and it will try to show you what it wants by showing you its thoughts. Look at the screenshot to see where the Plant's thoughts will show up.
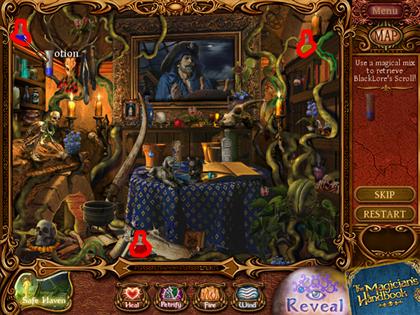
- In this screenshot, you can see three different colored Potions that have been highlighted.
- You can fill your Test Tube with any of the three Potions by using the Test Tube on a Potion.
- When you do this, the Test Tube gets a small portion of the Potion you used it on.
- You can use the Test Tube up to three times consecutively on a Potion before it becomes full.
- To empty out a Test Tube, use it on the Plant's mouth.
- You feed the Plant by using a Test Tube on the mouth of it.
- After feeding the Plant correctly about five times, the puzzle will be complete.
- The Plant will want you to combine two different potions at a time to make a unique color, so here is a color guide.1Red + 1Blue = Purple 2Red + 1Blue = Light Purple 1Red + 2Blue = Dark Purple 1Yellow + 1Red = Orange 2 Yellow + 1 Red = Light Orange 1Yellow + 2 Red = Dark Orange 1 Blue + 1 Yellow = Green 2 Blue + 1 Yellow = Dark Green 1 Blue + 2 Yellow = Light Green
- Use these color formulas if you need help mixing the right color for a Potion.
- After you are finished here, head over to the Throne Room to free the Fairies.
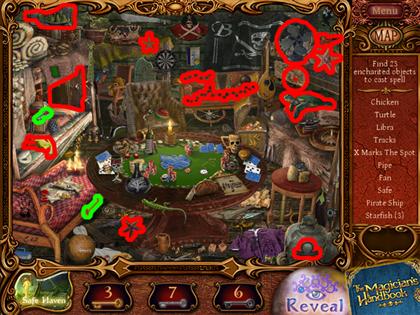
THRONE ROOM
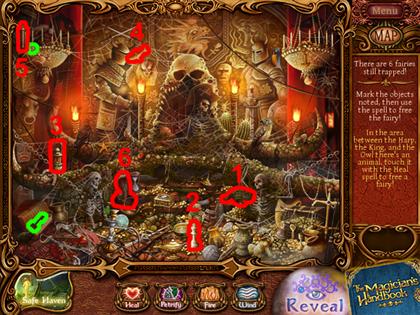
- There are six Fairies in this room that must be freed before you can move on.
- The highlighted objects in the screenshot have been numbered to match the numbers of the clues below. So "Clue #1" will match the object in the picture with a number "1" attached to it.
- Clue #1: In the area between the Harp, the King, and the Owl there's an animal. Touch it with the Heal spell to free a fairy!
- Clue #2: In the area below the Jewelry Box, right of the Camera but left of the Bell, there's a game piece; use Wind to free a fairy there!
- Clue #3: On the line between the Bandana and the Hookah there's a light device; touch it with the Petrify spell to free a fairy!
- Clue #4: In the area above the Beetle, left of the Maple Leaf and right of the All Seeing Eye, is an animal where the Petrify spell will free a fairy!
- Clue #5: Start at the X Marks the Spot and follow it past the Caduceus to a pirate object; touch it with the Heal spell to release a fairy!
- Clue #6: On the line between the Viking Horn and the Horseshoe, there is an animal; touch it with the Heal spell to free a fairy!
CHAPTER EIGHT
CHAPTER GOALS
- Find at least 53 enchanted objects.
- Learn the Detect spell.
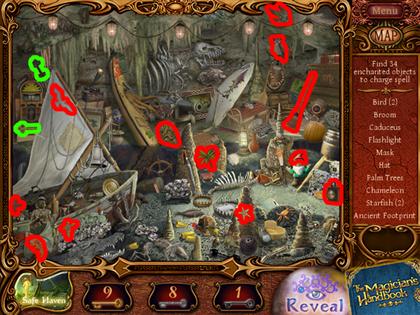
TREASURE TROVE

- Use the screenshot to find the key in this location.
- Also, use the screenshot for assistance in finding enchanted objects.
LIVING QUARTERS
- Use the screenshot to find the two keys in this location.
- Also, use the screenshot for assistance in finding enchanted objects.
GRAND FEAST
- Use the screenshot to find the key in this location.
- Also, use the screenshot for assistance in finding enchanted objects.
SWAMP HOUSE
- Use the screenshot to find the two keys in this location.
- Also, use the screenshot for assistance in finding enchanted objects.
BATTLEFIELD
- There are no keys in this location.
- Use the screenshot for assistance in finding enchanted objects.
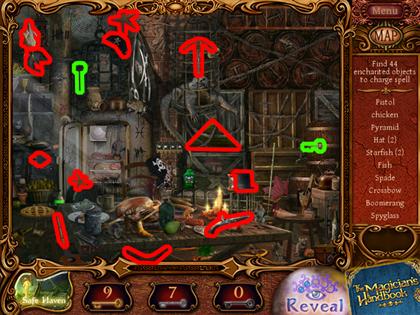
DARK MAGICIAN'S LAB
- There are no keys in this location.
- Use the screenshot for assistance in finding enchanted objects.
- After completing this room, you will be ready to earn your final spell.
DETECT SPELL PUZZLE

- There are 12 objects to put away this time.
- In the first screenshot there are seven objects to put away, and in the second screenshot there are five objects to put away. Use these screenshots for a little help.
- Match the objects with the red numbers to the positions of the blue numbers to put the objects in their proper places.
- Once you are done here, go to the School Room.
SCHOOL ROOM PUZZLE
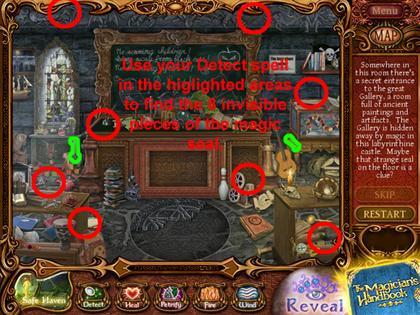
- Use your Detect on the areas which are highlighted in the screenshot to find the hidden, invisible objects.
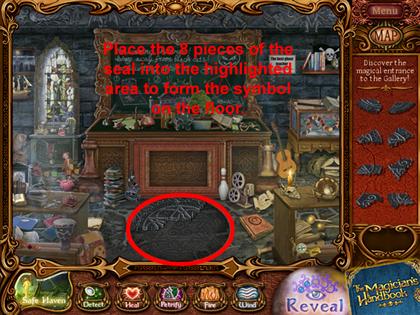
- Use the eight objects from your inventory to form a complete Seal symbol in the area highlighted.
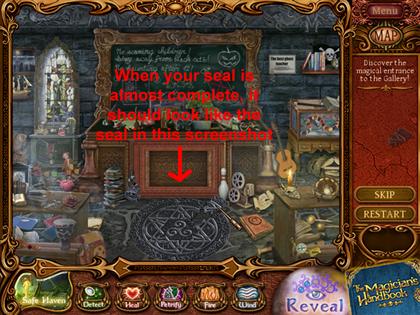
- The screenshot shows what the Seal symbol would look like if it were almost finished.
- After you finish making the Seal, the chapter will be complete.
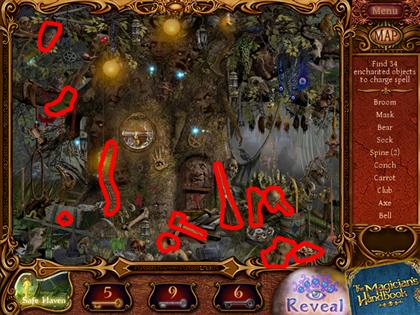
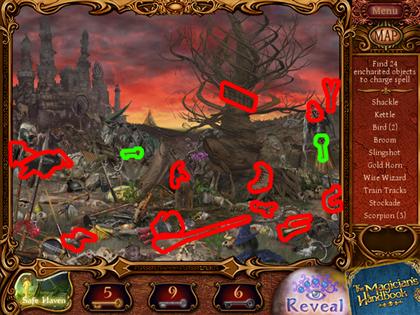
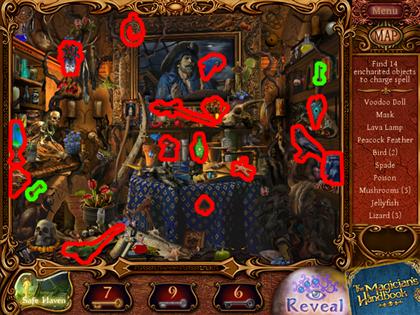
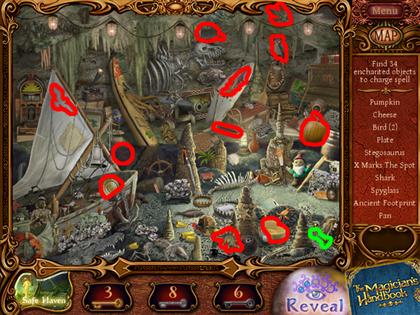
CHAPTER NINE
CHAPTER GOALS
- Find 54 enchanted objects.
- Rescue six trapped Fairies.
THRONE ROOM
- There are no keys in this location.
- Use the screenshot for assistance in finding enchanted objects.
GRAND FEAST
- Use the screenshot to find the two keys in this location.
- Also, use the screenshot for assistance in finding enchanted objects.
BLACKLORE'S COVE
- Use the screenshot to find the two keys in this location.
- Also, use the screenshot for assistance in finding enchanted objects.
OASIS
- Use the screenshot to find the key in this location.
- Also, use the screenshot for assistance in finding enchanted objects.
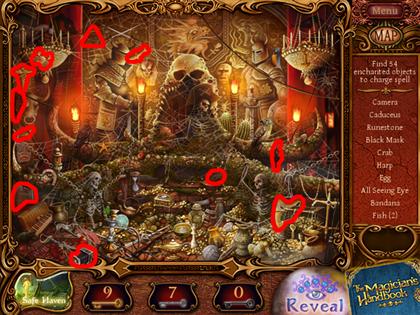
GALLERY
- Use the screenshot to find the two keys in this location.
- Also, use the screenshot for assistance in finding enchanted objects.
CRYPT OF HEROES
- Use the screenshot to find the two keys in this location.
- Also, use the screenshot for assistance in finding enchanted objects.
- After you are finished here, go to the Gallery.
GALLERY PUZZLE
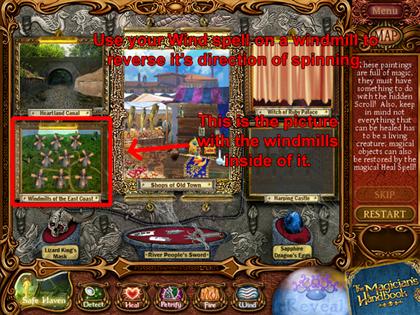
- Use your Wind spell on one of these Windmills to change the direction that it is spinning in.
- When you have all the Windmills in the picture spinning in the same direction, move on to the next step.
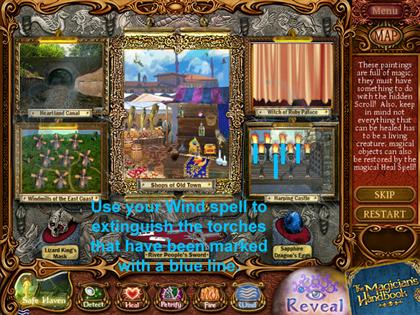
- Using your wind spell, blow out the four torches that have been marked with a blue line in the screenshot.
- When you have blown out the correct torches, move on to the next step.
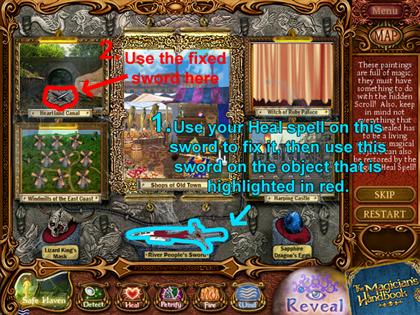
- Use your Heal spell on the Broken Sword that has been highlighted red in the screenshot.
- Afterwards, use your fixed Sword on the object that has been highlighted blue in the screenshot.
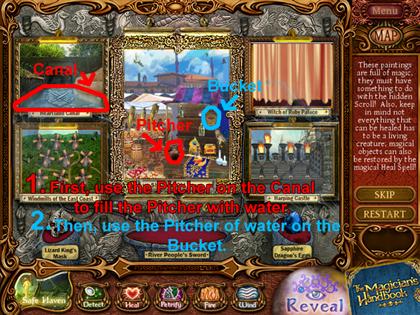
- Click on the Pitcher that has been highlighted to add it to your inventory.
- Then, use the Pitcher on the Canal to fill the Pitcher with water.
- Afterwards, use the Pitcher of water on the highlighted Bucket to fill the Bucket with water.
- Now use your Petrify spell on the Bucket of water.
- All of this should raise the curtain of the hidden picture, and get you ready for the next step.
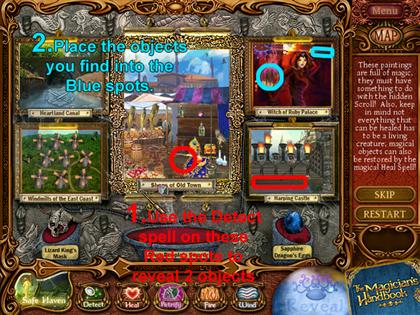
- Use your Detect spell on the spaces highlighted in red to find the Witch's Orb, and the Witch's Wand.
- Place the Orb into the area of the blue circle, and place the Wand into the blue rectangle to complete this puzzle.
- Next, go over to the Living Quarters to free the six trapped Fairies.
LIVING QUARTERS
- The highlighted objects in the screenshot have been numbered to match the numbers of the clues below. So "Clue #1" will match the object in the picture with a number "1" attached to it.
- Clue #1: In the area below the Chicken, to the left of the Lizard, there's an animal; touch it with the Fire spell to free a fairy!
- Clue #2: In the area above the Eggplant, below the Pipe, and to the right of the Cannonball, there's a magical object; use Wind to free a fairy there!
- Clue #3: Follow the Anchor past the Cannonball to an animal; touch it with the Wind spell to free a fairy!
- Clue #4: On a line between the Garlic and the Award there's an animal; touch it with the Detect spell to free a fairy!
- Clue #5: On a line between the Rose and the Wise Wizard, there's a game object; use the Petrify spell there to free a fairy!
- Clue #6: Follow a line from the Crystal Ball, past the Bear, to an edible object; use the Detect spell there to free a fairy!
CHAPTER TEN
CHAPTER GOALS
- Find at least 55 enchanted objects.
- Rescue the last six Fairies.
LIVING QUARTERS
- There are no keys at this location.
- Use the screenshot for assistance in finding enchanted objects.
OASIS
- Use the screenshot to find the two keys in this location.
- Also, use the screenshot for assistance in finding enchanted objects.
GALLERY
- Use the screenshot to find the two keys in this location.
- Also, use the screenshot for assistance in finding enchanted objects.
SCHOOL ROOM
- There are no keys in this room.
- Also, use the screenshot for assistance in finding enchanted objects.
LIBRARY OF MAGIC
- Use the screenshot to find the two keys in this location.
- Also, use the screenshot for assistance in finding enchanted objects.
DARK MAGICIAN'S LAB
- Use the screenshot to find the two keys in this location.
- Also, use the screenshot for assistance in finding enchanted objects.
OASIS PUZZLE
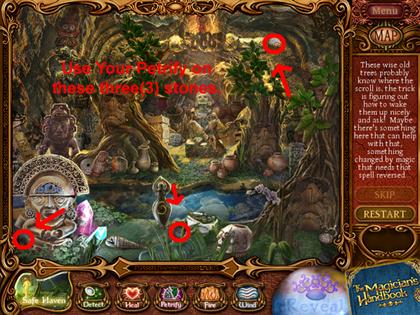
- First, restore the three objects that have been highlighted by using your Petrify spell.
- Afterwards, collect the three objects you just restored.
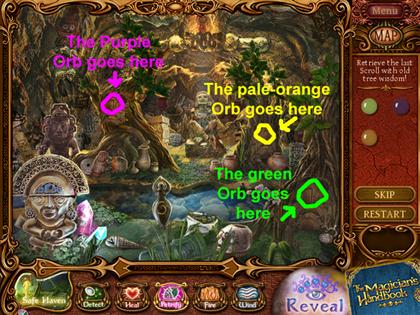
- Each of the Orbs you picked up has a different color, and each belongs to a tree.
- Using the screenshot's directions, place the stones over the correct trees' noses to make them ask you questions.
- Each tree will ask you four questions of a certain category.
- Here are four questions the green Orb Tree asked:Question: What land did you save in your previous adventure? Answer: Cursed Valley Question: What was the 1st spell you learned? Answer: Wind Question: What is the name of the Fairy helping you defeat BlackLore? Answer: Corrigan Question: Who frequents the School Room in the nearby Castle? Answer: Ghosts
- Here are four questions the purple Orb Tree asked:Question: Which symbol represents the sign Gemini? Answer: Twins Question: Which symbol represents the sign Libra? Answer: Scale Question: Which symbol represents the sign Aries? Answer: Ram Question: Which sign is for the date October 23 to November 21? Answer: Scorpion
- Here are four questions the yellow Orb Tree asked:Question: Which magical creature has the body of a lion, a spiked tail of a scorpion, a man's head with 3 rows of teeth, and blood red eyes? Answer: Manticore Question: Medusa is the only mortal amongst these mythological sisters. Answer: Gorgons Question: What is the name of the magical creature with the head and wings of an eagle, but the body of a lion? Answer: Griffin Question: What is the name of the dragon-like creature with two legs, is part serpent, and has a barbed tail? Answer: Wyvern
- After you have finished answering the questions of all the Trees, you will receive the last Fairy scroll.
- Go to Grand Feast to free the Fairies.
GRAND FEAST
- The highlighted objects in the screenshot have been numbered to match the numbers of the clues below. So "Clue #1" will match the object in the picture with a number "1" attached to it.
- Clue #1: Start at the Mask and follow it past the X Marks the Spot to an edible object, use the Fire spell there to free a fairy!
- Clue #2: On a line between the Boar and the larger Monkey there's an animal; touch it with the Heal spell to free a fairy!
- Clue #3: Start at the Peg Leg and follow it past the Spigot to an animal, a touch with the Petrify spell there will free a fairy!
- Clue #4: On the line between the Bell and the Caduceus there's an animal; touch it with the Wind spell to free a fairy!
- Clue #5: Start at the Grapes and follow a line past the Spade to a pirate object, touch it with the Heal spell to free a fairy!
- Clue #6: In the space between the Snail, the Knight, and the Pyramid there's a pirate object, use the Wind spell to free a fairy!
- This will conclude Chapter Ten.
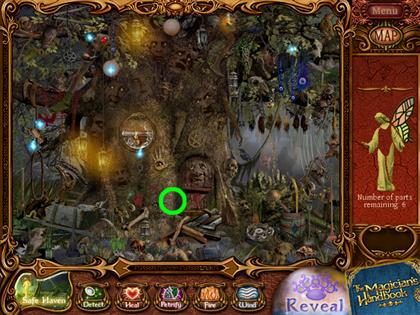
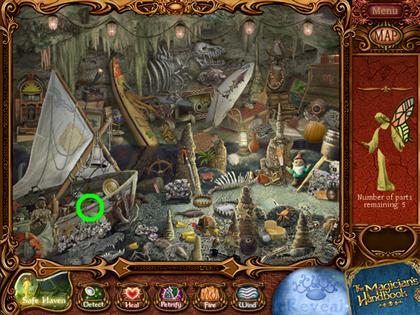
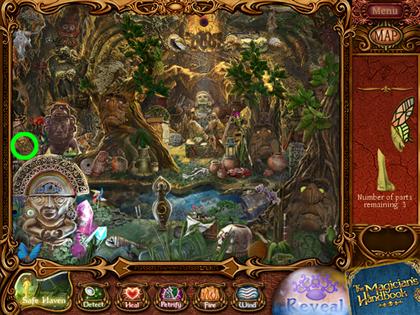
CHAPTER ELEVEN
CHAPTER GOALS
- Find the eight missing pieces of the Fairy Queen.
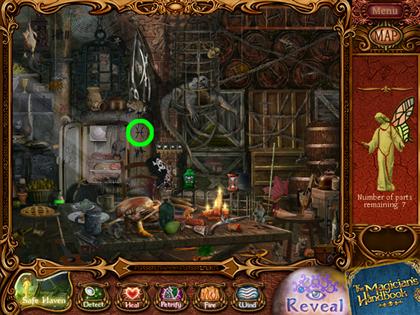
THRONE ROOM
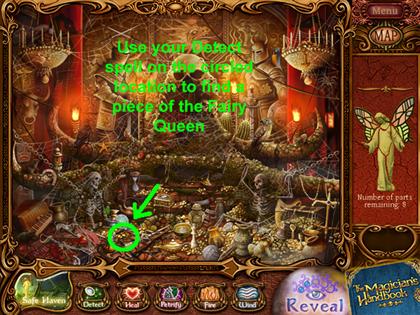
- Use Your Detect spell in the area of the highlighted circle to find a missing piece of the Fairy Queen.
GRAND FEAST
- Use Your Detect spell in the area of the highlighted circle to find a missing piece of the Fairy Queen.
SWAMP HOUSE
- Use Your Detect spell in the area of the highlighted circle to find a missing piece of the Fairy Queen.
BLACKLORE'S COVE
- Use Your Detect spell in the area of the highlighted circle to find a missing piece of the Fairy Queen.
BATTLEFIELD
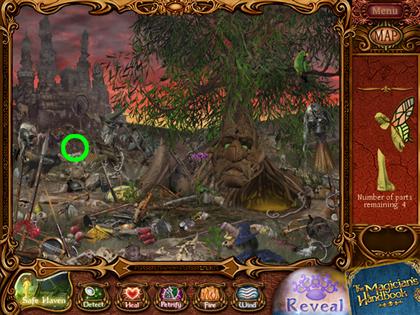
- Use Your Detect spell in the area of the highlighted circle to find a missing piece of the Fairy Queen.
OASIS
- Use Your Detect spell in the area of the highlighted circle to find a missing piece of the Fairy Queen.
GALLERY
- Use Your Detect spell in the area of the highlighted circle to find a missing piece of the Fairy Queen.
DARK MAGICIAN'S LAB
- Use Your Detect spell in the area of the highlighted circle to find a missing piece of the Fairy Queen.
Created at: 2009-06-30