

WALKTHROUGH MENU
- CHAPTER 1: GIANT CLOCK WORLD
- CHAPTER 2: FROZEN WORLD
- CHAPTER 3: VOLCANO WORLD
- CHAPTER 4: DWARVEN WORLD
- CHAPTER 5: FOREST WORLD
- CHAPTER 6: TOY WORLD
- CHAPTER 7: HOUSE REFLECTION WORLD
GENERAL TIPS
- The game consists of 7 chapters, each varying in length.
- There is only one game mode, which is untimed.
- Find items in a scene to unlock another part of the world in the map.
- There are several mini-games in between levels. You can skip the mini-games after a short while has passed.
- The Skip Puzzle button is located at the bottom of the puzzle.
- When you click randomly on the scene, the screen will freeze up for a few seconds.
- You can enter a Hotspot when you see an area glow in the scene.
MAGNIFYING GLASS & HINTS
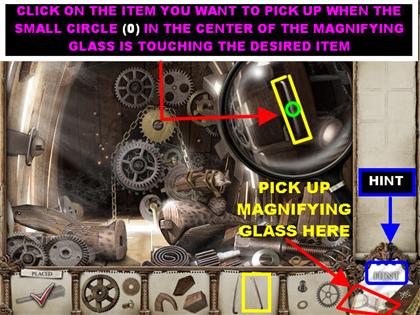
- Use the Magnifying Glass in the lower right for a magnified view of the items in the scene.
- You can pick up the Magnifying Glass by clicking on it in the lower right or by clicking on the spacebar on your keyboard.
- This tool can come in very hand when you are looking for really small pieces.
- To release the Magnifying Glass you can right-click your mouse or click it back in the lower right corner.
- The Hint Mirror is located in the lower right. Use it to help you find items in the scene or to see where an item needs to be placed.
- When you click on the Hint, 2 rays of light will circle around a random item on the list. The Hint can also show you the hotspots in the scene.
- The Hints are unlimited but you have to wait for the mirror to recharge before you can use it again.
INVENTORY
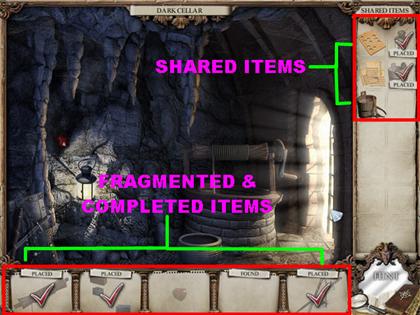
- Your goal is to find all the items shown in the box at the bottom of the scene. The items are shown in several pieces, once all the pieces from a box have been found all items will merge.
- Once the items have been found in a box, they will either stay at the bottom of the scene or they will go into the “SHARED ITEMS” tray on the right side of the scene.
- The completed items at the bottom of the scene will be labeled as “FOUND-PLACE IT”. These items can only be placed in the current scene.
- The completed items in the “SHARED ITEMS” box on the right can only be placed in a scene other than the one you found it in.
- When you hover over the scene, you will see a silhouette of the item that belongs in that spot. You will also see sparkles appear over areas in which you can place a completed object.
- Grab the desired item from inventory and click it onto the right spot.
- Transparent pieces can only be found after certain tasks have been performed or they can be uncovered in a room that is locked or closed.
MAP
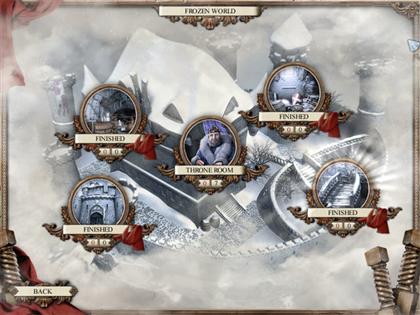
- The Map can help you navigate in between Worlds.
- Click on the book in the lower right to access the Map.
- You can use the Map as often as you’d like to go in between locations. This is really helpful to use when you are stuck in a spot and cannot move on.
- The name of each location is shown on the map along with a thumbnail showing you part of the location. Click on the thumbnail of the location you wish to visit.
- The numbers in RED at the bottom of each thumbnail signifies the amount of items you need to find in a particular scene.
- The BLACK number below each thumbnail signifies the number of completed objects that need to be placed back into a room.
CHAPTER 1: GIANT CLOCK WORLD
CLOCK ROOM
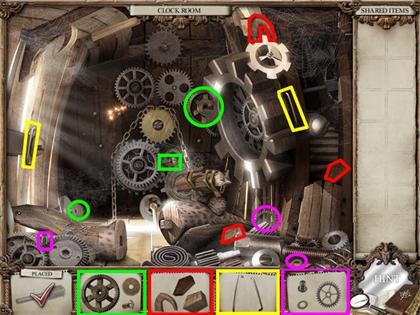
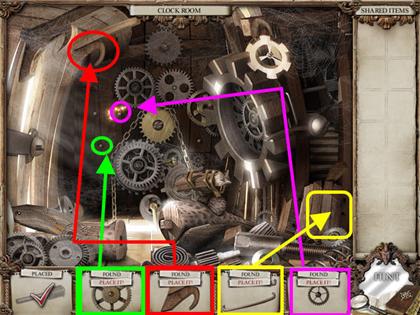
- The game will show you the first 3 items in the scene and where they belong.
- The first screenshot shows you the locations of all the fragmented items in the scene. All matching items have been color coordinated.
- Place the completed items as shown in the second screenshot.
- You will be taken to the map after all available items have been placed.
- Click on the book in the lower right corner to travel to another part of the world.
LOST CUCKOO
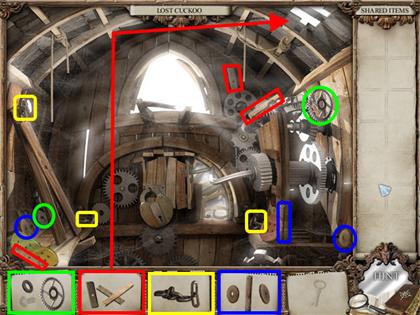
- Pick up the item according to the image in the screenshot.
- The Wooden Spindle and the Chains will go into your Shared Items Tray on the right.
- The Key and the Bolt will be found at a later time.
- Place the completed Boards in the upper right corner.
- Go into the Pendulum World.
PENDULUM
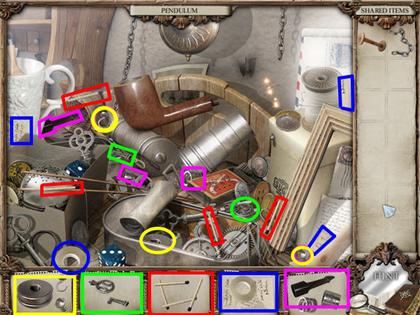
- Pick up the items according to the image in the screenshot.
- The Key will go into your shared Items in the upper right.
- Place the Matches inside the Matchbox in the center of the scene.
- The Torn Letter goes in the envelope in the upper right.
- Place the Chain in the Shared Items Tray on the chain hanging in the upper right.
- The Metal Lid goes on the silver container next to the pipe.
- The black piece goes at the end of the pipe.
- Go to the Messy Table.
MESSY TABLE
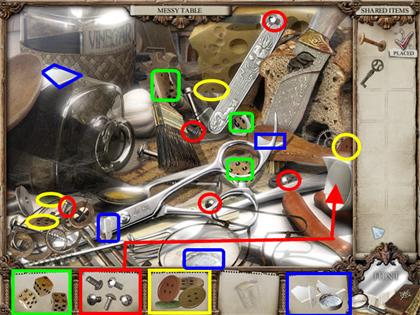
- Pick up the items according to the markings on the screenshot.
- The Buttons, the White Ceramic Piece and the Dice will go into your Shared Items Tray.
- Place the Bolts in the lower right.
- Go to the Corner Shelves location.
CORNER SHELVES
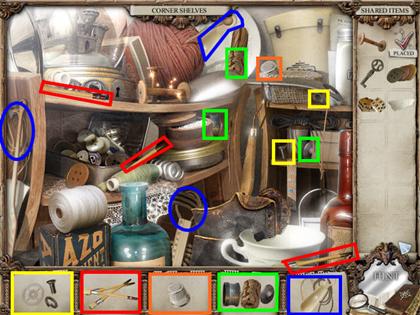
- Pick up the items according to the markings on the screenshot.
- The Gear in the first box cannot be picked up right away.
- The Brushes, the Bottle Stopper and the Thimble will go into the Shared Items Tray.
- Place the Shoestrings on the boot in the lower right.
- The Wooden Spindle goes on the shelf next to the other spindles.
- Place the Buttons next to the button in the middle shelf.
- The White Ceramic piece goes on the broken white mug in the lower right.
- Go back to the Messy Table.
MESSY TABLE
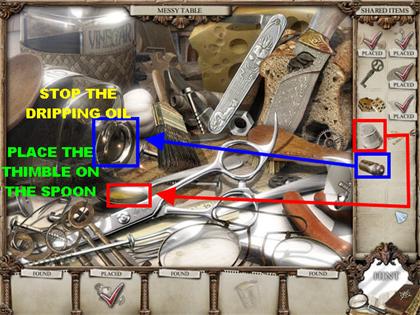
- Place the Thimble on the spoon with oil in the lower left.
- The Thimble fills with oil, click on the Thimble and it will go back into the Shared Items.
- Place the Bottle Stopper on the dripping bottle close to the spoon.
- This screen has been completed. Go back to the Pendulum location.
PENDULUM
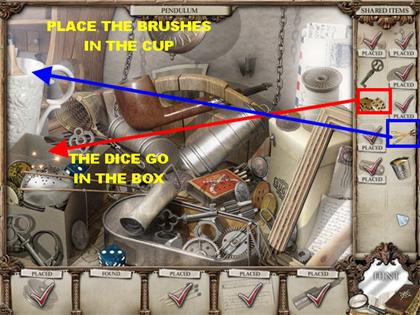
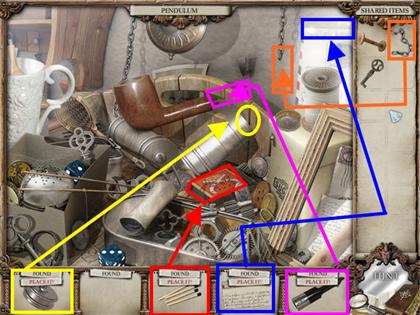
- Place the Brushes in the white cup in the upper left.
- The Dice go in the box in the lower left.
- Go back to the Lost Cuckoo room.
LOST CUCKOO – INSIDE CLOCKWORK
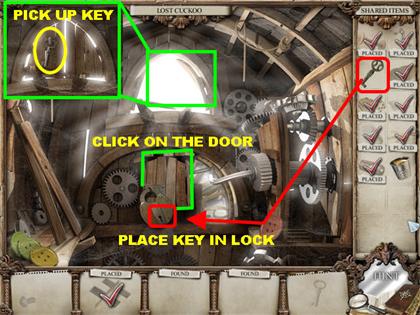
- Place the Key in the lock. You’ve just unlocked the Clockwork Box.
- Click on the Clockwork Box to enter it.
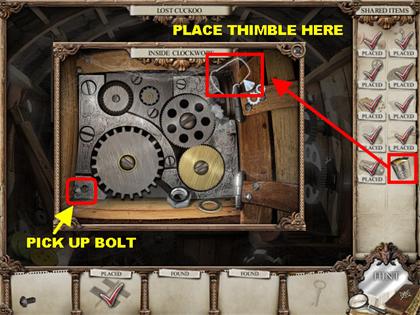
- Place the Thimble of Oil in the upper right side. The gears will start moving.
- Pick up the Bolt in the lower left corner. A gear will go into your Shared Items once the bolt has been picked up.
- Close out that window.
- Pick up the Key in the upper center of the scene. The Key goes into Shared Items.
- Go back to the Corner Shelves.
CORNER SHELVES
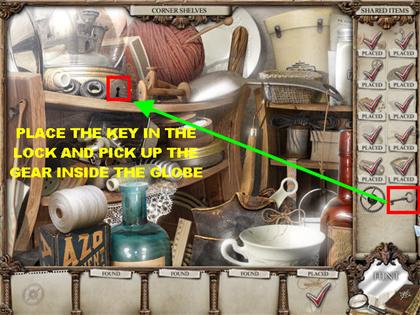
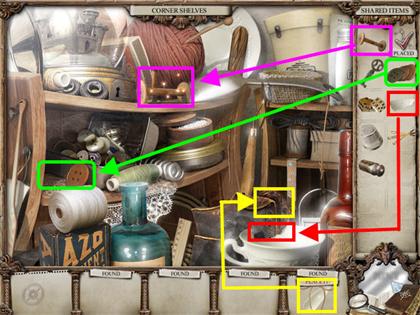
- Place the Key in the keyhole of the globe in the upper left to open the small door.
- Pick up the Gear at the base of the snow globe.
- Go back to the Clock Room.
CLOCK ROOM
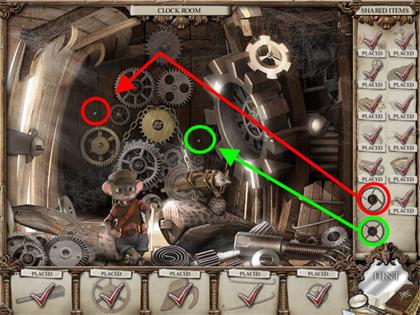
- Place the Gears in the spots according to the screenshot.
- The clock has been fixed. You will receive two mirror pieces which will allow you to enter the next world.
CHAPTER 2: FROZEN WORLD
THRONE ROOM
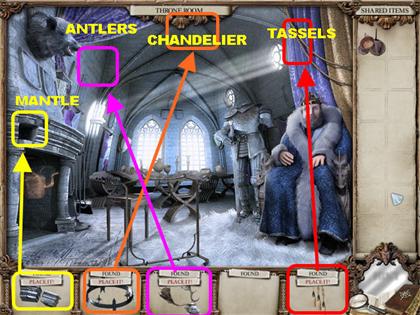
- Please pick up the items according to the markings in the screenshot.
- The Pans go into the Shared Items.
- Place the Tassels on the curtains in the upper right.
- The Chandelier goes in the upper center.
- Place the Stone pieces on the mantle over the fireplace.
- The Antlers go in the upper left.
- Go to the Castle Gate location.
CASTLE GATE – INSIDE CASTLE GATE
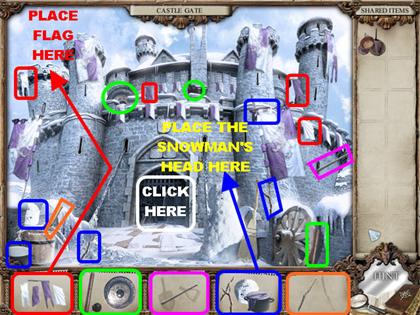
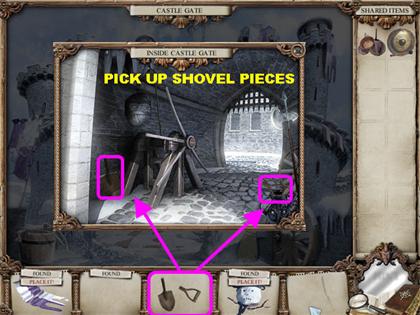
- Pick up the items according to the markings on the screenshot.
- Place the Snowman’s Head on the pile of snow in the lower right.
- Place the Flag in the upper left side of the castle.
- There is an extra location in this scene, click on the entrance to access it.
- Inside the Castle Gate, pick up the 2 Shovel pieces in the scene. Close the window.
- The Gong pieces and the Shovel will be stored in your Shared Items section.
- Go to Castle Kitchen.
CASTLE KITCHEN – INSIDE WOODEN CHEST
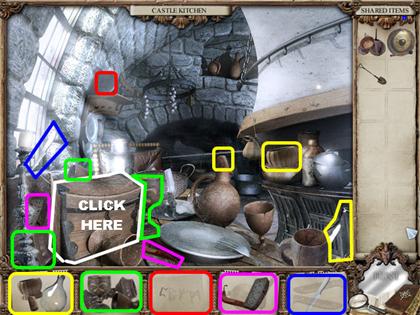
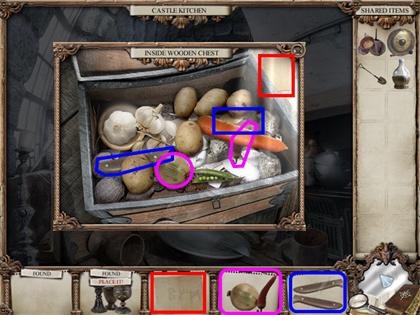
- Pick up the items according to the markings on the screenshot.
- There is an extra location in this scene, click on the wooden chest in the lower left to access it.
- Inside the wooden chest you can find the knife pieces, the onion, the paper and the red pepper. Please look at the screenshot for the locations of all these items.
- Close the window out.
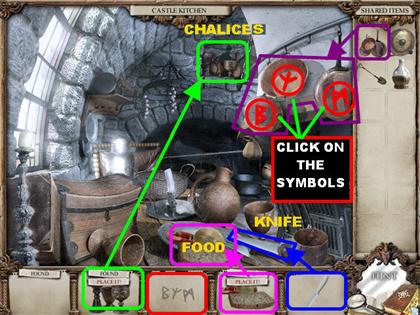
- Place the Knife on the side of the white plate in the lower right.
- Place the food items on the white plate in the lower right.
- The Chalices belong in the upper right side of the scene.
- The Pans belong in the upper right corner.
- After the Pans have been placed in their right spots, symbols will appear in the back of them.
- Click on the 3 symbols in the back of the Pans to complete the paper in the inventory box.
- The Bottle and the Paper go in the Shared Items Tray.
- Go to the Old Armory.
OLD ARMORY

- Pick up the items according to the markings in the screenshot.
- The Scarf, the Shield, the Mallet and Armor pieces will go into the Shared Items.
- The extra location in this scene is on the left side of the wall.
- Click on the left side of the wall to trigger a puzzle.
RUNE WALL PUZZLE
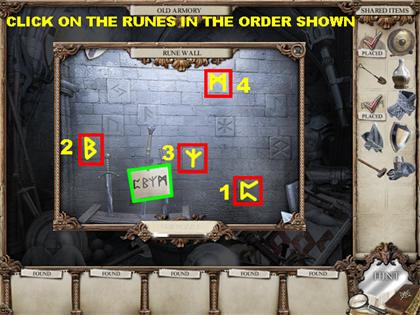
- Place the Paper with the Runes on the swords.
- Your goal is to click on the switches (stones) in the right order shown on the paper.
- Once the paper has been placed, couple of the switches will turn on.
- If any of the Runes are lit, click on them to turn them off.
- Please click on the runes in the order shown in the screenshot.
- Close that window to return to the Old Armory.
- Pick up the 2 items that appear in the niche in the back of the wall.
- Go to the Frozen Garden.
FROZEN GARDEN
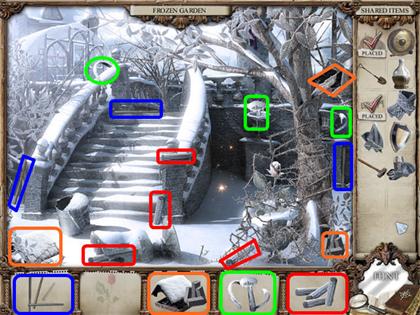
- Pick up the items according to the markings on the screenshot.
- The Logs will go into the Shared Items Tray.
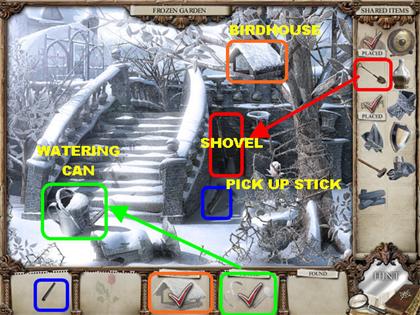
- Place the Birdhouse in the upper right corner.
- The Watering Can parts belong on the watering can in the lower left corner.
- The Shovel belongs on the right side of the steps, by the back wall.
- Once the Shovel has been placed, pick up the stick that appears in the snow.
- Go back to the Castle Gate.
CASTLE GATE
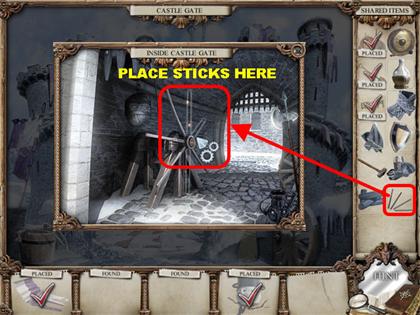
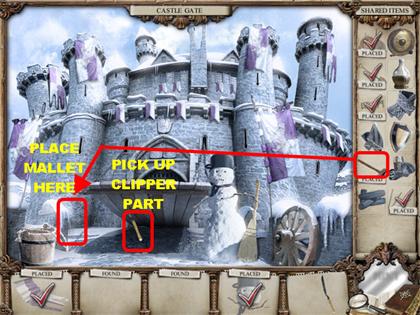
- Click Inside the Castle Gate.
- Place the sticks on the drawbridge lift. Close the window out.
- Place the Mallet in the lower left corner to lift the bridge.
- Pick up the Clipper Part under the bridge. The Clipper goes into your Shared Items.
- This screen has been completed.
- Go back to the Frozen Garden.
FROZEN GARDEN
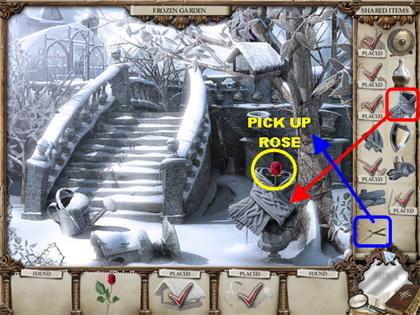
- Place the Clippers on the bark of the tree on the right.
- Place the Knit Scarf on the Rose.
- Click on the Rose to pick it up.
- Go back to the Throne Room.
THRONE ROOM
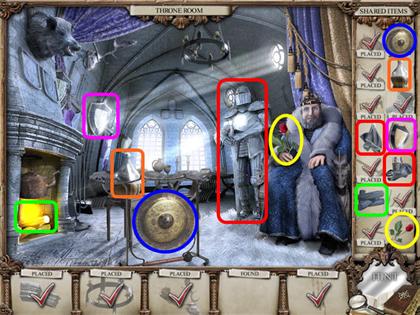
- The Armor Pieces go on the armor on the right.
- Place the Logs in the Fireplace.
- The Gong goes on the stand on the floor.
- The Bottle goes on the small table behind the gong.
- Place the Shield on the left side of the scene. The reflection of the shield bounces off of different things in the room and lights up the fireplace.
- Give the Rose to the King and he will give you 2 mirrors.
CHAPTER 3: VOLCANO WORLD
QUEEN’S ROOM
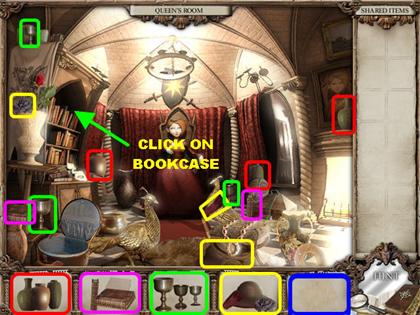
- Find the items according to the markings on the screenshot.
- Click on the bookcase on the left to enter Queen Odelia’s Bookcase.
QUEEN ODELIA’S BOOKCASE
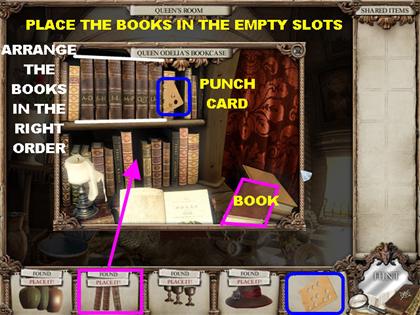
- Pick up the Red Book in the lower right.
- Place the set of Books in the empty slots on the shelf.
- Your goal is to place the books in the correct order.
- Click on two books and they will swap places. Make sure that all the books with the letters on the spine are next to each other.
- The solution from left to right is as follows:A-D E-H I-L M-P Q-T U-Z
- Pick up the Punch Card in the upper right. It will go into the Shared Items Tray.
- Close out the window.
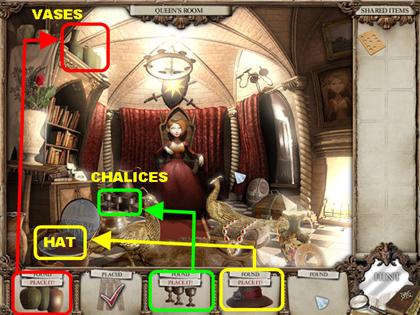
- The Vases belong on top of the bookcase.
- Place the Hat in the hatbox in the lower left.
- The Chalices go in the lower left.
- You are finished with this area for now. Go to the Blacksmith.
BLACKSMITH
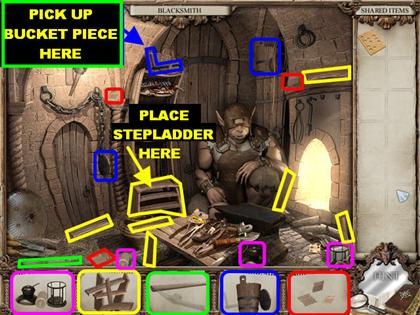
- Pick up the items according to the markings on the screenshot.
- The Torn Note and the Lantern will go into the Shared Items.
- Place the Stepladder below the shelves so you can reach the basket on top.
- Pick up the last piece of the Bucket that appears over the basket. The Bucket goes into your Shared Items.
- You are done for now, go into the Dark Cellar.
DARK CELLAR
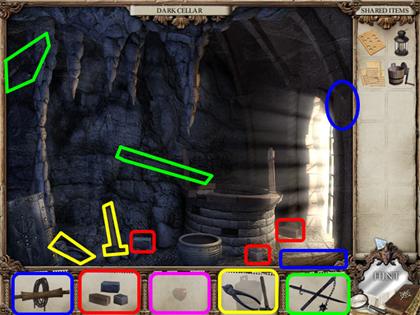
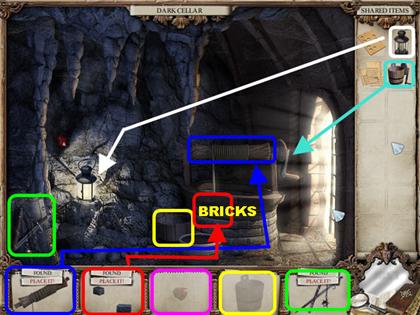
- Pick up the Items according to the markings on the screenshot.
- The Lantern goes on the lower left side of the wall. The light shines on the red gem on the wall, you can’t pick it up right now.
- Place the Bricks on the side of the well.
- The Weapons belong in the lower left corner.
- Place the Rope wrapped around the pole on top of the well.
- Place the Bucket with the Crank on the side of the well to fill the bucket with water.
- Pick up the Bucket on the left side of the well to place it back into the Shared Items.
- You are done for now, go to the Workshop.
WORKSHOP – SANDER RUNE MANUAL
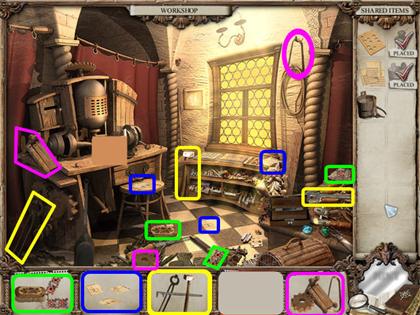
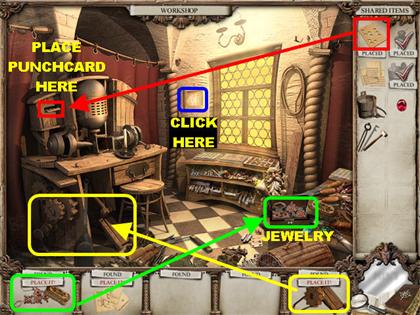
- Pick up the items according to the markings on the screenshot.
- Place the Jewelry on the lower right.
- The Punch Card in the Shared Items Tray goes onto the slot of the Gem machine.
- Place the Wheel and the Pedal on the lower left side of the table.
- Click on the frame on the left side of the window for a closer view.
SANDER RUNE MANUAL
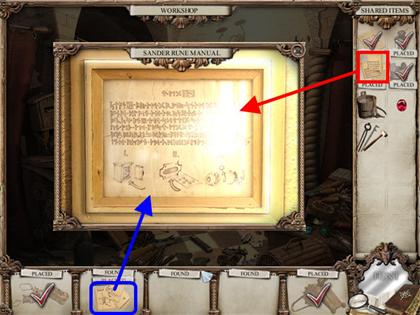
- Place the Torn letter from your Shared Items Tray on the upper half of the frame.
- Place the Torn Letter from your Inventory Tray at the bottom in the lower half of the frame.
- The Manual is now visible. This manual shows you the steps for using the machine.
- Close that window out and go back to the Blacksmith.
BLACKSMITH
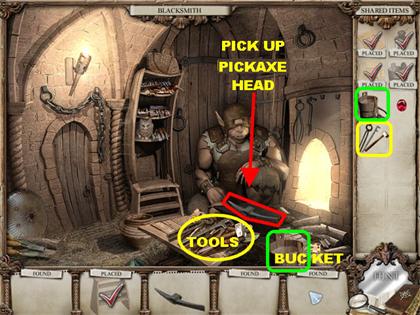
- Place the Bucket of Water in the lower right corner.
- The Tools belong on the small table.
- Pick up the Pick Head on the Anvil. The completed Pickaxe goes into the Shared Items.
- You are done with this screen; go back to the Dark Cellar.
DARK CELLAR
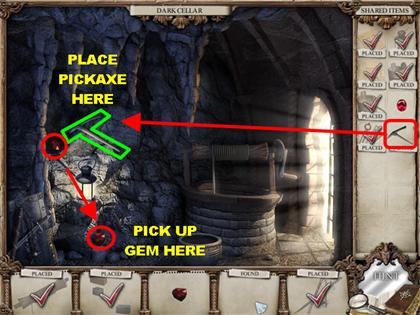
- Place the Pickaxe on the left side of the wall.
- Click on the red Gem that falls in the lower left and it will go into your Shared Items Tray.
- You are done with this screen, go back to the Workshop.
WORKSHOP
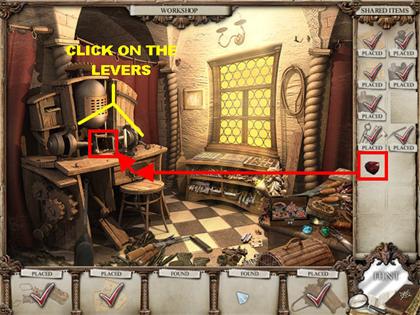
- Place the Red Gem in the machine’s slot.
- Click on the Levers of the machine to position them in the following manner:Left Lever – All the way up Right Lever – All the way down
- Pick up the polished red Gem that comes out of the machine.
- Go back to the Queen’s Room.
QUEEN’S ROOM
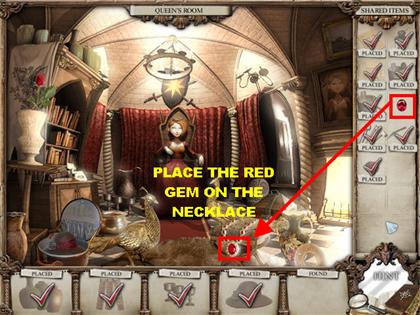
- Place the Red Gem on the necklace hanging off the gold peacock in the lower right.
- The Queen gives you 2 more mirror pieces.
CHAPTER 4: DWARVEN WORLD
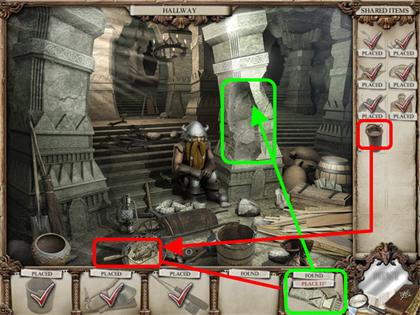
HALLWAY – INSIDE WOODEN BOX
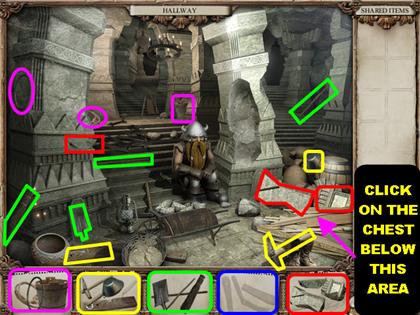
- Pick up the items according to the markings on the screenshot.
- Once all the pieces in the lower right have been picked up, a wooden box appears, click on it to enter the secret area.
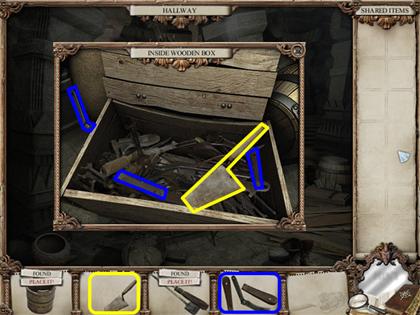
- Inside the Wooden Box pick up all the items marked in the screenshot.
- A knife goes into the Shared Items Tray.
- Close that window out and return to the Hallway.
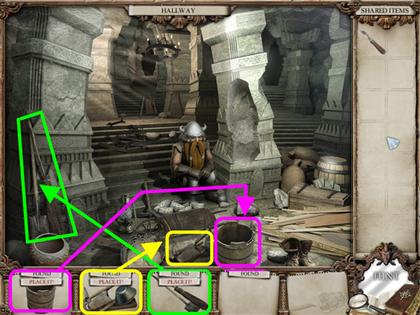
- Place the Bucket in the lower right.
- The Broom and dustpan go in the lower left, leaning against the wall.
- Place the digging tools in the lower right, next to the bucket.
- Leave this area for now and go to the Alchemy Lab.
ALCHEMY LAB – TABLE BEHIND THE CURTAIN
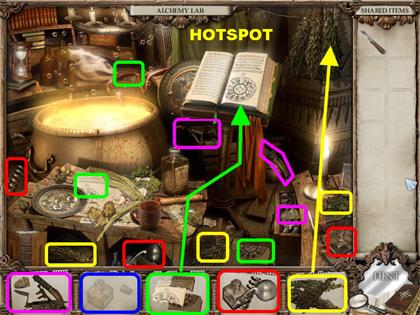
- Pick up the items as shown in the screenshot.
- The Herbs go in the upper right.
- The Torn Page goes in the open book.
- Click on the Curtains in the upper right to discover the hidden area.
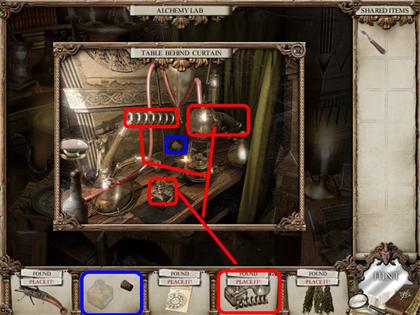
- Pick up the Cork in the center of the Table Behind the Curtain.
- Place the Spring, the Bottle and a Beaker in the silhouettes for the items. Even though you pick up these items as one unit, they will fall into different parts of the scene.
- Close that window and go to the Statue Garden.
STATUE GARDEN – INSIDE WOODEN BARREL
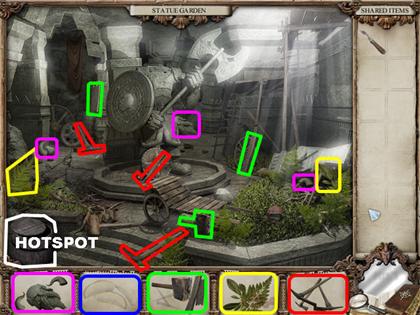
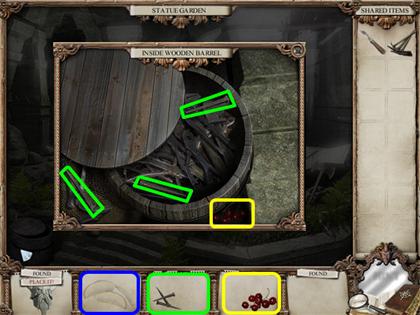
- Pick up the items according to the screenshot.
- Click on the barrel in the lower left to open the hidden area.
- Pick up the Nails and the Berries according to the screenshot.
- The Berries and the Pickaxes go into the Shared Items Tray.
- Close that window and return to the Garden.
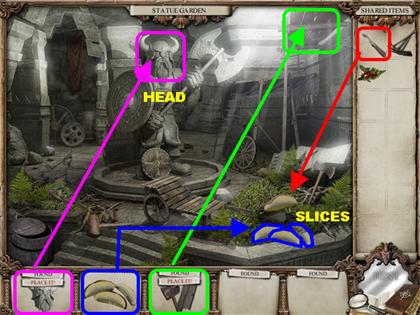
- Place the Statue Head on the Statue in the center of the scene.
- The Boards with Mallet go in the upper right side.
- Place the Knife on the mushroom in the lower right.
- Pick up the Mushroom Slices that appear below the shrubbery. The Mushroom Slices go into inventory.
- Leave this scene and go the Mine Drift.
MINE DRIFT
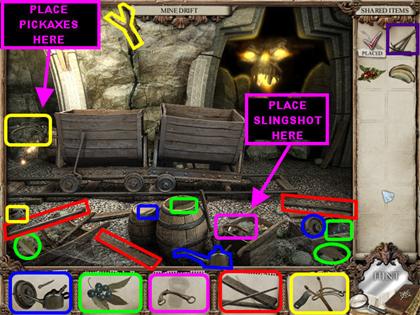
- Click on the items as shown in the screenshot.
- The Blueberries go into the Shared Items Tray.
- Place the Slingshot in the lower right.
- The Pickaxes from the Shared Items go on the left, next to the cart.
- Leave this scene and go back to the Alchemy Lab.
ALCHEMY LAB
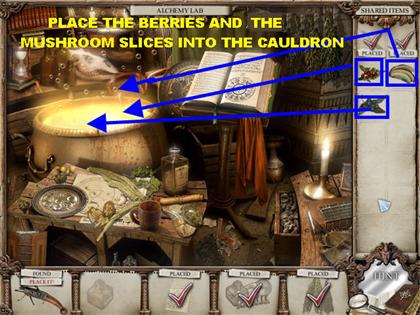
- Place the Red Berries in the cauldron.
- Place the Mushrooms in the cauldron.
- The Blueberries go in the cauldron as well.
- Click on the green curtains in the upper right for a closer view.
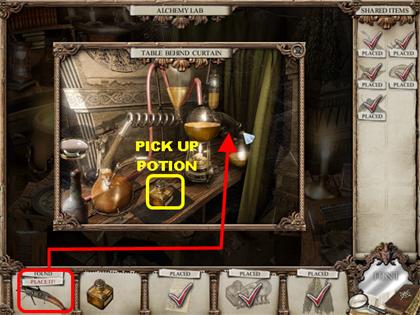
- Place the item in the first box at the bottom on the side of the distiller.
- Click on the potion that appears on the table to complete this scene.
- Go back to the Mine Drift.
MINE DRIFT
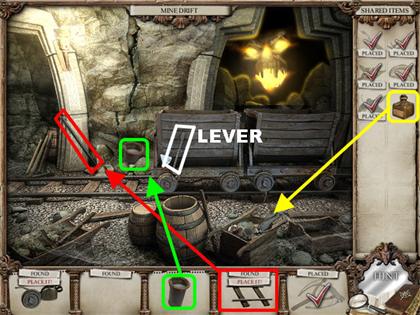
- Place the Potion in the lower right and the Mors will disappear.
- Place the Wheel and the Oiler at the bottom of the second cart.
- Click on the lever on the side of the first cart to move it aside.
- Pick up the stick that appears on the left side of the wall. This will complete the Tracks.
- Place the Railroad Tracks on the ground on the right side of the carts.
- Click on the lever on the side of the carts to move it once again.
- Pick up the bucket of water against the wall.
- This screen is finished, go back to the Hallway.
HALLWAY
- Place the bucket of water on the cement in the lower center. The scoope fills with cement.
- Click on the cement on the scoop and the last item in your inventory will turn into a stone piece.
- Place the stone piece in the hotspot on the right side of the wall.
- You are given 2 more mirror pieces.
CHAPTER 5: FOREST WORLD
BEDROOM
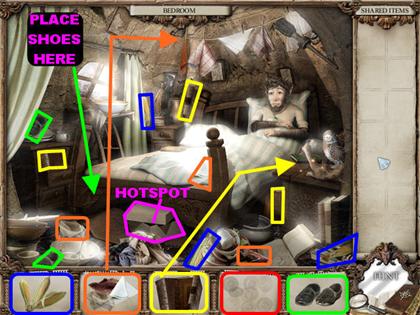
- Pick up the items as shown in the screenshot.
- Place the Handkerchiefs on the string in the upper center.
- Place the Books on the dresser on the right side of the bed.
- The Shoes go below the bed.
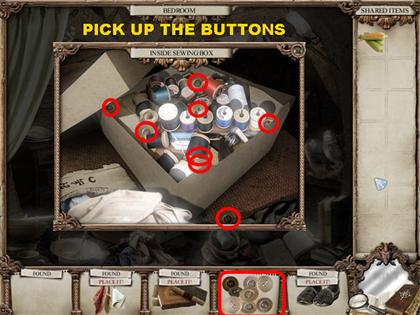
- Click on the sewing box below the bed for a closer view.
- Pick up all the Buttons inside the Sewing Box.
- The Sewing Box and the Corn on the Cobs go into your inventory Tray. Close the window out.
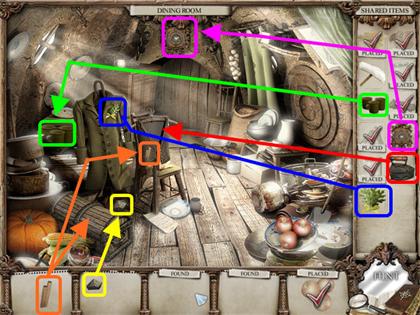
DINING ROOM
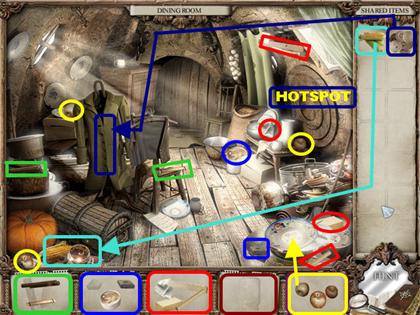
- Pick up the items according to the screenshot.
- Place the Buttons from the Shared Items on the Jacket on the left side of the scene.
- Place the Apples on the plate in the lower right corner.
- The Corn on the Cobs belong in the lower left corner.
- Click on the right side of the wall for a closer look at Faun’s Secret Stash.
FAUN’S SECRET STASH
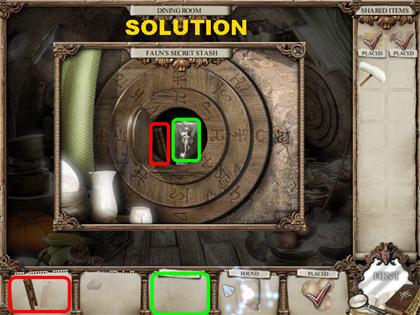
- Your goal is to place the concentric circles in the right order.
- Click on the circles to rotate them.
- Line up the symbols as shown in the screenshot.
- Once the circles are lined up correctly, the center will open.
- Click on the Jar to free the fairy. The Jar will go into your Shared Items section.
- Click on the 2 Pan Flute Sticks.
- Leave this location and go to the Tree House.
TREE HOUSE
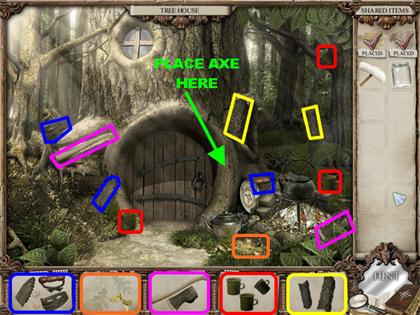
- Click on the items as shown in the screenshot.
- The Mugs and the Log go into your Shared Items.
- Place the Axe on the right side of the entrance.
- Go to Magic Glade.
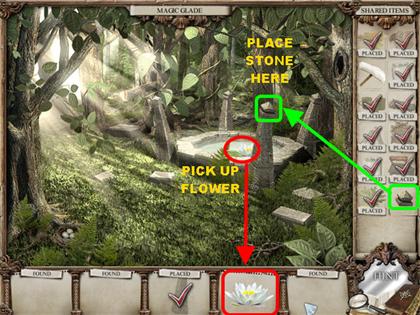
MAGIC GLADE
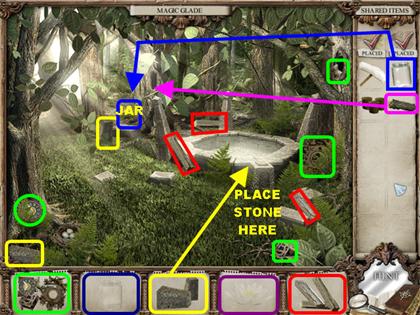
- Click on the items as shown in the screenshot.
- The 3 Logs and the Clock go into the Shared Items Tray.
- Place the Stone Pillar close to the fountain.
- The Jar from the Shared Items goes on the far left.
- Place the Log from the Shared Items over the Jar.
- Click on the Jar of Water to enter it into the Shared Items Tray.
- Go back to the Tree House.
TREE HOUSE
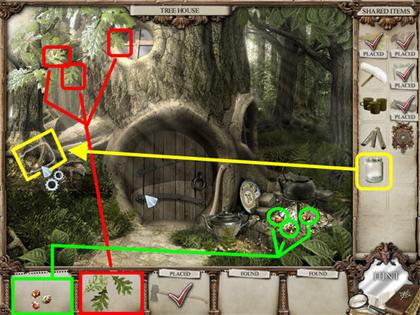
- Place the 3 Logs on the fireplace on the right.
- Once the Fire is lit, pick up the coals as shown in the screenshot. The Heated Iron will go into your Shared Items Tray.
- The Jar of Water belongs on the root of the tree on the left.
- Once the water has been absorbed, the leaves will grow.
- Pick up the leaves as shown in the screenshot. The Boutonniere will go into the Shared Items.
- Go back to the Dining Room.
DINING ROOM
- Place the Boutonniere on the jacket.
- Pick up the Stone that falls below the jacket.
- The Heated Iron belongs on the vest draped over the chair.
- Pick up the Pan Flute pieces on the vest.
- Place the Pan Flute on top of the chest in the lower left.
- Place the Clock above the entryway in the upper center.
- Place the 3 Mugs on the left, close to the boxes.
- Go back to the Magic Glade.
MAGIC GLADE
- The Stones belong on top of the pillar by the fountain.
- Pick up the Flower that appears in the fountain.
- Go back to the Bedroom.
BEDROOM
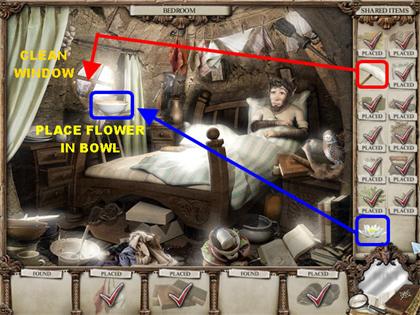
- Place the Mop by the window.
- Place the Flower in the bowl by window.
- You are given 2 mirror pieces.
CHAPTER 6: TOY WORLD
MISTY SHELF
- Pick up the items according to the markings on the screenshot.
- The Toy Soldier goes into the Shared Items Tray.
- The Stone Vase belongs in the lower right corner.
- Go to the Little Ship.
LITTLE SHIP
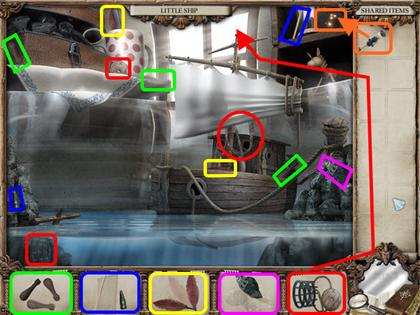
- Pick up the items according to markings on the screenshot.
- Place the Weaved Basket by the window in the upper right.
- The Toy Soldier goes in the upper right corner.
- Go to the Small Crack.
SMALL CRACK
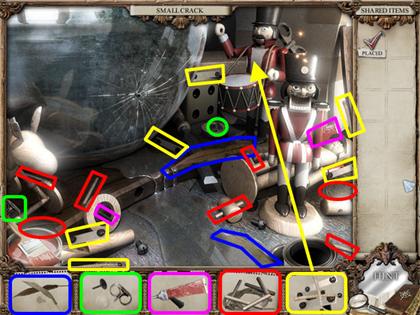
- Pick up the items as shown in the screenshot.
- The Rope Ladder and the Glue go into the Shared Items Tray.
- Place the Straps and the Drumsticks on the drummer soldier.
- Go to the Toy House.
TOY HOUSE
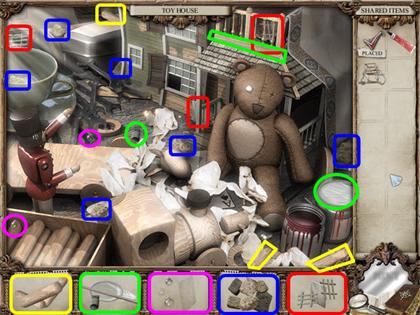
- Pick up the items according to the markings on the screenshot.
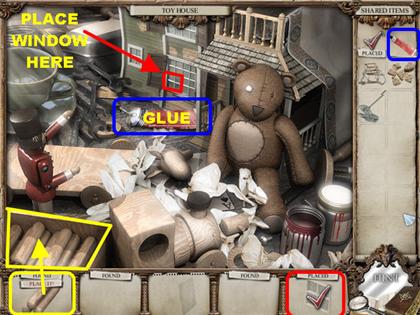
- Place the window on the broken window on the house.
- The wooden logs go in the box in the lower left.
- Place the tube of Glue on the ground, below the window you just replaced.
- Click on the Glue’s Cap and the glue will spill out.
- Click on the Glob of Glue that spills out of the Cap.
- Go back to the Misty Shelf.
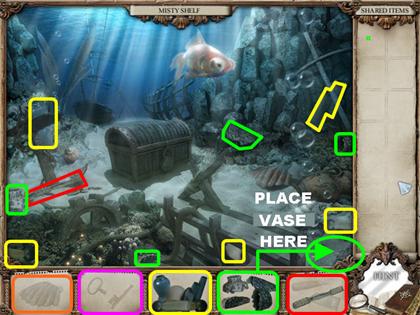
MISTY SHELF
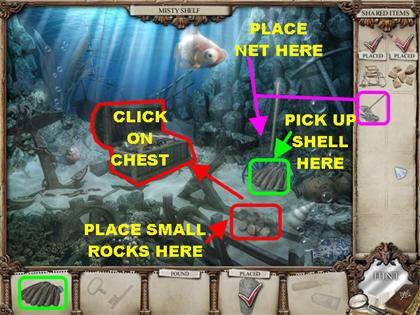
- Place the Net over by the Clam on the right.
- Pick up the Clam on the ground and it will go into your Shared Items.
- The Small Rocks belong in the lower right. The Chest opens after this action has been performed.
- Click on the chest to enter a new scene.
INSIDE OLD CHEST
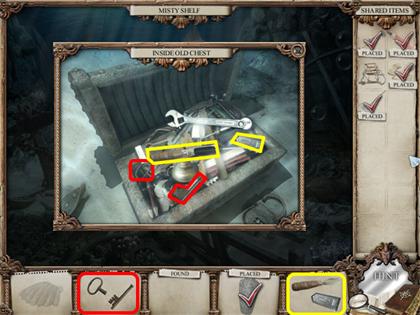
- Pick up the items according to the markings on the screenshot.
- The Tools and the Key go into your Shared Items.
- Go back to the Little Ship.
LITTLE SHIP
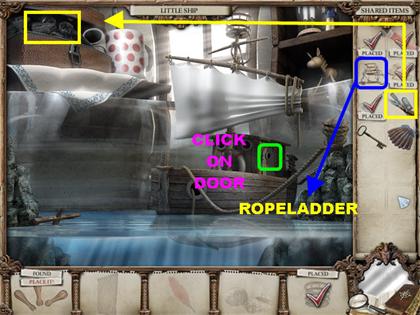
- The Tools from the Shared Items Tray belong in the suitcase in the upper left.
- Place the Rope Ladder on the small boat in the water.
- Click on the Little Ship’s door to enter Inside the Ship’s Cabin.
INSIDE SHIP’S CABIN
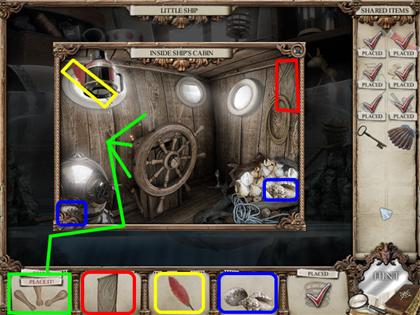
- Place the Pins on the Ship’s Wheel.
- Pick up the items according to the markings on the screenshot.
- The Shells, the Feathers, and the Flag go into the Shared Items.
- Go back to the Small Crack.
SMALL CRACK
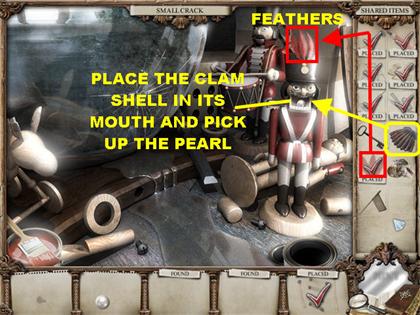
- Place the red Feathers on the nutcracker’s hat in the lower right.
- Click on the nutcracker’s mouth to open it.
- Place the Clam in the nutcracker’s mouth.
- Pick up the Pearl inside its mouth.
- The Pearl Earring goes into the Shared Items.
- Go back to the Toy House.
TOY HOUSE
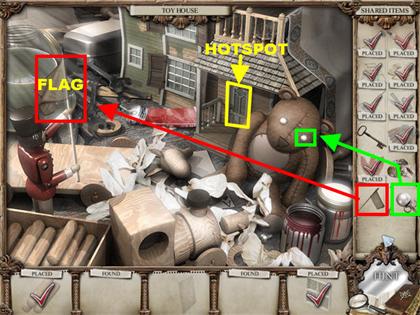
- Give the Flag to the soldier on the left.
- Place the Pearl Earring on the Bear’s right Eye and the bear will slump over.
SIDE DOOR LOCK
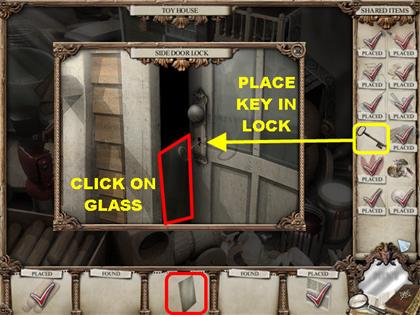
- Click on the door behind the Bear for a closer view.
- Place the Key in the lock to crack open the door.
- Click on the piece of Glass inside the doorway, it goes into the Shared Items Tray.
- Go back to the Small Crack.
SMALL CRACK
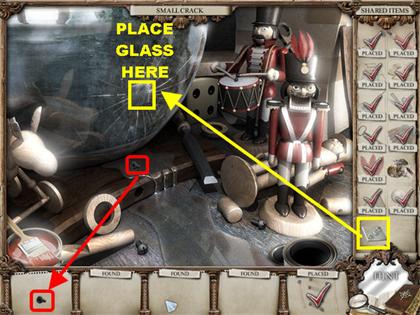
- Place the Glass Piece on the crack on the glass.
- Pick up the Screw on the water.
- The Leaves go into your Shared Items Tray.
- Go back to Misty Shelf.
MISTY SHELF
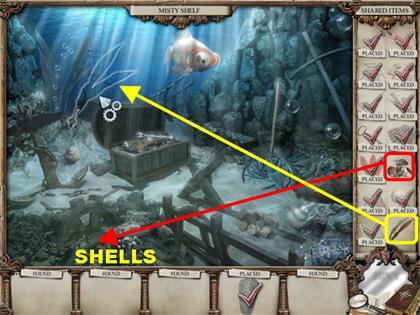
- Place the Shells in the lower left corner.
- Place the Leaves in the upper left.
- You receive 2 mirror pieces.
CHAPTER 7: HOUSE REFLECTION WORLD
OLD HALLWAY
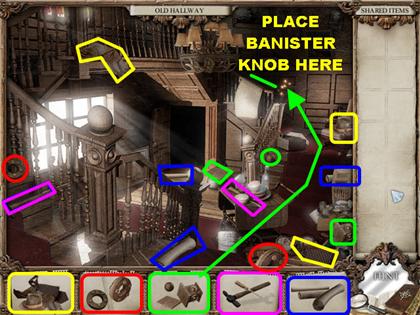
- Pick up the items according to the markings in the screenshot.
- Place the Banister Knob on the railing on the far right.
- The Scrolls and the Hat, and the Pipe go in your Shared Items.
- Go to the Boiler Room.
BOILER-ROOM
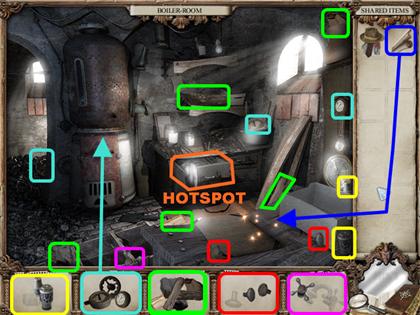
- Pick up the items according to the markings in the screenshot.
- Place the Gauges on the Boiler.
- The Rolled Carpets should be placed in the lower right.
- Click on the drawer next to the boiler for a closer view.
INSIDE TOOL DRAWER
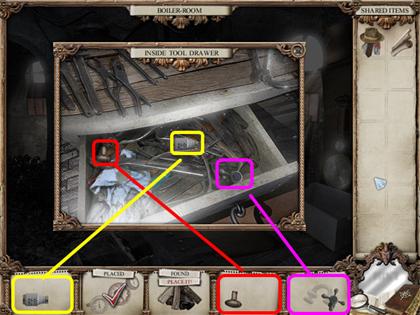
- Click on the items as marked in the screenshot.
- The Fuses and the Knobs go into the Shared Items.
- Go to the Bathroom.
BATHROOM - INSIDE DRAWER
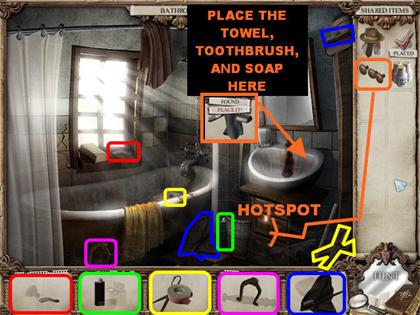
- Pick up the items as shown.
- Place the Knobs below the sink.
- Click on the middle drawer to open it.
- Click on the drawer again for a closer view.
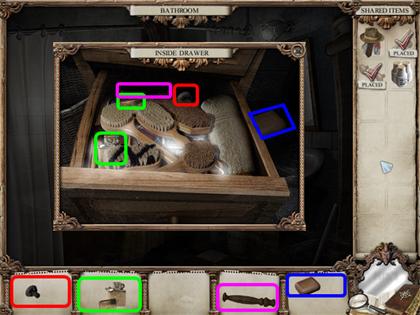
- Pick up the items as shown in the screenshot.
- The Lighter, the Handle and the Wooden Stand go into the Shared Items.
- Close out that pop-up window to return to the Bathroom.
- Bathroom – Place the Towel, Soap and Toothbrush (all in one) on the side of the sink.
- Go to the Old Lounge.
OLD LOUNGE
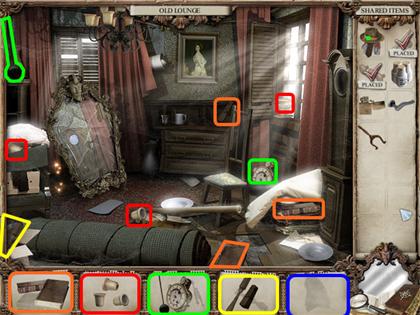
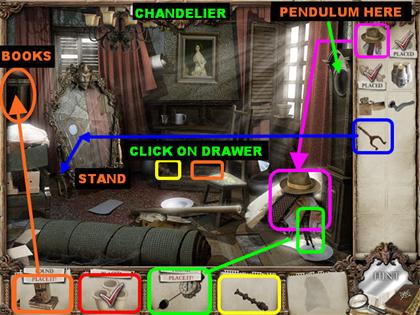
- Pick up the items according to the image on the screenshot.
- Place the Lamp shades on the chandelier in the upper left side of the ceiling.
- The Wooden Stand goes behind the large mirror on the left.
- The Hat, Tie and Scarf (one piece) go in the lower right.
- Pick up the Pendulum pieces that appear below the scarf in the lower right.
- Place the Pendulum on the grandfather clock on the right.
- Click on the bottom drawer of the dresser against the wall.
- Pick up the Baluster piece inside the drawer. The Baluster goes into the Shared Items.
- Pick up the Book piece inside the drawer.
- Place the Books on the bookshelf on the left.
- A safe appears on the back wall.
- Go back to the Old Hallway.
OLD HALLWAY – VERY OLD FUSE BOX
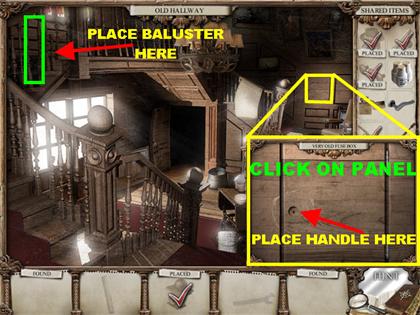
- Place the Baluster on the railing in the upper left.
- Click on the panel in the upper right for a closer view.
- Place the handle on the hole on the panel.
- Click on the Handle to open the door.
VERY OLD FUSE BOX MINI-GAME
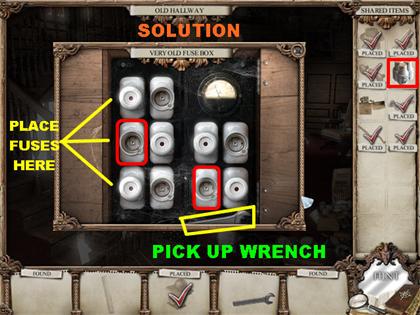
- Place the Fuses on the left side of the fuse box.
- Your goal is to light up all the fuses.
- Click on the fuses in the following order to solve the puzzle.
- Click on FIRST Fuse in the MIDDLE row.
- Click on the THIRD fuse in the BOTTOM row.
- Pick up the Wrench that appears in the lower right after the puzzle has been completed. The Tools go into the Shared Items.
- Close that window to return to the Old Hallway.
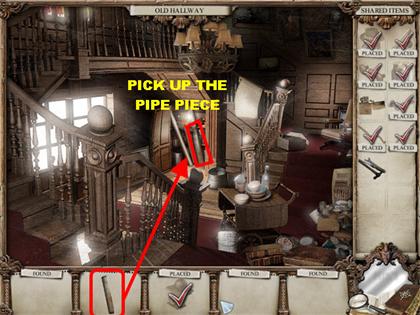
- Pick up the Pipe piece inside the closet below the steps.
- The Pipe goes in the Shared Items Tray.
- Go back to Boiler Room.
BOILER ROOM
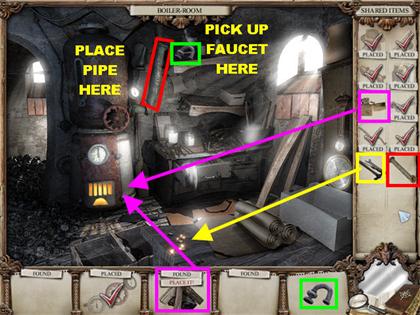
- Place the Pipe in the upper right side of the boiler to open the furnace.
- Place the Wooden Logs from your inventory box inside the furnace.
- The Lighter goes inside the furnace as well. Steam will come out of the furnace.
- Pick up the Faucet Part in the upper center. The Faucet goes into your Shared Items Tray.
- The Tools belong in the lower center.
- Go back to the Bathroom.
BATHROOM
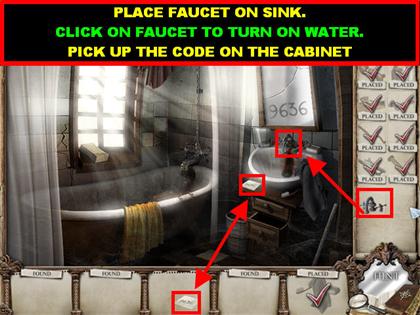
- Place the Faucet on the sink.
- Click on the Hot Water Faucet to start the water. The hot water will steam up the mirror.
- The number “9636” appears on the mirror after the steam hits it.
- Click on the piece of paper below the sink and the code will be entered into your Shared Items.
- Go back to the Old Lounge.
OLD LOUNGE – WALL SECURITY SAFE
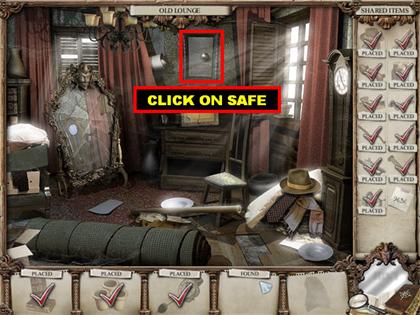
- Click on the safe on the back wall for a closer view.
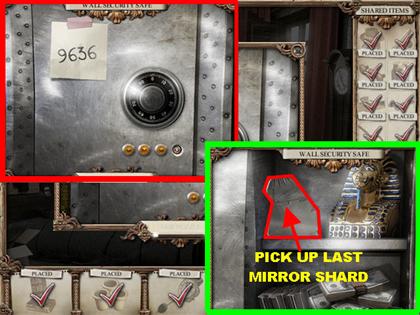
- Place the Code in the upper left side of the safe.
- SOLUTION - Click on the dial in the following manner:Click on the dial until it reaches number 90 and stop.
- The safe will now open.
- Click on the Mirror Shard that appears in the upper left side of the safe.
- Close the pop-up window to return to the Old Lounge.
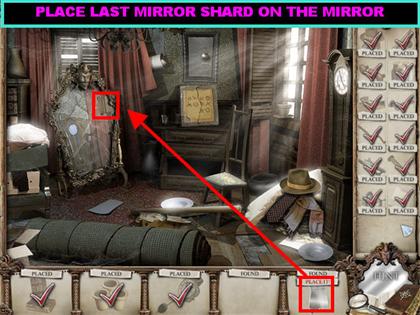
- Place the Mirror Shard on the upper right side of the mirror.
Created at: 2009-12-24